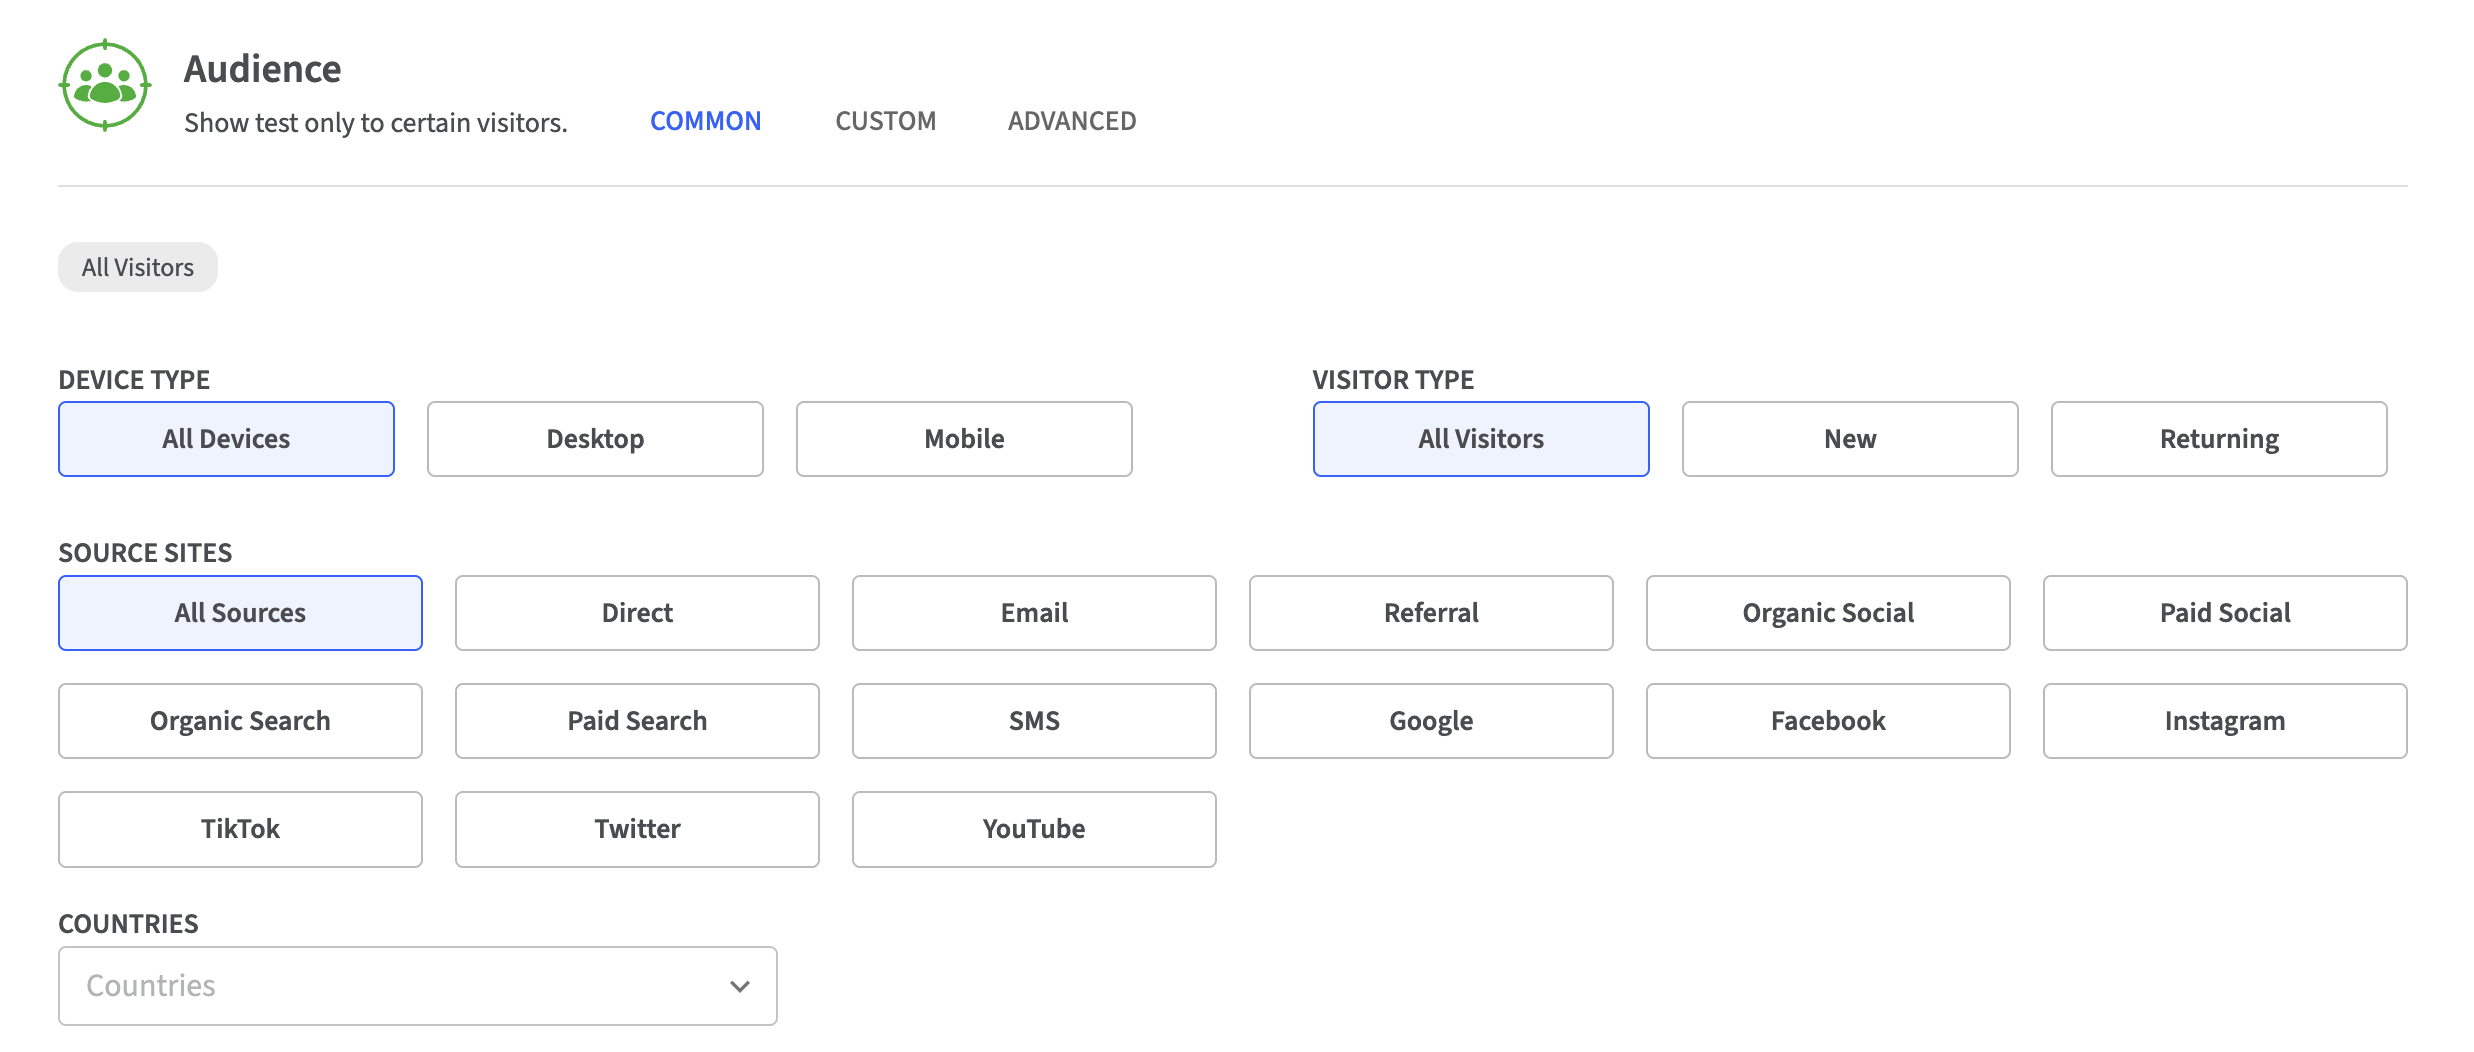
New visitors, on a mobile device, in any of the following countries: USA, Mexico, or Canada.
.png?alt=media)
Here is an example of a Custom audience used to target a test to only mobile visitors in the USA that come from one of three social campaigns.
.png?alt=media)
This one-clause audience targets anyone coming from Klaviyo marketing
 {% endhint %}
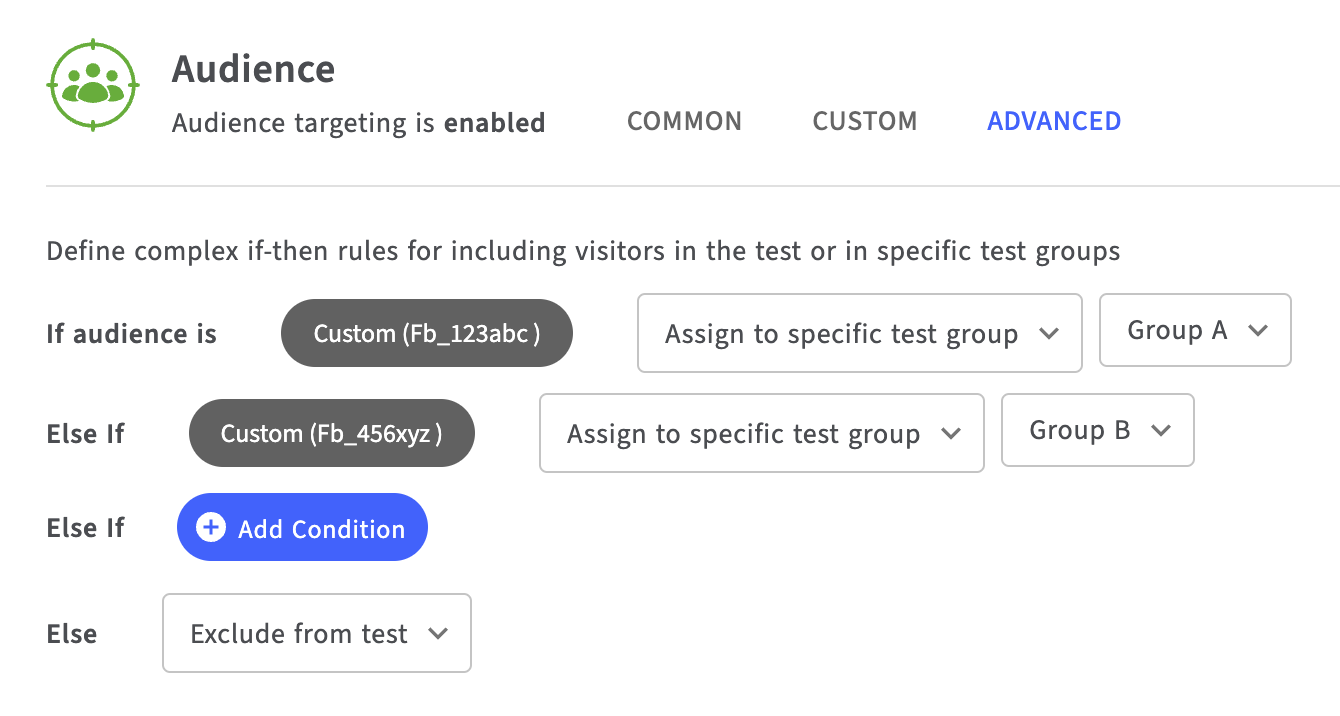
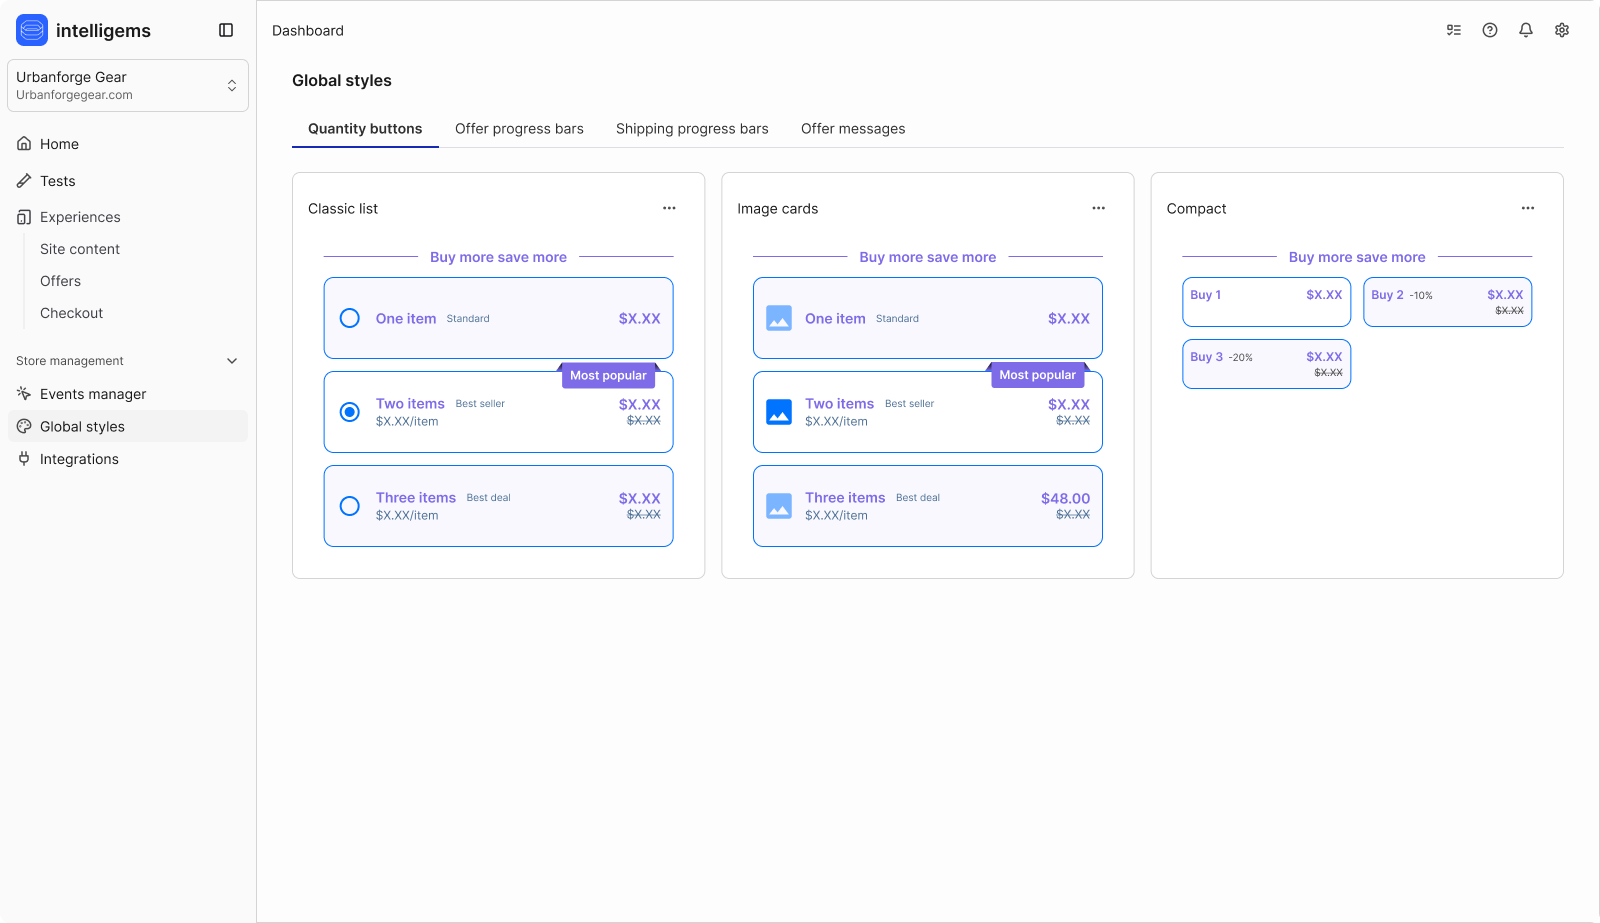
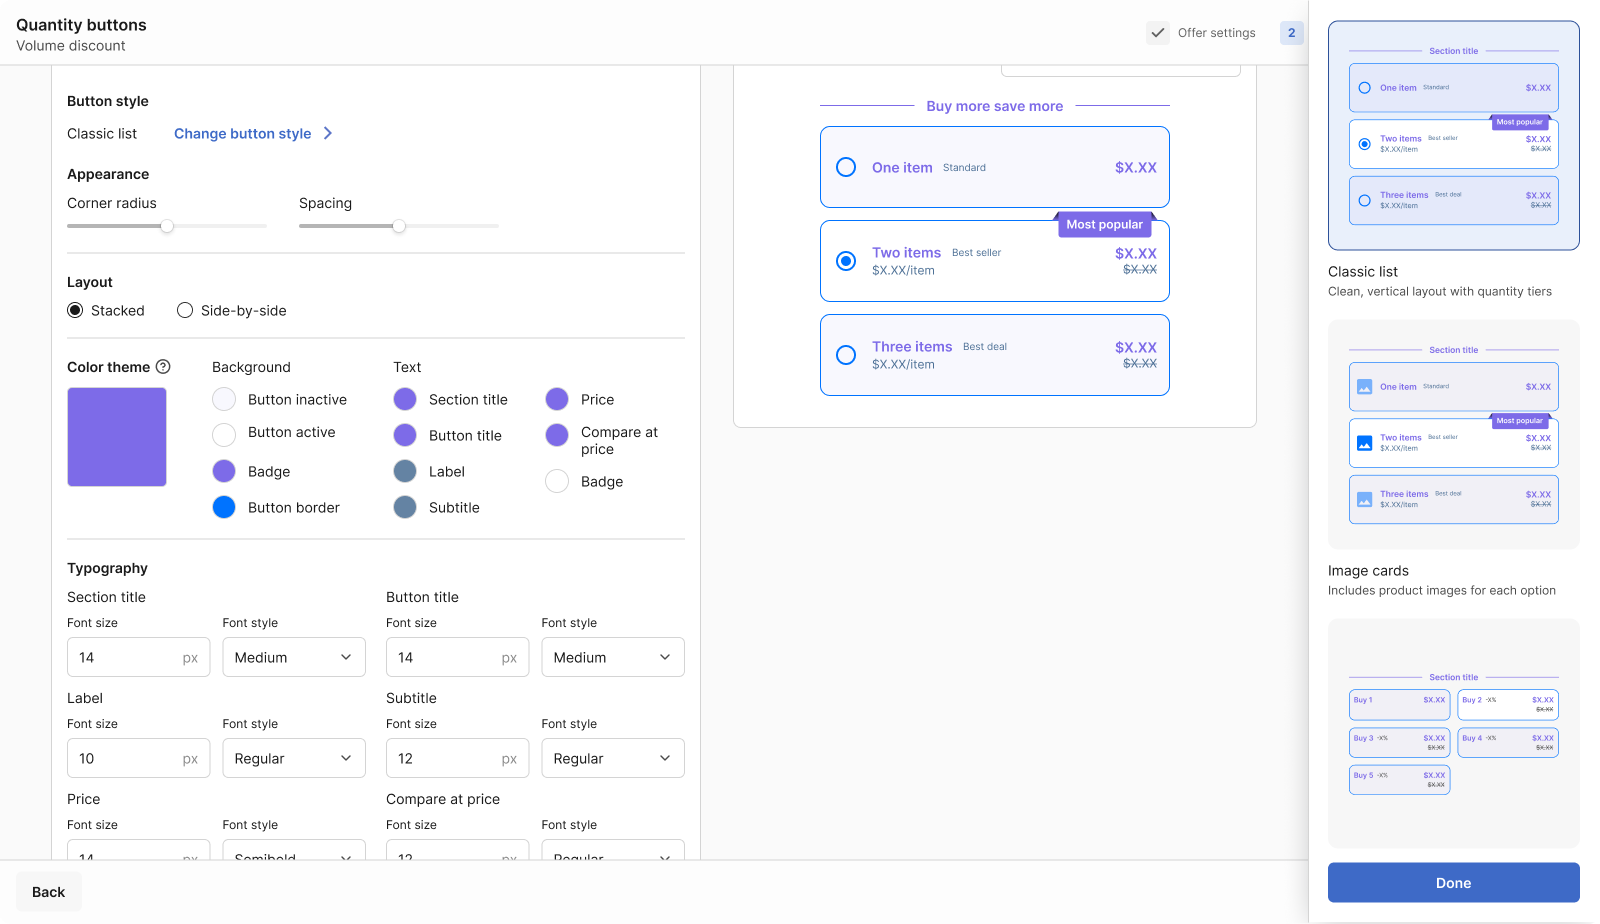
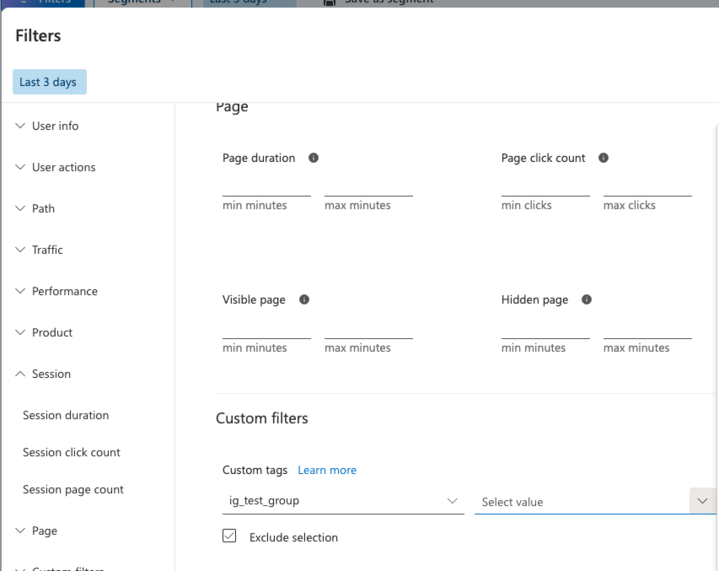
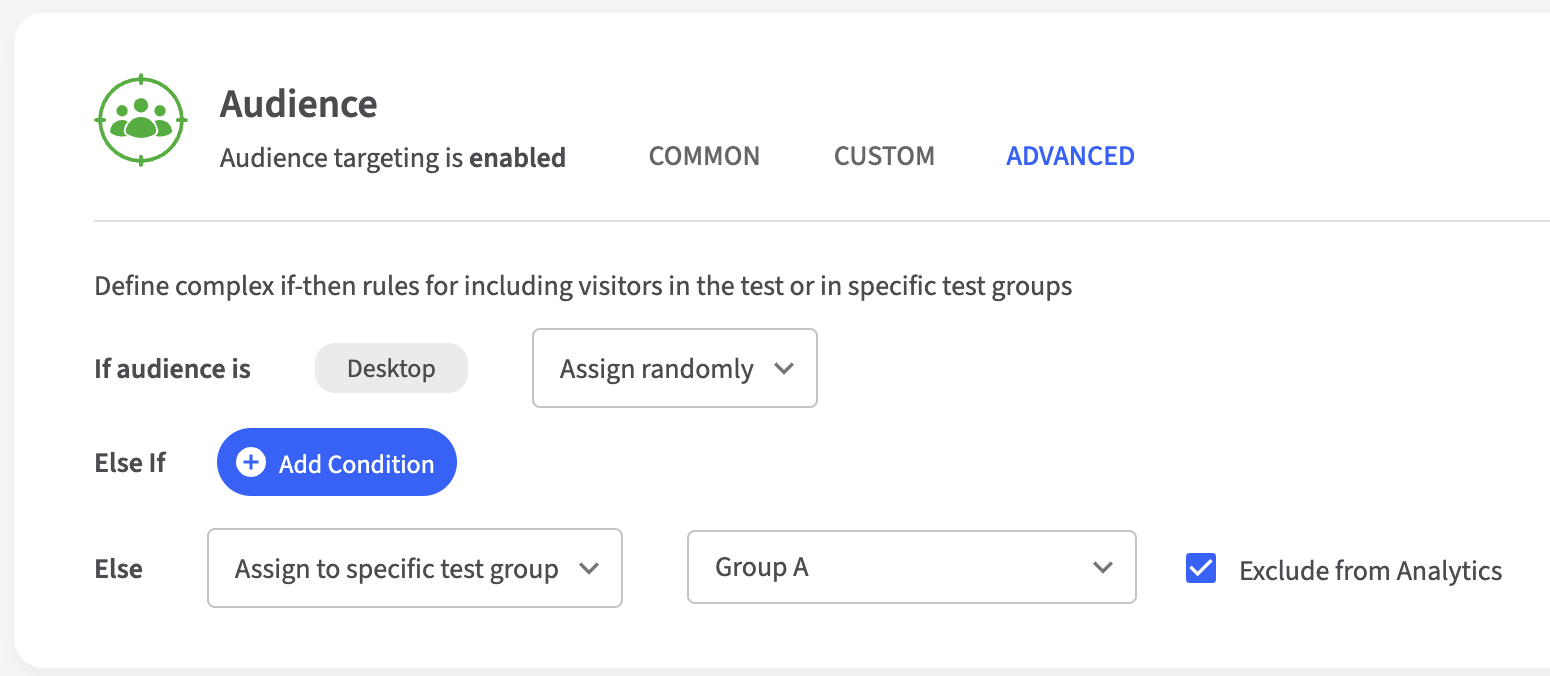
## Advanced Targeting
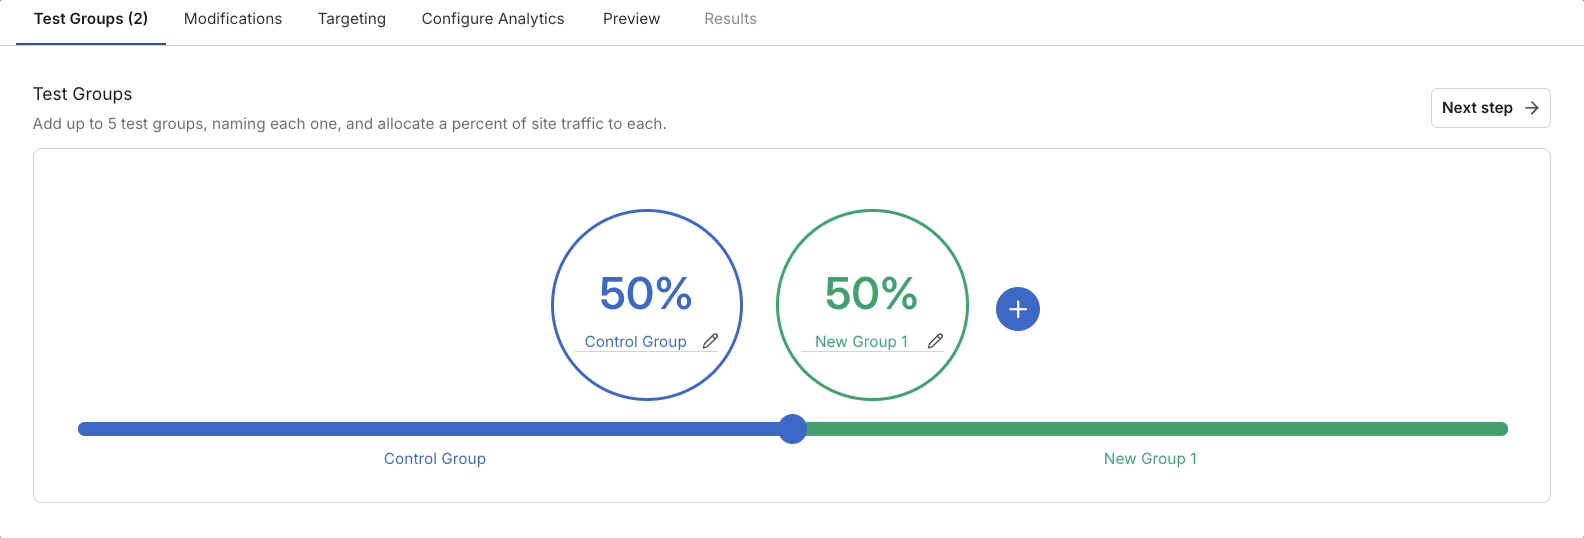
Rather than just identifying which visitors should be exposed to a test, Advanced Targeting additionally allows you to assign particular audiences to specific groups in the test, or to permanently exclude them.
This is done by creating multiple if-then clauses, where each clause allows you to build an audience (Common or Custom) and then choose how that audience should be treated by the test.
For each audience you define, Intelligems can take one of the following actions:
* **Assign it to a specific test group:** include the visitor in the test and assign a specific group. For example, to reach statistical significance faster you may want to place all international visitors in the Control Group (rather than excluding them), and distribute everyone else across several treatment groups.
* **Assign it a test group randomly:** include the visitor in the test and assign a test group as usual based on the %s defined in the test setup.
* **Exclude it from the test:** exclude the visitor from this test permanently. Intelligems will no longer assess whether they match the audience or not on subsequent page loads.
* **Do not assign it:** visitor will not be placed in the test but will also not be permanently excluded. Intelligems will re-assess every time they visit a new page.
You might use Advanced Audiences to allocate specific ad campaigns to specific groups. For example: if `utm_campaign = fb_123abc` then assign to `Group A`, else if `utm_campaign = fb_456xyz` then assign to `Group B`, else leave unassigned. This will put all traffic from the first campaign into Group A and the second campaign into Group B, but leave everyone else out of the test. This way you can make sure your ads match each website experience you’re testing.
{% endhint %}
## Advanced Targeting
Rather than just identifying which visitors should be exposed to a test, Advanced Targeting additionally allows you to assign particular audiences to specific groups in the test, or to permanently exclude them.
This is done by creating multiple if-then clauses, where each clause allows you to build an audience (Common or Custom) and then choose how that audience should be treated by the test.
For each audience you define, Intelligems can take one of the following actions:
* **Assign it to a specific test group:** include the visitor in the test and assign a specific group. For example, to reach statistical significance faster you may want to place all international visitors in the Control Group (rather than excluding them), and distribute everyone else across several treatment groups.
* **Assign it a test group randomly:** include the visitor in the test and assign a test group as usual based on the %s defined in the test setup.
* **Exclude it from the test:** exclude the visitor from this test permanently. Intelligems will no longer assess whether they match the audience or not on subsequent page loads.
* **Do not assign it:** visitor will not be placed in the test but will also not be permanently excluded. Intelligems will re-assess every time they visit a new page.
You might use Advanced Audiences to allocate specific ad campaigns to specific groups. For example: if `utm_campaign = fb_123abc` then assign to `Group A`, else if `utm_campaign = fb_456xyz` then assign to `Group B`, else leave unassigned. This will put all traffic from the first campaign into Group A and the second campaign into Group B, but leave everyone else out of the test. This way you can make sure your ads match each website experience you’re testing.


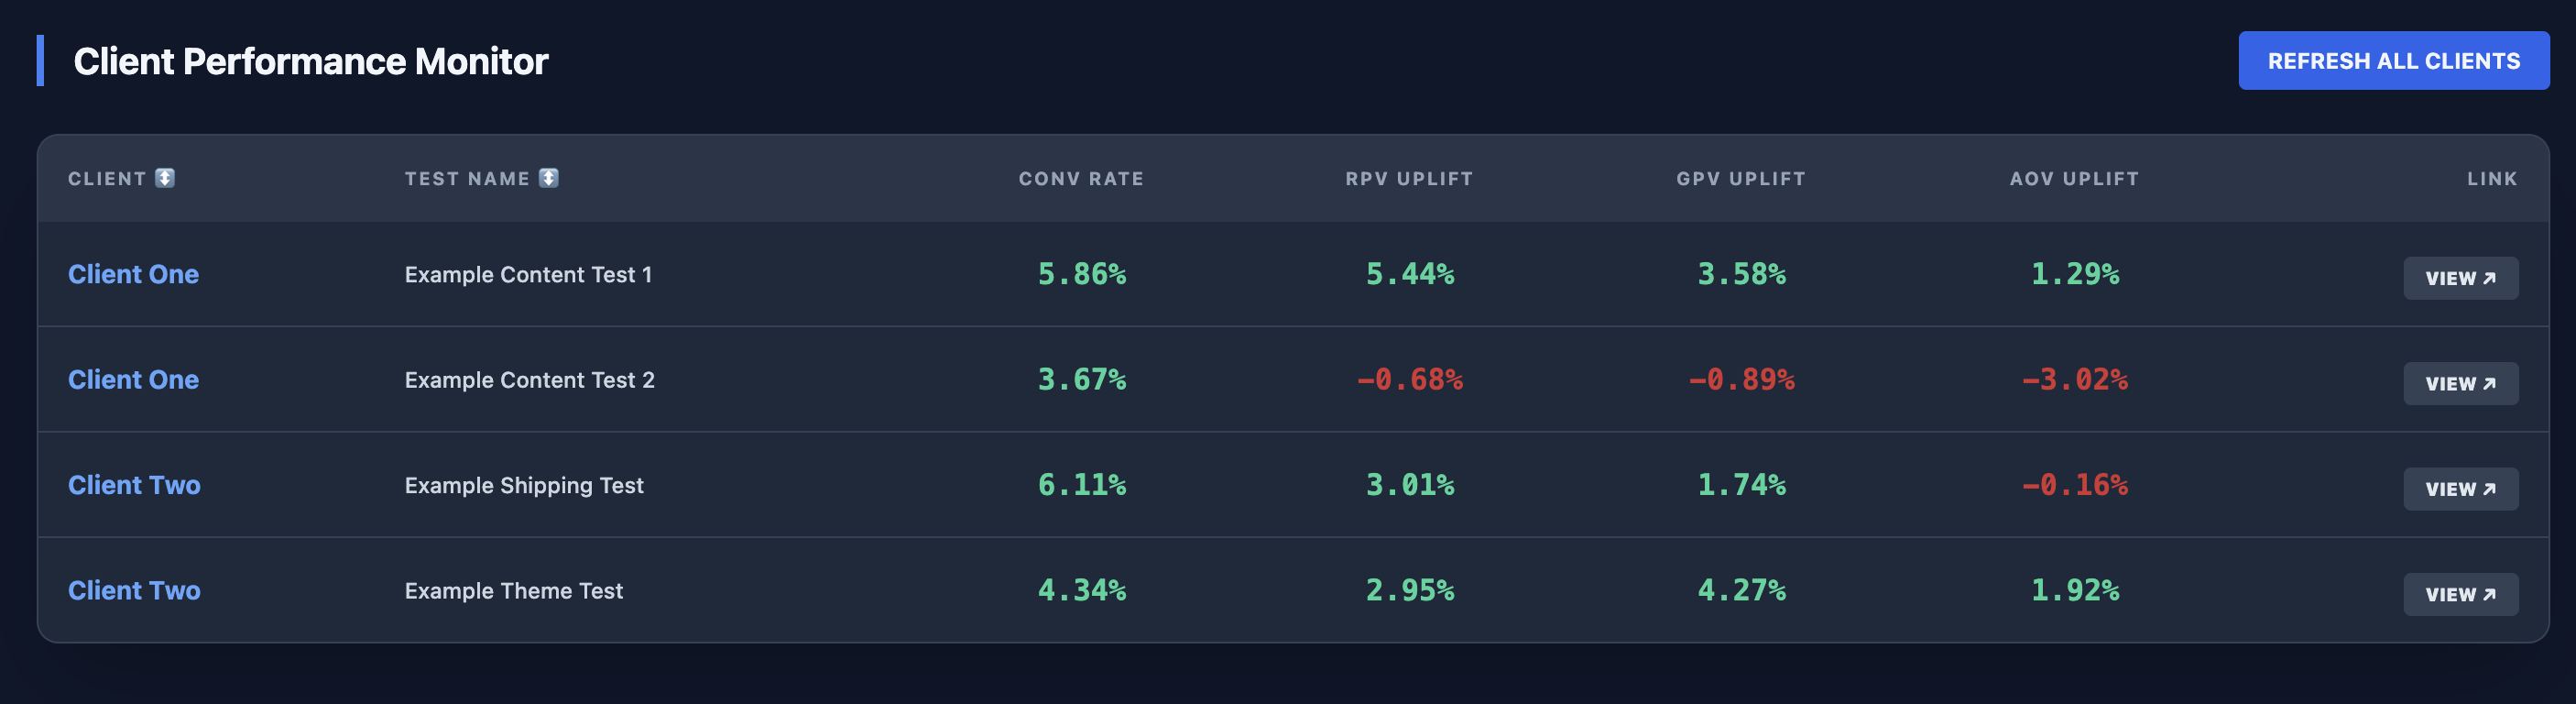
| Client ↕ | Test Name ↕ | Conv Rate | RPV Uplift | GPV Uplift | AOV Uplift | Link |
|---|---|---|---|---|---|---|
| Connecting to Intelligems... | ||||||


Exporting data from an Intelligems experiment
| Column Title | Description |
|---|---|
| test_group_name | Name of test group from experiment in Intelligems |
| order_id | Shopify's unique identifier for the order |
| order_name | Short identifier for the order, usually beginning with "#" |
| customer_id | Shopify's unique identifier of the customer |
| order_created_dt | Timestamp for when order was initially placed |
| shipping_method | Shipping method on the order |
| order_has_experiment_products | True if the order included any of the targeted products in the experiment (if any) |
| product_ids | An array of all ID's for the products included in the order |
| unit_quantity | Total number of units sold in the order |
| net_product_revenue | Total revenue from products in the order, net of discounts |
| net_shipping_revenue | Total revenue from shipping in the order, net of discounts |
| net_revenue | Total revenue from product and shipping on the order, net of discounts |
| total_tax | Total sum of taxes on the order |
| net_revenue_incl_tax | Net revenue including taxes |
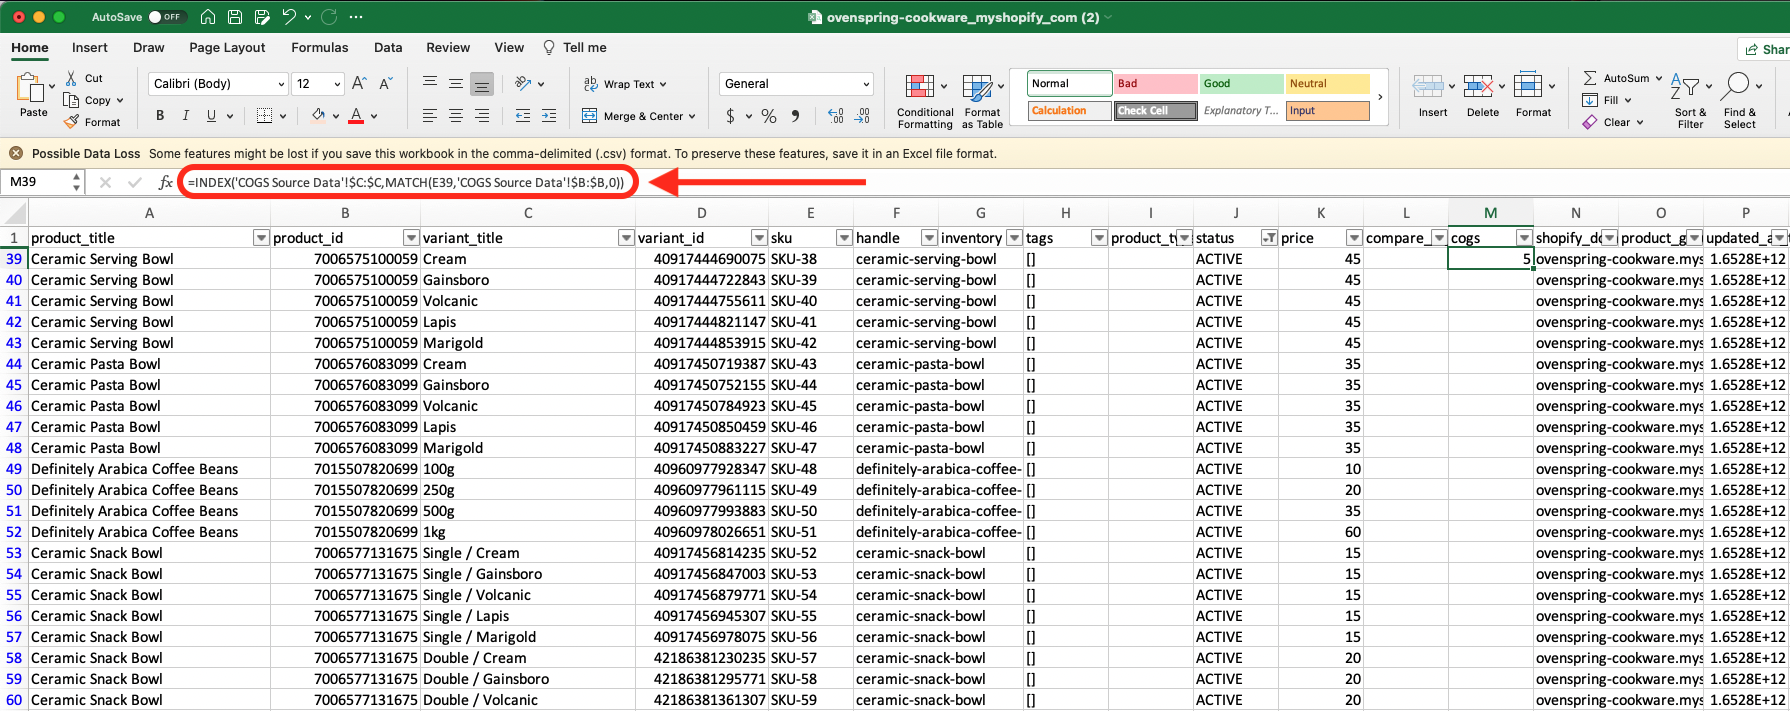
| product_cogs | Total cost of goods for order |
| shipping_cost | Assumed cost of shipping for the order. Based on the configured shipping cost assumption |
| transaction_fee | Assumed transaction fee for the order. Based on the configured transaction fee assumption |
| gross_profit | Gross profit from the order. Equal to net_revenue - product_cogs - shipping_cost - transaction_fee |
| order_value_z_score | Z-score of the order net revenue, used to identify outliers. See here (under "Z-Score") for more. |
| is_subscription_order | True if the order is a subscription order (first subscription orders are included in analytics, automatically-filled recurring orders are not included) |
| order_tags | Array of tags on order |
| billing_country_code | Country code from billing address on order |
| shipping_country_code | Country code from shipping address on order |
| session_visitor_type | "New" if the visitor who placed the order was new at the beginning of their first session in the experiment. "Returning" if they were returning |
| session_device_type | "Mobile" if the visitor who placed the order was on a mobile device or tablet, "Desktop" if the visitor was on a desktop device |
| session_country_code | Country code of the location of the visitor who placed the order |
| session_query_params | Dictionary of key-value pairs of the query parameters from the first page visit of the first session in the experiment for the visitor who placed the order |
| session_referrer | Domain of the site that referred the visitor in their first session in the experiment, if any |
| session_source_channel | Source channel of the first session in the experiment for visitor who placed the order |
| session_source_site | Source site of the first session in the experiment for visitor who placed the order |
| Column Title | Description |
|---|---|
| test_group_name | Name of test group from experiment in Intelligems |
| order_id | Shopify's unique identifier for the order |
| order_name | Short identifier for the order, usually beginning with "#" |
| customer_id | Shopify's unique identifier of the customer |
| order_created_dt | Timestamp for when order was initially placed |
| product_id | Product ID of the line item |
| variant_id | Variant ID of the line item |
| sku | SKU of the line item |
| product_title | Title of the product |
| variant_title | Title of the variant |
| gross_revenue | Net revenue plus discounts — i.e., price times quantity, before discounts |
| total_discount | Total discount for the line item |
| net_revenue | Total revenue from the line item, net of discounts |
| quantity | Unit quantity for the line item |
| total_cogs | Total cost of goods sold from the line item, based on COGS inputs |
| product_cogs | Total cost of goods for order |
| order_value_z_score | Z-score of the order net revenue, used to identify outliers. See here (under "Z-Score") for more. |
| order_tags | Array of tags on order |
| billing_country_code | Country code from billing address on order |
| shipping_country_code | Country code from shipping address on order |
| session_visitor_type | "New" if the visitor who placed the order was new at the beginning of their first session in the experiment. "Returning" if they were returning |
| session_device_type | "Mobile" if the visitor who placed the order was on a mobile device or tablet, "Desktop" if the visitor was on a desktop device |
| session_country_code | Country code of the location of the visitor who placed the order |
| session_query_params | Dictionary of key-value pairs of the query parameters from the first page visit of the first session in the experiment for the visitor who placed the order |
| session_referrer | Domain of the site that referred the visitor in their first session in the experiment, if any |
| session_source_channel | Source channel of the first session in the experiment for visitor who placed the order |
| session_source_site | Source site of the first session in the experiment for visitor who placed the order |


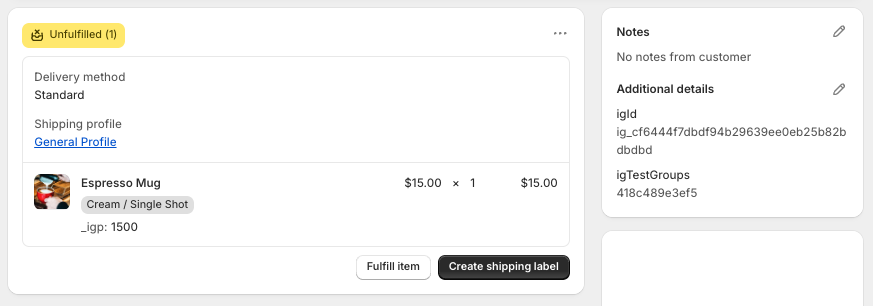
 ❗Note that if you do not complete this step, we will continue to append an igId onto your orders in the 'Additional Details' section in Shopify. Customers will not see this, and it will not cause any issues, but may cause confusion for your team if they do not know where it is coming from!
**Step 4: Remove Checkout Script *****or***** manage Duplicate Products, if applicable.**
❗This step is only applicable if you have run Price Tests!
***If you are on Shopify Plus and ran your test using a Checkout Script,*** you can now stop that script by either unpublishing the entire Checkout Script (if nothing else is in it), or by removing the Intelligems script if you use the Checkout Script for anything else.
***If you are not on Shopify Plus and ran your test using Duplicate Products,*** confirm those products are archived. See more details on managing Duplicate Products from previous tests [here](https://help.intelligems.io/can-i-delete-duplicate-products-once-a-pricing-test-is-over).
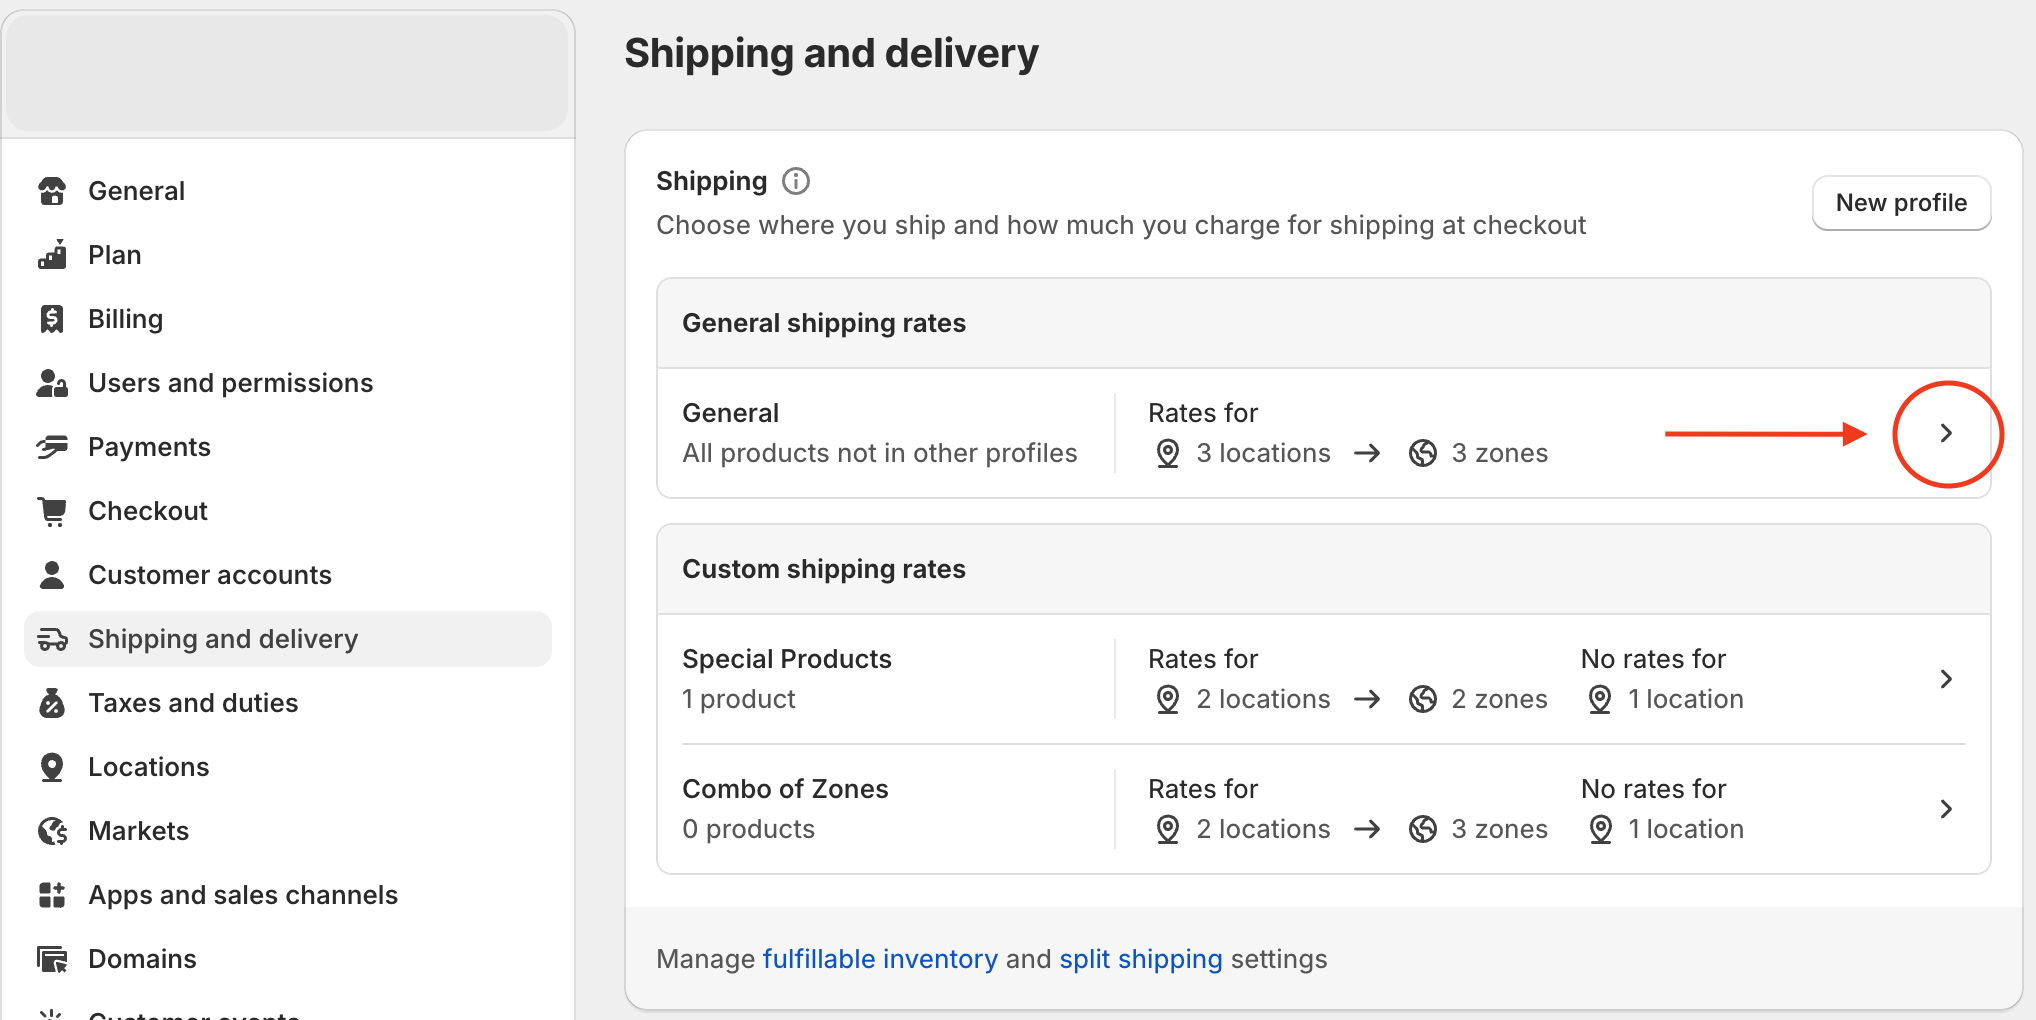
**Step 5: Remove Intelligems as a shipping rate provider, if applicable.**
❗This step is only applicable if you have run Shipping Tests!
Confirm that Intelligems is removed as a shipping rate provider. You can check this by going to your Settings in Shopify → Shipping and delivery → Manage by General Shipping Rates. Once you're there, confirm that 'Intelligems Shipping (Rates provided by app)' is not listed anywhere. If it is, please delete it using the three dots to the right and add your own rate to replace it if needed.
**Step 6: Send us your feedback!**
We are always looking to make improvements to our platform and processes! If there is something we could have done better, you have feature requests, or you just want to chat all things ecomm, please don't hesitate to reach out to
❗Note that if you do not complete this step, we will continue to append an igId onto your orders in the 'Additional Details' section in Shopify. Customers will not see this, and it will not cause any issues, but may cause confusion for your team if they do not know where it is coming from!
**Step 4: Remove Checkout Script *****or***** manage Duplicate Products, if applicable.**
❗This step is only applicable if you have run Price Tests!
***If you are on Shopify Plus and ran your test using a Checkout Script,*** you can now stop that script by either unpublishing the entire Checkout Script (if nothing else is in it), or by removing the Intelligems script if you use the Checkout Script for anything else.
***If you are not on Shopify Plus and ran your test using Duplicate Products,*** confirm those products are archived. See more details on managing Duplicate Products from previous tests [here](https://help.intelligems.io/can-i-delete-duplicate-products-once-a-pricing-test-is-over).
**Step 5: Remove Intelligems as a shipping rate provider, if applicable.**
❗This step is only applicable if you have run Shipping Tests!
Confirm that Intelligems is removed as a shipping rate provider. You can check this by going to your Settings in Shopify → Shipping and delivery → Manage by General Shipping Rates. Once you're there, confirm that 'Intelligems Shipping (Rates provided by app)' is not listed anywhere. If it is, please delete it using the three dots to the right and add your own rate to replace it if needed.
**Step 6: Send us your feedback!**
We are always looking to make improvements to our platform and processes! If there is something we could have done better, you have feature requests, or you just want to chat all things ecomm, please don't hesitate to reach out to | Shopify Plus | Price Testing Integration | integration-guide-using-checkout-scripts |
| Shopify Non-Plus | Price Testing Integration | integration-guide-using-duplicate-products |
| Shopify Functions | Price Testing Integration | integration-guide-using-shopify-functions |
| Control Group | New Group | |
| First Test - On vs. Off | No Gift With Purchase | Gift Provided at $100 Threshold |
| Second Test - $100 Threshold vs. $150 Threshold | Gift Provided at $100 Threshold | Gift Provided at $150 Threshold |
| Third Test - Gift A vs. Gift B | Gift A Provided at $100 Threshold | Gift B Provided at $100 Threshold |


Creating a user segment in GA4
  <!-- Google tag (gtag.js) -->
    <script async src="https://www.googletagmanager.com/gtag/js?id=AW-987654321"></script>
    <script>
      window.dataLayer = window.dataLayer || [];
      function gtag(){dataLayer.push(arguments);}
      gtag('js', new Date());

      gtag('config', 'AW-987654321');
    </script>
  <!-- Google tag (gtag.js) -->
    <script async src="https://www.googletagmanager.com/gtag/js?id=AW-987654321"></script>
    <script>
      window.dataLayer = window.dataLayer || [];
      function gtag(){dataLayer.push(arguments);}
      gtag('js', new Date());

      gtag('config', 'AW-987654321');
      gtag('config', 'G-1234567890');
    </script>


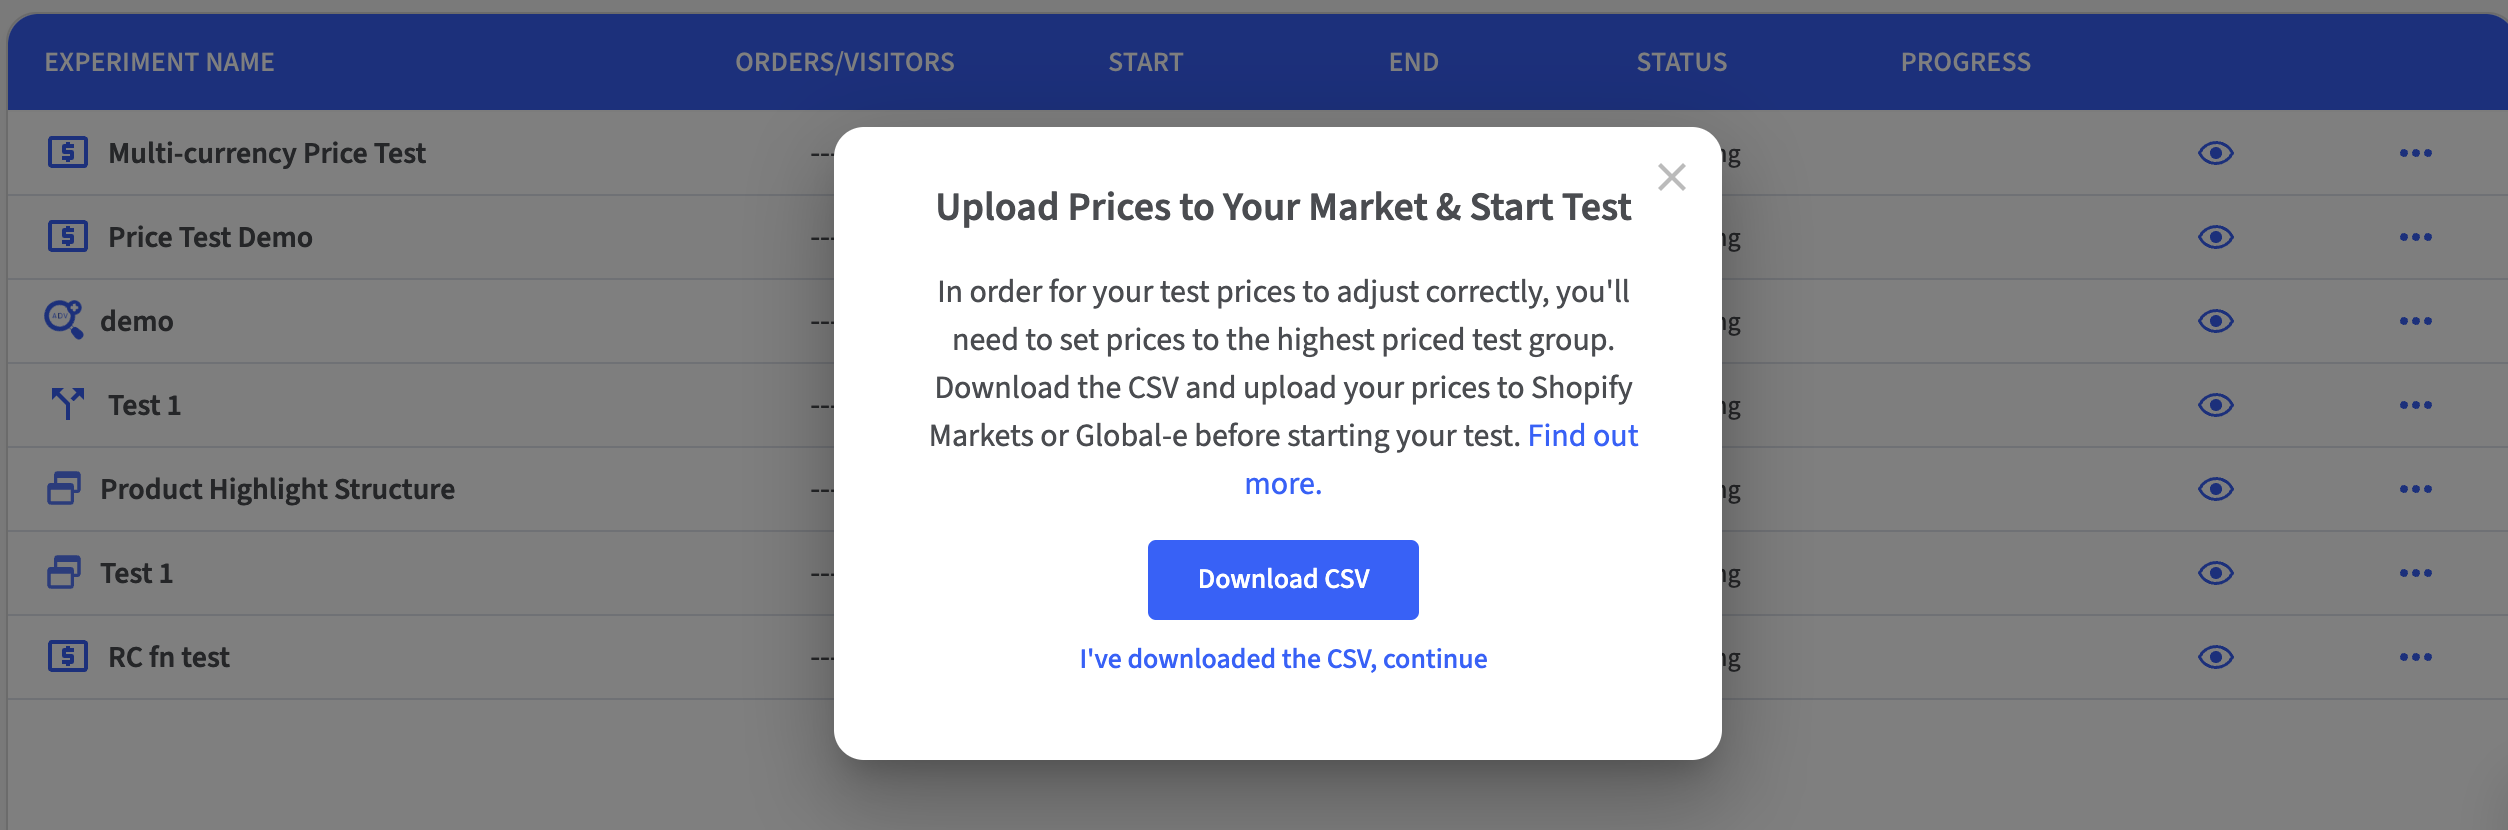
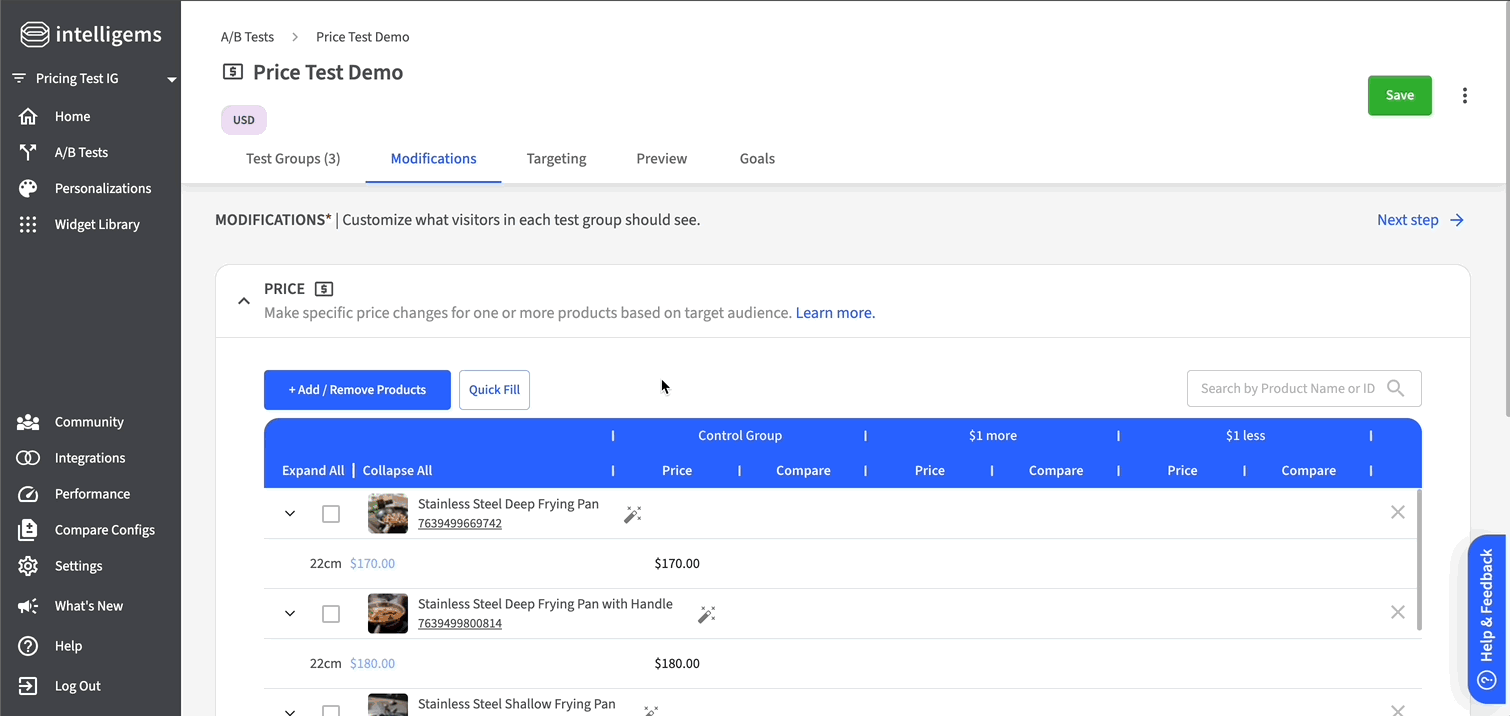 Using Microsoft Excel, Google Sheets, Numbers, or another spreadsheet editing tool, manually input the prices for the test groups and save the file with a .csv, .xls or .xlsx extension.
The following fields (columns) are **required** in the uploaded file.
* product\_title
* product\_id
* variant\_title
* variant\_id
* handle
* Price - \[Test Group Name] (*for each test group*)
* Compare Price - \[Test Group Name] (*for each test group*)
The rest of the fields in the template are provided for reference and are not required.
\
Back in the Intelligems app, click the 'Upload Prices' button and select the saved .csv, .xls or .xlsx file. Once it has uploaded, save the test to see the price changes.
Using Microsoft Excel, Google Sheets, Numbers, or another spreadsheet editing tool, manually input the prices for the test groups and save the file with a .csv, .xls or .xlsx extension.
The following fields (columns) are **required** in the uploaded file.
* product\_title
* product\_id
* variant\_title
* variant\_id
* handle
* Price - \[Test Group Name] (*for each test group*)
* Compare Price - \[Test Group Name] (*for each test group*)
The rest of the fields in the template are provided for reference and are not required.
\
Back in the Intelligems app, click the 'Upload Prices' button and select the saved .csv, .xls or .xlsx file. Once it has uploaded, save the test to see the price changes.
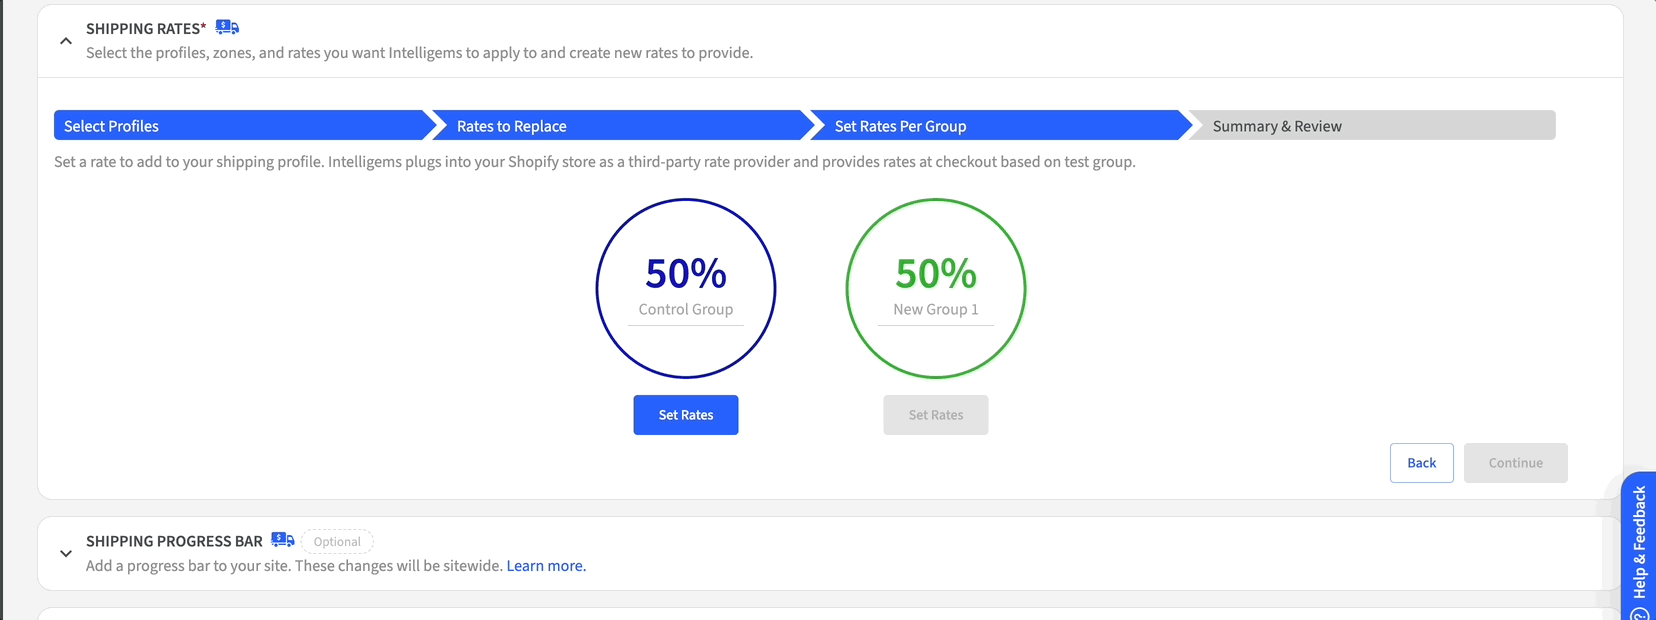

Example 1: Testing a single flat rate

Example 2: Testing multiple flat rates

Example 3: Testing flat rate and a threshold

Example 4: Testing a free threshold with rates under threshold provided by third party app

Example 5: Testing a free threshold with weight-based rates under threshold configured in Shopify

Example 6: Testing rates for each weight-based tier

Example 7: Testing rates and conditions for each weight-based tier
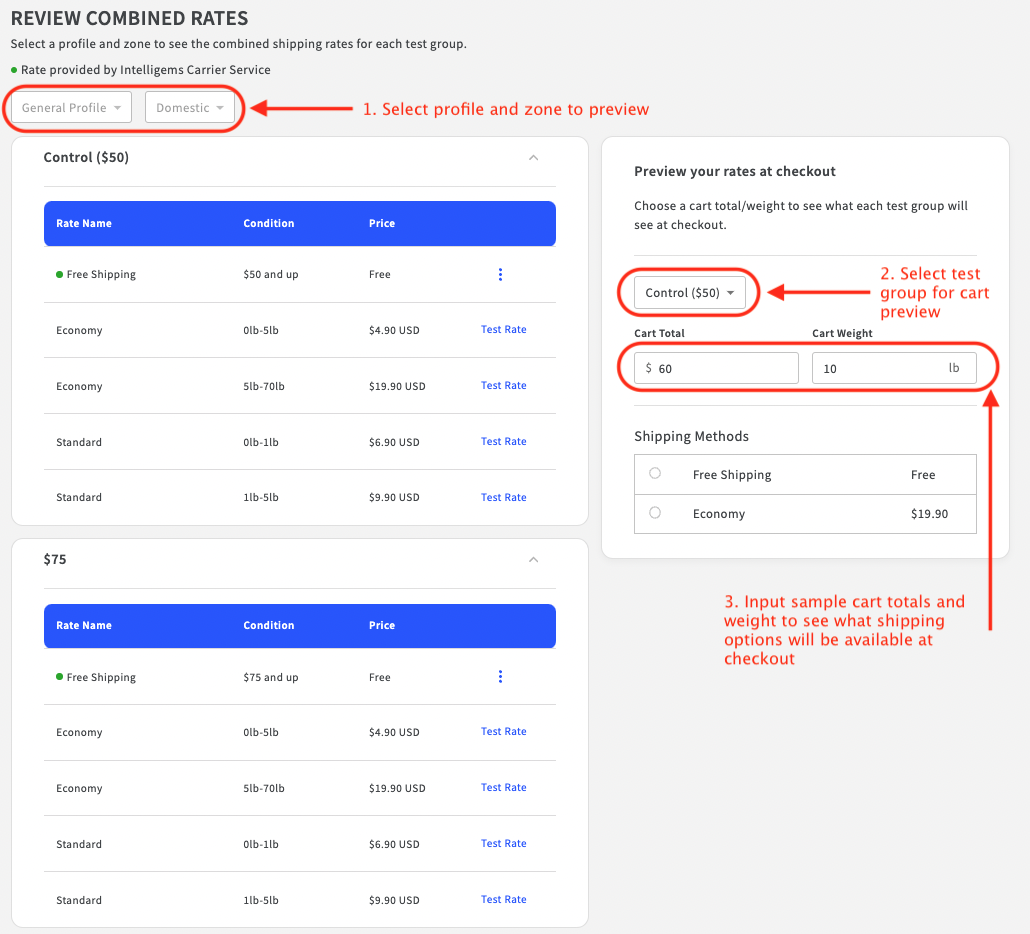
Review combined rates
 |  |  |
| Example 1: Under the Free Shipping Threshold | Example 2: Exceeded the Free Shipping Threshold | Example 3: Under the Cart Minimum Threshold |


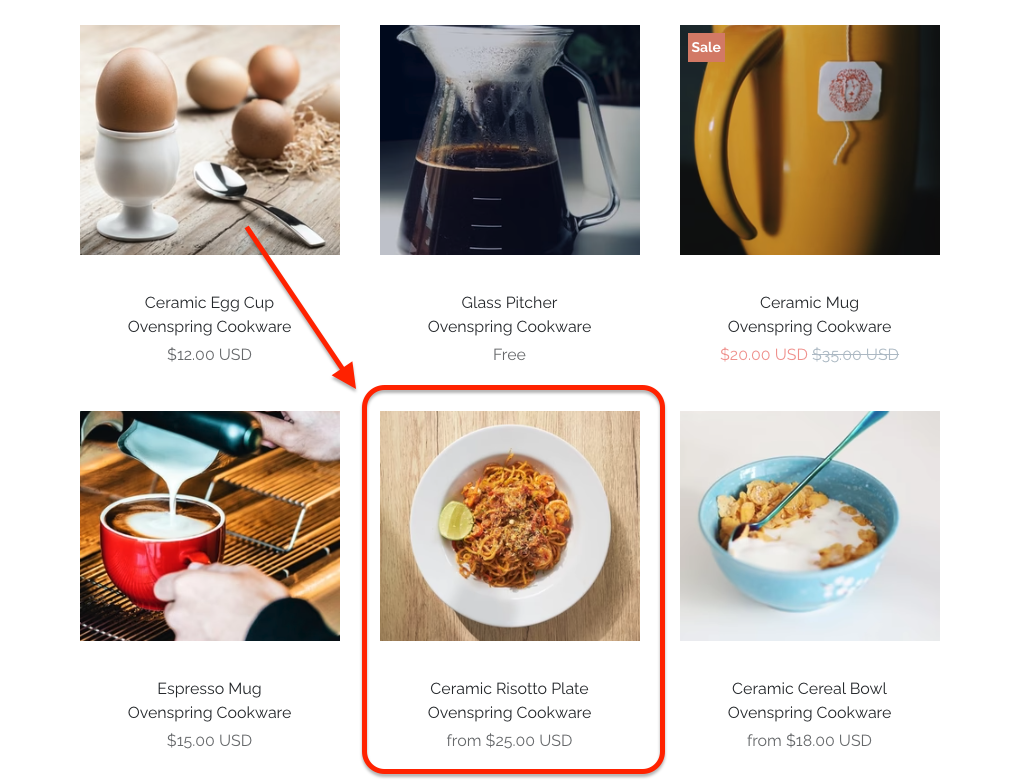


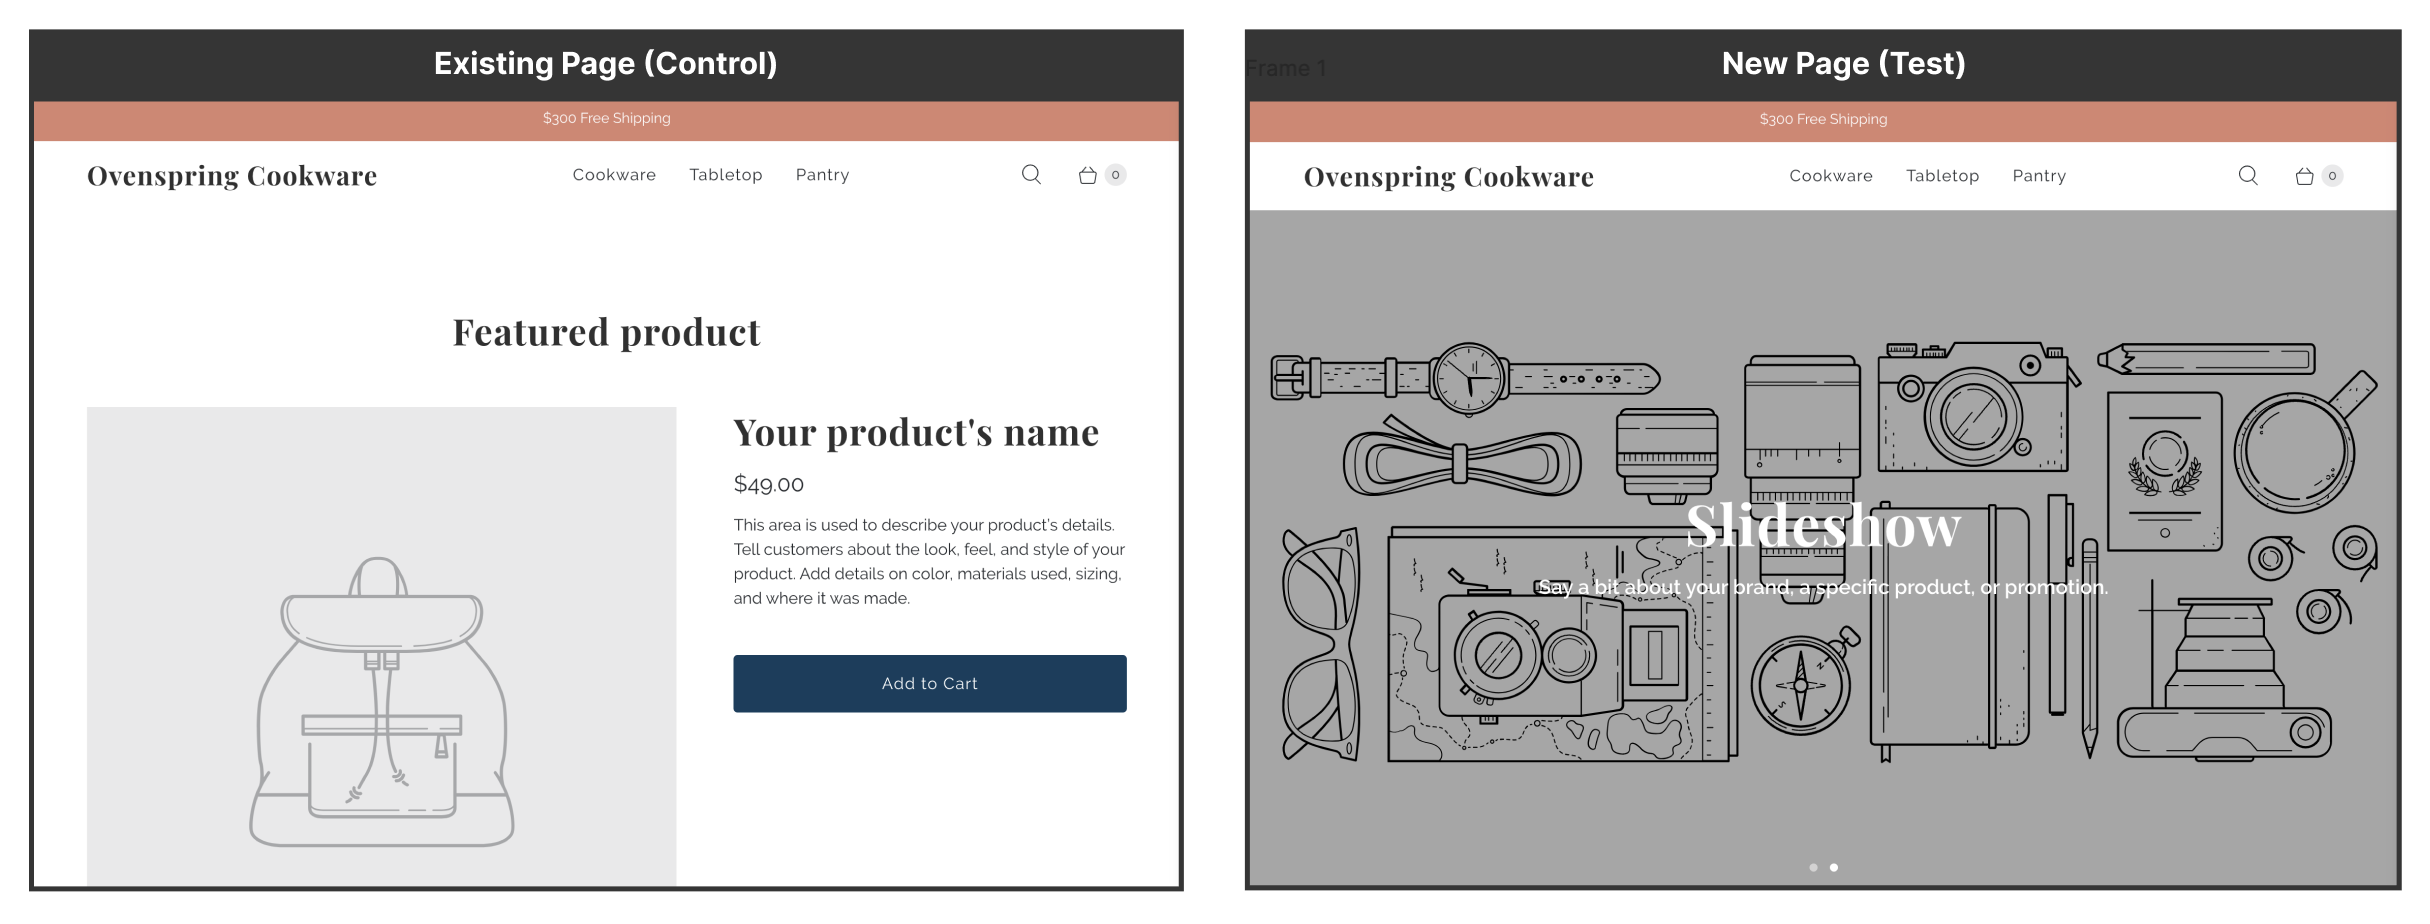
Two example landing pages that we'd like to test against each other
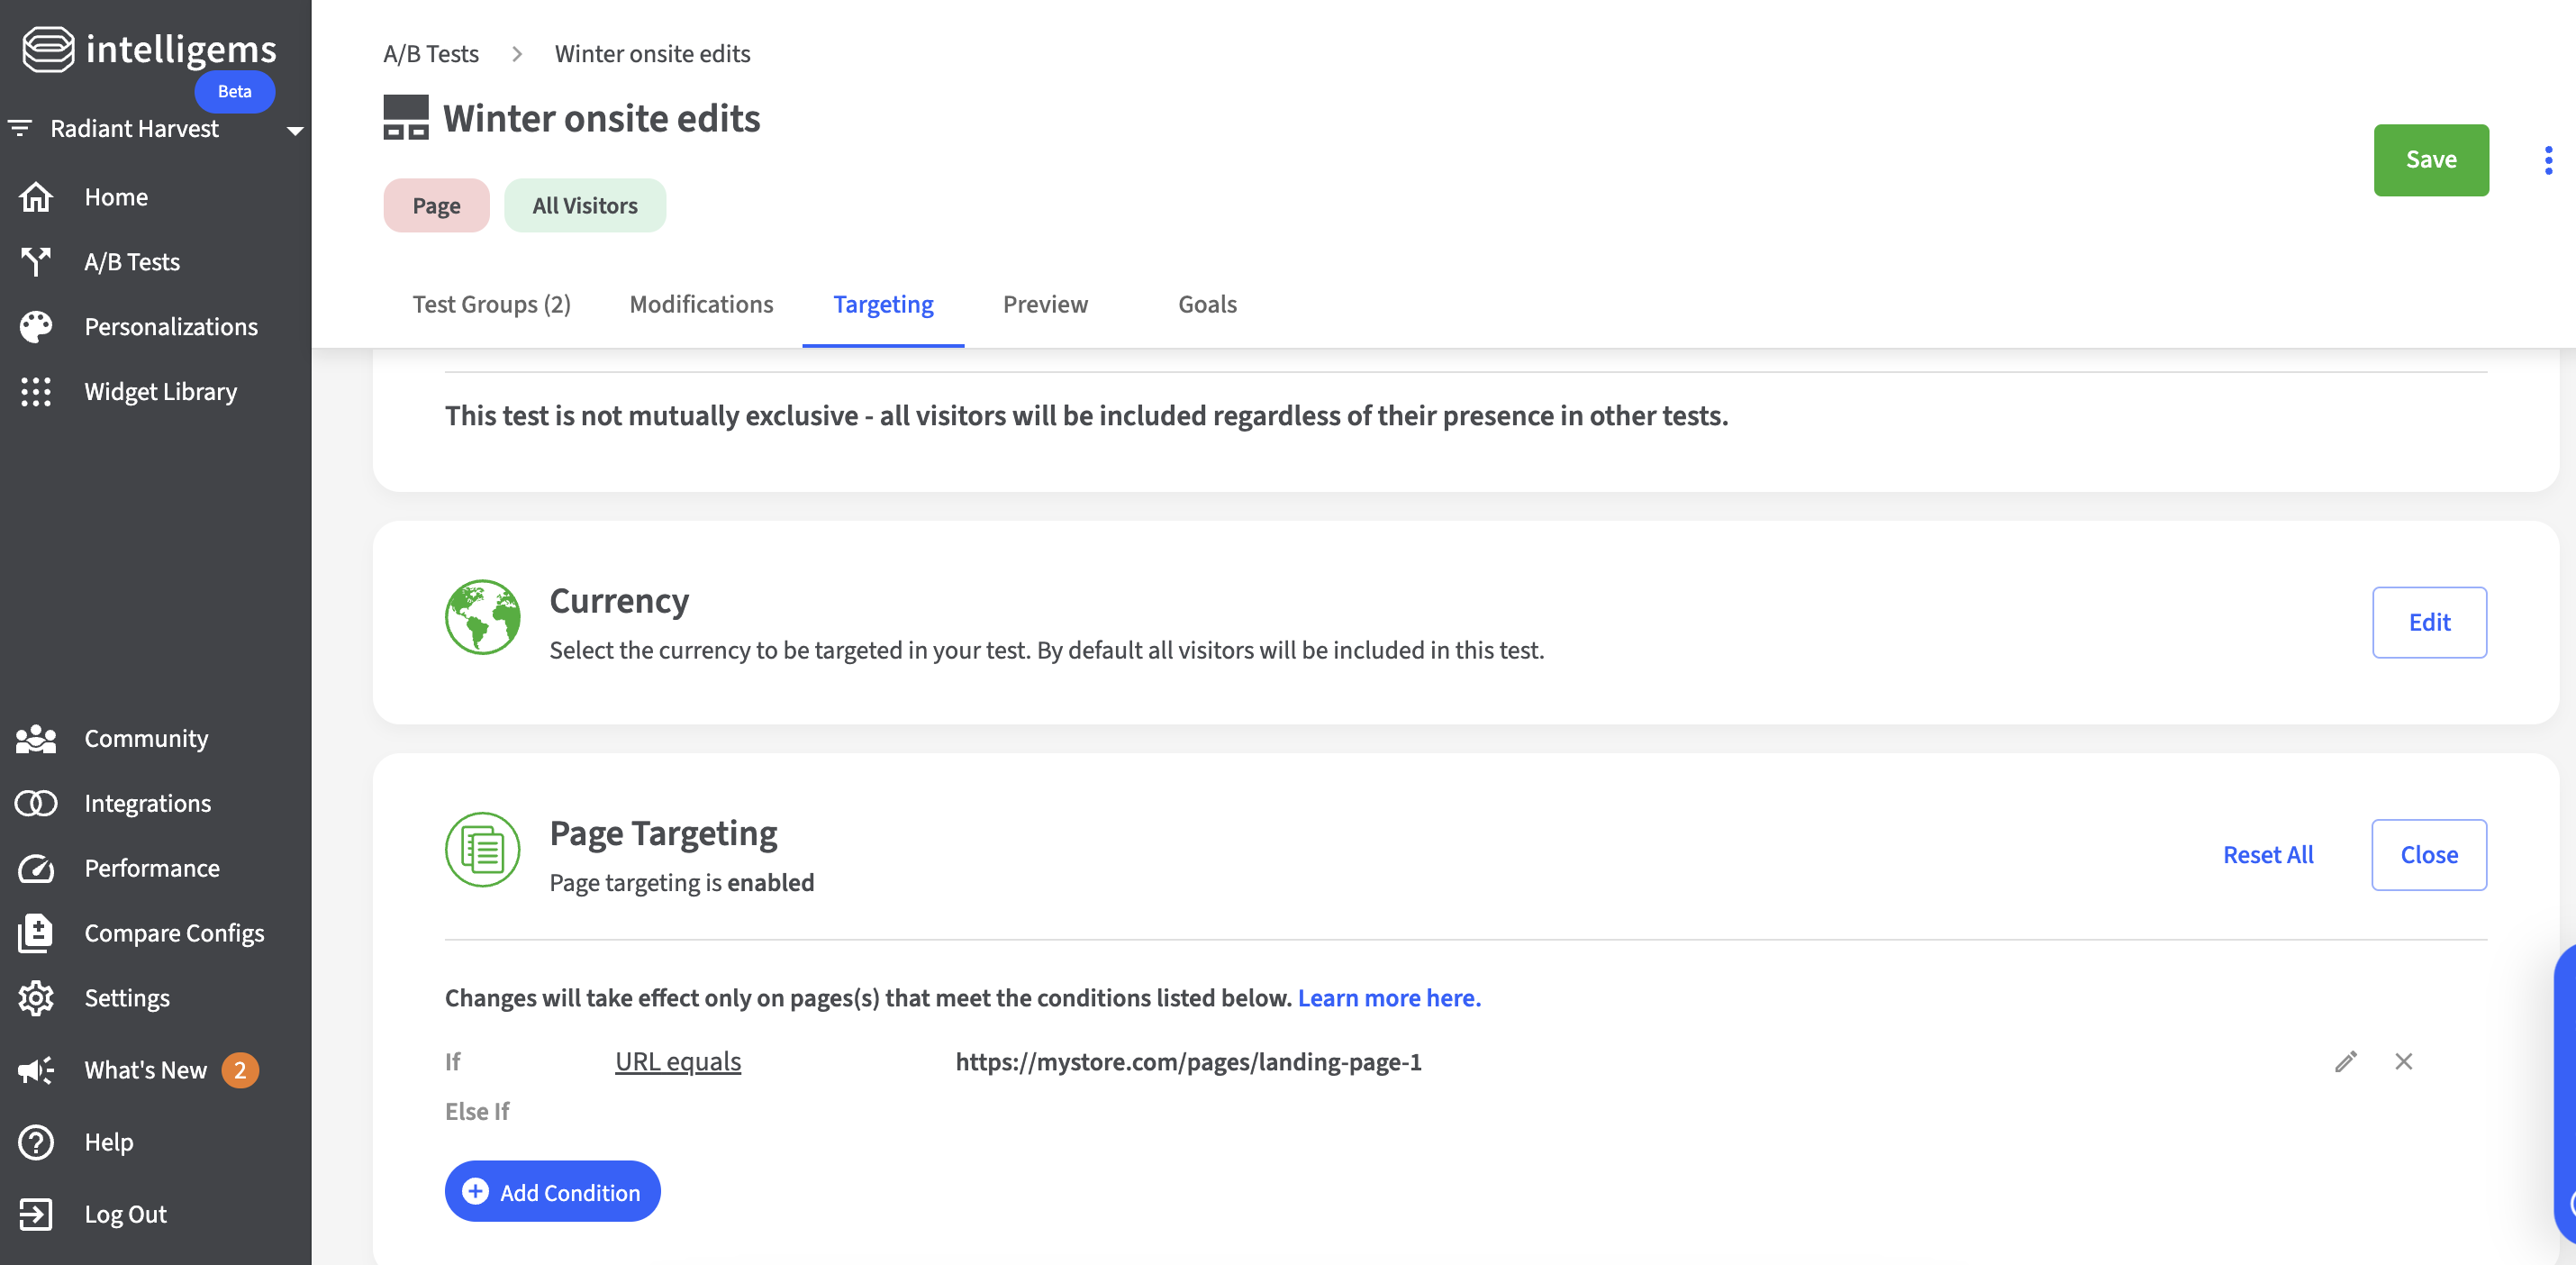
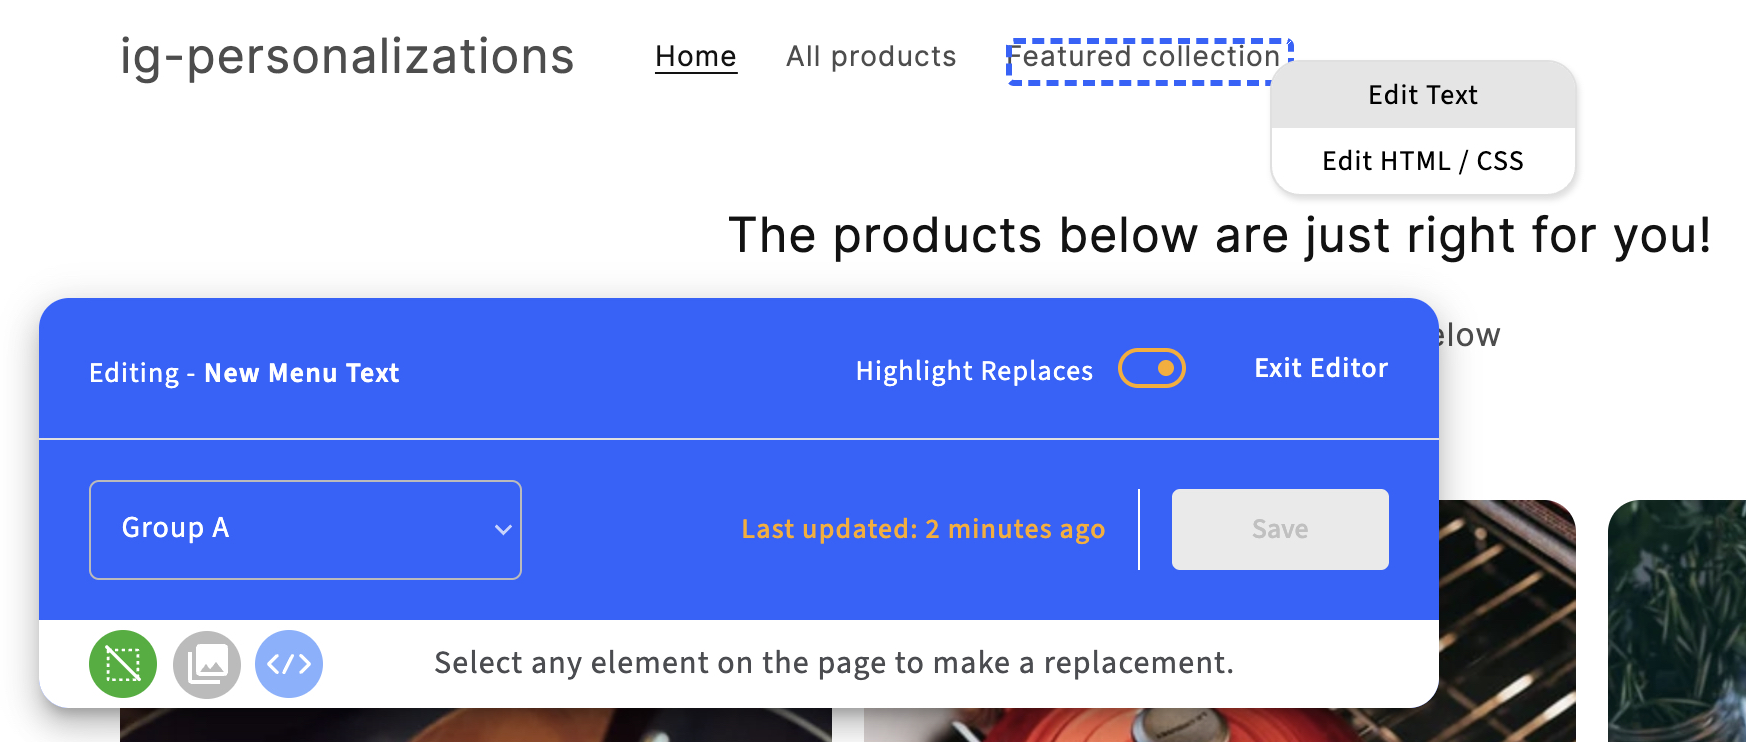
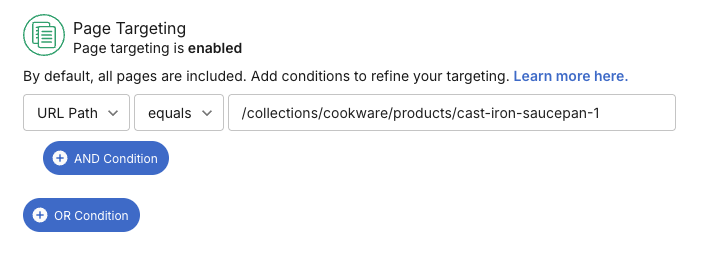
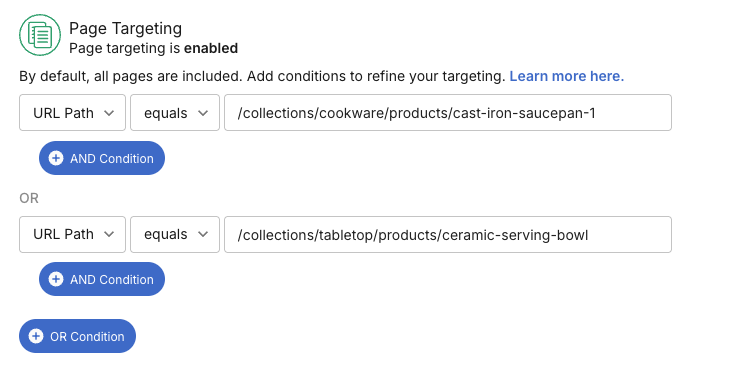
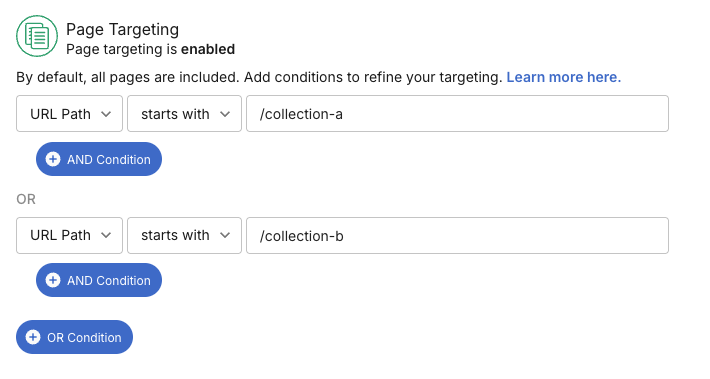
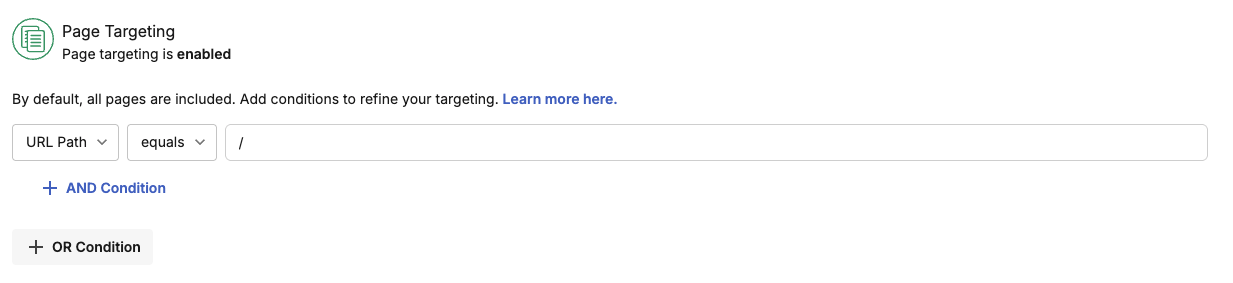
Page Targeting in an Onsite Edits Test
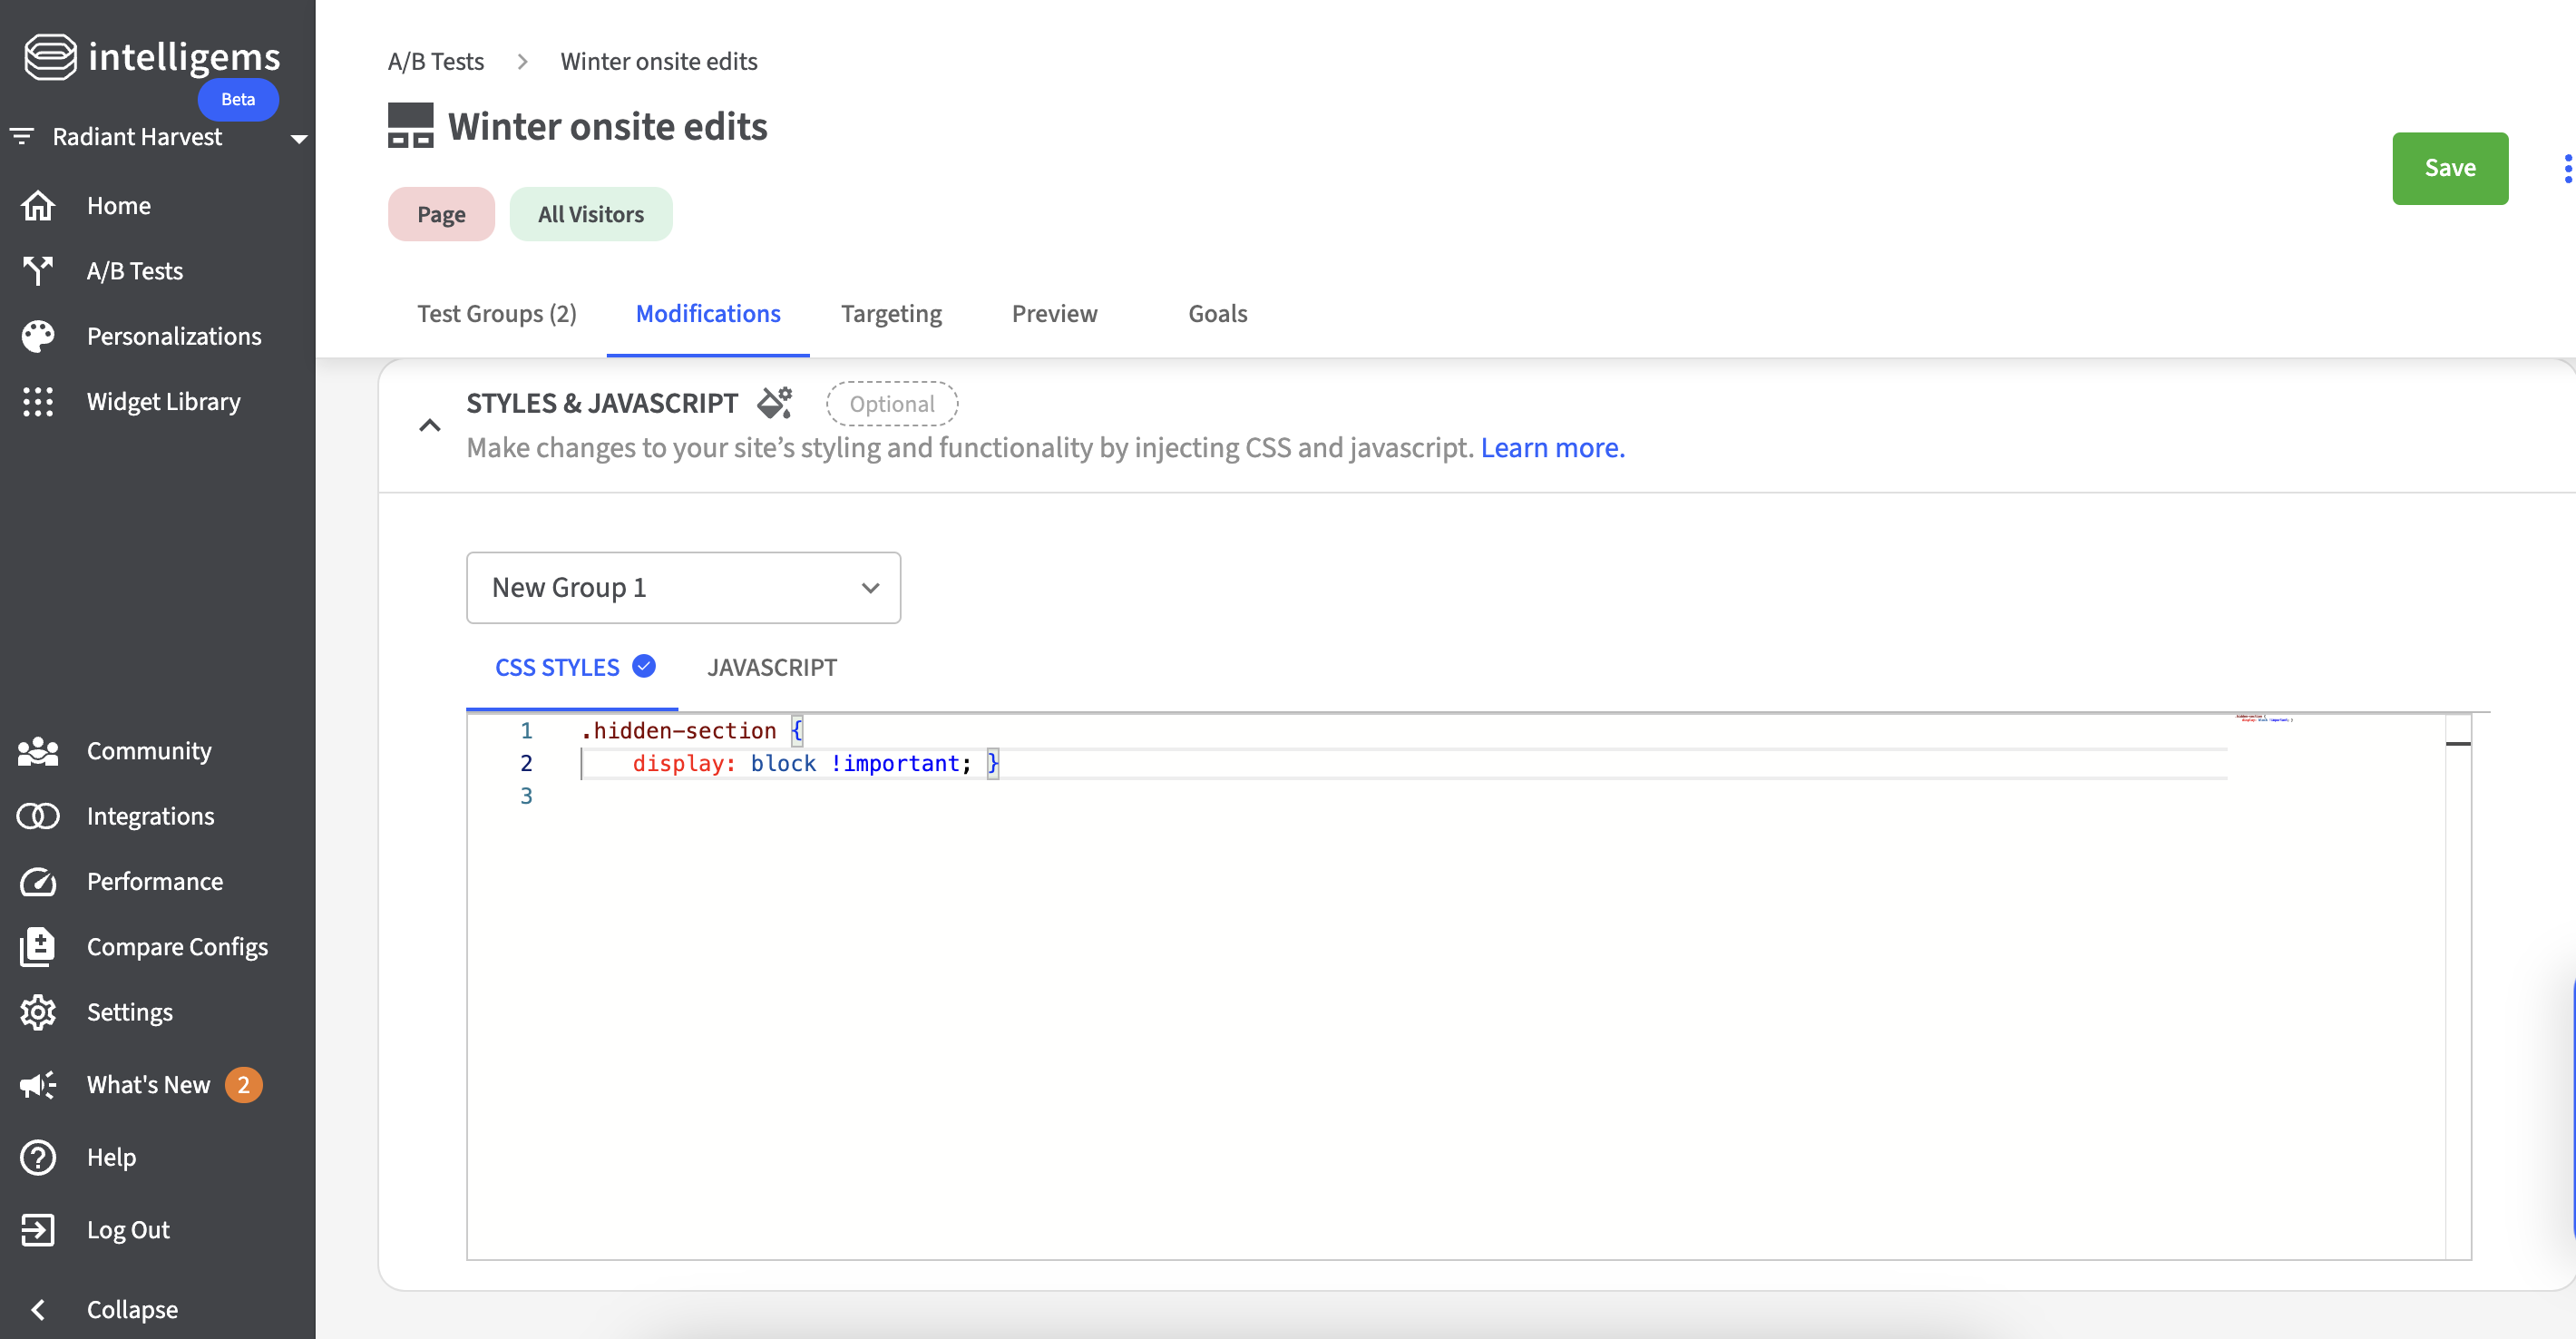
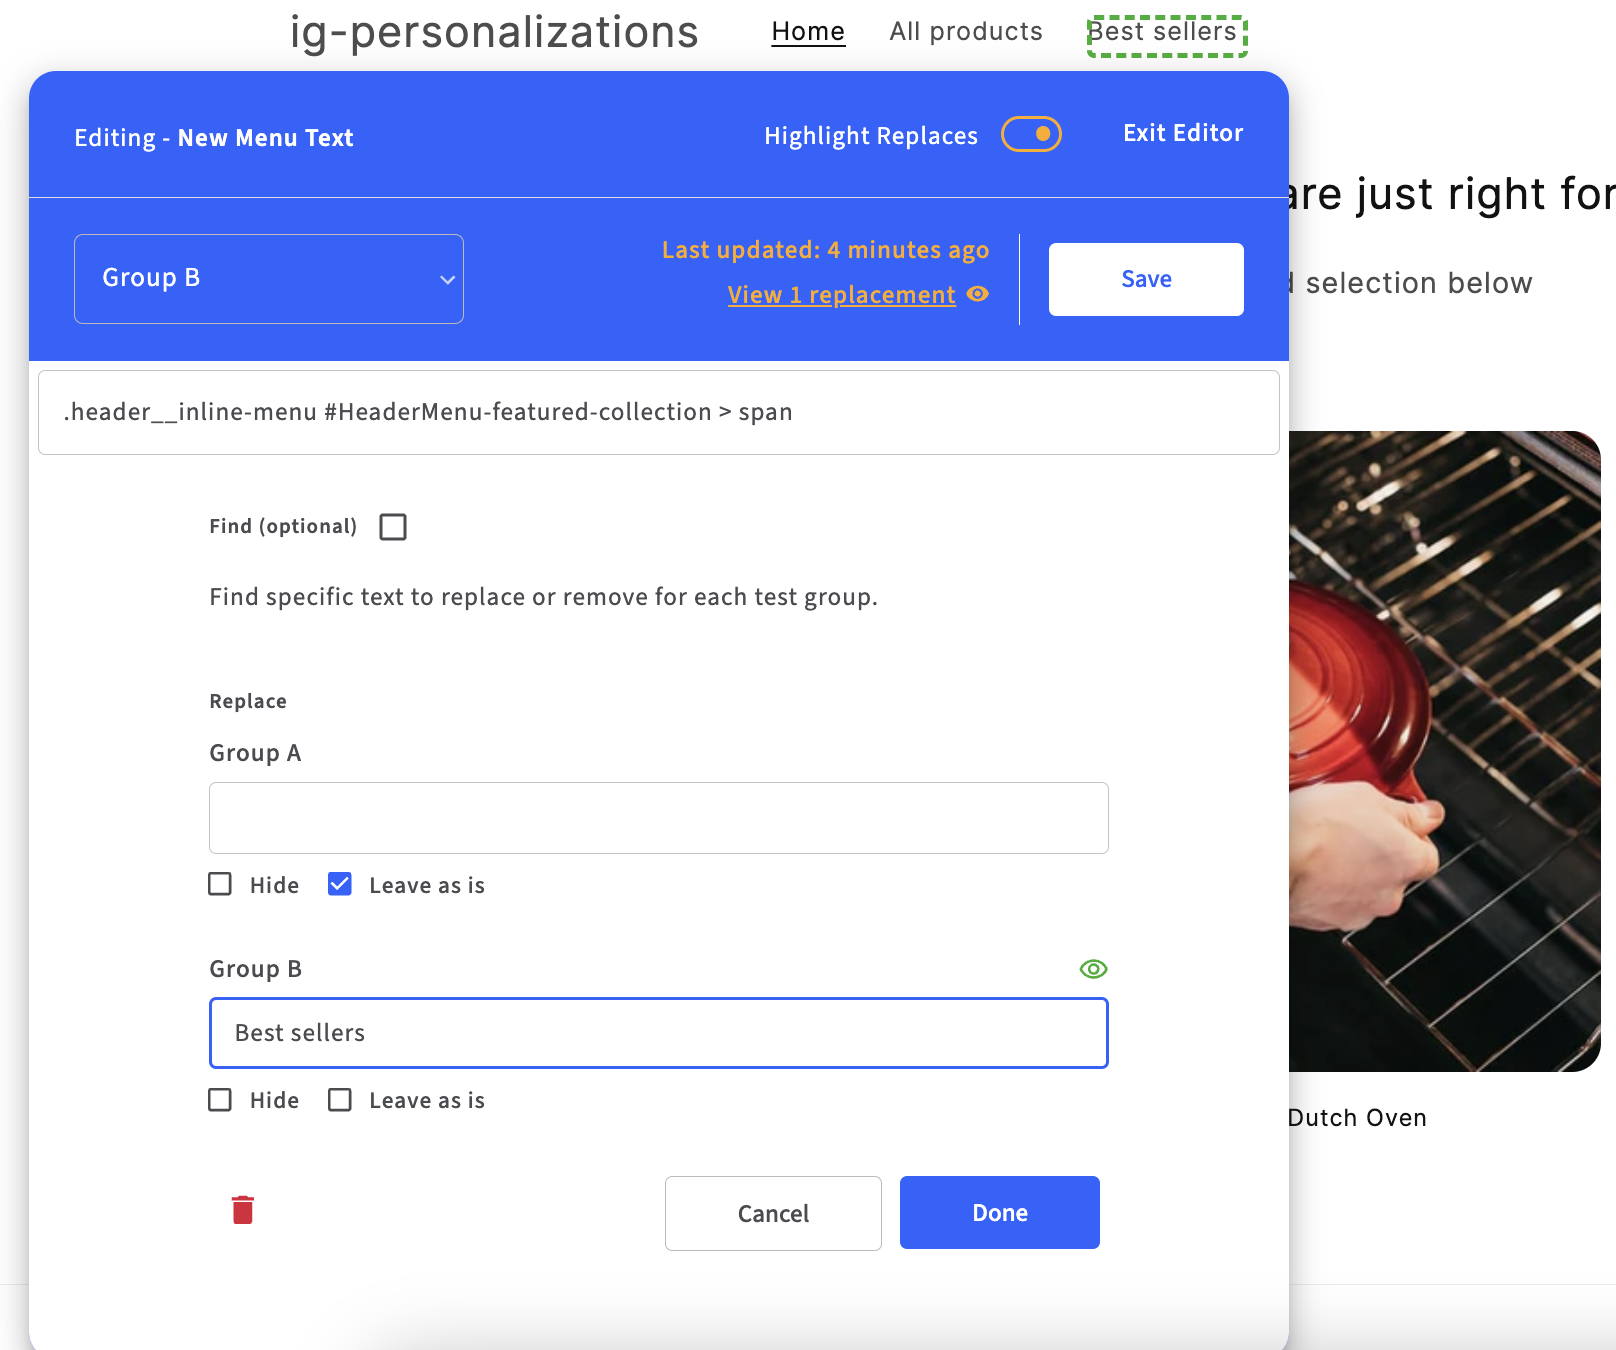
CSS injection in an Onsite Edits Test
 {% endhint %}
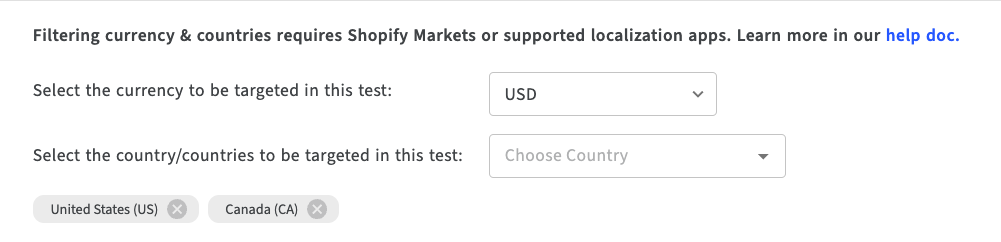
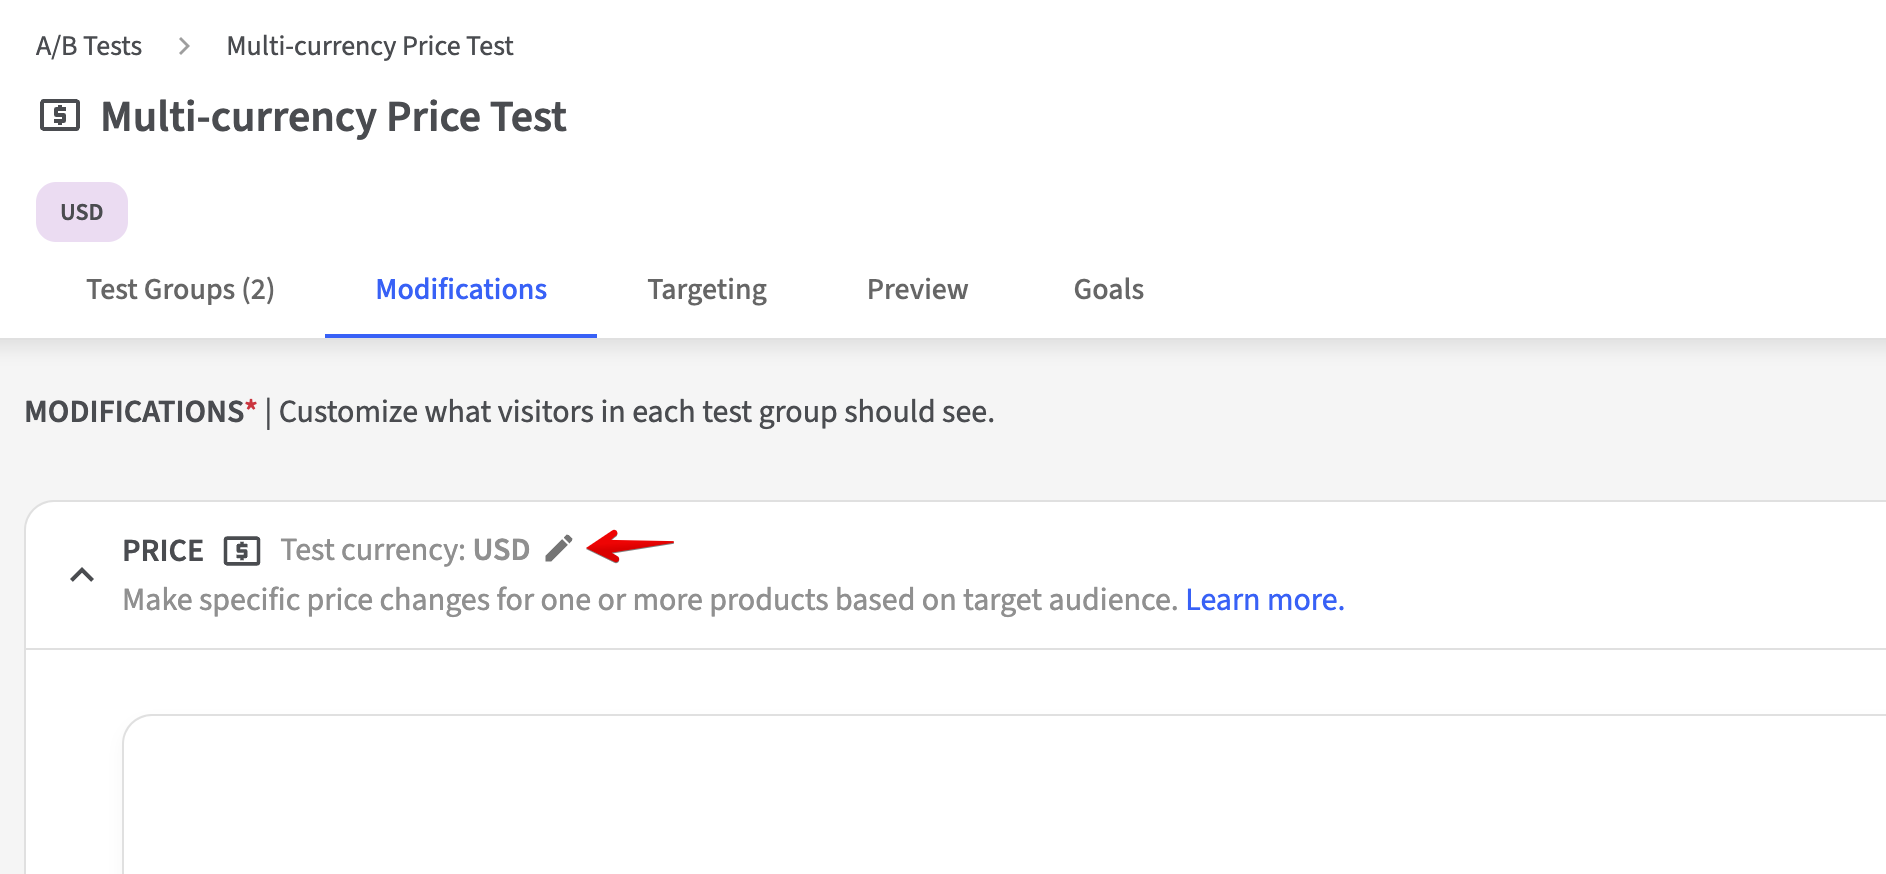
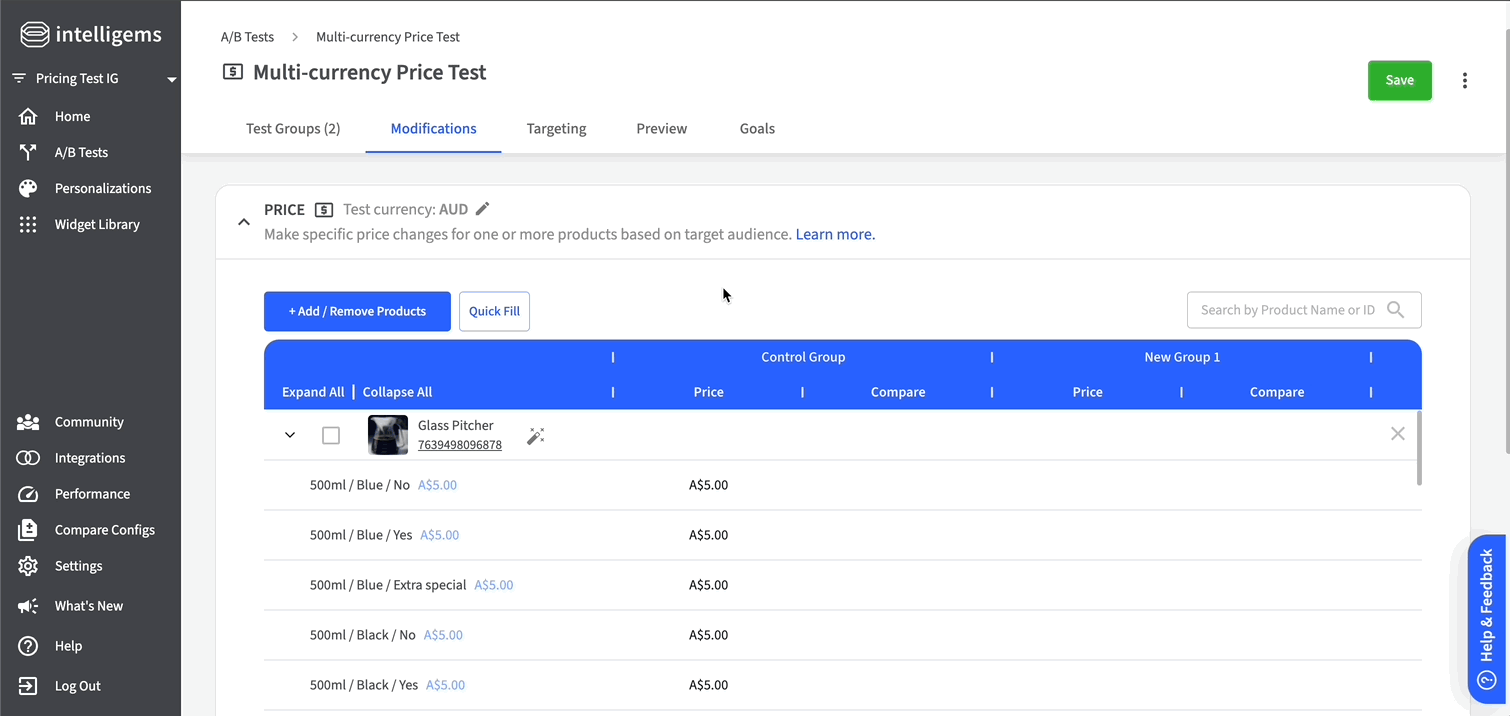
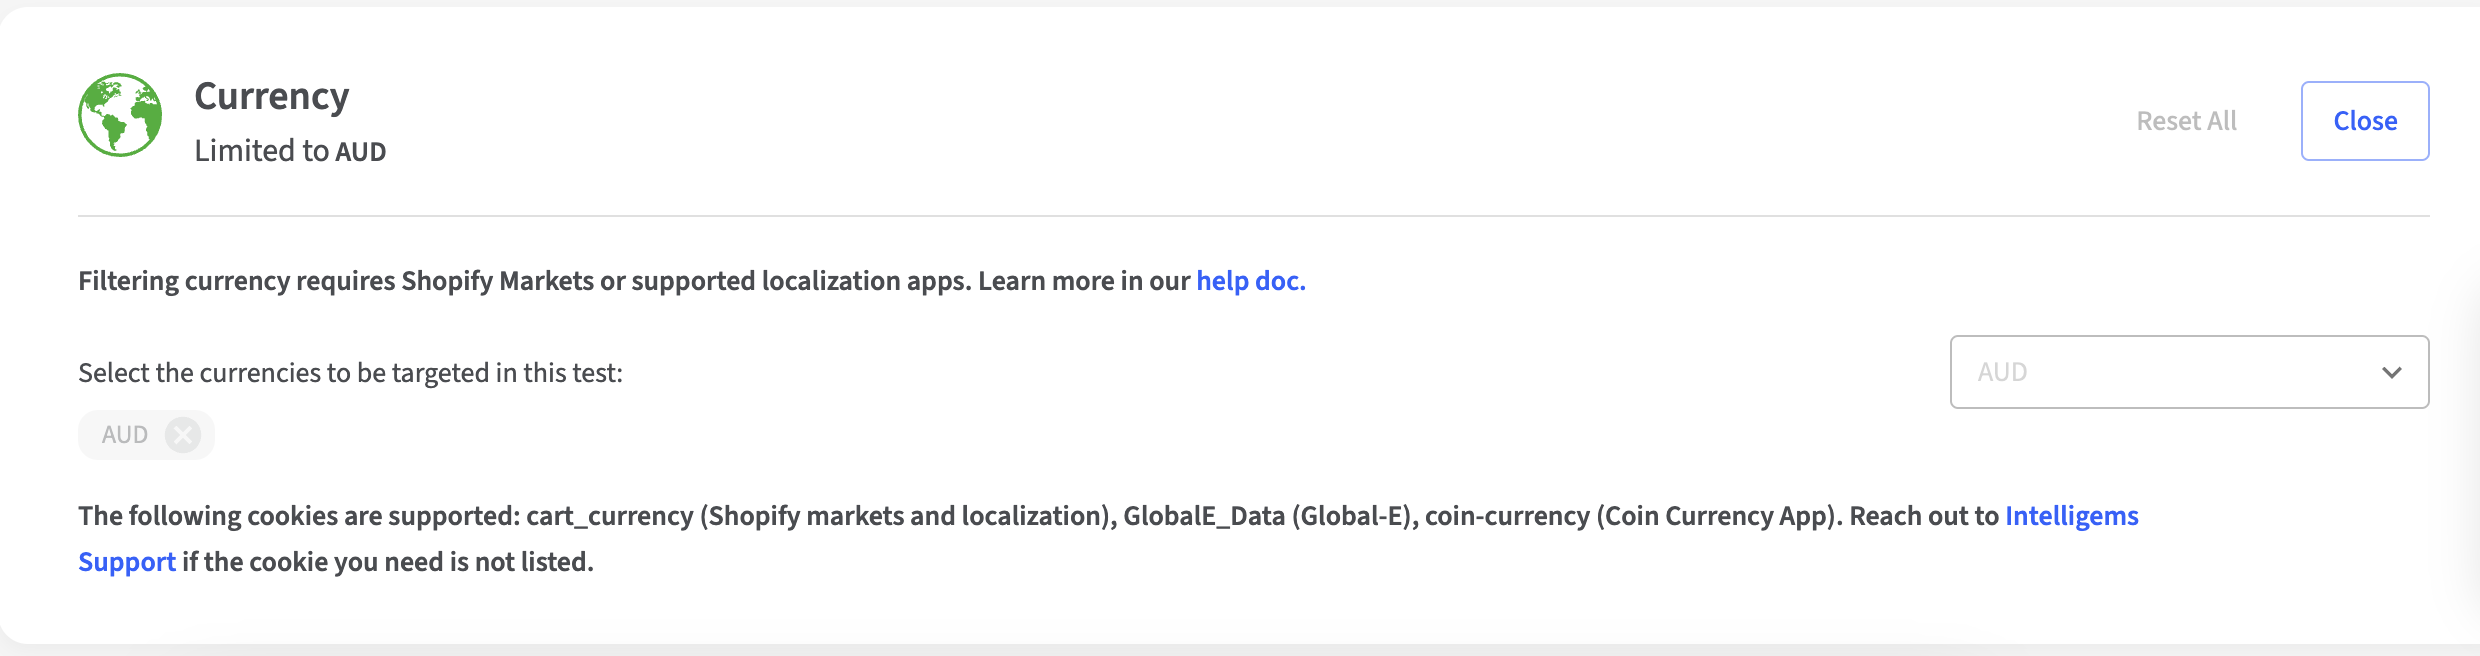
3. Currency targeting is set to your selected test currency by default, and will not be editable directly in the targeting section.
{% endhint %}
3. Currency targeting is set to your selected test currency by default, and will not be editable directly in the targeting section.

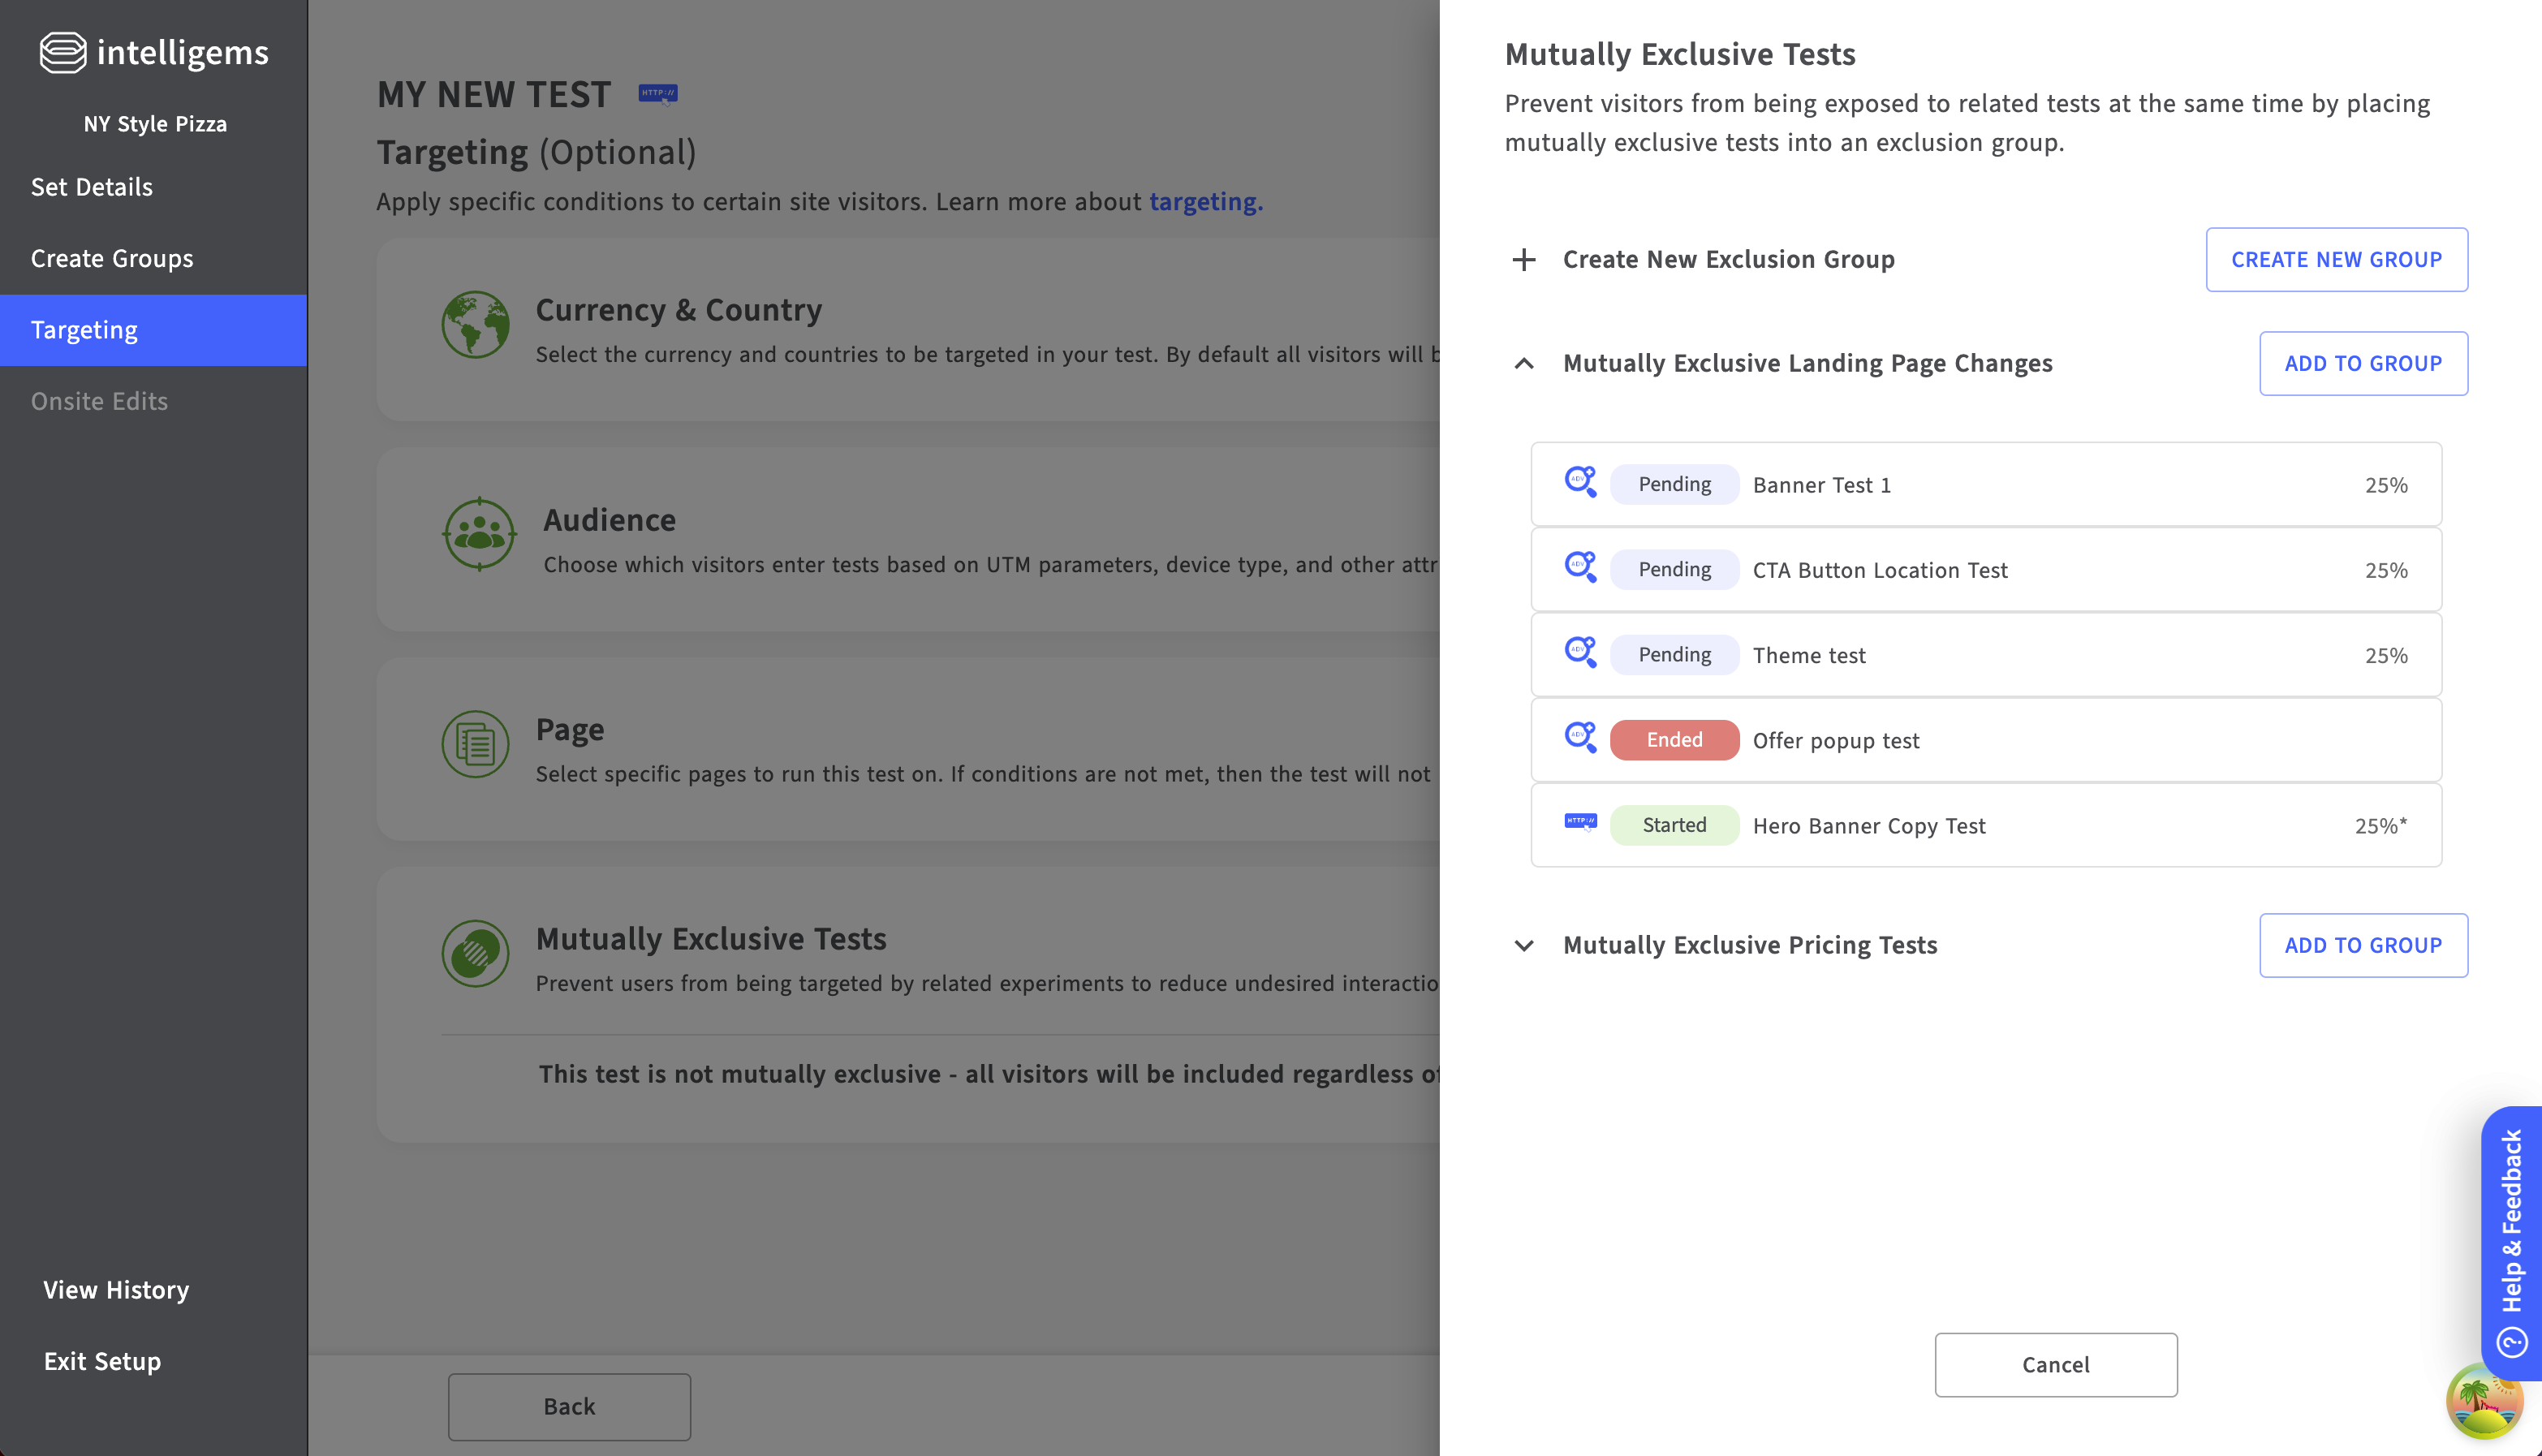
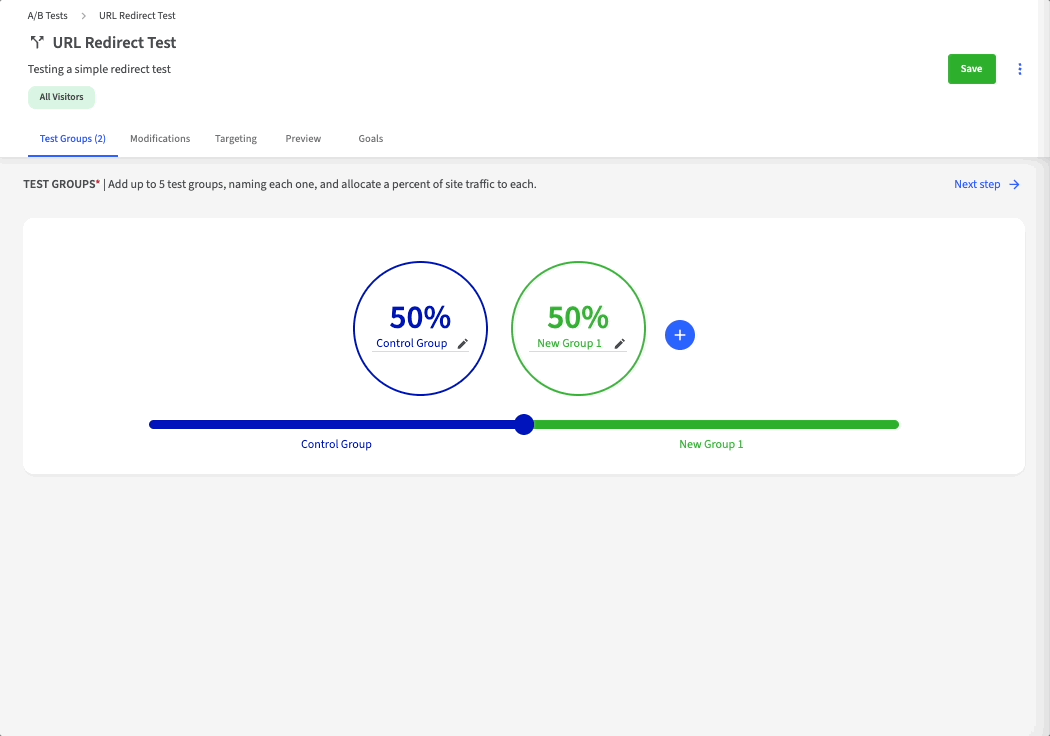
Making a test mutually exclusive
 {% endhint %}
#### Presentation and Styles
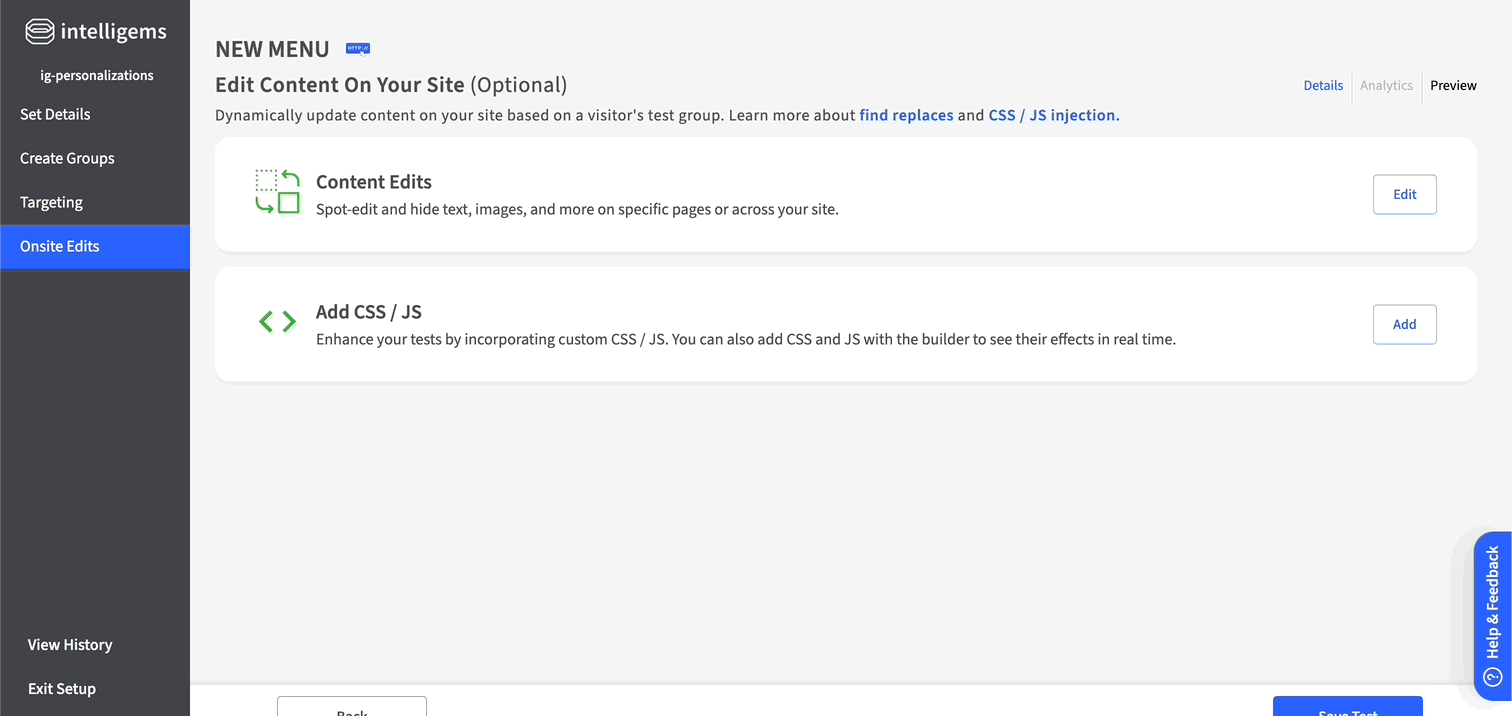
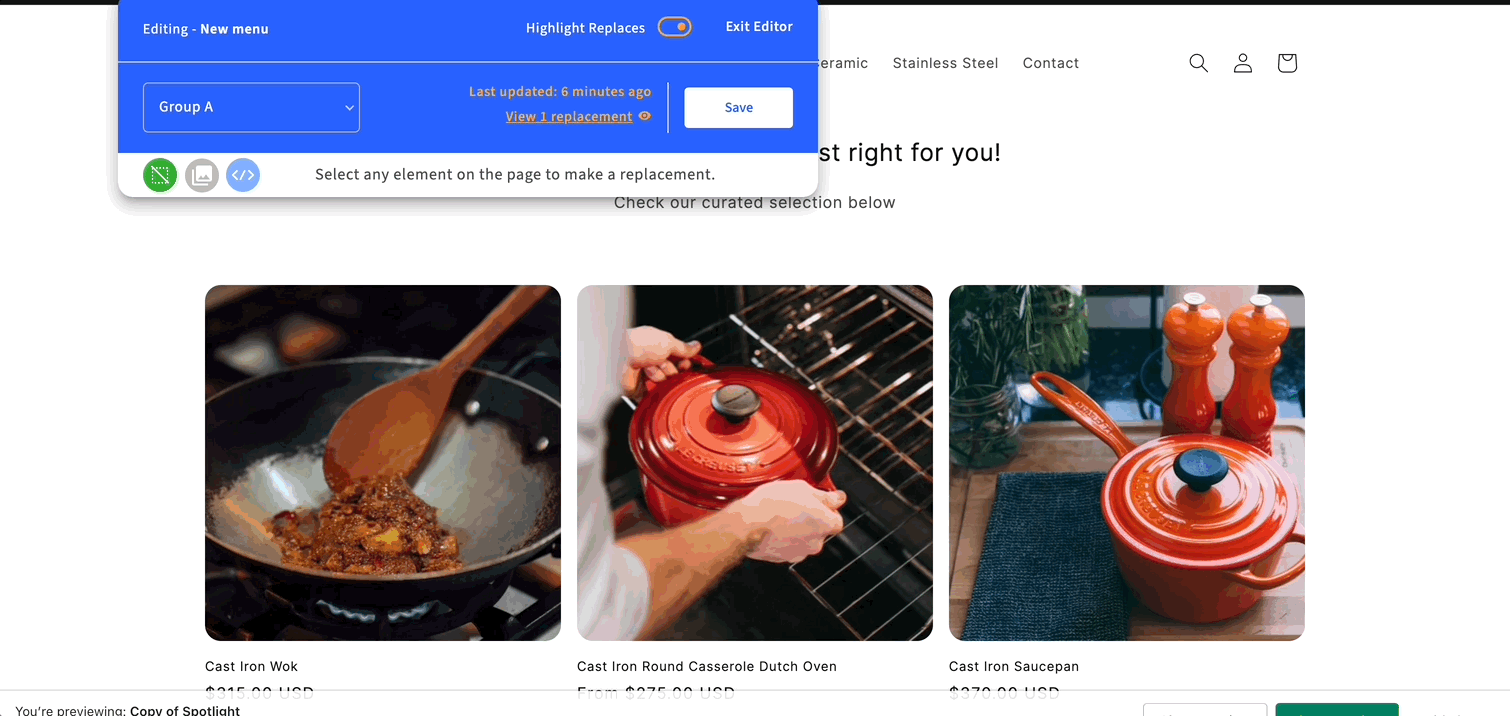
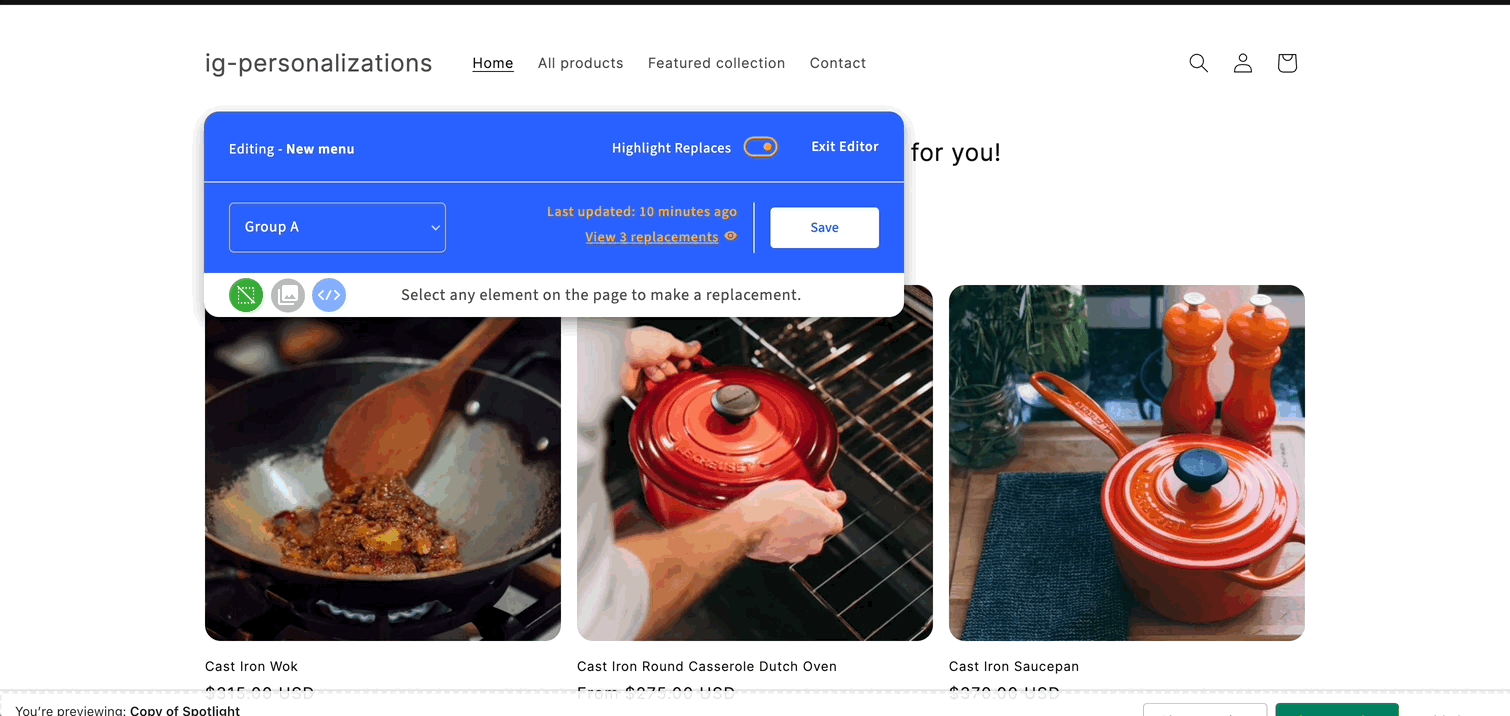
Perhaps you are happy with the options presented on your menu, but you want to test the ways your visitors perceive it. You can easily inject custom styles into your test, having an alternative presentation for your test group, without needing to make any theme modifications, as outlined below:
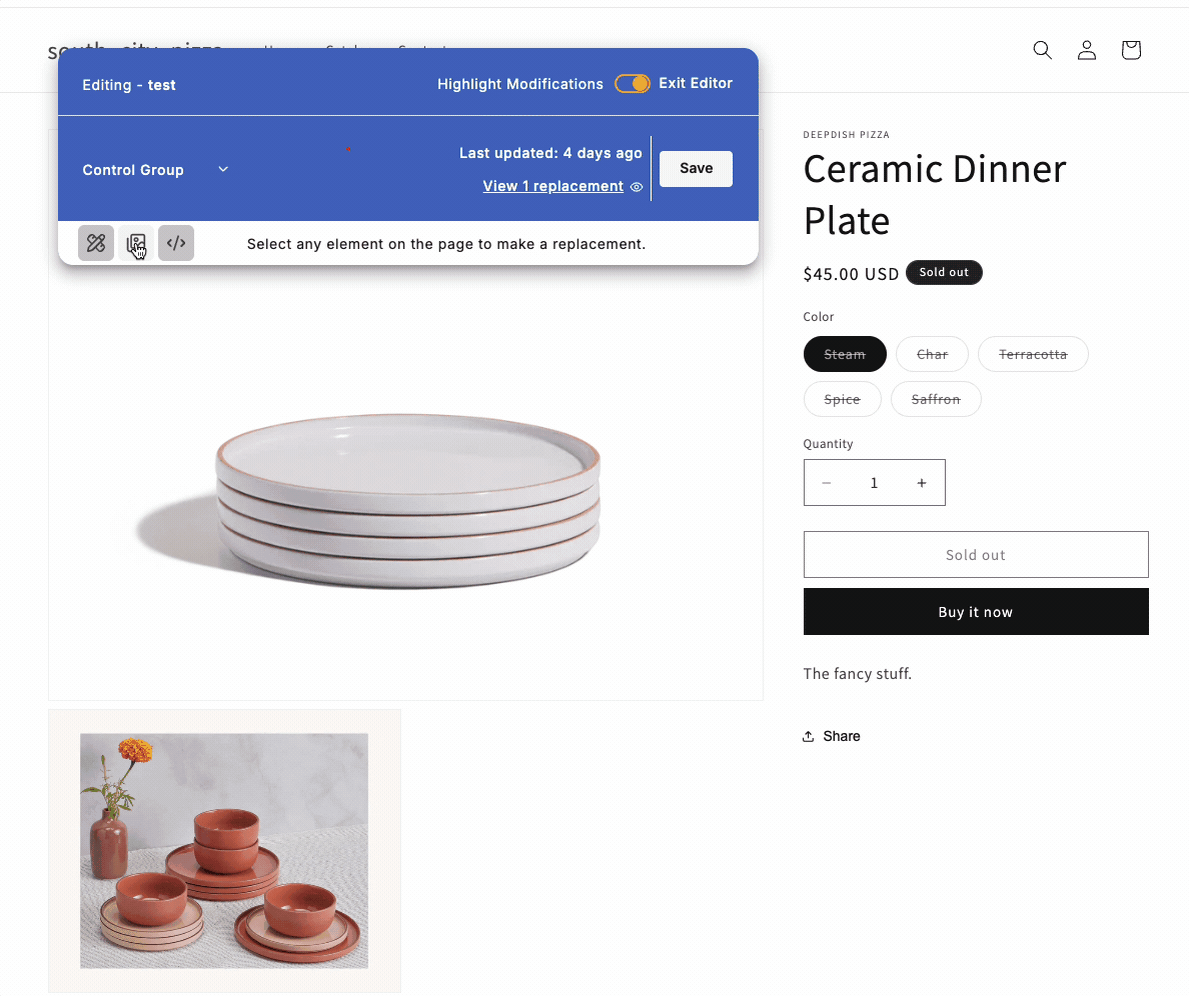
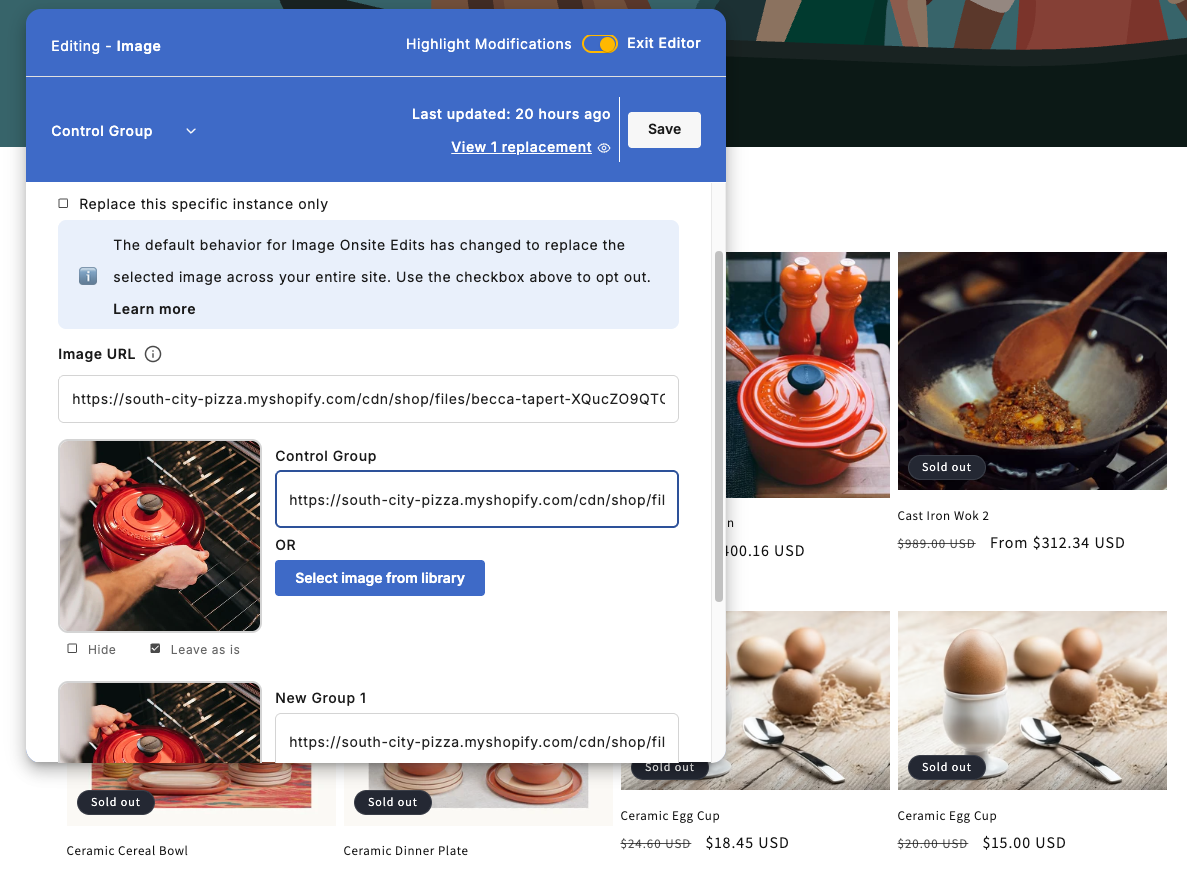
1. On Intelligems, create a new Content Test, selecting the type Onsite Edits (see [How to Set Up an Onsite Edits Test](https://docs.intelligems.io/content-testing/content-testing-getting-started/how-to-set-up-an-onsite-edits-test)).
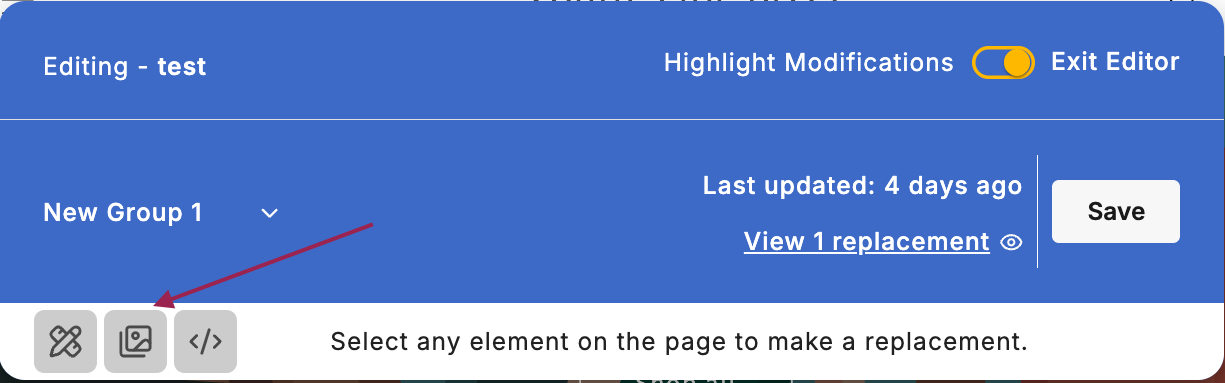
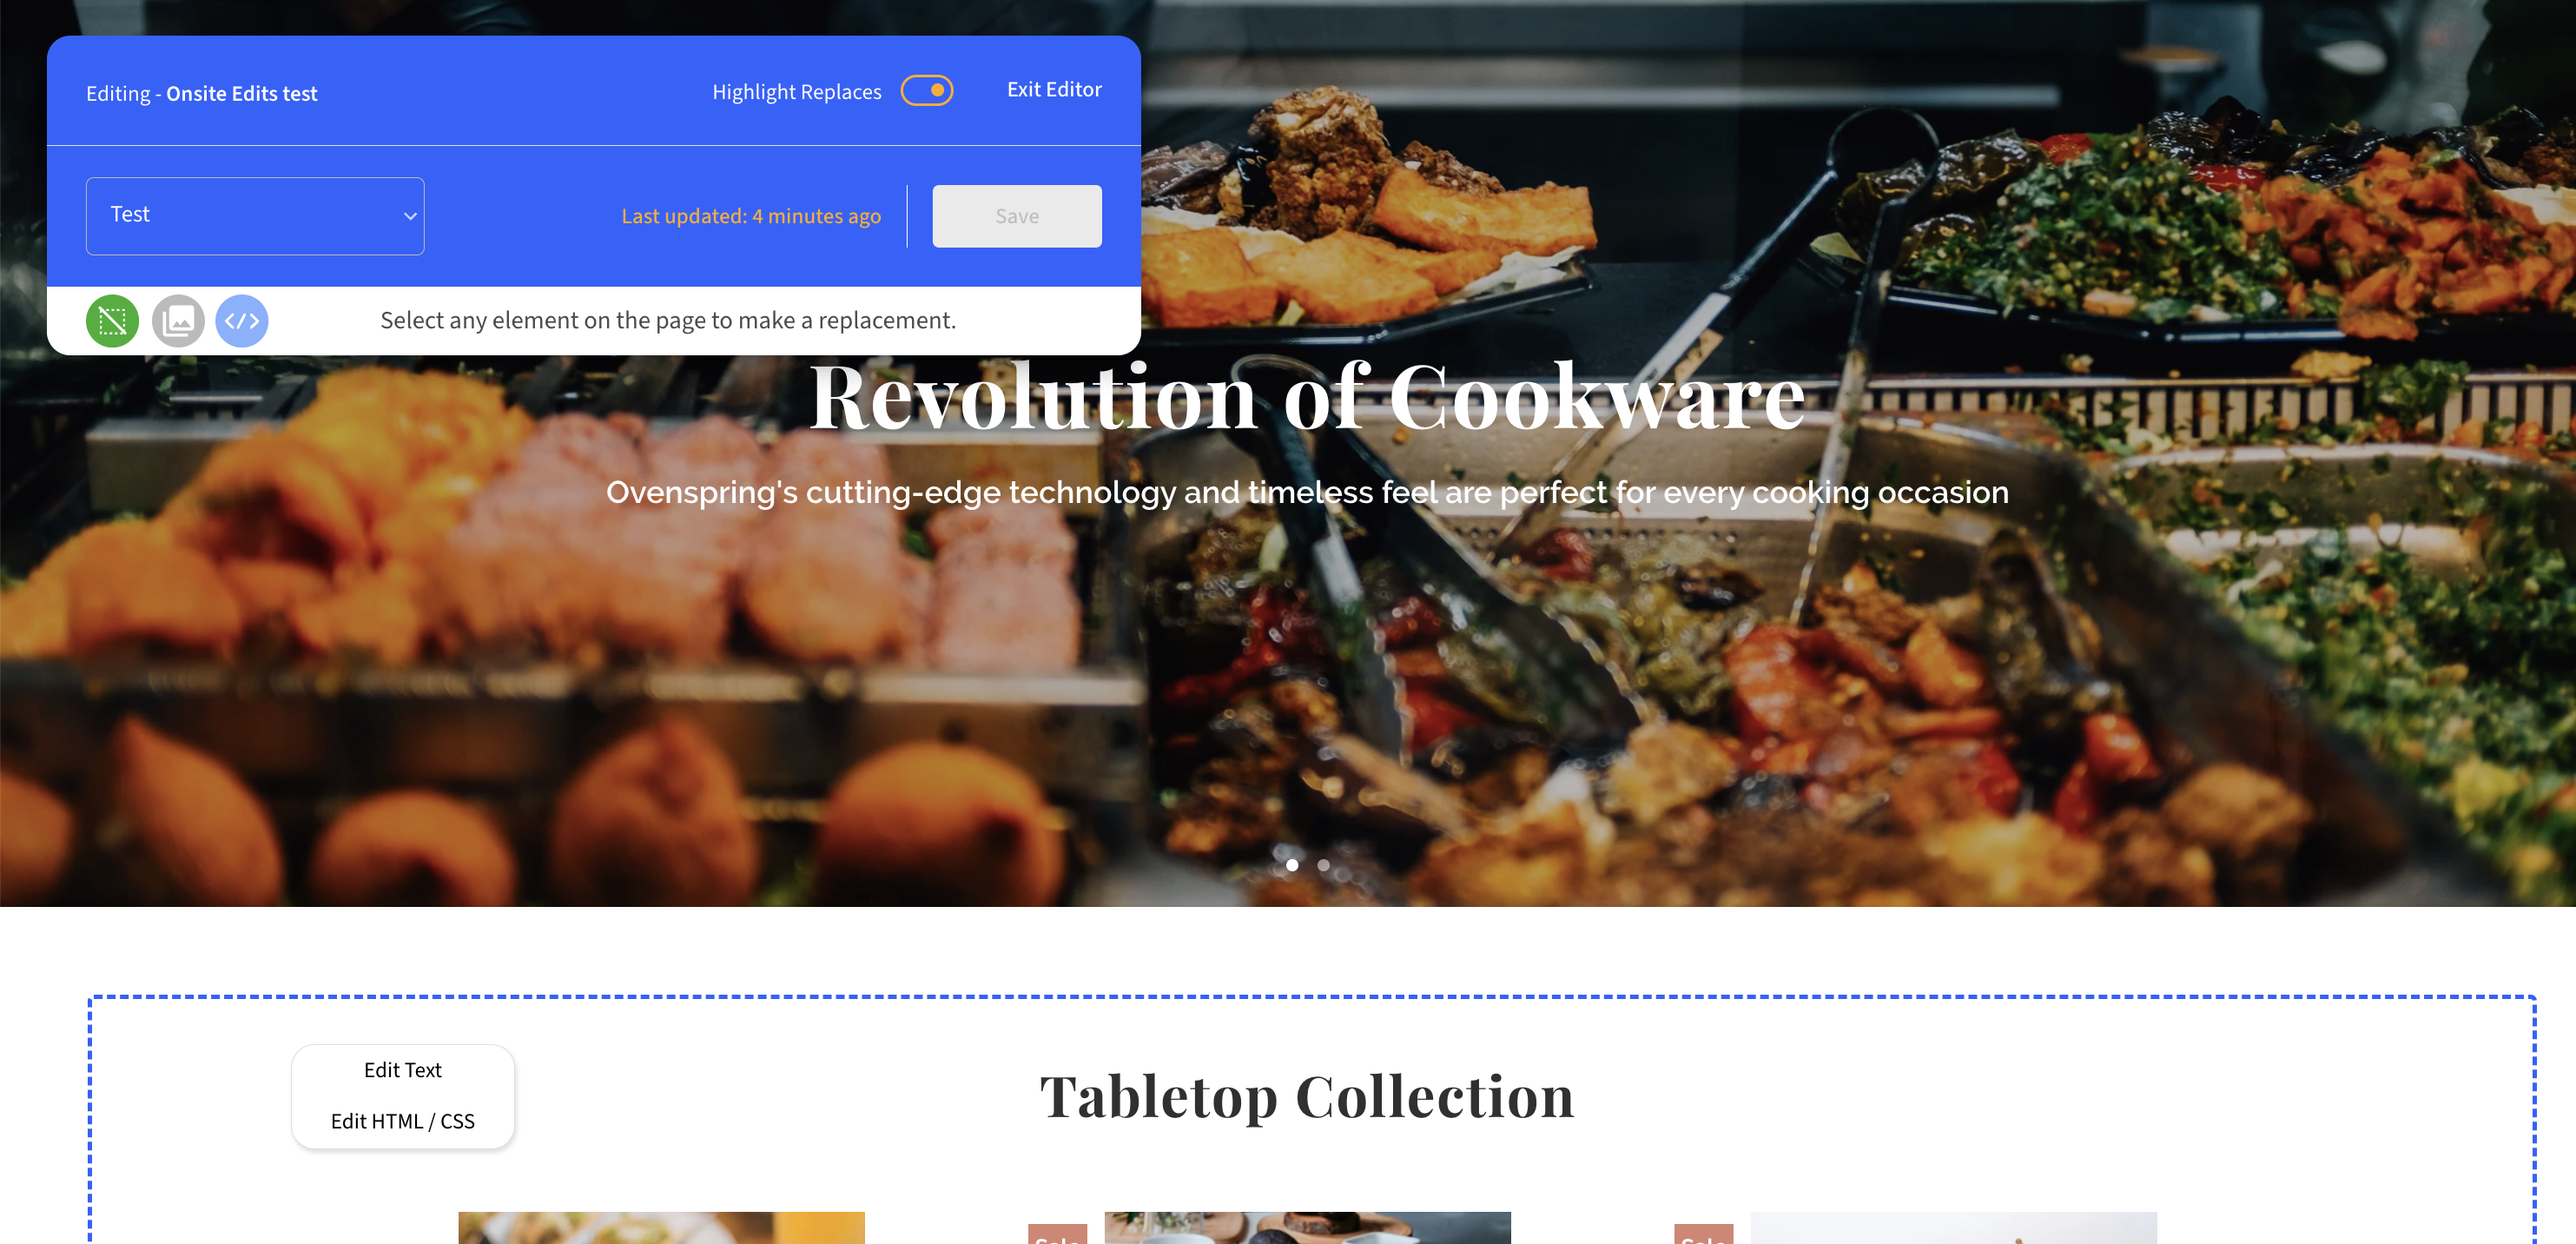
2. Load your test's preview, access the Onsite Editor, and go into editing mode.
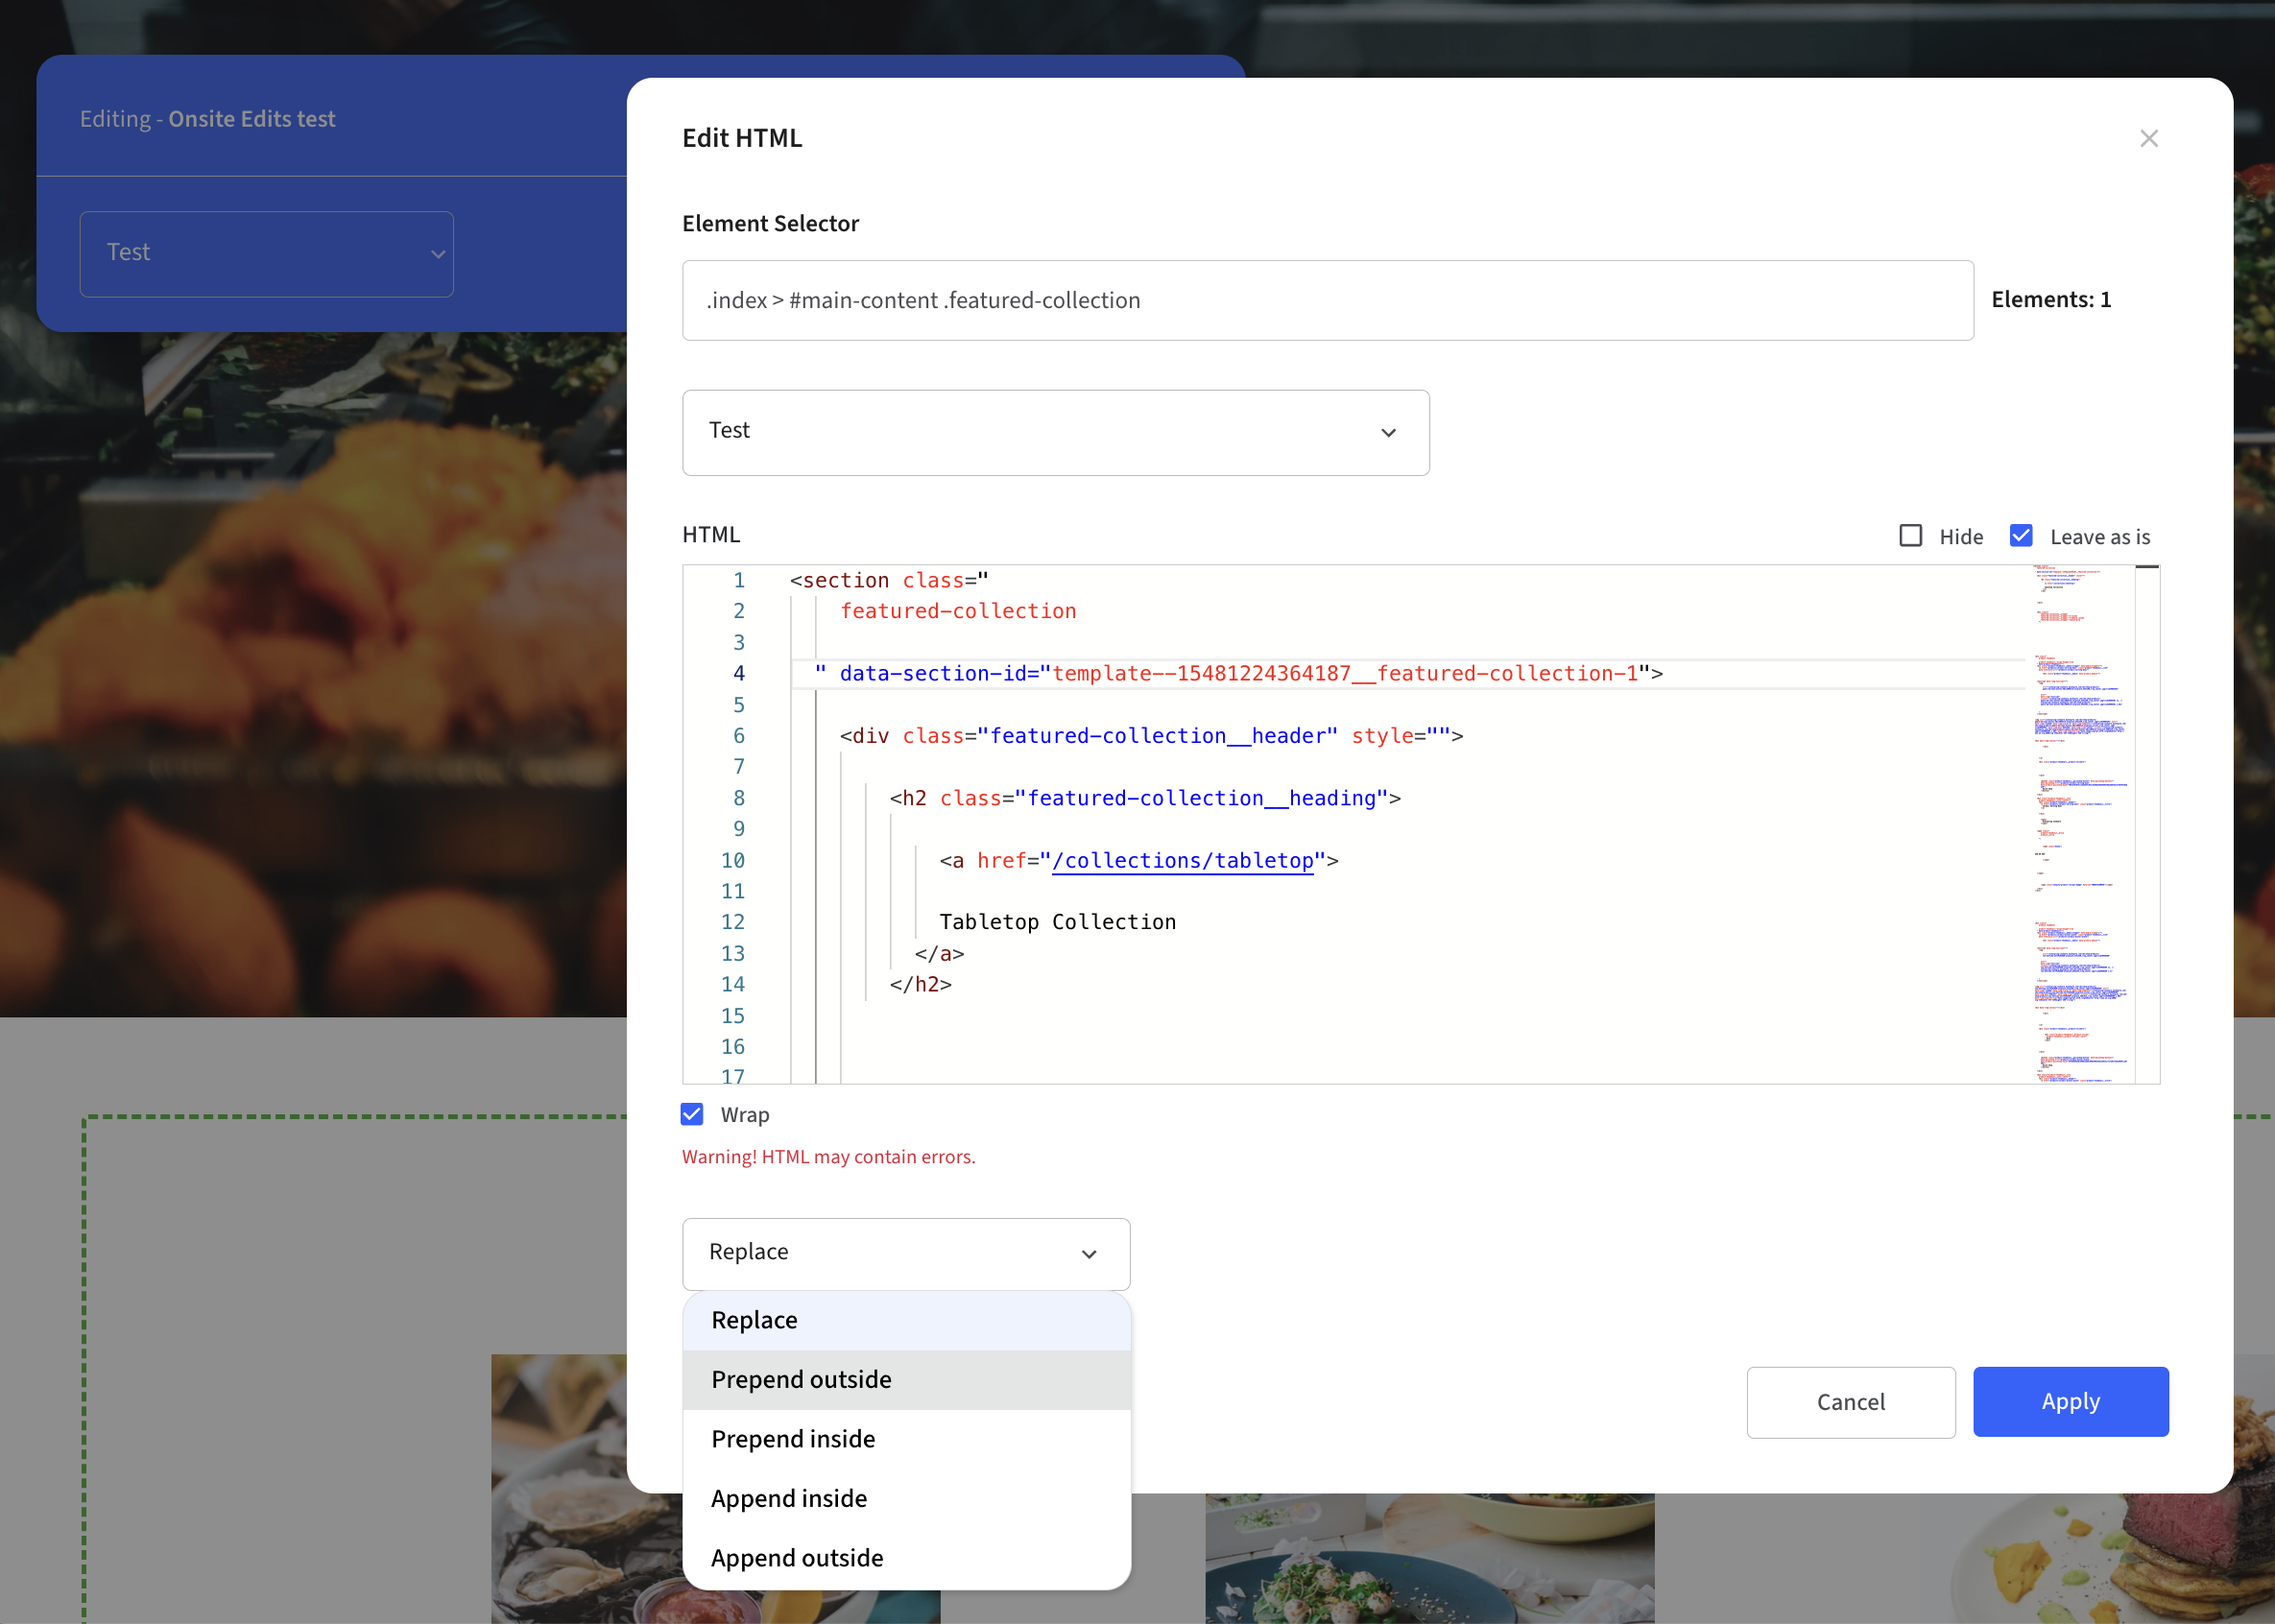
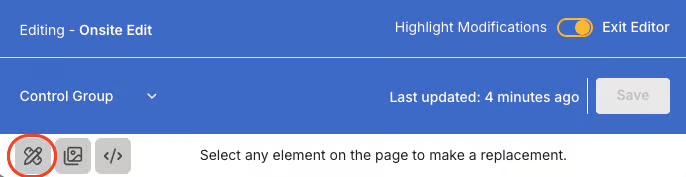
3. Click on the "\" icon to open the Global CSS / JS editor:
{% endhint %}
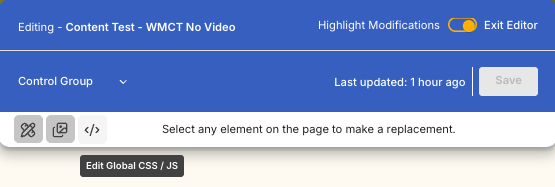
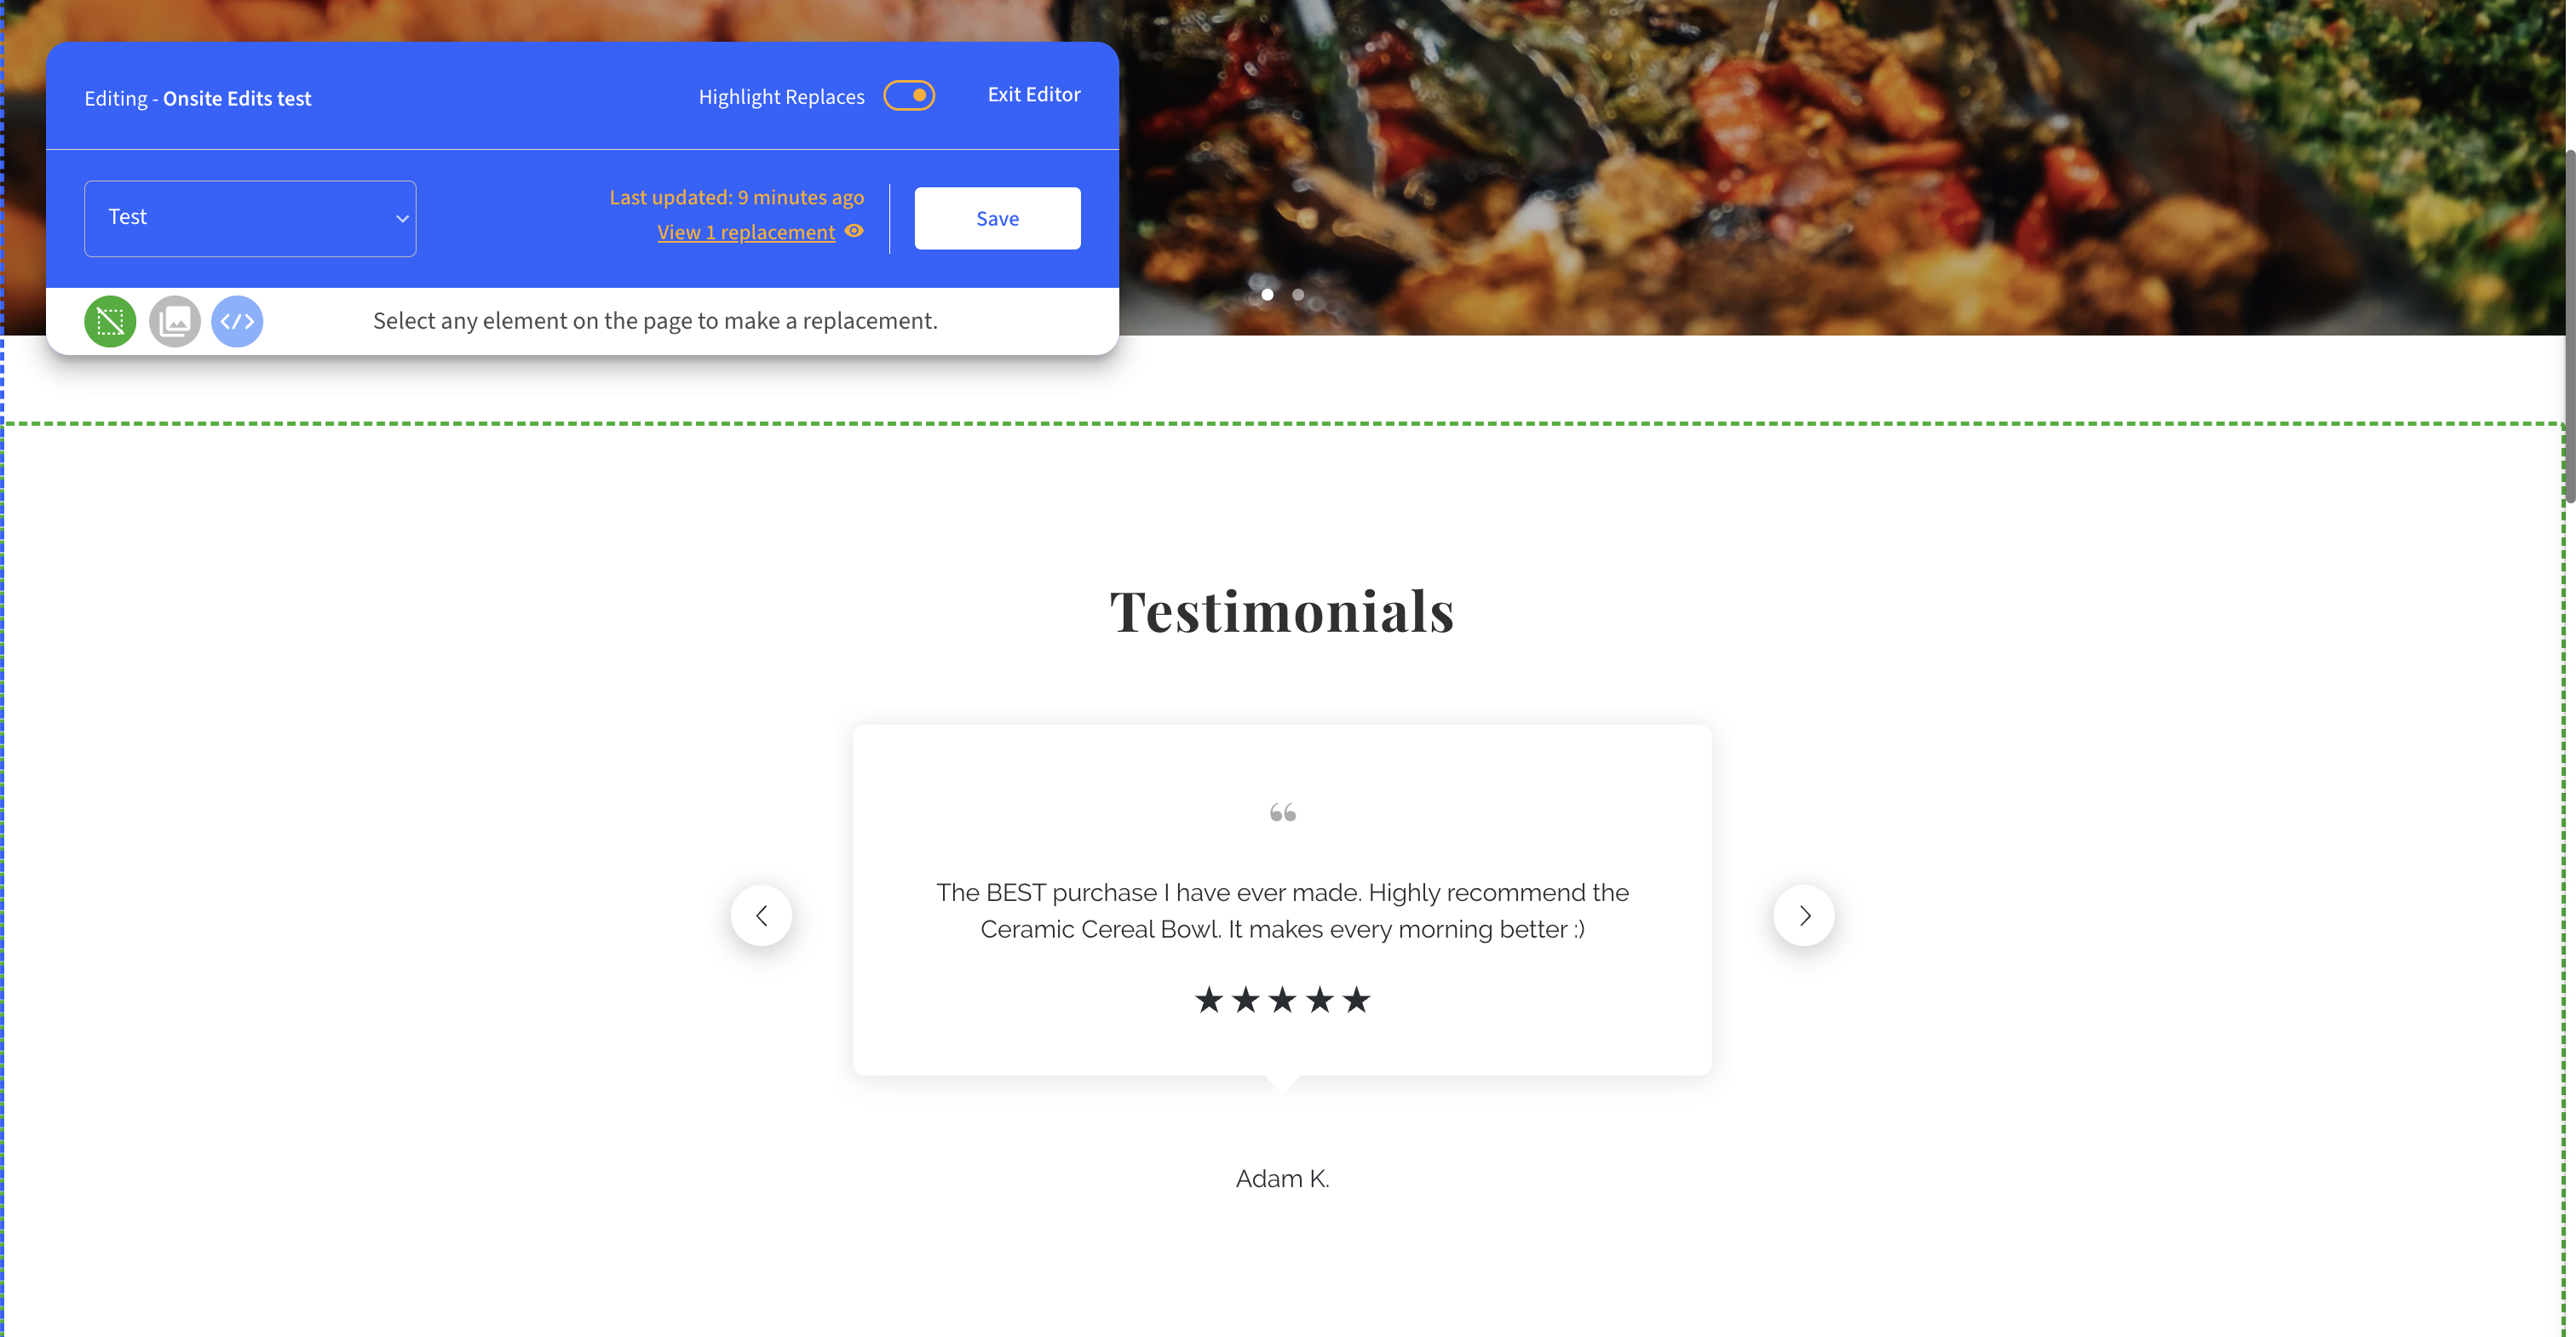
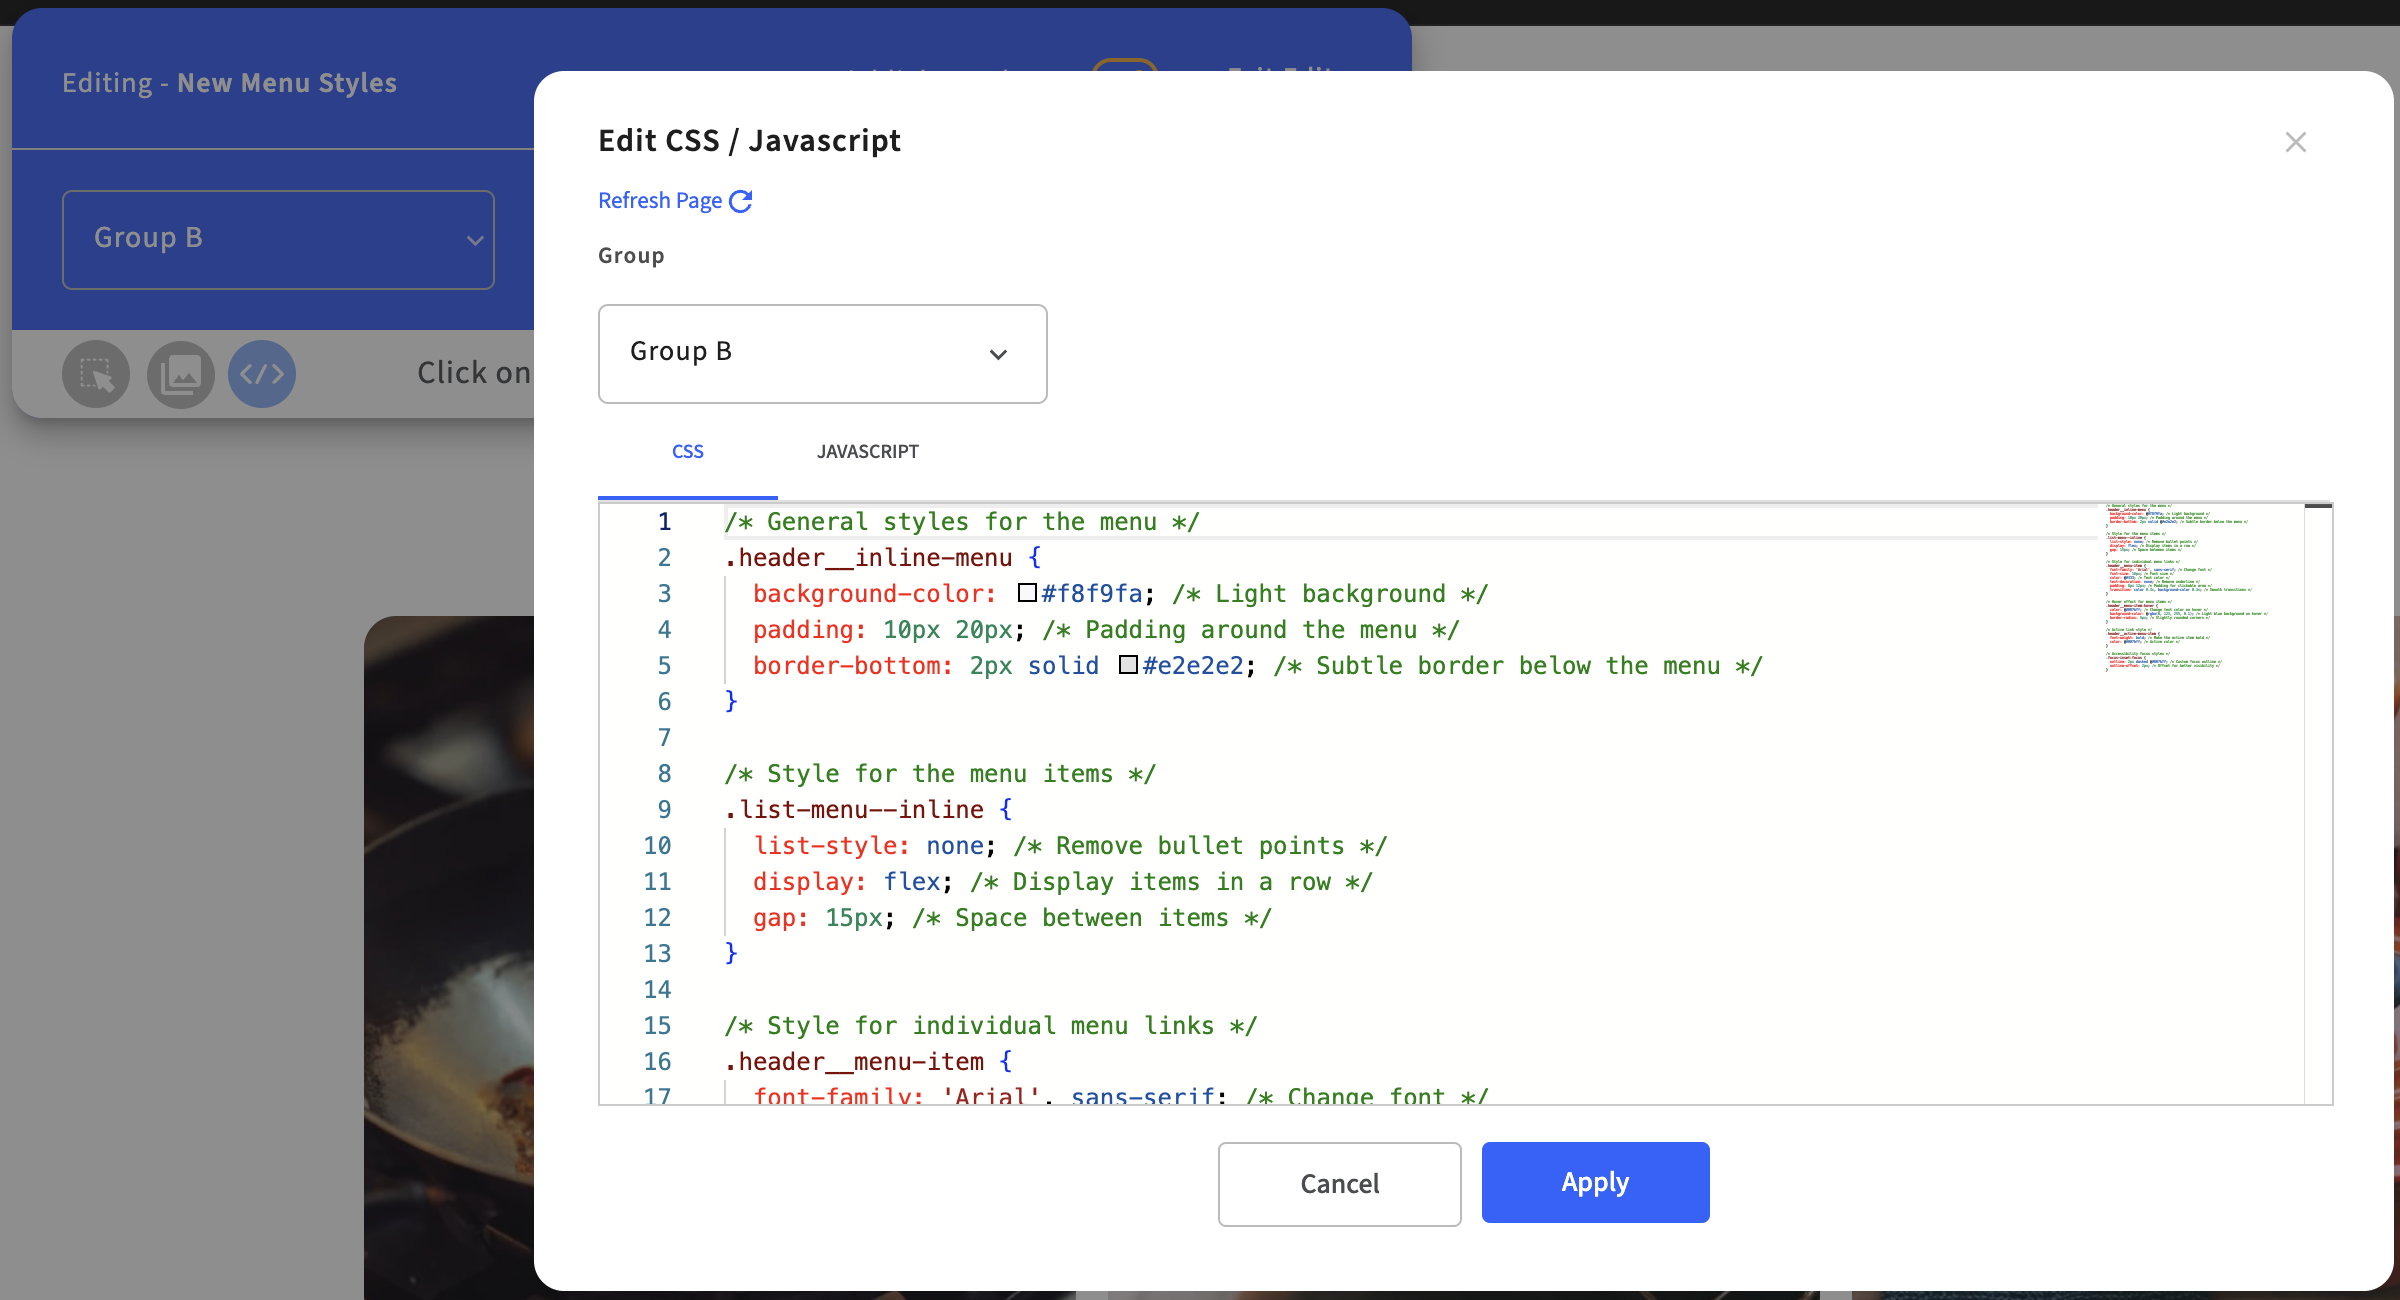
#### Presentation and Styles
Perhaps you are happy with the options presented on your menu, but you want to test the ways your visitors perceive it. You can easily inject custom styles into your test, having an alternative presentation for your test group, without needing to make any theme modifications, as outlined below:
1. On Intelligems, create a new Content Test, selecting the type Onsite Edits (see [How to Set Up an Onsite Edits Test](https://docs.intelligems.io/content-testing/content-testing-getting-started/how-to-set-up-an-onsite-edits-test)).
2. Load your test's preview, access the Onsite Editor, and go into editing mode.
3. Click on the "\" icon to open the Global CSS / JS editor:


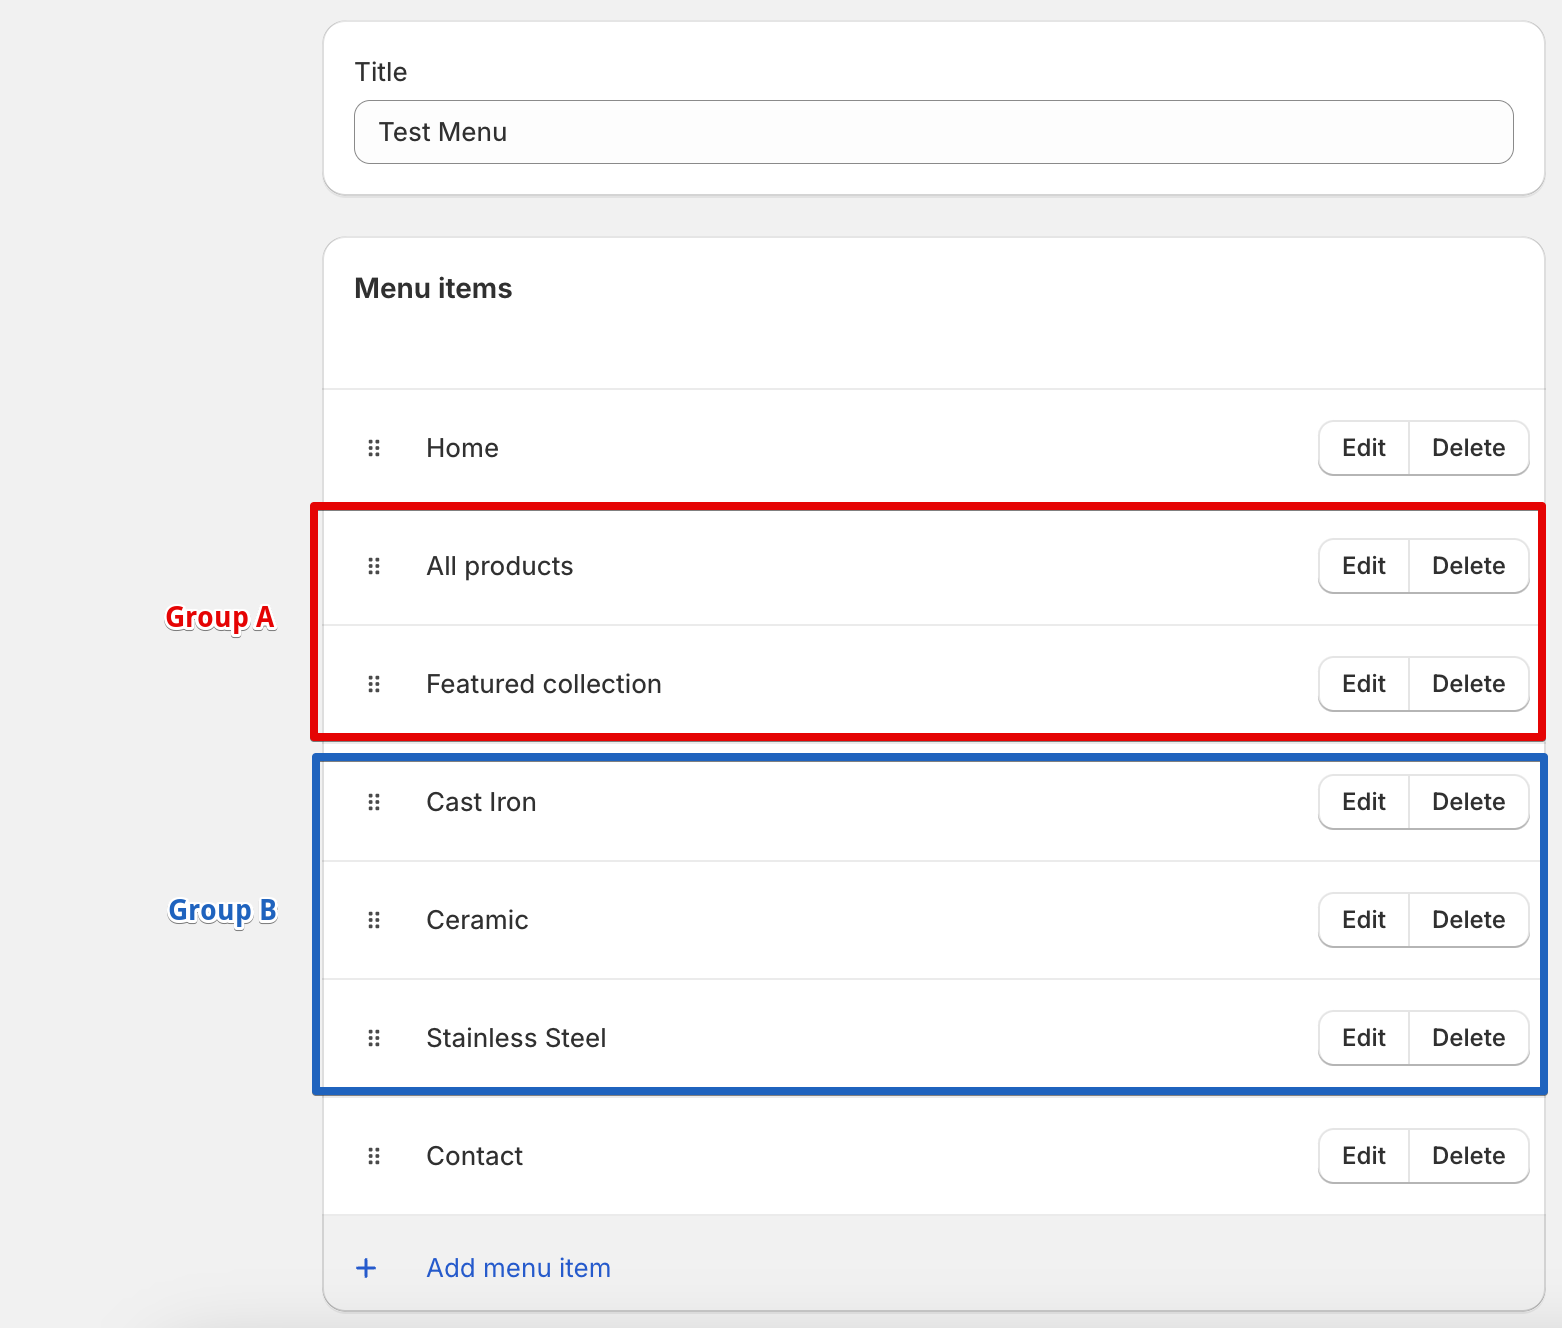
Shopify combination options
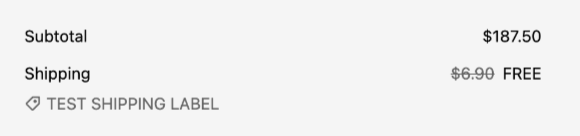
Discount Label Placement


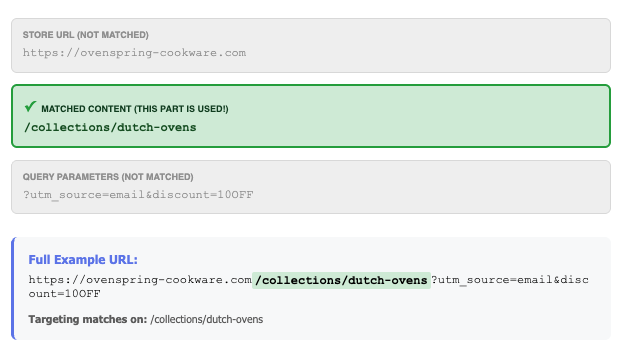
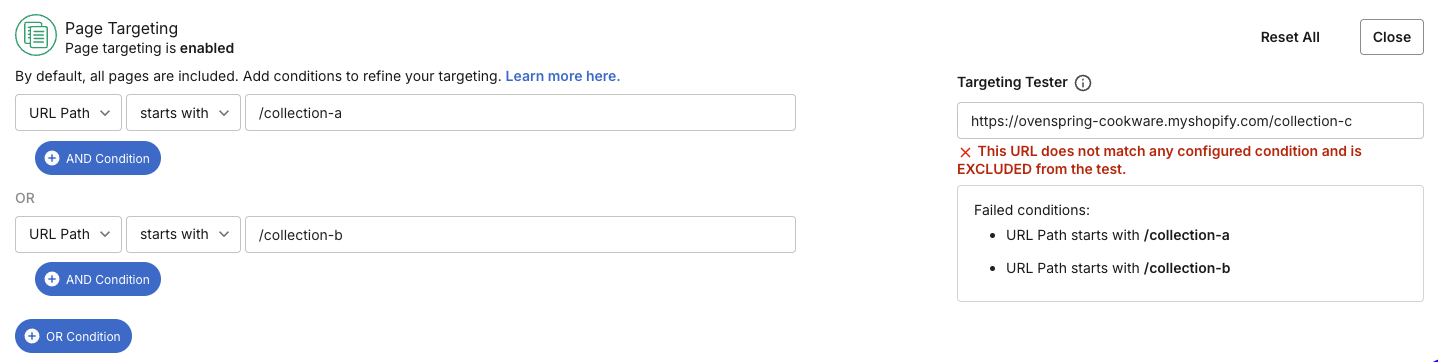
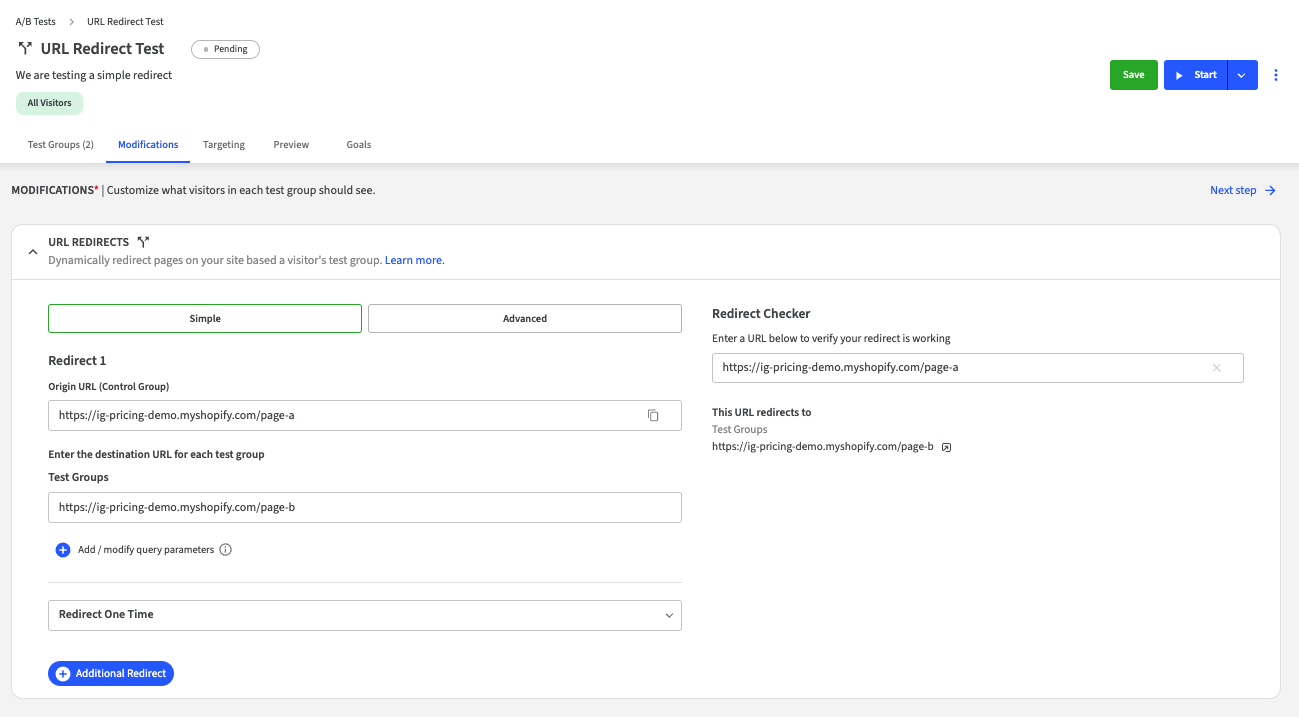
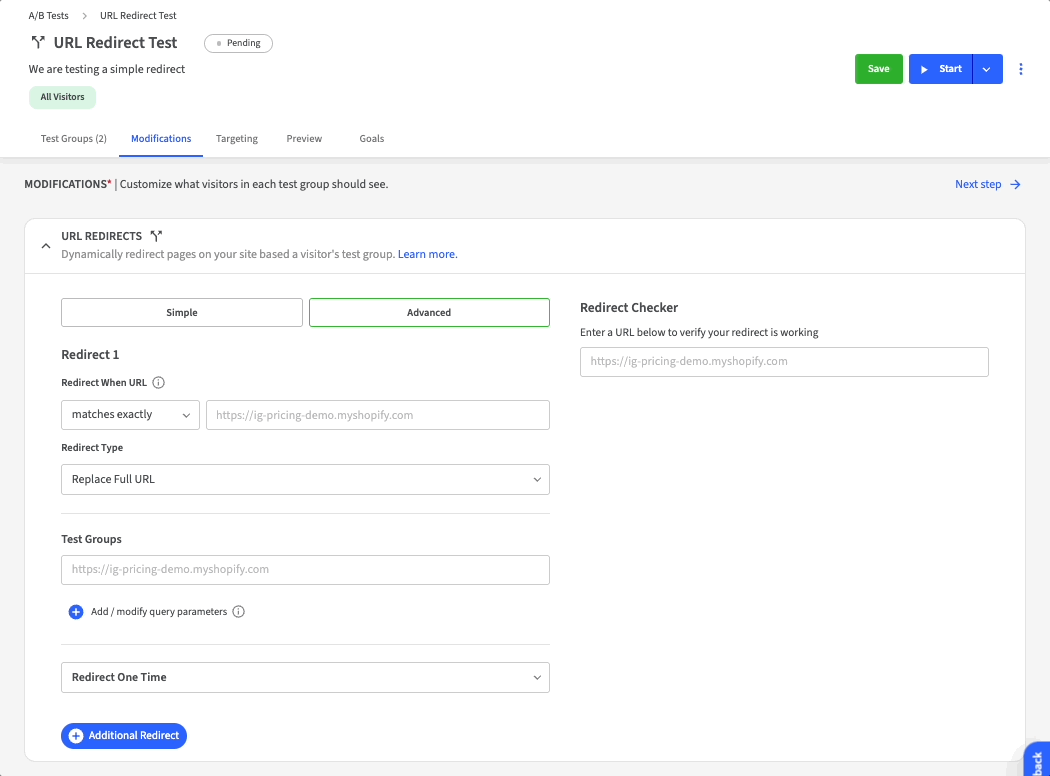
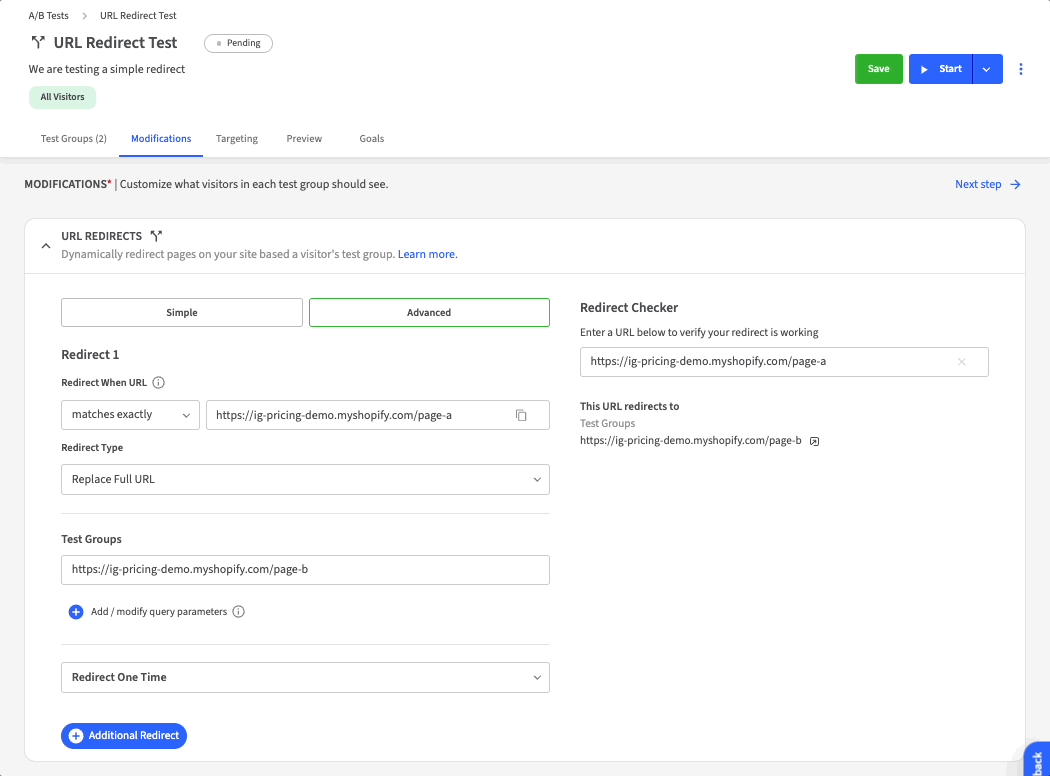
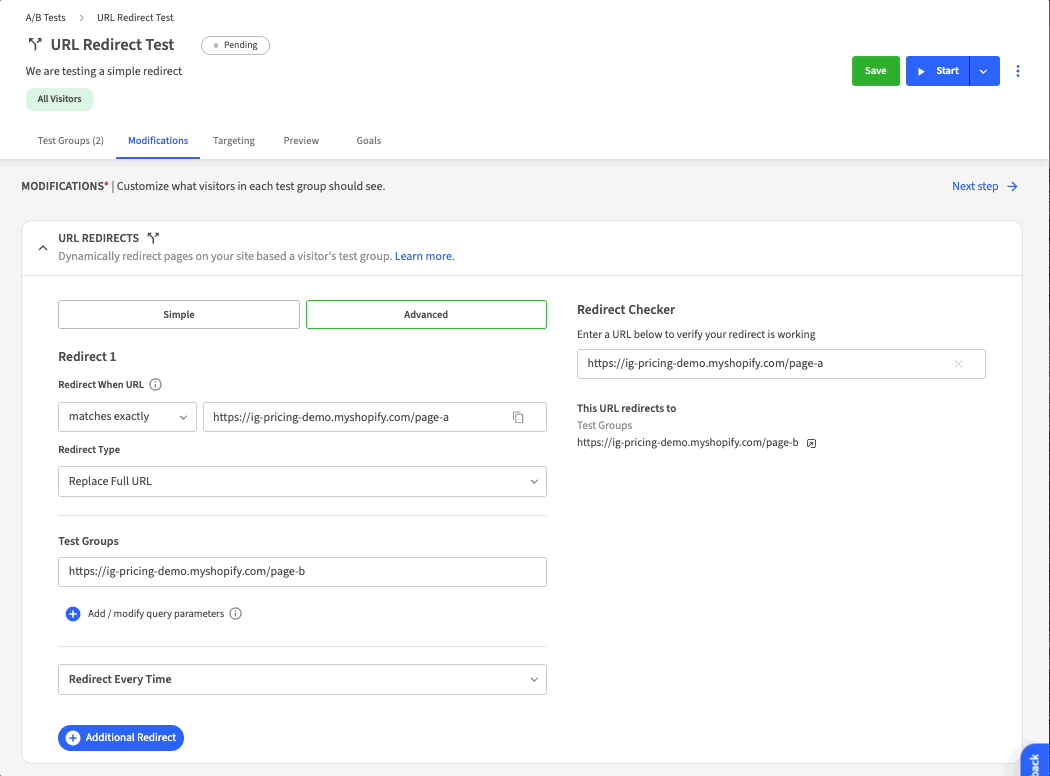
Proposed URL failed to match configured criteria.
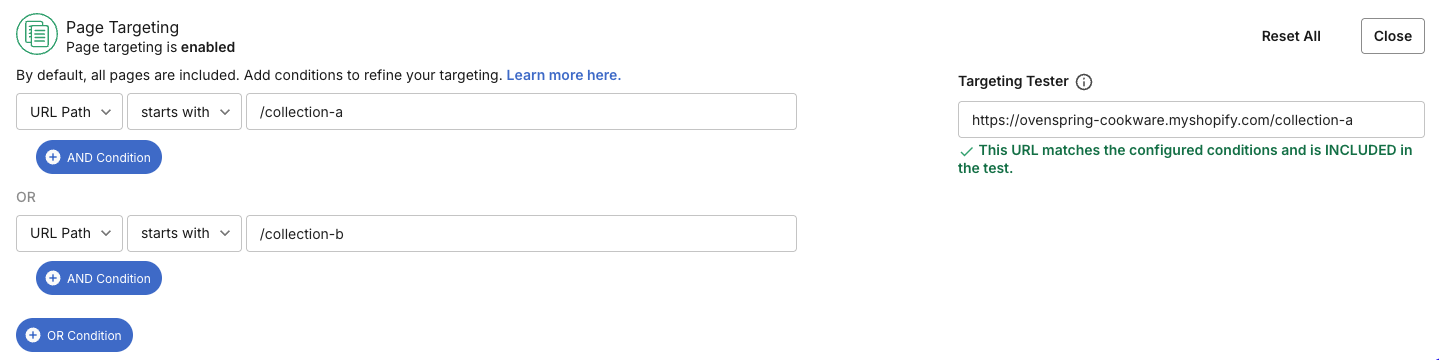
Proposed URL matches configured criteria