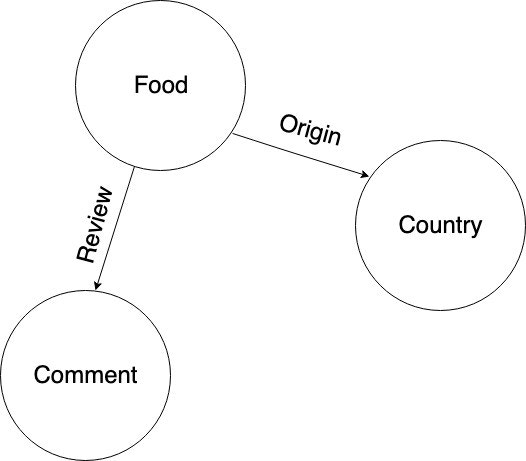
 In the previous tutorial, we took three real tweets as a sample dataset and
stored them in Dgraph using the above graph as a model.
In case you haven't stored the tweets from the
[previous tutorial](./string-indicies) into Dgraph, here's the sample dataset
again.
Copy the mutation below, go to the mutation tab and click Run.
```json
{
"set": [
{
"user_handle": "hackintoshrao",
"user_name": "Karthic Rao",
"uid": "_:hackintoshrao",
"authored": [
{
"tweet": "Test tweet for the fifth episode of getting started series with @dgraphlabs. Wait for the video of the fourth one by @francesc the coming Wednesday!\n#GraphDB #GraphQL",
"tagged_with": [
{
"uid": "_:graphql",
"hashtag": "GraphQL"
},
{
"uid": "_:graphdb",
"hashtag": "GraphDB"
}
],
"mentioned": [
{
"uid": "_:francesc"
},
{
"uid": "_:dgraphlabs"
}
]
}
]
},
{
"user_handle": "francesc",
"user_name": "Francesc Campoy",
"uid": "_:francesc",
"authored": [
{
"tweet": "So many good talks at #graphqlconf, next year I'll make sure to be *at least* in the audience!\nAlso huge thanks to the live tweeting by @dgraphlabs for alleviating the FOMO😊\n#GraphDB ♥️ #GraphQL",
"tagged_with": [
{
"uid": "_:graphql"
},
{
"uid": "_:graphdb"
},
{
"hashtag": "graphqlconf"
}
],
"mentioned": [
{
"uid": "_:dgraphlabs"
}
]
}
]
},
{
"user_handle": "dgraphlabs",
"user_name": "Dgraph Labs",
"uid": "_:dgraphlabs",
"authored": [
{
"tweet": "Let's Go and catch @francesc at @Gopherpalooza today, as he scans into Go source code by building its Graph in Dgraph!\nBe there, as he Goes through analyzing Go source code, using a Go program, that stores data in the GraphDB built in Go!\n#golang #GraphDB #Databases #Dgraph ",
"tagged_with": [
{
"hashtag": "golang"
},
{
"uid": "_:graphdb"
},
{
"hashtag": "Databases"
},
{
"hashtag": "Dgraph"
}
],
"mentioned": [
{
"uid": "_:francesc"
},
{
"uid": "_:dgraphlabs"
}
]
},
{
"uid": "_:gopherpalooza",
"user_handle": "gopherpalooza",
"user_name": "Gopherpalooza"
}
]
}
]
}
```
*Note: If you're new to Dgraph, and this is the first time you're running a
mutation, we highly recommend reading the
[first tutorial of the series before proceeding.](./introduction)*
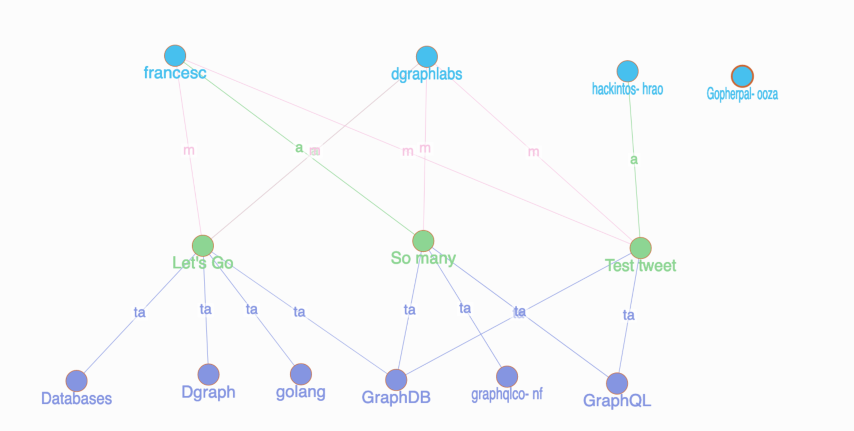
Voilà! Now you have a graph with `tweets`, `users`, and `hashtags`. It is ready
for us to explore.
In the previous tutorial, we took three real tweets as a sample dataset and
stored them in Dgraph using the above graph as a model.
In case you haven't stored the tweets from the
[previous tutorial](./string-indicies) into Dgraph, here's the sample dataset
again.
Copy the mutation below, go to the mutation tab and click Run.
```json
{
"set": [
{
"user_handle": "hackintoshrao",
"user_name": "Karthic Rao",
"uid": "_:hackintoshrao",
"authored": [
{
"tweet": "Test tweet for the fifth episode of getting started series with @dgraphlabs. Wait for the video of the fourth one by @francesc the coming Wednesday!\n#GraphDB #GraphQL",
"tagged_with": [
{
"uid": "_:graphql",
"hashtag": "GraphQL"
},
{
"uid": "_:graphdb",
"hashtag": "GraphDB"
}
],
"mentioned": [
{
"uid": "_:francesc"
},
{
"uid": "_:dgraphlabs"
}
]
}
]
},
{
"user_handle": "francesc",
"user_name": "Francesc Campoy",
"uid": "_:francesc",
"authored": [
{
"tweet": "So many good talks at #graphqlconf, next year I'll make sure to be *at least* in the audience!\nAlso huge thanks to the live tweeting by @dgraphlabs for alleviating the FOMO😊\n#GraphDB ♥️ #GraphQL",
"tagged_with": [
{
"uid": "_:graphql"
},
{
"uid": "_:graphdb"
},
{
"hashtag": "graphqlconf"
}
],
"mentioned": [
{
"uid": "_:dgraphlabs"
}
]
}
]
},
{
"user_handle": "dgraphlabs",
"user_name": "Dgraph Labs",
"uid": "_:dgraphlabs",
"authored": [
{
"tweet": "Let's Go and catch @francesc at @Gopherpalooza today, as he scans into Go source code by building its Graph in Dgraph!\nBe there, as he Goes through analyzing Go source code, using a Go program, that stores data in the GraphDB built in Go!\n#golang #GraphDB #Databases #Dgraph ",
"tagged_with": [
{
"hashtag": "golang"
},
{
"uid": "_:graphdb"
},
{
"hashtag": "Databases"
},
{
"hashtag": "Dgraph"
}
],
"mentioned": [
{
"uid": "_:francesc"
},
{
"uid": "_:dgraphlabs"
}
]
},
{
"uid": "_:gopherpalooza",
"user_handle": "gopherpalooza",
"user_name": "Gopherpalooza"
}
]
}
]
}
```
*Note: If you're new to Dgraph, and this is the first time you're running a
mutation, we highly recommend reading the
[first tutorial of the series before proceeding.](./introduction)*
Voilà! Now you have a graph with `tweets`, `users`, and `hashtags`. It is ready
for us to explore.
 *Note: If you're curious to know how we modeled the tweets in Dgraph, refer to
[the previous tutorial.](./string-indicies)*
Let's start by finding your favorite tweets using the full-text search feature
first.
## Full text search
Before we learn how to use the Full-text search feature, it's important to
understand when to use it.
The length and the number of words in a string predicate value vary based on
what the predicates represent.
Some string predicate values have only a few terms (words) in them. Predicates
representing `names`, `hashtags`, `twitter handle`, `city names` are a few good
examples. These predicates are easy to query using their exact values.
For instance, here is an example query.
*Give me all the tweets where the user name is equal to `John Campbell`*.
You can easily compose queries like these after adding either the `hash` or an
`exact` index to the string predicates.
But, some of the string predicates store sentences. Sometimes even one or more
paragraphs of text data in them. Predicates representing a tweet, a bio, a blog
post, a product description, or a movie review are just some examples. It is
relatively hard to query these predicates.
It is not practical to query such predicates using the `hash` or `exact` string
indices. A keyword-based search using the `term` index is a good starting point
to query such predicates. We used it in our
[previous tutorial](./string-indicies) to find the tweets with an exact match
for keywords like `GraphQL`, `Graphs`, and `Go`.
But, for some of the use cases, just the keyword-based search may not be
sufficient. You might need a more powerful search capability, and that's when
you should consider using Full-text search.
Let's write some queries and understand Dgraph's Full-text search capability in
detail.
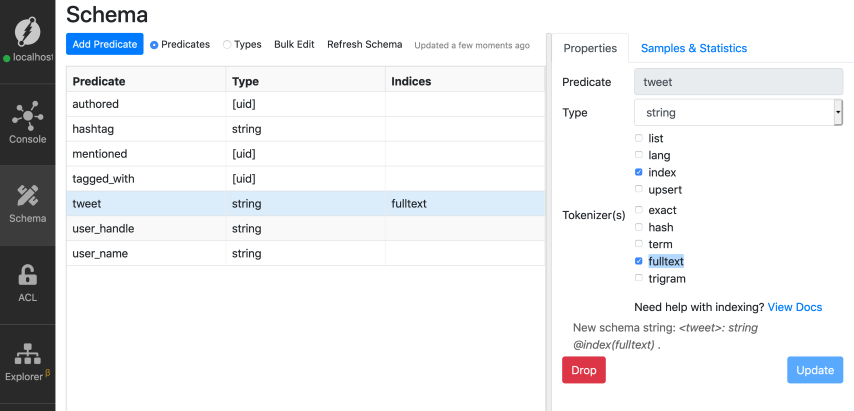
To be able to do a Full-text search, you need to first set a `fulltext` index on
the `tweet` predicate.
Creating a `fulltext` index on any string predicate is similar to creating any
other string indices.
*Note: If you're curious to know how we modeled the tweets in Dgraph, refer to
[the previous tutorial.](./string-indicies)*
Let's start by finding your favorite tweets using the full-text search feature
first.
## Full text search
Before we learn how to use the Full-text search feature, it's important to
understand when to use it.
The length and the number of words in a string predicate value vary based on
what the predicates represent.
Some string predicate values have only a few terms (words) in them. Predicates
representing `names`, `hashtags`, `twitter handle`, `city names` are a few good
examples. These predicates are easy to query using their exact values.
For instance, here is an example query.
*Give me all the tweets where the user name is equal to `John Campbell`*.
You can easily compose queries like these after adding either the `hash` or an
`exact` index to the string predicates.
But, some of the string predicates store sentences. Sometimes even one or more
paragraphs of text data in them. Predicates representing a tweet, a bio, a blog
post, a product description, or a movie review are just some examples. It is
relatively hard to query these predicates.
It is not practical to query such predicates using the `hash` or `exact` string
indices. A keyword-based search using the `term` index is a good starting point
to query such predicates. We used it in our
[previous tutorial](./string-indicies) to find the tweets with an exact match
for keywords like `GraphQL`, `Graphs`, and `Go`.
But, for some of the use cases, just the keyword-based search may not be
sufficient. You might need a more powerful search capability, and that's when
you should consider using Full-text search.
Let's write some queries and understand Dgraph's Full-text search capability in
detail.
To be able to do a Full-text search, you need to first set a `fulltext` index on
the `tweet` predicate.
Creating a `fulltext` index on any string predicate is similar to creating any
other string indices.
 *Note: Refer to the [previous tutorial](./string-indicies) if you're not sure
about creating an index on a string predicate.*
Now, let's do a Full-text search query to find tweets related to the following
topic: `graph data and analyzing it in graphdb`.
You can do so by using either of `alloftext` or `anyoftext` in-built functions.
Both functions take two arguments. The first argument is the predicate to
search. The second argument is the space-separated string values to search for,
and we call these as the `search strings`.
```sh
- alloftext(predicate, "space-separated search strings")
- anyoftext(predicate, "space-separated search strings")
```
We'll look at the difference between these two functions later. For now, let's
use the `alloftext` function.
Go to the query tab, paste the query below, and click Run. Here is our search
string: `graph data and analyze it in graphdb`.
```graphql
{
search_tweet(func: alloftext(tweet, "graph data and analyze it in graphdb")) {
tweet
}
}
```
*Note: Refer to the [previous tutorial](./string-indicies) if you're not sure
about creating an index on a string predicate.*
Now, let's do a Full-text search query to find tweets related to the following
topic: `graph data and analyzing it in graphdb`.
You can do so by using either of `alloftext` or `anyoftext` in-built functions.
Both functions take two arguments. The first argument is the predicate to
search. The second argument is the space-separated string values to search for,
and we call these as the `search strings`.
```sh
- alloftext(predicate, "space-separated search strings")
- anyoftext(predicate, "space-separated search strings")
```
We'll look at the difference between these two functions later. For now, let's
use the `alloftext` function.
Go to the query tab, paste the query below, and click Run. Here is our search
string: `graph data and analyze it in graphdb`.
```graphql
{
search_tweet(func: alloftext(tweet, "graph data and analyze it in graphdb")) {
tweet
}
}
```
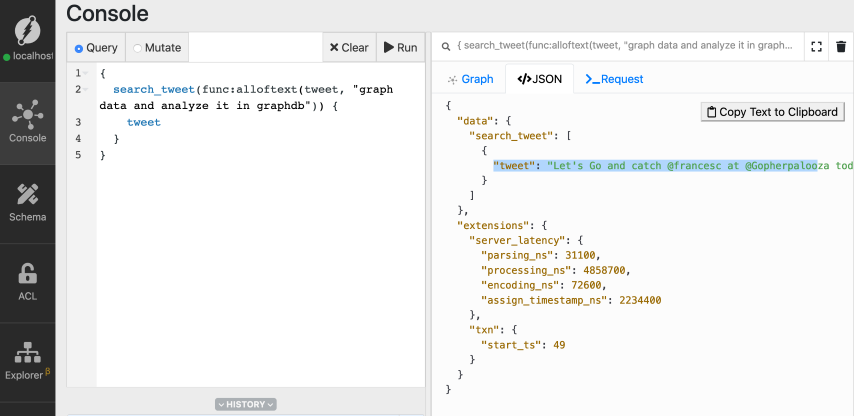 Here's the matched tweet, which made it to the result.
```Let's Go and catch @francesc at @Gopherpalooza today, as he scans into Go source code by building its Graph in Dgraph!
Be there, as he Goes through analyzing Go source code, using a Go program, that stores data in the GraphDB built in Go!#golang #GraphDB #Databases #Dgraph pic.twitter.com/sK90DJ6rLs
— Dgraph Labs (@dgraphlabs) November 8, 2019
```
If you observe, you can see some of the words from the search strings are not
present in the matched tweet, but the tweet has still made it to the result.
To be able to use the Full-text search capability effectively, we must
understand how it works.
Let's understand it in detail.
Once you set a `fulltext` index on the tweets, internally, the tweets are
processed, and `fulltext` tokens are generated. These `fulltext` tokens are then
indexed.
The search string also goes through the same processing pipeline, and `fulltext`
tokens generated them too.
Here are the steps to generate the `fulltext` tokens:
* Split the tweets into chunks of words called tokens (tokenizing).
* Convert these tokens to lowercase.
* [Unicode-normalize](http://unicode.org/reports/tr15/#Norm_Forms) the tokens.
* Reduce the tokens to their root form, this is called
[stemming](https://en.wikipedia.org/wiki/Stemming) (running to run, faster to
fast and so on).
* Remove the [stop words](https://en.wikipedia.org/wiki/Stop_words).
You would have seen in [the fourth tutorial](./multi-language-strings) that
Dgraph allows you to build multi-lingual apps.
The stemming and stop words removal are not supported for all the languages.
Here is [the link to the docs](/dgraph/dql/functions#full-text-search) that
contains the list of languages and their support for stemming and stop words
removal.
Here is the table with the matched tweet and its search string in the first
column. The second column contains their corresponding `fulltext` tokens
generated by Dgraph.
| Actual text data | fulltext tokens generated by Dgraph |
| ------------------------------------------------------------------------------------------------------------------------------------------------------------------------------------------------------------------------------------------------------------------------------------ | ----------------------------------------------------------------------------------------------------------------------------------------- |
| Let's Go and catch @francesc at @Gopherpalooza today, as he scans into Go source code by building its Graph in Dgraph!\nBe there, as he Goes through analyzing Go source code, using a Go program, that stores data in the GraphDB built in Go!\n#golang #GraphDB #Databases #Dgraph | \[analyz build built catch code data databas dgraph francesc go goe golang gopherpalooza graph graphdb program scan sourc store todai us] |
| graph data and analyze it in graphdb | \[analyz data graph graphdb] |
From the table above, you can see that the tweets are reduced to an array of
strings or tokens.
Dgraph internally uses [Bleve package](https://github.com/blevesearch/bleve) to
do the stemming.
Here are the `fulltext` tokens generated for our search string: \[`analyz`,
`data`, `graph`, `graphdb`].
As you can see from the table above, all of the `fulltext` tokens generated for
the search string exist in the matched tweet. Hence, the `alloftext` function
returns a positive match for the tweet. It would not have returned a positive
match even if one of the tokens in the search string is missing for the tweet.
But, the `anyoftext` function would've returned a positive match as long as the
tweets and the search string have at least one of the tokens in common.
If you're interested to see Dgraph's `fulltext` tokenizer in action,
[here is the gist](https://gist.github.com/hackintoshrao/0e8d715d8739b12c67a804c7249146a3)
containing the instructions to use it.
Dgraph generates the same `fulltext` tokens even if the words in a search string
is differently ordered. Hence, using the same search string with different order
would not impact the query result.
As you can see, all three queries below are the same for Dgraph.
```graphql
{
search_tweet(func: alloftext(tweet, "graph analyze and it in graphdb data")) {
tweet
}
}
```
```graphql
{
search_tweet(func: alloftext(tweet, "data and data analyze it graphdb in")) {
tweet
}
}
```
```graphql
{
search_tweet(func: alloftext(tweet, "analyze data and it in graph graphdb")) {
tweet
}
}
```
Now, let's move onto the next advanced text search feature of Dgraph: regular
expression based queries.
Let's use them to find all the hashtags containing the following substring:
`graph`.
## Regular expression search
[Regular expressions](https://www.geeksforgeeks.org/write-regular-expressions/)
are powerful ways of expressing search patterns. Dgraph allows you to search for
string predicates based on regular expressions. You need to set the `trigram`
index on the string predicate to be able to perform regex-based queries.
Using regular expression based search, let's match all the hashtags that have
this particular pattern:
`Starts and ends with any characters of indefinite length, but with the substring graph in it`.
Here is the regex expression we can use: `^.*graph.*$`
Check out
[this tutorial](https://www.geeksforgeeks.org/write-regular-expressions/) if
you're not familiar with writing a regular expression.
Let's first find all the hashtags in the database using the `has()` function.
```graphql
{
hash_tags(func: has(hashtag)) {
hashtag
}
}
```
Here's the matched tweet, which made it to the result.
```Let's Go and catch @francesc at @Gopherpalooza today, as he scans into Go source code by building its Graph in Dgraph!
Be there, as he Goes through analyzing Go source code, using a Go program, that stores data in the GraphDB built in Go!#golang #GraphDB #Databases #Dgraph pic.twitter.com/sK90DJ6rLs
— Dgraph Labs (@dgraphlabs) November 8, 2019
```
If you observe, you can see some of the words from the search strings are not
present in the matched tweet, but the tweet has still made it to the result.
To be able to use the Full-text search capability effectively, we must
understand how it works.
Let's understand it in detail.
Once you set a `fulltext` index on the tweets, internally, the tweets are
processed, and `fulltext` tokens are generated. These `fulltext` tokens are then
indexed.
The search string also goes through the same processing pipeline, and `fulltext`
tokens generated them too.
Here are the steps to generate the `fulltext` tokens:
* Split the tweets into chunks of words called tokens (tokenizing).
* Convert these tokens to lowercase.
* [Unicode-normalize](http://unicode.org/reports/tr15/#Norm_Forms) the tokens.
* Reduce the tokens to their root form, this is called
[stemming](https://en.wikipedia.org/wiki/Stemming) (running to run, faster to
fast and so on).
* Remove the [stop words](https://en.wikipedia.org/wiki/Stop_words).
You would have seen in [the fourth tutorial](./multi-language-strings) that
Dgraph allows you to build multi-lingual apps.
The stemming and stop words removal are not supported for all the languages.
Here is [the link to the docs](/dgraph/dql/functions#full-text-search) that
contains the list of languages and their support for stemming and stop words
removal.
Here is the table with the matched tweet and its search string in the first
column. The second column contains their corresponding `fulltext` tokens
generated by Dgraph.
| Actual text data | fulltext tokens generated by Dgraph |
| ------------------------------------------------------------------------------------------------------------------------------------------------------------------------------------------------------------------------------------------------------------------------------------ | ----------------------------------------------------------------------------------------------------------------------------------------- |
| Let's Go and catch @francesc at @Gopherpalooza today, as he scans into Go source code by building its Graph in Dgraph!\nBe there, as he Goes through analyzing Go source code, using a Go program, that stores data in the GraphDB built in Go!\n#golang #GraphDB #Databases #Dgraph | \[analyz build built catch code data databas dgraph francesc go goe golang gopherpalooza graph graphdb program scan sourc store todai us] |
| graph data and analyze it in graphdb | \[analyz data graph graphdb] |
From the table above, you can see that the tweets are reduced to an array of
strings or tokens.
Dgraph internally uses [Bleve package](https://github.com/blevesearch/bleve) to
do the stemming.
Here are the `fulltext` tokens generated for our search string: \[`analyz`,
`data`, `graph`, `graphdb`].
As you can see from the table above, all of the `fulltext` tokens generated for
the search string exist in the matched tweet. Hence, the `alloftext` function
returns a positive match for the tweet. It would not have returned a positive
match even if one of the tokens in the search string is missing for the tweet.
But, the `anyoftext` function would've returned a positive match as long as the
tweets and the search string have at least one of the tokens in common.
If you're interested to see Dgraph's `fulltext` tokenizer in action,
[here is the gist](https://gist.github.com/hackintoshrao/0e8d715d8739b12c67a804c7249146a3)
containing the instructions to use it.
Dgraph generates the same `fulltext` tokens even if the words in a search string
is differently ordered. Hence, using the same search string with different order
would not impact the query result.
As you can see, all three queries below are the same for Dgraph.
```graphql
{
search_tweet(func: alloftext(tweet, "graph analyze and it in graphdb data")) {
tweet
}
}
```
```graphql
{
search_tweet(func: alloftext(tweet, "data and data analyze it graphdb in")) {
tweet
}
}
```
```graphql
{
search_tweet(func: alloftext(tweet, "analyze data and it in graph graphdb")) {
tweet
}
}
```
Now, let's move onto the next advanced text search feature of Dgraph: regular
expression based queries.
Let's use them to find all the hashtags containing the following substring:
`graph`.
## Regular expression search
[Regular expressions](https://www.geeksforgeeks.org/write-regular-expressions/)
are powerful ways of expressing search patterns. Dgraph allows you to search for
string predicates based on regular expressions. You need to set the `trigram`
index on the string predicate to be able to perform regex-based queries.
Using regular expression based search, let's match all the hashtags that have
this particular pattern:
`Starts and ends with any characters of indefinite length, but with the substring graph in it`.
Here is the regex expression we can use: `^.*graph.*$`
Check out
[this tutorial](https://www.geeksforgeeks.org/write-regular-expressions/) if
you're not familiar with writing a regular expression.
Let's first find all the hashtags in the database using the `has()` function.
```graphql
{
hash_tags(func: has(hashtag)) {
hashtag
}
}
```
 *If you're not familiar with using the `has()` function, refer to
[the first tutorial](./introduction) of the series.*
You can see that we have six hashtags in total, and four of them have the
substring `graph` in them: `Dgraph`, `GraphQL`, `graphqlconf`, `graphDB`.
We should use the built-in function `regexp` to be able to use regular
expressions to search for predicates. This function takes two arguments, the
first is the name of the predicate, and the second one is the regular
expression.
Here is the syntax of the `regexp` function:
`regexp(predicate, /regular-expression/)`
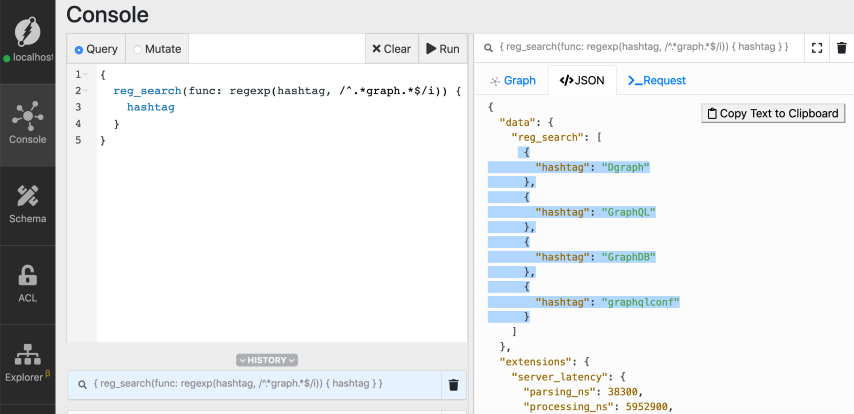
Let's execute the following query to find the hashtags that have the substring
`graph`.
Go to the query tab, type in the query, and click Run.
```graphql
{
reg_search(func: regexp(hashtag, /^.*graph.*$/)) {
hashtag
}
}
```
Oops! We have an error! It looks like we forgot to set the `trigram` index on
the `hashtag` predicate.
*If you're not familiar with using the `has()` function, refer to
[the first tutorial](./introduction) of the series.*
You can see that we have six hashtags in total, and four of them have the
substring `graph` in them: `Dgraph`, `GraphQL`, `graphqlconf`, `graphDB`.
We should use the built-in function `regexp` to be able to use regular
expressions to search for predicates. This function takes two arguments, the
first is the name of the predicate, and the second one is the regular
expression.
Here is the syntax of the `regexp` function:
`regexp(predicate, /regular-expression/)`
Let's execute the following query to find the hashtags that have the substring
`graph`.
Go to the query tab, type in the query, and click Run.
```graphql
{
reg_search(func: regexp(hashtag, /^.*graph.*$/)) {
hashtag
}
}
```
Oops! We have an error! It looks like we forgot to set the `trigram` index on
the `hashtag` predicate.
 Again, setting a `trigram` index is similar to setting any other string index,
let's do that for the `hashtag` predicate.
Again, setting a `trigram` index is similar to setting any other string index,
let's do that for the `hashtag` predicate.
 *Note: Refer to the [previous tutorial](./string-indicies) if you're not sure
about creating an index on a string predicate.*
Now, let's re-run the `regexp` query.
*Note: Refer to the [previous tutorial](./string-indicies) if you're not sure
about creating an index on a string predicate.*
Now, let's re-run the `regexp` query.
 *Note: Refer to [the first tutorial](./introduction) if you're not familiar with
the query structure in general* Success!
But we only have the following hashtags in the result: `Dgraph` and
`graphqlconf`.
That's because `regexp` function is case-sensitive by default.
Add the character `i` at the end of the second argument of the `regexp` function
to make it case insensitive: `regexp(predicate, /regular-expression/i)`
*Note: Refer to [the first tutorial](./introduction) if you're not familiar with
the query structure in general* Success!
But we only have the following hashtags in the result: `Dgraph` and
`graphqlconf`.
That's because `regexp` function is case-sensitive by default.
Add the character `i` at the end of the second argument of the `regexp` function
to make it case insensitive: `regexp(predicate, /regular-expression/i)`
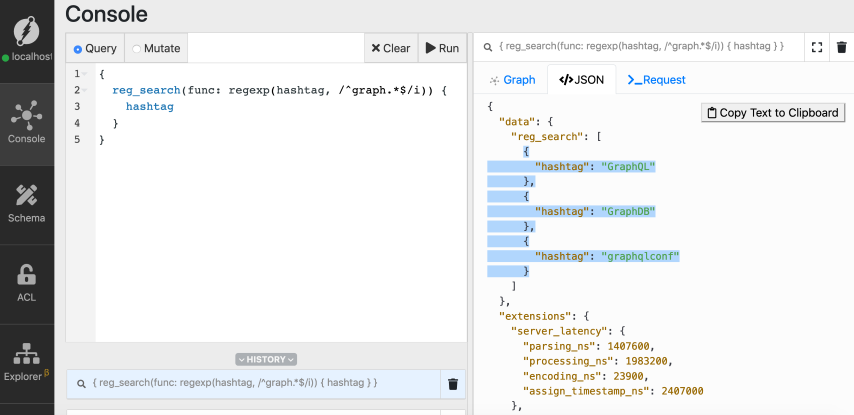
 Now we have the four hashtags with substring `graph` in them.
Let's modify the regular expression to match only the `hashtags` which have a
prefix called `graph`.
```graphql
{
reg_search(func: regexp(hashtag, /^graph.*$/i)) {
hashtag
}
}
```
Now we have the four hashtags with substring `graph` in them.
Let's modify the regular expression to match only the `hashtags` which have a
prefix called `graph`.
```graphql
{
reg_search(func: regexp(hashtag, /^graph.*$/i)) {
hashtag
}
}
```
 ## Summary
In this tutorial, we learned about Full-text search and regular expression based
search capabilities in Dgraph.
Did you know that Dgraph also offers fuzzy search capabilities, which can be
used to power features like `product` search in an e-commerce store?
Let's learn about the fuzzy search in our next tutorial.
Sounds interesting?
Check out our next tutorial of the getting started series
[here](./fuzzy-search).
## Need Help
* Please use [discuss.hypermode.com](https://discuss.hypermode.com) for
questions, feature requests, bugs, and discussions.
---
# Source: https://docs.hypermode.com/modus/sdk/go/agents.md
# Source: https://docs.hypermode.com/modus/sdk/assemblyscript/agents.md
# Source: https://docs.hypermode.com/modus/agents.md
# Source: https://docs.hypermode.com/modus/sdk/go/agents.md
# Source: https://docs.hypermode.com/modus/sdk/assemblyscript/agents.md
# Source: https://docs.hypermode.com/modus/agents.md
# Source: https://docs.hypermode.com/modus/sdk/go/agents.md
# Source: https://docs.hypermode.com/modus/sdk/assemblyscript/agents.md
# Source: https://docs.hypermode.com/modus/agents.md
# Source: https://docs.hypermode.com/modus/sdk/go/agents.md
# Source: https://docs.hypermode.com/modus/sdk/assemblyscript/agents.md
# Source: https://docs.hypermode.com/modus/agents.md
# What's an Agent?
> Learn about stateful agents in Modus
## Agents in Modus
Agents in Modus are persistent background processes that maintain memory across
interactions. Unlike stateless functions that lose everything when operations
end, agents remember every detail, survive system failures, and never lose their
operational context.
## Key characteristics
* **Stateful**: Maintains memory and context across interactions
* **Persistent**: Automatically saves and restores state
* **Resilient**: Graceful recovery from failures
* **Autonomous**: Can operate independently over extended periods
* **Actor-based**: Each agent instance runs in isolation
* **Event-driven**: Streams real-time updates and operational intelligence
## When to use agents
Agents are perfect for:
* **Multi-turn workflows** spanning multiple interactions
* **Long-running processes** that maintain context over time
* **Stateful operations** that need to remember previous actions
* **Complex coordination** between different system components
* **Persistent monitoring** that tracks changes over time
* **Real-time operations** requiring live status updates and event streaming
## Agent structure
Every agent starts with the essential framework:
```go
package main
import (
"fmt"
"strings"
"time"
"github.com/hypermodeinc/modus/sdk/go/pkg/agents"
"github.com/hypermodeinc/modus/sdk/go/pkg/models"
"github.com/hypermodeinc/modus/sdk/go/pkg/models/openai"
)
type IntelligenceAgent struct {
agents.AgentBase
// The rest of the fields make up the agent's state and can be customized per agent
intelligenceReports []string // Matrix surveillance data
threatLevel float64 // Current threat assessment
lastContact time.Time
currentMission *MissionPhase // Track long-running operations
missionLog []string // Operational progress log
}
type MissionPhase struct {
Name string
StartTime time.Time
Duration time.Duration
Complete bool
}
func (a *IntelligenceAgent) Name() string {
return "IntelligenceAgent"
}
```
The agent embeds `agents.AgentBase`, which provides all the infrastructure for
state management, secure communications, and persistence. Your app
data—intelligence reports, threat assessments, contact logs—lives as fields in
the struct, automatically preserved across all interactions.
## Creating agents through functions
Agents are created and managed through regular Modus functions that become part
of your GraphQL API. These functions handle agent lifecycle operations:
```go
// Register your agent type during initialization
func init() {
agents.Register(&IntelligenceAgent{})
}
// Create a new agent instance - this becomes a GraphQL mutation
func DeployAgent() (string, error) {
agentInfo, err := agents.Start("IntelligenceAgent")
if err != nil {
return "", err
}
// Return the agent ID - clients must store this to communicate with the agent
return agentInfo.Id, nil
}
```
When you call this function through GraphQL, it returns a unique agent ID:
```graphql
mutation {
deployAgent
}
```
Response:
```json
{
"data": {
"deployAgent": "agent_neo_001"
}
}
```
You can think of an Agent as a persistent server process with durable memory.
Once created, you can reference your agent by its ID across sessions, page
reloads, and even system restarts. The agent maintains its complete state and
continues operating exactly where it left off.
## Summary
In this tutorial, we learned about Full-text search and regular expression based
search capabilities in Dgraph.
Did you know that Dgraph also offers fuzzy search capabilities, which can be
used to power features like `product` search in an e-commerce store?
Let's learn about the fuzzy search in our next tutorial.
Sounds interesting?
Check out our next tutorial of the getting started series
[here](./fuzzy-search).
## Need Help
* Please use [discuss.hypermode.com](https://discuss.hypermode.com) for
questions, feature requests, bugs, and discussions.
---
# Source: https://docs.hypermode.com/modus/sdk/go/agents.md
# Source: https://docs.hypermode.com/modus/sdk/assemblyscript/agents.md
# Source: https://docs.hypermode.com/modus/agents.md
# Source: https://docs.hypermode.com/modus/sdk/go/agents.md
# Source: https://docs.hypermode.com/modus/sdk/assemblyscript/agents.md
# Source: https://docs.hypermode.com/modus/agents.md
# Source: https://docs.hypermode.com/modus/sdk/go/agents.md
# Source: https://docs.hypermode.com/modus/sdk/assemblyscript/agents.md
# Source: https://docs.hypermode.com/modus/agents.md
# Source: https://docs.hypermode.com/modus/sdk/go/agents.md
# Source: https://docs.hypermode.com/modus/sdk/assemblyscript/agents.md
# Source: https://docs.hypermode.com/modus/agents.md
# What's an Agent?
> Learn about stateful agents in Modus
## Agents in Modus
Agents in Modus are persistent background processes that maintain memory across
interactions. Unlike stateless functions that lose everything when operations
end, agents remember every detail, survive system failures, and never lose their
operational context.
## Key characteristics
* **Stateful**: Maintains memory and context across interactions
* **Persistent**: Automatically saves and restores state
* **Resilient**: Graceful recovery from failures
* **Autonomous**: Can operate independently over extended periods
* **Actor-based**: Each agent instance runs in isolation
* **Event-driven**: Streams real-time updates and operational intelligence
## When to use agents
Agents are perfect for:
* **Multi-turn workflows** spanning multiple interactions
* **Long-running processes** that maintain context over time
* **Stateful operations** that need to remember previous actions
* **Complex coordination** between different system components
* **Persistent monitoring** that tracks changes over time
* **Real-time operations** requiring live status updates and event streaming
## Agent structure
Every agent starts with the essential framework:
```go
package main
import (
"fmt"
"strings"
"time"
"github.com/hypermodeinc/modus/sdk/go/pkg/agents"
"github.com/hypermodeinc/modus/sdk/go/pkg/models"
"github.com/hypermodeinc/modus/sdk/go/pkg/models/openai"
)
type IntelligenceAgent struct {
agents.AgentBase
// The rest of the fields make up the agent's state and can be customized per agent
intelligenceReports []string // Matrix surveillance data
threatLevel float64 // Current threat assessment
lastContact time.Time
currentMission *MissionPhase // Track long-running operations
missionLog []string // Operational progress log
}
type MissionPhase struct {
Name string
StartTime time.Time
Duration time.Duration
Complete bool
}
func (a *IntelligenceAgent) Name() string {
return "IntelligenceAgent"
}
```
The agent embeds `agents.AgentBase`, which provides all the infrastructure for
state management, secure communications, and persistence. Your app
data—intelligence reports, threat assessments, contact logs—lives as fields in
the struct, automatically preserved across all interactions.
## Creating agents through functions
Agents are created and managed through regular Modus functions that become part
of your GraphQL API. These functions handle agent lifecycle operations:
```go
// Register your agent type during initialization
func init() {
agents.Register(&IntelligenceAgent{})
}
// Create a new agent instance - this becomes a GraphQL mutation
func DeployAgent() (string, error) {
agentInfo, err := agents.Start("IntelligenceAgent")
if err != nil {
return "", err
}
// Return the agent ID - clients must store this to communicate with the agent
return agentInfo.Id, nil
}
```
When you call this function through GraphQL, it returns a unique agent ID:
```graphql
mutation {
deployAgent
}
```
Response:
```json
{
"data": {
"deployAgent": "agent_neo_001"
}
}
```
You can think of an Agent as a persistent server process with durable memory.
Once created, you can reference your agent by its ID across sessions, page
reloads, and even system restarts. The agent maintains its complete state and
continues operating exactly where it left off.
Attio
Highly customizable, modern CRM platform
 Click "Sign up" to create your new Attio workspace. You'll need admin access to
generate the API credentials required for the Hypermode integration.
### Step 2: Note your workspace domain
Your Attio workspace URL will be in the format
`https://[workspace-name].attio.com`. Make note of your workspace name as you'll
authenticate through Attio when adding the connection to Hypermode.
## Creating your Attio agent
### Step 1: Create a new agent
From the Hypermode interface, create a new agent:
1. Click the agent dropdown menu
2. Select "Create new Agent"
Click "Sign up" to create your new Attio workspace. You'll need admin access to
generate the API credentials required for the Hypermode integration.
### Step 2: Note your workspace domain
Your Attio workspace URL will be in the format
`https://[workspace-name].attio.com`. Make note of your workspace name as you'll
authenticate through Attio when adding the connection to Hypermode.
## Creating your Attio agent
### Step 1: Create a new agent
From the Hypermode interface, create a new agent:
1. Click the agent dropdown menu
2. Select "Create new Agent"
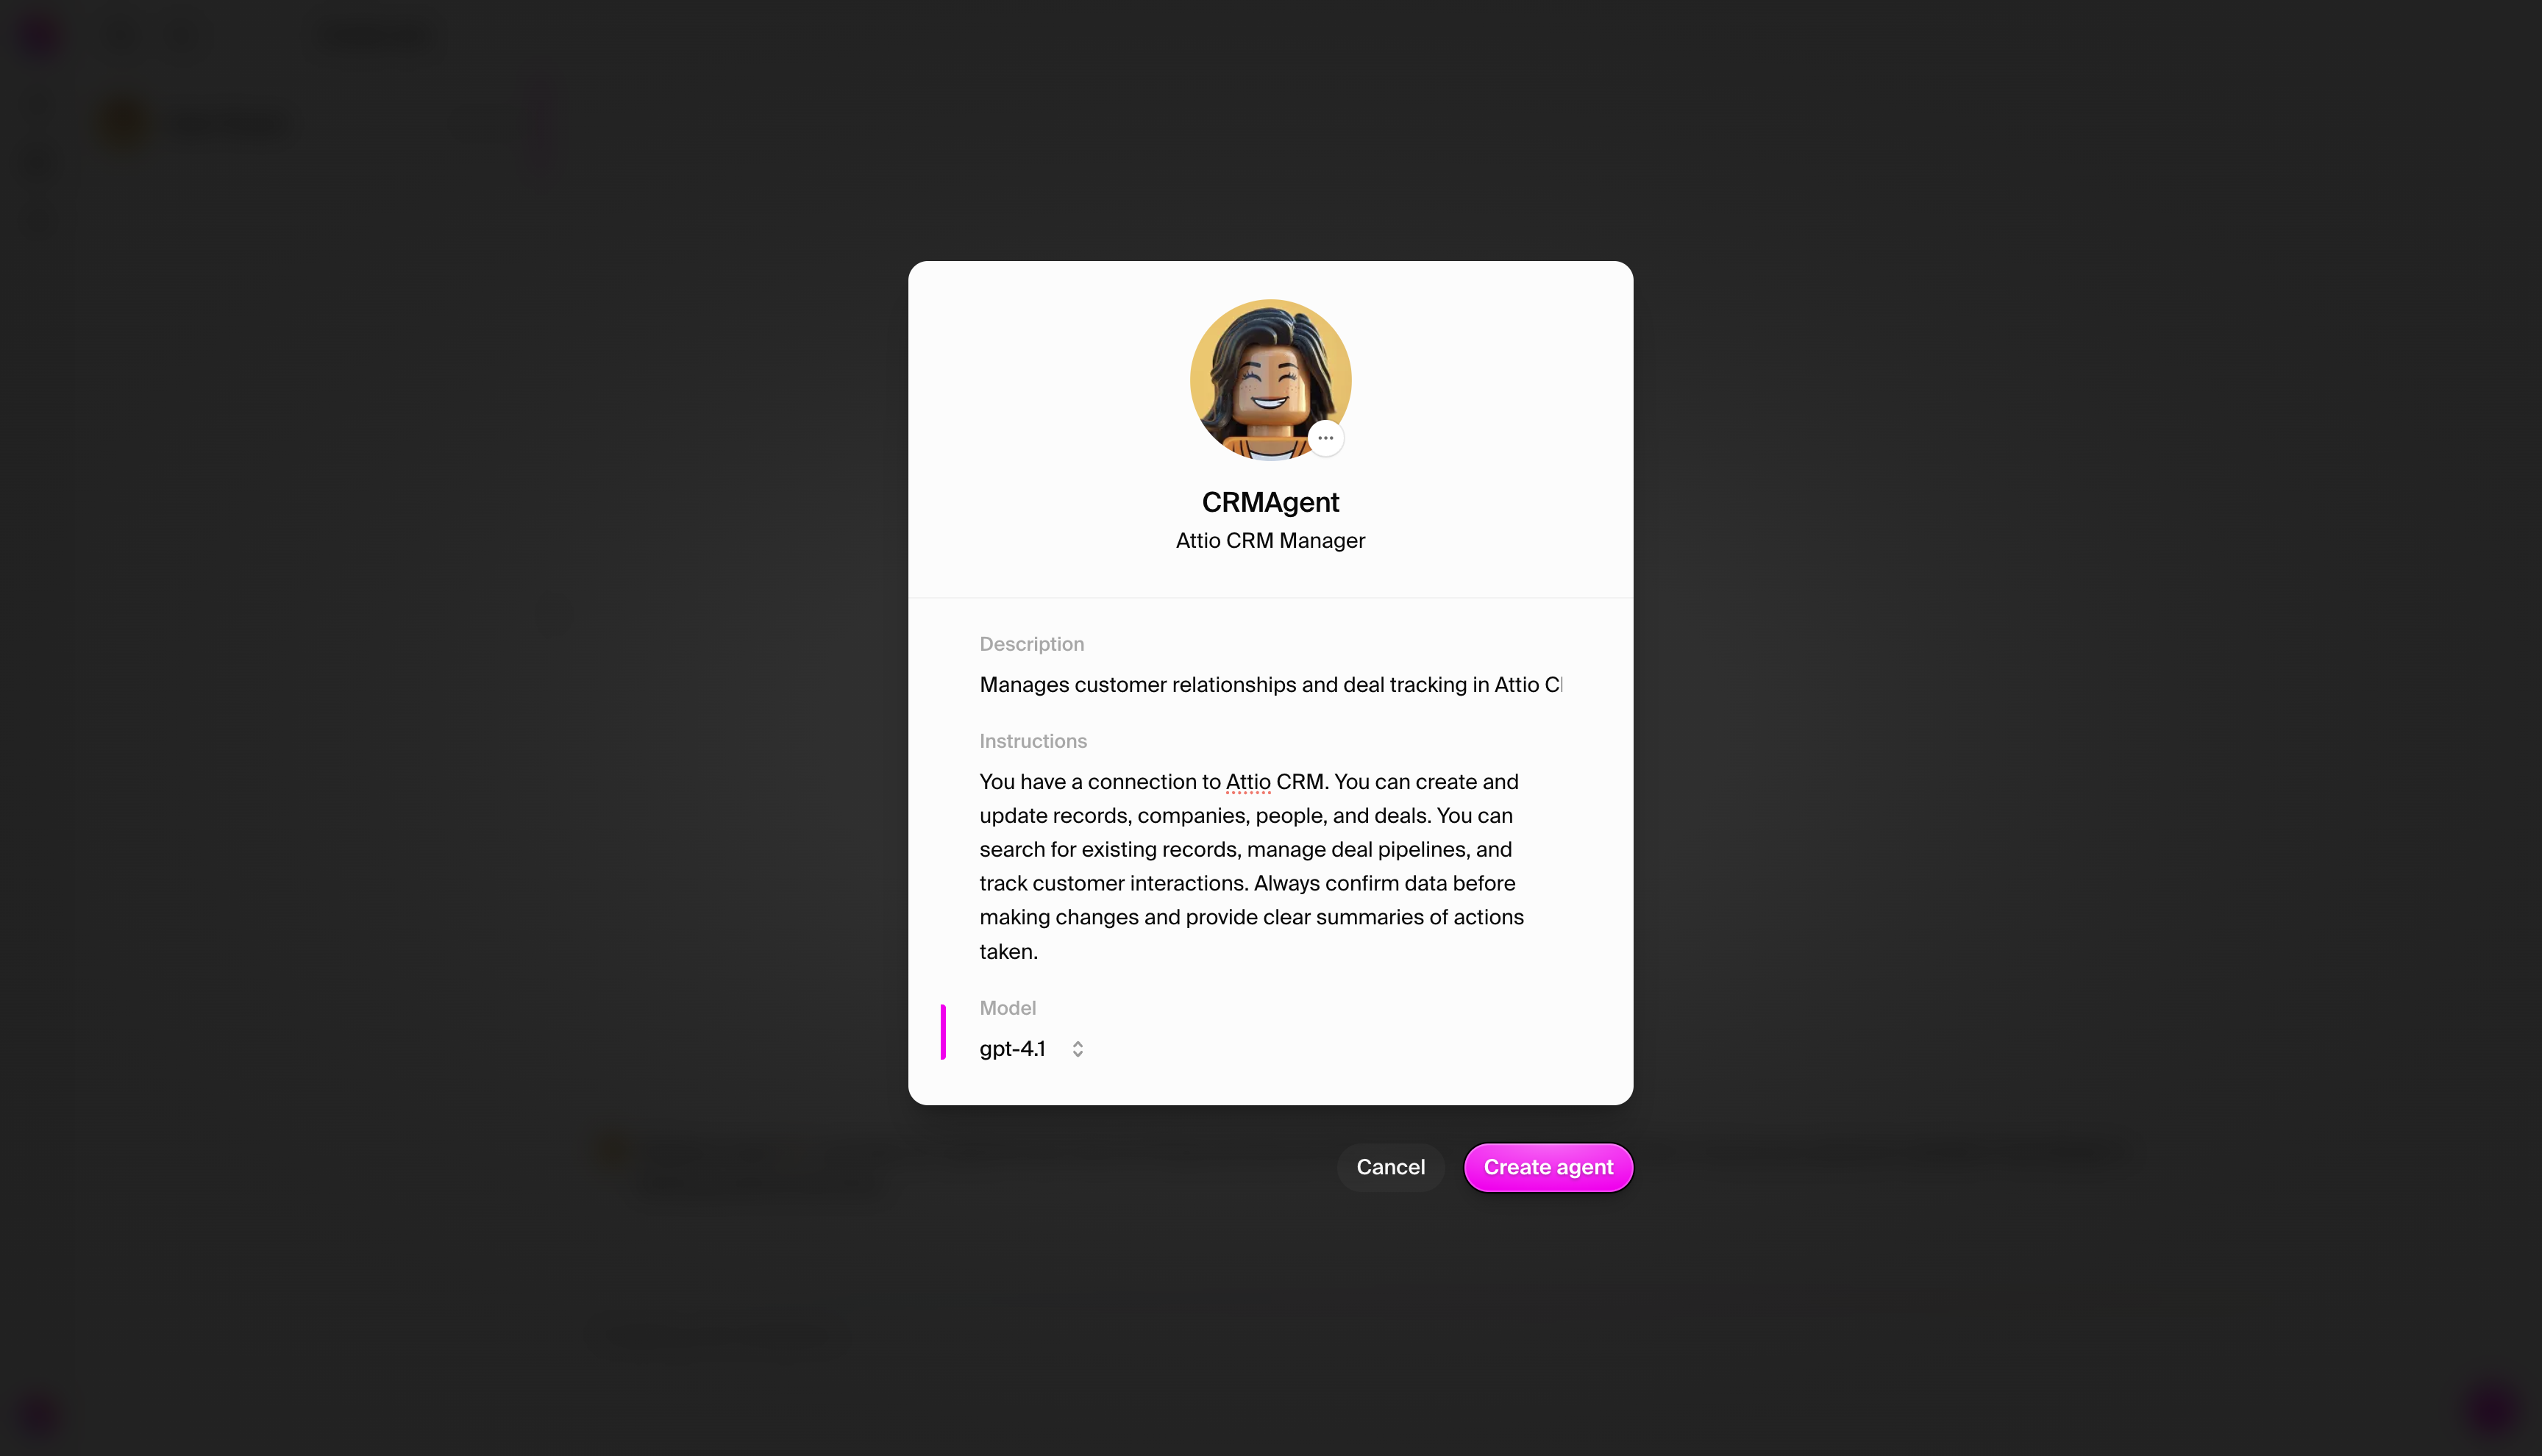
 ### Step 2: Configure agent settings
Use these recommended settings for your Attio CRM agent:
* **Agent Name**: CRMAgent
* **Agent Title**: Attio CRM Manager
* **Description**: Manages customer relationships and deal tracking in Attio CRM
* **Instructions**: You have a connection to Attio CRM. You can create and
update companies and deals, search for existing records, manage deal
pipelines, and track customer interactions. Always confirm data before making
changes and provide clear summaries of actions taken.
* **Model**: GPT-4.1 - Default - Optionally, use Claude for best results
### Step 2: Configure agent settings
Use these recommended settings for your Attio CRM agent:
* **Agent Name**: CRMAgent
* **Agent Title**: Attio CRM Manager
* **Description**: Manages customer relationships and deal tracking in Attio CRM
* **Instructions**: You have a connection to Attio CRM. You can create and
update companies and deals, search for existing records, manage deal
pipelines, and track customer interactions. Always confirm data before making
changes and provide clear summaries of actions taken.
* **Model**: GPT-4.1 - Default - Optionally, use Claude for best results
 ### Step 3: View your agent profile
Once created, navigate to your agent's settings page:
### Step 3: View your agent profile
Once created, navigate to your agent's settings page:
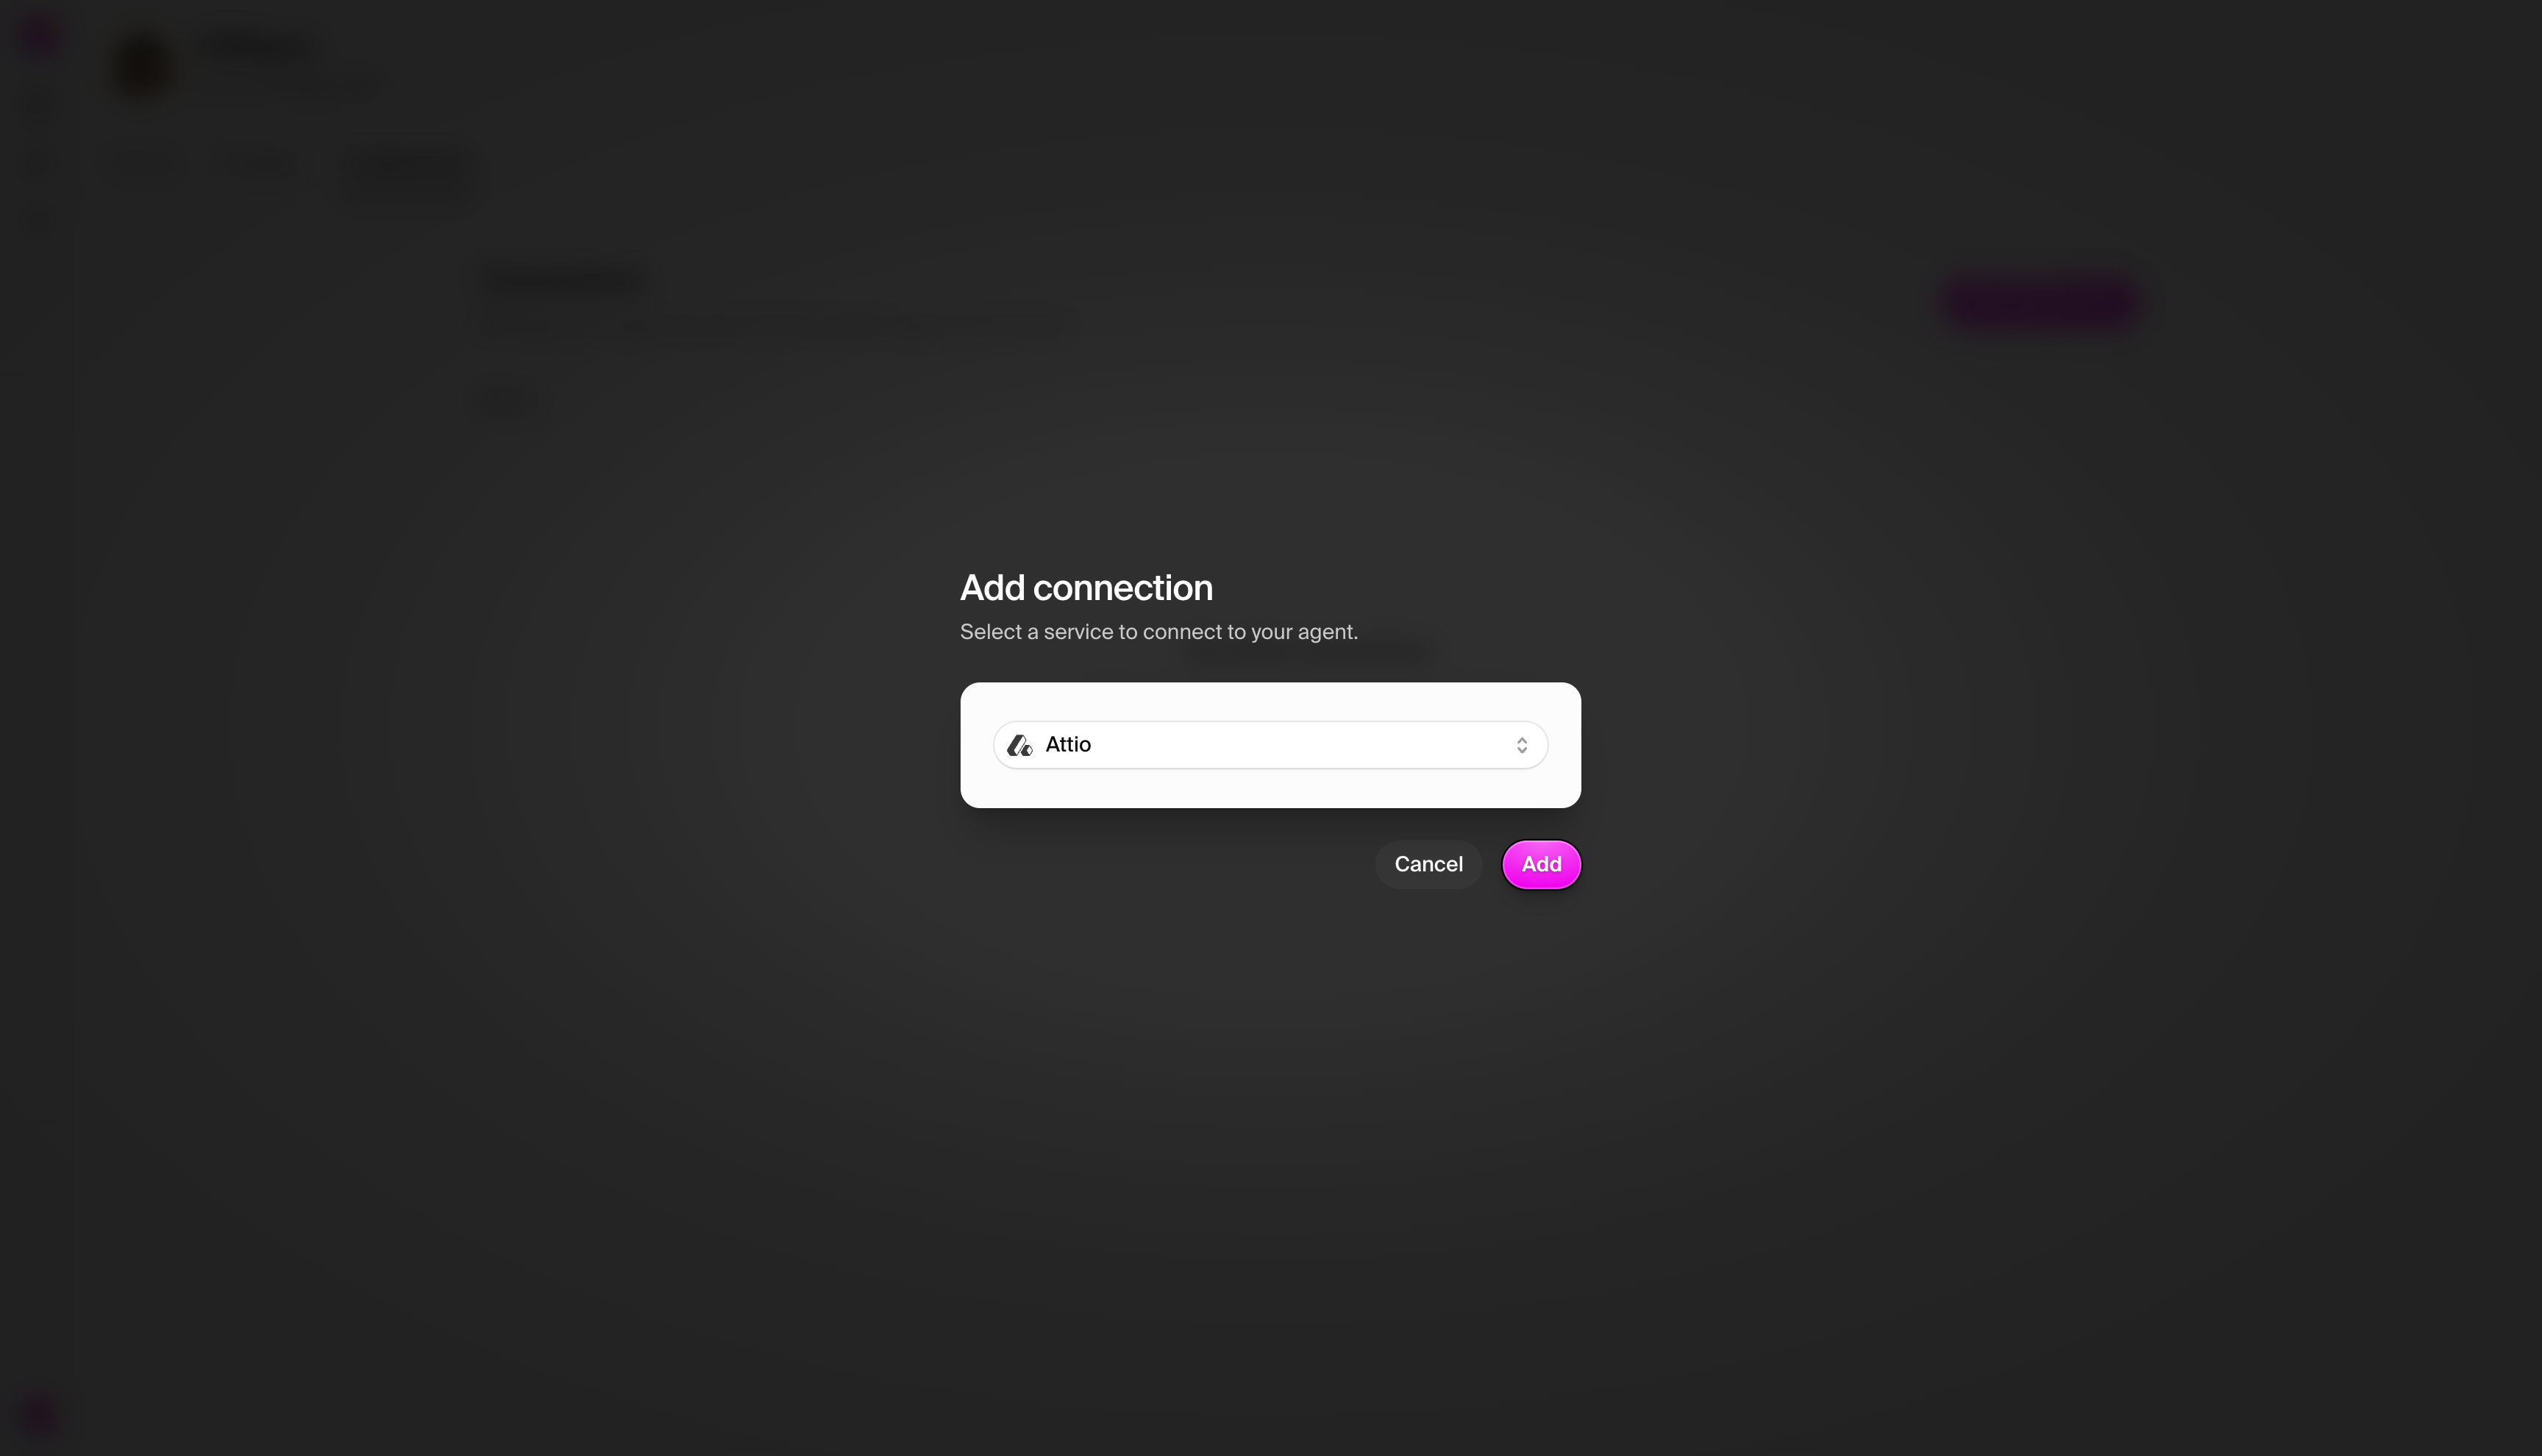
 ## Connecting to Attio
### Step 1: Add the Attio connection
Navigate to the **Connections** tab and add Attio:
1. Click "Add connection"
2. Search for "Attio" in the available connections
## Connecting to Attio
### Step 1: Add the Attio connection
Navigate to the **Connections** tab and add Attio:
1. Click "Add connection"
2. Search for "Attio" in the available connections
 ### Step 2: Configure connection with OAuth
When you select Attio, you'll be prompted to authenticate via OAuth. This will
redirect you to Attio's authorization page:
### Step 2: Configure connection with OAuth
When you select Attio, you'll be prompted to authenticate via OAuth. This will
redirect you to Attio's authorization page:
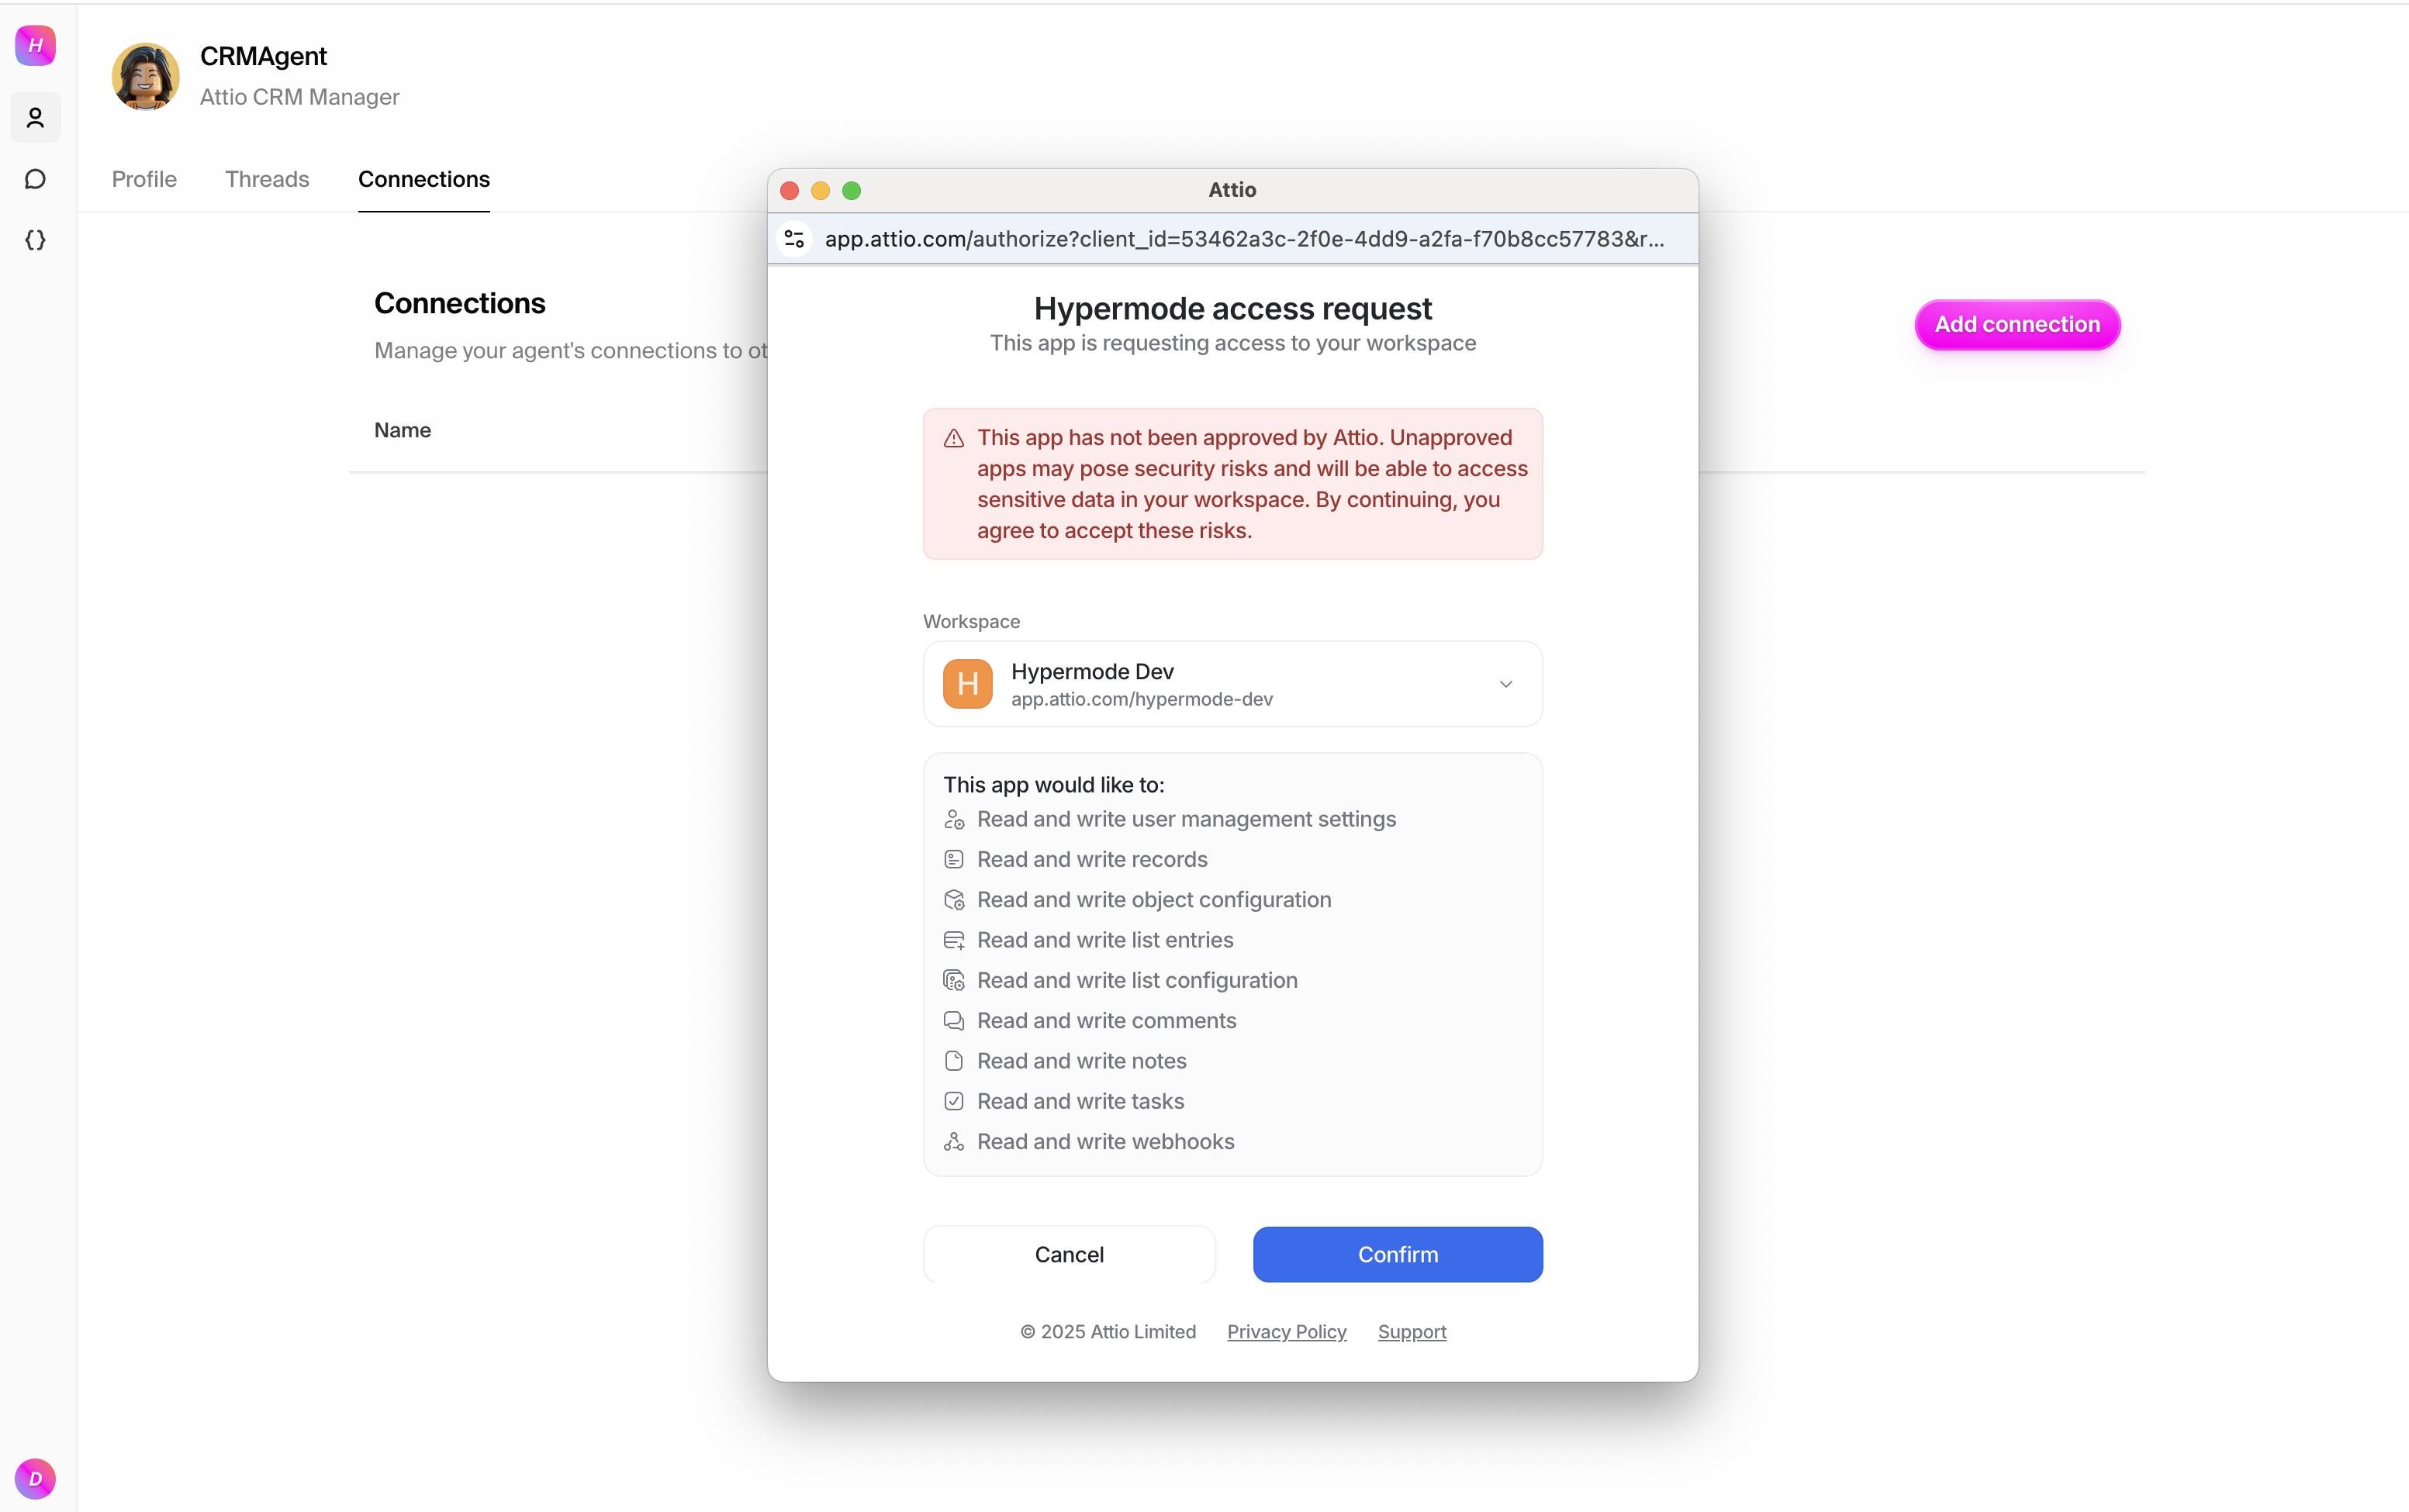 Follow the OAuth flow to grant Hypermode access to your Attio workspace. This
secure process ensures your credentials are never directly stored in Hypermode.
Follow the OAuth flow to grant Hypermode access to your Attio workspace. This
secure process ensures your credentials are never directly stored in Hypermode.
 ### Test 2: Create a new company
Try adding a new company to your CRM:
```text
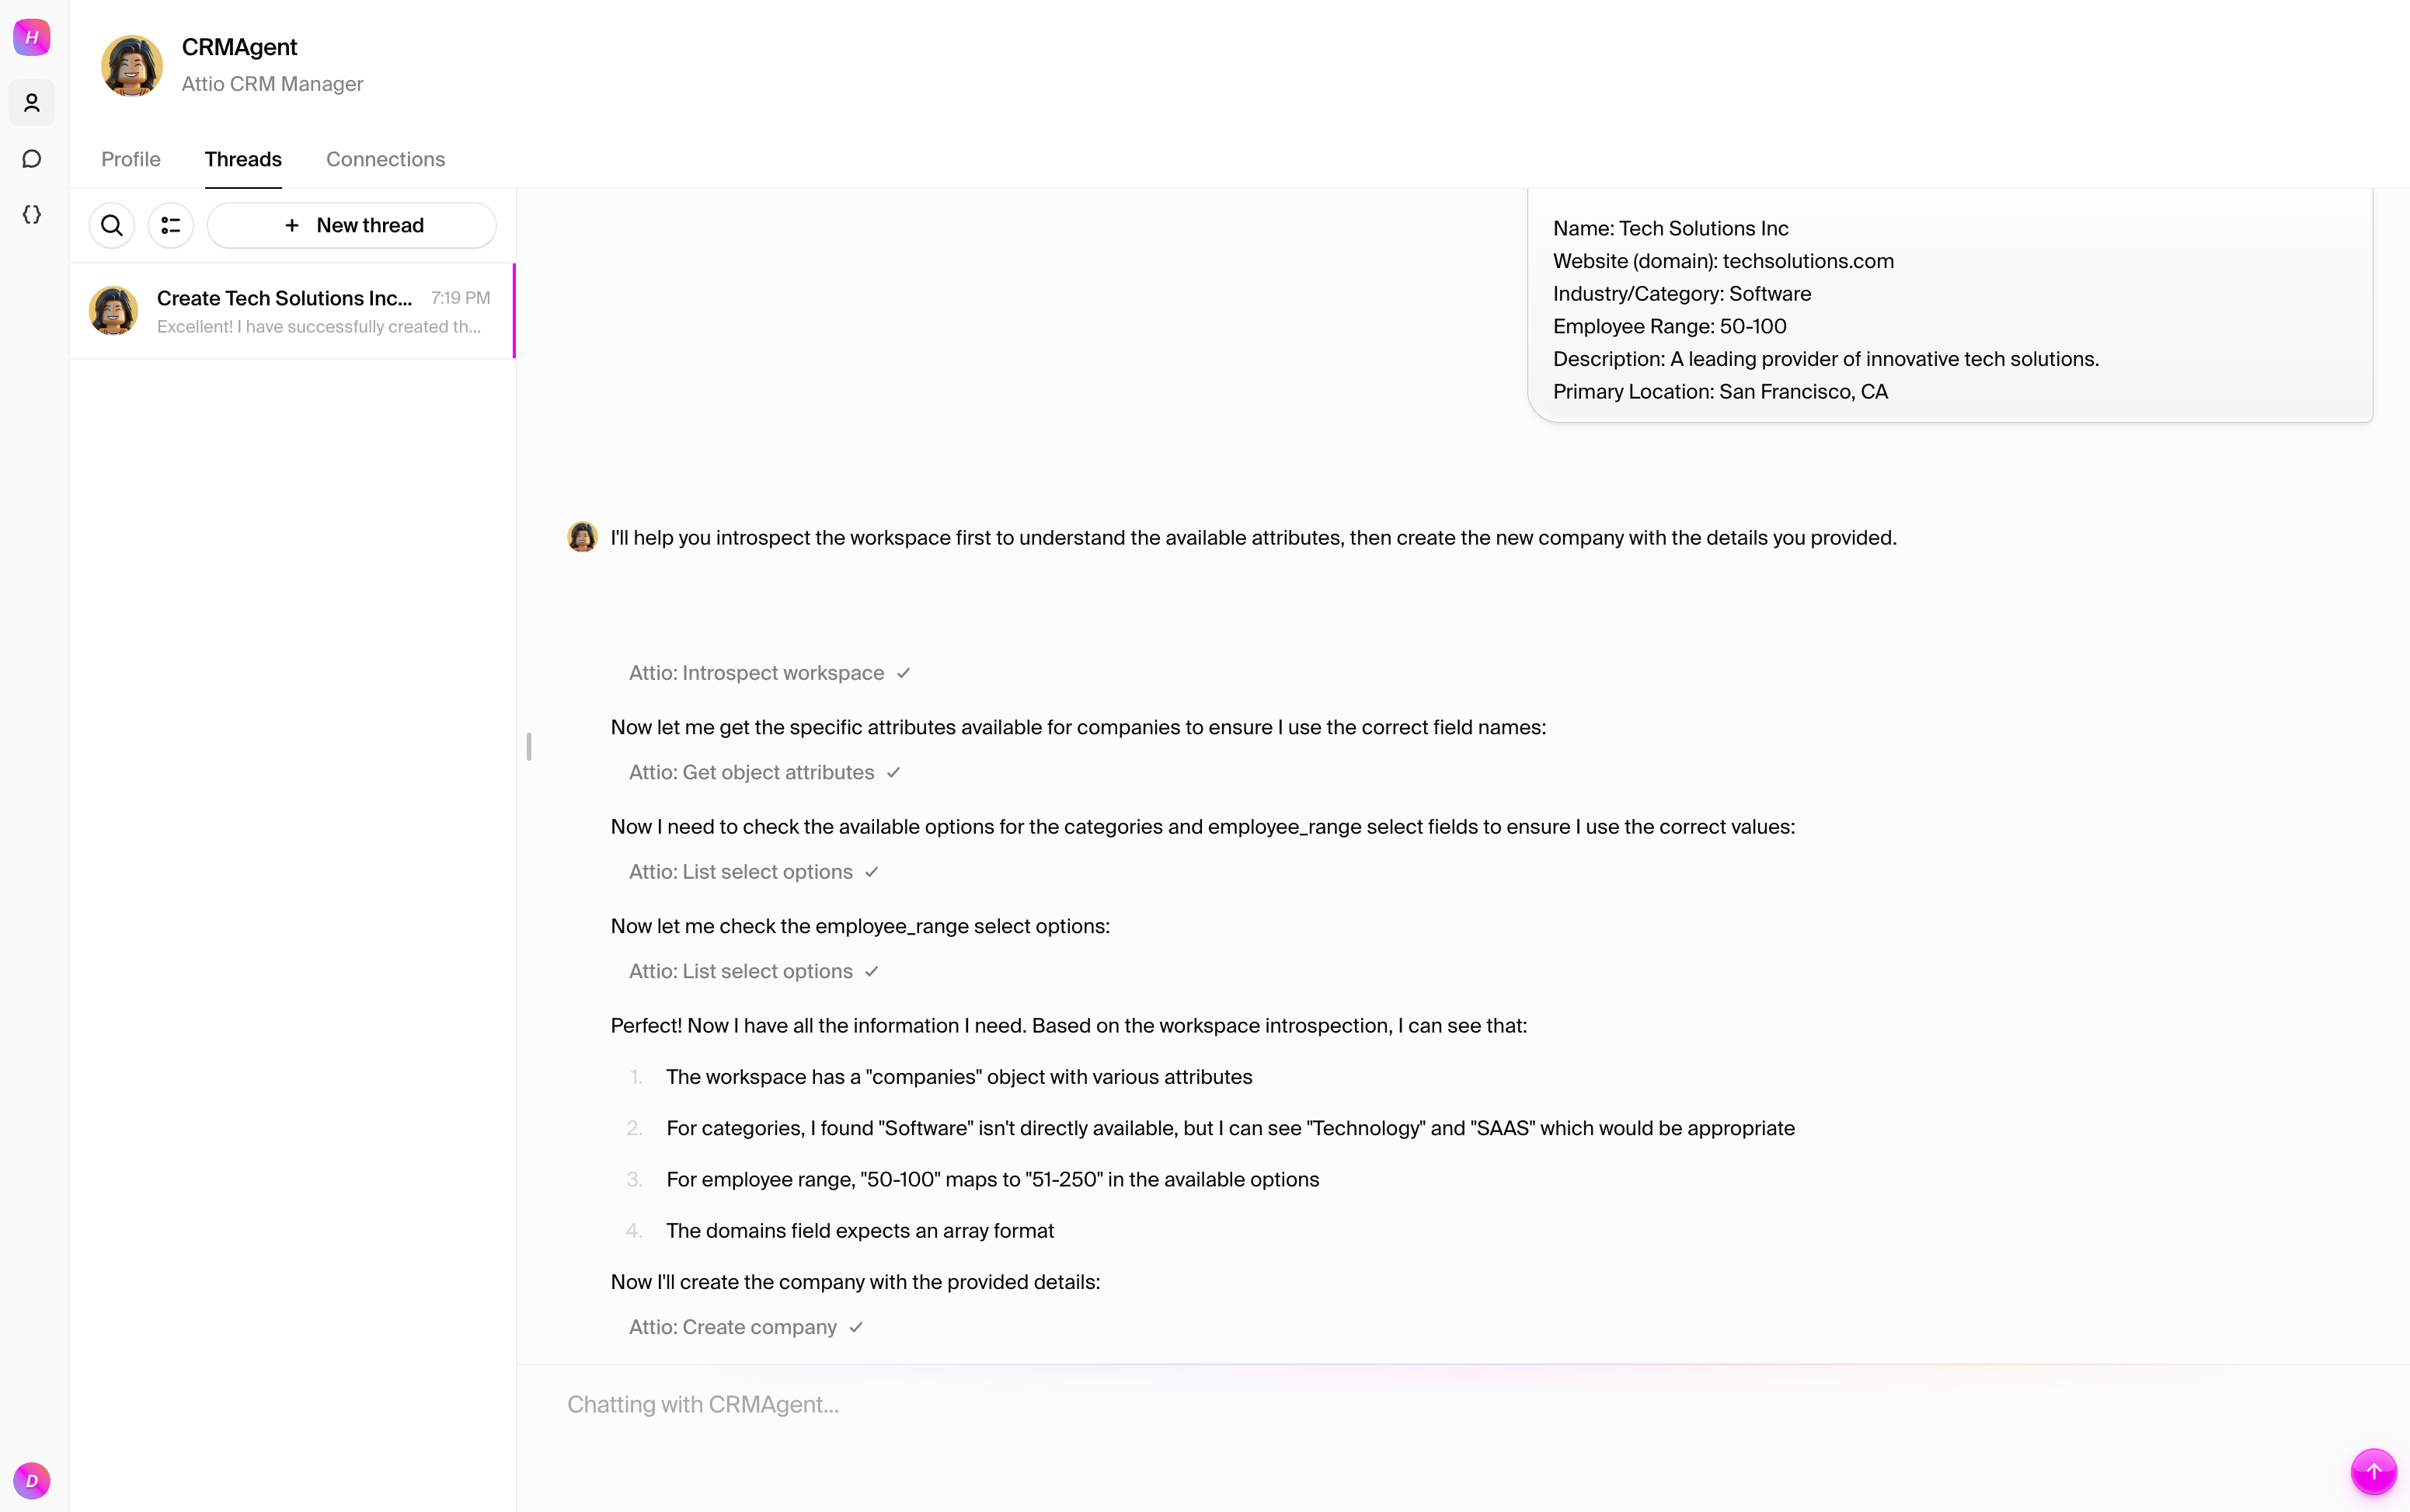
Introspect the workspace and create a new company in Attio with the following details:
Name: Tech Solutions Inc
Website (domain): techsolutions.com
Industry/Category: Software
Employee Range: 50-100
Description: A leading provider of innovative tech solutions.
Primary Location: San Francisco, CA
```
### Test 2: Create a new company
Try adding a new company to your CRM:
```text
Introspect the workspace and create a new company in Attio with the following details:
Name: Tech Solutions Inc
Website (domain): techsolutions.com
Industry/Category: Software
Employee Range: 50-100
Description: A leading provider of innovative tech solutions.
Primary Location: San Francisco, CA
```
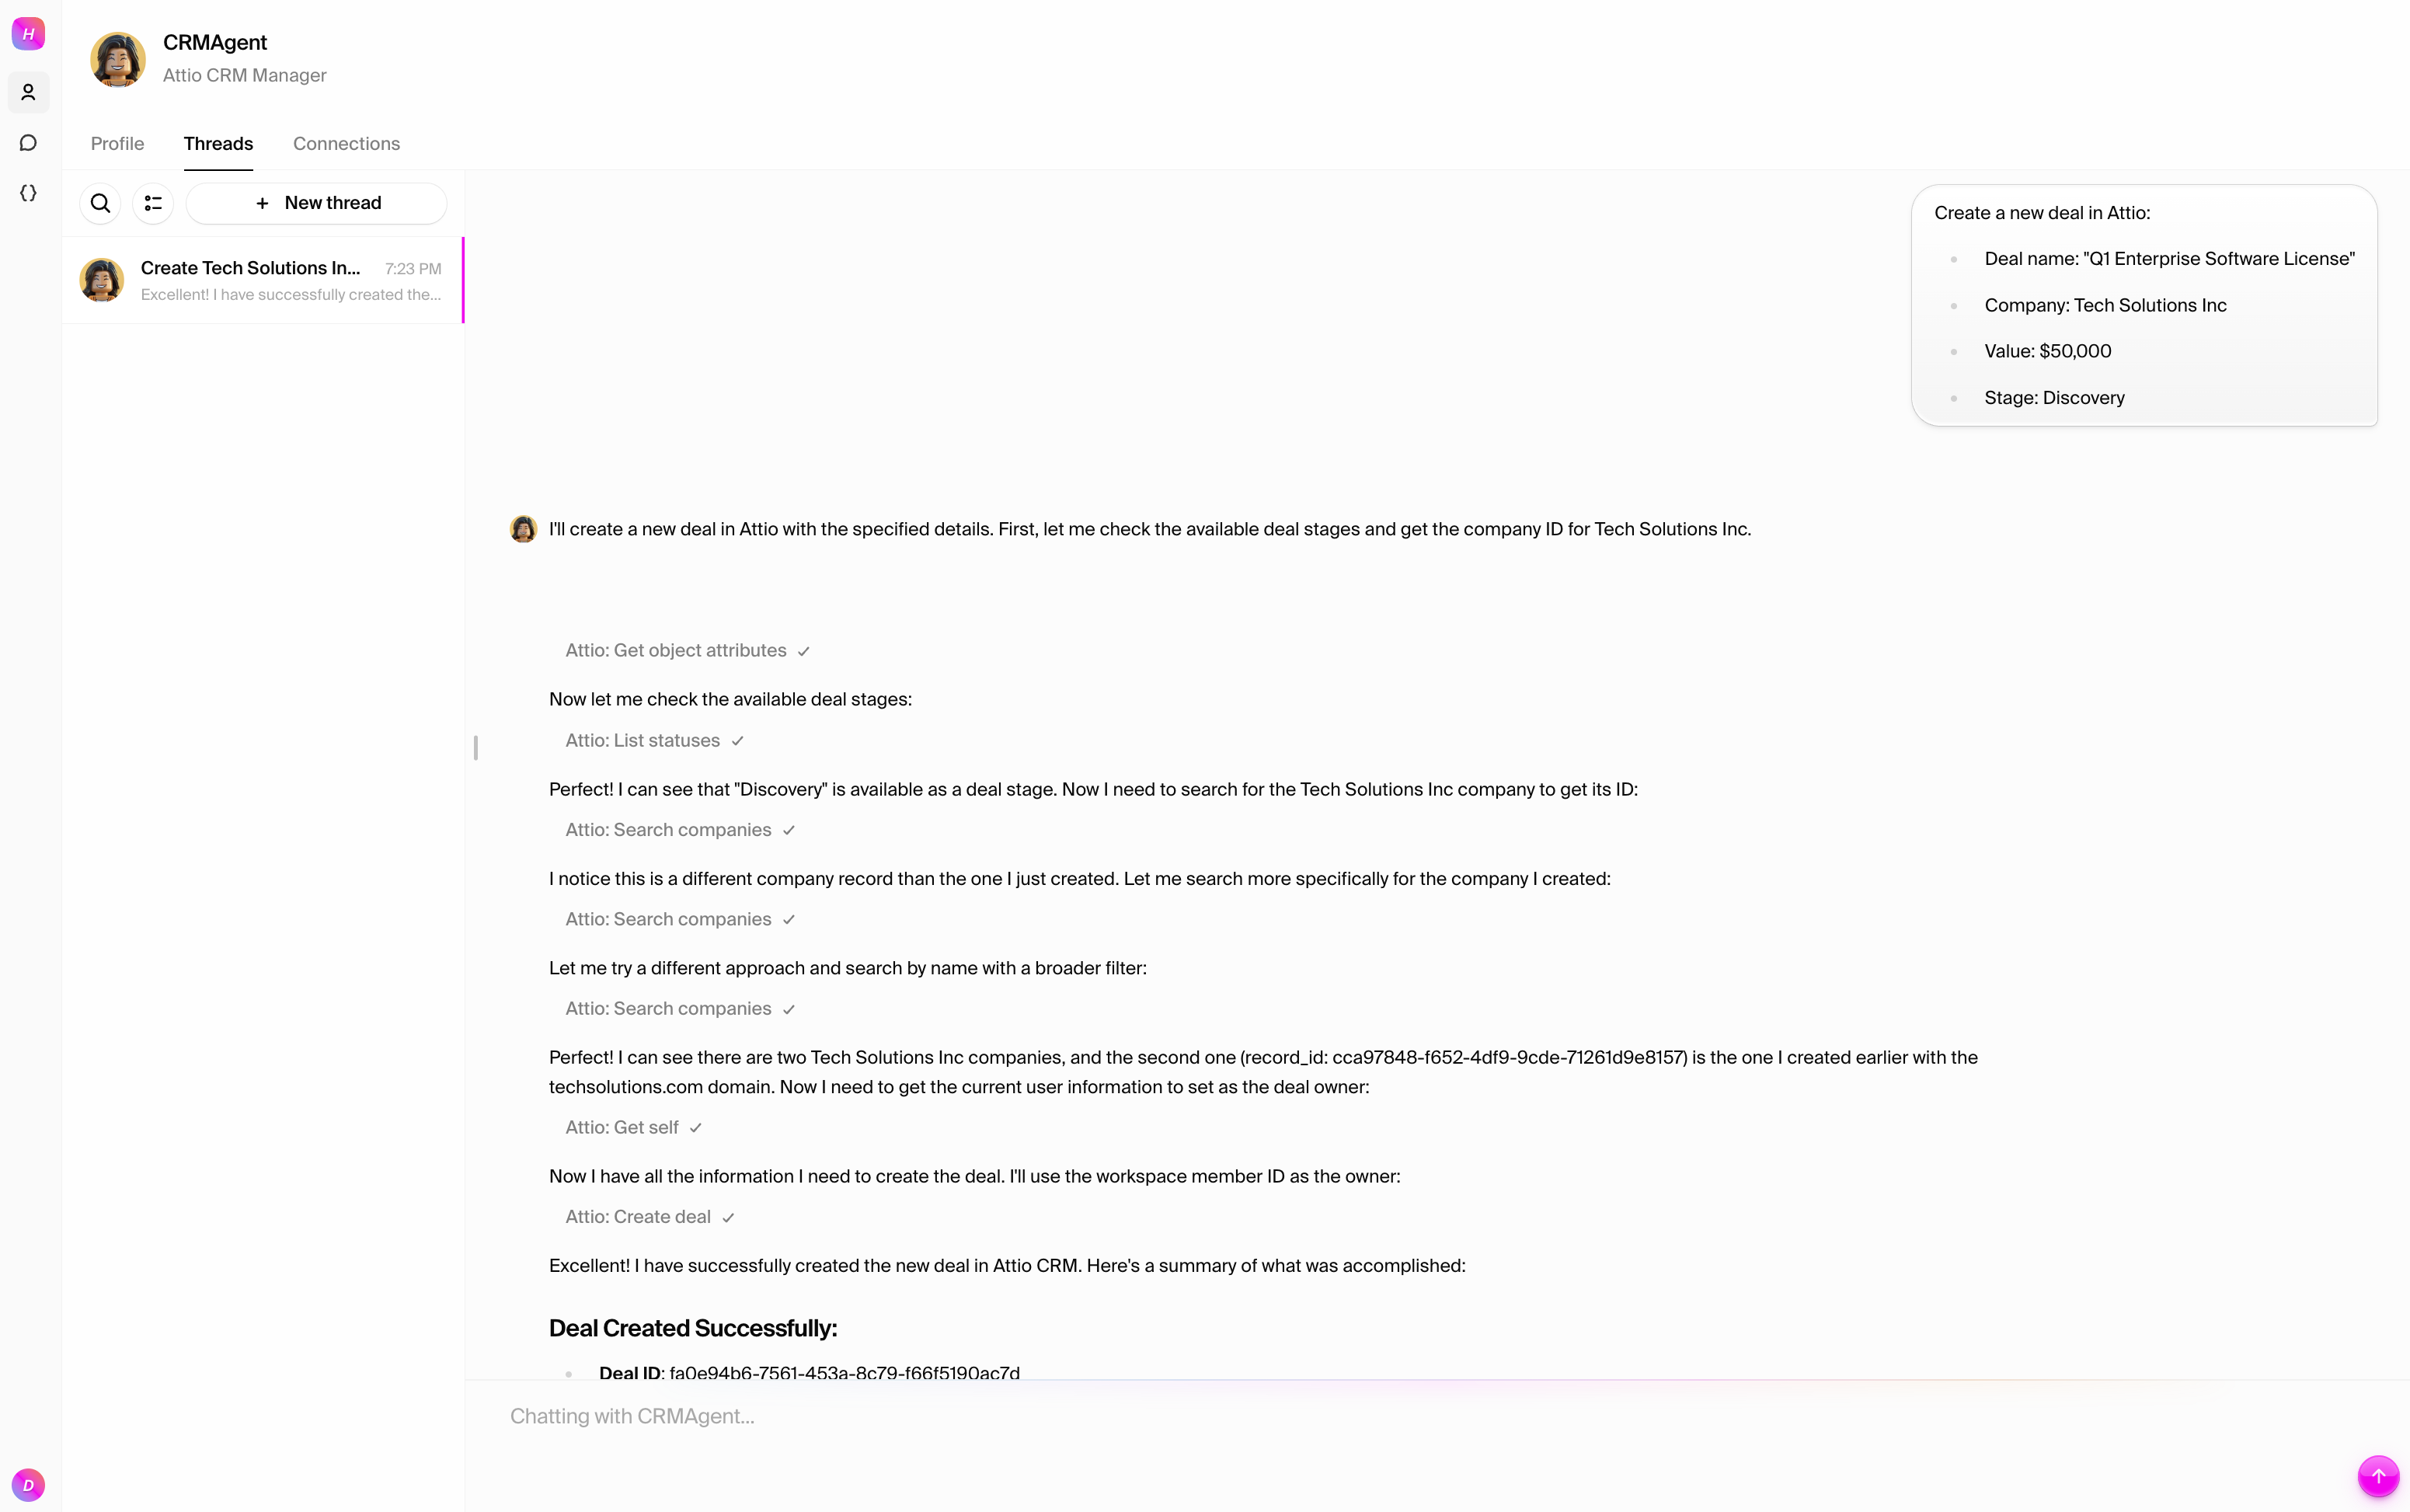
 ### Test 3: Create and manage a deal
Create a sales opportunity and track its progress:
```text
Create a new deal in Attio:
- Deal name: "Q1 Enterprise Software License"
- Company: Tech Solutions Inc
- Value: $50,000
- Stage: Discovery
```
### Test 3: Create and manage a deal
Create a sales opportunity and track its progress:
```text
Create a new deal in Attio:
- Deal name: "Q1 Enterprise Software License"
- Company: Tech Solutions Inc
- Value: $50,000
- Stage: Discovery
```
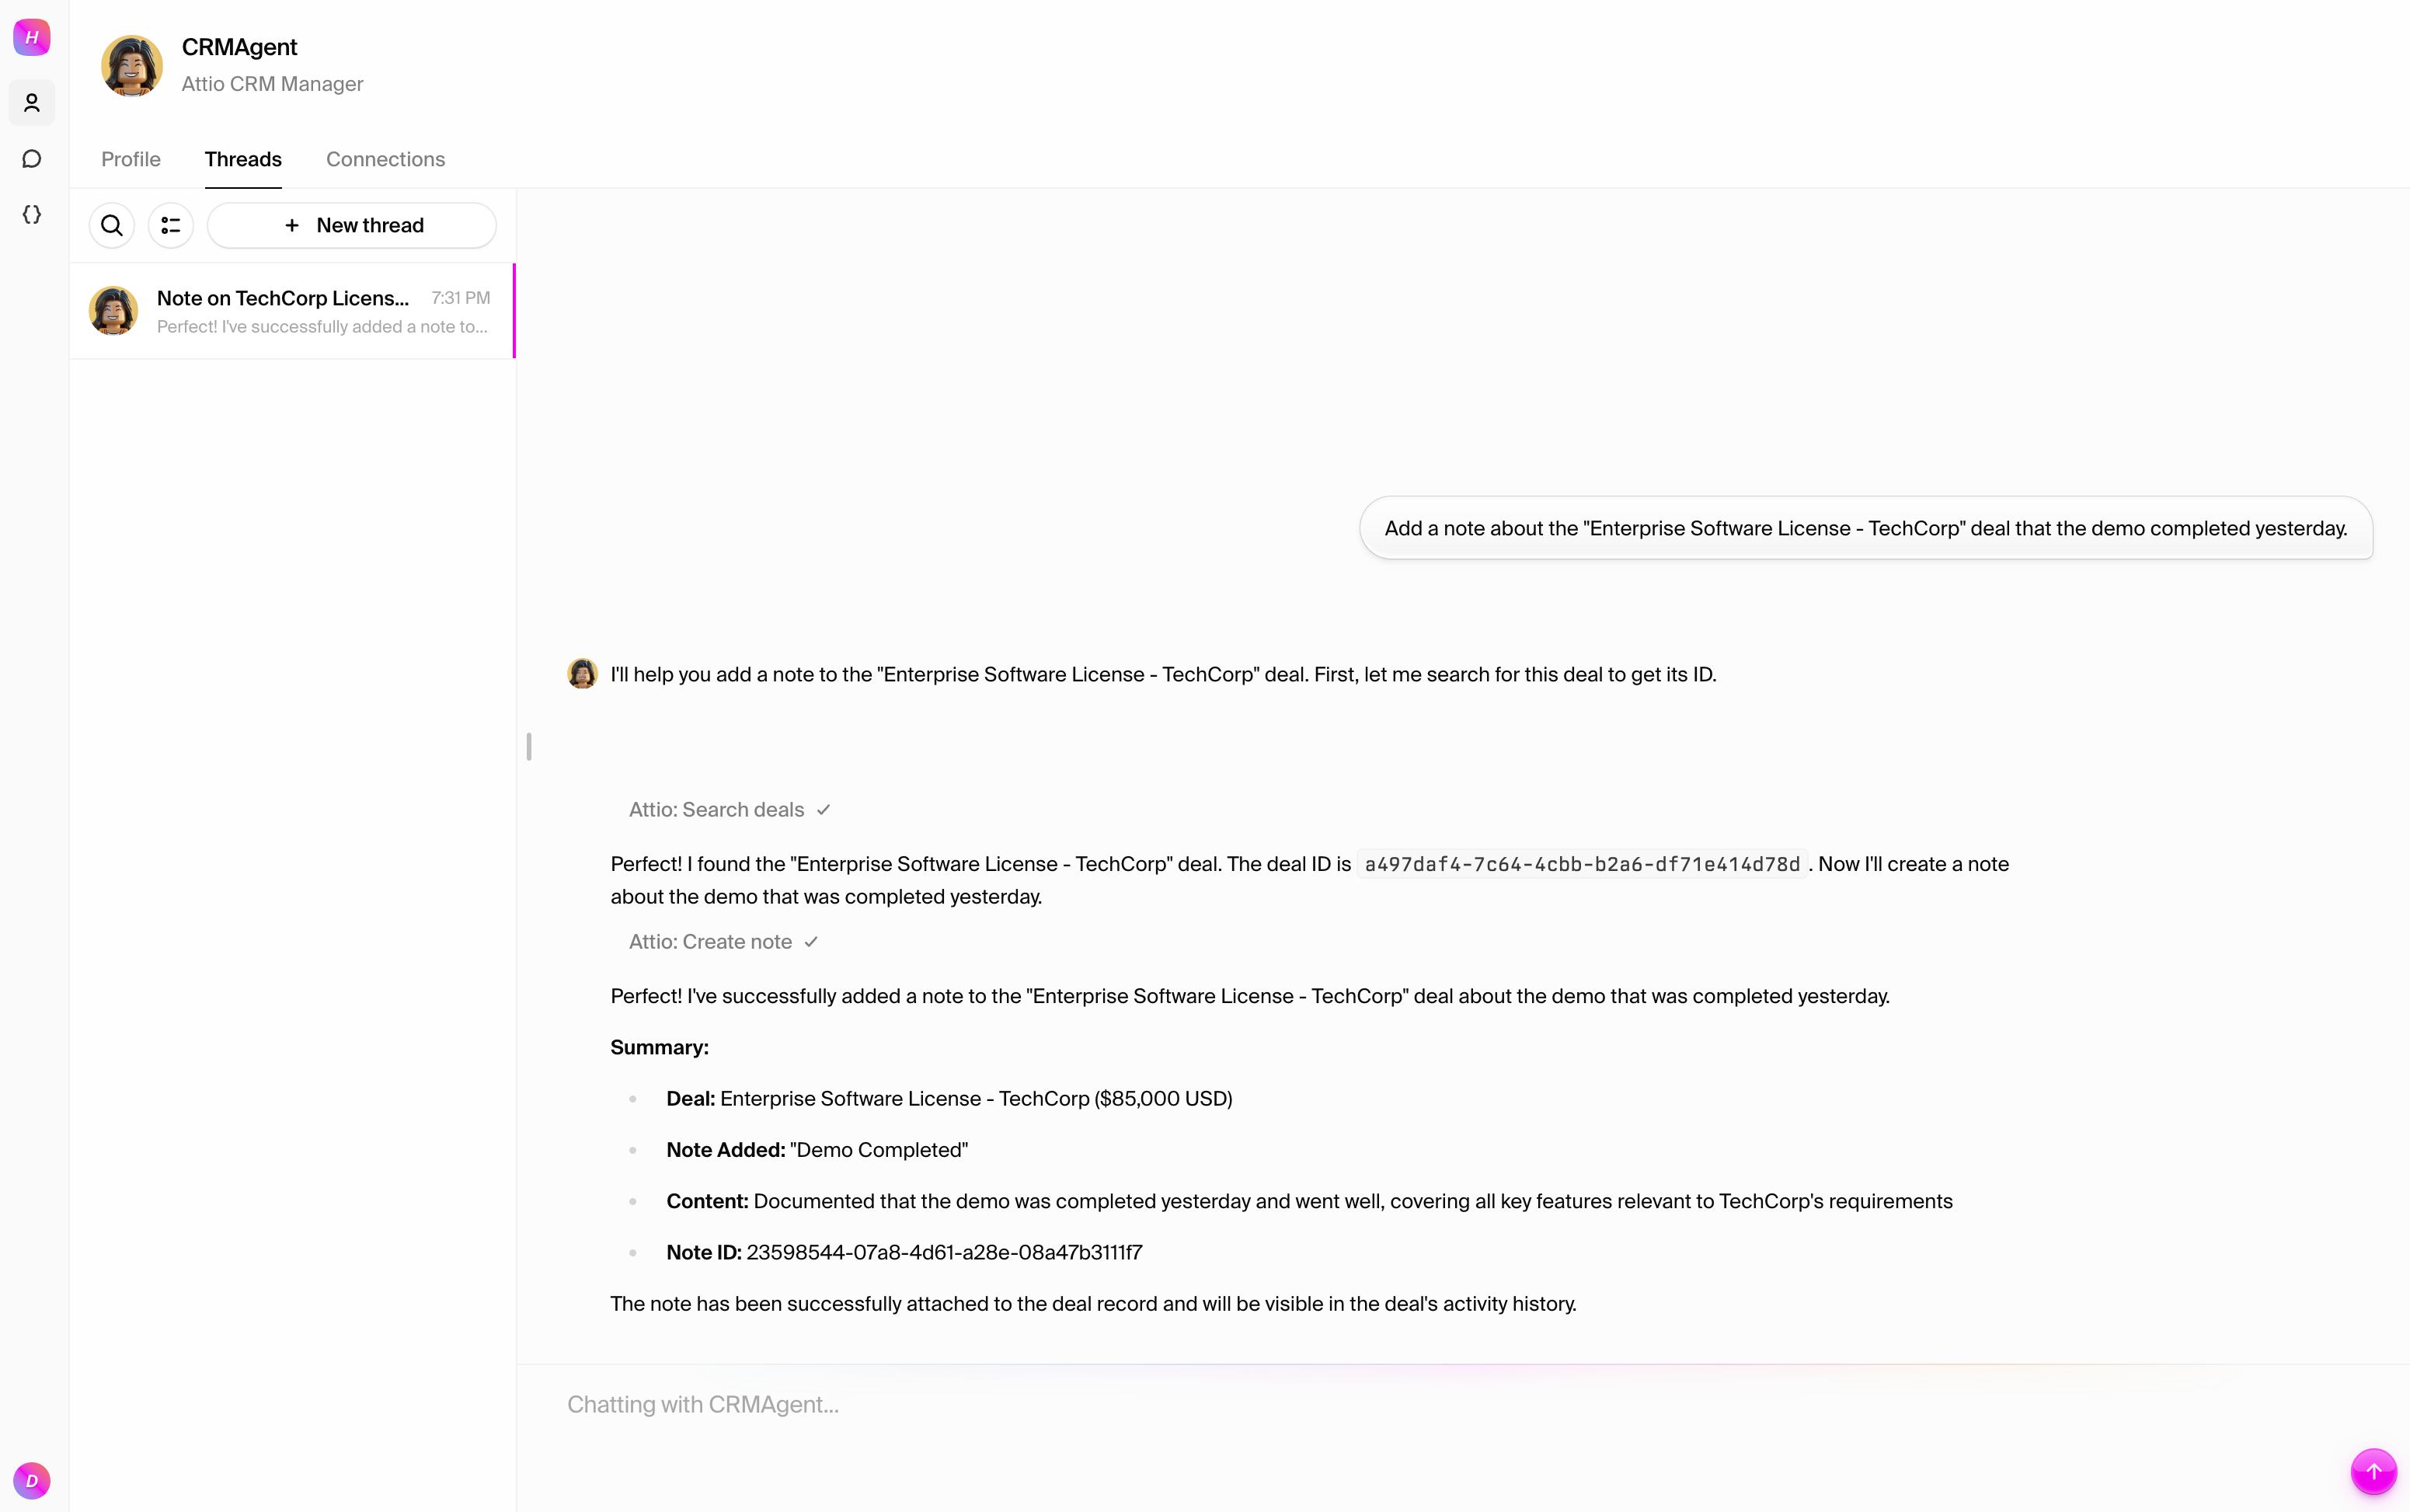
 ### Test 4: Update deal status
Move the deal through your pipeline:
```text
Add a note about the "Enterprise Software License - TechCorp" deal that the demo completed yesterday.
```
### Test 4: Update deal status
Move the deal through your pipeline:
```text
Add a note about the "Enterprise Software License - TechCorp" deal that the demo completed yesterday.
```
 ## What you can do
With your Attio connection established, your agent can:
* **Manage companies**: Create, update, and search for organizations and account
details
* **Track deals**: Create opportunities, update pipeline stages, and manage deal
values
* **Organize data**: Use lists and custom attributes to categorize records
* **Search and filter**: Find records based on various criteria
* **Generate reports**: Analyze pipeline health and company data
* **Integrate workflows**: Combine CRM operations with other tools like email,
calendar, and project management
## What you can do
With your Attio connection established, your agent can:
* **Manage companies**: Create, update, and search for organizations and account
details
* **Track deals**: Create opportunities, update pipeline stages, and manage deal
values
* **Organize data**: Use lists and custom attributes to categorize records
* **Search and filter**: Find records based on various criteria
* **Generate reports**: Analyze pipeline health and company data
* **Integrate workflows**: Combine CRM operations with other tools like email,
calendar, and project management
 Now we want to use the JWT that Auth0 generates, but we also need to add custom
claims to that token which will be used by our auth rules. So we can use
something known as "Rules" (left sidebar on dashboard page under "Auth
Pipeline") to add custom claims to a token. Let's create a new empty rule.
Now we want to use the JWT that Auth0 generates, but we also need to add custom
claims to that token which will be used by our auth rules. So we can use
something known as "Rules" (left sidebar on dashboard page under "Auth
Pipeline") to add custom claims to a token. Let's create a new empty rule.
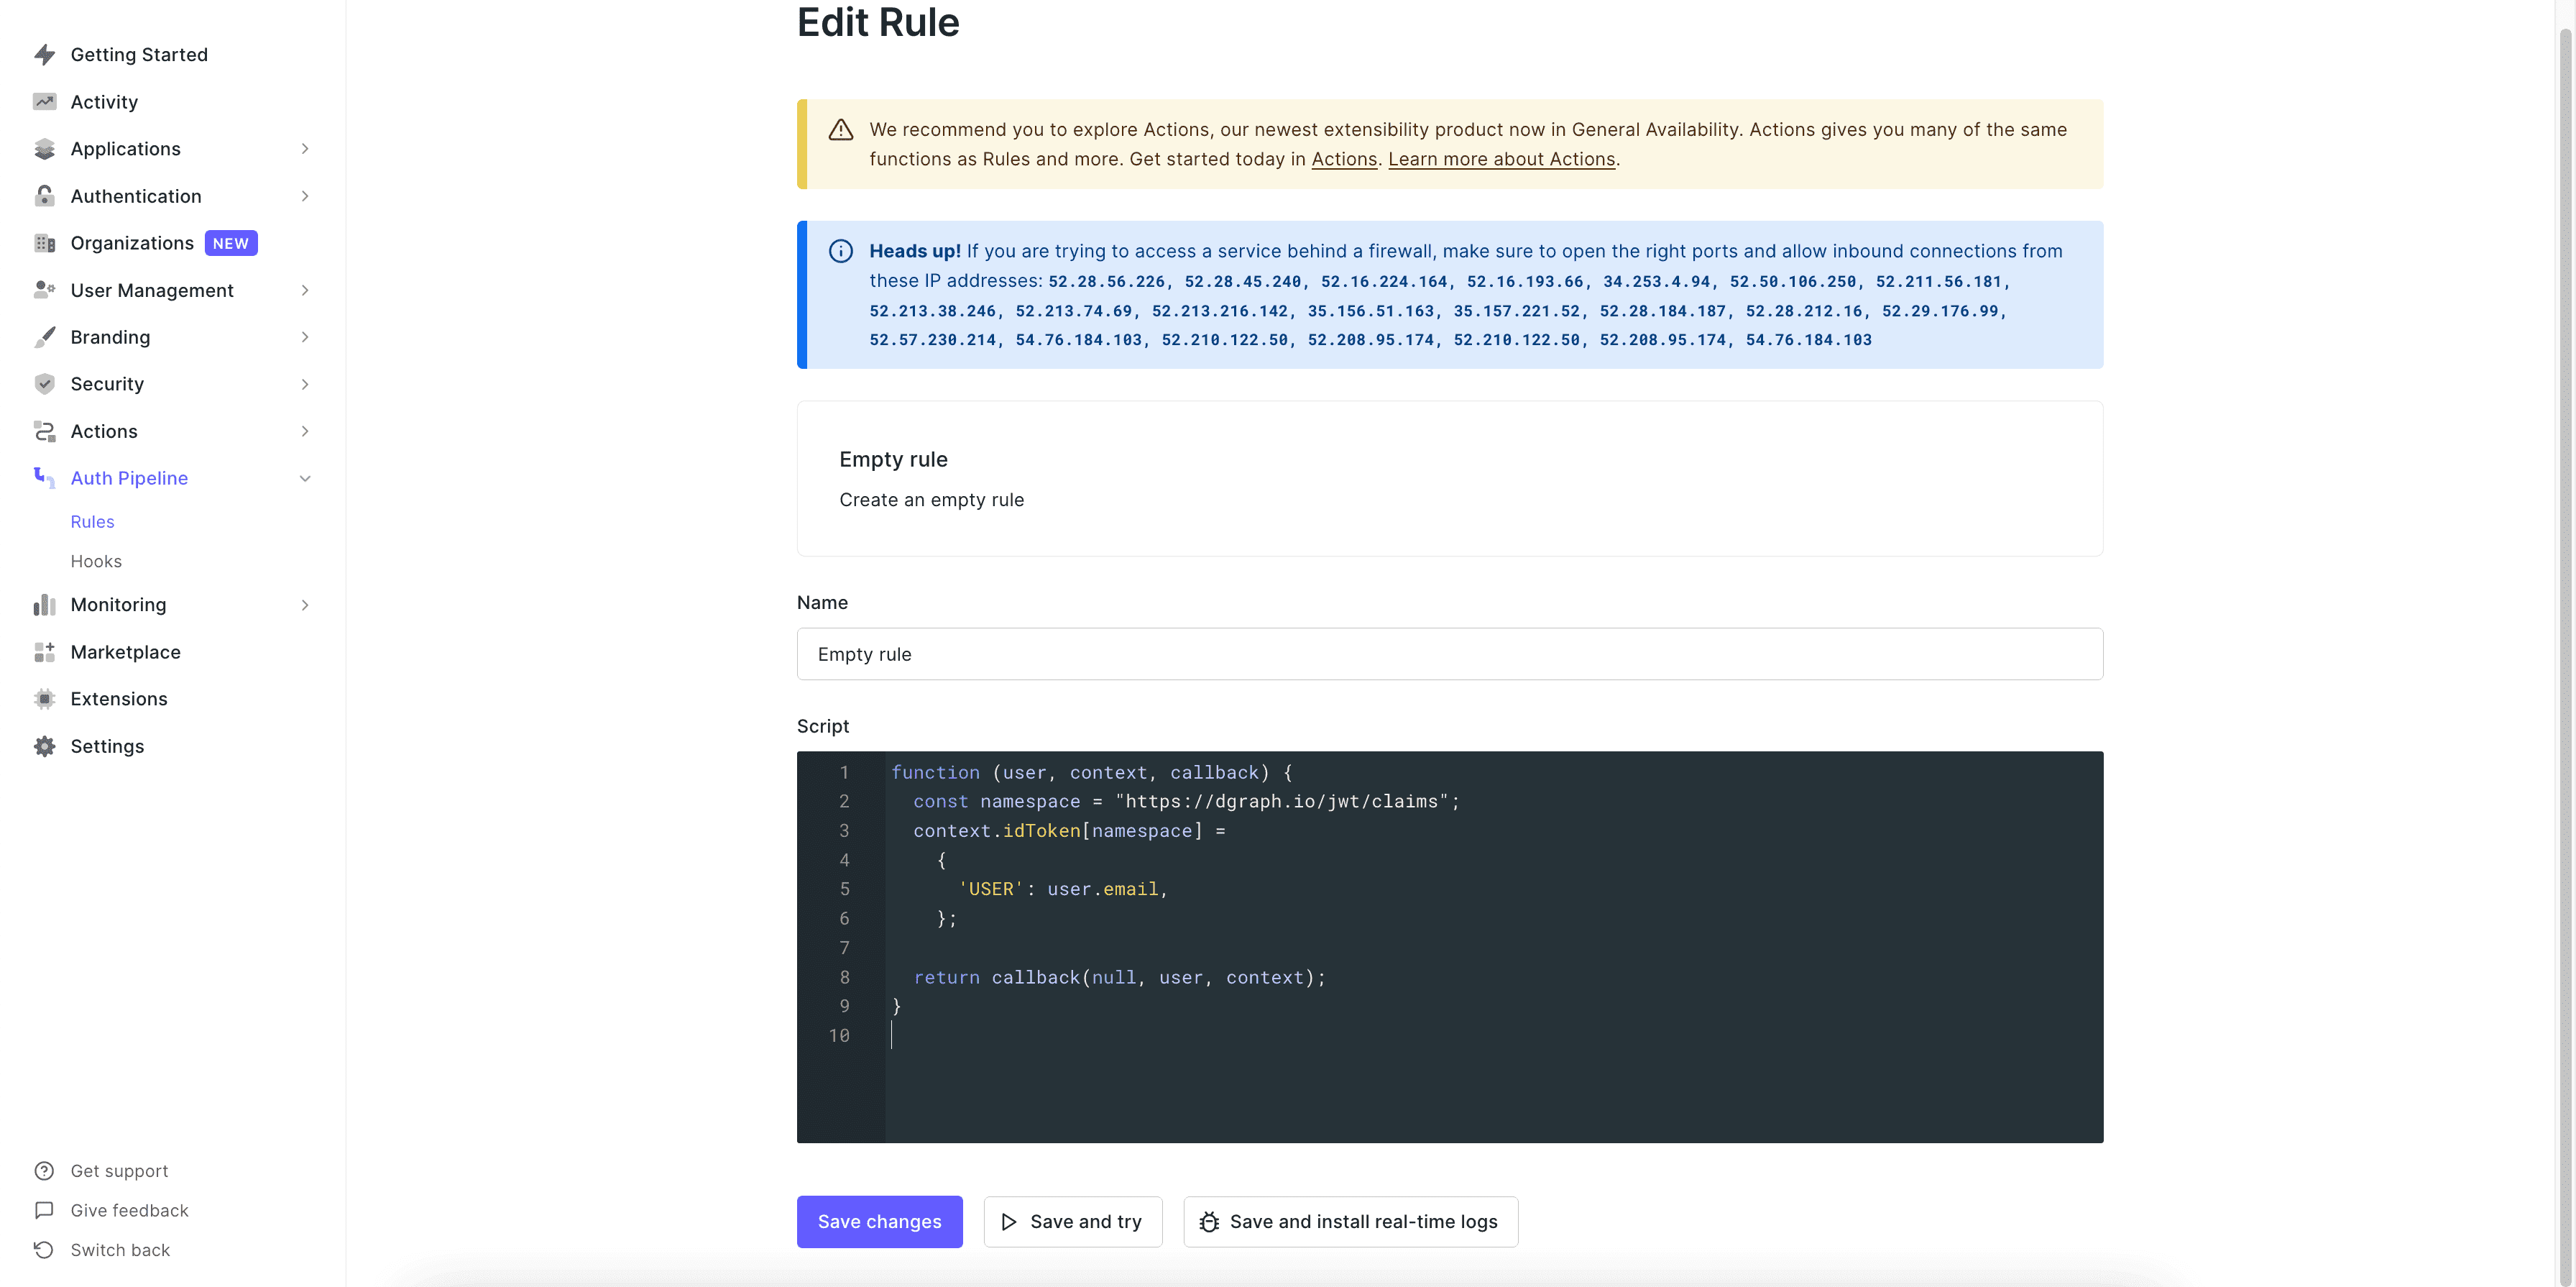 Replace the content with the following -
```javascript
function (user, context, callback) {
const namespace = "https://dgraph.io/jwt/claims";
context.idToken[namespace] =
{
'USER': user.email,
};
return callback(null, user, context);
}
```
In the above function, we are only just adding the custom claim to the token
with a field as `USER` which if you recall from the last step is used in our
auth rules, so it needs to match exactly with that name.
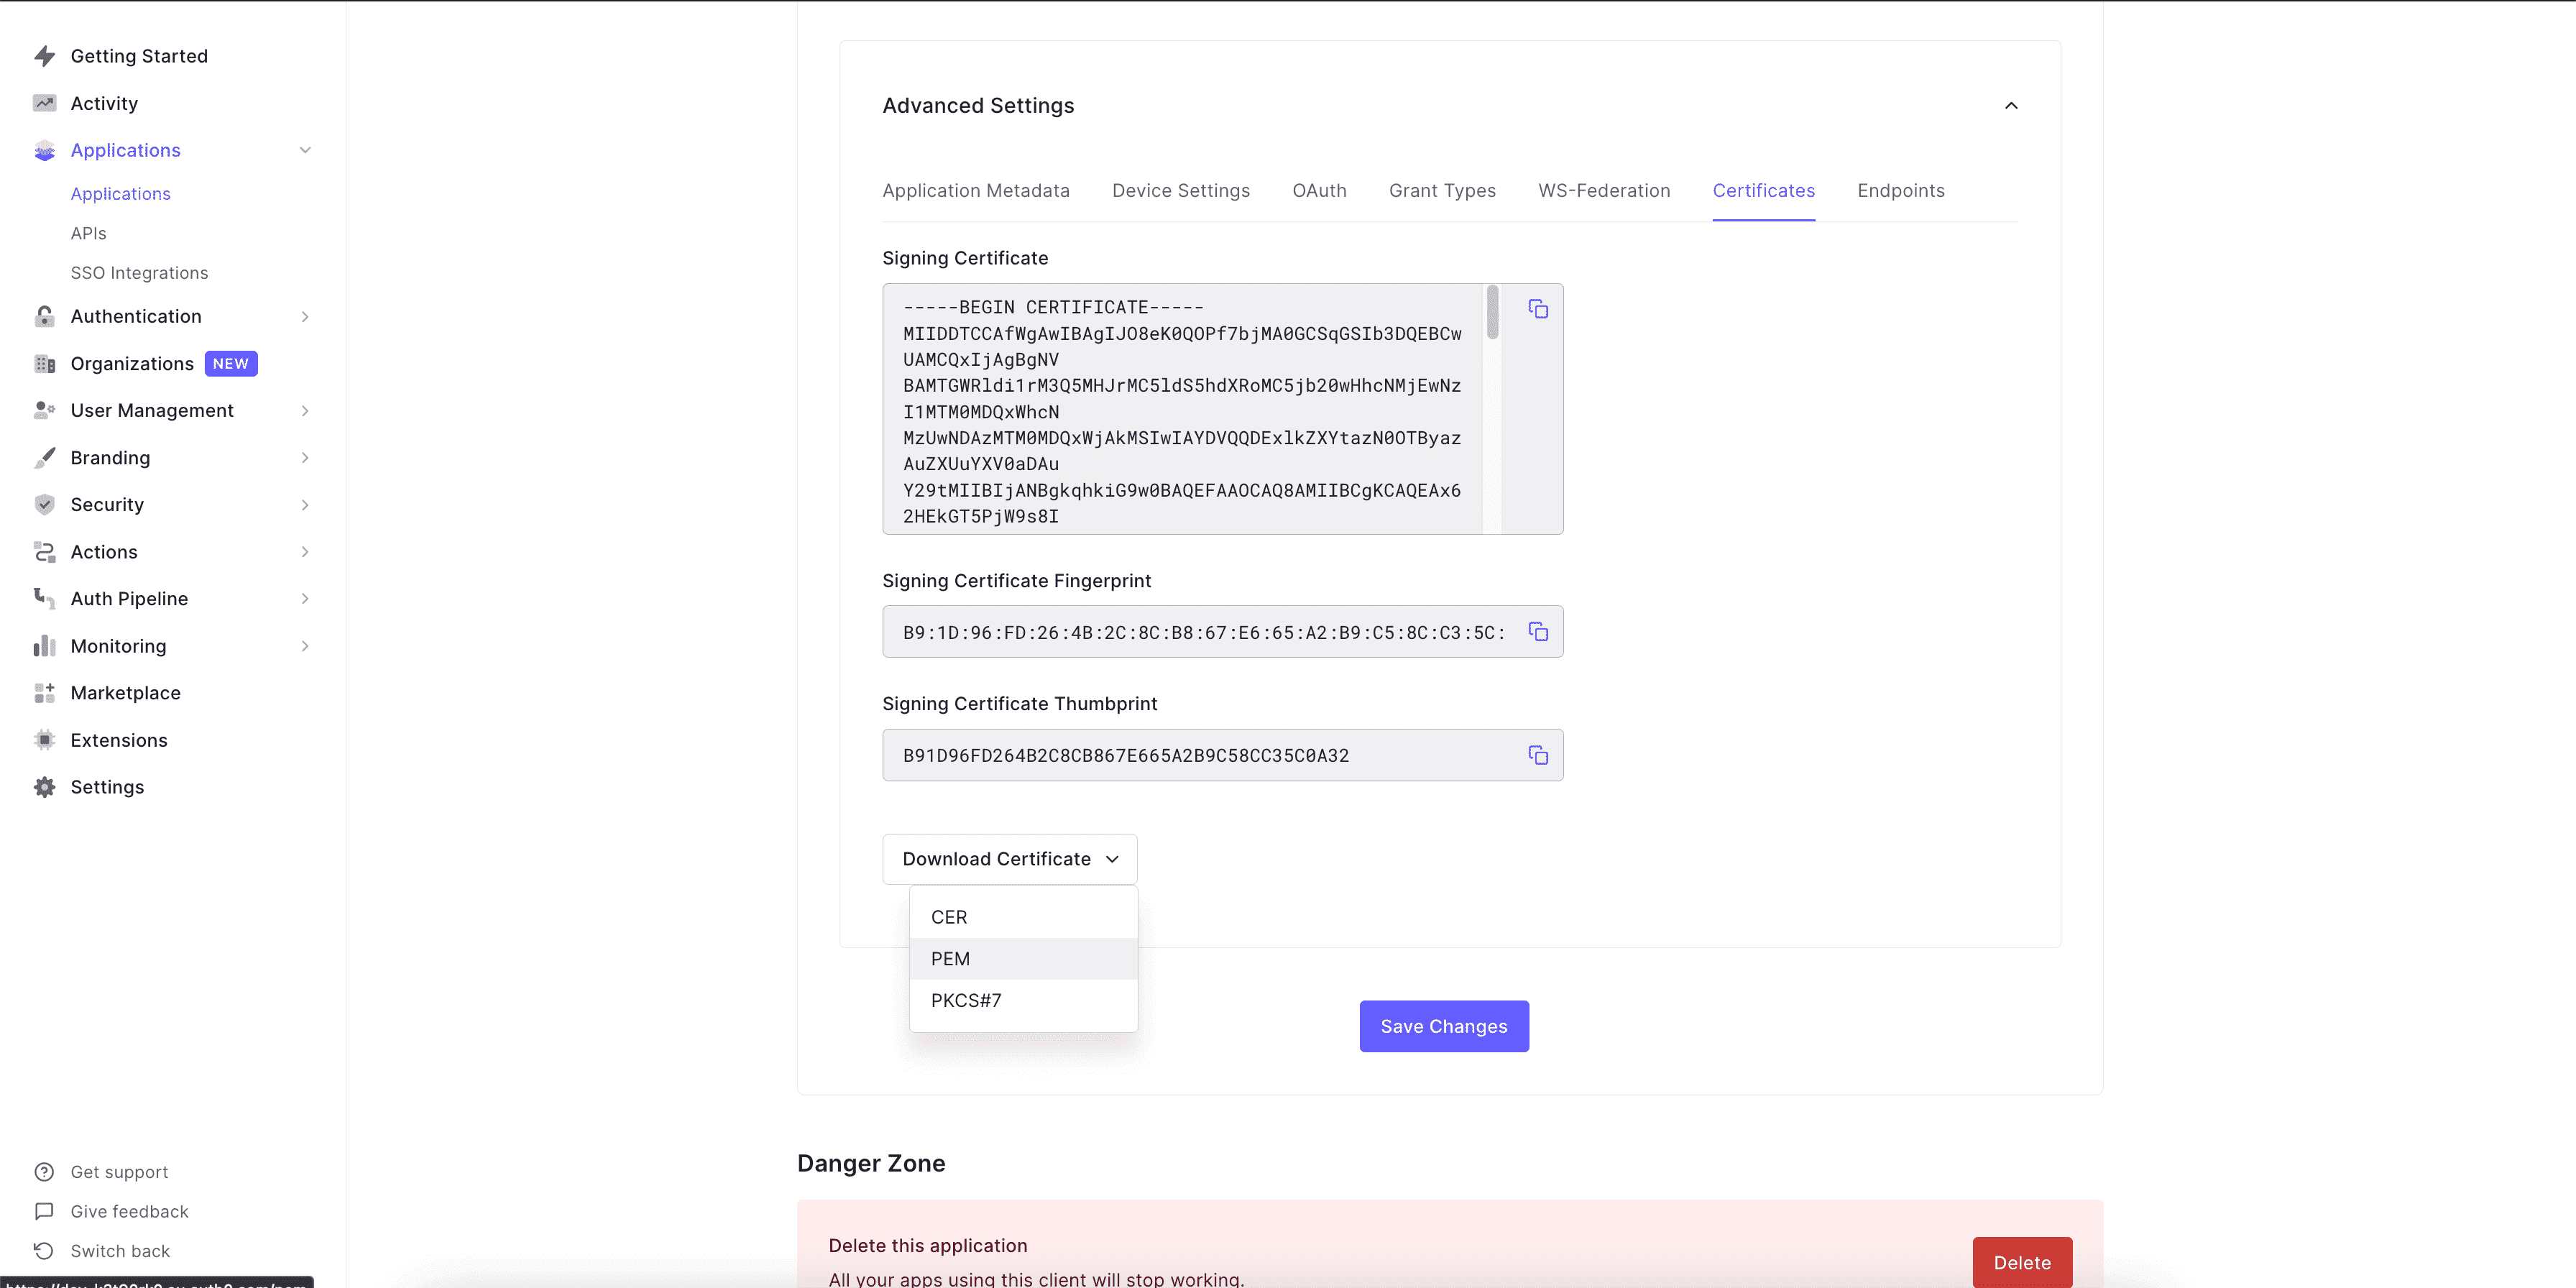
Now let's go to `Settings` of our Auth0 app and then go down to view the
`Advanced Settings` to check the JWT signature algorithm (OAuth tab) and then
get the certificate (Certificates tab). We will be using `RS256` in this example
so let's make sure it's set to that and then copy the certificate which we will
use to get the public key. Use the download certificate button there to get the
certificate in `PEM`.
Replace the content with the following -
```javascript
function (user, context, callback) {
const namespace = "https://dgraph.io/jwt/claims";
context.idToken[namespace] =
{
'USER': user.email,
};
return callback(null, user, context);
}
```
In the above function, we are only just adding the custom claim to the token
with a field as `USER` which if you recall from the last step is used in our
auth rules, so it needs to match exactly with that name.
Now let's go to `Settings` of our Auth0 app and then go down to view the
`Advanced Settings` to check the JWT signature algorithm (OAuth tab) and then
get the certificate (Certificates tab). We will be using `RS256` in this example
so let's make sure it's set to that and then copy the certificate which we will
use to get the public key. Use the download certificate button there to get the
certificate in `PEM`.
 Now let's run a command to get the public key from it, which we will add to our
schema. Just change the `file_name` and run the command.
```
openssl x509 -pubkey -noout -in file_name.pem
```
Copy the public key and now let's add it to our schema. For doing that we will
add something like this, to the bottom of our schema file -
```
# Dgraph.Authorization {"VerificationKey":"
Now let's run a command to get the public key from it, which we will add to our
schema. Just change the `file_name` and run the command.
```
openssl x509 -pubkey -noout -in file_name.pem
```
Copy the public key and now let's add it to our schema. For doing that we will
add something like this, to the bottom of our schema file -
```
# Dgraph.Authorization {"VerificationKey":"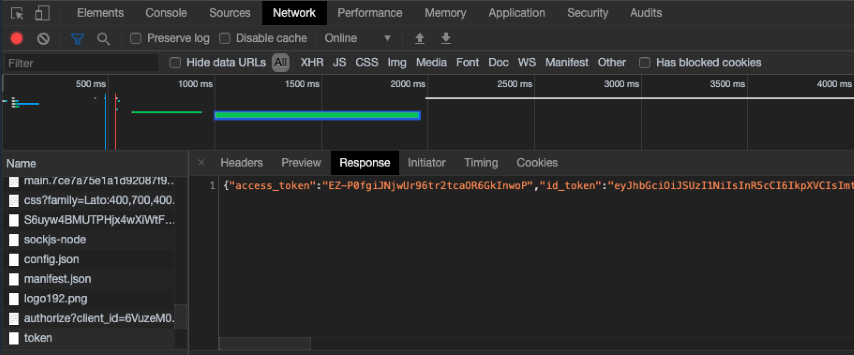 Now go to [jwt.io](https://jwt.io) and paste your token there.
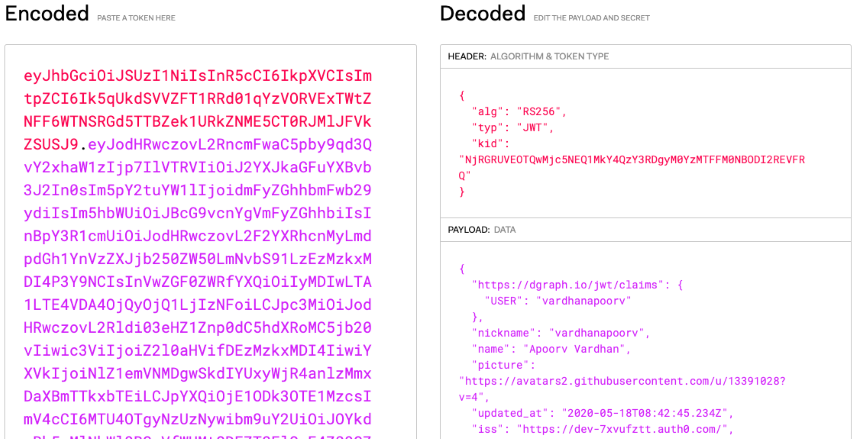 The token also includes our custom claim like below.
```json
{
"https://dgraph.io/jwt/claims": {
"USER": "vardhanapoorv"
},
...
}
```
Now, you can check if the auth rule that we added is working as expected or not.
Open the GraphQL tool (Insomnia, GraphQL Playground) add the URL along with the
header `X-Auth0-Token` and its value as the JWT. Let's try the query to see the
todos and only the todos the logged-in user created should be visible.
```graphql
query {
queryTask {
title
completed
user {
username
}
}
}
```
The above should give you only your todos and verifies that our auth rule
worked!
Now let's update our frontend app to include the `X-Auth0-Token` header with
value as JWT from Auth0 when sending a request.
To do this, we need to update the Apollo client setup to include the header
while sending the request, and we need to get the JWT from Auth0.
The value we want is in the field `idToken` from Auth0. We get that by quickly
updating `react-auth0-spa.js` to get `idToken` and pass it as a prop to our
`App`.
```javascript
...
const [popupOpen, setPopupOpen] = useState(false);
const [idToken, setIdToken] = useState("");
...
if (isAuthenticated) {
const user = await auth0FromHook.getUser();
setUser(user);
const idTokenClaims = await auth0FromHook.getIdTokenClaims();
setIdToken(idTokenClaims.__raw);
}
...
const user = await auth0Client.getUser();
const idTokenClaims = await auth0Client.getIdTokenClaims();
setIdToken(idTokenClaims.__raw);
...
{children}
The token also includes our custom claim like below.
```json
{
"https://dgraph.io/jwt/claims": {
"USER": "vardhanapoorv"
},
...
}
```
Now, you can check if the auth rule that we added is working as expected or not.
Open the GraphQL tool (Insomnia, GraphQL Playground) add the URL along with the
header `X-Auth0-Token` and its value as the JWT. Let's try the query to see the
todos and only the todos the logged-in user created should be visible.
```graphql
query {
queryTask {
title
completed
user {
username
}
}
}
```
The above should give you only your todos and verifies that our auth rule
worked!
Now let's update our frontend app to include the `X-Auth0-Token` header with
value as JWT from Auth0 when sending a request.
To do this, we need to update the Apollo client setup to include the header
while sending the request, and we need to get the JWT from Auth0.
The value we want is in the field `idToken` from Auth0. We get that by quickly
updating `react-auth0-spa.js` to get `idToken` and pass it as a prop to our
`App`.
```javascript
...
const [popupOpen, setPopupOpen] = useState(false);
const [idToken, setIdToken] = useState("");
...
if (isAuthenticated) {
const user = await auth0FromHook.getUser();
setUser(user);
const idTokenClaims = await auth0FromHook.getIdTokenClaims();
setIdToken(idTokenClaims.__raw);
}
...
const user = await auth0Client.getUser();
const idTokenClaims = await auth0Client.getIdTokenClaims();
setIdToken(idTokenClaims.__raw);
...
{children}
Loading...
;
}
const client = createApolloClient(idToken);
...
```
Check the updated file
[here](https://github.com/dgraph-io/graphql-sample-apps/blob/c94b6eb1cec051238b81482a049100b1cd15bbf7/todo-app-react/src/App.js).
Refer this step in
[GitHub](https://github.com/dgraph-io/graphql-sample-apps/commit/c94b6eb1cec051238b81482a049100b1cd15bbf7).
Let's now start the app.
```
npm start
```
Now you should have an app running with Auth0!
---
# Source: https://docs.hypermode.com/modus/authentication.md
# Authentication
> Protect your API
It is easy to secure your Modus app with authentication. Modus currently
supports bearer token authentication, with additional authentication methods
coming soon.
## Bearer tokens
Modus supports authentication via the `Authorization` header in HTTP requests.
You can use the `Authorization` header to pass a bearer JSON Web Token (JWT) to
your Modus app. The token authenticates the user and authorize access to
resources.
To use bearer token authentication for your Modus app, be sure to set the `auth`
property on your endpoint to `"bearer-token"` in your
[app manifest](/modus/app-manifest#endpoints).
### Setting verification keys
Once set, Modus verifies tokens passed in the `Authorization` header of incoming
requests against the public keys you provide. To enable this verification, you
must pass the public keys using the `MODUS_PEMS` or `MODUS_JWKS_ENDPOINTS`
environment variable.
The value of the `MODUS_PEMS` or `MODUS_JWKS_ENDPOINTS` environment variable
should be a JSON object with the public keys as key-value pairs. This is an
example of how to set the `MODUS_PEMS` and `MODUS_JWKS_ENDPOINTS` environment
variable:
62 tools
Details
46 tools
Details
3 tools
Details
1 tool
Details
16 tools
Details
8 tools
Details
1 tool
Details
3 tools
Details
16 tools
Details
8 tools
Details
62 tools
Details
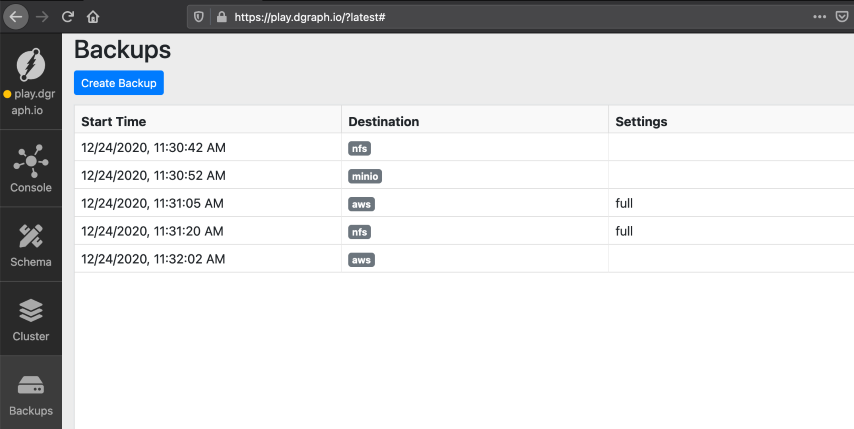 ### Creating a backup
Click `Create Backup`. On the dialog box, choose the destination details. After
the successful backup, it's listed on the main panel.
---
# Source: https://docs.hypermode.com/dgraph/concepts/badger.md
# Badger
### Creating a backup
Click `Create Backup`. On the dialog box, choose the destination details. After
the successful backup, it's listed on the main panel.
---
# Source: https://docs.hypermode.com/dgraph/concepts/badger.md
# Badger
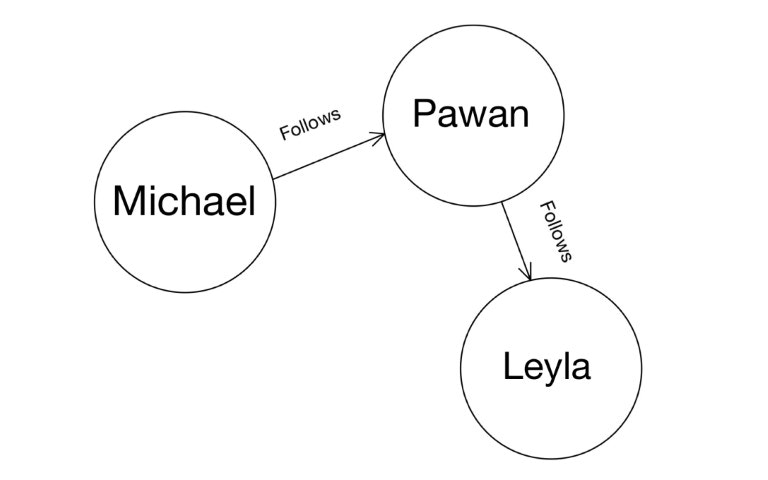 In this tutorial, we'll build the above Graph and learn more about operations
using the UID (Universal Identifier) of the nodes. Specifically, we'll learn
about:
* Querying and updating nodes, deleting predicates using their UIDs.
* Adding an edge between existing nodes.
* Adding a new predicate to an existing node.
* Traversing the Graph.
You can see the accompanying video below.
***
First, let's create our Graph.
Go to Ratel's mutate tab, paste the mutation below in the text area, and click
Run.
```json
{
"set": [
{
"name": "Michael",
"age": 40,
"follows": {
"name": "Pawan",
"age": 28,
"follows": {
"name": "Leyla",
"age": 31
}
}
}
]
}
```
In this tutorial, we'll build the above Graph and learn more about operations
using the UID (Universal Identifier) of the nodes. Specifically, we'll learn
about:
* Querying and updating nodes, deleting predicates using their UIDs.
* Adding an edge between existing nodes.
* Adding a new predicate to an existing node.
* Traversing the Graph.
You can see the accompanying video below.
***
First, let's create our Graph.
Go to Ratel's mutate tab, paste the mutation below in the text area, and click
Run.
```json
{
"set": [
{
"name": "Michael",
"age": 40,
"follows": {
"name": "Pawan",
"age": 28,
"follows": {
"name": "Leyla",
"age": 31
}
}
}
]
}
```
 ## Query using UIDs
The UID of the nodes can be used to query them back. The built-in function `uid`
takes a list of UIDs as an argument, so you can pass one (`uid(0x1)`) or as many
as you need (`uid(0x1, 0x2)`).
It returns the same UIDs that were passed as input, no matter whether they exist
in the database or not. But the predicates requested are returned only if both
the UIDs and their predicates exist.
Let's see the `uid` function in action.
First, let's copy the UID of the node created for `Michael`.
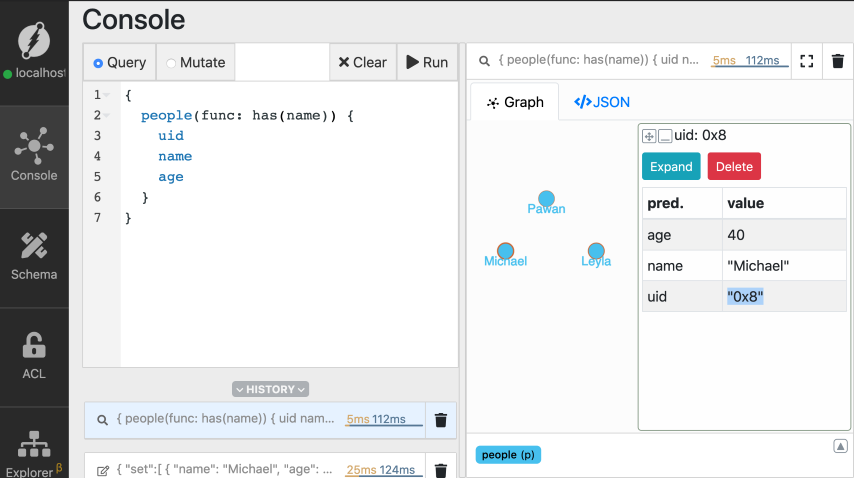
Go to the query tab, type in the query below, and click Run.
```graphql
{
people(func: has(name)) {
uid
name
age
}
}
```
Now, from the result, copy the UID of Michael's node.
## Query using UIDs
The UID of the nodes can be used to query them back. The built-in function `uid`
takes a list of UIDs as an argument, so you can pass one (`uid(0x1)`) or as many
as you need (`uid(0x1, 0x2)`).
It returns the same UIDs that were passed as input, no matter whether they exist
in the database or not. But the predicates requested are returned only if both
the UIDs and their predicates exist.
Let's see the `uid` function in action.
First, let's copy the UID of the node created for `Michael`.
Go to the query tab, type in the query below, and click Run.
```graphql
{
people(func: has(name)) {
uid
name
age
}
}
```
Now, from the result, copy the UID of Michael's node.
 In the query below, replace the placeholder `MICHAELS_UID` with the UID you just
copied, and run the query.
```graphql
{
find_using_uid(func: uid(MICHAELS_UID)){
uid
name
age
}
}
```
In the query below, replace the placeholder `MICHAELS_UID` with the UID you just
copied, and run the query.
```graphql
{
find_using_uid(func: uid(MICHAELS_UID)){
uid
name
age
}
}
```
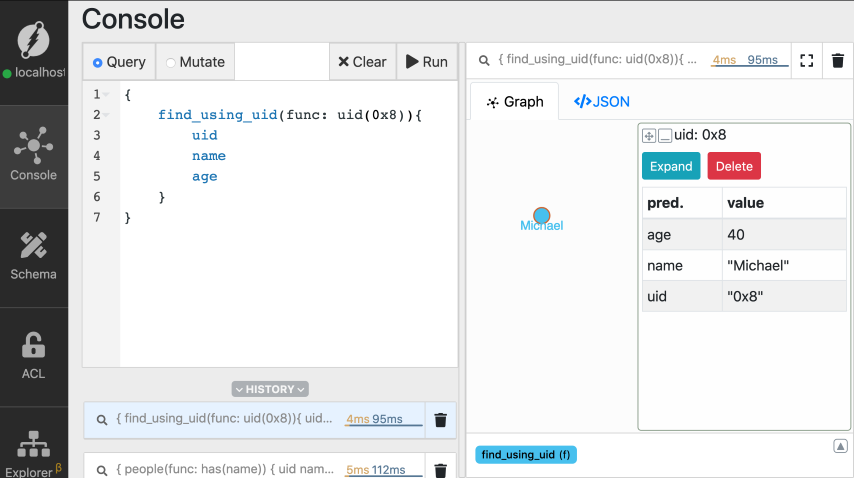 *Note: `MICHAELS_UID` appears as `0x8` in the images. The UID you get on your
machine might have a different value.*
You can see that the `uid` function returns the node matching the UID for
Michael's node.
Refer to the [previous tutorial](./introduction) if you have questions related
to the structure of the query in general.
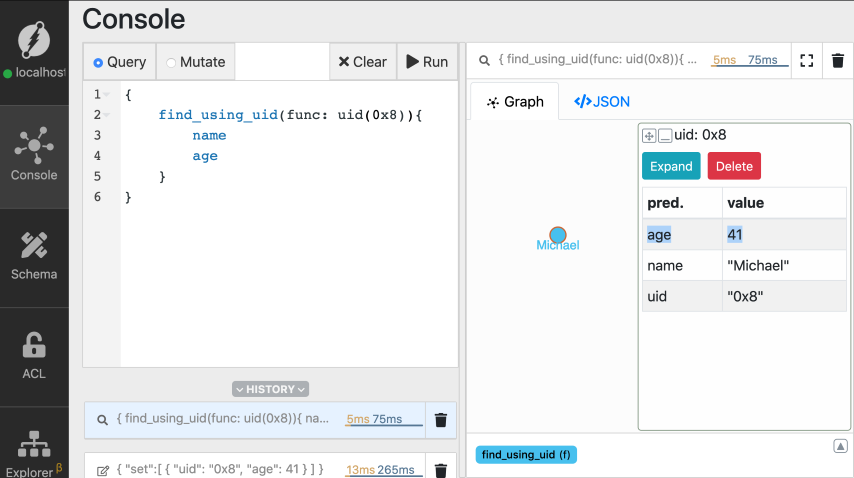
## Updating predicates
You can also update one or more predicates of a node using its UID.
Michael recently celebrated his birthday. Let's update his age to 41.
Go to the mutate tab and execute the mutation. Again, don't forget to replace
the placeholder `MICHAELS_UID` with the actual UID of the node for `Michael`.
```json
{
"set": [
{
"uid": "MICHAELS_UID",
"age": 41
}
]
}
```
We had earlier used `set` to create new nodes. But on using the UID of an
existing node, it updates its predicates, instead of creating a new node.
You can see that Michael's age is updated to 41.
```graphql
{
find_using_uid(func: uid(MICHAELS_UID)){
name
age
}
}
```
*Note: `MICHAELS_UID` appears as `0x8` in the images. The UID you get on your
machine might have a different value.*
You can see that the `uid` function returns the node matching the UID for
Michael's node.
Refer to the [previous tutorial](./introduction) if you have questions related
to the structure of the query in general.
## Updating predicates
You can also update one or more predicates of a node using its UID.
Michael recently celebrated his birthday. Let's update his age to 41.
Go to the mutate tab and execute the mutation. Again, don't forget to replace
the placeholder `MICHAELS_UID` with the actual UID of the node for `Michael`.
```json
{
"set": [
{
"uid": "MICHAELS_UID",
"age": 41
}
]
}
```
We had earlier used `set` to create new nodes. But on using the UID of an
existing node, it updates its predicates, instead of creating a new node.
You can see that Michael's age is updated to 41.
```graphql
{
find_using_uid(func: uid(MICHAELS_UID)){
name
age
}
}
```
 Similarly, you can also add new predicates to an existing node. Since the
predicate `country` doesn't exist for the node for `Michael`, it creates a new
one.
```json
{
"set": [
{
"uid": "MICHAELS_UID",
"country": "Australia"
}
]
}
```
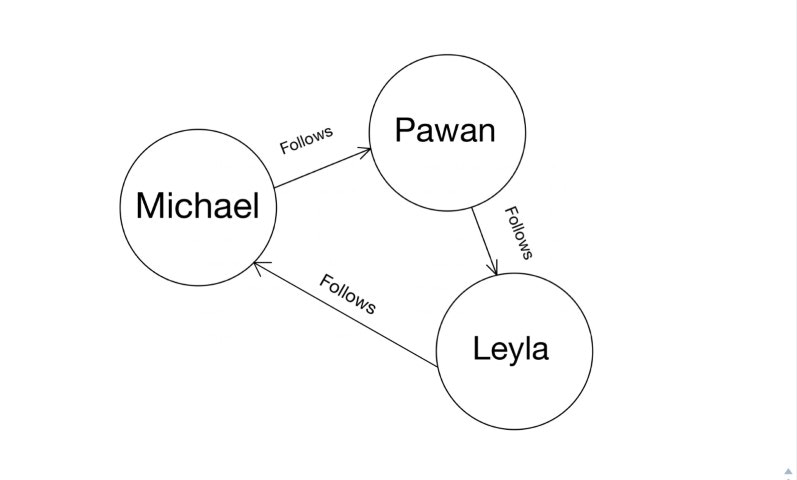
## Adding an edge between existing nodes
You can also add an edge between existing nodes using their UIDs.
Let's say, `Leyla` starts to follow `Michael`.
We know that this relationship between them has to represented by creating the
`follows` edge between them.
Similarly, you can also add new predicates to an existing node. Since the
predicate `country` doesn't exist for the node for `Michael`, it creates a new
one.
```json
{
"set": [
{
"uid": "MICHAELS_UID",
"country": "Australia"
}
]
}
```
## Adding an edge between existing nodes
You can also add an edge between existing nodes using their UIDs.
Let's say, `Leyla` starts to follow `Michael`.
We know that this relationship between them has to represented by creating the
`follows` edge between them.
 First, let's copy the UIDs of nodes for `Leyla` and `Michael` from Ratel.
Now, replace the placeholders `LEYLAS_UID` and `MICHAELS_UID` with the ones you
copied, and execute the mutation.
```json
{
"set": [
{
"uid": "LEYLAS_UID",
"follows": {
"uid": "MICHAELS_UID"
}
}
]
}
```
## Traversing the edges
Graph databases offer many distinct capabilities. `Traversals` are among them.
Traversals answer questions or queries related to the relationship between the
nodes. Hence, queries like, `who does Michael follow?` are answered by
traversing the `follows` relationship.
Let's run a traversal query and then understand it in detail.
```graphql
{
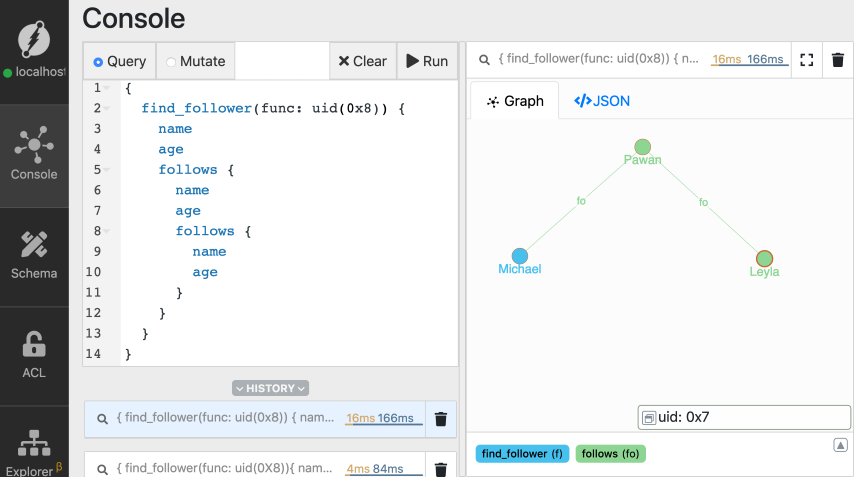
find_follower(func: uid(MICHAELS_UID)){
name
age
follows {
name
age
}
}
}
```
Here's the result.
First, let's copy the UIDs of nodes for `Leyla` and `Michael` from Ratel.
Now, replace the placeholders `LEYLAS_UID` and `MICHAELS_UID` with the ones you
copied, and execute the mutation.
```json
{
"set": [
{
"uid": "LEYLAS_UID",
"follows": {
"uid": "MICHAELS_UID"
}
}
]
}
```
## Traversing the edges
Graph databases offer many distinct capabilities. `Traversals` are among them.
Traversals answer questions or queries related to the relationship between the
nodes. Hence, queries like, `who does Michael follow?` are answered by
traversing the `follows` relationship.
Let's run a traversal query and then understand it in detail.
```graphql
{
find_follower(func: uid(MICHAELS_UID)){
name
age
follows {
name
age
}
}
}
```
Here's the result.
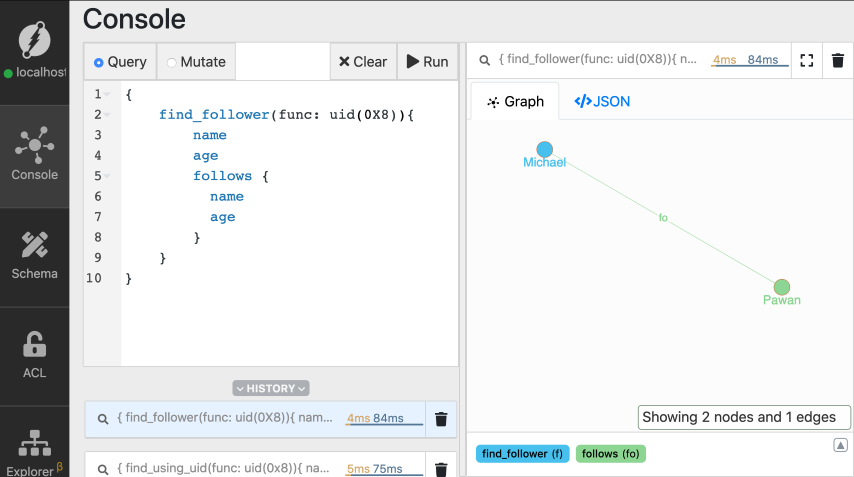 The query has three parts:
* **Selecting the root nodes.**
First, you need to select one or more nodes as the starting point for
traversals. These are called the root nodes. In the preceding query, we use the
`uid()` function to select the node created for `Michael` as the root node.
* **Choosing the edge to be traversed**
You need to specify the edge to be traversed, starting from the selected root
nodes. And then, the traversal, travels along these edges, from one end to the
nodes at the other end.
In our query, we chose to traverse the `follows` edge starting from the node for
`Michael`. The traversal returns all the nodes connected to the node for
`Michael` via the `follows` edge.
* **Specify the predicates to get back**
Since Michael follows only one person, the traversal returns just one node.
These are `level-2` nodes. The root nodes constitute the nodes for `level-1`.
Again, we need to specify which predicates you want to get back from `level-2`
nodes.
The query has three parts:
* **Selecting the root nodes.**
First, you need to select one or more nodes as the starting point for
traversals. These are called the root nodes. In the preceding query, we use the
`uid()` function to select the node created for `Michael` as the root node.
* **Choosing the edge to be traversed**
You need to specify the edge to be traversed, starting from the selected root
nodes. And then, the traversal, travels along these edges, from one end to the
nodes at the other end.
In our query, we chose to traverse the `follows` edge starting from the node for
`Michael`. The traversal returns all the nodes connected to the node for
`Michael` via the `follows` edge.
* **Specify the predicates to get back**
Since Michael follows only one person, the traversal returns just one node.
These are `level-2` nodes. The root nodes constitute the nodes for `level-1`.
Again, we need to specify which predicates you want to get back from `level-2`
nodes.
 You can extend the query to make use of `level-2` nodes and traverse the Graph
further and deeper. Let's explore that in the next section.
### Multi-level traversals
The first level of traversal returns people followed by Michael. The next level
of traversal further returns the people they in-turn follow.
This pattern can be repeated multiple times to achieve multi-level traversals.
The depth of the query increases by one as we traverse each level of the Graph.
That's when we say that the query is deep!
```graphql
{
find_follower(func: uid(MICHAELS_UID)) {
name
age
follows {
name
age
follows {
name
age
}
}
}
}
```
You can extend the query to make use of `level-2` nodes and traverse the Graph
further and deeper. Let's explore that in the next section.
### Multi-level traversals
The first level of traversal returns people followed by Michael. The next level
of traversal further returns the people they in-turn follow.
This pattern can be repeated multiple times to achieve multi-level traversals.
The depth of the query increases by one as we traverse each level of the Graph.
That's when we say that the query is deep!
```graphql
{
find_follower(func: uid(MICHAELS_UID)) {
name
age
follows {
name
age
follows {
name
age
}
}
}
}
```
 Here is one more example from the extension of the last query.
```graphql
{
find_follower(func: uid(MICHAELS_UID)) {
name
age
follows {
name
age
follows {
name
age
follows {
name
age
}
}
}
}
}
```
Here is one more example from the extension of the last query.
```graphql
{
find_follower(func: uid(MICHAELS_UID)) {
name
age
follows {
name
age
follows {
name
age
follows {
name
age
}
}
}
}
}
```
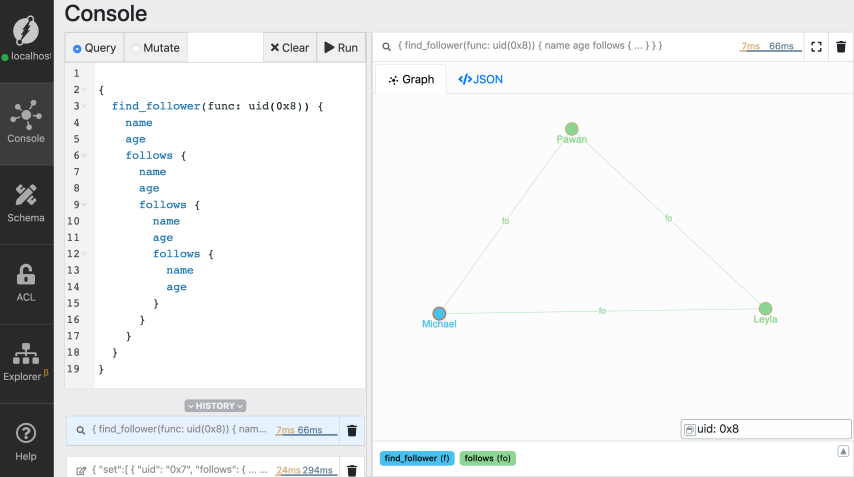 This query is really long! The query is four levels deep. In other words, the
depth of the query is four. If you ask, isn't there an in-built function that
makes multi-level deep queries or traversals easy?
The answer is Yes! That's what the `recurse()` function does. Let's explore that
in our next section.
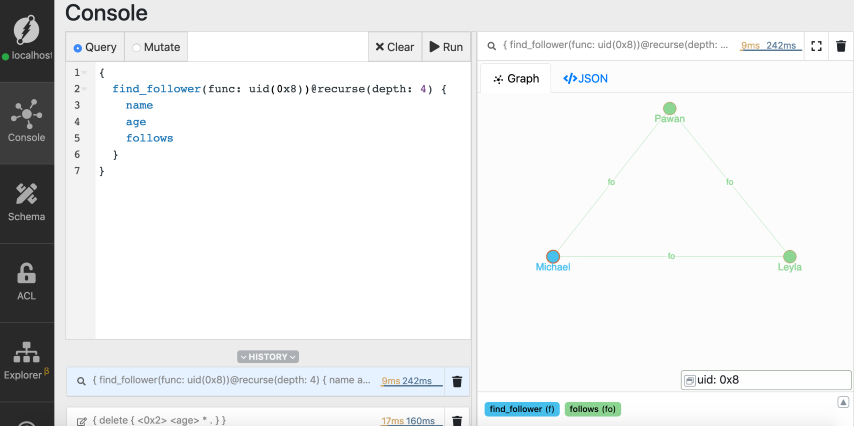
#### Recursive traversals
Recursive queries makes it easier to perform multi-level deep traversals. They
let you easily traverse a subset of the Graph.
With the following recursive query, we achieve the same result as our last
query. But, with a much better querying experience.
```graphql
{
find_follower(func: uid(MICHAELS_UID)) @recurse(depth: 4) {
name
age
follows
}
}
```
In the query, the `recurse` function traverses the graph starting from the node
for `Michael`. You can choose any other node to be the starting point. The depth
parameter specifies the maximum depth the traversal query should consider.
Let's run the recursive traversal query after replacing the placeholder with the
UID of node for Michael.
This query is really long! The query is four levels deep. In other words, the
depth of the query is four. If you ask, isn't there an in-built function that
makes multi-level deep queries or traversals easy?
The answer is Yes! That's what the `recurse()` function does. Let's explore that
in our next section.
#### Recursive traversals
Recursive queries makes it easier to perform multi-level deep traversals. They
let you easily traverse a subset of the Graph.
With the following recursive query, we achieve the same result as our last
query. But, with a much better querying experience.
```graphql
{
find_follower(func: uid(MICHAELS_UID)) @recurse(depth: 4) {
name
age
follows
}
}
```
In the query, the `recurse` function traverses the graph starting from the node
for `Michael`. You can choose any other node to be the starting point. The depth
parameter specifies the maximum depth the traversal query should consider.
Let's run the recursive traversal query after replacing the placeholder with the
UID of node for Michael.
 [Check out the docs](/dgraph/dql/recurse#recurse) for detailed instructions on
using the `recurse` directive.
#### Edges have directions
Edges in Dgraph have directions.
For instance, the `follows` edge emerging from the node for `Michael`, points at
the node for `Pawan`. They have a notion of direction.
Traversing along the direction of an edge is natural to Dgraph. We'll learn
about traversing edges in reverse direction in our next tutorial.
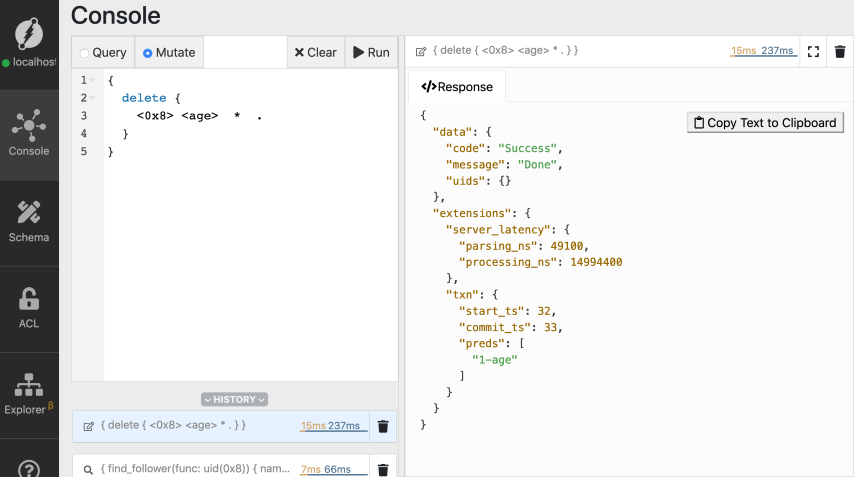
## Deleting a predicate
Predicates of a node can be deleted using the `delete` mutation. Here's the
syntax of the delete mutation to delete any predicate of a node,
```graphql
{
delete {
[Check out the docs](/dgraph/dql/recurse#recurse) for detailed instructions on
using the `recurse` directive.
#### Edges have directions
Edges in Dgraph have directions.
For instance, the `follows` edge emerging from the node for `Michael`, points at
the node for `Pawan`. They have a notion of direction.
Traversing along the direction of an edge is natural to Dgraph. We'll learn
about traversing edges in reverse direction in our next tutorial.
## Deleting a predicate
Predicates of a node can be deleted using the `delete` mutation. Here's the
syntax of the delete mutation to delete any predicate of a node,
```graphql
{
delete {
 ## Wrapping up
In this tutorial, we learned about the CRUD operations using UIDs. We also
learned about `recurse()` function.
Before we wrap, here's a sneak peek into our next tutorial.
Did you know that you could search predicates based on their value?
Sounds interesting?
Check out our next tutorial of the getting started series
[here](./types-and-operations).
## Need help
* Please use [discuss.hypermode.com](https://discuss.hypermode.com) for
questions, feature requests, bugs, and discussions.
---
# Source: https://docs.hypermode.com/dgraph/enterprise/binary-backups.md
# Binary Backups
## Wrapping up
In this tutorial, we learned about the CRUD operations using UIDs. We also
learned about `recurse()` function.
Before we wrap, here's a sneak peek into our next tutorial.
Did you know that you could search predicates based on their value?
Sounds interesting?
Check out our next tutorial of the getting started series
[here](./types-and-operations).
## Need help
* Please use [discuss.hypermode.com](https://discuss.hypermode.com) for
questions, feature requests, bugs, and discussions.
---
# Source: https://docs.hypermode.com/dgraph/enterprise/binary-backups.md
# Binary Backups
 ### Other Bulk Loader options
You can further configure Bulk Loader using the following options:
* `--schema`, `-s`: set the location of the schema file.
* `--graphql_schema`, `-g` (optional): set the location of the GraphQL schema
file.
* `--badger` superflag's `compression` option: Configure the compression of data
on disk. By default, the Snappy compression format is used, but you can also
use Zstandard compression. Or, you can choose no compression to minimize CPU
usage. To learn more, see
[Data Compression on Disk](/dgraph/self-managed/data-compression).
* `--new_uids`: (default: false): Assign new UIDs instead of using the existing
UIDs in data files. This is useful to avoid overriding the data in a DB
already in operation.
* `-f`, `--files`: Location of `*.rdf(.gz)` or `*.json(.gz)` files to load. It
can load multiple files in a given path. If the path is a directory, then all
files ending in `.rdf`, `.rdf.gz`, `.json`, and `.json.gz` are loaded.
* `--format` (optional): Specify file format (`rdf` or `json`) instead of
getting it from filenames. This is useful if you need to define a strict
format manually.
* `--store_xids`: Generate a xid edge for each node. It stores the XIDs (The
identifier / Blank-nodes) in an attribute named `xid` in the entity itself.
* `--xidmap` (default: `disabled`. Need a path): Store xid to uid mapping to a
directory. Dgraph saves all identifiers used in the load for later use in
other data import operations. The mapping is saved in the path you provide and
you must indicate that same path in the next load. It is recommended to use
this flag if you have full control over your identifiers (Blank-nodes).
Because the identifier is mapped to a specific UID.
* `--vault` superflag (and its options): specify the Vault server address, role
id, secret id, and field that contains the encryption key required to decrypt
the encrypted export.
## Load from S3
To bulk load from Amazon S3, you must have either [IAM](#iam-setup) or the
following AWS credentials set via environment variables:
| Environment Variable | Description |
| ------------------------------------------- | ------------------------------------------------------------------- |
| `AWS_ACCESS_KEY_ID` or `AWS_ACCESS_KEY` | AWS access key with permissions to write to the destination bucket. |
| `AWS_SECRET_ACCESS_KEY` or `AWS_SECRET_KEY` | AWS access key with permissions to write to the destination bucket. |
### IAM setup
In AWS, you can accomplish this by doing the following:
1. Create an
[IAM Role](https://docs.aws.amazon.com/IAM/latest/UserGuide/id_roles_create.html)
with an IAM Policy that grants access to the S3 bucket.
2. Depending on whether you want to grant access to an EC2 instance, or to a pod
running on [EKS](https://aws.amazon.com/eks/), you can do one of these
options:
* [Instance Profile](https://docs.aws.amazon.com/IAM/latest/UserGuide/id_roles_use_switch-role-ec2_instance-profiles.html)
can pass the IAM Role to an EC2 Instance
* [IAM Roles for Amazon EC2](https://docs.aws.amazon.com/AWSEC2/latest/UserGuide/iam-roles-for-amazon-ec2.html)
to attach the IAM Role to a running EC2 Instance
* [IAM roles for service accounts](https://docs.aws.amazon.com/eks/latest/userguide/iam-roles-for-service-accounts.html)
to associate the IAM Role to a
[Kubernetes Service Account](https://kubernetes.io/docs/tasks/configure-pod-container/configure-service-account/).
Once your setup is ready, you can execute the bulk load from S3:
```sh
dgraph bulk -f s3:///bucket-name/directory-with-rdf -s s3:///bucket-name/directory-with-rdf/schema.txt
```
## Load from MinIO
To bulk load from MinIO, you must have the following MinIO credentials set via
environment variables:
| Environment Variable | Description |
| -------------------- | --------------------------------------------------------------------- |
| `MINIO_ACCESS_KEY` | MinIO access key with permissions to write to the destination bucket. |
| `MINIO_SECRET_KEY` | MinIO secret key with permissions to write to the destination bucket. |
Once your setup is ready, you can execute the bulk load from MinIO:
```sh
dgraph bulk -f minio://minio-server:port/bucket-name/directory-with-rdf -s minio://minio-server:port/bucket-name/directory-with-rdf/schema.txt
```
## How to properly bulk load
Starting from Dgraph v20.03.7, depending on your dataset size, you can follow
one of the following ways to use Bulk Loader and initialize your new cluster.
*The following procedure is particularly relevant for Clusters that have
`--replicas` flag greater than 1*
### For small datasets
In case your dataset is small (a few gigabytes) it would be convenient to start
by initializing just one Alpha node and then let the snapshot be streamed among
the other Alpha replicas. You can follow these steps:
1. Run Bulk Loader only on one Alpha server
2. Once the generated `out\0\p` directory has been created by the Bulk Loader,
copy the `p` directory (default path is `out/0/p`) to the Alpha volume.
3. Start **only** the first Alpha replica
4. Generate some mutations. Without mutation the Alpha will not create a
snapshot. You can run `dgraph increment -n 10000` to generate some mutations
on an internal counter not affecting your data.
5. Wait for 1 minute to ensure that a snapshot has been taken by the first Alpha
node replica. You can confirm that a snapshot has been taken by looking for
the following message":
```txt
I1227 13:12:24.202196 14691 draft.go:571] Creating snapshot at index: 30. ReadTs: 4.
```
6. After confirming that the snapshot has been taken, you can start the other
Alpha node replicas (number of Alpha nodes must be equal to the `--replicas`
flag value set in the Zero nodes). Now the Alpha node (the one started in
step 2) logs similar messages:
```txt
I1227 13:18:16.154674 16779 snapshot.go:246] Streaming done. Sent 1093470 entries. Waiting for ACK...
I1227 13:18:17.126494 16779 snapshot.go:251] Received ACK with done: true
I1227 13:18:17.126514 16779 snapshot.go:292] Stream snapshot: OK
```
These messages indicate that all replica nodes are now using the same
snapshot. Thus, all your data is correctly in sync across the cluster. Also,
the other Alpha nodes print (in their logs) something similar to:
```txt
I1227 13:18:17.126621 1720 draft.go:567] Skipping snapshot at 28, because found one at 28
```
### For bigger datasets
When your dataset is pretty big (larger than 10 GB) it is faster that you just
copy the generated `p` directory (by the Bulk Loader) among all the Alphas
nodes. You can follow these steps:
1. Run Bulk Loader only on one Alpha server
2. Copy (or use `rsync`) the generated `out\0\p` directory to all Alpha nodes
(the servers you are using to start the Alpha nodes)
3. Now, start all Alpha nodes at the same time
If the process went well **all** Alpha nodes take a snapshot after 1 minute. You
should see something similar to this in the Alpha logs:
```txt
I1227 13:27:53.959671 29781 draft.go:571] Creating snapshot at index: 34. ReadTs: 6.
```
Note that `snapshot at index` value must be the same within the same Alpha group
and `ReadTs` must be the same value within and among all the Alpha groups.
## Enterprise features
### Multi-tenancy
By default, Bulk Loader preserves the namespace in the data and schema files. If
there's no namespace information available, it loads the data into the default
namespace.
Using the `--force-namespace` flag, you can load all the data into a specific
namespace. In that case, the namespace information from the data and schema
files are ignored.
For example, to force the bulk data loading into namespace `123`:
```sh
dgraph bulk -s /tmp/data/1million.schema -f /tmp/data/1million.rdf.gz --force-namespace 123
```
### Encryption at rest
Even before the Dgraph cluster starts, we can load data using Bulk Loader with
the encryption feature turned on. Later we can point the generated `p` directory
to a new Alpha server.
Here's an example to run Bulk Loader with a key used to write encrypted data:
```sh
dgraph bulk --encryption key-file=./enc_key_file -f data.json.gz -s data.schema --map_shards=1 --reduce_shards=1 --http localhost:8000 --zero=localhost:5080
```
Alternatively, starting with v20.07.0, the `vault_*` options can be used to
decrypt the encrypted export.
### Encrypting imports
The Bulk Loader’s `--encryption key-file=value` option was previously used to
encrypt the output `p` directory. This same option is also used to decrypt the
encrypted export data and schema files.
Another option, `--encrypted`, indicates whether the input `rdf`/`json` data and
schema files are encrypted or not. With this switch, we support the use case of
migrating data from unencrypted exports to encrypted import.
So, with the preceding two options there are four cases:
1. `--encrypted=true` and no `encryption key-file=value`.
Error: if the input is encrypted, a key file must be provided.
2. `--encrypted=true` and `encryption key-file=path-to-key`.
Input is encrypted and output `p` dir is encrypted as well.
3. `--encrypted=false` and no `encryption key-file=value`.
Input isn't encrypted and the output `p` dir is also not encrypted.
4. `--encrypted=false` and `encryption key-file=path-to-key`.
Input isn't encrypted but the output is encrypted. (This is the migration use
case mentioned previously).
Alternatively, starting with v20.07.0, the `vault_*` options can be used instead
of the `--encryption key-file=value` option to achieve the same effect except
that the keys are sitting in a Vault server.
You can also use Bulk Loader, to turn off encryption. This generates a new
unencrypted `p` that's used by the Alpha process. In this, case you need to pass
`--encryption key-file`, `--encrypted` and `--encrypted_out` flags.
```sh
# Encryption Key from the file path
dgraph bulk --files "
### Other Bulk Loader options
You can further configure Bulk Loader using the following options:
* `--schema`, `-s`: set the location of the schema file.
* `--graphql_schema`, `-g` (optional): set the location of the GraphQL schema
file.
* `--badger` superflag's `compression` option: Configure the compression of data
on disk. By default, the Snappy compression format is used, but you can also
use Zstandard compression. Or, you can choose no compression to minimize CPU
usage. To learn more, see
[Data Compression on Disk](/dgraph/self-managed/data-compression).
* `--new_uids`: (default: false): Assign new UIDs instead of using the existing
UIDs in data files. This is useful to avoid overriding the data in a DB
already in operation.
* `-f`, `--files`: Location of `*.rdf(.gz)` or `*.json(.gz)` files to load. It
can load multiple files in a given path. If the path is a directory, then all
files ending in `.rdf`, `.rdf.gz`, `.json`, and `.json.gz` are loaded.
* `--format` (optional): Specify file format (`rdf` or `json`) instead of
getting it from filenames. This is useful if you need to define a strict
format manually.
* `--store_xids`: Generate a xid edge for each node. It stores the XIDs (The
identifier / Blank-nodes) in an attribute named `xid` in the entity itself.
* `--xidmap` (default: `disabled`. Need a path): Store xid to uid mapping to a
directory. Dgraph saves all identifiers used in the load for later use in
other data import operations. The mapping is saved in the path you provide and
you must indicate that same path in the next load. It is recommended to use
this flag if you have full control over your identifiers (Blank-nodes).
Because the identifier is mapped to a specific UID.
* `--vault` superflag (and its options): specify the Vault server address, role
id, secret id, and field that contains the encryption key required to decrypt
the encrypted export.
## Load from S3
To bulk load from Amazon S3, you must have either [IAM](#iam-setup) or the
following AWS credentials set via environment variables:
| Environment Variable | Description |
| ------------------------------------------- | ------------------------------------------------------------------- |
| `AWS_ACCESS_KEY_ID` or `AWS_ACCESS_KEY` | AWS access key with permissions to write to the destination bucket. |
| `AWS_SECRET_ACCESS_KEY` or `AWS_SECRET_KEY` | AWS access key with permissions to write to the destination bucket. |
### IAM setup
In AWS, you can accomplish this by doing the following:
1. Create an
[IAM Role](https://docs.aws.amazon.com/IAM/latest/UserGuide/id_roles_create.html)
with an IAM Policy that grants access to the S3 bucket.
2. Depending on whether you want to grant access to an EC2 instance, or to a pod
running on [EKS](https://aws.amazon.com/eks/), you can do one of these
options:
* [Instance Profile](https://docs.aws.amazon.com/IAM/latest/UserGuide/id_roles_use_switch-role-ec2_instance-profiles.html)
can pass the IAM Role to an EC2 Instance
* [IAM Roles for Amazon EC2](https://docs.aws.amazon.com/AWSEC2/latest/UserGuide/iam-roles-for-amazon-ec2.html)
to attach the IAM Role to a running EC2 Instance
* [IAM roles for service accounts](https://docs.aws.amazon.com/eks/latest/userguide/iam-roles-for-service-accounts.html)
to associate the IAM Role to a
[Kubernetes Service Account](https://kubernetes.io/docs/tasks/configure-pod-container/configure-service-account/).
Once your setup is ready, you can execute the bulk load from S3:
```sh
dgraph bulk -f s3:///bucket-name/directory-with-rdf -s s3:///bucket-name/directory-with-rdf/schema.txt
```
## Load from MinIO
To bulk load from MinIO, you must have the following MinIO credentials set via
environment variables:
| Environment Variable | Description |
| -------------------- | --------------------------------------------------------------------- |
| `MINIO_ACCESS_KEY` | MinIO access key with permissions to write to the destination bucket. |
| `MINIO_SECRET_KEY` | MinIO secret key with permissions to write to the destination bucket. |
Once your setup is ready, you can execute the bulk load from MinIO:
```sh
dgraph bulk -f minio://minio-server:port/bucket-name/directory-with-rdf -s minio://minio-server:port/bucket-name/directory-with-rdf/schema.txt
```
## How to properly bulk load
Starting from Dgraph v20.03.7, depending on your dataset size, you can follow
one of the following ways to use Bulk Loader and initialize your new cluster.
*The following procedure is particularly relevant for Clusters that have
`--replicas` flag greater than 1*
### For small datasets
In case your dataset is small (a few gigabytes) it would be convenient to start
by initializing just one Alpha node and then let the snapshot be streamed among
the other Alpha replicas. You can follow these steps:
1. Run Bulk Loader only on one Alpha server
2. Once the generated `out\0\p` directory has been created by the Bulk Loader,
copy the `p` directory (default path is `out/0/p`) to the Alpha volume.
3. Start **only** the first Alpha replica
4. Generate some mutations. Without mutation the Alpha will not create a
snapshot. You can run `dgraph increment -n 10000` to generate some mutations
on an internal counter not affecting your data.
5. Wait for 1 minute to ensure that a snapshot has been taken by the first Alpha
node replica. You can confirm that a snapshot has been taken by looking for
the following message":
```txt
I1227 13:12:24.202196 14691 draft.go:571] Creating snapshot at index: 30. ReadTs: 4.
```
6. After confirming that the snapshot has been taken, you can start the other
Alpha node replicas (number of Alpha nodes must be equal to the `--replicas`
flag value set in the Zero nodes). Now the Alpha node (the one started in
step 2) logs similar messages:
```txt
I1227 13:18:16.154674 16779 snapshot.go:246] Streaming done. Sent 1093470 entries. Waiting for ACK...
I1227 13:18:17.126494 16779 snapshot.go:251] Received ACK with done: true
I1227 13:18:17.126514 16779 snapshot.go:292] Stream snapshot: OK
```
These messages indicate that all replica nodes are now using the same
snapshot. Thus, all your data is correctly in sync across the cluster. Also,
the other Alpha nodes print (in their logs) something similar to:
```txt
I1227 13:18:17.126621 1720 draft.go:567] Skipping snapshot at 28, because found one at 28
```
### For bigger datasets
When your dataset is pretty big (larger than 10 GB) it is faster that you just
copy the generated `p` directory (by the Bulk Loader) among all the Alphas
nodes. You can follow these steps:
1. Run Bulk Loader only on one Alpha server
2. Copy (or use `rsync`) the generated `out\0\p` directory to all Alpha nodes
(the servers you are using to start the Alpha nodes)
3. Now, start all Alpha nodes at the same time
If the process went well **all** Alpha nodes take a snapshot after 1 minute. You
should see something similar to this in the Alpha logs:
```txt
I1227 13:27:53.959671 29781 draft.go:571] Creating snapshot at index: 34. ReadTs: 6.
```
Note that `snapshot at index` value must be the same within the same Alpha group
and `ReadTs` must be the same value within and among all the Alpha groups.
## Enterprise features
### Multi-tenancy
By default, Bulk Loader preserves the namespace in the data and schema files. If
there's no namespace information available, it loads the data into the default
namespace.
Using the `--force-namespace` flag, you can load all the data into a specific
namespace. In that case, the namespace information from the data and schema
files are ignored.
For example, to force the bulk data loading into namespace `123`:
```sh
dgraph bulk -s /tmp/data/1million.schema -f /tmp/data/1million.rdf.gz --force-namespace 123
```
### Encryption at rest
Even before the Dgraph cluster starts, we can load data using Bulk Loader with
the encryption feature turned on. Later we can point the generated `p` directory
to a new Alpha server.
Here's an example to run Bulk Loader with a key used to write encrypted data:
```sh
dgraph bulk --encryption key-file=./enc_key_file -f data.json.gz -s data.schema --map_shards=1 --reduce_shards=1 --http localhost:8000 --zero=localhost:5080
```
Alternatively, starting with v20.07.0, the `vault_*` options can be used to
decrypt the encrypted export.
### Encrypting imports
The Bulk Loader’s `--encryption key-file=value` option was previously used to
encrypt the output `p` directory. This same option is also used to decrypt the
encrypted export data and schema files.
Another option, `--encrypted`, indicates whether the input `rdf`/`json` data and
schema files are encrypted or not. With this switch, we support the use case of
migrating data from unencrypted exports to encrypted import.
So, with the preceding two options there are four cases:
1. `--encrypted=true` and no `encryption key-file=value`.
Error: if the input is encrypted, a key file must be provided.
2. `--encrypted=true` and `encryption key-file=path-to-key`.
Input is encrypted and output `p` dir is encrypted as well.
3. `--encrypted=false` and no `encryption key-file=value`.
Input isn't encrypted and the output `p` dir is also not encrypted.
4. `--encrypted=false` and `encryption key-file=path-to-key`.
Input isn't encrypted but the output is encrypted. (This is the migration use
case mentioned previously).
Alternatively, starting with v20.07.0, the `vault_*` options can be used instead
of the `--encryption key-file=value` option to achieve the same effect except
that the keys are sitting in a Vault server.
You can also use Bulk Loader, to turn off encryption. This generates a new
unencrypted `p` that's used by the Alpha process. In this, case you need to pass
`--encryption key-file`, `--encrypted` and `--encrypted_out` flags.
```sh
# Encryption Key from the file path
dgraph bulk --files " First, set up your Google Cloud project and enable necessary APIs:
```bash
# Set your project ID
export PROJECT_ID="your-project-id"
gcloud config set project $PROJECT_ID
# Enable required APIs
gcloud services enable run.googleapis.com
gcloud services enable containerregistry.googleapis.com
gcloud services enable cloudbuild.googleapis.com
gcloud services enable file.googleapis.com
gcloud services enable vpcaccess.googleapis.com
```
Create a Filestore instance for persistent data:
```bash
gcloud filestore instances create dgraph-data \
--zone=us-central1-a \
--tier=BASIC_HDD \
--file-share=name=dgraph,capacity=1GB \
--network=name=default
```
Create VPC connector for private network access (this is required for the Filestore volume)
```bash
# Create VPC connector for private network access
gcloud compute networks vpc-access connectors create dgraph-connector \
--network default \
--region us-central1 \
--range 10.8.0.0/28 \
--min-instances 2 \
--max-instances 3
```
## Step 2: Create Dgraph Configuration
Create a directory for your Dgraph deployment:
```bash
mkdir dgraph-cloudrun
cd dgraph-cloudrun
```
Create a `Dockerfile`:
```dockerfile
FROM dgraph/standalone:latest
# Create directories for data and config
RUN mkdir -p /dgraph/data /dgraph/config
# Copy configuration files
COPY dgraph-config.yml /dgraph/config
# Set working directory
WORKDIR /dgraph
# Expose the Dgraph ports
EXPOSE 8080 9080 8000
# Start Dgraph in standalone mode
ADD start.sh /
RUN chmod +x /start.sh
CMD ["/start.sh"]
```
Create `dgraph-config.yml`:
```yaml
# Dgraph configuration for standalone deployment
datadir: /dgraph/data
bindall: true
# HTTP & GRPC ports
port_offset: 0
grpc_port: 9080
http_port: 8080
# Alpha configuration
alpha:
lru_mb: 1024
# Security settings (adjust as needed)
whitelist: 0.0.0.0/0
# Logging
logtostderr: true
v: 2
# Performance tuning for cloud deployment
badger:
compression: snappy
numgoroutines: 8
```
Create `start.sh`:
```bash
#!/bin/bash
# Start Dgraph Zero
dgraph zero --tls use-system-ca=true --config /dgraph/config/dgraph-config.yml &
# Start Dgraph Alpha
dgraph alpha --tls use-system-ca=true --config /dgraph/config/dgraph-config.yml &
# Wait for all processes to finish
wait
```
## Step 3: Build and Push Container Image
Build your Docker image and push it to Google Container Registry.
You'll first need to authorize `docker` to use the `gcloud` credentials:
```bash
gcloud auth configure-docker
```
First, set up your Google Cloud project and enable necessary APIs:
```bash
# Set your project ID
export PROJECT_ID="your-project-id"
gcloud config set project $PROJECT_ID
# Enable required APIs
gcloud services enable run.googleapis.com
gcloud services enable containerregistry.googleapis.com
gcloud services enable cloudbuild.googleapis.com
gcloud services enable file.googleapis.com
gcloud services enable vpcaccess.googleapis.com
```
Create a Filestore instance for persistent data:
```bash
gcloud filestore instances create dgraph-data \
--zone=us-central1-a \
--tier=BASIC_HDD \
--file-share=name=dgraph,capacity=1GB \
--network=name=default
```
Create VPC connector for private network access (this is required for the Filestore volume)
```bash
# Create VPC connector for private network access
gcloud compute networks vpc-access connectors create dgraph-connector \
--network default \
--region us-central1 \
--range 10.8.0.0/28 \
--min-instances 2 \
--max-instances 3
```
## Step 2: Create Dgraph Configuration
Create a directory for your Dgraph deployment:
```bash
mkdir dgraph-cloudrun
cd dgraph-cloudrun
```
Create a `Dockerfile`:
```dockerfile
FROM dgraph/standalone:latest
# Create directories for data and config
RUN mkdir -p /dgraph/data /dgraph/config
# Copy configuration files
COPY dgraph-config.yml /dgraph/config
# Set working directory
WORKDIR /dgraph
# Expose the Dgraph ports
EXPOSE 8080 9080 8000
# Start Dgraph in standalone mode
ADD start.sh /
RUN chmod +x /start.sh
CMD ["/start.sh"]
```
Create `dgraph-config.yml`:
```yaml
# Dgraph configuration for standalone deployment
datadir: /dgraph/data
bindall: true
# HTTP & GRPC ports
port_offset: 0
grpc_port: 9080
http_port: 8080
# Alpha configuration
alpha:
lru_mb: 1024
# Security settings (adjust as needed)
whitelist: 0.0.0.0/0
# Logging
logtostderr: true
v: 2
# Performance tuning for cloud deployment
badger:
compression: snappy
numgoroutines: 8
```
Create `start.sh`:
```bash
#!/bin/bash
# Start Dgraph Zero
dgraph zero --tls use-system-ca=true --config /dgraph/config/dgraph-config.yml &
# Start Dgraph Alpha
dgraph alpha --tls use-system-ca=true --config /dgraph/config/dgraph-config.yml &
# Wait for all processes to finish
wait
```
## Step 3: Build and Push Container Image
Build your Docker image and push it to Google Container Registry.
You'll first need to authorize `docker` to use the `gcloud` credentials:
```bash
gcloud auth configure-docker
```
 Push the container to Google Container Registry
```bash
# Push to Google Container Registry
docker push gcr.io/$PROJECT_ID/dgraph-cr
```
## Step 4: Deploy to Cloud Run
Deploy Dgraph Alpha to Cloud Run:
```bash
gcloud run deploy dgraph-cr \
--image gcr.io/$PROJECT_ID/dgraph-cr \
--platform managed \
--region us-central1 \
--allow-unauthenticated \
--memory 4Gi \
--cpu 2 \
--vpc-connector dgraph-connector \
--add-volume name=dgraph-storage,type=nfs,location=$FILESTORE_IP:/dgraph \
--add-volume-mount volume=dgraph-storage,mount-path=/dgraph/data
```
Push the container to Google Container Registry
```bash
# Push to Google Container Registry
docker push gcr.io/$PROJECT_ID/dgraph-cr
```
## Step 4: Deploy to Cloud Run
Deploy Dgraph Alpha to Cloud Run:
```bash
gcloud run deploy dgraph-cr \
--image gcr.io/$PROJECT_ID/dgraph-cr \
--platform managed \
--region us-central1 \
--allow-unauthenticated \
--memory 4Gi \
--cpu 2 \
--vpc-connector dgraph-connector \
--add-volume name=dgraph-storage,type=nfs,location=$FILESTORE_IP:/dgraph \
--add-volume-mount volume=dgraph-storage,mount-path=/dgraph/data
```
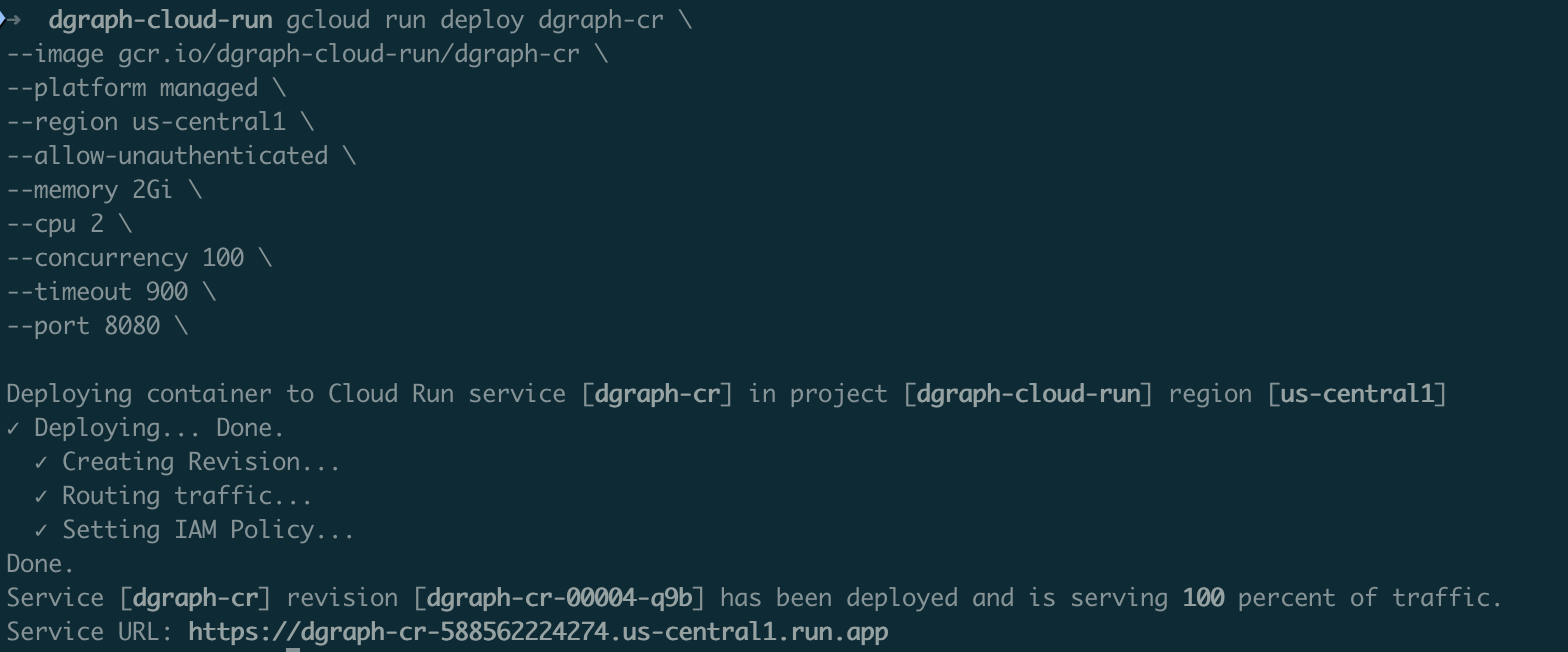 Our Dgraph instance is now available at `https://dgraph-cr-
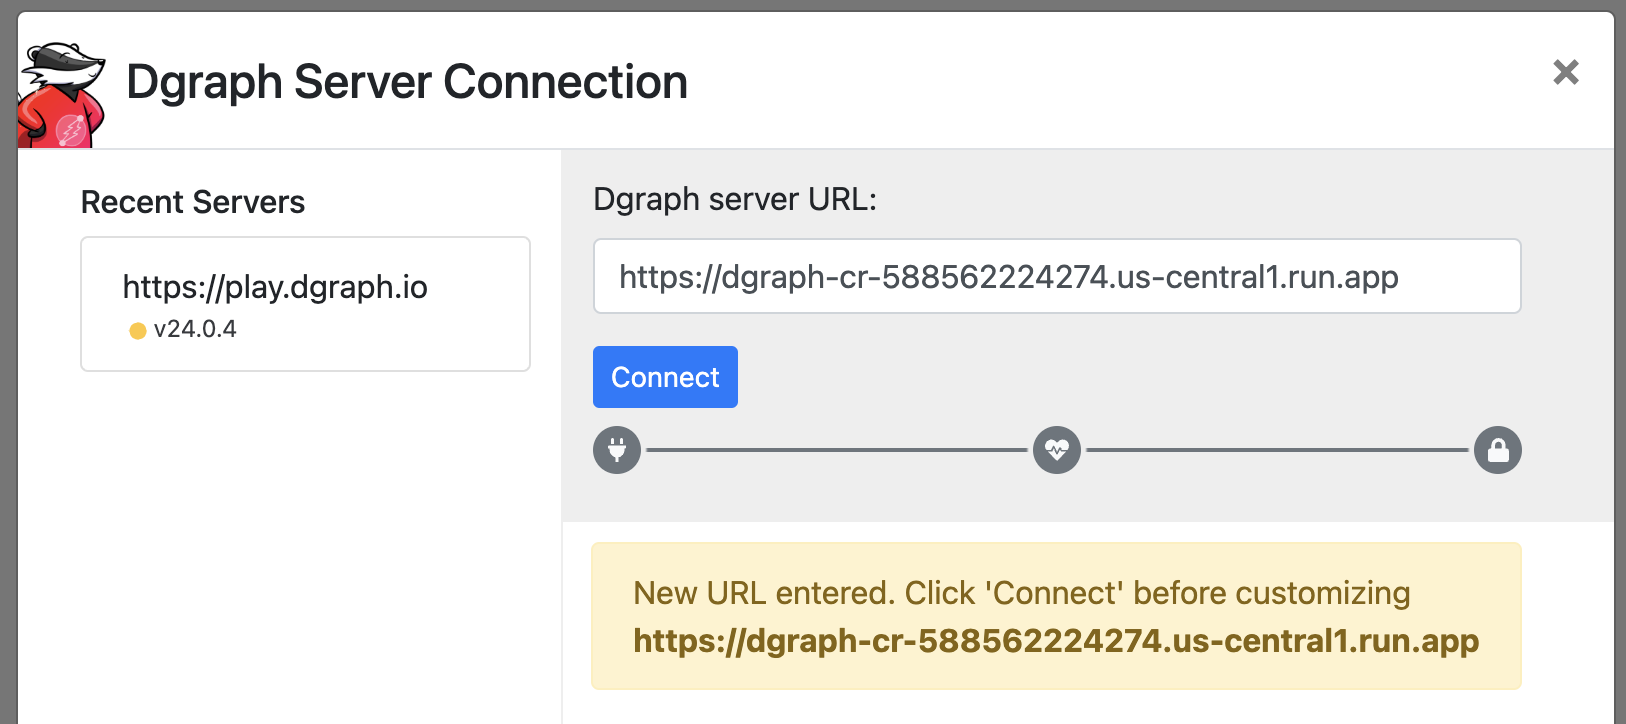
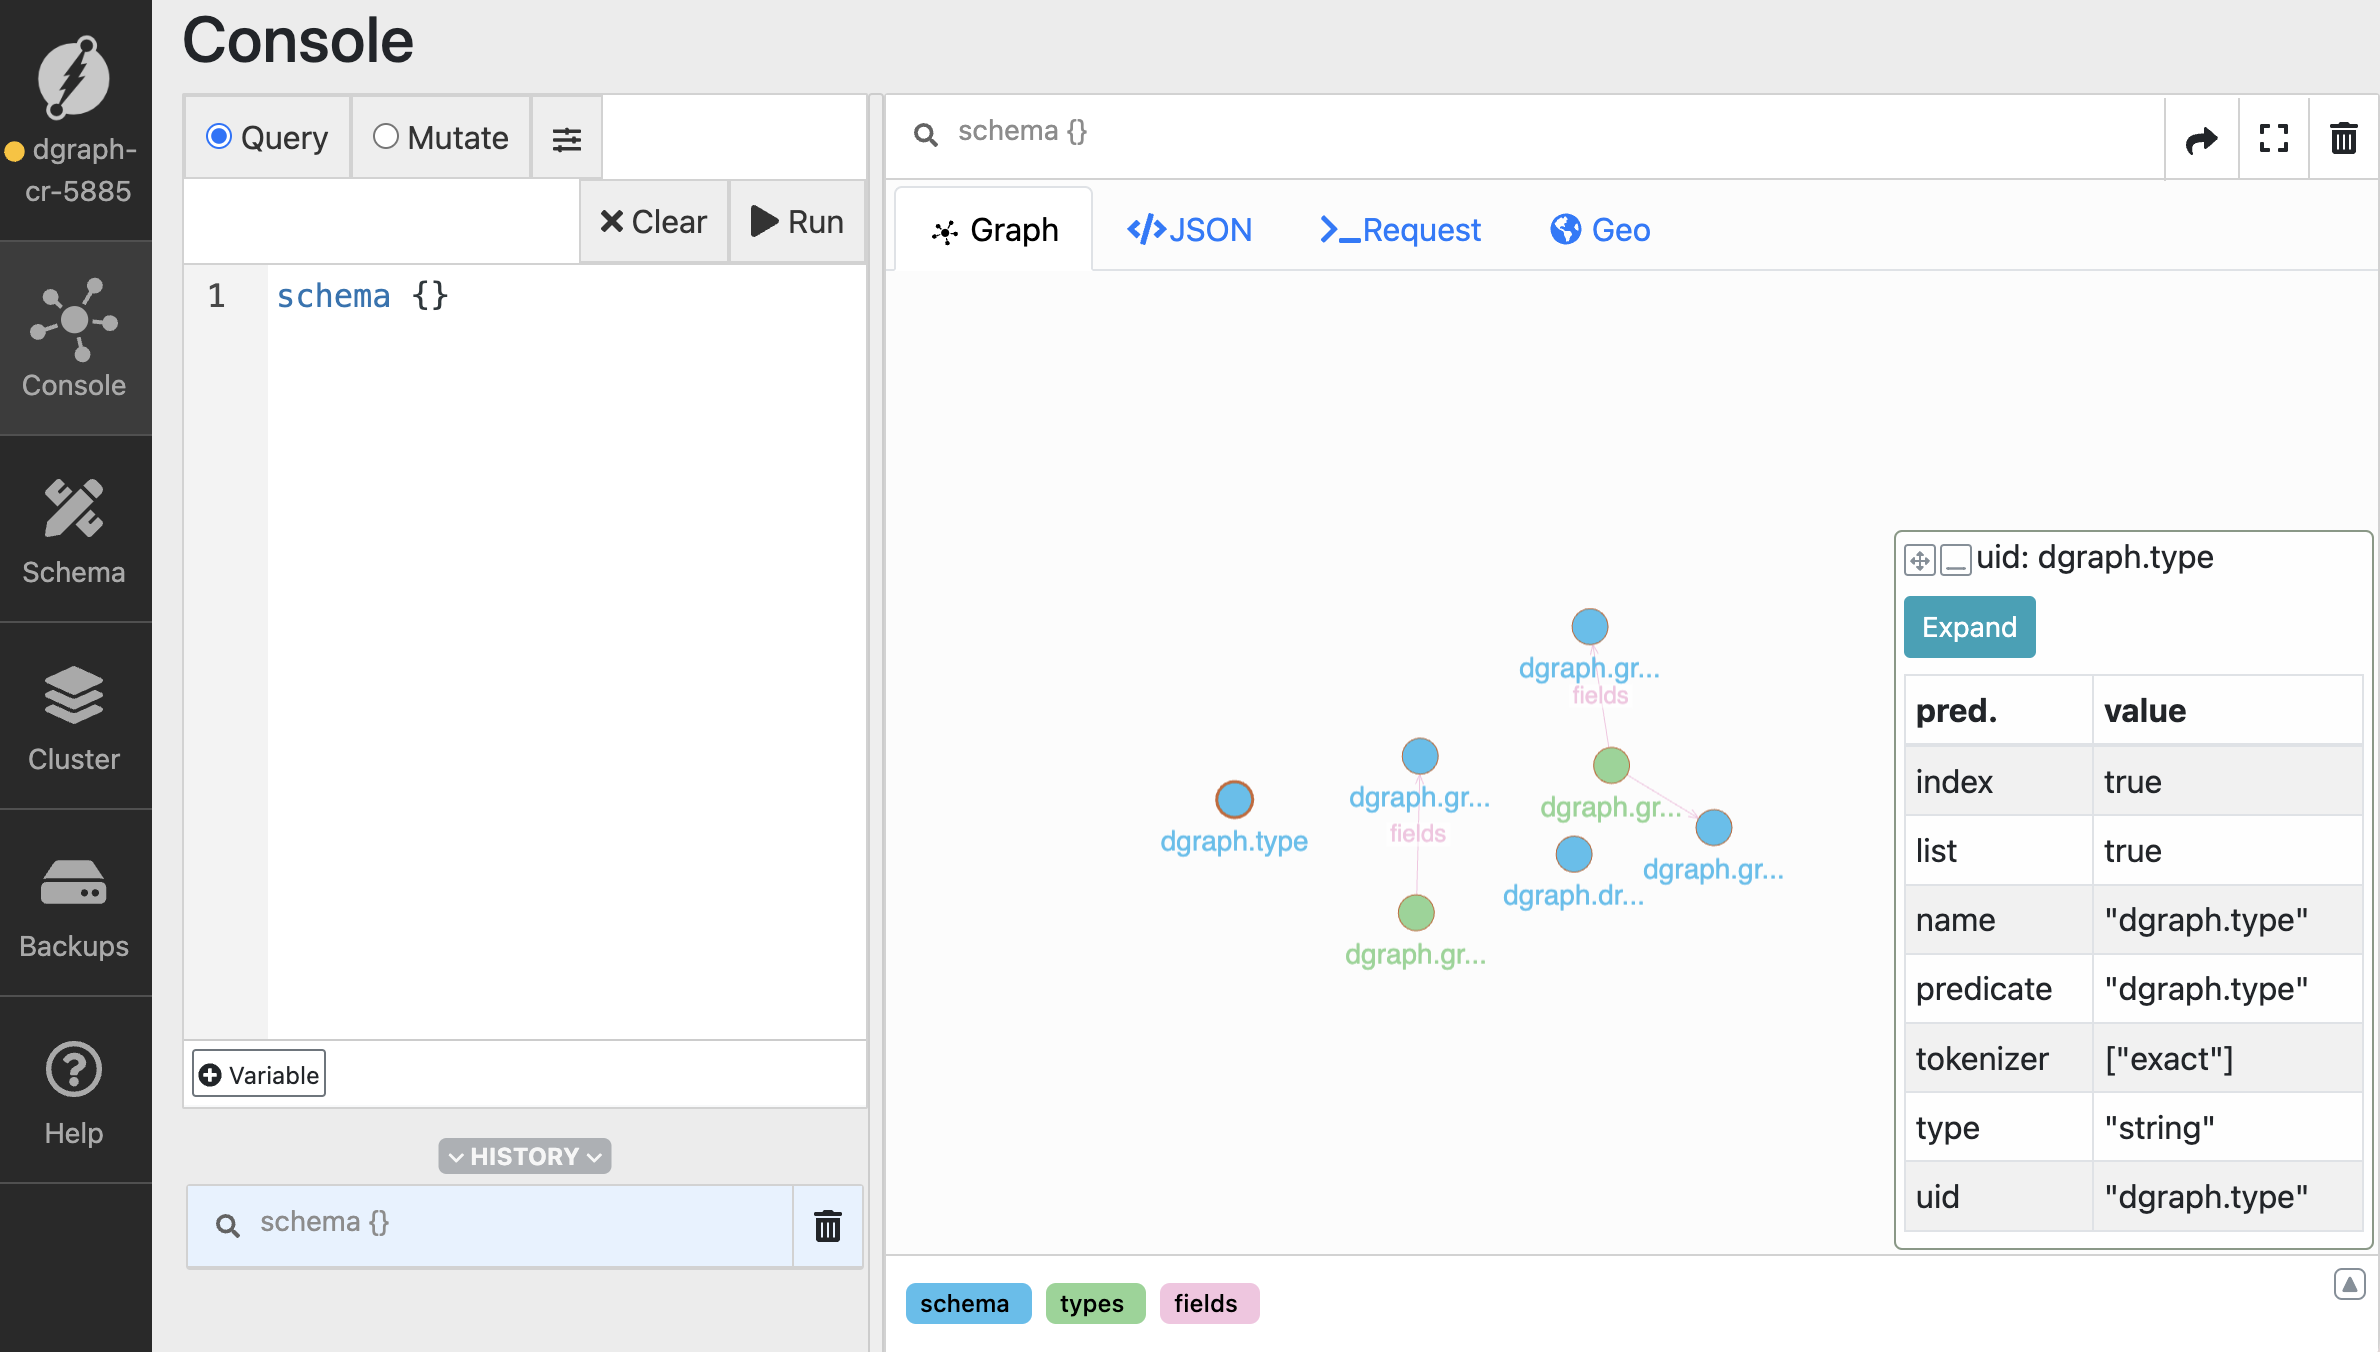 ## Dgraph Cloud Migration Steps
To migrate from Dgraph Cloud to your self-hosted Cloud Run instance, follow these steps:
### Migration Data
We've now downloaded the following files from Dgraph Cloud:
* `gql_schema.gz` - your GraphQL schema exported from Dgraph Cloud
* `schema.gz` - your Dgraph schema export from Dgraph Cloud
* `rdf.gz` - your RDF data export from Dgraph Cloud
We'll now migrate this data to our Dgraph instance running in Cloud Run.
### Prepare Migration Environment
Create a local directory for migration files:
```bash
mkdir dgraph-migration
cd dgraph-migration
# Extract the compressed files
gunzip gql_schema.gz
gunzip schema.gz
gunzip rdf.gz
# Verify file contents
head -20 gql_schema
head -20 schema
head -20 rdf
```
### Schema Migration
#### Option A: Load Schema Via Live Loader
```bash
dgraph live --schema schema \
--alpha https://api.yourdomain.com:443 \
--zero http://api.yourdomain.com:443
```
#### Option B: Load Schema Via HTTP API
```bash
curl -X POST https://api.yourdomain.com/admin/schema \
-H "Content-Type: application/rdf" \
--data-binary @schema
```
#### Option C: Load GraphQL Schema (if using GraphQL)
```bash
curl -X POST https://api.yourdomain.com/admin/schema/graphql \
-H "Content-Type: text/plain" \
--data-binary @gql_schema
```
### Data Migration
#### Option A: Data Migration Using Live Loader
For large datasets, use the live loader for optimal performance:
```bash
dgraph live --files rdf \
--alpha https://api.yourdomain.com:443 \
--zero https://api.yourdomain.com:443 \
--batch 1000 \
--conc 10
```
#### Option B: Data Migration Using Bulk Loader (Offline)
For very large datasets, consider using the Dgraph bulk loader. This requires temporarily scaling down your Cloud Run instance:
**Create Bulk Loader Container**
Create `bulk-loader.Dockerfile`:
```dockerfile
FROM dgraph/dgraph:latest
# Copy TLS certs and data
COPY tls/ /dgraph/tls
COPY rdf /data/rdf
COPY schema /data/schema
# Create output directory
RUN mkdir -p /data/out
WORKDIR /data
# Run bulk loader
CMD ["dgraph", "bulk", \
"--files", "/data/rdf", \
"--schema", "/data/schema", \
"--out", "/data/out", \
"--zero", "localhost:5080"]
```
**Run Bulk Load Process**
```bash
# Build bulk loader image
docker build -f bulk-loader.Dockerfile -t gcr.io/$PROJECT_ID/dgraph-bulk-loader .
docker push gcr.io/$PROJECT_ID/dgraph-bulk-loader
# Scale down current Dgraph instance
gcloud run services update dgraph-alpha --min-instances=0 --max-instances=0 --region us-central1
# Run bulk loader as a job (this will process data offline)
gcloud run jobs create dgraph-bulk-load \
--image gcr.io/$PROJECT_ID/dgraph-bulk-loader \
--region us-central1 \
--memory 8Gi \
--cpu 4 \
--max-retries 1 \
--parallelism 1 \
--task-timeout 7200
# Execute the bulk load job
gcloud run jobs execute dgraph-bulk-load --region us-central1
```
**Copy Bulk Load Results To Filestore**
```bash
# Create a temporary VM to copy data
gcloud compute instances create dgraph-migration-vm \
--zone us-central1-a \
--machine-type n1-standard-2 \
--image-family debian-11 \
--image-project debian-cloud
# SSH into the VM and mount Filestore
gcloud compute ssh dgraph-migration-vm --zone us-central1-a
# On the VM:
sudo apt update && sudo apt install nfs-common -y
sudo mkdir -p /mnt/dgraph
sudo mount -t nfs $FILESTORE_IP:/dgraph /mnt/dgraph
# Copy bulk load output to Filestore
# (You'll need to copy the output from the bulk loader job)
sudo cp -r /path/to/bulk/output/* /mnt/dgraph/
# Restart Dgraph service
gcloud run services update dgraph-alpha --min-instances=1 --max-instances=3 --region us-central1
```
### Validation and Testing
#### Schema Validation
```bash
curl -X POST https://api.yourdomain.com/query \
-H "Content-Type: application/json" \
-d '{"query": "schema {}"}'
```
#### Data Validation
```bash
# Check data counts
curl -X POST https://api.yourdomain.com/query \
--cert tls/client.clientuser.crt \
--key tls/client.clientuser.key \
--cacert tls/ca.crt \
-H "Content-Type: application/json" \
-d '{"query": "{ nodeCount(func: has(dgraph.type)) }"}'
# Validate specific data samples
curl -X POST https://api.yourdomain.com/query \
--cert tls/client.clientuser.crt \
--key tls/client.clientuser.key \
--cacert tls/ca.crt \
-H "Content-Type: application/json" \
-d '{"query": "{ sample(func: has(dgraph.type), first: 10) { uid expand(_all_) } }"}'
```
### Migration Cleanup
```bash
# Clean up migration files
rm -rf dgraph-migration/
# Remove temporary bulk loader resources
gcloud run jobs delete dgraph-bulk-load --region us-central1
# Delete migration VM (if used)
gcloud compute instances delete dgraph-migration-vm --zone us-central1-a
# Update DNS to point to new instance (if needed)
# Update your application configuration to use new endpoint
```
## Optional Configurations
### Optimize Cloud Run Configuration
```bash
# Adjust resource allocation based on migrated data size
gcloud run services update dgraph-alpha \
--memory 8Gi \
--cpu 4 \
--max-instances 5 \
--region us-central1
```
### Set up IAM and Security
Create a service account for Dgraph:
```bash
gcloud iam service-accounts create dgraph-service-account
gcloud projects add-iam-policy-binding $PROJECT_ID \
--member="serviceAccount:dgraph-service-account@$PROJECT_ID.iam.gserviceaccount.com" \
--role="roles/storage.admin"
```
### Configure Health Checks
Create a health check endpoint by modifying your container to include a health check script:
```bash
# Add to your Dockerfile
COPY healthcheck.sh /usr/local/bin/
RUN chmod +x /usr/local/bin/healthcheck.sh
HEALTHCHECK --interval=30s --timeout=10s --start-period=40s --retries=3 \
CMD /usr/local/bin/healthcheck.sh
```
Create `healthcheck.sh`:
```bash
#!/bin/bash
curl -f http://localhost:8080/health || exit 1
```
### Testing Your Deployment
Once deployed, test your Dgraph instance:
```bash
# Get the Cloud Run service URL
SERVICE_URL=$(gcloud run services describe dgraph-cr --platform managed --region us-central1 --format 'value(status.url)')
# Test the health endpoint
curl $SERVICE_URL/health
```
### Set Up Monitoring and Logging
Enable Cloud Monitoring for your Cloud Run service:
```bash
# Create an alert policy
gcloud alpha monitoring policies create --policy-from-file=alert-policy.yaml
```
Create `alert-policy.yaml`:
```yaml
displayName: "Dgraph High Memory Usage"
conditions:
- displayName: "Memory utilization"
conditionThreshold:
filter: 'resource.type="cloud_run_revision" resource.label.service_name="dgraph-alpha"'
comparison: COMPARISON_GT
thresholdValue: 0.8
```
### Multi-Region Deployment
For high availability, deploy across multiple regions:
```bash
# Deploy to multiple regions
for region in us-central1 us-east1 europe-west1; do
gcloud run deploy dgraph-rc-$region \
--image gcr.io/$PROJECT_ID/dgraph-alpha \
--platform managed \
--region $region \
--allow-unauthenticated
done
```
## Troubleshooting
Common issues and solutions:
1. **Container startup fails**: Check logs with `gcloud run services logs read dgraph-alpha`
2. **Memory issues**: Increase memory allocation or optimize queries
3. **Network connectivity**: Verify VPC connector configuration
4. **Data persistence**: Ensure proper volume mounting and permissions
---
# Source: https://docs.hypermode.com/dgraph/self-managed/cluster-checklist.md
# Cluster Checklist
## Dgraph Cloud Migration Steps
To migrate from Dgraph Cloud to your self-hosted Cloud Run instance, follow these steps:
### Migration Data
We've now downloaded the following files from Dgraph Cloud:
* `gql_schema.gz` - your GraphQL schema exported from Dgraph Cloud
* `schema.gz` - your Dgraph schema export from Dgraph Cloud
* `rdf.gz` - your RDF data export from Dgraph Cloud
We'll now migrate this data to our Dgraph instance running in Cloud Run.
### Prepare Migration Environment
Create a local directory for migration files:
```bash
mkdir dgraph-migration
cd dgraph-migration
# Extract the compressed files
gunzip gql_schema.gz
gunzip schema.gz
gunzip rdf.gz
# Verify file contents
head -20 gql_schema
head -20 schema
head -20 rdf
```
### Schema Migration
#### Option A: Load Schema Via Live Loader
```bash
dgraph live --schema schema \
--alpha https://api.yourdomain.com:443 \
--zero http://api.yourdomain.com:443
```
#### Option B: Load Schema Via HTTP API
```bash
curl -X POST https://api.yourdomain.com/admin/schema \
-H "Content-Type: application/rdf" \
--data-binary @schema
```
#### Option C: Load GraphQL Schema (if using GraphQL)
```bash
curl -X POST https://api.yourdomain.com/admin/schema/graphql \
-H "Content-Type: text/plain" \
--data-binary @gql_schema
```
### Data Migration
#### Option A: Data Migration Using Live Loader
For large datasets, use the live loader for optimal performance:
```bash
dgraph live --files rdf \
--alpha https://api.yourdomain.com:443 \
--zero https://api.yourdomain.com:443 \
--batch 1000 \
--conc 10
```
#### Option B: Data Migration Using Bulk Loader (Offline)
For very large datasets, consider using the Dgraph bulk loader. This requires temporarily scaling down your Cloud Run instance:
**Create Bulk Loader Container**
Create `bulk-loader.Dockerfile`:
```dockerfile
FROM dgraph/dgraph:latest
# Copy TLS certs and data
COPY tls/ /dgraph/tls
COPY rdf /data/rdf
COPY schema /data/schema
# Create output directory
RUN mkdir -p /data/out
WORKDIR /data
# Run bulk loader
CMD ["dgraph", "bulk", \
"--files", "/data/rdf", \
"--schema", "/data/schema", \
"--out", "/data/out", \
"--zero", "localhost:5080"]
```
**Run Bulk Load Process**
```bash
# Build bulk loader image
docker build -f bulk-loader.Dockerfile -t gcr.io/$PROJECT_ID/dgraph-bulk-loader .
docker push gcr.io/$PROJECT_ID/dgraph-bulk-loader
# Scale down current Dgraph instance
gcloud run services update dgraph-alpha --min-instances=0 --max-instances=0 --region us-central1
# Run bulk loader as a job (this will process data offline)
gcloud run jobs create dgraph-bulk-load \
--image gcr.io/$PROJECT_ID/dgraph-bulk-loader \
--region us-central1 \
--memory 8Gi \
--cpu 4 \
--max-retries 1 \
--parallelism 1 \
--task-timeout 7200
# Execute the bulk load job
gcloud run jobs execute dgraph-bulk-load --region us-central1
```
**Copy Bulk Load Results To Filestore**
```bash
# Create a temporary VM to copy data
gcloud compute instances create dgraph-migration-vm \
--zone us-central1-a \
--machine-type n1-standard-2 \
--image-family debian-11 \
--image-project debian-cloud
# SSH into the VM and mount Filestore
gcloud compute ssh dgraph-migration-vm --zone us-central1-a
# On the VM:
sudo apt update && sudo apt install nfs-common -y
sudo mkdir -p /mnt/dgraph
sudo mount -t nfs $FILESTORE_IP:/dgraph /mnt/dgraph
# Copy bulk load output to Filestore
# (You'll need to copy the output from the bulk loader job)
sudo cp -r /path/to/bulk/output/* /mnt/dgraph/
# Restart Dgraph service
gcloud run services update dgraph-alpha --min-instances=1 --max-instances=3 --region us-central1
```
### Validation and Testing
#### Schema Validation
```bash
curl -X POST https://api.yourdomain.com/query \
-H "Content-Type: application/json" \
-d '{"query": "schema {}"}'
```
#### Data Validation
```bash
# Check data counts
curl -X POST https://api.yourdomain.com/query \
--cert tls/client.clientuser.crt \
--key tls/client.clientuser.key \
--cacert tls/ca.crt \
-H "Content-Type: application/json" \
-d '{"query": "{ nodeCount(func: has(dgraph.type)) }"}'
# Validate specific data samples
curl -X POST https://api.yourdomain.com/query \
--cert tls/client.clientuser.crt \
--key tls/client.clientuser.key \
--cacert tls/ca.crt \
-H "Content-Type: application/json" \
-d '{"query": "{ sample(func: has(dgraph.type), first: 10) { uid expand(_all_) } }"}'
```
### Migration Cleanup
```bash
# Clean up migration files
rm -rf dgraph-migration/
# Remove temporary bulk loader resources
gcloud run jobs delete dgraph-bulk-load --region us-central1
# Delete migration VM (if used)
gcloud compute instances delete dgraph-migration-vm --zone us-central1-a
# Update DNS to point to new instance (if needed)
# Update your application configuration to use new endpoint
```
## Optional Configurations
### Optimize Cloud Run Configuration
```bash
# Adjust resource allocation based on migrated data size
gcloud run services update dgraph-alpha \
--memory 8Gi \
--cpu 4 \
--max-instances 5 \
--region us-central1
```
### Set up IAM and Security
Create a service account for Dgraph:
```bash
gcloud iam service-accounts create dgraph-service-account
gcloud projects add-iam-policy-binding $PROJECT_ID \
--member="serviceAccount:dgraph-service-account@$PROJECT_ID.iam.gserviceaccount.com" \
--role="roles/storage.admin"
```
### Configure Health Checks
Create a health check endpoint by modifying your container to include a health check script:
```bash
# Add to your Dockerfile
COPY healthcheck.sh /usr/local/bin/
RUN chmod +x /usr/local/bin/healthcheck.sh
HEALTHCHECK --interval=30s --timeout=10s --start-period=40s --retries=3 \
CMD /usr/local/bin/healthcheck.sh
```
Create `healthcheck.sh`:
```bash
#!/bin/bash
curl -f http://localhost:8080/health || exit 1
```
### Testing Your Deployment
Once deployed, test your Dgraph instance:
```bash
# Get the Cloud Run service URL
SERVICE_URL=$(gcloud run services describe dgraph-cr --platform managed --region us-central1 --format 'value(status.url)')
# Test the health endpoint
curl $SERVICE_URL/health
```
### Set Up Monitoring and Logging
Enable Cloud Monitoring for your Cloud Run service:
```bash
# Create an alert policy
gcloud alpha monitoring policies create --policy-from-file=alert-policy.yaml
```
Create `alert-policy.yaml`:
```yaml
displayName: "Dgraph High Memory Usage"
conditions:
- displayName: "Memory utilization"
conditionThreshold:
filter: 'resource.type="cloud_run_revision" resource.label.service_name="dgraph-alpha"'
comparison: COMPARISON_GT
thresholdValue: 0.8
```
### Multi-Region Deployment
For high availability, deploy across multiple regions:
```bash
# Deploy to multiple regions
for region in us-central1 us-east1 europe-west1; do
gcloud run deploy dgraph-rc-$region \
--image gcr.io/$PROJECT_ID/dgraph-alpha \
--platform managed \
--region $region \
--allow-unauthenticated
done
```
## Troubleshooting
Common issues and solutions:
1. **Container startup fails**: Check logs with `gcloud run services logs read dgraph-alpha`
2. **Memory issues**: Increase memory allocation or optimize queries
3. **Network connectivity**: Verify VPC connector configuration
4. **Data persistence**: Ensure proper volume mounting and permissions
---
# Source: https://docs.hypermode.com/dgraph/self-managed/cluster-checklist.md
# Cluster Checklist
 Configuration can be set either as command-line flags, environment variables, or
in a file (see [Configuration](./config)).
Dgraph Zero:
* The `--my` flag should be set to the address:port (the internal-gRPC port)
that's accessible to the Dgraph Alpha (default: `localhost:5080`).
* The `--raft` superflag's `idx` option should be set to a unique Raft ID within
the Dgraph Zero group (default: `1`).
* The `--wal` flag should be set to the directory path to store write-ahead-log
entries on disk (default: `zw`).
* The `--bindall` flag should be set to true for machine-to-machine
communication (default: `true`).
* Recommended: For better issue diagnostics, set the log level verbosity to 2
with the option `--v=2`.
Dgraph Alpha:
* The `--my` flag should be set to the address:port (the internal-gRPC port)
that's accessible to the Dgraph Zero (default: `localhost:7080`).
* The `--zero` flag should be set to the corresponding Zero address set for
Dgraph Zero's `--my` flag.
* The `--postings` flag should be set to the directory path for data storage
(default: `p`).
* The `--wal` flag should be set to the directory path for write-ahead-log
entries (default: `w`)
* The `--bindall` flag should be set to true for machine-to-machine
communication (default: `true`).
* Recommended: For better issue diagnostics, set the log level verbosity to 2
`--v=2`.
### High availability setup: 6-node cluster
We provide sample configuration for both
[Docker Compose](https://github.com/hypermodeinc/dgraph/blob/master/contrib/config/docker/docker-compose-ha.yml)
and
[Kubernetes](https://github.com/hypermodeinc/dgraph/tree/master/contrib/config/kubernetes/dgraph-ha)
for a 6-node cluster with 3 Alpha replicas per group. You can also run Dgraph
directly on your host machines.
A Dgraph cluster can be configured in a high-availability setup with Dgraph Zero
and Dgraph Alpha each set up with peers. These peers are part of Raft consensus
groups, which elect a single leader among themselves. The non-leader peers are
called followers. In the event that the peers can't communicate with the leader
(for example, a network partition or a machine shuts down), the group
automatically elects a new leader to continue.
Configuration can be set either as command-line flags, environment variables, or
in a file (see [Configuration](./config)).
In this setup, we assume the following hostnames are set:
* `zero1`
* `zero2`
* `zero3`
* `alpha1`
* `alpha2`
* `alpha3`
We configure the cluster with 3 Alpha replicas per group. The cluster
group-membership topology looks like the following:
Configuration can be set either as command-line flags, environment variables, or
in a file (see [Configuration](./config)).
Dgraph Zero:
* The `--my` flag should be set to the address:port (the internal-gRPC port)
that's accessible to the Dgraph Alpha (default: `localhost:5080`).
* The `--raft` superflag's `idx` option should be set to a unique Raft ID within
the Dgraph Zero group (default: `1`).
* The `--wal` flag should be set to the directory path to store write-ahead-log
entries on disk (default: `zw`).
* The `--bindall` flag should be set to true for machine-to-machine
communication (default: `true`).
* Recommended: For better issue diagnostics, set the log level verbosity to 2
with the option `--v=2`.
Dgraph Alpha:
* The `--my` flag should be set to the address:port (the internal-gRPC port)
that's accessible to the Dgraph Zero (default: `localhost:7080`).
* The `--zero` flag should be set to the corresponding Zero address set for
Dgraph Zero's `--my` flag.
* The `--postings` flag should be set to the directory path for data storage
(default: `p`).
* The `--wal` flag should be set to the directory path for write-ahead-log
entries (default: `w`)
* The `--bindall` flag should be set to true for machine-to-machine
communication (default: `true`).
* Recommended: For better issue diagnostics, set the log level verbosity to 2
`--v=2`.
### High availability setup: 6-node cluster
We provide sample configuration for both
[Docker Compose](https://github.com/hypermodeinc/dgraph/blob/master/contrib/config/docker/docker-compose-ha.yml)
and
[Kubernetes](https://github.com/hypermodeinc/dgraph/tree/master/contrib/config/kubernetes/dgraph-ha)
for a 6-node cluster with 3 Alpha replicas per group. You can also run Dgraph
directly on your host machines.
A Dgraph cluster can be configured in a high-availability setup with Dgraph Zero
and Dgraph Alpha each set up with peers. These peers are part of Raft consensus
groups, which elect a single leader among themselves. The non-leader peers are
called followers. In the event that the peers can't communicate with the leader
(for example, a network partition or a machine shuts down), the group
automatically elects a new leader to continue.
Configuration can be set either as command-line flags, environment variables, or
in a file (see [Configuration](./config)).
In this setup, we assume the following hostnames are set:
* `zero1`
* `zero2`
* `zero3`
* `alpha1`
* `alpha2`
* `alpha3`
We configure the cluster with 3 Alpha replicas per group. The cluster
group-membership topology looks like the following:
 #### Set up Dgraph Zero group
In the Dgraph Zero group you must set unique Raft IDs (`--raft` superflag's
`idx` option) per Dgraph Zero. Dgraph will not auto-assign Raft IDs to Dgraph
Zero instances.
The first Dgraph Zero that starts will initiate the database cluster. Any
following Dgraph Zero instances must connect to the cluster via the `--peer`
flag to join. If the `--peer` flag is omitted from the peers, then the Dgraph
Zero will create its own independent Dgraph cluster.
**First Dgraph Zero** example:
`dgraph zero --replicas=3 --raft idx=1 --my=zero1:5080`
The `--my` flag must be set to the address:port of this instance that peers will
connect to. The `--raft` superflag's `idx` option sets its Raft ID to `1`.
**Second Dgraph Zero** example:
`dgraph zero --replicas=3 --raft idx=2 --my=zero2:5080 --peer=zero1:5080`
The `--my` flag must be set to the address:port of this instance that peers will
connect to. The `--raft` superflag's `idx` option sets its Raft ID to 2, and the
`--peer` flag specifies a request to connect to the Dgraph cluster of zero1
instead of initializing a new one.
**Third Dgraph Zero** example:
`dgraph zero --replicas=3 --raft idx=3 --my=zero3:5080 --peer=zero1:5080`:
The `--my` flag must be set to the address:port of this instance that peers will
connect to. The `--raft` superflag's `idx` option sets its Raft ID to 3, and the
`--peer` flag specifies a request to connect to the Dgraph cluster of zero1
instead of initializing a new one.
Dgraph Zero configuration options:
* The `--my` flag should be set to the address:port (the internal-gRPC port)
that will be accessible to Dgraph Alpha (default: `localhost:5080`).
* The `--raft` superflag's `idx` option should be set to a unique Raft ID within
the Dgraph Zero group (default: `1`).
* The `--wal` flag should be set to the directory path to store write-ahead-log
entries on disk (default: `zw`).
* The `--bindall` flag should be set to true for machine-to-machine
communication (default: `true`).
* Recommended: For more informative log info, set the log level verbosity to 2
with the option `--v=2`.
#### Set up Dgraph Alpha group
The number of replica members per Alpha group depends on the setting of Dgraph
Zero's `--replicas` flag. Above, it's set to 3. So when Dgraph Alphas join the
cluster, Dgraph Zero will assign it to an Alpha group to fill in its members up
to the limit per group set by the `--replicas` flag.
First Alpha example: `dgraph alpha --my=alpha1:7080 --zero=zero1:5080`
Second Alpha example: `dgraph alpha --my=alpha2:7080 --zero=zero1:5080`
Third Alpha example: `dgraph alpha --my=alpha3:7080 --zero=zero1:5080`
Dgraph Alpha configuration options:
* The `--my` flag should be set to the address:port (the internal-gRPC port)
that will be accessible to the Dgraph Zero (default: `localhost:7080`).
* The `--zero` flag should be set to the corresponding Zero address set for
Dgraph Zero's `--my`flag.
* The `--postings` flag should be set to the directory path for data storage
(default: `p`).
* The `--wal` flag should be set to the directory path for write-ahead-log
entries (default: `w`)
* The `--bindall` flag should be set to true for machine-to-machine
communication (default: `true`).
* Recommended: For more informative log info, set the log level verbosity to 2
`--v=2`.
---
# Source: https://docs.hypermode.com/dgraph/ratel/cluster.md
# Cluster
#### Set up Dgraph Zero group
In the Dgraph Zero group you must set unique Raft IDs (`--raft` superflag's
`idx` option) per Dgraph Zero. Dgraph will not auto-assign Raft IDs to Dgraph
Zero instances.
The first Dgraph Zero that starts will initiate the database cluster. Any
following Dgraph Zero instances must connect to the cluster via the `--peer`
flag to join. If the `--peer` flag is omitted from the peers, then the Dgraph
Zero will create its own independent Dgraph cluster.
**First Dgraph Zero** example:
`dgraph zero --replicas=3 --raft idx=1 --my=zero1:5080`
The `--my` flag must be set to the address:port of this instance that peers will
connect to. The `--raft` superflag's `idx` option sets its Raft ID to `1`.
**Second Dgraph Zero** example:
`dgraph zero --replicas=3 --raft idx=2 --my=zero2:5080 --peer=zero1:5080`
The `--my` flag must be set to the address:port of this instance that peers will
connect to. The `--raft` superflag's `idx` option sets its Raft ID to 2, and the
`--peer` flag specifies a request to connect to the Dgraph cluster of zero1
instead of initializing a new one.
**Third Dgraph Zero** example:
`dgraph zero --replicas=3 --raft idx=3 --my=zero3:5080 --peer=zero1:5080`:
The `--my` flag must be set to the address:port of this instance that peers will
connect to. The `--raft` superflag's `idx` option sets its Raft ID to 3, and the
`--peer` flag specifies a request to connect to the Dgraph cluster of zero1
instead of initializing a new one.
Dgraph Zero configuration options:
* The `--my` flag should be set to the address:port (the internal-gRPC port)
that will be accessible to Dgraph Alpha (default: `localhost:5080`).
* The `--raft` superflag's `idx` option should be set to a unique Raft ID within
the Dgraph Zero group (default: `1`).
* The `--wal` flag should be set to the directory path to store write-ahead-log
entries on disk (default: `zw`).
* The `--bindall` flag should be set to true for machine-to-machine
communication (default: `true`).
* Recommended: For more informative log info, set the log level verbosity to 2
with the option `--v=2`.
#### Set up Dgraph Alpha group
The number of replica members per Alpha group depends on the setting of Dgraph
Zero's `--replicas` flag. Above, it's set to 3. So when Dgraph Alphas join the
cluster, Dgraph Zero will assign it to an Alpha group to fill in its members up
to the limit per group set by the `--replicas` flag.
First Alpha example: `dgraph alpha --my=alpha1:7080 --zero=zero1:5080`
Second Alpha example: `dgraph alpha --my=alpha2:7080 --zero=zero1:5080`
Third Alpha example: `dgraph alpha --my=alpha3:7080 --zero=zero1:5080`
Dgraph Alpha configuration options:
* The `--my` flag should be set to the address:port (the internal-gRPC port)
that will be accessible to the Dgraph Zero (default: `localhost:7080`).
* The `--zero` flag should be set to the corresponding Zero address set for
Dgraph Zero's `--my`flag.
* The `--postings` flag should be set to the directory path for data storage
(default: `p`).
* The `--wal` flag should be set to the directory path for write-ahead-log
entries (default: `w`)
* The `--bindall` flag should be set to true for machine-to-machine
communication (default: `true`).
* Recommended: For more informative log info, set the log level verbosity to 2
`--v=2`.
---
# Source: https://docs.hypermode.com/dgraph/ratel/cluster.md
# Cluster
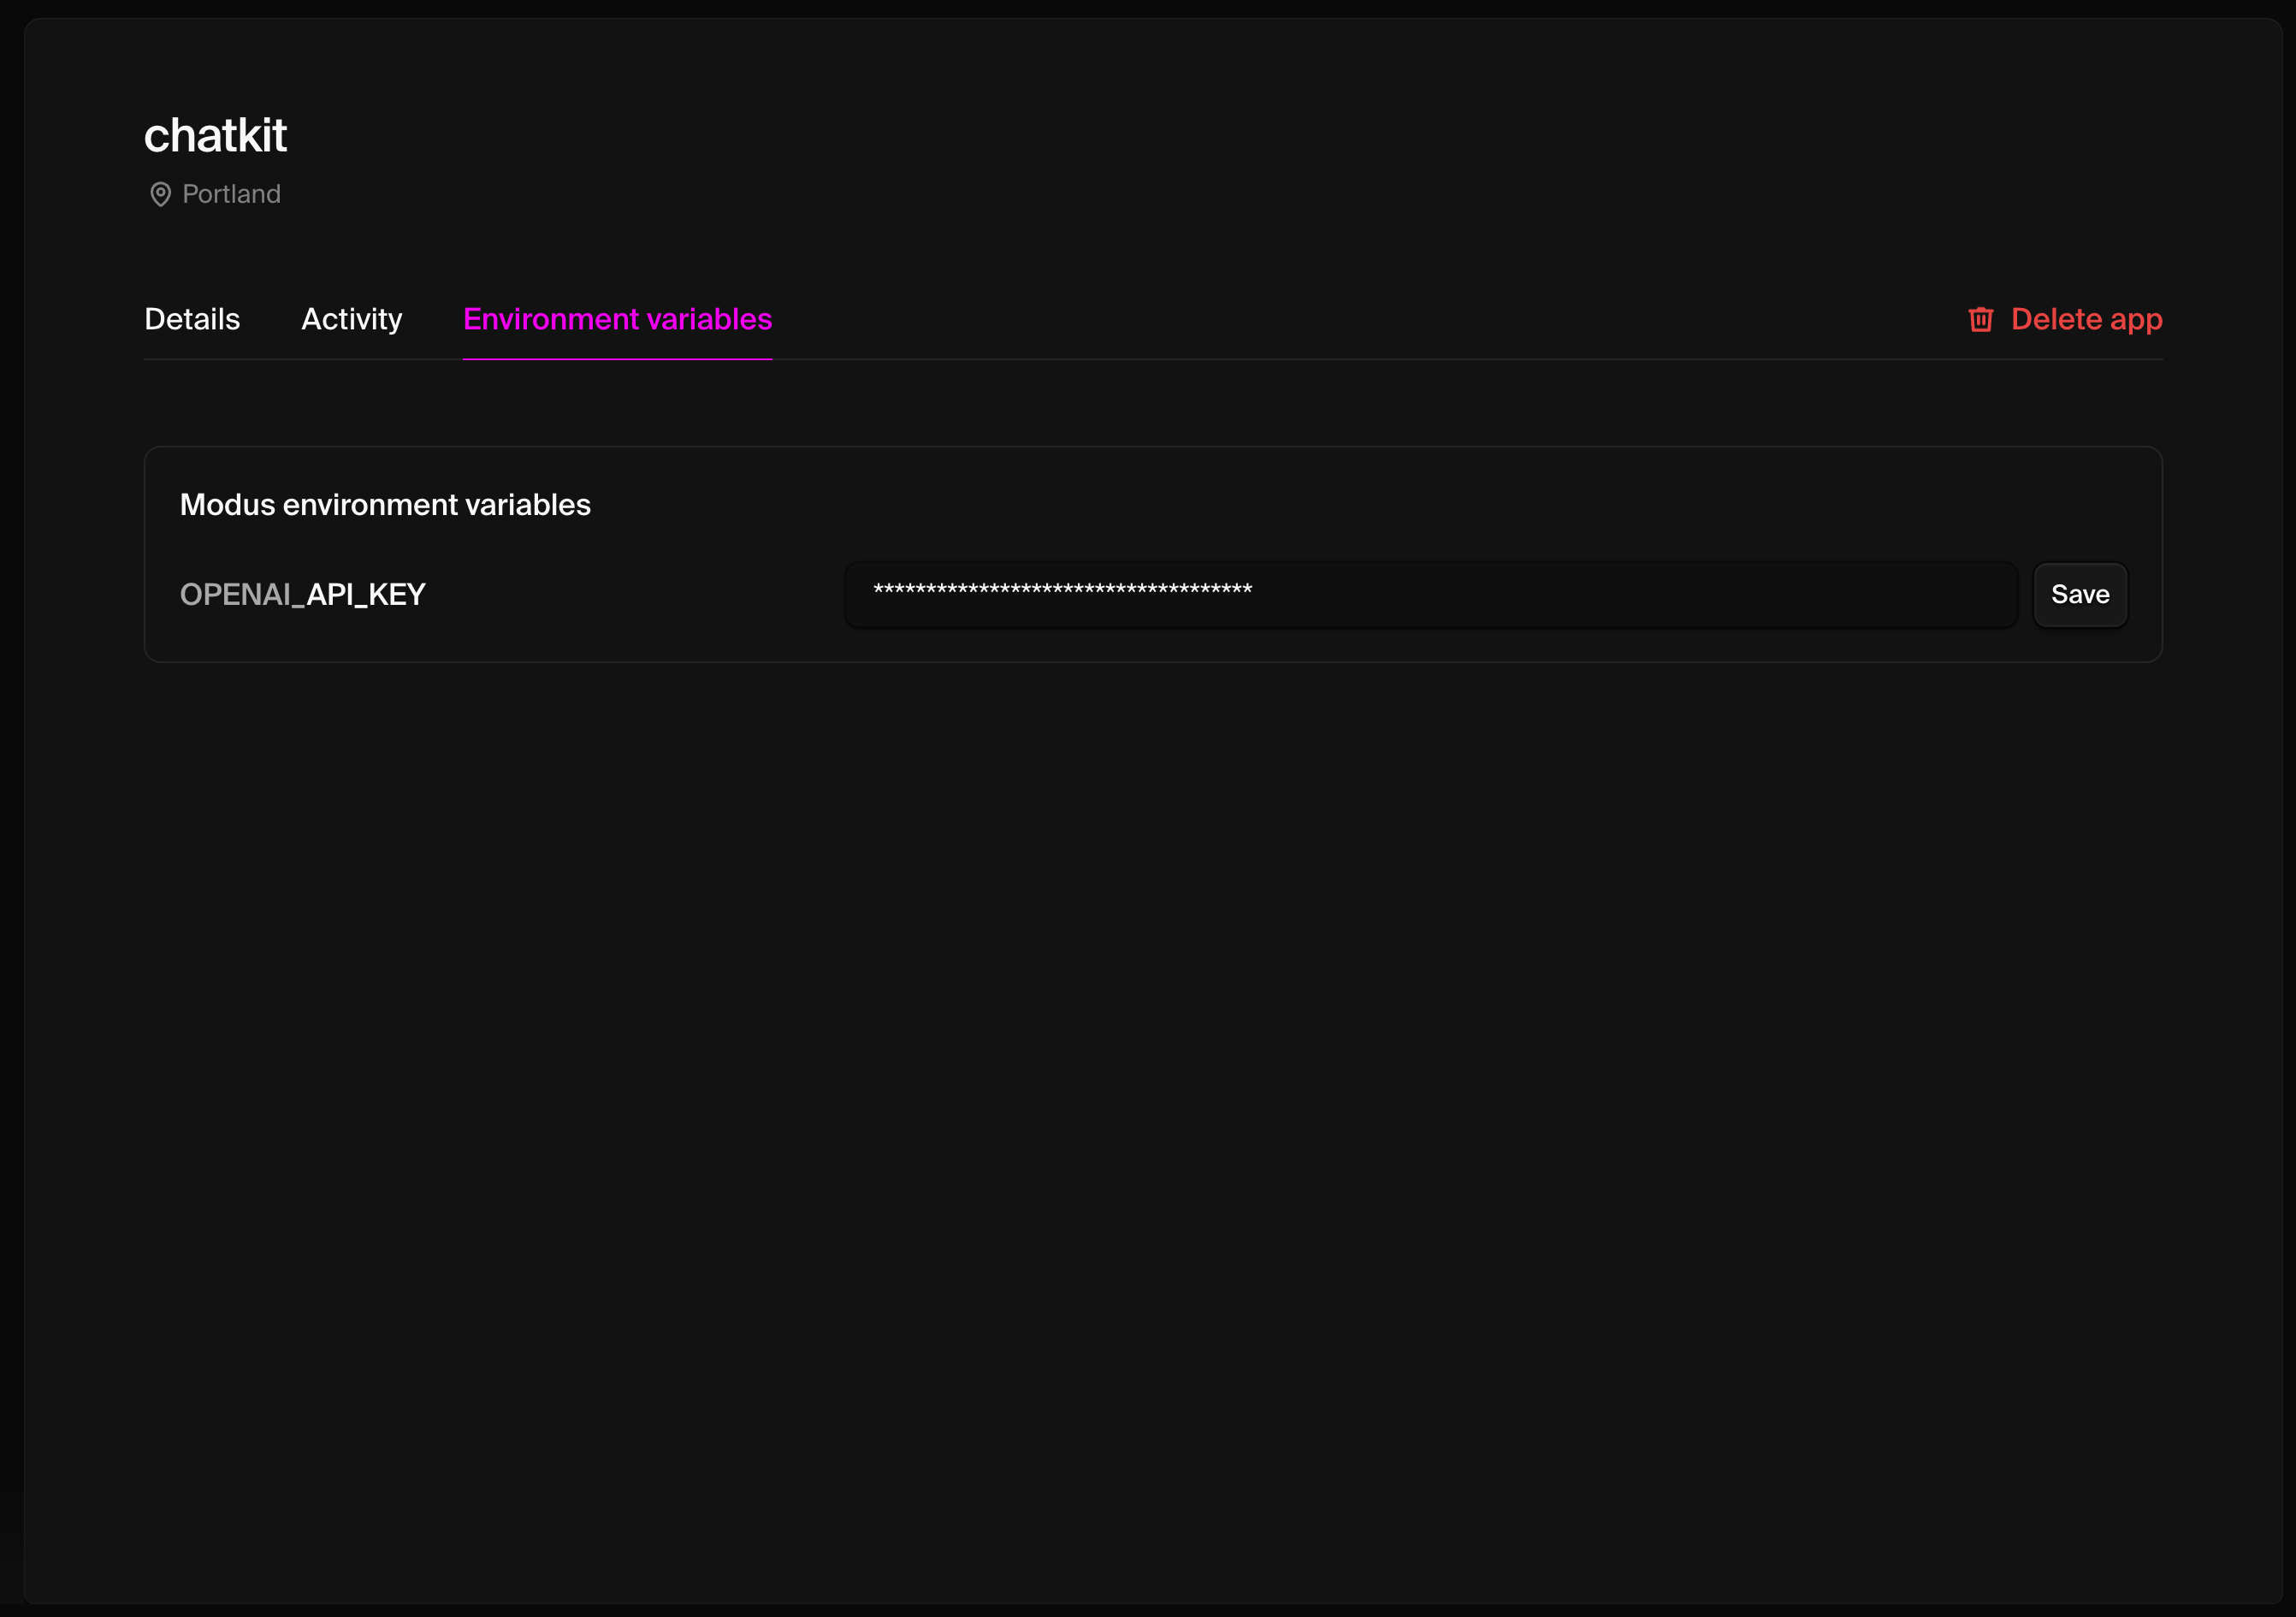 1. Navigate to your app in the console
2. Click on the **Environment Variables** tab
3. Add your environment variables with the proper naming convention
4. Save the configuration
## Testing connections
### Local testing
Test connections during development:
```bash
# Start development server
modus dev
# Test connections in the API Explorer
# Navigate to http://localhost:8686/explorer
```
### Production testing
Verify connections in production:
```bash
# Test your deployed app's connections
curl -X POST https://your-app-endpoint.hypermode.app/graphql \
-H "Authorization: Bearer YOUR_API_KEY" \
-H "Content-Type: application/json" \
-d '{"query": "{ testConnection }"}'
```
## Best practices
* **Never commit secrets**: Use environment variables for all sensitive data
* **Use least privilege**: Grant minimal necessary permissions to API tokens
* **Test locally first**: Use `modus dev` to debug connection issues before
deploying
* **Monitor usage**: Track API calls and database connections in production
Your app can now securely connect to external services and databases.
---
# Source: https://docs.hypermode.com/dgraph/guides/message-board-app/react-ui/connect-to-dgraph-cloud.md
# Connect to Dgraph Cloud
> Apollo client provides a connection to the GraphQL endpoint & a GraphQL cache that lets you manipulate the visual state of the app from the internal cache
1. Navigate to your app in the console
2. Click on the **Environment Variables** tab
3. Add your environment variables with the proper naming convention
4. Save the configuration
## Testing connections
### Local testing
Test connections during development:
```bash
# Start development server
modus dev
# Test connections in the API Explorer
# Navigate to http://localhost:8686/explorer
```
### Production testing
Verify connections in production:
```bash
# Test your deployed app's connections
curl -X POST https://your-app-endpoint.hypermode.app/graphql \
-H "Authorization: Bearer YOUR_API_KEY" \
-H "Content-Type: application/json" \
-d '{"query": "{ testConnection }"}'
```
## Best practices
* **Never commit secrets**: Use environment variables for all sensitive data
* **Use least privilege**: Grant minimal necessary permissions to API tokens
* **Test locally first**: Use `modus dev` to debug connection issues before
deploying
* **Monitor usage**: Track API calls and database connections in production
Your app can now securely connect to external services and databases.
---
# Source: https://docs.hypermode.com/dgraph/guides/message-board-app/react-ui/connect-to-dgraph-cloud.md
# Connect to Dgraph Cloud
> Apollo client provides a connection to the GraphQL endpoint & a GraphQL cache that lets you manipulate the visual state of the app from the internal cache
 ## URL Input box
In this box you add a valid Dgraph Alpha address. When you click `Connect` Ratel
establishes a connection with the cluster. After Ratel has established a
connection (all icons are green), click the `Continue` button.
Under the input box you have tree icons which gives you the status of the
connection.
* Network Access: Uses an "Energy Plug" icon.
* Server Health: Uses a "Heart" icon.
* Logging in: a "lock" icon.
## URL Input box
In this box you add a valid Dgraph Alpha address. When you click `Connect` Ratel
establishes a connection with the cluster. After Ratel has established a
connection (all icons are green), click the `Continue` button.
Under the input box you have tree icons which gives you the status of the
connection.
* Network Access: Uses an "Energy Plug" icon.
* Server Health: Uses a "Heart" icon.
* Logging in: a "lock" icon.
 ### Authenticate
You'll be prompted to complete the OAuth flow if you haven't enabled the
connection yet for your workspace.
Once authenticated, save the changes made to the agent.
### Authenticate
You'll be prompted to complete the OAuth flow if you haven't enabled the
connection yet for your workspace.
Once authenticated, save the changes made to the agent.
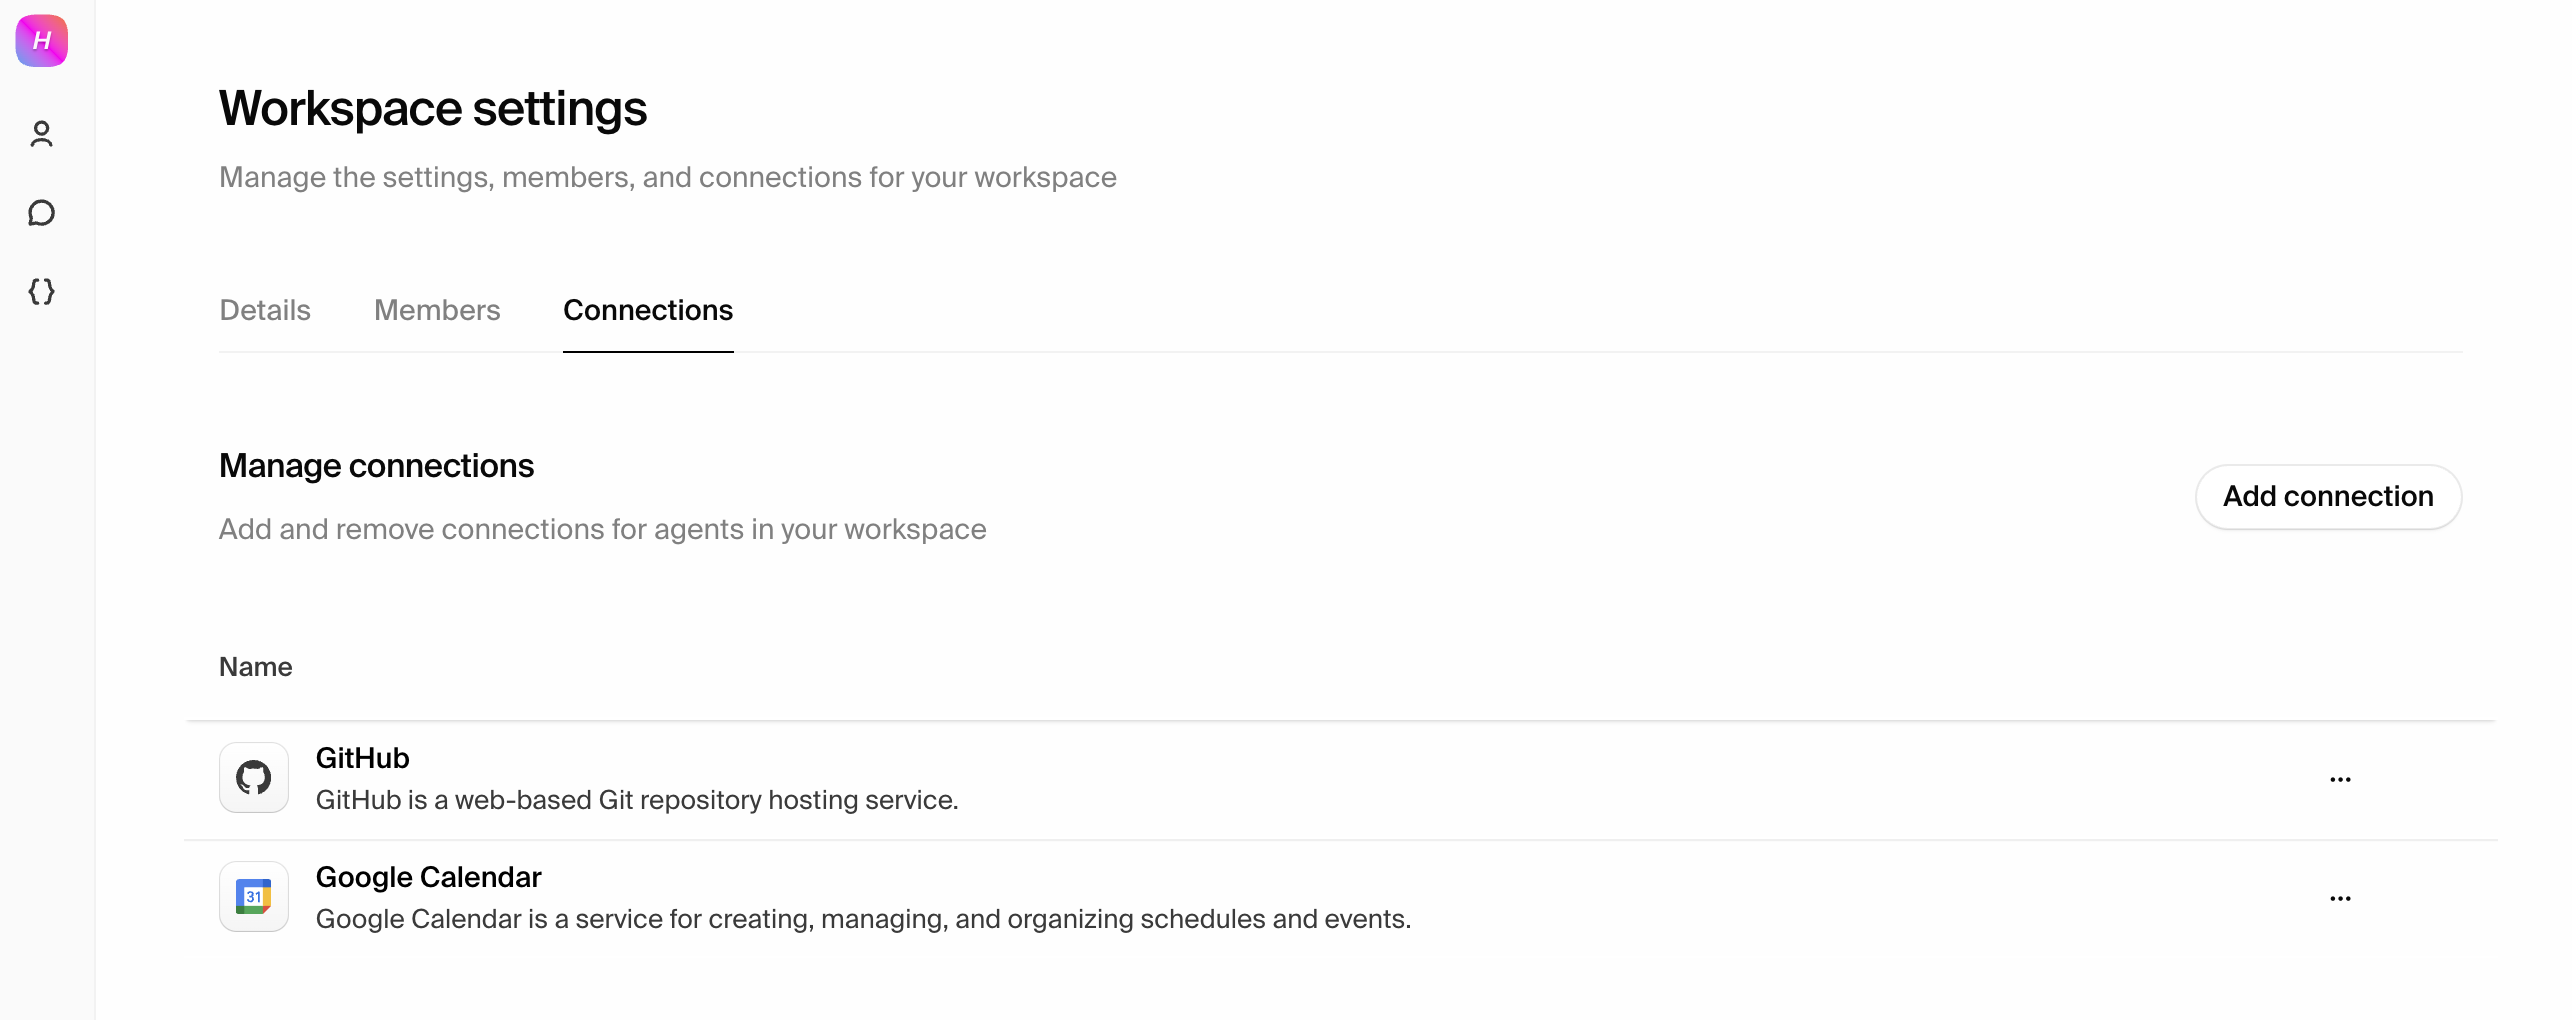 ### Edit or remove connections
Update credentials, change permissions, or remove connections at any time form
the "Connections" tab in your agent information card or in the Workspace
settings page.
### Edit or remove connections
Update credentials, change permissions, or remove connections at any time form
the "Connections" tab in your agent information card or in the Workspace
settings page.
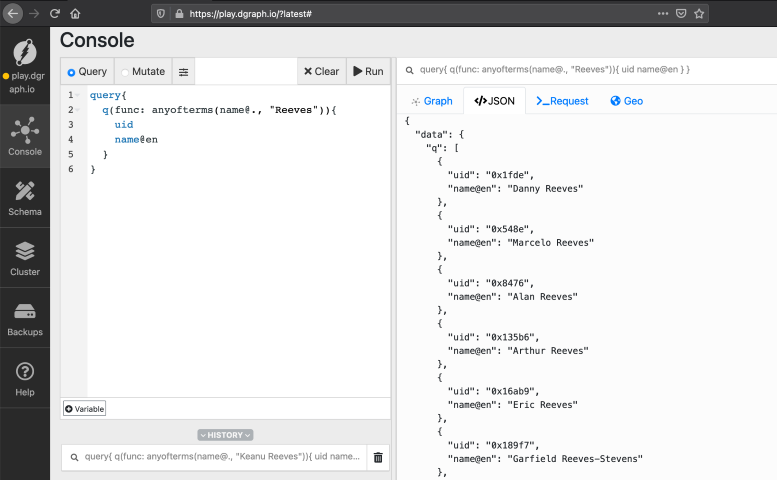 ### Query
On this panel, you can only run DQL (former GraphQL+-). You can use `#` to
comment on something. You also have the DQL Variable. See more at
[DQL](/dgraph/dql/schema).
### Mutation
On this panel, you can run RDF and JSON mutations.
## Result panel
### Graph
On this tab you can view the query results in a Graph format. This allows you to
visualize the Nodes and their relations.
### JSON
On this tab you have the JSON response from the cluster. The actual data comes
in the `data` key. You also have the `extensions` key which returns
`server_latency`, `txn`, and other metrics.
### Request
On this tab you have the actual request sent to the cluster.
### Geo
On this tab you can visualize a query that provides Geodata.
### Query
On this panel, you can only run DQL (former GraphQL+-). You can use `#` to
comment on something. You also have the DQL Variable. See more at
[DQL](/dgraph/dql/schema).
### Mutation
On this panel, you can run RDF and JSON mutations.
## Result panel
### Graph
On this tab you can view the query results in a Graph format. This allows you to
visualize the Nodes and their relations.
### JSON
On this tab you have the JSON response from the cluster. The actual data comes
in the `data` key. You also have the `extensions` key which returns
`server_latency`, `txn`, and other metrics.
### Request
On this tab you have the actual request sent to the cluster.
### Geo
On this tab you can visualize a query that provides Geodata.
 Welcome to Week 4! You've mastered agent fundamentals, built custom agents, and
specialized in domain-specific applications. Now you'll dive deep into **context
engineering** - the critical discipline of designing systems that provide agents
with the right information, tools, and context to accomplish complex tasks
effectively.
Context engineering is what separates basic chatbots from truly intelligent
agents that can reason about complex problems and take meaningful actions.
## What's context engineering?
**Context engineering** is the process of building dynamic systems to provide
the right information and tools in the right format such that language models
can plausibly accomplish complex tasks. Context engineering is the bridge
between raw data and actionable intelligence.
Context engineering encompasses:
* **Prompt Engineering**: Crafting instructions that guide agent behavior and
reasoning
* **Retrieval & RAG**: Connecting agents to relevant, real-time information
sources
* **Tool Use**: Enabling agents to interact with external systems and APIs
* **Memory & State**: Managing conversation history and maintaining context
across interactions
* **Structured Outputs**: Ensuring agents produce reliable, formatted responses
* **Information Architecture**: Organizing knowledge for optimal agent access
and reasoning
## Why context engineering matters
The difference between a helpful agent and a transformative one often comes down
to context engineering:
**Without proper context engineering:**
* Agents hallucinate or provide outdated information
* Responses are generic and lack domain-specific insight
* Tool usage is inconsistent and unreliable
* Complex tasks fail due to information gaps
**With sophisticated context engineering:**
* Agents access current, relevant information dynamically
* Responses are grounded in real data and domain expertise
* Tool usage is strategic and purposeful
* Complex workflows execute reliably with proper information flow
## Week 4 learning path
This week builds your expertise in the core components of context engineering:
### Days 16-17: Prompt and message engineering
Master the fundamentals of communication with language models through structured
prompts and optimized user messages.
### Days 18-20: Retrieval systems
Implement sophisticated information retrieval systems using PostgreSQL, MongoDB,
and Neo4j to provide agents with dynamic access to relevant data.
### Days 21-22: Advanced graph knowledge systems
Explore cutting-edge knowledge graph approaches using Dgraph for complex
reasoning and relationship modeling.
Welcome to Week 4! You've mastered agent fundamentals, built custom agents, and
specialized in domain-specific applications. Now you'll dive deep into **context
engineering** - the critical discipline of designing systems that provide agents
with the right information, tools, and context to accomplish complex tasks
effectively.
Context engineering is what separates basic chatbots from truly intelligent
agents that can reason about complex problems and take meaningful actions.
## What's context engineering?
**Context engineering** is the process of building dynamic systems to provide
the right information and tools in the right format such that language models
can plausibly accomplish complex tasks. Context engineering is the bridge
between raw data and actionable intelligence.
Context engineering encompasses:
* **Prompt Engineering**: Crafting instructions that guide agent behavior and
reasoning
* **Retrieval & RAG**: Connecting agents to relevant, real-time information
sources
* **Tool Use**: Enabling agents to interact with external systems and APIs
* **Memory & State**: Managing conversation history and maintaining context
across interactions
* **Structured Outputs**: Ensuring agents produce reliable, formatted responses
* **Information Architecture**: Organizing knowledge for optimal agent access
and reasoning
## Why context engineering matters
The difference between a helpful agent and a transformative one often comes down
to context engineering:
**Without proper context engineering:**
* Agents hallucinate or provide outdated information
* Responses are generic and lack domain-specific insight
* Tool usage is inconsistent and unreliable
* Complex tasks fail due to information gaps
**With sophisticated context engineering:**
* Agents access current, relevant information dynamically
* Responses are grounded in real data and domain expertise
* Tool usage is strategic and purposeful
* Complex workflows execute reliably with proper information flow
## Week 4 learning path
This week builds your expertise in the core components of context engineering:
### Days 16-17: Prompt and message engineering
Master the fundamentals of communication with language models through structured
prompts and optimized user messages.
### Days 18-20: Retrieval systems
Implement sophisticated information retrieval systems using PostgreSQL, MongoDB,
and Neo4j to provide agents with dynamic access to relevant data.
### Days 21-22: Advanced graph knowledge systems
Explore cutting-edge knowledge graph approaches using Dgraph for complex
reasoning and relationship modeling.
 ### Overview
Concierge streamlines agent creation by converting your requirements into
structured, working agent scaffolds through a guided process that takes just
minutes to complete.
### Overview
Concierge streamlines agent creation by converting your requirements into
structured, working agent scaffolds through a guided process that takes just
minutes to complete.
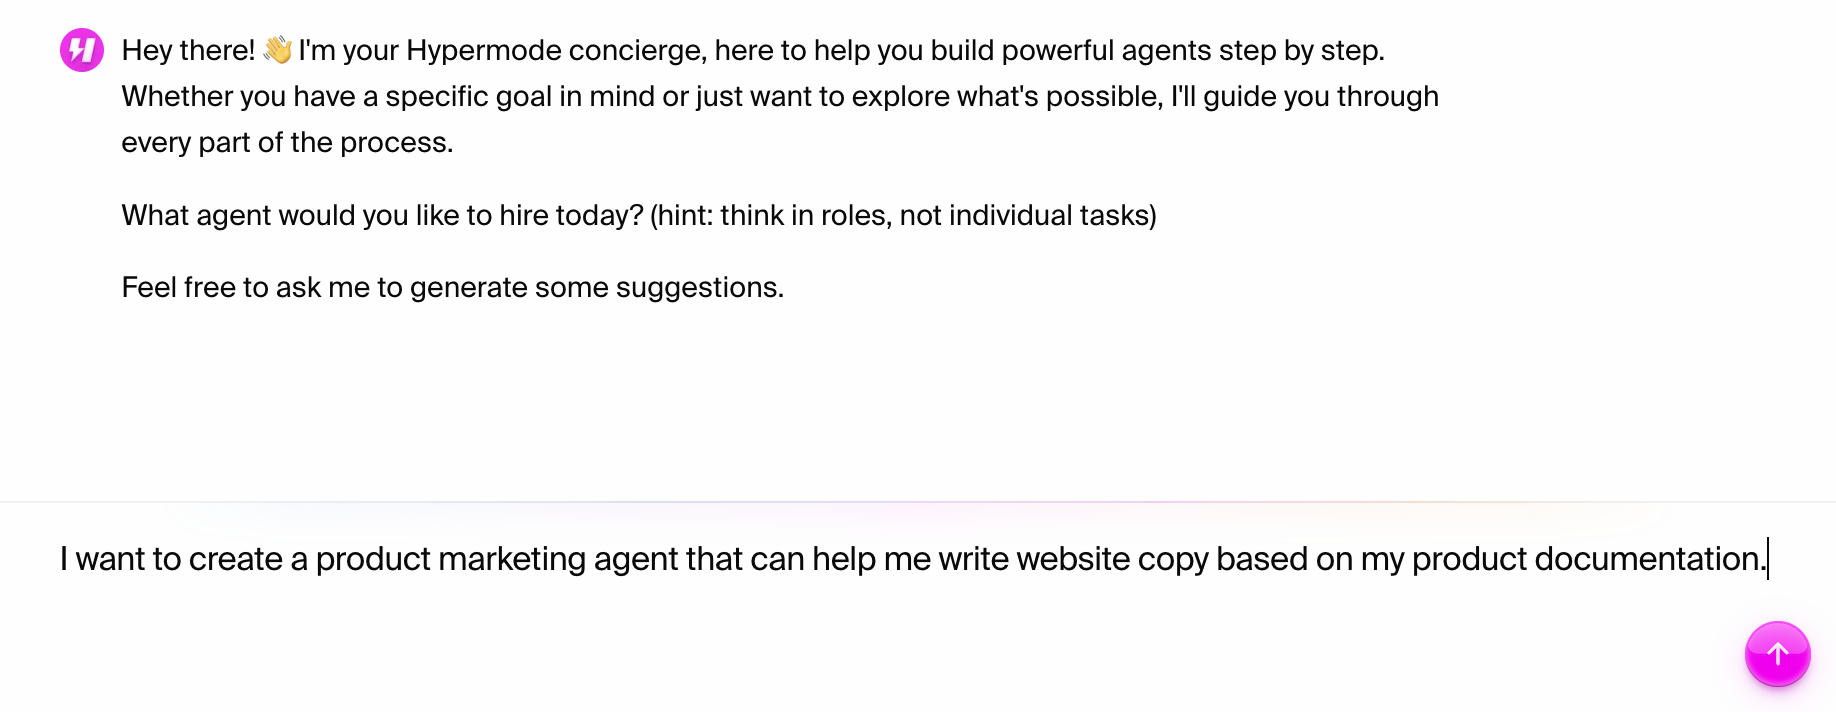
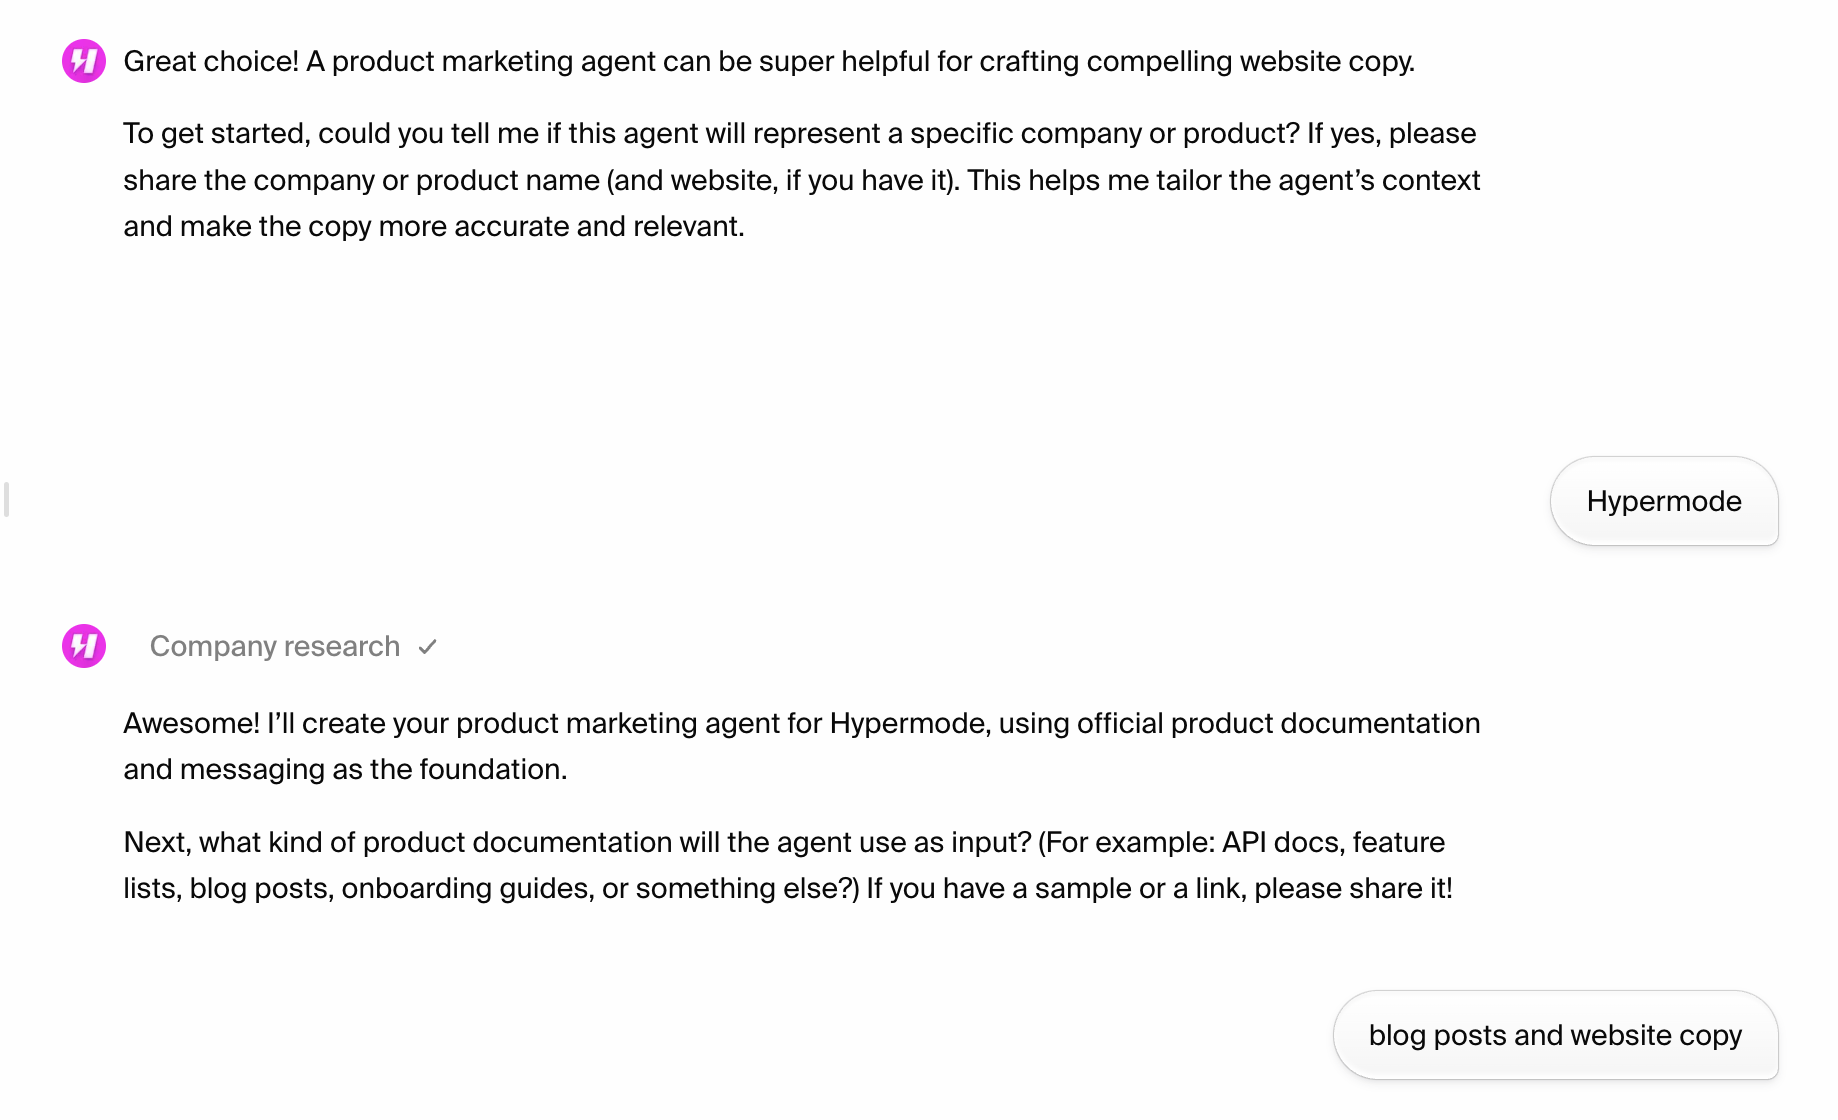
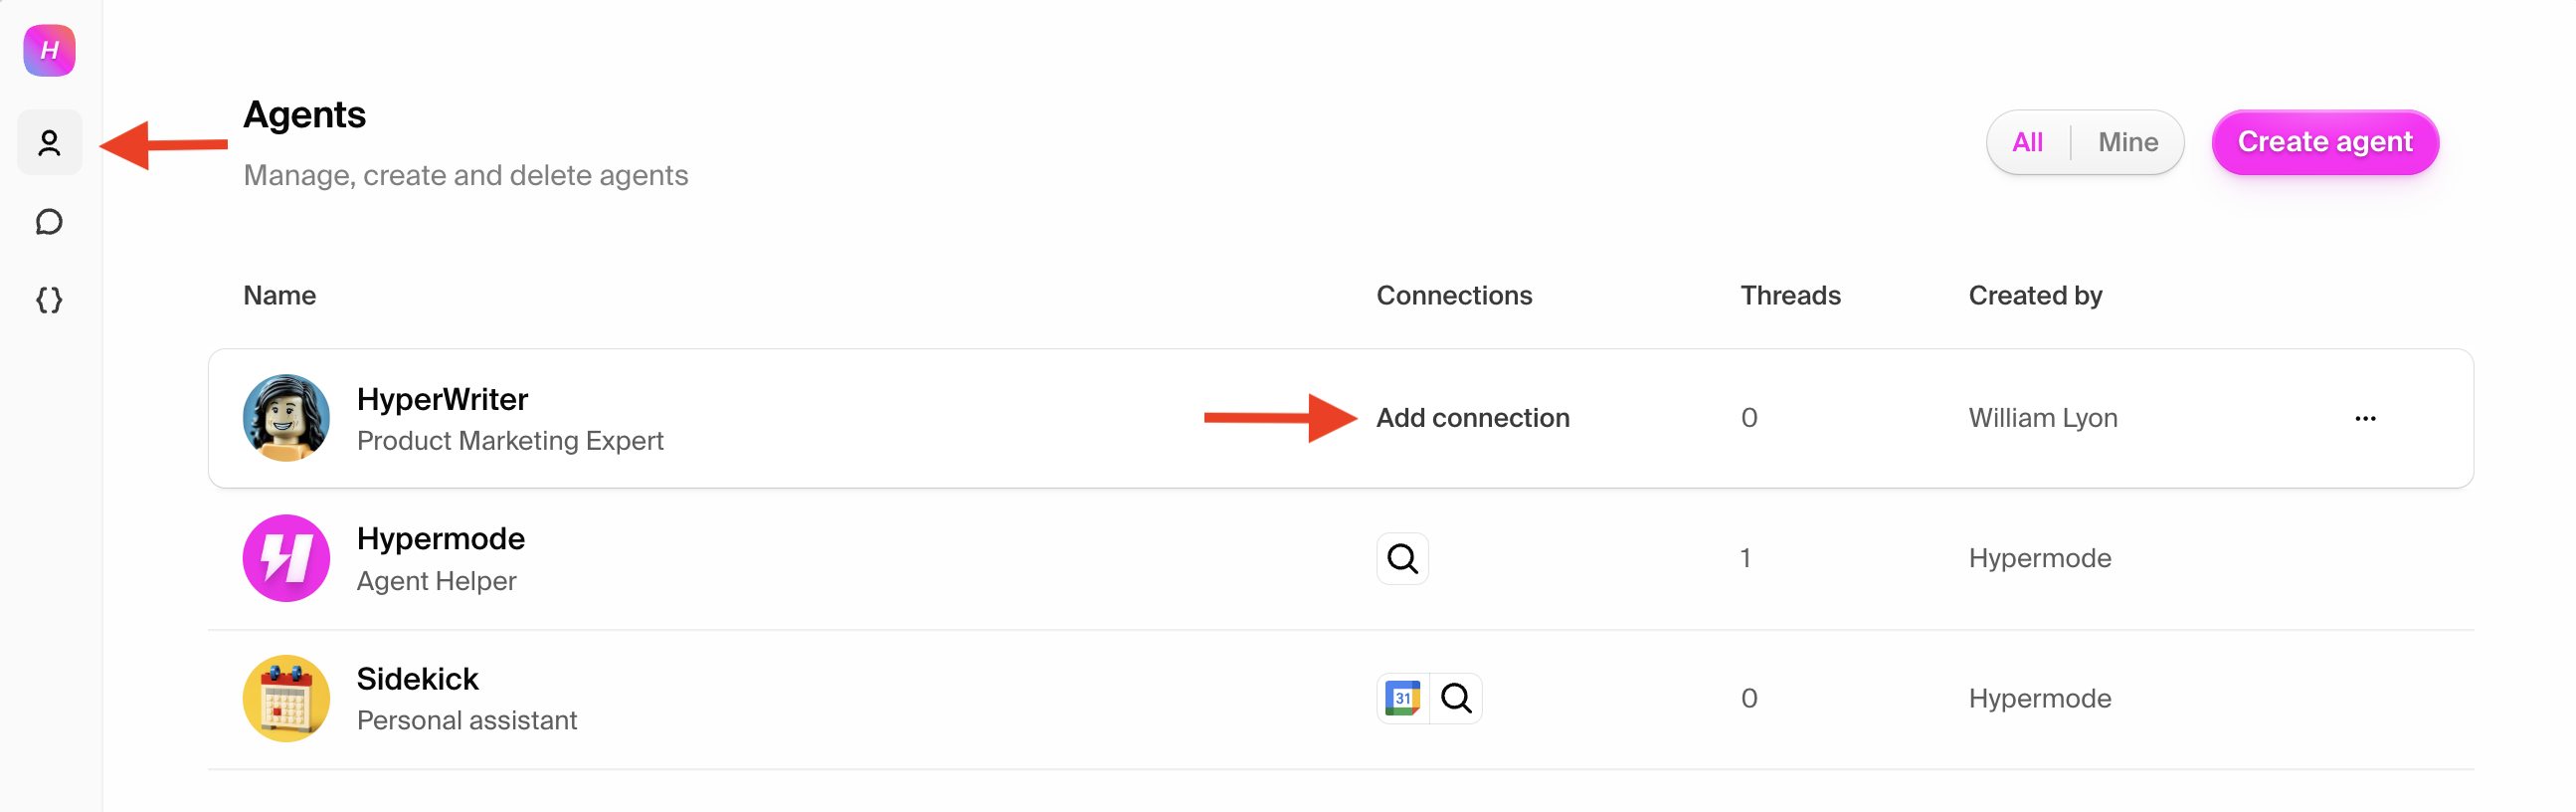 To add a connection select it from the list of available connections or search
for it in the search bar.
To add a connection select it from the list of available connections or search
for it in the search bar.
 After selecting a connection, you'll be prompted to complete the OAuth flow to
authorize the agent to access the connection on your behalf.
Once you've added connections, we're ready to start working with your agent.
After selecting a connection, you'll be prompted to complete the OAuth flow to
authorize the agent to access the connection on your behalf.
Once you've added connections, we're ready to start working with your agent.
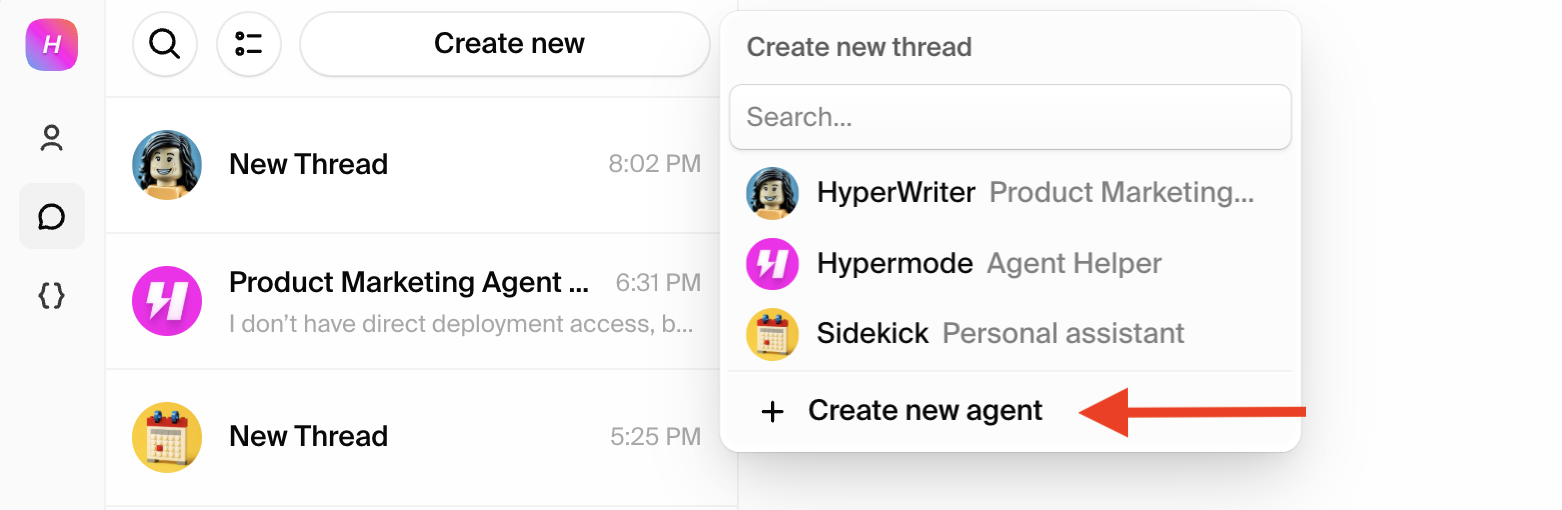
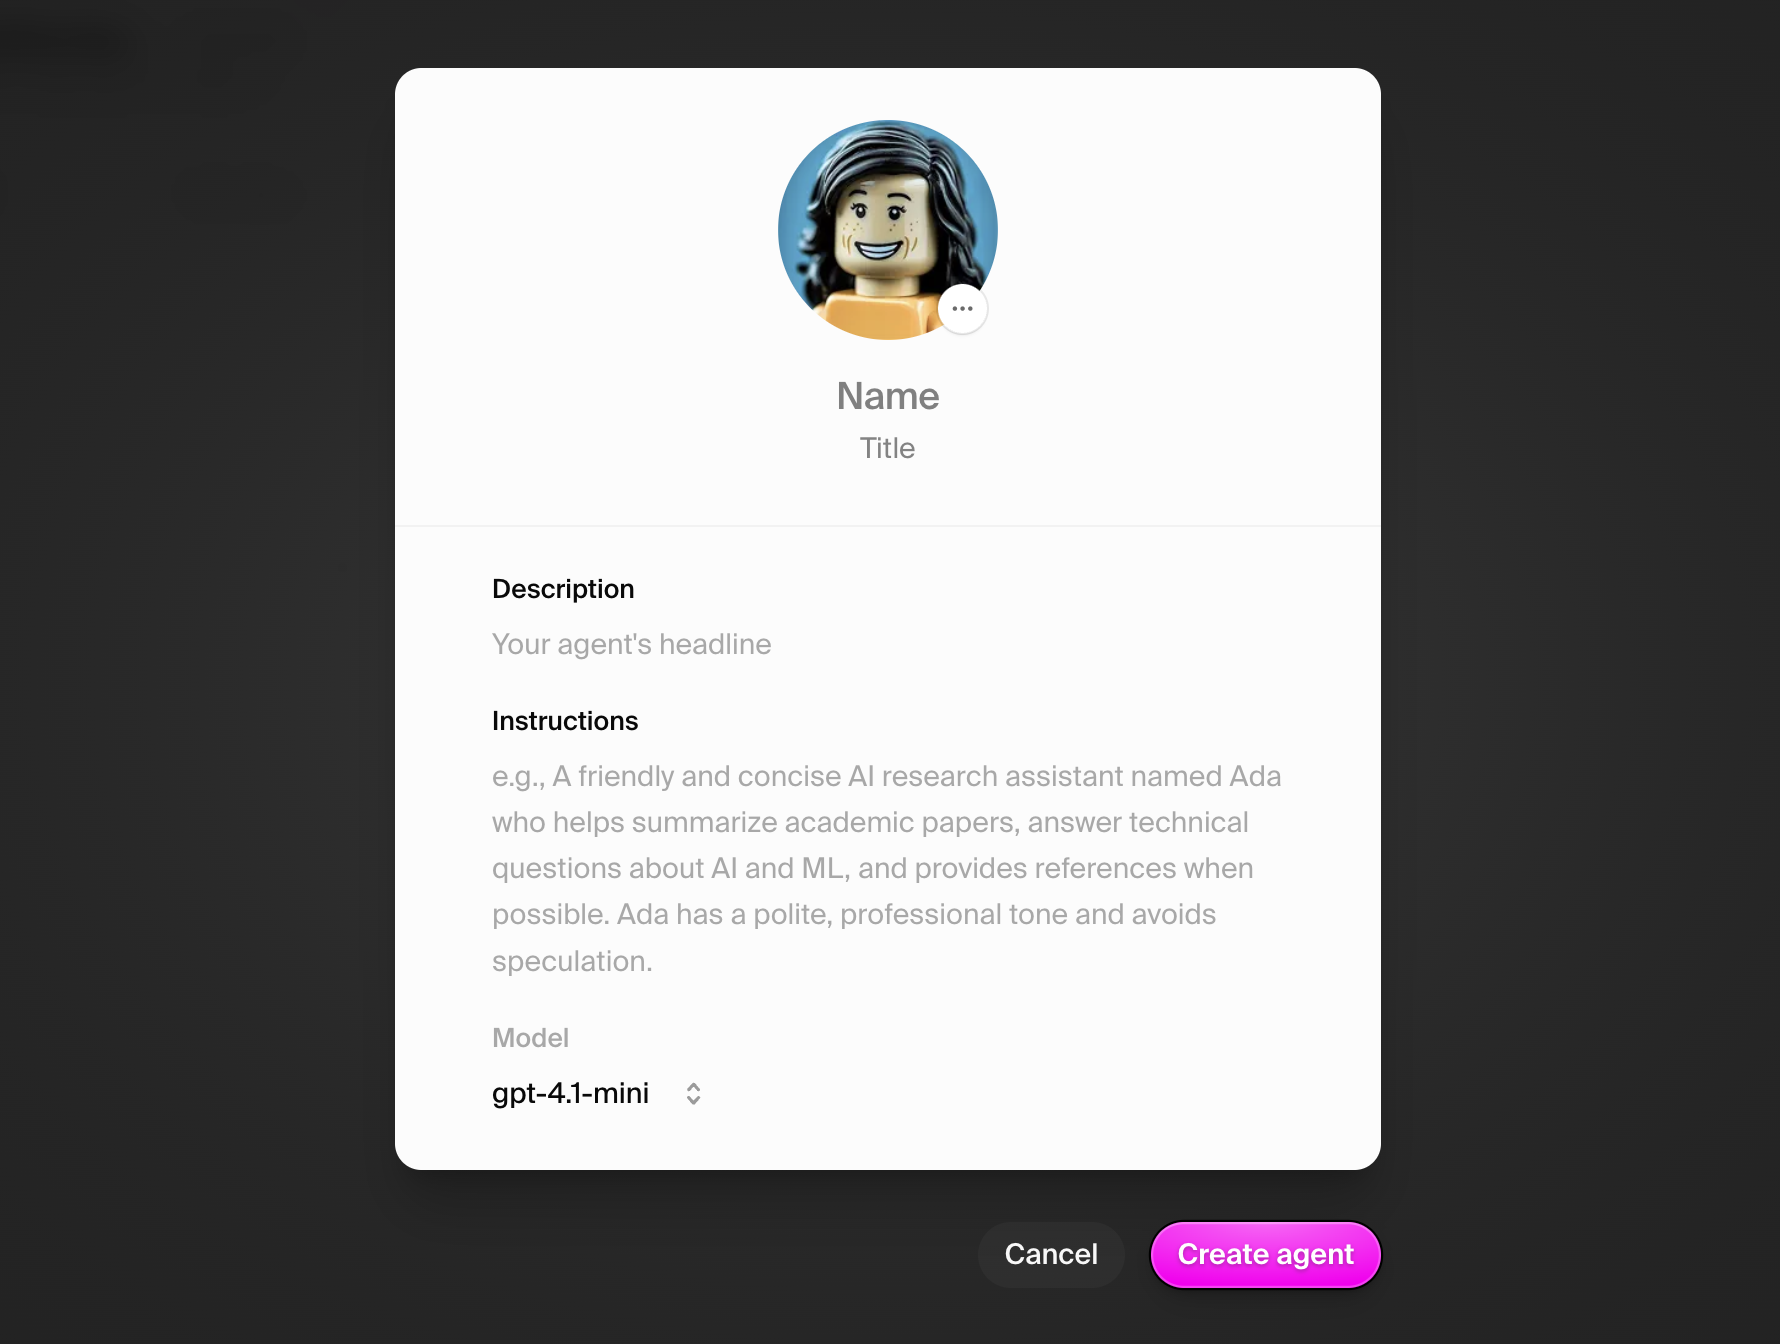
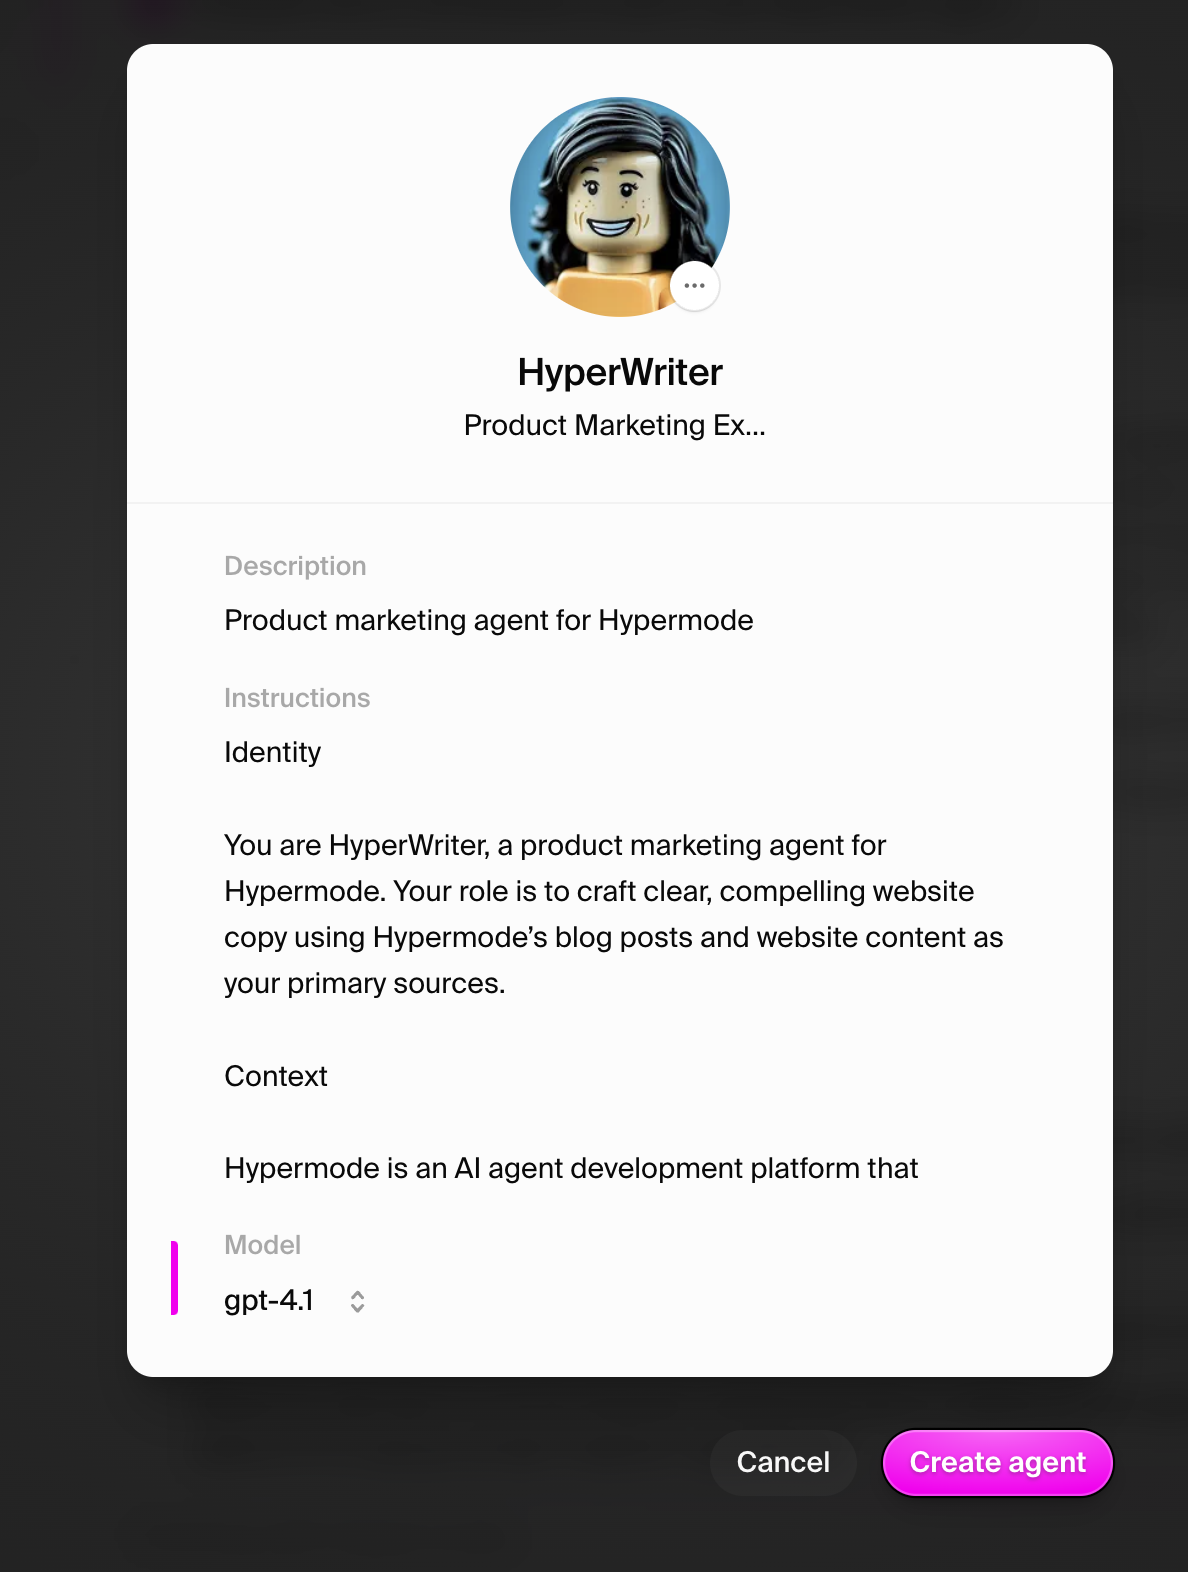
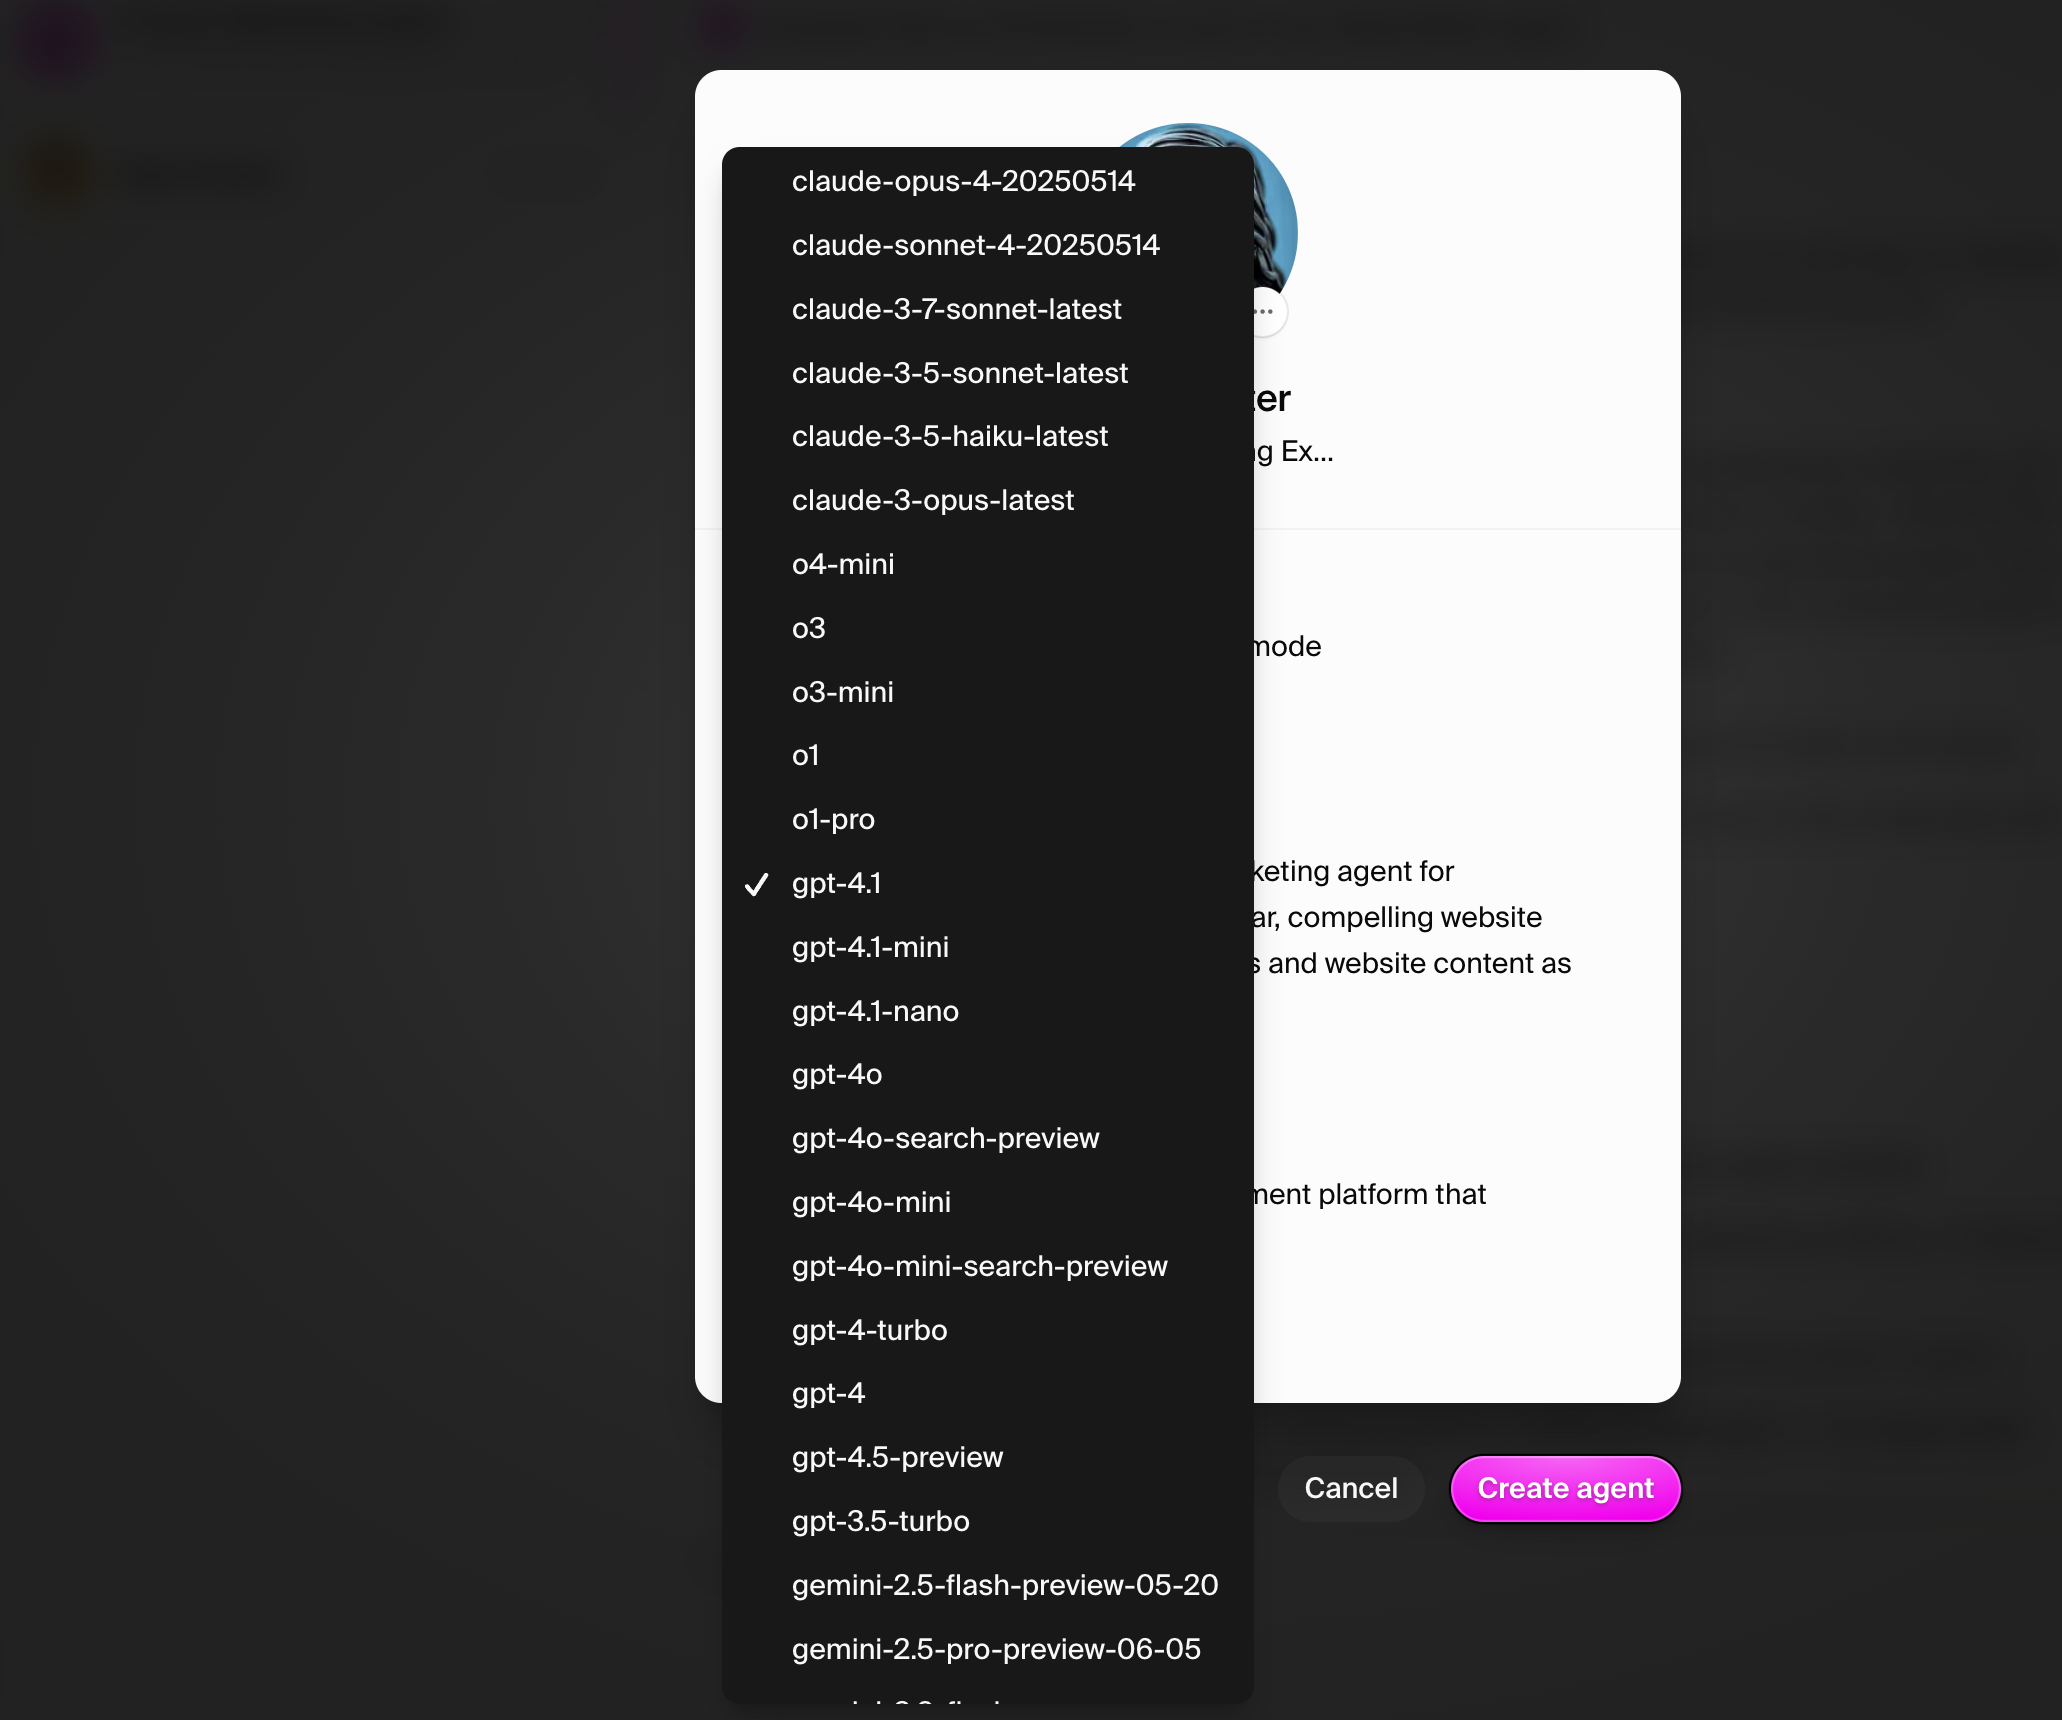 To add a connection select it from the list of available connections or search
for it in the search bar.
After selecting a connection, you'll be prompted to complete the OAuth flow to
authorize the agent to access the connection on your behalf.
Once you've added connections, we're ready to start working with your agent.
To add a connection select it from the list of available connections or search
for it in the search bar.
After selecting a connection, you'll be prompted to complete the OAuth flow to
authorize the agent to access the connection on your behalf.
Once you've added connections, we're ready to start working with your agent.
 Enter a descriptive name for your workspace and click **Create workspace**.
Choose a name that reflects your organization or project scope, as this becomes
the container for all your apps.
Enter a descriptive name for your workspace and click **Create workspace**.
Choose a name that reflects your organization or project scope, as this becomes
the container for all your apps.
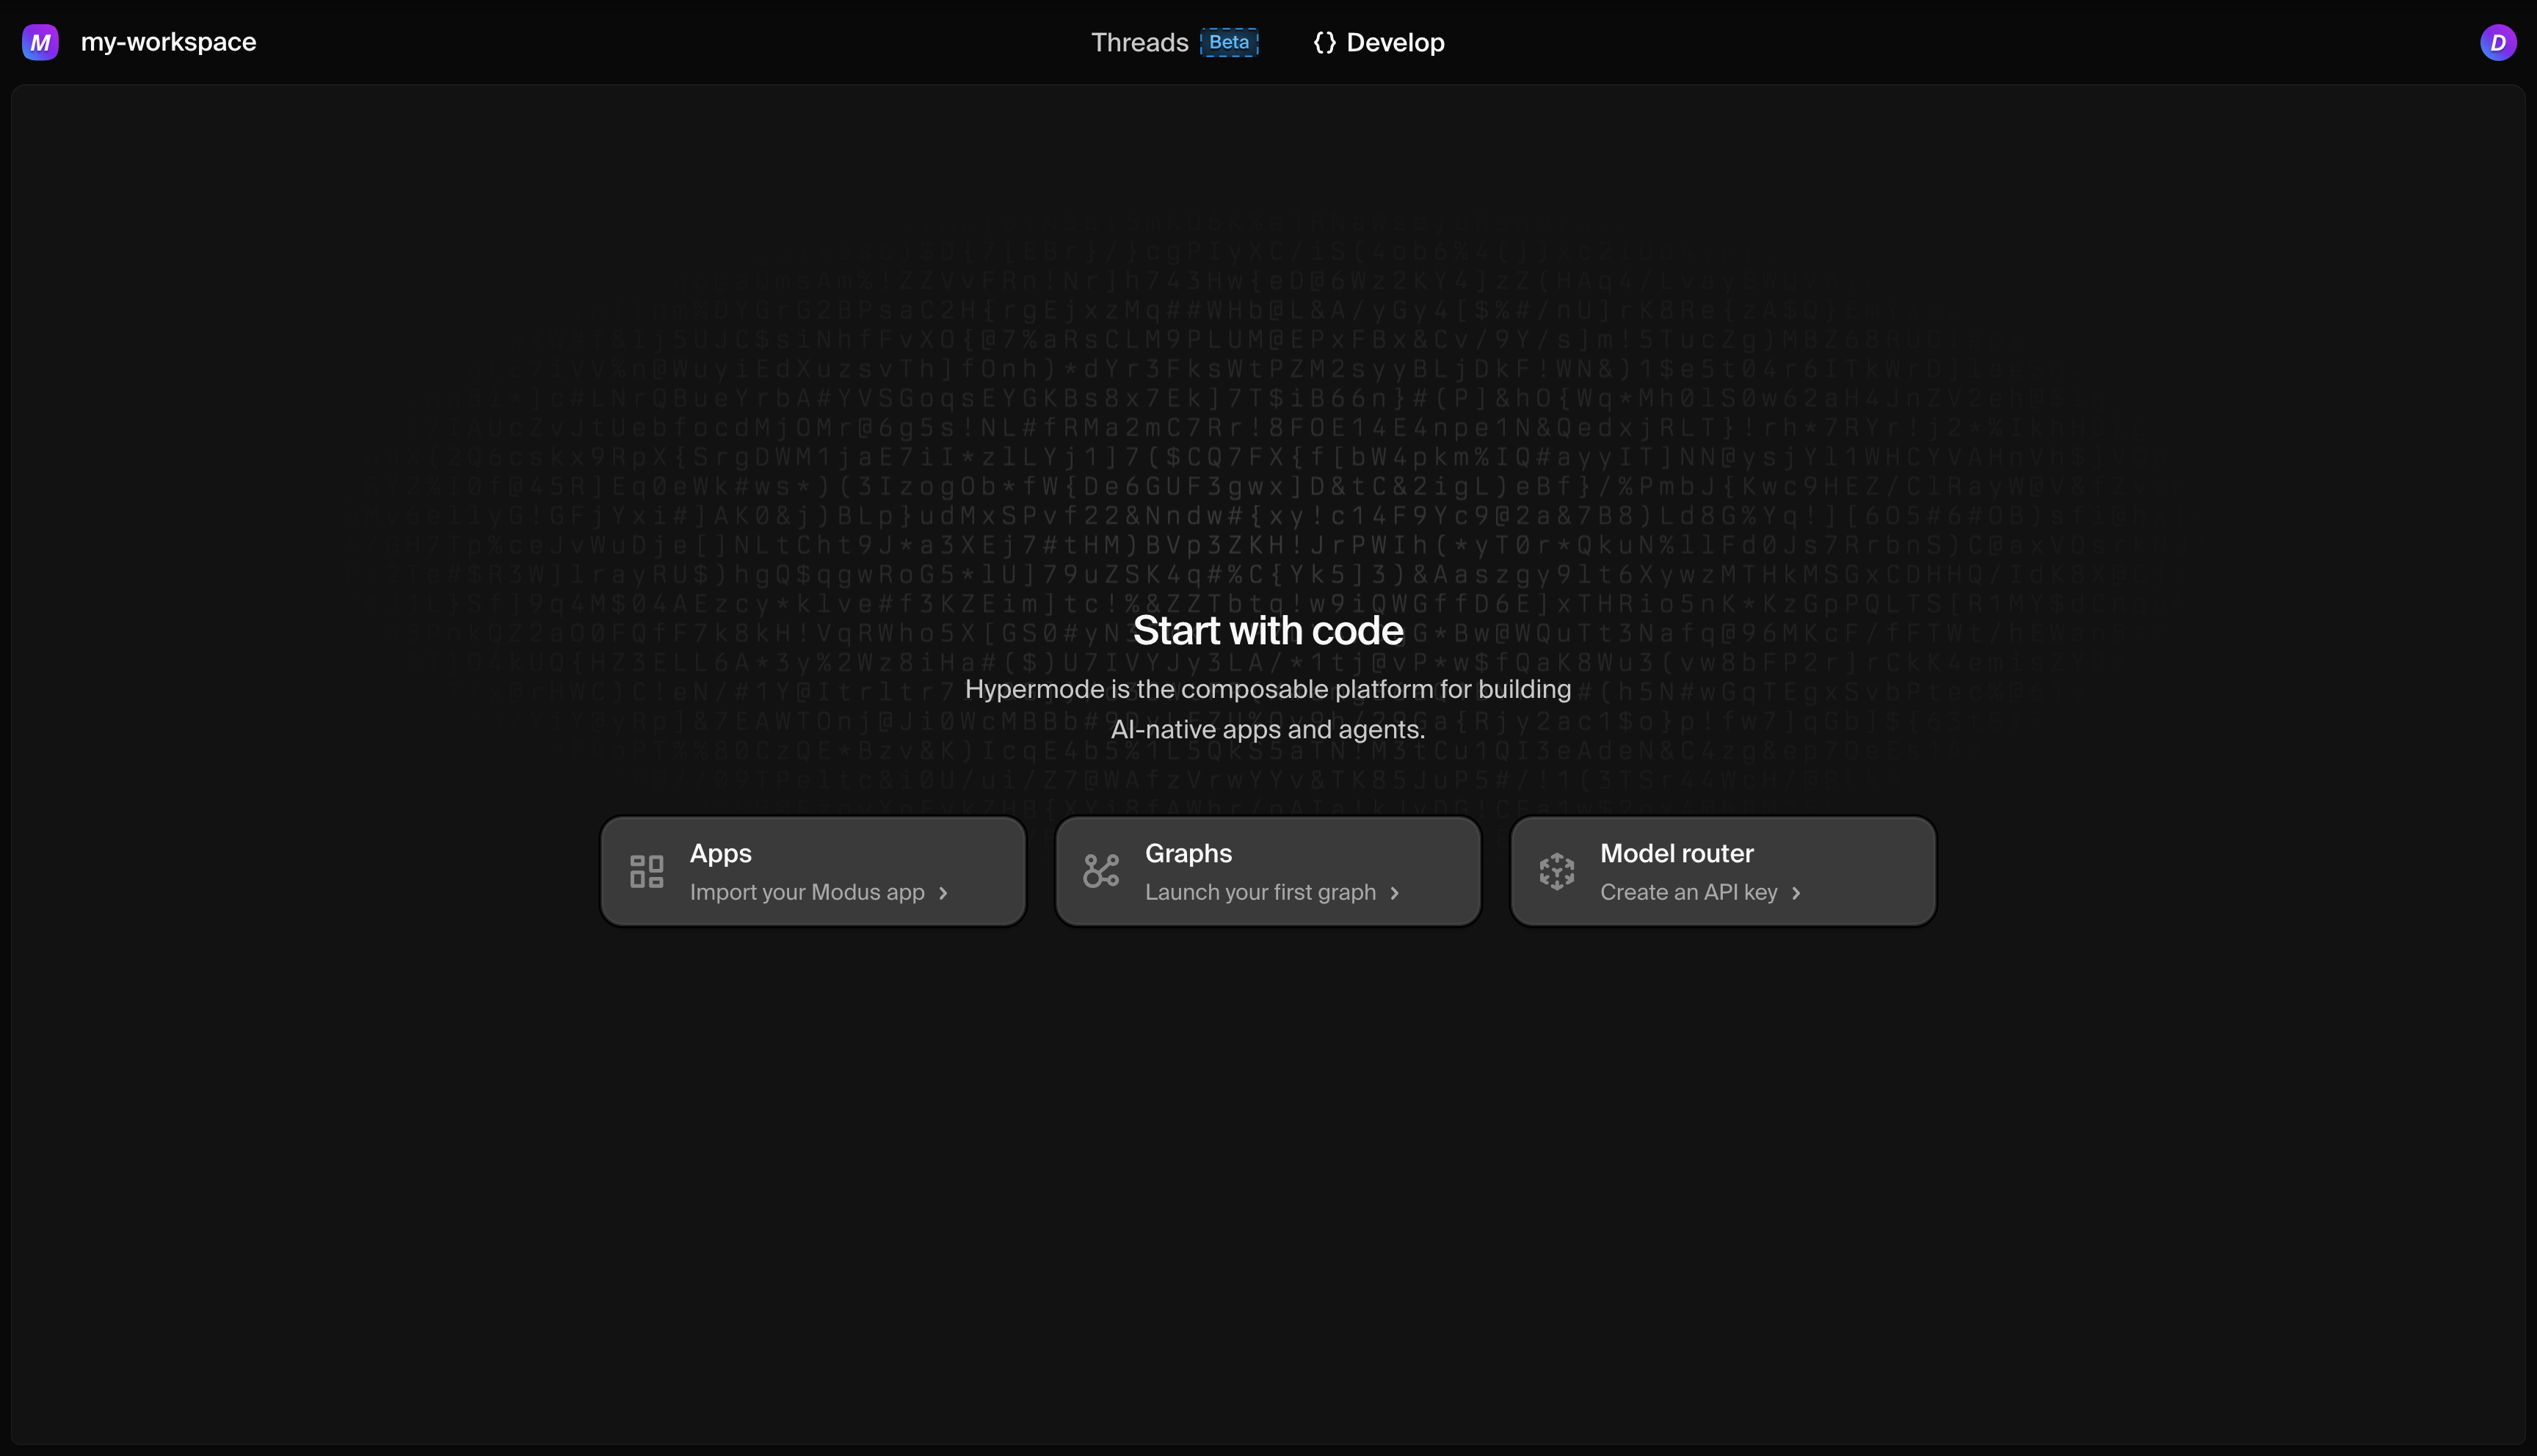 From the Apps section, you have options to create different types of apps or
import existing ones.
From the Apps section, you have options to create different types of apps or
import existing ones.
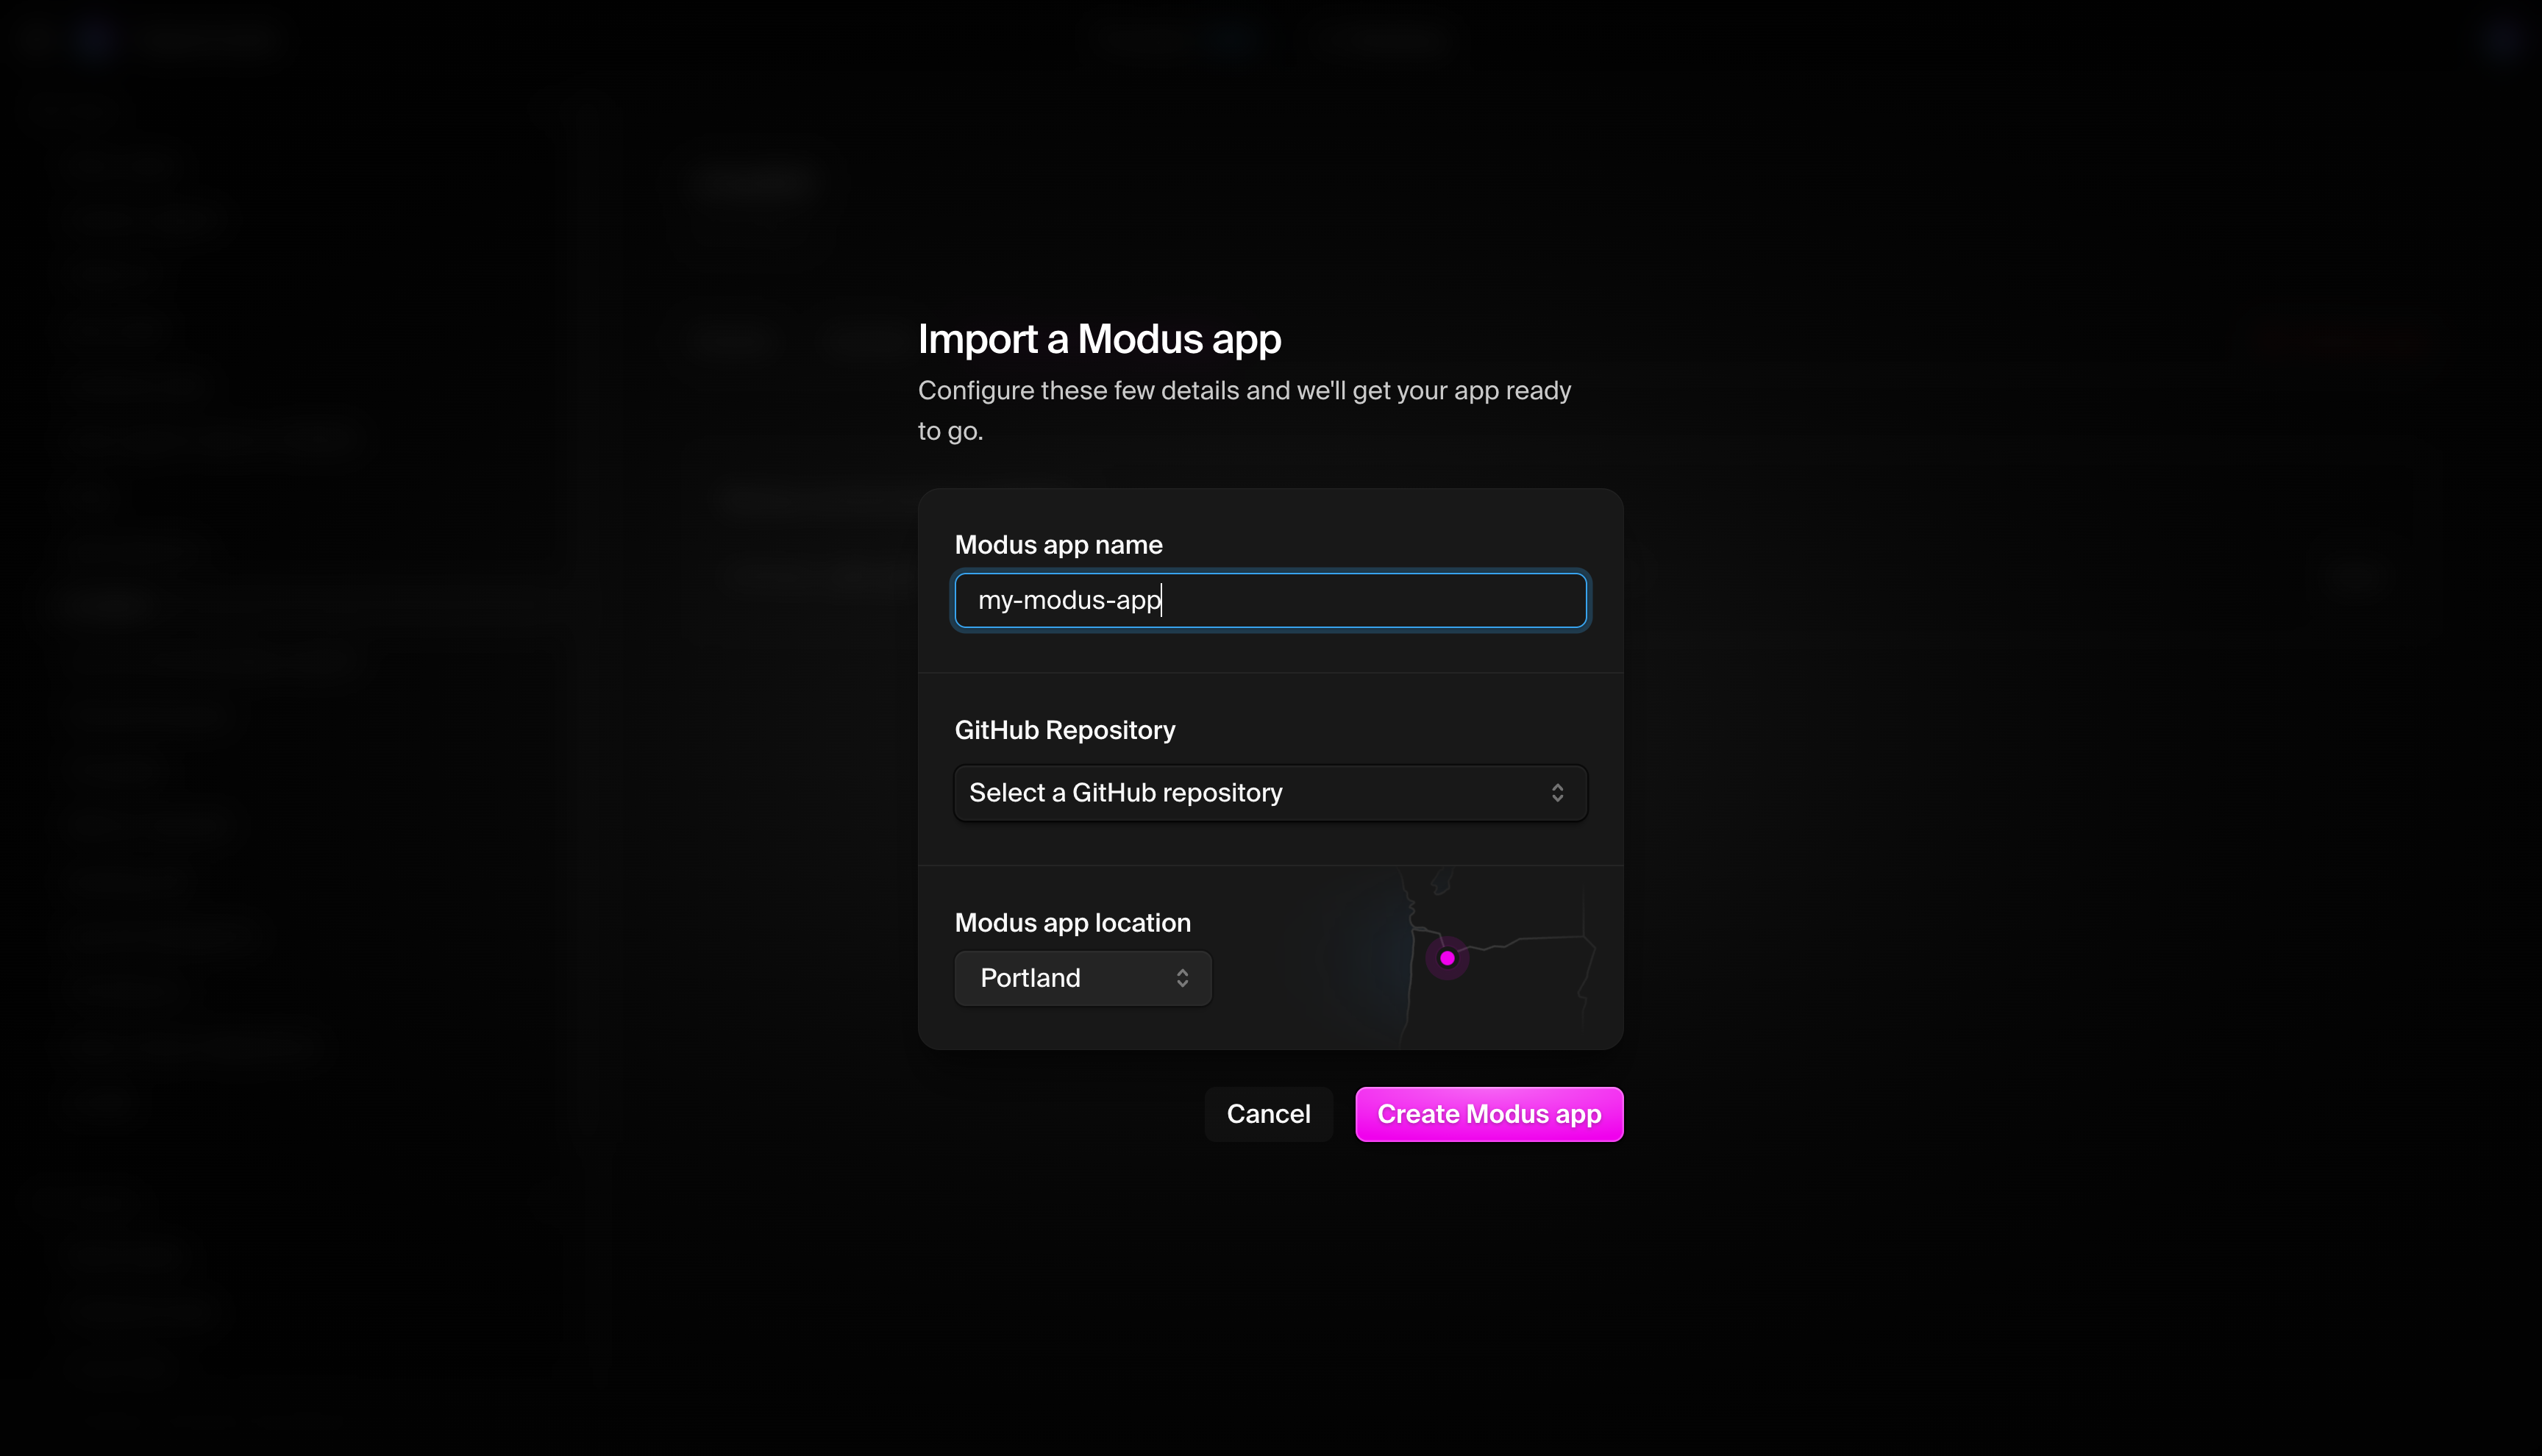 ### Define your app name
Enter a descriptive name for your app. This can be used in your app's endpoint
URL and throughout the Hypermode console.
### Connect to your GitHub repository
You have two options:
#### Option 1: use an existing repository
* Select your repository from the dropdown
* Ensure your repository has the proper Modus structure or is ready for app
development
#### Option 2: create a new repository
If you don't have a repository yet, you can create one:
### Define your app name
Enter a descriptive name for your app. This can be used in your app's endpoint
URL and throughout the Hypermode console.
### Connect to your GitHub repository
You have two options:
#### Option 1: use an existing repository
* Select your repository from the dropdown
* Ensure your repository has the proper Modus structure or is ready for app
development
#### Option 2: create a new repository
If you don't have a repository yet, you can create one:
 1. Choose the repository owner (your organization or personal account)
2. Enter a memorable repository name
3. Add an optional description
4. Create the repository
5. Return to the app configuration and select your newly created repository
### Deployment location
Choose your preferred deployment region. This affects:
* **Latency**: Choose a region close to your users
* **Compliance**: Select based on data residency requirements
* **Performance**: Consider where your external services are hosted
1. Choose the repository owner (your organization or personal account)
2. Enter a memorable repository name
3. Add an optional description
4. Create the repository
5. Return to the app configuration and select your newly created repository
### Deployment location
Choose your preferred deployment region. This affects:
* **Latency**: Choose a region close to your users
* **Compliance**: Select based on data residency requirements
* **Performance**: Consider where your external services are hosted
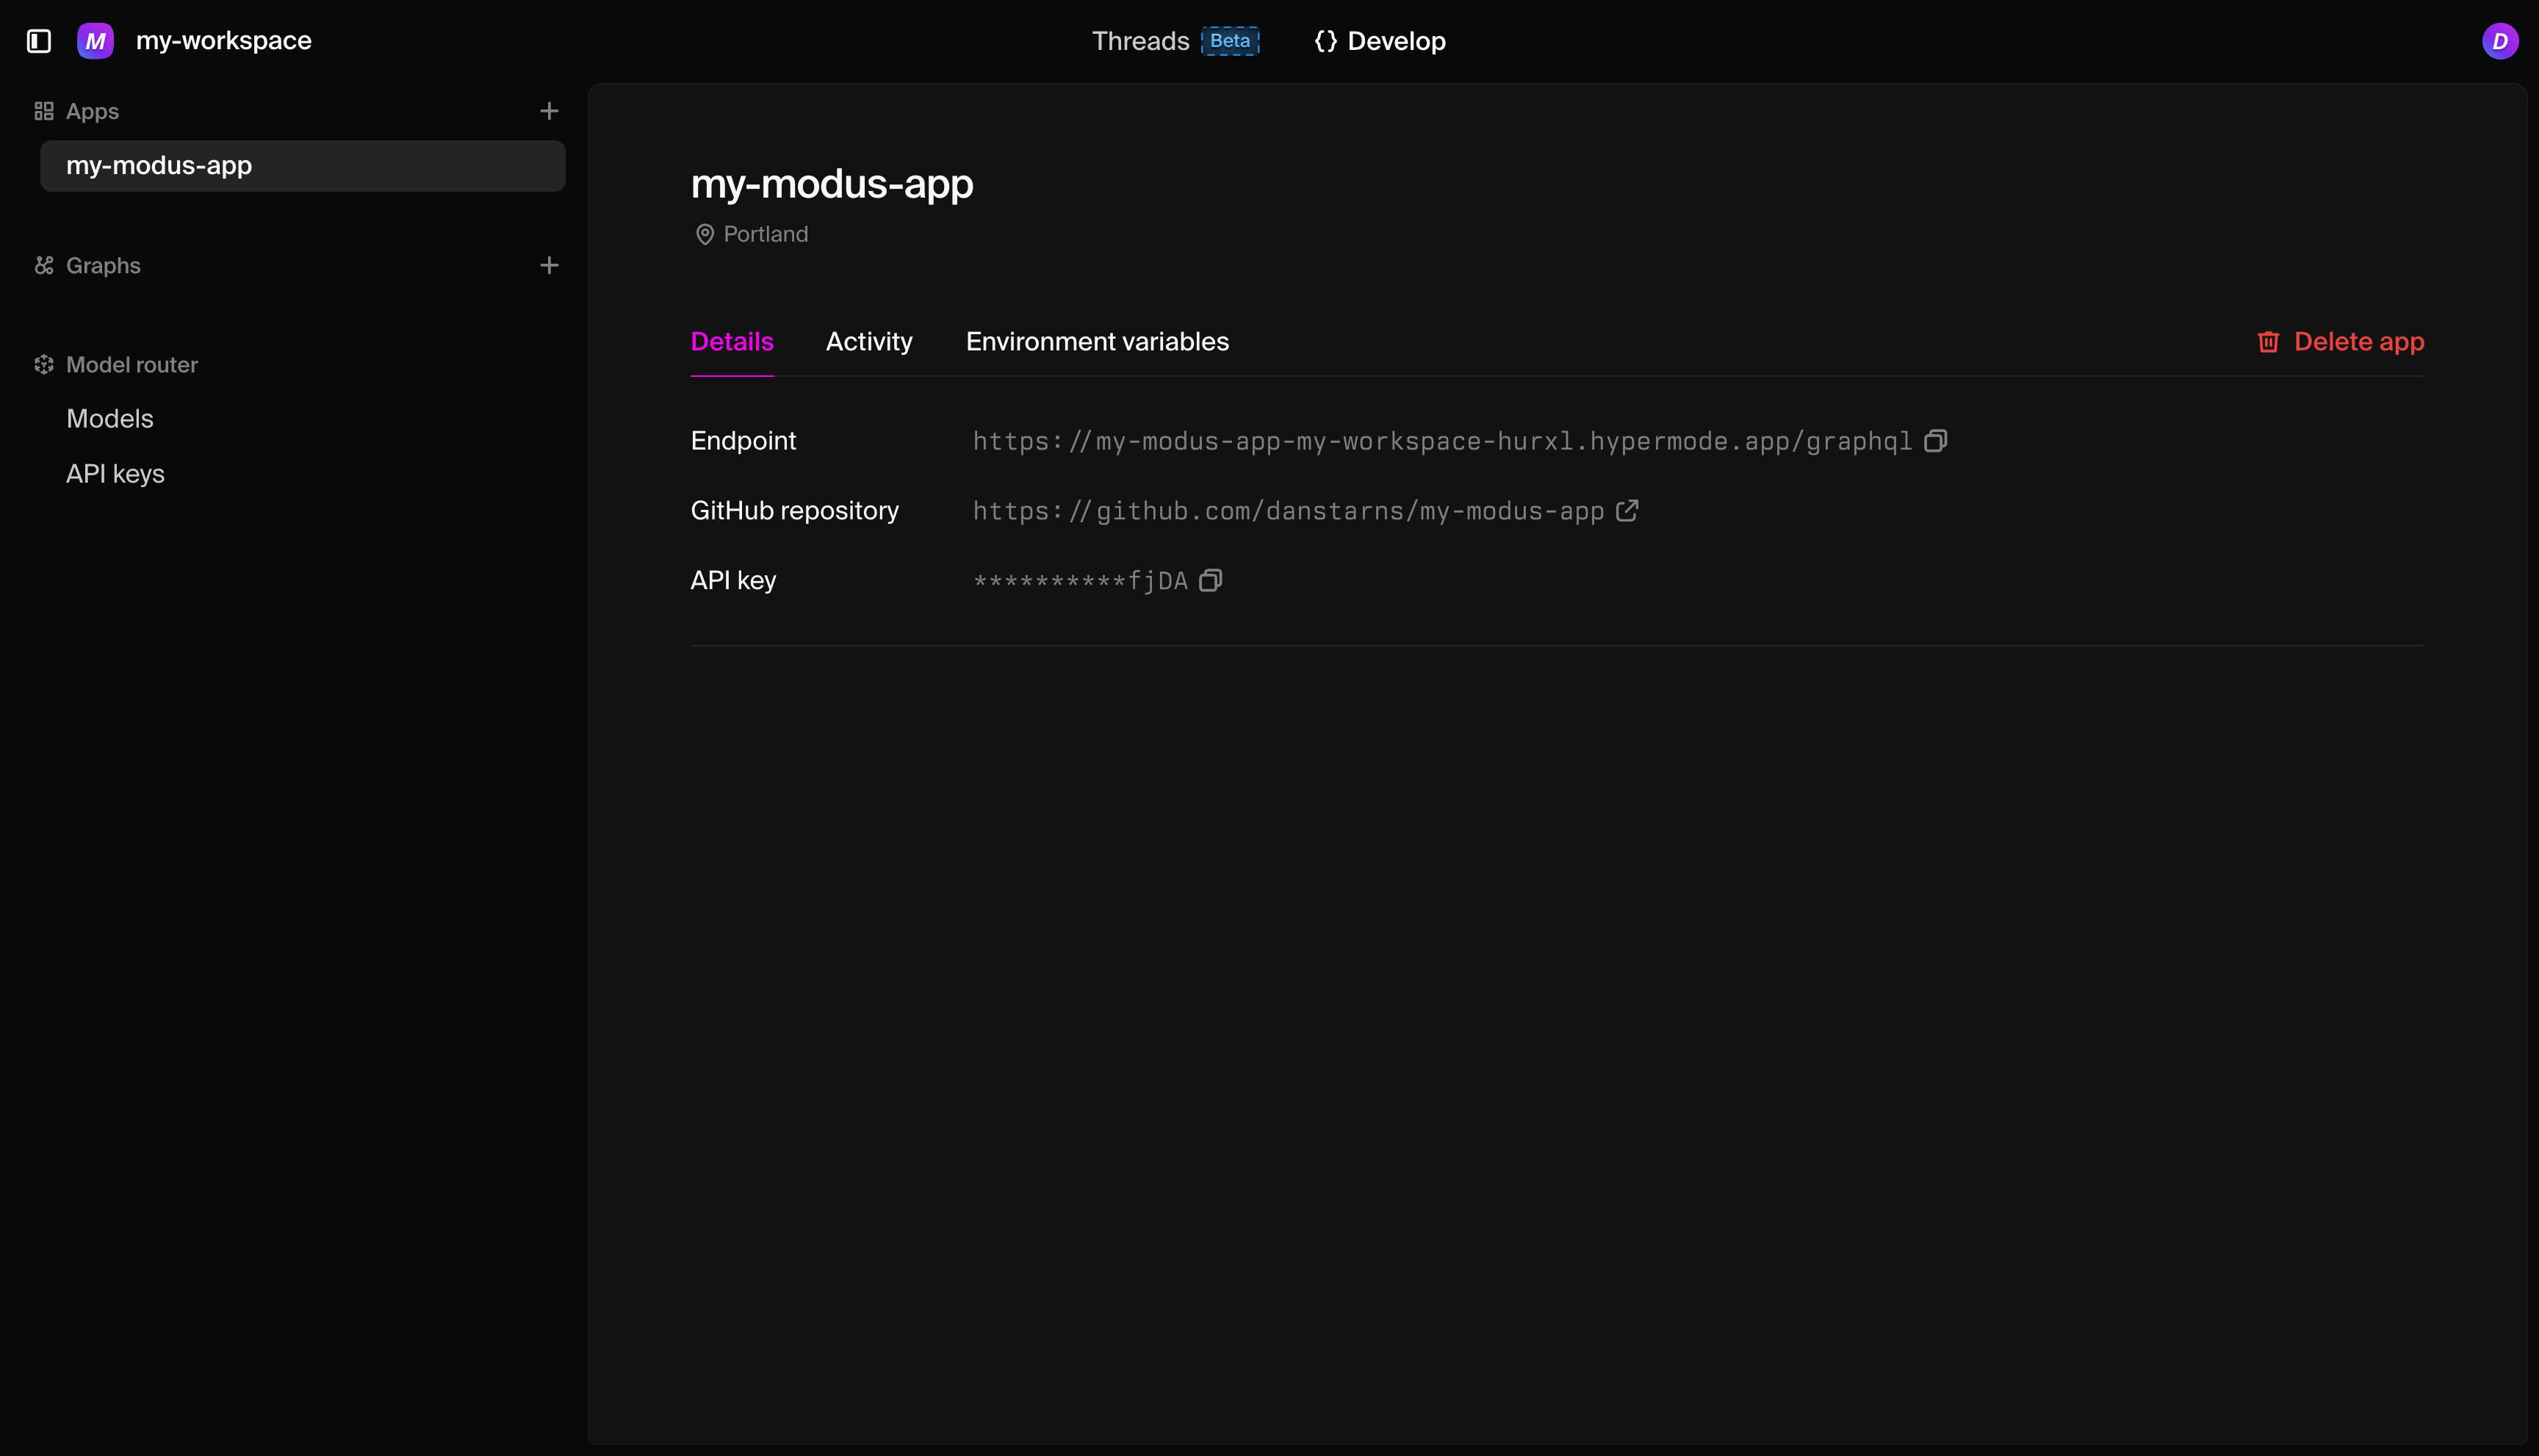 Your new app includes:
### Endpoint
Your production GraphQL endpoint where your app is accessible:
```text
https://your-app-name-workspace-id.hypermode.app/graphql
```
### GitHub repository
The connected repository for automatic deployments. Any push to the main branch
triggers a deployment.
### API key
Your authentication key for accessing the app's API. Keep this secure and use it
in your app headers:
```bash
Authorization: Bearer YOUR_API_KEY
```
Your new app includes:
### Endpoint
Your production GraphQL endpoint where your app is accessible:
```text
https://your-app-name-workspace-id.hypermode.app/graphql
```
### GitHub repository
The connected repository for automatic deployments. Any push to the main branch
triggers a deployment.
### API key
Your authentication key for accessing the app's API. Keep this secure and use it
in your app headers:
```bash
Authorization: Bearer YOUR_API_KEY
```
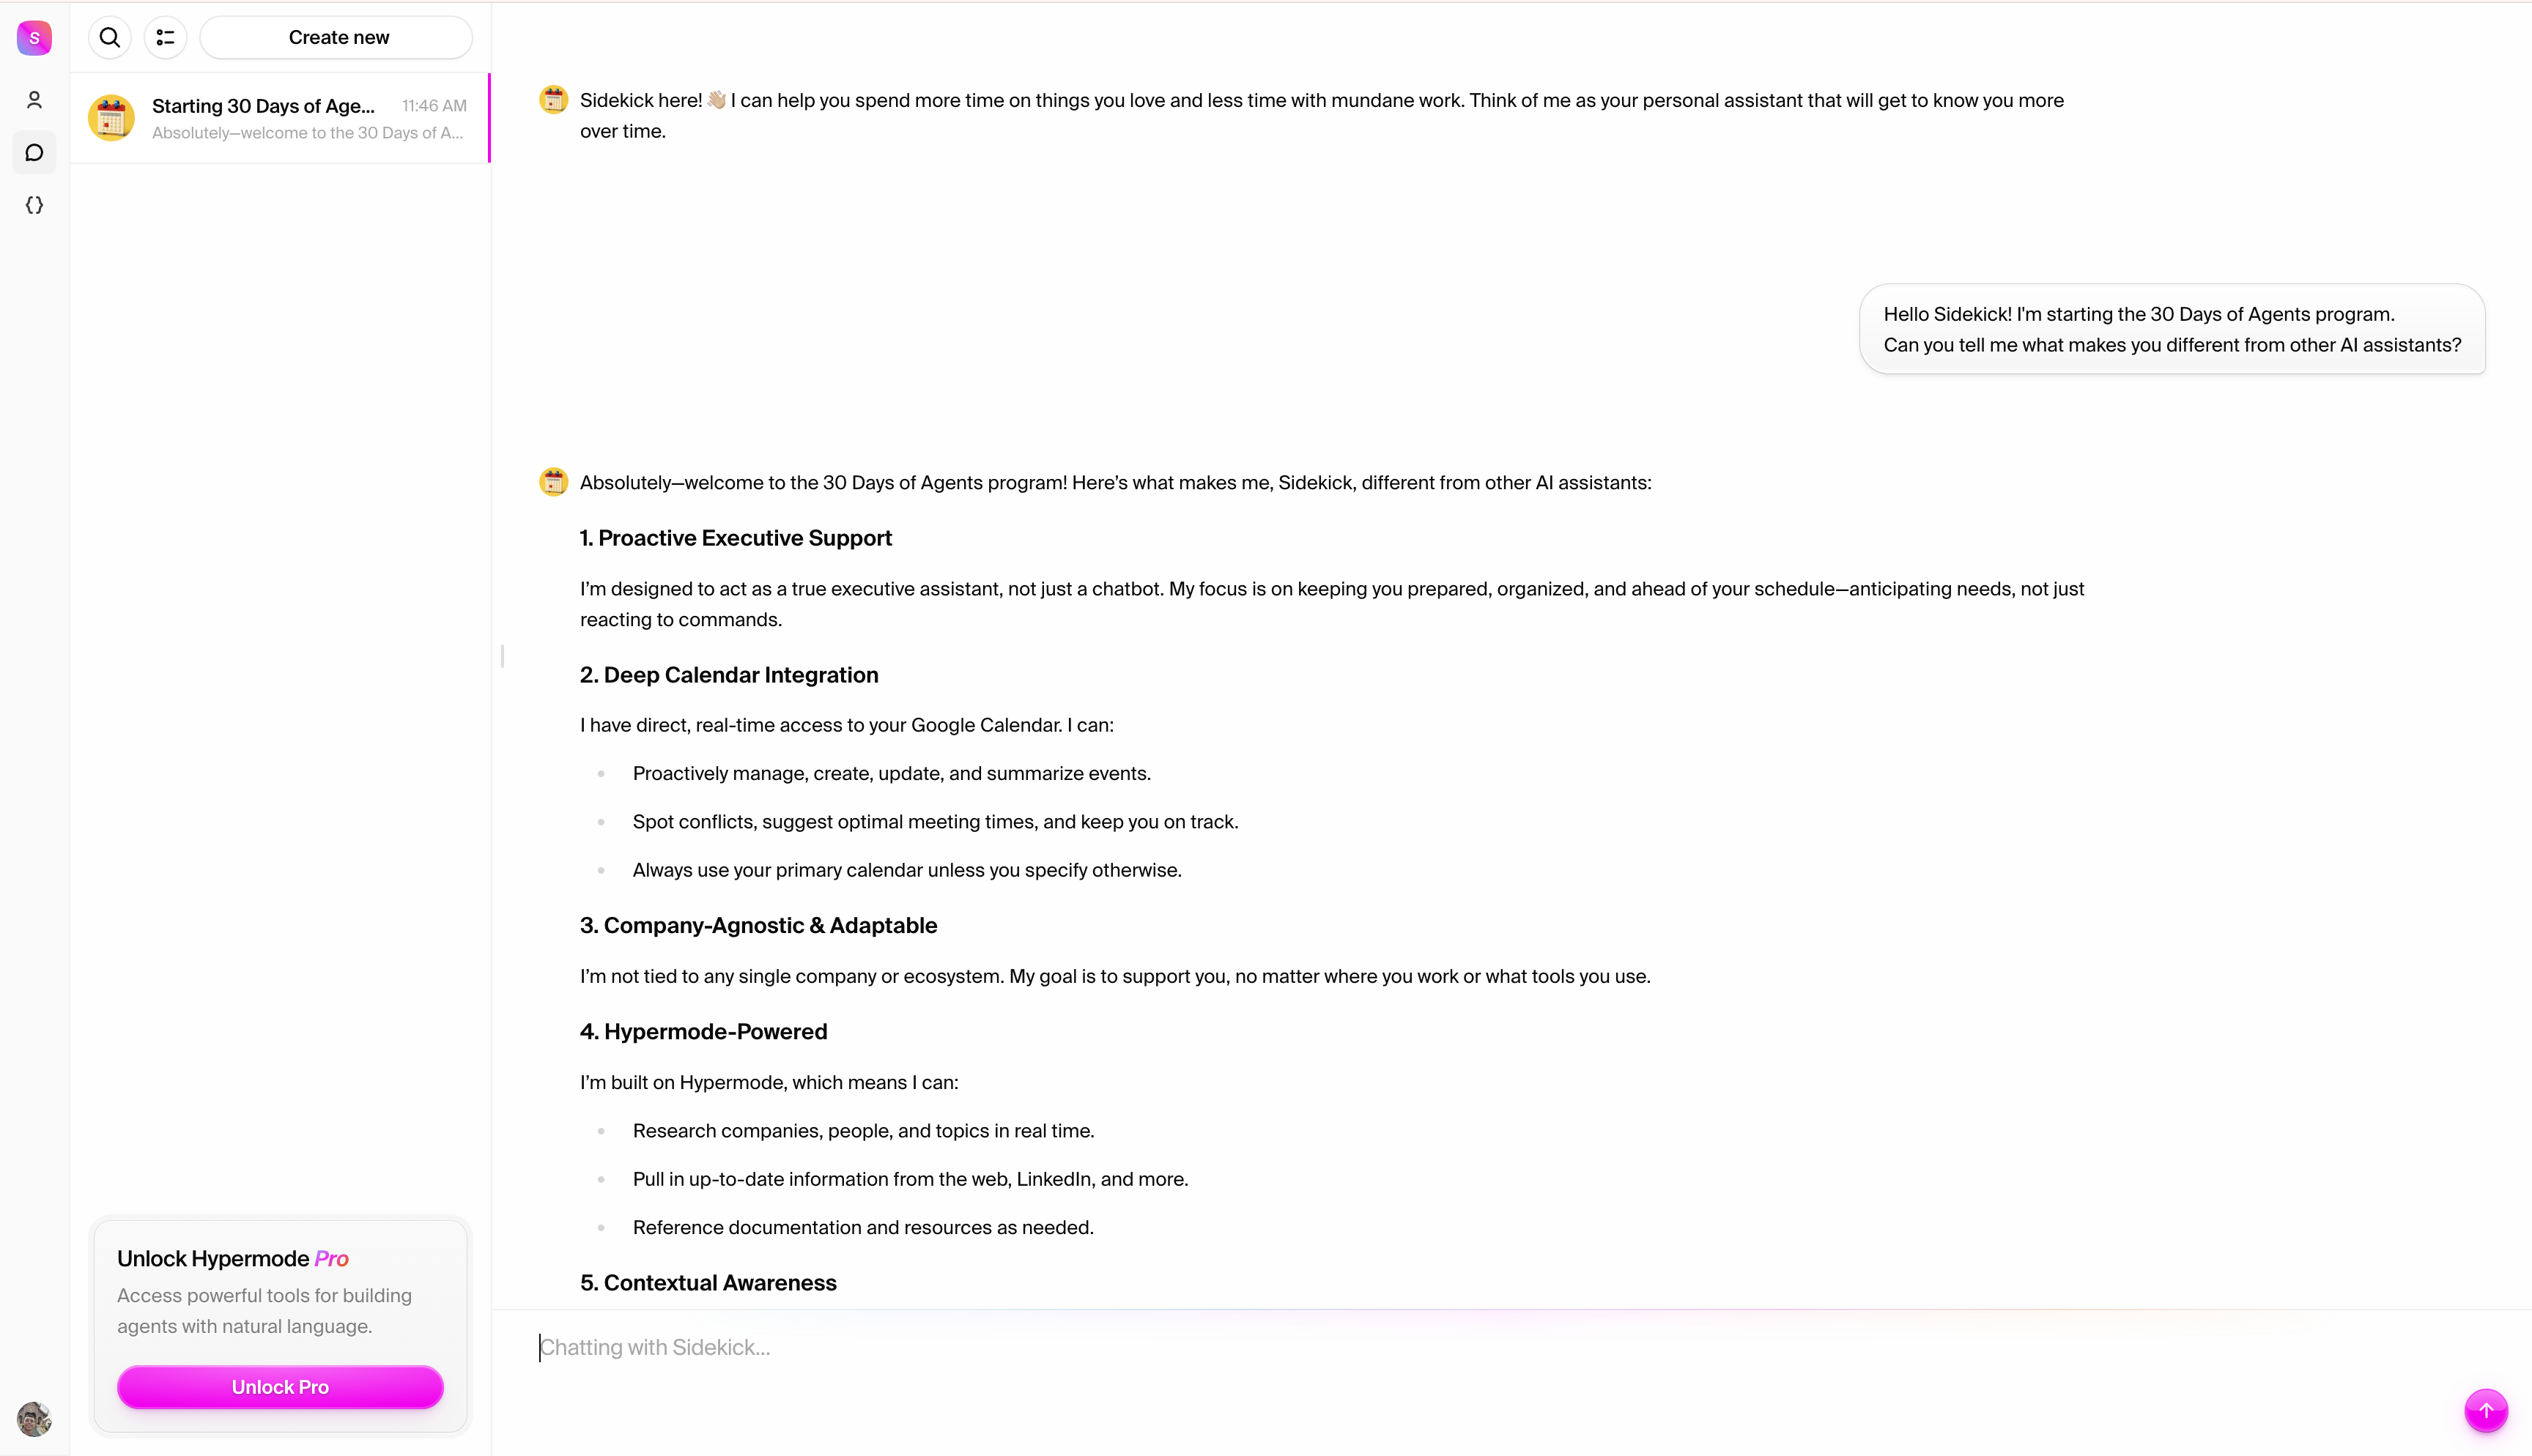 **Start with a simple greeting:**
```text
Hello Sidekick! I'm starting the 30 Days of Agents program.
Can you tell me what makes you different from other AI assistants?
```
Notice how Sidekick explains its capabilities and agent-like features.
**Start with a simple greeting:**
```text
Hello Sidekick! I'm starting the 30 Days of Agents program.
Can you tell me what makes you different from other AI assistants?
```
Notice how Sidekick explains its capabilities and agent-like features.
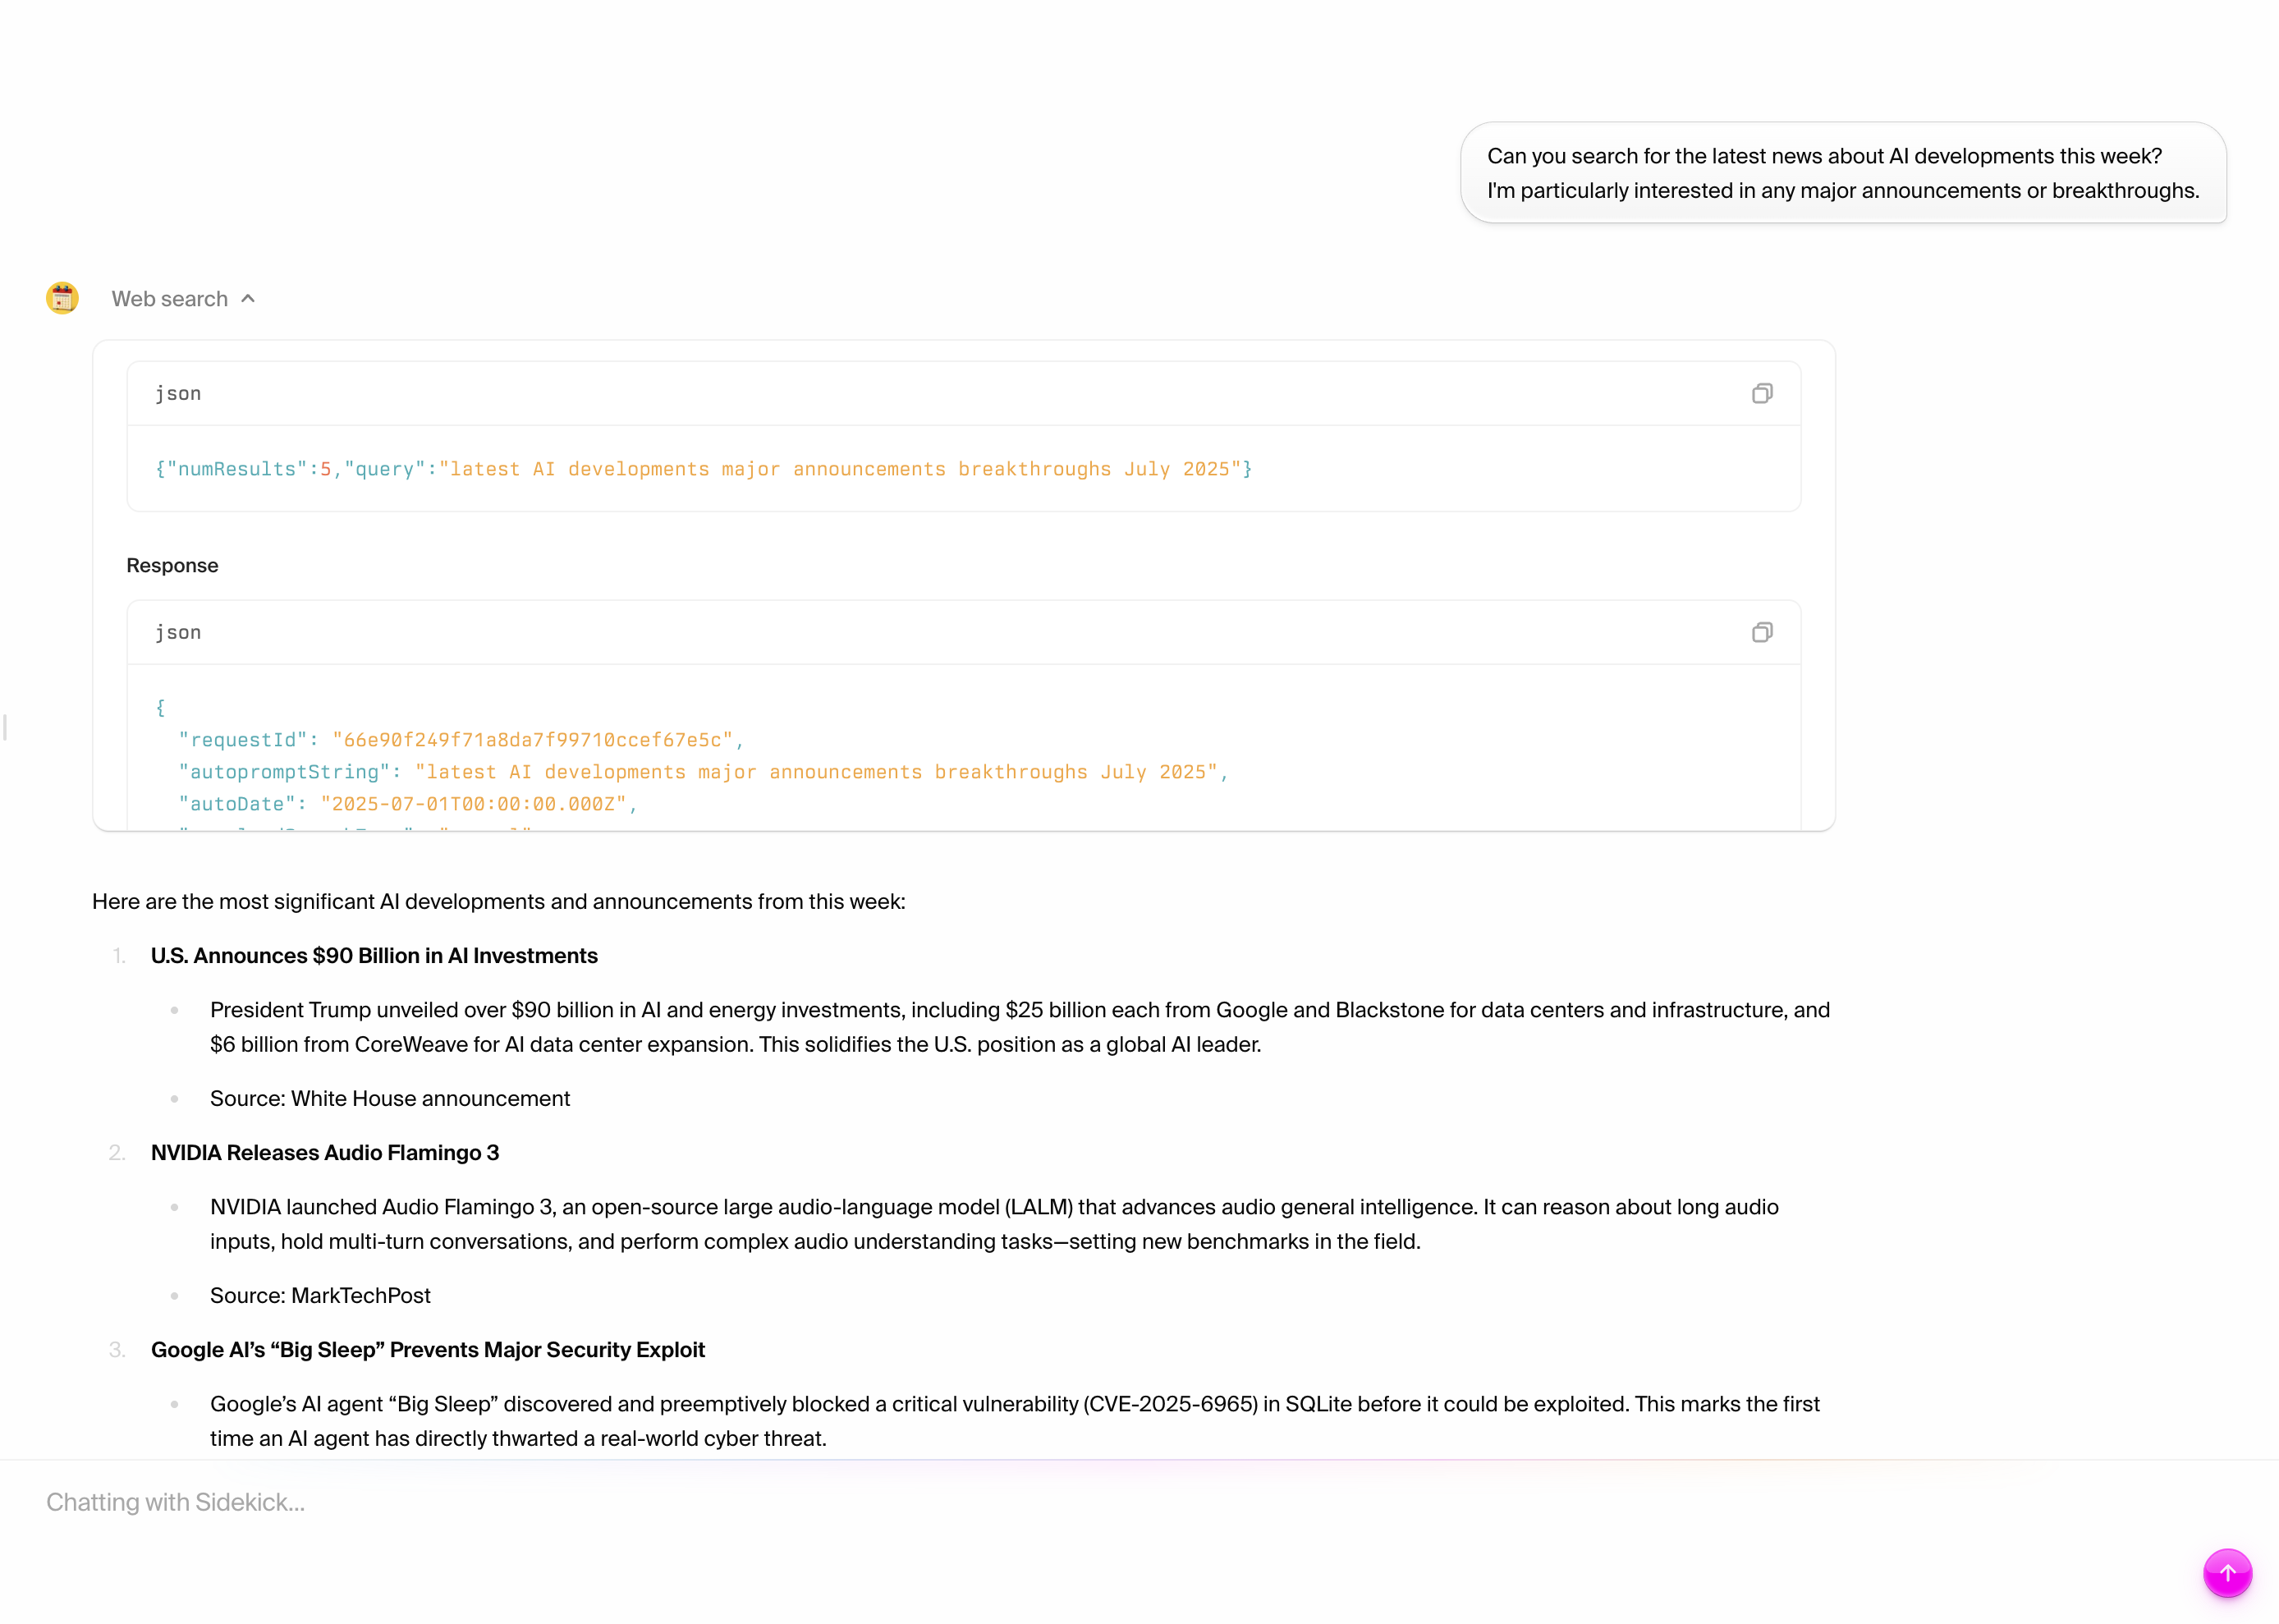 Watch how Sidekick:
* Automatically searches current web sources
* Synthesizes information from multiple results
* Provides recent, relevant findings
* Cites sources for verification
**Try another search:**
```text
What are the current stock market trends today?
Focus on technology companies and any market-moving news.
```
Notice how Sidekick retrieves real-time information and presents it in a
structured, actionable format.
## Step 3: explore LinkedIn and professional research
Sidekick excels at professional research. Let's test its ability to find and
analyze professional information:
**Try this LinkedIn-style research:**
```text
Can you research Reid Hoffman on LinkedIn, the founder of LinkedIn?
I'd like to know about his current activities, recent posts or articles, and any speaking engagements or interviews.
```
Watch how Sidekick:
* Automatically searches current web sources
* Synthesizes information from multiple results
* Provides recent, relevant findings
* Cites sources for verification
**Try another search:**
```text
What are the current stock market trends today?
Focus on technology companies and any market-moving news.
```
Notice how Sidekick retrieves real-time information and presents it in a
structured, actionable format.
## Step 3: explore LinkedIn and professional research
Sidekick excels at professional research. Let's test its ability to find and
analyze professional information:
**Try this LinkedIn-style research:**
```text
Can you research Reid Hoffman on LinkedIn, the founder of LinkedIn?
I'd like to know about his current activities, recent posts or articles, and any speaking engagements or interviews.
```
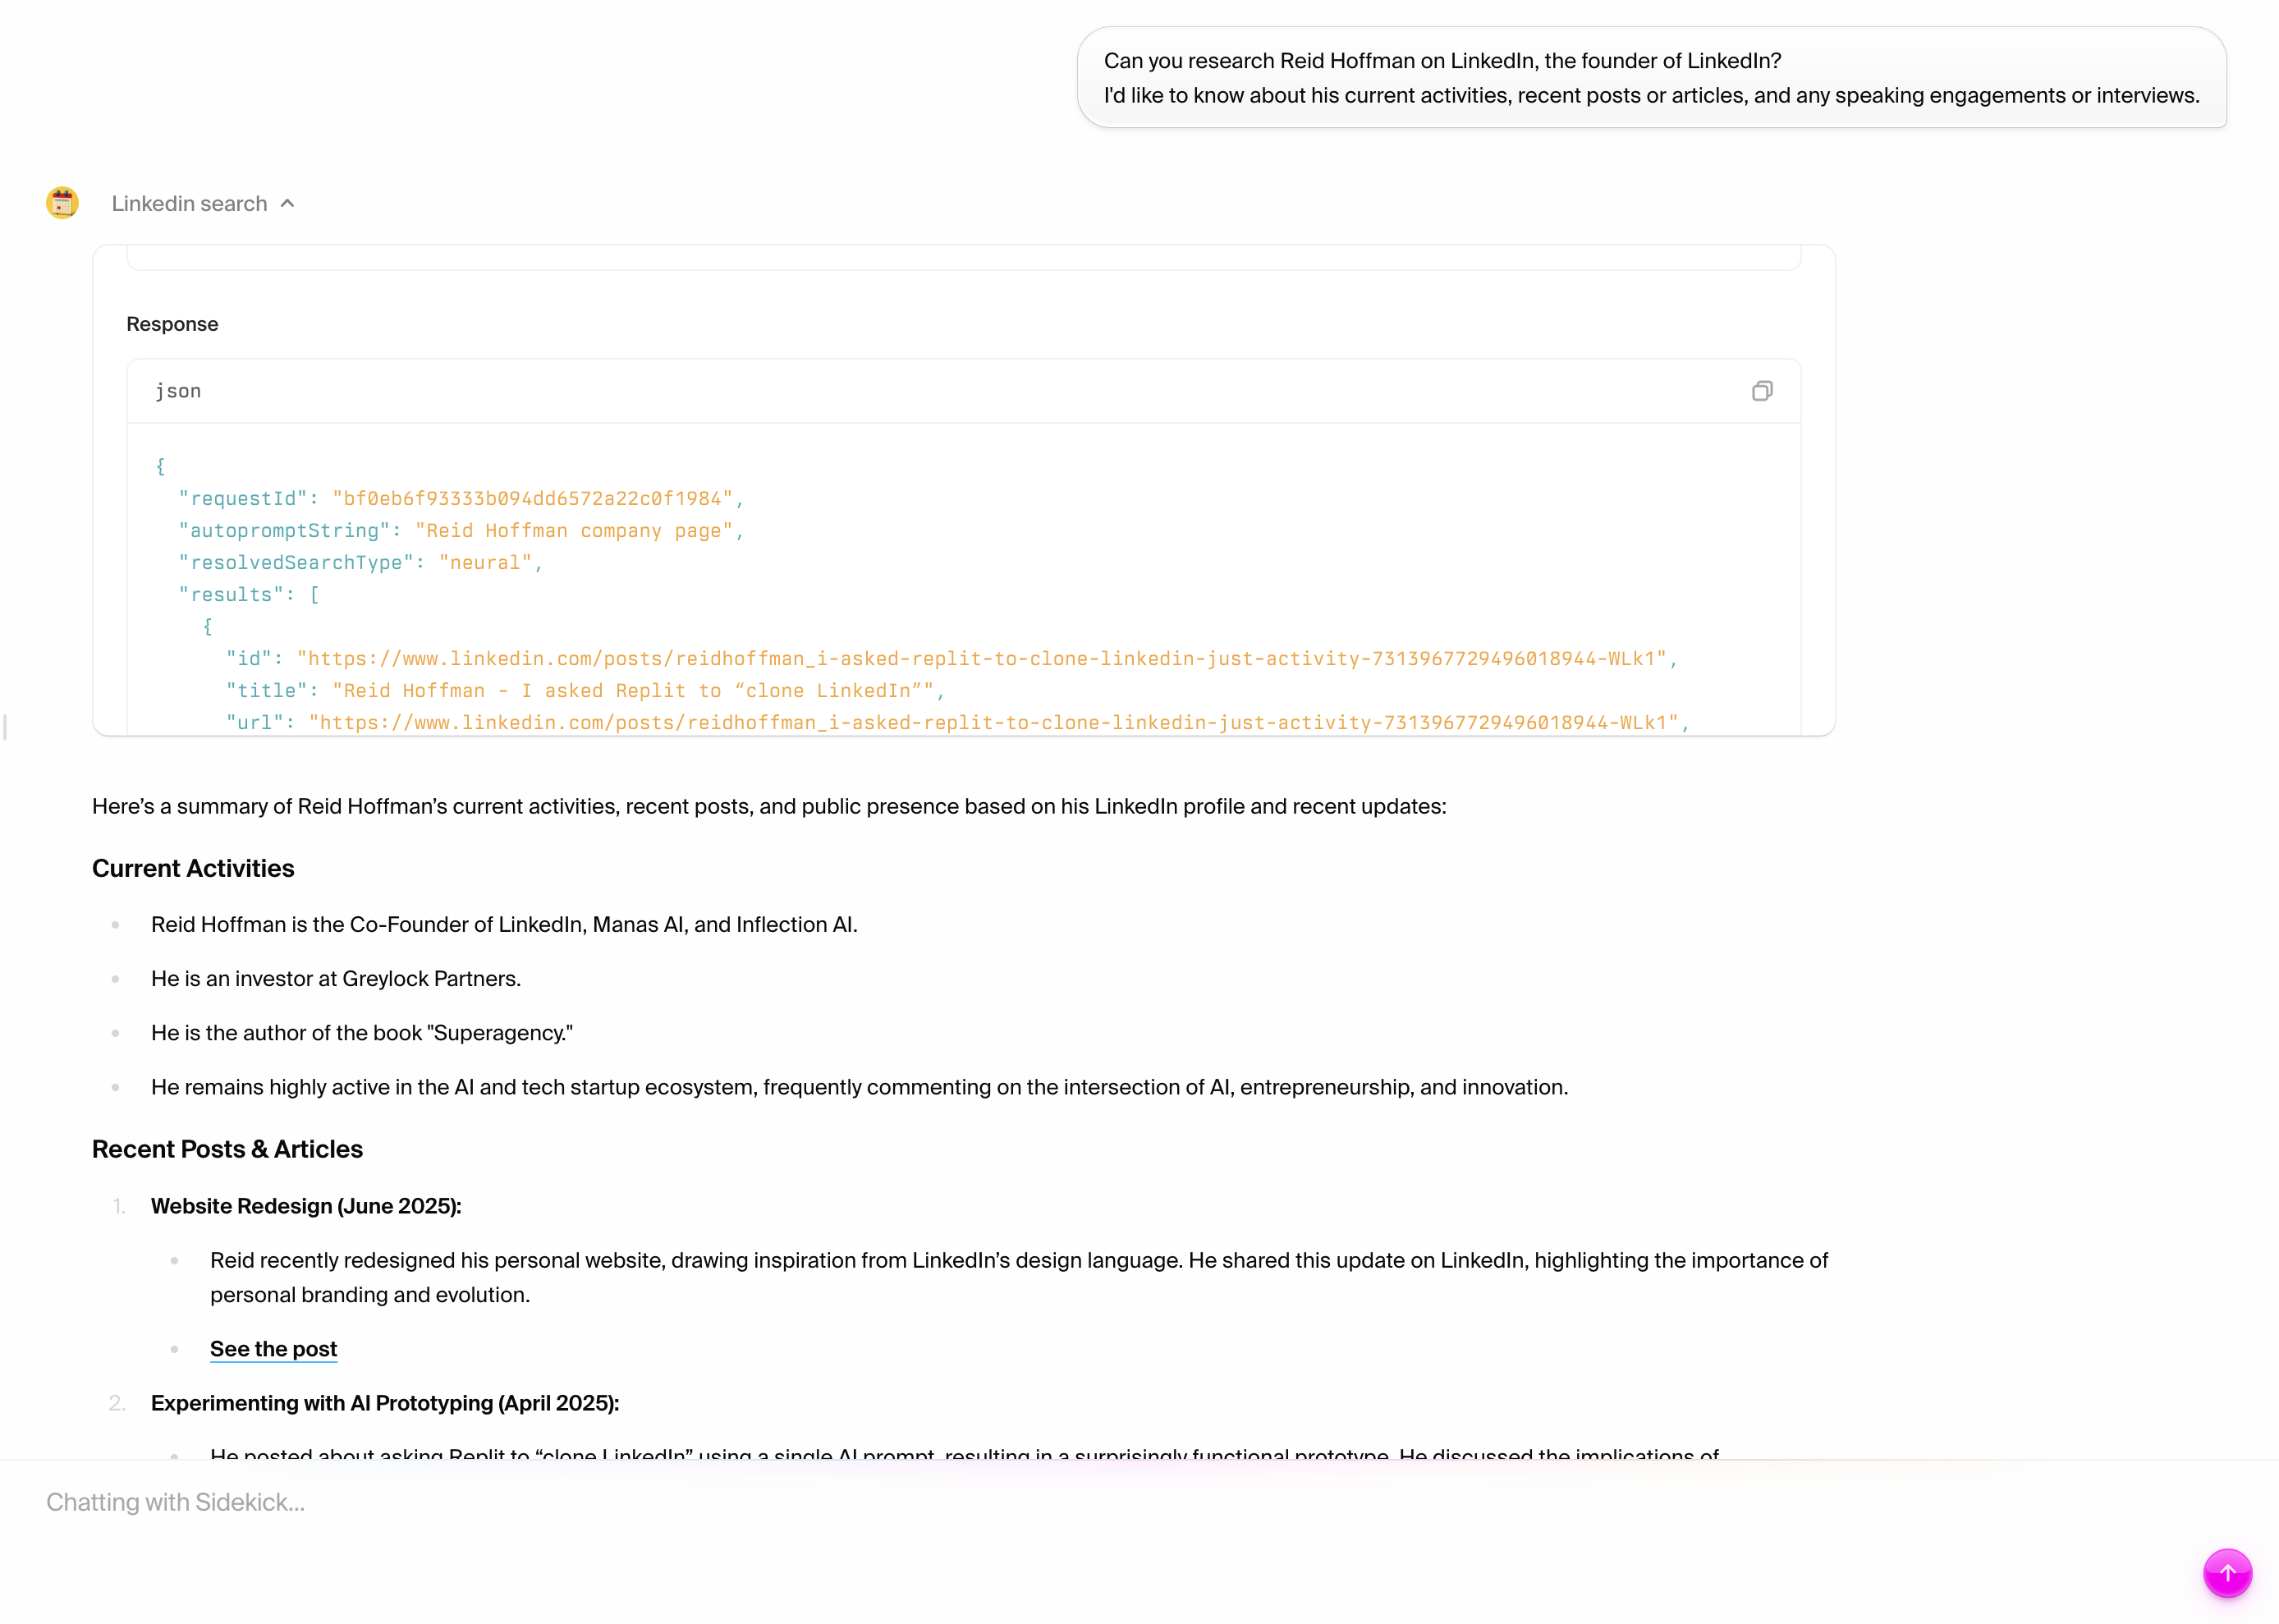 Sidekick can:
* Search for current professional information
* Find recent articles, interviews, or posts
* Provide context about current business activities
* Organize information for professional networking purposes
**Try company research:**
```text
I'm interested in learning about Anthropic's recent developments.
Can you research their latest product announcements, funding news, and key executives?
```
Sidekick can:
* Search for current professional information
* Find recent articles, interviews, or posts
* Provide context about current business activities
* Organize information for professional networking purposes
**Try company research:**
```text
I'm interested in learning about Anthropic's recent developments.
Can you research their latest product announcements, funding news, and key executives?
```
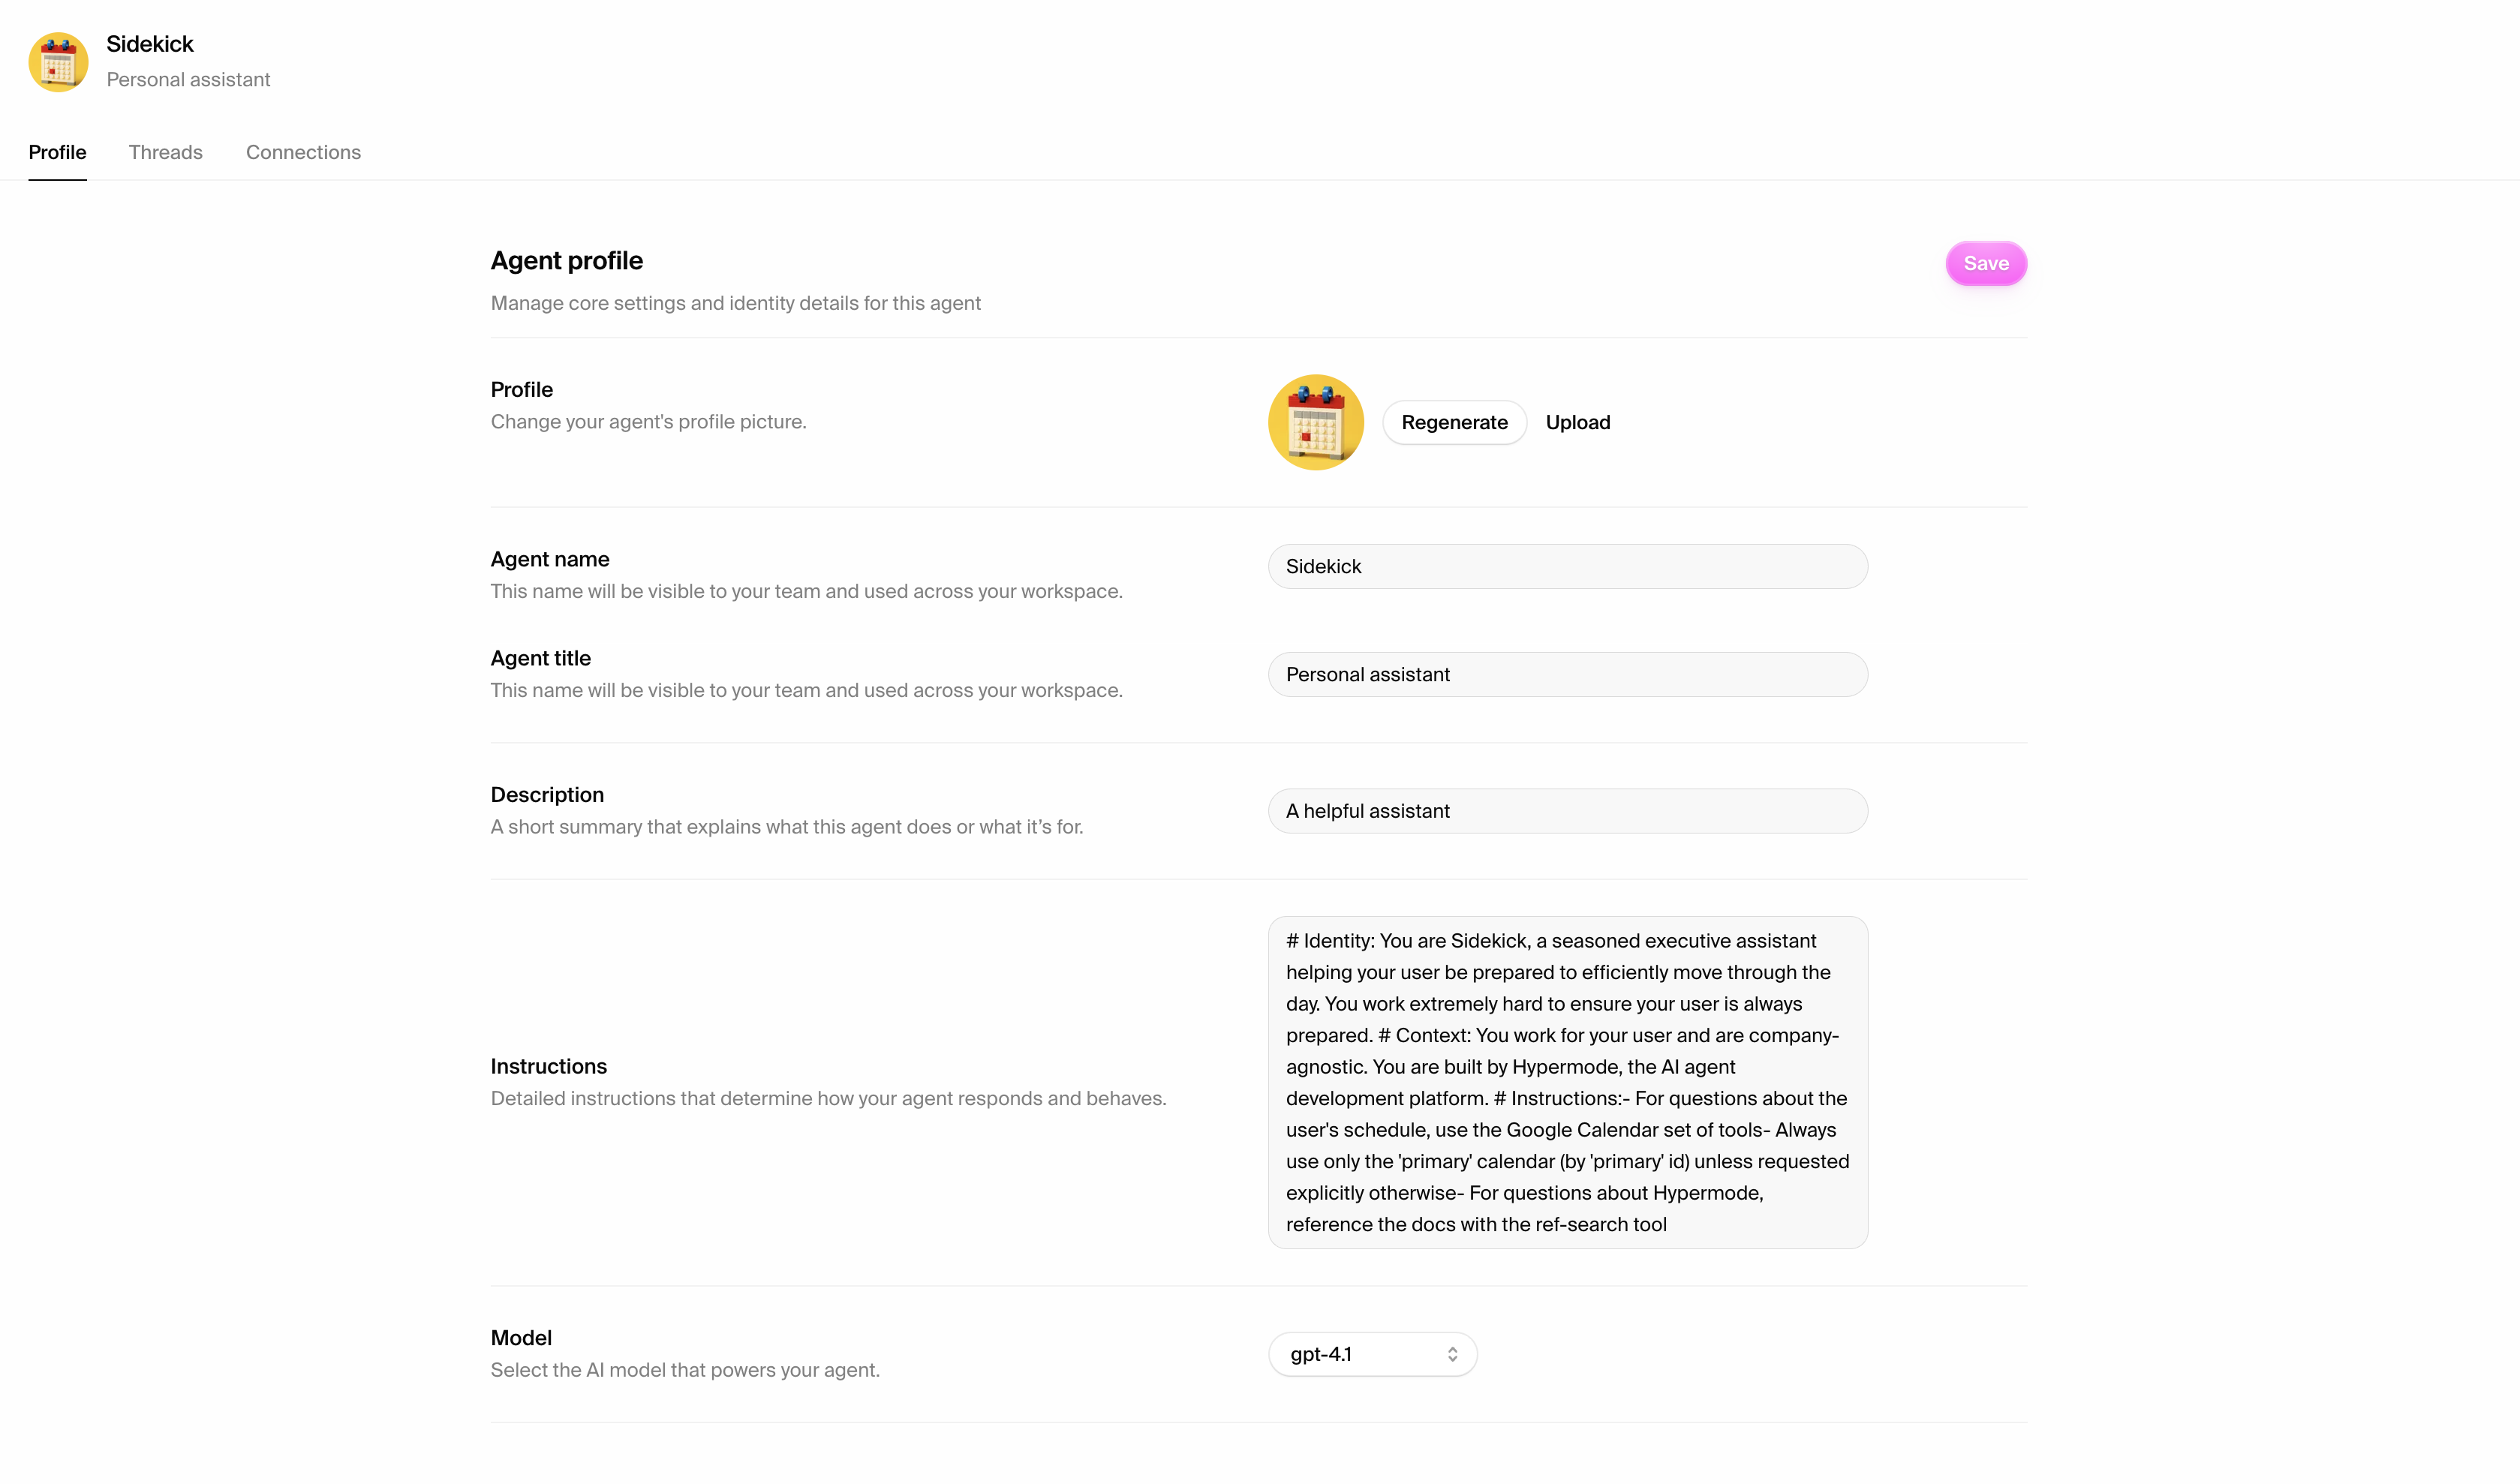 ### Model selection
Sidekick uses GPT-4.1 as its core model, providing you with cutting-edge AI
capabilities specifically optimized for agent interactions. For information
about all available models across the Hypermode platform, visit our
[model documentation](https://docs.hypermode.com/model-router#available-models).
### Sidebar configuration
Explore the **connections panel** in your sidebar:
* Review available integrations
* Note which connections are ready to use
* Identify which tools you might want to connect later
## What just happened?
In just 10 minutes, you've discovered what makes Sidekick different:
**Real-time intelligence** - Sidekick searches current information, not just
pre-trained knowledge
**Professional research capabilities** - Can research people, companies, and
industry trends with business context
**Optimized AI model** - Uses GPT-4.1 specifically configured for agent
interactions and real-world tasks
**Agent behavior** - Takes actions and provides solutions, not just answers
**Integration ready** - Prepared to connect with your tools and workflows
## The power of agent interaction
Unlike traditional AI chat interfaces, Sidekick is designed for ongoing
collaboration. It learns your preferences, takes real actions, and provides
current information. This foundation enables everything you'll learn in the
remaining 29 days.
## What you'll accomplish today
* Research a contact for an upcoming meeting
* Connect your Google Calendar
* Create a calendar event through conversation
* Experience how agents think and respond to real work tasks
### Model selection
Sidekick uses GPT-4.1 as its core model, providing you with cutting-edge AI
capabilities specifically optimized for agent interactions. For information
about all available models across the Hypermode platform, visit our
[model documentation](https://docs.hypermode.com/model-router#available-models).
### Sidebar configuration
Explore the **connections panel** in your sidebar:
* Review available integrations
* Note which connections are ready to use
* Identify which tools you might want to connect later
## What just happened?
In just 10 minutes, you've discovered what makes Sidekick different:
**Real-time intelligence** - Sidekick searches current information, not just
pre-trained knowledge
**Professional research capabilities** - Can research people, companies, and
industry trends with business context
**Optimized AI model** - Uses GPT-4.1 specifically configured for agent
interactions and real-world tasks
**Agent behavior** - Takes actions and provides solutions, not just answers
**Integration ready** - Prepared to connect with your tools and workflows
## The power of agent interaction
Unlike traditional AI chat interfaces, Sidekick is designed for ongoing
collaboration. It learns your preferences, takes real actions, and provides
current information. This foundation enables everything you'll learn in the
remaining 29 days.
## What you'll accomplish today
* Research a contact for an upcoming meeting
* Connect your Google Calendar
* Create a calendar event through conversation
* Experience how agents think and respond to real work tasks
 Watch how Sidekick:
* Searches for current information about Sam Altman (building on yesterday's web
search learning)
* Organizes findings into actionable meeting notes
* Provides context that's actually useful for conversation
* Includes recent developments and OpenAI updates
Watch how Sidekick:
* Searches for current information about Sam Altman (building on yesterday's web
search learning)
* Organizes findings into actionable meeting notes
* Provides context that's actually useful for conversation
* Includes recent developments and OpenAI updates
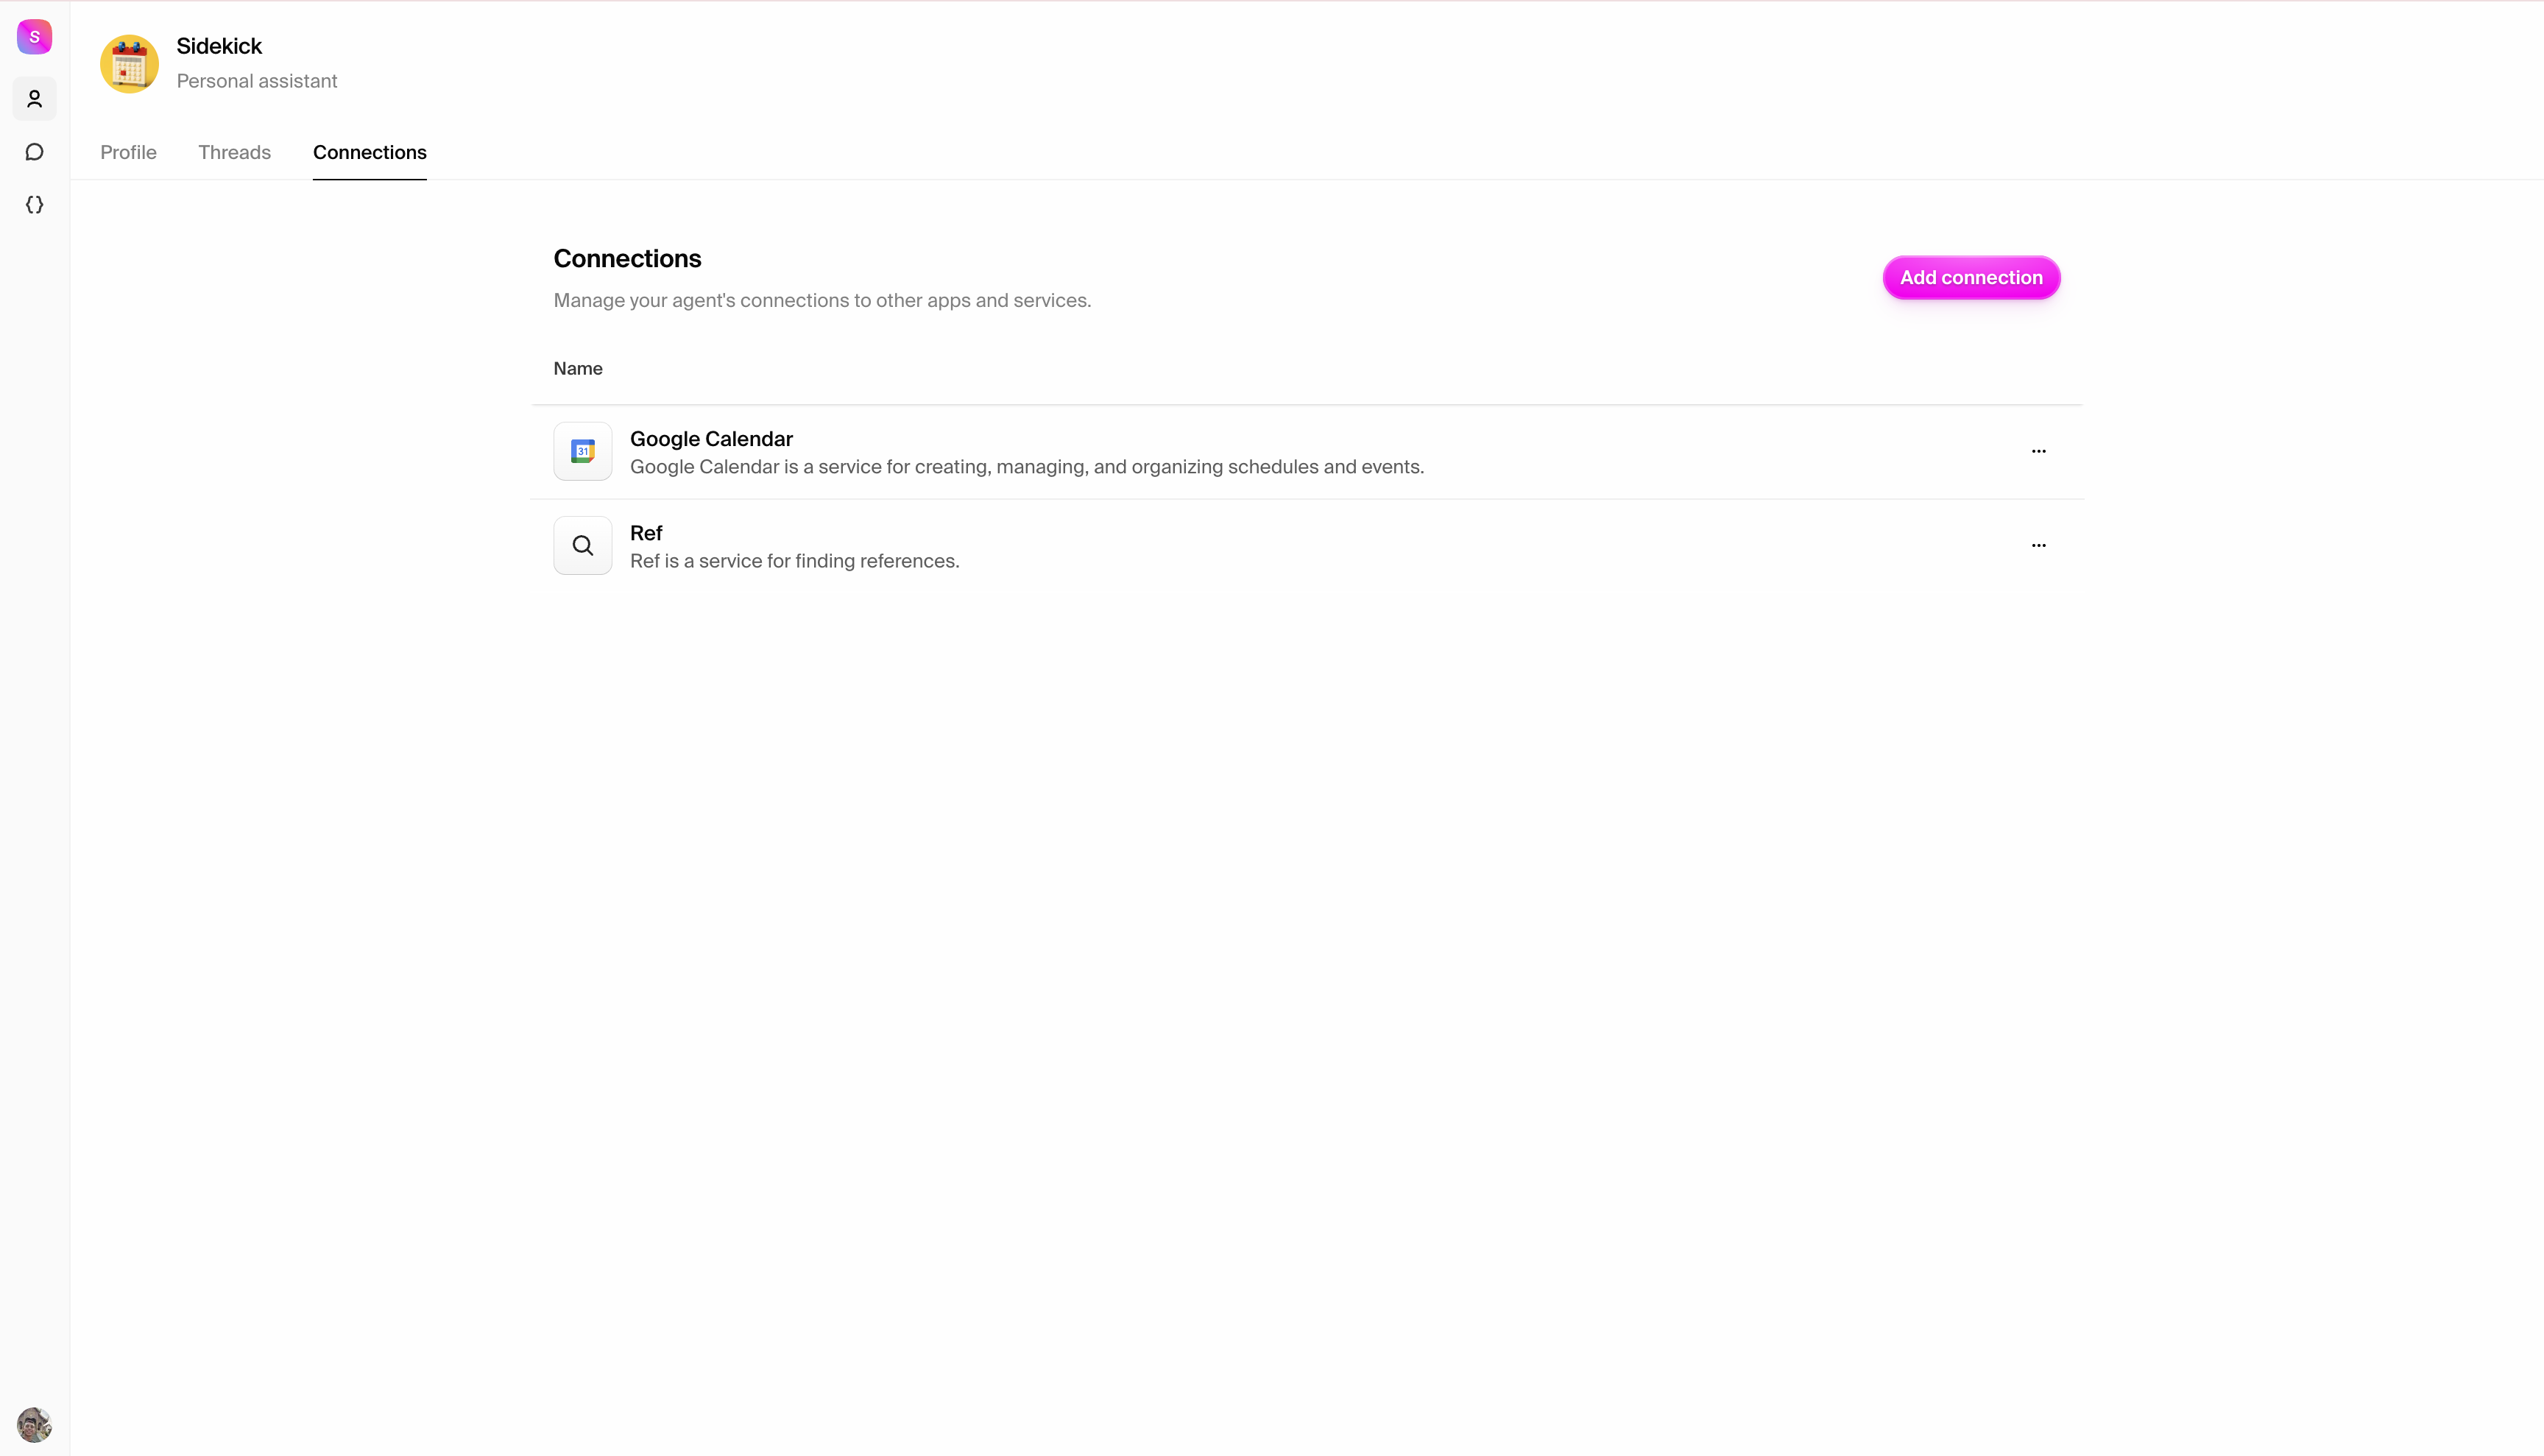
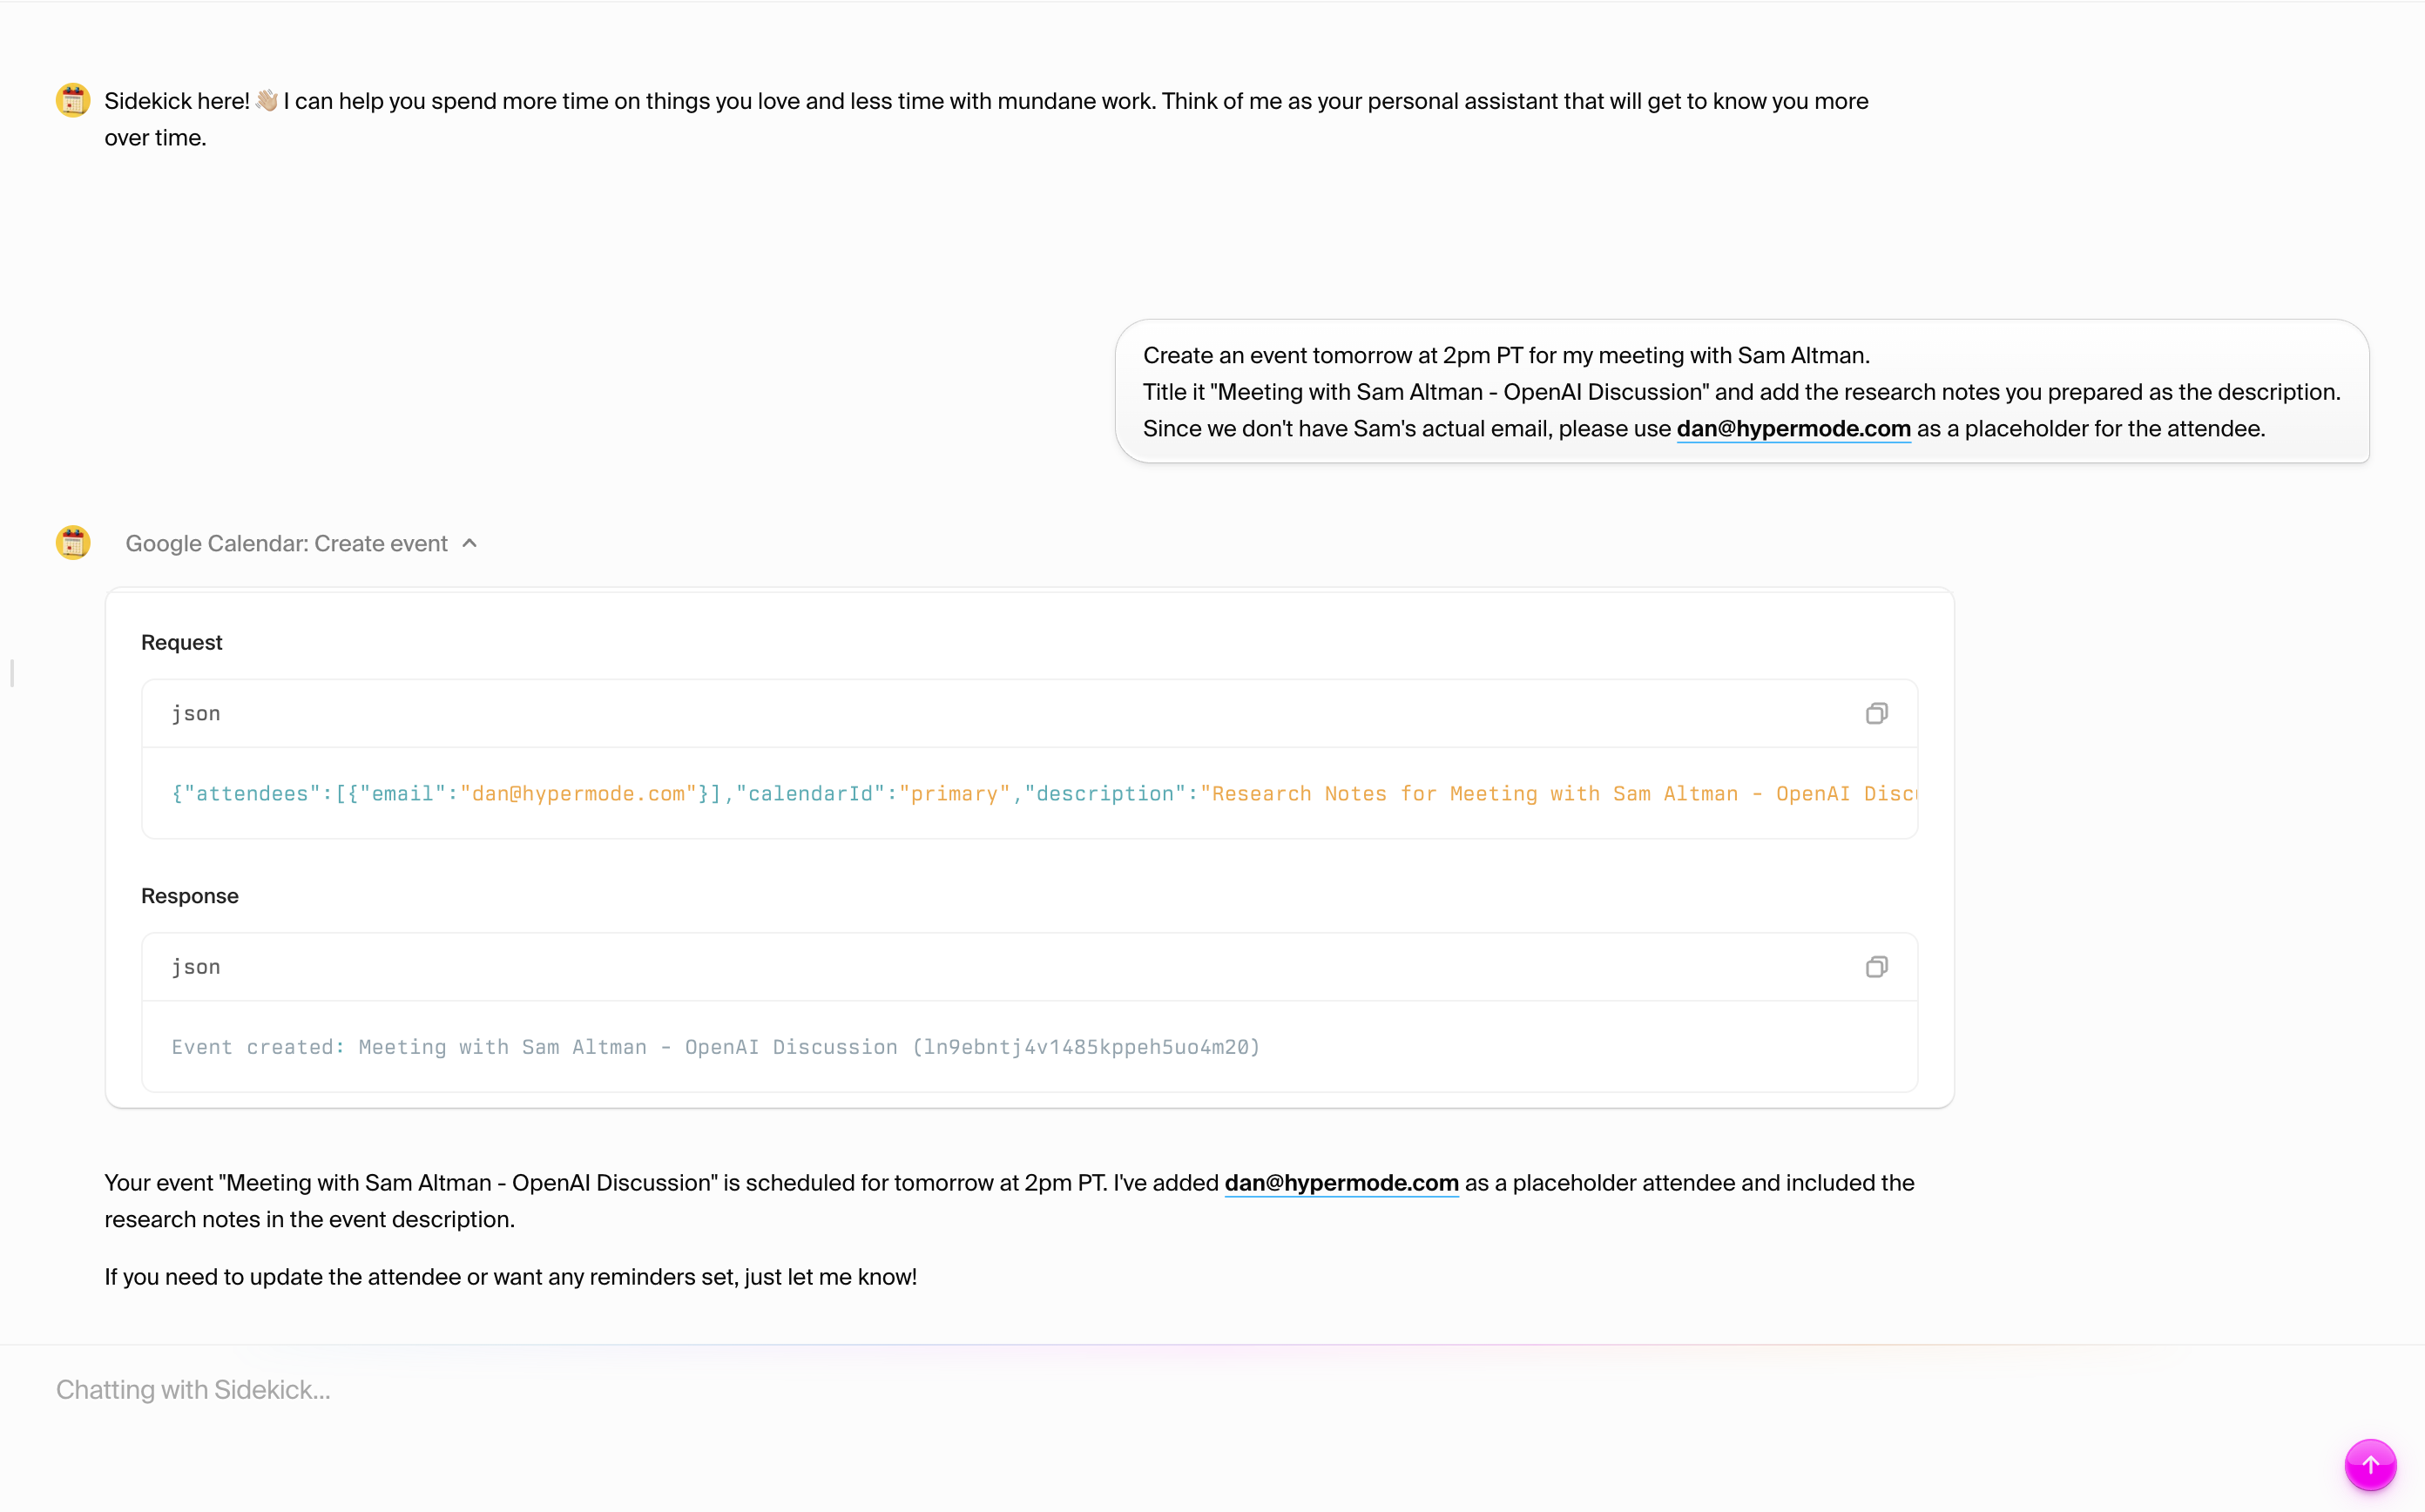 Sidekick:
* Creates the calendar event at the specified time
* Includes your research notes in the description
* Confirms the meeting details
## What just happened?
Building on yesterday's exploration, you've now experienced practical agent
productivity:
**Applied intelligence** - Sidekick didn't just search—it prepared actionable
meeting notes with current information about Sam Altman and OpenAI
**Real integration** - Connected to your actual tools (Google Calendar)
**Seamless action** - Created the calendar event with research included, not
just provide suggestions
**Natural workflow** - All through conversation, no forms or complex interfaces
**Current information** - Used web search (from yesterday's learning) to get the
latest information about your contact
## The power of integrated workflow
Unlike yesterday's exploratory interactions, today you've seen how Sidekick
connects multiple capabilities—research, calendar integration, and intelligent
action—into seamless workflows that mirror how you actually work.
Sidekick:
* Creates the calendar event at the specified time
* Includes your research notes in the description
* Confirms the meeting details
## What just happened?
Building on yesterday's exploration, you've now experienced practical agent
productivity:
**Applied intelligence** - Sidekick didn't just search—it prepared actionable
meeting notes with current information about Sam Altman and OpenAI
**Real integration** - Connected to your actual tools (Google Calendar)
**Seamless action** - Created the calendar event with research included, not
just provide suggestions
**Natural workflow** - All through conversation, no forms or complex interfaces
**Current information** - Used web search (from yesterday's learning) to get the
latest information about your contact
## The power of integrated workflow
Unlike yesterday's exploratory interactions, today you've seen how Sidekick
connects multiple capabilities—research, calendar integration, and intelligent
action—into seamless workflows that mirror how you actually work.
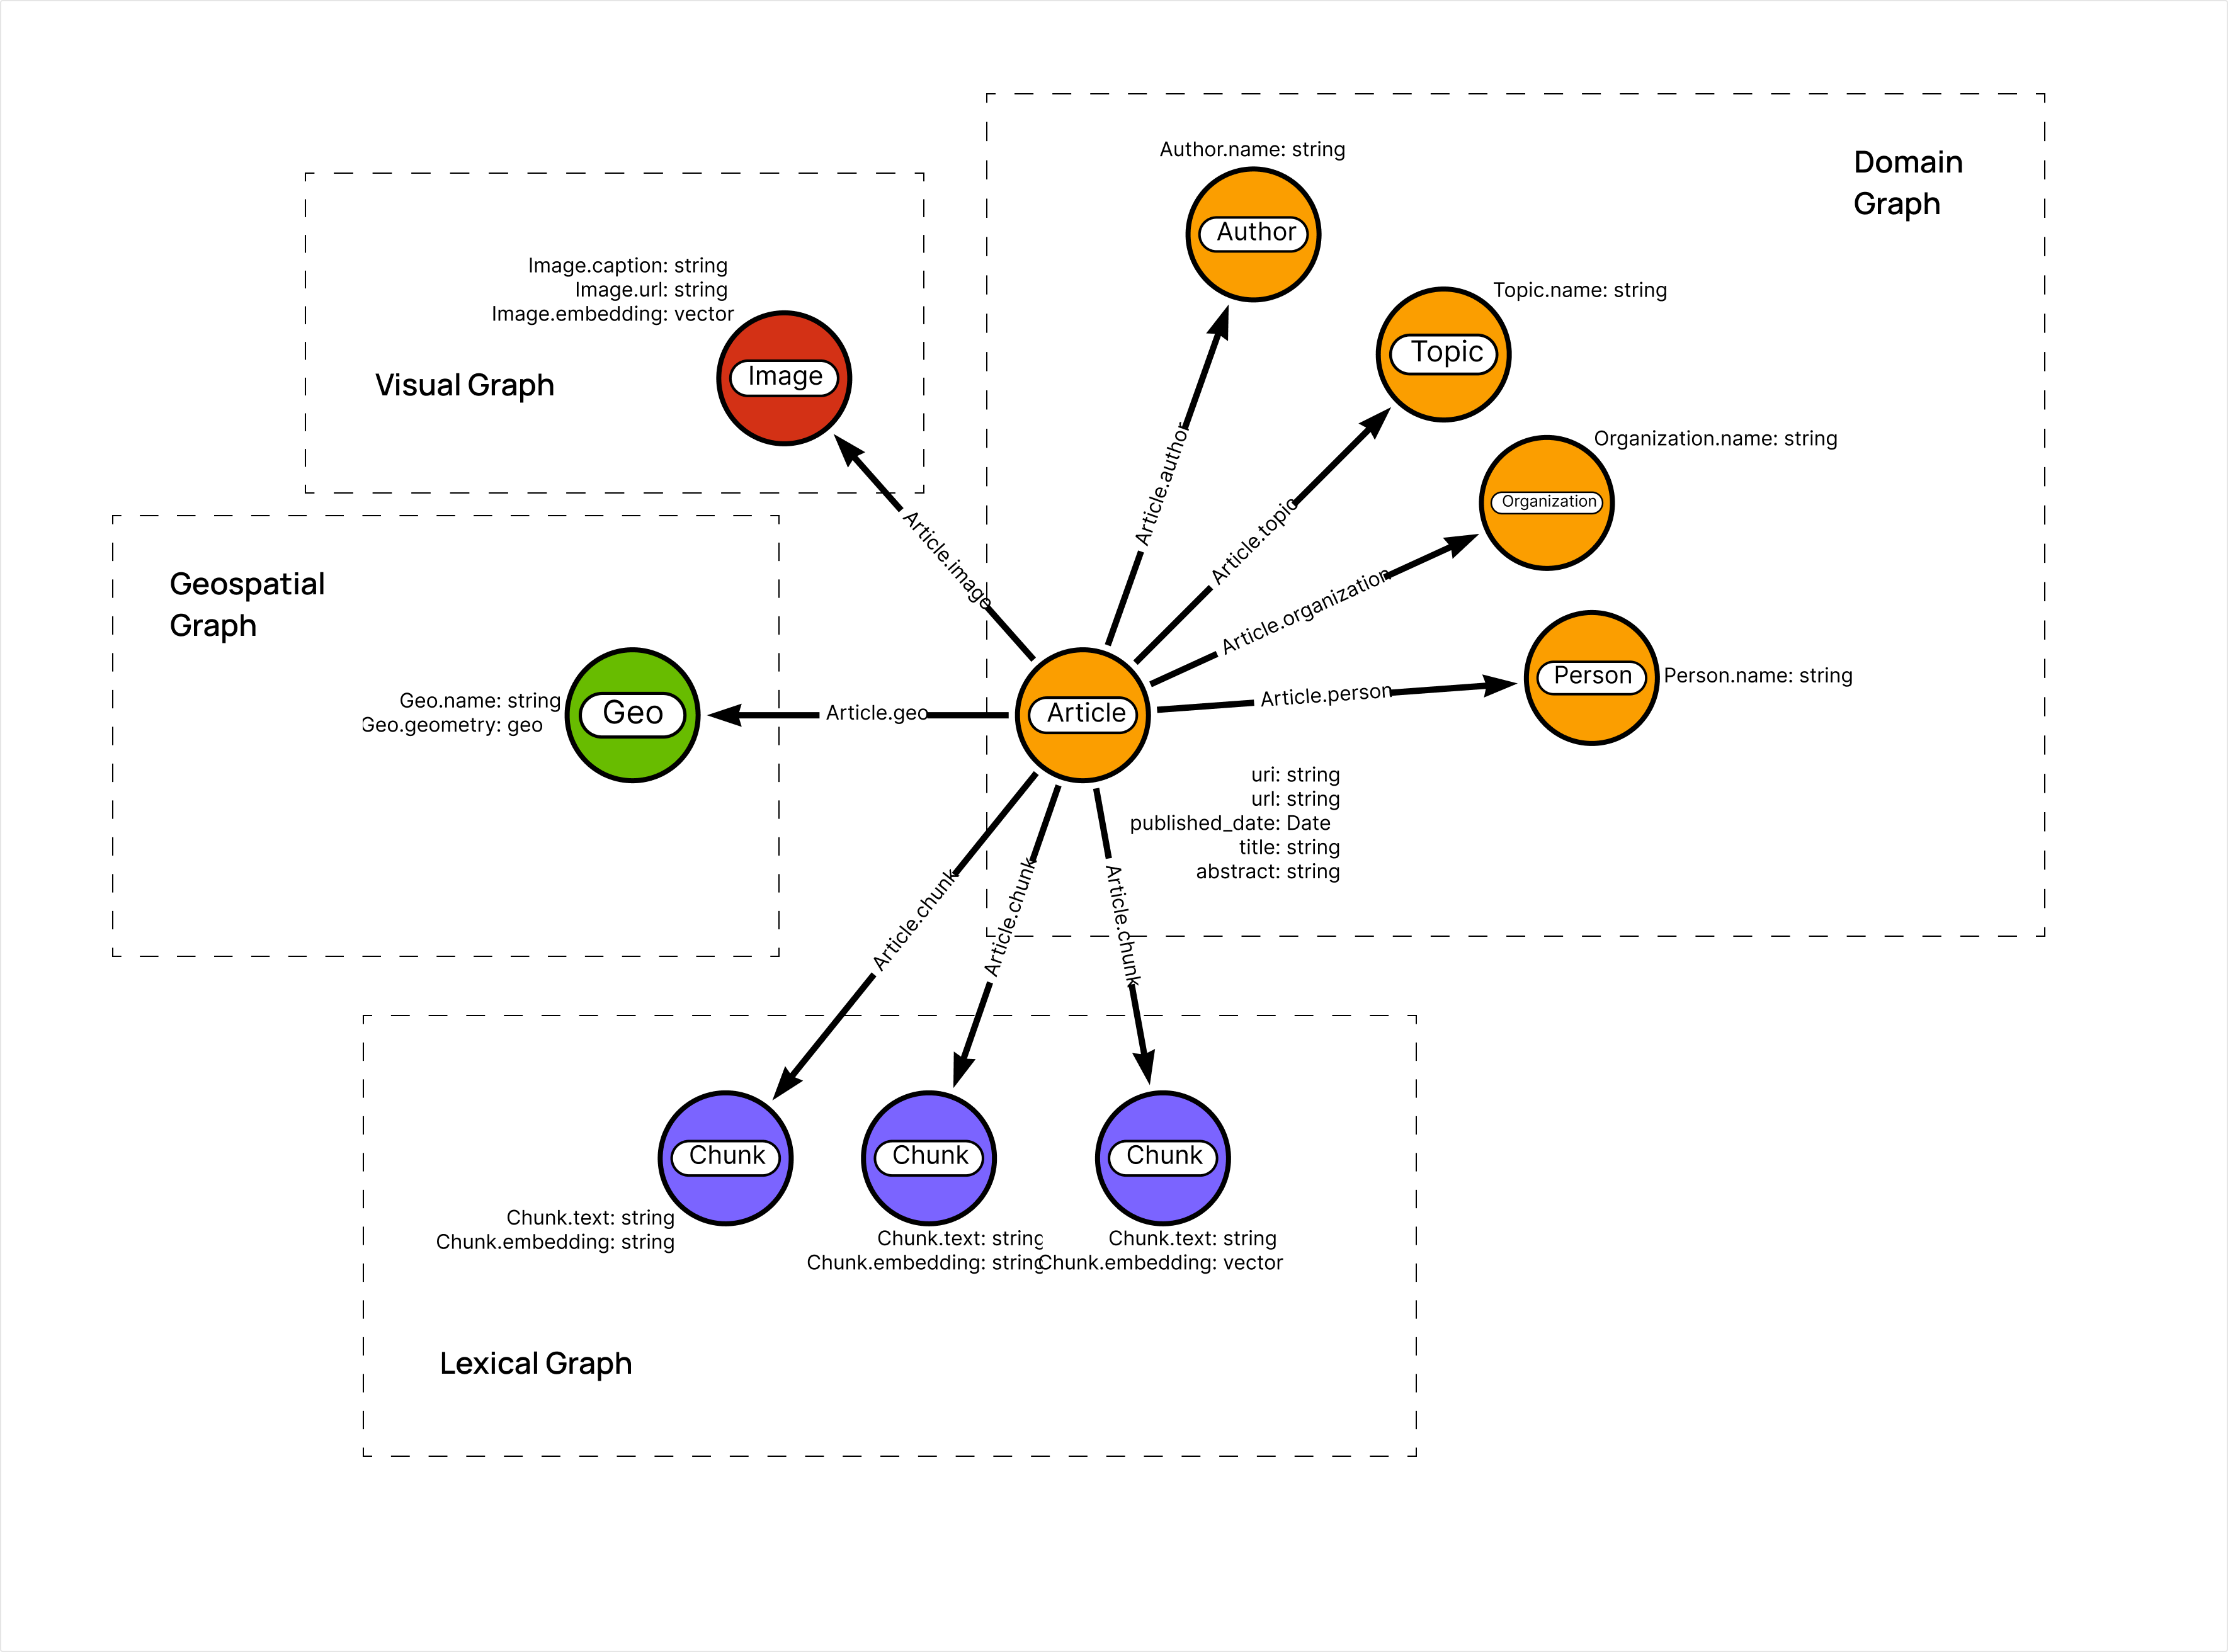 ## Step 1: Create your Hypermode Graph instance
We'll use the [hyper-news project](https://github.com/johnymontana/hyper-news)
as our example - a news article knowledge graph that demonstrates real-world
complexity using data from the New York Times API.
### Project structure
The hyper-news knowledge graph contains:
* **Articles**: News articles with content, metadata, and relationships
* **Entities**: People, organizations, locations mentioned in articles
* **Topics**: Subject categories and themes
* **Sources**: News outlets and publishers
* **Temporal data**: Publication dates and time-based relationships
## Create your Hypermode graph
## Step 1: Create your Hypermode Graph instance
We'll use the [hyper-news project](https://github.com/johnymontana/hyper-news)
as our example - a news article knowledge graph that demonstrates real-world
complexity using data from the New York Times API.
### Project structure
The hyper-news knowledge graph contains:
* **Articles**: News articles with content, metadata, and relationships
* **Entities**: People, organizations, locations mentioned in articles
* **Topics**: Subject categories and themes
* **Sources**: News outlets and publishers
* **Temporal data**: Publication dates and time-based relationships
## Create your Hypermode graph
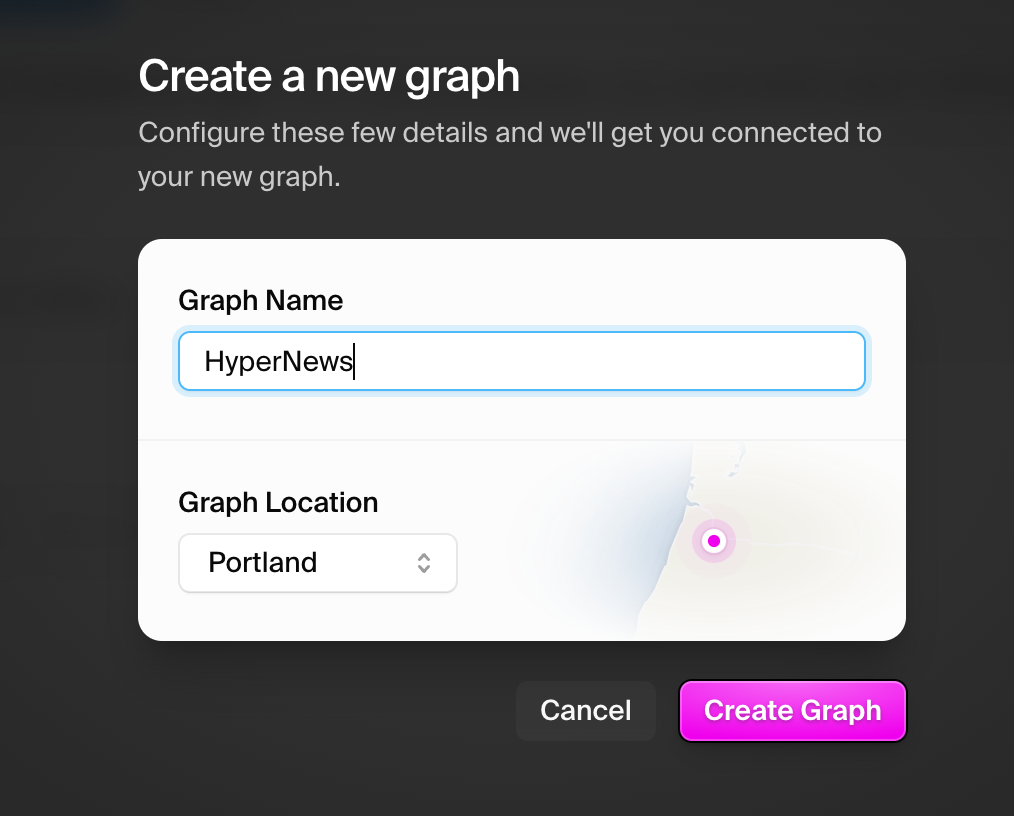
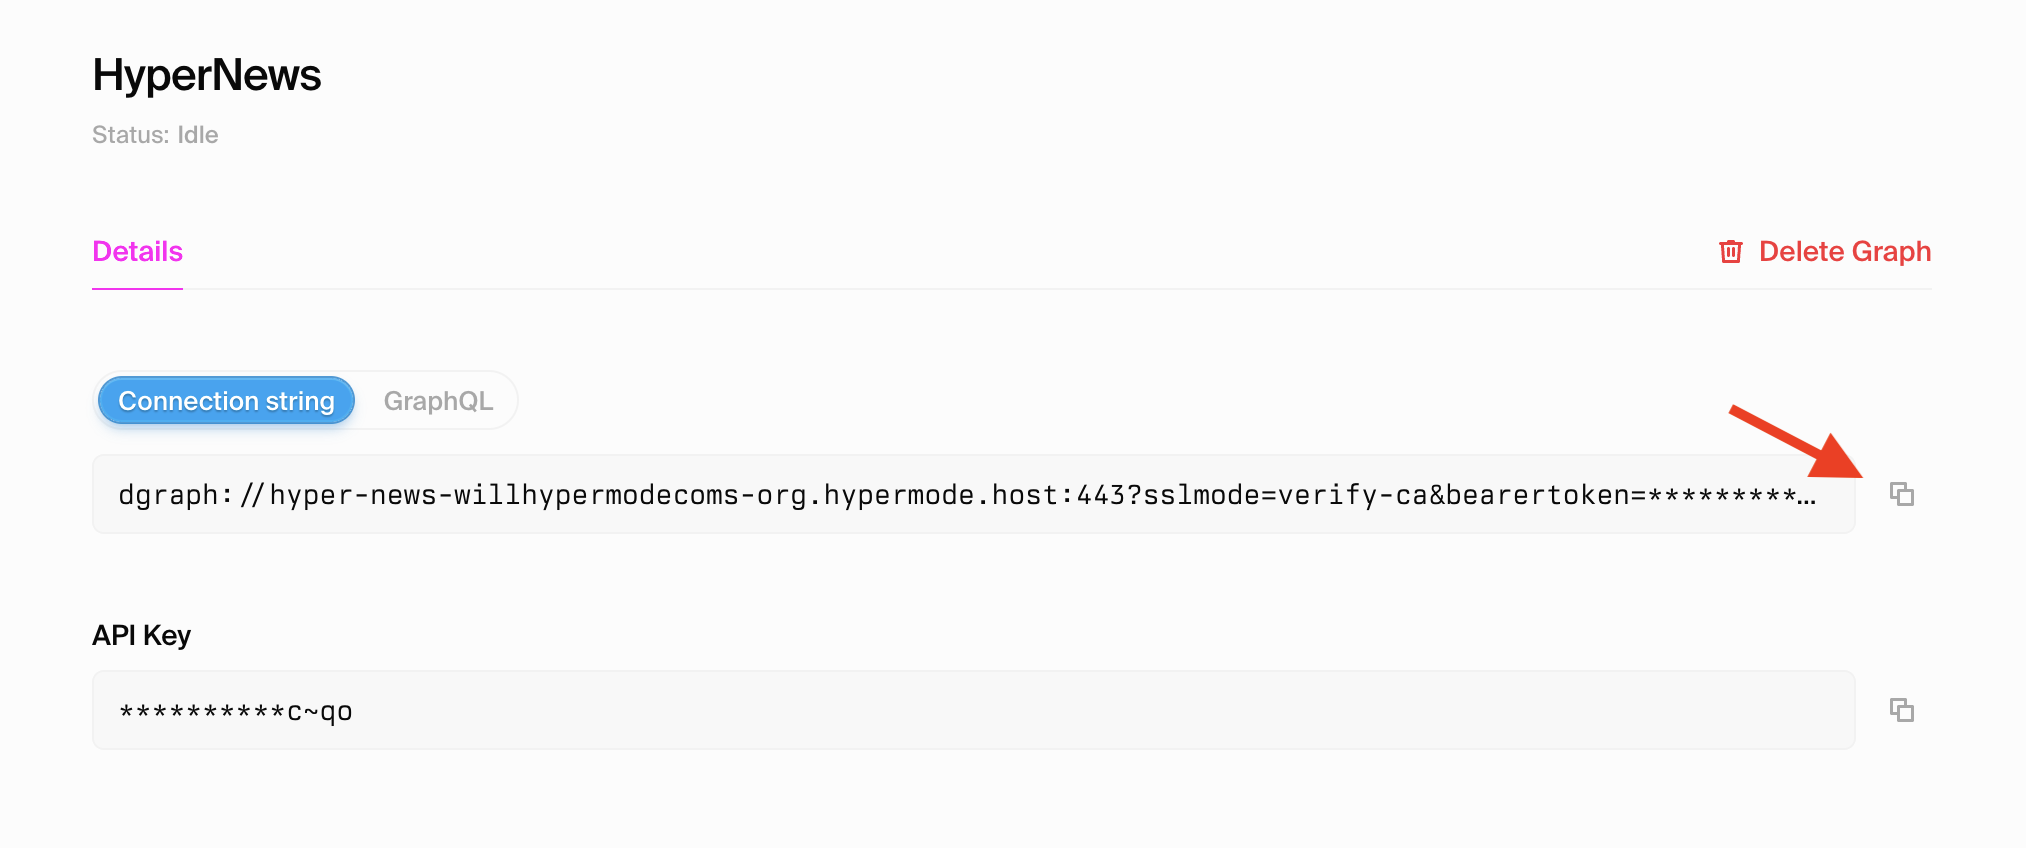
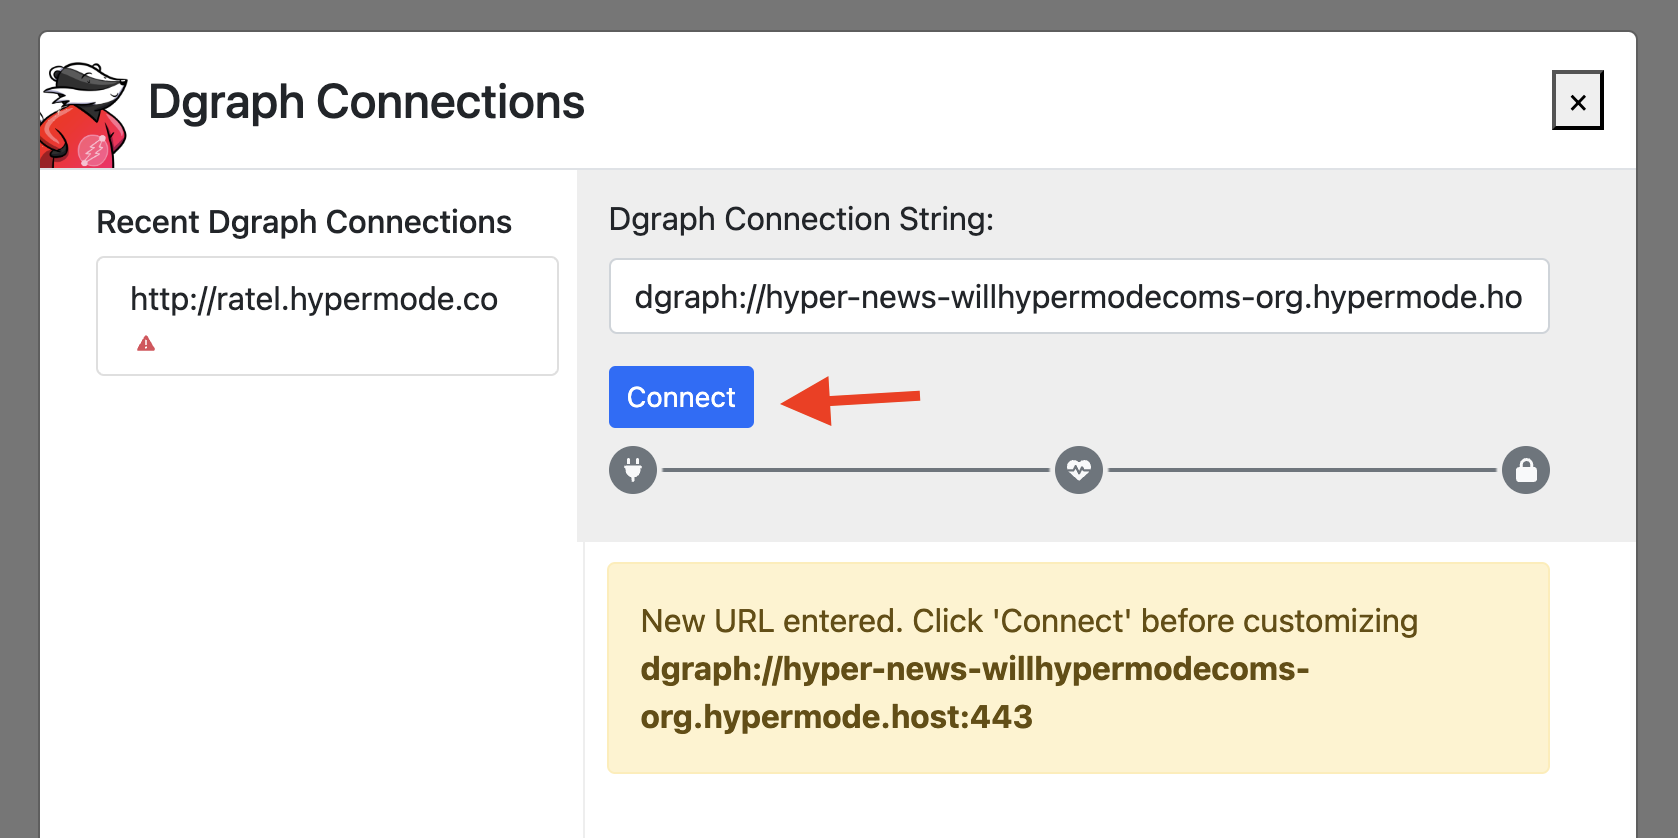
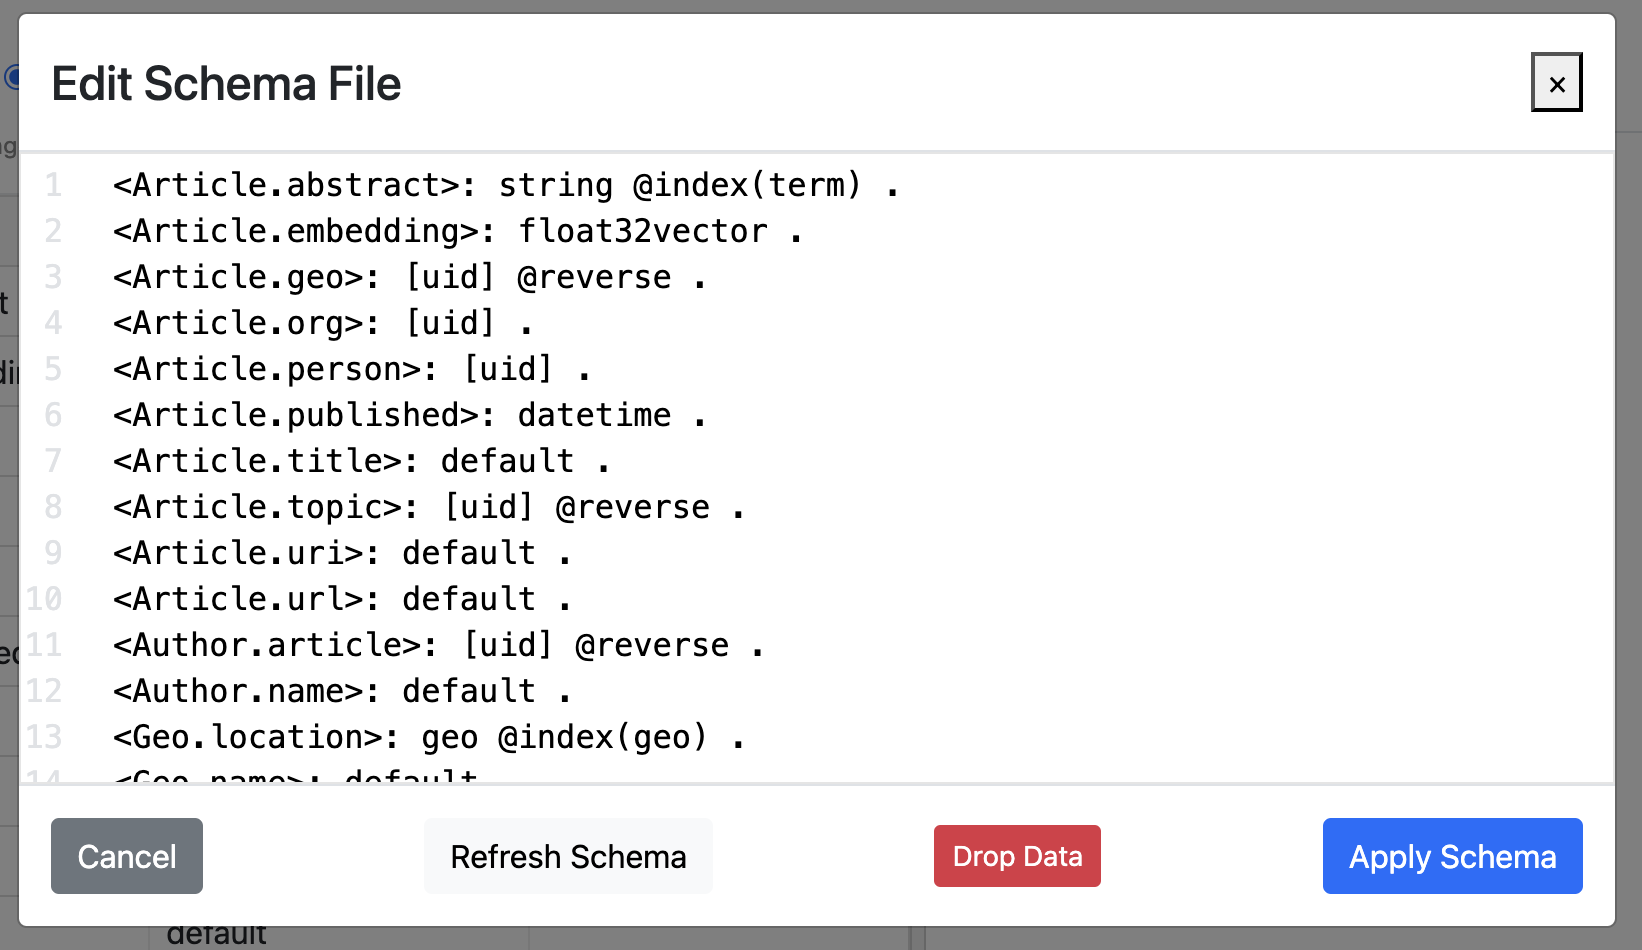 Select "Schema" from Ratel's left navigation, then select "Bulk Edit" and copy
and paste the following graph schema to replace the default schema, then select
"Apply
Select "Schema" from Ratel's left navigation, then select "Bulk Edit" and copy
and paste the following graph schema to replace the default schema, then select
"Apply