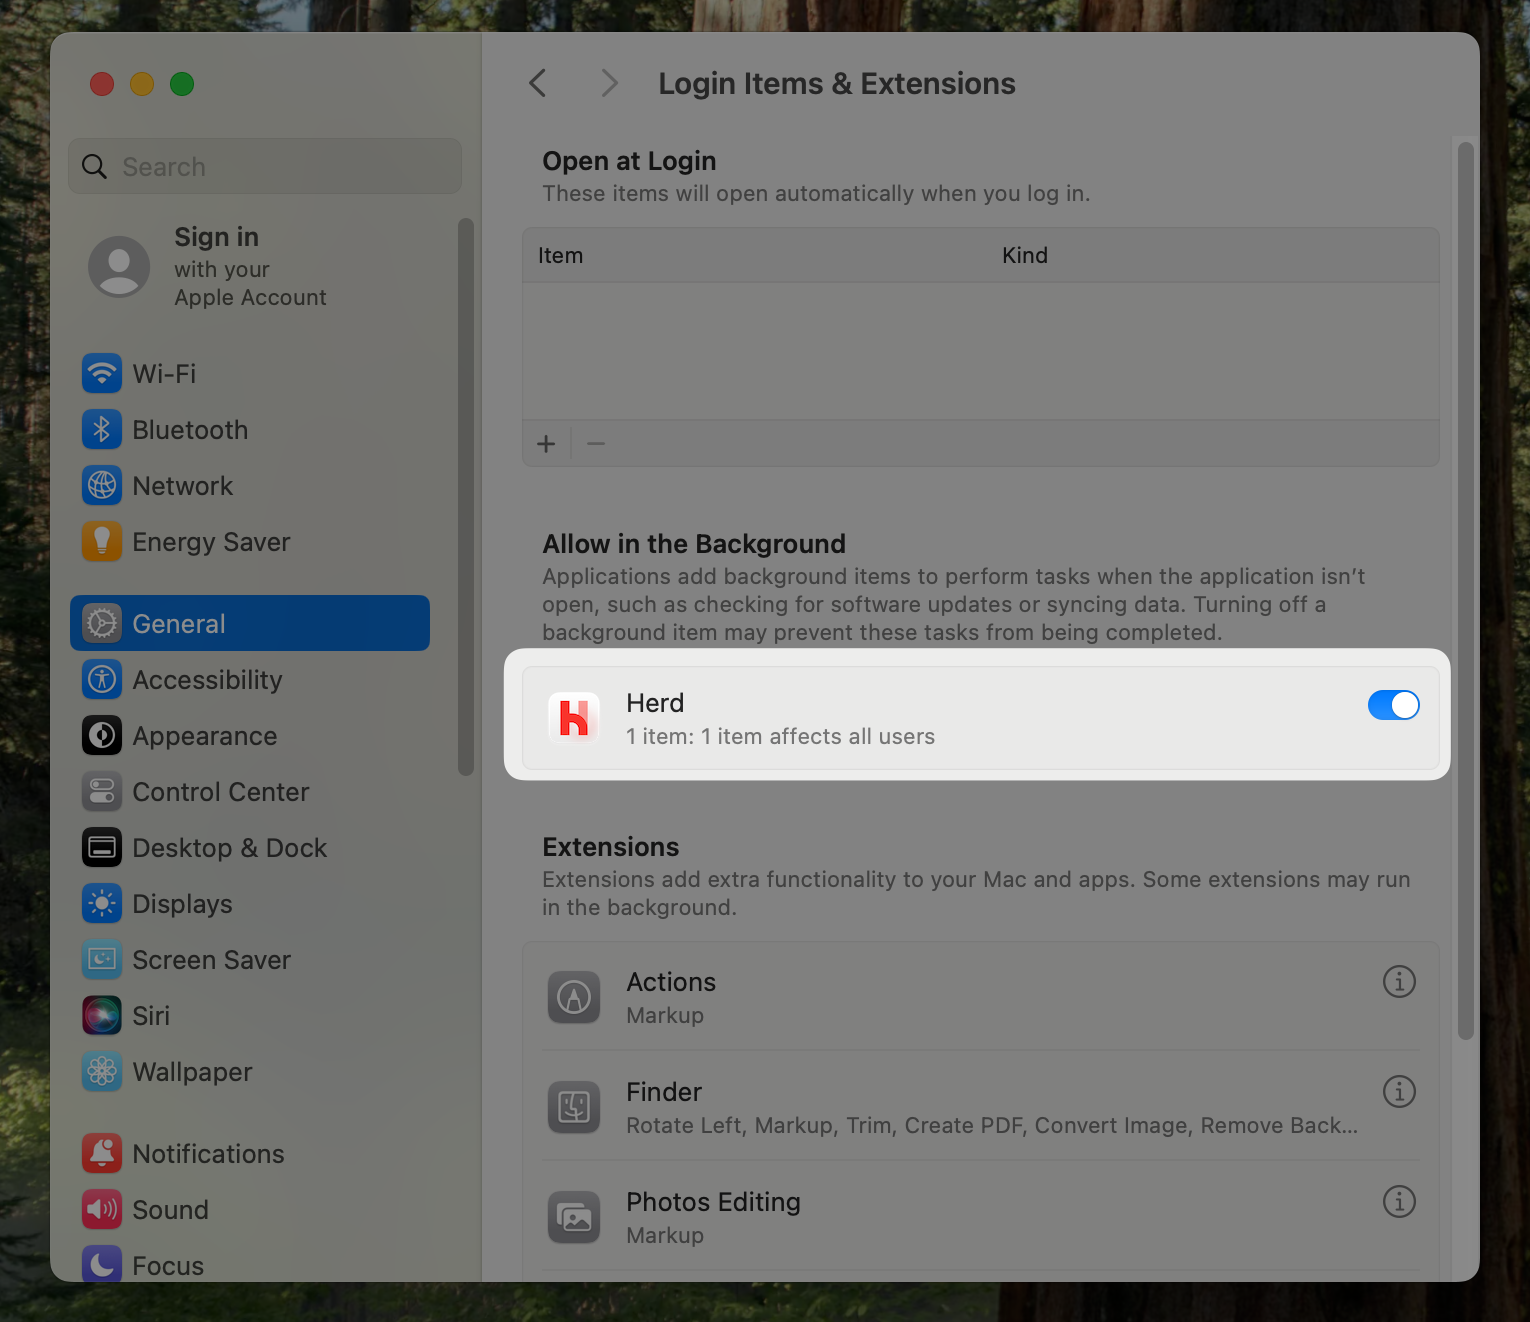
 To allow the Herd helper service to run in the background, please go to the "Login Items" section of your system settings and make sure that either `Herd` or `Beyond Code GmbH` ([us](https://beyondcode.com)) are allowed to run in the background.
---
# Source: https://herd.laravel.com/docs/macos/extending-herd/custom-drivers.md
> ## Documentation Index
> Fetch the complete documentation index at: https://herd.laravel.com/docs/llms.txt
> Use this file to discover all available pages before exploring further.
# Custom Drivers
# Custom Drivers
You can extend Herd with your own drivers to support customized setups of supported frameworks or to add new frameworks and applications that Herd doesn't support out of the box. You can also change the application information tab in the [Site Manager](/macos/sites/managing-sites) or add additional log file directories for the [Log Viewer](/macos/debugging/logs).
## Creating a driver
Herd internally leverages a heavily customized version of [Laravel Valet](https://laravel.com/docs/11.x/valet) for serving sites, and it includes all [drivers](https://github.com/laravel/valet/tree/master/cli/Valet/Drivers) that Valet provides. These drivers are a good start when creating your own custom driver, and it often makes sense to further extend them than starting from scratch.
To allow the Herd helper service to run in the background, please go to the "Login Items" section of your system settings and make sure that either `Herd` or `Beyond Code GmbH` ([us](https://beyondcode.com)) are allowed to run in the background.
---
# Source: https://herd.laravel.com/docs/macos/extending-herd/custom-drivers.md
> ## Documentation Index
> Fetch the complete documentation index at: https://herd.laravel.com/docs/llms.txt
> Use this file to discover all available pages before exploring further.
# Custom Drivers
# Custom Drivers
You can extend Herd with your own drivers to support customized setups of supported frameworks or to add new frameworks and applications that Herd doesn't support out of the box. You can also change the application information tab in the [Site Manager](/macos/sites/managing-sites) or add additional log file directories for the [Log Viewer](/macos/debugging/logs).
## Creating a driver
Herd internally leverages a heavily customized version of [Laravel Valet](https://laravel.com/docs/11.x/valet) for serving sites, and it includes all [drivers](https://github.com/laravel/valet/tree/master/cli/Valet/Drivers) that Valet provides. These drivers are a good start when creating your own custom driver, and it often makes sense to further extend them than starting from scratch.
 ---
# Source: https://herd.laravel.com/docs/macos/advanced-usage/directories-and-files.md
> ## Documentation Index
> Fetch the complete documentation index at: https://herd.laravel.com/docs/llms.txt
> Use this file to discover all available pages before exploring further.
# Directories and Files
# Herd Directories and Files
You may find the following files and directories helpful while you are troubleshooting issues with Herd.
## Main directory
The main directory contains all the following config files and directories and is a good start when troubleshooting issues with Herd. You may delete this folder if you plan to re-install Herd from scratch.
```bash theme={null}
~/Library/Application Support/Herd/
```
## Binaries
You can find all binaries of Herd in this directory. This includes binaries like composer or expose that ship with Herd as well as downloaded binaries like the latest PHP versions.
```bash theme={null}
~/Library/Application Support/Herd/bin
```
## Config
All config files for all Herd services live in this directory.
```bash theme={null}
~/Library/Application Support/Herd/config
```
### nginx
The nginx directory contains a `herd.conf` and the `nginx.conf`. Herd uses both to decide which sites it serves and what happens to files. In case you see a `Bad Gateway` error, there could be an issue in one of these files.
```bash theme={null}
~/Library/Application Support/Herd/config/nginx
```
Site-specific Nginx configuration files are located in the following directory:
```bash theme={null}
~/Library/Application Support/Herd/config/valet/Nginx
```
### php
This directory contains all `php.ini` files for all PHP versions on your machine. If you use Herd Pro, it also contains `debug.ini` files that Xdebug uses when you enable it for a request. If you're in debug mode, Herd loads the normal `php.ini` and applies the `debug.ini` on top.
```bash theme={null}
~/Library/Application Support/Herd/config/php
```
### Log
Herd stores all logs of nginx and php-fpm in this directory. It may also contain mail logs if you use Herd Pro.
```bash theme={null}
~/Library/Application Support/Herd/Log
```
---
# Source: https://herd.laravel.com/docs/macos/debugging/dumps.md
> ## Documentation Index
> Fetch the complete documentation index at: https://herd.laravel.com/docs/llms.txt
> Use this file to discover all available pages before exploring further.
# Dumps
# Debugging with Dumps
The Dumps feature can automatically intercept all `dump()` calls in your code and display them in a separate window instead of rendering them in the browser or CLI. But that's not all, it can also show HTTP requests, logs, Eloquent queries, dispatched jobs and Blade views to give you all the integrations that you need when debugging your app.
## Using Dump features
You may open the Dumps Window via the Herd system tray menu or open it with a globally configurable shortcut that you can define in the [shortcut settings](/macos/advanced-usage/shortcuts).
In order to enable dump interception and record debug information, click on the antenna icon in the title bar of the window. The icon will flash to indicate that dump interception is enabled.
Once enabled, you may use the `dump()` function as usual. Instead of printing the dump to your browser or terminal, Herd will open a window when a new dump becomes available.
---
# Source: https://herd.laravel.com/docs/macos/advanced-usage/directories-and-files.md
> ## Documentation Index
> Fetch the complete documentation index at: https://herd.laravel.com/docs/llms.txt
> Use this file to discover all available pages before exploring further.
# Directories and Files
# Herd Directories and Files
You may find the following files and directories helpful while you are troubleshooting issues with Herd.
## Main directory
The main directory contains all the following config files and directories and is a good start when troubleshooting issues with Herd. You may delete this folder if you plan to re-install Herd from scratch.
```bash theme={null}
~/Library/Application Support/Herd/
```
## Binaries
You can find all binaries of Herd in this directory. This includes binaries like composer or expose that ship with Herd as well as downloaded binaries like the latest PHP versions.
```bash theme={null}
~/Library/Application Support/Herd/bin
```
## Config
All config files for all Herd services live in this directory.
```bash theme={null}
~/Library/Application Support/Herd/config
```
### nginx
The nginx directory contains a `herd.conf` and the `nginx.conf`. Herd uses both to decide which sites it serves and what happens to files. In case you see a `Bad Gateway` error, there could be an issue in one of these files.
```bash theme={null}
~/Library/Application Support/Herd/config/nginx
```
Site-specific Nginx configuration files are located in the following directory:
```bash theme={null}
~/Library/Application Support/Herd/config/valet/Nginx
```
### php
This directory contains all `php.ini` files for all PHP versions on your machine. If you use Herd Pro, it also contains `debug.ini` files that Xdebug uses when you enable it for a request. If you're in debug mode, Herd loads the normal `php.ini` and applies the `debug.ini` on top.
```bash theme={null}
~/Library/Application Support/Herd/config/php
```
### Log
Herd stores all logs of nginx and php-fpm in this directory. It may also contain mail logs if you use Herd Pro.
```bash theme={null}
~/Library/Application Support/Herd/Log
```
---
# Source: https://herd.laravel.com/docs/macos/debugging/dumps.md
> ## Documentation Index
> Fetch the complete documentation index at: https://herd.laravel.com/docs/llms.txt
> Use this file to discover all available pages before exploring further.
# Dumps
# Debugging with Dumps
The Dumps feature can automatically intercept all `dump()` calls in your code and display them in a separate window instead of rendering them in the browser or CLI. But that's not all, it can also show HTTP requests, logs, Eloquent queries, dispatched jobs and Blade views to give you all the integrations that you need when debugging your app.
## Using Dump features
You may open the Dumps Window via the Herd system tray menu or open it with a globally configurable shortcut that you can define in the [shortcut settings](/macos/advanced-usage/shortcuts).
In order to enable dump interception and record debug information, click on the antenna icon in the title bar of the window. The icon will flash to indicate that dump interception is enabled.
Once enabled, you may use the `dump()` function as usual. Instead of printing the dump to your browser or terminal, Herd will open a window when a new dump becomes available.
 New dumps are automatically added to the top of the window, and you can clear the window by pressing the icon in the title bar of the dump window. All dumps are searchable so you can easily find what you are looking for.
By default, Herd only displays the output of the latest request, but you can enable persistent storage between requests in the settings. This keeps a history until you close the Dumps Window.
## Settings
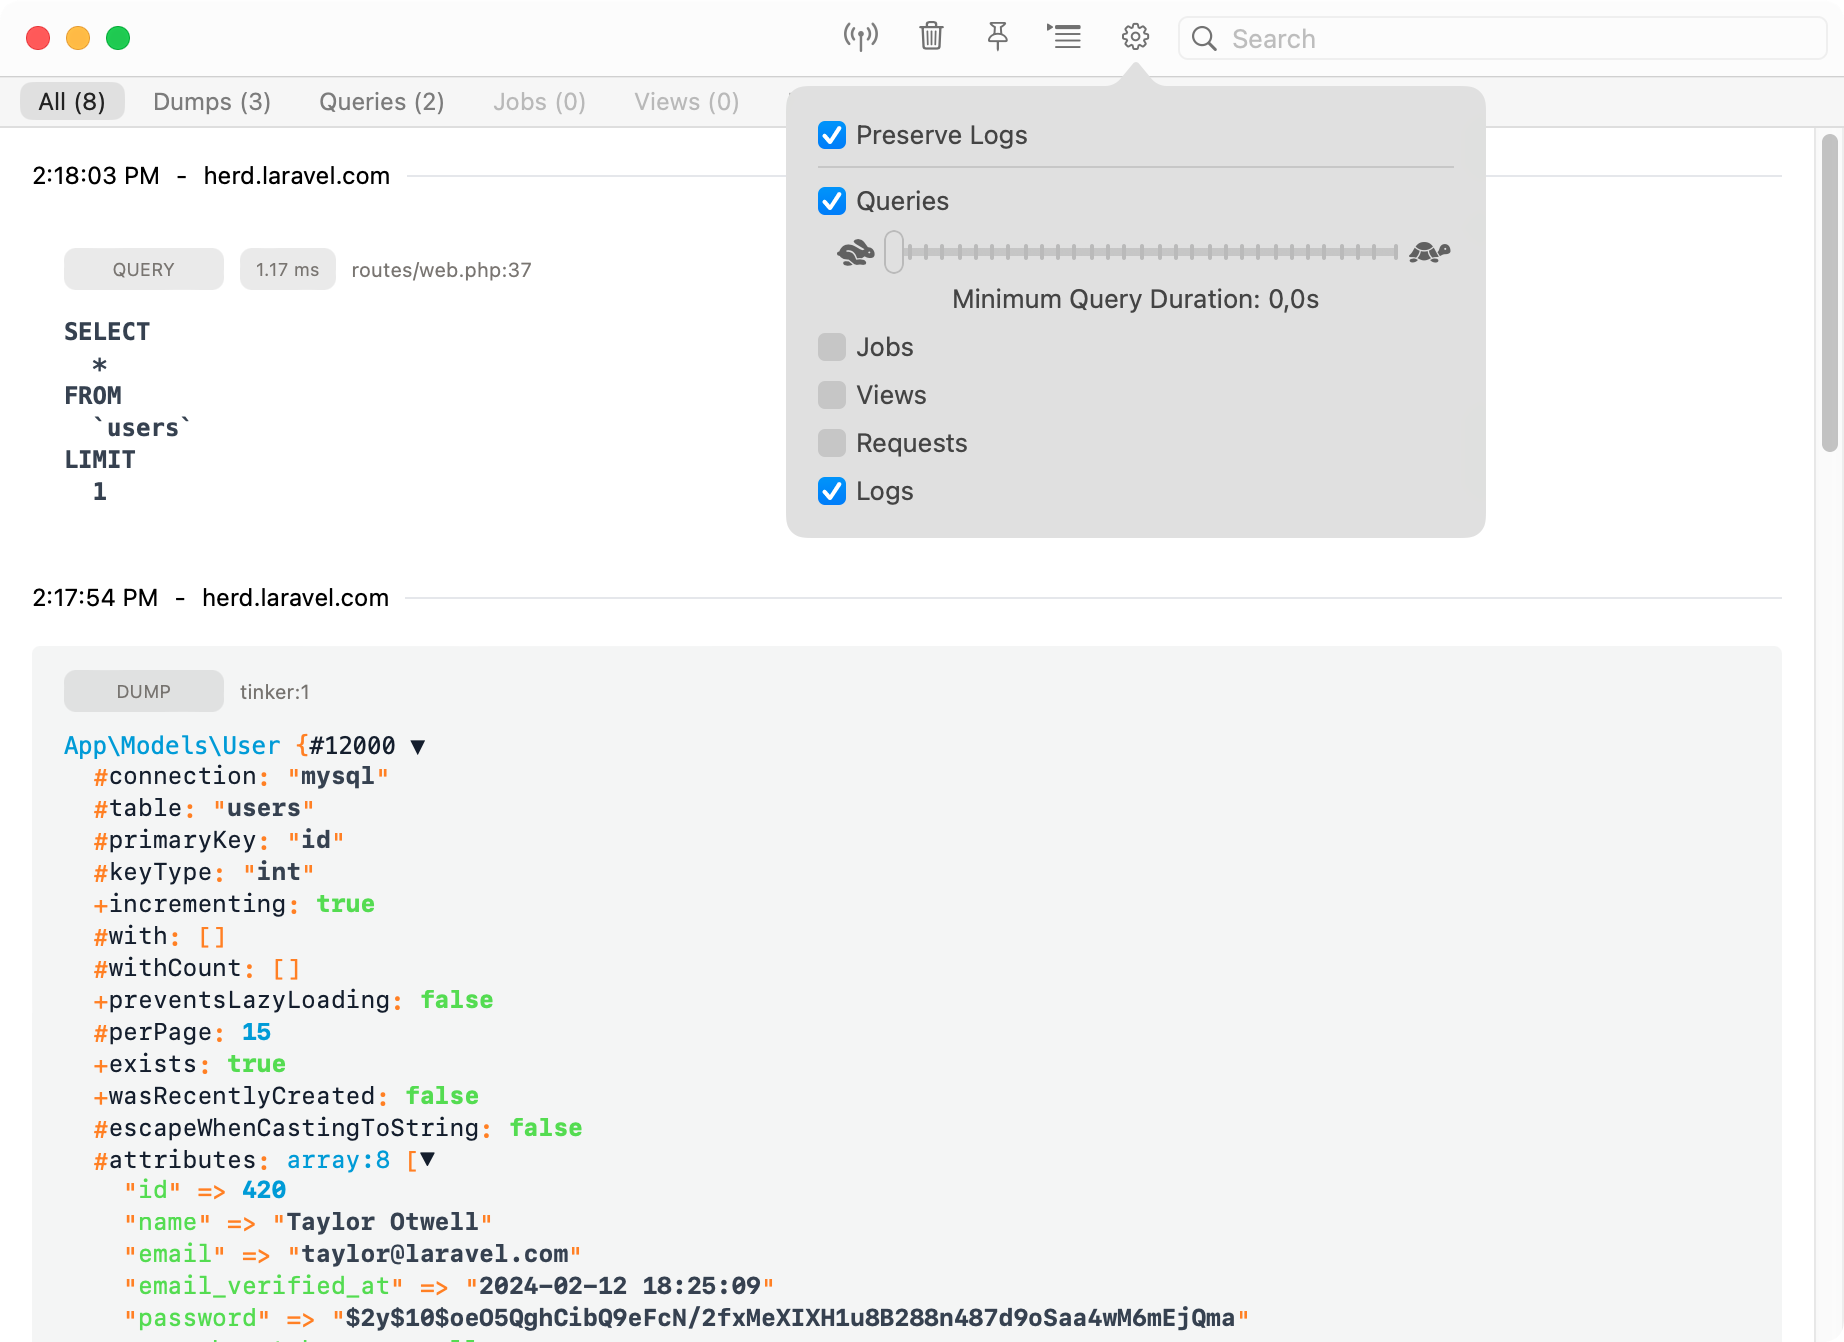
You can select which features you need when you start debugging, so that your requests stay as fast as usual and there's no bloat when digging into a problem.
New dumps are automatically added to the top of the window, and you can clear the window by pressing the icon in the title bar of the dump window. All dumps are searchable so you can easily find what you are looking for.
By default, Herd only displays the output of the latest request, but you can enable persistent storage between requests in the settings. This keeps a history until you close the Dumps Window.
## Settings
You can select which features you need when you start debugging, so that your requests stay as fast as usual and there's no bloat when digging into a problem.
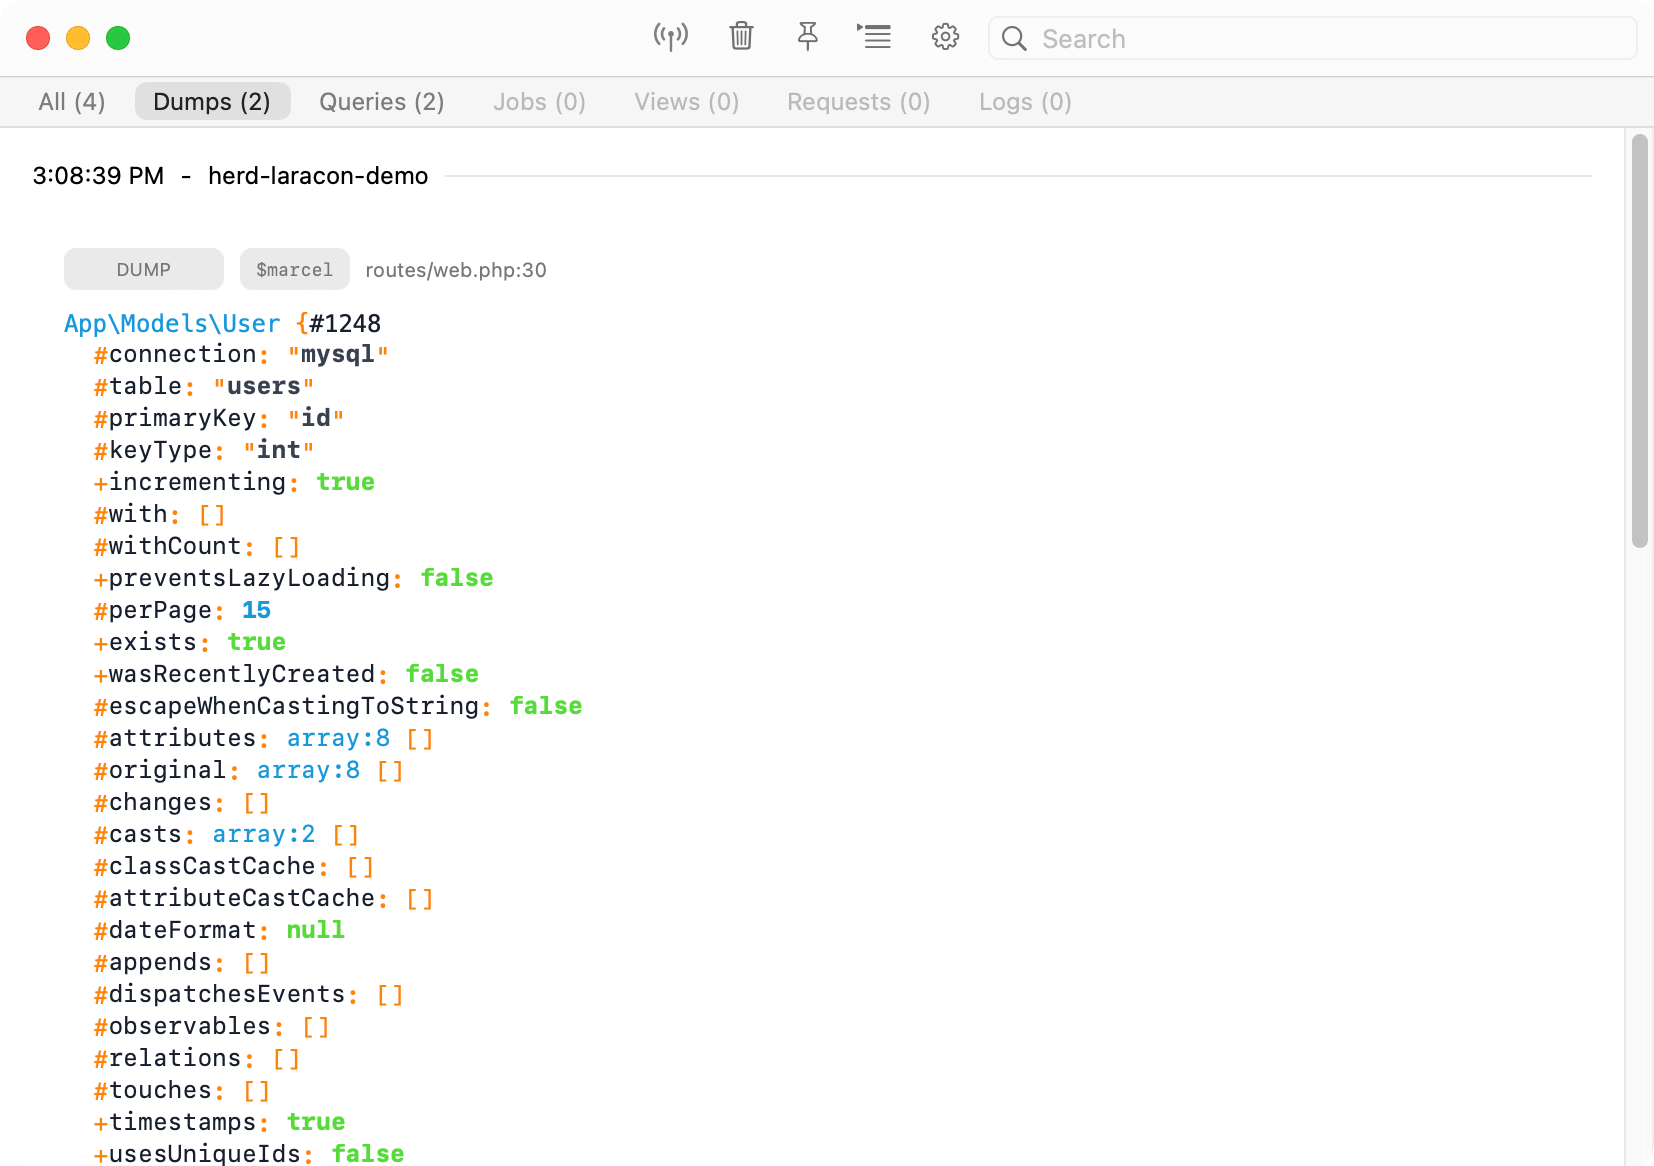
 ## Dumps
When enabled, all dumps that you run via Laravels' `dump()` or `dd()` methods automatically go to the Dumps Windows instead of your browser. This has the advantage that the dump doesn't break your layout and SPAs still work.
This also sends `dump()` calls from queued jobs to the dump window that you wouldn't see in your browser when working with real queues.
## Dumps
When enabled, all dumps that you run via Laravels' `dump()` or `dd()` methods automatically go to the Dumps Windows instead of your browser. This has the advantage that the dump doesn't break your layout and SPAs still work.
This also sends `dump()` calls from queued jobs to the dump window that you wouldn't see in your browser when working with real queues.
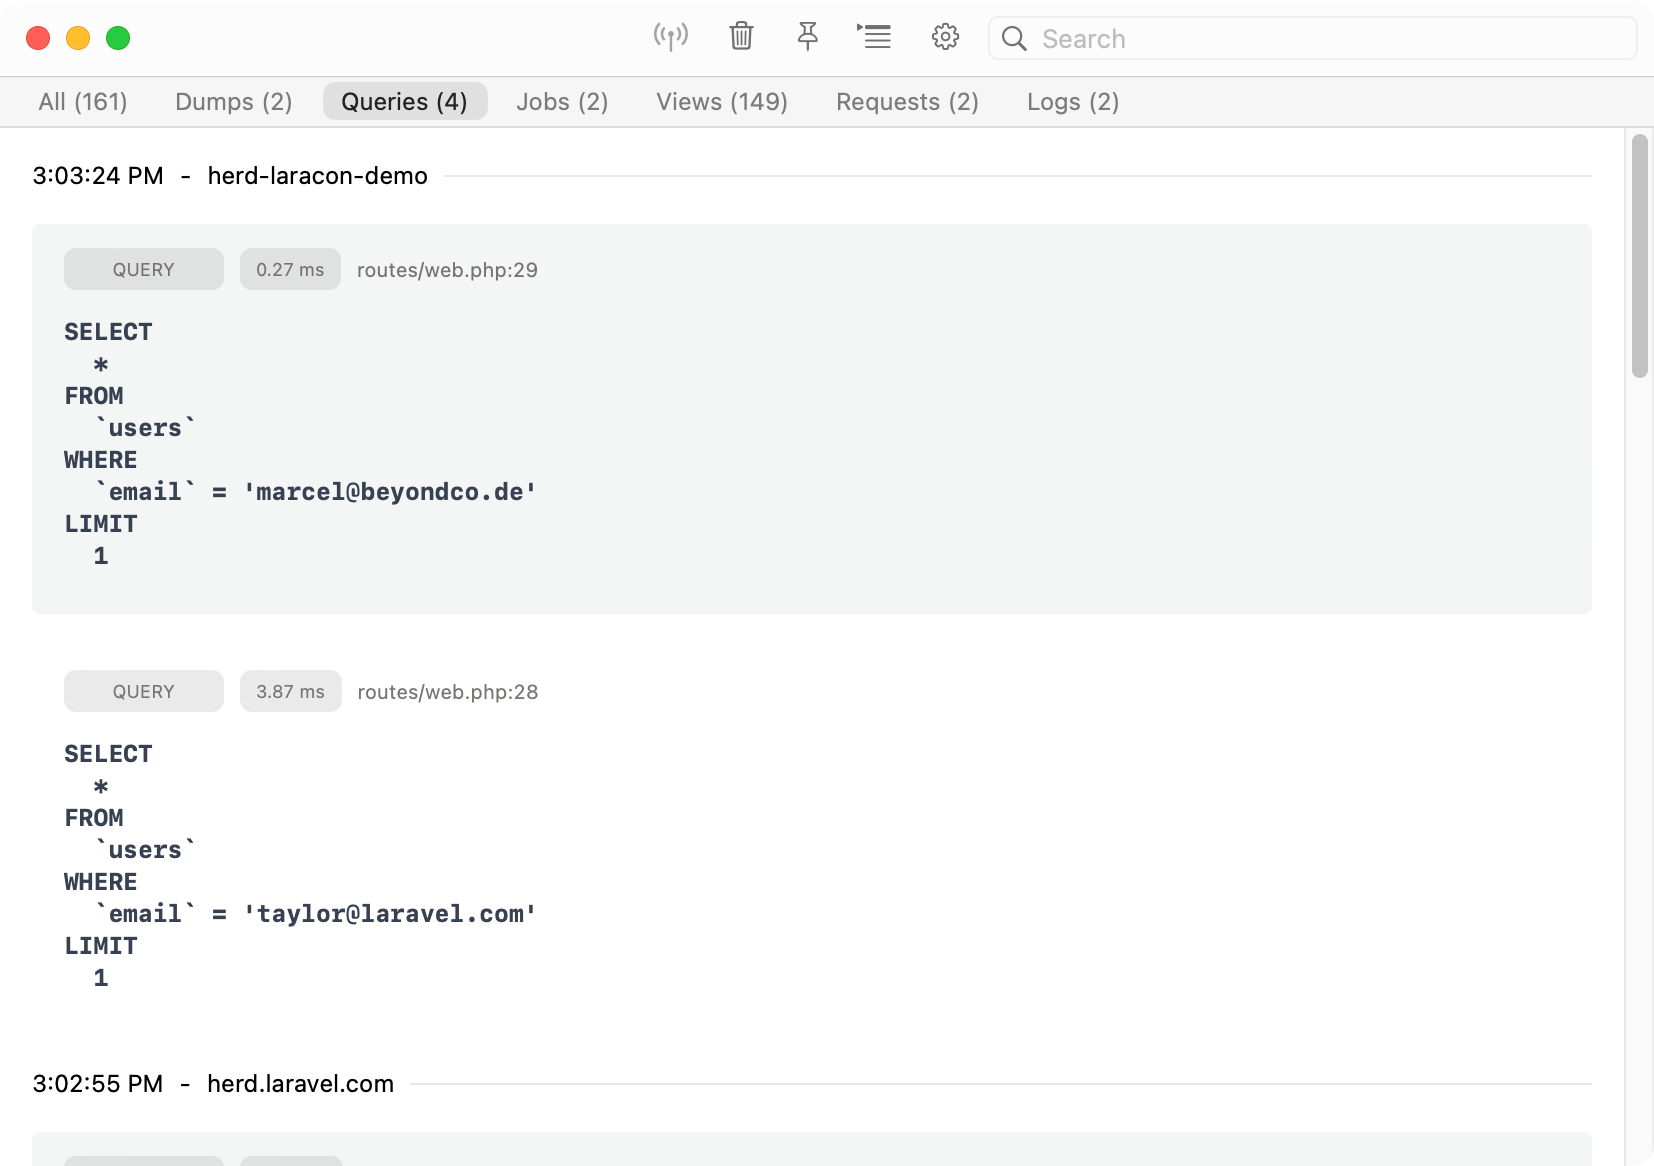
 ## Queries
You can display and debug Eloquent queries by enabling the query feature in the settings. If you want to debug specific queries, you can select the duration for these queries and skip fast ones which are good to go.
## Queries
You can display and debug Eloquent queries by enabling the query feature in the settings. If you want to debug specific queries, you can select the duration for these queries and skip fast ones which are good to go.
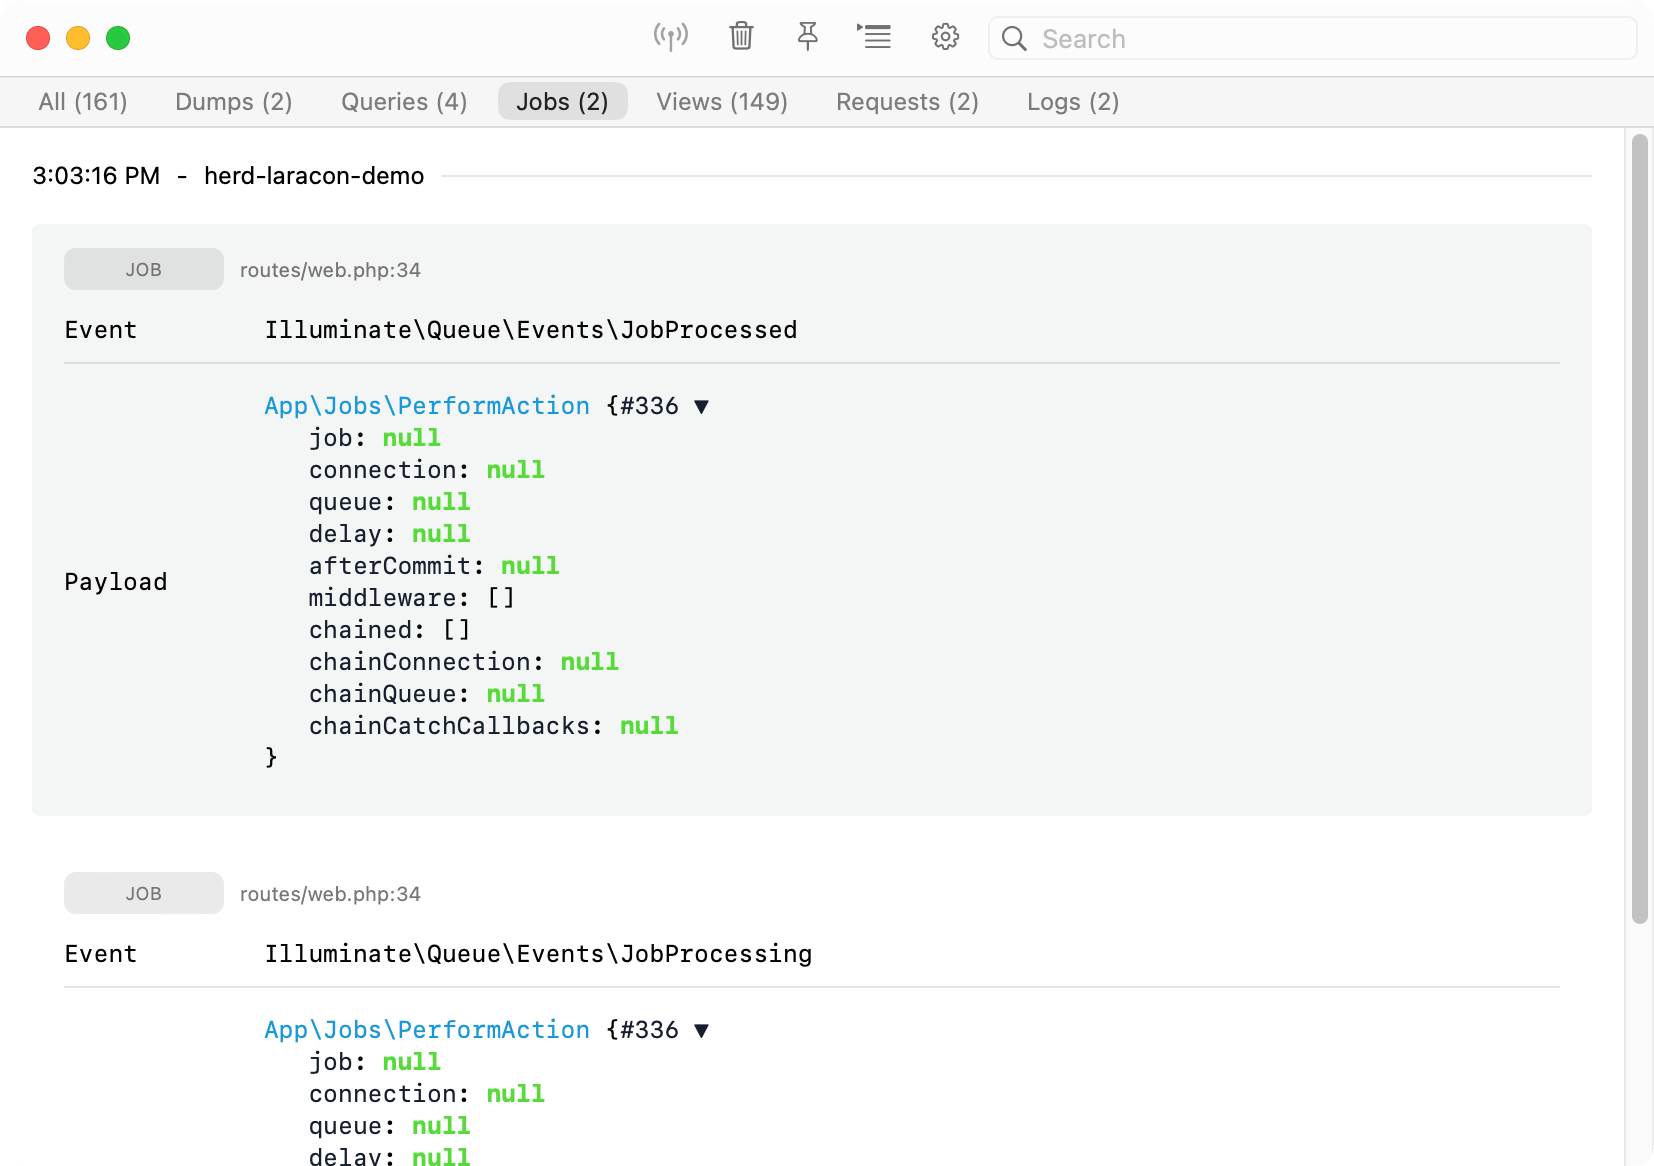
 ## Jobs
Enable job logging to get a list of all jobs that your application runs. This is super useful when you work with the sync driver and are not sure if all jobs are properly triggered.
## Jobs
Enable job logging to get a list of all jobs that your application runs. This is super useful when you work with the sync driver and are not sure if all jobs are properly triggered.
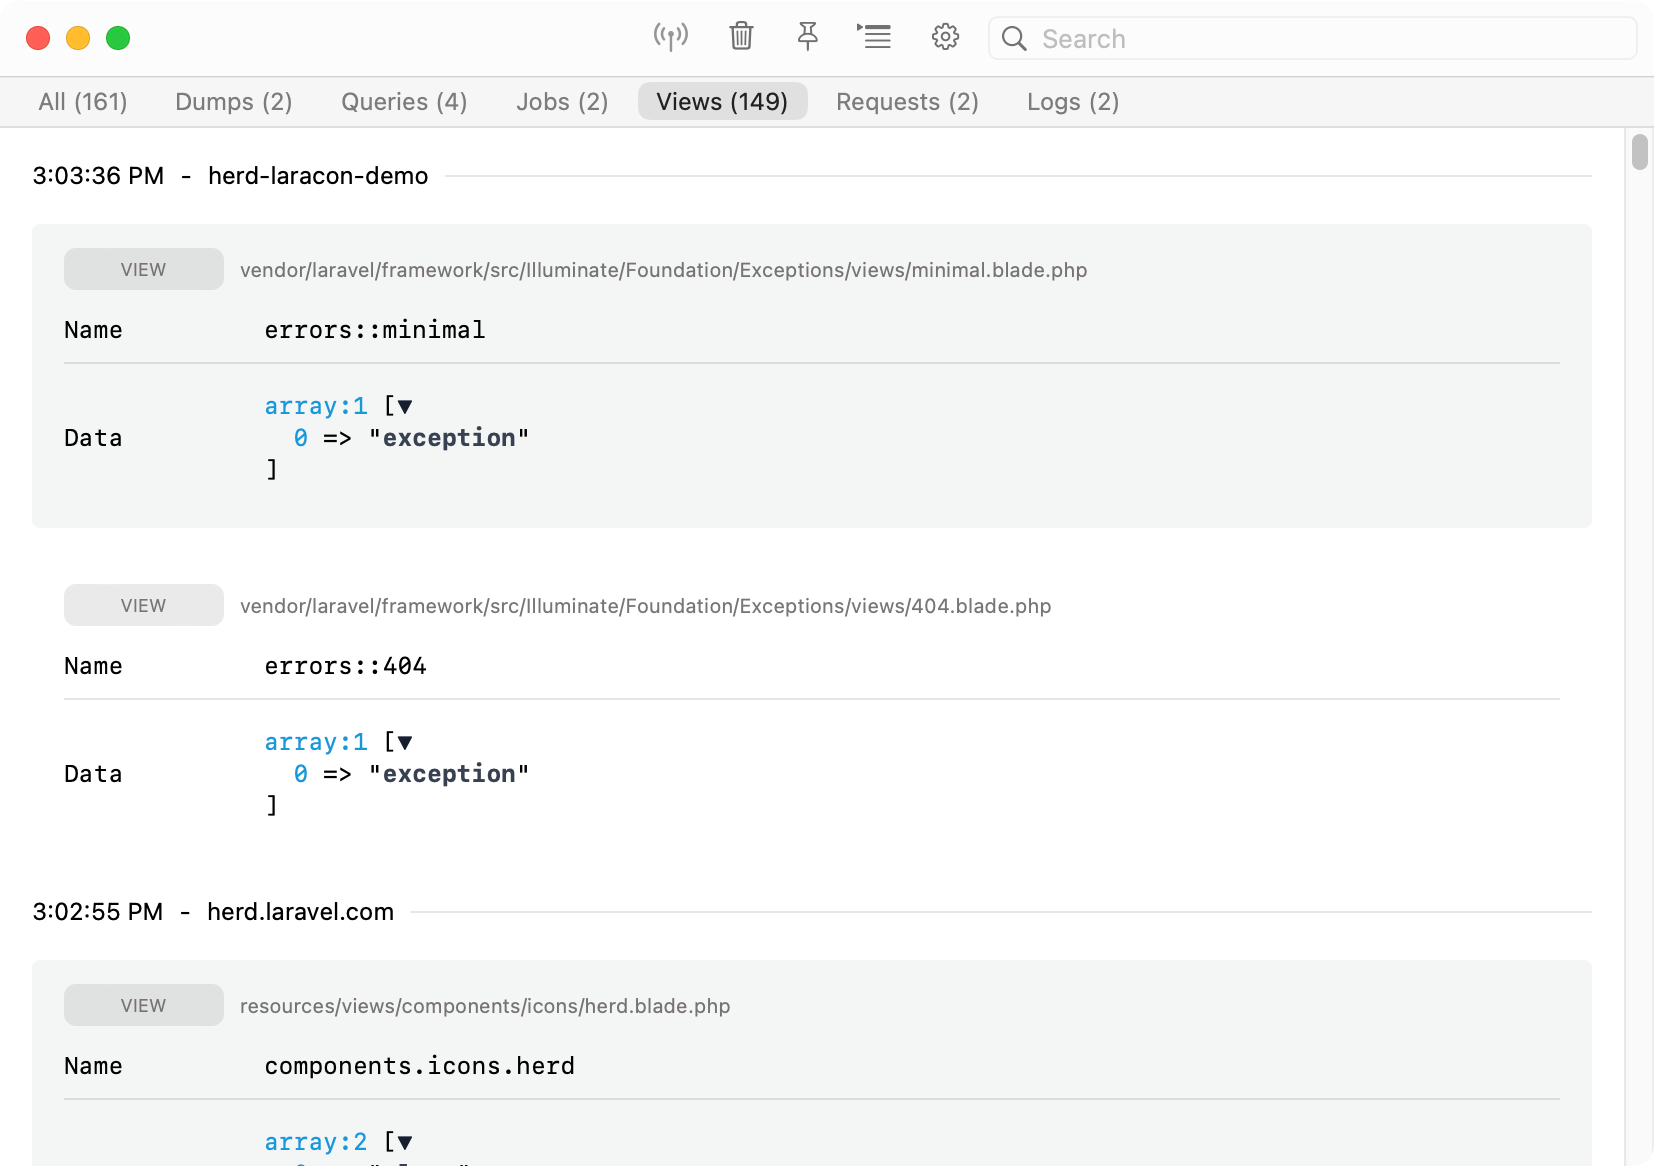
 ## Views
Sometimes, you want to know which data gets passed to a view and which views your application loads on a specific site. This tab lists all views that Laravel renders during a request.
## Views
Sometimes, you want to know which data gets passed to a view and which views your application loads on a specific site. This tab lists all views that Laravel renders during a request.
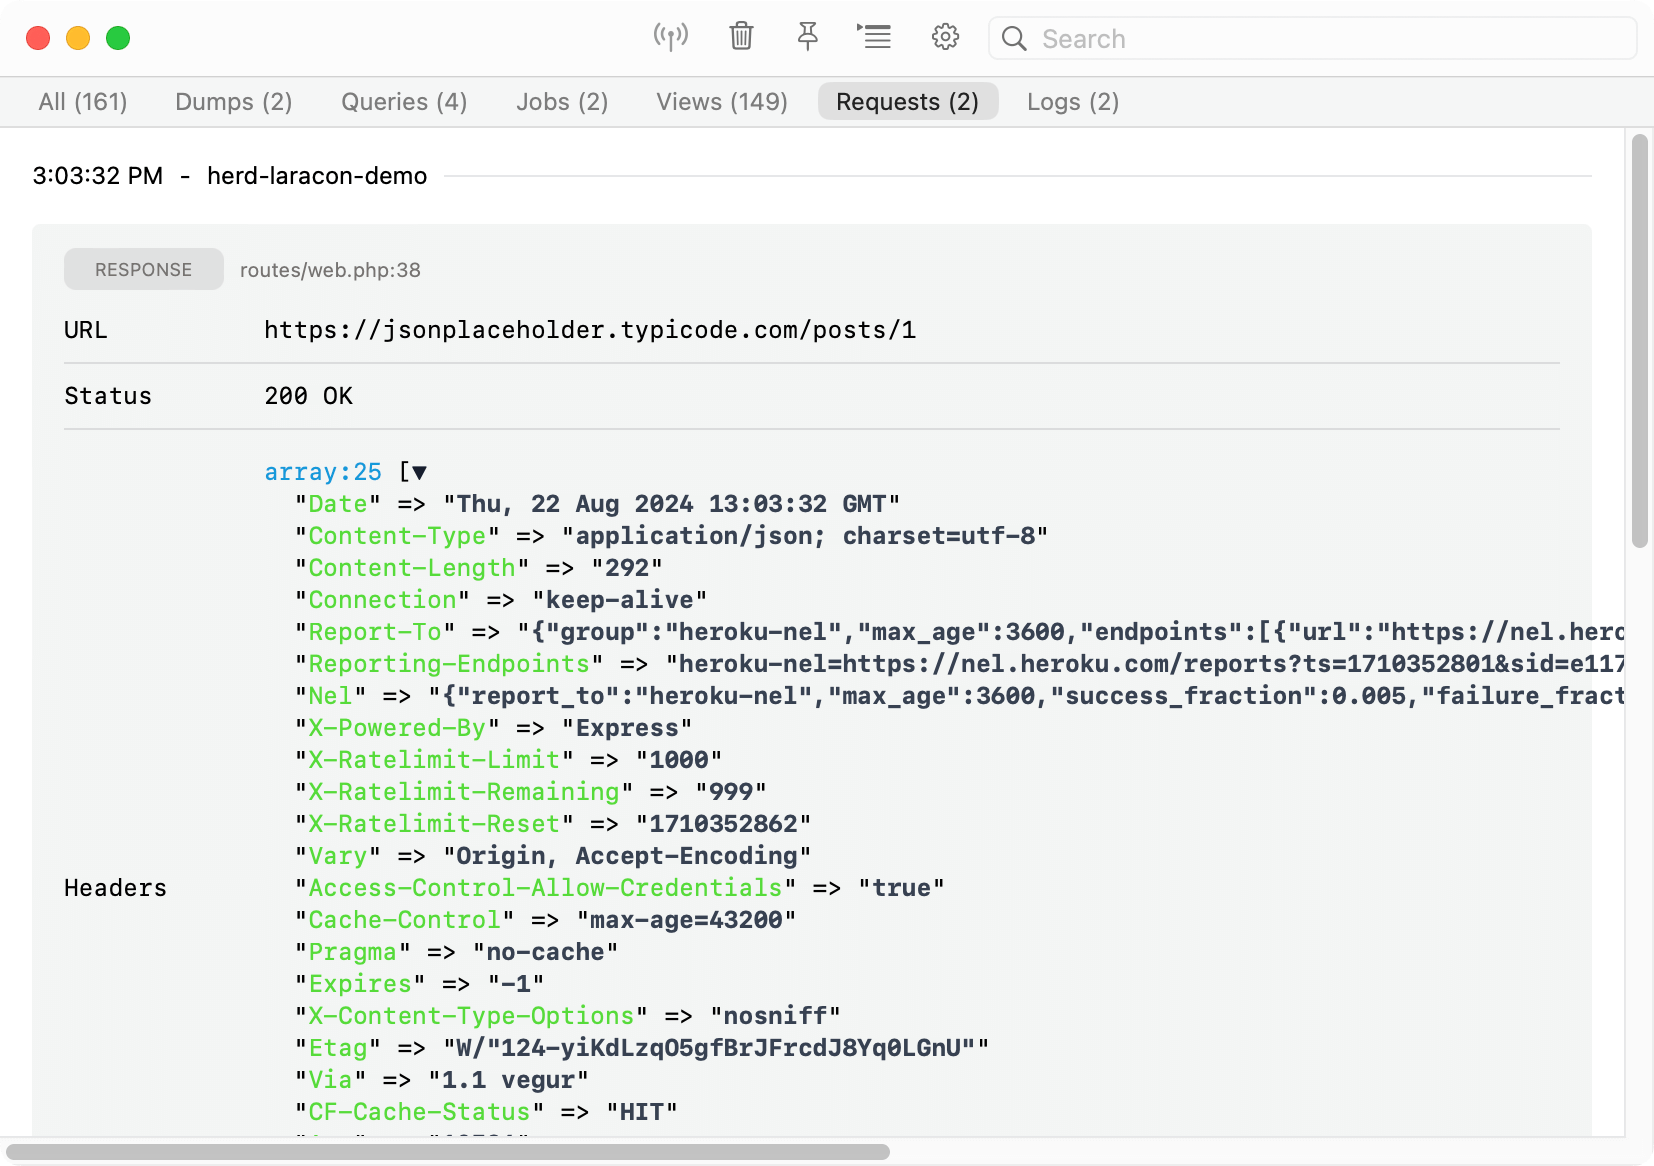
 ## HTTP
The request tab displays all outgoing HTTP requests of your application, so if you're working with an API, these calls show up in the Dumps Window and allow you to inspect them without searching through logs etc.
## HTTP
The request tab displays all outgoing HTTP requests of your application, so if you're working with an API, these calls show up in the Dumps Window and allow you to inspect them without searching through logs etc.
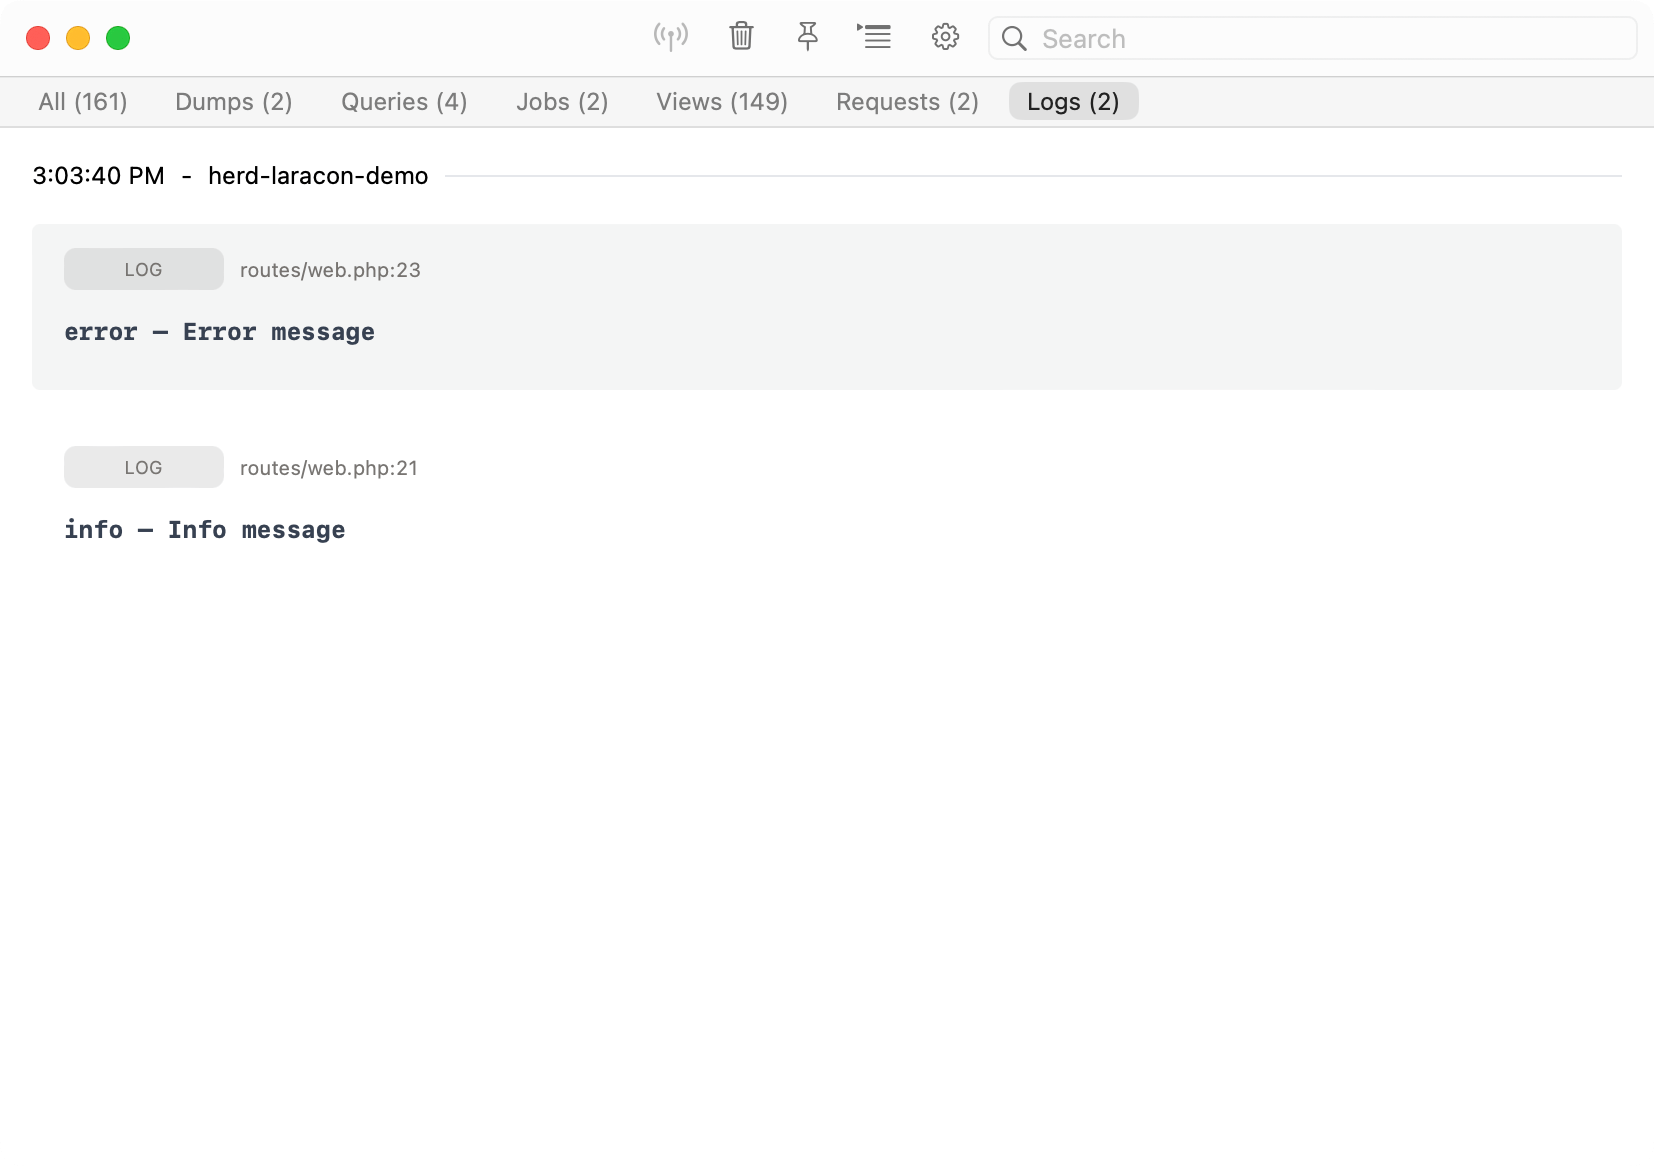
 ## Logs
You can get all logs of a request without using Herd's Log Viewer or digging through log files.
## Logs
You can get all logs of a request without using Herd's Log Viewer or digging through log files.
 ## Troubleshooting
The dumps feature uses Herds' own PHP extension so make sure it is present in your `php.ini` and the path to the extension is correct. If you think that there is a problem with the path, simply quit Herd, remove the extension from the ini file and start Herd again. This will add the extension to the configuration file with the correct path.
```ini theme={null}
extension=/Applications/Herd.app/Contents/Resources/herd-ext/herd-83-arm64.so
```
Technically, Herd uses this extension to inject code into your codebase in very early stages of the bootstrapping process. So if you're facing issues within your application, you might want to disable some or all of the features in the [settings](#settings).
---
# Source: https://herd.laravel.com/docs/macos/advanced-usage/herd-cli.md
> ## Documentation Index
> Fetch the complete documentation index at: https://herd.laravel.com/docs/llms.txt
> Use this file to discover all available pages before exploring further.
# Command Line
# Herd Command Line Interface
The following commands are available in the Laravel Herd CLI tool. Each command allows you to manage development environment settings and configurations directly from the command line.
## Common Commands
You can get the full list of commands by running `herd list` in your terminal.
* [herd composer](#herd-composer)
* [herd coverage](#herd-coverage)
* [herd debug](#herd-debug)
* [herd edit](#herd-edit)
* [herd init](#herd-init)
* [herd ini](#herd-ini)
* [herd isolate](#herd-isolate)
* [herd isolate-node](#herd-isolate-node)
* [herd isolated](#herd-isolated)
* [herd isolated-node](#herd-isolated-node)
* [herd link](#herd-link)
* [herd links](#herd-links)
* [herd log](#herd-log)
* [herd logs](#herd-logs)
* [herd open](#herd-open)
* [herd park](#herd-park)
* [herd parked](#herd-parked)
* [herd php](#herd-php)
* [herd restart](#herd-restart)
* [herd secure](#herd-secure)
* [herd secured](#herd-secured)
* [herd share](#herd-share)
* [herd site-information](#herd-site-information)
* [herd start](#herd-start)
* [herd stop](#herd-stop)
* [herd tinker](#herd-tinker)
* [herd unisolate](#herd-unisolate)
* [herd unisolate-node](#herd-unisolate-node)
* [herd unlink](#herd-unlink)
* [herd unsecure](#herd-unsecure)
* [herd use](#herd-use)
* [herd which](#herd-which)
* [herd which-php](#herd-which-php)
* [herd init:fresh](#herd-initfresh)
***
## herd composer
The `herd composer` command proxies composer calls to the isolated PHP version of a site. We recommend setting up an alias for your terminal so that running `composer` on the command line always uses `herd composer` and uses the correct PHP version for your site.
## herd coverage
You can run `herd coverage` to run PHP commands with Xdebug coverage enabled and it always uses the the isolated PHP executable.
## herd debug
Run `herd debug` and automatically load your `debug.ini` for this command. The `debug.ini` usually includes Xdebug so if you want to debug artisan commands, this is how to do it from your terminal.
## herd edit
The `herd edit` command opens the current directory in the configured IDE.
## herd ini
The `herd ini` command automatically opens the `php.ini` file for your current global PHP version in your configured IDE.
When running this command in an isolated project path, Herd will open the php.ini file for the isolated PHP version.
You may also specify which version you want to use:
```
herd ini 8.0
```
## herd init
If a `herd.yml` file is present in the directory, Herd configures your application according to the manifest file. Without a `herd.yml`, the command starts the wizard to create one.
## herd isolate
The command tells Herd to use a specific PHP version for this directory when serving sites or using the `herd composer` or `herd php` commands.
```bash theme={null}
herd use 8.2
herd use 8.3
herd use 8.4
```
## herd isolate-node
Similar to the `herd isolate` comand for PHP, the `herd isolate-node` command sets a specific Node.js version for a directory. The difference to the PHP version of the command is that `herd isolate-node` creates and NVM config file that autoamtically switches the global node version if you enter this directory – so you can't run multiple versions in different directories in parallel.
## herd isolated
The `isolated`command lists all sites with isolated PHP versions and givey you a quick overview where they are.
## herd isolated-node
Analog to the PHP command, the `isolate-node` command lists all sites with isolated Node.js versions.
## herd link
You can register applications outsite of a parked path via the `herd link` command. It also supports linking multiple domains to a single application.
```bash theme={null}
# Link the current directory as some-site.test
herd link some-site
# Link the same application via some-other-domain.test
herd link some-other-domain
```
## herd links
You can display all linked sites via `herd links`.
```bash theme={null}
+------------------+-----+------------------------------+------------------------------------+-------------+---------+
| Site | SSL | URL | Path | PHP Version | |
+------------------+-----+------------------------------+------------------------------------+-------------+---------+
| beyondco.de | | http://beyondco.de.test | /Users/seb/Code/beyondco.de | 8.2 | v21.3.0 |
| herd.laravel.com | | http://herd.laravel.com.test | /Users/seb/Code/herd.laravel.com | 8.3 | 21 |
| tinkerwell.app | X | https://tinkerwell.app.test | /Users/seb/Code/tinkerwell-site | 8.1 | v21.3.0 |
+------------------+-----+------------------------------+------------------------------------+-------------+---------+
```
## herd log
You can tail any logs from Herd via the `herd log` command. If you run it without an argument, it displays all available log files and if your specify a service, it tails the logs of this service.
```bash theme={null}
herd log
herd log nginx
```
## herd logs
If you're using [Herd Pro](https://herd.laravel.com/checkout), you can open the Log Viewer via `herd logs` from your terminal.
## herd open
The `herd open` command opens the current directory in a browser.
## herd park
You can park additional directories via the `herd park` command and make all subdirectories available via their `.test` domains.
## herd parked
Type `herd parked`to lists all sites in parked paths.
## herd php
The `herd php` command runs PHP commands using the isolated executable for the site.
```bash theme={null}
herd php artisan inspire
```
## herd restart
You can restart all Herd services via the `herd restart` command.
## herd secure
Generate a trusted TLS certificate by running `herd secure` in the directory of am application.
## herd secured
Run `herd secured` to list all currently secured sites with the expiration date of the certificate.
## herd share
You can share local applications via the `herd share` command and [Expose](https://expose.dev).
## herd site-information
The `herd site-information` command displays information based on the driver of the application. For Laravel applications, this is the result of the `php artisan about` command but you can replace that with a custom driver.
## herd start
Start all Herd services with `herd start`.
## herd stop
Stop all Herd services – from nginx and dnsmasq to all Herd Pro services – via `herd stop`.
## herd tinker
You can hop into a tinker session with your Laravel application via `herd tinker`. If Herd detects [Tinkerwell](https://tinkerwell.app) on your machine, it automatically opens the application in Tinkerwell.
## herd unisolate
If you've isolated the application at your current terminal path to a specific PHP version and want to use the global version again, you can run `herd unisolate` to remove the isolation.
## herd unisolate-node
Like `herd isolate`, the `unisolate-node` command removes the isolation to a specific Node.js version. The command uses Herd's nvm under the hood so make sure to have that installed first.
## herd unlink
You can remove the configuration for a linked site by running the `herd unlink` command in the linked directory.
## herd unsecure
Run `herd unsecure` to remove the TLS certificate of the domain and the automated redirect to HTTPS from nginx. Make sure to restart your browser session or clear your redirect cache because your browser will still try to send you to the HTTPS URL instead of simply serving the site via HTTP.
## herd use
The command `herd use` changes the global PHP version that Herd uses to serve all sites that don't have an isolated version.
```bash theme={null}
herd use 8.3
herd use 8.4
```
## herd which
In case that you are debugging issues with your custom Herd driver, you can run `herd which` to see which driver Herd detects for the application at your current terminal path.
## herd which-php
You can run `herd which php` to see which PHP binary Herd uses to serve the application at your current terminal path.
## herd init:fresh
Initializes a fresh Herd manifest file.
Herd also ships with the Forge CLI and you can run `forge` commands like `forge ssh` from any local site that you link via the Forge Integration without specifying a server.
---
# Source: https://herd.laravel.com/docs/macos/sites/herd-yaml.md
> ## Documentation Index
> Fetch the complete documentation index at: https://herd.laravel.com/docs/llms.txt
> Use this file to discover all available pages before exploring further.
# Herd.yml
# Sharing project configurations
When working in a team, it's important to ensure that everyone uses the same PHP version, certificate settings, and service versions. You can use the `herd.yml` file to manage these configurations within your repository.
## Creating the `herd.yml` file
The easiest way to create the `herd.yml` file is by running the `herd init` command in your project directory.
```bash theme={null}
herd init
```
This command starts a wizard to guide you through the setup process of the `herd.yml` file. If you run `herd init` in a project that already has this file, it configures your site accordingly. Re-running the command after a change, applies all additional configurations but does not remove existing ones.
The setup allows you to configure the following settings:
* Project Name
* Aliases (aka multiple domains)
* PHP Version
* TLS/SSL Certificates
[Herd Pro](https://herd.laravel.com/checkout) users can also specify [services](/macos/herd-pro-services/service-versions) in their `herd.yml` and to install them automatically. By default, Herd preselects the services that are present in your `.env` file, but you can add more if needed.
The list contains the latest versions of these services and if you need other versions, check the section about [editing the `herd.yml` file](#editing-the-codeherdymlcode-file).
```bash theme={null}
~ herd-website (main)
› herd init --fresh
┌ What is the name of your project? ───────────────────────────┐
│ herd-website │
└──────────────────────────────────────────────────────────────┘
...
┌ Do you want to add additional services? ─────────────────────┐
│ › ◻ Meilisearch (1.6.2) ┃ │
│ ◻ MinIO (RELEASE.2024-03-05) │ │
│ ◼ MySQL (8.0.36) │ │
│ ◻ PostgreSQL (16) │ │
│ ◼ Redis (7.0.0) │ │
└────────────────────────────────────────────────── 2 selected ┘
Use the space bar to select options.
```
After running the wizard, a `herd.yml` file will be created in your project root. To overwrite an existing file, you can use the `herd init --fresh` command and generate a new file.
## Setting up a project via `herd.yml`
If a `herd.yml` file exists in your project, Herd can automatically apply the necessary configuration via the `herd init` command.
```bash theme={null}
herd init
```
Running `herd init` checks for the presence of an `.env` file and if not, asks if the `.env.example` file should be copied. After that, this command applies the configurations, including installing and isolating the specific PHP version, aliases, services and more:
```bash theme={null}
~ herd-website (main)
› herd init
INFO Setting up your project…
INFO PHP 8.3 is installed.
INFO Site is secured.
INFO Mysql is running on port 3346
INFO Installing service Redis
INFO Redis is running on port 6379
DONE Your application is ready to go!
```
## Editing the `herd.yml` file
Here is an example of a `herd.yml` file using all possible customizations:
```yaml theme={null}
name: herd-website
php: '8.3'
secured: true
aliases:
- herd-laravel
services:
mysql:
version: 8.0.36
port: '${DB_PORT}'
redis:
version: 7.0.0
port: '${REDIS_PORT}'
```
Instead of referencing your applications' `.env` file with the placeholder (e.g. `${REDIS_PORT}`) you can set a fixed port as well - just keep in mind that your team members may use these ports already.
You can check out a list of available services and versions [here](/macos/herd-pro-services/service-versions).
---
# Source: https://herd.laravel.com/docs/macos/changelog/index.md
> ## Documentation Index
> Fetch the complete documentation index at: https://herd.laravel.com/docs/llms.txt
> Use this file to discover all available pages before exploring further.
# Changelog
## Troubleshooting
The dumps feature uses Herds' own PHP extension so make sure it is present in your `php.ini` and the path to the extension is correct. If you think that there is a problem with the path, simply quit Herd, remove the extension from the ini file and start Herd again. This will add the extension to the configuration file with the correct path.
```ini theme={null}
extension=/Applications/Herd.app/Contents/Resources/herd-ext/herd-83-arm64.so
```
Technically, Herd uses this extension to inject code into your codebase in very early stages of the bootstrapping process. So if you're facing issues within your application, you might want to disable some or all of the features in the [settings](#settings).
---
# Source: https://herd.laravel.com/docs/macos/advanced-usage/herd-cli.md
> ## Documentation Index
> Fetch the complete documentation index at: https://herd.laravel.com/docs/llms.txt
> Use this file to discover all available pages before exploring further.
# Command Line
# Herd Command Line Interface
The following commands are available in the Laravel Herd CLI tool. Each command allows you to manage development environment settings and configurations directly from the command line.
## Common Commands
You can get the full list of commands by running `herd list` in your terminal.
* [herd composer](#herd-composer)
* [herd coverage](#herd-coverage)
* [herd debug](#herd-debug)
* [herd edit](#herd-edit)
* [herd init](#herd-init)
* [herd ini](#herd-ini)
* [herd isolate](#herd-isolate)
* [herd isolate-node](#herd-isolate-node)
* [herd isolated](#herd-isolated)
* [herd isolated-node](#herd-isolated-node)
* [herd link](#herd-link)
* [herd links](#herd-links)
* [herd log](#herd-log)
* [herd logs](#herd-logs)
* [herd open](#herd-open)
* [herd park](#herd-park)
* [herd parked](#herd-parked)
* [herd php](#herd-php)
* [herd restart](#herd-restart)
* [herd secure](#herd-secure)
* [herd secured](#herd-secured)
* [herd share](#herd-share)
* [herd site-information](#herd-site-information)
* [herd start](#herd-start)
* [herd stop](#herd-stop)
* [herd tinker](#herd-tinker)
* [herd unisolate](#herd-unisolate)
* [herd unisolate-node](#herd-unisolate-node)
* [herd unlink](#herd-unlink)
* [herd unsecure](#herd-unsecure)
* [herd use](#herd-use)
* [herd which](#herd-which)
* [herd which-php](#herd-which-php)
* [herd init:fresh](#herd-initfresh)
***
## herd composer
The `herd composer` command proxies composer calls to the isolated PHP version of a site. We recommend setting up an alias for your terminal so that running `composer` on the command line always uses `herd composer` and uses the correct PHP version for your site.
## herd coverage
You can run `herd coverage` to run PHP commands with Xdebug coverage enabled and it always uses the the isolated PHP executable.
## herd debug
Run `herd debug` and automatically load your `debug.ini` for this command. The `debug.ini` usually includes Xdebug so if you want to debug artisan commands, this is how to do it from your terminal.
## herd edit
The `herd edit` command opens the current directory in the configured IDE.
## herd ini
The `herd ini` command automatically opens the `php.ini` file for your current global PHP version in your configured IDE.
When running this command in an isolated project path, Herd will open the php.ini file for the isolated PHP version.
You may also specify which version you want to use:
```
herd ini 8.0
```
## herd init
If a `herd.yml` file is present in the directory, Herd configures your application according to the manifest file. Without a `herd.yml`, the command starts the wizard to create one.
## herd isolate
The command tells Herd to use a specific PHP version for this directory when serving sites or using the `herd composer` or `herd php` commands.
```bash theme={null}
herd use 8.2
herd use 8.3
herd use 8.4
```
## herd isolate-node
Similar to the `herd isolate` comand for PHP, the `herd isolate-node` command sets a specific Node.js version for a directory. The difference to the PHP version of the command is that `herd isolate-node` creates and NVM config file that autoamtically switches the global node version if you enter this directory – so you can't run multiple versions in different directories in parallel.
## herd isolated
The `isolated`command lists all sites with isolated PHP versions and givey you a quick overview where they are.
## herd isolated-node
Analog to the PHP command, the `isolate-node` command lists all sites with isolated Node.js versions.
## herd link
You can register applications outsite of a parked path via the `herd link` command. It also supports linking multiple domains to a single application.
```bash theme={null}
# Link the current directory as some-site.test
herd link some-site
# Link the same application via some-other-domain.test
herd link some-other-domain
```
## herd links
You can display all linked sites via `herd links`.
```bash theme={null}
+------------------+-----+------------------------------+------------------------------------+-------------+---------+
| Site | SSL | URL | Path | PHP Version | |
+------------------+-----+------------------------------+------------------------------------+-------------+---------+
| beyondco.de | | http://beyondco.de.test | /Users/seb/Code/beyondco.de | 8.2 | v21.3.0 |
| herd.laravel.com | | http://herd.laravel.com.test | /Users/seb/Code/herd.laravel.com | 8.3 | 21 |
| tinkerwell.app | X | https://tinkerwell.app.test | /Users/seb/Code/tinkerwell-site | 8.1 | v21.3.0 |
+------------------+-----+------------------------------+------------------------------------+-------------+---------+
```
## herd log
You can tail any logs from Herd via the `herd log` command. If you run it without an argument, it displays all available log files and if your specify a service, it tails the logs of this service.
```bash theme={null}
herd log
herd log nginx
```
## herd logs
If you're using [Herd Pro](https://herd.laravel.com/checkout), you can open the Log Viewer via `herd logs` from your terminal.
## herd open
The `herd open` command opens the current directory in a browser.
## herd park
You can park additional directories via the `herd park` command and make all subdirectories available via their `.test` domains.
## herd parked
Type `herd parked`to lists all sites in parked paths.
## herd php
The `herd php` command runs PHP commands using the isolated executable for the site.
```bash theme={null}
herd php artisan inspire
```
## herd restart
You can restart all Herd services via the `herd restart` command.
## herd secure
Generate a trusted TLS certificate by running `herd secure` in the directory of am application.
## herd secured
Run `herd secured` to list all currently secured sites with the expiration date of the certificate.
## herd share
You can share local applications via the `herd share` command and [Expose](https://expose.dev).
## herd site-information
The `herd site-information` command displays information based on the driver of the application. For Laravel applications, this is the result of the `php artisan about` command but you can replace that with a custom driver.
## herd start
Start all Herd services with `herd start`.
## herd stop
Stop all Herd services – from nginx and dnsmasq to all Herd Pro services – via `herd stop`.
## herd tinker
You can hop into a tinker session with your Laravel application via `herd tinker`. If Herd detects [Tinkerwell](https://tinkerwell.app) on your machine, it automatically opens the application in Tinkerwell.
## herd unisolate
If you've isolated the application at your current terminal path to a specific PHP version and want to use the global version again, you can run `herd unisolate` to remove the isolation.
## herd unisolate-node
Like `herd isolate`, the `unisolate-node` command removes the isolation to a specific Node.js version. The command uses Herd's nvm under the hood so make sure to have that installed first.
## herd unlink
You can remove the configuration for a linked site by running the `herd unlink` command in the linked directory.
## herd unsecure
Run `herd unsecure` to remove the TLS certificate of the domain and the automated redirect to HTTPS from nginx. Make sure to restart your browser session or clear your redirect cache because your browser will still try to send you to the HTTPS URL instead of simply serving the site via HTTP.
## herd use
The command `herd use` changes the global PHP version that Herd uses to serve all sites that don't have an isolated version.
```bash theme={null}
herd use 8.3
herd use 8.4
```
## herd which
In case that you are debugging issues with your custom Herd driver, you can run `herd which` to see which driver Herd detects for the application at your current terminal path.
## herd which-php
You can run `herd which php` to see which PHP binary Herd uses to serve the application at your current terminal path.
## herd init:fresh
Initializes a fresh Herd manifest file.
Herd also ships with the Forge CLI and you can run `forge` commands like `forge ssh` from any local site that you link via the Forge Integration without specifying a server.
---
# Source: https://herd.laravel.com/docs/macos/sites/herd-yaml.md
> ## Documentation Index
> Fetch the complete documentation index at: https://herd.laravel.com/docs/llms.txt
> Use this file to discover all available pages before exploring further.
# Herd.yml
# Sharing project configurations
When working in a team, it's important to ensure that everyone uses the same PHP version, certificate settings, and service versions. You can use the `herd.yml` file to manage these configurations within your repository.
## Creating the `herd.yml` file
The easiest way to create the `herd.yml` file is by running the `herd init` command in your project directory.
```bash theme={null}
herd init
```
This command starts a wizard to guide you through the setup process of the `herd.yml` file. If you run `herd init` in a project that already has this file, it configures your site accordingly. Re-running the command after a change, applies all additional configurations but does not remove existing ones.
The setup allows you to configure the following settings:
* Project Name
* Aliases (aka multiple domains)
* PHP Version
* TLS/SSL Certificates
[Herd Pro](https://herd.laravel.com/checkout) users can also specify [services](/macos/herd-pro-services/service-versions) in their `herd.yml` and to install them automatically. By default, Herd preselects the services that are present in your `.env` file, but you can add more if needed.
The list contains the latest versions of these services and if you need other versions, check the section about [editing the `herd.yml` file](#editing-the-codeherdymlcode-file).
```bash theme={null}
~ herd-website (main)
› herd init --fresh
┌ What is the name of your project? ───────────────────────────┐
│ herd-website │
└──────────────────────────────────────────────────────────────┘
...
┌ Do you want to add additional services? ─────────────────────┐
│ › ◻ Meilisearch (1.6.2) ┃ │
│ ◻ MinIO (RELEASE.2024-03-05) │ │
│ ◼ MySQL (8.0.36) │ │
│ ◻ PostgreSQL (16) │ │
│ ◼ Redis (7.0.0) │ │
└────────────────────────────────────────────────── 2 selected ┘
Use the space bar to select options.
```
After running the wizard, a `herd.yml` file will be created in your project root. To overwrite an existing file, you can use the `herd init --fresh` command and generate a new file.
## Setting up a project via `herd.yml`
If a `herd.yml` file exists in your project, Herd can automatically apply the necessary configuration via the `herd init` command.
```bash theme={null}
herd init
```
Running `herd init` checks for the presence of an `.env` file and if not, asks if the `.env.example` file should be copied. After that, this command applies the configurations, including installing and isolating the specific PHP version, aliases, services and more:
```bash theme={null}
~ herd-website (main)
› herd init
INFO Setting up your project…
INFO PHP 8.3 is installed.
INFO Site is secured.
INFO Mysql is running on port 3346
INFO Installing service Redis
INFO Redis is running on port 6379
DONE Your application is ready to go!
```
## Editing the `herd.yml` file
Here is an example of a `herd.yml` file using all possible customizations:
```yaml theme={null}
name: herd-website
php: '8.3'
secured: true
aliases:
- herd-laravel
services:
mysql:
version: 8.0.36
port: '${DB_PORT}'
redis:
version: 7.0.0
port: '${REDIS_PORT}'
```
Instead of referencing your applications' `.env` file with the placeholder (e.g. `${REDIS_PORT}`) you can set a fixed port as well - just keep in mind that your team members may use these ports already.
You can check out a list of available services and versions [here](/macos/herd-pro-services/service-versions).
---
# Source: https://herd.laravel.com/docs/macos/changelog/index.md
> ## Documentation Index
> Fetch the complete documentation index at: https://herd.laravel.com/docs/llms.txt
> Use this file to discover all available pages before exploring further.
# Changelog
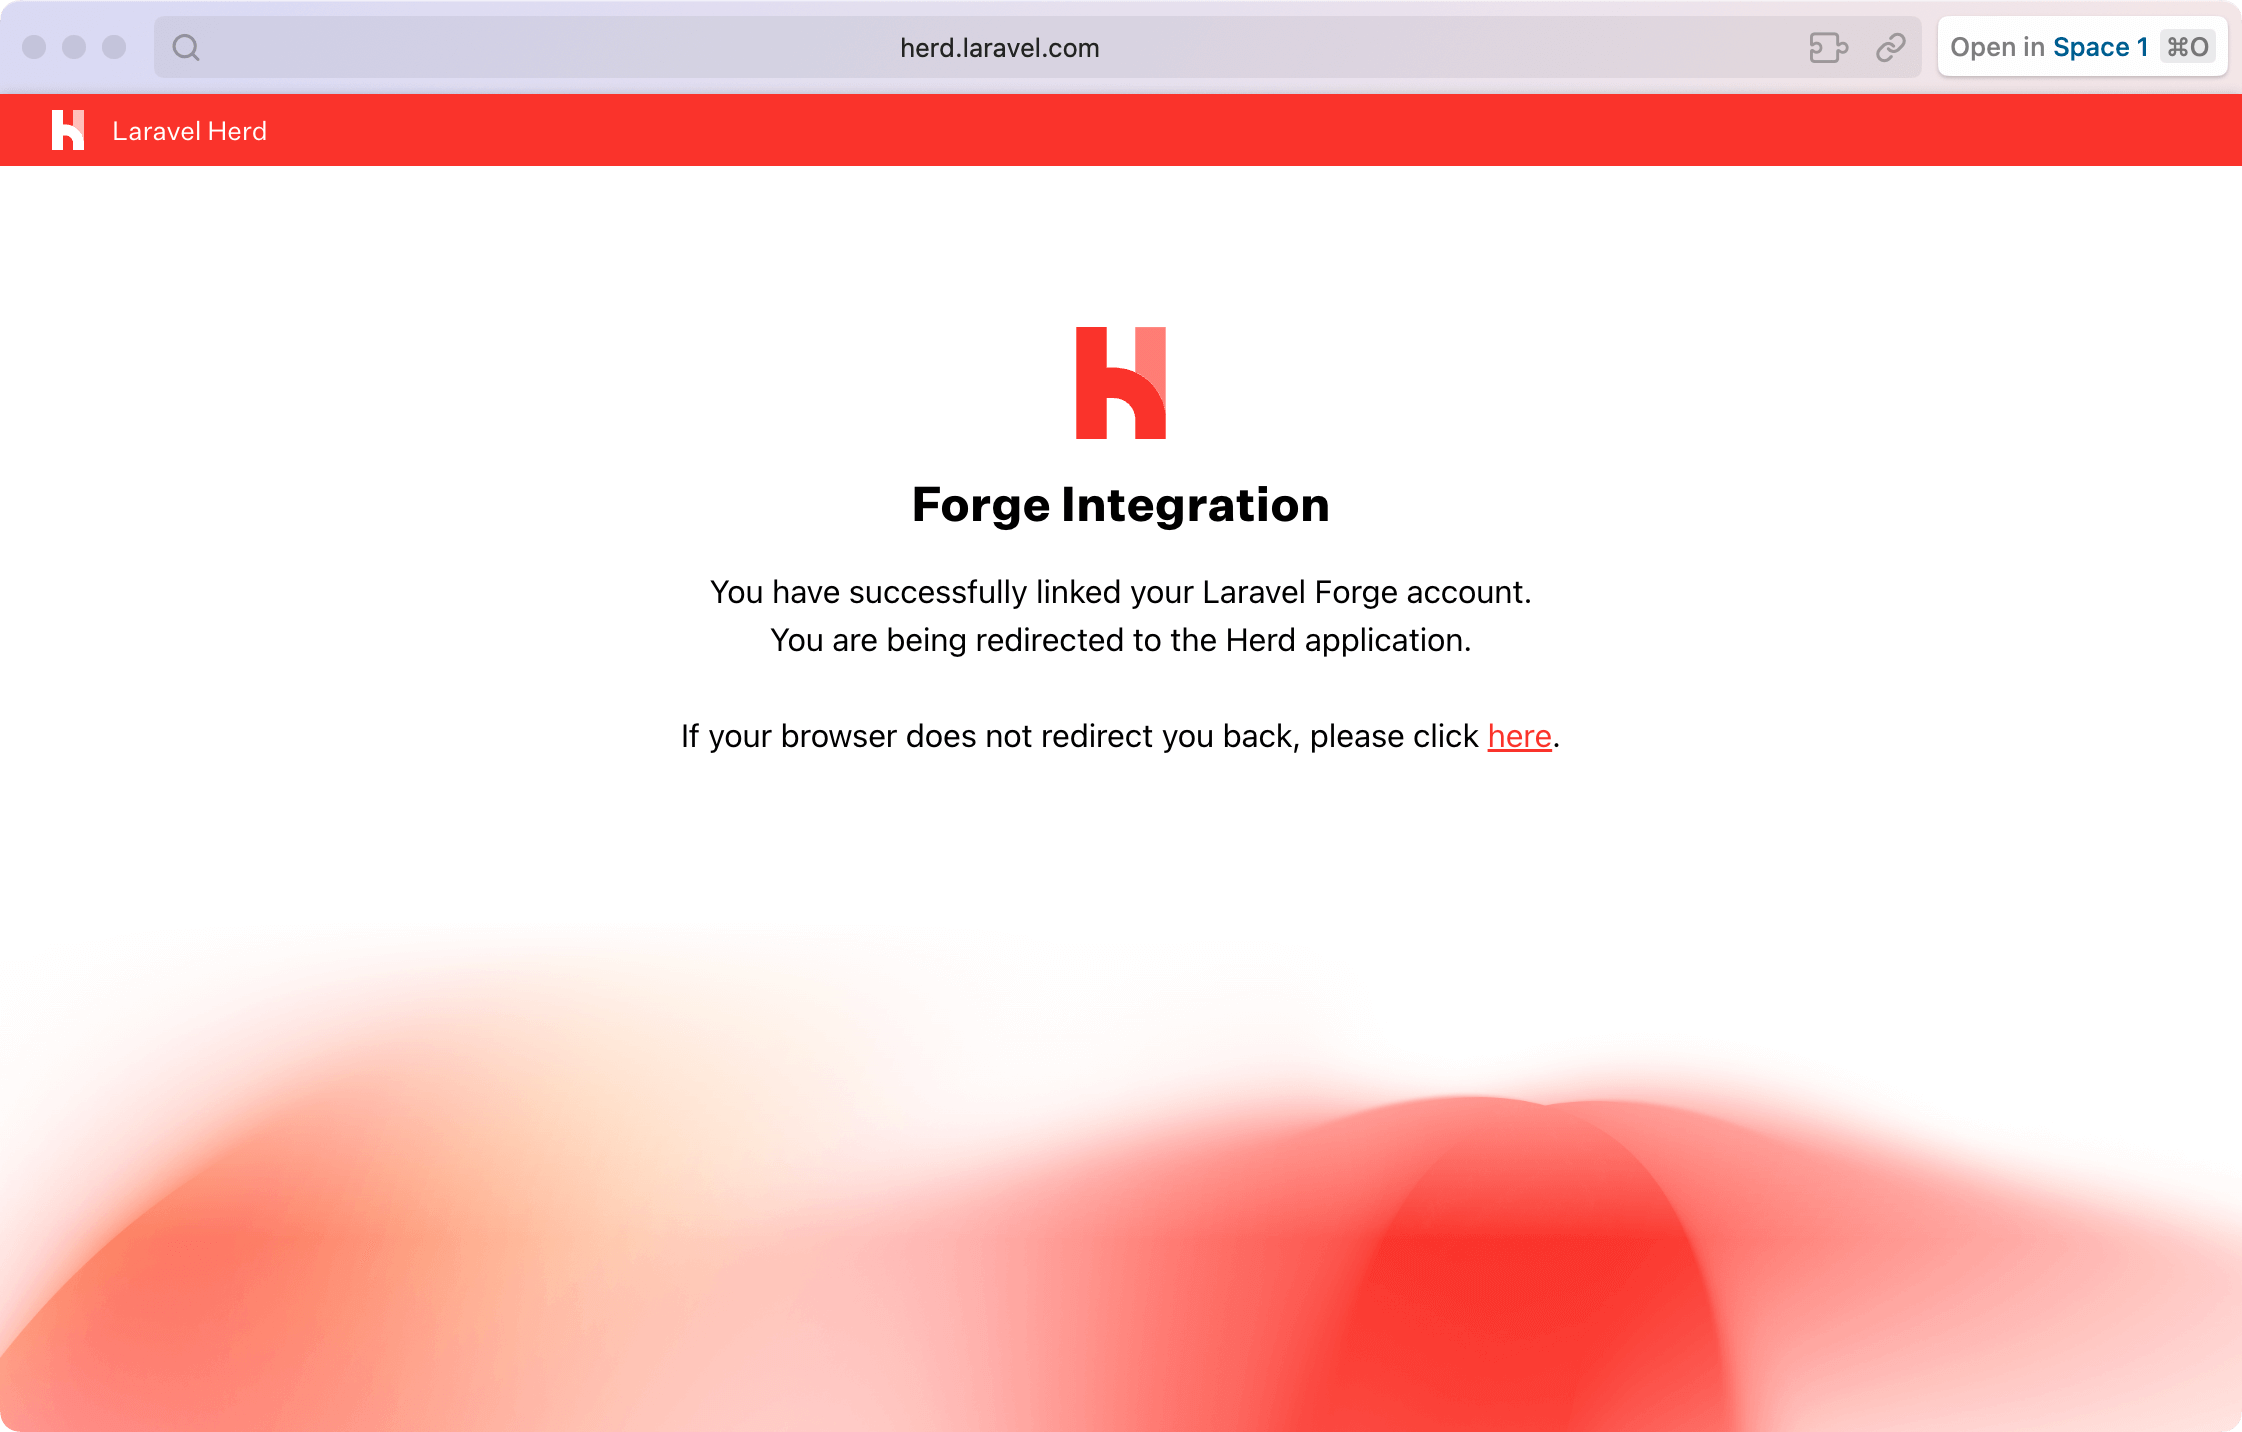
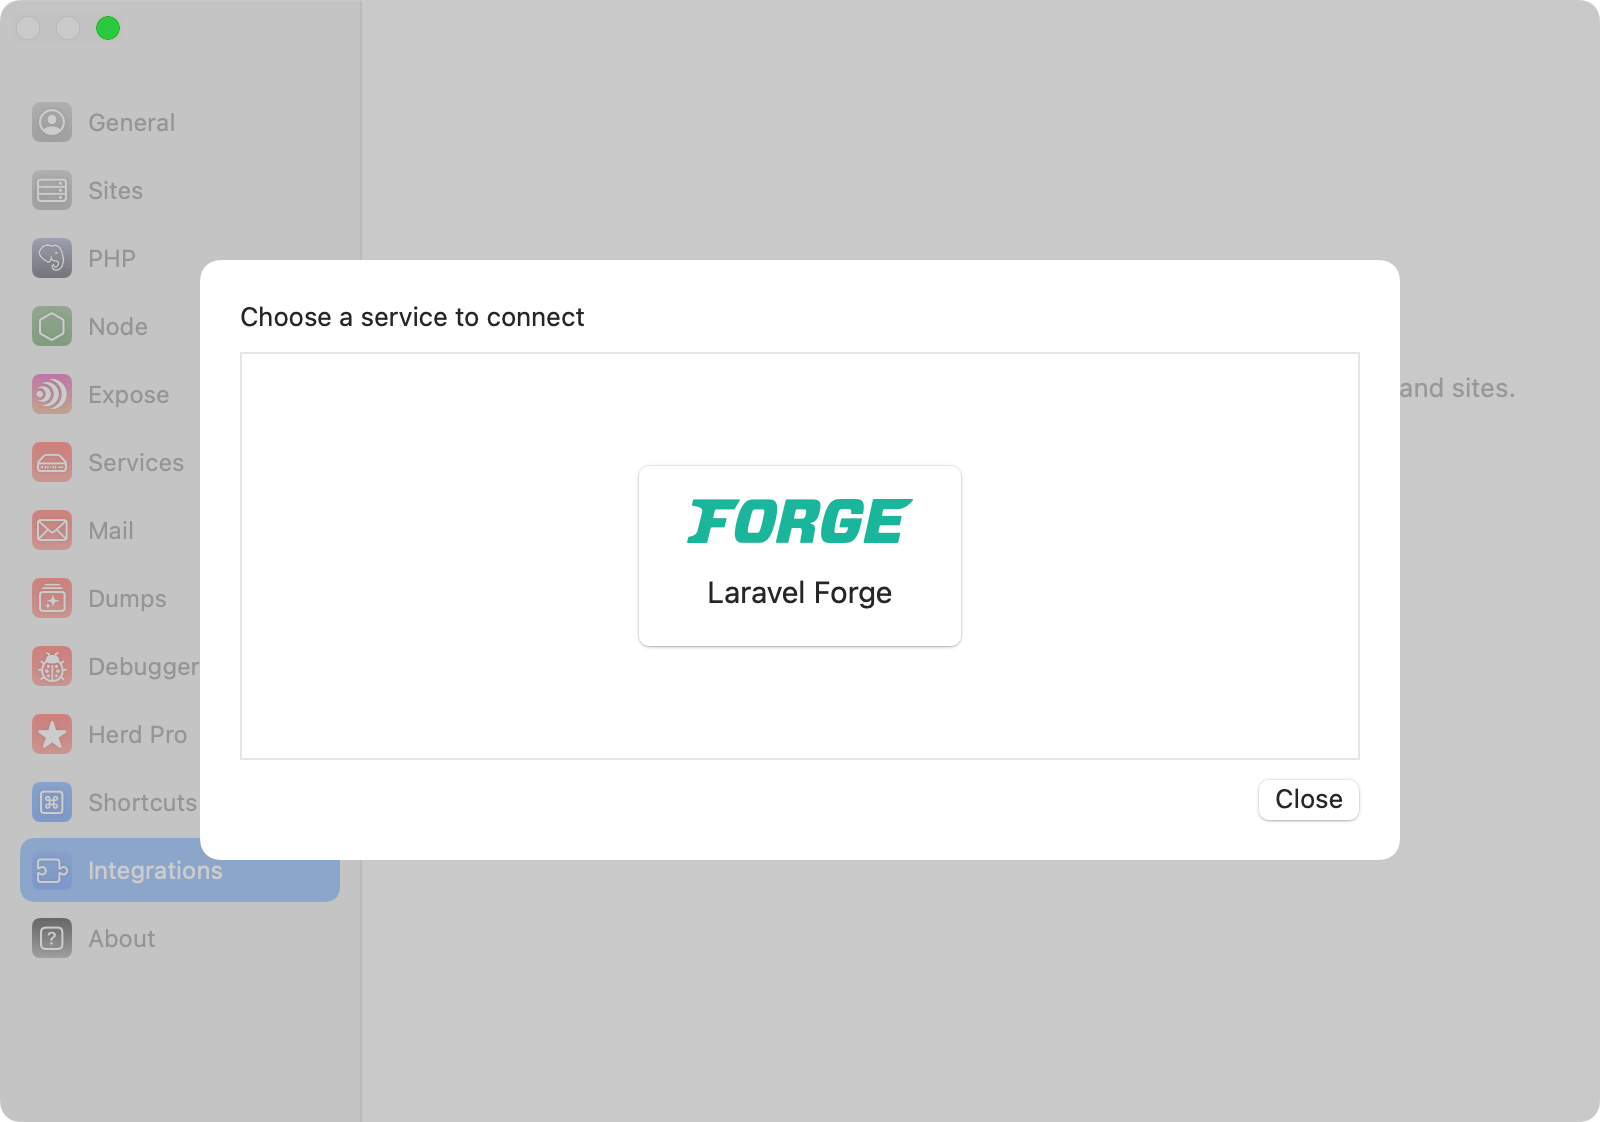 During the setup process, Herd connects to your Laravel Forge account and obtains an OAuth token during the authorization.
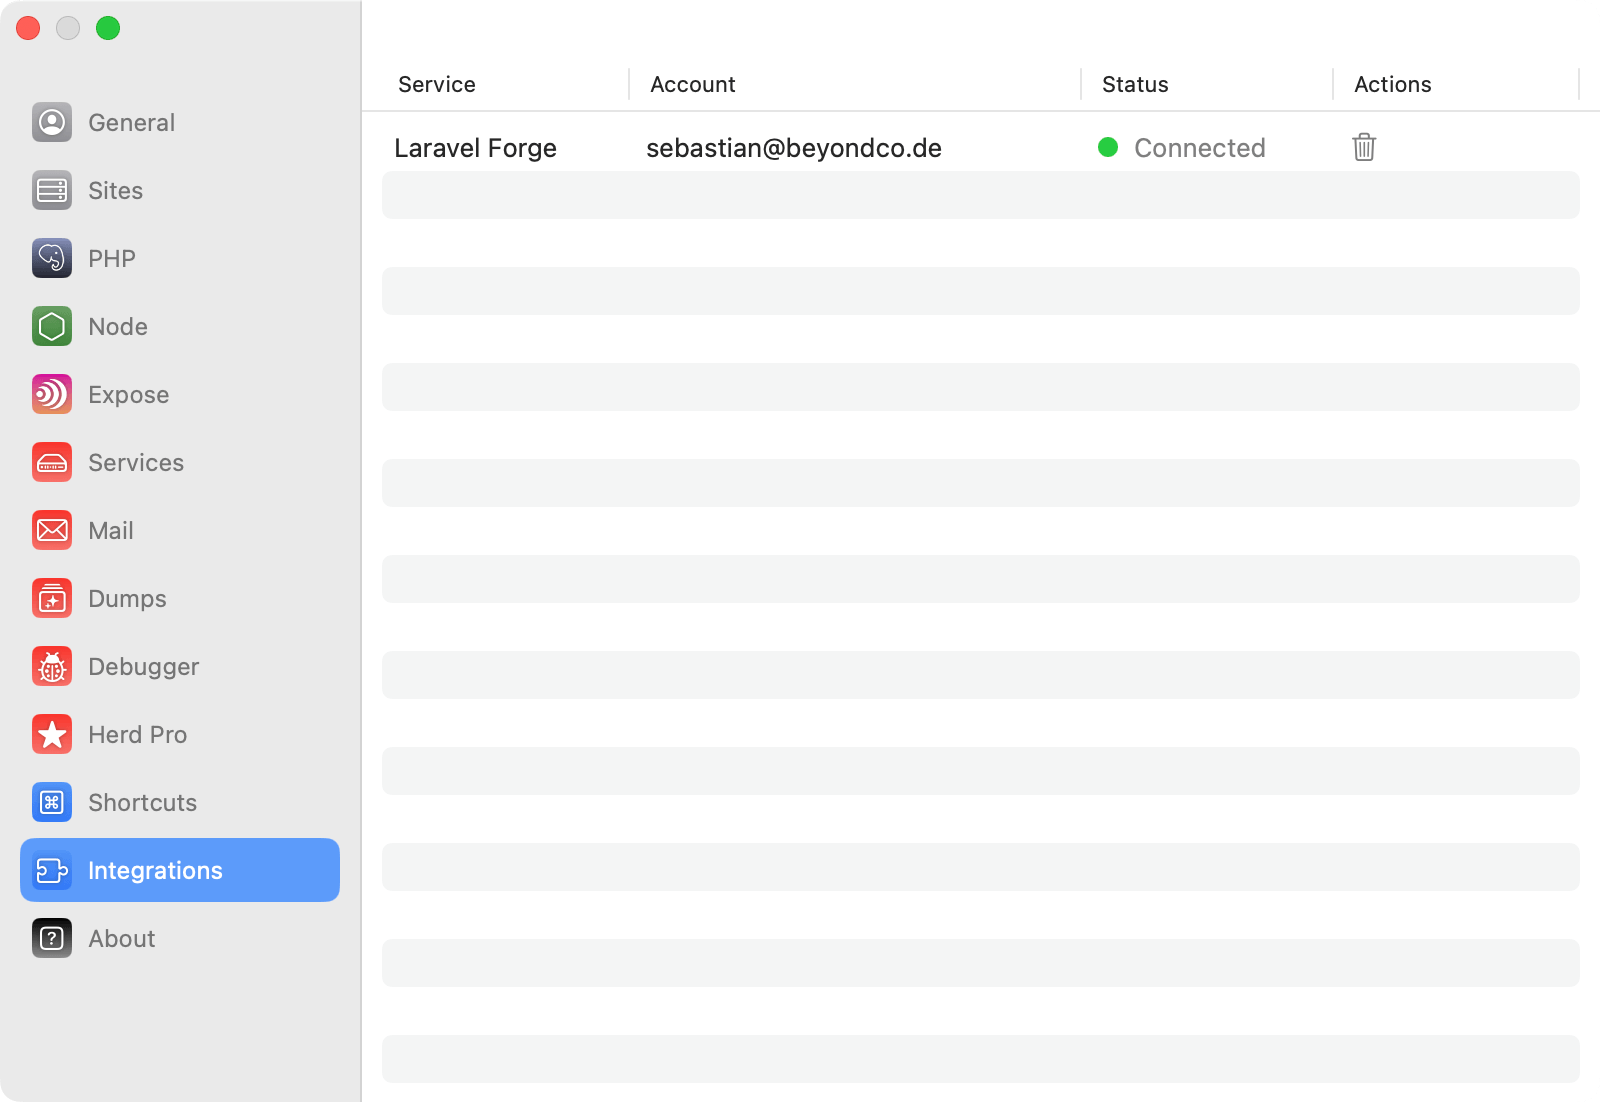
 When Forge and Herd are connected, it shows up in the integrations list. This means that you are ready to link local sites with sites on Forge now.
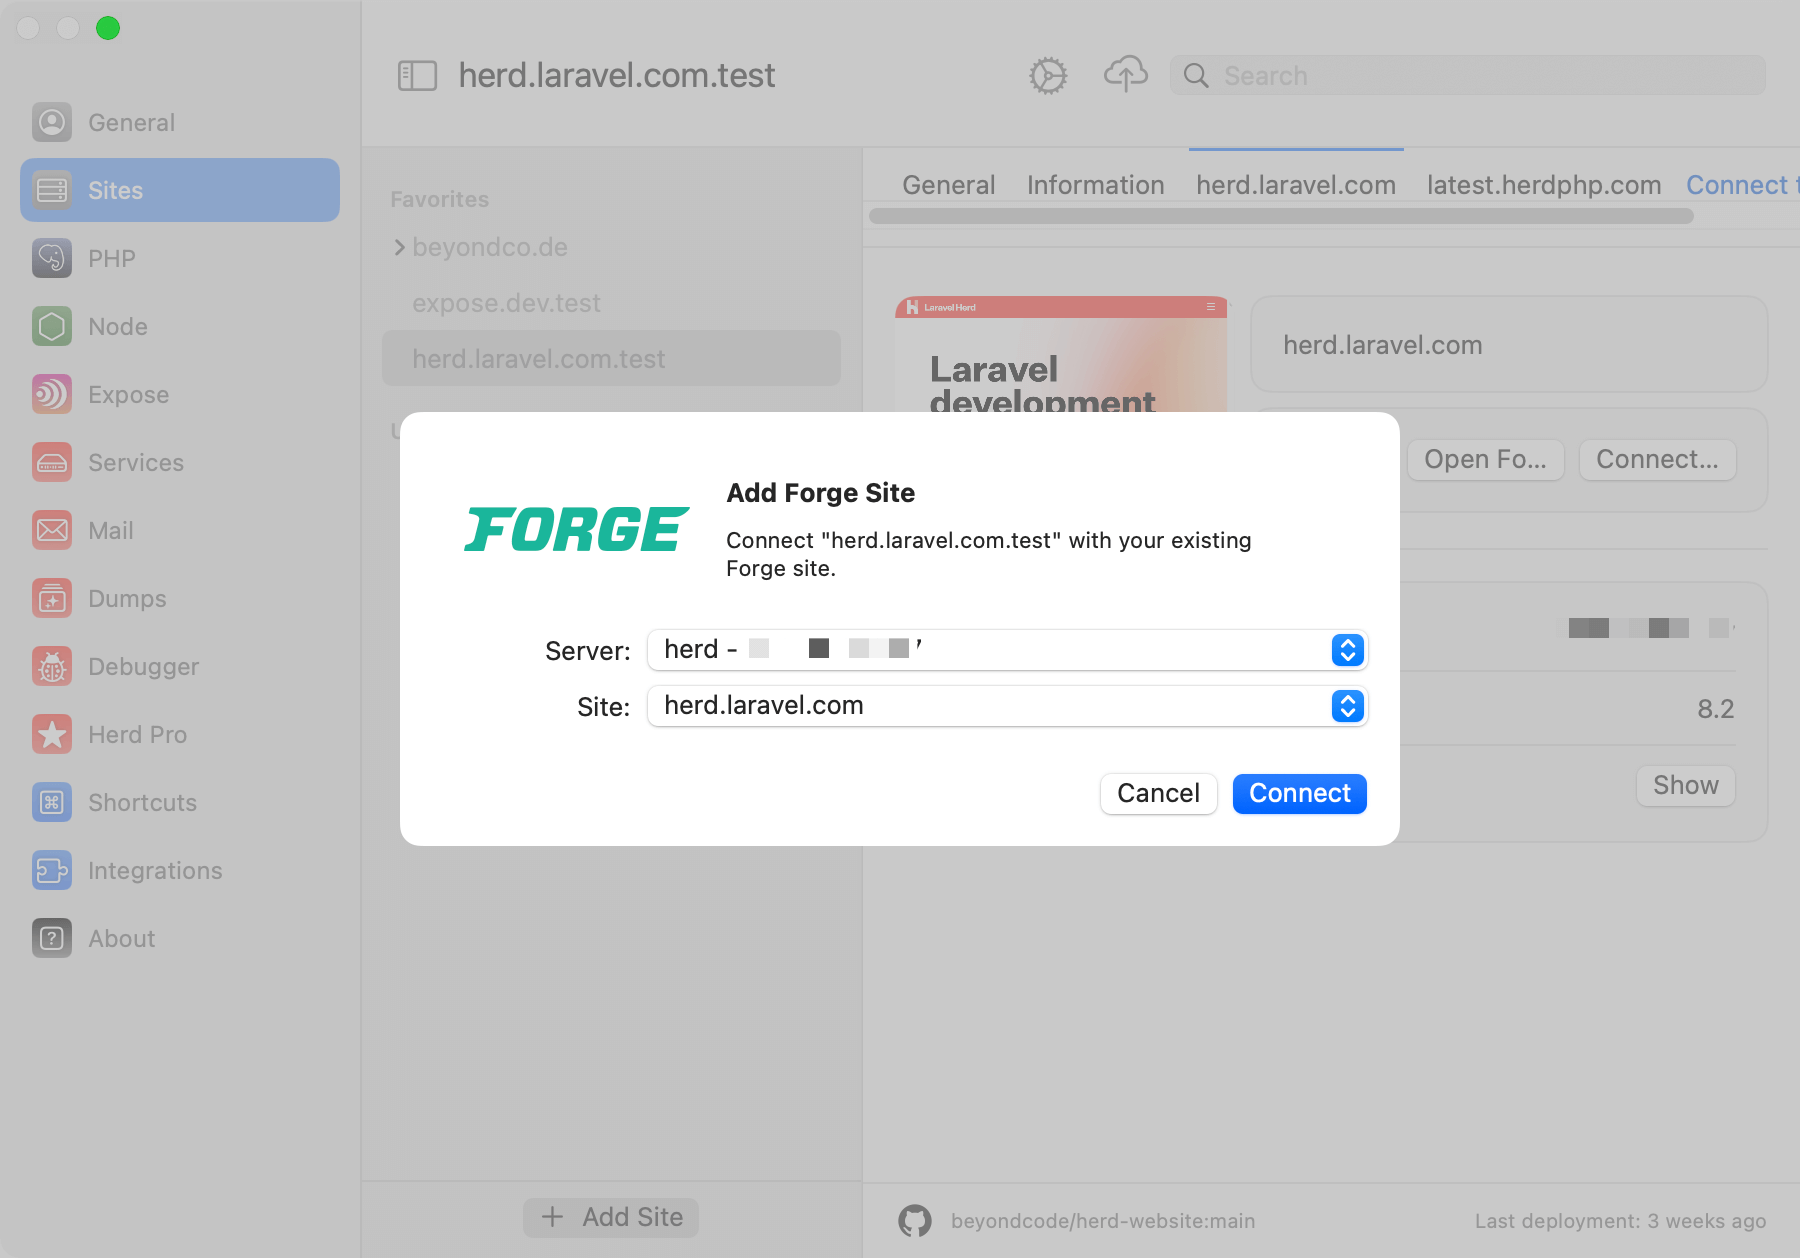
 ## Link a Herd site with Laravel Forge
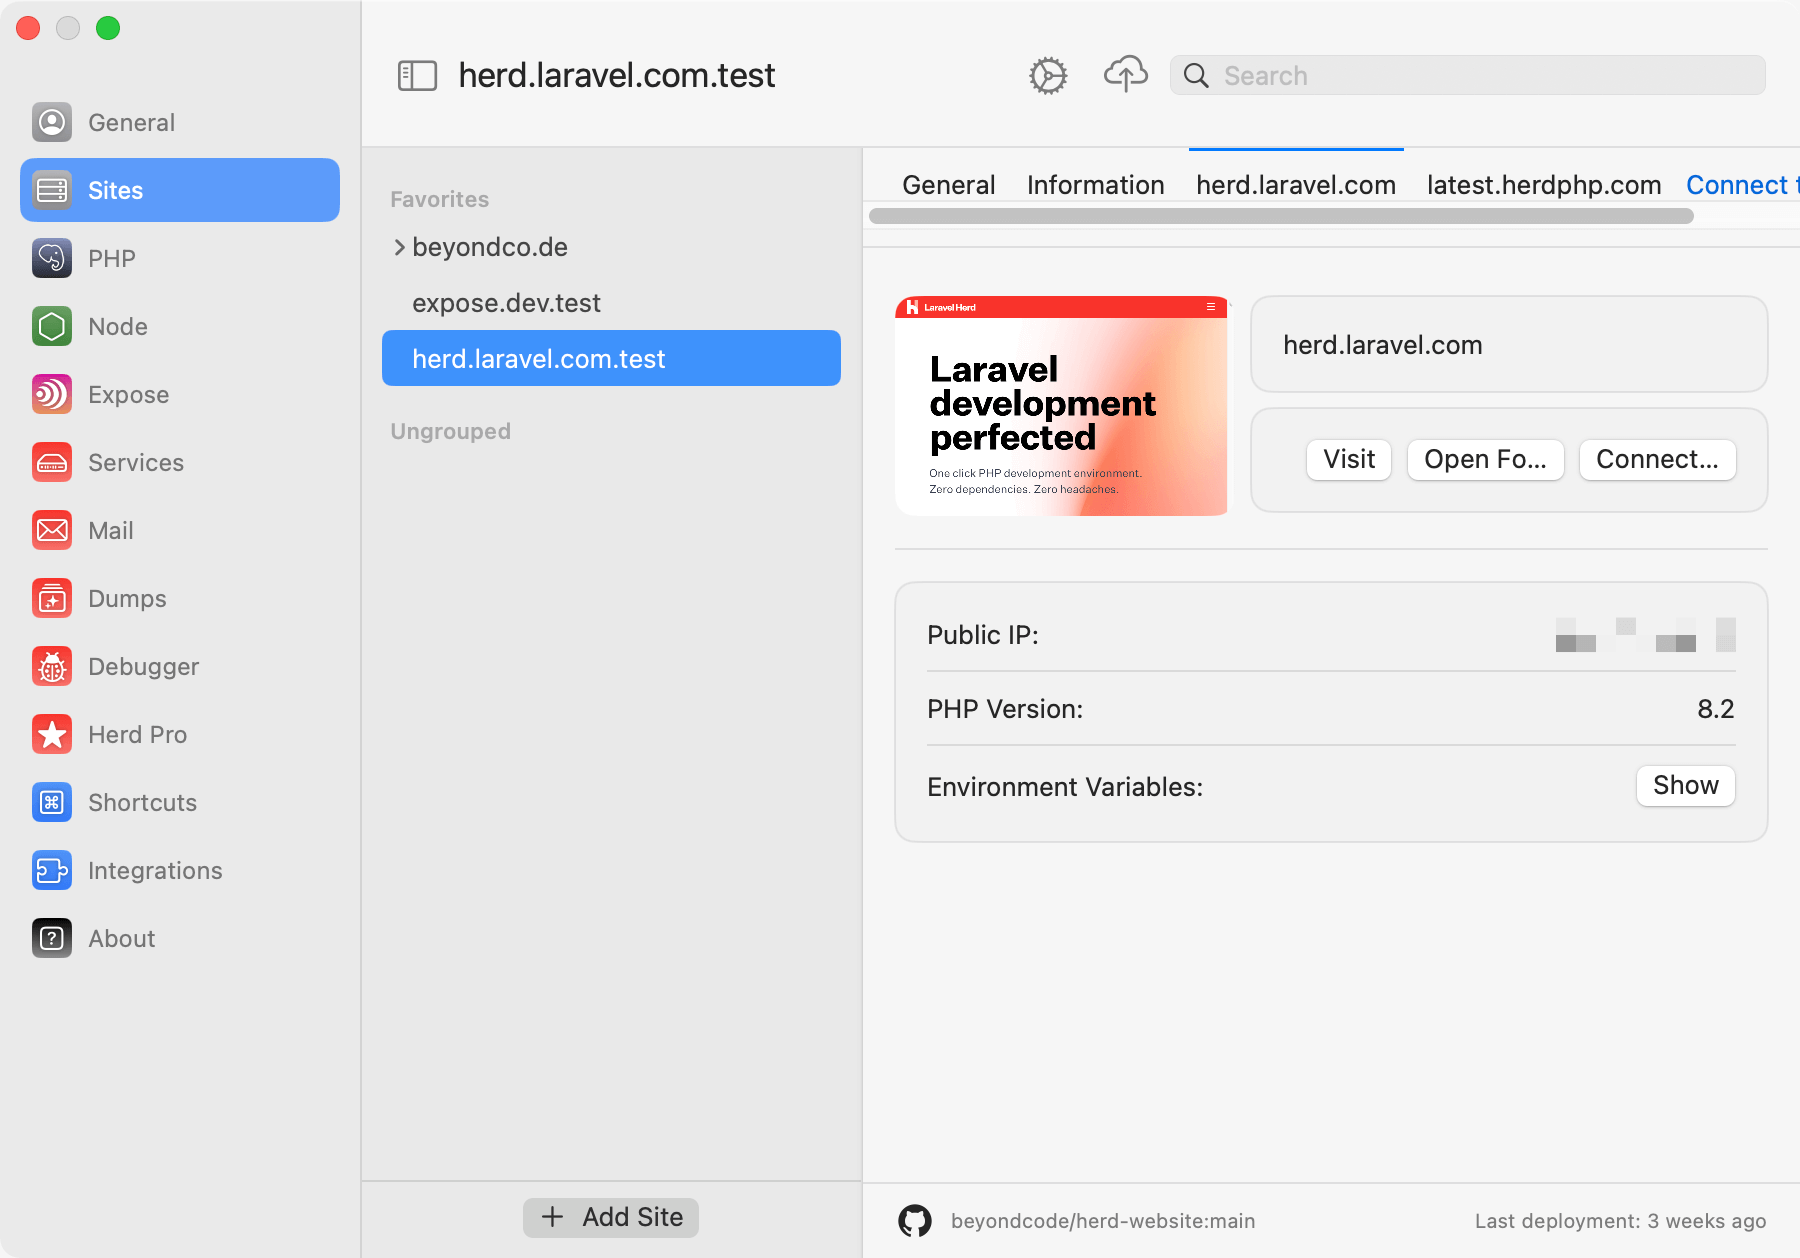
When the integration is set up, you can open the Sites panel, select a site and press the button to connect this site to one or more sites on Forge. This allows you to access development, staging and production environments directly from one Herd site.
## Link a Herd site with Laravel Forge
When the integration is set up, you can open the Sites panel, select a site and press the button to connect this site to one or more sites on Forge. This allows you to access development, staging and production environments directly from one Herd site.
 After you've selected a site, you can deploy the site with the icon in the main toolbar or use the other functions on the right side of the panel.
 ### Forge
The Forge button open your site in Forge and gives you access to all Forge features.
### SSH
You can directly open an SSH connection in your favorite terminal from the site menu.
### `.env`
If you want to copy some environment variables from a Forge site to recreate the same setup locally, you can open your `.env` file with the .env button.
## CLI
The Herd integration with the Forge CLI allows you to omit servers and sites from commands which makes it super easy to interact with your sites via the command line. Just run `forge` to see all available commands or go through the list below.
```bash theme={null}
command Execute a CLI command
deploy Deploy a site
open Open a site in forge.laravel.com
ssh Start an SSH session
tinker Tinker with a site
daemon:list List the daemons
daemon:logs Retrieve the latest daemon log messages
daemon:restart Restart a daemon
daemon:status Get the current status of a daemon
database:logs Retrieve the latest database log messages
database:restart Restart the database
database:shell Start a database shell
database:status Get the current status of the database
deploy:logs Retrieve the latest deployment log messages
env:pull Download the environment file for the given site
env:push Upload the environment file for the given site
nginx:logs Retrieve the latest Nginx log messages
nginx:restart Restart Nginx
nginx:status Get the current status of Nginx
php:logs Retrieve the latest PHP log messages
php:restart Restart PHP
php:status Get the current status of PHP
server:current [current] Determine your current server
server:list List the servers
server:switch [switch] Switch to a different server
site:list List the sites
site:logs Retrieve the latest site log messages
ssh:configure Configure SSH key based secure authentication
ssh:test Test the SSH key based secure authentication connection
```
If the CLI detects more than one linked site, it asks you which one you want to use before running the command:
```bash theme={null}
┌ Select the Forge integration to use: ────────────────────────┐
│ › ● herd.laravel.com │
│ ○ latest.herdphp.com │
└──────────────────────────────────────────────────────────────┘
```
## Version Control
Herd stores the server and site ids in a `herd.yml` within the root of your project. This way, everyone on your team can directly access the site if they have access to the site in Forge. If you want to fully leverage the `herd.yml`, read more [here](/macos/sites/herd-yaml).
```yaml theme={null}
integrations:
forge:
herd.laravel.com:
server-id: 12345
site-id: 67890
```
---
# Source: https://herd.laravel.com/docs/macos/herd-pro-services/laravel-reverb.md
> ## Documentation Index
> Fetch the complete documentation index at: https://herd.laravel.com/docs/llms.txt
> Use this file to discover all available pages before exploring further.
# Laravel Reverb
# Setting up a Laravel Reverb instance
[Laravel Reverb](https://reverb.laravel.com/) is a first-party WebSocket server for Laravel applications. It's open source and uses the Pusher protocol, making it the first choice for real-time communication between client and server in Laravel applications. If you want to learn more about Reverb, check out [Real-time games with Laravel](https://laracasts.com/series/real-time-games-with-laravel) on Laracasts.
While you can install it as a package into your existing application, it often makes sense to have a dedicated WebSocket server for all your applications.
Herd provides a convenient way to set up a dedicated Reverb instance on your machine with a few clicks. It even comes secured with an optional TLS certificate.
### Forge
The Forge button open your site in Forge and gives you access to all Forge features.
### SSH
You can directly open an SSH connection in your favorite terminal from the site menu.
### `.env`
If you want to copy some environment variables from a Forge site to recreate the same setup locally, you can open your `.env` file with the .env button.
## CLI
The Herd integration with the Forge CLI allows you to omit servers and sites from commands which makes it super easy to interact with your sites via the command line. Just run `forge` to see all available commands or go through the list below.
```bash theme={null}
command Execute a CLI command
deploy Deploy a site
open Open a site in forge.laravel.com
ssh Start an SSH session
tinker Tinker with a site
daemon:list List the daemons
daemon:logs Retrieve the latest daemon log messages
daemon:restart Restart a daemon
daemon:status Get the current status of a daemon
database:logs Retrieve the latest database log messages
database:restart Restart the database
database:shell Start a database shell
database:status Get the current status of the database
deploy:logs Retrieve the latest deployment log messages
env:pull Download the environment file for the given site
env:push Upload the environment file for the given site
nginx:logs Retrieve the latest Nginx log messages
nginx:restart Restart Nginx
nginx:status Get the current status of Nginx
php:logs Retrieve the latest PHP log messages
php:restart Restart PHP
php:status Get the current status of PHP
server:current [current] Determine your current server
server:list List the servers
server:switch [switch] Switch to a different server
site:list List the sites
site:logs Retrieve the latest site log messages
ssh:configure Configure SSH key based secure authentication
ssh:test Test the SSH key based secure authentication connection
```
If the CLI detects more than one linked site, it asks you which one you want to use before running the command:
```bash theme={null}
┌ Select the Forge integration to use: ────────────────────────┐
│ › ● herd.laravel.com │
│ ○ latest.herdphp.com │
└──────────────────────────────────────────────────────────────┘
```
## Version Control
Herd stores the server and site ids in a `herd.yml` within the root of your project. This way, everyone on your team can directly access the site if they have access to the site in Forge. If you want to fully leverage the `herd.yml`, read more [here](/macos/sites/herd-yaml).
```yaml theme={null}
integrations:
forge:
herd.laravel.com:
server-id: 12345
site-id: 67890
```
---
# Source: https://herd.laravel.com/docs/macos/herd-pro-services/laravel-reverb.md
> ## Documentation Index
> Fetch the complete documentation index at: https://herd.laravel.com/docs/llms.txt
> Use this file to discover all available pages before exploring further.
# Laravel Reverb
# Setting up a Laravel Reverb instance
[Laravel Reverb](https://reverb.laravel.com/) is a first-party WebSocket server for Laravel applications. It's open source and uses the Pusher protocol, making it the first choice for real-time communication between client and server in Laravel applications. If you want to learn more about Reverb, check out [Real-time games with Laravel](https://laracasts.com/series/real-time-games-with-laravel) on Laracasts.
While you can install it as a package into your existing application, it often makes sense to have a dedicated WebSocket server for all your applications.
Herd provides a convenient way to set up a dedicated Reverb instance on your machine with a few clicks. It even comes secured with an optional TLS certificate.
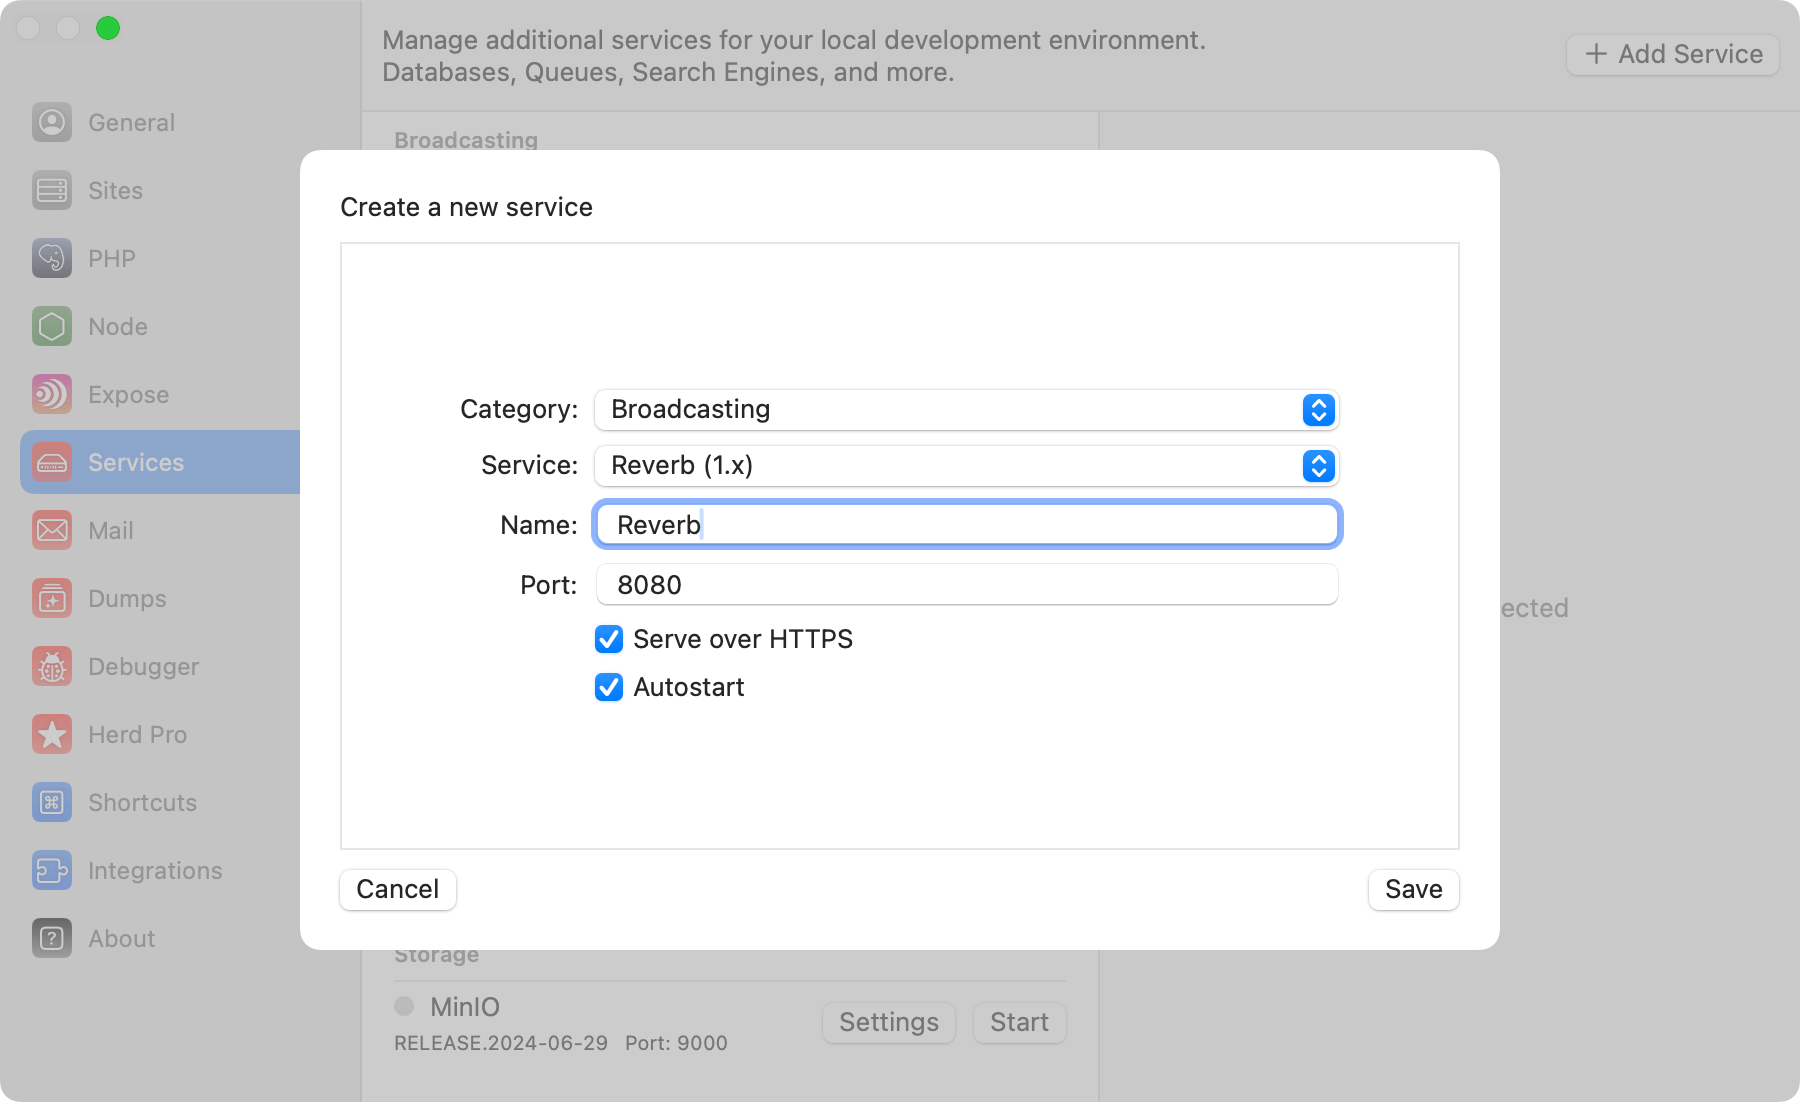 ## Connecting from your Laravel application
Laravel Reverb starts the WebSocket server on port `8080` but you can change it when creating a new service in case you're already running a different service on that port or want to run multiple instances in parallel.
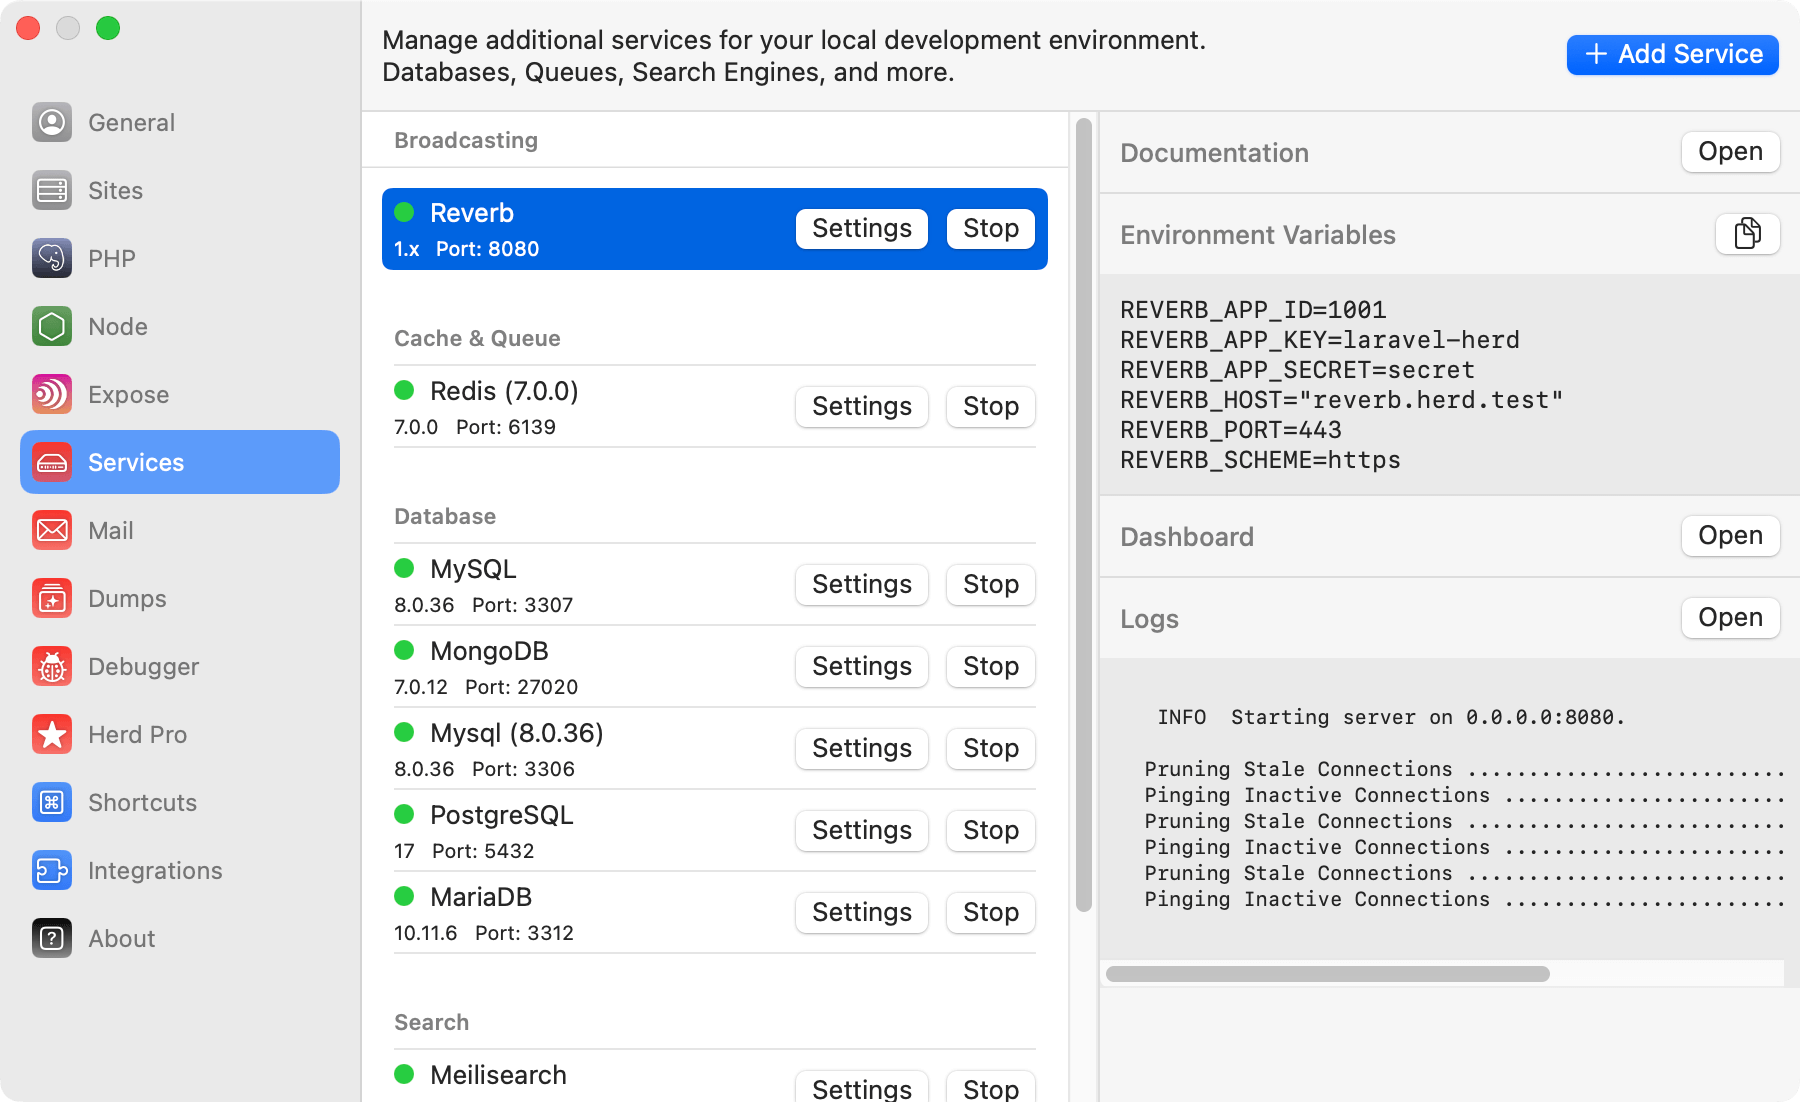
After installing Reverb, you can use the following environment variables to configure the service for your application.
```bash theme={null}
REVERB_APP_ID=1001
REVERB_APP_KEY=laravel-herd
REVERB_APP_SECRET=secret
REVERB_HOST="0.0.0.0"
REVERB_PORT=8080
```
Check out the [Laravel Echo documentation](https://laravel.com/docs/11.x/broadcasting#client-reverb) to learn how to connect your application frontend to the Laravel Reverb server.
## Logs
Reverb constantly logs information to the running process, so if you are debugging Reverb connection,s you can open the output of the Reverb process by pressing the Open button in the logs area on the right side.
## Connecting from your Laravel application
Laravel Reverb starts the WebSocket server on port `8080` but you can change it when creating a new service in case you're already running a different service on that port or want to run multiple instances in parallel.
After installing Reverb, you can use the following environment variables to configure the service for your application.
```bash theme={null}
REVERB_APP_ID=1001
REVERB_APP_KEY=laravel-herd
REVERB_APP_SECRET=secret
REVERB_HOST="0.0.0.0"
REVERB_PORT=8080
```
Check out the [Laravel Echo documentation](https://laravel.com/docs/11.x/broadcasting#client-reverb) to learn how to connect your application frontend to the Laravel Reverb server.
## Logs
Reverb constantly logs information to the running process, so if you are debugging Reverb connection,s you can open the output of the Reverb process by pressing the Open button in the logs area on the right side.
 ## Updates
Reverb uses composer and Herd supports updating Reverb to it's latest version via the Herd UI. Simply right click to open the context menu and select "update".
## Versions
Herd Pro allows you to install the following versions directly from the services tab of the settings. New versions are available regularly.
| Service | Version |
| ------- | ------- |
| Reverb | 1.x |
---
# Source: https://herd.laravel.com/docs/macos/guides/laravel.md
> ## Documentation Index
> Fetch the complete documentation index at: https://herd.laravel.com/docs/llms.txt
> Use this file to discover all available pages before exploring further.
# Laravel
# How to set up a Laravel application
Herd's main purpose is serving Laravel developers by providing a fully integrated development stack with PHP and nginx at its core. Both services are complemented with all tools that you need to work on almost any Laravel application. This means that Herd is the right tool, no matter if you are just starting as a beginner or work with Laravel for a decade.
This guide covers all steps that you need to follow to get up and running with a new Laravel application but also works if you replace the application creation step with checking out an existing git repository.
## Code Directory
Herd uses the concept of *parked paths* for serving sites via `.test` domains. By default, Herd creates and parks the `~/Herd` directory and every folder that you create in this directory is reachable via its own domain.
Let's open your terminal and go into the directory:
```bash theme={null}
cd ~/Herd
```
## Database Choices
Laravel ships with an SQLite database for your application by default but if you are familiar with MySQL or PostgreSQL, you should get a database instance up and running before you create or check our your application.
## Updates
Reverb uses composer and Herd supports updating Reverb to it's latest version via the Herd UI. Simply right click to open the context menu and select "update".
## Versions
Herd Pro allows you to install the following versions directly from the services tab of the settings. New versions are available regularly.
| Service | Version |
| ------- | ------- |
| Reverb | 1.x |
---
# Source: https://herd.laravel.com/docs/macos/guides/laravel.md
> ## Documentation Index
> Fetch the complete documentation index at: https://herd.laravel.com/docs/llms.txt
> Use this file to discover all available pages before exploring further.
# Laravel
# How to set up a Laravel application
Herd's main purpose is serving Laravel developers by providing a fully integrated development stack with PHP and nginx at its core. Both services are complemented with all tools that you need to work on almost any Laravel application. This means that Herd is the right tool, no matter if you are just starting as a beginner or work with Laravel for a decade.
This guide covers all steps that you need to follow to get up and running with a new Laravel application but also works if you replace the application creation step with checking out an existing git repository.
## Code Directory
Herd uses the concept of *parked paths* for serving sites via `.test` domains. By default, Herd creates and parks the `~/Herd` directory and every folder that you create in this directory is reachable via its own domain.
Let's open your terminal and go into the directory:
```bash theme={null}
cd ~/Herd
```
## Database Choices
Laravel ships with an SQLite database for your application by default but if you are familiar with MySQL or PostgreSQL, you should get a database instance up and running before you create or check our your application.
 After setting up your first Laravel application in Herd, you can now follow the docs to learn more about all features in more detail and fully leverage Herd when using it every day.
---
# Source: https://herd.laravel.com/docs/macos/debugging/logs.md
> ## Documentation Index
> Fetch the complete documentation index at: https://herd.laravel.com/docs/llms.txt
> Use this file to discover all available pages before exploring further.
# Log Viewer
# Inspect local log files
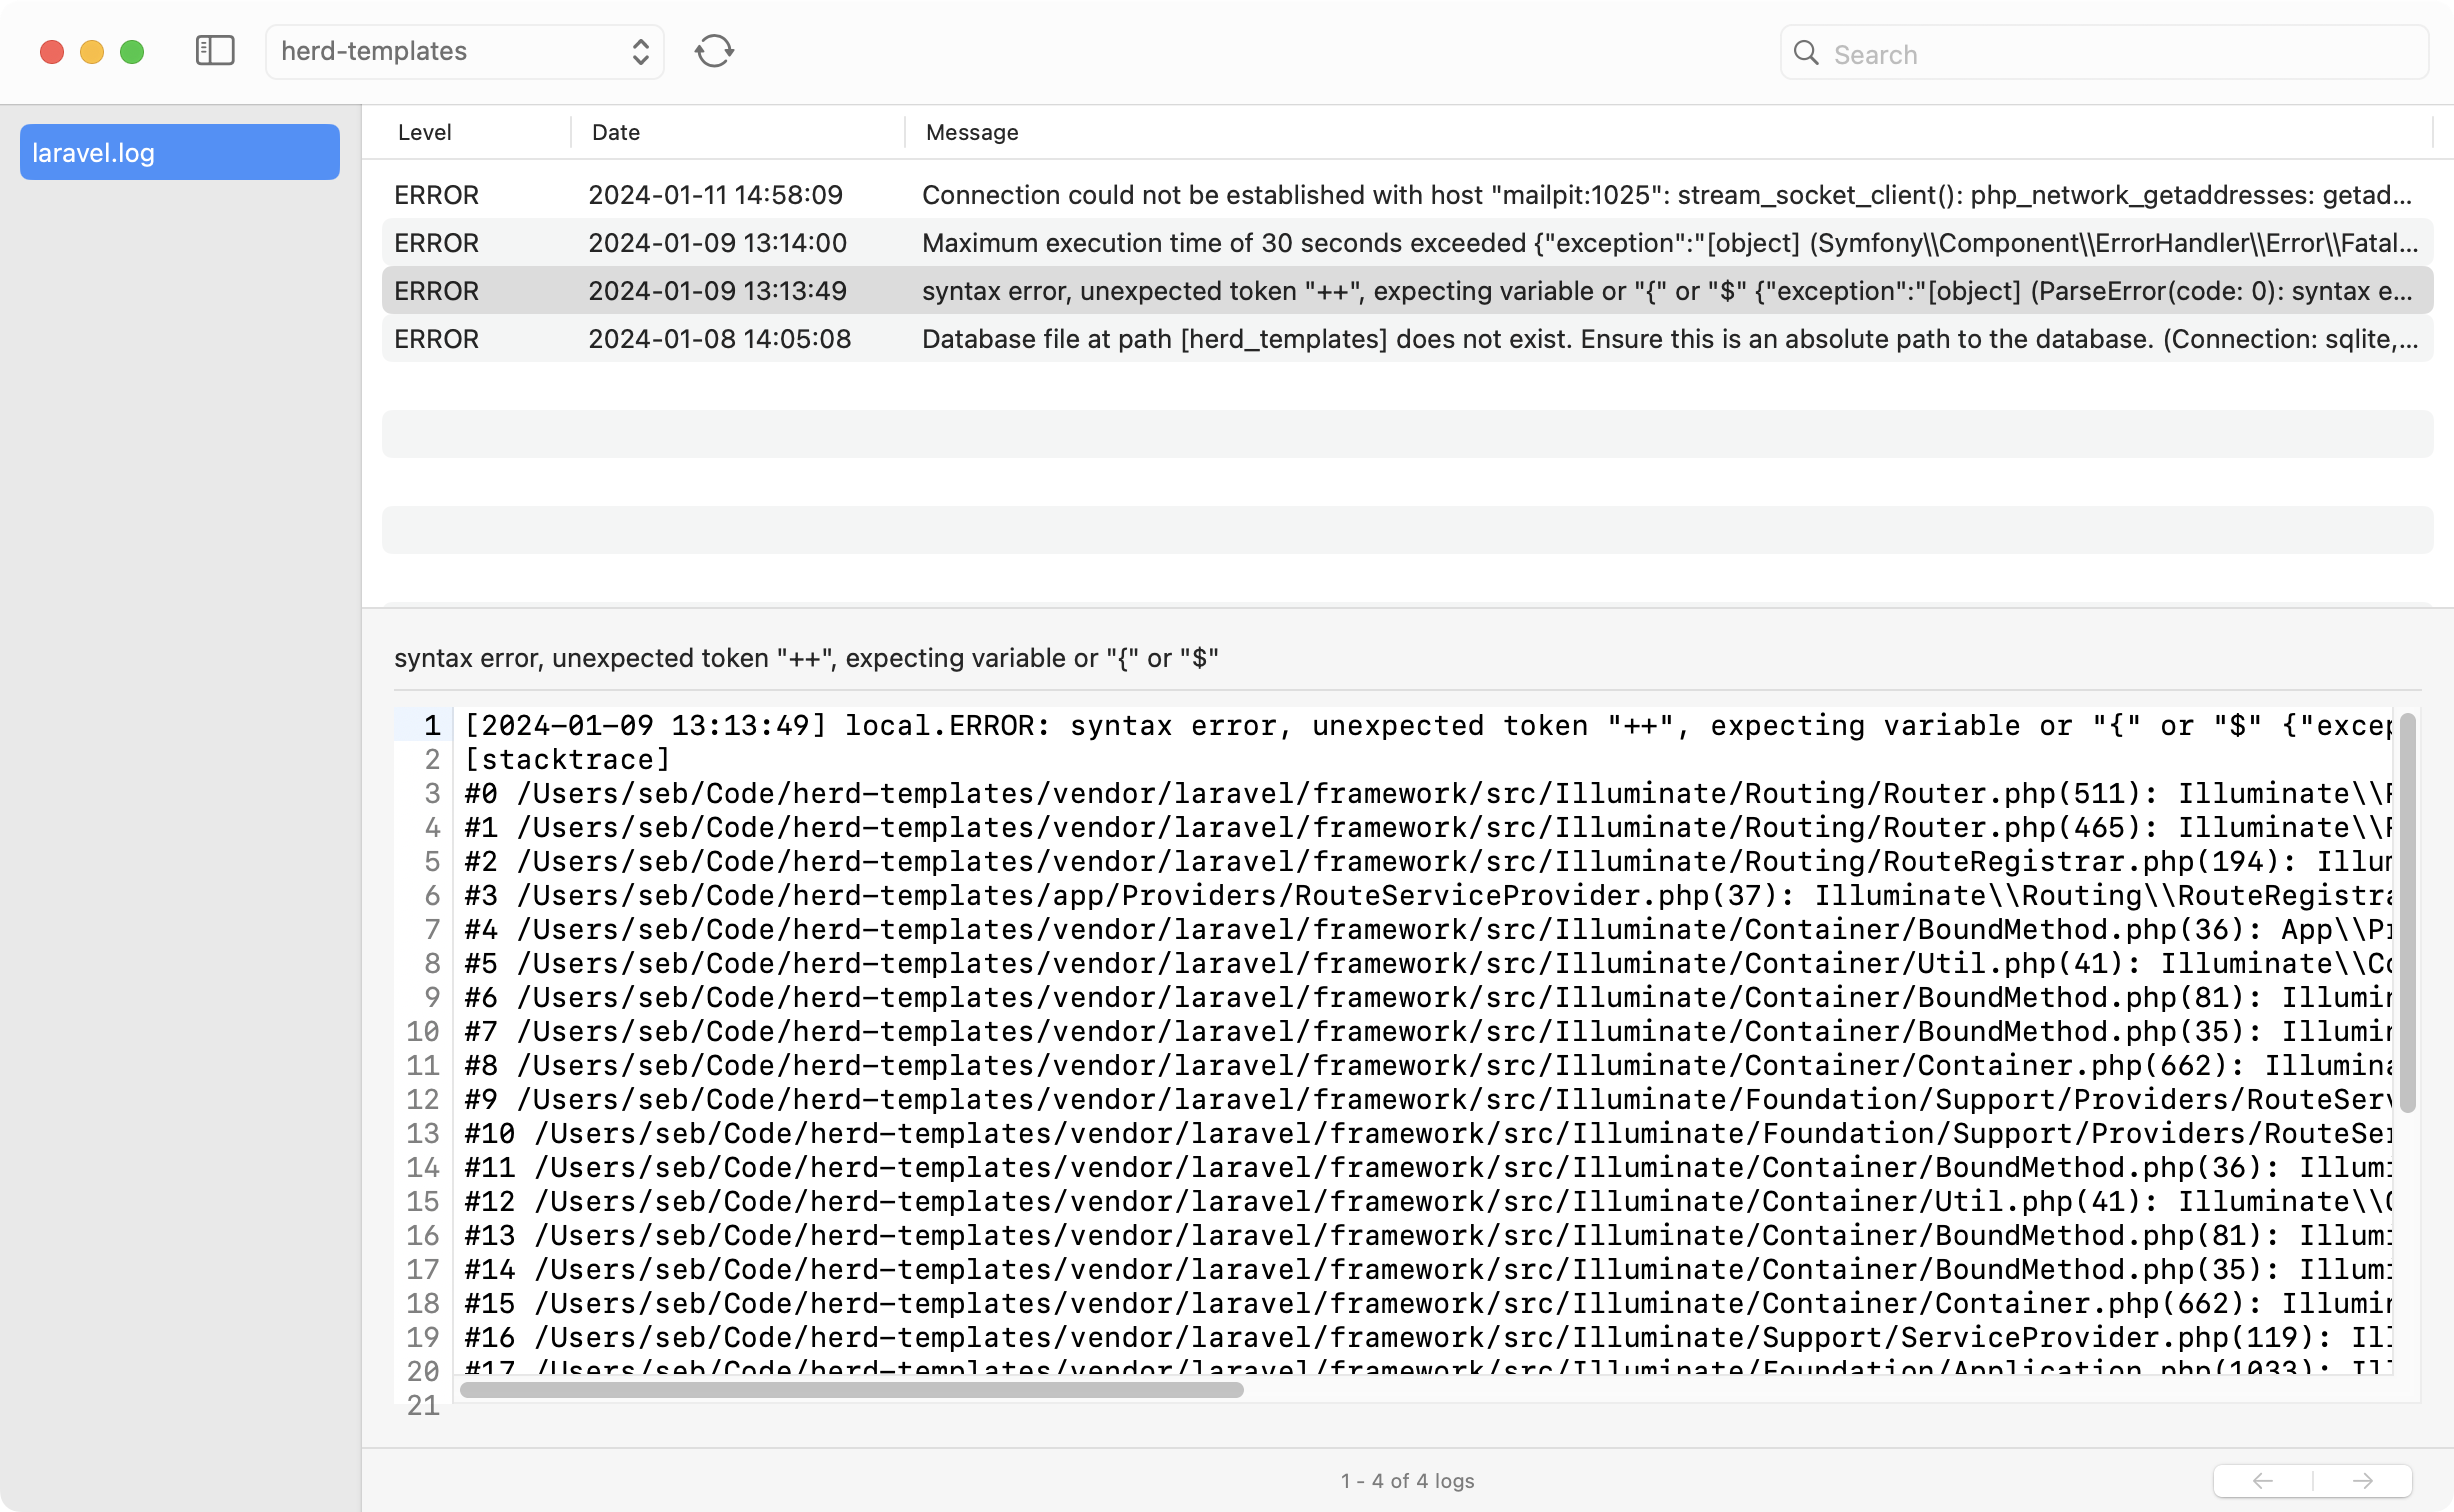
If you don't want to run a terminal command like `tail` or tail the logs with [Laravel Pail](https://laravel.com/docs/11.x/logging#tailing-log-messages-using-pail), you can use Herd's integrated log viewer. It allows you to inspect your log files in great detail and makes searching through logs a breeze.
If you are only interested in the logs of the latest request, you man use the [log view](/macos/debugging/dumps#logs) of the [Dumps](/macos/debugging/dumps) feature to get the most recent logs automatically.
After setting up your first Laravel application in Herd, you can now follow the docs to learn more about all features in more detail and fully leverage Herd when using it every day.
---
# Source: https://herd.laravel.com/docs/macos/debugging/logs.md
> ## Documentation Index
> Fetch the complete documentation index at: https://herd.laravel.com/docs/llms.txt
> Use this file to discover all available pages before exploring further.
# Log Viewer
# Inspect local log files
If you don't want to run a terminal command like `tail` or tail the logs with [Laravel Pail](https://laravel.com/docs/11.x/logging#tailing-log-messages-using-pail), you can use Herd's integrated log viewer. It allows you to inspect your log files in great detail and makes searching through logs a breeze.
If you are only interested in the logs of the latest request, you man use the [log view](/macos/debugging/dumps#logs) of the [Dumps](/macos/debugging/dumps) feature to get the most recent logs automatically.
 ## Selecting a Project and Log File
By default, the log window shows the latest log file of the last project that you visited in your browser. This allows you to quickly find the latest log file, but you can also switch between all projects that Herd knows and serves.
If your project includes more than one log file, for example when using daily log rotation, you can select the log file on the left.
## Searching in Log Files
The search bar at the top searches through all logs and allows you to pinpoint all log entries that match your search query. You can hit Cmd+F in the text area that shows the details of the entry and search within this single entry.
## Custom log paths
Herd looks for logs in the framework-specific standard directory, such as `storage/logs` for Laravel. You can change that directory and even add multiple log directories by using a [custom driver](/macos/extending-herd/custom-drivers#customize-herds-behaviour) for that application.
---
# Source: https://herd.laravel.com/docs/macos/herd-pro-services/mail.md
> ## Documentation Index
> Fetch the complete documentation index at: https://herd.laravel.com/docs/llms.txt
> Use this file to discover all available pages before exploring further.
# Mail
# Working with emails
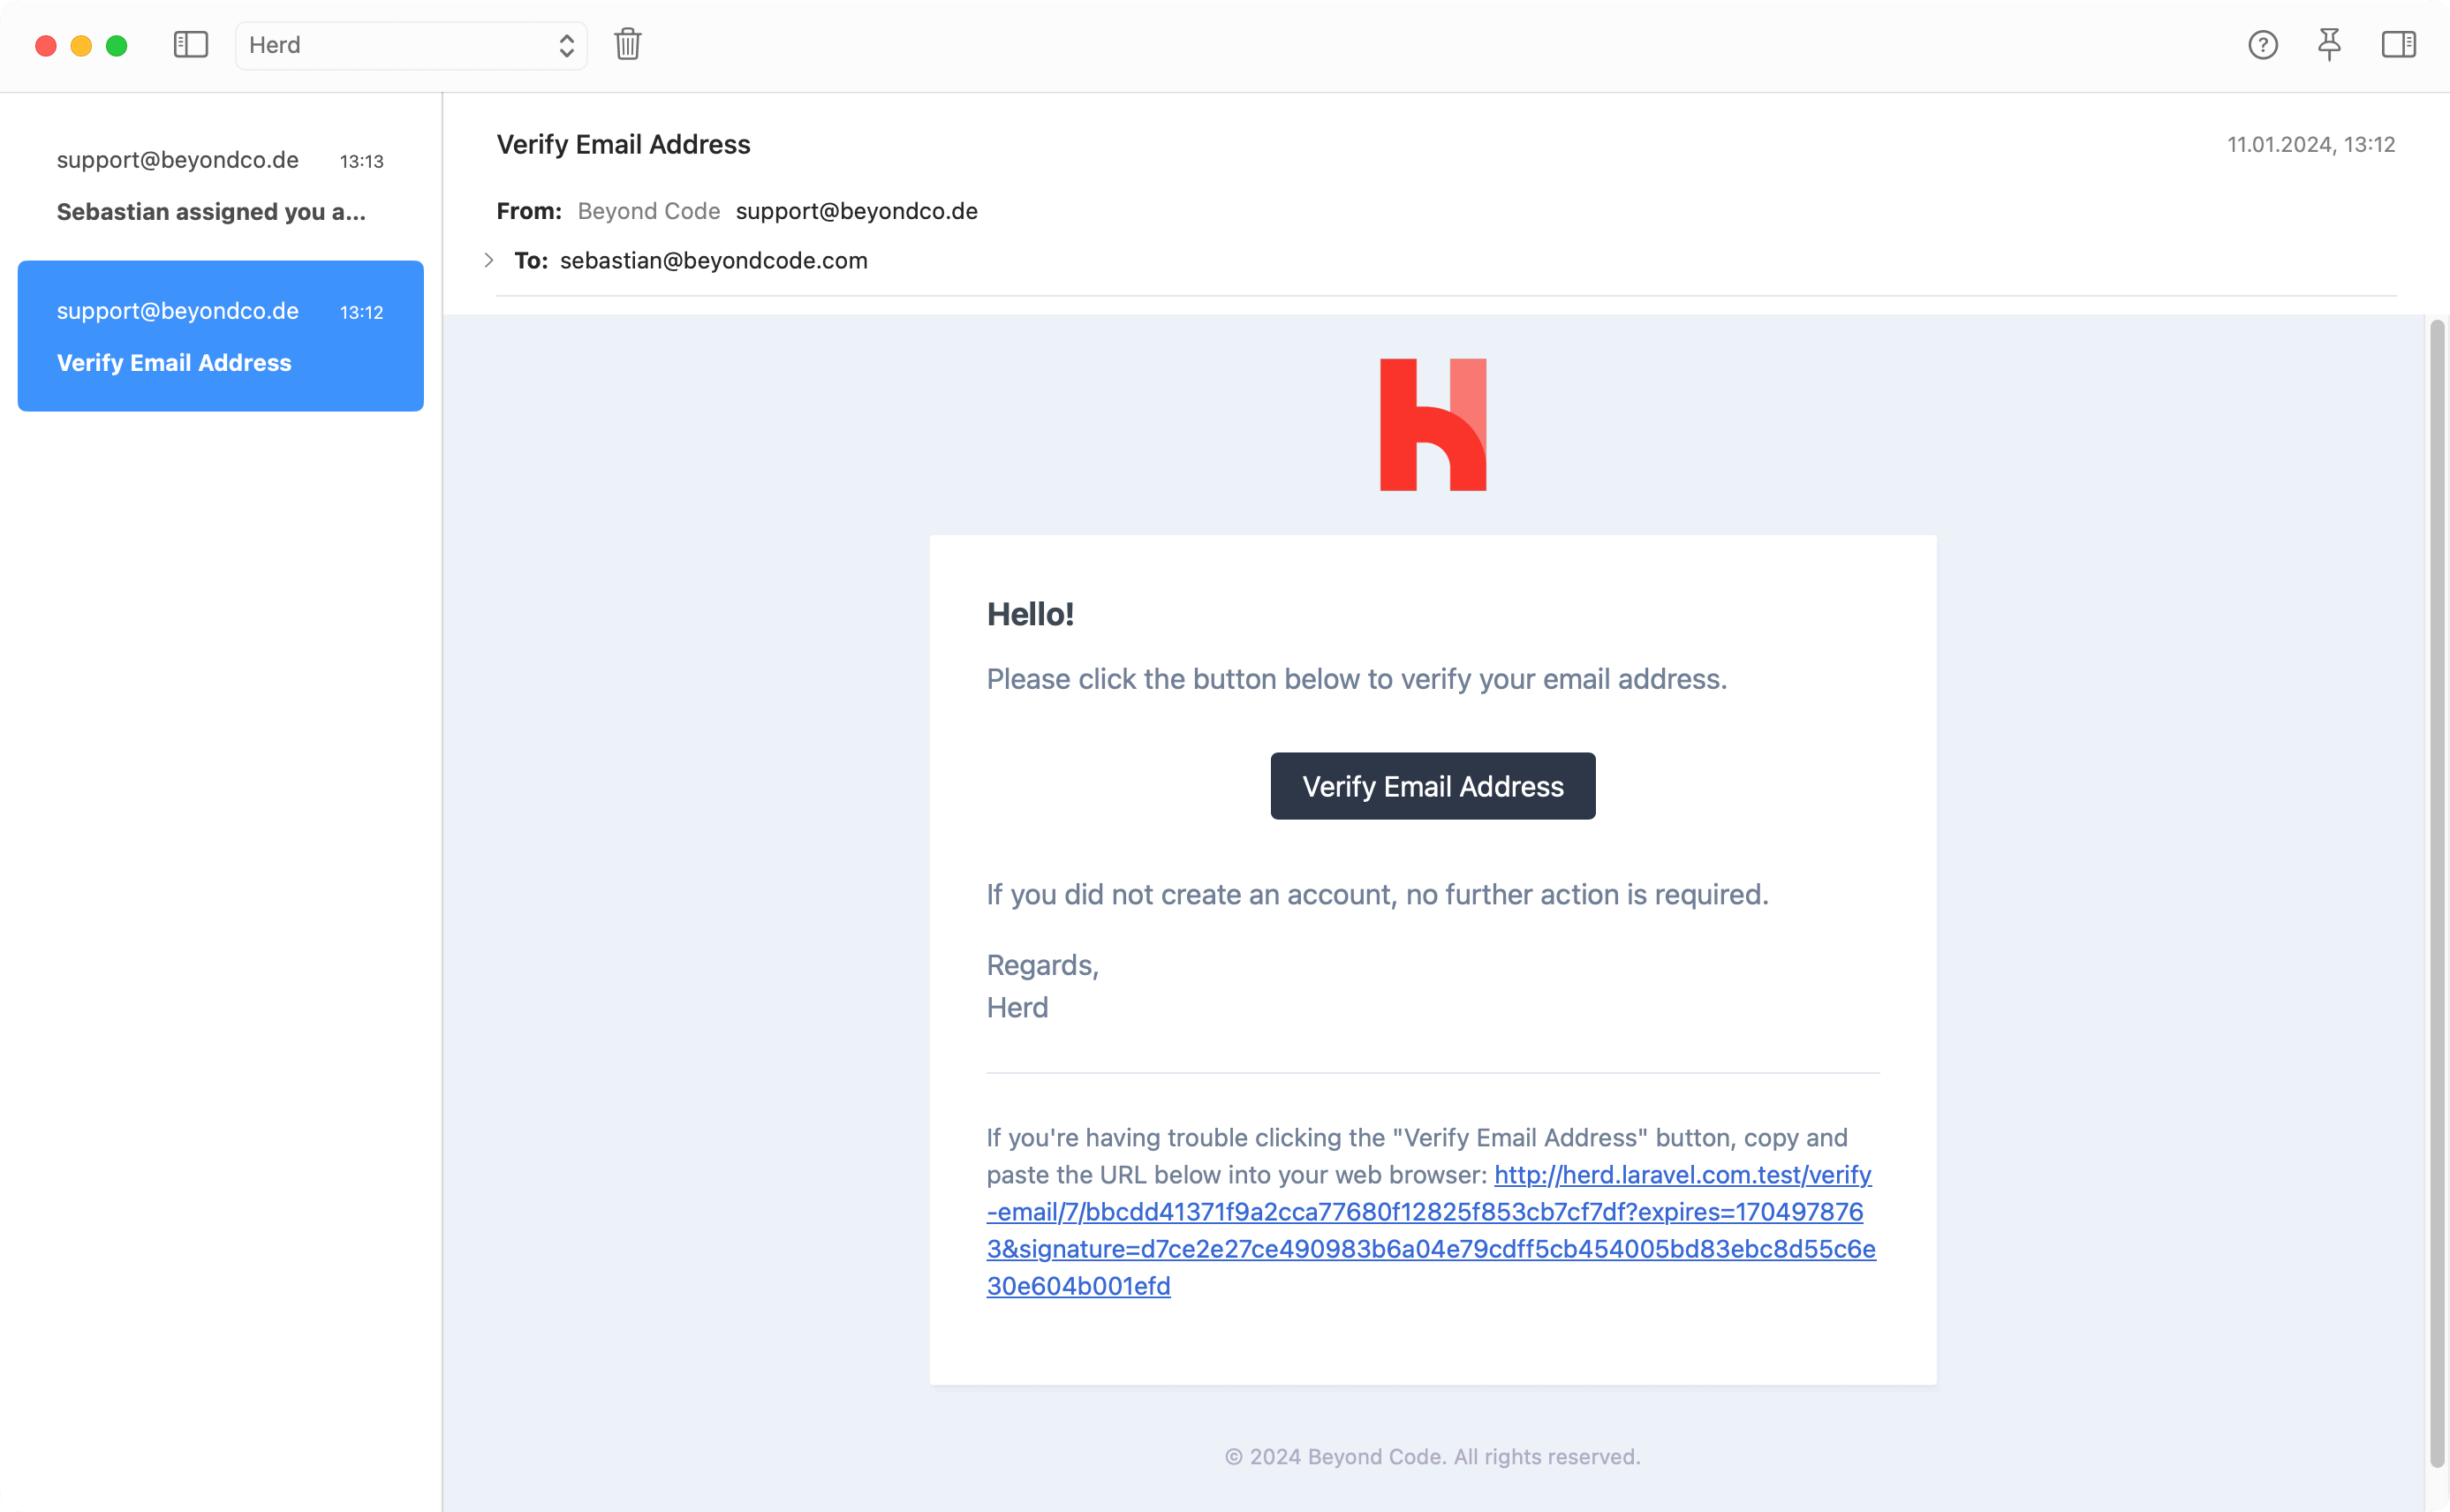
When you are working with emails locally, you need to make sure that these emails don't leave your machine and get sent to real users but it's also important to inspect them easily.
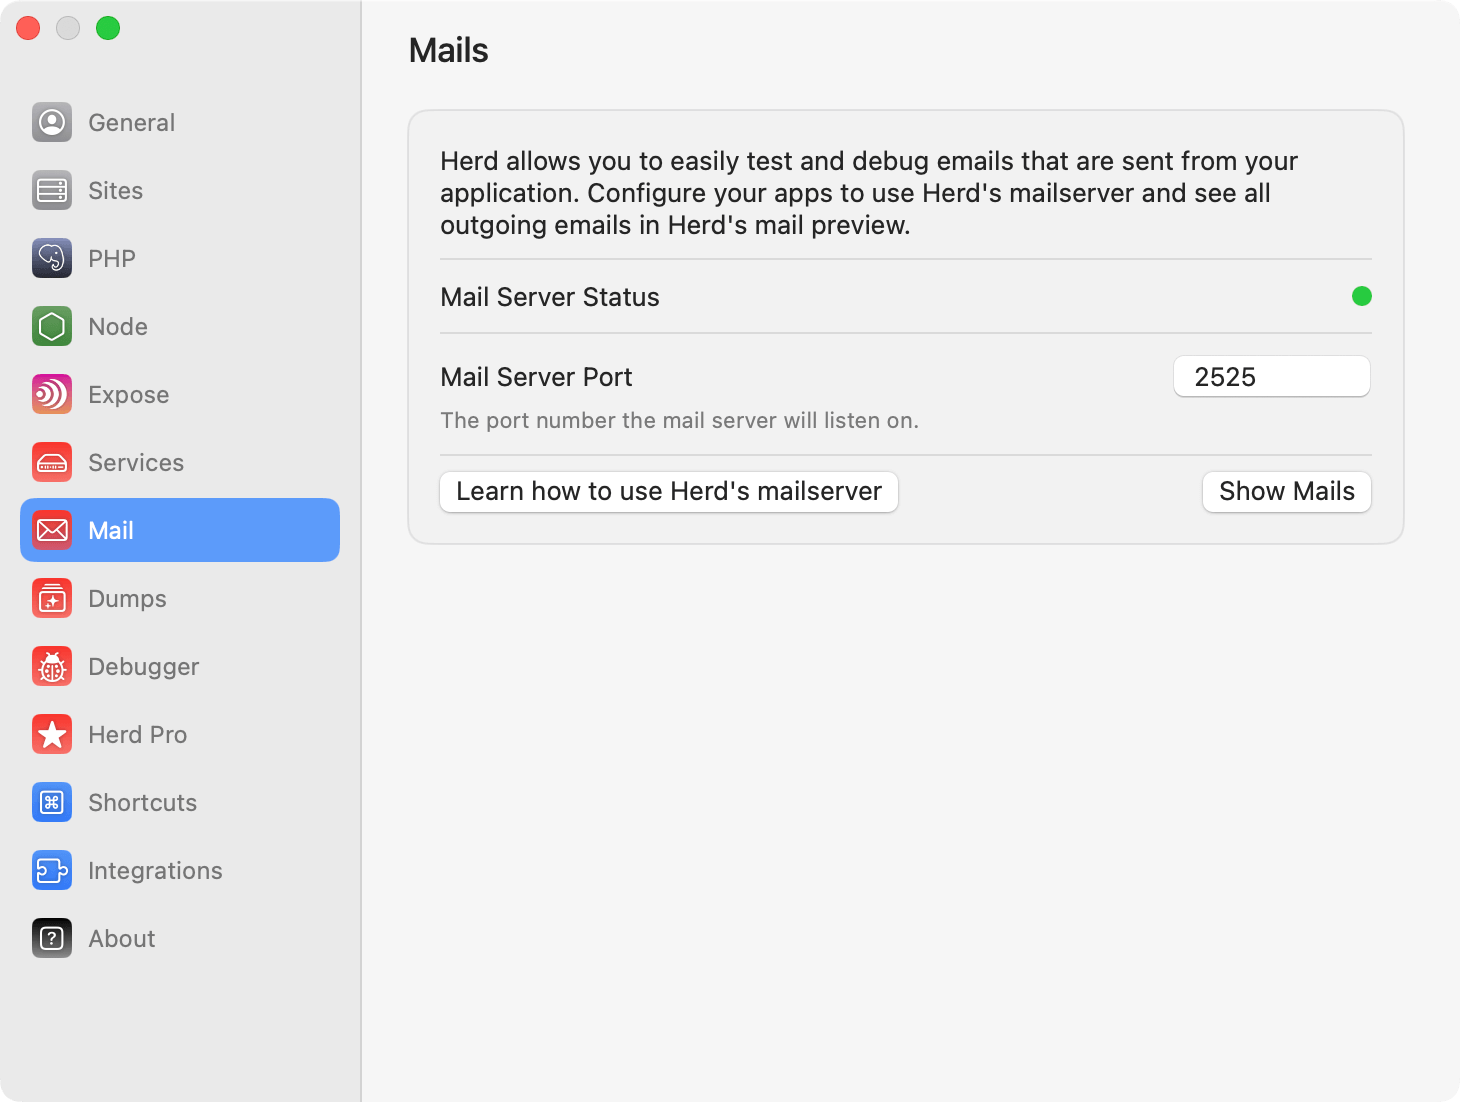
Herd Pro provides an SMTP mail server on your local machine that catches all outgoing emails instead of sending them to the world. It displays them in Herds own email client and provides rich debugging capabilities for all types of emails.
This saves you from sending emails to real users and frees you up from paying cloud services for developer email inboxes, not even requiring you to dig through log files when using the log driver. It's also super fast and organizes all emails per site.
## Selecting a Project and Log File
By default, the log window shows the latest log file of the last project that you visited in your browser. This allows you to quickly find the latest log file, but you can also switch between all projects that Herd knows and serves.
If your project includes more than one log file, for example when using daily log rotation, you can select the log file on the left.
## Searching in Log Files
The search bar at the top searches through all logs and allows you to pinpoint all log entries that match your search query. You can hit Cmd+F in the text area that shows the details of the entry and search within this single entry.
## Custom log paths
Herd looks for logs in the framework-specific standard directory, such as `storage/logs` for Laravel. You can change that directory and even add multiple log directories by using a [custom driver](/macos/extending-herd/custom-drivers#customize-herds-behaviour) for that application.
---
# Source: https://herd.laravel.com/docs/macos/herd-pro-services/mail.md
> ## Documentation Index
> Fetch the complete documentation index at: https://herd.laravel.com/docs/llms.txt
> Use this file to discover all available pages before exploring further.
# Mail
# Working with emails
When you are working with emails locally, you need to make sure that these emails don't leave your machine and get sent to real users but it's also important to inspect them easily.
Herd Pro provides an SMTP mail server on your local machine that catches all outgoing emails instead of sending them to the world. It displays them in Herds own email client and provides rich debugging capabilities for all types of emails.
This saves you from sending emails to real users and frees you up from paying cloud services for developer email inboxes, not even requiring you to dig through log files when using the log driver. It's also super fast and organizes all emails per site.
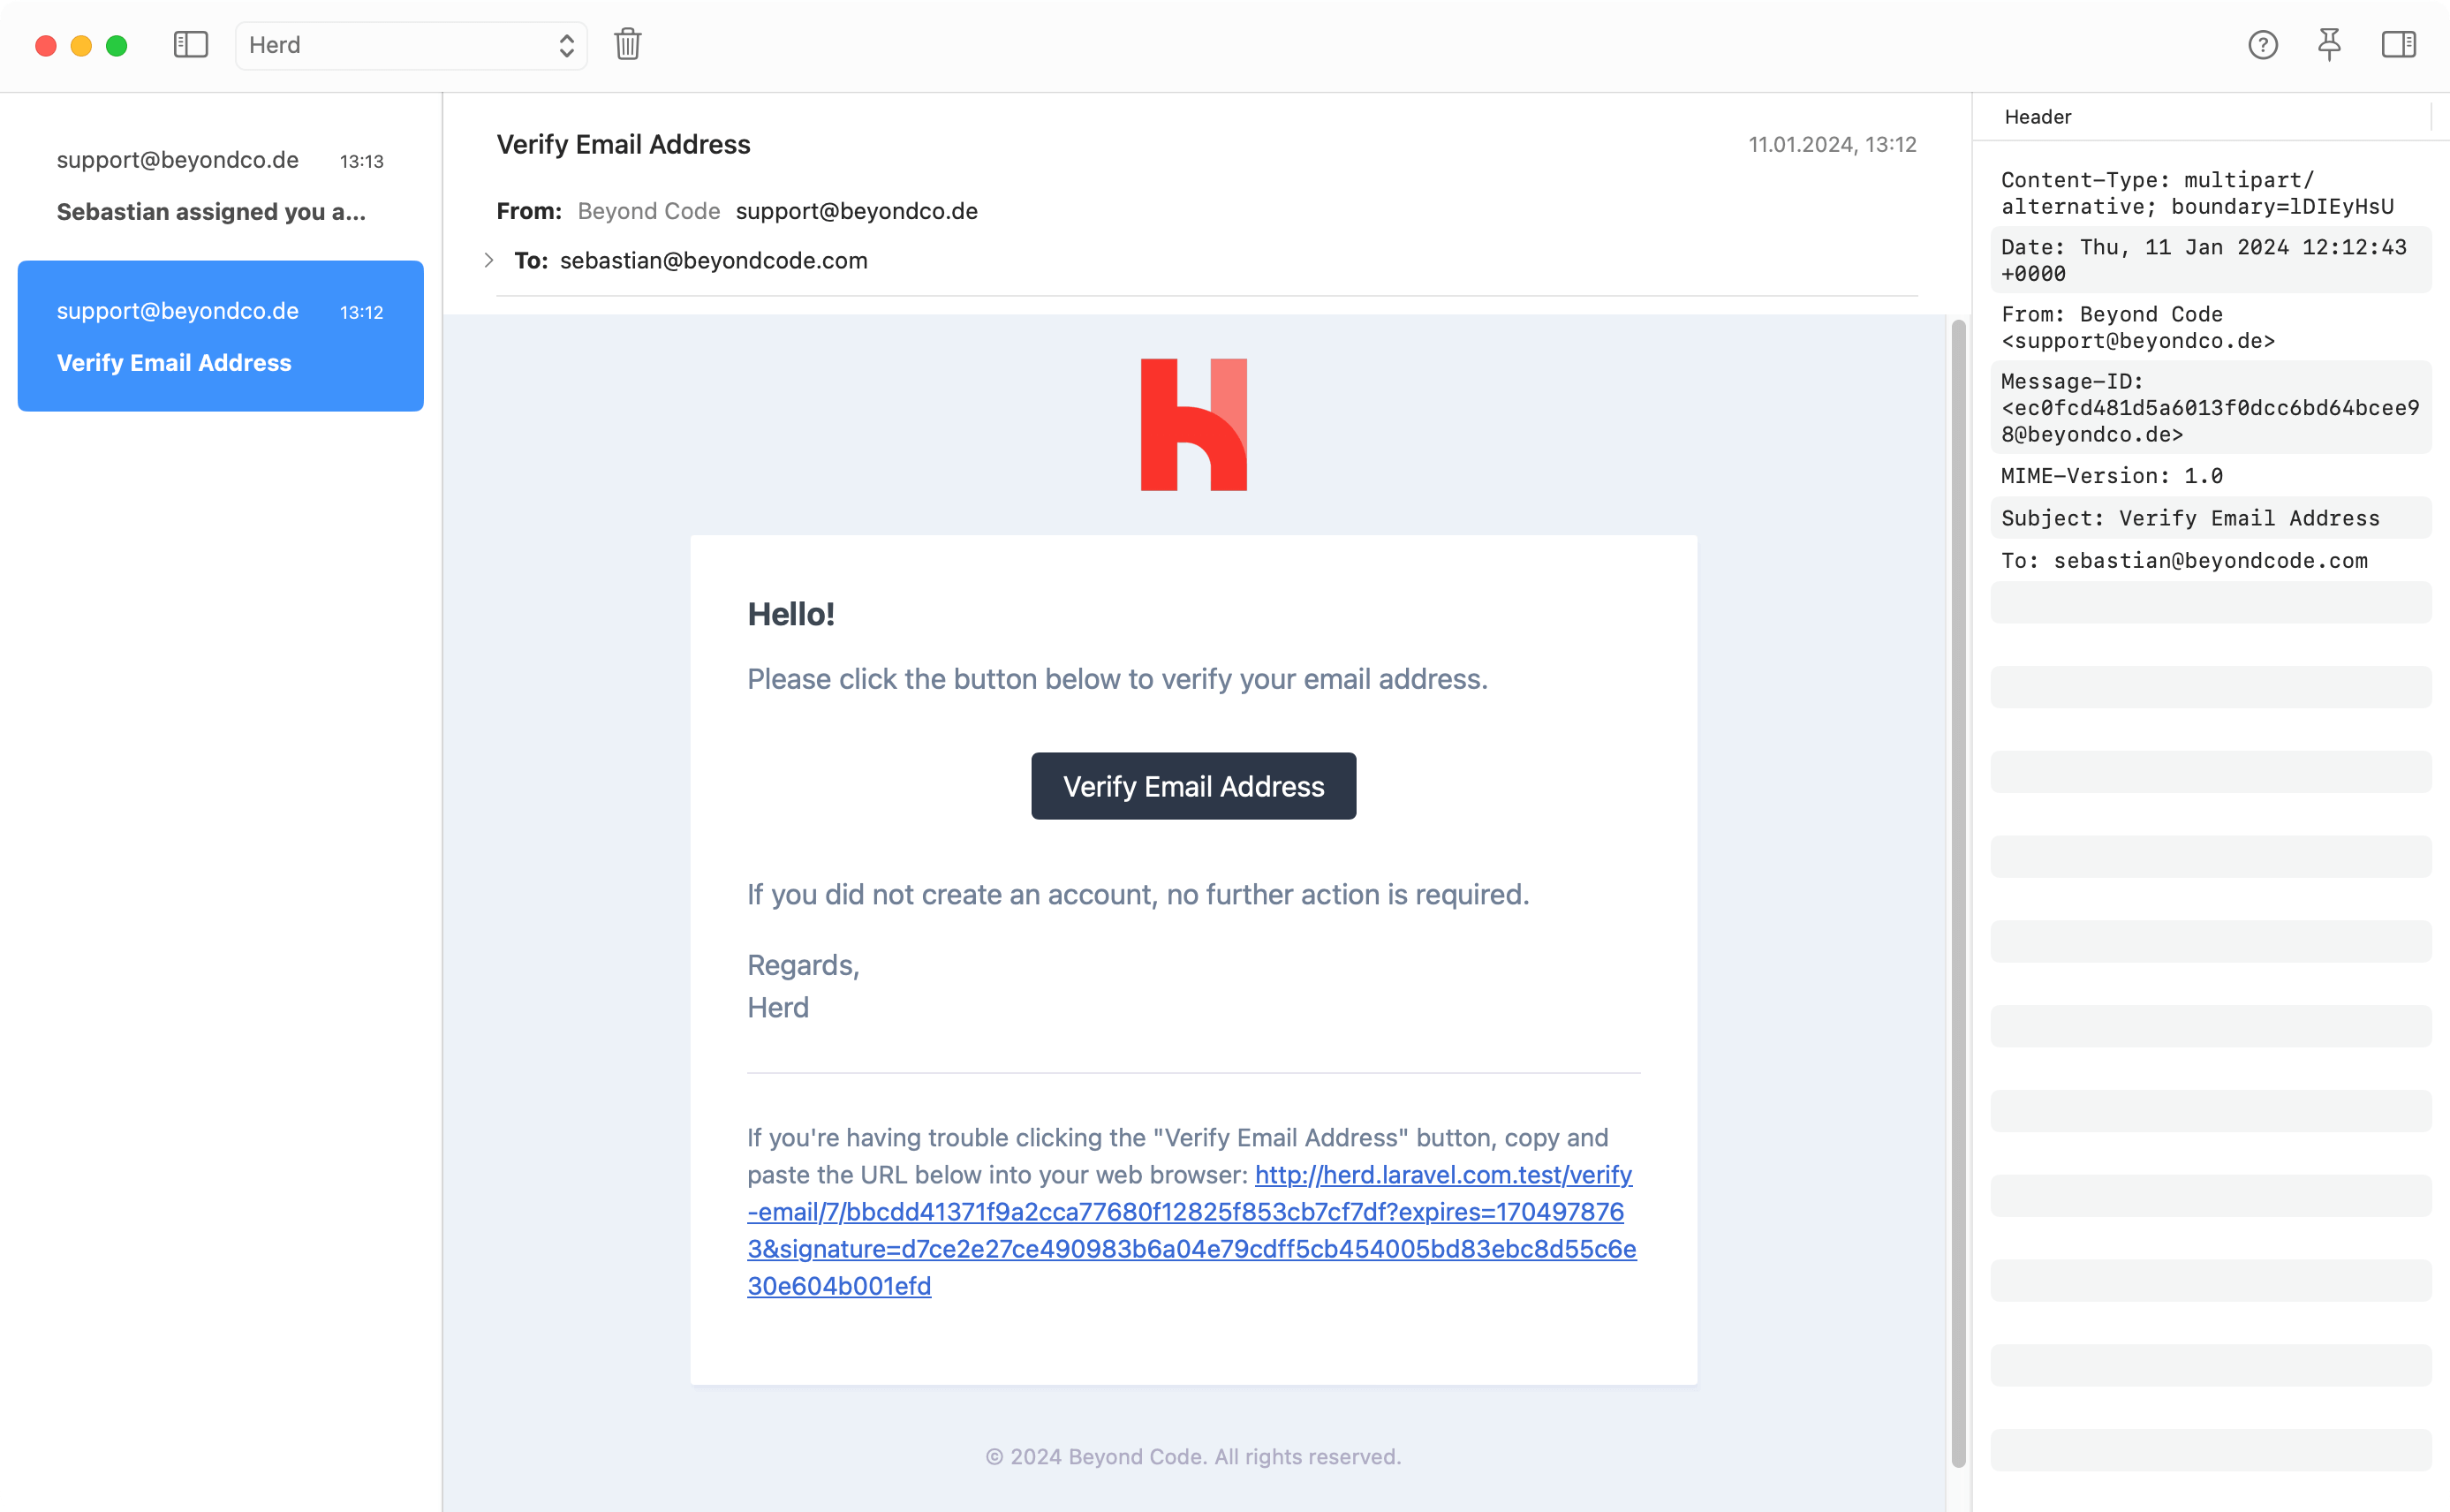
 ## Inspecting mails
You may inspect the header values of an email by opening the sidebar of the email window at the top right.
The HTML source of the email or the raw email content are available via right-click on the email itself. They open in a new window, and you can open raw or HTML content of multiple mails at the same time.
## Inspecting mails
You may inspect the header values of an email by opening the sidebar of the email window at the top right.
The HTML source of the email or the raw email content are available via right-click on the email itself. They open in a new window, and you can open raw or HTML content of multiple mails at the same time.
 ## Attachments
Herd stores all attachments in your Herd application directory and creates a folder for each email with all attached files. You can either open them from this folder or directly from the email.
```
~/Library/Application Support/Herd/Log/mail
```
## Deleting mails
You can delete single emails by selecting the email and pressing the `Backspace` key but if you want to get rid of a whole inbox, you can use the trash icon in the top bar of the mail window.
## Troubleshooting
If you accidentally sent thousands of emails to Herd or something is wrong, you can check the SQLite database file where Herd stores all emails. You can find the file at:
```
~/Library/Application Support/Herd/HerdCoreData.sqlite
```
You can truncate all mail related tables in this file without breaking the rest of the application.
---
# Source: https://herd.laravel.com/docs/macos/migration-guides/mamp.md
> ## Documentation Index
> Fetch the complete documentation index at: https://herd.laravel.com/docs/llms.txt
> Use this file to discover all available pages before exploring further.
# Migrating from MAMP
# How to migrate from MAMP to Herd
If you're currently using MAMP or MAMP Pro for your local PHP development and want to switch to Herd, this guide will
help you migrate your setup smoothly. Herd provides several advantages over MAMP, including:
* Deeply Integrated Laravel Support
* Advanced Web Development Debugging Tools
* Database Instance Management for MySQL, PostgreSQL, MongoDB and redis
* Additional Service Management for TypeSense, MeiliSearch, MinIO and Laravel Reverb
* First Party Laravel Forge Integration
* Native Xdebug Integration and Detection
## Before You Begin
Before starting the migration process, make sure you have:
1. A list of all your active MAMP sites
2. Database exports of all your databases
3. [Installed Herd](/macos/getting-started/installation)
## Exporting MAMP Databases
The first step is to export all your databases from MAMP. You can do this using phpMyAdmin that ships with MAMP or via the command line.
### Via phpMyAdmin
1. Open MAMP and start your servers
2. Navigate to phpMyAdmin (usually at [http://localhost:8888/phpMyAdmin](http://localhost:8888/phpMyAdmin))
3. Select each database you want to export
4. Click "Export" in the top menu
5. Choose "Quick" export method and "SQL" format
6. Click "Go" to download the SQL file
### Via Command Line
If you prefer using the command line, you can use the MySQL executable that ships with MAMP:
```bash theme={null}
"/Applications/MAMP/Library/bin/mysqldump" -u root -p database_name > database_name.sql
```
## Setting Up Databases in Herd
After exporting your databases, you'll need to set them up in Herd. You have several options:
### Option 1: Herd Pro Services (Recommended)
If you're using [Herd Pro](/macos/herd-pro-services/services), you can install MySQL directly from the Services panel:
1. Open Herd settings
2. Go to the Services tab
3. Click the + button and select MySQL
4. Import your database dumps using TablePlus or AdminerEvo directly from the service panel
### Option 2: Standalone MySQL
If you're using the free version of Herd, you can:
1. Install MySQL separately via Homebrew or download it from mysql.com
2. Import your databases using the mysql command line tool:
```bash theme={null}
mysql -u root database_name < database_name.sql
```
## Migrating Sites
### Step 1: Document Current Sites
First, make a list of your current MAMP sites and their document roots. In MAMP Pro, you can find these in the Hosts section of the application.
### Step 2: Set Up Herd Directory
Herd uses a central directory for serving sites. By default, this is `~/Herd`. You can also add additional [parked paths](/macos/getting-started/sites) in the settings.
### Step 3: Move Your Projects
1. Create your desired directory structure in your Herd directory
2. Move or copy your project files to this new location
3. Access your sites via their new `.test` domains automatically
For example, if your site was at:
```
/Applications/MAMP/htdocs/mysite
```
Move it to:
```
~/Herd/mysite
```
It will then be accessible at `http://mysite.test`
## Updating Configuration
### PHP Version
MAMP and Herd handle PHP versions differently. In Herd, you can:
1. Set a global PHP version via the menu bar or CLI:
```bash theme={null}
herd use 8.2
```
2. [Set per-site PHP versions](/macos/technology/php-versions#per-site-php-versions) either through the Site Manager or CLI:
```bash theme={null}
cd ~/Herd/mysite
herd isolate 8.1
```
### Database Connections
Update your database configuration in your applications. For Laravel applications, modify your `.env` file:
```env theme={null}
DB_CONNECTION=mysql
DB_HOST=127.0.0.1
DB_PORT=3306 # Or the port you configured in Herd
DB_DATABASE=your_database
DB_USERNAME=root
DB_PASSWORD=
```
### Virtual Hosts
Unlike MAMP, Herd doesn't require manual virtual host configuration. Simply placing your project in a [parked directory](/macos/getting-started/sites) makes it accessible via its `.test` domain. If you need custom domains, you can use the `link` command:
```bash theme={null}
cd ~/Herd/mysite
herd link custom-domain
```
### SSL Certificates
If you were using SSL certificates in MAMP, you can secure your sites in Herd with a single command:
```bash theme={null}
cd ~/Herd/mysite
herd secure
```
This automatically generates and installs a trusted SSL certificate for your local domain.
## PHP Extensions
Herd includes most common PHP extensions by default. If you need additional extensions, check the [PHP Extensions](/macos/technology/php-extensions) documentation for installation instructions.
## Mail Testing
If you were using MAMP's built-in mail catching, Herd Pro offers an [improved mail testing feature](/macos/herd-pro-services/mail) that captures all outgoing emails and provides a modern interface for inspection.
## Troubleshooting
### Common Issues
1. **Database Connection Issues**: Ensure you're using the correct port for your database connection. If you're using Herd Pro's MySQL service, check the port in the Services panel.
2. **PHP Version Mismatch**: If your application requires a specific PHP version, use `herd isolate` to set the correct version for that project.
3. **Missing Extensions**: Check the [PHP Extensions](/macos/technology/php-extensions) documentation if you need to install additional extensions.
For more help, consult the [troubleshooting guide](/macos/troubleshooting/common-issues) or reach out to the [community support](/macos/troubleshooting/support).
## Final Steps
1. Test all your migrated sites and ensure they work as expected
2. Verify database connections and functionality
3. Test any special PHP configurations or requirements
4. Once everything is working, you can uninstall MAMP
After completing this migration, you'll have a faster, more modern development environment that's easier to maintain and better integrated with macOS.
---
# Source: https://herd.laravel.com/docs/macos/sites/managing-sites.md
> ## Documentation Index
> Fetch the complete documentation index at: https://herd.laravel.com/docs/llms.txt
> Use this file to discover all available pages before exploring further.
# Managing Sites
# Manage Sites in Herd
If you've read the [Sites](/macos/getting-started/sites) introduction of the [Getting Started](/macos/getting-started/about-herd) section, you are already familiar with the concept of parked paths and linked directories – but how do you use them if you have many sites and use different technologies for them?
## Folder structure
We recommend to put all PHP based sites in your Herd directory until you reach a point where it makes sense to split them into a folder structure that makes sense for you. This could be sites per client, or if you run different technologies like Next.js, you can serve them from a different folder via `npm run dev`.
This setup keeps the [Site Manager](/macos/sites/managing-sites) clean and easy to use because you can simply unpark a directory in case that you don't work on these sites for a few weeks.
If you don't mind a long list in the Site Manager, you can also [mark your most important sites as favorites](#favorites) to display them at the beginning of the list.
## Site Manager
You can manage your sites via the CLI or open the Site Manager via the menu bar icon. This section of the docs explains all features of the Site Manager.
## Attachments
Herd stores all attachments in your Herd application directory and creates a folder for each email with all attached files. You can either open them from this folder or directly from the email.
```
~/Library/Application Support/Herd/Log/mail
```
## Deleting mails
You can delete single emails by selecting the email and pressing the `Backspace` key but if you want to get rid of a whole inbox, you can use the trash icon in the top bar of the mail window.
## Troubleshooting
If you accidentally sent thousands of emails to Herd or something is wrong, you can check the SQLite database file where Herd stores all emails. You can find the file at:
```
~/Library/Application Support/Herd/HerdCoreData.sqlite
```
You can truncate all mail related tables in this file without breaking the rest of the application.
---
# Source: https://herd.laravel.com/docs/macos/migration-guides/mamp.md
> ## Documentation Index
> Fetch the complete documentation index at: https://herd.laravel.com/docs/llms.txt
> Use this file to discover all available pages before exploring further.
# Migrating from MAMP
# How to migrate from MAMP to Herd
If you're currently using MAMP or MAMP Pro for your local PHP development and want to switch to Herd, this guide will
help you migrate your setup smoothly. Herd provides several advantages over MAMP, including:
* Deeply Integrated Laravel Support
* Advanced Web Development Debugging Tools
* Database Instance Management for MySQL, PostgreSQL, MongoDB and redis
* Additional Service Management for TypeSense, MeiliSearch, MinIO and Laravel Reverb
* First Party Laravel Forge Integration
* Native Xdebug Integration and Detection
## Before You Begin
Before starting the migration process, make sure you have:
1. A list of all your active MAMP sites
2. Database exports of all your databases
3. [Installed Herd](/macos/getting-started/installation)
## Exporting MAMP Databases
The first step is to export all your databases from MAMP. You can do this using phpMyAdmin that ships with MAMP or via the command line.
### Via phpMyAdmin
1. Open MAMP and start your servers
2. Navigate to phpMyAdmin (usually at [http://localhost:8888/phpMyAdmin](http://localhost:8888/phpMyAdmin))
3. Select each database you want to export
4. Click "Export" in the top menu
5. Choose "Quick" export method and "SQL" format
6. Click "Go" to download the SQL file
### Via Command Line
If you prefer using the command line, you can use the MySQL executable that ships with MAMP:
```bash theme={null}
"/Applications/MAMP/Library/bin/mysqldump" -u root -p database_name > database_name.sql
```
## Setting Up Databases in Herd
After exporting your databases, you'll need to set them up in Herd. You have several options:
### Option 1: Herd Pro Services (Recommended)
If you're using [Herd Pro](/macos/herd-pro-services/services), you can install MySQL directly from the Services panel:
1. Open Herd settings
2. Go to the Services tab
3. Click the + button and select MySQL
4. Import your database dumps using TablePlus or AdminerEvo directly from the service panel
### Option 2: Standalone MySQL
If you're using the free version of Herd, you can:
1. Install MySQL separately via Homebrew or download it from mysql.com
2. Import your databases using the mysql command line tool:
```bash theme={null}
mysql -u root database_name < database_name.sql
```
## Migrating Sites
### Step 1: Document Current Sites
First, make a list of your current MAMP sites and their document roots. In MAMP Pro, you can find these in the Hosts section of the application.
### Step 2: Set Up Herd Directory
Herd uses a central directory for serving sites. By default, this is `~/Herd`. You can also add additional [parked paths](/macos/getting-started/sites) in the settings.
### Step 3: Move Your Projects
1. Create your desired directory structure in your Herd directory
2. Move or copy your project files to this new location
3. Access your sites via their new `.test` domains automatically
For example, if your site was at:
```
/Applications/MAMP/htdocs/mysite
```
Move it to:
```
~/Herd/mysite
```
It will then be accessible at `http://mysite.test`
## Updating Configuration
### PHP Version
MAMP and Herd handle PHP versions differently. In Herd, you can:
1. Set a global PHP version via the menu bar or CLI:
```bash theme={null}
herd use 8.2
```
2. [Set per-site PHP versions](/macos/technology/php-versions#per-site-php-versions) either through the Site Manager or CLI:
```bash theme={null}
cd ~/Herd/mysite
herd isolate 8.1
```
### Database Connections
Update your database configuration in your applications. For Laravel applications, modify your `.env` file:
```env theme={null}
DB_CONNECTION=mysql
DB_HOST=127.0.0.1
DB_PORT=3306 # Or the port you configured in Herd
DB_DATABASE=your_database
DB_USERNAME=root
DB_PASSWORD=
```
### Virtual Hosts
Unlike MAMP, Herd doesn't require manual virtual host configuration. Simply placing your project in a [parked directory](/macos/getting-started/sites) makes it accessible via its `.test` domain. If you need custom domains, you can use the `link` command:
```bash theme={null}
cd ~/Herd/mysite
herd link custom-domain
```
### SSL Certificates
If you were using SSL certificates in MAMP, you can secure your sites in Herd with a single command:
```bash theme={null}
cd ~/Herd/mysite
herd secure
```
This automatically generates and installs a trusted SSL certificate for your local domain.
## PHP Extensions
Herd includes most common PHP extensions by default. If you need additional extensions, check the [PHP Extensions](/macos/technology/php-extensions) documentation for installation instructions.
## Mail Testing
If you were using MAMP's built-in mail catching, Herd Pro offers an [improved mail testing feature](/macos/herd-pro-services/mail) that captures all outgoing emails and provides a modern interface for inspection.
## Troubleshooting
### Common Issues
1. **Database Connection Issues**: Ensure you're using the correct port for your database connection. If you're using Herd Pro's MySQL service, check the port in the Services panel.
2. **PHP Version Mismatch**: If your application requires a specific PHP version, use `herd isolate` to set the correct version for that project.
3. **Missing Extensions**: Check the [PHP Extensions](/macos/technology/php-extensions) documentation if you need to install additional extensions.
For more help, consult the [troubleshooting guide](/macos/troubleshooting/common-issues) or reach out to the [community support](/macos/troubleshooting/support).
## Final Steps
1. Test all your migrated sites and ensure they work as expected
2. Verify database connections and functionality
3. Test any special PHP configurations or requirements
4. Once everything is working, you can uninstall MAMP
After completing this migration, you'll have a faster, more modern development environment that's easier to maintain and better integrated with macOS.
---
# Source: https://herd.laravel.com/docs/macos/sites/managing-sites.md
> ## Documentation Index
> Fetch the complete documentation index at: https://herd.laravel.com/docs/llms.txt
> Use this file to discover all available pages before exploring further.
# Managing Sites
# Manage Sites in Herd
If you've read the [Sites](/macos/getting-started/sites) introduction of the [Getting Started](/macos/getting-started/about-herd) section, you are already familiar with the concept of parked paths and linked directories – but how do you use them if you have many sites and use different technologies for them?
## Folder structure
We recommend to put all PHP based sites in your Herd directory until you reach a point where it makes sense to split them into a folder structure that makes sense for you. This could be sites per client, or if you run different technologies like Next.js, you can serve them from a different folder via `npm run dev`.
This setup keeps the [Site Manager](/macos/sites/managing-sites) clean and easy to use because you can simply unpark a directory in case that you don't work on these sites for a few weeks.
If you don't mind a long list in the Site Manager, you can also [mark your most important sites as favorites](#favorites) to display them at the beginning of the list.
## Site Manager
You can manage your sites via the CLI or open the Site Manager via the menu bar icon. This section of the docs explains all features of the Site Manager.
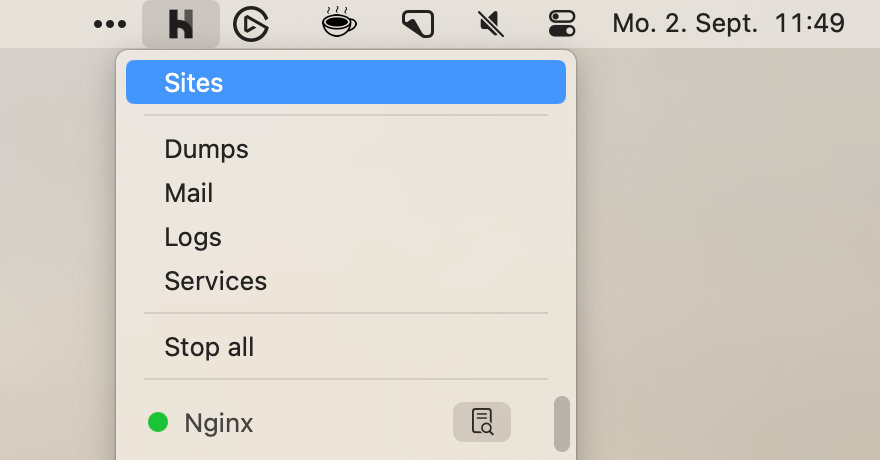 The Site Manager window is divided into the list of all your sites on the left side and a site management panel for the selected site on the right side.
You can hide the site list if you are working with mainly one site but also refresh the list in case that you are making changes to your parked or linked directories via the CLI and while the Site Manager is open.
Clicking on the plus button opens the site wizard that allows you to create Laravel applications or link existing ones that are not in a parked directory.
The Site Manager window is divided into the list of all your sites on the left side and a site management panel for the selected site on the right side.
You can hide the site list if you are working with mainly one site but also refresh the list in case that you are making changes to your parked or linked directories via the CLI and while the Site Manager is open.
Clicking on the plus button opens the site wizard that allows you to create Laravel applications or link existing ones that are not in a parked directory.
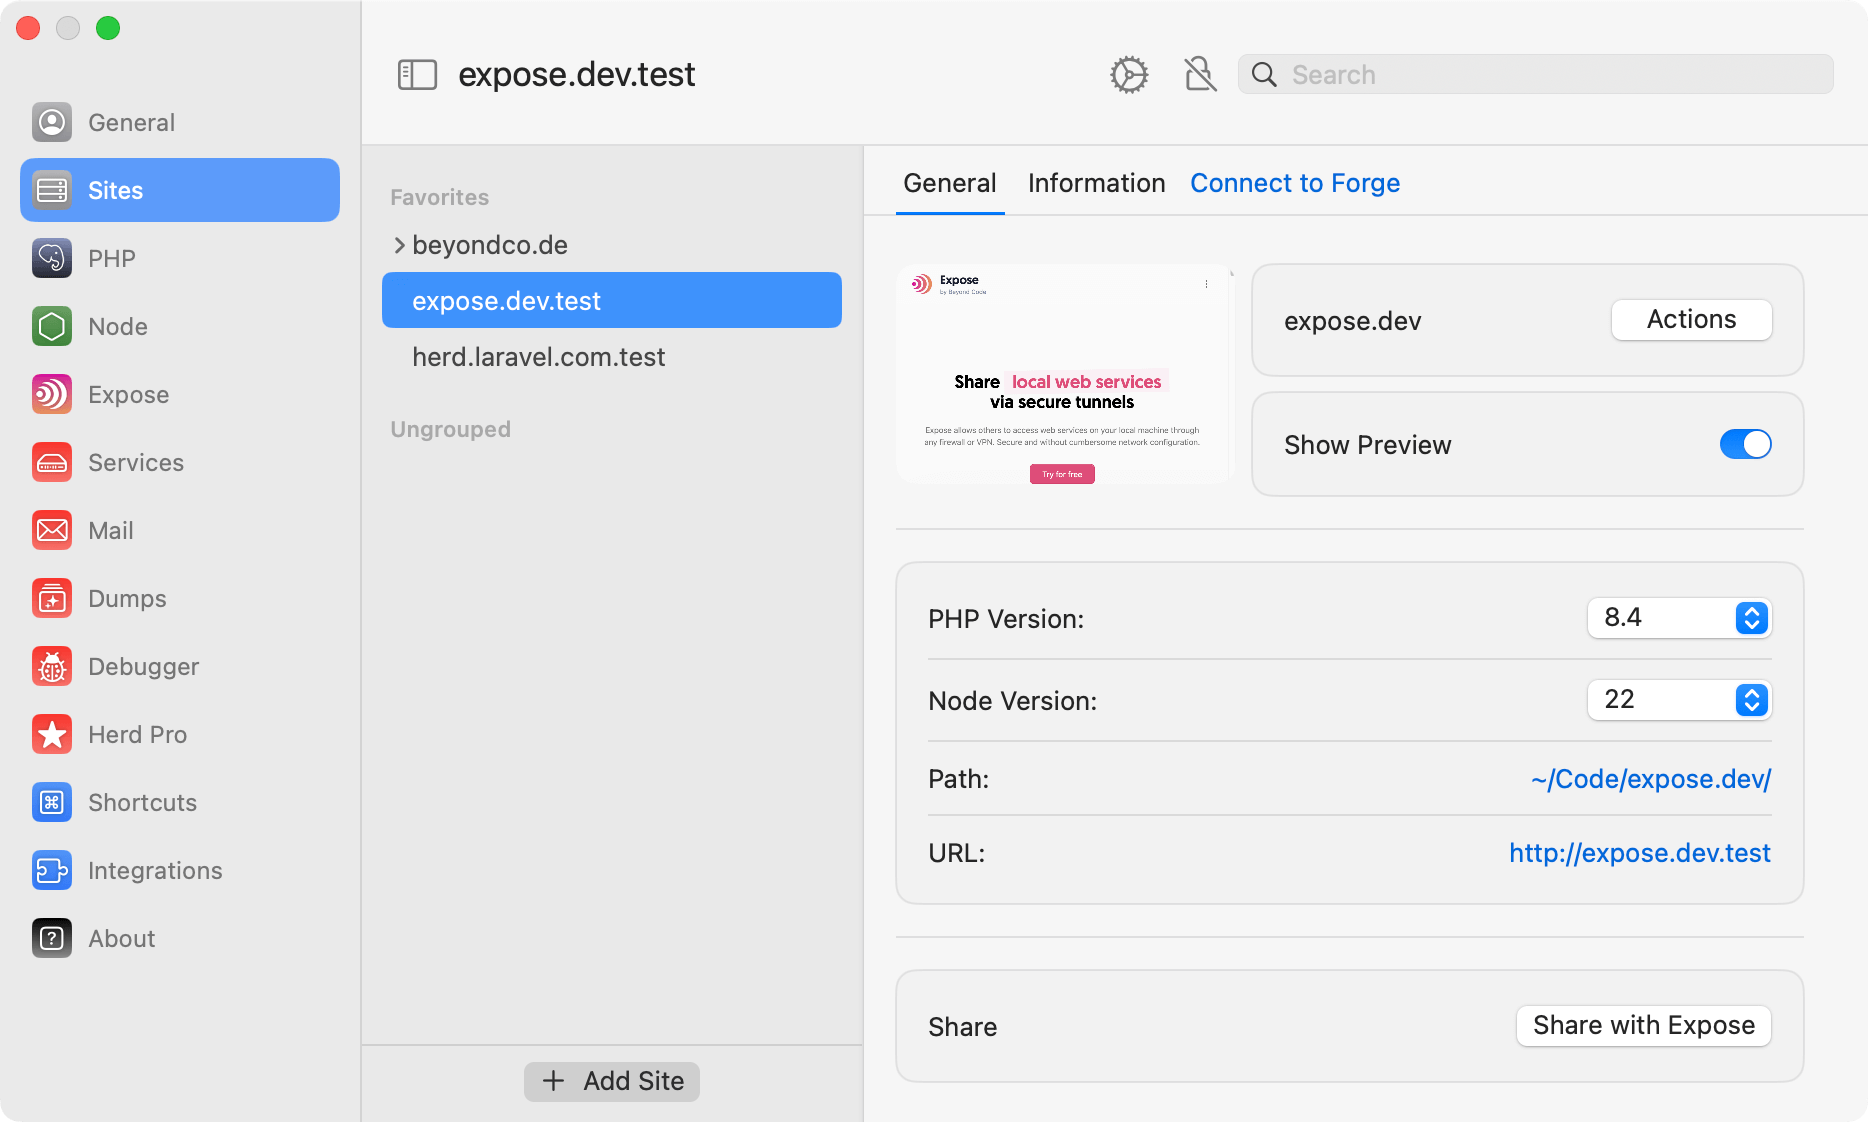 The right side of the Sites Manager is dedicated to the selected site and always shows a general tab where you can isolate this site to a specific PHP version. This tells Herd to serve this site with a specific PHP version and not to use the [global configuration](/macos/technology/php-versions#using-different-php-versions-via-the-gui) that you apply in the settings.
If you select a specific Node.js version, Herd creates an `.nvmrc` file in your project directory. This tells your terminal to switch to the selected Node and NPM version automatically.
### Information
The information tab shows driver specific information about the application. For Laravel applications, that's the content of the `php artisan about` command, but you can customize this with a [custom driver](/macos/extending-herd/custom-drivers).
### Integrations
You can connect a Herd site with one or more sites on Laravel Forge. You can learn more about this feature in [Forge Integration](/macos/integrations/laravel-forge) docs.
## Site Actions
Site Actions are like shortcuts from the site manager. They allow you to open your favorite terminal directly in the project directory, start a [Tinker(-well)](/macos/debugging/tinker) session or launch your IDE.
If you open the database, Herd tries to open the application database with its tables in TablePlus but uses AdminerEvo in case that you don't use TablePlus. This gives you quick access to the database on the basis of your `.env` file.
The log action is available for Herd Pro users and opens the [Log Viewer](/macos/debugging/logs) that ships with [Herd Pro](https://herd.laravel.com/checkout). The Profiler action enables and disables the [profiling feature](/macos/debugging/profiler).
The right side of the Sites Manager is dedicated to the selected site and always shows a general tab where you can isolate this site to a specific PHP version. This tells Herd to serve this site with a specific PHP version and not to use the [global configuration](/macos/technology/php-versions#using-different-php-versions-via-the-gui) that you apply in the settings.
If you select a specific Node.js version, Herd creates an `.nvmrc` file in your project directory. This tells your terminal to switch to the selected Node and NPM version automatically.
### Information
The information tab shows driver specific information about the application. For Laravel applications, that's the content of the `php artisan about` command, but you can customize this with a [custom driver](/macos/extending-herd/custom-drivers).
### Integrations
You can connect a Herd site with one or more sites on Laravel Forge. You can learn more about this feature in [Forge Integration](/macos/integrations/laravel-forge) docs.
## Site Actions
Site Actions are like shortcuts from the site manager. They allow you to open your favorite terminal directly in the project directory, start a [Tinker(-well)](/macos/debugging/tinker) session or launch your IDE.
If you open the database, Herd tries to open the application database with its tables in TablePlus but uses AdminerEvo in case that you don't use TablePlus. This gives you quick access to the database on the basis of your `.env` file.
The log action is available for Herd Pro users and opens the [Log Viewer](/macos/debugging/logs) that ships with [Herd Pro](https://herd.laravel.com/checkout). The Profiler action enables and disables the [profiling feature](/macos/debugging/profiler).
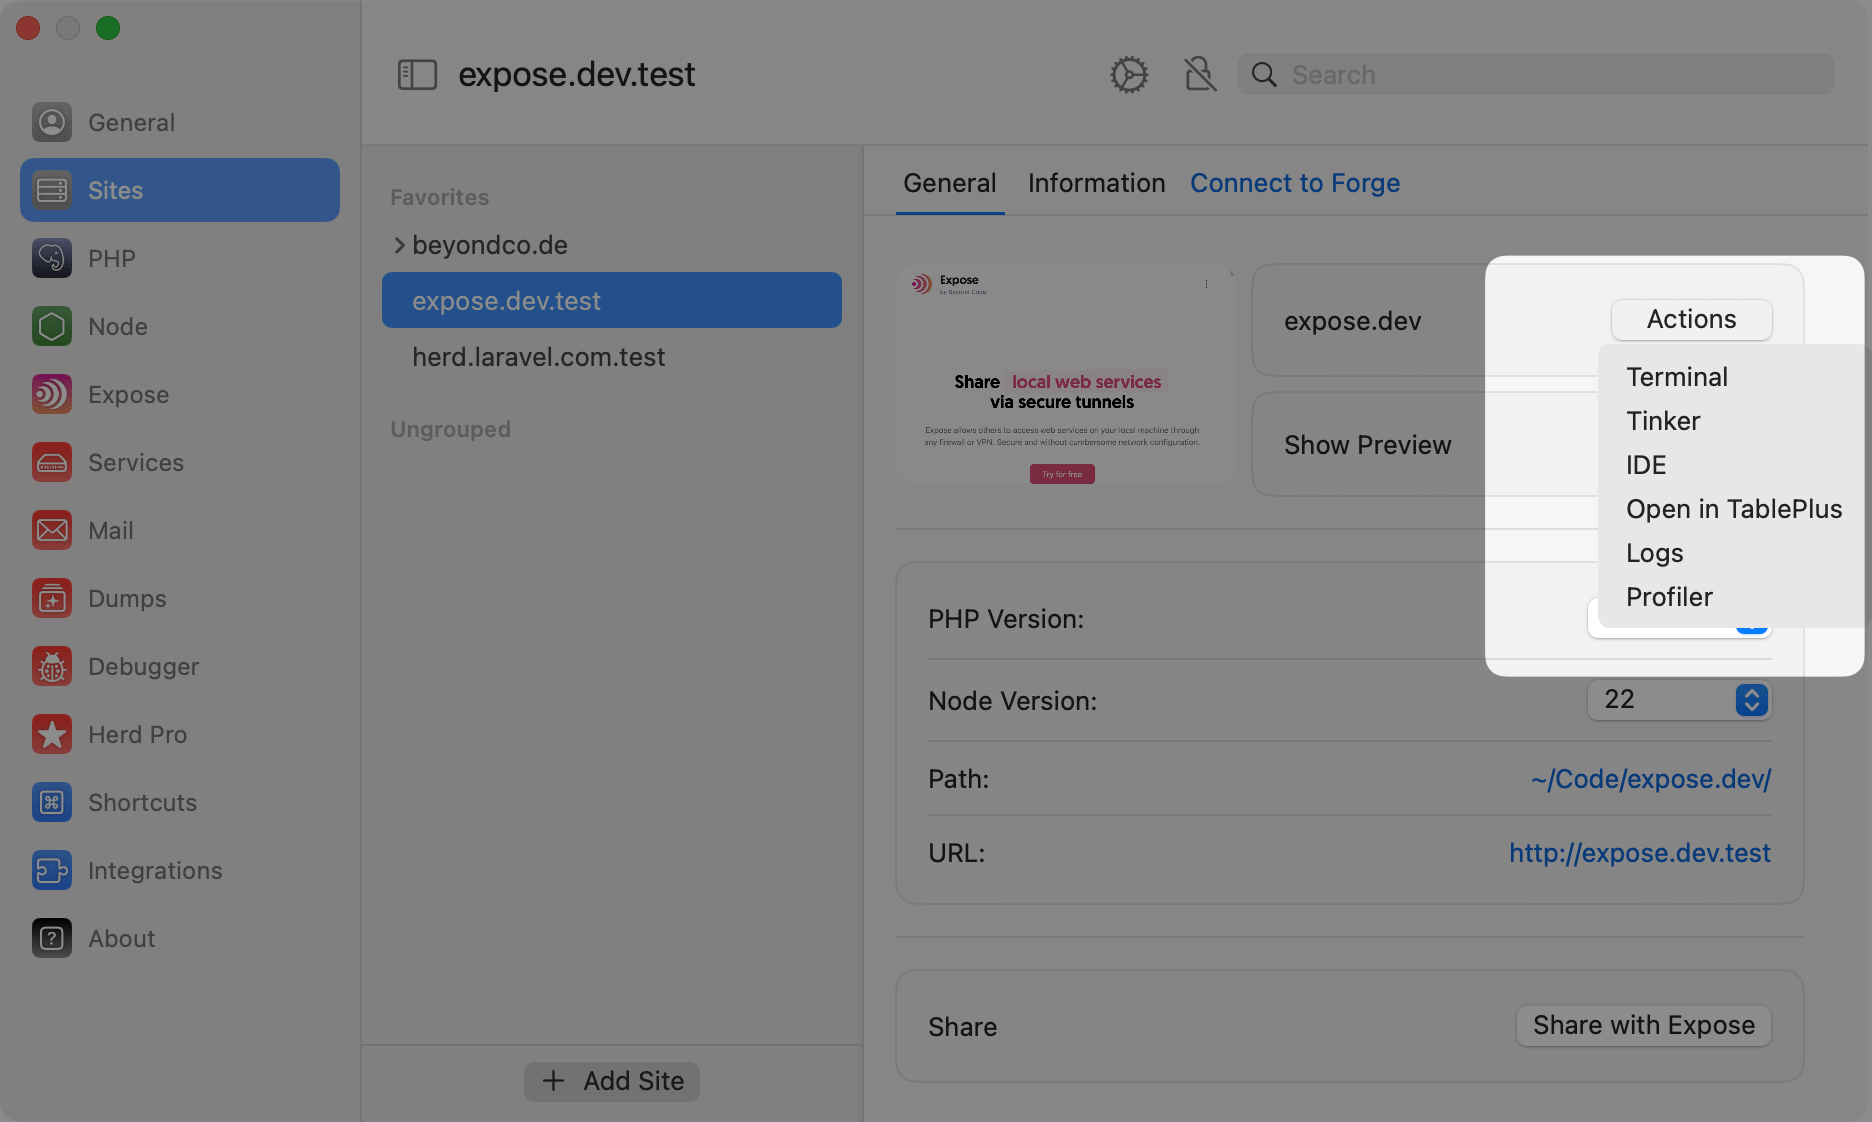 ### Securing Sites
You can serve sites via HTTPS instead of HTTP if your application requires this via [Securing Sites](/macos/sites/securing-sites).
### Groups
If you are working with many sites at the same time and don't want to use multiple parked directories that you add and remove when you need them, you can group sites and they automatically appear in your own site structure on the left side.
### Securing Sites
You can serve sites via HTTPS instead of HTTP if your application requires this via [Securing Sites](/macos/sites/securing-sites).
### Groups
If you are working with many sites at the same time and don't want to use multiple parked directories that you add and remove when you need them, you can group sites and they automatically appear in your own site structure on the left side.
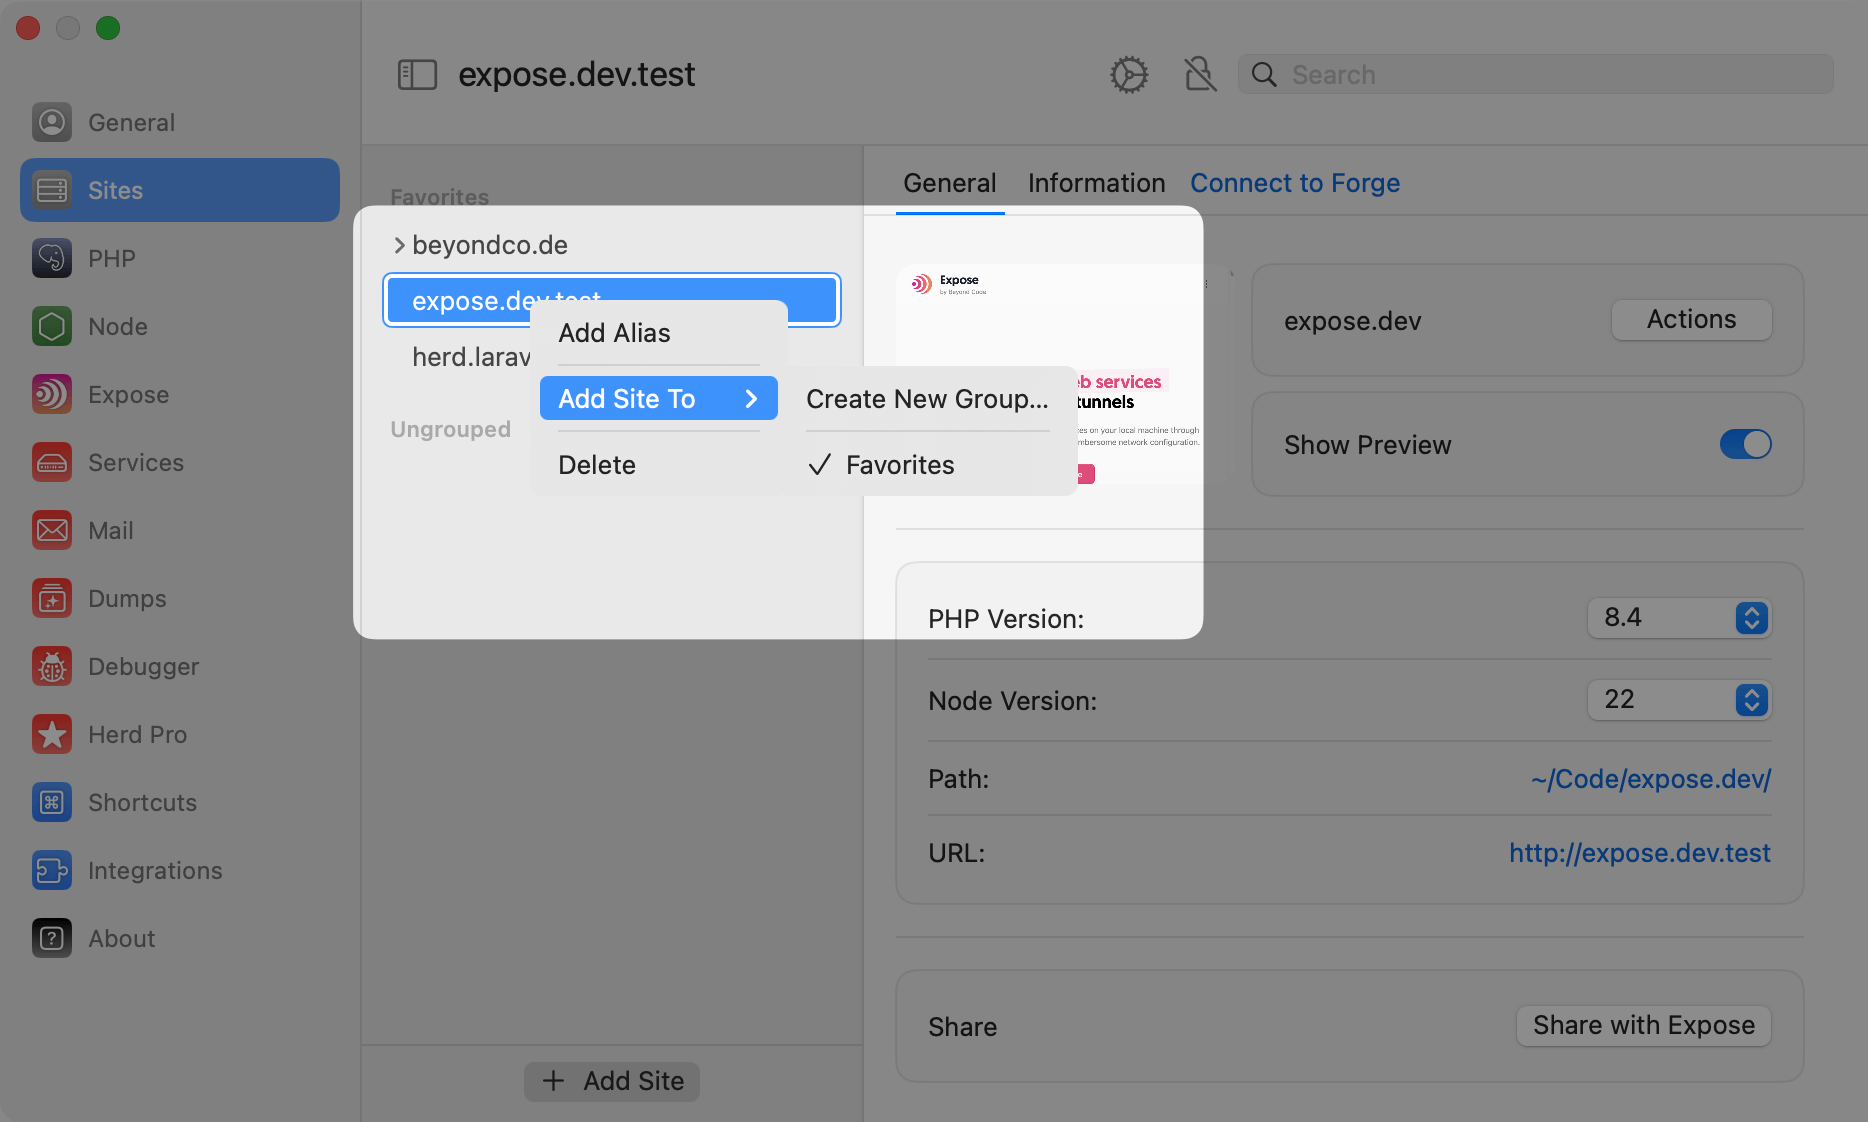 ### Deleting Sites
You can fully delete parked sites from your Herd directory with the trash icon. This is identical to deleting their folder with all files, so use this carefully.
## Best Practices
It's a good practice to name your local sites like your domains and subdomains to easily access them in your browser. As an example, the Herd website usually lives in the directory `~/Code/herd.laravel.com` so that it's accessible via `http://herd.laravel.com.test`. The Laravel website is in the directory `~/Code/laravel.com`, etc.
### Deleting Sites
You can fully delete parked sites from your Herd directory with the trash icon. This is identical to deleting their folder with all files, so use this carefully.
## Best Practices
It's a good practice to name your local sites like your domains and subdomains to easily access them in your browser. As an example, the Herd website usually lives in the directory `~/Code/herd.laravel.com` so that it's accessible via `http://herd.laravel.com.test`. The Laravel website is in the directory `~/Code/laravel.com`, etc.
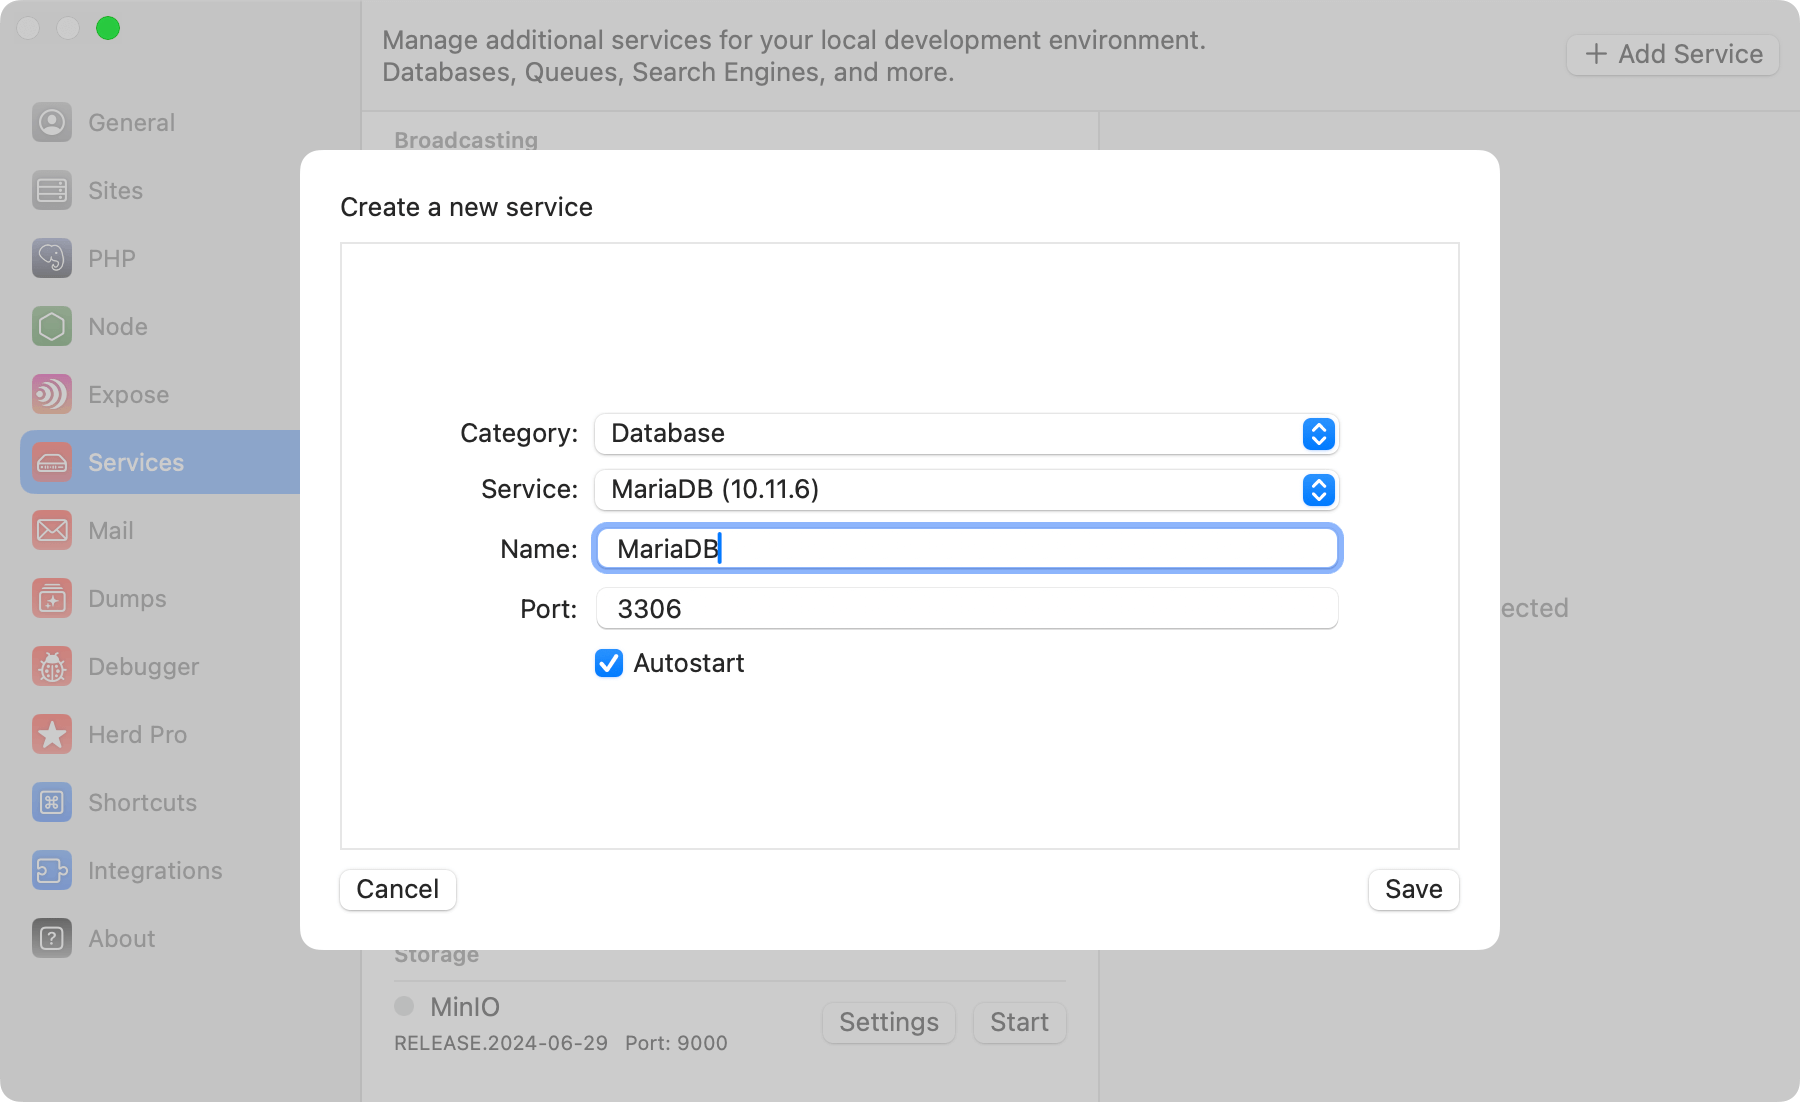 ## Configuration
Herd provides a sensible default configuration for your MariaDB instance that works seamlessly for new setups, and you can change the port of the service to run it in parallel to existing installations on your machine.
Enabling the autostart option automatically starts a service instance when you start Herd.
If you want to modify the settings of the database, you can right click the service in the settings and open its data directory. In this data directory, there is a `my.cnf` that this specific MariaDB instance loads on startup.
Make sure to restart the service if you make changes to this configuration.
## Creating databases
While Laravel applications can create a database when running the migrations for the first time, it's a good practice to set up the database within the database instance yourself.
The service details on the right side of the selected service allow you to open TablePlus or AdminerEvo with a single click. Herd automatically detects TablePlus on your machine and provides a connection string to access the database instance. If you don't use TablePlus, it opens AdminerEvo where it inserts the correct login credentials for you.
## Configuration
Herd provides a sensible default configuration for your MariaDB instance that works seamlessly for new setups, and you can change the port of the service to run it in parallel to existing installations on your machine.
Enabling the autostart option automatically starts a service instance when you start Herd.
If you want to modify the settings of the database, you can right click the service in the settings and open its data directory. In this data directory, there is a `my.cnf` that this specific MariaDB instance loads on startup.
Make sure to restart the service if you make changes to this configuration.
## Creating databases
While Laravel applications can create a database when running the migrations for the first time, it's a good practice to set up the database within the database instance yourself.
The service details on the right side of the selected service allow you to open TablePlus or AdminerEvo with a single click. Herd automatically detects TablePlus on your machine and provides a connection string to access the database instance. If you don't use TablePlus, it opens AdminerEvo where it inserts the correct login credentials for you.
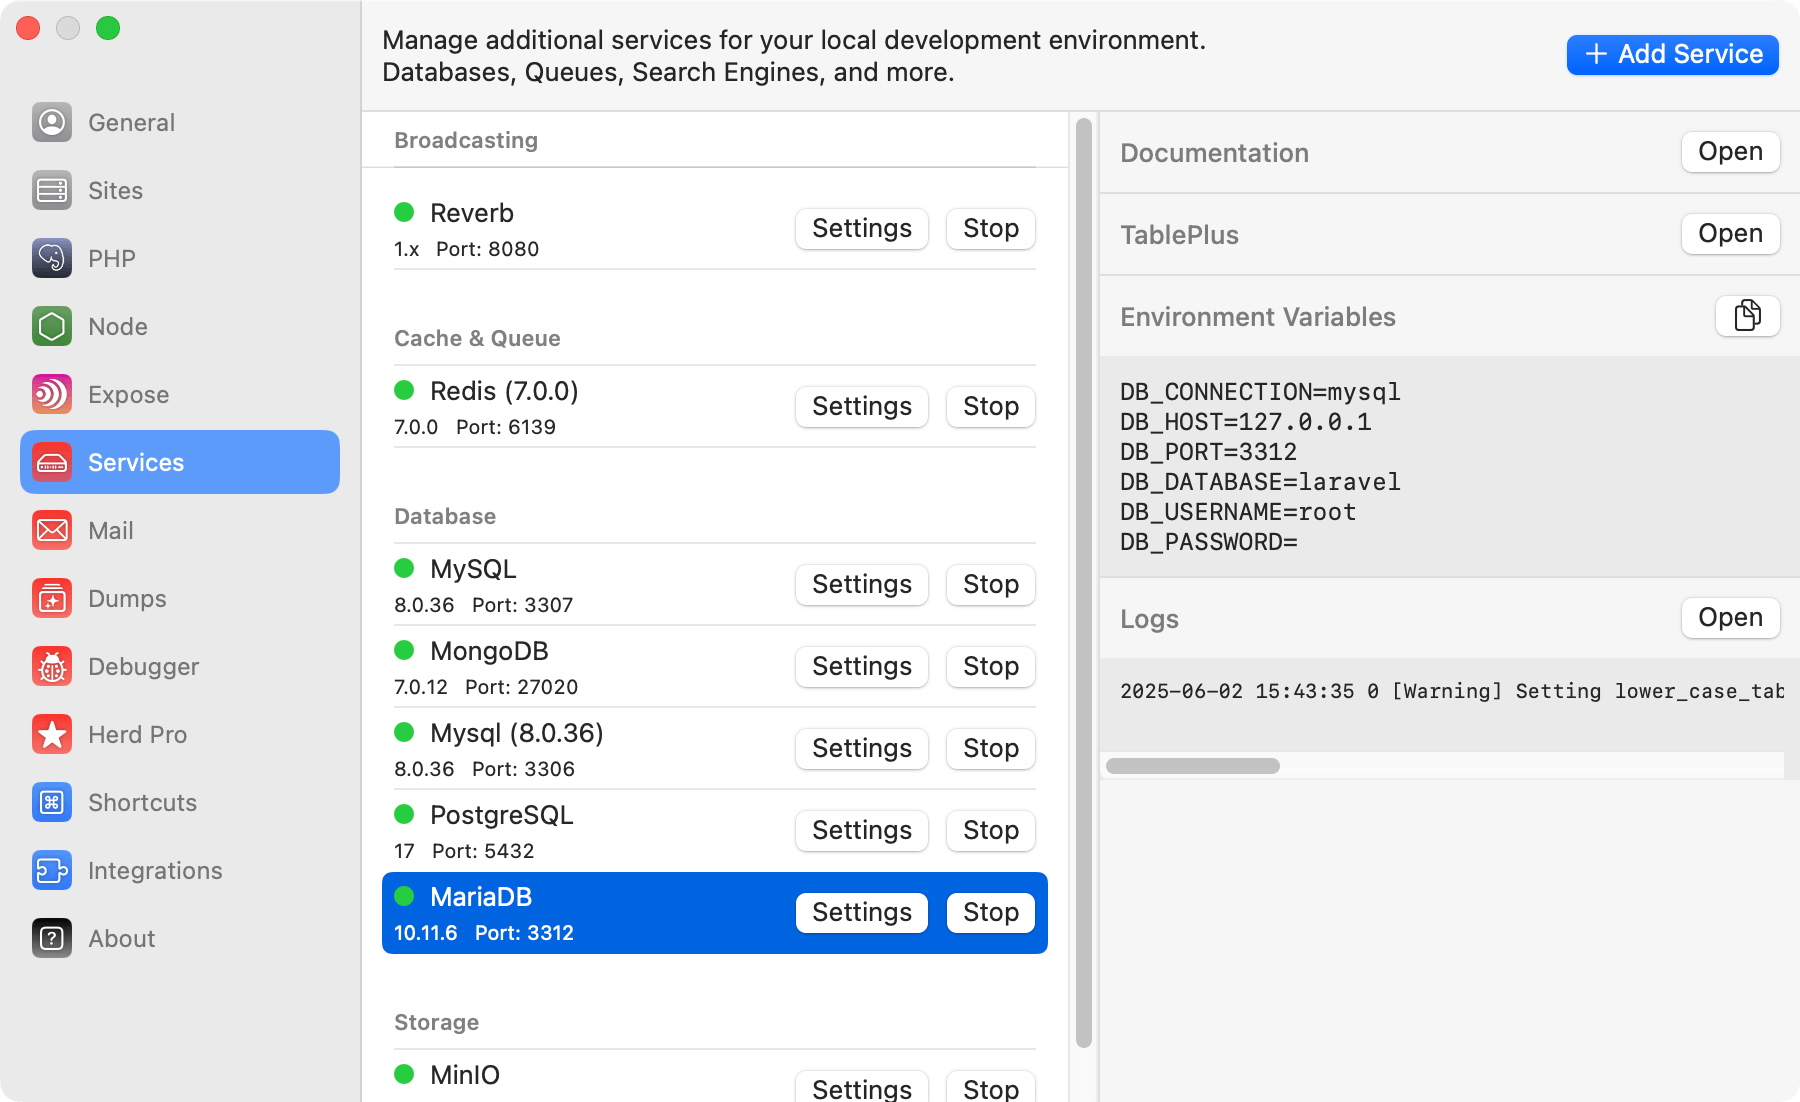 ## Connecting from your Laravel application
To connect your application to the server, you can use the credentials that are listed next to the running service in the settings, or you can use the ones below.
```env theme={null}
DB_CONNECTION=mysql
DB_HOST=127.0.0.1
DB_PORT=3307
DB_DATABASE=laravel # set this to your project database
DB_USERNAME=root
DB_PASSWORD=
```
## Database service migrations
Whether you set up a newer version of MariaDB or migrate from existing instances on your machine, the most comfortable way is to use a database client like [TablePlus](https://tableplus.com/) to export and import the database tables.
## Connecting via CLI
Herd symlinks the `mariadb` CLI to your PATH, so you can connect to the database via the command line.
As Laravel Herd allows you to start multiple MariaDB servers, you should specify the port to connect to the correct instance.
For example, to connect to the MariaDB server running on port 3306, you can use the following command:
```bash theme={null}
mariadb -u root -h 127.0.0.1 -P 3306 -p
```
## Versions
Herd Pro allows you to install the following versions directly from the services tab of the settings. New versions are available regularly.
| Service | Version |
| ------- | ------- |
| MariaDB | 10.11.6 |
---
# Source: https://herd.laravel.com/docs/macos/herd-pro-services/meilisearch.md
> ## Documentation Index
> Fetch the complete documentation index at: https://herd.laravel.com/docs/llms.txt
> Use this file to discover all available pages before exploring further.
# Meilisearch
# Set up Meilisearch for Laravel Scout
Meilisearch is a powerful search engine for your application, working perfectly with [Laravel Scout](https://laravel.com/docs/11.x/scout). It allows you to add a search engine with great relevancy, typo correction, and more to your application by simply adding the `Searchable` Trait to a model.
## Connecting from your Laravel application
To connect your application to the server, you can use the credentials that are listed next to the running service in the settings, or you can use the ones below.
```env theme={null}
DB_CONNECTION=mysql
DB_HOST=127.0.0.1
DB_PORT=3307
DB_DATABASE=laravel # set this to your project database
DB_USERNAME=root
DB_PASSWORD=
```
## Database service migrations
Whether you set up a newer version of MariaDB or migrate from existing instances on your machine, the most comfortable way is to use a database client like [TablePlus](https://tableplus.com/) to export and import the database tables.
## Connecting via CLI
Herd symlinks the `mariadb` CLI to your PATH, so you can connect to the database via the command line.
As Laravel Herd allows you to start multiple MariaDB servers, you should specify the port to connect to the correct instance.
For example, to connect to the MariaDB server running on port 3306, you can use the following command:
```bash theme={null}
mariadb -u root -h 127.0.0.1 -P 3306 -p
```
## Versions
Herd Pro allows you to install the following versions directly from the services tab of the settings. New versions are available regularly.
| Service | Version |
| ------- | ------- |
| MariaDB | 10.11.6 |
---
# Source: https://herd.laravel.com/docs/macos/herd-pro-services/meilisearch.md
> ## Documentation Index
> Fetch the complete documentation index at: https://herd.laravel.com/docs/llms.txt
> Use this file to discover all available pages before exploring further.
# Meilisearch
# Set up Meilisearch for Laravel Scout
Meilisearch is a powerful search engine for your application, working perfectly with [Laravel Scout](https://laravel.com/docs/11.x/scout). It allows you to add a search engine with great relevancy, typo correction, and more to your application by simply adding the `Searchable` Trait to a model.
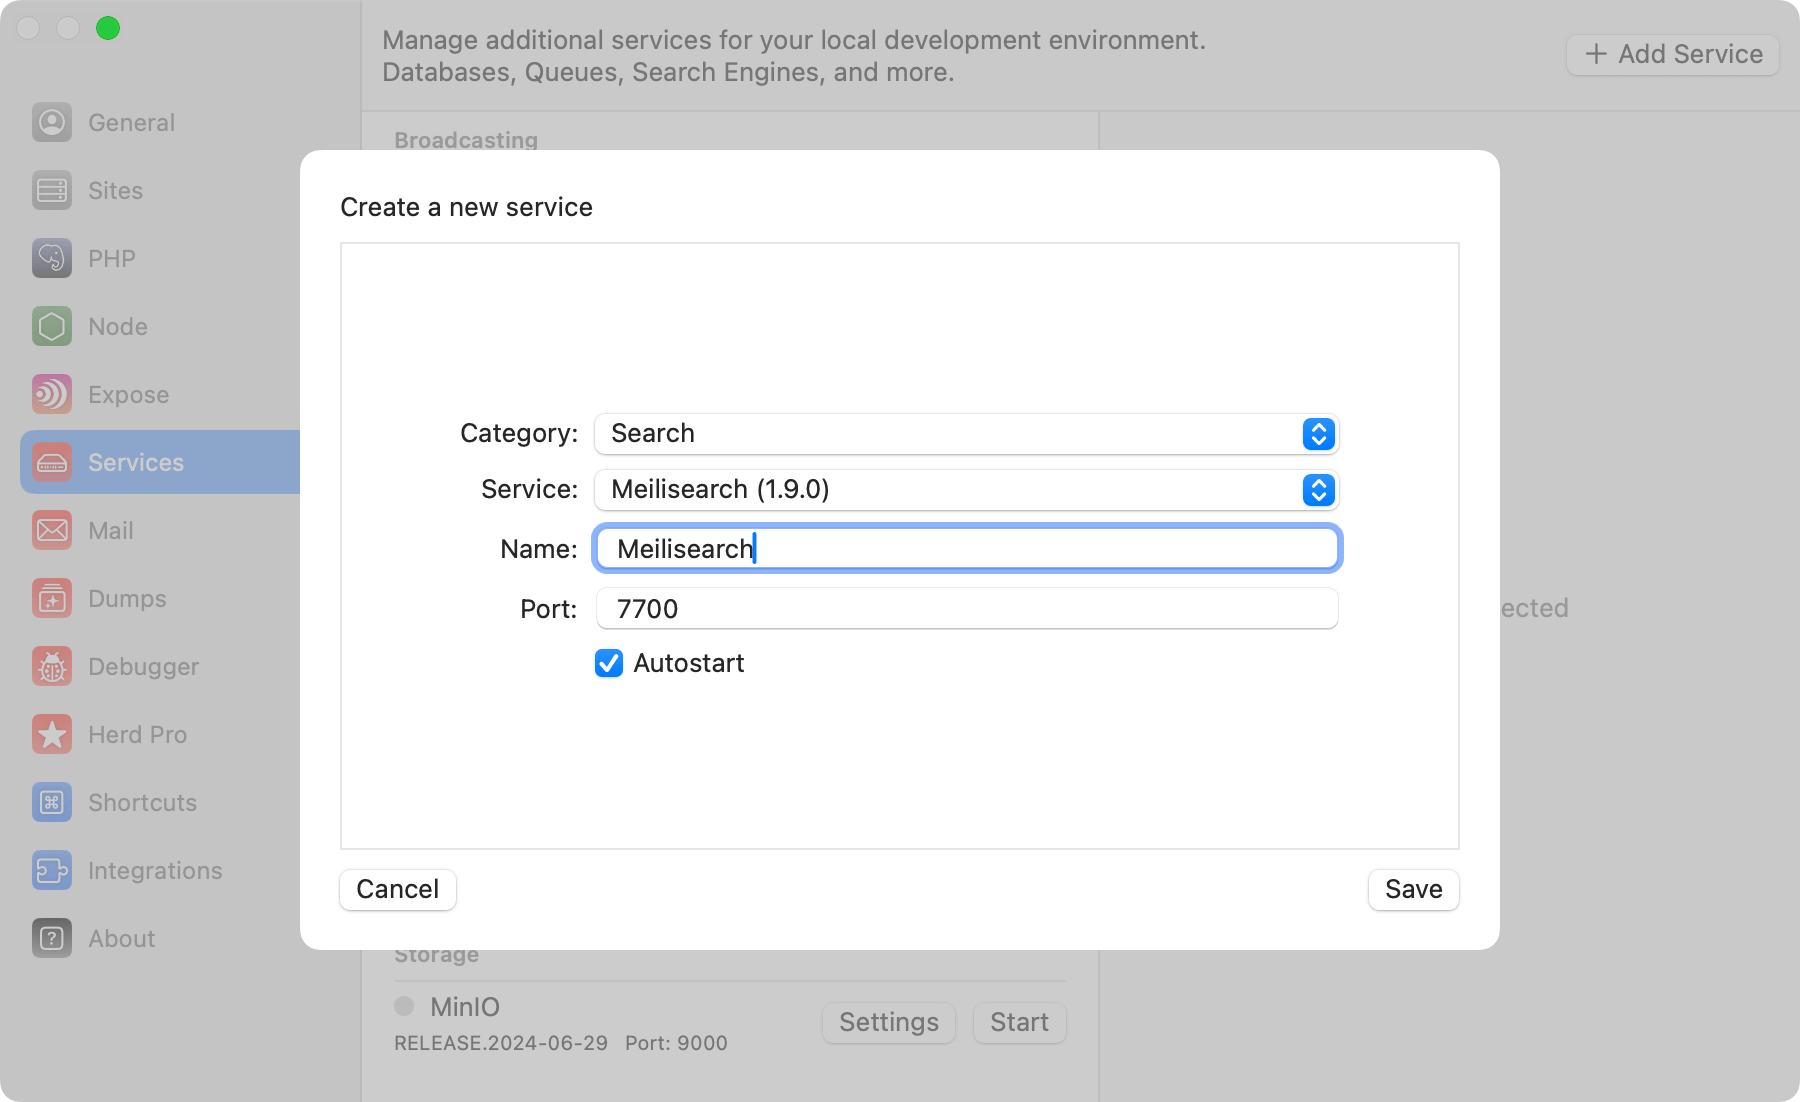 ## Connecting from your Laravel application
Like with all Herd services, you can configure the port as well as the service name of your Meilisearch instance and add the following environment variables to your `.env` file.
```env theme={null}
SCOUT_DRIVER=meilisearch
MEILISEARCH_HOST=http://127.0.0.1:7700
MEILISEARCH_KEY=LARAVEL-HERD
```
When using the Meilisearch driver you will need to install the Meilisearch PHP SDK via the composer package manager:
```bash theme={null}
composer require meilisearch/meilisearch-php http-interop/http-factory-guzzle
```
You can find additional information about using Laravel Scout with Meilisearch in the [Laravel documentation](https://laravel.com/docs/11.x/scout#meilisearch).
## Using Meilisearch
You can open the Meilisearch Dashboard or the logs of the service from the right side of the service details.
## Connecting from your Laravel application
Like with all Herd services, you can configure the port as well as the service name of your Meilisearch instance and add the following environment variables to your `.env` file.
```env theme={null}
SCOUT_DRIVER=meilisearch
MEILISEARCH_HOST=http://127.0.0.1:7700
MEILISEARCH_KEY=LARAVEL-HERD
```
When using the Meilisearch driver you will need to install the Meilisearch PHP SDK via the composer package manager:
```bash theme={null}
composer require meilisearch/meilisearch-php http-interop/http-factory-guzzle
```
You can find additional information about using Laravel Scout with Meilisearch in the [Laravel documentation](https://laravel.com/docs/11.x/scout#meilisearch).
## Using Meilisearch
You can open the Meilisearch Dashboard or the logs of the service from the right side of the service details.
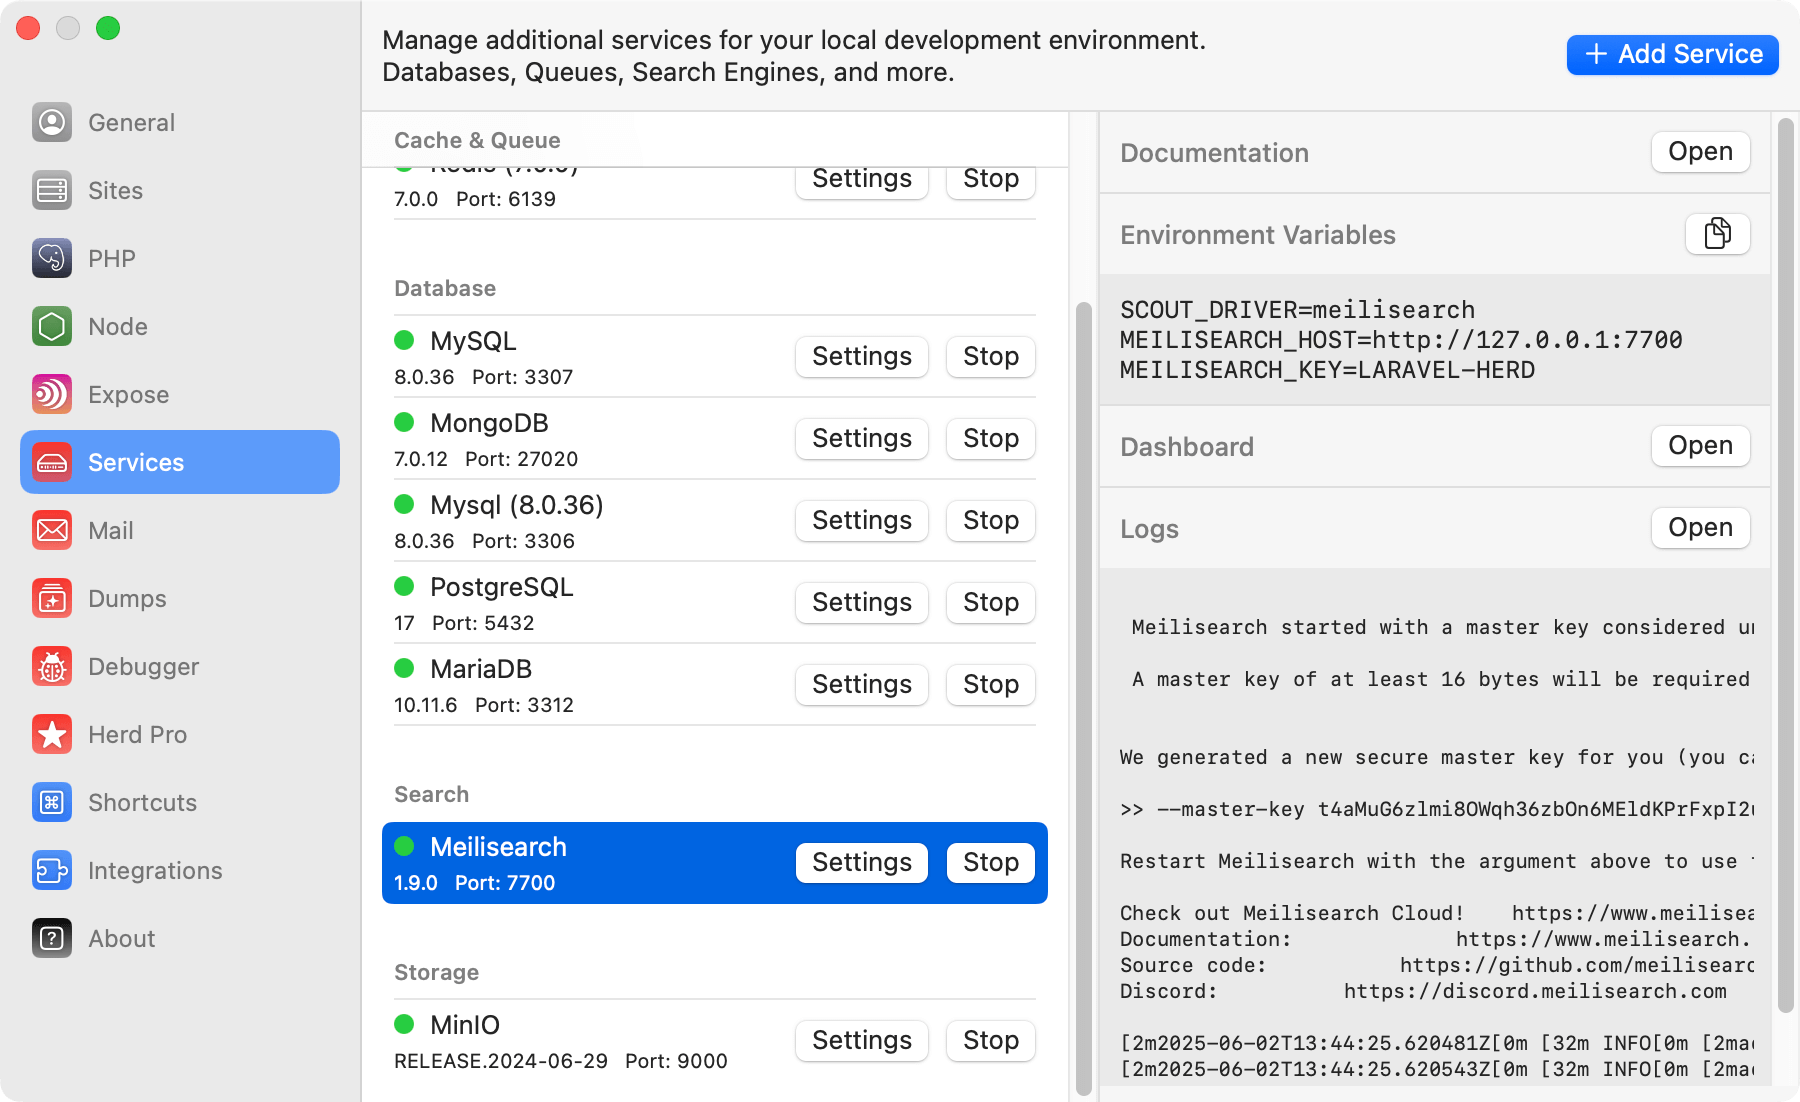 ## Dashboard
The Meilisearch dashboard is accessible via `http://locahost:port` or by using the dashboard button in the services list.
## Dashboard
The Meilisearch dashboard is accessible via `http://locahost:port` or by using the dashboard button in the services list.
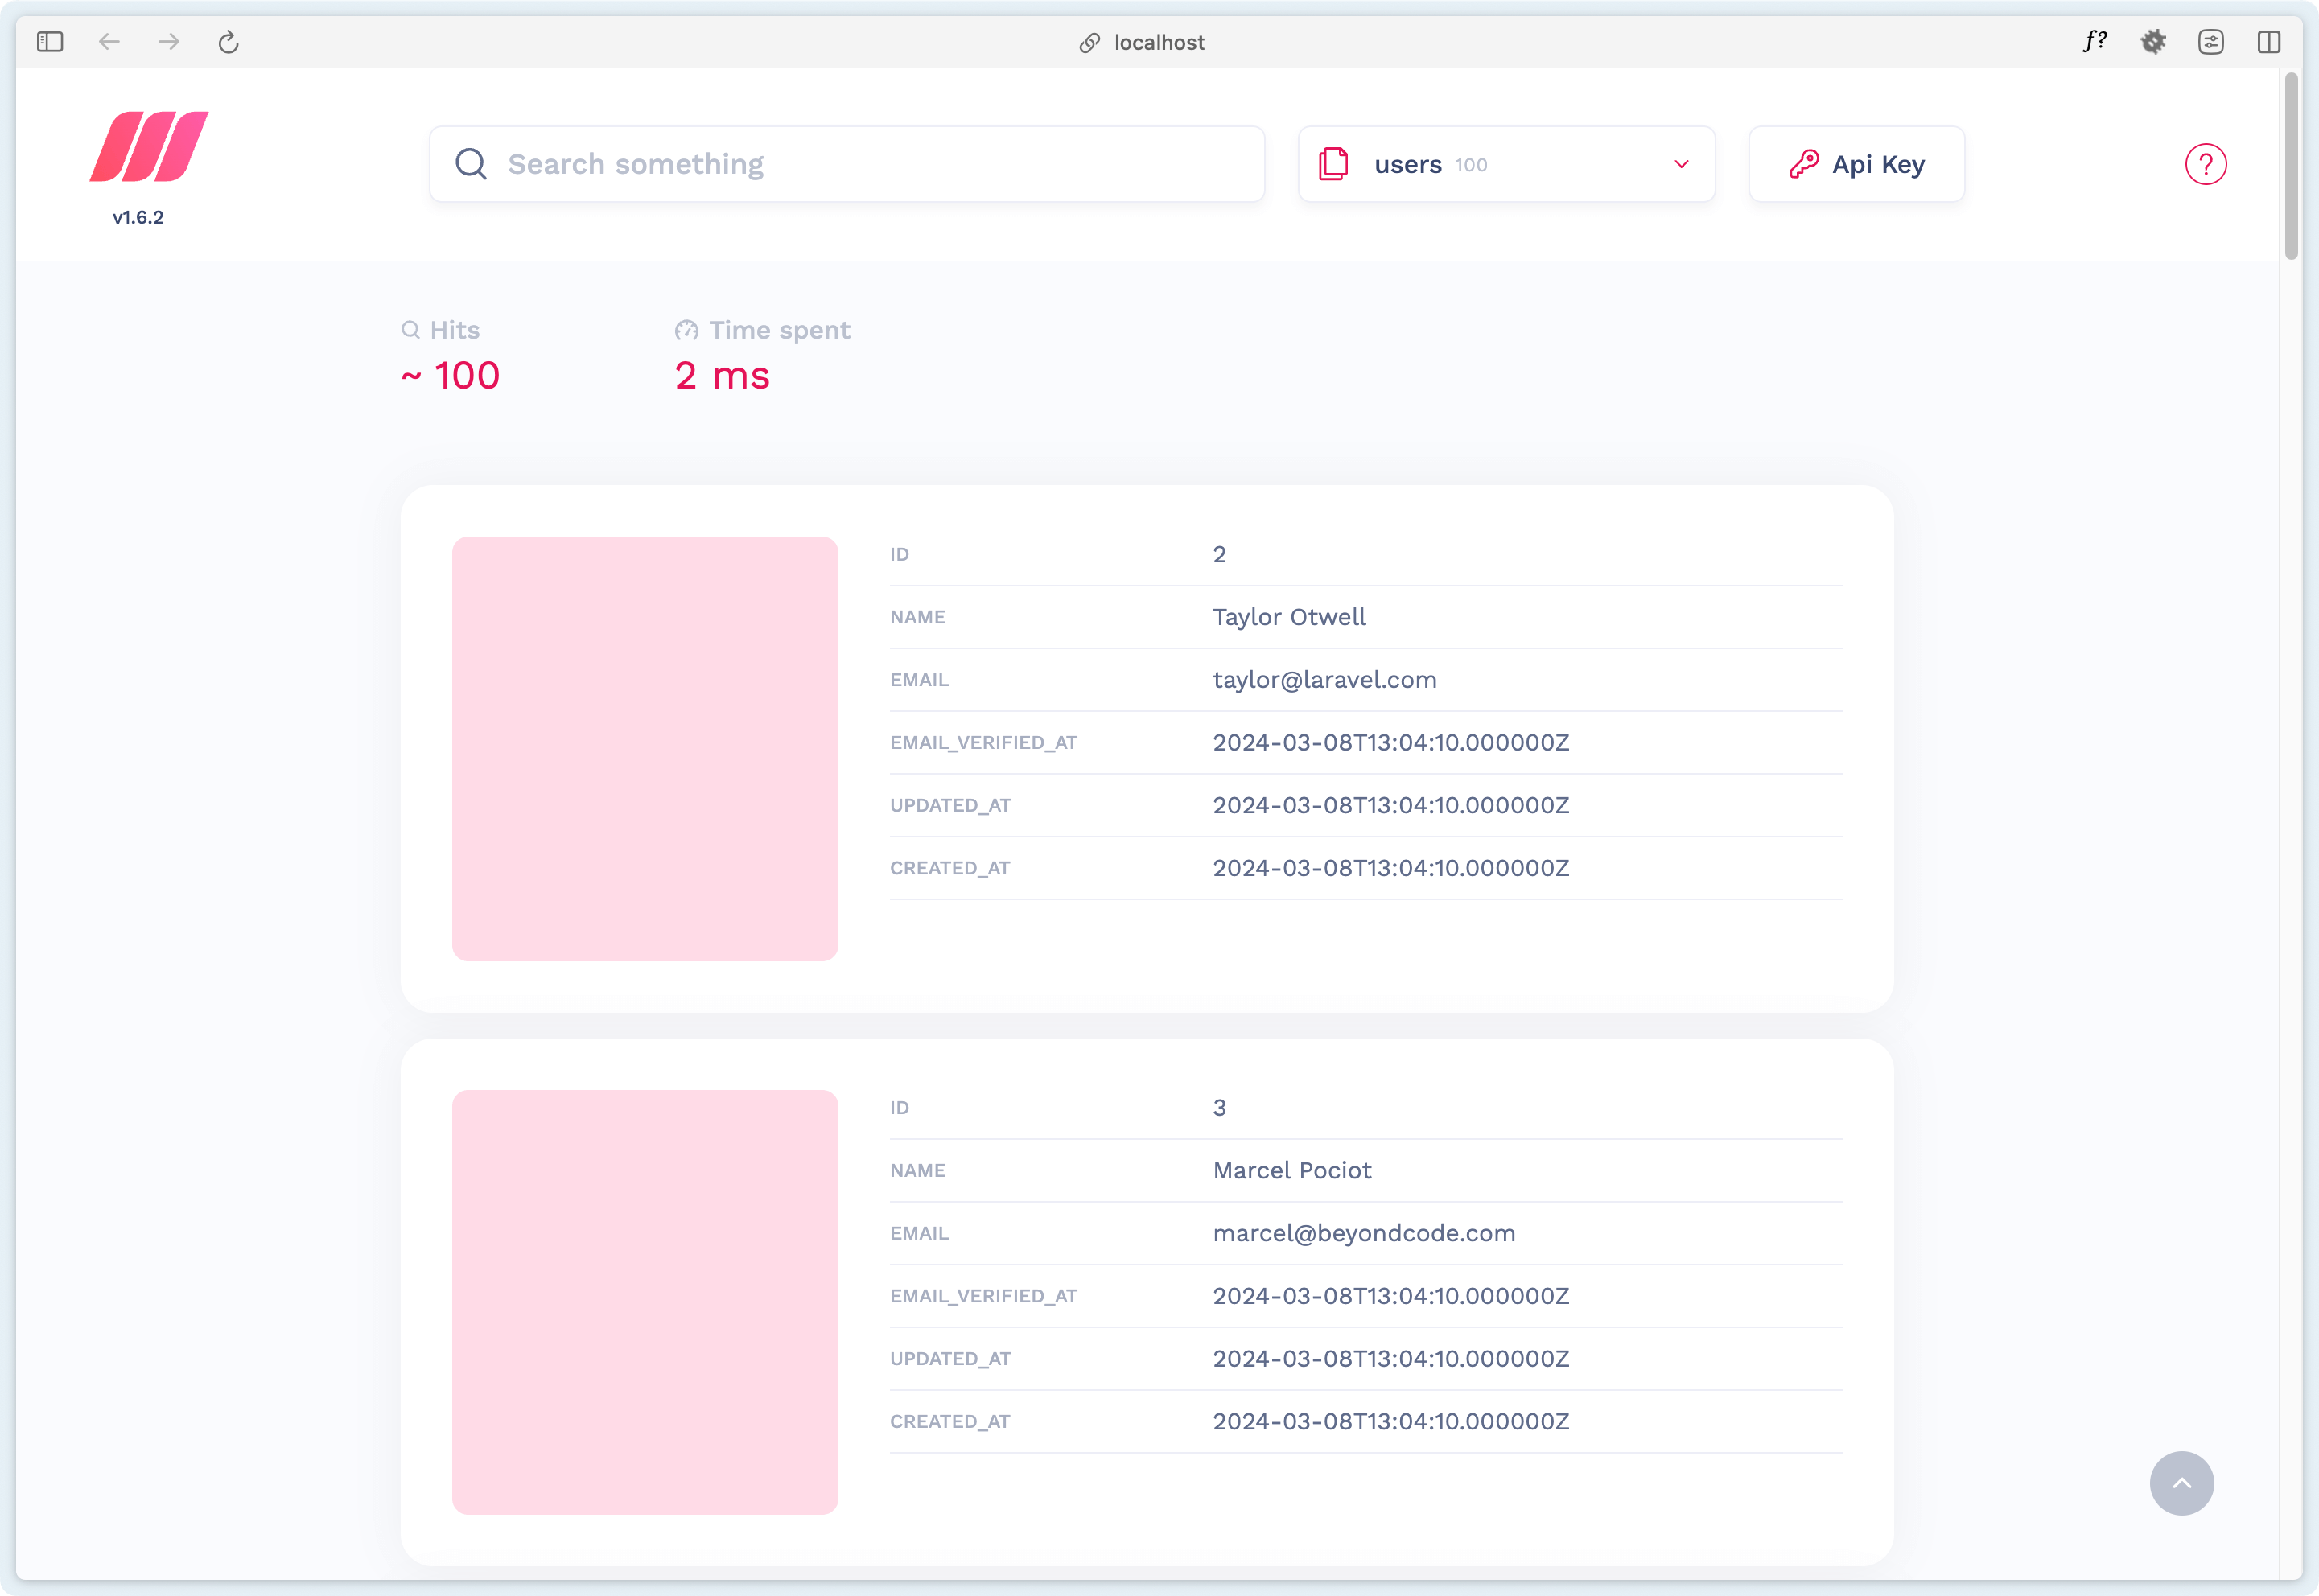 ## Versions
Herd Pro allows you to install the following versions directly from the services tab of the settings. New versions are available regularly.
| Service | Version |
| ----------- | ------- |
| Meilisearch | 1.9.0 |
---
# Source: https://herd.laravel.com/docs/macos/herd-pro-services/minio.md
> ## Documentation Index
> Fetch the complete documentation index at: https://herd.laravel.com/docs/llms.txt
> Use this file to discover all available pages before exploring further.
# MinIO
# Set up MinIO
MinIO is an open-source, S3 compatible object storage and works perfectly if you want to use the same APIs locally that you use on your production environment. You can set up MinIO as a Herd service and log into its dashboard to create your first storage bucket with the same credentials that you use as environment variables.
## Versions
Herd Pro allows you to install the following versions directly from the services tab of the settings. New versions are available regularly.
| Service | Version |
| ----------- | ------- |
| Meilisearch | 1.9.0 |
---
# Source: https://herd.laravel.com/docs/macos/herd-pro-services/minio.md
> ## Documentation Index
> Fetch the complete documentation index at: https://herd.laravel.com/docs/llms.txt
> Use this file to discover all available pages before exploring further.
# MinIO
# Set up MinIO
MinIO is an open-source, S3 compatible object storage and works perfectly if you want to use the same APIs locally that you use on your production environment. You can set up MinIO as a Herd service and log into its dashboard to create your first storage bucket with the same credentials that you use as environment variables.
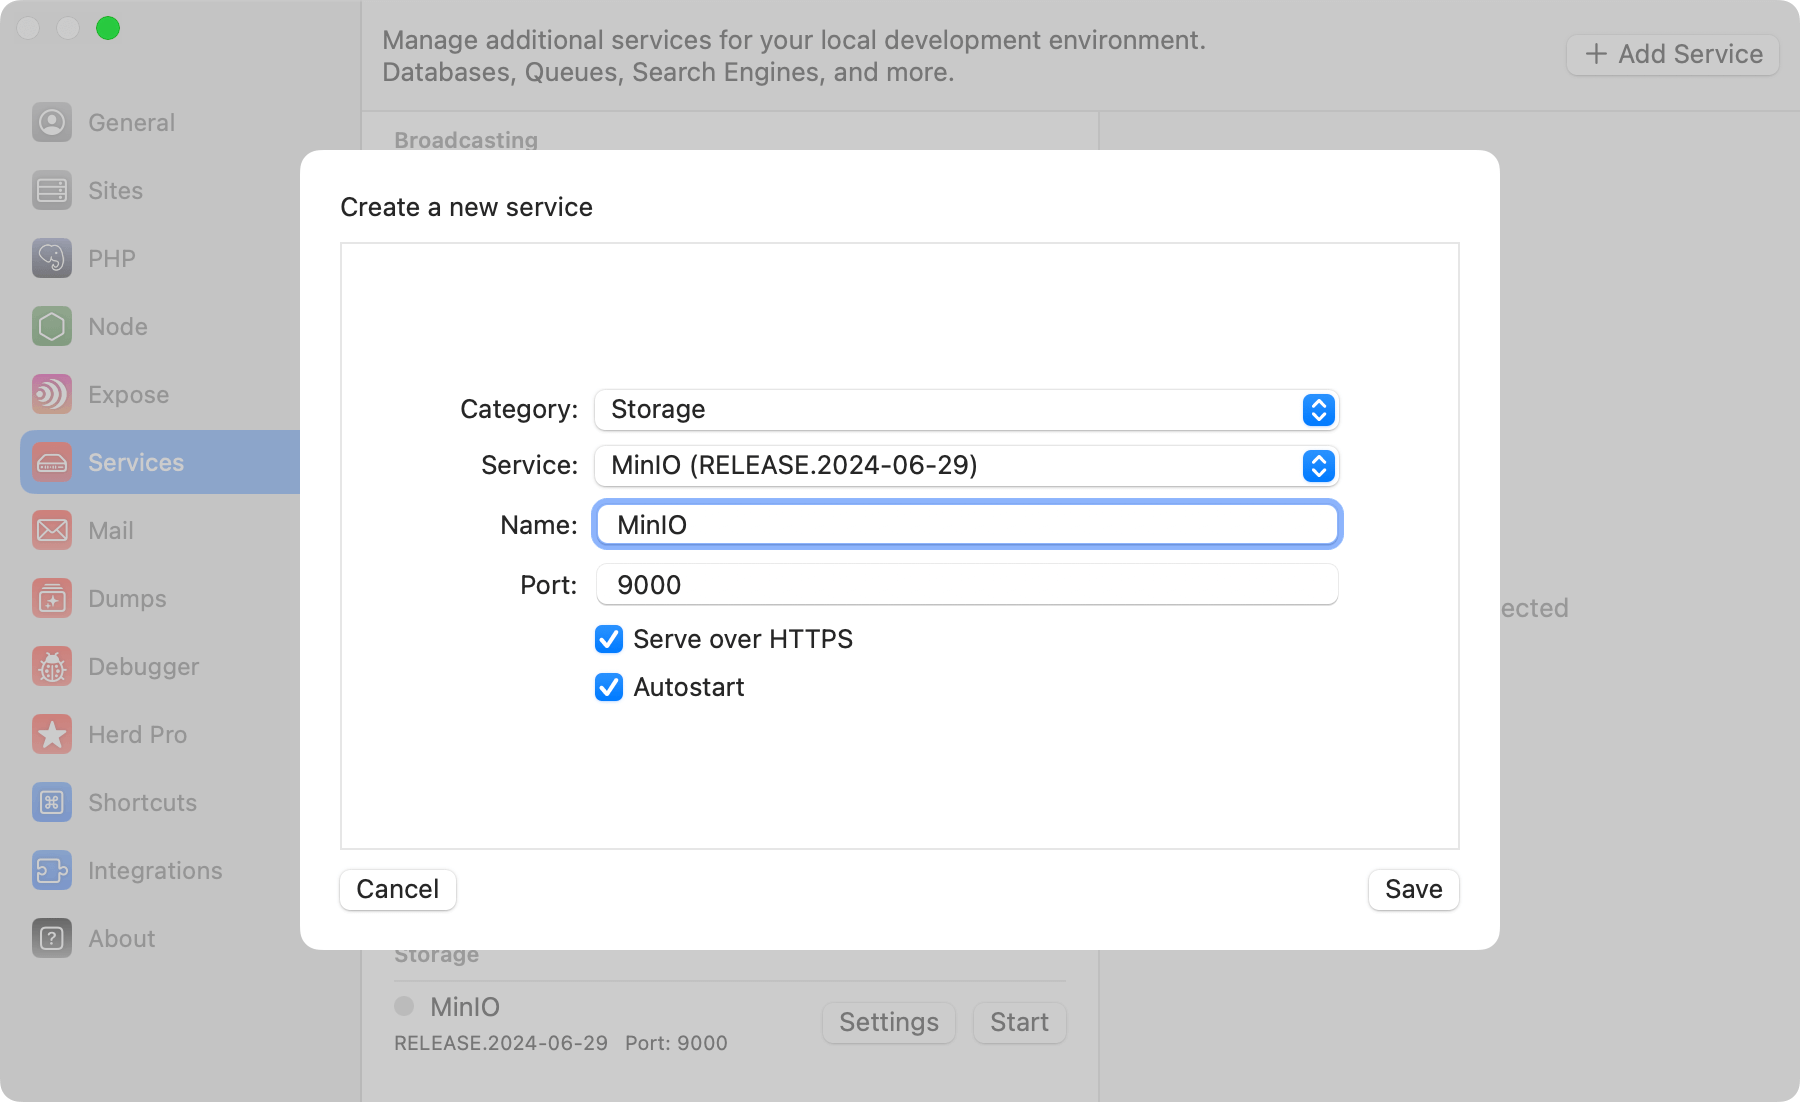 ## Configuration
Before you can connect your application to MinIO, you need to create a first bucket within the dashboard. The easiest way to access the dashboard or view the logs of the service is via the Herd service configuration.
## Configuration
Before you can connect your application to MinIO, you need to create a first bucket within the dashboard. The easiest way to access the dashboard or view the logs of the service is via the Herd service configuration.
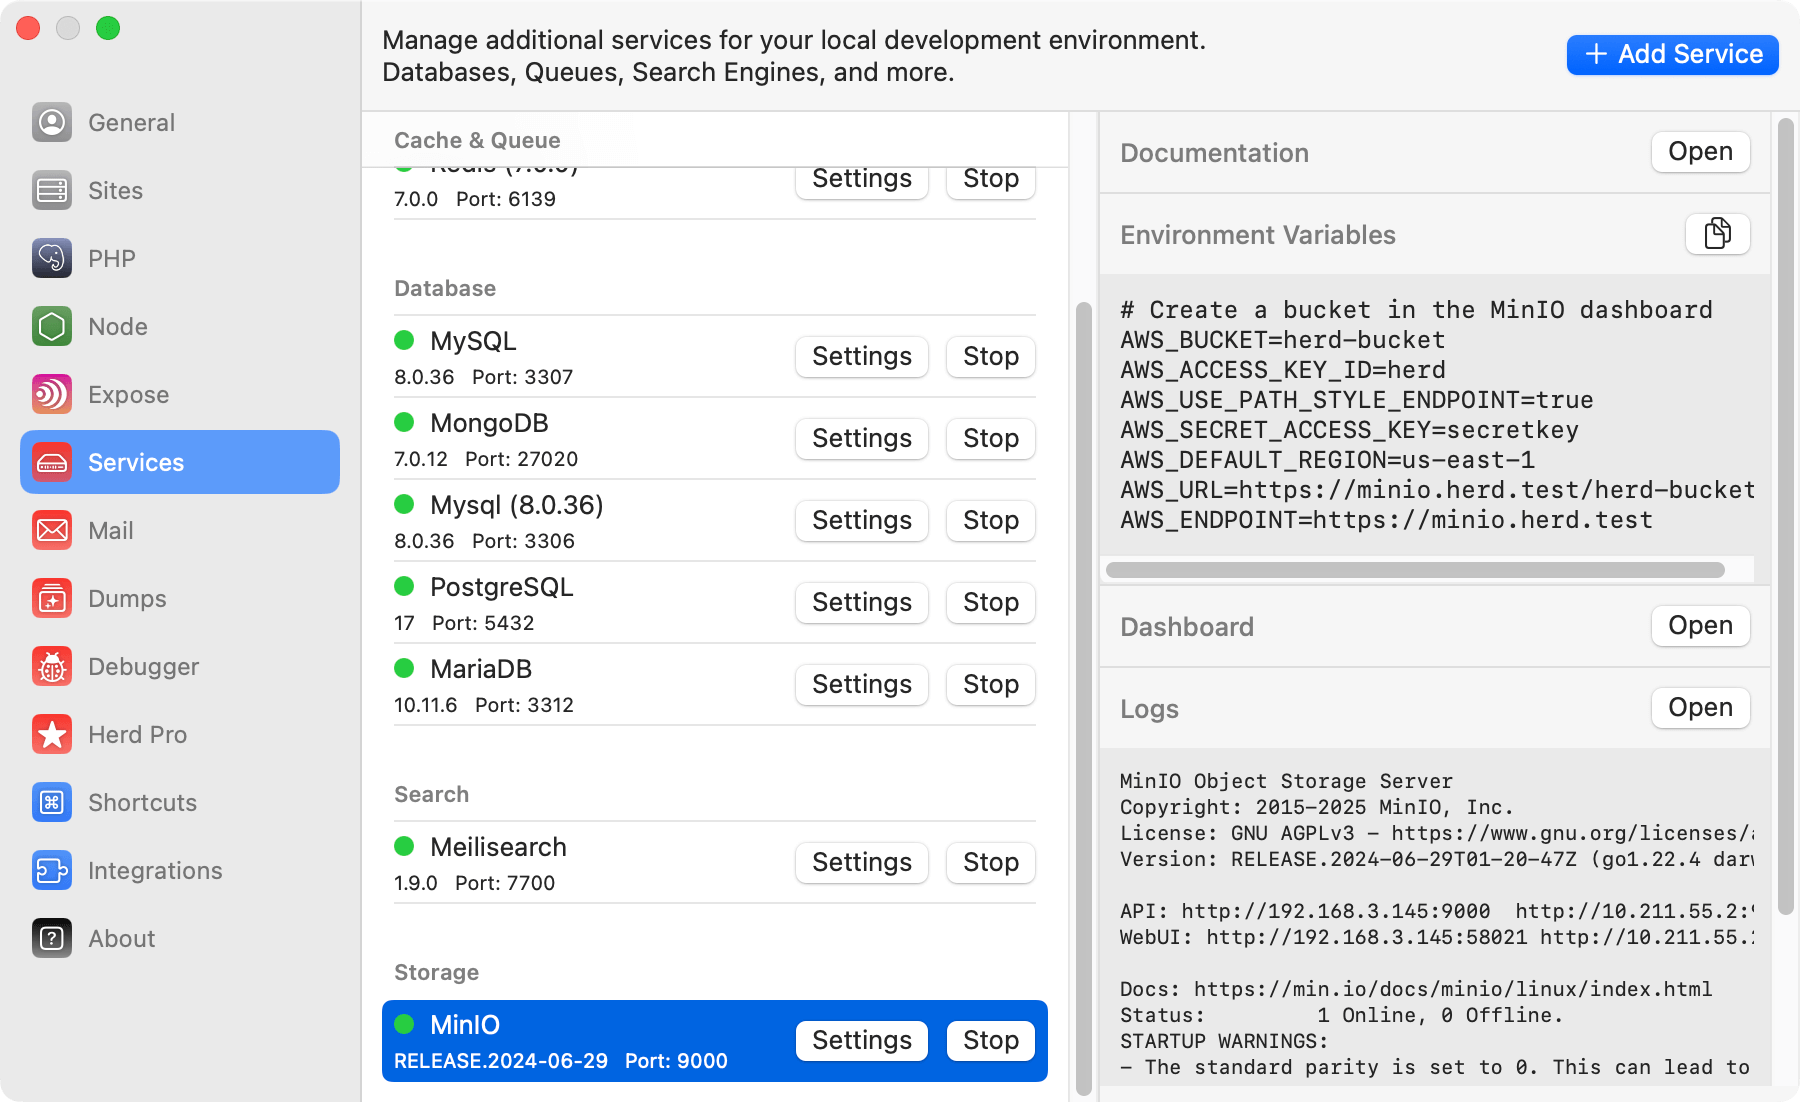 ## Dashboard
You can access the MinIO dashboard via `http://localhost:PORT` or by using the dashboard button in the services list. Log in with the `AWS_ACCESS_KEY_ID` and `AWS_SECRET_ACCESS_KEY` to create your first bucket and use the object storage like in your production environment.
## Dashboard
You can access the MinIO dashboard via `http://localhost:PORT` or by using the dashboard button in the services list. Log in with the `AWS_ACCESS_KEY_ID` and `AWS_SECRET_ACCESS_KEY` to create your first bucket and use the object storage like in your production environment.
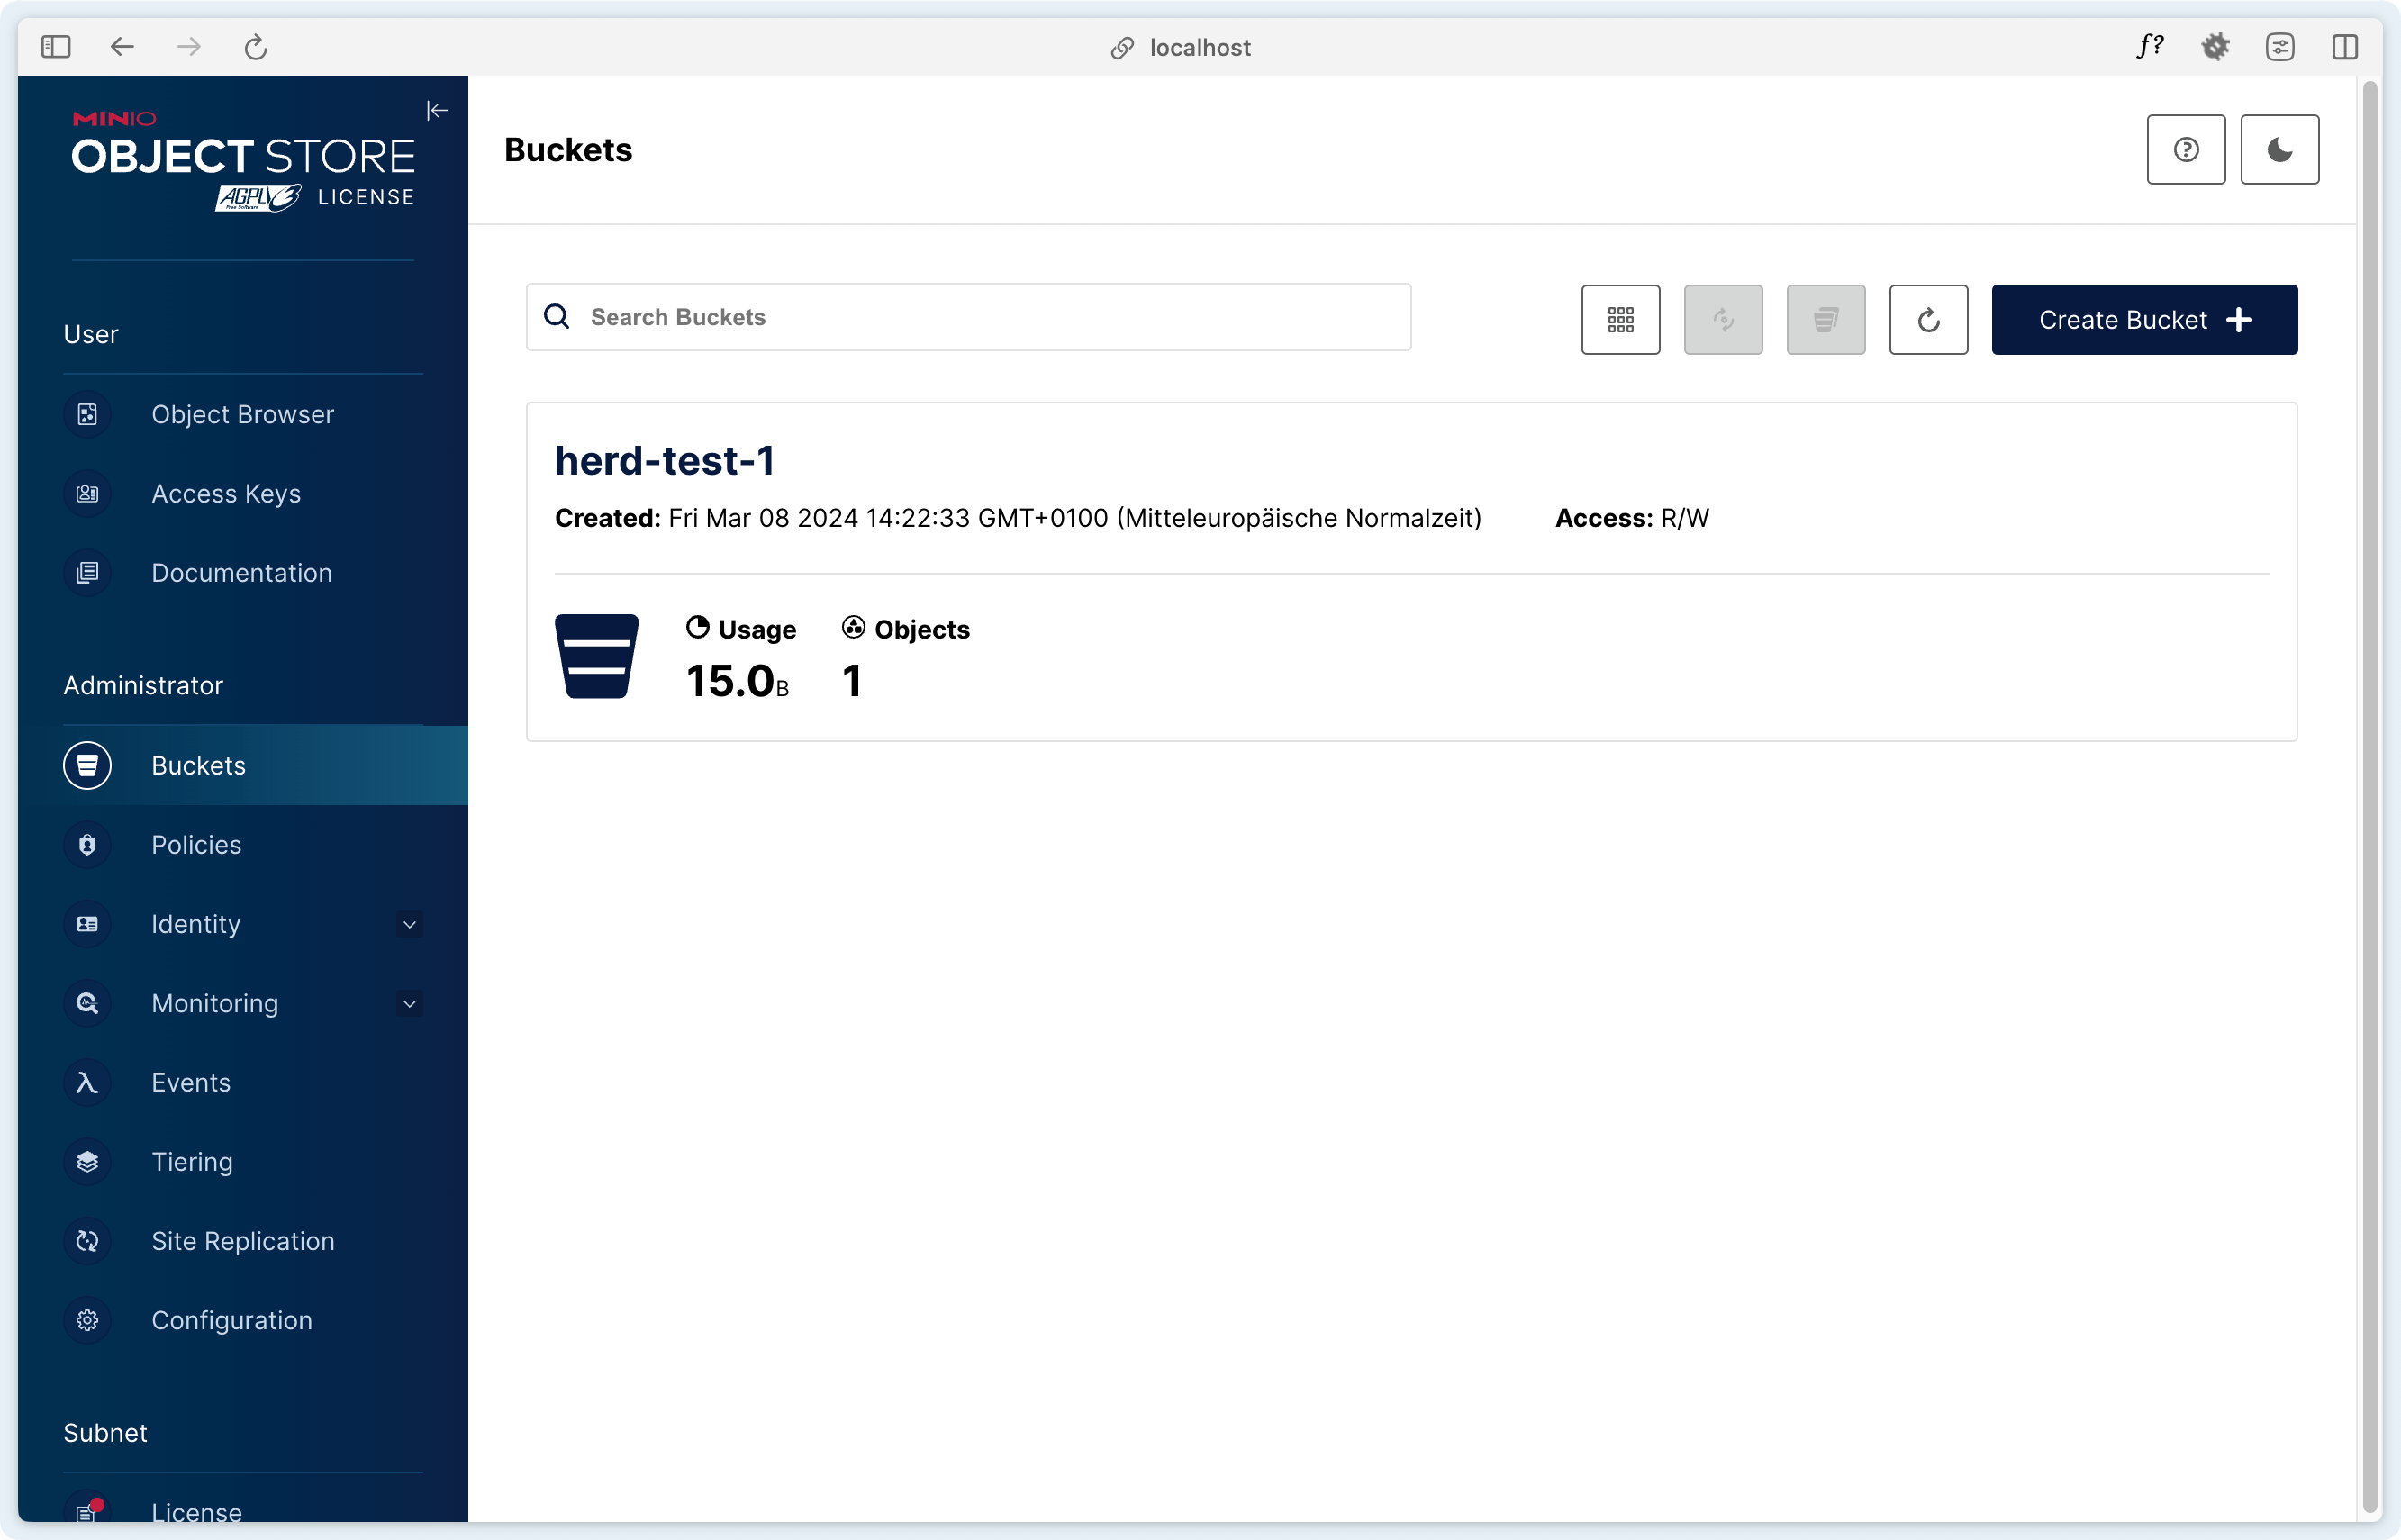 ## Configuration
After setting the name, port, and autostart options and starting up the service, please log into the dashboard and create a bucket to be able to upload files.
You can then adjust your `.env` file in order to connect to your local MinIO service.
```env theme={null}
AWS_BUCKET=herd-bucket # Your bucket name
AWS_ACCESS_KEY_ID=herd
AWS_SECRET_ACCESS_KEY=secretkey
AWS_USE_PATH_STYLE_ENDPOINT=true
AWS_URL=http://localhost:9000/YOUR-BUCKET-NAME
AWS_ENDPOINT=http://localhost:9000
```
You can find additional information about configuring MinIO with Laravel in the [Laravel documentation](https://laravel.com/docs/11.x/filesystem#amazon-s3-compatible-filesystems).
## Versions
Herd Pro allows you to install the following versions directly from the services tab of the settings. New versions are available regularly.
| Service | Version |
| ------- | ------------------ |
| MinIO | RELEASE.2024-06-29 |
---
# Source: https://herd.laravel.com/docs/macos/herd-pro-services/mongodb.md
> ## Documentation Index
> Fetch the complete documentation index at: https://herd.laravel.com/docs/llms.txt
> Use this file to discover all available pages before exploring further.
# MongoDB
# Installing MongoDB via Herd Pro
You can install the [MongoDB Community Edition](https://www.mongodb.com/products/self-managed/community-edition) from the service management section of the settings. This uses the MongoDB PHP extension and allows a seamless use of MongoDB in your application during development.
## Configuration
After setting the name, port, and autostart options and starting up the service, please log into the dashboard and create a bucket to be able to upload files.
You can then adjust your `.env` file in order to connect to your local MinIO service.
```env theme={null}
AWS_BUCKET=herd-bucket # Your bucket name
AWS_ACCESS_KEY_ID=herd
AWS_SECRET_ACCESS_KEY=secretkey
AWS_USE_PATH_STYLE_ENDPOINT=true
AWS_URL=http://localhost:9000/YOUR-BUCKET-NAME
AWS_ENDPOINT=http://localhost:9000
```
You can find additional information about configuring MinIO with Laravel in the [Laravel documentation](https://laravel.com/docs/11.x/filesystem#amazon-s3-compatible-filesystems).
## Versions
Herd Pro allows you to install the following versions directly from the services tab of the settings. New versions are available regularly.
| Service | Version |
| ------- | ------------------ |
| MinIO | RELEASE.2024-06-29 |
---
# Source: https://herd.laravel.com/docs/macos/herd-pro-services/mongodb.md
> ## Documentation Index
> Fetch the complete documentation index at: https://herd.laravel.com/docs/llms.txt
> Use this file to discover all available pages before exploring further.
# MongoDB
# Installing MongoDB via Herd Pro
You can install the [MongoDB Community Edition](https://www.mongodb.com/products/self-managed/community-edition) from the service management section of the settings. This uses the MongoDB PHP extension and allows a seamless use of MongoDB in your application during development.
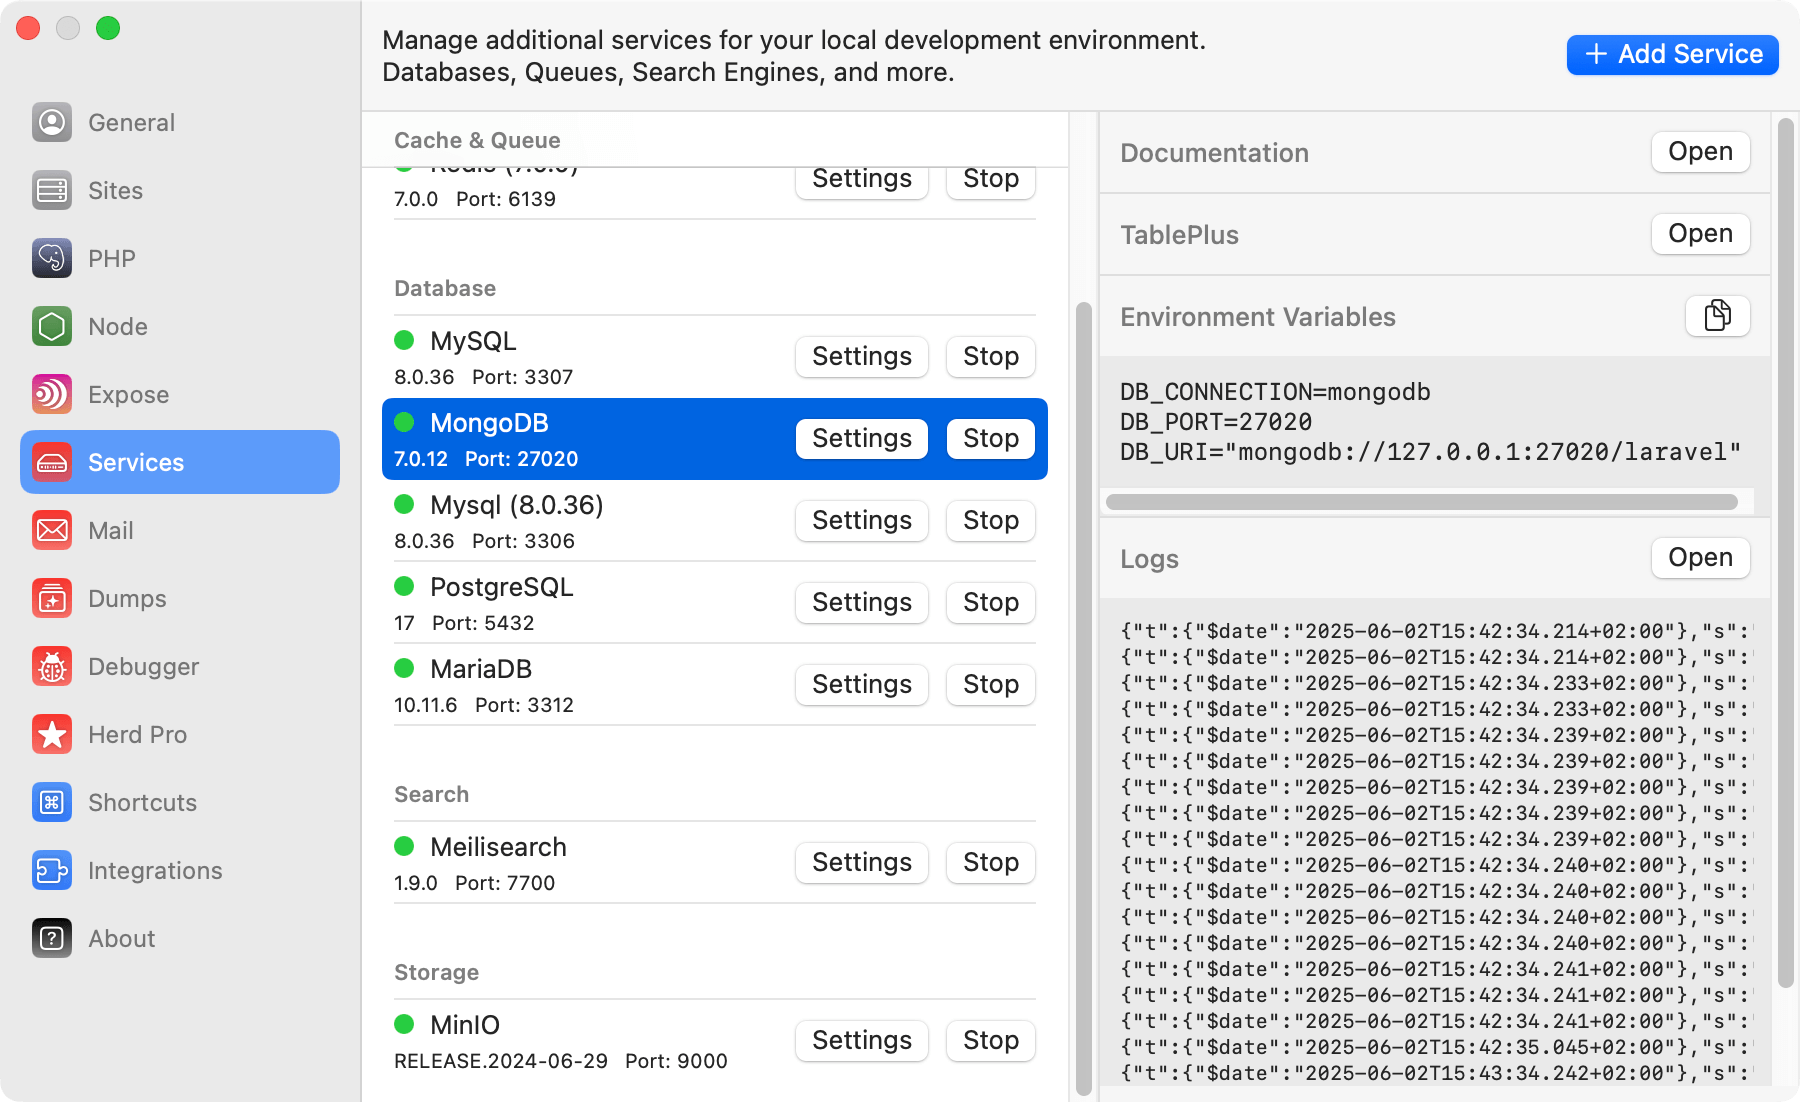 ## Configuration
Herd starts your MongoDB instance with sensible defaults that work great for new setups, and you can change the port of the service to run it in parallel to existing installations on your machine.
If you want to modify the settings of the service, you can right-click on the service in the settings and open its data directory. In this data directory, there is a `mongodb.conf` that this MongoDB instance loads on startup.
Make sure to restart the service if you make changes to this configuration.
## Creating databases
You can create databases in your MongoDB instance by using the tooling that you can download on the [official website](https://www.mongodb.com/docs/database-tools/) or use tools like TablePlus that work with a variety of database engines.
## Connecting from your Laravel application
In order to use MongoDB in combination with Laravel, you may use the `mongodb/laravel-mongodb` composer package.
Run the following command to add the dependency to your application:
```bash theme={null}
composer require mongodb/laravel-mongodb
```
To connect your application to the database server, you can use the credentials that are listed next to the running service in the settings, or you can use the ones below.
Add these settings to your `.env` file.
```env theme={null}
DB_CONNECTION=mongodb
DB_PORT=27020
DB_URI="mongodb://127.0.0.1:27020/laravel"
```
Please refer to the [Laravel MongoDB](https://www.mongodb.com/docs/drivers/php/laravel-mongodb/current/quick-start/download-and-install/#add-laravel-mongodb-to-the-dependencies) documentation for additional help.
## Database service migrations
Whether you set up a newer version of MongoDB or migrate from existing instances on your machine, the most comfortable way is to use a database client like [TablePlus](https://tableplus.com/) to export and import the database tables.
## Versions
Herd Pro allows you to install the following versions directly from the services tab of the settings. New versions are available regularly.
| Service | Version |
| ------- | ------- |
| MongoDB | 7.0.12 |
---
# Source: https://herd.laravel.com/docs/macos/herd-pro-services/mysql.md
> ## Documentation Index
> Fetch the complete documentation index at: https://herd.laravel.com/docs/llms.txt
> Use this file to discover all available pages before exploring further.
# MySQL
# Installing MySQL via Herd Pro
MySQL is the most popular relational database engine for web development, and setting up a database server with a few clicks makes it incredibly easy to follow tutorials or get up and running with a professional setup in minutes. Many popular hosting platforms like [Laravel Forge](https://forge.laravel.com) support MySQL databases out of the box, making the switch from local to production a breeze.
If you are new to Laravel and want to move from SQLite to a database service, MySQL is the best choice for most applications.
## Configuration
Herd starts your MongoDB instance with sensible defaults that work great for new setups, and you can change the port of the service to run it in parallel to existing installations on your machine.
If you want to modify the settings of the service, you can right-click on the service in the settings and open its data directory. In this data directory, there is a `mongodb.conf` that this MongoDB instance loads on startup.
Make sure to restart the service if you make changes to this configuration.
## Creating databases
You can create databases in your MongoDB instance by using the tooling that you can download on the [official website](https://www.mongodb.com/docs/database-tools/) or use tools like TablePlus that work with a variety of database engines.
## Connecting from your Laravel application
In order to use MongoDB in combination with Laravel, you may use the `mongodb/laravel-mongodb` composer package.
Run the following command to add the dependency to your application:
```bash theme={null}
composer require mongodb/laravel-mongodb
```
To connect your application to the database server, you can use the credentials that are listed next to the running service in the settings, or you can use the ones below.
Add these settings to your `.env` file.
```env theme={null}
DB_CONNECTION=mongodb
DB_PORT=27020
DB_URI="mongodb://127.0.0.1:27020/laravel"
```
Please refer to the [Laravel MongoDB](https://www.mongodb.com/docs/drivers/php/laravel-mongodb/current/quick-start/download-and-install/#add-laravel-mongodb-to-the-dependencies) documentation for additional help.
## Database service migrations
Whether you set up a newer version of MongoDB or migrate from existing instances on your machine, the most comfortable way is to use a database client like [TablePlus](https://tableplus.com/) to export and import the database tables.
## Versions
Herd Pro allows you to install the following versions directly from the services tab of the settings. New versions are available regularly.
| Service | Version |
| ------- | ------- |
| MongoDB | 7.0.12 |
---
# Source: https://herd.laravel.com/docs/macos/herd-pro-services/mysql.md
> ## Documentation Index
> Fetch the complete documentation index at: https://herd.laravel.com/docs/llms.txt
> Use this file to discover all available pages before exploring further.
# MySQL
# Installing MySQL via Herd Pro
MySQL is the most popular relational database engine for web development, and setting up a database server with a few clicks makes it incredibly easy to follow tutorials or get up and running with a professional setup in minutes. Many popular hosting platforms like [Laravel Forge](https://forge.laravel.com) support MySQL databases out of the box, making the switch from local to production a breeze.
If you are new to Laravel and want to move from SQLite to a database service, MySQL is the best choice for most applications.
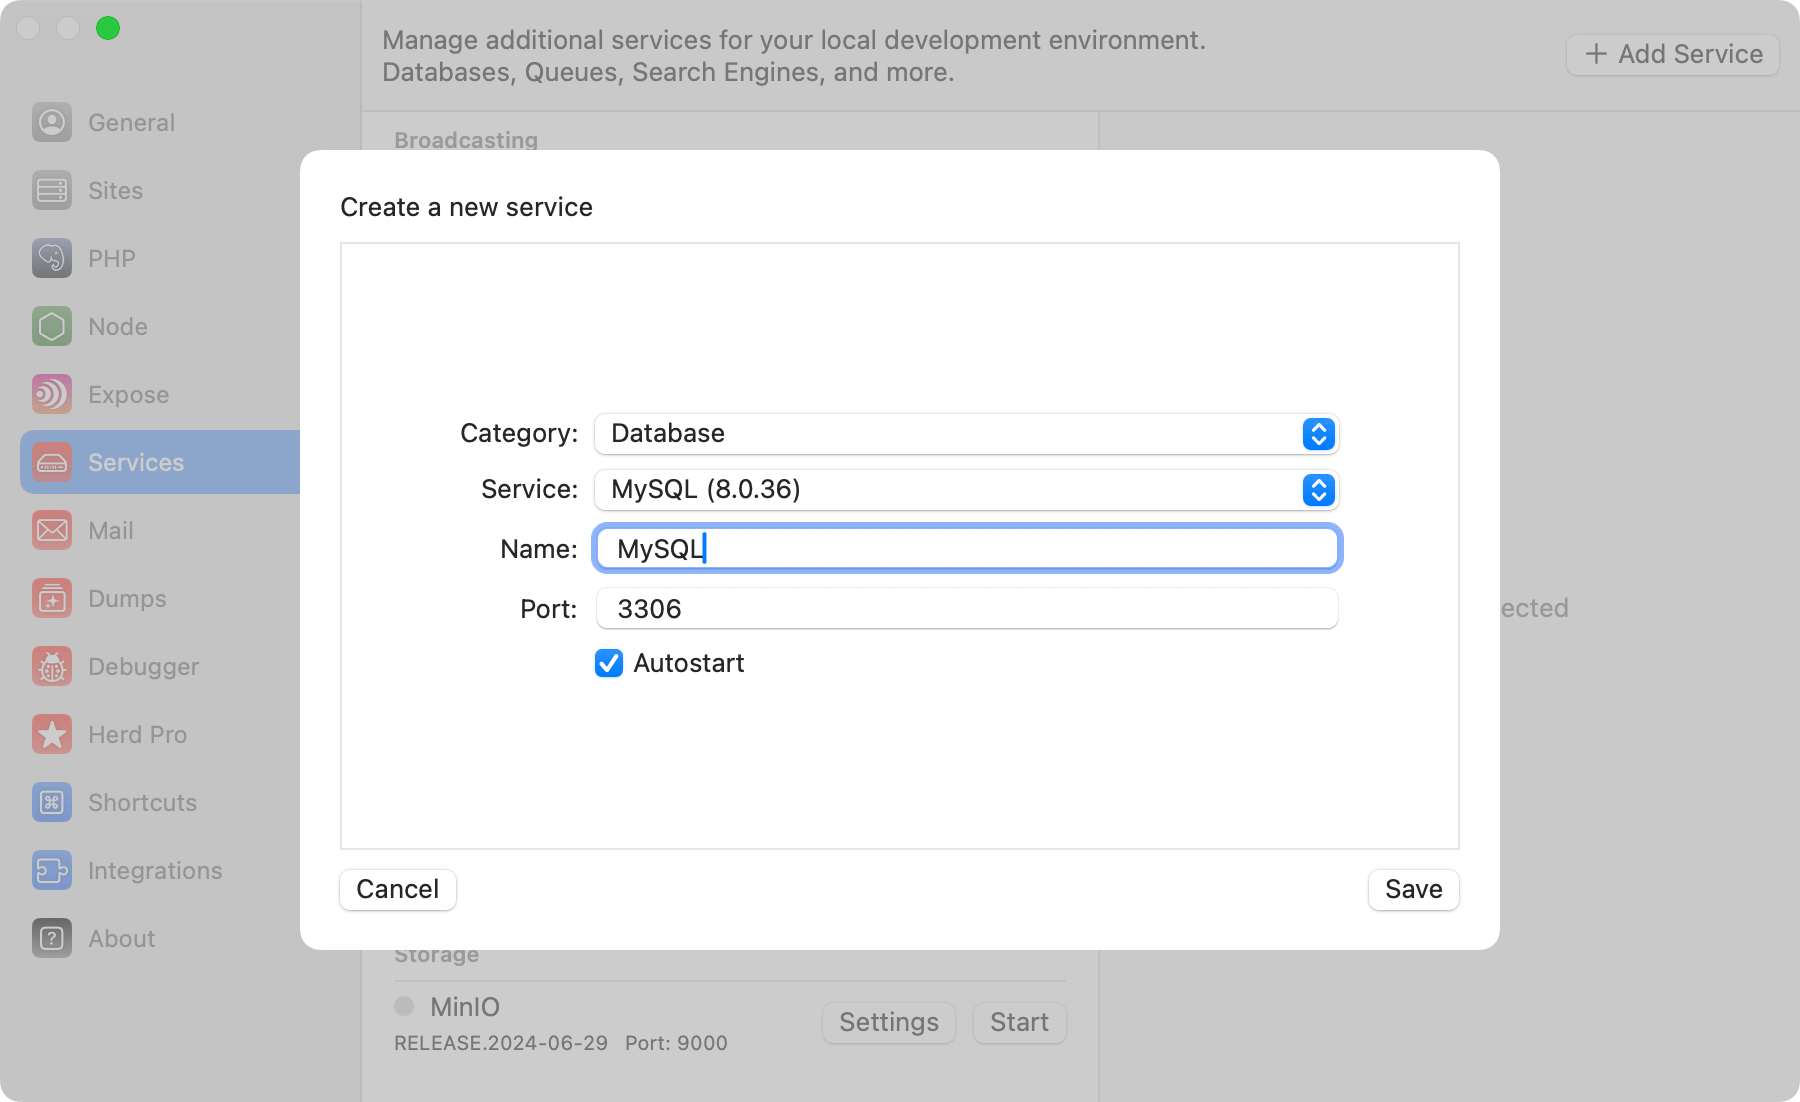 ## Configuration
Herd provides a sensible default configuration for your MySQL instance that works seamlessly for new setups, and you can change the port of the service to run it in parallel to existing installations on your machine.
Enabling the autostart option automatically starts a service instance when you start Herd.
If you want to modify the settings of the database, you can right click the service in the settings and open its data directory. In this data directory, there is a `my.cnf` that this specific MySQL instance loads on startup.
Make sure to restart the service if you make changes to this configuration.
## Creating databases
While Laravel applications can create a database when running the migrations for the first time, it's a good practice to set up the database within the database instance yourself.
The service details on the right side of the selected service allow you to open TablePlus or AdminerEvo with a single click. Herd automatically detects TablePlus on your machine and provides a connection string to access the database instance. If you don't use TablePlus, it opens AdminerEvo where it inserts the correct login credentials for you.
## Configuration
Herd provides a sensible default configuration for your MySQL instance that works seamlessly for new setups, and you can change the port of the service to run it in parallel to existing installations on your machine.
Enabling the autostart option automatically starts a service instance when you start Herd.
If you want to modify the settings of the database, you can right click the service in the settings and open its data directory. In this data directory, there is a `my.cnf` that this specific MySQL instance loads on startup.
Make sure to restart the service if you make changes to this configuration.
## Creating databases
While Laravel applications can create a database when running the migrations for the first time, it's a good practice to set up the database within the database instance yourself.
The service details on the right side of the selected service allow you to open TablePlus or AdminerEvo with a single click. Herd automatically detects TablePlus on your machine and provides a connection string to access the database instance. If you don't use TablePlus, it opens AdminerEvo where it inserts the correct login credentials for you.
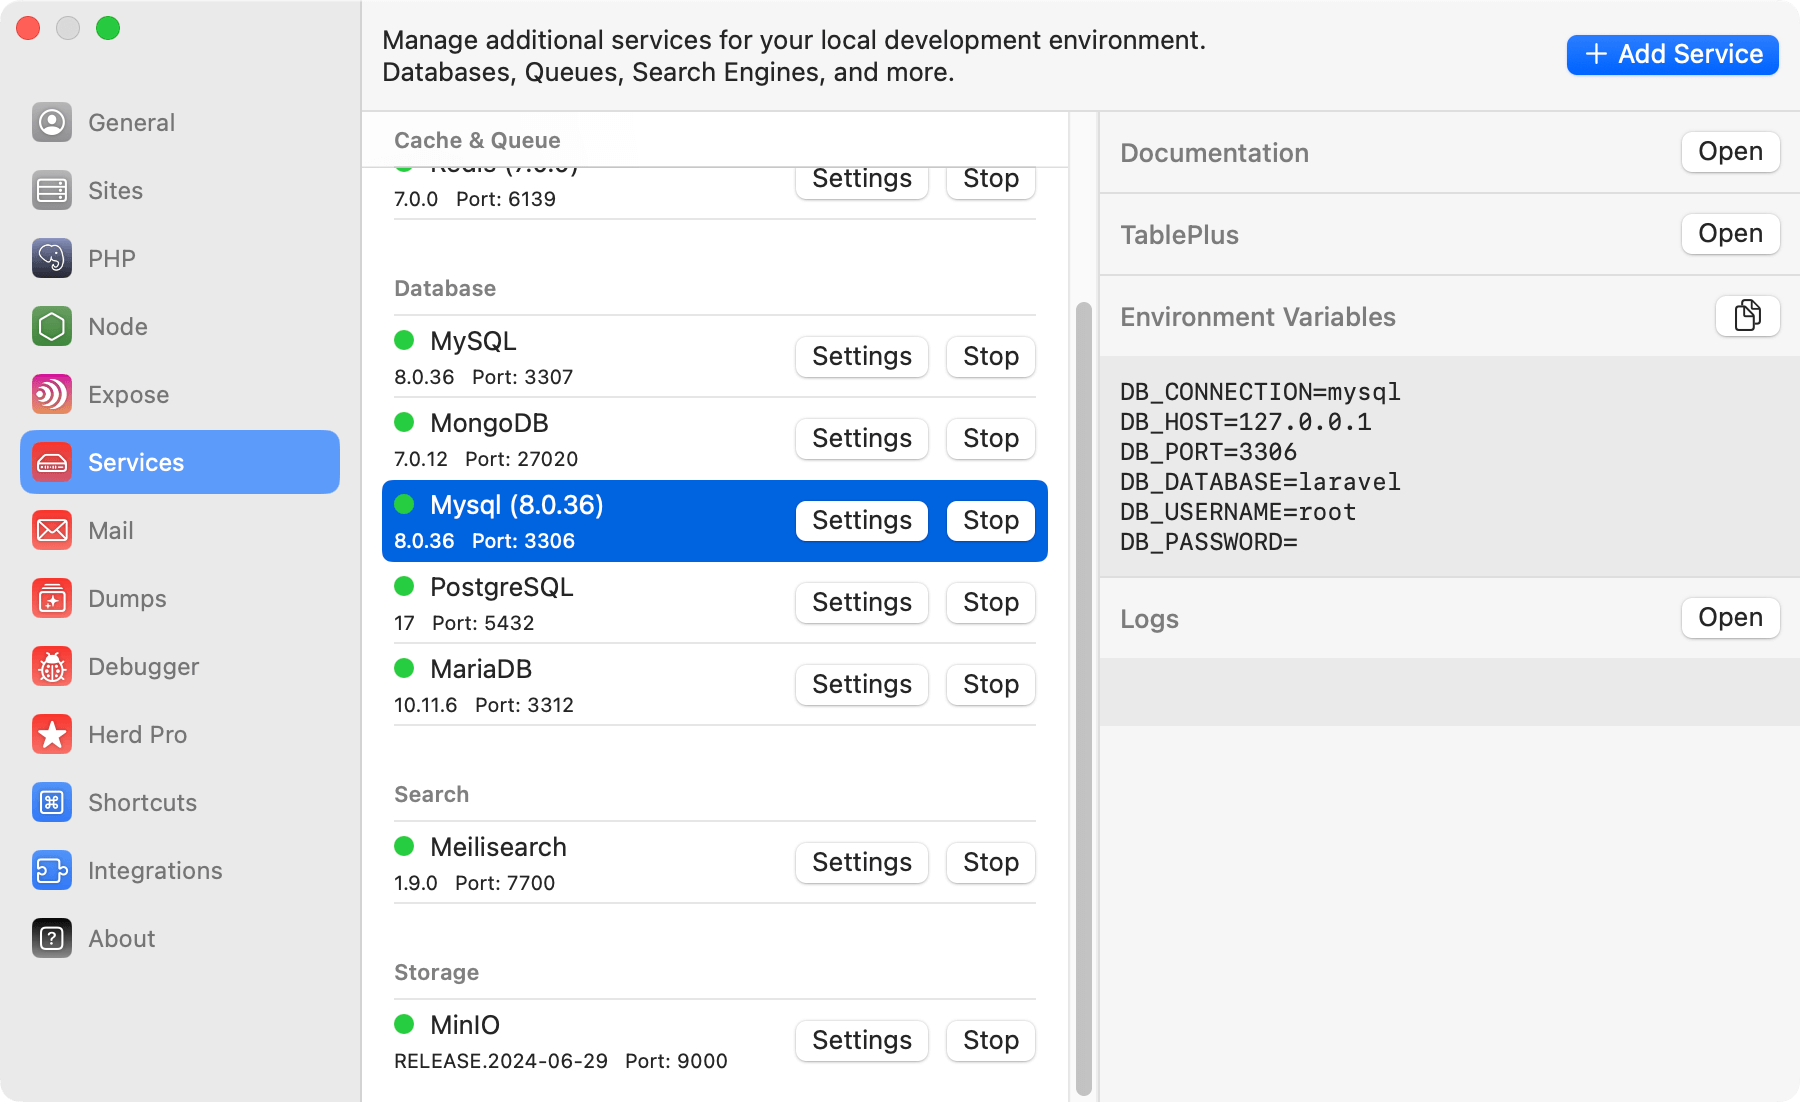 ## Connecting from your Laravel application
To connect your application to the server, you can use the credentials that are listed next to the running service in the settings, or you can use the ones below.
```env theme={null}
DB_CONNECTION=mysql
DB_HOST=127.0.0.1
DB_PORT=3307
DB_DATABASE=laravel # set this to your project database
DB_USERNAME=root
DB_PASSWORD=
```
## Database service migrations
Whether you set up a newer version of MySQL or migrate from existing instances on your machine, the most comfortable way is to use a database client like [TablePlus](https://tableplus.com/) to export and import the database tables.
## Connecting via CLI
Herd symlinks the `mysql` CLI to your PATH, so you can connect to the database via the command line.
As Laravel Herd allows you to start multiple MySQL servers, you should specify the port to connect to the correct instance.
For example, to connect to the MySQL server running on port 3306, you can use the following command:
```bash theme={null}
mysql -u root -h 127.0.0.1 -P 3306 -p
```
## Versions
Herd Pro allows you to install the following versions directly from the services tab of the settings. New versions are available regularly.
| Service | Version |
| ------- | ------- |
| MySQL | 8.4.\* |
| MySQL | 8.0.36 |
---
# Source: https://herd.laravel.com/docs/macos/sites/nginx-configuration.md
> ## Documentation Index
> Fetch the complete documentation index at: https://herd.laravel.com/docs/llms.txt
> Use this file to discover all available pages before exploring further.
# Nginx Configuration
# Advanced Nginx Configuration
Herd ships with a default Nginx configurations that is suitable for most projects. However, you can customize the
Nginx settings to fit your specific needs. You can do this in multiple ways and depending on your requirements. Some
settings can (and **must**) be configured via the Herd UI, while others require you to edit the Nginx configuration files directly.
## Via Herd
The most common configurations that usually require changes in your Nginx configuration are the maximum file upload size and the memory limit.
You can change these settings via the Herd UI within the PHP settings section. You can either configure them for all
PHP versions or set specific values per PHP version.
## Connecting from your Laravel application
To connect your application to the server, you can use the credentials that are listed next to the running service in the settings, or you can use the ones below.
```env theme={null}
DB_CONNECTION=mysql
DB_HOST=127.0.0.1
DB_PORT=3307
DB_DATABASE=laravel # set this to your project database
DB_USERNAME=root
DB_PASSWORD=
```
## Database service migrations
Whether you set up a newer version of MySQL or migrate from existing instances on your machine, the most comfortable way is to use a database client like [TablePlus](https://tableplus.com/) to export and import the database tables.
## Connecting via CLI
Herd symlinks the `mysql` CLI to your PATH, so you can connect to the database via the command line.
As Laravel Herd allows you to start multiple MySQL servers, you should specify the port to connect to the correct instance.
For example, to connect to the MySQL server running on port 3306, you can use the following command:
```bash theme={null}
mysql -u root -h 127.0.0.1 -P 3306 -p
```
## Versions
Herd Pro allows you to install the following versions directly from the services tab of the settings. New versions are available regularly.
| Service | Version |
| ------- | ------- |
| MySQL | 8.4.\* |
| MySQL | 8.0.36 |
---
# Source: https://herd.laravel.com/docs/macos/sites/nginx-configuration.md
> ## Documentation Index
> Fetch the complete documentation index at: https://herd.laravel.com/docs/llms.txt
> Use this file to discover all available pages before exploring further.
# Nginx Configuration
# Advanced Nginx Configuration
Herd ships with a default Nginx configurations that is suitable for most projects. However, you can customize the
Nginx settings to fit your specific needs. You can do this in multiple ways and depending on your requirements. Some
settings can (and **must**) be configured via the Herd UI, while others require you to edit the Nginx configuration files directly.
## Via Herd
The most common configurations that usually require changes in your Nginx configuration are the maximum file upload size and the memory limit.
You can change these settings via the Herd UI within the PHP settings section. You can either configure them for all
PHP versions or set specific values per PHP version.
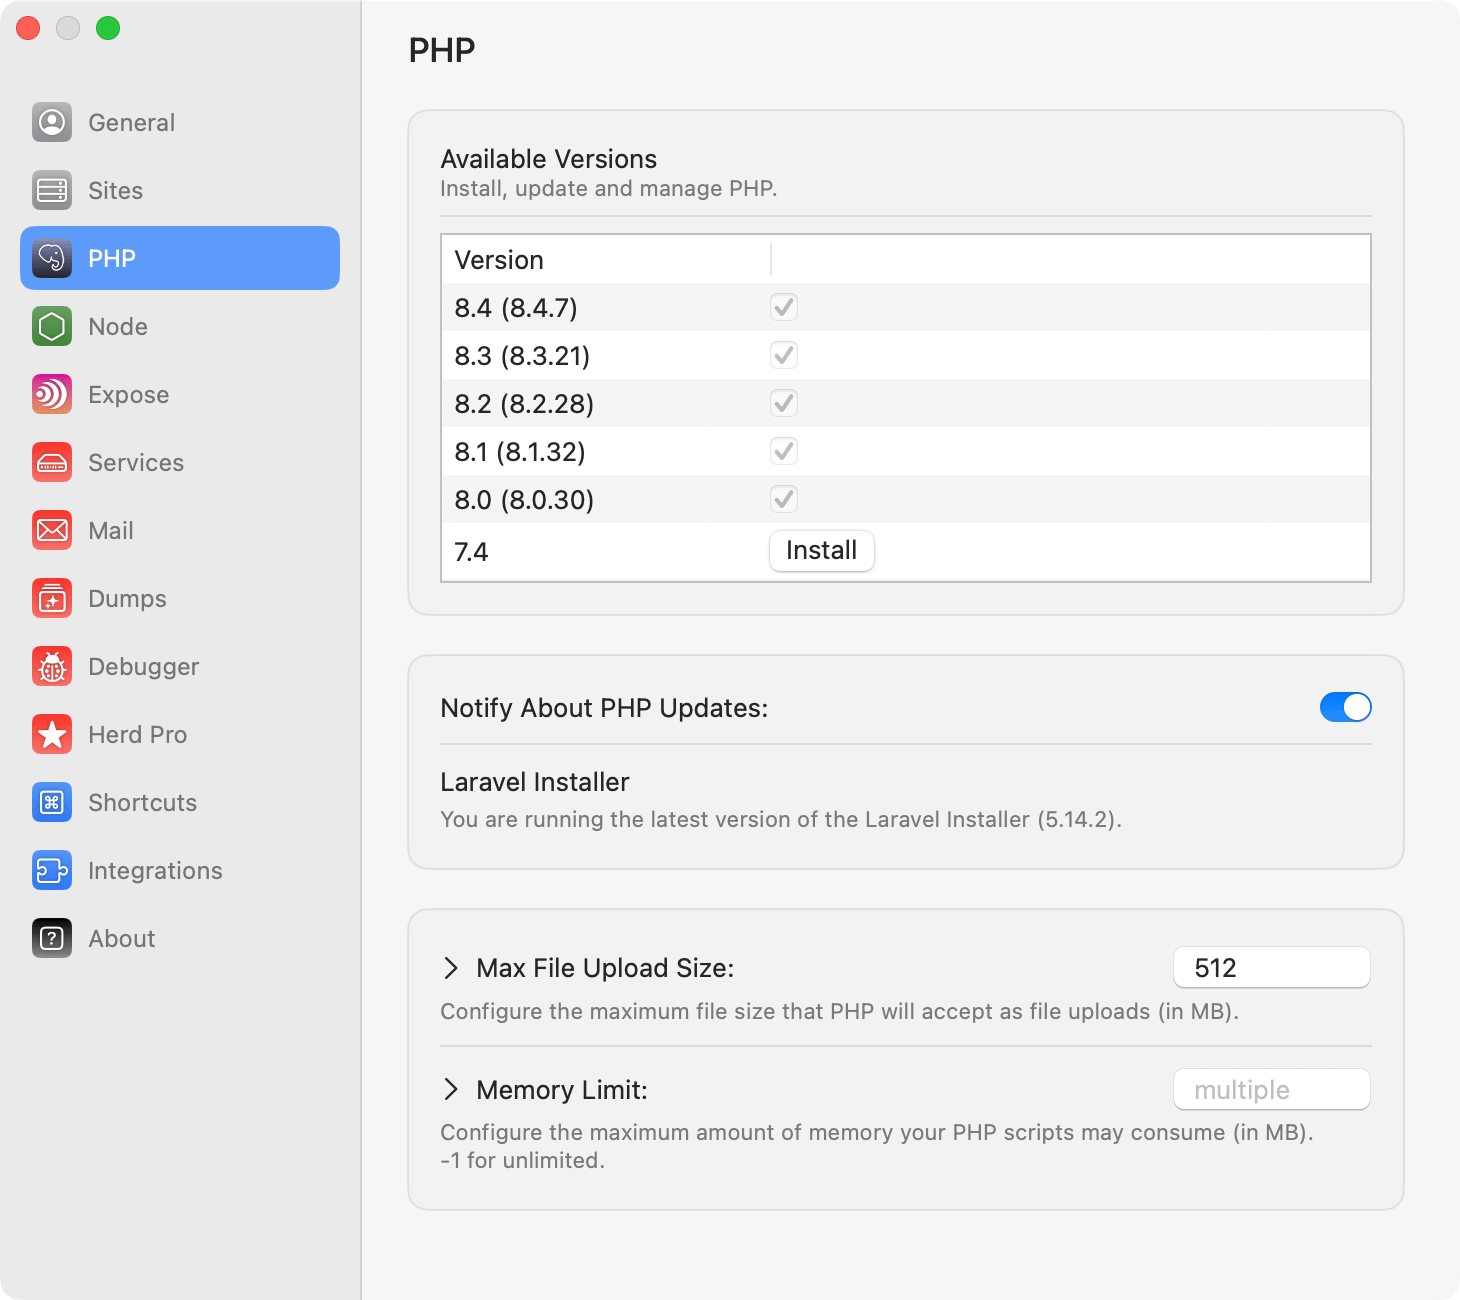 You can also change the PHP version for a specific site via the Herd UI. You can either do that in the sites settings or
via the command line by running `herd isolate 8.3` (or any other version you want to use). This creates a dedicated nginx
configuration file for the specified PHP version and use this version for all web request of the current site.
To use the same version via the command line, you can run `herd php artisan ...` or `herd composer ...` instead of just using `php artisan ...` or `composer ...`.
This will ensure that the correct PHP version is used for the command.
If you secure a site with a TLS/SSL certificate, this creates a dedicated Nginx configuration file for the site and you
can make further changes to the Nginx configuration for this site in this file (see below).
You can also change the PHP version for a specific site via the Herd UI. You can either do that in the sites settings or
via the command line by running `herd isolate 8.3` (or any other version you want to use). This creates a dedicated nginx
configuration file for the specified PHP version and use this version for all web request of the current site.
To use the same version via the command line, you can run `herd php artisan ...` or `herd composer ...` instead of just using `php artisan ...` or `composer ...`.
This will ensure that the correct PHP version is used for the command.
If you secure a site with a TLS/SSL certificate, this creates a dedicated Nginx configuration file for the site and you
can make further changes to the Nginx configuration for this site in this file (see below).
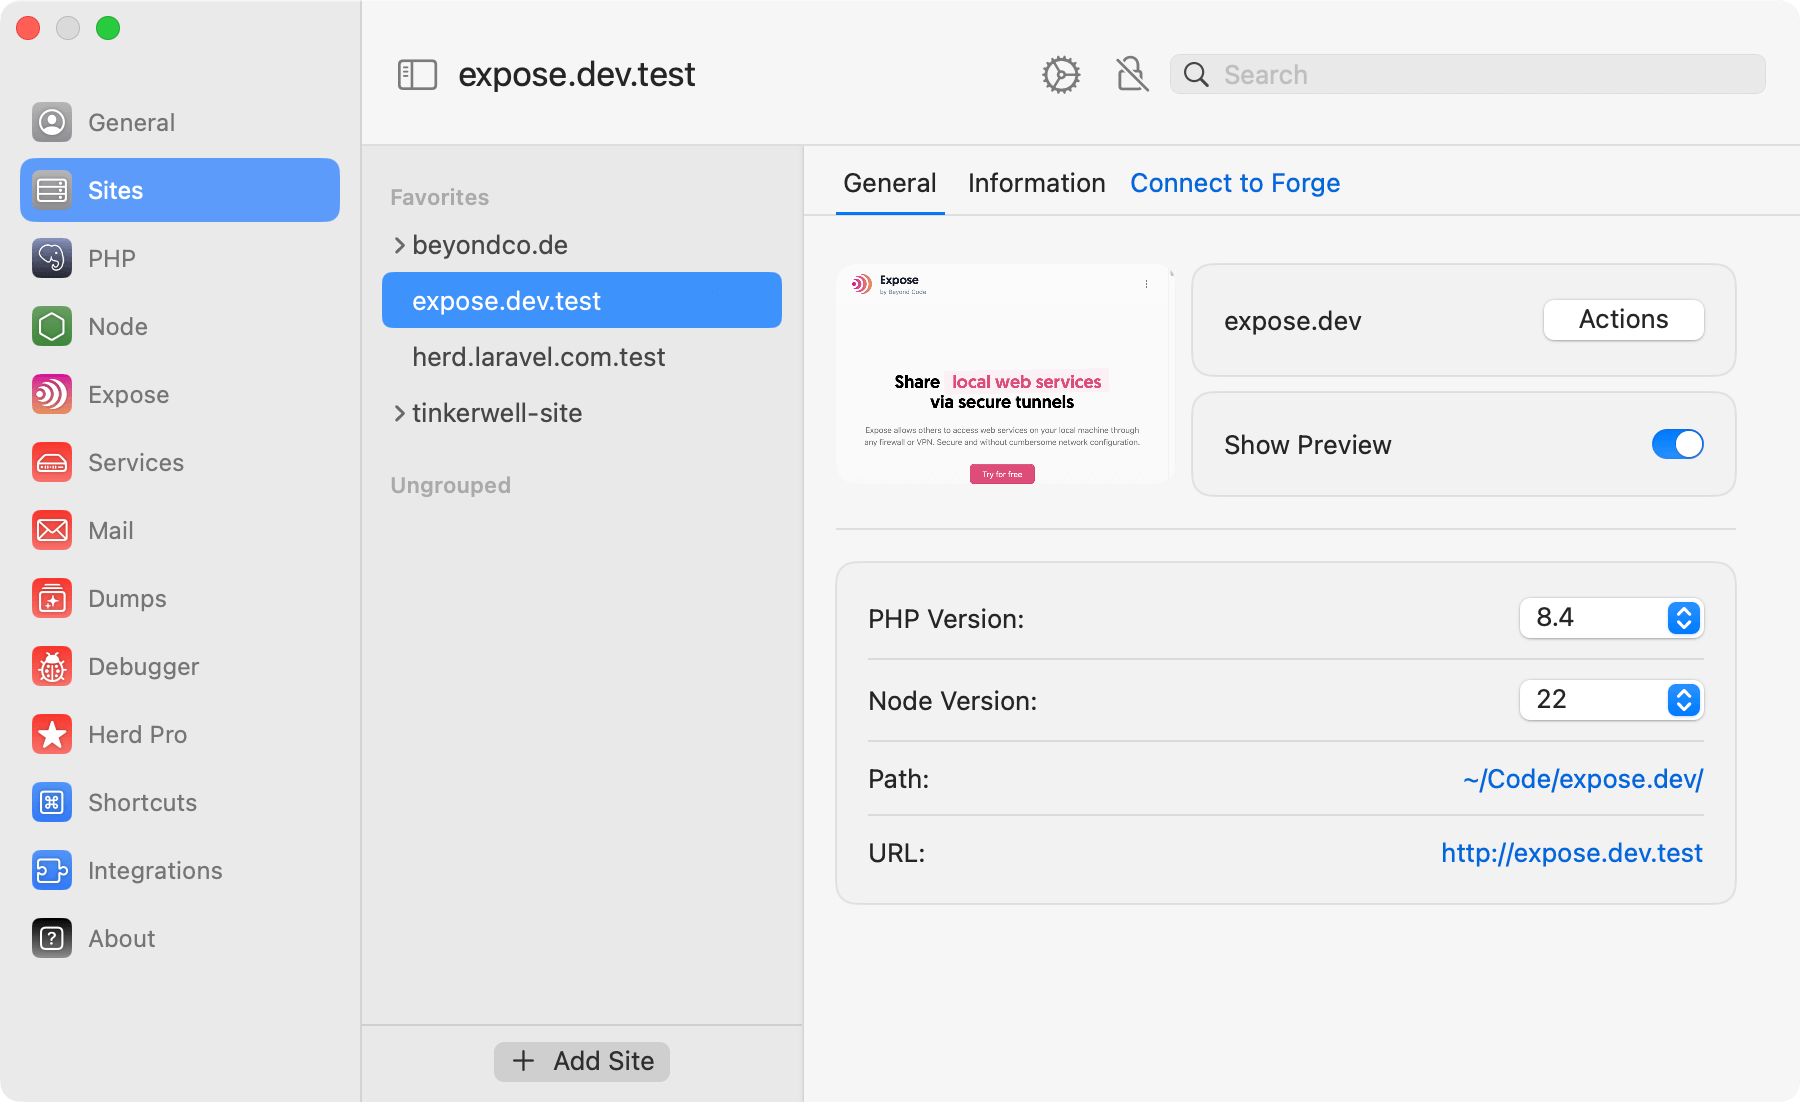 ## Customizing the global nginx configuration
Herd comes with default configuration files that are in your Herd configuration directory a `~/Library/Application Support/Herd/config/nginx`.
This directory contains the files `nginx.conf` and `herd.conf` that Herd loads on every request. You can edit these files
to make global changes to all projects – but we recommend only changing site-specific files because we might rewrite these files in future updates.
## Customizing the site-specific nginx configuration
If you isolate the PHP version for a site or secure it with a TLS/SSL certificate, Herd creates a dedicated Nginx
configuration file for this site. This file is located at `~/Library/Application Support/Herd/config/valet/Nginx` and named
after the site domain. For example, if your site is `herd.laravel.com.test`, the file will be named `herd.laravel.com.test`.
You can edit this file to make site-specific changes to the Nginx configuration but make sure to keep Herd specific elements like the
isolated PHP version or references to the TLS/SSL certificate intact.
## CORS
Herd does not ship with a specific CORS configuration because we believe that your local environment should match your
standard production environment as closely as possible. If you need to configure CORS for your project, you can do that similar to
how you would do it in production and either create a global CORS configuration for all sites or add the required header in your site-specific file.
```
# CORS Rules
add_header Access-Control-Allow-Origin *;
# END of CORS Rules #
```
### CORS in Laravel
For the Laravel framework, you publish the CORS middleware as described
in the [Laravel documentation](https://laravel.com/docs/12.x/routing#cors).
---
# Source: https://herd.laravel.com/docs/macos/technology/node-versions.md
> ## Documentation Index
> Fetch the complete documentation index at: https://herd.laravel.com/docs/llms.txt
> Use this file to discover all available pages before exploring further.
# Manage Node.js
# Managing Node.js versions
Herd ships with [nvm](https://github.com/nvm-sh/nvm), the Node version manager which allows the management of multiple [Node.js](https://nodejs.org/) versions on your machine. By default, Herd automatically installs the latest available version of Node.js for you.
Herd requires a specific nvm version and can't use existing nvm installations. If you are migrating from a previous nvm setup, please consult the [Troubleshooting](#troubleshooting) section if it doesn't work as expected.
## Via the GUI
You may install and update the Node.js versions on your machine via the Herd GUI. Simply click on the button and Herd will take care of the rest.
## Customizing the global nginx configuration
Herd comes with default configuration files that are in your Herd configuration directory a `~/Library/Application Support/Herd/config/nginx`.
This directory contains the files `nginx.conf` and `herd.conf` that Herd loads on every request. You can edit these files
to make global changes to all projects – but we recommend only changing site-specific files because we might rewrite these files in future updates.
## Customizing the site-specific nginx configuration
If you isolate the PHP version for a site or secure it with a TLS/SSL certificate, Herd creates a dedicated Nginx
configuration file for this site. This file is located at `~/Library/Application Support/Herd/config/valet/Nginx` and named
after the site domain. For example, if your site is `herd.laravel.com.test`, the file will be named `herd.laravel.com.test`.
You can edit this file to make site-specific changes to the Nginx configuration but make sure to keep Herd specific elements like the
isolated PHP version or references to the TLS/SSL certificate intact.
## CORS
Herd does not ship with a specific CORS configuration because we believe that your local environment should match your
standard production environment as closely as possible. If you need to configure CORS for your project, you can do that similar to
how you would do it in production and either create a global CORS configuration for all sites or add the required header in your site-specific file.
```
# CORS Rules
add_header Access-Control-Allow-Origin *;
# END of CORS Rules #
```
### CORS in Laravel
For the Laravel framework, you publish the CORS middleware as described
in the [Laravel documentation](https://laravel.com/docs/12.x/routing#cors).
---
# Source: https://herd.laravel.com/docs/macos/technology/node-versions.md
> ## Documentation Index
> Fetch the complete documentation index at: https://herd.laravel.com/docs/llms.txt
> Use this file to discover all available pages before exploring further.
# Manage Node.js
# Managing Node.js versions
Herd ships with [nvm](https://github.com/nvm-sh/nvm), the Node version manager which allows the management of multiple [Node.js](https://nodejs.org/) versions on your machine. By default, Herd automatically installs the latest available version of Node.js for you.
Herd requires a specific nvm version and can't use existing nvm installations. If you are migrating from a previous nvm setup, please consult the [Troubleshooting](#troubleshooting) section if it doesn't work as expected.
## Via the GUI
You may install and update the Node.js versions on your machine via the Herd GUI. Simply click on the button and Herd will take care of the rest.
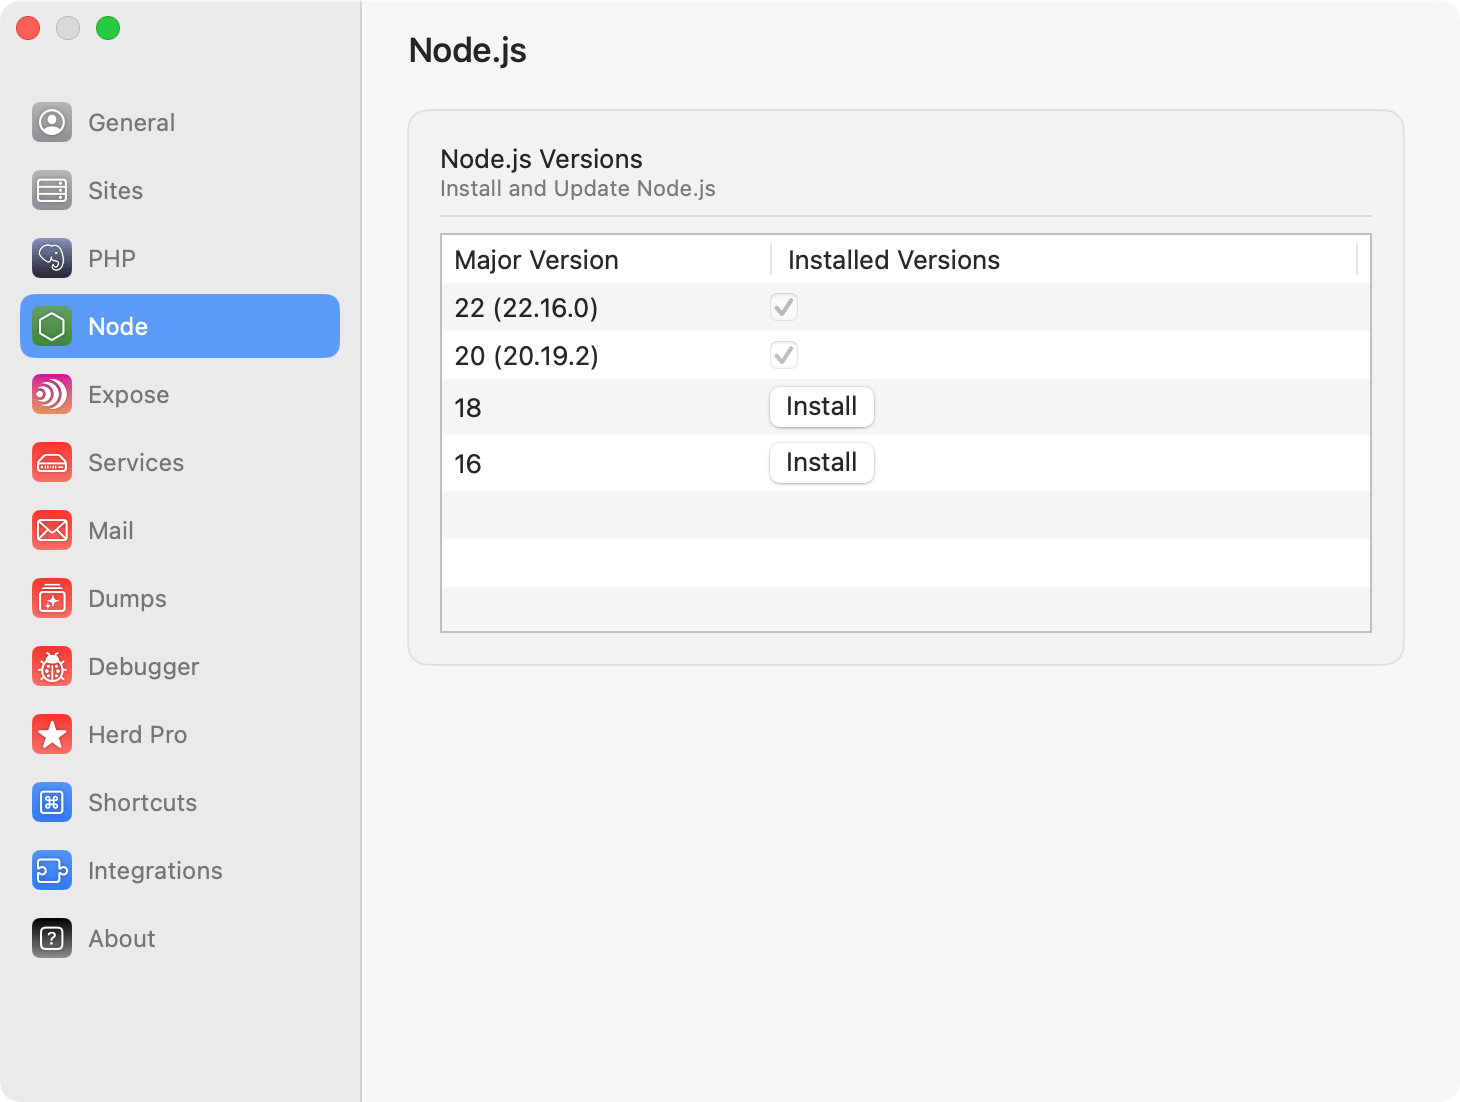 ## Via the CLI
You can use `nvm` on your command line to install, update and switch between Node.js versions any time. To switch to a different version, simply enter `nvm use VERSION` and nvm runs all required commands to change the version and make it accessible in your terminal.
For more information about nvm, take a look at the [official nvm documentation](https://github.com/nvm-sh/nvm?tab=readme-ov-file#usage).
### Commands that you might use regularly
```bash theme={null}
# Install node 20
nvm install 20
# Uninstall node 20
nvm uninstall 20
# Switch to node 20
nvm use 20
## Display all commands
nvm help
```
# Per-site Node versions
By default, the Node version available via CLI will be the most recent one.
However, if you need to support different Node.js versions for different sites, you may use the isolated Node functionality.
This configures Herd to use the specified Node version for the site, regardless of the global Node version.
If you use oh-my-zsh, Herd automatically detects the Node.js version to use when changing directories via your terminal.
## Via the CLI
You may use the `herd isolate-node` command to specify which Node.js version a particular folder should use. The `isolate-node` command configures
Herd/nvm to use the specified Node.js version for the site located in your current working directory:
```bash theme={null}
cd ~/Herd/example-site
herd isolate-node 21
```
If your site name does not match the name of the directory that contains it, you may specify the site name using the `--site` option:
```bash theme={null}
herd isolate-node 21 --site="site-name"
```
You can be as specific as you want, when isolating Node.js versions:
```bash theme={null}
herd isolate-node 16.13.2
```
You may execute the `isolated-node` command to display a list of all of your isolated sites and their Node.js versions:
```bash theme={null}
herd isolated-node
```
To revert a site back to the globally installed Node.js version, you may invoke the `unisolate-node` command from the site's root directory:
```bash theme={null}
herd unisolate-node
```
## Updating Node.js
If you open the Node settings, Herd checks if there are new versions available and displays an update button next to every version that you can update.
## Via the CLI
You can use `nvm` on your command line to install, update and switch between Node.js versions any time. To switch to a different version, simply enter `nvm use VERSION` and nvm runs all required commands to change the version and make it accessible in your terminal.
For more information about nvm, take a look at the [official nvm documentation](https://github.com/nvm-sh/nvm?tab=readme-ov-file#usage).
### Commands that you might use regularly
```bash theme={null}
# Install node 20
nvm install 20
# Uninstall node 20
nvm uninstall 20
# Switch to node 20
nvm use 20
## Display all commands
nvm help
```
# Per-site Node versions
By default, the Node version available via CLI will be the most recent one.
However, if you need to support different Node.js versions for different sites, you may use the isolated Node functionality.
This configures Herd to use the specified Node version for the site, regardless of the global Node version.
If you use oh-my-zsh, Herd automatically detects the Node.js version to use when changing directories via your terminal.
## Via the CLI
You may use the `herd isolate-node` command to specify which Node.js version a particular folder should use. The `isolate-node` command configures
Herd/nvm to use the specified Node.js version for the site located in your current working directory:
```bash theme={null}
cd ~/Herd/example-site
herd isolate-node 21
```
If your site name does not match the name of the directory that contains it, you may specify the site name using the `--site` option:
```bash theme={null}
herd isolate-node 21 --site="site-name"
```
You can be as specific as you want, when isolating Node.js versions:
```bash theme={null}
herd isolate-node 16.13.2
```
You may execute the `isolated-node` command to display a list of all of your isolated sites and their Node.js versions:
```bash theme={null}
herd isolated-node
```
To revert a site back to the globally installed Node.js version, you may invoke the `unisolate-node` command from the site's root directory:
```bash theme={null}
herd unisolate-node
```
## Updating Node.js
If you open the Node settings, Herd checks if there are new versions available and displays an update button next to every version that you can update.
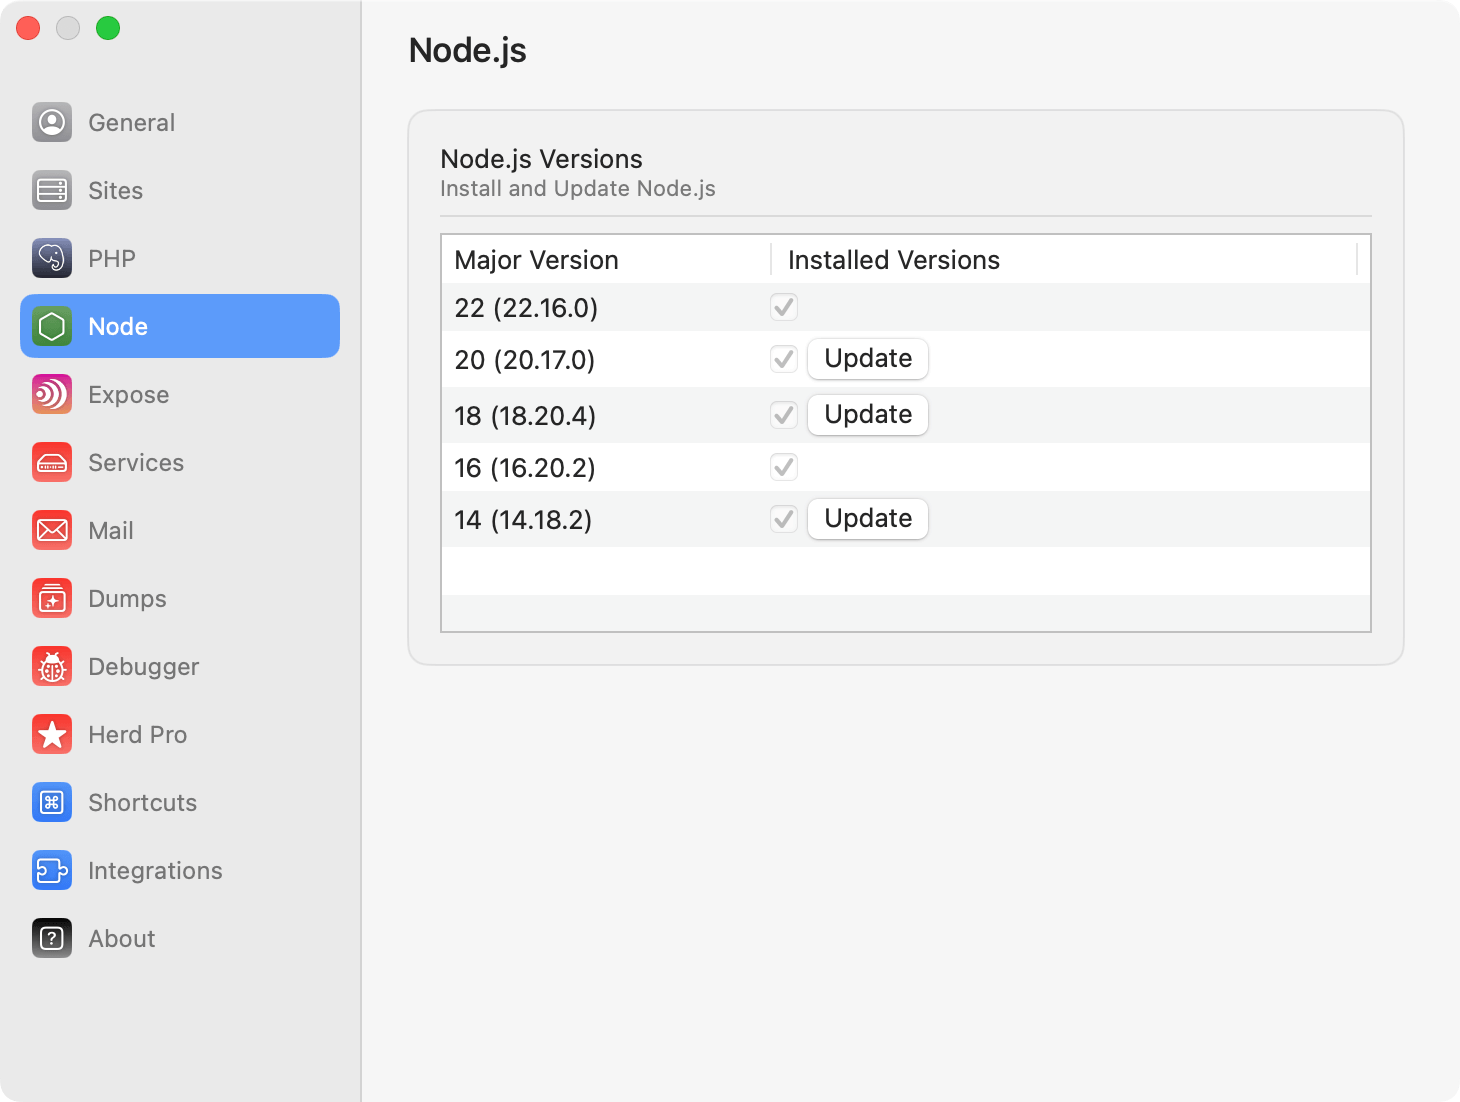 Herd uses nvm under the hood and this means that existing versions are kept when pressing the update button. The update downloads and installs the latest version and makes this one the preferred version for the related major version.
## Uninstalling Node
If you want to uninstall a specific version, either consult the [official nvm documentation](https://github.com/nvm-sh/nvm) or run the uninstall command from your terminal.
```
nvm uninstall VERSION
```
You can verify which versions you have with the command `nvm list`. So if you want to uninstall node 18.20.4, run `nvm uninstall 18.20.4`.
## Troubleshooting
Herd parses command output to determine your current Node.js version. If it can't parse the output because there is output that it doesn't understand, or you are using an unsupported shell, it displays `Unknown` for your node version in the sites list. Herd is an opinionated development environment that relies on bash or zsh, so other shells can lead to errors.
There are situations where Herd can not install nvm and keeps displaying the install button for nvm in the settings. This can happen if there are traces of a previous install on your system – this could be a broken node symlink or nvm paths in your `.zshrc` file.
---
# Source: https://herd.laravel.com/docs/macos/troubleshooting/odbc-drivers.md
> ## Documentation Index
> Fetch the complete documentation index at: https://herd.laravel.com/docs/llms.txt
> Use this file to discover all available pages before exploring further.
# ODBC Drivers
# Using Microsoft ODBC Drivers on macOS
You might encounter the following error message when trying to use the Microsoft ODBC Driver for SQL Server on macOS:
> "This extension requires the Microsoft ODBC Driver for SQL Server to communicate with SQL Server."
In order to install the missing ODBC driver, please take a alook at the latest official [ODBC Driver installation guide](https://learn.microsoft.com/en-us/sql/connect/odbc/linux-mac/install-microsoft-odbc-driver-sql-server-macos?view=sql-server-ver16#microsoft-odbc-18) from Microsoft.
After installing the driver, you will need to manually symlink the Homebrew installed driver to the default location where the Microsoft ODBC Driver for SQL Server expects it to be. This can be done by running the following command:
Herd uses nvm under the hood and this means that existing versions are kept when pressing the update button. The update downloads and installs the latest version and makes this one the preferred version for the related major version.
## Uninstalling Node
If you want to uninstall a specific version, either consult the [official nvm documentation](https://github.com/nvm-sh/nvm) or run the uninstall command from your terminal.
```
nvm uninstall VERSION
```
You can verify which versions you have with the command `nvm list`. So if you want to uninstall node 18.20.4, run `nvm uninstall 18.20.4`.
## Troubleshooting
Herd parses command output to determine your current Node.js version. If it can't parse the output because there is output that it doesn't understand, or you are using an unsupported shell, it displays `Unknown` for your node version in the sites list. Herd is an opinionated development environment that relies on bash or zsh, so other shells can lead to errors.
There are situations where Herd can not install nvm and keeps displaying the install button for nvm in the settings. This can happen if there are traces of a previous install on your system – this could be a broken node symlink or nvm paths in your `.zshrc` file.
---
# Source: https://herd.laravel.com/docs/macos/troubleshooting/odbc-drivers.md
> ## Documentation Index
> Fetch the complete documentation index at: https://herd.laravel.com/docs/llms.txt
> Use this file to discover all available pages before exploring further.
# ODBC Drivers
# Using Microsoft ODBC Drivers on macOS
You might encounter the following error message when trying to use the Microsoft ODBC Driver for SQL Server on macOS:
> "This extension requires the Microsoft ODBC Driver for SQL Server to communicate with SQL Server."
In order to install the missing ODBC driver, please take a alook at the latest official [ODBC Driver installation guide](https://learn.microsoft.com/en-us/sql/connect/odbc/linux-mac/install-microsoft-odbc-driver-sql-server-macos?view=sql-server-ver16#microsoft-odbc-18) from Microsoft.
After installing the driver, you will need to manually symlink the Homebrew installed driver to the default location where the Microsoft ODBC Driver for SQL Server expects it to be. This can be done by running the following command:
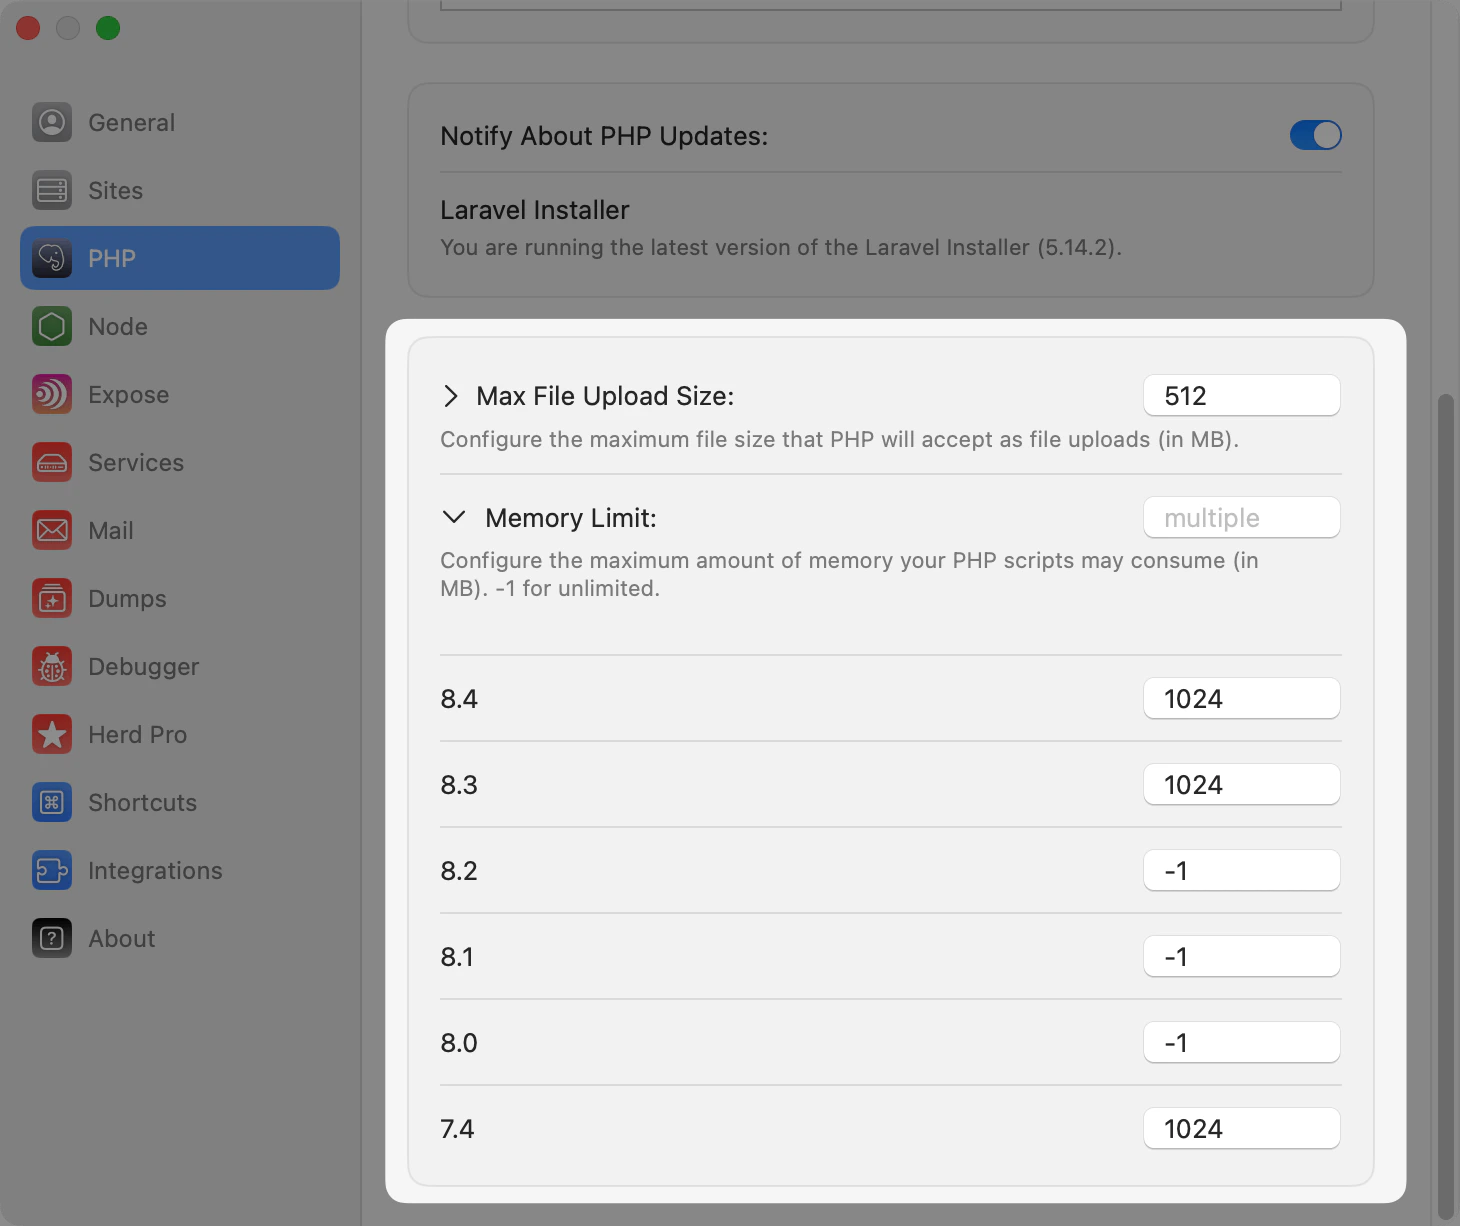 Herd gives you easy access to the PHP configuration files on your machine, the easiest way to get to the file is to select the php.ini directory from the context menu of the settings.
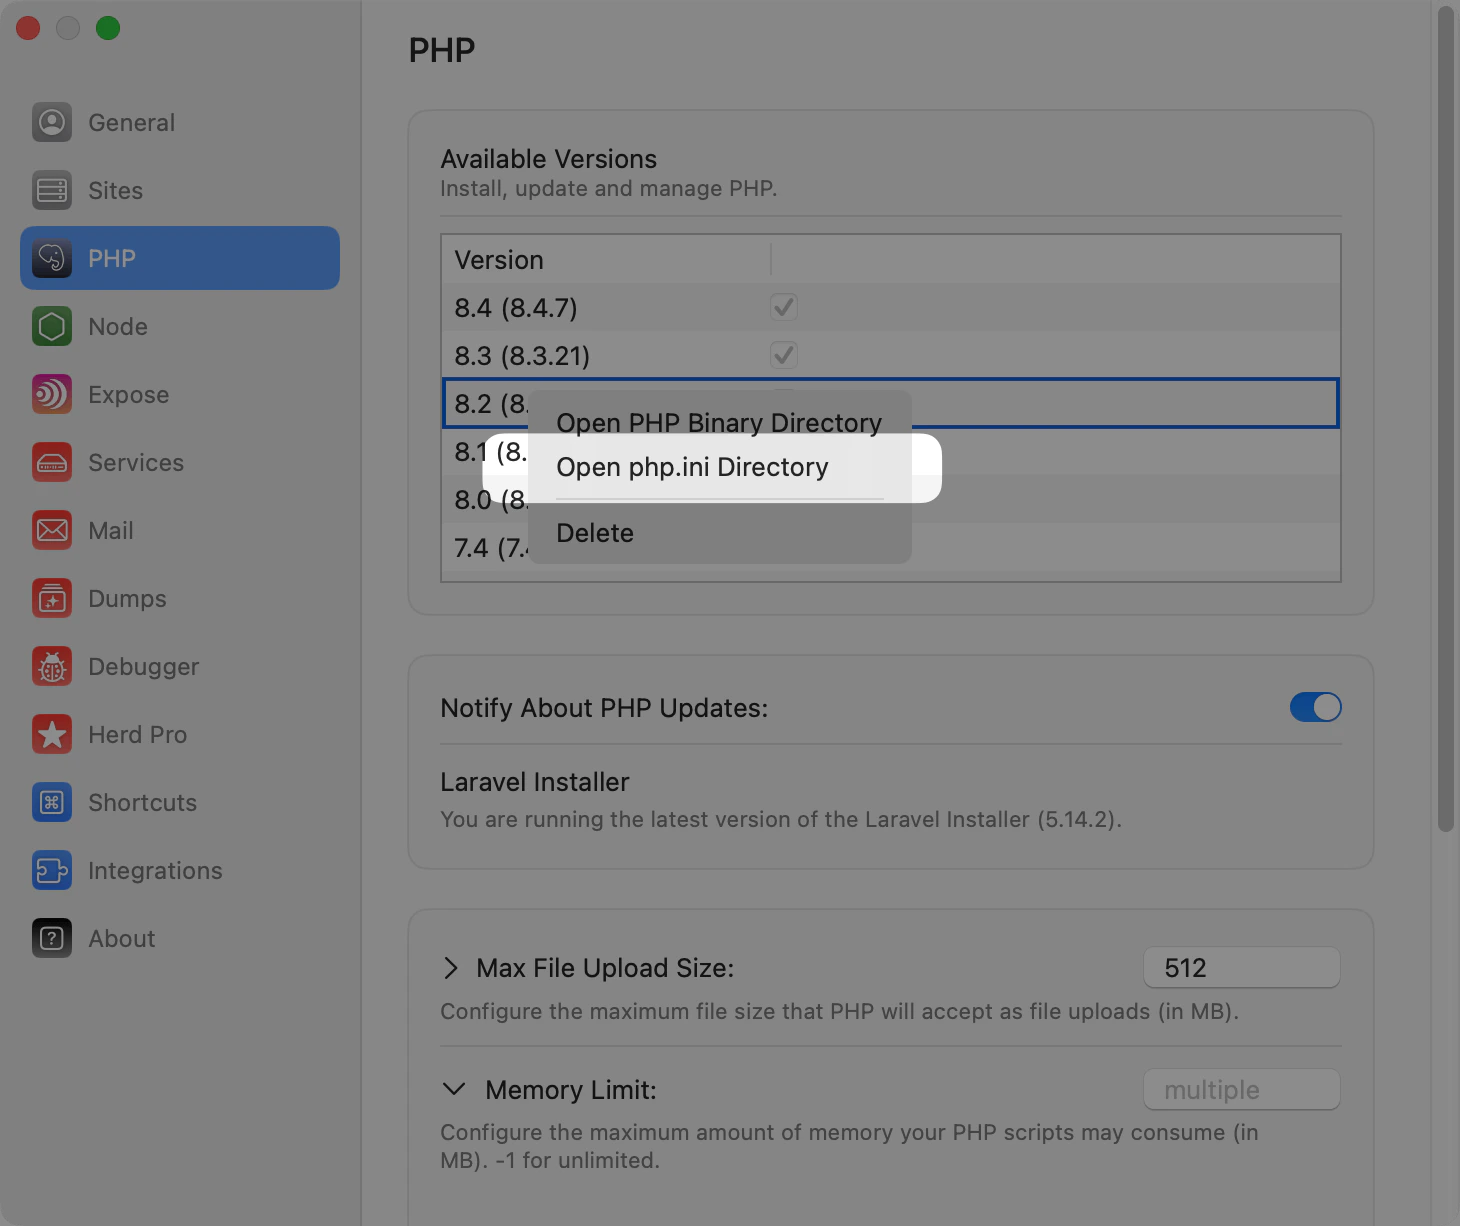 Each PHP version has its own `php.ini` file at `~/Library/Application Support/Herd/config/php/
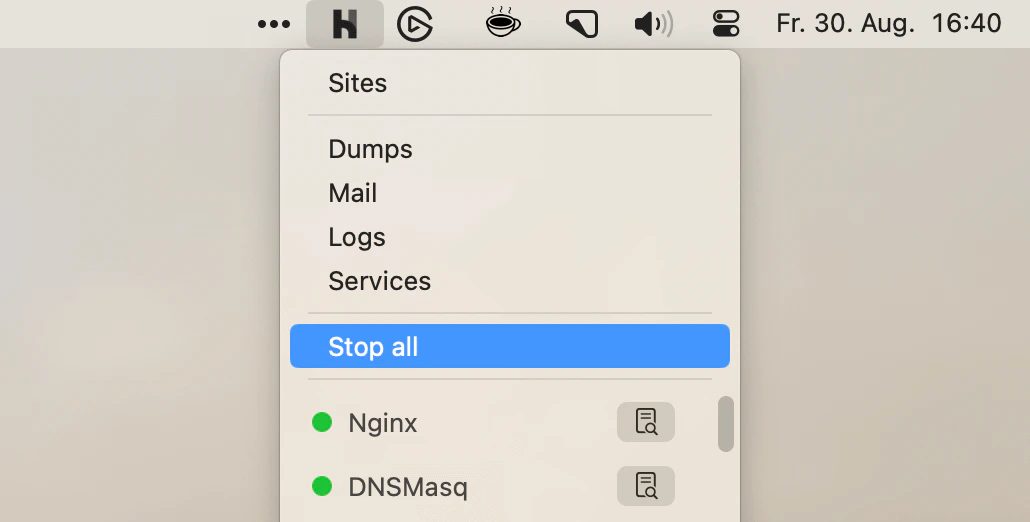 Alternatively, you can use the `herd restart` command in the terminal.
```shell theme={null}
herd restart
```
---
# Source: https://herd.laravel.com/docs/macos/technology/php-versions.md
> ## Documentation Index
> Fetch the complete documentation index at: https://herd.laravel.com/docs/llms.txt
> Use this file to discover all available pages before exploring further.
# Manage PHP
# Using different PHP versions
Herd ships with the latest stable PHP version by default. Currently, that's PHP 8.3.
However, you may install and use different PHP versions for your sites and configure Herd that every project uses the version that it needs.
## Using different PHP versions via the GUI
You can manage your PHP versions in the "PHP" tab of the preferences window. This window allows you to install and update PHP versions with a single click.
Alternatively, you can use the `herd restart` command in the terminal.
```shell theme={null}
herd restart
```
---
# Source: https://herd.laravel.com/docs/macos/technology/php-versions.md
> ## Documentation Index
> Fetch the complete documentation index at: https://herd.laravel.com/docs/llms.txt
> Use this file to discover all available pages before exploring further.
# Manage PHP
# Using different PHP versions
Herd ships with the latest stable PHP version by default. Currently, that's PHP 8.3.
However, you may install and use different PHP versions for your sites and configure Herd that every project uses the version that it needs.
## Using different PHP versions via the GUI
You can manage your PHP versions in the "PHP" tab of the preferences window. This window allows you to install and update PHP versions with a single click.
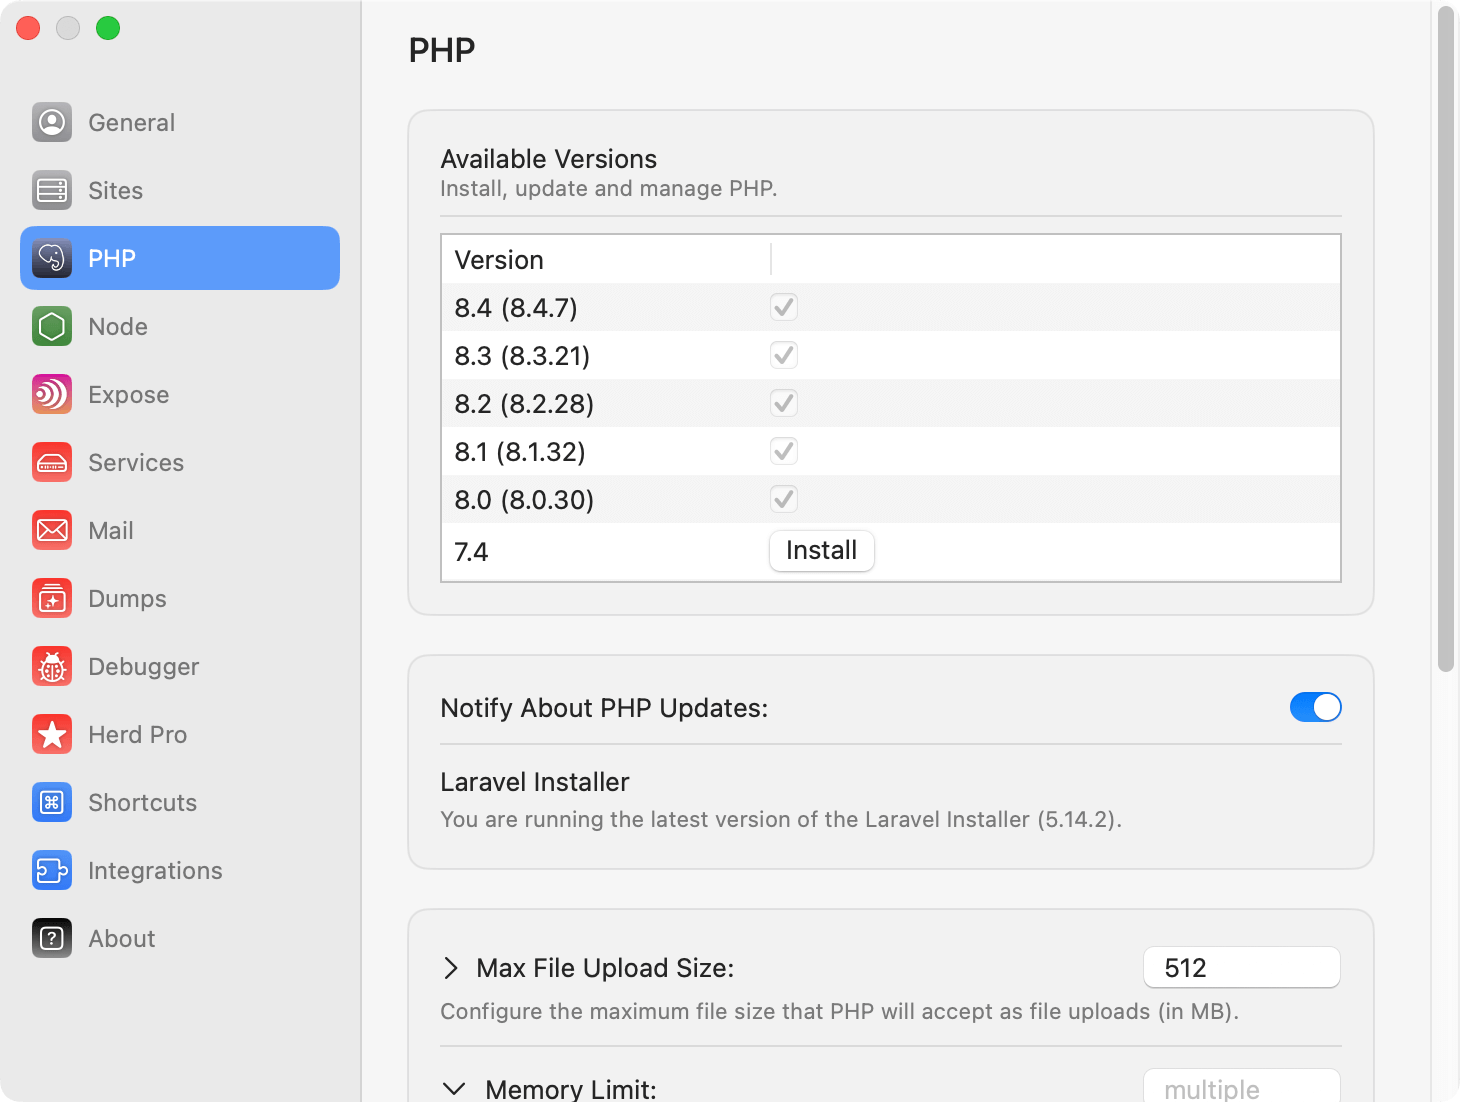 In order to change the global PHP version that Herd uses by default, select it in the dropdown menu in the menu bar.
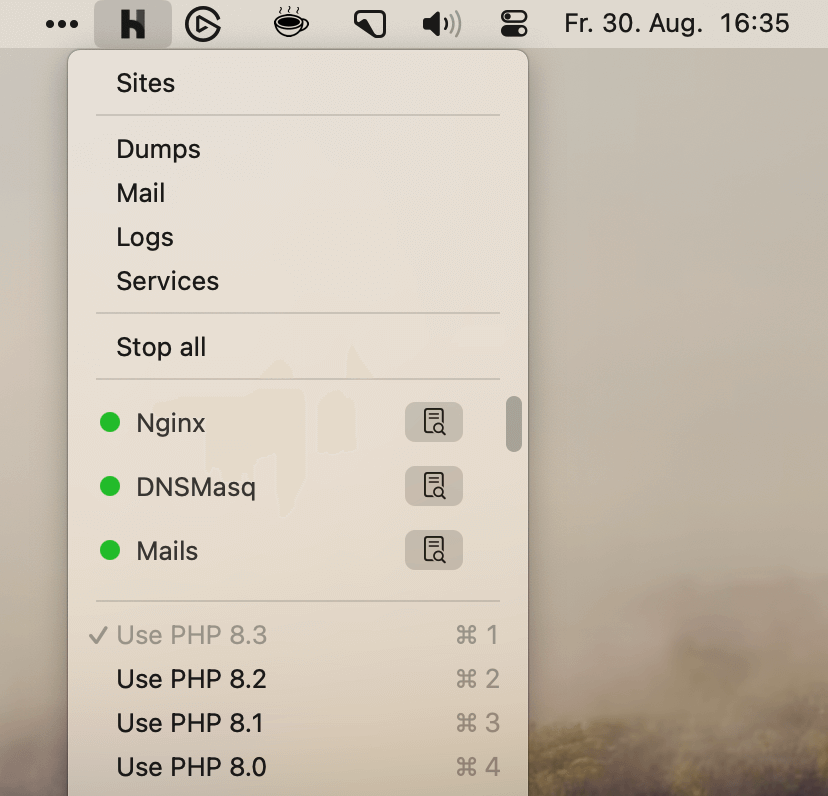 Herd uses the global PHP version for all sites that are not [isolated](#per-site-php-versions).
## Using different PHP versions via the CLI
If you prefer to use the CLI, you can use the `herd use` command to set the global PHP version.
```shell theme={null}
herd use 8.2
```
# Per-site PHP versions
By default, Herd uses the global PHP version to serve all your sites. However, if you need to support different PHP versions for different sites, you may use the isolate function. This configures Herd to use a specific PHP version for a site, regardless of the global PHP version.
## Per site PHP versions via the GUI
You can configure the PHP version per site in the [Site Manager](/macos/sites/managing-sites). This gives you a list of all your sites and allows you to configure the PHP version that each site uses.
Just select the PHP version that you want to use for the site in the dropdown menu.
Herd uses the global PHP version for all sites that are not [isolated](#per-site-php-versions).
## Using different PHP versions via the CLI
If you prefer to use the CLI, you can use the `herd use` command to set the global PHP version.
```shell theme={null}
herd use 8.2
```
# Per-site PHP versions
By default, Herd uses the global PHP version to serve all your sites. However, if you need to support different PHP versions for different sites, you may use the isolate function. This configures Herd to use a specific PHP version for a site, regardless of the global PHP version.
## Per site PHP versions via the GUI
You can configure the PHP version per site in the [Site Manager](/macos/sites/managing-sites). This gives you a list of all your sites and allows you to configure the PHP version that each site uses.
Just select the PHP version that you want to use for the site in the dropdown menu.
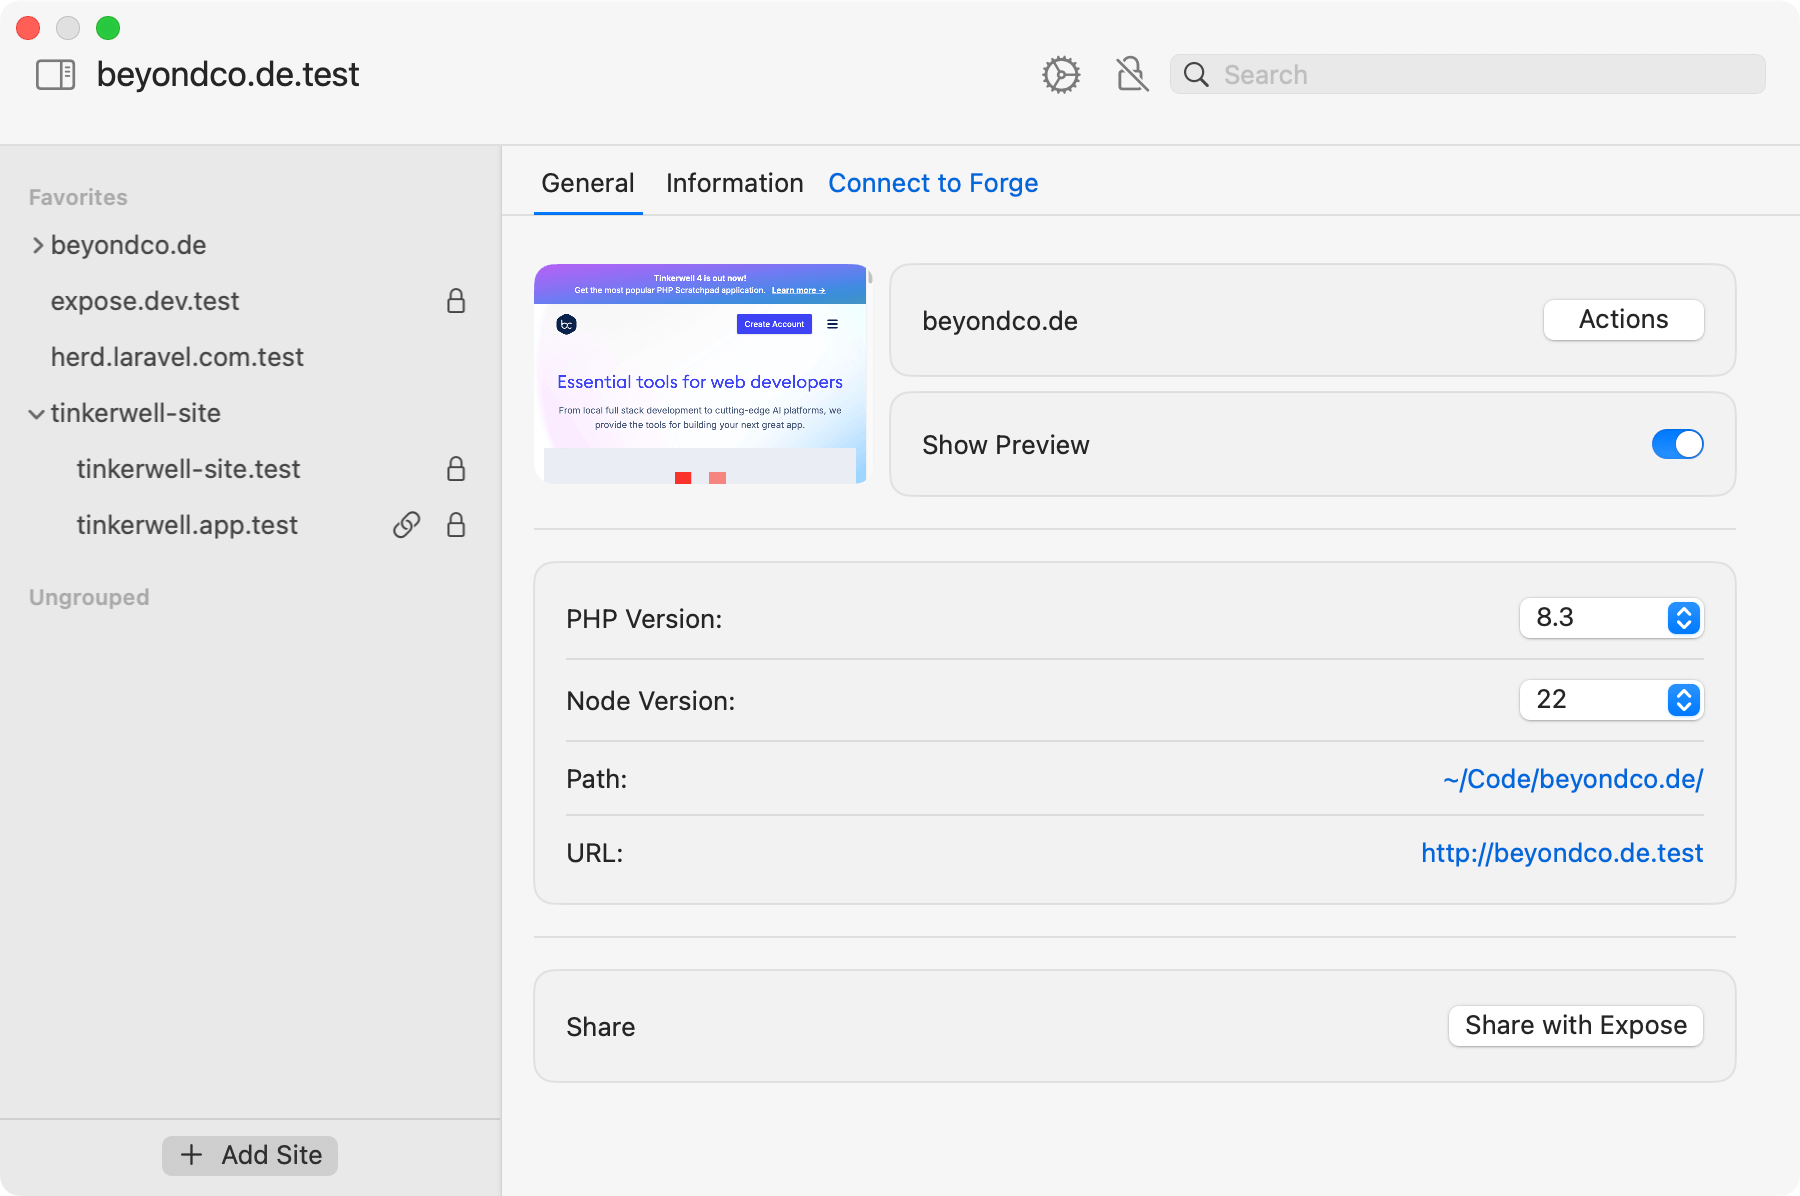 ## Per site PHP versions via the CLI
If you prefer to use the CLI, you can use the `herd isolate` command to specify which PHP version a particular site should use.
The `isolate` command configures Herd to use the specified PHP version for the site located in your current working directory:
```shell theme={null}
cd ~/Herd/example-site
herd isolate 8.0
```
If your site name does not match the name of the directory that contains it, you may specify the name using the `--site` option:
```shell theme={null}
herd isolate 8.0 --site="site-name"
```
For convenience, you may use the `herd php`, `composer`, and `which-php` commands to proxy calls to the appropriate PHP CLI or tool based on the configured PHP version for the current directly and site:
```shell theme={null}
herd php
herd composer
herd which-php
```
You may execute the `isolated` command to display a list of all of your isolated sites and their PHP and Node.js versions:
```shell theme={null}
herd isolated
```
To revert a site back to Herd's globally installed PHP version, you may invoke the `unisolate` command from the root directory of the site:
```shell theme={null}
herd unisolate
```
## Uninstalling PHP versions
You can uninstall PHP versions from the PHP settings. Simply right-click on a version and delete it via the context menu.
## Per site PHP versions via the CLI
If you prefer to use the CLI, you can use the `herd isolate` command to specify which PHP version a particular site should use.
The `isolate` command configures Herd to use the specified PHP version for the site located in your current working directory:
```shell theme={null}
cd ~/Herd/example-site
herd isolate 8.0
```
If your site name does not match the name of the directory that contains it, you may specify the name using the `--site` option:
```shell theme={null}
herd isolate 8.0 --site="site-name"
```
For convenience, you may use the `herd php`, `composer`, and `which-php` commands to proxy calls to the appropriate PHP CLI or tool based on the configured PHP version for the current directly and site:
```shell theme={null}
herd php
herd composer
herd which-php
```
You may execute the `isolated` command to display a list of all of your isolated sites and their PHP and Node.js versions:
```shell theme={null}
herd isolated
```
To revert a site back to Herd's globally installed PHP version, you may invoke the `unisolate` command from the root directory of the site:
```shell theme={null}
herd unisolate
```
## Uninstalling PHP versions
You can uninstall PHP versions from the PHP settings. Simply right-click on a version and delete it via the context menu.
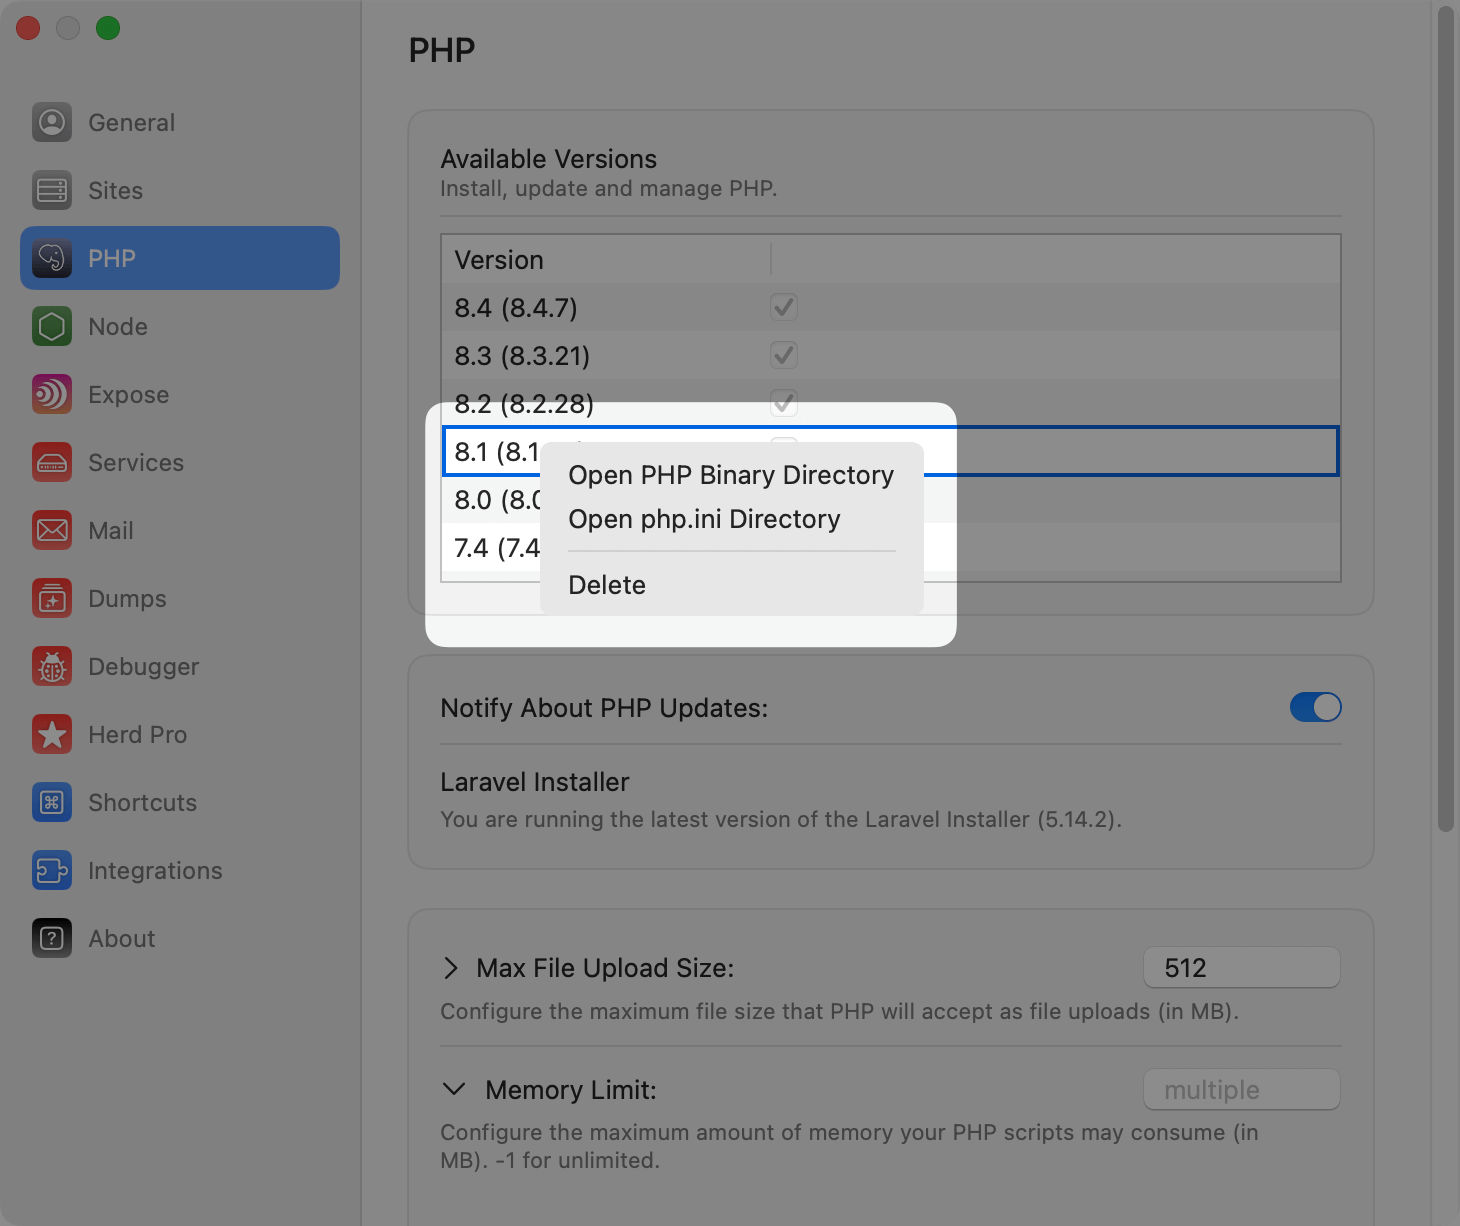 If you prefer deleting a PHP version manually, you can go into the Herd application directory and delete the files from your system. Once you reopen the settings, you can reinstall them.
```
~/Library/Application Support/Herd/bin
```
---
# Source: https://herd.laravel.com/docs/macos/herd-pro-services/postgresql.md
> ## Documentation Index
> Fetch the complete documentation index at: https://herd.laravel.com/docs/llms.txt
> Use this file to discover all available pages before exploring further.
# PostgreSQL
# Installing PostgreSQL via Herd Pro
PostgreSQL is a powerful, open-source object-relational database system that is known for its reliability and robustness.
Laravel Herd Pro extends PostgreSQL by providing a number of popular extensions:
* [PostGIS](https://postgis.net/) - adds support for geographic objects to the PostgreSQL database, making it easy to store and query spatial data.
* [pgrouting](https://pgrouting.org/) - adds routing functionality to PostgreSQL, allowing you to calculate the shortest path between two points.
* [pgvector](https://github.com/pgvector/pgvector) - a vector similarity search extension for PostgreSQL, which allows you to search for (among other things) OpenAI embeddings in your database.
If you prefer deleting a PHP version manually, you can go into the Herd application directory and delete the files from your system. Once you reopen the settings, you can reinstall them.
```
~/Library/Application Support/Herd/bin
```
---
# Source: https://herd.laravel.com/docs/macos/herd-pro-services/postgresql.md
> ## Documentation Index
> Fetch the complete documentation index at: https://herd.laravel.com/docs/llms.txt
> Use this file to discover all available pages before exploring further.
# PostgreSQL
# Installing PostgreSQL via Herd Pro
PostgreSQL is a powerful, open-source object-relational database system that is known for its reliability and robustness.
Laravel Herd Pro extends PostgreSQL by providing a number of popular extensions:
* [PostGIS](https://postgis.net/) - adds support for geographic objects to the PostgreSQL database, making it easy to store and query spatial data.
* [pgrouting](https://pgrouting.org/) - adds routing functionality to PostgreSQL, allowing you to calculate the shortest path between two points.
* [pgvector](https://github.com/pgvector/pgvector) - a vector similarity search extension for PostgreSQL, which allows you to search for (among other things) OpenAI embeddings in your database.
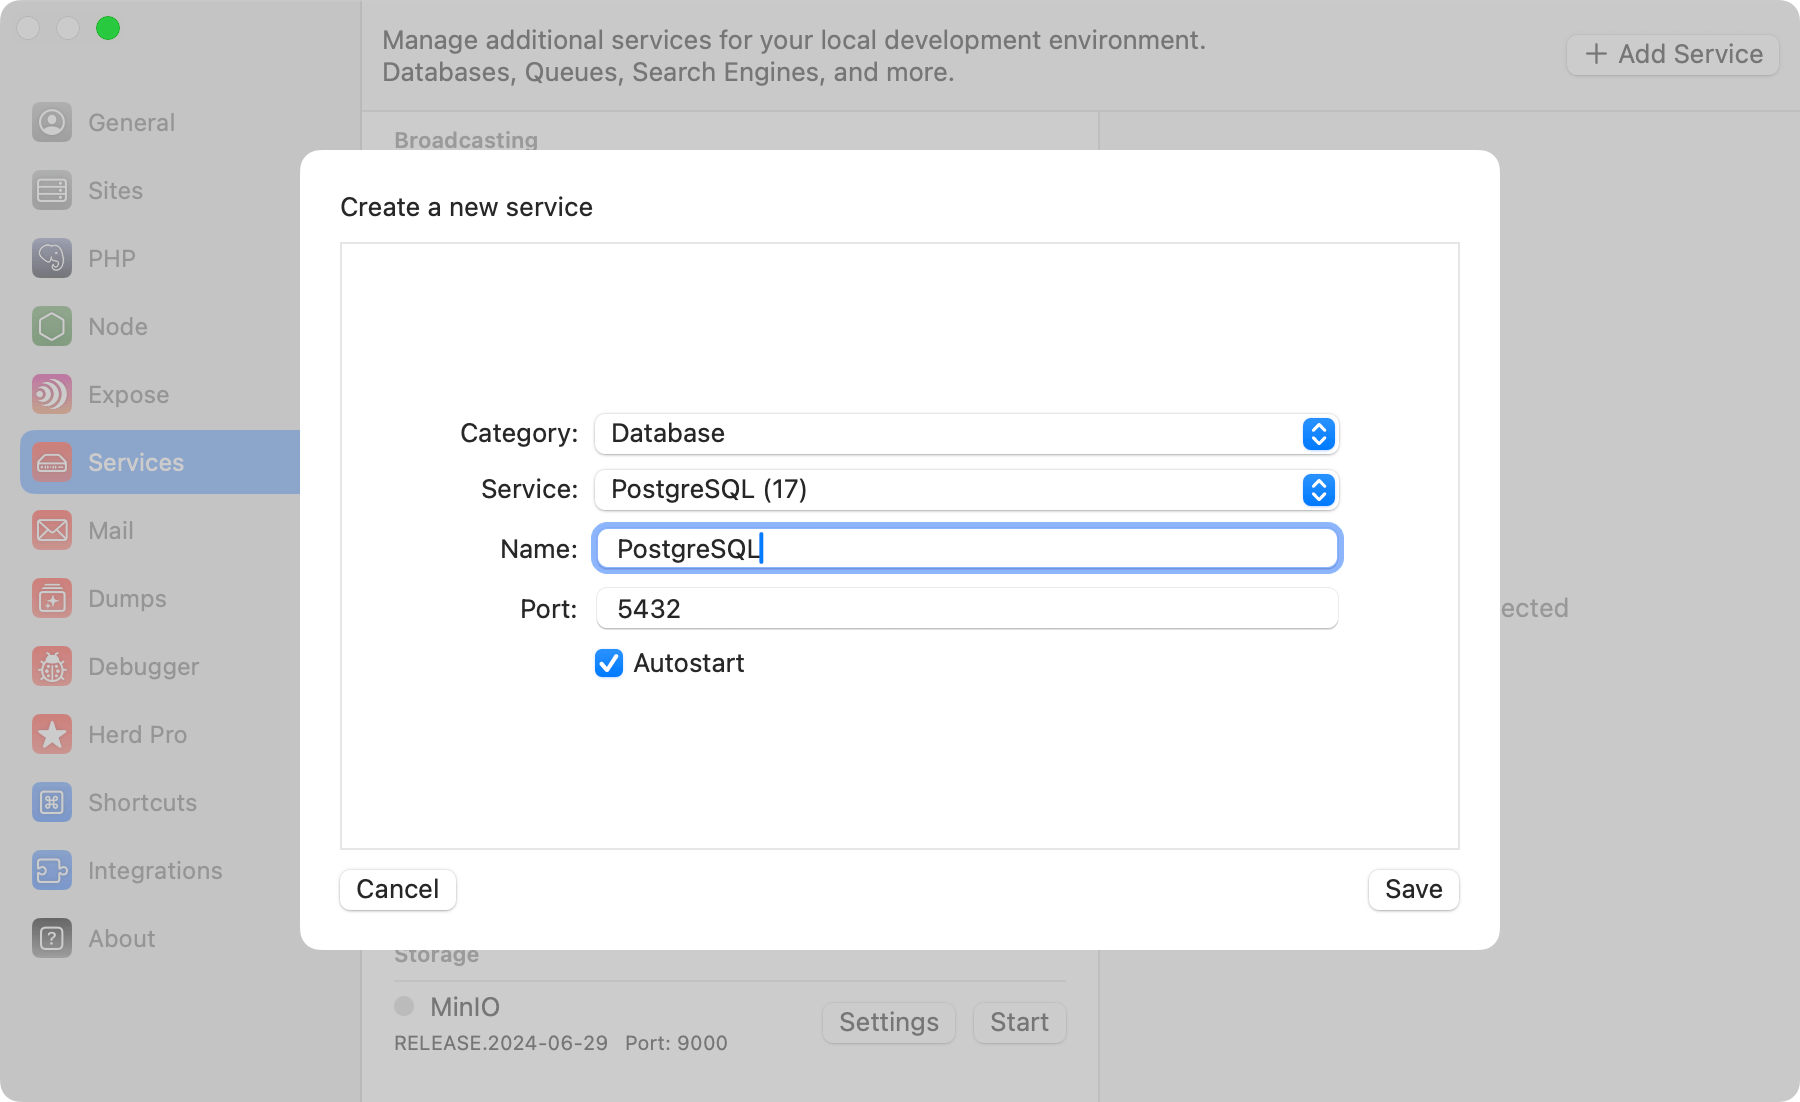 ## Configuration
Herd uses a common default configuration for your PostgreSQL instance that works seamlessly for most setups, and you can change the port of the service to run it in parallel to existing installations on your machine.
Enabling the autostart option automatically starts a service instance when you start Herd.
If you want to modify the settings of the database, you can right-click the service in the settings and open its data directory. In this data directory, there is a `postgresql.conf` that this specific PostgreSQL instance loads on startup.
Make sure to restart the service if you make changes to this configuration.
## Creating databases
Before you can connect your application to the database service, you need an actual database within the instance of the service. Herd provides a convenient way to open TablePlus or AdminerEvo in case that you don't use TablePlus.
When clicking on the related button for these tools on the right side of the service details, Herd opens a connection to the database in your preferred tool and automatically logs you in.
## Configuration
Herd uses a common default configuration for your PostgreSQL instance that works seamlessly for most setups, and you can change the port of the service to run it in parallel to existing installations on your machine.
Enabling the autostart option automatically starts a service instance when you start Herd.
If you want to modify the settings of the database, you can right-click the service in the settings and open its data directory. In this data directory, there is a `postgresql.conf` that this specific PostgreSQL instance loads on startup.
Make sure to restart the service if you make changes to this configuration.
## Creating databases
Before you can connect your application to the database service, you need an actual database within the instance of the service. Herd provides a convenient way to open TablePlus or AdminerEvo in case that you don't use TablePlus.
When clicking on the related button for these tools on the right side of the service details, Herd opens a connection to the database in your preferred tool and automatically logs you in.
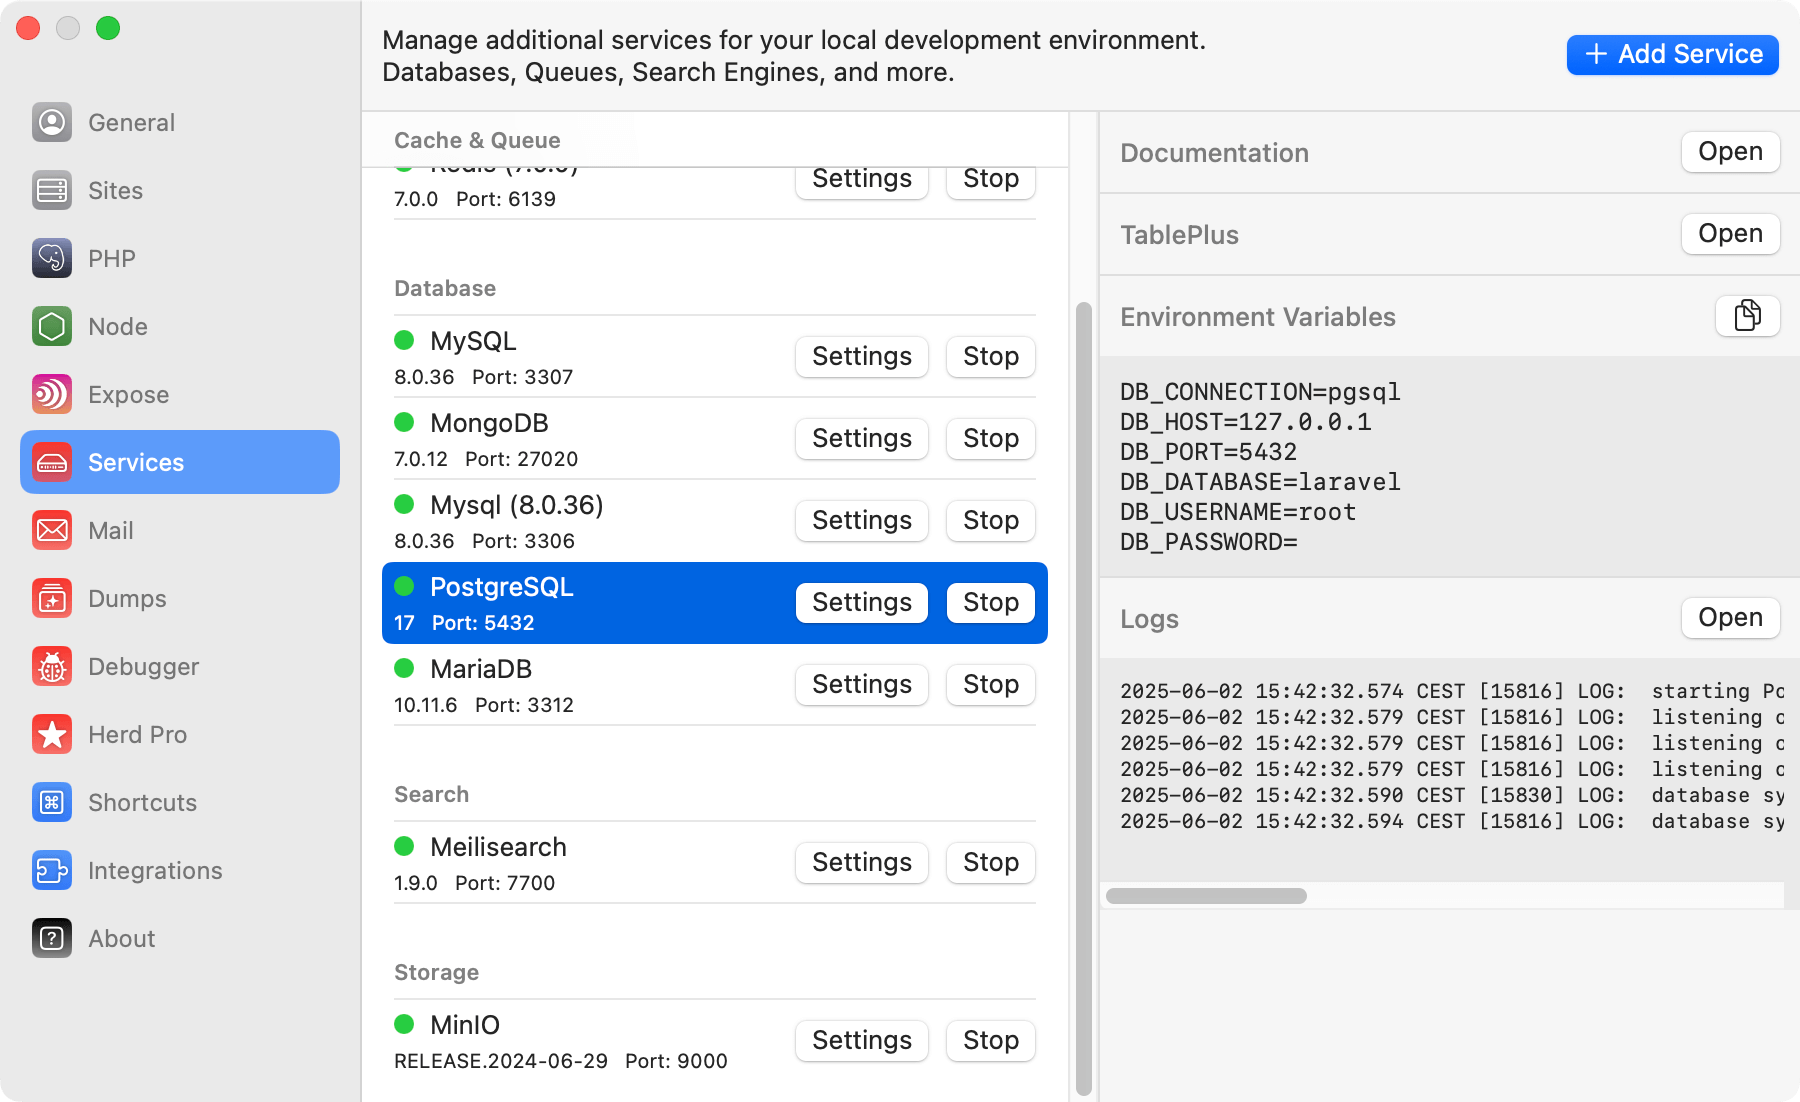 ## Connecting from your Laravel application
To connect it within your application, you can use the credentials that are listed next to the running service in the settings, or you can use the ones below.
```env theme={null}
DB_CONNECTION=pgsql
DB_HOST=127.0.0.1
DB_PORT=5432
DB_DATABASE=laravel # set this to your project database
DB_USERNAME=root
DB_PASSWORD=
```
## Database service migrations
Whether you set up a newer version of PostgreSQL or migrate from existing instances on your machine, the most comfortable way is to use a database client like [TablePlus](https://tableplus.com/) to export and import the database tables.
## Versions
Herd Pro allows you to install the following versions directly from the services tab of the settings. New versions are available regularly.
| Service | Version |
| ---------- | ------- |
| PostgreSQL | 14.x |
| PostgreSQL | 15.x |
| PostgreSQL | 16.x |
| PostgreSQL | 17.x |
---
# Source: https://herd.laravel.com/docs/macos/debugging/profiler.md
> ## Documentation Index
> Fetch the complete documentation index at: https://herd.laravel.com/docs/llms.txt
> Use this file to discover all available pages before exploring further.
# Profiler
# Profiling Applications
Herd supports a customized version of the [SPX profiler](https://github.com/beyondcode/php-spx) for PHP. The profiler allows you to identify bottlenecks in your application and supports profiling web and CLI requests.
## Installing the profiler extension
You can download and install the profiler extension by running this command in your terminal:
```bash theme={null}
/bin/bash -c "$(curl -fsSL https://raw.githubusercontent.com/beyondcode/php-spx/HEAD/install.sh)"
```
This command downloads the extension and moves it to your Herd application directory and also adds it to all your existing `php.ini` files. If you install a new version, please run this command again to add it to this version automatically.
The extension does not profile requests automatically and requires environment variables or specific headers to record and profile the request, so you can keep it enabled without slowing down your normal setup.
## Profiling Web Requests
You can either open the profiler dashboard from the site configuration of the Site Manager or by opening the `/herd-profiler` route of your application. This route is dynamically added to requests when you enable the profiler in the settings.
### The Profiler Dashboard
Herd uses the SPX extension for PHP to profile your application and display a customized dashboard of your requests. Please make sure to enable the profiling on the top left.
## Connecting from your Laravel application
To connect it within your application, you can use the credentials that are listed next to the running service in the settings, or you can use the ones below.
```env theme={null}
DB_CONNECTION=pgsql
DB_HOST=127.0.0.1
DB_PORT=5432
DB_DATABASE=laravel # set this to your project database
DB_USERNAME=root
DB_PASSWORD=
```
## Database service migrations
Whether you set up a newer version of PostgreSQL or migrate from existing instances on your machine, the most comfortable way is to use a database client like [TablePlus](https://tableplus.com/) to export and import the database tables.
## Versions
Herd Pro allows you to install the following versions directly from the services tab of the settings. New versions are available regularly.
| Service | Version |
| ---------- | ------- |
| PostgreSQL | 14.x |
| PostgreSQL | 15.x |
| PostgreSQL | 16.x |
| PostgreSQL | 17.x |
---
# Source: https://herd.laravel.com/docs/macos/debugging/profiler.md
> ## Documentation Index
> Fetch the complete documentation index at: https://herd.laravel.com/docs/llms.txt
> Use this file to discover all available pages before exploring further.
# Profiler
# Profiling Applications
Herd supports a customized version of the [SPX profiler](https://github.com/beyondcode/php-spx) for PHP. The profiler allows you to identify bottlenecks in your application and supports profiling web and CLI requests.
## Installing the profiler extension
You can download and install the profiler extension by running this command in your terminal:
```bash theme={null}
/bin/bash -c "$(curl -fsSL https://raw.githubusercontent.com/beyondcode/php-spx/HEAD/install.sh)"
```
This command downloads the extension and moves it to your Herd application directory and also adds it to all your existing `php.ini` files. If you install a new version, please run this command again to add it to this version automatically.
The extension does not profile requests automatically and requires environment variables or specific headers to record and profile the request, so you can keep it enabled without slowing down your normal setup.
## Profiling Web Requests
You can either open the profiler dashboard from the site configuration of the Site Manager or by opening the `/herd-profiler` route of your application. This route is dynamically added to requests when you enable the profiler in the settings.
### The Profiler Dashboard
Herd uses the SPX extension for PHP to profile your application and display a customized dashboard of your requests. Please make sure to enable the profiling on the top left.
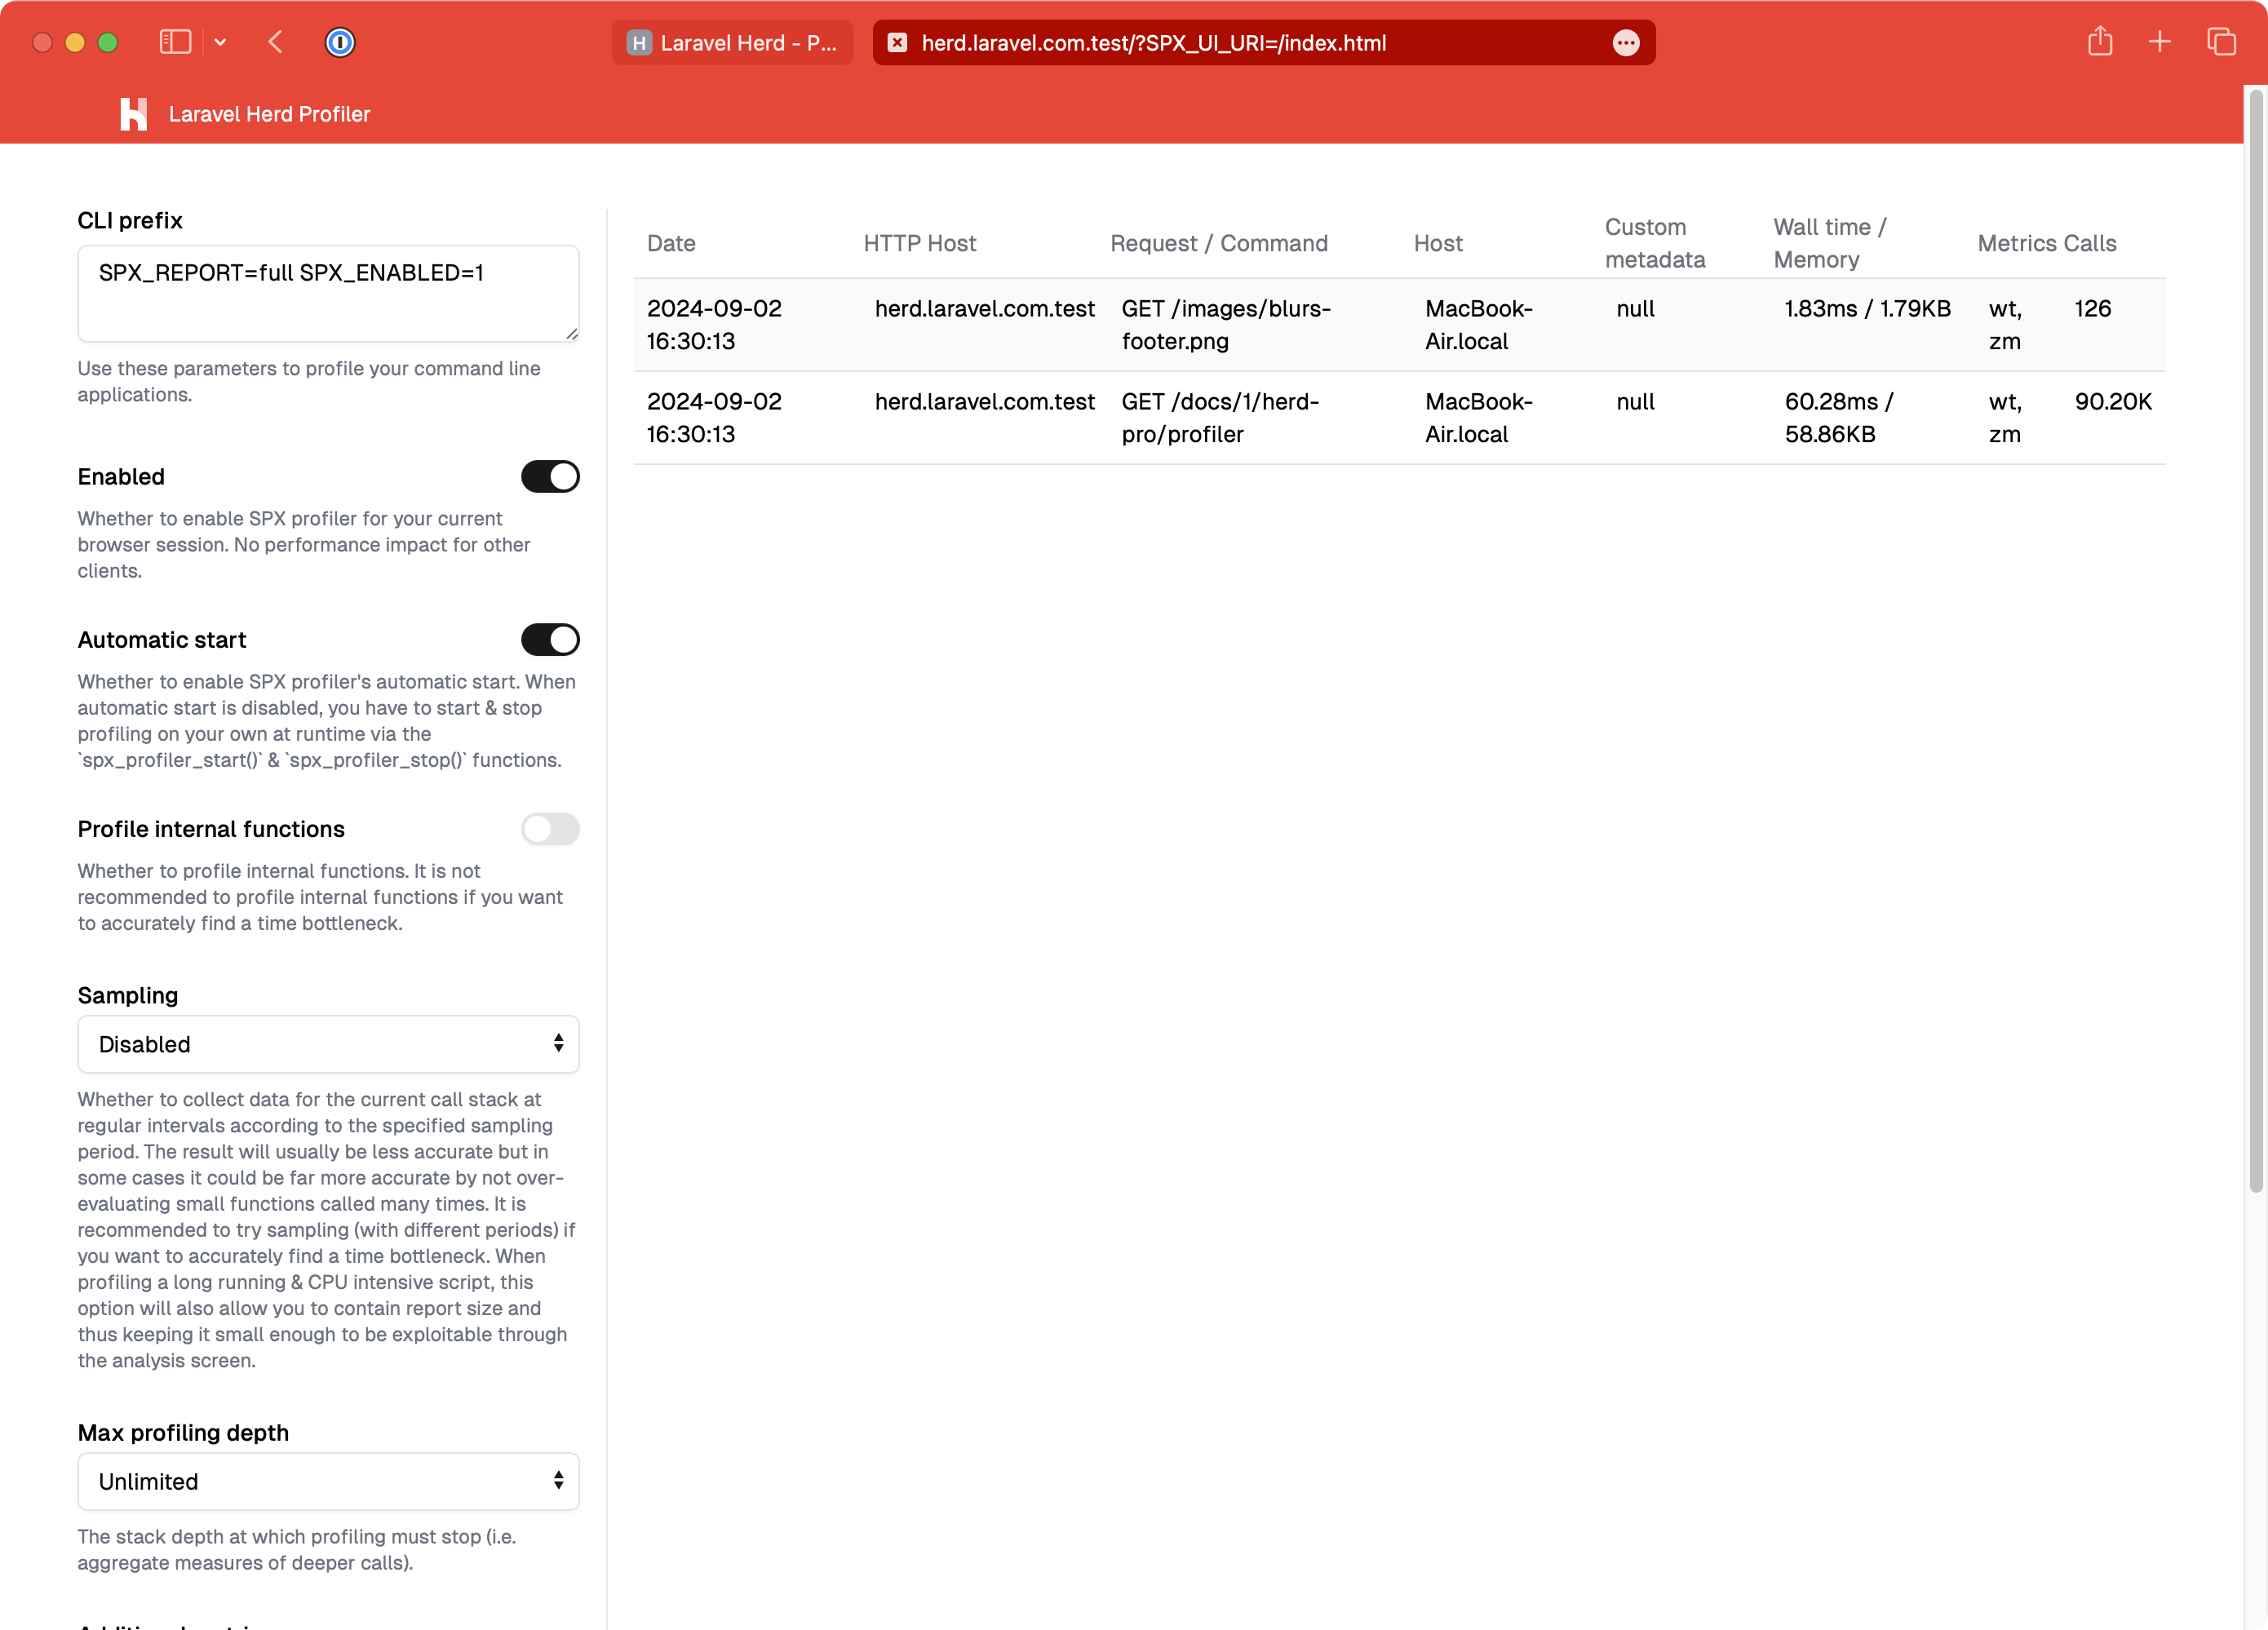 ### Results
If you click on a web request in the dashboard, it loads a breakdown of the request and allows you to inspect function calls and other operations in great detail.
### Results
If you click on a web request in the dashboard, it loads a breakdown of the request and allows you to inspect function calls and other operations in great detail.
 ## Profiling CLI scripts
While you can profile web requests via the dashboard, SPX has a profiler for CLI requests as well. When the SPX extension is active, you can run PHP scripts with `herd profile` to trigger the profiling process. As an example, you can profile artisan commands with this command:
```bash theme={null}
herd profile artisan inspire
```
This profiles the command and displays the results directly in your terminal.
## Profiling CLI scripts
While you can profile web requests via the dashboard, SPX has a profiler for CLI requests as well. When the SPX extension is active, you can run PHP scripts with `herd profile` to trigger the profiling process. As an example, you can profile artisan commands with this command:
```bash theme={null}
herd profile artisan inspire
```
This profiles the command and displays the results directly in your terminal.
 ## Profiling long-running CLI scripts
When you have long-running CLI scripts, such as daemonized processes, you might want to see profiling information regularly, instead of only seeing them once you end your PHP script.
You can do this by running:
```bash theme={null}
herd profile --live artisan long-running-task
```
You can learn more about SPX in the [official documentation](https://github.com/NoiseByNorthwest/php-spx).
---
# Source: https://herd.laravel.com/docs/macos/herd-pro-services/redis.md
> ## Documentation Index
> Fetch the complete documentation index at: https://herd.laravel.com/docs/llms.txt
> Use this file to discover all available pages before exploring further.
# Redis
# Setting up Redis
Redis is a fast in-memory data store that is very versatile, and most Laravel applications use it for caching or as queue service. While you may go with the `sync` driver for queues and the `file` driver for caches locally, it's often useful to have the same development setup that you use in production.
## Profiling long-running CLI scripts
When you have long-running CLI scripts, such as daemonized processes, you might want to see profiling information regularly, instead of only seeing them once you end your PHP script.
You can do this by running:
```bash theme={null}
herd profile --live artisan long-running-task
```
You can learn more about SPX in the [official documentation](https://github.com/NoiseByNorthwest/php-spx).
---
# Source: https://herd.laravel.com/docs/macos/herd-pro-services/redis.md
> ## Documentation Index
> Fetch the complete documentation index at: https://herd.laravel.com/docs/llms.txt
> Use this file to discover all available pages before exploring further.
# Redis
# Setting up Redis
Redis is a fast in-memory data store that is very versatile, and most Laravel applications use it for caching or as queue service. While you may go with the `sync` driver for queues and the `file` driver for caches locally, it's often useful to have the same development setup that you use in production.
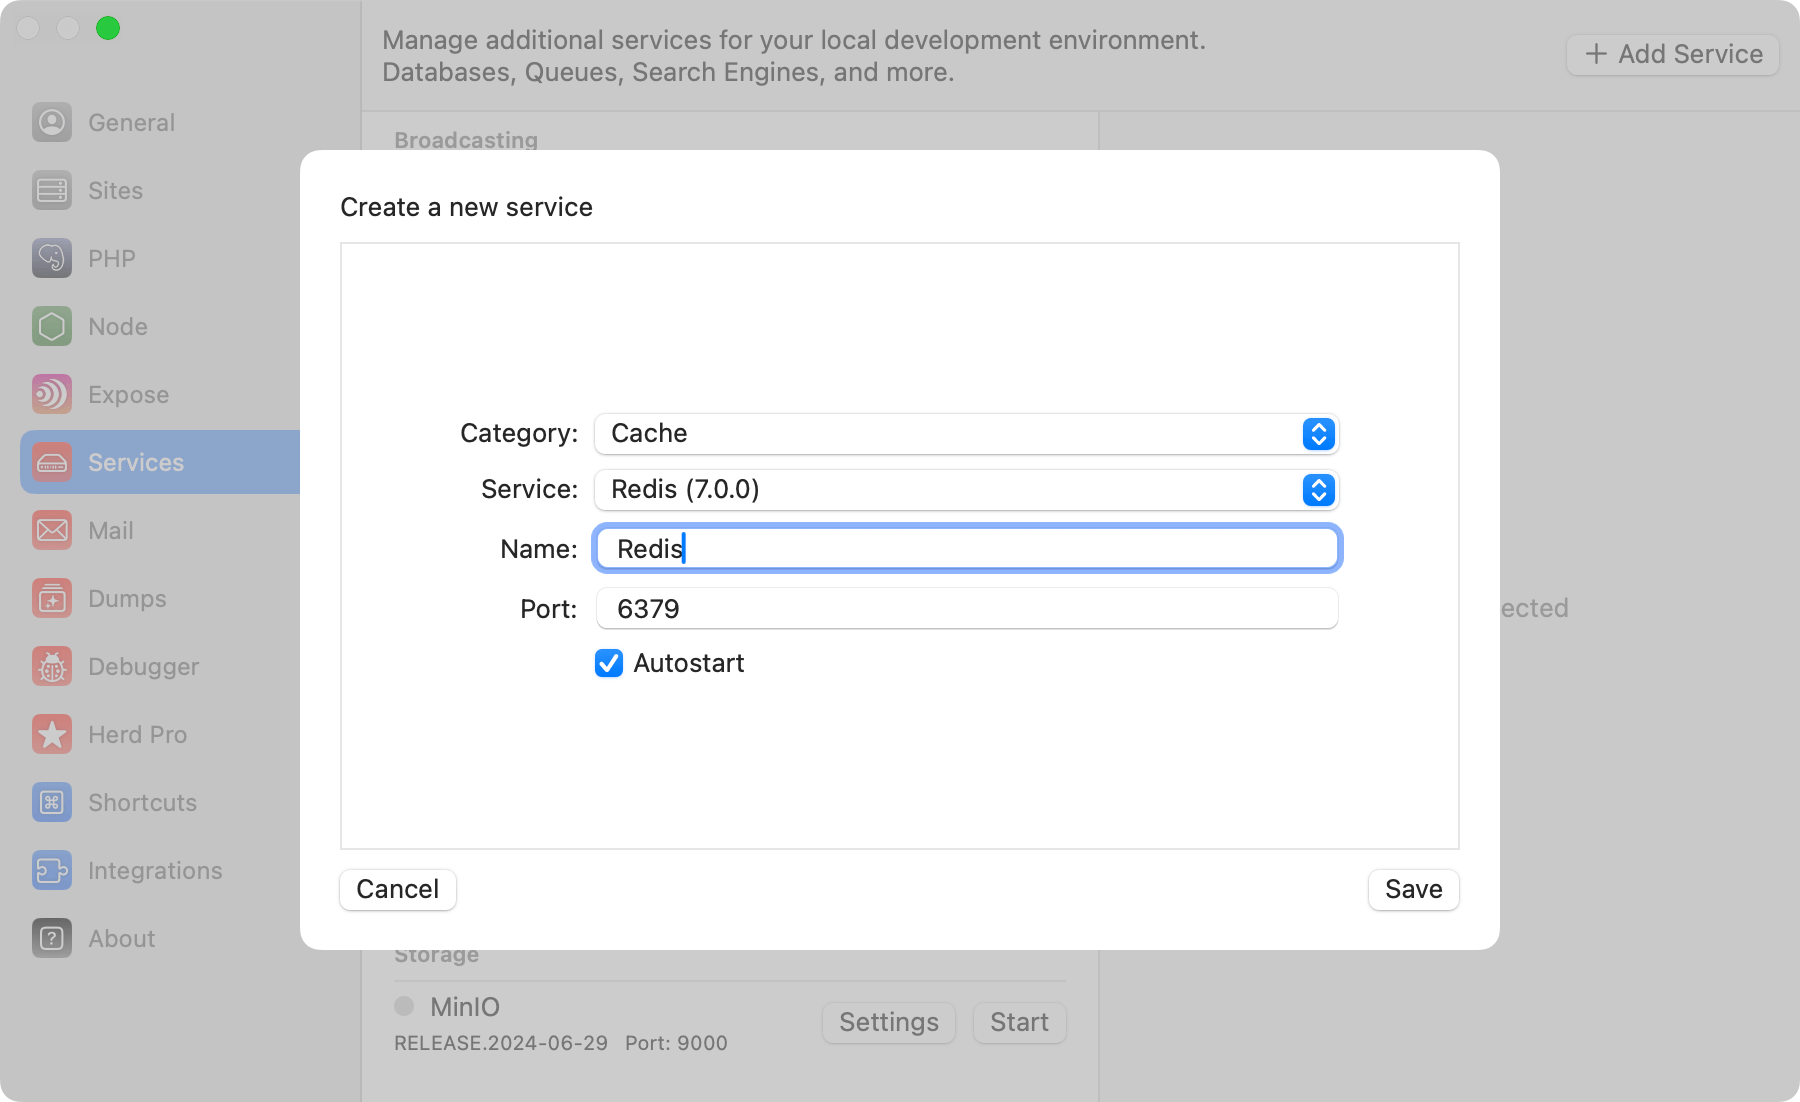 ## Configuration
Redis comes with a sensible default configuration, making it easy to use for local development without any changes. If you want change the port of the Redis service or decide if you want to automatically start it with Herd, you can do that in the settings of the service.
You can modify the configuration by right-clicking the service in the settings and open its data directory. In this data directory, there is a `redis.conf` that this specific Redis instance loads on startup.
Make sure to restart the service if you make changes to this configuration file.
## Accessing the Redis instance
You usually don't need dedicated Redis databases within your redis instance but if you decide to do that or want to debug the content of your Redis database, you can open TablePlus directly from the menu on the right side.
## Configuration
Redis comes with a sensible default configuration, making it easy to use for local development without any changes. If you want change the port of the Redis service or decide if you want to automatically start it with Herd, you can do that in the settings of the service.
You can modify the configuration by right-clicking the service in the settings and open its data directory. In this data directory, there is a `redis.conf` that this specific Redis instance loads on startup.
Make sure to restart the service if you make changes to this configuration file.
## Accessing the Redis instance
You usually don't need dedicated Redis databases within your redis instance but if you decide to do that or want to debug the content of your Redis database, you can open TablePlus directly from the menu on the right side.
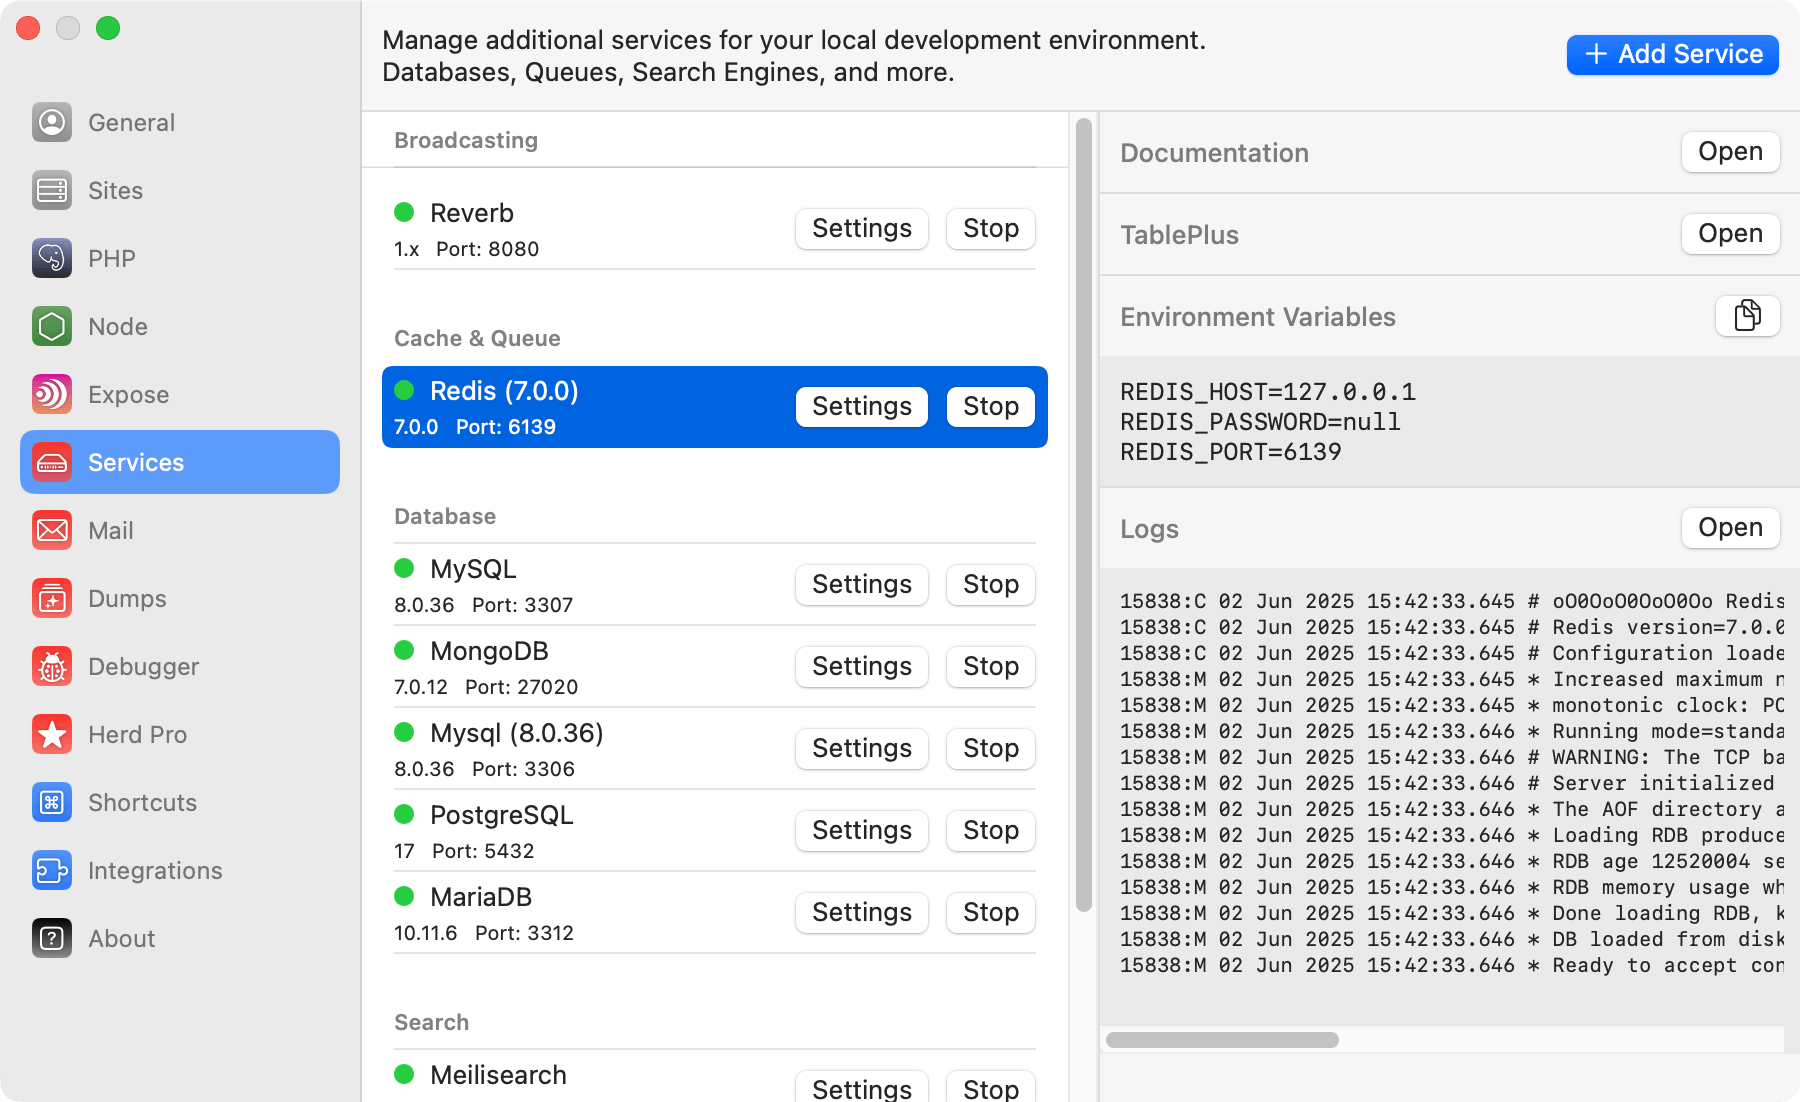 ## Connecting from your Laravel application
To connect it within your application, you can use the credentials that are listed next to the running service in the settings, or you can use the ones below.
```env theme={null}
# Driver configuration
CACHE_DRIVER=redis
QUEUE_CONNECTION=redis
SESSION_DRIVER=redis
# Redis setup
REDIS_HOST=127.0.0.1
REDIS_PASSWORD=null
REDIS_PORT=6138
```
## Versions
Herd Pro allows you to install the following versions directly from the services tab of the settings. New versions are available regularly.
| Service | Version |
| ------- | ------- |
| Redis | 7.0.0 |
---
# Source: https://herd.laravel.com/docs/macos/troubleshooting/restarting-services.md
> ## Documentation Index
> Fetch the complete documentation index at: https://herd.laravel.com/docs/llms.txt
> Use this file to discover all available pages before exploring further.
# Restarting Services
# Restarting Herd Services
It might happen that Herd displays that a service like `FPM` is not running for a specific PHP version. This can happen if Herd is unable to properly shut down all background services when you close the app or migrate from a previous setup.
## Via the GUI
You may force a restart of all Herd services by clicking on the Herd icon in the menu bar and holding the `option` key `⌥`.
This will change the `Stop all` menu item to `Force stop all`. Click on it to forcefully stop all Herd services, and then click on `Start all` to restart them.
## Via the terminal
To kill all stray services, go to your terminal and perform the `killall` command for every service that is still running, naming the services.
## Force a shutdown of all Herd services
This command shuts down all processes that Herd might run (PHP 7.4 - 8.4, Nginx and Dnsmasq).
### Shutdown all Herd services on Apple Silicon Macs
```shell theme={null}
sudo killall nginx-arm64 dnsmasq-arm64 \
php74-fpm \
php80-fpm \
php81-fpm \
php82-fpm \
php83-fpm \
php84-fpm
```
### Shutdown all Herd services on Intel Macs
```shell theme={null}
sudo killall nginx-x86 dnsmasq-x86 \
php74-fpm \
php80-fpm \
php81-fpm \
php82-fpm \
php83-fpm \
php84-fpm
```
## Restart the background service
Herd has a background service that is responsible for running nginx and dnsmasq as root on your machine. You can shutdown this services by terminating if via the activity monitor of macOS and searching for a service with the name `de.beyondco.herd.helper`.
---
# Source: https://herd.laravel.com/docs/macos/migration-guides/sail.md
> ## Documentation Index
> Fetch the complete documentation index at: https://herd.laravel.com/docs/llms.txt
> Use this file to discover all available pages before exploring further.
# Migrating from Sail
# How to migrate from Laravel Sail to Herd
If you're currently using Laravel Sail for local development and want to switch to Herd, this guide will walk you through the migration process. While both tools provide excellent development environments, they have different approaches to managing services and dependencies.
## Understanding the Differences
Laravel Sail uses Docker containers to provide isolated development environments, while Herd takes a native approach by running services directly on your machine. Here are the key differences:
## Connecting from your Laravel application
To connect it within your application, you can use the credentials that are listed next to the running service in the settings, or you can use the ones below.
```env theme={null}
# Driver configuration
CACHE_DRIVER=redis
QUEUE_CONNECTION=redis
SESSION_DRIVER=redis
# Redis setup
REDIS_HOST=127.0.0.1
REDIS_PASSWORD=null
REDIS_PORT=6138
```
## Versions
Herd Pro allows you to install the following versions directly from the services tab of the settings. New versions are available regularly.
| Service | Version |
| ------- | ------- |
| Redis | 7.0.0 |
---
# Source: https://herd.laravel.com/docs/macos/troubleshooting/restarting-services.md
> ## Documentation Index
> Fetch the complete documentation index at: https://herd.laravel.com/docs/llms.txt
> Use this file to discover all available pages before exploring further.
# Restarting Services
# Restarting Herd Services
It might happen that Herd displays that a service like `FPM` is not running for a specific PHP version. This can happen if Herd is unable to properly shut down all background services when you close the app or migrate from a previous setup.
## Via the GUI
You may force a restart of all Herd services by clicking on the Herd icon in the menu bar and holding the `option` key `⌥`.
This will change the `Stop all` menu item to `Force stop all`. Click on it to forcefully stop all Herd services, and then click on `Start all` to restart them.
## Via the terminal
To kill all stray services, go to your terminal and perform the `killall` command for every service that is still running, naming the services.
## Force a shutdown of all Herd services
This command shuts down all processes that Herd might run (PHP 7.4 - 8.4, Nginx and Dnsmasq).
### Shutdown all Herd services on Apple Silicon Macs
```shell theme={null}
sudo killall nginx-arm64 dnsmasq-arm64 \
php74-fpm \
php80-fpm \
php81-fpm \
php82-fpm \
php83-fpm \
php84-fpm
```
### Shutdown all Herd services on Intel Macs
```shell theme={null}
sudo killall nginx-x86 dnsmasq-x86 \
php74-fpm \
php80-fpm \
php81-fpm \
php82-fpm \
php83-fpm \
php84-fpm
```
## Restart the background service
Herd has a background service that is responsible for running nginx and dnsmasq as root on your machine. You can shutdown this services by terminating if via the activity monitor of macOS and searching for a service with the name `de.beyondco.herd.helper`.
---
# Source: https://herd.laravel.com/docs/macos/migration-guides/sail.md
> ## Documentation Index
> Fetch the complete documentation index at: https://herd.laravel.com/docs/llms.txt
> Use this file to discover all available pages before exploring further.
# Migrating from Sail
# How to migrate from Laravel Sail to Herd
If you're currently using Laravel Sail for local development and want to switch to Herd, this guide will walk you through the migration process. While both tools provide excellent development environments, they have different approaches to managing services and dependencies.
## Understanding the Differences
Laravel Sail uses Docker containers to provide isolated development environments, while Herd takes a native approach by running services directly on your machine. Here are the key differences:
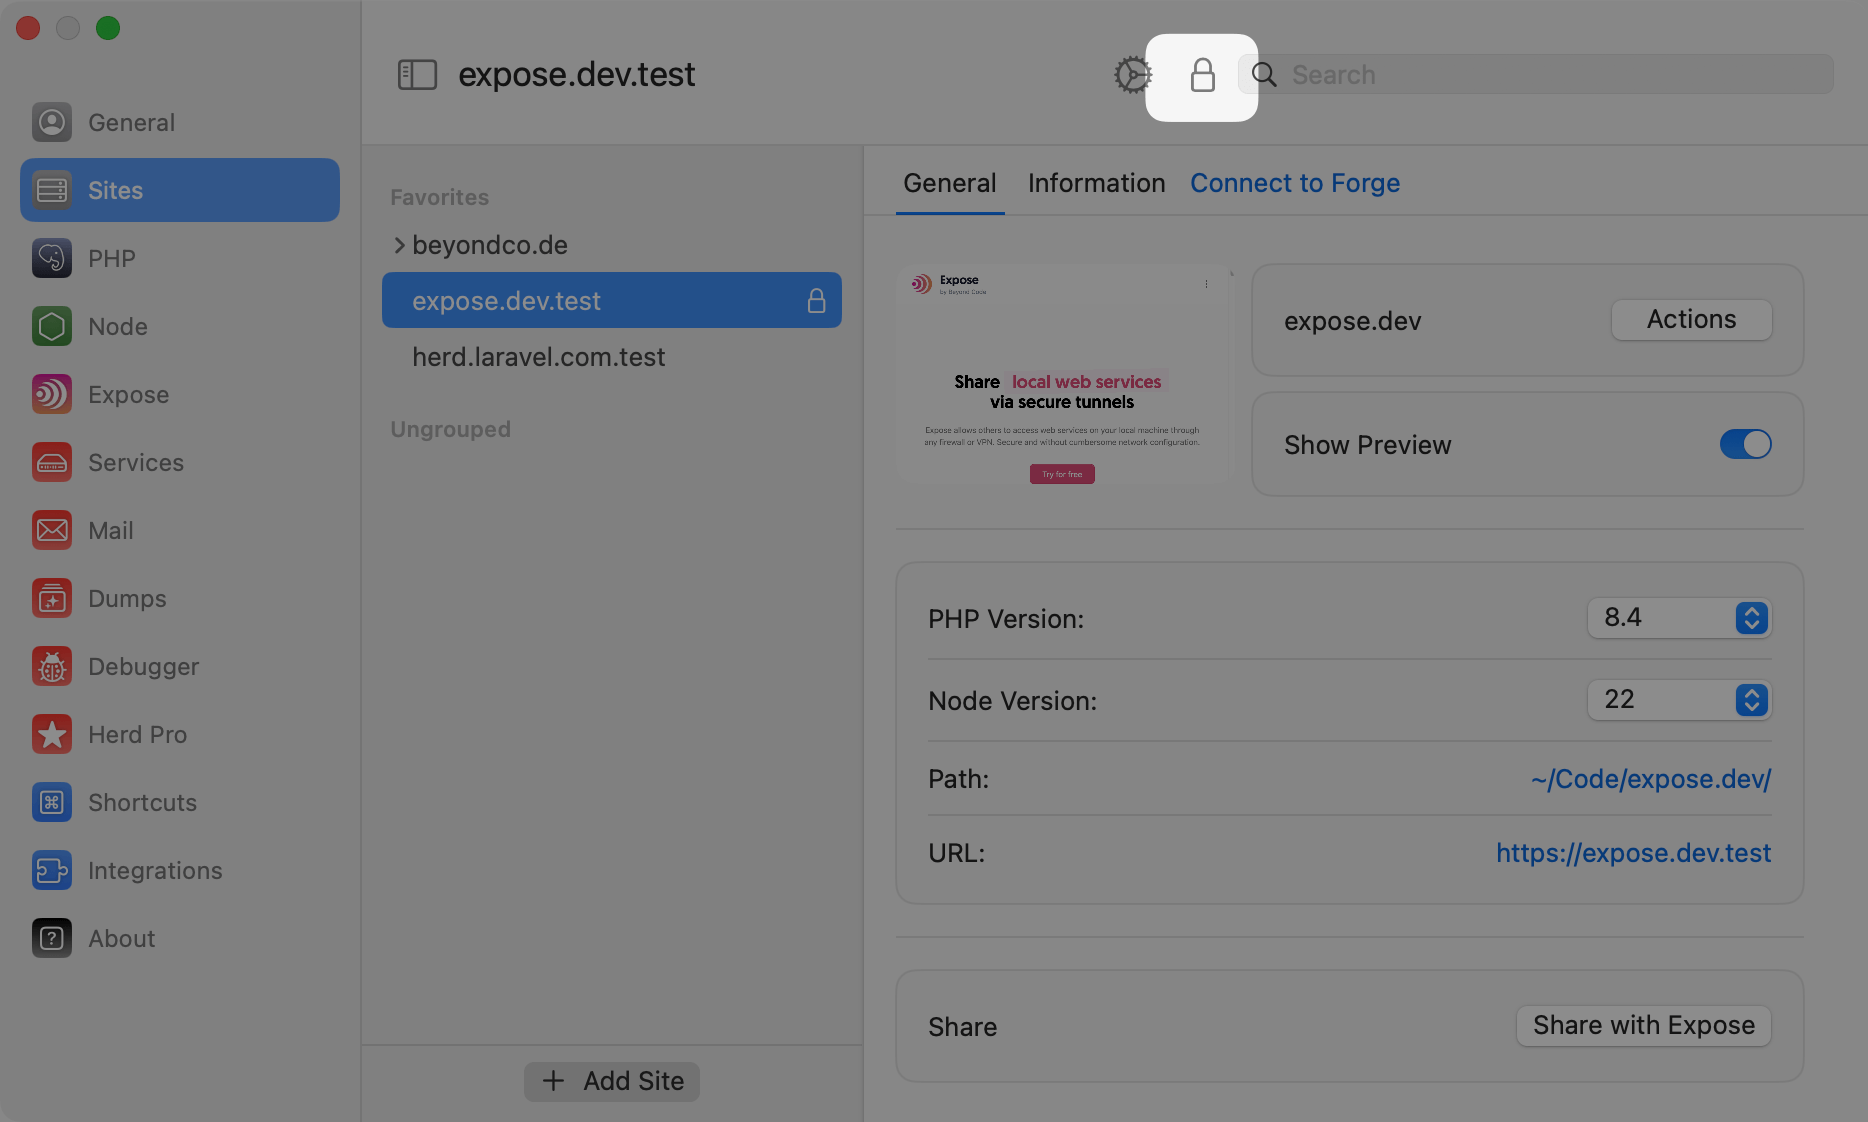 Clicking on the lock icon toggles the status of the site. If you're securing the site, you may need to confirm one or more permission related popups to create the local certificate.
## Via the CLI
If you prefer to use the CLI, you can use the `herd secure` command to secure/unsecure a site.
For example, if Herd serves your site via the `example-site.test` domain, you need run the following command to secure it:
```shell theme={null}
# secure the current working directory
herd secure
# secure example-site.test from anywhere
herd secure example-site
```
To "unsecure" a site and revert back to serving its traffic over plain HTTP, use the `unsecore` command.
Like the `secure` command, this command accepts the sitename that you wish to unsecure:
```shell theme={null}
# unsecure the current working directory
herd unsecure
# unsecure example-site.test from anywhere
herd unsecure example-site
```
After unsecuring a site, you man need to restart your browser session because many browsers like Google Chrome cache redirects to HTTPS and will give you a hard time.
## Listing all secure sites
The Herd CLI has a command to list all sites that have a local TLS certificate. You may want to use that for debugging purposes.
```shell theme={null}
herd secured
```
This gives you a similar output to this:
```
+----------------------------+----------------------------+
| Site | Valid Until |
+----------------------------+----------------------------+
| expose.dev.test | 2024-08-10 12:07:38 GMT |
| herd-templates.test | 2024-09-05 25:12:77 GMT |
| reverb-110.test | 2024-09-11 13:44:56 GMT |
| tinkerwell.app.test | 2024-10-16 19:53:32 GMT |
+----------------------------+----------------------------+
```
---
# Source: https://herd.laravel.com/docs/macos/herd-pro-services/service-versions.md
> ## Documentation Index
> Fetch the complete documentation index at: https://herd.laravel.com/docs/llms.txt
> Use this file to discover all available pages before exploring further.
# Version Matrix
# Services Version List
This page provides an overview of available Herd services on macOS in different versions. New versions are available regularly and they work great for general purpose development, but you can always install very specific versions by downloading them from their vendor or by using Brew or Docker.
## Databases
| Service | Version |
| :--------- | ------- |
| MariaDB | 10.11.6 |
| MongoDB | 7.0.x |
| MySQL | 8.0.x |
| MySQL | 8.4.x |
| MySQL | 9.4.x |
| PostgreSQL | 14.x |
| PostgreSQL | 15.x |
| PostgreSQL | 16.x |
| PostgreSQL | 17.x |
| PostgreSQL | 18.x |
## Caches & Queues
| Service | Version |
| :------ | ------- |
| Redis | 7.0.x |
| Redis | 7.4.x |
| Valkey | 7.2.x |
| Valkey | 8.0.x |
| Valkey | 8.1.x |
## Broadcasting
| Service | Version |
| :------ | ------- |
| Reverb | 1.x |
## Search
| Service | Version |
| :---------- | ------- |
| Meilisearch | 1.x |
| Typesense | 0.26 |
| Typesense | 29.x |
## Storage
| Service | Version |
| :------ | ------------------ |
| MinIO | RELEASE.2024-XX-XX |
| MinIO | RELEASE.2025-XX-XX |
---
# Source: https://herd.laravel.com/docs/macos/herd-pro-services/services.md
> ## Documentation Index
> Fetch the complete documentation index at: https://herd.laravel.com/docs/llms.txt
> Use this file to discover all available pages before exploring further.
# Services
# Services
Herd Pro provides an interface that allows you to spin up complementary services to your site easily. These services can be databases, queues and broadcasting systems, but also search engines and storage providers that mimic your production environment.
You can combine these services with a [herd.yml](/macos/sites/herd-yaml) in your project and store the site configuration for a project within the repository. This makes it super easy for others to spin up a development environment with all services in seconds.
## Installing Services
To install a service, go to the settings and select the services tab. In this tab, you can add new services and manage existing ones.
Every service has a binary directory where the applications files live and a data directory where the service stores the data and custom configuration. You can access both folders by right-clicking the service and selecting the destination.
Clicking on the lock icon toggles the status of the site. If you're securing the site, you may need to confirm one or more permission related popups to create the local certificate.
## Via the CLI
If you prefer to use the CLI, you can use the `herd secure` command to secure/unsecure a site.
For example, if Herd serves your site via the `example-site.test` domain, you need run the following command to secure it:
```shell theme={null}
# secure the current working directory
herd secure
# secure example-site.test from anywhere
herd secure example-site
```
To "unsecure" a site and revert back to serving its traffic over plain HTTP, use the `unsecore` command.
Like the `secure` command, this command accepts the sitename that you wish to unsecure:
```shell theme={null}
# unsecure the current working directory
herd unsecure
# unsecure example-site.test from anywhere
herd unsecure example-site
```
After unsecuring a site, you man need to restart your browser session because many browsers like Google Chrome cache redirects to HTTPS and will give you a hard time.
## Listing all secure sites
The Herd CLI has a command to list all sites that have a local TLS certificate. You may want to use that for debugging purposes.
```shell theme={null}
herd secured
```
This gives you a similar output to this:
```
+----------------------------+----------------------------+
| Site | Valid Until |
+----------------------------+----------------------------+
| expose.dev.test | 2024-08-10 12:07:38 GMT |
| herd-templates.test | 2024-09-05 25:12:77 GMT |
| reverb-110.test | 2024-09-11 13:44:56 GMT |
| tinkerwell.app.test | 2024-10-16 19:53:32 GMT |
+----------------------------+----------------------------+
```
---
# Source: https://herd.laravel.com/docs/macos/herd-pro-services/service-versions.md
> ## Documentation Index
> Fetch the complete documentation index at: https://herd.laravel.com/docs/llms.txt
> Use this file to discover all available pages before exploring further.
# Version Matrix
# Services Version List
This page provides an overview of available Herd services on macOS in different versions. New versions are available regularly and they work great for general purpose development, but you can always install very specific versions by downloading them from their vendor or by using Brew or Docker.
## Databases
| Service | Version |
| :--------- | ------- |
| MariaDB | 10.11.6 |
| MongoDB | 7.0.x |
| MySQL | 8.0.x |
| MySQL | 8.4.x |
| MySQL | 9.4.x |
| PostgreSQL | 14.x |
| PostgreSQL | 15.x |
| PostgreSQL | 16.x |
| PostgreSQL | 17.x |
| PostgreSQL | 18.x |
## Caches & Queues
| Service | Version |
| :------ | ------- |
| Redis | 7.0.x |
| Redis | 7.4.x |
| Valkey | 7.2.x |
| Valkey | 8.0.x |
| Valkey | 8.1.x |
## Broadcasting
| Service | Version |
| :------ | ------- |
| Reverb | 1.x |
## Search
| Service | Version |
| :---------- | ------- |
| Meilisearch | 1.x |
| Typesense | 0.26 |
| Typesense | 29.x |
## Storage
| Service | Version |
| :------ | ------------------ |
| MinIO | RELEASE.2024-XX-XX |
| MinIO | RELEASE.2025-XX-XX |
---
# Source: https://herd.laravel.com/docs/macos/herd-pro-services/services.md
> ## Documentation Index
> Fetch the complete documentation index at: https://herd.laravel.com/docs/llms.txt
> Use this file to discover all available pages before exploring further.
# Services
# Services
Herd Pro provides an interface that allows you to spin up complementary services to your site easily. These services can be databases, queues and broadcasting systems, but also search engines and storage providers that mimic your production environment.
You can combine these services with a [herd.yml](/macos/sites/herd-yaml) in your project and store the site configuration for a project within the repository. This makes it super easy for others to spin up a development environment with all services in seconds.
## Installing Services
To install a service, go to the settings and select the services tab. In this tab, you can add new services and manage existing ones.
Every service has a binary directory where the applications files live and a data directory where the service stores the data and custom configuration. You can access both folders by right-clicking the service and selecting the destination.
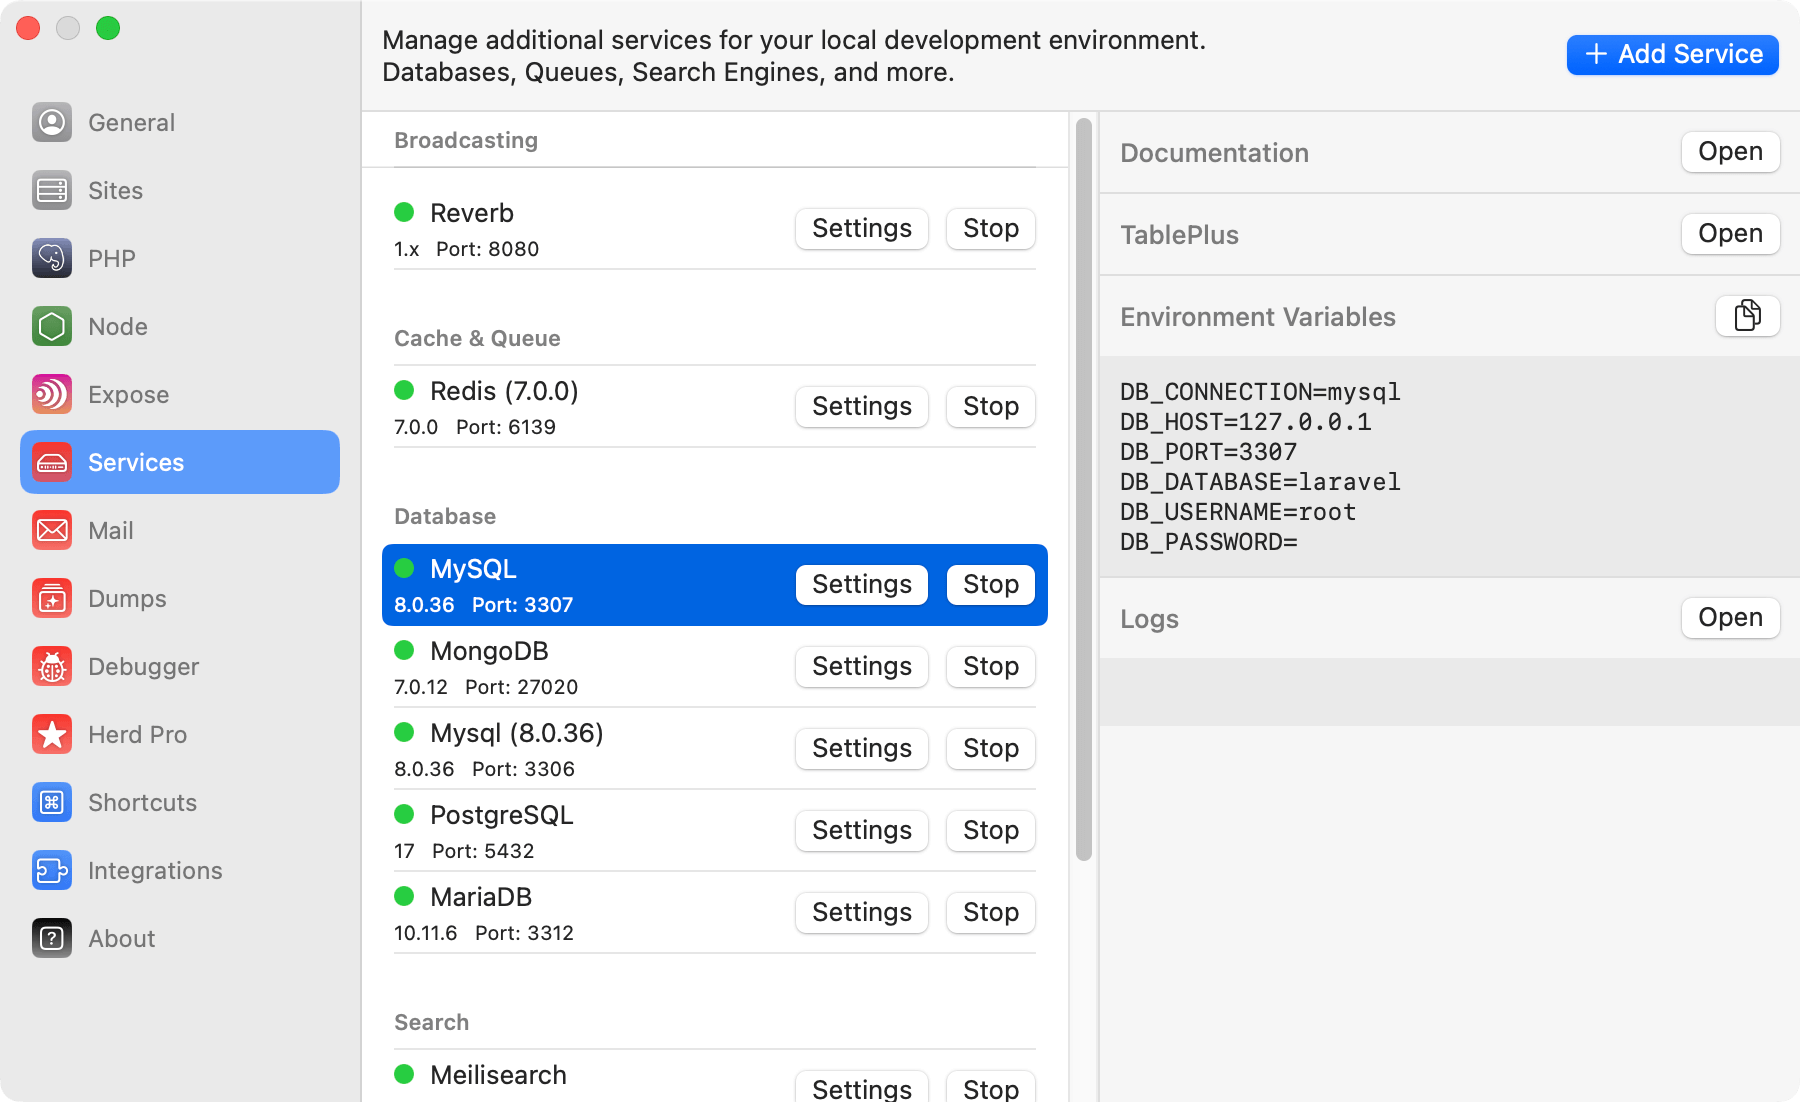 ## Managing Services
All services have a right click menu with actions for the individual service. These actions always include a force quit option and directory shortcuts but also provide individual actions that a tailored to the service.
## Available Services
Herd Pro ships with the following services:
* [MySQL](/macos/herd-pro-services/mysql)
* [MariaDB](/macos/herd-pro-services/mariadb)
* [PostgreSQL](/macos/herd-pro-services/postgresql)
* [MongoDB](/macos/herd-pro-services/mongodb)
* [Redis](/macos/herd-pro-services/redis)
* [Laravel Reverb](/macos/herd-pro-services/laravel-reverb)
* [Typesense](/macos/herd-pro-services/typesense)
* [Meilisearch](/macos/herd-pro-services/meilisearch)
* [MinIO](/macos/herd-pro-services/minio)
You can see which versions Herd provides in the [version matrix](/macos/herd-pro-services/service-versions).
## Deleting Services
You can delete services via right-clicking on them in the service manager and selecting delete.
---
# Source: https://herd.laravel.com/docs/macos/sites/sharing-sites.md
> ## Documentation Index
> Fetch the complete documentation index at: https://herd.laravel.com/docs/llms.txt
> Use this file to discover all available pages before exploring further.
# Sharing Sites
# How to share a site
Herd makes it easy to share your local sites with the world. This is great for testing your sites on different devices, receiving webhooks, or sharing them with clients and colleagues.
Herd uses [Expose](https://expose.dev) to share your sites.
## Sharing sites via Expose
## Managing Services
All services have a right click menu with actions for the individual service. These actions always include a force quit option and directory shortcuts but also provide individual actions that a tailored to the service.
## Available Services
Herd Pro ships with the following services:
* [MySQL](/macos/herd-pro-services/mysql)
* [MariaDB](/macos/herd-pro-services/mariadb)
* [PostgreSQL](/macos/herd-pro-services/postgresql)
* [MongoDB](/macos/herd-pro-services/mongodb)
* [Redis](/macos/herd-pro-services/redis)
* [Laravel Reverb](/macos/herd-pro-services/laravel-reverb)
* [Typesense](/macos/herd-pro-services/typesense)
* [Meilisearch](/macos/herd-pro-services/meilisearch)
* [MinIO](/macos/herd-pro-services/minio)
You can see which versions Herd provides in the [version matrix](/macos/herd-pro-services/service-versions).
## Deleting Services
You can delete services via right-clicking on them in the service manager and selecting delete.
---
# Source: https://herd.laravel.com/docs/macos/sites/sharing-sites.md
> ## Documentation Index
> Fetch the complete documentation index at: https://herd.laravel.com/docs/llms.txt
> Use this file to discover all available pages before exploring further.
# Sharing Sites
# How to share a site
Herd makes it easy to share your local sites with the world. This is great for testing your sites on different devices, receiving webhooks, or sharing them with clients and colleagues.
Herd uses [Expose](https://expose.dev) to share your sites.
## Sharing sites via Expose
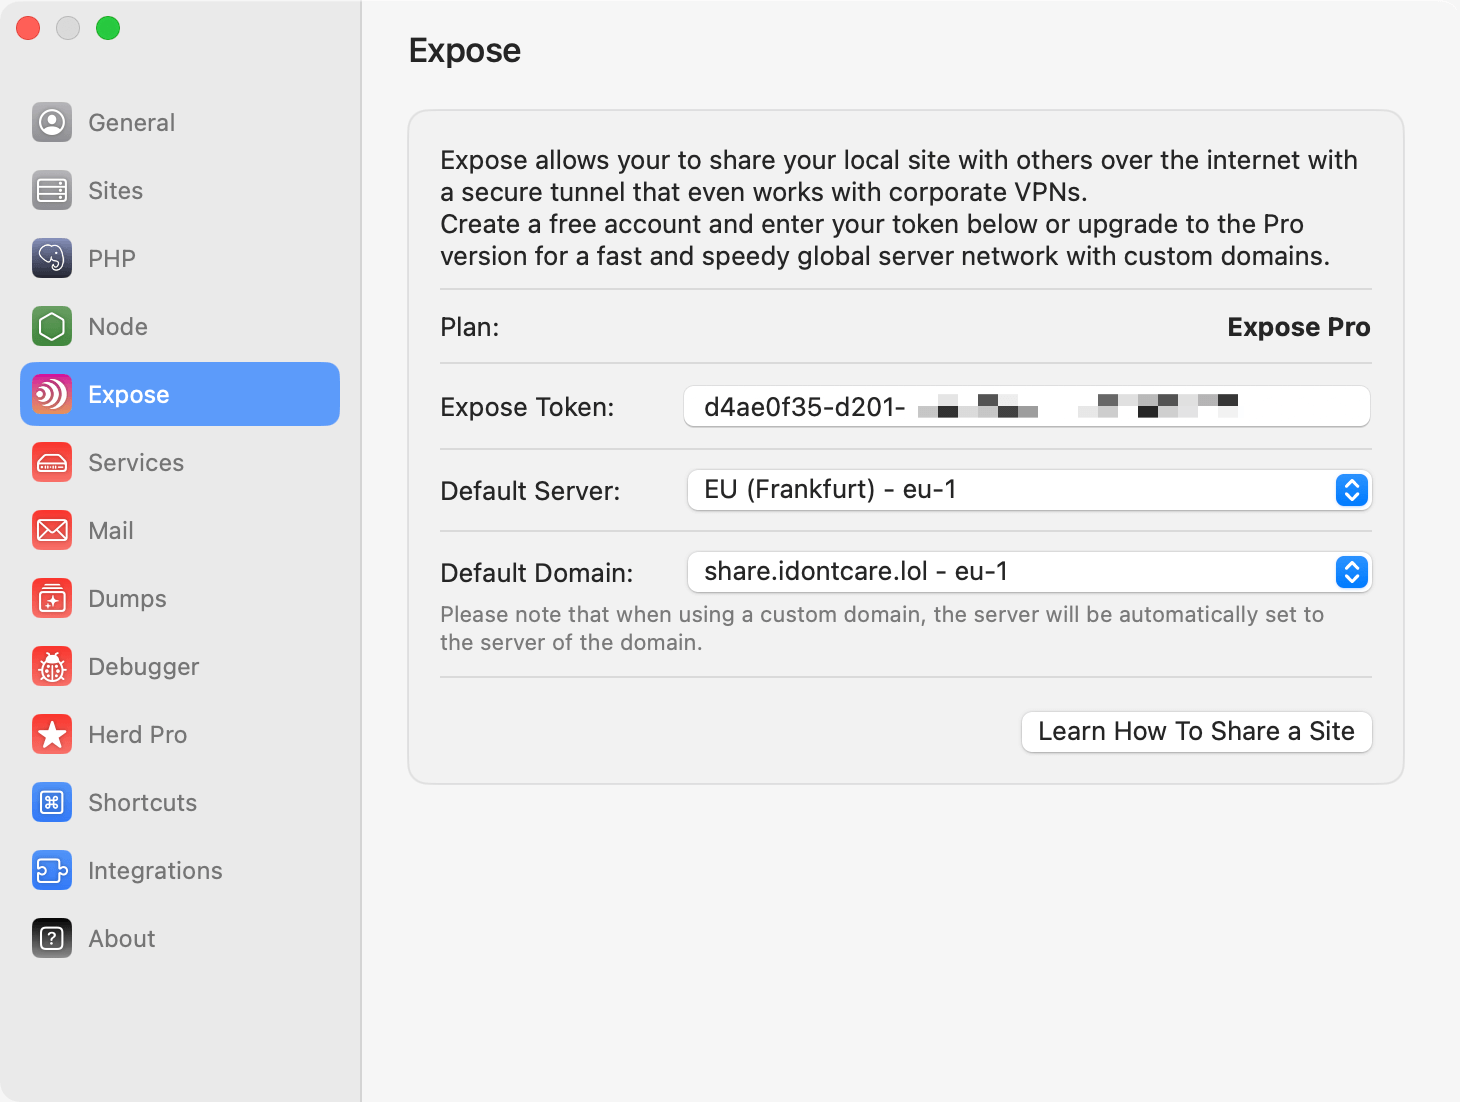 Or you can use the CLI:
```shell theme={null}
expose token YOUR_TOKEN_HERE
```
Once you configured your authentication token, you can share your sites by running `herd share` or `expose share` in the site directory that you want to share.
```shell theme={null}
cd ~/Herd/example-site
herd share
# Share a linked site:
herd share http://your-local-site.test
# You can share a secured site with:
herd share https://your-secured-local-site.test
```
You can specify a subdomain or server region for best performance and by adding parameters for them to the `share` command.
```shell theme={null}
herd share https://example-site.test --subdomain=my-project-name --server=us-1
```
## Sharing with basic authentication
You may protect your share links with basic authentication by using the `--basicAuth` argument when sharing your site.
```shell theme={null}
herd share https://example-site.test --basicAuth="user:password"
```
## Sharing sites via ngrok
If you want to use ngrok, install it according to their instructions. After that, you can share Herd sites via the terminal:
```shell theme={null}
ngrok http --host-header=rewrite unsecured-site.test
ngrok http --host-header=rewrite secured-site.test:443
```
---
# Source: https://herd.laravel.com/docs/macos/advanced-usage/shortcuts.md
> ## Documentation Index
> Fetch the complete documentation index at: https://herd.laravel.com/docs/llms.txt
> Use this file to discover all available pages before exploring further.
# Shortcuts
# Shortcuts
Herd comes with global shortcuts that integrate with your system and make accessing your current project easier than ever.
You can set up these global shortcuts in the settings.
Or you can use the CLI:
```shell theme={null}
expose token YOUR_TOKEN_HERE
```
Once you configured your authentication token, you can share your sites by running `herd share` or `expose share` in the site directory that you want to share.
```shell theme={null}
cd ~/Herd/example-site
herd share
# Share a linked site:
herd share http://your-local-site.test
# You can share a secured site with:
herd share https://your-secured-local-site.test
```
You can specify a subdomain or server region for best performance and by adding parameters for them to the `share` command.
```shell theme={null}
herd share https://example-site.test --subdomain=my-project-name --server=us-1
```
## Sharing with basic authentication
You may protect your share links with basic authentication by using the `--basicAuth` argument when sharing your site.
```shell theme={null}
herd share https://example-site.test --basicAuth="user:password"
```
## Sharing sites via ngrok
If you want to use ngrok, install it according to their instructions. After that, you can share Herd sites via the terminal:
```shell theme={null}
ngrok http --host-header=rewrite unsecured-site.test
ngrok http --host-header=rewrite secured-site.test:443
```
---
# Source: https://herd.laravel.com/docs/macos/advanced-usage/shortcuts.md
> ## Documentation Index
> Fetch the complete documentation index at: https://herd.laravel.com/docs/llms.txt
> Use this file to discover all available pages before exploring further.
# Shortcuts
# Shortcuts
Herd comes with global shortcuts that integrate with your system and make accessing your current project easier than ever.
You can set up these global shortcuts in the settings.
 Herd supports the following shortcuts:
* Open `php artisan tinker` or [Tinkerwell](https://tinkerwell.app) for the active project
* Open the path of the active project in your terminal
* Open the list of sites in Herd
* Open Dumps
* Enable/Disable dump interception
* Clear all dumps
* Open Mails
* Open Log Viewer
Every time you serve a site by opening the site in your browser, this site becomes the active project and Herd remembers its URL and path.
## Terminals
When a shortcut opens a terminal, Herd uses the terminal that you select in the settings. Herd supports the default Terminal, [iTerm](https://iterm2.com/) and [Warp](https://www.warp.dev/) – but Warp does not come with the possibility to run commands after it opens, so it doesn't have the same convenience as the default Terminal or iTerm.
---
# Source: https://herd.laravel.com/docs/macos/getting-started/sites.md
> ## Documentation Index
> Fetch the complete documentation index at: https://herd.laravel.com/docs/llms.txt
> Use this file to discover all available pages before exploring further.
# Sites
# Sites
Herd uses the concept of *parked* paths and *linked* directories for serving sites. You can access every site in a parked path via `
Herd supports the following shortcuts:
* Open `php artisan tinker` or [Tinkerwell](https://tinkerwell.app) for the active project
* Open the path of the active project in your terminal
* Open the list of sites in Herd
* Open Dumps
* Enable/Disable dump interception
* Clear all dumps
* Open Mails
* Open Log Viewer
Every time you serve a site by opening the site in your browser, this site becomes the active project and Herd remembers its URL and path.
## Terminals
When a shortcut opens a terminal, Herd uses the terminal that you select in the settings. Herd supports the default Terminal, [iTerm](https://iterm2.com/) and [Warp](https://www.warp.dev/) – but Warp does not come with the possibility to run commands after it opens, so it doesn't have the same convenience as the default Terminal or iTerm.
---
# Source: https://herd.laravel.com/docs/macos/getting-started/sites.md
> ## Documentation Index
> Fetch the complete documentation index at: https://herd.laravel.com/docs/llms.txt
> Use this file to discover all available pages before exploring further.
# Sites
# Sites
Herd uses the concept of *parked* paths and *linked* directories for serving sites. You can access every site in a parked path via `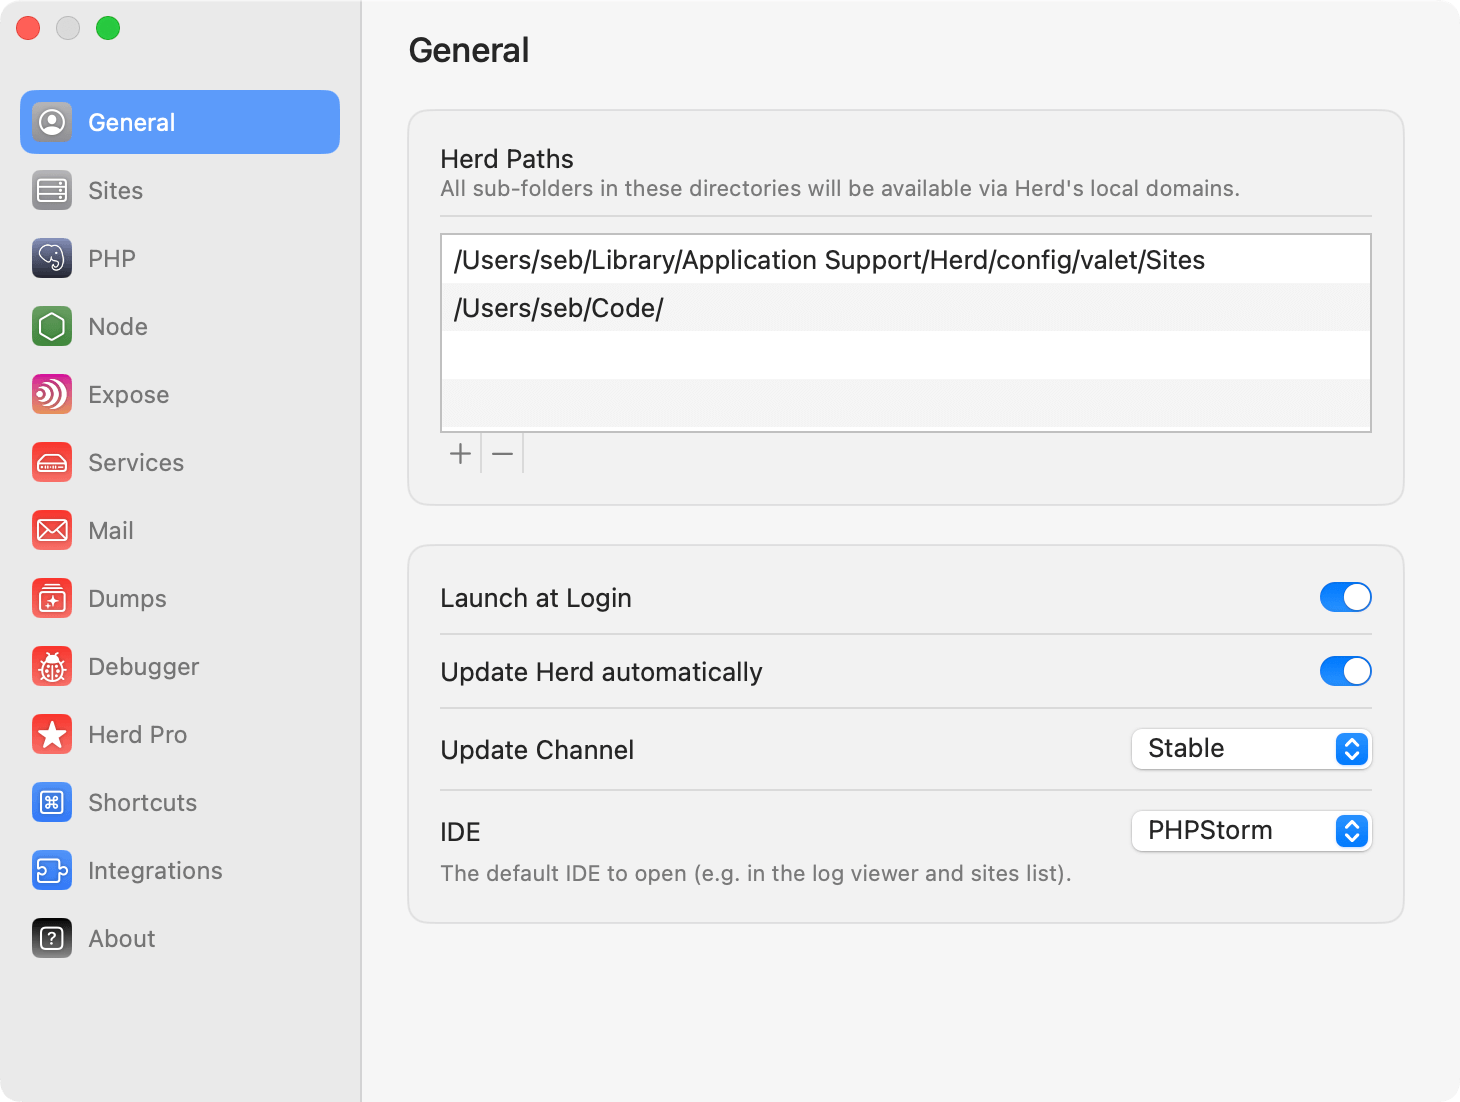 Aside from Laravel, Herd [supports many frameworks](/macos/extending-herd/supported-frameworks) and applications out-of-the-box. If your framework is not in the list, you can create a [custom driver](/macos/extending-herd/custom-drivers) to run it with Herd.
## Creating your first site
The fastest way to manage your sites and to create new applications is the command line.
```shell theme={null}
cd ~/Herd
laravel new my-new-site
cd my-new-site
herd open
herd edit
```
These commands go into your Herd directory, create a brand new Laravel application and open it in your browser. The `herd edit` command even opens your favorite IDE.
## Linking an existing site
You can link an existing site with a specific domain via the `link` command from any directory on your machine. The `link` command uses the directory name as domain name if you don't set additional parameters.
```shell theme={null}
cd ~/Sites/your-project
herd link
herd link custom-domain
```
These commands create Herd configurations, and you can now access the application via `your-project.test` and `custom-domain.test`. This is useful if you want to use an application from multiple domains, for example in multi-tenancy environments or if you don't store all your projects in a single code directory.
## Via the GUI
If you prefer creating and linking sites via a graphical user interface, you can use Herd's site wizard to create new Laravel applications or link existing projects.
You can start the site wizard by opening the [Site Manager](/macos/sites/managing-sites) from the Herd menu bar icon and selecting the plus icon at the top left.
Aside from Laravel, Herd [supports many frameworks](/macos/extending-herd/supported-frameworks) and applications out-of-the-box. If your framework is not in the list, you can create a [custom driver](/macos/extending-herd/custom-drivers) to run it with Herd.
## Creating your first site
The fastest way to manage your sites and to create new applications is the command line.
```shell theme={null}
cd ~/Herd
laravel new my-new-site
cd my-new-site
herd open
herd edit
```
These commands go into your Herd directory, create a brand new Laravel application and open it in your browser. The `herd edit` command even opens your favorite IDE.
## Linking an existing site
You can link an existing site with a specific domain via the `link` command from any directory on your machine. The `link` command uses the directory name as domain name if you don't set additional parameters.
```shell theme={null}
cd ~/Sites/your-project
herd link
herd link custom-domain
```
These commands create Herd configurations, and you can now access the application via `your-project.test` and `custom-domain.test`. This is useful if you want to use an application from multiple domains, for example in multi-tenancy environments or if you don't store all your projects in a single code directory.
## Via the GUI
If you prefer creating and linking sites via a graphical user interface, you can use Herd's site wizard to create new Laravel applications or link existing projects.
You can start the site wizard by opening the [Site Manager](/macos/sites/managing-sites) from the Herd menu bar icon and selecting the plus icon at the top left.
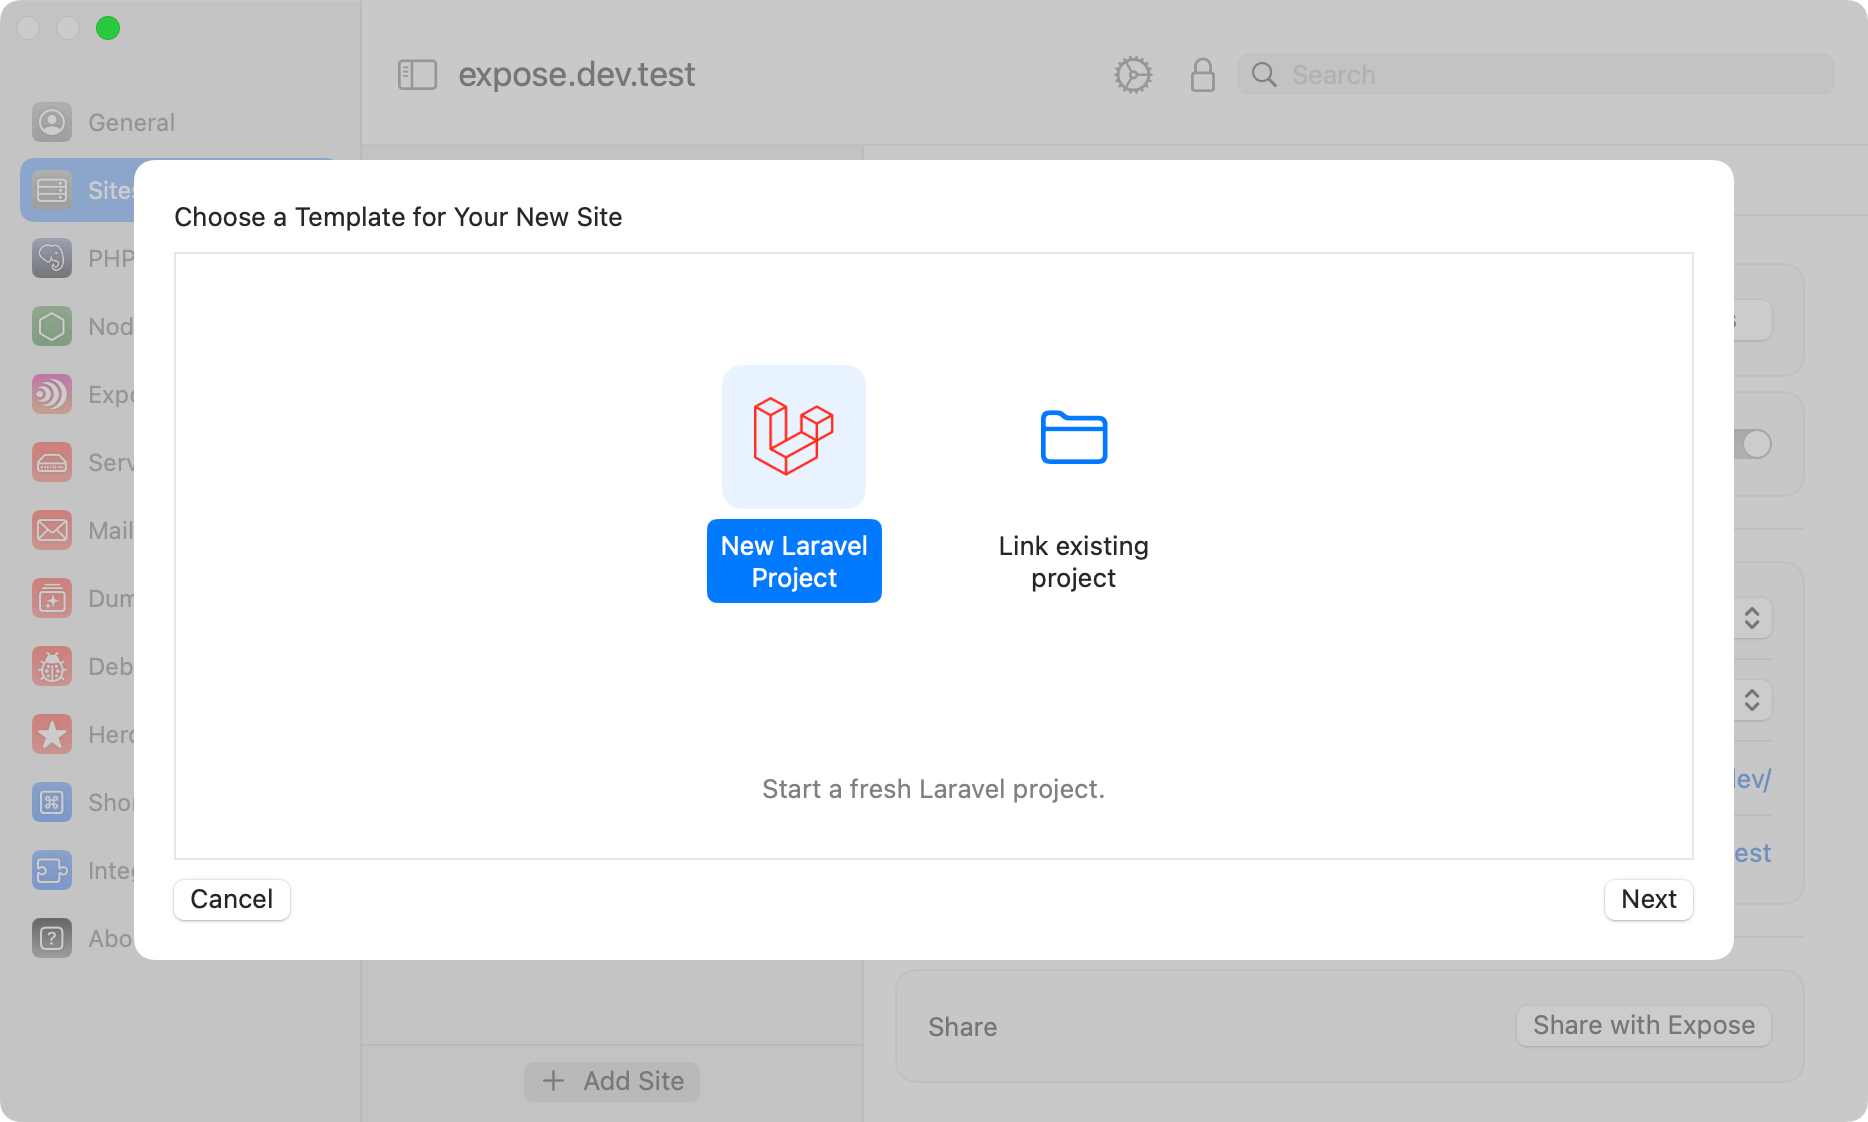 ## Unlinking an existing site
You may remove a previously created link, by using the `unlink` command from any directory on your machine. The `unlink` command uses the directory name as domain name if you don't set additional parameters.
```shell theme={null}
cd ~/Sites/your-project
herd unlink
herd unlink custom-domain
```
These commands remove any previous created links to your site.
## Application Information
The "Information" tab gives you a brief overview of the application. Laravel apps display the content of the `php artisan about` command, but you can customize the overview by using a [custom driver](/macos/extending-herd/custom-drivers) for your site.
## Integrations
Herd allows linking your local site with first-party Laravel cloud services and makes triggering common tasks like deployments super easy. At the moment, Herd supports connecting to sites on Laravel Forge with the [Forge integration](/macos/integrations/laravel-forge).
---
# Source: https://herd.laravel.com/docs/macos/advanced-usage/social-auth.md
> ## Documentation Index
> Fetch the complete documentation index at: https://herd.laravel.com/docs/llms.txt
> Use this file to discover all available pages before exploring further.
# Social Authentication
# Implementing Social Authentication
When implementing social authentication in your Laravel application, you may face the issue that Herd's `.test`
domain is not recognized by the social authentication providers. This is because they often require a public top-level
domain (TLD) for their callback URLs. Herd does not support changing the `.test` domain to a public TLD, because
that would introduce serious security issues to your machine – but we can work around this.
## Using the fwd.host Webservice
We've created a web service that acts as a proxy for your redirects and does not store any data. You can use this service
to handle social authentication callbacks by setting your callback URLs to `https://fwd.host/http://your-herd-site.test/auth/callback`.
This way, the social authentication provider will redirect to `fwd.host`, which will then forward the request to your Herd site.
You can see the setup in the following screenshot:
## Unlinking an existing site
You may remove a previously created link, by using the `unlink` command from any directory on your machine. The `unlink` command uses the directory name as domain name if you don't set additional parameters.
```shell theme={null}
cd ~/Sites/your-project
herd unlink
herd unlink custom-domain
```
These commands remove any previous created links to your site.
## Application Information
The "Information" tab gives you a brief overview of the application. Laravel apps display the content of the `php artisan about` command, but you can customize the overview by using a [custom driver](/macos/extending-herd/custom-drivers) for your site.
## Integrations
Herd allows linking your local site with first-party Laravel cloud services and makes triggering common tasks like deployments super easy. At the moment, Herd supports connecting to sites on Laravel Forge with the [Forge integration](/macos/integrations/laravel-forge).
---
# Source: https://herd.laravel.com/docs/macos/advanced-usage/social-auth.md
> ## Documentation Index
> Fetch the complete documentation index at: https://herd.laravel.com/docs/llms.txt
> Use this file to discover all available pages before exploring further.
# Social Authentication
# Implementing Social Authentication
When implementing social authentication in your Laravel application, you may face the issue that Herd's `.test`
domain is not recognized by the social authentication providers. This is because they often require a public top-level
domain (TLD) for their callback URLs. Herd does not support changing the `.test` domain to a public TLD, because
that would introduce serious security issues to your machine – but we can work around this.
## Using the fwd.host Webservice
We've created a web service that acts as a proxy for your redirects and does not store any data. You can use this service
to handle social authentication callbacks by setting your callback URLs to `https://fwd.host/http://your-herd-site.test/auth/callback`.
This way, the social authentication provider will redirect to `fwd.host`, which will then forward the request to your Herd site.
You can see the setup in the following screenshot:
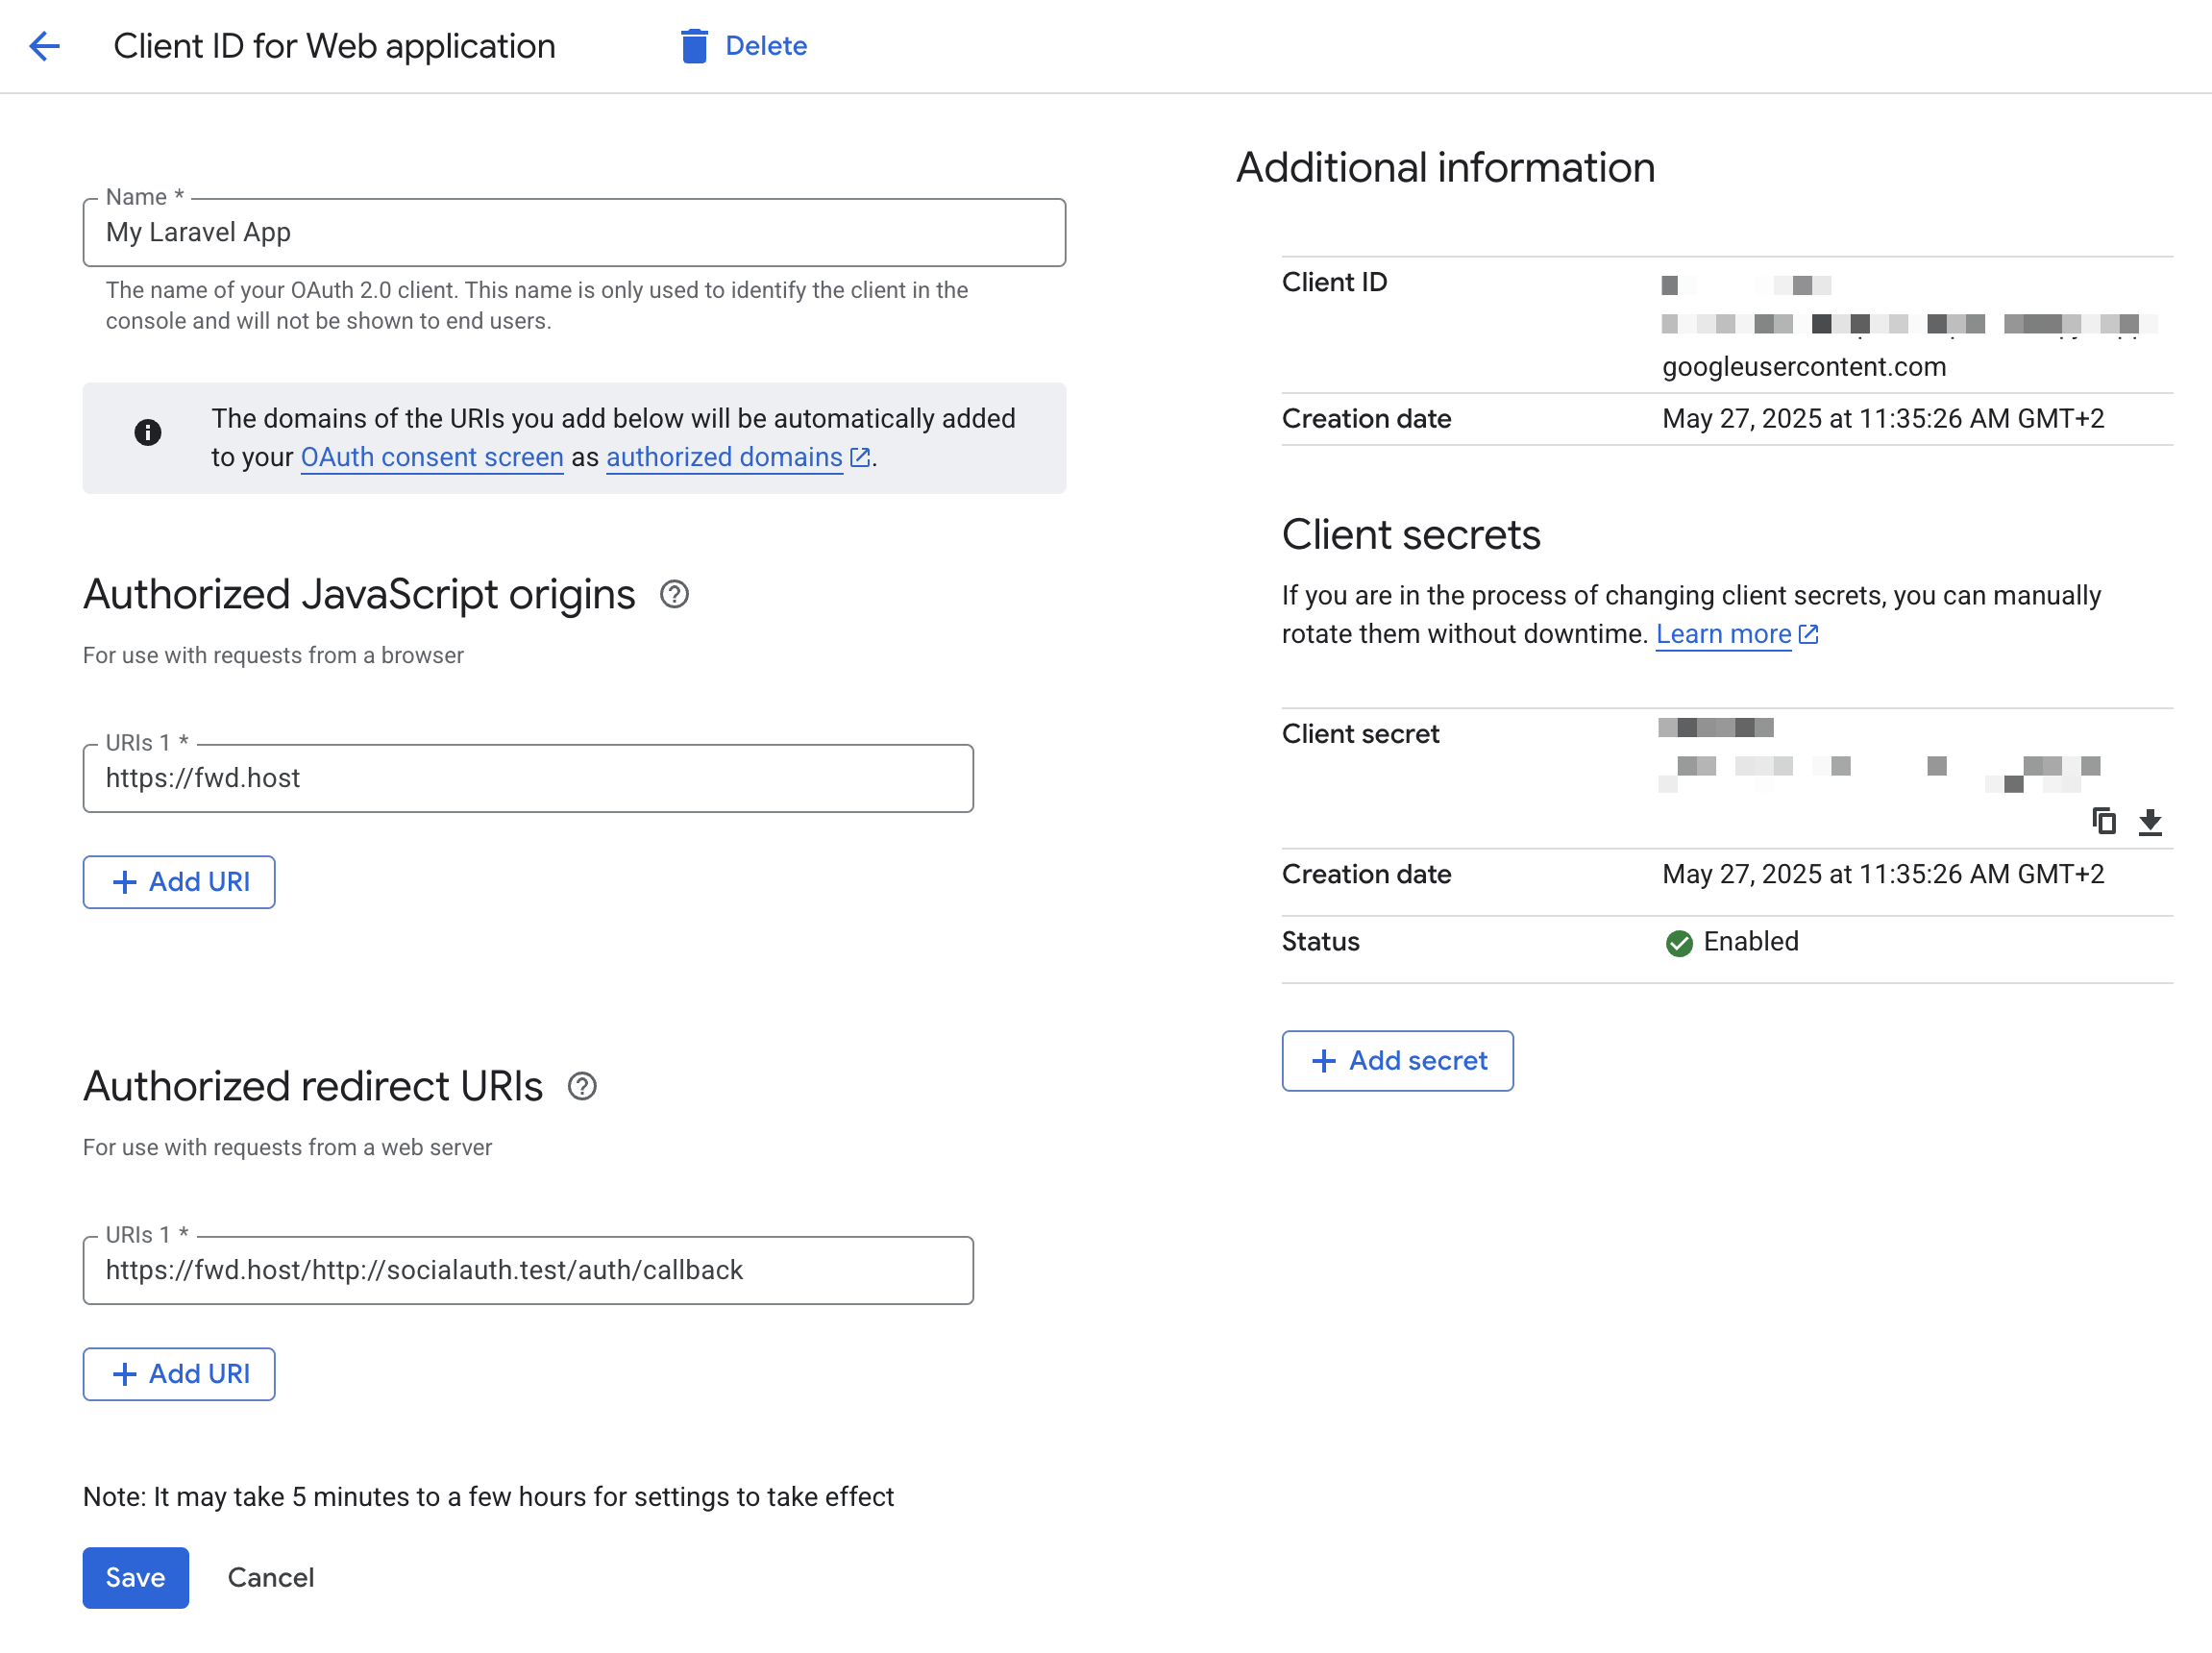 The `fwd.host` service will forward the request to your Herd site, allowing you to handle the social authentication as usual.
For security reasons, the redirects are limited to Herd sites with `.test` domains only, so you cannot use this service to redirect to any other site.
---
# Source: https://herd.laravel.com/docs/macos/troubleshooting/support.md
> ## Documentation Index
> Fetch the complete documentation index at: https://herd.laravel.com/docs/llms.txt
> Use this file to discover all available pages before exploring further.
# Support
# Community Support
If you encounter any technical issues that you can't solve with the docs or the troubleshooting section, please check the issues in the [community repository](https://github.com/beyondcode/herd-community/issues?q=).
If there is no closed issue that solves your problem, please create a new one so that we can follow up and make the solution available to everyone until we can provide a fix.
## Email support
[Herd Pro](/#plans) or [Herd for Teams](/#plans) users can get priority email support at [support@beyondco.de](mailto:support@beyondco.de). We usually respond within a few hours during weekdays.
Also do not hesitate to email us if you have a license or billing related question.
## Security Related Issues
If you discover any security related issues, please email [support@beyondco.de](mailto:support@beyondco.de) instead of using the issue tracker.
---
# Source: https://herd.laravel.com/docs/macos/extending-herd/supported-frameworks.md
> ## Documentation Index
> Fetch the complete documentation index at: https://herd.laravel.com/docs/llms.txt
> Use this file to discover all available pages before exploring further.
# Supported Frameworks
# Supported Frameworks
You may think that Herd is for Laravel development only, but thanks to the foundational work of [Laravel Valet](https://laravel.com/docs/11.x/valet#custom-valet-drivers), it ships with drivers for many other frameworks and web applications.
## Supported Frameworks
* [Laravel](https://laravel.com)
* [CakePHP 3](https://cakephp.org/)
* [Slim](https://www.slimframework.com/)
* [Symfony](https://symfony.com/)
* [Zend](https://framework.zend.com/)
## Content Management Systems
* [Bedrock](https://roots.io/bedrock/)
* [Contao](https://contao.org/en/)
* [Craft](https://craftcms.com/)
* [Drupal](https://www.drupal.org/)
* [ExpressionEngine](https://expressionengine.com)
* [Jigsaw](https://jigsaw.tighten.com/)
* [Joomla!](https://www.joomla.org/)
* [Kirby](https://getkirby.com/)
* [OctoberCMS](https://octobercms.com/)
* [Sculpin](https://sculpin.io/)
* [Statamic](https://statamic.com/)
* [WordPress](https://wordpress.org/)
## Ecommerce
* [Magento 2](https://business.adobe.com/products/magento/magento-commerce.html)
If Herd does not support your framework out of the box, or you use a custom setup for your application, you can create a [custom driver](/macos/extending-herd/custom-drivers) to serve your site with Herd.
---
# Source: https://herd.laravel.com/docs/macos/debugging/tinker.md
> ## Documentation Index
> Fetch the complete documentation index at: https://herd.laravel.com/docs/llms.txt
> Use this file to discover all available pages before exploring further.
# Tinker
# Launching Tinker
Laravel Tinker is a REPL for Laravel, and it allows you to interact with your application via the command line. While you usually start it via the terminal by running `php artisan tinker` or `herd tinker`, Herd provides a convenient button in the actions column in the sites settings as well as a global shortcut that instantly opens the active project automatically.
The `fwd.host` service will forward the request to your Herd site, allowing you to handle the social authentication as usual.
For security reasons, the redirects are limited to Herd sites with `.test` domains only, so you cannot use this service to redirect to any other site.
---
# Source: https://herd.laravel.com/docs/macos/troubleshooting/support.md
> ## Documentation Index
> Fetch the complete documentation index at: https://herd.laravel.com/docs/llms.txt
> Use this file to discover all available pages before exploring further.
# Support
# Community Support
If you encounter any technical issues that you can't solve with the docs or the troubleshooting section, please check the issues in the [community repository](https://github.com/beyondcode/herd-community/issues?q=).
If there is no closed issue that solves your problem, please create a new one so that we can follow up and make the solution available to everyone until we can provide a fix.
## Email support
[Herd Pro](/#plans) or [Herd for Teams](/#plans) users can get priority email support at [support@beyondco.de](mailto:support@beyondco.de). We usually respond within a few hours during weekdays.
Also do not hesitate to email us if you have a license or billing related question.
## Security Related Issues
If you discover any security related issues, please email [support@beyondco.de](mailto:support@beyondco.de) instead of using the issue tracker.
---
# Source: https://herd.laravel.com/docs/macos/extending-herd/supported-frameworks.md
> ## Documentation Index
> Fetch the complete documentation index at: https://herd.laravel.com/docs/llms.txt
> Use this file to discover all available pages before exploring further.
# Supported Frameworks
# Supported Frameworks
You may think that Herd is for Laravel development only, but thanks to the foundational work of [Laravel Valet](https://laravel.com/docs/11.x/valet#custom-valet-drivers), it ships with drivers for many other frameworks and web applications.
## Supported Frameworks
* [Laravel](https://laravel.com)
* [CakePHP 3](https://cakephp.org/)
* [Slim](https://www.slimframework.com/)
* [Symfony](https://symfony.com/)
* [Zend](https://framework.zend.com/)
## Content Management Systems
* [Bedrock](https://roots.io/bedrock/)
* [Contao](https://contao.org/en/)
* [Craft](https://craftcms.com/)
* [Drupal](https://www.drupal.org/)
* [ExpressionEngine](https://expressionengine.com)
* [Jigsaw](https://jigsaw.tighten.com/)
* [Joomla!](https://www.joomla.org/)
* [Kirby](https://getkirby.com/)
* [OctoberCMS](https://octobercms.com/)
* [Sculpin](https://sculpin.io/)
* [Statamic](https://statamic.com/)
* [WordPress](https://wordpress.org/)
## Ecommerce
* [Magento 2](https://business.adobe.com/products/magento/magento-commerce.html)
If Herd does not support your framework out of the box, or you use a custom setup for your application, you can create a [custom driver](/macos/extending-herd/custom-drivers) to serve your site with Herd.
---
# Source: https://herd.laravel.com/docs/macos/debugging/tinker.md
> ## Documentation Index
> Fetch the complete documentation index at: https://herd.laravel.com/docs/llms.txt
> Use this file to discover all available pages before exploring further.
# Tinker
# Launching Tinker
Laravel Tinker is a REPL for Laravel, and it allows you to interact with your application via the command line. While you usually start it via the terminal by running `php artisan tinker` or `herd tinker`, Herd provides a convenient button in the actions column in the sites settings as well as a global shortcut that instantly opens the active project automatically.
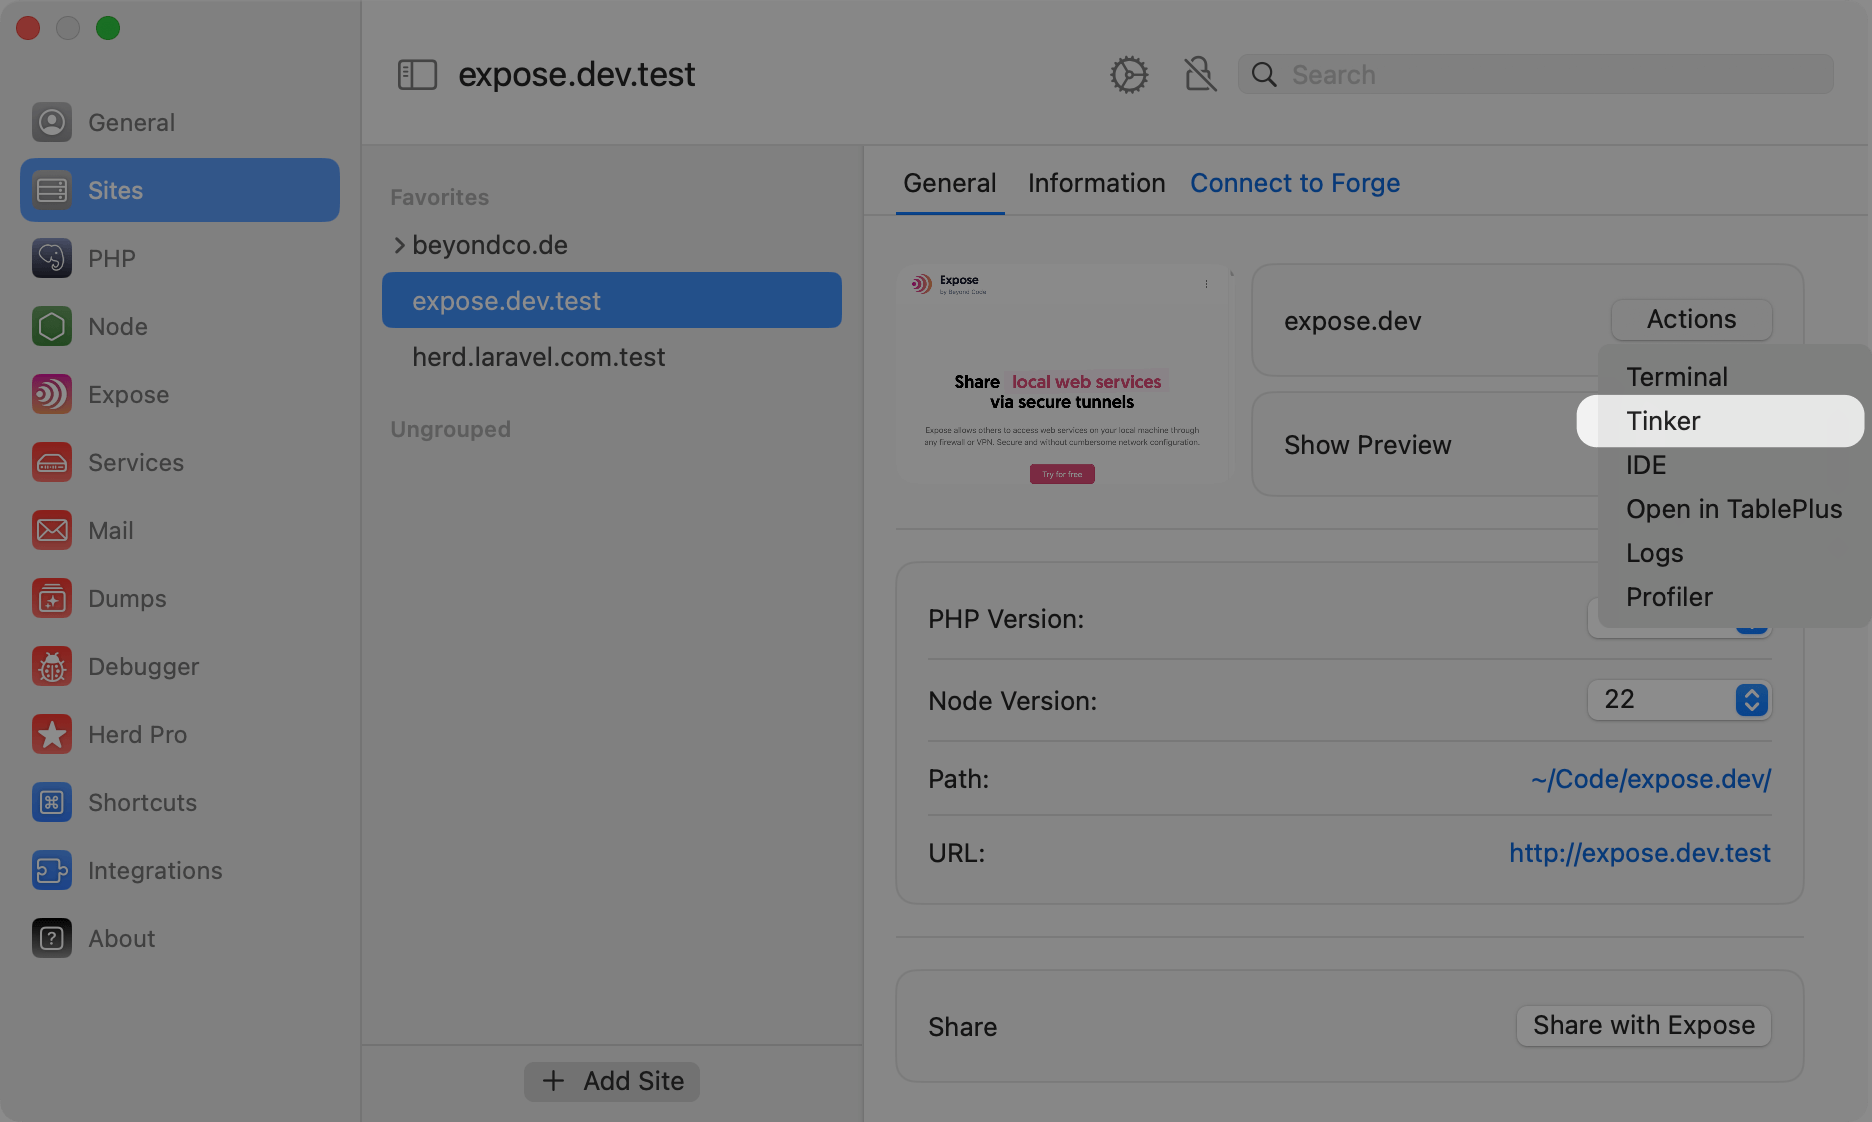 ## Open Tinker with a global shortcut
Herd allows you to define global system shortcuts and Tinker is part of this configuration. By pressing the global tinker shortcut, Herd starts a tinker session for the last site that you visited via your browser.
## Open Tinker with a global shortcut
Herd allows you to define global system shortcuts and Tinker is part of this configuration. By pressing the global tinker shortcut, Herd starts a tinker session for the last site that you visited via your browser.
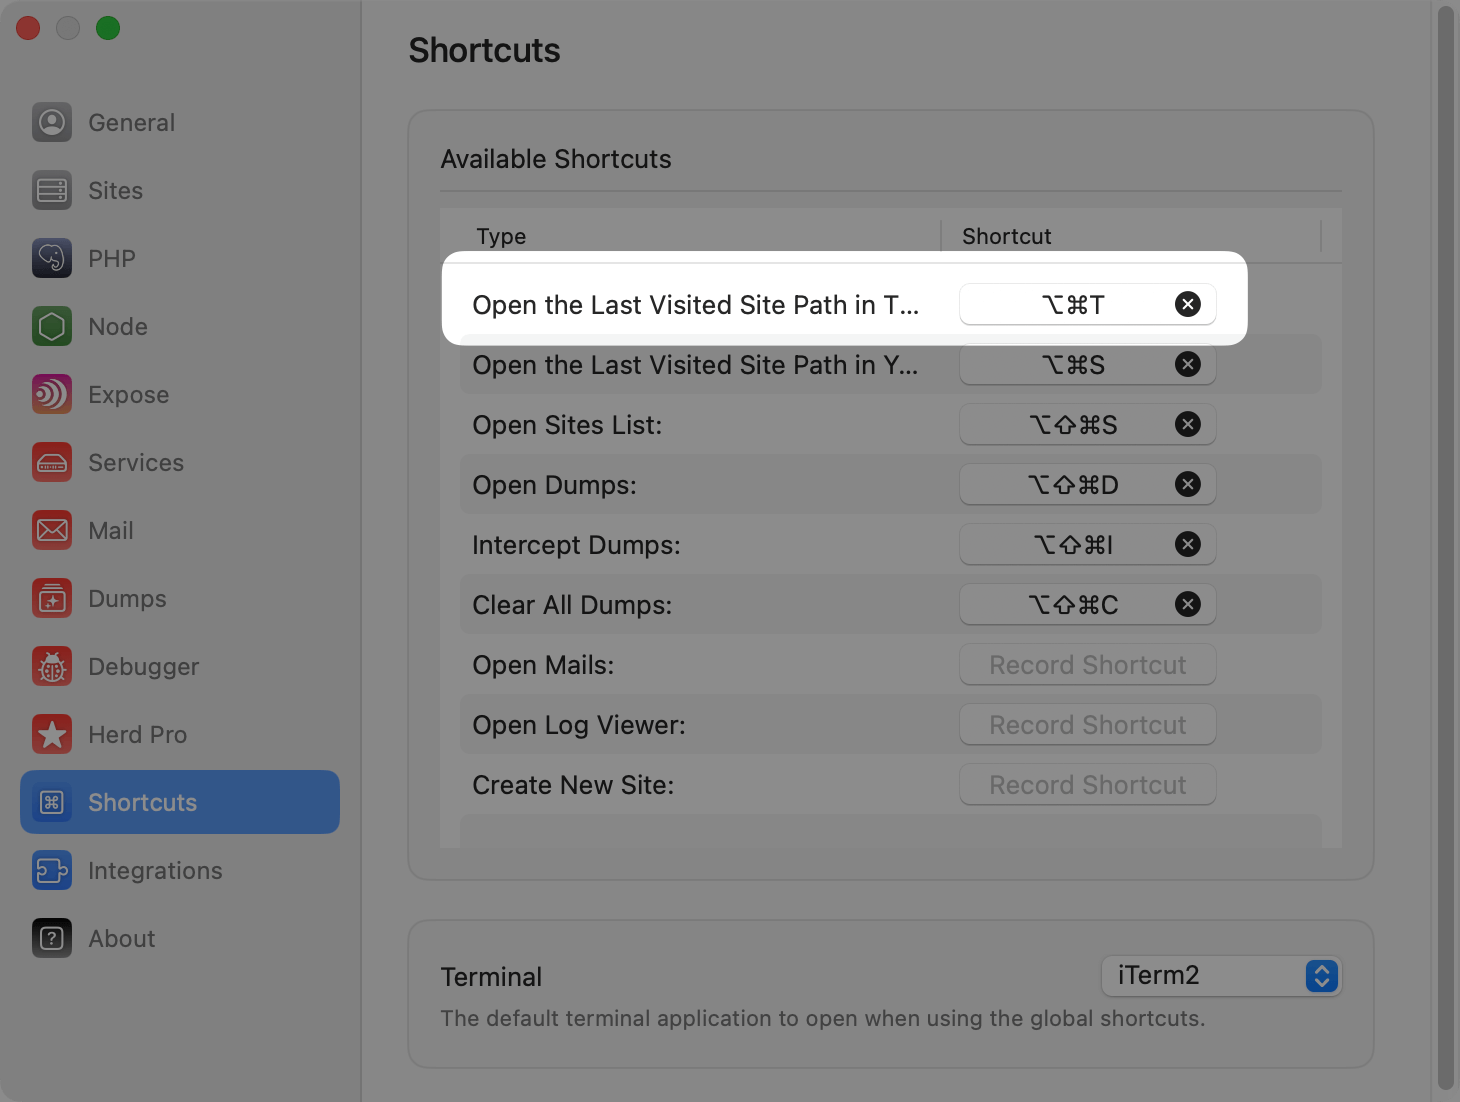 # Tinkerwell Integration
[Tinkerwell](https://tinkerwell.app) users benefit from the deep integration between both tools, so if you are running `herd tinker`, click the button in the site settings or press the global shortcut and Herd detects Tinkerwell on your machine, Tinkerwell opens a new tab with the most recent Herd project automatically.
This allows you to quickly iterate on complex Eloquent queries or debug some code. It also provides autocompletion and a familiar multi-line code editor experience that goes beyond a simple REPL.
# Tinkerwell Integration
[Tinkerwell](https://tinkerwell.app) users benefit from the deep integration between both tools, so if you are running `herd tinker`, click the button in the site settings or press the global shortcut and Herd detects Tinkerwell on your machine, Tinkerwell opens a new tab with the most recent Herd project automatically.
This allows you to quickly iterate on complex Eloquent queries or debug some code. It also provides autocompletion and a familiar multi-line code editor experience that goes beyond a simple REPL.
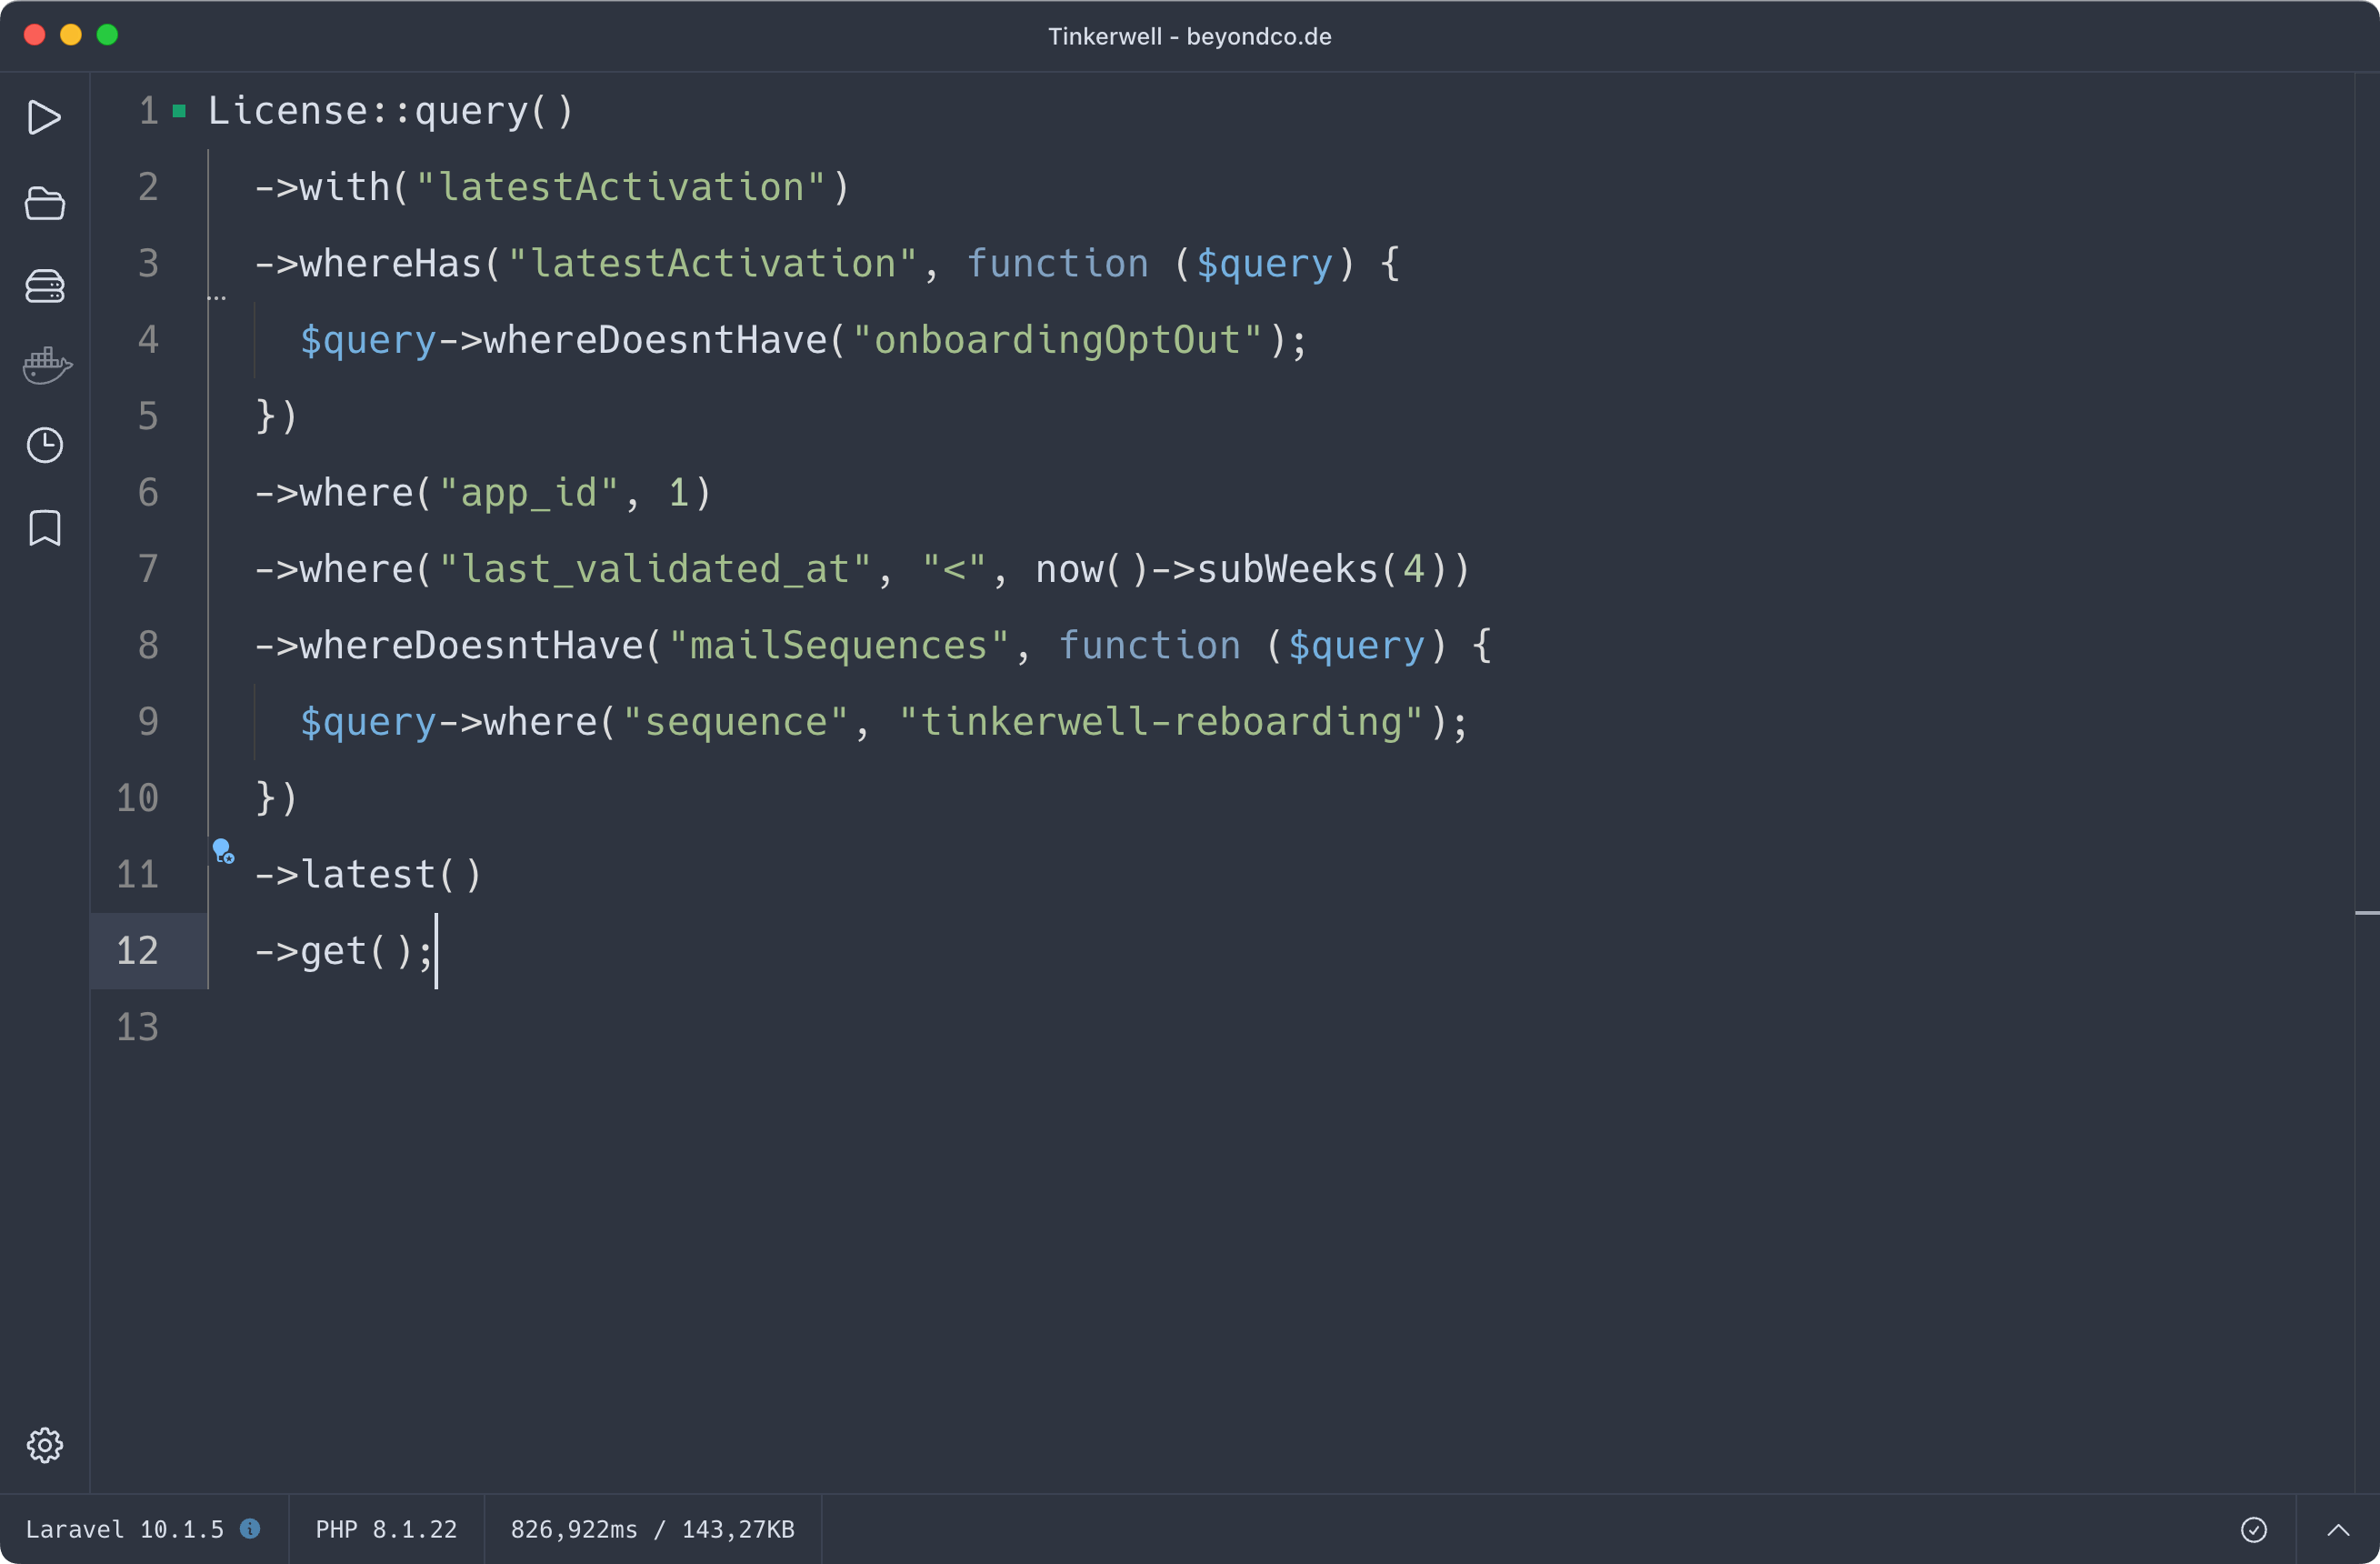 Tinkerwell ships with support for all of Herds PHP versions and automatically loads the correct configuration files.
---
# Source: https://herd.laravel.com/docs/macos/herd-pro-services/typesense.md
> ## Documentation Index
> Fetch the complete documentation index at: https://herd.laravel.com/docs/llms.txt
> Use this file to discover all available pages before exploring further.
# Typesense
# Set up Typesense for Laravel Scout
Typesense is a lightning-fast open source search engine for your application, working perfectly with [Laravel Scout](https://laravel.com/docs/11.x/scout). It allows you to add a search engine with great relevancy, typo correction, and more to your application by simply adding the `Searchable` Trait to a model.
Herd makes setting up a Typesense service super easy:
Tinkerwell ships with support for all of Herds PHP versions and automatically loads the correct configuration files.
---
# Source: https://herd.laravel.com/docs/macos/herd-pro-services/typesense.md
> ## Documentation Index
> Fetch the complete documentation index at: https://herd.laravel.com/docs/llms.txt
> Use this file to discover all available pages before exploring further.
# Typesense
# Set up Typesense for Laravel Scout
Typesense is a lightning-fast open source search engine for your application, working perfectly with [Laravel Scout](https://laravel.com/docs/11.x/scout). It allows you to add a search engine with great relevancy, typo correction, and more to your application by simply adding the `Searchable` Trait to a model.
Herd makes setting up a Typesense service super easy:
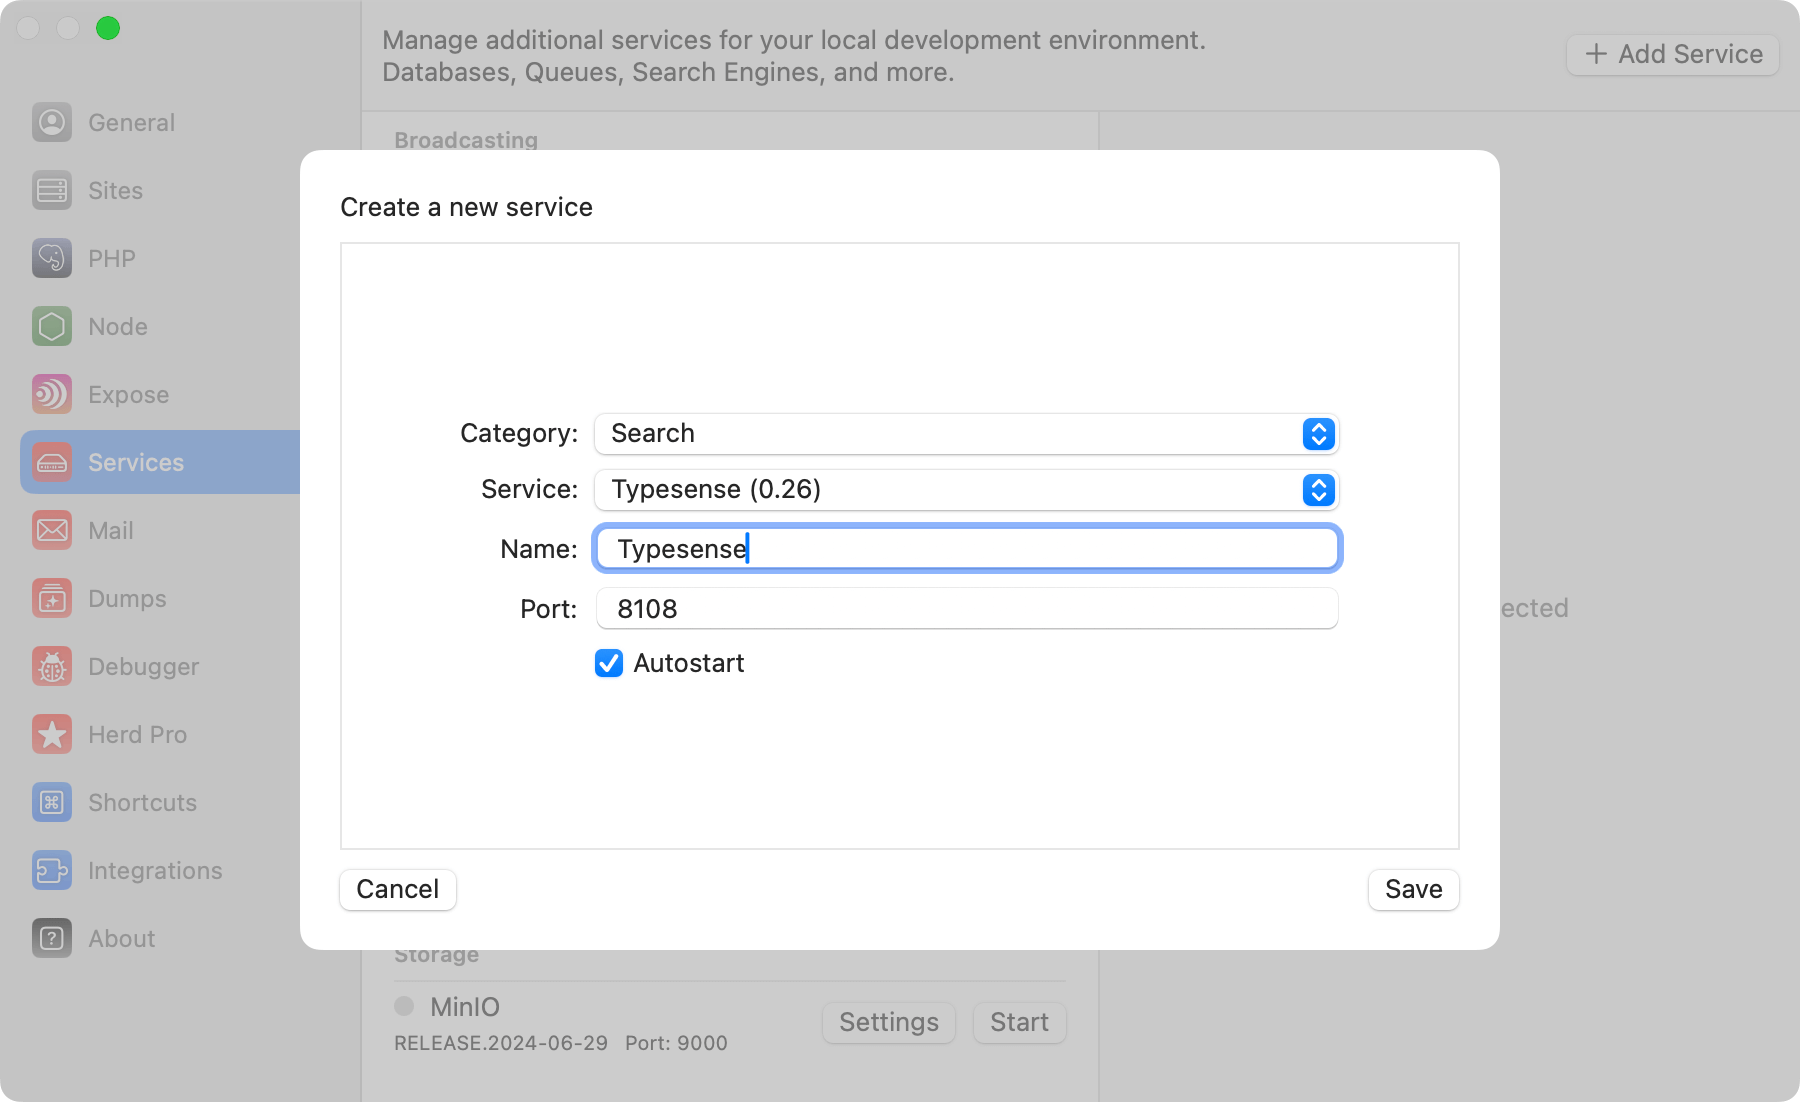 ## Connecting from your Laravel application
Like with all Herd services, you can configure the port as well as the service name of your Typesense instance and then add the following environment variables to your `.env` file.
```env theme={null}
SCOUT_DRIVER=typesense
TYPESENSE_API_KEY=LARAVEL-HERD
TYPESENSE_HOST=localhost
```
If you're using a different port, you can simply copy the connections details from the right side of the service settings. The Typesense detail view also gives you a quick access to the logs of the service.
## Connecting from your Laravel application
Like with all Herd services, you can configure the port as well as the service name of your Typesense instance and then add the following environment variables to your `.env` file.
```env theme={null}
SCOUT_DRIVER=typesense
TYPESENSE_API_KEY=LARAVEL-HERD
TYPESENSE_HOST=localhost
```
If you're using a different port, you can simply copy the connections details from the right side of the service settings. The Typesense detail view also gives you a quick access to the logs of the service.
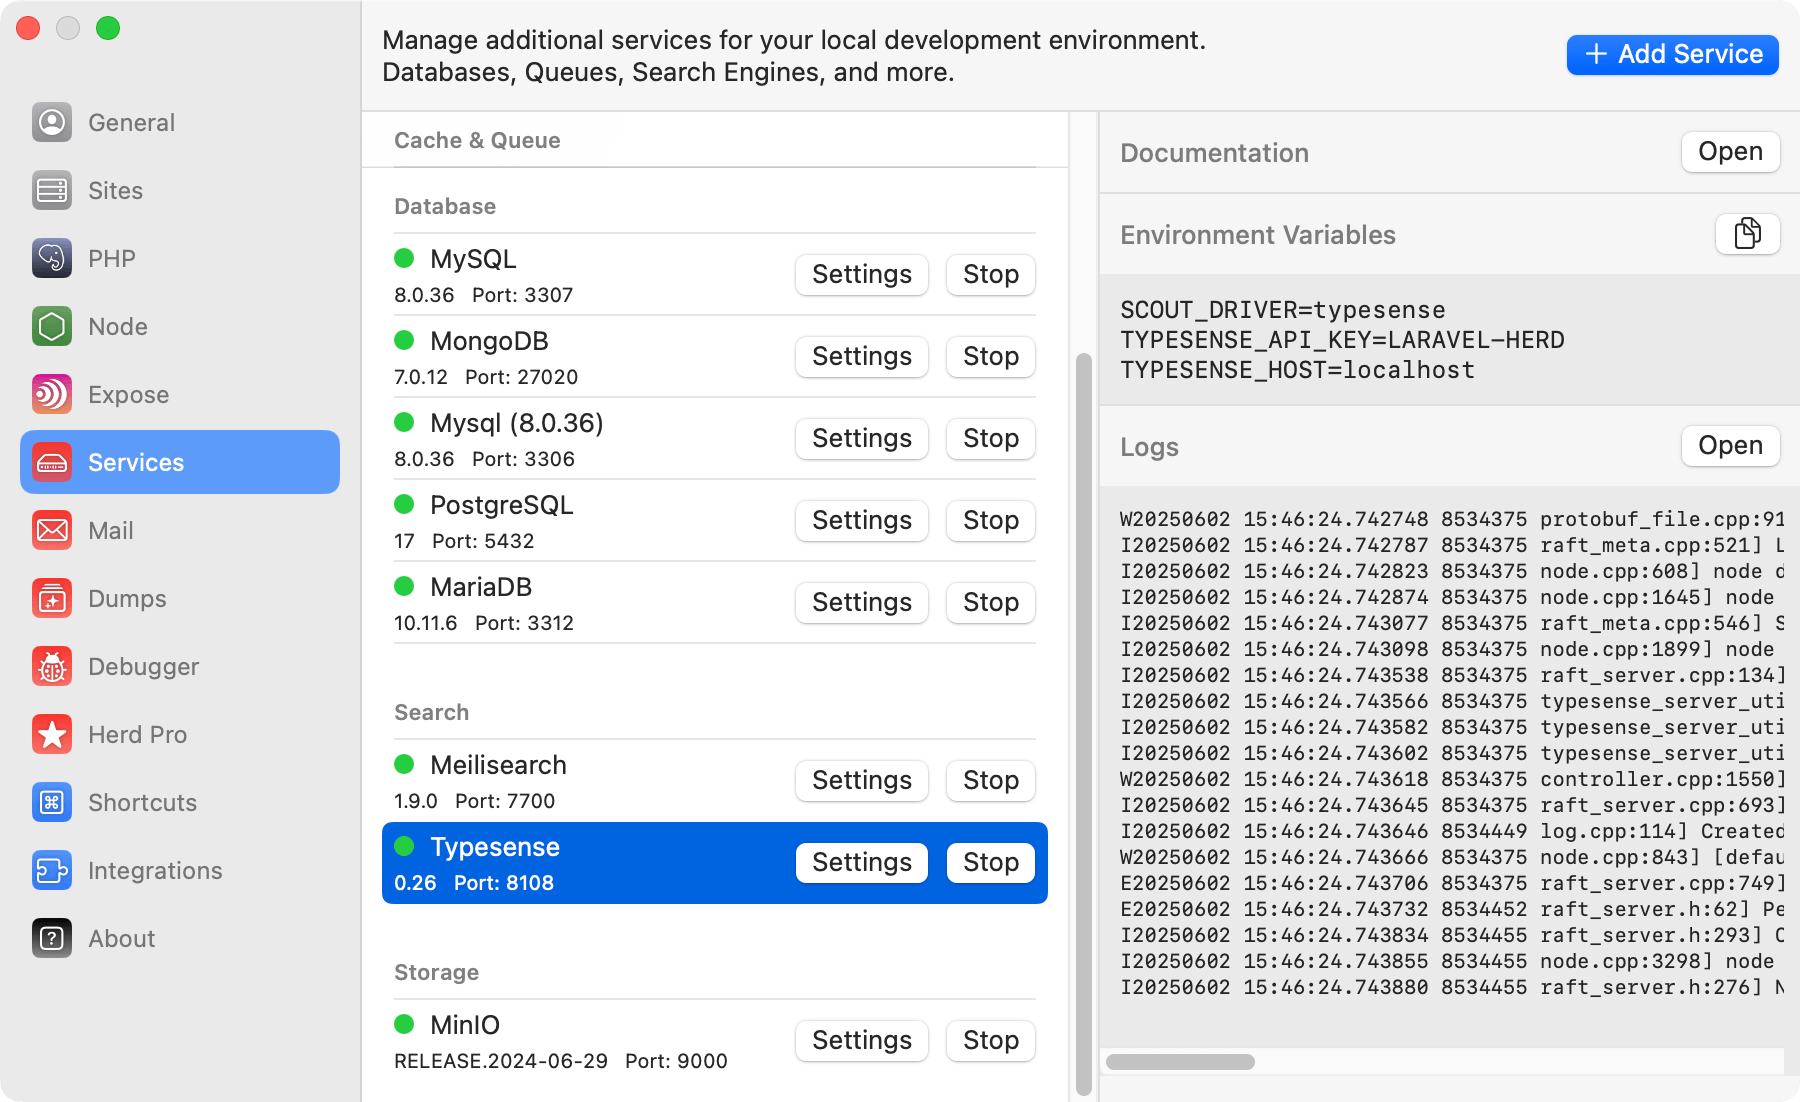 When using the Typesense with Laravel Scout you will need to install the Typesense PHP SDK via the Composer package manager:
```bash theme={null}
composer require typesense/typesense-php
```
You can find additional information about using Laravel Scout with Typesense in the [Laravel documentation](https://laravel.com/docs/11.x/scout#typesense)
## Versions
Herd Pro allows you to install the following versions directly from the services tab of the settings. New versions are available regularly.
| Service | Version |
| --------- | ------- |
| Typesense | 0.26 |
---
# Source: https://herd.laravel.com/docs/macos/troubleshooting/uninstalling.md
> ## Documentation Index
> Fetch the complete documentation index at: https://herd.laravel.com/docs/llms.txt
> Use this file to discover all available pages before exploring further.
# Uninstalling Herd
# Uninstalling Herd
In case you want to uninstall Herd from your machine, you may use the uninstall script that Herd provides:
When using the Typesense with Laravel Scout you will need to install the Typesense PHP SDK via the Composer package manager:
```bash theme={null}
composer require typesense/typesense-php
```
You can find additional information about using Laravel Scout with Typesense in the [Laravel documentation](https://laravel.com/docs/11.x/scout#typesense)
## Versions
Herd Pro allows you to install the following versions directly from the services tab of the settings. New versions are available regularly.
| Service | Version |
| --------- | ------- |
| Typesense | 0.26 |
---
# Source: https://herd.laravel.com/docs/macos/troubleshooting/uninstalling.md
> ## Documentation Index
> Fetch the complete documentation index at: https://herd.laravel.com/docs/llms.txt
> Use this file to discover all available pages before exploring further.
# Uninstalling Herd
# Uninstalling Herd
In case you want to uninstall Herd from your machine, you may use the uninstall script that Herd provides:
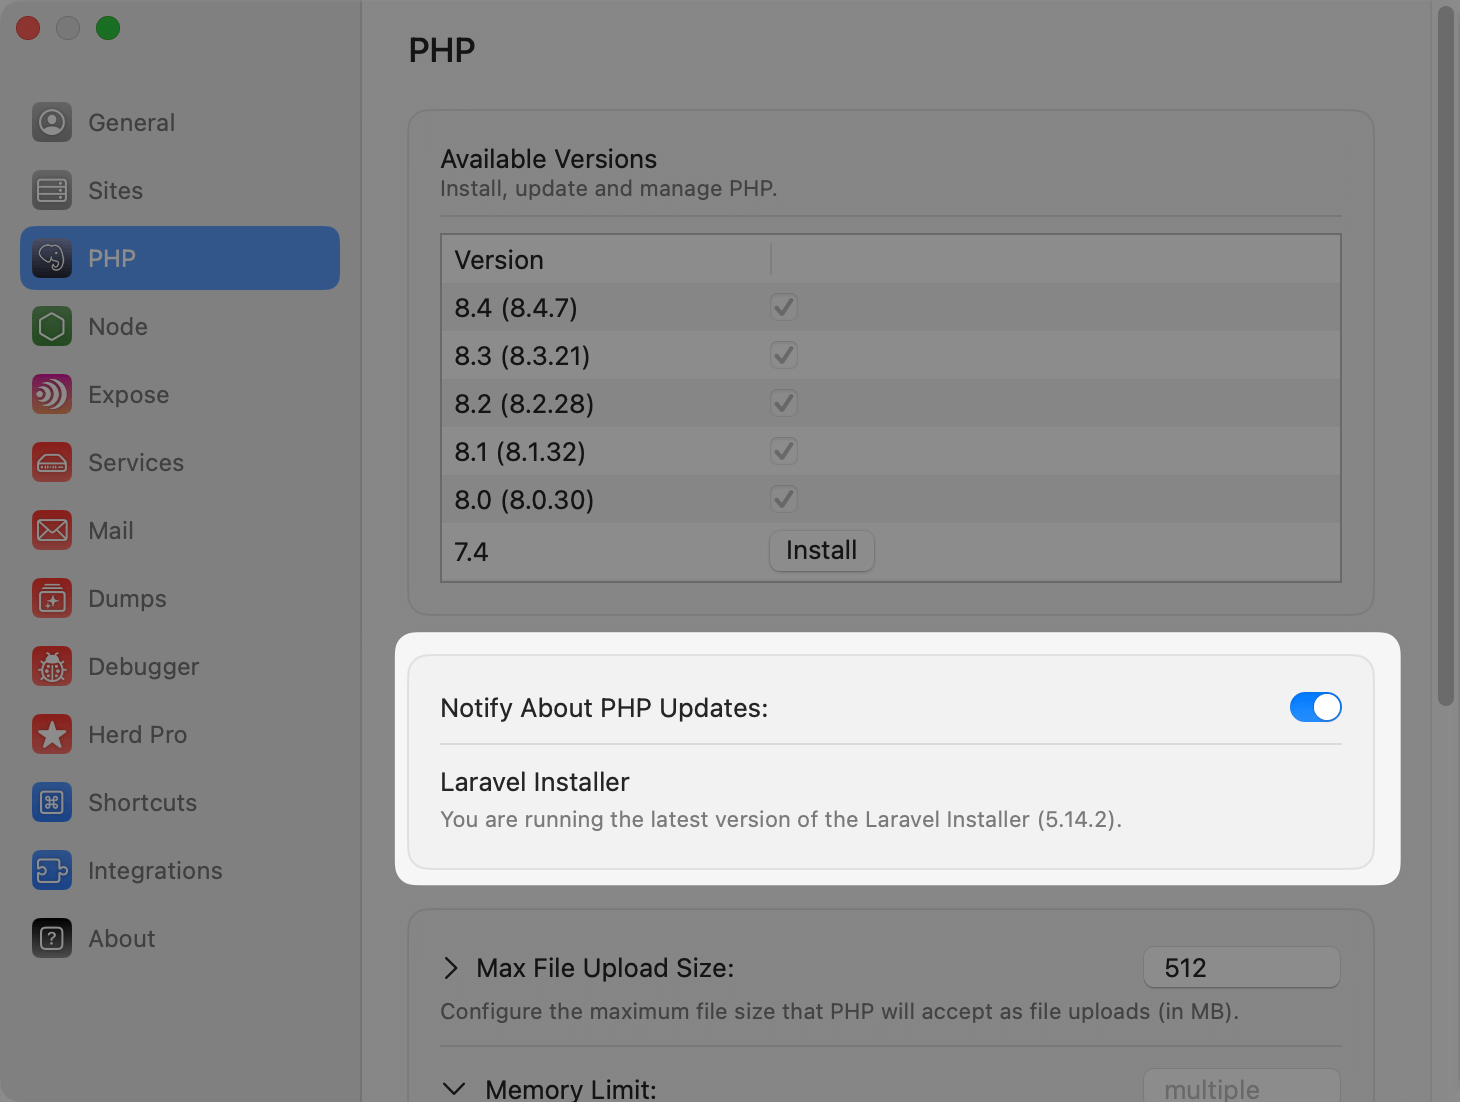 ## Composer and Expose
You can update Composer and Expose to their latest version with their integrated `self-update` commands but usually get them with Herd updates, too.
```bash theme={null}
composer self-update
expose self-update
```
## Node.js versions
Herd ships with [nvm](https://github.com/nvm-sh/nvm) and allows you to install and use multiple Node.js versions at the same time. Officially, Herd supports the latest versions of the following major versions:
* 22.x
* 20.x
* 18.x
* 16.x
However, you may manually install any available Node.js version via the [CLI](/macos/technology/node-versions#via-the-cli).
If you want to learn more about Node.js versions and their management in Herd, go to [Manage Node.js versions](/macos/technology/node-versions).
---
# Source: https://herd.laravel.com/docs/macos/herd-pro-services/valkey.md
> ## Documentation Index
> Fetch the complete documentation index at: https://herd.laravel.com/docs/llms.txt
> Use this file to discover all available pages before exploring further.
# Valkey
# Setting up Valkey
Valkey is an alternative to Redis that is API compatible and can be used as a cache and queue driver in Laravel
applications. It's free and open source, making it a great choice for local development since Redis pivoted to a less
developer friendly license.
## Composer and Expose
You can update Composer and Expose to their latest version with their integrated `self-update` commands but usually get them with Herd updates, too.
```bash theme={null}
composer self-update
expose self-update
```
## Node.js versions
Herd ships with [nvm](https://github.com/nvm-sh/nvm) and allows you to install and use multiple Node.js versions at the same time. Officially, Herd supports the latest versions of the following major versions:
* 22.x
* 20.x
* 18.x
* 16.x
However, you may manually install any available Node.js version via the [CLI](/macos/technology/node-versions#via-the-cli).
If you want to learn more about Node.js versions and their management in Herd, go to [Manage Node.js versions](/macos/technology/node-versions).
---
# Source: https://herd.laravel.com/docs/macos/herd-pro-services/valkey.md
> ## Documentation Index
> Fetch the complete documentation index at: https://herd.laravel.com/docs/llms.txt
> Use this file to discover all available pages before exploring further.
# Valkey
# Setting up Valkey
Valkey is an alternative to Redis that is API compatible and can be used as a cache and queue driver in Laravel
applications. It's free and open source, making it a great choice for local development since Redis pivoted to a less
developer friendly license.
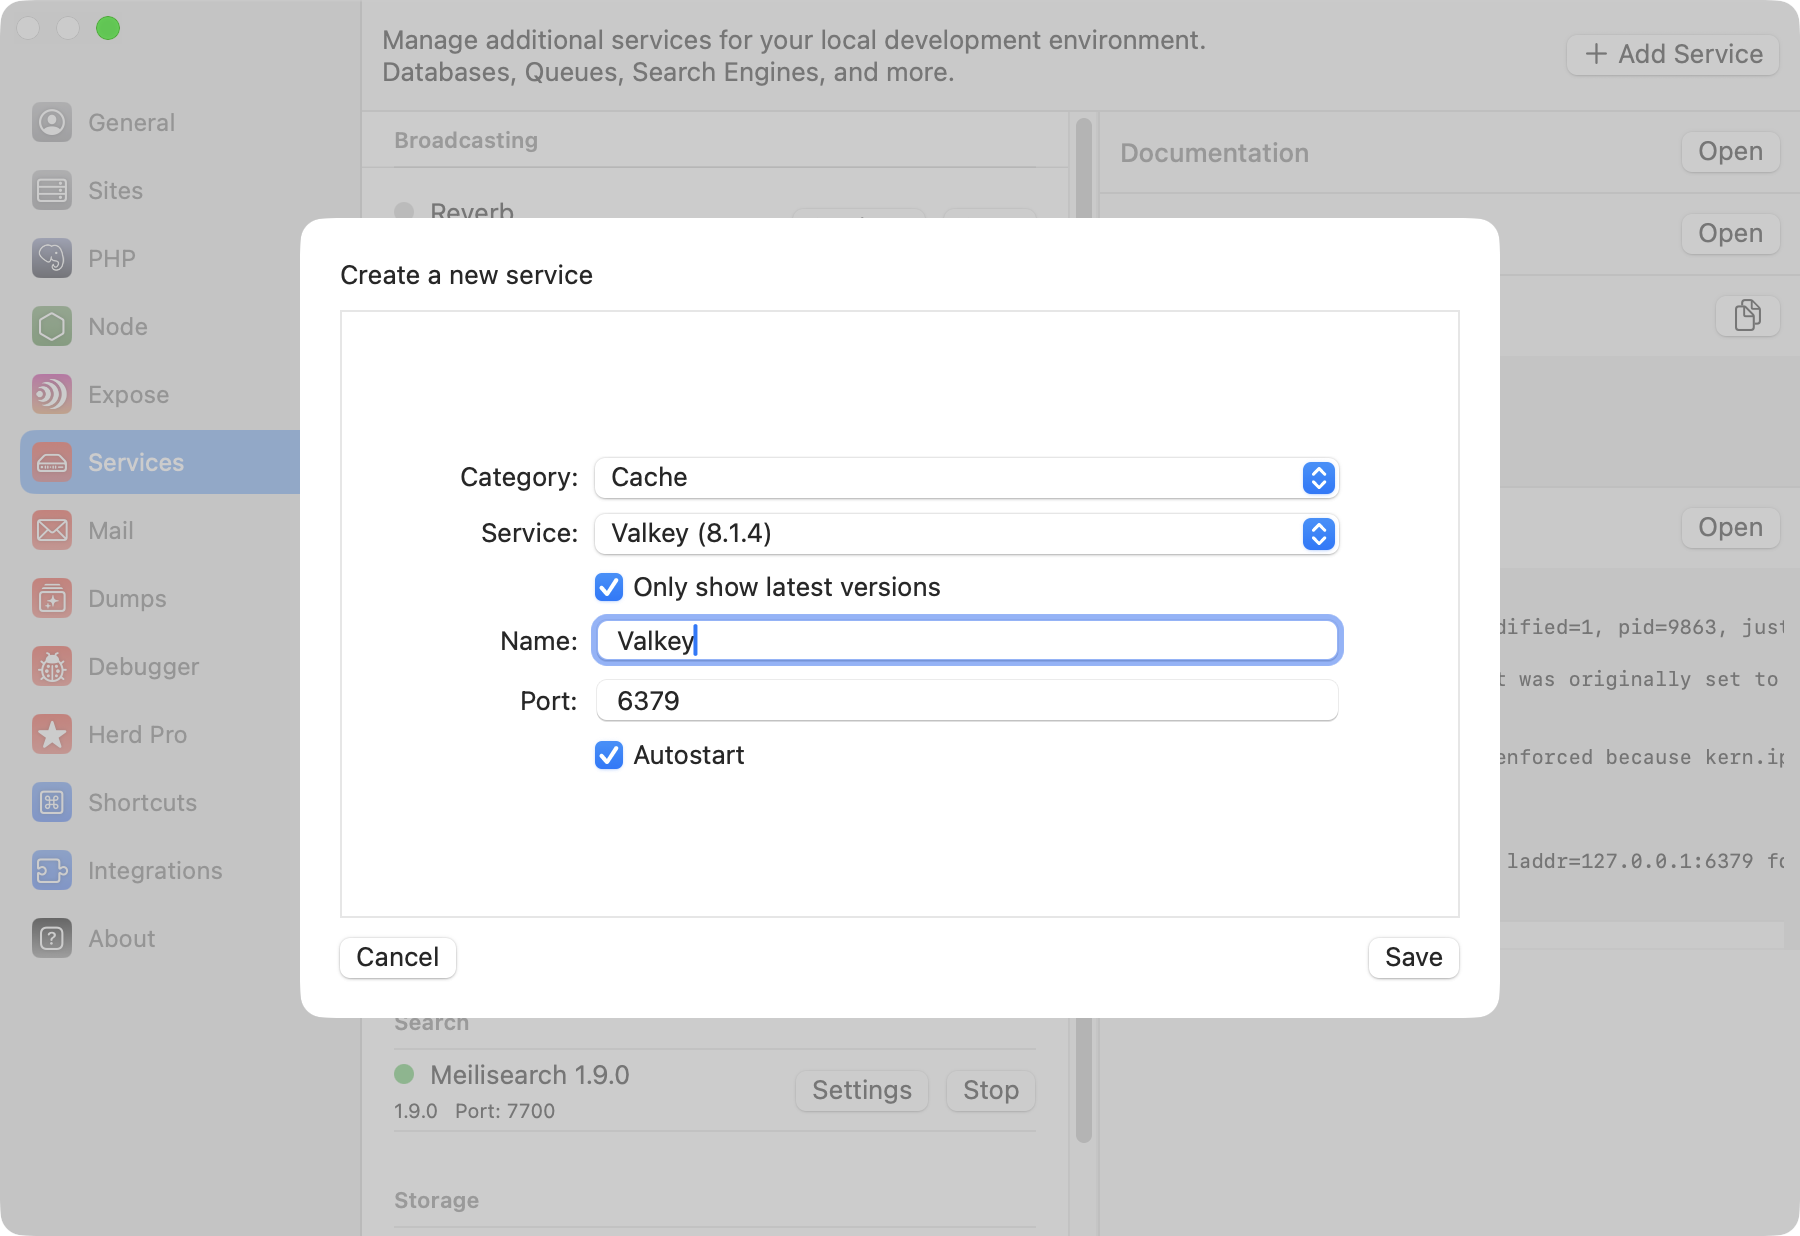 ## Configuration
Valkey comes with a sensible default configuration, making it easy to use for local development without any changes. If you want to change the port of the Valkey service or decide if you want to automatically start it with Herd, you can do that in the settings of the service.
You can modify the configuration by right-clicking the service in the settings and opening its data directory. In this data directory, there is a `valkey.conf` that this specific Valkey instance loads on startup.
Make sure to restart the service if you make changes to this configuration file.
## Accessing the Valkey instance
You usually don't need dedicated databases within your Valkey instance, but if you decide to do that or want to debug the content of your database, you can open TablePlus directly from the menu on the right side.
## Configuration
Valkey comes with a sensible default configuration, making it easy to use for local development without any changes. If you want to change the port of the Valkey service or decide if you want to automatically start it with Herd, you can do that in the settings of the service.
You can modify the configuration by right-clicking the service in the settings and opening its data directory. In this data directory, there is a `valkey.conf` that this specific Valkey instance loads on startup.
Make sure to restart the service if you make changes to this configuration file.
## Accessing the Valkey instance
You usually don't need dedicated databases within your Valkey instance, but if you decide to do that or want to debug the content of your database, you can open TablePlus directly from the menu on the right side.
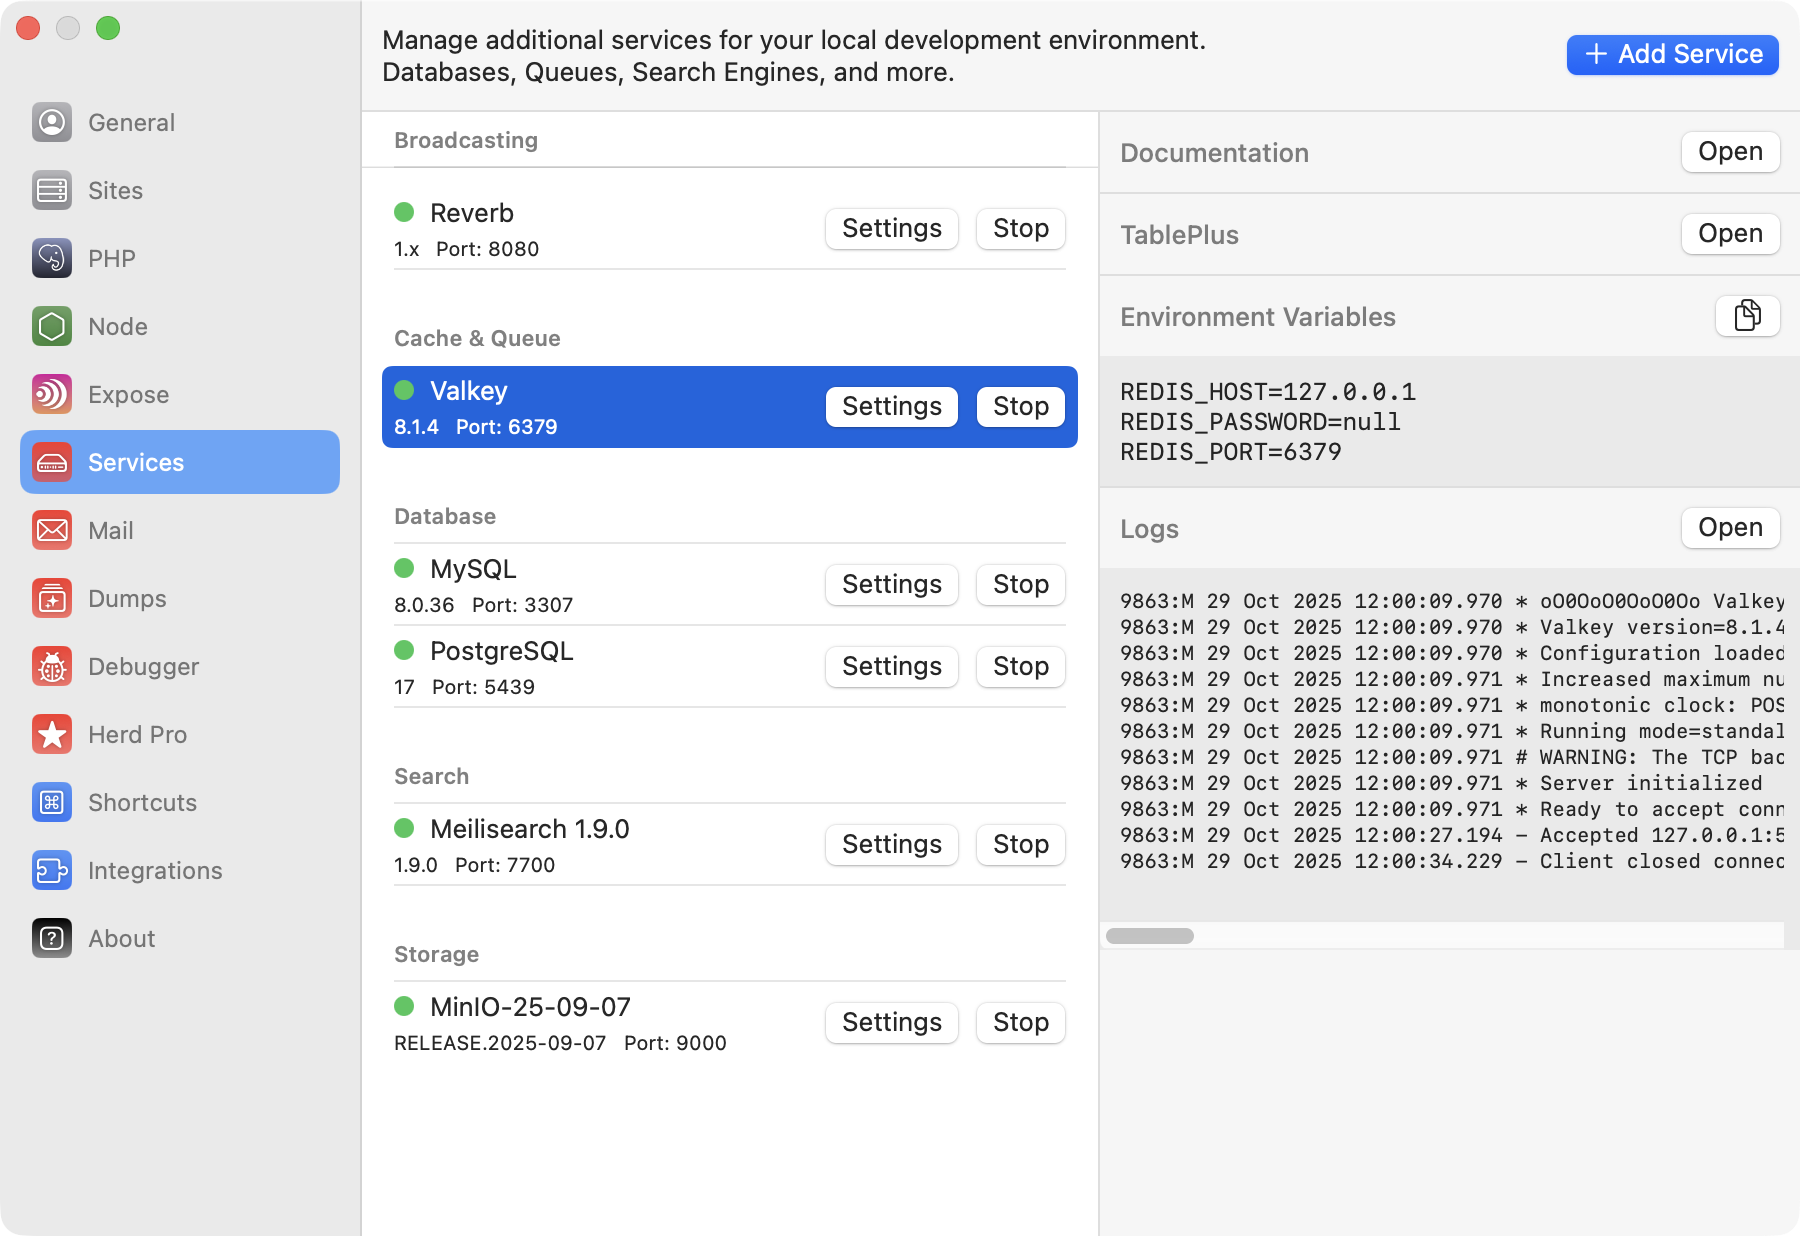 ## Connecting from your Laravel application
To connect it within your application, you can use the credentials that are listed next to the running service in the
settings, or you can use the ones below. Since Valkey is API compatible with Redis, the configuration is the same.
```env theme={null}
# Driver configuration
CACHE_DRIVER=redis
QUEUE_CONNECTION=redis
SESSION_DRIVER=redis
# Redis setup
REDIS_HOST=127.0.0.1
REDIS_PASSWORD=null
REDIS_PORT=6379
```
## Versions
Herd Pro allows you to install the following versions directly from the services tab of the settings. New versions are available regularly.
| Service | Version |
| ------- | ------- |
| Valkey | 7.2.x |
| Valkey | 8.0.x |
| Valkey | 8.1.x |
---
# Source: https://herd.laravel.com/docs/macos/guides/wordpress.md
> ## Documentation Index
> Fetch the complete documentation index at: https://herd.laravel.com/docs/llms.txt
> Use this file to discover all available pages before exploring further.
# WordPress
# How to set up a WordPress site
While Herd was mainly developed with Laravel in mind, most concepts apply to working with WordPress, too. Herd supports standard WordPress setups as well as Bedrock with its different folder structure. This guide covers the installation of a standard WordPress site via a zip file but you can apply the same concepts when using the WordPress CLI or cloning a git repository.
## Code Directory
Herd uses the concept of *parked paths* for serving sites via `.test` domains. By default, Herd creates and parks the `~/Herd` directory and every folder that you create in this directory is reachable via its own domain.
This means that you can simply move or install a site to this directory and don't have to create it via the Site Manager in Herd – it just works.
## Database Setup
While Laravel uses SQLite as default, WordPress requires either MySQL or MariaDB as database service for your site. You can set up this database via a free tool like [dbngin](https://dbngin.com) or set up a database instance via a [Herd service](/macos/herd-pro-services/services).
## Connecting from your Laravel application
To connect it within your application, you can use the credentials that are listed next to the running service in the
settings, or you can use the ones below. Since Valkey is API compatible with Redis, the configuration is the same.
```env theme={null}
# Driver configuration
CACHE_DRIVER=redis
QUEUE_CONNECTION=redis
SESSION_DRIVER=redis
# Redis setup
REDIS_HOST=127.0.0.1
REDIS_PASSWORD=null
REDIS_PORT=6379
```
## Versions
Herd Pro allows you to install the following versions directly from the services tab of the settings. New versions are available regularly.
| Service | Version |
| ------- | ------- |
| Valkey | 7.2.x |
| Valkey | 8.0.x |
| Valkey | 8.1.x |
---
# Source: https://herd.laravel.com/docs/macos/guides/wordpress.md
> ## Documentation Index
> Fetch the complete documentation index at: https://herd.laravel.com/docs/llms.txt
> Use this file to discover all available pages before exploring further.
# WordPress
# How to set up a WordPress site
While Herd was mainly developed with Laravel in mind, most concepts apply to working with WordPress, too. Herd supports standard WordPress setups as well as Bedrock with its different folder structure. This guide covers the installation of a standard WordPress site via a zip file but you can apply the same concepts when using the WordPress CLI or cloning a git repository.
## Code Directory
Herd uses the concept of *parked paths* for serving sites via `.test` domains. By default, Herd creates and parks the `~/Herd` directory and every folder that you create in this directory is reachable via its own domain.
This means that you can simply move or install a site to this directory and don't have to create it via the Site Manager in Herd – it just works.
## Database Setup
While Laravel uses SQLite as default, WordPress requires either MySQL or MariaDB as database service for your site. You can set up this database via a free tool like [dbngin](https://dbngin.com) or set up a database instance via a [Herd service](/macos/herd-pro-services/services).
 Your WordPress site is now running via Herd and you can start working on it.
## Debugging with Dumps
[Herd Pro](/#plans) allows you to debug your site with a convenient `dump` helper. So if you're working on plugins and need to output data for debugging purposes, this is super powerful. In this example, we\`re creating a very basic plugin and dumping a string and all existing posts of the fresh WordPress install.
```php theme={null}
/*
Plugin Name: My Herd Plugin
Plugin URI: https://example.com/my-herd-plugin
Description: A simple plugin to demonstrate WordPress plugin development.
Version: 1.0
Author: Your Name
Author URI: https://example.com
License: GPL2
*/
// Hook into an action
add_action('wp_head', 'my_custom_function');
function my_custom_function() {
dump("Hello from Herd 👋");
dump(get_posts());
}
```
When opening any page of your site, the function runs and sends the debug output to the dumps window where it looks like this example.
Your WordPress site is now running via Herd and you can start working on it.
## Debugging with Dumps
[Herd Pro](/#plans) allows you to debug your site with a convenient `dump` helper. So if you're working on plugins and need to output data for debugging purposes, this is super powerful. In this example, we\`re creating a very basic plugin and dumping a string and all existing posts of the fresh WordPress install.
```php theme={null}
/*
Plugin Name: My Herd Plugin
Plugin URI: https://example.com/my-herd-plugin
Description: A simple plugin to demonstrate WordPress plugin development.
Version: 1.0
Author: Your Name
Author URI: https://example.com
License: GPL2
*/
// Hook into an action
add_action('wp_head', 'my_custom_function');
function my_custom_function() {
dump("Hello from Herd 👋");
dump(get_posts());
}
```
When opening any page of your site, the function runs and sends the debug output to the dumps window where it looks like this example.
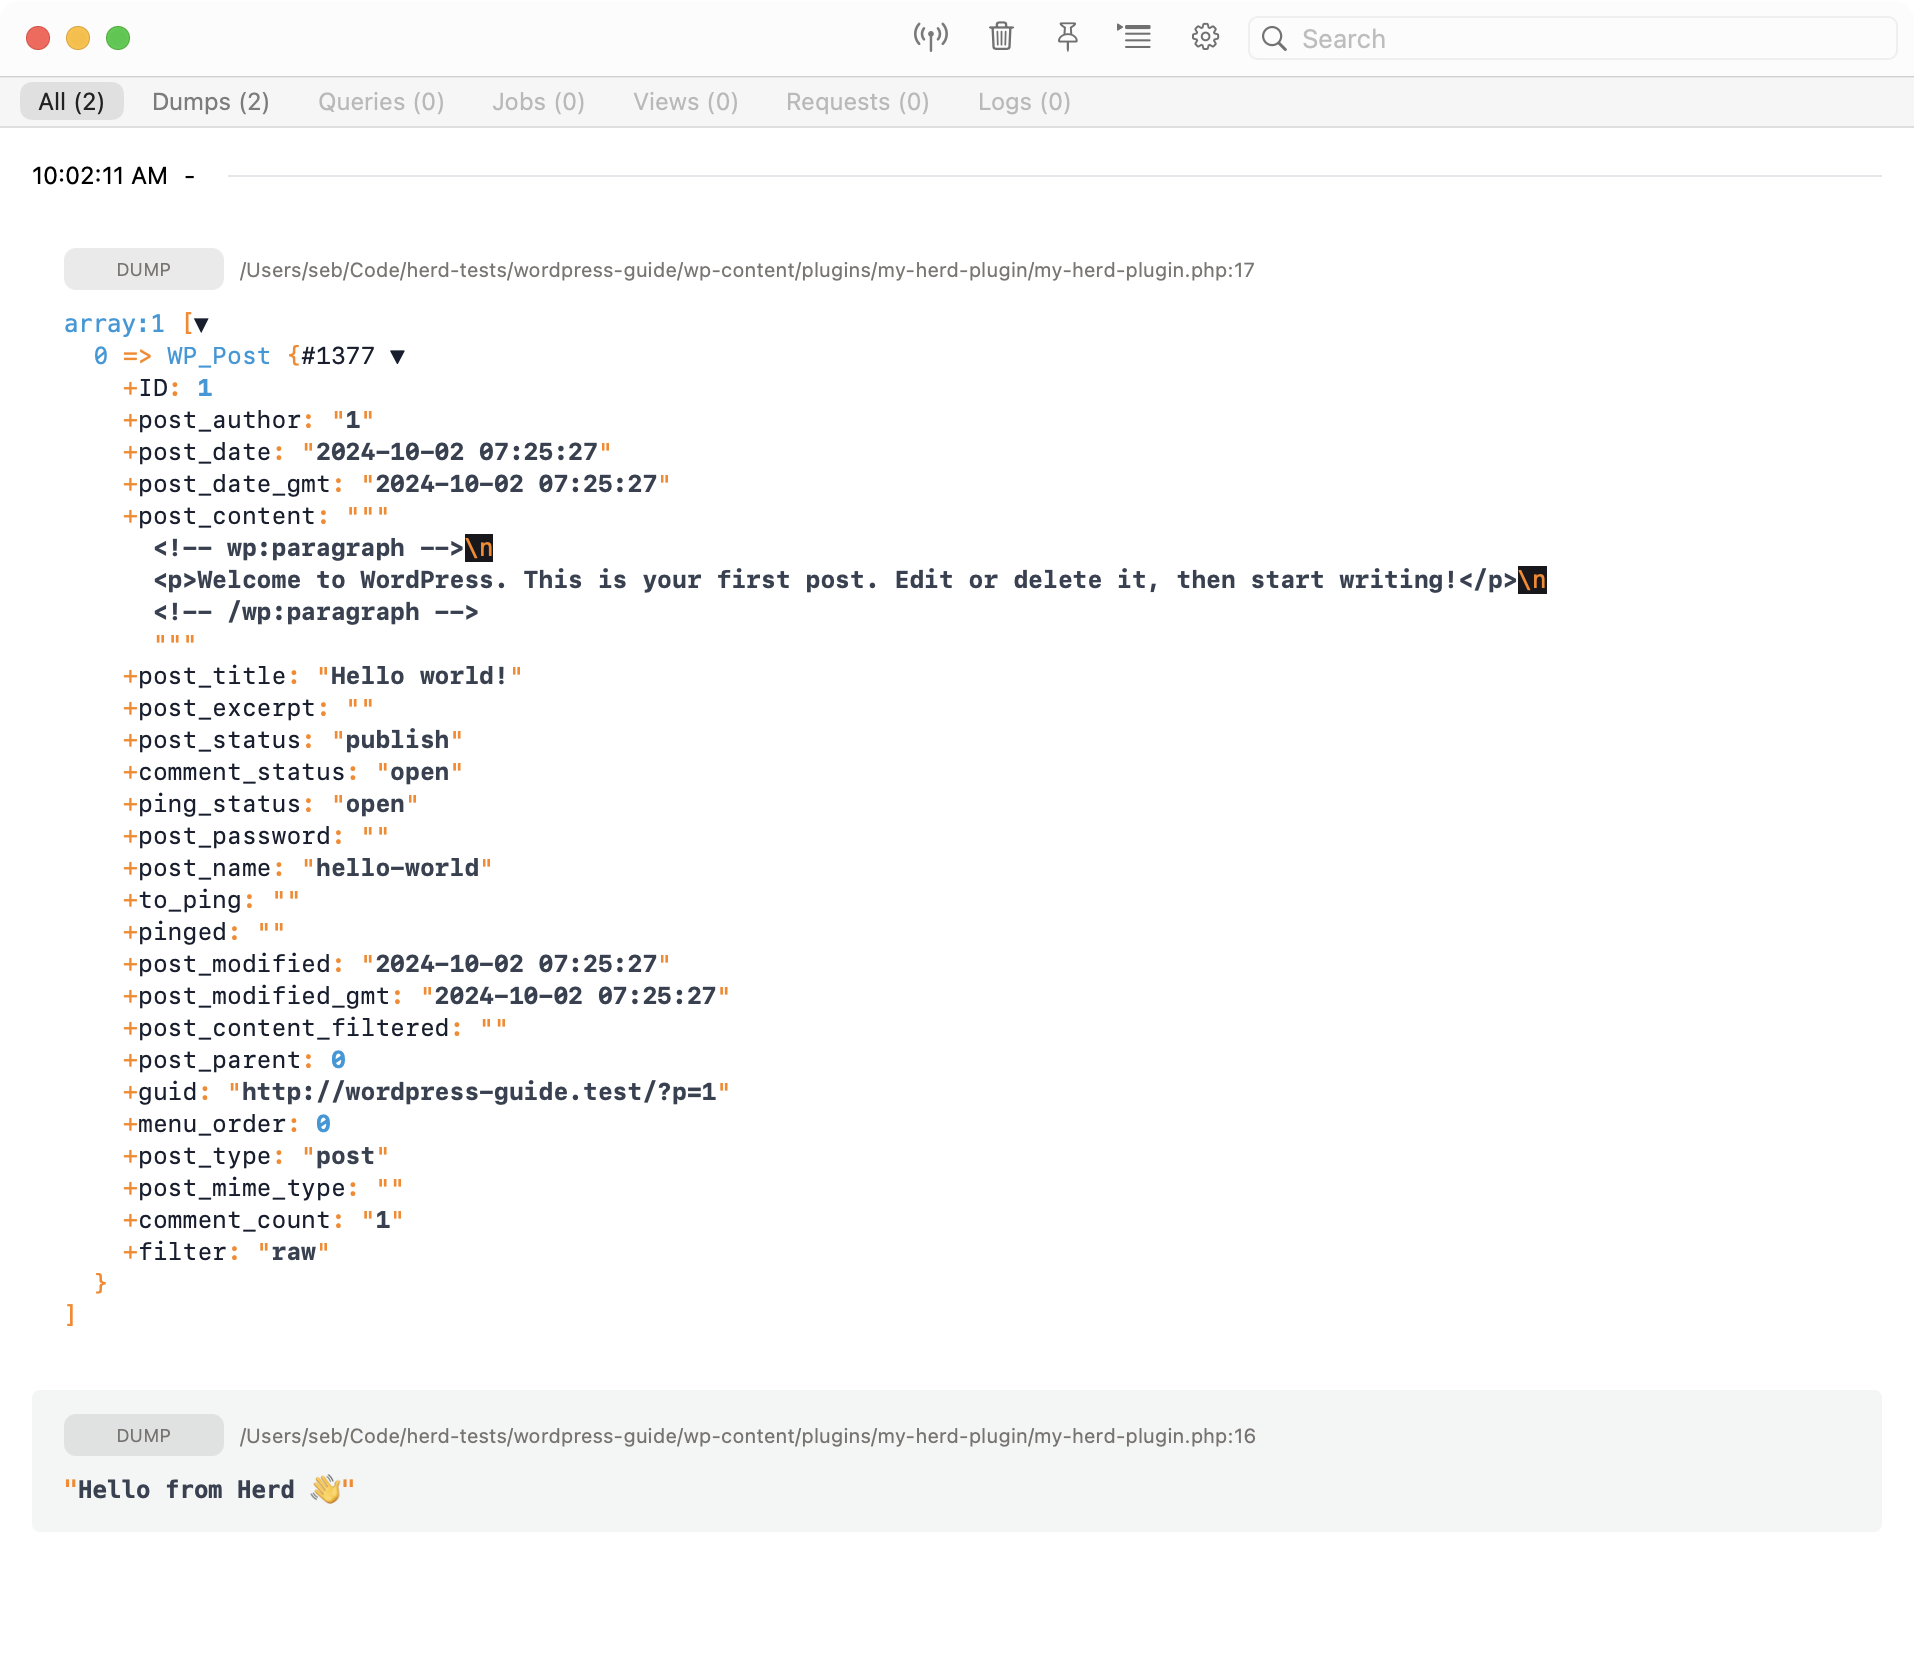 ## Test Emails
Testing emails can be cumbersome and even result in sending emails to your users when you're connected to a real mail service. Herd solves this by running a local email server that catches your mails and sends them to an internal email client that you can use for testing the email.
The quickest way to set up mails in Herd Pro is by defining a mailer in the `functions.php`. Simply paste the following snippet to the end of your `functions.php` to receive emails in Herd.
```php theme={null}
function herd_mailer($phpmailer) {
$phpmailer->isSMTP();
$phpmailer->Host = '127.0.0.1';
$phpmailer->SMTPAuth = true;
$phpmailer->Port = 2525;
$phpmailer->Username = 'WordPress';
$phpmailer->Password = '';
}
add_action('phpmailer_init', 'herd_mailer');
```
Every time when your application sends an email, it uses Herd's integrated mail service. If it's the first email from this application, it creates an inbox for this application based on the username of the configuration so that you can easily identify emails and where they are from.
You can test this feature by logging out of your site and using the password reset form to trigger an email.
## Test Emails
Testing emails can be cumbersome and even result in sending emails to your users when you're connected to a real mail service. Herd solves this by running a local email server that catches your mails and sends them to an internal email client that you can use for testing the email.
The quickest way to set up mails in Herd Pro is by defining a mailer in the `functions.php`. Simply paste the following snippet to the end of your `functions.php` to receive emails in Herd.
```php theme={null}
function herd_mailer($phpmailer) {
$phpmailer->isSMTP();
$phpmailer->Host = '127.0.0.1';
$phpmailer->SMTPAuth = true;
$phpmailer->Port = 2525;
$phpmailer->Username = 'WordPress';
$phpmailer->Password = '';
}
add_action('phpmailer_init', 'herd_mailer');
```
Every time when your application sends an email, it uses Herd's integrated mail service. If it's the first email from this application, it creates an inbox for this application based on the username of the configuration so that you can easily identify emails and where they are from.
You can test this feature by logging out of your site and using the password reset form to trigger an email.
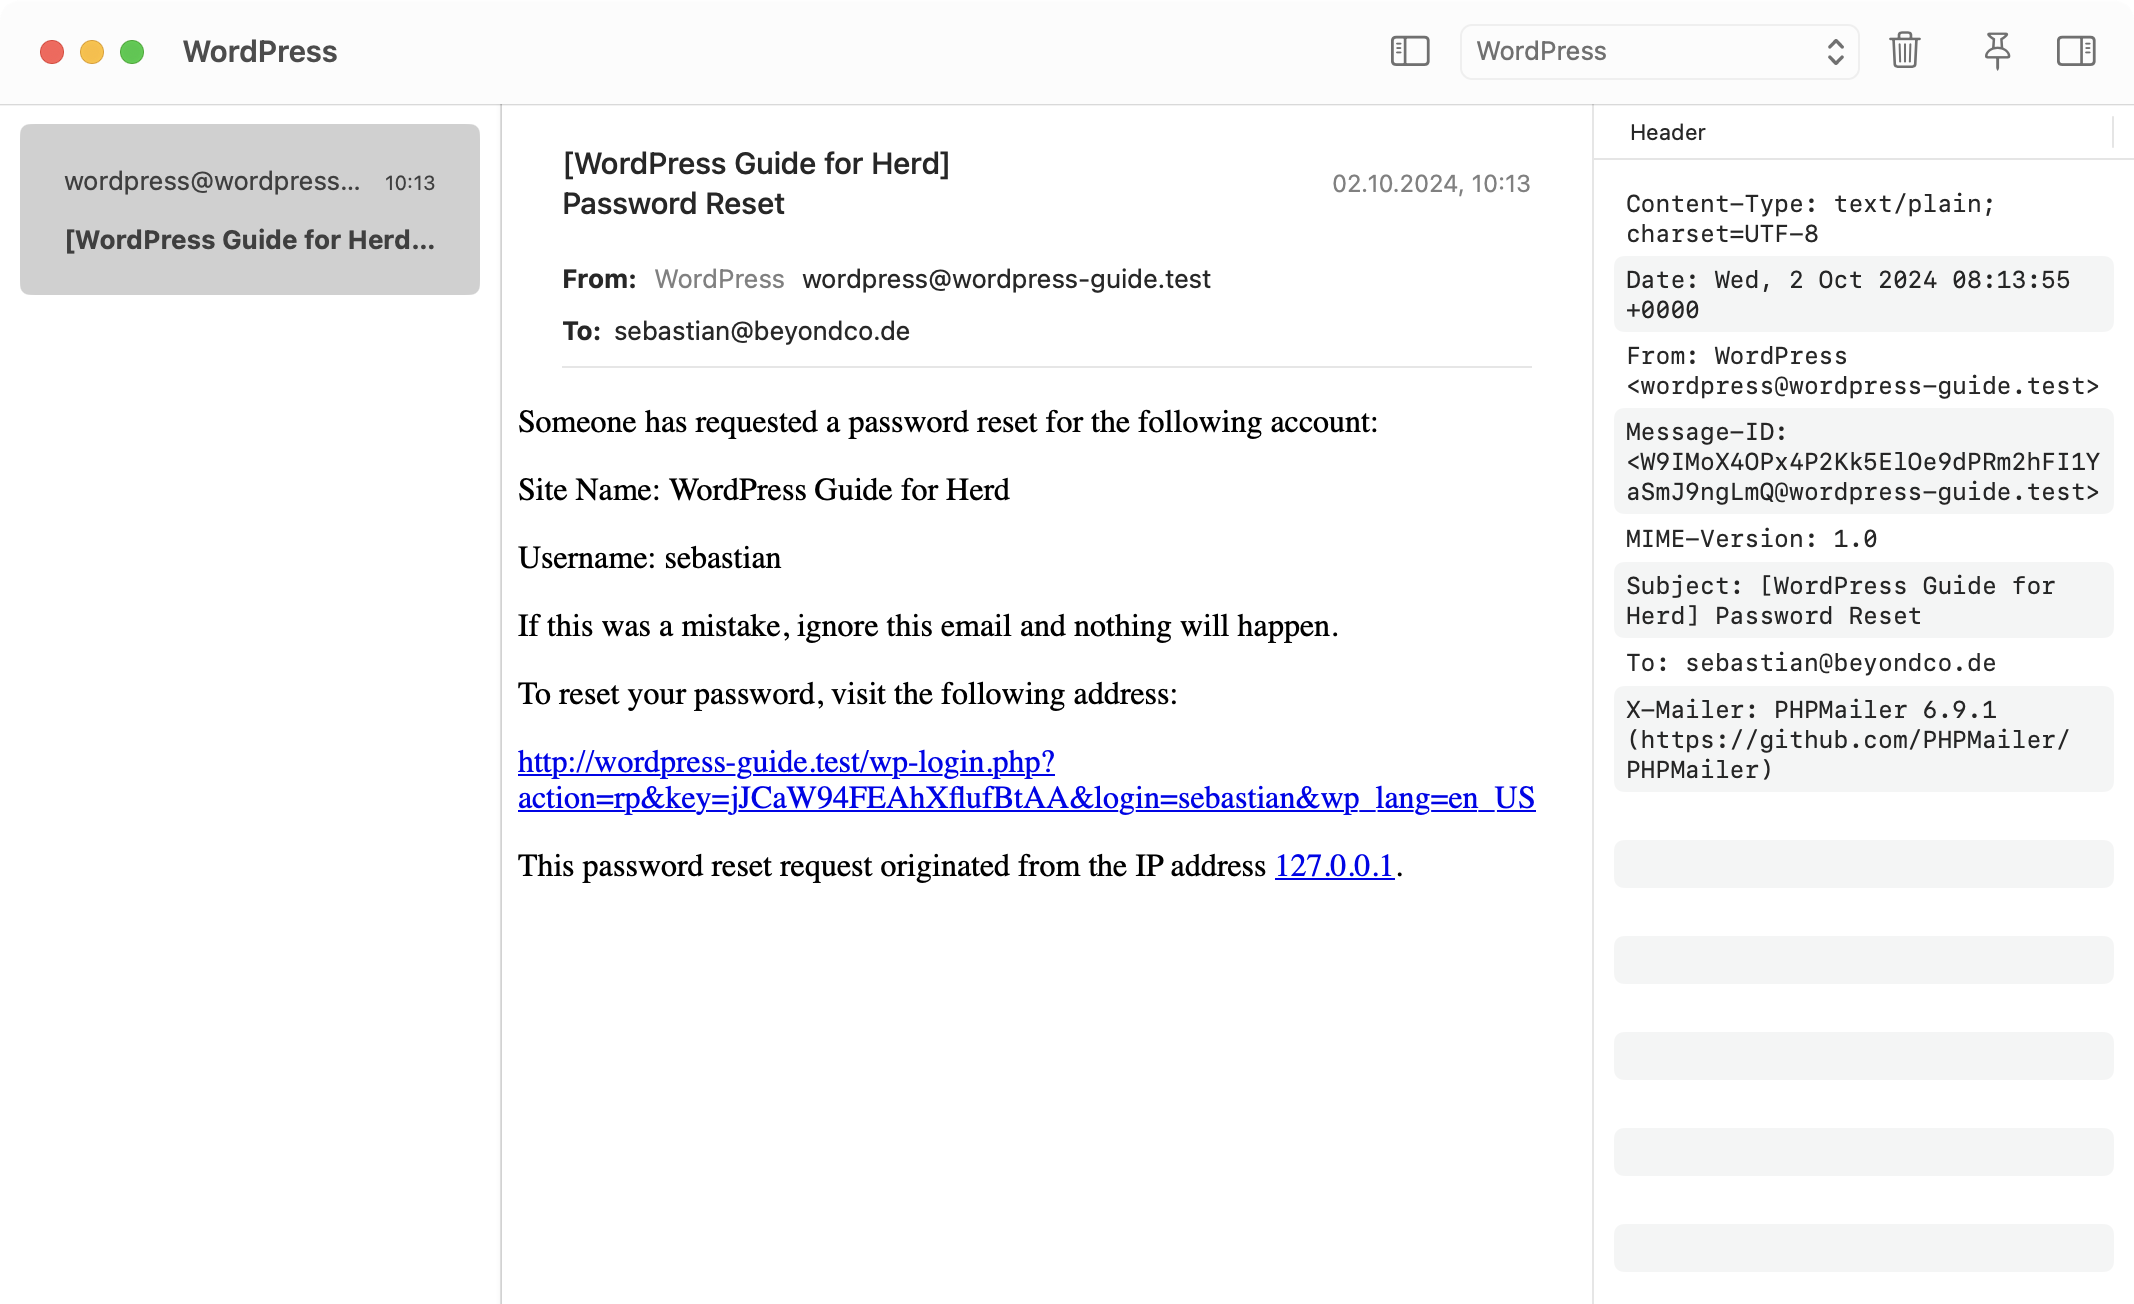 After setting up your first WordPress site in Herd, you can now follow the docs to learn more about all features in more detail and fully leverage Herd when using it every day.
---
# Source: https://herd.laravel.com/docs/macos/debugging/xdebug-detection.md
> ## Documentation Index
> Fetch the complete documentation index at: https://herd.laravel.com/docs/llms.txt
> Use this file to discover all available pages before exploring further.
# Xdebug Detection
# Automatically use Xdebug
Herd Pro is able to detect Xdebug headers in HTTP requests or breakpoints in PHPStorm and routes these requests to a PHP process with Xdebug automatically. This keeps your site super fast on all normal requests but provides advanced debugging capabilities with Xdebug when needed.
After setting up your first WordPress site in Herd, you can now follow the docs to learn more about all features in more detail and fully leverage Herd when using it every day.
---
# Source: https://herd.laravel.com/docs/macos/debugging/xdebug-detection.md
> ## Documentation Index
> Fetch the complete documentation index at: https://herd.laravel.com/docs/llms.txt
> Use this file to discover all available pages before exploring further.
# Xdebug Detection
# Automatically use Xdebug
Herd Pro is able to detect Xdebug headers in HTTP requests or breakpoints in PHPStorm and routes these requests to a PHP process with Xdebug automatically. This keeps your site super fast on all normal requests but provides advanced debugging capabilities with Xdebug when needed.
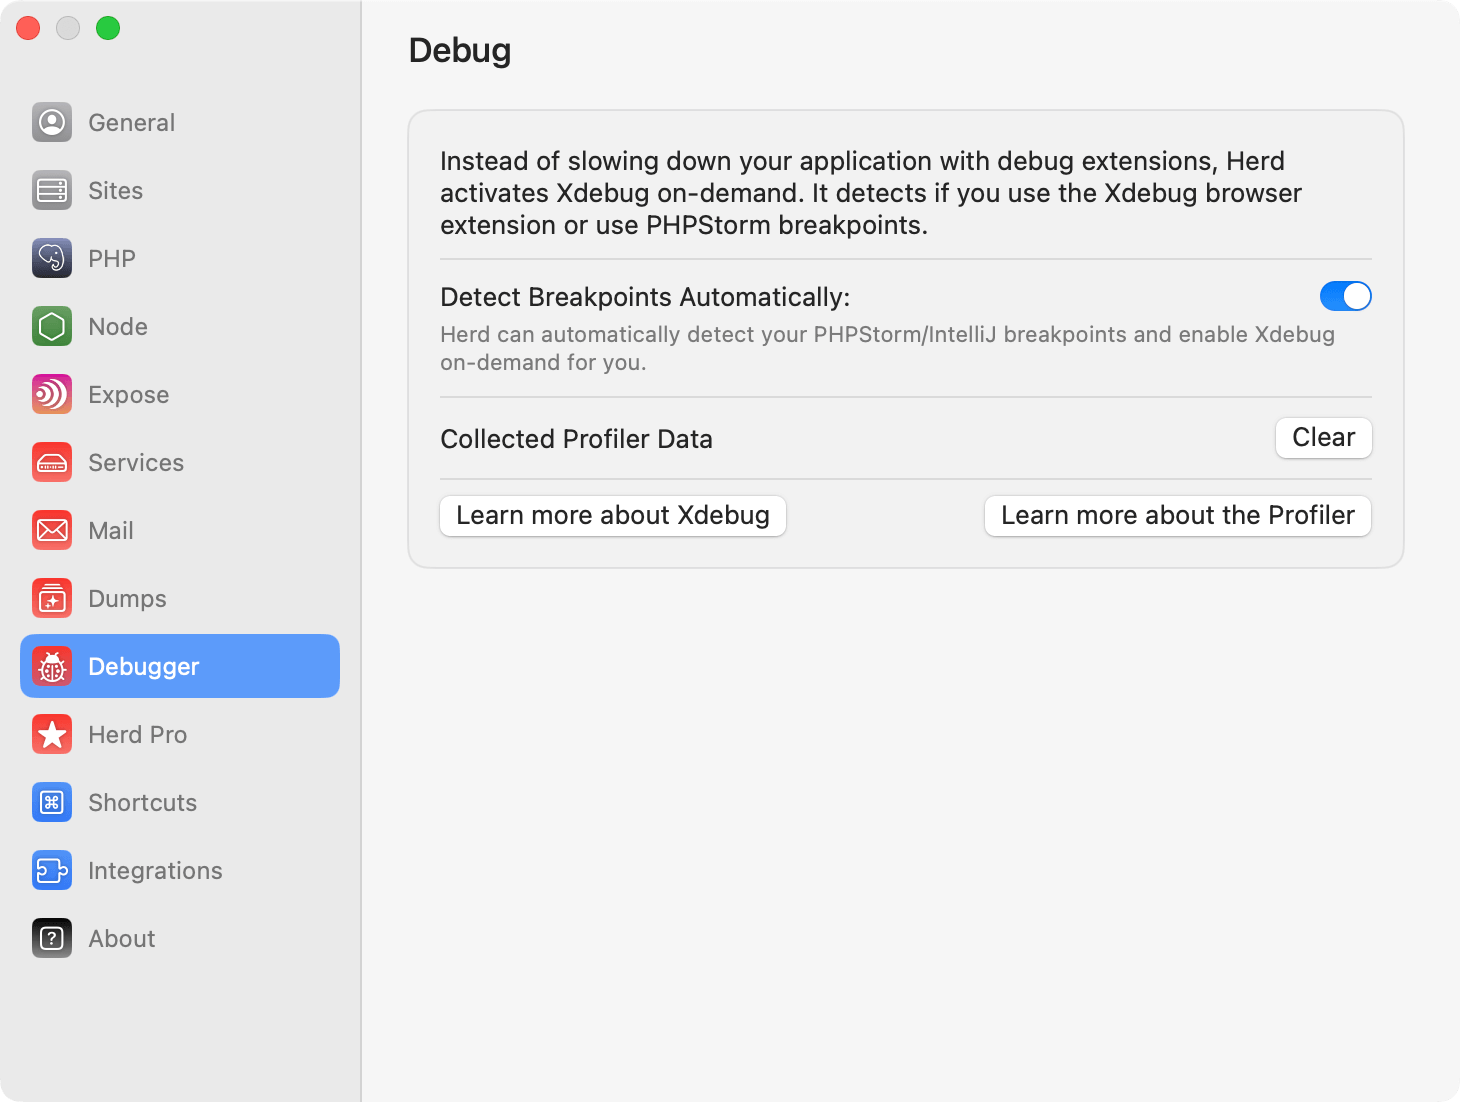 When you set or remove a breakpoint in PhpStorm and save the file, this creates a temporary file within the `.idea` folder of your project. Herd parses these files to detect breakpoints.
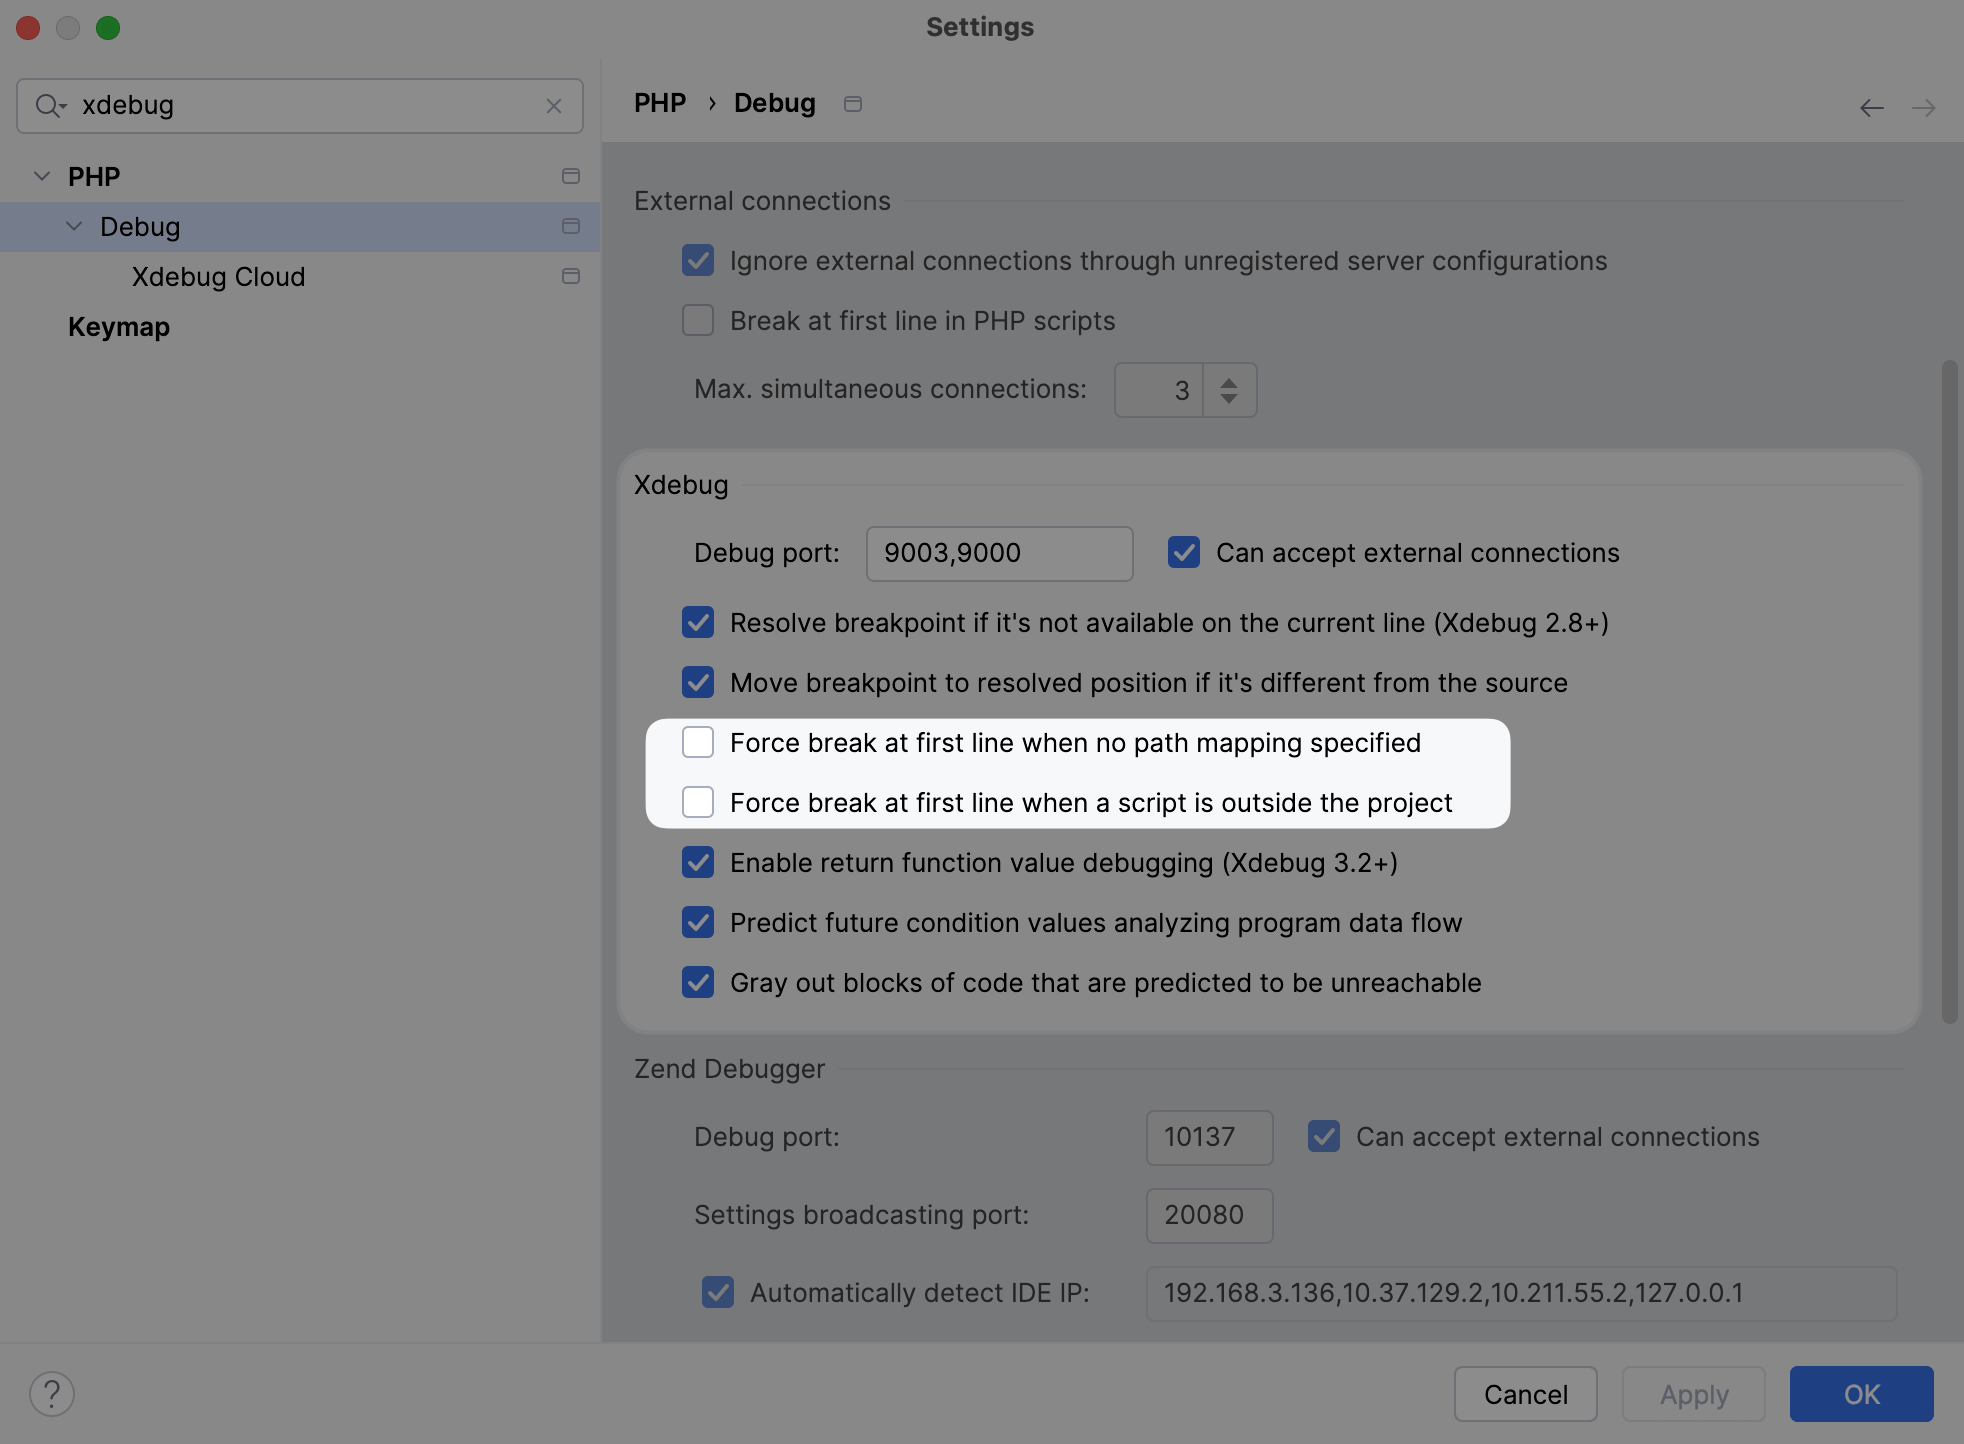 If you do not use PHPStorm, you can use browser extensions for Xdebug to automatically load Xdebug.
## Setup with browser extensions
Herd uses the headers of Xdebug browser extensions that you can install via the [Chrome Web Store](https://chromewebstore.google.com/detail/xdebug-extension/aoelhdemabeimdhedkidlnbkfhnhgnhm) or [Firefox Addons](https://addons.mozilla.org/firefox/addon/xdebug-helper-for-firefox).
Once you enable the Xdebug feature in the browser extension, Herd serves the request via a PHP process with an enabled Xdebug extensions.
## Using Xdebug on the command line
You can run CLI commands via `herd debug ..` instead of using `php ...` to use the php binary with Xdebug enabled. For example, if you are debugging an artisan command, you can run `herd debug artisan your:command` to trigger your breakpoint.
## Code Coverage
Herd has a `coverage` command that allows you to run Xdebug's coverage mode on your test suite:
```bash theme={null}
herd coverage ./vendor/bin/pest --coverage
```
## Troubleshooting
If the detection does not work, please make sure to save the file with the breakpoint after setting or removing the breakpoint.
---
# Source: https://herd.laravel.com/docs/macos/debugging/xdebug.md
> ## Documentation Index
> Fetch the complete documentation index at: https://herd.laravel.com/docs/llms.txt
> Use this file to discover all available pages before exploring further.
# Xdebug
# Using Xdebug with Herd
Herd includes support for [Xdebug](https://xdebug.org/), a popular and powerful debugger for PHP.
The free version of Herd ships with Xdebug's PHP extensions out-of-the-box, but you need to manually enable the extension when you need it.
If Xdebug is too much for you and you prefer debugging via dumps, check out the [Dumps](/macos/debugging/dumps) of Herd Pro.
If you do not use PHPStorm, you can use browser extensions for Xdebug to automatically load Xdebug.
## Setup with browser extensions
Herd uses the headers of Xdebug browser extensions that you can install via the [Chrome Web Store](https://chromewebstore.google.com/detail/xdebug-extension/aoelhdemabeimdhedkidlnbkfhnhgnhm) or [Firefox Addons](https://addons.mozilla.org/firefox/addon/xdebug-helper-for-firefox).
Once you enable the Xdebug feature in the browser extension, Herd serves the request via a PHP process with an enabled Xdebug extensions.
## Using Xdebug on the command line
You can run CLI commands via `herd debug ..` instead of using `php ...` to use the php binary with Xdebug enabled. For example, if you are debugging an artisan command, you can run `herd debug artisan your:command` to trigger your breakpoint.
## Code Coverage
Herd has a `coverage` command that allows you to run Xdebug's coverage mode on your test suite:
```bash theme={null}
herd coverage ./vendor/bin/pest --coverage
```
## Troubleshooting
If the detection does not work, please make sure to save the file with the breakpoint after setting or removing the breakpoint.
---
# Source: https://herd.laravel.com/docs/macos/debugging/xdebug.md
> ## Documentation Index
> Fetch the complete documentation index at: https://herd.laravel.com/docs/llms.txt
> Use this file to discover all available pages before exploring further.
# Xdebug
# Using Xdebug with Herd
Herd includes support for [Xdebug](https://xdebug.org/), a popular and powerful debugger for PHP.
The free version of Herd ships with Xdebug's PHP extensions out-of-the-box, but you need to manually enable the extension when you need it.
If Xdebug is too much for you and you prefer debugging via dumps, check out the [Dumps](/macos/debugging/dumps) of Herd Pro.