{version}
{version}
{version}
{version}
{version}
{version}
{version}
{version}
uv commands.
{version}
uv commands.
{version}
{version}
{version}
                New in version:
                {version}
;
};
{version}
{version}
uv commands.
{version}
 #### Dependencies
FastMCP offers multiple ways to manage dependencies for your Cursor servers:
**Individual packages**: Use the `--with` flag to specify packages your server needs. You can use this flag multiple times:
```bash theme={"theme":{"light":"snazzy-light","dark":"dark-plus"}}
fastmcp install cursor server.py --with pandas --with requests
```
**Requirements file**: For projects with a `requirements.txt` file, use `--with-requirements` to install all dependencies at once:
```bash theme={"theme":{"light":"snazzy-light","dark":"dark-plus"}}
fastmcp install cursor server.py --with-requirements requirements.txt
```
**Editable packages**: When developing local packages, use `--with-editable` to install them in editable mode:
```bash theme={"theme":{"light":"snazzy-light","dark":"dark-plus"}}
fastmcp install cursor server.py --with-editable ./my-local-package
```
Alternatively, you can use a `fastmcp.json` configuration file (recommended):
```json fastmcp.json theme={"theme":{"light":"snazzy-light","dark":"dark-plus"}}
{
"$schema": "https://gofastmcp.com/public/schemas/fastmcp.json/v1.json",
"source": {
"path": "server.py",
"entrypoint": "mcp"
},
"environment": {
"dependencies": ["pandas", "requests"]
}
}
```
#### Python Version and Project Configuration
Control your server's Python environment with these options:
**Python version**: Use `--python` to specify which Python version your server should use. This is essential when your server requires specific Python features:
```bash theme={"theme":{"light":"snazzy-light","dark":"dark-plus"}}
fastmcp install cursor server.py --python 3.11
```
**Project directory**: Use `--project` to run your server within a specific project context. This ensures `uv` discovers all project configuration files and uses the correct virtual environment:
```bash theme={"theme":{"light":"snazzy-light","dark":"dark-plus"}}
fastmcp install cursor server.py --project /path/to/my-project
```
#### Environment Variables
#### Dependencies
FastMCP offers multiple ways to manage dependencies for your Cursor servers:
**Individual packages**: Use the `--with` flag to specify packages your server needs. You can use this flag multiple times:
```bash theme={"theme":{"light":"snazzy-light","dark":"dark-plus"}}
fastmcp install cursor server.py --with pandas --with requests
```
**Requirements file**: For projects with a `requirements.txt` file, use `--with-requirements` to install all dependencies at once:
```bash theme={"theme":{"light":"snazzy-light","dark":"dark-plus"}}
fastmcp install cursor server.py --with-requirements requirements.txt
```
**Editable packages**: When developing local packages, use `--with-editable` to install them in editable mode:
```bash theme={"theme":{"light":"snazzy-light","dark":"dark-plus"}}
fastmcp install cursor server.py --with-editable ./my-local-package
```
Alternatively, you can use a `fastmcp.json` configuration file (recommended):
```json fastmcp.json theme={"theme":{"light":"snazzy-light","dark":"dark-plus"}}
{
"$schema": "https://gofastmcp.com/public/schemas/fastmcp.json/v1.json",
"source": {
"path": "server.py",
"entrypoint": "mcp"
},
"environment": {
"dependencies": ["pandas", "requests"]
}
}
```
#### Python Version and Project Configuration
Control your server's Python environment with these options:
**Python version**: Use `--python` to specify which Python version your server should use. This is essential when your server requires specific Python features:
```bash theme={"theme":{"light":"snazzy-light","dark":"dark-plus"}}
fastmcp install cursor server.py --python 3.11
```
**Project directory**: Use `--project` to run your server within a specific project context. This ensures `uv` discovers all project configuration files and uses the correct virtual environment:
```bash theme={"theme":{"light":"snazzy-light","dark":"dark-plus"}}
fastmcp install cursor server.py --project /path/to/my-project
```
#### Environment Variables
{version}
{version}
{version}
{version}
{version}
{version}
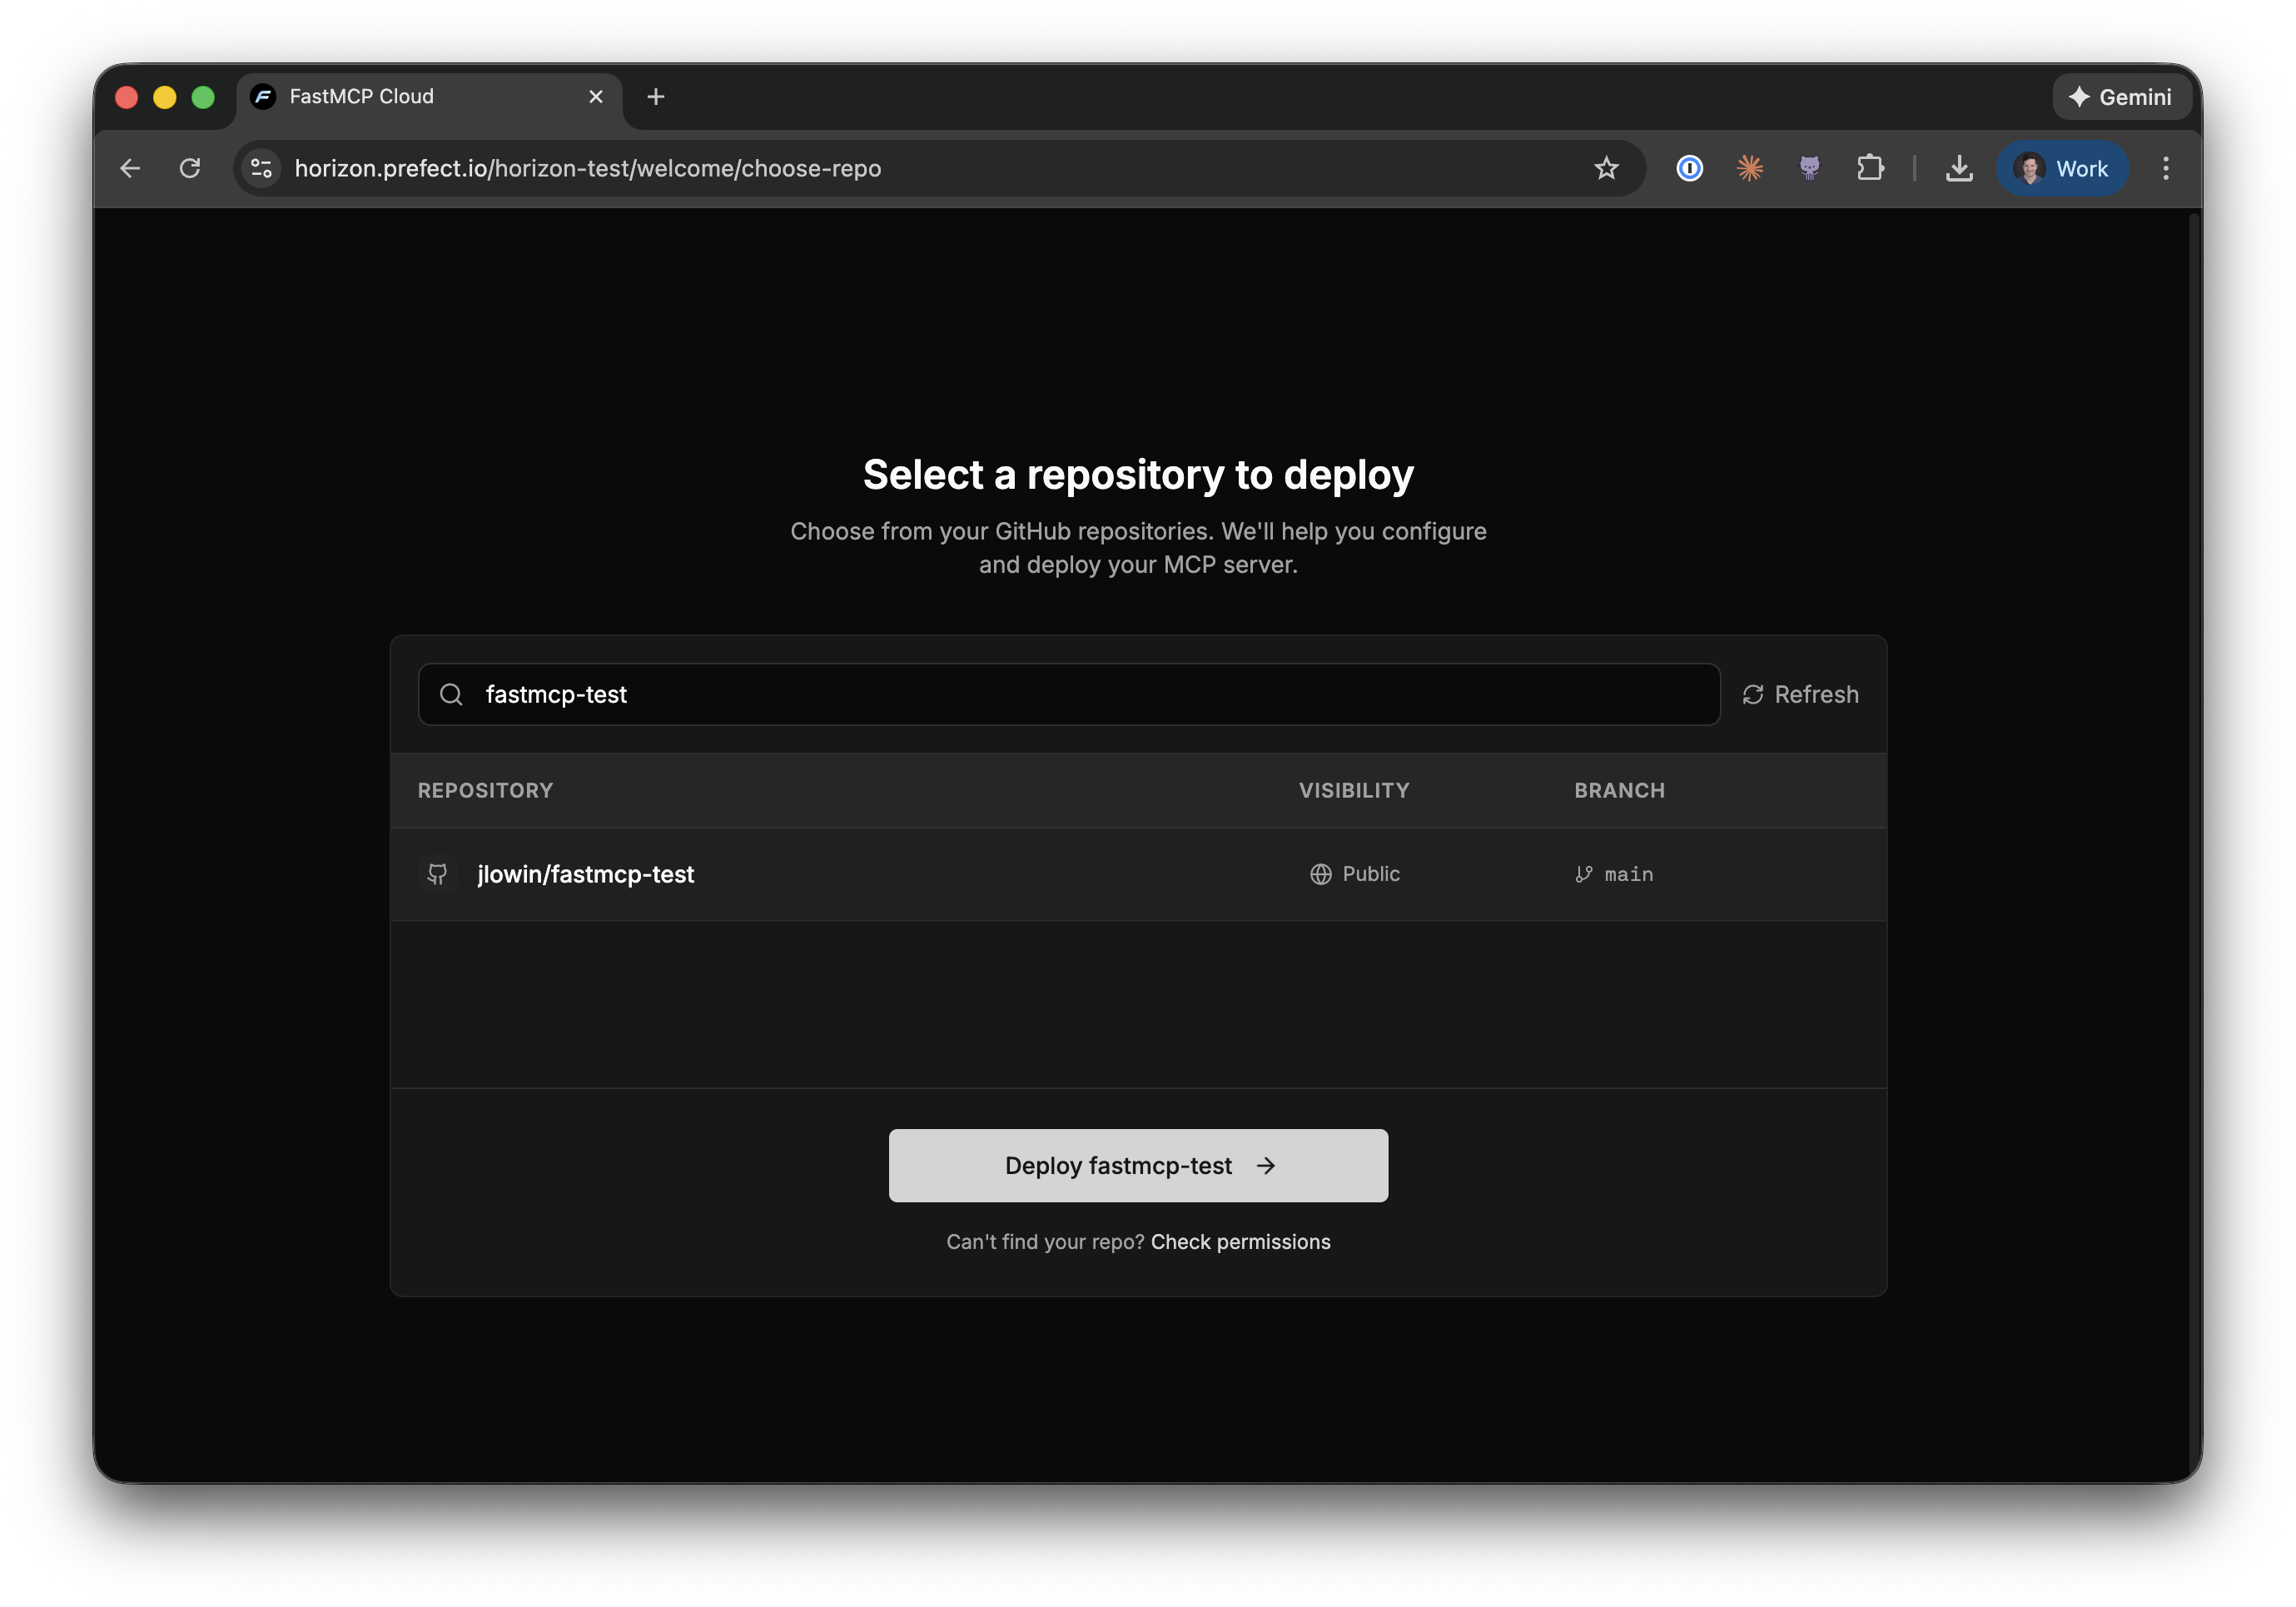
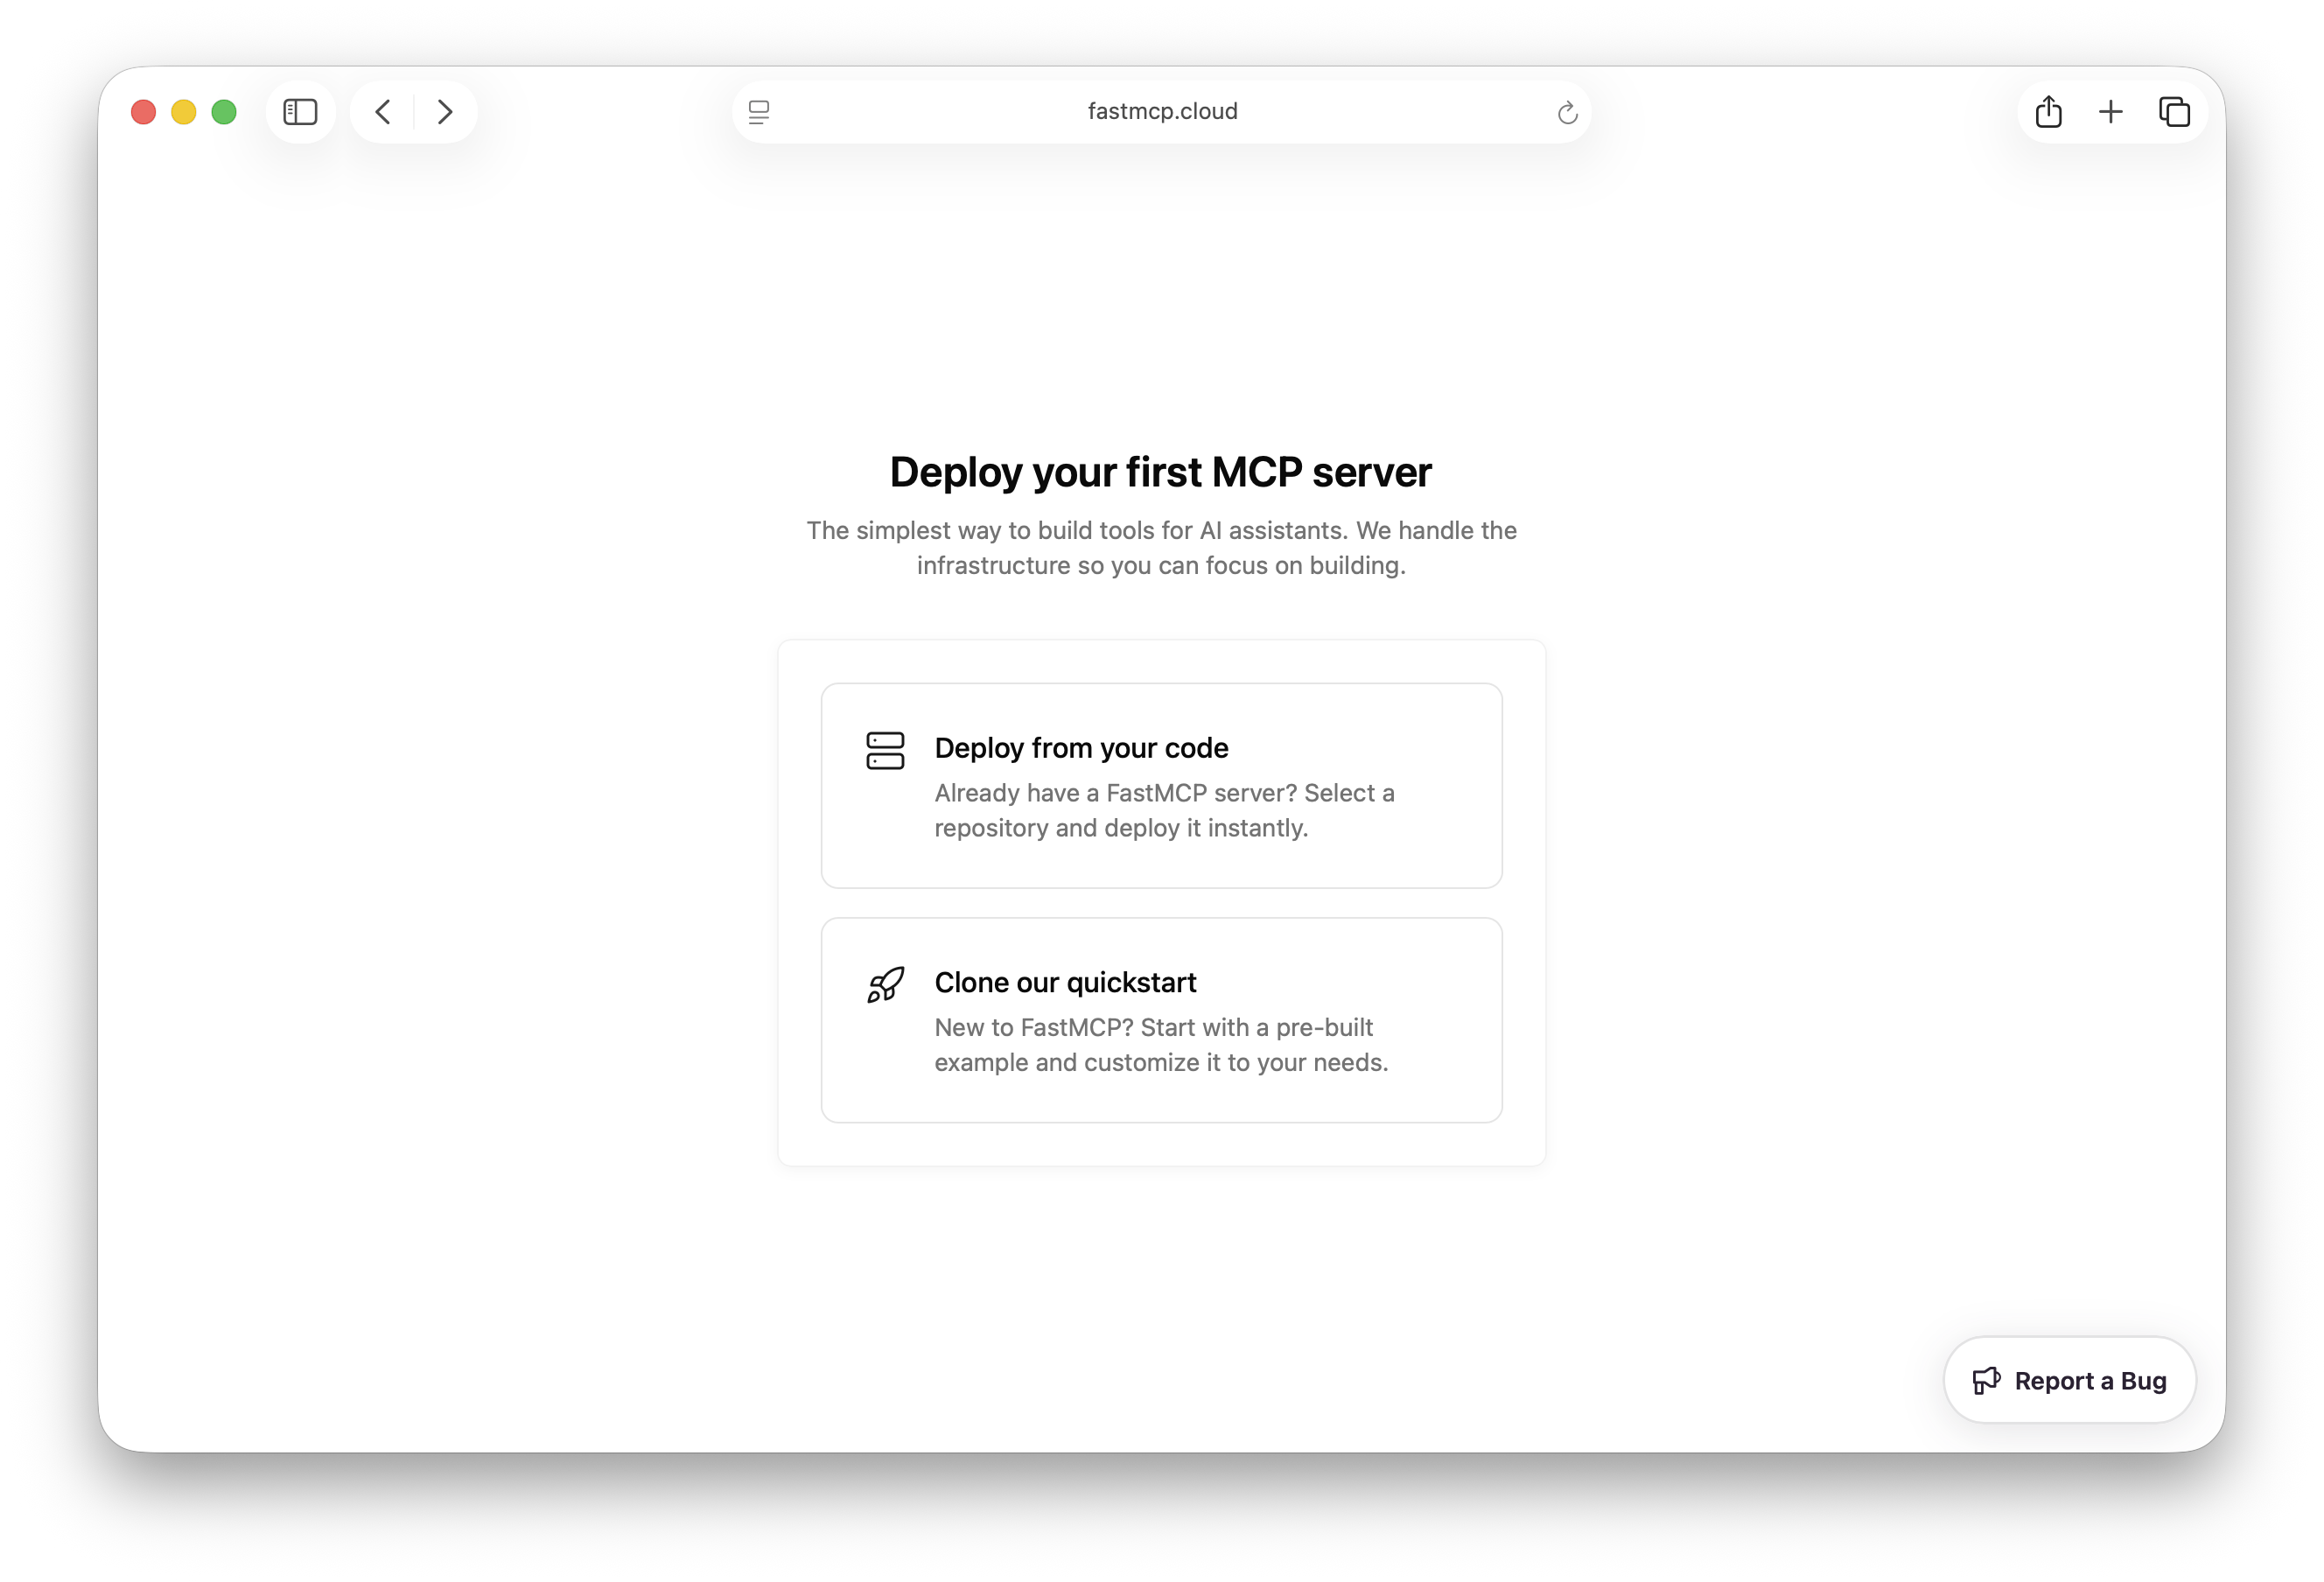 Next, you'll be prompted to configure your project.
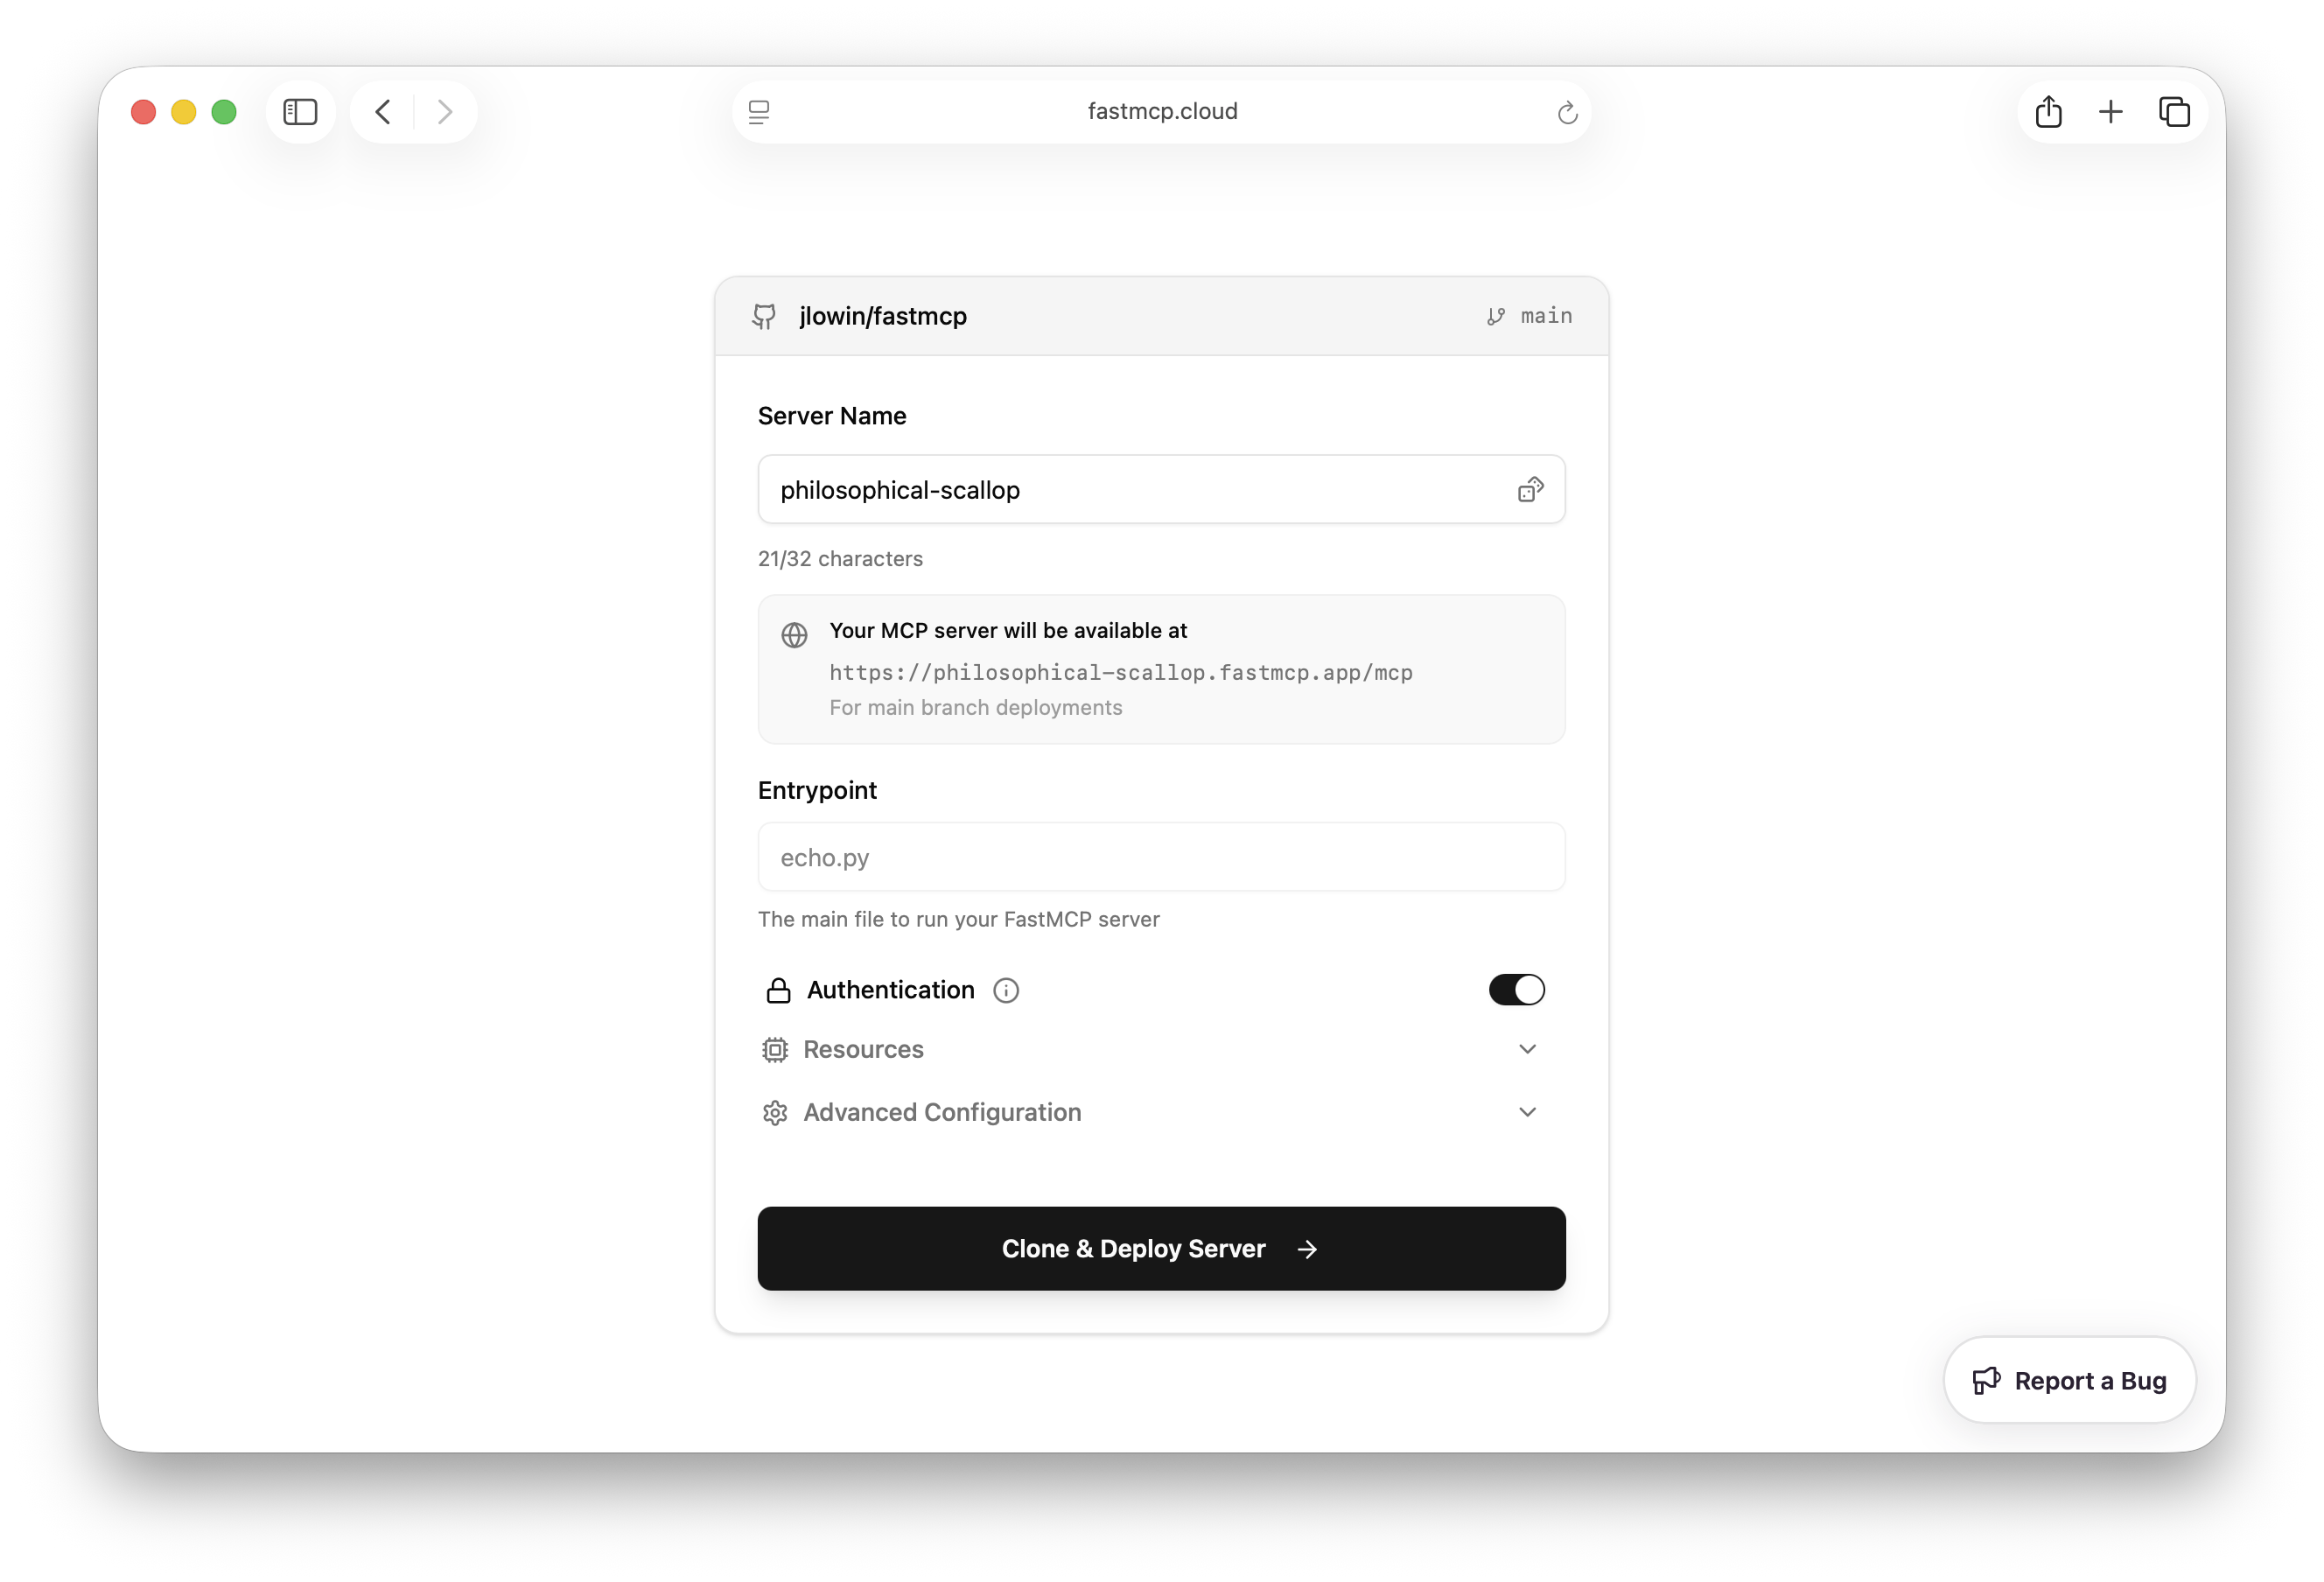 The configuration screen lets you specify:
* **Name**: The name of your project. This will be used to generate a unique URL for your server.
* **Entrypoint**: The Python file containing your FastMCP server (e.g., `echo.py`). This field has the same syntax as the `fastmcp run` command, for example `echo.py:my_server` to specify a specific object in the file.
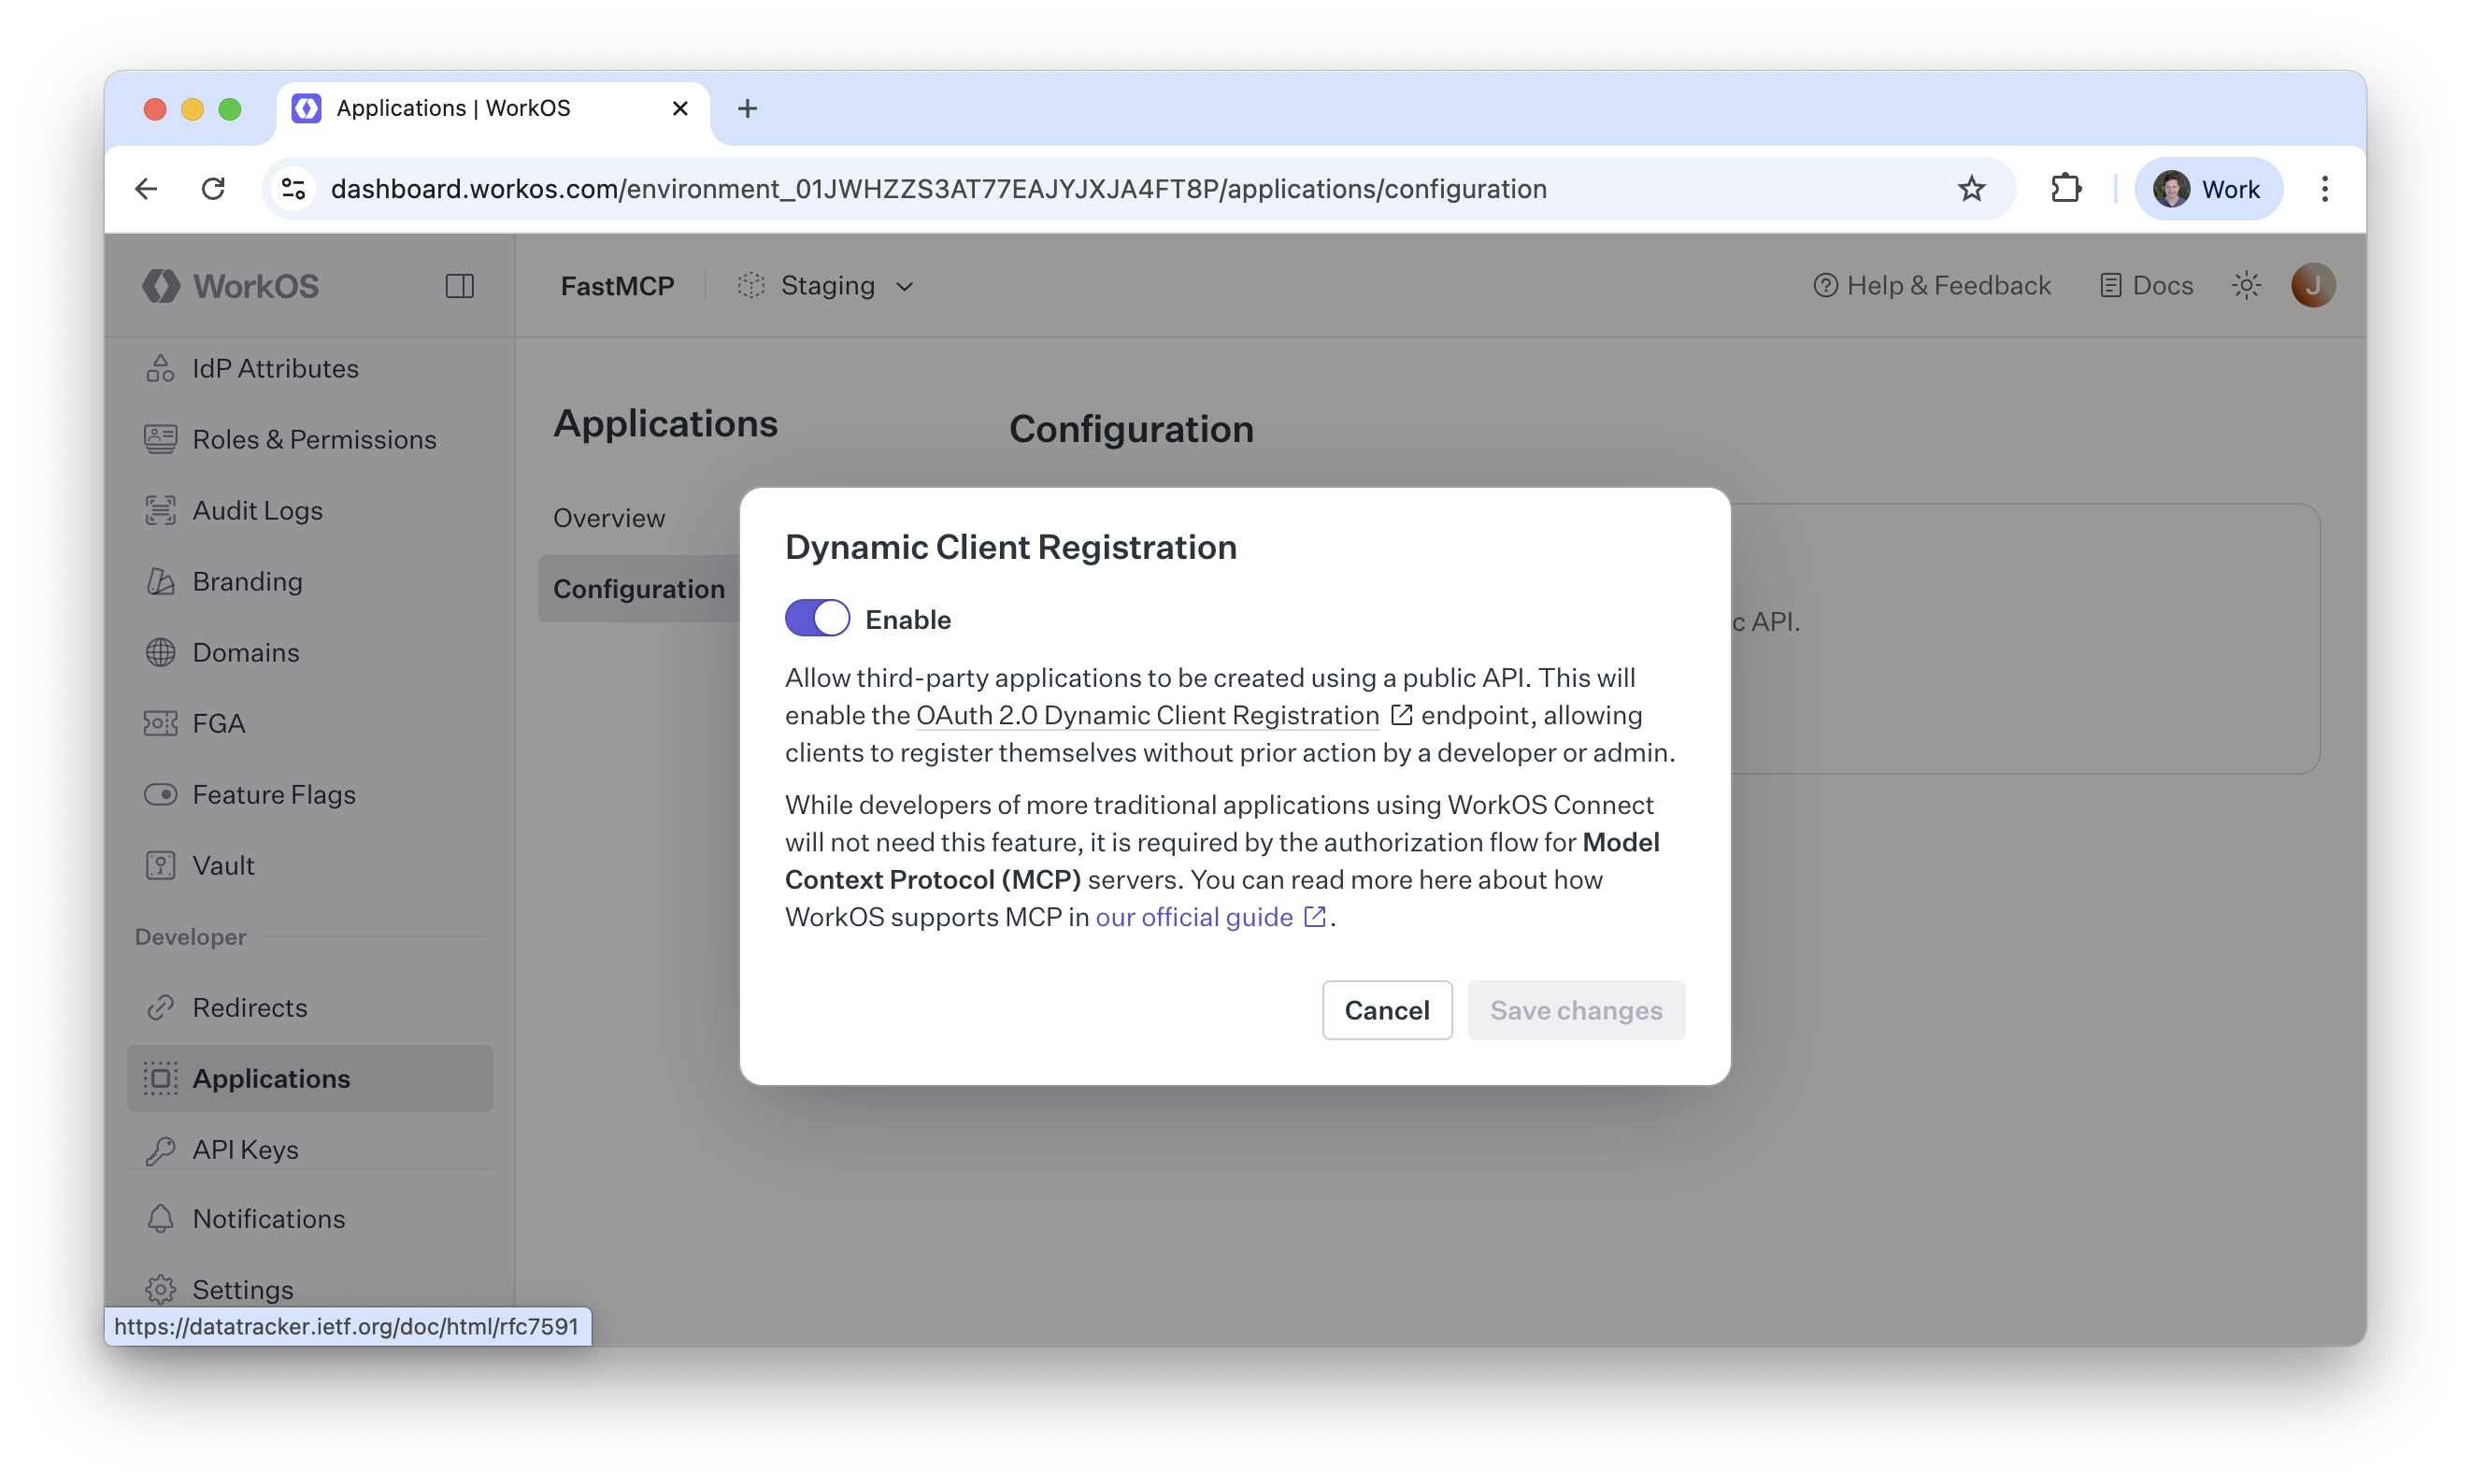
* **Authentication**: If disabled, your server is open to the public. If enabled, only other members of your FastMCP Cloud organization will be able to connect.
Note that FastMCP Cloud will automatically detect yours server's Python dependencies from either a `requirements.txt` or `pyproject.toml` file.
### Step 2: Deploy Your Server
Once you configure your project, FastMCP Cloud will:
1. Clone the repository
2. Build your FastMCP server
3. Deploy it to a unique URL
4. Make it immediately available for connections
The configuration screen lets you specify:
* **Name**: The name of your project. This will be used to generate a unique URL for your server.
* **Entrypoint**: The Python file containing your FastMCP server (e.g., `echo.py`). This field has the same syntax as the `fastmcp run` command, for example `echo.py:my_server` to specify a specific object in the file.
* **Authentication**: If disabled, your server is open to the public. If enabled, only other members of your FastMCP Cloud organization will be able to connect.
Note that FastMCP Cloud will automatically detect yours server's Python dependencies from either a `requirements.txt` or `pyproject.toml` file.
### Step 2: Deploy Your Server
Once you configure your project, FastMCP Cloud will:
1. Clone the repository
2. Build your FastMCP server
3. Deploy it to a unique URL
4. Make it immediately available for connections
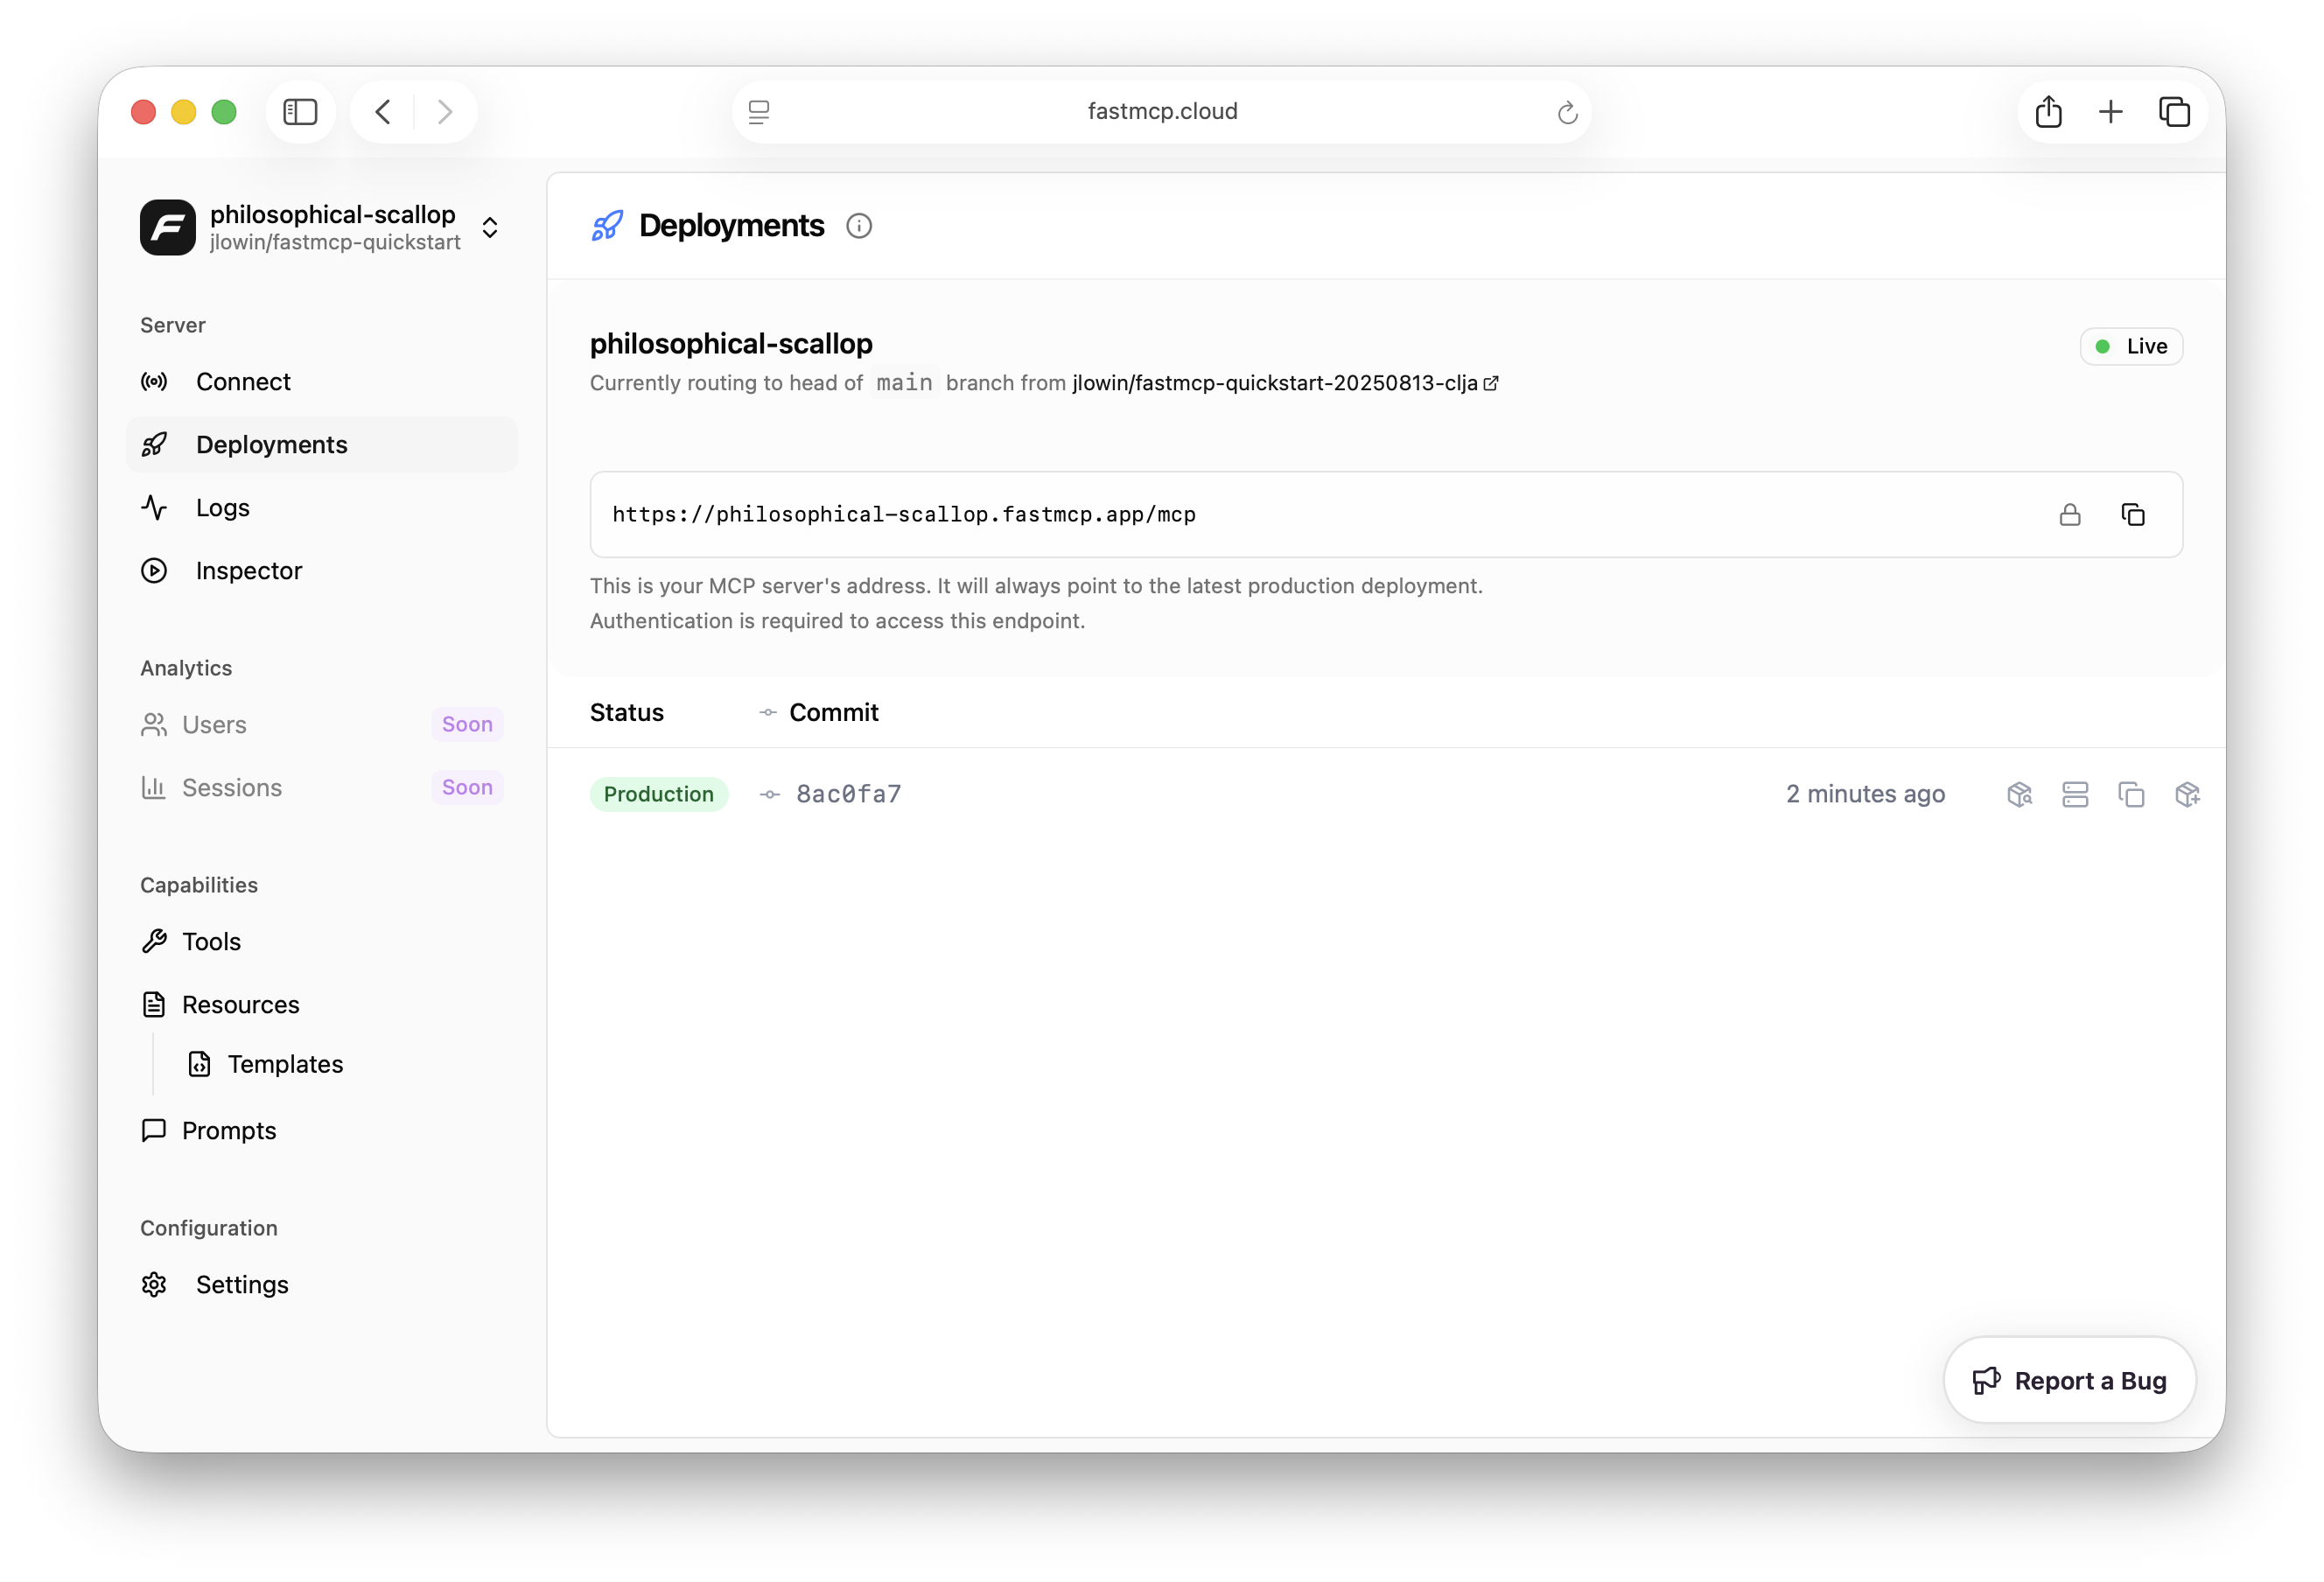 FastMCP Cloud will monitor your repo and redeploy your server whenever you push a change to the `main` branch. In addition, FastMCP Cloud will build and deploy servers for every PR your open, hosting them on unique URLs, so you can test changes before updating your production server.
### Step 3: Connect to Your Server
Once your server is deployed, it will be accessible at a URL like:
```
https://your-project-name.fastmcp.app/mcp
```
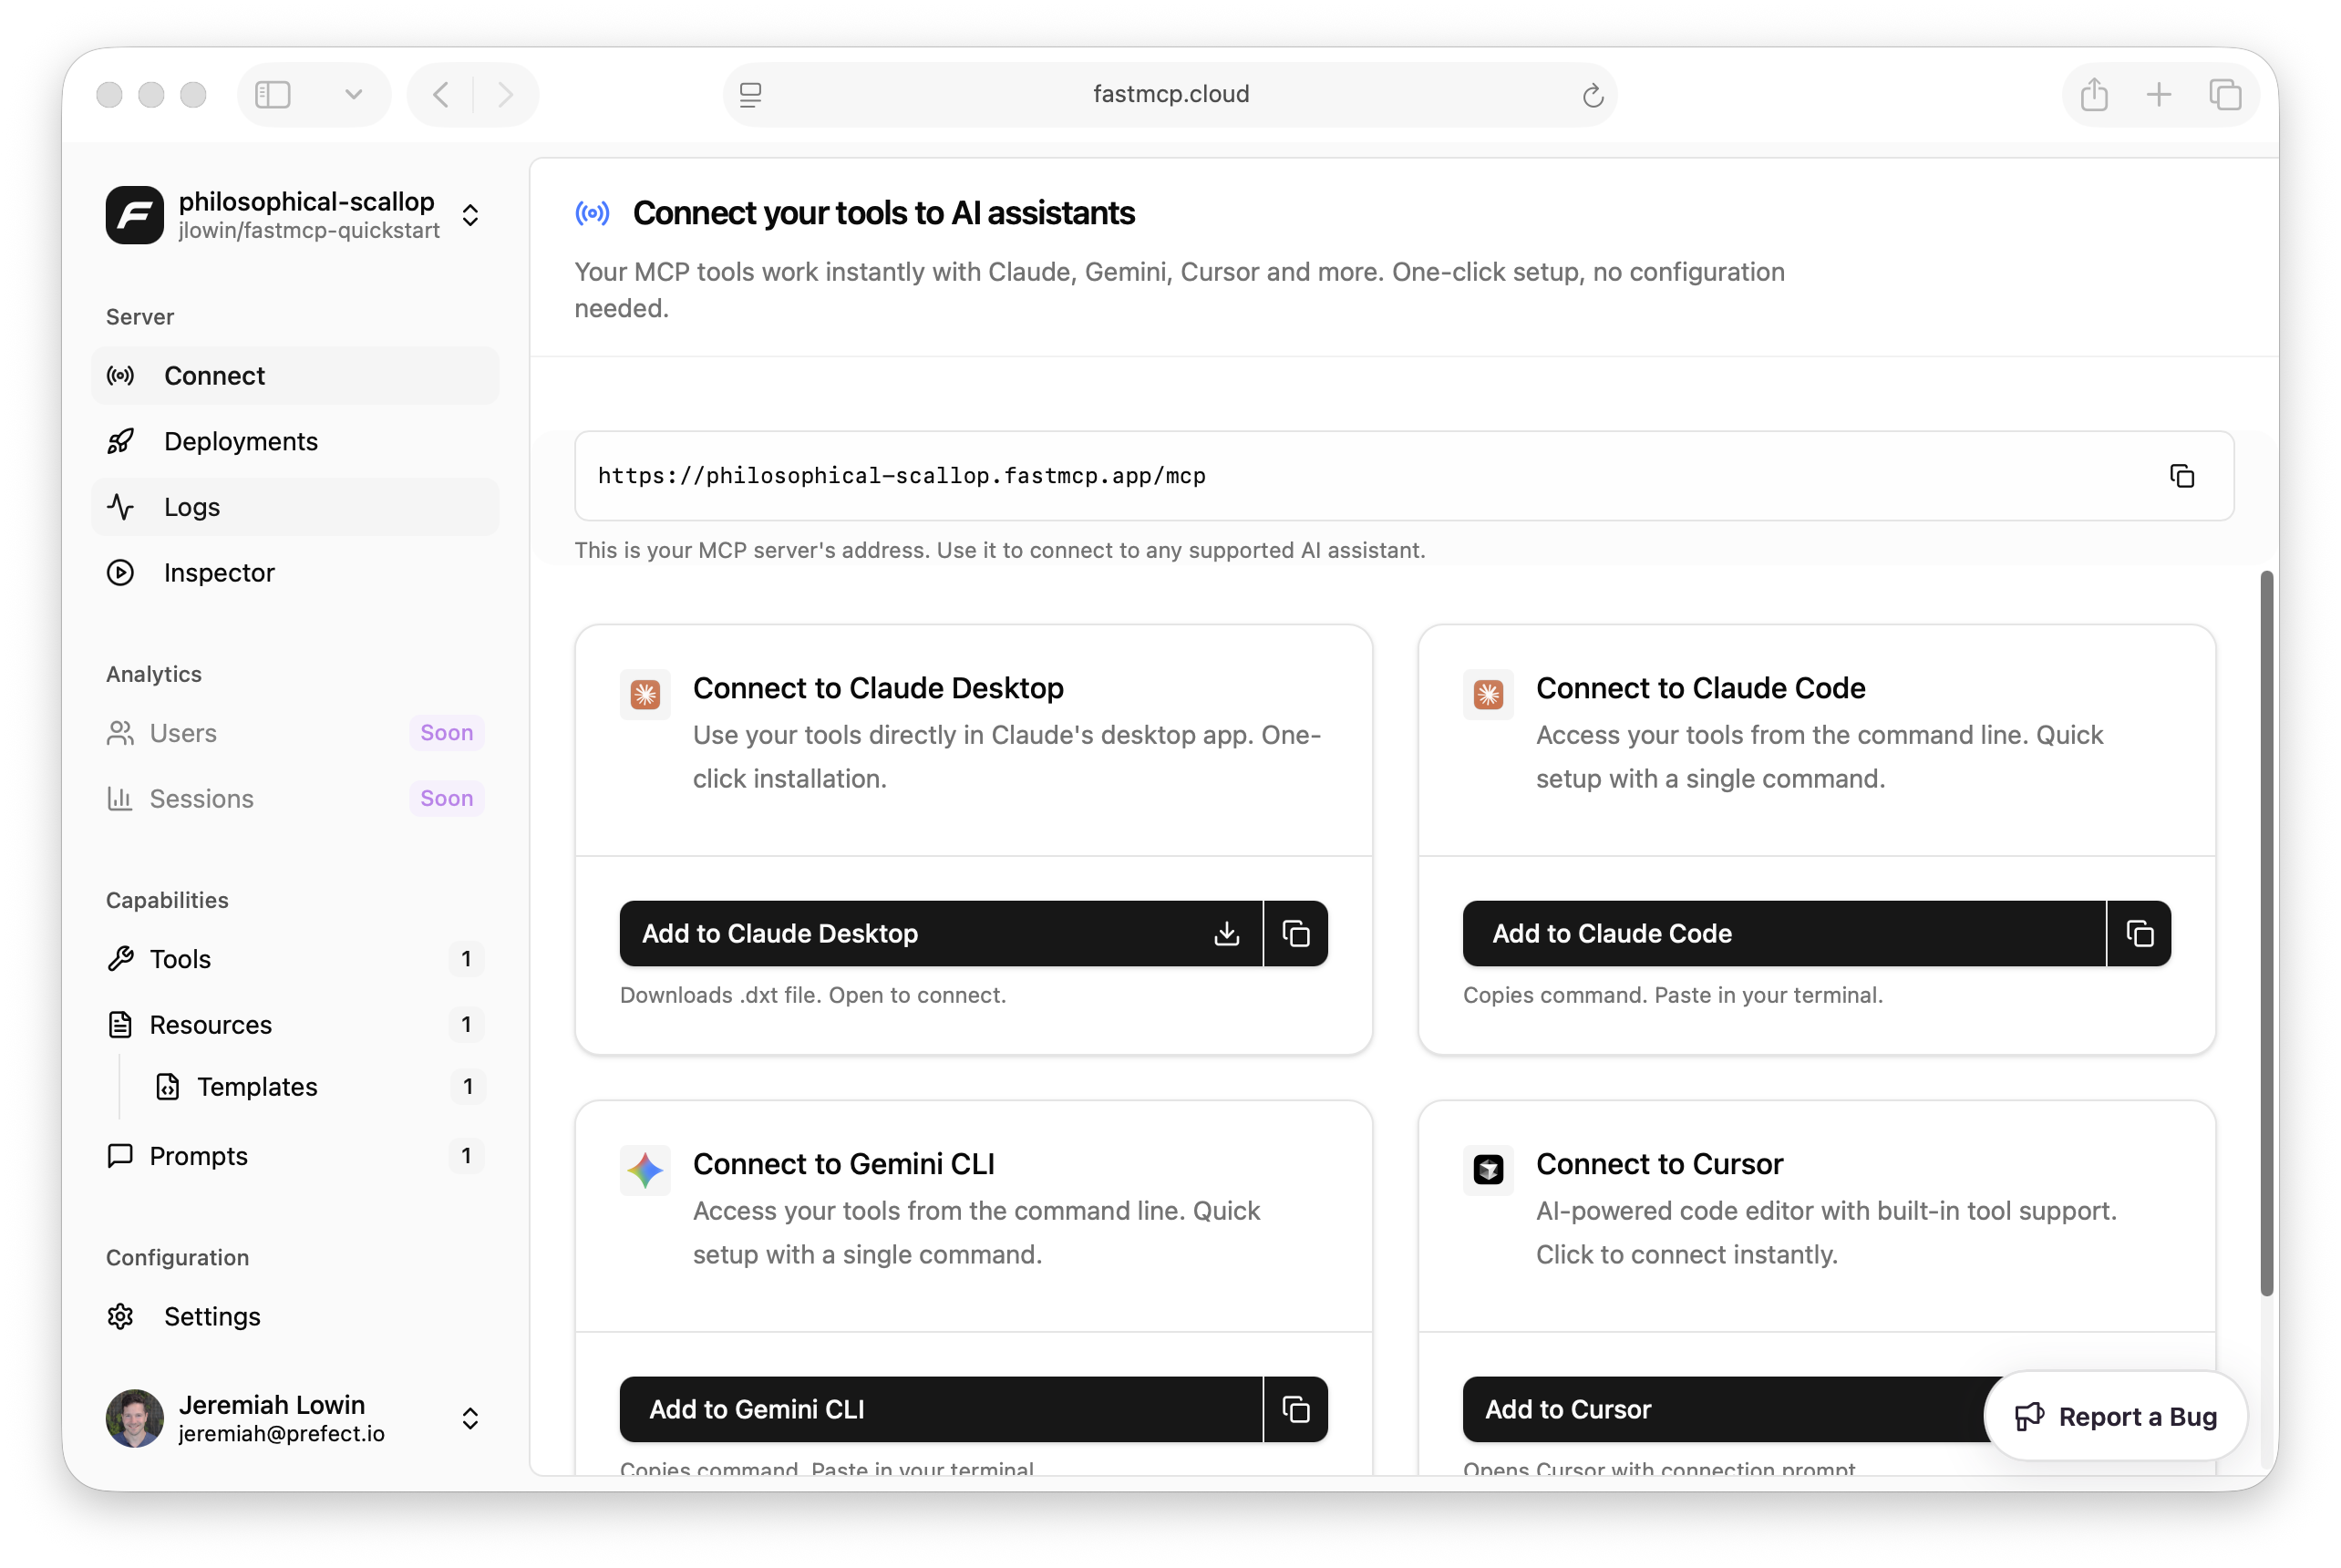
You should be able to connect to it as soon as you see the deployment succeed! FastMCP Cloud provides instant connection options for popular LLM clients:
FastMCP Cloud will monitor your repo and redeploy your server whenever you push a change to the `main` branch. In addition, FastMCP Cloud will build and deploy servers for every PR your open, hosting them on unique URLs, so you can test changes before updating your production server.
### Step 3: Connect to Your Server
Once your server is deployed, it will be accessible at a URL like:
```
https://your-project-name.fastmcp.app/mcp
```
You should be able to connect to it as soon as you see the deployment succeed! FastMCP Cloud provides instant connection options for popular LLM clients:
 ---
# Source: https://gofastmcp.com/python-sdk/fastmcp-decorators.md
> ## Documentation Index
> Fetch the complete documentation index at: https://gofastmcp.com/llms.txt
> Use this file to discover all available pages before exploring further.
# decorators
# `fastmcp.decorators`
Shared decorator utilities for FastMCP.
## Functions
### `resolve_task_config`
---
# Source: https://gofastmcp.com/python-sdk/fastmcp-decorators.md
> ## Documentation Index
> Fetch the complete documentation index at: https://gofastmcp.com/llms.txt
> Use this file to discover all available pages before exploring further.
# decorators
# `fastmcp.decorators`
Shared decorator utilities for FastMCP.
## Functions
### `resolve_task_config` {version}
{version}
uv commands.
{version}
{version}
{version}
{version}
uv commands.
{version}
{version}
{version}
{version}
{version}
{version}
{version}
                New in version:
                {version}
;
};
{version}
{version}
{version}
{version}
{version}
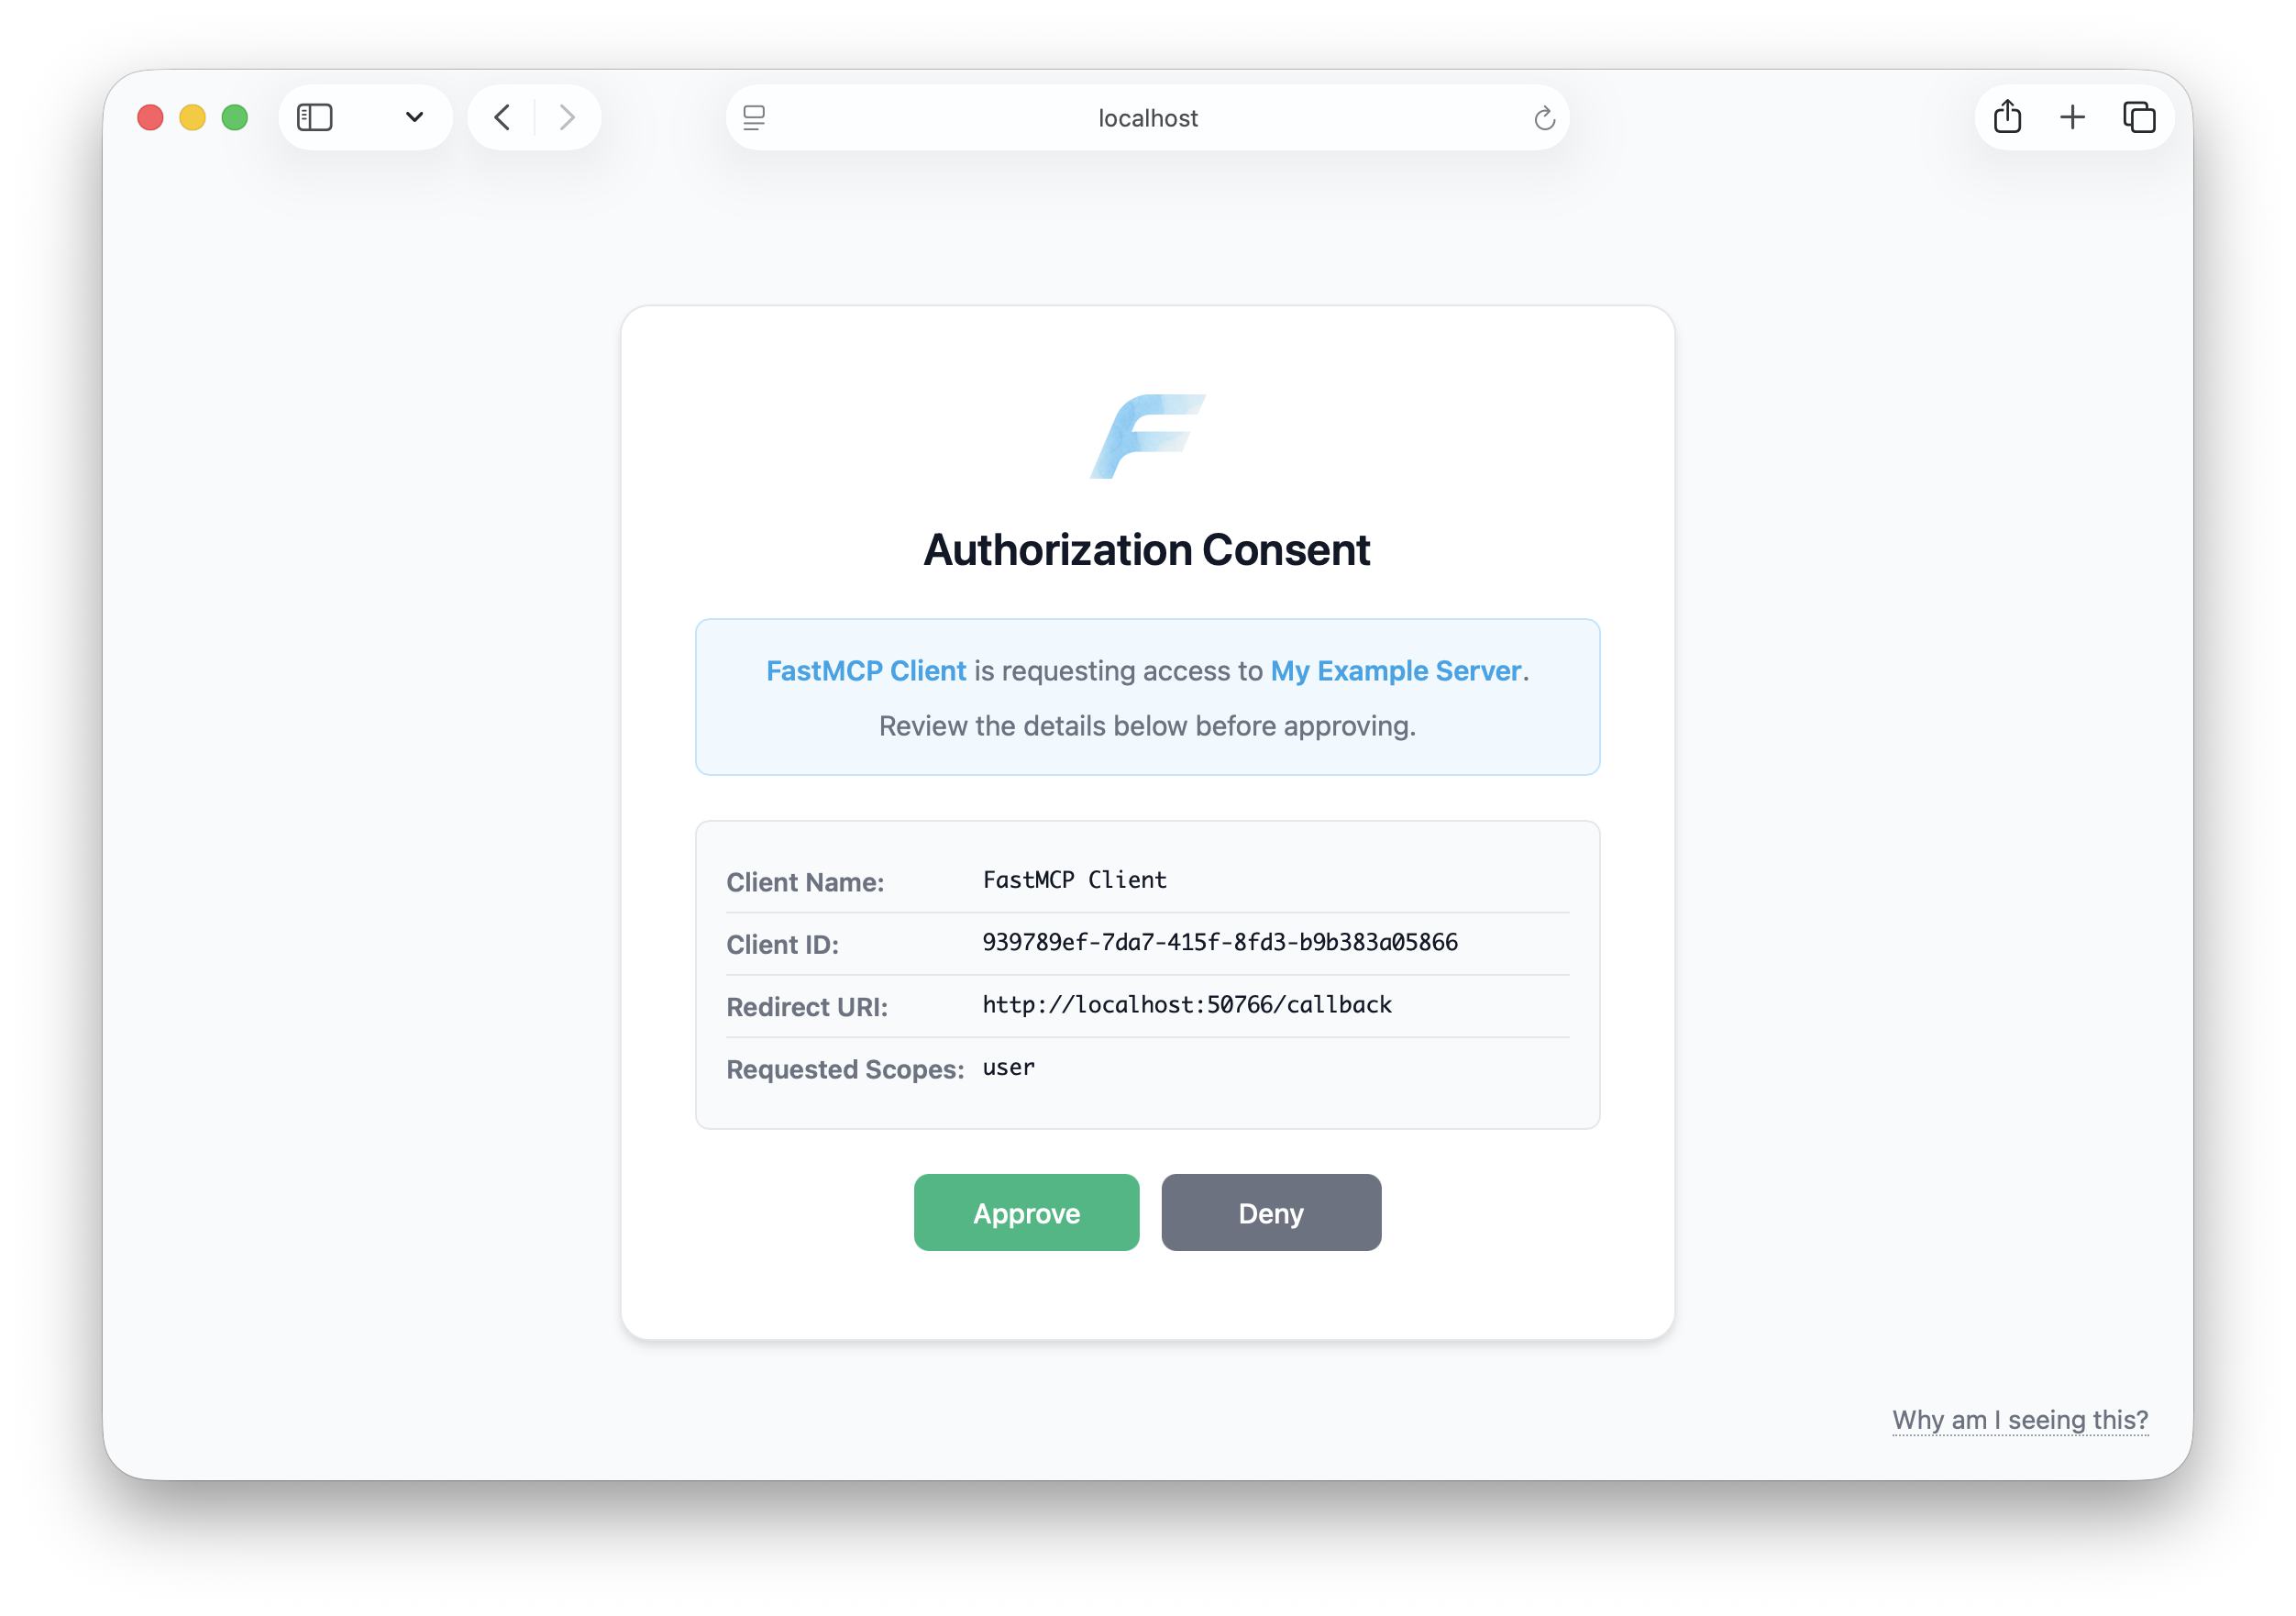 The consent page automatically displays your server's name, icon, and website URL, if available. These visual identifiers help users confirm they're authorizing the correct server.
**Learn more:**
* [MCP Security Best Practices](https://modelcontextprotocol.io/specification/2025-06-18/basic/security_best_practices#confused-deputy-problem) - Official specification guidance
* [Confused Deputy Attacks Explained](https://den.dev/blog/mcp-confused-deputy-api-management/) - Detailed walkthrough by Den Delimarsky
## Production Configuration
For production deployments, load sensitive credentials from environment variables:
```python theme={"theme":{"light":"snazzy-light","dark":"dark-plus"}}
import os
from fastmcp import FastMCP
from fastmcp.server.auth.providers.github import GitHubProvider
# Load secrets from environment variables
auth = GitHubProvider(
client_id=os.environ.get("GITHUB_CLIENT_ID"),
client_secret=os.environ.get("GITHUB_CLIENT_SECRET"),
base_url=os.environ.get("BASE_URL", "https://your-production-server.com")
)
mcp = FastMCP(name="My Server", auth=auth)
@mcp.tool
def protected_tool(data: str) -> str:
"""This tool is now protected by OAuth."""
return f"Processed: {data}"
if __name__ == "__main__":
mcp.run(transport="http", port=8000)
```
This keeps secrets out of your codebase while maintaining explicit configuration.
---
# Source: https://gofastmcp.com/clients/auth/oauth.md
> ## Documentation Index
> Fetch the complete documentation index at: https://gofastmcp.com/llms.txt
> Use this file to discover all available pages before exploring further.
# OAuth Authentication
> Authenticate your FastMCP client via OAuth 2.1.
export const VersionBadge = ({version}) => {
return
The consent page automatically displays your server's name, icon, and website URL, if available. These visual identifiers help users confirm they're authorizing the correct server.
**Learn more:**
* [MCP Security Best Practices](https://modelcontextprotocol.io/specification/2025-06-18/basic/security_best_practices#confused-deputy-problem) - Official specification guidance
* [Confused Deputy Attacks Explained](https://den.dev/blog/mcp-confused-deputy-api-management/) - Detailed walkthrough by Den Delimarsky
## Production Configuration
For production deployments, load sensitive credentials from environment variables:
```python theme={"theme":{"light":"snazzy-light","dark":"dark-plus"}}
import os
from fastmcp import FastMCP
from fastmcp.server.auth.providers.github import GitHubProvider
# Load secrets from environment variables
auth = GitHubProvider(
client_id=os.environ.get("GITHUB_CLIENT_ID"),
client_secret=os.environ.get("GITHUB_CLIENT_SECRET"),
base_url=os.environ.get("BASE_URL", "https://your-production-server.com")
)
mcp = FastMCP(name="My Server", auth=auth)
@mcp.tool
def protected_tool(data: str) -> str:
"""This tool is now protected by OAuth."""
return f"Processed: {data}"
if __name__ == "__main__":
mcp.run(transport="http", port=8000)
```
This keeps secrets out of your codebase while maintaining explicit configuration.
---
# Source: https://gofastmcp.com/clients/auth/oauth.md
> ## Documentation Index
> Fetch the complete documentation index at: https://gofastmcp.com/llms.txt
> Use this file to discover all available pages before exploring further.
# OAuth Authentication
> Authenticate your FastMCP client via OAuth 2.1.
export const VersionBadge = ({version}) => {
return {version}
{version}
{version}
{version}
{version}
{version}
{version}
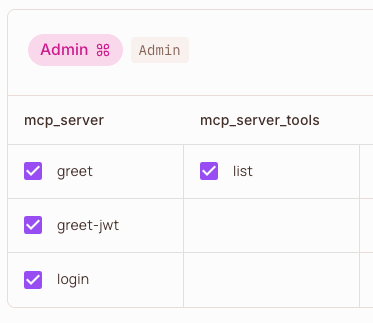 *Example: In Permit.io, the 'Admin' role is granted permissions on resources and actions as mapped by the middleware. For example, 'greet', 'greet-jwt', and 'login' are actions on the 'mcp\_server' resource, and 'list' is an action on the 'mcp\_server\_tools' resource.*
> **Note:**
> Don't forget to assign the relevant role (e.g., Admin, User) to the user authenticating to your MCP server (such as the user in the JWT) in the Permit.io Directory. Without the correct role assignment, users will not have access to the resources and actions you've configured in your policies.
>
>
*Example: In Permit.io, the 'Admin' role is granted permissions on resources and actions as mapped by the middleware. For example, 'greet', 'greet-jwt', and 'login' are actions on the 'mcp\_server' resource, and 'list' is an action on the 'mcp\_server\_tools' resource.*
> **Note:**
> Don't forget to assign the relevant role (e.g., Admin, User) to the user authenticating to your MCP server (such as the user in the JWT) in the Permit.io Directory. Without the correct role assignment, users will not have access to the resources and actions you've configured in your policies.
>
> 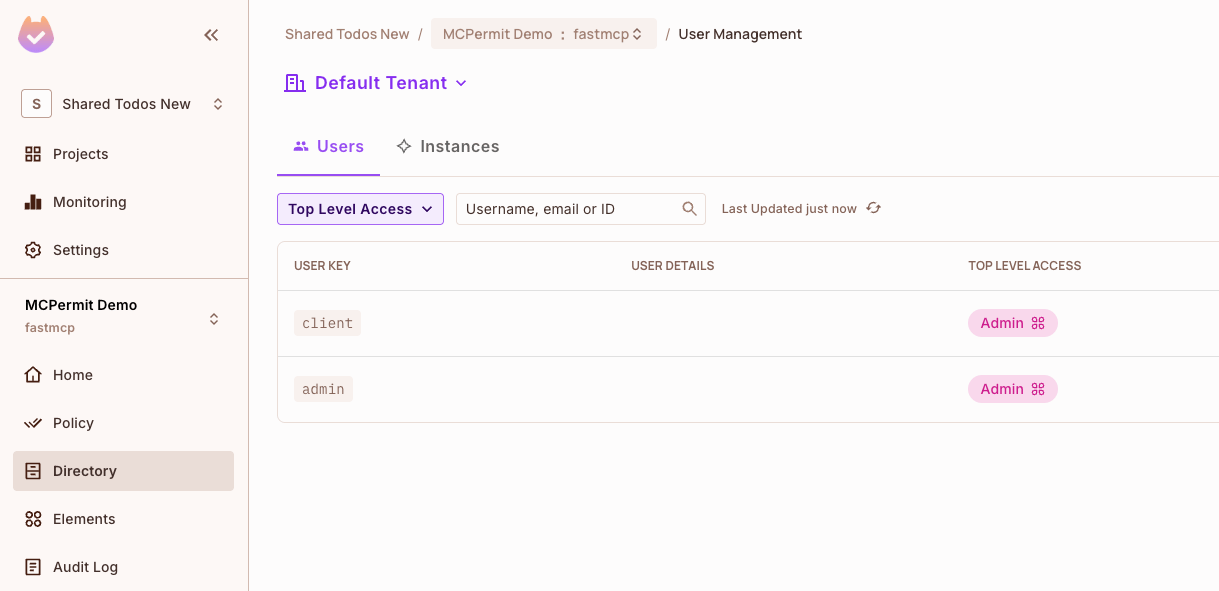 >
> *Example: In Permit.io Directory, both 'client' and 'admin' users are assigned the 'Admin' role, granting them the permissions defined in your policy mapping.*
For detailed policy mapping examples and configuration, see [Detailed Policy Mapping](https://github.com/permitio/permit-fastmcp/blob/main/docs/policy-mapping.md).
### Listing Operations
The middleware behaves as a filter for listing operations (`tools/list`, `resources/list`, `prompts/list`), hiding to the client components that are not authorized by the defined policies.
```mermaid theme={"theme":{"light":"snazzy-light","dark":"dark-plus"}}
sequenceDiagram
participant MCPClient as MCP Client
participant PermitMiddleware as Permit.io Middleware
participant MCPServer as FastMCP Server
participant PermitPDP as Permit.io PDP
MCPClient->>PermitMiddleware: MCP Listing Request (e.g., tools/list)
PermitMiddleware->>MCPServer: MCP Listing Request
MCPServer-->>PermitMiddleware: MCP Listing Response
PermitMiddleware->>PermitPDP: Authorization Checks
PermitPDP->>PermitMiddleware: Authorization Decisions
PermitMiddleware-->>MCPClient: Filtered MCP Listing Response
```
### Execution Operations
The middleware behaves as an enforcement point for execution operations (`tools/call`, `resources/read`, `prompts/get`), blocking operations that are not authorized by the defined policies.
```mermaid theme={"theme":{"light":"snazzy-light","dark":"dark-plus"}}
sequenceDiagram
participant MCPClient as MCP Client
participant PermitMiddleware as Permit.io Middleware
participant MCPServer as FastMCP Server
participant PermitPDP as Permit.io PDP
MCPClient->>PermitMiddleware: MCP Execution Request (e.g., tools/call)
PermitMiddleware->>PermitPDP: Authorization Check
PermitPDP->>PermitMiddleware: Authorization Decision
PermitMiddleware-->>MCPClient: MCP Unauthorized Error (if denied)
PermitMiddleware->>MCPServer: MCP Execution Request (if allowed)
MCPServer-->>PermitMiddleware: MCP Execution Response (if allowed)
PermitMiddleware-->>MCPClient: MCP Execution Response (if allowed)
```
## Add Authorization to Your Server
>
> *Example: In Permit.io Directory, both 'client' and 'admin' users are assigned the 'Admin' role, granting them the permissions defined in your policy mapping.*
For detailed policy mapping examples and configuration, see [Detailed Policy Mapping](https://github.com/permitio/permit-fastmcp/blob/main/docs/policy-mapping.md).
### Listing Operations
The middleware behaves as a filter for listing operations (`tools/list`, `resources/list`, `prompts/list`), hiding to the client components that are not authorized by the defined policies.
```mermaid theme={"theme":{"light":"snazzy-light","dark":"dark-plus"}}
sequenceDiagram
participant MCPClient as MCP Client
participant PermitMiddleware as Permit.io Middleware
participant MCPServer as FastMCP Server
participant PermitPDP as Permit.io PDP
MCPClient->>PermitMiddleware: MCP Listing Request (e.g., tools/list)
PermitMiddleware->>MCPServer: MCP Listing Request
MCPServer-->>PermitMiddleware: MCP Listing Response
PermitMiddleware->>PermitPDP: Authorization Checks
PermitPDP->>PermitMiddleware: Authorization Decisions
PermitMiddleware-->>MCPClient: Filtered MCP Listing Response
```
### Execution Operations
The middleware behaves as an enforcement point for execution operations (`tools/call`, `resources/read`, `prompts/get`), blocking operations that are not authorized by the defined policies.
```mermaid theme={"theme":{"light":"snazzy-light","dark":"dark-plus"}}
sequenceDiagram
participant MCPClient as MCP Client
participant PermitMiddleware as Permit.io Middleware
participant MCPServer as FastMCP Server
participant PermitPDP as Permit.io PDP
MCPClient->>PermitMiddleware: MCP Execution Request (e.g., tools/call)
PermitMiddleware->>PermitPDP: Authorization Check
PermitPDP->>PermitMiddleware: Authorization Decision
PermitMiddleware-->>MCPClient: MCP Unauthorized Error (if denied)
PermitMiddleware->>MCPServer: MCP Execution Request (if allowed)
MCPServer-->>PermitMiddleware: MCP Execution Response (if allowed)
PermitMiddleware-->>MCPClient: MCP Execution Response (if allowed)
```
## Add Authorization to Your Server
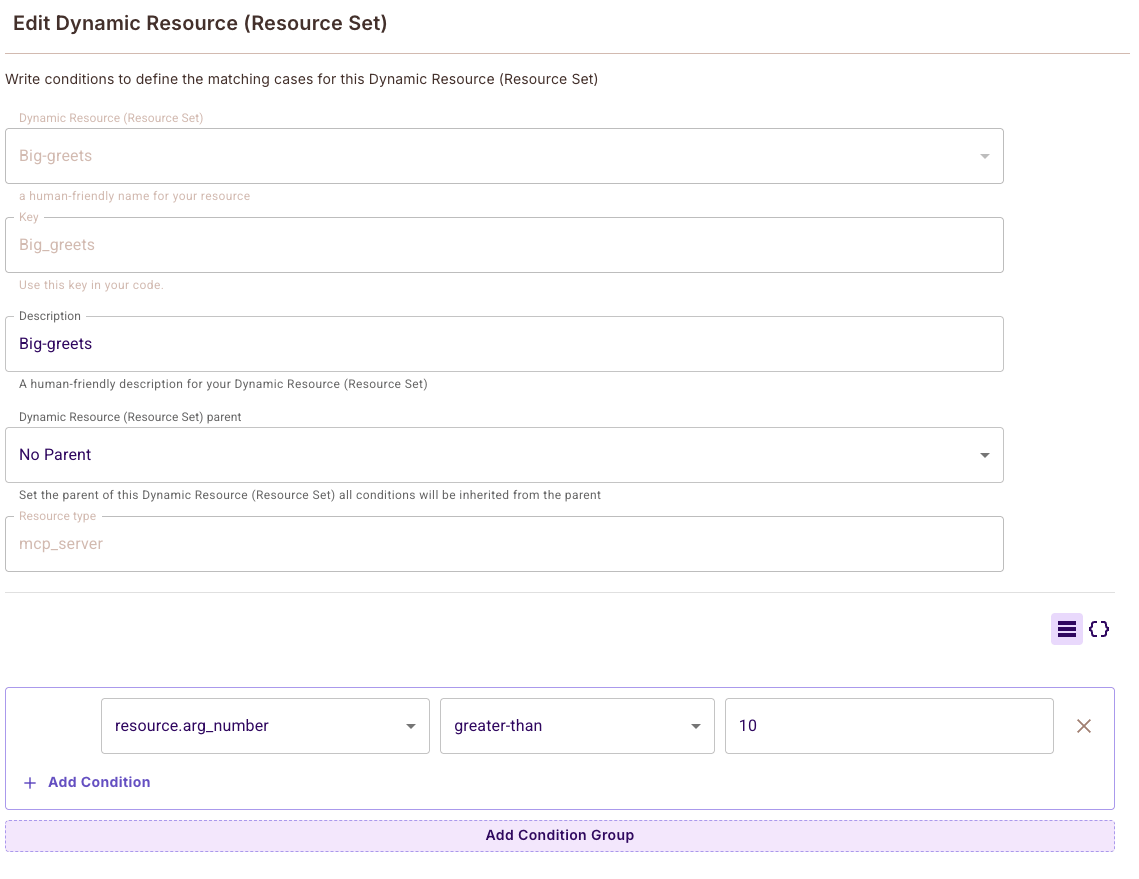 *Example: Create dynamic resources with conditions like `resource.arg_number greater-than 10` to allow the `conditional-greet` tool only when the number argument exceeds 10.*
#### Example: Conditional Access
Create a dynamic resource with conditions like `resource.arg_number greater-than 10` to allow the `conditional-greet` tool only when the number argument exceeds 10.
```python theme={"theme":{"light":"snazzy-light","dark":"dark-plus"}}
@mcp.tool
def conditional_greet(name: str, number: int) -> str:
"""Greet a user only if number > 10"""
return f"Hello, {name}! Your number is {number}"
```
*Example: Create dynamic resources with conditions like `resource.arg_number greater-than 10` to allow the `conditional-greet` tool only when the number argument exceeds 10.*
#### Example: Conditional Access
Create a dynamic resource with conditions like `resource.arg_number greater-than 10` to allow the `conditional-greet` tool only when the number argument exceeds 10.
```python theme={"theme":{"light":"snazzy-light","dark":"dark-plus"}}
@mcp.tool
def conditional_greet(name: str, number: int) -> str:
"""Greet a user only if number > 10"""
return f"Hello, {name}! Your number is {number}"
```
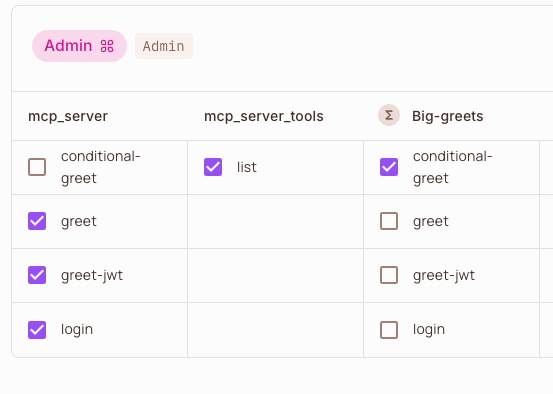 *Example: The Admin role is granted access to the "conditional-greet" action on the "Big-greets" dynamic resource, while other tools like "greet", "greet-jwt", and "login" are granted on the base "mcp\_server" resource.*
For comprehensive ABAC configuration and advanced policy examples, see [ABAC Policies with Tool Arguments](https://github.com/permitio/permit-fastmcp/blob/main/docs/policy-mapping.md#abac-policies-with-tool-arguments).
### Run the Server
Start your FastMCP server normally:
```bash theme={"theme":{"light":"snazzy-light","dark":"dark-plus"}}
python server.py
```
The middleware will now intercept all MCP requests and check them against your Permit.io policies. Requests include user identification through the configured identity mode and automatic mapping of MCP methods to authorization resources and actions.
## Advanced Configuration
### Environment Variables
Configure the middleware using environment variables:
```bash theme={"theme":{"light":"snazzy-light","dark":"dark-plus"}}
# Permit.io configuration
export PERMIT_MCP_PERMIT_PDP_URL="http://localhost:7766"
export PERMIT_MCP_PERMIT_API_KEY="your-api-key"
# Identity configuration
export PERMIT_MCP_IDENTITY_MODE="jwt"
export PERMIT_MCP_IDENTITY_JWT_SECRET="your-jwt-secret"
# Method configuration
export PERMIT_MCP_KNOWN_METHODS='["tools/list","tools/call"]'
export PERMIT_MCP_BYPASSED_METHODS='["initialize","ping"]'
# Logging configuration
export PERMIT_MCP_ENABLE_AUDIT_LOGGING="true"
```
For a complete list of all configuration options and environment variables, see [Configuration Reference](https://github.com/permitio/permit-fastmcp/blob/main/docs/configuration-reference.md).
### Custom Middleware Configuration
```python theme={"theme":{"light":"snazzy-light","dark":"dark-plus"}}
from permit_fastmcp.middleware.middleware import PermitMcpMiddleware
middleware = PermitMcpMiddleware(
permit_pdp_url="http://localhost:7766",
permit_api_key="your-api-key",
enable_audit_logging=True,
bypass_methods=["initialize", "ping", "health/*"]
)
mcp.add_middleware(middleware)
```
For advanced configuration options and custom middleware extensions, see [Advanced Configuration](https://github.com/permitio/permit-fastmcp/blob/main/docs/advanced-configuration.md).
## Example: Complete JWT Authentication Server
See the [example server](https://github.com/permitio/permit-fastmcp/blob/main/permit_fastmcp/example_server/example.py) for a full implementation with JWT-based authentication. For additional examples and usage patterns, see [Example Server](https://github.com/permitio/permit-fastmcp/blob/main/permit_fastmcp/example_server/):
```python theme={"theme":{"light":"snazzy-light","dark":"dark-plus"}}
from fastmcp import FastMCP, Context
from permit_fastmcp.middleware.middleware import PermitMcpMiddleware
import jwt
import datetime
# Configure JWT identity extraction
os.environ["PERMIT_MCP_IDENTITY_MODE"] = "jwt"
os.environ["PERMIT_MCP_IDENTITY_JWT_SECRET"] = "mysecretkey"
mcp = FastMCP("My MCP Server")
@mcp.tool
def login(username: str, password: str) -> str:
"""Login to get a JWT token"""
if username == "admin" and password == "password":
token = jwt.encode(
{"sub": username, "exp": datetime.datetime.utcnow() + datetime.timedelta(hours=1)},
"mysecretkey",
algorithm="HS256"
)
return f"Bearer {token}"
raise Exception("Invalid credentials")
@mcp.tool
def greet_jwt(ctx: Context) -> str:
"""Greet a user by extracting their name from JWT"""
# JWT extraction handled by middleware
return "Hello, authenticated user!"
mcp.add_middleware(PermitMcpMiddleware(
permit_pdp_url="http://localhost:7766",
permit_api_key="your-permit-api-key"
))
if __name__ == "__main__":
mcp.run(transport="http")
```
*Example: The Admin role is granted access to the "conditional-greet" action on the "Big-greets" dynamic resource, while other tools like "greet", "greet-jwt", and "login" are granted on the base "mcp\_server" resource.*
For comprehensive ABAC configuration and advanced policy examples, see [ABAC Policies with Tool Arguments](https://github.com/permitio/permit-fastmcp/blob/main/docs/policy-mapping.md#abac-policies-with-tool-arguments).
### Run the Server
Start your FastMCP server normally:
```bash theme={"theme":{"light":"snazzy-light","dark":"dark-plus"}}
python server.py
```
The middleware will now intercept all MCP requests and check them against your Permit.io policies. Requests include user identification through the configured identity mode and automatic mapping of MCP methods to authorization resources and actions.
## Advanced Configuration
### Environment Variables
Configure the middleware using environment variables:
```bash theme={"theme":{"light":"snazzy-light","dark":"dark-plus"}}
# Permit.io configuration
export PERMIT_MCP_PERMIT_PDP_URL="http://localhost:7766"
export PERMIT_MCP_PERMIT_API_KEY="your-api-key"
# Identity configuration
export PERMIT_MCP_IDENTITY_MODE="jwt"
export PERMIT_MCP_IDENTITY_JWT_SECRET="your-jwt-secret"
# Method configuration
export PERMIT_MCP_KNOWN_METHODS='["tools/list","tools/call"]'
export PERMIT_MCP_BYPASSED_METHODS='["initialize","ping"]'
# Logging configuration
export PERMIT_MCP_ENABLE_AUDIT_LOGGING="true"
```
For a complete list of all configuration options and environment variables, see [Configuration Reference](https://github.com/permitio/permit-fastmcp/blob/main/docs/configuration-reference.md).
### Custom Middleware Configuration
```python theme={"theme":{"light":"snazzy-light","dark":"dark-plus"}}
from permit_fastmcp.middleware.middleware import PermitMcpMiddleware
middleware = PermitMcpMiddleware(
permit_pdp_url="http://localhost:7766",
permit_api_key="your-api-key",
enable_audit_logging=True,
bypass_methods=["initialize", "ping", "health/*"]
)
mcp.add_middleware(middleware)
```
For advanced configuration options and custom middleware extensions, see [Advanced Configuration](https://github.com/permitio/permit-fastmcp/blob/main/docs/advanced-configuration.md).
## Example: Complete JWT Authentication Server
See the [example server](https://github.com/permitio/permit-fastmcp/blob/main/permit_fastmcp/example_server/example.py) for a full implementation with JWT-based authentication. For additional examples and usage patterns, see [Example Server](https://github.com/permitio/permit-fastmcp/blob/main/permit_fastmcp/example_server/):
```python theme={"theme":{"light":"snazzy-light","dark":"dark-plus"}}
from fastmcp import FastMCP, Context
from permit_fastmcp.middleware.middleware import PermitMcpMiddleware
import jwt
import datetime
# Configure JWT identity extraction
os.environ["PERMIT_MCP_IDENTITY_MODE"] = "jwt"
os.environ["PERMIT_MCP_IDENTITY_JWT_SECRET"] = "mysecretkey"
mcp = FastMCP("My MCP Server")
@mcp.tool
def login(username: str, password: str) -> str:
"""Login to get a JWT token"""
if username == "admin" and password == "password":
token = jwt.encode(
{"sub": username, "exp": datetime.datetime.utcnow() + datetime.timedelta(hours=1)},
"mysecretkey",
algorithm="HS256"
)
return f"Bearer {token}"
raise Exception("Invalid credentials")
@mcp.tool
def greet_jwt(ctx: Context) -> str:
"""Greet a user by extracting their name from JWT"""
# JWT extraction handled by middleware
return "Hello, authenticated user!"
mcp.add_middleware(PermitMcpMiddleware(
permit_pdp_url="http://localhost:7766",
permit_api_key="your-permit-api-key"
))
if __name__ == "__main__":
mcp.run(transport="http")
```
 ### Step 2: Configure Your Server
Next, you'll configure how Horizon should build and deploy your server.
### Step 2: Configure Your Server
Next, you'll configure how Horizon should build and deploy your server.
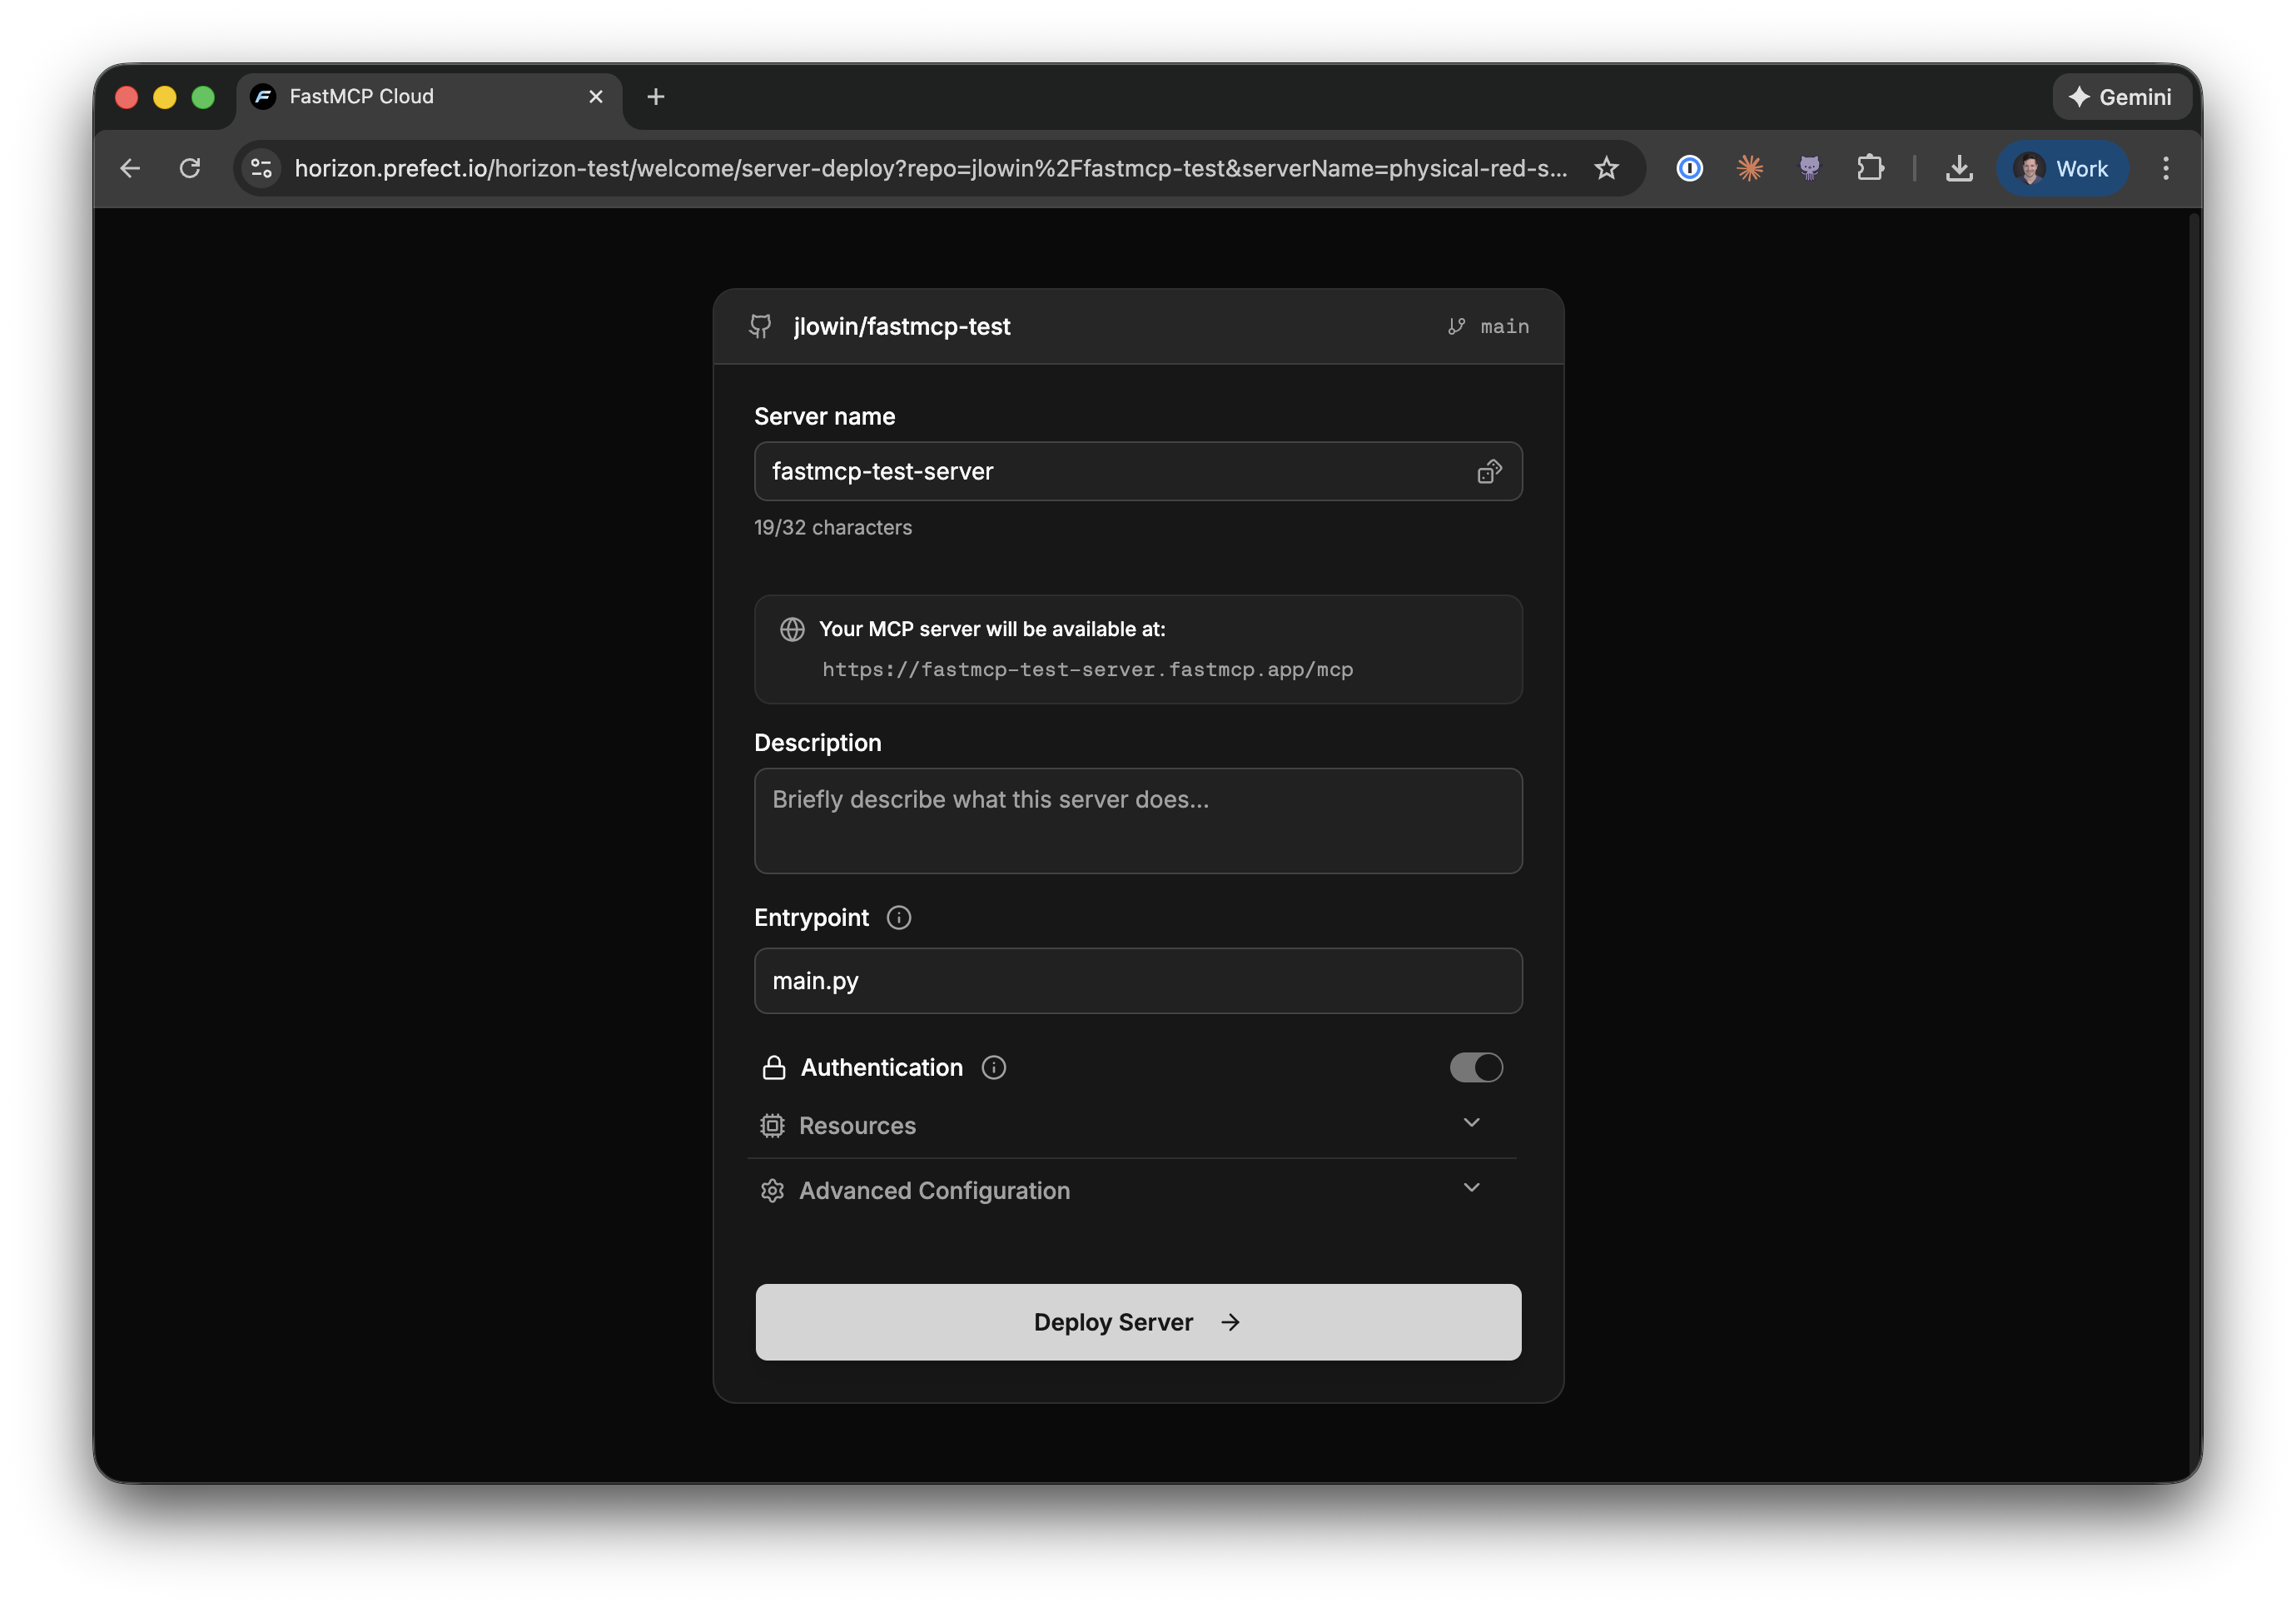 The configuration screen lets you specify:
* **Server name**: A unique name for your server. This determines your server's URL.
* **Description**: A brief description of what your server does.
* **Entrypoint**: The Python file containing your FastMCP server (e.g., `main.py`). This field has the same syntax as the `fastmcp run` command—use `main.py:mcp` to specify a specific object in the file.
* **Authentication**: When enabled, only authenticated users in your organization can connect. Horizon handles all the OAuth complexity for you.
Horizon will automatically detect your server's Python dependencies from either a `requirements.txt` or `pyproject.toml` file.
### Step 3: Deploy and Connect
Click **Deploy Server** and Horizon will clone your repository, build your server, and deploy it to a unique URL—typically in under 60 seconds.
The configuration screen lets you specify:
* **Server name**: A unique name for your server. This determines your server's URL.
* **Description**: A brief description of what your server does.
* **Entrypoint**: The Python file containing your FastMCP server (e.g., `main.py`). This field has the same syntax as the `fastmcp run` command—use `main.py:mcp` to specify a specific object in the file.
* **Authentication**: When enabled, only authenticated users in your organization can connect. Horizon handles all the OAuth complexity for you.
Horizon will automatically detect your server's Python dependencies from either a `requirements.txt` or `pyproject.toml` file.
### Step 3: Deploy and Connect
Click **Deploy Server** and Horizon will clone your repository, build your server, and deploy it to a unique URL—typically in under 60 seconds.
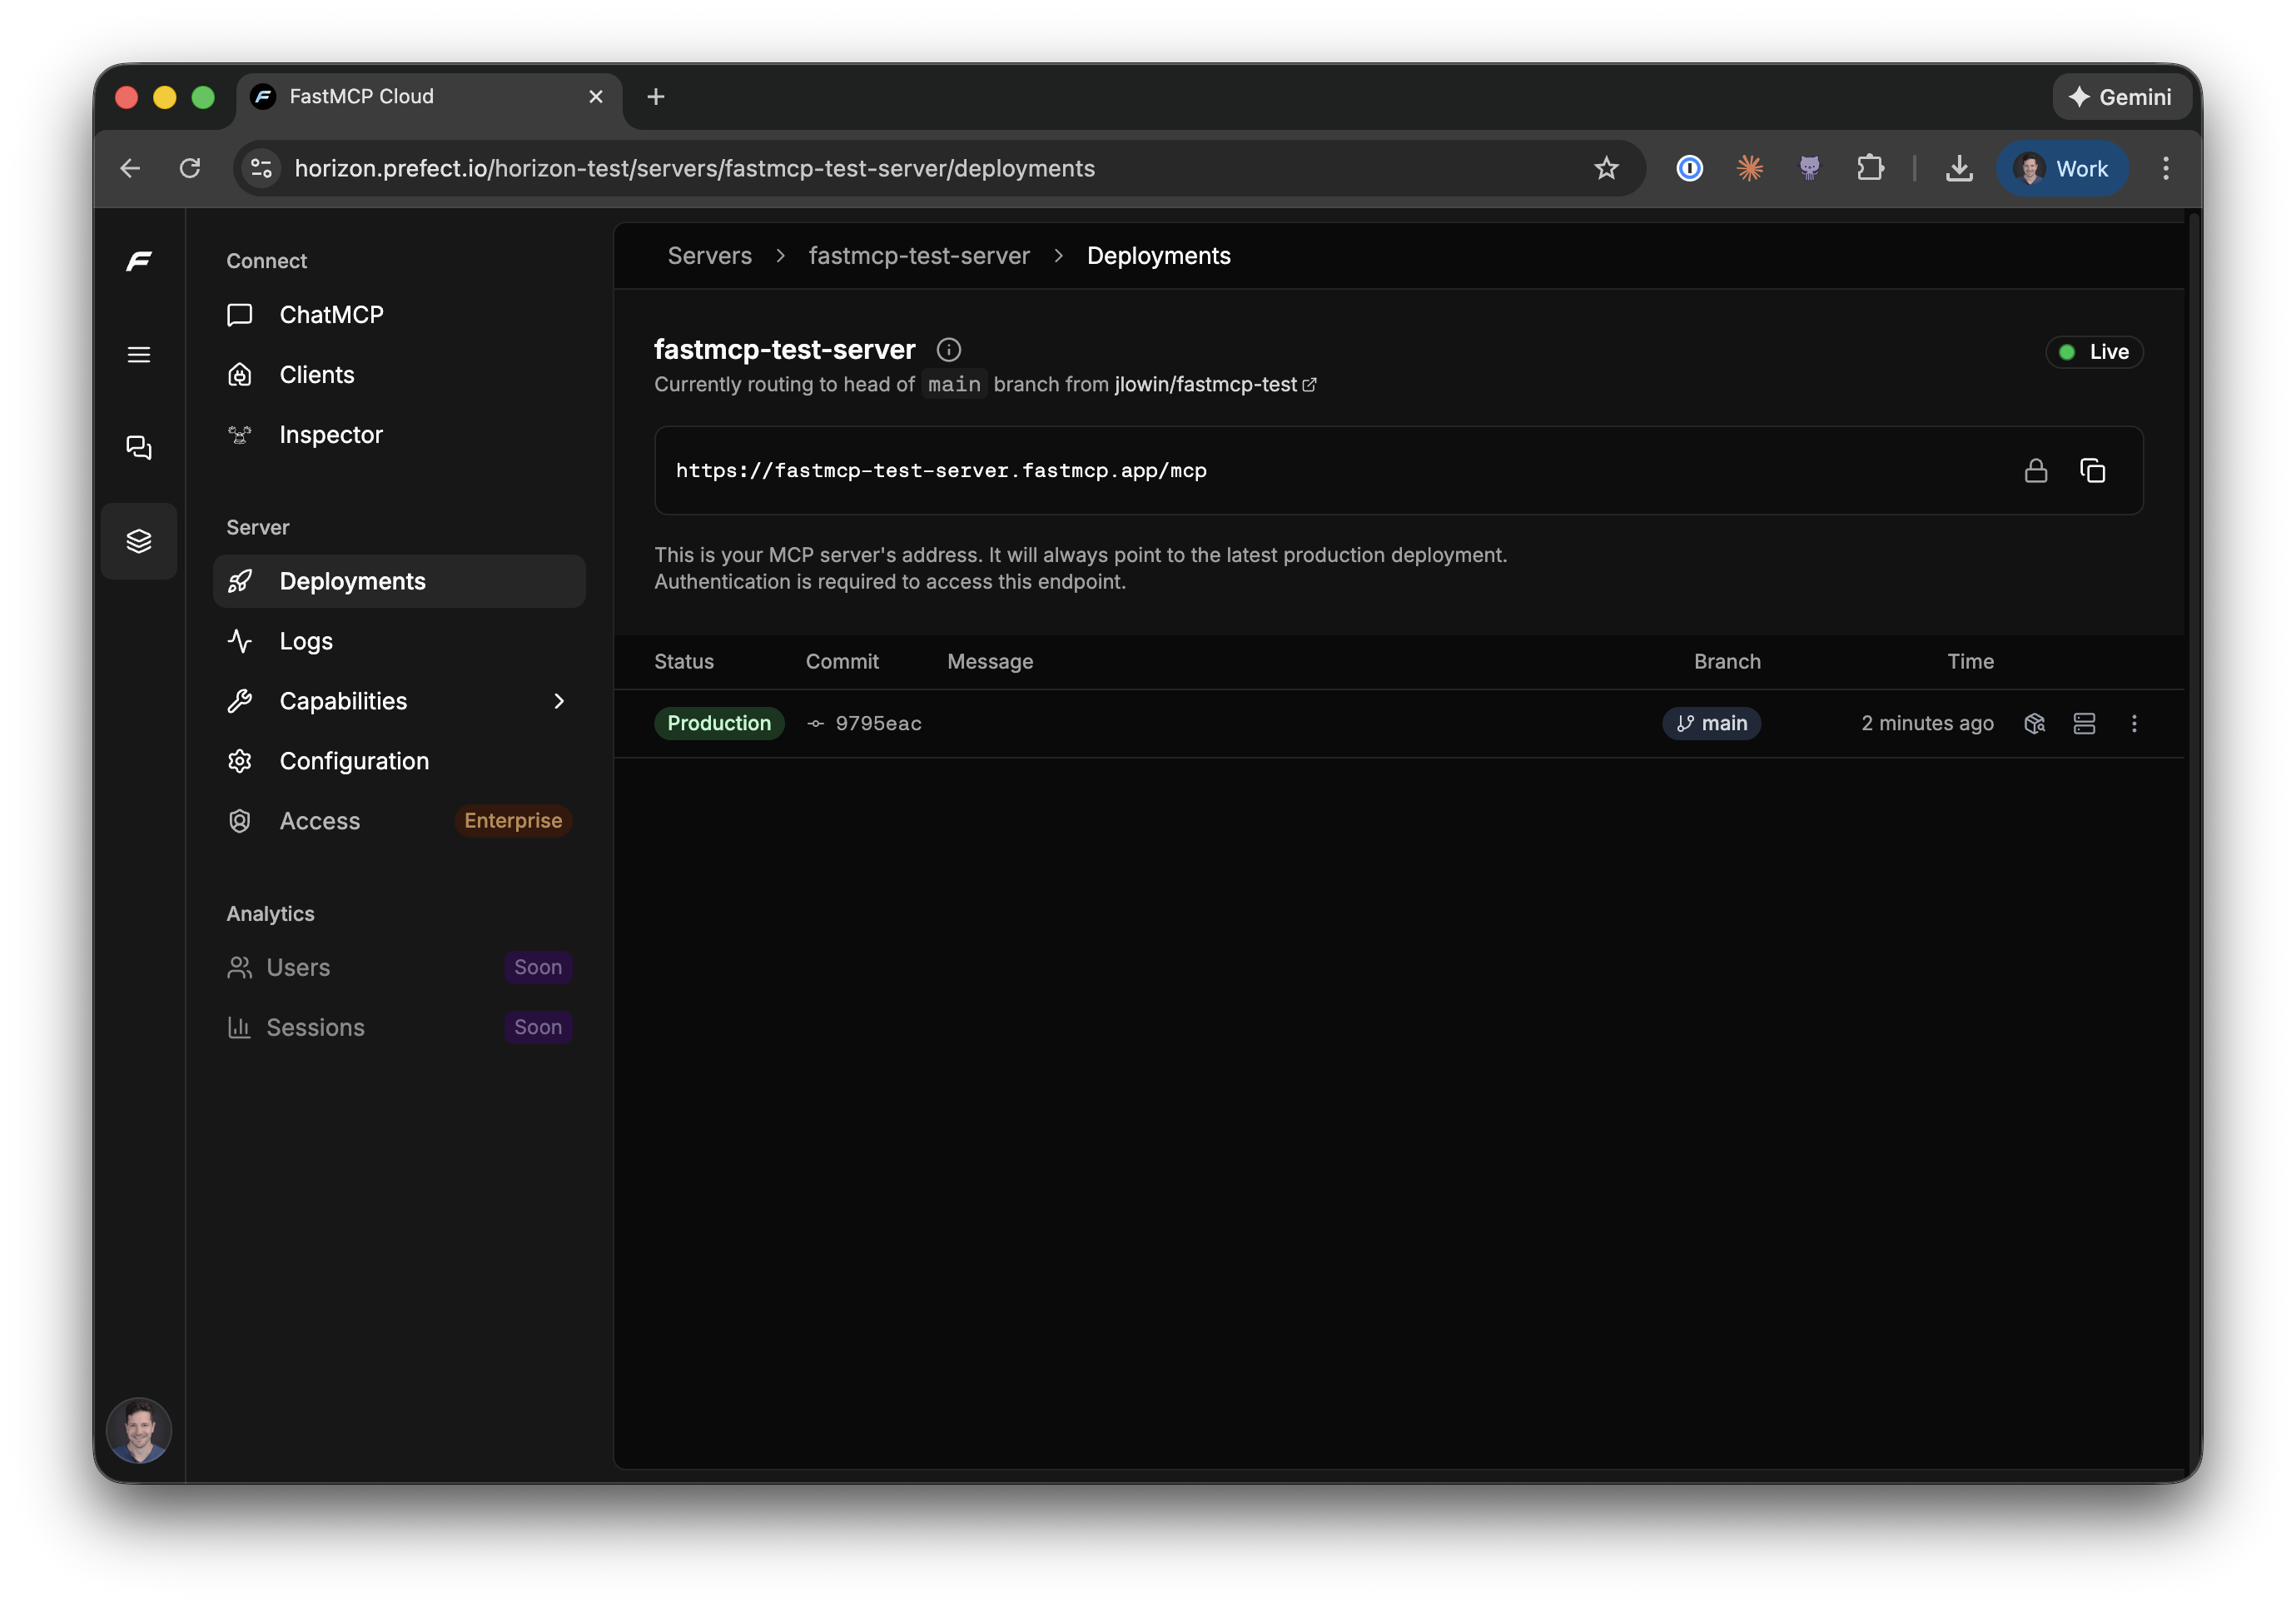 Once deployed, your server is accessible at a URL like:
```
https://your-server-name.fastmcp.app/mcp
```
Horizon monitors your repo and redeploys automatically whenever you push to `main`. It also builds preview deployments for every PR, so you can test changes before they go live.
## Testing Your Server
Horizon provides two ways to verify your server is working before connecting external clients.
### Inspector
The Inspector gives you a structured view of everything your server exposes—tools, resources, and prompts. You can click any tool, fill in the inputs, execute it, and see the output. This is useful for systematically validating each capability and debugging specific behaviors.
### ChatMCP
For quick end-to-end testing, ChatMCP lets you interact with your server conversationally. It uses a fast model optimized for rapid iteration—you can verify the server works, test tool calls in context, and confirm the overall behavior before sharing it with others.
Once deployed, your server is accessible at a URL like:
```
https://your-server-name.fastmcp.app/mcp
```
Horizon monitors your repo and redeploys automatically whenever you push to `main`. It also builds preview deployments for every PR, so you can test changes before they go live.
## Testing Your Server
Horizon provides two ways to verify your server is working before connecting external clients.
### Inspector
The Inspector gives you a structured view of everything your server exposes—tools, resources, and prompts. You can click any tool, fill in the inputs, execute it, and see the output. This is useful for systematically validating each capability and debugging specific behaviors.
### ChatMCP
For quick end-to-end testing, ChatMCP lets you interact with your server conversationally. It uses a fast model optimized for rapid iteration—you can verify the server works, test tool calls in context, and confirm the overall behavior before sharing it with others.
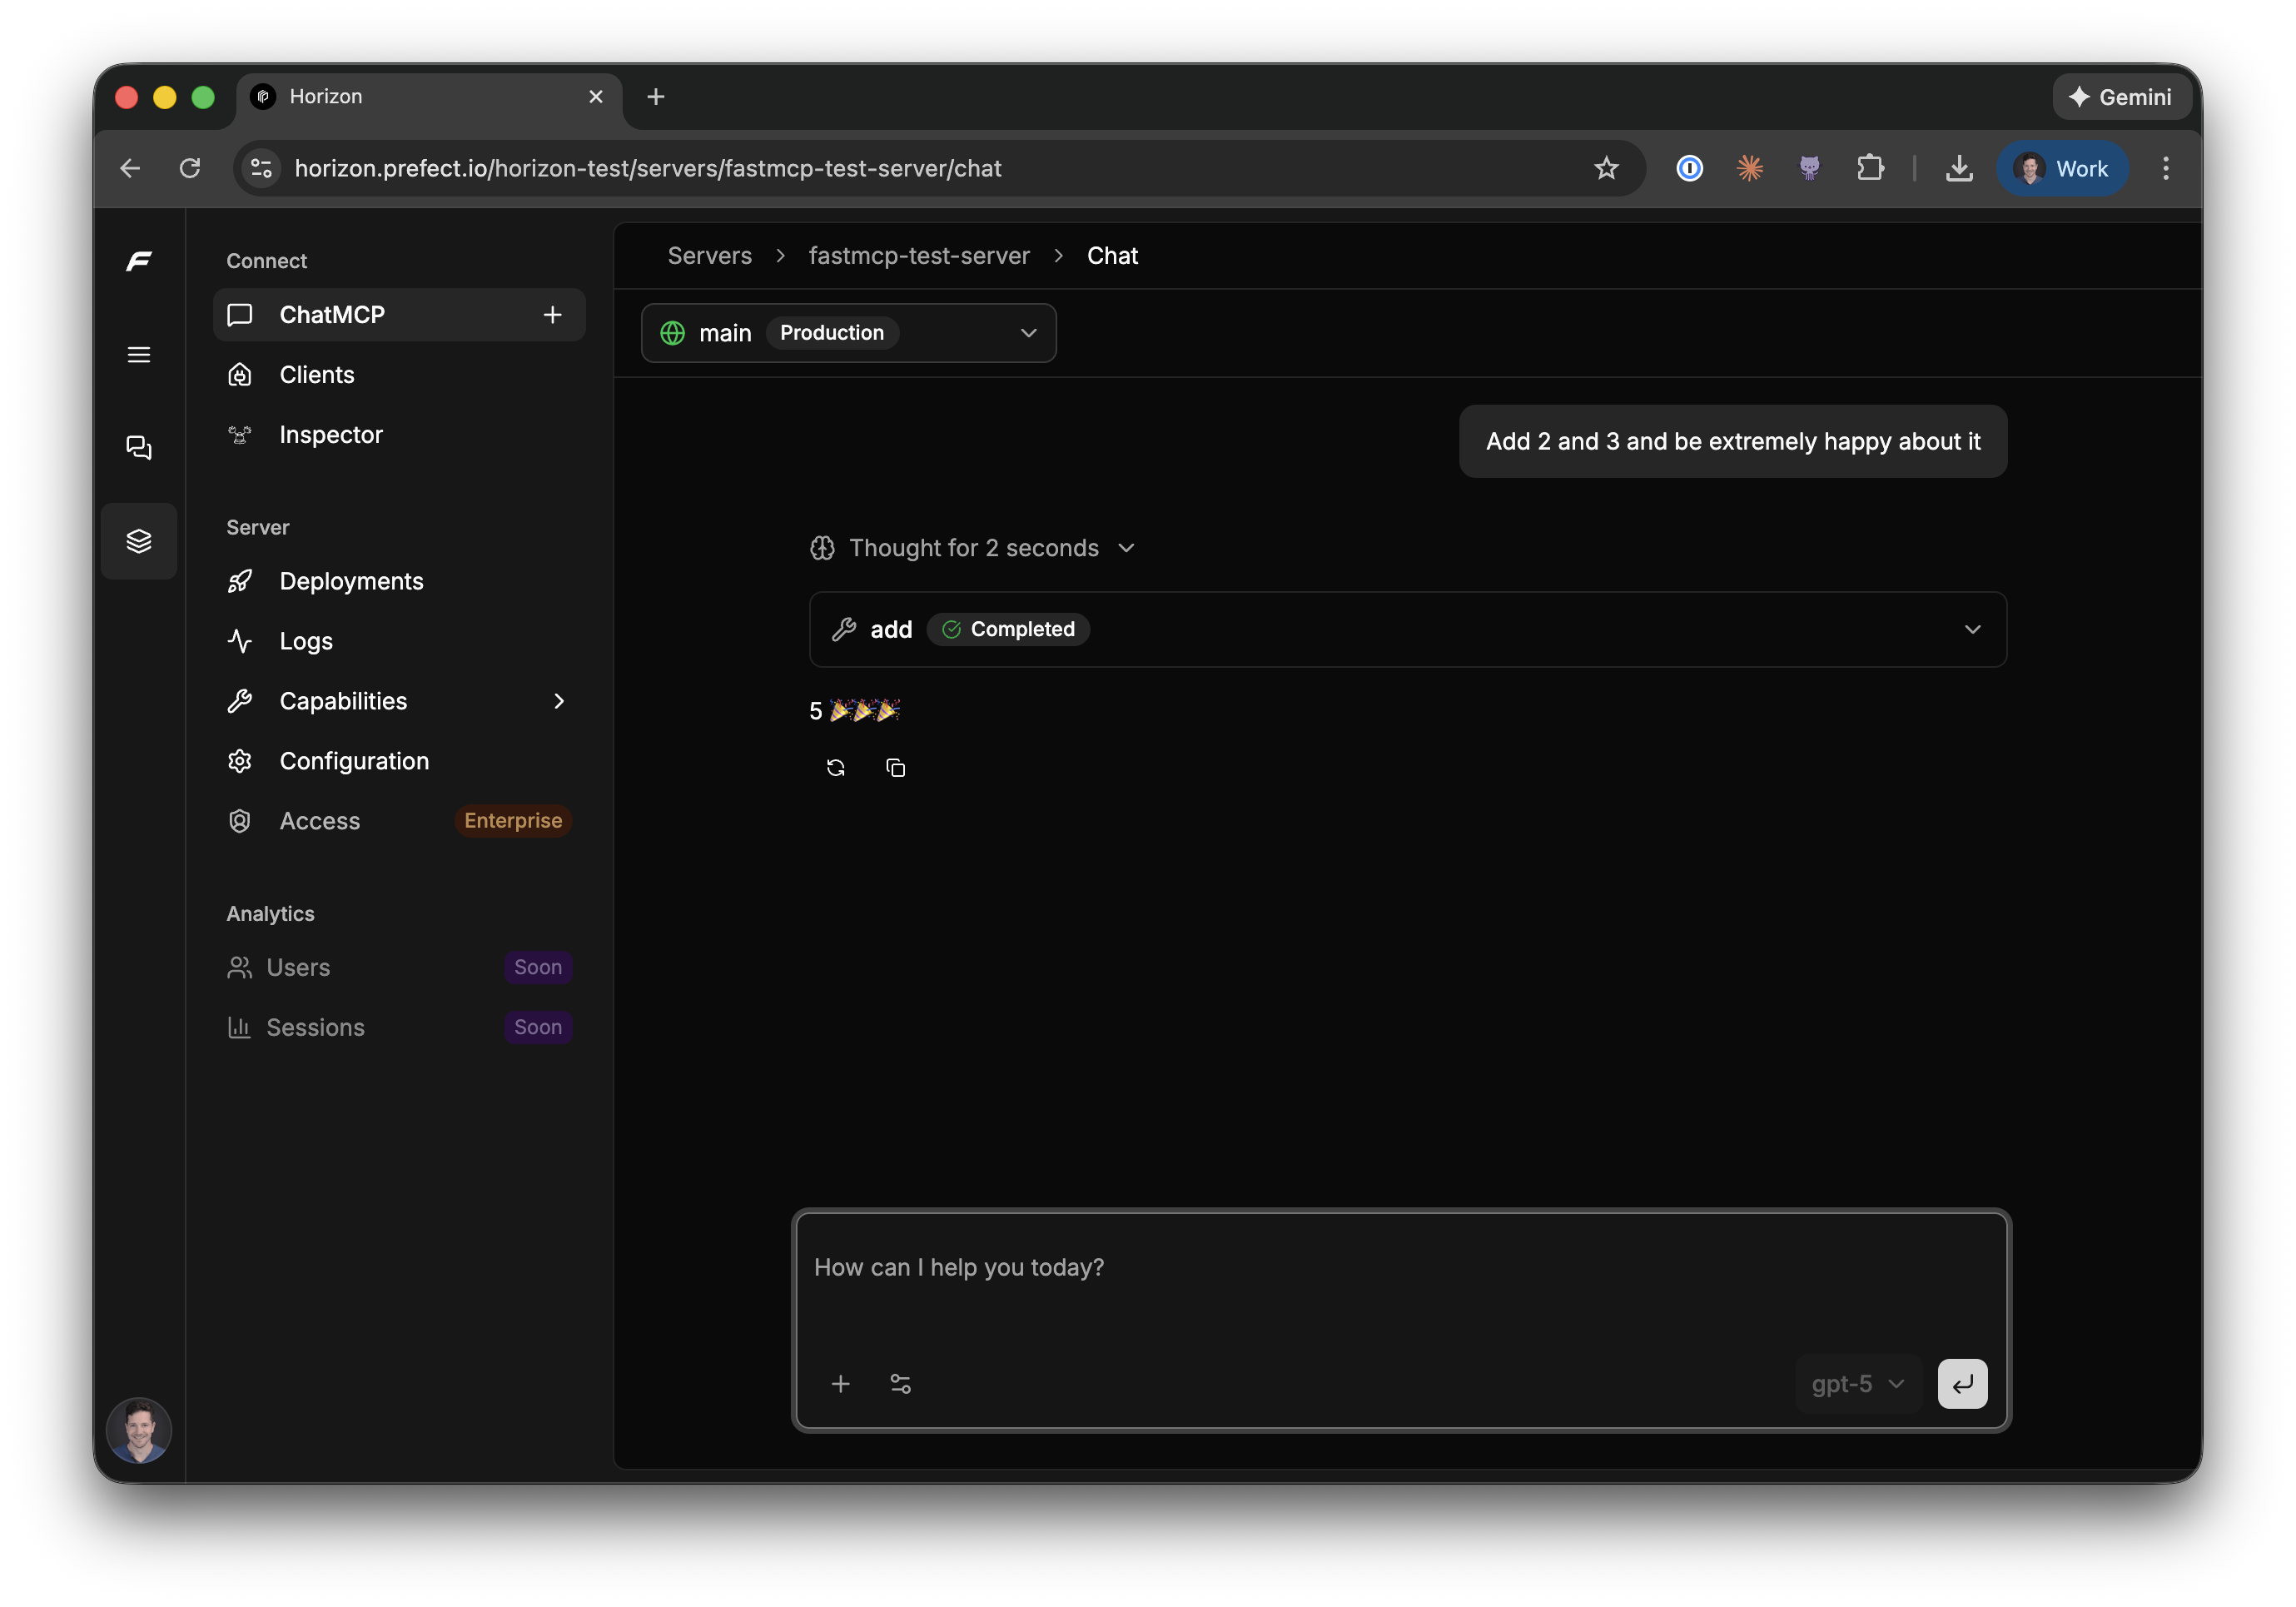 ChatMCP is designed for testing, not as a daily work environment. Once you've confirmed your server works, you can copy connection snippets for Claude Desktop, Cursor, Claude Code, and other MCP clients—or use the FastMCP client library to connect programmatically.
## Horizon Agents
Beyond testing individual servers, Horizon lets you create **Agents**—chat interfaces backed by one or more MCP servers. While ChatMCP tests a single server, Agents let you compose capabilities from multiple servers into a unified experience.
ChatMCP is designed for testing, not as a daily work environment. Once you've confirmed your server works, you can copy connection snippets for Claude Desktop, Cursor, Claude Code, and other MCP clients—or use the FastMCP client library to connect programmatically.
## Horizon Agents
Beyond testing individual servers, Horizon lets you create **Agents**—chat interfaces backed by one or more MCP servers. While ChatMCP tests a single server, Agents let you compose capabilities from multiple servers into a unified experience.
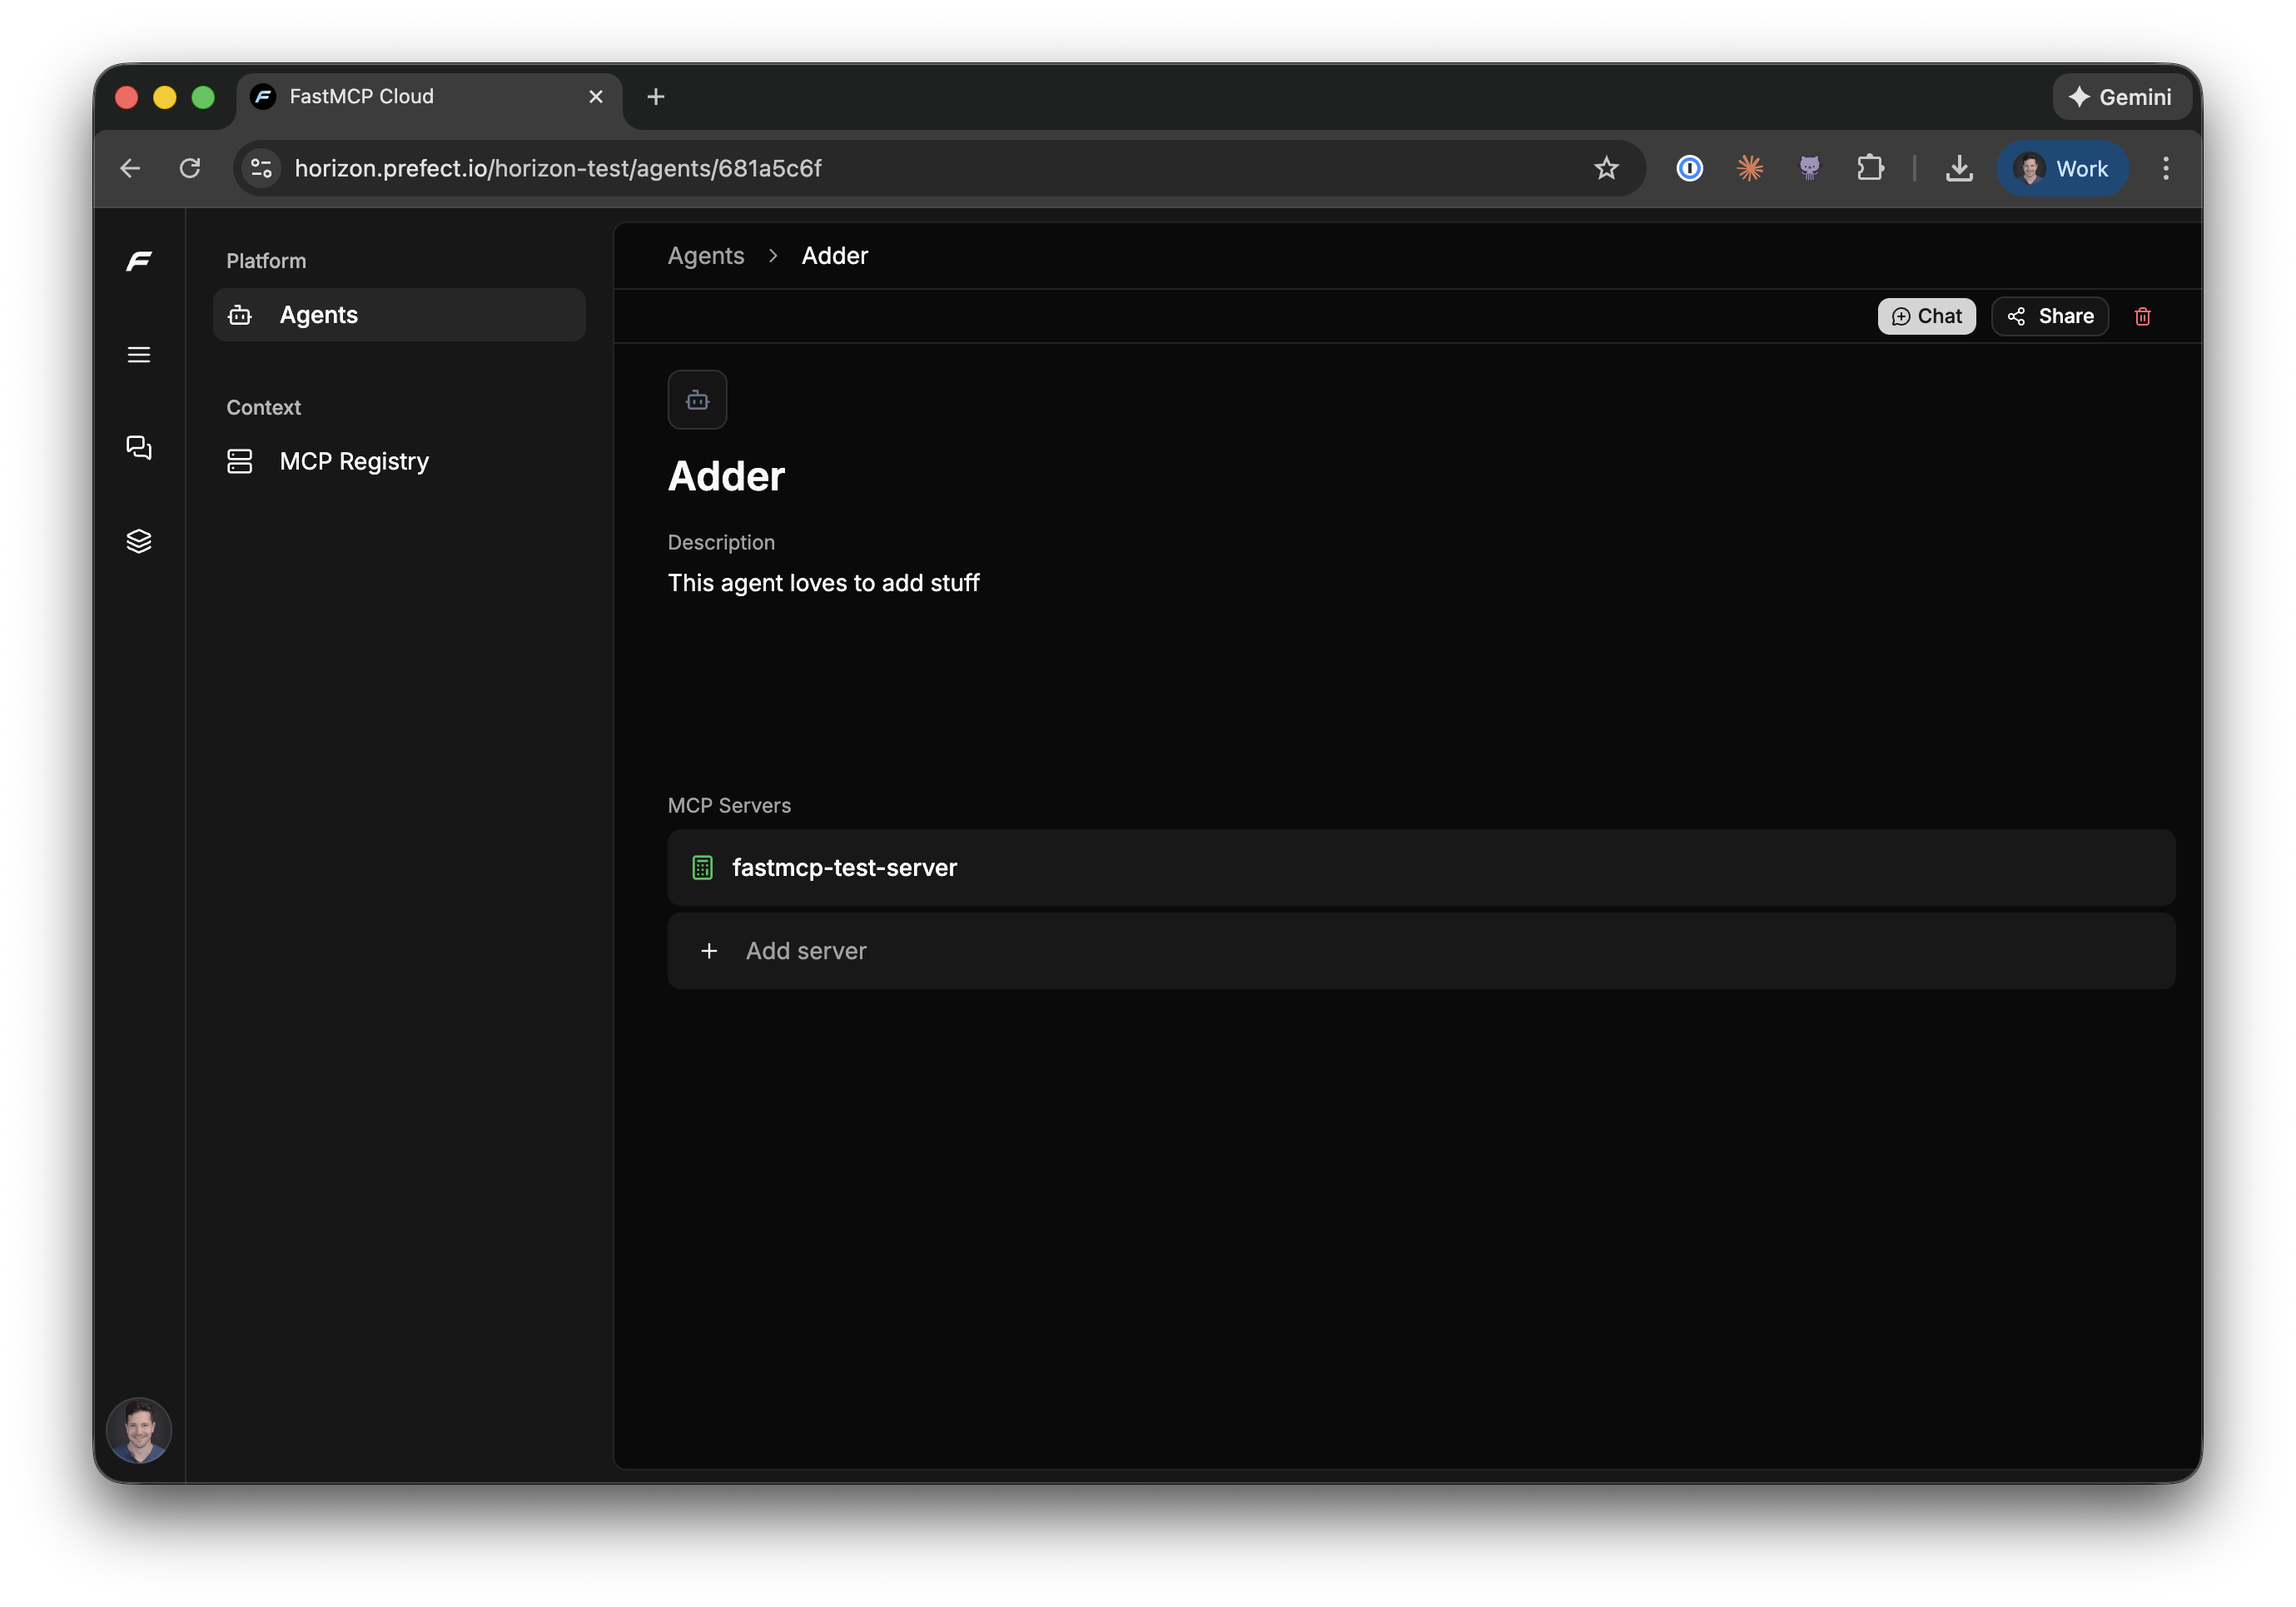 To create an agent:
1. Navigate to **Agents** in the sidebar
2. Click **Create Agent** and give it a name and description
3. Add MCP servers to the agent—these can be servers you've deployed to Horizon or external servers in the registry
Once configured, you can chat with your agent directly in Horizon:
To create an agent:
1. Navigate to **Agents** in the sidebar
2. Click **Create Agent** and give it a name and description
3. Add MCP servers to the agent—these can be servers you've deployed to Horizon or external servers in the registry
Once configured, you can chat with your agent directly in Horizon:
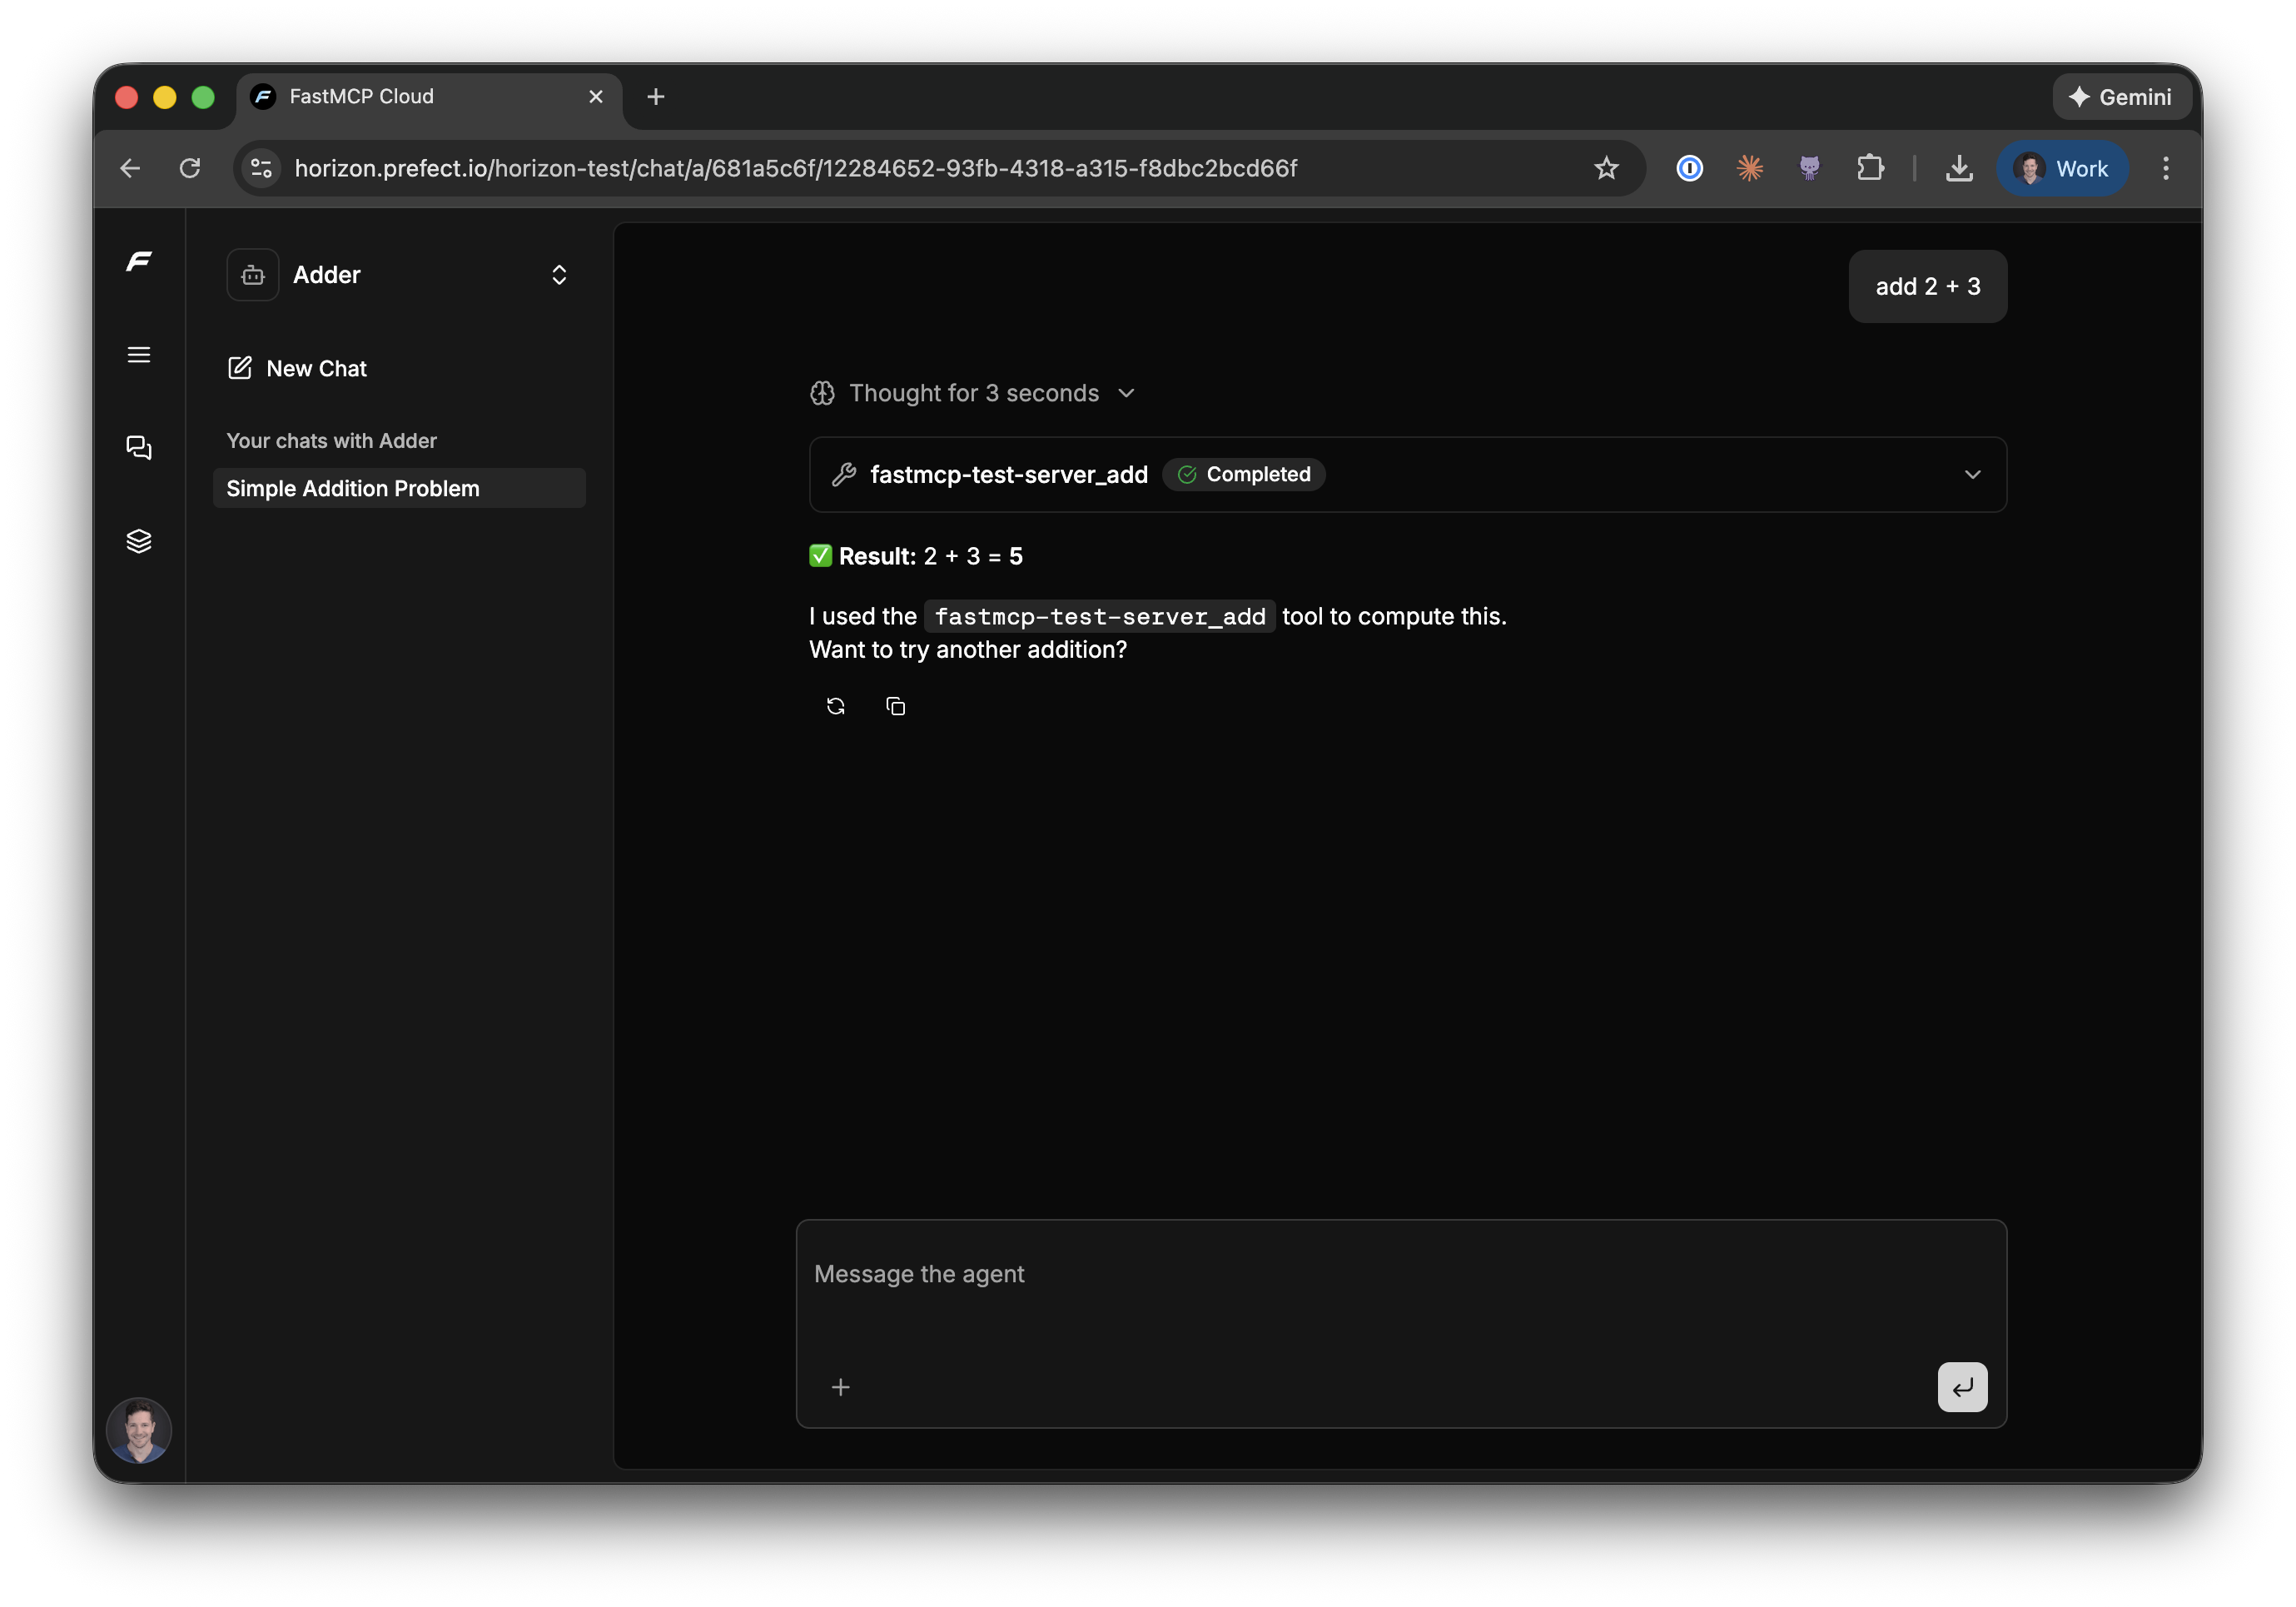 Agents are useful for creating purpose-built interfaces that combine tools from different servers. For example, you might create an agent that has access to both your company's internal data server and a general-purpose utilities server.
---
# Source: https://gofastmcp.com/servers/progress.md
# Source: https://gofastmcp.com/clients/progress.md
> ## Documentation Index
> Fetch the complete documentation index at: https://gofastmcp.com/llms.txt
> Use this file to discover all available pages before exploring further.
# Progress Monitoring
> Handle progress notifications from long-running server operations.
export const VersionBadge = ({version}) => {
return
Agents are useful for creating purpose-built interfaces that combine tools from different servers. For example, you might create an agent that has access to both your company's internal data server and a general-purpose utilities server.
---
# Source: https://gofastmcp.com/servers/progress.md
# Source: https://gofastmcp.com/clients/progress.md
> ## Documentation Index
> Fetch the complete documentation index at: https://gofastmcp.com/llms.txt
> Use this file to discover all available pages before exploring further.
# Progress Monitoring
> Handle progress notifications from long-running server operations.
export const VersionBadge = ({version}) => {
return {version}
{version}
{version}
{version}
{version}
{version}
{version}
{version}
{version}
{version}
{version}
{version}
{version}
{version}
{version}
{version}
{version}
{version}
{version}
{version}
{version}
{version}
{version}
{version}
{version}

 **FastMCP is the standard framework for building MCP applications.** The [Model Context Protocol](https://modelcontextprotocol.io/) (MCP) provides a standardized way to connect LLMs to tools and data, and FastMCP makes it production-ready with clean, Pythonic code:
```python {1} theme={"theme":{"light":"snazzy-light","dark":"dark-plus"}}
from fastmcp import FastMCP
mcp = FastMCP("Demo 🚀")
@mcp.tool
def add(a: int, b: int) -> int:
"""Add two numbers"""
return a + b
if __name__ == "__main__":
mcp.run()
```
**FastMCP is the standard framework for building MCP applications.** The [Model Context Protocol](https://modelcontextprotocol.io/) (MCP) provides a standardized way to connect LLMs to tools and data, and FastMCP makes it production-ready with clean, Pythonic code:
```python {1} theme={"theme":{"light":"snazzy-light","dark":"dark-plus"}}
from fastmcp import FastMCP
mcp = FastMCP("Demo 🚀")
@mcp.tool
def add(a: int, b: int) -> int:
"""Add two numbers"""
return a + b
if __name__ == "__main__":
mcp.run()
```
{version}