# Deepconverse
> A policy document can be configured for the chat bot. To view policy document in bot :
---
# Source: https://docs.deepconverse.com/product-docs/chatbots/customizations/adding-a-link-to-your-privacy-policy-in-chatbot-window.md
# Adding a link to your Privacy Policy in Chatbot window
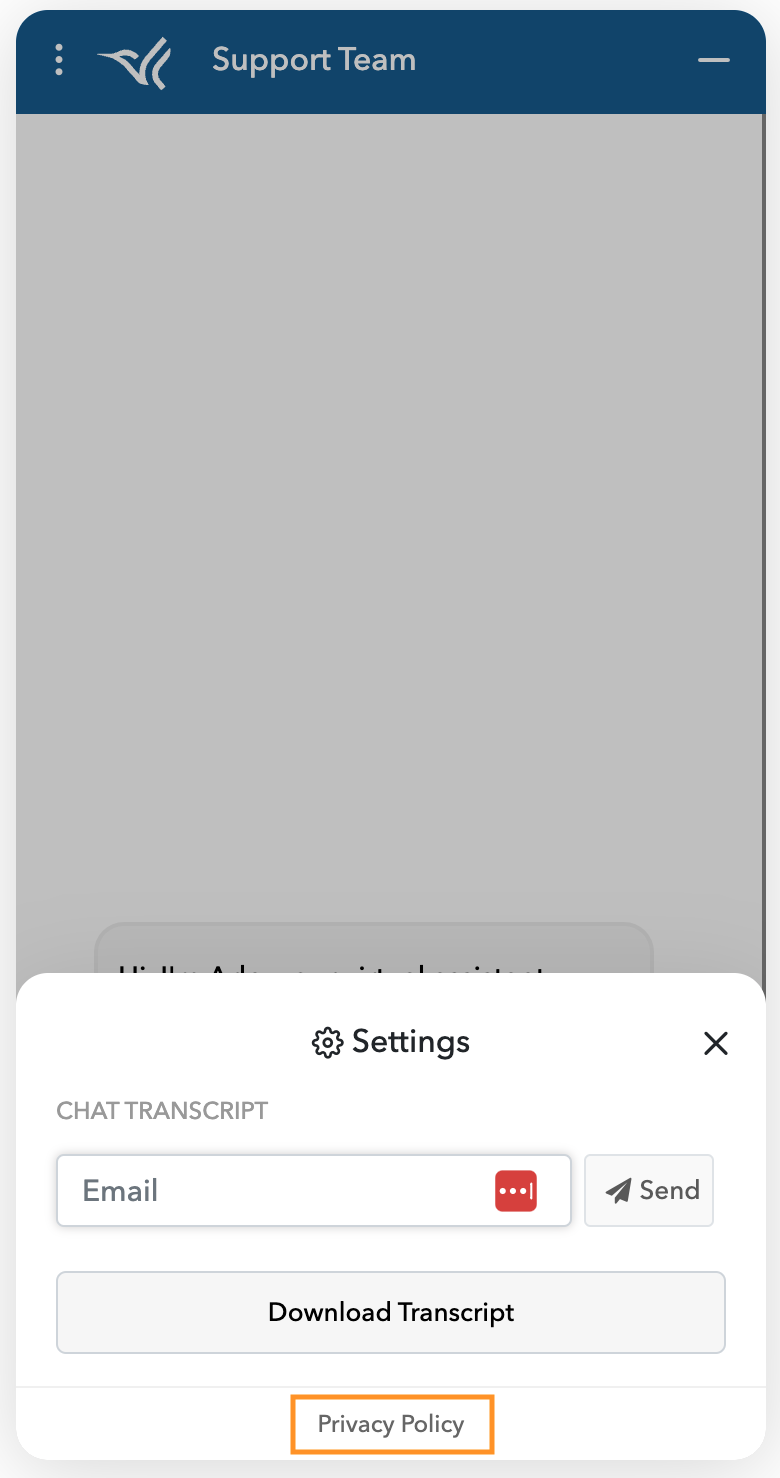
A policy document can be configured for the chat bot. To view policy document in bot :
* Click on ***Settings*** icon***.***
* On settings page, click on ***Privacy Policy*** link. The document will be opened in a new tab.
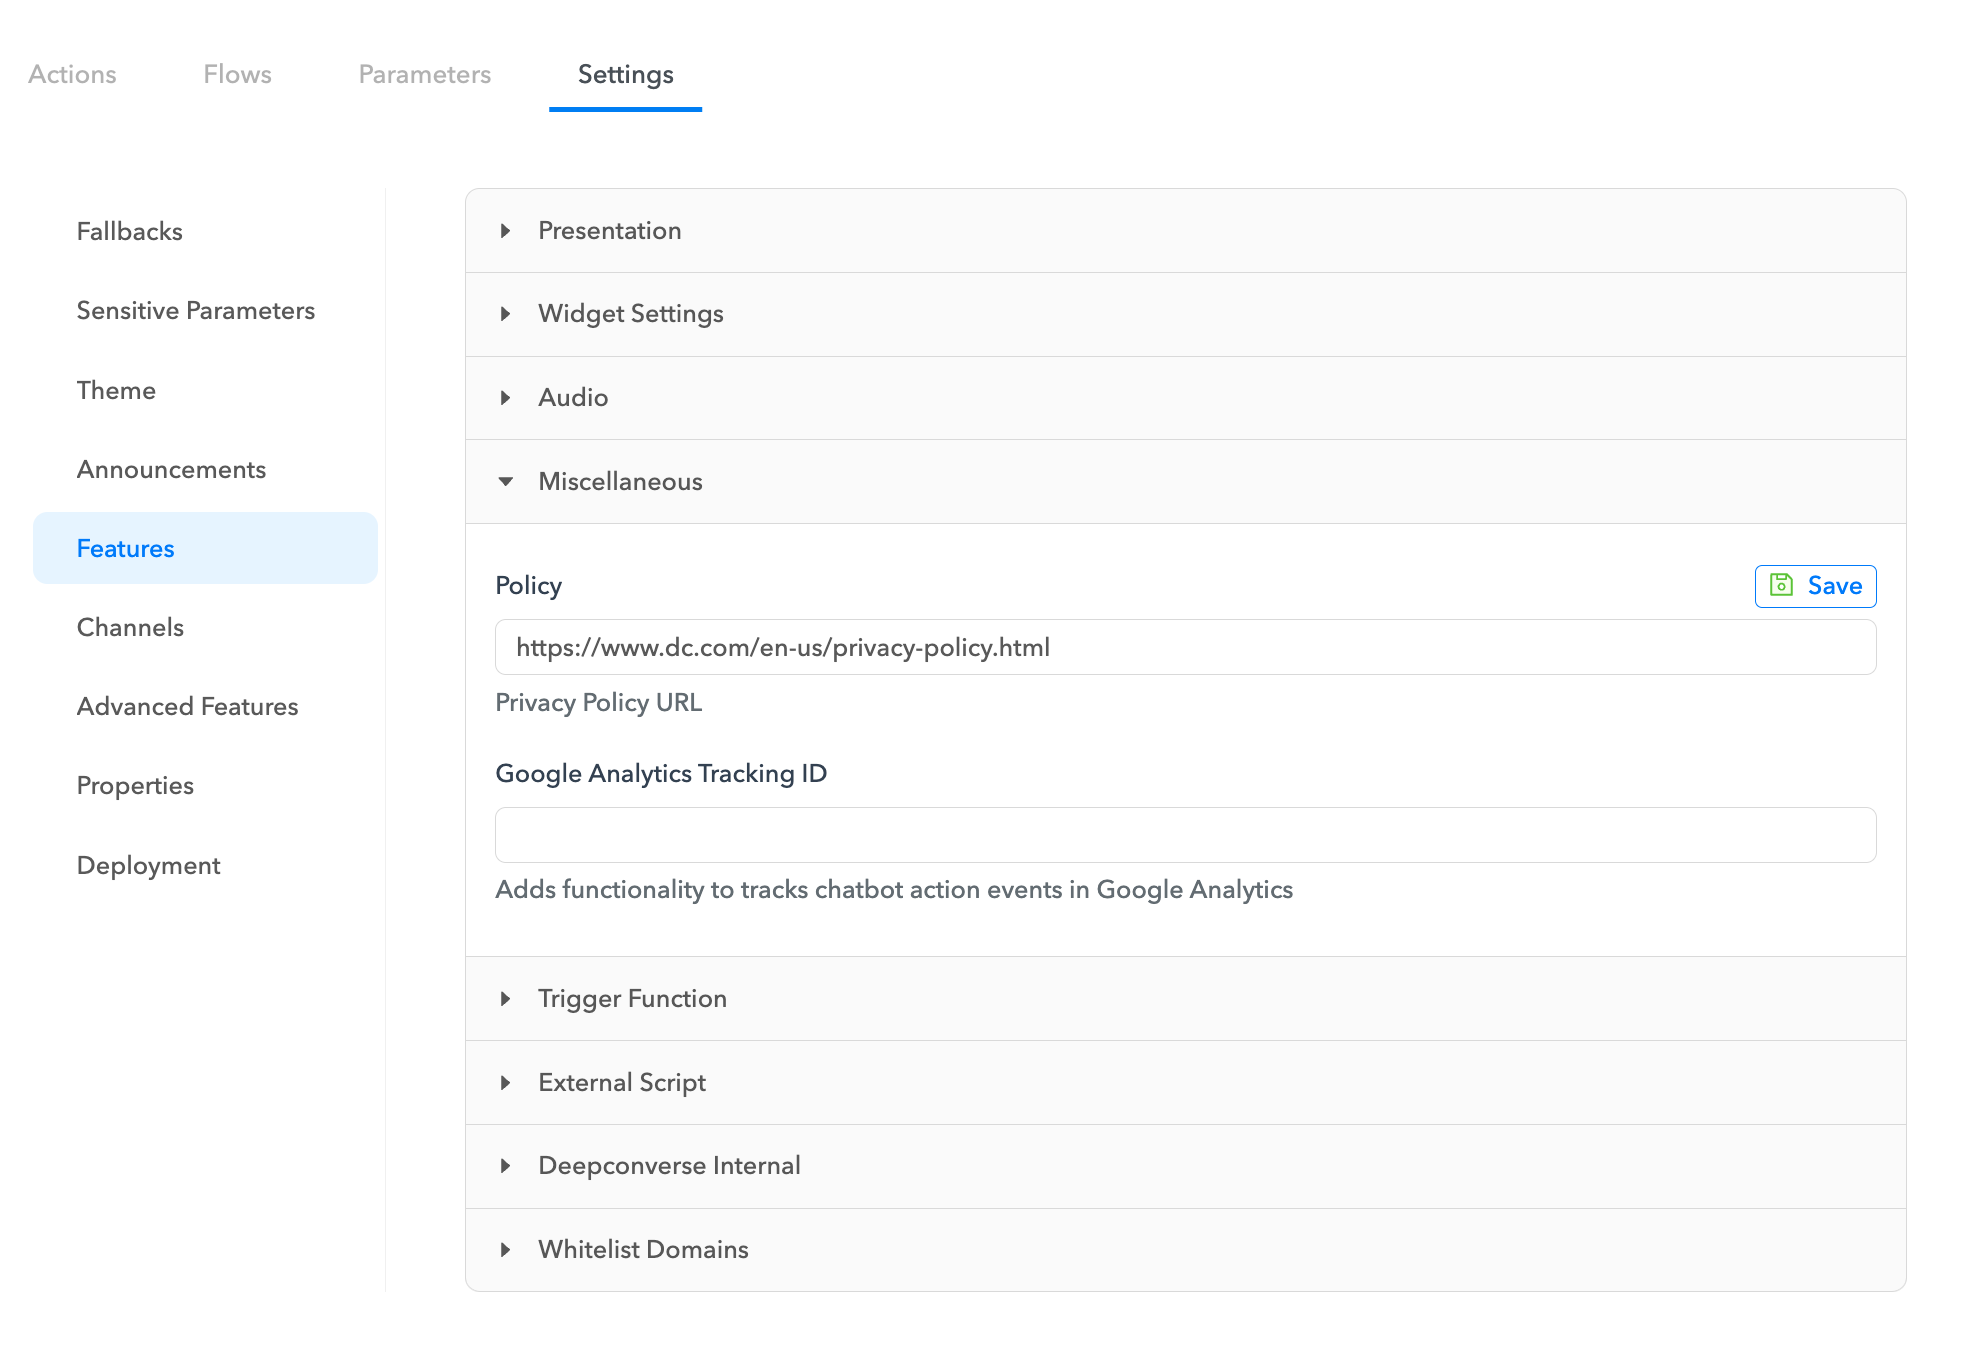
**Configure privacy policy document**
* Navigate to the ***Chat bot App*** in the admin dashboard.
* Under the ***Bots*** section select the chat bot for which you would like to add the policy document.
* Select the ***Features*** tab.
* Select the **Miscellaneous** tab
---
# Source: https://docs.deepconverse.com/product-docs/chatbots/deploy/adding-widget-to-your-shopify-store/adding-the-widget-to-shopify-via-the-theme-editor-embed-block.md
# Adding the widget to Shopify via the Theme editor embed block
{% embed url="" %}
This guide will walk you through the steps of installing the DeepConverse chatbot on Shopify via the Theme editor
#### Go to [admin.deepconverse.com](https://admin.deepconverse.com)
#### 1. Click "Chatbots"
Click on "Chatbots"

#### 2. Click the chatbot that you want to add to Shopify
Navigate to "DeepConverse Shopify"

#### 3. Click "Settings"
Select the "Settings" option

#### 4. Click "Deployment"
Choose the "Deployment" option

#### 5. Choose the version
Click on the "DraftPublished" field

#### 6. Copy the URL of the script
Click here

#### 7. Switch to your store admin page
Switch to "admin.shopify.com"

#### 8. Click "Online Store"
Select the option to "Online Store"

#### 9. Click "Customize"
Navigate to the "Customize" section

#### 10. This will open the Theme editor. Now click on the App embeds
Go to "online-store-web.shopifyapps.com"

#### 11. Click "DeepConverse AI Support Agent"
Click the selected location

#### 12. Click "Deployment Script"
Click on "Deployment Script"

#### 13. Paste the script url that you copied

#### 14. Enable the DeepConverse chatbot by clicking the toggle

#### 15. You will see the chatbot appear on the page

#### 16. Click "Save". Your theme is now saved with the chatbot and live.

Reach out to us if you face any issues during the setup process
[Powered by **guidde**](https://www.guidde.com)
---
# Source: https://docs.deepconverse.com/product-docs/account/adding-users.md
# Adding Users
If you are the **Site Admin** then you will have the permission to invite other users to have access to different components of the administration dashboard.
Once a user has been added they will receive an invitation to setup their account.
### Adding Users
To add new users navigate to the [Users](https://admin.deepconverse.com/dashboard/account/users) section located in ⚙[ *Account App*](https://admin.deepconverse.com/dashboard/account)*.* Here you will be able to see all the existing users along with their roles.

* Click **Add User** to add a new user.
* You will be presented with a form to enter the user email.
* You can choose whether to create this user as an **Admin**.
* Next, choose which apps this user will have access to and what roles they will have for that app.
* On clicking submit the user will be created.
* Finally, the new user will receive the instructions on setting up their account.

---
# Source: https://docs.deepconverse.com/product-docs/chatbots/deploy/adding-widget-to-your-shopify-store.md
# Adding widget to your Shopify Store
## [How to install the DeepConverse chatbot in Shopify store](https://app.guidde.com/playbooks/ackUcRZF3rWkpck6Vyu9oU)
{% embed url="" %}
Lets see how we can install the DeepConverse chatbot in a Shopify store.
#### Go to [www.shopify.com](https://www.shopify.com)
#### 1. Click "Log in"
Click on "Log in"

#### 2. Switch to "accounts.shopify.com"
Switch to "accounts.shopify.com"

#### 3. Switch to "admin.shopify.com"
Navigate to "admin.shopify.com"

#### 4. Click "Online Store"
Navigate to the "Online Store" section.

#### 5. Switch to "online-store-web.shopifyapps.com"
Go to "Theme editor"

#### 6. Click "Customize"
Select "Customize" from the menu.

#### 7. Switch to the "DeepConverse Dashboard"
Navigate back to the DeepConverse dashboard

#### 8. Select the chatbot you would like to put
In this case we select the DeepConverse Shopify chatbot that we are going to add to our store

#### 9. Click "Settings"
Access the "Settings" option.

#### 10. Click "Deployment"
Click on "Deployment" in the menu.

#### 11. Choose the Published or Draft version
Select the version of the chatbot to add

#### 12. Click the copy icon
Copy the script

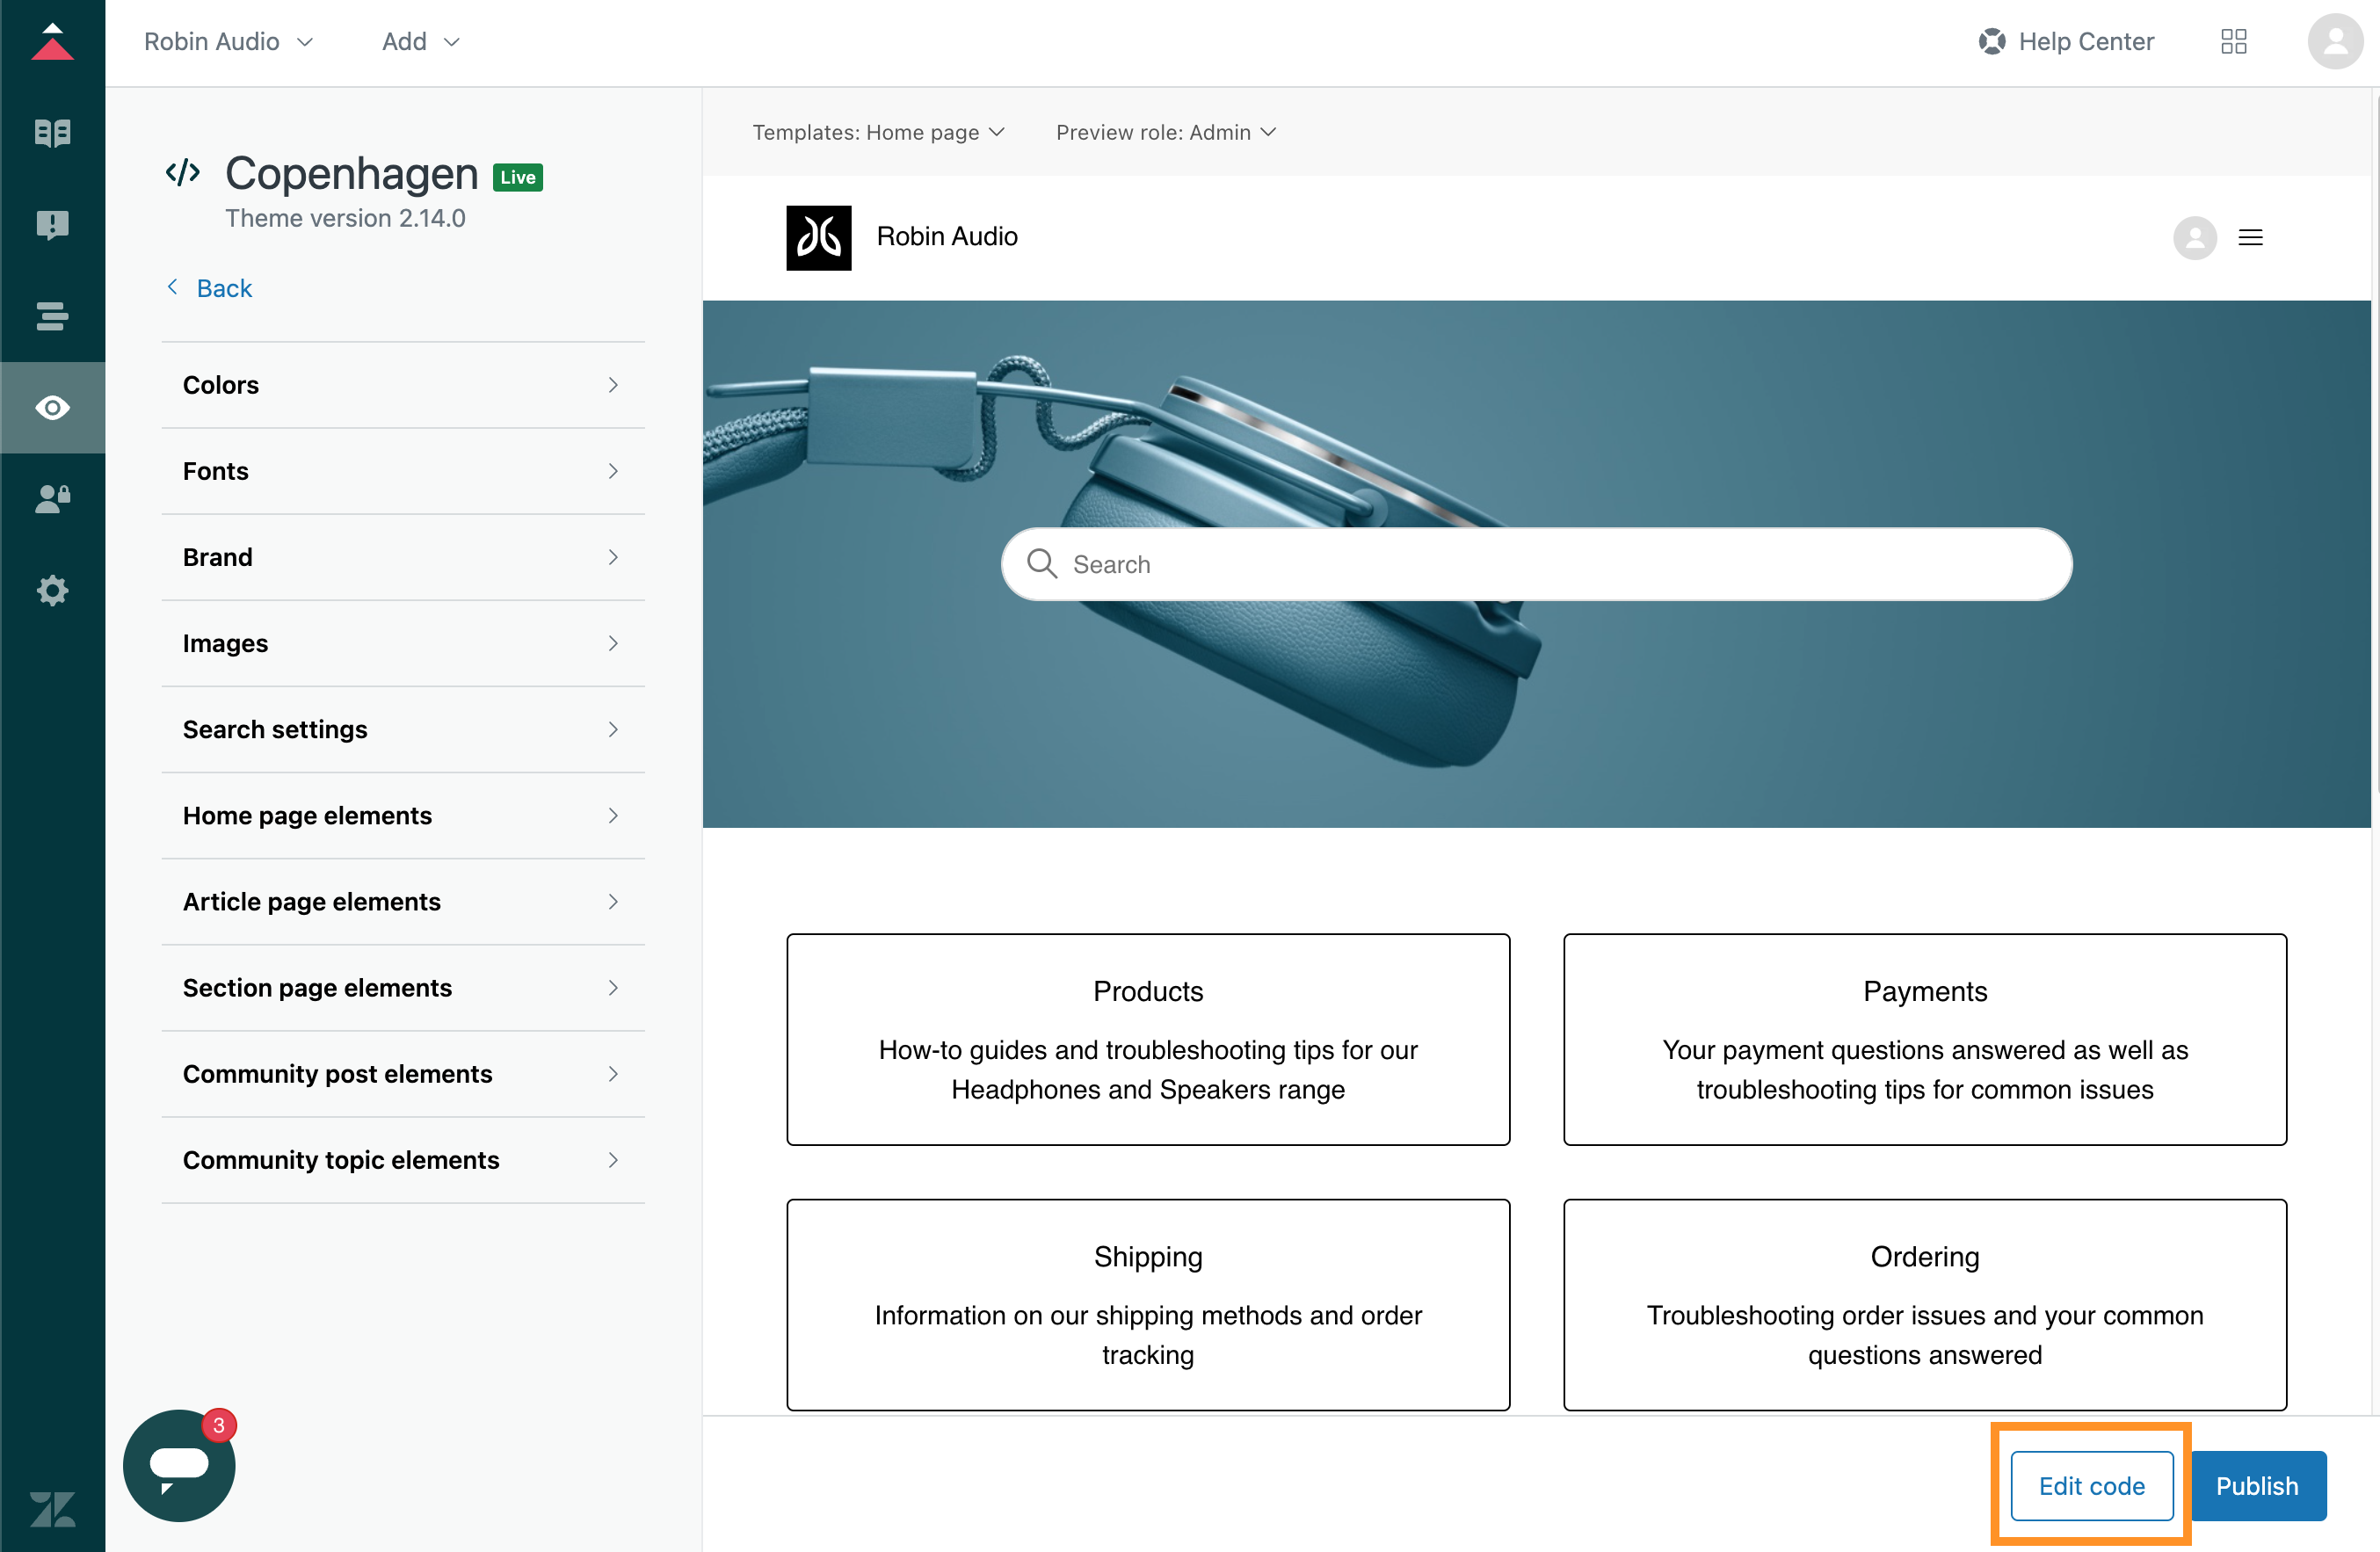
#### 13. Switch back to the theme editor
Navigate back to the theme editor to add the script

#### 14. Click "Edit code"
Select "Edit code" from the menu.

#### 15. Edit the theme file
theme.liquid is the file that has the scripts we will add our script tag here on the bottom.

#### 16. Paste the script tag
Save the changes and then preview the store

#### 17. Click "Preview store"
Preview your store.

#### 18. Switch to your Shopify Store
You will see the chatbot icon on the bottom of the page

#### 19. Click "Hide bar" to remove the preview banner
Click on "Hide bar."

#### 20. Try the chatbot
Your chatbot is now ready to be used on the store. Publish the theme and make it live.

Hopefully this will make it easier to add the chatbot for you. If you run into issues please reach out to the DeepConverse team.
[Powered by **guidde**](https://www.guidde.com)
---
# Source: https://docs.deepconverse.com/product-docs/chatbots/deploy/adding-widget-to-your-website.md
# Adding widget to your website
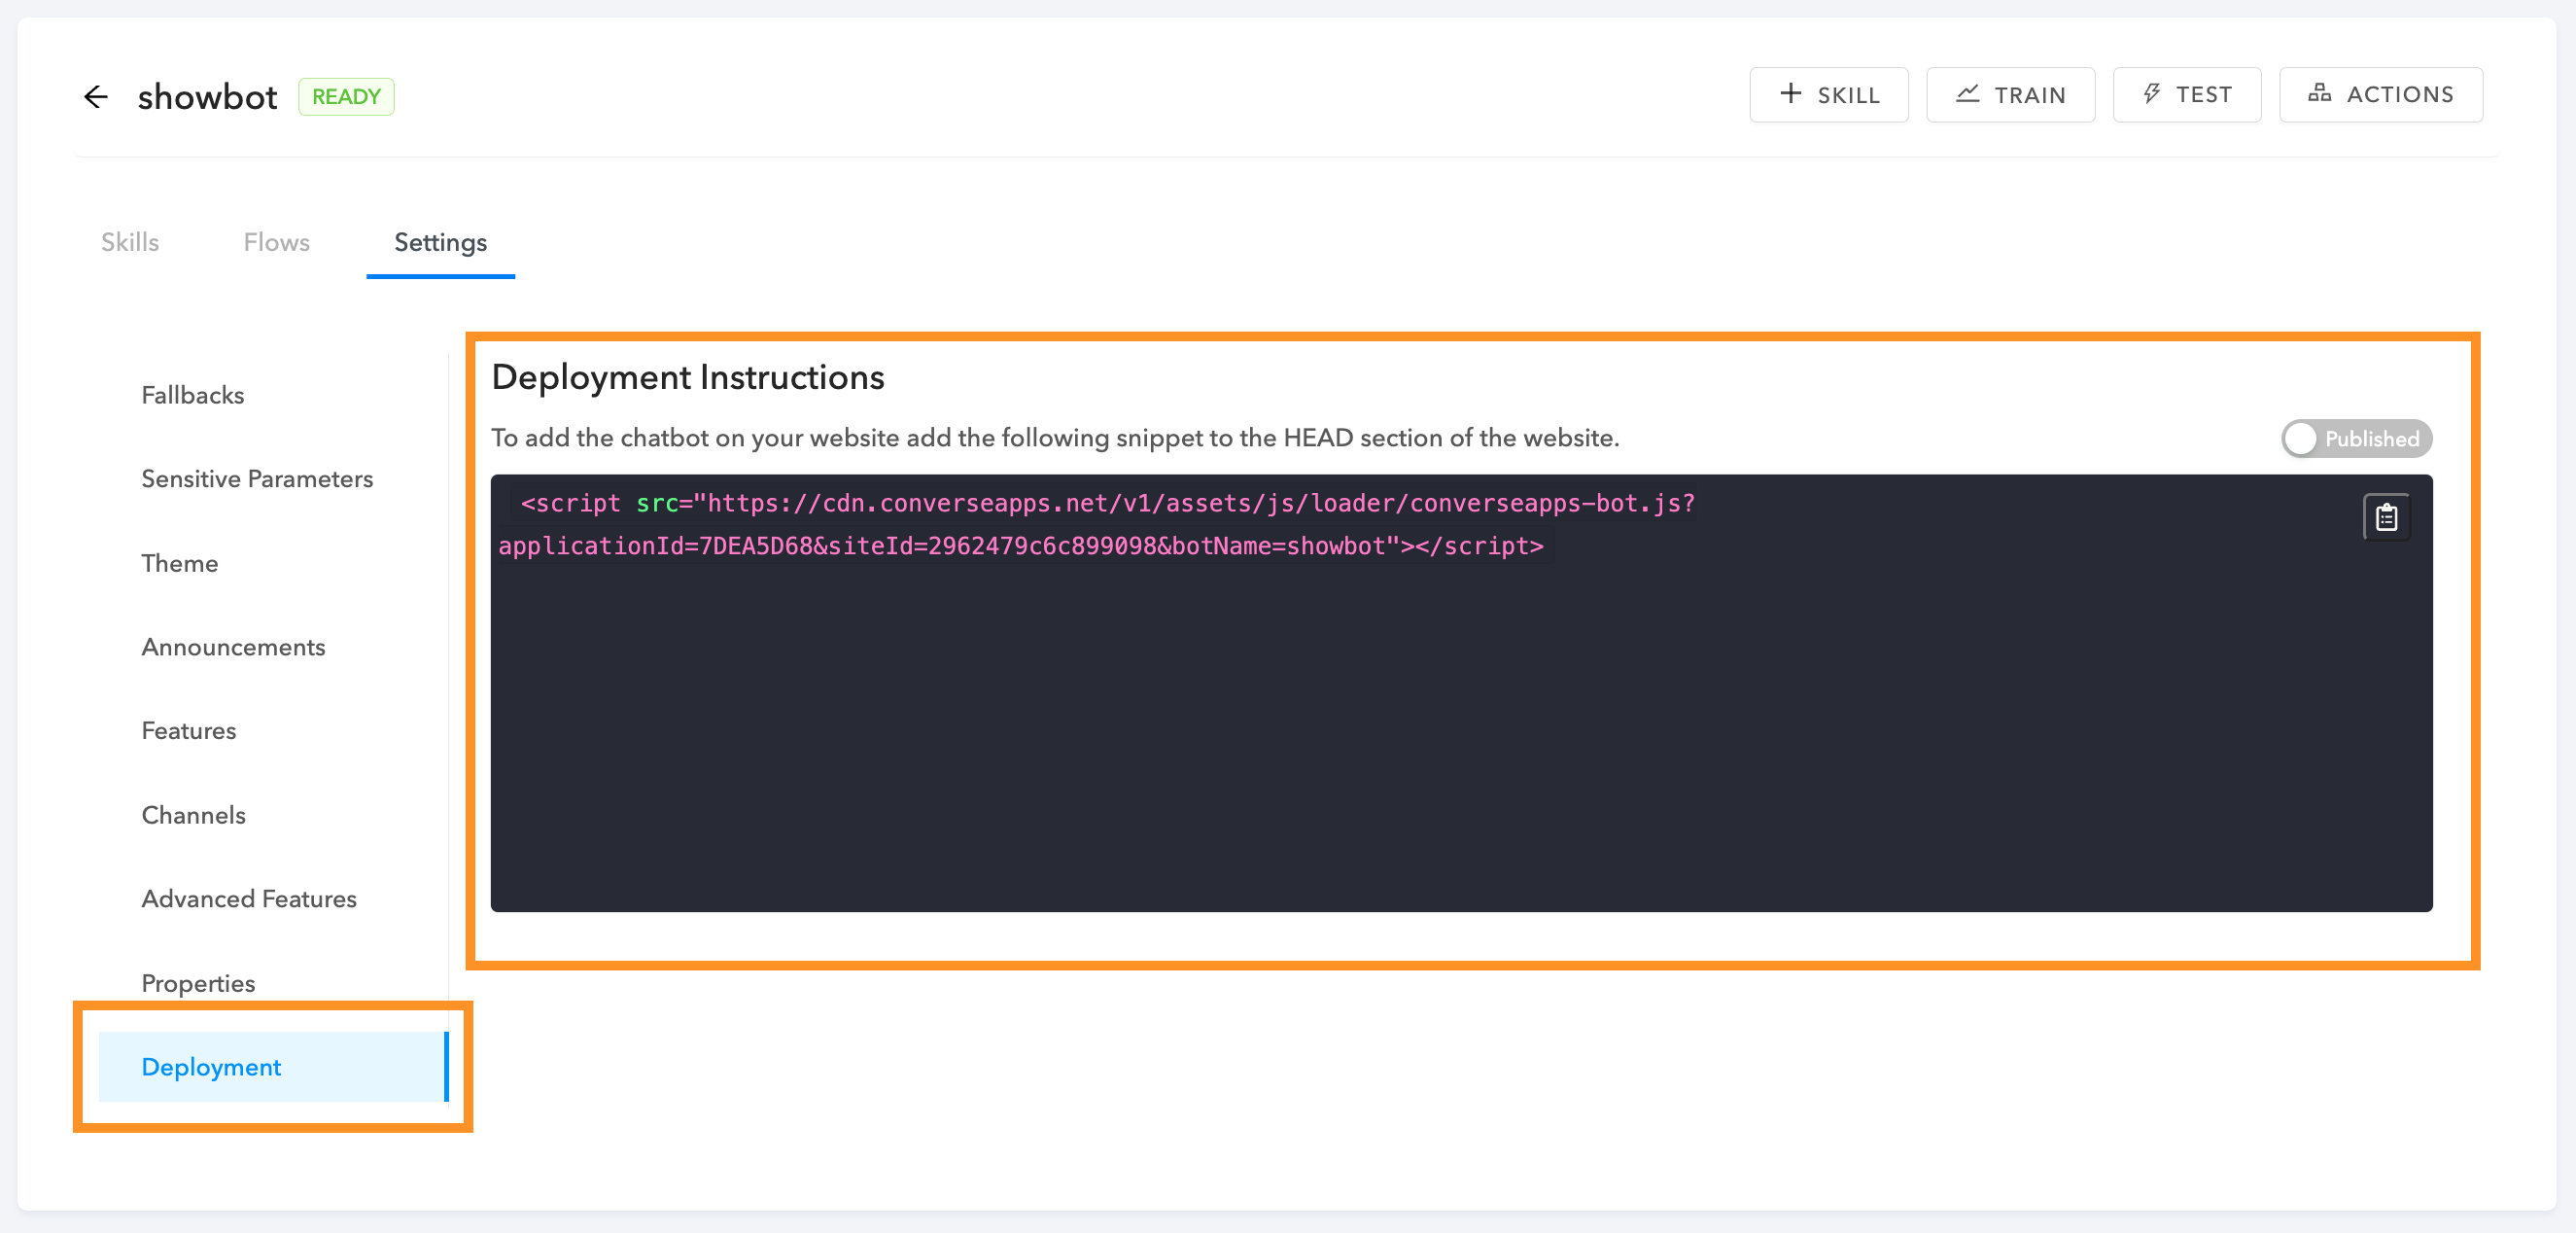
You can add the chatbot to your website by following the steps below.
1. Open the Chatbot that you are planning to add to your help center
2. Navigate to the **Settings** > **Deployment** and copy the snippet for your chatbot.\
\&#xNAN;*Note: You can toggle between the **draft** and **published** version*
3. Next, add the script tag to the `head` or the `body` tag of the webpages you want the chatbot to be shown\
\
Navigate to the webpage you will now be able to see the chatbot appear.
### Note
The chatbot script is by default configured to always show the widget. In cases you want to customize when the widget shows and metadata refer to the article below.
{% content-ref url="custom-initialization-and-passing-metadata" %}
[custom-initialization-and-passing-metadata](https://docs.deepconverse.com/product-docs/chatbots/deploy/custom-initialization-and-passing-metadata)
{% endcontent-ref %}
---
# Source: https://docs.deepconverse.com/product-docs/chatbots/deploy/adding-widget-to-your-zendesk-help-center.md
# Adding widget to your Zendesk Help Center
You can add the chatbot to your Zendesk Help Center by following the steps below.
1. Open the Chatbot that you are planning to add to your help center
2. Navigate to the **Settings** > **Deployment** and copy the snippet for your chatbot.\
\&#xNAN;*Note: You can toggle between the **draft** and **published** version*
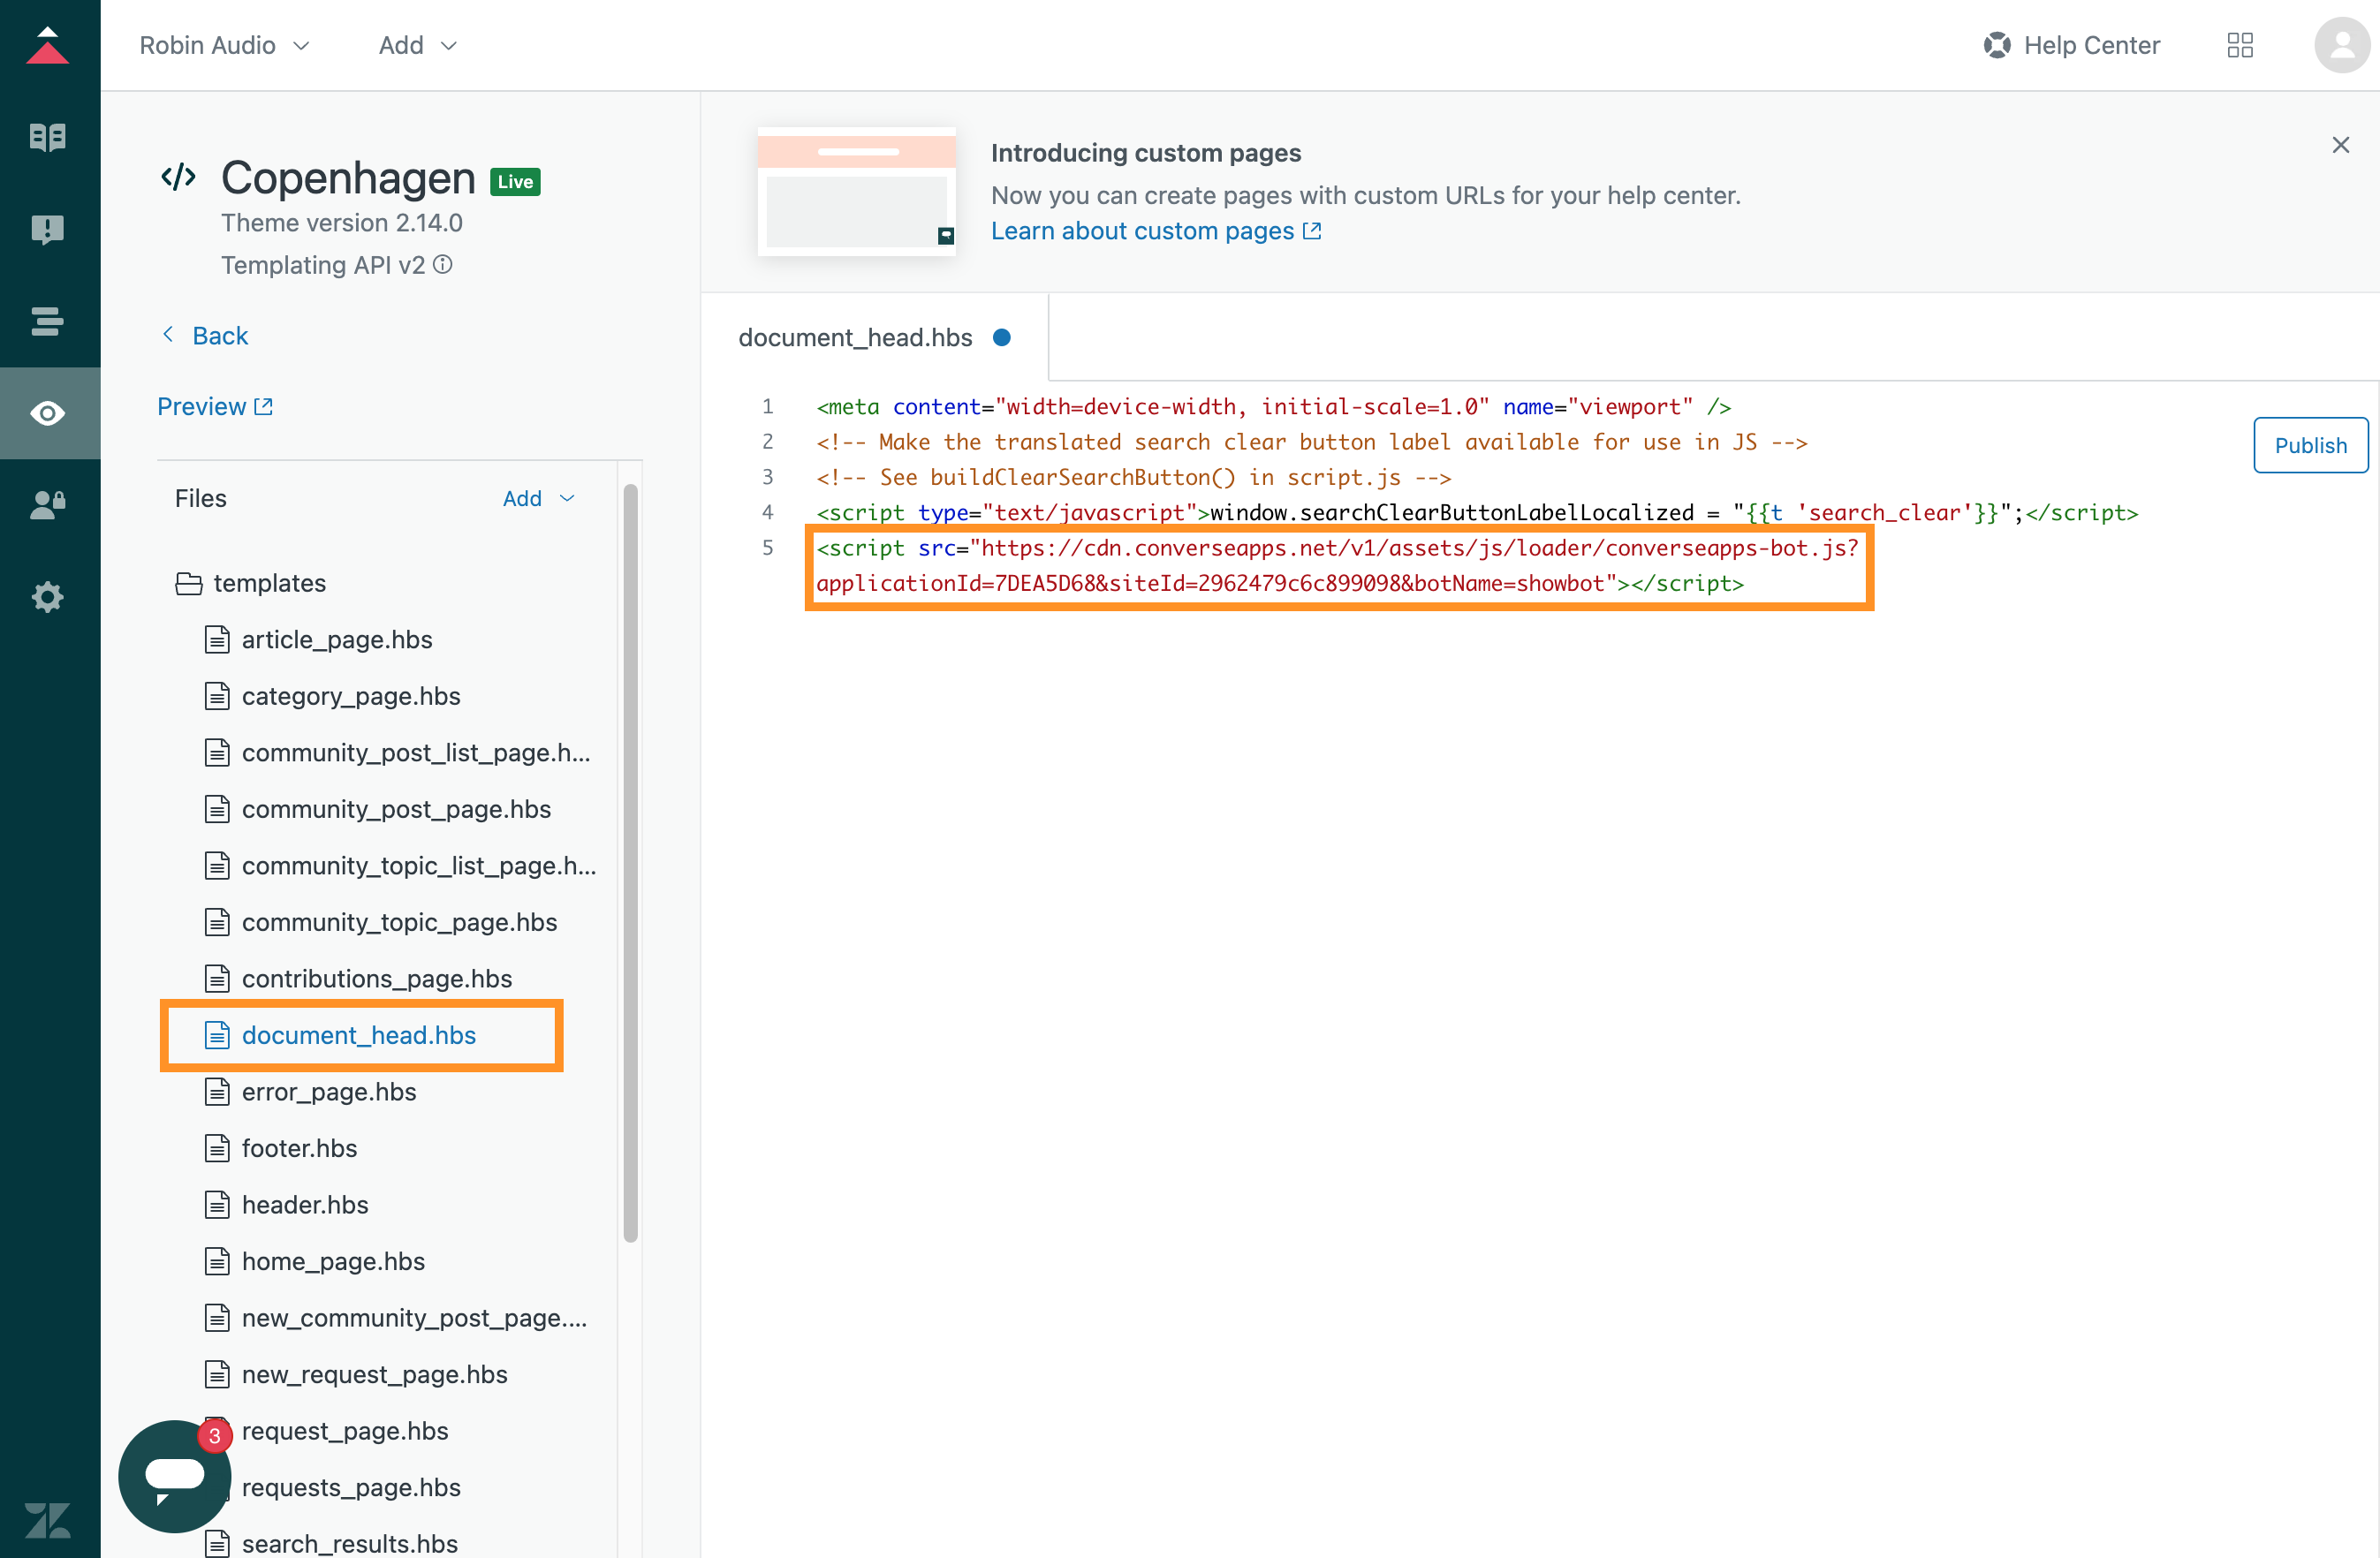
3. Next, open the Zendesk Guide and Navigate to the theme in which you would like to add the chatbot by clicking **Customize Design** > **Customize**\
4. On the theme page click **Edit Code**\
5. On the Edit Code screen choose **document\_head.hbs** and add the script snippet there for the chatbot. Once done click **Publish**\
\
Navigate to the help center you will now be able to see the chatbot appear.
### Disable Zendesk Chat Widget
In order to have a good experience you can disable the Zendesk Web Widget from appearing by default. Follow the instructions mentioned in this article:
[Removing Web Widget (Classic) from your website or help center](https://support.zendesk.com/hc/en-us/articles/4408839367706-Removing-Web-Widget-Classic-from-your-website-or-help-center)
---
# Source: https://docs.deepconverse.com/product-docs/chatbots/advanced-functionality.md
# Advanced Functionality
- [Connection Override](/product-docs/chatbots/advanced-functionality/connection-override.md)
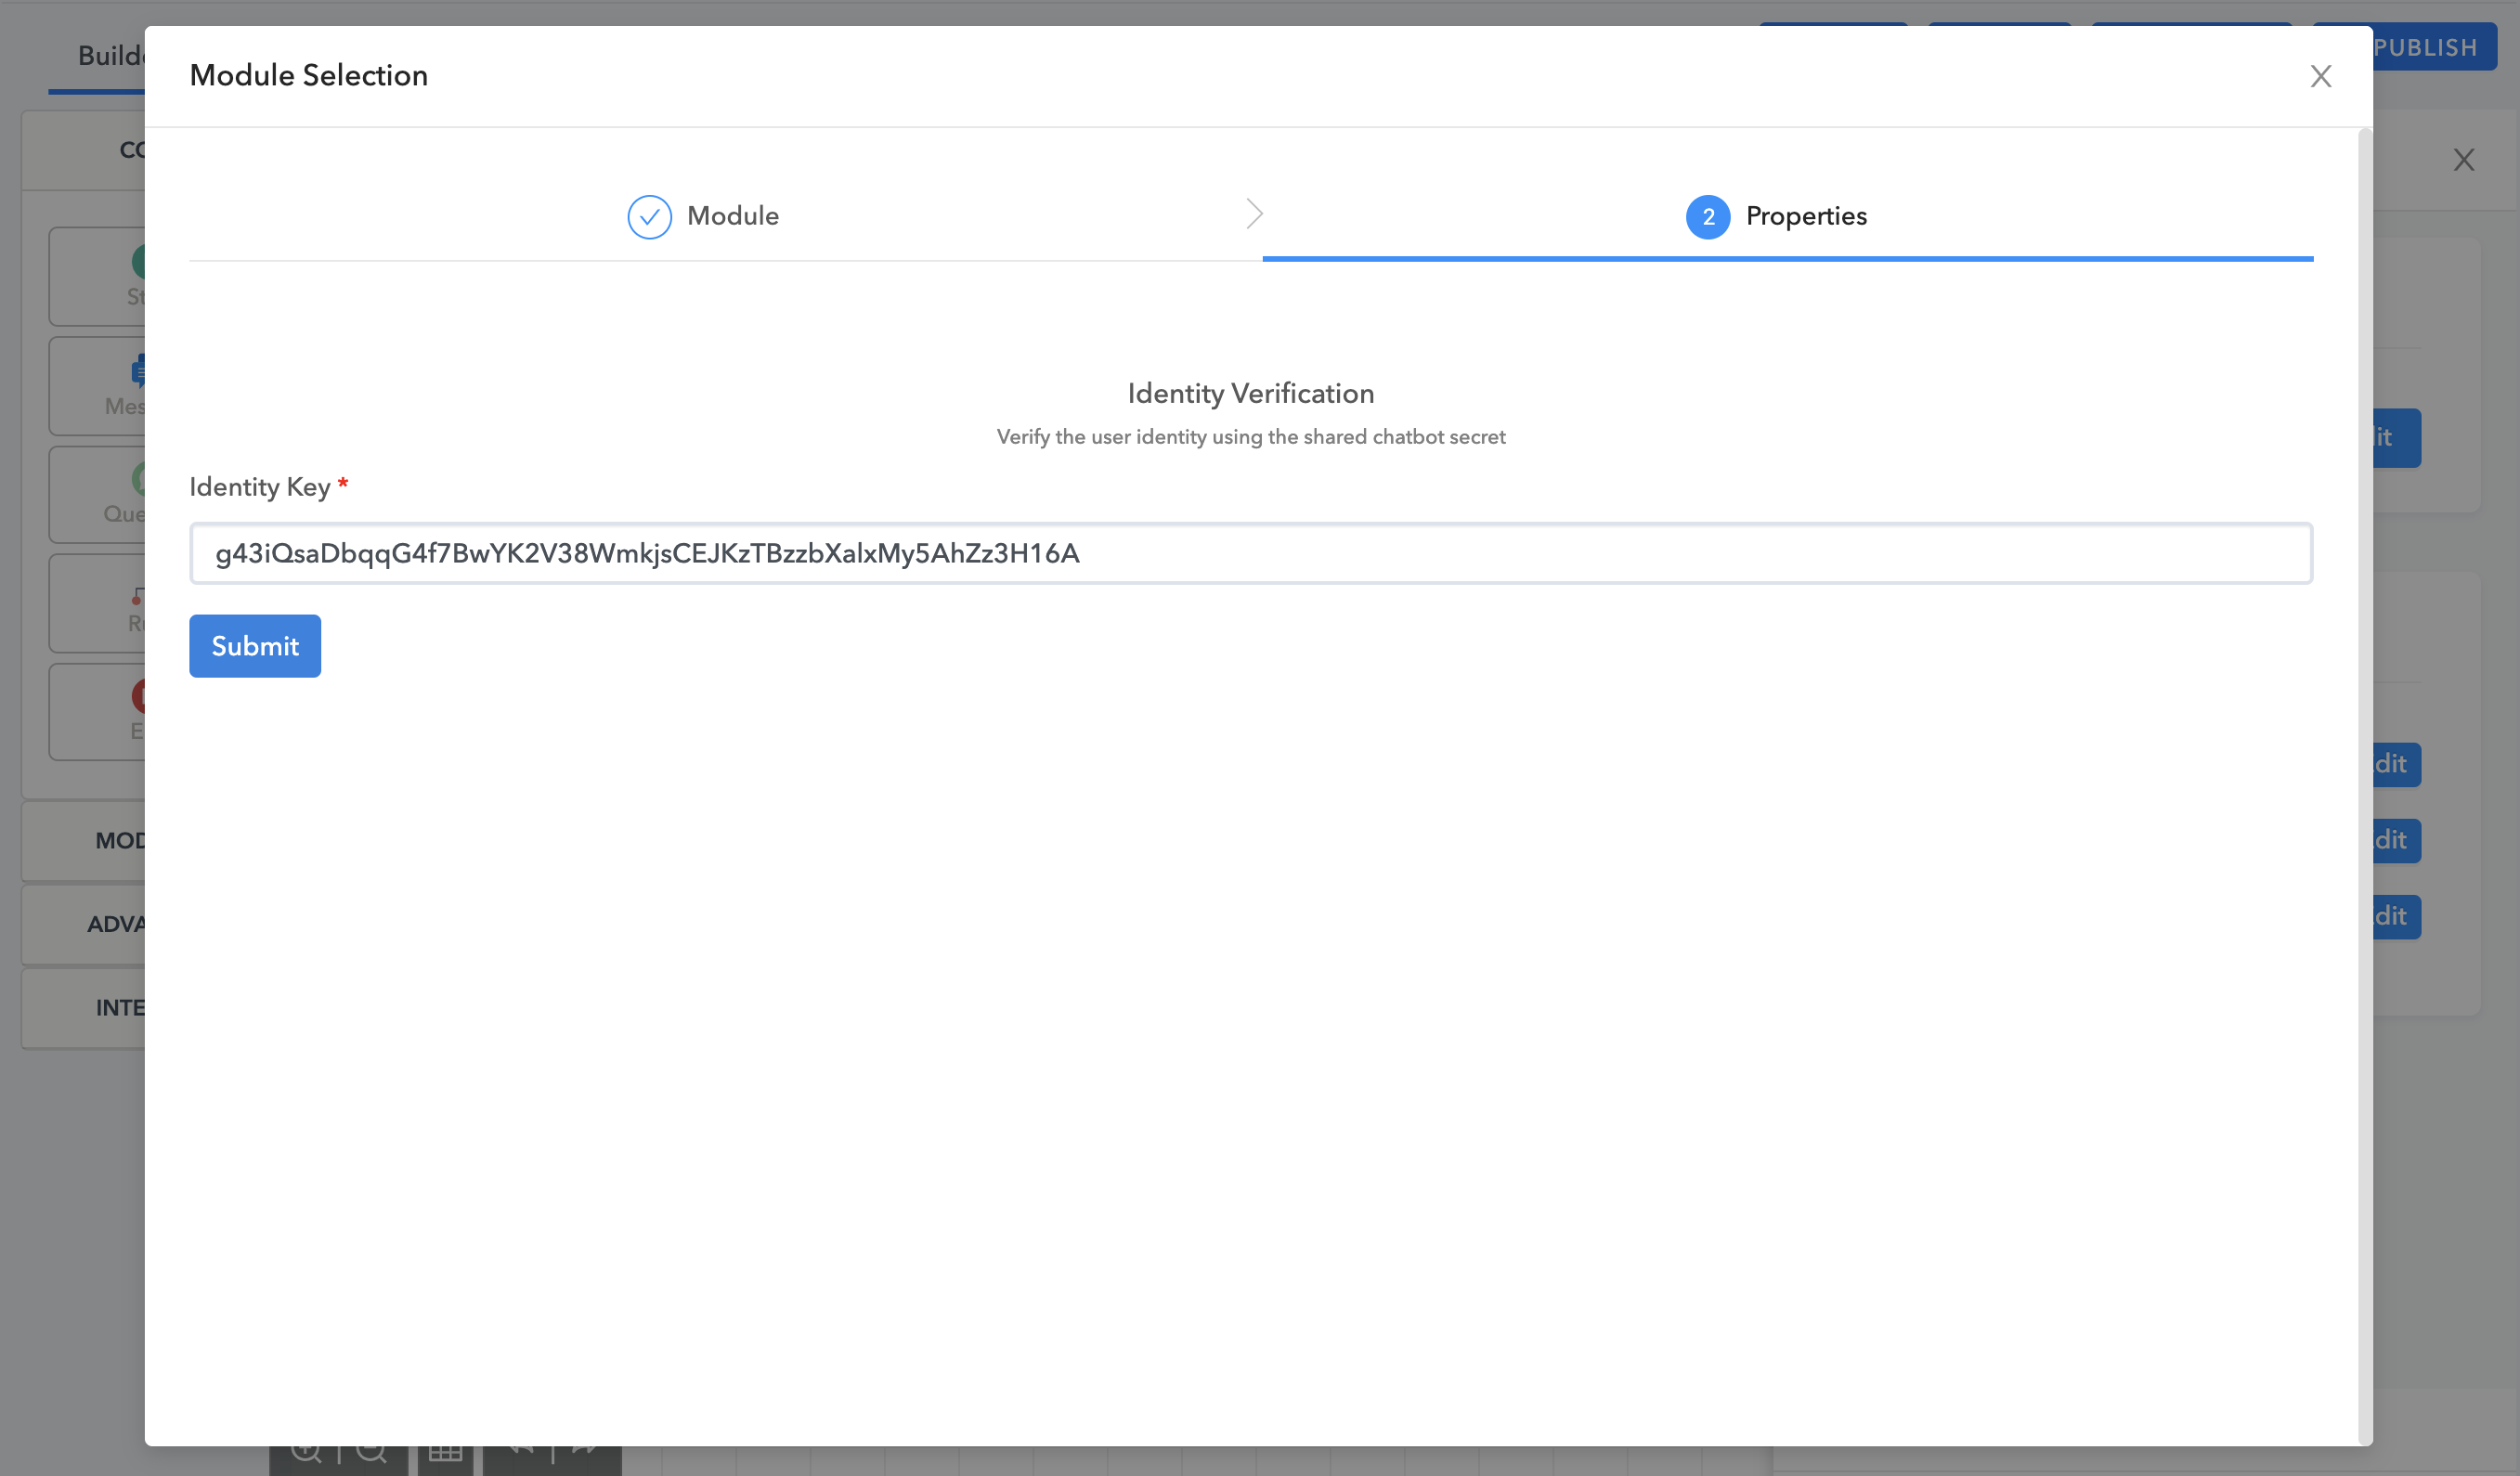
- [User Identity Verification](/product-docs/chatbots/advanced-functionality/user-identity-verification.md): Verify the identity of users
- [Announcements](/product-docs/chatbots/advanced-functionality/announcements.md)
- [Channel Specific Functionality](/product-docs/chatbots/advanced-functionality/channel-specific-functionality.md)
- [Zendesk Sunshine Conversations](/product-docs/chatbots/advanced-functionality/channel-specific-functionality/zendesk-sunshine-conversations.md)
- [How to handle image and file uploads in Zendesk Sunshine Conversations?](/product-docs/chatbots/advanced-functionality/channel-specific-functionality/zendesk-sunshine-conversations/how-to-handle-image-and-file-uploads-in-zendesk-sunshine-conversations.md)
- [Zendesk Chat (Classic)](/product-docs/chatbots/advanced-functionality/channel-specific-functionality/zendesk-chat-classic.md)
- [How to handoff conversations to Zendesk Chat (Classic) ?](/product-docs/chatbots/advanced-functionality/channel-specific-functionality/zendesk-chat-classic/how-to-handoff-conversations-to-zendesk-chat-classic.md)
- [Calendly](/product-docs/chatbots/advanced-functionality/channel-specific-functionality/calendly.md)
---
# Source: https://docs.deepconverse.com/product-docs/conversational-flow-builder/conversation-blocks/salesforce-blocks/agent-availability-block.md
# Agent Availability Block
{% hint style="info" %}
The Salesforce connector is available is part of the **Enterprise** plan
{% endhint %}
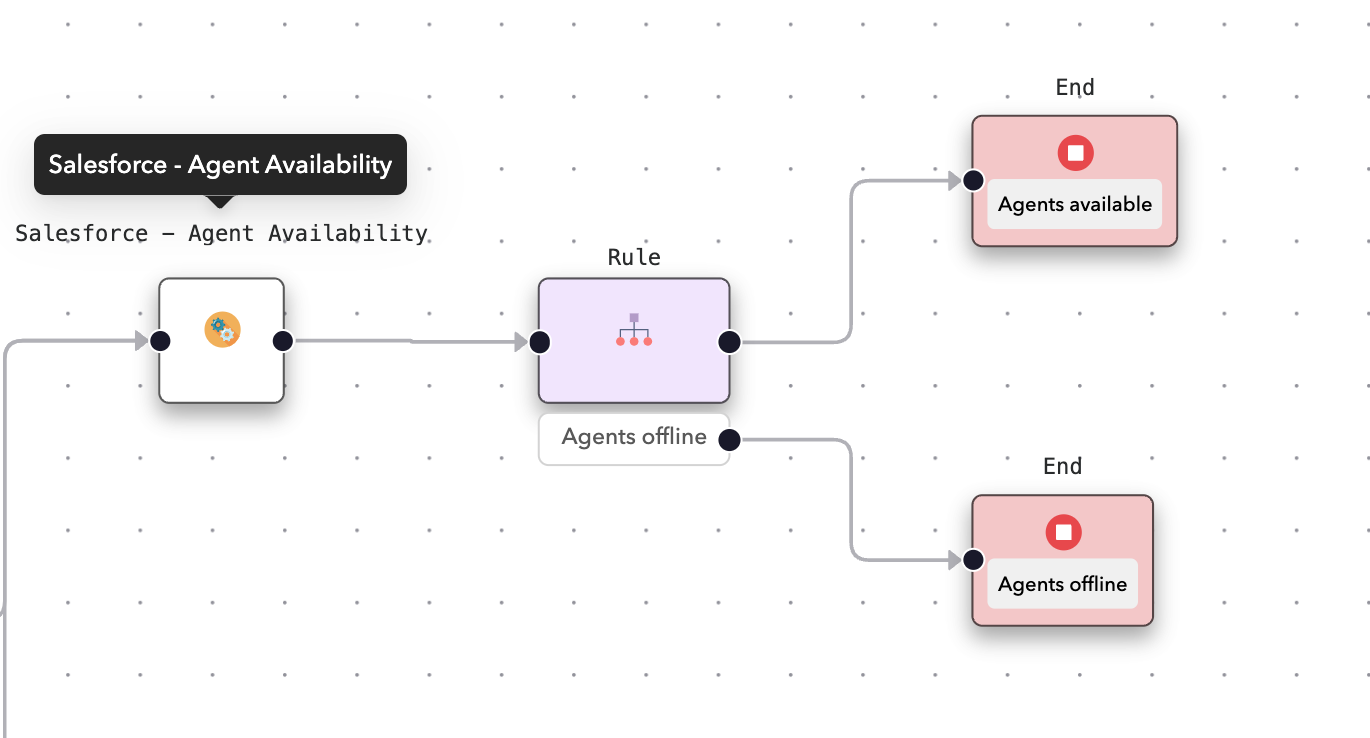
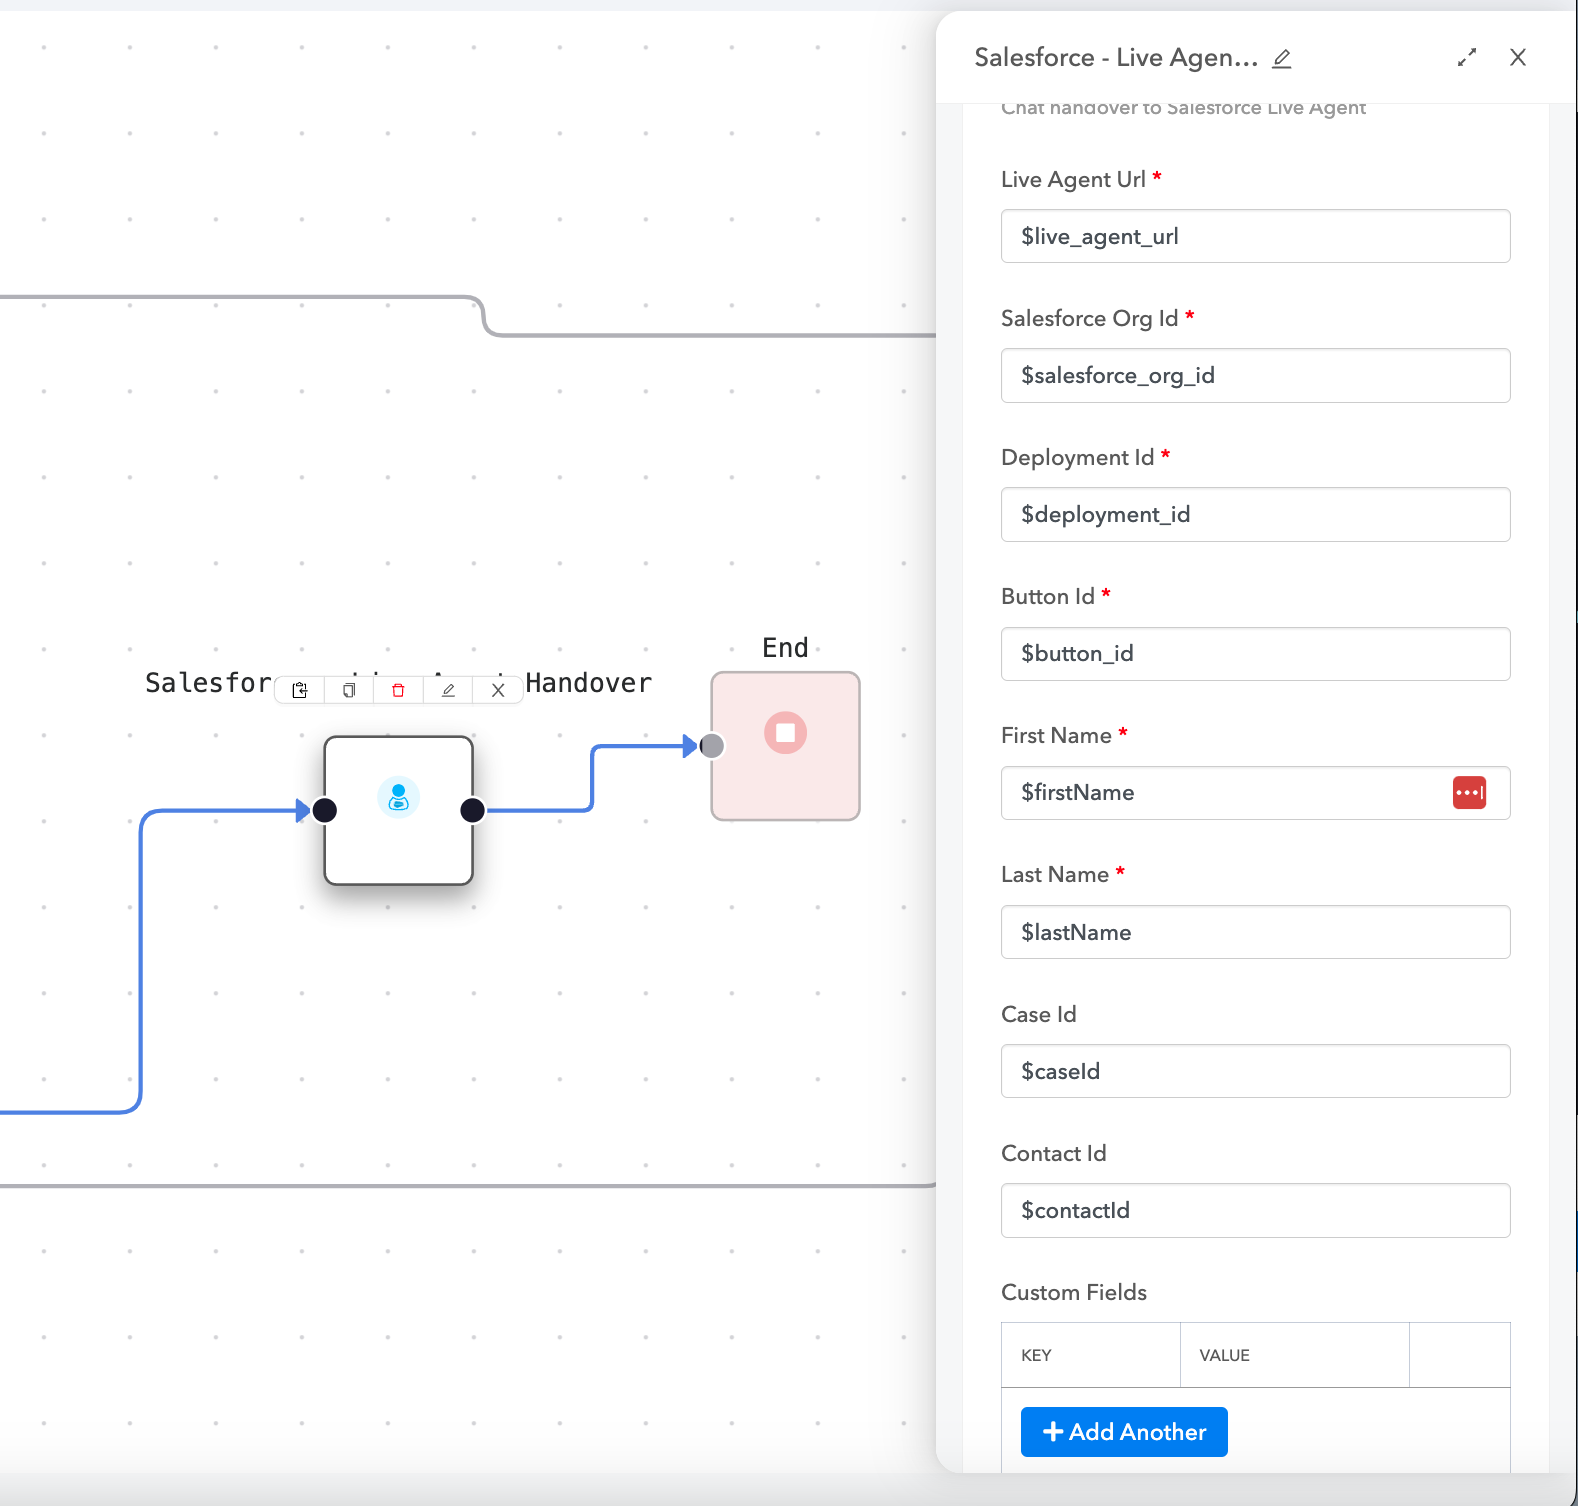
You can make use of the **Salesforce - Agent Availability** block to check if the agents are available to do live chat in a specific group.
### Setup
You will need to define the following parameters:
1. Live Agent Url
2. Salesforce Organization Id
3. Deployment Id
4. Button Id
Once you define the node, the node will check for availability of agents and then set the parameter
```
availability = available (if agents are available)
availability = no (if no agents are available)
```
You can then use the parameter in subsequent rules to route the conversation accordingly.
---
# Source: https://docs.deepconverse.com/product-docs/chatbots/deploy/android-sdk.md
# Android SDK
DeepConverse provides an easy to use SDK for integrating the chatbot into your app. To setup the SDK follow the steps below.
### Installation
**Step 1.** Add it in your root build.gradle at the end of repositories:
```css
allprojects {
repositories {
...
maven { url 'https://jitpack.io' }
}
}
```
**Step 2.** Add the dependency
```css
dependencies {
implementation 'com.github.converselabs:android-sdk:1.0.6'
}
```
### Setup
Here is a sample ViewController showing how you can include the SDK and load the bot on the click action of a button. You can also pass in metadata to the chatbot.
You will require ***DOMAIN*** and ***BOT\_NAME*** which can be found from the dashboard.
```
package com.sample.webviewapp;
import android.os.Bundle;
import android.view.View;
import android.widget.Button;
import android.widget.LinearLayout;
import androidx.appcompat.app.AppCompatActivity;
import com.deepconverse.android_sdk.DeepConverseSDK;
import com.deepconverse.webviewapp.R;
import java.util.HashMap;
import java.util.Map;
public class MainActivity extends AppCompatActivity implements DeepConverseSDK.WebViewCallback {
private Button openWebViewButton;
private LinearLayout webUrlContainer;
private DeepConverseSDK deepConverseSDK;
@Override
protected void onCreate(Bundle savedInstanceState) {
super.onCreate(savedInstanceState);
setContentView(R.layout.activity_main);
openWebViewButton = findViewById(R.id.openWebViewButton);
webUrlContainer = findViewById(R.id.webUrlContainer);
openWebViewButton.setOnClickListener(new View.OnClickListener() {
@Override
public void onClick(View v) {
if (deepConverseSDK != null) {
// Remove the existing WebUrlView if present
webUrlContainer.removeView(deepConverseSDK);
deepConverseSDK.destroyView();
}
// Create a new instance of WebUrlView
Map metadata = new HashMap<>();
metadata.put("draft", "true");
deepConverseSDK = new DeepConverseSDK(MainActivity.this, DOMAIN,
BOT_NAME, metadata);
deepConverseSDK.setLayoutParams(new LinearLayout.LayoutParams(
LinearLayout.LayoutParams.MATCH_PARENT,
LinearLayout.LayoutParams.MATCH_PARENT));
deepConverseSDK.setWebViewCallback(MainActivity.this);
deepConverseSDK.load();
webUrlContainer.addView(deepConverseSDK);
// Show the webUrlContainer and trigger a layout pass
webUrlContainer.setVisibility(View.VISIBLE);
webUrlContainer.requestLayout();
}
});
}
@Override
public void onViewClosed() {
// Remove the WebUrlView from the container
if (deepConverseSDK != null) {
webUrlContainer.removeView(deepConverseSDK);
deepConverseSDK.destroyView();
deepConverseSDK = null;
webUrlContainer.setVisibility(View.GONE);
}
}
}
```
#### Android Releases
---
# Source: https://docs.deepconverse.com/product-docs/chatbots/advanced-functionality/announcements.md
# Announcements
Announcement feature is used to display a message on top of the chabots for any important message to be displayed to the user or for promoting any seasonal sales or offers the company has.
### Enabling the Announcement Feature
To add the Announcement feature, open the chatbot for which you want to add the Announcement and click on settings tab, click on Announcement tab which should look like this 
Click on **Add Announcement** and it opens a tab where you need to add the title and description of the announcement which should look like this.

Make sure that the **Start Date** and **End Date** are entered appropriately matching the time when you want the announcement to be displayed on the chatbot(s) along with the description and title for the announcement you create and click on submit which creates an announcement which can be used on the chatbots. \
\
**Note**: When you click on the pencil Icon to edit the Announcement and if you made changes to any announcement, the toggle bar for Active goes inactive, make sure that you change it back to active after if any changes are made to an existing announcement. \
\
Once the above steps are performed, you can click on test on the top of the chatbot page to test the chatbot created for the announcement feature added and this is how it should look \
\
\
---
# Source: https://docs.deepconverse.com/product-docs/conversational-flow-builder/assign-parameters-in-conversations.md
# Assign Parameters in Conversations
The chatbot conversation can remember certain parameters that are set in the conversation. These can be set at various points to help make decisions at future points in the conversation. A classic example is setting parameter based on users selection.
For ex. if a user is asked a question "Please select the reason for contacting us today" and presented with options "Sales" and "Support", we can store their selection in a parameter for use in the rest of the conversation.
### How to set a parameter?
* Open the conversation flow and navigate to the node where you would like to set a parameter.
* Click on the node and open the right panel
* In the right panel scroll down to **Additional Settings** and click **Edit** next to **Assign Parameters**
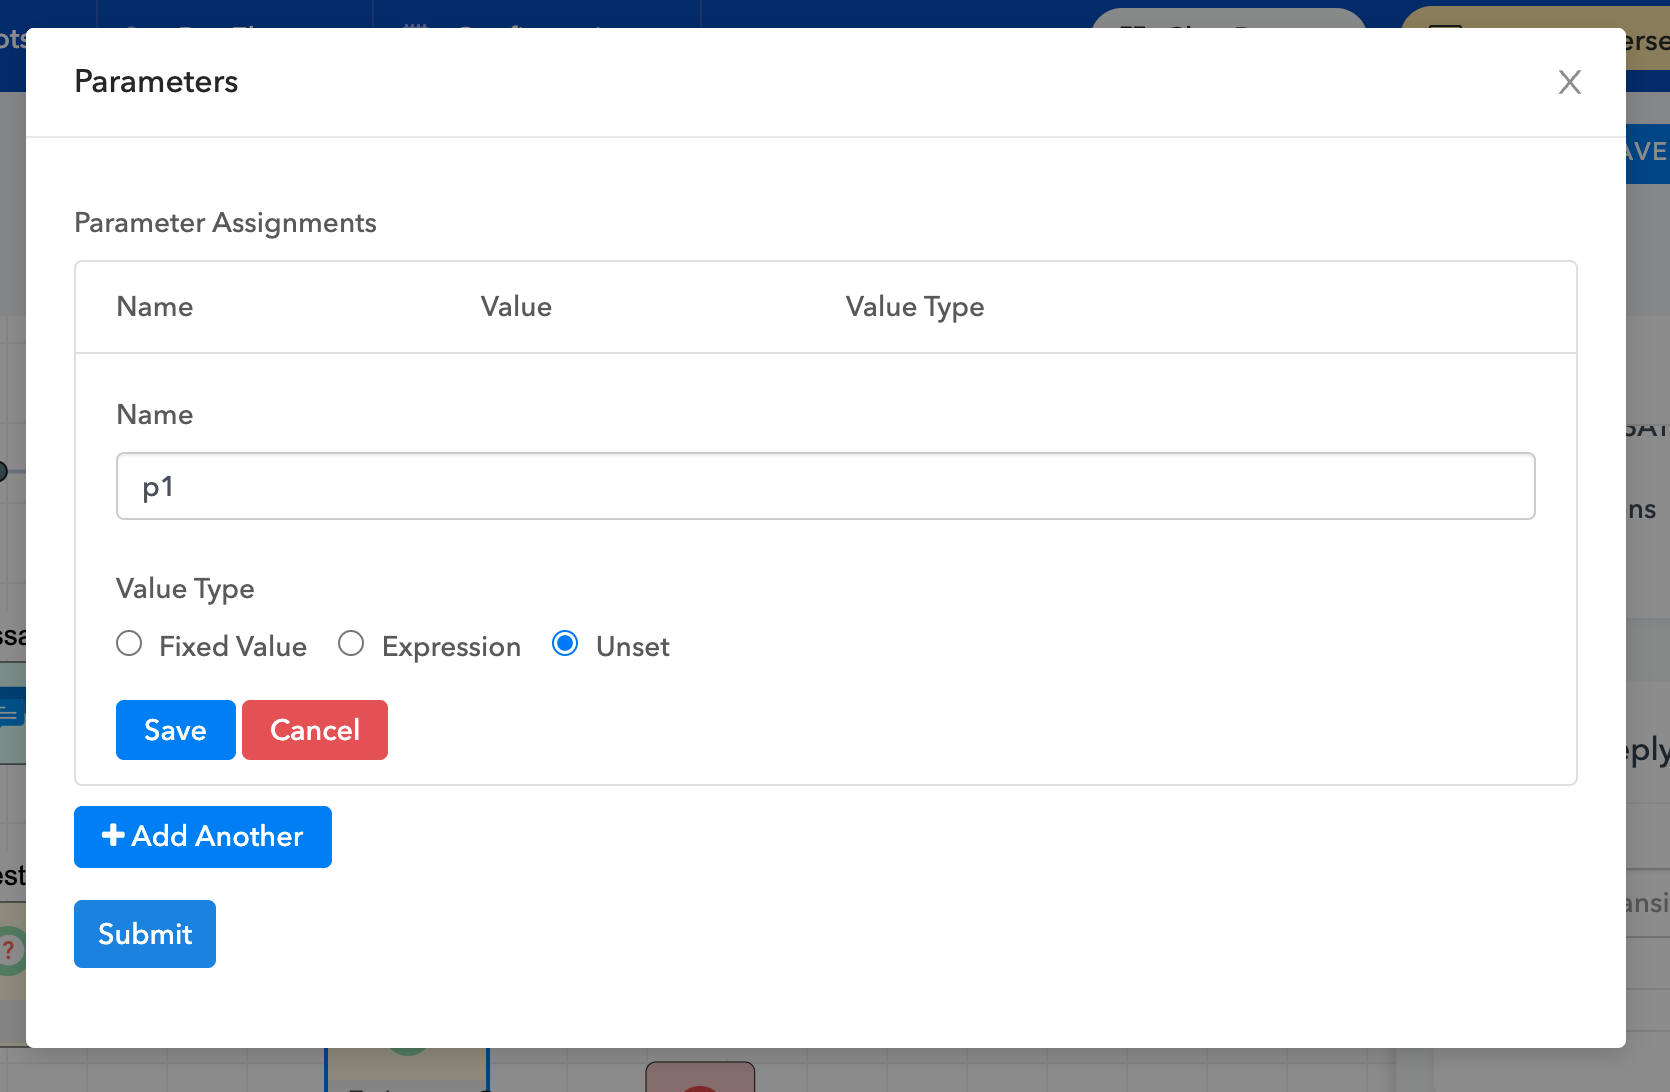
* In the popup you will be able to add parameters and save them at this node.
* If a captured or declared parameter holds sensitive data such as an API Key, email etc. you should declare it under **Sensitive Parameters** to ensure it is scrubbed from the transcript.
* Optionally the parameter can be declared as Encrypted
***Note**: Parameters are assigned after the node has been evaluated and are available for use from the subsequent steps*
### Types of Parameter Values
#### Fixed Values
Fixed parameter values can be used to set parameters for routing the conversation or using some conversation state available from the platform.
| **Parameter** | **Description** |
| -------------------------- | ------------------------------------------------------------------------------------------------------------------------------------------------ |
| $sys\_transcript | Allows you to store the transcript of the conversation till this point into the parameter |
| $sys\_outgoing\_transition | Allows you to capture the user selection in case of a Question node into a parameter |
| $a.b.c | Allows copying the nested parameter value from the conversation context. This is useful for api calls where the response might be a nested JSON. |
| \ | Saves the text value in the parameter and is available in the conversation till unset |
#### Expression
Expressions allow to transform data and store the result in a parameter. The expressions are useful if you are looking to do operations such as math operations, string manipulation and certain built in functions that are provided through the platform.
**Operators**
Here is a list of operators that you use with the conversation parameters
| `+` |
|
| ---- | -------------------------------------------------------------------------------------------------------------------------------------------------------------------------------------- |
| `-` | subtract two things `x - y` `100 - 1` -> `99` |
| `/` | divide one thing by another `x / y` `100/10` -> `10` |
| `*` | multiple one thing by another `x * y` `10 * 10` -> `100` |
| `**` | 'to the power of' `x**y` `2 ** 10` -> `1024` |
| `%` | modulus. (remainder) `x % y` `15 % 4` -> `3` |
| `==` | equals `x == y` `15 == 4` -> `False` |
| `<` | Less than. `x < y` `1 < 4` -> `True` |
| `>` | Greater than. `x > y` `1 > 4` -> `False` |
| `<=` | Less than or Equal to. `x <= y` `1 < 4` -> `True` |
| `>=` | Greater or Equal to `x >= 21` `1 >= 4` -> `False` |
| `in` | is something contained within something else. `"spam" in "my breakfast"` -> `False` |
\
**Utility Functions**
In addition to the operators you can also use certain prebuilt utility functions.
| DOUBLE | Convert parameter to a floating point type |
| ---------------------- | ---------------------------------------------------------------------------------------------------------------------------------------------------------- |
| MD5 | Generate the md5 hash of the parameter |
| INT | Convert parameter to a integer type |
| STR | Convert parameter to string type |
| SORT\_LIST | Sort the list of values in ascending order |
| REVERSE\_LIST | Reverse the list of values |
| APPEND\_LIST | Sort the list of values |
| SUBSTITUTE | Substitute part of a string ex. *SUBSTITUTE(param1, '-', '\_')* |
| FORMAT\_DATE |
example: SPLIT\_PART('Dhruv Arya', ' ', 1) will be equal to "Arya"
|
| CURRENT\_DATE\_BETWEEN | CURRENT\_DATE\_BETWEEN(start\_date\_or\_timestamp, end\_date\_or\_timestamp) |
### How to unset a parameter value?
You can unset a parameter by choosing the **Unset** option and giving the parameter name or path you would like to unset.
You can use path notation as well ex. `a.b.c`
### How to use parameters in messages?
Parameters can be used in our templating language by referring to them as follows:
```
Hello {{ firstName }}
```
### Action Parameters
Action parameters are special purpose parameters that allow you to define actions to take during the flow execution. These are fixed value parameters with value serving as a property of the parameter.
You can set this like the image below:

| **Parameter** | **Value Type** | **Description** |
| ----------------- | ------------------------------------------------------------------ | ------------------------------------------ |
| \_\_action\_delay | Number of Seconds to delay, maximum delay of 15 seconds is allowed | Allows you to delay going to the next node |
---
# Source: https://docs.deepconverse.com/product-docs/chatbots/basics.md
# Basics
- [Building chatbot intents](/product-docs/chatbots/basics/building-chatbot-intents.md)
- [Intent action responses](/product-docs/chatbots/basics/intent-action-responses.md)
- [Chatbot Persistence mode](/product-docs/chatbots/basics/chatbot-persistence-mode.md)
- [Publishing changes](/product-docs/chatbots/basics/publishing-changes.md)
---
# Source: https://docs.deepconverse.com/product-docs/chatbots/branding.md
# Branding
Chatbots Themes can be customized to reflect your brand closely and provide a more personalized conversational experience to your customers.
### Prerequisites
* Navigate to the [Chatbot App](https://admin.deepconverse.com/dashboard/chatbots/home) in the admin dashboard
* Under the ***Bots*** section select the chatbot for which you would like to customize the theme.
* Select the ***Theme*** tab to customize the theme for the bot. You will be able to preview the theme before saving it.
In the theme tab you will be able to select the following options:
---
# Source: https://docs.deepconverse.com/product-docs/chatbots/basics/building-chatbot-intents.md
# Building chatbot intents
You can get started with building conversational responses with intents using the low code conversational flows.
### Adding Intents
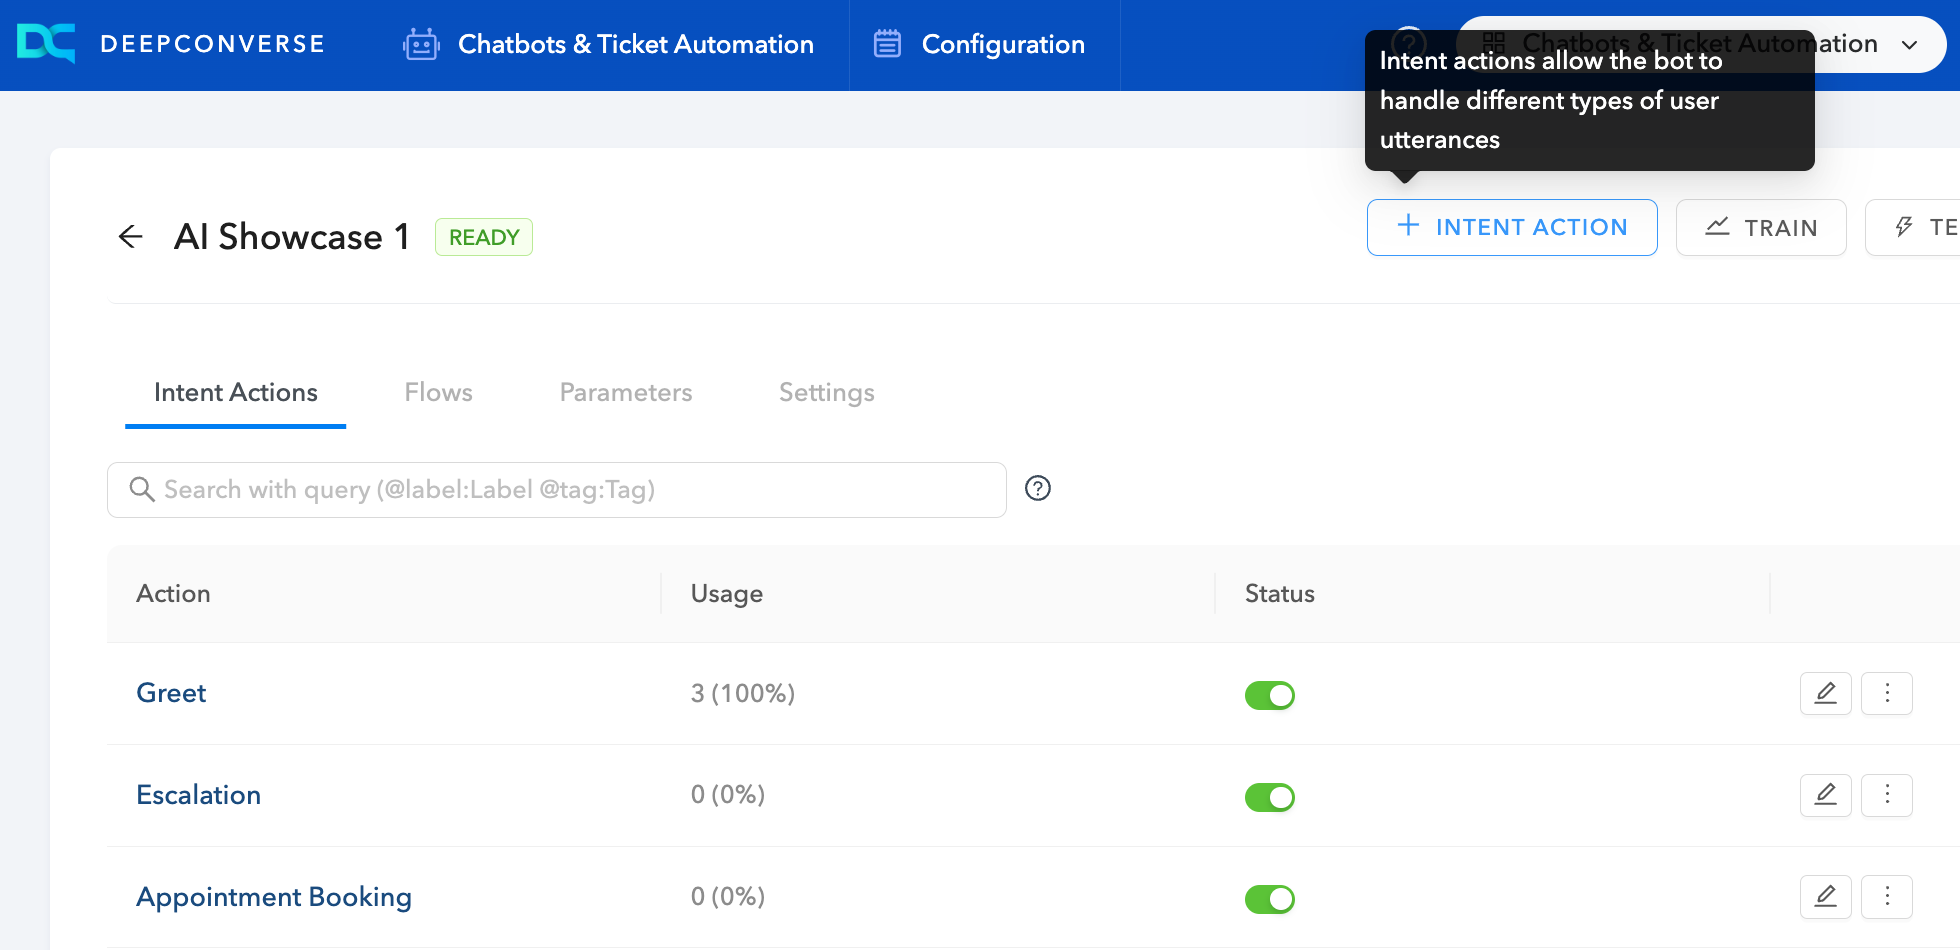
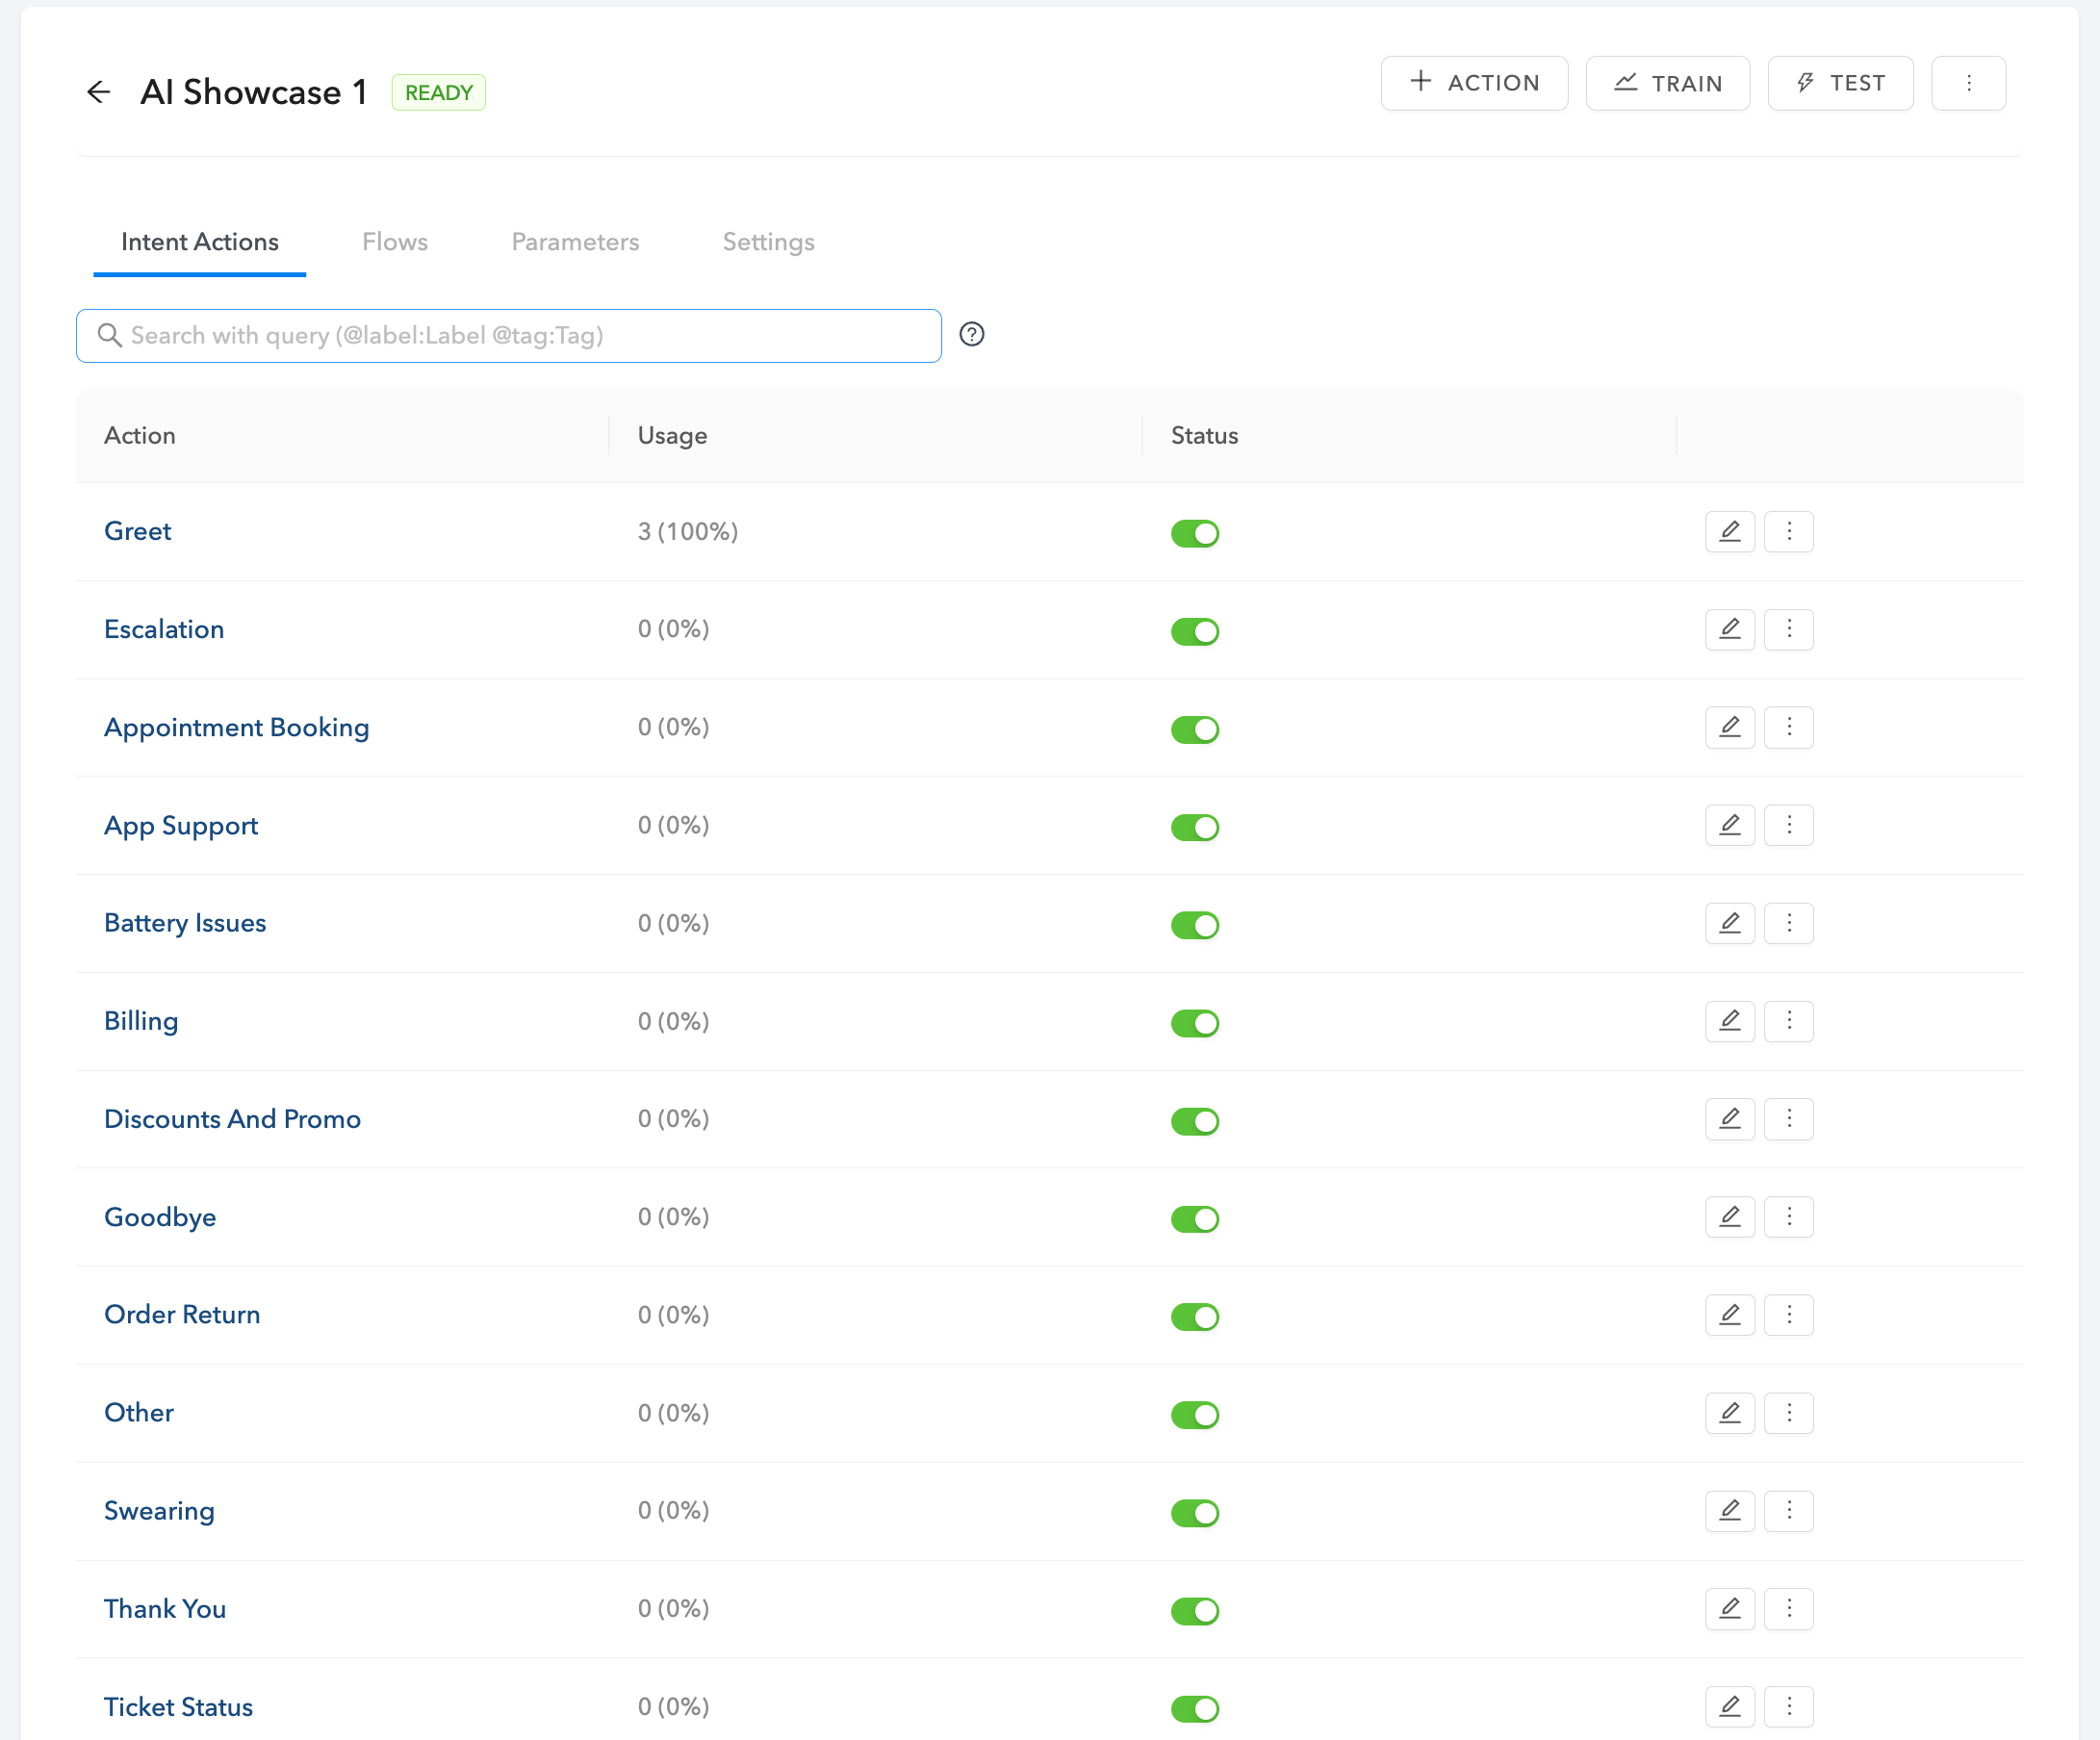
Once you are in the chatbot page you will be taken to the list of Intents that are defined for your chatbot. Intents serve as the brains of the chatbot to understand the questions and messages from customers are respond accordingly.
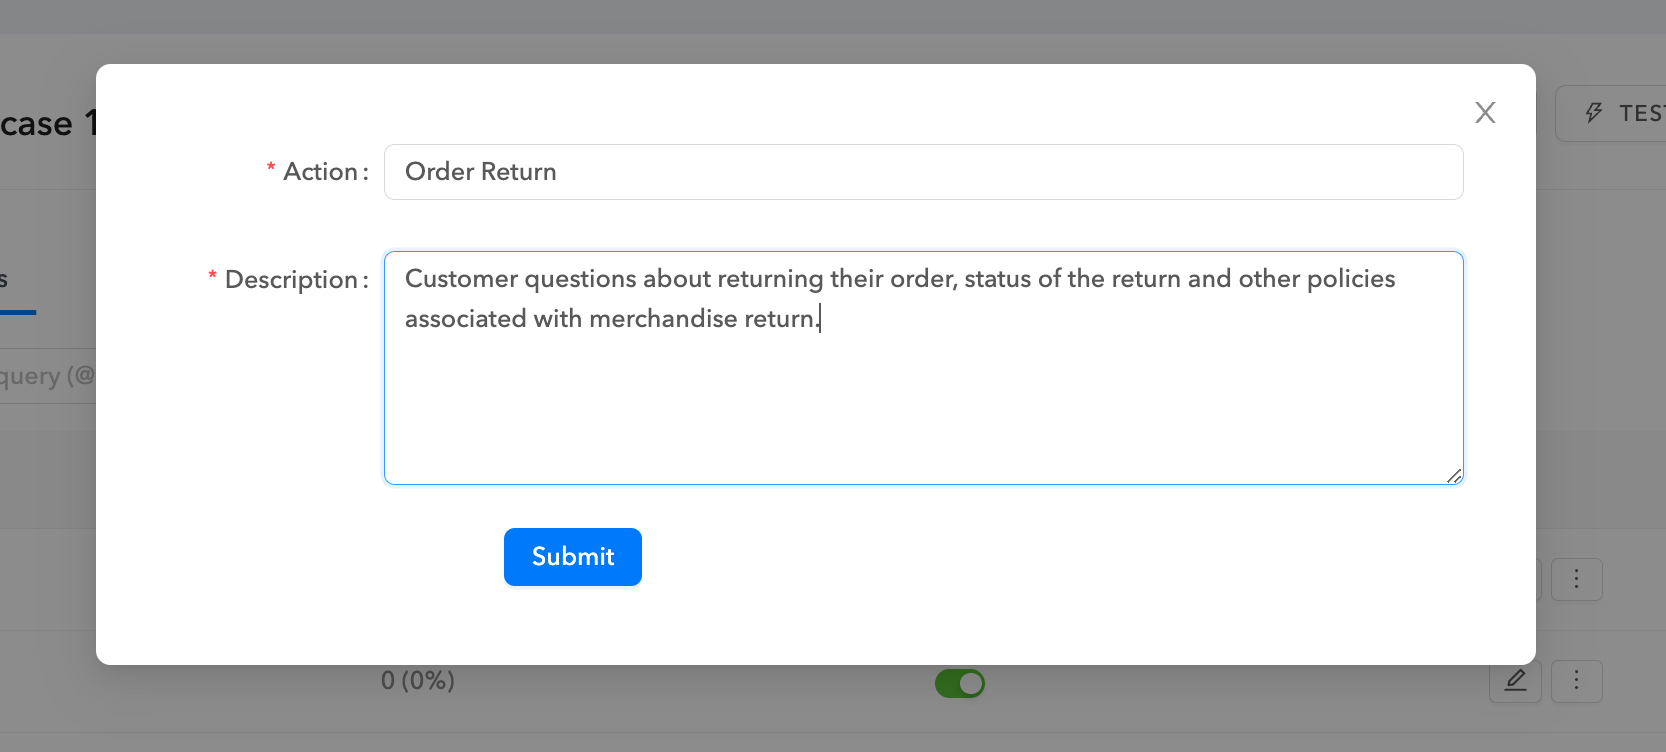
To add an intent click on **+Intent Actions** on the top.
You will be prompted with a dialog to give it a meaningful name and give a description for the intent.
{% hint style="info" %}
The Intent Action **name** and **description** should be meaningful as they are used by the chatbot AI engine to understand the messages from the customers.
{% endhint %}
### Adding Sentences for Intents
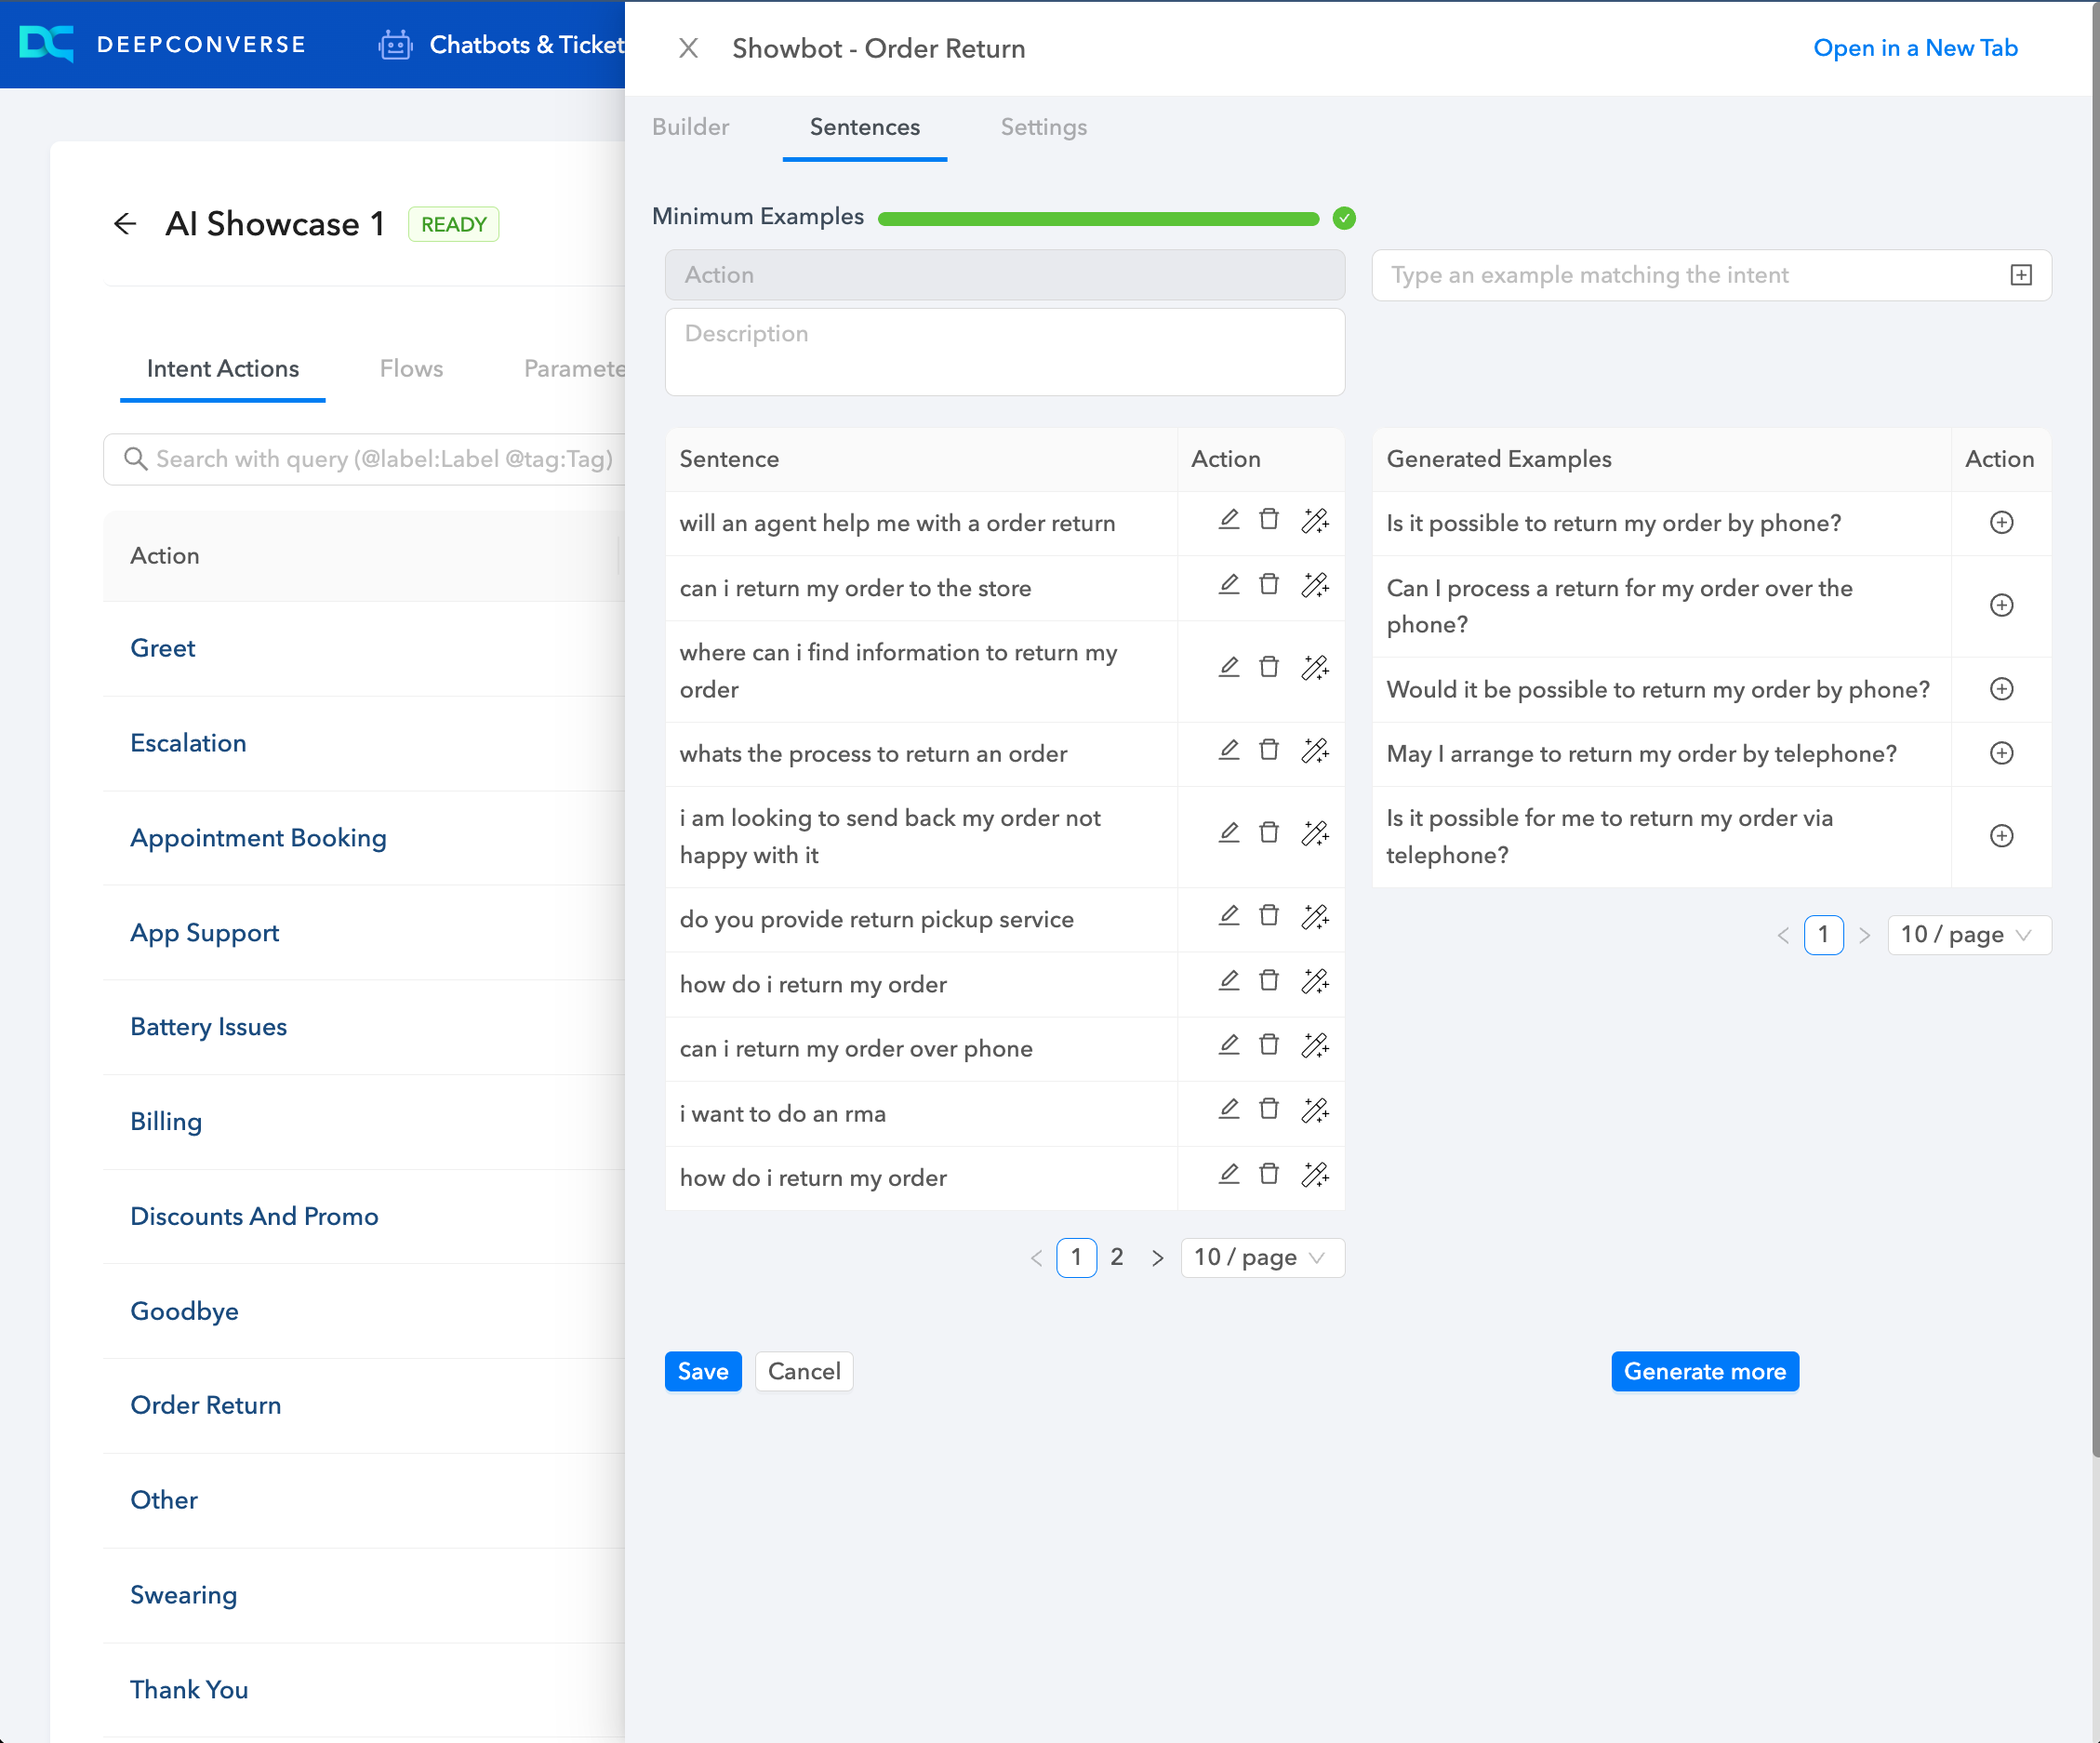
To help the chatbot learn on how your customers will reach this intent action you can provide it sentences. This helps the chatbot to understand the customer questions better.
You should add atleast five sentences/phrases to help the AI engine understand the intent. The sentences should be distinct and represent how customers could ask their questions.
To view the sentences page click on the intent and select the **Sentences** tab.
As you can see in the screenshot below you can see the sentences currently added and a list of AI generated suggestions that can be added. You can also use the *magic wand* icon next to a pre-existing sentence to generate variations of it.
### Activate and Deactivate Intents
You can change the status of intents by toggling the Status field. This will result in the chatbot not executing the response and falling back to the default workflow.
---
# Source: https://docs.deepconverse.com/product-docs/guides/building-guides.md
# Building Guides
Guides can be built in the DeepConverse dashboard similar to how a step by step decision tree would be built. Guides over significant advantages over decision trees.
The allow use of AI and ability to have business rules, API callouts and decision making functionality to lead users to a resolution.
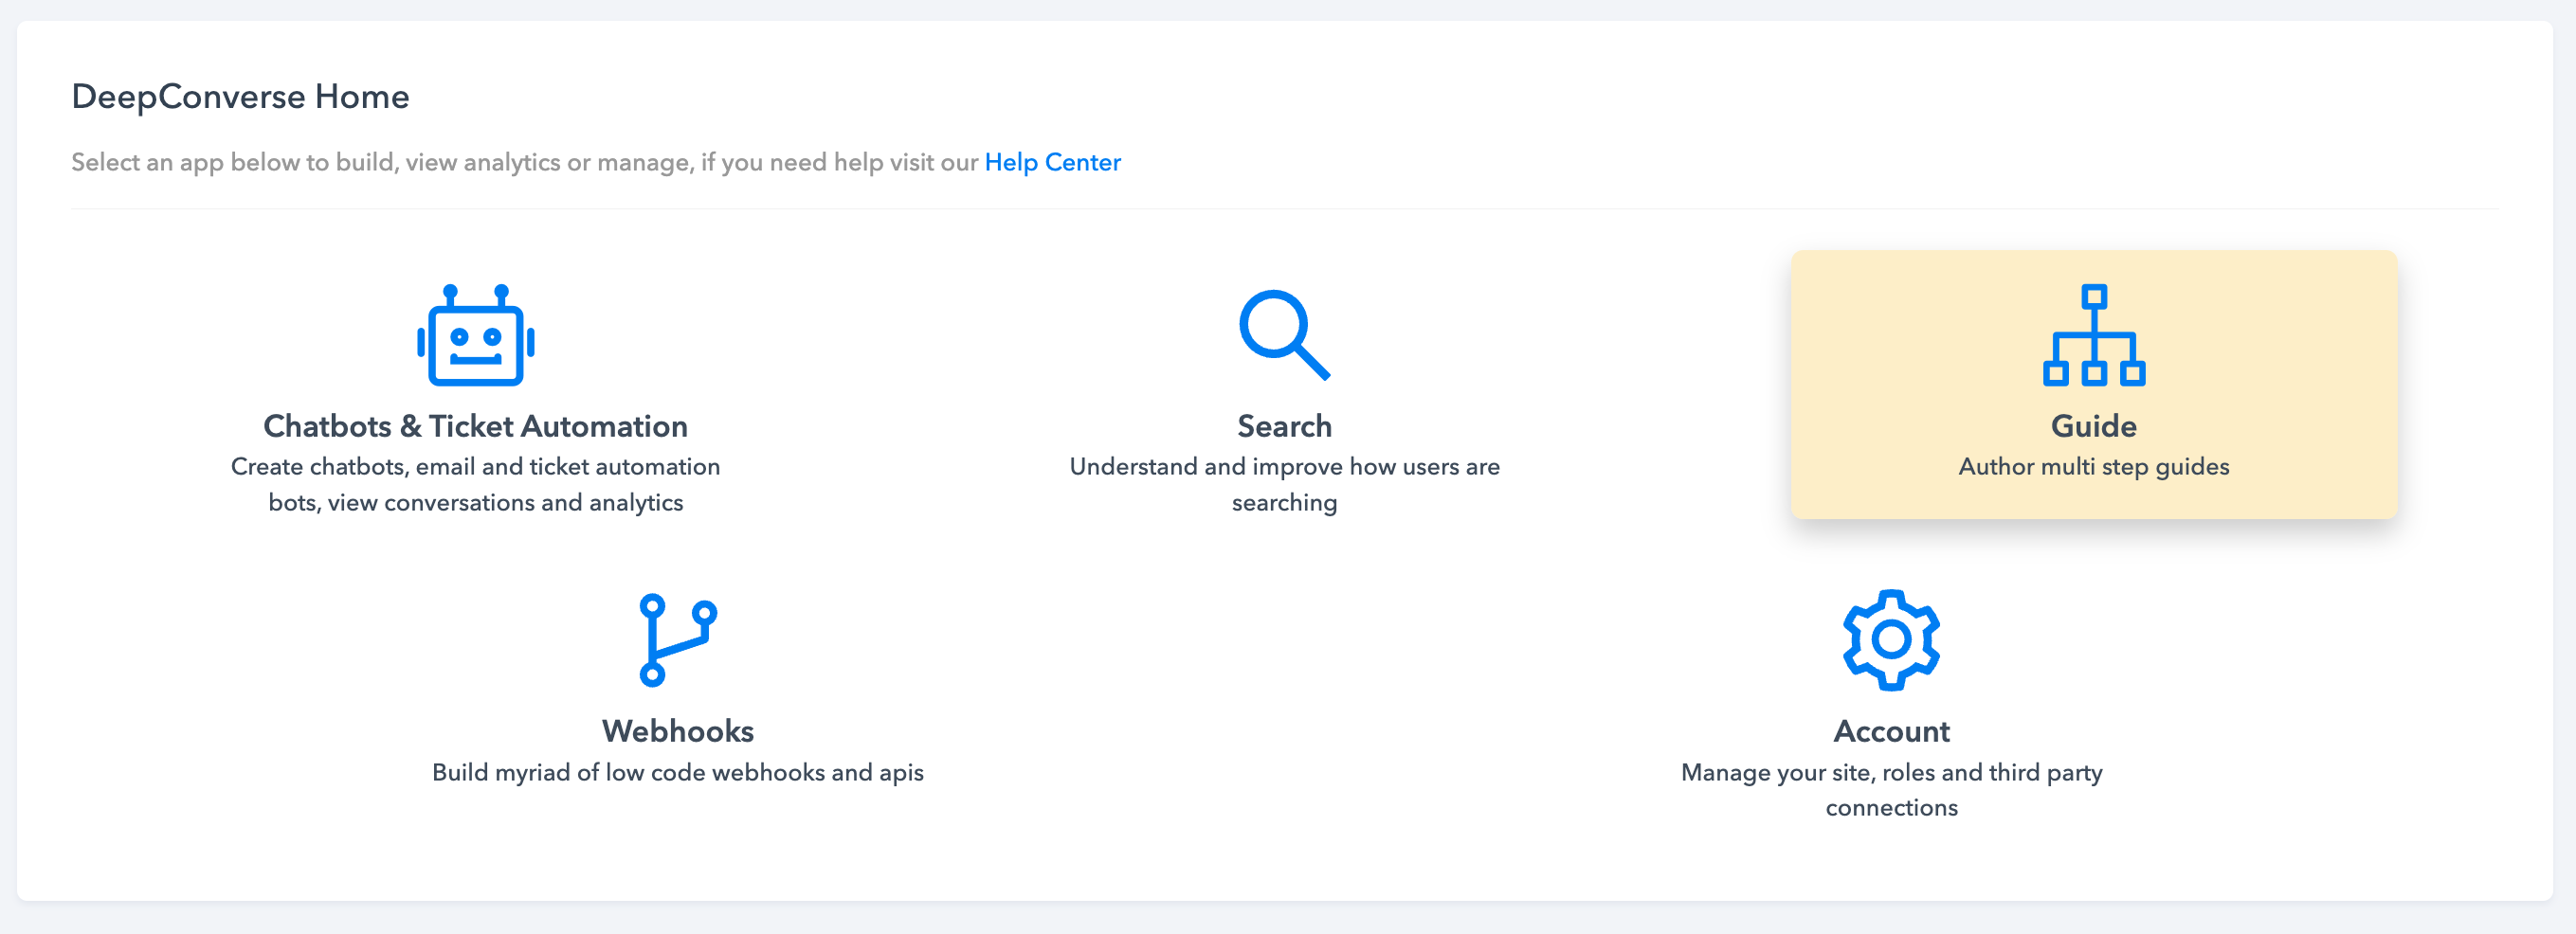
To build a Guide flow navigate to **Guides** app on the dashboard
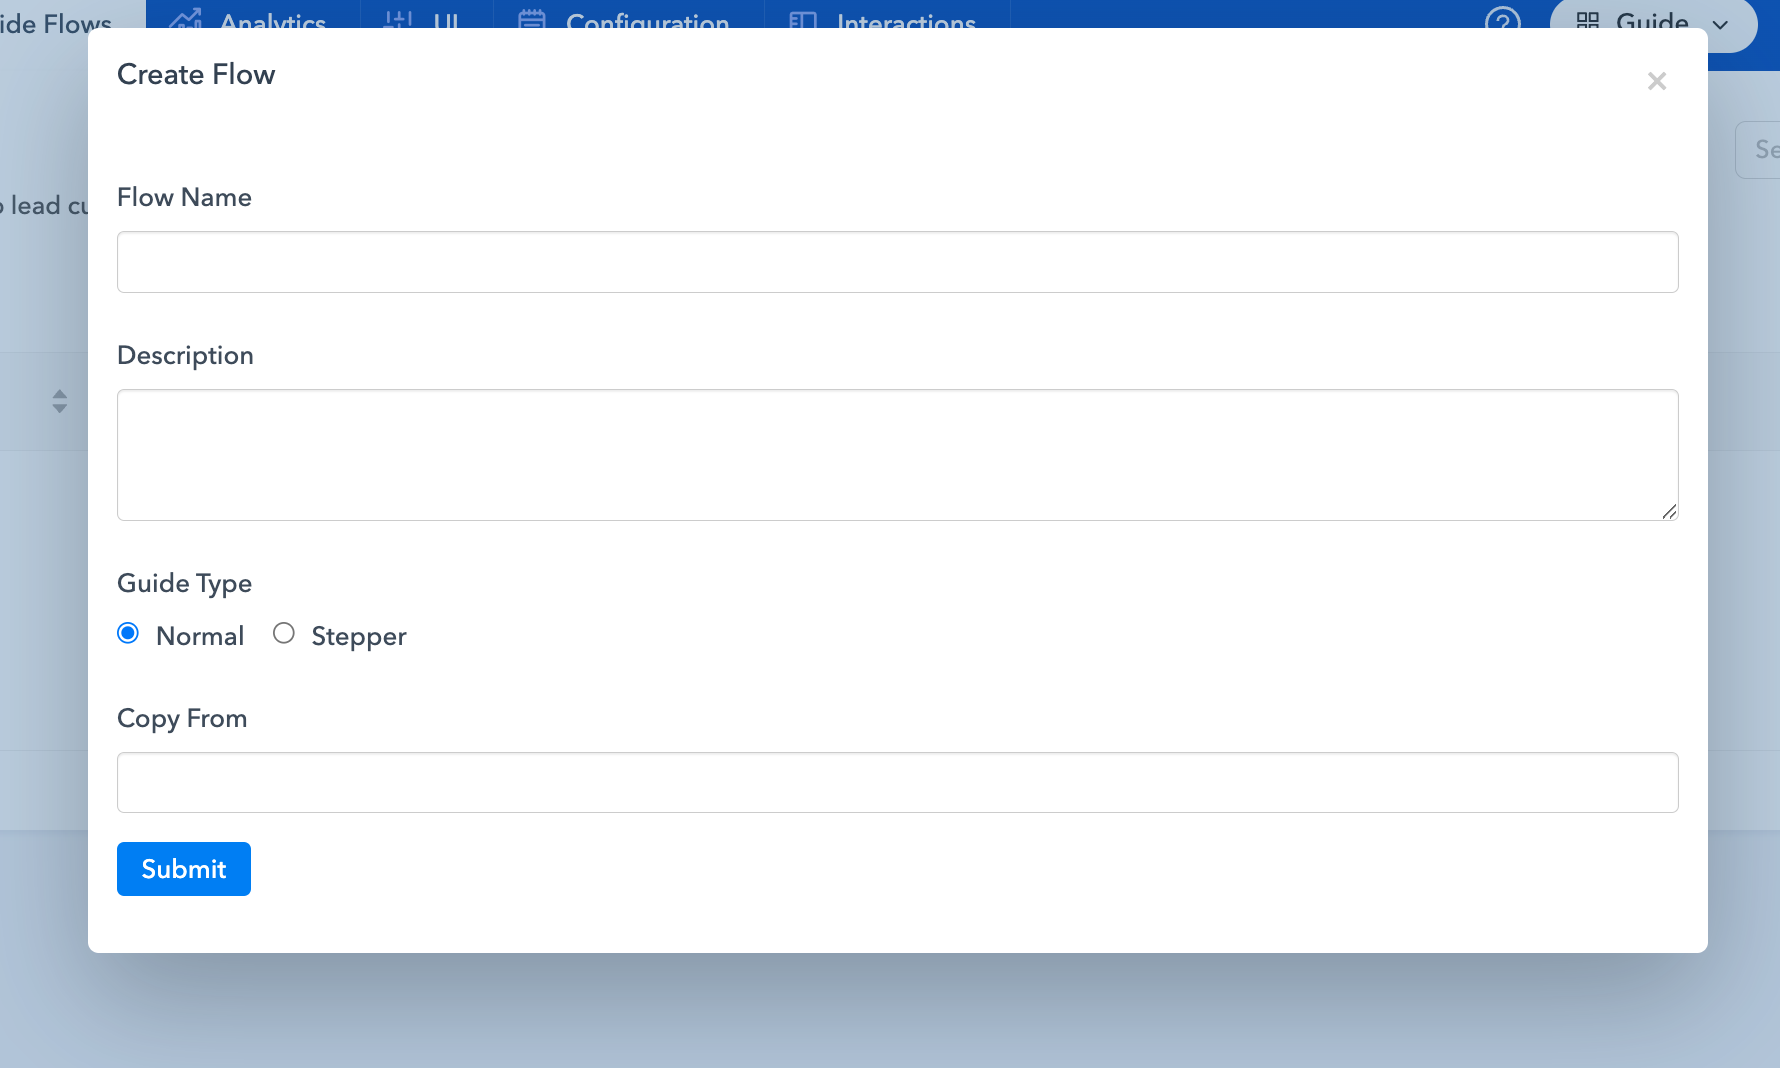
From here you can now click on **Create** to give the Guide a name and meaningful description. The name and description should as descriptive as possible for the AI to be able to show guides in search or when embedded in the chatbot.
Guides comprise of a collection of **Guide Step** blocks. Each of the block has the content and question to ask the customer along with possible answers that the customer can select.
You can now drag the nodes and build a guide flow.
Here is more information on how to use guides.
{% content-ref url="../conversational-flow-builder/conversation-blocks/guide-blocks/guide-step-guide-flow" %}
[guide-step-guide-flow](https://docs.deepconverse.com/product-docs/conversational-flow-builder/conversation-blocks/guide-blocks/guide-step-guide-flow)
{% endcontent-ref %}
{% content-ref url="../conversational-flow-builder/conversation-blocks/guide-blocks/guide-chatbot" %}
[guide-chatbot](https://docs.deepconverse.com/product-docs/conversational-flow-builder/conversation-blocks/guide-blocks/guide-chatbot)
{% endcontent-ref %}
{% content-ref url="embedding-guides-in-chatbots" %}
[embedding-guides-in-chatbots](https://docs.deepconverse.com/product-docs/guides/embedding-guides-in-chatbots)
{% endcontent-ref %}
---
# Source: https://docs.deepconverse.com/product-docs/chatbots/advanced-functionality/channel-specific-functionality/calendly.md
# Calendly
DeepConverse now supports integrating with the calendly app with our chatbots which enables the user to be able to schedule an event or a meeting right from the chatbot without having to go to their calendly account. \
\
\
**Here's how to integrate Calendly with DeepConverse chatbot:** \
\
1\) In oder to Integrate Calendly with DeepConverse Chatbot, once has to have an account on calendly. If you do not have one, please create an account. \
\
2\) Once the account is created on Calendly, the home page looks something like this 
3\) Click on the gear icon next to the "New Event Type" and copy the meeting URL for your profile where the scheduled events can be tracked and managed. \
\
4\) On the flow builder, select calendly add-on and paste the calendly URL which you copied in the above step and it should look like this:

5\) Add a rule with two options where one is for a successful event generation and the other one is for an unsuccessful one, looking something like this: \
\

6\) Click on the edit icon on one of the events created, to assign conditions for the above to trigger based on a successful or failed event creation. \
\

Here, we have added a condition where we took **calendlyPayload** as a field to check for the event generation information and if the same is empty, it means an event is not created and if it's not empty that means an event is generated and the payload has the information related to the event. \
\
\
7\) Once the above steps are performed, the chatbot successfully integrated with **Calendly** will open up a calendar within the chatbot for the user to select a date and time and then enter the basic details like the username and email id so that the event invite will be forwarded to the same. \
\
\
Here's an example of a flow which was created which depicts the details about the calendly integration with the chatbot.

---
# Source: https://docs.deepconverse.com/product-docs/chatbots/advanced-functionality/channel-specific-functionality.md
# Channel Specific Functionality
- [Zendesk Sunshine Conversations](/product-docs/chatbots/advanced-functionality/channel-specific-functionality/zendesk-sunshine-conversations.md)
- [How to handle image and file uploads in Zendesk Sunshine Conversations?](/product-docs/chatbots/advanced-functionality/channel-specific-functionality/zendesk-sunshine-conversations/how-to-handle-image-and-file-uploads-in-zendesk-sunshine-conversations.md)
- [Zendesk Chat (Classic)](/product-docs/chatbots/advanced-functionality/channel-specific-functionality/zendesk-chat-classic.md)
- [How to handoff conversations to Zendesk Chat (Classic) ?](/product-docs/chatbots/advanced-functionality/channel-specific-functionality/zendesk-chat-classic/how-to-handoff-conversations-to-zendesk-chat-classic.md)
- [Calendly](/product-docs/chatbots/advanced-functionality/channel-specific-functionality/calendly.md)
---
# Source: https://docs.deepconverse.com/product-docs/analytics/chatbot-analytics.md
# Chatbot Analytics
The analytics page for a chatbot provides insights into how the chatbot is performing. It also includes details around the answers being used, resolutions, guides and feedback being given from customers. We walk through the different analytics sections.
{% tabs %}
{% tab title="Overview" %}
The overview tab gives a high level picture of your chatbot performance it includes the following metrics.
| Metric | Definition |
| ---------------------------- | ----------------------------------------------------------------------------------------------------------------------------------------------------------------------------------------------------------------------------------------------------------- |
| Sessions | Number of chat conversations that were started |
| Self Service Rate | (Number of conversations without agent handover / Total number of conversations) x 100 |
| Confirmed Resolutions | Number of conversations with confirmed helpful feedback and no handoff to agents |
| Informed | Number of conversations where an answer was presented to inform the customer |
| Agent Handovers | Number of conversations with request to speak with an agent or escalation |
| Time in widget | Time spent by the customer in chat (in seconds) |
| Conversation Count over Time |
|
### Chat Widget
| Metric | Definition |
| ----------------- | ------------------------------------------------------------------ |
| Locale Breakdown | Visualization showing the top locales |
| Device Breakdown | Visualization showing the devices used to interact with the widget |
| Browser Breakdown | Visualization showing the browser used to interact with the widget |
### Flows
Top flows being used in chat conversations
{% endtab %}
{% tab title="Answer Performance" %}
Answer performance tab looks at the various answers being provided and their feedback from customers.
| Metric | Definition |
| --------------------------------------------- | ----------------------------------------------------------------------------------------------------------------------------------------------------------------- |
| Sessions | Number of chat conversations that were started |
| Self Service Rate | (Number of deflected conversations / Total number of conversations) x 100 |
| Informed | Number of conversations where an answer was presented to inform the customer |
| Confirmed Resolution | Number of conversations with confirmed helpful feedback and no handoff to agents |
| Conversations leading to Confirmed Resolution | The visualization shows a waterfall of the number of conversations and how many were informed (shown an answer) and times people confirmed it helped. |
| Types of Answers Presented |
Breakdown of the answer presented - Link - Article - Guide - Flow
|
| Top Answers | This table provides a list of the Answer titles, url and number of times it is presented in a conversation and number of distinct times its used in conversations |
| Answer Feedback | This table provides a list of the answers and times customers said provided helpful (positive) and not helpful (negative) feedback. |
| Top Answers to review | Answers which customers have indicated are not helpful. |
| Top Links Clicked | URLs clicked by customers in answers and in the chatbot |
### Guides in Chat Conversations
If you are using Guides in the chatbot you will see the interactions feedback here.
| Metric | Definition |
| --------------------------- | ----------------------------------------------------------------------------------------------- |
| Guides used in Conversation | Shows the Guide names, url and the number of times it is used in conversations |
| Guide Feedback | Shows the number of times customers said Guide was helpful (positive) or not helpful (negative) |
| | |
| {% endtab %} | |
{% tab title="Customer Satisfaction" %}
If you are capturing feedback from customers interacting with the chatbot you can view it here.
| Metric | Definition |
| ------------------------ | -------------------------------------------------------------------------------------------------------------------------------------------------------------------------------------------- |
| Overall CSAT | Shows the overall CSAT for the chatbot on the scale of 1-5 |
| Number of Responses | Total number of csat responses |
| Rating Distribution | Breakdown of rating by number of conversations |
| CSAT Responses |
Responses given by the customers. Each response can include:
Rating (1-5) Feedback (Tags) Comments (Free text comment) Outcome (Issue resolved / Issue not resolved)
|
| Avg. CSAT over time | CSAT Rating over time |
| Outcome Distribution | Breakdown of the outcome |
| Positive Feedback Detail |
Breakdown of the positive feedback:
- Efficient Chat - Friendly - Helpful Resolutions - Knowledgeable Support - Understood by needs
|
| Negative Feedback Detail |
Breakdown of the positive feedback:
- Did not understand - Technical issues - Took too long - Unfriendly - Unhelpful answers
|
| {% endtab %} | |
| {% endtabs %} | |
### Filtering
In order to drill down further you have the following filters available:
| Filter | Definition |
| ------------------- | ------------------------------------------------------------------------------------------------------ |
| Date Range | Select the time period for which you would like to view the analytics. (Defaults to last week) |
| Conversation Action | See analytics based on the specific action in the analytics |
| Dimensions | You can track custom dimensions such as product, utm params etc. and filter analytics to drill deeper. |
### Timezone
You can change the timezone from the top right dropdown.
### Exports
You can use the right most **Export** button to export the current view as a PNG or PDF to share.
---
# Source: https://docs.deepconverse.com/product-docs/chatbots/basics/chatbot-persistence-mode.md
# Chatbot Persistence mode
Persistence mode allows you to choose between clearing your chat conversation or saving it upon the page reload. \
\
There are two options in Persistence Mode
### Persist
When you select this, upon the page reload, the conversation won't be cleared and will resume from where it was paused.
### Clear on Reload
Upon selecting this option, the chat conversation is cleared and once the page is reloaded, it starts the chatbot from the beginning of the flow.
### Clear on Tab Close
Upon selecting this option, the chat conversation is cleared and once the tab is closed, it starts the chatbot from the beginning of the flow.
### How to choose the mode?
You can access/enable Persistence mode, by going to settings of the chatbot and selecting "Features" on the left help panel. \
\
Click on the Widget setting and you can see a dropdown for persistence mode which allows you to choose between the options.
---
# Source: https://docs.deepconverse.com/product-docs/chatbots/deploy/chatbot-versioning.md
# Chatbot Versioning
Chatbots have two versions that are active at any point of time: **Published** and **Draft**
Versions can be differentiated based on the script being used to load the chatbot.
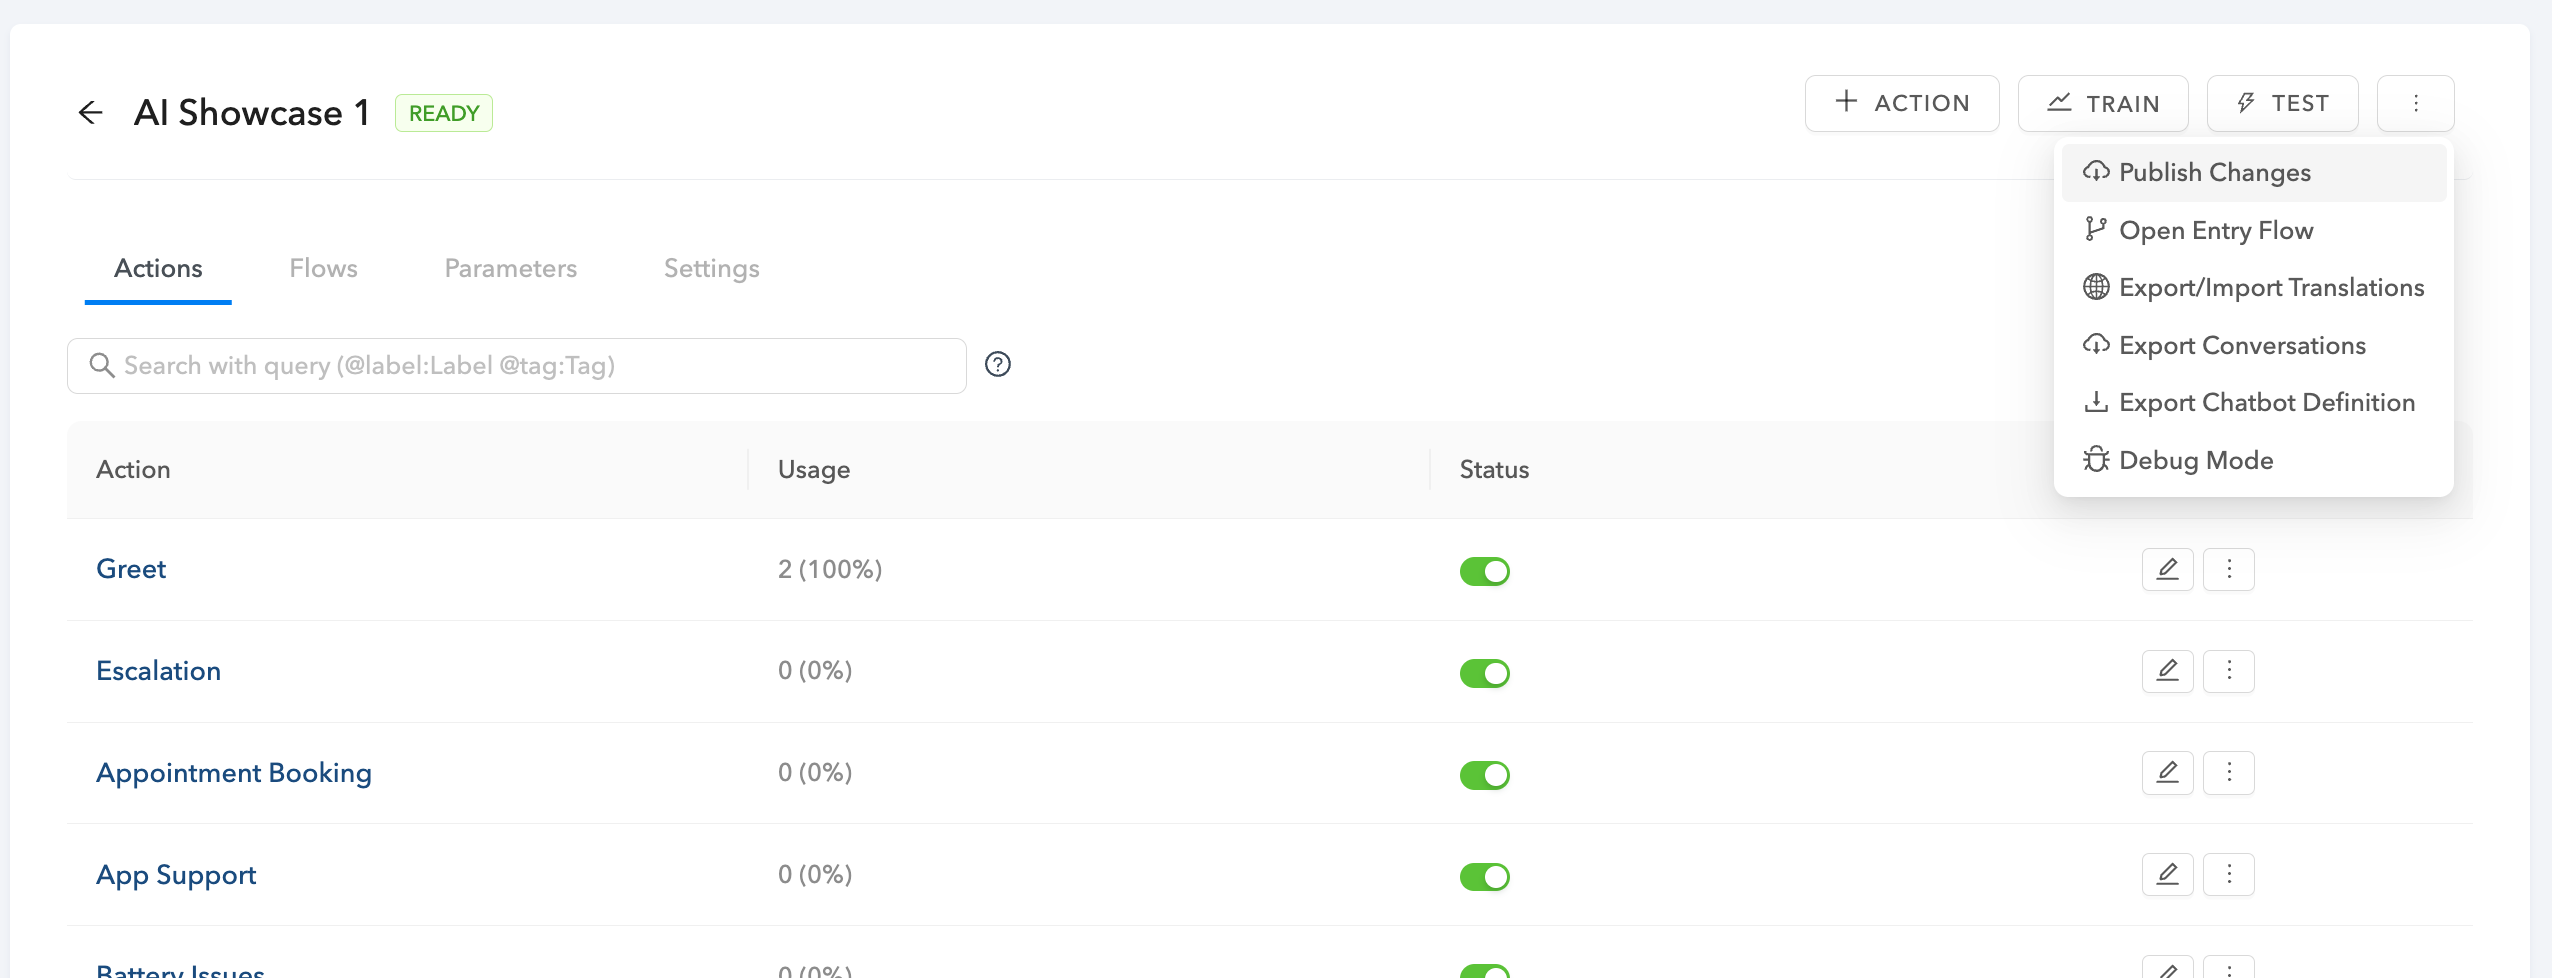
### How to Publish the chatbot?
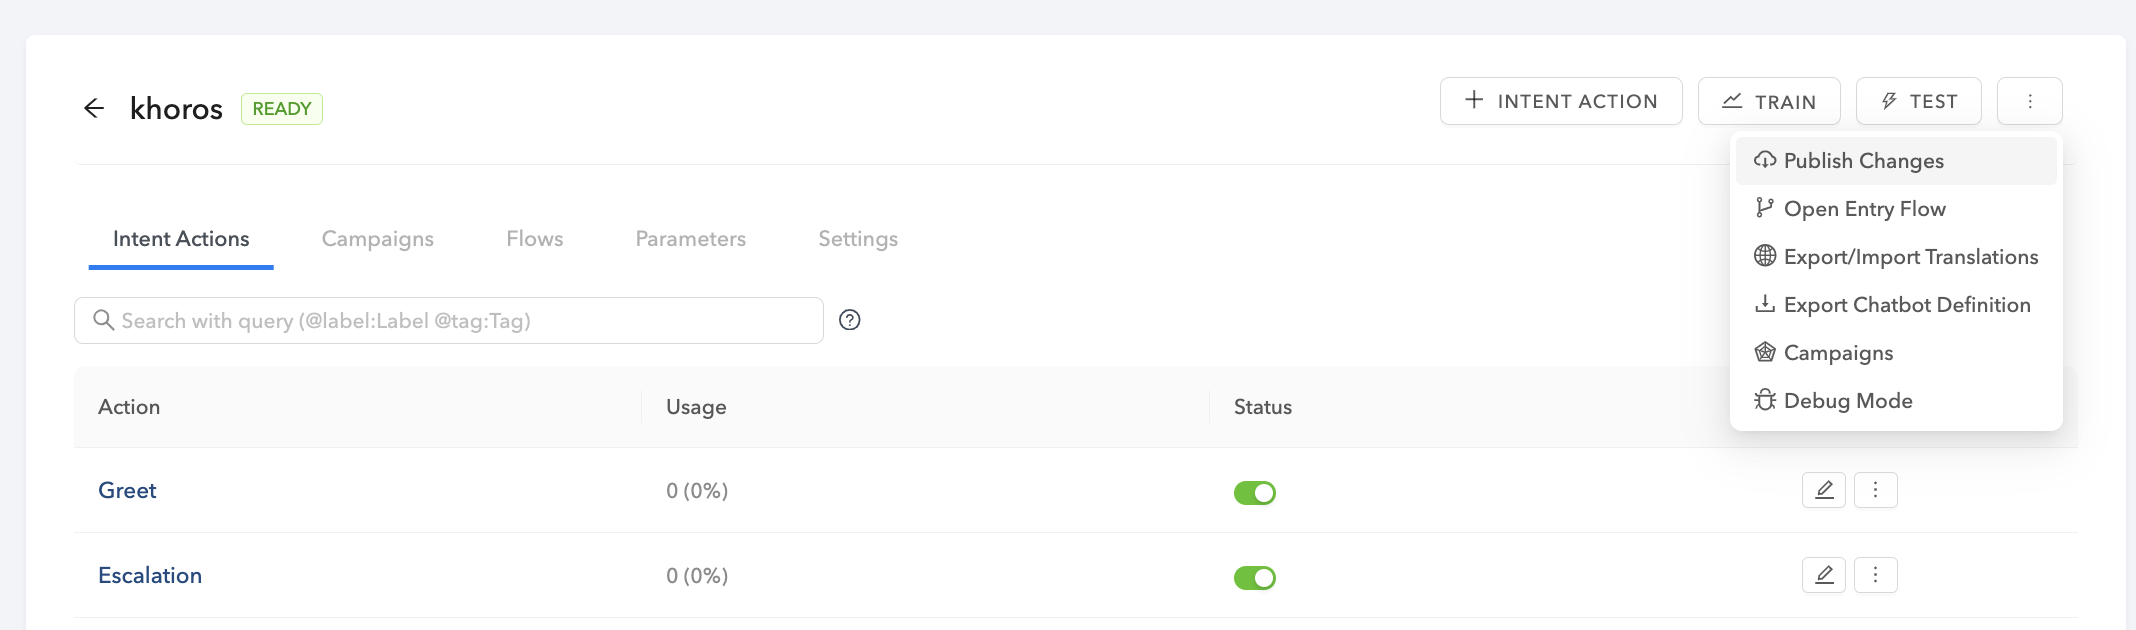
You can go to the chatbot you want to publish and on the top right corner click on **Publish Changes.**
---
# Source: https://docs.deepconverse.com/product-docs/conversational-flow-builder/conversation-blocks/client-events.md
# Client Events
Client Events allow you to control the UI state of the chatbot such as opening/closing minimizing and much more.
### Minimize Chatbot
This client event can be used at any point in a chatbot to minimize the chatbot widget. This event can be used in multiple ways such as minimizing the chatbot window upon the chat completion so that users know that they have reached the end of the conversation. This is a [reference video](https://www.loom.com/share/5d504a0d3c994ece8836538e80cb4b61) of its working.
### Maximize Chatbot
This client event is used to maximize/open the chatbot window from a point where the window is in a minimized state/closed. This is a [video](https://www.loom.com/share/1e9a7fdbfc094c238342331024e9d145?sid=dc8e91d9-e889-4001-a23b-b84a4cb43707) of it’s working.
### Show Close Button
The above client event can be used to show an ‘X’ symbol on the top right corner of the chatbot window for the users to be able to end the chat once the resolution has been provided or incase the user wants to restart a fresh conversation with the chatbot. This also comes handy in between conversational flows where we can enable or disable it for certain steps per need basis. Here is a [reference video](https://www.loom.com/share/442ec5e6b168425cb7990f6d0c7d1ead?sid=a333b8ef-57ef-4fa1-b16d-9547eeec6761) of it’s working.
### Hide Close Button
The ‘Hide Close Button’ event can be used anywhere in the chatbot wherein the client doesn’t want the users to be able to end the chat for example a step which is mandatory to move forward in the chatbot conversation. Triggering this event will remove the ‘X’ symbol from the top right corner of the chatbot window this refraining the users from ending the chat. You can find the reference [video here](https://www.loom.com/share/bc674131acf3492e953c4b4ec6ad98cb?sid=49ffb6d4-f2ed-49f7-9d00-f5d2d9f37f7d).
### Show Escape Hatch
In case a user does not find the required topic/solution on the chatbot, they can use the escape hatch which appears on the bottom most part of the chatbot window to land on a specific page/window or as configured by the client. For example if the chatbot is designed to serve the technical queries and a user wants help on the sales part, we can configure this event to achieve so. Here is a [reference video](https://www.loom.com/share/dc8bb8d36f5248379f35b5f1e641b5b7?sid=d9cf9ba0-bf35-4821-8694-f76846c81d68) of its working.
### Hide Escape Hatch
This event in the chatbot when triggered hides the escape hatch phrase so that the users are not diverted out of the chatbot in case the solution is present within the chatbot. This can be used by us as per our need in the conversational flow to help users maintain the continuity in the flow inturn yielding to a solution. [Click here](https://www.loom.com/share/74a6ea1276b94c8db26133b3148e7eb7?sid=0330472e-18d3-4dff-8aaa-c6e9e0e74cd6) to check out the reference video.
### Show Restart Button
An event which when triggered allows a user to restart the conversation from any point through a conversation. A dedicated button shows up on the top right corner of the chatbot window allowing the user to click on it and in turn restarting the conversation. For instance, this feature becomes very handy in cases where a user wants to explore various services offered by the chatbot to better understand and decide the course of action. Please check the reference [video here](https://www.loom.com/share/080d5f7b49744e99940f111a9a2817a7?sid=bd544447-34ff-4103-b599-7f100f4b9e91)
### Hide Restart Button
The event which when triggered can be used to hide the ‘Restart Conversation Button’ from the top right corner of the chatbot thus restricting the users from restarting the conversation from any point in the flow. This will allow the chatbot to keep the users streamlined to the intended solution and hence providing a better resolution rate. Please find the video [reference here](https://www.loom.com/share/ef5f21c6ac864f9790fdd87ab530a62f?sid=a4094af8-d30d-4352-9c1b-830b977b10ad).
---
# Source: https://docs.deepconverse.com/product-docs/chatbots/advanced-functionality/connection-override.md
# Connection Override
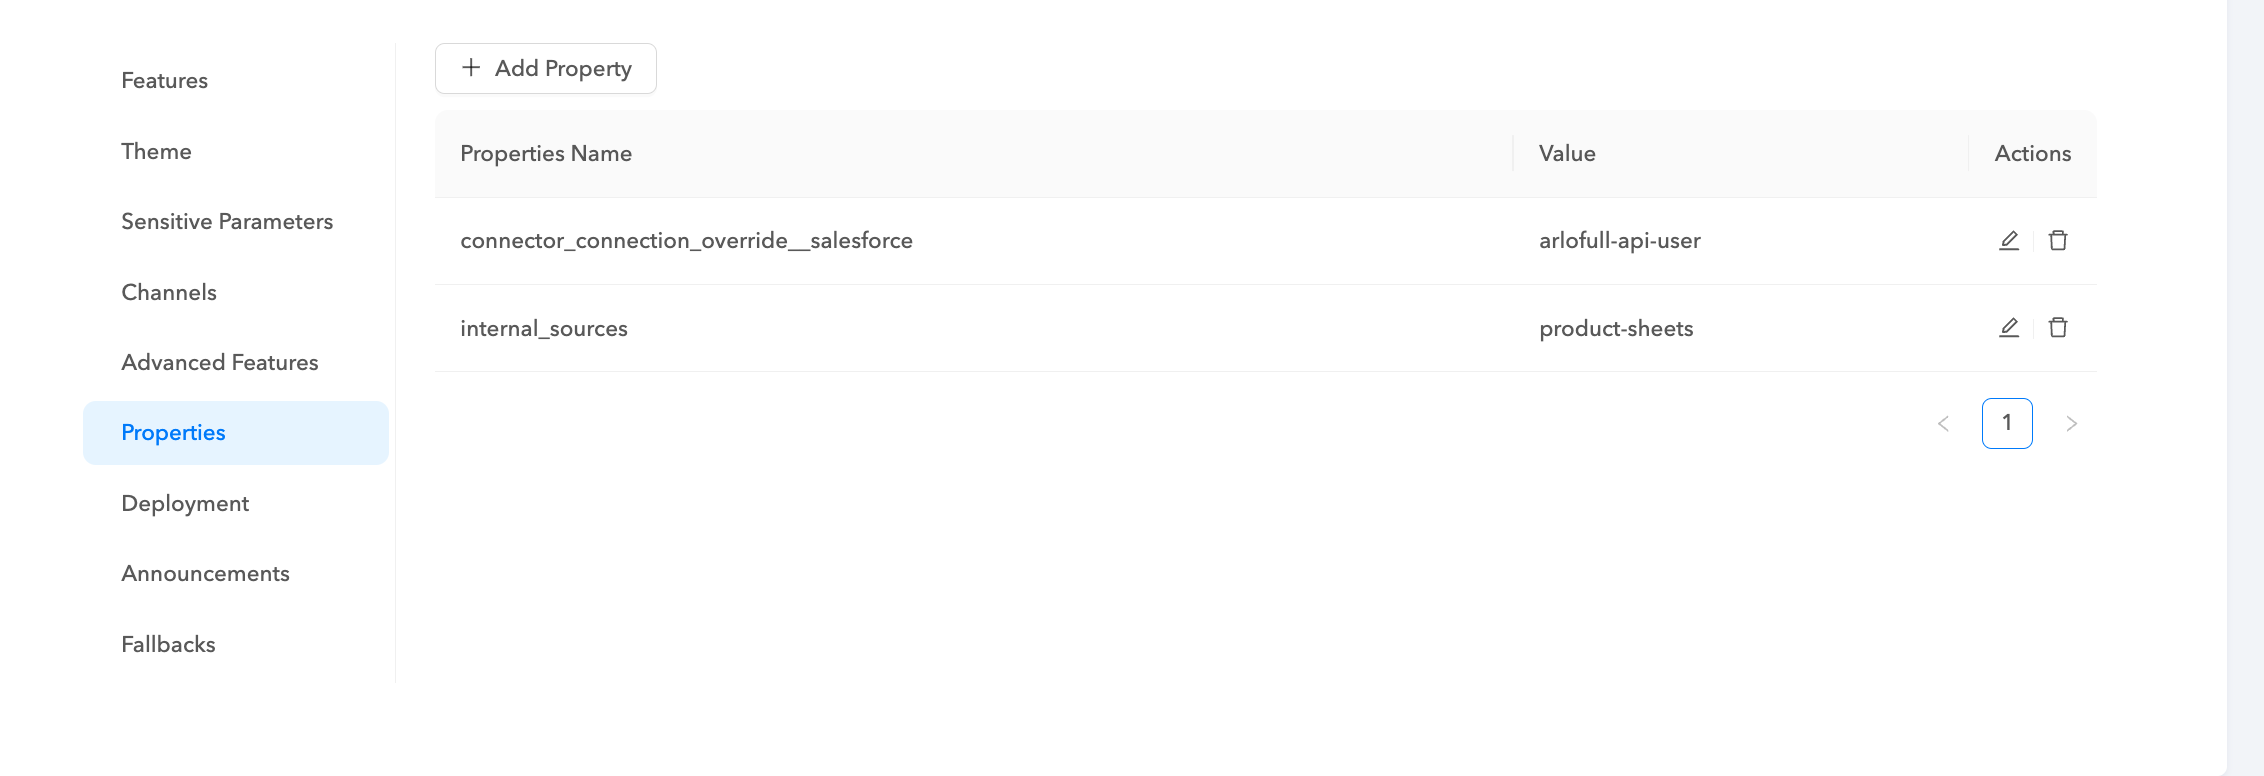
You can override the connection being used in the `Connector` node by adding a property in the chatbot with the connection you would like to override it with.
{% hint style="info" %}
`connector_connection_override__salesforce`
{% endhint %}
Use the above property in the chatbot and put the value as the connection you would like to use in the Salesforce Connector calls.
---
# Source: https://docs.deepconverse.com/product-docs/support/contacting-support.md
# Contacting Support
If you would like to report bugs or request new features you can contact the DeepConverse support team by sending an email to
You can also submit a ticket from the [DeepConverse dashboard](https://admin.deepconverse.com/dashboard/account/support) by going to **Account** > **Support.**
### Reporting Technical Issues and Bugs
When submitting a technical issue, there are a couple of things that can be included that will help our developers in identifying and fixing an issue. Also, this may save some time in waiting for messages back and forth between you and the support staff.
* Provide details on the actual behavior you are noticing
* Provide details on the behavior expected in the product
* Include screenshots, videos and links to where the behavior can be seen for reproduction
* Include details on the severity of the issue
Once you report the issue our team will review the ticket and let you know the game plan to address it.
### Feature Requests
Our team is always looking for feedback and is very open to learning about how our customers would like to us our products. If you have ideas on product features you’d like to see added to DeepConverse share your ideas with us by creating a [Support Ticket](mailto:support@deepconverse.com) and selecting the type **Feature Request**.
Include details on your use case that you are trying to address and what feature in DeepConverse can help you accomplish that better.
---
# Source: https://docs.deepconverse.com/product-docs/conversational-flow-builder/conversation-blocks.md
# Conversation Blocks
- [Question](/product-docs/conversational-flow-builder/conversation-blocks/question.md)
- [Salesforce Blocks](/product-docs/conversational-flow-builder/conversation-blocks/salesforce-blocks.md)
- [Agent Availability Block](/product-docs/conversational-flow-builder/conversation-blocks/salesforce-blocks/agent-availability-block.md)
- [Live Agent Handover](/product-docs/conversational-flow-builder/conversation-blocks/salesforce-blocks/live-agent-handover.md): Handoff to Salesforce support agents using Live Agent Rest API
- [Guide Blocks](/product-docs/conversational-flow-builder/conversation-blocks/guide-blocks.md)
- [Guide Step (Guide Flow)](/product-docs/conversational-flow-builder/conversation-blocks/guide-blocks/guide-step-guide-flow.md)
- [Solved Block](/product-docs/conversational-flow-builder/conversation-blocks/guide-blocks/solved-block.md)
- [Unsolved Block](/product-docs/conversational-flow-builder/conversation-blocks/guide-blocks/unsolved-block.md)
- [Guide (Chatbot)](/product-docs/conversational-flow-builder/conversation-blocks/guide-blocks/guide-chatbot.md)
- [HTTP Request](/product-docs/conversational-flow-builder/conversation-blocks/http-request.md)
- [Client Events](/product-docs/conversational-flow-builder/conversation-blocks/client-events.md)
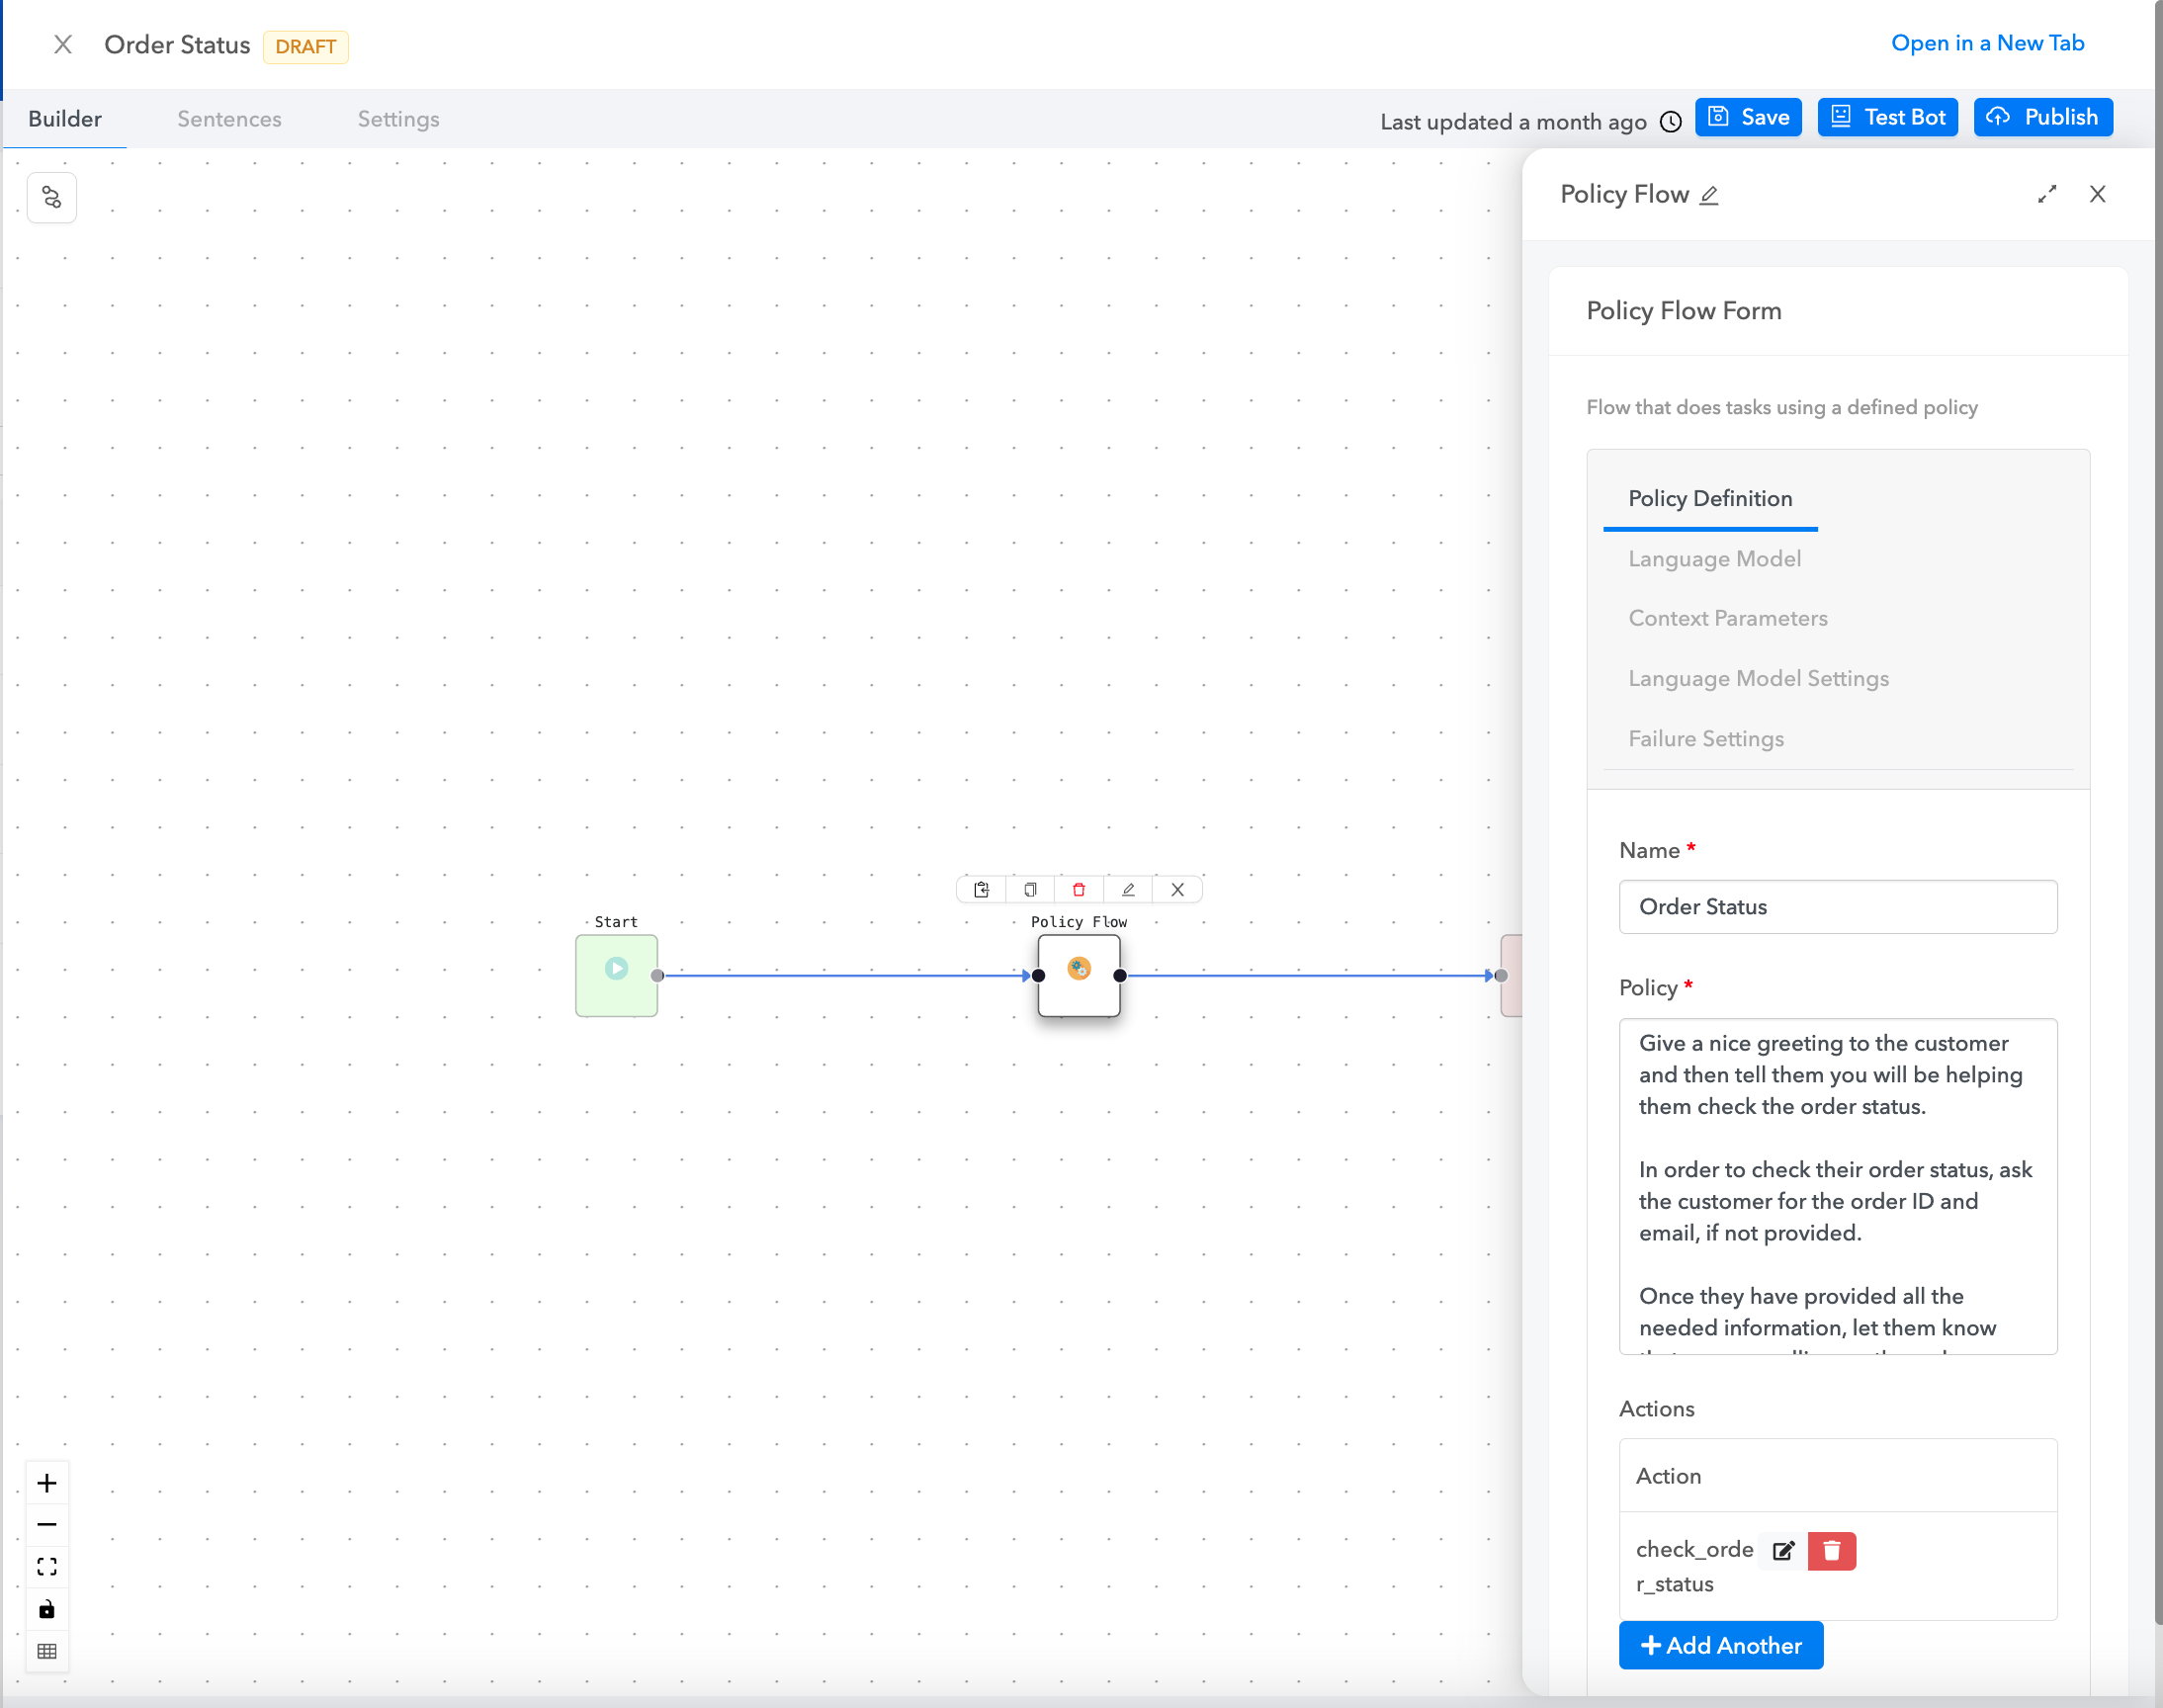
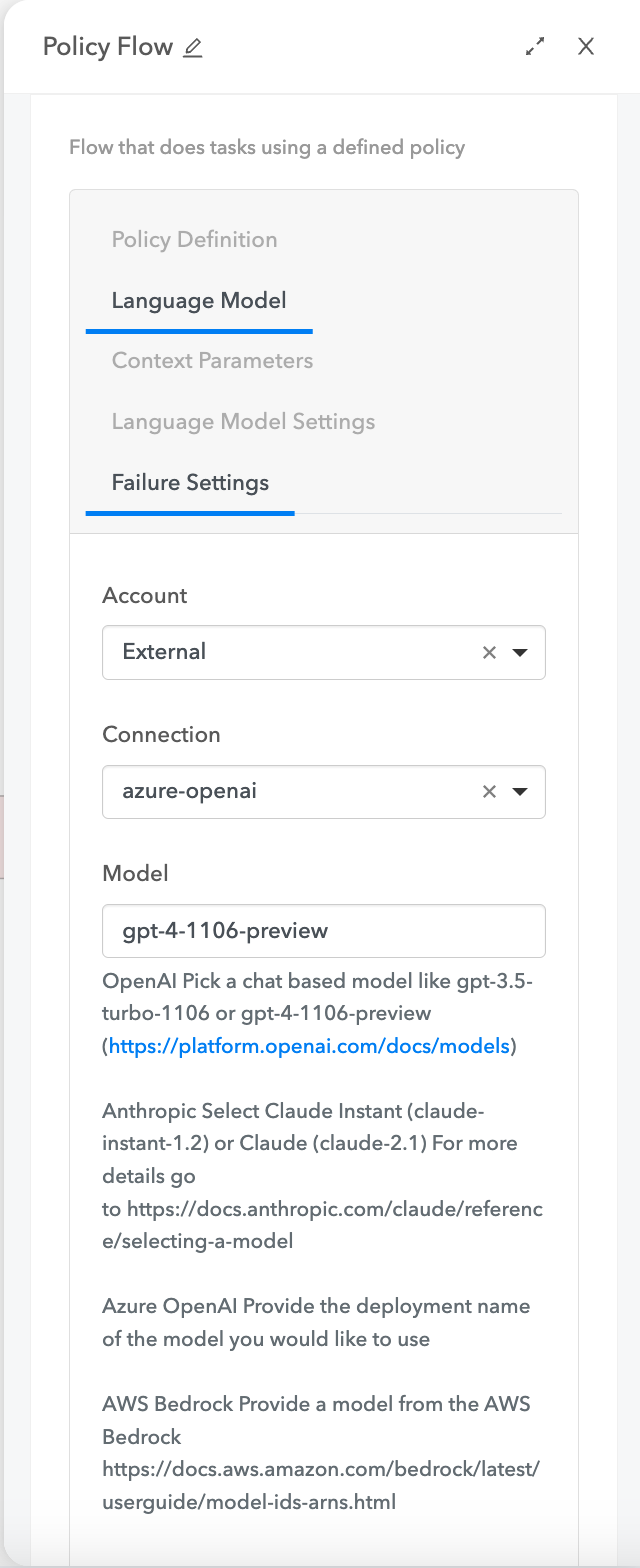
- [Policy](/product-docs/conversational-flow-builder/conversation-blocks/policy.md): Make use of Large Language models to provide Conversational reasoning and task execution
- [Zendesk Sunshine Conversations Handoff (In Widget)](/product-docs/conversational-flow-builder/conversation-blocks/zendesk-sunshine-conversations-handoff-in-widget.md)
---
# Source: https://docs.deepconverse.com/product-docs/analytics/export-api/conversations-endpoint.md
# Conversations Endpoint
The Conversations endpoint returns data about the Conversations your bot has with your customers. Conversation data includes the following fields.
| **Conversation ID** (\_id) | Unique id for the conversation |
| ------------------------------------------------ | ----------------------------------------------------------------------------------------------------- |
| **Start Time** (startTime) | The conversation's start time. |
| **Last conversation action time** (lastActionAt) | The time of last conversation update. |
| **Locale** (locale) | Locale of the conversation |
| **Tags** (tags) | List of the tags added to the conversation such as resolved, informed, liveChat etc. |
| **Metadata** (metadata) | All the metadata stored as part of the conversation. This will include system and user set parameters |
Here is a sample request for the conversations endpoint
````python
```python
import requests
url = "https://api.converseapps.com/conversations/export/v1/conversations"
params={
'start_time': 1696118400,
'end_time': 1696550400,
'bot_name': 'r3-218210',
'per_page': 1000
}
headers = {
'x-api-key': '',
}
response = requests.get(url, headers=headers, params=params)
print(response.json())
```
````
To iterate through the results pass the `cursor` value till the cursor returned by the API is `null`
---
# Source: https://docs.deepconverse.com/product-docs/chatbots/deploy/custom-initialization-and-passing-metadata.md
# Custom Initialization and Passing Metadata
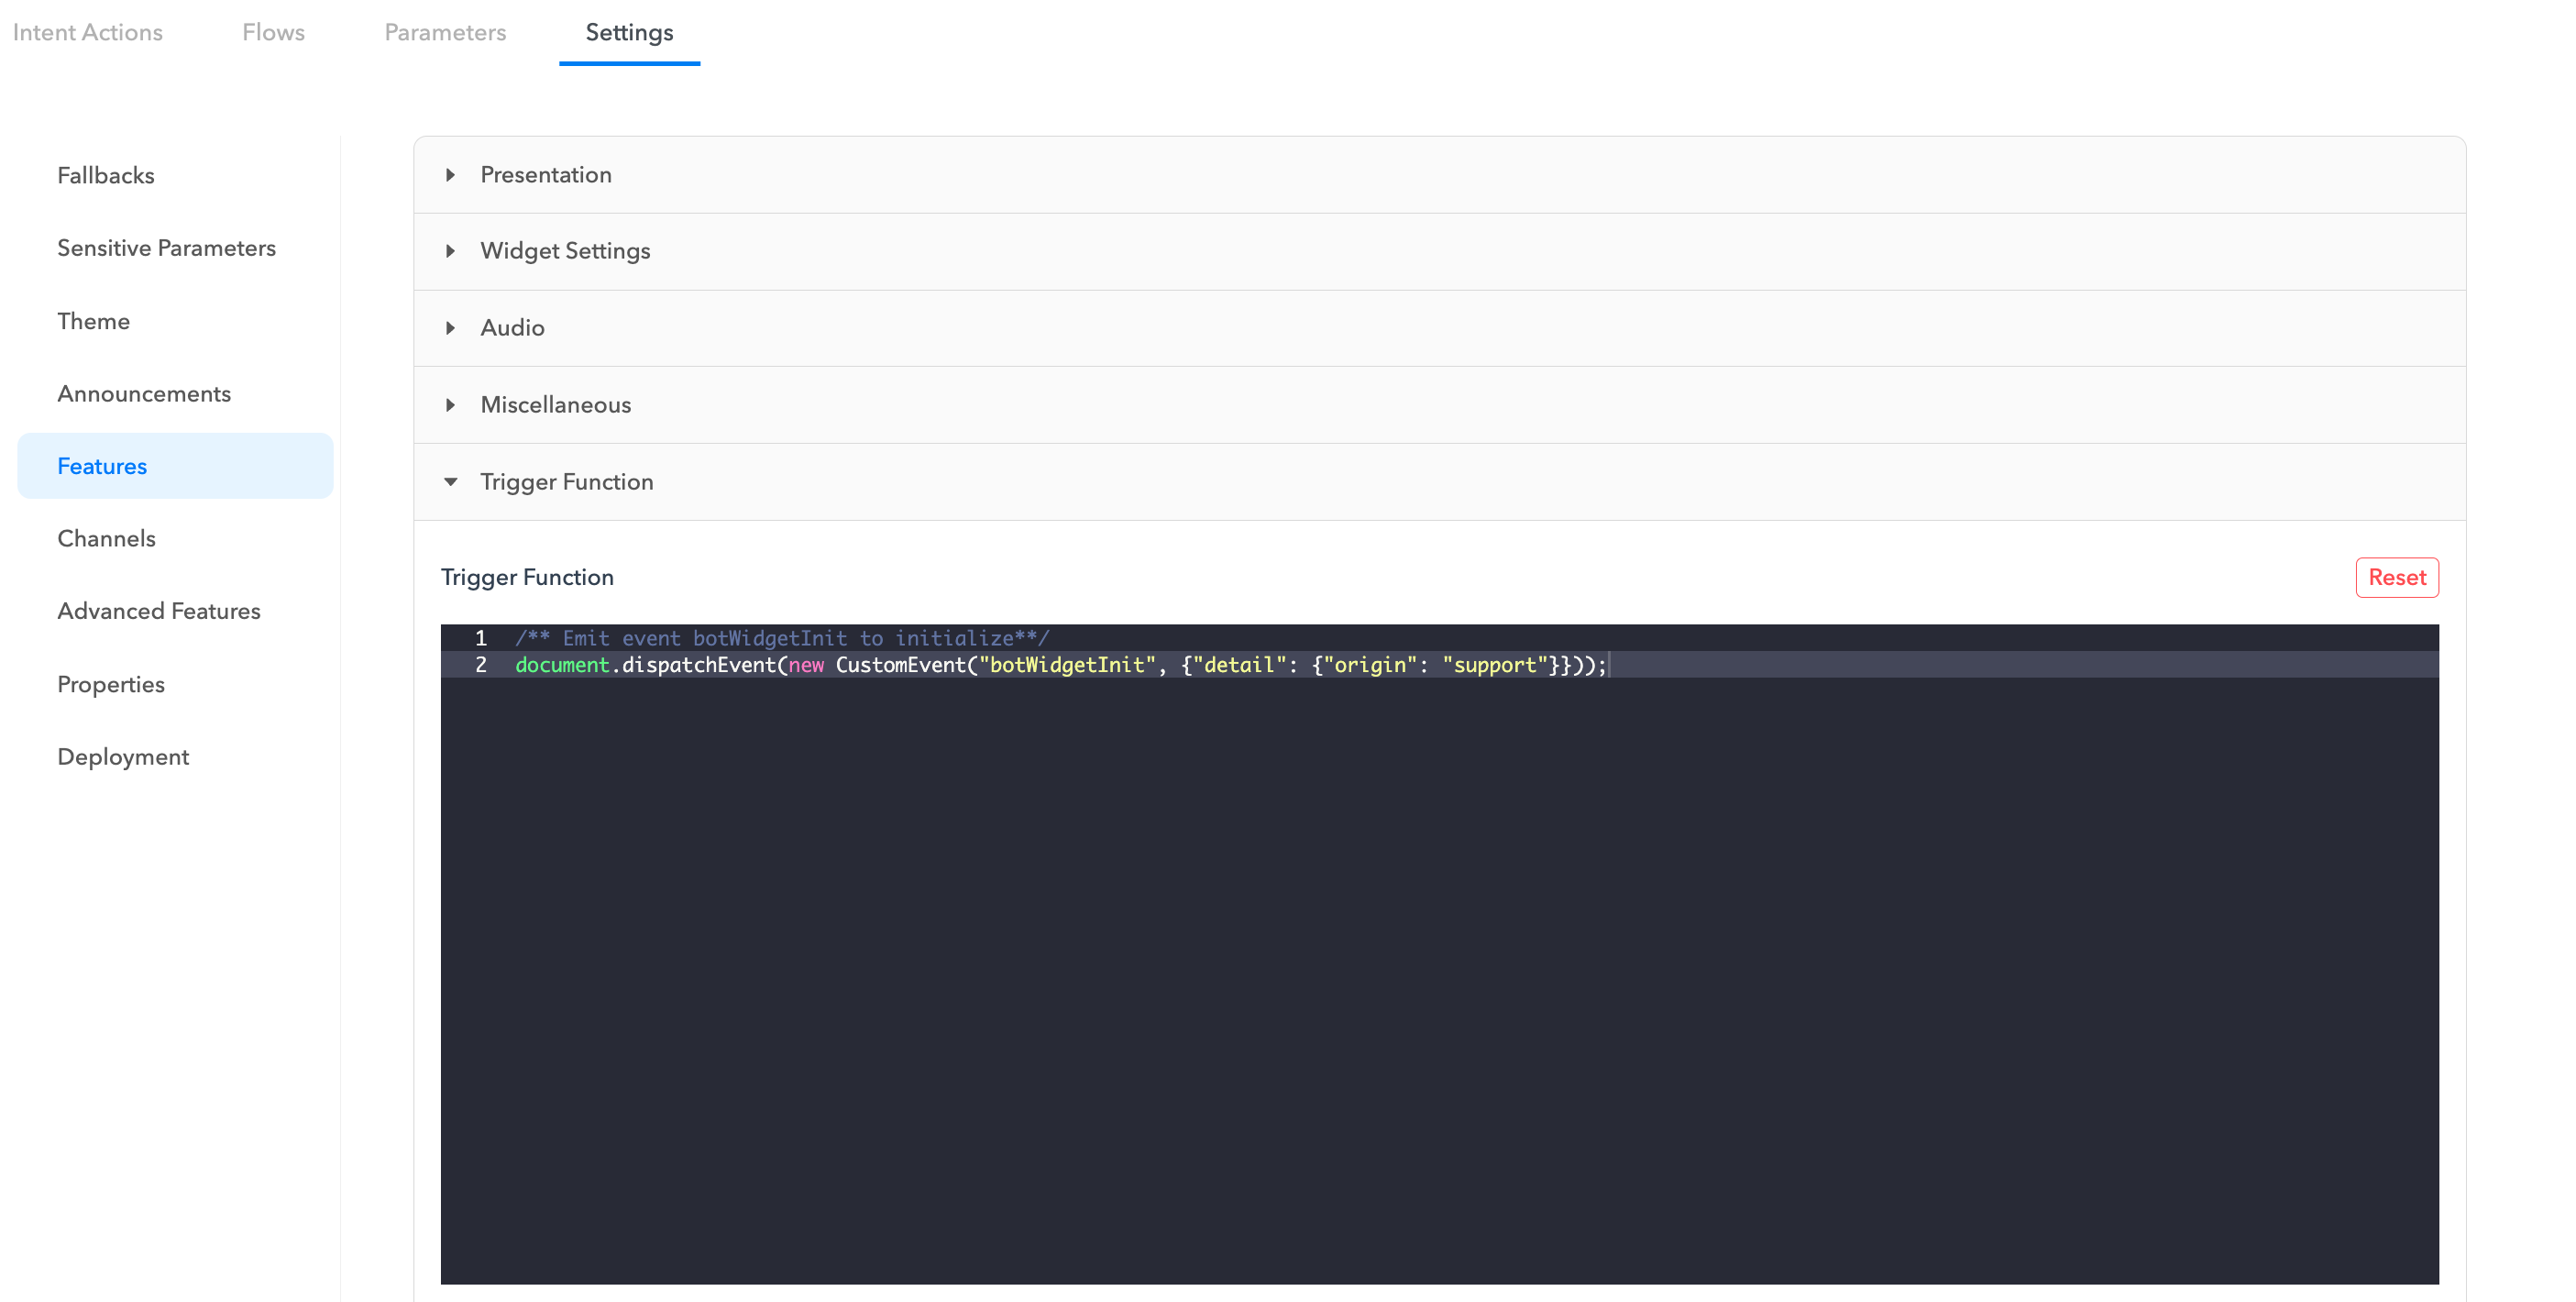
By default the chatbot script is configured to show the chatbot on load. In cases you need customization on which pages does the chatbot show on or pass specific metadata you can override the trigger function and initialize the chatbot on your webpage.
You can find the **Trigger Function** under **Features**
### Initializing the chatbot
The chatbot works based on events passed through the script. You can fire the following event to show the chatbot on a page. You can customize when the event is sent based on the origin, button click or any other action on the page to show the chatbot.
```javascript
document.dispatchEvent(new CustomEvent("botWidgetInit", {"detail": {"origin": "support"}}));
```
### Passing Metadata
To make decisions in the flow you can pass metadata to the chatbot. This metadata live in the conversation context and is available to use in routing/api and other actions.
```javascript
let metadata = {
"origin": "support",
"tags": ["ios", "vip"]
}
document.dispatchEvent(new CustomEvent("botWidgetInit", {"detail": metadata}));
```
---
# Source: https://docs.deepconverse.com/product-docs/chatbots/customizations.md
# Customizations
- [Adding a link to your Privacy Policy in Chatbot window](/product-docs/chatbots/customizations/adding-a-link-to-your-privacy-policy-in-chatbot-window.md)
---
# Source: https://docs.deepconverse.com/product-docs/security/data-request-policy.md
# Data Request Policy
This Data Request Policy sets out DeepConverse's procedure for responding to a request received from a third party, law enforcement or other government authority to disclose personal information processed by DeepConverse.
When DeepConverse receives a Data Disclosure Request, it will handle that Data Disclosure Request in accordance with this policy. If applicable data protection law(s) require a higher standard of protection for personal information than is required by this policy, DeepConverse will comply with the relevant requirements of those applicable data protection law(s).
### General principle on Data Disclosure Requests
As a general principle, DeepConverse does not disclose personal information in response to a Data Disclosure Request unless either:
* We are under a compelling legal obligation to make such disclosure
* Taking into account the nature, context, purposes, scope and urgency of the Data Disclosure Request and the privacy rights and freedoms of any affected individuals, there is an imminent risk of serious harm that merits compliance with the Data Disclosure Requests in any event.
For that reason, unless it is legally prohibited from doing so or there is an imminent risk of serious harm, DeepConverse will notify and consult with the competent data protection authorities (and, where it processes the personal information on behalf of a Customer, the Customer) to address the Data Disclosure Request.
### Handling of a Data Disclosure Request
DeepConverse will respond to a Data Disclosure Request received through the support channels after it is reviewed by Chief Security Officer. Requests will be tracked and maintain a line of communication with the requester.
DeepConverse Team will carefully review each and every Data Disclosure Request on a case-by-case basis. We will liaise with the legal department and outside counsel as appropriate to deal with the request to determine the nature, context, purposes, scope and urgency of the Data Disclosure Request, and its validity under applicable laws, to identify whether action may be needed to challenge the Data Disclosure Request and/or to notify the Customer and/or competent data protection authorities in accordance to procedures established.
### Notice of a Data Disclosure Request
#### Notice to the Customer
If a request concerns personal information for which a Customer is the controller, DeepConverse will ordinarily ask the requestor to make the Data Disclosure Request directly to the relevant Customer. If the customer agrees, DeepConverse will support the requestor in accordance with the terms of the customer's contract to respond to the Data Disclosure Request.
If this is not possible (for example, because the requester declines to make the Data Disclosure Request directly to the Customer, does not know the customer’s identity, or if DeepConverse is not permitted by law to disclose the Data Disclosure Request), DeepConverse will notify and provide the Customer with the details of the Data Disclosure Request prior to disclosing any personal information, unless legally prohibited from doing so or where an imminent risk of serious harm exists that prohibits prior notification.
#### Notice to the competent data protection authorities
If the requester is in a country that does not provide an adequate level of protection for the personal information in accordance with applicable data protection laws, then DeepConverse will also put the request on hold to notify and consult with the competent data protection authorities, unless legally prohibited or where an imminent risk of serious harm exists that prohibits prior notification.
Where DeepConverse is prohibited from notifying the competent data protection authorities and suspending the request, DeepConverse will use its best efforts (taking into account the nature, context, purposes, scope, and urgency of the request) to inform the requestor about its obligations under applicable data protection law and to obtain the right to waive this prohibition. Such efforts may include asking the requestor to put the request on hold, so that DeepConverse can consult with the competent data protection authorities, or to allow disclosure to specified personnel at DeepConverse’s customer, and may also, in appropriate circumstances, include seeking a court order to this effect. DeepConverse will maintain a written record of the efforts it takes.
### Bulk transfers
In no event will DeepConverse transfer Personal Information to a requestor in a massive, disproportionate, and indiscriminate manner that goes beyond what is necessary in a democratic society.
---
# Source: https://docs.deepconverse.com/product-docs/conversational-flow-builder/data-tables.md
# Data Tables
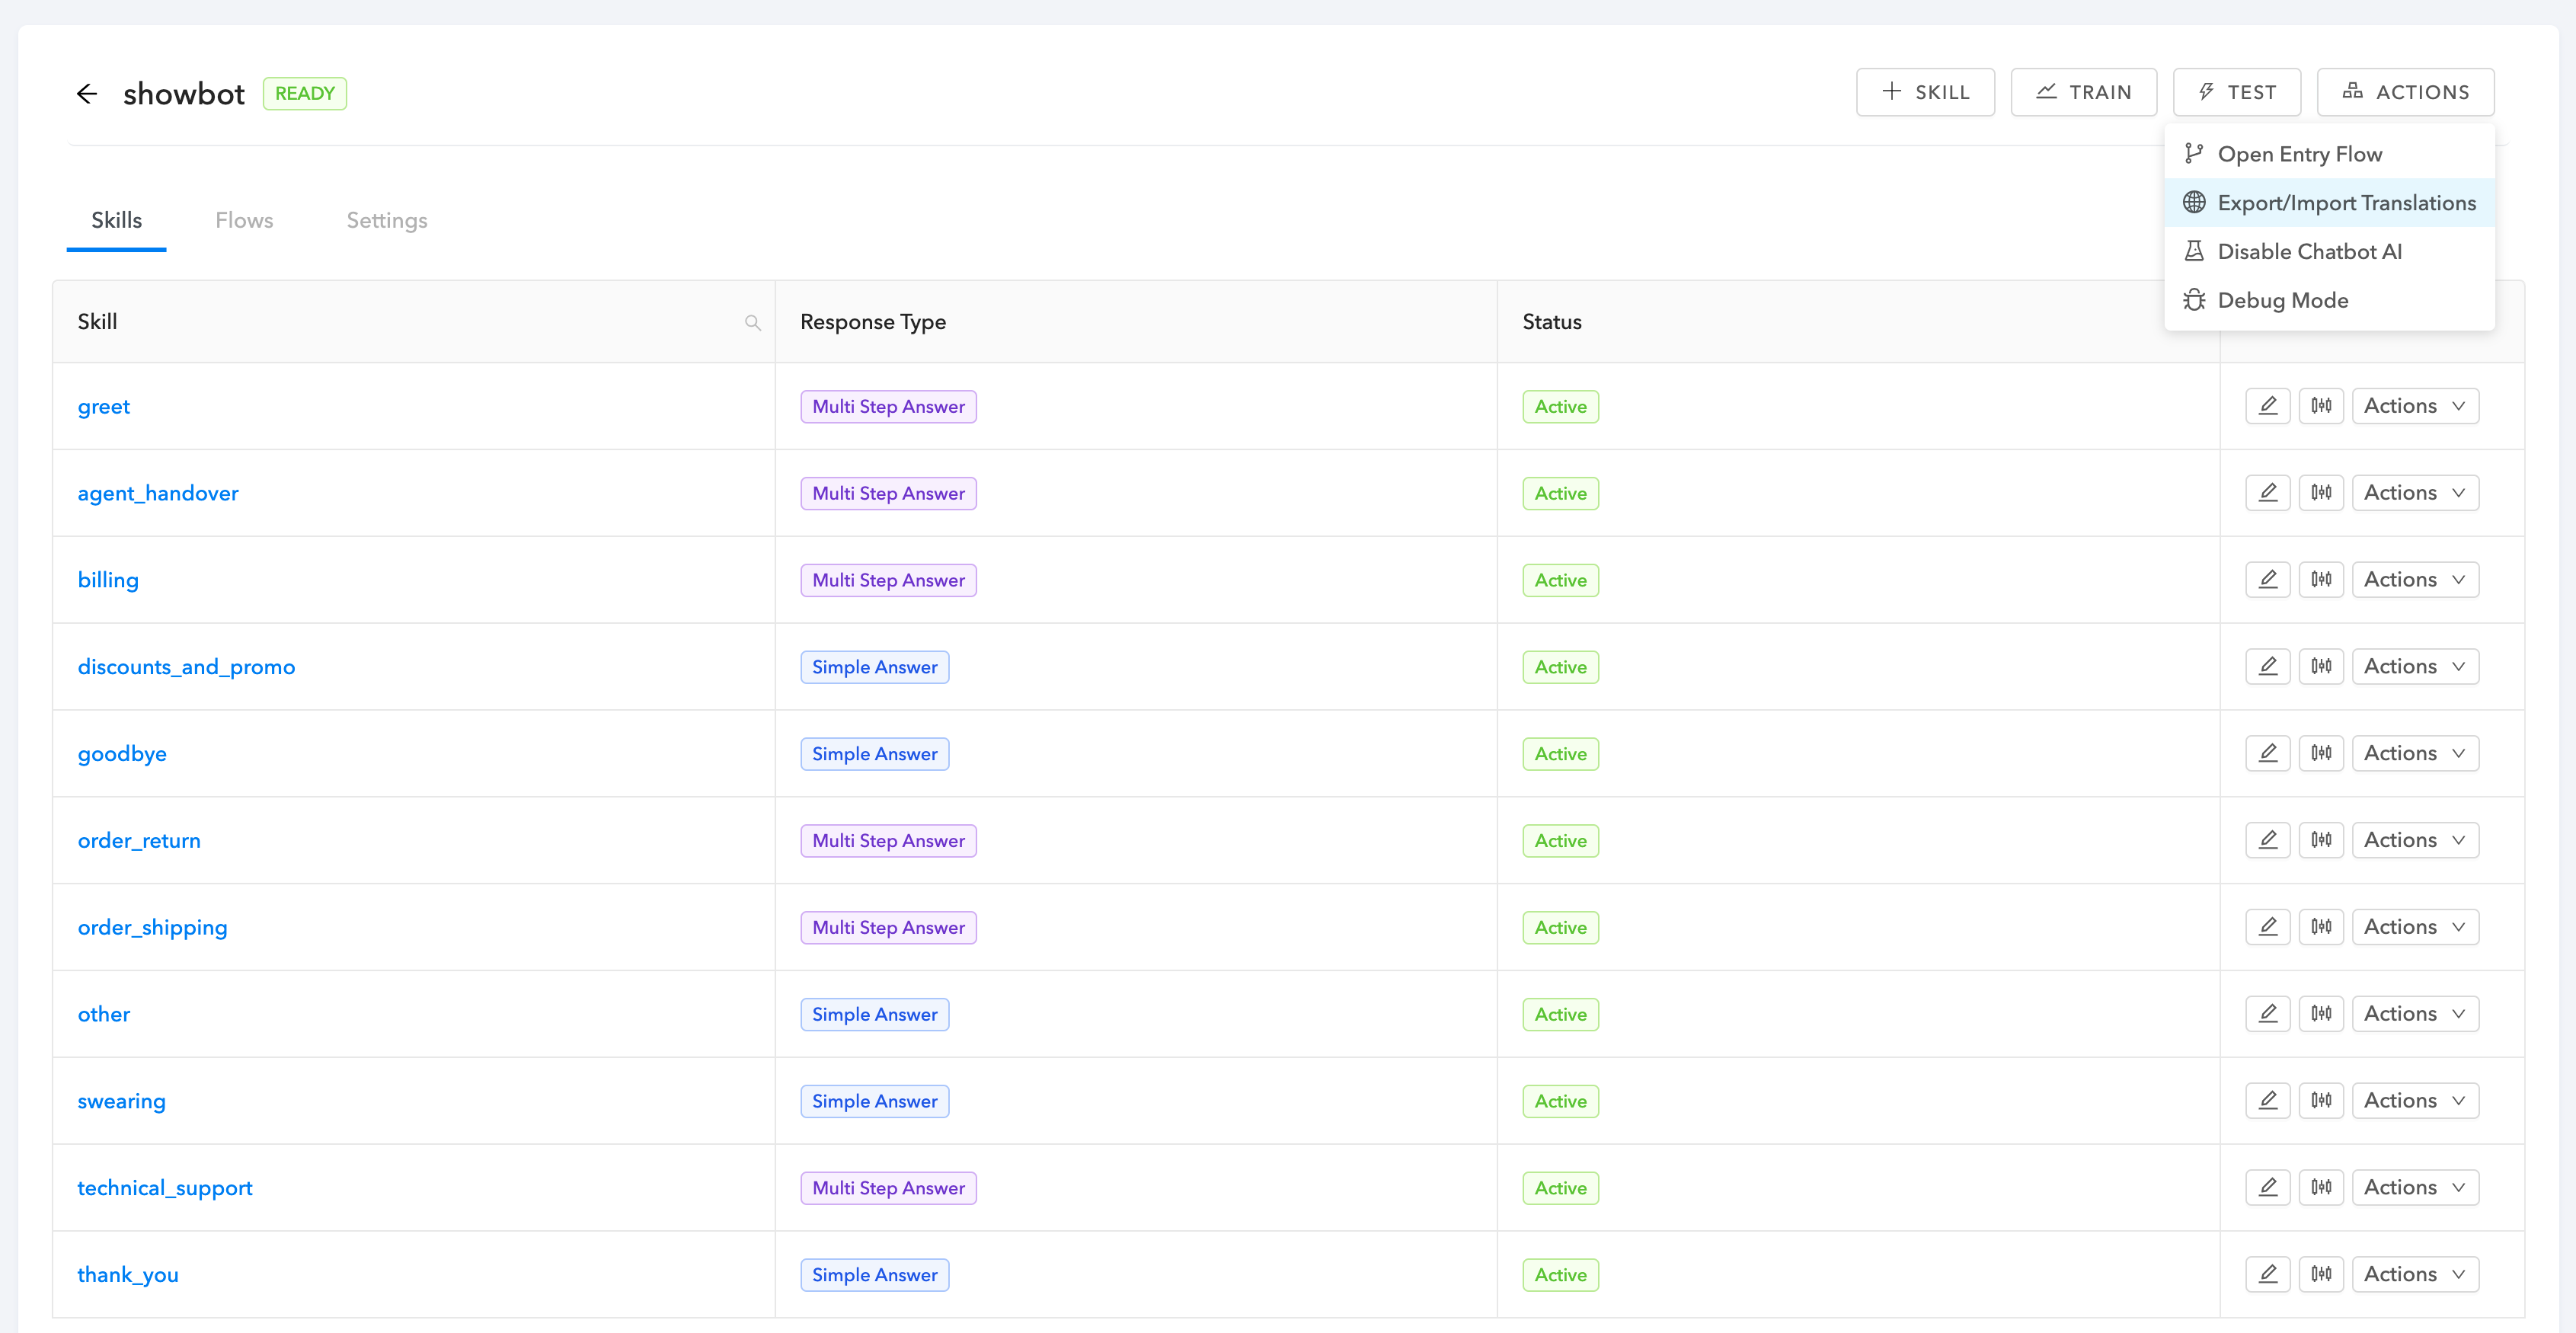
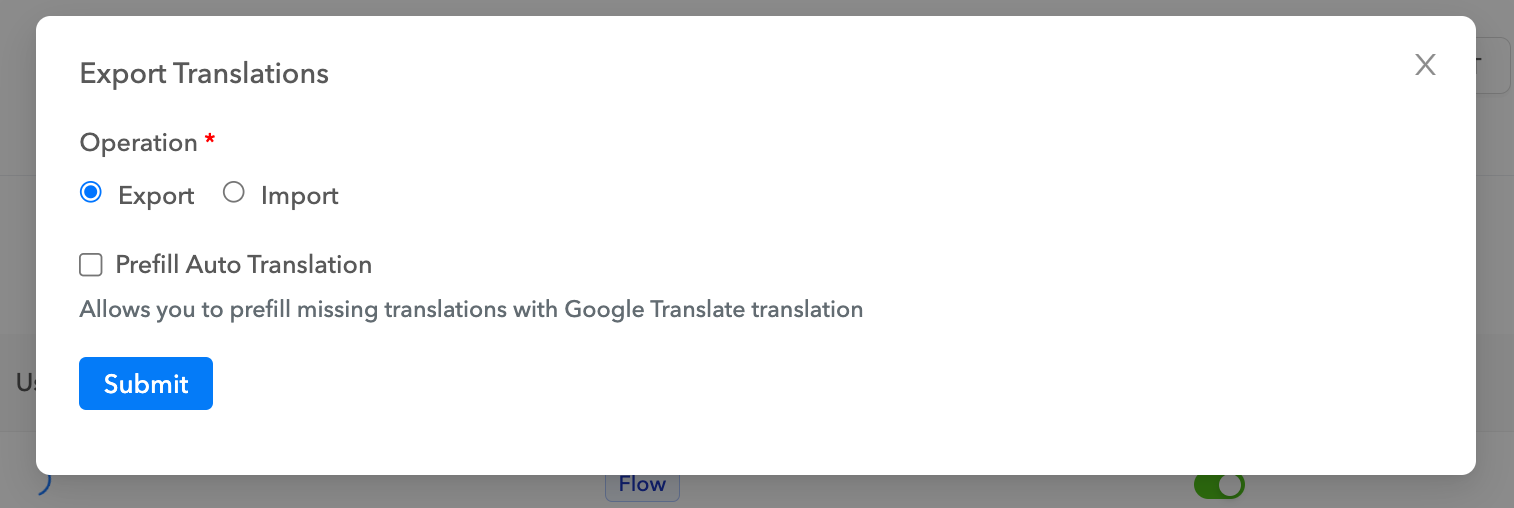
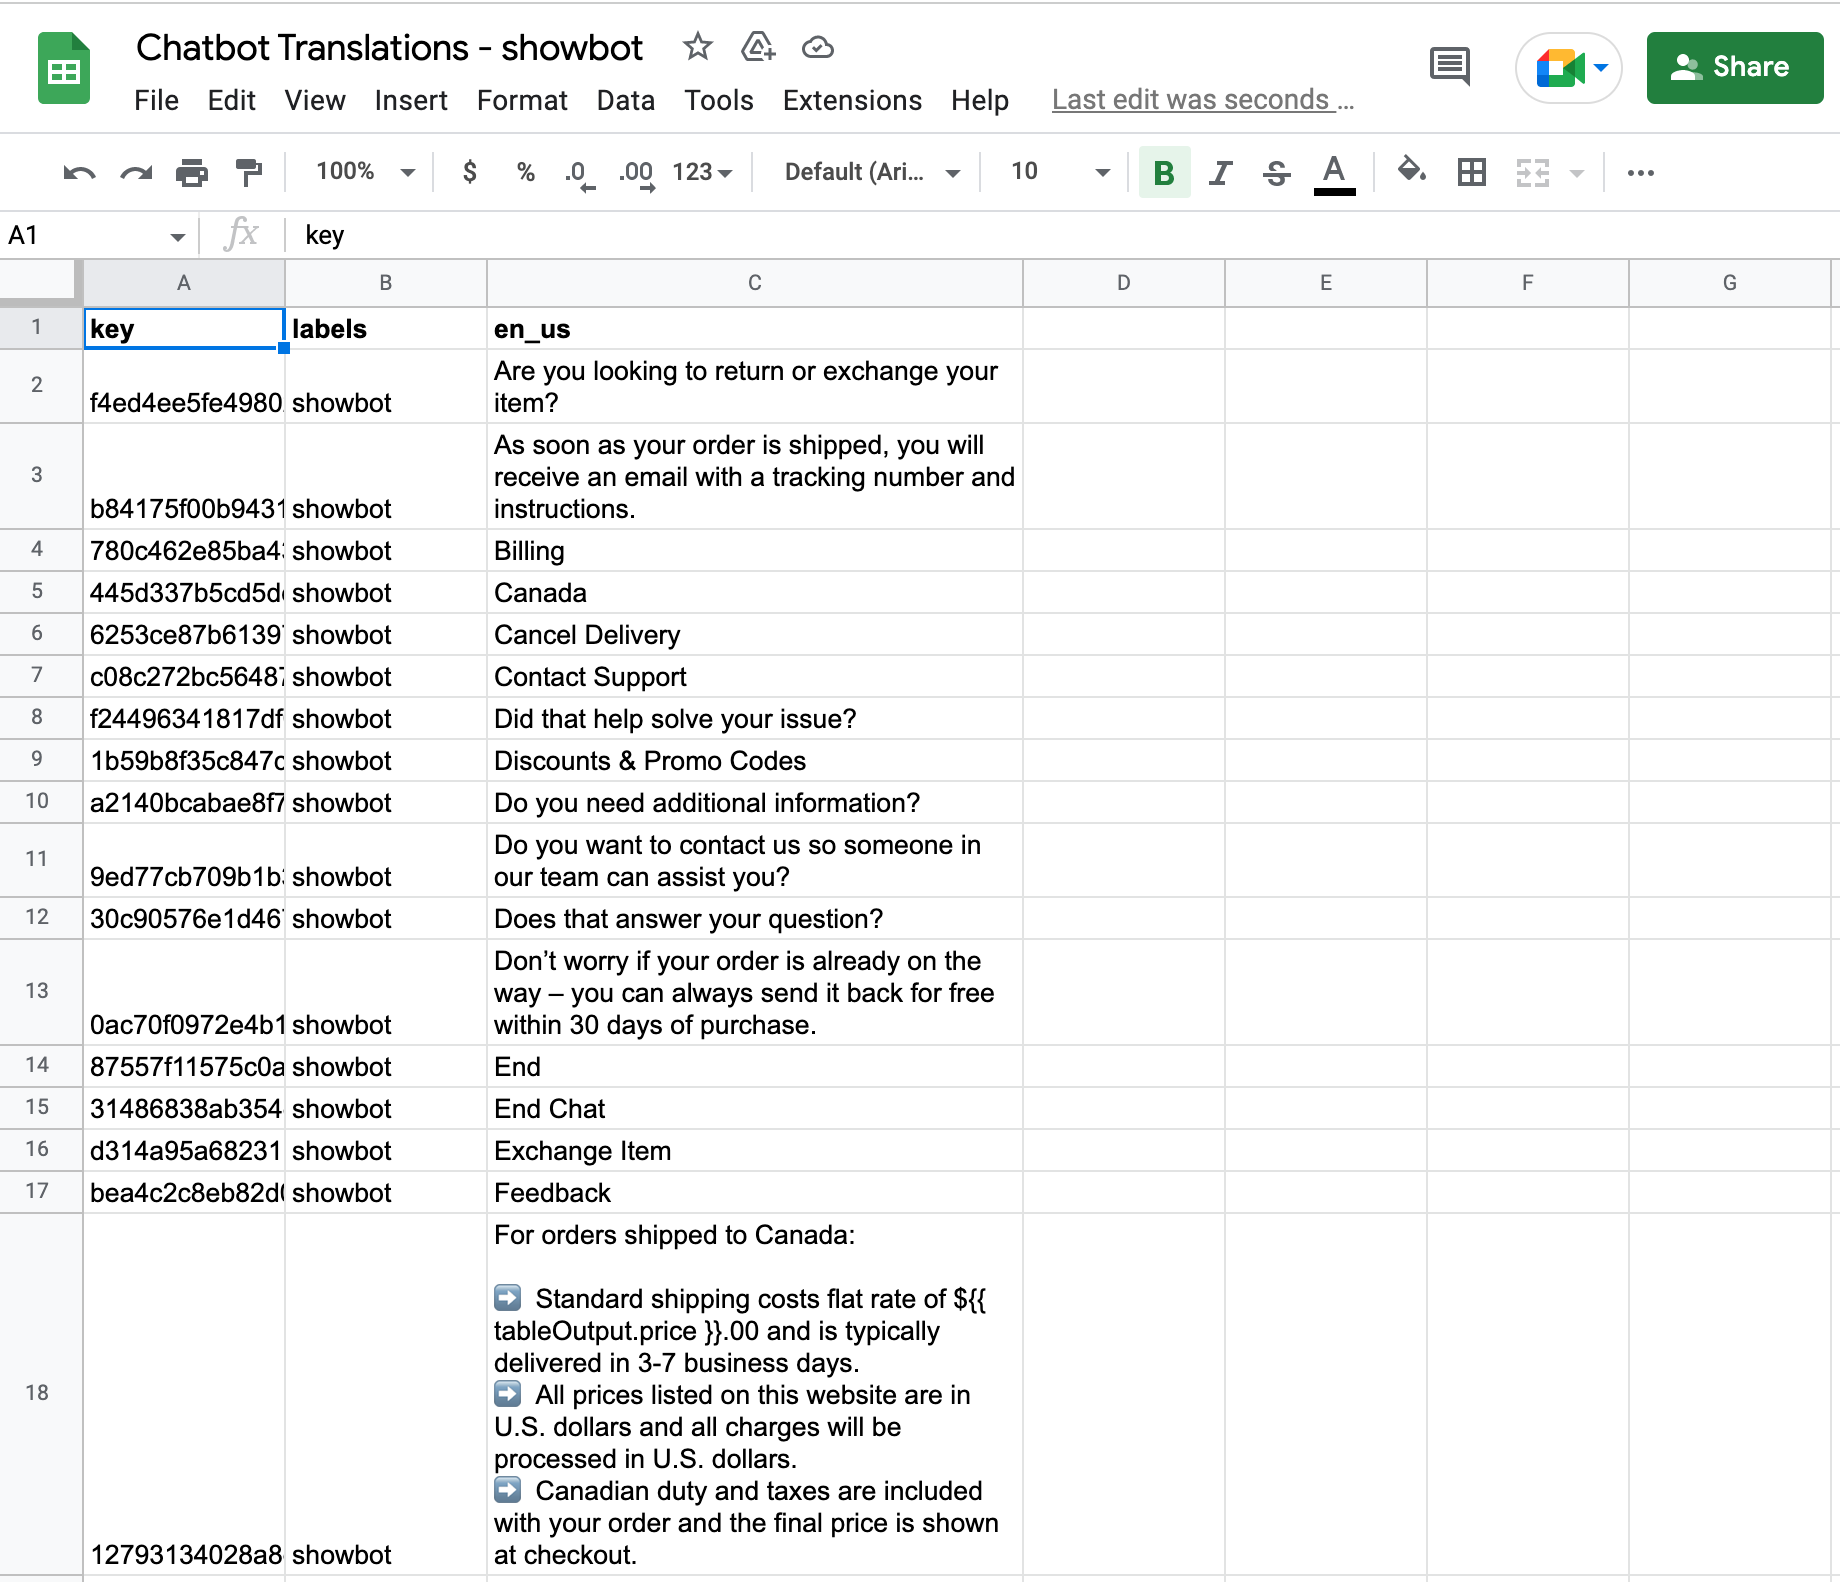
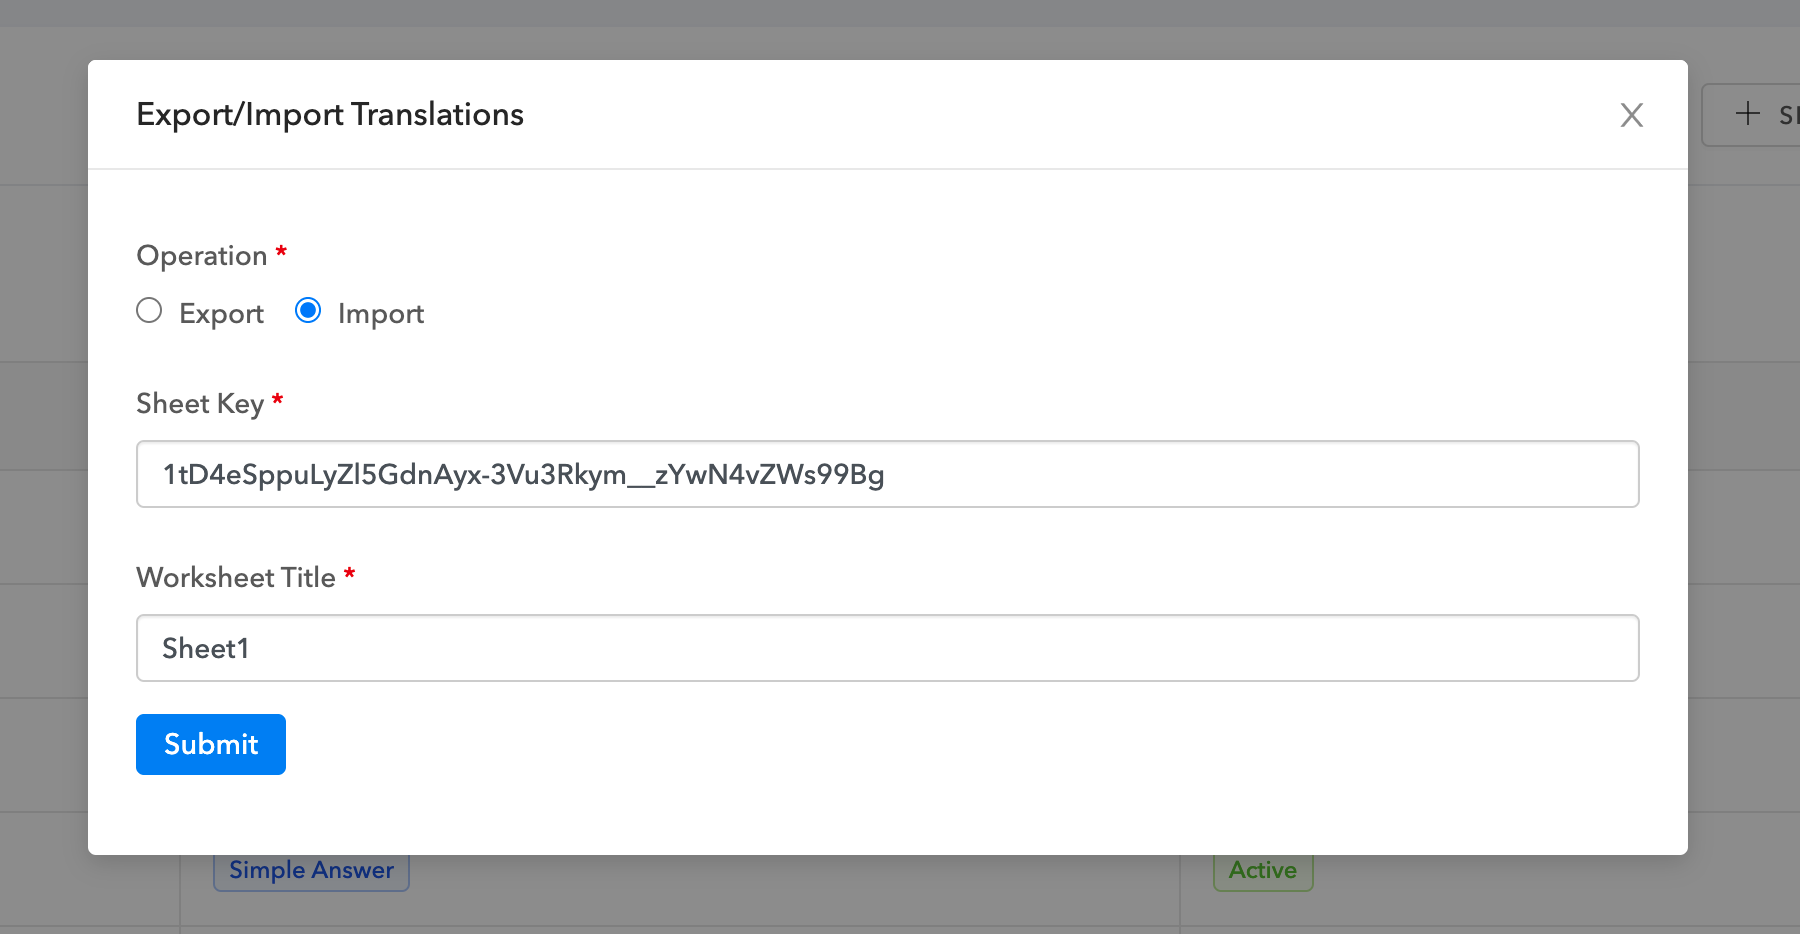
**Data Tables** allow you to store data into DeepConverse that you can lookup and serve to your customers. The data can be created through the DeepConverse dashboard or imported from a Google Sheet.
***Note:** To use this feature your account needs to have access to Data Tables. Please reach out to us if you are interested in using this feature*
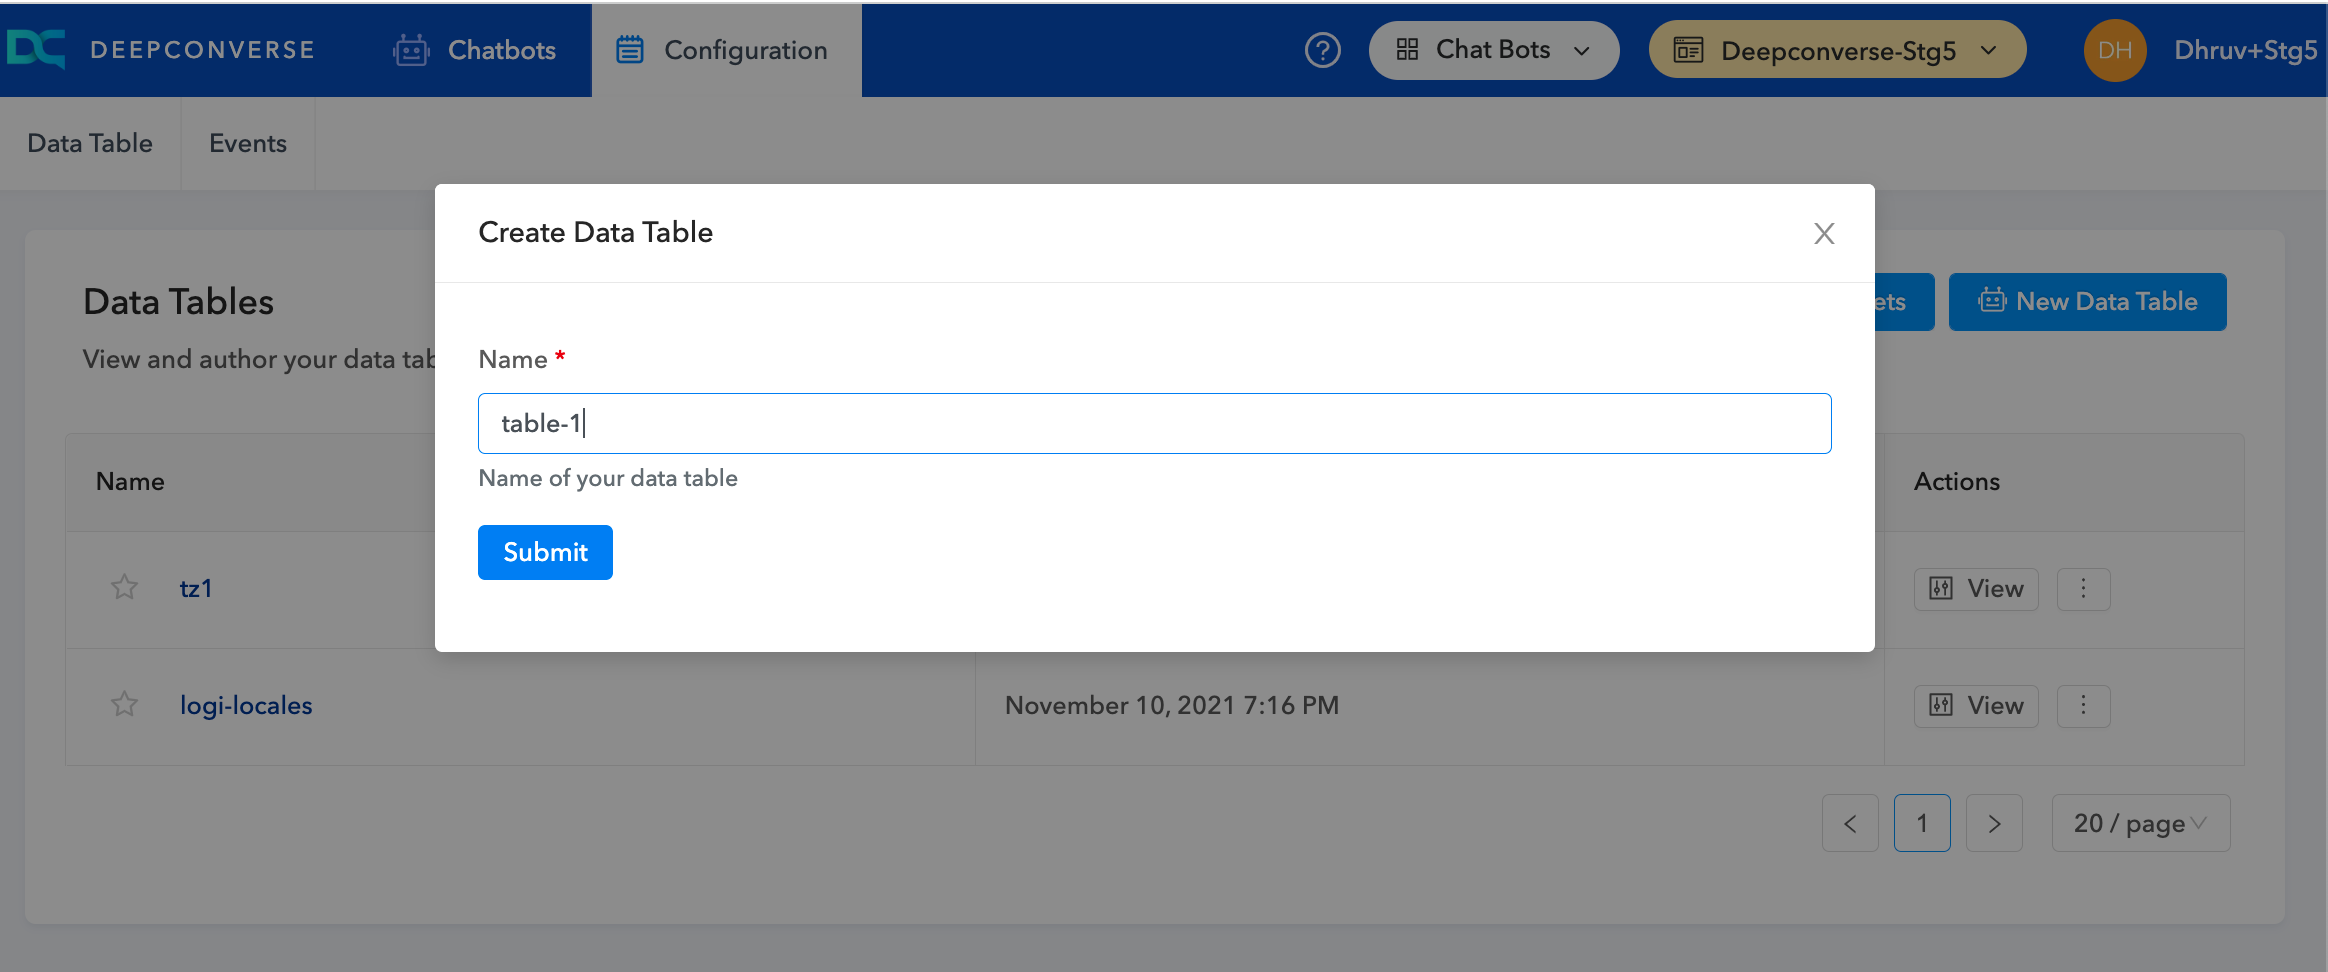
### Creating a Data Table in the dashboard
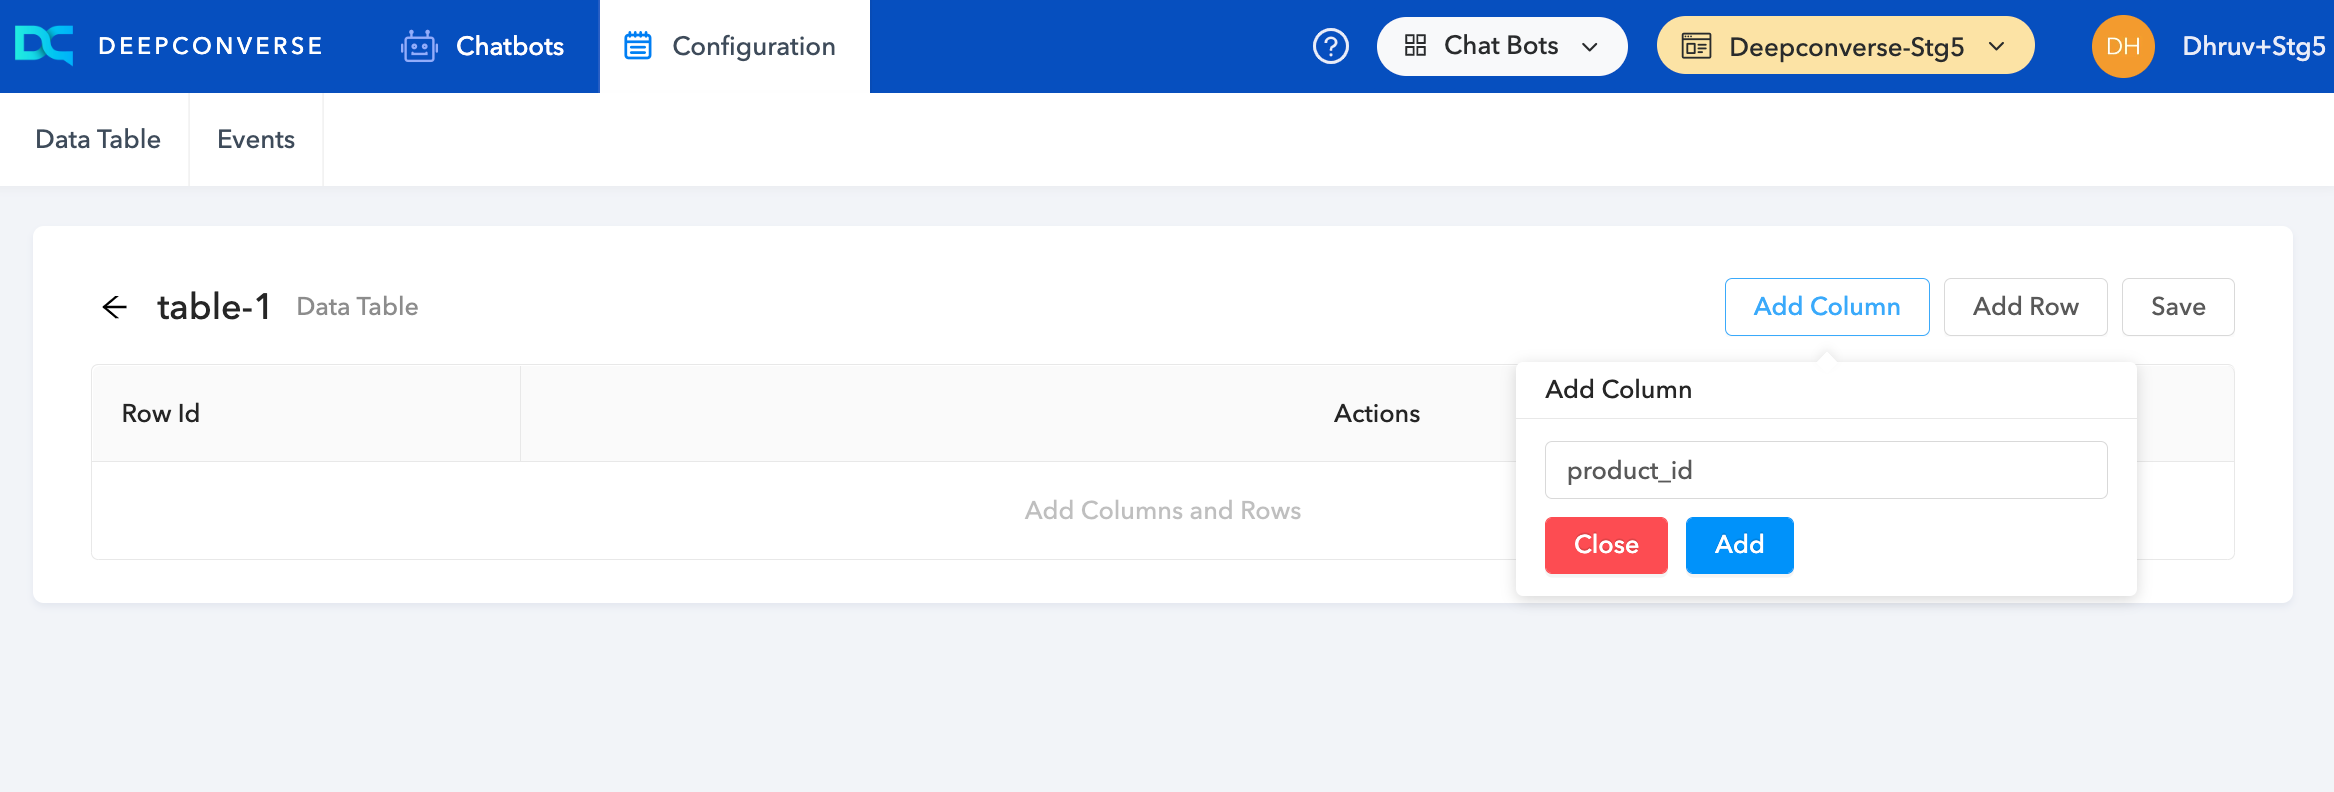
Data Tables can be created under **Chatbots** > **Configuration** > **New Data Table**
Once the table is created you can add any column by clicking **Add Column**
Once you have defined your columns you can click on **Add Row** to add the entries into your table.
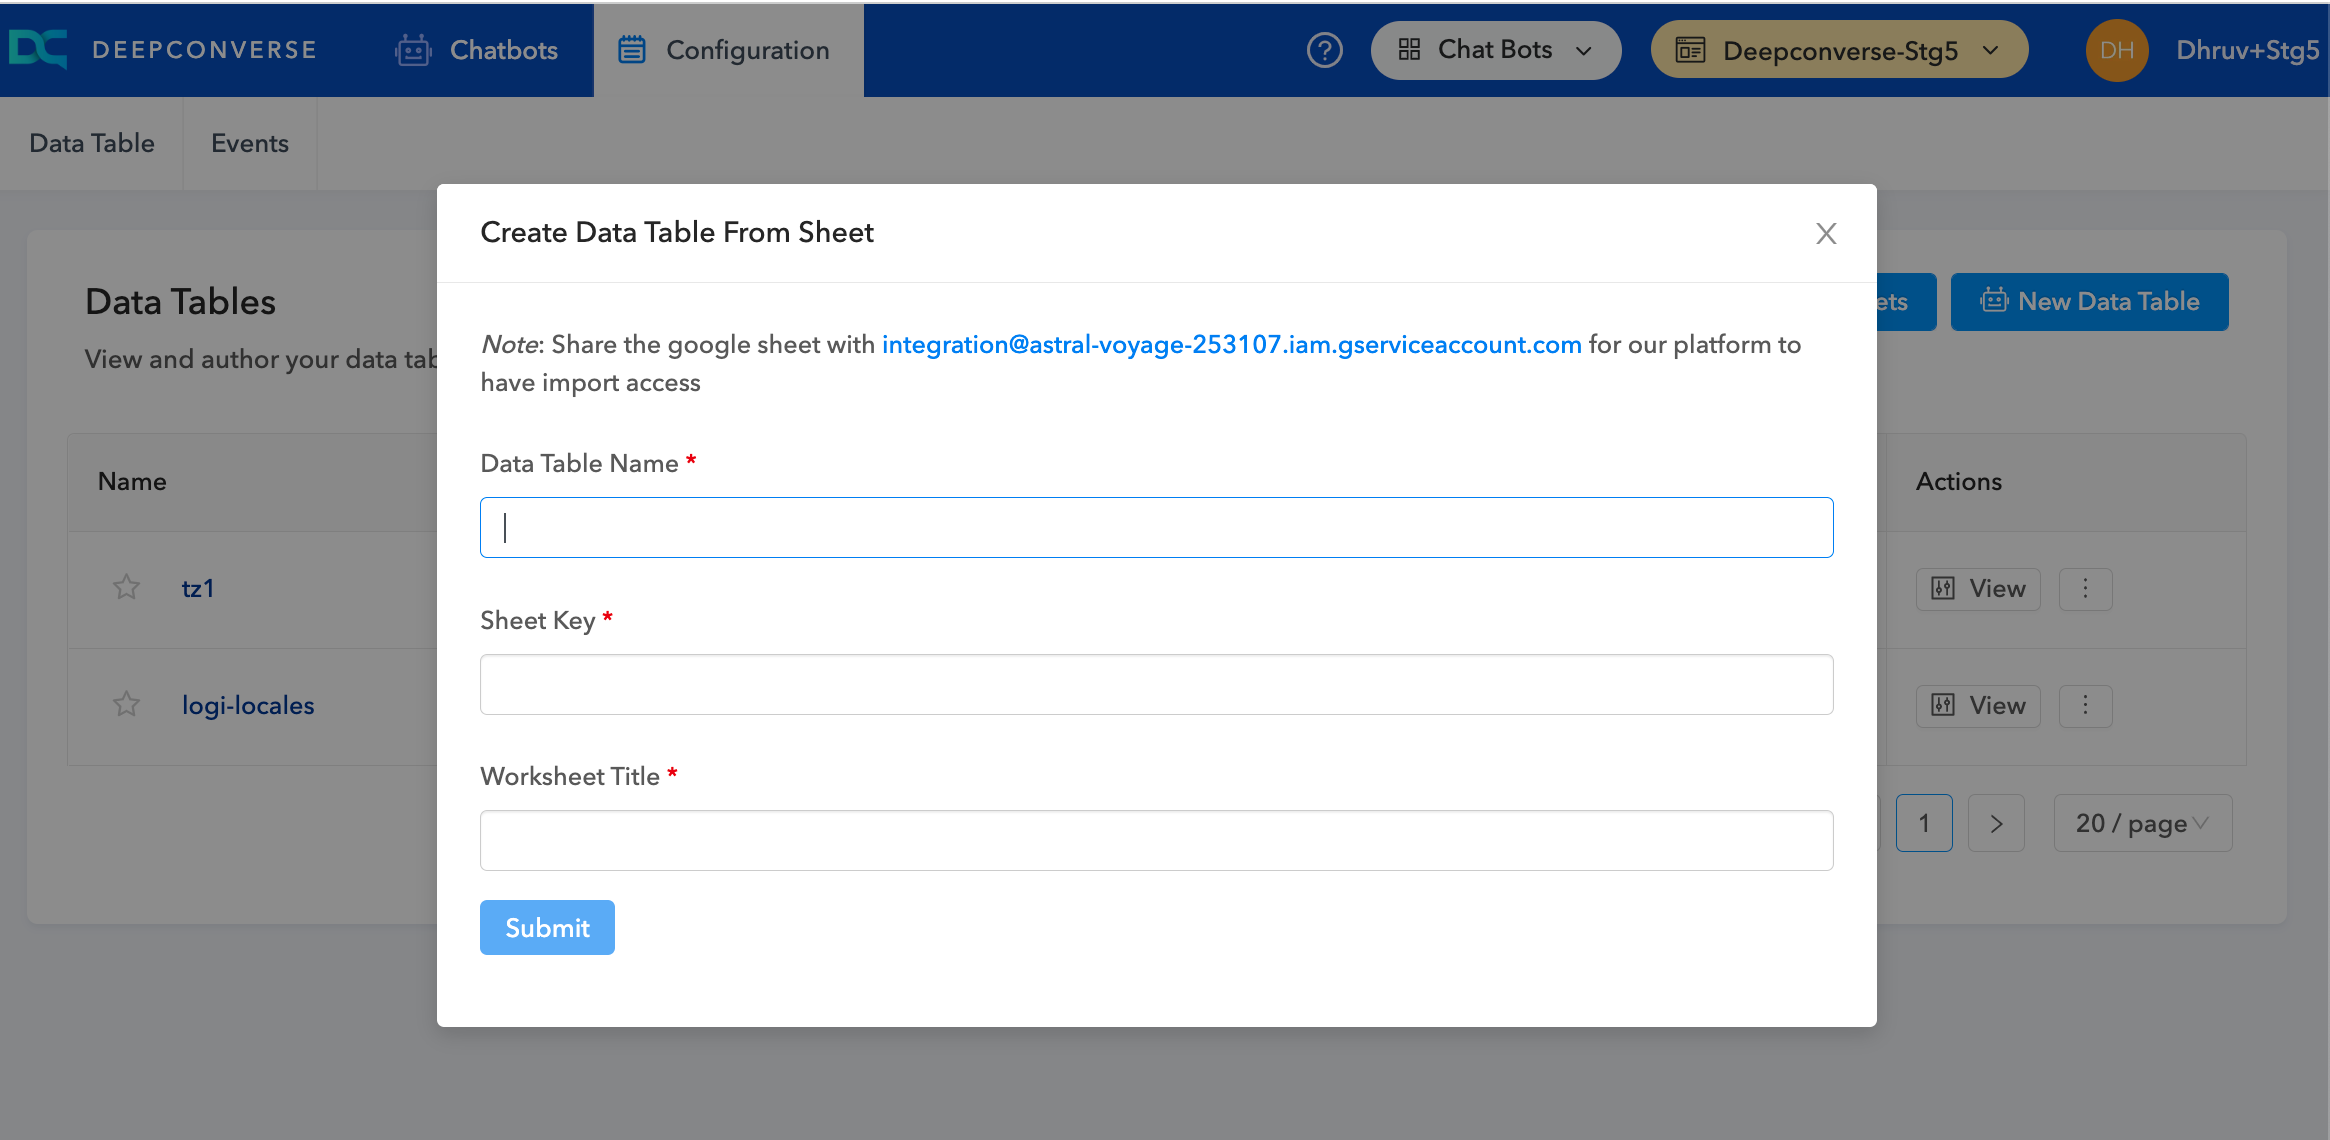
### Importing a Google Sheet as a Data Table
You can maintain your Data Table in an external Google Sheet shared within your organization and teams. It is very easy to import the sheet into DeepConverse.
To get started click on **Import from Google Sheet** on the Data Table page.
First share the Google Sheet with our integration account
[integration@astral-voyage-253107.iam.gserviceaccount.com](https://help.deepconverse.com/hc/en-us/articles/integration@astral-voyage-253107.iam.gserviceaccount.com)
In the dialog you will need to enter:
* *Table Name*
* *Sheet Key* (As shown below the highlighted part is the sheet key)
* *Worksheet Title* - Name of the sheet you are trying to import
On **Submit** you will be able to see the table.
***Note: To update the table just redo the import***
---
# Source: https://docs.deepconverse.com/product-docs/security/deepconverse-public-ips.md
# DeepConverse Public IPs
If you are making external calls from DeepConverse conversational and guide flows you can whitelist the following list of IPs:
```
34.216.138.143
```
---
# Source: https://docs.deepconverse.com/product-docs/chatbots/deploy.md
# Deploy
- [Chatbot Versioning](/product-docs/chatbots/deploy/chatbot-versioning.md)
- [iOS SDK](/product-docs/chatbots/deploy/ios-sdk.md)
- [iOS (Custom Webview)](/product-docs/chatbots/deploy/ios-sdk/ios-custom-webview.md)
- [Android SDK](/product-docs/chatbots/deploy/android-sdk.md)
- [Adding widget to your Zendesk Help Center](/product-docs/chatbots/deploy/adding-widget-to-your-zendesk-help-center.md)
- [Adding widget to your website](/product-docs/chatbots/deploy/adding-widget-to-your-website.md)
- [Custom Initialization and Passing Metadata](/product-docs/chatbots/deploy/custom-initialization-and-passing-metadata.md)
- [Open chatbot via Javascript](/product-docs/chatbots/deploy/open-chatbot-via-javascript.md)
- [Adding widget to your Shopify Store](/product-docs/chatbots/deploy/adding-widget-to-your-shopify-store.md)
- [Adding the widget to Shopify via the Theme editor embed block](/product-docs/chatbots/deploy/adding-widget-to-your-shopify-store/adding-the-widget-to-shopify-via-the-theme-editor-embed-block.md)
---
# Source: https://docs.deepconverse.com/product-docs/guides/embedding-guides-in-chatbots.md
# Embedding Guides in Chatbots
Guides can be embedded into the chatbot using the Guide block.
{% content-ref url="../conversational-flow-builder/conversation-blocks/guide-blocks/guide-chatbot" %}
[guide-chatbot](https://docs.deepconverse.com/product-docs/conversational-flow-builder/conversation-blocks/guide-blocks/guide-chatbot)
{% endcontent-ref %}
Customers can go through Guides in the chatbot and troubleshoot issues seamlessly. Here is an interaction example.
{% embed url="" %}
### Events
When a customer goes through a Guide there can be three outcomes.
1. Solved
2. Unsolved
3. Skipped
For Solved/Unsolved we track that as an Answer Feedback given for the specific guide that is presented to the customer.
You can make use of the emitting events on the transitions if you want to mark the chatbot conversation as Successful or Unsuccessful.
---
# Source: https://docs.deepconverse.com/product-docs/guides/embedding-guides-on-your-website.md
# Embedding Guides on your website
Guides can be added to your website via two methods. You can either embed a specific Guide directly on a webpage or have the Guide open in a popup on the page. Both these methods are fairly simple and allow flexibility in adding Guides to your websites.
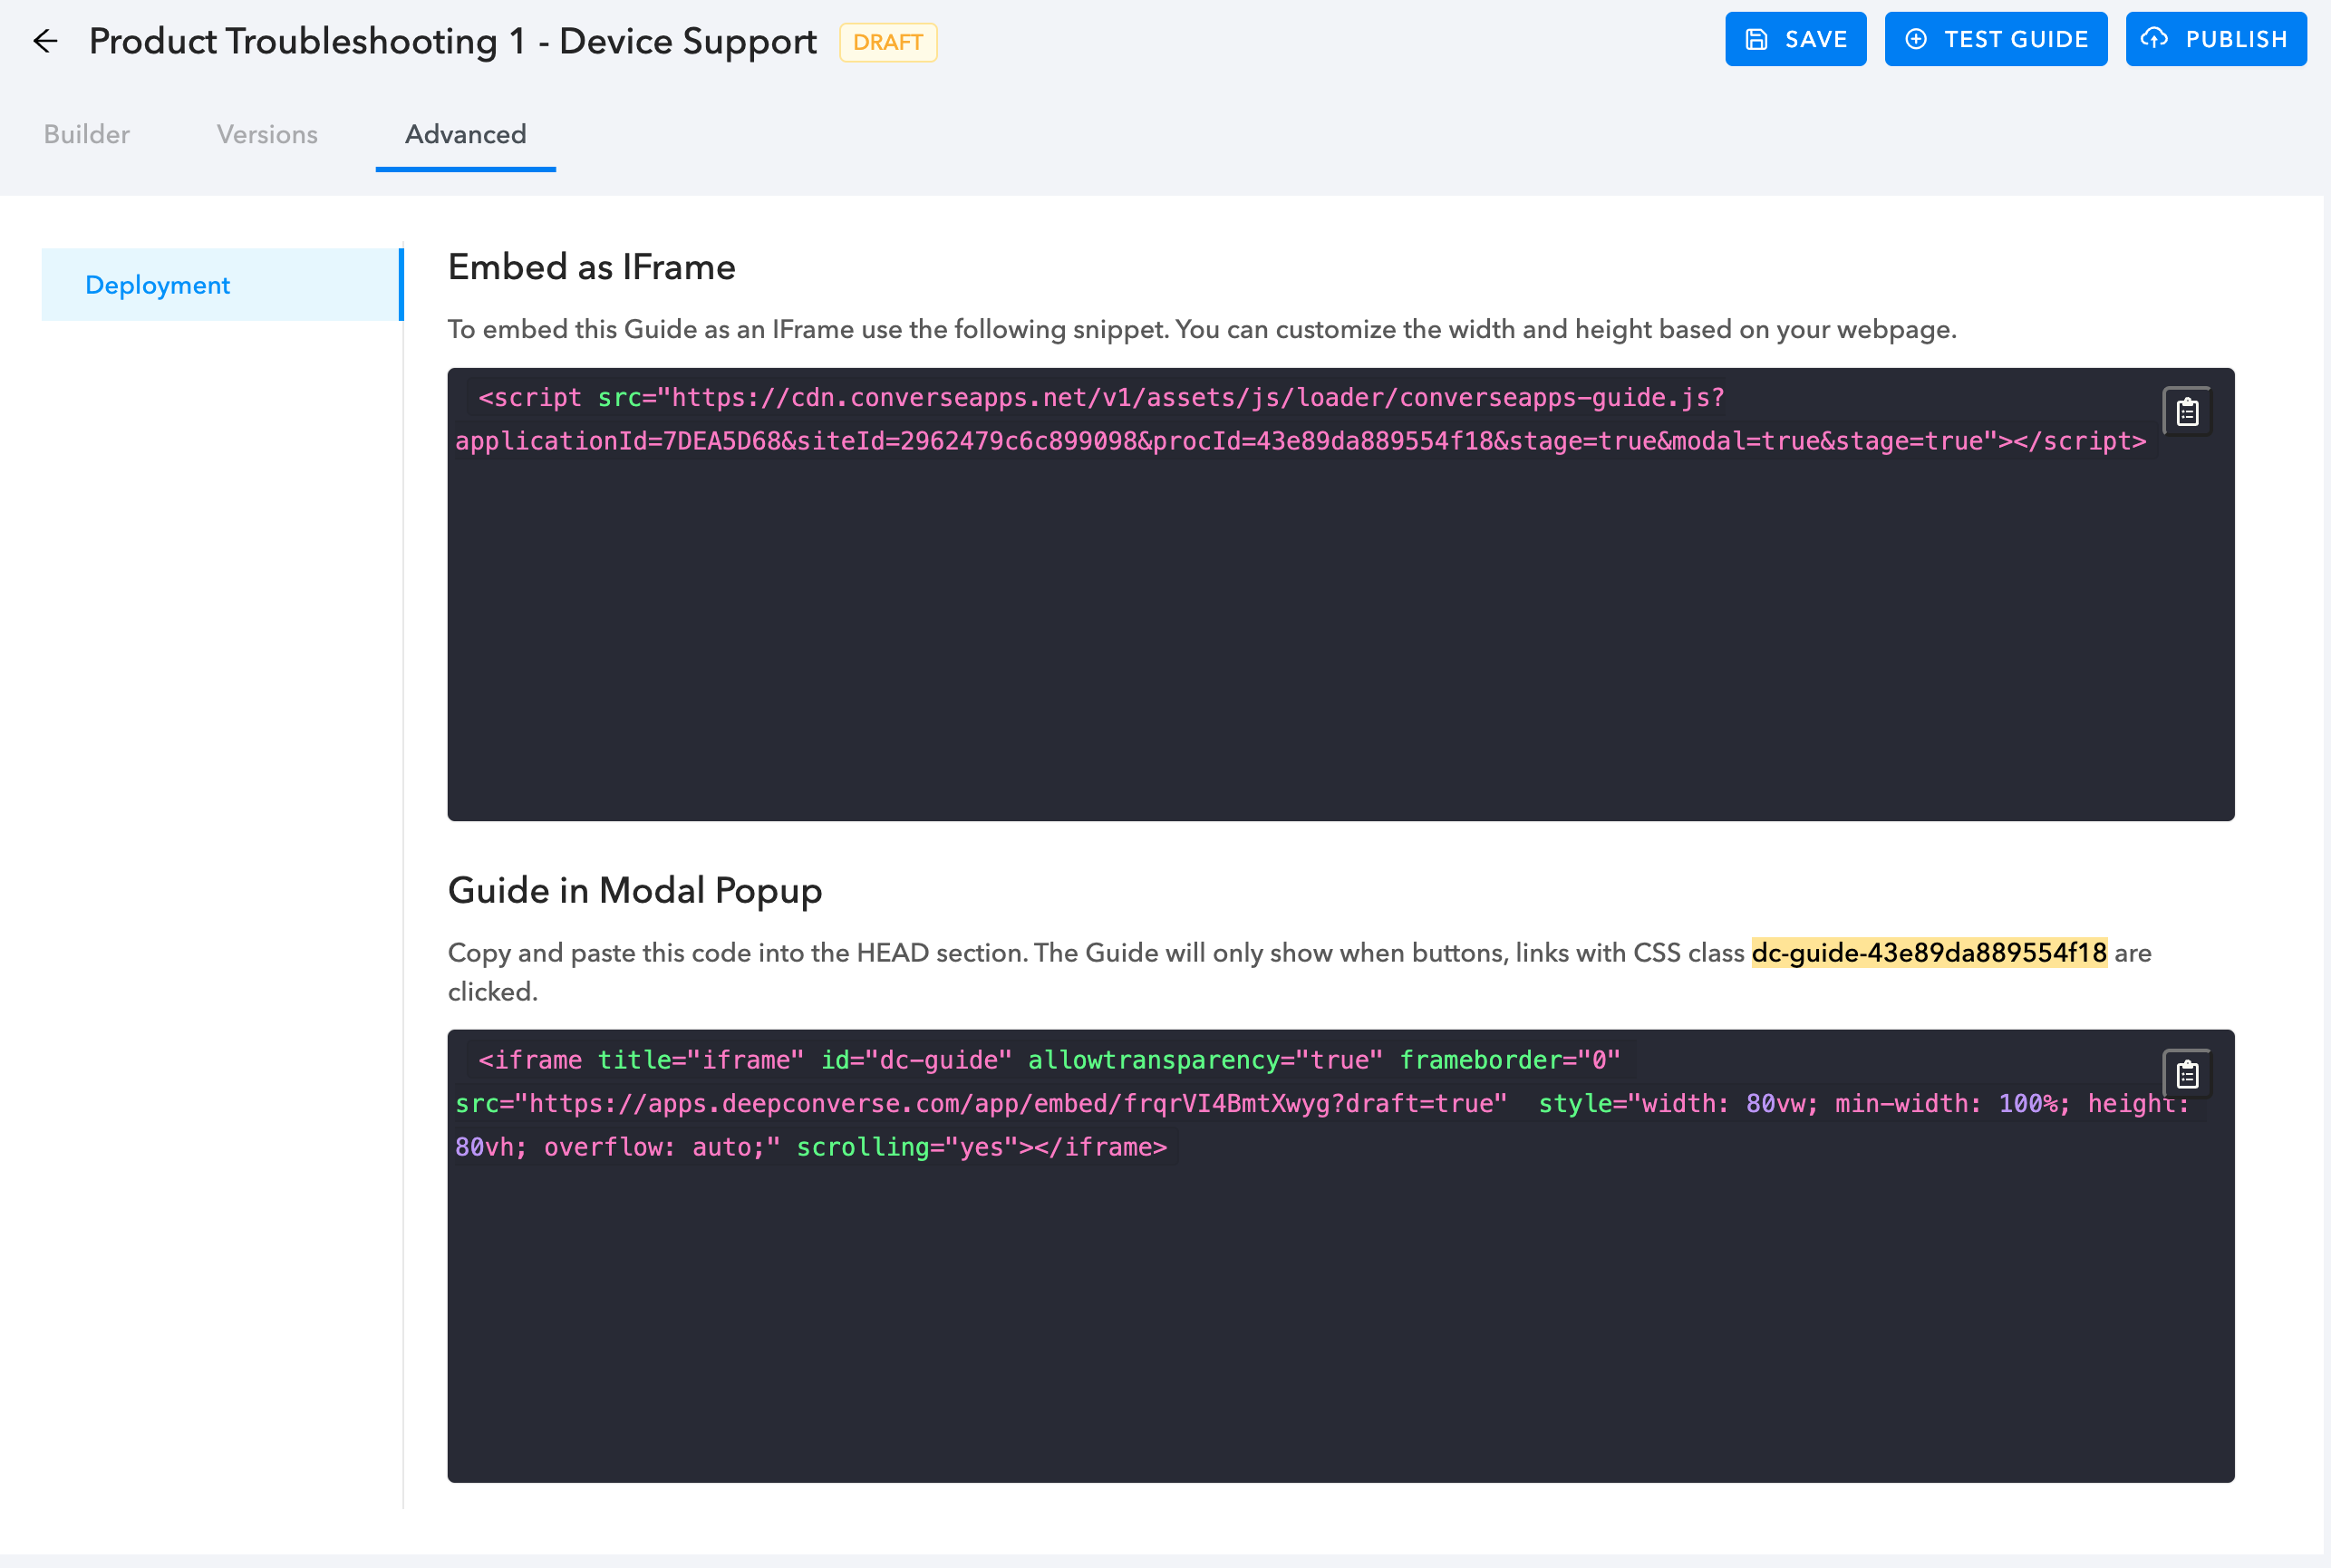
### Embed a Guide on a Webpage
Each Guide has a unique URL that can be used to open it. To embed the Guide in your webpage you can use the URL and add it as an IFrame on the webpage.
To get the IFrame code snippet Open the Guide you would like to deploy and click **Advanced** **>** **Deployment**.
### Show Guide in a popup Modal
We also support showing a Guide in a modal popup. This allows use of the majority of the screen a user has with the Guide in focus. We provide a lightweight script that runs an IFrame Guide in a modal window.
The modal is shown when any of the HTML elements (such as buttons, links etc.) containing the CSS class **dc-guide-{guide\_id}** are clicked.
---
# Source: https://docs.deepconverse.com/product-docs/analytics/export-api.md
# Export API
{% hint style="info" %}
This feature is only available with the **Enterprise** plan
{% endhint %}
We provide ability for you to export conversations and messages for internal analytics, GDPR or storage purposes at your premises.
The Export API consists of two endpoints:
* Conversations
* Conversation data along with metadata and parameters
* Messages
* Individual messages exchanged between customers, agents and chatbot
### Usage Limitations
The API is accessing data from our archive and storage. To ensure a smooth experience we enforce the following limitations:
#### Rate Limit
The API is limited to 3 requests / per second per endpoint.
#### Page Size
Exports utilize a cursor based iteration. Each call is limited to 1000 records that can be exported.
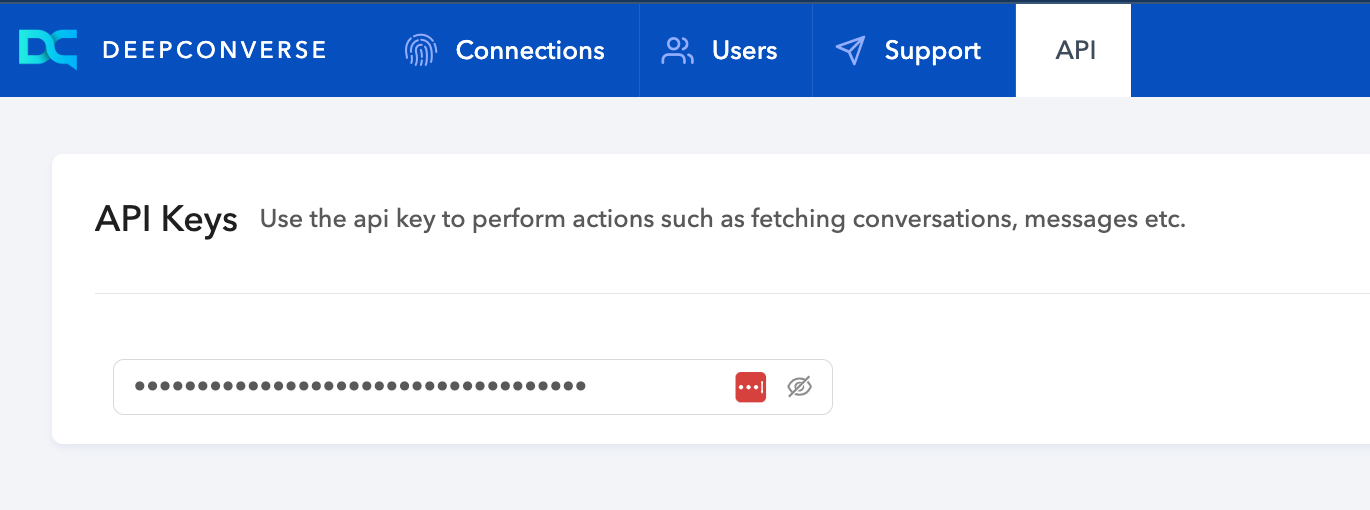
### API access token
You will need your API access token to export the data. Your account access token can be found in the dashboard and is only accessible to the site admin.
You will find this under **Account** > **API**
---
# Source: https://docs.deepconverse.com/product-docs/security/generative-ai-technical-security-measures.md
# Generative AI - Technical Security Measures
{% hint style="info" %}
This document applies to our Generative AI features used in the platform
{% endhint %}
The following document builds on the technical and organizational security measures that are in place and addresses specific questions relating to use of Generative AI in our products:
### Data Processors
DeepConverse has a process for vetting data processors to ensure that any customer data that is processed by an external entity adheres to the standards of maintaining data security and privacy. We make use of the following platforms to serve Generative AI models.
* Azure OpenAI
* AWS
* Google Cloud (Future)
#### Azure Open AI
* Azure data centers are located in the US
* GPT-3.5 & GPT-4 used dependent on use cases
* Safeguards in place
* Data is not used to train other models
* Compliance in place ([Azure Trust Center](https://www.microsoft.com/en-us/trust-center/product-overview))
* Retention
* Microsoft may store data for up to 30 days to detect abuse. DeepConverse is currently in the process of adding an option to reduce this time as well.
* Difference between OpenAI and Azure OpenAI
Azure OpenAI is a fully managed service offered by Microsoft Azure. It comes with SLAs, security and reliability to support enterprise use cases.\
|
| ChatGPT WebApp | Microsoft Azure OpenAI ChatGPT APIs |
| ---------------------- | ------------------- | ----------------------------------- |
| Access method | WebApp / IPhone App | API only |
| Data retention | Undefined | 30 days for Moderation only |
| Data used for Training | Yes | No |
| Control over PII data | None | PII can be filtered out |
\
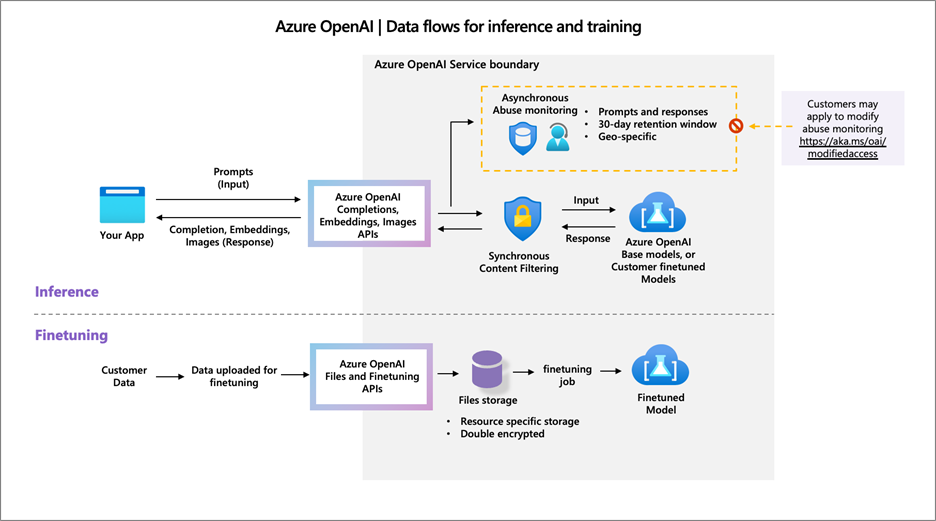
Data Flow diagram for Azure OpenAI
### PII and PHI Handling
DeepConverse does not make use of PII to provide answers and capabilities in the platform. PII and PHI are removed from the information being sent to Generative models.
* PII is retained only till needed for the conversation, for:
* Case creation
* API lookups that need PII
* Configurable duration
* Minimum 15 days\
* Post Conversation
* PII is removed
* Non-PII Data is retained for analytics and DeepConverse model improvement\
* PII Processed for Flow Execution
* User messages
* Problem Specification:
* PII (mostly during case creation)
* Name
* Email
* Zip code, Order Number etc
### Hallucinations
Generative AI models due to their generative nature can hallucinate i.e. give textual output that is most probable based on the input being provided. The models are outputting the content word by word on the likelihood of it being most probable.
* DeepConverse makes use of Retrieval Augmented Question Answering to provide ground truth data to the models and reason out the answer. This approach reduces the risk of hallucination as we do not allow the model to use its memory.
* DeepConverse also checks for sources of the information being generated. If we cannot determine the source we understand that the likelihood of the content being a hallucination is higher.
* We make us of reasoning capabilities of LLMs to reduce hallucinations
* All Generative AI actions are logged and available for review for our team to identify potential hallucinations and place more safeguards as we iterate on improving the models.
---
# Source: https://docs.deepconverse.com/product-docs/voice-bot/getting-started-with-voice-bots.md
# Getting Started with Voice Bots
In this section you will learn how to build bots that can be deployed on the voice / phone channel. The voice bots are capable of handling calls, providing answers and executing complex workflows using AI and Automation.
Voice bots are built using the same core building blocks as the chatbots.
{% hint style="warning" %}
This is feature is in **ALPHA**. For more information contact the DeepConverse team.
{% endhint %}
### Importance of voice bots
Voice bots built on the DeepConverse platform integrate with the business's contact center. Once a voice bot has been set up, customers can interact in human like conversations. The voice bots make use of:
1. **Speech to text (STT)** module to listen to the request of the customer, transcribe it and provide it to DeepConverse platform.
2. DeepConverse platform handles the **Natural language understanding** performing the relevant actions and composing a reply.
3. **Text to speech (TTS)** module to take the reply and convert it to human voice to be played back to the customer.
### Considerations
1. Currently voice bots are optimized for handling support calls in English
2. Many of the platform blocks are interoperable between the voice and chat channels. That said due to the difference in the channel and expectation from customers certain channel specific behavoirs are introduced. This helps handle complex use cases better within the conversation.
---
# Source: https://docs.deepconverse.com/product-docs/integrations/supported-integrations/gorgias.md
# Gorgias
You can create a connection with Gorgias from [Admin Dashboard.](https://admin.deepconverse.com/dashboard)
1. Navigate to the **Account section**.
2. Click on **Add Connection** to add the connection
3. Select Gorgias
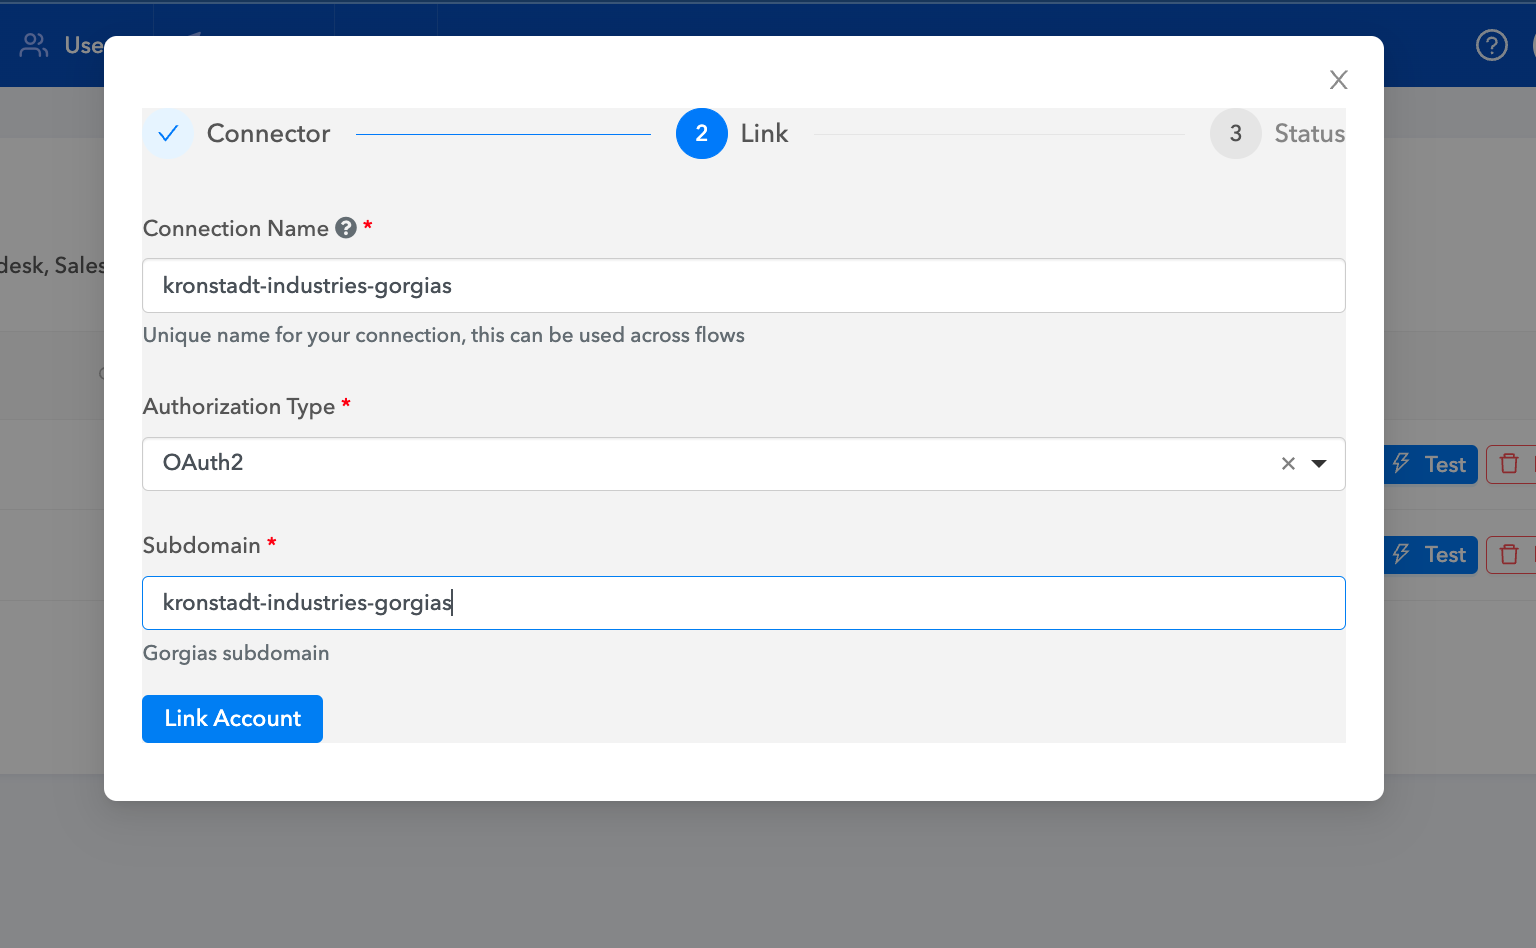
4. Provide the connection name
5. Select Authorization Type
* OAuth2
6. Enter the Gorgias subdomain
7. Click on Link Account
8. Login with your Gorgias account credentials
9. Allow access for permissions
10. Click on Test Connection to test the response of your connection.
Account Subdomain
{% hint style="info" %}
*If the Gorgias URL is **xyz123.gorgias.com** subdomain value is **xyz123***
{% endhint %}
---
# Source: https://docs.deepconverse.com/product-docs/conversational-flow-builder/conversation-blocks/guide-blocks.md
# Guide Blocks
- [Guide Step (Guide Flow)](/product-docs/conversational-flow-builder/conversation-blocks/guide-blocks/guide-step-guide-flow.md)
- [Solved Block](/product-docs/conversational-flow-builder/conversation-blocks/guide-blocks/solved-block.md)
- [Unsolved Block](/product-docs/conversational-flow-builder/conversation-blocks/guide-blocks/unsolved-block.md)
- [Guide (Chatbot)](/product-docs/conversational-flow-builder/conversation-blocks/guide-blocks/guide-chatbot.md)
---
# Source: https://docs.deepconverse.com/product-docs/conversational-flow-builder/conversation-blocks/guide-blocks/guide-chatbot.md
# Guide (Chatbot)
You can use the Guide node to reference a Guide in the chatbot. You can drag the Guide node and the choose the specific Guide that you want the customer to go through.
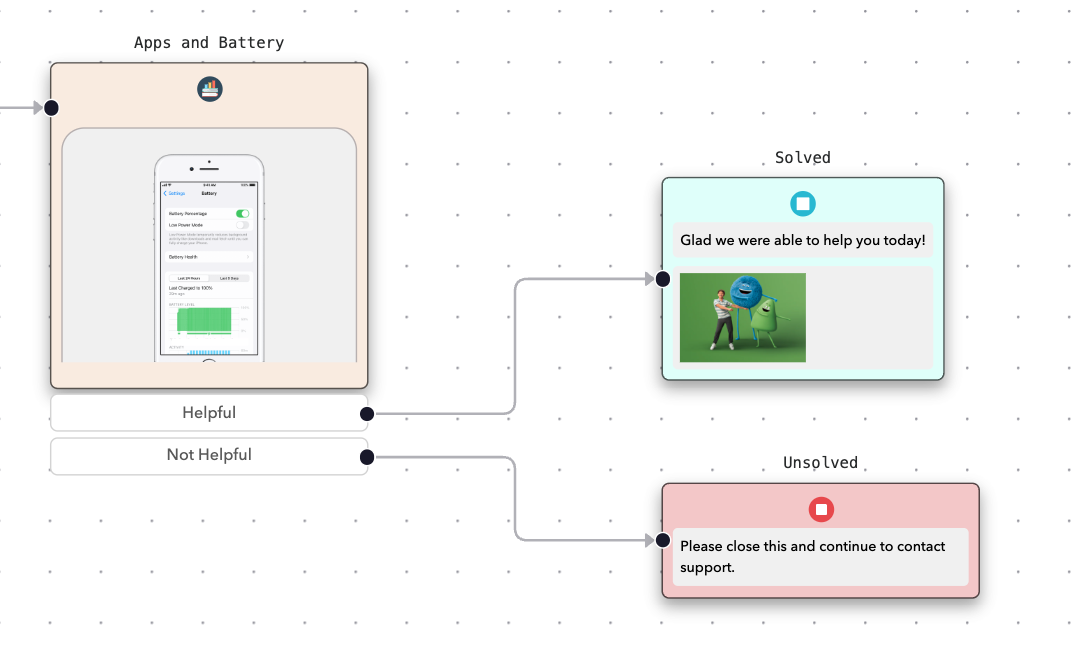
The Guide block has three transitions dependent on the outcome of the guide.
#### Solved
Customer goes through the Guide and reaches a Solved step. At this point you can connect Solved transition to how you want to respond to the customer.
#### Unsolved
Customer goes through the Guide and reaches a Unsolved step. At this point you can connect Unsolved transition to how you want to respond to the customer.
#### Skipped
Customer goes through the Guide and closes the Guide without completing it or reaching a Solved/Unsolved state. At this point you can connect Skipped transition to how you want to respond to the customer.
---
# Source: https://docs.deepconverse.com/product-docs/conversational-flow-builder/conversation-blocks/guide-blocks/guide-step-guide-flow.md
# Guide Step (Guide Flow)
You can build your interactive guide very easily and quickly with the help of **Guide Step** node. The node contains the following sections:
1. Title
2. Sub Title
3. Content for the step
4. Question
5. Media (Images/Video)
To add the details on the node click the **Edit** button after selecting the Guide Step
---
# Source: https://docs.deepconverse.com/product-docs/guides/guide-theme-customization.md
# Guide Theme Customization
All the Guides built can be customised to align with your brand identity. With DeepConverse’s intuitive Theme Customization tool, you can now effortlessly set the tone for your Guides and tailor it precisely to your business needs. This feature puts the power of design in your hands.\
\
Where to Find:\
\
To access the Guide theme settings in the DeepConverse dashboard, proceed to the third icon located on the leftmost side of the screen. Upon hovering over this icon, a submenu will appear, presenting various options. Within this submenu, locate and select the 'UI' option. Clicking on 'UI' will take you to the Guide theme settings page.
\
Page Overview:\
\
The page consists of two parts:\
\
1\. Settings:- This section of the page allows us to control the entire theme settings, make changes to it, write custom scripts etc.\
\
2\. Guide View:- This section of the page allows us to view the changes made to the theme in real time and the same would reflect in production.
\
\
\
We will now explore the various elements within the ‘Settings’ section of the page.\
\
Theme settings:\
\
1\. The first option under theme settings offers a dropdown which lets the user choose a theme for the Guides to have. There is also a button next to the dropdown labelled ‘New’ which allows a user to create a custom theme to implement on the Guides. By default, you will see ‘default\_guide\_theme’in the dropdown.\
\
2\. The next option is to set the Header Logo. This logo in a Guide shows up while it is loading and also on the top of the Guide. Users will need the logo URL to be able to add a header to the Guide.\
\
Header Logo while loading of the Guide:\
\
\
Header Logo when the Guide is running:\
\
\
3\. Header Logo Height and Width:\
\
Users can customise the uploaded logo by setting the logo height and width as per their wish to meet their business requirements for a better experience.\
\
4\. Primary Colour:\
\
The colour set over here acts as a primary colour for all the Guides and can be defined in multiple ways such as choosing the colour directly, defining the Hex code for a colour, defining RGBA and can also be chosen from a spectrum. Primary colour affects all the clickable elements in a Guide.\
\
\
Configuration Settings:\
\
This section consists of 3 sub parts which are as below:\
1\. Launcher\
2\. External Styling\
3\. External Scripts\
\
Launcher:\
\
This sub part further consists of 4 options which can be enabled or disabled by the user as per the business requirements. They are listed as below:\
\
1.1 Show History - This option allows the user to take a glance on the path they have taken through the guide to reach a particular solution. Disabling this will remove the option for users to view the path covered.\
\
Button to check history:\
\
\
Upon clicking the History button, users can check the path traversed.\
\
\
1.2 Show Header - This setting allows the user to either show/hide the header basis the requirement.\
\
1.3 Show Restart - Enabling or disabling this option will determine whether the ‘Start Over’ button is displayed or hidden for users. This button allows users to initiate a guide restart at any juncture throughout the resolution process.\
\
1.4 Continue on End - This feature grants users the ability to backtrack to any step upon completing a guide. Activating this option will present users with a 'Back' button upon reaching the guide's conclusion, facilitating the correction of previously chosen options.\
\
\
\
2\. External Styling:\
\
External Styling consists of two options inside it. The first option is CSS styling and the second option is to add a stylesheet.\
In case a user wants to go beyond the default customisation options provided to modify any elements in the Guide, they can implement a custom CSS here to achieve the same. Selecting this option will open an editor for the user to write their style and upon saving the same should reflect on the UI.\
\
Additionally, if a user has a set of styles defined in a stylesheet, the user can insert its link to achieve the defined style in the guide. Also the user can have multiple stylesheets added to achieve their requirement.\
\
\
3\. External Scripts:\
\
Users have the capability to integrate a JavaScript code or segment within this interface to attain specific stylistic or functional enhancements tailored to their needs. Opting for this feature will initiate an editor, enabling users to compose their script, and subsequent saving will seamlessly manifest the alterations on the user interface. Whether through the inclusion of an inline script or by referencing a script via URL, this functionality empowers users with comprehensive autonomy to customize their guide according to individual preferences.
{% embed url="" %}
---
# Source: https://docs.deepconverse.com/product-docs/guides/how-to-copy-guides-across-sites.md
# How to copy Guides across sites
{% hint style="info" %}
Applies to customers with **Multi-Site** deployment feature on our **Enterprise** plan
{% endhint %}
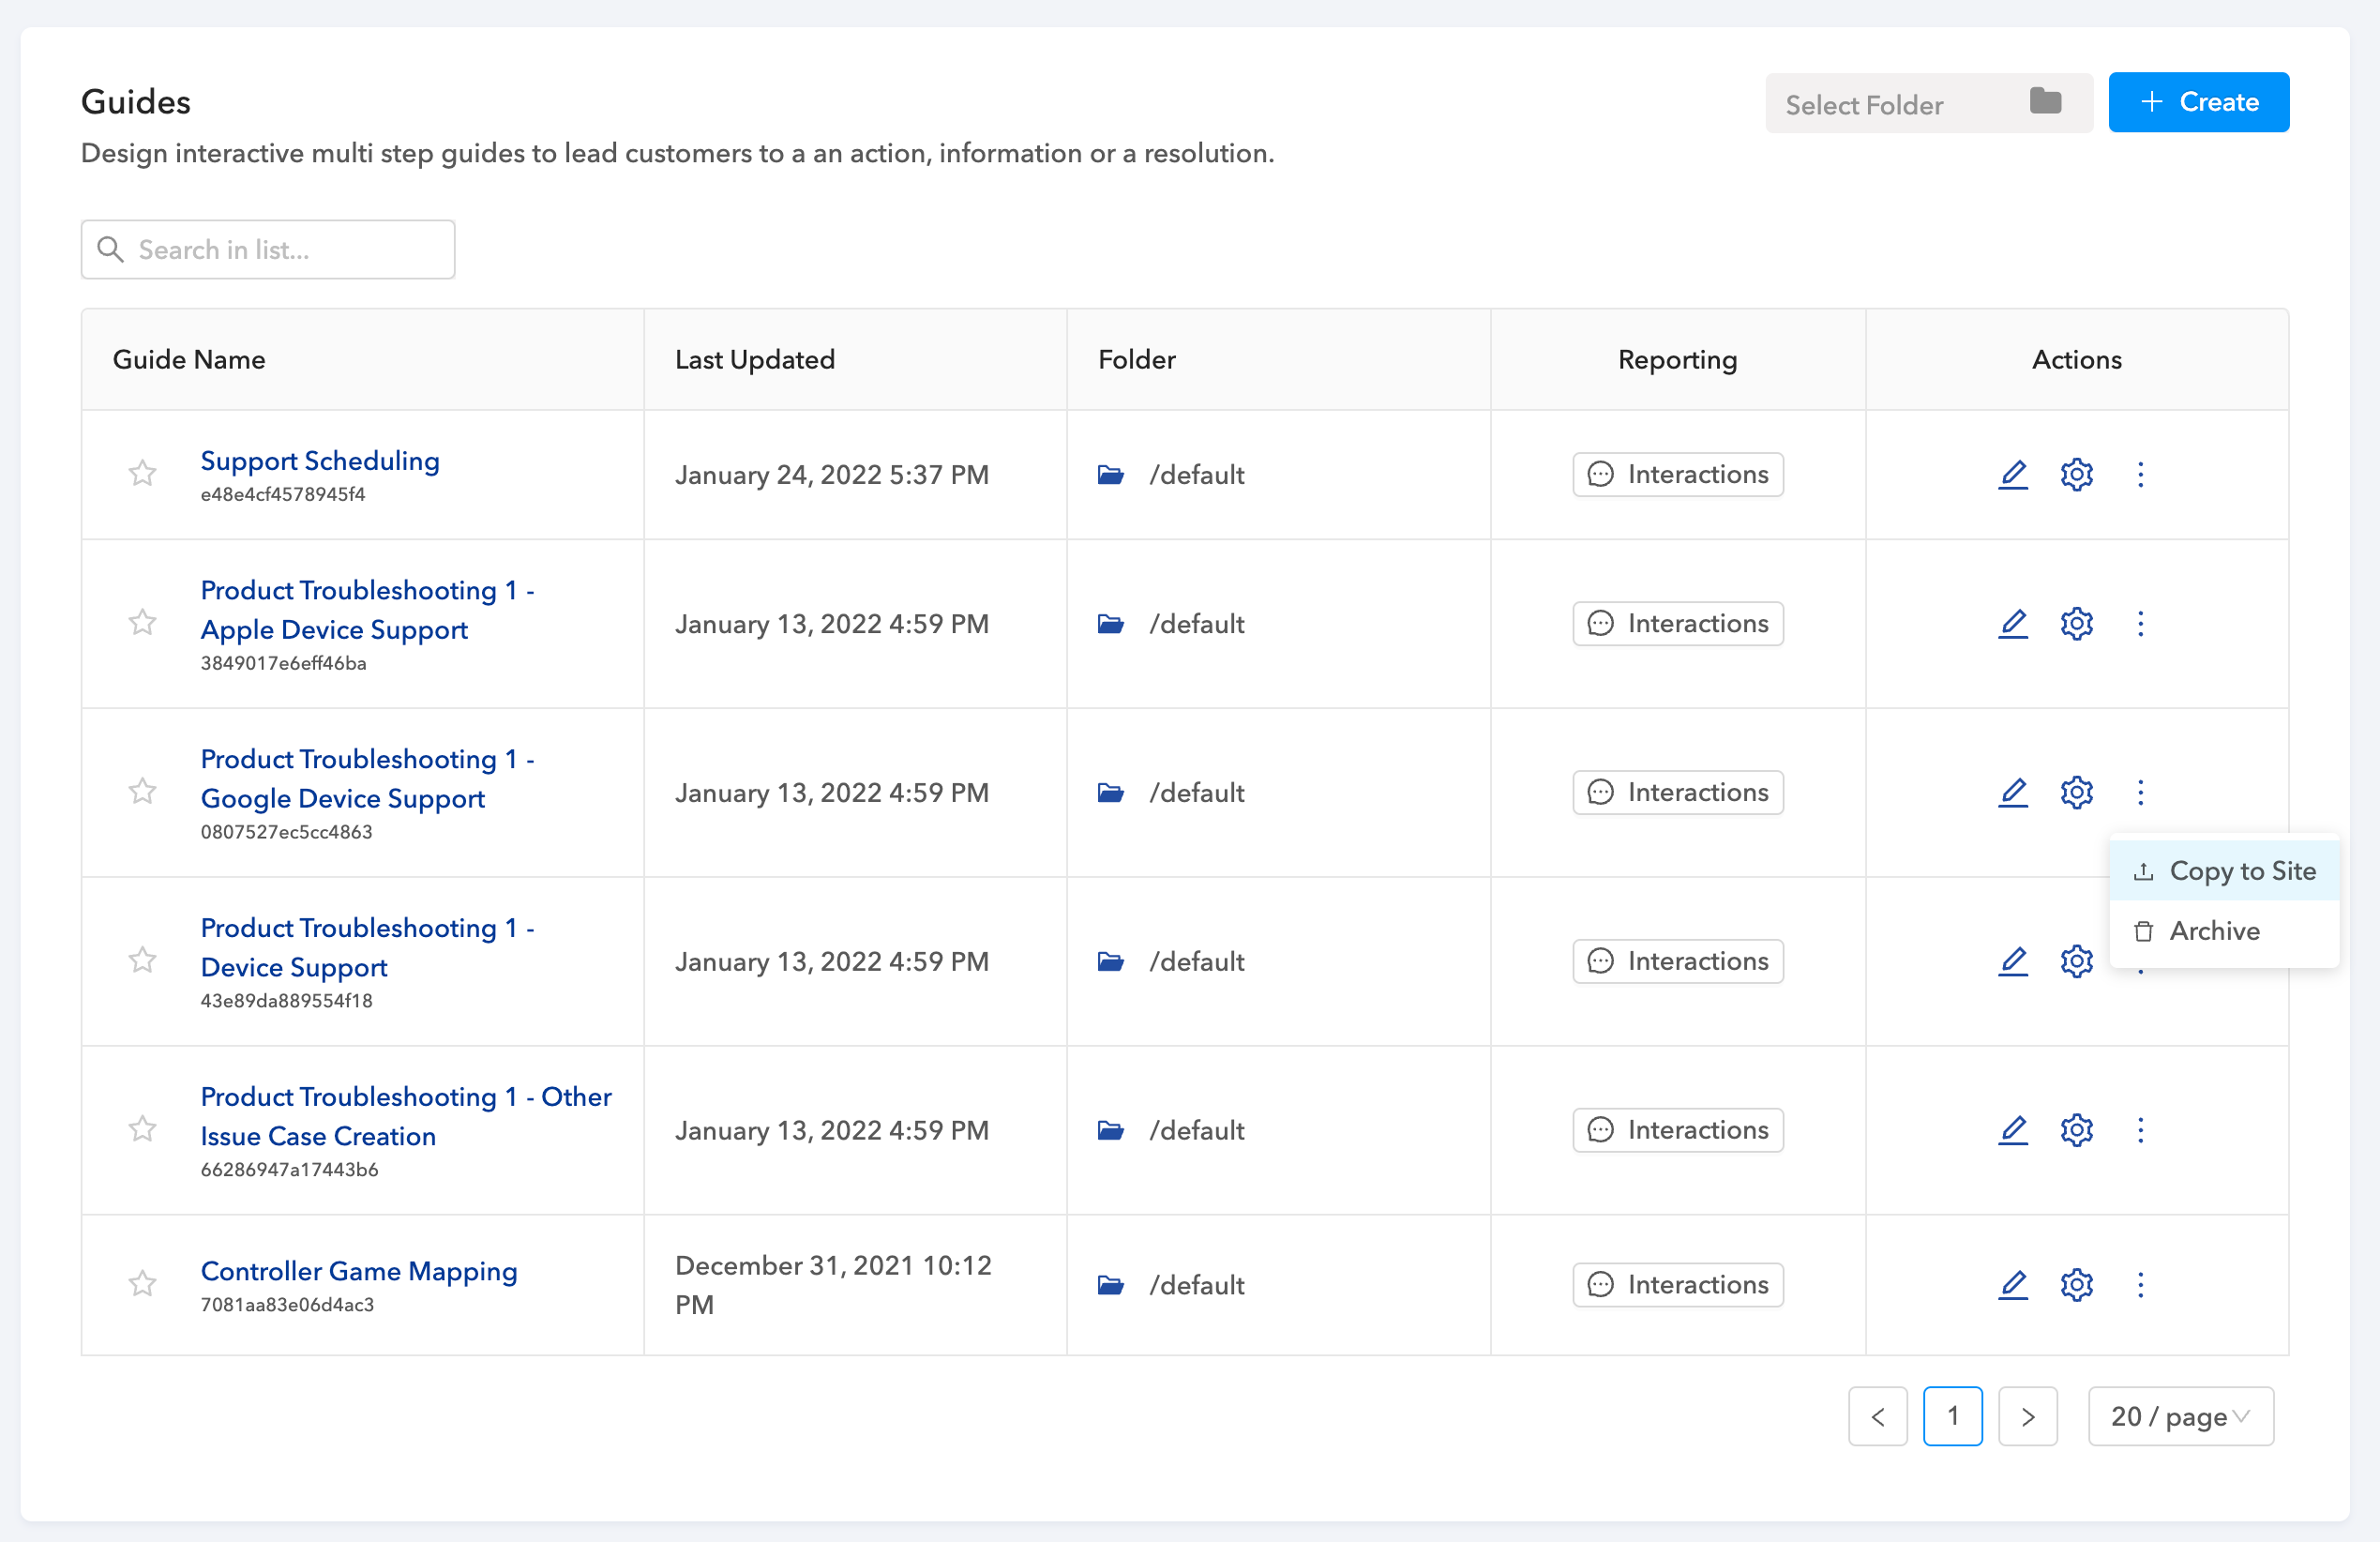
If you have Guide flows that you would like to copy across to another site, you can follow the steps below.
1. Navigate to [Guide Flows](https://admin.deepconverse.com/guide/list) page
2. Hover over the menu of the flow you would like to copy and select **Copy to Site**
3. Select the target site you would like to copy to
4. After selecting the site click **OK**
5. The flow would be copied to the target site and is now available for use.
#### Notes
* When you copy a guide flow to a site that already has the flow id, *a new version would be created for that guide under the same flow id*
* If the target site does not have the flow id a new flow will be created with the latest version being copied.
---
# Source: https://docs.deepconverse.com/product-docs/chatbots/advanced-functionality/channel-specific-functionality/zendesk-sunshine-conversations/how-to-handle-image-and-file-uploads-in-zendesk-sunshine-conversations.md
# How to handle image and file uploads in Zendesk Sunshine Conversations?
When using the Zendesk Sunshine Conversations channel you can accept file and image attachments from customers. This allows supporting use cases such as:
* Returns Automation
* Proof of Purchase Validation
* Product Documentation
Customers can upload file/images at any point in the conversation. These out of bound uploads are maintained in the conversation in Zendesk.
If you would like to accept a file/image upload at a certain point you case use the **Zendesk Sunshine Conversations File Upload** add on. What this does is wait for the user to upload a file and then progress the flow to the next step.
Example flow using the file upload:

#### File Parameters
After the user uploads you will have access to the following parameters:
| **Parameter** | **Purpose** |
| ------------- | ---------------------------------------------- |
| fileName | Name of the file uploaded by the customer |
| fileUrl | Media URL hosted by Zendesk |
| fileType | Mime type of the file uploaded by the customer |
For additional details about supported file types and sizes refer to [Sunshine Conversations documentation](https://docs.smooch.io/guide/validating-files/)
### User Experience
Here is the conversation flow in action on Zendesk Sunshine Conversations web widget:
{% embed url="" %}
---
# Source: https://docs.deepconverse.com/product-docs/chatbots/advanced-functionality/channel-specific-functionality/zendesk-chat-classic/how-to-handoff-conversations-to-zendesk-chat-classic.md
# How to handoff conversations to Zendesk Chat (Classic) ?
In a chat conversation you can escalate to Zendesk Chat agents by connecting the conversation from the chatbot to Zendesk Classic Chat widget.
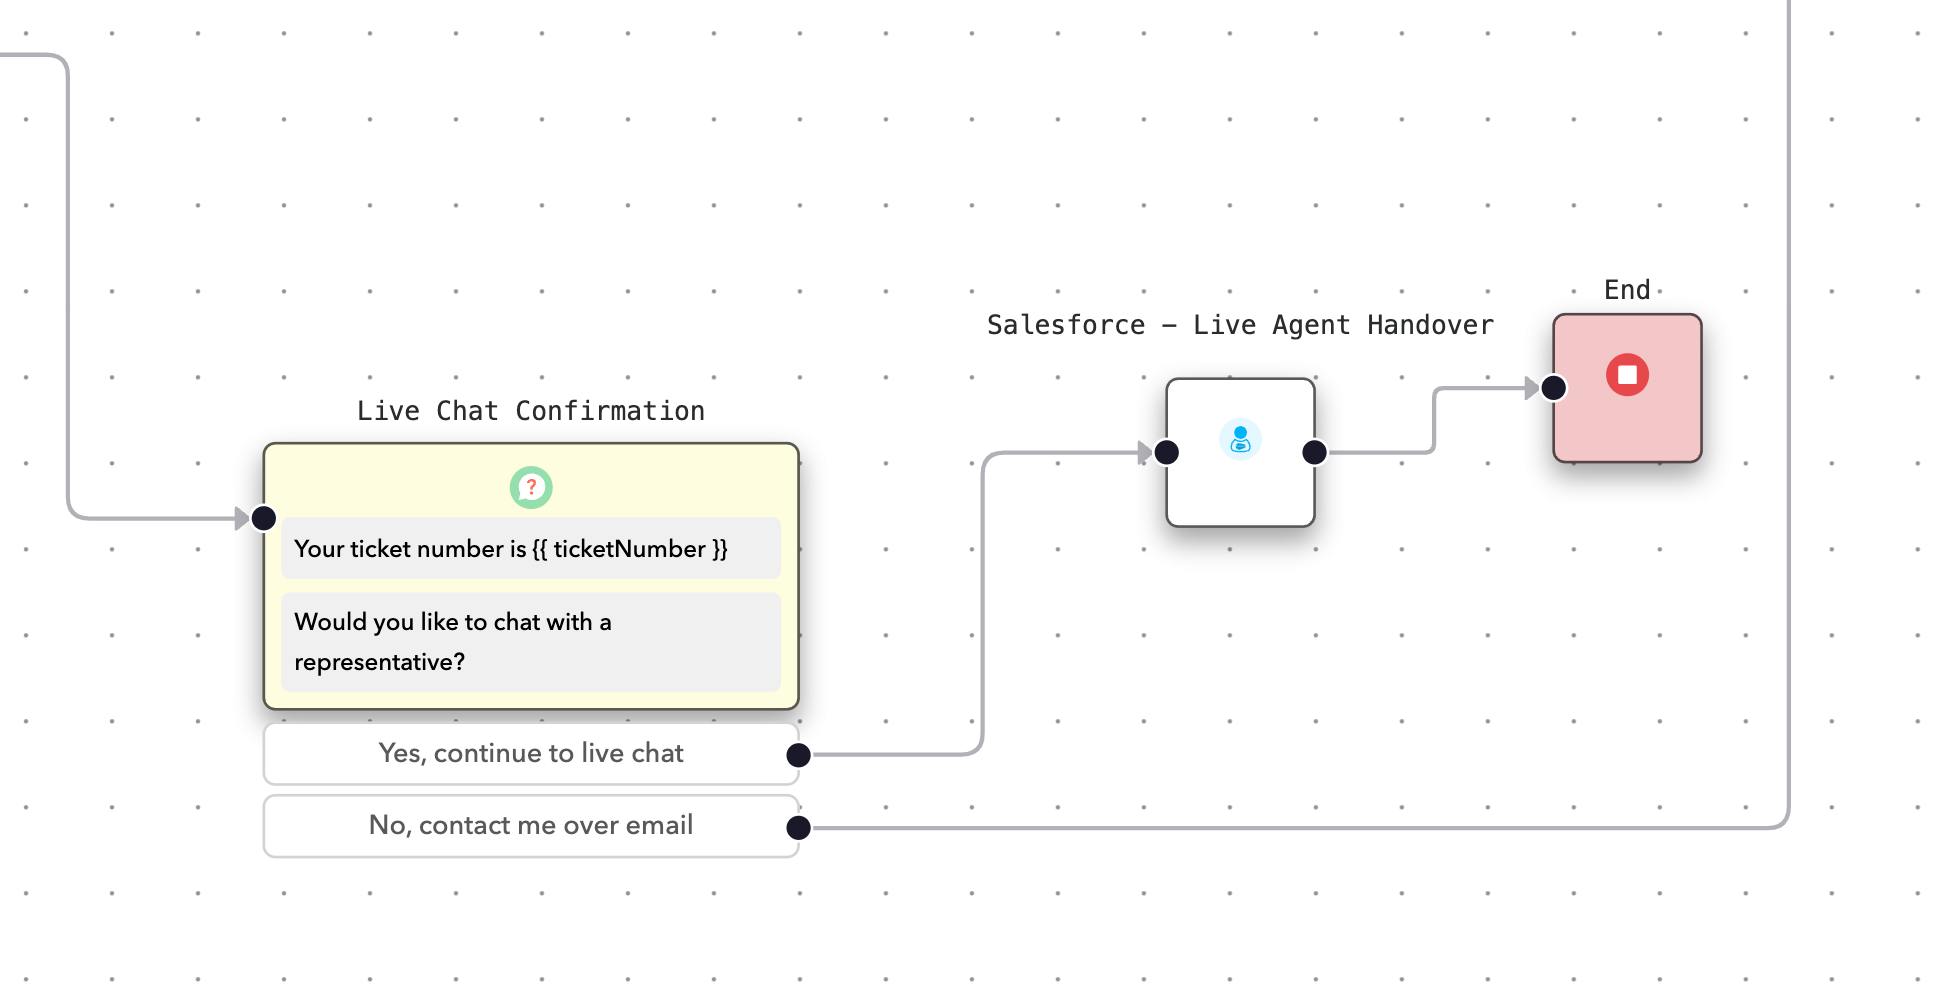
In order to achieve this you will drag the **Zendesk Chat Widget Handover** add on and connect to the flow. For initiating the handover you will need the **name** and **email** of the customer. An example flow with the configuration is shown below.
For the link to the zendesk snippet.js you can find it by following the steps - [Link](https://support.zendesk.com/hc/en-us/articles/4408881932698-Adding-the-Zendesk-Chat-widget-to-your-website)

### Widget Configuration
To support the seamless handoff we will need to add some minor configurations in our trigger function. Here is an example trigger function.
```
addScript("https://static.zdassets.com/ekr/snippet.js?key=4c9db6e3-9bc0-4d01-9207-438668af2578", 'ze-snippet', 'window.zE(\'webWidget\', \'hide\');');
window.zESettings = { cookies: true };
/** Emit event botWidgetInit to initialize**/
document.dispatchEvent(new CustomEvent("botWidgetInit", {"detail": {zendeskClassicChatEnabled: true}}));
```
### User Experience
{% embed url="" %}
---
# Source: https://docs.deepconverse.com/product-docs/conversational-flow-builder/data-tables/how-to-read-or-search-data-from-data-tables.md
# How to read or search data from Data Tables?
Data Tables are a robust data storage options for configuration and other datasets. You can reference them and use these to lookup information based on the conversation / guide context.
### Supported Operations
| **Operation** | **Function** |
| ------------- | ----------------------------------------------------------- |
| Lookup | Allows you to find a single record using a key value query |
| Search | Allows you to find multiple records using a key value query |
| Get All | Allows you to get all the values in the data table |
### Using in the flow
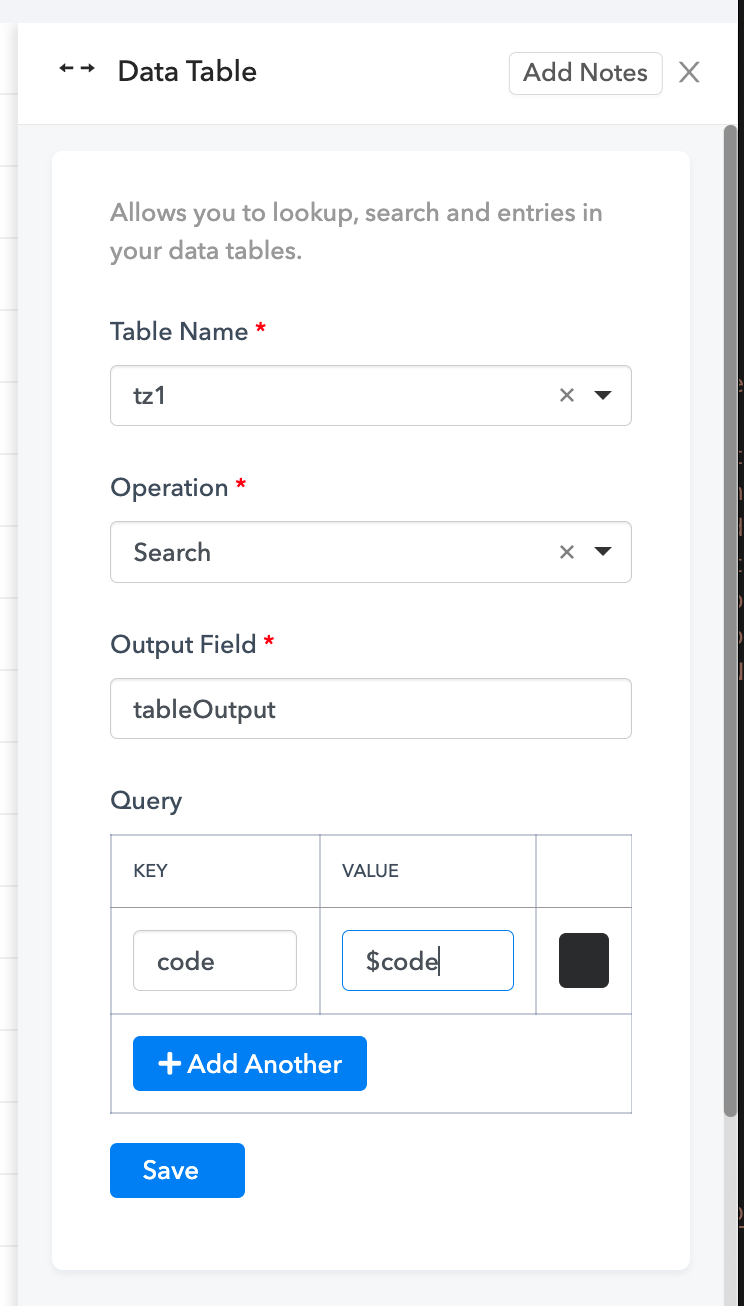
You can use the data tables with the Data Table Add On.
When you drag the node you can put it as a step in the flow. In the right panel for the configuration you can choose the Table name, Operation, Output Field and Query.
Note: In the query you can use parameters from the context to lookup values.
---
# Source: https://docs.deepconverse.com/product-docs/conversational-flow-builder/how-to-use-rules-in-conversations.md
# How to use Rules in Conversations
When conversations are complex and responses to questions depend on attributes in external information we can make use of rules to navigate the user to the right conversation response.
Rules allow you to define segmented conversation responses based on a defined criteria.
### Adding Rules
1. Rules can be authored by dragging the ***Rule*** node on to the flow builder.
2. On the right panel you can add a rule by entering a name for your rule.
3. Once you add the rule click on the name of the rule you added to define the criteria for it.\
### Authoring Rule Criteria
Each rule criteria is composed of one or more conditions and for each of the conditions you can do the following:
* Check all of the conditions (**AND** operation) - In this mode all conditions need to hold true for the rule to be true
* Check any of the conditions (**OR** operation) - In this mode any of the condition needs to be true for the rule to be true
The rule condition is composed of three parts:
1. Parameter Field Name
2. Operator
3. Field Value
#### Adding Conditions
| **Operator** | **Supported Types** |
| ------------ | --------------------- |
| Not Equals | Number, Text, Boolean |
| Equals | Number, Text, Boolean |
| Greater Than | Number |
| Less Than | Number |
| Contains | Text |
| Is Not Empty | Text, List |
| Is Empty | Text, List |
{% embed url="" %}
---
# Source: https://docs.deepconverse.com/product-docs/conversational-flow-builder/conversation-blocks/http-request.md
# HTTP Request
The HTTP Request block allows you to make request to any external Rest API. The primary use case for this in chat is to fetch data from a customized external system and also to send collected information out to an external system such as an order update.
### How to make a API Request?
1. Start by selecting extensions in the flow palette on the left in the flow builder
2. Drag an Add On node on to the flow builder\
3. In the properties add the details of the API you are calling.
1. You can choose the url or specify a parameter that holds the url
2. Specify headers, payloads and HTTP method
4. Save the properties and then connect your node in your flow
### How to use the API Response?
When your HTTP Request gets a response back it is available in a parameter called **actionOutput**. This parameter will contain the response sent by the external system.
To use this you can make use of templating language to access any fields inside the response. For example if this is the response and we wanted to show order details:
API Response
```
{"order": {"id": 12, "name": "blue tshirt", "price": 10, "count" 1}}
```
Template
```
Order Id: {{ actionOutput.order.id }}
Product: {{ actionOutput.order.name }} ${{ actionOutput.order.price }}
Quantity: {{ actionOutput.order.count }}
```
The templates can be used in any messages being sent to customers.
---
# Source: https://docs.deepconverse.com/product-docs/analytics/integrating-with-google-analytics.md
# Integrating with Google Analytics
When you use the DeepConverse chat widget you can also integrate it seamlessly with Google Analytics. This allows you to use your existing GA property and track events and user interactions happening in the chatbot.
You can set the Google Analytics property in the **Features > Miscellaneous** section of your chatbot (shown below)
{% hint style="warning" %}
This feature requires **Google Analytics 4**
{% endhint %}
We list out the events that are tracked with different interactions in the chatbot.
| **Event Name** | **Event Label** | **Description** |
| ------------------- | --------------- | --------------------------------------------------------- |
| Open Bot | | Fired when user clicks on chat bubble to open chatbot |
| Setting Clicked | | Fired when user clicks on Settings icon |
| Minimize Bot | | Fired when user minimized chatbot |
| Close Bot | | Fired when user closes chatbot |
| Close Preview | | Fired when user closes the chatbot bubble text |
| User Clicked | Button Text | Fired when user clicks on a quick reply button |
| Enlarge Image | | Fired when user clicks to enlarge an image |
| Confirm End Chat | | Fired when user clicks confirm end chat |
| Continue Chat | | Fired when a user clicks on Continue chat |
| Download Transcript | | Fired when user clicks Download Transcript |
| Input Submitted | User Input Text | Fired when user types something into the chatbot text box |
### Google Analytics View
You will be able to see the events show up in Google Analytics. Now you use these events to filter and segment users and create views based on them.
---
# Source: https://docs.deepconverse.com/product-docs/chatbots/basics/intent-action-responses.md
# Intent action responses
When the chatbot understands an **intent** it can respond by taking the user through a **Flow**. The flow is a conversational workflow that walks customers through different actions and/or provides information.
When you add a **intent** it is automatically associated with a flow.
### Flows
Flows are authored using our Conversation Flow Builder. Flows can be used to author API callouts, forms, questions, conditional rules and make use of prebuilt building blocks (Add On).
Learn more about authoring flows by visiting the pages below.
{% content-ref url="../../conversational-flow-builder" %}
[conversational-flow-builder](https://docs.deepconverse.com/product-docs/conversational-flow-builder)
{% endcontent-ref %}
{% content-ref url="../../conversational-flow-builder/conversation-blocks" %}
[conversation-blocks](https://docs.deepconverse.com/product-docs/conversational-flow-builder/conversation-blocks)
{% endcontent-ref %}
---
# Source: https://docs.deepconverse.com/product-docs/chatbots/deploy/ios-sdk/ios-custom-webview.md
# iOS (Custom Webview)
In cases where the implementation of the chatbot requires customization of the UI or app elements its recommended to implement a custom webview.
We provide our open source SDK for reference. You can find it here on our [Github](https://github.com/converselabs/ios-sdk).
### Webview
You can load the webview with the following URL which is configured to auto open the chatbot on receiving the trigger event.
```url
https://cdn.deepconverse.com/v1/assets/widget/embedded-chatbot?hostname=-.deepconverse.com
```
Once your webview has been created with this URL on click of a button or any other action which loads the URL you will invoke the following Javascript in the webview.
```swift
// Load the chatbot with Metadata
private func actionButtonJs() -> String {
do {
var metadataJSON = json(from: self.session.metadata)
print("[DeepConverseSDK] Metadata:", metadataJSON)
let s = """
setTimeout(function () {var evt = new CustomEvent('botWidgetInit', { detail: \(metadataJSON!) });document.dispatchEvent(evt);}, 100)
document.addEventListener('dc.bot', function(e) {
let payload = { action: e.detail.action };
window.webkit.messageHandlers.actionTapped.postMessage(payload);
});
"""
return s;
} catch {
print("[DeepConverseSDK] Error in Metadata" + error.localizedDescription);
// Fallback to load without metadata
let s = """
setTimeout(function () {var evt = new CustomEvent('botWidgetInit', { detail: {} });document.dispatchEvent(evt);}, 100)
document.addEventListener('dc.bot', function(e) {
let payload = { action: e.detail.action };
window.webkit.messageHandlers.actionTapped.postMessage(payload);
});
"""
return s;
}
}
```
Here is the example of how to configure the webview and use the above function.
```swift
// Some code
private func configureWebview() {
let webConfiguration = WKWebViewConfiguration()
let contentController = WKUserContentController()
let js: String = actionButtonJs();
let userScript = WKUserScript(source: js, injectionTime: WKUserScriptInjectionTime.atDocumentEnd, forMainFrameOnly: false)
contentController.removeAllUserScripts()
contentController.addUserScript(userScript)
contentController.add(
self,
name: "actionTapped"
)
webConfiguration.userContentController = contentController
self.webview = WKWebView(frame: self.view.frame, configuration: webConfiguration)
self.webview.navigationDelegate = self
self.view.addSubview(self.webview)
self.webview.scrollView.isScrollEnabled = false
let webRequest = URLRequest(url: url,
cachePolicy: .useProtocolCachePolicy,
timeoutInterval: timeout)
let layoutGuide = self.view.safeAreaLayoutGuide
self.webview.translatesAutoresizingMaskIntoConstraints = false
self.webview.leadingAnchor.constraint(
equalTo: layoutGuide.leadingAnchor).isActive = true
self.webview.trailingAnchor.constraint(
equalTo: layoutGuide.trailingAnchor).isActive = true
self.webview.topAnchor.constraint(
equalTo: layoutGuide.topAnchor).isActive = true
self.webview.bottomAnchor.constraint(
equalTo: layoutGuide.bottomAnchor).isActive = true
self.webview.load(webRequest)
DispatchQueue.main.asyncAfter(deadline: .now() + timeout) {
if (self.webview.isLoading) {
self.webview.stopLoading()
self.delegate.didWebViewFail(withError: DeepConverseWebHostError.WebViewTimeout)
}
}
}
```
We also provide callbacks to assist closing the webview.
In the above code snippet we register the `actionTapped` handler to listen to the callbacks. Three main actions are sent back in `open`, `minimize`, `close`
```swift
// Some code
extension DeepConverseHostViewController : WKScriptMessageHandler {
public func userContentController (
_ userContentController: WKUserContentController,
didReceive message: WKScriptMessage
) {
do {
print("[DeepConverseSDK] message:", message.body);
guard let payload = message.body as? [String: String] else { return }
print("struct:", payload["action"])
switch (payload["action"]) {
case "open":
print("[DeepConverseSDK] open action");
break;
case "minimize":
print("[DeepConverseSDK] minimize action")
self.dismiss(animated: true, completion: nil);
break;
case "close":
print("[DeepConverseSDK] close action");
break;
default:
print("[DeepConverseSDK] unknown action")
}
delegate.didReceiveEvent(event: payload)
} catch {
print("[DeepConverseSDK] Event error")
}
}
}
```
With the webview configured you can use now have the custom view controller as child or top level container as required in your app.
---
# Source: https://docs.deepconverse.com/product-docs/chatbots/deploy/ios-sdk.md
# iOS SDK
DeepConverse provides an easy to use SDK for integrating the chatbot into your app. To setup the SDK follow the steps below.
### Installation
You can include the SDK by using ***Cocoapods*** and adding this into your ***Podfile***
```
pod 'DeepConverse', :git => 'https://github.com/converselabs/ios-sdk.git', :branch => 'release'
```
### Setup
Here is a sample ViewController showing how you can include the SDK and load the bot on the click action of a button. You can also pass in metadata to the chatbot.
You will require ***DOMAIN*** and ***BOT\_NAME*** which can be found from the dashboard.
---
# Source: https://docs.deepconverse.com/product-docs/conversational-flow-builder/conversation-blocks/salesforce-blocks/live-agent-handover.md
# Live Agent Handover
The **Live Agent Handover** block allows you to handoff customers to a Salesforce Live Agent. In addition to the handover you can associate cases and contacts. You also have the ability to prefill fields on the [LiveChatTranscript](https://developer.salesforce.com/docs/atlas.en-us.object_reference.meta/object_reference/sforce_api_objects_livechattranscript.htm) object.
Salesforce - Live Agent Handover Node
By default the following are the required fields which can either be populated directly or with parameters.
1. Live Agent Url
2. Salesforce Organization Id
3. Deployment Id
4. Button Id
Optional fields include the following:
| Field | Description |
| ------------- | ------------------------------------------------------------------------------------------------------------------------------------------------------------------- |
| Case Id | The Salesforce Case object to associate with the transcript. This should be created prior to handoff if the association is needed |
| Contact Id | The Salesforce Contact object to associate with the transcript. This should be created prior to handoff if the association is needed |
| Custom Fields | These are key value pairs to be set on the LiveChatTranscript object. These can be either the default Salesforce fields or any custom fields added into the object. |
On the completion of the chat the flow would move forward to the next node. Completion can happen with the following scenarios:
1. Chat ended by agent
2. Chat ended by user
3. Disconnect from user (Abandonment leading to ending of chat after a timeout)
---
# Source: https://docs.deepconverse.com/product-docs/chatbots/localization.md
# Localization
You can export the text content used in the chatbot for translating it into other languages. DeepConverse makes it easy for you to export it to a Google Sheet for collaborative editing and sharing. Once you are ready with the translations and the locales for your site you can import it back into DeepConverse.
### Exporting Translations
To export translations navigate to the chatbot that you would like to export.
On the chatbot page click Actions > Export/Import Translations.

In the open form click Submit if you would like to export to a new sheet, or enter the Sheet Key and Worksheet Title for the sheet you would like to update.
*Once the export is completed the sheet will be shared with your email.*
**Prefill Auto Translation**
This allows you to prefill the sheet with Google Translate values if the translation does not exist.
Here is an example of how the exported translations would look like.
### Adding Translations
Once you have exported the text into the Google Sheet you can add additional columns each representing a locale that you would like to target.
Add the corresponding translation for that row in the cell.
Here is an example of how **French (fr)** is added into the sheet.
***Tip***: You can use the [GOOGLETRANSLATE](https://support.google.com/docs/answer/3093331?hl=en) function already available in Google Sheets for quick translations
### Importing Translations
On the chatbot page click Actions > Export/Import Translations.
Select **Import** as the operation
Enter the **Sheet Key** and the **Worksheet Title**
**Notes**:
1. Locales in the Google Sheet should match the locales you use in your production/deployment environments for the translations to get picked up.
2. If a text doesn't have the the corresponding language translation then it will default to using text from 'en\_us' as the fallback
---
# Source: https://docs.deepconverse.com/product-docs/security/reporting-security-vulnerabilities/log4shell-vulnerability.md
# Log4Shell Vulnerability
A security vulnerability affecting the Java logging framework Log4j was publicly disclosed in December 2021
DeepConverse platform does not use Java technology for our core services, and as a result, our services are not impacted by the Log4Shell vulnerability.
We tested our systems for external exploitability of the vulnerability to identify possible attack vectors. We patched our logging infrastructure, and updated them accordingly based on the recommended guidance from Elastic and AWS.
Additional controls are also being employed to mitigate the risk. We are monitoring abnormal patterns in DeepConverse inbound and outbound traffic, and activating new web application firewall (WAF) rules and blocking suspicious IPs.
---
# Source: https://docs.deepconverse.com/product-docs/analytics/message-viewer.md
# Message Viewer
Message viewer is a tool that allows you to see the conversation messages exchanged between the customers and the chatbot. This is helpful to see and filter by message types or searching specific interactions.
You can access it by clicking **Messages** for the chatbot you would like to view it for.
You can do the following:
* View the messages identified by Sender (Bot or User)
* Node type that the flow went through
* Message shown to the customer
* View the conversation where this message was shown or reached
### Filtering
You can filter the messages by the following:
* Node type
* Action type
* Sender
* Conversation Id
* Message Id
* Date
---
# Source: https://docs.deepconverse.com/product-docs/analytics/export-api/messages-endpoint.md
# Messages Endpoint
The Messages endpoint returns data about the messages within a Conversation. This will include information like the type, sender, the time the message was sent and message specific data.
| **Message ID** (\_id) | The message's unique ID. |
| ------------------------------------- | ------------------------------------------------------------------------------------------------------- |
| **Time** (time) | The time the message was sent |
| **Conversation ID** (conversationId) | The unique ID of the conversation the message belongs to. |
| **Type of the Message** (type) | The type of message |
| **Message data** (outMsg) | The details of the message sent by the chatbot |
| **User Action Type** (userActionType) | The type of action taken by the user. This value only exists for type **UserInput** |
| **User Input** (userInput) | The value of userInput done by the customer. This can be the content of text, quick reply or form input |
Here is a sample request for the messages endpoint
```python
import requests
url = "https://api.converseapps.com/conversations/export/v1/messages"
params={
'start_time': 1696118400,
'end_time': 1696550400,
'bot_name': 'r3-218210',
'per_page': 1000
}
headers = {
'x-api-key': '',
}
response = requests.get(url, headers=headers, params=params)
print(response.json())
```
To iterate through the results pass the `cursor` value till the cursor returned by the API is `null.`
Optional: You can use the `conversation_id` parameter to fetch messages for a specific conversation.
---
# Source: https://docs.deepconverse.com/product-docs/account/multiple-sites.md
# Multiple Sites
{% hint style="info" %}
Feature available with **Enterprise** plan
{% endhint %}
DeepConverse supports working with multiple site implementations. Such a setup allows you to onboard multiple active sites (help centers, marketing sites, development sites) on the platform.
This feature helps organizations create:
* Sandbox environments
* Multi brand environments
The dashboard is always is acting within the context of the site that is currently active. You can see the active site on the top right corner.

Active Site is ***Deepconverse-Stg5***
On hovering over the site you can select and switch to another one of the active sites. Once selected that site now becomes active and all objects, analytics that are associated with the selected site are shown.

---
# Source: https://docs.deepconverse.com/product-docs/chatbots/deploy/open-chatbot-via-javascript.md
# Open chatbot via Javascript
You can trigger opening of the chatbot on click of a button or an external event. To do so use the following Javascript
```javascript
window.dispatchEvent(new CustomEvent('dc.bot.show'));
```
---
# Source: https://docs.deepconverse.com/product-docs/account/permissions-and-roles.md
# Permissions and Roles
Users can be provided different roles based on the apps and functions they need access to in the DeepConverse dashboard.
Each of the apps supports the ***Builder***, ***Viewer*** and ***Analytics*** role. Each of the users can additionally be given an **Admin** role that allows them to certain site administration permissions. We detail the roles below.
### Builder
Builder gets access to all functionality of the app. They will be able to build and save all elements within the app.
### Viewer
Viewers only have read access. They can view all the elements within the app but will not have the permission to save or make changes.
### Analytics
Analytics role provides access to analytics and reported generated as a part of that app.
### Admin
Admins have additional permissions on managing the sites. They can perform the following tasks:
* Add additional users with roles to the DeepConverse dashboard
* Add connections to third party integrations

---
# Source: https://docs.deepconverse.com/product-docs/support/platform-stability.md
# Platform Stability
We publish status updates about the platform. You can view it here on our status page.
[DeepConverse Status Page](https://deepconverse.statuspage.io/)
---
# Source: https://docs.deepconverse.com/product-docs/conversational-flow-builder/conversation-blocks/policy.md
# Policy
The **Policy** node allows you to specify a task that the chatbot can perform to assist the users. The instructions for the task can be written in plain text and the chatbot will walk the user through it making decisions based on the user messages. The **Policy** node makes use of Large Language models such as GPT-4 to execute the instructions.
### Using the Policy Node
The Policy Node comprises of the following core pieces along with optional configurations.
1. **Name -** A meaningful name for the Policy
2. **Policy** - Instructions describing the approach for the chatbot. This can be as detailed as needed. The policy should clearly define the task to do and the exit criteria for completion of the policy
3. **Actions** - Actions are API calls that the Policy can execute.
#### Example Policy for 'Checking Order Status'
> Give a nice greeting to the customer and then tell them you will be helping them check the order status.
>
> In order to check their order status, ask the customer for the order ID and email, if not provided.
>
> Once they have provided all the needed information, let them know that you are pulling up the order.
>
> If you are able to find the order provide them with the status, shipping address and the tracking url.
>
> If you are not able to find the order ask them to check the information they provided and provide it again.
### Configuration Options for Policy Node
In addition to the core components you have control on the type of model, failure criteria and context provided to the Policy Node.
#### Language Model
This specifies the LLM to use for executing the Policy. You can use DeepConverse account or bring your own LLM from (Azure, OpenAI, Anthropic).
You also have an option to specify which model you would like to use.
#### Context Parameters
To help the policy execution you have the option of specifying which context data the policy has access to. For example, if you already have the name and email captured you can provide it to the node. In this way it can skip asking for the same data again.
1. Parameters to Include - This property is used to list out the parameters from the context to provide to the policy node.
2. Parameters to Capture - This property is used to specify the parameters along with a detailed description that the chatbot should capture via the policy.
#### Failure Settings
To ensure that the chatbot does not get stuck in the Policy node you have the option of specifying maximum number of turns that should happen for the policy.
## Policy Node in Action
Here is a demo of the Policy Node in action. You can see it walking the customer through the order status check.
{% embed url="" %}
---
# Source: https://docs.deepconverse.com/product-docs/conversational-flow-builder/assign-parameters-in-conversations/predefined-parameters.md
# Predefined Parameters
The system will prepopulate common parameters to help make decisions in the flows. Below is a list of the predefined parameters.
Parameter Name
__sys_userIp
IP Address of the customer
__sys_userAgent
User agent of the browser
__sys_userAgentParsed
Parsed representation of the user agent
Example: {"device": {"brand": "Apple", "family": "Mac", "model": "Mac"}, "os": {"family": "Mac OS X", "major": "10", "minor": "9", "patch": "4", "patch_minor": null}, "string": "Mozilla/5.0 (Macintosh; Intel Mac OS X 10_9_4) AppleWebKit/537.36 (KHTML, like Gecko) Chrome/41.0.2272.104 Safari/537.36", "user_agent": {"family": "Chrome", "major": "41", "minor": "0", "patch": "2272"}}
---
# Source: https://docs.deepconverse.com/product-docs/chatbots/basics/publishing-changes.md
# Publishing changes
As you build through the chatbot you will reach a point where you are ready to rollout the changes to your website. This is where Publishing comes in. The chatbot and flows have two states **DRAFT** and **PUBLISHED**
### Publishing the Chatbot
All changes you do such as to add intents, update the responses and sentences all the changes remain in the DRAFT state of the chatbot. Once you are ready with the intents you can click **Publish Changes** to make them live.
{% hint style="warning" %}
Publishing the chatbot does not publish the associated flows. You will need to publish the flows separately. If a flow doesn't have a Published version it will default to using the latest draft version.
{% endhint %}
### Publishing the Flows
Any new changes made to the flow are saved in a new DRAFT version of the flow. Once you are ready you can go ahead and publish the changes.
The Published version of the flow is used in the Published chatbot version. If there are no published version the latest draft version is used.
---
# Source: https://docs.deepconverse.com/product-docs/conversational-flow-builder/conversation-blocks/question.md
# Question
The *Question* node allows you to present some information to the customers and ask questions. Answers to the questions can be added as *Transitions* and connected to other nodes in the flow.
The *Answers (Transitions)* are shown to the users after the messages as quick reply buttons. On selection of one of the buttons the user moves ahead in the conversation.
### Authoring Messages to User
Click on the link to learn about [Message Authoring](https://help.deepconverse.com/hc/en-us/articles/4402958615444)
### Adding Quick Reply to Question Node
Quick replies can be added to the question node to have paths to other parts of the flow. These are presented to the customers as Quick Reply answers which on selection routes them to the specific path.
### Question Node in Action
Here is a video showing the Question node in action.
{% embed url="" %}
---
# Source: https://docs.deepconverse.com/product-docs/security/reporting-security-vulnerabilities.md
# Reporting Security Vulnerabilities
At DeepConverse, security of our customers and users of our products is taken very seriously. We welcome reports from security researchers and experts about possible security vulnerabilities with our products.
If you're a security expert or researcher and you believe you've discovered a security-related issue with DeepConverse products we appreciate your help in disclosing the issue to us responsibly.
### Reporting Guidelines
* Please submit a bug to us at or through a [Support Ticket](https://help.deepconverse.com/hc/en-us/requests/new) with a detailed description of the issue and the steps required to reproduce what you have observed.
* Give us a reasonable time to respond to the issue before making any information about it public.
* Not access or modify user information without permission of the account owner.
* Not expose other users to vulnerabilities. All testing should be done on your own user pages, and only between accounts you control.
* Not attempt non-technical attacks such as social engineering, phishing, or physical attacks against our employees, users, or infrastructure.
* Act in good faith not to degrade the performance of our services (including denial of service)
---
# Source: https://docs.deepconverse.com/product-docs/conversational-flow-builder/conversation-blocks/salesforce-blocks.md
# Salesforce Blocks
To ease out building workflows for Salesforce we provide prebuilt functionality that can be used in conversational flows.
---
# Source: https://docs.deepconverse.com/product-docs/integrations/supported-integrations/salesforce.md
# Salesforce
You can create a connection with Salesforce from [Admin Dashboard.](https://admin.deepconverse.com/dashboard) DeepConverse has a Connected App that allows us to connect to your Salesforce Org using OAuth2. We can connect to both Sandbox and Production Orgs.
1. Navigate to the **Account section**.
2. Click on **Add Connection** to add the connection
3. Select **SALESFORCE** connector
4. Provide the connection name
5. Select Authorization Type as **OAuth2**
6. Click on Link Account
7\. Login with your Salesforce account credentials
8\. Allow access for permissions
9\. Click on **Test Connection** to test the response of your connection.
---
# Source: https://docs.deepconverse.com/product-docs/support/service-levels-and-response-times.md
# Service Levels and Response Times
We realize the importance of keeping your sales and support infrastructure from disruptions. As such we work hard to maintain the uptime of our platform and services. In an event of a disruption or questions our team will provide support and guidance for all reported issues.
**Our SLA excludes the following performance issues**:
* Issues caused by factors outside of our reasonable control
* Issues that resulted from any actions or inaction by you or a third-party
* Changes to your platform without notice of impact to DeepConverse
### Service Levels
DeepConverse offers different levels of service for issues reported to us. The service level represents our timeline and commitment of providing you with a first response. The SLA is for the first response to your issue and will depend on the support plan your organization has. We will strive to provide subsequent responses to you as quickly as possible. \
| | **Assist Basic** | **Assist Core** |
| ---------- | ---------------------------------------------------------- | -------------------------- |
| |
Business Hours 9 AM - 5 PM PST
| *24/7 prioritized support* |
| **Urgent** | 1 day | 1 hour |
| **High** | 3 days | 4 hours |
| **Normal** | 5 days | 2 days |
| **Low** | 7 days | 4 days |
\* All requests must be routed through our help center for compliance and tracking
---
# Source: https://docs.deepconverse.com/product-docs/voice-bot/setup-and-configuration.md
# Setup and Configuration
In this article we guide you throught the setup of the Voice bot. Voice bots currently require a **Twilio** account. Follow the instructions to setup your phone number and connect it to the bot.
---
# Source: https://docs.deepconverse.com/product-docs/ticket-automation/setup-zendesk-email-and-ticket-automation.md
# Setup Zendesk email and ticket automation
DeepConverse for Zendesk email and ticket automation allows you to build an AI and Automation layer to respond and handle tickets efficiently. The automation engine does the work of understanding the tickets and responding accordingly with macros, email templates and responses from knowledge articles.
### Pre-requisties
Before configuring Zendesk we need to ensure that there are some steps completed in the DeepConverse dashboard.
1. Establish **OAuth connection** with your Zendesk instance
2. Create **bot** and **workflows** (these are the actions you want the bot to handle)
3. Configure **connection** to use for the bot
### Execution Flow
At a high level this is the flow that gets executed
1. Customer **creates a ticket** in Zendesk
2. When the ticket is created a Zendesk **trigger** will get fired and **notify** DeepConverse with the relevant ticket information.
3. DeepConverse will make **predictions** and choose the **workflow to execute**
4. Workflow will **update the ticket** and if needed **add a reply** in the ticket as a comment.
### Zendesk Setup and Configuration
#### Create a Webhook in Zendesk
You will need to add a webhook to inform DeepConverse of changes to tickets in Zendesk. The steps to do this in Zendesk are here -
[Creating webhooks to interact with third-party systems](https://support.zendesk.com/hc/en-us/articles/4408839108378-Creating-webhooks-to-interact-with-third-party-systems)
You can find the webhook url from the DeepConverse channels page.
 
#### Create a trigger in Zendesk
For DeepConverse to handle tickets we will need to add a trigger which will inform DeepConverse when tickets are created.
1. Navigate to **Zendesk Admin Center** > **Objects and Rules** > **Triggers**
2. Click **Add Trigger**
3. Fill out the trigger with the information below.
**Name**: DeepConverse Automation
**Conditions**
Meet ALL of the following conditions
* `Tags` contains none of `dc-automation-triggered`
* `Ticket` is `Updated`
Meet ANY of the following conditions
* `Channel` is `Email` (Add any other channels that you would like the trigger to run for)
Actions
* Notify active webhook: DeepConverse Automation\
JSON Body:
```
{
"agent": {
"name": "{{ticket.assignee.name}}",
"email": "{{ticket.assignee.email}}"
},
"requester": {
"name": "{{ticket.requester.name}}",
"email": "{{ticket.requester.email}}"
},
"payload": {
"id": "{{ticket.id}}",
"source": "{{ticket.via}}",
"title": "{{ticket.title}}",
"description": "{{ticket.description}}",
"status": "{{ticket.status}}",
"message": "{{ticket.latest_comment}}",
"tags": "{{ticket.tags}}",
"updated_stamp": "{{ticket.updated_at_with_timestamp}}",
"brand": "{{ticket.brand.name}}",
... custom fields
"marketplace": "{{ticket.ticket_field_8792255150861}}"
}
}
```
* Add tags: `dc-automation-triggered`
Once the trigger has been Saved go back to the triggers screen.
#### Ordering of Triggers
To ensure that DeepConverse gets all the information needed for executing the Automation we will need to have the DeepConverse Automation trigger placed after some of the business rule triggers have been applied.
Follow the instructions here to reorder the trigger: [Reordering and sorting triggers](https://support.zendesk.com/hc/en-us/articles/4408894209562-Reordering-and-sorting-triggers)
### Tags that are used by DeepConverse
| **Tag** | **Description** |
| ---------------------------- | ----------------------------------------------------------------------- |
| dc-automation-triggered | Marks that the ticket went through the DeepConverse automation webhook. |
| dc-auto-reply | Marks that the ticket has an auto reply comment to the customer. |
| dc-automation-ticket-updated | Marks that certain fields in the ticket were updated by the automation |
| dc-email-positive-feedback | Marks positive feedback given by the customer to the auto reply email |
| dc-email-negative-feedback | Marks negative feedback given by the customer to the auto reply email |
---
# Source: https://docs.deepconverse.com/product-docs/conversational-flow-builder/conversation-blocks/guide-blocks/solved-block.md
# Solved Block
Solved Block can be used in Guides to mark that the customer has reached a resolution.
When a customer reaches a **Solved** node it is tracked as a successful interaction.
---
# Source: https://docs.deepconverse.com/product-docs/security/subprocessors.md
# Subprocessors
To provide services DeepConverse uses third party Subprocessors. Before adding a Subprocessor DeepConverse performs diligence to ensure the their security, privacy and confidentiality practices.
## DeepConverse Platform
DeepConverse uses the following Sub-Processors to provide its core platform and customer support automation software services.
---
# Source: https://docs.deepconverse.com/product-docs/integrations/supported-integrations.md
# Supported Integrations
Once you have a basic structure for the informational chatbot and ticket automation, the next step would be to connect to an external system such as a CRM.
Common use cases include:
* Creating, Updating tickets
* Fetching order status
* Modifying orders
* And many more..
**DeepConverse integrates with the following tools out-of-box**
* [Zendesk](https://docs.deepconverse.com/product-docs/integrations/supported-integrations/zendesk)
* [Zendesk Sunshine Conversations](https://docs.deepconverse.com/product-docs/integrations/supported-integrations/zendesk-sunshine-conversations)
* [Salesforce](https://docs.deepconverse.com/product-docs/integrations/supported-integrations/salesforce)
---
# Source: https://docs.deepconverse.com/product-docs/voice-bot/supported-use-cases-for-voice-bot.md
# Supported use cases for Voice Bot
The voice bot builds on the DeepConverse platform and allows a myriad of use cases to be built out. The following use cases are supported out of the box.
1. Question / Answering using Generative AI
2. Information capturing and escalation
3. Sending out information over SMS during the voice interaction
4. Capture of complex information / document uplaods via SMS during call interaction
5. Policy based conversational flows that use Generative AI to help the customer achieve a goal.
6. Allow hold music during the call
7. Conditional call forwarding and routing to call center departments
---
# Source: https://docs.deepconverse.com/product-docs/security/technical-and-organizational-security-measures.md
# Technical and Organizational Security Measures
The following technical measures are in place to protect the personal data handled by DeepConverse Inc.:
**Encryption of personal data.**
* Data at rest is encrypted using the AES-256 algorithm.
* Employee laptops are encrypted using full disk AES-256 encryption.
* HTTPS encryption on every web interface, using industry standard algorithms and certificates.
* Secure transmission of all traffic, internal and external, using by default TLS 1.2.
* Access to operational environments requires use of secure protocols such as HTTPS.
* Data that resides in Amazon Web Services (AWS) is encrypted at rest as stated in AWS documentation and whitepapers. In particular, AWS instances and volumes are encrypted using AES-256. Encryption keys via AWS Key Management Service (KMS) are IAM role-protected, and protected by AWS-provided HSM certified under FIPS 140-2.
**Measures for ensuring the ability to restore the availability and access to personal data in a timely manner in the event of a physical or technical incident.**
* Processing nodes and data stores are replicated across geographically separate locations using cloud provider functionality (Availability Zones) to protect against local outage conditions.
* Databases are backed up daily with backups maintained for at least one year to provide recoverability from data corruption events.
* Backups and Availability Zone fail overs are tested regularly.
* All infrastructure and applications are built and deployed ‘as code’, with the ability to recreate an environment from sources in a different region.
**Processes for regularly testing, assessing, and evaluating the effectiveness of technical and organizational measures to ensure the security of the processing.**
* User activity including logins, configuration changes, deletions and updates are written automatically to audit logs which are forwarded to a central logging system.
* All actions in the cloud provider system are logged to a central logging system (including cloud API calls, network flow logs).
* Changes to configuration of security controls (firewalls, VPNs) are logged to a central logging system.
* Logs are available only to authorized employees, stored off-system, and available for security investigations. Access controls are in place to prevent unauthorized access. Write access to logging data is strictly prohibited. Logging facilities and log information are protected against tampering and unauthorized access through use of access controls and security measures.
* Logs are maintained for at least one year to facilitate investigations if necessary.
* A Security Information and Event Monitoring system (SIEM) operates on this logging information to detect anomalies or other indications of security problems. The SIEM generates alerts for such conditions for investigation and action by designated security personnel.
* Regular vulnerability scans and configuration scans of all components are run at least monthly, with any findings addressed within identified timeframes based on severity.
* Static and Dynamic Analysis tools are used to maintain security during the development of software.
* Annual penetration testing for all components, including web and mobile applications.
* In place a public Vulnerability Disclosure Program.
* All controls are assessed annually be external auditors to meet industry standard certifications.
**Measures for user identification and authorization.**
* Access to operational and production environments is protected by use of unique user accounts, strong passwords, use of Multi-Factor Authentication (MFA), role-based access, and least privilege principle.
* Authorization requests and provisioning are logged, tracked and audited.
* Customer-generated OAuth tokens are stored in an encrypted state.
* Keys required for decryption are stored in a secure, managed repository (such as AWS KMS) that employs industry-leading hardware security modules that meet or exceed applicable regulatory and compliance obligations.
* Access keys used by production applications (e.g. AWS Access Keys) are accessible only to authorized personnel. They are rotated (changed) as required (e.g., pursuant to a security advisory or personnel departure).
* User activity in operational environments including access, modification or deletion of data is logged.
**Measures for the protection of Data during transmission.**
* Remote access to the network via VPN tunnel and end-to-end encryption HTTPS encryption for data in transit (using TLS 1.2 or greater).
**Measures for the protection of Data during storage.**
* Customer data is logically separated and attempts to access data outside allowed domain boundaries are prevented and logged. Measures are in place to ensure executable uploads, code, or unauthorized actors are not permitted to access unauthorized data - including one customer accessing files of another customer.
* Endpoint security software: all production instances have endpoint security software which is monitored for unusual or problematic activity.
* System inputs recorded via log files. o Access Control Lists (ACL).
* Multi-factor Authentication (MFA).
**Measures for ensuring physical security of locations at which personal data are processed**
* Data center controls are maintained by cloud service providers, who are regularly audited for compliance to industry standards (ISO27001, SOC2, PCI, etc.) Corporate facilities (which do not house customer data/personal data) also have the following safeguards:
* Physical access to all restricted facilities is documented and managed.
* All information resource facilities (e.g. network closets and storerooms) are physically protected in proportion to the criticality or importance of their function.
* Access to information resource facilities is granted only to company personnel and contractors whose job responsibilities require access to those facilities.
* The process for granting card and/or key access to information resource facilities includes the approval of the person responsible for physical facility management.
* Everyone granted access rights to an information resource facility must sign the appropriate access and non-disclosure agreements.
* Access cards and/or keys must not be shared or loaned to others.
* Access cards and/or keys that are no longer required are returned to the person responsible for physical facility management. Cards must not be reallocated to another individual, bypassing the return process.
* Lost or stolen access cards and/or keys must be reported to the person responsible for physical facility management as soon as practical.
* Cards and/or keys must not have identified information coded into them.
* All information resource facilities that allow access to visitors will track visitor access with a sign-in log.
* Card access records and visitor logs for information resource facilities are kept for routine review based upon the criticality of the information resources being protected.
* The person responsible for information resource physical facility management removes the card and/or key access rights of individuals that change roles within the organization or are separated from their relationship with the organization.
* Visitors in card access-controlled areas of information resource facilities must always be accompanied by authorized personnel.
* The person responsible for physical facility management reviews access records and visitor logs for the facility on a periodic basis and investigate any unusual access.
* The person responsible for physical facility management reviews card and/or key access rights for the facility on a periodic basis and remove access for individuals that no longer require access.
* Signage for restricted access rooms and locations is practiced, yet minimally discernible evidence of the importance of the location is displayed.
* Only individuals authorized by asset owners are permitted to move assets off-site. Details of the individual’s identity and role is documented and returned with the asset.
* Equipment is protected to reduce the risks from environmental threats, hazards, and opportunities for unauthorized access.
**Measures for ensuring events logging.**
* Remote logging.
* A central Security Information and Event Management (SIEM) system and other product tools monitor security or activities.
**Measures for ensuring system configuration, including default configuration.**
* DeepConverse has in place a Change Management Policy.
* DeepConverse monitors changes to in-scope systems to ensure that changes follow the process and to mitigate the risk of un-detected changes to production. Changes are tracked in our change platform.
* Access Control Policy and Procedures.
* Mobile device management.
**Measures for internal IT and IT security governance and management.**
* Information-related business operations continue to be carried out in line with the ISO27001:2013 standard.
* DeepConverse has in place a written information security policy, including supporting documentation.
**Measures for certification/assurance of processes and products.**
* DeepConverse has been audited by a third party and has achieved SOC2 Type 1 compliance, attesting to its commitment to controls that safeguard the confidentiality and security of information stored and processed in its services.
* DeepConverse is aligned with ISO 27001 principles
**Measures for ensuring data minimization.**
* Detailed privacy assessments are performed related to implementation of new products/services and processing of personal data by third parties.
* Data collection is limited to the purposes of processing (or the data that the customer chooses to provide).
* Security measures are in place to provide only the minimum amount of access necessary to perform required functions.
* Data retention time limits restricted.
* Restrict access to personal data to the parties involved in the processing in accordance with the “need to know” principle and according to the function behind the creation of differentiated access profiles.
**Measures for ensuring Data quality.**
* Applications are designed to reduce/prevent duplication. Many application-level checks are in place to ensure data integrity.
* The QA team ensures these items are working as designed and implemented before reaching the production environment.
**Measures for ensuring limited data retention.**
* DeepConverse has a Data Deletion Policy in place.
* Customer data is retained for as long as the account is in active status. Data enters an “expired” state when the account is voluntarily closed.
* Expired account data will be retained for 90 days. After this period, the account and related data will be removed. Customers that wish to voluntarily close their account should download their data manually prior to closing their account.
* If a customer account is involuntarily suspended, then there is a 30 days grace period during which the account will be inaccessible but can be reopened if the customer meets their payment obligations and resolves any terms of service violations.
**Measures for ensuring accountability.**
* Customer Privacy Assessments are required when introducing any new product/service that involves processing of personal data.
* Data protection impact assessments are part of any new processing initiative.
**Measures for allowing Data portability and ensuring erasure.**
DeepConverse has a process that allows individuals to exercise their privacy rights (e.g. right of erasure or right to data portability), as described in DeepConverse’'s Privacy Notices.
---
# Source: https://docs.deepconverse.com/product-docs/conversational-flow-builder/conversation-blocks/guide-blocks/unsolved-block.md
# Unsolved Block
Unsolved Block can be used in Guides to mark that the customer has reached a point where the solutions were not helpful. At this point they would need additional help.
When a customer reaches a **Unsolved** node it is tracked as an escalated interaction.
---
# Source: https://docs.deepconverse.com/product-docs/chatbots/advanced-functionality/user-identity-verification.md
# User Identity Verification
Identity verification allows the chatbot to verify that your users are not being impersonated. It ensures that conversations are private and all user metadata is verified before being put to use.
### How does Identity Verification work?
Identity verification makes use of a shared secret that is known to the chatbot and your server. Using this shared secret we generate a hash of the user metadata json. When the chatbot is started this user hash is verified with the shared secret and if the hash matches our computed hash we add the user metadata into the chatbot flow context.
After verification the user metadata is available to use throughout the flow.
### How to use Identity Verification in the flow?
To use identity verification there are two components:
* Identity Verification in Conversation Flow
* Identity Hash Generation
#### Identity Verification in Conversation Flow
* Get started by going to your greet flow and adding the Identity Verification module. \
* In the Identity Verification module settings set the shared secret value. (This shared secret is what you will be using on your server for hash generation)\
* The identity verification module will use the shared secret and generate the hash of the incoming data and compare that with the hash that you provide.
* *If the values match the user metadata will become available in the flow context*.
#### Identity Hash Generation
* To use identity verification you will need to pass in browser\_userHash variable when you invoke the chatbot.
* Identity Verification works by using a server side generated [HMAC (hash based message authentication code)](http://en.wikipedia.org/wiki/Hash-based_message_authentication_code), using SHA256, on either the user’s *metadata.*
* *Note: Metadata keys should be sorted when generating the HMAC*
* Here is an example of how to invoke the chatbot with the metadata.
---
# Source: https://docs.deepconverse.com/product-docs/analytics/viewing-chat-conversations.md
# Viewing Chat Conversations
Conversation viewer allows you to see all the conversations customers have had with your chatbot. It will record the sequence of all the events as well messages exchanged between the customers and bot / agents.
To access the conversations click on **Conversations** button for the chatbot you want to see the conversations for.
### Understanding the Viewer
---
# Source: https://docs.deepconverse.com/product-docs/voice-bot/voice-bot-architecture.md
# Voice Bot Architecture
The voice bot is geared towards handling inboung voice calls. When a customer calls the business phone number they will be routed to the voice bot. The voice bot then handles the request and if needed escalates it to a human agent.
## Architecture
The voice bot architecture comprises of the following components that integrate together.
1. **Contact Center** - The contact center provides the support agents and handles the overall functionality related to IVR, routing, forwarding and assignment. It may also serve as the system of record holding the call recordings and associated analytics.
2. **DeepConverse Platform** - The DeepConverse platform provides the orchestration of the conversation, executes the business logic and handles the AI and Automation components.
3. **Cloud Speech Processing** - This component is responsible for the Speech-to-Text and the Text-to-Speech layer.
## Call Workflow
1. The call is received by the Contact Center configured phone number. The call and metadata is setup.
2. Based on the business logic the call is forwarded to the preconfigured **Twilio** phone number which is connected to the DeepConverse platform.
3. Using the webhook DeepConverse identifies the chatbot and the initiates the conversational flow.
4. The conversation continues till the customer shows an intent to escalate or end the call.
---
# Source: https://docs.deepconverse.com/product-docs/what-is-deepconverse.md
# What is DeepConverse?
We want to help support **teams to work more efficiently** by creating a simple yet powerful platform for them to **help customers find answers and perform actions**.
---
# Source: https://docs.deepconverse.com/product-docs/conversational-flow-builder/what-is-the-conversation-flow-builder.md
# What is the Conversation Flow Builder?
The **Conversation Flow Builder** allows you to build out the conversation as a flow using key conversation elements such as Questions, Answers, Forms, Backend Integrations etc.
You can view the flow as how the conversation would move when users either type their messages to questions or provide information requested from them. Each of the nodes in the conversation can be connected to build out how our chatbot should talk to the customers.
### What are nodes in the Flow Builder?
Nodes are the building blocks of the conversation. These are specific elements available to ask users questions, present information to them, call external systems and do actions.
Each of the nodes can be connected with transitions which represents how the conversation flows when a user takes an action.
Nodes have events, properties and some additional properties specific to the type of node being used.
---
# Source: https://docs.deepconverse.com/product-docs/chatbots/advanced-functionality/channel-specific-functionality/zendesk-chat-classic.md
# Zendesk Chat (Classic)
- [How to handoff conversations to Zendesk Chat (Classic) ?](/product-docs/chatbots/advanced-functionality/channel-specific-functionality/zendesk-chat-classic/how-to-handoff-conversations-to-zendesk-chat-classic.md)
---
# Source: https://docs.deepconverse.com/product-docs/conversational-flow-builder/conversation-blocks/zendesk-sunshine-conversations-handoff-in-widget.md
# Zendesk Sunshine Conversations Handoff (In Widget)
We will walkthrough the setup required to do the Sunshine Conversations Handover using the DeepConverse chat widget.
{% hint style="info" %}
This article allows you to do a handoff to Zendesk within DeepConverse chat widget
{% endhint %}
1. Make sure you have connected to **Zendesk Sunshine Conversations** via the **Connections** page
2. Navigate to **Zendesk Admin** > **Bots**. Here you will see DeepConverse under marketplace bots.
3. Go ahead and navigate to **Messaging** to see if the web widget channel is active.
4. Create an API Key for the Conversations API for DeepConverse.
5. Reach out to the DeepConverse team to find out the **Web Messenger Integration Id** to use for the handoff. This is found via the integrations API \
[`https://api.smooch.io/v2/apps/{{appId}}/integrations`](https://api.smooch.io/v2/apps/%7B%7BappId%7D%7D/integrations)
6. Use the Web Messenger Integration Id along with the connection and fields to pass to Zendesk in the Escalation Flow.\
7. In order for DeepConverse to receive the Conversation events add a Conversation Integration with the following API: \
\
[`https://api.converseapps.com/messaging/smooch/events`](https://api.converseapps.com/messaging/smooch/events)
#### Fields Available in Handoff
Field Name
Description
tags
Comma separated list of tags to add to Zendesk ticket
brand_id
Id of the Zendesk brand to use
priority
Priority of Zendesk ticket
requester.name
Name of the requester (Use $ to reference a parameter)
requester.email
Email of the requester
<field_id>
Custom field value to set
---
# Source: https://docs.deepconverse.com/product-docs/integrations/supported-integrations/zendesk-sunshine-conversations.md
# Source: https://docs.deepconverse.com/product-docs/chatbots/advanced-functionality/channel-specific-functionality/zendesk-sunshine-conversations.md
# Zendesk Sunshine Conversations
- [How to handle image and file uploads in Zendesk Sunshine Conversations?](/product-docs/chatbots/advanced-functionality/channel-specific-functionality/zendesk-sunshine-conversations/how-to-handle-image-and-file-uploads-in-zendesk-sunshine-conversations.md)
---
# Source: https://docs.deepconverse.com/product-docs/integrations/supported-integrations/zendesk.md
# Zendesk
You can create a connection with Zendesk from [Admin Dashboard.](https://admin.deepconverse.com/dashboard)
1. Navigate to the **Account section**.
2. Click on **Add Connection** to add the connection
3. Select **Zendesk**
4. Provide the connection name
5. Select Authorization Type
* OAuth2
* Public API
* APIToken
6. Click on Link Account
7. Login with your Zendesk account credentials
8. Allow access for permissions\
9. Click on Test Connection to test the response of your connection.
#### Account Subdomain
{% hint style="info" %}
*If the help center URL is **xyz123.zendesk.com** subdomain value is **xyz123***
{% endhint %}