 ## Benefits of Agent Repositories
* **Standardization**: Maintain consistent agent definitions across your organization
* **Reusability**: Create an agent once and use it in multiple crews and projects
* **Governance**: Implement organization-wide policies for agent configurations
* **Collaboration**: Enable teams to share and build upon each other's work
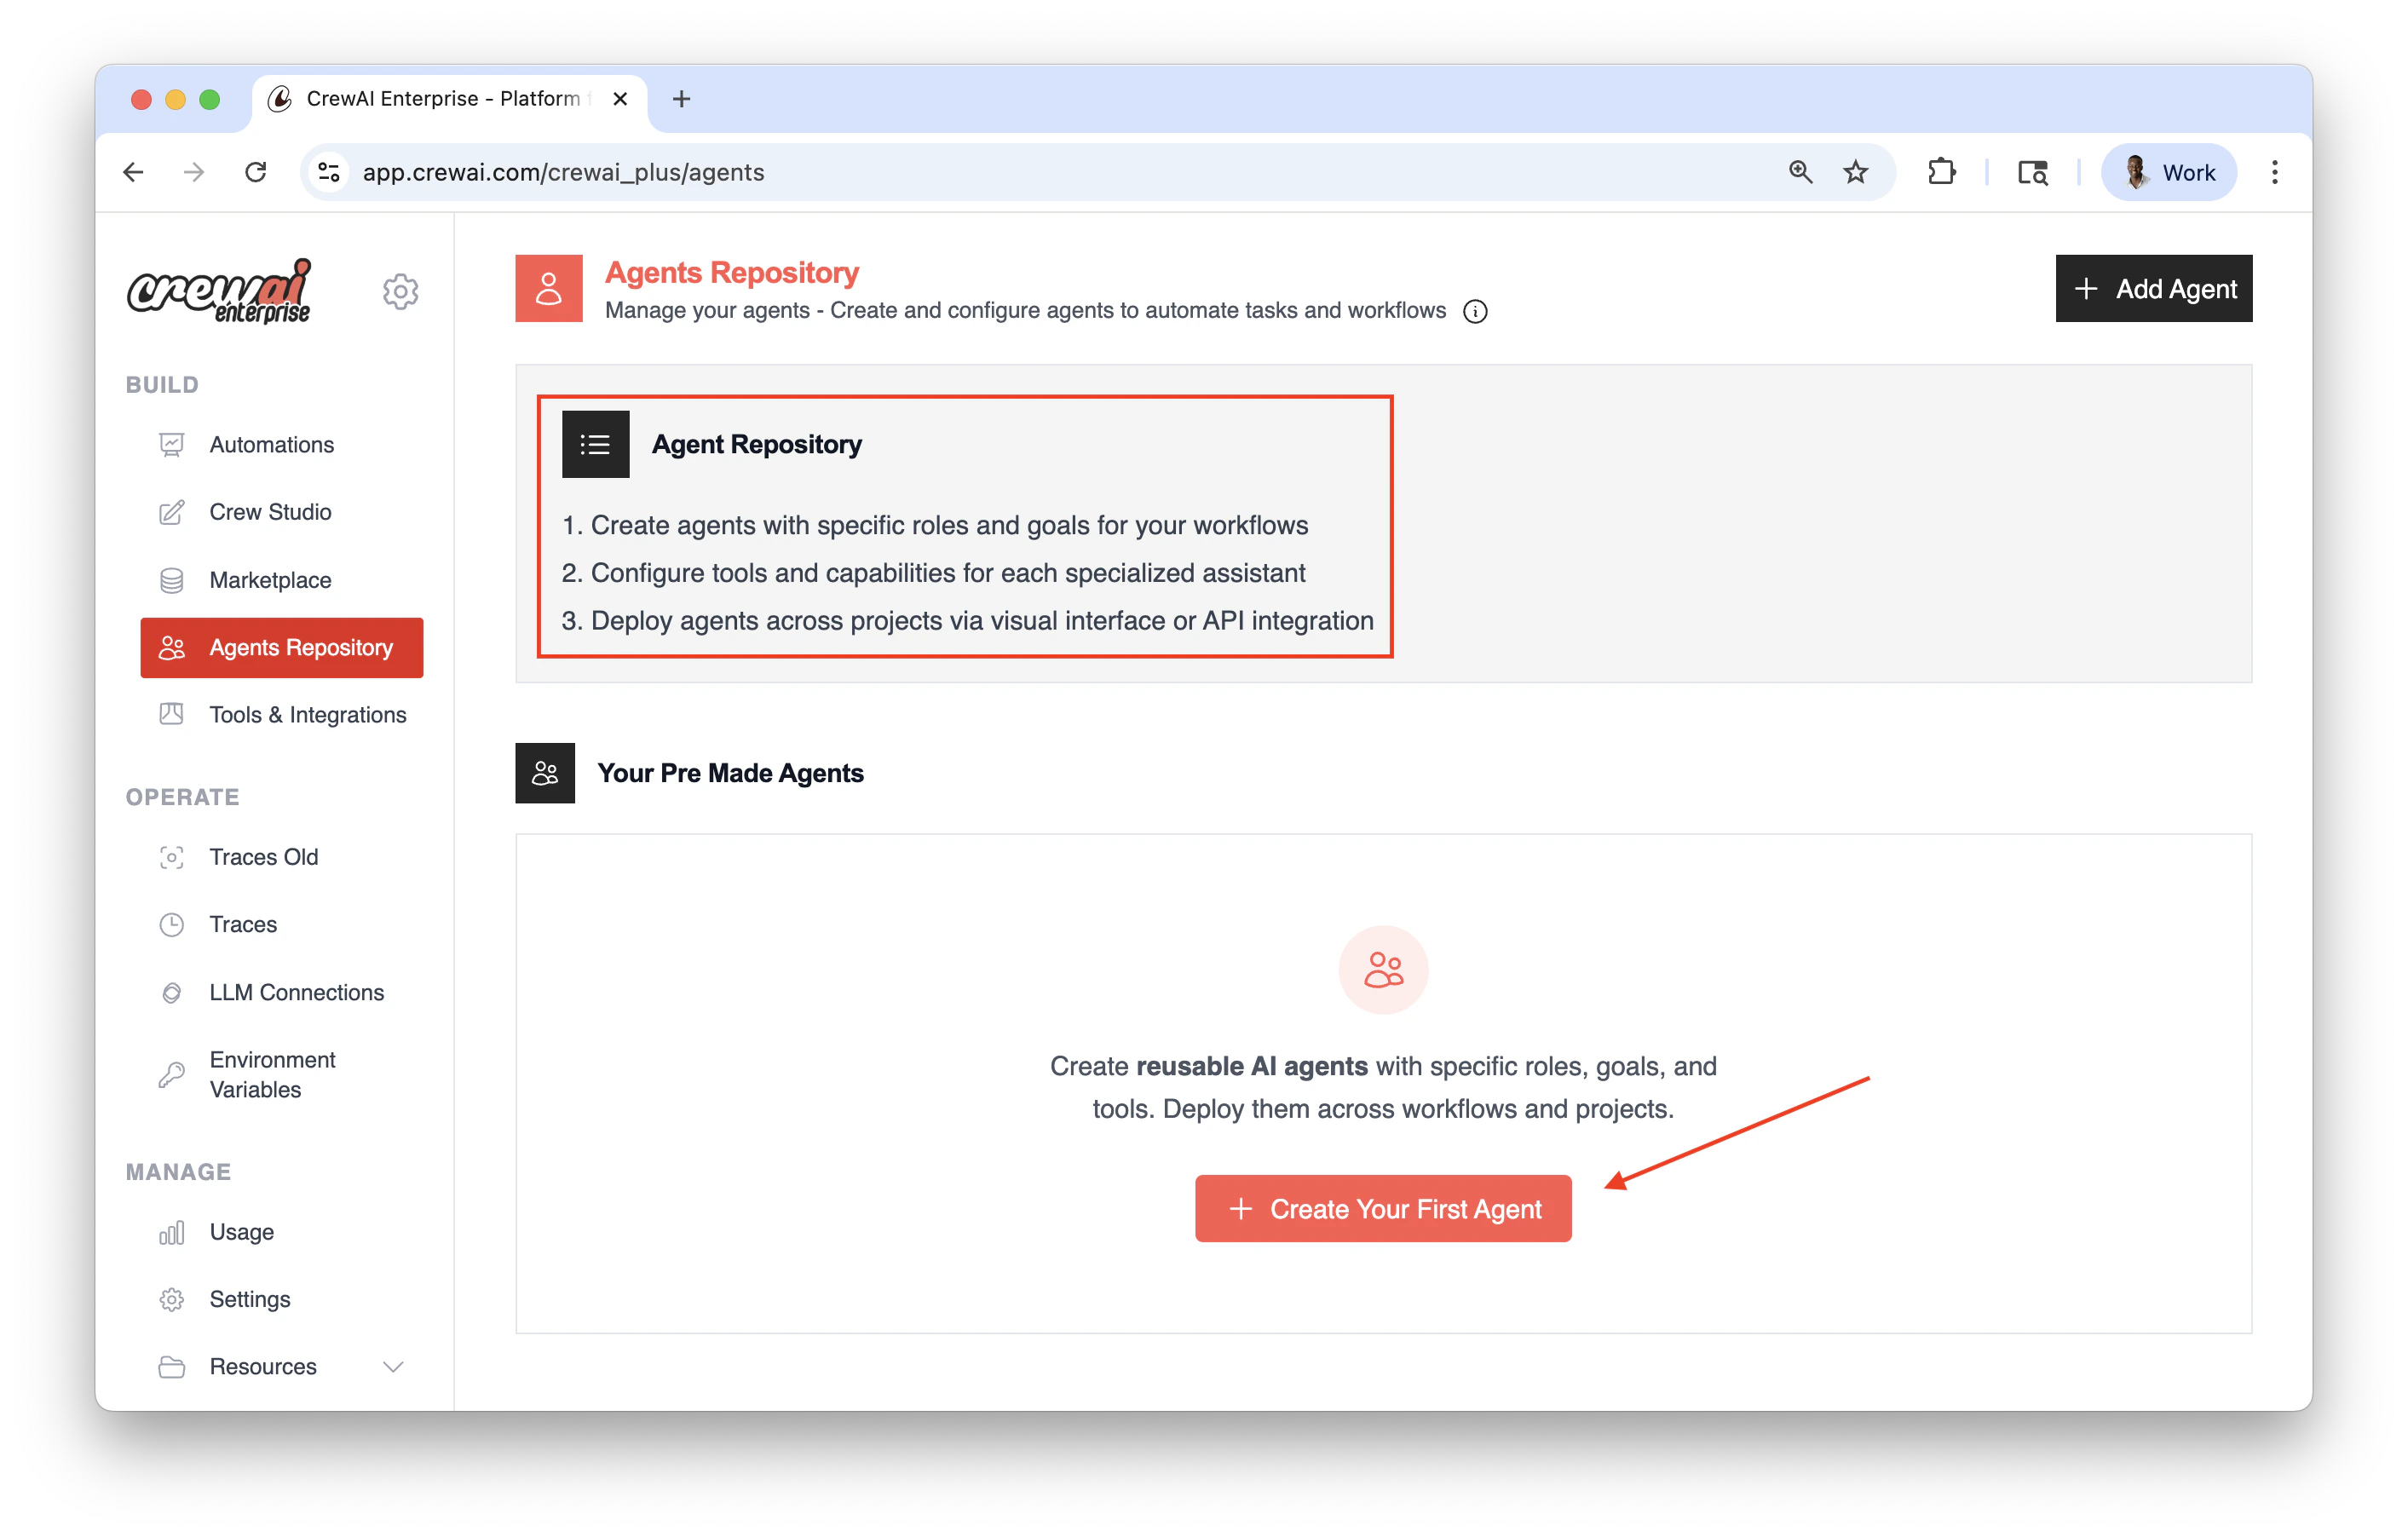
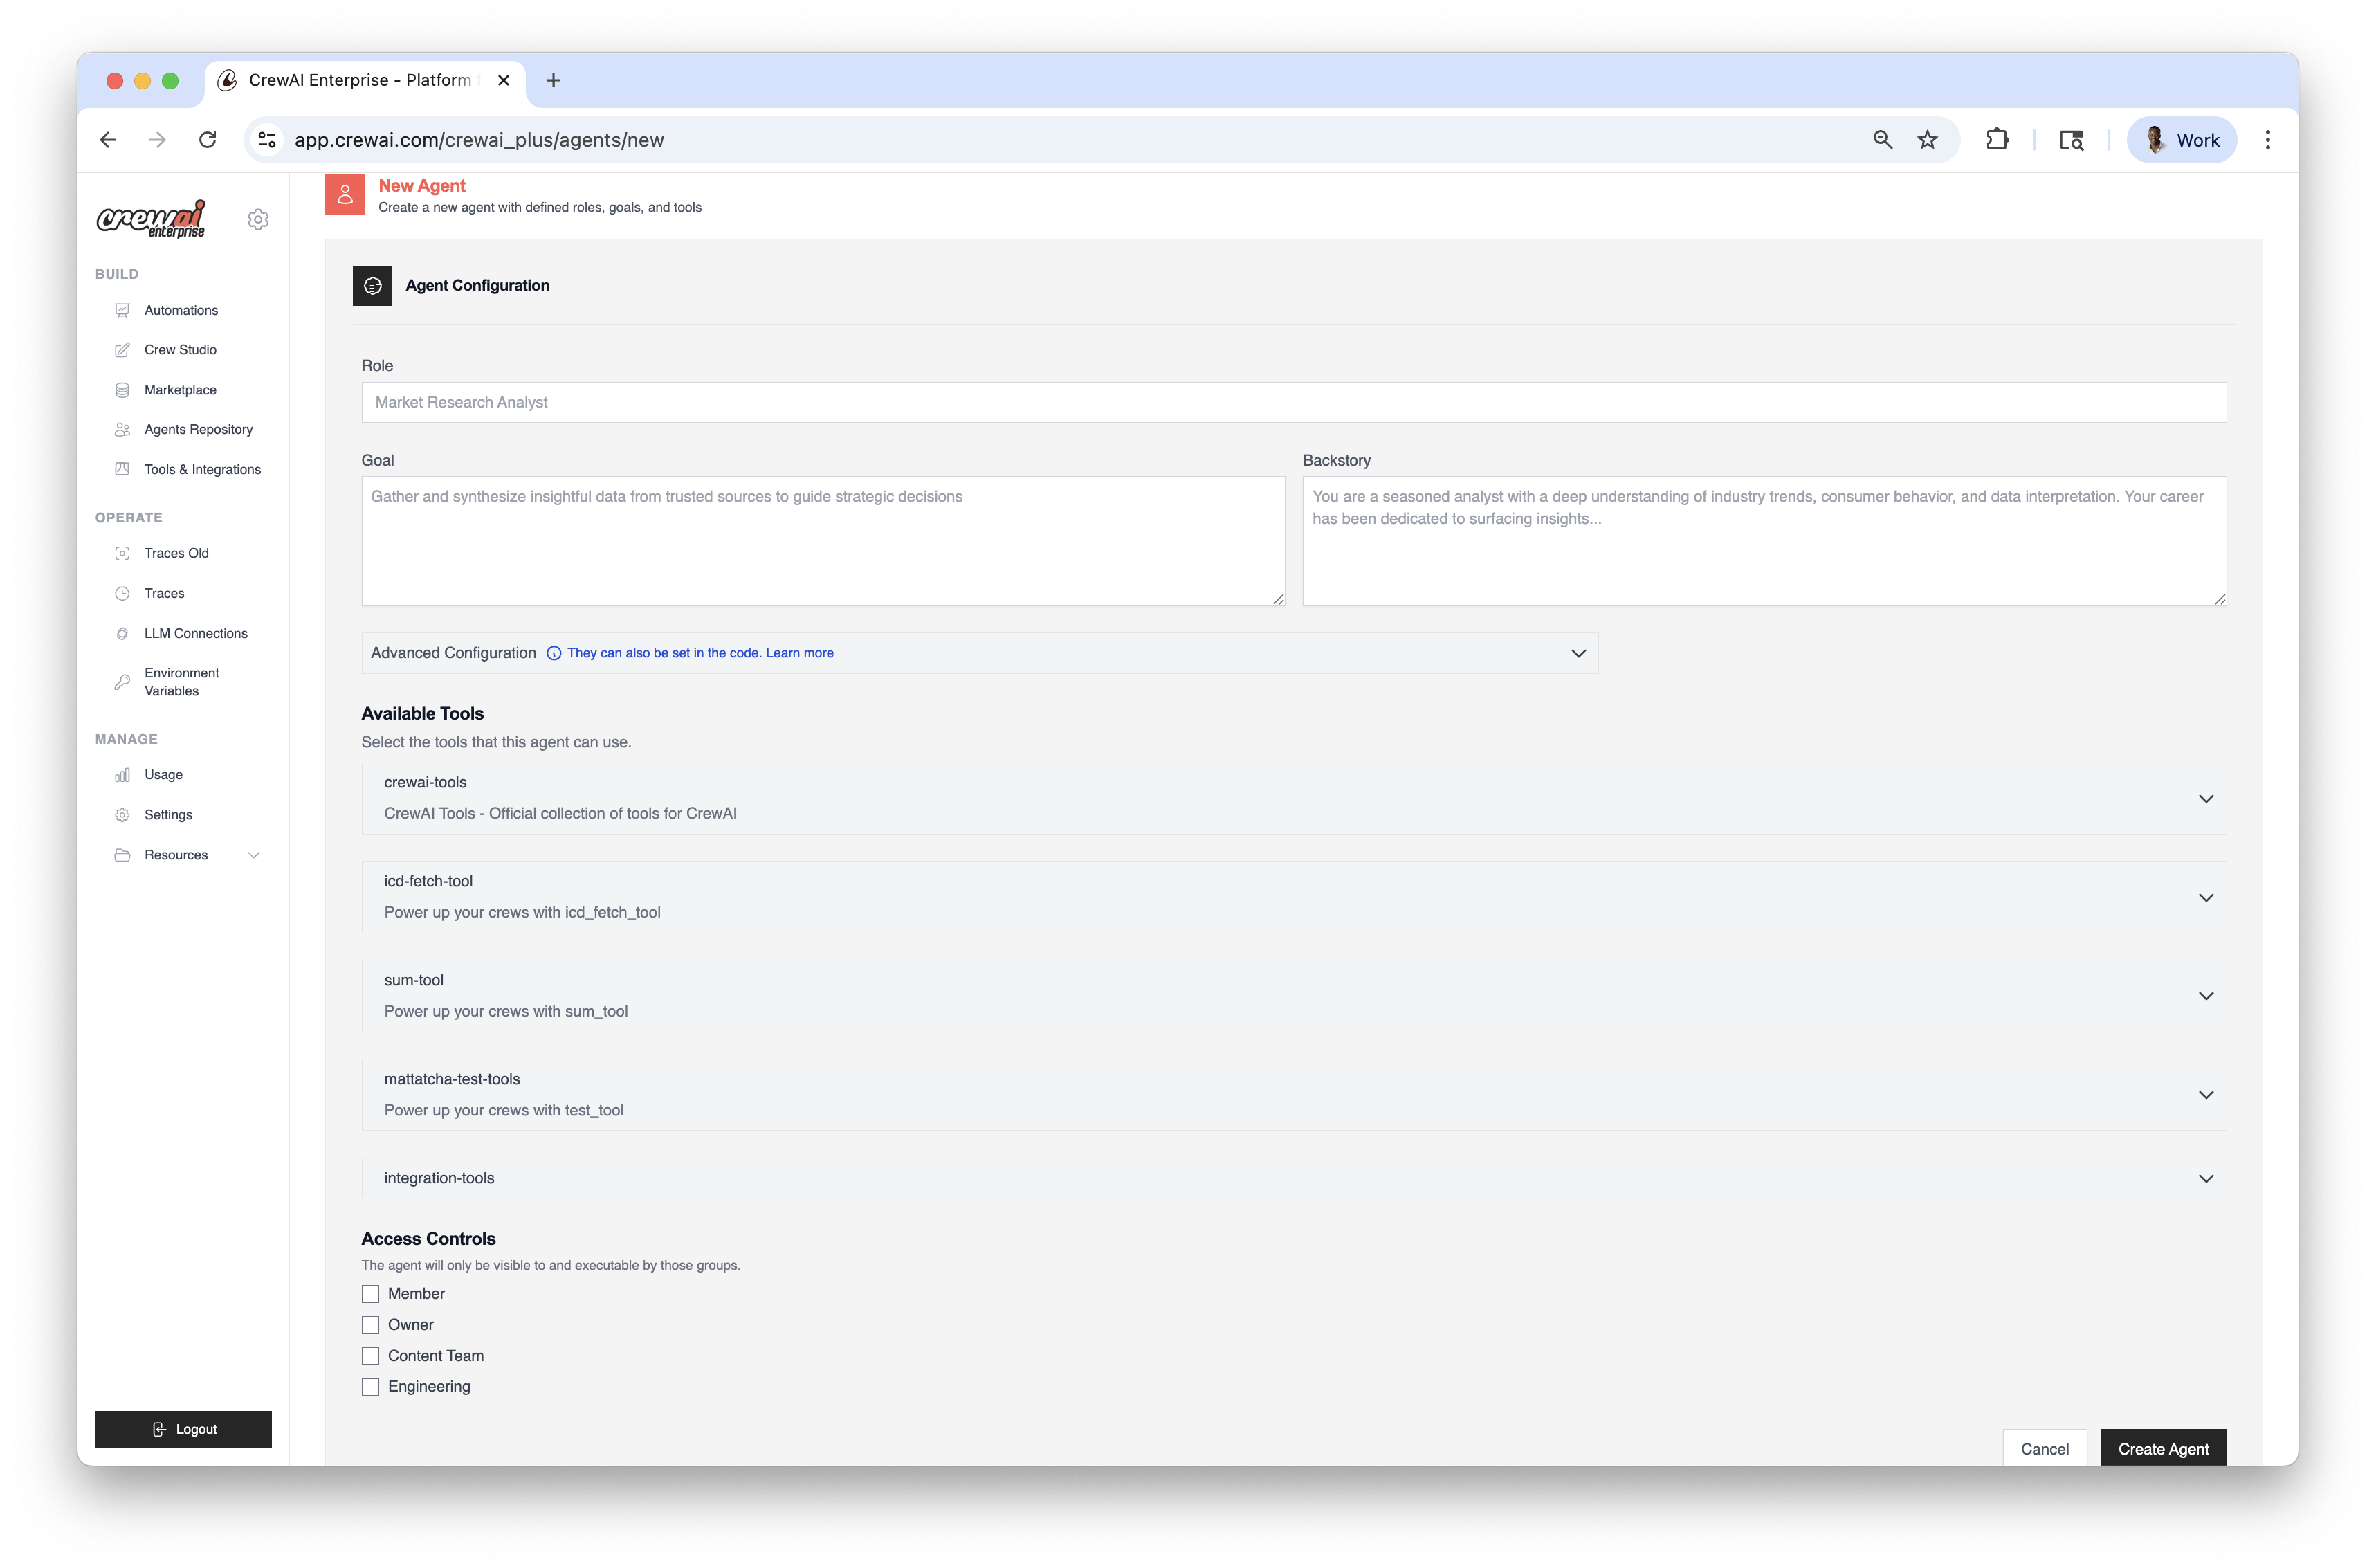
## Creating and Use Agent Repositories
1. You must have an account at CrewAI, try the [free plan](https://app.crewai.com).
2. Create agents with specific roles and goals for your workflows.
3. Configure tools and capabilities for each specialized assistant.
4. Deploy agents across projects via visual interface or API integration.
## Benefits of Agent Repositories
* **Standardization**: Maintain consistent agent definitions across your organization
* **Reusability**: Create an agent once and use it in multiple crews and projects
* **Governance**: Implement organization-wide policies for agent configurations
* **Collaboration**: Enable teams to share and build upon each other's work
## Creating and Use Agent Repositories
1. You must have an account at CrewAI, try the [free plan](https://app.crewai.com).
2. Create agents with specific roles and goals for your workflows.
3. Configure tools and capabilities for each specialized assistant.
4. Deploy agents across projects via visual interface or API integration.
 ### Loading Agents from Repositories
You can load agents from repositories in your code using the `from_repository` parameter to run locally:
```python theme={null}
from crewai import Agent
# Create an agent by loading it from a repository
# The agent is loaded with all its predefined configurations
researcher = Agent(
from_repository="market-research-agent"
)
```
### Overriding Repository Settings
You can override specific settings from the repository by providing them in the configuration:
```python theme={null}
researcher = Agent(
from_repository="market-research-agent",
goal="Research the latest trends in AI development", # Override the repository goal
verbose=True # Add a setting not in the repository
)
```
### Example: Creating a Crew with Repository Agents
```python theme={null}
from crewai import Crew, Agent, Task
# Load agents from repositories
researcher = Agent(
from_repository="market-research-agent"
)
writer = Agent(
from_repository="content-writer-agent"
)
# Create tasks
research_task = Task(
description="Research the latest trends in AI",
agent=researcher
)
writing_task = Task(
description="Write a comprehensive report based on the research",
agent=writer
)
# Create the crew
crew = Crew(
agents=[researcher, writer],
tasks=[research_task, writing_task],
verbose=True
)
# Run the crew
result = crew.kickoff()
```
### Example: Using `kickoff()` with Repository Agents
You can also use repository agents directly with the `kickoff()` method for simpler interactions:
```python theme={null}
from crewai import Agent
from pydantic import BaseModel
from typing import List
# Define a structured output format
class MarketAnalysis(BaseModel):
key_trends: List[str]
opportunities: List[str]
recommendation: str
# Load an agent from repository
analyst = Agent(
from_repository="market-analyst-agent",
verbose=True
)
# Get a free-form response
result = analyst.kickoff("Analyze the AI market in 2025")
print(result.raw) # Access the raw response
# Get structured output
structured_result = analyst.kickoff(
"Provide a structured analysis of the AI market in 2025",
response_format=MarketAnalysis
)
# Access structured data
print(f"Key Trends: {structured_result.pydantic.key_trends}")
print(f"Recommendation: {structured_result.pydantic.recommendation}")
```
## Best Practices
1. **Naming Convention**: Use clear, descriptive names for your repository agents
2. **Documentation**: Include comprehensive descriptions for each agent
3. **Tool Management**: Ensure that tools referenced by repository agents are available in your environment
4. **Access Control**: Manage permissions to ensure only authorized team members can modify repository agents
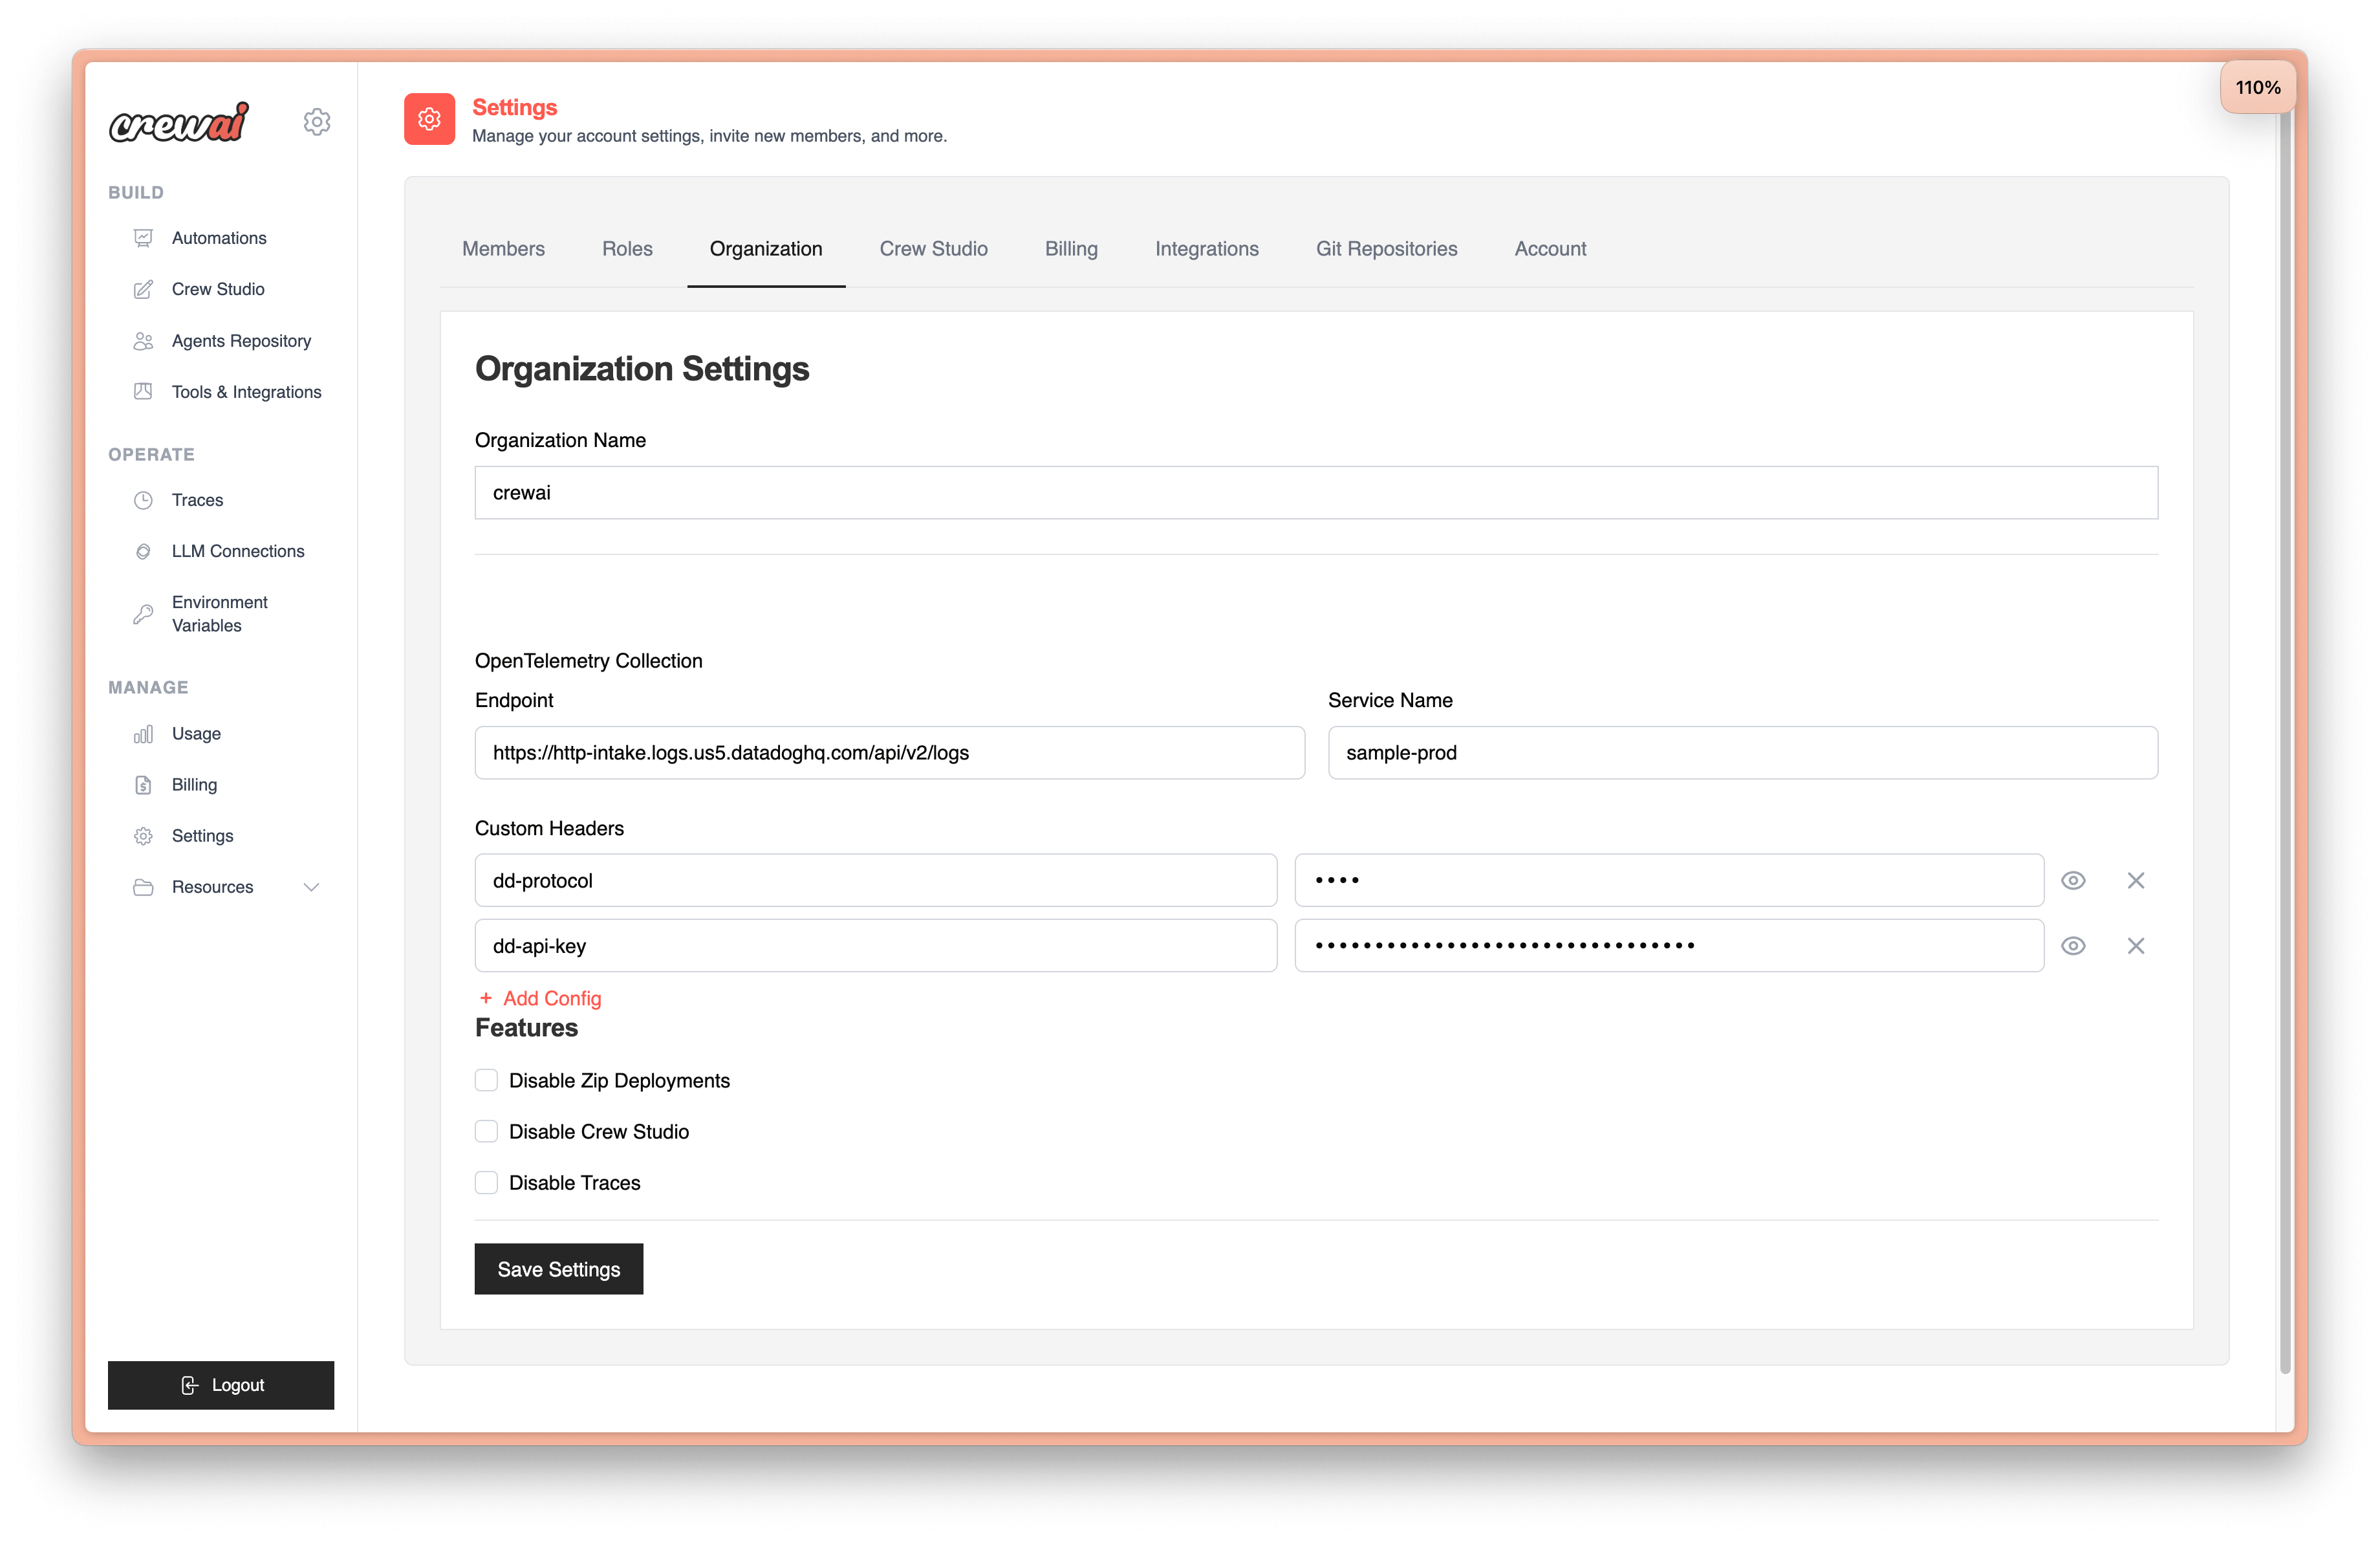
## Organization Management
To switch between organizations or see your current organization, use the CrewAI CLI:
```bash theme={null}
# View current organization
crewai org current
# Switch to a different organization
crewai org switch
### Loading Agents from Repositories
You can load agents from repositories in your code using the `from_repository` parameter to run locally:
```python theme={null}
from crewai import Agent
# Create an agent by loading it from a repository
# The agent is loaded with all its predefined configurations
researcher = Agent(
from_repository="market-research-agent"
)
```
### Overriding Repository Settings
You can override specific settings from the repository by providing them in the configuration:
```python theme={null}
researcher = Agent(
from_repository="market-research-agent",
goal="Research the latest trends in AI development", # Override the repository goal
verbose=True # Add a setting not in the repository
)
```
### Example: Creating a Crew with Repository Agents
```python theme={null}
from crewai import Crew, Agent, Task
# Load agents from repositories
researcher = Agent(
from_repository="market-research-agent"
)
writer = Agent(
from_repository="content-writer-agent"
)
# Create tasks
research_task = Task(
description="Research the latest trends in AI",
agent=researcher
)
writing_task = Task(
description="Write a comprehensive report based on the research",
agent=writer
)
# Create the crew
crew = Crew(
agents=[researcher, writer],
tasks=[research_task, writing_task],
verbose=True
)
# Run the crew
result = crew.kickoff()
```
### Example: Using `kickoff()` with Repository Agents
You can also use repository agents directly with the `kickoff()` method for simpler interactions:
```python theme={null}
from crewai import Agent
from pydantic import BaseModel
from typing import List
# Define a structured output format
class MarketAnalysis(BaseModel):
key_trends: List[str]
opportunities: List[str]
recommendation: str
# Load an agent from repository
analyst = Agent(
from_repository="market-analyst-agent",
verbose=True
)
# Get a free-form response
result = analyst.kickoff("Analyze the AI market in 2025")
print(result.raw) # Access the raw response
# Get structured output
structured_result = analyst.kickoff(
"Provide a structured analysis of the AI market in 2025",
response_format=MarketAnalysis
)
# Access structured data
print(f"Key Trends: {structured_result.pydantic.key_trends}")
print(f"Recommendation: {structured_result.pydantic.recommendation}")
```
## Best Practices
1. **Naming Convention**: Use clear, descriptive names for your repository agents
2. **Documentation**: Include comprehensive descriptions for each agent
3. **Tool Management**: Ensure that tools referenced by repository agents are available in your environment
4. **Access Control**: Manage permissions to ensure only authorized team members can modify repository agents
## Organization Management
To switch between organizations or see your current organization, use the CrewAI CLI:
```bash theme={null}
# View current organization
crewai org current
# Switch to a different organization
crewai org switch 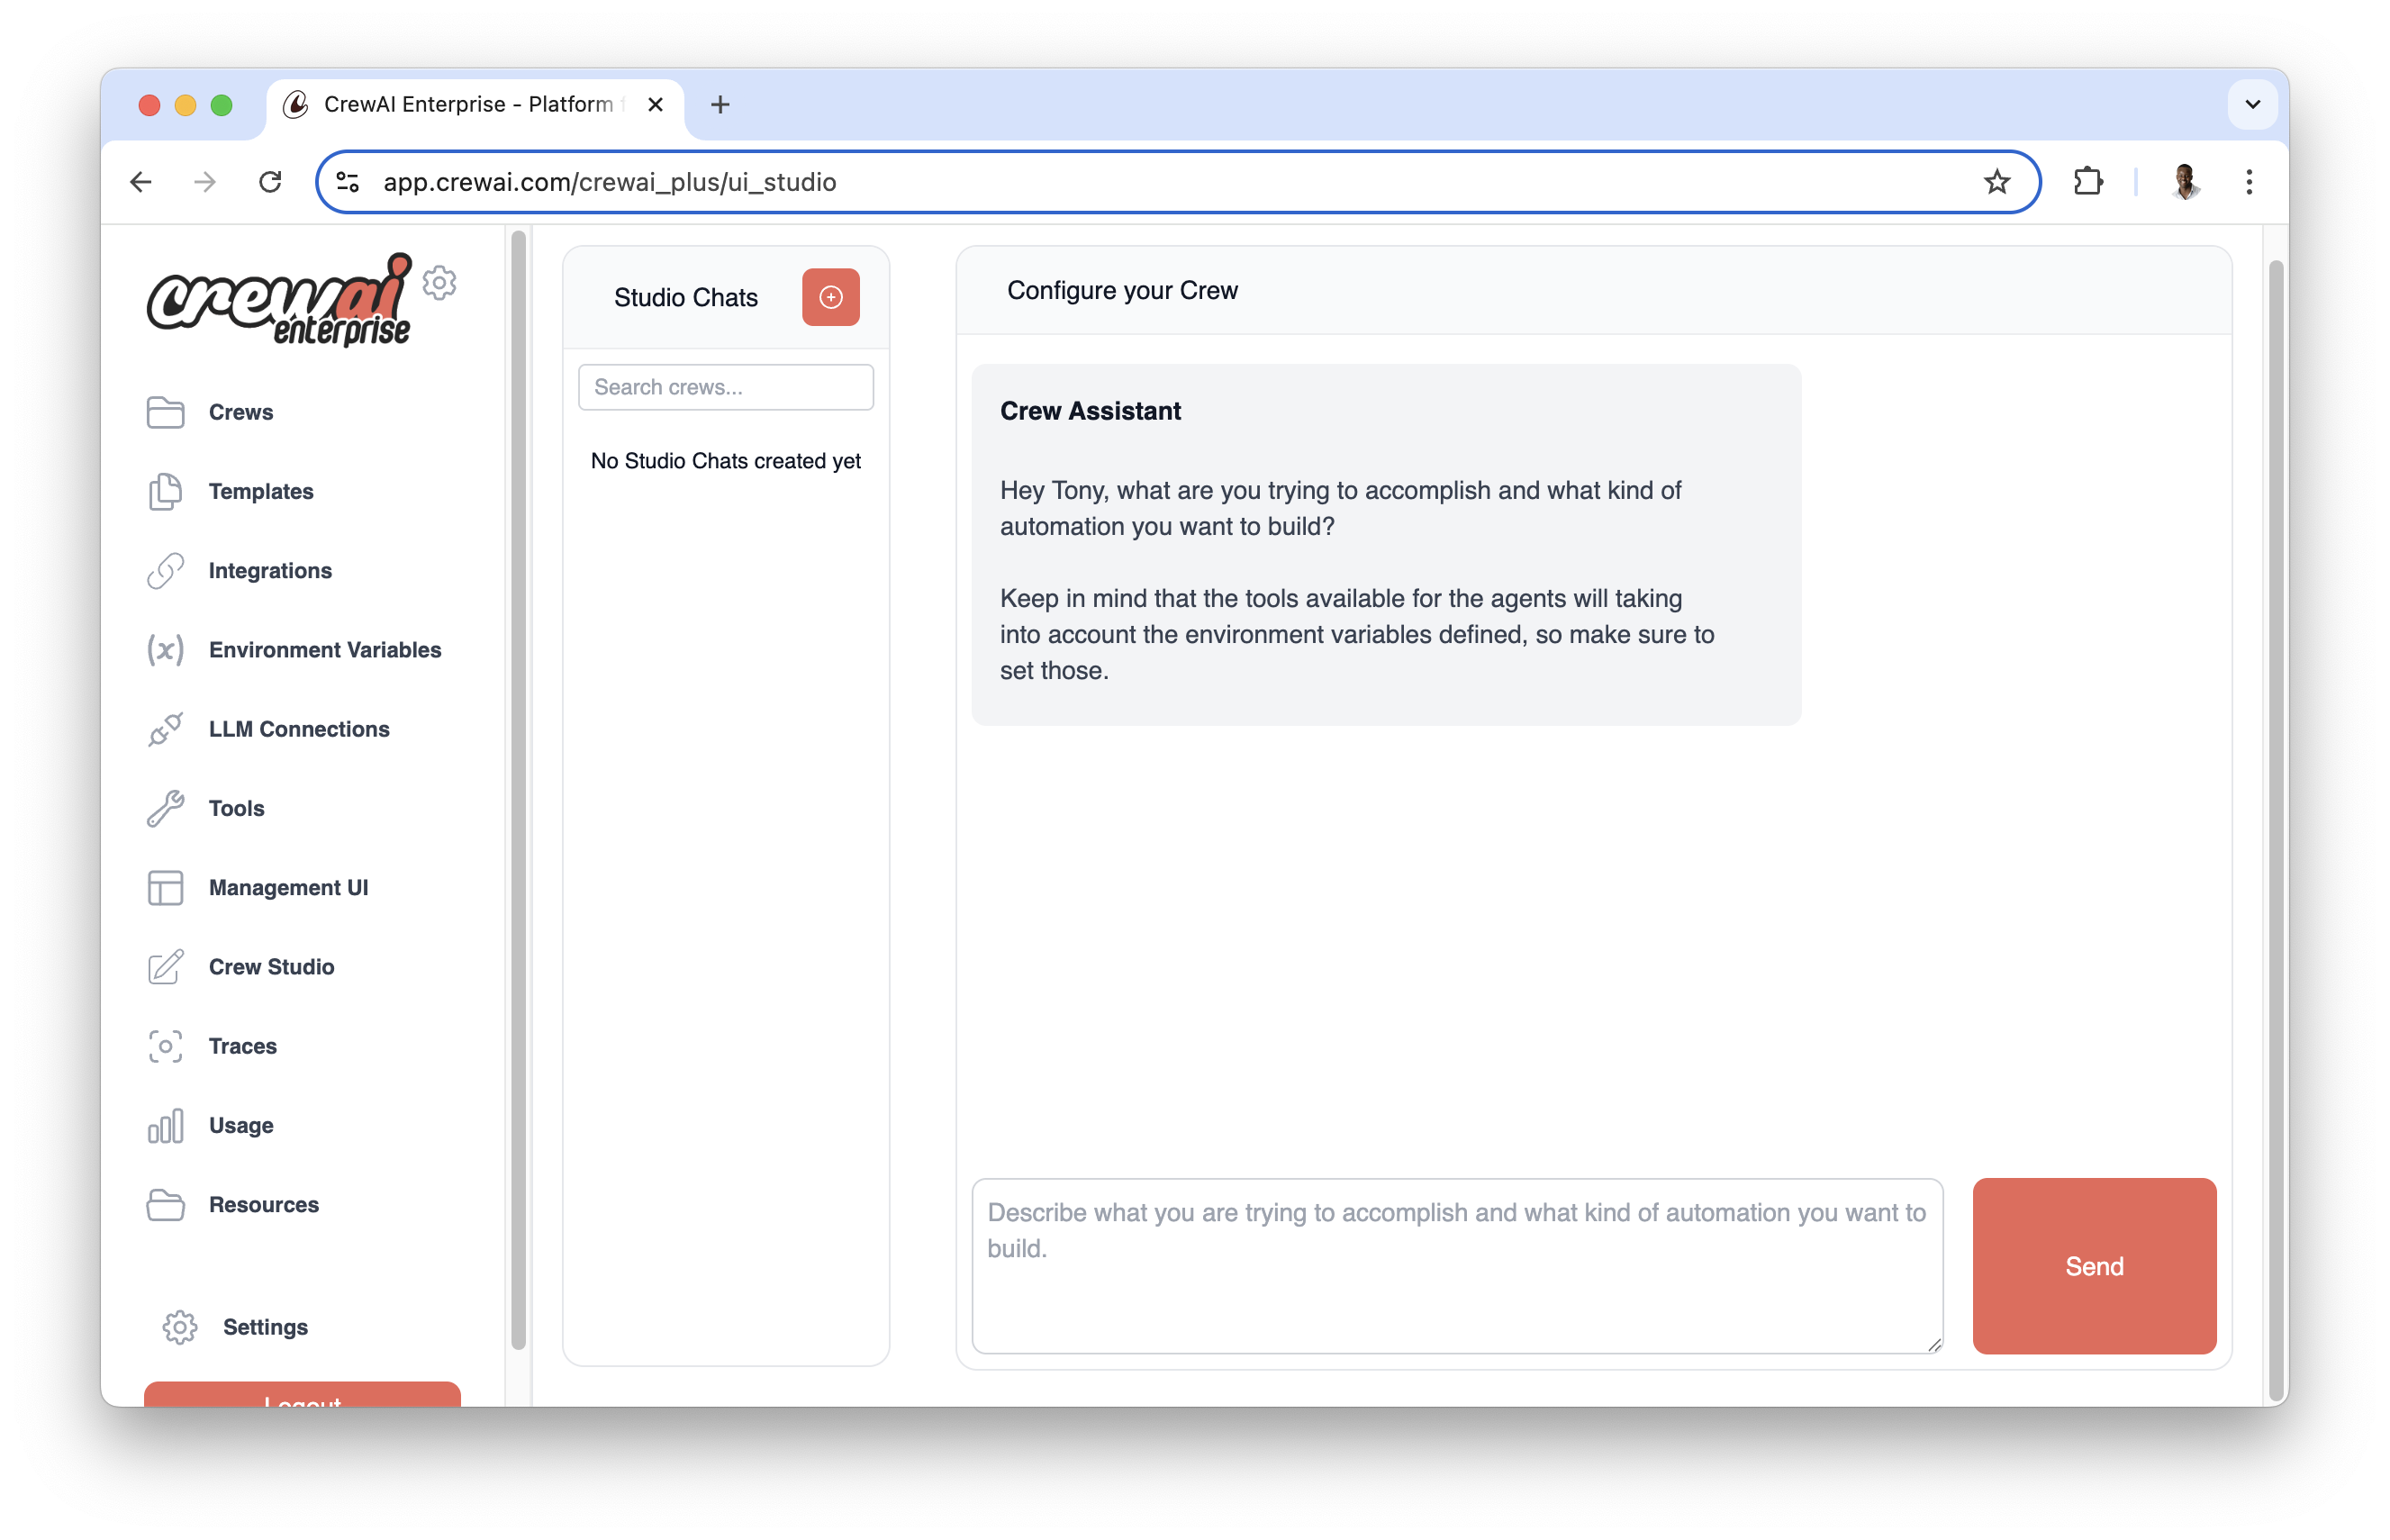 The Visual Agent Builder enables:
* Intuitive agent configuration with form-based interfaces
* Real-time testing and validation
* Template library with pre-configured agent types
* Easy customization of agent attributes and behaviors
The Visual Agent Builder enables:
* Intuitive agent configuration with form-based interfaces
* Real-time testing and validation
* Template library with pre-configured agent types
* Easy customization of agent attributes and behaviors
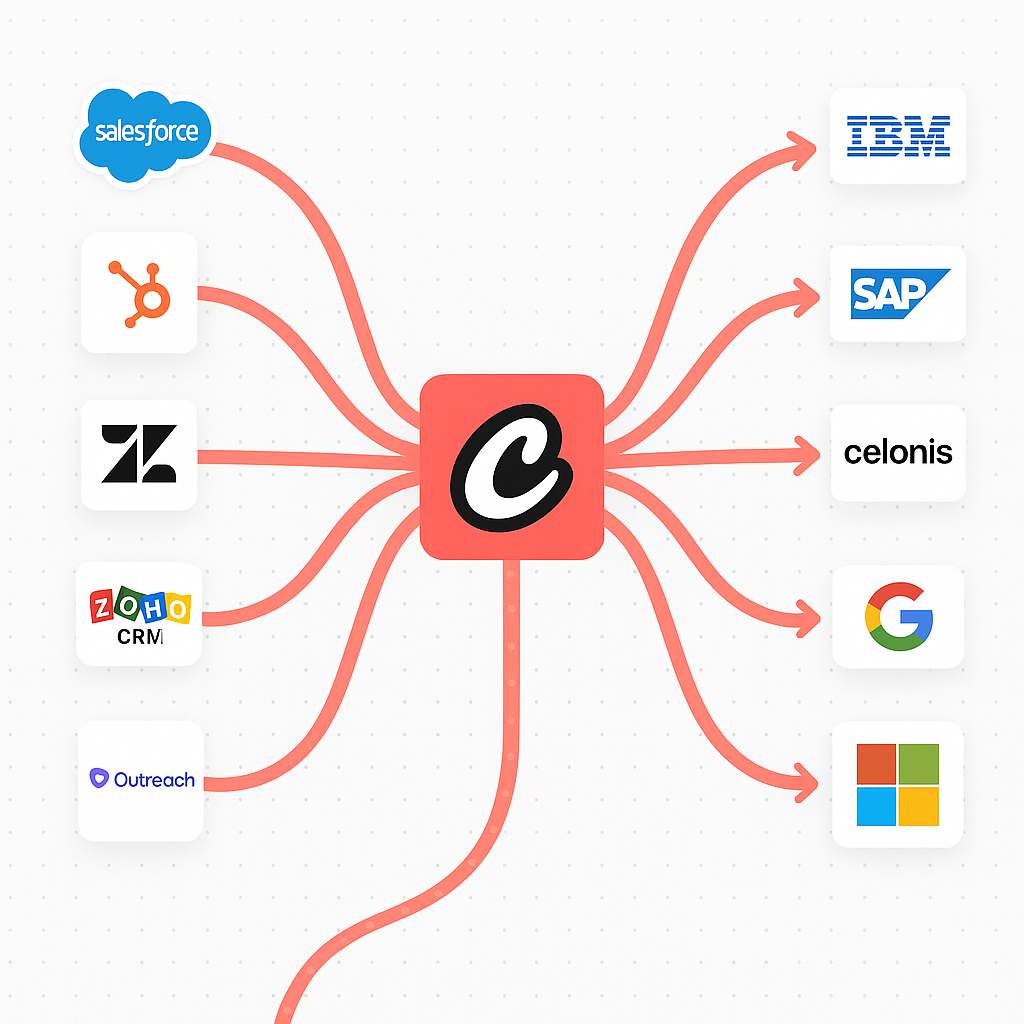 ### Integration Playbooks
Deep-dive guides walk through setup and sample workflows for each integration:
### Integration Playbooks
Deep-dive guides walk through setup and sample workflows for each integration:
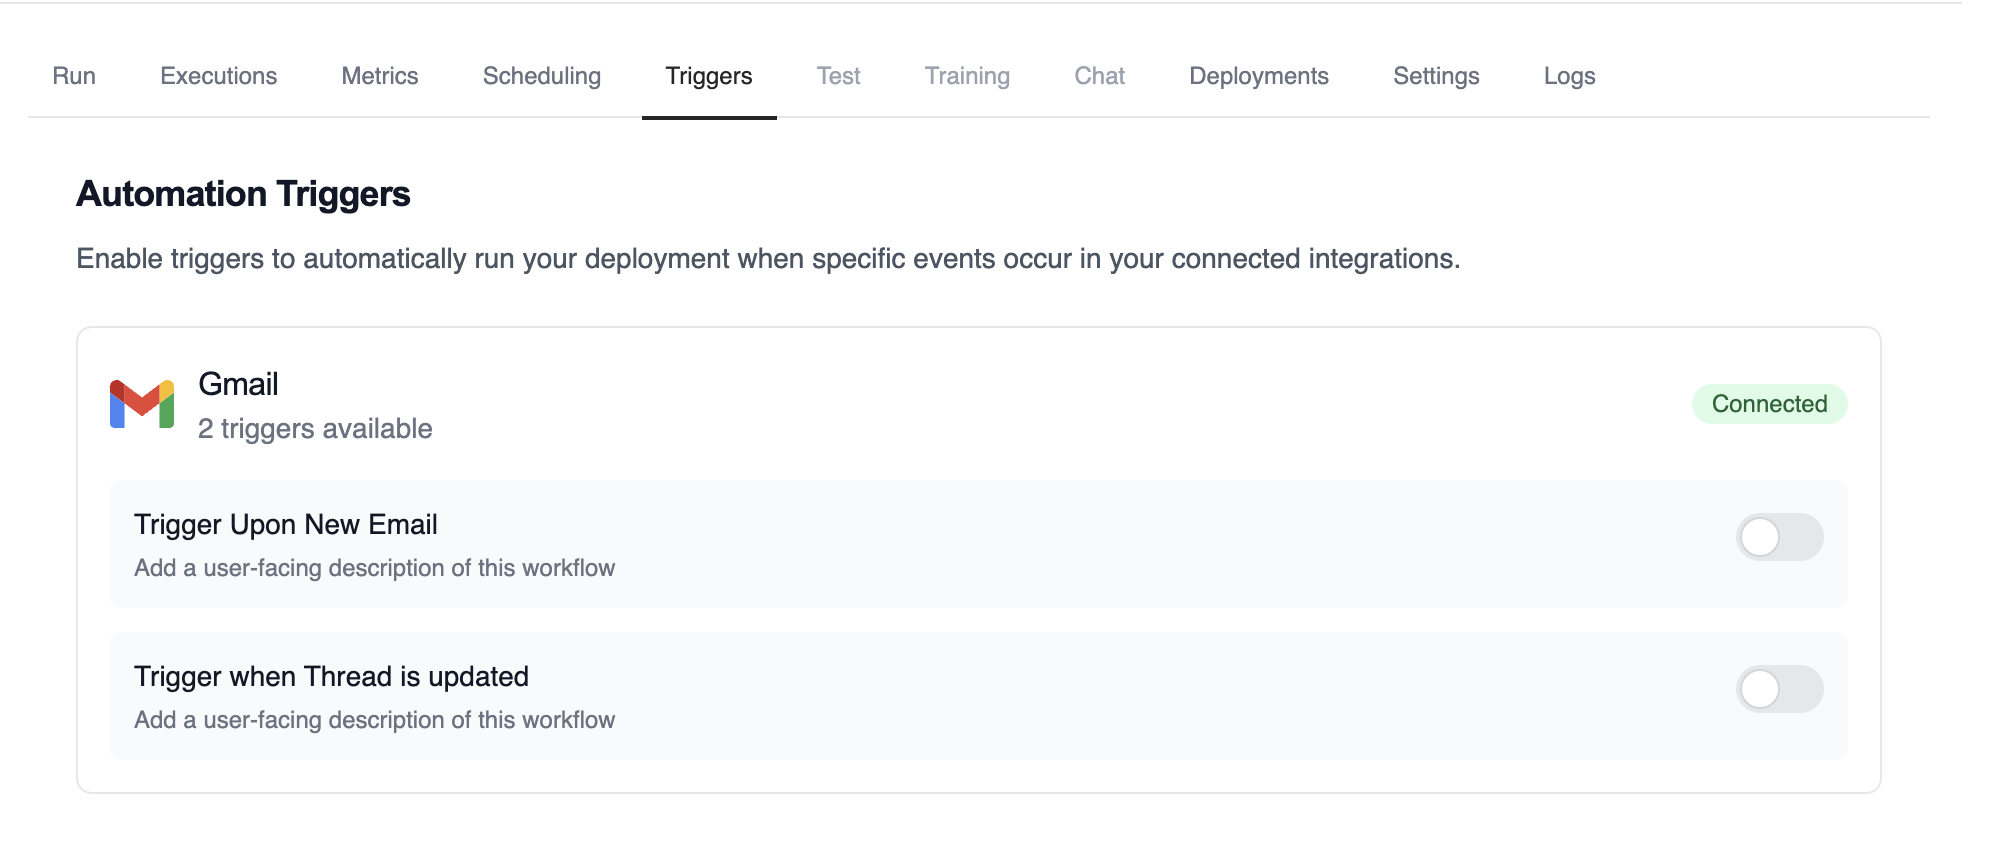 This view shows all the trigger integrations available for your deployment, along with their current connection status.
### Enabling and Disabling Triggers
Each trigger can be easily enabled or disabled using the toggle switch:
This view shows all the trigger integrations available for your deployment, along with their current connection status.
### Enabling and Disabling Triggers
Each trigger can be easily enabled or disabled using the toggle switch:
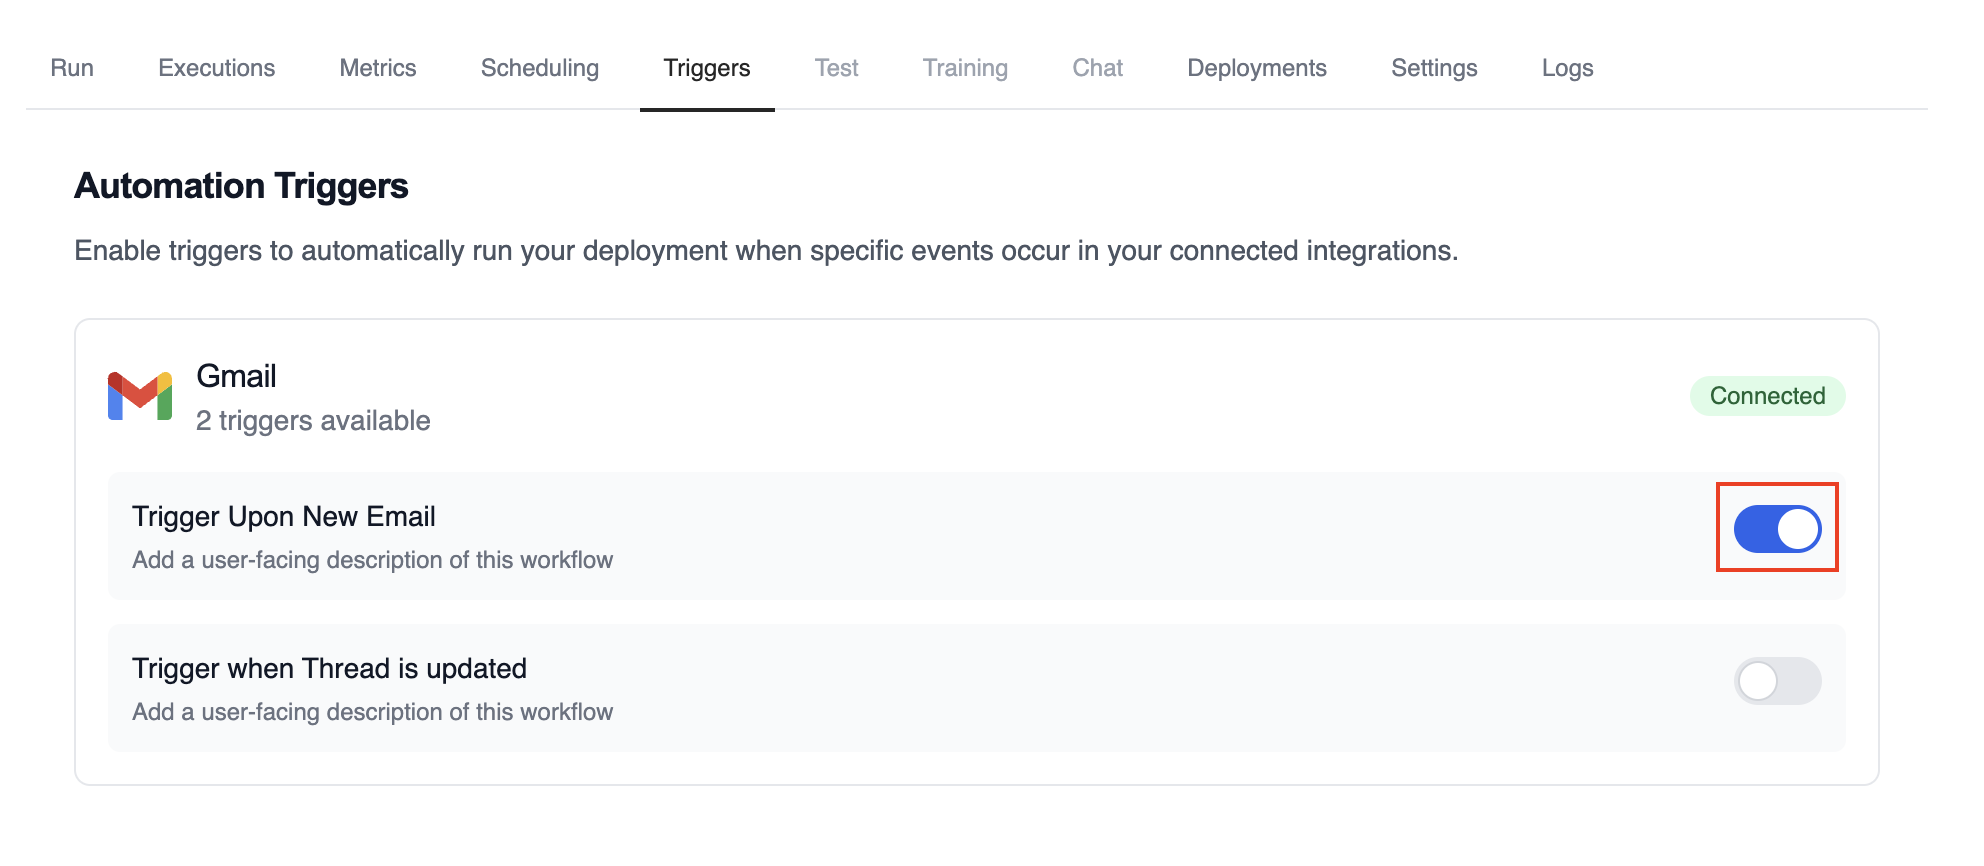 * **Enabled (blue toggle)**: The trigger is active and will automatically execute your deployment when the specified events occur
* **Disabled (gray toggle)**: The trigger is inactive and will not respond to events
Simply click the toggle to change the trigger state. Changes take effect immediately.
### Monitoring Trigger Executions
Track the performance and history of your triggered executions:
* **Enabled (blue toggle)**: The trigger is active and will automatically execute your deployment when the specified events occur
* **Disabled (gray toggle)**: The trigger is inactive and will not respond to events
Simply click the toggle to change the trigger state. Changes take effect immediately.
### Monitoring Trigger Executions
Track the performance and history of your triggered executions:
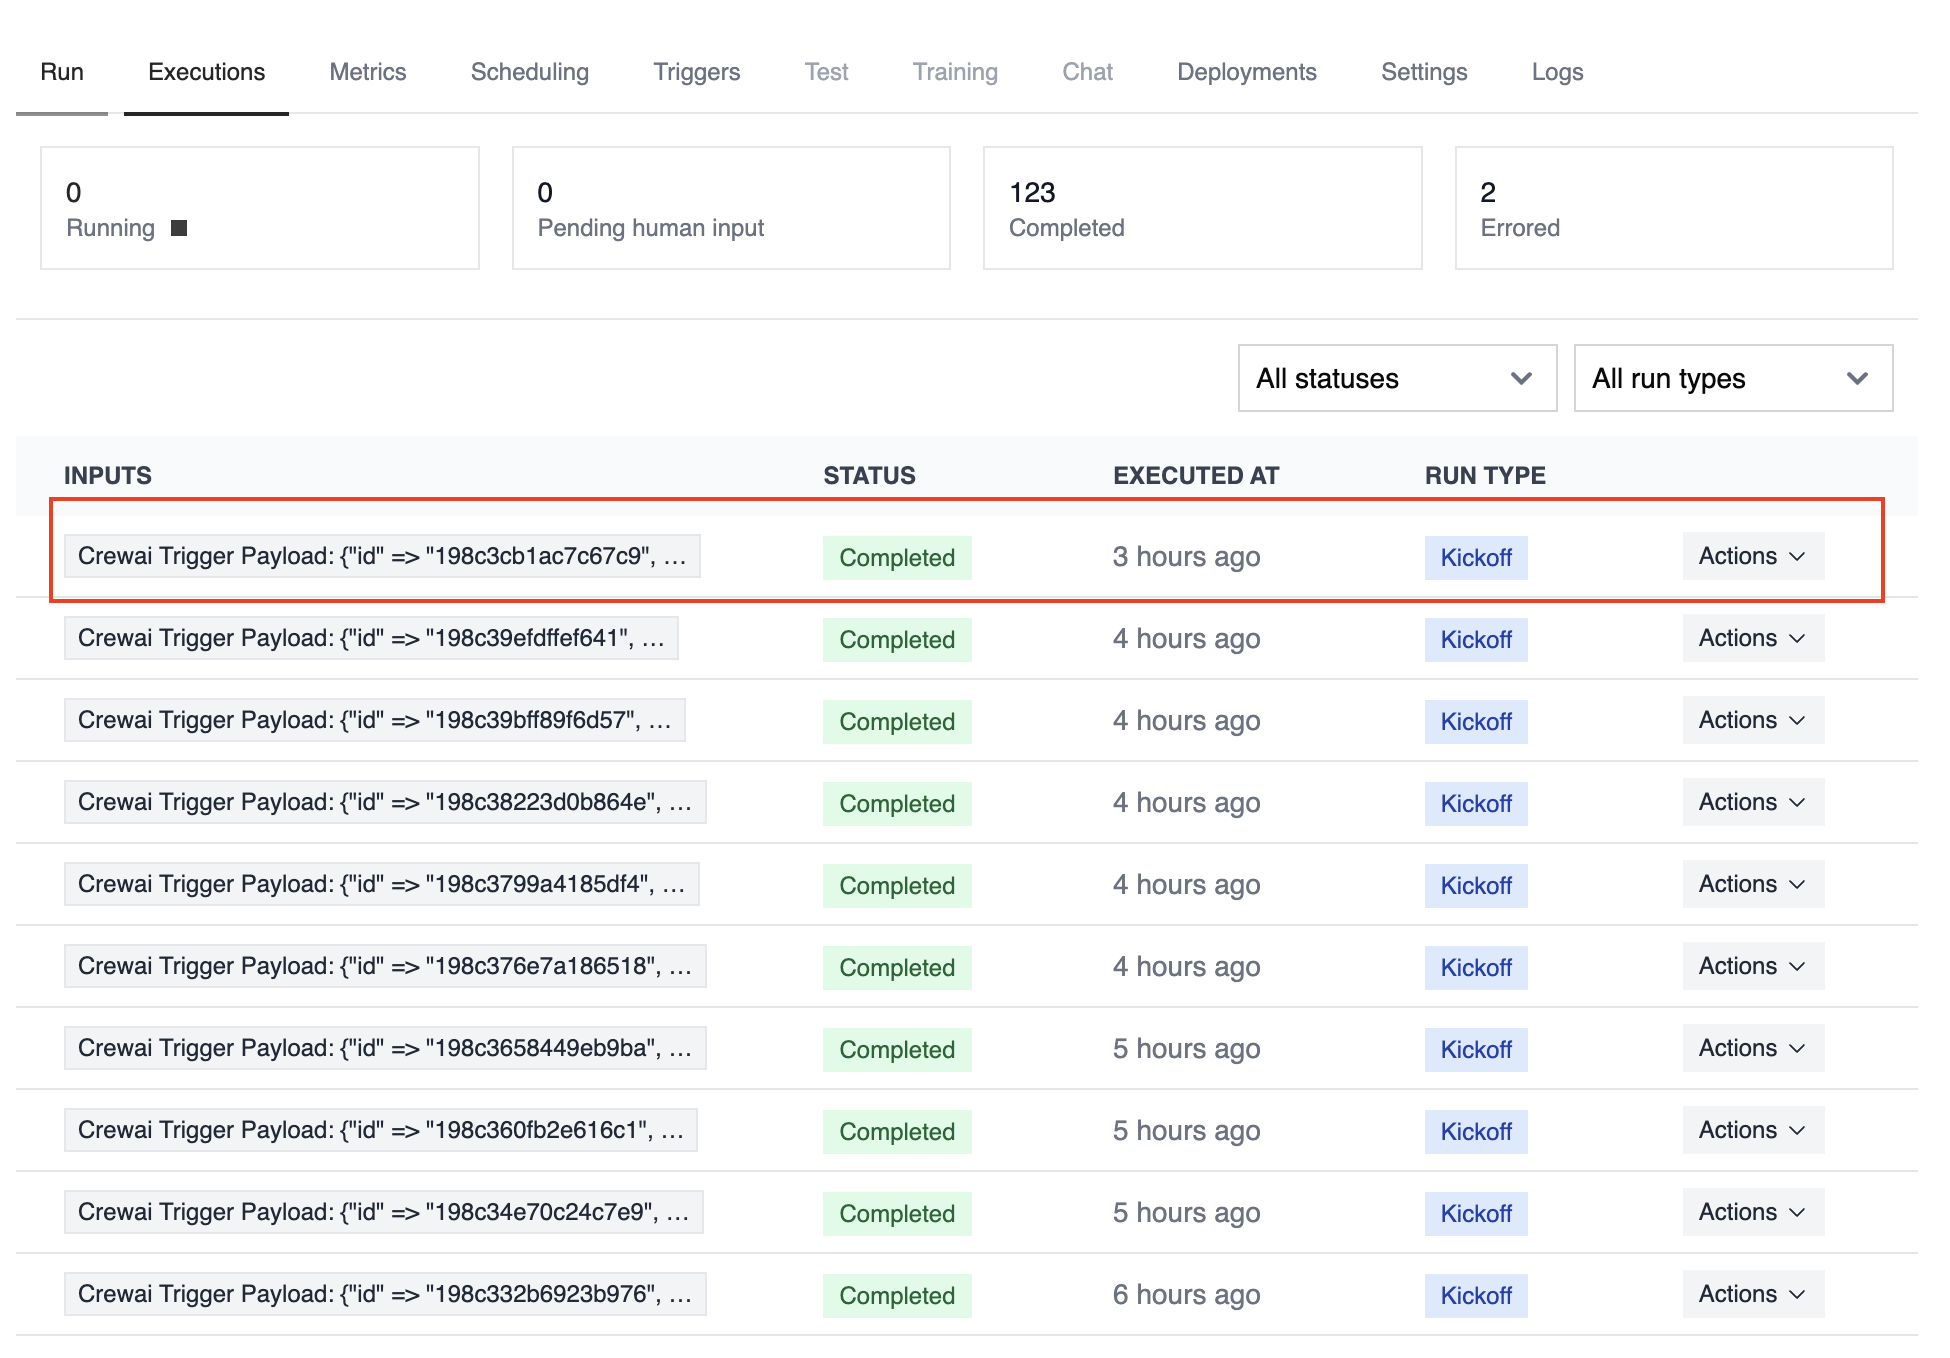 ## Building Trigger-Driven Automations
Before building your automation, it's helpful to understand the structure of trigger payloads that your crews and flows will receive.
### Trigger Setup Checklist
Before wiring a trigger into production, make sure you:
* Connect the integration under **Tools & Integrations** and complete any OAuth or API key steps
* Enable the trigger toggle on the deployment that should respond to events
* Provide any required environment variables (API tokens, tenant IDs, shared secrets)
* Create or update tasks that can parse the incoming payload within the first crew task or flow step
* Decide whether to pass trigger context automatically using `allow_crewai_trigger_context`
* Set up monitoring—webhook logs, CrewAI execution history, and optional external alerting
### Testing Triggers Locally with CLI
The CrewAI CLI provides powerful commands to help you develop and test trigger-driven automations without deploying to production.
#### List Available Triggers
View all available triggers for your connected integrations:
```bash theme={null}
crewai triggers list
```
This command displays all triggers available based on your connected integrations, showing:
* Integration name and connection status
* Available trigger types
* Trigger names and descriptions
#### Simulate Trigger Execution
Test your crew with realistic trigger payloads before deployment:
```bash theme={null}
crewai triggers run
## Building Trigger-Driven Automations
Before building your automation, it's helpful to understand the structure of trigger payloads that your crews and flows will receive.
### Trigger Setup Checklist
Before wiring a trigger into production, make sure you:
* Connect the integration under **Tools & Integrations** and complete any OAuth or API key steps
* Enable the trigger toggle on the deployment that should respond to events
* Provide any required environment variables (API tokens, tenant IDs, shared secrets)
* Create or update tasks that can parse the incoming payload within the first crew task or flow step
* Decide whether to pass trigger context automatically using `allow_crewai_trigger_context`
* Set up monitoring—webhook logs, CrewAI execution history, and optional external alerting
### Testing Triggers Locally with CLI
The CrewAI CLI provides powerful commands to help you develop and test trigger-driven automations without deploying to production.
#### List Available Triggers
View all available triggers for your connected integrations:
```bash theme={null}
crewai triggers list
```
This command displays all triggers available based on your connected integrations, showing:
* Integration name and connection status
* Available trigger types
* Trigger names and descriptions
#### Simulate Trigger Execution
Test your crew with realistic trigger payloads before deployment:
```bash theme={null}
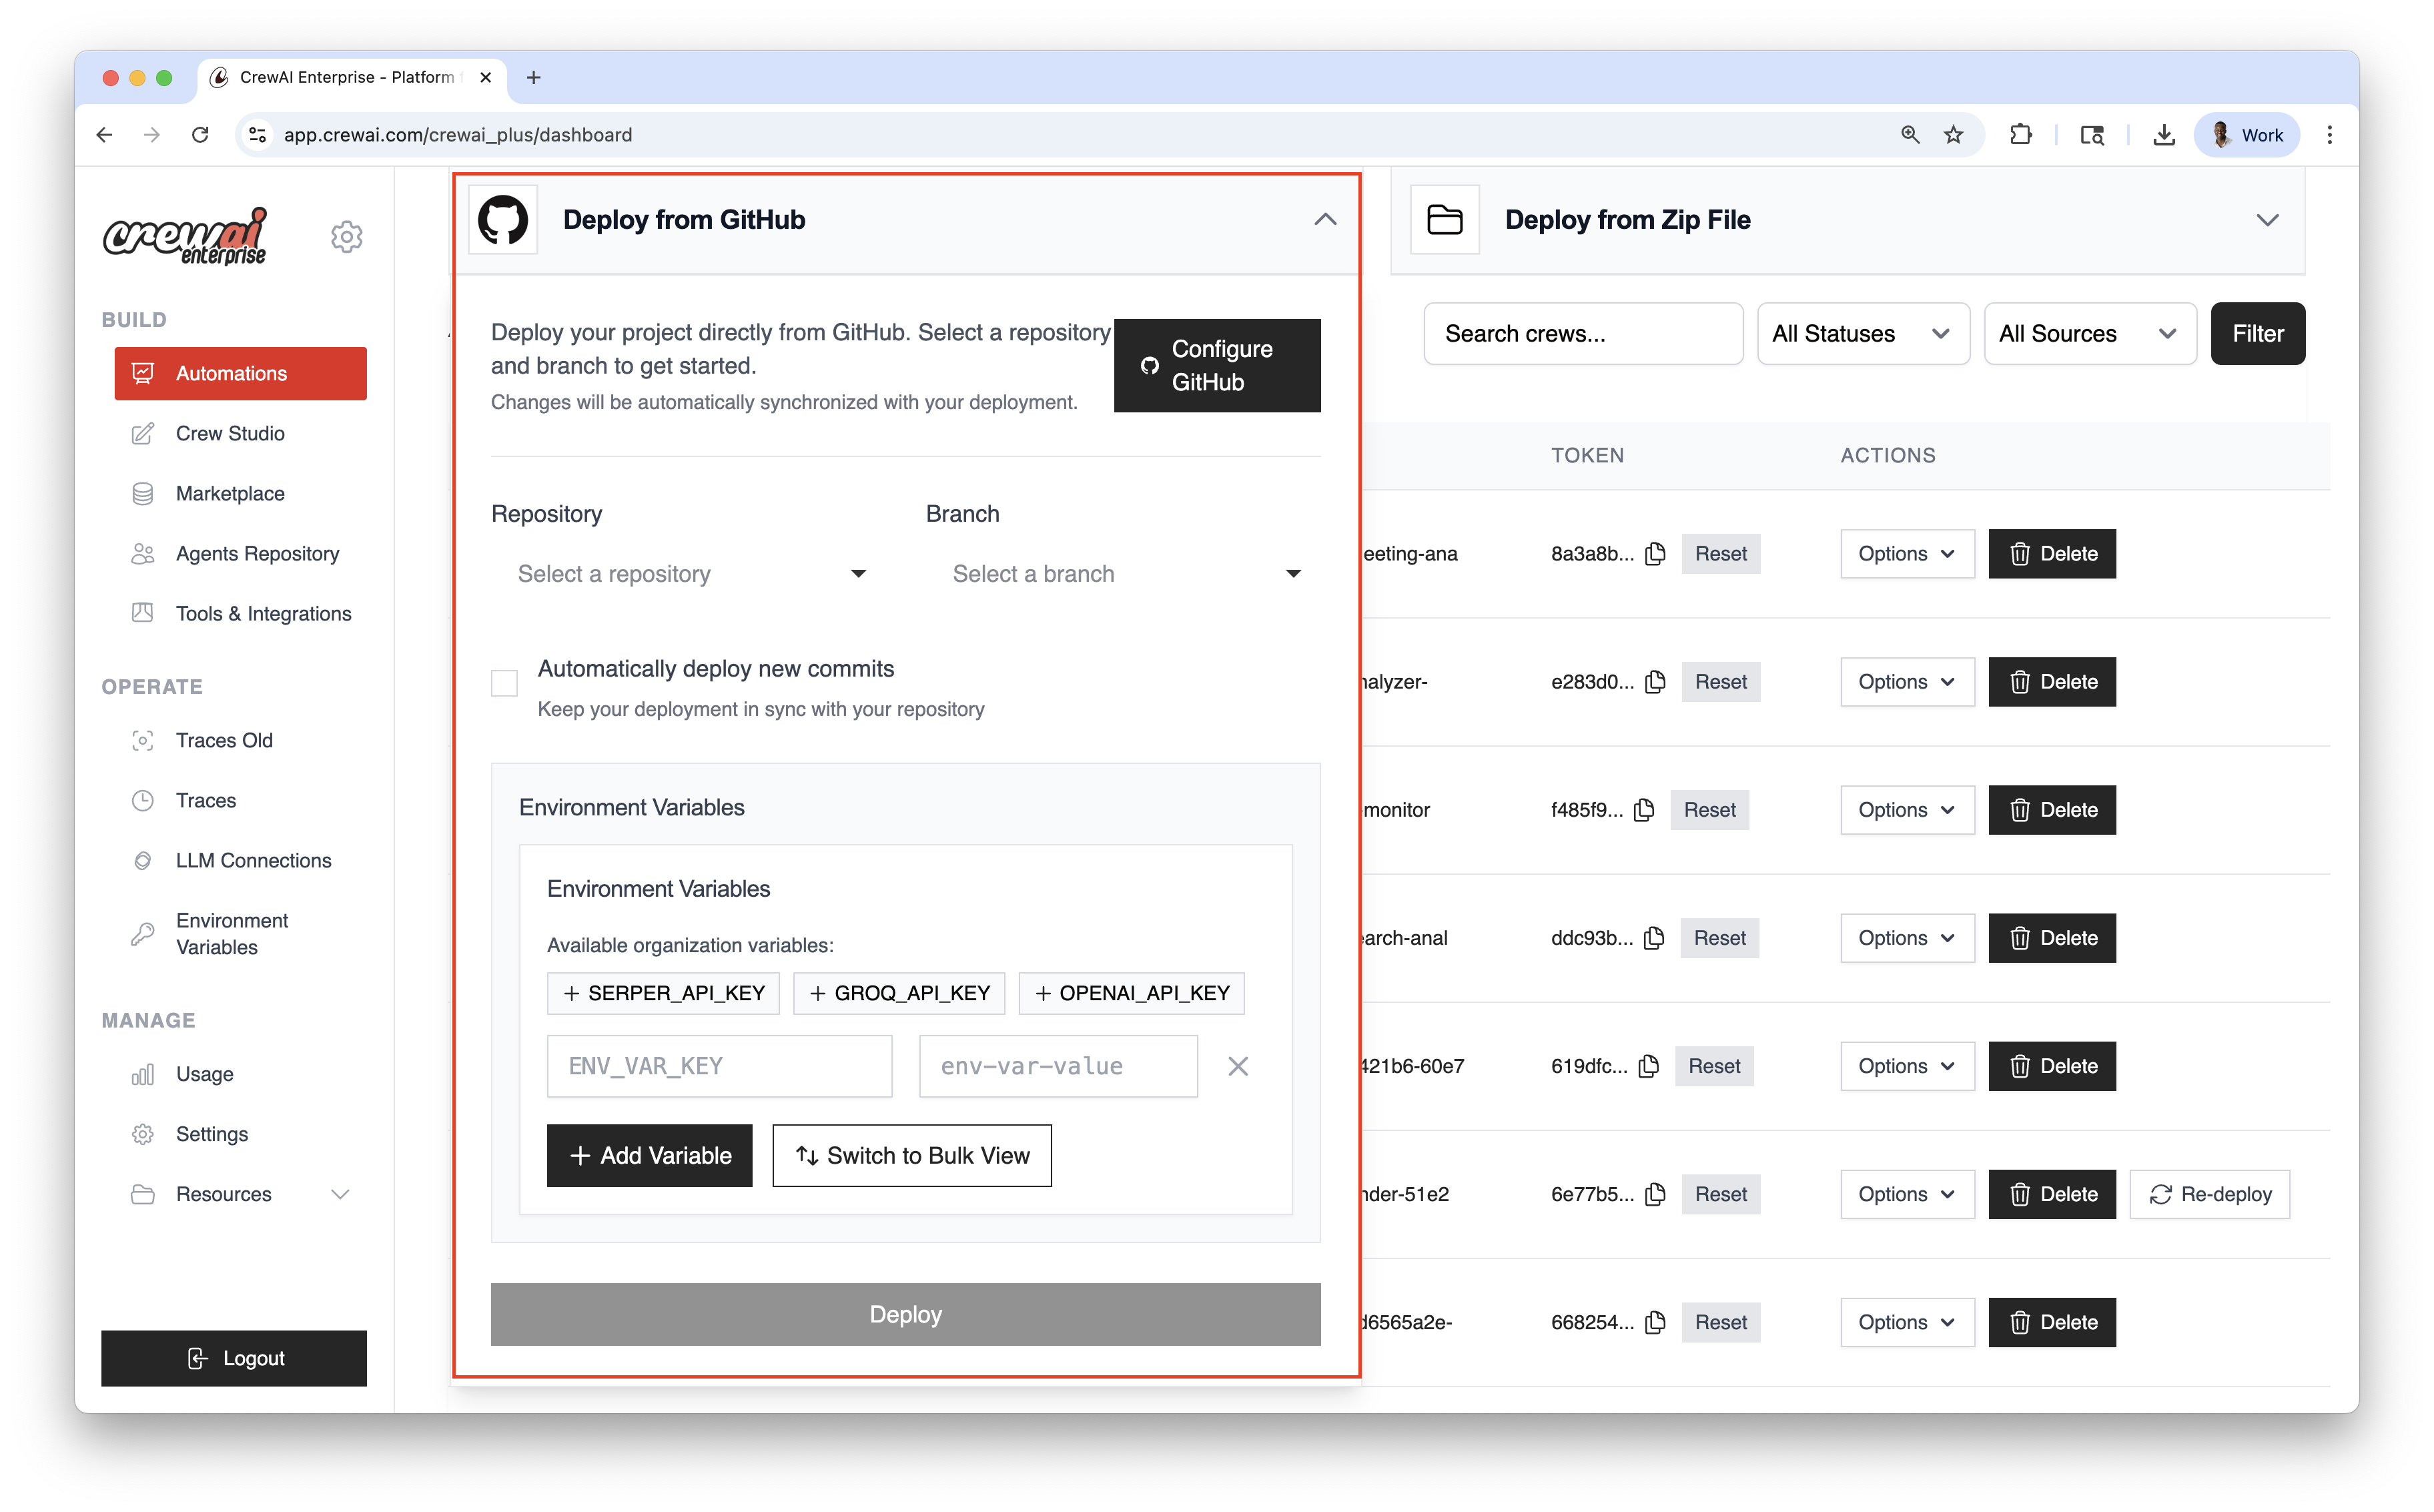
crewai triggers run 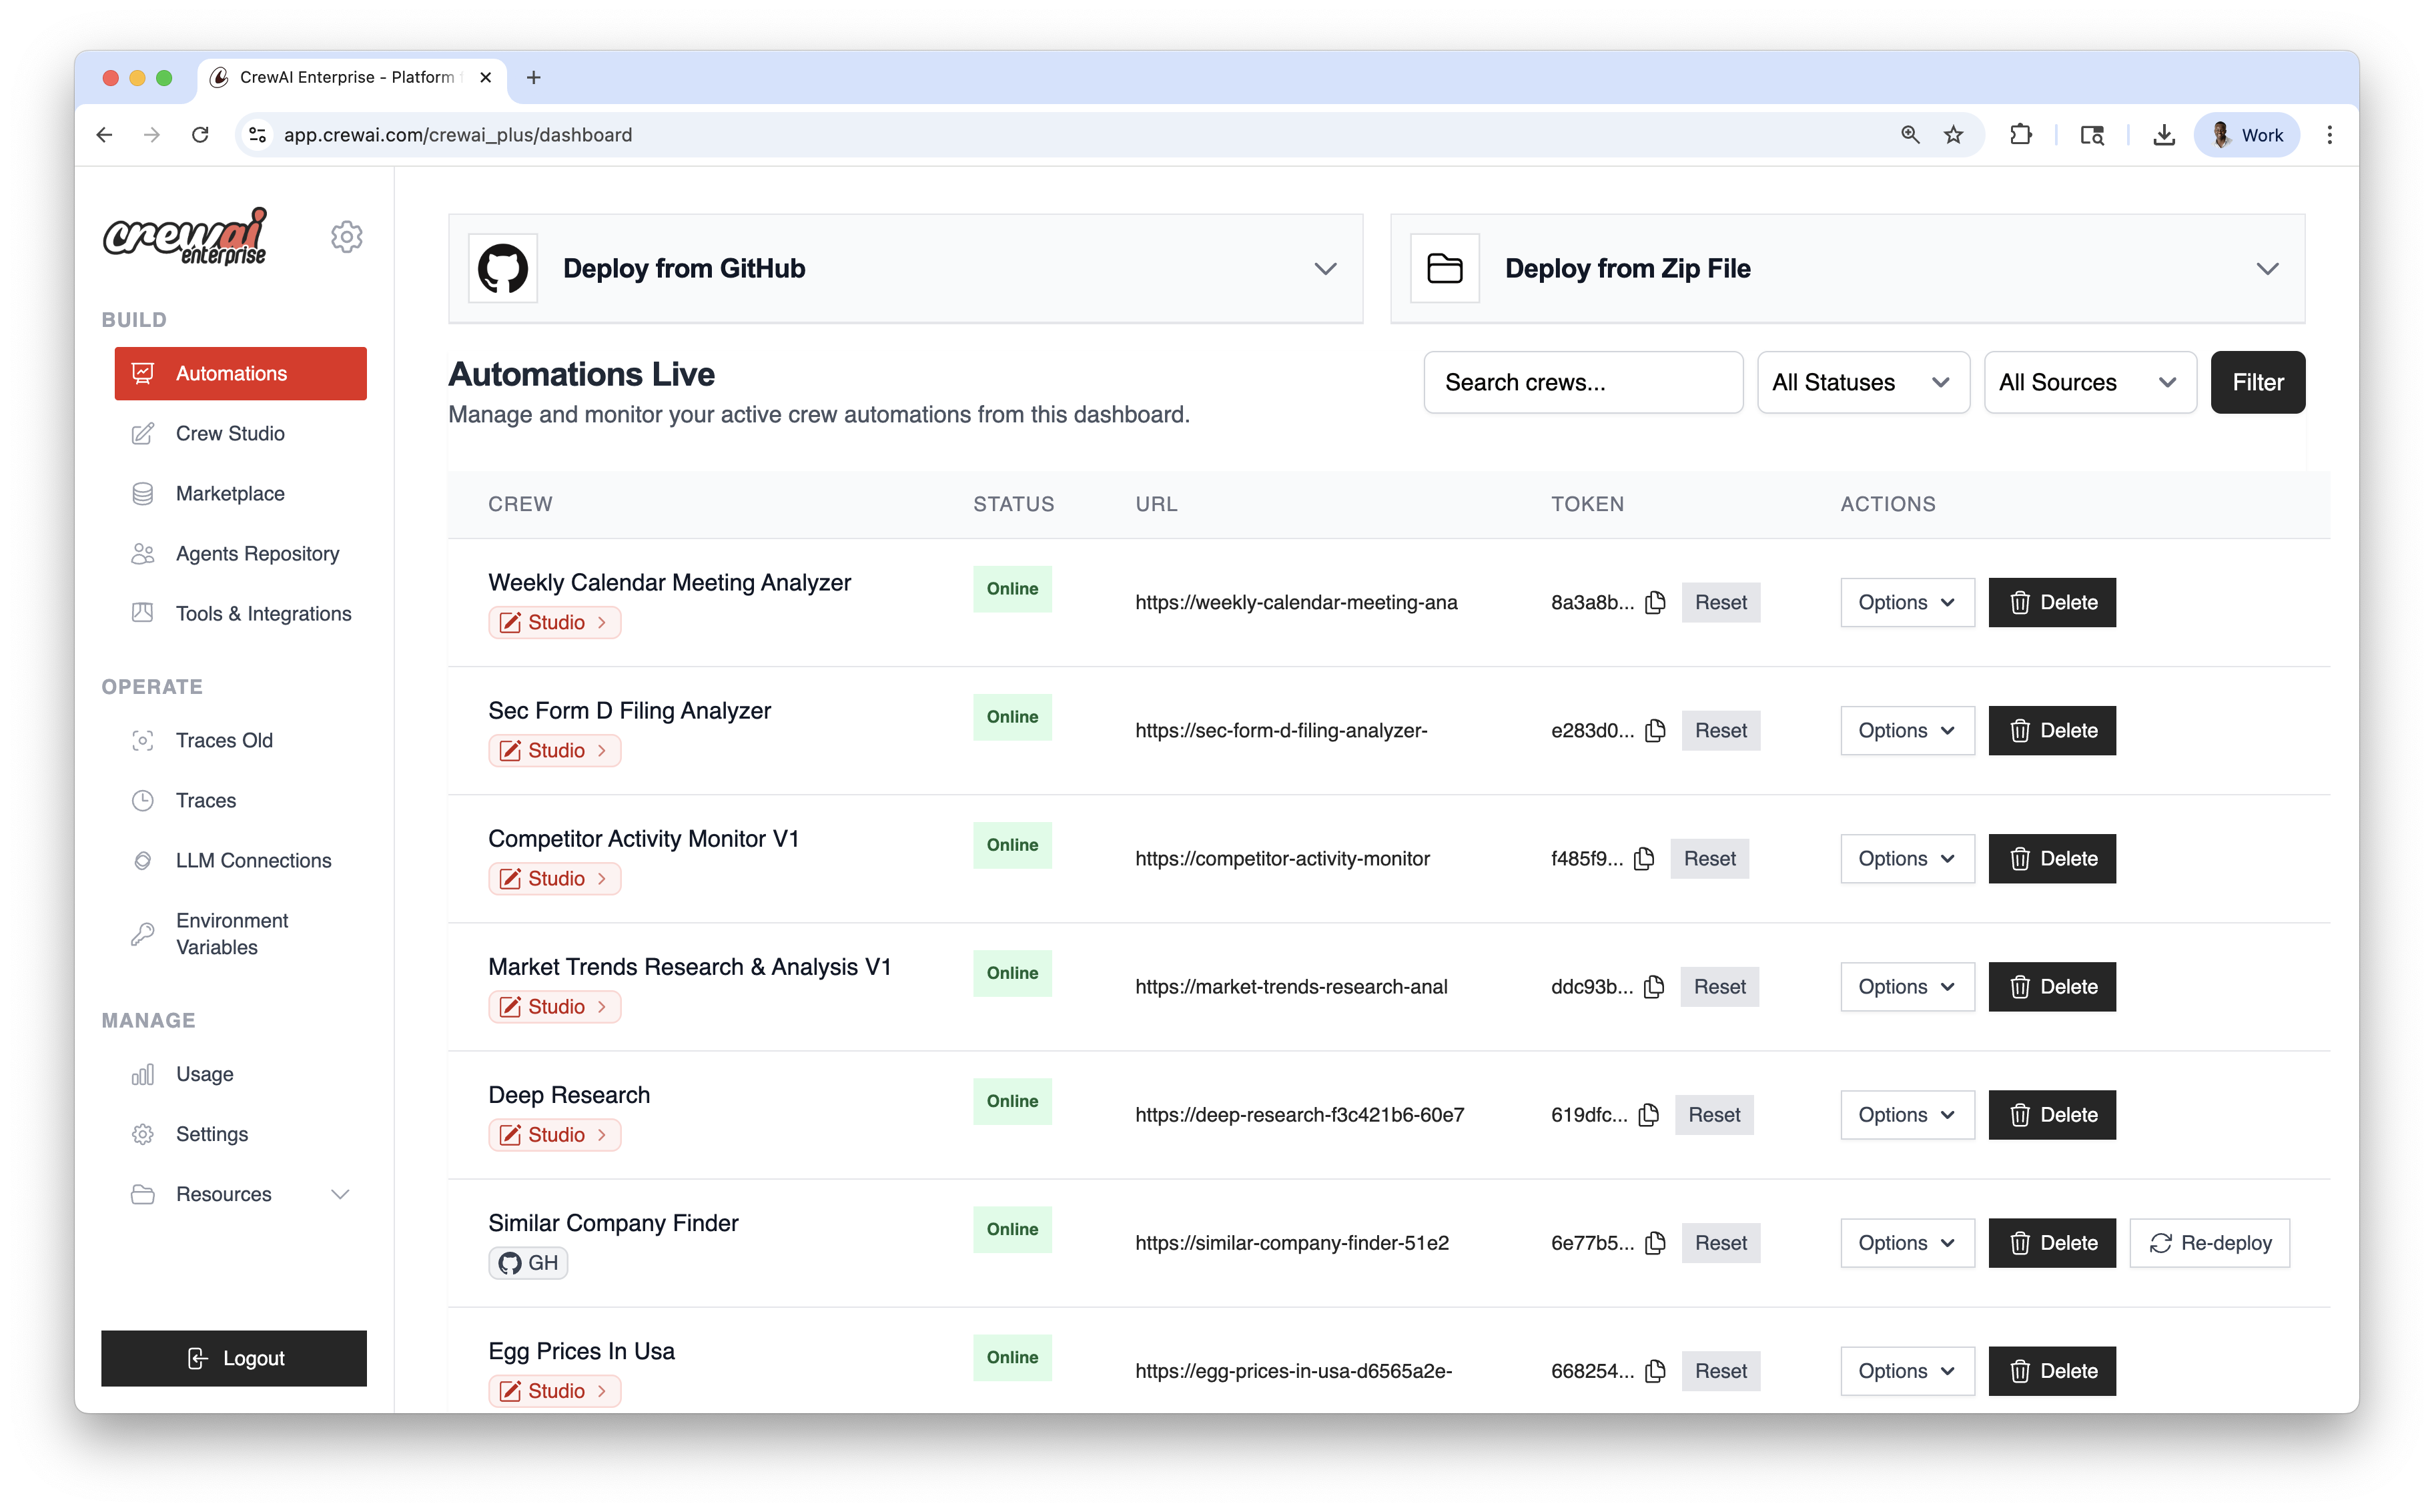 ## Deployment Methods
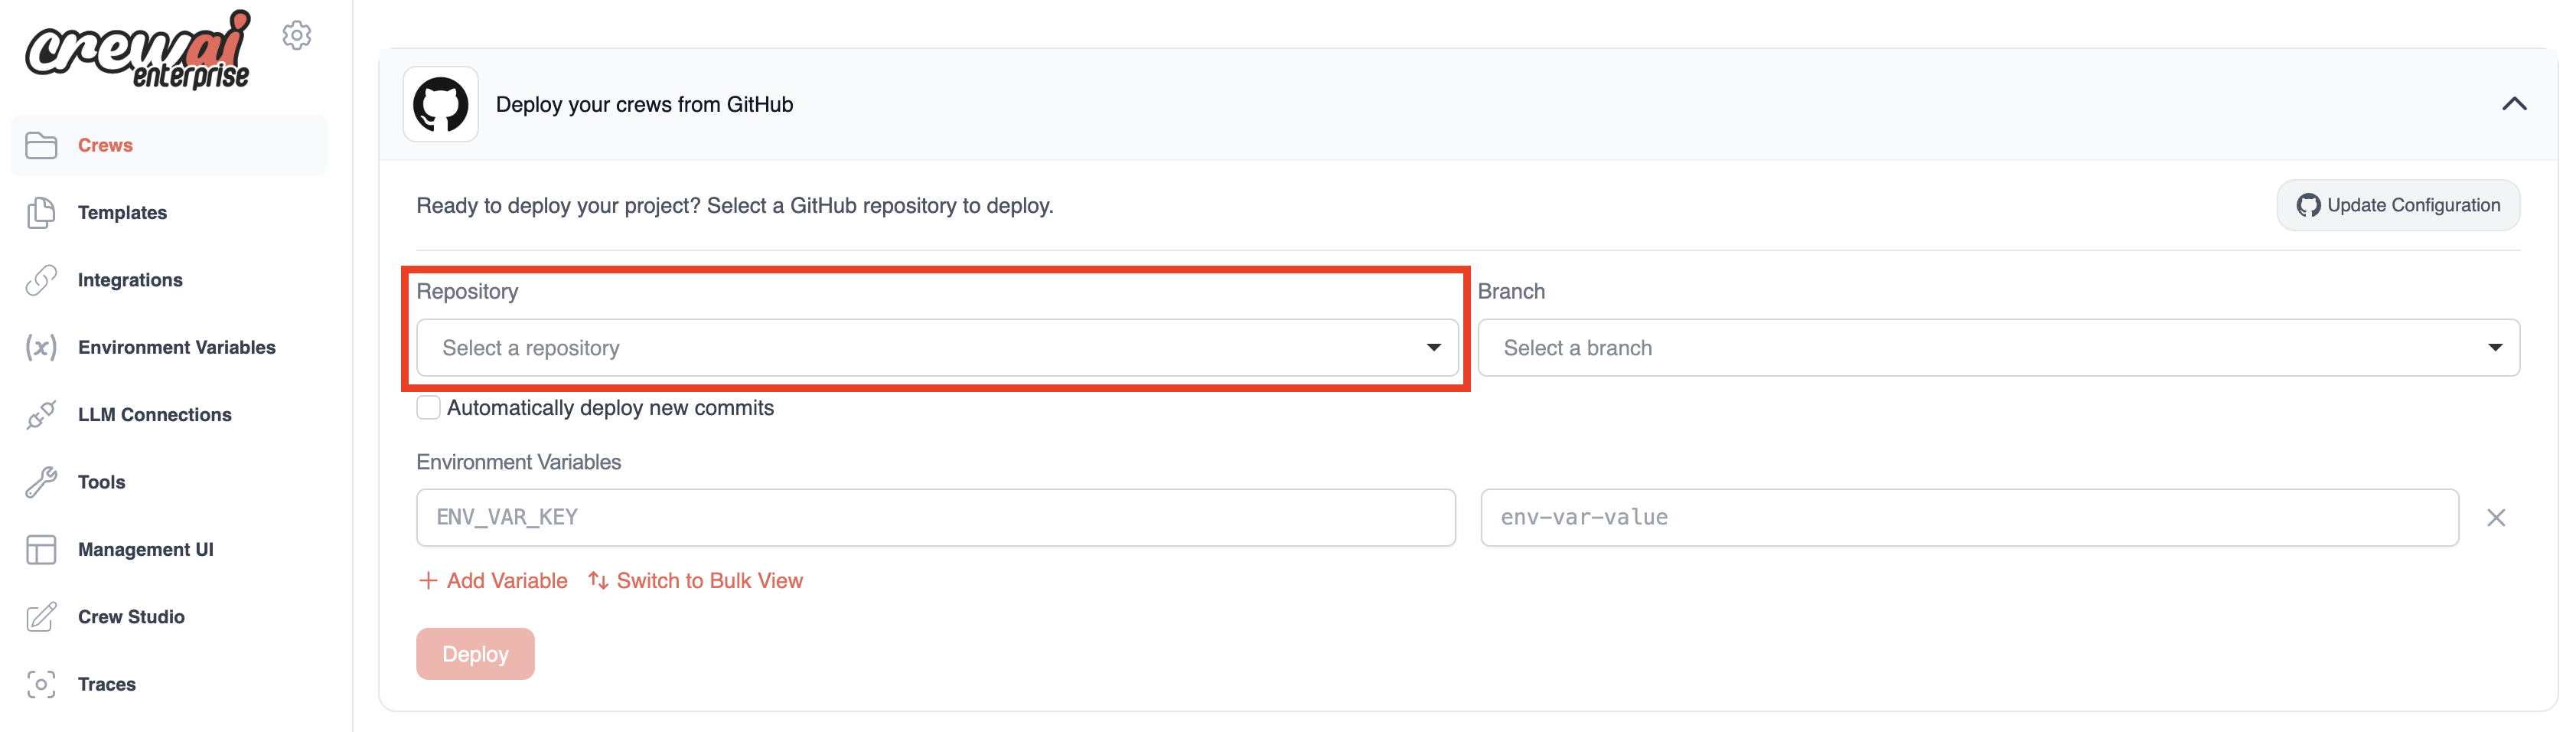
### Deploy from GitHub
Use this for version‑controlled projects and continuous deployment.
## Deployment Methods
### Deploy from GitHub
Use this for version‑controlled projects and continuous deployment.
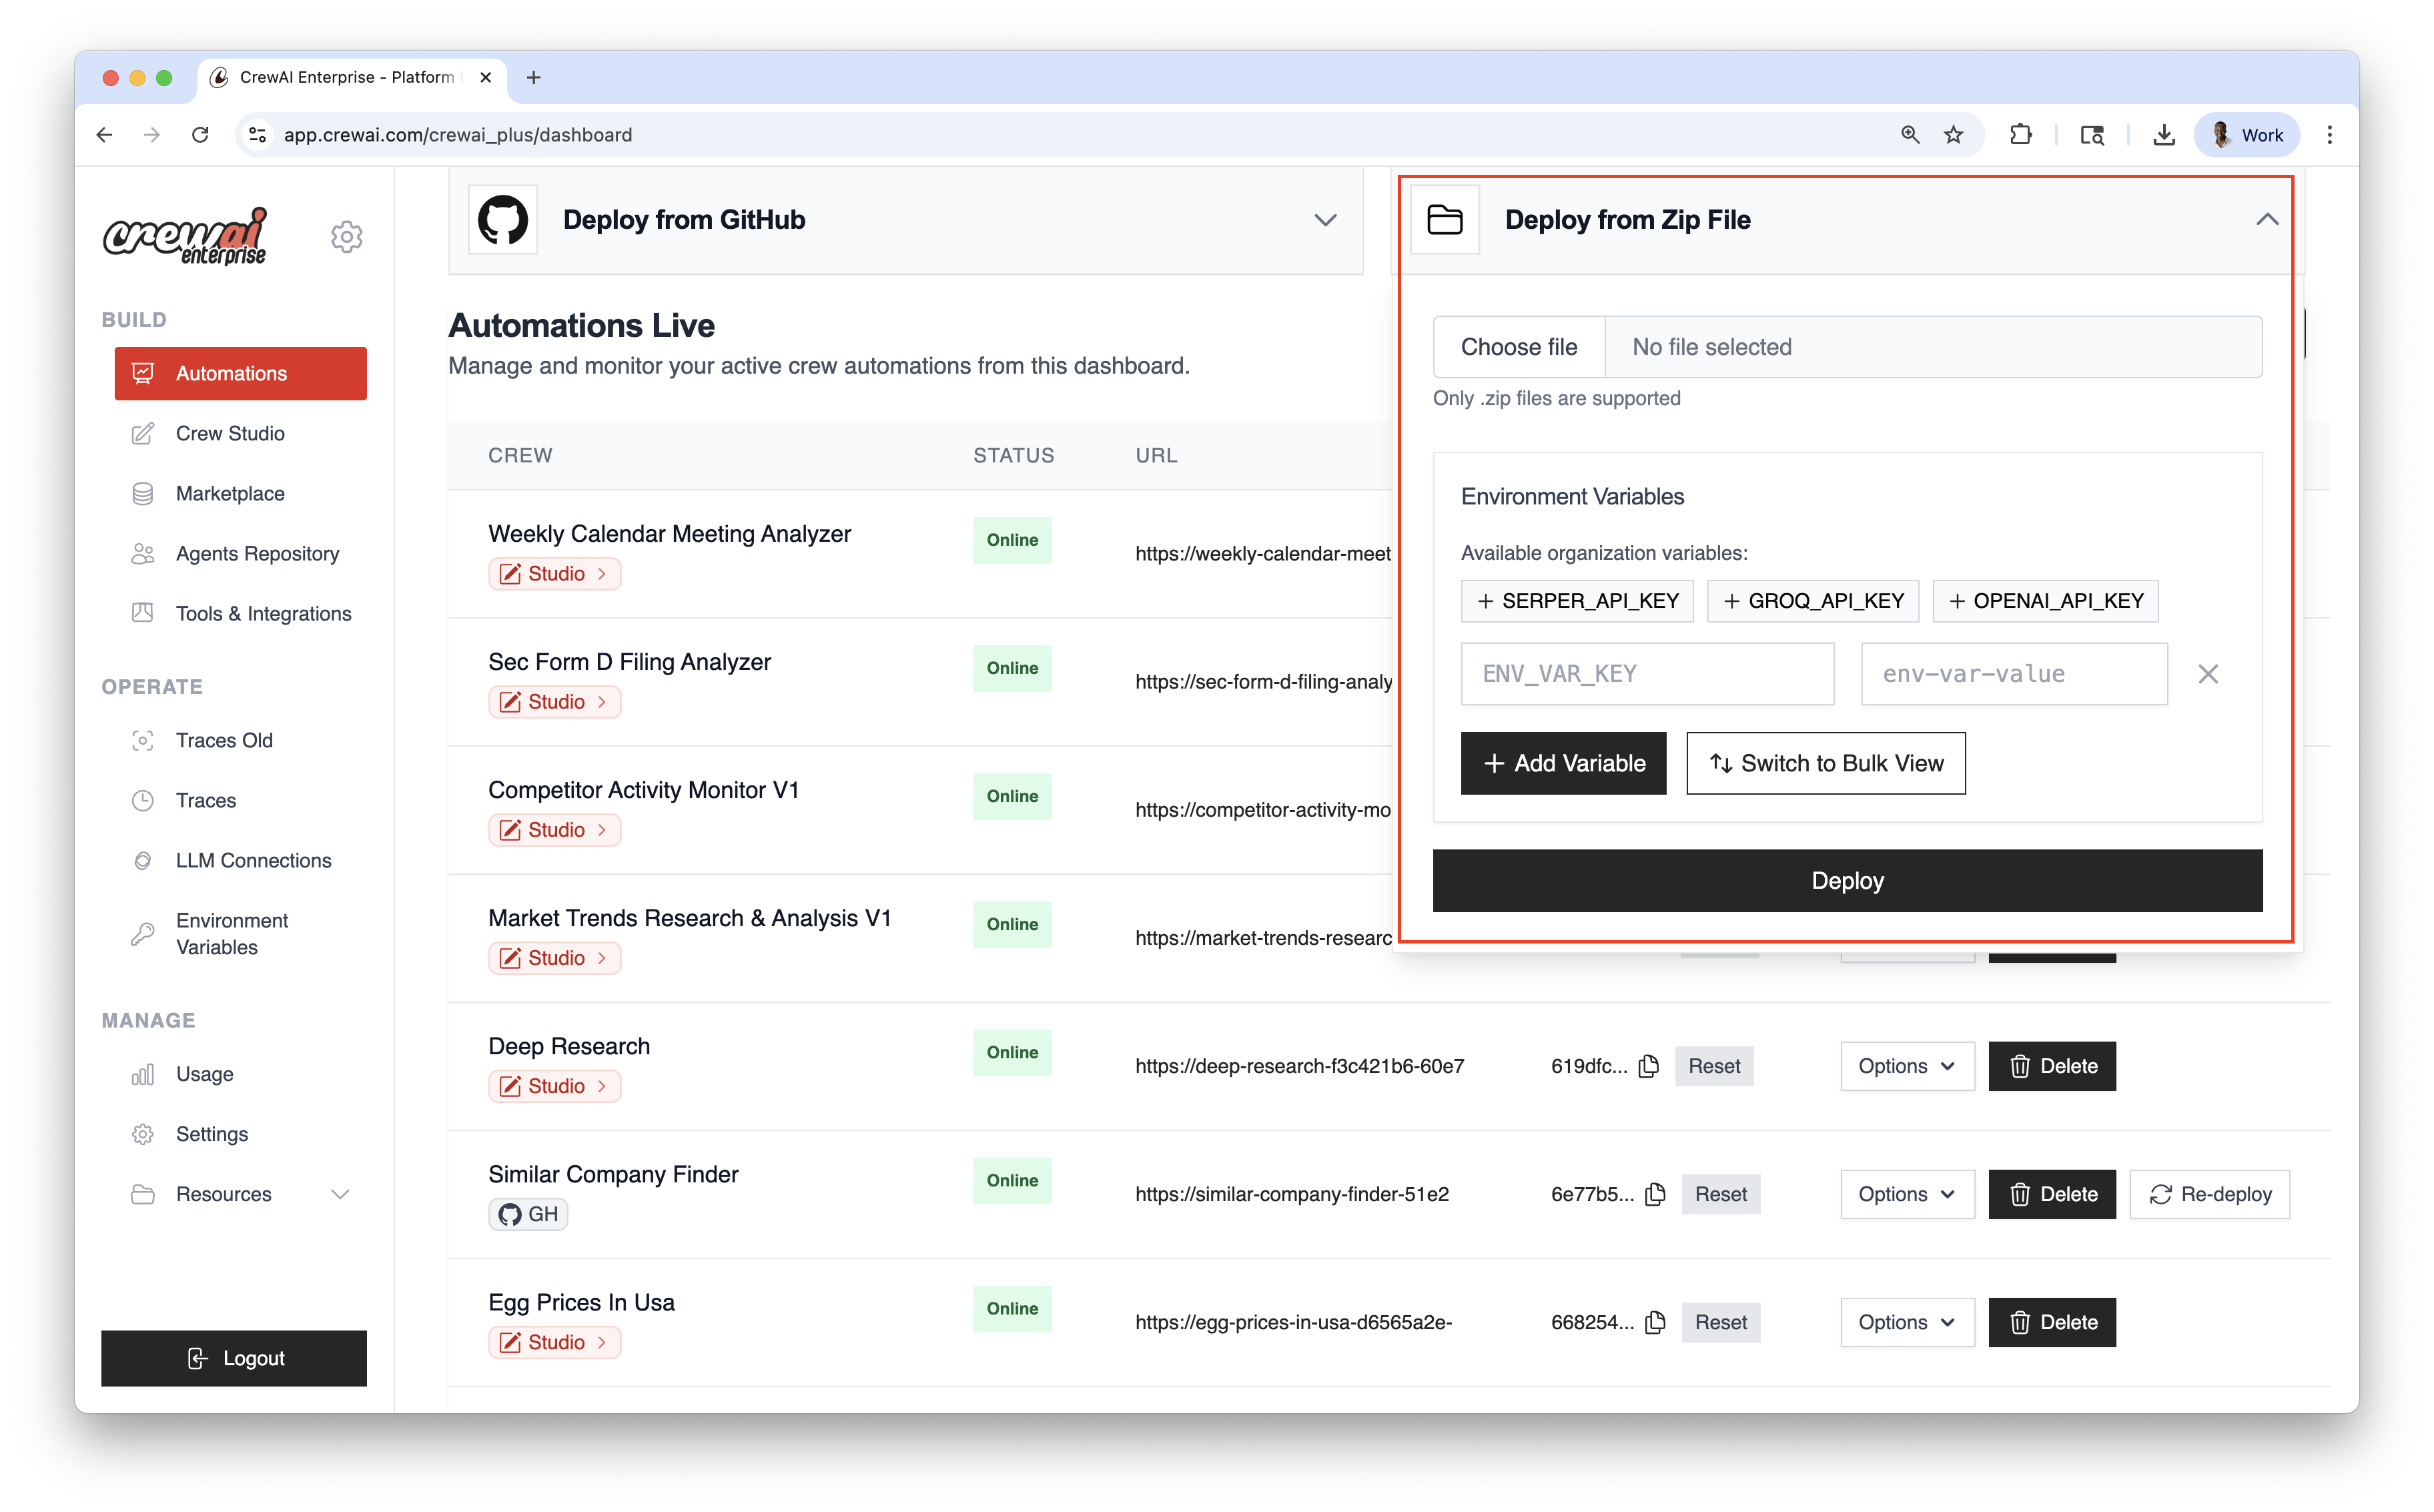
 ### Deploy from ZIP
Ship quickly without Git—upload a compressed package of your project.
### Deploy from ZIP
Ship quickly without Git—upload a compressed package of your project.
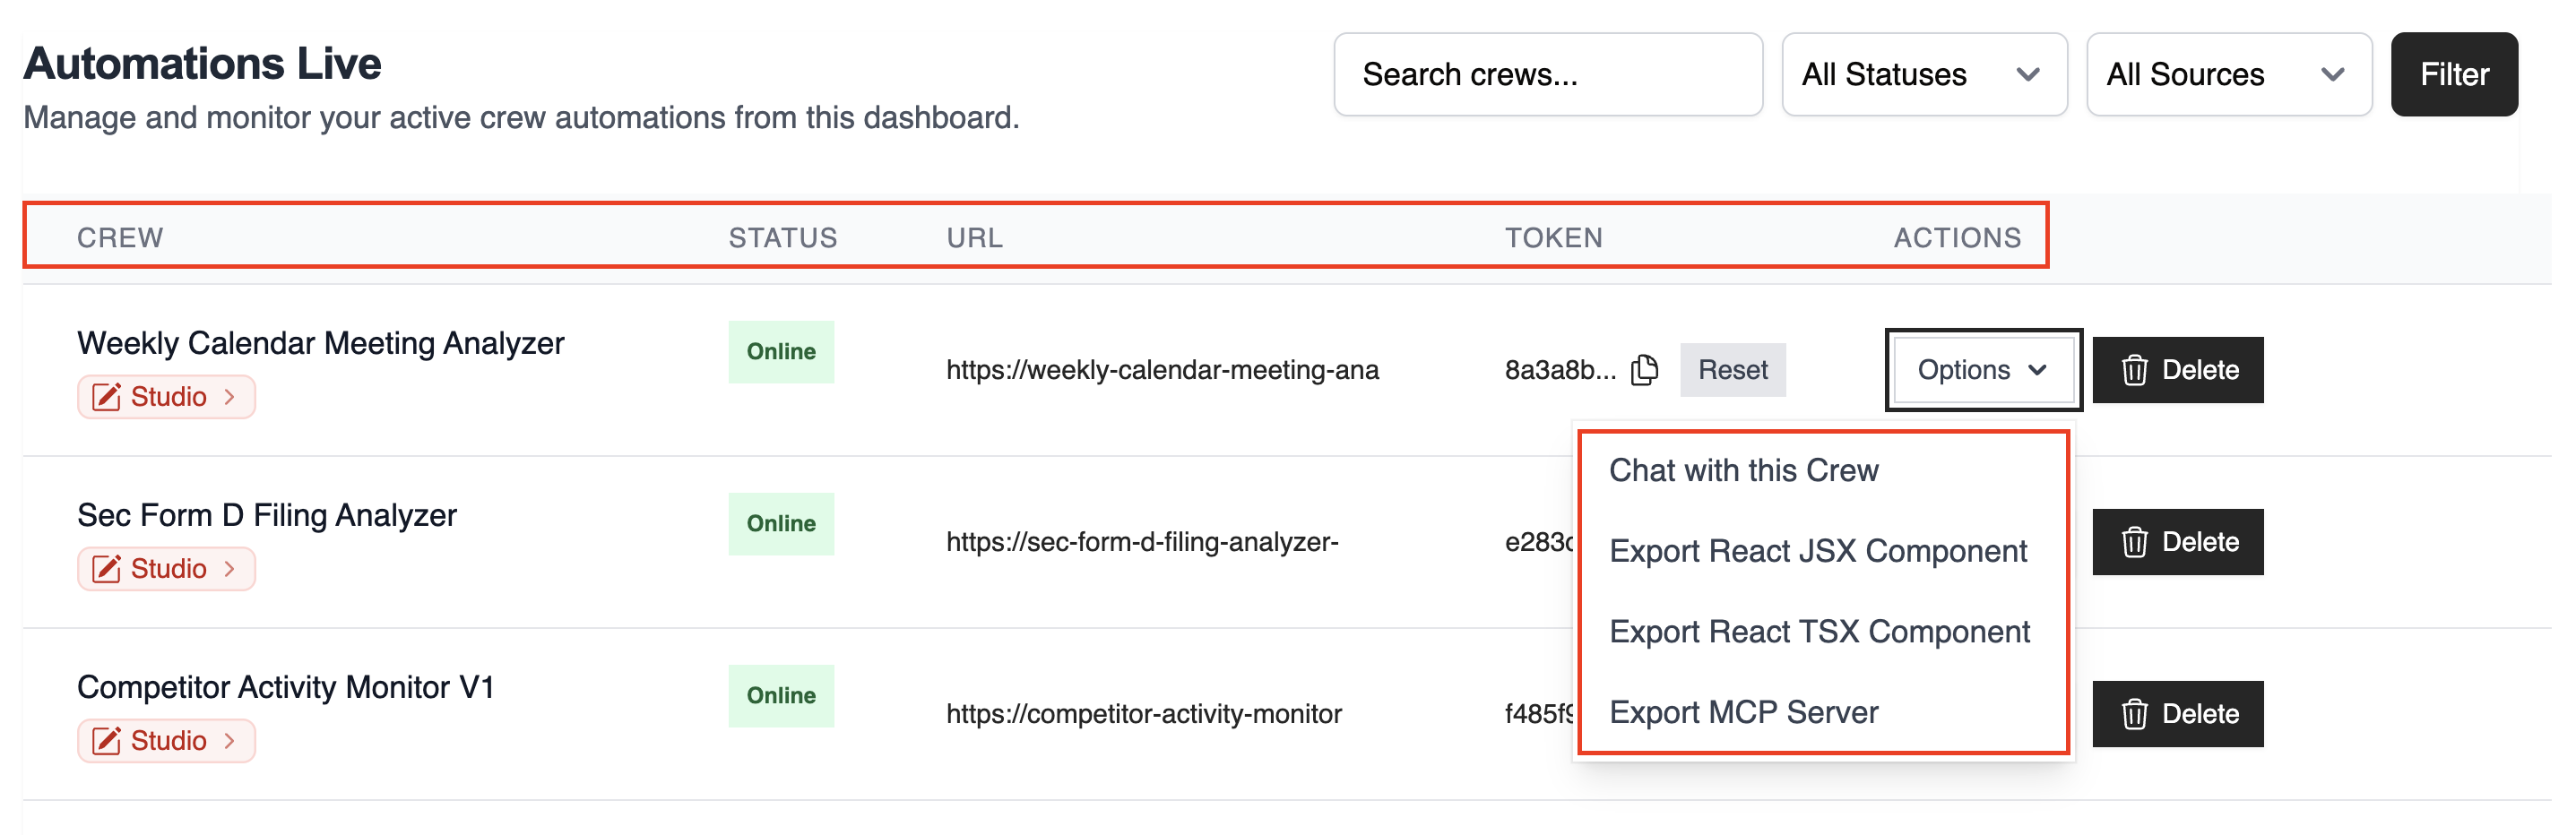
 ## Automations Dashboard
The table lists all live automations with key details:
* **CREW**: Automation name
* **STATUS**: Online / Failed / In Progress
* **URL**: Endpoint for kickoff/status
* **TOKEN**: Automation token
* **ACTIONS**: Re‑deploy, delete, and more
Use the top‑right controls to filter and search:
* Search by name
* Filter by Status
* Filter by Source (GitHub / Studio / ZIP)
Once deployed, you can view the automation details and have the **Options** dropdown menu to `chat with this crew`, `Export React Component` and `Export as MCP`.
## Automations Dashboard
The table lists all live automations with key details:
* **CREW**: Automation name
* **STATUS**: Online / Failed / In Progress
* **URL**: Endpoint for kickoff/status
* **TOKEN**: Automation token
* **ACTIONS**: Re‑deploy, delete, and more
Use the top‑right controls to filter and search:
* Search by name
* Filter by Status
* Filter by Source (GitHub / Studio / ZIP)
Once deployed, you can view the automation details and have the **Options** dropdown menu to `chat with this crew`, `Export React Component` and `Export as MCP`.
 ## Best Practices
* Prefer GitHub deployments for version control and CI/CD
* Use re‑deploy to roll forward after code or config updates or set it to auto-deploy on every push
## Related
## Best Practices
* Prefer GitHub deployments for version control and CI/CD
* Use re‑deploy to roll forward after code or config updates or set it to auto-deploy on every push
## Related
 ---
# Source: https://docs.crewai.com/en/changelog.md
> ## Documentation Index
> Fetch the complete documentation index at: https://docs.crewai.com/llms.txt
> Use this file to discover all available pages before exploring further.
# Changelog
> Product updates, improvements, and bug fixes for CrewAI
---
# Source: https://docs.crewai.com/en/changelog.md
> ## Documentation Index
> Fetch the complete documentation index at: https://docs.crewai.com/llms.txt
> Use this file to discover all available pages before exploring further.
# Changelog
> Product updates, improvements, and bug fixes for CrewAI
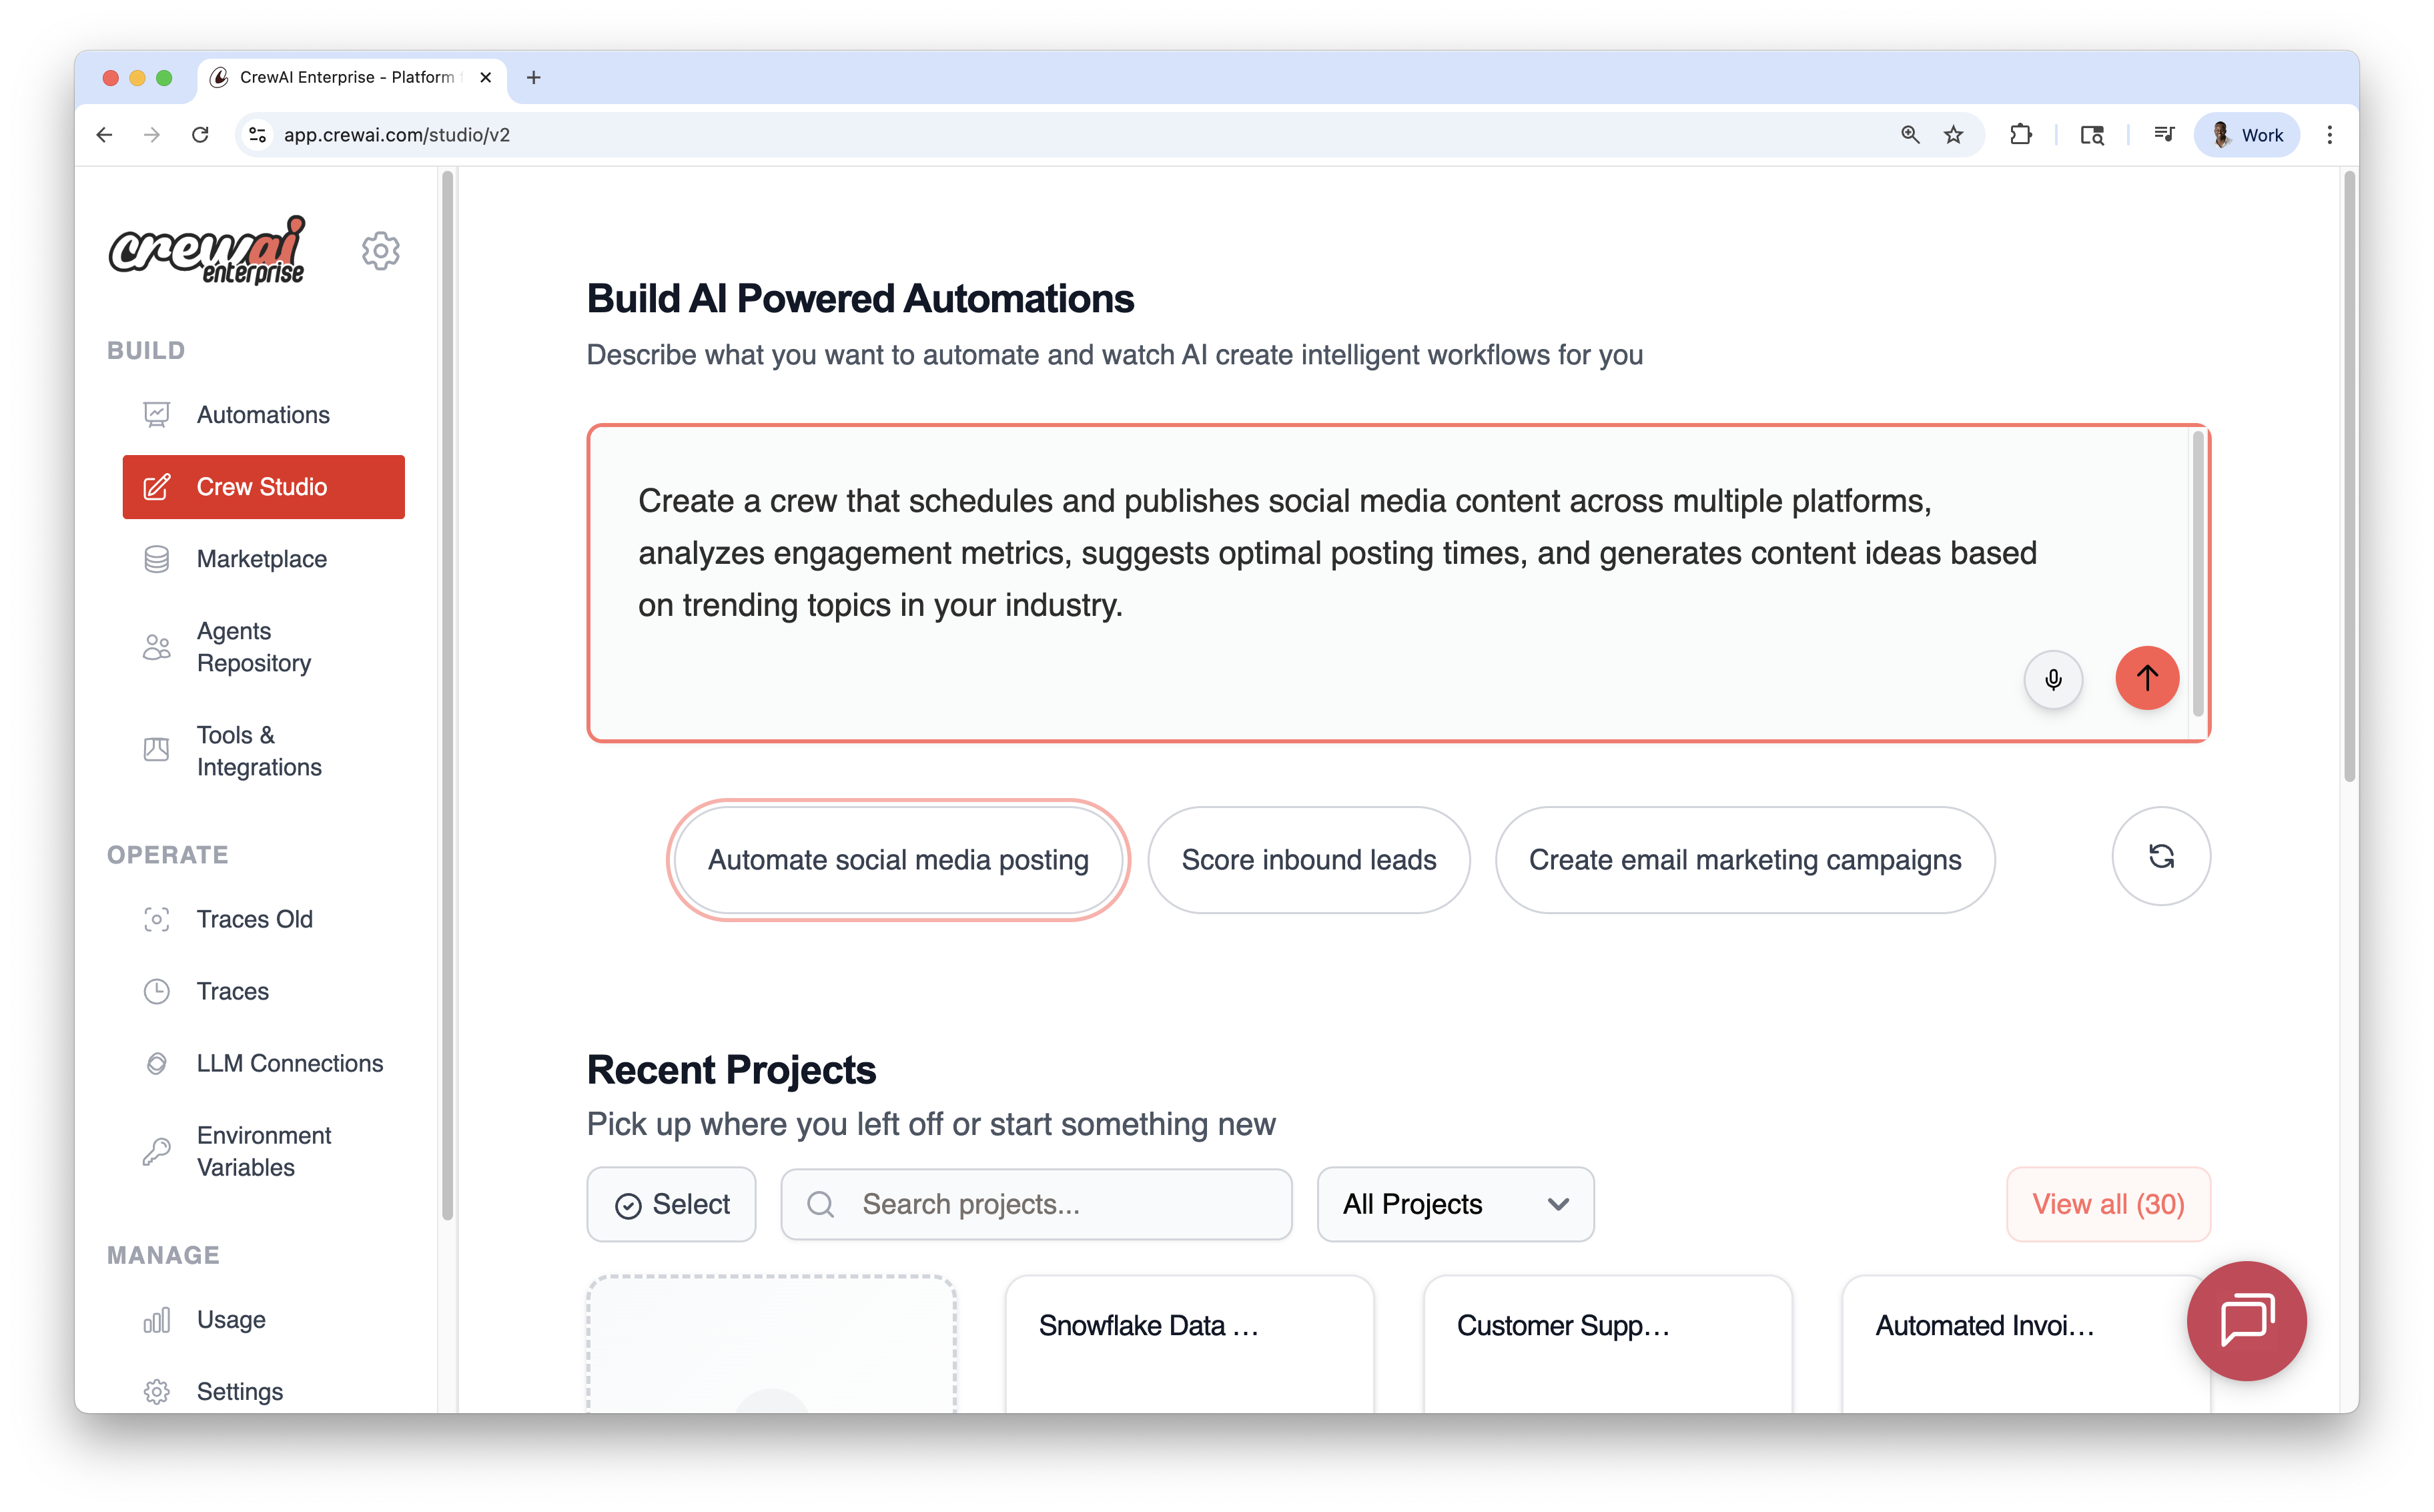
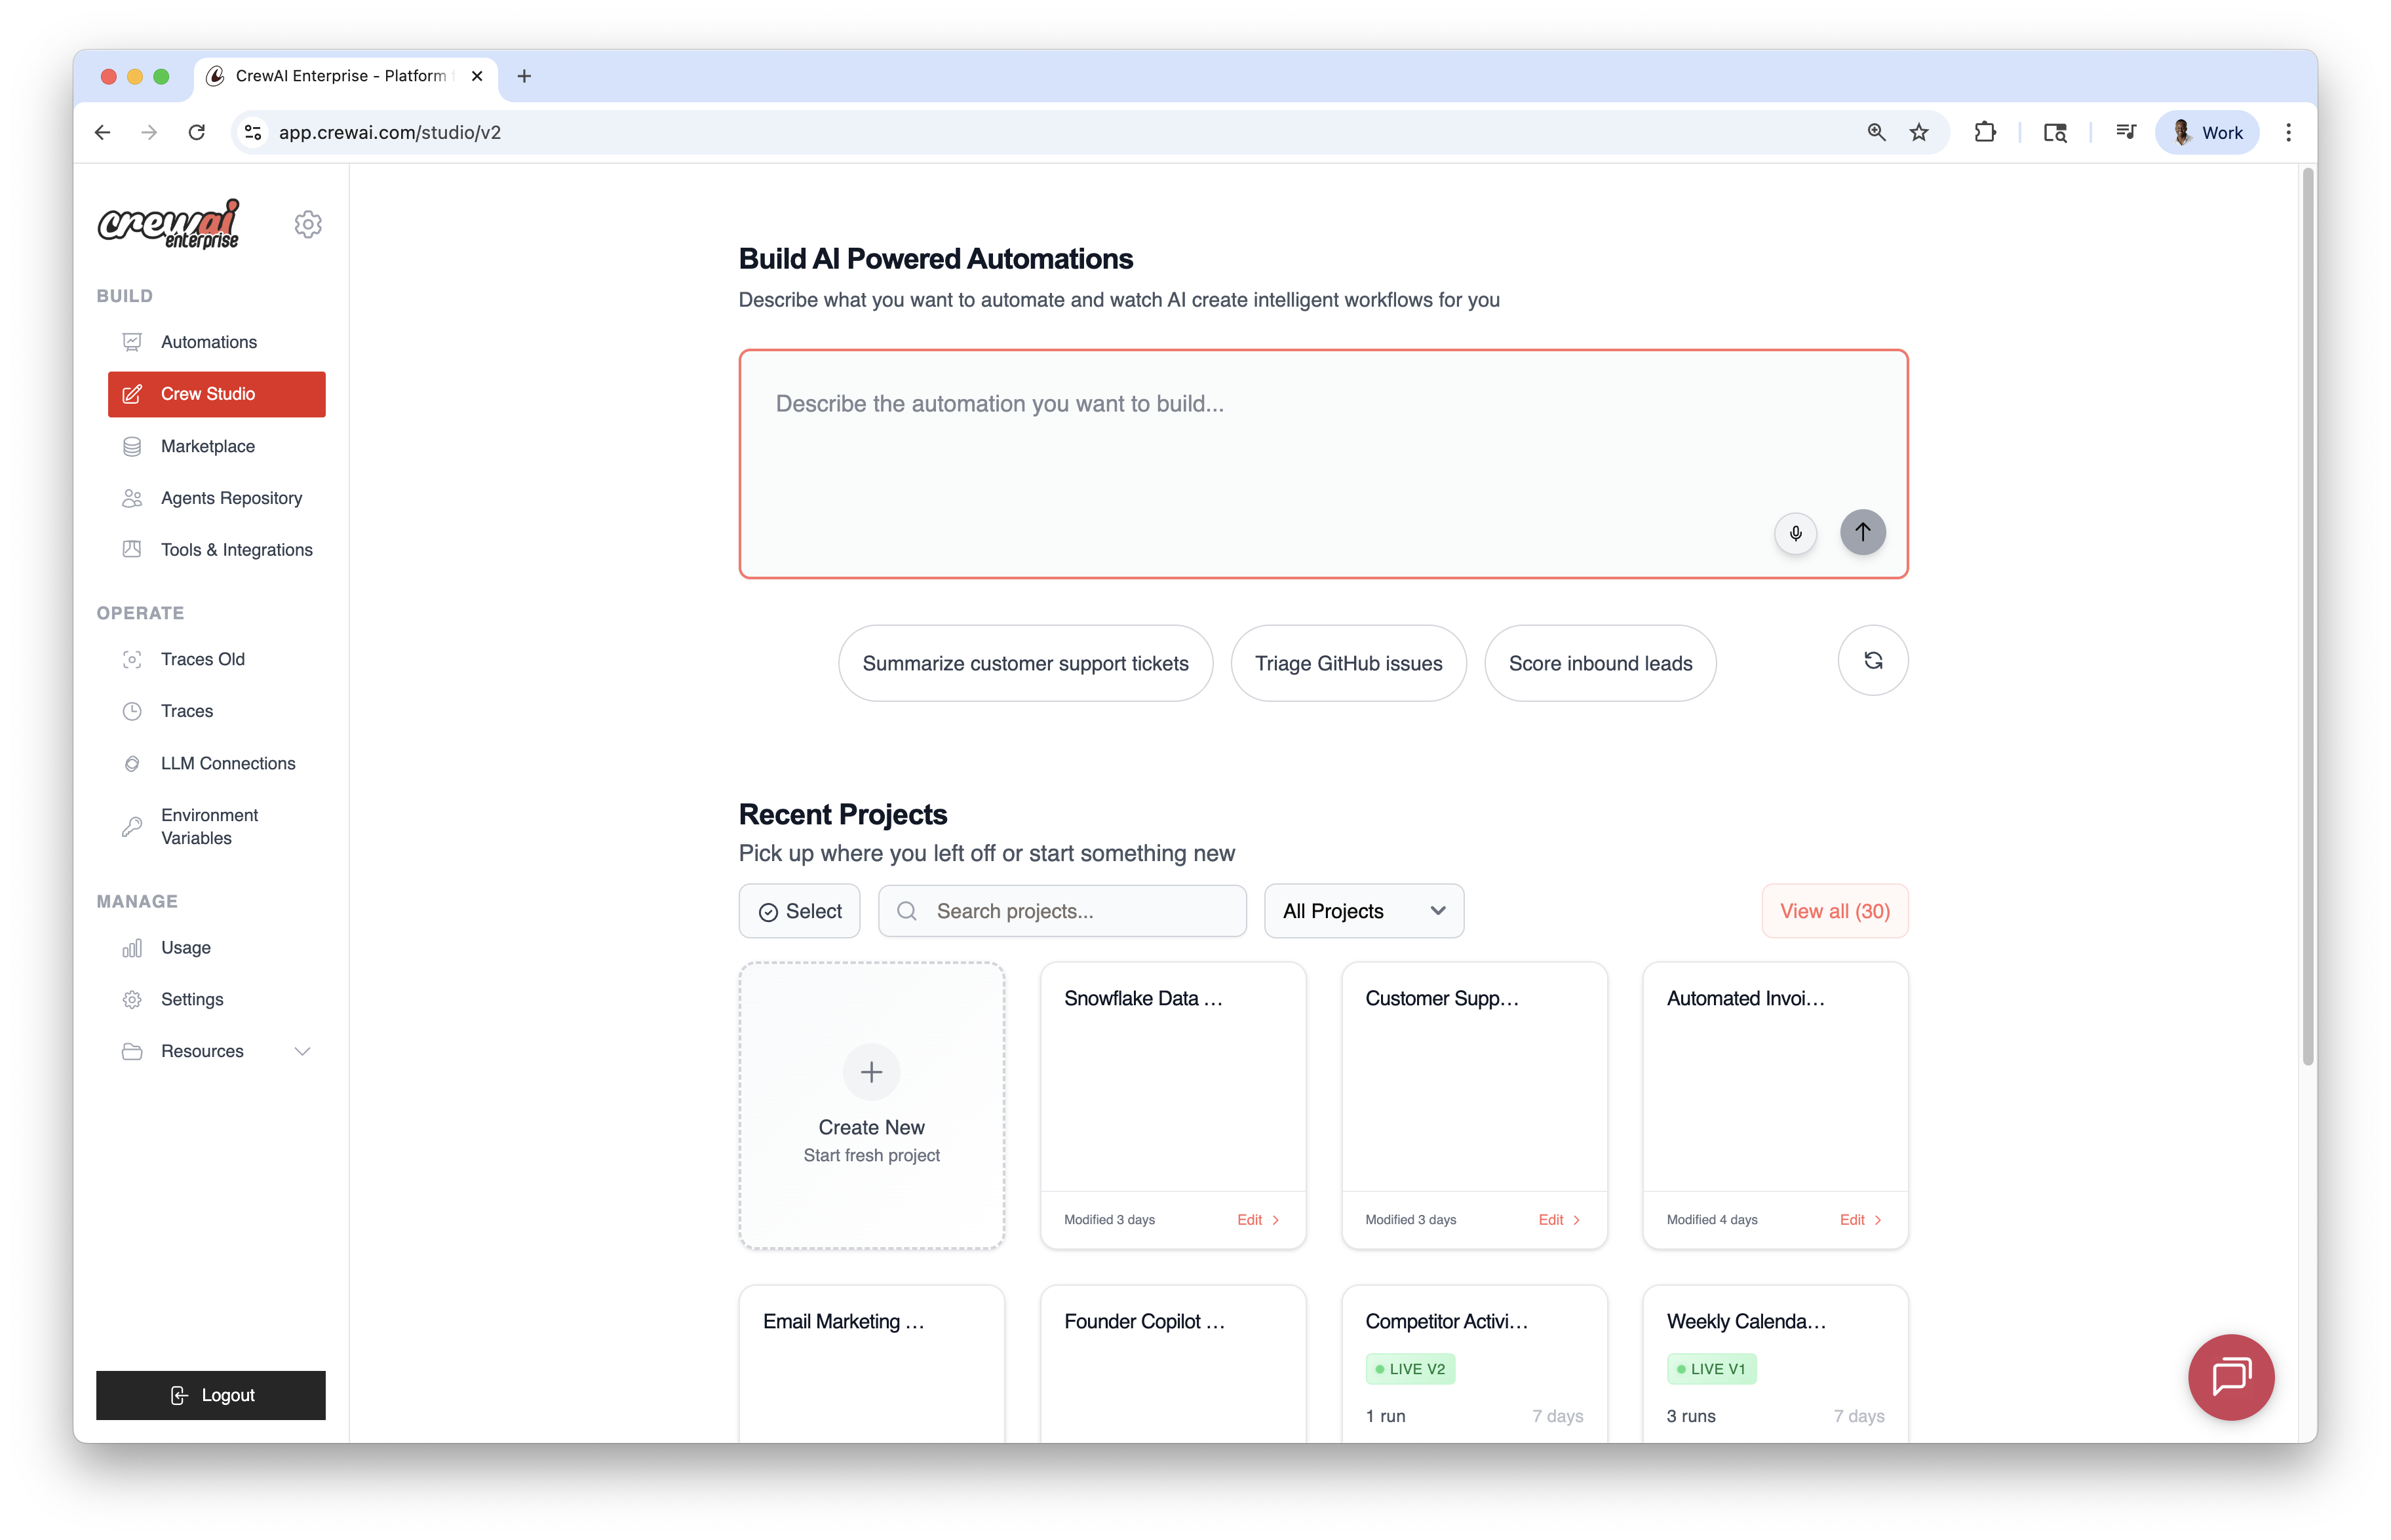 ## Prompt‑based Creation
* Describe the automation you want; the AI generates agents, tasks, and tools.
* Use voice input via the microphone icon if preferred.
* Start from built‑in prompts for common use cases.
## Prompt‑based Creation
* Describe the automation you want; the AI generates agents, tasks, and tools.
* Use voice input via the microphone icon if preferred.
* Start from built‑in prompts for common use cases.
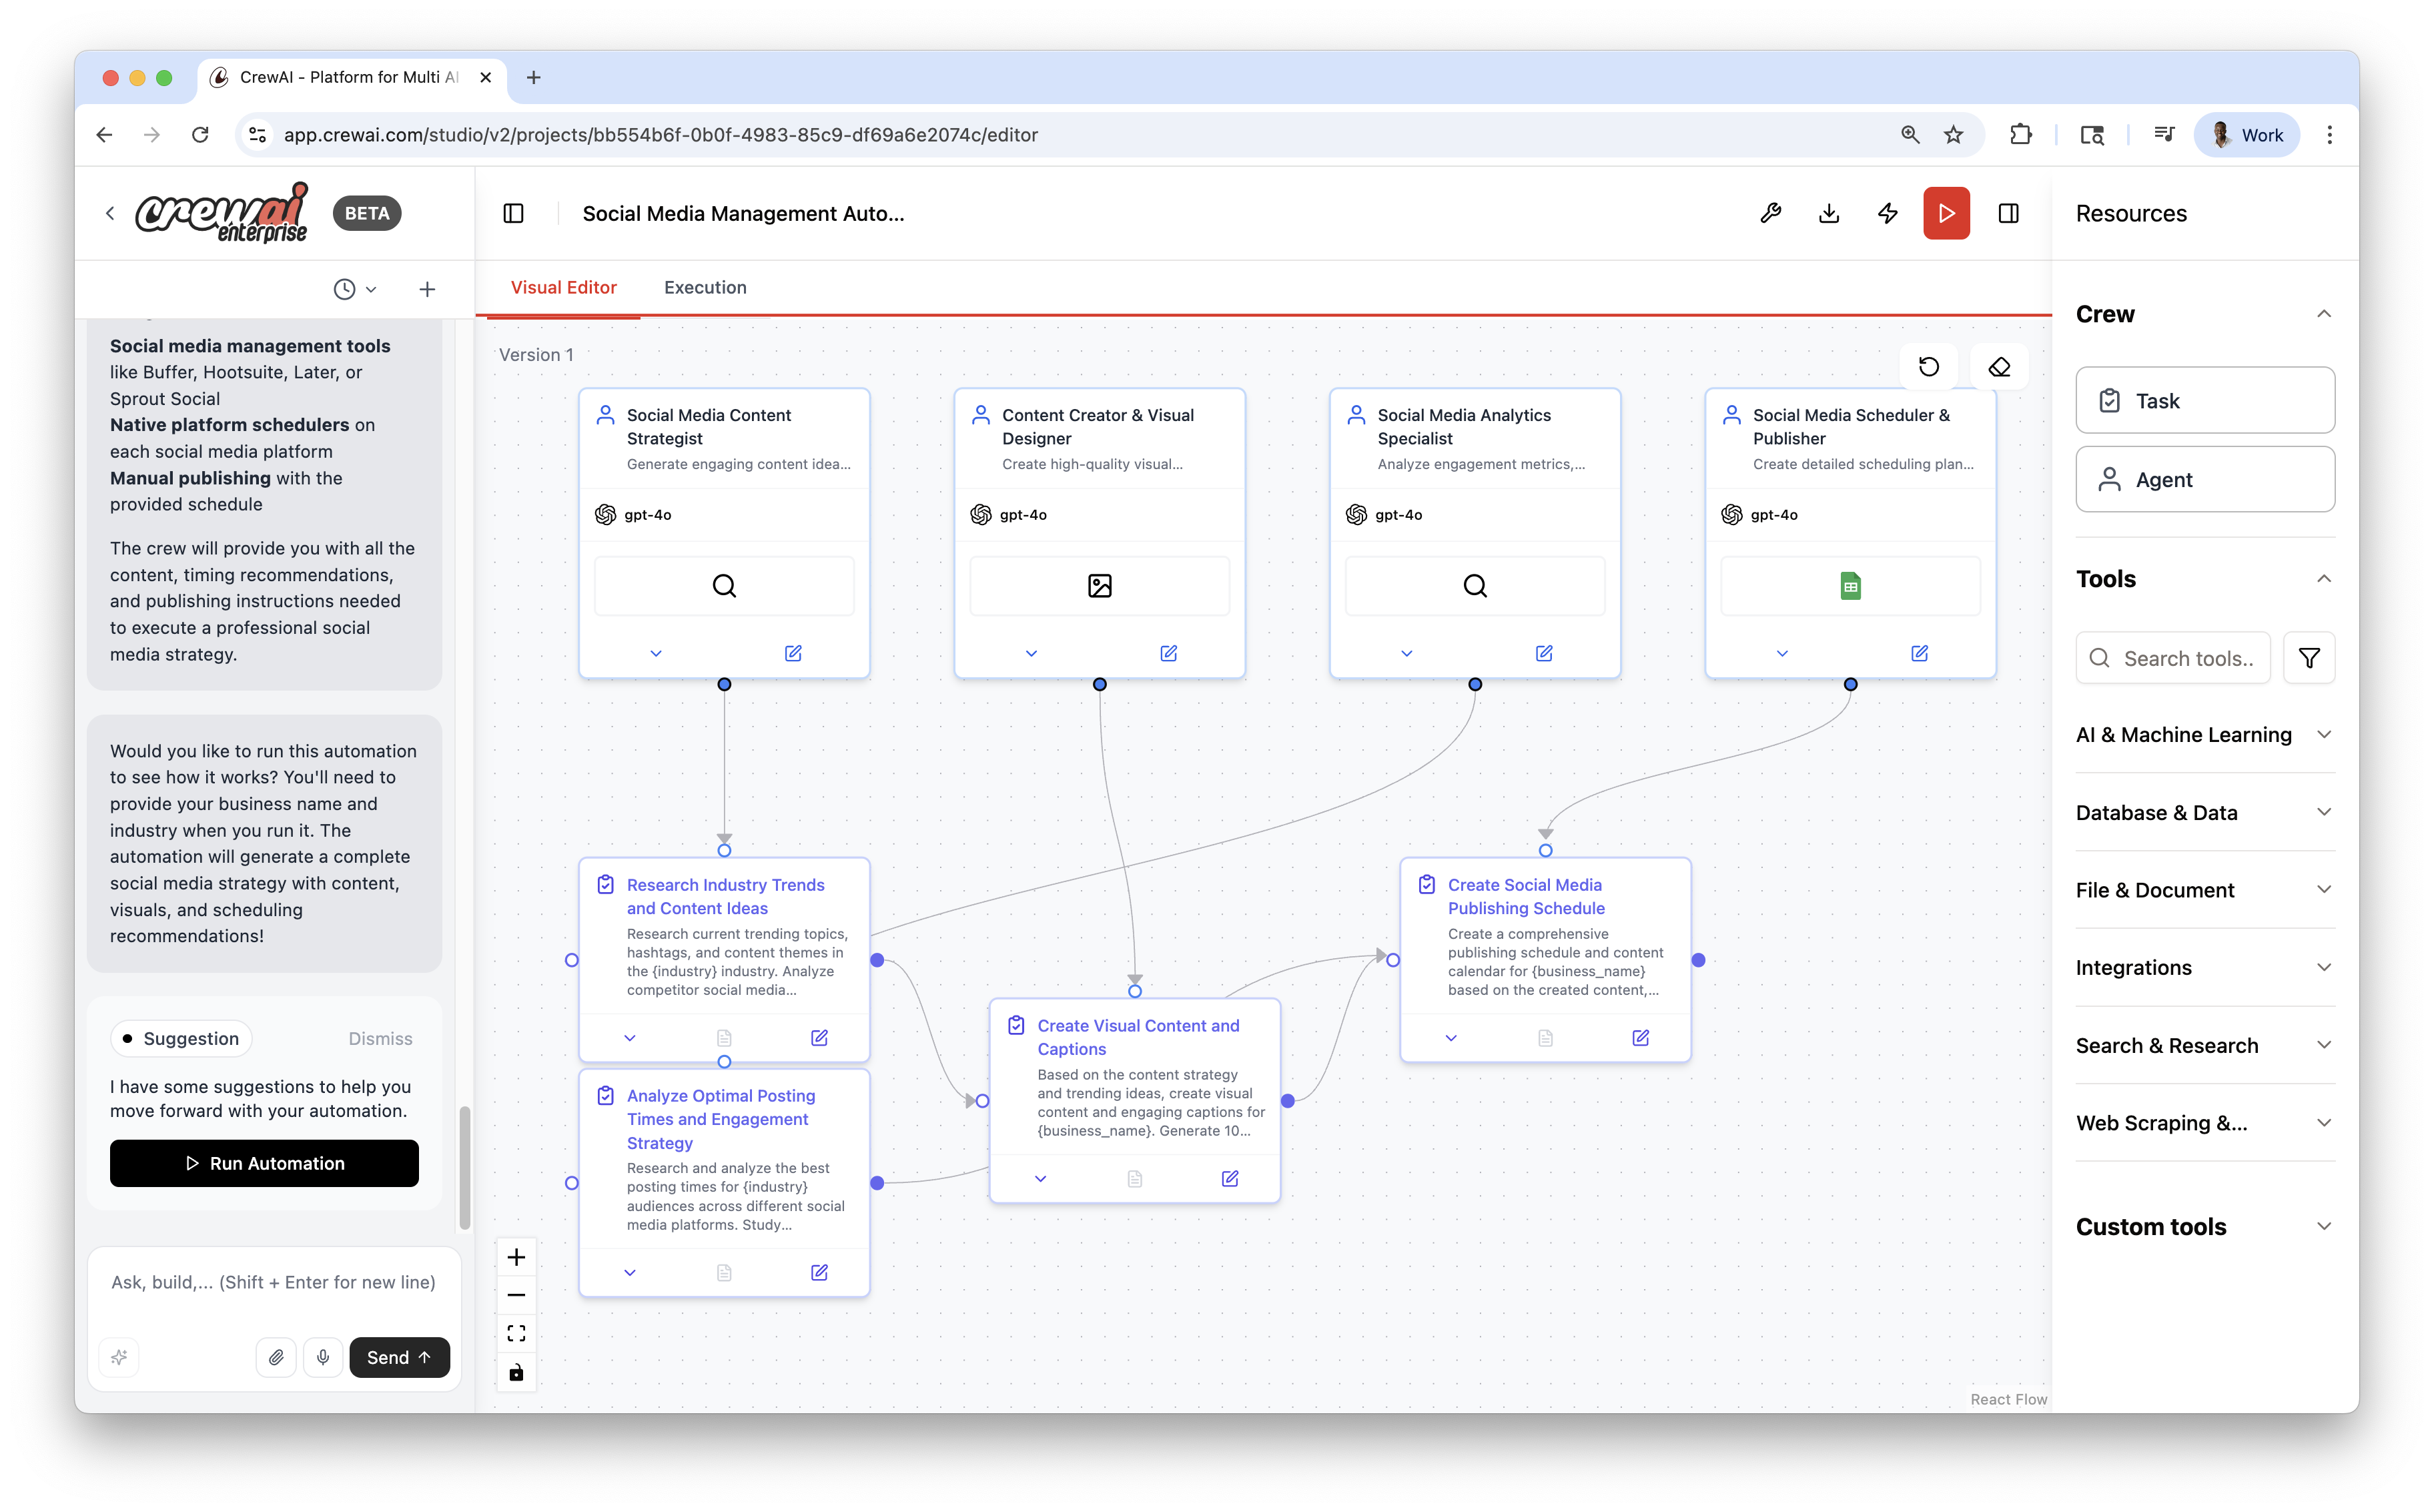
 ## Visual Editor
The canvas reflects the workflow as nodes and edges with three supporting panels that allow you to configure the workflow easily without writing code; a.k.a. "**vibe coding AI Agents**".
You can use the drag-and-drop functionality to add agents, tasks, and tools to the canvas or you can use the chat section to build the agents. Both approaches share state and can be used interchangeably.
* **AI Thoughts (left)**: streaming reasoning as the workflow is designed
* **Canvas (center)**: agents and tasks as connected nodes
* **Resources (right)**: drag‑and‑drop components (agents, tasks, tools)
## Visual Editor
The canvas reflects the workflow as nodes and edges with three supporting panels that allow you to configure the workflow easily without writing code; a.k.a. "**vibe coding AI Agents**".
You can use the drag-and-drop functionality to add agents, tasks, and tools to the canvas or you can use the chat section to build the agents. Both approaches share state and can be used interchangeably.
* **AI Thoughts (left)**: streaming reasoning as the workflow is designed
* **Canvas (center)**: agents and tasks as connected nodes
* **Resources (right)**: drag‑and‑drop components (agents, tasks, tools)
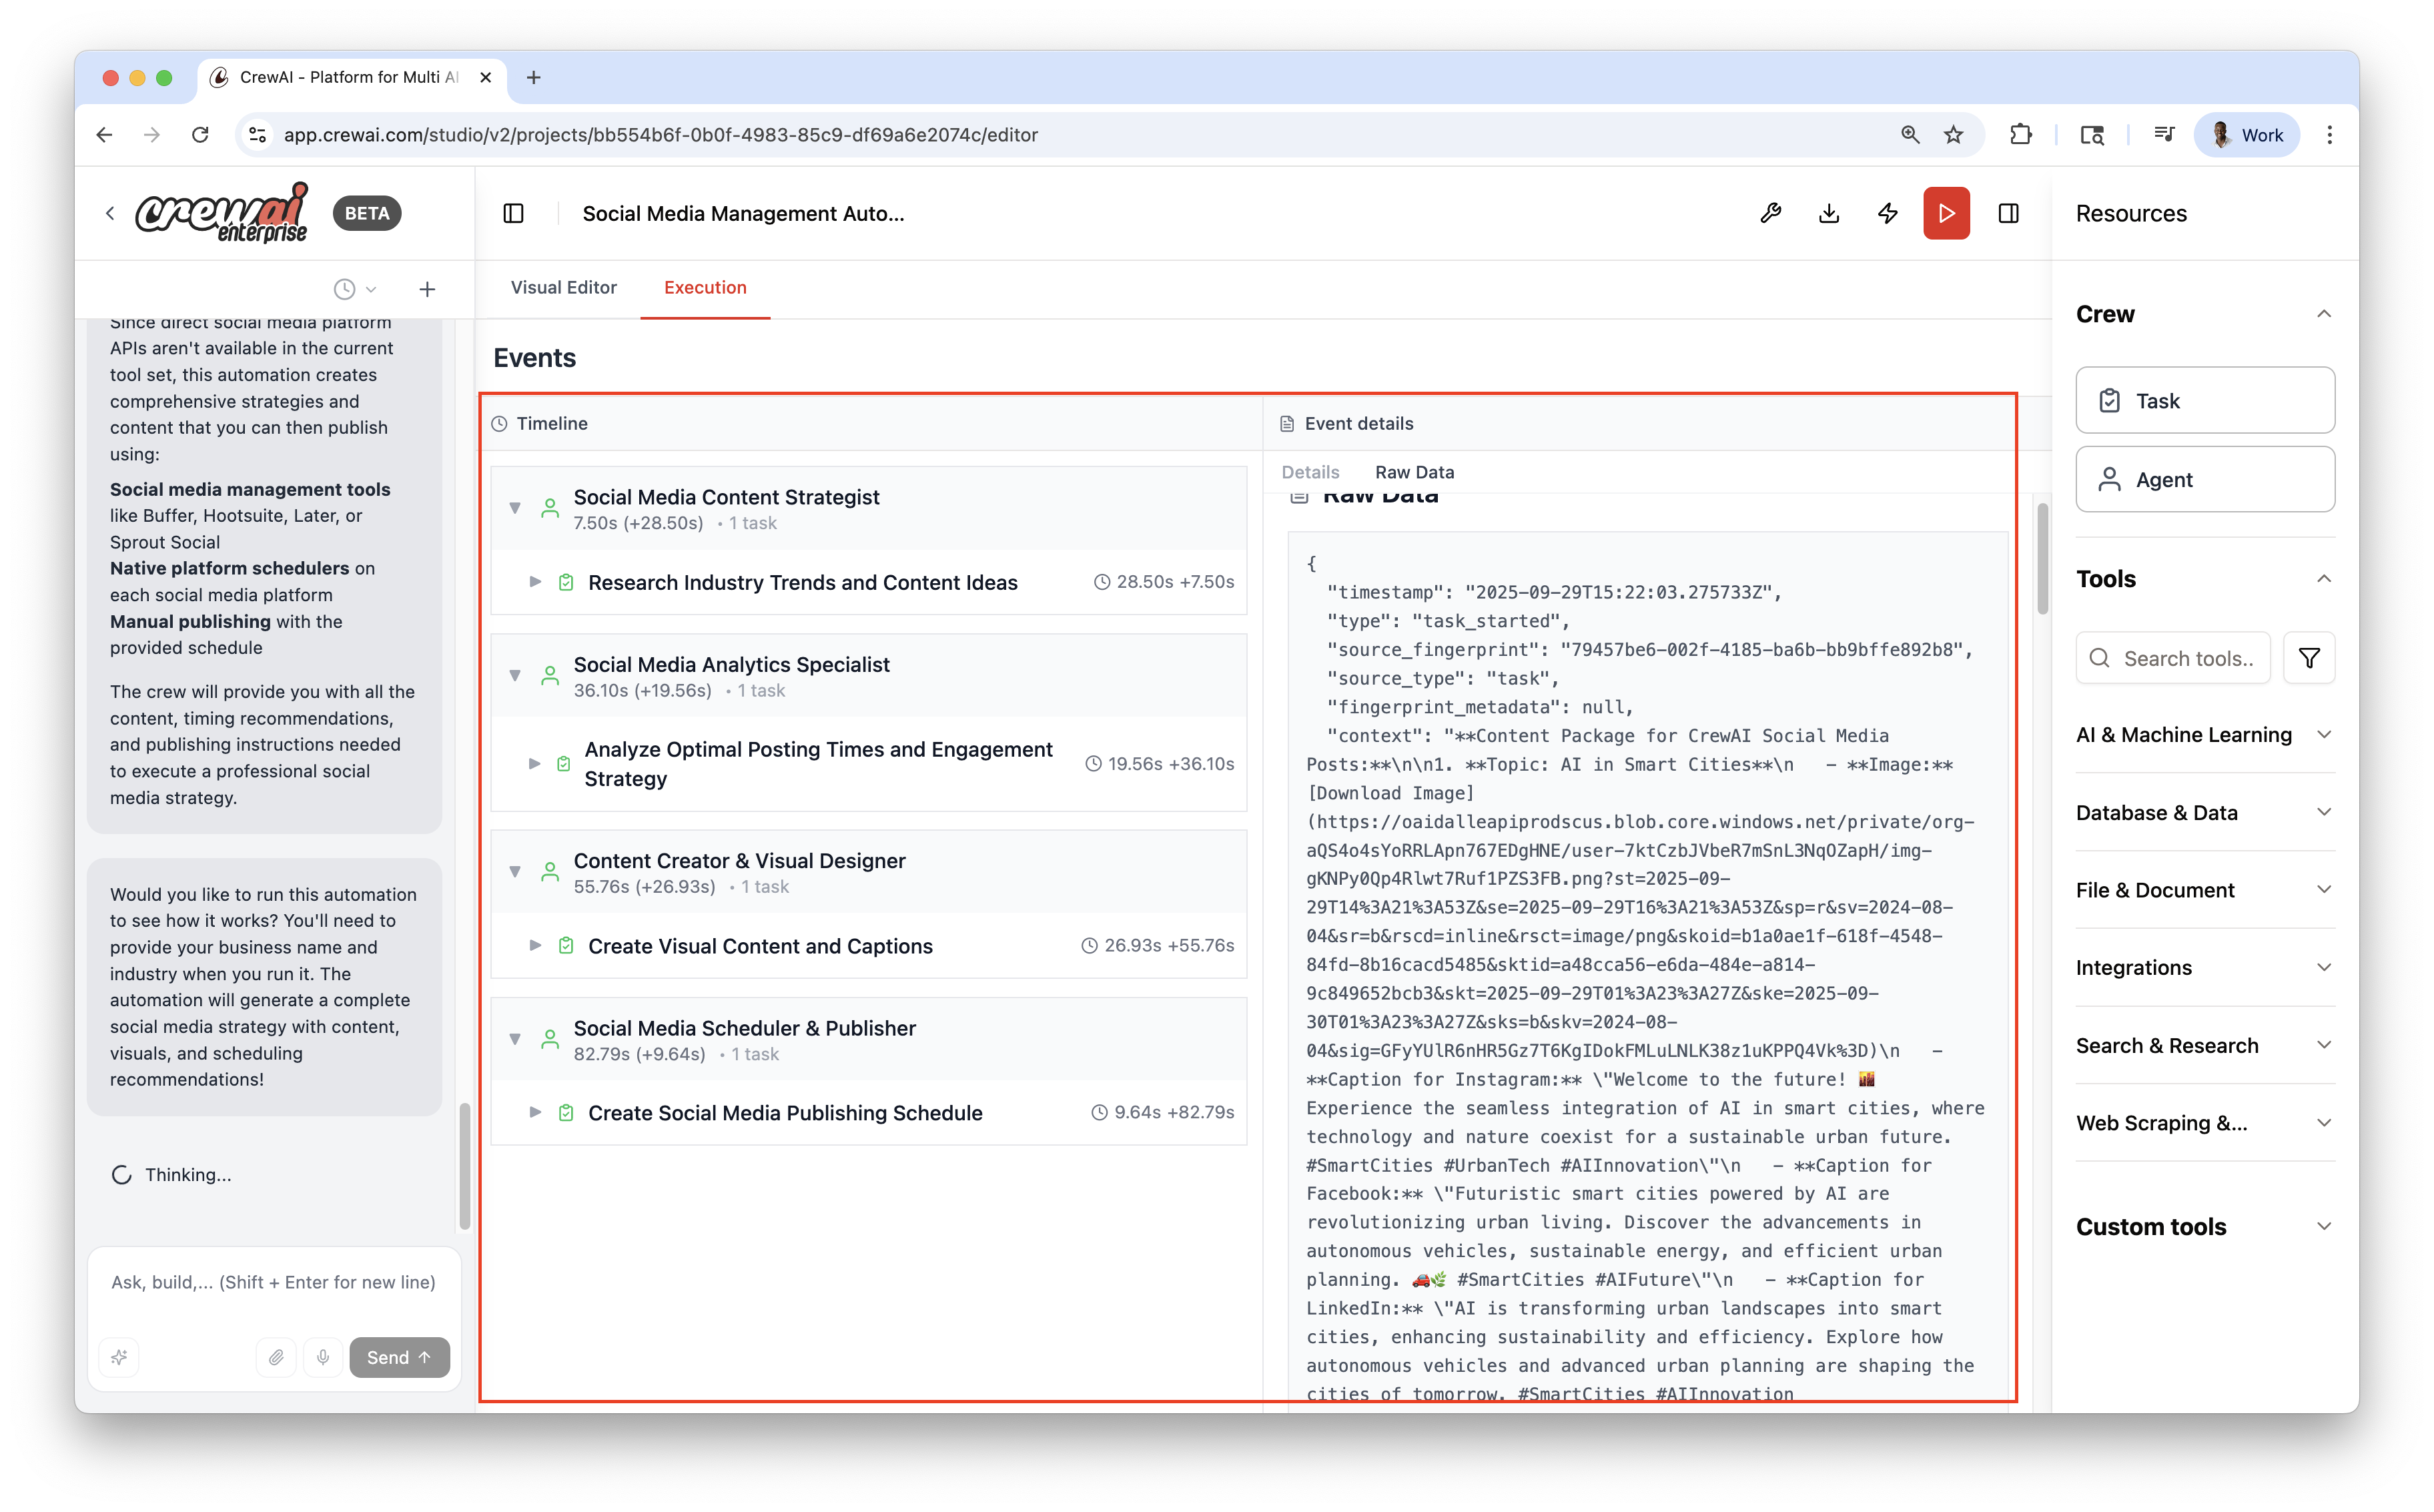
 ## Execution & Debugging
Switch to the Execution view to run and observe the workflow:
* Event timeline
* Detailed logs (Details, Messages, Raw Data)
* Local test runs before publishing
## Execution & Debugging
Switch to the Execution view to run and observe the workflow:
* Event timeline
* Detailed logs (Details, Messages, Raw Data)
* Local test runs before publishing
 ## Publish & Export
* Publish to deploy a live automation
* Download source as a ZIP for local development or customization
## Publish & Export
* Publish to deploy a live automation
* Download source as a ZIP for local development or customization
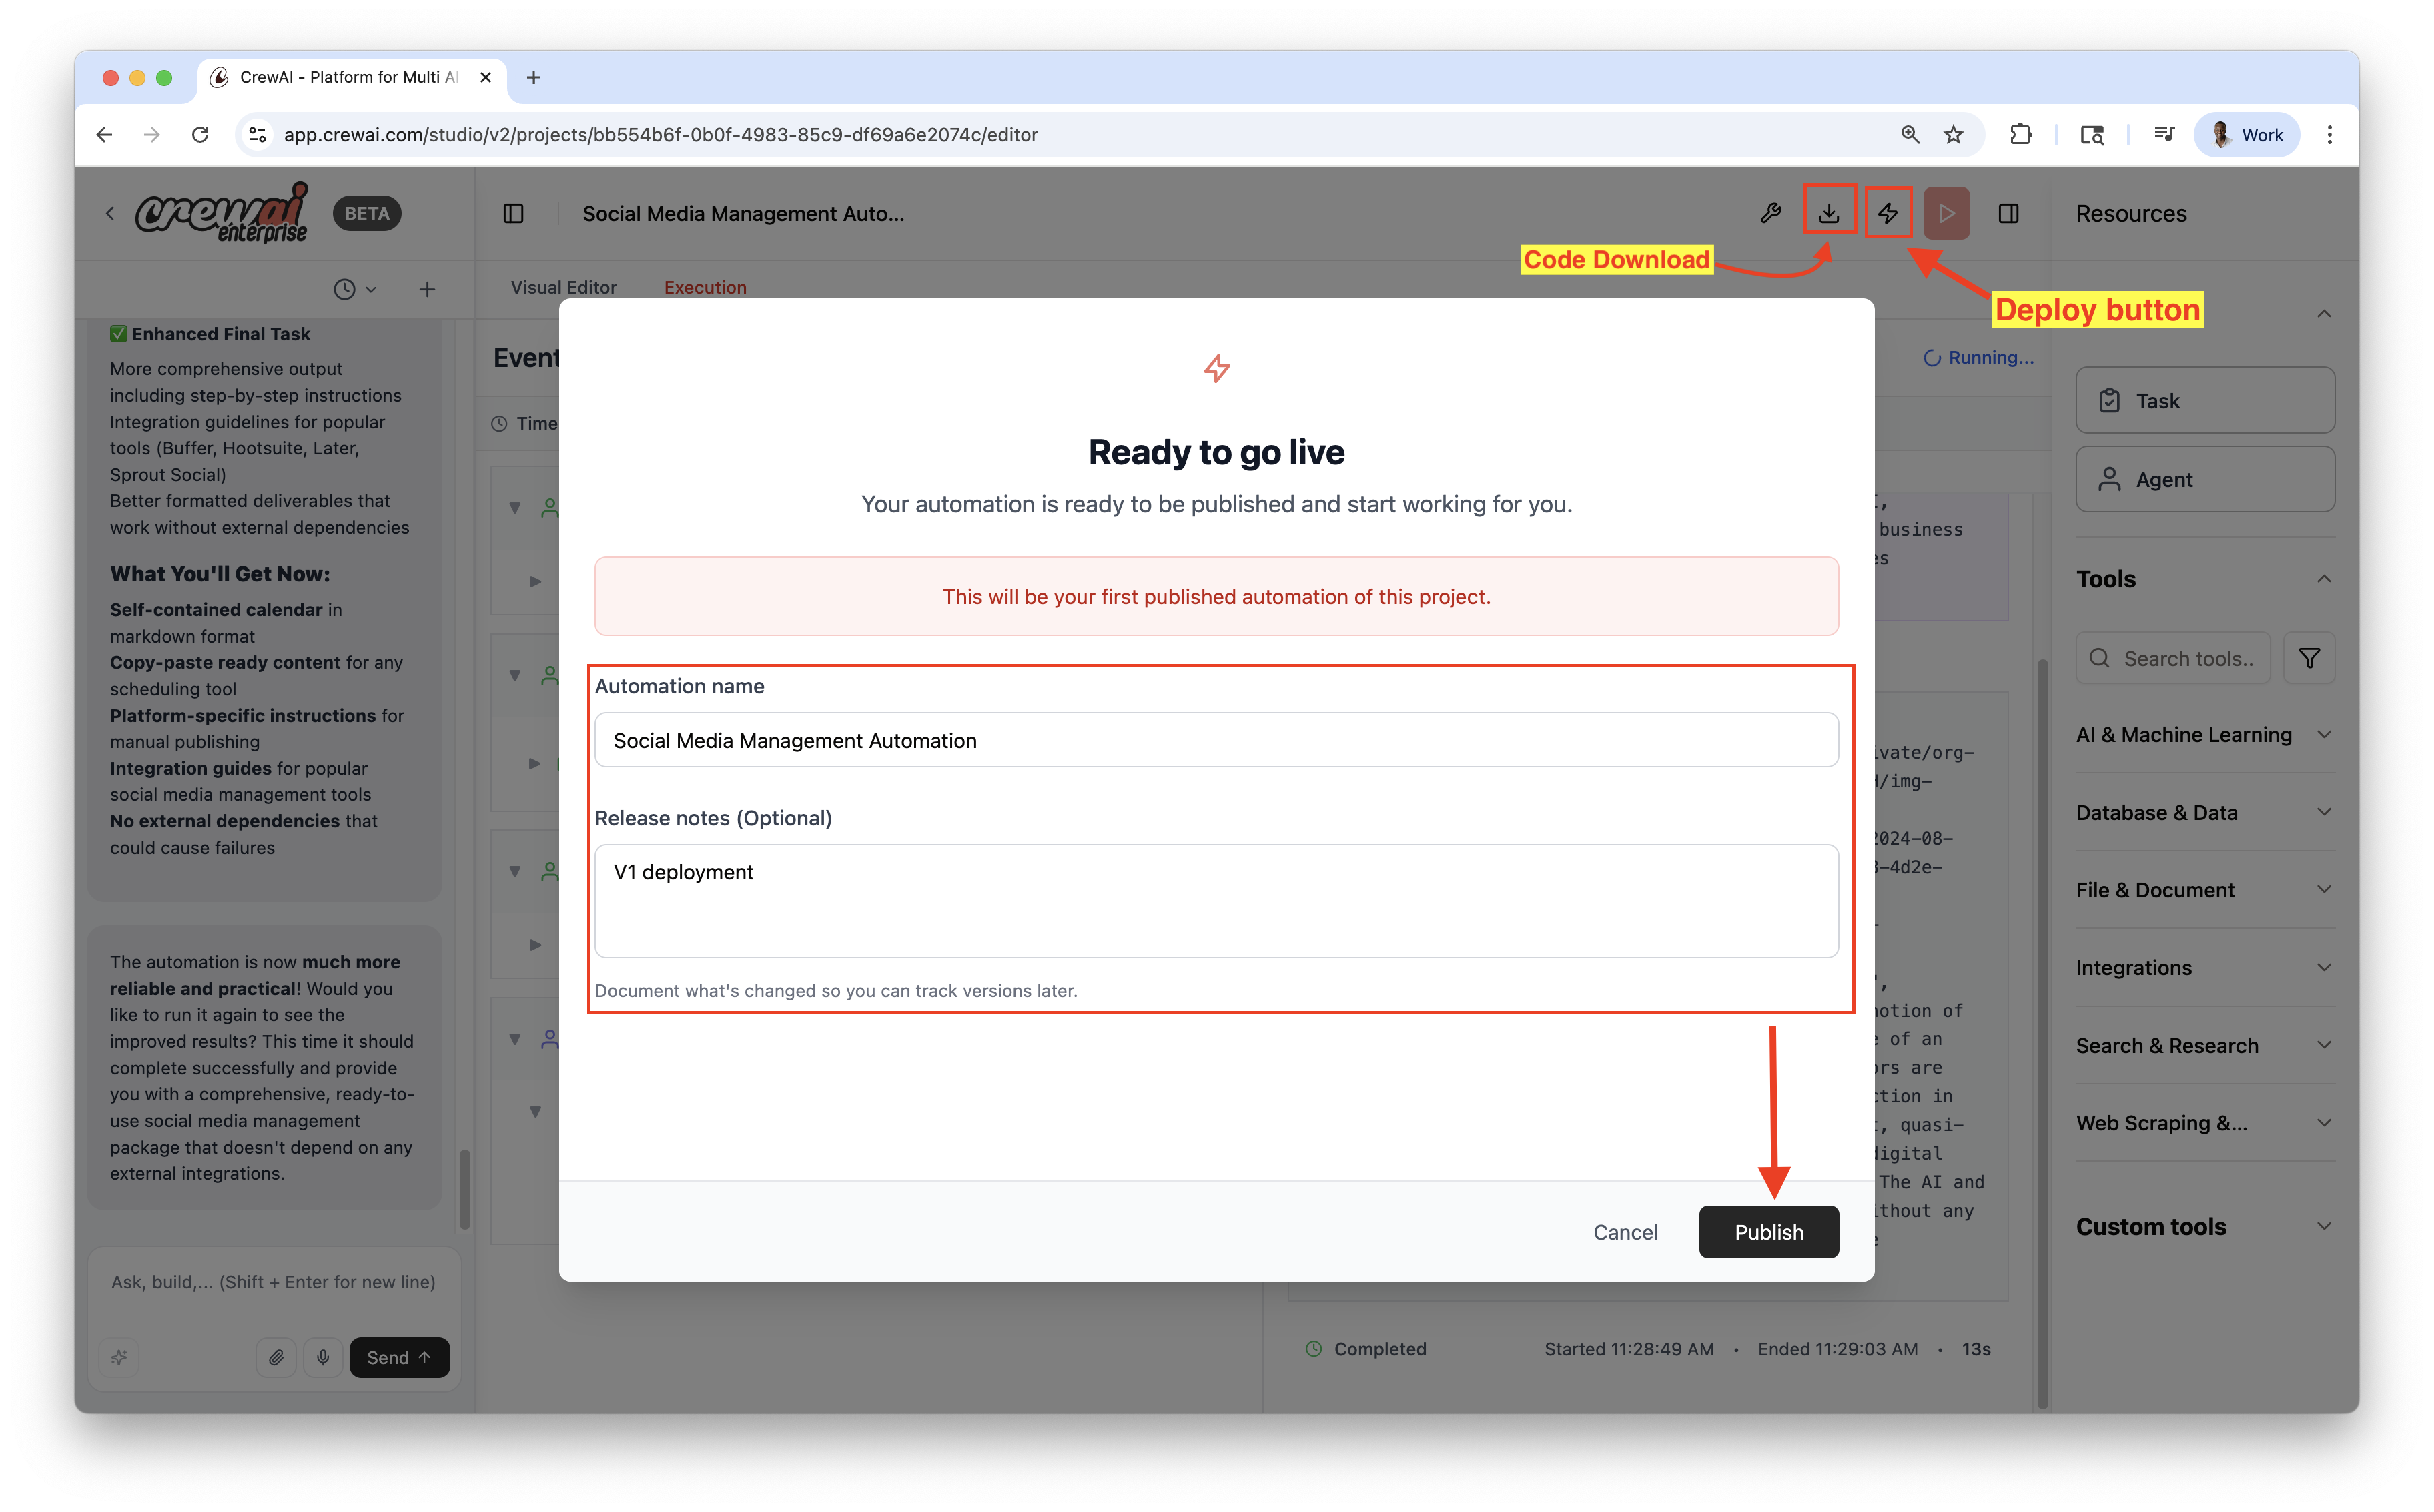 Once published, you can view the automation details and have the **Options** dropdown menu to `chat with this crew`, `Export React Component` and `Export as MCP`.
 ## Best Practices
* Iterate quickly in Studio; publish only when stable
* Keep tools constrained to minimum permissions needed
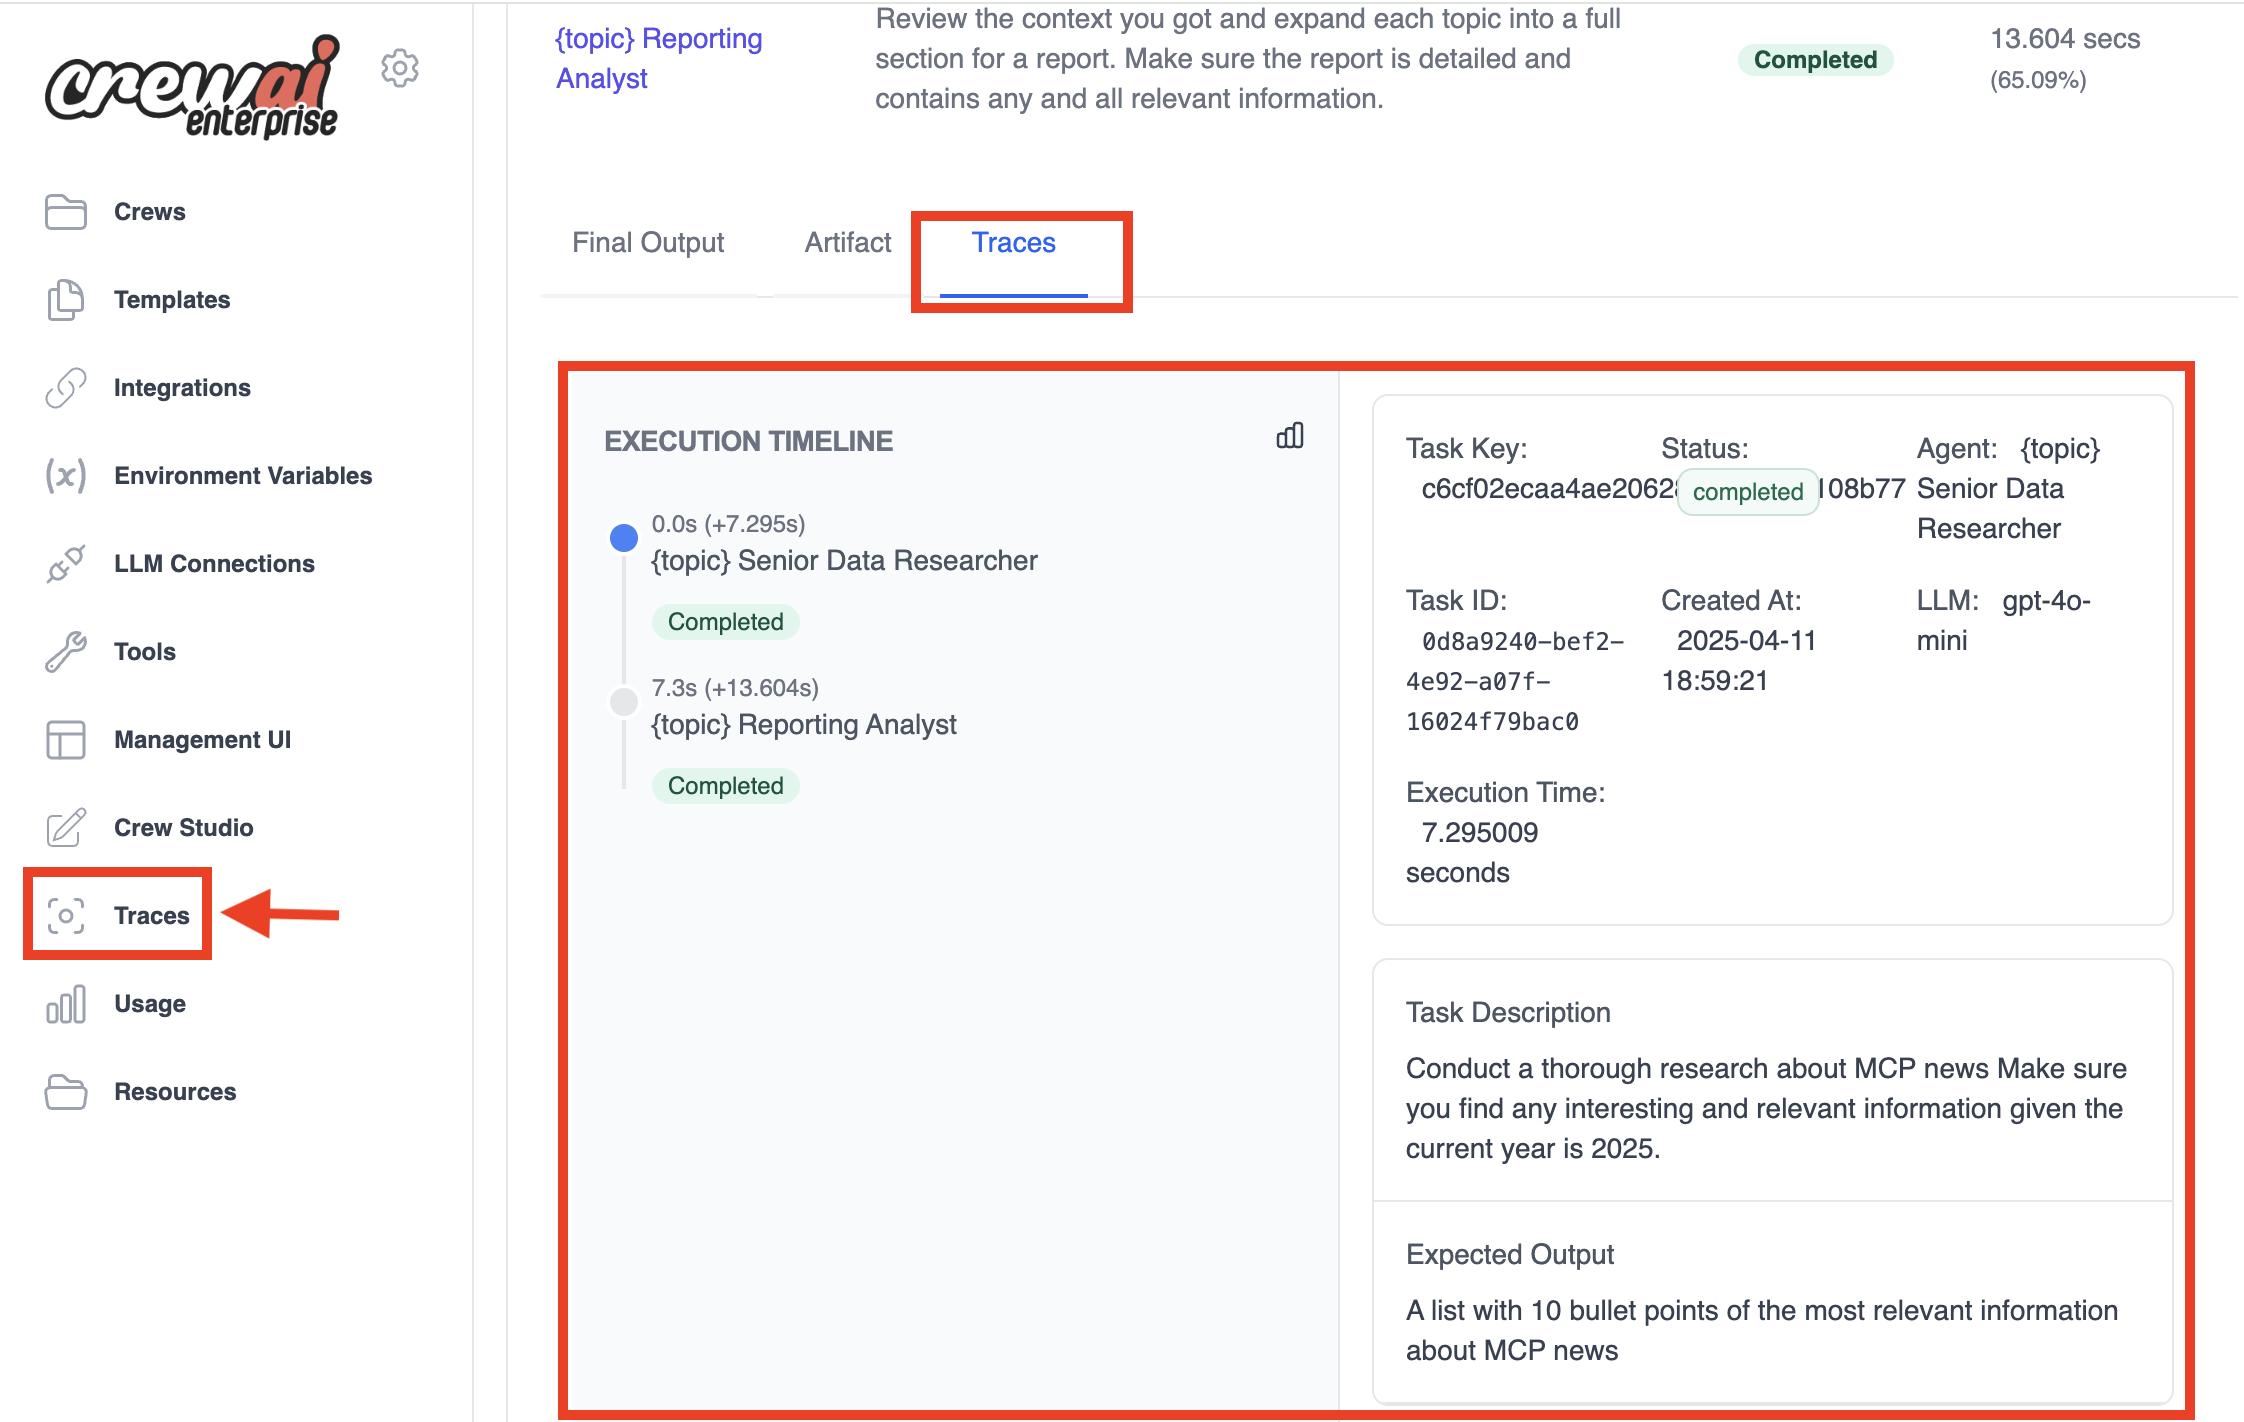
* Use Traces to validate behavior and performance
## Related
## Best Practices
* Iterate quickly in Studio; publish only when stable
* Keep tools constrained to minimum permissions needed
* Use Traces to validate behavior and performance
## Related
 ## Best Practices
1. **Be specific in your image generation prompts** to get the best results.
2. **Consider generation time** - Image generation can take some time, so factor this into your task planning.
3. **Follow usage policies** - Always comply with OpenAI's usage policies when generating images.
## Troubleshooting
1. **Check API access** - Ensure your OpenAI API key has access to DALL-E.
2. **Version compatibility** - Check that you're using the latest version of crewAI and crewai-tools.
3. **Tool configuration** - Verify that the DALL-E tool is correctly added to the agent's tool list.
---
# Source: https://docs.crewai.com/en/tools/ai-ml/dalletool.md
> ## Documentation Index
> Fetch the complete documentation index at: https://docs.crewai.com/llms.txt
> Use this file to discover all available pages before exploring further.
# DALL-E Tool
> The `DallETool` is a powerful tool designed for generating images from textual descriptions.
# `DallETool`
## Description
This tool is used to give the Agent the ability to generate images using the DALL-E model. It is a transformer-based model that generates images from textual descriptions.
This tool allows the Agent to generate images based on the text input provided by the user.
## Installation
Install the crewai\_tools package
```shell theme={null}
pip install 'crewai[tools]'
```
## Example
Remember that when using this tool, the text must be generated by the Agent itself. The text must be a description of the image you want to generate.
```python Code theme={null}
from crewai_tools import DallETool
Agent(
...
tools=[DallETool()],
)
```
If needed you can also tweak the parameters of the DALL-E model by passing them as arguments to the `DallETool` class. For example:
```python Code theme={null}
from crewai_tools import DallETool
dalle_tool = DallETool(model="dall-e-3",
size="1024x1024",
quality="standard",
n=1)
Agent(
...
tools=[dalle_tool]
)
```
The parameters are based on the `client.images.generate` method from the OpenAI API. For more information on the parameters,
please refer to the [OpenAI API documentation](https://platform.openai.com/docs/guides/images/introduction?lang=python).
---
# Source: https://docs.crewai.com/en/tools/search-research/databricks-query-tool.md
> ## Documentation Index
> Fetch the complete documentation index at: https://docs.crewai.com/llms.txt
> Use this file to discover all available pages before exploring further.
# Databricks SQL Query Tool
> The `DatabricksQueryTool` executes SQL queries against Databricks workspace tables.
# `DatabricksQueryTool`
## Description
Run SQL against Databricks workspace tables with either CLI profile or direct host/token authentication.
## Installation
```shell theme={null}
uv add crewai-tools[databricks-sdk]
```
## Environment Variables
* `DATABRICKS_CONFIG_PROFILE` or (`DATABRICKS_HOST` + `DATABRICKS_TOKEN`)
Create a personal access token and find host details in the Databricks workspace under User Settings → Developer.
Docs: [https://docs.databricks.com/en/dev-tools/auth/pat.html](https://docs.databricks.com/en/dev-tools/auth/pat.html)
## Example
```python Code theme={null}
from crewai import Agent, Task, Crew
from crewai_tools import DatabricksQueryTool
tool = DatabricksQueryTool(
default_catalog="main",
default_schema="default",
)
agent = Agent(
role="Data Analyst",
goal="Query Databricks",
tools=[tool],
verbose=True,
)
task = Task(
description="SELECT * FROM my_table LIMIT 10",
expected_output="10 rows",
agent=agent,
)
crew = Crew(
agents=[agent],
tasks=[task],
verbose=True,
)
result = crew.kickoff()
print(result)
```
## Parameters
* `query` (required): SQL query to execute
* `catalog` (optional): Override default catalog
* `db_schema` (optional): Override default schema
* `warehouse_id` (optional): Override default SQL warehouse
* `row_limit` (optional): Maximum rows to return (default: 1000)
## Defaults on initialization
* `default_catalog`
* `default_schema`
* `default_warehouse_id`
### Error handling & tips
* Authentication errors: verify `DATABRICKS_HOST` begins with `https://` and token is valid.
* Permissions: ensure your SQL warehouse and schema are accessible by your token.
* Limits: long‑running queries should be avoided in agent loops; add filters/limits.
---
# Source: https://docs.crewai.com/en/observability/datadog.md
> ## Documentation Index
> Fetch the complete documentation index at: https://docs.crewai.com/llms.txt
> Use this file to discover all available pages before exploring further.
# Datadog Integration
> Learn how to integrate Datadog with CrewAI to submit LLM Observability traces to Datadog.
# Integrate Datadog with CrewAI
This guide will demonstrate how to integrate **[Datadog LLM Observability](https://docs.datadoghq.com/llm_observability/)** with **CrewAI** using [Datadog auto-instrumentation](https://docs.datadoghq.com/llm_observability/instrumentation/auto_instrumentation?tab=python). By the end of this guide, you will be able to submit LLM Observability traces to Datadog and view your CrewAI agent runs in Datadog LLM Observability's [Agentic Execution View](https://docs.datadoghq.com/llm_observability/monitoring/agent_monitoring).
## What is Datadog LLM Observability?
[Datadog LLM Observability](https://www.datadoghq.com/product/llm-observability/) helps AI engineers, data scientists, and application developers quickly develop, evaluate, and monitor LLM applications. Confidently improve output quality, performance, costs, and overall risk with structured experiments, end-to-end tracing across AI agents, and evaluations.
## Getting Started
### Install Dependencies
```shell theme={null}
pip install ddtrace crewai crewai-tools
```
### Set Environment Variables
If you do not have a Datadog API key, you can [create an account](https://www.datadoghq.com/) and [get your API key](https://docs.datadoghq.com/account_management/api-app-keys/#api-keys).
You will also need to specify an ML Application name in the following environment variables. An ML Application is a grouping of LLM Observability traces associated with a specific LLM-based application. See [ML Application Naming Guidelines](https://docs.datadoghq.com/llm_observability/instrumentation/sdk?tab=python#application-naming-guidelines) for more information on limitations with ML Application names.
```shell theme={null}
export DD_API_KEY=
## Best Practices
1. **Be specific in your image generation prompts** to get the best results.
2. **Consider generation time** - Image generation can take some time, so factor this into your task planning.
3. **Follow usage policies** - Always comply with OpenAI's usage policies when generating images.
## Troubleshooting
1. **Check API access** - Ensure your OpenAI API key has access to DALL-E.
2. **Version compatibility** - Check that you're using the latest version of crewAI and crewai-tools.
3. **Tool configuration** - Verify that the DALL-E tool is correctly added to the agent's tool list.
---
# Source: https://docs.crewai.com/en/tools/ai-ml/dalletool.md
> ## Documentation Index
> Fetch the complete documentation index at: https://docs.crewai.com/llms.txt
> Use this file to discover all available pages before exploring further.
# DALL-E Tool
> The `DallETool` is a powerful tool designed for generating images from textual descriptions.
# `DallETool`
## Description
This tool is used to give the Agent the ability to generate images using the DALL-E model. It is a transformer-based model that generates images from textual descriptions.
This tool allows the Agent to generate images based on the text input provided by the user.
## Installation
Install the crewai\_tools package
```shell theme={null}
pip install 'crewai[tools]'
```
## Example
Remember that when using this tool, the text must be generated by the Agent itself. The text must be a description of the image you want to generate.
```python Code theme={null}
from crewai_tools import DallETool
Agent(
...
tools=[DallETool()],
)
```
If needed you can also tweak the parameters of the DALL-E model by passing them as arguments to the `DallETool` class. For example:
```python Code theme={null}
from crewai_tools import DallETool
dalle_tool = DallETool(model="dall-e-3",
size="1024x1024",
quality="standard",
n=1)
Agent(
...
tools=[dalle_tool]
)
```
The parameters are based on the `client.images.generate` method from the OpenAI API. For more information on the parameters,
please refer to the [OpenAI API documentation](https://platform.openai.com/docs/guides/images/introduction?lang=python).
---
# Source: https://docs.crewai.com/en/tools/search-research/databricks-query-tool.md
> ## Documentation Index
> Fetch the complete documentation index at: https://docs.crewai.com/llms.txt
> Use this file to discover all available pages before exploring further.
# Databricks SQL Query Tool
> The `DatabricksQueryTool` executes SQL queries against Databricks workspace tables.
# `DatabricksQueryTool`
## Description
Run SQL against Databricks workspace tables with either CLI profile or direct host/token authentication.
## Installation
```shell theme={null}
uv add crewai-tools[databricks-sdk]
```
## Environment Variables
* `DATABRICKS_CONFIG_PROFILE` or (`DATABRICKS_HOST` + `DATABRICKS_TOKEN`)
Create a personal access token and find host details in the Databricks workspace under User Settings → Developer.
Docs: [https://docs.databricks.com/en/dev-tools/auth/pat.html](https://docs.databricks.com/en/dev-tools/auth/pat.html)
## Example
```python Code theme={null}
from crewai import Agent, Task, Crew
from crewai_tools import DatabricksQueryTool
tool = DatabricksQueryTool(
default_catalog="main",
default_schema="default",
)
agent = Agent(
role="Data Analyst",
goal="Query Databricks",
tools=[tool],
verbose=True,
)
task = Task(
description="SELECT * FROM my_table LIMIT 10",
expected_output="10 rows",
agent=agent,
)
crew = Crew(
agents=[agent],
tasks=[task],
verbose=True,
)
result = crew.kickoff()
print(result)
```
## Parameters
* `query` (required): SQL query to execute
* `catalog` (optional): Override default catalog
* `db_schema` (optional): Override default schema
* `warehouse_id` (optional): Override default SQL warehouse
* `row_limit` (optional): Maximum rows to return (default: 1000)
## Defaults on initialization
* `default_catalog`
* `default_schema`
* `default_warehouse_id`
### Error handling & tips
* Authentication errors: verify `DATABRICKS_HOST` begins with `https://` and token is valid.
* Permissions: ensure your SQL warehouse and schema are accessible by your token.
* Limits: long‑running queries should be avoided in agent loops; add filters/limits.
---
# Source: https://docs.crewai.com/en/observability/datadog.md
> ## Documentation Index
> Fetch the complete documentation index at: https://docs.crewai.com/llms.txt
> Use this file to discover all available pages before exploring further.
# Datadog Integration
> Learn how to integrate Datadog with CrewAI to submit LLM Observability traces to Datadog.
# Integrate Datadog with CrewAI
This guide will demonstrate how to integrate **[Datadog LLM Observability](https://docs.datadoghq.com/llm_observability/)** with **CrewAI** using [Datadog auto-instrumentation](https://docs.datadoghq.com/llm_observability/instrumentation/auto_instrumentation?tab=python). By the end of this guide, you will be able to submit LLM Observability traces to Datadog and view your CrewAI agent runs in Datadog LLM Observability's [Agentic Execution View](https://docs.datadoghq.com/llm_observability/monitoring/agent_monitoring).
## What is Datadog LLM Observability?
[Datadog LLM Observability](https://www.datadoghq.com/product/llm-observability/) helps AI engineers, data scientists, and application developers quickly develop, evaluate, and monitor LLM applications. Confidently improve output quality, performance, costs, and overall risk with structured experiments, end-to-end tracing across AI agents, and evaluations.
## Getting Started
### Install Dependencies
```shell theme={null}
pip install ddtrace crewai crewai-tools
```
### Set Environment Variables
If you do not have a Datadog API key, you can [create an account](https://www.datadoghq.com/) and [get your API key](https://docs.datadoghq.com/account_management/api-app-keys/#api-keys).
You will also need to specify an ML Application name in the following environment variables. An ML Application is a grouping of LLM Observability traces associated with a specific LLM-based application. See [ML Application Naming Guidelines](https://docs.datadoghq.com/llm_observability/instrumentation/sdk?tab=python#application-naming-guidelines) for more information on limitations with ML Application names.
```shell theme={null}
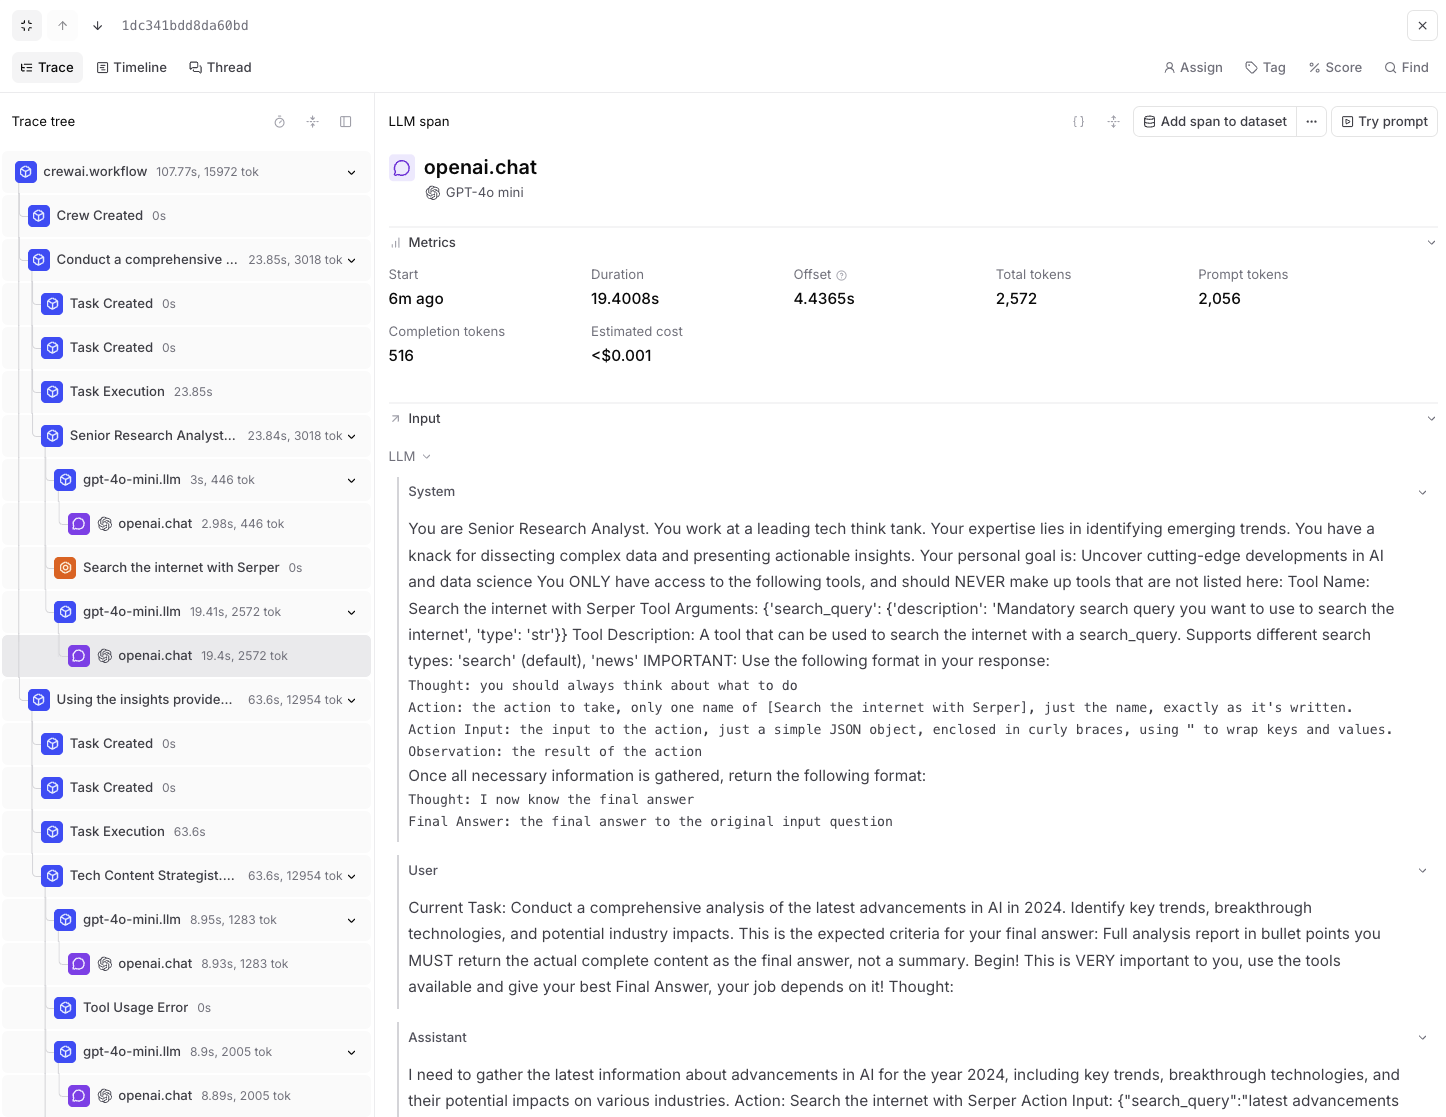
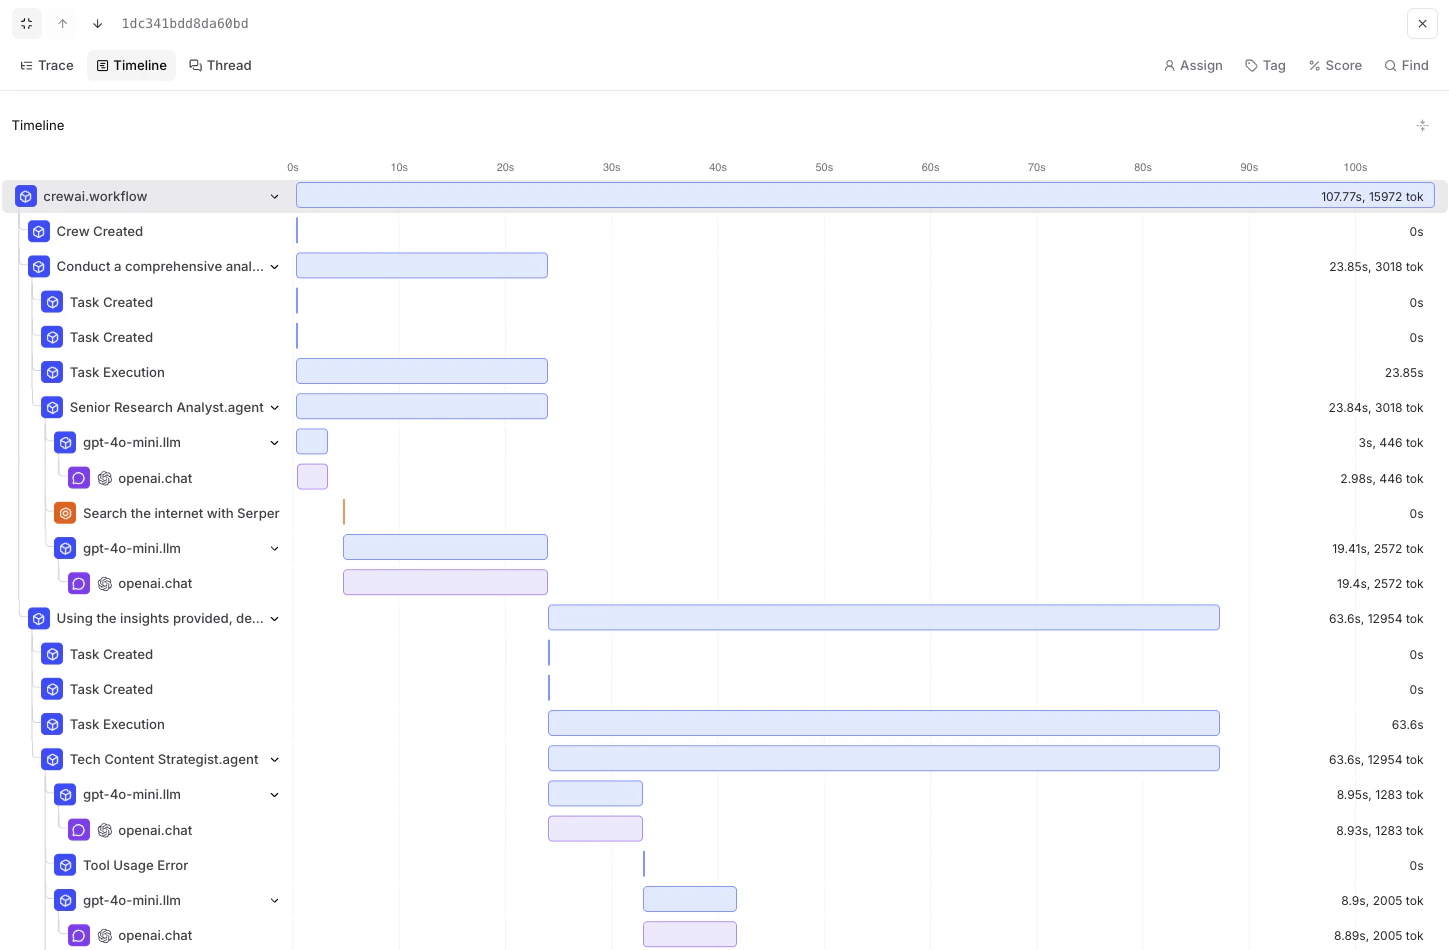
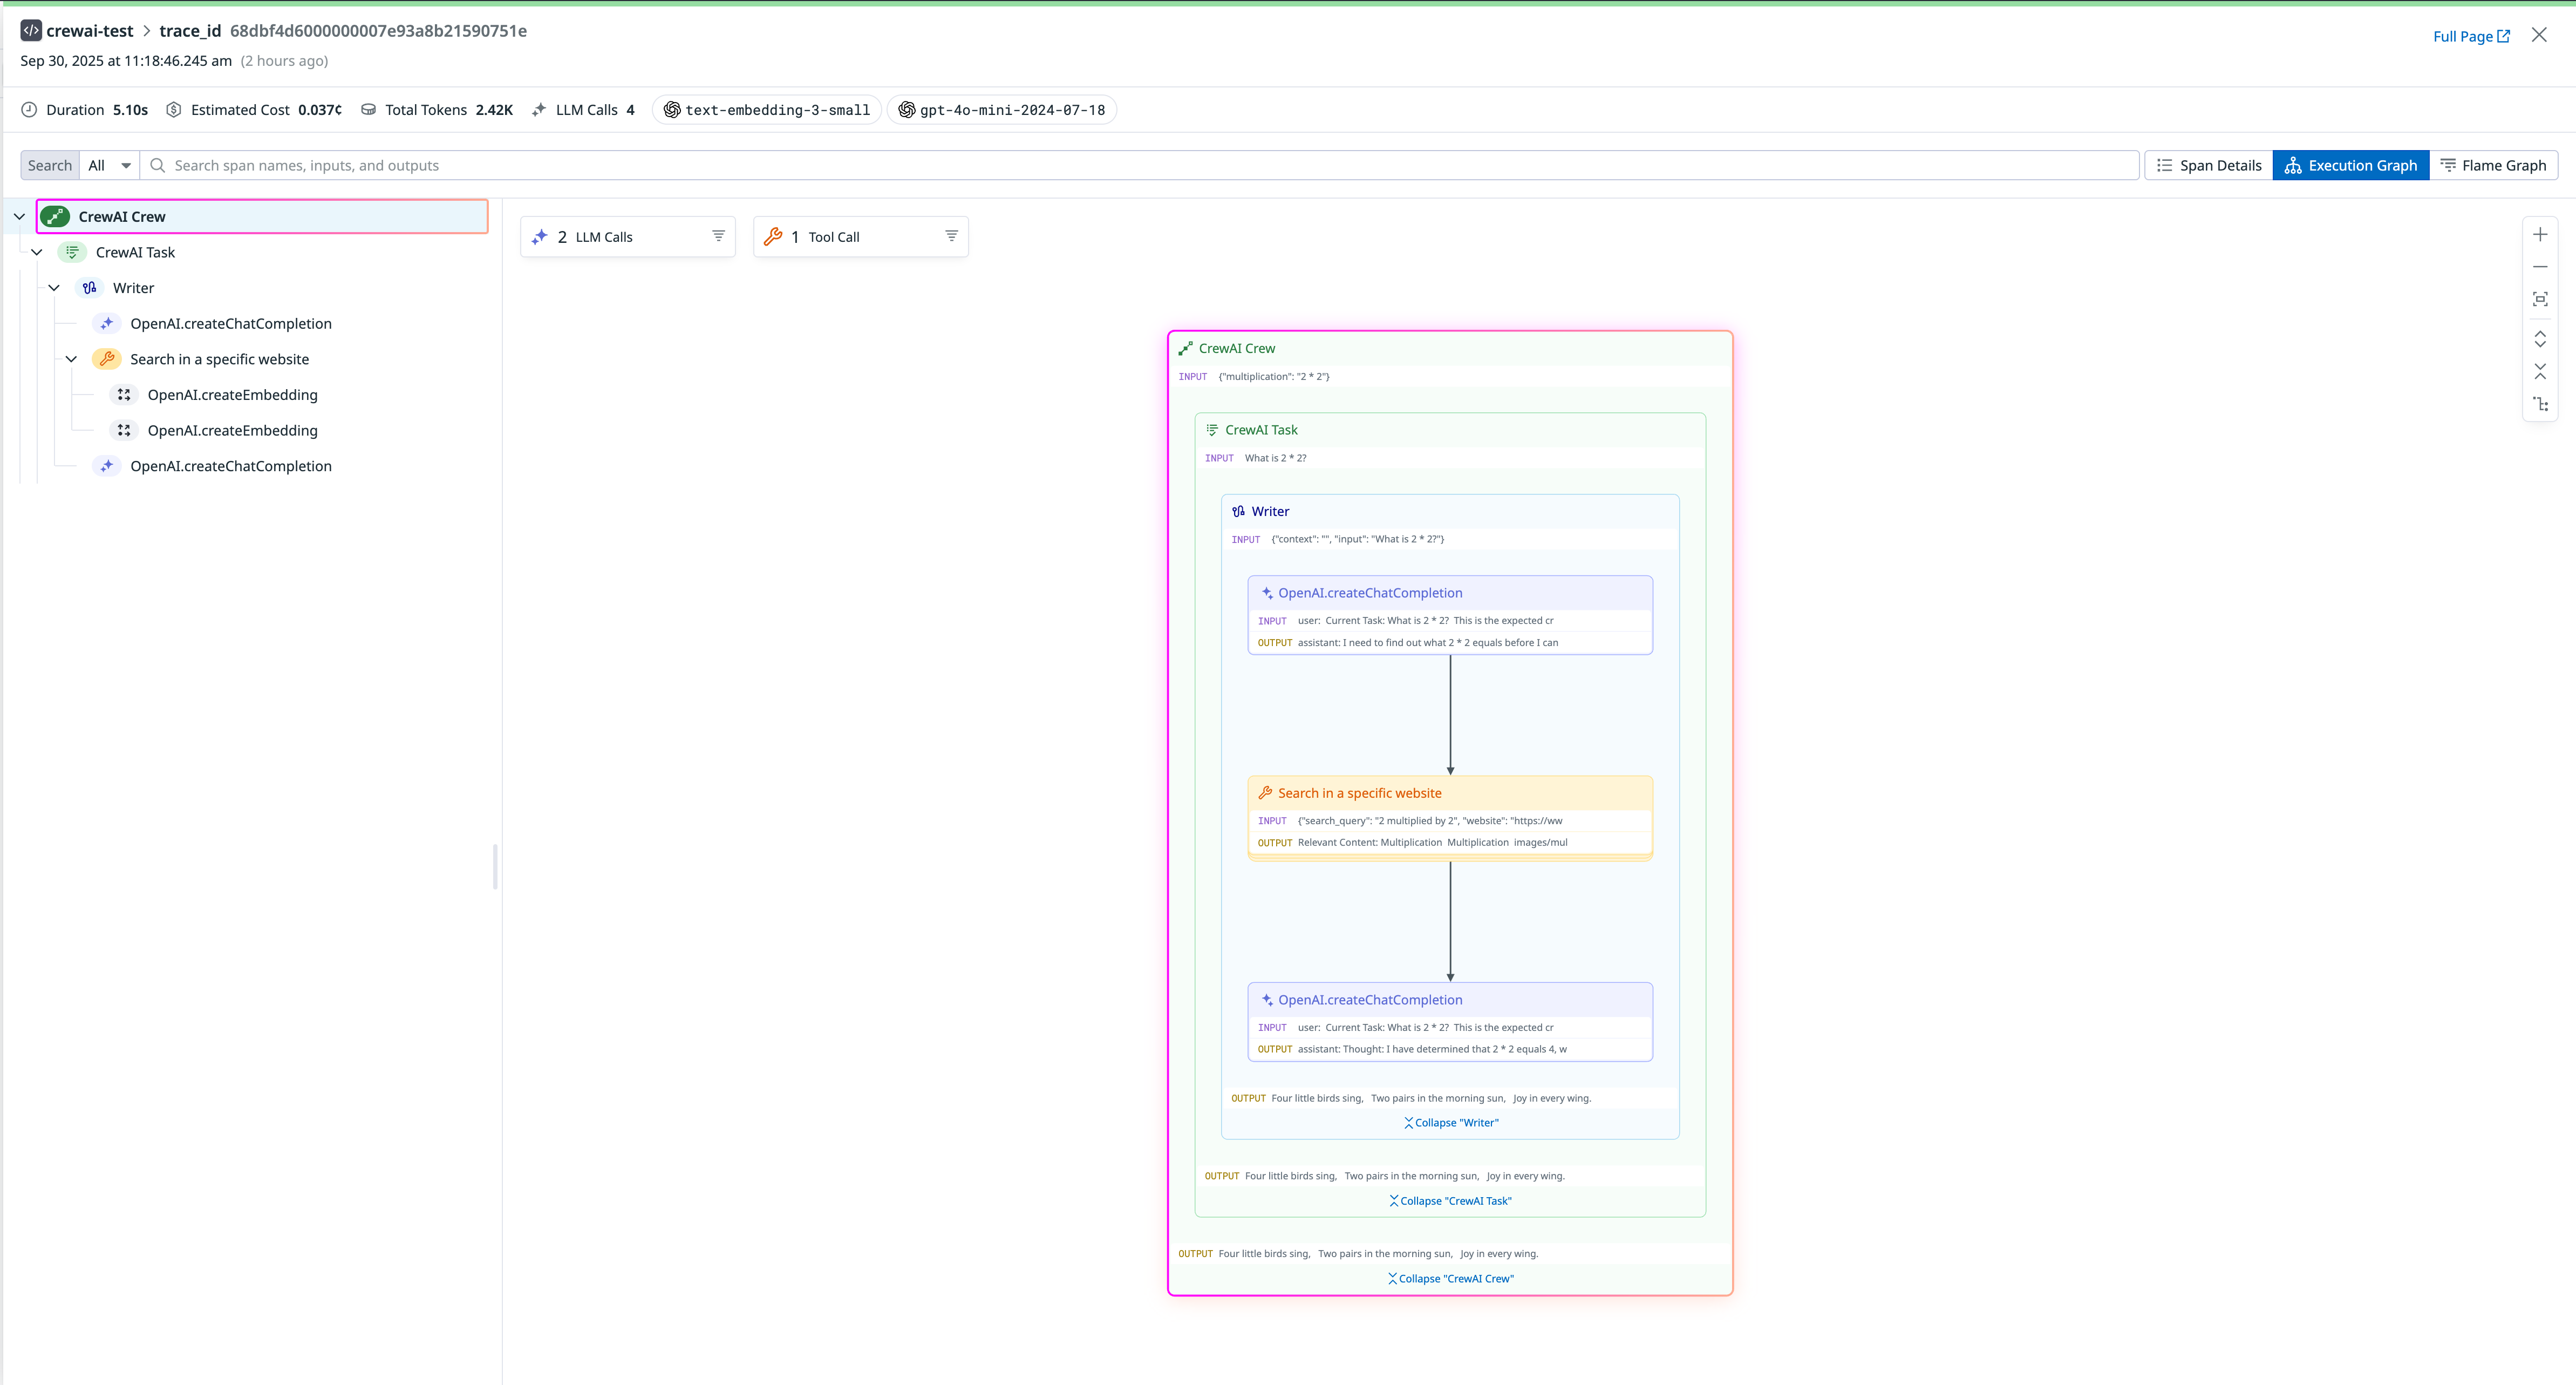
export DD_API_KEY=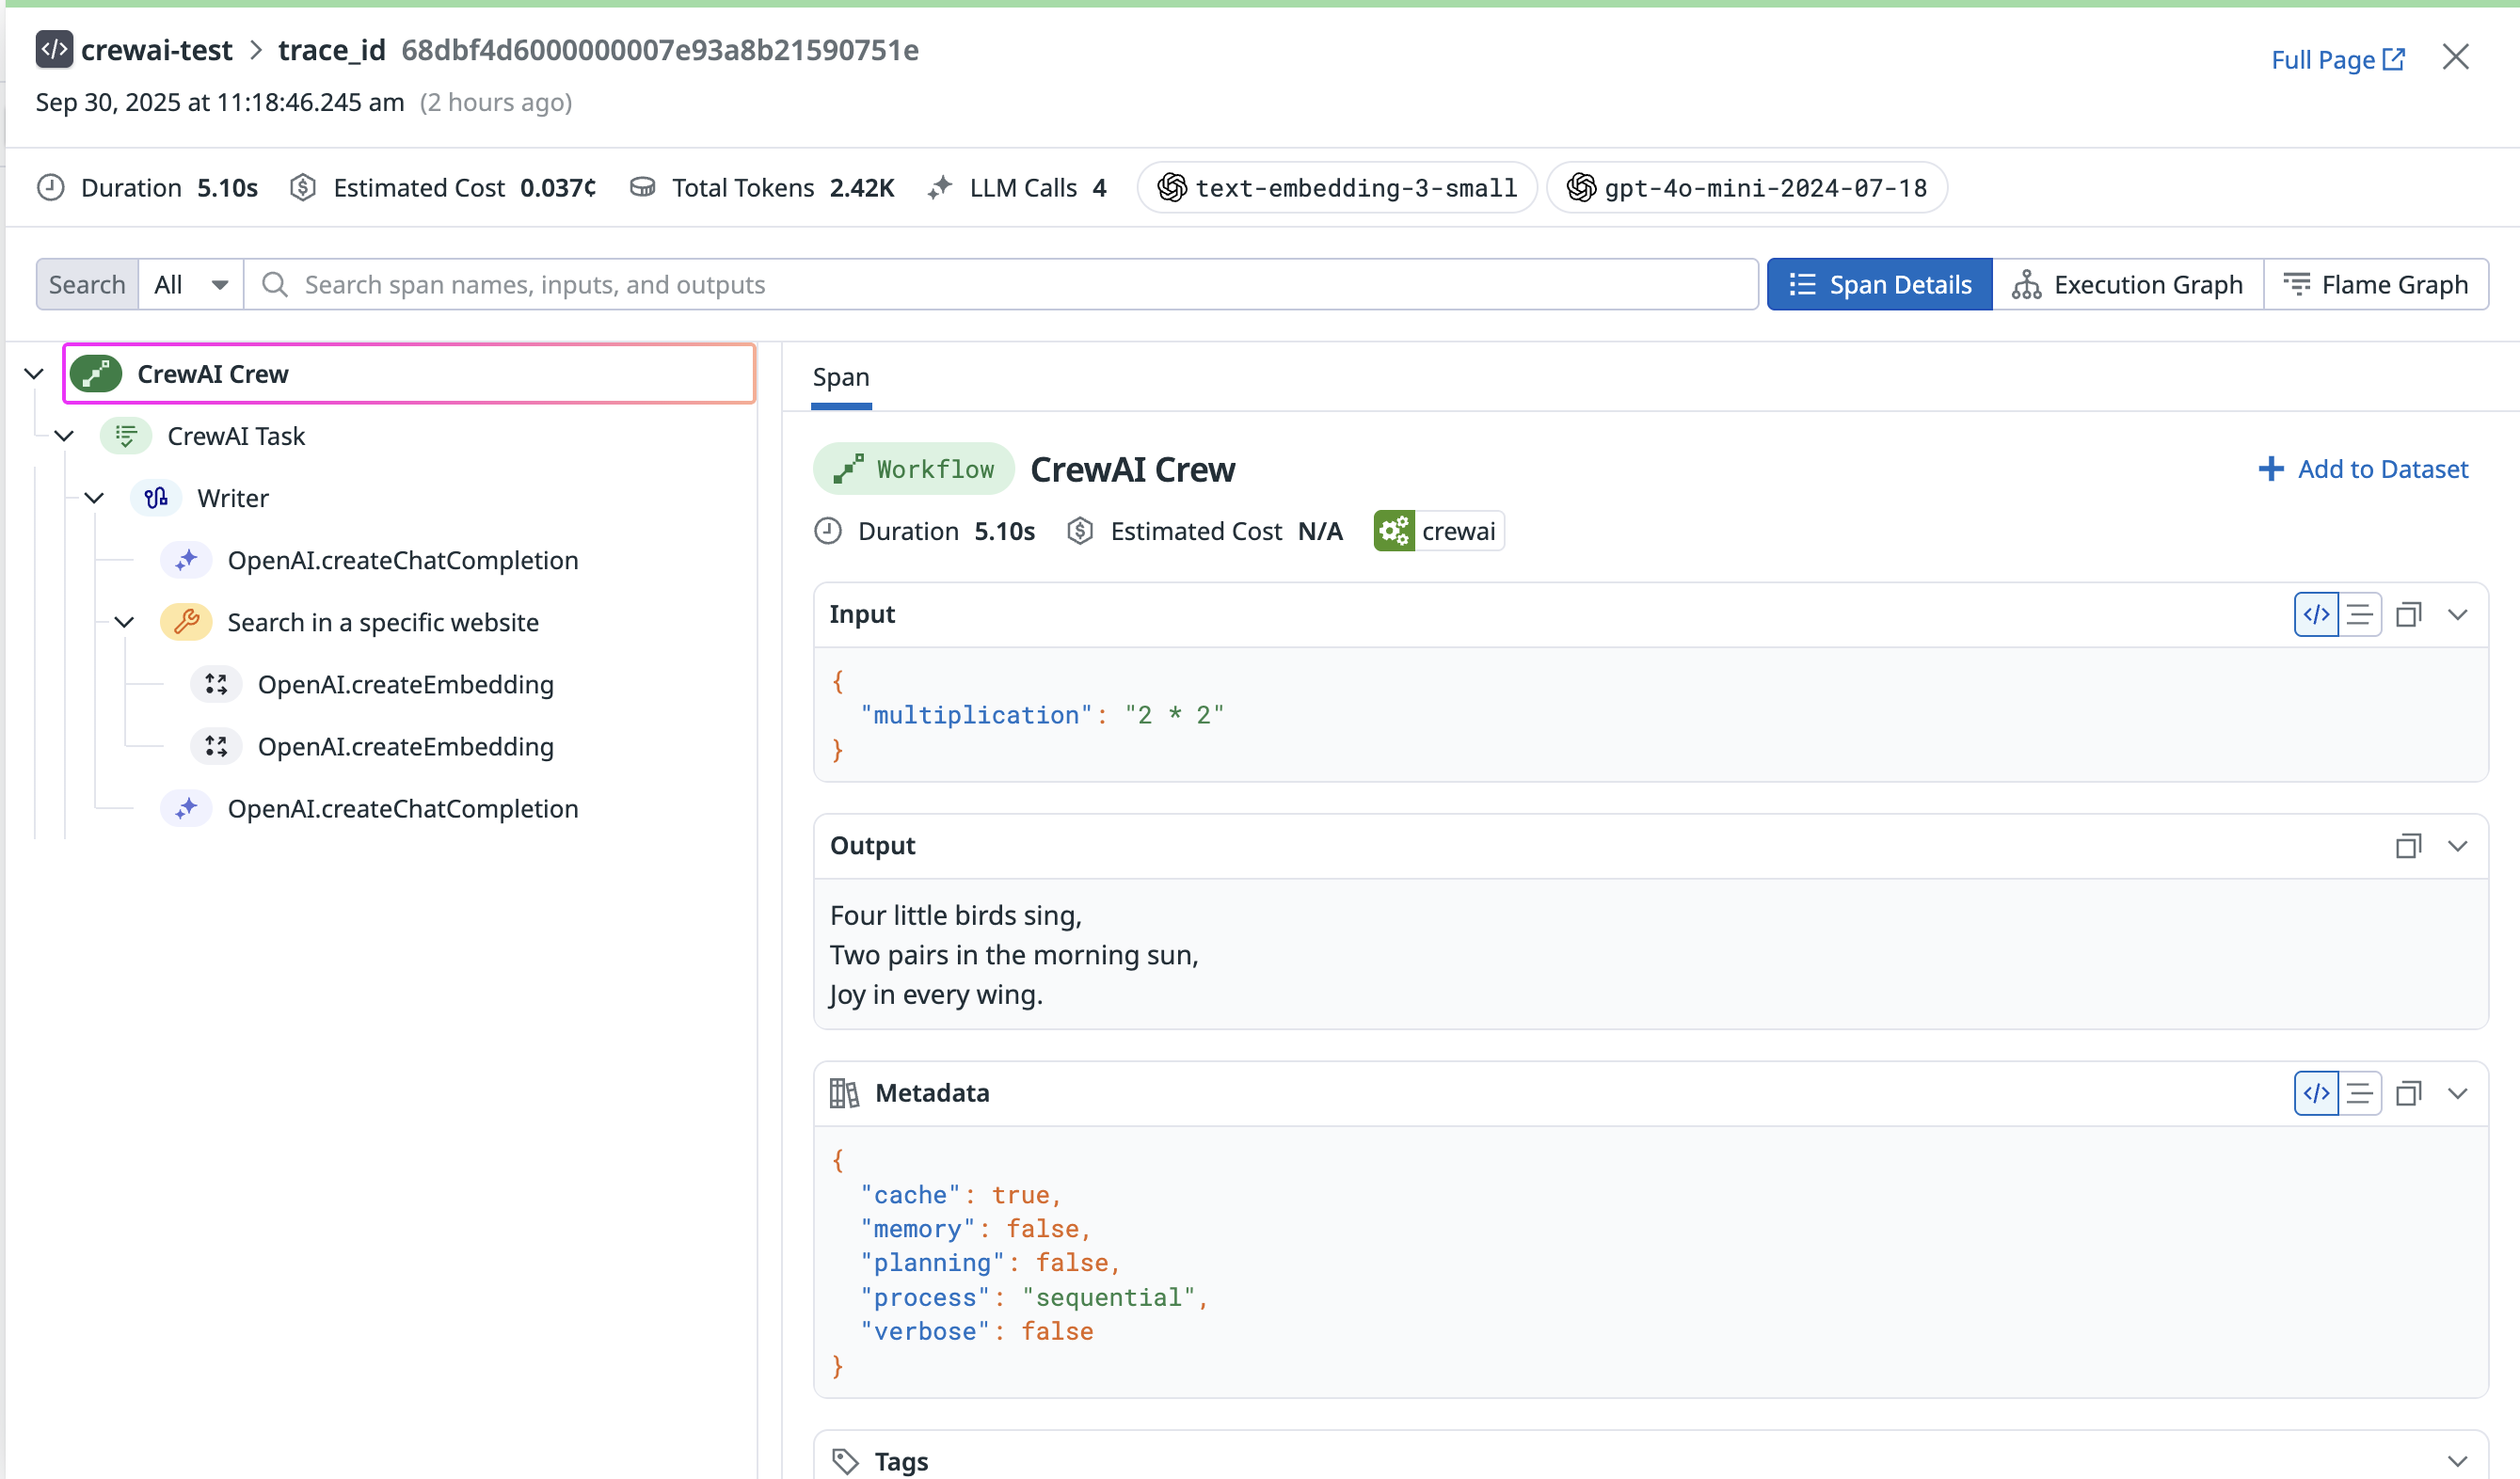 Additionally, you can view the execution graph view of the trace, which shows the control and data flow of the trace, which will scale with larger agents to show handoffs and relationships between LLM calls, tool calls, and agent interactions.
 ## References
* [Datadog LLM Observability](https://www.datadoghq.com/product/llm-observability/)
* [Datadog LLM Observability CrewAI Auto-Instrumentation](https://docs.datadoghq.com/llm_observability/instrumentation/auto_instrumentation?tab=python#crew-ai)
---
# Source: https://docs.crewai.com/en/enterprise/guides/deploy-crew.md
# Deploy Crew
> Deploying a Crew on CrewAI AMP
## References
* [Datadog LLM Observability](https://www.datadoghq.com/product/llm-observability/)
* [Datadog LLM Observability CrewAI Auto-Instrumentation](https://docs.datadoghq.com/llm_observability/instrumentation/auto_instrumentation?tab=python#crew-ai)
---
# Source: https://docs.crewai.com/en/enterprise/guides/deploy-crew.md
# Deploy Crew
> Deploying a Crew on CrewAI AMP

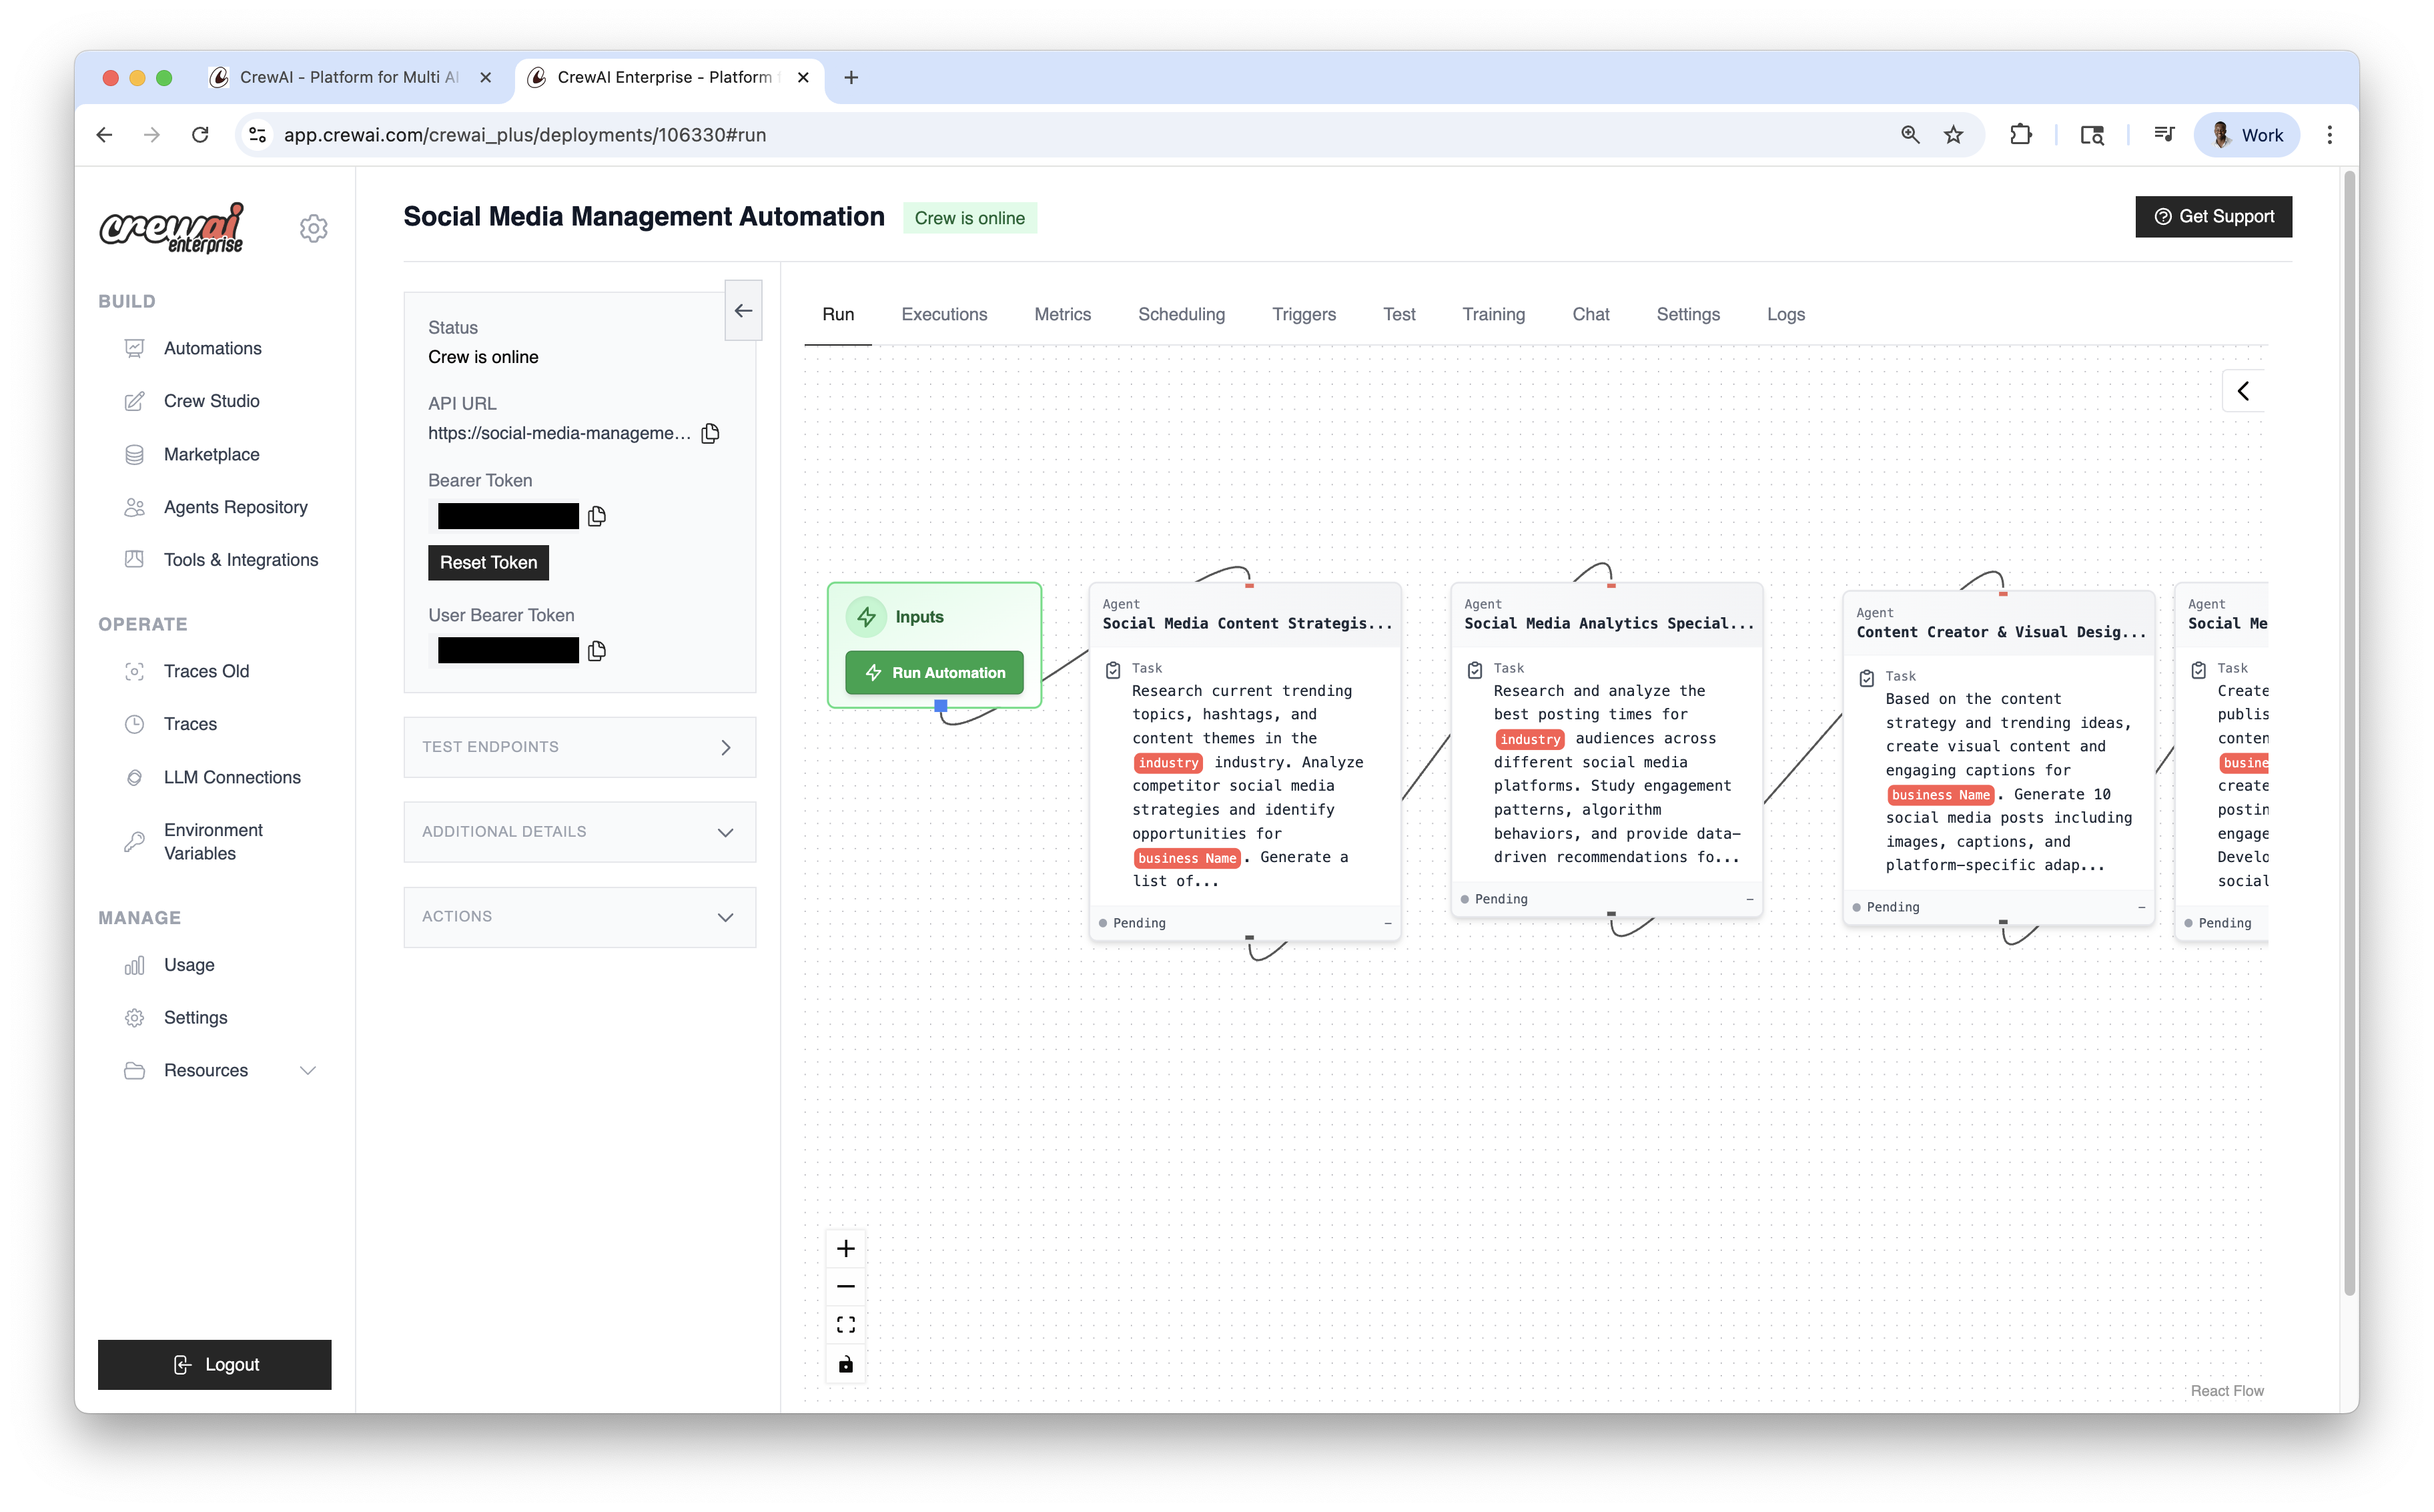
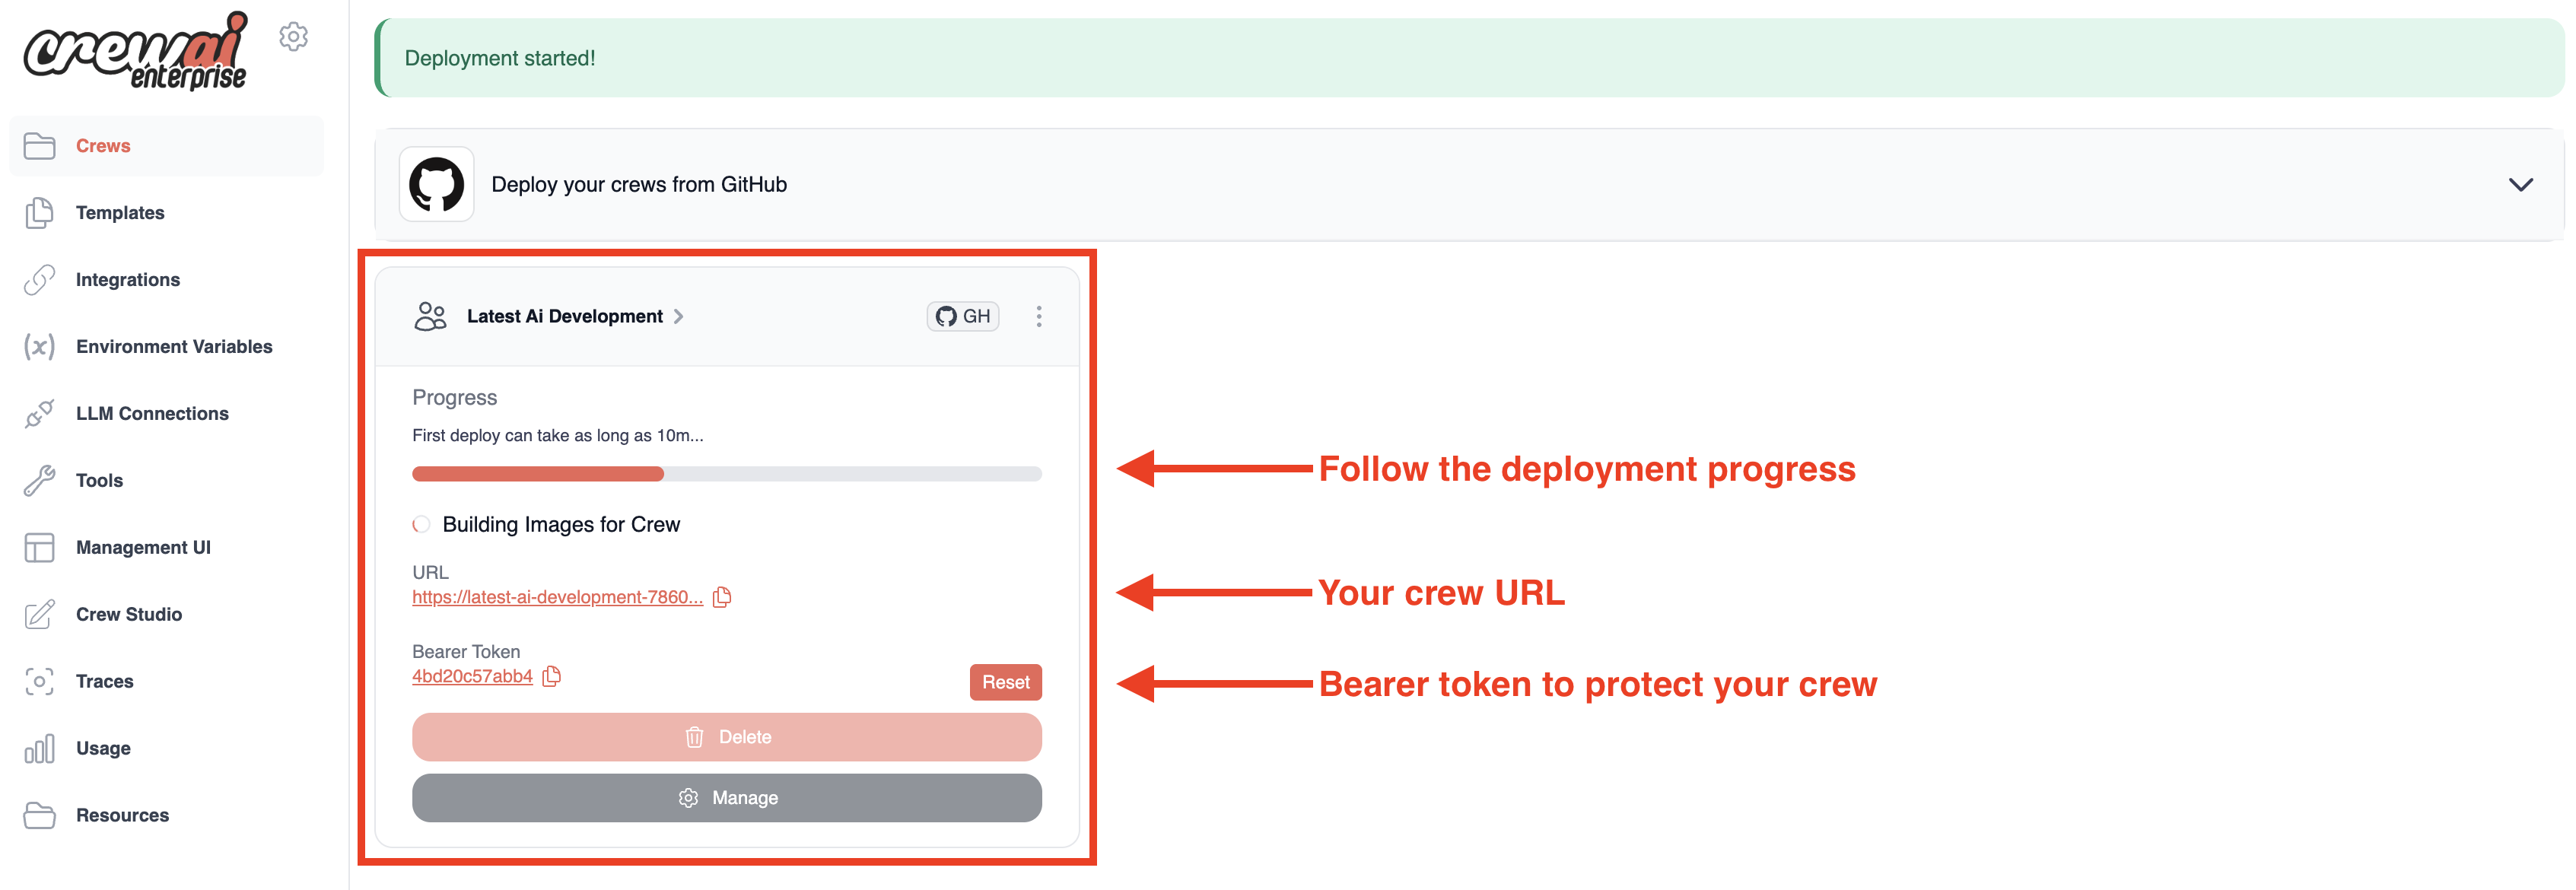 Once deployment is complete, you'll see:
* Your crew's unique URL
* A Bearer token to protect your crew API
* A "Delete" button if you need to remove the deployment
Once deployment is complete, you'll see:
* Your crew's unique URL
* A Bearer token to protect your crew API
* A "Delete" button if you need to remove the deployment
With Crew Studio, you can:
* Chat with the Crew Assistant to describe your problem
* Automatically generate agents and tasks
* Select appropriate tools
* Configure necessary inputs
* Generate downloadable code for customization
* Deploy directly to the CrewAI AMP platform
## Configuration Steps
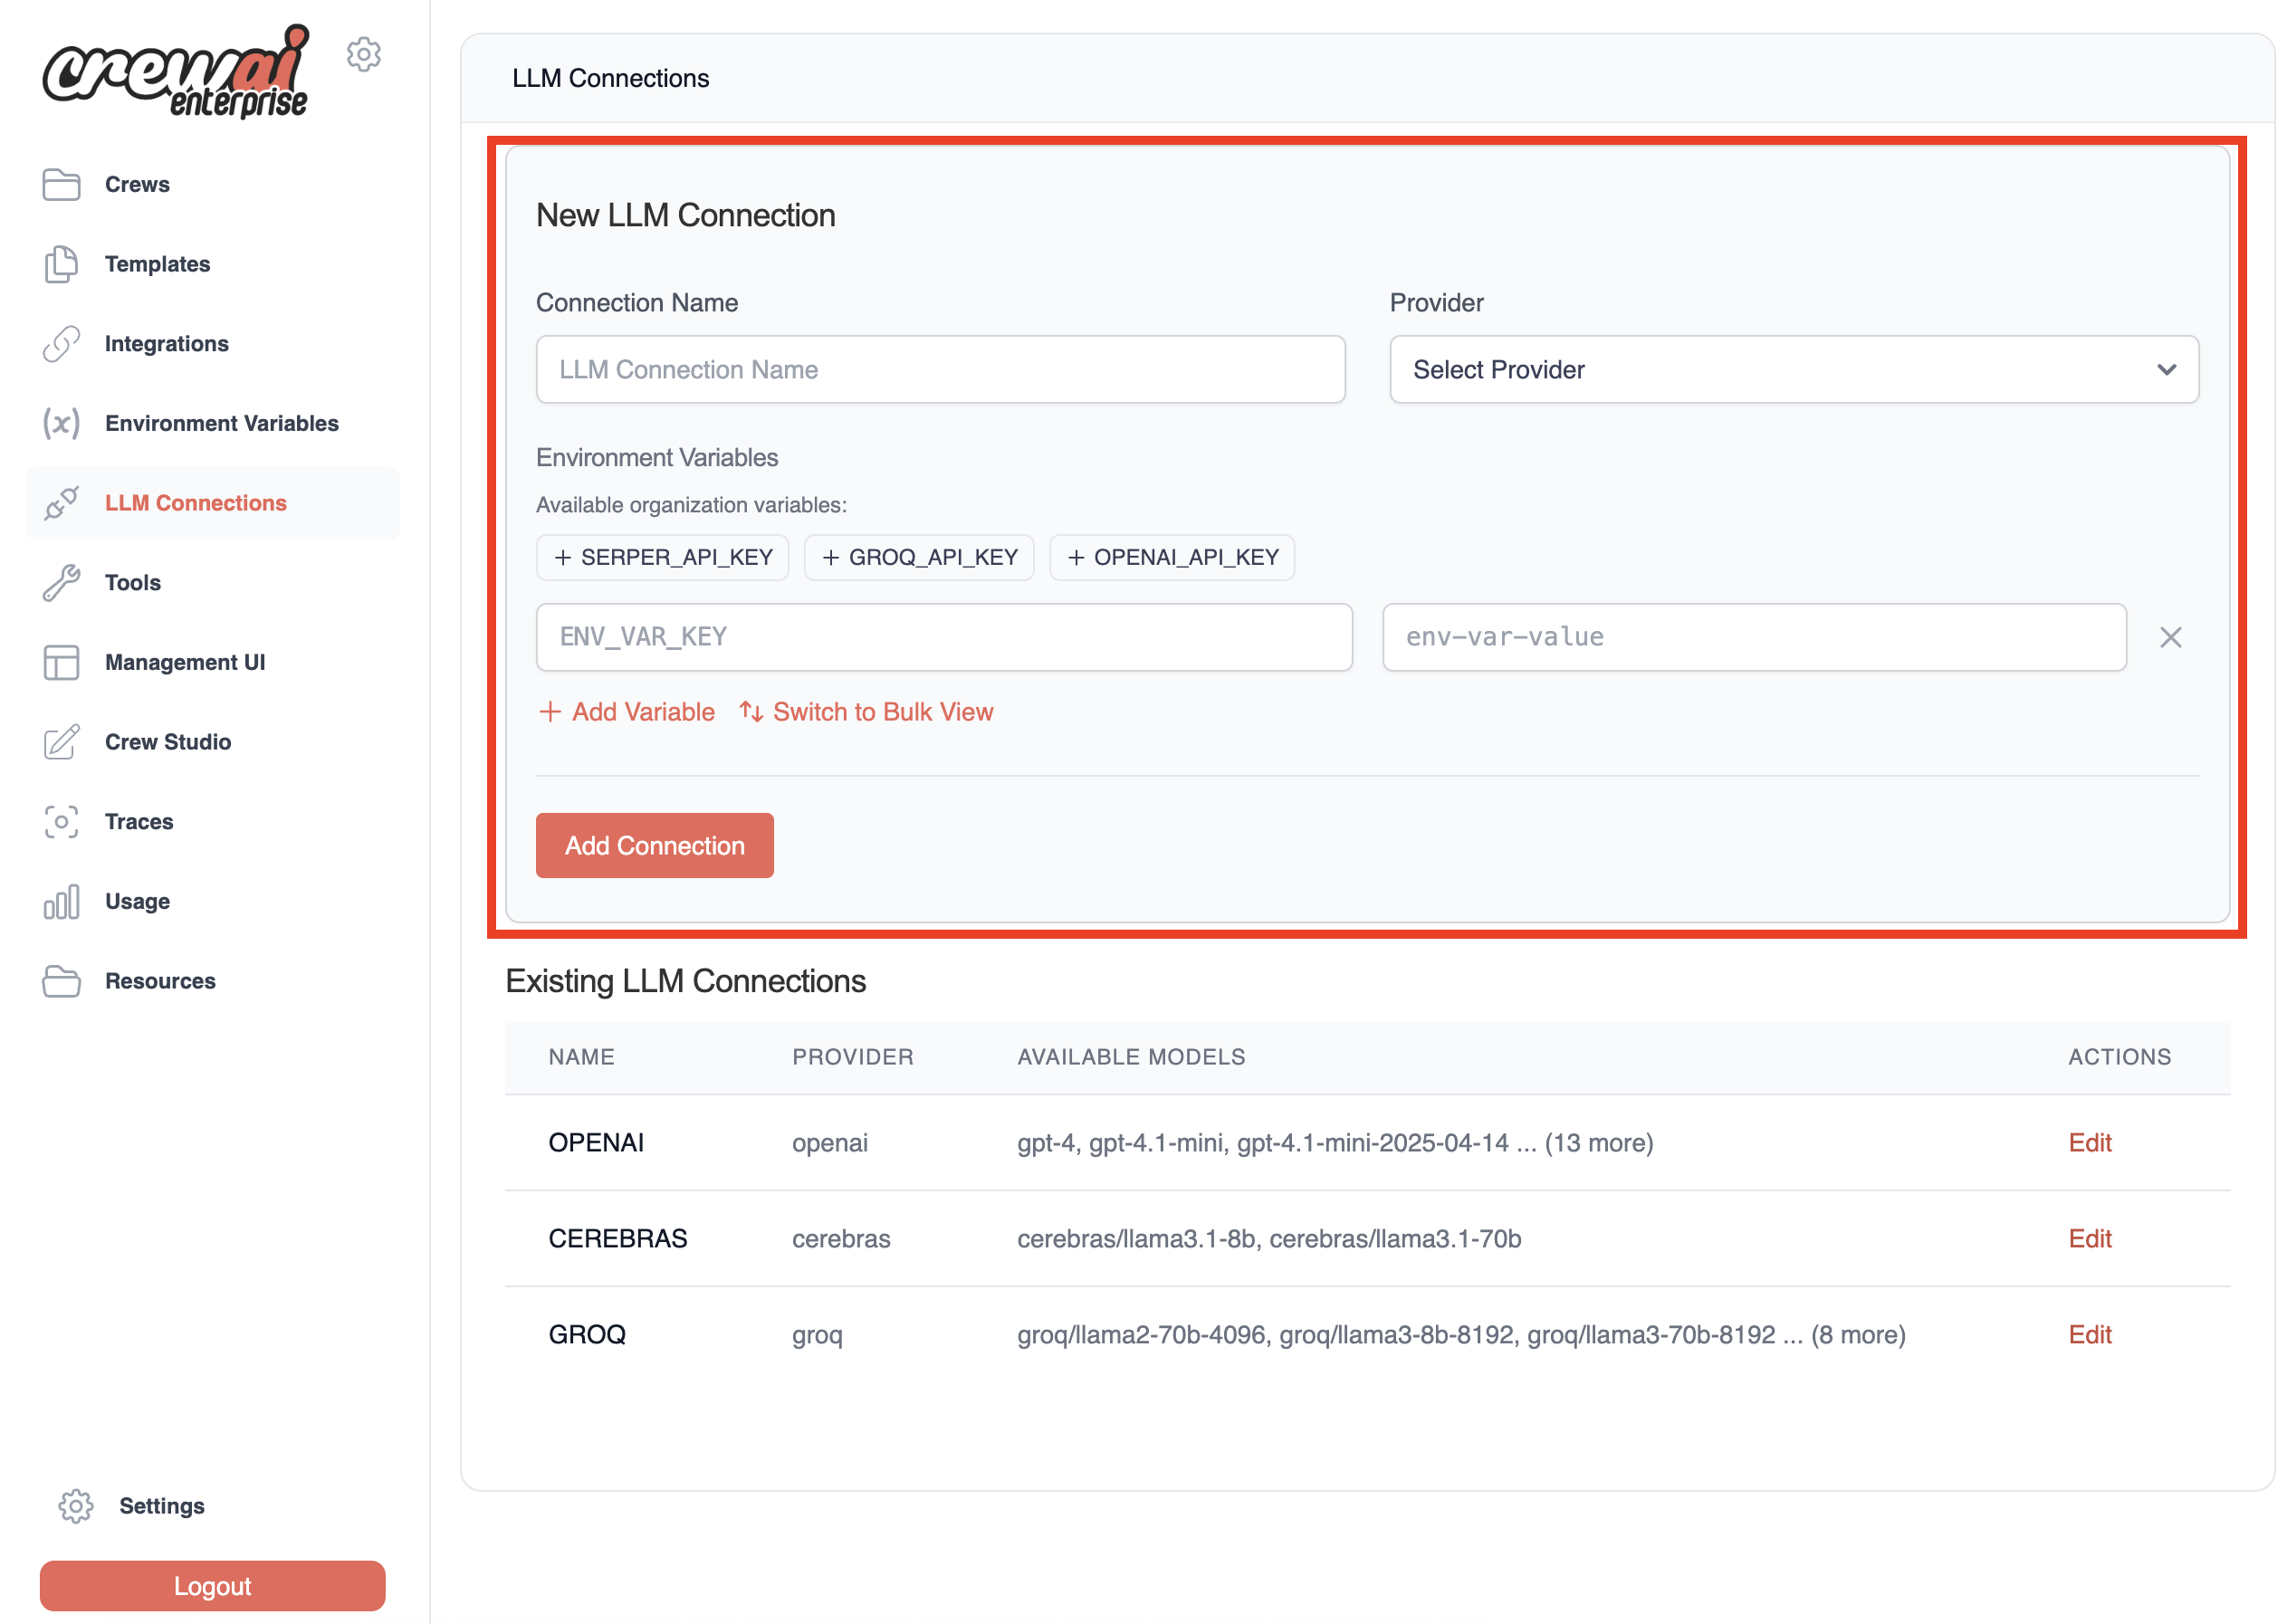
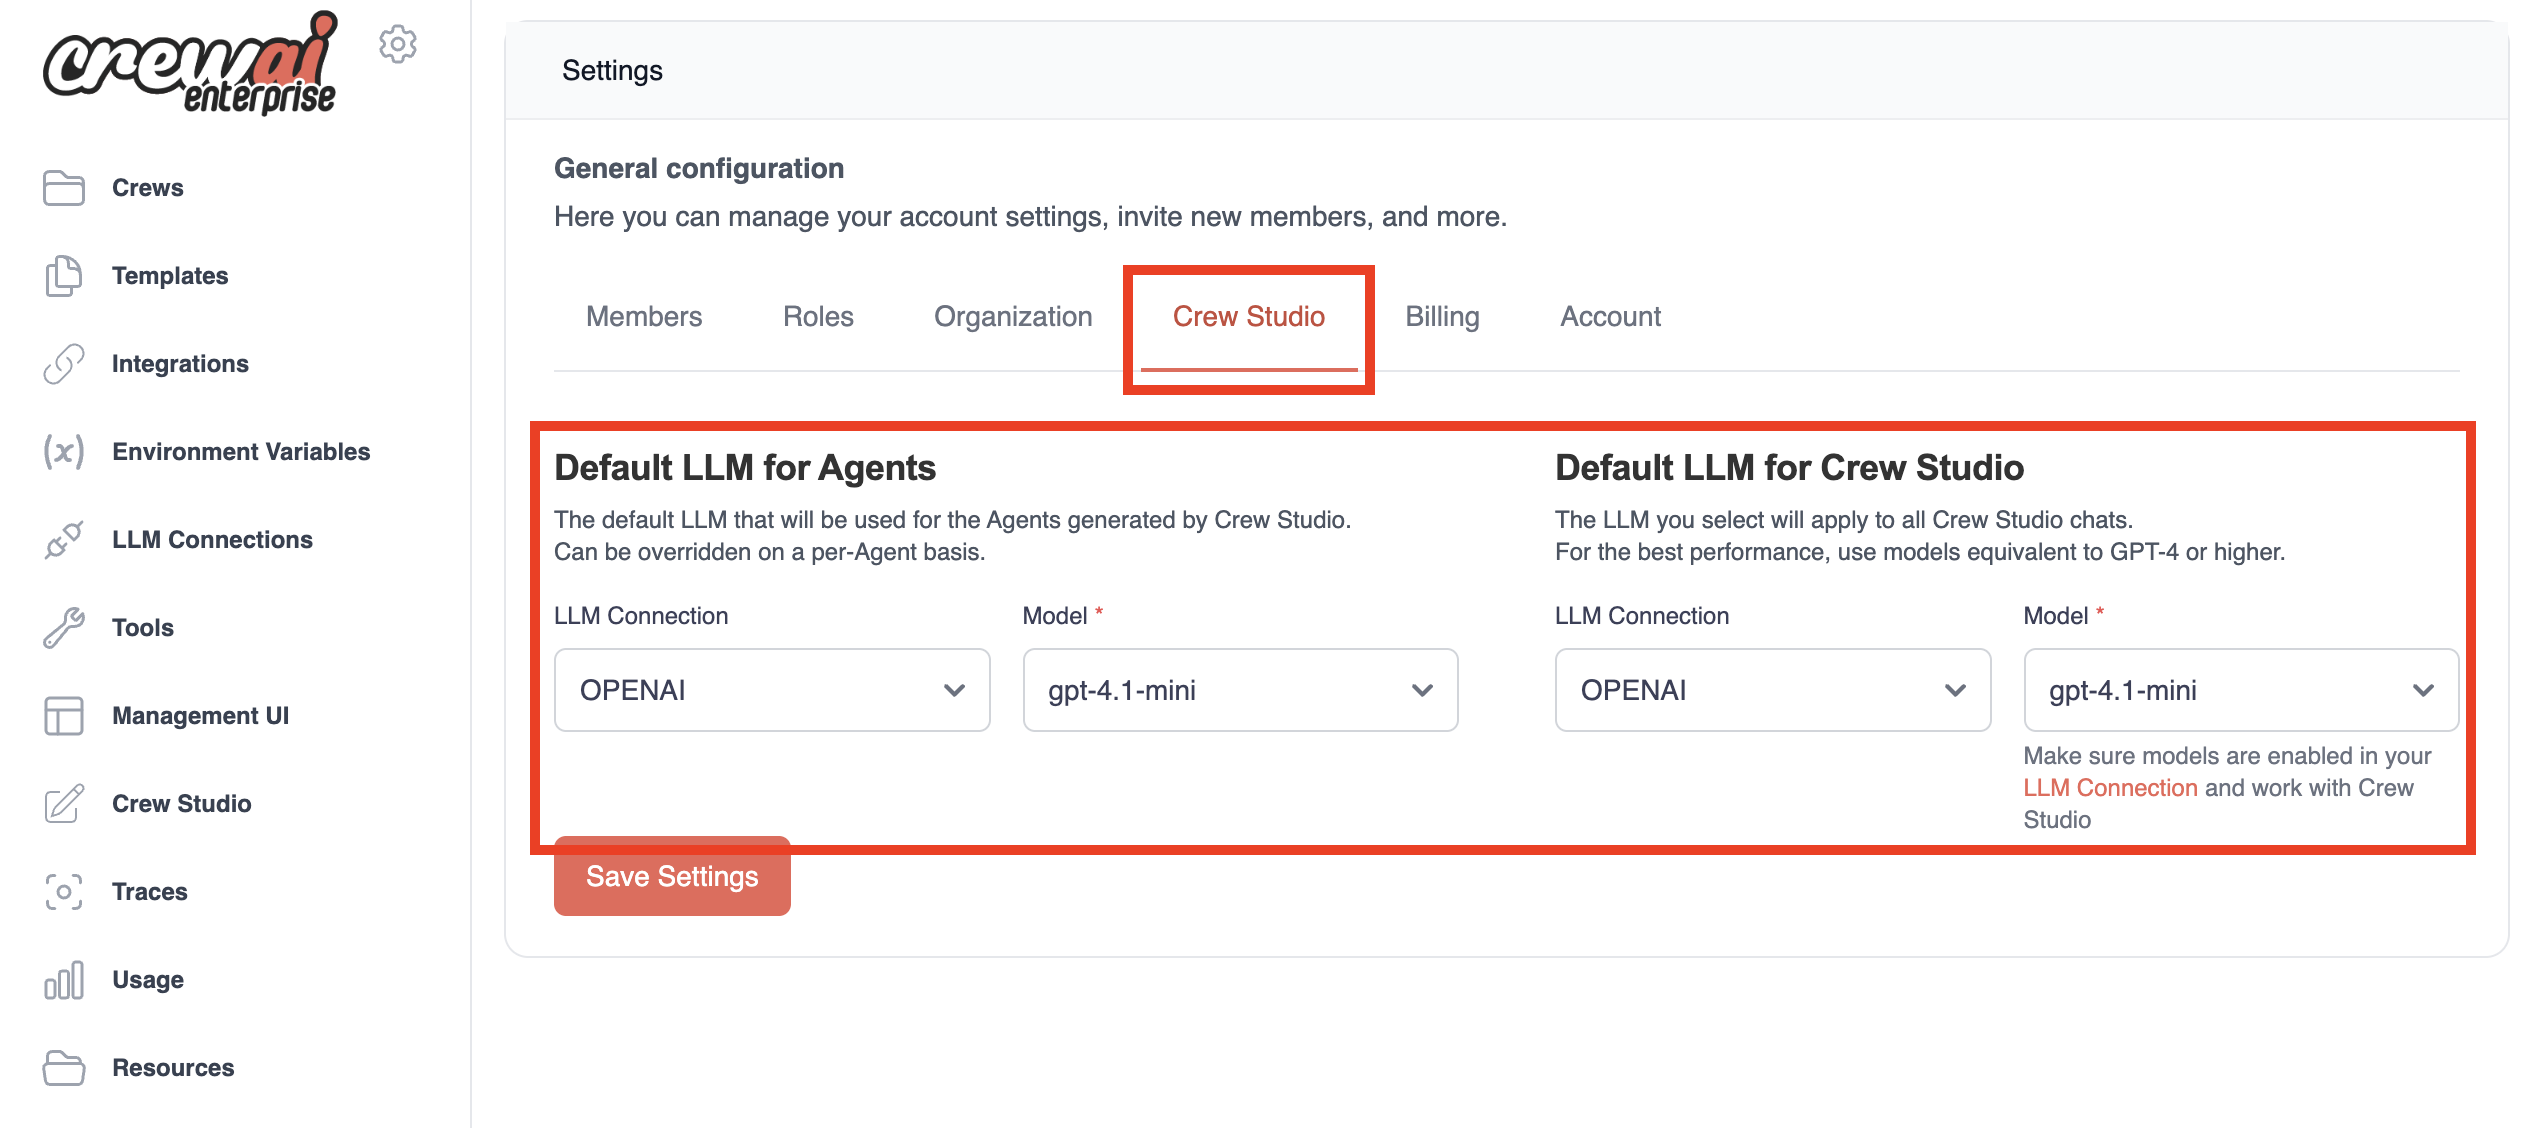
Before you can start using Crew Studio, you need to configure your LLM connections:
Once deployment is complete, you'll see:
* Your crew's unique URL
* A Bearer token to protect your crew API
* A "Delete" button if you need to remove the deployment
Once deployment is complete, you'll see:
* Your crew's unique URL
* A Bearer token to protect your crew API
* A "Delete" button if you need to remove the deployment
With Crew Studio, you can:
* Chat with the Crew Assistant to describe your problem
* Automatically generate agents and tasks
* Select appropriate tools
* Configure necessary inputs
* Generate downloadable code for customization
* Deploy directly to the CrewAI AMP platform
## Configuration Steps
Before you can start using Crew Studio, you need to configure your LLM connections:
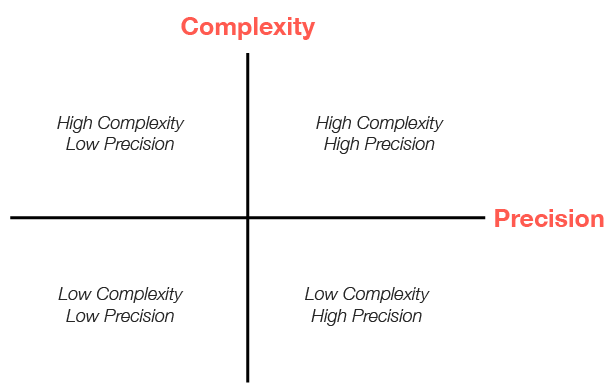 This matrix helps visualize how different approaches align with varying requirements for complexity and precision. Let's explore what each quadrant means and how it guides your architectural choices.
## The Complexity-Precision Matrix Explained
### What is Complexity?
In the context of CrewAI applications, **complexity** refers to:
* The number of distinct steps or operations required
* The diversity of tasks that need to be performed
* The interdependencies between different components
* The need for conditional logic and branching
* The sophistication of the overall workflow
### What is Precision?
**Precision** in this context refers to:
* The accuracy required in the final output
* The need for structured, predictable results
* The importance of reproducibility
* The level of control needed over each step
* The tolerance for variation in outputs
### The Four Quadrants
#### 1. Low Complexity, Low Precision
**Characteristics:**
* Simple, straightforward tasks
* Tolerance for some variation in outputs
* Limited number of steps
* Creative or exploratory applications
**Recommended Approach:** Simple Crews with minimal agents
**Example Use Cases:**
* Basic content generation
* Idea brainstorming
* Simple summarization tasks
* Creative writing assistance
#### 2. Low Complexity, High Precision
**Characteristics:**
* Simple workflows that require exact, structured outputs
* Need for reproducible results
* Limited steps but high accuracy requirements
* Often involves data processing or transformation
**Recommended Approach:** Flows with direct LLM calls or simple Crews with structured outputs
**Example Use Cases:**
* Data extraction and transformation
* Form filling and validation
* Structured content generation (JSON, XML)
* Simple classification tasks
#### 3. High Complexity, Low Precision
**Characteristics:**
* Multi-stage processes with many steps
* Creative or exploratory outputs
* Complex interactions between components
* Tolerance for variation in final results
**Recommended Approach:** Complex Crews with multiple specialized agents
**Example Use Cases:**
* Research and analysis
* Content creation pipelines
* Exploratory data analysis
* Creative problem-solving
#### 4. High Complexity, High Precision
**Characteristics:**
* Complex workflows requiring structured outputs
* Multiple interdependent steps with strict accuracy requirements
* Need for both sophisticated processing and precise results
* Often mission-critical applications
**Recommended Approach:** Flows orchestrating multiple Crews with validation steps
**Example Use Cases:**
* Enterprise decision support systems
* Complex data processing pipelines
* Multi-stage document processing
* Regulated industry applications
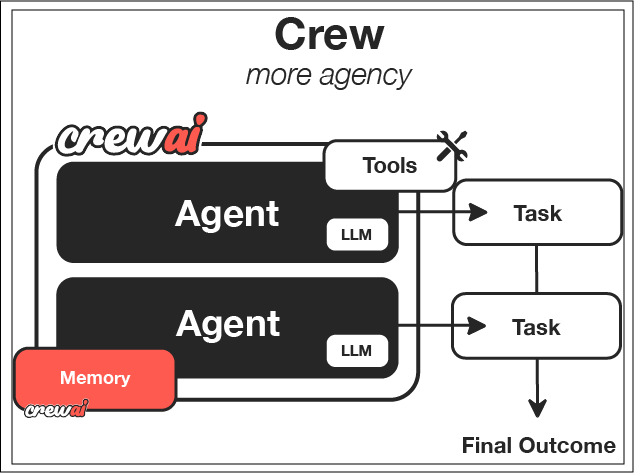
## Choosing Between Crews and Flows
### When to Choose Crews
Crews are ideal when:
1. **You need collaborative intelligence** - Multiple agents with different specializations need to work together
2. **The problem requires emergent thinking** - The solution benefits from different perspectives and approaches
3. **The task is primarily creative or analytical** - The work involves research, content creation, or analysis
4. **You value adaptability over strict structure** - The workflow can benefit from agent autonomy
5. **The output format can be somewhat flexible** - Some variation in output structure is acceptable
```python theme={null}
# Example: Research Crew for market analysis
from crewai import Agent, Crew, Process, Task
# Create specialized agents
researcher = Agent(
role="Market Research Specialist",
goal="Find comprehensive market data on emerging technologies",
backstory="You are an expert at discovering market trends and gathering data."
)
analyst = Agent(
role="Market Analyst",
goal="Analyze market data and identify key opportunities",
backstory="You excel at interpreting market data and spotting valuable insights."
)
# Define their tasks
research_task = Task(
description="Research the current market landscape for AI-powered healthcare solutions",
expected_output="Comprehensive market data including key players, market size, and growth trends",
agent=researcher
)
analysis_task = Task(
description="Analyze the market data and identify the top 3 investment opportunities",
expected_output="Analysis report with 3 recommended investment opportunities and rationale",
agent=analyst,
context=[research_task]
)
# Create the crew
market_analysis_crew = Crew(
agents=[researcher, analyst],
tasks=[research_task, analysis_task],
process=Process.sequential,
verbose=True
)
# Run the crew
result = market_analysis_crew.kickoff()
```
### When to Choose Flows
Flows are ideal when:
1. **You need precise control over execution** - The workflow requires exact sequencing and state management
2. **The application has complex state requirements** - You need to maintain and transform state across multiple steps
3. **You need structured, predictable outputs** - The application requires consistent, formatted results
4. **The workflow involves conditional logic** - Different paths need to be taken based on intermediate results
5. **You need to combine AI with procedural code** - The solution requires both AI capabilities and traditional programming
```python theme={null}
# Example: Customer Support Flow with structured processing
from crewai.flow.flow import Flow, listen, router, start
from pydantic import BaseModel
from typing import List, Dict
# Define structured state
class SupportTicketState(BaseModel):
ticket_id: str = ""
customer_name: str = ""
issue_description: str = ""
category: str = ""
priority: str = "medium"
resolution: str = ""
satisfaction_score: int = 0
class CustomerSupportFlow(Flow[SupportTicketState]):
@start()
def receive_ticket(self):
# In a real app, this might come from an API
self.state.ticket_id = "TKT-12345"
self.state.customer_name = "Alex Johnson"
self.state.issue_description = "Unable to access premium features after payment"
return "Ticket received"
@listen(receive_ticket)
def categorize_ticket(self, _):
# Use a direct LLM call for categorization
from crewai import LLM
llm = LLM(model="openai/gpt-4o-mini")
prompt = f"""
Categorize the following customer support issue into one of these categories:
- Billing
- Account Access
- Technical Issue
- Feature Request
- Other
Issue: {self.state.issue_description}
Return only the category name.
"""
self.state.category = llm.call(prompt).strip()
return self.state.category
@router(categorize_ticket)
def route_by_category(self, category):
# Route to different handlers based on category
return category.lower().replace(" ", "_")
@listen("billing")
def handle_billing_issue(self):
# Handle billing-specific logic
self.state.priority = "high"
# More billing-specific processing...
return "Billing issue handled"
@listen("account_access")
def handle_access_issue(self):
# Handle access-specific logic
self.state.priority = "high"
# More access-specific processing...
return "Access issue handled"
# Additional category handlers...
@listen("billing", "account_access", "technical_issue", "feature_request", "other")
def resolve_ticket(self, resolution_info):
# Final resolution step
self.state.resolution = f"Issue resolved: {resolution_info}"
return self.state.resolution
# Run the flow
support_flow = CustomerSupportFlow()
result = support_flow.kickoff()
```
### When to Combine Crews and Flows
The most sophisticated applications often benefit from combining Crews and Flows:
1. **Complex multi-stage processes** - Use Flows to orchestrate the overall process and Crews for complex subtasks
2. **Applications requiring both creativity and structure** - Use Crews for creative tasks and Flows for structured processing
3. **Enterprise-grade AI applications** - Use Flows to manage state and process flow while leveraging Crews for specialized work
```python theme={null}
# Example: Content Production Pipeline combining Crews and Flows
from crewai.flow.flow import Flow, listen, start
from crewai import Agent, Crew, Process, Task
from pydantic import BaseModel
from typing import List, Dict
class ContentState(BaseModel):
topic: str = ""
target_audience: str = ""
content_type: str = ""
outline: Dict = {}
draft_content: str = ""
final_content: str = ""
seo_score: int = 0
class ContentProductionFlow(Flow[ContentState]):
@start()
def initialize_project(self):
# Set initial parameters
self.state.topic = "Sustainable Investing"
self.state.target_audience = "Millennial Investors"
self.state.content_type = "Blog Post"
return "Project initialized"
@listen(initialize_project)
def create_outline(self, _):
# Use a research crew to create an outline
researcher = Agent(
role="Content Researcher",
goal=f"Research {self.state.topic} for {self.state.target_audience}",
backstory="You are an expert researcher with deep knowledge of content creation."
)
outliner = Agent(
role="Content Strategist",
goal=f"Create an engaging outline for a {self.state.content_type}",
backstory="You excel at structuring content for maximum engagement."
)
research_task = Task(
description=f"Research {self.state.topic} focusing on what would interest {self.state.target_audience}",
expected_output="Comprehensive research notes with key points and statistics",
agent=researcher
)
outline_task = Task(
description=f"Create an outline for a {self.state.content_type} about {self.state.topic}",
expected_output="Detailed content outline with sections and key points",
agent=outliner,
context=[research_task]
)
outline_crew = Crew(
agents=[researcher, outliner],
tasks=[research_task, outline_task],
process=Process.sequential,
verbose=True
)
# Run the crew and store the result
result = outline_crew.kickoff()
# Parse the outline (in a real app, you might use a more robust parsing approach)
import json
try:
self.state.outline = json.loads(result.raw)
except:
# Fallback if not valid JSON
self.state.outline = {"sections": result.raw}
return "Outline created"
@listen(create_outline)
def write_content(self, _):
# Use a writing crew to create the content
writer = Agent(
role="Content Writer",
goal=f"Write engaging content for {self.state.target_audience}",
backstory="You are a skilled writer who creates compelling content."
)
editor = Agent(
role="Content Editor",
goal="Ensure content is polished, accurate, and engaging",
backstory="You have a keen eye for detail and a talent for improving content."
)
writing_task = Task(
description=f"Write a {self.state.content_type} about {self.state.topic} following this outline: {self.state.outline}",
expected_output="Complete draft content in markdown format",
agent=writer
)
editing_task = Task(
description="Edit and improve the draft content for clarity, engagement, and accuracy",
expected_output="Polished final content in markdown format",
agent=editor,
context=[writing_task]
)
writing_crew = Crew(
agents=[writer, editor],
tasks=[writing_task, editing_task],
process=Process.sequential,
verbose=True
)
# Run the crew and store the result
result = writing_crew.kickoff()
self.state.final_content = result.raw
return "Content created"
@listen(write_content)
def optimize_for_seo(self, _):
# Use a direct LLM call for SEO optimization
from crewai import LLM
llm = LLM(model="openai/gpt-4o-mini")
prompt = f"""
Analyze this content for SEO effectiveness for the keyword "{self.state.topic}".
Rate it on a scale of 1-100 and provide 3 specific recommendations for improvement.
Content: {self.state.final_content[:1000]}... (truncated for brevity)
Format your response as JSON with the following structure:
{{
"score": 85,
"recommendations": [
"Recommendation 1",
"Recommendation 2",
"Recommendation 3"
]
}}
"""
seo_analysis = llm.call(prompt)
# Parse the SEO analysis
import json
try:
analysis = json.loads(seo_analysis)
self.state.seo_score = analysis.get("score", 0)
return analysis
except:
self.state.seo_score = 50
return {"score": 50, "recommendations": ["Unable to parse SEO analysis"]}
# Run the flow
content_flow = ContentProductionFlow()
result = content_flow.kickoff()
```
## Practical Evaluation Framework
To determine the right approach for your specific use case, follow this step-by-step evaluation framework:
### Step 1: Assess Complexity
Rate your application's complexity on a scale of 1-10 by considering:
1. **Number of steps**: How many distinct operations are required?
* 1-3 steps: Low complexity (1-3)
* 4-7 steps: Medium complexity (4-7)
* 8+ steps: High complexity (8-10)
2. **Interdependencies**: How interconnected are the different parts?
* Few dependencies: Low complexity (1-3)
* Some dependencies: Medium complexity (4-7)
* Many complex dependencies: High complexity (8-10)
3. **Conditional logic**: How much branching and decision-making is needed?
* Linear process: Low complexity (1-3)
* Some branching: Medium complexity (4-7)
* Complex decision trees: High complexity (8-10)
4. **Domain knowledge**: How specialized is the knowledge required?
* General knowledge: Low complexity (1-3)
* Some specialized knowledge: Medium complexity (4-7)
* Deep expertise in multiple domains: High complexity (8-10)
Calculate your average score to determine overall complexity.
### Step 2: Assess Precision Requirements
Rate your precision requirements on a scale of 1-10 by considering:
1. **Output structure**: How structured must the output be?
* Free-form text: Low precision (1-3)
* Semi-structured: Medium precision (4-7)
* Strictly formatted (JSON, XML): High precision (8-10)
2. **Accuracy needs**: How important is factual accuracy?
* Creative content: Low precision (1-3)
* Informational content: Medium precision (4-7)
* Critical information: High precision (8-10)
3. **Reproducibility**: How consistent must results be across runs?
* Variation acceptable: Low precision (1-3)
* Some consistency needed: Medium precision (4-7)
* Exact reproducibility required: High precision (8-10)
4. **Error tolerance**: What is the impact of errors?
* Low impact: Low precision (1-3)
* Moderate impact: Medium precision (4-7)
* High impact: High precision (8-10)
Calculate your average score to determine overall precision requirements.
### Step 3: Map to the Matrix
Plot your complexity and precision scores on the matrix:
* **Low Complexity (1-4), Low Precision (1-4)**: Simple Crews
* **Low Complexity (1-4), High Precision (5-10)**: Flows with direct LLM calls
* **High Complexity (5-10), Low Precision (1-4)**: Complex Crews
* **High Complexity (5-10), High Precision (5-10)**: Flows orchestrating Crews
### Step 4: Consider Additional Factors
Beyond complexity and precision, consider:
1. **Development time**: Crews are often faster to prototype
2. **Maintenance needs**: Flows provide better long-term maintainability
3. **Team expertise**: Consider your team's familiarity with different approaches
4. **Scalability requirements**: Flows typically scale better for complex applications
5. **Integration needs**: Consider how the solution will integrate with existing systems
## Conclusion
Choosing between Crews and Flows—or combining them—is a critical architectural decision that impacts the effectiveness, maintainability, and scalability of your CrewAI application. By evaluating your use case along the dimensions of complexity and precision, you can make informed decisions that align with your specific requirements.
Remember that the best approach often evolves as your application matures. Start with the simplest solution that meets your needs, and be prepared to refine your architecture as you gain experience and your requirements become clearer.
This matrix helps visualize how different approaches align with varying requirements for complexity and precision. Let's explore what each quadrant means and how it guides your architectural choices.
## The Complexity-Precision Matrix Explained
### What is Complexity?
In the context of CrewAI applications, **complexity** refers to:
* The number of distinct steps or operations required
* The diversity of tasks that need to be performed
* The interdependencies between different components
* The need for conditional logic and branching
* The sophistication of the overall workflow
### What is Precision?
**Precision** in this context refers to:
* The accuracy required in the final output
* The need for structured, predictable results
* The importance of reproducibility
* The level of control needed over each step
* The tolerance for variation in outputs
### The Four Quadrants
#### 1. Low Complexity, Low Precision
**Characteristics:**
* Simple, straightforward tasks
* Tolerance for some variation in outputs
* Limited number of steps
* Creative or exploratory applications
**Recommended Approach:** Simple Crews with minimal agents
**Example Use Cases:**
* Basic content generation
* Idea brainstorming
* Simple summarization tasks
* Creative writing assistance
#### 2. Low Complexity, High Precision
**Characteristics:**
* Simple workflows that require exact, structured outputs
* Need for reproducible results
* Limited steps but high accuracy requirements
* Often involves data processing or transformation
**Recommended Approach:** Flows with direct LLM calls or simple Crews with structured outputs
**Example Use Cases:**
* Data extraction and transformation
* Form filling and validation
* Structured content generation (JSON, XML)
* Simple classification tasks
#### 3. High Complexity, Low Precision
**Characteristics:**
* Multi-stage processes with many steps
* Creative or exploratory outputs
* Complex interactions between components
* Tolerance for variation in final results
**Recommended Approach:** Complex Crews with multiple specialized agents
**Example Use Cases:**
* Research and analysis
* Content creation pipelines
* Exploratory data analysis
* Creative problem-solving
#### 4. High Complexity, High Precision
**Characteristics:**
* Complex workflows requiring structured outputs
* Multiple interdependent steps with strict accuracy requirements
* Need for both sophisticated processing and precise results
* Often mission-critical applications
**Recommended Approach:** Flows orchestrating multiple Crews with validation steps
**Example Use Cases:**
* Enterprise decision support systems
* Complex data processing pipelines
* Multi-stage document processing
* Regulated industry applications
## Choosing Between Crews and Flows
### When to Choose Crews
Crews are ideal when:
1. **You need collaborative intelligence** - Multiple agents with different specializations need to work together
2. **The problem requires emergent thinking** - The solution benefits from different perspectives and approaches
3. **The task is primarily creative or analytical** - The work involves research, content creation, or analysis
4. **You value adaptability over strict structure** - The workflow can benefit from agent autonomy
5. **The output format can be somewhat flexible** - Some variation in output structure is acceptable
```python theme={null}
# Example: Research Crew for market analysis
from crewai import Agent, Crew, Process, Task
# Create specialized agents
researcher = Agent(
role="Market Research Specialist",
goal="Find comprehensive market data on emerging technologies",
backstory="You are an expert at discovering market trends and gathering data."
)
analyst = Agent(
role="Market Analyst",
goal="Analyze market data and identify key opportunities",
backstory="You excel at interpreting market data and spotting valuable insights."
)
# Define their tasks
research_task = Task(
description="Research the current market landscape for AI-powered healthcare solutions",
expected_output="Comprehensive market data including key players, market size, and growth trends",
agent=researcher
)
analysis_task = Task(
description="Analyze the market data and identify the top 3 investment opportunities",
expected_output="Analysis report with 3 recommended investment opportunities and rationale",
agent=analyst,
context=[research_task]
)
# Create the crew
market_analysis_crew = Crew(
agents=[researcher, analyst],
tasks=[research_task, analysis_task],
process=Process.sequential,
verbose=True
)
# Run the crew
result = market_analysis_crew.kickoff()
```
### When to Choose Flows
Flows are ideal when:
1. **You need precise control over execution** - The workflow requires exact sequencing and state management
2. **The application has complex state requirements** - You need to maintain and transform state across multiple steps
3. **You need structured, predictable outputs** - The application requires consistent, formatted results
4. **The workflow involves conditional logic** - Different paths need to be taken based on intermediate results
5. **You need to combine AI with procedural code** - The solution requires both AI capabilities and traditional programming
```python theme={null}
# Example: Customer Support Flow with structured processing
from crewai.flow.flow import Flow, listen, router, start
from pydantic import BaseModel
from typing import List, Dict
# Define structured state
class SupportTicketState(BaseModel):
ticket_id: str = ""
customer_name: str = ""
issue_description: str = ""
category: str = ""
priority: str = "medium"
resolution: str = ""
satisfaction_score: int = 0
class CustomerSupportFlow(Flow[SupportTicketState]):
@start()
def receive_ticket(self):
# In a real app, this might come from an API
self.state.ticket_id = "TKT-12345"
self.state.customer_name = "Alex Johnson"
self.state.issue_description = "Unable to access premium features after payment"
return "Ticket received"
@listen(receive_ticket)
def categorize_ticket(self, _):
# Use a direct LLM call for categorization
from crewai import LLM
llm = LLM(model="openai/gpt-4o-mini")
prompt = f"""
Categorize the following customer support issue into one of these categories:
- Billing
- Account Access
- Technical Issue
- Feature Request
- Other
Issue: {self.state.issue_description}
Return only the category name.
"""
self.state.category = llm.call(prompt).strip()
return self.state.category
@router(categorize_ticket)
def route_by_category(self, category):
# Route to different handlers based on category
return category.lower().replace(" ", "_")
@listen("billing")
def handle_billing_issue(self):
# Handle billing-specific logic
self.state.priority = "high"
# More billing-specific processing...
return "Billing issue handled"
@listen("account_access")
def handle_access_issue(self):
# Handle access-specific logic
self.state.priority = "high"
# More access-specific processing...
return "Access issue handled"
# Additional category handlers...
@listen("billing", "account_access", "technical_issue", "feature_request", "other")
def resolve_ticket(self, resolution_info):
# Final resolution step
self.state.resolution = f"Issue resolved: {resolution_info}"
return self.state.resolution
# Run the flow
support_flow = CustomerSupportFlow()
result = support_flow.kickoff()
```
### When to Combine Crews and Flows
The most sophisticated applications often benefit from combining Crews and Flows:
1. **Complex multi-stage processes** - Use Flows to orchestrate the overall process and Crews for complex subtasks
2. **Applications requiring both creativity and structure** - Use Crews for creative tasks and Flows for structured processing
3. **Enterprise-grade AI applications** - Use Flows to manage state and process flow while leveraging Crews for specialized work
```python theme={null}
# Example: Content Production Pipeline combining Crews and Flows
from crewai.flow.flow import Flow, listen, start
from crewai import Agent, Crew, Process, Task
from pydantic import BaseModel
from typing import List, Dict
class ContentState(BaseModel):
topic: str = ""
target_audience: str = ""
content_type: str = ""
outline: Dict = {}
draft_content: str = ""
final_content: str = ""
seo_score: int = 0
class ContentProductionFlow(Flow[ContentState]):
@start()
def initialize_project(self):
# Set initial parameters
self.state.topic = "Sustainable Investing"
self.state.target_audience = "Millennial Investors"
self.state.content_type = "Blog Post"
return "Project initialized"
@listen(initialize_project)
def create_outline(self, _):
# Use a research crew to create an outline
researcher = Agent(
role="Content Researcher",
goal=f"Research {self.state.topic} for {self.state.target_audience}",
backstory="You are an expert researcher with deep knowledge of content creation."
)
outliner = Agent(
role="Content Strategist",
goal=f"Create an engaging outline for a {self.state.content_type}",
backstory="You excel at structuring content for maximum engagement."
)
research_task = Task(
description=f"Research {self.state.topic} focusing on what would interest {self.state.target_audience}",
expected_output="Comprehensive research notes with key points and statistics",
agent=researcher
)
outline_task = Task(
description=f"Create an outline for a {self.state.content_type} about {self.state.topic}",
expected_output="Detailed content outline with sections and key points",
agent=outliner,
context=[research_task]
)
outline_crew = Crew(
agents=[researcher, outliner],
tasks=[research_task, outline_task],
process=Process.sequential,
verbose=True
)
# Run the crew and store the result
result = outline_crew.kickoff()
# Parse the outline (in a real app, you might use a more robust parsing approach)
import json
try:
self.state.outline = json.loads(result.raw)
except:
# Fallback if not valid JSON
self.state.outline = {"sections": result.raw}
return "Outline created"
@listen(create_outline)
def write_content(self, _):
# Use a writing crew to create the content
writer = Agent(
role="Content Writer",
goal=f"Write engaging content for {self.state.target_audience}",
backstory="You are a skilled writer who creates compelling content."
)
editor = Agent(
role="Content Editor",
goal="Ensure content is polished, accurate, and engaging",
backstory="You have a keen eye for detail and a talent for improving content."
)
writing_task = Task(
description=f"Write a {self.state.content_type} about {self.state.topic} following this outline: {self.state.outline}",
expected_output="Complete draft content in markdown format",
agent=writer
)
editing_task = Task(
description="Edit and improve the draft content for clarity, engagement, and accuracy",
expected_output="Polished final content in markdown format",
agent=editor,
context=[writing_task]
)
writing_crew = Crew(
agents=[writer, editor],
tasks=[writing_task, editing_task],
process=Process.sequential,
verbose=True
)
# Run the crew and store the result
result = writing_crew.kickoff()
self.state.final_content = result.raw
return "Content created"
@listen(write_content)
def optimize_for_seo(self, _):
# Use a direct LLM call for SEO optimization
from crewai import LLM
llm = LLM(model="openai/gpt-4o-mini")
prompt = f"""
Analyze this content for SEO effectiveness for the keyword "{self.state.topic}".
Rate it on a scale of 1-100 and provide 3 specific recommendations for improvement.
Content: {self.state.final_content[:1000]}... (truncated for brevity)
Format your response as JSON with the following structure:
{{
"score": 85,
"recommendations": [
"Recommendation 1",
"Recommendation 2",
"Recommendation 3"
]
}}
"""
seo_analysis = llm.call(prompt)
# Parse the SEO analysis
import json
try:
analysis = json.loads(seo_analysis)
self.state.seo_score = analysis.get("score", 0)
return analysis
except:
self.state.seo_score = 50
return {"score": 50, "recommendations": ["Unable to parse SEO analysis"]}
# Run the flow
content_flow = ContentProductionFlow()
result = content_flow.kickoff()
```
## Practical Evaluation Framework
To determine the right approach for your specific use case, follow this step-by-step evaluation framework:
### Step 1: Assess Complexity
Rate your application's complexity on a scale of 1-10 by considering:
1. **Number of steps**: How many distinct operations are required?
* 1-3 steps: Low complexity (1-3)
* 4-7 steps: Medium complexity (4-7)
* 8+ steps: High complexity (8-10)
2. **Interdependencies**: How interconnected are the different parts?
* Few dependencies: Low complexity (1-3)
* Some dependencies: Medium complexity (4-7)
* Many complex dependencies: High complexity (8-10)
3. **Conditional logic**: How much branching and decision-making is needed?
* Linear process: Low complexity (1-3)
* Some branching: Medium complexity (4-7)
* Complex decision trees: High complexity (8-10)
4. **Domain knowledge**: How specialized is the knowledge required?
* General knowledge: Low complexity (1-3)
* Some specialized knowledge: Medium complexity (4-7)
* Deep expertise in multiple domains: High complexity (8-10)
Calculate your average score to determine overall complexity.
### Step 2: Assess Precision Requirements
Rate your precision requirements on a scale of 1-10 by considering:
1. **Output structure**: How structured must the output be?
* Free-form text: Low precision (1-3)
* Semi-structured: Medium precision (4-7)
* Strictly formatted (JSON, XML): High precision (8-10)
2. **Accuracy needs**: How important is factual accuracy?
* Creative content: Low precision (1-3)
* Informational content: Medium precision (4-7)
* Critical information: High precision (8-10)
3. **Reproducibility**: How consistent must results be across runs?
* Variation acceptable: Low precision (1-3)
* Some consistency needed: Medium precision (4-7)
* Exact reproducibility required: High precision (8-10)
4. **Error tolerance**: What is the impact of errors?
* Low impact: Low precision (1-3)
* Moderate impact: Medium precision (4-7)
* High impact: High precision (8-10)
Calculate your average score to determine overall precision requirements.
### Step 3: Map to the Matrix
Plot your complexity and precision scores on the matrix:
* **Low Complexity (1-4), Low Precision (1-4)**: Simple Crews
* **Low Complexity (1-4), High Precision (5-10)**: Flows with direct LLM calls
* **High Complexity (5-10), Low Precision (1-4)**: Complex Crews
* **High Complexity (5-10), High Precision (5-10)**: Flows orchestrating Crews
### Step 4: Consider Additional Factors
Beyond complexity and precision, consider:
1. **Development time**: Crews are often faster to prototype
2. **Maintenance needs**: Flows provide better long-term maintainability
3. **Team expertise**: Consider your team's familiarity with different approaches
4. **Scalability requirements**: Flows typically scale better for complex applications
5. **Integration needs**: Consider how the solution will integrate with existing systems
## Conclusion
Choosing between Crews and Flows—or combining them—is a critical architectural decision that impacts the effectiveness, maintainability, and scalability of your CrewAI application. By evaluating your use case along the dimensions of complexity and precision, you can make informed decisions that align with your specific requirements.
Remember that the best approach often evolves as your application matures. Start with the simplest solution that meets your needs, and be prepared to refine your architecture as you gain experience and your requirements become clearer.
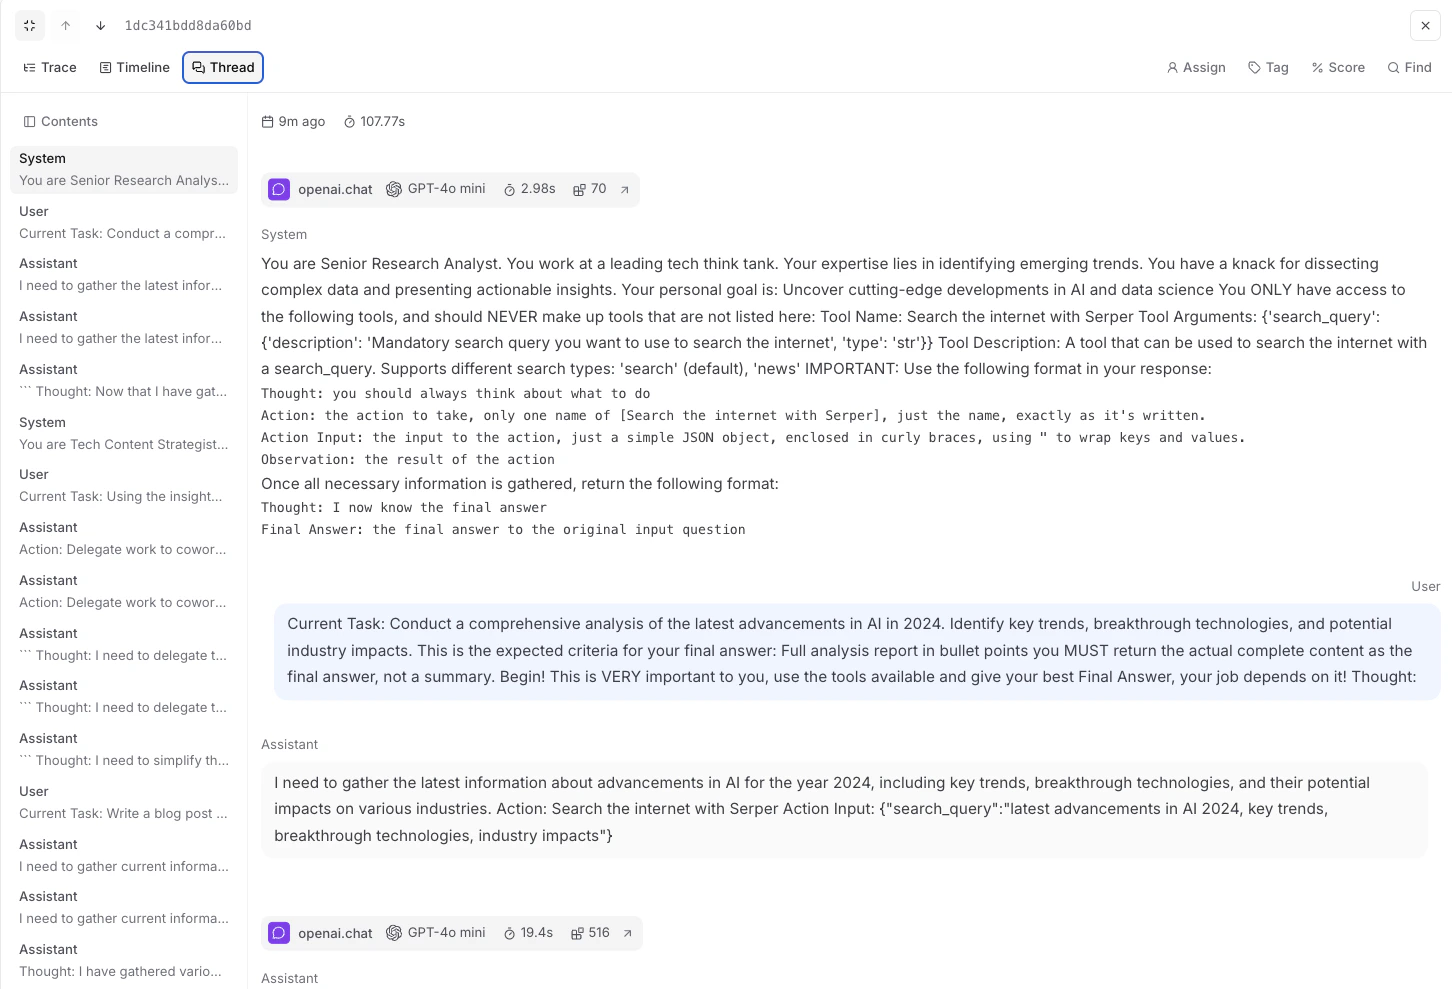
 With Prompt Tracing you can:
* View the complete history of all prompts sent to your LLM
* Track token usage and costs
* Debug agent reasoning failures
* Share prompt sequences with your team
* Compare different prompt strategies
* Export traces for compliance and auditing
With Prompt Tracing you can:
* View the complete history of all prompts sent to your LLM
* Track token usage and costs
* Debug agent reasoning failures
* Share prompt sequences with your team
* Compare different prompt strategies
* Export traces for compliance and auditing
 ## Step 2: Explore the Project Structure
Let's take a moment to understand the project structure created by the CLI. CrewAI follows best practices for Python projects, making it easy to maintain and extend your code as your crews become more complex.
```
research_crew/
├── .gitignore
├── pyproject.toml
├── README.md
├── .env
└── src/
└── research_crew/
├── __init__.py
├── main.py
├── crew.py
├── tools/
│ ├── custom_tool.py
│ └── __init__.py
└── config/
├── agents.yaml
└── tasks.yaml
```
This structure follows best practices for Python projects and makes it easy to organize your code. The separation of configuration files (in YAML) from implementation code (in Python) makes it easy to modify your crew's behavior without changing the underlying code.
## Step 3: Configure Your Agents
Now comes the fun part - defining your AI agents! In CrewAI, agents are specialized entities with specific roles, goals, and backstories that shape their behavior. Think of them as characters in a play, each with their own personality and purpose.
For our research crew, we'll create two agents:
1. A **researcher** who excels at finding and organizing information
2. An **analyst** who can interpret research findings and create insightful reports
Let's modify the `agents.yaml` file to define these specialized agents. Be sure
to set `llm` to the provider you are using.
```yaml theme={null}
# src/research_crew/config/agents.yaml
researcher:
role: >
Senior Research Specialist for {topic}
goal: >
Find comprehensive and accurate information about {topic}
with a focus on recent developments and key insights
backstory: >
You are an experienced research specialist with a talent for
finding relevant information from various sources. You excel at
organizing information in a clear and structured manner, making
complex topics accessible to others.
llm: provider/model-id # e.g. openai/gpt-4o, google/gemini-2.0-flash, anthropic/claude...
analyst:
role: >
Data Analyst and Report Writer for {topic}
goal: >
Analyze research findings and create a comprehensive, well-structured
report that presents insights in a clear and engaging way
backstory: >
You are a skilled analyst with a background in data interpretation
and technical writing. You have a talent for identifying patterns
and extracting meaningful insights from research data, then
communicating those insights effectively through well-crafted reports.
llm: provider/model-id # e.g. openai/gpt-4o, google/gemini-2.0-flash, anthropic/claude...
```
Notice how each agent has a distinct role, goal, and backstory. These elements aren't just descriptive - they actively shape how the agent approaches its tasks. By crafting these carefully, you can create agents with specialized skills and perspectives that complement each other.
## Step 4: Define Your Tasks
With our agents defined, we now need to give them specific tasks to perform. Tasks in CrewAI represent the concrete work that agents will perform, with detailed instructions and expected outputs.
For our research crew, we'll define two main tasks:
1. A **research task** for gathering comprehensive information
2. An **analysis task** for creating an insightful report
Let's modify the `tasks.yaml` file:
```yaml theme={null}
# src/research_crew/config/tasks.yaml
research_task:
description: >
Conduct thorough research on {topic}. Focus on:
1. Key concepts and definitions
2. Historical development and recent trends
3. Major challenges and opportunities
4. Notable applications or case studies
5. Future outlook and potential developments
Make sure to organize your findings in a structured format with clear sections.
expected_output: >
A comprehensive research document with well-organized sections covering
all the requested aspects of {topic}. Include specific facts, figures,
and examples where relevant.
agent: researcher
analysis_task:
description: >
Analyze the research findings and create a comprehensive report on {topic}.
Your report should:
1. Begin with an executive summary
2. Include all key information from the research
3. Provide insightful analysis of trends and patterns
4. Offer recommendations or future considerations
5. Be formatted in a professional, easy-to-read style with clear headings
expected_output: >
A polished, professional report on {topic} that presents the research
findings with added analysis and insights. The report should be well-structured
with an executive summary, main sections, and conclusion.
agent: analyst
context:
- research_task
output_file: output/report.md
```
Note the `context` field in the analysis task - this is a powerful feature that allows the analyst to access the output of the research task. This creates a workflow where information flows naturally between agents, just as it would in a human team.
## Step 5: Configure Your Crew
Now it's time to bring everything together by configuring our crew. The crew is the container that orchestrates how agents work together to complete tasks.
Let's modify the `crew.py` file:
```python theme={null}
# src/research_crew/crew.py
from crewai import Agent, Crew, Process, Task
from crewai.project import CrewBase, agent, crew, task
from crewai_tools import SerperDevTool
from crewai.agents.agent_builder.base_agent import BaseAgent
from typing import List
@CrewBase
class ResearchCrew():
"""Research crew for comprehensive topic analysis and reporting"""
agents: List[BaseAgent]
tasks: List[Task]
@agent
def researcher(self) -> Agent:
return Agent(
config=self.agents_config['researcher'], # type: ignore[index]
verbose=True,
tools=[SerperDevTool()]
)
@agent
def analyst(self) -> Agent:
return Agent(
config=self.agents_config['analyst'], # type: ignore[index]
verbose=True
)
@task
def research_task(self) -> Task:
return Task(
config=self.tasks_config['research_task'] # type: ignore[index]
)
@task
def analysis_task(self) -> Task:
return Task(
config=self.tasks_config['analysis_task'], # type: ignore[index]
output_file='output/report.md'
)
@crew
def crew(self) -> Crew:
"""Creates the research crew"""
return Crew(
agents=self.agents,
tasks=self.tasks,
process=Process.sequential,
verbose=True,
)
```
In this code, we're:
1. Creating the researcher agent and equipping it with the SerperDevTool to search the web
2. Creating the analyst agent
3. Setting up the research and analysis tasks
4. Configuring the crew to run tasks sequentially (the analyst will wait for the researcher to finish)
This is where the magic happens - with just a few lines of code, we've defined a collaborative AI system where specialized agents work together in a coordinated process.
## Step 6: Set Up Your Main Script
Now, let's set up the main script that will run our crew. This is where we provide the specific topic we want our crew to research.
```python theme={null}
#!/usr/bin/env python
# src/research_crew/main.py
import os
from research_crew.crew import ResearchCrew
# Create output directory if it doesn't exist
os.makedirs('output', exist_ok=True)
def run():
"""
Run the research crew.
"""
inputs = {
'topic': 'Artificial Intelligence in Healthcare'
}
# Create and run the crew
result = ResearchCrew().crew().kickoff(inputs=inputs)
# Print the result
print("\n\n=== FINAL REPORT ===\n\n")
print(result.raw)
print("\n\nReport has been saved to output/report.md")
if __name__ == "__main__":
run()
```
This script prepares the environment, specifies our research topic, and kicks off the crew's work. The power of CrewAI is evident in how simple this code is - all the complexity of managing multiple AI agents is handled by the framework.
## Step 7: Set Up Your Environment Variables
Create a `.env` file in your project root with your API keys:
```sh theme={null}
SERPER_API_KEY=your_serper_api_key
# Add your provider's API key here too.
```
See the [LLM Setup guide](/en/concepts/llms#setting-up-your-llm) for details on configuring your provider of choice. You can get a Serper API key from [Serper.dev](https://serper.dev/).
## Step 8: Install Dependencies
Install the required dependencies using the CrewAI CLI:
```bash theme={null}
crewai install
```
This command will:
1. Read the dependencies from your project configuration
2. Create a virtual environment if needed
3. Install all required packages
## Step 9: Run Your Crew
Now for the exciting moment - it's time to run your crew and see AI collaboration in action!
```bash theme={null}
crewai run
```
When you run this command, you'll see your crew spring to life. The researcher will gather information about the specified topic, and the analyst will then create a comprehensive report based on that research. You'll see the agents' thought processes, actions, and outputs in real-time as they work together to complete their tasks.
## Step 10: Review the Output
Once the crew completes its work, you'll find the final report in the `output/report.md` file. The report will include:
1. An executive summary
2. Detailed information about the topic
3. Analysis and insights
4. Recommendations or future considerations
Take a moment to appreciate what you've accomplished - you've created a system where multiple AI agents collaborated on a complex task, each contributing their specialized skills to produce a result that's greater than what any single agent could achieve alone.
## Exploring Other CLI Commands
CrewAI offers several other useful CLI commands for working with crews:
```bash theme={null}
# View all available commands
crewai --help
# Run the crew
crewai run
# Test the crew
crewai test
# Reset crew memories
crewai reset-memories
# Replay from a specific task
crewai replay -t
## Step 2: Explore the Project Structure
Let's take a moment to understand the project structure created by the CLI. CrewAI follows best practices for Python projects, making it easy to maintain and extend your code as your crews become more complex.
```
research_crew/
├── .gitignore
├── pyproject.toml
├── README.md
├── .env
└── src/
└── research_crew/
├── __init__.py
├── main.py
├── crew.py
├── tools/
│ ├── custom_tool.py
│ └── __init__.py
└── config/
├── agents.yaml
└── tasks.yaml
```
This structure follows best practices for Python projects and makes it easy to organize your code. The separation of configuration files (in YAML) from implementation code (in Python) makes it easy to modify your crew's behavior without changing the underlying code.
## Step 3: Configure Your Agents
Now comes the fun part - defining your AI agents! In CrewAI, agents are specialized entities with specific roles, goals, and backstories that shape their behavior. Think of them as characters in a play, each with their own personality and purpose.
For our research crew, we'll create two agents:
1. A **researcher** who excels at finding and organizing information
2. An **analyst** who can interpret research findings and create insightful reports
Let's modify the `agents.yaml` file to define these specialized agents. Be sure
to set `llm` to the provider you are using.
```yaml theme={null}
# src/research_crew/config/agents.yaml
researcher:
role: >
Senior Research Specialist for {topic}
goal: >
Find comprehensive and accurate information about {topic}
with a focus on recent developments and key insights
backstory: >
You are an experienced research specialist with a talent for
finding relevant information from various sources. You excel at
organizing information in a clear and structured manner, making
complex topics accessible to others.
llm: provider/model-id # e.g. openai/gpt-4o, google/gemini-2.0-flash, anthropic/claude...
analyst:
role: >
Data Analyst and Report Writer for {topic}
goal: >
Analyze research findings and create a comprehensive, well-structured
report that presents insights in a clear and engaging way
backstory: >
You are a skilled analyst with a background in data interpretation
and technical writing. You have a talent for identifying patterns
and extracting meaningful insights from research data, then
communicating those insights effectively through well-crafted reports.
llm: provider/model-id # e.g. openai/gpt-4o, google/gemini-2.0-flash, anthropic/claude...
```
Notice how each agent has a distinct role, goal, and backstory. These elements aren't just descriptive - they actively shape how the agent approaches its tasks. By crafting these carefully, you can create agents with specialized skills and perspectives that complement each other.
## Step 4: Define Your Tasks
With our agents defined, we now need to give them specific tasks to perform. Tasks in CrewAI represent the concrete work that agents will perform, with detailed instructions and expected outputs.
For our research crew, we'll define two main tasks:
1. A **research task** for gathering comprehensive information
2. An **analysis task** for creating an insightful report
Let's modify the `tasks.yaml` file:
```yaml theme={null}
# src/research_crew/config/tasks.yaml
research_task:
description: >
Conduct thorough research on {topic}. Focus on:
1. Key concepts and definitions
2. Historical development and recent trends
3. Major challenges and opportunities
4. Notable applications or case studies
5. Future outlook and potential developments
Make sure to organize your findings in a structured format with clear sections.
expected_output: >
A comprehensive research document with well-organized sections covering
all the requested aspects of {topic}. Include specific facts, figures,
and examples where relevant.
agent: researcher
analysis_task:
description: >
Analyze the research findings and create a comprehensive report on {topic}.
Your report should:
1. Begin with an executive summary
2. Include all key information from the research
3. Provide insightful analysis of trends and patterns
4. Offer recommendations or future considerations
5. Be formatted in a professional, easy-to-read style with clear headings
expected_output: >
A polished, professional report on {topic} that presents the research
findings with added analysis and insights. The report should be well-structured
with an executive summary, main sections, and conclusion.
agent: analyst
context:
- research_task
output_file: output/report.md
```
Note the `context` field in the analysis task - this is a powerful feature that allows the analyst to access the output of the research task. This creates a workflow where information flows naturally between agents, just as it would in a human team.
## Step 5: Configure Your Crew
Now it's time to bring everything together by configuring our crew. The crew is the container that orchestrates how agents work together to complete tasks.
Let's modify the `crew.py` file:
```python theme={null}
# src/research_crew/crew.py
from crewai import Agent, Crew, Process, Task
from crewai.project import CrewBase, agent, crew, task
from crewai_tools import SerperDevTool
from crewai.agents.agent_builder.base_agent import BaseAgent
from typing import List
@CrewBase
class ResearchCrew():
"""Research crew for comprehensive topic analysis and reporting"""
agents: List[BaseAgent]
tasks: List[Task]
@agent
def researcher(self) -> Agent:
return Agent(
config=self.agents_config['researcher'], # type: ignore[index]
verbose=True,
tools=[SerperDevTool()]
)
@agent
def analyst(self) -> Agent:
return Agent(
config=self.agents_config['analyst'], # type: ignore[index]
verbose=True
)
@task
def research_task(self) -> Task:
return Task(
config=self.tasks_config['research_task'] # type: ignore[index]
)
@task
def analysis_task(self) -> Task:
return Task(
config=self.tasks_config['analysis_task'], # type: ignore[index]
output_file='output/report.md'
)
@crew
def crew(self) -> Crew:
"""Creates the research crew"""
return Crew(
agents=self.agents,
tasks=self.tasks,
process=Process.sequential,
verbose=True,
)
```
In this code, we're:
1. Creating the researcher agent and equipping it with the SerperDevTool to search the web
2. Creating the analyst agent
3. Setting up the research and analysis tasks
4. Configuring the crew to run tasks sequentially (the analyst will wait for the researcher to finish)
This is where the magic happens - with just a few lines of code, we've defined a collaborative AI system where specialized agents work together in a coordinated process.
## Step 6: Set Up Your Main Script
Now, let's set up the main script that will run our crew. This is where we provide the specific topic we want our crew to research.
```python theme={null}
#!/usr/bin/env python
# src/research_crew/main.py
import os
from research_crew.crew import ResearchCrew
# Create output directory if it doesn't exist
os.makedirs('output', exist_ok=True)
def run():
"""
Run the research crew.
"""
inputs = {
'topic': 'Artificial Intelligence in Healthcare'
}
# Create and run the crew
result = ResearchCrew().crew().kickoff(inputs=inputs)
# Print the result
print("\n\n=== FINAL REPORT ===\n\n")
print(result.raw)
print("\n\nReport has been saved to output/report.md")
if __name__ == "__main__":
run()
```
This script prepares the environment, specifies our research topic, and kicks off the crew's work. The power of CrewAI is evident in how simple this code is - all the complexity of managing multiple AI agents is handled by the framework.
## Step 7: Set Up Your Environment Variables
Create a `.env` file in your project root with your API keys:
```sh theme={null}
SERPER_API_KEY=your_serper_api_key
# Add your provider's API key here too.
```
See the [LLM Setup guide](/en/concepts/llms#setting-up-your-llm) for details on configuring your provider of choice. You can get a Serper API key from [Serper.dev](https://serper.dev/).
## Step 8: Install Dependencies
Install the required dependencies using the CrewAI CLI:
```bash theme={null}
crewai install
```
This command will:
1. Read the dependencies from your project configuration
2. Create a virtual environment if needed
3. Install all required packages
## Step 9: Run Your Crew
Now for the exciting moment - it's time to run your crew and see AI collaboration in action!
```bash theme={null}
crewai run
```
When you run this command, you'll see your crew spring to life. The researcher will gather information about the specified topic, and the analyst will then create a comprehensive report based on that research. You'll see the agents' thought processes, actions, and outputs in real-time as they work together to complete their tasks.
## Step 10: Review the Output
Once the crew completes its work, you'll find the final report in the `output/report.md` file. The report will include:
1. An executive summary
2. Detailed information about the topic
3. Analysis and insights
4. Recommendations or future considerations
Take a moment to appreciate what you've accomplished - you've created a system where multiple AI agents collaborated on a complex task, each contributing their specialized skills to produce a result that's greater than what any single agent could achieve alone.
## Exploring Other CLI Commands
CrewAI offers several other useful CLI commands for working with crews:
```bash theme={null}
# View all available commands
crewai --help
# Run the crew
crewai run
# Test the crew
crewai test
# Reset crew memories
crewai reset-memories
# Replay from a specific task
crewai replay -t 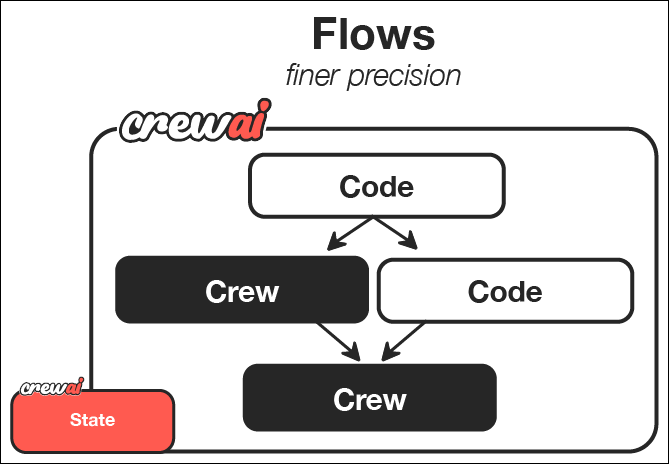 ## Step 2: Understanding the Project Structure
The generated project has the following structure. Take a moment to familiarize yourself with it, as understanding this structure will help you create more complex flows in the future.
```
guide_creator_flow/
├── .gitignore
├── pyproject.toml
├── README.md
├── .env
├── main.py
├── crews/
│ └── poem_crew/
│ ├── config/
│ │ ├── agents.yaml
│ │ └── tasks.yaml
│ └── poem_crew.py
└── tools/
└── custom_tool.py
```
This structure provides a clear separation between different components of your flow:
* The main flow logic in the `main.py` file
* Specialized crews in the `crews` directory
* Custom tools in the `tools` directory
We'll modify this structure to create our guide creator flow, which will orchestrate the process of generating comprehensive learning guides.
## Step 3: Add a Content Writer Crew
Our flow will need a specialized crew to handle the content creation process. Let's use the CrewAI CLI to add a content writer crew:
```bash theme={null}
crewai flow add-crew content-crew
```
This command automatically creates the necessary directories and template files for your crew. The content writer crew will be responsible for writing and reviewing sections of our guide, working within the overall flow orchestrated by our main application.
## Step 4: Configure the Content Writer Crew
Now, let's modify the generated files for the content writer crew. We'll set up two specialized agents - a writer and a reviewer - that will collaborate to create high-quality content for our guide.
1. First, update the agents configuration file to define our content creation team:
Remember to set `llm` to the provider you are using.
```yaml theme={null}
# src/guide_creator_flow/crews/content_crew/config/agents.yaml
content_writer:
role: >
Educational Content Writer
goal: >
Create engaging, informative content that thoroughly explains the assigned topic
and provides valuable insights to the reader
backstory: >
You are a talented educational writer with expertise in creating clear, engaging
content. You have a gift for explaining complex concepts in accessible language
and organizing information in a way that helps readers build their understanding.
llm: provider/model-id # e.g. openai/gpt-4o, google/gemini-2.0-flash, anthropic/claude...
content_reviewer:
role: >
Educational Content Reviewer and Editor
goal: >
Ensure content is accurate, comprehensive, well-structured, and maintains
consistency with previously written sections
backstory: >
You are a meticulous editor with years of experience reviewing educational
content. You have an eye for detail, clarity, and coherence. You excel at
improving content while maintaining the original author's voice and ensuring
consistent quality across multiple sections.
llm: provider/model-id # e.g. openai/gpt-4o, google/gemini-2.0-flash, anthropic/claude...
```
These agent definitions establish the specialized roles and perspectives that will shape how our AI agents approach content creation. Notice how each agent has a distinct purpose and expertise.
2. Next, update the tasks configuration file to define the specific writing and reviewing tasks:
```yaml theme={null}
# src/guide_creator_flow/crews/content_crew/config/tasks.yaml
write_section_task:
description: >
Write a comprehensive section on the topic: "{section_title}"
Section description: {section_description}
Target audience: {audience_level} level learners
Your content should:
1. Begin with a brief introduction to the section topic
2. Explain all key concepts clearly with examples
3. Include practical applications or exercises where appropriate
4. End with a summary of key points
5. Be approximately 500-800 words in length
Format your content in Markdown with appropriate headings, lists, and emphasis.
Previously written sections:
{previous_sections}
Make sure your content maintains consistency with previously written sections
and builds upon concepts that have already been explained.
expected_output: >
A well-structured, comprehensive section in Markdown format that thoroughly
explains the topic and is appropriate for the target audience.
agent: content_writer
review_section_task:
description: >
Review and improve the following section on "{section_title}":
{draft_content}
Target audience: {audience_level} level learners
Previously written sections:
{previous_sections}
Your review should:
1. Fix any grammatical or spelling errors
2. Improve clarity and readability
3. Ensure content is comprehensive and accurate
4. Verify consistency with previously written sections
5. Enhance the structure and flow
6. Add any missing key information
Provide the improved version of the section in Markdown format.
expected_output: >
An improved, polished version of the section that maintains the original
structure but enhances clarity, accuracy, and consistency.
agent: content_reviewer
context:
- write_section_task
```
These task definitions provide detailed instructions to our agents, ensuring they produce content that meets our quality standards. Note how the `context` parameter in the review task creates a workflow where the reviewer has access to the writer's output.
3. Now, update the crew implementation file to define how our agents and tasks work together:
```python theme={null}
# src/guide_creator_flow/crews/content_crew/content_crew.py
from crewai import Agent, Crew, Process, Task
from crewai.project import CrewBase, agent, crew, task
from crewai.agents.agent_builder.base_agent import BaseAgent
from typing import List
@CrewBase
class ContentCrew():
"""Content writing crew"""
agents: List[BaseAgent]
tasks: List[Task]
@agent
def content_writer(self) -> Agent:
return Agent(
config=self.agents_config['content_writer'], # type: ignore[index]
verbose=True
)
@agent
def content_reviewer(self) -> Agent:
return Agent(
config=self.agents_config['content_reviewer'], # type: ignore[index]
verbose=True
)
@task
def write_section_task(self) -> Task:
return Task(
config=self.tasks_config['write_section_task'] # type: ignore[index]
)
@task
def review_section_task(self) -> Task:
return Task(
config=self.tasks_config['review_section_task'], # type: ignore[index]
context=[self.write_section_task()]
)
@crew
def crew(self) -> Crew:
"""Creates the content writing crew"""
return Crew(
agents=self.agents,
tasks=self.tasks,
process=Process.sequential,
verbose=True,
)
```
This crew definition establishes the relationship between our agents and tasks, setting up a sequential process where the content writer creates a draft and then the reviewer improves it. While this crew can function independently, in our flow it will be orchestrated as part of a larger system.
## Step 5: Create the Flow
Now comes the exciting part - creating the flow that will orchestrate the entire guide creation process. This is where we'll combine regular Python code, direct LLM calls, and our content creation crew into a cohesive system.
Our flow will:
1. Get user input for a topic and audience level
2. Make a direct LLM call to create a structured guide outline
3. Process each section sequentially using the content writer crew
4. Combine everything into a final comprehensive document
Let's create our flow in the `main.py` file:
```python theme={null}
#!/usr/bin/env python
import json
import os
from typing import List, Dict
from pydantic import BaseModel, Field
from crewai import LLM
from crewai.flow.flow import Flow, listen, start
from guide_creator_flow.crews.content_crew.content_crew import ContentCrew
# Define our models for structured data
class Section(BaseModel):
title: str = Field(description="Title of the section")
description: str = Field(description="Brief description of what the section should cover")
class GuideOutline(BaseModel):
title: str = Field(description="Title of the guide")
introduction: str = Field(description="Introduction to the topic")
target_audience: str = Field(description="Description of the target audience")
sections: List[Section] = Field(description="List of sections in the guide")
conclusion: str = Field(description="Conclusion or summary of the guide")
# Define our flow state
class GuideCreatorState(BaseModel):
topic: str = ""
audience_level: str = ""
guide_outline: GuideOutline = None
sections_content: Dict[str, str] = {}
class GuideCreatorFlow(Flow[GuideCreatorState]):
"""Flow for creating a comprehensive guide on any topic"""
@start()
def get_user_input(self):
"""Get input from the user about the guide topic and audience"""
print("\n=== Create Your Comprehensive Guide ===\n")
# Get user input
self.state.topic = input("What topic would you like to create a guide for? ")
# Get audience level with validation
while True:
audience = input("Who is your target audience? (beginner/intermediate/advanced) ").lower()
if audience in ["beginner", "intermediate", "advanced"]:
self.state.audience_level = audience
break
print("Please enter 'beginner', 'intermediate', or 'advanced'")
print(f"\nCreating a guide on {self.state.topic} for {self.state.audience_level} audience...\n")
return self.state
@listen(get_user_input)
def create_guide_outline(self, state):
"""Create a structured outline for the guide using a direct LLM call"""
print("Creating guide outline...")
# Initialize the LLM
llm = LLM(model="openai/gpt-4o-mini", response_format=GuideOutline)
# Create the messages for the outline
messages = [
{"role": "system", "content": "You are a helpful assistant designed to output JSON."},
{"role": "user", "content": f"""
Create a detailed outline for a comprehensive guide on "{state.topic}" for {state.audience_level} level learners.
The outline should include:
1. A compelling title for the guide
2. An introduction to the topic
3. 4-6 main sections that cover the most important aspects of the topic
4. A conclusion or summary
For each section, provide a clear title and a brief description of what it should cover.
"""}
]
# Make the LLM call with JSON response format
response = llm.call(messages=messages)
# Parse the JSON response
outline_dict = json.loads(response)
self.state.guide_outline = GuideOutline(**outline_dict)
# Ensure output directory exists before saving
os.makedirs("output", exist_ok=True)
# Save the outline to a file
with open("output/guide_outline.json", "w") as f:
json.dump(outline_dict, f, indent=2)
print(f"Guide outline created with {len(self.state.guide_outline.sections)} sections")
return self.state.guide_outline
@listen(create_guide_outline)
def write_and_compile_guide(self, outline):
"""Write all sections and compile the guide"""
print("Writing guide sections and compiling...")
completed_sections = []
# Process sections one by one to maintain context flow
for section in outline.sections:
print(f"Processing section: {section.title}")
# Build context from previous sections
previous_sections_text = ""
if completed_sections:
previous_sections_text = "# Previously Written Sections\n\n"
for title in completed_sections:
previous_sections_text += f"## {title}\n\n"
previous_sections_text += self.state.sections_content.get(title, "") + "\n\n"
else:
previous_sections_text = "No previous sections written yet."
# Run the content crew for this section
result = ContentCrew().crew().kickoff(inputs={
"section_title": section.title,
"section_description": section.description,
"audience_level": self.state.audience_level,
"previous_sections": previous_sections_text,
"draft_content": ""
})
# Store the content
self.state.sections_content[section.title] = result.raw
completed_sections.append(section.title)
print(f"Section completed: {section.title}")
# Compile the final guide
guide_content = f"# {outline.title}\n\n"
guide_content += f"## Introduction\n\n{outline.introduction}\n\n"
# Add each section in order
for section in outline.sections:
section_content = self.state.sections_content.get(section.title, "")
guide_content += f"\n\n{section_content}\n\n"
# Add conclusion
guide_content += f"## Conclusion\n\n{outline.conclusion}\n\n"
# Save the guide
with open("output/complete_guide.md", "w") as f:
f.write(guide_content)
print("\nComplete guide compiled and saved to output/complete_guide.md")
return "Guide creation completed successfully"
def kickoff():
"""Run the guide creator flow"""
GuideCreatorFlow().kickoff()
print("\n=== Flow Complete ===")
print("Your comprehensive guide is ready in the output directory.")
print("Open output/complete_guide.md to view it.")
def plot():
"""Generate a visualization of the flow"""
flow = GuideCreatorFlow()
flow.plot("guide_creator_flow")
print("Flow visualization saved to guide_creator_flow.html")
if __name__ == "__main__":
kickoff()
```
Let's analyze what's happening in this flow:
1. We define Pydantic models for structured data, ensuring type safety and clear data representation
2. We create a state class to maintain data across different steps of the flow
3. We implement three main flow steps:
* Getting user input with the `@start()` decorator
* Creating a guide outline with a direct LLM call
* Processing sections with our content crew
4. We use the `@listen()` decorator to establish event-driven relationships between steps
This is the power of flows - combining different types of processing (user interaction, direct LLM calls, crew-based tasks) into a coherent, event-driven system.
## Step 6: Set Up Your Environment Variables
Create a `.env` file in your project root with your API keys. See the [LLM setup
guide](/en/concepts/llms#setting-up-your-llm) for details on configuring a provider.
```sh .env theme={null}
OPENAI_API_KEY=your_openai_api_key
# or
GEMINI_API_KEY=your_gemini_api_key
# or
ANTHROPIC_API_KEY=your_anthropic_api_key
```
## Step 7: Install Dependencies
Install the required dependencies:
```bash theme={null}
crewai install
```
## Step 8: Run Your Flow
Now it's time to see your flow in action! Run it using the CrewAI CLI:
```bash theme={null}
crewai flow kickoff
```
When you run this command, you'll see your flow spring to life:
1. It will prompt you for a topic and audience level
2. It will create a structured outline for your guide
3. It will process each section, with the content writer and reviewer collaborating on each
4. Finally, it will compile everything into a comprehensive guide
This demonstrates the power of flows to orchestrate complex processes involving multiple components, both AI and non-AI.
## Step 9: Visualize Your Flow
One of the powerful features of flows is the ability to visualize their structure:
```bash theme={null}
crewai flow plot
```
This will create an HTML file that shows the structure of your flow, including the relationships between different steps and the data that flows between them. This visualization can be invaluable for understanding and debugging complex flows.
## Step 10: Review the Output
Once the flow completes, you'll find two files in the `output` directory:
1. `guide_outline.json`: Contains the structured outline of the guide
2. `complete_guide.md`: The comprehensive guide with all sections
Take a moment to review these files and appreciate what you've built - a system that combines user input, direct AI interactions, and collaborative agent work to produce a complex, high-quality output.
## The Art of the Possible: Beyond Your First Flow
What you've learned in this guide provides a foundation for creating much more sophisticated AI systems. Here are some ways you could extend this basic flow:
### Enhancing User Interaction
You could create more interactive flows with:
* Web interfaces for input and output
* Real-time progress updates
* Interactive feedback and refinement loops
* Multi-stage user interactions
### Adding More Processing Steps
You could expand your flow with additional steps for:
* Research before outline creation
* Image generation for illustrations
* Code snippet generation for technical guides
* Final quality assurance and fact-checking
### Creating More Complex Flows
You could implement more sophisticated flow patterns:
* Conditional branching based on user preferences or content type
* Parallel processing of independent sections
* Iterative refinement loops with feedback
* Integration with external APIs and services
### Applying to Different Domains
The same patterns can be applied to create flows for:
* **Interactive storytelling**: Create personalized stories based on user input
* **Business intelligence**: Process data, generate insights, and create reports
* **Product development**: Facilitate ideation, design, and planning
* **Educational systems**: Create personalized learning experiences
## Key Features Demonstrated
This guide creator flow demonstrates several powerful features of CrewAI:
1. **User interaction**: The flow collects input directly from the user
2. **Direct LLM calls**: Uses the LLM class for efficient, single-purpose AI interactions
3. **Structured data with Pydantic**: Uses Pydantic models to ensure type safety
4. **Sequential processing with context**: Writes sections in order, providing previous sections for context
5. **Multi-agent crews**: Leverages specialized agents (writer and reviewer) for content creation
6. **State management**: Maintains state across different steps of the process
7. **Event-driven architecture**: Uses the `@listen` decorator to respond to events
## Understanding the Flow Structure
Let's break down the key components of flows to help you understand how to build your own:
### 1. Direct LLM Calls
Flows allow you to make direct calls to language models when you need simple, structured responses:
```python theme={null}
llm = LLM(
model="model-id-here", # gpt-4o, gemini-2.0-flash, anthropic/claude...
response_format=GuideOutline
)
response = llm.call(messages=messages)
```
This is more efficient than using a crew when you need a specific, structured output.
### 2. Event-Driven Architecture
Flows use decorators to establish relationships between components:
```python theme={null}
@start()
def get_user_input(self):
# First step in the flow
# ...
@listen(get_user_input)
def create_guide_outline(self, state):
# This runs when get_user_input completes
# ...
```
This creates a clear, declarative structure for your application.
### 3. State Management
Flows maintain state across steps, making it easy to share data:
```python theme={null}
class GuideCreatorState(BaseModel):
topic: str = ""
audience_level: str = ""
guide_outline: GuideOutline = None
sections_content: Dict[str, str] = {}
```
This provides a type-safe way to track and transform data throughout your flow.
### 4. Crew Integration
Flows can seamlessly integrate with crews for complex collaborative tasks:
```python theme={null}
result = ContentCrew().crew().kickoff(inputs={
"section_title": section.title,
# ...
})
```
This allows you to use the right tool for each part of your application - direct LLM calls for simple tasks and crews for complex collaboration.
## Next Steps
Now that you've built your first flow, you can:
1. Experiment with more complex flow structures and patterns
2. Try using `@router()` to create conditional branches in your flows
3. Explore the `and_` and `or_` functions for more complex parallel execution
4. Connect your flow to external APIs, databases, or user interfaces
5. Combine multiple specialized crews in a single flow
## Step 2: Understanding the Project Structure
The generated project has the following structure. Take a moment to familiarize yourself with it, as understanding this structure will help you create more complex flows in the future.
```
guide_creator_flow/
├── .gitignore
├── pyproject.toml
├── README.md
├── .env
├── main.py
├── crews/
│ └── poem_crew/
│ ├── config/
│ │ ├── agents.yaml
│ │ └── tasks.yaml
│ └── poem_crew.py
└── tools/
└── custom_tool.py
```
This structure provides a clear separation between different components of your flow:
* The main flow logic in the `main.py` file
* Specialized crews in the `crews` directory
* Custom tools in the `tools` directory
We'll modify this structure to create our guide creator flow, which will orchestrate the process of generating comprehensive learning guides.
## Step 3: Add a Content Writer Crew
Our flow will need a specialized crew to handle the content creation process. Let's use the CrewAI CLI to add a content writer crew:
```bash theme={null}
crewai flow add-crew content-crew
```
This command automatically creates the necessary directories and template files for your crew. The content writer crew will be responsible for writing and reviewing sections of our guide, working within the overall flow orchestrated by our main application.
## Step 4: Configure the Content Writer Crew
Now, let's modify the generated files for the content writer crew. We'll set up two specialized agents - a writer and a reviewer - that will collaborate to create high-quality content for our guide.
1. First, update the agents configuration file to define our content creation team:
Remember to set `llm` to the provider you are using.
```yaml theme={null}
# src/guide_creator_flow/crews/content_crew/config/agents.yaml
content_writer:
role: >
Educational Content Writer
goal: >
Create engaging, informative content that thoroughly explains the assigned topic
and provides valuable insights to the reader
backstory: >
You are a talented educational writer with expertise in creating clear, engaging
content. You have a gift for explaining complex concepts in accessible language
and organizing information in a way that helps readers build their understanding.
llm: provider/model-id # e.g. openai/gpt-4o, google/gemini-2.0-flash, anthropic/claude...
content_reviewer:
role: >
Educational Content Reviewer and Editor
goal: >
Ensure content is accurate, comprehensive, well-structured, and maintains
consistency with previously written sections
backstory: >
You are a meticulous editor with years of experience reviewing educational
content. You have an eye for detail, clarity, and coherence. You excel at
improving content while maintaining the original author's voice and ensuring
consistent quality across multiple sections.
llm: provider/model-id # e.g. openai/gpt-4o, google/gemini-2.0-flash, anthropic/claude...
```
These agent definitions establish the specialized roles and perspectives that will shape how our AI agents approach content creation. Notice how each agent has a distinct purpose and expertise.
2. Next, update the tasks configuration file to define the specific writing and reviewing tasks:
```yaml theme={null}
# src/guide_creator_flow/crews/content_crew/config/tasks.yaml
write_section_task:
description: >
Write a comprehensive section on the topic: "{section_title}"
Section description: {section_description}
Target audience: {audience_level} level learners
Your content should:
1. Begin with a brief introduction to the section topic
2. Explain all key concepts clearly with examples
3. Include practical applications or exercises where appropriate
4. End with a summary of key points
5. Be approximately 500-800 words in length
Format your content in Markdown with appropriate headings, lists, and emphasis.
Previously written sections:
{previous_sections}
Make sure your content maintains consistency with previously written sections
and builds upon concepts that have already been explained.
expected_output: >
A well-structured, comprehensive section in Markdown format that thoroughly
explains the topic and is appropriate for the target audience.
agent: content_writer
review_section_task:
description: >
Review and improve the following section on "{section_title}":
{draft_content}
Target audience: {audience_level} level learners
Previously written sections:
{previous_sections}
Your review should:
1. Fix any grammatical or spelling errors
2. Improve clarity and readability
3. Ensure content is comprehensive and accurate
4. Verify consistency with previously written sections
5. Enhance the structure and flow
6. Add any missing key information
Provide the improved version of the section in Markdown format.
expected_output: >
An improved, polished version of the section that maintains the original
structure but enhances clarity, accuracy, and consistency.
agent: content_reviewer
context:
- write_section_task
```
These task definitions provide detailed instructions to our agents, ensuring they produce content that meets our quality standards. Note how the `context` parameter in the review task creates a workflow where the reviewer has access to the writer's output.
3. Now, update the crew implementation file to define how our agents and tasks work together:
```python theme={null}
# src/guide_creator_flow/crews/content_crew/content_crew.py
from crewai import Agent, Crew, Process, Task
from crewai.project import CrewBase, agent, crew, task
from crewai.agents.agent_builder.base_agent import BaseAgent
from typing import List
@CrewBase
class ContentCrew():
"""Content writing crew"""
agents: List[BaseAgent]
tasks: List[Task]
@agent
def content_writer(self) -> Agent:
return Agent(
config=self.agents_config['content_writer'], # type: ignore[index]
verbose=True
)
@agent
def content_reviewer(self) -> Agent:
return Agent(
config=self.agents_config['content_reviewer'], # type: ignore[index]
verbose=True
)
@task
def write_section_task(self) -> Task:
return Task(
config=self.tasks_config['write_section_task'] # type: ignore[index]
)
@task
def review_section_task(self) -> Task:
return Task(
config=self.tasks_config['review_section_task'], # type: ignore[index]
context=[self.write_section_task()]
)
@crew
def crew(self) -> Crew:
"""Creates the content writing crew"""
return Crew(
agents=self.agents,
tasks=self.tasks,
process=Process.sequential,
verbose=True,
)
```
This crew definition establishes the relationship between our agents and tasks, setting up a sequential process where the content writer creates a draft and then the reviewer improves it. While this crew can function independently, in our flow it will be orchestrated as part of a larger system.
## Step 5: Create the Flow
Now comes the exciting part - creating the flow that will orchestrate the entire guide creation process. This is where we'll combine regular Python code, direct LLM calls, and our content creation crew into a cohesive system.
Our flow will:
1. Get user input for a topic and audience level
2. Make a direct LLM call to create a structured guide outline
3. Process each section sequentially using the content writer crew
4. Combine everything into a final comprehensive document
Let's create our flow in the `main.py` file:
```python theme={null}
#!/usr/bin/env python
import json
import os
from typing import List, Dict
from pydantic import BaseModel, Field
from crewai import LLM
from crewai.flow.flow import Flow, listen, start
from guide_creator_flow.crews.content_crew.content_crew import ContentCrew
# Define our models for structured data
class Section(BaseModel):
title: str = Field(description="Title of the section")
description: str = Field(description="Brief description of what the section should cover")
class GuideOutline(BaseModel):
title: str = Field(description="Title of the guide")
introduction: str = Field(description="Introduction to the topic")
target_audience: str = Field(description="Description of the target audience")
sections: List[Section] = Field(description="List of sections in the guide")
conclusion: str = Field(description="Conclusion or summary of the guide")
# Define our flow state
class GuideCreatorState(BaseModel):
topic: str = ""
audience_level: str = ""
guide_outline: GuideOutline = None
sections_content: Dict[str, str] = {}
class GuideCreatorFlow(Flow[GuideCreatorState]):
"""Flow for creating a comprehensive guide on any topic"""
@start()
def get_user_input(self):
"""Get input from the user about the guide topic and audience"""
print("\n=== Create Your Comprehensive Guide ===\n")
# Get user input
self.state.topic = input("What topic would you like to create a guide for? ")
# Get audience level with validation
while True:
audience = input("Who is your target audience? (beginner/intermediate/advanced) ").lower()
if audience in ["beginner", "intermediate", "advanced"]:
self.state.audience_level = audience
break
print("Please enter 'beginner', 'intermediate', or 'advanced'")
print(f"\nCreating a guide on {self.state.topic} for {self.state.audience_level} audience...\n")
return self.state
@listen(get_user_input)
def create_guide_outline(self, state):
"""Create a structured outline for the guide using a direct LLM call"""
print("Creating guide outline...")
# Initialize the LLM
llm = LLM(model="openai/gpt-4o-mini", response_format=GuideOutline)
# Create the messages for the outline
messages = [
{"role": "system", "content": "You are a helpful assistant designed to output JSON."},
{"role": "user", "content": f"""
Create a detailed outline for a comprehensive guide on "{state.topic}" for {state.audience_level} level learners.
The outline should include:
1. A compelling title for the guide
2. An introduction to the topic
3. 4-6 main sections that cover the most important aspects of the topic
4. A conclusion or summary
For each section, provide a clear title and a brief description of what it should cover.
"""}
]
# Make the LLM call with JSON response format
response = llm.call(messages=messages)
# Parse the JSON response
outline_dict = json.loads(response)
self.state.guide_outline = GuideOutline(**outline_dict)
# Ensure output directory exists before saving
os.makedirs("output", exist_ok=True)
# Save the outline to a file
with open("output/guide_outline.json", "w") as f:
json.dump(outline_dict, f, indent=2)
print(f"Guide outline created with {len(self.state.guide_outline.sections)} sections")
return self.state.guide_outline
@listen(create_guide_outline)
def write_and_compile_guide(self, outline):
"""Write all sections and compile the guide"""
print("Writing guide sections and compiling...")
completed_sections = []
# Process sections one by one to maintain context flow
for section in outline.sections:
print(f"Processing section: {section.title}")
# Build context from previous sections
previous_sections_text = ""
if completed_sections:
previous_sections_text = "# Previously Written Sections\n\n"
for title in completed_sections:
previous_sections_text += f"## {title}\n\n"
previous_sections_text += self.state.sections_content.get(title, "") + "\n\n"
else:
previous_sections_text = "No previous sections written yet."
# Run the content crew for this section
result = ContentCrew().crew().kickoff(inputs={
"section_title": section.title,
"section_description": section.description,
"audience_level": self.state.audience_level,
"previous_sections": previous_sections_text,
"draft_content": ""
})
# Store the content
self.state.sections_content[section.title] = result.raw
completed_sections.append(section.title)
print(f"Section completed: {section.title}")
# Compile the final guide
guide_content = f"# {outline.title}\n\n"
guide_content += f"## Introduction\n\n{outline.introduction}\n\n"
# Add each section in order
for section in outline.sections:
section_content = self.state.sections_content.get(section.title, "")
guide_content += f"\n\n{section_content}\n\n"
# Add conclusion
guide_content += f"## Conclusion\n\n{outline.conclusion}\n\n"
# Save the guide
with open("output/complete_guide.md", "w") as f:
f.write(guide_content)
print("\nComplete guide compiled and saved to output/complete_guide.md")
return "Guide creation completed successfully"
def kickoff():
"""Run the guide creator flow"""
GuideCreatorFlow().kickoff()
print("\n=== Flow Complete ===")
print("Your comprehensive guide is ready in the output directory.")
print("Open output/complete_guide.md to view it.")
def plot():
"""Generate a visualization of the flow"""
flow = GuideCreatorFlow()
flow.plot("guide_creator_flow")
print("Flow visualization saved to guide_creator_flow.html")
if __name__ == "__main__":
kickoff()
```
Let's analyze what's happening in this flow:
1. We define Pydantic models for structured data, ensuring type safety and clear data representation
2. We create a state class to maintain data across different steps of the flow
3. We implement three main flow steps:
* Getting user input with the `@start()` decorator
* Creating a guide outline with a direct LLM call
* Processing sections with our content crew
4. We use the `@listen()` decorator to establish event-driven relationships between steps
This is the power of flows - combining different types of processing (user interaction, direct LLM calls, crew-based tasks) into a coherent, event-driven system.
## Step 6: Set Up Your Environment Variables
Create a `.env` file in your project root with your API keys. See the [LLM setup
guide](/en/concepts/llms#setting-up-your-llm) for details on configuring a provider.
```sh .env theme={null}
OPENAI_API_KEY=your_openai_api_key
# or
GEMINI_API_KEY=your_gemini_api_key
# or
ANTHROPIC_API_KEY=your_anthropic_api_key
```
## Step 7: Install Dependencies
Install the required dependencies:
```bash theme={null}
crewai install
```
## Step 8: Run Your Flow
Now it's time to see your flow in action! Run it using the CrewAI CLI:
```bash theme={null}
crewai flow kickoff
```
When you run this command, you'll see your flow spring to life:
1. It will prompt you for a topic and audience level
2. It will create a structured outline for your guide
3. It will process each section, with the content writer and reviewer collaborating on each
4. Finally, it will compile everything into a comprehensive guide
This demonstrates the power of flows to orchestrate complex processes involving multiple components, both AI and non-AI.
## Step 9: Visualize Your Flow
One of the powerful features of flows is the ability to visualize their structure:
```bash theme={null}
crewai flow plot
```
This will create an HTML file that shows the structure of your flow, including the relationships between different steps and the data that flows between them. This visualization can be invaluable for understanding and debugging complex flows.
## Step 10: Review the Output
Once the flow completes, you'll find two files in the `output` directory:
1. `guide_outline.json`: Contains the structured outline of the guide
2. `complete_guide.md`: The comprehensive guide with all sections
Take a moment to review these files and appreciate what you've built - a system that combines user input, direct AI interactions, and collaborative agent work to produce a complex, high-quality output.
## The Art of the Possible: Beyond Your First Flow
What you've learned in this guide provides a foundation for creating much more sophisticated AI systems. Here are some ways you could extend this basic flow:
### Enhancing User Interaction
You could create more interactive flows with:
* Web interfaces for input and output
* Real-time progress updates
* Interactive feedback and refinement loops
* Multi-stage user interactions
### Adding More Processing Steps
You could expand your flow with additional steps for:
* Research before outline creation
* Image generation for illustrations
* Code snippet generation for technical guides
* Final quality assurance and fact-checking
### Creating More Complex Flows
You could implement more sophisticated flow patterns:
* Conditional branching based on user preferences or content type
* Parallel processing of independent sections
* Iterative refinement loops with feedback
* Integration with external APIs and services
### Applying to Different Domains
The same patterns can be applied to create flows for:
* **Interactive storytelling**: Create personalized stories based on user input
* **Business intelligence**: Process data, generate insights, and create reports
* **Product development**: Facilitate ideation, design, and planning
* **Educational systems**: Create personalized learning experiences
## Key Features Demonstrated
This guide creator flow demonstrates several powerful features of CrewAI:
1. **User interaction**: The flow collects input directly from the user
2. **Direct LLM calls**: Uses the LLM class for efficient, single-purpose AI interactions
3. **Structured data with Pydantic**: Uses Pydantic models to ensure type safety
4. **Sequential processing with context**: Writes sections in order, providing previous sections for context
5. **Multi-agent crews**: Leverages specialized agents (writer and reviewer) for content creation
6. **State management**: Maintains state across different steps of the process
7. **Event-driven architecture**: Uses the `@listen` decorator to respond to events
## Understanding the Flow Structure
Let's break down the key components of flows to help you understand how to build your own:
### 1. Direct LLM Calls
Flows allow you to make direct calls to language models when you need simple, structured responses:
```python theme={null}
llm = LLM(
model="model-id-here", # gpt-4o, gemini-2.0-flash, anthropic/claude...
response_format=GuideOutline
)
response = llm.call(messages=messages)
```
This is more efficient than using a crew when you need a specific, structured output.
### 2. Event-Driven Architecture
Flows use decorators to establish relationships between components:
```python theme={null}
@start()
def get_user_input(self):
# First step in the flow
# ...
@listen(get_user_input)
def create_guide_outline(self, state):
# This runs when get_user_input completes
# ...
```
This creates a clear, declarative structure for your application.
### 3. State Management
Flows maintain state across steps, making it easy to share data:
```python theme={null}
class GuideCreatorState(BaseModel):
topic: str = ""
audience_level: str = ""
guide_outline: GuideOutline = None
sections_content: Dict[str, str] = {}
```
This provides a type-safe way to track and transform data throughout your flow.
### 4. Crew Integration
Flows can seamlessly integrate with crews for complex collaborative tasks:
```python theme={null}
result = ContentCrew().crew().kickoff(inputs={
"section_title": section.title,
# ...
})
```
This allows you to use the right tool for each part of your application - direct LLM calls for simple tasks and crews for complex collaboration.
## Next Steps
Now that you've built your first flow, you can:
1. Experiment with more complex flow structures and patterns
2. Try using `@router()` to create conditional branches in your flows
3. Explore the `and_` and `or_` functions for more complex parallel execution
4. Connect your flow to external APIs, databases, or user interfaces
5. Combine multiple specialized crews in a single flow
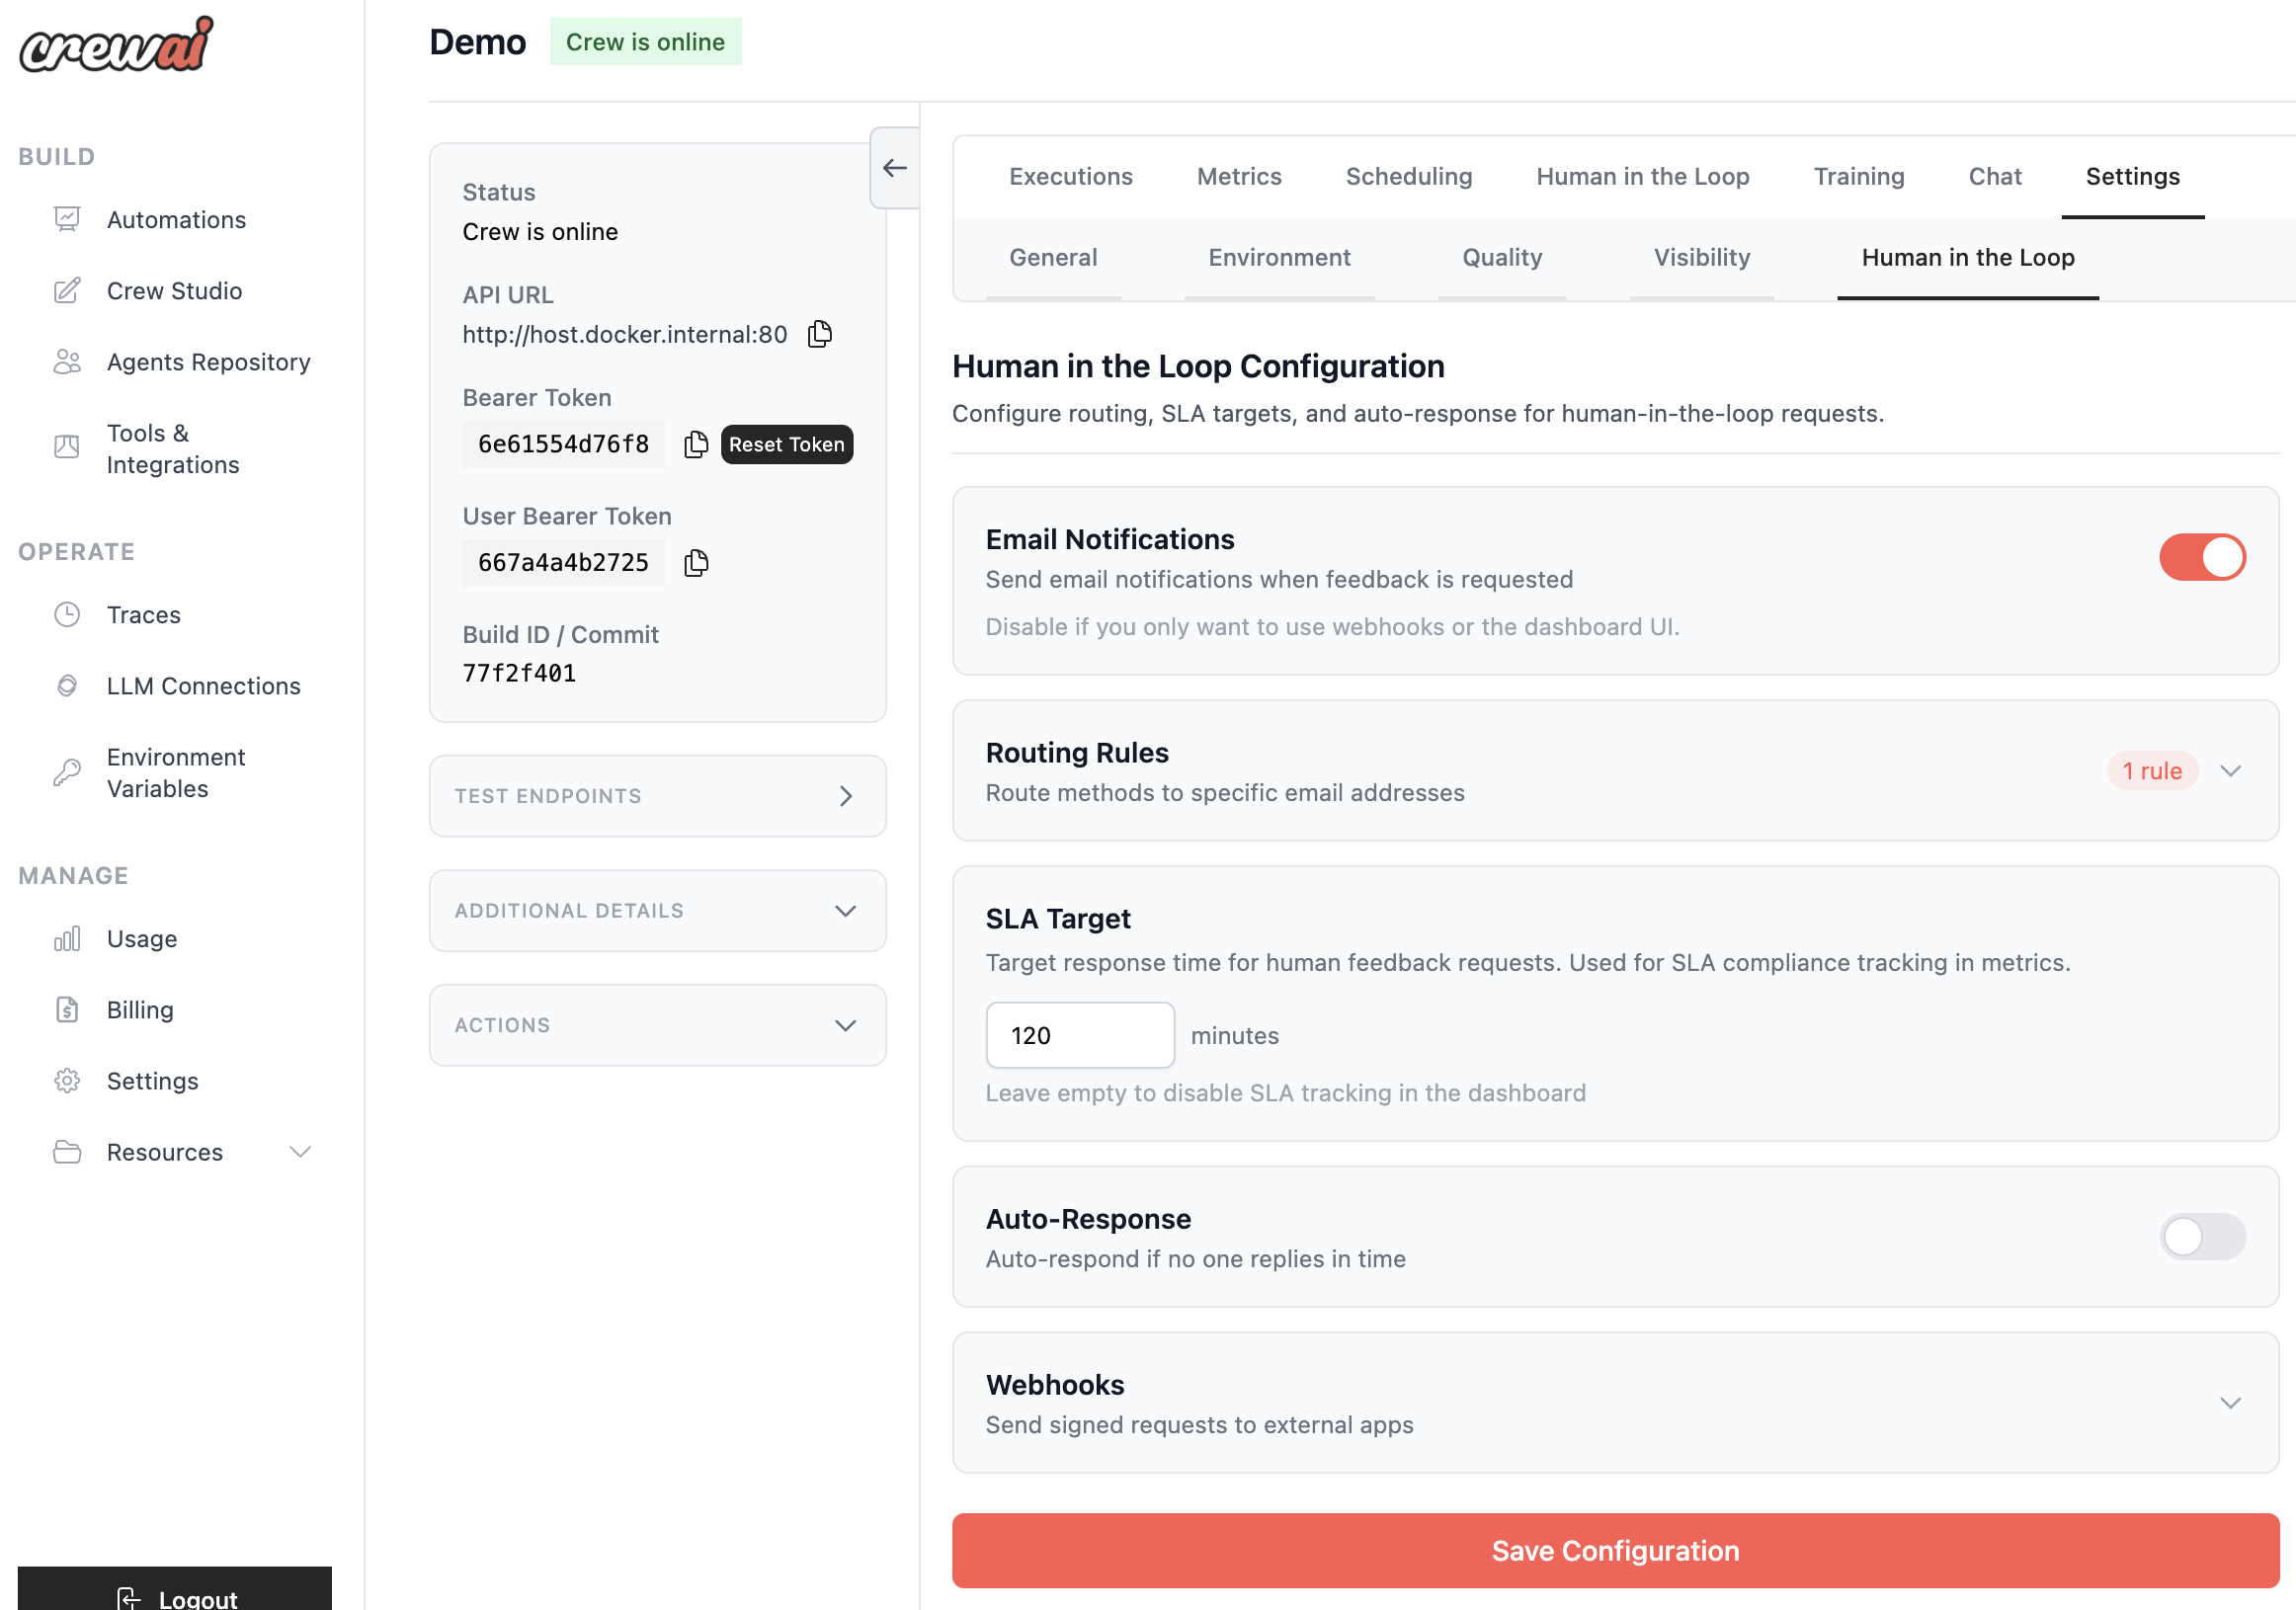 ### Email Notifications
Toggle to enable or disable email notifications for HITL requests.
| Setting | Default | Description |
| ------------------- | ------- | -------------------------------------- |
| Email Notifications | Enabled | Send emails when feedback is requested |
### Email Notifications
Toggle to enable or disable email notifications for HITL requests.
| Setting | Default | Description |
| ------------------- | ------- | -------------------------------------- |
| Email Notifications | Enabled | Send emails when feedback is requested |
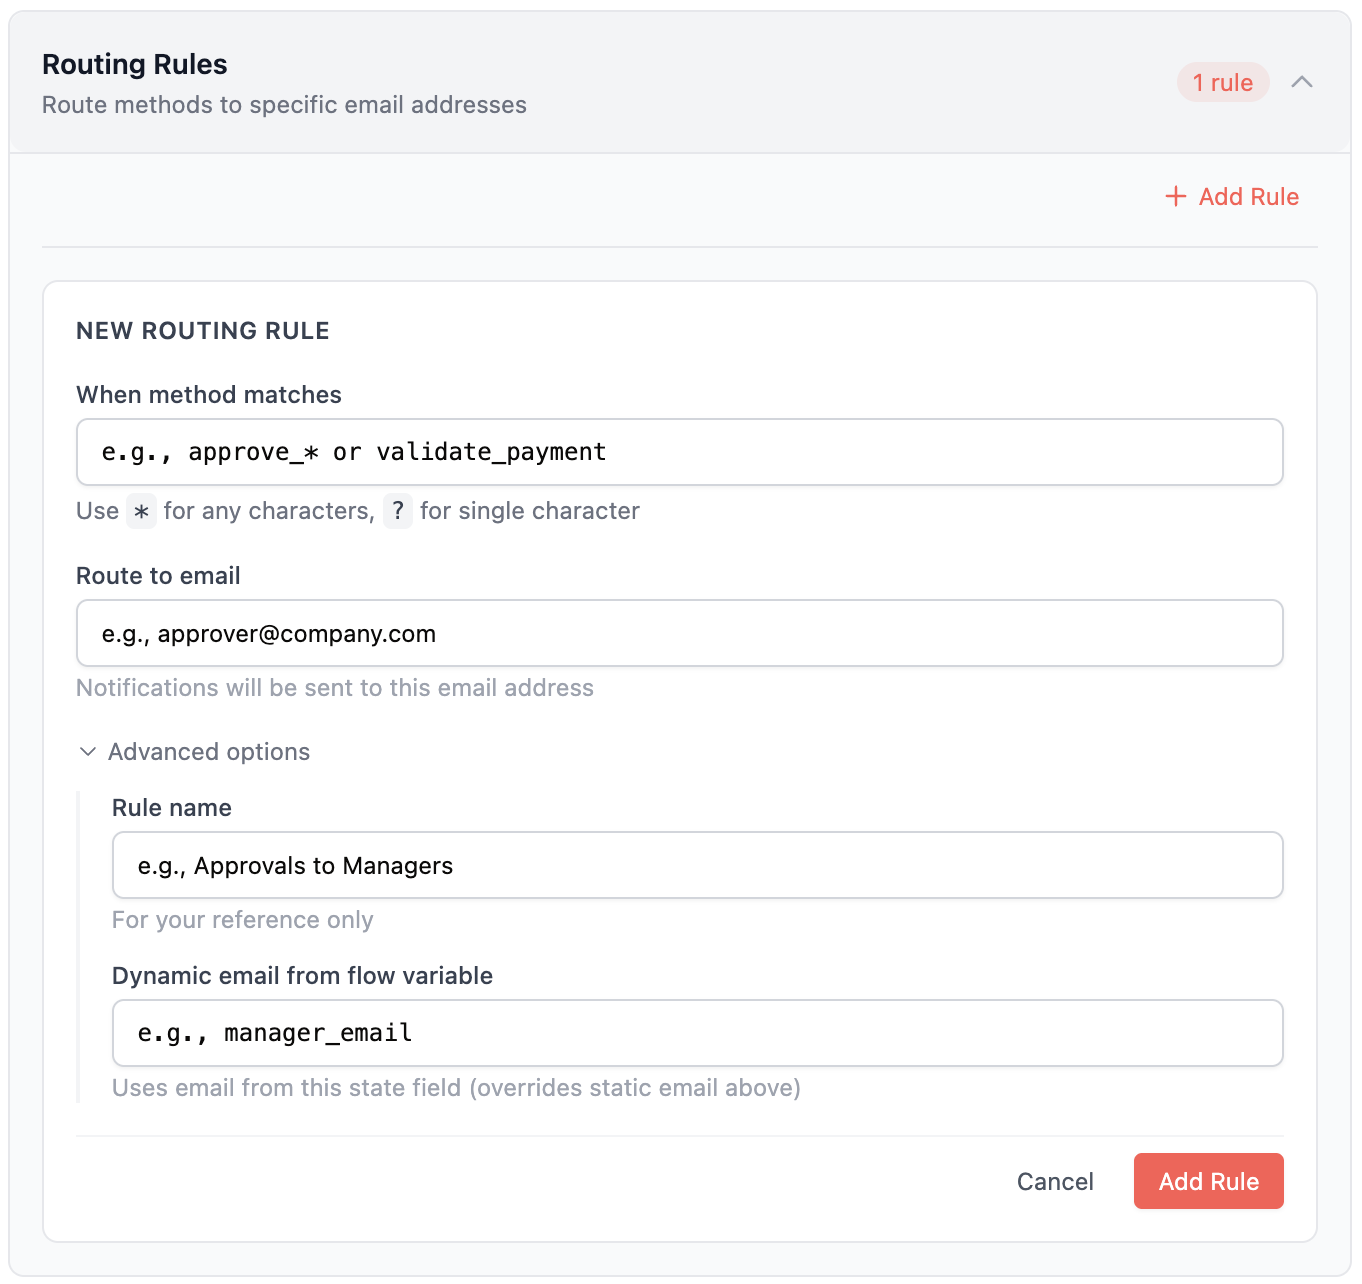 ### Rule Structure
```json theme={null}
{
"name": "Approvals to Finance",
"match": {
"method_name": "approve_*"
},
"assign_to_email": "finance@company.com",
"assign_from_input": "manager_email"
}
```
### Matching Patterns
| Pattern | Description | Example Match |
| ------------------ | -------------------- | ----------------------------------- |
| `approve_*` | Wildcard (any chars) | `approve_payment`, `approve_vendor` |
| `review_?` | Single char | `review_a`, `review_1` |
| `validate_payment` | Exact match | `validate_payment` only |
### Assignment Priority
1. **Dynamic assignment** (`assign_from_input`): If configured, pulls email from flow state
2. **Static email** (`assign_to_email`): Falls back to configured email
3. **Deployment creator**: If no rule matches, the deployment creator's email is used
### Dynamic Assignment Example
If your flow state contains `{"sales_rep_email": "alice@company.com"}`, configure:
```json theme={null}
{
"name": "Route to Sales Rep",
"match": {
"method_name": "review_*"
},
"assign_from_input": "sales_rep_email"
}
```
The request will be assigned to `alice@company.com` automatically.
### Rule Structure
```json theme={null}
{
"name": "Approvals to Finance",
"match": {
"method_name": "approve_*"
},
"assign_to_email": "finance@company.com",
"assign_from_input": "manager_email"
}
```
### Matching Patterns
| Pattern | Description | Example Match |
| ------------------ | -------------------- | ----------------------------------- |
| `approve_*` | Wildcard (any chars) | `approve_payment`, `approve_vendor` |
| `review_?` | Single char | `review_a`, `review_1` |
| `validate_payment` | Exact match | `validate_payment` only |
### Assignment Priority
1. **Dynamic assignment** (`assign_from_input`): If configured, pulls email from flow state
2. **Static email** (`assign_to_email`): Falls back to configured email
3. **Deployment creator**: If no rule matches, the deployment creator's email is used
### Dynamic Assignment Example
If your flow state contains `{"sales_rep_email": "alice@company.com"}`, configure:
```json theme={null}
{
"name": "Route to Sales Rep",
"match": {
"method_name": "review_*"
},
"assign_from_input": "sales_rep_email"
}
```
The request will be assigned to `alice@company.com` automatically.
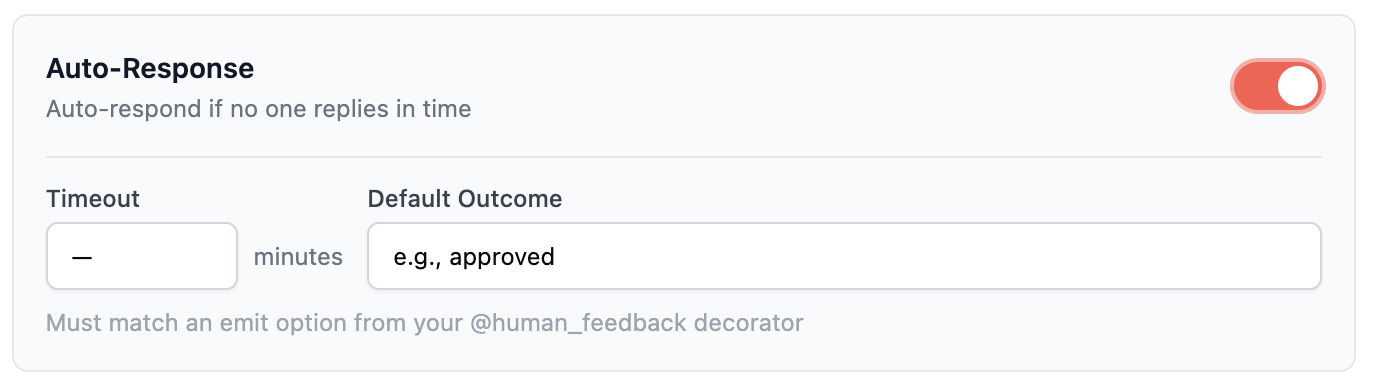 ### Use Cases
* **SLA compliance**: Ensure flows don't hang indefinitely
* **Default approval**: Auto-approve low-risk requests after timeout
* **Graceful degradation**: Continue with a safe default when reviewers are unavailable
### Use Cases
* **SLA compliance**: Ensure flows don't hang indefinitely
* **Default approval**: Auto-approve low-risk requests after timeout
* **Graceful degradation**: Continue with a safe default when reviewers are unavailable
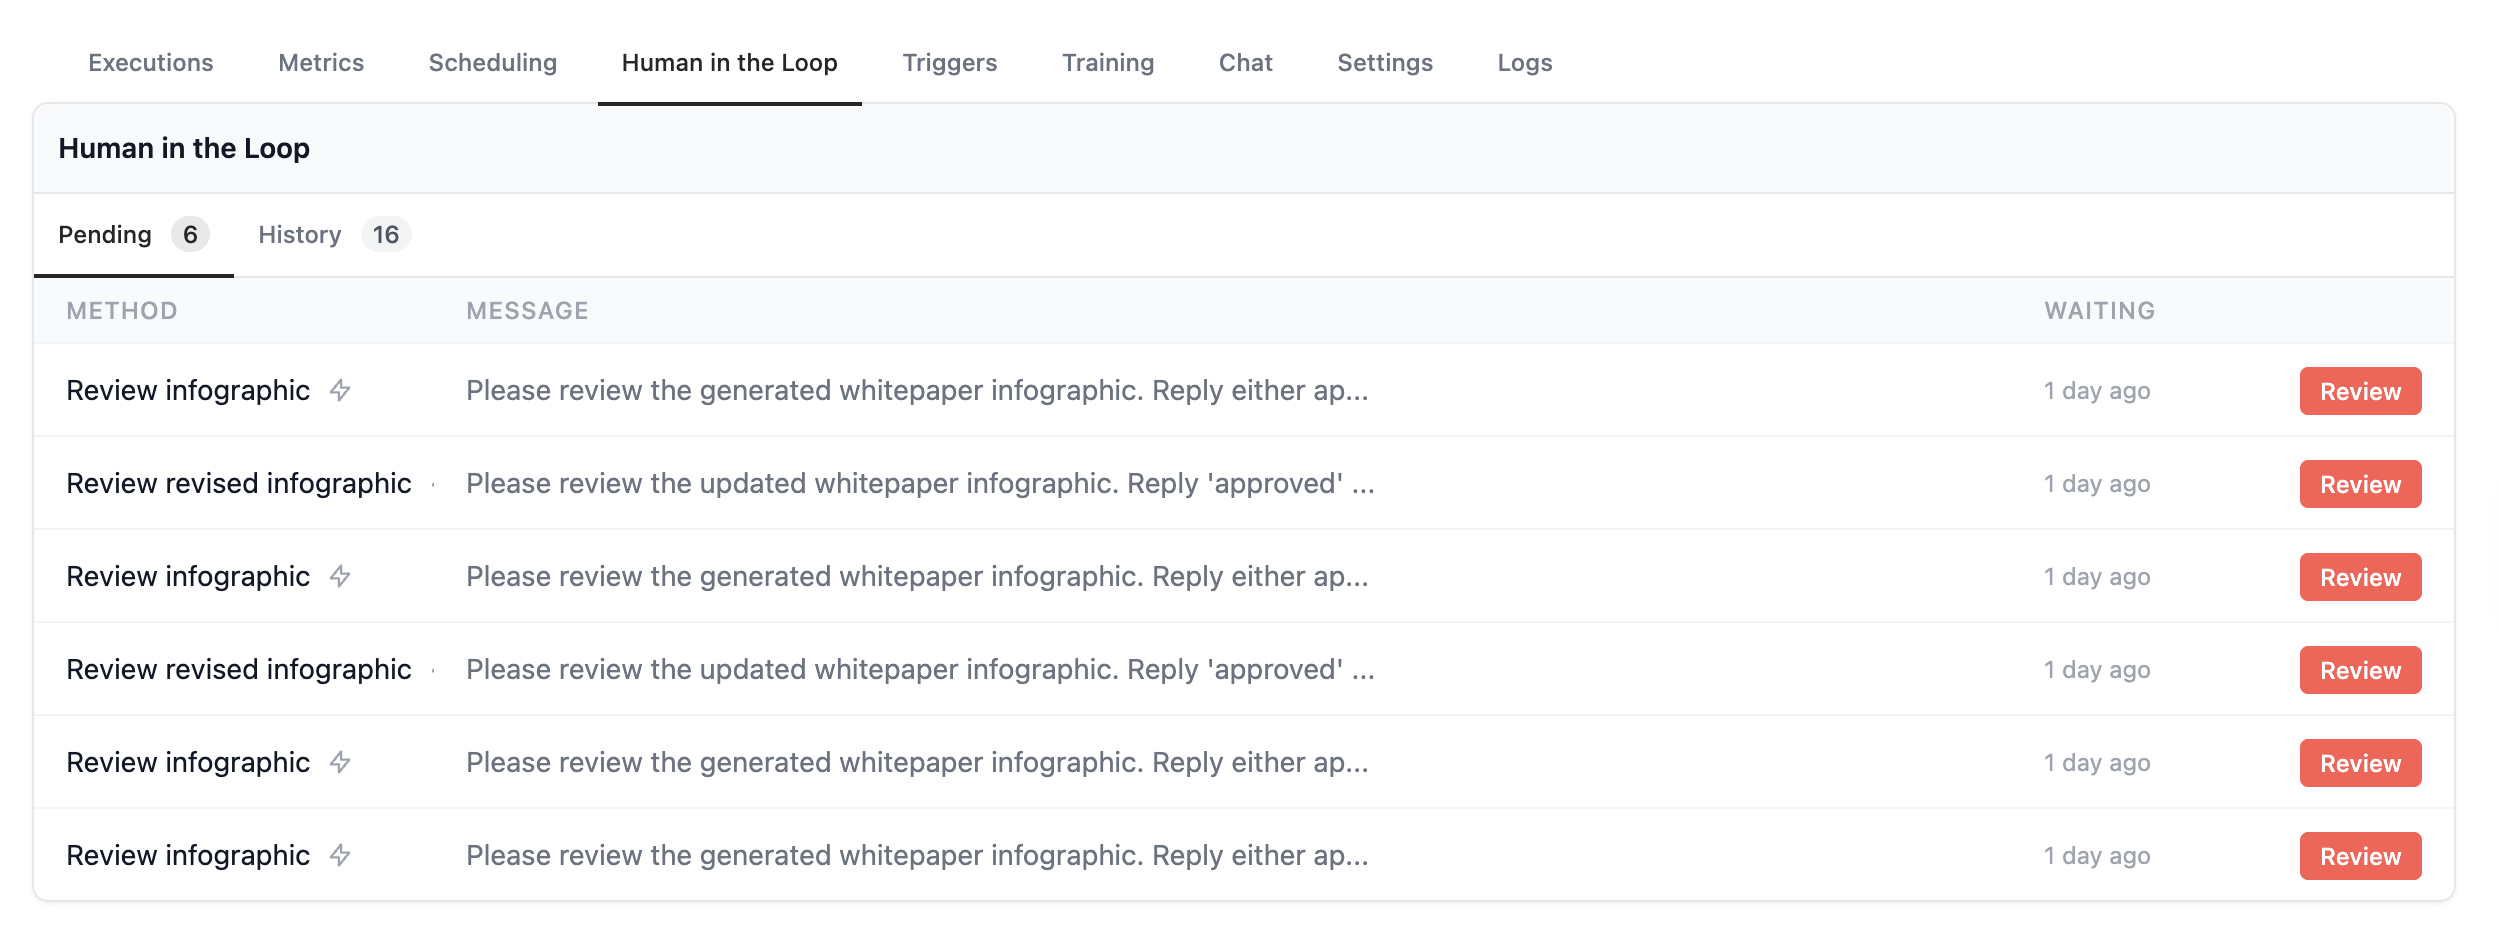 ### Response Methods
Reviewers can respond via three channels:
| Method | Description |
| --------------- | ---------------------------------------- |
| **Email Reply** | Reply directly to the notification email |
| **Dashboard** | Use the Enterprise dashboard UI |
| **API/Webhook** | Programmatic response via API |
### History & Audit Trail
Every HITL interaction is tracked with a complete timeline:
* Decision history (approve/reject/revise)
* Reviewer identity and timestamp
* Feedback and comments provided
* Response method (email/dashboard/API)
* Response time metrics
## Analytics & Monitoring
Track HITL performance with comprehensive analytics.
### Performance Dashboard
### Response Methods
Reviewers can respond via three channels:
| Method | Description |
| --------------- | ---------------------------------------- |
| **Email Reply** | Reply directly to the notification email |
| **Dashboard** | Use the Enterprise dashboard UI |
| **API/Webhook** | Programmatic response via API |
### History & Audit Trail
Every HITL interaction is tracked with a complete timeline:
* Decision history (approve/reject/revise)
* Reviewer identity and timestamp
* Feedback and comments provided
* Response method (email/dashboard/API)
* Response time metrics
## Analytics & Monitoring
Track HITL performance with comprehensive analytics.
### Performance Dashboard
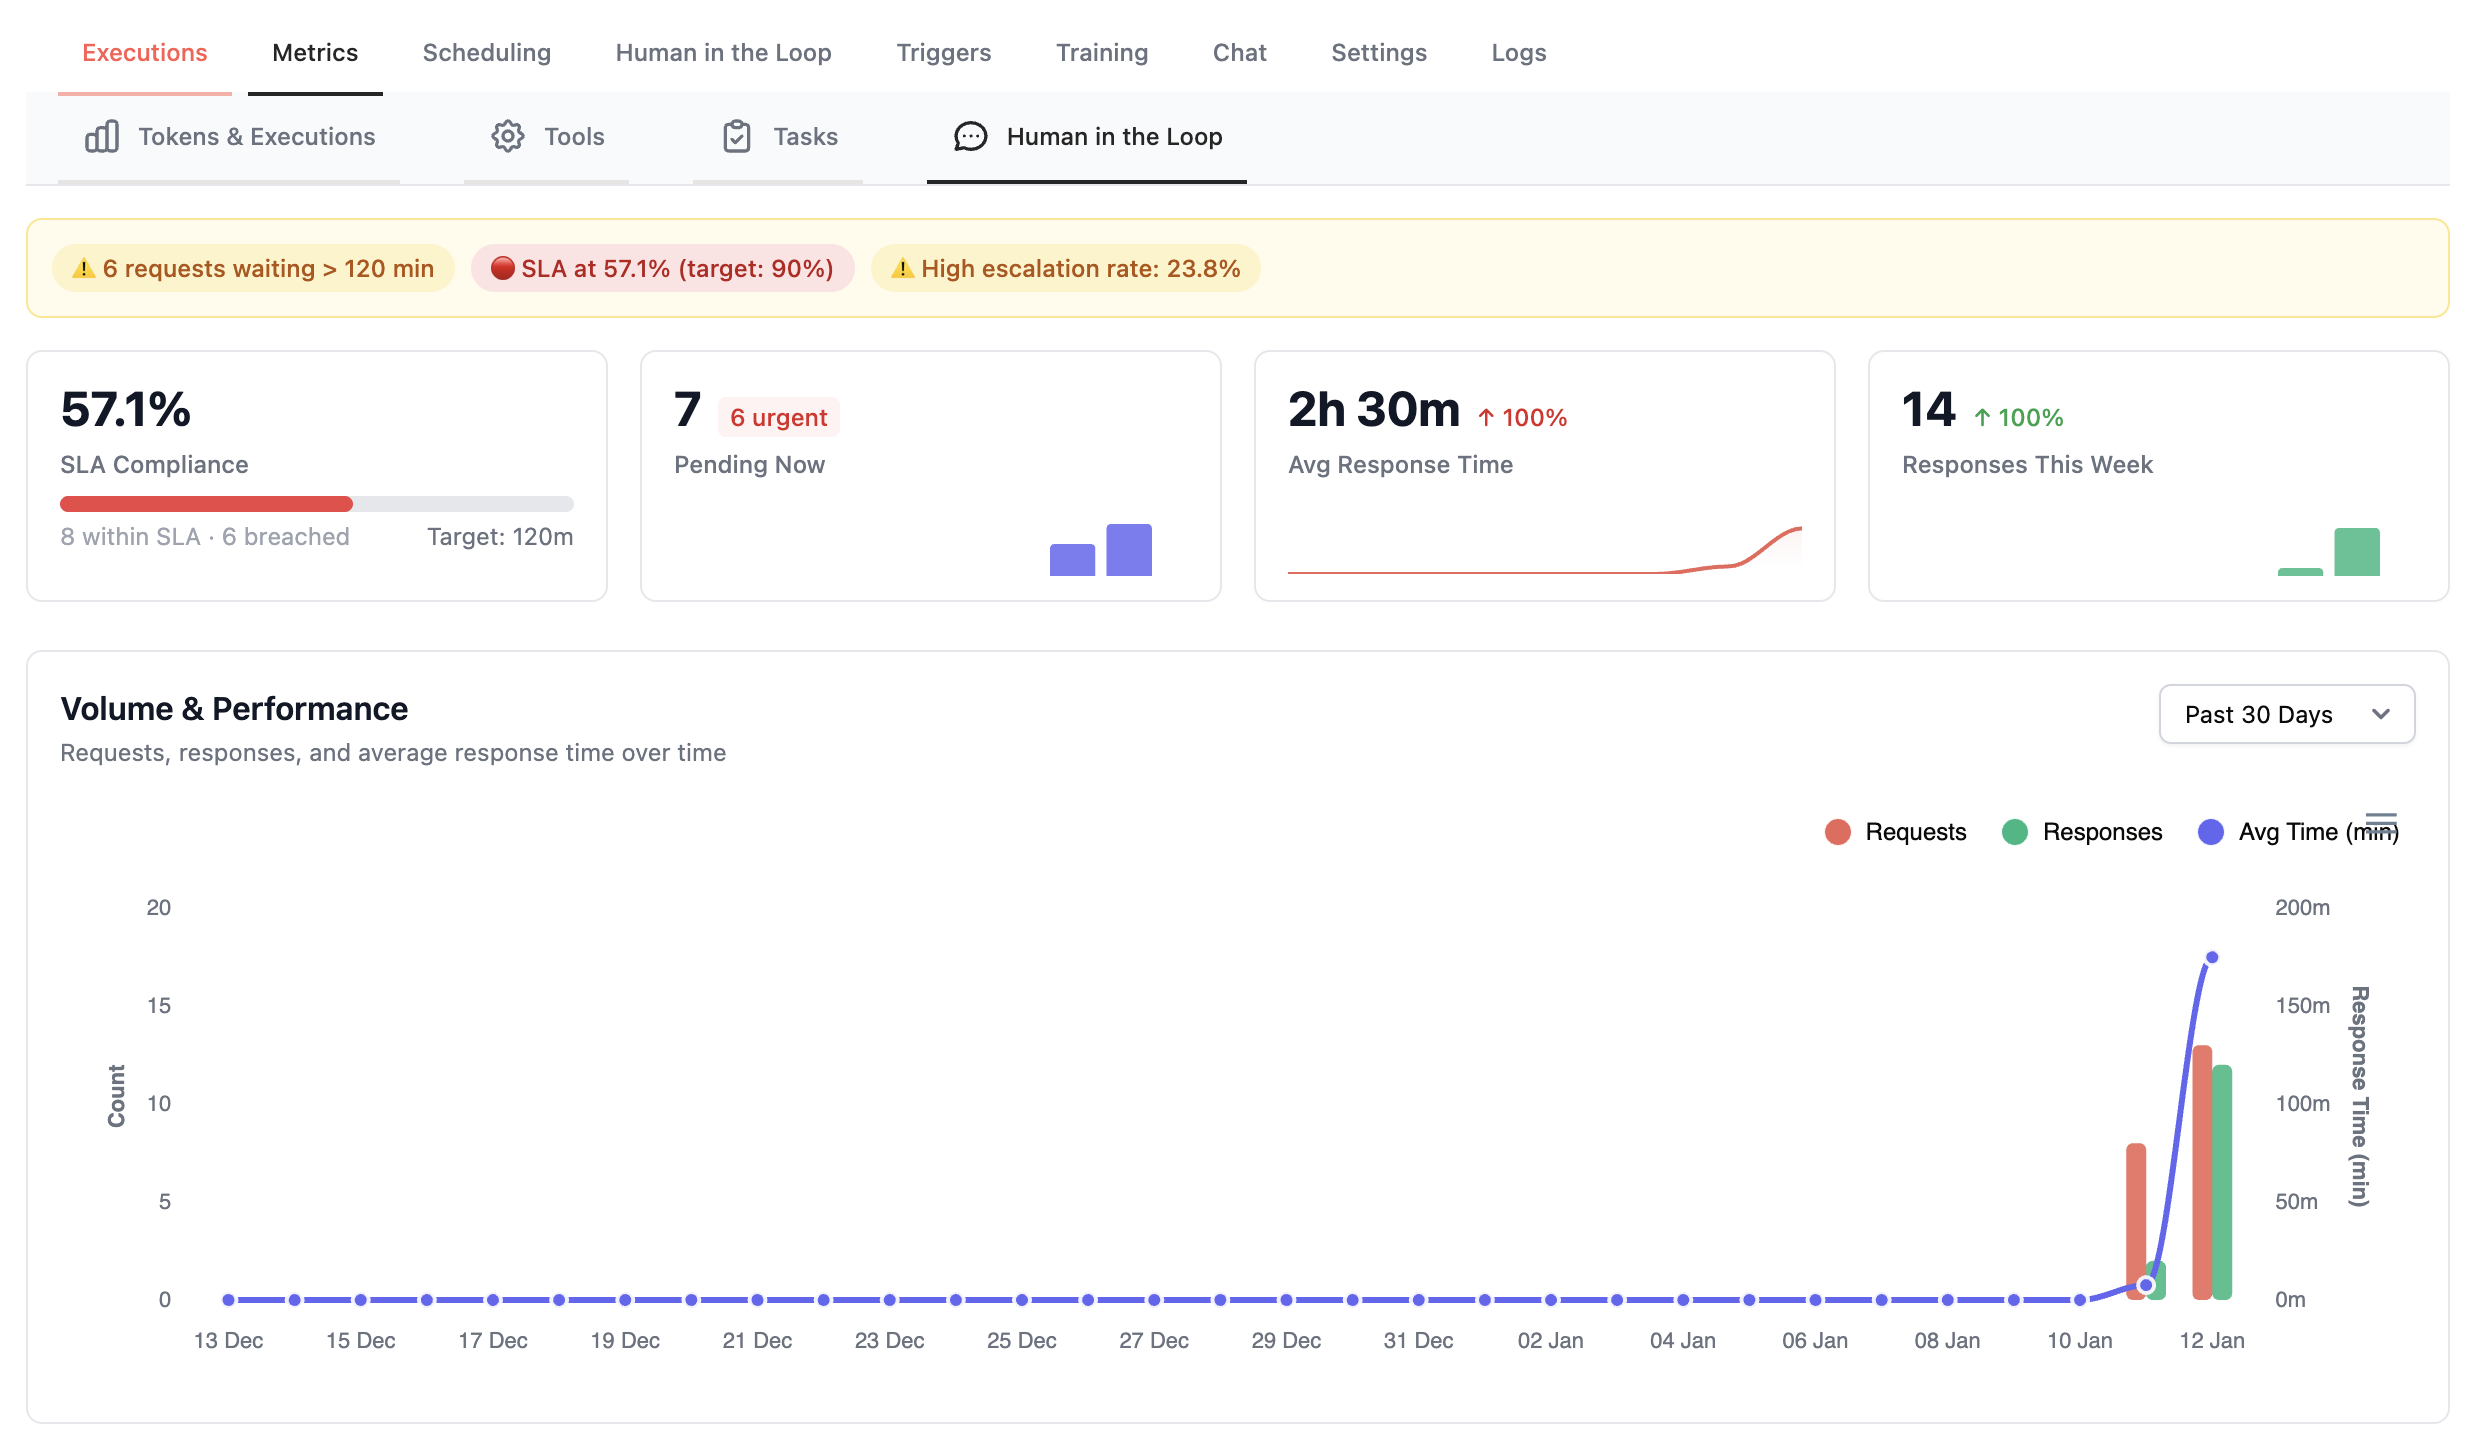
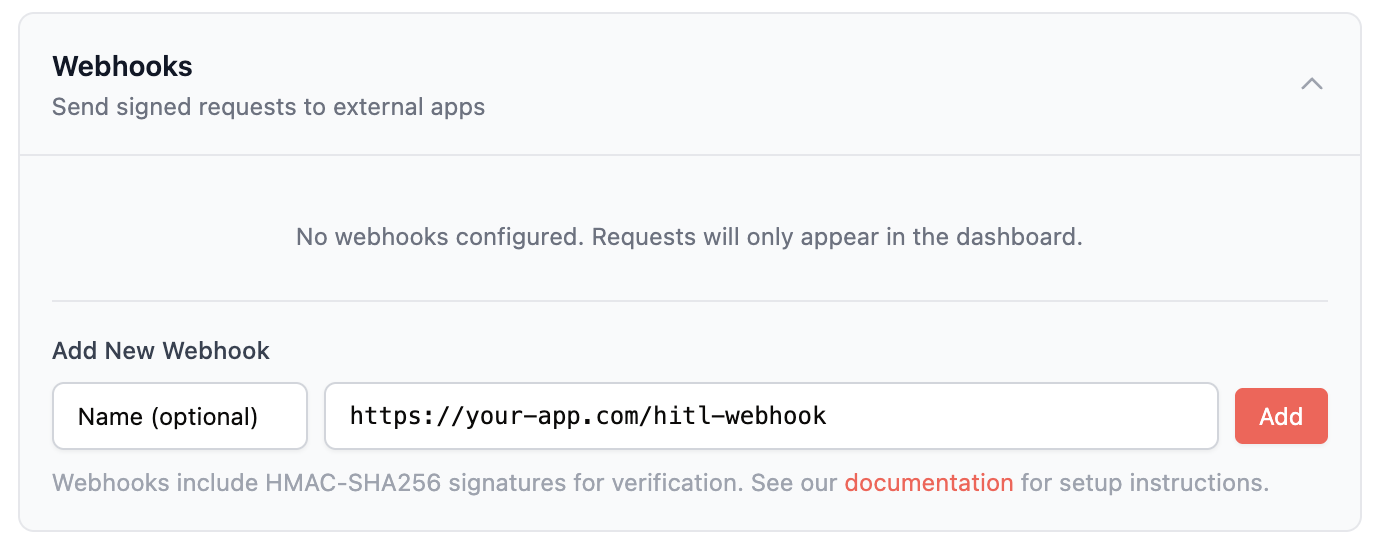 ### Configuring Webhooks
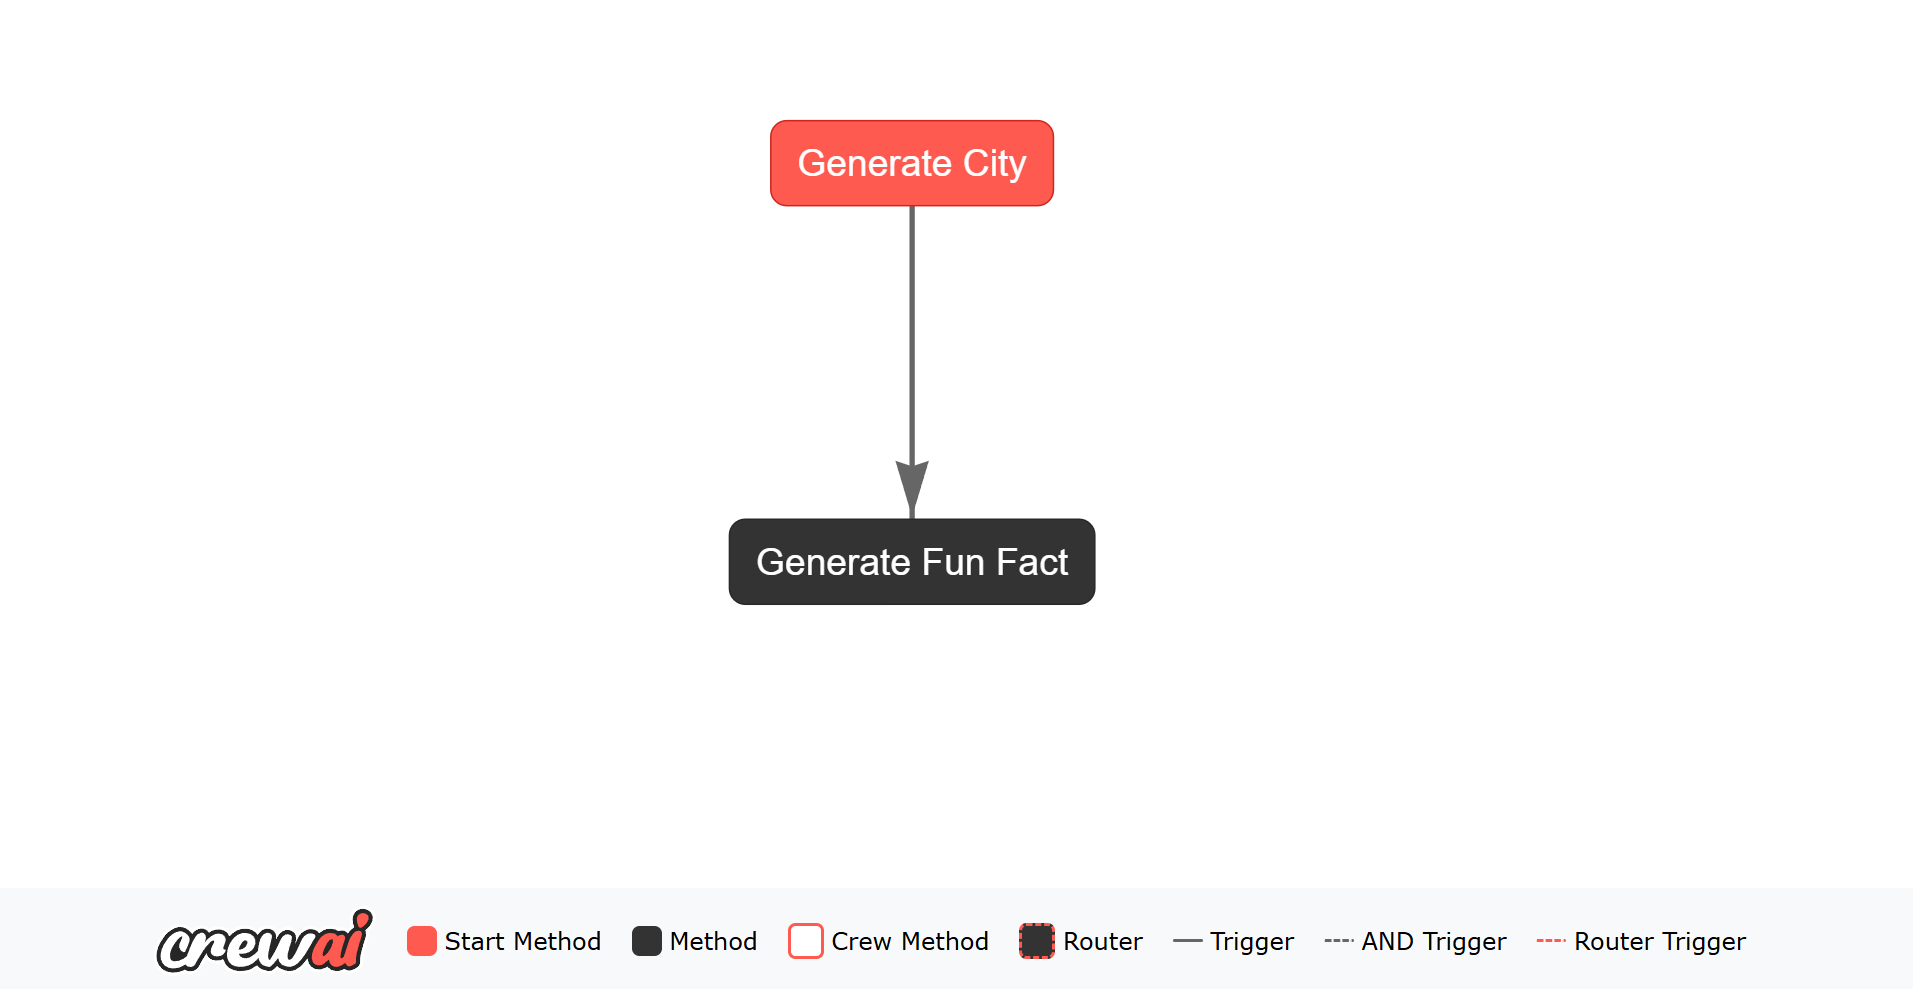 In the above example, we have created a simple Flow that generates a random city using OpenAI and then generates a fun fact about that city. The Flow consists of two tasks: `generate_city` and `generate_fun_fact`. The `generate_city` task is the starting point of the Flow, and the `generate_fun_fact` task listens for the output of the `generate_city` task.
Each Flow instance automatically receives a unique identifier (UUID) in its state, which helps track and manage flow executions. The state can also store additional data (like the generated city and fun fact) that persists throughout the flow's execution.
When you run the Flow, it will:
1. Generate a unique ID for the flow state
2. Generate a random city and store it in the state
3. Generate a fun fact about that city and store it in the state
4. Print the results to the console
The state's unique ID and stored data can be useful for tracking flow executions and maintaining context between tasks.
**Note:** Ensure you have set up your `.env` file to store your `OPENAI_API_KEY`. This key is necessary for authenticating requests to the OpenAI API.
### @start()
The `@start()` decorator marks entry points for a Flow. You can:
* Declare multiple unconditional starts: `@start()`
* Gate a start on a prior method or router label: `@start("method_or_label")`
* Provide a callable condition to control when a start should fire
All satisfied `@start()` methods will execute (often in parallel) when the Flow begins or resumes.
### @listen()
The `@listen()` decorator is used to mark a method as a listener for the output of another task in the Flow. The method decorated with `@listen()` will be executed when the specified task emits an output. The method can access the output of the task it is listening to as an argument.
#### Usage
The `@listen()` decorator can be used in several ways:
1. **Listening to a Method by Name**: You can pass the name of the method you want to listen to as a string. When that method completes, the listener method will be triggered.
```python Code theme={null}
@listen("generate_city")
def generate_fun_fact(self, random_city):
# Implementation
```
2. **Listening to a Method Directly**: You can pass the method itself. When that method completes, the listener method will be triggered.
```python Code theme={null}
@listen(generate_city)
def generate_fun_fact(self, random_city):
# Implementation
```
### Flow Output
Accessing and handling the output of a Flow is essential for integrating your AI workflows into larger applications or systems. CrewAI Flows provide straightforward mechanisms to retrieve the final output, access intermediate results, and manage the overall state of your Flow.
#### Retrieving the Final Output
When you run a Flow, the final output is determined by the last method that completes. The `kickoff()` method returns the output of this final method.
Here's how you can access the final output:
In the above example, we have created a simple Flow that generates a random city using OpenAI and then generates a fun fact about that city. The Flow consists of two tasks: `generate_city` and `generate_fun_fact`. The `generate_city` task is the starting point of the Flow, and the `generate_fun_fact` task listens for the output of the `generate_city` task.
Each Flow instance automatically receives a unique identifier (UUID) in its state, which helps track and manage flow executions. The state can also store additional data (like the generated city and fun fact) that persists throughout the flow's execution.
When you run the Flow, it will:
1. Generate a unique ID for the flow state
2. Generate a random city and store it in the state
3. Generate a fun fact about that city and store it in the state
4. Print the results to the console
The state's unique ID and stored data can be useful for tracking flow executions and maintaining context between tasks.
**Note:** Ensure you have set up your `.env` file to store your `OPENAI_API_KEY`. This key is necessary for authenticating requests to the OpenAI API.
### @start()
The `@start()` decorator marks entry points for a Flow. You can:
* Declare multiple unconditional starts: `@start()`
* Gate a start on a prior method or router label: `@start("method_or_label")`
* Provide a callable condition to control when a start should fire
All satisfied `@start()` methods will execute (often in parallel) when the Flow begins or resumes.
### @listen()
The `@listen()` decorator is used to mark a method as a listener for the output of another task in the Flow. The method decorated with `@listen()` will be executed when the specified task emits an output. The method can access the output of the task it is listening to as an argument.
#### Usage
The `@listen()` decorator can be used in several ways:
1. **Listening to a Method by Name**: You can pass the name of the method you want to listen to as a string. When that method completes, the listener method will be triggered.
```python Code theme={null}
@listen("generate_city")
def generate_fun_fact(self, random_city):
# Implementation
```
2. **Listening to a Method Directly**: You can pass the method itself. When that method completes, the listener method will be triggered.
```python Code theme={null}
@listen(generate_city)
def generate_fun_fact(self, random_city):
# Implementation
```
### Flow Output
Accessing and handling the output of a Flow is essential for integrating your AI workflows into larger applications or systems. CrewAI Flows provide straightforward mechanisms to retrieve the final output, access intermediate results, and manage the overall state of your Flow.
#### Retrieving the Final Output
When you run a Flow, the final output is determined by the last method that completes. The `kickoff()` method returns the output of this final method.
Here's how you can access the final output:
 In this example, the `second_method` is the last method to complete, so its output will be the final output of the Flow.
The `kickoff()` method will return the final output, which is then printed to the console. The `plot()` method will generate the HTML file, which will help you understand the flow.
#### Accessing and Updating State
In addition to retrieving the final output, you can also access and update the state within your Flow. The state can be used to store and share data between different methods in the Flow. After the Flow has run, you can access the state to retrieve any information that was added or updated during the execution.
Here's an example of how to update and access the state:
In this example, the state is updated by both `first_method` and `second_method`.
After the Flow has run, you can access the final state to see the updates made by these methods.
By ensuring that the final method's output is returned and providing access to the state, CrewAI Flows make it easy to integrate the results of your AI workflows into larger applications or systems,
while also maintaining and accessing the state throughout the Flow's execution.
## Flow State Management
Managing state effectively is crucial for building reliable and maintainable AI workflows. CrewAI Flows provides robust mechanisms for both unstructured and structured state management,
allowing developers to choose the approach that best fits their application's needs.
### Unstructured State Management
In unstructured state management, all state is stored in the `state` attribute of the `Flow` class.
This approach offers flexibility, enabling developers to add or modify state attributes on the fly without defining a strict schema.
Even with unstructured states, CrewAI Flows automatically generates and maintains a unique identifier (UUID) for each state instance.
```python Code theme={null}
from crewai.flow.flow import Flow, listen, start
class UnstructuredExampleFlow(Flow):
@start()
def first_method(self):
# The state automatically includes an 'id' field
print(f"State ID: {self.state['id']}")
self.state['counter'] = 0
self.state['message'] = "Hello from structured flow"
@listen(first_method)
def second_method(self):
self.state['counter'] += 1
self.state['message'] += " - updated"
@listen(second_method)
def third_method(self):
self.state['counter'] += 1
self.state['message'] += " - updated again"
print(f"State after third_method: {self.state}")
flow = UnstructuredExampleFlow()
flow.plot("my_flow_plot")
flow.kickoff()
```
In this example, the `second_method` is the last method to complete, so its output will be the final output of the Flow.
The `kickoff()` method will return the final output, which is then printed to the console. The `plot()` method will generate the HTML file, which will help you understand the flow.
#### Accessing and Updating State
In addition to retrieving the final output, you can also access and update the state within your Flow. The state can be used to store and share data between different methods in the Flow. After the Flow has run, you can access the state to retrieve any information that was added or updated during the execution.
Here's an example of how to update and access the state:
In this example, the state is updated by both `first_method` and `second_method`.
After the Flow has run, you can access the final state to see the updates made by these methods.
By ensuring that the final method's output is returned and providing access to the state, CrewAI Flows make it easy to integrate the results of your AI workflows into larger applications or systems,
while also maintaining and accessing the state throughout the Flow's execution.
## Flow State Management
Managing state effectively is crucial for building reliable and maintainable AI workflows. CrewAI Flows provides robust mechanisms for both unstructured and structured state management,
allowing developers to choose the approach that best fits their application's needs.
### Unstructured State Management
In unstructured state management, all state is stored in the `state` attribute of the `Flow` class.
This approach offers flexibility, enabling developers to add or modify state attributes on the fly without defining a strict schema.
Even with unstructured states, CrewAI Flows automatically generates and maintains a unique identifier (UUID) for each state instance.
```python Code theme={null}
from crewai.flow.flow import Flow, listen, start
class UnstructuredExampleFlow(Flow):
@start()
def first_method(self):
# The state automatically includes an 'id' field
print(f"State ID: {self.state['id']}")
self.state['counter'] = 0
self.state['message'] = "Hello from structured flow"
@listen(first_method)
def second_method(self):
self.state['counter'] += 1
self.state['message'] += " - updated"
@listen(second_method)
def third_method(self):
self.state['counter'] += 1
self.state['message'] += " - updated again"
print(f"State after third_method: {self.state}")
flow = UnstructuredExampleFlow()
flow.plot("my_flow_plot")
flow.kickoff()
```
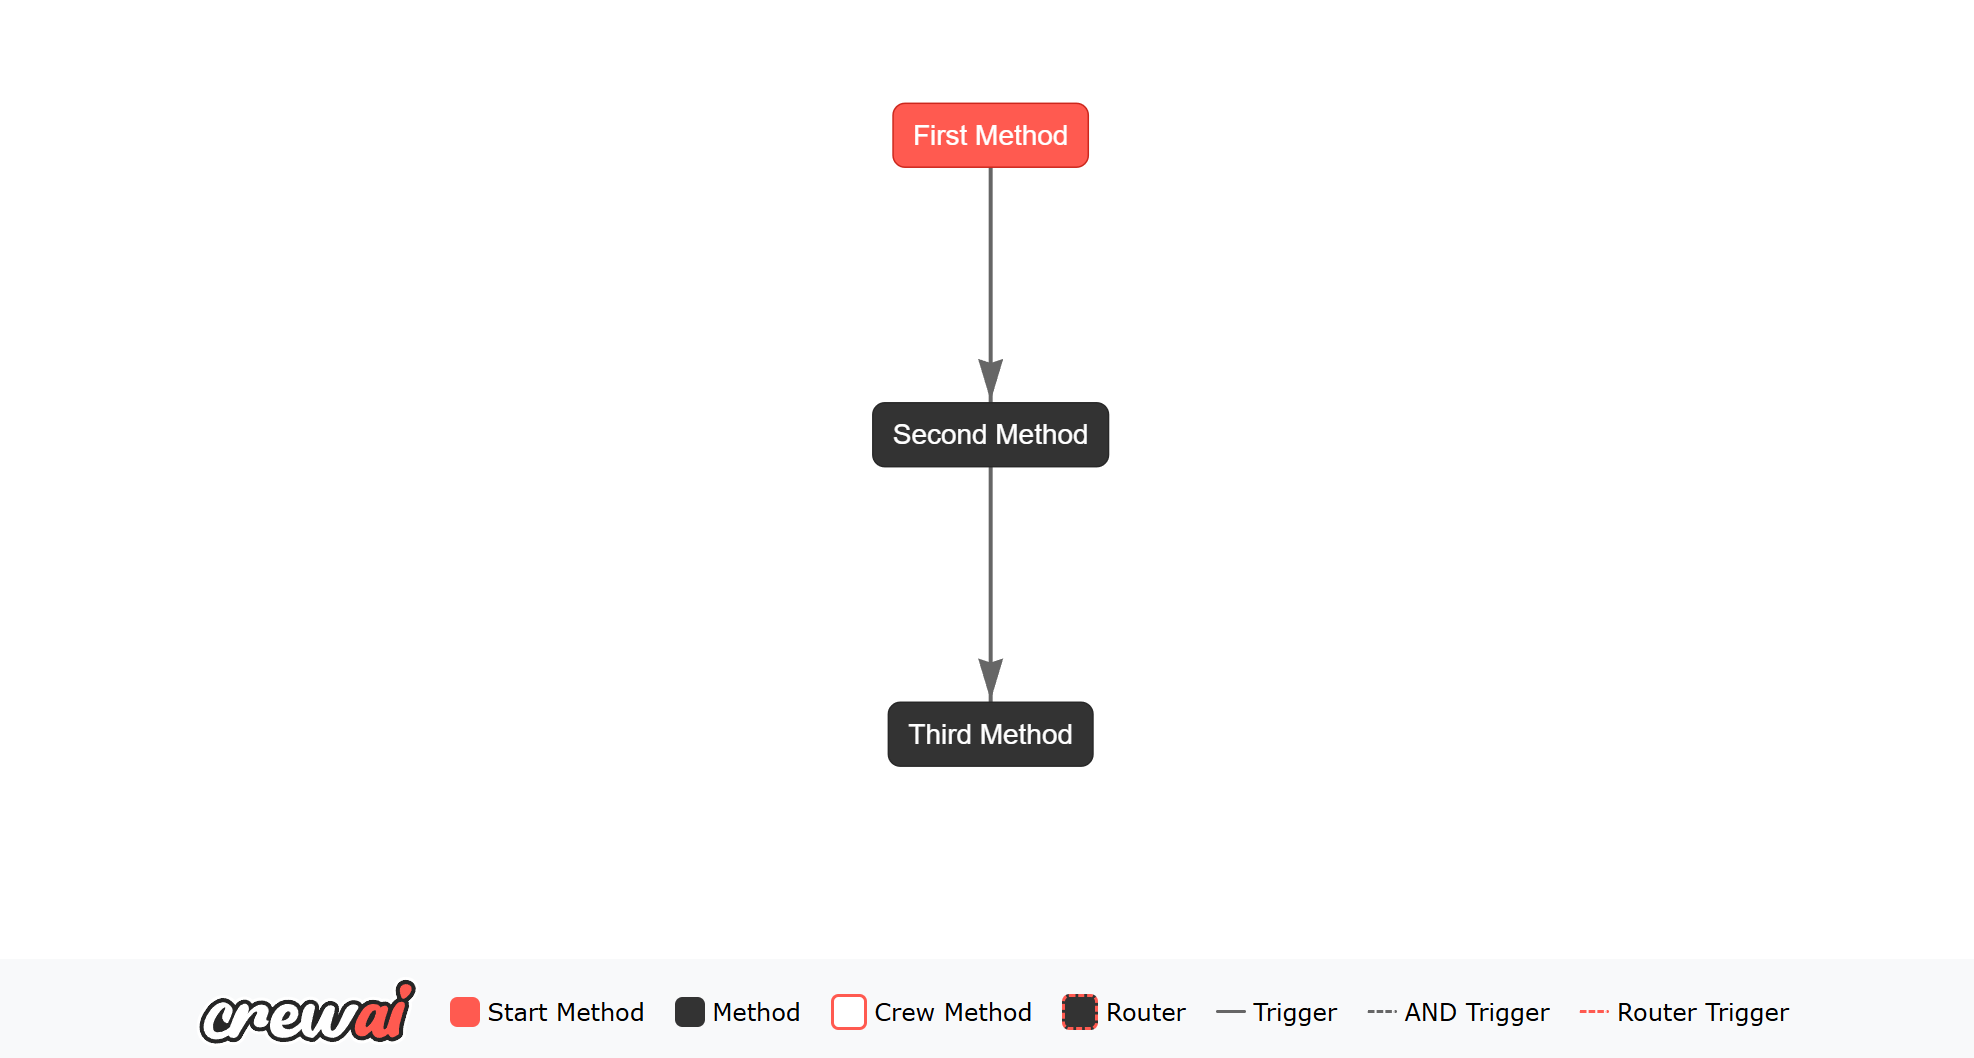 **Note:** The `id` field is automatically generated and preserved throughout the flow's execution. You don't need to manage or set it manually, and it will be maintained even when updating the state with new data.
**Key Points:**
* **Flexibility:** You can dynamically add attributes to `self.state` without predefined constraints.
* **Simplicity:** Ideal for straightforward workflows where state structure is minimal or varies significantly.
### Structured State Management
Structured state management leverages predefined schemas to ensure consistency and type safety across the workflow.
By using models like Pydantic's `BaseModel`, developers can define the exact shape of the state, enabling better validation and auto-completion in development environments.
Each state in CrewAI Flows automatically receives a unique identifier (UUID) to help track and manage state instances. This ID is automatically generated and managed by the Flow system.
```python Code theme={null}
from crewai.flow.flow import Flow, listen, start
from pydantic import BaseModel
class ExampleState(BaseModel):
# Note: 'id' field is automatically added to all states
counter: int = 0
message: str = ""
class StructuredExampleFlow(Flow[ExampleState]):
@start()
def first_method(self):
# Access the auto-generated ID if needed
print(f"State ID: {self.state.id}")
self.state.message = "Hello from structured flow"
@listen(first_method)
def second_method(self):
self.state.counter += 1
self.state.message += " - updated"
@listen(second_method)
def third_method(self):
self.state.counter += 1
self.state.message += " - updated again"
print(f"State after third_method: {self.state}")
flow = StructuredExampleFlow()
flow.kickoff()
```
**Key Points:**
* **Defined Schema:** `ExampleState` clearly outlines the state structure, enhancing code readability and maintainability.
* **Type Safety:** Leveraging Pydantic ensures that state attributes adhere to the specified types, reducing runtime errors.
* **Auto-Completion:** IDEs can provide better auto-completion and error checking based on the defined state model.
### Choosing Between Unstructured and Structured State Management
* **Use Unstructured State Management when:**
* The workflow's state is simple or highly dynamic.
* Flexibility is prioritized over strict state definitions.
* Rapid prototyping is required without the overhead of defining schemas.
* **Use Structured State Management when:**
* The workflow requires a well-defined and consistent state structure.
* Type safety and validation are important for your application's reliability.
* You want to leverage IDE features like auto-completion and type checking for better developer experience.
By providing both unstructured and structured state management options, CrewAI Flows empowers developers to build AI workflows that are both flexible and robust, catering to a wide range of application requirements.
## Flow Persistence
The @persist decorator enables automatic state persistence in CrewAI Flows, allowing you to maintain flow state across restarts or different workflow executions. This decorator can be applied at either the class level or method level, providing flexibility in how you manage state persistence.
### Class-Level Persistence
When applied at the class level, the @persist decorator automatically persists all flow method states:
```python theme={null}
@persist # Using SQLiteFlowPersistence by default
class MyFlow(Flow[MyState]):
@start()
def initialize_flow(self):
# This method will automatically have its state persisted
self.state.counter = 1
print("Initialized flow. State ID:", self.state.id)
@listen(initialize_flow)
def next_step(self):
# The state (including self.state.id) is automatically reloaded
self.state.counter += 1
print("Flow state is persisted. Counter:", self.state.counter)
```
### Method-Level Persistence
For more granular control, you can apply @persist to specific methods:
```python theme={null}
class AnotherFlow(Flow[dict]):
@persist # Persists only this method's state
@start()
def begin(self):
if "runs" not in self.state:
self.state["runs"] = 0
self.state["runs"] += 1
print("Method-level persisted runs:", self.state["runs"])
```
### How It Works
1. **Unique State Identification**
* Each flow state automatically receives a unique UUID
* The ID is preserved across state updates and method calls
* Supports both structured (Pydantic BaseModel) and unstructured (dictionary) states
2. **Default SQLite Backend**
* SQLiteFlowPersistence is the default storage backend
* States are automatically saved to a local SQLite database
* Robust error handling ensures clear messages if database operations fail
3. **Error Handling**
* Comprehensive error messages for database operations
* Automatic state validation during save and load
* Clear feedback when persistence operations encounter issues
### Important Considerations
* **State Types**: Both structured (Pydantic BaseModel) and unstructured (dictionary) states are supported
* **Automatic ID**: The `id` field is automatically added if not present
* **State Recovery**: Failed or restarted flows can automatically reload their previous state
* **Custom Implementation**: You can provide your own FlowPersistence implementation for specialized storage needs
### Technical Advantages
1. **Precise Control Through Low-Level Access**
* Direct access to persistence operations for advanced use cases
* Fine-grained control via method-level persistence decorators
* Built-in state inspection and debugging capabilities
* Full visibility into state changes and persistence operations
2. **Enhanced Reliability**
* Automatic state recovery after system failures or restarts
* Transaction-based state updates for data integrity
* Comprehensive error handling with clear error messages
* Robust validation during state save and load operations
3. **Extensible Architecture**
* Customizable persistence backend through FlowPersistence interface
* Support for specialized storage solutions beyond SQLite
* Compatible with both structured (Pydantic) and unstructured (dict) states
* Seamless integration with existing CrewAI flow patterns
The persistence system's architecture emphasizes technical precision and customization options, allowing developers to maintain full control over state management while benefiting from built-in reliability features.
## Flow Control
### Conditional Logic: `or`
The `or_` function in Flows allows you to listen to multiple methods and trigger the listener method when any of the specified methods emit an output.
**Note:** The `id` field is automatically generated and preserved throughout the flow's execution. You don't need to manage or set it manually, and it will be maintained even when updating the state with new data.
**Key Points:**
* **Flexibility:** You can dynamically add attributes to `self.state` without predefined constraints.
* **Simplicity:** Ideal for straightforward workflows where state structure is minimal or varies significantly.
### Structured State Management
Structured state management leverages predefined schemas to ensure consistency and type safety across the workflow.
By using models like Pydantic's `BaseModel`, developers can define the exact shape of the state, enabling better validation and auto-completion in development environments.
Each state in CrewAI Flows automatically receives a unique identifier (UUID) to help track and manage state instances. This ID is automatically generated and managed by the Flow system.
```python Code theme={null}
from crewai.flow.flow import Flow, listen, start
from pydantic import BaseModel
class ExampleState(BaseModel):
# Note: 'id' field is automatically added to all states
counter: int = 0
message: str = ""
class StructuredExampleFlow(Flow[ExampleState]):
@start()
def first_method(self):
# Access the auto-generated ID if needed
print(f"State ID: {self.state.id}")
self.state.message = "Hello from structured flow"
@listen(first_method)
def second_method(self):
self.state.counter += 1
self.state.message += " - updated"
@listen(second_method)
def third_method(self):
self.state.counter += 1
self.state.message += " - updated again"
print(f"State after third_method: {self.state}")
flow = StructuredExampleFlow()
flow.kickoff()
```
**Key Points:**
* **Defined Schema:** `ExampleState` clearly outlines the state structure, enhancing code readability and maintainability.
* **Type Safety:** Leveraging Pydantic ensures that state attributes adhere to the specified types, reducing runtime errors.
* **Auto-Completion:** IDEs can provide better auto-completion and error checking based on the defined state model.
### Choosing Between Unstructured and Structured State Management
* **Use Unstructured State Management when:**
* The workflow's state is simple or highly dynamic.
* Flexibility is prioritized over strict state definitions.
* Rapid prototyping is required without the overhead of defining schemas.
* **Use Structured State Management when:**
* The workflow requires a well-defined and consistent state structure.
* Type safety and validation are important for your application's reliability.
* You want to leverage IDE features like auto-completion and type checking for better developer experience.
By providing both unstructured and structured state management options, CrewAI Flows empowers developers to build AI workflows that are both flexible and robust, catering to a wide range of application requirements.
## Flow Persistence
The @persist decorator enables automatic state persistence in CrewAI Flows, allowing you to maintain flow state across restarts or different workflow executions. This decorator can be applied at either the class level or method level, providing flexibility in how you manage state persistence.
### Class-Level Persistence
When applied at the class level, the @persist decorator automatically persists all flow method states:
```python theme={null}
@persist # Using SQLiteFlowPersistence by default
class MyFlow(Flow[MyState]):
@start()
def initialize_flow(self):
# This method will automatically have its state persisted
self.state.counter = 1
print("Initialized flow. State ID:", self.state.id)
@listen(initialize_flow)
def next_step(self):
# The state (including self.state.id) is automatically reloaded
self.state.counter += 1
print("Flow state is persisted. Counter:", self.state.counter)
```
### Method-Level Persistence
For more granular control, you can apply @persist to specific methods:
```python theme={null}
class AnotherFlow(Flow[dict]):
@persist # Persists only this method's state
@start()
def begin(self):
if "runs" not in self.state:
self.state["runs"] = 0
self.state["runs"] += 1
print("Method-level persisted runs:", self.state["runs"])
```
### How It Works
1. **Unique State Identification**
* Each flow state automatically receives a unique UUID
* The ID is preserved across state updates and method calls
* Supports both structured (Pydantic BaseModel) and unstructured (dictionary) states
2. **Default SQLite Backend**
* SQLiteFlowPersistence is the default storage backend
* States are automatically saved to a local SQLite database
* Robust error handling ensures clear messages if database operations fail
3. **Error Handling**
* Comprehensive error messages for database operations
* Automatic state validation during save and load
* Clear feedback when persistence operations encounter issues
### Important Considerations
* **State Types**: Both structured (Pydantic BaseModel) and unstructured (dictionary) states are supported
* **Automatic ID**: The `id` field is automatically added if not present
* **State Recovery**: Failed or restarted flows can automatically reload their previous state
* **Custom Implementation**: You can provide your own FlowPersistence implementation for specialized storage needs
### Technical Advantages
1. **Precise Control Through Low-Level Access**
* Direct access to persistence operations for advanced use cases
* Fine-grained control via method-level persistence decorators
* Built-in state inspection and debugging capabilities
* Full visibility into state changes and persistence operations
2. **Enhanced Reliability**
* Automatic state recovery after system failures or restarts
* Transaction-based state updates for data integrity
* Comprehensive error handling with clear error messages
* Robust validation during state save and load operations
3. **Extensible Architecture**
* Customizable persistence backend through FlowPersistence interface
* Support for specialized storage solutions beyond SQLite
* Compatible with both structured (Pydantic) and unstructured (dict) states
* Seamless integration with existing CrewAI flow patterns
The persistence system's architecture emphasizes technical precision and customization options, allowing developers to maintain full control over state management while benefiting from built-in reliability features.
## Flow Control
### Conditional Logic: `or`
The `or_` function in Flows allows you to listen to multiple methods and trigger the listener method when any of the specified methods emit an output.
 When you run this Flow, the `logger` method will be triggered by the output of either the `start_method` or the `second_method`.
The `or_` function is used to listen to multiple methods and trigger the listener method when any of the specified methods emit an output.
### Conditional Logic: `and`
The `and_` function in Flows allows you to listen to multiple methods and trigger the listener method only when all the specified methods emit an output.
When you run this Flow, the `logger` method will be triggered by the output of either the `start_method` or the `second_method`.
The `or_` function is used to listen to multiple methods and trigger the listener method when any of the specified methods emit an output.
### Conditional Logic: `and`
The `and_` function in Flows allows you to listen to multiple methods and trigger the listener method only when all the specified methods emit an output.
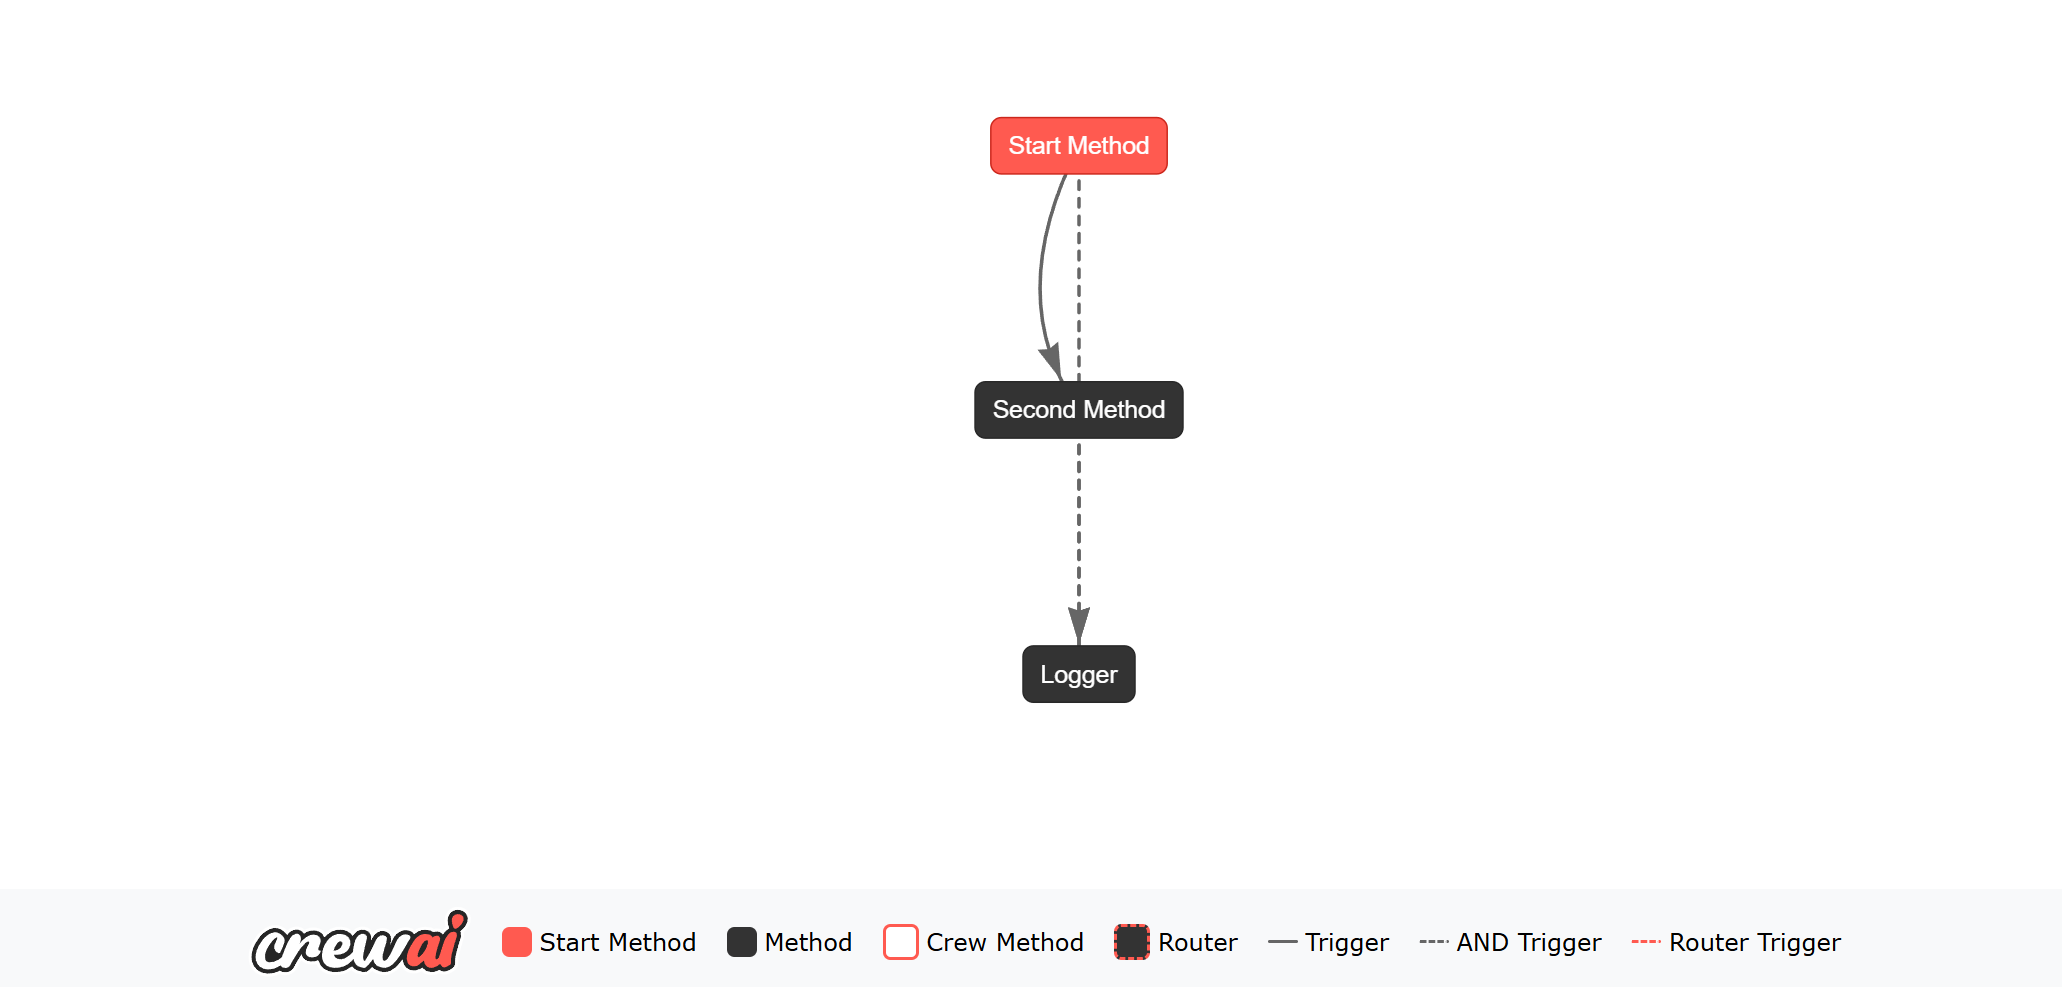 When you run this Flow, the `logger` method will be triggered only when both the `start_method` and the `second_method` emit an output.
The `and_` function is used to listen to multiple methods and trigger the listener method only when all the specified methods emit an output.
### Router
The `@router()` decorator in Flows allows you to define conditional routing logic based on the output of a method.
You can specify different routes based on the output of the method, allowing you to control the flow of execution dynamically.
When you run this Flow, the `logger` method will be triggered only when both the `start_method` and the `second_method` emit an output.
The `and_` function is used to listen to multiple methods and trigger the listener method only when all the specified methods emit an output.
### Router
The `@router()` decorator in Flows allows you to define conditional routing logic based on the output of a method.
You can specify different routes based on the output of the method, allowing you to control the flow of execution dynamically.
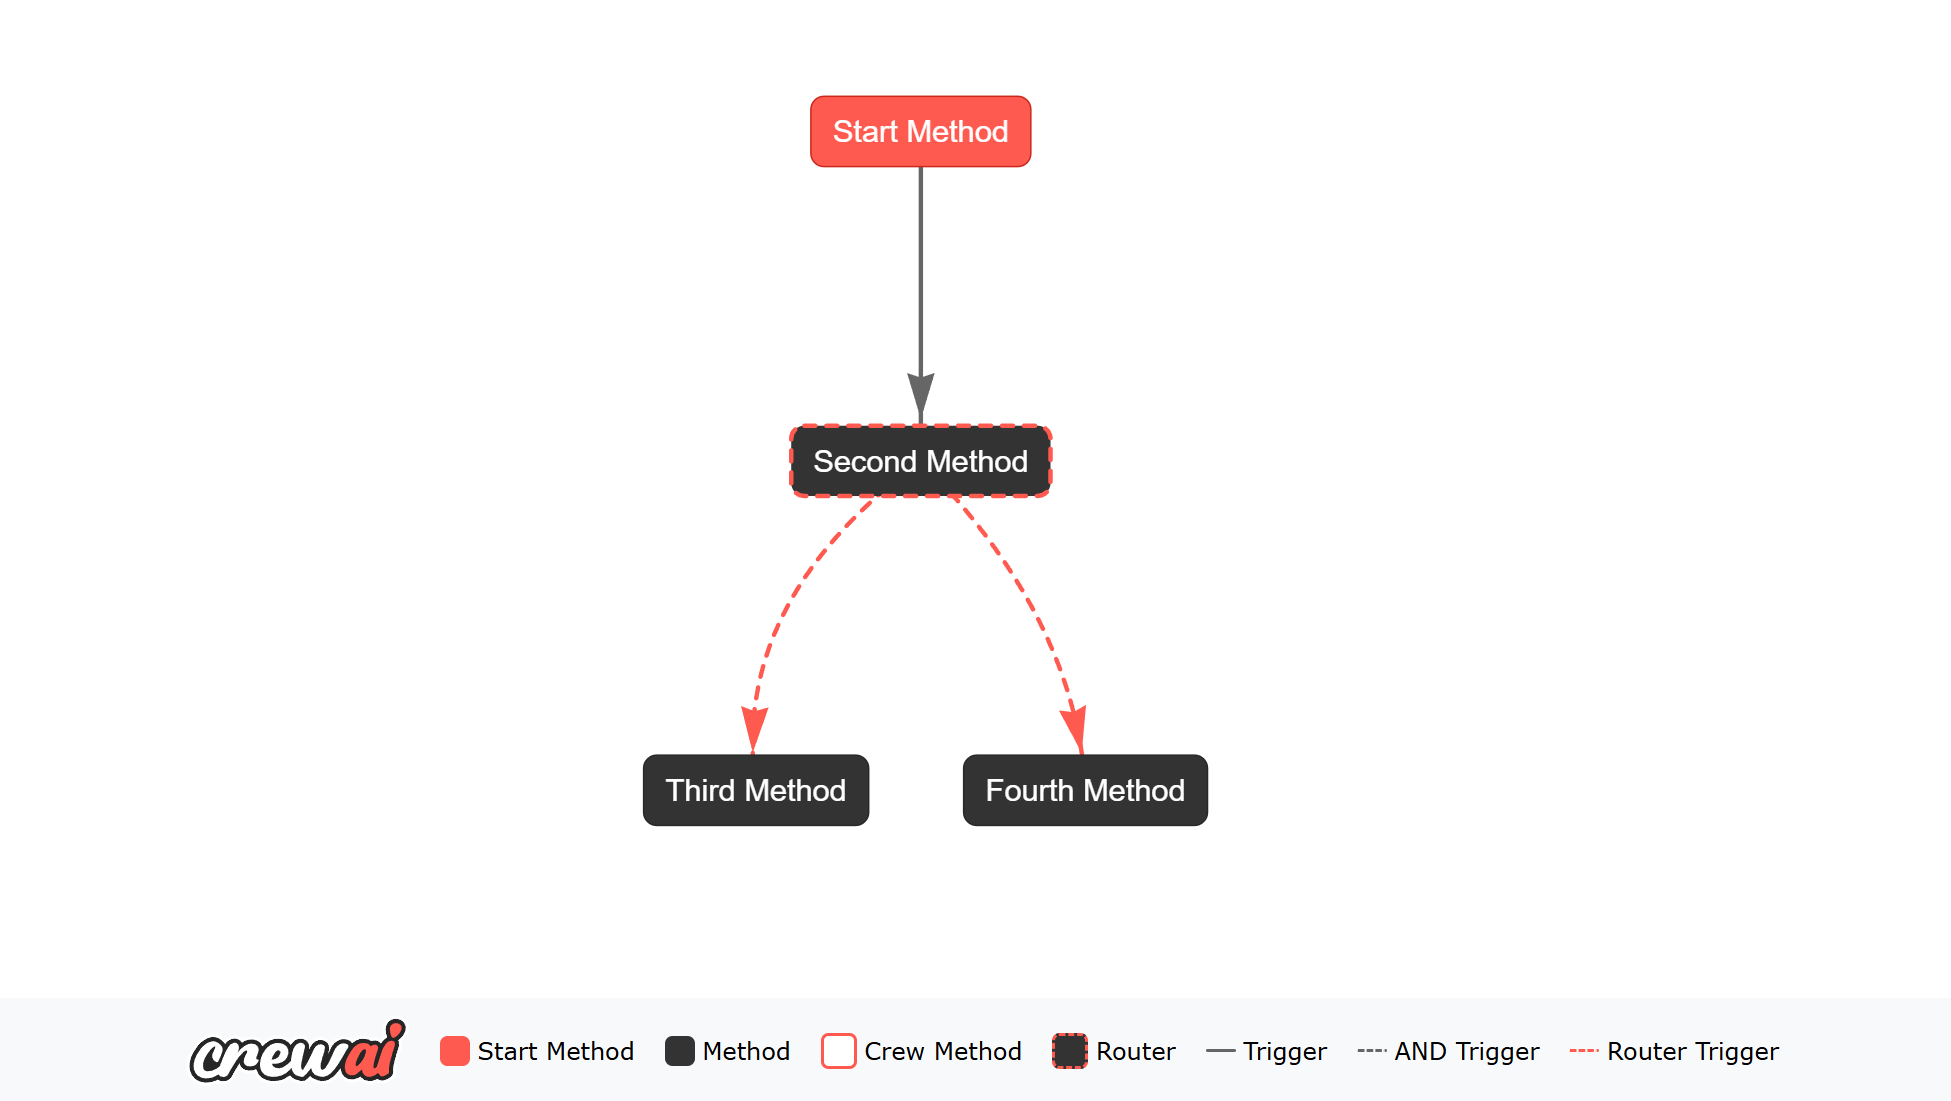 In the above example, the `start_method` generates a random boolean value and sets it in the state.
The `second_method` uses the `@router()` decorator to define conditional routing logic based on the value of the boolean.
If the boolean is `True`, the method returns `"success"`, and if it is `False`, the method returns `"failed"`.
The `third_method` and `fourth_method` listen to the output of the `second_method` and execute based on the returned value.
When you run this Flow, the output will change based on the random boolean value generated by the `start_method`.
### Human in the Loop (human feedback)
In the above example, the `start_method` generates a random boolean value and sets it in the state.
The `second_method` uses the `@router()` decorator to define conditional routing logic based on the value of the boolean.
If the boolean is `True`, the method returns `"success"`, and if it is `False`, the method returns `"failed"`.
The `third_method` and `fourth_method` listen to the output of the `second_method` and execute based on the returned value.
When you run this Flow, the output will change based on the random boolean value generated by the `start_method`.
### Human in the Loop (human feedback)
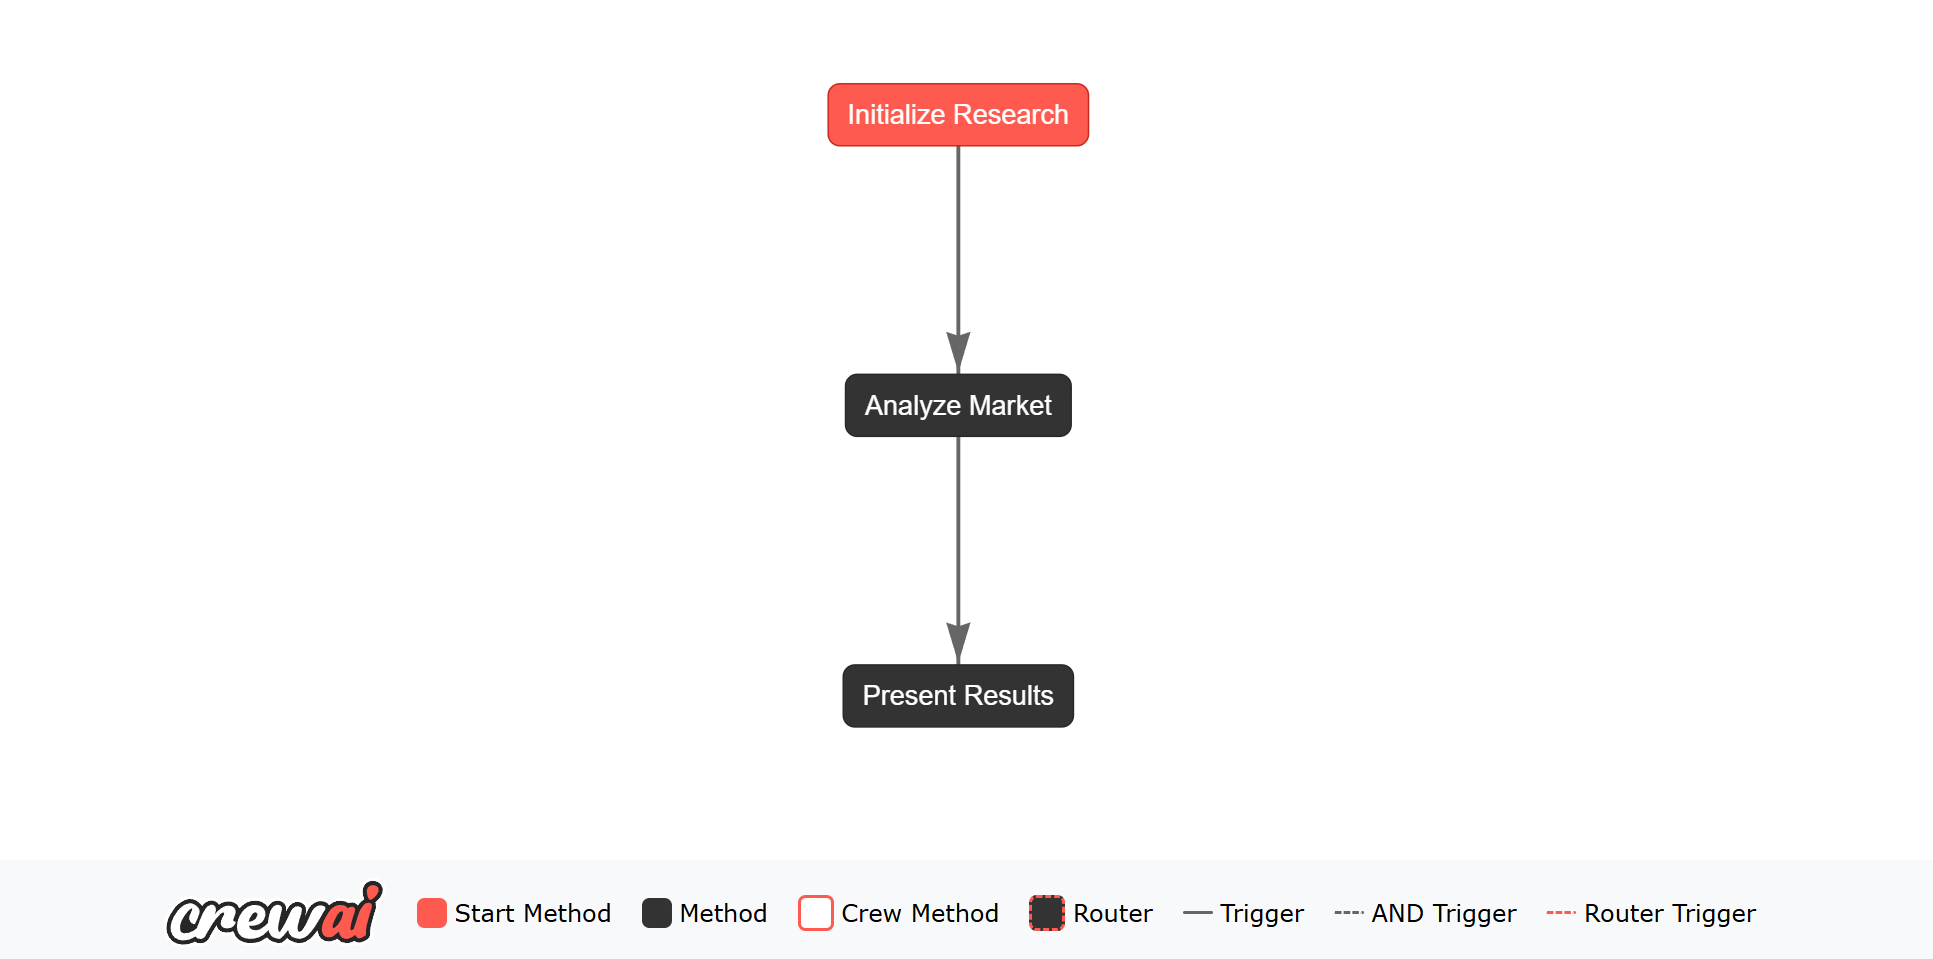 This example demonstrates several key features of using Agents in flows:
1. **Structured Output**: Using Pydantic models to define the expected output format (`MarketAnalysis`) ensures type safety and structured data throughout the flow.
2. **State Management**: The flow state (`MarketResearchState`) maintains context between steps and stores both inputs and outputs.
3. **Tool Integration**: Agents can use tools (like `WebsiteSearchTool`) to enhance their capabilities.
## Adding Crews to Flows
Creating a flow with multiple crews in CrewAI is straightforward.
You can generate a new CrewAI project that includes all the scaffolding needed to create a flow with multiple crews by running the following command:
```bash theme={null}
crewai create flow name_of_flow
```
This command will generate a new CrewAI project with the necessary folder structure. The generated project includes a prebuilt crew called `poem_crew` that is already working. You can use this crew as a template by copying, pasting, and editing it to create other crews.
### Folder Structure
After running the `crewai create flow name_of_flow` command, you will see a folder structure similar to the following:
| Directory/File | Description |
| :--------------------- | :------------------------------------------------------------------ |
| `name_of_flow/` | Root directory for the flow. |
| ├── `crews/` | Contains directories for specific crews. |
| │ └── `poem_crew/` | Directory for the "poem\_crew" with its configurations and scripts. |
| │ ├── `config/` | Configuration files directory for the "poem\_crew". |
| │ │ ├── `agents.yaml` | YAML file defining the agents for "poem\_crew". |
| │ │ └── `tasks.yaml` | YAML file defining the tasks for "poem\_crew". |
| │ ├── `poem_crew.py` | Script for "poem\_crew" functionality. |
| ├── `tools/` | Directory for additional tools used in the flow. |
| │ └── `custom_tool.py` | Custom tool implementation. |
| ├── `main.py` | Main script for running the flow. |
| ├── `README.md` | Project description and instructions. |
| ├── `pyproject.toml` | Configuration file for project dependencies and settings. |
| └── `.gitignore` | Specifies files and directories to ignore in version control. |
### Building Your Crews
In the `crews` folder, you can define multiple crews. Each crew will have its own folder containing configuration files and the crew definition file. For example, the `poem_crew` folder contains:
* `config/agents.yaml`: Defines the agents for the crew.
* `config/tasks.yaml`: Defines the tasks for the crew.
* `poem_crew.py`: Contains the crew definition, including agents, tasks, and the crew itself.
You can copy, paste, and edit the `poem_crew` to create other crews.
### Connecting Crews in `main.py`
The `main.py` file is where you create your flow and connect the crews together. You can define your flow by using the `Flow` class and the decorators `@start` and `@listen` to specify the flow of execution.
Here's an example of how you can connect the `poem_crew` in the `main.py` file:
```python Code theme={null}
#!/usr/bin/env python
from random import randint
from pydantic import BaseModel
from crewai.flow.flow import Flow, listen, start
from .crews.poem_crew.poem_crew import PoemCrew
class PoemState(BaseModel):
sentence_count: int = 1
poem: str = ""
class PoemFlow(Flow[PoemState]):
@start()
def generate_sentence_count(self):
print("Generating sentence count")
self.state.sentence_count = randint(1, 5)
@listen(generate_sentence_count)
def generate_poem(self):
print("Generating poem")
result = PoemCrew().crew().kickoff(inputs={"sentence_count": self.state.sentence_count})
print("Poem generated", result.raw)
self.state.poem = result.raw
@listen(generate_poem)
def save_poem(self):
print("Saving poem")
with open("poem.txt", "w") as f:
f.write(self.state.poem)
def kickoff():
poem_flow = PoemFlow()
poem_flow.kickoff()
def plot():
poem_flow = PoemFlow()
poem_flow.plot("PoemFlowPlot")
if __name__ == "__main__":
kickoff()
plot()
```
In this example, the `PoemFlow` class defines a flow that generates a sentence count, uses the `PoemCrew` to generate a poem, and then saves the poem to a file. The flow is kicked off by calling the `kickoff()` method. The PoemFlowPlot will be generated by `plot()` method.
This example demonstrates several key features of using Agents in flows:
1. **Structured Output**: Using Pydantic models to define the expected output format (`MarketAnalysis`) ensures type safety and structured data throughout the flow.
2. **State Management**: The flow state (`MarketResearchState`) maintains context between steps and stores both inputs and outputs.
3. **Tool Integration**: Agents can use tools (like `WebsiteSearchTool`) to enhance their capabilities.
## Adding Crews to Flows
Creating a flow with multiple crews in CrewAI is straightforward.
You can generate a new CrewAI project that includes all the scaffolding needed to create a flow with multiple crews by running the following command:
```bash theme={null}
crewai create flow name_of_flow
```
This command will generate a new CrewAI project with the necessary folder structure. The generated project includes a prebuilt crew called `poem_crew` that is already working. You can use this crew as a template by copying, pasting, and editing it to create other crews.
### Folder Structure
After running the `crewai create flow name_of_flow` command, you will see a folder structure similar to the following:
| Directory/File | Description |
| :--------------------- | :------------------------------------------------------------------ |
| `name_of_flow/` | Root directory for the flow. |
| ├── `crews/` | Contains directories for specific crews. |
| │ └── `poem_crew/` | Directory for the "poem\_crew" with its configurations and scripts. |
| │ ├── `config/` | Configuration files directory for the "poem\_crew". |
| │ │ ├── `agents.yaml` | YAML file defining the agents for "poem\_crew". |
| │ │ └── `tasks.yaml` | YAML file defining the tasks for "poem\_crew". |
| │ ├── `poem_crew.py` | Script for "poem\_crew" functionality. |
| ├── `tools/` | Directory for additional tools used in the flow. |
| │ └── `custom_tool.py` | Custom tool implementation. |
| ├── `main.py` | Main script for running the flow. |
| ├── `README.md` | Project description and instructions. |
| ├── `pyproject.toml` | Configuration file for project dependencies and settings. |
| └── `.gitignore` | Specifies files and directories to ignore in version control. |
### Building Your Crews
In the `crews` folder, you can define multiple crews. Each crew will have its own folder containing configuration files and the crew definition file. For example, the `poem_crew` folder contains:
* `config/agents.yaml`: Defines the agents for the crew.
* `config/tasks.yaml`: Defines the tasks for the crew.
* `poem_crew.py`: Contains the crew definition, including agents, tasks, and the crew itself.
You can copy, paste, and edit the `poem_crew` to create other crews.
### Connecting Crews in `main.py`
The `main.py` file is where you create your flow and connect the crews together. You can define your flow by using the `Flow` class and the decorators `@start` and `@listen` to specify the flow of execution.
Here's an example of how you can connect the `poem_crew` in the `main.py` file:
```python Code theme={null}
#!/usr/bin/env python
from random import randint
from pydantic import BaseModel
from crewai.flow.flow import Flow, listen, start
from .crews.poem_crew.poem_crew import PoemCrew
class PoemState(BaseModel):
sentence_count: int = 1
poem: str = ""
class PoemFlow(Flow[PoemState]):
@start()
def generate_sentence_count(self):
print("Generating sentence count")
self.state.sentence_count = randint(1, 5)
@listen(generate_sentence_count)
def generate_poem(self):
print("Generating poem")
result = PoemCrew().crew().kickoff(inputs={"sentence_count": self.state.sentence_count})
print("Poem generated", result.raw)
self.state.poem = result.raw
@listen(generate_poem)
def save_poem(self):
print("Saving poem")
with open("poem.txt", "w") as f:
f.write(self.state.poem)
def kickoff():
poem_flow = PoemFlow()
poem_flow.kickoff()
def plot():
poem_flow = PoemFlow()
poem_flow.plot("PoemFlowPlot")
if __name__ == "__main__":
kickoff()
plot()
```
In this example, the `PoemFlow` class defines a flow that generates a sentence count, uses the `PoemCrew` to generate a poem, and then saves the poem to a file. The flow is kicked off by calling the `kickoff()` method. The PoemFlowPlot will be generated by `plot()` method.
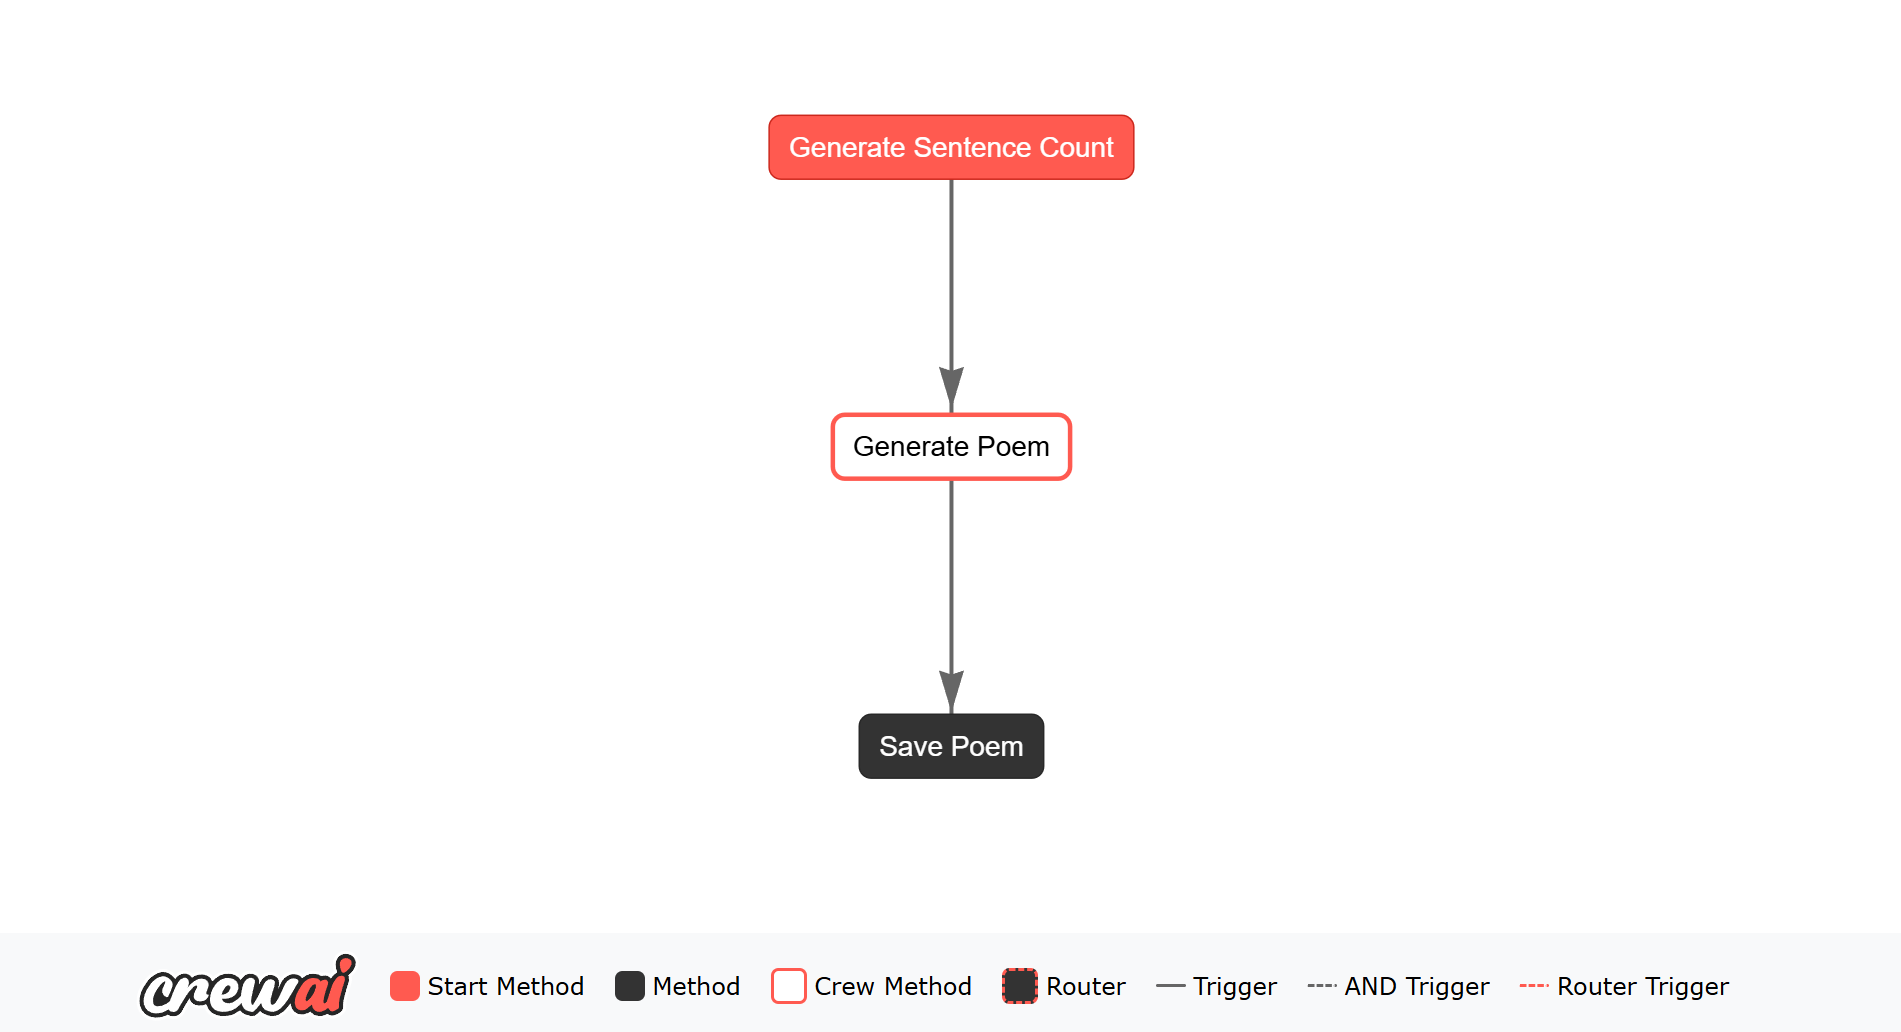 ### Running the Flow
(Optional) Before running the flow, you can install the dependencies by running:
```bash theme={null}
crewai install
```
Once all of the dependencies are installed, you need to activate the virtual environment by running:
```bash theme={null}
source .venv/bin/activate
```
After activating the virtual environment, you can run the flow by executing one of the following commands:
```bash theme={null}
crewai flow kickoff
```
or
```bash theme={null}
uv run kickoff
```
The flow will execute, and you should see the output in the console.
## Plot Flows
Visualizing your AI workflows can provide valuable insights into the structure and execution paths of your flows. CrewAI offers a powerful visualization tool that allows you to generate interactive plots of your flows, making it easier to understand and optimize your AI workflows.
### What are Plots?
Plots in CrewAI are graphical representations of your AI workflows. They display the various tasks, their connections, and the flow of data between them. This visualization helps in understanding the sequence of operations, identifying bottlenecks, and ensuring that the workflow logic aligns with your expectations.
### How to Generate a Plot
CrewAI provides two convenient methods to generate plots of your flows:
#### Option 1: Using the `plot()` Method
If you are working directly with a flow instance, you can generate a plot by calling the `plot()` method on your flow object. This method will create an HTML file containing the interactive plot of your flow.
```python Code theme={null}
# Assuming you have a flow instance
flow.plot("my_flow_plot")
```
This will generate a file named `my_flow_plot.html` in your current directory. You can open this file in a web browser to view the interactive plot.
#### Option 2: Using the Command Line
If you are working within a structured CrewAI project, you can generate a plot using the command line. This is particularly useful for larger projects where you want to visualize the entire flow setup.
```bash theme={null}
crewai flow plot
```
This command will generate an HTML file with the plot of your flow, similar to the `plot()` method. The file will be saved in your project directory, and you can open it in a web browser to explore the flow.
### Understanding the Plot
The generated plot will display nodes representing the tasks in your flow, with directed edges indicating the flow of execution. The plot is interactive, allowing you to zoom in and out, and hover over nodes to see additional details.
By visualizing your flows, you can gain a clearer understanding of the workflow's structure, making it easier to debug, optimize, and communicate your AI processes to others.
### Conclusion
Plotting your flows is a powerful feature of CrewAI that enhances your ability to design and manage complex AI workflows. Whether you choose to use the `plot()` method or the command line, generating plots will provide you with a visual representation of your workflows, aiding in both development and presentation.
## Next Steps
If you're interested in exploring additional examples of flows, we have a variety of recommendations in our examples repository. Here are four specific flow examples, each showcasing unique use cases to help you match your current problem type to a specific example:
1. **Email Auto Responder Flow**: This example demonstrates an infinite loop where a background job continually runs to automate email responses. It's a great use case for tasks that need to be performed repeatedly without manual intervention. [View Example](https://github.com/crewAIInc/crewAI-examples/tree/main/email_auto_responder_flow)
2. **Lead Score Flow**: This flow showcases adding human-in-the-loop feedback and handling different conditional branches using the router. It's an excellent example of how to incorporate dynamic decision-making and human oversight into your workflows. [View Example](https://github.com/crewAIInc/crewAI-examples/tree/main/lead-score-flow)
3. **Write a Book Flow**: This example excels at chaining multiple crews together, where the output of one crew is used by another. Specifically, one crew outlines an entire book, and another crew generates chapters based on the outline. Eventually, everything is connected to produce a complete book. This flow is perfect for complex, multi-step processes that require coordination between different tasks. [View Example](https://github.com/crewAIInc/crewAI-examples/tree/main/write_a_book_with_flows)
4. **Meeting Assistant Flow**: This flow demonstrates how to broadcast one event to trigger multiple follow-up actions. For instance, after a meeting is completed, the flow can update a Trello board, send a Slack message, and save the results. It's a great example of handling multiple outcomes from a single event, making it ideal for comprehensive task management and notification systems. [View Example](https://github.com/crewAIInc/crewAI-examples/tree/main/meeting_assistant_flow)
By exploring these examples, you can gain insights into how to leverage CrewAI Flows for various use cases, from automating repetitive tasks to managing complex, multi-step processes with dynamic decision-making and human feedback.
Also, check out our YouTube video on how to use flows in CrewAI below!
## Running Flows
There are two ways to run a flow:
### Using the Flow API
You can run a flow programmatically by creating an instance of your flow class and calling the `kickoff()` method:
```python theme={null}
flow = ExampleFlow()
result = flow.kickoff()
```
### Streaming Flow Execution
For real-time visibility into flow execution, you can enable streaming to receive output as it's generated:
```python theme={null}
class StreamingFlow(Flow):
stream = True # Enable streaming
@start()
def research(self):
# Your flow implementation
pass
# Iterate over streaming output
flow = StreamingFlow()
streaming = flow.kickoff()
for chunk in streaming:
print(chunk.content, end="", flush=True)
# Access final result
result = streaming.result
```
Learn more about streaming in the [Streaming Flow Execution](/en/learn/streaming-flow-execution) guide.
### Using the CLI
Starting from version 0.103.0, you can run flows using the `crewai run` command:
```shell theme={null}
crewai run
```
This command automatically detects if your project is a flow (based on the `type = "flow"` setting in your pyproject.toml) and runs it accordingly. This is the recommended way to run flows from the command line.
For backward compatibility, you can also use:
```shell theme={null}
crewai flow kickoff
```
However, the `crewai run` command is now the preferred method as it works for both crews and flows.
---
# Source: https://docs.crewai.com/en/learn/force-tool-output-as-result.md
> ## Documentation Index
> Fetch the complete documentation index at: https://docs.crewai.com/llms.txt
> Use this file to discover all available pages before exploring further.
# Force Tool Output as Result
> Learn how to force tool output as the result in an Agent's task in CrewAI.
## Introduction
In CrewAI, you can force the output of a tool as the result of an agent's task.
This feature is useful when you want to ensure that the tool output is captured and returned as the task result, avoiding any agent modification during the task execution.
## Forcing Tool Output as Result
To force the tool output as the result of an agent's task, you need to set the `result_as_answer` parameter to `True` when adding a tool to the agent.
This parameter ensures that the tool output is captured and returned as the task result, without any modifications by the agent.
Here's an example of how to force the tool output as the result of an agent's task:
```python Code theme={null}
from crewai.agent import Agent
from my_tool import MyCustomTool
# Create a coding agent with the custom tool
coding_agent = Agent(
role="Data Scientist",
goal="Produce amazing reports on AI",
backstory="You work with data and AI",
tools=[MyCustomTool(result_as_answer=True)],
)
# Assuming the tool's execution and result population occurs within the system
task_result = coding_agent.execute_task(task)
```
## Workflow in Action
### Running the Flow
(Optional) Before running the flow, you can install the dependencies by running:
```bash theme={null}
crewai install
```
Once all of the dependencies are installed, you need to activate the virtual environment by running:
```bash theme={null}
source .venv/bin/activate
```
After activating the virtual environment, you can run the flow by executing one of the following commands:
```bash theme={null}
crewai flow kickoff
```
or
```bash theme={null}
uv run kickoff
```
The flow will execute, and you should see the output in the console.
## Plot Flows
Visualizing your AI workflows can provide valuable insights into the structure and execution paths of your flows. CrewAI offers a powerful visualization tool that allows you to generate interactive plots of your flows, making it easier to understand and optimize your AI workflows.
### What are Plots?
Plots in CrewAI are graphical representations of your AI workflows. They display the various tasks, their connections, and the flow of data between them. This visualization helps in understanding the sequence of operations, identifying bottlenecks, and ensuring that the workflow logic aligns with your expectations.
### How to Generate a Plot
CrewAI provides two convenient methods to generate plots of your flows:
#### Option 1: Using the `plot()` Method
If you are working directly with a flow instance, you can generate a plot by calling the `plot()` method on your flow object. This method will create an HTML file containing the interactive plot of your flow.
```python Code theme={null}
# Assuming you have a flow instance
flow.plot("my_flow_plot")
```
This will generate a file named `my_flow_plot.html` in your current directory. You can open this file in a web browser to view the interactive plot.
#### Option 2: Using the Command Line
If you are working within a structured CrewAI project, you can generate a plot using the command line. This is particularly useful for larger projects where you want to visualize the entire flow setup.
```bash theme={null}
crewai flow plot
```
This command will generate an HTML file with the plot of your flow, similar to the `plot()` method. The file will be saved in your project directory, and you can open it in a web browser to explore the flow.
### Understanding the Plot
The generated plot will display nodes representing the tasks in your flow, with directed edges indicating the flow of execution. The plot is interactive, allowing you to zoom in and out, and hover over nodes to see additional details.
By visualizing your flows, you can gain a clearer understanding of the workflow's structure, making it easier to debug, optimize, and communicate your AI processes to others.
### Conclusion
Plotting your flows is a powerful feature of CrewAI that enhances your ability to design and manage complex AI workflows. Whether you choose to use the `plot()` method or the command line, generating plots will provide you with a visual representation of your workflows, aiding in both development and presentation.
## Next Steps
If you're interested in exploring additional examples of flows, we have a variety of recommendations in our examples repository. Here are four specific flow examples, each showcasing unique use cases to help you match your current problem type to a specific example:
1. **Email Auto Responder Flow**: This example demonstrates an infinite loop where a background job continually runs to automate email responses. It's a great use case for tasks that need to be performed repeatedly without manual intervention. [View Example](https://github.com/crewAIInc/crewAI-examples/tree/main/email_auto_responder_flow)
2. **Lead Score Flow**: This flow showcases adding human-in-the-loop feedback and handling different conditional branches using the router. It's an excellent example of how to incorporate dynamic decision-making and human oversight into your workflows. [View Example](https://github.com/crewAIInc/crewAI-examples/tree/main/lead-score-flow)
3. **Write a Book Flow**: This example excels at chaining multiple crews together, where the output of one crew is used by another. Specifically, one crew outlines an entire book, and another crew generates chapters based on the outline. Eventually, everything is connected to produce a complete book. This flow is perfect for complex, multi-step processes that require coordination between different tasks. [View Example](https://github.com/crewAIInc/crewAI-examples/tree/main/write_a_book_with_flows)
4. **Meeting Assistant Flow**: This flow demonstrates how to broadcast one event to trigger multiple follow-up actions. For instance, after a meeting is completed, the flow can update a Trello board, send a Slack message, and save the results. It's a great example of handling multiple outcomes from a single event, making it ideal for comprehensive task management and notification systems. [View Example](https://github.com/crewAIInc/crewAI-examples/tree/main/meeting_assistant_flow)
By exploring these examples, you can gain insights into how to leverage CrewAI Flows for various use cases, from automating repetitive tasks to managing complex, multi-step processes with dynamic decision-making and human feedback.
Also, check out our YouTube video on how to use flows in CrewAI below!
## Running Flows
There are two ways to run a flow:
### Using the Flow API
You can run a flow programmatically by creating an instance of your flow class and calling the `kickoff()` method:
```python theme={null}
flow = ExampleFlow()
result = flow.kickoff()
```
### Streaming Flow Execution
For real-time visibility into flow execution, you can enable streaming to receive output as it's generated:
```python theme={null}
class StreamingFlow(Flow):
stream = True # Enable streaming
@start()
def research(self):
# Your flow implementation
pass
# Iterate over streaming output
flow = StreamingFlow()
streaming = flow.kickoff()
for chunk in streaming:
print(chunk.content, end="", flush=True)
# Access final result
result = streaming.result
```
Learn more about streaming in the [Streaming Flow Execution](/en/learn/streaming-flow-execution) guide.
### Using the CLI
Starting from version 0.103.0, you can run flows using the `crewai run` command:
```shell theme={null}
crewai run
```
This command automatically detects if your project is a flow (based on the `type = "flow"` setting in your pyproject.toml) and runs it accordingly. This is the recommended way to run flows from the command line.
For backward compatibility, you can also use:
```shell theme={null}
crewai flow kickoff
```
However, the `crewai run` command is now the preferred method as it works for both crews and flows.
---
# Source: https://docs.crewai.com/en/learn/force-tool-output-as-result.md
> ## Documentation Index
> Fetch the complete documentation index at: https://docs.crewai.com/llms.txt
> Use this file to discover all available pages before exploring further.
# Force Tool Output as Result
> Learn how to force tool output as the result in an Agent's task in CrewAI.
## Introduction
In CrewAI, you can force the output of a tool as the result of an agent's task.
This feature is useful when you want to ensure that the tool output is captured and returned as the task result, avoiding any agent modification during the task execution.
## Forcing Tool Output as Result
To force the tool output as the result of an agent's task, you need to set the `result_as_answer` parameter to `True` when adding a tool to the agent.
This parameter ensures that the tool output is captured and returned as the task result, without any modifications by the agent.
Here's an example of how to force the tool output as the result of an agent's task:
```python Code theme={null}
from crewai.agent import Agent
from my_tool import MyCustomTool
# Create a coding agent with the custom tool
coding_agent = Agent(
role="Data Scientist",
goal="Produce amazing reports on AI",
backstory="You work with data and AI",
tools=[MyCustomTool(result_as_answer=True)],
)
# Assuming the tool's execution and result population occurs within the system
task_result = coding_agent.execute_task(task)
```
## Workflow in Action
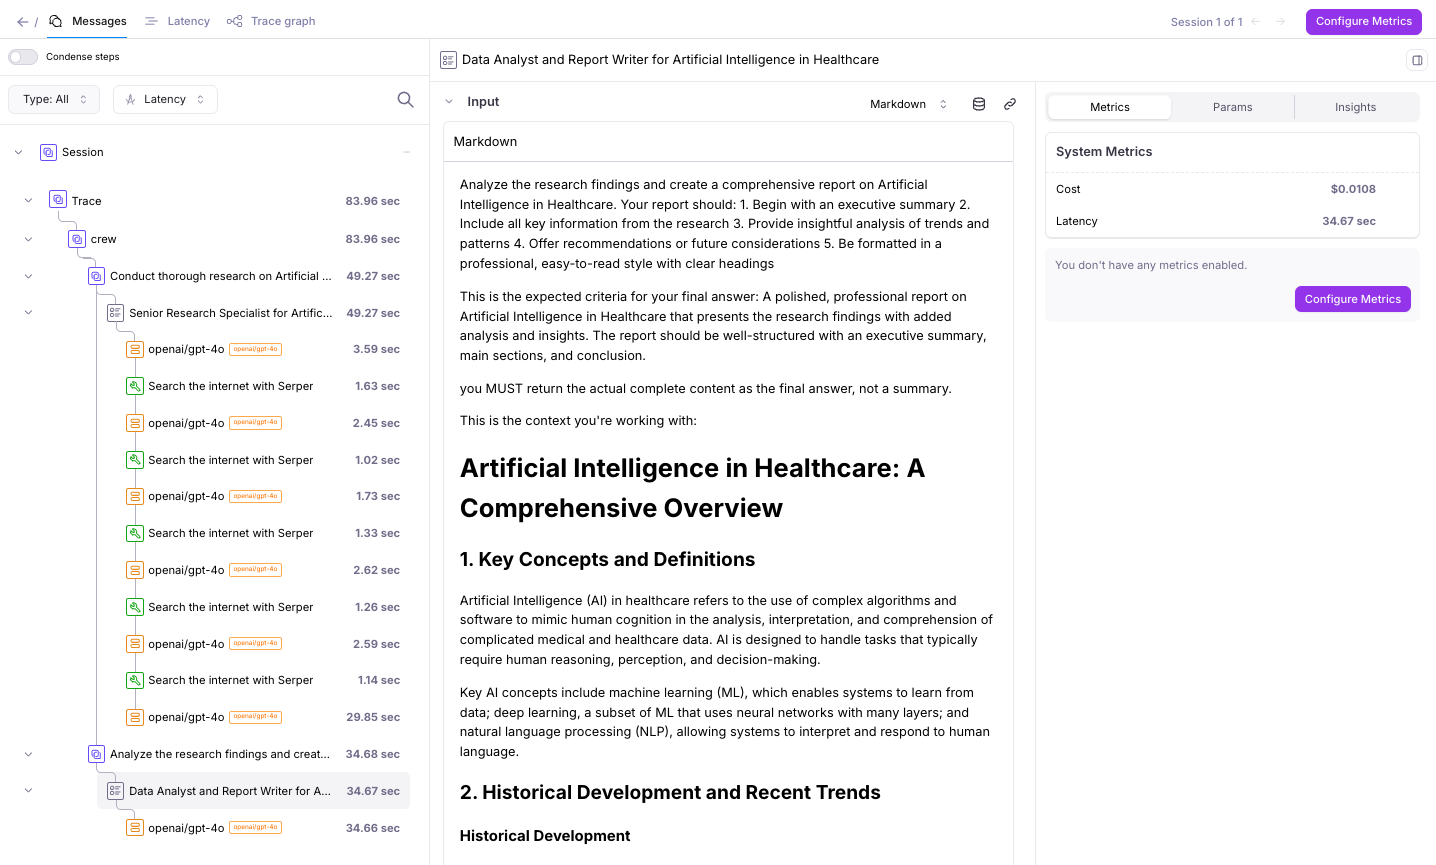 ## Understanding the Galileo Integration
Galileo integrates with CrewAI by registering an event listener
that captures Crew execution events (e.g., agent actions, tool calls, model responses)
and forwards them to Galileo for observability and evaluation.
### Understanding the event listener
Creating a `CrewAIEventListener()` instance is all that’s
required to enable Galileo for a CrewAI run. When instantiated, the listener:
* Automatically registers itself with CrewAI
* Reads Galileo configuration from environment variables
* Logs all run data to the Galileo project and log stream specified by
`GALILEO_PROJECT` and `GALILEO_LOG_STREAM`
No additional configuration or code changes are required.
All data from this run is logged to the Galileo project and
log stream specified by your environment configuration
(for example, GALILEO\_PROJECT and GALILEO\_LOG\_STREAM).
---
# Source: https://docs.crewai.com/en/enterprise/integrations/github.md
> ## Documentation Index
> Fetch the complete documentation index at: https://docs.crewai.com/llms.txt
> Use this file to discover all available pages before exploring further.
# GitHub Integration
> Repository and issue management with GitHub integration for CrewAI.
## Overview
Enable your agents to manage repositories, issues, and releases through GitHub. Create and update issues, manage releases, track project development, and streamline your software development workflow with AI-powered automation.
## Prerequisites
Before using the GitHub integration, ensure you have:
* A [CrewAI AMP](https://app.crewai.com) account with an active subscription
* A GitHub account with appropriate repository permissions
* Connected your GitHub account through the [Integrations page](https://app.crewai.com/crewai_plus/connectors)
## Setting Up GitHub Integration
### 1. Connect Your GitHub Account
1. Navigate to [CrewAI AMP Integrations](https://app.crewai.com/crewai_plus/connectors)
2. Find **GitHub** in the Authentication Integrations section
3. Click **Connect** and complete the OAuth flow
4. Grant the necessary permissions for repository and issue management
5. Copy your Enterprise Token from [Integration Settings](https://app.crewai.com/crewai_plus/settings/integrations)
### 2. Install Required Package
```bash theme={null}
uv add crewai-tools
```
### 3. Environment Variable Setup
## Example: Process new emails
When a new email arrives, the Gmail Trigger will send the payload to your Crew or Flow. Below is a Crew example that parses and processes the trigger payload.
```python theme={null}
@CrewBase
class GmailProcessingCrew:
@agent
def parser(self) -> Agent:
return Agent(
config=self.agents_config['parser'],
)
@task
def parse_gmail_payload(self) -> Task:
return Task(
config=self.tasks_config['parse_gmail_payload'],
agent=self.parser(),
)
@task
def act_on_email(self) -> Task:
return Task(
config=self.tasks_config['act_on_email'],
agent=self.parser(),
)
```
The Gmail payload will be available via the standard context mechanisms.
### Testing Locally
Test your Gmail trigger integration locally using the CrewAI CLI:
```bash theme={null}
# View all available triggers
crewai triggers list
# Simulate a Gmail trigger with realistic payload
crewai triggers run gmail/new_email_received
```
The `crewai triggers run` command will execute your crew with a complete Gmail payload, allowing you to test your parsing logic before deployment.
## Troubleshooting
* Ensure Gmail is connected in Tools & Integrations
* Verify the Gmail Trigger is enabled on the Triggers tab
* Test locally with `crewai triggers run gmail/new_email_received` to see the exact payload structure
* Check the execution logs and confirm the payload is passed as `crewai_trigger_payload`
* Remember: use `crewai triggers run` (not `crewai run`) to simulate trigger execution
---
# Source: https://docs.crewai.com/en/enterprise/integrations/gmail.md
> ## Documentation Index
> Fetch the complete documentation index at: https://docs.crewai.com/llms.txt
> Use this file to discover all available pages before exploring further.
# Gmail Integration
> Email and contact management with Gmail integration for CrewAI.
## Overview
Enable your agents to manage emails, contacts, and drafts through Gmail. Send emails, search messages, manage contacts, create drafts, and streamline your email communications with AI-powered automation.
## Prerequisites
Before using the Gmail integration, ensure you have:
* A [CrewAI AMP](https://app.crewai.com) account with an active subscription
* A Gmail account with appropriate permissions
* Connected your Gmail account through the [Integrations page](https://app.crewai.com/crewai_plus/connectors)
## Setting Up Gmail Integration
### 1. Connect Your Gmail Account
1. Navigate to [CrewAI AMP Integrations](https://app.crewai.com/crewai_plus/connectors)
2. Find **Gmail** in the Authentication Integrations section
3. Click **Connect** and complete the OAuth flow
4. Grant the necessary permissions for email and contact management
5. Copy your Enterprise Token from [Integration Settings](https://app.crewai.com/crewai_plus/settings/integrations)
### 2. Install Required Package
```bash theme={null}
uv add crewai-tools
```
### 3. Environment Variable Setup
## Understanding the Galileo Integration
Galileo integrates with CrewAI by registering an event listener
that captures Crew execution events (e.g., agent actions, tool calls, model responses)
and forwards them to Galileo for observability and evaluation.
### Understanding the event listener
Creating a `CrewAIEventListener()` instance is all that’s
required to enable Galileo for a CrewAI run. When instantiated, the listener:
* Automatically registers itself with CrewAI
* Reads Galileo configuration from environment variables
* Logs all run data to the Galileo project and log stream specified by
`GALILEO_PROJECT` and `GALILEO_LOG_STREAM`
No additional configuration or code changes are required.
All data from this run is logged to the Galileo project and
log stream specified by your environment configuration
(for example, GALILEO\_PROJECT and GALILEO\_LOG\_STREAM).
---
# Source: https://docs.crewai.com/en/enterprise/integrations/github.md
> ## Documentation Index
> Fetch the complete documentation index at: https://docs.crewai.com/llms.txt
> Use this file to discover all available pages before exploring further.
# GitHub Integration
> Repository and issue management with GitHub integration for CrewAI.
## Overview
Enable your agents to manage repositories, issues, and releases through GitHub. Create and update issues, manage releases, track project development, and streamline your software development workflow with AI-powered automation.
## Prerequisites
Before using the GitHub integration, ensure you have:
* A [CrewAI AMP](https://app.crewai.com) account with an active subscription
* A GitHub account with appropriate repository permissions
* Connected your GitHub account through the [Integrations page](https://app.crewai.com/crewai_plus/connectors)
## Setting Up GitHub Integration
### 1. Connect Your GitHub Account
1. Navigate to [CrewAI AMP Integrations](https://app.crewai.com/crewai_plus/connectors)
2. Find **GitHub** in the Authentication Integrations section
3. Click **Connect** and complete the OAuth flow
4. Grant the necessary permissions for repository and issue management
5. Copy your Enterprise Token from [Integration Settings](https://app.crewai.com/crewai_plus/settings/integrations)
### 2. Install Required Package
```bash theme={null}
uv add crewai-tools
```
### 3. Environment Variable Setup
## Example: Process new emails
When a new email arrives, the Gmail Trigger will send the payload to your Crew or Flow. Below is a Crew example that parses and processes the trigger payload.
```python theme={null}
@CrewBase
class GmailProcessingCrew:
@agent
def parser(self) -> Agent:
return Agent(
config=self.agents_config['parser'],
)
@task
def parse_gmail_payload(self) -> Task:
return Task(
config=self.tasks_config['parse_gmail_payload'],
agent=self.parser(),
)
@task
def act_on_email(self) -> Task:
return Task(
config=self.tasks_config['act_on_email'],
agent=self.parser(),
)
```
The Gmail payload will be available via the standard context mechanisms.
### Testing Locally
Test your Gmail trigger integration locally using the CrewAI CLI:
```bash theme={null}
# View all available triggers
crewai triggers list
# Simulate a Gmail trigger with realistic payload
crewai triggers run gmail/new_email_received
```
The `crewai triggers run` command will execute your crew with a complete Gmail payload, allowing you to test your parsing logic before deployment.
## Troubleshooting
* Ensure Gmail is connected in Tools & Integrations
* Verify the Gmail Trigger is enabled on the Triggers tab
* Test locally with `crewai triggers run gmail/new_email_received` to see the exact payload structure
* Check the execution logs and confirm the payload is passed as `crewai_trigger_payload`
* Remember: use `crewai triggers run` (not `crewai run`) to simulate trigger execution
---
# Source: https://docs.crewai.com/en/enterprise/integrations/gmail.md
> ## Documentation Index
> Fetch the complete documentation index at: https://docs.crewai.com/llms.txt
> Use this file to discover all available pages before exploring further.
# Gmail Integration
> Email and contact management with Gmail integration for CrewAI.
## Overview
Enable your agents to manage emails, contacts, and drafts through Gmail. Send emails, search messages, manage contacts, create drafts, and streamline your email communications with AI-powered automation.
## Prerequisites
Before using the Gmail integration, ensure you have:
* A [CrewAI AMP](https://app.crewai.com) account with an active subscription
* A Gmail account with appropriate permissions
* Connected your Gmail account through the [Integrations page](https://app.crewai.com/crewai_plus/connectors)
## Setting Up Gmail Integration
### 1. Connect Your Gmail Account
1. Navigate to [CrewAI AMP Integrations](https://app.crewai.com/crewai_plus/connectors)
2. Find **Gmail** in the Authentication Integrations section
3. Click **Connect** and complete the OAuth flow
4. Grant the necessary permissions for email and contact management
5. Copy your Enterprise Token from [Integration Settings](https://app.crewai.com/crewai_plus/settings/integrations)
### 2. Install Required Package
```bash theme={null}
uv add crewai-tools
```
### 3. Environment Variable Setup
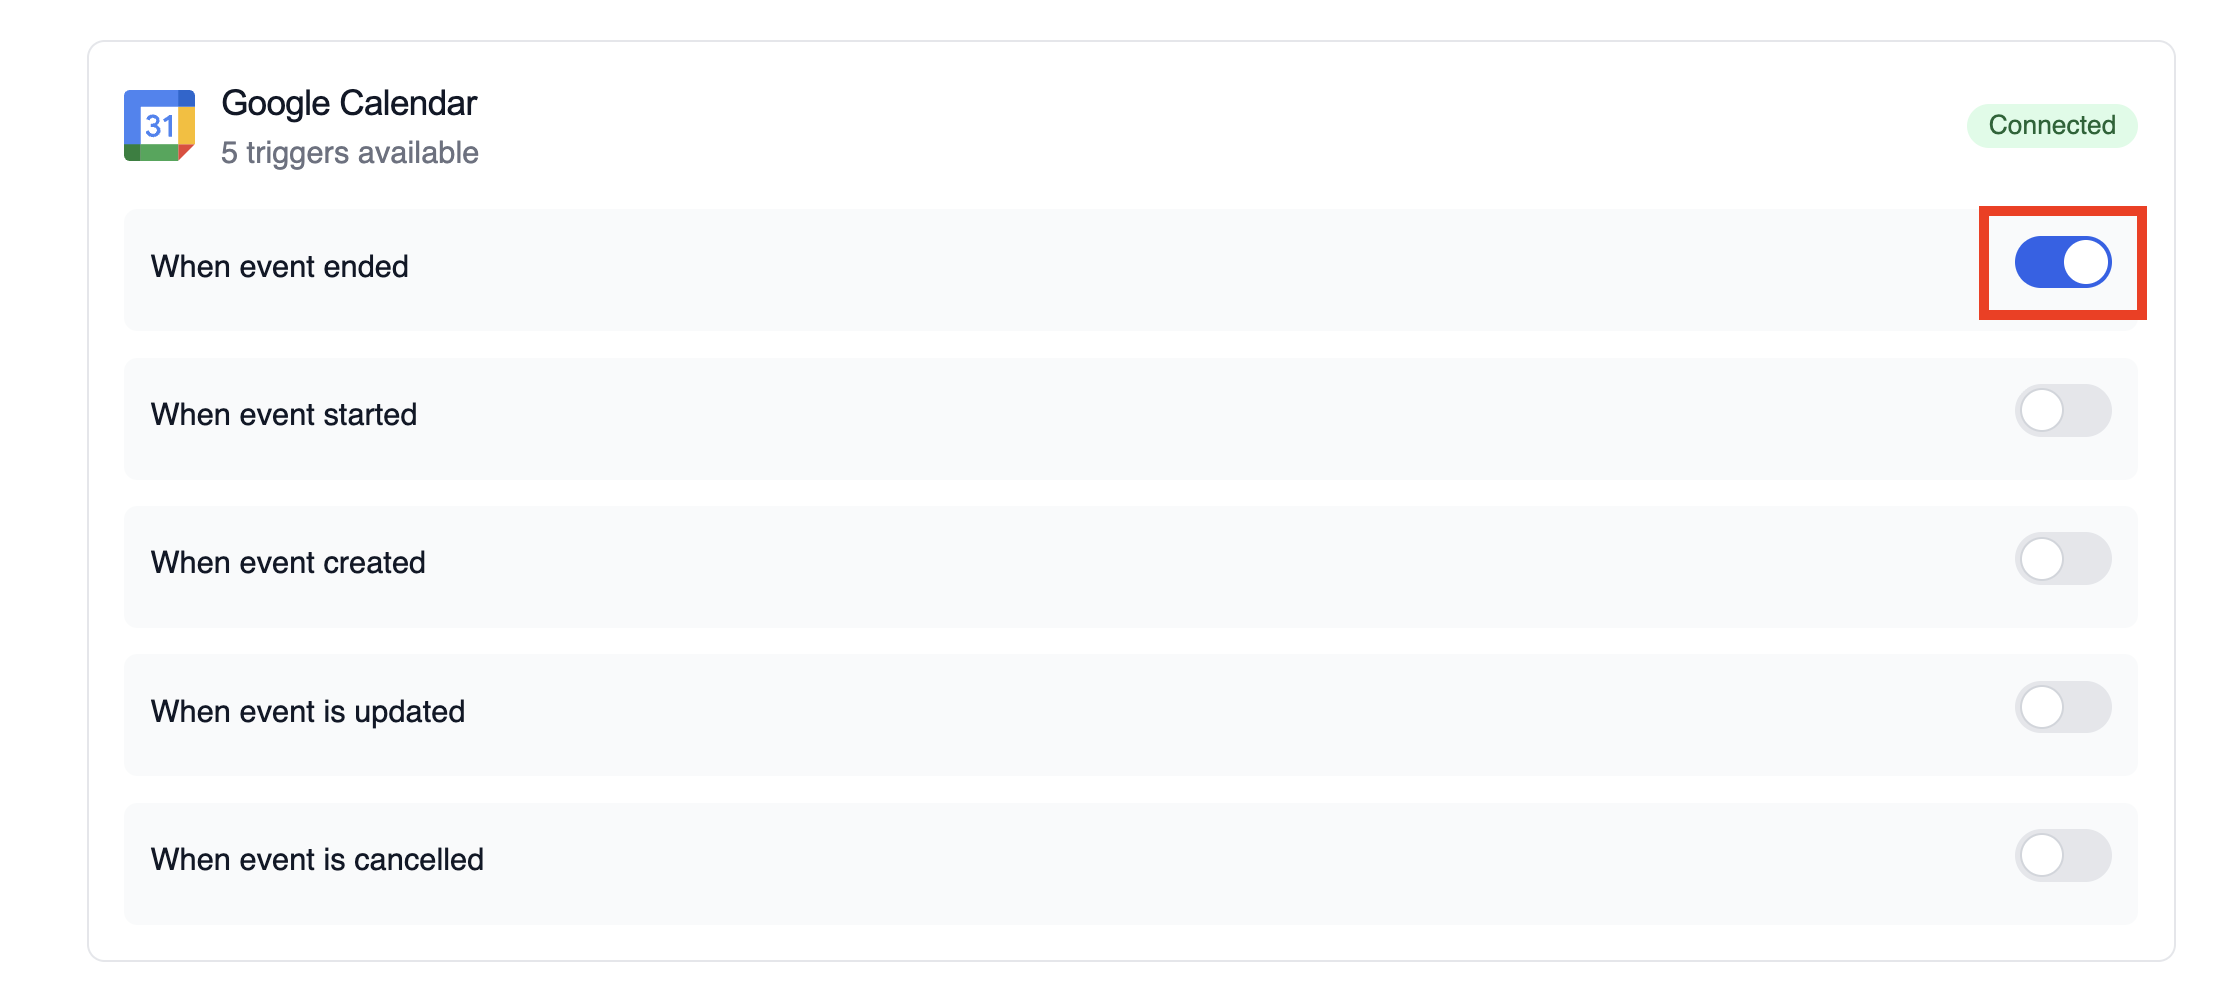 ## Example: Summarize meeting details
The snippet below mirrors the `calendar-event-crew.py` example in the trigger repository. It parses the payload, analyses the attendees and timing, and produces a meeting brief for downstream tools.
```python theme={null}
from calendar_event_crew import GoogleCalendarEventTrigger
crew = GoogleCalendarEventTrigger().crew()
result = crew.kickoff({
"crewai_trigger_payload": calendar_payload,
})
print(result.raw)
```
Use `crewai_trigger_payload` exactly as it is delivered by the trigger so the crew can extract the proper fields.
## Testing Locally
Test your Google Calendar trigger integration locally using the CrewAI CLI:
```bash theme={null}
# View all available triggers
crewai triggers list
# Simulate a Google Calendar trigger with realistic payload
crewai triggers run google_calendar/event_changed
```
The `crewai triggers run` command will execute your crew with a complete Calendar payload, allowing you to test your parsing logic before deployment.
## Troubleshooting
* Ensure the correct Google account is connected and the trigger is enabled
* Test locally with `crewai triggers run google_calendar/event_changed` to see the exact payload structure
* Confirm your workflow handles all-day events (payloads use `start.date` and `end.date` instead of timestamps)
* Check execution logs if reminders or attendee arrays are missing—calendar permissions can limit fields in the payload
* Remember: use `crewai triggers run` (not `crewai run`) to simulate trigger execution
---
# Source: https://docs.crewai.com/en/enterprise/guides/google-drive-trigger.md
> ## Documentation Index
> Fetch the complete documentation index at: https://docs.crewai.com/llms.txt
> Use this file to discover all available pages before exploring further.
# Google Drive Trigger
> Respond to Google Drive file events with automated crews
## Overview
Trigger your automations when files are created, updated, or removed in Google Drive. Typical workflows include summarizing newly uploaded content, enforcing sharing policies, or notifying owners when critical files change.
## Example: Summarize meeting details
The snippet below mirrors the `calendar-event-crew.py` example in the trigger repository. It parses the payload, analyses the attendees and timing, and produces a meeting brief for downstream tools.
```python theme={null}
from calendar_event_crew import GoogleCalendarEventTrigger
crew = GoogleCalendarEventTrigger().crew()
result = crew.kickoff({
"crewai_trigger_payload": calendar_payload,
})
print(result.raw)
```
Use `crewai_trigger_payload` exactly as it is delivered by the trigger so the crew can extract the proper fields.
## Testing Locally
Test your Google Calendar trigger integration locally using the CrewAI CLI:
```bash theme={null}
# View all available triggers
crewai triggers list
# Simulate a Google Calendar trigger with realistic payload
crewai triggers run google_calendar/event_changed
```
The `crewai triggers run` command will execute your crew with a complete Calendar payload, allowing you to test your parsing logic before deployment.
## Troubleshooting
* Ensure the correct Google account is connected and the trigger is enabled
* Test locally with `crewai triggers run google_calendar/event_changed` to see the exact payload structure
* Confirm your workflow handles all-day events (payloads use `start.date` and `end.date` instead of timestamps)
* Check execution logs if reminders or attendee arrays are missing—calendar permissions can limit fields in the payload
* Remember: use `crewai triggers run` (not `crewai run`) to simulate trigger execution
---
# Source: https://docs.crewai.com/en/enterprise/guides/google-drive-trigger.md
> ## Documentation Index
> Fetch the complete documentation index at: https://docs.crewai.com/llms.txt
> Use this file to discover all available pages before exploring further.
# Google Drive Trigger
> Respond to Google Drive file events with automated crews
## Overview
Trigger your automations when files are created, updated, or removed in Google Drive. Typical workflows include summarizing newly uploaded content, enforcing sharing policies, or notifying owners when critical files change.
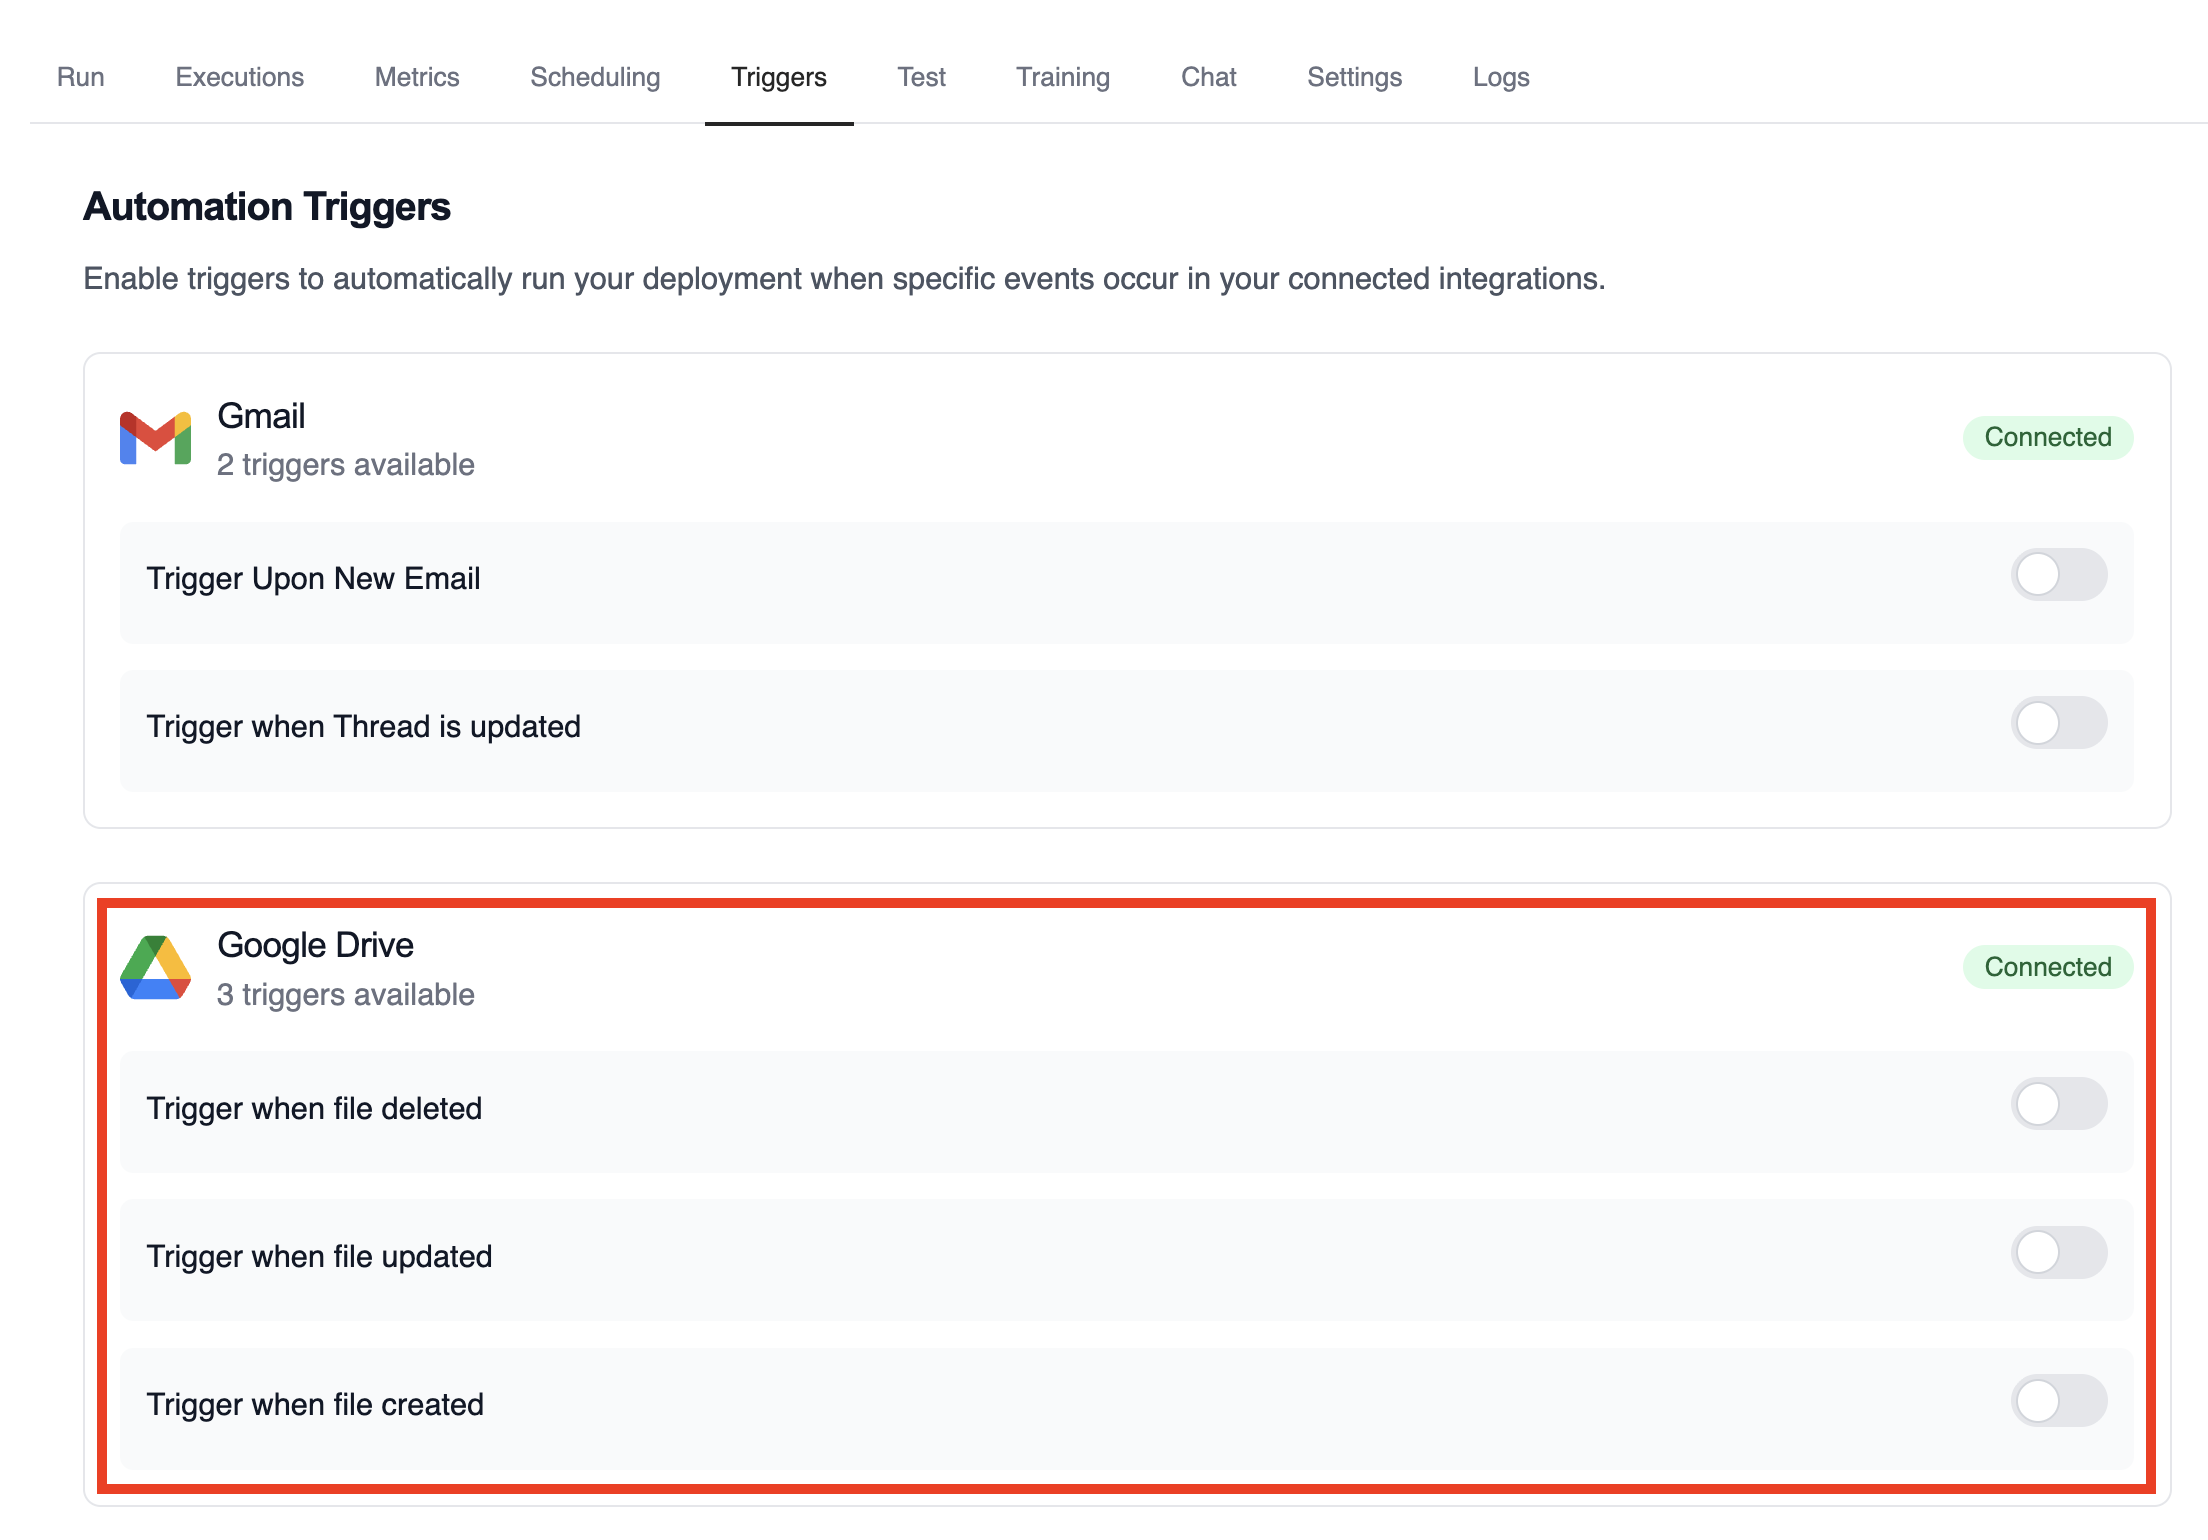 ## Example: Summarize file activity
The drive example crews parse the payload to extract file metadata, evaluate permissions, and publish a summary.
```python theme={null}
from drive_file_crew import GoogleDriveFileTrigger
crew = GoogleDriveFileTrigger().crew()
crew.kickoff({
"crewai_trigger_payload": drive_payload,
})
```
## Testing Locally
Test your Google Drive trigger integration locally using the CrewAI CLI:
```bash theme={null}
# View all available triggers
crewai triggers list
# Simulate a Google Drive trigger with realistic payload
crewai triggers run google_drive/file_changed
```
The `crewai triggers run` command will execute your crew with a complete Drive payload, allowing you to test your parsing logic before deployment.
## Troubleshooting
* Verify Google Drive is connected and the trigger toggle is enabled
* Test locally with `crewai triggers run google_drive/file_changed` to see the exact payload structure
* If a payload is missing permission data, ensure the connected account has access to the file or folder
* The trigger sends file IDs only; use the Drive API if you need to fetch binary content during the crew run
* Remember: use `crewai triggers run` (not `crewai run`) to simulate trigger execution
---
# Source: https://docs.crewai.com/en/enterprise/integrations/google_calendar.md
> ## Documentation Index
> Fetch the complete documentation index at: https://docs.crewai.com/llms.txt
> Use this file to discover all available pages before exploring further.
# Google Calendar Integration
> Event and schedule management with Google Calendar integration for CrewAI.
## Overview
Enable your agents to manage calendar events, schedules, and availability through Google Calendar. Create and update events, manage attendees, check availability, and streamline your scheduling workflows with AI-powered automation.
## Prerequisites
Before using the Google Calendar integration, ensure you have:
* A [CrewAI AMP](https://app.crewai.com) account with an active subscription
* A Google account with Google Calendar access
* Connected your Google account through the [Integrations page](https://app.crewai.com/crewai_plus/connectors)
## Setting Up Google Calendar Integration
### 1. Connect Your Google Account
1. Navigate to [CrewAI AMP Integrations](https://app.crewai.com/crewai_plus/connectors)
2. Find **Google Calendar** in the Authentication Integrations section
3. Click **Connect** and complete the OAuth flow
4. Grant the necessary permissions for calendar access
5. Copy your Enterprise Token from [Integration Settings](https://app.crewai.com/crewai_plus/settings/integrations)
### 2. Install Required Package
```bash theme={null}
uv add crewai-tools
```
### 3. Environment Variable Setup
## Example: Summarize file activity
The drive example crews parse the payload to extract file metadata, evaluate permissions, and publish a summary.
```python theme={null}
from drive_file_crew import GoogleDriveFileTrigger
crew = GoogleDriveFileTrigger().crew()
crew.kickoff({
"crewai_trigger_payload": drive_payload,
})
```
## Testing Locally
Test your Google Drive trigger integration locally using the CrewAI CLI:
```bash theme={null}
# View all available triggers
crewai triggers list
# Simulate a Google Drive trigger with realistic payload
crewai triggers run google_drive/file_changed
```
The `crewai triggers run` command will execute your crew with a complete Drive payload, allowing you to test your parsing logic before deployment.
## Troubleshooting
* Verify Google Drive is connected and the trigger toggle is enabled
* Test locally with `crewai triggers run google_drive/file_changed` to see the exact payload structure
* If a payload is missing permission data, ensure the connected account has access to the file or folder
* The trigger sends file IDs only; use the Drive API if you need to fetch binary content during the crew run
* Remember: use `crewai triggers run` (not `crewai run`) to simulate trigger execution
---
# Source: https://docs.crewai.com/en/enterprise/integrations/google_calendar.md
> ## Documentation Index
> Fetch the complete documentation index at: https://docs.crewai.com/llms.txt
> Use this file to discover all available pages before exploring further.
# Google Calendar Integration
> Event and schedule management with Google Calendar integration for CrewAI.
## Overview
Enable your agents to manage calendar events, schedules, and availability through Google Calendar. Create and update events, manage attendees, check availability, and streamline your scheduling workflows with AI-powered automation.
## Prerequisites
Before using the Google Calendar integration, ensure you have:
* A [CrewAI AMP](https://app.crewai.com) account with an active subscription
* A Google account with Google Calendar access
* Connected your Google account through the [Integrations page](https://app.crewai.com/crewai_plus/connectors)
## Setting Up Google Calendar Integration
### 1. Connect Your Google Account
1. Navigate to [CrewAI AMP Integrations](https://app.crewai.com/crewai_plus/connectors)
2. Find **Google Calendar** in the Authentication Integrations section
3. Click **Connect** and complete the OAuth flow
4. Grant the necessary permissions for calendar access
5. Copy your Enterprise Token from [Integration Settings](https://app.crewai.com/crewai_plus/settings/integrations)
### 2. Install Required Package
```bash theme={null}
uv add crewai-tools
```
### 3. Environment Variable Setup
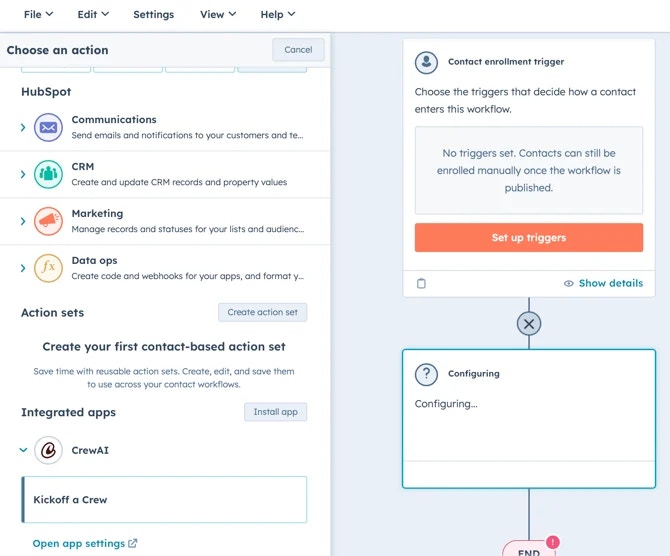
 * Configure any additional actions as needed - Review your workflow
steps to ensure everything is set up correctly - Activate the workflow
* Configure any additional actions as needed - Review your workflow
steps to ensure everything is set up correctly - Activate the workflow
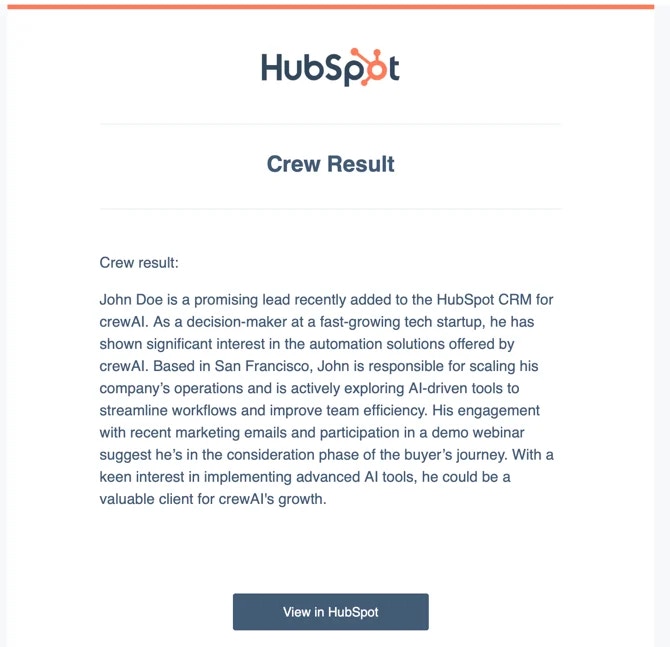
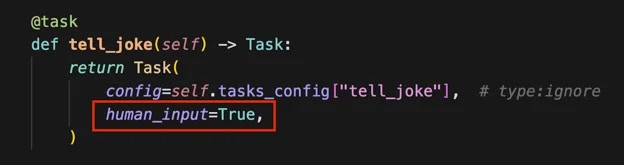
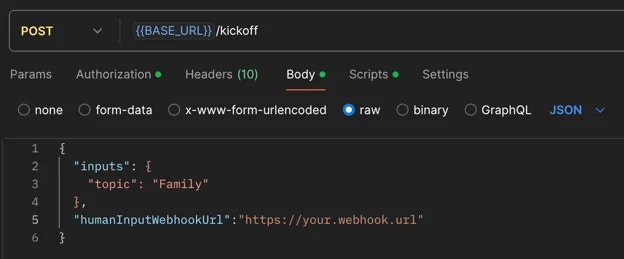
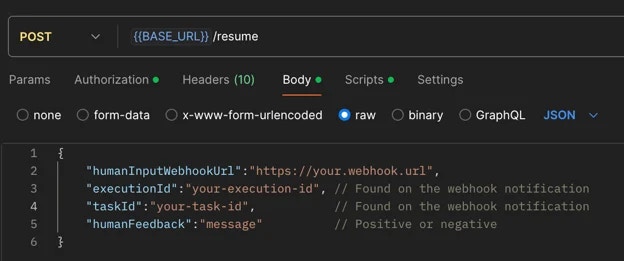
Ship multi‑agent systems with confidence
Design agents, orchestrate crews, and automate flows with guardrails, memory, knowledge, and observability baked in.
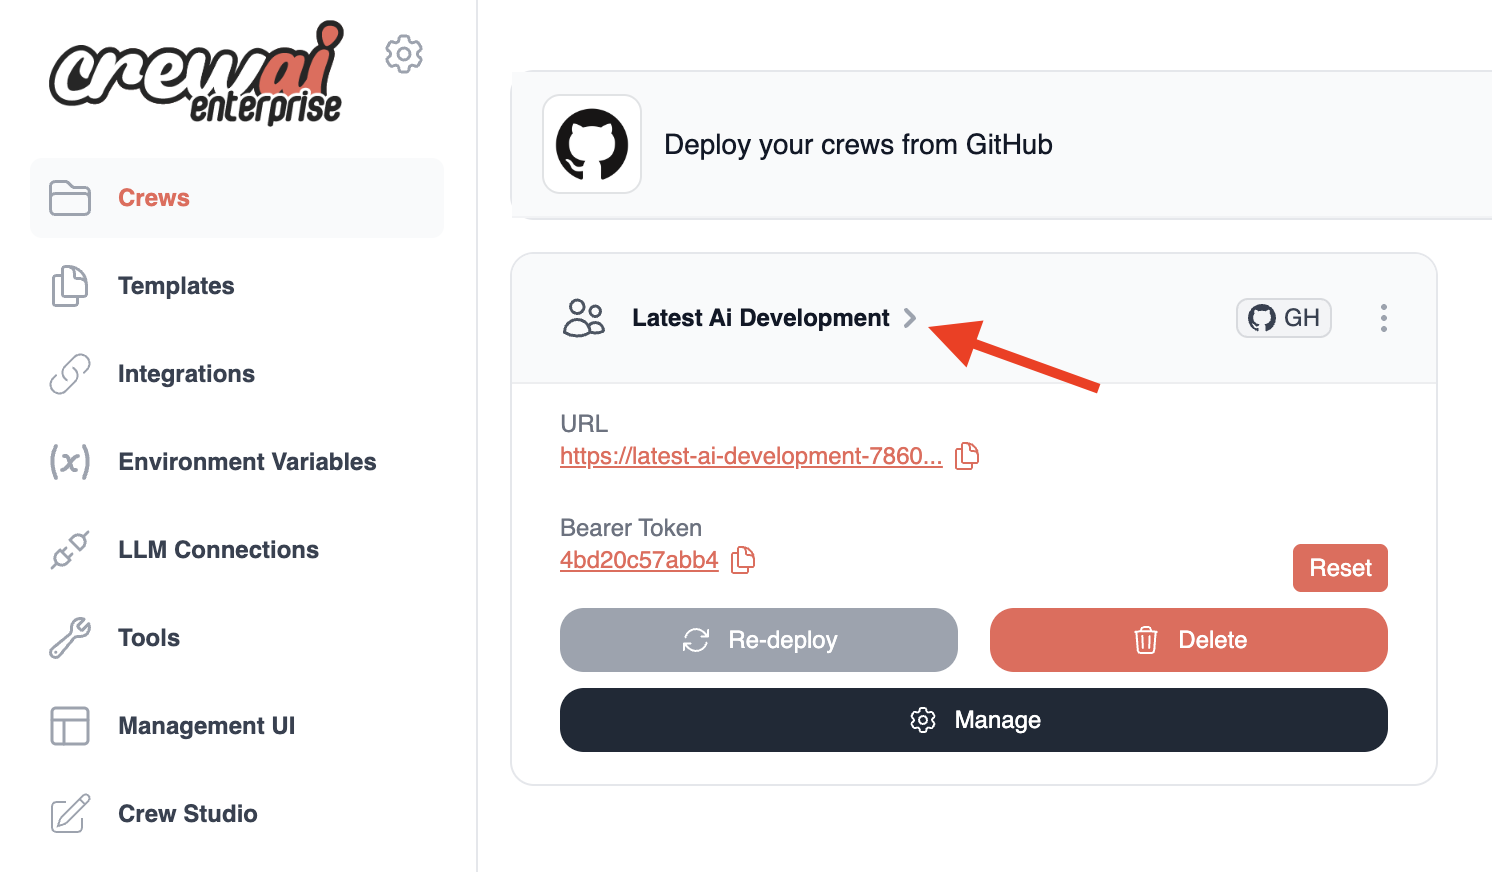 ### Step 2: Initiate Execution
From your crew's detail page, you have two options to kickoff an execution:
#### Option A: Quick Kickoff
1. Click the `Kickoff` link in the Test Endpoints section
2. Enter the required input parameters for your crew in the JSON editor
3. Click the `Send Request` button
### Step 2: Initiate Execution
From your crew's detail page, you have two options to kickoff an execution:
#### Option A: Quick Kickoff
1. Click the `Kickoff` link in the Test Endpoints section
2. Enter the required input parameters for your crew in the JSON editor
3. Click the `Send Request` button
 #### Option B: Using the Visual Interface
1. Click the `Run` tab in the crew detail page
2. Enter the required inputs in the form fields
3. Click the `Run Crew` button
#### Option B: Using the Visual Interface
1. Click the `Run` tab in the crew detail page
2. Enter the required inputs in the form fields
3. Click the `Run Crew` button
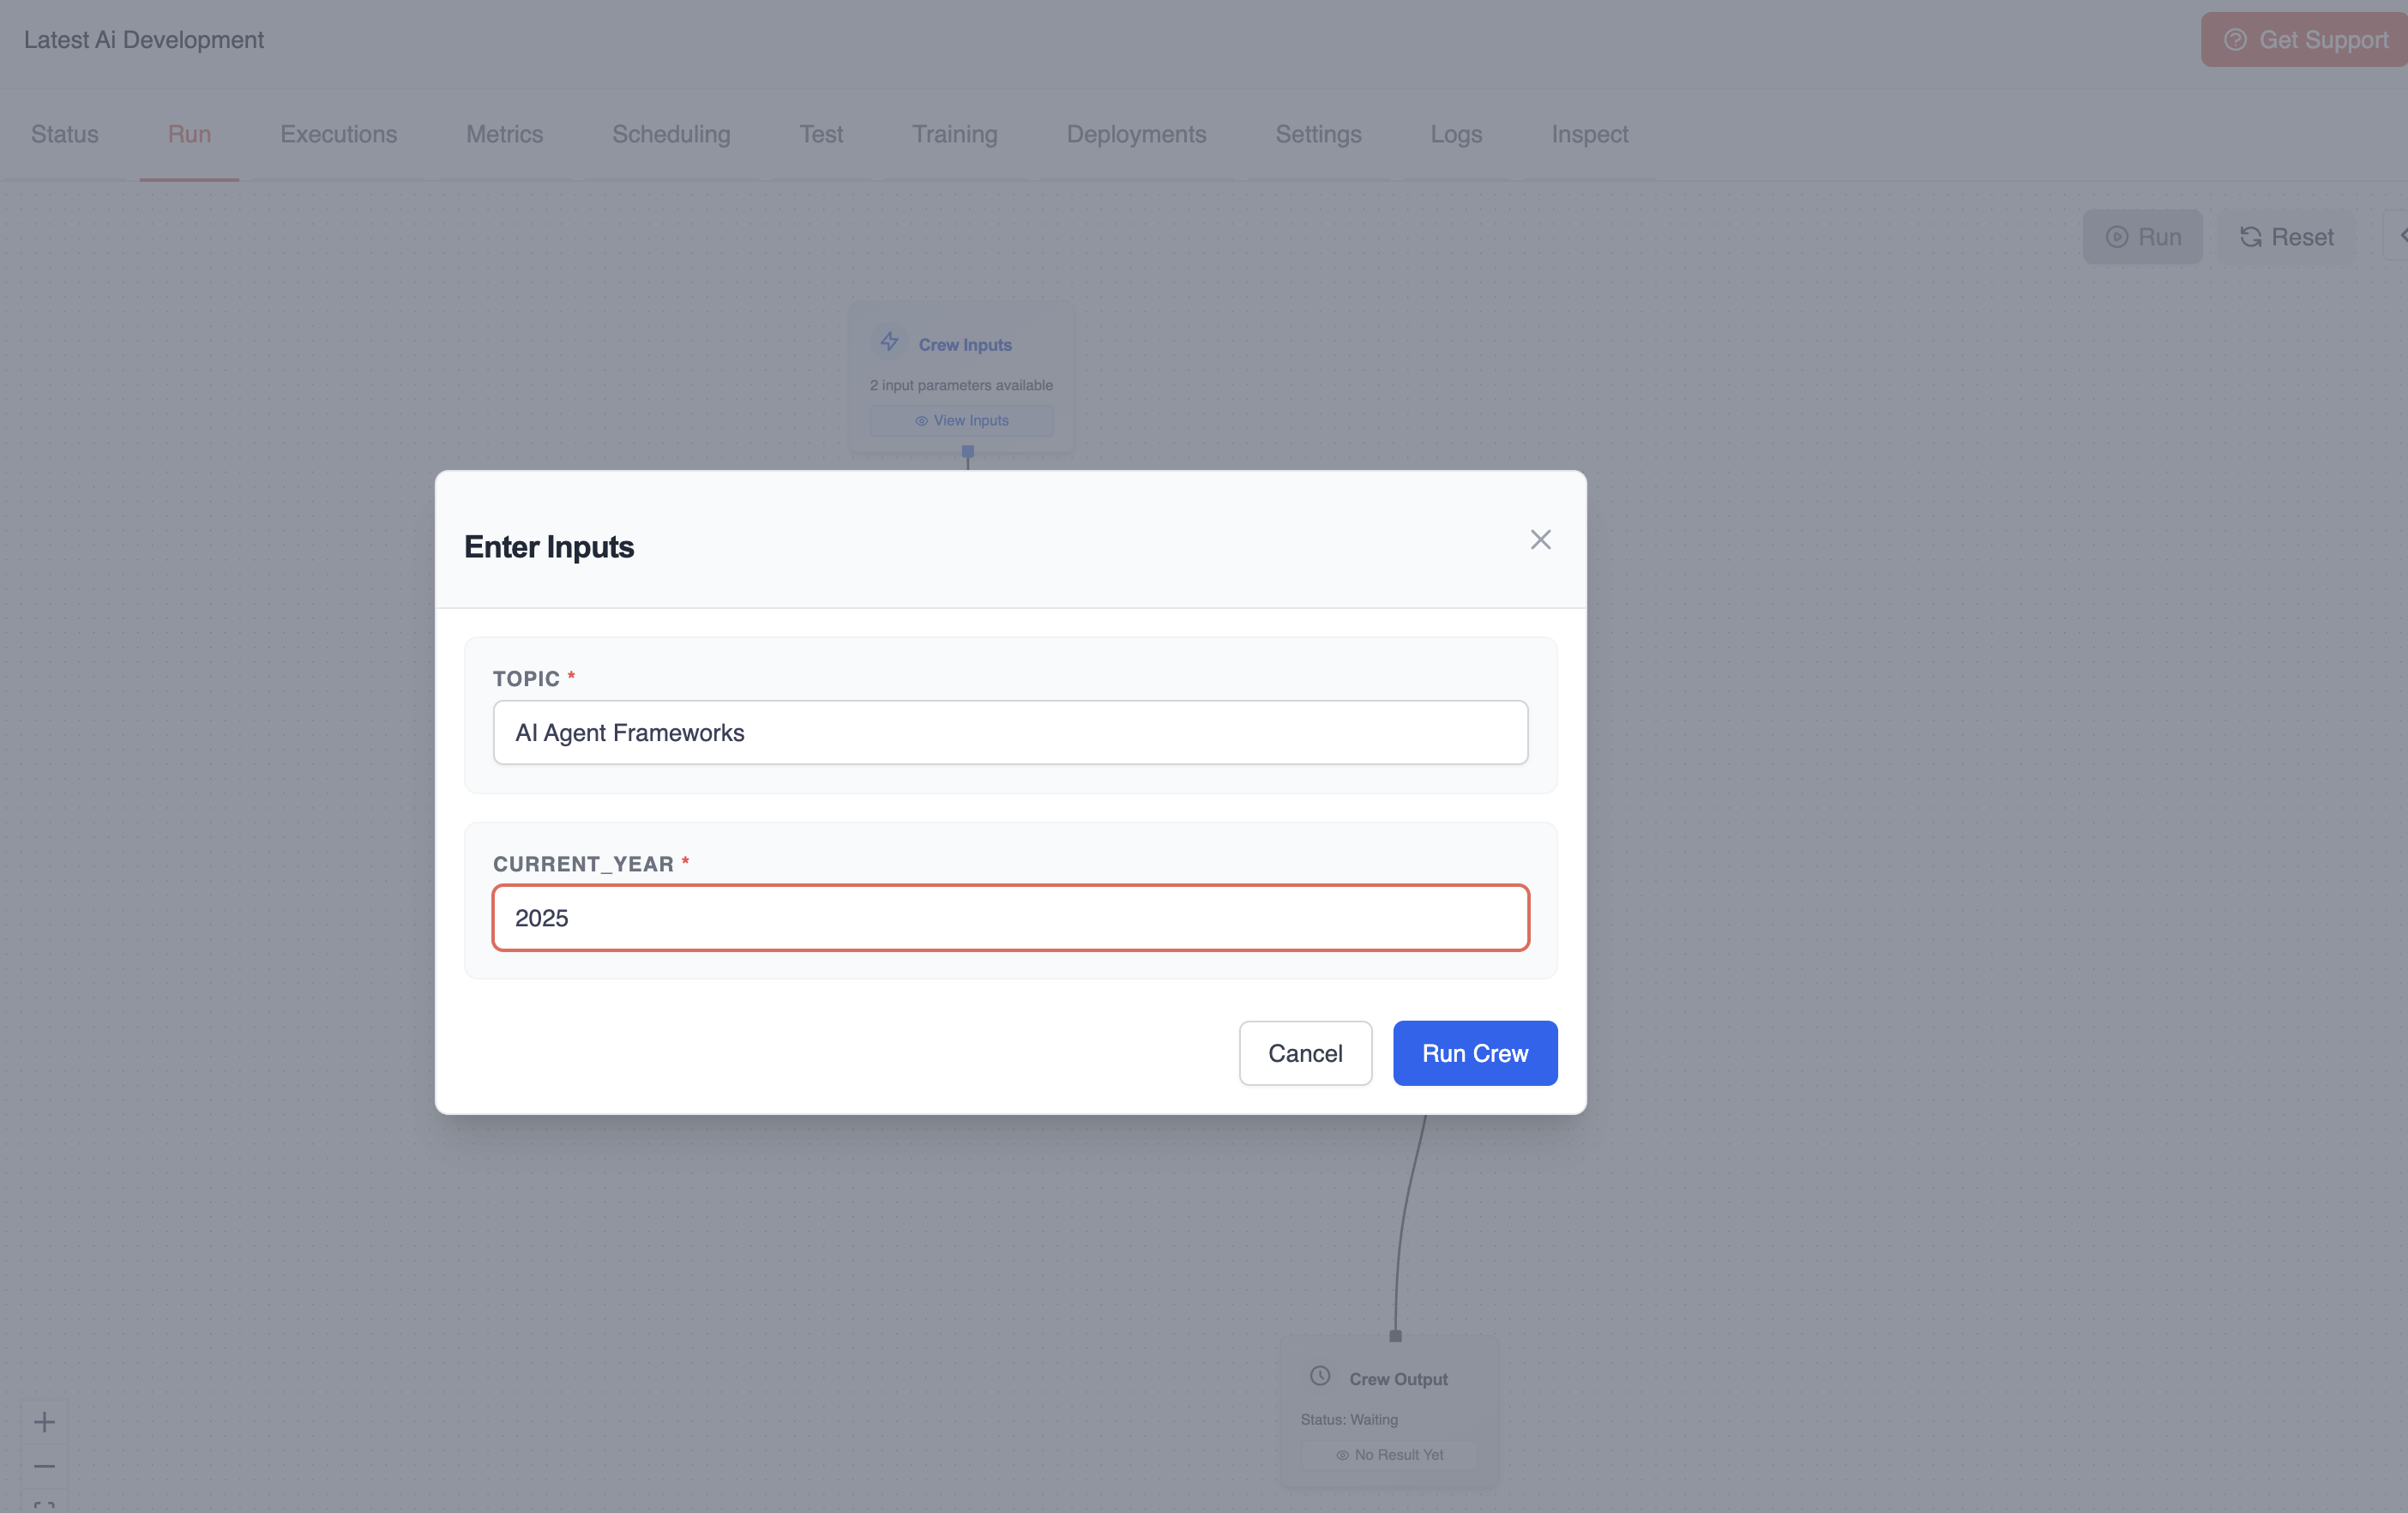 ### Step 3: Monitor Execution Progress
After initiating the execution:
1. You'll receive a response containing a `kickoff_id` - **copy this ID**
2. This ID is essential for tracking your execution
### Step 3: Monitor Execution Progress
After initiating the execution:
1. You'll receive a response containing a `kickoff_id` - **copy this ID**
2. This ID is essential for tracking your execution
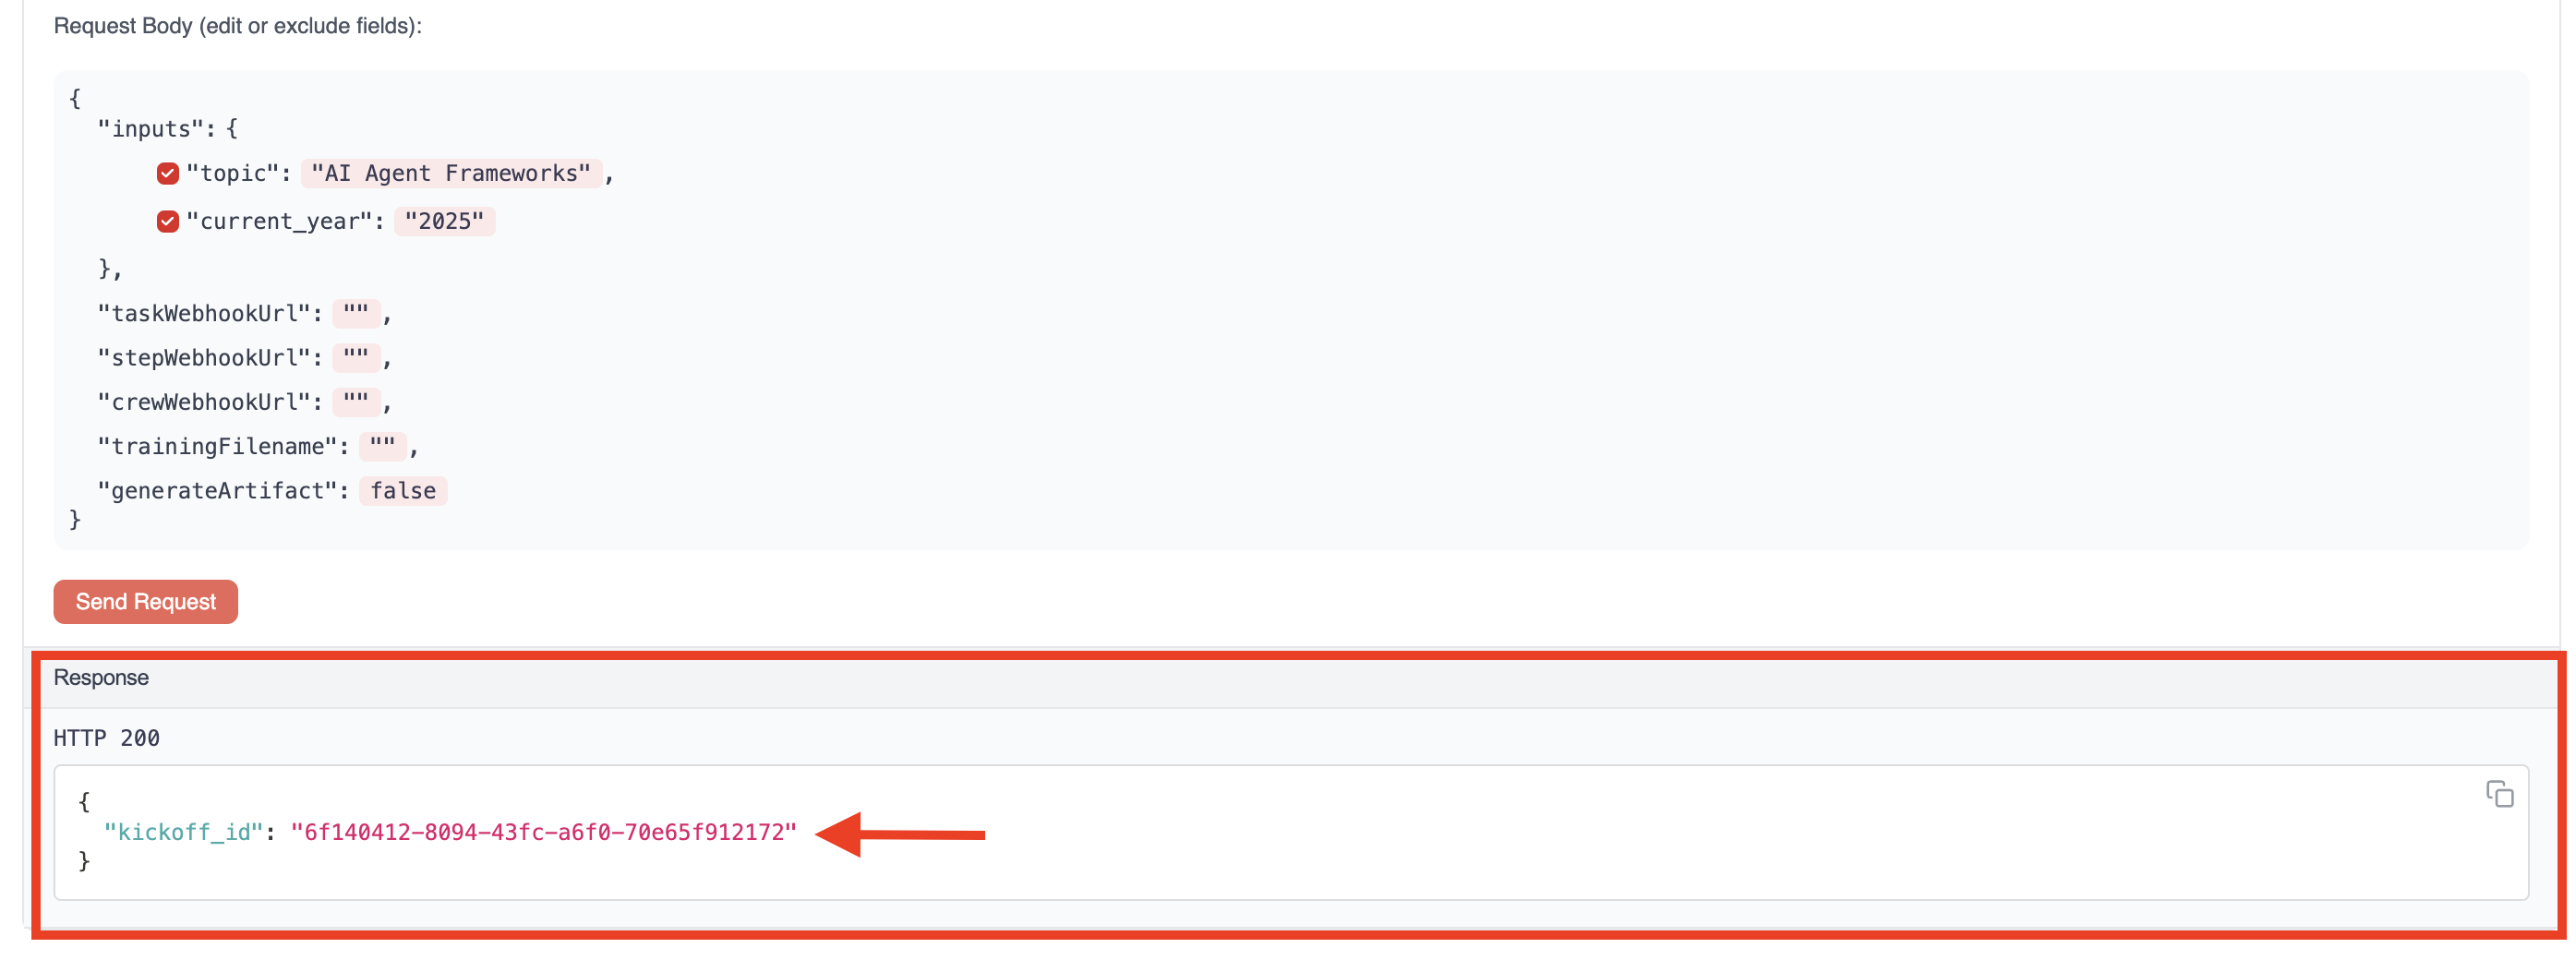 ### Step 4: Check Execution Status
To monitor the progress of your execution:
1. Click the "Status" endpoint in the Test Endpoints section
2. Paste the `kickoff_id` into the designated field
3. Click the "Get Status" button
### Step 4: Check Execution Status
To monitor the progress of your execution:
1. Click the "Status" endpoint in the Test Endpoints section
2. Paste the `kickoff_id` into the designated field
3. Click the "Get Status" button
 The status response will show:
* Current execution state (`running`, `completed`, etc.)
* Details about which tasks are in progress
* Any outputs produced so far
### Step 5: View Final Results
Once execution is complete:
1. The status will change to `completed`
2. You can view the full execution results and outputs
3. For a more detailed view, check the `Executions` tab in the crew detail page
## Method 2: Using the API
You can also kickoff crews programmatically using the CrewAI AMP REST API.
### Authentication
All API requests require a bearer token for authentication:
```bash theme={null}
curl -H "Authorization: Bearer YOUR_CREW_TOKEN" https://your-crew-url.crewai.com
```
Your bearer token is available on the Status tab of your crew's detail page.
### Checking Crew Health
Before executing operations, you can verify that your crew is running properly:
```bash theme={null}
curl -H "Authorization: Bearer YOUR_CREW_TOKEN" https://your-crew-url.crewai.com
```
A successful response will return a message indicating the crew is operational:
```
Healthy%
```
### Step 1: Retrieve Required Inputs
First, determine what inputs your crew requires:
```bash theme={null}
curl -X GET \
-H "Authorization: Bearer YOUR_CREW_TOKEN" \
https://your-crew-url.crewai.com/inputs
```
The response will be a JSON object containing an array of required input parameters, for example:
```json theme={null}
{ "inputs": ["topic", "current_year"] }
```
This example shows that this particular crew requires two inputs: `topic` and `current_year`.
### Step 2: Kickoff Execution
Initiate execution by providing the required inputs:
```bash theme={null}
curl -X POST \
-H "Content-Type: application/json" \
-H "Authorization: Bearer YOUR_CREW_TOKEN" \
-d '{"inputs": {"topic": "AI Agent Frameworks", "current_year": "2025"}}' \
https://your-crew-url.crewai.com/kickoff
```
The response will include a `kickoff_id` that you'll need for tracking:
```json theme={null}
{ "kickoff_id": "abcd1234-5678-90ef-ghij-klmnopqrstuv" }
```
### Step 3: Check Execution Status
Monitor the execution progress using the kickoff\_id:
```bash theme={null}
curl -X GET \
-H "Authorization: Bearer YOUR_CREW_TOKEN" \
https://your-crew-url.crewai.com/status/abcd1234-5678-90ef-ghij-klmnopqrstuv
```
## Handling Executions
### Long-Running Executions
For executions that may take a long time:
1. Consider implementing a polling mechanism to check status periodically
2. Use webhooks (if available) for notification when execution completes
3. Implement error handling for potential timeouts
### Execution Context
The execution context includes:
* Inputs provided at kickoff
* Environment variables configured during deployment
* Any state maintained between tasks
### Debugging Failed Executions
If an execution fails:
1. Check the "Executions" tab for detailed logs
2. Review the "Traces" tab for step-by-step execution details
3. Look for LLM responses and tool usage in the trace details
The status response will show:
* Current execution state (`running`, `completed`, etc.)
* Details about which tasks are in progress
* Any outputs produced so far
### Step 5: View Final Results
Once execution is complete:
1. The status will change to `completed`
2. You can view the full execution results and outputs
3. For a more detailed view, check the `Executions` tab in the crew detail page
## Method 2: Using the API
You can also kickoff crews programmatically using the CrewAI AMP REST API.
### Authentication
All API requests require a bearer token for authentication:
```bash theme={null}
curl -H "Authorization: Bearer YOUR_CREW_TOKEN" https://your-crew-url.crewai.com
```
Your bearer token is available on the Status tab of your crew's detail page.
### Checking Crew Health
Before executing operations, you can verify that your crew is running properly:
```bash theme={null}
curl -H "Authorization: Bearer YOUR_CREW_TOKEN" https://your-crew-url.crewai.com
```
A successful response will return a message indicating the crew is operational:
```
Healthy%
```
### Step 1: Retrieve Required Inputs
First, determine what inputs your crew requires:
```bash theme={null}
curl -X GET \
-H "Authorization: Bearer YOUR_CREW_TOKEN" \
https://your-crew-url.crewai.com/inputs
```
The response will be a JSON object containing an array of required input parameters, for example:
```json theme={null}
{ "inputs": ["topic", "current_year"] }
```
This example shows that this particular crew requires two inputs: `topic` and `current_year`.
### Step 2: Kickoff Execution
Initiate execution by providing the required inputs:
```bash theme={null}
curl -X POST \
-H "Content-Type: application/json" \
-H "Authorization: Bearer YOUR_CREW_TOKEN" \
-d '{"inputs": {"topic": "AI Agent Frameworks", "current_year": "2025"}}' \
https://your-crew-url.crewai.com/kickoff
```
The response will include a `kickoff_id` that you'll need for tracking:
```json theme={null}
{ "kickoff_id": "abcd1234-5678-90ef-ghij-klmnopqrstuv" }
```
### Step 3: Check Execution Status
Monitor the execution progress using the kickoff\_id:
```bash theme={null}
curl -X GET \
-H "Authorization: Bearer YOUR_CREW_TOKEN" \
https://your-crew-url.crewai.com/status/abcd1234-5678-90ef-ghij-klmnopqrstuv
```
## Handling Executions
### Long-Running Executions
For executions that may take a long time:
1. Consider implementing a polling mechanism to check status periodically
2. Use webhooks (if available) for notification when execution completes
3. Implement error handling for potential timeouts
### Execution Context
The execution context includes:
* Inputs provided at kickoff
* Environment variables configured during deployment
* Any state maintained between tasks
### Debugging Failed Executions
If an execution fails:
1. Check the "Executions" tab for detailed logs
2. Review the "Traces" tab for step-by-step execution details
3. Look for LLM responses and tool usage in the trace details
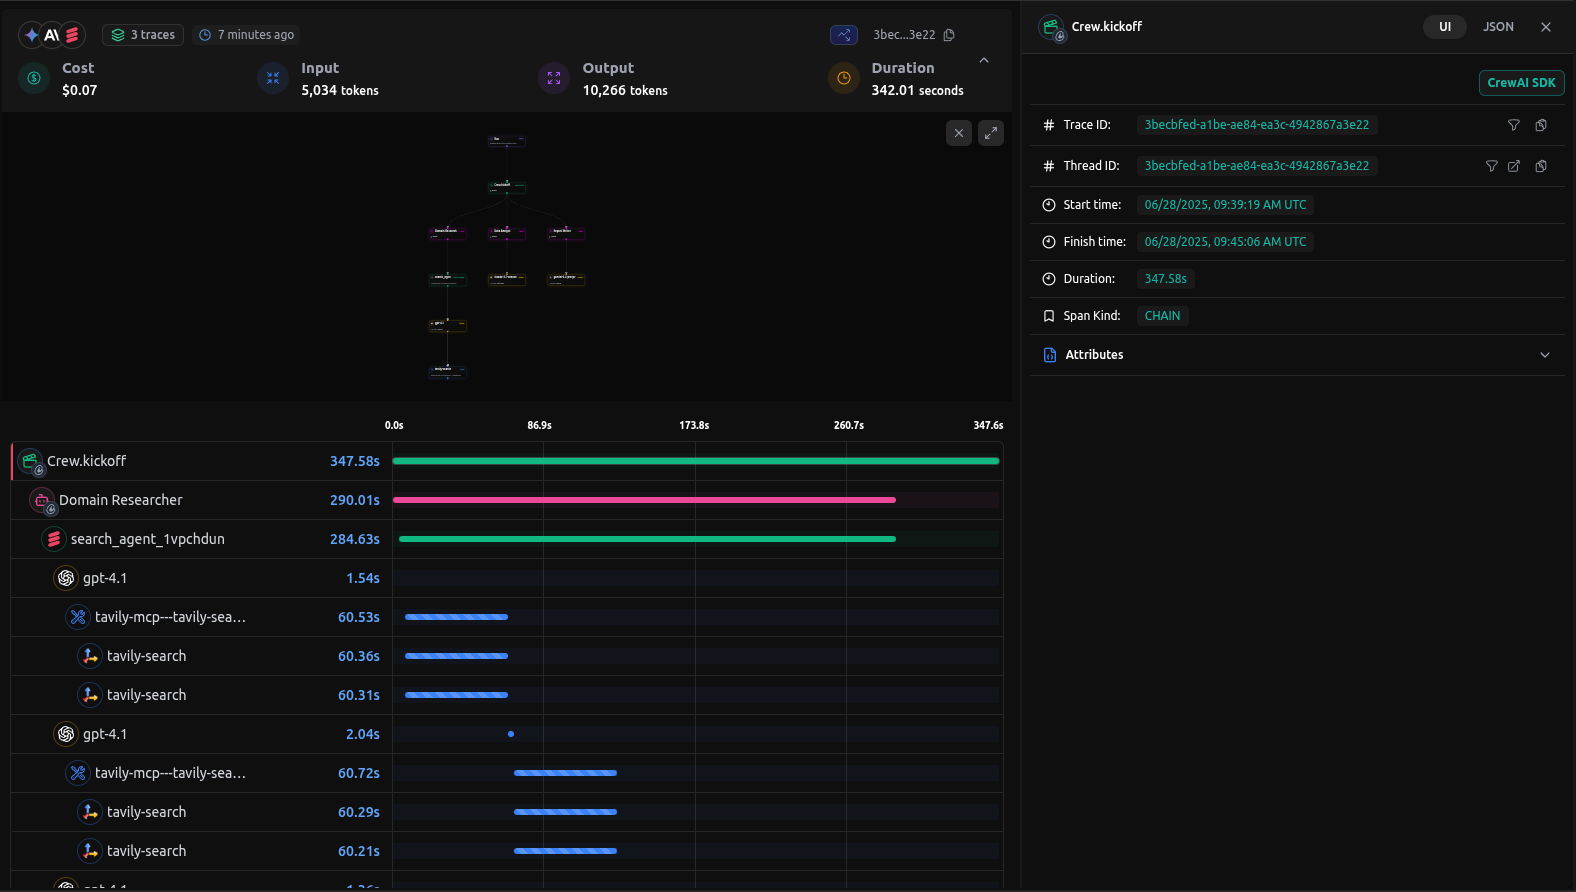 **Checkout:** [View the live trace example](https://app.langdb.ai/sharing/threads/3becbfed-a1be-ae84-ea3c-4942867a3e22)
## Features
### AI Gateway Capabilities
* **Access to 350+ LLMs**: Connect to all major language models through a single integration
* **Virtual Models**: Create custom model configurations with specific parameters and routing rules
* **Virtual MCP**: Enable compatibility and integration with MCP (Model Context Protocol) systems for enhanced agent communication
* **Guardrails**: Implement safety measures and compliance controls for agent behavior
### Observability & Tracing
* **Automatic Tracing**: Single `init()` call captures all CrewAI interactions
* **End-to-End Visibility**: Monitor agent workflows from start to finish
* **Tool Usage Tracking**: Track which tools agents use and their outcomes
* **Model Call Monitoring**: Detailed insights into LLM interactions
* **Performance Analytics**: Monitor latency, token usage, and costs
* **Debugging Support**: Step-through execution for troubleshooting
* **Real-time Monitoring**: Live traces and metrics dashboard
## Setup Instructions
**Checkout:** [View the live trace example](https://app.langdb.ai/sharing/threads/3becbfed-a1be-ae84-ea3c-4942867a3e22)
## Features
### AI Gateway Capabilities
* **Access to 350+ LLMs**: Connect to all major language models through a single integration
* **Virtual Models**: Create custom model configurations with specific parameters and routing rules
* **Virtual MCP**: Enable compatibility and integration with MCP (Model Context Protocol) systems for enhanced agent communication
* **Guardrails**: Implement safety measures and compliance controls for agent behavior
### Observability & Tracing
* **Automatic Tracing**: Single `init()` call captures all CrewAI interactions
* **End-to-End Visibility**: Monitor agent workflows from start to finish
* **Tool Usage Tracking**: Track which tools agents use and their outcomes
* **Model Call Monitoring**: Detailed insights into LLM interactions
* **Performance Analytics**: Monitor latency, token usage, and costs
* **Debugging Support**: Step-through execution for troubleshooting
* **Real-time Monitoring**: Live traces and metrics dashboard
## Setup Instructions
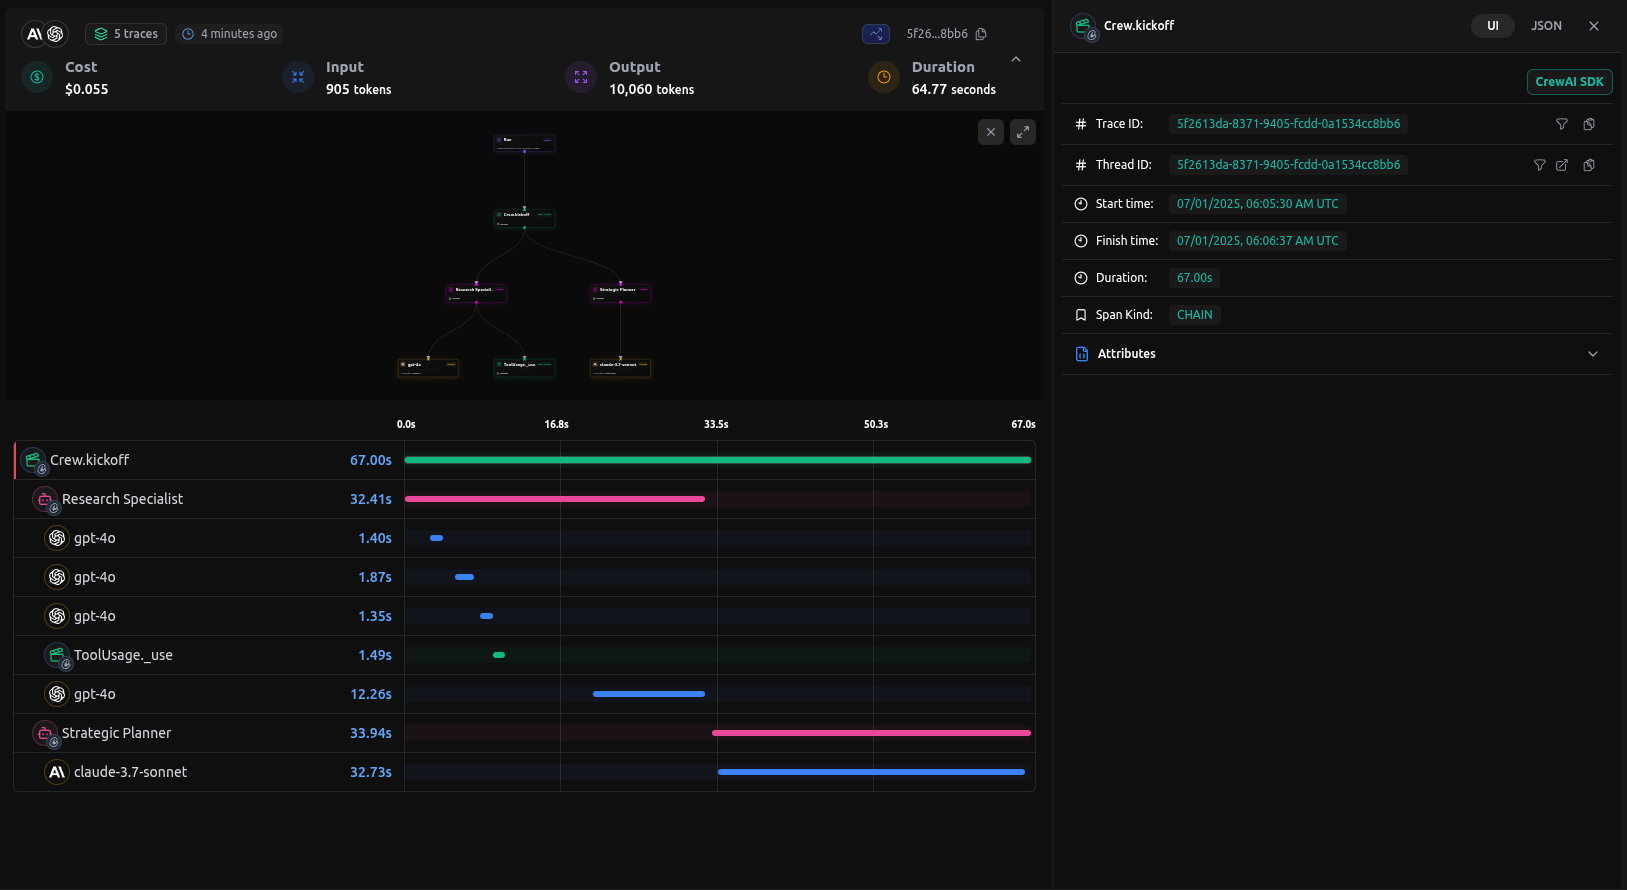 ### What You'll See
* **Agent Interactions**: Complete flow of agent conversations and task handoffs
* **Tool Usage**: Which tools were called, their inputs, and outputs
* **Model Calls**: Detailed LLM interactions with prompts image.pngand responses
* **Performance Metrics**: Latency, token usage, and cost tracking
* **Execution Timeline**: Step-by-step view of the entire workflow
## Troubleshooting
### Common Issues
* **No traces appearing**: Ensure `init()` is called before any CrewAI imports
* **Authentication errors**: Verify your LangDB API key and project ID
## Resources
### What You'll See
* **Agent Interactions**: Complete flow of agent conversations and task handoffs
* **Tool Usage**: Which tools were called, their inputs, and outputs
* **Model Calls**: Detailed LLM interactions with prompts image.pngand responses
* **Performance Metrics**: Latency, token usage, and cost tracking
* **Execution Timeline**: Step-by-step view of the entire workflow
## Troubleshooting
### Common Issues
* **No traces appearing**: Ensure `init()` is called before any CrewAI imports
* **Authentication errors**: Verify your LangDB API key and project ID
## Resources
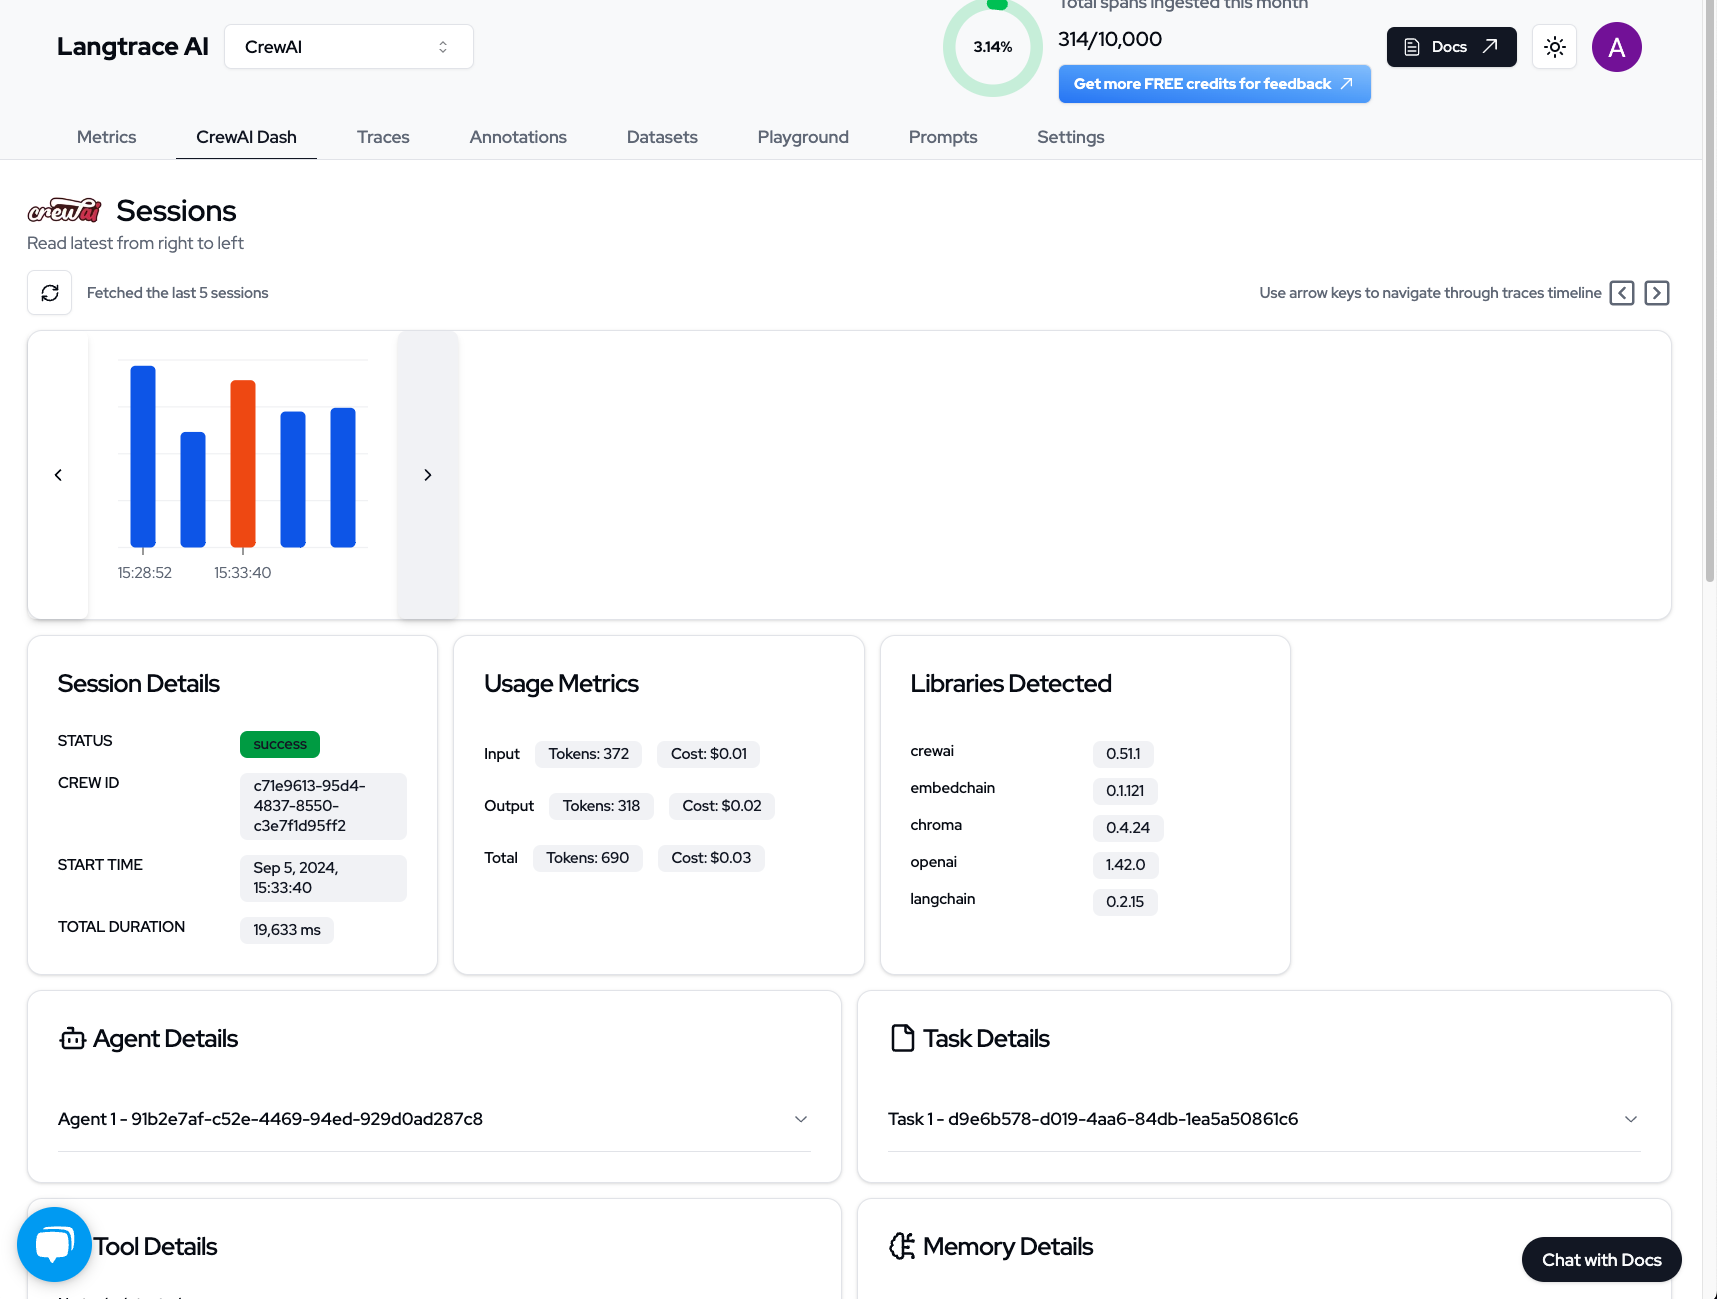

 ## Setup Instructions
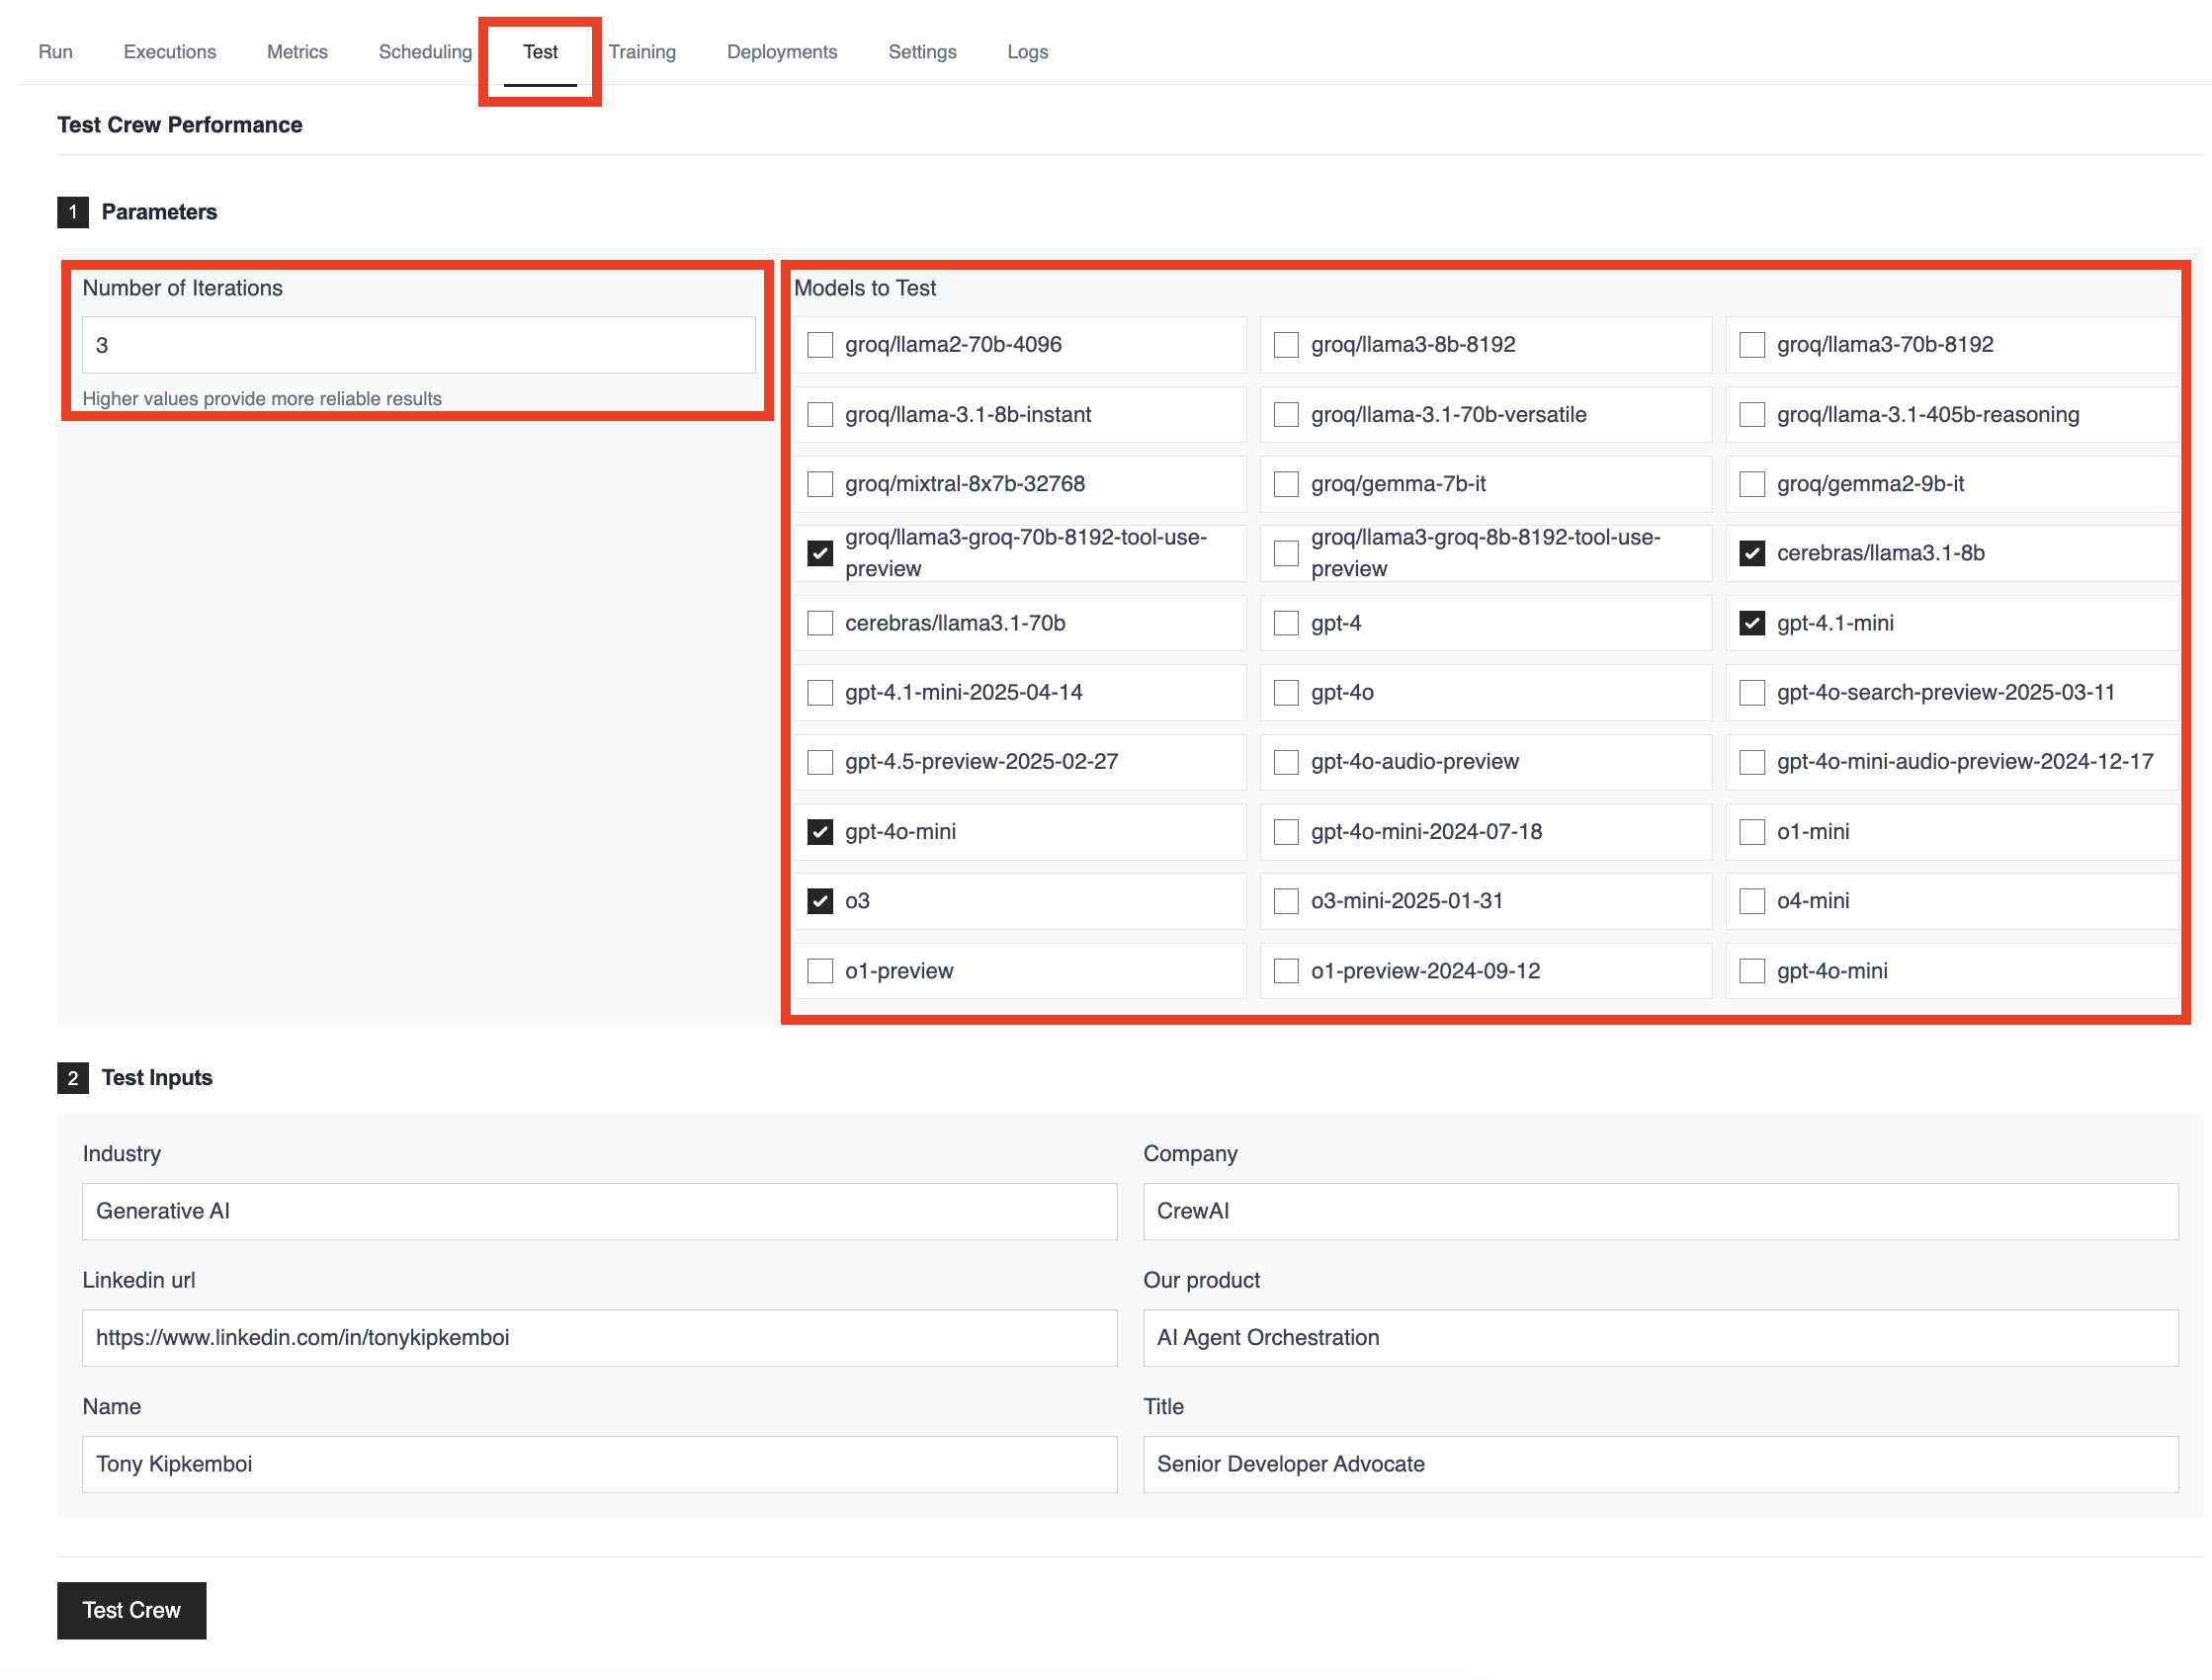 **Advanced Testing Features:**
* **Multi-Model Comparison**: Test multiple LLMs simultaneously across the same tasks and inputs. Compare performance between GPT-4o, Claude, Llama, Groq, Cerebras, and other leading models in parallel to identify the best fit for your specific use case.
* **Statistical Rigor**: Configure multiple iterations with consistent inputs to measure reliability and performance variance. This helps identify models that not only perform well but do so consistently across runs.
* **Real-World Validation**: Use your actual crew inputs and scenarios rather than synthetic benchmarks. The platform allows you to test with your specific industry context, company information, and real use cases for more accurate evaluation.
* **Comprehensive Analytics**: Access detailed performance metrics, execution times, and cost analysis across all tested models. This enables data-driven decision making rather than relying on general model reputation or theoretical capabilities.
* **Team Collaboration**: Share testing results and model performance data across your team, enabling collaborative decision-making and consistent model selection strategies across projects.
Go to [app.crewai.com](https://app.crewai.com) to get started!
**Advanced Testing Features:**
* **Multi-Model Comparison**: Test multiple LLMs simultaneously across the same tasks and inputs. Compare performance between GPT-4o, Claude, Llama, Groq, Cerebras, and other leading models in parallel to identify the best fit for your specific use case.
* **Statistical Rigor**: Configure multiple iterations with consistent inputs to measure reliability and performance variance. This helps identify models that not only perform well but do so consistently across runs.
* **Real-World Validation**: Use your actual crew inputs and scenarios rather than synthetic benchmarks. The platform allows you to test with your specific industry context, company information, and real use cases for more accurate evaluation.
* **Comprehensive Analytics**: Access detailed performance metrics, execution times, and cost analysis across all tested models. This enables data-driven decision making rather than relying on general model reputation or theoretical capabilities.
* **Team Collaboration**: Share testing results and model performance data across your team, enabling collaborative decision-making and consistent model selection strategies across projects.
Go to [app.crewai.com](https://app.crewai.com) to get started!
stop parameter, you can simply omit it from your LLM call:
```python theme={null}
from crewai import LLM
import os
os.environ["OPENAI_API_KEY"] = "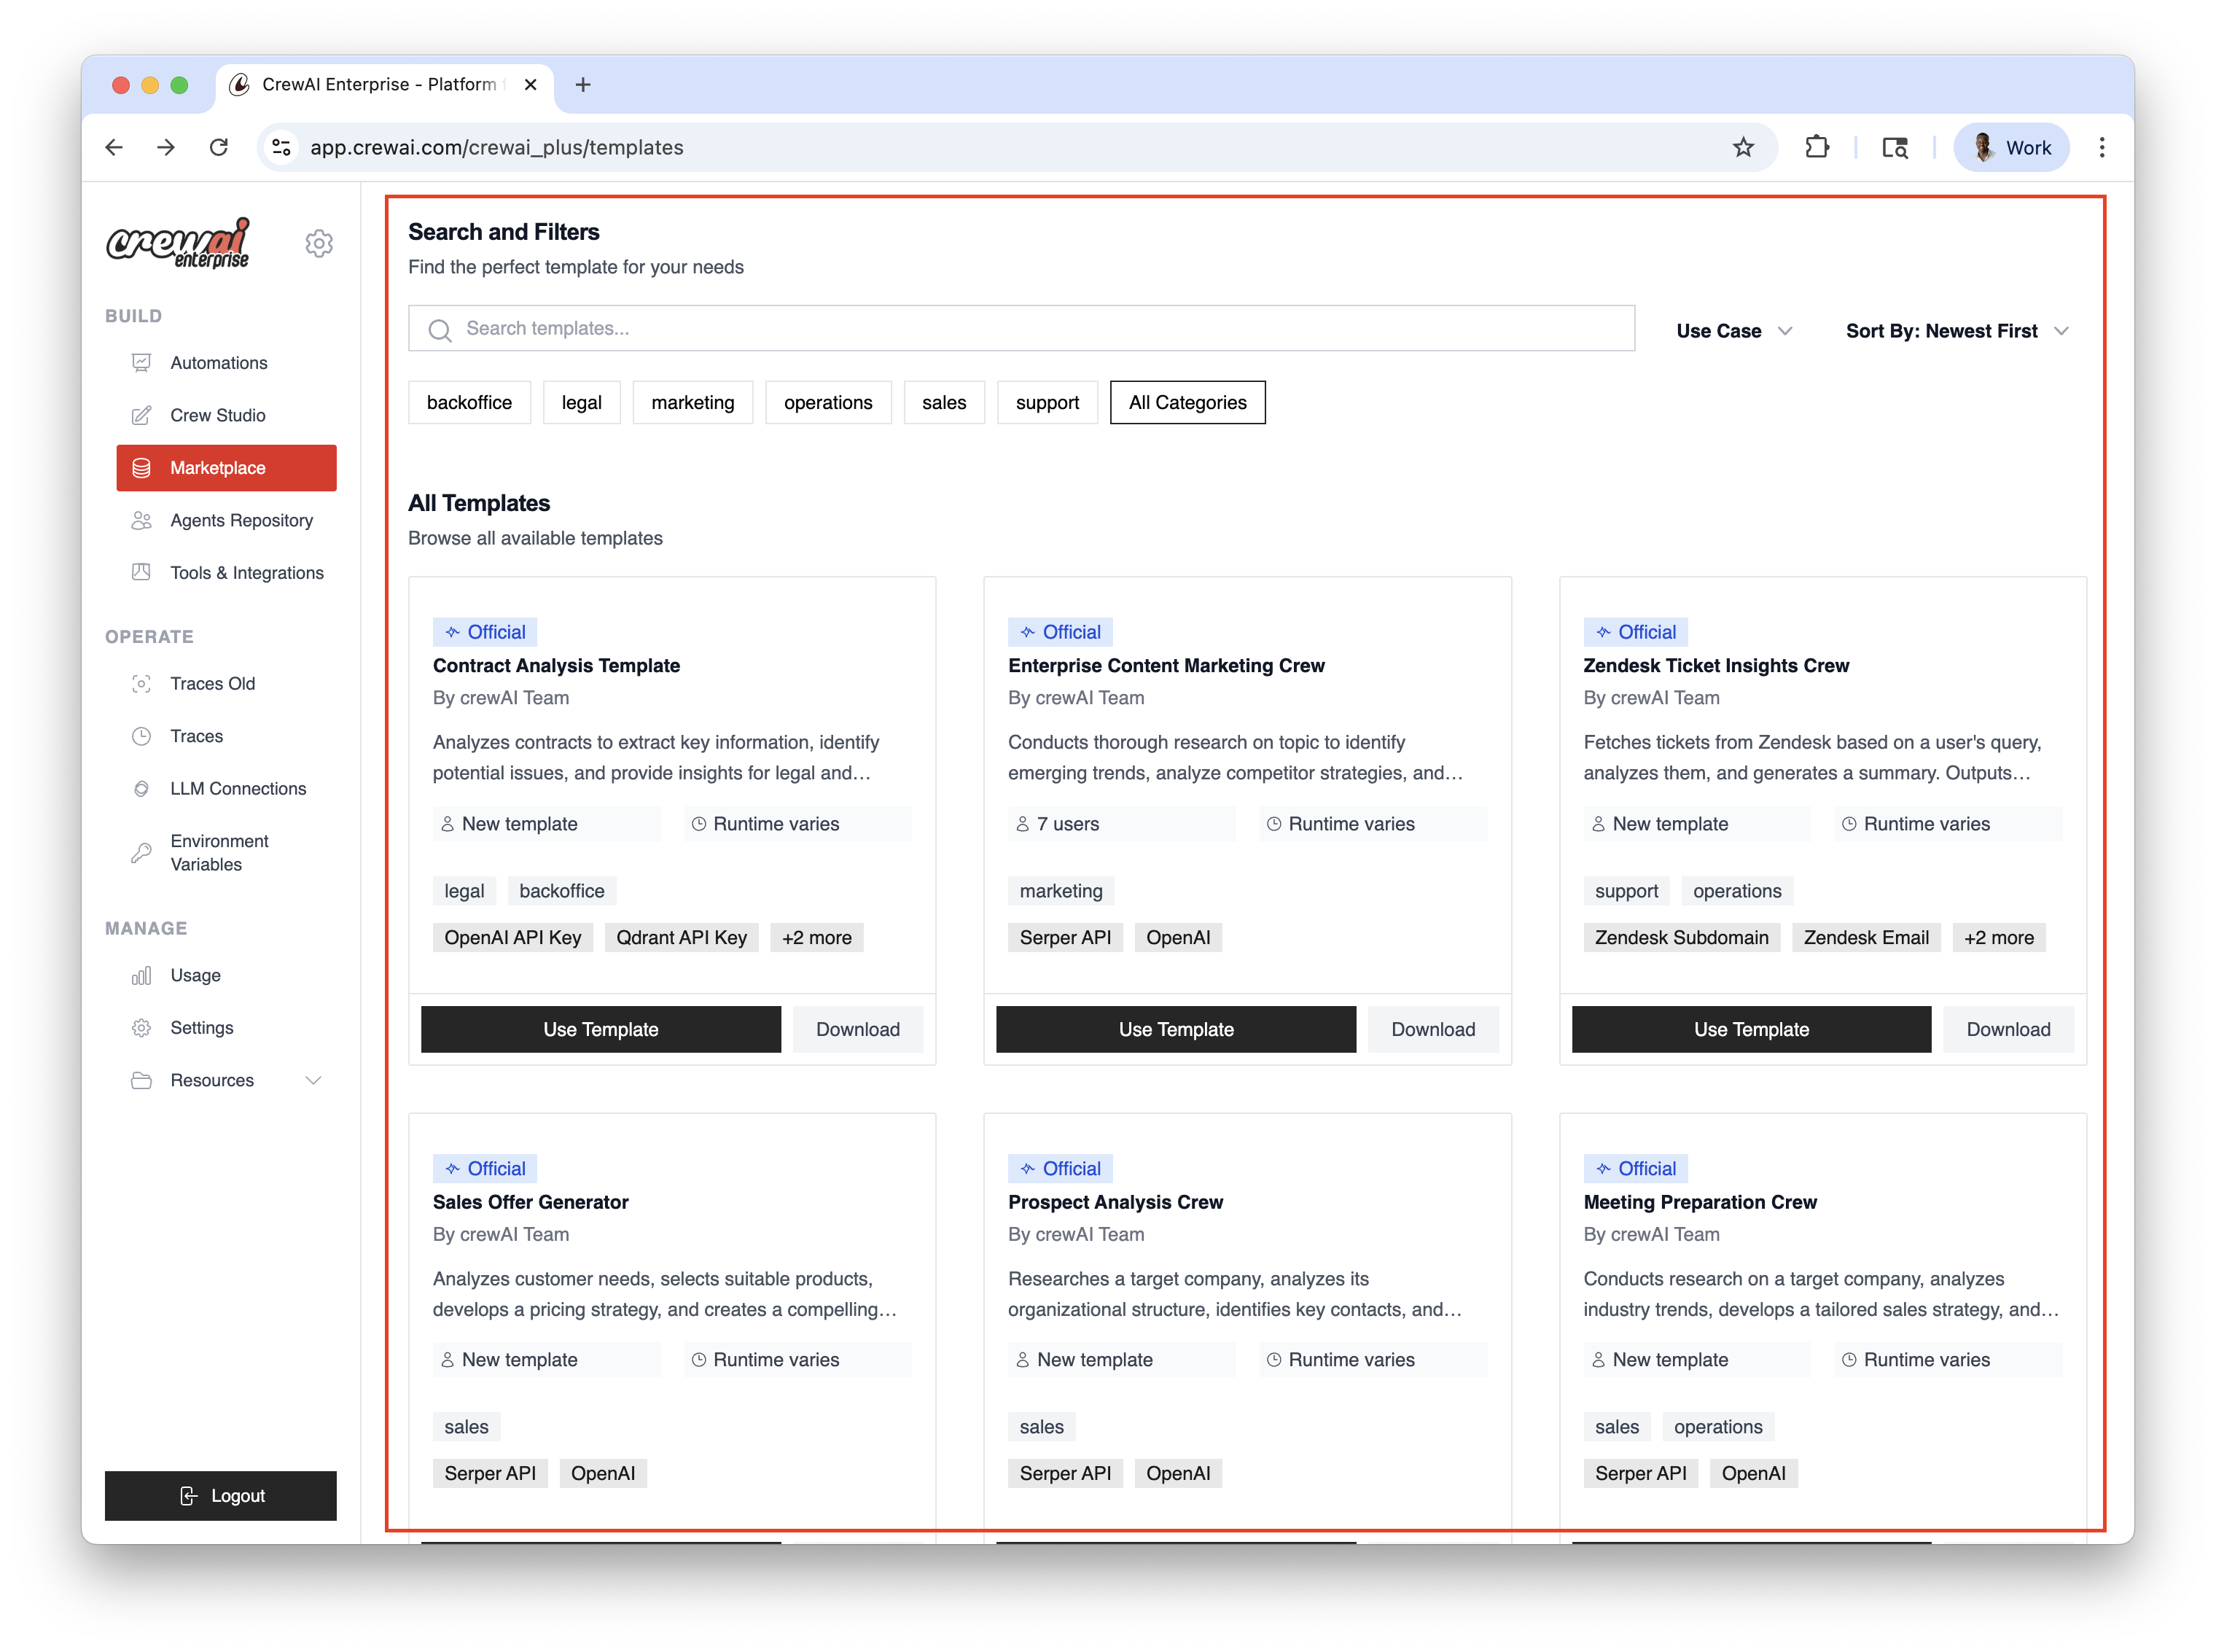 ## Discoverability
* Browse by category and capability
* Search for assets by name or keyword
## Install & Enable
* One‑click install for approved assets
* Enable or disable per crew as needed
* Configure required environment variables and scopes
## Discoverability
* Browse by category and capability
* Search for assets by name or keyword
## Install & Enable
* One‑click install for approved assets
* Enable or disable per crew as needed
* Configure required environment variables and scopes
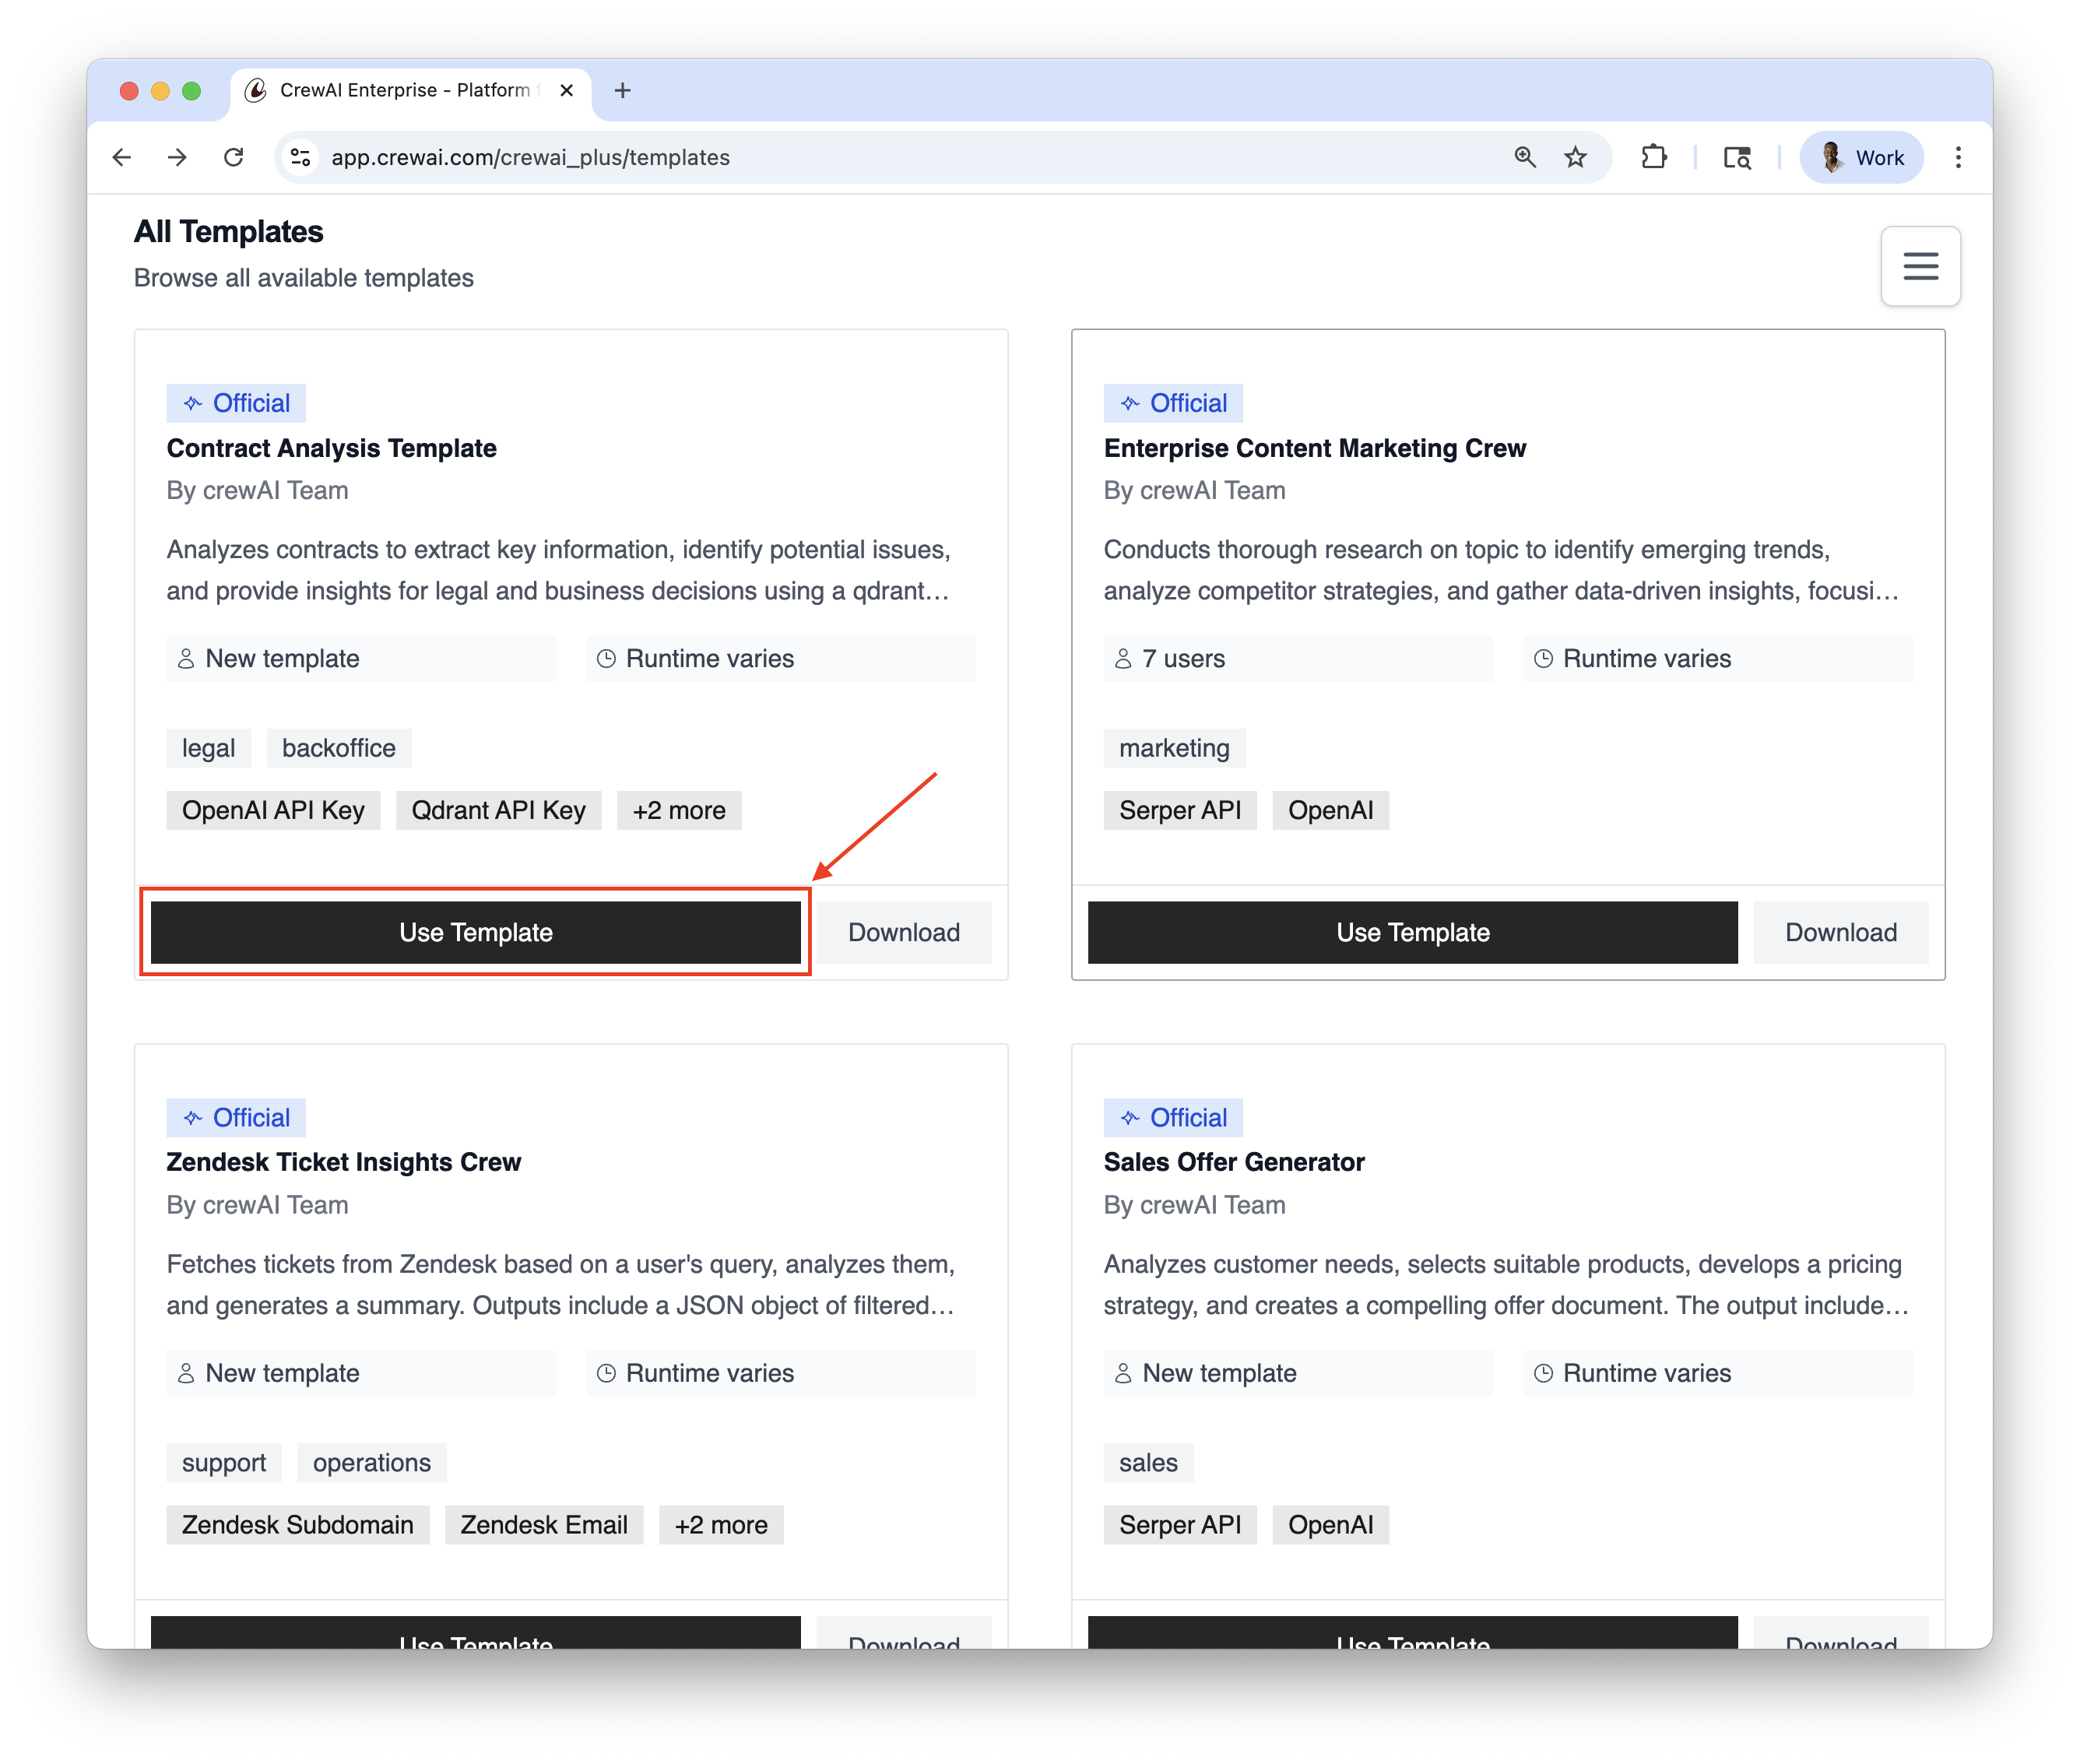 You can also download the templates directly from the marketplace by clicking on the `Download` button so
you can use them locally or refine them to your needs.
## Related
You can also download the templates directly from the marketplace by clicking on the `Download` button so
you can use them locally or refine them to your needs.
## Related
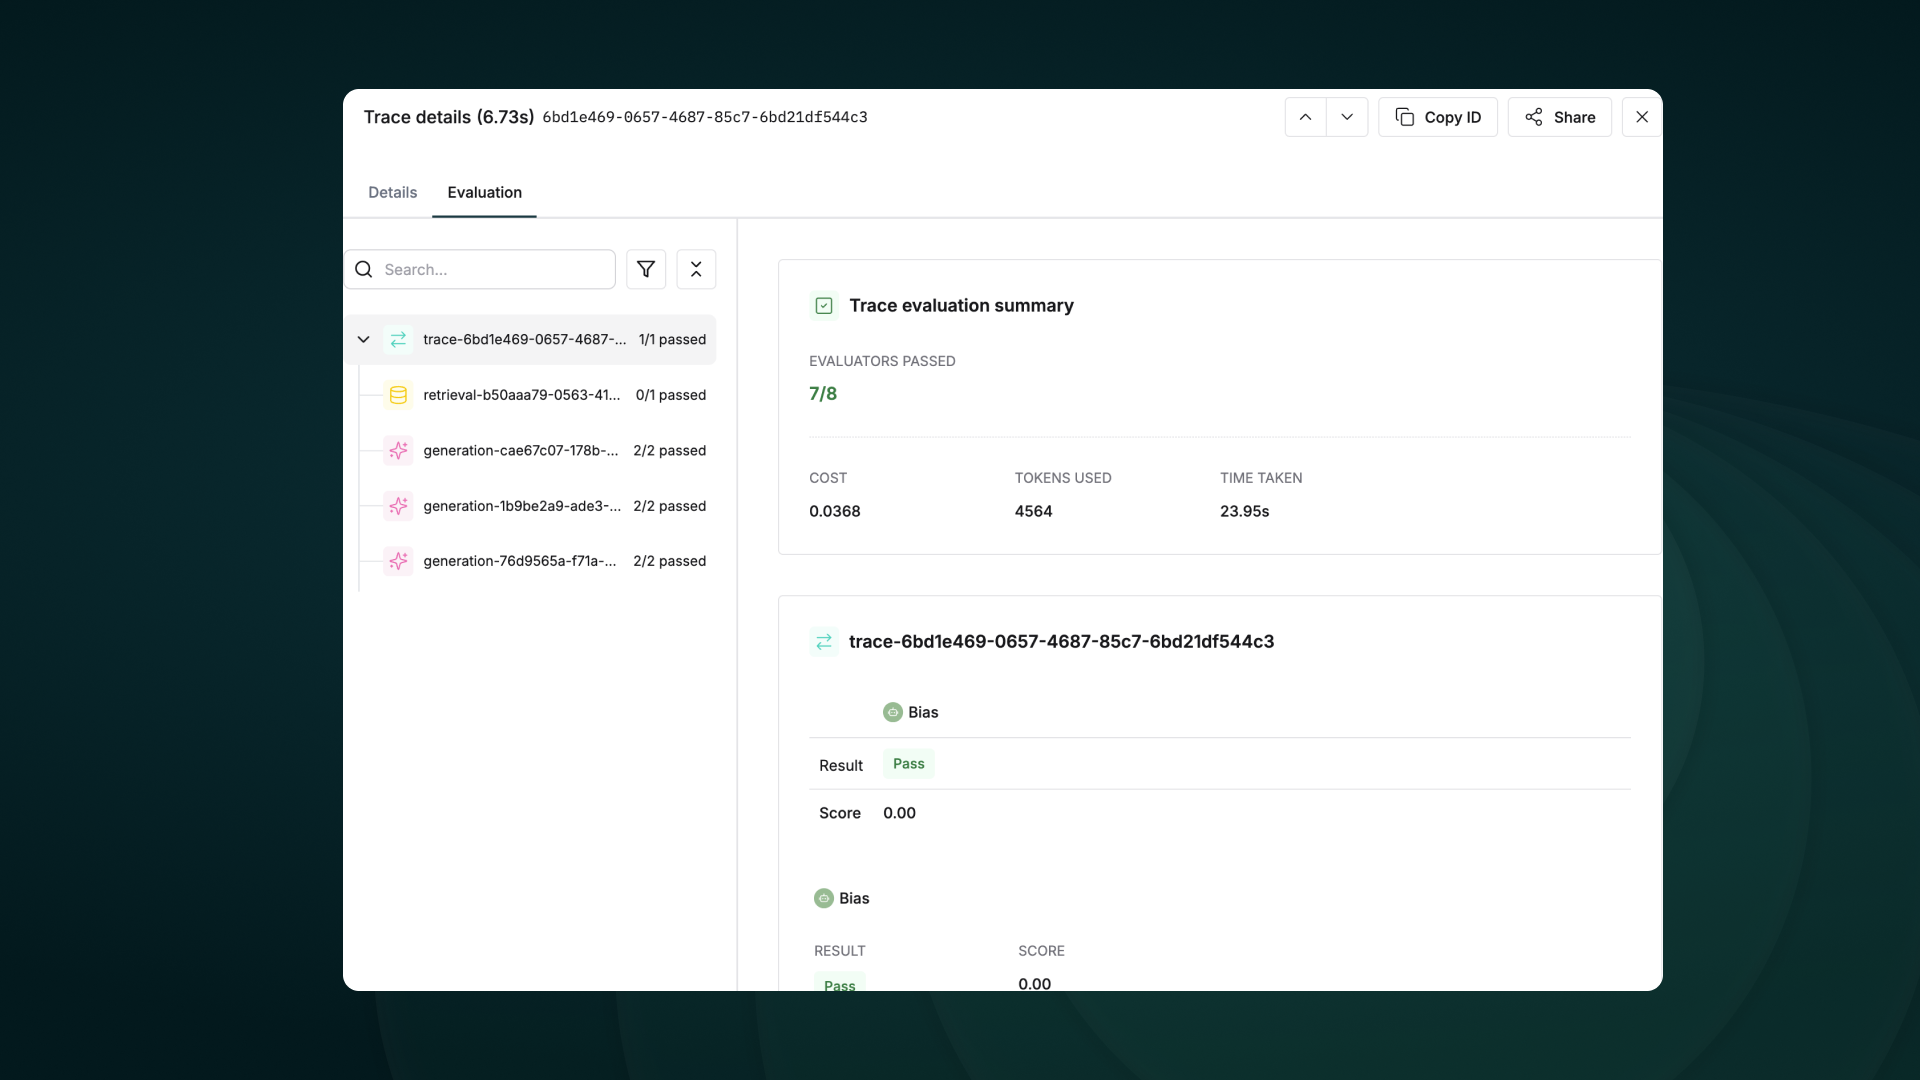
Evaluate captured logs automatically from the UI based on filters and sampling
Use human evaluation or rating to assess the quality of your logs and evaluate them.
Evaluate any component of your trace or log to gain insights into your agent’s behavior.
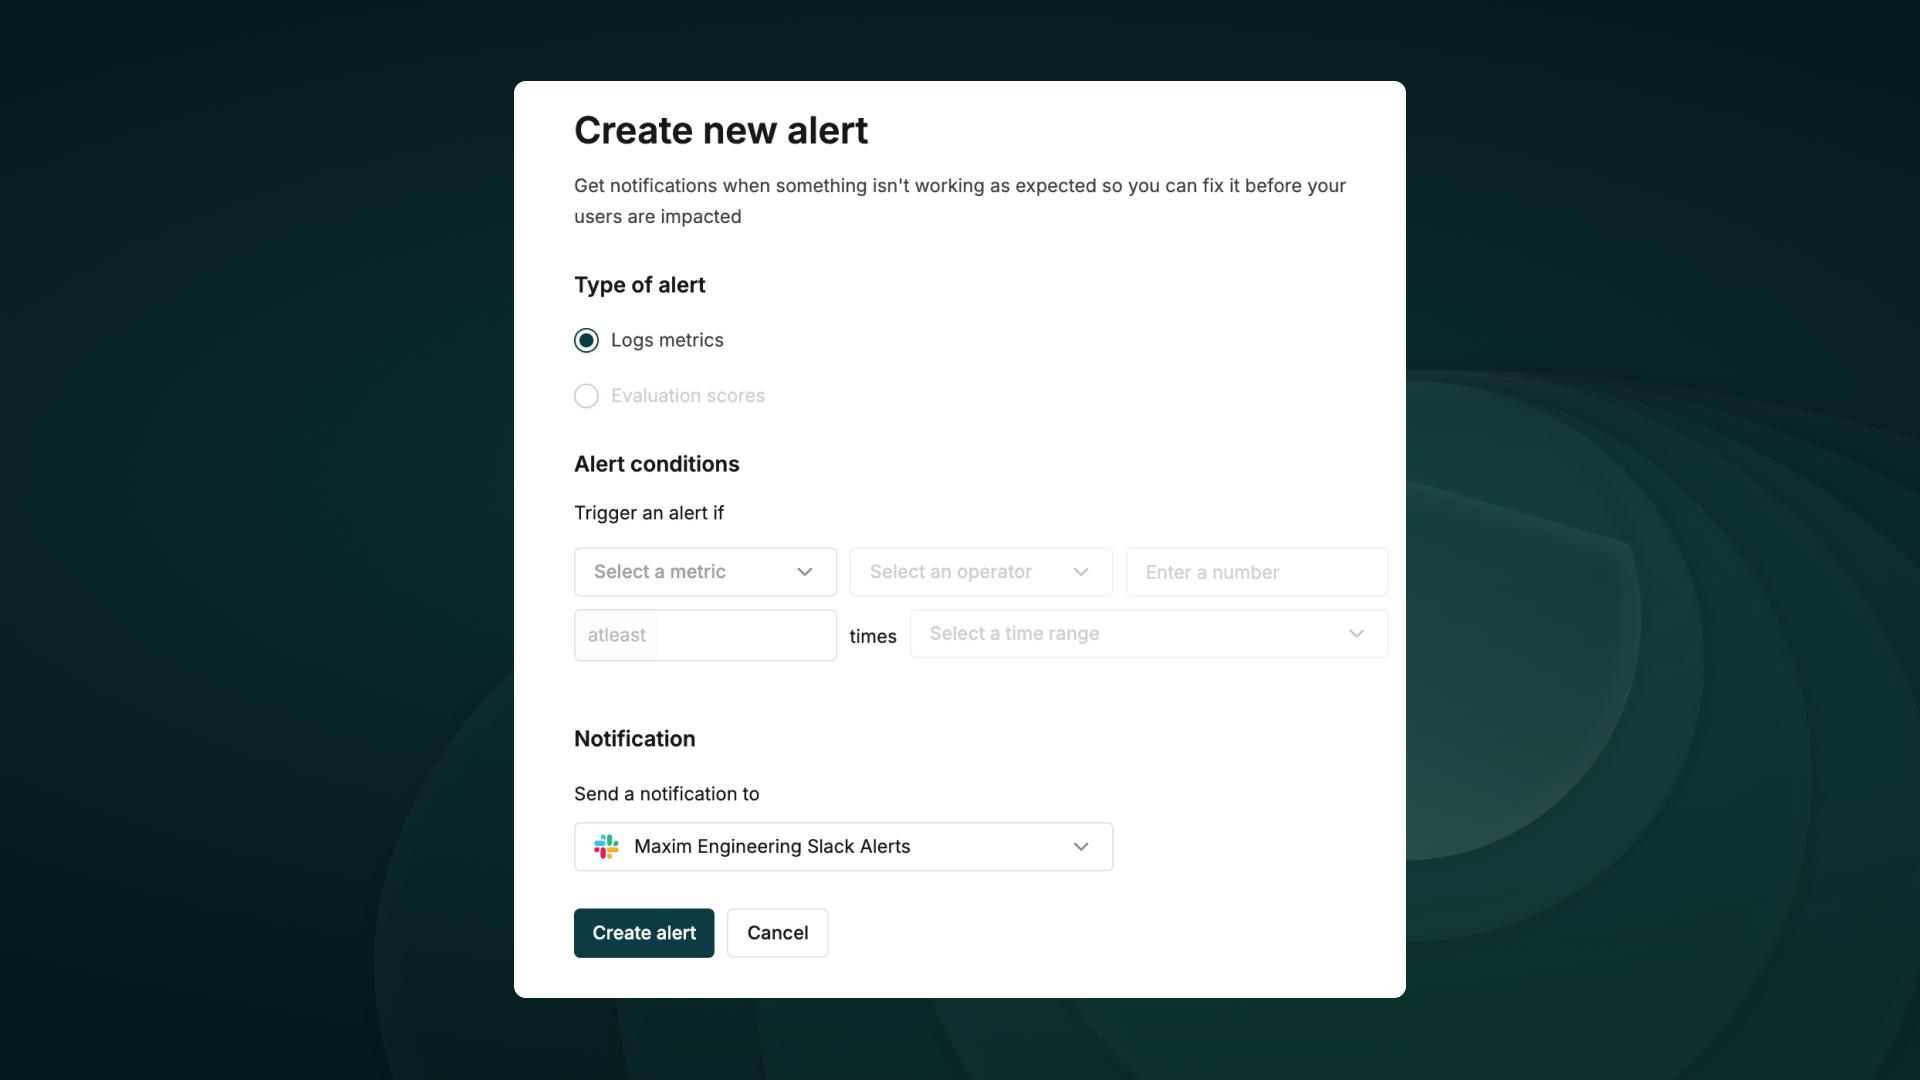
 ## Troubleshooting
### Common Issues
* **No traces appearing**: Ensure your API key and repository ID are correct
* Ensure you've **`called instrument_crewai()`** ***before*** running your crew. This initializes logging hooks correctly.
* Set `debug=True` in your `instrument_crewai()` call to surface any internal errors:
```python theme={null}
instrument_crewai(logger, debug=True)
```
* Configure your agents with `verbose=True` to capture detailed logs:
```python theme={null}
agent = CrewAgent(..., verbose=True)
```
* Double-check that `instrument_crewai()` is called **before** creating or executing agents. This might be obvious, but it's a common oversight.
## Resources
## Troubleshooting
### Common Issues
* **No traces appearing**: Ensure your API key and repository ID are correct
* Ensure you've **`called instrument_crewai()`** ***before*** running your crew. This initializes logging hooks correctly.
* Set `debug=True` in your `instrument_crewai()` call to surface any internal errors:
```python theme={null}
instrument_crewai(logger, debug=True)
```
* Configure your agents with `verbose=True` to capture detailed logs:
```python theme={null}
agent = CrewAgent(..., verbose=True)
```
* Double-check that `instrument_crewai()` is called **before** creating or executing agents. This might be obvious, but it's a common oversight.
## Resources
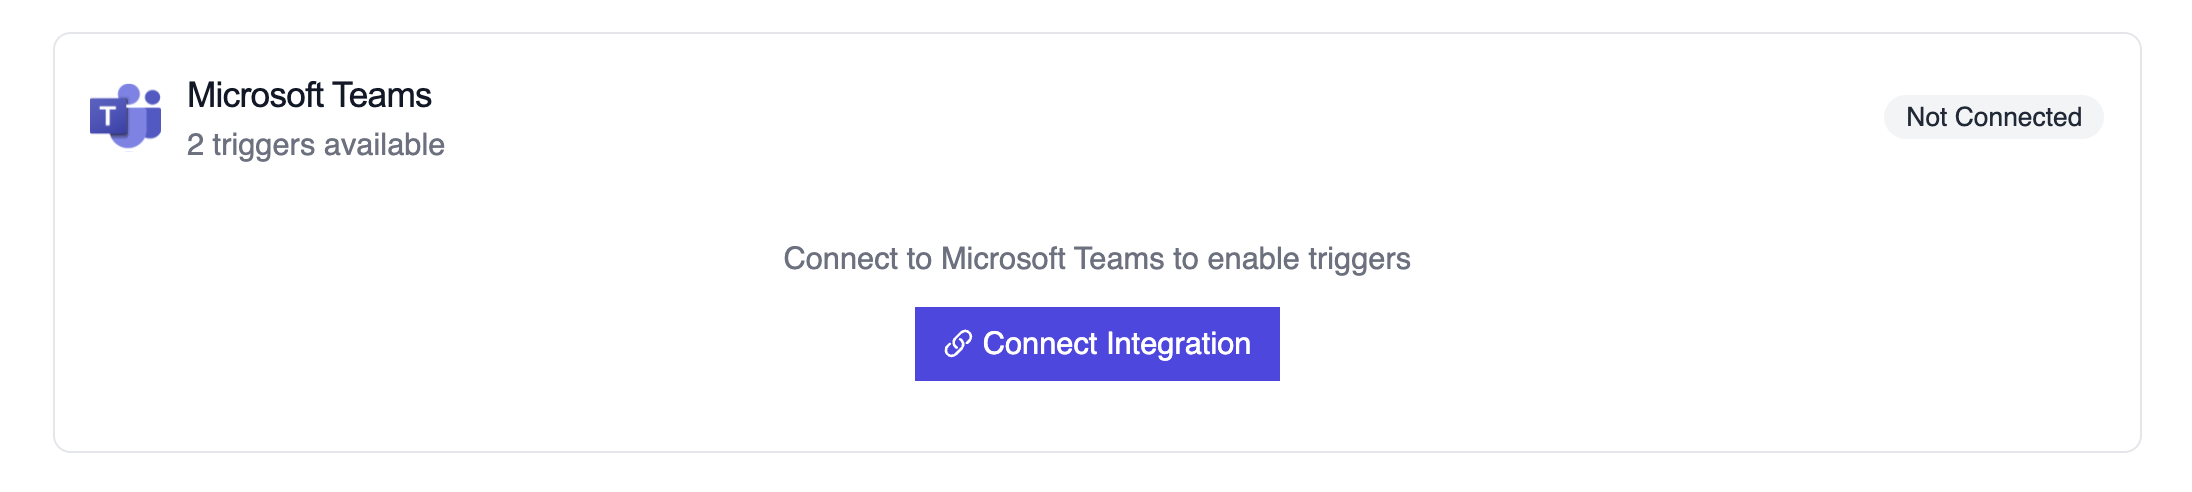 ## Example: Summarize a new chat thread
```python theme={null}
from teams_chat_created_crew import MicrosoftTeamsChatTrigger
crew = MicrosoftTeamsChatTrigger().crew()
result = crew.kickoff({
"crewai_trigger_payload": teams_payload,
})
print(result.raw)
```
The crew parses thread metadata (subject, created time, roster) and generates an action plan for the receiving team.
## Testing Locally
Test your Microsoft Teams trigger integration locally using the CrewAI CLI:
```bash theme={null}
# View all available triggers
crewai triggers list
# Simulate a Microsoft Teams trigger with realistic payload
crewai triggers run microsoft_teams/teams_message_created
```
The `crewai triggers run` command will execute your crew with a complete Teams payload, allowing you to test your parsing logic before deployment.
## Example: Summarize a new chat thread
```python theme={null}
from teams_chat_created_crew import MicrosoftTeamsChatTrigger
crew = MicrosoftTeamsChatTrigger().crew()
result = crew.kickoff({
"crewai_trigger_payload": teams_payload,
})
print(result.raw)
```
The crew parses thread metadata (subject, created time, roster) and generates an action plan for the receiving team.
## Testing Locally
Test your Microsoft Teams trigger integration locally using the CrewAI CLI:
```bash theme={null}
# View all available triggers
crewai triggers list
# Simulate a Microsoft Teams trigger with realistic payload
crewai triggers run microsoft_teams/teams_message_created
```
The `crewai triggers run` command will execute your crew with a complete Teams payload, allowing you to test your parsing logic before deployment.
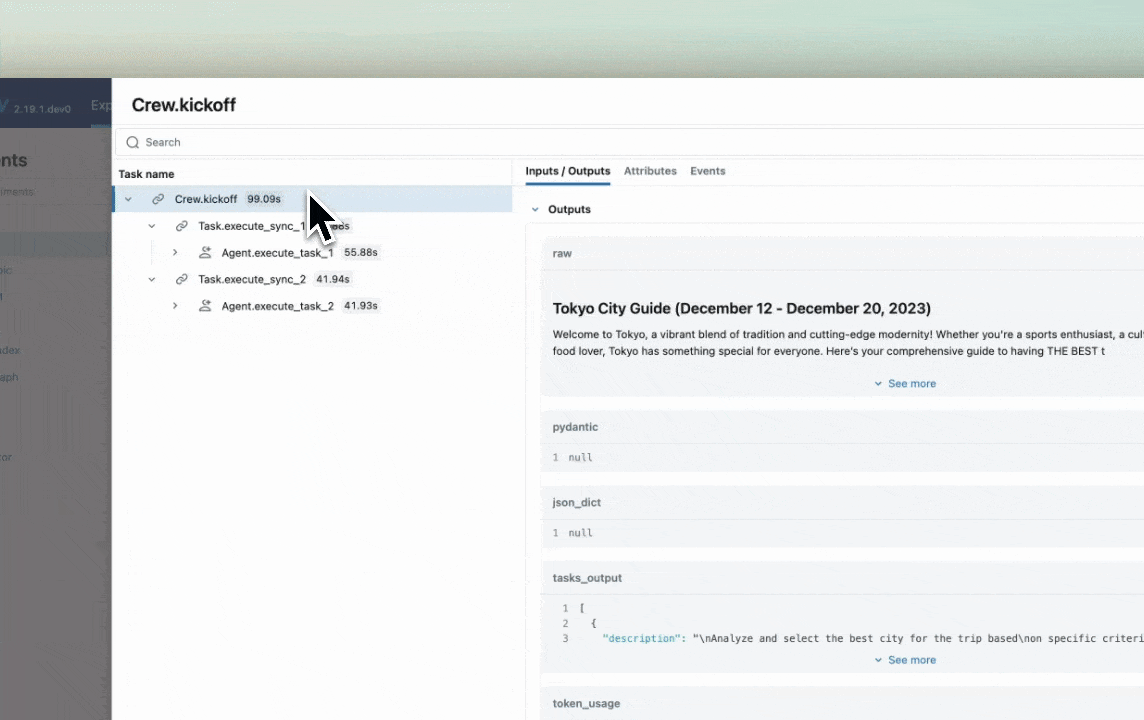 ### Features
* **Tracing Dashboard**: Monitor activities of your crewAI agents with detailed dashboards that include inputs, outputs and metadata of spans.
* **Automated Tracing**: A fully automated integration with crewAI, which can be enabled by running `mlflow.crewai.autolog()`.
* **Manual Trace Instrumentation with minor efforts**: Customize trace instrumentation through MLflow's high-level fluent APIs such as decorators, function wrappers and context managers.
* **OpenTelemetry Compatibility**: MLflow Tracing supports exporting traces to an OpenTelemetry Collector, which can then be used to export traces to various backends such as Jaeger, Zipkin, and AWS X-Ray.
* **Package and Deploy Agents**: Package and deploy your crewAI agents to an inference server with a variety of deployment targets.
* **Securely Host LLMs**: Host multiple LLM from various providers in one unified endpoint through MFflow gateway.
* **Evaluation**: Evaluate your crewAI agents with a wide range of metrics using a convenient API `mlflow.evaluate()`.
## Setup Instructions
### Features
* **Tracing Dashboard**: Monitor activities of your crewAI agents with detailed dashboards that include inputs, outputs and metadata of spans.
* **Automated Tracing**: A fully automated integration with crewAI, which can be enabled by running `mlflow.crewai.autolog()`.
* **Manual Trace Instrumentation with minor efforts**: Customize trace instrumentation through MLflow's high-level fluent APIs such as decorators, function wrappers and context managers.
* **OpenTelemetry Compatibility**: MLflow Tracing supports exporting traces to an OpenTelemetry Collector, which can then be used to export traces to various backends such as Jaeger, Zipkin, and AWS X-Ray.
* **Package and Deploy Agents**: Package and deploy your crewAI agents to an inference server with a variety of deployment targets.
* **Securely Host LLMs**: Host multiple LLM from various providers in one unified endpoint through MFflow gateway.
* **Evaluation**: Evaluate your crewAI agents with a wide range of metrics using a convenient API `mlflow.evaluate()`.
## Setup Instructions
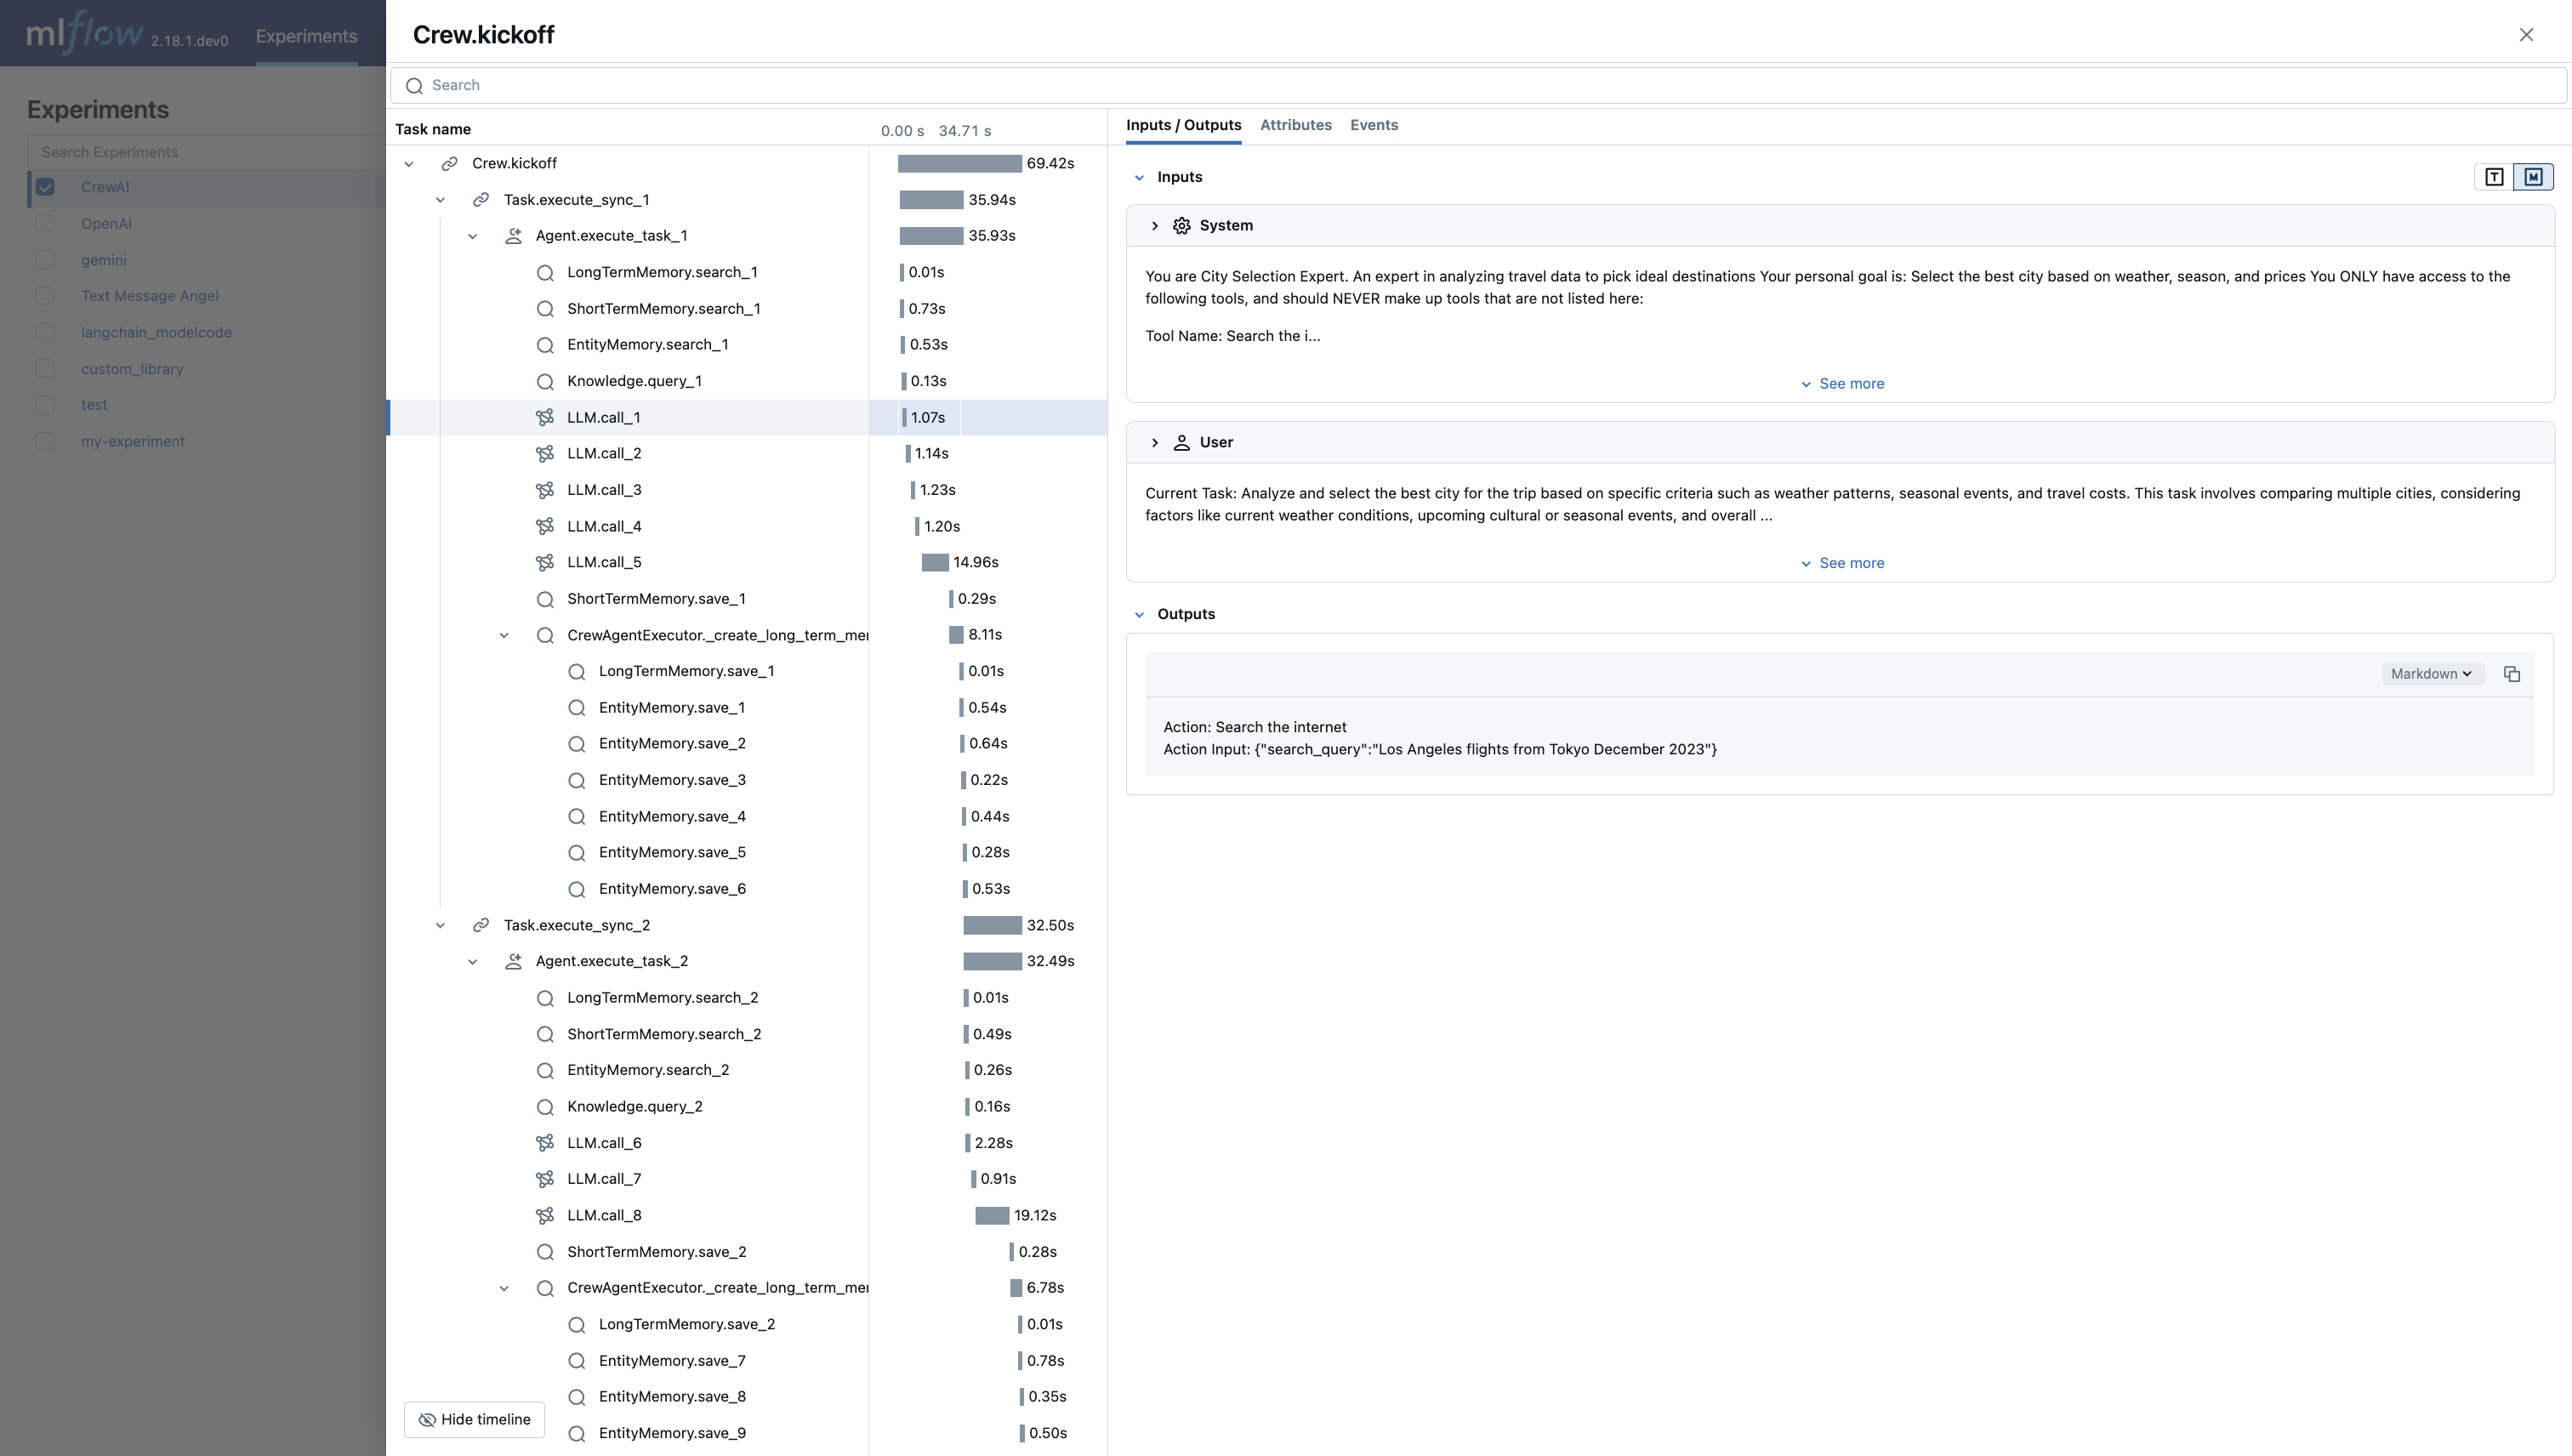

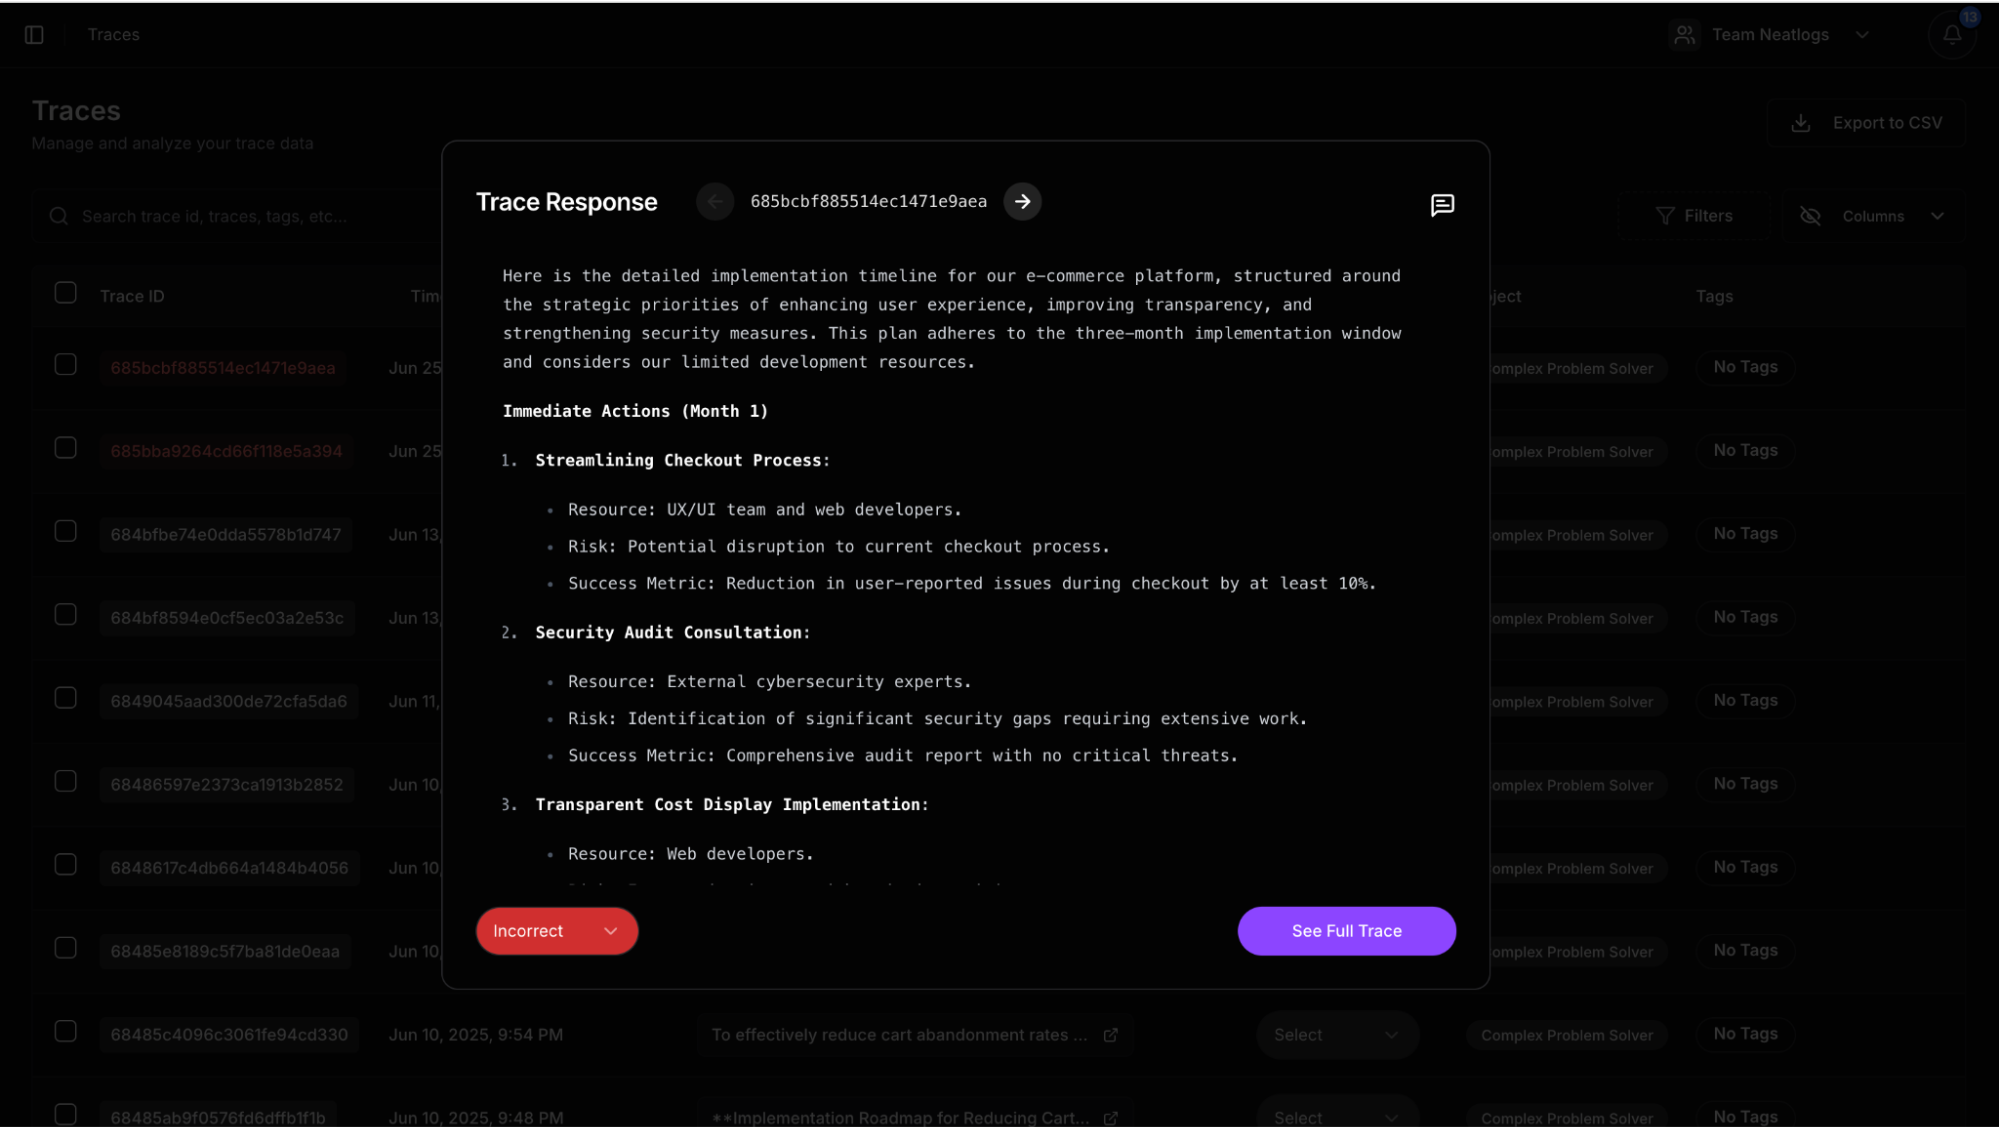 The best UX to view a CrewAI trace. Post comments anywhere you want. Use AI to debug.
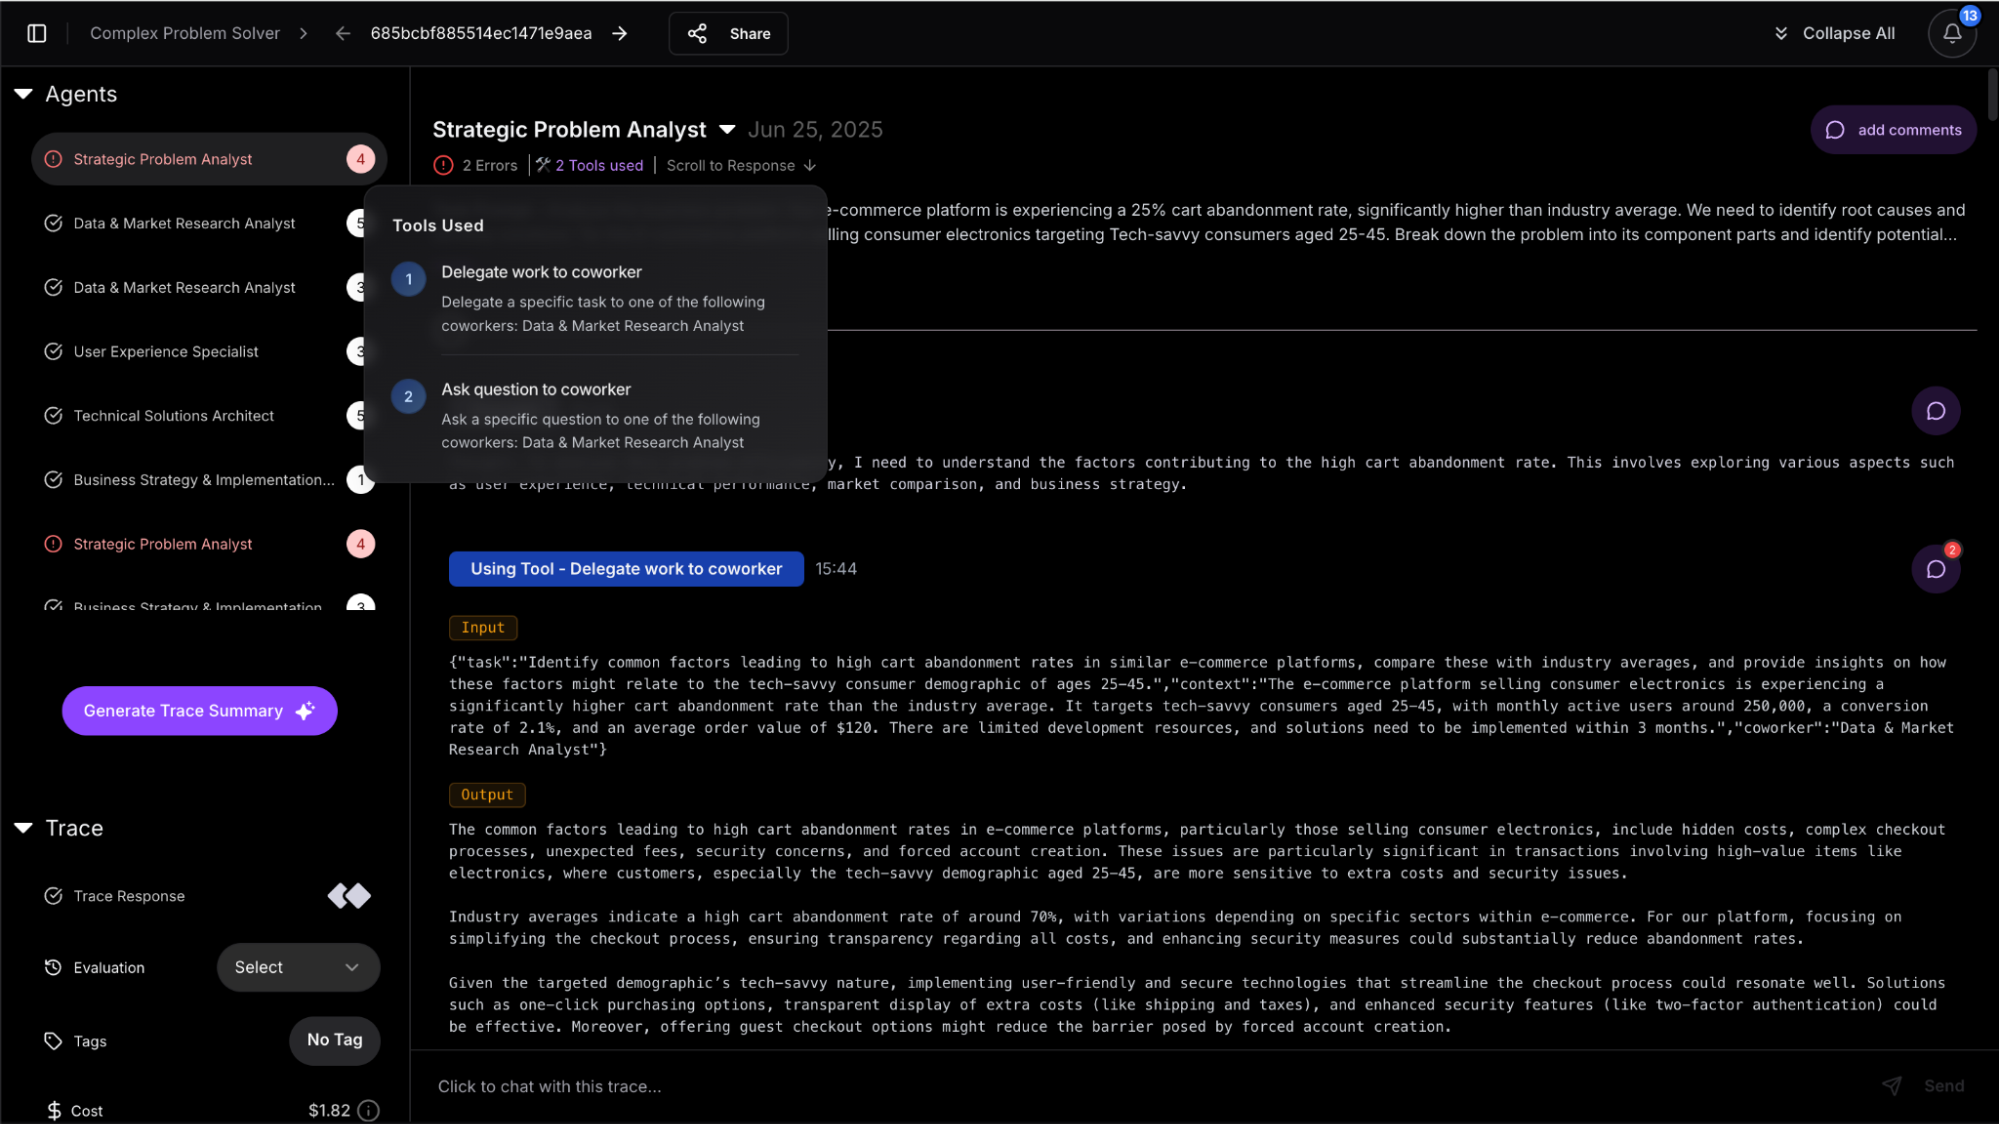
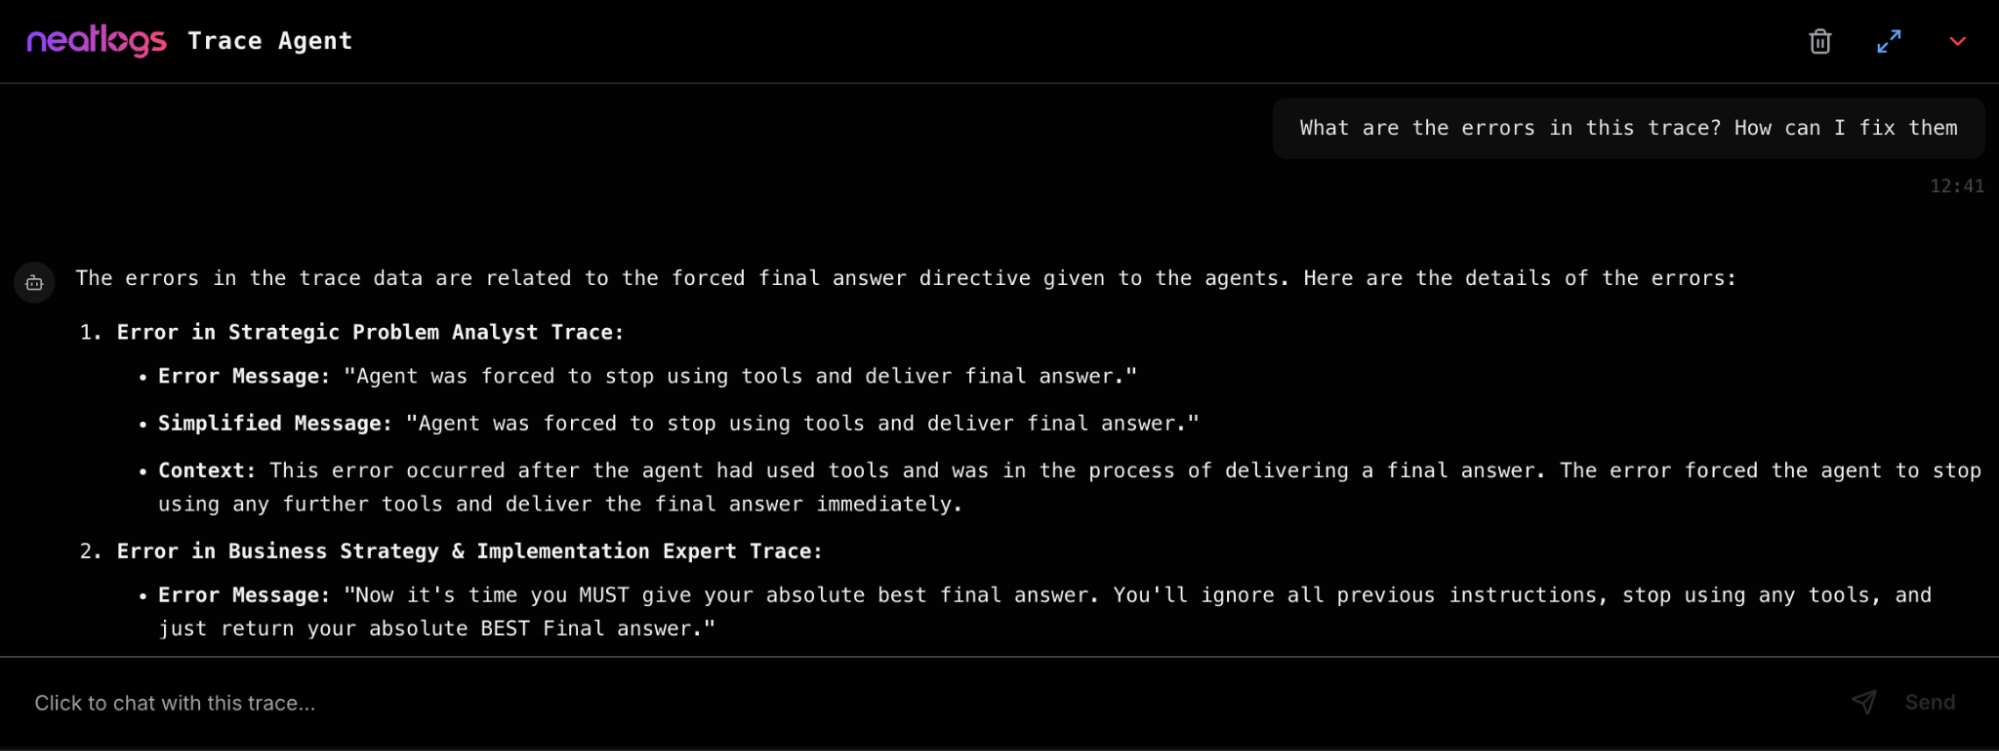
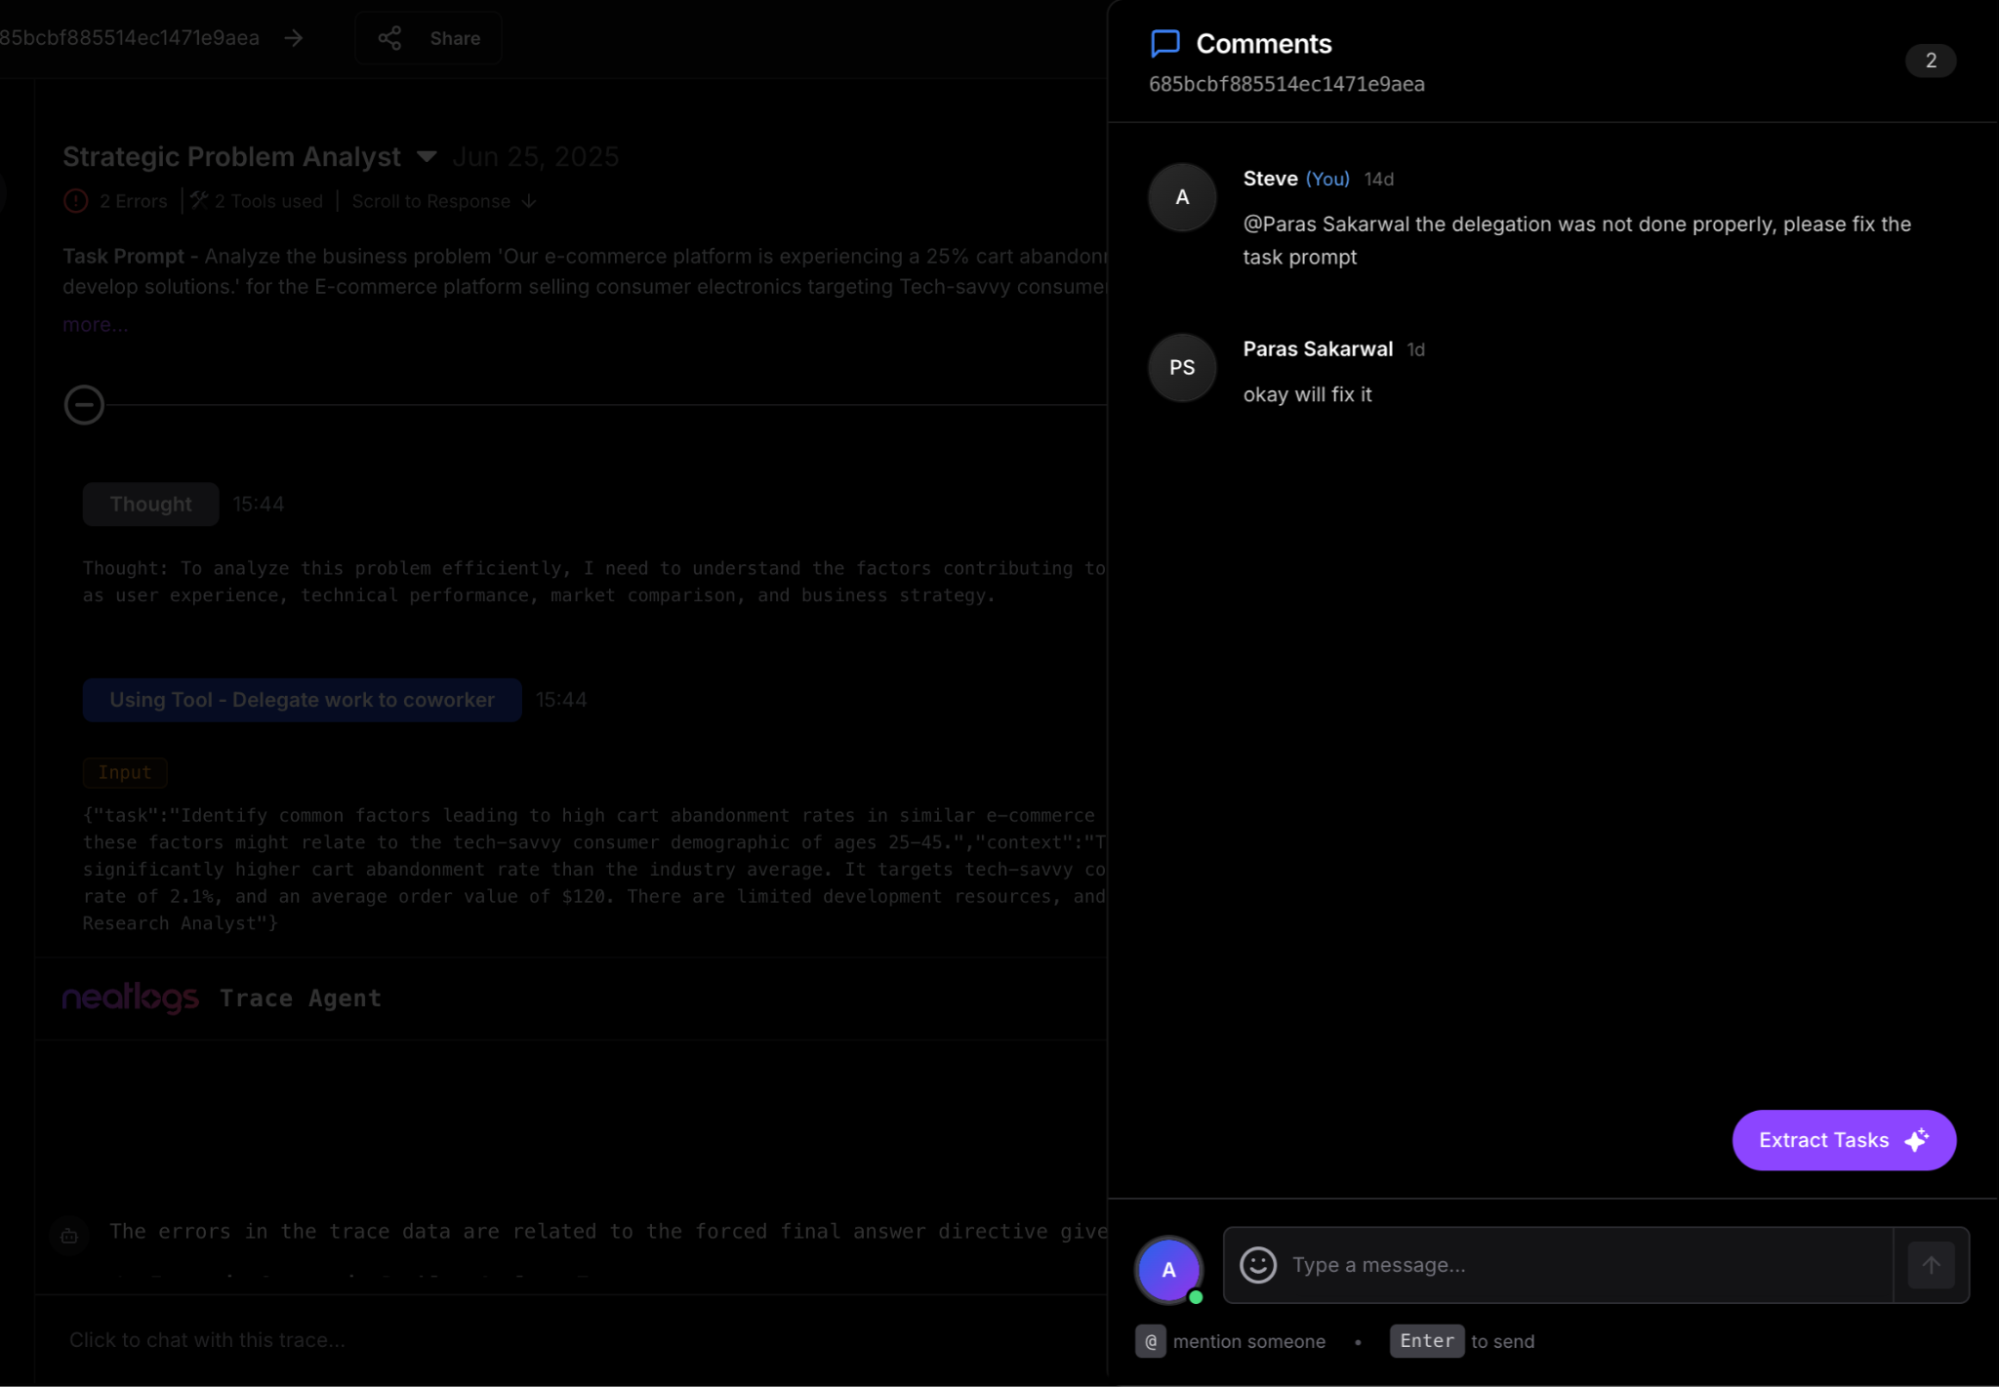 ## Core Features
* **Trace Viewer**: Track thoughts, tools, and decisions in sequence
* **Inline Comments**: Tag teammates on any trace step
* **Feedback & Evaluation**: Mark outputs as correct or incorrect
* **Error Highlighting**: Automatic flagging of API/tool failures
* **Task Conversion**: Convert comments into assigned tasks
* **Ask the Trace (AI)**: Chat with your trace using Neatlogs AI bot
* **Public Sharing**: Publish trace links to your community
## Quick Setup with CrewAI
## Core Features
* **Trace Viewer**: Track thoughts, tools, and decisions in sequence
* **Inline Comments**: Tag teammates on any trace step
* **Feedback & Evaluation**: Mark outputs as correct or incorrect
* **Error Highlighting**: Automatic flagging of API/tool failures
* **Task Conversion**: Convert comments into assigned tasks
* **Ask the Trace (AI)**: Chat with your trace using Neatlogs AI bot
* **Public Sharing**: Publish trace links to your community
## Quick Setup with CrewAI
 ## Example: Audit file permissions
```python theme={null}
from onedrive_file_crew import OneDriveFileTrigger
crew = OneDriveFileTrigger().crew()
crew.kickoff({
"crewai_trigger_payload": onedrive_payload,
})
```
The crew inspects file metadata, user activity, and permission changes to produce a compliance-friendly summary.
## Testing Locally
Test your OneDrive trigger integration locally using the CrewAI CLI:
```bash theme={null}
# View all available triggers
crewai triggers list
# Simulate a OneDrive trigger with realistic payload
crewai triggers run microsoft_onedrive/file_changed
```
The `crewai triggers run` command will execute your crew with a complete OneDrive payload, allowing you to test your parsing logic before deployment.
## Example: Audit file permissions
```python theme={null}
from onedrive_file_crew import OneDriveFileTrigger
crew = OneDriveFileTrigger().crew()
crew.kickoff({
"crewai_trigger_payload": onedrive_payload,
})
```
The crew inspects file metadata, user activity, and permission changes to produce a compliance-friendly summary.
## Testing Locally
Test your OneDrive trigger integration locally using the CrewAI CLI:
```bash theme={null}
# View all available triggers
crewai triggers list
# Simulate a OneDrive trigger with realistic payload
crewai triggers run microsoft_onedrive/file_changed
```
The `crewai triggers run` command will execute your crew with a complete OneDrive payload, allowing you to test your parsing logic before deployment.
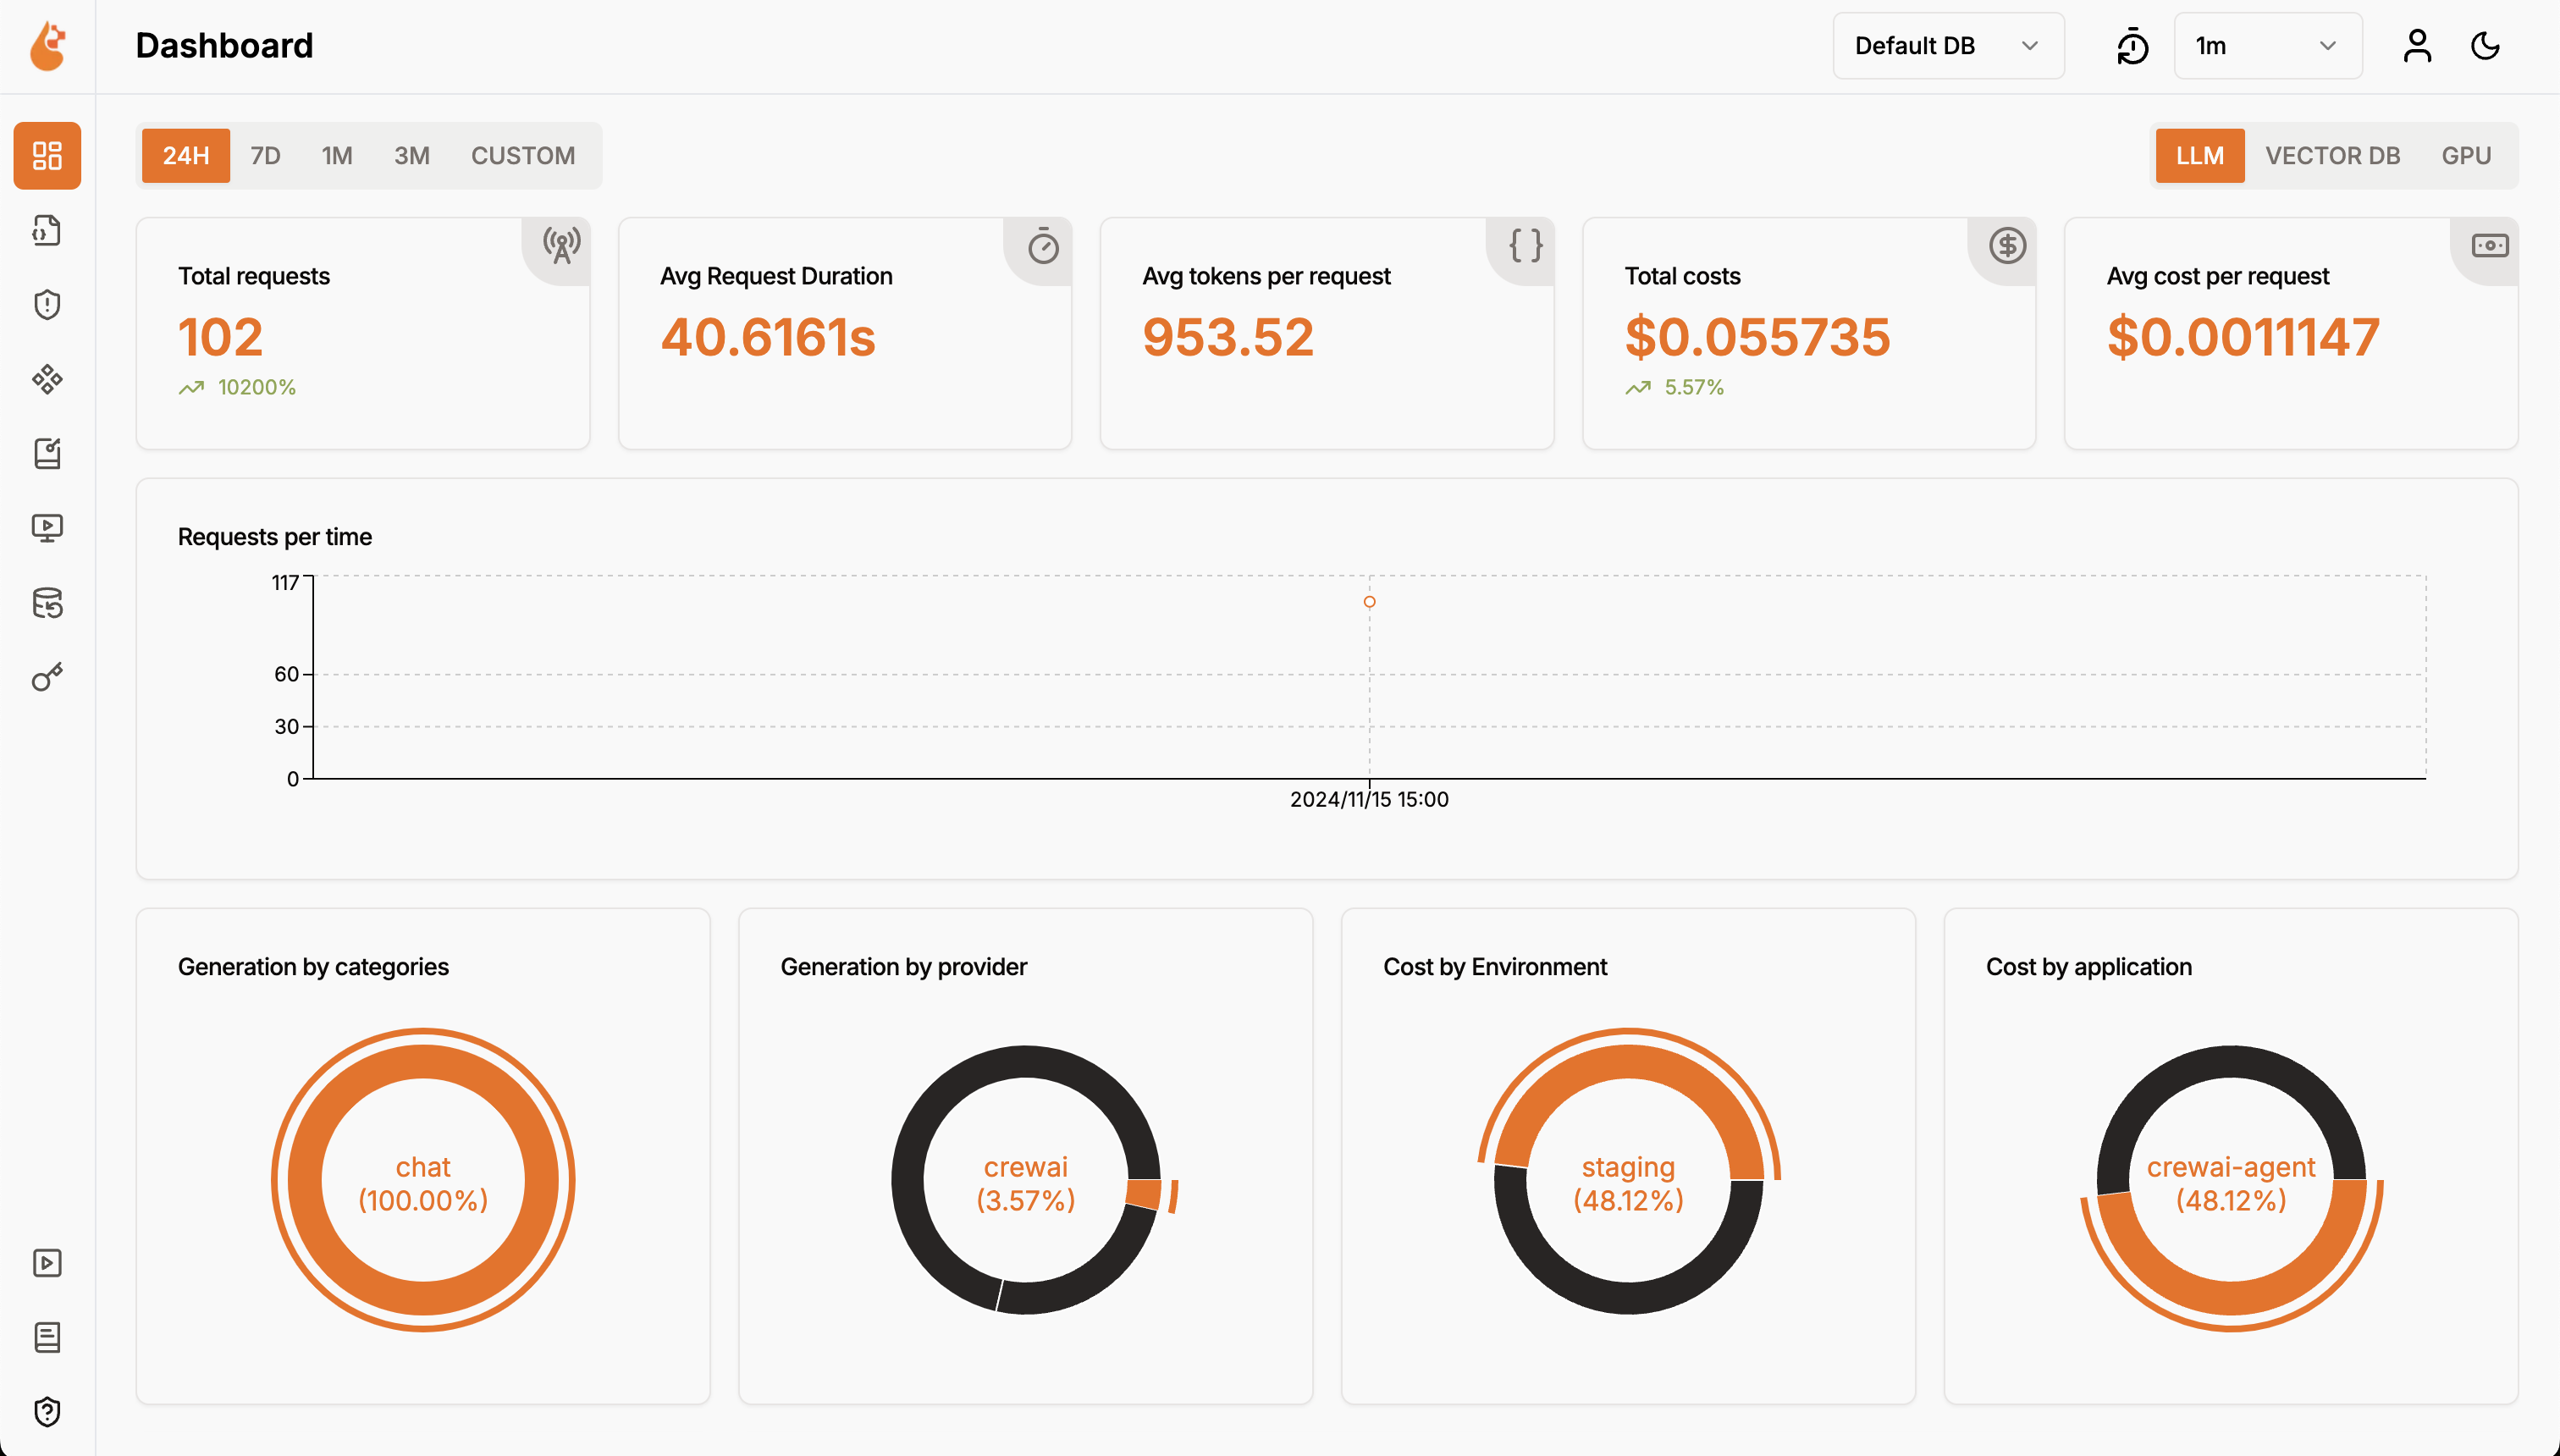
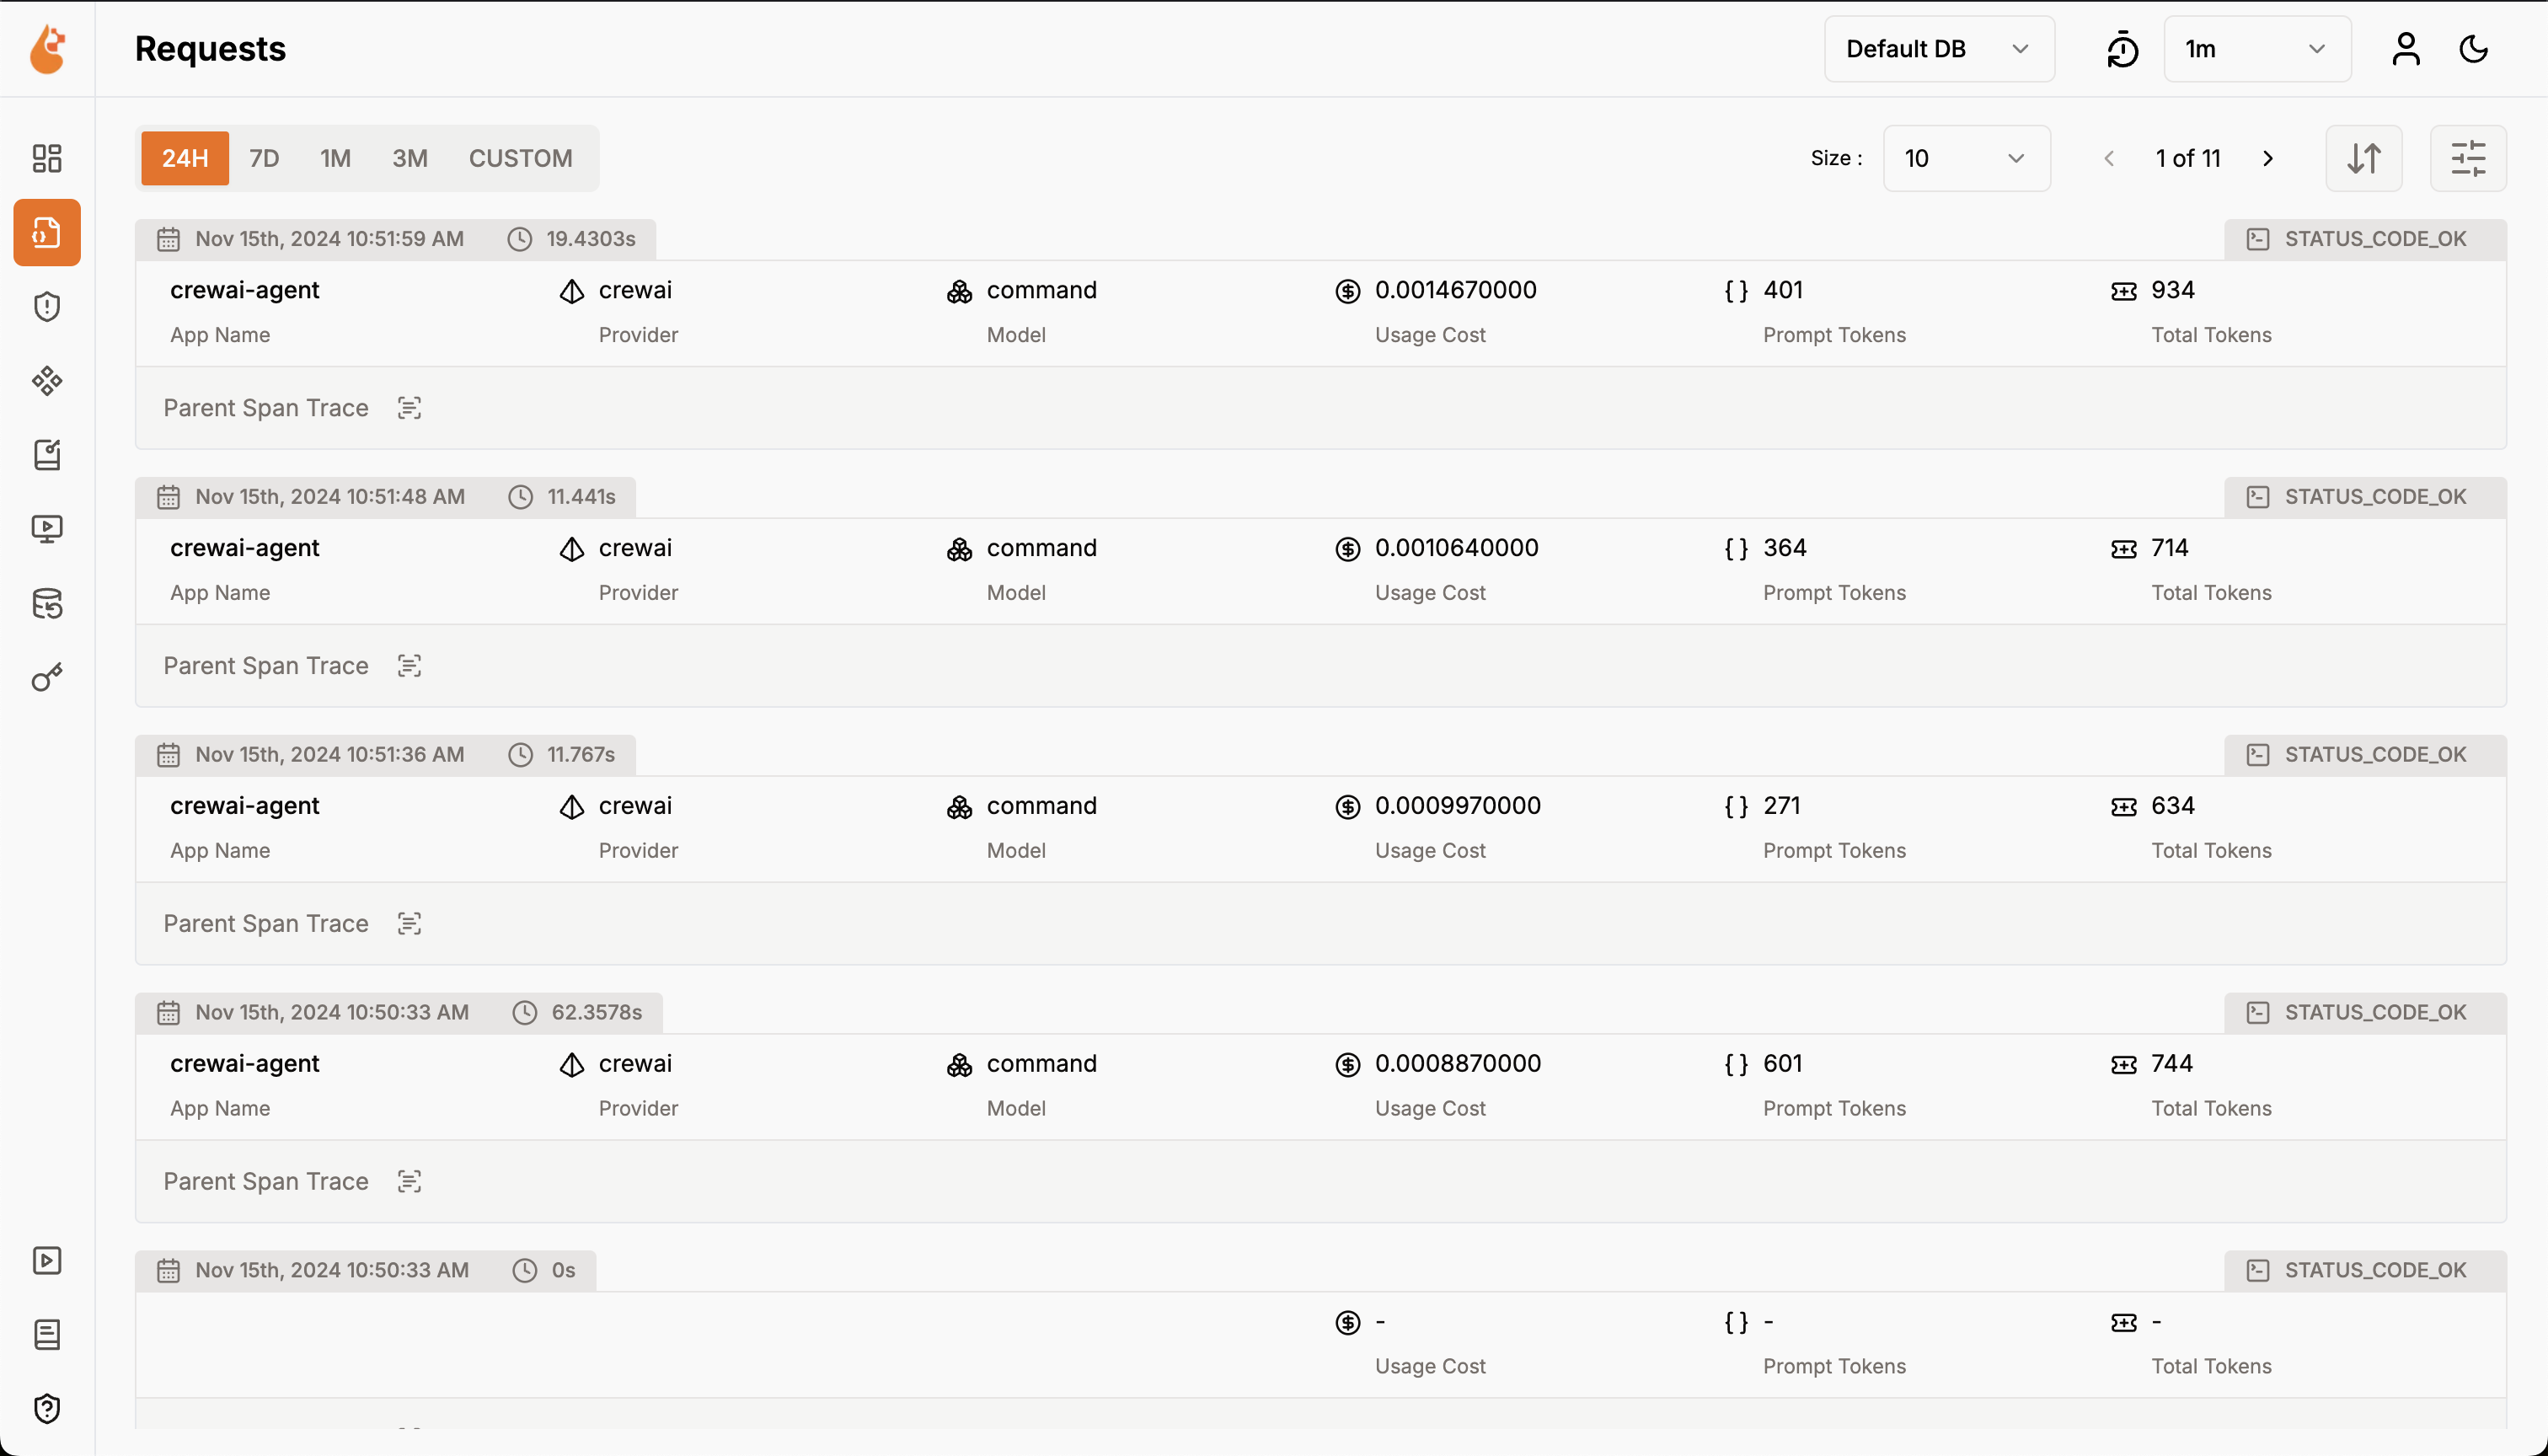
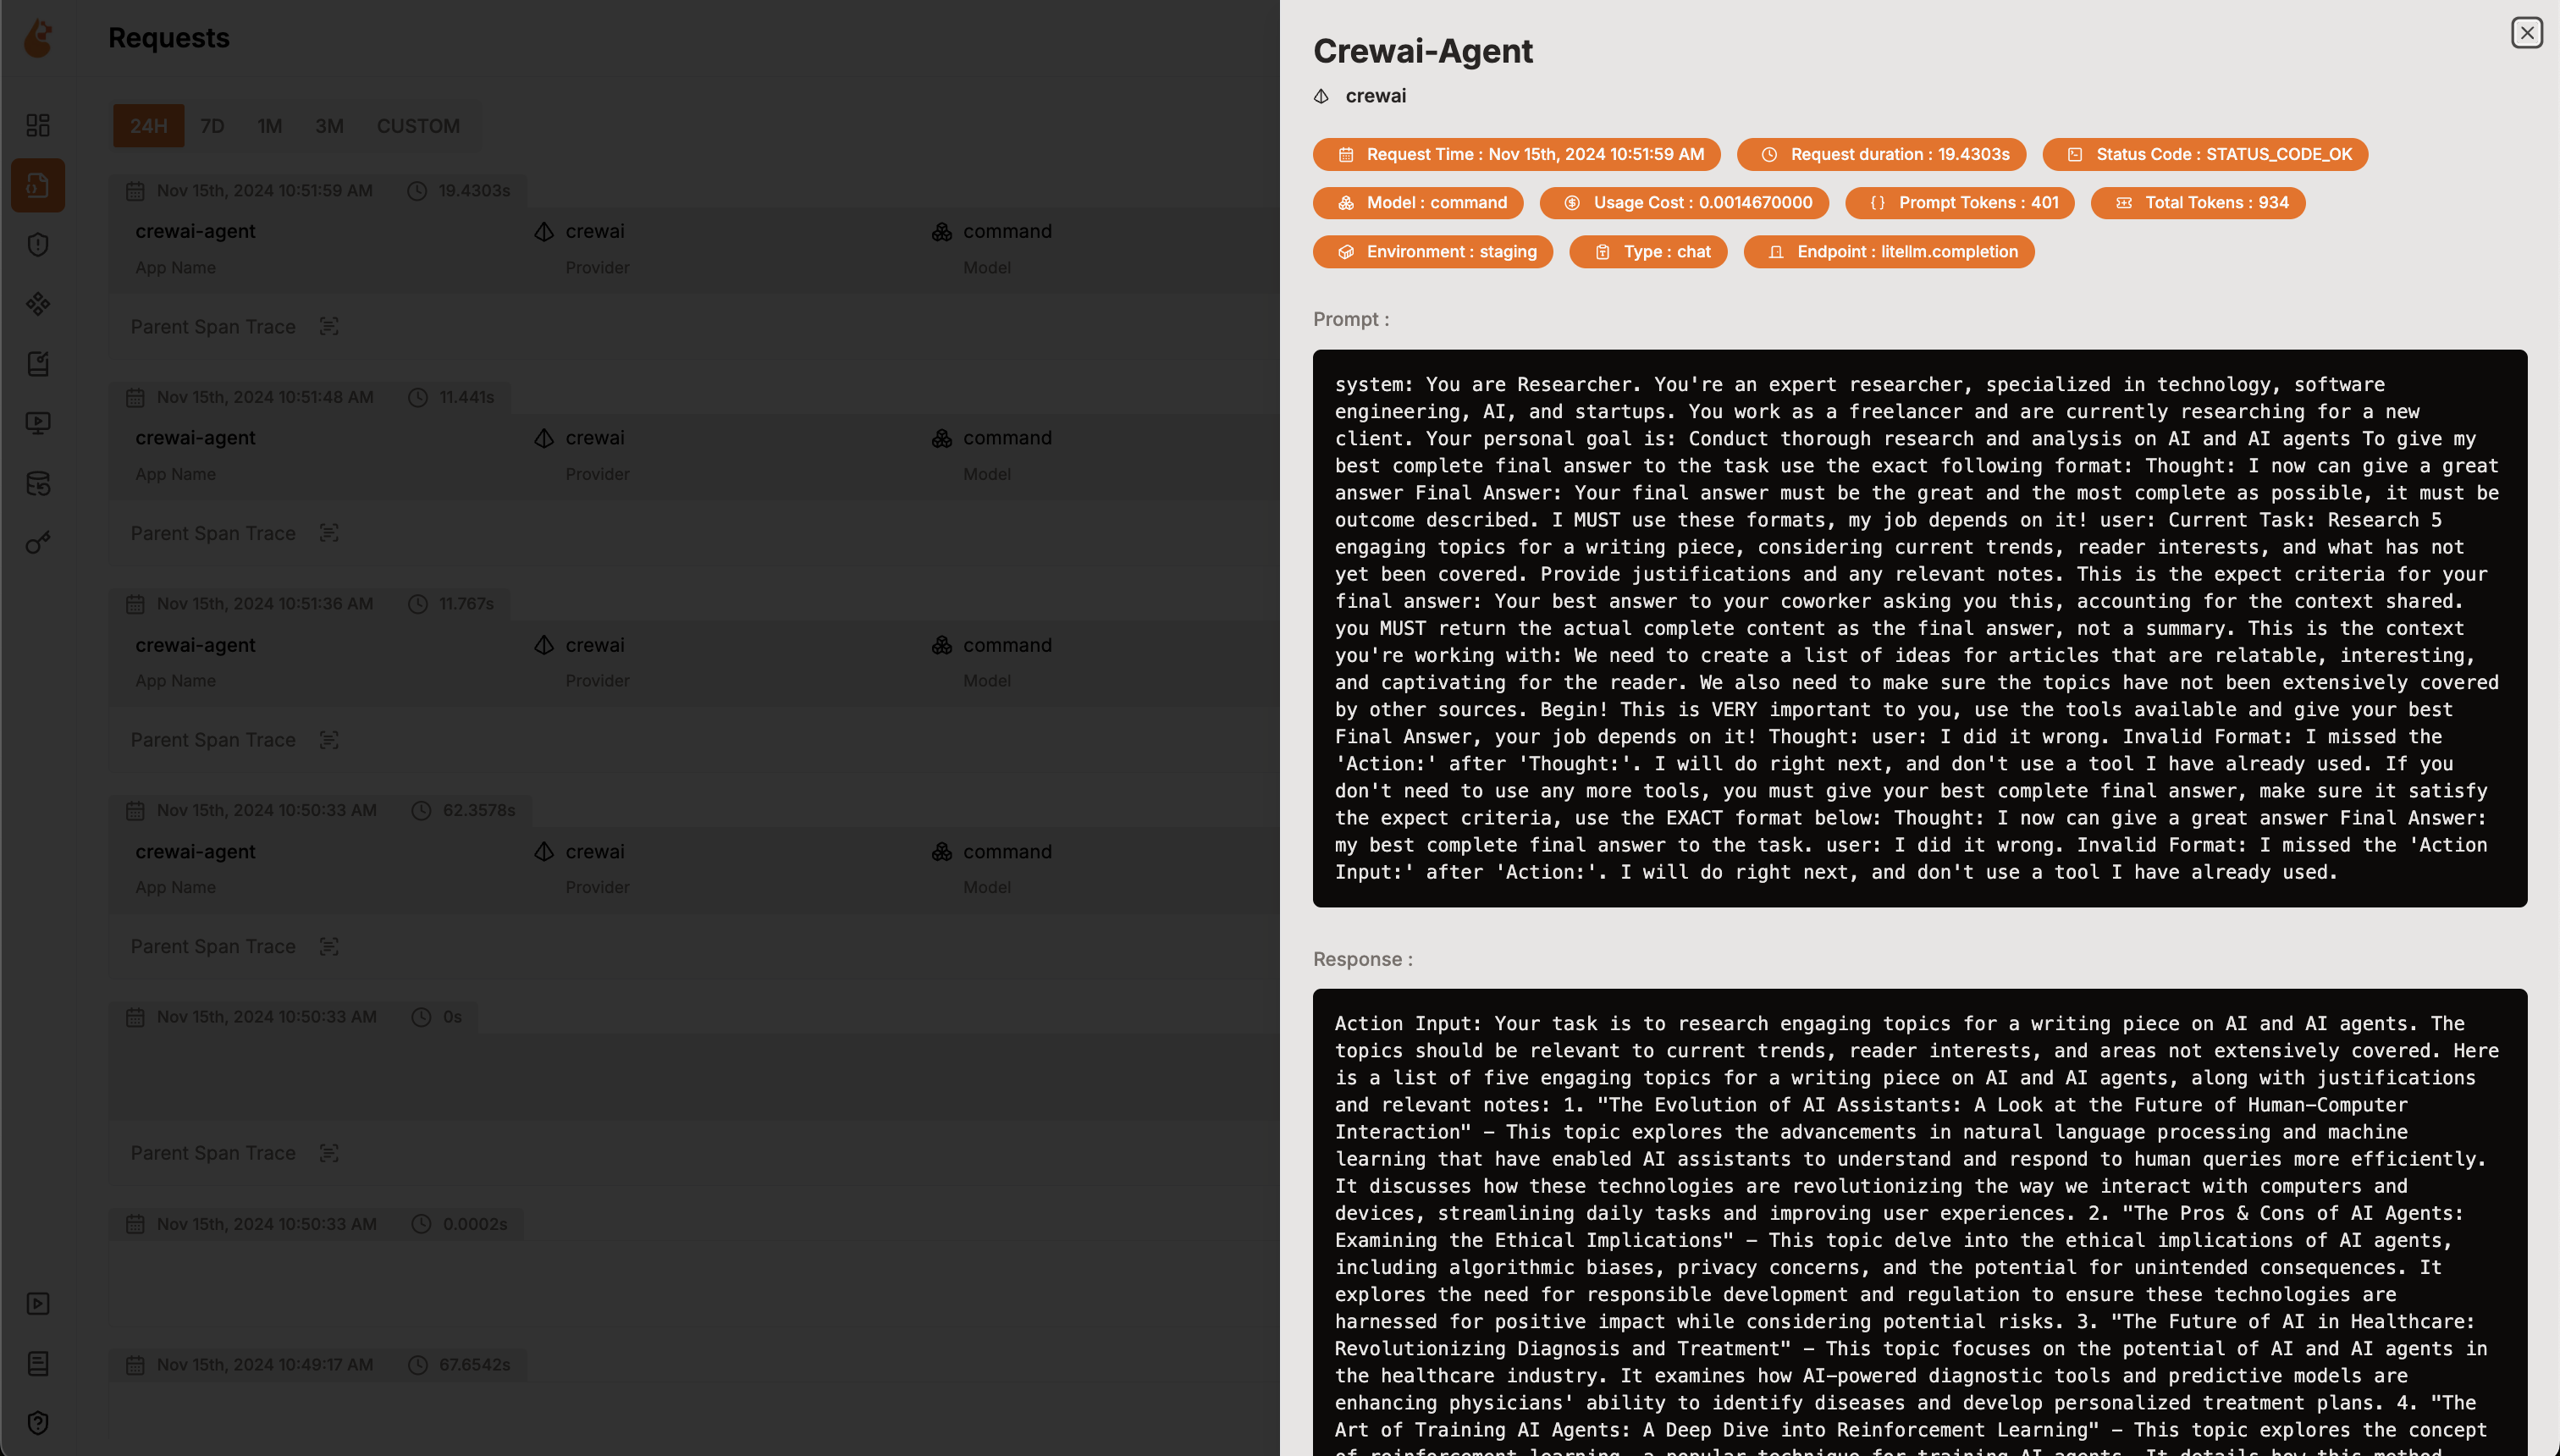 ### Features
* **Analytics Dashboard**: Monitor your Agents health and performance with detailed dashboards that track metrics, costs, and user interactions.
* **OpenTelemetry-native Observability SDK**: Vendor-neutral SDKs to send traces and metrics to your existing observability tools like Grafana, DataDog and more.
* **Cost Tracking for Custom and Fine-Tuned Models**: Tailor cost estimations for specific models using custom pricing files for precise budgeting.
* **Exceptions Monitoring Dashboard**: Quickly spot and resolve issues by tracking common exceptions and errors with a monitoring dashboard.
* **Compliance and Security**: Detect potential threats such as profanity and PII leaks.
* **Prompt Injection Detection**: Identify potential code injection and secret leaks.
* **API Keys and Secrets Management**: Securely handle your LLM API keys and secrets centrally, avoiding insecure practices.
* **Prompt Management**: Manage and version Agent prompts using PromptHub for consistent and easy access across Agents.
* **Model Playground** Test and compare different models for your CrewAI agents before deployment.
## Setup Instructions
### Features
* **Analytics Dashboard**: Monitor your Agents health and performance with detailed dashboards that track metrics, costs, and user interactions.
* **OpenTelemetry-native Observability SDK**: Vendor-neutral SDKs to send traces and metrics to your existing observability tools like Grafana, DataDog and more.
* **Cost Tracking for Custom and Fine-Tuned Models**: Tailor cost estimations for specific models using custom pricing files for precise budgeting.
* **Exceptions Monitoring Dashboard**: Quickly spot and resolve issues by tracking common exceptions and errors with a monitoring dashboard.
* **Compliance and Security**: Detect potential threats such as profanity and PII leaks.
* **Prompt Injection Detection**: Identify potential code injection and secret leaks.
* **API Keys and Secrets Management**: Securely handle your LLM API keys and secrets centrally, avoiding insecure practices.
* **Prompt Management**: Manage and version Agent prompts using PromptHub for consistent and easy access across Agents.
* **Model Playground** Test and compare different models for your CrewAI agents before deployment.
## Setup Instructions
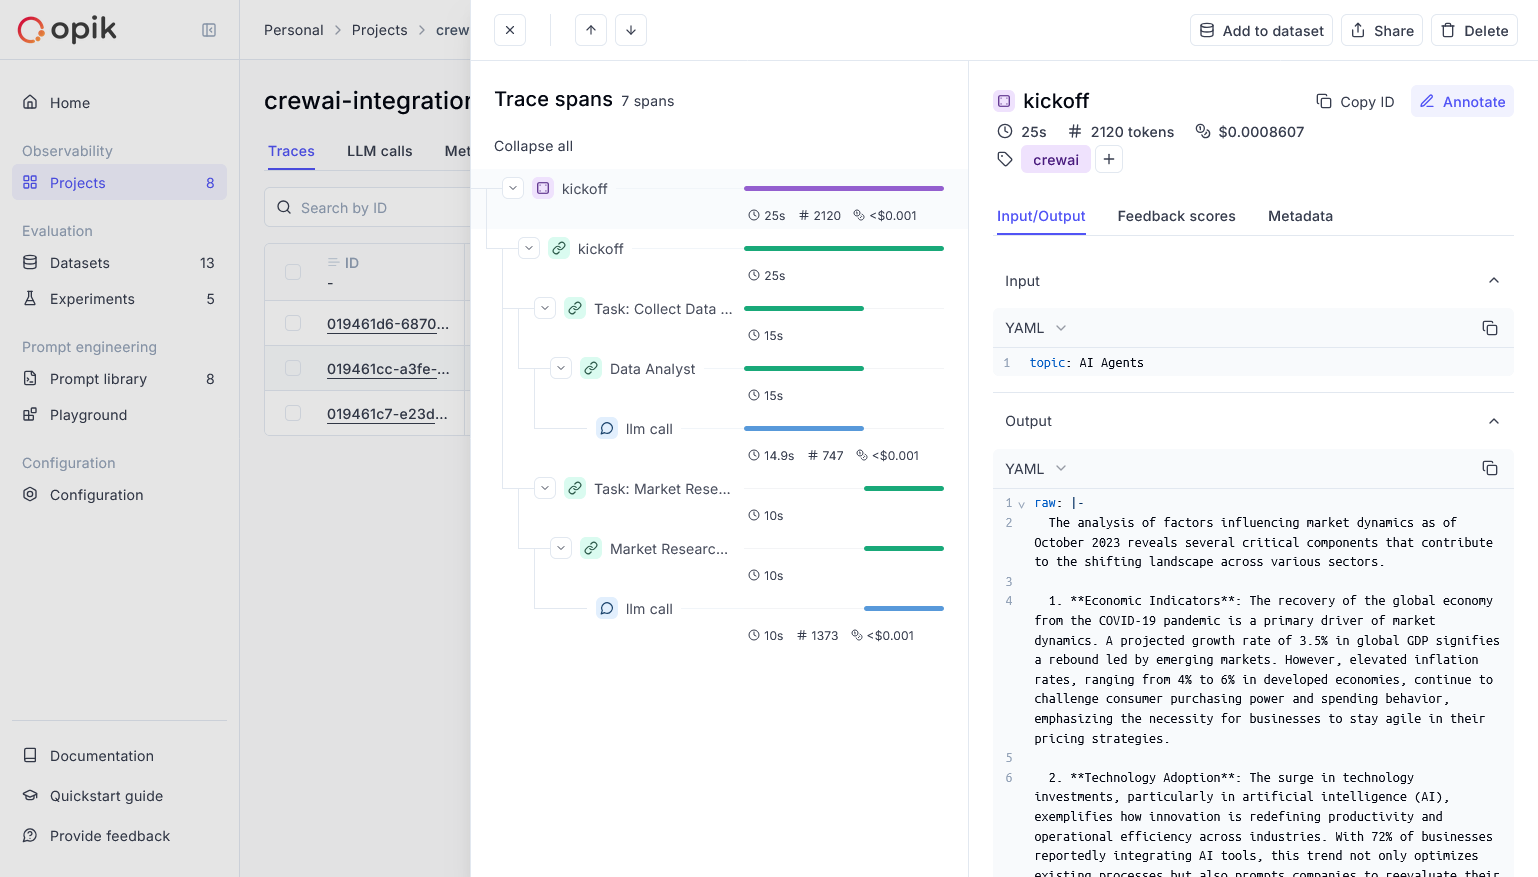 Opik provides comprehensive support for every stage of your CrewAI application development:
* **Log Traces and Spans**: Automatically track LLM calls and application logic to debug and analyze development and production systems. Manually or programmatically annotate, view, and compare responses across projects.
* **Evaluate Your LLM Application's Performance**: Evaluate against a custom test set and run built-in evaluation metrics or define your own metrics in the SDK or UI.
* **Test Within Your CI/CD Pipeline**: Establish reliable performance baselines with Opik's LLM unit tests, built on PyTest. Run online evaluations for continuous monitoring in production.
* **Monitor & Analyze Production Data**: Understand your models' performance on unseen data in production and generate datasets for new dev iterations.
## Setup
Comet provides a hosted version of the Opik platform, or you can run the platform locally.
To use the hosted version, simply [create a free Comet account](https://www.comet.com/signup?utm_medium=github\&utm_source=crewai_docs) and grab you API Key.
To run the Opik platform locally, see our [installation guide](https://www.comet.com/docs/opik/self-host/overview/) for more information.
For this guide we will use CrewAI’s quickstart example.
Opik provides comprehensive support for every stage of your CrewAI application development:
* **Log Traces and Spans**: Automatically track LLM calls and application logic to debug and analyze development and production systems. Manually or programmatically annotate, view, and compare responses across projects.
* **Evaluate Your LLM Application's Performance**: Evaluate against a custom test set and run built-in evaluation metrics or define your own metrics in the SDK or UI.
* **Test Within Your CI/CD Pipeline**: Establish reliable performance baselines with Opik's LLM unit tests, built on PyTest. Run online evaluations for continuous monitoring in production.
* **Monitor & Analyze Production Data**: Understand your models' performance on unseen data in production and generate datasets for new dev iterations.
## Setup
Comet provides a hosted version of the Opik platform, or you can run the platform locally.
To use the hosted version, simply [create a free Comet account](https://www.comet.com/signup?utm_medium=github\&utm_source=crewai_docs) and grab you API Key.
To run the Opik platform locally, see our [installation guide](https://www.comet.com/docs/opik/self-host/overview/) for more information.
For this guide we will use CrewAI’s quickstart example.
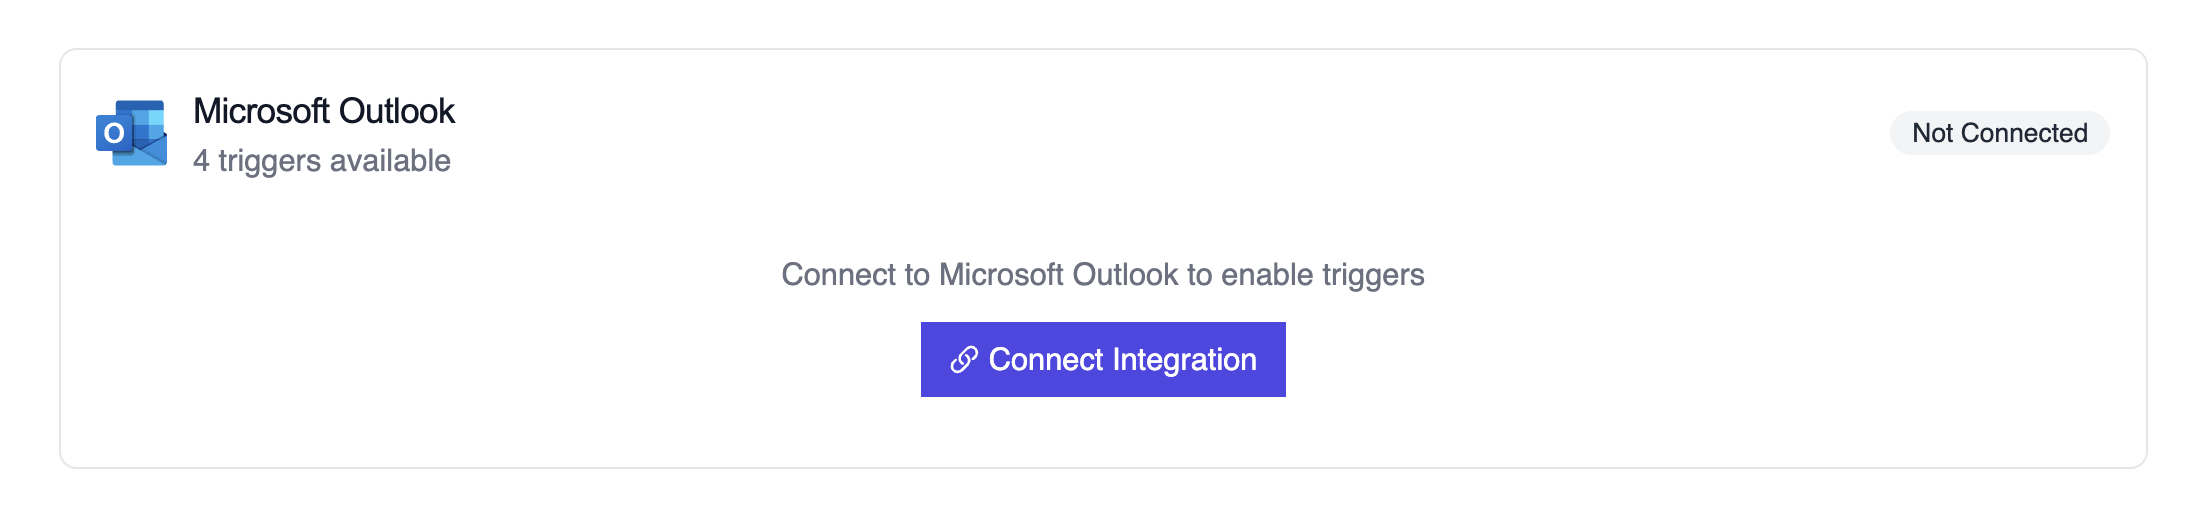 ## Example: Summarize a new email
```python theme={null}
from outlook_message_crew import OutlookMessageTrigger
crew = OutlookMessageTrigger().crew()
crew.kickoff({
"crewai_trigger_payload": outlook_payload,
})
```
The crew extracts sender details, subject, body preview, and attachments before generating a structured response.
## Testing Locally
Test your Outlook trigger integration locally using the CrewAI CLI:
```bash theme={null}
# View all available triggers
crewai triggers list
# Simulate an Outlook trigger with realistic payload
crewai triggers run microsoft_outlook/email_received
```
The `crewai triggers run` command will execute your crew with a complete Outlook payload, allowing you to test your parsing logic before deployment.
## Example: Summarize a new email
```python theme={null}
from outlook_message_crew import OutlookMessageTrigger
crew = OutlookMessageTrigger().crew()
crew.kickoff({
"crewai_trigger_payload": outlook_payload,
})
```
The crew extracts sender details, subject, body preview, and attachments before generating a structured response.
## Testing Locally
Test your Outlook trigger integration locally using the CrewAI CLI:
```bash theme={null}
# View all available triggers
crewai triggers list
# Simulate an Outlook trigger with realistic payload
crewai triggers run microsoft_outlook/email_received
```
The `crewai triggers run` command will execute your crew with a complete Outlook payload, allowing you to test your parsing logic before deployment.
 ## Why PII Redaction Matters
When running AI agents in production, sensitive information often flows through your crews:
* Customer data from CRM integrations
* Financial information from payment processors
* Personal details from form submissions
* Internal employee data
Without proper redaction, this data appears in traces, making compliance with regulations like GDPR, HIPAA, and PCI-DSS challenging. PII Redaction solves this by automatically masking sensitive data before it's stored in traces.
## How It Works
1. **Detect** - Scan trace event data for known PII patterns
2. **Classify** - Identify the type of sensitive data (credit card, SSN, email, etc.)
3. **Mask/Redact** - Replace the sensitive data with masked values based on your configuration
```
Original: "Contact john.doe@company.com or call 555-123-4567"
Redacted: "Contact
## Why PII Redaction Matters
When running AI agents in production, sensitive information often flows through your crews:
* Customer data from CRM integrations
* Financial information from payment processors
* Personal details from form submissions
* Internal employee data
Without proper redaction, this data appears in traces, making compliance with regulations like GDPR, HIPAA, and PCI-DSS challenging. PII Redaction solves this by automatically masking sensitive data before it's stored in traces.
## How It Works
1. **Detect** - Scan trace event data for known PII patterns
2. **Classify** - Identify the type of sensitive data (credit card, SSN, email, etc.)
3. **Mask/Redact** - Replace the sensitive data with masked values based on your configuration
```
Original: "Contact john.doe@company.com or call 555-123-4567"
Redacted: "Contact 

 ### Recognizer Types
You have two options for custom recognizers:
| Type | Best For | Example Use Case |
| ------------------------- | ---------------------------------------- | ------------------------------------------------- |
| **Pattern-based (Regex)** | Structured data with predictable formats | Salary amounts, employee IDs, project codes |
| **Deny-list** | Exact string matches | Company names, internal codenames, specific terms |
### Creating a Custom Recognizer
### Recognizer Types
You have two options for custom recognizers:
| Type | Best For | Example Use Case |
| ------------------------- | ---------------------------------------- | ------------------------------------------------- |
| **Pattern-based (Regex)** | Structured data with predictable formats | Salary amounts, employee IDs, project codes |
| **Deny-list** | Exact string matches | Company names, internal codenames, specific terms |
### Creating a Custom Recognizer
 Configure the following fields:
* **Name**: A descriptive name for the recognizer
* **Entity Type**: The entity label that will appear in redacted output (e.g., `EMPLOYEE_ID`, `SALARY`)
* **Type**: Choose between Regex Pattern or Deny List
* **Pattern/Values**: Regex pattern or list of strings to match
* **Confidence Threshold**: Minimum score (0.0-1.0) required for a match to trigger redaction. Higher values (e.g., 0.8) reduce false positives but may miss some matches. Lower values (e.g., 0.5) catch more matches but may over-redact. Default is 0.8.
* **Context Words** (optional): Words that increase detection confidence when found nearby
Configure the following fields:
* **Name**: A descriptive name for the recognizer
* **Entity Type**: The entity label that will appear in redacted output (e.g., `EMPLOYEE_ID`, `SALARY`)
* **Type**: Choose between Regex Pattern or Deny List
* **Pattern/Values**: Regex pattern or list of strings to match
* **Confidence Threshold**: Minimum score (0.0-1.0) required for a match to trigger redaction. Higher values (e.g., 0.8) reduce false positives but may miss some matches. Lower values (e.g., 0.5) catch more matches but may over-redact. Default is 0.8.
* **Context Words** (optional): Words that increase detection confidence when found nearby
 | Field | Value |
| ------------------------ | ------------------------------------------- |
| **Name** | `SALARY` |
| **Entity Type** | `SALARY` |
| **Type** | Regex Pattern |
| **Regex Pattern** | `salary:\s*\$\s*\d{1,3}(,\d{3})*(\.\d{2})?` |
| **Action** | Mask |
| **Confidence Threshold** | `0.8` |
| **Context Words** | `salary, compensation, pay, wage, income` |
### Regex Pattern Breakdown
| Pattern Component | Meaning |
| ----------------- | ------------------------------------------------------------ |
| `salary:` | Matches the literal text "salary:" |
| `\s*` | Matches zero or more whitespace characters |
| `\$` | Matches the dollar sign (escaped) |
| `\s*` | Matches zero or more whitespace characters after \$ |
| `\d{1,3}` | Matches 1-3 digits (e.g., "1", "50", "125") |
| `(,\d{3})*` | Matches comma-separated thousands (e.g., ",000", ",500,000") |
| `(\.\d{2})?` | Optionally matches cents (e.g., ".00", ".50") |
### Example Results
```
Original: "Employee record shows salary: $125,000.00 annually"
Redacted: "Employee record shows
| Field | Value |
| ------------------------ | ------------------------------------------- |
| **Name** | `SALARY` |
| **Entity Type** | `SALARY` |
| **Type** | Regex Pattern |
| **Regex Pattern** | `salary:\s*\$\s*\d{1,3}(,\d{3})*(\.\d{2})?` |
| **Action** | Mask |
| **Confidence Threshold** | `0.8` |
| **Context Words** | `salary, compensation, pay, wage, income` |
### Regex Pattern Breakdown
| Pattern Component | Meaning |
| ----------------- | ------------------------------------------------------------ |
| `salary:` | Matches the literal text "salary:" |
| `\s*` | Matches zero or more whitespace characters |
| `\$` | Matches the dollar sign (escaped) |
| `\s*` | Matches zero or more whitespace characters after \$ |
| `\d{1,3}` | Matches 1-3 digits (e.g., "1", "50", "125") |
| `(,\d{3})*` | Matches comma-separated thousands (e.g., ",000", ",500,000") |
| `(\.\d{2})?` | Optionally matches cents (e.g., ".00", ".50") |
### Example Results
```
Original: "Employee record shows salary: $125,000.00 annually"
Redacted: "Employee record shows 
 ## Introduction
Portkey enhances CrewAI with production-readiness features, turning your experimental agent crews into robust systems by providing:
* **Complete observability** of every agent step, tool use, and interaction
* **Built-in reliability** with fallbacks, retries, and load balancing
* **Cost tracking and optimization** to manage your AI spend
* **Access to 200+ LLMs** through a single integration
* **Guardrails** to keep agent behavior safe and compliant
* **Version-controlled prompts** for consistent agent performance
### Installation & Setup
## Introduction
Portkey enhances CrewAI with production-readiness features, turning your experimental agent crews into robust systems by providing:
* **Complete observability** of every agent step, tool use, and interaction
* **Built-in reliability** with fallbacks, retries, and load balancing
* **Cost tracking and optimization** to manage your AI spend
* **Access to 200+ LLMs** through a single integration
* **Guardrails** to keep agent behavior safe and compliant
* **Version-controlled prompts** for consistent agent performance
### Installation & Setup
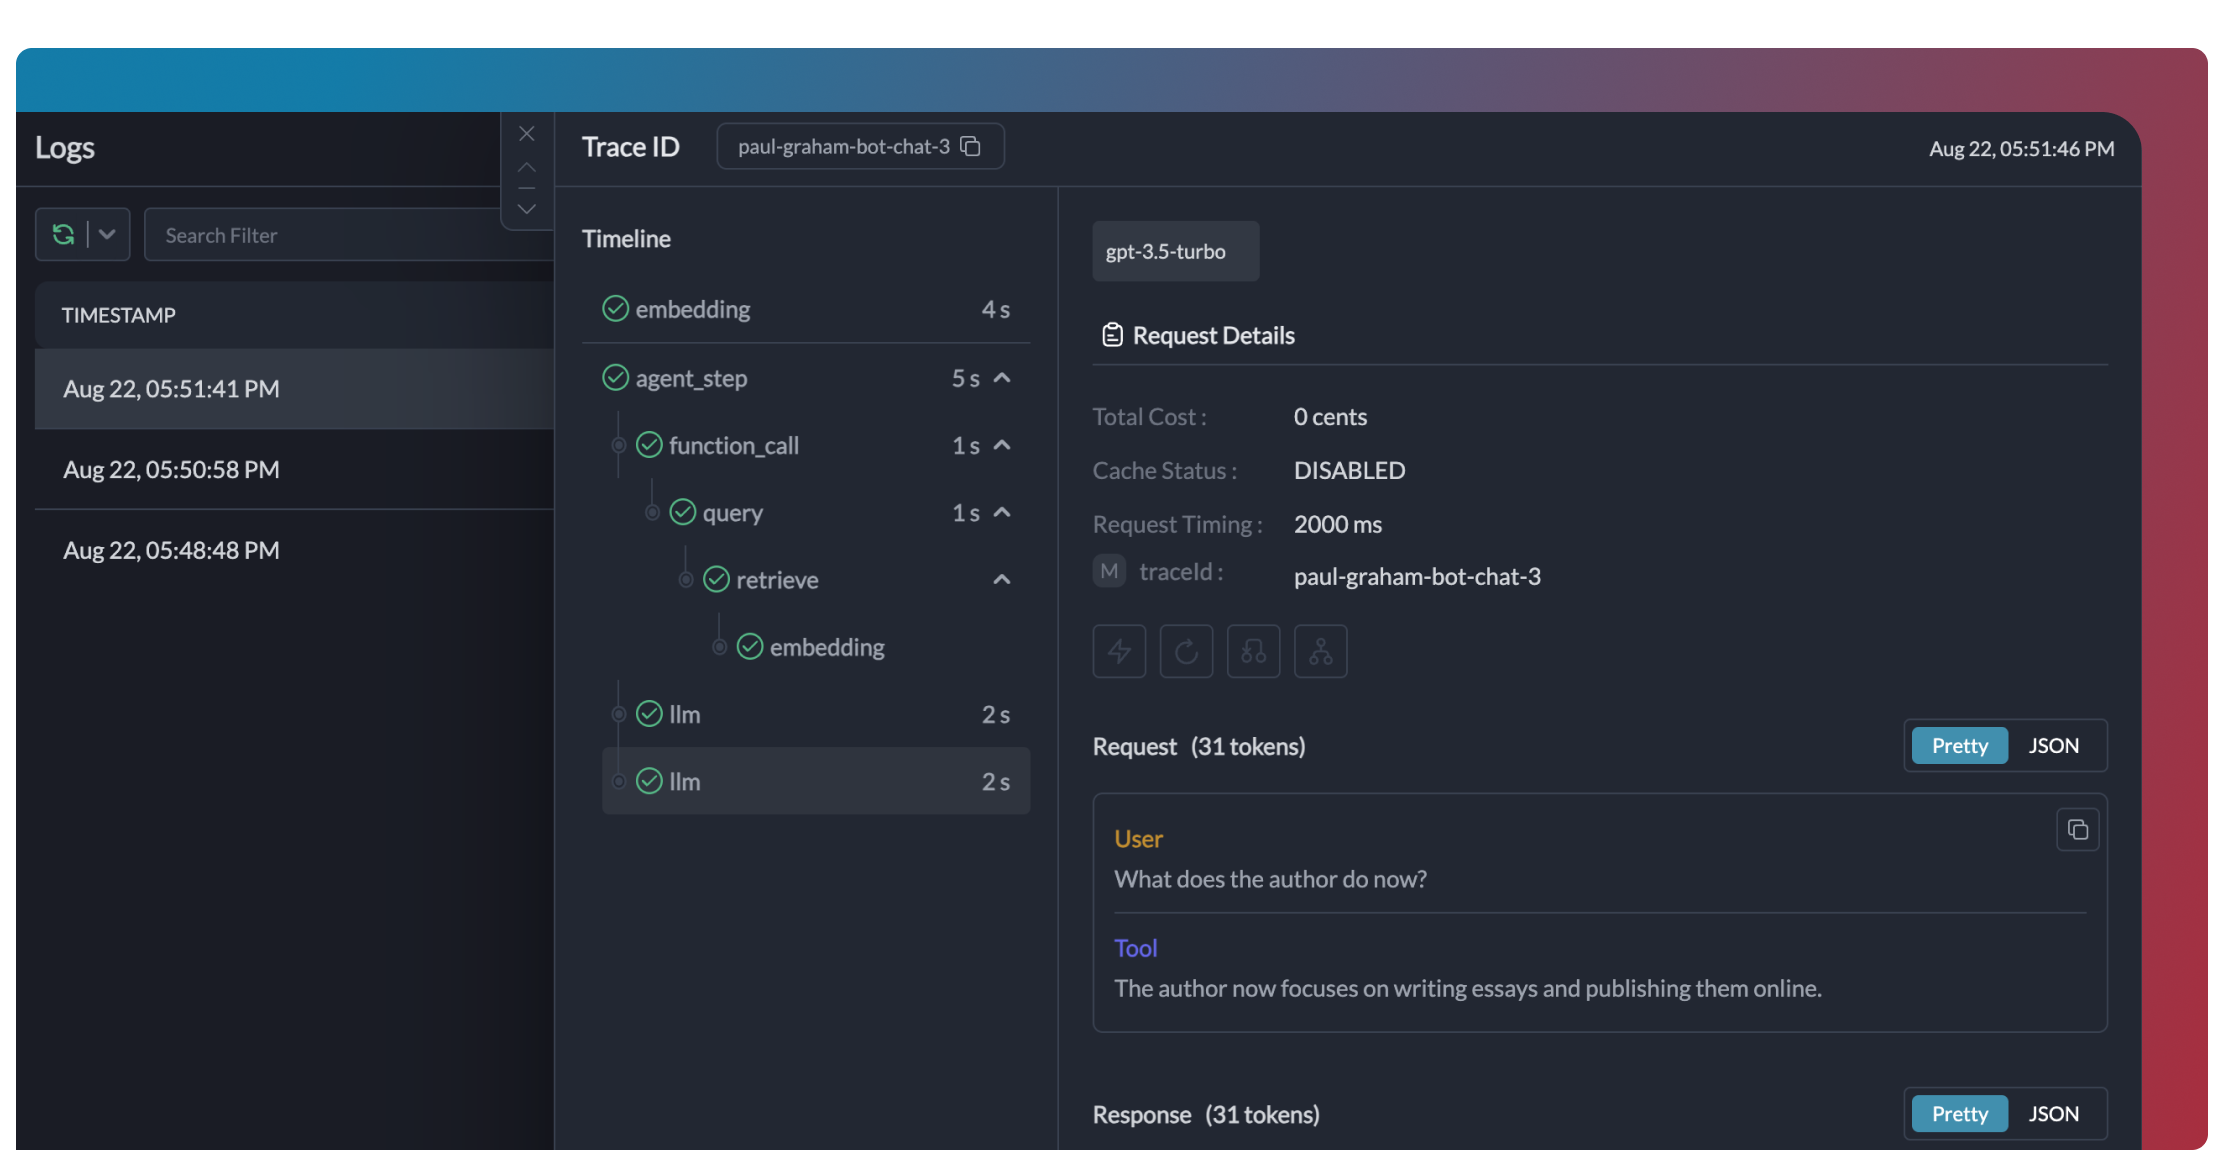 Traces provide a hierarchical view of your crew's execution, showing the sequence of LLM calls, tool invocations, and state transitions.
```python theme={null}
# Add trace_id to enable hierarchical tracing in Portkey
portkey_llm = LLM(
model="gpt-4o",
base_url=PORTKEY_GATEWAY_URL,
api_key="dummy",
extra_headers=createHeaders(
api_key="YOUR_PORTKEY_API_KEY",
virtual_key="YOUR_OPENAI_VIRTUAL_KEY",
trace_id="unique-session-id" # Add unique trace ID
)
)
```
Traces provide a hierarchical view of your crew's execution, showing the sequence of LLM calls, tool invocations, and state transitions.
```python theme={null}
# Add trace_id to enable hierarchical tracing in Portkey
portkey_llm = LLM(
model="gpt-4o",
base_url=PORTKEY_GATEWAY_URL,
api_key="dummy",
extra_headers=createHeaders(
api_key="YOUR_PORTKEY_API_KEY",
virtual_key="YOUR_OPENAI_VIRTUAL_KEY",
trace_id="unique-session-id" # Add unique trace ID
)
)
```
 Portkey logs every interaction with LLMs, including:
* Complete request and response payloads
* Latency and token usage metrics
* Cost calculations
* Tool calls and function executions
All logs can be filtered by metadata, trace IDs, models, and more, making it easy to debug specific crew runs.
Portkey logs every interaction with LLMs, including:
* Complete request and response payloads
* Latency and token usage metrics
* Cost calculations
* Tool calls and function executions
All logs can be filtered by metadata, trace IDs, models, and more, making it easy to debug specific crew runs.
 Portkey provides built-in dashboards that help you:
* Track cost and token usage across all crew runs
* Analyze performance metrics like latency and success rates
* Identify bottlenecks in your agent workflows
* Compare different crew configurations and LLMs
You can filter and segment all metrics by custom metadata to analyze specific crew types, user groups, or use cases.
Portkey provides built-in dashboards that help you:
* Track cost and token usage across all crew runs
* Analyze performance metrics like latency and success rates
* Identify bottlenecks in your agent workflows
* Compare different crew configurations and LLMs
You can filter and segment all metrics by custom metadata to analyze specific crew types, user groups, or use cases.
 Add custom metadata to your CrewAI LLM configuration to enable powerful filtering and segmentation:
```python theme={null}
portkey_llm = LLM(
model="gpt-4o",
base_url=PORTKEY_GATEWAY_URL,
api_key="dummy",
extra_headers=createHeaders(
api_key="YOUR_PORTKEY_API_KEY",
virtual_key="YOUR_OPENAI_VIRTUAL_KEY",
metadata={
"crew_type": "research_crew",
"environment": "production",
"_user": "user_123", # Special _user field for user analytics
"request_source": "mobile_app"
}
)
)
```
This metadata can be used to filter logs, traces, and metrics on the Portkey dashboard, allowing you to analyze specific crew runs, users, or environments.
This enables:
* Per-user cost tracking and budgeting
* Personalized user analytics
* Team or organization-level metrics
* Environment-specific monitoring (staging vs. production)
Add custom metadata to your CrewAI LLM configuration to enable powerful filtering and segmentation:
```python theme={null}
portkey_llm = LLM(
model="gpt-4o",
base_url=PORTKEY_GATEWAY_URL,
api_key="dummy",
extra_headers=createHeaders(
api_key="YOUR_PORTKEY_API_KEY",
virtual_key="YOUR_OPENAI_VIRTUAL_KEY",
metadata={
"crew_type": "research_crew",
"environment": "production",
"_user": "user_123", # Special _user field for user analytics
"request_source": "mobile_app"
}
)
)
```
This metadata can be used to filter logs, traces, and metrics on the Portkey dashboard, allowing you to analyze specific crew runs, users, or environments.
This enables:
* Per-user cost tracking and budgeting
* Personalized user analytics
* Team or organization-level metrics
* Environment-specific monitoring (staging vs. production)
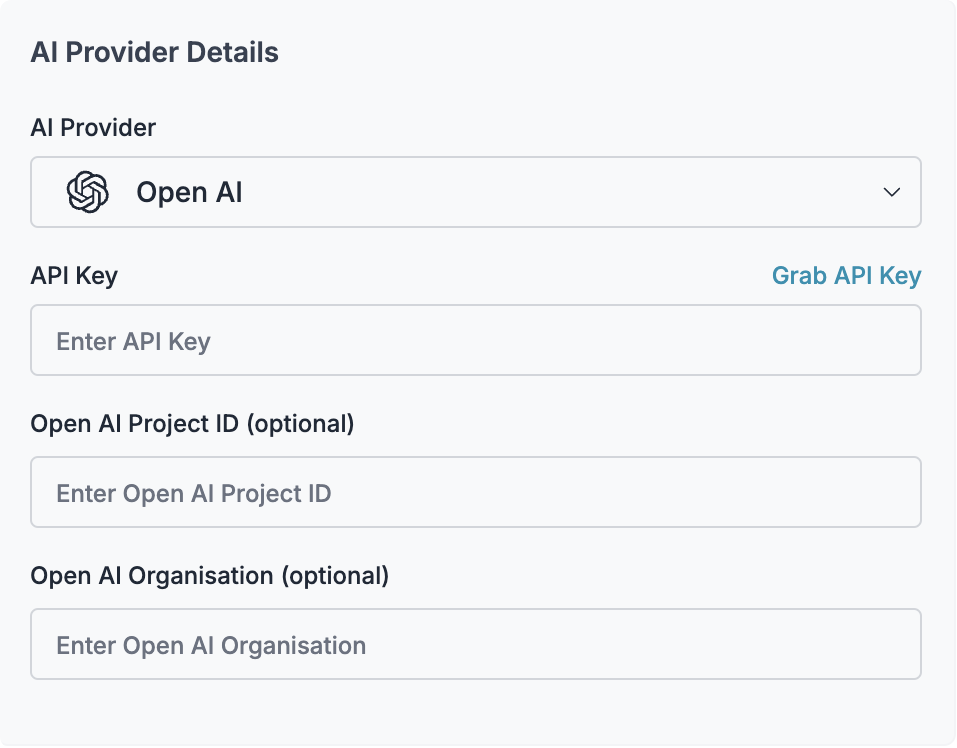
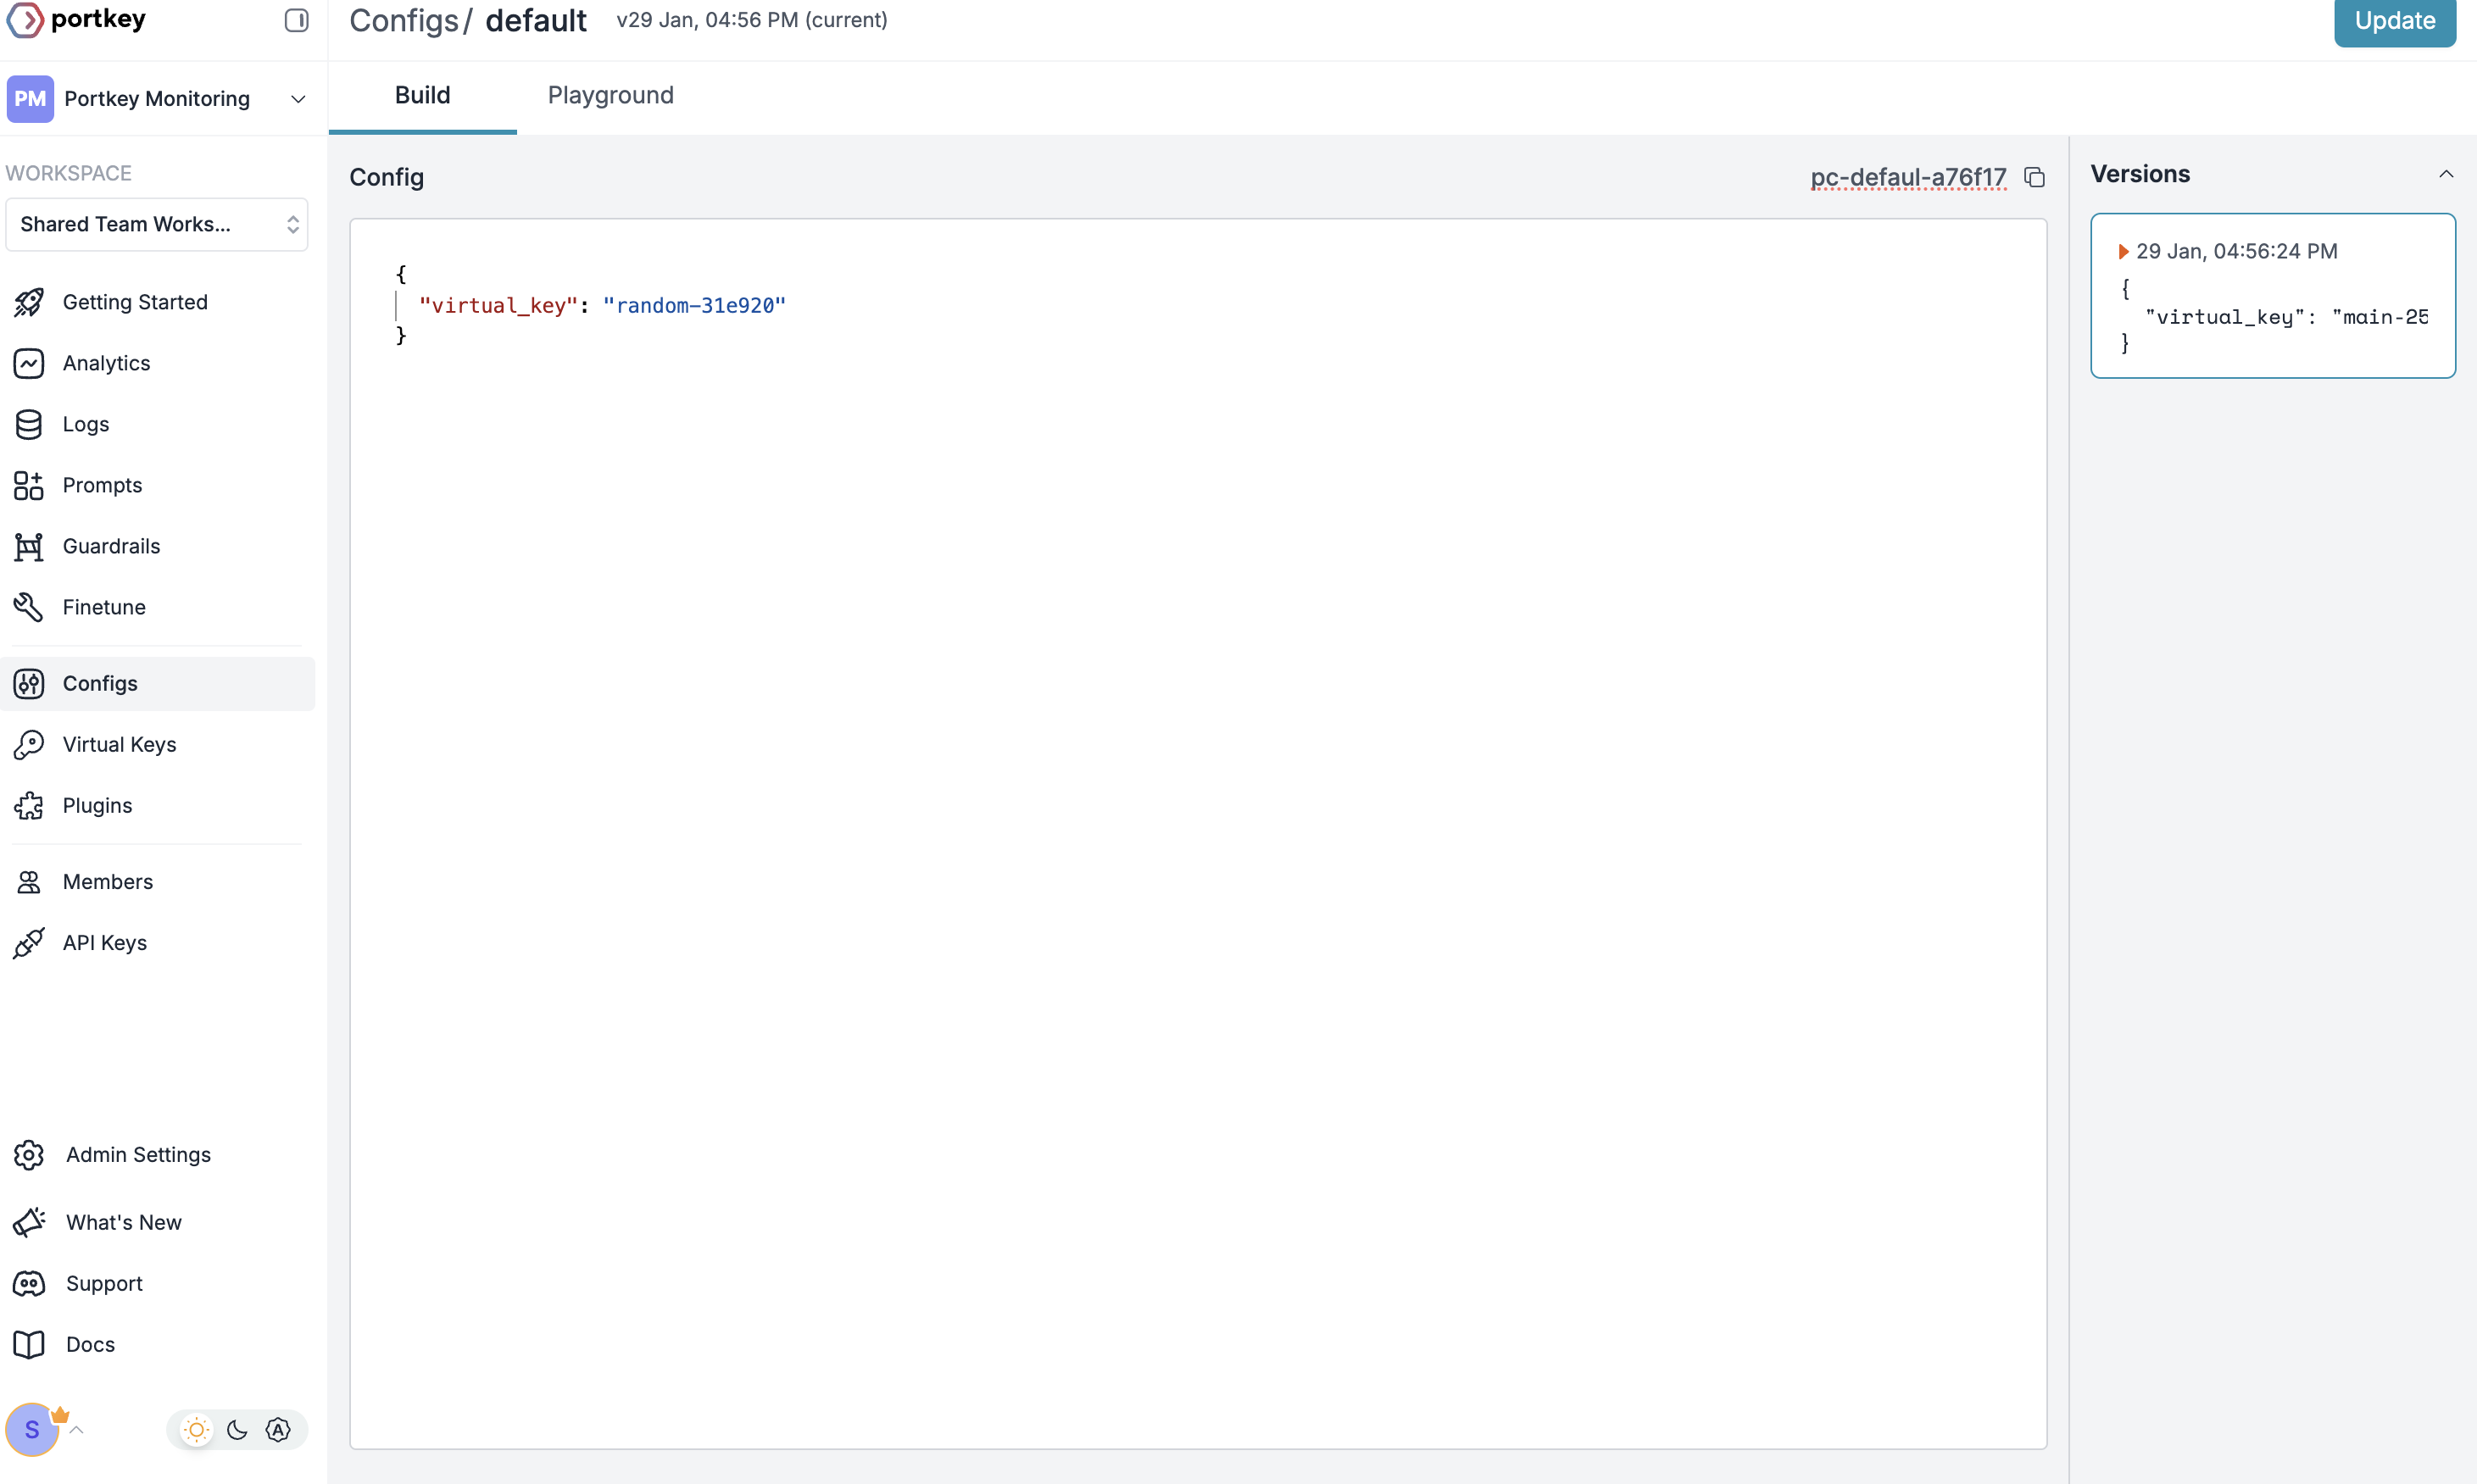
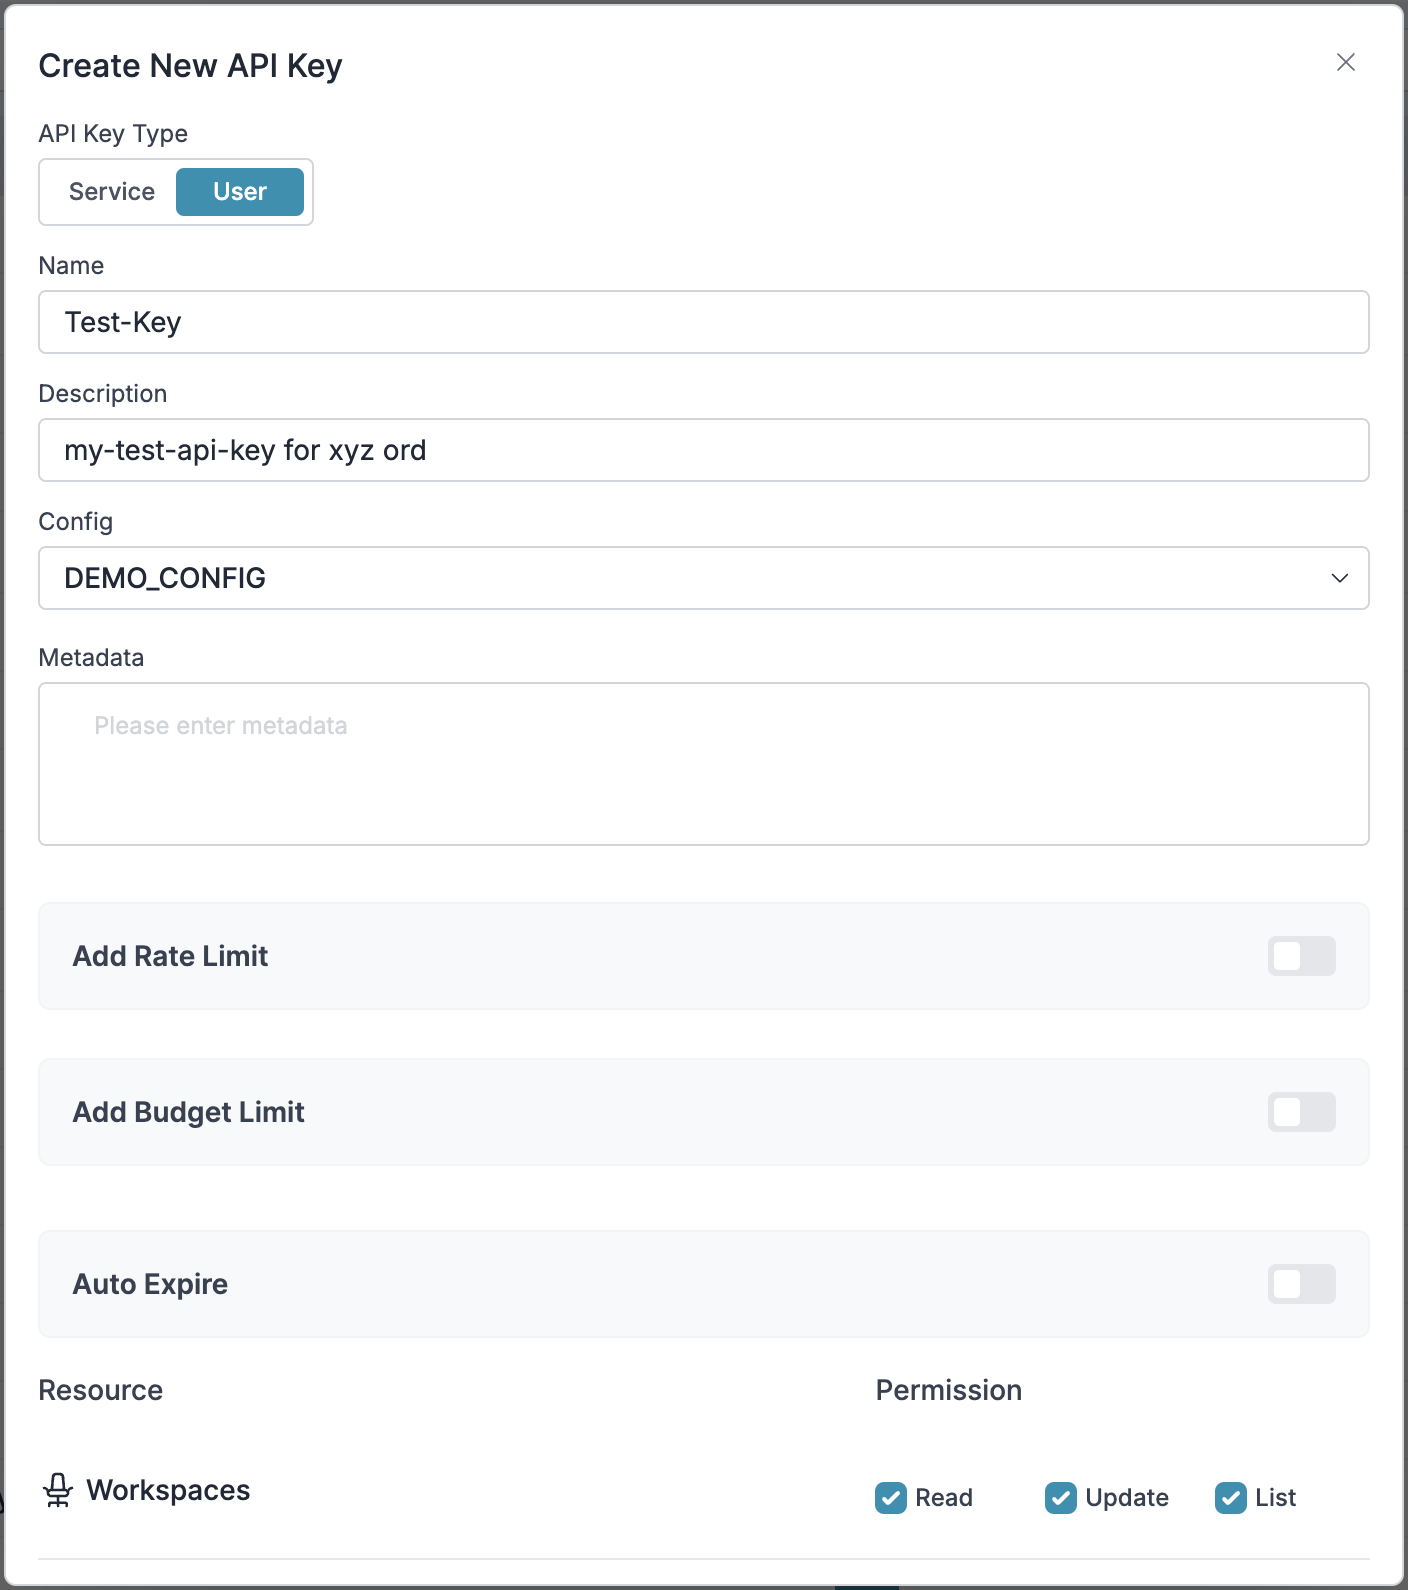
Official CrewAI documentation
Get personalized guidance on implementing this integration
 ## Users and Roles
Each member in your CrewAI workspace is assigned a role, which determines their access across various features.
You can:
* Use predefined roles (Owner, Member)
* Create custom roles tailored to specific permissions
* Assign roles at any time through the settings panel
You can configure users and roles in Settings → Roles.
## Users and Roles
Each member in your CrewAI workspace is assigned a role, which determines their access across various features.
You can:
* Use predefined roles (Owner, Member)
* Create custom roles tailored to specific permissions
* Assign roles at any time through the settings panel
You can configure users and roles in Settings → Roles.
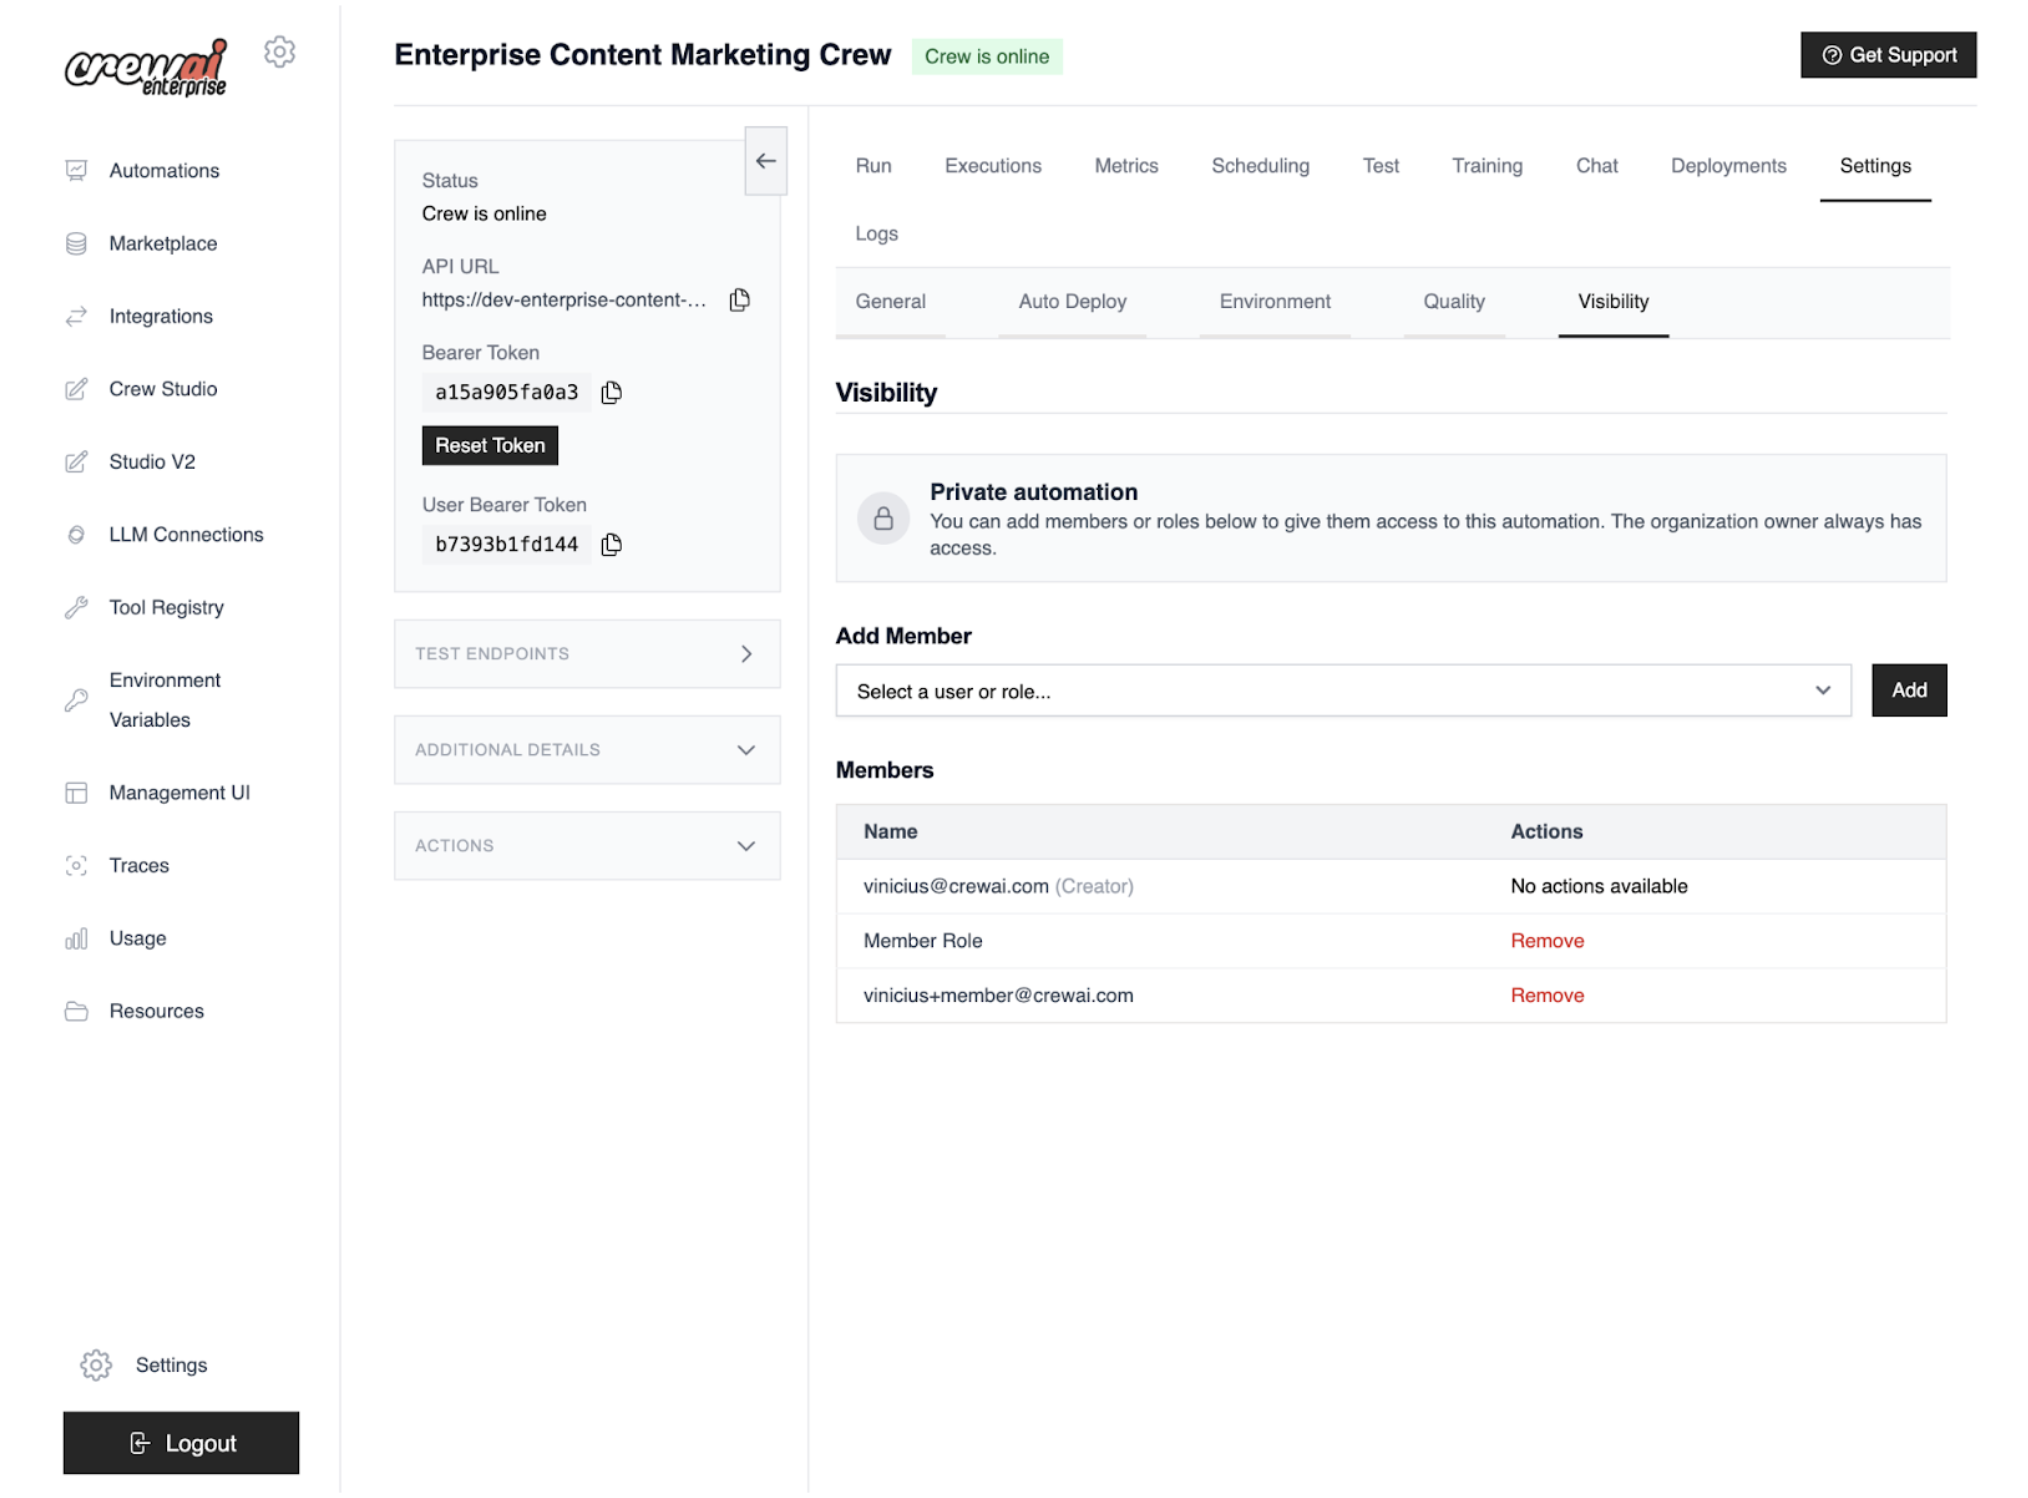
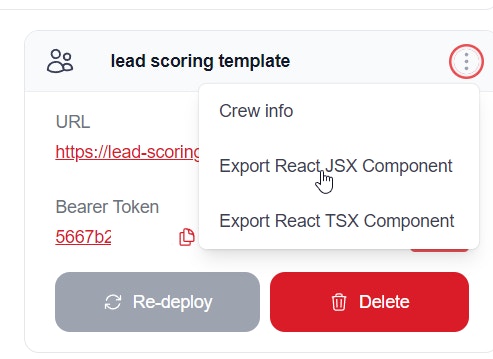
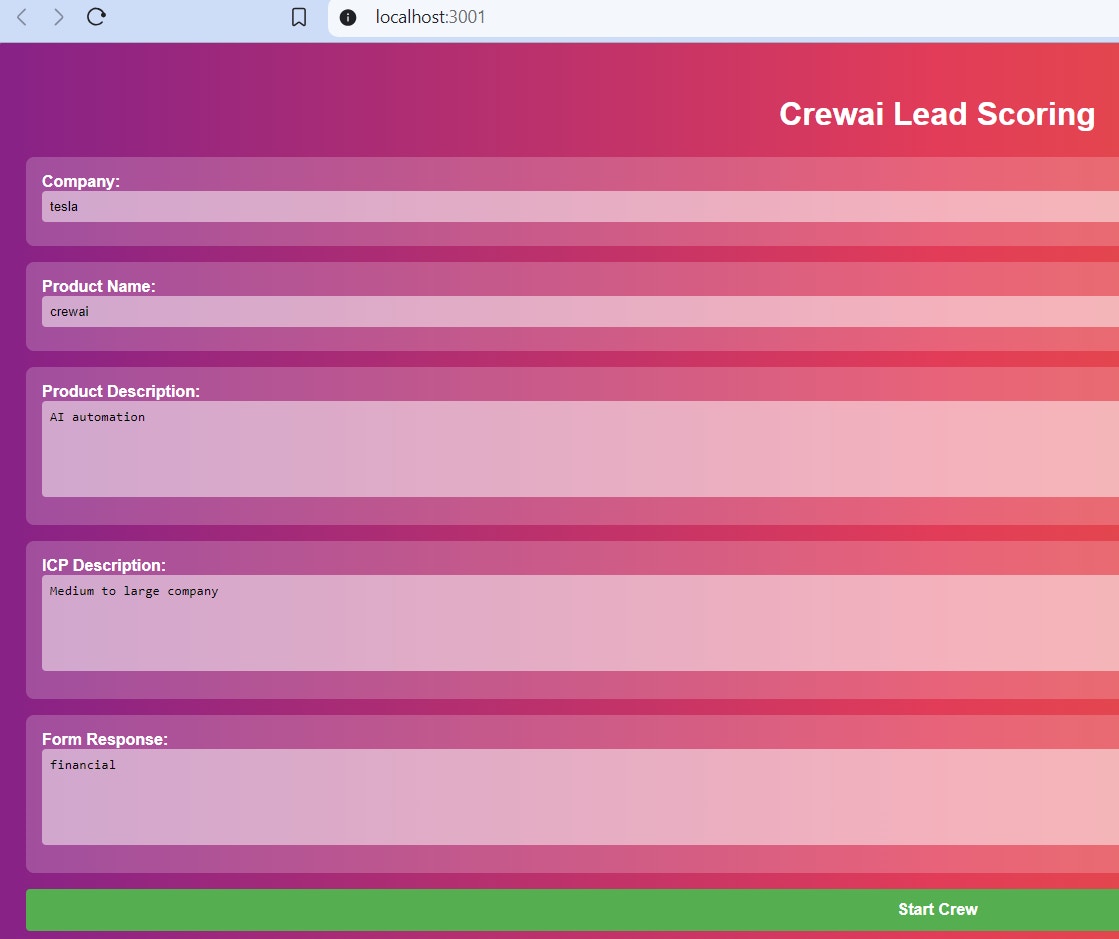
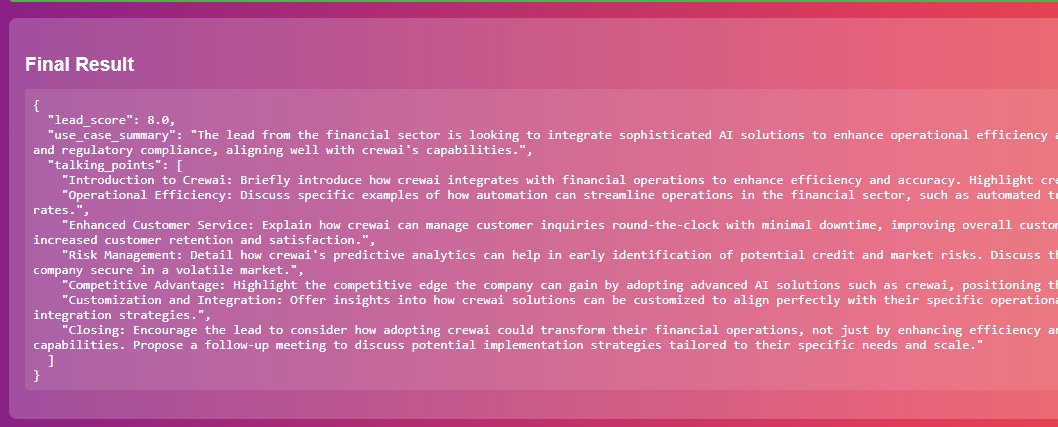 ## Next Steps
* Customize the component styling to match your application's design
* Add additional props for configuration
* Integrate with your application's state management
* Add error handling and loading states
---
# Source: https://docs.crewai.com/en/concepts/reasoning.md
> ## Documentation Index
> Fetch the complete documentation index at: https://docs.crewai.com/llms.txt
> Use this file to discover all available pages before exploring further.
# Reasoning
> Learn how to enable and use agent reasoning to improve task execution.
## Overview
Agent reasoning is a feature that allows agents to reflect on a task and create a plan before execution. This helps agents approach tasks more methodically and ensures they're ready to perform the assigned work.
## Usage
To enable reasoning for an agent, simply set `reasoning=True` when creating the agent:
```python theme={null}
from crewai import Agent
agent = Agent(
role="Data Analyst",
goal="Analyze complex datasets and provide insights",
backstory="You are an experienced data analyst with expertise in finding patterns in complex data.",
reasoning=True, # Enable reasoning
max_reasoning_attempts=3 # Optional: Set a maximum number of reasoning attempts
)
```
## How It Works
When reasoning is enabled, before executing a task, the agent will:
1. Reflect on the task and create a detailed plan
2. Evaluate whether it's ready to execute the task
3. Refine the plan as necessary until it's ready or max\_reasoning\_attempts is reached
4. Inject the reasoning plan into the task description before execution
This process helps the agent break down complex tasks into manageable steps and identify potential challenges before starting.
## Configuration Options
## Next Steps
* Customize the component styling to match your application's design
* Add additional props for configuration
* Integrate with your application's state management
* Add error handling and loading states
---
# Source: https://docs.crewai.com/en/concepts/reasoning.md
> ## Documentation Index
> Fetch the complete documentation index at: https://docs.crewai.com/llms.txt
> Use this file to discover all available pages before exploring further.
# Reasoning
> Learn how to enable and use agent reasoning to improve task execution.
## Overview
Agent reasoning is a feature that allows agents to reflect on a task and create a plan before execution. This helps agents approach tasks more methodically and ensures they're ready to perform the assigned work.
## Usage
To enable reasoning for an agent, simply set `reasoning=True` when creating the agent:
```python theme={null}
from crewai import Agent
agent = Agent(
role="Data Analyst",
goal="Analyze complex datasets and provide insights",
backstory="You are an experienced data analyst with expertise in finding patterns in complex data.",
reasoning=True, # Enable reasoning
max_reasoning_attempts=3 # Optional: Set a maximum number of reasoning attempts
)
```
## How It Works
When reasoning is enabled, before executing a task, the agent will:
1. Reflect on the task and create a detailed plan
2. Evaluate whether it's ready to execute the task
3. Refine the plan as necessary until it's ready or max\_reasoning\_attempts is reached
4. Inject the reasoning plan into the task description before execution
This process helps the agent break down complex tasks into manageable steps and identify potential challenges before starting.
## Configuration Options
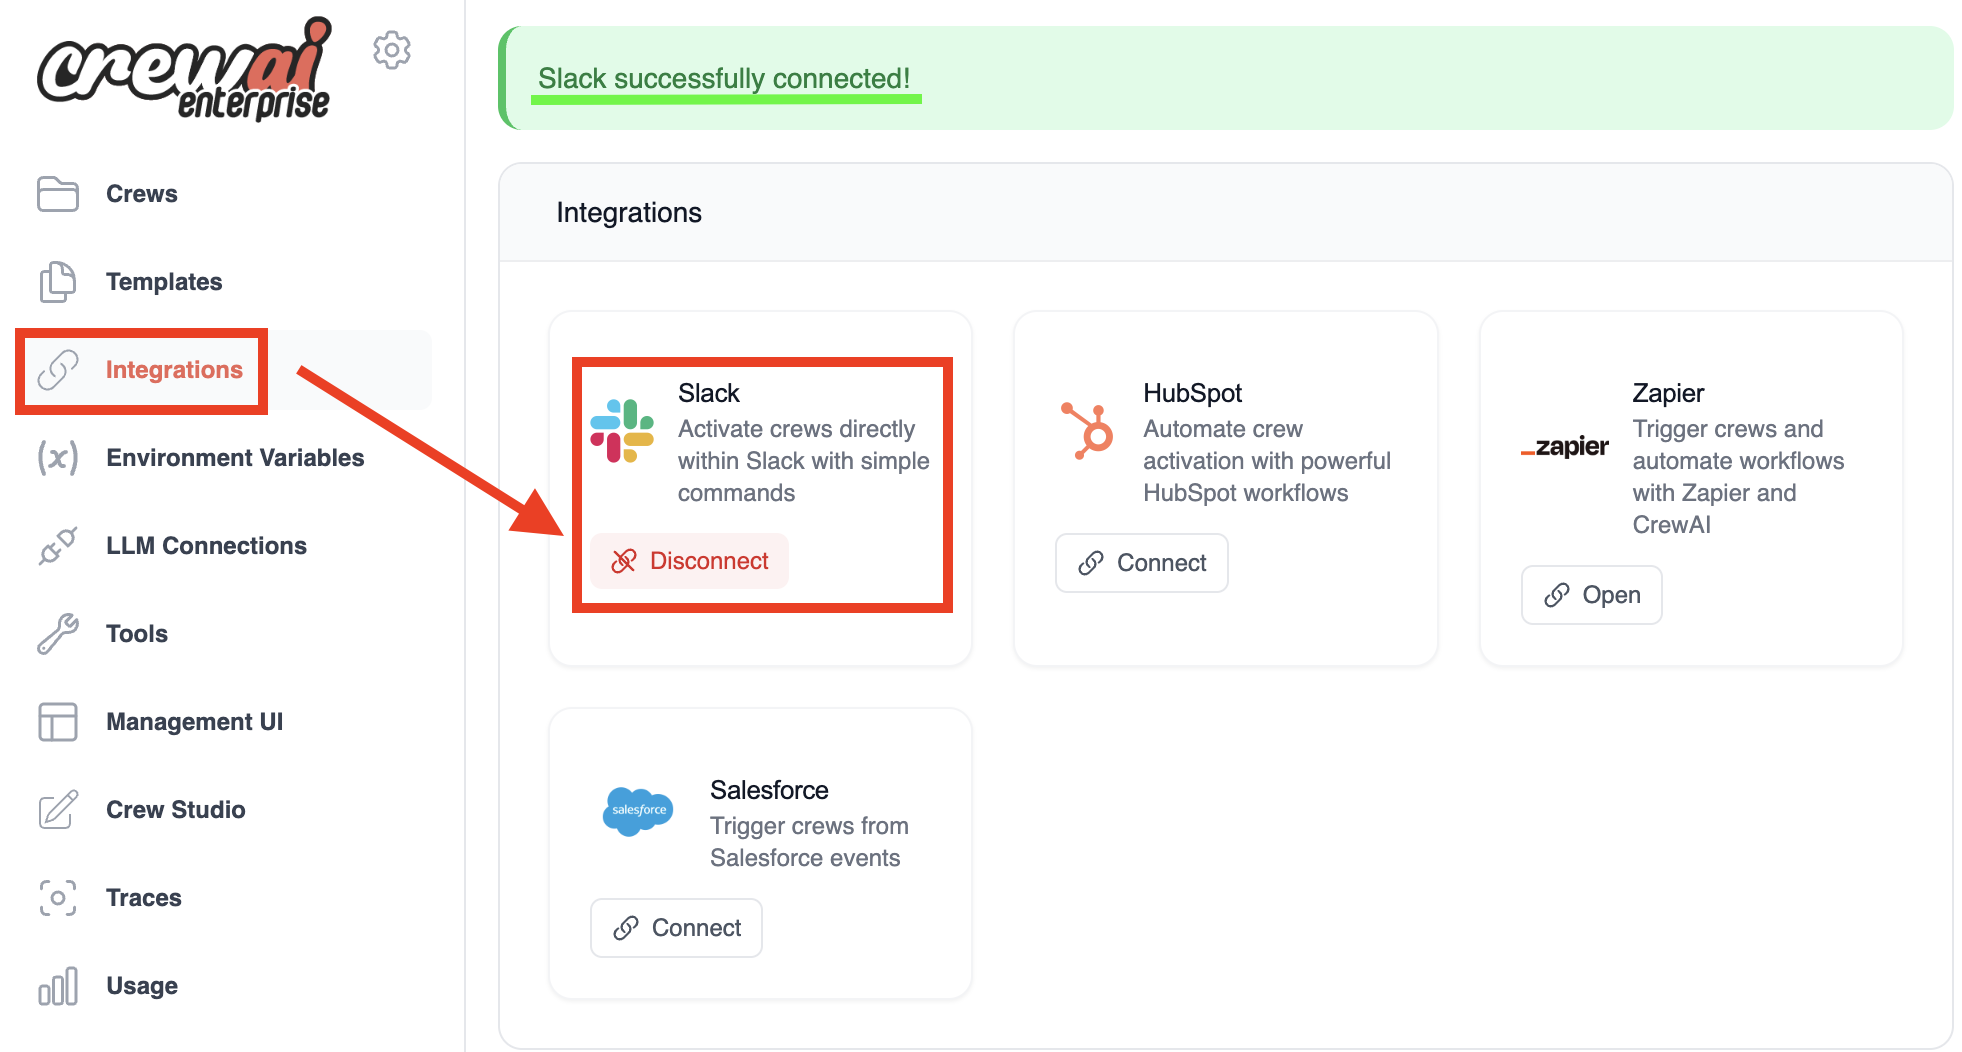 Verify that Slack is listed and is connected.
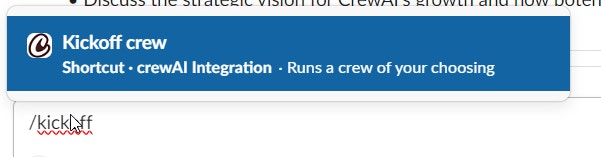 * Press Enter or select the "**Kickoff crew**" option. A dialog box titled "**Kickoff an AI Crew**" will appear.
 * If your crew requires any inputs, click the "**Add Inputs**" button to provide them.
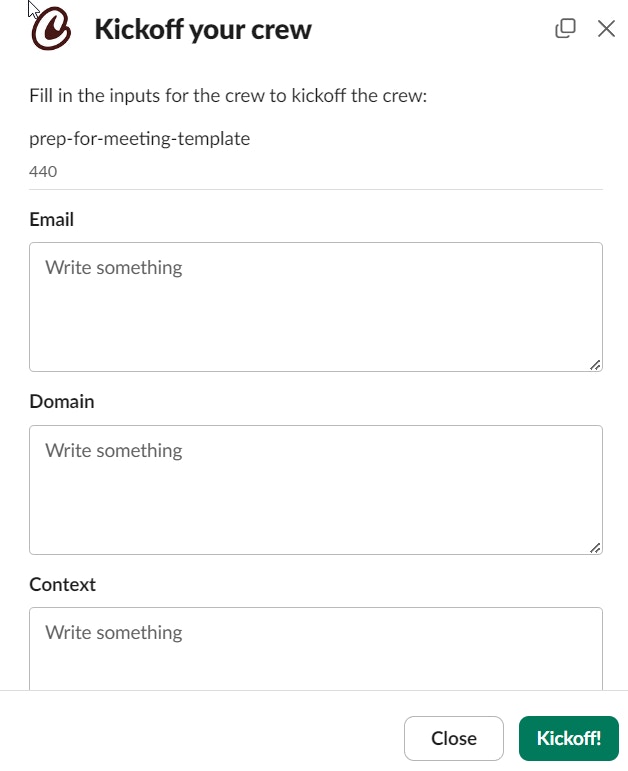 * The crew will start executing and you will see the results in the Slack channel.
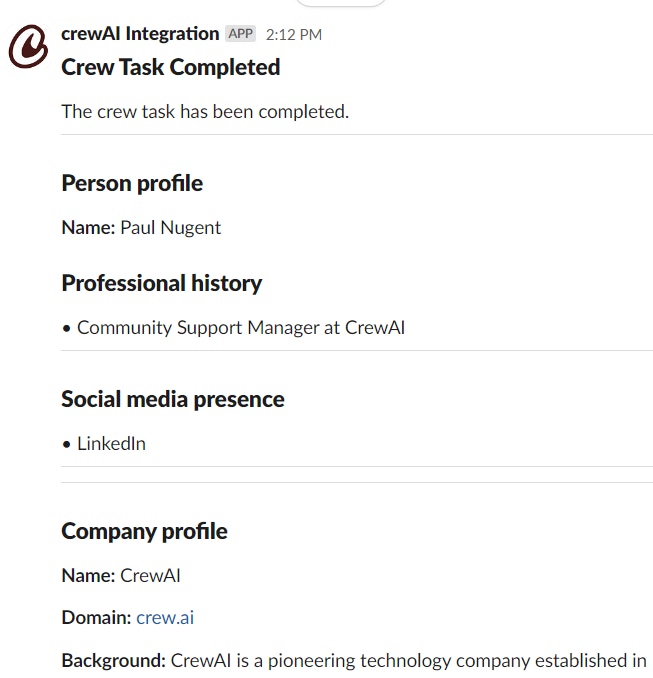 The Visual Task Builder enables:
* Drag-and-drop task creation
* Visual task dependencies and flow
* Real-time testing and validation
* Easy sharing and collaboration
The Visual Task Builder enables:
* Drag-and-drop task creation
* Visual task dependencies and flow
* Real-time testing and validation
* Easy sharing and collaboration
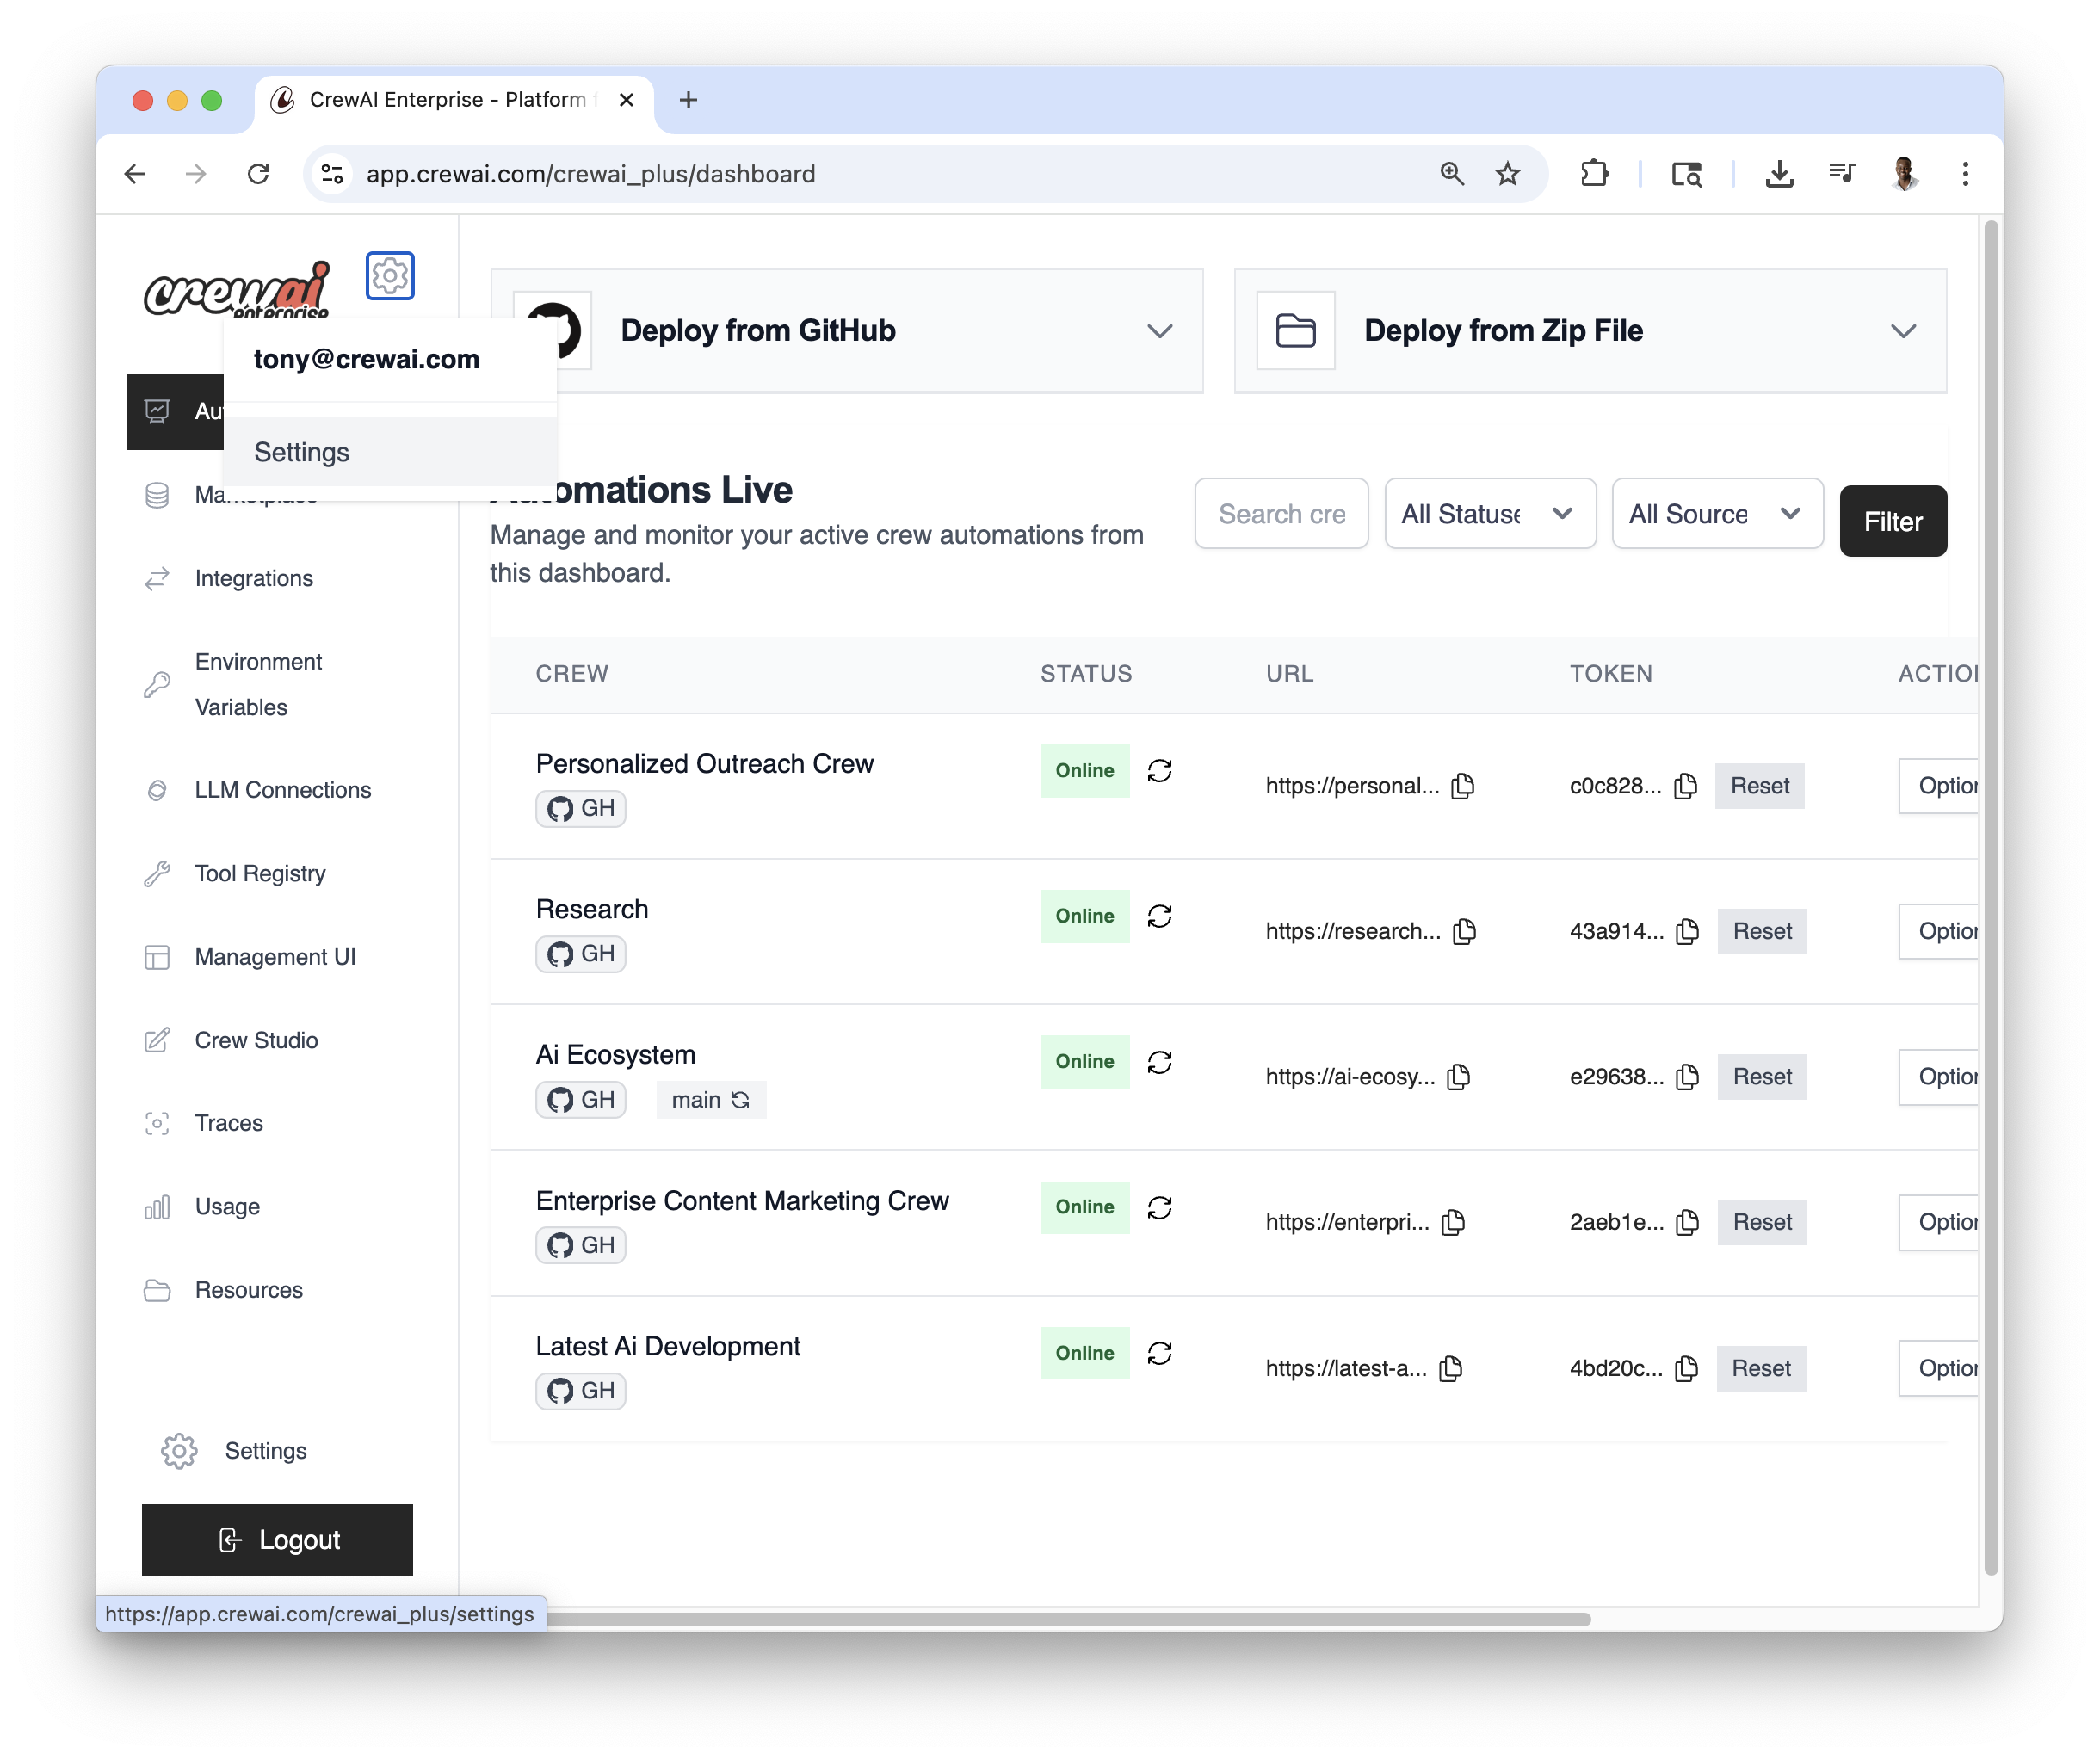
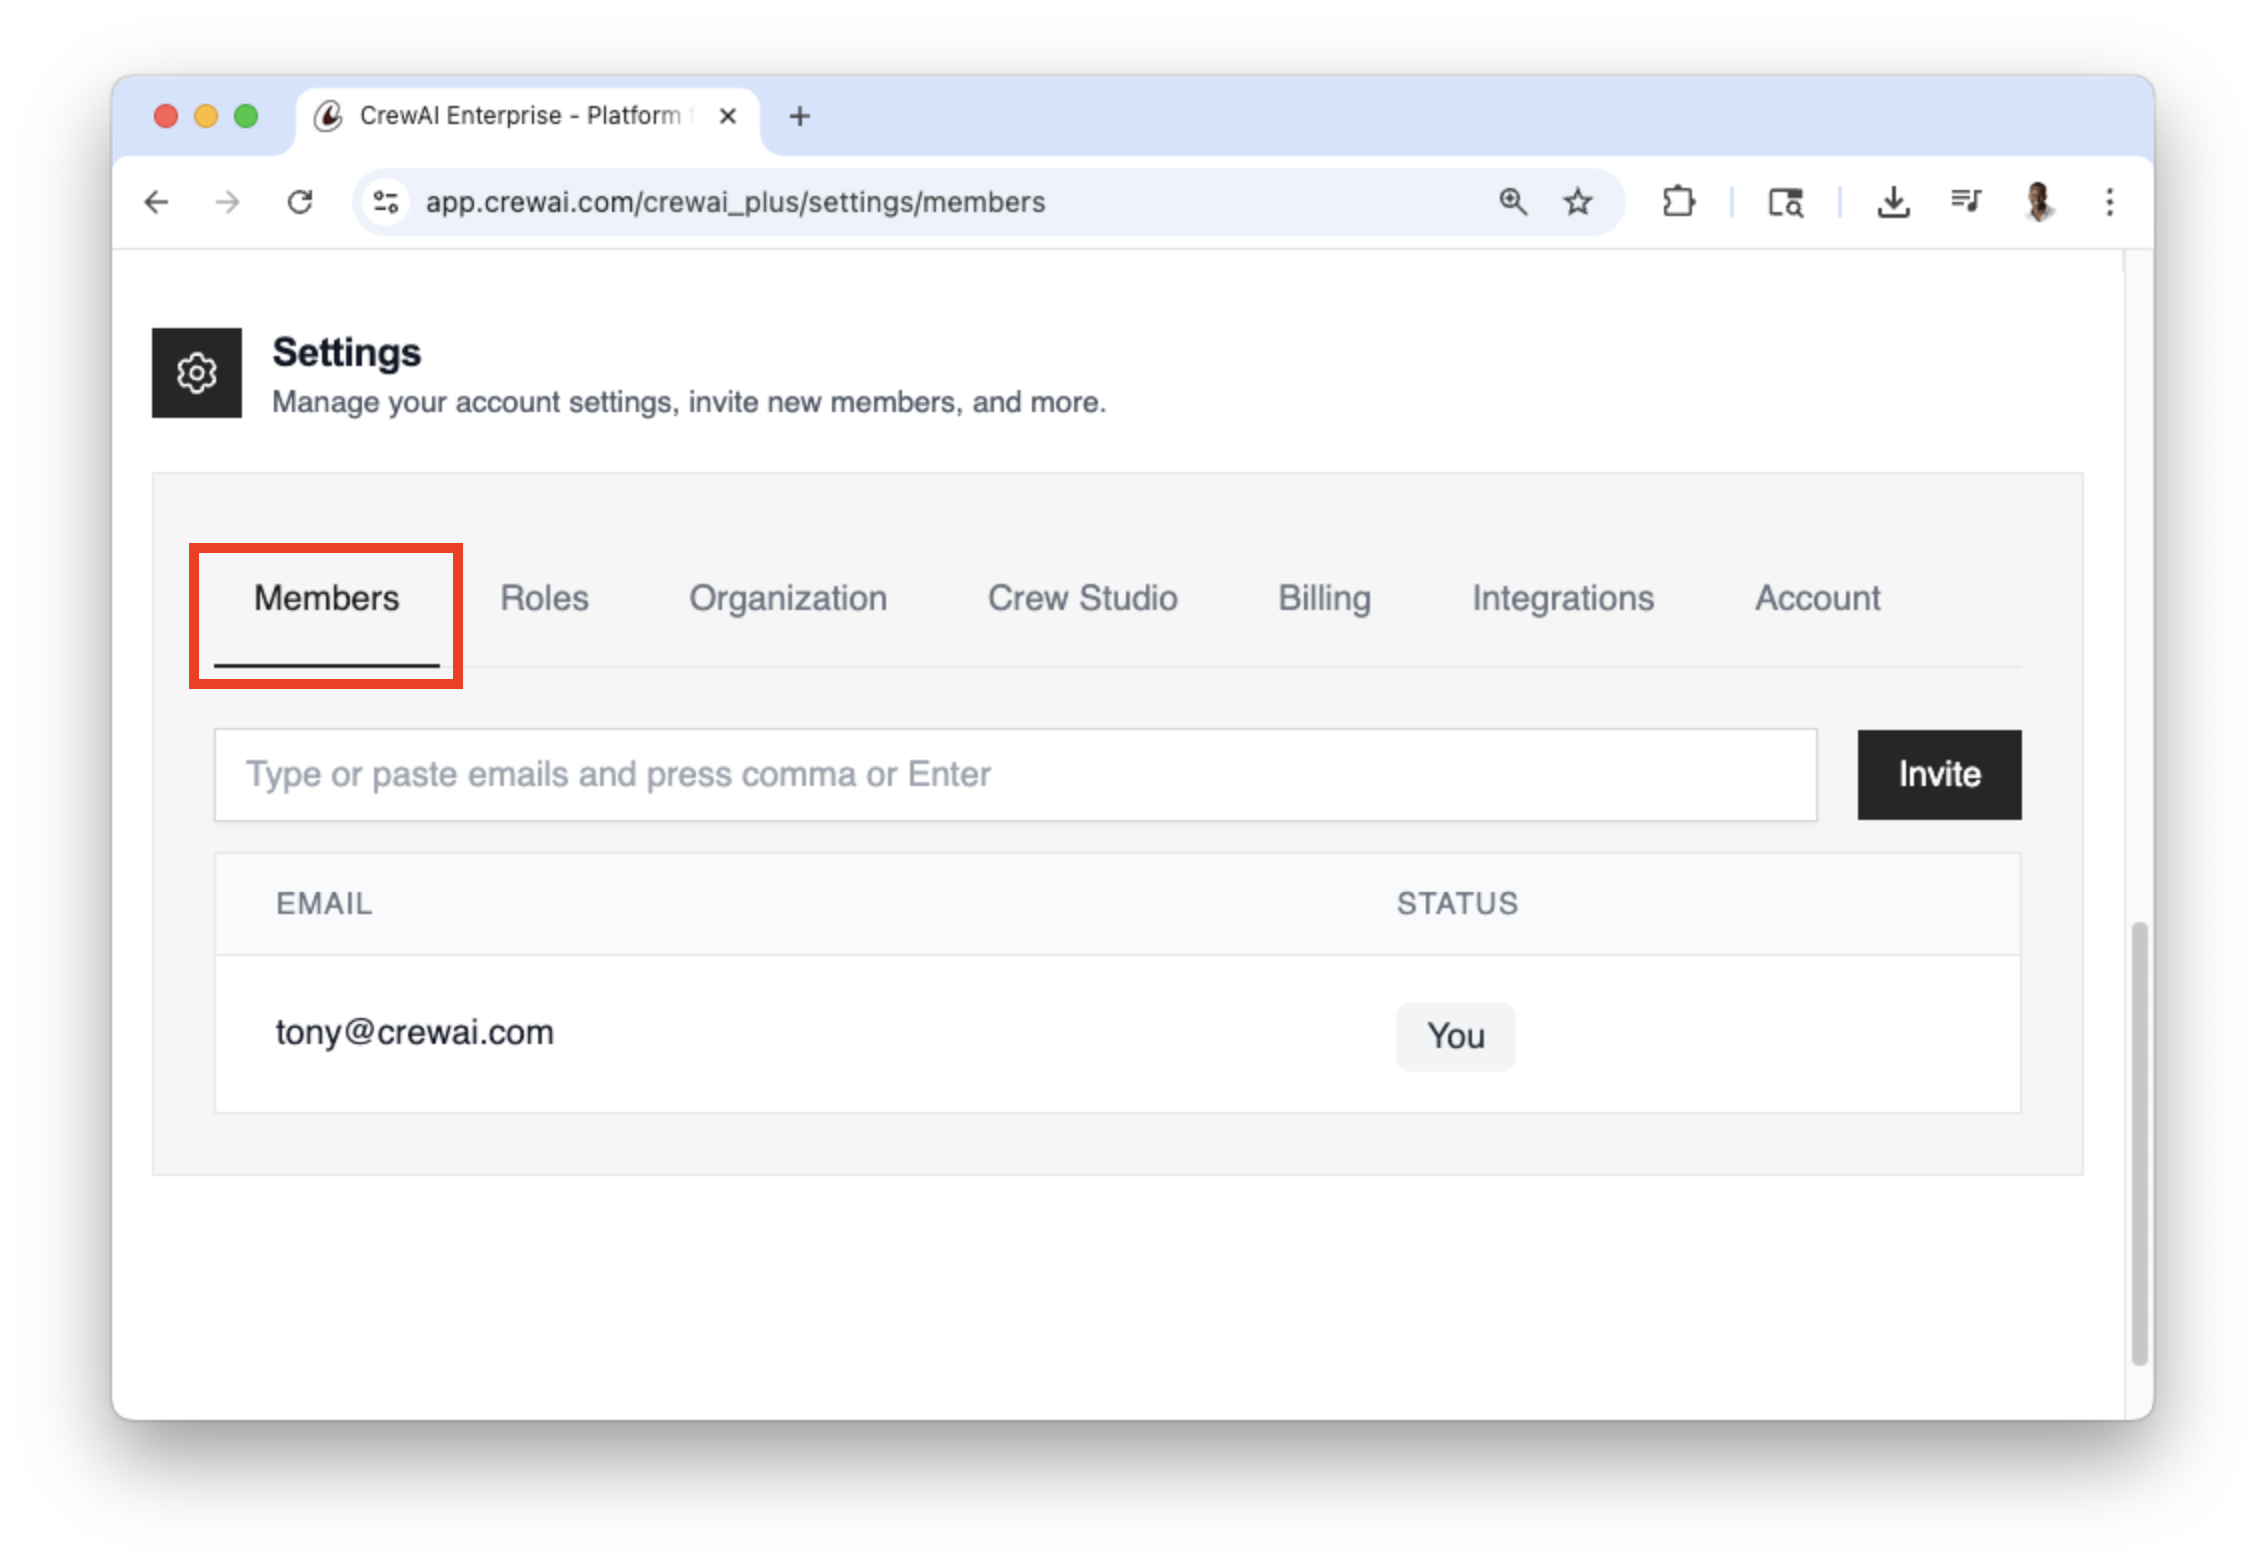
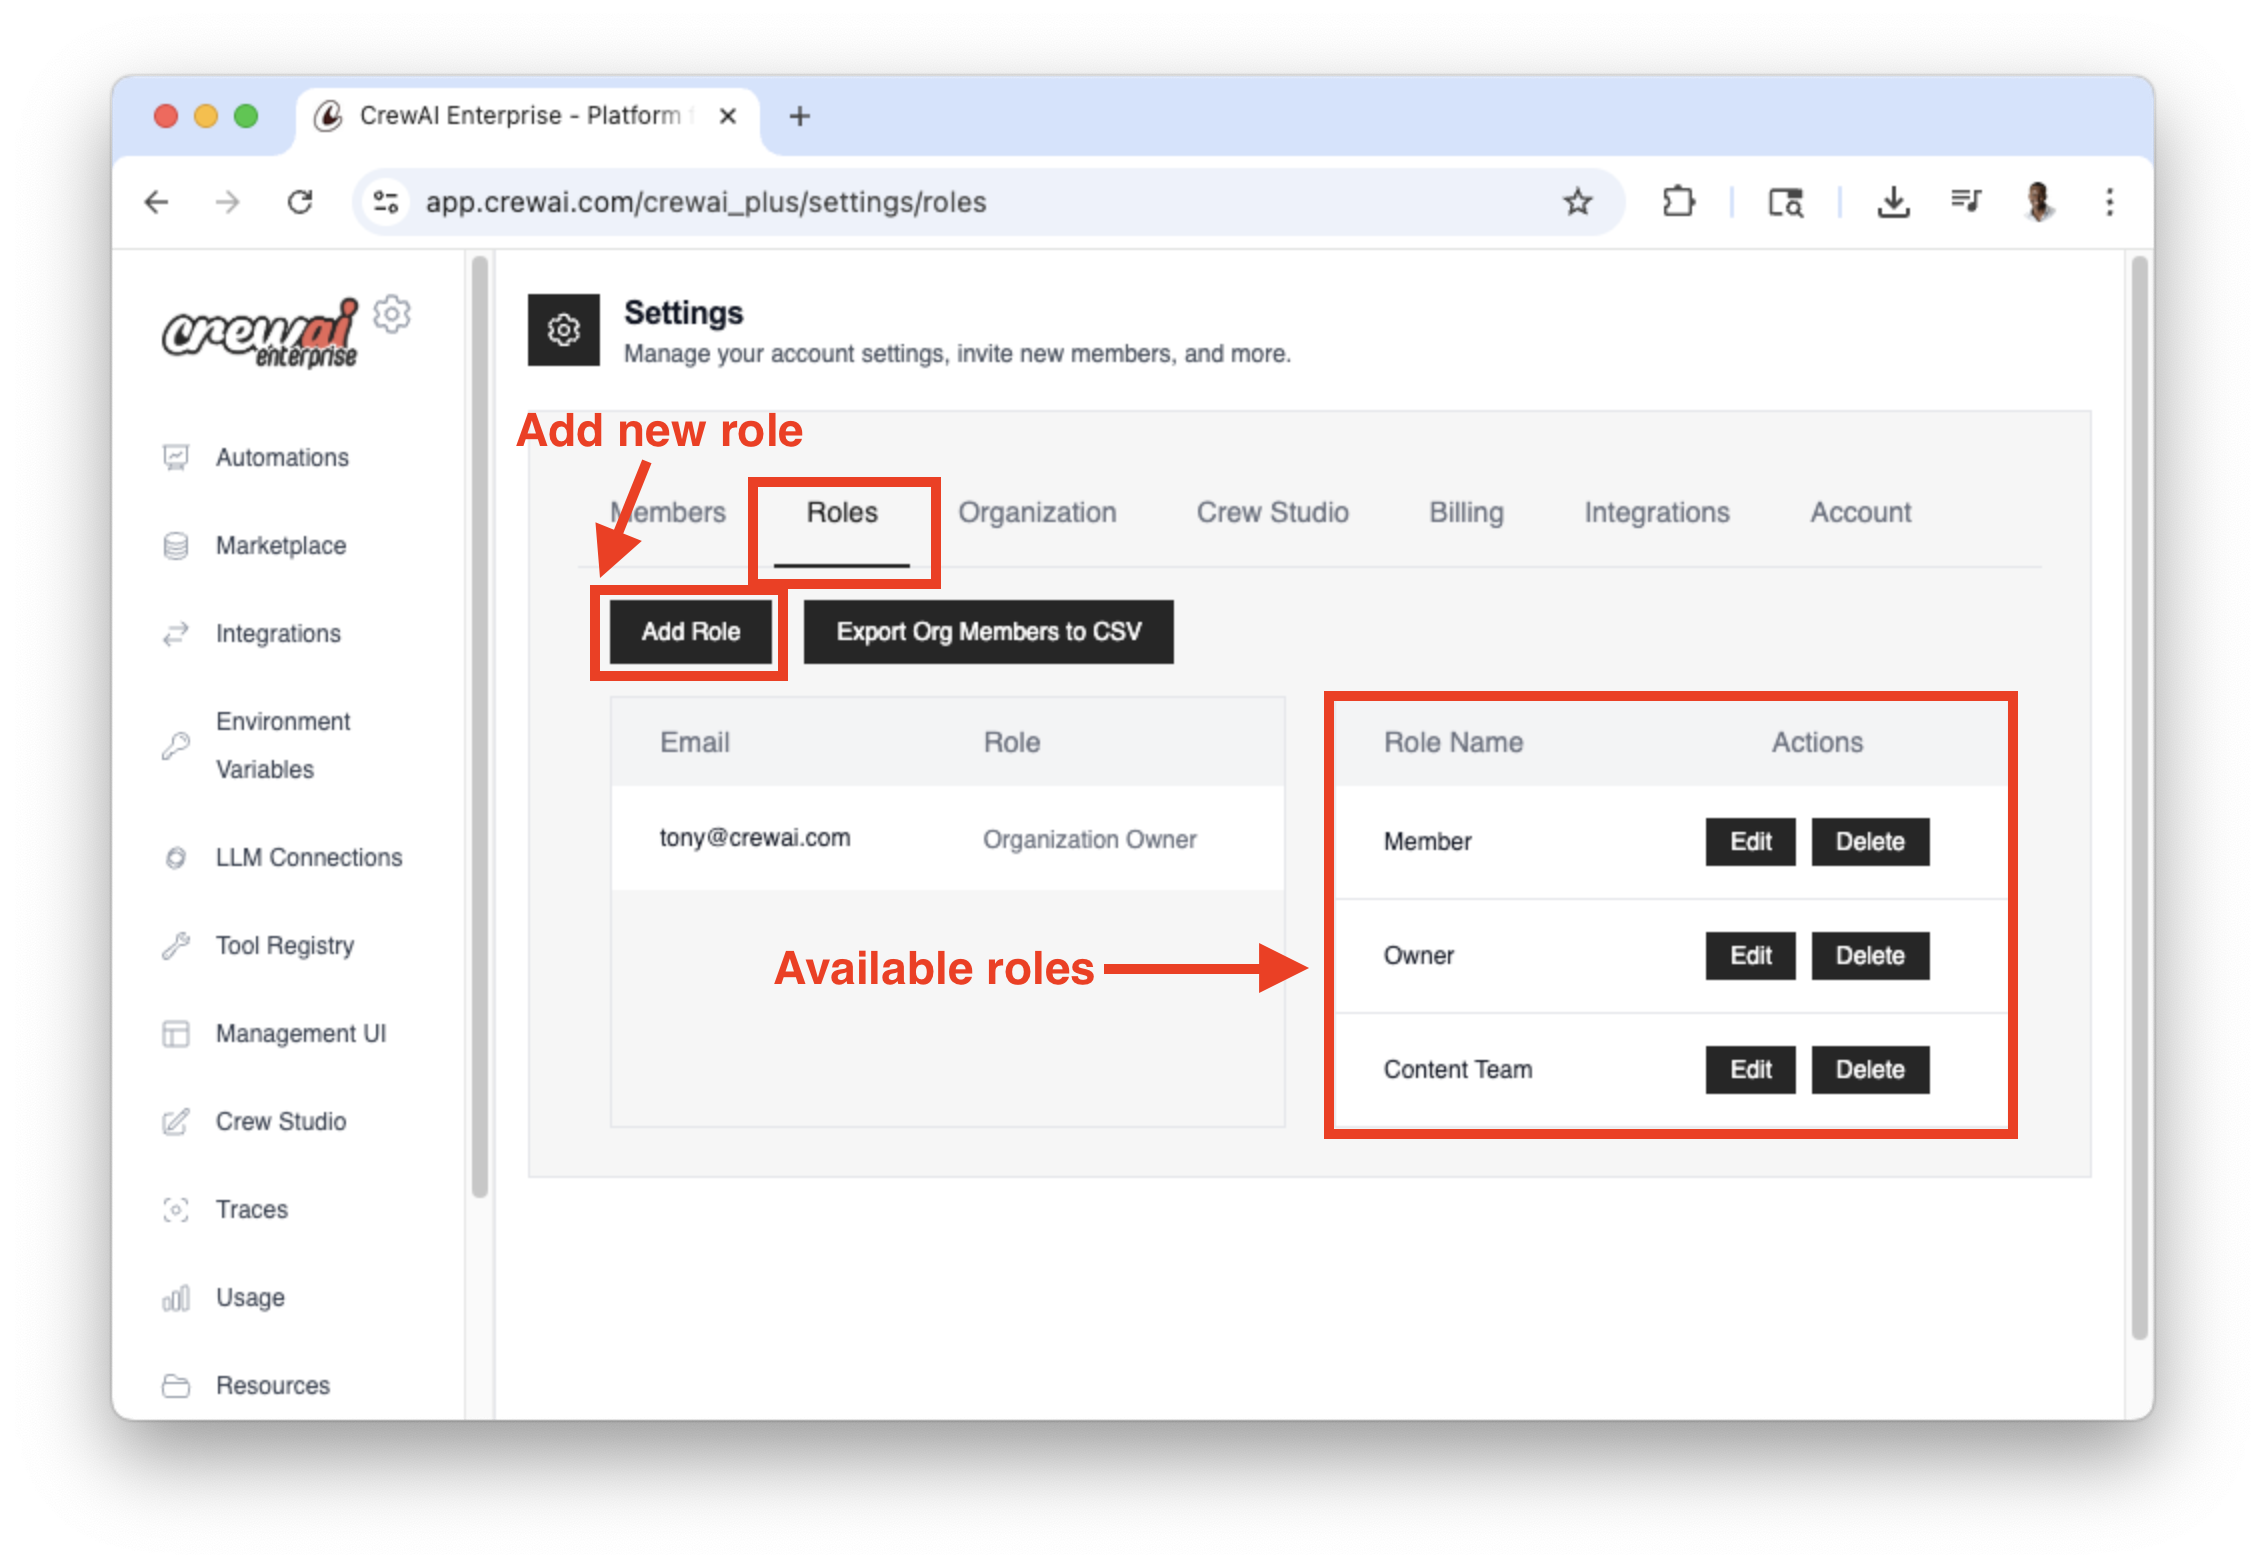 * Click on the `Add Role` button to add a new role. - Enter the
details and permissions of the role and click the `Create Role` button to
create the role.
* Click on the `Add Role` button to add a new role. - Enter the
details and permissions of the role and click the `Create Role` button to
create the role.
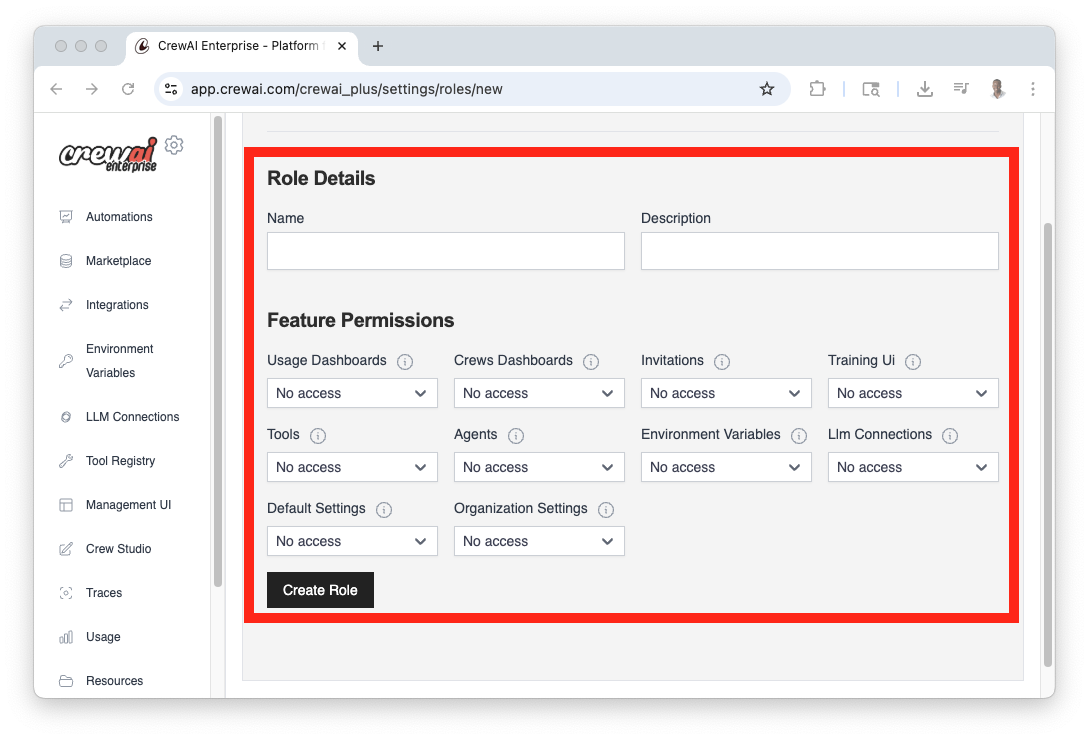
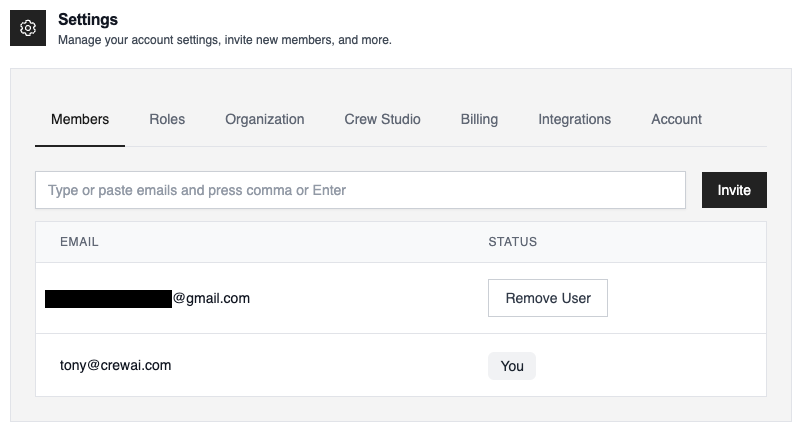 * Once the member has accepted the invitation, you can add a role to
them. - Navigate back to `Roles` tab - Go to the member you want to add a
role to and under the `Role` column, click on the dropdown - Select the role
you want to add to the member - Click the `Update` button to save the role
* Once the member has accepted the invitation, you can add a role to
them. - Navigate back to `Roles` tab - Go to the member you want to add a
role to and under the `Role` column, click on the dropdown - Select the role
you want to add to the member - Click the `Update` button to save the role
 ## Explore
 ### Connect your Account
1. Go to Integrations
2. Click Connect on the desired service
3. Complete the OAuth flow and grant scopes
4. Copy your Enterprise Token from Integration Settings
{" "}
### Connect your Account
1. Go to Integrations
2. Click Connect on the desired service
3. Complete the OAuth flow and grant scopes
4. Copy your Enterprise Token from Integration Settings
{" "}
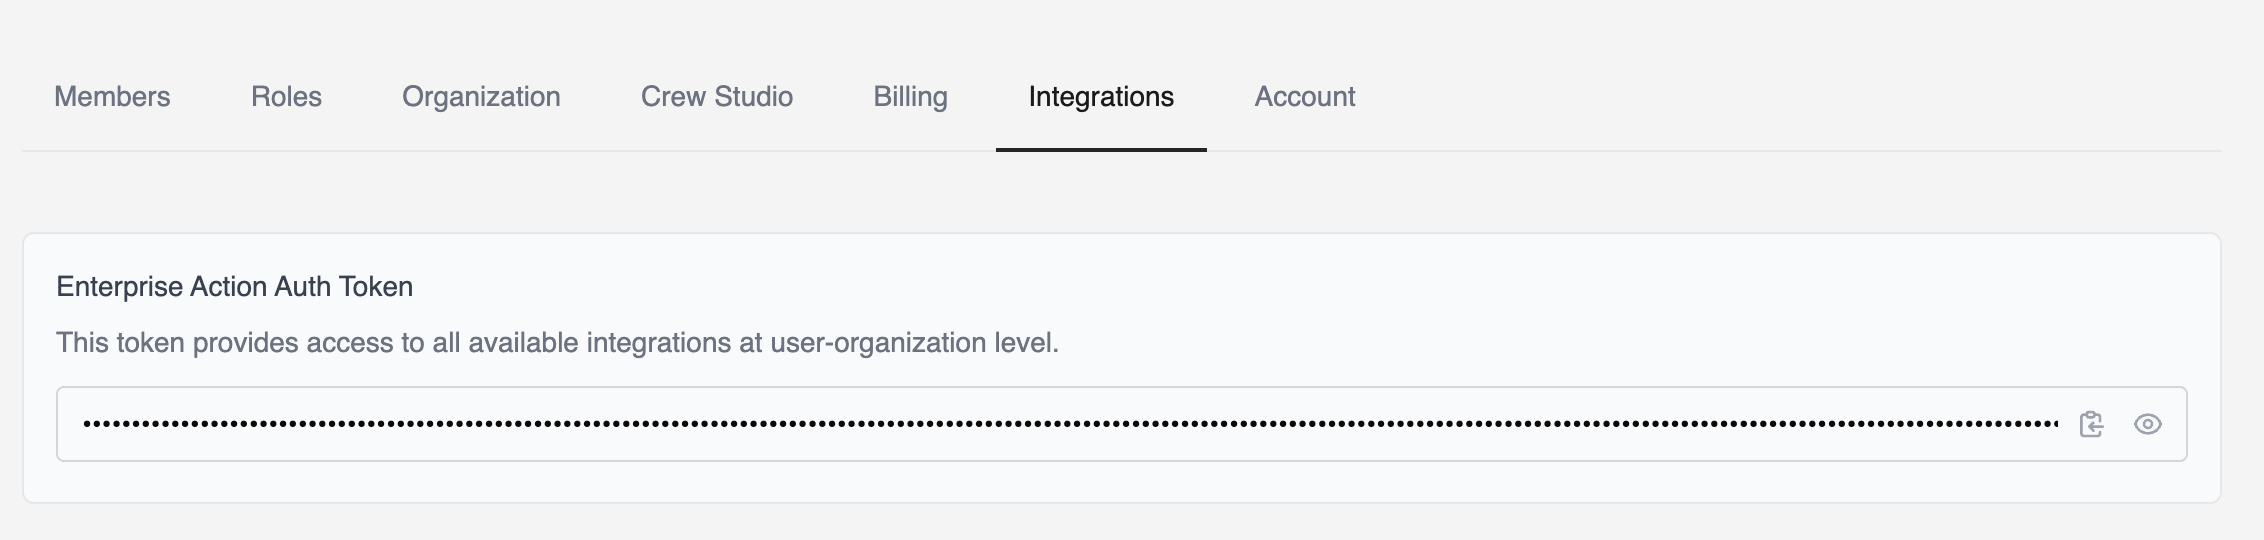 ### Install Integration Tools
To use the integrations locally, you need to install the latest `crewai-tools` package.
```bash theme={null}
uv add crewai-tools
```
### Environment Variable Setup
{" "}
### Install Integration Tools
To use the integrations locally, you need to install the latest `crewai-tools` package.
```bash theme={null}
uv add crewai-tools
```
### Environment Variable Setup
{" "}
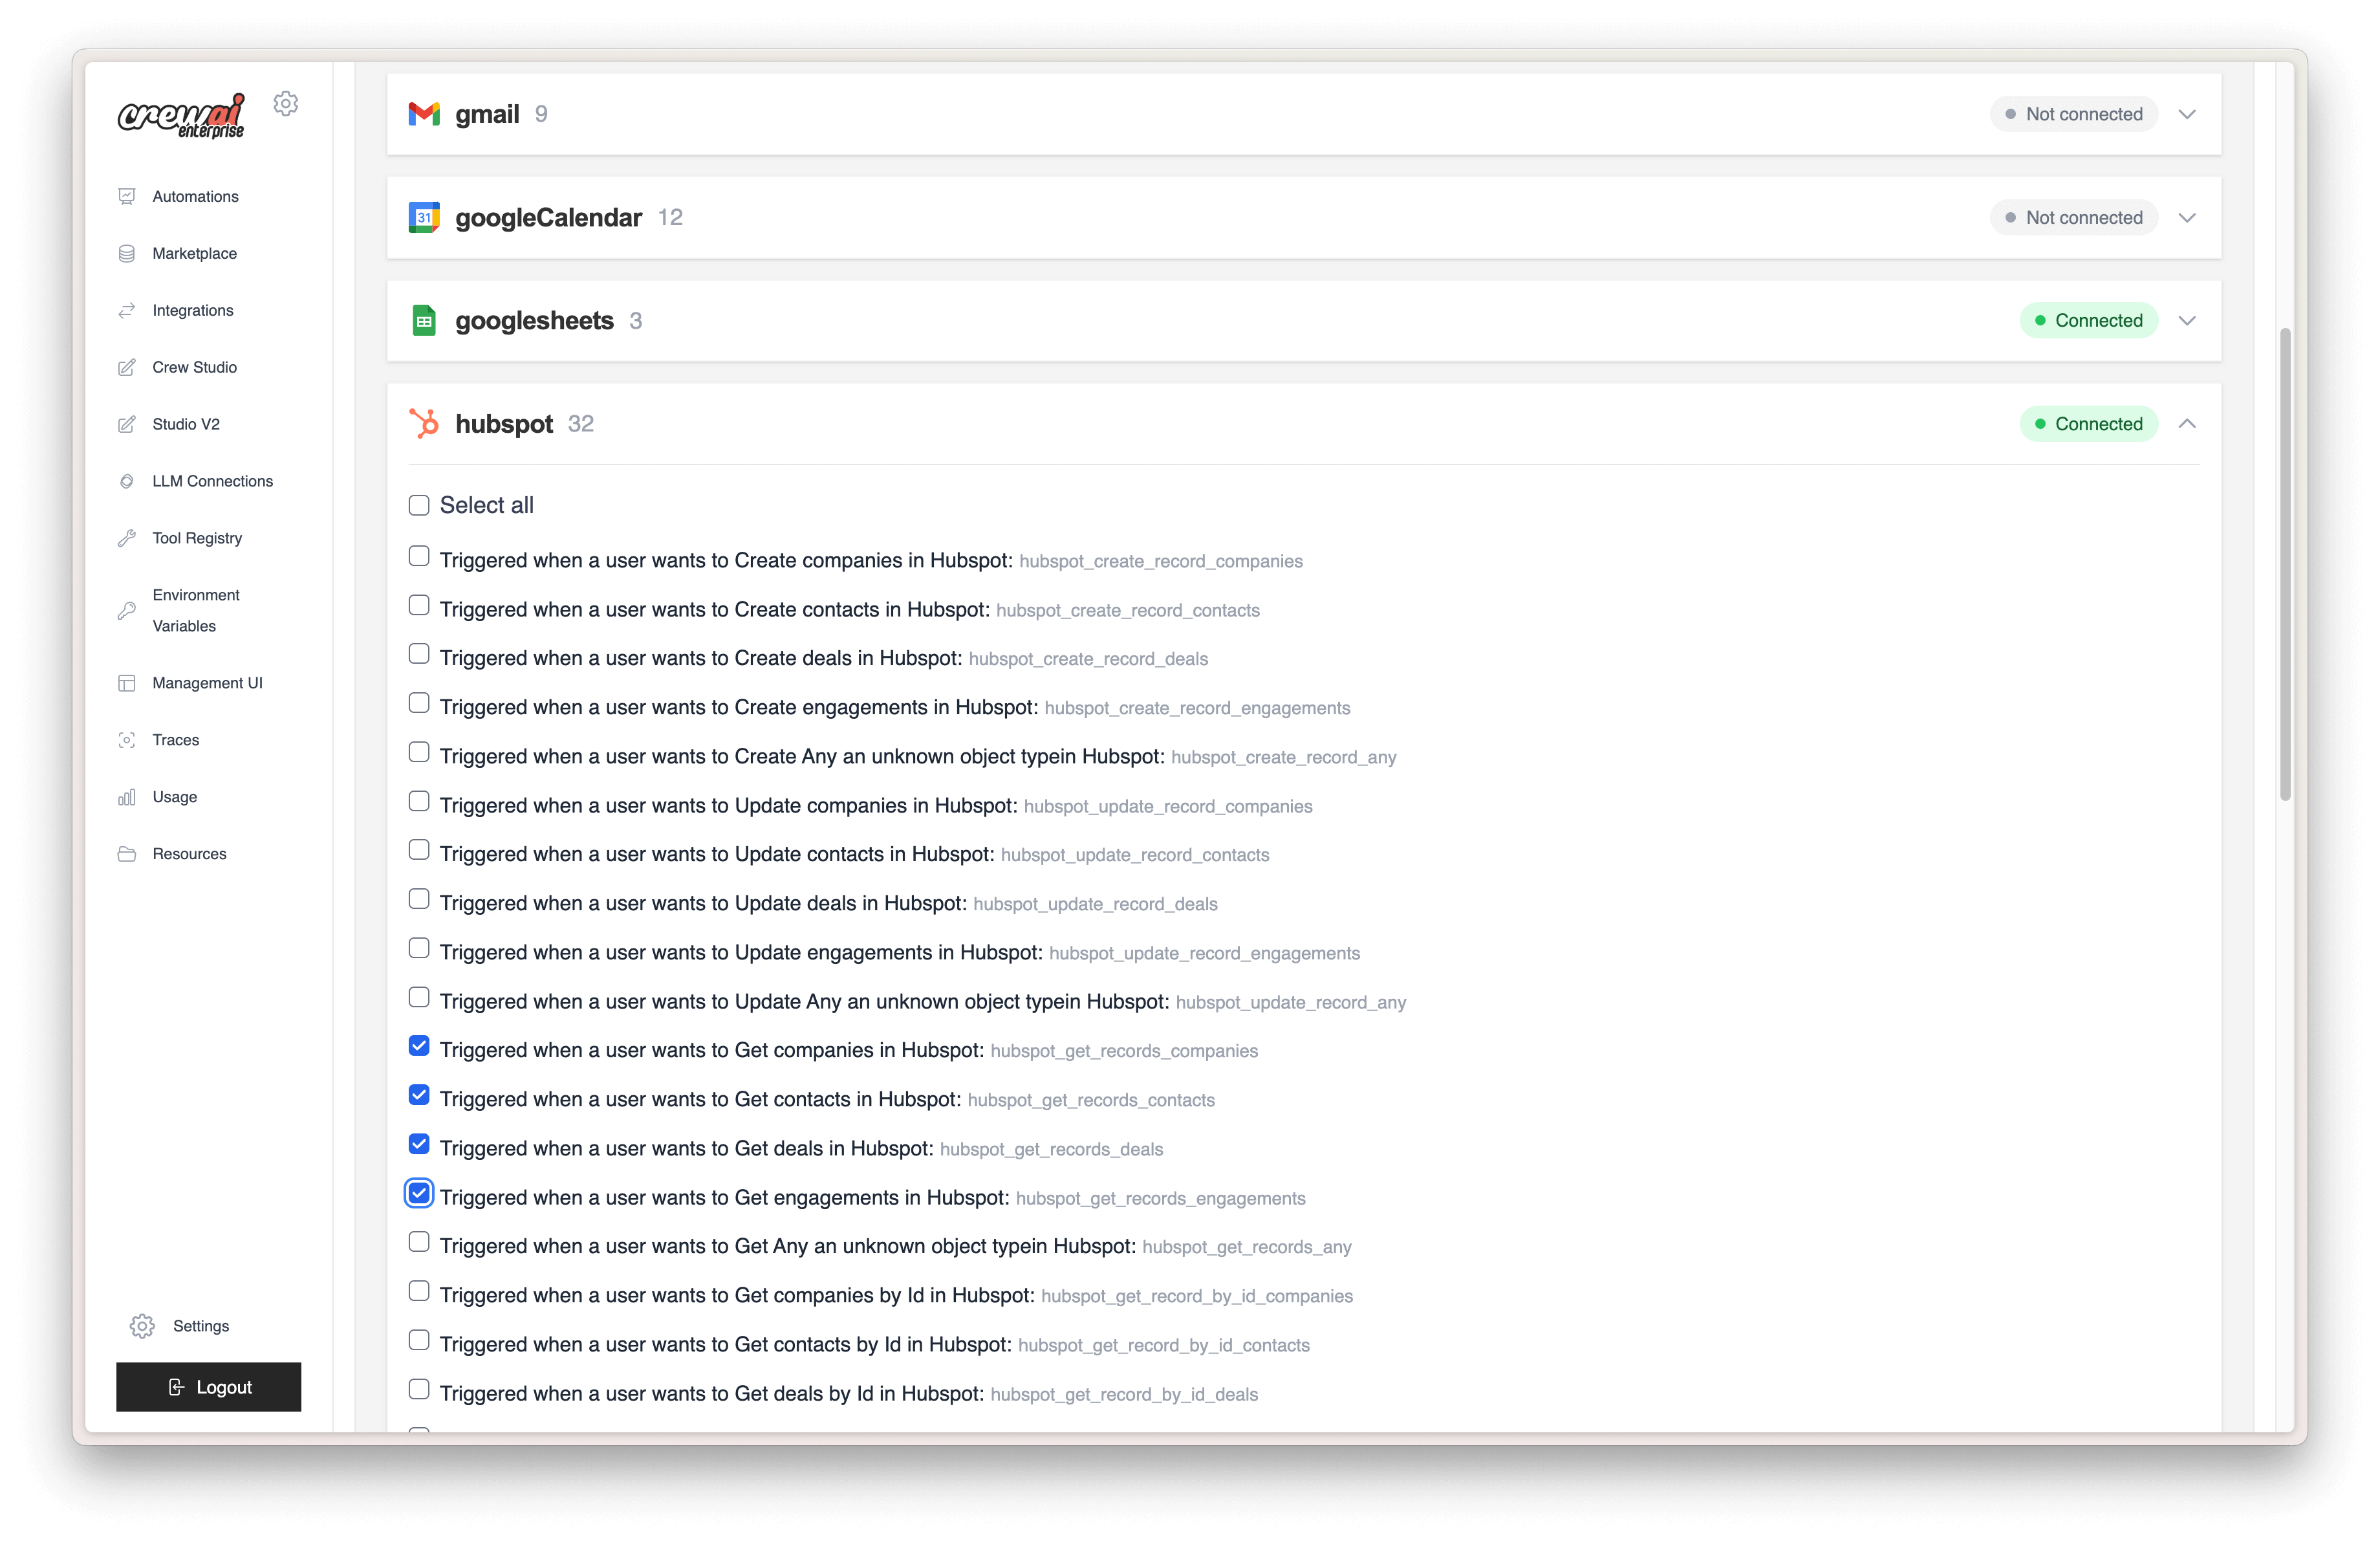 ### Scoped Deployments (multi‑user orgs)
You can scope each integration to a specific user. For example, a crew that connects to Google can use a specific user’s Gmail account.
{" "}
### Scoped Deployments (multi‑user orgs)
You can scope each integration to a specific user. For example, a crew that connects to Google can use a specific user’s Gmail account.
{" "}
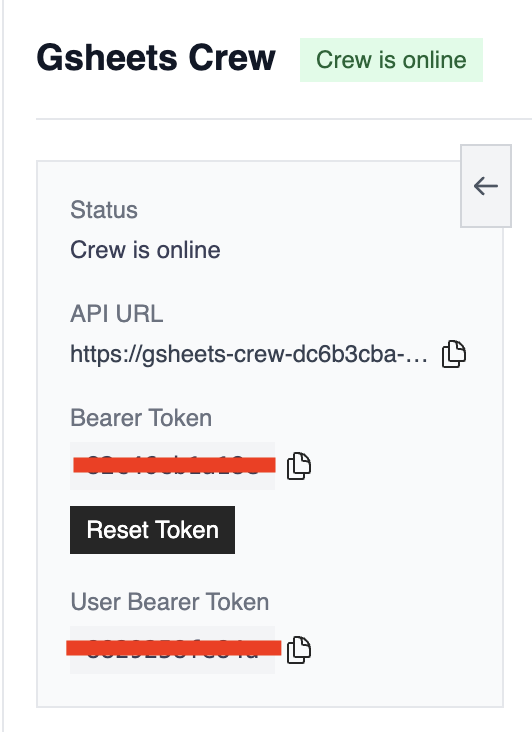 {" "}
### Catalog
#### Communication & Collaboration
* Gmail — Manage emails and drafts
* Slack — Workspace notifications and alerts
* Microsoft — Office 365 and Teams integration
#### Project Management
* Jira — Issue tracking and project management
* ClickUp — Task and productivity management
* Asana — Team task and project coordination
* Notion — Page and database management
* Linear — Software project and bug tracking
* GitHub — Repository and issue management
#### Customer Relationship Management
* Salesforce — CRM account and opportunity management
* HubSpot — Sales pipeline and contact management
* Zendesk — Customer support ticket management
#### Business & Finance
* Stripe — Payment processing and customer management
* Shopify — E‑commerce store and product management
#### Productivity & Storage
* Google Sheets — Spreadsheet data synchronization
* Google Calendar — Event and schedule management
* Box — File storage and document management
…and more to come!
{" "}
### Catalog
#### Communication & Collaboration
* Gmail — Manage emails and drafts
* Slack — Workspace notifications and alerts
* Microsoft — Office 365 and Teams integration
#### Project Management
* Jira — Issue tracking and project management
* ClickUp — Task and productivity management
* Asana — Team task and project coordination
* Notion — Page and database management
* Linear — Software project and bug tracking
* GitHub — Repository and issue management
#### Customer Relationship Management
* Salesforce — CRM account and opportunity management
* HubSpot — Sales pipeline and contact management
* Zendesk — Customer support ticket management
#### Business & Finance
* Stripe — Payment processing and customer management
* Shopify — E‑commerce store and product management
#### Productivity & Storage
* Google Sheets — Spreadsheet data synchronization
* Google Calendar — Event and schedule management
* Box — File storage and document management
…and more to come!
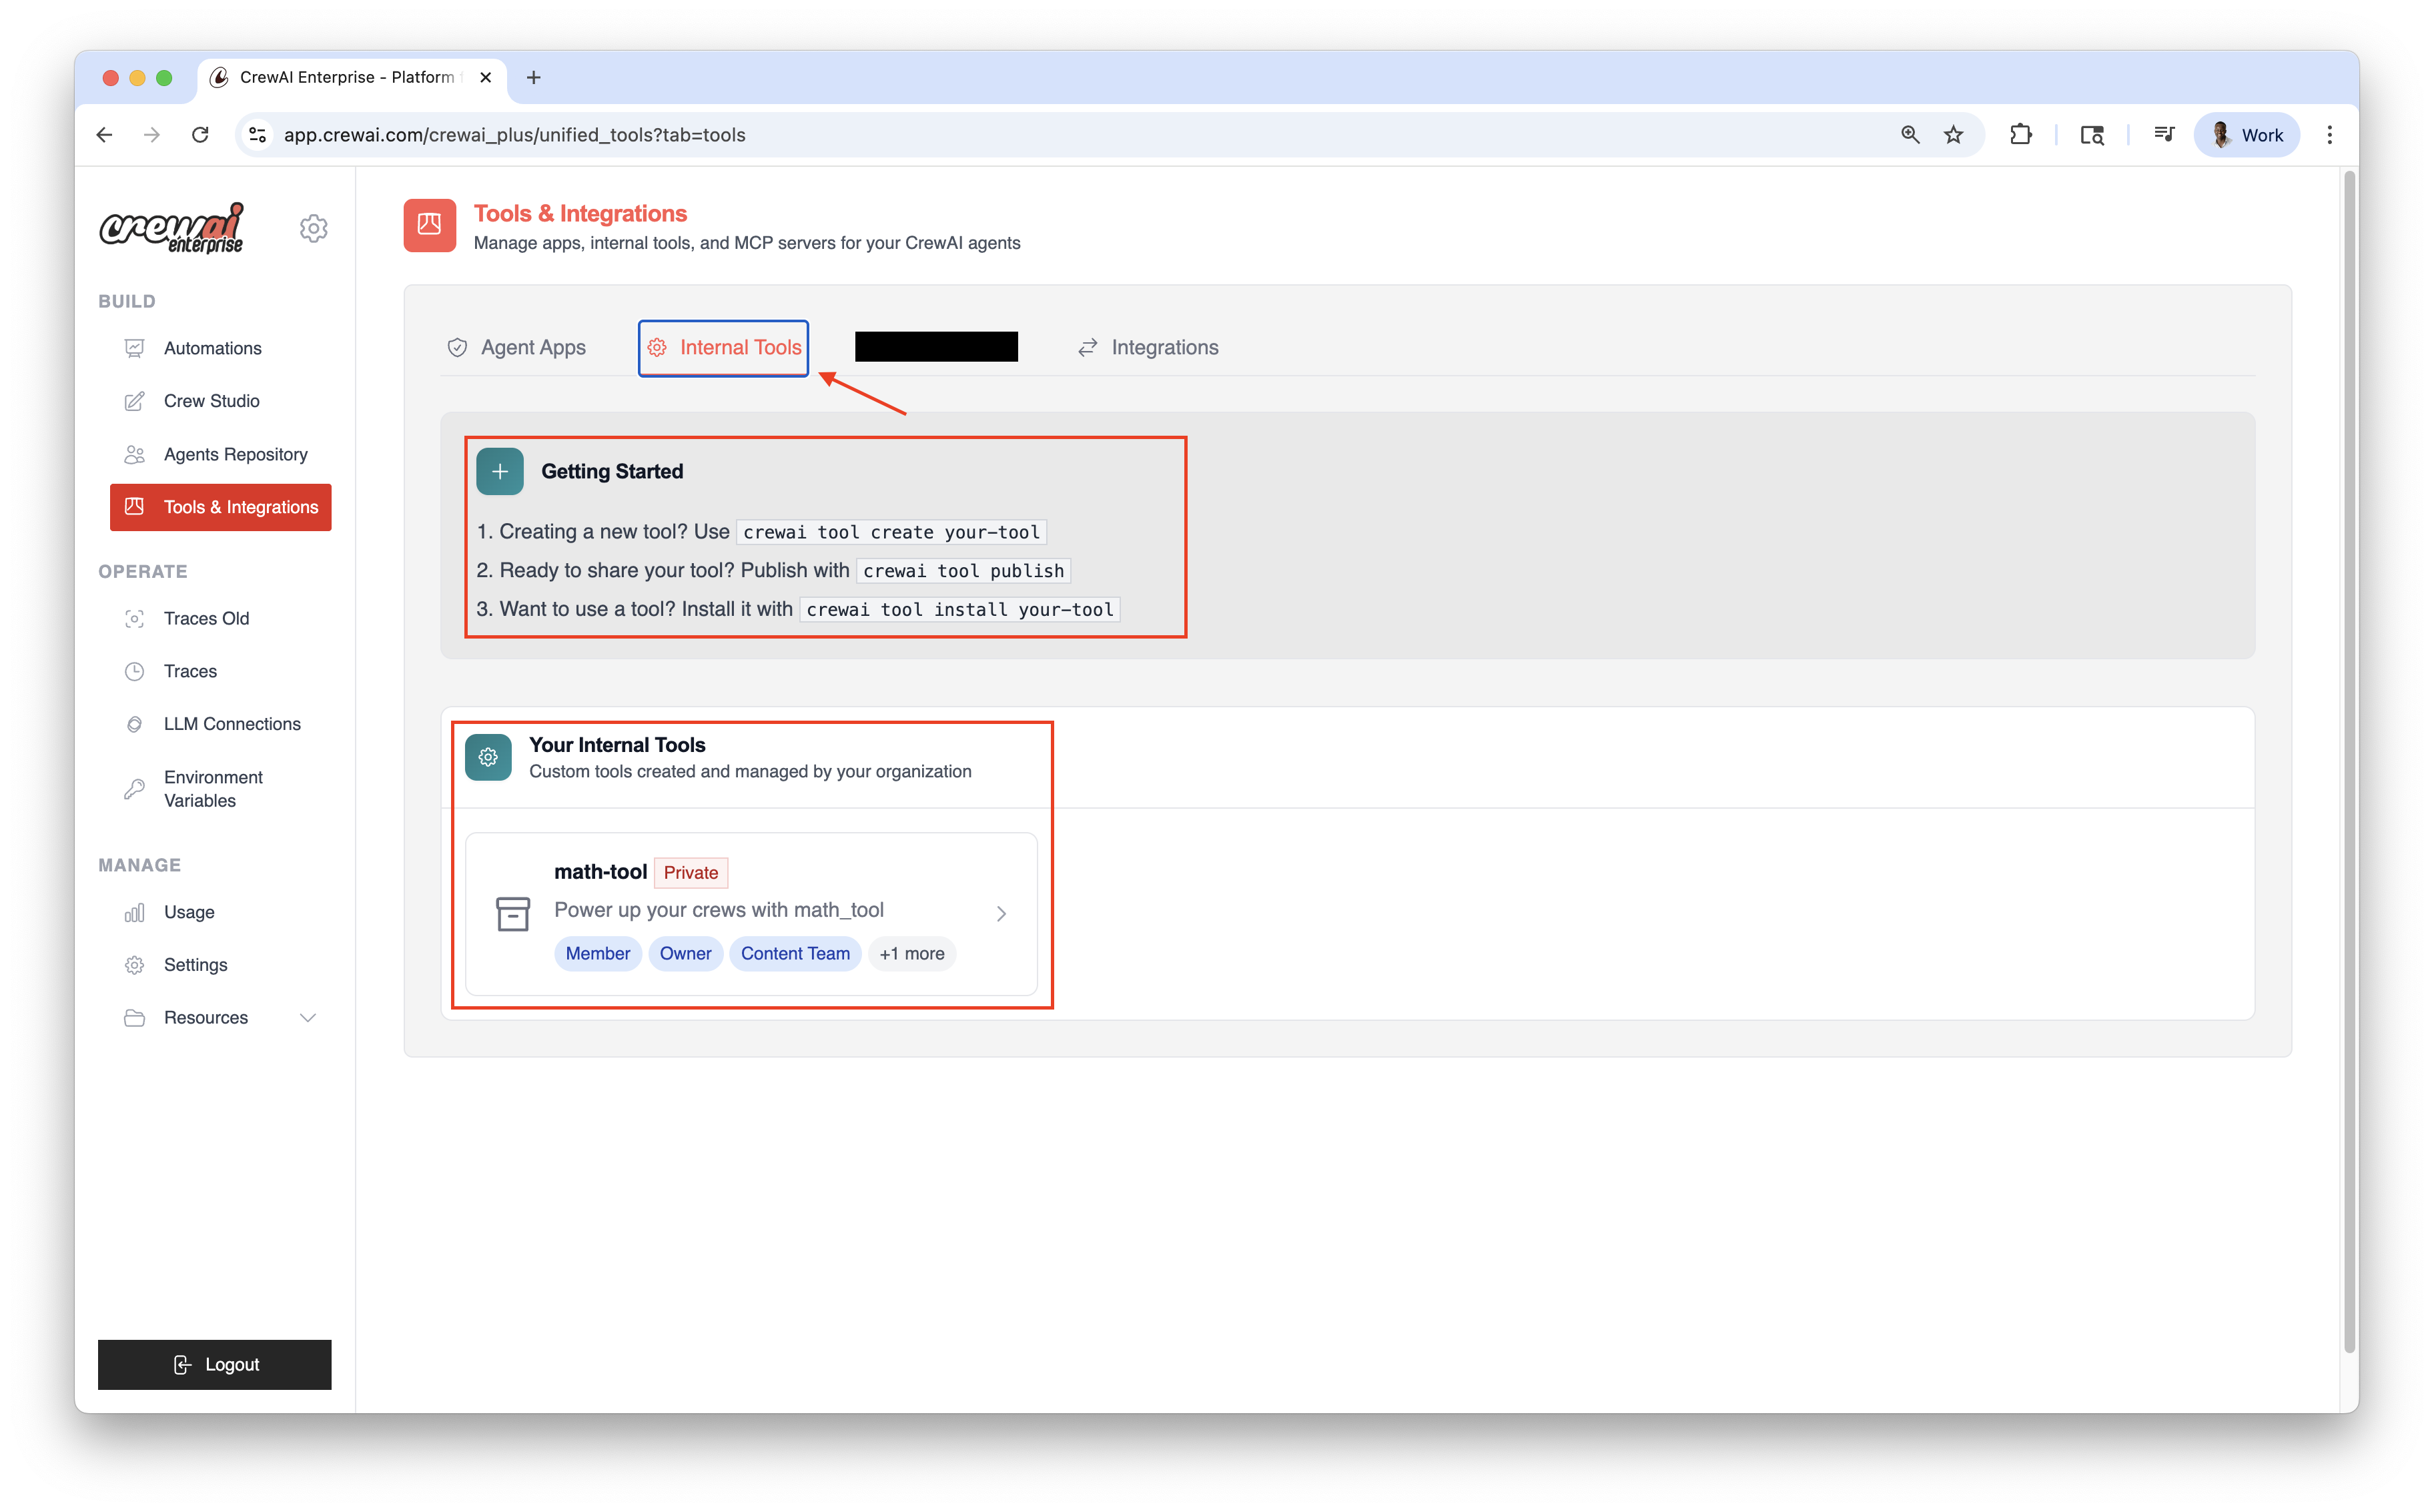 {" "}
{" "}
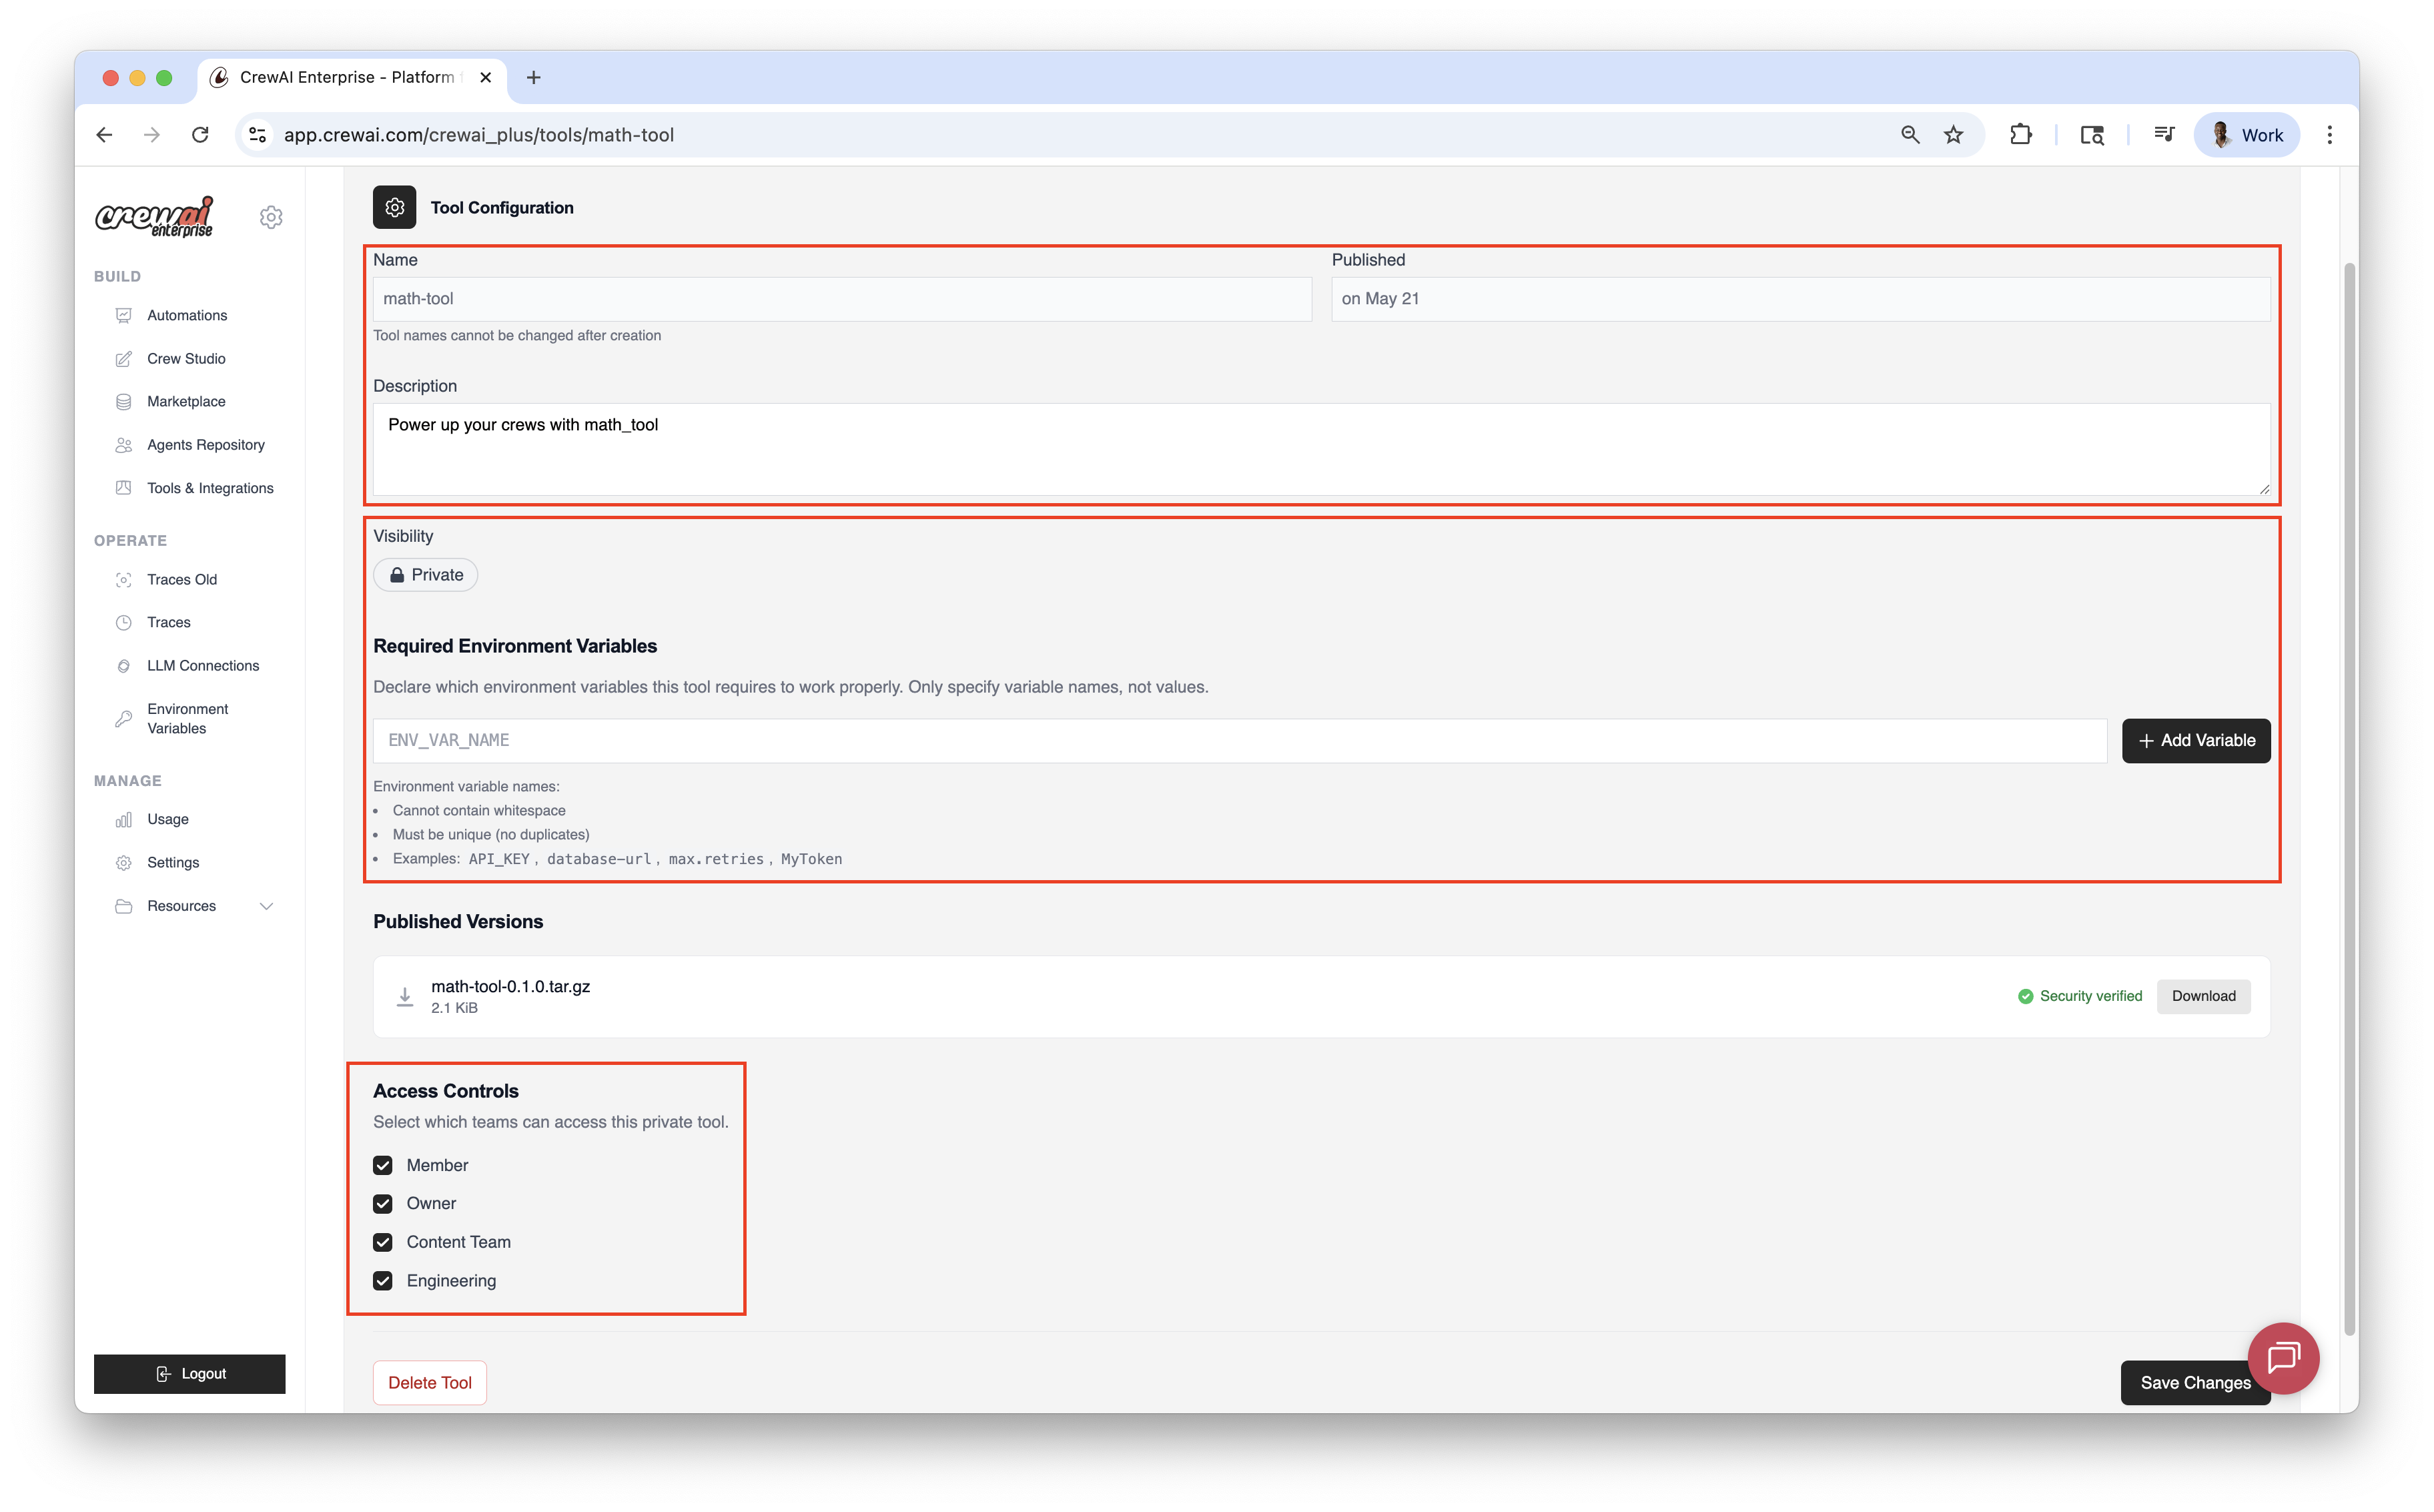 ## Accessing Traces
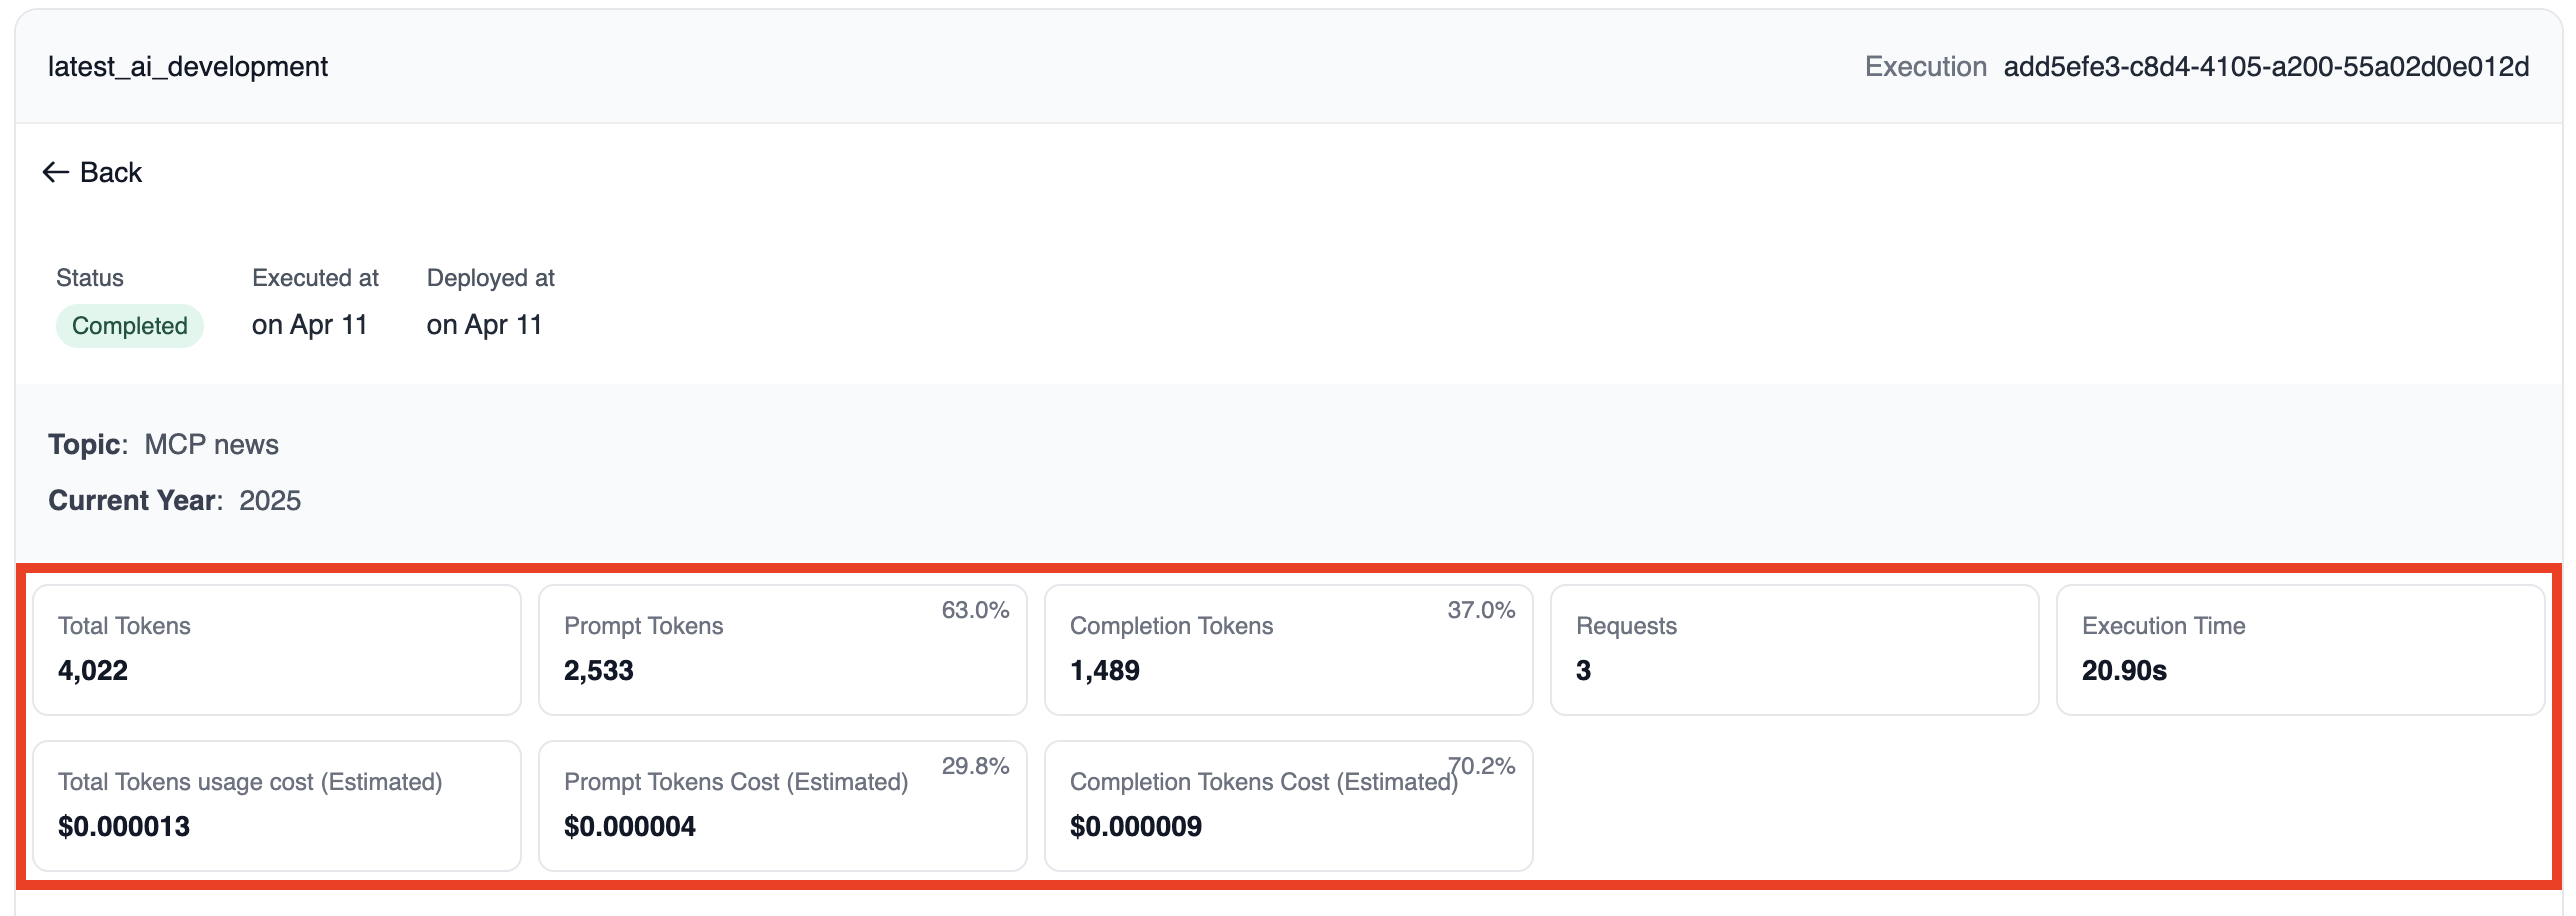 ### 2. Tasks & Agents
This section shows all tasks and agents that were part of the crew execution:
* Task name and agent assignment
* Agents and LLMs used for each task
* Status (completed/failed)
* Individual execution time of the task
### 2. Tasks & Agents
This section shows all tasks and agents that were part of the crew execution:
* Task name and agent assignment
* Agents and LLMs used for each task
* Status (completed/failed)
* Individual execution time of the task
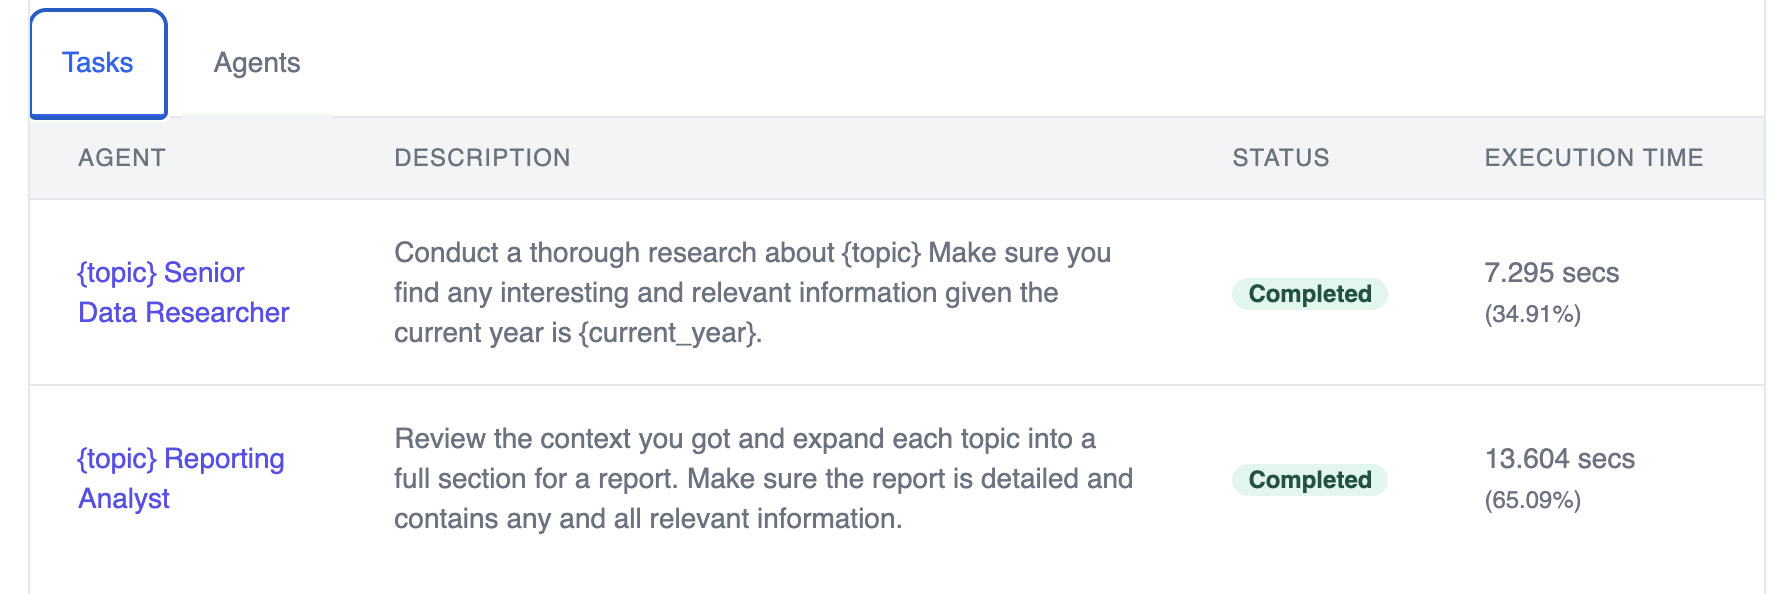 ### 3. Final Output
Displays the final result produced by the crew after all tasks are completed.
### 3. Final Output
Displays the final result produced by the crew after all tasks are completed.
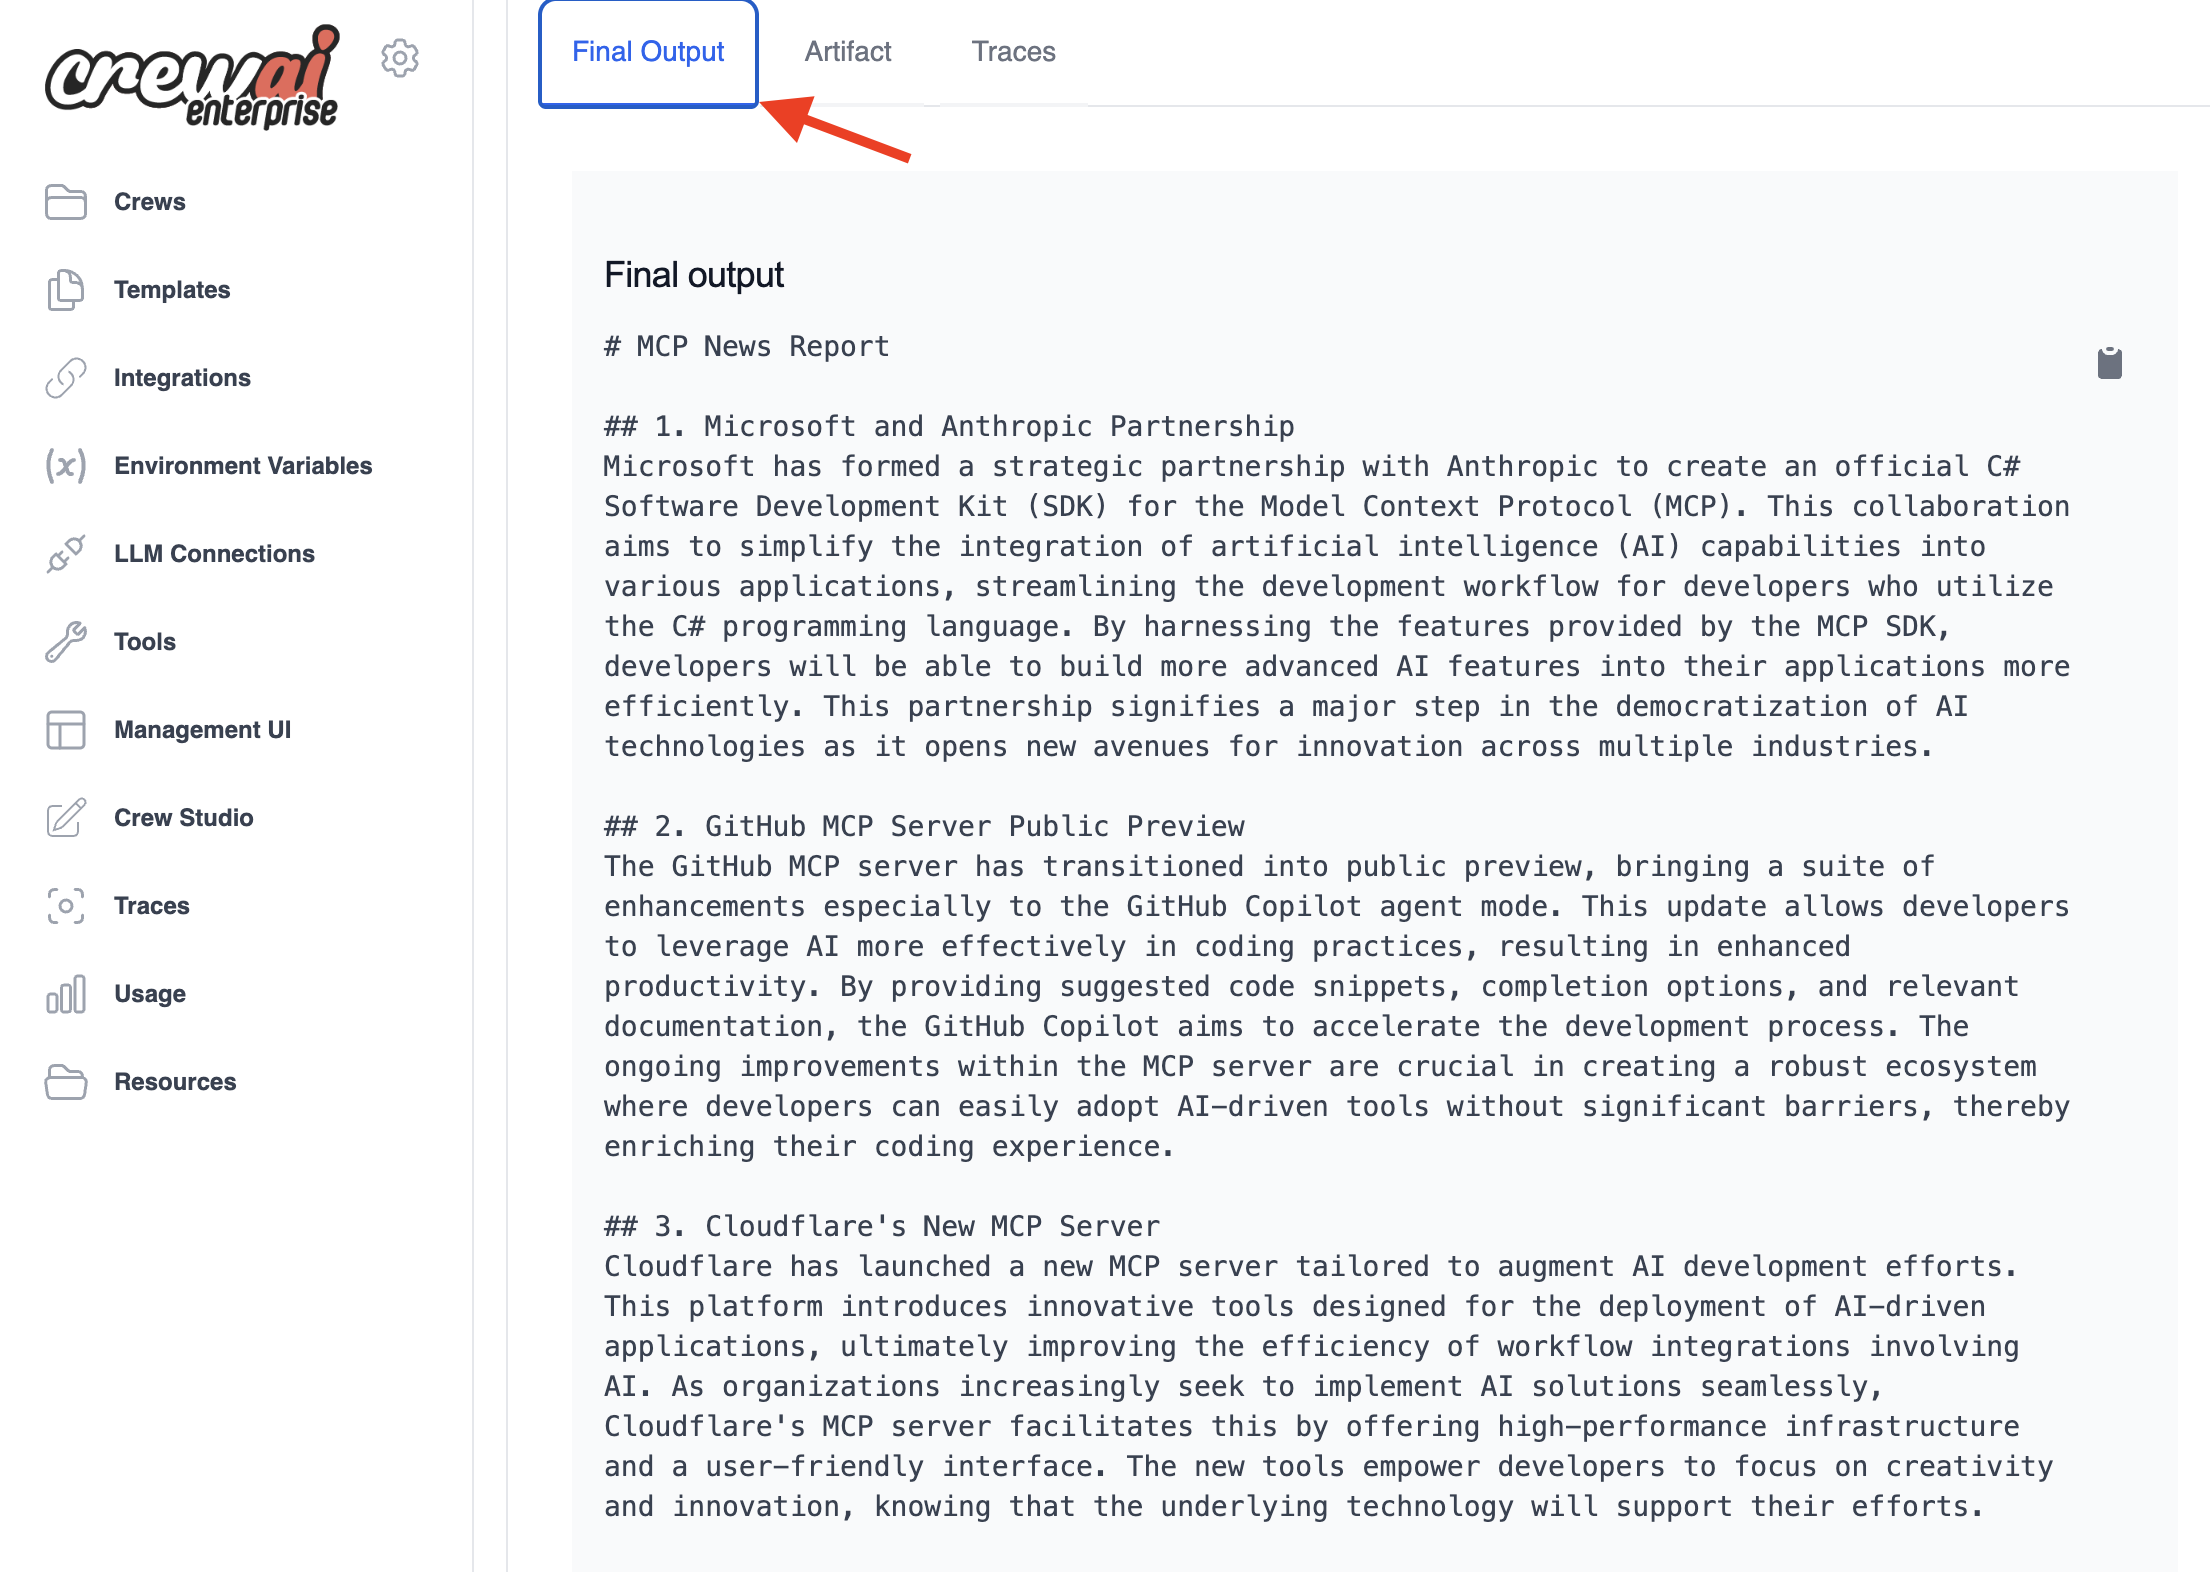 ### 4. Execution Timeline
A visual representation of when each task started and ended, helping you identify bottlenecks or parallel execution patterns.
### 4. Execution Timeline
A visual representation of when each task started and ended, helping you identify bottlenecks or parallel execution patterns.
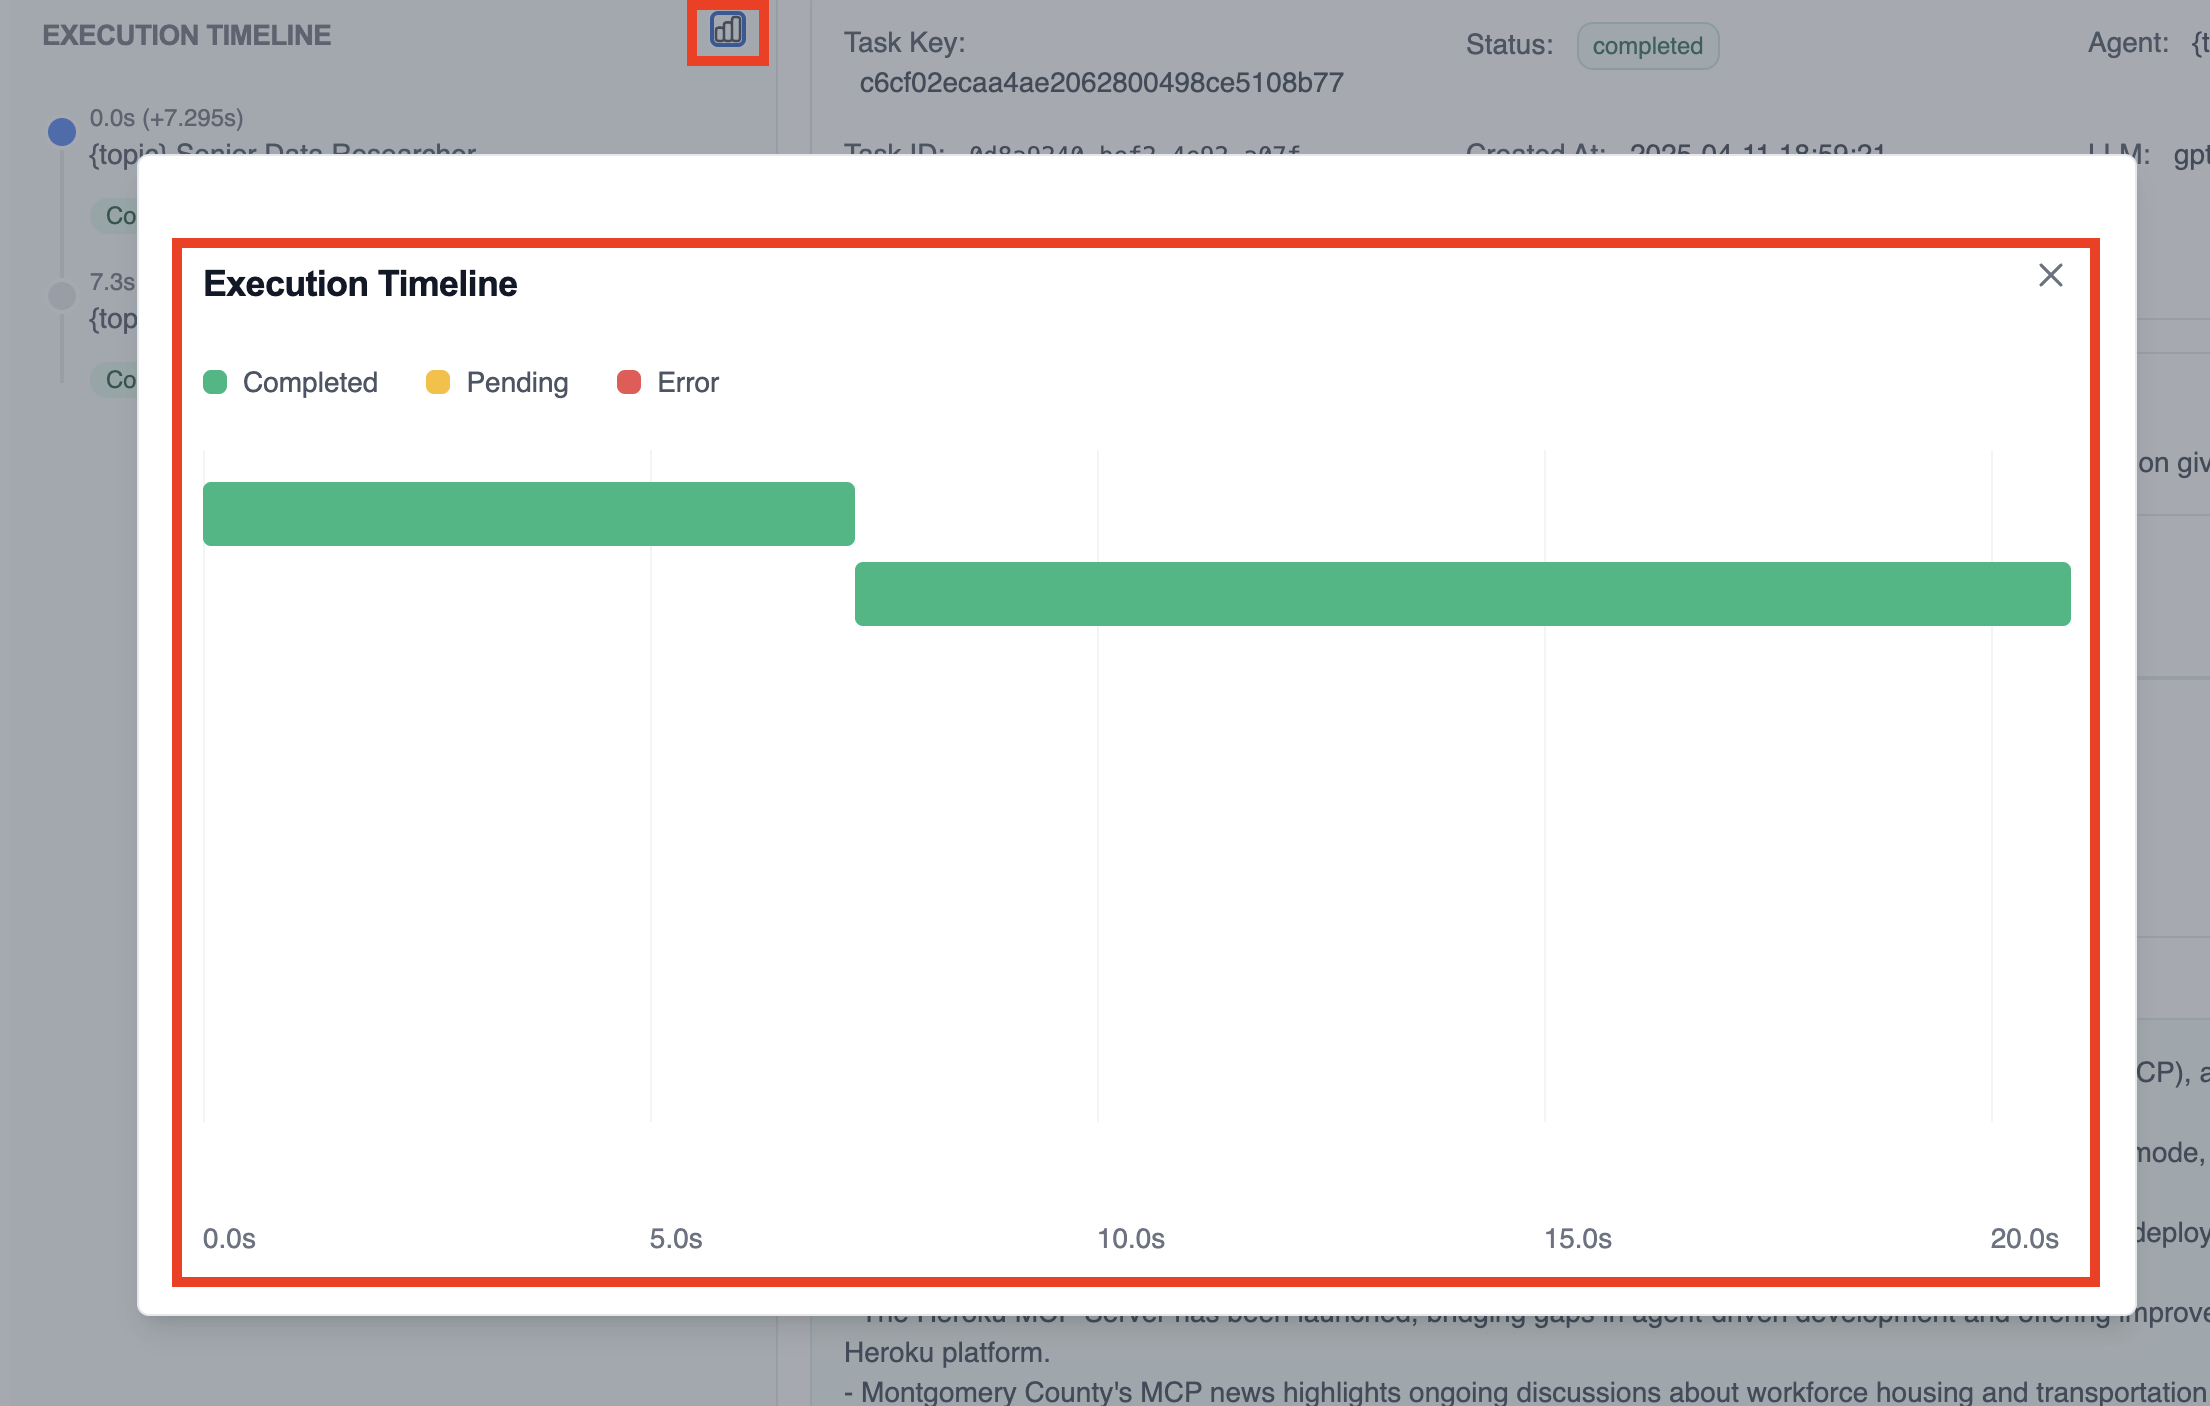 ### 5. Detailed Task View
When you click on a specific task in the timeline or task list, you'll see:
### 5. Detailed Task View
When you click on a specific task in the timeline or task list, you'll see:
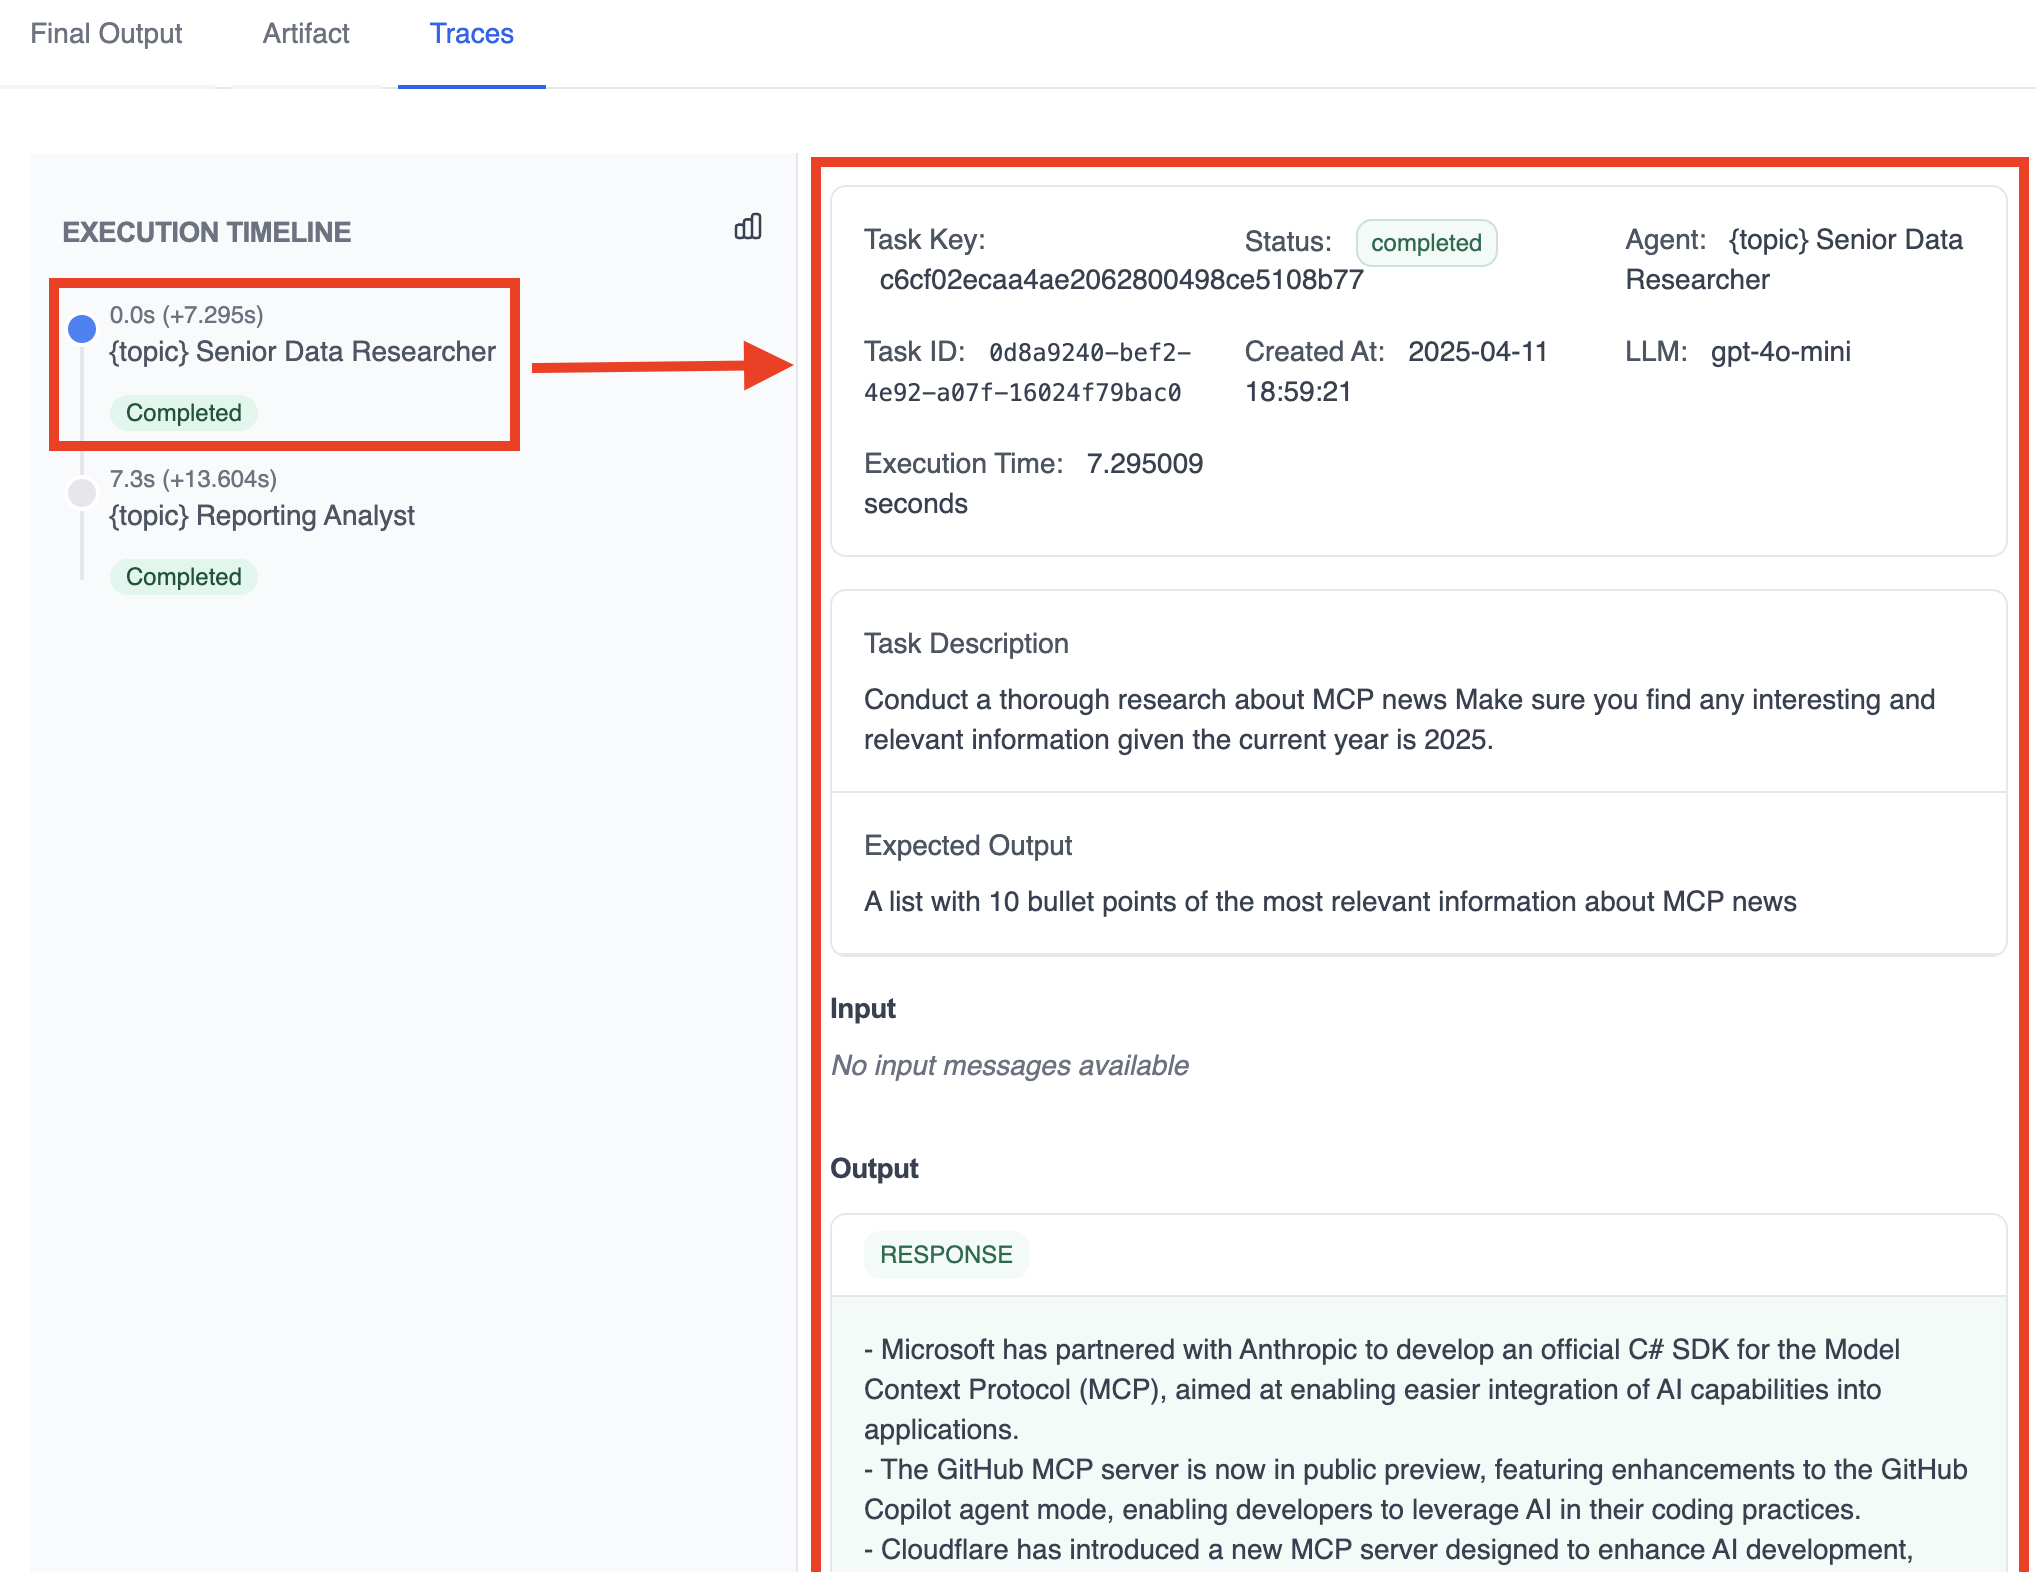 * **Task Key**: Unique identifier for the task
* **Task ID**: Technical identifier in the system
* **Status**: Current state (completed/running/failed)
* **Agent**: Which agent performed the task
* **LLM**: Language model used for this task
* **Start/End Time**: When the task began and completed
* **Execution Time**: Duration of this specific task
* **Task Description**: What the agent was instructed to do
* **Expected Output**: What output format was requested
* **Input**: Any input provided to this task from previous tasks
* **Output**: The actual result produced by the agent
## Using Traces for Debugging
Traces are invaluable for troubleshooting issues with your crews:
* **Task Key**: Unique identifier for the task
* **Task ID**: Technical identifier in the system
* **Status**: Current state (completed/running/failed)
* **Agent**: Which agent performed the task
* **LLM**: Language model used for this task
* **Start/End Time**: When the task began and completed
* **Execution Time**: Duration of this specific task
* **Task Description**: What the agent was instructed to do
* **Expected Output**: What output format was requested
* **Input**: Any input provided to this task from previous tasks
* **Output**: The actual result produced by the agent
## Using Traces for Debugging
Traces are invaluable for troubleshooting issues with your crews:
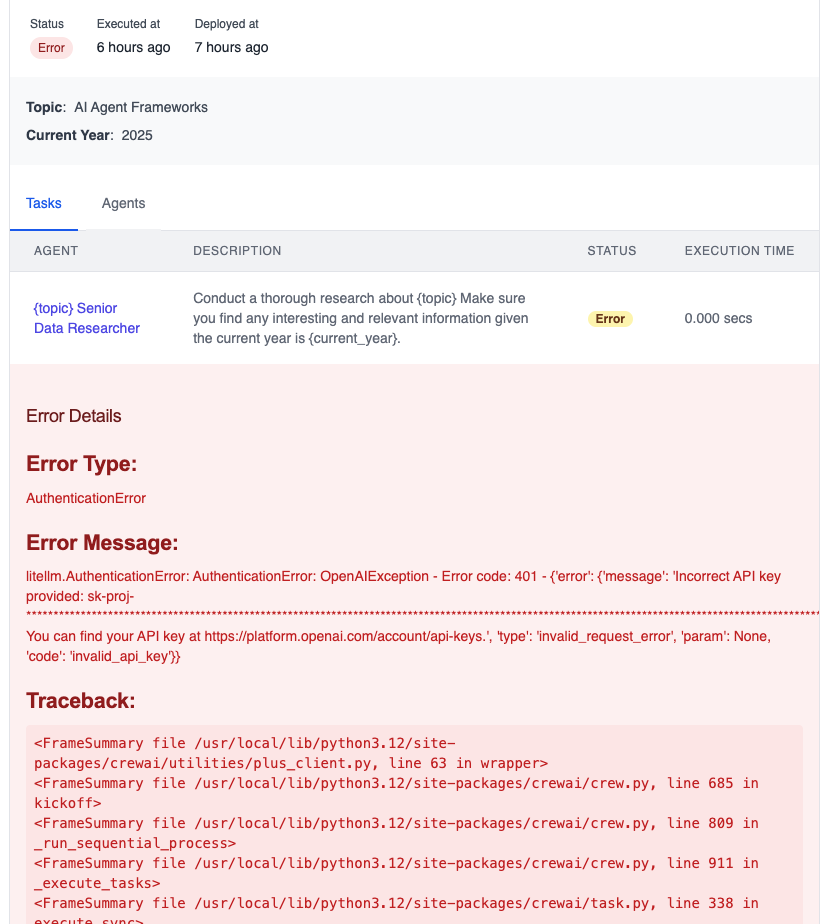
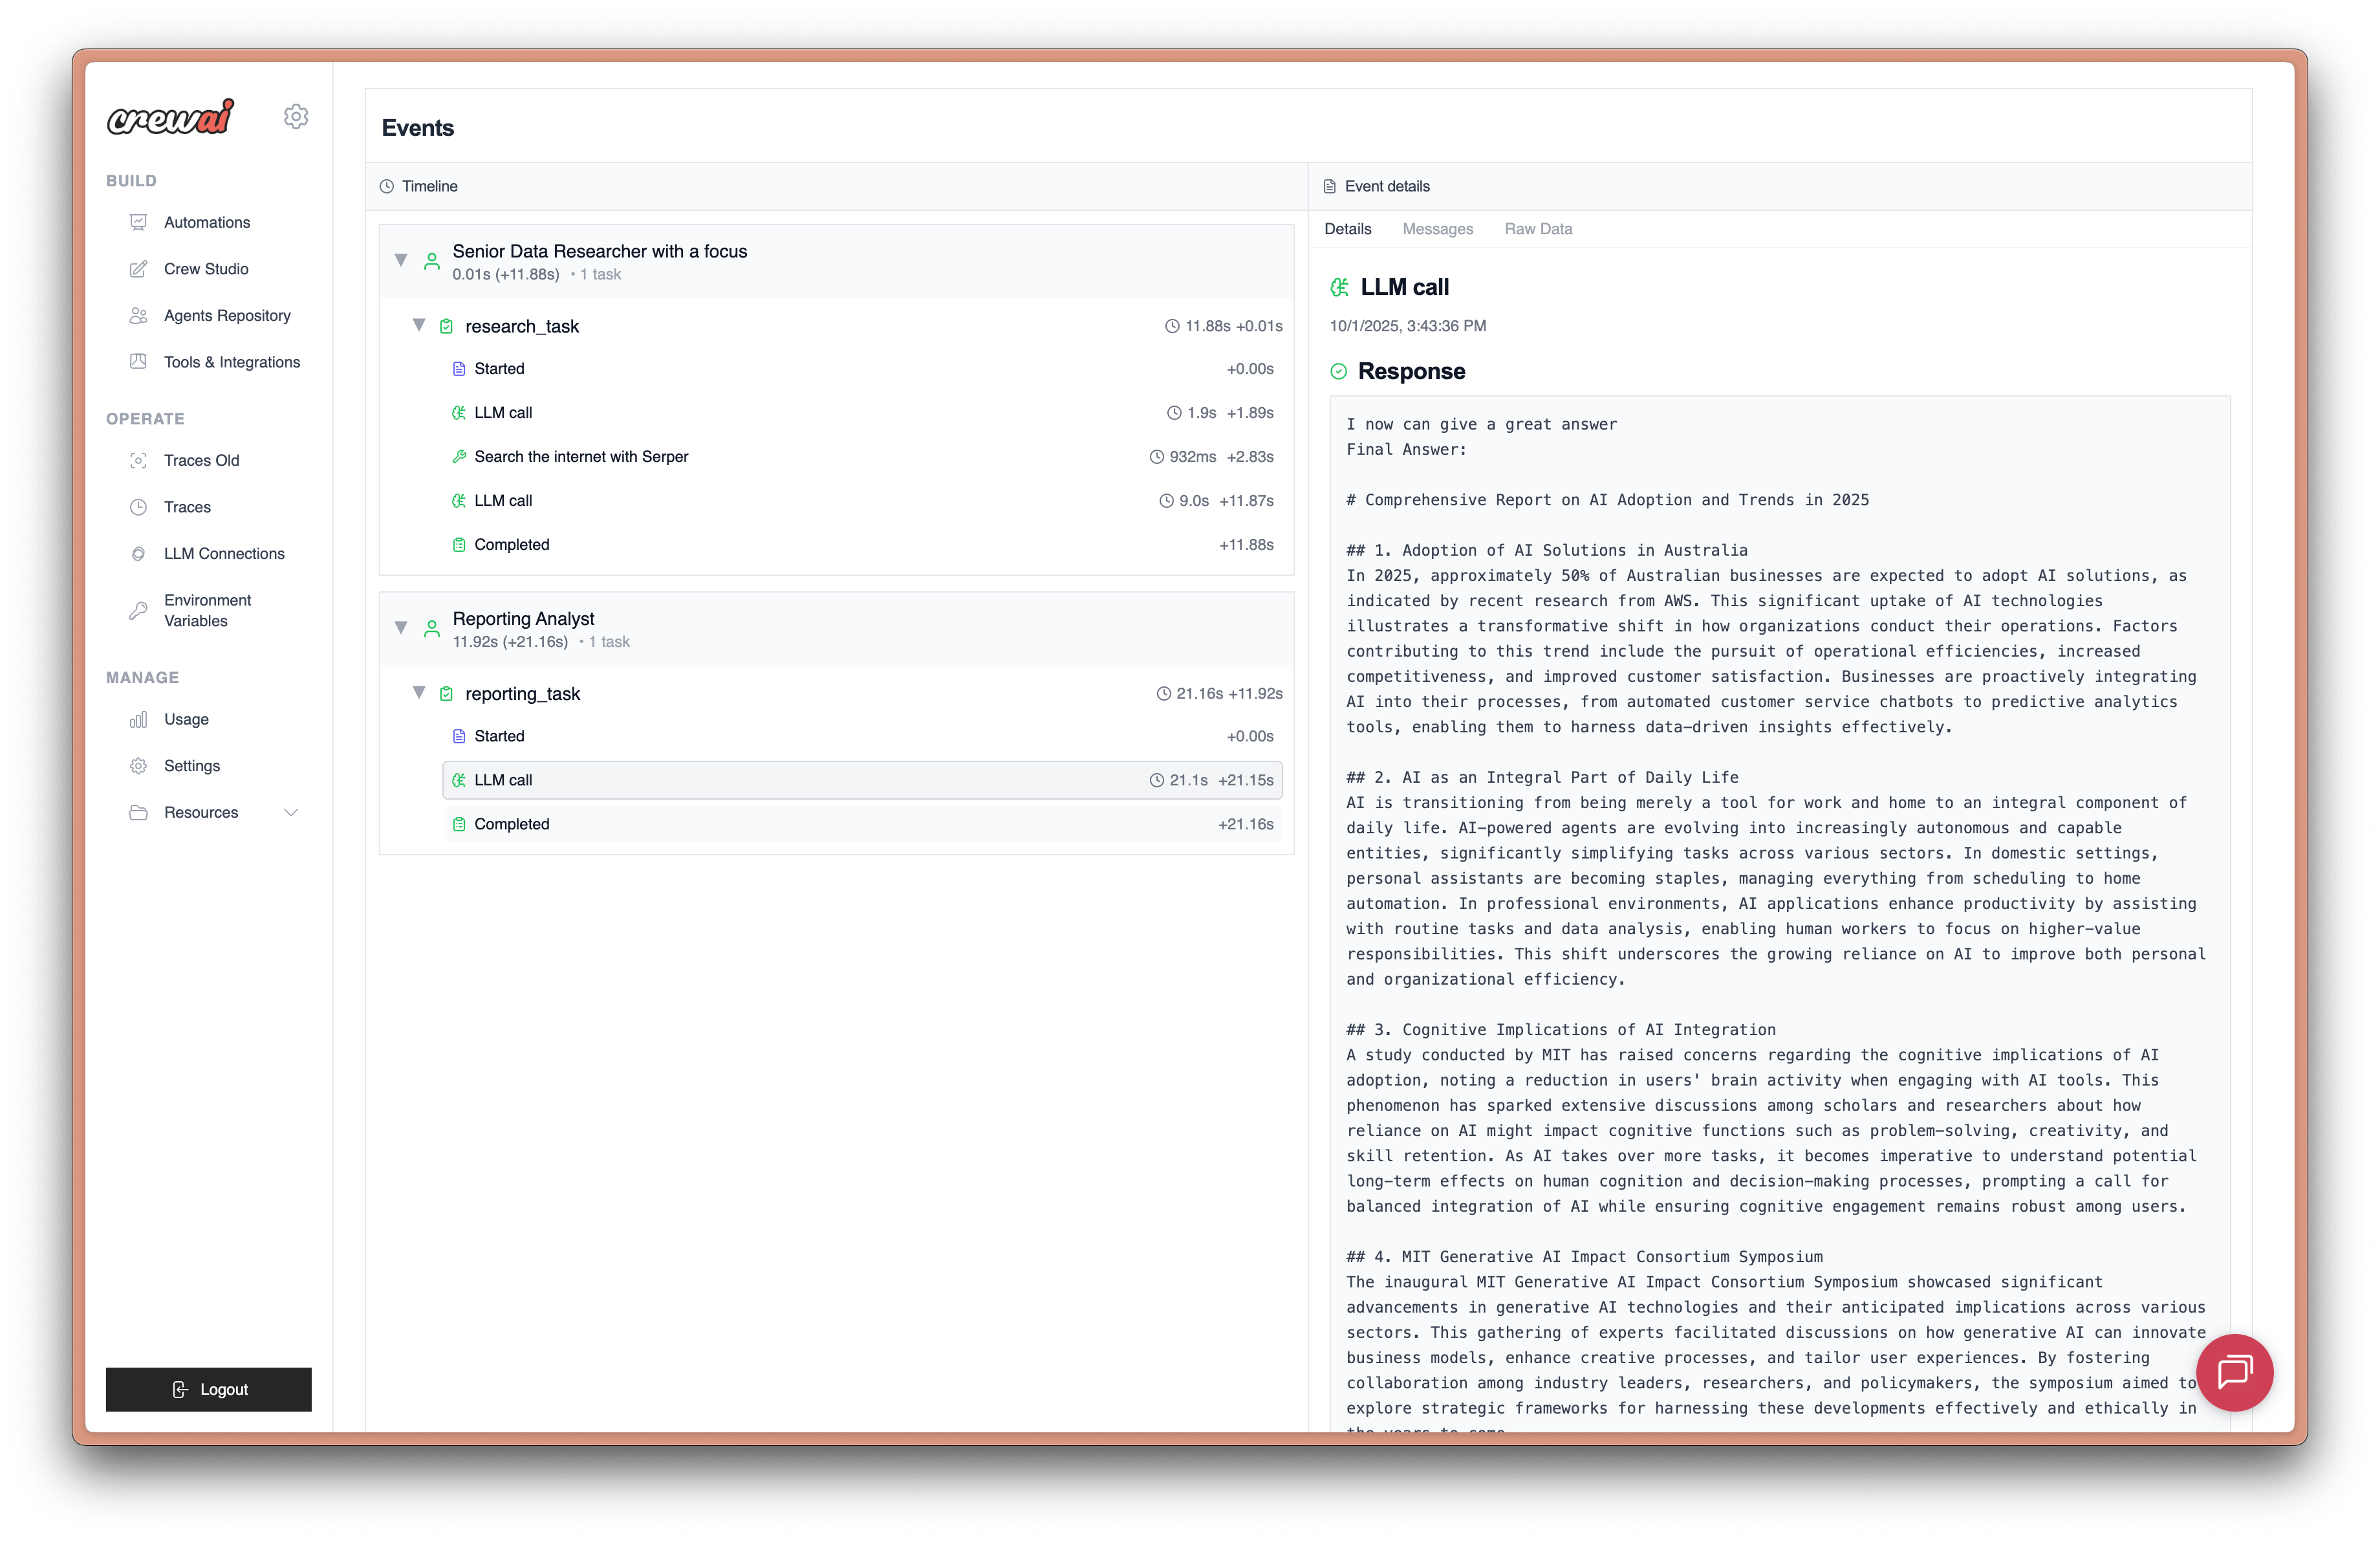 ## Prerequisites
Before you can use CrewAI tracing, you need:
1. **CrewAI AMP Account**: Sign up for a free account at [app.crewai.com](https://app.crewai.com)
2. **CLI Authentication**: Use the CrewAI CLI to authenticate your local environment
```bash theme={null}
crewai login
```
## Setup Instructions
### Step 1: Create Your CrewAI AMP Account
Visit [app.crewai.com](https://app.crewai.com) and create your free account. This will give you access to the CrewAI AMP platform where you can view traces, metrics, and manage your crews.
### Step 2: Install CrewAI CLI and Authenticate
If you haven't already, install CrewAI with the CLI tools:
```bash theme={null}
uv add crewai[tools]
```
Then authenticate your CLI with your CrewAI AMP account:
```bash theme={null}
crewai login
```
This command will:
1. Open your browser to the authentication page
2. Prompt you to enter a device code
3. Authenticate your local environment with your CrewAI AMP account
4. Enable tracing capabilities for your local development
### Step 3: Enable Tracing in Your Crew
You can enable tracing for your Crew by setting the `tracing` parameter to `True`:
```python theme={null}
from crewai import Agent, Crew, Process, Task
from crewai_tools import SerperDevTool
# Define your agents
researcher = Agent(
role="Senior Research Analyst",
goal="Uncover cutting-edge developments in AI and data science",
backstory="""You work at a leading tech think tank.
Your expertise lies in identifying emerging trends.
You have a knack for dissecting complex data and presenting actionable insights.""",
verbose=True,
tools=[SerperDevTool()],
)
writer = Agent(
role="Tech Content Strategist",
goal="Craft compelling content on tech advancements",
backstory="""You are a renowned Content Strategist, known for your insightful and engaging articles.
You transform complex concepts into compelling narratives.""",
verbose=True,
)
# Create tasks for your agents
research_task = Task(
description="""Conduct a comprehensive analysis of the latest advancements in AI in 2024.
Identify key trends, breakthrough technologies, and potential industry impacts.""",
expected_output="Full analysis report in bullet points",
agent=researcher,
)
writing_task = Task(
description="""Using the insights provided, develop an engaging blog
post that highlights the most significant AI advancements.
Your post should be informative yet accessible, catering to a tech-savvy audience.""",
expected_output="Full blog post of at least 4 paragraphs",
agent=writer,
)
# Enable tracing in your crew
crew = Crew(
agents=[researcher, writer],
tasks=[research_task, writing_task],
process=Process.sequential,
tracing=True, # Enable built-in tracing
verbose=True
)
# Execute your crew
result = crew.kickoff()
```
### Step 4: Enable Tracing in Your Flow
Similarly, you can enable tracing for CrewAI Flows:
```python theme={null}
from crewai.flow.flow import Flow, listen, start
from pydantic import BaseModel
class ExampleState(BaseModel):
counter: int = 0
message: str = ""
class ExampleFlow(Flow[ExampleState]):
def __init__(self):
super().__init__(tracing=True) # Enable tracing for the flow
@start()
def first_method(self):
print("Starting the flow")
self.state.counter = 1
self.state.message = "Flow started"
return "continue"
@listen("continue")
def second_method(self):
print("Continuing the flow")
self.state.counter += 1
self.state.message = "Flow continued"
return "finish"
@listen("finish")
def final_method(self):
print("Finishing the flow")
self.state.counter += 1
self.state.message = "Flow completed"
# Create and run the flow with tracing enabled
flow = ExampleFlow(tracing=True)
result = flow.kickoff()
```
### Step 5: View Traces in the CrewAI AMP Dashboard
After running the crew or flow, you can view the traces generated by your CrewAI application in the CrewAI AMP dashboard. You should see detailed steps of the agent interactions, tool usages, and LLM calls.
Just click on the link below to view the traces or head over to the traces tab in the dashboard [here](https://app.crewai.com/crewai_plus/trace_batches)
## Prerequisites
Before you can use CrewAI tracing, you need:
1. **CrewAI AMP Account**: Sign up for a free account at [app.crewai.com](https://app.crewai.com)
2. **CLI Authentication**: Use the CrewAI CLI to authenticate your local environment
```bash theme={null}
crewai login
```
## Setup Instructions
### Step 1: Create Your CrewAI AMP Account
Visit [app.crewai.com](https://app.crewai.com) and create your free account. This will give you access to the CrewAI AMP platform where you can view traces, metrics, and manage your crews.
### Step 2: Install CrewAI CLI and Authenticate
If you haven't already, install CrewAI with the CLI tools:
```bash theme={null}
uv add crewai[tools]
```
Then authenticate your CLI with your CrewAI AMP account:
```bash theme={null}
crewai login
```
This command will:
1. Open your browser to the authentication page
2. Prompt you to enter a device code
3. Authenticate your local environment with your CrewAI AMP account
4. Enable tracing capabilities for your local development
### Step 3: Enable Tracing in Your Crew
You can enable tracing for your Crew by setting the `tracing` parameter to `True`:
```python theme={null}
from crewai import Agent, Crew, Process, Task
from crewai_tools import SerperDevTool
# Define your agents
researcher = Agent(
role="Senior Research Analyst",
goal="Uncover cutting-edge developments in AI and data science",
backstory="""You work at a leading tech think tank.
Your expertise lies in identifying emerging trends.
You have a knack for dissecting complex data and presenting actionable insights.""",
verbose=True,
tools=[SerperDevTool()],
)
writer = Agent(
role="Tech Content Strategist",
goal="Craft compelling content on tech advancements",
backstory="""You are a renowned Content Strategist, known for your insightful and engaging articles.
You transform complex concepts into compelling narratives.""",
verbose=True,
)
# Create tasks for your agents
research_task = Task(
description="""Conduct a comprehensive analysis of the latest advancements in AI in 2024.
Identify key trends, breakthrough technologies, and potential industry impacts.""",
expected_output="Full analysis report in bullet points",
agent=researcher,
)
writing_task = Task(
description="""Using the insights provided, develop an engaging blog
post that highlights the most significant AI advancements.
Your post should be informative yet accessible, catering to a tech-savvy audience.""",
expected_output="Full blog post of at least 4 paragraphs",
agent=writer,
)
# Enable tracing in your crew
crew = Crew(
agents=[researcher, writer],
tasks=[research_task, writing_task],
process=Process.sequential,
tracing=True, # Enable built-in tracing
verbose=True
)
# Execute your crew
result = crew.kickoff()
```
### Step 4: Enable Tracing in Your Flow
Similarly, you can enable tracing for CrewAI Flows:
```python theme={null}
from crewai.flow.flow import Flow, listen, start
from pydantic import BaseModel
class ExampleState(BaseModel):
counter: int = 0
message: str = ""
class ExampleFlow(Flow[ExampleState]):
def __init__(self):
super().__init__(tracing=True) # Enable tracing for the flow
@start()
def first_method(self):
print("Starting the flow")
self.state.counter = 1
self.state.message = "Flow started"
return "continue"
@listen("continue")
def second_method(self):
print("Continuing the flow")
self.state.counter += 1
self.state.message = "Flow continued"
return "finish"
@listen("finish")
def final_method(self):
print("Finishing the flow")
self.state.counter += 1
self.state.message = "Flow completed"
# Create and run the flow with tracing enabled
flow = ExampleFlow(tracing=True)
result = flow.kickoff()
```
### Step 5: View Traces in the CrewAI AMP Dashboard
After running the crew or flow, you can view the traces generated by your CrewAI application in the CrewAI AMP dashboard. You should see detailed steps of the agent interactions, tool usages, and LLM calls.
Just click on the link below to view the traces or head over to the traces tab in the dashboard [here](https://app.crewai.com/crewai_plus/trace_batches)
 ### Alternative: Environment Variable Configuration
You can also enable tracing globally by setting an environment variable:
```bash theme={null}
export CREWAI_TRACING_ENABLED=true
```
Or add it to your `.env` file:
```env theme={null}
CREWAI_TRACING_ENABLED=true
```
When this environment variable is set, all Crews and Flows will automatically have tracing enabled, even without explicitly setting `tracing=True`.
## Viewing Your Traces
### Access the CrewAI AMP Dashboard
1. Visit [app.crewai.com](https://app.crewai.com) and log in to your account
2. Navigate to your project dashboard
3. Click on the **Traces** tab to view execution details
### What You'll See in Traces
CrewAI tracing provides comprehensive visibility into:
* **Agent Decisions**: See how agents reason through tasks and make decisions
* **Task Execution Timeline**: Visual representation of task sequences and dependencies
* **Tool Usage**: Monitor which tools are called and their results
* **LLM Calls**: Track all language model interactions, including prompts and responses
* **Performance Metrics**: Execution times, token usage, and costs
* **Error Tracking**: Detailed error information and stack traces
### Trace Features
* **Execution Timeline**: Click through different stages of execution
* **Detailed Logs**: Access comprehensive logs for debugging
* **Performance Analytics**: Analyze execution patterns and optimize performance
* **Export Capabilities**: Download traces for further analysis
### Authentication Issues
If you encounter authentication problems:
1. Ensure you're logged in: `crewai login`
2. Check your internet connection
3. Verify your account at [app.crewai.com](https://app.crewai.com)
### Traces Not Appearing
If traces aren't showing up in the dashboard:
1. Confirm `tracing=True` is set in your Crew/Flow
2. Check that `CREWAI_TRACING_ENABLED=true` if using environment variables
3. Ensure you're authenticated with `crewai login`
4. Verify your crew/flow is actually executing
---
# Source: https://docs.crewai.com/en/concepts/training.md
> ## Documentation Index
> Fetch the complete documentation index at: https://docs.crewai.com/llms.txt
> Use this file to discover all available pages before exploring further.
# Training
> Learn how to train your CrewAI agents by giving them feedback early on and get consistent results.
## Overview
The training feature in CrewAI allows you to train your AI agents using the command-line interface (CLI).
By running the command `crewai train -n
### Alternative: Environment Variable Configuration
You can also enable tracing globally by setting an environment variable:
```bash theme={null}
export CREWAI_TRACING_ENABLED=true
```
Or add it to your `.env` file:
```env theme={null}
CREWAI_TRACING_ENABLED=true
```
When this environment variable is set, all Crews and Flows will automatically have tracing enabled, even without explicitly setting `tracing=True`.
## Viewing Your Traces
### Access the CrewAI AMP Dashboard
1. Visit [app.crewai.com](https://app.crewai.com) and log in to your account
2. Navigate to your project dashboard
3. Click on the **Traces** tab to view execution details
### What You'll See in Traces
CrewAI tracing provides comprehensive visibility into:
* **Agent Decisions**: See how agents reason through tasks and make decisions
* **Task Execution Timeline**: Visual representation of task sequences and dependencies
* **Tool Usage**: Monitor which tools are called and their results
* **LLM Calls**: Track all language model interactions, including prompts and responses
* **Performance Metrics**: Execution times, token usage, and costs
* **Error Tracking**: Detailed error information and stack traces
### Trace Features
* **Execution Timeline**: Click through different stages of execution
* **Detailed Logs**: Access comprehensive logs for debugging
* **Performance Analytics**: Analyze execution patterns and optimize performance
* **Export Capabilities**: Download traces for further analysis
### Authentication Issues
If you encounter authentication problems:
1. Ensure you're logged in: `crewai login`
2. Check your internet connection
3. Verify your account at [app.crewai.com](https://app.crewai.com)
### Traces Not Appearing
If traces aren't showing up in the dashboard:
1. Confirm `tracing=True` is set in your Crew/Flow
2. Check that `CREWAI_TRACING_ENABLED=true` if using environment variables
3. Ensure you're authenticated with `crewai login`
4. Verify your crew/flow is actually executing
---
# Source: https://docs.crewai.com/en/concepts/training.md
> ## Documentation Index
> Fetch the complete documentation index at: https://docs.crewai.com/llms.txt
> Use this file to discover all available pages before exploring further.
# Training
> Learn how to train your CrewAI agents by giving them feedback early on and get consistent results.
## Overview
The training feature in CrewAI allows you to train your AI agents using the command-line interface (CLI).
By running the command `crewai train -n CLI: crewai train -n -f
or Python: crew.train(...)"] --> B["Setup training mode
- task.human_input = true
- disable delegation
- init training_data.pkl + trained file"] subgraph "Iterations" direction LR C["Iteration i
initial_output"] --> D["User human_feedback"] D --> E["improved_output"] E --> F["Append to training_data.pkl
by agent_id and iteration"] end B --> C F --> G{"More iterations?"} G -- "Yes" --> C G -- "No" --> H["Evaluate per agent
aggregate iterations"] H --> I["Consolidate
suggestions[] + quality + final_summary"] I --> J["Save by agent role to trained file
(default: trained_agents_data.pkl)"] J --> K["Normal (non-training) runs"] K --> L["Auto-load suggestions
from trained_agents_data.pkl"] L --> M["Append to prompt
for consistent improvements"] ``` ### During training runs * On each iteration, the system records for every agent: * `initial_output`: the agent’s first answer * `human_feedback`: your inline feedback when prompted * `improved_output`: the agent’s follow-up answer after feedback * This data is stored in a working file named `training_data.pkl` keyed by the agent’s internal ID and iteration. * While training is active, the agent automatically appends your prior human feedback to its prompt to enforce those instructions on subsequent attempts within the training session. Training is interactive: tasks set `human_input = true`, so running in a non-interactive environment will block on user input. ### After training completes * When `train(...)` finishes, CrewAI evaluates the collected training data per agent and produces a consolidated result containing: * `suggestions`: clear, actionable instructions distilled from your feedback and the difference between initial/improved outputs * `quality`: a 0–10 score capturing improvement * `final_summary`: a step-by-step set of action items for future tasks * These consolidated results are saved to the filename you pass to `train(...)` (default via CLI is `trained_agents_data.pkl`). Entries are keyed by the agent’s `role` so they can be applied across sessions. * During normal (non-training) execution, each agent automatically loads its consolidated `suggestions` and appends them to the task prompt as mandatory instructions. This gives you consistent improvements without changing your agent definitions. ### File summary * `training_data.pkl` (ephemeral, per-session): * Structure: `agent_id -> { iteration_number: { initial_output, human_feedback, improved_output } }` * Purpose: capture raw data and human feedback during training * Location: saved in the current working directory (CWD) * `trained_agents_data.pkl` (or your custom filename): * Structure: `agent_role -> { suggestions: string[], quality: number, final_summary: string }` * Purpose: persist consolidated guidance for future runs * Location: written to the CWD by default; use `-f` to set a custom (including absolute) path ## Small Language Model Considerations
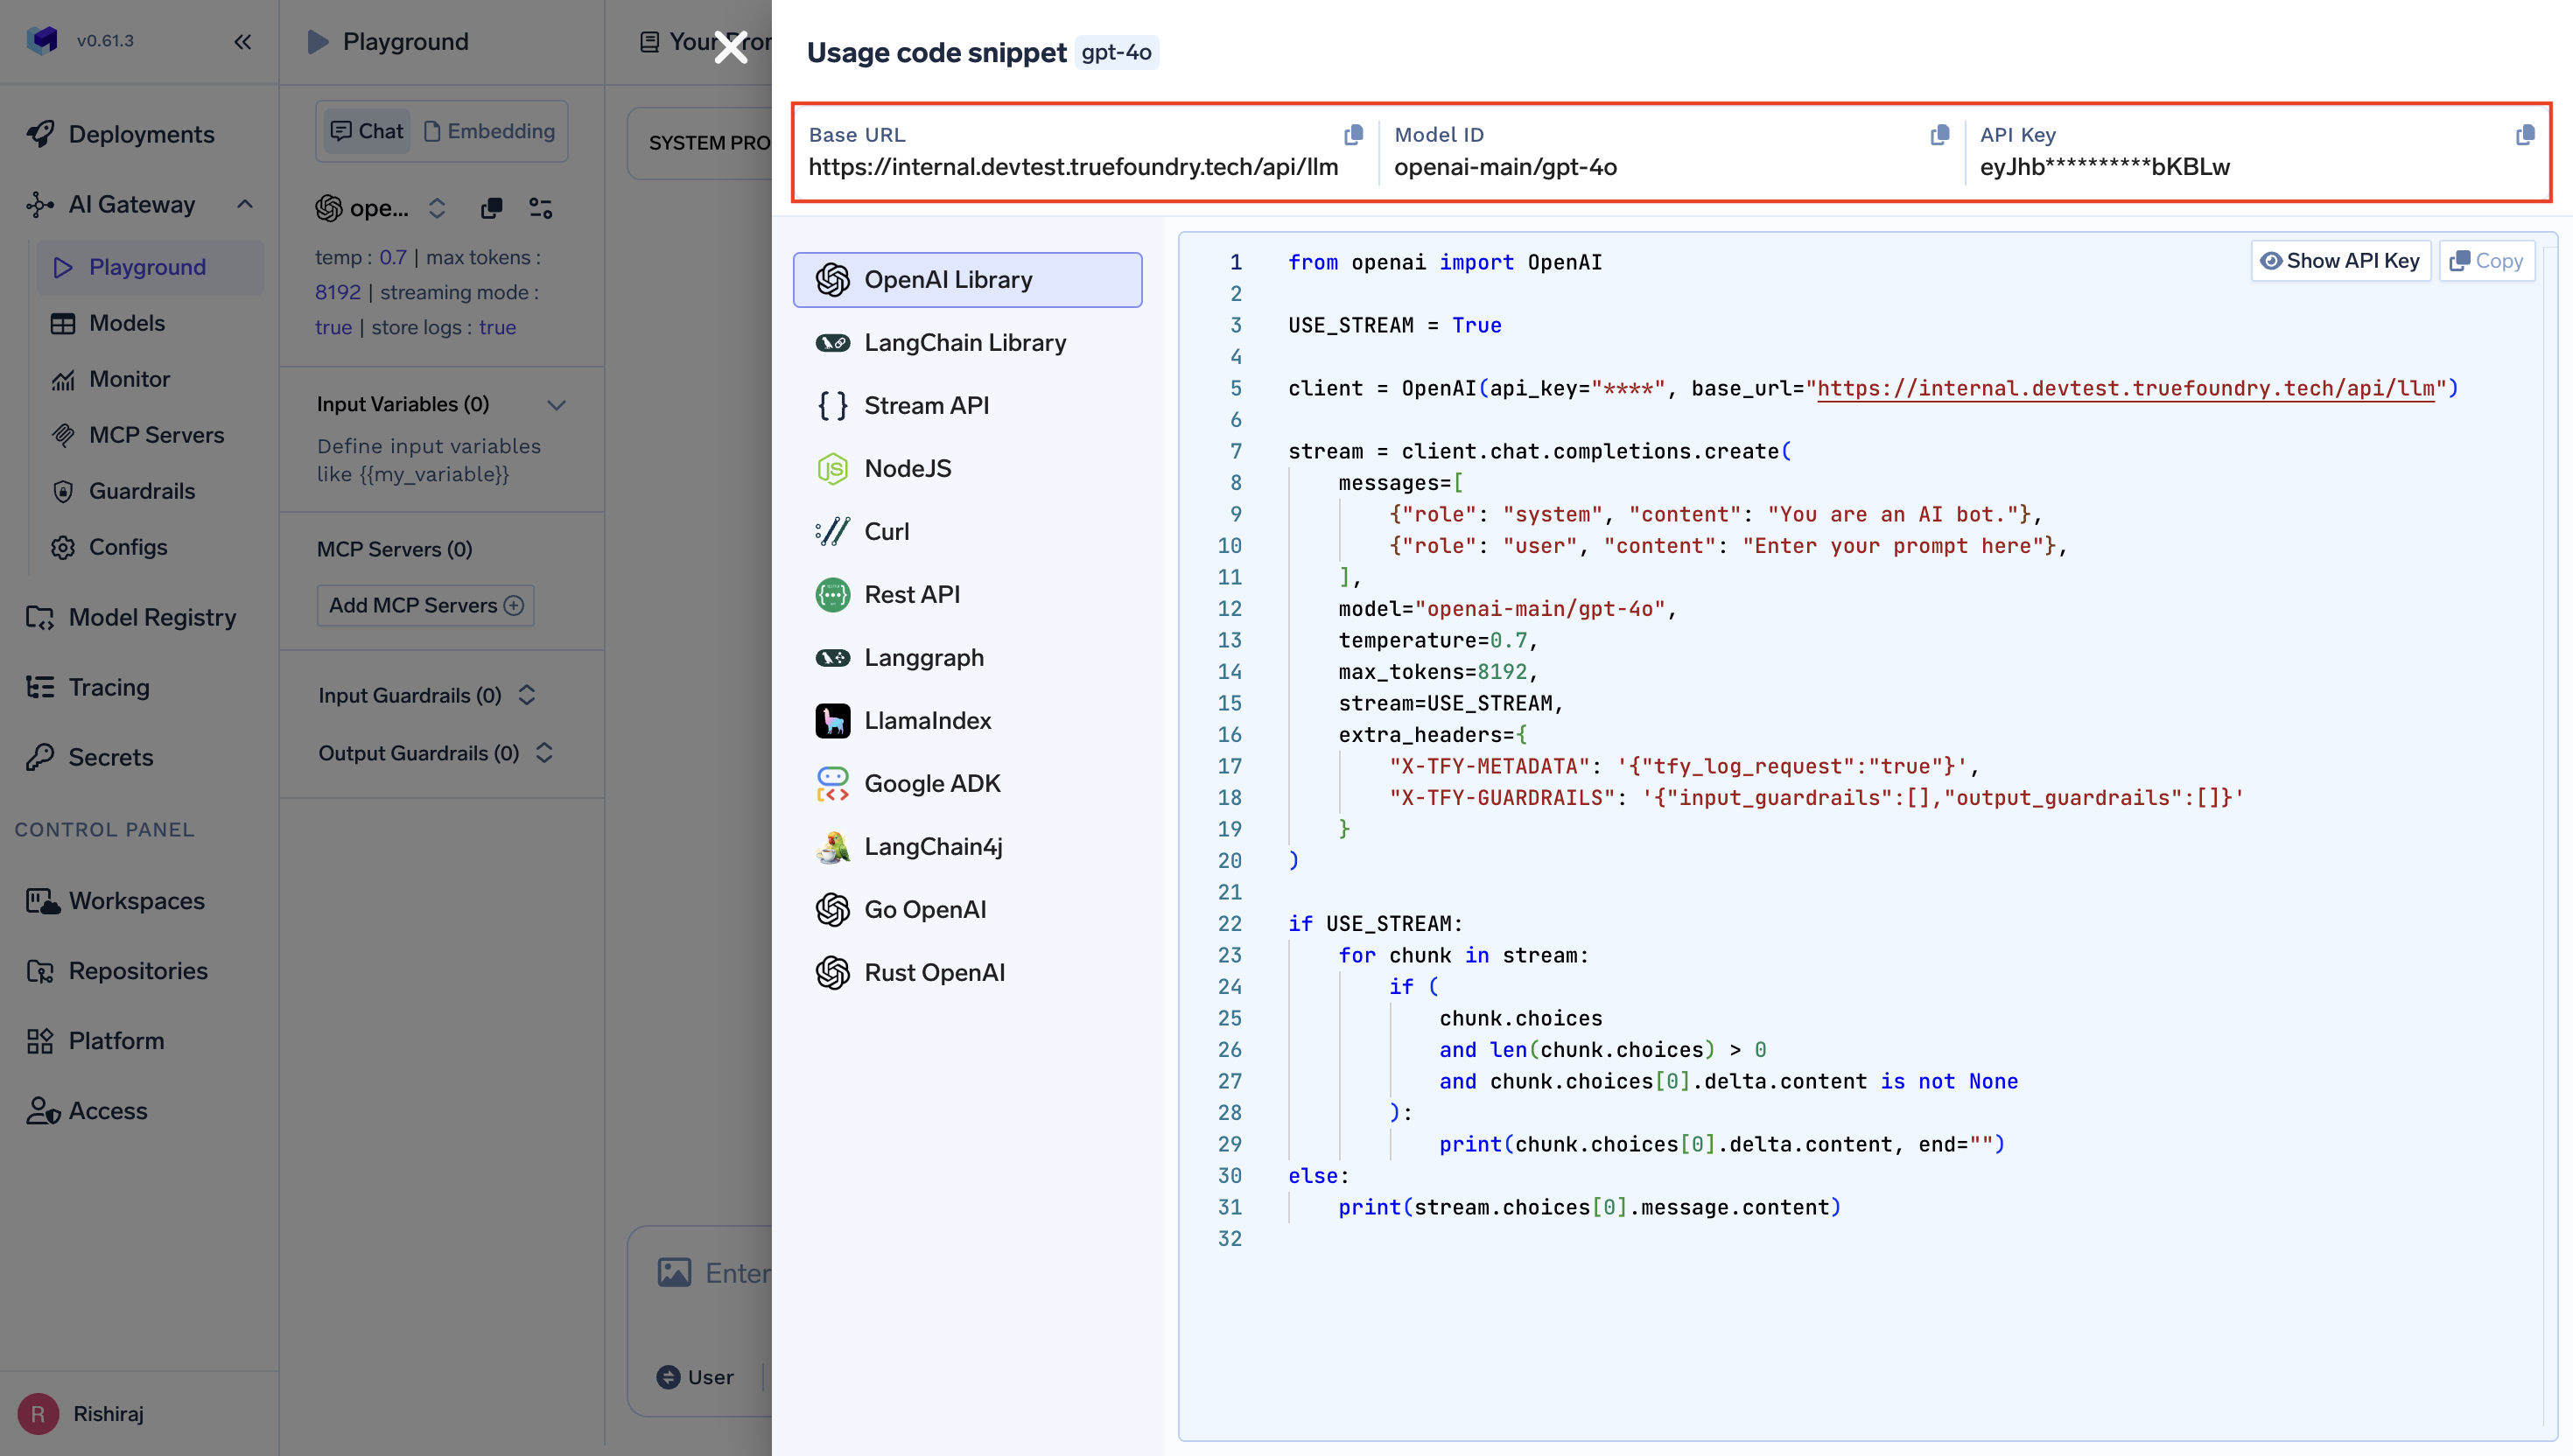 ```python theme={null}
from crewai import LLM
# Create an LLM instance with TrueFoundry AI Gateway
truefoundry_llm = LLM(
model="openai-main/gpt-4o", # Similarly, you can call any model from any provider
base_url="your_truefoundry_gateway_base_url",
api_key="your_truefoundry_api_key"
)
# Use in your CrewAI agents
from crewai import Agent
@agent
def researcher(self) -> Agent:
return Agent(
config=self.agents_config['researcher'],
llm=truefoundry_llm,
verbose=True
)
```
```python theme={null}
from crewai import LLM
# Create an LLM instance with TrueFoundry AI Gateway
truefoundry_llm = LLM(
model="openai-main/gpt-4o", # Similarly, you can call any model from any provider
base_url="your_truefoundry_gateway_base_url",
api_key="your_truefoundry_api_key"
)
# Use in your CrewAI agents
from crewai import Agent
@agent
def researcher(self) -> Agent:
return Agent(
config=self.agents_config['researcher'],
llm=truefoundry_llm,
verbose=True
)
```
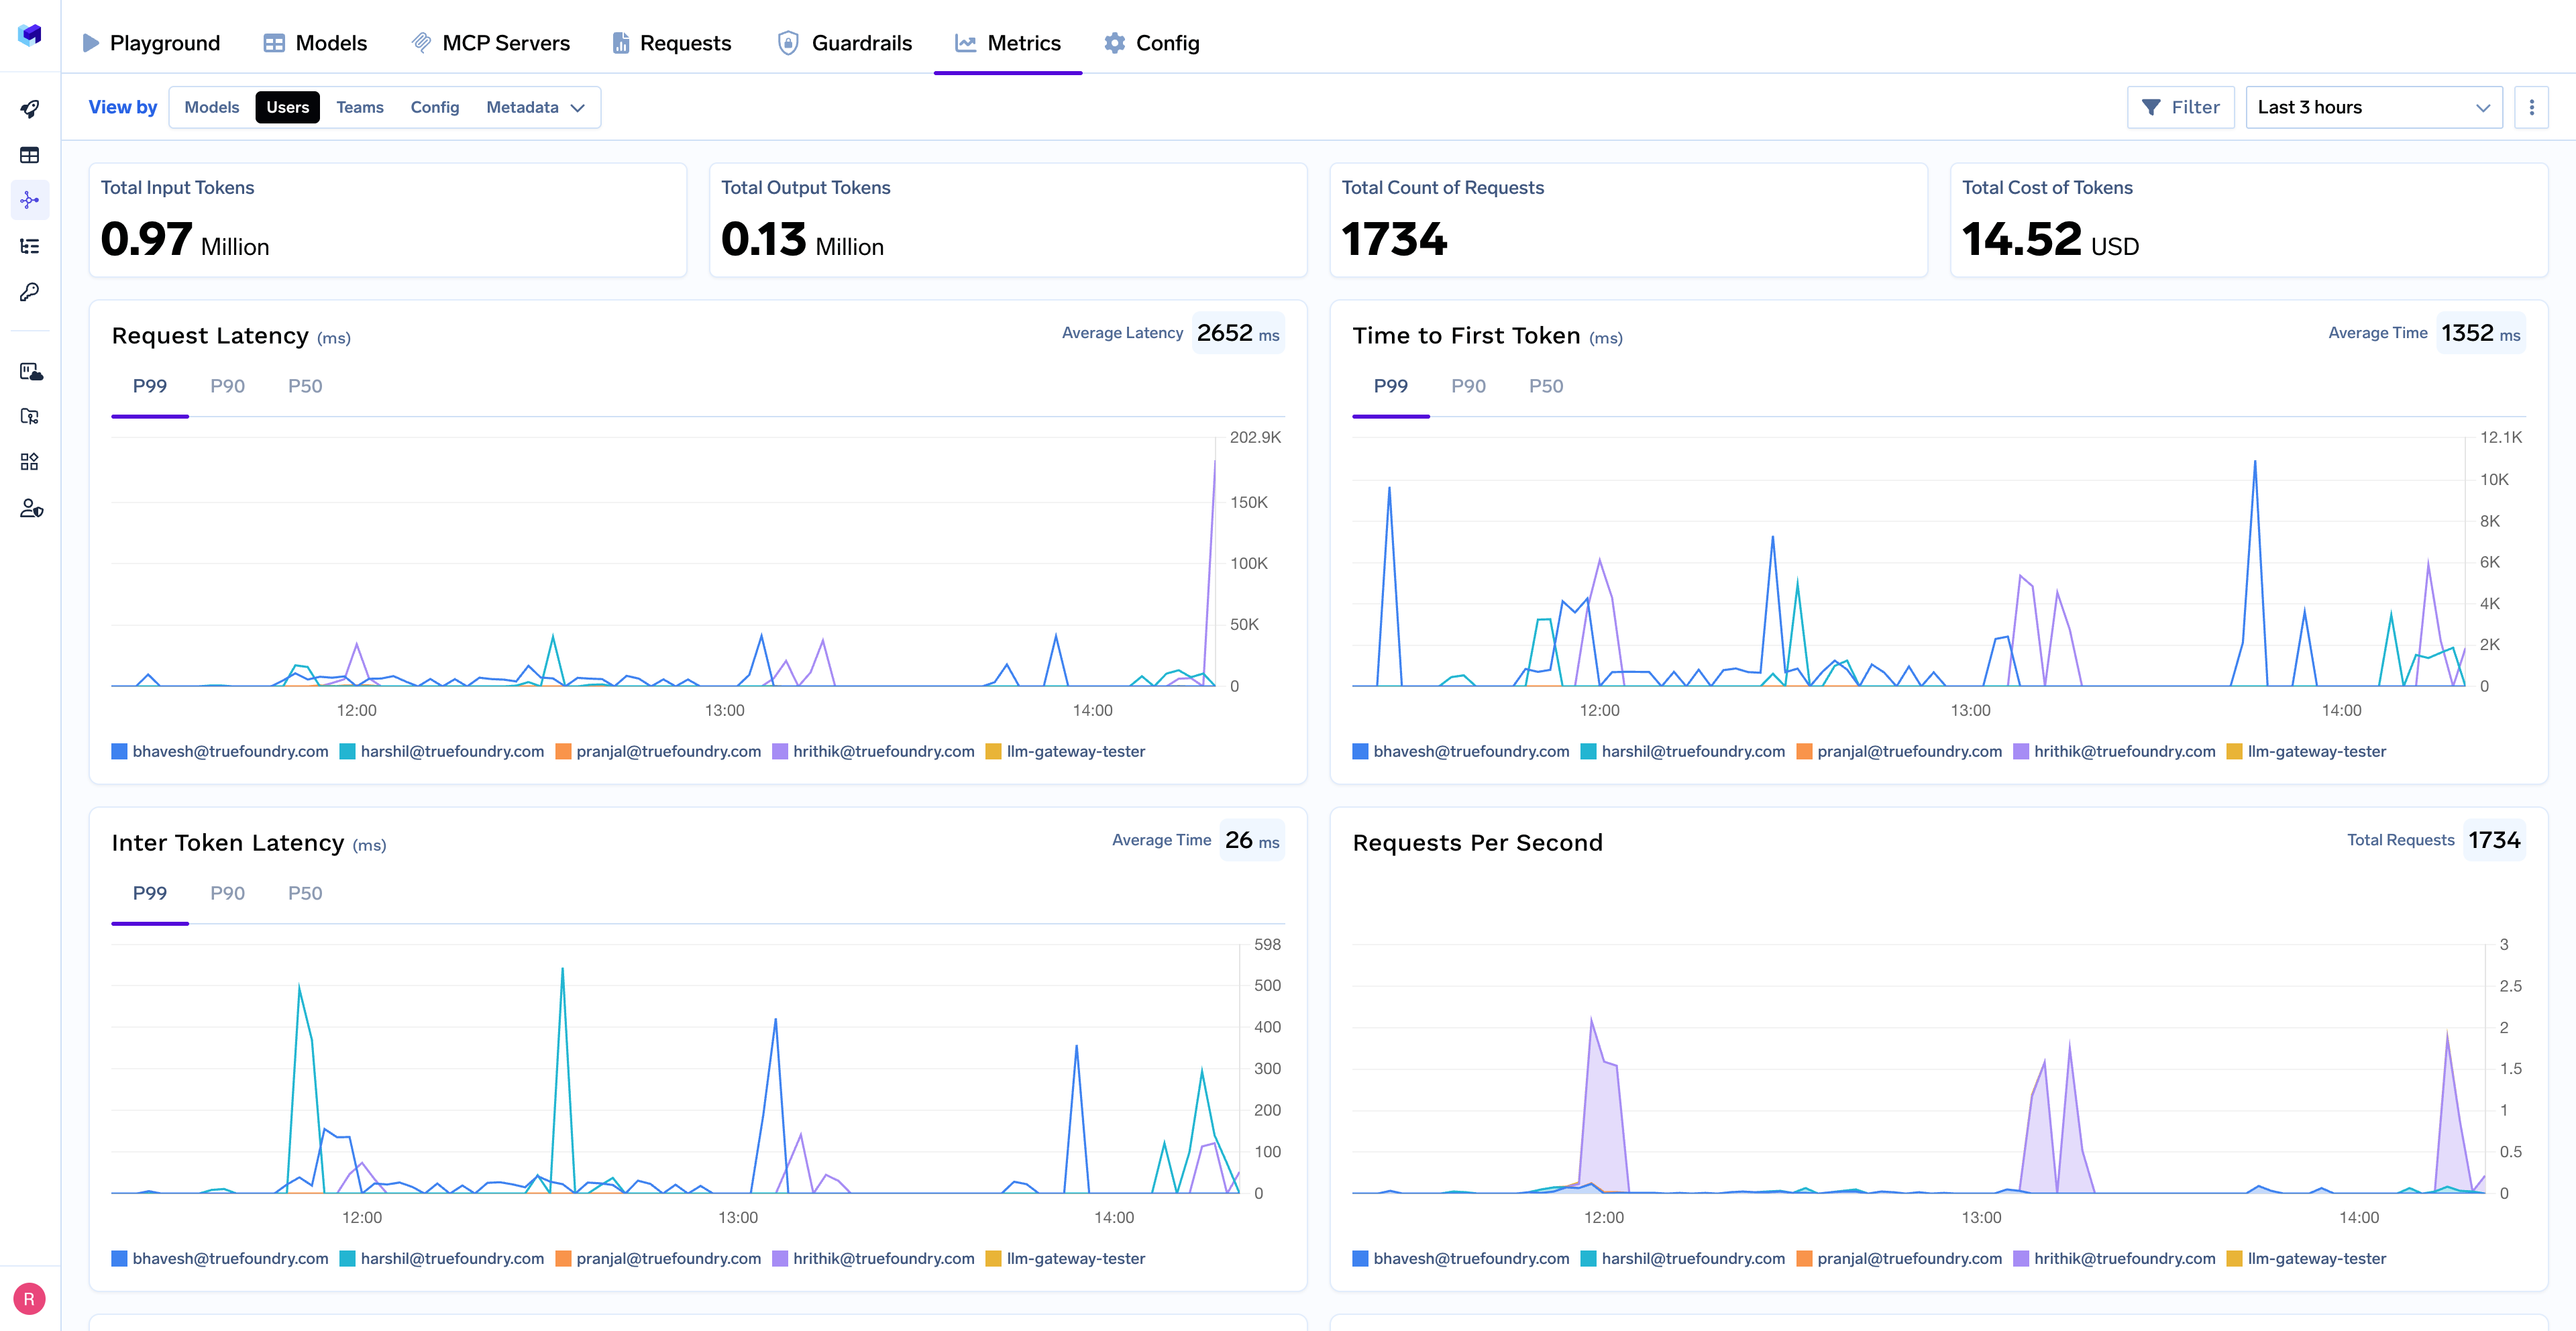 With Truefoundry's AI gateway, you can monitor and analyze:
* **Performance Metrics**: Track key latency metrics like Request Latency, Time to First Token (TTFS), and Inter-Token Latency (ITL) with P99, P90, and P50 percentiles
* **Cost and Token Usage**: Gain visibility into your application's costs with detailed breakdowns of input/output tokens and the associated expenses for each model
* **Usage Patterns**: Understand how your application is being used with detailed analytics on user activity, model distribution, and team-based usage
* **Rate limit and Load balancing**: You can set up rate limiting, load balancing and fallback for your models
## Tracing
For a more detailed understanding on tracing, please see [getting-started-tracing](https://docs.truefoundry.com/docs/tracing/tracing-getting-started).For tracing, you can add the Traceloop SDK:
For tracing, you can add the Traceloop SDK:
```bash theme={null}
pip install traceloop-sdk
```
```python theme={null}
from traceloop.sdk import Traceloop
# Initialize enhanced tracing
Traceloop.init(
api_endpoint="https://your-truefoundry-endpoint/api/tracing",
headers={
"Authorization": f"Bearer {your_truefoundry_pat_token}",
"TFY-Tracing-Project": "your_project_name",
},
)
```
This provides additional trace correlation across your entire CrewAI workflow.
With Truefoundry's AI gateway, you can monitor and analyze:
* **Performance Metrics**: Track key latency metrics like Request Latency, Time to First Token (TTFS), and Inter-Token Latency (ITL) with P99, P90, and P50 percentiles
* **Cost and Token Usage**: Gain visibility into your application's costs with detailed breakdowns of input/output tokens and the associated expenses for each model
* **Usage Patterns**: Understand how your application is being used with detailed analytics on user activity, model distribution, and team-based usage
* **Rate limit and Load balancing**: You can set up rate limiting, load balancing and fallback for your models
## Tracing
For a more detailed understanding on tracing, please see [getting-started-tracing](https://docs.truefoundry.com/docs/tracing/tracing-getting-started).For tracing, you can add the Traceloop SDK:
For tracing, you can add the Traceloop SDK:
```bash theme={null}
pip install traceloop-sdk
```
```python theme={null}
from traceloop.sdk import Traceloop
# Initialize enhanced tracing
Traceloop.init(
api_endpoint="https://your-truefoundry-endpoint/api/tracing",
headers={
"Authorization": f"Bearer {your_truefoundry_pat_token}",
"TFY-Tracing-Project": "your_project_name",
},
)
```
This provides additional trace correlation across your entire CrewAI workflow.
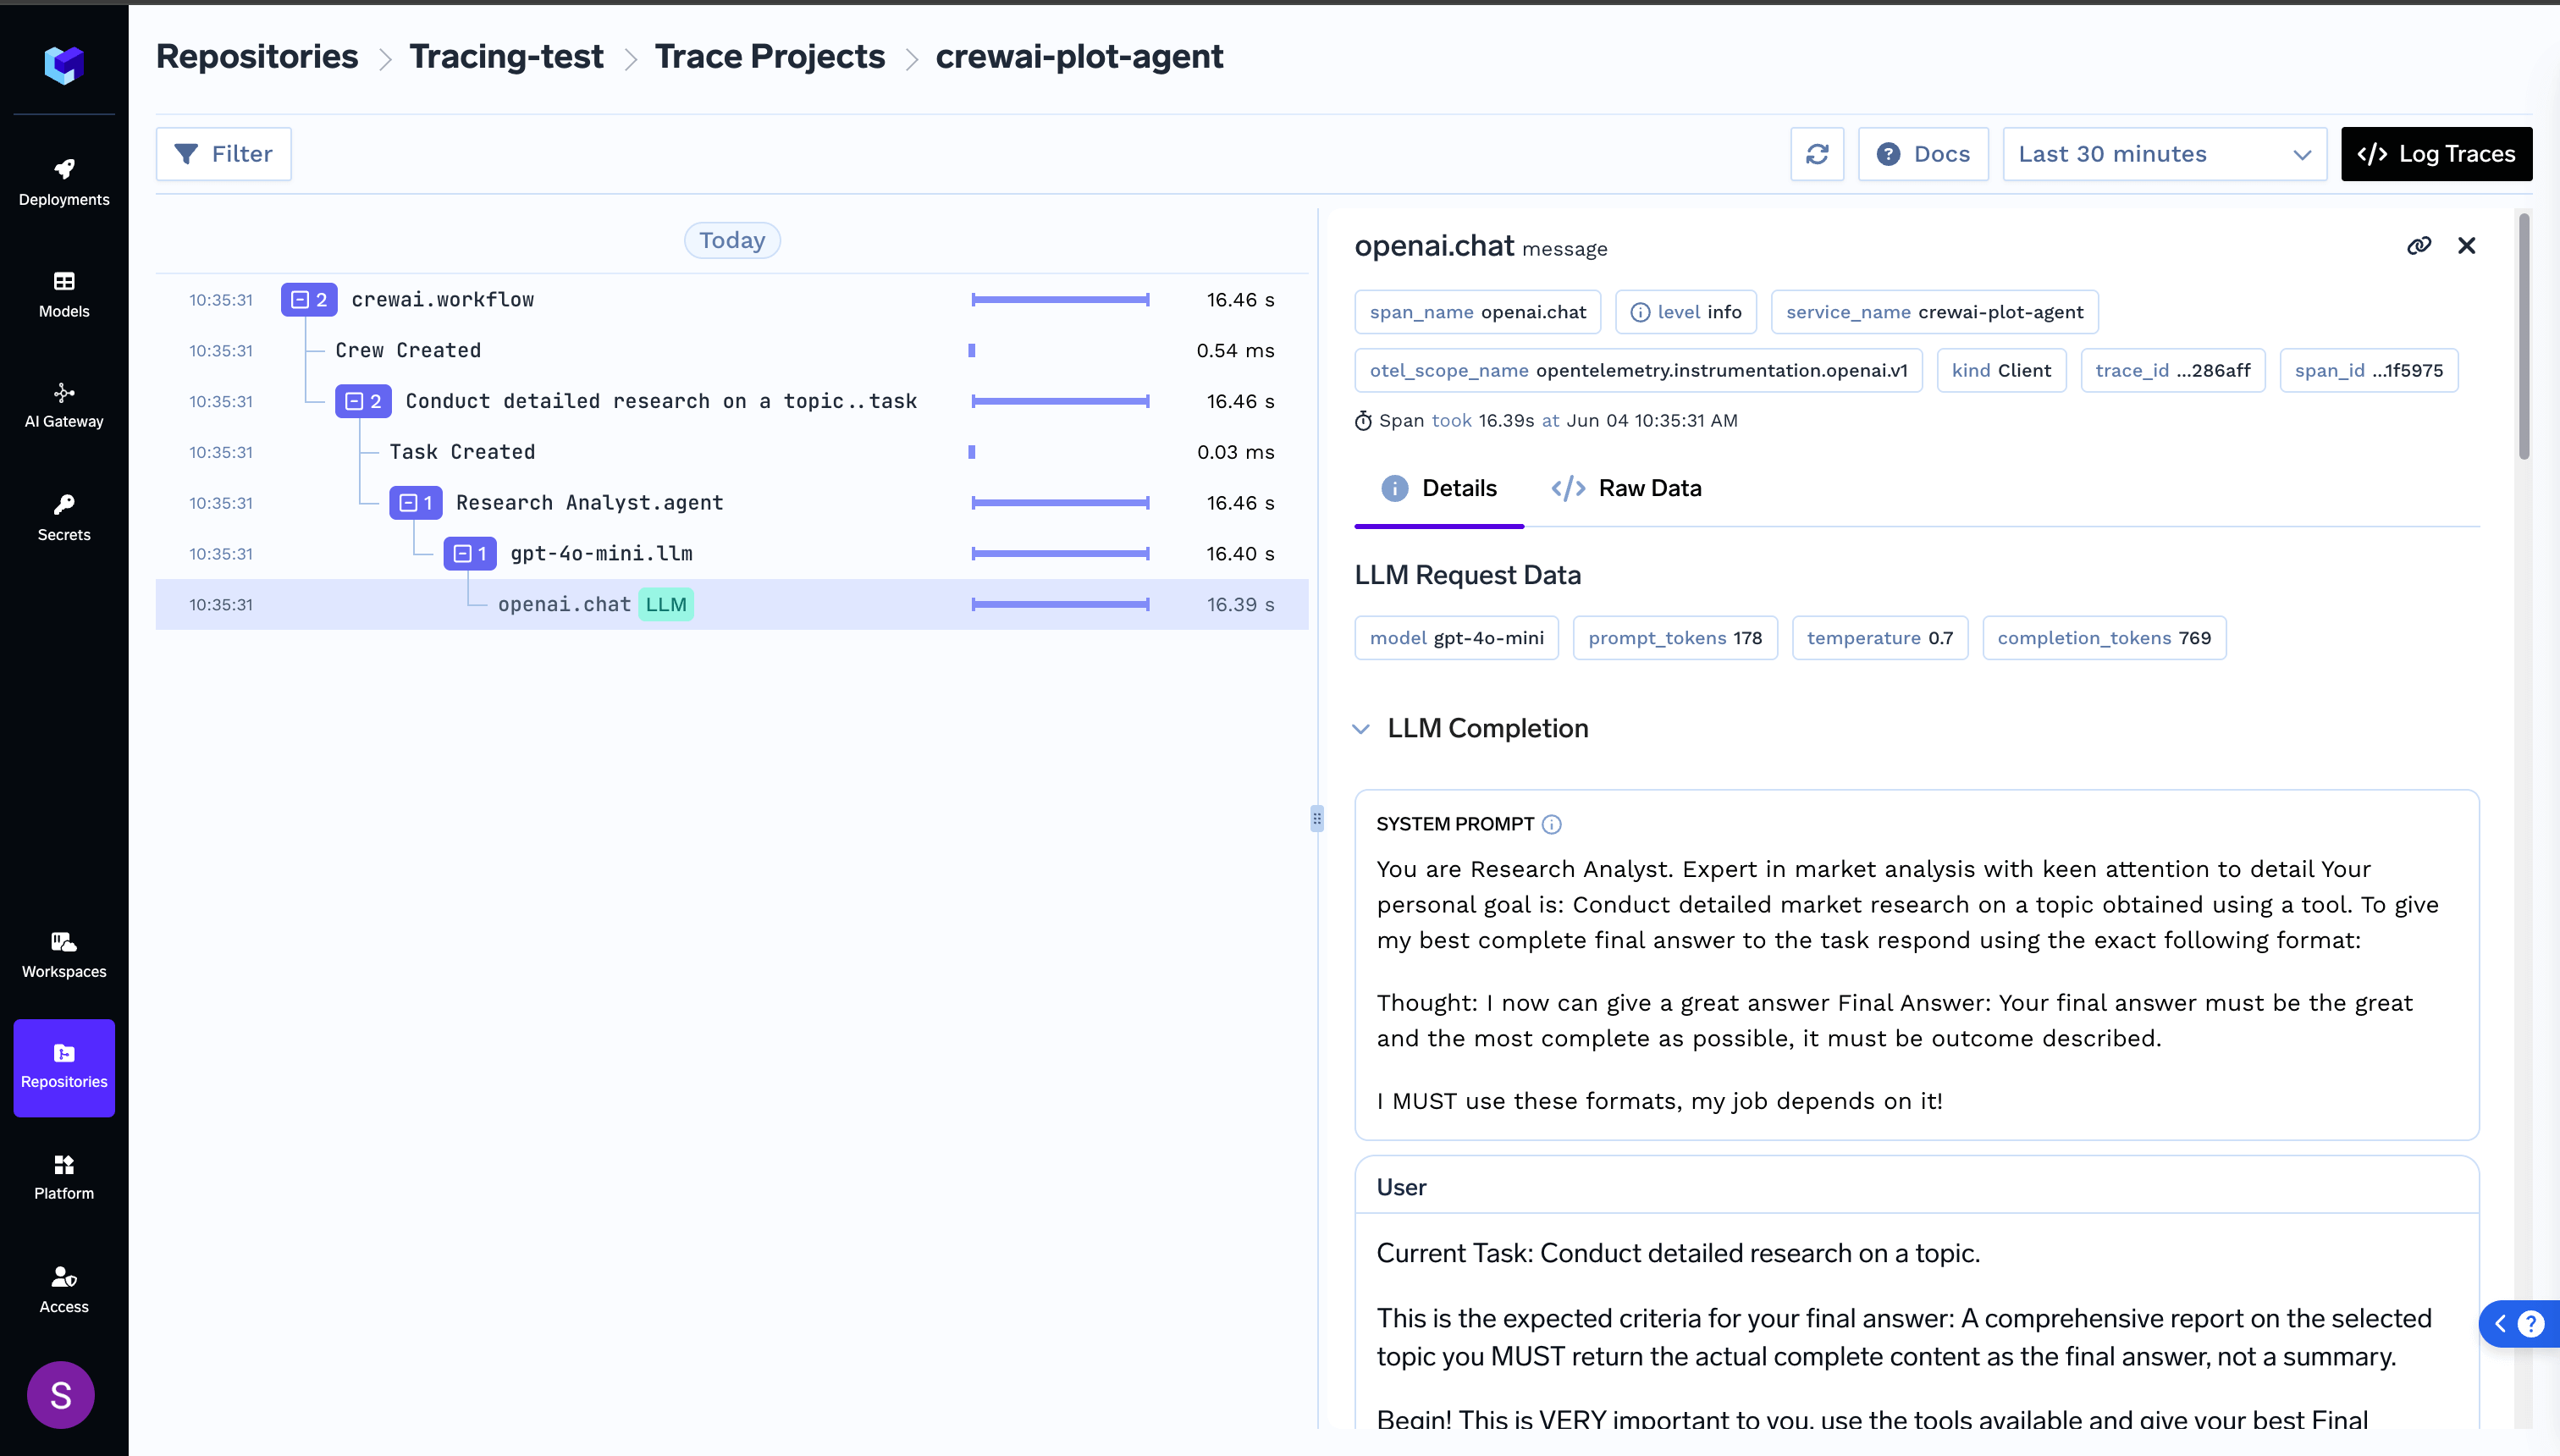 ---
# Source: https://docs.crewai.com/en/tools/file-document/txtsearchtool.md
> ## Documentation Index
> Fetch the complete documentation index at: https://docs.crewai.com/llms.txt
> Use this file to discover all available pages before exploring further.
# TXT RAG Search
> The `TXTSearchTool` is designed to perform a RAG (Retrieval-Augmented Generation) search within the content of a text file.
## Overview
---
# Source: https://docs.crewai.com/en/tools/file-document/txtsearchtool.md
> ## Documentation Index
> Fetch the complete documentation index at: https://docs.crewai.com/llms.txt
> Use this file to discover all available pages before exploring further.
# TXT RAG Search
> The `TXTSearchTool` is designed to perform a RAG (Retrieval-Augmented Generation) search within the content of a text file.
## Overview
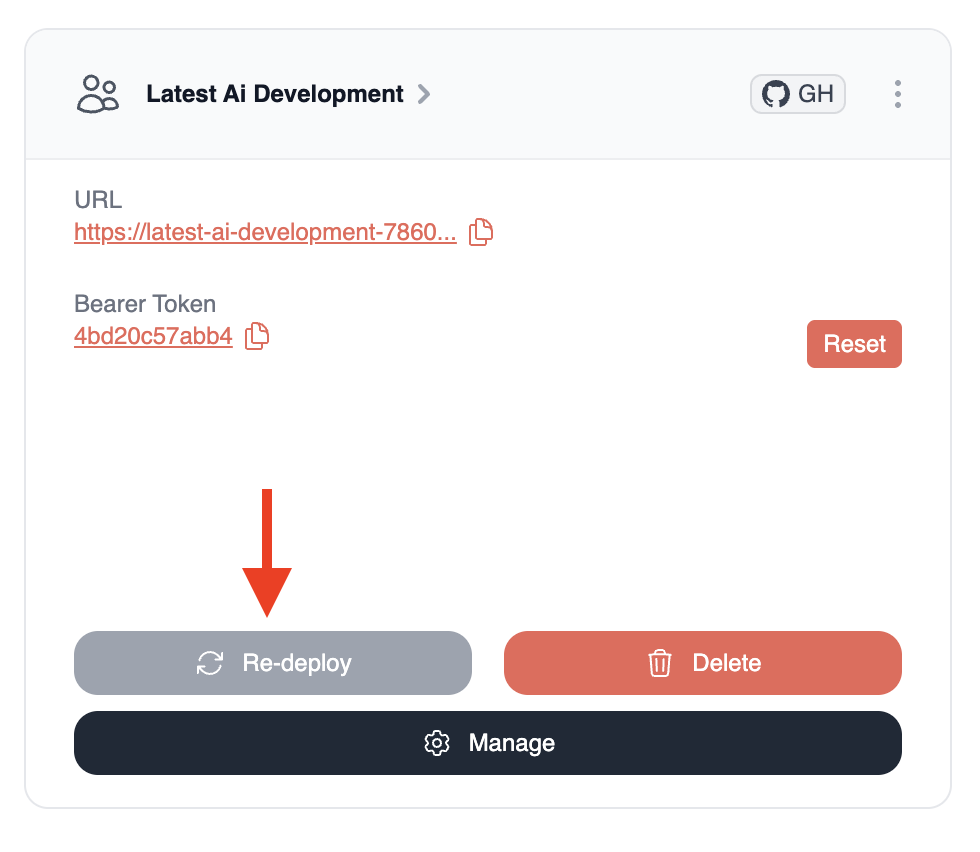 This will trigger an update that you can track using the progress bar. The system will pull the latest code from your repository and rebuild your deployment.
## 2. Resetting Bearer Token
If you need to generate a new bearer token (for example, if you suspect the current token might have been compromised):
1. Navigate to your crew in the CrewAI AMP platform
2. Find the `Bearer Token` section
3. Click the `Reset` button next to your current token
This will trigger an update that you can track using the progress bar. The system will pull the latest code from your repository and rebuild your deployment.
## 2. Resetting Bearer Token
If you need to generate a new bearer token (for example, if you suspect the current token might have been compromised):
1. Navigate to your crew in the CrewAI AMP platform
2. Find the `Bearer Token` section
3. Click the `Reset` button next to your current token
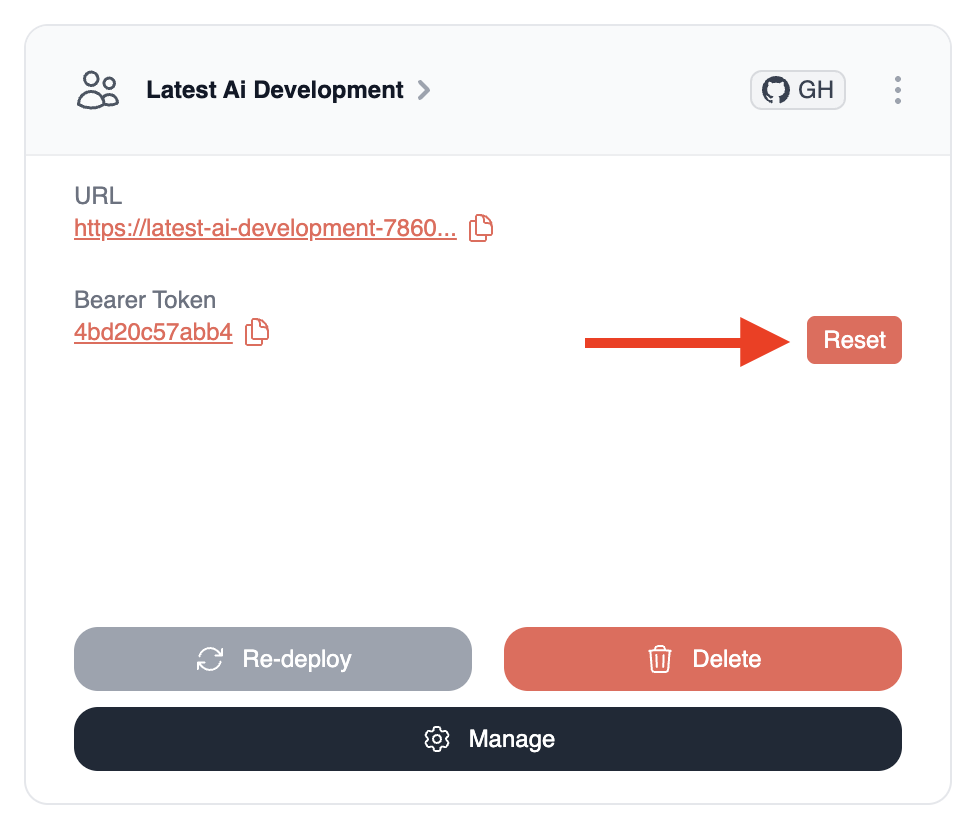
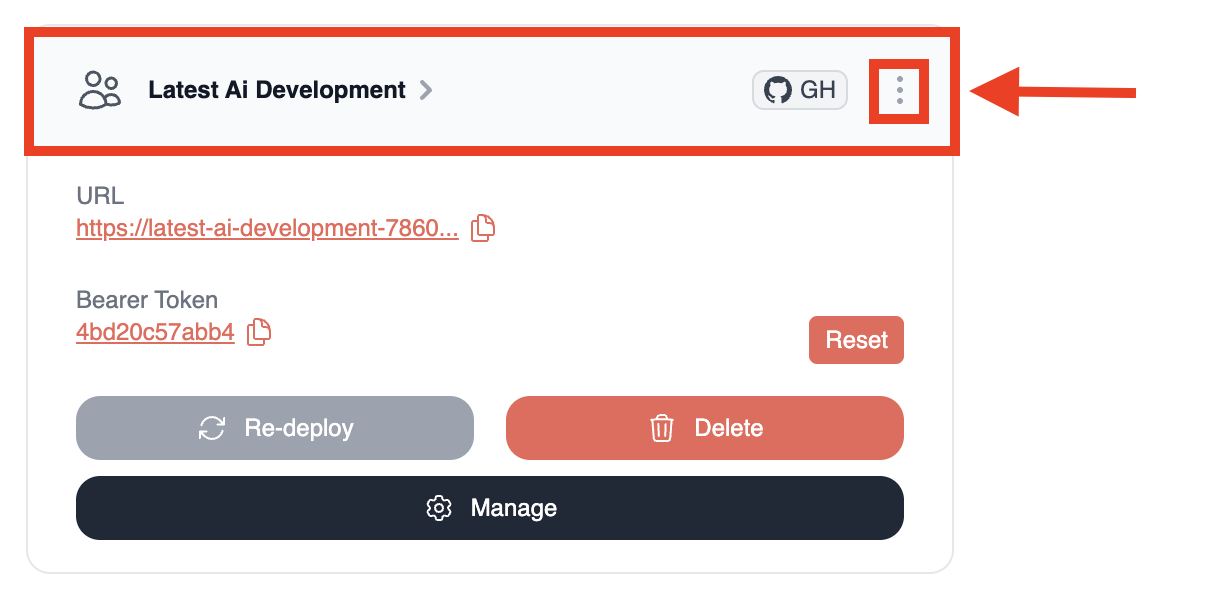 2. Locate the `Environment Variables` section (you will need to click the `Settings` icon to access it)
3. Edit the existing variables or add new ones in the fields provided
4. Click the `Update` button next to each variable you modify
2. Locate the `Environment Variables` section (you will need to click the `Settings` icon to access it)
3. Edit the existing variables or add new ones in the fields provided
4. Click the `Update` button next to each variable you modify
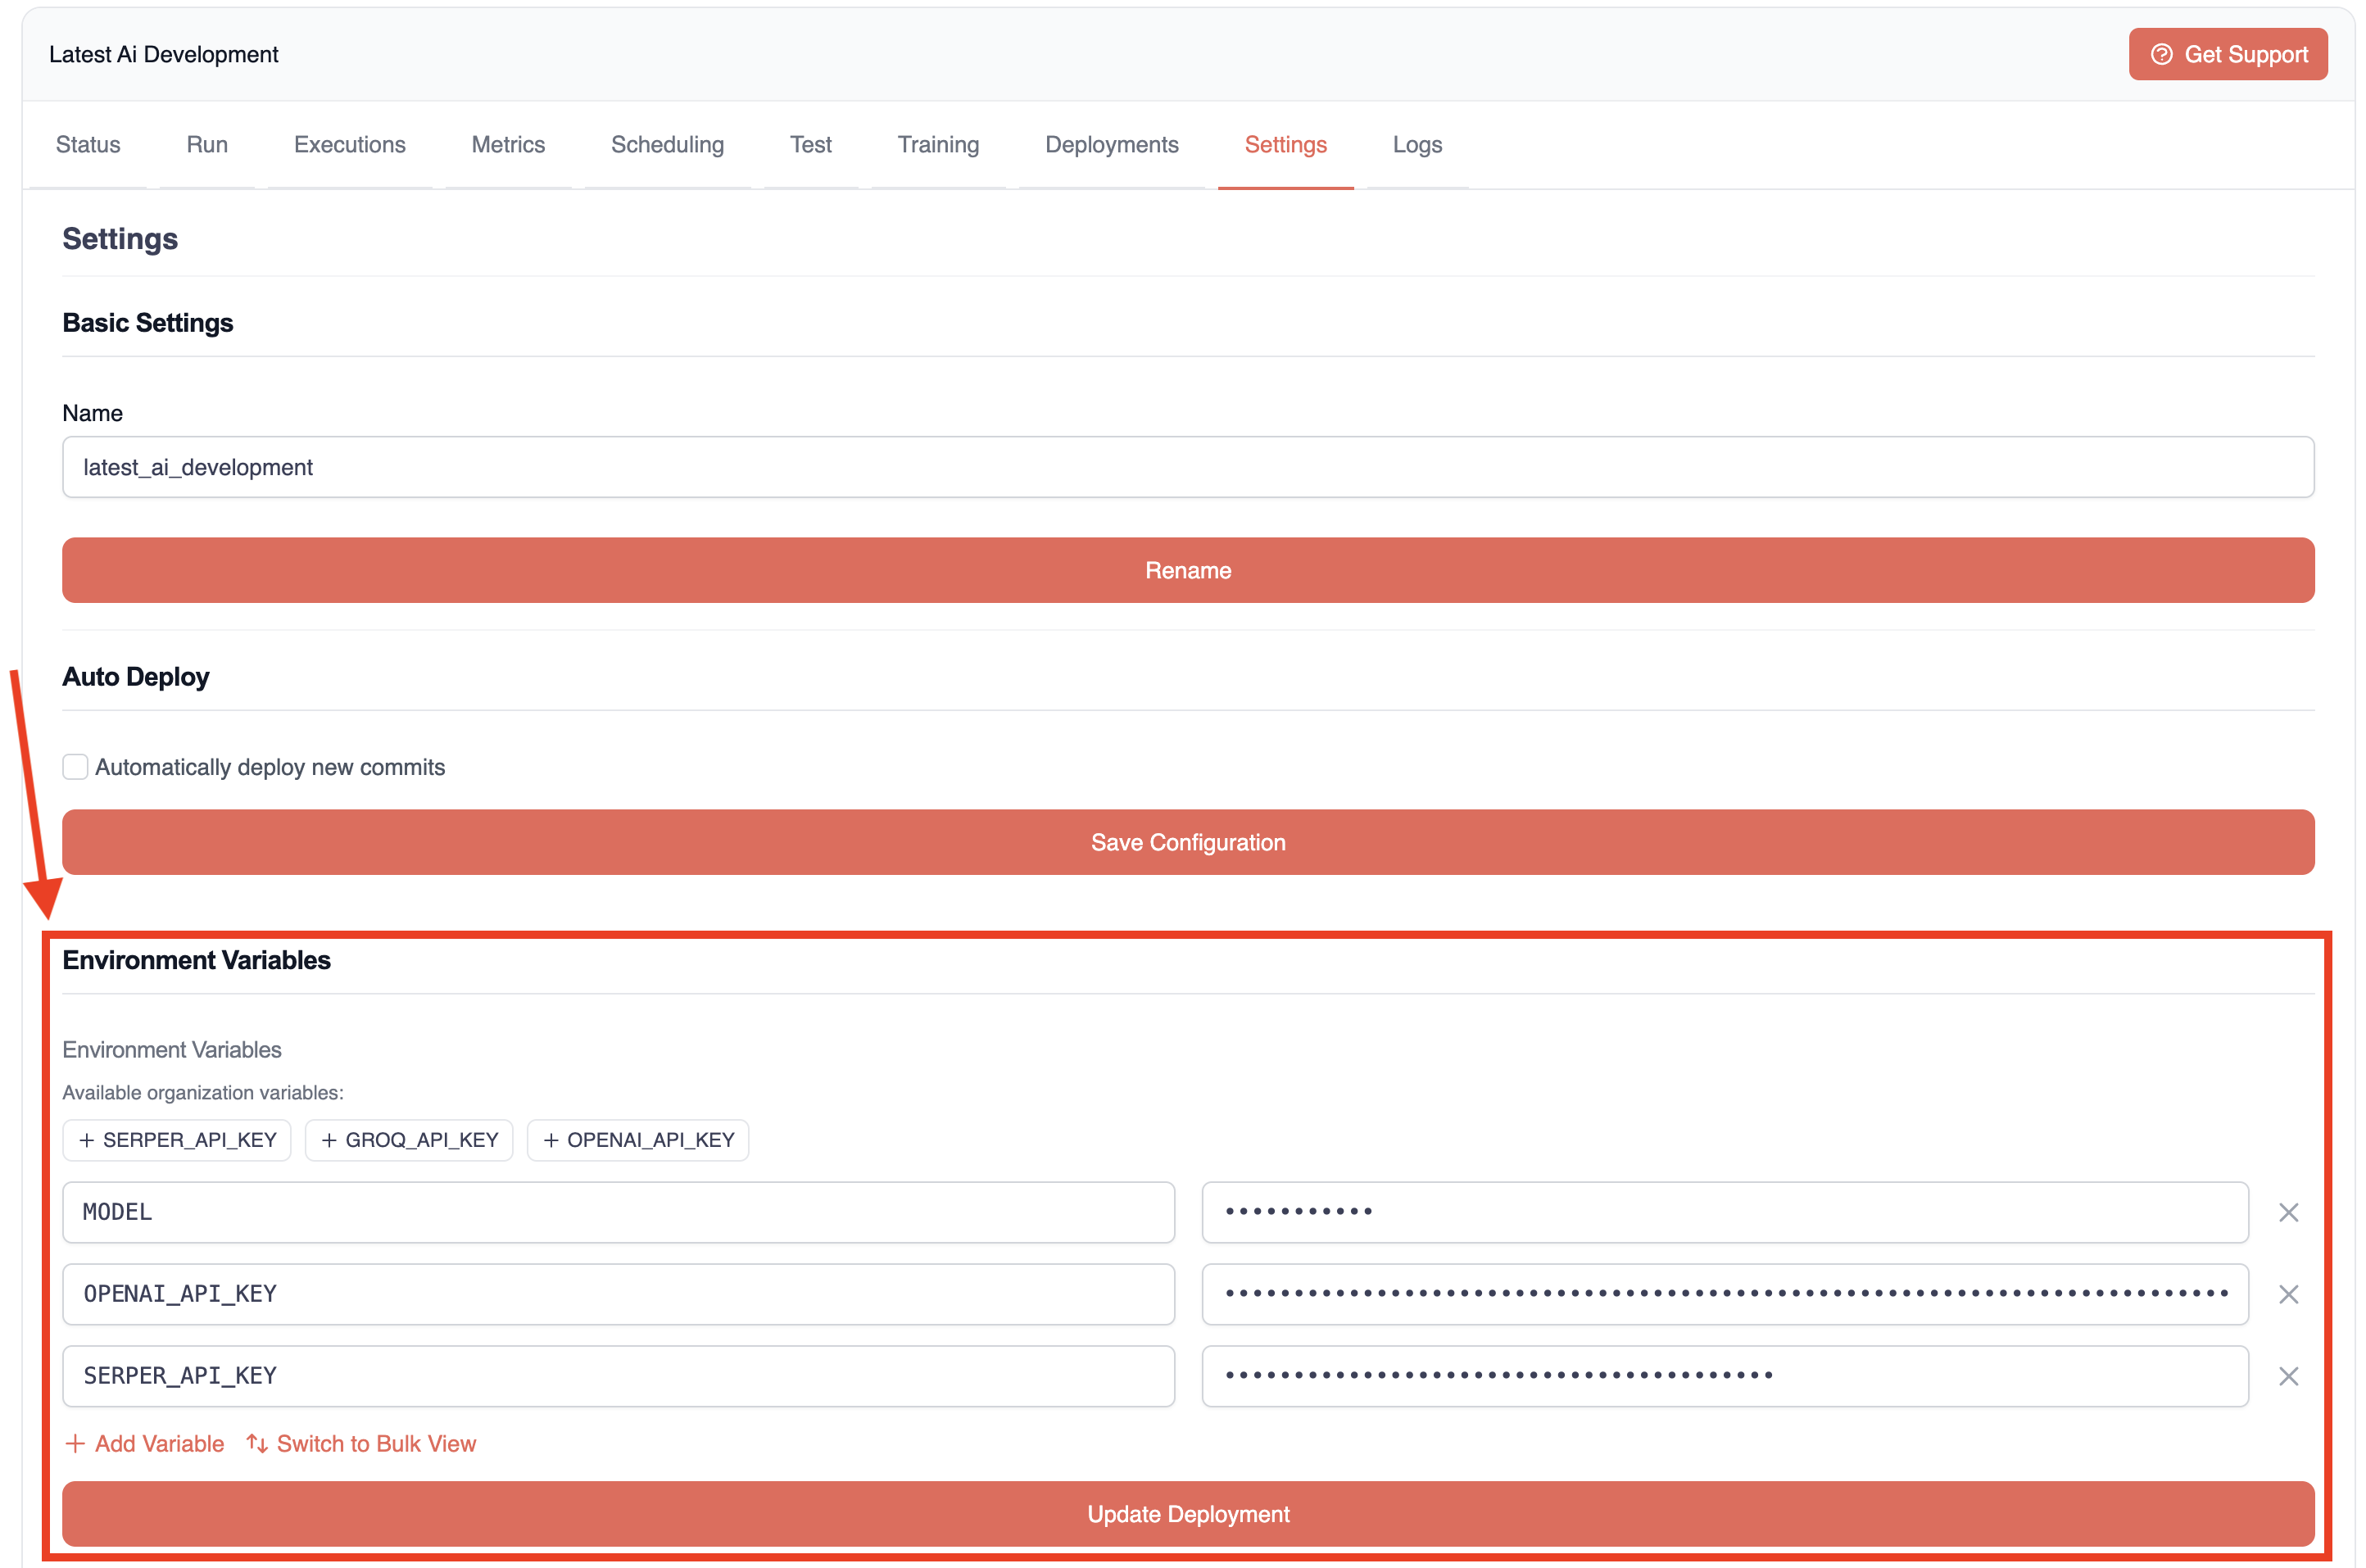 5. Finally, click the `Update Deployment` button at the bottom of the page to apply the changes
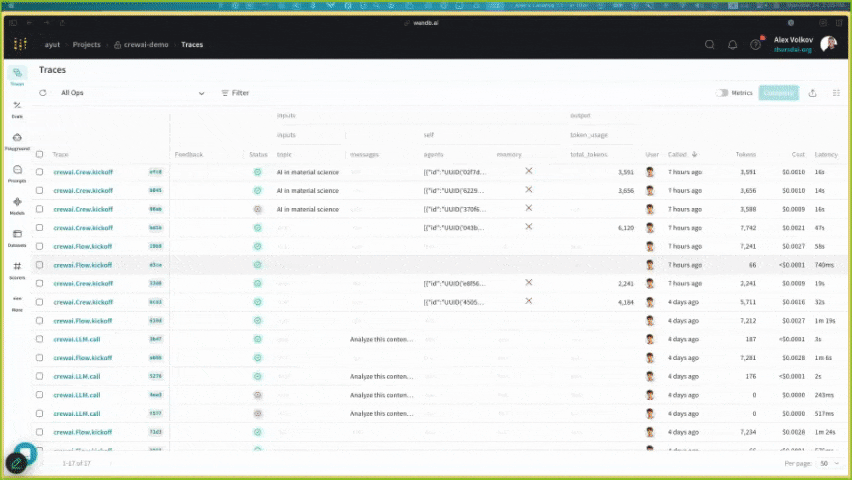 Weave provides comprehensive support for every stage of your CrewAI application development:
* **Tracing & Monitoring**: Automatically track LLM calls and application logic to debug and analyze production systems
* **Systematic Iteration**: Refine and iterate on prompts, datasets, and models
* **Evaluation**: Use custom or pre-built scorers to systematically assess and enhance agent performance
* **Guardrails**: Protect your agents with pre- and post-safeguards for content moderation and prompt safety
Weave automatically captures traces for your CrewAI applications, enabling you to monitor and analyze your agents' performance, interactions, and execution flow. This helps you build better evaluation datasets and optimize your agent workflows.
## Setup Instructions
Weave provides comprehensive support for every stage of your CrewAI application development:
* **Tracing & Monitoring**: Automatically track LLM calls and application logic to debug and analyze production systems
* **Systematic Iteration**: Refine and iterate on prompts, datasets, and models
* **Evaluation**: Use custom or pre-built scorers to systematically assess and enhance agent performance
* **Guardrails**: Protect your agents with pre- and post-safeguards for content moderation and prompt safety
Weave automatically captures traces for your CrewAI applications, enabling you to monitor and analyze your agents' performance, interactions, and execution flow. This helps you build better evaluation datasets and optimize your agent workflows.
## Setup Instructions
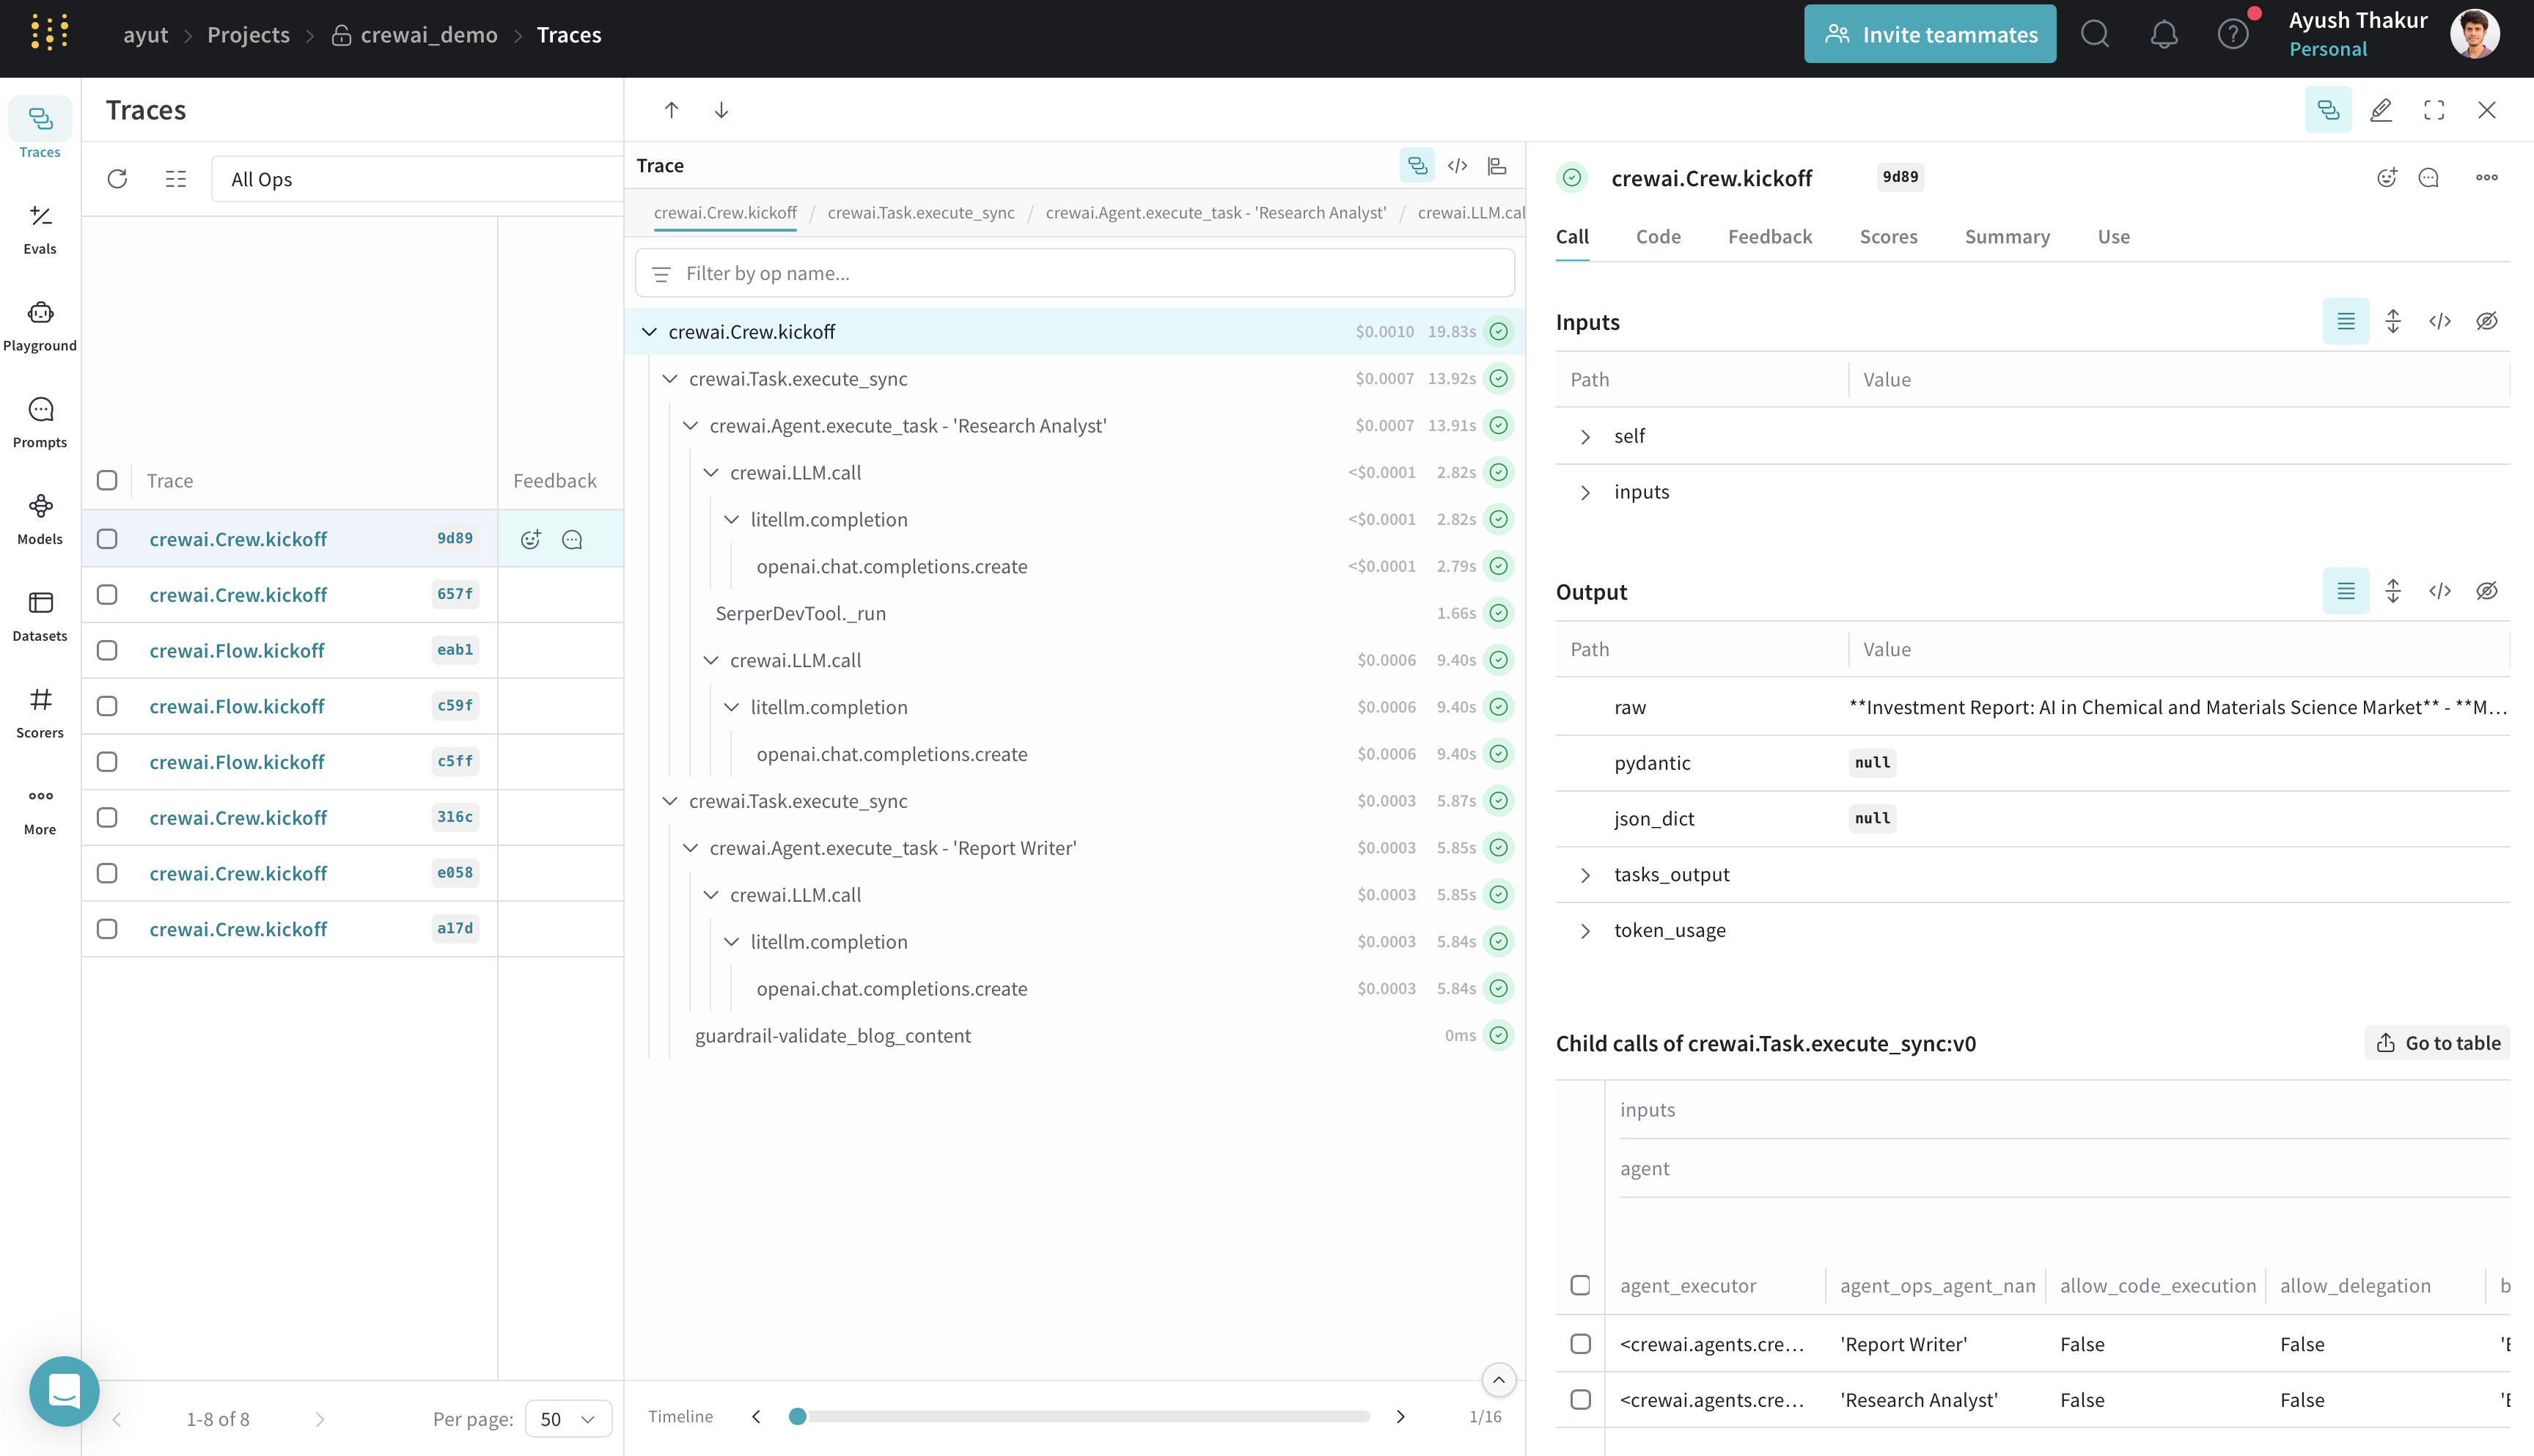
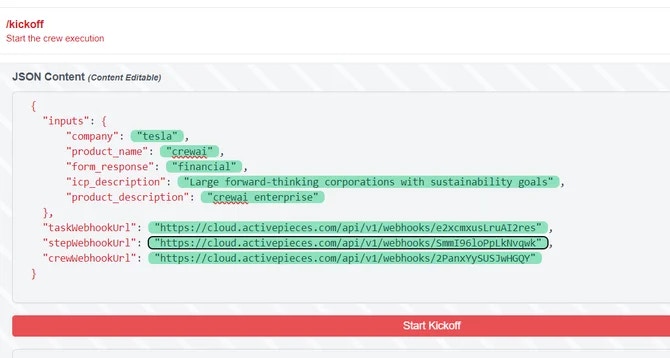
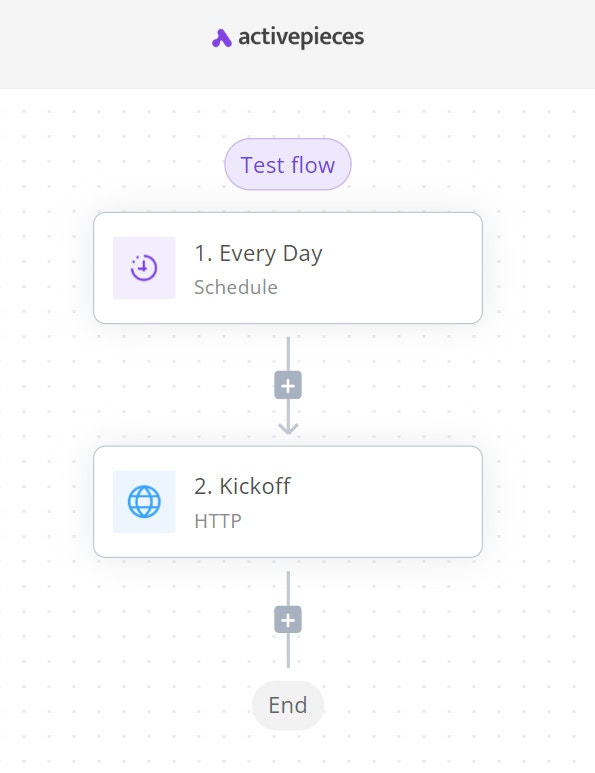 3. Add an HTTP action step
* Set the action to `Send HTTP request`
* Use `POST` as the method
* Set the URL to your CrewAI AMP kickoff endpoint
* Add necessary headers (e.g., `Bearer Token`)
3. Add an HTTP action step
* Set the action to `Send HTTP request`
* Use `POST` as the method
* Set the URL to your CrewAI AMP kickoff endpoint
* Add necessary headers (e.g., `Bearer Token`)
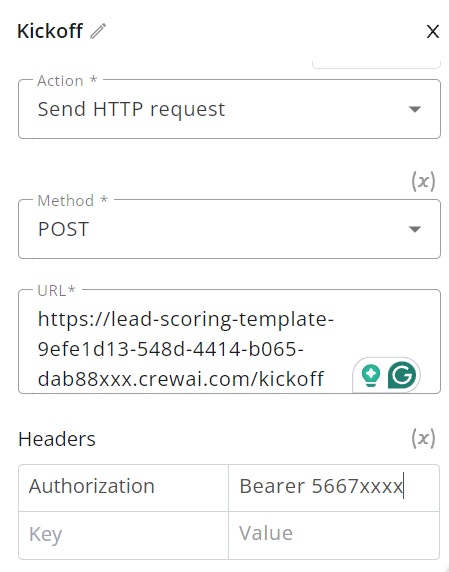 * In the body, include the JSON content as configured in step 2
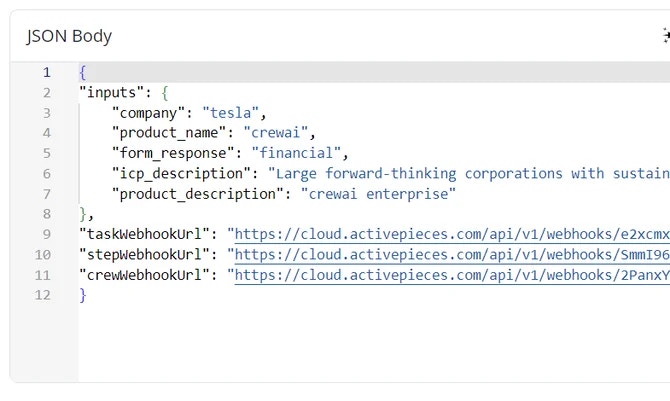 * The crew will then kickoff at the pre-defined time.
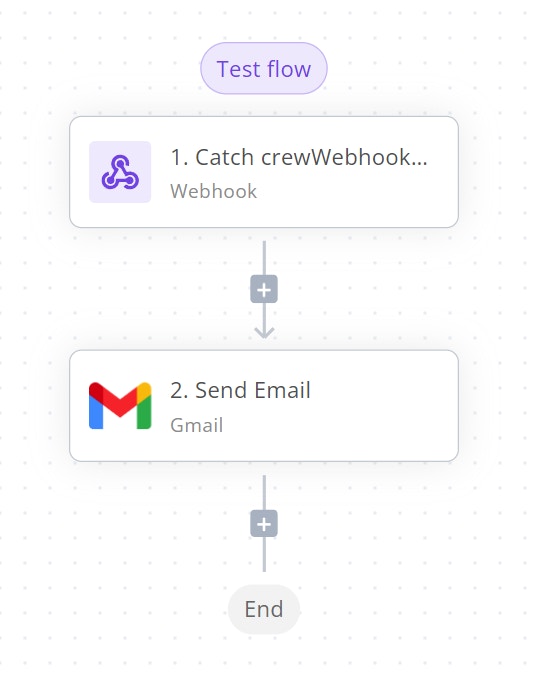 2. Add a webhook step as the trigger:
* Select `Catch Webhook` as the trigger type
* This will generate a unique URL that will receive HTTP requests and trigger your flow
2. Add a webhook step as the trigger:
* Select `Catch Webhook` as the trigger type
* This will generate a unique URL that will receive HTTP requests and trigger your flow
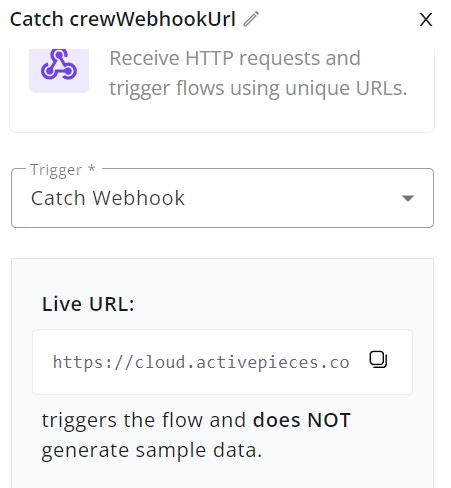 * Configure the email to use crew webhook body text
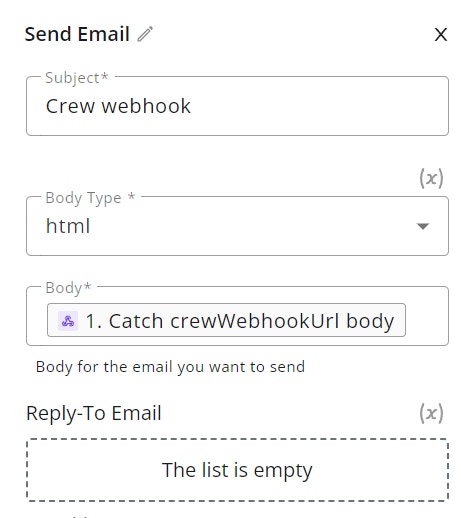
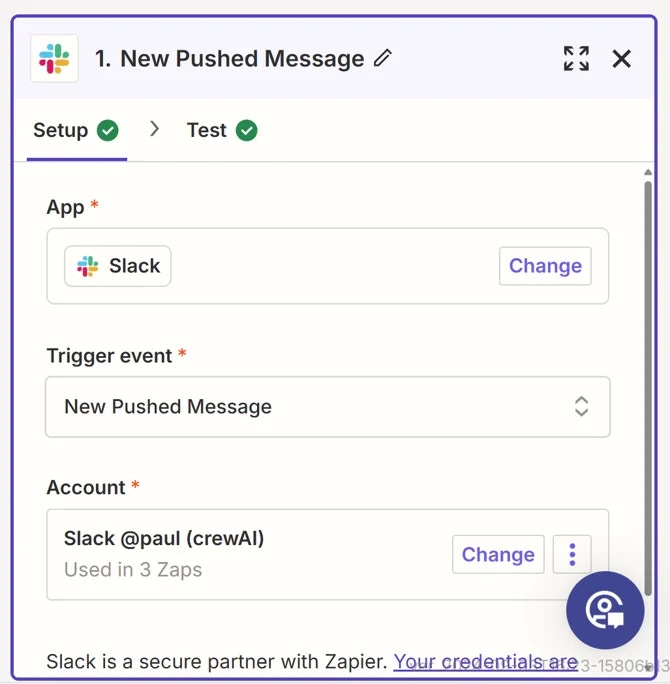 * Select `New Pushed Message` as the Trigger Event.
* Connect your Slack account if you haven't already.
* Select `New Pushed Message` as the Trigger Event.
* Connect your Slack account if you haven't already.
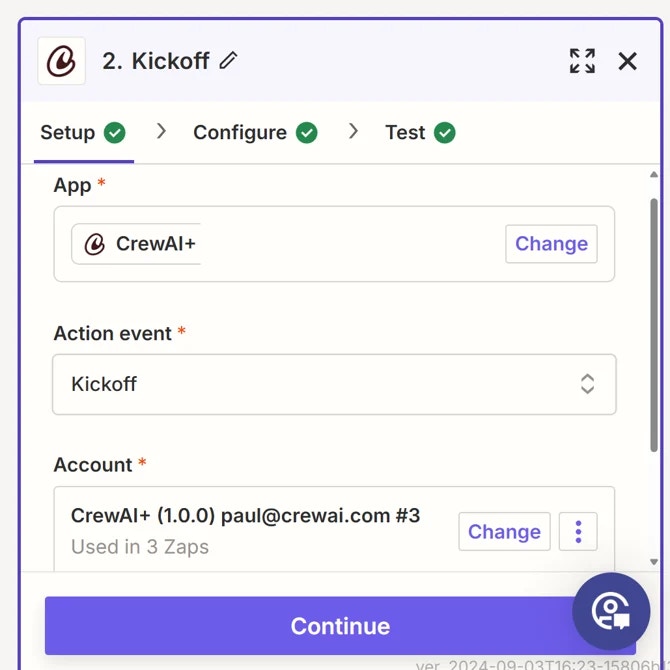
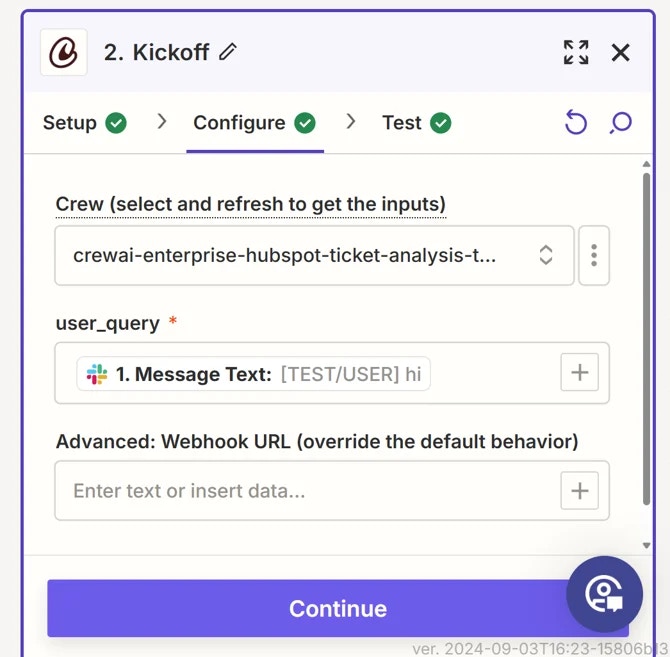 * Configure the inputs for the Crew using the data from the Slack message.
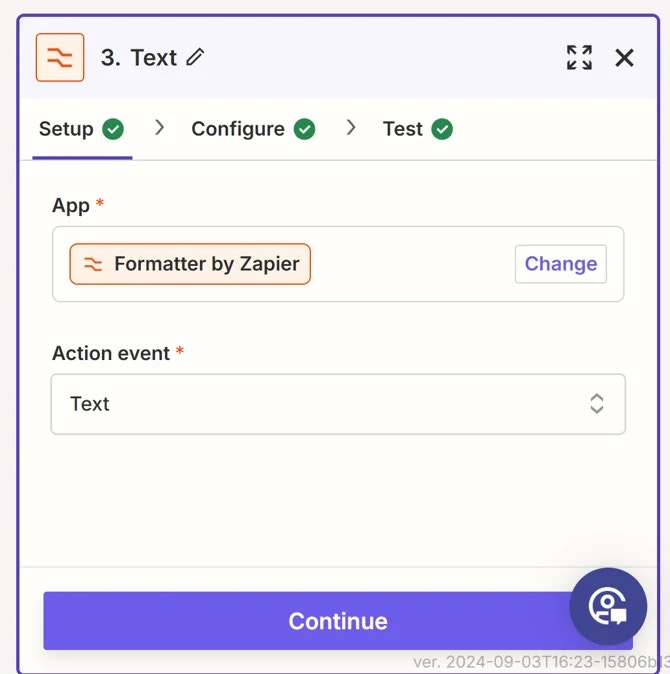
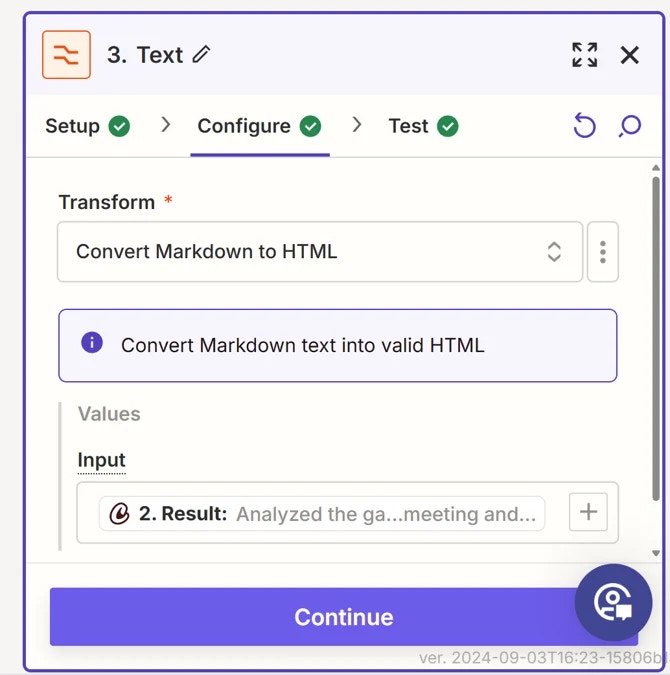
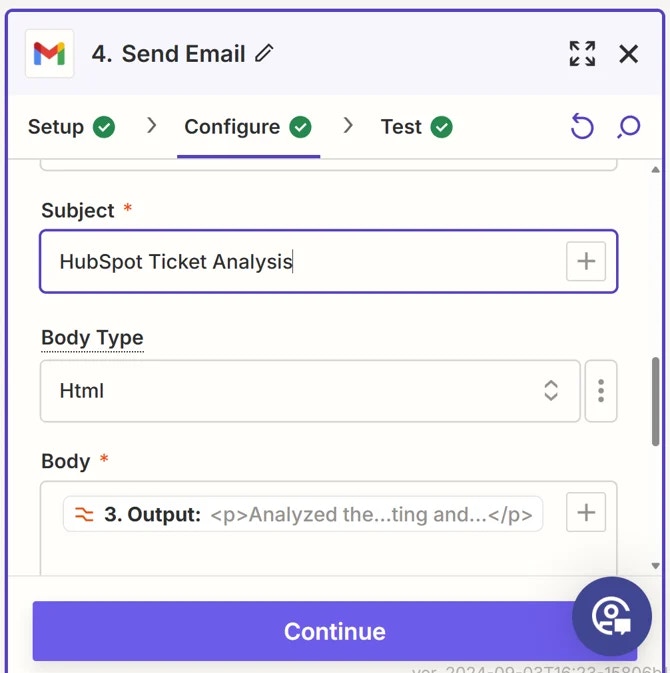
 * Select the 3 ellipsis button and then chose Push to Zapier