# Comfy
> ## Documentation Index
---
# Source: https://docs.comfy.org/interface/settings/3d.md
> ## Documentation Index
> Fetch the complete documentation index at: https://docs.comfy.org/llms.txt
> Use this file to discover all available pages before exploring further.
# ComfyUI 3D Settings
> Detailed description of ComfyUI 3D setting options
This section of settings is mainly used to control the initialization settings of 3D-related components in ComfyUI, including camera, lighting, scene, etc. When creating new 3D components, they will be initialized according to these settings. After creation, these settings can still be adjusted individually.
## Camera
### Initial Camera Type
* **Options**:
* `perspective`
* `orthographic`
* **Function**: Controls whether the default camera is perspective or orthographic when creating new 3D components. This default setting can still be switched individually for each component after creation
## Light
The light settings in this section are used to set the default lighting settings for 3D components. The corresponding settings in the 3D settings in ComfyUI can also be modified.
### Light Adjustment Increment
* **Default Value**: 0.5
* **Function**: Controls the step size when adjusting light intensity in 3D scenes. Smaller step values allow for finer light adjustments, while larger values make each adjustment more noticeable
### Light Intensity Minimum
* **Default Value**: 1
* **Function**: Sets the minimum light intensity value allowed in 3D scenes. This defines the lowest brightness that can be set when adjusting the lighting of any 3D control
### Light Intensity Maximum
* **Default Value**: 10
* **Function**: Sets the maximum light intensity value allowed in 3D scenes. This defines the upper limit of brightness that can be set when adjusting the lighting of any 3D control
### Initial Light Intensity
* **Default Value**: 3
* **Function**: Sets the default brightness level of lights in 3D scenes. This value determines the intensity with which lights illuminate objects when creating new 3D controls, but each control can be adjusted individually after creation
## Scene
### Initial Background Color
* **Function**: Controls the default background color of 3D scenes. This setting determines the background appearance when creating new 3D components, but each component can be adjusted individually after creation
* **Default Value**: `282828` (dark gray)
Change the background color, which can also be adjusted in the canvas.
### Initial Preview Visibility
* **Function**: Controls whether the preview screen is displayed by default when creating new 3D components. This default setting can still be toggled individually for each component after creation
* **Default Value**: true (enabled)
### Initial Grid Visibility
* **Function**: Controls whether the grid is displayed by default when creating new 3D components. This default setting can still be toggled individually for each component after creation
* **Default Value**: true (enabled)
Hide or show the grid on initialization
---
# Source: https://docs.comfy.org/built-in-nodes/BasicScheduler.md
> ## Documentation Index
> Fetch the complete documentation index at: https://docs.comfy.org/llms.txt
> Use this file to discover all available pages before exploring further.
# BasicScheduler - ComfyUI Built-in Node Documentation
> The BasicScheduler node is used to compute a sequence of sigma values for diffusion models based on the provided scheduler, model, and denoising parameters.
The `BasicScheduler` node is designed to compute a sequence of sigma values for diffusion models based on the provided scheduler, model, and denoising parameters. It dynamically adjusts the total number of steps based on the denoise factor to fine-tune the diffusion process, providing precise "recipes" for different stages in advanced sampling processes that require fine control (such as multi-stage sampling).
## Inputs
| Parameter | Data Type | Input Type | Default | Range | Metaphor Description | Technical Purpose |
| ----------- | -------------- | ---------- | ------- | --------- | ------------------------------------------------------------------------- | ---------------------------------------------------------- |
| `model` | MODEL | Input | - | - | **Canvas Type**: Different canvas materials need different paint formulas | Diffusion model object, determines sigma calculation basis |
| `scheduler` | COMBO\[STRING] | Widget | - | 9 options | **Mixing Technique**: Choose how paint concentration changes | Scheduling algorithm, controls noise decay mode |
| `steps` | INT | Widget | 20 | 1-10000 | **Mixing Count**: 20 mixes vs 50 mixes precision difference | Sampling steps, affects generation quality and speed |
| `denoise` | FLOAT | Widget | 1.0 | 0.0-1.0 | **Creation Intensity**: Control level from fine-tuning to repainting | Denoising strength, supports partial repainting scenarios |
### Scheduler Types
Based on source code `comfy.samplers.SCHEDULER_NAMES`, supports the following 9 schedulers:
| Scheduler Name | Characteristics | Use Cases | Noise Decay Pattern |
| --------------------- | ----------------- | ----------------------------- | ----------------------------- |
| **normal** | Standard linear | General scenarios, balanced | Uniform decay |
| **karras** | Smooth transition | High quality, detail-rich | Smooth non-linear decay |
| **exponential** | Exponential decay | Fast generation, efficiency | Exponential rapid decay |
| **sgm\_uniform** | SGM uniform | Specific model optimization | SGM optimized decay |
| **simple** | Simple scheduling | Quick testing, basic use | Simplified decay |
| **ddim\_uniform** | DDIM uniform | DDIM sampling optimization | DDIM specific decay |
| **beta** | Beta distribution | Special distribution needs | Beta function decay |
| **linear\_quadratic** | Linear quadratic | Complex scenario optimization | Quadratic function decay |
| **kl\_optimal** | KL optimal | Theoretical optimization | KL divergence optimized decay |
## Outputs
| Parameter | Data Type | Output Type | Metaphor Description | Technical Meaning |
| --------- | --------- | ----------- | ------------------------------------------------------------------------------ | -------------------------------------------------------------- |
| `sigmas` | SIGMAS | Output | **Paint Recipe Chart**: Detailed paint concentration list for step-by-step use | Noise level sequence, guides diffusion model denoising process |
## Node Role: Artist's Color Mixing Assistant
Imagine you are an artist creating a clear image from a chaotic mixture of paint (noise). `BasicScheduler` acts like your **professional color mixing assistant**, whose job is to prepare a series of precise paint concentration recipes:
### Workflow
* **Step 1**: Use 90% concentration paint (high noise level)
* **Step 2**: Use 80% concentration paint
* **Step 3**: Use 70% concentration paint
* **...**
* **Final Step**: Use 0% concentration (clean canvas, no noise)
### Color Assistant's Special Skills
**Different mixing methods (scheduler)**:
* **"karras" mixing method**: Paint concentration changes very smoothly, like professional artist's gradient technique
* **"exponential" mixing method**: Paint concentration decreases rapidly, suitable for quick creation
* **"linear" mixing method**: Paint concentration decreases uniformly, stable and controllable
**Fine control (steps)**:
* **20 mixes**: Quick painting, efficiency priority
* **50 mixes**: Fine painting, quality priority
**Creation intensity (denoise)**:
* **1.0 = Complete new creation**: Start completely from blank canvas
* **0.5 = Half transformation**: Keep half of original painting, transform half
* **0.2 = Fine adjustment**: Only make subtle adjustments to original painting
### Collaboration with Other Nodes
`BasicScheduler` (Color Assistant) → Prepare Recipe → `SamplerCustom` (Artist) → Actual Painting → Completed Work
---
# Source: https://docs.comfy.org/built-in-nodes/Canny.md
> ## Documentation Index
> Fetch the complete documentation index at: https://docs.comfy.org/llms.txt
> Use this file to discover all available pages before exploring further.
# Canny - ComfyUI Built-in Node Documentation
> The Canny node used to extract edge lines from photos.
Extract all edge lines from photos, like using a pen to outline a photo, drawing out the contours and detail boundaries of objects.
## Working Principle
Imagine you are an artist who needs to use a pen to outline a photo. The Canny node acts like an intelligent assistant, helping you decide where to draw lines (edges) and where not to.
This process is like a screening job:
* **High threshold** is the "must draw line standard": only very obvious and clear contour lines will be drawn, such as facial contours of people and building frames
* **Low threshold** is the "definitely don't draw line standard": edges that are too weak will be ignored to avoid drawing noise and meaningless lines
* **Middle area**: edges between the two standards will be drawn together if they connect to "must draw lines", but won't be drawn if they are isolated
The final output is a black and white image, where white parts are detected edge lines and black parts are areas without edges.
## Inputs
| Parameter Name | Data Type | Input Type | Default | Range | Function Description |
| ---------------- | --------- | ---------- | ------- | --------- | --------------------------------------------------------------------------------------------------------------- |
| `image` | IMAGE | Input | - | - | Original photo that needs edge extraction |
| `low_threshold` | FLOAT | Widget | 0.4 | 0.01-0.99 | Low threshold, determines how weak edges to ignore. Lower values preserve more details but may produce noise |
| `high_threshold` | FLOAT | Widget | 0.8 | 0.01-0.99 | High threshold, determines how strong edges to preserve. Higher values only keep the most obvious contour lines |
## Outputs
| Output Name | Data Type | Description |
| ----------- | --------- | ----------------------------------------------------------------------------------------------- |
| `image` | IMAGE | Black and white edge image, white lines are detected edges, black areas are parts without edges |
## Parameter Comparison
**Common Issues:**
* Broken edges: Try lowering high threshold
* Too much noise: Raise low threshold
* Missing important details: Lower low threshold
* Edges too rough: Check input image quality and resolution
---
# Source: https://docs.comfy.org/built-in-nodes/CheckpointLoaderSimple.md
> ## Documentation Index
> Fetch the complete documentation index at: https://docs.comfy.org/llms.txt
> Use this file to discover all available pages before exploring further.
# CheckpointLoaderSimple - ComfyUI Built-in Node Documentation
> The CheckpointLoaderSimple node is used to load model files from specified locations and decompose them into three core components: the main model, text encoder, and image encoder/decoder.
This is a model loader node that loads model files from specified locations and decomposes them into three core components: the main model, text encoder, and image encoder/decoder.
This node automatically detects all model files in the `ComfyUI/models/checkpoints` folder, as well as additional paths configured in your `extra_model_paths.yaml` file.
1. **Model Compatibility**: Ensure the selected model is compatible with your workflow. Different model types (such as SD1.5, SDXL, Flux, etc.) need to be paired with corresponding samplers and other nodes
2. **File Management**: Place model files in the `ComfyUI/models/checkpoints` folder, or configure other paths through extra\_model\_paths.yaml
3. **Interface Refresh**: If new model files are added while ComfyUI is running, you need to refresh the browser (Ctrl+R) to see the new files in the dropdown list
## Inputs
| Parameter | Data Type | Input Type | Default | Range | Description |
| ----------- | --------- | ---------- | ------- | ------------------------------------- | ----------------------------------------------------------------------------------------------------------------- |
| `ckpt_name` | STRING | Widget | null | All model files in checkpoints folder | Select the checkpoint model file name to load, which determines the AI model used for subsequent image generation |
## Outputs
| Output Name | Data Type | Description |
| ----------- | --------- | --------------------------------------------------------------------------------------------------------------- |
| `MODEL` | MODEL | The main diffusion model used for image denoising generation, the core component of AI image creation |
| `CLIP` | CLIP | The model used for encoding text prompts, converting text descriptions into information that AI can understand |
| `VAE` | VAE | The model used for image encoding and decoding, responsible for converting between pixel space and latent space |
---
# Source: https://docs.comfy.org/built-in-nodes/ClipLoader.md
> ## Documentation Index
> Fetch the complete documentation index at: https://docs.comfy.org/llms.txt
> Use this file to discover all available pages before exploring further.
# ClipLoader - ComfyUI Built-in Node Documentation
> The ClipLoader node is used to load CLIP text encoder models independently.
This node is primarily used for loading CLIP text encoder models independently.
The model files can be detected in the following paths:
* "ComfyUI/models/text\_encoders/"
* "ComfyUI/models/clip/"
> If you save a model after ComfyUI has started, you'll need to refresh the ComfyUI frontend to get the latest model file path list
Supported model formats:
* `.ckpt`
* `.pt`
* `.pt2`
* `.bin`
* `.pth`
* `.safetensors`
* `.pkl`
* `.sft`
For more details on the latest model file loading, please refer to [folder\_paths](https://github.com/comfyanonymous/ComfyUI/blob/master/folder_paths.py)
## Inputs
| Parameter | Data Type | Description |
| ----------- | -------------- | -------------------------------------------------------------------------------------------------------------------------------------------------------------------------------------------------------------------------------------------------- |
| `clip_name` | COMBO\[STRING] | Specifies the name of the CLIP model to be loaded. This name is used to locate the model file within a predefined directory structure. |
| `type` | COMBO\[STRING] | Determines the type of CLIP model to load. As ComfyUI supports more models, new types will be added here. Please check the `CLIPLoader` class definition in [node.py](https://github.com/comfyanonymous/ComfyUI/blob/master/nodes.py) for details. |
| `device` | COMBO\[STRING] | Choose the device for loading the CLIP model. `default` will run the model on GPU, while selecting `CPU` will force loading on CPU. |
### Device Options Explained
**When to choose "default":**
* Have sufficient GPU memory
* Want the best performance
* Let the system optimize memory usage automatically
**When to choose "cpu":**
* Insufficient GPU memory
* Need to reserve GPU memory for other models (like UNet)
* Running in a low VRAM environment
* Debugging or special purpose needs
**Performance Impact**
Running on CPU will be much slower than GPU, but it can save valuable GPU memory for other more important model components. In memory-constrained environments, putting the CLIP model on CPU is a common optimization strategy.
### Supported Combinations
| Model Type | Corresponding Encoder |
| ----------------- | ----------------------- |
| stable\_diffusion | clip-l |
| stable\_cascade | clip-g |
| sd3 | t5 xxl/ clip-g / clip-l |
| stable\_audio | t5 base |
| mochi | t5 xxl |
| cosmos | old t5 xxl |
| lumina2 | gemma 2 2B |
| wan | umt5 xxl |
As ComfyUI updates, these combinations may expand. For details, please refer to the `CLIPLoader` class definition in [node.py](https://github.com/comfyanonymous/ComfyUI/blob/master/nodes.py)
## Outputs
| Parameter | Data Type | Description |
| --------- | --------- | ------------------------------------------------------------------------------- |
| `clip` | CLIP | The loaded CLIP model, ready for use in downstream tasks or further processing. |
## Additional Notes
CLIP models play a core role as text encoders in ComfyUI, responsible for converting text prompts into numerical representations that diffusion models can understand. You can think of them as translators, responsible for translating your text into a language that large models can understand. Of course, different models have their own "dialects," so different CLIP encoders are needed between different architectures to complete the text encoding process.
---
# Source: https://docs.comfy.org/built-in-nodes/ClipMergeSimple.md
> ## Documentation Index
> Fetch the complete documentation index at: https://docs.comfy.org/llms.txt
> Use this file to discover all available pages before exploring further.
# ClipMergeSimple - ComfyUI Built-in Node Documentation
> The ClipMergeSimple node is used to combine two CLIP text encoder models based on a specified ratio.
`CLIPMergeSimple` is an advanced model merging node used to combine two CLIP text encoder models based on a specified ratio.
This node specializes in merging two CLIP models based on a specified ratio, effectively blending their characteristics. It selectively applies patches from one model to another, excluding specific components like position IDs and logit scale, to create a hybrid model that combines features from both source models.
## Inputs
| Parameter | Data Type | Description |
| --------- | --------- | --------------------------------------------------------------------------------------------------------------------------------------------------------------------------------------------------------------------------------- |
| `clip1` | CLIP | The first CLIP model to be merged. It serves as the base model for the merging process. |
| `clip2` | CLIP | The second CLIP model to be merged. Its key patches, except for position IDs and logit scale, are applied to the first model based on the specified ratio. |
| `ratio` | FLOAT | Range `0.0 - 1.0`, determines the proportion of features from the second model to blend into the first model. A ratio of 1.0 means fully adopting the second model's features, while 0.0 retains only the first model's features. |
## Outputs
| Parameter | Data Type | Description |
| --------- | --------- | ---------------------------------------------------------------------------------------------------------------- |
| `clip` | CLIP | The resulting merged CLIP model, incorporating features from both input models according to the specified ratio. |
## Merging Mechanism Explained
### Merging Algorithm
The node uses weighted averaging to merge the two models:
1. **Clone Base Model**: First clones `clip1` as the base model
2. **Get Patches**: Obtains all key patches from `clip2`
3. **Filter Special Keys**: Skips keys ending with `.position_ids` and `.logit_scale`
4. **Apply Weighted Merge**: Uses the formula `(1.0 - ratio) * clip1 + ratio * clip2`
### Ratio Parameter Explained
* **ratio = 0.0**: Fully uses clip1, ignores clip2
* **ratio = 0.5**: 50% contribution from each model
* **ratio = 1.0**: Fully uses clip2, ignores clip1
## Use Cases
1. **Model Style Fusion**: Combine characteristics of CLIP models trained on different data
2. **Performance Optimization**: Balance strengths and weaknesses of different models
3. **Experimental Research**: Explore combinations of different CLIP encoders
---
# Source: https://docs.comfy.org/built-in-nodes/ClipSave.md
> ## Documentation Index
> Fetch the complete documentation index at: https://docs.comfy.org/llms.txt
> Use this file to discover all available pages before exploring further.
# ClipSave - ComfyUI Built-in Node Documentation
> The ClipSave node is used to save CLIP text encoder models in SafeTensors format.
The `CLIPSave` node is designed for saving CLIP text encoder models in SafeTensors format. This node is part of advanced model merging workflows and is typically used in conjunction with nodes like `CLIPMergeSimple` and `CLIPMergeAdd`. The saved files use the SafeTensors format to ensure security and compatibility.
## Inputs
| Parameter | Data Type | Required | Default Value | Description |
| ---------------- | -------------- | -------- | -------------- | ------------------------------------------ |
| clip | CLIP | Yes | - | The CLIP model to be saved |
| filename\_prefix | STRING | Yes | "clip/ComfyUI" | The prefix path for the saved file |
| prompt | PROMPT | Hidden | - | Workflow prompt information (for metadata) |
| extra\_pnginfo | EXTRA\_PNGINFO | Hidden | - | Additional PNG information (for metadata) |
## Outputs
This node has no defined output types. It saves the processed files to the `ComfyUI/output/` folder.
### Multi-file Saving Strategy
The node saves different components based on the CLIP model type:
| Prefix Type | File Suffix | Description |
| ------------ | ----------- | --------------------- |
| `clip_l.` | `_clip_l` | CLIP-L text encoder |
| `clip_g.` | `_clip_g` | CLIP-G text encoder |
| Empty prefix | No suffix | Other CLIP components |
## Usage Notes
1. **File Location**: All files are saved in the `ComfyUI/output/` directory
2. **File Format**: Models are saved in SafeTensors format for security
3. **Metadata**: Includes workflow information and PNG metadata if available
4. **Naming Convention**: Uses the specified prefix plus appropriate suffixes based on model type
---
# Source: https://docs.comfy.org/built-in-nodes/ClipSetLastLayer.md
> ## Documentation Index
> Fetch the complete documentation index at: https://docs.comfy.org/llms.txt
> Use this file to discover all available pages before exploring further.
# ClipSetLastLayer - ComfyUI Built-in Node Documentation
> The ClipSetLastLayer node is used to control the processing depth of CLIP models.
`CLIP Set Last Layer` is a core node in ComfyUI for controlling the processing depth of CLIP models. It allows users to precisely control where the CLIP text encoder stops processing, affecting both the depth of text understanding and the style of generated images.
Imagine the CLIP model as a 24-layer intelligent brain:
* Shallow layers (1-8): Recognize basic letters and words
* Middle layers (9-16): Understand grammar and sentence structure
* Deep layers (17-24): Grasp abstract concepts and complex semantics
`CLIP Set Last Layer` works like a **"thinking depth controller"**:
-1: Use all 24 layers (complete understanding)
-2: Stop at layer 23 (slightly simplified)
-12: Stop at layer 13 (medium understanding)
-24: Use only layer 1 (basic understanding)
## Inputs
| Parameter | Data Type | Default | Range | Description |
| -------------------- | --------- | ------- | --------- | ----------------------------------------------------------------------------------- |
| `clip` | CLIP | - | - | The CLIP model to be modified |
| `stop_at_clip_layer` | INT | -1 | -24 to -1 | Specifies which layer to stop at, -1 uses all layers, -24 uses only the first layer |
## Outputs
| Output Name | Data Type | Description |
| ----------- | --------- | -------------------------------------------------------------------- |
| clip | CLIP | The modified CLIP model with the specified layer set as the last one |
## Why Set the Last Layer
* **Performance Optimization**: Like not needing a PhD to understand simple sentences, sometimes shallow understanding is enough and faster
* **Style Control**: Different levels of understanding produce different artistic styles
* **Compatibility**: Some models might perform better at specific layers
---
# Source: https://docs.comfy.org/built-in-nodes/ClipTextEncode.md
> ## Documentation Index
> Fetch the complete documentation index at: https://docs.comfy.org/llms.txt
> Use this file to discover all available pages before exploring further.
# ClipTextEncode - ComfyUI Built-in Node Documentation
> The ClipTextEncode node is used to convert text prompts into AI-understandable 'language' for image generation.
`CLIP Text Encode (CLIPTextEncode)` acts like a translator, converting your creative text prompts into a special "language" that AI can understand, helping the AI accurately interpret what kind of image you want to create.
Imagine communicating with a foreign artist - you need a translator to help accurately convey the artwork you want. This node acts as that translator, using the CLIP model (an AI model trained on vast amounts of image-text pairs) to understand your text descriptions and convert them into "instructions" that the AI art model can understand.
## Inputs
| Parameter | Data Type | Input Method | Default | Range | Description |
| --------- | --------- | --------------- | ------- | ------------------ | ---------------------------------------------------------------------------------------------------------------------------------------------------- |
| text | STRING | Text Input | Empty | Any text | Like detailed instructions to an artist, enter your image description here. Supports multi-line text for detailed descriptions. |
| clip | CLIP | Model Selection | None | Loaded CLIP models | Like choosing a specific translator, different CLIP models are like different translators with slightly different understandings of artistic styles. |
## Outputs
| Output Name | Data Type | Description |
| ------------ | ------------ | --------------------------------------------------------------------------------------------------------------------------------------------------------------------------------------------------------------- |
| CONDITIONING | CONDITIONING | These are the translated "painting instructions" containing detailed creative guidance that the AI model can understand. These instructions tell the AI model how to create an image matching your description. |
## Usage Tips
1. **Basic Text Prompt Usage**
* Write detailed descriptions like you're writing a short essay
* More specific descriptions lead to more accurate results
* Use English commas to separate different descriptive elements
2. **Special Feature: Using Embedding Models**
* Embedding models are like preset art style packages that can quickly apply specific artistic effects
* Currently supports .safetensors, .pt, and .bin file formats, and you don't necessarily need to use the complete model name
* How to use:
1. Place the embedding model file (in .pt format) in the `ComfyUI/models/embeddings` folder
2. Use `embedding:model_name` in your text
Example: If you have a model called `EasyNegative.pt`, you can use it like this:
```
a beautiful landscape, embedding:EasyNegative, high quality
```
3. **Prompt Weight Adjustment**
* Use parentheses to adjust the importance of certain descriptions
* For example: `(beautiful:1.2)` will make the "beautiful" feature more prominent
* Regular parentheses `()` have a default weight of 1.1
* Use keyboard shortcuts `ctrl + up/down arrow` to quickly adjust weights
* The weight adjustment step size can be modified in settings
4. **Important Notes**
* Ensure the CLIP model is properly loaded
* Use positive and clear text descriptions
* When using embedding models, make sure the file name is correct and compatible with your current main model's architecture
---
# Source: https://docs.comfy.org/built-in-nodes/ClipTextEncodeFlux.md
> ## Documentation Index
> Fetch the complete documentation index at: https://docs.comfy.org/llms.txt
> Use this file to discover all available pages before exploring further.
# ClipTextEncodeFlux - ComfyUI Built-in Node Documentation
> The ClipTextEncodeFlux node is used to encode text prompts into Flux-compatible conditioning embeddings.
`CLIPTextEncodeFlux` is an advanced text encoding node in ComfyUI, specifically designed for the Flux architecture. It uses a dual-encoder mechanism (CLIP-L and T5XXL) to process both structured keywords and detailed natural language descriptions, providing the Flux model with more accurate and comprehensive text understanding for improved text-to-image generation quality.
This node is based on a dual-encoder collaboration mechanism:
1. The `clip_l` input is processed by the CLIP-L encoder, extracting style, theme, and other keyword features—ideal for concise descriptions.
2. The `t5xxl` input is processed by the T5XXL encoder, which excels at understanding complex and detailed natural language scene descriptions.
3. The outputs from both encoders are fused, and combined with the `guidance` parameter to generate unified conditioning embeddings (`CONDITIONING`) for downstream Flux sampler nodes, controlling how closely the generated content matches the text description.
## Inputs
| Parameter | Data Type | Input Method | Default | Range | Description |
| ---------- | --------- | ------------ | ------- | ---------------- | ---------------------------------------------------------------------------------------------------------------------- |
| `clip` | CLIP | Node input | None | - | Must be a CLIP model supporting the Flux architecture, including both CLIP-L and T5XXL encoders |
| `clip_l` | STRING | Text box | None | Up to 77 tokens | Suitable for concise keyword descriptions, such as style or theme |
| `t5xxl` | STRING | Text box | None | Nearly unlimited | Suitable for detailed natural language descriptions, expressing complex scenes and details |
| `guidance` | FLOAT | Slider | 3.5 | 0.0 - 100.0 | Controls the influence of text conditions on the generation process; higher values mean stricter adherence to the text |
## Outputs
| Output Name | Data Type | Description |
| -------------- | ------------ | ------------------------------------------------------------------------------------------------------------------ |
| `CONDITIONING` | CONDITIONING | Contains the fused embeddings from both encoders and the guidance parameter, used for conditional image generation |
## Usage Examples
### Prompt Examples
* **clip\_l input** (keyword style):
* Use structured, concise keyword combinations
* Example: `masterpiece, best quality, portrait, oil painting, dramatic lighting`
* Focus on style, quality, and main subject
* **t5xxl input** (natural language description):
* Use complete, fluent scene descriptions
* Example: `A highly detailed portrait in oil painting style, featuring dramatic chiaroscuro lighting that creates deep shadows and bright highlights, emphasizing the subject's features with renaissance-inspired composition.`
* Focus on scene details, spatial relationships, and lighting effects
### Notes
1. Make sure to use a CLIP model compatible with the Flux architecture
2. It is recommended to fill in both `clip_l` and `t5xxl` to leverage the dual-encoder advantage
3. Note the 77-token limit for `clip_l`
4. Adjust the `guidance` parameter based on the generated results
---
# Source: https://docs.comfy.org/built-in-nodes/ClipTextEncodeHunyuanDit.md
> ## Documentation Index
> Fetch the complete documentation index at: https://docs.comfy.org/llms.txt
> Use this file to discover all available pages before exploring further.
# ClipTextEncodeHunyuanDit - ComfyUI Built-in Node Documentation
> The ClipTextEncodeHunyuanDit node is used to encode text prompts into HunyuanDiT-compatible conditioning embeddings.
The `CLIPTextEncodeHunyuanDiT` node's main function is to convert input text into a form that the model can understand. It is an advanced conditioning node specifically designed for the dual text encoder architecture of the HunyuanDiT model.
Its primary role is like a translator, converting our text descriptions into "machine language" that the AI model can understand. The `bert` and `mt5xl` inputs prefer different types of prompt inputs.
## Inputs
| Parameter | Data Type | Description |
| --------- | --------- | -------------------------------------------------------------------------------------------------------------------------------------------- |
| `clip` | CLIP | A CLIP model instance used for text tokenization and encoding, which is core to generating conditions. |
| `bert` | STRING | Text input for encoding, prefers phrases and keywords, supports multiline and dynamic prompts. |
| `mt5xl` | STRING | Another text input for encoding, supports multiline and dynamic prompts (multilingual), can use complete sentences and complex descriptions. |
## Outputs
| Parameter | Data Type | Description |
| -------------- | ------------ | ------------------------------------------------------------------------------- |
| `CONDITIONING` | CONDITIONING | The encoded conditional output used for further processing in generation tasks. |
---
# Source: https://docs.comfy.org/built-in-nodes/ClipTextEncodeSdxl.md
> ## Documentation Index
> Fetch the complete documentation index at: https://docs.comfy.org/llms.txt
> Use this file to discover all available pages before exploring further.
# ClipTextEncodeSdxl - ComfyUI Built-in Node Documentation
> The ClipTextEncodeSdxl node is used to encode text prompts into SDXL-compatible conditioning embeddings.
This node is designed to encode text input using a CLIP model specifically customized for the SDXL architecture. It uses a dual encoder system (CLIP-L and CLIP-G) to process text descriptions, resulting in more accurate image generation.
## Inputs
| Parameter | Data Type | Description |
| --------------- | --------- | ------------------------------------------------------ |
| `clip` | CLIP | CLIP model instance used for text encoding. |
| `width` | INT | Specifies the image width in pixels, default 1024. |
| `height` | INT | Specifies the image height in pixels, default 1024. |
| `crop_w` | INT | Width of the crop area in pixels, default 0. |
| `crop_h` | INT | Height of the crop area in pixels, default 0. |
| `target_width` | INT | Target width for the output image, default 1024. |
| `target_height` | INT | Target height for the output image, default 1024. |
| `text_g` | STRING | Global text description for overall scene description. |
| `text_l` | STRING | Local text description for detail description. |
## Outputs
| Parameter | Data Type | Description |
| -------------- | ------------ | ------------------------------------------------------------------------------ |
| `CONDITIONING` | CONDITIONING | Contains encoded text and conditional information needed for image generation. |
---
# Source: https://docs.comfy.org/built-in-nodes/ClipTextEncodeSdxlRefiner.md
> ## Documentation Index
> Fetch the complete documentation index at: https://docs.comfy.org/llms.txt
> Use this file to discover all available pages before exploring further.
# ClipTextEncodeSdxlRefiner - ComfyUI Built-in Node Documentation
> The ClipTextEncodeSdxlRefiner node is used to encode text prompts into SDXL Refiner-compatible conditioning embeddings.
This node is specifically designed for the SDXL Refiner model to convert text prompts into conditioning information by incorporating aesthetic scores and dimensional information to enhance the conditions for generation tasks, thereby improving the final refinement effect. It acts like a professional art director, not only conveying your creative intent but also injecting precise aesthetic standards and specification requirements into the work.
## About SDXL Refiner
SDXL Refiner is a specialized refinement model that focuses on enhancing image details and quality based on the SDXL base model. This process is like having an art retoucher:
1. First, it receives preliminary images or text descriptions generated by the base model
2. Then, it guides the refinement process through precise aesthetic scoring and dimensional parameters
3. Finally, it focuses on processing high-frequency image details to improve overall quality
Refiner can be used in two ways:
* As a standalone refinement step for post-processing images generated by the base model
* As part of an expert integration system, taking over processing during the low-noise phase of generation
## Inputs
| Parameter Name | Data Type | Input Type | Default Value | Value Range | Description |
| -------------- | --------- | ---------- | ------------- | ----------- | ---------------------------------------------------------------------------------------------------------------------------------------------------------------------------------------------------------------------------------------------------------------------------------------------------------- |
| `clip` | CLIP | Required | - | - | CLIP model instance used for text tokenization and encoding, the core component for converting text into model-understandable format |
| `ascore` | FLOAT | Optional | 6.0 | 0.0-1000.0 | Controls the visual quality and aesthetics of generated images, similar to setting quality standards for artwork: - High scores(7.5-8.5): Pursues more refined, detail-rich effects - Medium scores(6.0-7.0): Balanced quality control - Low scores(2.0-3.0): Suitable for negative prompts |
| `width` | INT | Required | 1024 | 64-16384 | Specifies output image width (pixels), must be multiple of 8. SDXL performs best when total pixel count is close to 1024×1024 (about 1M pixels) |
| `height` | INT | Required | 1024 | 64-16384 | Specifies output image height (pixels), must be multiple of 8. SDXL performs best when total pixel count is close to 1024×1024 (about 1M pixels) |
| `text` | STRING | Required | - | - | Text prompt description, supports multi-line input and dynamic prompt syntax. In Refiner, text prompts should focus more on describing desired visual quality and detail characteristics |
## Outputs
| Output Name | Data Type | Description |
| -------------- | ------------ | ------------------------------------------------------------------------------------------------------------------------------------------------------------------------------------------------------ |
| `CONDITIONING` | CONDITIONING | Refined conditional output containing integrated encoding of text semantics, aesthetic standards, and dimensional information, specifically for guiding SDXL Refiner model in precise image refinement |
## Notes
1. This node is specifically optimized for the SDXL Refiner model and differs from regular CLIPTextEncode nodes
2. An aesthetic score of 7.5 is recommended as the baseline, which is the standard setting used in SDXL training
3. All dimensional parameters must be multiples of 8, and total pixel count close to 1024×1024 (about 1M pixels) is recommended
4. The Refiner model focuses on enhancing image details and quality, so text prompts should emphasize desired visual effects rather than scene content
5. In practical use, Refiner is typically used in the later stages of generation (approximately the last 20% of steps), focusing on detail optimization
---
# Source: https://docs.comfy.org/built-in-nodes/ClipVisionEncode.md
> ## Documentation Index
> Fetch the complete documentation index at: https://docs.comfy.org/llms.txt
> Use this file to discover all available pages before exploring further.
# ClipVisionEncode - ComfyUI Built-in Node Documentation
> The ClipVisionEncode node is used to encode input images into visual feature vectors through the CLIP Vision model.
The `CLIP Vision Encode` node is an image encoding node in ComfyUI, used to convert input images into visual feature vectors through the CLIP Vision model. This node is an important bridge connecting image and text understanding, and is widely used in various AI image generation and processing workflows.
**Node Functionality**
* **Image feature extraction**: Converts input images into high-dimensional feature vectors
* **Multimodal bridging**: Provides a foundation for joint processing of images and text
* **Conditional generation**: Provides visual conditions for image-based conditional generation
## Inputs
| Parameter Name | Data Type | Description |
| -------------- | ------------ | -------------------------------------------------------------------- |
| `clip_vision` | CLIP\_VISION | CLIP vision model, usually loaded via the CLIPVisionLoader node |
| `image` | IMAGE | The input image to be encoded |
| `crop` | Dropdown | Image cropping method, options: center (center crop), none (no crop) |
## Outputs
| Output Name | Data Type | Description |
| -------------------- | -------------------- | ----------------------- |
| CLIP\_VISION\_OUTPUT | CLIP\_VISION\_OUTPUT | Encoded visual features |
This output object contains:
* `last_hidden_state`: The last hidden state
* `image_embeds`: Image embedding vector
* `penultimate_hidden_states`: The penultimate hidden state
* `mm_projected`: Multimodal projection result (if available)
---
# Source: https://docs.comfy.org/built-in-nodes/ClipVisionLoader.md
> ## Documentation Index
> Fetch the complete documentation index at: https://docs.comfy.org/llms.txt
> Use this file to discover all available pages before exploring further.
# Load CLIP Vision - ComfyUI Built-in Node Documentation
> The Load CLIP Vision node is used to load CLIP Vision models from the `ComfyUI/models/clip_vision` folder.
This node automatically detects models located in the `ComfyUI/models/clip_vision` folder, as well as any additional model paths configured in the `extra_model_paths.yaml` file. If you add models after starting ComfyUI, please **refresh the ComfyUI interface** to ensure the latest model files are listed.
## Inputs
| Field | Data Type | Description |
| ----------- | -------------- | --------------------------------------------------------------------------- |
| `clip_name` | COMBO\[STRING] | Lists all supported model files in the `ComfyUI/models/clip_vision` folder. |
## Outputs
| Field | Data Type | Description |
| ------------- | ------------ | ---------------------------------------------------------------------------------- |
| `clip_vision` | CLIP\_VISION | Loaded CLIP Vision model, ready for encoding images or other vision-related tasks. |
---
# Source: https://docs.comfy.org/built-in-nodes/Load3D.md
> ## Documentation Index
> Fetch the complete documentation index at: https://docs.comfy.org/llms.txt
> Use this file to discover all available pages before exploring further.
# Load3D - ComfyUI Built-in Node Documentation
> The Load3D node is a core node in ComfyUI for loading and previewing various 3D model files, supporting multi-format import and rich three-dimensional view operations.
The Load3D node is a core node for loading and processing 3D model files. When loading the node, it automatically retrieves available 3D resources from `ComfyUI/input/3d/`. You can also upload supported 3D files for preview using the upload function.
**Supported Formats**
Currently, this node supports multiple 3D file formats, including `.gltf`, `.glb`, `.obj`, `.fbx`, and `.stl`.
**3D Node Preferences**
Some related preferences for 3D nodes can be configured in ComfyUI's settings menu. Please refer to the following documentation for corresponding settings:
[Settings Menu - 3D](/interface/settings/3d)
Besides regular node outputs, Load3D has lots of 3D view-related settings in the canvas menu.
## Inputs
| Parameter Name | Type | Description | Default | Range |
| -------------- | -------------- | --------------------------------------------------------------------------------------------- | ------- | ----------------- |
| model\_file | File Selection | 3D model file path, supports upload, defaults to reading model files from `ComfyUI/input/3d/` | - | Supported formats |
| width | INT | Canvas rendering width | 1024 | 1-4096 |
| height | INT | Canvas rendering height | 1024 | 1-4096 |
## Outputs
| Parameter Name | Data Type | Description |
| ---------------- | -------------- | ---------------------------------------------------------------------------------------------- |
| image | IMAGE | Canvas rendered image |
| mask | MASK | Mask containing current model position |
| mesh\_path | STRING | Model file path |
| normal | IMAGE | Normal map |
| lineart | IMAGE | Line art image output, corresponding `edge_threshold` can be adjusted in the canvas model menu |
| camera\_info | LOAD3D\_CAMERA | Camera information |
| recording\_video | VIDEO | Recorded video (only when recording exists) |
All corresponding outputs preview
## Canvas Area Description
The Load3D node's Canvas area contains numerous view operations, including:
* Preview view settings (grid, background color, preview view)
* Camera control: Control FOV, camera type
* Global illumination intensity: Adjust lighting intensity
* Video recording: Record and export videos
* Model export: Supports `GLB`, `OBJ`, `STL` formats
* And more
1. Contains multiple menus and hidden menus of the Load 3D node
2. Menu for `resizing preview window` and `canvas video recording`
3. 3D view operation axis
4. Preview thumbnail
5. Preview size settings, scale preview view display by setting dimensions and then resizing window
### 1. View Operations
View control operations:
* Left-click + drag: Rotate the view
* Right-click + drag: Pan the view
* Middle wheel scroll or middle-click + drag: Zoom in/out
* Coordinate axis: Switch views
### 2. Left Menu Functions
In the canvas, some settings are hidden in the menu. Click the menu button to expand different menus
* 1. Scene: Contains preview window grid, background color, preview settings
* 2. Model: Model rendering mode, texture materials, up direction settings
* 3. Camera: Switch between orthographic and perspective views, and set the perspective angle size
* 4. Light: Scene global illumination intensity
* 5. Export: Export model to other formats (GLB, OBJ, STL)
#### Scene
The Scene menu provides some basic scene setting functions
1. Show/Hide grid
2. Set background color
3. Click to upload a background image
4. Hide the preview
#### Model
The Model menu provides some model-related functions
1. **Up direction**: Determine which axis is the up direction for the model
2. **Material mode**: Switch model rendering modes - Original, Normal, Wireframe, Lineart
#### Camera
This menu provides switching between orthographic and perspective views, and perspective angle size settings
1. **Camera**: Quickly switch between orthographic and orthographic views
2. **FOV**: Adjust FOV angle
#### Light
Through this menu, you can quickly adjust the scene's global illumination intensity
#### Export
This menu provides the ability to quickly convert and export model formats
### 3. Right Menu Functions
The right menu has two main functions:
1. **Reset view ratio**: After clicking the button, the view will adjust the canvas rendering area ratio according to the set width and height
2. **Video recording**: Allows you to record current 3D view operations as video, allows import, and can be output as `recording_video` to subsequent nodes
---
# Source: https://docs.comfy.org/interface/settings/about.md
> ## Documentation Index
> Fetch the complete documentation index at: https://docs.comfy.org/llms.txt
> Use this file to discover all available pages before exploring further.
# About Page
> Detailed description of ComfyUI About settings page
The About page is an information display panel in the ComfyUI settings system, used to show application version information, related links, and system statistics. These settings can provide us with critical information when you submit feedback or report issues.
### Version Information Badges
The About page displays the following core version information:
* **ComfyUI Version**: Shows the backend ComfyUI version number, linked to the official GitHub repository
* **ComfyUI\_frontend Version**: Shows the frontend interface version number, linked to the frontend GitHub repository
* **Discord Community**: Provides a link to the ComfyOrg Discord server
* **Official Website**: Links to the ComfyOrg official website
Since the version information here mainly corresponds to stable version information, if you are using the nightly version, the corresponding commit hash will not be displayed here. If you are using the nightly version, you can use the `git log` command in the corresponding ComfyUI main directory to view the corresponding commit hash and other information.
Another common issue is that different dependency packages may fail and rollback during updates.
### Custom Node Badges
If custom nodes are installed, the About page will also display additional badge information provided by custom nodes. These badges are registered by each custom node through the `aboutPageBadges` property.
### System Info
The bottom of the page displays detailed system statistics, including:
* Hardware configuration information
* Software environment information
* System performance data
## Extension Developer Guide
Extension developers can add custom badges to the About page by adding the `aboutPageBadges` property to their extension configuration:
```javascript theme={null}
app.registerExtension({
name: 'MyExtension',
aboutPageBadges: [
{
label: 'My Extension v1.0.0',
url: 'https://github.com/myuser/myextension',
icon: 'pi pi-github'
}
]
})
```
---
# Source: https://docs.comfy.org/support/payment/accepted-payment-methods.md
> ## Documentation Index
> Fetch the complete documentation index at: https://docs.comfy.org/llms.txt
> Use this file to discover all available pages before exploring further.
# Accepted payment methods
> Learn about the payment methods accepted by Comfy Organization Inc
Comfy Organization Inc uses Stripe as our payment processor, which means you can only use payment methods that Stripe accepts. Generally, you can pay with major credit and debit cards like Visa, Mastercard, and American Express, as well as some digital wallets such as Google Pay and Link in some regions. The options you see during checkout are the ones available to you.
## Credit and debit cards
We accept the following major credit and debit cards:
* Visa
* Mastercard
* American Express
## Digital wallets
You can also pay using digital wallet services:
* Google Pay
* Link
## Alternative payment methods
We also support the following payment methods, but only in USD:
* Alipay
* WeChat Pay
WeChat Pay and Alipay are only available in specific regions. Check the `Business locations` section in the Stripe documentation to verify availability in your country:
* [Stripe WeChat Pay documentation](https://docs.stripe.com/payments/wechat-pay#get-started)
* [Stripe Alipay documentation](https://docs.stripe.com/payments/alipay)
*Select **USD** as your payment currency (1) to unlock the Alipay and WeChat Pay options (2) during checkout.*
Alipay and WeChat Pay are not yet supported for Comfy Cloud Subscription.
To enable these options, choose **USD** in the Stripe billing portal currency selector. Once USD is selected, Alipay and WeChat Pay appear in the payment method list.
## Requirements
To successfully process your payment:
* Your card must have sufficient funds or available credit
* Your billing address must match the address on file with your card issuer
* International cards are accepted, but may be subject to currency conversion fees from your bank
## Security
Stripe is a PCI Service Provider Level 1, the most stringent level of certification available in the payments industry. All payment information is processed securely using industry-standard encryption. Comfy Organization Inc does not store your complete card details on our servers.
## Payment processing
Payments are processed immediately upon subscription or renewal. You will receive a confirmation email once your payment has been successfully processed.
If you experience any issues with payment processing, please contact our [support team](https://support.comfy.org/) for assistance.
---
# Source: https://docs.comfy.org/tutorials/audio/ace-step/ace-step-v1.md
> ## Documentation Index
> Fetch the complete documentation index at: https://docs.comfy.org/llms.txt
> Use this file to discover all available pages before exploring further.
# ComfyUI ACE-Step Native Example
> This guide will help you create dynamic music using the ACE-Step model in ComfyUI
ACE-Step is an open-source foundational music generation model jointly developed by Chinese team StepFun and ACE Studio, aimed at providing music creators with efficient, flexible and high-quality music generation and editing tools.
The model is released under the [Apache-2.0](https://github.com/ace-step/ACE-Step?tab=readme-ov-file#-license) license and is free for commercial use.
As a powerful music generation foundation, ACE-Step provides rich extensibility. Through fine-tuning techniques like LoRA and ControlNet, developers can customize the model according to their actual needs.
Whether it's audio editing, vocal synthesis, accompaniment production, voice cloning or style transfer applications, ACE-Step provides stable and reliable technical support.
This flexible architecture greatly simplifies the development process of music AI applications, allowing more creators to quickly apply AI technology to music creation.
Currently, ACE-Step has released related training code, including LoRA model training, and the corresponding ControlNet training code will be released in the future.
You can visit their [Github](https://github.com/ace-step/ACE-Step?tab=readme-ov-file#-roadmap) to learn more details.
Make sure your ComfyUI is updated.
* [Download ComfyUI](https://www.comfy.org/download)
* [Update Guide](/installation/update_comfyui)
Workflows in this guide can be found in the [Workflow Templates](/interface/features/template).
If you can't find them in the template, your ComfyUI may be outdated. (Desktop version's update will delay sometime)
If nodes are missing when loading a workflow, possible reasons:
1. You are not using the latest ComfyUI version (Nightly version)
2. Some nodes failed to import at startup
* The Desktop is base on ComfyUI stable release, it will auto-update when there is a new Desktop stable release available.
* [Cloud](https://cloud.comfy.org) will update after ComfyUI stable release.
So, if you find any core node missing in this document, it might be because the new core nodes have not yet been released in the latest stable version. Please wait for the next stable release.
## ACE-Step ComfyUI Text-to-Audio Generation Workflow Example
### 1. Download Workflow and Related Models
Click the button below to download the corresponding workflow file. Drag it into ComfyUI to load the workflow information. The workflow includes model download information.
You can also manually download [ace\_step\_v1\_3.5b.safetensors](https://huggingface.co/Comfy-Org/ACE-Step_ComfyUI_repackaged/blob/main/all_in_one/ace_step_v1_3.5b.safetensors) and save it to the `ComfyUI/models/checkpoints` folder
### 2. Complete the Workflow Step by Step
1. Ensure the `Load Checkpoints` node has loaded the `ace_step_v1_3.5b.safetensors` model
2. (Optional) In the `EmptyAceStepLatentAudio` node, you can set the duration of the music to be generated
3. (Optional) In the `LatentOperationTonemapReinhard` node, you can adjust the `multiplier` to control the volume of the vocals (higher numbers result in more prominent vocals)
4. (Optional) Input corresponding music styles etc. in the `tags` field of `TextEncodeAceStepAudio`
5. (Optional) Input corresponding lyrics in the `lyrics` field of `TextEncodeAceStepAudio`
6. Click the `Run` button, or use the shortcut `Ctrl(cmd) + Enter` to execute the audio generation
7. After the workflow completes,, you can preview the generated audio in the `Save Audio` node. You can click to play and listen to it, and the audio will also be saved to `ComfyUI/output/audio` (subdirectory determined by the `Save Audio` node).
## ACE-Step ComfyUI Audio-to-Audio Workflow
Similar to image-to-image workflows, you can input a piece of music and use the workflow below to resample and generate music. You can also adjust the difference from the original audio by controlling the `denoise` parameter in the `Ksampler`.
### 1. Download Workflow File
Click the button below to download the corresponding workflow file. Drag it into ComfyUI to load the workflow information.
### 2. Complete the Workflow Step by Step
1. Ensure the `Load Checkpoints` node has loaded the `ace_step_v1_3.5b.safetensors` model
2. Upload the provided audio file in the `LoadAudio` node
3. (Optional) Input corresponding music styles and lyrics in the `tags` and `lyrics` fields of `TextEncodeAceStepAudio`. Providing lyrics is very important for audio editing
4. (Optional) Modify the `denoise` parameter in the `Ksampler` node to adjust the noise added during sampling to control similarity with the original audio (smaller values result in more similarity to the original audio; setting it to `1.00` is approximately equivalent to having no audio input)
5. Click the `Run` button, or use the shortcut `Ctrl(cmd) + Enter` to execute the audio generation
6. After the workflow completes, you can preview the generated audio in the `Save Audio` node. You can click to play and listen to it, and the audio will also be saved to `ComfyUI/output/audio` (subdirectory determined by the `Save Audio` node).
You can also implement the lyrics modification and editing functionality from the ACE-Step project page, modifying the original lyrics to change the audio effect.
### 3. Additional Workflow Notes
1. In the example workflow, you can change the `tags` in `TextEncodeAceStepAudio` from `male voice` to `female voice` to generate female vocals.
2. You can also modify the `lyrics` in `TextEncodeAceStepAudio` to change the lyrics and thus the generated audio. Refer to the examples on the ACE-Step project page for more details.
## ACE-Step Prompt Guide
ACE currently uses two types of prompts: `tags` and `lyrics`.
* `tags`: Mainly used to describe music styles, scenes, etc. Similar to prompts we use for other generations, they primarily describe the overall style and requirements of the audio, separated by English commas
* `lyrics`: Mainly used to describe lyrics, supporting lyric structure tags such as \[verse], \[chorus], and \[bridge] to distinguish different parts of the lyrics. You can also input instrument names for purely instrumental music
You can find rich examples of `tags` and `lyrics` on the [ACE-Step model homepage](https://ace-step.github.io/). You can refer to these examples to try corresponding prompts. This document's prompt guide is organized based on the project to help you quickly try combinations to achieve your desired effect.
### Tags (prompt)
#### Mainstream Music Styles
Use short tag combinations to generate specific music styles
* electronic
* rock
* pop
* funk
* soul
* cyberpunk
* Acid jazz
* electro
* em (electronic music)
* soft electric drums
* melodic
#### Scene Types
Combine specific usage scenarios and atmospheres to generate music that matches the corresponding mood
* background music for parties
* radio broadcasts
* workout playlists
#### Instrumental Elements
* saxophone
* jazz
* piano, violin
#### Vocal Types
* female voice
* male voice
* clean vocals
#### Professional Terms
Use some professional terms commonly used in music to precisely control music effects
* 110 bpm (beats per minute is 110)
* fast tempo
* slow tempo
* loops
* fills
* acoustic guitar
* electric bass
{/* - Lyrics editing:
- edit lyrics: 'When I was young' -> 'When you were kid' (lyrics editing example) */}
### Lyrics
#### Lyric Structure Tags
* \[outro]
* \[verse]
* \[chorus]
* \[bridge]
#### Multilingual Support
* ACE-Step V1 supports multiple languages. When used, ACE-Step converts different languages into English letters and then generates music.
* In ComfyUI, we haven't fully implemented the conversion of all languages to English letters. Currently, only [Japanese hiragana and katakana characters](https://github.com/comfyanonymous/ComfyUI/commit/5d3cc85e13833aeb6ef9242cdae243083e30c6fc) are implemented.
So if you need to use multiple languages for music generation, you need to first convert the corresponding language to English letters, and then input the language code abbreviation at the beginning of the `lyrics`, such as Chinese `[zh]`, Korean `[ko]`, etc.
For example:
```
[verse]
[zh]wo3zou3guo4shen1ye4de5jie1dao4
[zh]leng3feng1chui1luan4si1nian4de5piao4liang4wai4tao4
[zh]ni3de5wei1xiao4xiang4xing1guang1hen3xuan4yao4
[zh]zhao4liang4le5wo3gu1du2de5mei3fen1mei3miao3
[chorus]
[verse]
[ko]hamkke si-kkeuleo-un sesang-ui sodong-eul pihae
[ko]honja ogsang-eseo dalbich-ui eolyeompus-ileul balaboda
[ko]niga salang-eun lideum-i ganghan eum-ag gatdago malhaess-eo
[ko]han ta han tamada ma-eum-ui ondoga eolmana heojeonhanji ijge hae
[bridge]
[es]cantar mi anhelo por ti sin ocultar
[es]como poesía y pintura, lleno de anhelo indescifrable
[es]tu sombra es tan terca como el viento, inborrable
[es]persiguiéndote en vuelo, brilla como cruzar una mar de nubes
[chorus]
[fr]que tu sois le vent qui souffle sur ma main
[fr]un contact chaud comme la douce pluie printanière
[fr]que tu sois le vent qui s'entoure de mon corps
[fr]un amour profond qui ne s'éloignera jamais
```
Currently, ACE-Step supports 19 languages, but the following ten languages have better support:
* English
* Chinese: \[zh]
* Russian: \[ru]
* Spanish: \[es]
* Japanese: \[ja]
* German: \[de]
* French: \[fr]
* Portuguese: \[pt]
* Italian: \[it]
* Korean: \[ko]
The language tags above have not been fully tested at the time of writing this documentation. If any language tag is incorrect, please [submit an issue to our documentation repository](https://github.com/Comfy-Org/docs/issues) and we will make timely corrections.
## ACE-Step Related Resources
* [Project Page](https://ace-step.github.io/)
* [Hugging Face](https://huggingface.co/ACE-Step/ACE-Step-v1-3.5B)
* [GitHub](https://github.com/ace-step/ACE-Step)
* [Training Scripts](https://github.com/ace-step/ACE-Step?tab=readme-ov-file#-train)
---
# Source: https://docs.comfy.org/api-reference/registry/add-review-to-a-specific-version-of-a-node.md
> ## Documentation Index
> Fetch the complete documentation index at: https://docs.comfy.org/llms.txt
> Use this file to discover all available pages before exploring further.
# Add review to a specific version of a node
## OpenAPI
````yaml https://api.comfy.org/openapi post /nodes/{nodeId}/reviews
openapi: 3.0.2
info:
title: Comfy API
version: '1.0'
servers:
- url: https://api.comfy.org
security: []
paths:
/nodes/{nodeId}/reviews:
post:
tags:
- Registry
summary: Add review to a specific version of a node
operationId: PostNodeReview
parameters:
- in: path
name: nodeId
required: true
schema:
type: string
- description: number of star given to the node version
in: query
name: star
required: true
schema:
type: integer
responses:
'200':
content:
application/json:
schema:
$ref: '#/components/schemas/Node'
description: Detailed information about a specific node
'400':
description: Bad Request
'404':
content:
application/json:
schema:
$ref: '#/components/schemas/Error'
description: Node version not found
'500':
content:
application/json:
schema:
$ref: '#/components/schemas/ErrorResponse'
description: Internal server error
components:
schemas:
Node:
properties:
author:
type: string
banner_url:
description: URL to the node's banner.
type: string
category:
deprecated: true
description: >-
DEPRECATED: The category of the node. Use 'tags' field instead. This
field will be removed in a future version.
type: string
created_at:
description: The date and time when the node was created
format: date-time
type: string
description:
type: string
downloads:
description: The number of downloads of the node.
type: integer
github_stars:
description: Number of stars on the GitHub repository.
type: integer
icon:
description: URL to the node's icon.
type: string
id:
description: The unique identifier of the node.
type: string
latest_version:
$ref: '#/components/schemas/NodeVersion'
license:
description: The path to the LICENSE file in the node's repository.
type: string
name:
description: The display name of the node.
type: string
preempted_comfy_node_names:
description: A list of Comfy node names that are preempted by this node.
items:
type: string
type: array
publisher:
$ref: '#/components/schemas/Publisher'
rating:
description: The average rating of the node.
type: number
repository:
description: URL to the node's repository.
type: string
search_ranking:
description: >-
A numerical value representing the node's search ranking, used for
sorting search results.
type: integer
status:
$ref: '#/components/schemas/NodeStatus'
status_detail:
description: The status detail of the node.
type: string
supported_accelerators:
description: >-
List of accelerators (e.g. CUDA, DirectML, ROCm) that this node
supports
items:
type: string
type: array
supported_comfyui_frontend_version:
description: Supported versions of ComfyUI frontend
type: string
supported_comfyui_version:
description: Supported versions of ComfyUI
type: string
supported_os:
description: List of operating systems that this node supports
items:
type: string
type: array
tags:
items:
type: string
type: array
tags_admin:
description: Admin-only tags for security warnings and admin metadata
items:
type: string
type: array
translations:
additionalProperties:
additionalProperties: true
type: object
description: Translations of node metadata in different languages.
type: object
type: object
Error:
properties:
details:
description: >-
Optional detailed information about the error or hints for resolving
it.
items:
type: string
type: array
message:
description: A clear and concise description of the error.
type: string
type: object
ErrorResponse:
properties:
error:
type: string
message:
type: string
required:
- error
- message
type: object
NodeVersion:
properties:
changelog:
description: Summary of changes made in this version
type: string
comfy_node_extract_status:
description: The status of comfy node extraction process.
type: string
createdAt:
description: The date and time the version was created.
format: date-time
type: string
dependencies:
description: A list of pip dependencies required by the node.
items:
type: string
type: array
deprecated:
description: Indicates if this version is deprecated.
type: boolean
downloadUrl:
description: '[Output Only] URL to download this version of the node'
type: string
id:
type: string
node_id:
description: The unique identifier of the node.
type: string
status:
$ref: '#/components/schemas/NodeVersionStatus'
status_reason:
type: string
supported_accelerators:
description: >-
List of accelerators (e.g. CUDA, DirectML, ROCm) that this node
supports
items:
type: string
type: array
supported_comfyui_frontend_version:
description: Supported versions of ComfyUI frontend
type: string
supported_comfyui_version:
description: Supported versions of ComfyUI
type: string
supported_os:
description: List of operating systems that this node supports
items:
type: string
type: array
tags:
items:
type: string
type: array
tags_admin:
description: Admin-only tags for security warnings and admin metadata
items:
type: string
type: array
version:
description: >-
The version identifier, following semantic versioning. Must be
unique for the node.
type: string
type: object
Publisher:
properties:
createdAt:
description: The date and time the publisher was created.
format: date-time
type: string
description:
type: string
id:
description: >-
The unique identifier for the publisher. It's akin to a username.
Should be lowercase.
type: string
logo:
description: URL to the publisher's logo.
type: string
members:
description: A list of members in the publisher.
items:
$ref: '#/components/schemas/PublisherMember'
type: array
name:
type: string
source_code_repo:
type: string
status:
$ref: '#/components/schemas/PublisherStatus'
support:
type: string
website:
type: string
type: object
NodeStatus:
enum:
- NodeStatusActive
- NodeStatusDeleted
- NodeStatusBanned
type: string
NodeVersionStatus:
enum:
- NodeVersionStatusActive
- NodeVersionStatusDeleted
- NodeVersionStatusBanned
- NodeVersionStatusPending
- NodeVersionStatusFlagged
type: string
PublisherMember:
properties:
id:
description: The unique identifier for the publisher member.
type: string
role:
description: The role of the user in the publisher.
type: string
user:
$ref: '#/components/schemas/PublisherUser'
type: object
PublisherStatus:
enum:
- PublisherStatusActive
- PublisherStatusBanned
type: string
PublisherUser:
properties:
email:
description: The email address for this user.
type: string
id:
description: The unique id for this user.
type: string
name:
description: The name for this user.
type: string
type: object
````
---
# Source: https://docs.comfy.org/api-reference/cloud/asset/add-tags-to-asset.md
> ## Documentation Index
> Fetch the complete documentation index at: https://docs.comfy.org/llms.txt
> Use this file to discover all available pages before exploring further.
# Add tags to asset
> Adds one or more tags to an existing asset
## OpenAPI
````yaml openapi-cloud.yaml post /api/assets/{id}/tags
openapi: 3.0.3
info:
title: Comfy Cloud API
description: >
**Experimental API:** This API is experimental and subject to change.
Endpoints, request/response formats, and behavior may be modified without
notice.
API for Comfy Cloud - Run ComfyUI workflows on cloud infrastructure.
This API allows you to interact with Comfy Cloud programmatically,
including:
- Submitting and managing workflows
- Uploading and downloading files
- Monitoring job status and progress
## Cloud vs OSS ComfyUI Compatibility
Comfy Cloud implements the same API interfaces as OSS ComfyUI for maximum
compatibility,
but some fields are accepted for compatibility while being handled
differently or ignored:
| Field | Endpoints | Cloud Behavior |
|-------|-----------|----------------|
| `subfolder` | `/api/view`, `/api/upload/*` | **Ignored** - Cloud uses
content-addressed storage (hash-based). Returned in responses for
client-side organization. |
| `type` (input/output/temp) | `/api/view`, `/api/upload/*` | Partially used
- All files stored with tag-based organization rather than directory
structure. |
| `overwrite` | `/api/upload/*` | **Ignored** - Content-addressed storage
means identical content always has the same hash. |
| `number`, `front` | `/api/prompt` | **Ignored** - Cloud uses its own fair
queue scheduling per user. |
| `split`, `full_info` | `/api/userdata` | **Ignored** - Cloud always
returns full file metadata. |
These fields are retained in the API schema for drop-in compatibility with
existing ComfyUI clients and workflows.
version: 1.0.0
license:
name: GNU General Public License v3.0
url: https://github.com/comfyanonymous/ComfyUI/blob/master/LICENSE
servers:
- url: https://cloud.comfy.org
description: Comfy Cloud API
security:
- ApiKeyAuth: []
tags:
- name: workflow
description: |
Submit workflows for execution and manage the execution queue.
This is the primary way to run ComfyUI workflows on the cloud.
- name: job
description: |
Monitor job status, view execution history, and manage running jobs.
Jobs are created when you submit a workflow via POST /api/prompt.
- name: asset
description: |
Upload, download, and manage persistent assets (images, models, outputs).
Assets provide durable storage with tagging and metadata support.
- name: file
description: |
Legacy file upload and download endpoints compatible with local ComfyUI.
For new integrations, consider using the Assets API instead.
- name: model
description: |
Browse available AI models. Models are pre-loaded on cloud infrastructure.
- name: node
description: |
Get information about available ComfyUI nodes and their inputs/outputs.
Useful for building dynamic workflow interfaces.
- name: user
description: |
User account information and personal data storage.
- name: system
description: |
Server status, health checks, and system information.
paths:
/api/assets/{id}/tags:
post:
tags:
- asset
summary: Add tags to asset
description: Adds one or more tags to an existing asset
operationId: addAssetTags
parameters:
- name: id
in: path
required: true
description: Asset ID
schema:
type: string
format: uuid
requestBody:
required: true
content:
application/json:
schema:
type: object
required:
- tags
properties:
tags:
type: array
items:
type: string
minItems: 1
description: Tags to add to the asset
responses:
'200':
description: Tags added successfully
content:
application/json:
schema:
$ref: '#/components/schemas/TagsModificationResponse'
'400':
description: Invalid request
content:
application/json:
schema:
$ref: '#/components/schemas/ErrorResponse'
'401':
description: Unauthorized
content:
application/json:
schema:
$ref: '#/components/schemas/ErrorResponse'
'404':
description: Asset not found
content:
application/json:
schema:
$ref: '#/components/schemas/ErrorResponse'
'500':
description: Internal server error
content:
application/json:
schema:
$ref: '#/components/schemas/ErrorResponse'
components:
schemas:
TagsModificationResponse:
type: object
required:
- total_tags
properties:
added:
type: array
items:
type: string
description: Tags that were successfully added (for add operation)
removed:
type: array
items:
type: string
description: Tags that were successfully removed (for remove operation)
already_present:
type: array
items:
type: string
description: Tags that were already present (for add operation)
not_present:
type: array
items:
type: string
description: Tags that were not present (for remove operation)
total_tags:
type: array
items:
type: string
description: All tags on the asset after the operation
ErrorResponse:
type: object
required:
- code
- message
properties:
code:
type: string
message:
type: string
securitySchemes:
ApiKeyAuth:
type: apiKey
in: header
name: X-API-Key
description: |
API key authentication. Generate an API key from your account settings
at https://comfy.org/account. Pass the key in the X-API-Key header.
````
---
# Source: https://docs.comfy.org/development/comfyui-server/api-key-integration.md
> ## Documentation Index
> Fetch the complete documentation index at: https://docs.comfy.org/llms.txt
> Use this file to discover all available pages before exploring further.
# ComfyUI Account API Key Integration
> This article explains how to use ComfyUI Account API Key to call paid API nodes in headless mode
Starting from [PR #8041](https://github.com/comfyanonymous/ComfyUI/pull/8041), ComfyUI supports directly using built-in paid API nodes through your ComfyUI Account API Key, without requiring a specific frontend interface (you can even run without a frontend).
This means you can create workflows that combine:
* local OS models
* tools from the custom node community
* popular paid models
Then run everything together by simply sending the prompt to the Comfy webserver API, letting it handle all the orchestration.
This is helpful for users who want to use Comfy as a backend service, via the command line, with their own frontend, etc.
## Prerequisites
Using your ComfyUI Account API Key to call paid API nodes requires:
* A ComfyUI Account API Key
* Sufficient account credits
**Important:** This page describes the **ComfyUI Account API Key** used for accessing paid API nodes in workflows. If you're looking to publish custom nodes to the registry instead, see [Publishing Nodes](/registry/publishing).
To use your ComfyUI Account API Key to call paid API nodes, you need to first register an account on [ComfyUI Platform](https://platform.comfy.org/login) and create an API key
Please refer to the User Interface section to learn how to login with API Key
You need to ensure your ComfyUI account has sufficient credits to test the corresponding features.
Please refer to the Credits section to learn how to purchase credits for your account
## Python Example
Here is an example of how to send a workflow containing API nodes to the ComfyUI API using Python code:
```python theme={null}
"""Using API nodes when running ComfyUI headless or with alternative frontend
You can execute a ComfyUI workflow that contains API nodes by including an API key in the prompt.
The API key should be added to the `extra_data` field of the payload.
Below we show an example of how to do this.
See more:
- API nodes overview: https://docs.comfy.org/tutorials/partner-nodes/overview
- To generate an API key, login here: https://platform.comfy.org/login
"""
import json
from urllib import request
SERVER_URL = "http://127.0.0.1:8188"
# We have a prompt/job (workflow in "API format") that contains API nodes.
workflow_with_api_nodes = """{
"11": {
"inputs": {
"prompt": "A dreamy, surreal half-body portrait of a young woman meditating. She has a short, straight bob haircut dyed in pastel pink, with soft bangs covering her forehead. Her eyes are gently closed, and her hands are raised in a calm, open-palmed meditative pose, fingers slightly curved, as if levitating or in deep concentration. She wears a colorful dress made of patchwork-like pastel tiles, featuring clouds, stars, and rainbows. Around her float translucent, iridescent soap bubbles reflecting the rainbow hues. The background is a fantastical sky filled with cotton-candy clouds and vivid rainbow waves, giving the entire scene a magical, dreamlike atmosphere. Emphasis on youthful serenity, whimsical ambiance, and vibrant soft lighting.",
"prompt_upsampling": false,
"seed": 589991183902375,
"aspect_ratio": "1:1",
"raw": false,
"image_prompt_strength": 0.4000000000000001,
"image_prompt": [
"14",
0
]
},
"class_type": "FluxProUltraImageNode",
"_meta": {
"title": "Flux 1.1 [pro] Ultra Image"
}
},
"12": {
"inputs": {
"filename_prefix": "ComfyUI",
"images": [
"11",
0
]
},
"class_type": "SaveImage",
"_meta": {
"title": "Save Image"
}
},
"14": {
"inputs": {
"image": "example.png"
},
"class_type": "LoadImage",
"_meta": {
"title": "Load Image"
}
}
}"""
prompt = json.loads(workflow_with_api_nodes)
payload = {
"prompt": prompt,
# Add the `api_key_comfy_org` to the payload.
# You can first get the key from the associated user if handling multiple clients.
"extra_data": {
"api_key_comfy_org": "comfyui-87d01e28d*******************************************************" # replace with actual key
},
}
data = json.dumps(payload).encode("utf-8")
req = request.Request(f"{SERVER_URL}/prompt", data=data)
request.urlopen(req)
```
## Related Documentation
* [API nodes overview](https://docs.comfy.org/tutorials/partner-nodes/overview)
* [Account management](https://docs.comfy.org/interface/user)
* [Credits](https://docs.comfy.org/interface/credits)
---
# Source: https://docs.comfy.org/development/cloud/api-reference.md
> ## Documentation Index
> Fetch the complete documentation index at: https://docs.comfy.org/llms.txt
> Use this file to discover all available pages before exploring further.
# Cloud API Reference
> Complete API reference with code examples for Comfy Cloud
**Experimental API:** This API is experimental and subject to change. Endpoints, request/response formats, and behavior may be modified without notice. Some endpoints are maintained for compatibility with local ComfyUI but may have different semantics (e.g., ignored fields).
This page provides complete examples for common Comfy Cloud API operations.
**Subscription Required:** Running workflows via the API requires an active Comfy Cloud subscription. See [pricing plans](https://www.comfy.org/cloud/pricing?utm_source=docs\&utm_campaign=cloud-api) for details.
## Setup
All examples use these common imports and configuration:
```bash curl theme={null}
export COMFY_CLOUD_API_KEY="your-api-key"
export BASE_URL="https://cloud.comfy.org"
```
```typescript TypeScript theme={null}
import { readFile, writeFile } from "fs/promises";
const BASE_URL = "https://cloud.comfy.org";
const API_KEY = process.env.COMFY_CLOUD_API_KEY!;
function getHeaders(): HeadersInit {
return {
"X-API-Key": API_KEY,
"Content-Type": "application/json",
};
}
```
```python Python theme={null}
import os
import requests
import json
import time
import asyncio
import aiohttp
BASE_URL = "https://cloud.comfy.org"
API_KEY = os.environ["COMFY_CLOUD_API_KEY"]
def get_headers():
return {
"X-API-Key": API_KEY,
"Content-Type": "application/json"
}
```
***
## Object Info
Retrieve available node definitions. This is useful for understanding what nodes are available and their input/output specifications.
```bash curl theme={null}
curl -X GET "$BASE_URL/api/object_info" \
-H "X-API-Key: $COMFY_CLOUD_API_KEY"
```
```typescript TypeScript theme={null}
async function getObjectInfo(): Promise> {
const response = await fetch(`${BASE_URL}/api/object_info`, {
headers: getHeaders(),
});
if (!response.ok) throw new Error(`HTTP ${response.status}`);
return response.json();
}
const objectInfo = await getObjectInfo();
console.log(`Available nodes: ${Object.keys(objectInfo).length}`);
const ksampler = objectInfo["KSampler"] ?? {};
console.log(`KSampler inputs: ${Object.keys(ksampler.input?.required ?? {})}`);
```
```python Python theme={null}
def get_object_info():
"""Fetch all available node definitions from cloud."""
response = requests.get(
f"{BASE_URL}/api/object_info",
headers=get_headers()
)
response.raise_for_status()
return response.json()
# Get all nodes
object_info = get_object_info()
print(f"Available nodes: {len(object_info)}")
# Get a specific node's definition
ksampler = object_info.get("KSampler", {})
inputs = list(ksampler.get('input', {}).get('required', {}).keys())
print(f"KSampler inputs: {inputs}")
```
***
## Uploading Inputs
Upload images, masks, or other files for use in workflows.
### Direct Upload (Multipart)
```bash curl theme={null}
curl -X POST "$BASE_URL/api/upload/image" \
-H "X-API-Key: $COMFY_CLOUD_API_KEY" \
-F "image=@my_image.png" \
-F "type=input" \
-F "overwrite=true"
```
```typescript TypeScript theme={null}
async function uploadInput(
filePath: string,
inputType: string = "input"
): Promise<{ name: string; subfolder: string }> {
const file = await readFile(filePath);
const formData = new FormData();
formData.append("image", new Blob([file]), filePath.split("/").pop());
formData.append("type", inputType);
formData.append("overwrite", "true");
const response = await fetch(`${BASE_URL}/api/upload/image`, {
method: "POST",
headers: { "X-API-Key": API_KEY },
body: formData,
});
if (!response.ok) throw new Error(`HTTP ${response.status}`);
return response.json();
}
const result = await uploadInput("my_image.png");
console.log(`Uploaded: ${result.name} to ${result.subfolder}`);
```
```python Python theme={null}
def upload_input(file_path: str, input_type: str = "input") -> dict:
"""Upload a file directly to cloud.
Args:
file_path: Path to the file to upload
input_type: "input" for images, "temp" for temporary files
Returns:
Upload response with filename and subfolder
"""
with open(file_path, "rb") as f:
files = {"image": f}
data = {"type": input_type, "overwrite": "true"}
response = requests.post(
f"{BASE_URL}/api/upload/image",
headers={"X-API-Key": API_KEY}, # No Content-Type for multipart
files=files,
data=data
)
response.raise_for_status()
return response.json()
# Upload an image
result = upload_input("my_image.png")
print(f"Uploaded: {result['name']} to {result['subfolder']}")
```
### Upload Mask
The `subfolder` parameter is accepted for API compatibility but ignored in cloud storage. All files are stored in a flat, content-addressed namespace.
```bash curl theme={null}
curl -X POST "$BASE_URL/api/upload/mask" \
-H "X-API-Key: $COMFY_CLOUD_API_KEY" \
-F "image=@mask.png" \
-F "type=input" \
-F "subfolder=clipspace" \
-F 'original_ref={"filename":"my_image.png","subfolder":"","type":"input"}'
```
```typescript TypeScript theme={null}
async function uploadMask(
filePath: string,
originalRef: { filename: string; subfolder: string; type: string }
): Promise<{ name: string; subfolder: string }> {
const file = await readFile(filePath);
const formData = new FormData();
formData.append("image", new Blob([file]), filePath.split("/").pop());
formData.append("type", "input");
formData.append("subfolder", "clipspace");
formData.append("original_ref", JSON.stringify(originalRef));
const response = await fetch(`${BASE_URL}/api/upload/mask`, {
method: "POST",
headers: { "X-API-Key": API_KEY },
body: formData,
});
if (!response.ok) throw new Error(`HTTP ${response.status}`);
return response.json();
}
const maskResult = await uploadMask("mask.png", {
filename: "my_image.png",
subfolder: "",
type: "input",
});
console.log(`Uploaded mask: ${maskResult.name}`);
```
```python Python theme={null}
def upload_mask(file_path: str, original_ref: dict) -> dict:
"""Upload a mask associated with an original image.
Args:
file_path: Path to the mask file
original_ref: Reference to the original image {"filename": "...", "subfolder": "...", "type": "..."}
"""
with open(file_path, "rb") as f:
files = {"image": f}
data = {
"type": "input",
"subfolder": "clipspace",
"original_ref": json.dumps(original_ref)
}
response = requests.post(
f"{BASE_URL}/api/upload/mask",
headers={"X-API-Key": API_KEY},
files=files,
data=data
)
response.raise_for_status()
return response.json()
```
***
## Running Workflows
Submit a workflow for execution.
### Submit Workflow
```bash curl theme={null}
curl -X POST "$BASE_URL/api/prompt" \
-H "X-API-Key: $COMFY_CLOUD_API_KEY" \
-H "Content-Type: application/json" \
-d '{"prompt": '"$(cat workflow_api.json)"'}'
```
```typescript TypeScript theme={null}
async function submitWorkflow(workflow: Record): Promise {
const response = await fetch(`${BASE_URL}/api/prompt`, {
method: "POST",
headers: getHeaders(),
body: JSON.stringify({ prompt: workflow }),
});
if (!response.ok) throw new Error(`HTTP ${response.status}`);
const result = await response.json();
if (result.error) {
throw new Error(`Workflow error: ${result.error}`);
}
return result.prompt_id;
}
const workflow = JSON.parse(await readFile("workflow_api.json", "utf-8"));
const promptId = await submitWorkflow(workflow);
console.log(`Submitted job: ${promptId}`);
```
```python Python theme={null}
def submit_workflow(workflow: dict) -> str:
"""Submit a workflow and return the prompt_id (job ID).
Args:
workflow: ComfyUI workflow in API format
Returns:
prompt_id for tracking the job
"""
response = requests.post(
f"{BASE_URL}/api/prompt",
headers=get_headers(),
json={"prompt": workflow}
)
response.raise_for_status()
result = response.json()
if "error" in result:
raise ValueError(f"Workflow error: {result['error']}")
return result["prompt_id"]
# Load and submit a workflow
with open("workflow_api.json") as f:
workflow = json.load(f)
prompt_id = submit_workflow(workflow)
print(f"Submitted job: {prompt_id}")
```
### Using Partner Nodes
If your workflow contains [Partner Nodes](/tutorials/api-nodes/overview) (nodes that call external AI services like Flux Pro, Ideogram, etc.), you must include your Comfy API key in the `extra_data` field of the request payload.
The ComfyUI frontend automatically packages your API key into `extra_data` when running workflows in the browser. This section is only relevant when calling the API directly.
```bash curl theme={null}
curl -X POST "$BASE_URL/api/prompt" \
-H "X-API-Key: $COMFY_CLOUD_API_KEY" \
-H "Content-Type: application/json" \
-d '{
"prompt": '"$(cat workflow_api.json)"',
"extra_data": {
"api_key_comfy_org": "your-comfy-api-key"
}
}'
```
```typescript TypeScript theme={null}
async function submitWorkflowWithPartnerNodes(
workflow: Record,
apiKey: string
): Promise {
const response = await fetch(`${BASE_URL}/api/prompt`, {
method: "POST",
headers: getHeaders(),
body: JSON.stringify({
prompt: workflow,
extra_data: {
api_key_comfy_org: apiKey,
},
}),
});
if (!response.ok) throw new Error(`HTTP ${response.status}`);
const result = await response.json();
return result.prompt_id;
}
// Use when workflow contains Partner Nodes (e.g., Flux Pro, Ideogram, etc.)
const promptId = await submitWorkflowWithPartnerNodes(workflow, API_KEY);
```
```python Python theme={null}
def submit_workflow_with_partner_nodes(workflow: dict, api_key: str) -> str:
"""Submit a workflow that uses Partner Nodes.
Args:
workflow: ComfyUI workflow in API format
api_key: Your API key from platform.comfy.org
Returns:
prompt_id for tracking the job
"""
response = requests.post(
f"{BASE_URL}/api/prompt",
headers=get_headers(),
json={
"prompt": workflow,
"extra_data": {
"api_key_comfy_org": api_key
}
}
)
response.raise_for_status()
return response.json()["prompt_id"]
# Use when workflow contains Partner Nodes
prompt_id = submit_workflow_with_partner_nodes(workflow, API_KEY)
```
Generate your API key at [platform.comfy.org](https://platform.comfy.org/login). This is the same key used for Cloud API authentication (`X-API-Key` header).
### Modify Workflow Inputs
```typescript TypeScript theme={null}
function setWorkflowInput(
workflow: Record,
nodeId: string,
inputName: string,
value: any
): Record {
if (workflow[nodeId]) {
workflow[nodeId].inputs[inputName] = value;
}
return workflow;
}
// Example: Set seed and prompt
let workflow = JSON.parse(await readFile("workflow_api.json", "utf-8"));
workflow = setWorkflowInput(workflow, "3", "seed", 12345);
workflow = setWorkflowInput(workflow, "6", "text", "a beautiful landscape");
```
```python Python theme={null}
def set_workflow_input(workflow: dict, node_id: str, input_name: str, value) -> dict:
"""Modify a workflow input value.
Args:
workflow: The workflow dict
node_id: ID of the node to modify
input_name: Name of the input field
value: New value
Returns:
Modified workflow
"""
if node_id in workflow:
workflow[node_id]["inputs"][input_name] = value
return workflow
# Example: Set seed and prompt
workflow = set_workflow_input(workflow, "3", "seed", 12345)
workflow = set_workflow_input(workflow, "6", "text", "a beautiful landscape")
```
***
## Checking Job Status
Poll for job completion.
**Job Status Values:**
The API returns one of the following status values:
| Status | Description |
| ------------- | ---------------------------------- |
| `pending` | Job is queued and waiting to start |
| `in_progress` | Job is currently executing |
| `completed` | Job finished successfully |
| `failed` | Job encountered an error |
| `cancelled` | Job was cancelled by user |
```bash curl theme={null}
# Poll for job completion
curl -X GET "$BASE_URL/api/job/{prompt_id}/status" \
-H "X-API-Key: $COMFY_CLOUD_API_KEY"
# Response examples:
# {"status": "pending"} - Job is queued
# {"status": "in_progress"} - Job is currently running
# {"status": "completed"} - Job finished successfully
# {"status": "failed"} - Job encountered an error
# {"status": "cancelled"} - Job was cancelled
```
```typescript TypeScript theme={null}
interface JobStatus {
status: string;
}
async function getJobStatus(promptId: string): Promise {
const response = await fetch(`${BASE_URL}/api/job/${promptId}/status`, {
headers: getHeaders(),
});
if (!response.ok) throw new Error(`HTTP ${response.status}`);
return response.json();
}
async function pollForCompletion(
promptId: string,
timeout: number = 300,
pollInterval: number = 2000
): Promise {
const startTime = Date.now();
while (Date.now() - startTime < timeout * 1000) {
const { status } = await getJobStatus(promptId);
if (status === "completed") {
return;
} else if (["failed", "cancelled"].includes(status)) {
throw new Error(`Job failed with status: ${status}`);
}
await new Promise((resolve) => setTimeout(resolve, pollInterval));
}
throw new Error(`Job ${promptId} did not complete within ${timeout}s`);
}
await pollForCompletion(promptId);
console.log("Job completed!");
```
```python Python theme={null}
def get_job_status(prompt_id: str) -> str:
"""Get the current status of a job."""
response = requests.get(
f"{BASE_URL}/api/job/{prompt_id}/status",
headers=get_headers()
)
response.raise_for_status()
return response.json()["status"]
def poll_for_completion(prompt_id: str, timeout: int = 300, poll_interval: float = 2.0) -> None:
"""Poll until job completes or times out."""
start_time = time.time()
while time.time() - start_time < timeout:
status = get_job_status(prompt_id)
if status == "completed":
return
elif status in ("failed", "cancelled"):
raise RuntimeError(f"Job failed with status: {status}")
time.sleep(poll_interval)
raise TimeoutError(f"Job {prompt_id} did not complete within {timeout}s")
poll_for_completion(prompt_id)
print("Job completed!")
```
***
## WebSocket for Real-Time Progress
Connect to the WebSocket for real-time execution updates.
The `clientId` parameter is currently ignored—all connections for a user receive the same messages. Pass a unique `clientId` for forward compatibility.
```typescript TypeScript theme={null}
async function listenForCompletion(
promptId: string,
timeout: number = 300000
): Promise> {
const wsUrl = `wss://cloud.comfy.org/ws?clientId=${crypto.randomUUID()}&token=${API_KEY}`;
const outputs: Record = {};
return new Promise((resolve, reject) => {
const ws = new WebSocket(wsUrl);
const timer = setTimeout(() => {
ws.close();
reject(new Error(`Job did not complete within ${timeout / 1000}s`));
}, timeout);
ws.onmessage = (event) => {
const data = JSON.parse(event.data);
const msgType = data.type;
const msgData = data.data ?? {};
// Filter to our job
if (msgData.prompt_id !== promptId) return;
if (msgType === "executing") {
const node = msgData.node;
if (node) {
console.log(`Executing node: ${node}`);
} else {
console.log("Execution complete");
}
} else if (msgType === "progress") {
console.log(`Progress: ${msgData.value}/${msgData.max}`);
} else if (msgType === "executed" && msgData.output) {
outputs[msgData.node] = msgData.output;
} else if (msgType === "execution_success") {
console.log("Job completed successfully!");
clearTimeout(timer);
ws.close();
resolve(outputs);
} else if (msgType === "execution_error") {
const errorMsg = msgData.exception_message ?? "Unknown error";
clearTimeout(timer);
ws.close();
reject(new Error(`Execution error: ${errorMsg}`));
}
};
ws.onerror = (err) => {
clearTimeout(timer);
reject(err);
};
});
}
// Wait for completion and collect outputs
const outputs = await listenForCompletion(promptId);
```
```python Python theme={null}
import asyncio
import aiohttp
import json
import uuid
async def listen_for_completion(prompt_id: str, timeout: float = 300.0) -> dict:
"""Connect to WebSocket and listen for job completion.
Returns:
Final outputs from the job
"""
ws_url = BASE_URL.replace("https://", "wss://")
client_id = str(uuid.uuid4())
ws_url = f"{ws_url}/ws?clientId={client_id}&token={API_KEY}"
outputs = {}
async with aiohttp.ClientSession() as session:
async with session.ws_connect(ws_url) as ws:
async def receive_messages():
async for msg in ws:
if msg.type == aiohttp.WSMsgType.TEXT:
data = json.loads(msg.data)
msg_type = data.get("type")
msg_data = data.get("data", {})
# Filter to our job
if msg_data.get("prompt_id") != prompt_id:
continue
if msg_type == "executing":
node = msg_data.get("node")
if node:
print(f"Executing node: {node}")
elif msg_type == "progress":
value = msg_data.get("value", 0)
max_val = msg_data.get("max", 100)
print(f"Progress: {value}/{max_val}")
elif msg_type == "executed":
node_id = msg_data.get("node")
output = msg_data.get("output", {})
if output:
outputs[node_id] = output
elif msg_type == "execution_success":
print("Job completed successfully!")
return outputs
elif msg_type == "execution_error":
error_msg = msg_data.get("exception_message", "Unknown error")
raise RuntimeError(f"Execution error: {error_msg}")
elif msg.type == aiohttp.WSMsgType.ERROR:
raise RuntimeError(f"WebSocket error: {ws.exception()}")
try:
return await asyncio.wait_for(receive_messages(), timeout=timeout)
except asyncio.TimeoutError:
raise TimeoutError(f"Job did not complete within {timeout}s")
# Wait for completion and collect outputs
outputs = await listen_for_completion(prompt_id)
```
### WebSocket Message Types
Messages are sent as JSON text frames unless otherwise noted.
| Type | Description |
| ----------------------- | ---------------------------------------------------------------------------------------- |
| `status` | Queue status update with `queue_remaining` count |
| `notification` | User-friendly status message (`value` field contains text like "Executing workflow\...") |
| `execution_start` | Workflow execution has started |
| `executing` | A specific node is now executing (node ID in `node` field) |
| `progress` | Step progress within a node (`value`/`max` for sampling steps) |
| `progress_state` | Extended progress state with node metadata (nested `nodes` object) |
| `executed` | Node completed with outputs (images, video, etc. in `output` field) |
| `execution_cached` | Nodes skipped because outputs are cached (`nodes` array) |
| `execution_success` | Entire workflow completed successfully |
| `execution_error` | Workflow failed (includes `exception_type`, `exception_message`, `traceback`) |
| `execution_interrupted` | Workflow was cancelled by user |
#### Binary Messages (Preview Images)
During image generation, ComfyUI sends **binary WebSocket frames** containing preview images. These are raw binary data (not JSON):
| Binary Type | Value | Description |
| ----------------------------- | ----- | --------------------------------------------- |
| `PREVIEW_IMAGE` | `1` | In-progress preview during diffusion sampling |
| `TEXT` | `3` | Text output from nodes (progress text) |
| `PREVIEW_IMAGE_WITH_METADATA` | `4` | Preview image with node context metadata |
**Binary frame formats** (all integers are big-endian):
| Offset | Size | Field | Description |
| ------ | -------- | ------------ | --------------------------- |
| 0 | 4 bytes | `type` | `0x00000001` |
| 4 | 4 bytes | `image_type` | Format code (1=JPEG, 2=PNG) |
| 8 | variable | `image_data` | Raw image bytes |
| Offset | Size | Field | Description |
| ------ | -------- | ------------- | --------------------------- |
| 0 | 4 bytes | `type` | `0x00000003` |
| 4 | 4 bytes | `node_id_len` | Length of node\_id string |
| 8 | N bytes | `node_id` | UTF-8 encoded node ID |
| 8+N | variable | `text` | UTF-8 encoded progress text |
| Offset | Size | Field | Description |
| ------ | -------- | -------------- | ----------------------- |
| 0 | 4 bytes | `type` | `0x00000004` |
| 4 | 4 bytes | `metadata_len` | Length of metadata JSON |
| 8 | N bytes | `metadata` | UTF-8 JSON (see below) |
| 8+N | variable | `image_data` | Raw JPEG/PNG bytes |
**Metadata JSON structure:**
```json theme={null}
{
"node_id": "3",
"display_node_id": "3",
"real_node_id": "3",
"prompt_id": "abc-123",
"parent_node_id": null
}
```
See the [OpenAPI Specification](/development/cloud/openapi) for complete schema definitions of each JSON message type.
***
## Downloading Outputs
Retrieve generated files after job completion.
```bash curl theme={null}
# Download a single output file (follow 302 redirect with -L)
curl -L "$BASE_URL/api/view?filename=output.png&subfolder=&type=output" \
-H "X-API-Key: $COMFY_CLOUD_API_KEY" \
-o output.png
```
```typescript TypeScript theme={null}
async function downloadOutput(
filename: string,
subfolder: string = "",
outputType: string = "output"
): Promise {
const params = new URLSearchParams({ filename, subfolder, type: outputType });
// Get the redirect URL
const response = await fetch(`${BASE_URL}/api/view?${params}`, {
headers: { "X-API-Key": API_KEY },
redirect: "manual",
});
if (response.status !== 302) throw new Error(`HTTP ${response.status}`);
const signedUrl = response.headers.get("location")!;
// Fetch from signed URL
const fileResponse = await fetch(signedUrl);
if (!fileResponse.ok) throw new Error(`HTTP ${fileResponse.status}`);
return fileResponse.arrayBuffer();
}
async function saveOutputs(
outputs: Record,
outputDir: string = "."
): Promise {
for (const nodeOutputs of Object.values(outputs)) {
for (const key of ["images", "video", "audio"]) {
for (const fileInfo of (nodeOutputs as any)[key] ?? []) {
const data = await downloadOutput(
fileInfo.filename,
fileInfo.subfolder ?? "",
fileInfo.type ?? "output"
);
const path = `${outputDir}/${fileInfo.filename}`;
await writeFile(path, Buffer.from(data));
console.log(`Saved: ${path}`);
}
}
}
}
// Download all outputs
await saveOutputs(outputs, "./my_outputs");
```
```python Python theme={null}
def download_output(filename: str, subfolder: str = "", output_type: str = "output") -> bytes:
"""Download an output file.
Args:
filename: Name of the file
subfolder: Subfolder path (usually empty)
output_type: "output" for final outputs, "temp" for previews
Returns:
File bytes
"""
params = {
"filename": filename,
"subfolder": subfolder,
"type": output_type
}
response = requests.get(
f"{BASE_URL}/api/view",
headers=get_headers(),
params=params
)
response.raise_for_status()
return response.content
def save_outputs(outputs: dict, output_dir: str = "."):
"""Save all outputs from a job to disk.
Args:
outputs: Outputs dict from job (node_id -> output_data)
output_dir: Directory to save files to
"""
import os
os.makedirs(output_dir, exist_ok=True)
for node_id, node_outputs in outputs.items():
for key in ("images", "video", "audio"):
for file_info in node_outputs.get(key, []):
filename = file_info["filename"]
subfolder = file_info.get("subfolder", "")
output_type = file_info.get("type", "output")
data = download_output(filename, subfolder, output_type)
output_path = os.path.join(output_dir, filename)
with open(output_path, "wb") as f:
f.write(data)
print(f"Saved: {output_path}")
# Download all outputs
save_outputs(outputs, "./my_outputs")
```
***
## Complete End-to-End Example
Here's a full example that ties everything together:
```typescript TypeScript theme={null}
const BASE_URL = "https://cloud.comfy.org";
const API_KEY = process.env.COMFY_CLOUD_API_KEY!;
function getHeaders(): HeadersInit {
return { "X-API-Key": API_KEY, "Content-Type": "application/json" };
}
async function submitWorkflow(workflow: Record): Promise {
const response = await fetch(`${BASE_URL}/api/prompt`, {
method: "POST",
headers: getHeaders(),
body: JSON.stringify({ prompt: workflow }),
});
if (!response.ok) throw new Error(`HTTP ${response.status}`);
return (await response.json()).prompt_id;
}
async function waitForCompletion(
promptId: string,
timeout: number = 300000
): Promise> {
const wsUrl = `wss://cloud.comfy.org/ws?clientId=${crypto.randomUUID()}&token=${API_KEY}`;
const outputs: Record = {};
return new Promise((resolve, reject) => {
const ws = new WebSocket(wsUrl);
const timer = setTimeout(() => {
ws.close();
reject(new Error("Job timed out"));
}, timeout);
ws.onmessage = (event) => {
const data = JSON.parse(event.data);
if (data.data?.prompt_id !== promptId) return;
const msgType = data.type;
const msgData = data.data ?? {};
if (msgType === "progress") {
console.log(`Progress: ${msgData.value}/${msgData.max}`);
} else if (msgType === "executed" && msgData.output) {
outputs[msgData.node] = msgData.output;
} else if (msgType === "execution_success") {
clearTimeout(timer);
ws.close();
resolve(outputs);
} else if (msgType === "execution_error") {
clearTimeout(timer);
ws.close();
reject(new Error(msgData.exception_message ?? "Unknown error"));
}
};
ws.onerror = (err) => {
clearTimeout(timer);
reject(err);
};
});
}
async function downloadOutputs(
outputs: Record,
outputDir: string
): Promise {
for (const nodeOutputs of Object.values(outputs)) {
for (const key of ["images", "video", "audio"]) {
for (const fileInfo of (nodeOutputs as any)[key] ?? []) {
const params = new URLSearchParams({
filename: fileInfo.filename,
subfolder: fileInfo.subfolder ?? "",
type: fileInfo.type ?? "output",
});
// Get redirect URL (don't follow to avoid sending auth to storage)
const response = await fetch(`${BASE_URL}/api/view?${params}`, {
headers: { "X-API-Key": API_KEY },
redirect: "manual",
});
if (response.status !== 302) throw new Error(`HTTP ${response.status}`);
const signedUrl = response.headers.get("location")!;
// Fetch from signed URL without auth headers
const fileResponse = await fetch(signedUrl);
if (!fileResponse.ok) throw new Error(`HTTP ${fileResponse.status}`);
const path = `${outputDir}/${fileInfo.filename}`;
await writeFile(path, Buffer.from(await fileResponse.arrayBuffer()));
console.log(`Downloaded: ${path}`);
}
}
}
}
async function main() {
// 1. Load workflow
const workflow = JSON.parse(await readFile("workflow_api.json", "utf-8"));
// 2. Modify workflow parameters
workflow["3"].inputs.seed = 42;
workflow["6"].inputs.text = "a beautiful sunset over mountains";
// 3. Submit workflow
const promptId = await submitWorkflow(workflow);
console.log(`Job submitted: ${promptId}`);
// 4. Wait for completion with progress
const outputs = await waitForCompletion(promptId);
console.log(`Job completed! Found ${Object.keys(outputs).length} output nodes`);
// 5. Download outputs
await downloadOutputs(outputs, "./outputs");
console.log("Done!");
}
main();
```
```python Python theme={null}
import os
import requests
import json
import asyncio
import aiohttp
import uuid
BASE_URL = "https://cloud.comfy.org"
API_KEY = os.environ["COMFY_CLOUD_API_KEY"]
def get_headers():
return {"X-API-Key": API_KEY, "Content-Type": "application/json"}
def upload_image(file_path: str) -> dict:
"""Upload an image and return the reference for use in workflows."""
with open(file_path, "rb") as f:
response = requests.post(
f"{BASE_URL}/api/upload/image",
headers={"X-API-Key": API_KEY},
files={"image": f},
data={"type": "input", "overwrite": "true"}
)
response.raise_for_status()
return response.json()
def submit_workflow(workflow: dict) -> str:
"""Submit workflow and return prompt_id."""
response = requests.post(
f"{BASE_URL}/api/prompt",
headers=get_headers(),
json={"prompt": workflow}
)
response.raise_for_status()
return response.json()["prompt_id"]
async def wait_for_completion(prompt_id: str, timeout: float = 300.0) -> dict:
"""Wait for job completion via WebSocket."""
ws_url = BASE_URL.replace("https://", "wss://") + f"/ws?clientId={uuid.uuid4()}&token={API_KEY}"
outputs = {}
async with aiohttp.ClientSession() as session:
async with session.ws_connect(ws_url) as ws:
start = asyncio.get_event_loop().time()
async for msg in ws:
if asyncio.get_event_loop().time() - start > timeout:
raise TimeoutError("Job timed out")
if msg.type != aiohttp.WSMsgType.TEXT:
continue
data = json.loads(msg.data)
if data.get("data", {}).get("prompt_id") != prompt_id:
continue
msg_type = data.get("type")
msg_data = data.get("data", {})
if msg_type == "progress":
print(f"Progress: {msg_data.get('value')}/{msg_data.get('max')}")
elif msg_type == "executed":
if output := msg_data.get("output"):
outputs[msg_data["node"]] = output
elif msg_type == "execution_success":
return outputs
elif msg_type == "execution_error":
raise RuntimeError(msg_data.get("exception_message", "Unknown error"))
return outputs
def download_outputs(outputs: dict, output_dir: str):
"""Download all output files."""
os.makedirs(output_dir, exist_ok=True)
for node_outputs in outputs.values():
for key in ["images", "video", "audio"]:
for file_info in node_outputs.get(key, []):
params = {
"filename": file_info["filename"],
"subfolder": file_info.get("subfolder", ""),
"type": file_info.get("type", "output")
}
response = requests.get(f"{BASE_URL}/api/view", headers=get_headers(), params=params)
response.raise_for_status()
path = os.path.join(output_dir, file_info["filename"])
with open(path, "wb") as f:
f.write(response.content)
print(f"Downloaded: {path}")
async def main():
# 1. Load workflow
with open("workflow_api.json") as f:
workflow = json.load(f)
# 2. Optionally upload input images
# image_ref = upload_image("input.png")
# workflow["1"]["inputs"]["image"] = image_ref["name"]
# 3. Modify workflow parameters
workflow["3"]["inputs"]["seed"] = 42
workflow["6"]["inputs"]["text"] = "a beautiful sunset over mountains"
# 4. Submit workflow
prompt_id = submit_workflow(workflow)
print(f"Job submitted: {prompt_id}")
# 5. Wait for completion with progress
outputs = await wait_for_completion(prompt_id)
print(f"Job completed! Found {len(outputs)} output nodes")
# 6. Download outputs
download_outputs(outputs, "./outputs")
print("Done!")
if __name__ == "__main__":
asyncio.run(main())
```
***
## Queue Management
### Get Queue Status
```bash curl theme={null}
curl -X GET "$BASE_URL/api/queue" \
-H "X-API-Key: $COMFY_CLOUD_API_KEY"
```
```typescript TypeScript theme={null}
async function getQueue(): Promise<{
queue_running: any[];
queue_pending: any[];
}> {
const response = await fetch(`${BASE_URL}/api/queue`, {
headers: getHeaders(),
});
if (!response.ok) throw new Error(`HTTP ${response.status}`);
return response.json();
}
const queue = await getQueue();
console.log(`Running: ${queue.queue_running.length}`);
console.log(`Pending: ${queue.queue_pending.length}`);
```
```python Python theme={null}
def get_queue():
"""Get current queue status."""
response = requests.get(
f"{BASE_URL}/api/queue",
headers=get_headers()
)
response.raise_for_status()
return response.json()
queue = get_queue()
print(f"Running: {len(queue.get('queue_running', []))}")
print(f"Pending: {len(queue.get('queue_pending', []))}")
```
### Cancel a Job
```bash curl theme={null}
curl -X POST "$BASE_URL/api/queue" \
-H "X-API-Key: $COMFY_CLOUD_API_KEY" \
-H "Content-Type: application/json" \
-d '{"delete": ["PROMPT_ID_HERE"]}'
```
```typescript TypeScript theme={null}
async function cancelJob(promptId: string): Promise {
const response = await fetch(`${BASE_URL}/api/queue`, {
method: "POST",
headers: getHeaders(),
body: JSON.stringify({ delete: [promptId] }),
});
if (!response.ok) throw new Error(`HTTP ${response.status}`);
}
```
```python Python theme={null}
def cancel_job(prompt_id: str):
"""Cancel a pending or running job."""
response = requests.post(
f"{BASE_URL}/api/queue",
headers=get_headers(),
json={"delete": [prompt_id]}
)
response.raise_for_status()
return response.json()
```
### Interrupt Current Execution
```bash curl theme={null}
curl -X POST "$BASE_URL/api/interrupt" \
-H "X-API-Key: $COMFY_CLOUD_API_KEY"
```
```typescript TypeScript theme={null}
async function interrupt(): Promise {
const response = await fetch(`${BASE_URL}/api/interrupt`, {
method: "POST",
headers: getHeaders(),
});
if (!response.ok) throw new Error(`HTTP ${response.status}`);
}
```
```python Python theme={null}
def interrupt():
"""Interrupt the currently running job."""
response = requests.post(
f"{BASE_URL}/api/interrupt",
headers=get_headers()
)
response.raise_for_status()
```
***
## Error Handling
### HTTP Errors
REST API endpoints return standard HTTP status codes:
| Status | Description |
| ------ | ---------------------------------------------- |
| `400` | Invalid request (bad workflow, missing fields) |
| `401` | Unauthorized (invalid or missing API key) |
| `402` | Insufficient credits |
| `429` | Subscription inactive |
| `500` | Internal server error |
### Execution Errors
During workflow execution, errors are delivered via the `execution_error` WebSocket message. The `exception_type` field identifies the error category:
| Exception Type | Description |
| --------------------------- | -------------------------------------------------- |
| `ValidationError` | Invalid workflow or inputs |
| `ModelDownloadError` | Required model not available or failed to download |
| `ImageDownloadError` | Failed to download input image from URL |
| `OOMError` | Out of GPU memory |
| `InsufficientFundsError` | Account balance too low (for Partner Nodes) |
| `InactiveSubscriptionError` | Subscription not active |
---
# Source: https://docs.comfy.org/interface/appearance.md
> ## Documentation Index
> Fetch the complete documentation index at: https://docs.comfy.org/llms.txt
> Use this file to discover all available pages before exploring further.
# Customizing ComfyUI Appearance
> Learn how to customize the appearance of ComfyUI using color palettes and advanced CSS options
ComfyUI offers flexible appearance customization options that allow you to personalize the interface to your preferences.
## Color Palette System
The primary way to customize ComfyUI's appearance is through the built-in color palette system.
This allows you to:
1. Switch ComfyUI themes
2. Export the currently selected theme as JSON format
3. Load custom theme configuration from JSON file
4. Delete custom theme configuration
For appearance needs that cannot be satisfied by the color palette, you can perform advanced appearance customization through the [user.css](#advanced-customization-with-user-css) file
### How to Customize Color Themes
The color palette allows you to modify many specific properties. Here are some of the most commonly customized elements, with colors represented in hexadecimal format:
1. The JSON comments below are for illustration only. Do not copy the content below for modification as it will cause the theme to malfunction.
2. Since we are still iterating frequently, the content below may change with ComfyUI frontend updates. If you need to modify, please export the theme configuration from settings and then modify it.
```json theme={null}
{
"id": "dark", // Must be unique, cannot be the same as other theme IDs
"name": "Dark (Default)", // Theme name, displayed in theme selector
"colors": {
"node_slot": { // Node connection slot color configuration
"CLIP": "#FFD500", // CLIP model connection slot color
"CLIP_VISION": "#A8DADC", // CLIP Vision model connection slot color
"CLIP_VISION_OUTPUT": "#ad7452", // CLIP Vision output connection slot color
"CONDITIONING": "#FFA931", // Conditioning control connection slot color
"CONTROL_NET": "#6EE7B7", // ControlNet model connection slot color
"IMAGE": "#64B5F6", // Image data connection slot color
"LATENT": "#FF9CF9", // Latent space connection slot color
"MASK": "#81C784", // Mask data connection slot color
"MODEL": "#B39DDB", // Model connection slot color
"STYLE_MODEL": "#C2FFAE", // Style model connection slot color
"VAE": "#FF6E6E", // VAE model connection slot color
"NOISE": "#B0B0B0", // Noise data connection slot color
"GUIDER": "#66FFFF", // Guider connection slot color
"SAMPLER": "#ECB4B4", // Sampler connection slot color
"SIGMAS": "#CDFFCD", // Sigmas data connection slot color
"TAESD": "#DCC274" // TAESD model connection slot color
},
"litegraph_base": { // LiteGraph base interface configuration
"BACKGROUND_IMAGE": "", // Background image, default is empty
"CLEAR_BACKGROUND_COLOR": "#222", // Main canvas background color
"NODE_TITLE_COLOR": "#999", // Node title text color
"NODE_SELECTED_TITLE_COLOR": "#FFF", // Selected node title color
"NODE_TEXT_SIZE": 14, // Node text size
"NODE_TEXT_COLOR": "#AAA", // Node text color
"NODE_TEXT_HIGHLIGHT_COLOR": "#FFF", // Node text highlight color
"NODE_SUBTEXT_SIZE": 12, // Node subtext size
"NODE_DEFAULT_COLOR": "#333", // Node default color
"NODE_DEFAULT_BGCOLOR": "#353535", // Node default background color
"NODE_DEFAULT_BOXCOLOR": "#666", // Node default border color
"NODE_DEFAULT_SHAPE": 2, // Node default shape
"NODE_BOX_OUTLINE_COLOR": "#FFF", // Node border outline color
"NODE_BYPASS_BGCOLOR": "#FF00FF", // Node bypass background color
"NODE_ERROR_COLOUR": "#E00", // Node error state color
"DEFAULT_SHADOW_COLOR": "rgba(0,0,0,0.5)", // Default shadow color
"DEFAULT_GROUP_FONT": 24, // Group default font size
"WIDGET_BGCOLOR": "#222", // Widget background color
"WIDGET_OUTLINE_COLOR": "#666", // Widget outline color
"WIDGET_TEXT_COLOR": "#DDD", // Widget text color
"WIDGET_SECONDARY_TEXT_COLOR": "#999", // Widget secondary text color
"WIDGET_DISABLED_TEXT_COLOR": "#666", // Widget disabled state text color
"LINK_COLOR": "#9A9", // Connection line color
"EVENT_LINK_COLOR": "#A86", // Event connection line color
"CONNECTING_LINK_COLOR": "#AFA", // Connecting line color
"BADGE_FG_COLOR": "#FFF", // Badge foreground color
"BADGE_BG_COLOR": "#0F1F0F" // Badge background color
},
"comfy_base": { // ComfyUI base interface configuration
"fg-color": "#fff", // Foreground color
"bg-color": "#202020", // Background color
"comfy-menu-bg": "#353535", // Menu background color
"comfy-menu-secondary-bg": "#303030", // Secondary menu background color
"comfy-input-bg": "#222", // Input field background color
"input-text": "#ddd", // Input text color
"descrip-text": "#999", // Description text color
"drag-text": "#ccc", // Drag text color
"error-text": "#ff4444", // Error text color
"border-color": "#4e4e4e", // Border color
"tr-even-bg-color": "#222", // Table even row background color
"tr-odd-bg-color": "#353535", // Table odd row background color
"content-bg": "#4e4e4e", // Content area background color
"content-fg": "#fff", // Content area foreground color
"content-hover-bg": "#222", // Content area hover background color
"content-hover-fg": "#fff", // Content area hover foreground color
"bar-shadow": "rgba(16, 16, 16, 0.5) 0 0 0.5rem" // Bar shadow effect
}
}
}
```
## Canvas
### Background Image
* **Requirements**: ComfyUI frontend version 1.20.5 or newer
* **Function**: Set a custom background image for the canvas to provide a more personalized workspace. You can upload images or use web images to set the background for the canvas.
## Node
### Node Opacity
* **Function**: Set the opacity of nodes, where 0 represents completely transparent and 1 represents completely opaque.
## Node Widget
### Textarea Widget Font Size
* **Range**: 8 - 24
* **Function**: Set the font size in textarea widgets. Adjusts the text display size in text input boxes to improve readability.
## Sidebar
### Unified Sidebar Width
* **Function**: When enabled, the sidebar width will be unified to a consistent width when switching between different sidebars. If disabled, different sidebars can maintain their custom widths when switching.
### Sidebar Size
* **Function**: Control the size of the sidebar, can be set to normal or small.
### Sidebar Location
* **Function**: Control whether the sidebar is displayed on the left or right side of the interface, allowing users to adjust the sidebar position according to their usage habits.
### Sidebar Style
* **Function**: Control the visual style of the sidebar. Options include:
* **Connected**: The sidebar appears connected to the edge of the interface.
* **Floating**: The sidebar appears as a floating panel with visual separation from the interface edge.
## Tree Explorer
### Tree Explorer Item Padding
* **Function**: Set the padding of items in the tree explorer (sidebar panel), adjusting the spacing between items in the tree structure.
## Advanced Customization with user.css
For cases where the color palette doesn't provide enough control, you can use custom CSS via a user.css file. This method is recommended for advanced users who need to customize elements that aren't available in the color palette system.
### Requirements
* ComfyUI frontend version 1.20.5 or newer
### Setting Up user.css
1. Create a file named `user.css` in your ComfyUI user directory (same location as your workflows and settings - see location details below)
2. Add your custom CSS rules to this file
3. Restart ComfyUI or refresh the page to apply changes
### User Directory Location
The ComfyUI user directory is where your personal settings, workflows, and customizations are stored. The location depends on your installation type:
```
C:\Users\\AppData\Roaming\ComfyUI\user
```
```
~//ComfyUI/user
```
```
~/.config/ComfyUI/user
```
The user directory is located in your ComfyUI installation folder:
```
/user
```
For example, if you cloned ComfyUI to `C:\ComfyUI`, your user directory would be `C:\ComfyUI\user\default` (or `C:\ComfyUI\user\john` if you've set up a custom username).
ComfyUI supports multiple users per installation. If you haven't configured a custom username, it defaults to "default". Each user gets their own subdirectory within the `user` folder.
The user directory is located in your ComfyUI portable folder:
```
/ComfyUI/user
```
For example: `ComfyUI_windows_portable/ComfyUI/user/default`
ComfyUI supports multiple users per installation. If you haven't configured a custom username, it defaults to "default". Each user gets their own subdirectory within the `user` folder.
This location contains your workflows, settings, and other user-specific files.
After finding the above folder location, please copy the corresponding CSS file to the corresponding user directory, such as the default user folder being `ComfyUI/user/default`, then restart ComfyUI or refresh the page to apply changes.
### user.css Examples and Related Instructions
The `user.css` file is loaded early in the application startup process. So you may need to use `!important` in your CSS rules to ensure they override the default styles.
**user.css Customization Examples**
```css theme={null}
/* Increase font size in inputs and menus for better readability */
.comfy-multiline-input, .litecontextmenu .litemenu-entry {
font-size: 20px !important;
}
/* Make context menu entries larger for easier selection */
.litegraph .litemenu-entry,
.litemenu-title {
font-size: 24px !important;
}
/* Custom styling for specific elements not available in the color palette */
.comfy-menu {
border: 1px solid rgb(126, 179, 189) !important;
border-radius: 0px 0px 0px 10px !important;
backdrop-filter: blur(2px);
}
```
**Best Practices**
1. **Start with the color palette** for most customizations
2. Use **user.css only when necessary** for elements not covered by the color palette
3. **Export your theme** before making significant changes so you can revert if needed
4. **Share your themes** with the community to inspire others
**Troubleshooting**
* If your color palette changes don't appear, try refreshing the page
* If CSS customizations don't work, check that you're using frontend version 1.20.5+
* Try adding `!important` to user.css rules that aren't being applied
* Keep backups of your customizations to easily restore them
---
# Source: https://docs.comfy.org/support/subscription/canceling.md
> ## Documentation Index
> Fetch the complete documentation index at: https://docs.comfy.org/llms.txt
> Use this file to discover all available pages before exploring further.
# Canceling your Comfy Cloud subscription
> Learn how to cancel your Comfy Cloud subscription
## How to cancel
To cancel your Comfy Cloud subscription:
1. Visit and log in to [cloud.comfy.org](https://cloud.comfy.org/?utm_source=docs)
2. Navigate to the settings menu
3. Go to **Plan & Credits**
4. Click **Manage subscription**
5. Click `Cancel subscription` button in Stripe to cancel your subscription
## Important notes
* All Comfy Cloud subscription plans automatically renew unless you set your plan to cancel
* Your subscription will remain active until the end of your current billing period
* You can resubscribe at any time by visiting [cloud.comfy.org](https://cloud.comfy.org/?utm_source=docs)
---
# Source: https://docs.comfy.org/support/subscription/changing-plan.md
> ## Documentation Index
> Fetch the complete documentation index at: https://docs.comfy.org/llms.txt
> Use this file to discover all available pages before exploring further.
# Changing your subscription plan
> Learn how to change your Comfy Cloud subscription plan
## How to change your subscription plan
You can upgrade or downgrade your Comfy Cloud subscription plan at any time. Follow these steps to change your plan:
### Step 1: Open the settings panel
Click the **Plan & Credits** menu to open the settings panel.
### Step 2: Access subscription management
In the **Plan & Credits** panel, click the **Manage subscription** button to open the subscription settings.
### Step 3: Select a new plan
Select any plan you want, then click the **Change** button.
### Step 4: Open the billing portal
After opening the Comfy billing portal, click the **Update subscription** button.
### Step 5: Confirm your new plan
Select the plan you want, then click **Continue** to confirm your selection.
## Billing for plan changes
### Upgrading to a higher-priced plan
If your current subscription plan price is lower than the target plan, you will need to pay the price difference. You will receive an equivalent credit amount corresponding to the price difference.
### Downgrading to a lower-priced plan
If your current subscription plan price is higher than the target plan, your subscription will switch to the new plan after the current billing cycle ends. The new subscription will be based on the new pricing plan.
---
# Source: https://docs.comfy.org/tutorials/partner-nodes/openai/chat.md
> ## Documentation Index
> Fetch the complete documentation index at: https://docs.comfy.org/llms.txt
> Use this file to discover all available pages before exploring further.
# OpenAI Chat API Node ComfyUI Official Example
> This article will introduce how to use OpenAI Chat Partner nodes in ComfyUI to complete conversational functions
OpenAI is a company focused on generative AI, providing powerful conversational capabilities. Currently, ComfyUI has integrated the OpenAI API, allowing you to directly use the related nodes in ComfyUI to complete conversational functions.
In this guide, we will walk you through completing the corresponding conversational functionality.
To use the API nodes, you need to ensure that you are logged in properly and using a permitted network environment. Please refer to the [API Nodes Overview](/tutorials/partner-nodes/overview) section of the documentation to understand the specific requirements for using the API nodes.
Make sure your ComfyUI is updated.
* [Download ComfyUI](https://www.comfy.org/download)
* [Update Guide](/installation/update_comfyui)
Workflows in this guide can be found in the [Workflow Templates](/interface/features/template).
If you can't find them in the template, your ComfyUI may be outdated. (Desktop version's update will delay sometime)
If nodes are missing when loading a workflow, possible reasons:
1. You are not using the latest ComfyUI version (Nightly version)
2. Some nodes failed to import at startup
* The Desktop is base on ComfyUI stable release, it will auto-update when there is a new Desktop stable release available.
* [Cloud](https://cloud.comfy.org) will update after ComfyUI stable release.
So, if you find any core node missing in this document, it might be because the new core nodes have not yet been released in the latest stable version. Please wait for the next stable release.
## OpenAI Chat Workflow
### 1. Workflow File Download
Please download the Json file below and drag it into ComfyUI to load the corresponding workflow.
### 2. Complete the Workflow Execution Step by Step
In the corresponding template, we have built a role setting for analyzing prompt generation.
You can refer to the numbers in the image to complete the basic text-to-image workflow execution:
1. In the `Load Image` node, load the image you need AI to interpret
2. (Optional) If needed, you can modify the settings in `OpenAI Chat Advanced Options` to have AI execute specific tasks
3. In the `OpenAI Chat` node, you can modify `Prompt` to set the conversation prompt, or modify `model` to select different models
4. Click the `Run` button, or use the shortcut `Ctrl(cmd) + Enter` to execute the conversation.
5. After waiting for the API to return results, you can view the corresponding AI returned content in the `Preview Any` node.
### 3. Additional Notes
* Currently, the file input node `OpenAI Chat Input Files` requires files to be uploaded to the `ComfyUI/input/` directory first. This node is being improved, and we will modify the template after updates
* The workflow provides an example using `Batch Images` for input. If you have multiple images that need AI interpretation, you can refer to the step diagram and use right-click to set the corresponding node mode to `Always` to enable it
---
# Source: https://docs.comfy.org/api-reference/cloud/asset/check-if-asset-exists-by-hash.md
> ## Documentation Index
> Fetch the complete documentation index at: https://docs.comfy.org/llms.txt
> Use this file to discover all available pages before exploring further.
# Check if asset exists by hash
> Checks if content with the given hash exists in cloud storage.
Returns 200 if the content exists, 404 if it doesn't.
Useful for checking availability before using `/api/assets/from-hash`.
## OpenAPI
````yaml openapi-cloud.yaml head /api/assets/hash/{hash}
openapi: 3.0.3
info:
title: Comfy Cloud API
description: >
**Experimental API:** This API is experimental and subject to change.
Endpoints, request/response formats, and behavior may be modified without
notice.
API for Comfy Cloud - Run ComfyUI workflows on cloud infrastructure.
This API allows you to interact with Comfy Cloud programmatically,
including:
- Submitting and managing workflows
- Uploading and downloading files
- Monitoring job status and progress
## Cloud vs OSS ComfyUI Compatibility
Comfy Cloud implements the same API interfaces as OSS ComfyUI for maximum
compatibility,
but some fields are accepted for compatibility while being handled
differently or ignored:
| Field | Endpoints | Cloud Behavior |
|-------|-----------|----------------|
| `subfolder` | `/api/view`, `/api/upload/*` | **Ignored** - Cloud uses
content-addressed storage (hash-based). Returned in responses for
client-side organization. |
| `type` (input/output/temp) | `/api/view`, `/api/upload/*` | Partially used
- All files stored with tag-based organization rather than directory
structure. |
| `overwrite` | `/api/upload/*` | **Ignored** - Content-addressed storage
means identical content always has the same hash. |
| `number`, `front` | `/api/prompt` | **Ignored** - Cloud uses its own fair
queue scheduling per user. |
| `split`, `full_info` | `/api/userdata` | **Ignored** - Cloud always
returns full file metadata. |
These fields are retained in the API schema for drop-in compatibility with
existing ComfyUI clients and workflows.
version: 1.0.0
license:
name: GNU General Public License v3.0
url: https://github.com/comfyanonymous/ComfyUI/blob/master/LICENSE
servers:
- url: https://cloud.comfy.org
description: Comfy Cloud API
security:
- ApiKeyAuth: []
tags:
- name: workflow
description: |
Submit workflows for execution and manage the execution queue.
This is the primary way to run ComfyUI workflows on the cloud.
- name: job
description: |
Monitor job status, view execution history, and manage running jobs.
Jobs are created when you submit a workflow via POST /api/prompt.
- name: asset
description: |
Upload, download, and manage persistent assets (images, models, outputs).
Assets provide durable storage with tagging and metadata support.
- name: file
description: |
Legacy file upload and download endpoints compatible with local ComfyUI.
For new integrations, consider using the Assets API instead.
- name: model
description: |
Browse available AI models. Models are pre-loaded on cloud infrastructure.
- name: node
description: |
Get information about available ComfyUI nodes and their inputs/outputs.
Useful for building dynamic workflow interfaces.
- name: user
description: |
User account information and personal data storage.
- name: system
description: |
Server status, health checks, and system information.
paths:
/api/assets/hash/{hash}:
head:
tags:
- asset
summary: Check if asset exists by hash
description: |
Checks if content with the given hash exists in cloud storage.
Returns 200 if the content exists, 404 if it doesn't.
Useful for checking availability before using `/api/assets/from-hash`.
operationId: checkAssetByHash
parameters:
- name: hash
in: path
required: true
description: Blake3 hash of the asset in format 'blake3:hex_digest'
schema:
type: string
pattern: ^blake3:[a-f0-9]{64}$
example: >-
blake3:a1b2c3d4e5f6789012345678901234567890123456789012345678901234
responses:
'200':
description: Asset exists
'400':
description: Invalid hash format
content:
application/json:
schema:
$ref: '#/components/schemas/ErrorResponse'
'401':
description: Unauthorized
content:
application/json:
schema:
$ref: '#/components/schemas/ErrorResponse'
'404':
description: Asset not found
'500':
description: Internal server error
content:
application/json:
schema:
$ref: '#/components/schemas/ErrorResponse'
components:
schemas:
ErrorResponse:
type: object
required:
- code
- message
properties:
code:
type: string
message:
type: string
securitySchemes:
ApiKeyAuth:
type: apiKey
in: header
name: X-API-Key
description: |
API key authentication. Generate an API key from your account settings
at https://comfy.org/account. Pass the key in the X-API-Key header.
````
---
# Source: https://docs.comfy.org/registry/cicd.md
> ## Documentation Index
> Fetch the complete documentation index at: https://docs.comfy.org/llms.txt
> Use this file to discover all available pages before exploring further.
# Custom Node CI/CD
## Introduction
When making changes to custom nodes, it's not uncommon to break things in Comfy or other custom nodes. It is often unrealistic to test on every operating system and different configurations of Pytorch.
### Run Comfy Workflows using Github Actions
[Comfy-Action](https://github.com/Comfy-Org/comfy-action) allows you to run a Comfy workflow\.json file on Github Actions. It supports downloading models, custom nodes, and runs on Linux/Mac/Windows.
### Results
Output files are uploaded to the [CI/CD Dashboard](https://ci.comfy.org/) and can be viewed as a last step before committing new changes or publishing new versions of the custom node.
---
# Source: https://docs.comfy.org/registry/claim-my-node.md
> ## Documentation Index
> Fetch the complete documentation index at: https://docs.comfy.org/llms.txt
> Use this file to discover all available pages before exploring further.
# Claim My Node
## Overview
The **Claim My Node** feature allows developers to claim ownership of custom nodes in the ComfyUI Registry. This system ensures that only the rightful authors can manage and update their published nodes, providing security and accountability within the community.
## What are Unclaimed Nodes?
As we migrate from ComfyUI Manager to the Comfy Registry with new standards, many custom nodes that were previously listed in the ComfyUI Manager legacy system now appear as "unclaimed" in the registry. These are nodes that:
* Were originally published in the ComfyUI Manager legacy system
* Have been migrated to the Comfy Registry to meet the latest standards
* Are waiting for their original authors to claim ownership
We provide an easy way for developers to claim these migrated nodes, ensuring a smooth transition from the legacy system to the new registry standard while maintaining proper ownership and control.
## Getting Started
To claim your nodes:
1. **Navigate to Your Unclaimed Node Page**: Visit your unclaimed node page, Click "Claim my node!" button.
2. **Create a Publisher (if you don't have one yet)**:
* If you haven't created a publisher yet, you'll be prompted to create one. A publisher is required to claim nodes and manage them effectively.
3. **Select a Publisher**: Choose the publisher under which you want to claim the node. this step will redirect you to the claim page.
To claim the node under the choosed publisher, follow these steps:
1. **Review Node Information:**
* Check the node details, including the name, repository link, and publisher status as shown on the screen.
2. **GitHub Authentication:**
* Click the "Continue with GitHub" button to start the authentication process. Ensure you're logged in to the correct GitHub account with admin rights to the repository.
3. **Verify Admin Access:**
* Once logged in, the system will verify if you have admin privileges for the specified GitHub repository. This step is crucial to ensure you have the necessary permissions.
4. **Claim the Node:**
* If the verification is successful, Click "Claim" to claim the node. The publisher status will change, indicating ownership.
5. **Complete!:**
* After successfully claiming the node, you can continue on [publishing](./publishing) and managing your node as the rightful owner.
## Frequently Asked Questions
Any GitHub user can submit a claim request, but claims are verified against the original node repository and author information.
Claims are automatically approved once GitHub admin permissions to the repository are verified. This happens instantly upon submitting your claim.
Once approved, you'll have full control over your node's management, including publish versions, updates meta, deprecation, and policy settings.
No, claims are automatically validated against GitHub repository admin permissions. Only users with admin access to the original repository can successfully claim nodes.
Claims are automatically processed based on GitHub admin permissions. If you don't have admin access to the repository, the claim will be automatically denied. Contact the repository owner to request admin access if you believe you should have ownership rights.
---
# Source: https://docs.comfy.org/api-reference/registry/claim-nodeid-into-publisherid-for-the-authenticated-publisher.md
> ## Documentation Index
> Fetch the complete documentation index at: https://docs.comfy.org/llms.txt
> Use this file to discover all available pages before exploring further.
# Claim nodeId into publisherId for the authenticated publisher
> This endpoint allows a publisher to claim an unclaimed node that they own the repo, which is identified by the nodeId. The unclaimed node's repository must be owned by the authenticated user.
## OpenAPI
````yaml https://api.comfy.org/openapi post /publishers/{publisherId}/nodes/{nodeId}/claim-my-node
openapi: 3.0.2
info:
title: Comfy API
version: '1.0'
servers:
- url: https://api.comfy.org
security: []
paths:
/publishers/{publisherId}/nodes/{nodeId}/claim-my-node:
post:
tags:
- Registry
summary: Claim nodeId into publisherId for the authenticated publisher
description: >
This endpoint allows a publisher to claim an unclaimed node that they
own the repo, which is identified by the nodeId. The unclaimed node's
repository must be owned by the authenticated user.
operationId: ClaimMyNode
parameters:
- in: path
name: publisherId
required: true
schema:
type: string
- in: path
name: nodeId
required: true
schema:
type: string
requestBody:
content:
application/json:
schema:
$ref: '#/components/schemas/ClaimMyNodeRequest'
required: true
responses:
'204':
description: Node claimed successfully
'400':
content:
application/json:
schema:
$ref: '#/components/schemas/ErrorResponse'
description: Bad request, invalid input data
'401':
description: Unauthorized
'403':
content:
application/json:
schema:
$ref: '#/components/schemas/ErrorResponse'
description: |
Forbidden - various authorization and permission issues
Includes:
- The authenticated user does not have permission to claim the node
- The node is already claimed by another publisher
- The GH_TOKEN is invalid
- The repository is not owned by the authenticated GitHub user
'429':
content:
application/json:
schema:
$ref: '#/components/schemas/ErrorResponse'
description: Too many requests - GitHub API rate limit exceeded
'500':
content:
application/json:
schema:
$ref: '#/components/schemas/ErrorResponse'
description: Internal server error
'503':
content:
application/json:
schema:
$ref: '#/components/schemas/ErrorResponse'
description: Service unavailable - GitHub API is currently unavailable
security:
- BearerAuth: []
components:
schemas:
ClaimMyNodeRequest:
properties:
GH_TOKEN:
description: GitHub token to verify if the user owns the repo of the node
type: string
required:
- GH_TOKEN
type: object
ErrorResponse:
properties:
error:
type: string
message:
type: string
required:
- error
- message
type: object
securitySchemes:
BearerAuth:
bearerFormat: JWT
scheme: bearer
type: http
````
---
# Source: https://docs.comfy.org/get_started/cloud.md
> ## Documentation Index
> Fetch the complete documentation index at: https://docs.comfy.org/llms.txt
> Use this file to discover all available pages before exploring further.
# Comfy Cloud
> Get started with Comfy Cloud to run ComfyUI workflows in the cloud without local installation
Click here to access ComfyUI Cloud directly
## What is Comfy Cloud?
ComfyUI Cloud is the cloud version of ComfyUI with the same features as the local version. Everything is pre-installed and ready to use.
### Key features
No installation required. All models and custom nodes are pre-installed and ready to use
Run workflows fast on our powerful server GPUs without needing your own hardware
Automatically stays current with the latest ComfyUI releases and features
Use ComfyUI from any device with an internet connection - no local installation needed
## Cloud vs local
ComfyUI offers both an official cloud version, [Comfy Cloud](https://comfy.org/cloud), and an open-source self-hosted version. If you have a powerful GPU, running ComfyUI locally is a great option. The cloud version, on the other hand, is an online service that's ready to use instantly—simply open the URL, no installation or setup required.
| Category | Comfy Cloud | Self-hosted (local ComfyUI) |
| ----------------------- | --------------------------------------------------------------------------------------------------------- | -------------------------------------------------------------------------------------------------------------------------------------------------- |
| **Cost** | Monthly Subscription | Free |
| **GPU** | Powerful Blackwell RTX 6000 Pros | Bring your own GPU |
| **Technical Knowledge** | No technical knowledge required. | While desktop and portable give you easy ways to get started, you'll need to troubleshoot custom node installations and local installation issues. |
| **Custom Nodes** | Use pre-installed custom nodes and never worry about compatibility issues. | Install any custom node you want, but you'll need to manage it yourself. |
| **Models** | Use pre-installed models. Import LoRA models from Civitai. Import models from Hugging Face (coming soon). | Use any models you want, but you'll need to download them first. |
| **Notable Differences** | Easy to onboard your team | Works offline, infinitely customizable |
| **Get started** | [Run ComfyUI Cloud](https://comfy.org/cloud) | [Install ComfyUI locally](/installation/system_requirements) |
## Pricing and subscription
View pricing and subscription options for Comfy Cloud
## How to use ComfyUI Cloud
Using ComfyUI Cloud is essentially the same as using your local ComfyUI. If this is your first time using ComfyUI, here are some quick tips to get started:
Click the template icon in the left sidebar to browse available workflows.
Click on the template you want to run.
1. In the loaded workflow, since we have pre-installed all models in the cloud version, all templates are ready to run immediately after loading.
2. If you need to make updates, you only need to provide image inputs or text prompts. Check the `Load Image` node or `CLIP Text Encode` node.
If everything is correct, click the "Run" icon or use the shortcut "Ctrl + Enter" to run the workflow.
After clicking run, our service will start allocating a machine for your workflow. You can check the execution status of the corresponding workflow in the queue panel.
After the workflow execution is complete, you can save the generated content locally. Depending on the asset type, the save method is as follows:
In the queue panel or on the save image node, right-click on the generated image and select "Save image" to save the image locally.
In the queue panel or on the save video node:
1. Click the three dots on the browser player component to open the menu
2. Select "Download" to save the video locally.
In the queue panel or on the save audio node:
1. Click the three dots on the browser player component to open the menu
2. Select "Download" to save the audio file locally.
In the 3D browser node menu, select the "Export" option, choose the format you want to save, and the 3D file will be saved locally.
## Feedback
If you have any thoughts, suggestions, or run into any issues, simply click the "Feedback" icon. This will directly send your feedback to us.
## Frequently Asked Questions
View frequently asked questions and answers about Comfy Cloud, including pricing, features, limitations, and more
## Next steps
Programmatically run workflows via the Cloud API
Explore tutorials to learn ComfyUI workflows
Join our Discord community for help
---
# Source: https://docs.comfy.org/interface/settings/comfy-desktop.md
> ## Documentation Index
> Fetch the complete documentation index at: https://docs.comfy.org/llms.txt
> Use this file to discover all available pages before exploring further.
# Comfy Desktop General Settings
> Detailed description of ComfyUI Desktop general setting options
## General
### Window Style
**Function**: Controls the title bar style of the application window
### Automatically check for updates
**Function**: Automatically checks for ComfyUI Desktop updates and will remind you to update when updates are available
### Send anonymous usage metrics
**Function**: Sends anonymous usage statistics to help improve the software. Changes to this setting require a restart to take effect
## UV
This section is mainly for users in China, because many of the original mirrors used by Desktop are outside of China, so access may not be friendly for domestic users. You can set your own mirror sources here to improve access speed and ensure that corresponding packages can be accessed and downloaded normally.
### Python Install Mirror
**Function**:
* Managed Python installation packages are downloaded from the Astral python-build-standalone project
* Can set mirror URL to use different Python installation sources
* The provided URL will replace the default GitHub download address
* Supports using file:// protocol to read distribution packages from local directories\
**Validation**: Automatically checks mirror reachability
### Pypi Install Mirror
**Function**: Default pip package installation mirror source
### Torch Install Mirror
**Function**: PyTorch-specific pip installation mirror source
---
# Source: https://docs.comfy.org/interface/settings/comfy.md
> ## Documentation Index
> Fetch the complete documentation index at: https://docs.comfy.org/llms.txt
> Use this file to discover all available pages before exploring further.
# Comfy Settings
> Detailed description of ComfyUI core setting options
## API Nodes
### Show API node pricing badge
* **Default Value**: Enabled
* **Function**: Controls whether to display pricing badges on API nodes, helping users identify the usage cost of API nodes
> For more information about API nodes, please refer to [API Nodes](/tutorials/partner-nodes/overview)
## Dev Mode
### Enable dev mode options (API save, etc.)
* **Default Value**: Disabled
* **Function**: Enables development mode options (such as API save, etc.)
## Edit Token Weight
### Ctrl+up/down precision
* **Default Value**: 0.01
* **Function**: When using CLIPTextEncode type nodes or text input node widgets, use Ctrl+up/down to quickly adjust weights. This option changes the weight value for each adjustment
## Locale
### Language
* **Options**: English, 中文 (Chinese),日本語 (Japanese), 한국어 (Korean), Русский (Russian), Español (Spanish), Français (French)
* **Default Value**: Auto-detect browser language
* **Function**: Modify the display language of ComfyUI interface
## Menu
### Use new menu
* **Default Value**: Top
* **Function**: Select menu interface and position, currently only supports Top, Bottom, Disabled
The menu interface will be displayed at the top of the workspace
The menu bar interface will be displayed at the bottom of the workspace
If you prefer the early legacy menu, you can try this option.
Since we are constantly updating, some new features will not be synchronized and supported in the legacy menu.
## Model Library
Model Library refers to the model management function in the ComfyUI sidebar menu. You can use this function to view models in your `ComfyUI/models` and additionally configured model folders.
### What name to display in the model library tree view
* **Default Value**: title
* **Function**: Select the name format to display in the model library tree view, currently only supports filename and title
### Automatically load all model folders
* **Default Value**: Disabled
* **Function**: Whether to automatically detect model files in all folders when clicking the model library. Enabling may cause loading delays (requires traversing all folders). When disabled, files in the corresponding folder will only be loaded when clicking the folder name.
## Node
During the iteration process of ComfyUI, we will adjust some nodes and enable some nodes. These nodes may undergo major changes or be removed in future versions. However, to ensure compatibility, deprecated nodes have not been removed. You can use the settings below to enable whether to display **experimental nodes** and **deprecated nodes**.
### Show deprecated nodes in search
* **Default Value**: Disabled
* **Function**: Controls whether to display deprecated nodes in search. Deprecated nodes are hidden by default in the UI, but remain effective in existing workflows.
### Show experimental nodes in search
* **Default Value**: Enabled
* **Function**: Controls whether to display experimental nodes in search. Experimental nodes are some new feature support, but are not fully stable and may change or be removed in future versions.
## Node Search Box
### Number of nodes suggestions
* **Default Value**: 5
* **Function**: Used to modify the number of recommended nodes in the related node context menu. The larger the value, the more related recommended nodes are displayed.
### Show node frequency in search results
* **Default Value**: Disabled
* **Function**: Controls whether to display node usage frequency in search results
### Show node id name in search results
* **Default Value**: Disabled
* **Function**: Controls whether to display node ID names in search results
### Show node category in search results
* **Default Value**: Enabled
* **Function**: Controls whether to display node categories in search results, helping users understand node classification information
### Node preview
* **Default Value**: Enabled
* **Function**: Controls whether to display node previews in search results, making it convenient for you to quickly preview nodes
### Node search box implementation
* **Default Value**: default
* **Function**: Select the implementation method of the node search box (experimental feature). If you select `litegraph (legacy)`, it will switch to the early ComfyUI search box
## Node Widget
### Widget control mode
* **Options**: before, after
* **Function**: Controls whether the timing of node widget value updates is before or after workflow execution, such as updating seed values
### Textarea widget spellcheck
* **Default Value**: Disabled
* **Function**: Controls whether text area widgets enable spellcheck, providing spellcheck functionality during text input. This functionality is implemented through the browser's spellcheck attribute
## Queue
### Queue history size
* **Default Value**: 100
* **Function**: Controls the queue history size recorded in the sidebar queue history panel. The larger the value, the more queue history is recorded. When the number is large, loading the page will also consume more memory
## Queue Button
### Batch count limit
* **Default Value**: 100
* **Function**: Sets the maximum number of tasks added to the queue in a single click, preventing accidentally adding too many tasks to the queue
## Validation
### Validate node definitions (slow)
* **Default Value**: Disabled
* **Function**: Controls whether to validate all node definitions at startup (slow). Only recommended for node developers. When enabled, the system will use Zod schemas to strictly validate each node definition. This functionality will consume more memory and time
* **Error Handling**: Failed node definitions will be skipped and warning information will be output to the console
Since detailed schema validation needs to be performed on all node definitions, this feature will significantly increase startup time, so it is disabled by default and only recommended for node developers
### Validate workflows
* **Default Value**: Enabled
* **Function**: Ensures the structural and connection correctness of workflows. If enabled, the system will call `useWorkflowValidation().validateWorkflow()` to validate workflow data
* **Validation Process**: The validation process includes two steps:
* Schema validation: Use Zod schemas to validate workflow structure
* Link repair: Check and repair connection issues between nodes
* **Error Handling**: When validation fails, error prompts will be displayed, but workflow loading will not be blocked
## Window
### Show confirmation when closing window
* **Default Value**: Enabled
* **Function**: When there are modified but unsaved workflows, controls whether to display confirmation when closing the browser window or tab, preventing accidental window closure that leads to loss of unsaved workflows
## Workflow
### Persist workflow state and restore on page (re)load
* **Default Value**: Enabled
* **Function**: Controls whether to restore workflow state on page (re)load, maintaining workflow content after page refresh
### Auto Save
* **Default Value**: off
* **Function**: Controls the auto-save behavior of workflows, automatically saving workflow changes to avoid data loss
### Auto Save Delay (ms)
* **Default Value**: 1000
* **Function**: Sets the delay time for auto-save, only effective when auto-save is set to "after delay"
### Show confirmation when deleting workflows
* **Default Value**: Enabled
* **Function**: Controls whether to display a confirmation dialog when deleting workflows in the sidebar, preventing accidental deletion of important workflows
### Save and restore canvas position and zoom level in workflows
* **Default Value**: Enabled
* **Function**: Controls whether to save and restore canvas position and zoom level in workflows, restoring the previous view state when reopening workflows
### Opened workflows position
* **Options**: Sidebar, Topbar, Topbar (Second Row)
* **Default Value**: Topbar
* **Function**: Controls the display position of opened workflow tabs, currently only supports Sidebar, Topbar, Topbar (Second Row)
### Prompt for filename when saving workflow
* **Default Value**: Enabled
* **Function**: Controls whether to prompt for filename input when saving workflows, allowing users to customize workflow filenames
### Sort node IDs when saving workflow
* **Default Value**: Disabled
* **Function**: Determines whether to sort node IDs when saving workflows, making workflow file format more standardized and convenient for version control
### Show missing nodes warning
* **Default Value**: Enabled
* **Function**: Controls whether to display warnings for missing nodes in workflows, helping users identify unavailable nodes in workflows
### Show missing models warning
* **Default Value**: Enabled
* **Function**: We support adding model link information to widget values in workflow files for prompts when loading model files. When enabled, if you don't have the corresponding model files locally, warnings for missing models in workflows will be displayed
### Require confirmation when clearing workflow
* **Default Value**: Enabled
* **Function**: Controls whether to display a confirmation dialog when clearing workflows, preventing accidental clearing of workflow content
### Save node IDs to workflow
* **Default Value**: Enabled
* **Function**: Controls whether to save node IDs when saving workflows, making workflow file format more standardized and convenient for version control
---
# Source: https://docs.comfy.org/installation/comfyui_portable_windows.md
> ## Documentation Index
> Fetch the complete documentation index at: https://docs.comfy.org/llms.txt
> Use this file to discover all available pages before exploring further.
# ComfyUI(portable) Windows
> This tutorial will guide you on how to download and start using ComfyUI Portable and run the corresponding programs
**ComfyUI Portable** is a standalone packaged complete ComfyUI Windows version that has integrated an independent **Python (python\_embeded)** required for ComfyUI to run. You only need to extract it to use it. Currently, the portable version supports running through **Nvidia GPU** or **CPU**.
This guide section will walk you through installing ComfyUI Portable.
## Download ComfyUI Portable
You can get the latest ComfyUI Portable download link by clicking the link below
After downloading, you can use decompression software like [7-ZIP](https://7-zip.org/) to extract the compressed package
The file structure and description after extracting the portable version are as follows:
```
ComfyUI_windows_portable
├── 📂ComfyUI // ComfyUI main program
├── 📂python_embeded // Independent Python environment
├── 📂update // Batch scripts for upgrading portable version
├── README_VERY_IMPORTANT.txt // ComfyUI Portable usage instructions in English
├── run_cpu.bat // Double click to start ComfyUI (CPU only)
└── run_nvidia_gpu.bat // Double click to start ComfyUI (Nvidia GPU)
```
## How to Launch ComfyUI
Double click either `run_nvidia_gpu.bat` or `run_cpu.bat` depending on your computer's configuration to launch ComfyUI.
You will see the command running as shown in the image below
When you see something similar to the image
```
To see the GUI go to: http://127.0.0.1:8188
```
At this point, your ComfyUI service has started. Normally, ComfyUI will automatically open your default browser and navigate to `http://127.0.0.1:8188`. If it doesn't open automatically, please manually open your browser and visit this address.
During use, please do not close the corresponding command line window, otherwise ComfyUI will stop running
## Adding Extra Model Paths
If you want to manage your model files outside of `ComfyUI/models`, you may have the following reasons:
* You have multiple ComfyUI instances and want them to share model files to save disk space
* You have different types of GUI programs (such as WebUI) and want them to use the same model files
* Model files cannot be recognized or found
We provide a way to add extra model search paths via the `extra_model_paths.yaml` configuration file
### Open Config File
For the ComfyUI version such as [portable](/installation/comfyui_portable_windows) and [manual](/installation/manual_install), you can find an example file named `extra_model_paths.yaml.example` in the root directory of ComfyUI:
```
ComfyUI/extra_model_paths.yaml.example
```
Copy and rename it to `extra_model_paths.yaml` for use. Keep it in ComfyUI's root directory at `ComfyUI/extra_model_paths.yaml`.
You can also find the config example file [here](https://github.com/comfyanonymous/ComfyUI/blob/master/extra_model_paths.yaml.example)
If you are using the [ComfyUI Desktop](/installation/desktop/windows) application, you can follow the image below to open the extra model config file:
Or open it directly at:
```
C:\Users\YourUsername\AppData\Roaming\ComfyUI\extra_models_config.yaml
```
```
~/Library/Application Support/ComfyUI/extra_models_config.yaml
```
You should keep the file in the same directory, should not move these files to other places.
If the file does not exist, you can create it yourself with any text editor.
### Example Structure
Suppose you want to add the following model paths to ComfyUI:
```
📁 YOUR_PATH/
├── 📁models/
| ├── 📁 loras/
| │ └── xxxxx.safetensors
| ├── 📁 checkpoints/
| │ └── xxxxx.safetensors
| ├── 📁 vae/
| │ └── xxxxx.safetensors
| └── 📁 controlnet/
| └── xxxxx.safetensors
```
Then you can configure the `extra_model_paths.yaml` file like below to let ComfyUI recognize the model paths on your device:
```
my_custom_config:
base_path: YOUR_PATH
loras: models/loras/
checkpoints: models/checkpoints/
vae: models/vae/
controlnet: models/controlnet/
```
or
```
my_custom_config:
base_path: YOUR_PATH/models/
loras: loras
checkpoints: checkpoints
vae: vae
controlnet: controlnet
```
For the desktop version, please add the configuration to the existing configuration path without overwriting the path configuration generated during installation. Please back up the corresponding file before modification, so that you can restore it when you make a mistake.
Or you can refer to the default [extra\_model\_paths.yaml.example](https://github.com/comfyanonymous/ComfyUI/blob/master/extra_model_paths.yaml.example) for more configuration options. After saving, you need to **restart ComfyUI** for the changes to take effect.
Below is the original config example:
```yaml theme={null}
#Rename this to extra_model_paths.yaml and ComfyUI will load it
#config for a1111 ui
#all you have to do is change the base_path to where yours is installed
a111:
base_path: path/to/stable-diffusion-webui/
checkpoints: models/Stable-diffusion
configs: models/Stable-diffusion
vae: models/VAE
loras: |
models/Lora
models/LyCORIS
upscale_models: |
models/ESRGAN
models/RealESRGAN
models/SwinIR
embeddings: embeddings
hypernetworks: models/hypernetworks
controlnet: models/ControlNet
#config for comfyui
#your base path should be either an existing comfy install or a central folder where you store all of your models, loras, etc.
#comfyui:
# base_path: path/to/comfyui/
# # You can use is_default to mark that these folders should be listed first, and used as the default dirs for eg downloads
# #is_default: true
# checkpoints: models/checkpoints/
# clip: models/clip/
# clip_vision: models/clip_vision/
# configs: models/configs/
# controlnet: models/controlnet/
# diffusion_models: |
# models/diffusion_models
# models/unet
# embeddings: models/embeddings/
# loras: models/loras/
# upscale_models: models/upscale_models/
# vae: models/vae/
#other_ui:
# base_path: path/to/ui
# checkpoints: models/checkpoints
# gligen: models/gligen
# custom_nodes: path/custom_nodes
```
For example, if your WebUI is located at `D:\stable-diffusion-webui\`, you can modify the corresponding configuration to
```yaml theme={null}
a111:
base_path: D:\stable-diffusion-webui\
checkpoints: models/Stable-diffusion
configs: models/Stable-diffusion
vae: models/VAE
loras: |
models/Lora
models/LyCORIS
upscale_models: |
models/ESRGAN
models/RealESRGAN
models/SwinIR
embeddings: embeddings
hypernetworks: models/hypernetworks
controlnet: models/ControlNet
```
### Add Extra Custom Nodes Path
Besides adding external models, you can also add custom nodes paths that are not in the default path of ComfyUI
Please note that this will not change the default installation path of custom nodes, but will add an extra path search when starting ComfyUI. You still need to complete the installation of custom node dependencies in the corresponding environment to ensure the integrity of the running environment.
Below is a simple configuration example (MacOS), please modify it according to your actual situation and add it to the corresponding configuration file, save it and restart ComfyUI for the changes to take effect:
```yaml theme={null}
my_custom_nodes:
custom_nodes: /Users/your_username/Documents/extra_custom_nodes
```
## First Image Generation
After successful installation, you can refer to the section below to start your ComfyUI journey\~
This tutorial will guide you through your first model installation and text-to-image generation
## Additional ComfyUI Portable Instructions
### 1. Upgrading ComfyUI Portable
You can use the batch commands in the update folder to upgrade your ComfyUI Portable version
```
ComfyUI_windows_portable
└─ 📂update
├── update.py
├── update_comfyui.bat // Update ComfyUI to the latest commit version
├── update_comfyui_and_python_dependencies.bat // Only use when you have issues with your runtime environment
└── update_comfyui_stable.bat // Update ComfyUI to the latest stable version
```
### 2. Setting Up LAN Access for ComfyUI Portable
If your ComfyUI is running on a local network and you want other devices to access ComfyUI, you can modify the `run_nvidia_gpu.bat` or `run_cpu.bat` file using Notepad to complete the configuration. This is mainly done by adding `--listen` to specify the listening address.
Below is an example of the `run_nvidia_gpu.bat` file command with the `--listen` parameter added
```bat theme={null}
.\python_embeded\python.exe -s ComfyUI\main.py --listen --windows-standalone-build
pause
```
After enabling ComfyUI, you will notice the final running address will become
```
Starting server
To see the GUI go to: http://0.0.0.0:8188
To see the GUI go to: http://[::]:8188
```
You can press `WIN + R` and type `cmd` to open the command prompt, then enter `ipconfig` to view your local IP address. Other devices can then access ComfyUI by entering `http://your-local-IP:8188` in their browser.
---
# Source: https://docs.comfy.org/development/comfyui-server/comms_messages.md
> ## Documentation Index
> Fetch the complete documentation index at: https://docs.comfy.org/llms.txt
> Use this file to discover all available pages before exploring further.
# Messages
## Messages
During execution (or when the state of the queue changes), the `PromptExecutor` sends messages back to the client
through the `send_sync` method of `PromptServer`.
These messages are received by a socket event listener defined in `api.js` (at time of writing around line 90, or search for `this.socket.addEventListener`),
which creates a `CustomEvent` object for any known message type, and dispatches it to any registered listeners.
An extension can register to receive events (normally done in the `setup()` function) following the standard Javascript idiom:
```Javascript theme={null}
api.addEventListener(message_type, messageHandler);
```
If the `message_type` is not one of the built in ones, it will be added to the list of known message types automatically. The message `messageHandler`
will be called with a `CustomEvent` object, which extends the event raised by the socket to add a `.detail` property, which is a dictionary of
the data sent by the server. So usage is generally along the lines of:
```Javascript theme={null}
function messageHandler(event) {
if (event.detail.node == aNodeIdThatIsInteresting) {
// do something with event.detail.other_things
}
}
```
### Built in message types
During execution (or when the state of the queue changes), the `PromptExecutor` sends the following messages back to the client
through the `send_sync` method of `PromptServer`. An extension can register as a listener for any of these.
| event | when | data |
| ----------------------- | -------------------------------------------------------------------------- | ------------------------------------------------------------------------------------------------------- |
| `execution_start` | When a prompt is about to run | `prompt_id` |
| `execution_error` | When an error occurs during execution | `prompt_id`, plus additional information |
| `execution_interrupted` | When execution is stopped by a node raising `InterruptProcessingException` | `prompt_id`, `node_id`, `node_type` and `executed` (a list of executed nodes) |
| `execution_cached` | At the start of execution | `prompt_id`, `nodes` (a list of nodes which are being skipped because their cached outputs can be used) |
| `execution_success` | When all nodes from the prompt have been successfully executed | `prompt_id`, `timestamp` |
| `executing` | When a new node is about to be executed | `node` (node id or `None` to indicate completion), `prompt_id` |
| `executed` | When a node returns a ui element | `node` (node id), `prompt_id`, `output` |
| `progress` | During execution of a node that implements the required hook | `node` (node id), `prompt_id`, `value`, `max` |
| `status` | When the state of the queue changes | `exec_info`, a dictionary holding `queue_remaining`, the number of entries in the queue |
### Using executed
Despite the name, an `executed` message is not sent whenever a node completes execution (unlike `executing`), but only when the node
returns a ui update.
To do this, the main function needs to return a dictionary instead of a tuple:
```python theme={null}
# at the end of my main method
return { "ui":a_new_dictionary, "result": the_tuple_of_output_values }
```
`a_new_dictionary` will then be sent as the value of `output` in an `executed` message.
The `result` key can be omitted if the node has no outputs (see, for instance, the code for `SaveImage` in `nodes.py`)
### Custom message types
As indicated above, on the client side, a custom message type can be added simply by registering as a listener for a unique message type name.
```Javascript theme={null}
api.addEventListener("my.custom.message", messageHandler);
```
On the server, the code is equally simple:
```Python theme={null}
from server import PromptServer
# then, in your main execution function (normally)
PromptServer.instance.send_sync("my.custom.message", a_dictionary)
```
#### Getting node\_id
Most of the built-in messages include the current node id in the value of `node`. It's likely that you will want to do the same.
The node\_id is available on the server side through a hidden input, which is obtained with the `hidden` key in the `INPUT_TYPES` dictionary:
```Python theme={null}
@classmethod
def INPUT_TYPES(s):
return {"required" : { }, # whatever your required inputs are
"hidden": { "node_id": "UNIQUE_ID" } } # Add the hidden key
def my_main_function(self, required_inputs, node_id):
# do some things
PromptServer.instance.send_sync("my.custom.message", {"node": node_id, "other_things": etc})
```
---
# Source: https://docs.comfy.org/development/comfyui-server/comms_overview.md
> ## Documentation Index
> Fetch the complete documentation index at: https://docs.comfy.org/llms.txt
> Use this file to discover all available pages before exploring further.
# Server Overview
## Overview
The Comfy server runs on top of the [aiohttp framework](https://docs.aiohttp.org/), which in turn uses [asyncio](https://pypi.org/project/asyncio/).
Messages from the server to the client are sent by socket messages through the `send_sync` method of the server,
which is an instance of `PromptServer` (defined in `server.py`). They are processed
by a socket event listener registered in `api.js`. See [messages](/development/comfyui-server/comms_messages).
Messages from the client to the server are sent by the `api.fetchApi()` method defined in `api.js`,
and are handled by http routes defined by the server. See [routes](/development/comfyui-server/comms_routes).
The client submits the whole workflow (widget values and all) when you queue a request.
The server does not receive any changes you make after you send a request to the queue.
If you want to modify server behavior during execution, you'll need routes.
---
# Source: https://docs.comfy.org/development/comfyui-server/comms_routes.md
> ## Documentation Index
> Fetch the complete documentation index at: https://docs.comfy.org/llms.txt
> Use this file to discover all available pages before exploring further.
# Routes
## Routes
The server defines a series of `get` and `post` methods
which can be found by searching for `@routes` in `server.py`. When you submit a workflow
in the web client, it is posted to `/prompt` which validates the prompt and adds it to an execution queue,
returning either a `prompt_id` and `number` (the position in the queue), or `error` and `node_errors` if validation fails.
The prompt queue is defined in `execution.py`, which also defines the `PromptExecutor` class.
### Built in routes
`server.py` defines the following routes:
#### Core API Routes
| path | get/post/ws | purpose |
| ------------------------------ | ----------- | ------------------------------------------------------------------------- |
| `/` | get | load the comfy webpage |
| `/ws` | websocket | WebSocket endpoint for real-time communication with the server |
| `/embeddings` | get | retrieve a list of the names of embeddings available |
| `/extensions` | get | retrieve a list of the extensions registering a `WEB_DIRECTORY` |
| `/features` | get | retrieve server features and capabilities |
| `/models` | get | retrieve a list of available model types |
| `/models/{folder}` | get | retrieve models in a specific folder |
| `/workflow_templates` | get | retrieve a map of custom node modules and associated template workflows |
| `/upload/image` | post | upload an image |
| `/upload/mask` | post | upload a mask |
| `/view` | get | view an image. Lots of options, see `@routes.get("/view")` in `server.py` |
| `/view_metadata`/{folder_name} | get | retrieve metadata for a model |
| `/system_stats` | get | retrieve information about the system (python version, devices, vram etc) |
| `/prompt` | get | retrieve current queue status and execution information |
| `/prompt` | post | submit a prompt to the queue |
| `/object_info` | get | retrieve details of all node types |
| `/object_info/{node_class}` | get | retrieve details of one node type |
| `/history` | get | retrieve the queue history |
| `/history/{prompt_id}` | get | retrieve the queue history for a specific prompt |
| `/history` | post | clear history or delete history item |
| `/queue` | get | retrieve the current state of the execution queue |
| `/queue` | post | manage queue operations (clear pending/running) |
| `/interrupt` | post | stop the current workflow execution |
| `/free` | post | free memory by unloading specified models |
| `/userdata` | get | list user data files in a specified directory |
| `/v2/userdata` | get | enhanced version that lists files and directories in structured format |
| `/userdata/{file}` | get | retrieve a specific user data file |
| `/userdata/{file}` | post | upload or update a user data file |
| `/userdata/{file}` | delete | delete a specific user data file |
| `/userdata/{file}/move/{dest}` | post | move or rename a user data file |
| `/users` | get | get user information |
| `/users` | post | create a new user (multi-user mode only) |
### WebSocket Communication
The `/ws` endpoint provides real-time bidirectional communication between the client and server. This is used for:
* Receiving execution progress updates
* Getting node execution status in real-time
* Receiving error messages and debugging information
* Live updates when queue status changes
The WebSocket connection sends JSON messages with different types such as:
* `status` - Overall system status updates
* `execution_start` - When a prompt execution begins
* `execution_cached` - When cached results are used
* `executing` - Updates during node execution
* `progress` - Progress updates for long-running operations
* `executed` - When a node completes execution
### Custom routes
If you want to send a message from the client to the server during execution, you will need to add a custom route to the server.
For anything complicated, you will need to dive into the [aiohttp framework docs](https://docs.aiohttp.org/), but most cases can
be handled as follows:
```Python theme={null}
from server import PromptServer
from aiohttp import web
routes = PromptServer.instance.routes
@routes.post('/my_new_path')
async def my_function(request):
the_data = await request.post()
# the_data now holds a dictionary of the values sent
MyClass.handle_my_message(the_data)
return web.json_response({})
```
Unless you know what you are doing, don't try to define `my_function` within a class.
The `@routes.post` decorator does a lot of work! Instead, define the function as above
and then call a classmethod.You can also define a `@routes.get` if you aren't changing anything.
The client can use this new route by sending a `FormData` object with code something like this,
which would result in `the_data`, in the above code, containing `message` and `node_id` keys:
```Javascript theme={null}
import { api } from "../../scripts/api.js";
function send_message(node_id, message) {
const body = new FormData();
body.append('message',message);
body.append('node_id', node_id);
api.fetchApi("/my_new_path", { method: "POST", body, });
}
```
---
# Source: https://docs.comfy.org/manager/configuration.md
> ## Documentation Index
> Fetch the complete documentation index at: https://docs.comfy.org/llms.txt
> Use this file to discover all available pages before exploring further.
# Configuration
> Configure ComfyUI-Manager settings
## Configuration paths
Starting from V3.38, Manager uses a protected system path for enhanced security.
| ComfyUI Version | Manager Path |
| ------------------------------- | ------------------------------------------- |
| v0.3.76+ (with System User API) | `/__manager/` |
| Older versions | `/default/ComfyUI-Manager/` |
If executed without any options, the `` path defaults to `ComfyUI/user`. It can be set using `--user-directory `.
### Configuration files
| File | Description |
| -------------------- | -------------------------------- |
| `config.ini` | Basic configuration |
| `channels.list` | Configurable channel lists |
| `pip_overrides.json` | Custom pip package mappings |
| `pip_blacklist.list` | Packages to prevent installation |
| `pip_auto_fix.list` | Packages to auto-restore |
| `snapshots/` | Saved snapshot files |
| `startup-scripts/` | Startup script files |
| `components/` | Component files |
## Config.ini options
Modify the `config.ini` file to apply settings. The path is displayed in startup log messages.
```ini theme={null}
[default]
git_exe =
use_uv =
default_cache_as_channel_url =
bypass_ssl =
file_logging =
windows_selector_event_loop_policy =
model_download_by_agent =
downgrade_blacklist =
security_level =
always_lazy_install =
network_mode =
```
### Network modes
| Mode | Description |
| --------- | ------------------------------------------------------------------------------------------ |
| `public` | Standard public network environment |
| `private` | Closed network with private node DB configured via `channel_url` (uses cache if available) |
| `offline` | No external connections (uses cache if available) |
### Security levels
| Level | Description |
| --------- | ------------------------------------------------------------------------------------------------------------------------------ |
| `strong` | Doesn't allow high and middle level risky features |
| `normal` | Doesn't allow high level risky features; middle level features available |
| `normal-` | Doesn't allow high level risky features if `--listen` is specified and not starts with `127.`; middle level features available |
| `weak` | All features available |
#### Risk levels for features
| Risk Level | Features |
| ---------- | ------------------------------------------------------------------------------------------------------- |
| **High** | Install via git url, pip install, installation of custom nodes not in default channel, fix custom nodes |
| **Middle** | Uninstall/Update, installation of custom nodes in default channel, restore/remove snapshot, restart |
| **Low** | Update ComfyUI |
## Environment variables
| Variable | Description |
| ----------------- | ------------------------------------- |
| `COMFYUI_PATH` | Installation path of ComfyUI |
| `GITHUB_ENDPOINT` | Reverse proxy for GitHub access |
| `HF_ENDPOINT` | Reverse proxy for Hugging Face access |
### Examples
Redirecting GitHub requests through a proxy:
```bash theme={null}
GITHUB_ENDPOINT=https://mirror.ghproxy.com/https://github.com
```
Changing Hugging Face endpoint:
```bash theme={null}
HF_ENDPOINT=https://some-hf-mirror.com
```
## Advanced configuration
### Prevent downgrade of specific packages
List package names in the `downgrade_blacklist` section of `config.ini`, separated by commas:
```ini theme={null}
downgrade_blacklist = diffusers, kornia
```
### Custom pip mapping
Create a `pip_overrides.json` file to change the installation of specific pip packages to user-defined installations. Refer to `pip_overrides.json.template` for the format.
### Prevent installation of specific pip packages
List package names one per line in the `pip_blacklist.list` file.
### Automatically restore pip installation
List pip spec requirements in `pip_auto_fix.list` (similar to `requirements.txt`). It will automatically restore specified versions when starting ComfyUI or when versions get mismatched during custom node installations. `--index-url` can be used.
### Use aria2 as downloader
For faster downloads, you can configure ComfyUI-Manager to use aria2. See the [aria2 setup guide](https://github.com/ltdrdata/ComfyUI-Manager/blob/main/docs/en/use_aria2.md).
## extra\_model\_paths.yaml configuration
The following settings are applied based on the section marked as `is_default`:
* `custom_nodes`: Path for installing custom nodes
* `download_model_base`: Path for downloading models
## CLI tools
ComfyUI-Manager provides `cm-cli`, a command line tool that allows you to use Manager features without running ComfyUI. This is useful for automating custom node installation and managing installations in headless environments.
For detailed cm-cli documentation, see the [official cm-cli guide](https://github.com/ltdrdata/ComfyUI-Manager/blob/main/docs/en/cm-cli.md).
For a more comprehensive CLI experience, consider using [comfy-cli](/comfy-cli/getting-started).
---
# Source: https://docs.comfy.org/support/contact-support.md
> ## Documentation Index
> Fetch the complete documentation index at: https://docs.comfy.org/llms.txt
> Use this file to discover all available pages before exploring further.
# Contact support
> Get help and report issues for ComfyUI
Get help with ComfyUI through our support channels and report issues in the appropriate repository.
## Support channels
Get help from our support team
## Report issues
Report bugs and issues in the corresponding GitHub repository:
Report UI-related issues in ComfyUI\_frontend
Report core functionality issues
Report issues with the desktop version
---
# Source: https://docs.comfy.org/custom-nodes/js/context-menu-migration.md
> ## Documentation Index
> Fetch the complete documentation index at: https://docs.comfy.org/llms.txt
> Use this file to discover all available pages before exploring further.
# Context Menu Migration Guide
This guide helps you migrate from the deprecated monkey-patching approach to the new context menu extension API.
The old approach of monkey-patching `LGraphCanvas.prototype.getCanvasMenuOptions` and `nodeType.prototype.getExtraMenuOptions` is deprecated:
If you see deprecation warnings in your browser console, your extension is using the old API and should be migrated.
## Migrating Canvas Menus
### Old Approach (Deprecated)
The old approach modified the prototype during extension setup:
```javascript theme={null}
import { app } from "../../scripts/app.js"
app.registerExtension({
name: "MyExtension",
async setup() {
// ❌ OLD: Monkey-patching the prototype
const original = LGraphCanvas.prototype.getCanvasMenuOptions
LGraphCanvas.prototype.getCanvasMenuOptions = function() {
const options = original.apply(this, arguments)
options.push(null) // separator
options.push({
content: "My Custom Action",
callback: () => {
console.log("Action triggered")
}
})
return options
}
}
})
```
### New Approach (Recommended)
The new approach uses a dedicated extension hook:
```javascript theme={null}
import { app } from "../../scripts/app.js"
app.registerExtension({
name: "MyExtension",
// ✅ NEW: Use the getCanvasMenuItems hook
getCanvasMenuItems(canvas) {
return [
null, // separator
{
content: "My Custom Action",
callback: () => {
console.log("Action triggered")
}
}
]
}
})
```
### Key Differences
| Old Approach | New Approach |
| -------------------------- | -------------------------------- |
| Modified in `setup()` | Uses `getCanvasMenuItems()` hook |
| Wraps existing function | Returns menu items directly |
| Modifies `options` array | Returns new array |
| Canvas accessed via `this` | Canvas passed as parameter |
## Migrating Node Menus
### Old Approach (Deprecated)
The old approach modified the node type prototype:
```javascript theme={null}
import { app } from "../../scripts/app.js"
app.registerExtension({
name: "MyExtension",
async beforeRegisterNodeDef(nodeType, nodeData, app) {
if (nodeType.comfyClass === "KSampler") {
// ❌ OLD: Monkey-patching the node prototype
const original = nodeType.prototype.getExtraMenuOptions
nodeType.prototype.getExtraMenuOptions = function(canvas, options) {
original?.apply(this, arguments)
options.push({
content: "Randomize Seed",
callback: () => {
const seedWidget = this.widgets.find(w => w.name === "seed")
if (seedWidget) {
seedWidget.value = Math.floor(Math.random() * 1000000)
}
}
})
}
}
}
})
```
### New Approach (Recommended)
The new approach uses a dedicated extension hook:
```javascript theme={null}
import { app } from "../../scripts/app.js"
app.registerExtension({
name: "MyExtension",
// ✅ NEW: Use the getNodeMenuItems hook
getNodeMenuItems(node) {
const items = []
// Add items only for specific node types
if (node.comfyClass === "KSampler") {
items.push({
content: "Randomize Seed",
callback: () => {
const seedWidget = node.widgets.find(w => w.name === "seed")
if (seedWidget) {
seedWidget.value = Math.floor(Math.random() * 1000000)
}
}
})
}
return items
}
})
```
### Key Differences
| Old Approach | New Approach |
| ------------------------------------- | ------------------------------------ |
| Modified in `beforeRegisterNodeDef()` | Uses `getNodeMenuItems()` hook |
| Type-specific via `if` check | Type-specific via `if` check in hook |
| Modifies `options` array | Returns new array |
| Node accessed via `this` | Node passed as parameter |
## Common Patterns
### Conditional Menu Items
Both approaches support conditional items, but the new API is cleaner:
```javascript theme={null}
// ✅ NEW: Clean conditional logic
getCanvasMenuItems(canvas) {
const items = []
if (canvas.selectedItems.size > 0) {
items.push({
content: `Process ${canvas.selectedItems.size} Selected Nodes`,
callback: () => {
// Process nodes
}
})
}
return items
}
```
### Adding Separators
Separators are added the same way in both approaches:
```javascript theme={null}
getCanvasMenuItems(canvas) {
return [
null, // Separator (horizontal line)
{
content: "My Action",
callback: () => {}
}
]
}
```
### Creating Submenus
The recommended way to create submenus is using the declarative `submenu` property:
```javascript theme={null}
getNodeMenuItems(node) {
return [
{
content: "Advanced Options",
submenu: {
options: [
{ content: "Option 1", callback: () => {} },
{ content: "Option 2", callback: () => {} }
]
}
}
]
}
```
This declarative approach is cleaner and matches the patterns used throughout the ComfyUI codebase.
While a callback-based approach with `has_submenu: true` and `new LiteGraph.ContextMenu()` is also supported, the declarative `submenu` property is preferred for better maintainability.
### Accessing State
```javascript theme={null}
// ✅ NEW: State access is clearer
getCanvasMenuItems(canvas) {
// Access canvas properties
const selectedCount = canvas.selectedItems.size
const graphMousePos = canvas.graph_mouse
return [/* menu items */]
}
getNodeMenuItems(node) {
// Access node properties
const nodeType = node.comfyClass
const isDisabled = node.mode === 2
const widgets = node.widgets
return [/* menu items */]
}
```
## Troubleshooting
### How to Identify Old API Usage
Look for these patterns in your code:
```javascript theme={null}
// ❌ Signs of old API:
LGraphCanvas.prototype.getCanvasMenuOptions = function() { /* ... */ }
nodeType.prototype.getExtraMenuOptions = function() { /* ... */ }
```
### Understanding Deprecation Warnings
If you see this warning in the console:
```
[DEPRECATED] Monkey-patching getCanvasMenuOptions is deprecated. (Extension: "MyExtension")
Please use the new context menu API instead.
See: https://docs.comfy.org/custom-nodes/js/context-menu-migration
```
Your extension is using the old approach and should be migrated.
### Verifying Migration Success
After migration:
1. Remove all prototype modifications from `setup()` and `beforeRegisterNodeDef()`
2. Add `getCanvasMenuItems()` and/or `getNodeMenuItems()` hooks
3. Test that your menu items still appear correctly
4. Verify no deprecation warnings appear in the console
### Complete Migration Example
**Before:**
```javascript theme={null}
app.registerExtension({
name: "MyExtension",
async setup() {
const original = LGraphCanvas.prototype.getCanvasMenuOptions
LGraphCanvas.prototype.getCanvasMenuOptions = function() {
const options = original.apply(this, arguments)
options.push({ content: "Action", callback: () => {} })
return options
}
},
async beforeRegisterNodeDef(nodeType) {
if (nodeType.comfyClass === "KSampler") {
const original = nodeType.prototype.getExtraMenuOptions
nodeType.prototype.getExtraMenuOptions = function(_, options) {
original?.apply(this, arguments)
options.push({ content: "Node Action", callback: () => {} })
}
}
}
})
```
**After:**
```javascript theme={null}
app.registerExtension({
name: "MyExtension",
getCanvasMenuItems(canvas) {
return [
{ content: "Action", callback: () => {} }
]
},
getNodeMenuItems(node) {
if (node.comfyClass === "KSampler") {
return [
{ content: "Node Action", callback: () => {} }
]
}
return []
}
})
```
## Additional Resources
* [Annotated Examples](./javascript_examples) - More examples using the new API
* [Extension Hooks](./javascript_hooks) - Complete list of available extension hooks
* [Commands and Keybindings](./javascript_commands_keybindings) - Add keyboard shortcuts to your menu actions
---
# Source: https://docs.comfy.org/community/contributing.md
> ## Documentation Index
> Fetch the complete documentation index at: https://docs.comfy.org/llms.txt
> Use this file to discover all available pages before exploring further.
# Contributing
### How to contribute
We welcome contributions of all kinds. Check out the various repositories we support on our [Github organization](https://github.com/Comfy-Org).
You can also contribute by sharing workflows or developing [custom nodes](/custom-nodes/overview).
---
# Source: https://docs.comfy.org/tutorials/controlnet/controlnet.md
> ## Documentation Index
> Fetch the complete documentation index at: https://docs.comfy.org/llms.txt
> Use this file to discover all available pages before exploring further.
# ComfyUI ControlNet Usage Example
> This guide will introduce you to the basic concepts of ControlNet and demonstrate how to generate corresponding images in ComfyUI
Achieving precise control over image creation in AI image generation cannot be done with just one click.
It typically requires numerous generation attempts to produce a satisfactory image. However, the emergence of **ControlNet** has effectively addressed this challenge.
ControlNet is a conditional control generation model based on diffusion models (such as Stable Diffusion),
first proposed by [Lvmin Zhang](https://lllyasviel.github.io/) and Maneesh Agrawala et al. in 2023 in the paper [Adding Conditional Control to Text-to-Image Diffusion Models](https://arxiv.org/abs/2302.05543).
ControlNet models significantly enhance the controllability of image generation and the ability to reproduce details by introducing multimodal input conditions,
such as edge detection maps, depth maps, and pose keypoints.
These conditioning constraints make image generation more controllable, allowing multiple ControlNet models to be used simultaneously during the drawing process for better results.
Before ControlNet, we could only rely on the model to generate images repeatedly until we were satisfied with the results, which involved a lot of randomness.
With the advent of ControlNet, we can control image generation by introducing additional conditions.
For example, we can use a simple sketch to guide the image generation process, producing images that closely align with our sketch.
In this example, we will guide you through installing and using ControlNet models in [ComfyUI](https://github.com/comfyanonymous/ComfyUI), and complete a sketch-controlled image generation example.

The workflows for other types of ControlNet V1.1 models are similar to this example. You only need to select the appropriate model and upload the corresponding reference image based on your needs.
## ControlNet Image Preprocessing Information
Different types of ControlNet models typically require different types of reference images:

> Image source: [ComfyUI ControlNet aux](https://github.com/Fannovel16/comfyui_controlnet_aux)
Since the current **Comfy Core** nodes do not include all types of **preprocessors**, in the actual examples in this documentation, we will provide pre-processed images.
However, in practical use, you may need to use custom nodes to preprocess images to meet the requirements of different ControlNet models. Below are some relevant custom nodes:
* [ComfyUI-Advanced-ControlNet](https://github.com/Kosinkadink/ComfyUI-Advanced-ControlNet)
* [ComfyUI ControlNet aux](https://github.com/Fannovel16/comfyui_controlnet_aux)
## ComfyUI ControlNet Workflow Example Explanation
### 1. ControlNet Workflow Assets
Please download the workflow image below and drag it into ComfyUI to load the workflow:

Images with workflow JSON in their metadata can be directly dragged into ComfyUI or loaded using the menu `Workflows` -> `Open (ctrl+o)`.
This image already includes download links for the corresponding models, and dragging it into ComfyUI will automatically prompt for downloads.
Please download the image below, which we will use as input:

### 2. Manual Model Installation
If your network cannot successfully complete the automatic download of the corresponding models, please try manually downloading the models below and placing them in the specified directories:
* [dreamCreationVirtual3DECommerce\_v10.safetensors](https://civitai.com/api/download/models/731340?type=Model\&format=SafeTensor\&size=full\&fp=fp16)
* [vae-ft-mse-840000-ema-pruned.safetensors](https://huggingface.co/stabilityai/sd-vae-ft-mse-original/resolve/main/vae-ft-mse-840000-ema-pruned.safetensors?download=true)
* [control\_v11p\_sd15\_scribble\_fp16.safetensors](https://huggingface.co/comfyanonymous/ControlNet-v1-1_fp16_safetensors/resolve/main/control_v11p_sd15_scribble_fp16.safetensors?download=true)
```
ComfyUI/
├── models/
│ ├── checkpoints/
│ │ └── dreamCreationVirtual3DECommerce_v10.safetensors
│ ├── vae/
│ │ └── vae-ft-mse-840000-ema-pruned.safetensors
│ └── controlnet/
│ └── control_v11p_sd15_scribble_fp16.safetensors
```
In this example, you could also use the VAE model embedded in dreamCreationVirtual3DECommerce\_v10.safetensors, but we're following the model author's recommendation to use a separate VAE model.
### 3. Step-by-Step Workflow Execution
1. Ensure that `Load Checkpoint` can load **dreamCreationVirtual3DECommerce\_v10.safetensors**
2. Ensure that `Load VAE` can load **vae-ft-mse-840000-ema-pruned.safetensors**
3. Click `Upload` in the `Load Image` node to upload the input image provided earlier
4. Ensure that `Load ControlNet` can load **control\_v11p\_sd15\_scribble\_fp16.safetensors**
5. Click the `Queue` button or use the shortcut `Ctrl(cmd) + Enter` to execute the image generation
## Related Node Explanations
### Load ControlNet Node Explanation
Models located in `ComfyUI\models\controlnet` will be detected by ComfyUI and can be loaded through this node.
### Apply ControlNet Node Explanation
This node accepts the ControlNet model loaded by `load controlnet` and generates corresponding control conditions based on the input image.
**Input Types**
| Parameter Name | Function |
| --------------- | ------------------------------------------------------------------------------------------------------------------------------------------ |
| `positive` | Positive conditioning |
| `negative` | Negative conditioning |
| `control_net` | The ControlNet model to be applied |
| `image` | Preprocessed image used as reference for ControlNet application |
| `vae` | VAE model input |
| `strength` | Strength of ControlNet application; higher values increase ControlNet's influence on the generated image |
| `start_percent` | Determines when to start applying ControlNet as a percentage; e.g., 0.2 means ControlNet guidance begins when 20% of diffusion is complete |
| `end_percent` | Determines when to stop applying ControlNet as a percentage; e.g., 0.8 means ControlNet guidance stops when 80% of diffusion is complete |
**Output Types**
| Parameter Name | Function |
| -------------- | -------------------------------------------------- |
| `positive` | Positive conditioning data processed by ControlNet |
| `negative` | Negative conditioning data processed by ControlNet |
You can use chain connections to apply multiple ControlNet models, as shown in the image below. You can also refer to the [Mixing ControlNet Models](/tutorials/controlnet/mixing-controlnets) guide to learn more about combining multiple ControlNet models.
You might see the `Apply ControlNet(Old)` node in some early workflows, which is an early version of the ControlNet node. It is currently deprecated and not visible by default in search and node lists.
To enable it, go to **Settings** --> **comfy** --> **Node** and enable the `Show deprecated nodes in search` option. However, it's recommended to use the new node.
## Start Your Exploration
1. Try creating similar sketches, or even draw your own, and use ControlNet models to generate images to experience the benefits of ControlNet.
2. Adjust the `Control Strength` parameter in the Apply ControlNet node to control the influence of the ControlNet model on the generated image.
3. Visit the [ControlNet-v1-1\_fp16\_safetensors](https://huggingface.co/comfyanonymous/ControlNet-v1-1_fp16_safetensors/tree/main) repository to download other types of ControlNet models and try using them to generate images.
---
# Source: https://docs.comfy.org/tutorials/image/cosmos/cosmos-predict2-t2i.md
> ## Documentation Index
> Fetch the complete documentation index at: https://docs.comfy.org/llms.txt
> Use this file to discover all available pages before exploring further.
# Cosmos Predict2 Text-to-Image ComfyUI Official Example
> This guide demonstrates how to complete Cosmos-Predict2 text-to-image workflow in ComfyUI
Cosmos-Predict2 is NVIDIA's next-generation physical world foundation model, specifically designed for high-quality visual generation and prediction tasks in physical AI scenarios.
The model features exceptional physical accuracy, environmental interactivity, and detail reproduction capabilities, enabling realistic simulation of complex physical phenomena and dynamic scenes.
Cosmos-Predict2 supports various generation methods including Text-to-Image (Text2Image) and Video-to-World (Video2World), and is widely used in industrial simulation, autonomous driving, urban planning, scientific research, and other fields.
GitHub:[Cosmos-predict2](https://github.com/nvidia-cosmos/cosmos-predict2)
huggingface: [Cosmos-Predict2](https://huggingface.co/collections/nvidia/cosmos-predict2-68028efc052239369a0f2959)
This guide will walk you through completing **text-to-image** workflow in ComfyUI.
For the video generation section, please refer to the following part:
Using Cosmos-Predict2 for video generation
Make sure your ComfyUI is updated.
* [Download ComfyUI](https://www.comfy.org/download)
* [Update Guide](/installation/update_comfyui)
Workflows in this guide can be found in the [Workflow Templates](/interface/features/template).
If you can't find them in the template, your ComfyUI may be outdated. (Desktop version's update will delay sometime)
If nodes are missing when loading a workflow, possible reasons:
1. You are not using the latest ComfyUI version (Nightly version)
2. Some nodes failed to import at startup
* The Desktop is base on ComfyUI stable release, it will auto-update when there is a new Desktop stable release available.
* [Cloud](https://cloud.comfy.org) will update after ComfyUI stable release.
So, if you find any core node missing in this document, it might be because the new core nodes have not yet been released in the latest stable version. Please wait for the next stable release.
---
# Source: https://docs.comfy.org/tutorials/video/cosmos/cosmos-predict2-video2world.md
> ## Documentation Index
> Fetch the complete documentation index at: https://docs.comfy.org/llms.txt
> Use this file to discover all available pages before exploring further.
# Cosmos Predict2 Video2World ComfyUI Official Example
> This guide demonstrates how to complete Cosmos-Predict2 Video2World workflows in ComfyUI
Cosmos-Predict2 is NVIDIA's next-generation physical world foundation model, specifically designed for high-quality visual generation and prediction tasks in physical AI scenarios.
The model features exceptional physical accuracy, environmental interactivity, and detail reproduction capabilities, enabling realistic simulation of complex physical phenomena and dynamic scenes.
Cosmos-Predict2 supports various generation methods including Text-to-Image (Text2Image) and Video-to-World (Video2World),
and is widely used in industrial simulation, autonomous driving, urban planning, scientific research, and other fields.
It serves as a crucial foundational tool for promoting deep integration of intelligent vision and the physical world.
GitHub:[Cosmos-predict2](https://github.com/nvidia-cosmos/cosmos-predict2)
huggingface: [Cosmos-Predict2](https://huggingface.co/collections/nvidia/cosmos-predict2-68028efc052239369a0f2959)
This guide will walk you through completing **Video2World** generation in ComfyUI.
For the text-to-image section, please refer to the following part:
Using Cosmos-Predict2 for text-to-image generation
---
# Source: https://docs.comfy.org/api-reference/registry/create-a-new-custom-node.md
> ## Documentation Index
> Fetch the complete documentation index at: https://docs.comfy.org/llms.txt
> Use this file to discover all available pages before exploring further.
# Create a new custom node
## OpenAPI
````yaml https://api.comfy.org/openapi post /publishers/{publisherId}/nodes
openapi: 3.0.2
info:
title: Comfy API
version: '1.0'
servers:
- url: https://api.comfy.org
security: []
paths:
/publishers/{publisherId}/nodes:
post:
tags:
- Registry
summary: Create a new custom node
operationId: CreateNode
parameters:
- in: path
name: publisherId
required: true
schema:
type: string
requestBody:
content:
application/json:
schema:
$ref: '#/components/schemas/Node'
required: true
responses:
'201':
content:
application/json:
schema:
$ref: '#/components/schemas/Node'
description: Node created successfully
'400':
content:
application/json:
schema:
$ref: '#/components/schemas/ErrorResponse'
description: Bad request, invalid input data.
'401':
description: Unauthorized
'500':
content:
application/json:
schema:
$ref: '#/components/schemas/ErrorResponse'
description: Internal server error
security:
- BearerAuth: []
components:
schemas:
Node:
properties:
author:
type: string
banner_url:
description: URL to the node's banner.
type: string
category:
deprecated: true
description: >-
DEPRECATED: The category of the node. Use 'tags' field instead. This
field will be removed in a future version.
type: string
created_at:
description: The date and time when the node was created
format: date-time
type: string
description:
type: string
downloads:
description: The number of downloads of the node.
type: integer
github_stars:
description: Number of stars on the GitHub repository.
type: integer
icon:
description: URL to the node's icon.
type: string
id:
description: The unique identifier of the node.
type: string
latest_version:
$ref: '#/components/schemas/NodeVersion'
license:
description: The path to the LICENSE file in the node's repository.
type: string
name:
description: The display name of the node.
type: string
preempted_comfy_node_names:
description: A list of Comfy node names that are preempted by this node.
items:
type: string
type: array
publisher:
$ref: '#/components/schemas/Publisher'
rating:
description: The average rating of the node.
type: number
repository:
description: URL to the node's repository.
type: string
search_ranking:
description: >-
A numerical value representing the node's search ranking, used for
sorting search results.
type: integer
status:
$ref: '#/components/schemas/NodeStatus'
status_detail:
description: The status detail of the node.
type: string
supported_accelerators:
description: >-
List of accelerators (e.g. CUDA, DirectML, ROCm) that this node
supports
items:
type: string
type: array
supported_comfyui_frontend_version:
description: Supported versions of ComfyUI frontend
type: string
supported_comfyui_version:
description: Supported versions of ComfyUI
type: string
supported_os:
description: List of operating systems that this node supports
items:
type: string
type: array
tags:
items:
type: string
type: array
tags_admin:
description: Admin-only tags for security warnings and admin metadata
items:
type: string
type: array
translations:
additionalProperties:
additionalProperties: true
type: object
description: Translations of node metadata in different languages.
type: object
type: object
ErrorResponse:
properties:
error:
type: string
message:
type: string
required:
- error
- message
type: object
NodeVersion:
properties:
changelog:
description: Summary of changes made in this version
type: string
comfy_node_extract_status:
description: The status of comfy node extraction process.
type: string
createdAt:
description: The date and time the version was created.
format: date-time
type: string
dependencies:
description: A list of pip dependencies required by the node.
items:
type: string
type: array
deprecated:
description: Indicates if this version is deprecated.
type: boolean
downloadUrl:
description: '[Output Only] URL to download this version of the node'
type: string
id:
type: string
node_id:
description: The unique identifier of the node.
type: string
status:
$ref: '#/components/schemas/NodeVersionStatus'
status_reason:
type: string
supported_accelerators:
description: >-
List of accelerators (e.g. CUDA, DirectML, ROCm) that this node
supports
items:
type: string
type: array
supported_comfyui_frontend_version:
description: Supported versions of ComfyUI frontend
type: string
supported_comfyui_version:
description: Supported versions of ComfyUI
type: string
supported_os:
description: List of operating systems that this node supports
items:
type: string
type: array
tags:
items:
type: string
type: array
tags_admin:
description: Admin-only tags for security warnings and admin metadata
items:
type: string
type: array
version:
description: >-
The version identifier, following semantic versioning. Must be
unique for the node.
type: string
type: object
Publisher:
properties:
createdAt:
description: The date and time the publisher was created.
format: date-time
type: string
description:
type: string
id:
description: >-
The unique identifier for the publisher. It's akin to a username.
Should be lowercase.
type: string
logo:
description: URL to the publisher's logo.
type: string
members:
description: A list of members in the publisher.
items:
$ref: '#/components/schemas/PublisherMember'
type: array
name:
type: string
source_code_repo:
type: string
status:
$ref: '#/components/schemas/PublisherStatus'
support:
type: string
website:
type: string
type: object
NodeStatus:
enum:
- NodeStatusActive
- NodeStatusDeleted
- NodeStatusBanned
type: string
NodeVersionStatus:
enum:
- NodeVersionStatusActive
- NodeVersionStatusDeleted
- NodeVersionStatusBanned
- NodeVersionStatusPending
- NodeVersionStatusFlagged
type: string
PublisherMember:
properties:
id:
description: The unique identifier for the publisher member.
type: string
role:
description: The role of the user in the publisher.
type: string
user:
$ref: '#/components/schemas/PublisherUser'
type: object
PublisherStatus:
enum:
- PublisherStatusActive
- PublisherStatusBanned
type: string
PublisherUser:
properties:
email:
description: The email address for this user.
type: string
id:
description: The unique id for this user.
type: string
name:
description: The name for this user.
type: string
type: object
securitySchemes:
BearerAuth:
bearerFormat: JWT
scheme: bearer
type: http
````
---
# Source: https://docs.comfy.org/api-reference/registry/create-a-new-personal-access-token.md
> ## Documentation Index
> Fetch the complete documentation index at: https://docs.comfy.org/llms.txt
> Use this file to discover all available pages before exploring further.
# Create a new personal access token
## OpenAPI
````yaml https://api.comfy.org/openapi post /publishers/{publisherId}/tokens
openapi: 3.0.2
info:
title: Comfy API
version: '1.0'
servers:
- url: https://api.comfy.org
security: []
paths:
/publishers/{publisherId}/tokens:
post:
tags:
- Registry
summary: Create a new personal access token
operationId: CreatePersonalAccessToken
parameters:
- in: path
name: publisherId
required: true
schema:
type: string
requestBody:
content:
application/json:
schema:
$ref: '#/components/schemas/PersonalAccessToken'
required: true
responses:
'201':
content:
application/json:
schema:
properties:
token:
description: The newly created personal access token.
type: string
type: object
description: Token created successfully
'400':
content:
application/json:
schema:
$ref: '#/components/schemas/ErrorResponse'
description: Bad request, invalid input data.
'403':
content:
application/json:
schema:
$ref: '#/components/schemas/ErrorResponse'
description: Forbidden
'500':
content:
application/json:
schema:
$ref: '#/components/schemas/ErrorResponse'
description: Internal server error
security:
- BearerAuth: []
components:
schemas:
PersonalAccessToken:
properties:
createdAt:
description: '[Output Only]The date and time the token was created.'
format: date-time
type: string
description:
description: Optional. A more detailed description of the token's intended use.
type: string
id:
description: Unique identifier for the GitCommit
format: uuid
type: string
name:
description: Required. The name of the token. Can be a simple description.
type: string
token:
description: >-
[Output Only]. The personal access token. Only returned during
creation.
type: string
type: object
ErrorResponse:
properties:
error:
type: string
message:
type: string
required:
- error
- message
type: object
securitySchemes:
BearerAuth:
bearerFormat: JWT
scheme: bearer
type: http
````
---
# Source: https://docs.comfy.org/api-reference/registry/create-a-new-publisher.md
> ## Documentation Index
> Fetch the complete documentation index at: https://docs.comfy.org/llms.txt
> Use this file to discover all available pages before exploring further.
# Create a new publisher
## OpenAPI
````yaml https://api.comfy.org/openapi post /publishers
openapi: 3.0.2
info:
title: Comfy API
version: '1.0'
servers:
- url: https://api.comfy.org
security: []
paths:
/publishers:
post:
tags:
- Registry
summary: Create a new publisher
operationId: CreatePublisher
requestBody:
content:
application/json:
schema:
$ref: '#/components/schemas/Publisher'
required: true
responses:
'201':
content:
application/json:
schema:
$ref: '#/components/schemas/Publisher'
description: Publisher created successfully
'400':
content:
application/json:
schema:
$ref: '#/components/schemas/ErrorResponse'
description: Bad request, invalid input data
'401':
description: Unauthorized
'403':
content:
application/json:
schema:
$ref: '#/components/schemas/ErrorResponse'
description: Forbidden
'500':
content:
application/json:
schema:
$ref: '#/components/schemas/ErrorResponse'
description: Internal server error
security:
- BearerAuth: []
components:
schemas:
Publisher:
properties:
createdAt:
description: The date and time the publisher was created.
format: date-time
type: string
description:
type: string
id:
description: >-
The unique identifier for the publisher. It's akin to a username.
Should be lowercase.
type: string
logo:
description: URL to the publisher's logo.
type: string
members:
description: A list of members in the publisher.
items:
$ref: '#/components/schemas/PublisherMember'
type: array
name:
type: string
source_code_repo:
type: string
status:
$ref: '#/components/schemas/PublisherStatus'
support:
type: string
website:
type: string
type: object
ErrorResponse:
properties:
error:
type: string
message:
type: string
required:
- error
- message
type: object
PublisherMember:
properties:
id:
description: The unique identifier for the publisher member.
type: string
role:
description: The role of the user in the publisher.
type: string
user:
$ref: '#/components/schemas/PublisherUser'
type: object
PublisherStatus:
enum:
- PublisherStatusActive
- PublisherStatusBanned
type: string
PublisherUser:
properties:
email:
description: The email address for this user.
type: string
id:
description: The unique id for this user.
type: string
name:
description: The name for this user.
type: string
type: object
securitySchemes:
BearerAuth:
bearerFormat: JWT
scheme: bearer
type: http
````
---
# Source: https://docs.comfy.org/account/create-account.md
> ## Documentation Index
> Fetch the complete documentation index at: https://docs.comfy.org/llms.txt
> Use this file to discover all available pages before exploring further.
# Create a Comfy account
> Learn how to create a new Comfy account for ComfyUI to access all features and services.
Your Comfy account gives you access to [partner nodes (API node)](/tutorials/partner-nodes/overview) and [cloud subscriptions](https://www.comfy.org/cloud), enabling you to use premium features and services across the ComfyUI platform.
## Creating a Comfy account on Comfy Cloud
You can create a Comfy account for ComfyUI directly on Comfy Cloud:
1. Navigate to [Comfy Cloud](https://www.comfy.org)
2. Click **Sign up** or **Create account**
3. Choose one of the following login methods:
* **Email**: Enter your email address and create a password
* **Google**: Sign up with your Google account
* **GitHub**: Sign up with your GitHub account
4. Complete the registration process
5. Verify your email if using email registration
## Creating a Comfy account locally
If you have ComfyUI installed locally, you can create a Comfy account through the application:
1. Open ComfyUI on your local machine
2. Navigate to **Settings** in the interface
3. Go to the **User** section (see [User settings](/interface/user) for details)
4. Click **Create account** or **Sign up**
5. Choose one of the following login methods:
* **Email**: Enter your email address and create a password
* **Google**: Sign up with your Google account
* **GitHub**: Sign up with your GitHub account
6. Complete the registration process
## Next steps
Once your account is created and verified:
* [Log in to your account](/account/login)
* Set up your profile preferences
* Start using ComfyUI features
* Explore tutorials and documentation
## Troubleshooting
If you encounter issues during account creation:
* Ensure your email address is valid and not already registered
* Check that your password meets the minimum requirements
* Clear your browser cache and try again
* Contact [support](/support/contact-support) if problems persist
---
# Source: https://docs.comfy.org/api-reference/cloud/asset/create-asset-reference-from-existing-hash.md
> ## Documentation Index
> Fetch the complete documentation index at: https://docs.comfy.org/llms.txt
> Use this file to discover all available pages before exploring further.
# Create asset reference from existing hash
> Creates a new asset reference using an existing hash from cloud storage.
This avoids re-uploading file content when the underlying data already exists,
which is useful for large files or when referencing well-known assets.
The user provides their own metadata and tags for the new reference.
## OpenAPI
````yaml openapi-cloud.yaml post /api/assets/from-hash
openapi: 3.0.3
info:
title: Comfy Cloud API
description: >
**Experimental API:** This API is experimental and subject to change.
Endpoints, request/response formats, and behavior may be modified without
notice.
API for Comfy Cloud - Run ComfyUI workflows on cloud infrastructure.
This API allows you to interact with Comfy Cloud programmatically,
including:
- Submitting and managing workflows
- Uploading and downloading files
- Monitoring job status and progress
## Cloud vs OSS ComfyUI Compatibility
Comfy Cloud implements the same API interfaces as OSS ComfyUI for maximum
compatibility,
but some fields are accepted for compatibility while being handled
differently or ignored:
| Field | Endpoints | Cloud Behavior |
|-------|-----------|----------------|
| `subfolder` | `/api/view`, `/api/upload/*` | **Ignored** - Cloud uses
content-addressed storage (hash-based). Returned in responses for
client-side organization. |
| `type` (input/output/temp) | `/api/view`, `/api/upload/*` | Partially used
- All files stored with tag-based organization rather than directory
structure. |
| `overwrite` | `/api/upload/*` | **Ignored** - Content-addressed storage
means identical content always has the same hash. |
| `number`, `front` | `/api/prompt` | **Ignored** - Cloud uses its own fair
queue scheduling per user. |
| `split`, `full_info` | `/api/userdata` | **Ignored** - Cloud always
returns full file metadata. |
These fields are retained in the API schema for drop-in compatibility with
existing ComfyUI clients and workflows.
version: 1.0.0
license:
name: GNU General Public License v3.0
url: https://github.com/comfyanonymous/ComfyUI/blob/master/LICENSE
servers:
- url: https://cloud.comfy.org
description: Comfy Cloud API
security:
- ApiKeyAuth: []
tags:
- name: workflow
description: |
Submit workflows for execution and manage the execution queue.
This is the primary way to run ComfyUI workflows on the cloud.
- name: job
description: |
Monitor job status, view execution history, and manage running jobs.
Jobs are created when you submit a workflow via POST /api/prompt.
- name: asset
description: |
Upload, download, and manage persistent assets (images, models, outputs).
Assets provide durable storage with tagging and metadata support.
- name: file
description: |
Legacy file upload and download endpoints compatible with local ComfyUI.
For new integrations, consider using the Assets API instead.
- name: model
description: |
Browse available AI models. Models are pre-loaded on cloud infrastructure.
- name: node
description: |
Get information about available ComfyUI nodes and their inputs/outputs.
Useful for building dynamic workflow interfaces.
- name: user
description: |
User account information and personal data storage.
- name: system
description: |
Server status, health checks, and system information.
paths:
/api/assets/from-hash:
post:
tags:
- asset
summary: Create asset reference from existing hash
description: >
Creates a new asset reference using an existing hash from cloud storage.
This avoids re-uploading file content when the underlying data already
exists,
which is useful for large files or when referencing well-known assets.
The user provides their own metadata and tags for the new reference.
operationId: createAssetFromHash
requestBody:
required: true
content:
application/json:
schema:
type: object
required:
- hash
- tags
properties:
hash:
type: string
description: >-
Hash of the existing asset. Supports Blake3 (blake3:) or
SHA256 (sha256:) formats
pattern: ^(blake3|sha256):[a-f0-9]{64}$
name:
type: string
description: Display name for the asset reference (optional)
tags:
type: array
items:
type: string
minItems: 1
description: >-
Freeform tags for the asset. Common types include "models",
"input", "output", and "temp", but any tag can be used in
any order.
mime_type:
type: string
description: MIME type of the asset (e.g., "image/png", "video/mp4")
user_metadata:
type: object
description: Custom metadata for this asset reference
additionalProperties: true
responses:
'200':
description: Asset reference already exists (returned existing)
content:
application/json:
schema:
$ref: '#/components/schemas/AssetCreated'
'201':
description: Asset reference created successfully
content:
application/json:
schema:
$ref: '#/components/schemas/AssetCreated'
'400':
description: Invalid request (bad hash format, invalid tags, etc.)
content:
application/json:
schema:
$ref: '#/components/schemas/ErrorResponse'
'401':
description: Unauthorized
content:
application/json:
schema:
$ref: '#/components/schemas/ErrorResponse'
'404':
description: Source asset with given hash not found
content:
application/json:
schema:
$ref: '#/components/schemas/ErrorResponse'
'500':
description: Internal server error
content:
application/json:
schema:
$ref: '#/components/schemas/ErrorResponse'
components:
schemas:
AssetCreated:
allOf:
- $ref: '#/components/schemas/Asset'
- type: object
required:
- created_new
properties:
created_new:
type: boolean
description: >-
Whether this was a new asset creation (true) or returned
existing (false)
ErrorResponse:
type: object
required:
- code
- message
properties:
code:
type: string
message:
type: string
Asset:
type: object
required:
- id
- name
- size
- created_at
- updated_at
properties:
id:
type: string
format: uuid
description: Unique identifier for the asset
name:
type: string
description: Name of the asset file
asset_hash:
type: string
description: Blake3 hash of the asset content
pattern: ^blake3:[a-f0-9]{64}$
size:
type: integer
format: int64
description: Size of the asset in bytes
mime_type:
type: string
description: MIME type of the asset
tags:
type: array
items:
type: string
description: Tags associated with the asset
user_metadata:
type: object
description: Custom user metadata for the asset
additionalProperties: true
preview_url:
type: string
format: uri
description: URL for asset preview/thumbnail
preview_id:
type: string
format: uuid
description: ID of the preview asset if available
nullable: true
prompt_id:
type: string
format: uuid
description: ID of the job/prompt that created this asset, if available
nullable: true
created_at:
type: string
format: date-time
description: Timestamp when the asset was created
updated_at:
type: string
format: date-time
description: Timestamp when the asset was last updated
last_access_time:
type: string
format: date-time
description: Timestamp when the asset was last accessed
is_immutable:
type: boolean
description: Whether this asset is immutable (cannot be modified or deleted)
securitySchemes:
ApiKeyAuth:
type: apiKey
in: header
name: X-API-Key
description: |
API key authentication. Generate an API key from your account settings
at https://comfy.org/account. Pass the key in the X-API-Key header.
````
---
# Source: https://docs.comfy.org/api-reference/registry/create-comfy-nodes-for-certain-node.md
> ## Documentation Index
> Fetch the complete documentation index at: https://docs.comfy.org/llms.txt
> Use this file to discover all available pages before exploring further.
# create comfy-nodes for certain node
## OpenAPI
````yaml https://api.comfy.org/openapi post /nodes/{nodeId}/versions/{version}/comfy-nodes
openapi: 3.0.2
info:
title: Comfy API
version: '1.0'
servers:
- url: https://api.comfy.org
security: []
paths:
/nodes/{nodeId}/versions/{version}/comfy-nodes:
parameters:
- in: path
name: nodeId
required: true
schema:
type: string
- in: path
name: version
required: true
schema:
type: string
post:
tags:
- Registry
summary: create comfy-nodes for certain node
operationId: CreateComfyNodes
requestBody:
content:
application/json:
schema:
properties:
cloud_build_info:
$ref: '#/components/schemas/ComfyNodeCloudBuildInfo'
nodes:
additionalProperties:
$ref: '#/components/schemas/ComfyNode'
reason:
type: string
status:
type: string
success:
type: boolean
type: object
required: true
responses:
'204':
description: Comy Nodes created successfully
'401':
description: Unauthorized
'403':
content:
application/json:
schema:
$ref: '#/components/schemas/ErrorResponse'
description: Forbidden
'404':
content:
application/json:
schema:
$ref: '#/components/schemas/ErrorResponse'
description: Version not found
'409':
content:
application/json:
schema:
$ref: '#/components/schemas/ErrorResponse'
description: Existing Comfy Nodes exists
'500':
content:
application/json:
schema:
$ref: '#/components/schemas/ErrorResponse'
description: Internal server error
components:
schemas:
ComfyNodeCloudBuildInfo:
properties:
build_id:
type: string
location:
type: string
project_id:
type: string
project_number:
type: string
type: object
ComfyNode:
properties:
category:
description: UI category where the node is listed, used for grouping nodes.
type: string
comfy_node_name:
description: Unique identifier for the node
type: string
deprecated:
description: >-
Indicates if the node is deprecated. Deprecated nodes are hidden in
the UI.
type: boolean
description:
description: Brief description of the node's functionality or purpose.
type: string
experimental:
description: >-
Indicates if the node is experimental, subject to changes or
removal.
type: boolean
function:
description: Name of the entry-point function to execute the node.
type: string
input_types:
description: Defines input parameters
type: string
output_is_list:
description: Boolean values indicating if each output is a list.
items:
type: boolean
type: array
policy:
$ref: '#/components/schemas/ComfyNodePolicy'
return_names:
description: Names of the outputs for clarity in workflows.
type: string
return_types:
description: Specifies the types of outputs produced by the node.
type: string
type: object
ErrorResponse:
properties:
error:
type: string
message:
type: string
required:
- error
- message
type: object
ComfyNodePolicy:
enum:
- ComfyNodePolicyActive
- ComfyNodePolicyBanned
- ComfyNodePolicyLocalOnly
type: string
````
---
# Source: https://docs.comfy.org/api-reference/registry/create-node-translations.md
> ## Documentation Index
> Fetch the complete documentation index at: https://docs.comfy.org/llms.txt
> Use this file to discover all available pages before exploring further.
# Create Node Translations
## OpenAPI
````yaml https://api.comfy.org/openapi post /nodes/{nodeId}/translations
openapi: 3.0.2
info:
title: Comfy API
version: '1.0'
servers:
- url: https://api.comfy.org
security: []
paths:
/nodes/{nodeId}/translations:
post:
tags:
- Registry
summary: Create Node Translations
operationId: CreateNodeTranslations
parameters:
- description: The unique identifier of the node.
in: path
name: nodeId
required: true
schema:
type: string
requestBody:
content:
application/json:
schema:
properties:
data:
additionalProperties:
additionalProperties: true
type: object
type: object
type: object
required: true
responses:
'201':
description: Detailed information about a specific node
'400':
description: Bad Request
'404':
content:
application/json:
schema:
$ref: '#/components/schemas/Error'
description: Node version not found
'500':
content:
application/json:
schema:
$ref: '#/components/schemas/ErrorResponse'
description: Internal server error
components:
schemas:
Error:
properties:
details:
description: >-
Optional detailed information about the error or hints for resolving
it.
items:
type: string
type: array
message:
description: A clear and concise description of the error.
type: string
type: object
ErrorResponse:
properties:
error:
type: string
message:
type: string
required:
- error
- message
type: object
````
---
# Source: https://docs.comfy.org/interface/credits.md
> ## Documentation Index
> Fetch the complete documentation index at: https://docs.comfy.org/llms.txt
> Use this file to discover all available pages before exploring further.
# Credits Management
> In this article, we will introduce ComfyUI's credit management features, including how to obtain, use, and view credits.
The credit system was added to support the `Partner Nodes`, as calling closed-source AI models requires token consumption, so proper credit management is necessary. By default, the credits interface is not displayed. Please first log in to your ComfyUI account in `Settings` -> `User`, and then you can view your associated account's credit information in `Settings` -> `Credits`.
ComfyUI will always remain fully open-source and free for local users.
## How to Purchase Credits?
Below is a demonstration video for purchasing credits:
Detailed steps are as follows:
Log in to your ComfyUI account in `Settings` -> `User`
After logging in, you should see the `Credits` option added to the menu
Go to `Settings` -> `Credits` to purchase credits
In the popup, set the purchase amount and click the `Buy` button
On the payment page, please follow these steps:
1. Select the currency for payment
2. Confirm that the email is the same as your ComfyUI registration email
3. Choose your payment method
* Credit Card
* WeChat (only supported when paying in Comfy Credits)
* Alipay (only supported when paying in Comfy Credits)
4. Click the `Pay` button or the `Generate QR Code` button to complete the payment process
After completing the payment, please return to `Menu` -> `Credits` to check if your balance has been updated. Try refreshing the interface or restarting if necessary
## Frequently Asked Questions
No, when your credit balance is negative, you will not be able to run Partner Nodes
Currently, we do not support refunds
Click on `Settings` -> `Credits` to see your current balance and access the `Credit History` entry
You can log into the same account on multiple devices, but we do not support sharing credits with other users
Due to different image sizes and generation quantities, the `Tokens` and `Credits` consumed each time vary. In `Settings` -> `Credits`, you can see the credits consumed each time and the corresponding credit history
Please ensure you are paying in Comfy Credits, as WeChat and Alipay are only supported when paying in Comfy Credits
Yes, the expiration depends on the type of credits:
* **Monthly credits**: Expire at the end of your billing period
* **Top-up credits**: Expire 1 year from the date of purchase
---
# Source: https://docs.comfy.org/troubleshooting/custom-node-issues.md
> ## Documentation Index
> Fetch the complete documentation index at: https://docs.comfy.org/llms.txt
> Use this file to discover all available pages before exploring further.
# How to Troubleshoot and Solve ComfyUI Issues
> Troubleshoot and fix problems caused by custom nodes and extensions
Here is the overall approach for troubleshooting custom node issues:
```mermaid theme={null}
flowchart TD
A[Issue Encountered] --> B{Does the issue disappear after disabling all custom nodes?}
B -- Yes --> C[Issue caused by custom nodes]
B -- No --> D[Issue not caused by custom nodes, refer to other troubleshooting docs]
C --> E{Check frontend extensions first?}
E -- Yes --> F[Troubleshoot in ComfyUI frontend
]
F --> H[Use binary search to locate problematic node]
G --> H
H --> I[Fix, replace, report or remove problematic node]
I --> J[Issue solved]
```
## How to disable all custom nodes?
Start ComfyUI Desktop with custom nodes disabled from the settings menu
or run the server manually:
```bash theme={null}
cd path/to/your/comfyui
python main.py --disable-all-custom-nodes
```
```bash theme={null}
cd ComfyUI
python main.py --disable-all-custom-nodes
```
Open the folder where the portable version is located, and find the `run_nvidia_gpu.bat` or `run_cpu.bat` file
1. Copy `run_nvidia_gpu.bat` or `run_cpu.bat` file and rename it to `run_nvidia_gpu_disable_custom_nodes.bat`
2. Open the copied file with Notepad
3. Add the `--disable-all-custom-nodes` parameter to the file, or copy the parameters below into a `.txt` file and rename the file to `run_nvidia_gpu_disable_custom_nodes.bat`
```bash theme={null}
.\python_embeded\python.exe -s ComfyUI\main.py --disable-all-custom-nodes --windows-standalone-build
pause
```
4. Save the file and close it
5. Double-click the file to run it. If everything is normal, you should see ComfyUI start and custom nodes disabled
1. Enter the folder where the portable version is located
2. Open the terminal by right-clicking the menu → Open terminal
3. Ensure that the folder name is the current directory of the portable version
4. Enter the following command to start ComfyUI through the portable python and disable custom nodes
```
.\python_embeded\python.exe -s ComfyUI\main.py --disable-all-custom-nodes
```
**Results:**
* ✅ **Issue disappears**: A custom node is causing the problem → Continue to Step 2
* ❌ **Issue persists**: Not a custom node issue → [Report the issue](#reporting-issues)
## What is Binary Search?
In this document, we will introduce the binary search approach for troubleshooting custom node issues, which involves checking half of the custom nodes at a time until we locate the problematic node.
Please refer to the flowchart below for the specific approach - enable half of the currently disabled nodes each time and check if the issue appears, until we identify which custom node is causing the issue
```mermaid theme={null}
flowchart TD
A[Start] --> B{Split all custom nodes in half}
B --> C[Enable first half of custom nodes]
C --> D[Restart ComfyUI and test]
D --> E{Does the issue appear?}
E --> |Yes| F[Issue is in enabled custom nodes]
E --> |No| G[Issue is in disabled custom nodes]
F --> H{Enabled custom nodes > 1?}
G --> I{Disabled custom nodes > 1?}
H --> |Yes| J[Continue binary search on enabled nodes]
I --> |Yes| K[Continue binary search on disabled nodes]
H --> |No| L[Found problematic custom node]
I --> |No| L
J --> B
K --> B
L --> M[End]
```
## Two Troubleshooting Methods
In this document, we categorize custom nodes into two types for troubleshooting:
* A: Custom nodes with frontend extensions
* B: Regular custom nodes
Let's first understand the potential issues and causes for different types of custom nodes:
For custom nodes, we can prioritize troubleshooting those with frontend extensions, as they cause the most issues. Their main conflicts arise from incompatibilities with ComfyUI frontend version updates.
Common issues include:
* Workflows not executing
* Some nodes can't show preview images(such as save image node)
* Misaligned UI elements
* Unable to access ComfyUI frontend
* Completely broken UI or blank screen
* Unable to communicate normally with ComfyUI backend
* Node connections not working properly
* And more
Common causes for these issues:
* Frontend modifications during updates that custom nodes haven't adapted to yet
* Users updating ComfyUI without synchronously upgrading custom nodes, even though authors have released compatible versions
* Authors stopping maintenance, leading to incompatibility between custom node extensions and the ComfyUI frontend
If the problem isn't caused by custom nodes' frontend extensions, issues often relate to dependencies. Common problems include:
* "Failed to import" errors in console/logs
* Missing nodes still showing as missing after installation and restart
* ComfyUI crashes or fails to start
* And more
Common causes for these errors:
* Custom nodes requiring additional wheels like ComfyUI-Nunchaku
* Custom nodes using strict dependency versions (e.g., `torch==2.4.1`) while other plugins use different versions (e.g., `torch>=2.4.2`), causing conflicts after installation
* Network issues preventing successful dependency installation
When problems involve Python environment interdependencies and versions, troubleshooting becomes more complex and requires knowledge of Python environment management, including how to install and uninstall dependencies
## Using Binary Search for Troubleshooting
Among these two different types of custom node issues, conflicts between custom node frontend extensions and ComfyUI are more common. We'll prioritize troubleshooting these nodes first. Here's the overall troubleshooting approach:
### 1. Troubleshooting the Custom Nodes' Frontend Extensions
After starting ComfyUI, find the `Extensions` menu in settings and follow the steps shown in the image to disable all third-party extensions
If you can't enter ComfyUI frontend, just skip the frontend extensions troubleshooting section and continue to [General Custom Node Troubleshooting Approach](#2-general-custom-node-troubleshooting-approach)
After disabling frontend extensions for the first time, it's recommended to restart ComfyUI to ensure all frontend extensions are properly disabled
* If the problem disappears, then it was caused by custom node frontend extensions, and we can proceed with binary search troubleshooting
* If the problem persists, then it's not caused by frontend extensions - please refer to the other troubleshooting approaches in this document
Use the method mentioned at the beginning of this document to troubleshoot, enabling half of the custom nodes at a time until you find the problematic node
Refer to the image to enable half of the frontend extensions. Note that if extension names are similar, they likely come from the same custom node's frontend extensions
If you find the problematic custom node, please refer to the problem fixing section of this document to resolve the custom node issues
Using this method, you don't need to restart ComfyUI multiple times - just reload ComfyUI after enabling/disabling custom node frontend extensions. Plus, your troubleshooting scope is limited to nodes with frontend extensions, which greatly narrows down the search range.
### 2. General Custom Node Troubleshooting
For the binary search localization method, in addition to manual search, we also have automated binary search using comfy-cli, as detailed below:
Using Comfy CLI requires some command line experience. If you're not comfortable with it, use manual binary search instead.
If you have [Comfy CLI](/comfy-cli/getting-started) installed, you can use the automated bisect tool to find the problematic node:
```bash theme={null}
# Start a bisect session
comfy-cli node bisect start
# Follow the prompts:
# - Test ComfyUI with the current set of enabled nodes
# - Mark as 'good' if the issue is gone: comfy-cli node bisect good
# - Mark as 'bad' if the issue persists: comfy-cli node bisect bad
# - Repeat until the problematic node is identified
# Reset when done
comfy-cli node bisect reset
```
The bisect tool will automatically enable/disable nodes and guide you through the process.
Before starting, please **create a backup** of your custom\_nodes folder in case something goes wrong.
If you prefer to do the process manually or don't have Comfy CLI installed, follow the steps below:
Before starting, enter the `\ComfyUI\` folder
* **Backup all custom nodes**: Copy and rename `custom_nodes` to `custom_nodes_backup`
* **Create a temporary folder**: Create a folder named `custom_nodes_temp`
Or use the following command line to backup:
```bash theme={null}
# Create backup and temporary folder
mkdir "%USERPROFILE%\custom_nodes_backup"
mkdir "%USERPROFILE%\custom_nodes_temp"
# Backup all content
xcopy "custom_nodes\*" "%USERPROFILE%\custom_nodes_backup\" /E /H /Y
```
Manually backup custom\_nodes folder
Or use the following command line to backup:
```bash theme={null}
# Create backup and temporary folder
mkdir ~/custom_nodes_backup
mkdir ~/custom_nodes_temp
# Backup all content
cp -r custom_nodes/* ~/custom_nodes_backup/
```
```bash theme={null}
# Create backup and temporary folder
mkdir /content/custom_nodes_backup
mkdir /content/custom_nodes_temp
# Backup all content
cp -r /content/ComfyUI/custom_nodes/* /content/custom_nodes_backup/
```
Since Windows has a visual interface, you can skip this step unless you're only using the command line
```bash theme={null}
dir custom_nodes
```
```bash theme={null}
ls custom_nodes/
```
```bash theme={null}
ls /content/ComfyUI/custom_nodes/
```
Let's assume that you have 8 custom nodes. Move the first half to temporary storage:
```bash theme={null}
# Move first half (nodes 1-4) to temp
move "custom_nodes\node1" "%USERPROFILE%\custom_nodes_temp\"
move "custom_nodes\node2" "%USERPROFILE%\custom_nodes_temp\"
move "custom_nodes\node3" "%USERPROFILE%\custom_nodes_temp\"
move "custom_nodes\node4" "%USERPROFILE%\custom_nodes_temp\"
```
```bash theme={null}
# Move first half (nodes 1-4) to temp
mv custom_nodes/node1 ~/custom_nodes_temp/
mv custom_nodes/node2 ~/custom_nodes_temp/
mv custom_nodes/node3 ~/custom_nodes_temp/
mv custom_nodes/node4 ~/custom_nodes_temp/
```
```bash theme={null}
# Move first half (nodes 1-4) to temp
mv /content/ComfyUI/custom_nodes/node1 /content/custom_nodes_temp/
mv /content/ComfyUI/custom_nodes/node2 /content/custom_nodes_temp/
mv /content/ComfyUI/custom_nodes/node3 /content/custom_nodes_temp/
mv /content/ComfyUI/custom_nodes/node4 /content/custom_nodes_temp/
```
Start ComfyUI normally
```bash theme={null}
python main.py
```
* **Issue persists**: Problem is in the remaining nodes (5-8)
* **Issue disappears**: Problem was in the moved nodes (1-4)
* If issue persists: Move half of remaining nodes (e.g., nodes 7-8) to temp
* If issue gone: Move half of temp nodes (e.g., nodes 3-4) back to custom\_nodes
* Repeat until you find the single problematic node
## How to Fix the Issue
Once you've identified the problematic custom node:
### Option 1: Update the Node
1. Check if there's an update available in ComfyUI Manager
2. Update the node and test again
### Option 2: Replace the Node
1. Look for alternative custom nodes with similar functionality
2. Check the [ComfyUI Registry](https://registry.comfy.org) for alternatives
### Option 3: Report the Issue
Contact the custom node developer:
1. Find the node's GitHub repository
2. Create an issue with:
* Your ComfyUI version
* Error messages/logs
* Steps to reproduce
* Your operating system
### Option 4: Remove or Disable the Node
If no fix is available and you don't need the functionality:
1. Remove the problematic node from `custom_nodes/` or disable it in the ComfyUI Manager interface
2. Restart ComfyUI
## Reporting Issues
If the issue isn't caused by custom nodes, refer to the general [troubleshooting overview](/troubleshooting/overview) for other common problems.
### For Custom Node-Specific Issues
Contact the custom node developer:
* Find the node's GitHub repository
* Create an issue with your ComfyUI version, error messages, reproduction steps, and OS
* Check the node's documentation and Issues page for known issues
### For ComfyUI Core Issues
* **GitHub**: [ComfyUI Issues](https://github.com/comfyanonymous/ComfyUI/issues)
* **Forum**: [Official ComfyUI Forum](https://forum.comfy.org/)
### For Desktop App Issues
* **GitHub**: [ComfyUI Desktop Issues](https://github.com/Comfy-Org/desktop/issues)
### For Frontend Issues
* **GitHub**: [ComfyUI Frontend Issues](https://github.com/Comfy-Org/ComfyUI_frontend/issues)
For general installation, model, or performance issues, see our [troubleshooting overview](/troubleshooting/overview) and [model issues](/troubleshooting/model-issues) pages.
---
# Source: https://docs.comfy.org/development/core-concepts/custom-nodes.md
> ## Documentation Index
> Fetch the complete documentation index at: https://docs.comfy.org/llms.txt
> Use this file to discover all available pages before exploring further.
# Custom Nodes
> Learn about installing, enabling dependencies, updating, disabling, and uninstalling custom nodes in ComfyUI
## About Custom Nodes
After installing ComfyUI, you'll discover that it includes many built-in nodes. These native nodes are called **Comfy Core** nodes, which are officially maintained by ComfyUI.
Additionally, there are numerous [**custom nodes**](https://registry.comfy.org) created by various authors from the ComfyUI community. These custom nodes bring extensive functionality to ComfyUI, greatly expanding its capabilities and feature boundaries.
In this guide, we'll cover various operations related to custom nodes, including installation, updates, disabling, uninstalling, and dependency installation.
Anyone can develop their own custom extensions for ComfyUI and share them with others. You can find many community custom nodes [here](https://registry.comfy.org). If you want to develop your own custom nodes, visit the section below to get started:
Learn how to start developing a custom node
## Custom Node Management
In this section we will cover:
* Installing custom nodes
* Installing node dependencies
* Custom node version control
* Uninstalling custom nodes
* Temporarily disabling custom nodes
* Handling custom node dependency conflicts
### 1. Installing Custom Nodes
Currently, ComfyUI supports installing custom nodes through multiple methods, including:
* [Install via ComfyUI Manager (Recommended)](#install-via-comfyui-manager)
* Install via Git
* Manual installation
We recommend installing custom nodes through **ComfyUI Manager**, which is a highly significant tool in the ComfyUI custom node ecosystem. It makes custom node management (such as searching, installing, updating, disabling, and uninstalling) simple - you just need to search for the node you want to install in ComfyUI Manager and click install.
However, since all custom nodes are currently stored on GitHub, for regions that cannot access GitHub normally, we have written detailed instructions for different custom node installation methods in this guide.
Additionally, since we recommend using **ComfyUI Manager** for plugin management, we recommend using this tool for plugin management. You can find its source code [here](https://github.com/Comfy-Org/ComfyUI-Manager).
Therefore, in this documentation, we will use installing ComfyUI Manager as a custom node installation example, and supplement how to use it for node management in the relevant introduction sections.
Since ComfyUI Manager has very rich functionality, we will use a separate document to introduce the ComfyUI Manager installation chapter. Please visit the link below to learn how to use ComfyUI Manager to install custom nodes.
Learn how to use ComfyUI Manager to install custom nodes
First, you need to ensure that Git is installed on your system. You can check if Git is installed by entering the following command in your system terminal:
```bash theme={null}
git --version
```
If Git is installed, you will see output similar to the following:
If not yet installed, please visit [git-scm.com](https://git-scm.com/) to download the corresponding installation package. Linux users please refer to [git-scm.com/downloads/linux](https://git-scm.com/downloads/linux) for installation instructions.
For ComfyUI Desktop version, you can use the Desktop terminal as shown below to complete the installation.
After completing the Git installation, we need the repository address of the custom node. Here we use the ComfyUI-Manager repository address as an example:
```bash theme={null}
https://github.com/Comfy-Org/ComfyUI-Manager
```
For regions that cannot access GitHub smoothly, you can try using other code hosting service websites to fork the corresponding repository, then use that repository address to complete the node installation, such as gitee, etc.
First, we need to navigate to the ComfyUI custom nodes directory. Using ComfyUI portable version as an example, if the folder location is `D:\ComfyUI_windows_portable`, then you should be able to find the custom nodes folder at `D:\ComfyUI_windows_portable\ComfyUI\custom_nodes`. First, we need to use the `cd` command to enter the corresponding directory:
```bash theme={null}
cd D:\ComfyUI_windows_portable\ComfyUI\custom_nodes
```
Then we use the `git clone` command to complete the node installation:
```bash theme={null}
git clone https://github.com/Comfy-Org/ComfyUI-Manager
```
If everything goes smoothly, you will see output similar to the following:
This means you have successfully cloned the custom node code. Next, we need to install the corresponding dependencies.
Please refer to the instructions in the [Installing Node Dependencies](#installing-node-dependencies) section for dependency installation.
Manual installation is not the recommended installation method, but it serves as a backup option when you cannot install smoothly using git.
Plugins installed this way will lose the corresponding git version history information and will not be convenient for subsequent version management.
For manual installation, we need to first download the corresponding node code and then extract it to the appropriate directory.
Visit the corresponding custom node repository page:
1. Click the `Code` button
2. Then click the `Download ZIP` button to download the ZIP package
3. Extract the ZIP package
Copy the extracted code from the above steps to the ComfyUI custom nodes directory. Using ComfyUI portable version as an example, if the folder location is `D:\ComfyUI_windows_portable`, then you should be able to find the custom nodes folder at `D:\ComfyUI_windows_portable\ComfyUI\custom_nodes`. Copy the extracted code from the above steps to the corresponding directory.
Please refer to the instructions in the [Installing Node Dependencies](#installing-node-dependencies) section for dependency installation.
### 2. Installing Node Dependencies
Custom nodes all require the installation of related dependencies. For example, for ComfyUI-Manager, you can visit the [requirements.txt](https://github.com/Comfy-Org/ComfyUI-Manager/blob/main/requirements.txt) file to view the dependency package requirements.
In the previous steps, we only cloned the custom node code locally and did not install the corresponding dependencies, so next we need to install the corresponding dependencies.
Actually, if you use ComfyUI-Manager to install plugins, ComfyUI Manager will automatically help you complete the dependency installation. You just need to restart ComfyUI after installing the plugin. This is why we strongly recommend using ComfyUI Manager to install custom nodes.
But perhaps you may not be able to use ComfyUI Manager to install custom nodes smoothly in some situations, so we provide this more detailed dependency installation guide.
In the [Dependencies](/development/core-concepts/dependencies) chapter, we introduced the relevant content about dependencies in ComfyUI. ComfyUI is a **Python**-based project, and we built an independent **Python** runtime environment for running ComfyUI. All related dependencies need to be installed in this independent **Python** runtime environment.
If you run `pip install -r requirements.txt` directly in the system-level terminal, the corresponding dependencies may be installed in the system-level **Python** environment, which will cause the dependencies to still be missing in ComfyUI's environment, preventing the corresponding custom nodes from running normally.
So next we need to use ComfyUI's independent Python runtime environment to complete the dependency installation.
Depending on different ComfyUI versions, we will use different methods to install the corresponding dependencies:
For ComfyUI Portable version, it uses an embedded Python located in the `\ComfyUI_windows_portable\python_embeded` directory. We need to use this Python to complete the dependency installation.
First, start the terminal in the portable version directory, or use the `cd` command to navigate to the `\ComfyUI_windows_portable\` directory after starting the terminal.
Ensure that the terminal directory is `\ComfyUI_windows_portable\`, as shown below for `D:\ComfyUI_windows_portable\`
Then use `python_embeded\python.exe` to complete the dependency installation:
```bash theme={null}
python_embeded\python.exe -m pip install -r ComfyUI\custom_nodes\ComfyUI-Manager\requirements.txt
```
Of course, you can replace ComfyUI-Manager with the name of the custom node you actually installed, but make sure that a `requirements.txt` file exists in the corresponding node directory.
Since ComfyUI Desktop already has ComfyUI-Manager and its dependencies installed during the installation process, and this guide uses ComfyUI Manager as an example for custom node installation, you don't actually need to perform ComfyUI Manager dependency installation in the desktop version.
If there are no unexpected issues, we recommend using ComfyUI Manager to install custom nodes, so you don't need to manually install dependencies.
Then use the following command to install the dependencies for the corresponding plugin:
```bash theme={null}
pip install -r .\custom_nodes\\requirements.txt
```
As shown below, this is the dependency installation for ComfyUI-Hunyuan3Dwrapper:
For users with custom Python environments, we recommend using `pip install -r requirements.txt` to complete the dependency installation.
### Custom Node Version Control
Custom node version control is actually based on Git version control. You can manage node versions through Git, but ComfyUI Manager has already integrated this version management functionality very well. Many thanks to [@Dr.Lt.Data](https://github.com/ltdrdata) for bringing us such a convenient tool.
In this section, we will still explain these two different plugin version management methods for you, but if you use ZIP packages for manual installation, the corresponding git version history information will be lost, making it impossible to perform version management.
Since we are iterating on ComfyUI Manager, the actual latest interface and steps may change significantly
Perform the corresponding operations as shown to enter the ComfyUI Manager interface
You can use the corresponding filters to filter out installed node packages and then perform the corresponding node management
Switch to the corresponding version. Manager will help you complete the corresponding dependency updates and installation. Usually, you need to restart ComfyUI after switching versions for the changes to take effect.
Find the directory folder where your corresponding node is located, such as `ComfyUI/custom_nodes/ComfyUI-Manager`
Use the `cd` command to enter the corresponding folder:
```bash theme={null}
cd /ComfyUI/custom_nodes/ComfyUI-Manager
```
You can use the following command to view all available tags and releases:
```bash theme={null}
git tag
```
This will list all version tags, and you can choose the version you want to switch to.
Use the following command to switch to a specified tag or release:
```bash theme={null}
git checkout
```
Replace `` with the specific version tag you want to switch to.
If you want to switch to a specific commit version, you can use the following command:
```bash theme={null}
git checkout
```
Replace `` with the specific commit hash you want to switch to.
Since the dependencies of the corresponding custom node package may change after version switching, you need to reinstall the dependencies for the corresponding node. Please refer to the instructions in the [Installing Node Dependencies](#2-installing-node-dependencies) section to enter the corresponding environment for installation.
### Uninstalling Custom Nodes
To be updated
### Temporarily Disabling Custom Nodes
To be updated
### Custom Node Dependency Conflicts
To be updated
## ComfyUI Manager
This tool is currently included by default in the [Desktop version](/installation/desktop/windows), while in the [Portable version](/installation/comfyui_portable_windows), you need to refer to the installation instructions in the [Install Manager](#installing-custom-nodes) section of this document.
As ComfyUI continues to develop, ComfyUI Manager plays an increasingly important role in ComfyUI. Currently, ComfyUI-Manager has officially joined the Comfy Org organization, officially becoming part of ComfyUI's core dependencies, and continues to be maintained by the original author [Dr.Lt.Data](https://github.com/ltdrdata). You can read [this blog post](https://blog.comfy.org/p/comfyui-manager-joins-comfy-org) for more information.
In future iterations, we will greatly optimize the use of ComfyUI Manager, so the interface shown in this documentation may differ from the latest version of ComfyUI Manager.
### Installing the Manager
If you are running the ComfyUI server application, you need to install the manager. If ComfyUI is running, please close it before continuing.
The first step is to install Git, which is a command-line application for software version control. Git will download the ComfyUI manager from [github.com](https://github.com). Download and install Git from [git-scm.com](https://git-scm.com/).
After installing Git, navigate to the ComfyUI server program directory and enter the folder labeled **custom\_nodes**. Open a command window or terminal. Make sure the command line shows the current directory path as **custom\_nodes**. Enter the following command. This will download the manager. Technically, this is called *cloning a Git repository*.
### Detecting Missing Nodes
After installing the manager, you can detect missing nodes in the manager.
## Developing a Custom Node
If you have some development capabilities, please start with the documentation below to learn how to begin developing a custom node.
Learn how to start developing a custom node
---
# Source: https://docs.comfy.org/tutorials/partner-nodes/openai/dall-e-2.md
> ## Documentation Index
> Fetch the complete documentation index at: https://docs.comfy.org/llms.txt
> Use this file to discover all available pages before exploring further.
# OpenAI DALL·E 2 Node
> Learn how to use the OpenAI DALL·E 2 Partner node to generate images in ComfyUI
OpenAI DALL·E 2 is part of the ComfyUI Partner Nodes series, allowing users to generate images through OpenAI's **DALL·E 2** model.
This node supports:
* Text-to-image generation
* Image editing functionality (inpainting through masks)
## Node Overview
The **OpenAI DALL·E 2** node generates images synchronously through OpenAI's image generation API. It receives text prompts and returns images that match the description.
To use the API nodes, you need to ensure that you are logged in properly and using a permitted network environment. Please refer to the [API Nodes Overview](/tutorials/partner-nodes/overview) section of the documentation to understand the specific requirements for using the API nodes.
Make sure your ComfyUI is updated.
* [Download ComfyUI](https://www.comfy.org/download)
* [Update Guide](/installation/update_comfyui)
Workflows in this guide can be found in the [Workflow Templates](/interface/features/template).
If you can't find them in the template, your ComfyUI may be outdated. (Desktop version's update will delay sometime)
If nodes are missing when loading a workflow, possible reasons:
1. You are not using the latest ComfyUI version (Nightly version)
2. Some nodes failed to import at startup
* The Desktop is base on ComfyUI stable release, it will auto-update when there is a new Desktop stable release available.
* [Cloud](https://cloud.comfy.org) will update after ComfyUI stable release.
So, if you find any core node missing in this document, it might be because the new core nodes have not yet been released in the latest stable version. Please wait for the next stable release.
## Parameter Description
### Required Parameters
| Parameter | Description |
| --------- | ------------------------------------------------------------- |
| `prompt` | Text prompt describing the image content you want to generate |
### Widget Parameters
| Parameter | Description | Options/Range | Default Value |
| --------- | -------------------------------------------------------------------------- | --------------------------------- | ------------- |
| `seed` | Seed value for image generation (currently not implemented in the backend) | 0 to 2^31-1 | 0 |
| `size` | Output image dimensions | "256x256", "512x512", "1024x1024" | "1024x1024" |
| `n` | Number of images to generate | 1 to 8 | 1 |
### Optional Parameters
| Parameter | Description | Options/Range | Default Value |
| --------- | ------------------------------------------ | --------------- | ------------- |
| `image` | Optional reference image for image editing | Any image input | None |
| `mask` | Optional mask for local inpainting | Mask input | None |
## Usage Method
## Workflow Examples
This Partner node currently supports two workflows:
* Text to Image
* Inpainting
Image to Image workflow is not supported
### Text to Image Example
The image below contains a simple text-to-image workflow. Please download the corresponding image and drag it into ComfyUI to load the workflow.

The corresponding example is very simple
You only need to load the `OpenAI DALL·E 2` node, input the description of the image you want to generate in the `prompt` node, connect a `Save Image` node, and then run the workflow.
### Inpainting Workflow
DALL·E 2 supports image editing functionality, allowing you to use a mask to specify the area to be replaced. Below is a simple inpainting workflow example:
#### 1. Workflow File Download
Download the image below and drag it into ComfyUI to load the corresponding workflow.

We will use the image below as input:

#### 2. Workflow File Usage Instructions
Since this workflow is relatively simple, if you want to manually implement the corresponding workflow yourself, you can follow the steps below:
1. Use the `Load Image` node to load the image
2. Right-click on the load image node and select `MaskEditor`
3. In the mask editor, use the brush to draw the area you want to redraw
4. Connect the loaded image to the `image` input of the **OpenAI DALL·E 2** node
5. Connect the mask to the `mask` input of the **OpenAI DALL·E 2** node
6. Edit the prompt in the `prompt` node
7. Run the workflow
**Notes**
* If you want to use the image editing functionality, you must provide both an image and a mask (both are required)
* The mask and image must be the same size
* When inputting large images, the node will automatically resize the image to an appropriate size
* The URLs returned by the API are valid for a short period, please save the results promptly
* Each generation consumes credits, charged according to image size and quantity
## FAQs
Please update your ComfyUI to the latest version (the latest commit or the latest [desktop version](https://www.comfy.org/download)).
We may add more API support in the future, and the corresponding nodes will be updated, so please keep your ComfyUI up to date.
Please note that you need to distinguish between the nightly version and the release version.
In some cases, the latest `release` version may not be updated in time compared to the `nightly` version.
Since we are still iterating quickly, please ensure you are using the latest version when you cannot find the corresponding node.
API access requires that your current request is based on a secure network environment. The current requirements for API access are as follows:
* The local network only allows access from `127.0.0.1` or `localhost`, which may mean that you cannot use the API Nodes in a ComfyUI service started with the `--listen` parameter in a LAN environment.
* Able to access our API service normally (a proxy service may be required in some regions).
* Your account does not have enough [credits](/interface/credits).
* Currently, only `127.0.0.1` or `localhost` access is supported.
* Ensure your account has enough credits.
API Nodes require credits for API calls to closed-source models, so they do not support free usage.
Please refer to the following documentation:
1. [Comfy Account](/interface/user): Find the `User` section in the settings menu to log in.
2. [Credits](/interface/credits): After logging in, the settings interface will show the credits menu. You can purchase credits in `Settings` → `Credits`. We use a prepaid system, so there will be no unexpected charges.
3. Complete the payment through Stripe.
4. Check if the credits have been updated. If not, try restarting or refreshing the page.
Currently, we do not support refunds for credits.
If you believe there is an error resulting in unused balance due to technical issues, please [contact support](mailto:support@comfy.org).
Credits are not intended to be used as a negative balance or credit line. However, due to race conditions where partner nodes don't always report costs before execution, a single execution may consume more credits than your remaining balance and temporarily result in a negative balance after completion. When your balance is negative, you will not be able to run Partner Nodes until you top up and restore a positive balance. Please ensure you have enough credits before making API calls.
Please visit the [Credits](/interface/credits) menu after logging in to check the corresponding credits.
Currently, the API Nodes are still in the testing phase and do not support this feature yet, but we have considered adding it.
No, your credits do not expire.
No, your credits cannot be transferred to other users and are limited to the currently logged-in account, but we do not restrict the number of devices that can log in.
We do not limit the number of devices that can log in; you can use your account anywhere you want.
Email a request to [support@comfy.org](mailto:support@comfy.org) and we will delete your information
---
# Source: https://docs.comfy.org/tutorials/partner-nodes/openai/dall-e-3.md
> ## Documentation Index
> Fetch the complete documentation index at: https://docs.comfy.org/llms.txt
> Use this file to discover all available pages before exploring further.
# OpenAI DALL·E 3 Node
> Learn how to use the OpenAI DALL·E 3 Partner node to generate images in ComfyUI
OpenAI DALL·E 3 is part of the ComfyUI Partner Nodes series, allowing users to generate images through OpenAI's **DALL·E 3** model. This node supports text-to-image generation functionality.
## Node Overview
DALL·E 3 is OpenAI's latest image generation model, capable of creating detailed and high-quality images based on text prompts. Through this node in ComfyUI, you can directly access DALL·E 3's generation capabilities without leaving the ComfyUI interface.
The **OpenAI DALL·E 3** node generates images synchronously through OpenAI's image generation API. It receives text prompts and returns images that match the description.
To use the API nodes, you need to ensure that you are logged in properly and using a permitted network environment. Please refer to the [API Nodes Overview](/tutorials/partner-nodes/overview) section of the documentation to understand the specific requirements for using the API nodes.
Make sure your ComfyUI is updated.
* [Download ComfyUI](https://www.comfy.org/download)
* [Update Guide](/installation/update_comfyui)
Workflows in this guide can be found in the [Workflow Templates](/interface/features/template).
If you can't find them in the template, your ComfyUI may be outdated. (Desktop version's update will delay sometime)
If nodes are missing when loading a workflow, possible reasons:
1. You are not using the latest ComfyUI version (Nightly version)
2. Some nodes failed to import at startup
* The Desktop is base on ComfyUI stable release, it will auto-update when there is a new Desktop stable release available.
* [Cloud](https://cloud.comfy.org) will update after ComfyUI stable release.
So, if you find any core node missing in this document, it might be because the new core nodes have not yet been released in the latest stable version. Please wait for the next stable release.
## Parameter Details
### Required Parameters
| Parameter | Type | Description |
| --------- | ---- | ---------------------------------------------------------------------------------------------------------------------------- |
| prompt | Text | Text prompt for generating images. Supports multi-line input, can describe in detail the image content you want to generate. |
### Widget Parameters
| Parameter | Type | Options | Default Value | Description |
| --------- | ------- | ------------------------------- | ------------- | ----------------------------------------------------------------------------------------------------------------------------------------- |
| seed | Integer | 0-2147483647 | 0 | Random seed used to control the generation result |
| quality | Option | standard, hd | standard | Image quality setting. The "hd" option generates higher quality images but may require more computational resources |
| style | Option | natural, vivid | natural | Image style. "Vivid" tends to generate hyperrealistic and dramatic images, while "natural" produces more natural, less exaggerated images |
| size | Option | 1024x1024, 1024x1792, 1792x1024 | 1024x1024 | Size of the generated image. You can choose square or rectangular images in different orientations |
## Usage Examples
You can download the image below and drag it into ComfyUI to load the corresponding workflow

Since the corresponding workflow is very simple, you can also directly add the **OpenAI DALL·E 3** node in ComfyUI, input the description of the image you want to generate, and then run the workflow
1. Add the **OpenAI DALL·E 3** node in ComfyUI
2. Enter the description of the image you want to generate in the prompt text box
3. Adjust optional parameters as needed (quality, style, size, etc.)
4. Run the workflow to generate the image
## FAQs
Please update your ComfyUI to the latest version (the latest commit or the latest [desktop version](https://www.comfy.org/download)).
We may add more API support in the future, and the corresponding nodes will be updated, so please keep your ComfyUI up to date.
Please note that you need to distinguish between the nightly version and the release version.
In some cases, the latest `release` version may not be updated in time compared to the `nightly` version.
Since we are still iterating quickly, please ensure you are using the latest version when you cannot find the corresponding node.
API access requires that your current request is based on a secure network environment. The current requirements for API access are as follows:
* The local network only allows access from `127.0.0.1` or `localhost`, which may mean that you cannot use the API Nodes in a ComfyUI service started with the `--listen` parameter in a LAN environment.
* Able to access our API service normally (a proxy service may be required in some regions).
* Your account does not have enough [credits](/interface/credits).
* Currently, only `127.0.0.1` or `localhost` access is supported.
* Ensure your account has enough credits.
API Nodes require credits for API calls to closed-source models, so they do not support free usage.
Please refer to the following documentation:
1. [Comfy Account](/interface/user): Find the `User` section in the settings menu to log in.
2. [Credits](/interface/credits): After logging in, the settings interface will show the credits menu. You can purchase credits in `Settings` → `Credits`. We use a prepaid system, so there will be no unexpected charges.
3. Complete the payment through Stripe.
4. Check if the credits have been updated. If not, try restarting or refreshing the page.
Currently, we do not support refunds for credits.
If you believe there is an error resulting in unused balance due to technical issues, please [contact support](mailto:support@comfy.org).
Credits are not intended to be used as a negative balance or credit line. However, due to race conditions where partner nodes don't always report costs before execution, a single execution may consume more credits than your remaining balance and temporarily result in a negative balance after completion. When your balance is negative, you will not be able to run Partner Nodes until you top up and restore a positive balance. Please ensure you have enough credits before making API calls.
Please visit the [Credits](/interface/credits) menu after logging in to check the corresponding credits.
Currently, the API Nodes are still in the testing phase and do not support this feature yet, but we have considered adding it.
No, your credits do not expire.
No, your credits cannot be transferred to other users and are limited to the currently logged-in account, but we do not restrict the number of devices that can log in.
We do not limit the number of devices that can log in; you can use your account anywhere you want.
Email a request to [support@comfy.org](mailto:support@comfy.org) and we will delete your information
---
# Source: https://docs.comfy.org/custom-nodes/backend/datatypes.md
> ## Documentation Index
> Fetch the complete documentation index at: https://docs.comfy.org/llms.txt
> Use this file to discover all available pages before exploring further.
# Datatypes
These are the most important built in datatypes. You can also [define your own](./more_on_inputs#custom-datatypes).
Datatypes are used on the client side to prevent a workflow from passing the wrong form of data into a node - a bit like strong typing.
The JavaScript client side code will generally not allow a node output to be connected to an input of a different datatype,
although a few exceptions are noted below.
## Comfy datatypes
### COMBO
* No additional parameters in `INPUT_TYPES`
* Python datatype: defined as `list[str]`, output value is `str`
Represents a dropdown menu widget.
Unlike other datatypes, `COMBO` it is not specified in `INPUT_TYPES` by a `str`, but by a `list[str]`
corresponding to the options in the dropdown list, with the first option selected by default.
`COMBO` inputs are often dynamically generated at run time. For instance, in the built-in `CheckpointLoaderSimple` node, you find
```
"ckpt_name": (folder_paths.get_filename_list("checkpoints"), )
```
or they might just be a fixed list of options,
```
"play_sound": (["no","yes"], {}),
```
### Primitive and reroute
Primitive and reroute nodes only exist on the client side. They do not have an intrinsic datatype, but when connected they take on
the datatype of the input or output to which they have been connected (which is why they can't connect to a `*` input...)
## Python datatypes
### INT
* Additional parameters in `INPUT_TYPES`:
* `default` is required
* `min` and `max` are optional
* Python datatype `int`
### FLOAT
* Additional parameters in `INPUT_TYPES`:
* `default` is required
* `min`, `max`, `step` are optional
* Python datatype `float`
### STRING
* Additional parameters in `INPUT_TYPES`:
* `default` is required
* Python datatype `str`
### BOOLEAN
* Additional parameters in `INPUT_TYPES`:
* `default` is required
* Python datatype `bool`
## Tensor datatypes
### IMAGE
* No additional parameters in `INPUT_TYPES`
* Python datatype `torch.Tensor` with *shape* \[B,H,W,C]
A batch of `B` images, height `H`, width `W`, with `C` channels (generally `C=3` for `RGB`).
### LATENT
* No additional parameters in `INPUT_TYPES`
* Python datatype `dict`, containing a `torch.Tensor` with *shape* \[B,C,H,W]
The `dict` passed contains the key `samples`, which is a `torch.Tensor` with *shape* \[B,C,H,W] representing
a batch of `B` latents, with `C` channels (generally `C=4` for existing stable diffusion models), height `H`, width `W`.
The height and width are 1/8 of the corresponding image size (which is the value you set in the Empty Latent Image node).
Other entries in the dictionary contain things like latent masks.
{/* TODO new SD models might have different C values? */}
### MASK
* No additional parameters in `INPUT_TYPES`
* Python datatype `torch.Tensor` with *shape* \[H,W] or \[B,C,H,W]
### AUDIO
* No additional parameters in `INPUT_TYPES`
* Python datatype `dict`, containing a `torch.Tensor` with *shape* \[B, C, T] and a sample rate.
The `dict` passed contains the key `waveform`, which is a `torch.Tensor` with *shape* \[B, C, T] representing a batch of `B` audio samples, with `C` channels (`C=2` for stereo and `C=1` for mono), and `T` time steps (i.e., the number of audio samples).
The `dict` contains another key `sample_rate`, which indicates the sampling rate of the audio.
## Custom Sampling datatypes
### Noise
The `NOISE` datatype represents a *source* of noise (not the actual noise itself). It can be represented by any Python object
that provides a method to generate noise, with the signature `generate_noise(self, input_latent:Tensor) -> Tensor`, and a
property, `seed:Optional[int]`.
The `seed` is passed into `sample` guider in the `SamplerCustomAdvanced`, but does not appear to be used in any of the standard guiders.
It is Optional, so you can generally set it to None.
When noise is to be added, the latent is passed into this method, which should return a `Tensor` of the same shape containing the noise.
See the [noise mixing example](./snippets#creating-noise-variations)
### Sampler
The `SAMPLER` datatype represents a sampler, which is represented as a Python object providing a `sample` method.
Stable diffusion sampling is beyond the scope of this guide; see `comfy/samplers.py` if you want to dig into this part of the code.
### Sigmas
The `SIGMAS` datatypes represents the values of sigma before and after each step in the sampling process, as produced by a scheduler.
This is represented as a one-dimensional tensor, of length `steps+1`, where each element represents the noise expected to be present
before the corresponding step, with the final value representing the noise present after the final step.
A `normal` scheduler, with 20 steps and denoise of 1, for an SDXL model, produces:
```
tensor([14.6146, 10.7468, 8.0815, 6.2049, 4.8557,
3.8654, 3.1238, 2.5572, 2.1157, 1.7648,
1.4806, 1.2458, 1.0481, 0.8784, 0.7297,
0.5964, 0.4736, 0.3555, 0.2322, 0.0292, 0.0000])
```
The starting value of sigma depends on the model, which is why a scheduler node requires a `MODEL` input to produce a SIGMAS output
### Guider
A `GUIDER` is a generalisation of the denoising process, as 'guided' by a prompt or any other form of conditioning. In Comfy the guider is
represented by a `callable` Python object providing a `__call__(*args, **kwargs)` method which is called by the sample.
The `__call__` method takes (in `args[0]`) a batch of noisy latents (tensor `[B,C,H,W]`), and returns a prediction of the noise (a tensor of the same shape).
## Model datatypes
There are a number of more technical datatypes for stable diffusion models. The most significant ones are `MODEL`, `CLIP`, `VAE` and `CONDITIONING`.
Working with these is (for the time being) beyond the scope of this guide! {/* TODO but maybe not forever */}
## Additional Parameters
Below is a list of officially supported keys that can be used in the 'extra options' portion of an input definition.
You can use additional keys for your own custom widgets, but should *not* reuse any of the keys below for other purposes.
| Key | Description |
| ---------------- | ------------------------------------------------------------------------------------------------------------------------------------------------------------------------------------------------ |
| `default` | The default value of the widget |
| `min` | The minimum value of a number (`FLOAT` or `INT`) |
| `max` | The maximum value of a number (`FLOAT` or `INT`) |
| `step` | The amount to increment or decrement a widget |
| `label_on` | The label to use in the UI when the bool is `True` (`BOOL`) |
| `label_off` | The label to use in the UI when the bool is `False` (`BOOL`) |
| `defaultInput` | Defaults to an input socket rather than a supported widget |
| `forceInput` | `defaultInput` and also don't allow converting to a widget |
| `multiline` | Use a multiline text box (`STRING`) |
| `placeholder` | Placeholder text to display in the UI when empty (`STRING`) |
| `dynamicPrompts` | Causes the front-end to evaluate dynamic prompts |
| `lazy` | Declares that this input uses [Lazy Evaluation](./lazy_evaluation) |
| `rawLink` | When a link exists, rather than receiving the evaluated value, you will receive the link (i.e. `["nodeId", ]`). Primarily useful when your node uses [Node Expansion](./expansion). |
---
# Source: https://docs.comfy.org/api-reference/registry/delete-a-publisher.md
> ## Documentation Index
> Fetch the complete documentation index at: https://docs.comfy.org/llms.txt
> Use this file to discover all available pages before exploring further.
# Delete a publisher
## OpenAPI
````yaml https://api.comfy.org/openapi delete /publishers/{publisherId}
openapi: 3.0.2
info:
title: Comfy API
version: '1.0'
servers:
- url: https://api.comfy.org
security: []
paths:
/publishers/{publisherId}:
delete:
tags:
- Registry
summary: Delete a publisher
operationId: DeletePublisher
parameters:
- in: path
name: publisherId
required: true
schema:
type: string
responses:
'204':
description: Publisher deleted successfully
'404':
content:
application/json:
schema:
$ref: '#/components/schemas/ErrorResponse'
description: Publisher not found
'500':
content:
application/json:
schema:
$ref: '#/components/schemas/ErrorResponse'
description: Internal server error
security:
- BearerAuth: []
components:
schemas:
ErrorResponse:
properties:
error:
type: string
message:
type: string
required:
- error
- message
type: object
securitySchemes:
BearerAuth:
bearerFormat: JWT
scheme: bearer
type: http
````
---
# Source: https://docs.comfy.org/api-reference/registry/delete-a-specific-node.md
> ## Documentation Index
> Fetch the complete documentation index at: https://docs.comfy.org/llms.txt
> Use this file to discover all available pages before exploring further.
# Delete a specific node
## OpenAPI
````yaml https://api.comfy.org/openapi delete /publishers/{publisherId}/nodes/{nodeId}
openapi: 3.0.2
info:
title: Comfy API
version: '1.0'
servers:
- url: https://api.comfy.org
security: []
paths:
/publishers/{publisherId}/nodes/{nodeId}:
delete:
tags:
- Registry
summary: Delete a specific node
operationId: DeleteNode
parameters:
- in: path
name: publisherId
required: true
schema:
type: string
- in: path
name: nodeId
required: true
schema:
type: string
responses:
'204':
description: Node deleted successfully
'403':
content:
application/json:
schema:
$ref: '#/components/schemas/ErrorResponse'
description: Forbidden
'404':
content:
application/json:
schema:
$ref: '#/components/schemas/ErrorResponse'
description: Node not found
'500':
content:
application/json:
schema:
$ref: '#/components/schemas/ErrorResponse'
description: Internal server error
security:
- BearerAuth: []
components:
schemas:
ErrorResponse:
properties:
error:
type: string
message:
type: string
required:
- error
- message
type: object
securitySchemes:
BearerAuth:
bearerFormat: JWT
scheme: bearer
type: http
````
---
# Source: https://docs.comfy.org/api-reference/registry/delete-a-specific-personal-access-token.md
> ## Documentation Index
> Fetch the complete documentation index at: https://docs.comfy.org/llms.txt
> Use this file to discover all available pages before exploring further.
# Delete a specific personal access token
## OpenAPI
````yaml https://api.comfy.org/openapi delete /publishers/{publisherId}/tokens/{tokenId}
openapi: 3.0.2
info:
title: Comfy API
version: '1.0'
servers:
- url: https://api.comfy.org
security: []
paths:
/publishers/{publisherId}/tokens/{tokenId}:
delete:
tags:
- Registry
summary: Delete a specific personal access token
operationId: DeletePersonalAccessToken
parameters:
- in: path
name: publisherId
required: true
schema:
type: string
- in: path
name: tokenId
required: true
schema:
type: string
responses:
'204':
description: Token deleted successfully
'403':
content:
application/json:
schema:
$ref: '#/components/schemas/ErrorResponse'
description: Forbidden
'404':
content:
application/json:
schema:
$ref: '#/components/schemas/ErrorResponse'
description: Token not found
'500':
content:
application/json:
schema:
$ref: '#/components/schemas/ErrorResponse'
description: Internal server error
security:
- BearerAuth: []
components:
schemas:
ErrorResponse:
properties:
error:
type: string
message:
type: string
required:
- error
- message
type: object
securitySchemes:
BearerAuth:
bearerFormat: JWT
scheme: bearer
type: http
````
---
# Source: https://docs.comfy.org/api-reference/cloud/user/delete-a-user-data-file.md
> ## Documentation Index
> Fetch the complete documentation index at: https://docs.comfy.org/llms.txt
> Use this file to discover all available pages before exploring further.
# Delete a user data file
> Delete a user data file from the database. The file parameter should be
the relative path within the user's data directory.
## OpenAPI
````yaml openapi-cloud.yaml delete /api/userdata/{file}
openapi: 3.0.3
info:
title: Comfy Cloud API
description: >
**Experimental API:** This API is experimental and subject to change.
Endpoints, request/response formats, and behavior may be modified without
notice.
API for Comfy Cloud - Run ComfyUI workflows on cloud infrastructure.
This API allows you to interact with Comfy Cloud programmatically,
including:
- Submitting and managing workflows
- Uploading and downloading files
- Monitoring job status and progress
## Cloud vs OSS ComfyUI Compatibility
Comfy Cloud implements the same API interfaces as OSS ComfyUI for maximum
compatibility,
but some fields are accepted for compatibility while being handled
differently or ignored:
| Field | Endpoints | Cloud Behavior |
|-------|-----------|----------------|
| `subfolder` | `/api/view`, `/api/upload/*` | **Ignored** - Cloud uses
content-addressed storage (hash-based). Returned in responses for
client-side organization. |
| `type` (input/output/temp) | `/api/view`, `/api/upload/*` | Partially used
- All files stored with tag-based organization rather than directory
structure. |
| `overwrite` | `/api/upload/*` | **Ignored** - Content-addressed storage
means identical content always has the same hash. |
| `number`, `front` | `/api/prompt` | **Ignored** - Cloud uses its own fair
queue scheduling per user. |
| `split`, `full_info` | `/api/userdata` | **Ignored** - Cloud always
returns full file metadata. |
These fields are retained in the API schema for drop-in compatibility with
existing ComfyUI clients and workflows.
version: 1.0.0
license:
name: GNU General Public License v3.0
url: https://github.com/comfyanonymous/ComfyUI/blob/master/LICENSE
servers:
- url: https://cloud.comfy.org
description: Comfy Cloud API
security:
- ApiKeyAuth: []
tags:
- name: workflow
description: |
Submit workflows for execution and manage the execution queue.
This is the primary way to run ComfyUI workflows on the cloud.
- name: job
description: |
Monitor job status, view execution history, and manage running jobs.
Jobs are created when you submit a workflow via POST /api/prompt.
- name: asset
description: |
Upload, download, and manage persistent assets (images, models, outputs).
Assets provide durable storage with tagging and metadata support.
- name: file
description: |
Legacy file upload and download endpoints compatible with local ComfyUI.
For new integrations, consider using the Assets API instead.
- name: model
description: |
Browse available AI models. Models are pre-loaded on cloud infrastructure.
- name: node
description: |
Get information about available ComfyUI nodes and their inputs/outputs.
Useful for building dynamic workflow interfaces.
- name: user
description: |
User account information and personal data storage.
- name: system
description: |
Server status, health checks, and system information.
paths:
/api/userdata/{file}:
delete:
tags:
- user
summary: Delete a user data file
description: |
Delete a user data file from the database. The file parameter should be
the relative path within the user's data directory.
operationId: deleteUserdataFile
parameters:
- name: file
in: path
required: true
description: The file path to delete (URL encoded if necessary).
schema:
type: string
responses:
'204':
description: File deleted successfully (No Content).
'401':
description: Unauthorized.
content:
text/plain:
schema:
type: string
'404':
description: File not found.
content:
text/plain:
schema:
type: string
'500':
description: Internal server error.
content:
text/plain:
schema:
type: string
components:
securitySchemes:
ApiKeyAuth:
type: apiKey
in: header
name: X-API-Key
description: |
API key authentication. Generate an API key from your account settings
at https://comfy.org/account. Pass the key in the X-API-Key header.
````
---
# Source: https://docs.comfy.org/account/delete-account.md
> ## Documentation Index
> Fetch the complete documentation index at: https://docs.comfy.org/llms.txt
> Use this file to discover all available pages before exploring further.
# Delete your Comfy account
> Learn how to permanently delete your Comfy account for ComfyUI and associated data.
Account deletion is permanent and cannot be undone. All your data, workflows, and settings will be permanently removed.
## Before you delete
Before proceeding with account deletion, consider:
* **Backup your data**: For Comfy Cloud users, your assets are stored under your account, so back up any data you want to keep. If you don't use Comfy Cloud, your API usage can be found at [https://platform.comfy.org/](https://platform.comfy.org/)
* **Cancel subscriptions**: Ensure all active subscriptions are cancelled to avoid future charges
* **Download invoices**: Save copies of any payment history or invoices you may need
* **Alternative options**: Consider deactivating your account temporarily instead of permanent deletion
## Deleting your Comfy account
To permanently delete your Comfy account for ComfyUI, send a deletion request to [support@comfy.org](mailto:support@comfy.org).
Include the following in your email:
* The email address associated with your account
* A clear statement requesting account deletion (e.g., "I request the deletion of my account and all associated personal data")
Under GDPR and similar data protection regulations, you have the right to request deletion of your personal data. We will process your request within 30 days and send you a confirmation once your account and data have been permanently deleted.
Older versions of the application may still display a "Delete account" button in the account settings. This button is no longer functional. Please use the email process described above.
## What gets deleted
When you delete your account, the following data is permanently removed:
* Your user profile and account information
* All saved workflows and projects
* Generated images and outputs
* Custom settings and preferences
* Payment history and billing information
* API keys and access tokens
---
# Source: https://docs.comfy.org/api-reference/cloud/asset/delete-asset.md
> ## Documentation Index
> Fetch the complete documentation index at: https://docs.comfy.org/llms.txt
> Use this file to discover all available pages before exploring further.
# Delete asset
> Deletes an asset and its content from storage.
Both the database record and storage content are deleted.
## OpenAPI
````yaml openapi-cloud.yaml delete /api/assets/{id}
openapi: 3.0.3
info:
title: Comfy Cloud API
description: >
**Experimental API:** This API is experimental and subject to change.
Endpoints, request/response formats, and behavior may be modified without
notice.
API for Comfy Cloud - Run ComfyUI workflows on cloud infrastructure.
This API allows you to interact with Comfy Cloud programmatically,
including:
- Submitting and managing workflows
- Uploading and downloading files
- Monitoring job status and progress
## Cloud vs OSS ComfyUI Compatibility
Comfy Cloud implements the same API interfaces as OSS ComfyUI for maximum
compatibility,
but some fields are accepted for compatibility while being handled
differently or ignored:
| Field | Endpoints | Cloud Behavior |
|-------|-----------|----------------|
| `subfolder` | `/api/view`, `/api/upload/*` | **Ignored** - Cloud uses
content-addressed storage (hash-based). Returned in responses for
client-side organization. |
| `type` (input/output/temp) | `/api/view`, `/api/upload/*` | Partially used
- All files stored with tag-based organization rather than directory
structure. |
| `overwrite` | `/api/upload/*` | **Ignored** - Content-addressed storage
means identical content always has the same hash. |
| `number`, `front` | `/api/prompt` | **Ignored** - Cloud uses its own fair
queue scheduling per user. |
| `split`, `full_info` | `/api/userdata` | **Ignored** - Cloud always
returns full file metadata. |
These fields are retained in the API schema for drop-in compatibility with
existing ComfyUI clients and workflows.
version: 1.0.0
license:
name: GNU General Public License v3.0
url: https://github.com/comfyanonymous/ComfyUI/blob/master/LICENSE
servers:
- url: https://cloud.comfy.org
description: Comfy Cloud API
security:
- ApiKeyAuth: []
tags:
- name: workflow
description: |
Submit workflows for execution and manage the execution queue.
This is the primary way to run ComfyUI workflows on the cloud.
- name: job
description: |
Monitor job status, view execution history, and manage running jobs.
Jobs are created when you submit a workflow via POST /api/prompt.
- name: asset
description: |
Upload, download, and manage persistent assets (images, models, outputs).
Assets provide durable storage with tagging and metadata support.
- name: file
description: |
Legacy file upload and download endpoints compatible with local ComfyUI.
For new integrations, consider using the Assets API instead.
- name: model
description: |
Browse available AI models. Models are pre-loaded on cloud infrastructure.
- name: node
description: |
Get information about available ComfyUI nodes and their inputs/outputs.
Useful for building dynamic workflow interfaces.
- name: user
description: |
User account information and personal data storage.
- name: system
description: |
Server status, health checks, and system information.
paths:
/api/assets/{id}:
delete:
tags:
- asset
summary: Delete asset
description: |
Deletes an asset and its content from storage.
Both the database record and storage content are deleted.
operationId: deleteAsset
parameters:
- name: id
in: path
required: true
description: Asset ID
schema:
type: string
format: uuid
responses:
'204':
description: Asset deleted successfully
'401':
description: Unauthorized
content:
application/json:
schema:
$ref: '#/components/schemas/ErrorResponse'
'404':
description: Asset not found
content:
application/json:
schema:
$ref: '#/components/schemas/ErrorResponse'
'500':
description: Internal server error
content:
application/json:
schema:
$ref: '#/components/schemas/ErrorResponse'
components:
schemas:
ErrorResponse:
type: object
required:
- code
- message
properties:
code:
type: string
message:
type: string
securitySchemes:
ApiKeyAuth:
type: apiKey
in: header
name: X-API-Key
description: |
API key authentication. Generate an API key from your account settings
at https://comfy.org/account. Pass the key in the X-API-Key header.
````
---
# Source: https://docs.comfy.org/development/core-concepts/dependencies.md
> ## Documentation Index
> Fetch the complete documentation index at: https://docs.comfy.org/llms.txt
> Use this file to discover all available pages before exploring further.
# Dependencies
> Understand dependencies in ComfyUI
## A workflow file depends on other files
We often obtain various workflow files from the community, but frequently find that the workflow cannot run directly after loading. This is because a workflow file depends on other files besides the workflow itself, such as media asset inputs, models, custom nodes, related Python dependencies, etc.
ComfyUI workflows can only run normally when all relevant dependencies are satisfied.
ComfyUI workflow dependencies mainly fall into the following categories:
* Assets (media files including audio, video, images, and other inputs)
* Custom nodes
* Python dependencies
* Models (such as Stable Diffusion models, etc.)
## Assets
An AI model is an example of an ***asset***. In media production, an asset is some media file that supplies input data. For example, a video editing program operates on movie files stored on disk. The editing program's project file holds links to these movie file assets, allowing non-destructive editing that doesn't alter the original movie files.
ComfyUI works the same way. A workflow can only run if all of the required assets are found and loaded. Generative AI models, images, movies, and sounds are some examples of assets that a workflow might depend upon. These are therefore known as ***dependent assets*** or ***asset dependencies***.
## Custom Nodes
Custom nodes are an important component of ComfyUI that extend its functionality. They are created by the community and can be installed to add new capabilities to your workflows.
## Python Dependencies
ComfyUI is a Python-based project. We build a standalone Python environment to run ComfyUI, and all related dependencies are installed in this isolated Python environment.
### ComfyUI Dependencies
You can view ComfyUI's current dependencies in the [requirements.txt](https://github.com/comfyanonymous/ComfyUI/blob/master/requirements.txt) file:
```text theme={null}
comfyui-frontend-package==1.32.9
comfyui-workflow-templates==0.7.25
comfyui-embedded-docs==0.3.1
torch
torchsde
torchvision
torchaudio
numpy>=1.25.0
einops
transformers>=4.50.3
tokenizers>=0.13.3
sentencepiece
safetensors>=0.4.2
aiohttp>=3.11.8
yarl>=1.18.0
pyyaml
Pillow
scipy
tqdm
psutil
alembic
SQLAlchemy
av>=14.2.0
#non essential dependencies:
kornia>=0.7.1
spandrel
pydantic~=2.0
pydantic-settings~=2.0
```
As ComfyUI evolves, we may adjust dependencies accordingly, such as adding new dependencies or removing ones that are no longer needed.
So if you use Git to update ComfyUI, you need to run the following command in the corresponding environment after pulling the latest updates:
```bash theme={null}
pip install -r requirements.txt
```
This ensures that ComfyUI's dependencies are up to date for proper operation. You can also modify specific package dependency versions to upgrade or downgrade certain dependencies.
Additionally, ComfyUI's frontend [ComfyUI\_frontend](https://github.com/Comfy-Org/ComfyUI_frontend) is currently maintained as a separate project. We update the `comfyui-frontend-package` dependency version after the corresponding version stabilizes. If you need to switch to a different frontend version, you can check the version information [here](https://pypi.org/project/comfyui-frontend-package/#history).
### Custom Node Dependencies
Thanks to the efforts of many authors in the ComfyUI community, we can extend ComfyUI's functionality by using different custom nodes, enabling impressive creativity.
Typically, each custom node has its own dependencies and a separate `requirements.txt` file.
If you use [ComfyUI Manager](https://github.com/ltdrdata/ComfyUI-Manager) to install custom nodes, ComfyUI Manager will usually automatically install the corresponding dependencies.
There are also cases where you need to install dependencies manually. Currently, all custom nodes are installed in the `ComfyUI/custom_nodes` directory.
You need to navigate to the corresponding plugin directory in your ComfyUI Python environment and run `pip install -r requirements.txt` to install the dependencies.
If you're using the [Windows Portable version](/installation/comfyui_portable_windows), you can use the following command in the `ComfyUI_windows_portable` directory:
```
python_embeded\python.exe -m pip install -r ComfyUI\custom_nodes\\requirements.txt
```
to install the dependencies for the corresponding node.
### Dependency Conflicts
Dependency conflicts are a common issue when using ComfyUI. You might find that after installing or updating a custom node, previously installed custom nodes can no longer be found in ComfyUI's node library, or error pop-ups appear. One possible reason is dependency conflicts.
There can be many reasons for dependency conflicts, such as:
1. Custom node version locking
Some plugins may fix the exact version of a dependency library (e.g., `open_clip_torch==2.26.1`), while other plugins may require a higher version (e.g., `open_clip_torch>=2.29.0`), making it impossible to satisfy both version requirements simultaneously.
**Solution**: You can try changing the fixed version dependency to a range constraint, such as `open_clip_torch>=2.26.1`, and then reinstall the dependencies to resolve these issues.
2. Environment pollution
During the installation of custom node dependencies, it may overwrite versions of libraries already installed by other plugins. For example, multiple plugins may depend on `PyTorch` but require different CUDA versions, and the later installed plugin will break the existing environment.
**Solutions**:
* You can try manually installing specific versions of dependencies in the Python virtual environment to resolve such issues.
* Or create different Python virtual environments for different plugins to resolve these issues.
* Try installing plugins one by one, restarting ComfyUI after each installation to observe if dependency conflicts occur.
3. Custom node dependency versions incompatible with ComfyUI dependency versions
These types of dependency conflicts may be more difficult to resolve, and you may need to upgrade/downgrade ComfyUI or change the dependency versions of custom nodes to resolve these issues.
**Solution**: These types of dependency conflicts may be more difficult to resolve, and you may need to upgrade/downgrade ComfyUI or change the dependency versions of custom nodes to resolve these issues.
## Models
Models are a significant asset dependency for ComfyUI. Various custom nodes and workflows are built around specific models, such as the Stable Diffusion series, Flux series, Ltxv, and others.
These models are an essential foundation for creation with ComfyUI, so we need to ensure that the models we use are properly available. Typically, our models are saved in the corresponding directory under `ComfyUI/models/`. Of course, you can also create an [extra\_model\_paths.yaml](https://github.com/comfyanonymous/ComfyUI/blob/master/extra_model_paths.yaml.example) by modifying the template to make additional model paths recognized by ComfyUI.
This allows multiple ComfyUI instances to share the same model library, reducing disk usage.
## Software
An advanced application like ComfyUI also has ***software dependencies***. These are libraries of programming code and data that are required for the application to run. Custom nodes are examples of software dependencies. On an even more fundamental level, the Python programming environment is the ultimate dependency for ComfyUI. The correct version of Python is required to run a particular version of ComfyUI. Updates to Python, ComfyUI, and custom nodes can all be handled from the **ComfyUI Manager** window.
---
# Source: https://docs.comfy.org/tutorials/controlnet/depth-controlnet.md
> ## Documentation Index
> Fetch the complete documentation index at: https://docs.comfy.org/llms.txt
> Use this file to discover all available pages before exploring further.
# ComfyUI Depth ControlNet Usage Example
> This guide will introduce you to the basic concepts of Depth ControlNet and demonstrate how to generate corresponding images in ComfyUI
## Introduction to Depth Maps and Depth ControlNet
A depth map is a special type of image that uses grayscale values to represent the distance between objects in a scene and the observer or camera. In a depth map, the grayscale value is inversely proportional to distance: brighter areas (closer to white) indicate objects that are closer, while darker areas (closer to black) indicate objects that are farther away.

Depth ControlNet is a ControlNet model specifically trained to understand and utilize depth map information. It helps AI correctly interpret spatial relationships, ensuring that generated images conform to the spatial structure specified by the depth map, thereby enabling precise control over three-dimensional spatial layouts.
### Application Scenarios for Depth Maps with ControlNet
Depth maps have numerous applications in various scenarios:
1. **Portrait Scenes**: Control the spatial relationship between subjects and backgrounds, avoiding distortion in critical areas such as faces
2. **Landscape Scenes**: Control the hierarchical relationships between foreground, middle ground, and background
3. **Architectural Scenes**: Control the spatial structure and perspective relationships of buildings
4. **Product Showcase**: Control the separation and spatial positioning of products against their backgrounds
In this example, we will use a depth map to generate an architectural visualization scene.
## ComfyUI ControlNet Workflow Example Explanation
### 1. ControlNet Workflow Assets
Please download the workflow image below and drag it into ComfyUI to load the workflow:

Images with workflow JSON in their metadata can be directly dragged into ComfyUI or loaded using the menu `Workflows` -> `Open (ctrl+o)`.
This image already includes download links for the corresponding models, and dragging it into ComfyUI will automatically prompt for downloads.
Please download the image below, which we will use as input:

### 2. Model Installation
If your network cannot successfully complete the automatic download of the corresponding models, please try manually downloading the models below and placing them in the specified directories:
* [architecturerealmix\_v11.safetensors](https://civitai.com/api/download/models/431755?type=Model\&format=SafeTensor\&size=full\&fp=fp16)
* [control\_v11f1p\_sd15\_depth\_fp16.safetensors](https://huggingface.co/comfyanonymous/ControlNet-v1-1_fp16_safetensors/resolve/main/control_v11f1p_sd15_depth_fp16.safetensors?download=true)
```
ComfyUI/
├── models/
│ ├── checkpoints/
│ │ └── architecturerealmix_v11.safetensors
│ └── controlnet/
│ └── control_v11f1p_sd15_depth_fp16.safetensors
```
### 3. Step-by-Step Workflow Execution
1. Ensure that `Load Checkpoint` can load **architecturerealmix\_v11.safetensors**
2. Ensure that `Load ControlNet` can load **control\_v11f1p\_sd15\_depth\_fp16.safetensors**
3. Click `Upload` in the `Load Image` node to upload the depth image provided earlier
4. Click the `Queue` button or use the shortcut `Ctrl(cmd) + Enter` to execute the image generation
## Combining Depth Control with Other Techniques
Based on different creative needs, you can combine Depth ControlNet with other types of ControlNet to achieve better results:
1. **Depth + Lineart**: Maintain spatial relationships while reinforcing outlines, suitable for architecture, products, and character design
2. **Depth + Pose**: Control character posture while maintaining correct spatial relationships, suitable for character scenes
For more information on using multiple ControlNet models together, please refer to the [Mixing ControlNet](/tutorials/controlnet/mixing-controlnets) example.
---
# Source: https://docs.comfy.org/tutorials/controlnet/depth-t2i-adapter.md
> ## Documentation Index
> Fetch the complete documentation index at: https://docs.comfy.org/llms.txt
> Use this file to discover all available pages before exploring further.
# ComfyUI Depth T2I Adapter Usage Example
> This guide will introduce you to the basic concepts of Depth T2I Adapter and demonstrate how to generate corresponding images in ComfyUI
## Introduction to T2I Adapter
[T2I-Adapter](https://huggingface.co/TencentARC/T2I-Adapter) is a lightweight adapter developed by [Tencent ARC Lab](https://github.com/TencentARC) designed to enhance the structural, color, and style control capabilities of text-to-image generation models (such as Stable Diffusion).
It works by aligning external conditions (such as edge detection maps, depth maps, sketches, or color reference images) with the model's internal features, achieving high-precision control without modifying the original model structure. With only about 77M parameters (approximately 300MB in size), its inference speed is about 3 times faster than [ControlNet](https://github.com/lllyasviel/ControlNet-v1-1-nightly), and it supports multiple condition combinations (such as sketch + color grid). Application scenarios include line art to image conversion, color style transfer, multi-element scene generation, and more.
### Comparison Between T2I Adapter and ControlNet
Although their functions are similar, there are notable differences in implementation and application:
1. **Lightweight Design**: T2I Adapter has fewer parameters and a smaller memory footprint
2. **Inference Speed**: T2I Adapter is typically about 3 times faster than ControlNet
3. **Control Precision**: ControlNet offers more precise control in certain scenarios, while T2I Adapter is more suitable for lightweight control
4. **Multi-condition Combination**: T2I Adapter shows more significant resource advantages when combining multiple conditions
### Main Types of T2I Adapter
T2I Adapter provides various types to control different aspects:
* **Depth**: Controls the spatial structure and depth relationships in images
* **Line Art (Canny/Sketch)**: Controls image edges and lines
* **Keypose**: Controls character poses and actions
* **Segmentation (Seg)**: Controls scene layout through semantic segmentation
* **Color**: Controls the overall color scheme of images
In ComfyUI, using T2I Adapter is similar to [ControlNet](/tutorials/controlnet/controlnet) in terms of interface and workflow. In this example, we will demonstrate how to use a depth T2I Adapter to control an interior scene.

## Value of Depth T2I Adapter Applications
Depth maps have several important applications in image generation:
1. **Spatial Layout Control**: Accurately describes three-dimensional spatial structures, suitable for interior design and architectural visualization
2. **Object Positioning**: Controls the relative position and size of objects in a scene, suitable for product showcases and scene construction
3. **Perspective Relationships**: Maintains reasonable perspective and proportions, suitable for landscape and urban scene generation
4. **Light and Shadow Layout**: Natural light and shadow distribution based on depth information, enhancing realism
We will use interior design as an example to demonstrate how to use the depth T2I Adapter, but these techniques are applicable to other scenarios as well.
## ComfyUI Depth T2I Adapter Workflow Example Explanation
### 1. Depth T2I Adapter Workflow Assets
Please download the workflow image below and drag it into ComfyUI to load the workflow:

Images with workflow JSON in their metadata can be directly dragged into ComfyUI or loaded using the menu `Workflows` -> `Open (ctrl+o)`.
This image already includes download links for the corresponding models, and dragging it into ComfyUI will automatically prompt for downloads.
Please download the image below, which we will use as input:

### 2. Model Installation
If your network cannot successfully complete the automatic download of the corresponding models, please try manually downloading the models below and placing them in the specified directories:
* [interiordesignsuperm\_v2.safetensors](https://civitai.com/api/download/models/93152?type=Model\&format=SafeTensor\&size=full\&fp=fp16)
* [t2iadapter\_depth\_sd15v2.pth](https://huggingface.co/TencentARC/T2I-Adapter/resolve/main/models/t2iadapter_depth_sd15v2.pth?download=true)
```
ComfyUI/
├── models/
│ ├── checkpoints/
│ │ └── interiordesignsuperm_v2.safetensors
│ └── controlnet/
│ └── t2iadapter_depth_sd15v2.pth
```
### 3. Step-by-Step Workflow Execution
1. Ensure that `Load Checkpoint` can load **interiordesignsuperm\_v2.safetensors**
2. Ensure that `Load ControlNet` can load **t2iadapter\_depth\_sd15v2.pth**
3. Click `Upload` in the `Load Image` node to upload the input image provided earlier
4. Click the `Queue` button or use the shortcut `Ctrl(cmd) + Enter` to execute the image generation
## General Tips for Using T2I Adapter
### Input Image Quality Optimization
Regardless of the application scenario, high-quality input images are key to successfully using T2I Adapter:
1. **Moderate Contrast**: Control images (such as depth maps, line art) should have clear contrast, but not excessively extreme
2. **Clear Boundaries**: Ensure that major structures and element boundaries are clearly distinguishable in the control image
3. **Noise Control**: Try to avoid excessive noise in control images, especially for depth maps and line art
4. **Reasonable Layout**: Control images should have a reasonable spatial layout and element distribution
## Characteristics of T2I Adapter Usage
One major advantage of T2I Adapter is its ability to easily combine multiple conditions for complex control effects:
1. **Depth + Edge**: Control spatial layout while maintaining clear structural edges, suitable for architecture and interior design
2. **Line Art + Color**: Control shapes while specifying color schemes, suitable for character design and illustrations
3. **Pose + Segmentation**: Control character actions while defining scene areas, suitable for complex narrative scenes
Mixing different T2I Adapters, or combining them with other control methods (such as ControlNet, regional prompts, etc.), can further expand creative possibilities. To achieve mixing, simply chain multiple `Apply ControlNet` nodes together in the same way as described in [Mixing ControlNet](/tutorials/controlnet/mixing-controlnets).
---
# Source: https://docs.comfy.org/support/payment/editing-payment-information.md
> ## Documentation Index
> Fetch the complete documentation index at: https://docs.comfy.org/llms.txt
> Use this file to discover all available pages before exploring further.
# Editing your payment information
> Learn how to update your payment method and billing details
You can update your payment information at any time through your account settings.
## How to edit payment information
1. Log in to your ComfyUI account and open the profile menu
2. Click **User Settings**
3. Select the **Credits** tab in the settings panel
4. Choose **Invoice History** to open the Stripe billing portal in a new tab
5. Click **Update information** and edit your billing or payment details
6. Save your changes in the Stripe portal
### Visual walkthrough
*Open the profile menu and choose **User Settings** to manage billing.*
*Go to the **Credits** tab and select **Invoice History**.*
*Review the billing information fields in the Stripe portal.*
*Click **Update information** to edit payment details and save your changes.*
## What you can update
You can modify the following payment details:
* Credit or debit card number
* Card expiration date
* CVV/security code
* Billing address
* Payment method type (switch between card and digital wallet)
## When changes take effect
* Changes to your payment method take effect immediately
* Your next billing cycle will use the updated payment information
* Updates to billing details (name, address, tax ID) only apply to future invoices; existing invoices cannot be modified
* Active subscriptions will not be interrupted when you update payment details
## Important notes
* You must have an active payment method on file to maintain your subscription
* If you remove a payment method, you must add a new one before the next billing date
* Keep a copy of past invoices before making changes if you need them for record keeping
* Updating your payment information does not change your billing date or subscription plan
## Troubleshooting
If you encounter issues updating your payment information:
* Verify that all information is entered correctly
* Ensure your card has not expired
* Check that your billing address matches your card issuer's records
* Try using a different browser or clearing your cache
* Contact our [support team](https://support.comfy.org/) if problems persist
---
# Source: https://docs.comfy.org/development/comfyui-server/execution_model_inversion_guide.md
> ## Documentation Index
> Fetch the complete documentation index at: https://docs.comfy.org/llms.txt
> Use this file to discover all available pages before exploring further.
# Execution Model Inversion Guide
[PR #2666](https://github.com/comfyanonymous/ComfyUI/pull/2666) inverts the execution model from a back-to-front recursive model to a front-to-back topological sort. While most custom nodes should continue to "just work", this page is intended to serve as a guide for custom node creators to the things that *could* break.
## Breaking Changes
### Monkey Patching
Any code that monkey patched the execution model is likely to stop working. Note that the performance of execution with this PR exceeds that with the most popular monkey patches, so many of them will be unnecessary.
### Optional Input Validation
Prior to this PR, only nodes that were connected to outputs exclusively through a string of `"required"` inputs were actually validated. If you had custom nodes that were only ever connected to `"optional"` inputs, you previously wouldn't have been seeing that they failed validation.
If your nodes' outputs could already be connected to `"required"` inputs, it is unlikely that anything in this section applies to you. It will primarily apply to custom node authors who use custom types and exclusively use `"optional"` inputs.
Here are some of the things that could cause you to fail validation along with recommended solutions:
* Use of reserved [Additional Parameters](/custom-nodes/backend/datatypes#additional-parameters) like `min` and `max` on types that aren't comparable (e.g. dictionaries) in order to configure custom widgets.
* Change the additional parameters used to non-reserved keys like `uiMin` and `uiMax`. *(Recommended Solution)*
```python theme={null}
@classmethod
def INPUT_TYPES(cls):
return {
"required": {
"my_size": ("VEC2", {"uiMin": 0.0, "uiMax": 1.0}),
}
}
```
* Define a custom [VALIDATE\_INPUTS](/custom-nodes/backend/server_overview#validate-inputs) function with this input so validation of it is skipped. *(Quick Solution)*
```python theme={null}
@classmethod
def VALIDATE_INPUTS(cls, my_size):
return True
```
* Use of composite types (e.g. `CUSTOM_A,CUSTOM_B`)
* (When used as output) Define and use a wrapper like `MakeSmartType` [seen here in the PR's unit tests](https://github.com/comfyanonymous/ComfyUI/pull/2666/files#diff-714643f1fdb6f8798c45f77ab10d212ca7f41dd71bbe55069f1f9f146a8f0cb9R2)
```python theme={null}
class MyCustomNode:
@classmethod
def INPUT_TYPES(cls):
return {
"required": {
"input": (MakeSmartType("FOO,BAR"), {}),
}
}
RETURN_TYPES = (MakeSmartType("FOO,BAR"),)
# ...
```
* (When used as input) Define a custom[VALIDATE\_INPUTS](/custom-nodes/backend/server_overview#validate-inputs) function that takes a `input_types` argument so type validation is skipped.
```python theme={null}
@classmethod
def VALIDATE_INPUTS(cls, input_types):
return True
```
* (Supports both, convenient) Define and use the `@VariantSupport` decorator [seen here in the PR's unit tests](https://github.com/comfyanonymous/ComfyUI/pull/2666/files#diff-714643f1fdb6f8798c45f77ab10d212ca7f41dd71bbe55069f1f9f146a8f0cb9R15)
```python theme={null}
@VariantSupport
class MyCustomNode:
@classmethod
def INPUT_TYPES(cls):
return {
"required": {
"input": ("FOO,BAR", {}),
}
}
RETURN_TYPES = (MakeSmartType("FOO,BAR"),)
# ...
```
* The use of lists (e.g. `[1, 2, 3]`) as constants in the graph definition (e.g. to represent a const `VEC3` input). This would have required a front-end extension before. Previously, lists of size exactly `2` would have failed anyway -- they would have been treated as broken links.
* Wrap the lists in a dictionary like `{ "value": [1, 2, 3] }`
### Execution Order
Execution order has always changed depending on which nodes happen to have which IDs, but it may now change depending on which values are cached as well. In general, the execution order should be considered non-deterministic and subject to change (beyond what is enforced by the graph's structure).
Don't rely on the execution order.
*HIC SUNT DRACONES*
## New Functionality
### Validation Changes
A number of features were added to the `VALIDATE_INPUTS` function in order to lessen the impact of the [Optional Input Validation](#optional-input-validation) mentioned above.
* Default validation will now be skipped for inputs which are received by the `VALIDATE_INPUTS` function.
* The `VALIDATE_INPUTS` function can now take `**kwargs` which causes all inputs to be treated as validated by the node creator.
* The `VALIDATE_INPUTS` function can take an input named `input_types`. This input will be a dict mapping each input (connected via a link) to the type of the connected output. When this argument exists, type validation for the node's inputs is skipped.
You can read more at [VALIDATE\_INPUTS](/custom-nodes/backend/server_overview#validate-inputs).
### Lazy Evaluation
Inputs can be evaluated lazily (i.e. you can wait to see if they are needed before evaluating the attached node and all its ancestors). See [Lazy Evaluation](/custom-nodes/backend/lazy_evaluation) for more information.
### Node Expansion
At runtime, nodes can expand into a subgraph of nodes. This is what allows loops to be implemented (via tail-recursion). See [Node Expansion](/custom-nodes/backend/expansion) for more information.
---
# Source: https://docs.comfy.org/custom-nodes/backend/expansion.md
> ## Documentation Index
> Fetch the complete documentation index at: https://docs.comfy.org/llms.txt
> Use this file to discover all available pages before exploring further.
# Node Expansion
## Node Expansion
Normally, when a node is executed, that execution function immediately returns the output results of that node. "Node Expansion" is a relatively advanced technique that allows nodes to return a new subgraph of nodes that should take its place in the graph. This technique is what allows custom nodes to implement loops.
### A Simple Example
First, here's a simple example of what node expansion looks like:
We highly recommend using the `GraphBuilder` class when creating subgraphs. It isn't mandatory, but it prevents you from making many easy mistakes.
```python theme={null}
def load_and_merge_checkpoints(self, checkpoint_path1, checkpoint_path2, ratio):
from comfy_execution.graph_utils import GraphBuilder # Usually at the top of the file
graph = GraphBuilder()
checkpoint_node1 = graph.node("CheckpointLoaderSimple", checkpoint_path=checkpoint_path1)
checkpoint_node2 = graph.node("CheckpointLoaderSimple", checkpoint_path=checkpoint_path2)
merge_model_node = graph.node("ModelMergeSimple", model1=checkpoint_node1.out(0), model2=checkpoint_node2.out(0), ratio=ratio)
merge_clip_node = graph.node("ClipMergeSimple", clip1=checkpoint_node1.out(1), clip2=checkpoint_node2.out(1), ratio=ratio)
return {
# Returning (MODEL, CLIP, VAE) outputs
"result": (merge_model_node.out(0), merge_clip_node.out(0), checkpoint_node1.out(2)),
"expand": graph.finalize(),
}
```
While this same node could previously be implemented by manually calling into ComfyUI internals, using expansion means that each subnode will be cached separately (so if you change `model2`, you don't have to reload `model1`).
### Requirements
In order to perform node expansion, a node must return a dictionary with the following keys:
1. `result`: A tuple of the outputs of the node. This may be a mix of finalized values (like you would return from a normal node) and node outputs.
2. `expand`: The finalized graph to perform expansion on. See below if you are not using the `GraphBuilder`.
#### Additional Requirements if not using GraphBuilder
The format expected from the `expand` key is the same as the ComfyUI API format. The following requirements are handled by the `GraphBuilder`, but must be handled manually if you choose to forego it:
1. Node IDs must be unique across the entire graph. (This includes between multiple executions of the same node due to the use of lists.)
2. Node IDs must be deterministic and consistent between multiple executions of the graph (including partial executions due to caching).
Even if you don't want to use the `GraphBuilder` for actually building the graph (e.g. because you're loading the raw json of the graph from a file), you can use the `GraphBuilder.alloc_prefix()` function to generate a prefix and `comfy.graph_utils.add_graph_prefix` to fix existing graphs to meet these requirements.
### Efficient Subgraph Caching
While you can pass non-literal inputs to nodes within the subgraph (like torch tensors), this can inhibit caching *within* the subgraph. When possible, you should pass links to subgraph objects rather than the node itself. (You can declare an input as a `rawLink` within the input's [Additional Parameters](./datatypes#additional-parameters) to do this easily.)
---
# Source: https://docs.comfy.org/interface/settings/extension.md
> ## Documentation Index
> Fetch the complete documentation index at: https://docs.comfy.org/llms.txt
> Use this file to discover all available pages before exploring further.
# Extension Settings
> Detailed description of ComfyUI extension management and setting options
The Extension settings panel is a special management panel in the ComfyUI frontend settings system, specifically used to manage the enable/disable status of frontend extension plugins. Unlike Custom Nodes, this panel is only used to manage frontend extensions registered by custom nodes, not to disable custom nodes themselves.
These frontend extension plugins are used to enhance the ComfyUI experience, such as providing shortcuts, settings, UI components, menu items, and other features.
Extension status changes require a page reload to take effect:
## Extension Settings Panel Features
### 1. Extension List Management
Displays all registered extensions, including:
* Extension Name
* Core extension identification (displays "Core" label)
* Enable/disable status
### 2. Search Functionality
Provides a search box to quickly find specific extensions:
### 3. Enable/Disable Control
Each extension has an independent toggle switch:
### 4. Batch Operations
Provides right-click menu for batch operations:
* Enable All extensions
* Disable All extensions
* Disable 3rd Party extensions (keep core extensions)
## Notes
* Extension status changes require a page reload to take effect
* Some core extensions cannot be disabled
* The system will automatically disable known problematic extensions
* Extension settings are automatically saved to the user configuration file
This Extension settings panel is essentially a "frontend plugin manager" that allows users to flexibly control ComfyUI's functional modules.
---
# Source: https://docs.comfy.org/tutorials/partner-nodes/faq.md
> ## Documentation Index
> Fetch the complete documentation index at: https://docs.comfy.org/llms.txt
> Use this file to discover all available pages before exploring further.
# FAQs about Partner Nodes
> Some FAQs you may encounter when using Partner Nodes.
This article addresses common questions regarding the use of Partner nodes.
Please update your ComfyUI to the latest version (the latest commit or the latest [desktop version](https://www.comfy.org/download)).
We may add more API support in the future, and the corresponding nodes will be updated, so please keep your ComfyUI up to date.
Please note that you need to distinguish between the nightly version and the release version.
In some cases, the latest `release` version may not be updated in time compared to the `nightly` version.
Since we are still iterating quickly, please ensure you are using the latest version when you cannot find the corresponding node.
API access requires that your current request is based on a secure network environment. The current requirements for API access are as follows:
* The local network only allows access from `127.0.0.1` or `localhost`, which may mean that you cannot use the API Nodes in a ComfyUI service started with the `--listen` parameter in a LAN environment.
* Able to access our API service normally (a proxy service may be required in some regions).
* Your account does not have enough [credits](/interface/credits).
* Currently, only `127.0.0.1` or `localhost` access is supported.
* Ensure your account has enough credits.
API Nodes require credits for API calls to closed-source models, so they do not support free usage.
Please refer to the following documentation:
1. [Comfy Account](/interface/user): Find the `User` section in the settings menu to log in.
2. [Credits](/interface/credits): After logging in, the settings interface will show the credits menu. You can purchase credits in `Settings` → `Credits`. We use a prepaid system, so there will be no unexpected charges.
3. Complete the payment through Stripe.
4. Check if the credits have been updated. If not, try restarting or refreshing the page.
Currently, we do not support refunds for credits.
If you believe there is an error resulting in unused balance due to technical issues, please [contact support](mailto:support@comfy.org).
Credits are not intended to be used as a negative balance or credit line. However, due to race conditions where partner nodes don't always report costs before execution, a single execution may consume more credits than your remaining balance and temporarily result in a negative balance after completion. When your balance is negative, you will not be able to run Partner Nodes until you top up and restore a positive balance. Please ensure you have enough credits before making API calls.
Please visit the [Credits](/interface/credits) menu after logging in to check the corresponding credits.
Currently, the API Nodes are still in the testing phase and do not support this feature yet, but we have considered adding it.
No, your credits do not expire.
No, your credits cannot be transferred to other users and are limited to the currently logged-in account, but we do not restrict the number of devices that can log in.
We do not limit the number of devices that can log in; you can use your account anywhere you want.
Email a request to [support@comfy.org](mailto:support@comfy.org) and we will delete your information
---
# Source: https://docs.comfy.org/tutorials/partner-nodes/bria/fibo.md
> ## Documentation Index
> Fetch the complete documentation index at: https://docs.comfy.org/llms.txt
> Use this file to discover all available pages before exploring further.
# Bria FIBO Edit API Node ComfyUI Official Example
> Learn how to use the Bria FIBO Edit Partner node for precision image editing in ComfyUI
FIBO Edit is Bria AI's JSON-native image editing model, now available in ComfyUI through Partner Nodes. It lets you combine images with structured JSON prompts to make precise, targeted edits—no prompt guessing, no unwanted changes to the rest of your image.
## About FIBO Edit
**Key features:**
* **Surgical edits**: Change specific attributes (lighting, color, texture, materials) without breaking the rest of the scene
* **Background swaps and object modifications**: Precise control over targeted areas
* **Reproducible, auditable edits**: Structured JSON inputs for consistent results
* **100% licensed data**: Full governance and legal clarity for commercial use
* **Strong prompt adherence**: Validated on PRISM-style evaluations
To use the API nodes, you need to ensure that you are logged in properly and using a permitted network environment. Please refer to the [API Nodes Overview](/tutorials/partner-nodes/overview) section of the documentation to understand the specific requirements for using the API nodes.
Make sure your ComfyUI is updated.
* [Download ComfyUI](https://www.comfy.org/download)
* [Update Guide](/installation/update_comfyui)
Workflows in this guide can be found in the [Workflow Templates](/interface/features/template).
If you can't find them in the template, your ComfyUI may be outdated. (Desktop version's update will delay sometime)
If nodes are missing when loading a workflow, possible reasons:
1. You are not using the latest ComfyUI version (Nightly version)
2. Some nodes failed to import at startup
* The Desktop is base on ComfyUI stable release, it will auto-update when there is a new Desktop stable release available.
* [Cloud](https://cloud.comfy.org) will update after ComfyUI stable release.
So, if you find any core node missing in this document, it might be because the new core nodes have not yet been released in the latest stable version. Please wait for the next stable release.
## FIBO Edit Workflows
Download the Bria FIBO Image Edit workflow.
Download the Bria FIBO Image Outpainting workflow.
Try the Image Edit workflow instantly on Comfy Cloud.
Try the Image Outpainting workflow instantly on Comfy Cloud.
## Example outputs
FIBO Edit excels at various editing tasks:
* **Time of day changes**: Relight your scene or change the time of day
* **Material and texture swaps**: Try different colors, materials, fabrics, and clothing
* **Object material replacement**: Swap out the material on specific objects
* **Masked area editing**: Mask out a specific area to edit with precision
* **Text adjustment**: Adjust the text in an image
* **Art style transformation**: Re-imagine your image in a different art style
---
# Source: https://docs.comfy.org/get_started/first_generation.md
> ## Documentation Index
> Fetch the complete documentation index at: https://docs.comfy.org/llms.txt
> Use this file to discover all available pages before exploring further.
# Getting Started with AI Image Generation
> This tutorial will guide you through your first image generation with ComfyUI, covering basic interface operations like workflow loading, model installation, and image generation
This guide aims to help you understand ComfyUI's basic operations and complete your first image generation. We'll cover:
1. Loading example workflows
* Loading from ComfyUI's workflow templates
* Loading from images with workflow metadata
2. Model installation guidance
* Automatic model installation
* Manual model installation
* Using ComfyUI Manager for model installation
3. Completing your first text-to-image generation
## About Text-to-Image
Text-to-Image is a fundamental AI drawing feature that generates images from text descriptions. It's one of the most commonly used functions in AI art generation. You can think of the process as telling your requirements (positive and negative prompts) to an artist (the drawing model), who will then create what you want. Detailed explanations about text-to-image will be covered in the [Text to Image](/tutorials/basic/text-to-image) chapter.
## ComfyUI Text-to-Image Workflow Tutorial
### 1. Launch ComfyUI
Make sure you've followed the [installation guide](/installation/system_requirements) to start ComfyUI and can successfully enter the ComfyUI interface. Alternatively, you can use [Comfy Cloud](/get_started/cloud) to use ComfyUI without any installation.
If you have not installed ComfyUI, please choose a suitable version to install based on your device.
ComfyUI Desktop currently supports standalone installation for **Windows and MacOS (ARM)**, currently in Beta
* Code is open source on [Github](https://github.com/Comfy-Org/desktop)
Because Desktop is always built based on the **stable release**, so the latest updates may take some time to experience for Desktop, if you want to always experience the latest version, please use the portable version or manual installation
You can choose the appropriate installation for your system and hardware below
Suitable for **Windows** version with **Nvidia** GPU
Suitable for MacOS with **Apple Silicon**
ComfyUI Desktop **currently has no Linux prebuilds**, please visit the [Manual Installation](/installation/manual_install) section to install ComfyUI
Portable version is a ComfyUI version that integrates an independent embedded Python environment, using the portable version you can experience the latest features, currently only supports **Windows** system
Supports **Windows** ComfyUI version running on **Nvidia GPUs** or **CPU-only**, always use the latest commits and completely portable.
Supports all system types and GPU types (Nvidia, AMD, Intel, Apple Silicon, Ascend NPU, Cambricon MLU)
### 2. Load Default Text-to-Image Workflow
ComfyUI usually loads the default text-to-image workflow automatically when launched. However, you can try different methods to load workflows to familiarize yourself with ComfyUI's basic operations:
Follow the numbered steps in the image:
1. Click the **Fit View** button in the bottom right to ensure any loaded workflow isn't hidden
2. Click the **folder icon (workflows)** in the sidebar
3. Click the **Browse example workflows** button at the top of the Workflows panel
Continue with:
4. Select the first default workflow **Image Generation** to load it
Alternatively, you can select **Browse workflow templates** from the workflow menu
All images generated by ComfyUI contain metadata including workflow information. You can load workflows by:
* Dragging and dropping a ComfyUI-generated image into the interface
* Using menu **Workflows** -> **Open** to open an image
Try loading the workflow using this example image:

ComfyUI workflows can be stored in JSON format. You can export workflows using menu **Workflows** -> **Export**.
Try downloading and loading this example workflow:
After downloading, use menu **Workflows** -> **Open** to load the JSON file.
### 3. Model Installation
Most ComfyUI installations don't include base models by default. After loading the workflow, if you don't have the [v1-5-pruned-emaonly-fp16.safetensors](https://huggingface.co/Comfy-Org/stable-diffusion-v1-5-archive/blob/main/v1-5-pruned-emaonly-fp16.safetensors) model installed, you'll see this prompt:
All models are stored in `/ComfyUI/models/` with subfolders like `checkpoints`, `embeddings`, `vae`, `lora`, `upscale_model`, etc. ComfyUI detects models in these folders and paths configured in `extra_model_paths.yaml` at startup.
You can install models through:
After you click the **Download** button, ComfyUI will execute the download, and different behaviors will be performed depending on the version you are using.
The desktop version will automatically complete the model download and save it to the `/ComfyUI/models/checkpoints` directory.
You can wait for the installation to complete or view the installation progress in the model panel on the sidebar.
If everything goes smoothly, the model should be able to download locally. If the download fails for a long time, please try other installation methods.
The browser will execute file downloads. Please save the file to the `/ComfyUI_windows_portable/ComfyUI/models/checkpoints` directory after the download is complete.
ComfyUI Manager is a tool for managing custom nodes, models, and plugins.
Click the `Manager` button to open ComfyUI Manager
Click `Model Manager`
1. Search for `v1-5-pruned-emaonly.ckpt`
2. Click `install` on the desired model
Visit [v1-5-pruned-emaonly-fp16.safetensors](https://huggingface.co/Comfy-Org/stable-diffusion-v1-5-archive/blob/main/v1-5-pruned-emaonly-fp16.safetensors) and follow this guide:
Save the downloaded file to:
Save to `/ComfyUI/models/checkpoints`
Save to `ComfyUI_windows_portable/ComfyUI/models/checkpoints`
Refresh or restart ComfyUI after saving.
### 4. Load Model and Generate Your First Image
After installing the model:
1. In the **Load Checkpoint** node, ensure **v1-5-pruned-emaonly-fp16.safetensors** is selected
2. Click `Queue` or press `Ctrl + Enter` to generate
The result will appear in the **Save Image** node. Right-click to save locally.
For detailed text-to-image instructions, see our comprehensive guide:
Click here for detailed text-to-image workflow instructions
## Troubleshooting
### Model Loading Issues
If the `Load Checkpoint` node shows no models or displays "null", verify your model installation location and try refreshing or restarting ComfyUI.
---
# Source: https://docs.comfy.org/tutorials/partner-nodes/black-forest-labs/flux-1-1-pro-ultra-image.md
> ## Documentation Index
> Fetch the complete documentation index at: https://docs.comfy.org/llms.txt
> Use this file to discover all available pages before exploring further.
# Flux 1.1 Pro Ultra Image API Node ComfyUI Official Workflow Examples
> This guide covers how to use the Flux 1.1 Pro Ultra Image Partner node in ComfyUI
FLUX 1.1 Pro Ultra is a high-performance AI image generation tool by BlackForestLabs, featuring ultra-high resolution and efficient generation capabilities. It supports up to 4MP resolution (4x the standard version) while keeping single image generation time under 10 seconds - 2.5x faster than similar high-resolution models.
The tool offers two core modes:
* **Ultra Mode**: Designed for high-resolution needs, perfect for advertising and e-commerce where detail magnification is important. It accurately reflects prompts while maintaining generation speed.
* **Raw Mode**: Focuses on natural realism, optimizing skin tones, lighting, and landscape details. Reduces the "AI look" and is ideal for photography and realistic style creation.
We now support the Flux 1.1 Pro Ultra Image node in ComfyUI. This guide will cover:
* Flux 1.1 Pro Text-to-Image
* Flux 1.1 Pro Image-to-Image (Remix)
To use the API nodes, you need to ensure that you are logged in properly and using a permitted network environment. Please refer to the [API Nodes Overview](/tutorials/partner-nodes/overview) section of the documentation to understand the specific requirements for using the API nodes.
Make sure your ComfyUI is updated.
* [Download ComfyUI](https://www.comfy.org/download)
* [Update Guide](/installation/update_comfyui)
Workflows in this guide can be found in the [Workflow Templates](/interface/features/template).
If you can't find them in the template, your ComfyUI may be outdated. (Desktop version's update will delay sometime)
If nodes are missing when loading a workflow, possible reasons:
1. You are not using the latest ComfyUI version (Nightly version)
2. Some nodes failed to import at startup
* The Desktop is base on ComfyUI stable release, it will auto-update when there is a new Desktop stable release available.
* [Cloud](https://cloud.comfy.org) will update after ComfyUI stable release.
So, if you find any core node missing in this document, it might be because the new core nodes have not yet been released in the latest stable version. Please wait for the next stable release.
## Flux 1.1 Pro Ultra Image Node Documentation
Check the following documentation for detailed node parameter settings:
* [Flux 1.1 Pro Ultra Image](/images/built-in-nodes/api_nodes/bfl/flux-1-1-pro-ultra-image.jpg)
## Flux 1.1 \[pro] Text-to-Image Tutorial
### 1. Download Workflow File
Download and drag the following file into ComfyUI to load the workflow:

### 2. Complete the Workflow Steps
Follow the numbered steps to complete the basic workflow:
1. (Optional) Modify the prompt in the `Flux 1.1 [pro] Ultra Image` node
2. (Optional) Set `raw` parameter to `false` for more realistic output
3. Click `Run` or use shortcut `Ctrl(cmd) + Enter` to generate the image
4. After the API returns results, view the generated image in the `Save Image` node. Images are saved to the `ComfyUI/output/` directory
## Flux 1.1\[pro] Image-to-Image Tutorial
When adding an `image_prompt` to the node input, the output will blend features from the input image (Remix). The `image_prompt_strength` value affects the blend ratio: higher values make the output more similar to the input image.
### 1. Download Workflow File
Download and drag the following file into ComfyUI, or right-click the purple node in the Text-to-Image workflow and set `mode` to `always` to enable `image_prompt` input:

We'll use this image as input:

### 2. Complete the Workflow Steps
Follow these numbered steps:
1. Click **Upload** on the `Load Image` node to upload your input image
2. (Optional) Adjust `image_prompt_strength` in `Flux 1.1 [pro] Ultra Image` to change the blend ratio
3. Click `Run` or use shortcut `Ctrl(cmd) + Enter` to generate the image
4. After the API returns results, view the generated image in the `Save Image` node. Images are saved to the `ComfyUI/output/` directory
Here's a comparison of outputs with different `image_prompt_strength` values:
---
# Source: https://docs.comfy.org/tutorials/flux/flux-1-controlnet.md
> ## Documentation Index
> Fetch the complete documentation index at: https://docs.comfy.org/llms.txt
> Use this file to discover all available pages before exploring further.
# ComfyUI Flux.1 ControlNet Examples
> This guide will demonstrate workflow examples using Flux.1 ControlNet.
## FLUX.1 ControlNet Model Introduction
FLUX.1 Canny and Depth are two powerful models from the [FLUX.1 Tools](https://blackforestlabs.ai/flux-1-tools/) launched by [Black Forest Labs](https://blackforestlabs.ai/). This toolkit is designed to add control and guidance capabilities to FLUX.1, enabling users to modify and recreate real or generated images.
**FLUX.1-Depth-dev** and **FLUX.1-Canny-dev** are both 12B parameter Rectified Flow Transformer models that can generate images based on text descriptions while maintaining the structural features of the input image.
The Depth version maintains the spatial structure of the source image through depth map extraction techniques, while the Canny version uses edge detection techniques to preserve the structural features of the source image, allowing users to choose the appropriate control method based on different needs.
Both models have the following features:
* Top-tier output quality and detail representation
* Excellent prompt following ability while maintaining consistency with the original image
* Trained using guided distillation techniques for improved efficiency
* Open weights for the research community
* API interfaces (pro version) and open-source weights (dev version)
Additionally, Black Forest Labs also provides **FLUX.1-Depth-dev-lora** and **FLUX.1-Canny-dev-lora** adapter versions extracted from the complete models.
These can be applied to the FLUX.1 \[dev] base model to provide similar functionality with smaller file size, especially suitable for resource-constrained environments.
We will use the full version of **FLUX.1-Canny-dev** and **FLUX.1-Depth-dev-lora** to complete the workflow examples.
All workflow images's Metadata contains the corresponding model download information. You can load the workflows by:
* Dragging them directly into ComfyUI
* Or using the menu `Workflows` -> `Open(ctrl+o)`
If you're not using the Desktop Version or some models can't be downloaded automatically, please refer to the manual installation sections to save the model files to the corresponding folder.
For image preprocessors, you can use the following custom nodes to complete image preprocessing. In this example, we will provide processed images as input.
* [ComfyUI-Advanced-ControlNet](https://github.com/Kosinkadink/ComfyUI-Advanced-ControlNet)
* [ComfyUI ControlNet aux](https://github.com/Fannovel16/comfyui_controlnet_aux)
## FLUX.1-Canny-dev Complete Version Workflow
### 1. Workflow and Asset
Please download the workflow image below and drag it into ComfyUI to load the workflow

Please download the image below, which we will use as the input image

### 2. Manual Models Installation
If you have previously used the [complete version of Flux related workflows](/tutorials/flux/flux-1-text-to-image), then you only need to download the **flux1-canny-dev.safetensors** model file.
Since you need to first agree to the terms of [black-forest-labs/FLUX.1-Canny-dev](https://huggingface.co/black-forest-labs/FLUX.1-Canny-dev), please visit the [black-forest-labs/FLUX.1-Canny-dev](https://huggingface.co/black-forest-labs/FLUX.1-Canny-dev) page and make sure you have agreed to the corresponding terms as shown in the image below.
Complete model list:
* [clip\_l.safetensors](https://huggingface.co/comfyanonymous/flux_text_encoders/resolve/main/clip_l.safetensors?download=true)
* [t5xxl\_fp16.safetensors](https://huggingface.co/comfyanonymous/flux_text_encoders/resolve/main/t5xxl_fp16.safetensors?download=true)
* [ae.safetensors](https://huggingface.co/black-forest-labs/FLUX.1-schnell/resolve/main/ae.safetensors?download=true)
* [flux1-canny-dev.safetensors](https://huggingface.co/black-forest-labs/FLUX.1-Canny-dev/resolve/main/flux1-canny-dev.safetensors?download=true) (Please ensure you have agreed to the corresponding repo's terms)
File storage location:
```
ComfyUI/
├── models/
│ ├── text_encoders/
│ │ ├── clip_l.safetensors
│ │ └── t5xxl_fp16.safetensors
│ ├── vae/
│ │ └── ae.safetensors
│ └── diffusion_models/
│ └── flux1-canny-dev.safetensors
```
### 3. Step-by-Step Workflow Execution
1. Make sure `ae.safetensors` is loaded in the `Load VAE` node
2. Make sure `flux1-canny-dev.safetensors` is loaded in the `Load Diffusion Model` node
3. Make sure the following models are loaded in the `DualCLIPLoader` node:
* clip\_name1: t5xxl\_fp16.safetensors
* clip\_name2: clip\_l.safetensors
4. Upload the provided input image in the `Load Image` node
5. Click the `Queue` button, or use the shortcut `Ctrl(cmd) + Enter` to run the workflow
### 4. Start Your Experimentation
Try using the [FLUX.1-Depth-dev](https://huggingface.co/black-forest-labs/FLUX.1-Depth-dev) model to complete the Depth version of the workflow
You can use the image below as input

Or use the following custom nodes to complete image preprocessing:
* [ComfyUI-Advanced-ControlNet](https://github.com/Kosinkadink/ComfyUI-Advanced-ControlNet)
* [ComfyUI ControlNet aux](https://github.com/Fannovel16/comfyui_controlnet_aux)
## FLUX.1-Depth-dev-lora Workflow
The LoRA version workflow builds on the complete version by adding the LoRA model. Compared to the [complete version of the Flux workflow](/tutorials/flux/flux-1-text-to-image), it adds nodes for loading and using the corresponding LoRA model.
### 1. Workflow and Asset
Please download the workflow image below and drag it into ComfyUI to load the workflow

Please download the image below, which we will use as the input image

### 2. Manual Model Download
If you have previously used the [complete version of Flux related workflows](/tutorials/flux/flux-1-text-to-image), then you only need to download the **flux1-depth-dev-lora.safetensors** model file.
Complete model list:
* [clip\_l.safetensors](https://huggingface.co/comfyanonymous/flux_text_encoders/resolve/main/clip_l.safetensors?download=true)
* [t5xxl\_fp16.safetensors](https://huggingface.co/comfyanonymous/flux_text_encoders/resolve/main/t5xxl_fp16.safetensors?download=true)
* [ae.safetensors](https://huggingface.co/black-forest-labs/FLUX.1-schnell/resolve/main/ae.safetensors?download=true)
* [flux1-dev.safetensors](https://huggingface.co/black-forest-labs/FLUX.1-dev/resolve/main/flux1-dev.safetensors?download=true)
* [flux1-depth-dev-lora.safetensors](https://huggingface.co/black-forest-labs/FLUX.1-Depth-dev-lora/resolve/main/flux1-depth-dev-lora.safetensors?download=true)
File storage location:
```
ComfyUI/
├── models/
│ ├── text_encoders/
│ │ ├── clip_l.safetensors
│ │ └── t5xxl_fp16.safetensors
│ ├── vae/
│ │ └── ae.safetensors
│ ├── diffusion_models/
│ │ └── flux1-dev.safetensors
│ └── loras/
│ └── flux1-depth-dev-lora.safetensors
```
### 3. Step-by-Step Workflow Execution
1. Make sure `flux1-dev.safetensors` is loaded in the `Load Diffusion Model` node
2. Make sure `flux1-depth-dev-lora.safetensors` is loaded in the `LoraLoaderModelOnly` node
3. Make sure the following models are loaded in the `DualCLIPLoader` node:
* clip\_name1: t5xxl\_fp16.safetensors
* clip\_name2: clip\_l.safetensors
4. Upload the provided input image in the `Load Image` node
5. Make sure `ae.safetensors` is loaded in the `Load VAE` node
6. Click the `Queue` button, or use the shortcut `Ctrl(cmd) + Enter` to run the workflow
### 4. Start Your Experimentation
Try using the [FLUX.1-Canny-dev-lora](https://huggingface.co/black-forest-labs/FLUX.1-Canny-dev-lora) model to complete the Canny version of the workflow
Use [ComfyUI-Advanced-ControlNet](https://github.com/Kosinkadink/ComfyUI-Advanced-ControlNet) or [ComfyUI ControlNet aux](https://github.com/Fannovel16/comfyui_controlnet_aux) to complete image preprocessing
## Community Versions of Flux Controlnets
XLab and InstantX + Shakker Labs have released Controlnets for Flux.
**InstantX:**
* [FLUX.1-dev-Controlnet-Canny](https://huggingface.co/InstantX/FLUX.1-dev-Controlnet-Canny/blob/main/diffusion_pytorch_model.safetensors)
* [FLUX.1-dev-ControlNet-Depth](https://huggingface.co/Shakker-Labs/FLUX.1-dev-ControlNet-Depth/blob/main/diffusion_pytorch_model.safetensors)
* [FLUX.1-dev-ControlNet-Union-Pro](https://huggingface.co/Shakker-Labs/FLUX.1-dev-ControlNet-Union-Pro/blob/main/diffusion_pytorch_model.safetensors)
**XLab**: [flux-controlnet-collections](https://huggingface.co/XLabs-AI/flux-controlnet-collections)
Place these files in the `ComfyUI/models/controlnet` directory.
You can visit [Flux Controlnet Example](https://raw.githubusercontent.com/comfyanonymous/ComfyUI_examples/refs/heads/master/flux/flux_controlnet_example.png) to get the corresponding workflow image, and use the image from [here](https://raw.githubusercontent.com/comfyanonymous/ComfyUI_examples/refs/heads/master/flux/girl_in_field.png) as the input image.
---
# Source: https://docs.comfy.org/tutorials/flux/flux-1-fill-dev.md
> ## Documentation Index
> Fetch the complete documentation index at: https://docs.comfy.org/llms.txt
> Use this file to discover all available pages before exploring further.
# ComfyUI Flux.1 fill dev Example
> This guide demonstrates how to use Flux.1 fill dev to create Inpainting and Outpainting workflows.
## Introduction to Flux.1 fill dev Model
Flux.1 fill dev is one of the core tools in the [FLUX.1 Tools suite](https://blackforestlabs.ai/flux-1-tools/) launched by [Black Forest Labs](https://blackforestlabs.ai/), specifically designed for image inpainting and outpainting.
Key features of Flux.1 fill dev:
* Powerful image inpainting and outpainting capabilities, with results second only to the commercial version FLUX.1 Fill \[pro].
* Excellent prompt understanding and following ability, precisely capturing user intent while maintaining high consistency with the original image.
* Advanced guided distillation training technology, making the model more efficient while maintaining high-quality output.
* Friendly licensing terms, with generated outputs usable for personal, scientific, and commercial purposes, please refer to the [FLUX.1 \[dev\] non-commercial license](https://huggingface.co/black-forest-labs/FLUX.1-dev/blob/main/LICENSE.md) for details.
Open Source Repository: [FLUX.1 \[dev\]](https://huggingface.co/black-forest-labs/FLUX.1-dev)
This guide will demonstrate inpainting and outpainting workflows based on the Flux.1 fill dev model.
If you're not familiar with inpainting and outpainting workflows, you can refer to [ComfyUI Layout Inpainting Example](/tutorials/basic/inpaint) and [ComfyUI Image Extension Example](/tutorials/basic/outpaint) for some related explanations.
## Flux.1 Fill dev and related models installation
Before we begin, let's complete the installation of the Flux.1 Fill dev model files. The inpainting and outpainting workflows will use exactly the same model files.
If you've previously used the full version of the [Flux.1 Text-to-Image workflow](/tutorials/flux/flux-1-text-to-image),
then you only need to download the **flux1-fill-dev.safetensors** model file in this section.
However, since downloading the corresponding model requires agreeing to the corresponding usage agreement, please visit the [black-forest-labs/FLUX.1-Fill-dev](https://huggingface.co/black-forest-labs/FLUX.1-Fill-dev) page and make sure you have agreed to the corresponding agreement as shown in the image below.
Complete model list:
* [clip\_l.safetensors](https://huggingface.co/comfyanonymous/flux_text_encoders/resolve/main/clip_l.safetensors?download=true)
* [t5xxl\_fp16.safetensors](https://huggingface.co/comfyanonymous/flux_text_encoders/resolve/main/t5xxl_fp16.safetensors?download=true)
* [ae.safetensors](https://huggingface.co/black-forest-labs/FLUX.1-schnell/resolve/main/ae.safetensors?download=true)
* [flux1-fill-dev.safetensors](https://huggingface.co/black-forest-labs/FLUX.1-Fill-dev/resolve/main/flux1-fill-dev.safetensors?download=true)
File storage location:
```
ComfyUI/
├── models/
│ ├── text_encoders/
│ │ ├── clip_l.safetensors
│ │ └── t5xxl_fp16.safetensors
│ ├── vae/
│ │ └── ae.safetensors
│ └── diffusion_models/
│ └── flux1-fill-dev.safetensors
```
## Flux.1 Fill dev inpainting workflow
### 1. Inpainting workflow and asset
Please download the image below and drag it into ComfyUI to load the corresponding workflow

Please download the image below, we will use it as the input image

The corresponding image already contains an alpha channel, so you don't need to draw a mask separately.
If you want to draw your own mask, please [click here](https://raw.githubusercontent.com/Comfy-Org/example_workflows/main/flux/inpaint/flux_fill_inpaint_input_original.png) to get the image without a mask, and refer to the MaskEditor usage section in the [ComfyUI Layout Inpainting Example](/tutorials/basic/inpaint#using-the-mask-editor) to learn how to draw a mask in the `Load Image` node.
### 2. Steps to run the workflow
1. Ensure the `Load Diffusion Model` node has `flux1-fill-dev.safetensors` loaded.
2. Ensure the `DualCLIPLoader` node has the following models loaded:
* clip\_name1: `t5xxl_fp16.safetensors`
* clip\_name2: `clip_l.safetensors`
3. Ensure the `Load VAE` node has `ae.safetensors` loaded.
4. Upload the input image provided in the document to the `Load Image` node; if you're using the version without a mask, remember to complete the mask drawing using the mask editor
5. Click the `Queue` button, or use the shortcut `Ctrl(cmd) + Enter` to run the workflow
## Flux.1 Fill dev Outpainting Workflow
### 1. Outpainting workflow and asset
Please download the image below and drag it into ComfyUI to load the corresponding workflow

Please download the image below, we will use it as the input image

### 2. Steps to run the workflow
1. Ensure the `Load Diffusion Model` node has `flux1-fill-dev.safetensors` loaded.
2. Ensure the `DualCLIPLoader` node has the following models loaded:
* clip\_name1: `t5xxl_fp16.safetensors`
* clip\_name2: `clip_l.safetensors`
3. Ensure the `Load VAE` node has `ae.safetensors` loaded.
4. Upload the input image provided in the document to the `Load Image` node
5. Click the `Queue` button, or use the shortcut `Ctrl(cmd) + Enter` to run the workflow
---
# Source: https://docs.comfy.org/tutorials/flux/flux-1-kontext-dev.md
> ## Documentation Index
> Fetch the complete documentation index at: https://docs.comfy.org/llms.txt
> Use this file to discover all available pages before exploring further.
# ComfyUI Flux Kontext Dev Native Workflow Example
> ComfyUI Flux Kontext Dev Native Workflow Example.
## About FLUX.1 Kontext Dev
FLUX.1 Kontext is a breakthrough multimodal image editing model from Black Forest Labs that supports simultaneous text and image input, intelligently understanding image context and performing precise editing. Its development version is an open-source diffusion transformer model with 12 billion parameters, featuring excellent context understanding and character consistency maintenance, ensuring that key elements such as character features and composition layout remain stable even after multiple iterative edits.
It shares the same core capabilities as the FLUX.1 Kontext suite:
* Character Consistency: Preserves unique elements in images across multiple scenes and environments, such as reference characters or objects in the image.
* Editing: Makes targeted modifications to specific elements in the image without affecting other parts.
* Style Reference: Generates novel scenes while preserving the unique style of the reference image according to text prompts.
* Interactive Speed: Minimal latency in image generation and editing.
While the previously released API version offers the highest fidelity and speed, FLUX.1 Kontext \[Dev] runs entirely on local machines, providing unparalleled flexibility for developers, researchers, and advanced users who wish to experiment.
### Version Information
* **\[FLUX.1 Kontext \[pro]** - Commercial version, focused on rapid iterative editing
* **FLUX.1 Kontext \[max]** - Experimental version with stronger prompt adherence
* **FLUX.1 Kontext \[dev]** - Open source version (used in this tutorial), 12B parameters, mainly for research
Currently in ComfyUI, you can use all these versions, where [Pro and Max versions](/tutorials/partner-nodes/black-forest-labs/flux-1-kontext) can be called through API nodes, while the Dev open source version please refer to the instructions in this guide.
Make sure your ComfyUI is updated.
* [Download ComfyUI](https://www.comfy.org/download)
* [Update Guide](/installation/update_comfyui)
Workflows in this guide can be found in the [Workflow Templates](/interface/features/template).
If you can't find them in the template, your ComfyUI may be outdated. (Desktop version's update will delay sometime)
If nodes are missing when loading a workflow, possible reasons:
1. You are not using the latest ComfyUI version (Nightly version)
2. Some nodes failed to import at startup
* The Desktop is base on ComfyUI stable release, it will auto-update when there is a new Desktop stable release available.
* [Cloud](https://cloud.comfy.org) will update after ComfyUI stable release.
So, if you find any core node missing in this document, it might be because the new core nodes have not yet been released in the latest stable version. Please wait for the next stable release.
## Model Download
To run the workflows in this guide successfully, you first need to download the following model files. You can also directly get the model download links from the corresponding workflows, which already contain the model file download information.
**Diffusion Model**
* [flux1-dev-kontext\_fp8\_scaled.safetensors](https://huggingface.co/Comfy-Org/flux1-kontext-dev_ComfyUI/resolve/main/split_files/diffusion_models/flux1-dev-kontext_fp8_scaled.safetensors)
If you want to use the original weights, you can visit Black Forest Labs' related repository to obtain and use the original model weights.
**VAE**
* [ae.safetensors](https://huggingface.co/Comfy-Org/Lumina_Image_2.0_Repackaged/blob/main/split_files/vae/ae.safetensors)
**Text Encoder**
* [clip\_l.safetensors](https://huggingface.co/comfyanonymous/flux_text_encoders/blob/main/clip_l.safetensors)
* [t5xxl\_fp16.safetensors](https://huggingface.co/comfyanonymous/flux_text_encoders/resolve/main/t5xxl_fp16.safetensors) or [t5xxl\_fp8\_e4m3fn\_scaled.safetensors](https://huggingface.co/comfyanonymous/flux_text_encoders/resolve/main/t5xxl_fp8_e4m3fn_scaled.safetensors)
Model save location
```
📂 ComfyUI/
├── 📂 models/
│ ├── 📂 diffusion_models/
│ │ └── flux1-dev-kontext_fp8_scaled.safetensors
│ ├── 📂 vae/
│ │ └── ae.safetensor
│ └── 📂 text_encoders/
│ ├── clip_l.safetensors
│ └── t5xxl_fp16.safetensors or t5xxl_fp8_e4m3fn_scaled.safetensors
```
## Flux.1 Kontext Dev Workflow
This workflow uses the `Load Image(from output)` node to load the image to be edited, making it more convenient for you to access the edited image for multiple rounds of editing.
### 1. Workflow and Input Image Download
Download the following files and drag them into ComfyUI to load the corresponding workflow

**Input Image**

### 2. Complete the workflow step by step
You can refer to the numbers in the image to complete the workflow run:
1. In the `Load Diffusion Model` node, load the `flux1-dev-kontext_fp8_scaled.safetensors` model
2. In the `DualCLIP Load` node, ensure that `clip_l.safetensors` and `t5xxl_fp16.safetensors` or `t5xxl_fp8_e4m3fn_scaled.safetensors` are loaded
3. In the `Load VAE` node, ensure that `ae.safetensors` model is loaded
4. In the `Load Image(from output)` node, load the provided input image
5. In the `CLIP Text Encode` node, modify the prompts, only English is supported
6. Click the `Queue` button, or use the shortcut `Ctrl(cmd) + Enter` to run the workflow
## Flux Kontext Prompt Techniques
### 1. Basic Modifications
* Simple and direct: `"Change the car color to red"`
* Maintain style: `"Change to daytime while maintaining the same style of the painting"`
### 2. Style Transfer
**Principles:**
* Clearly name style: `"Transform to Bauhaus art style"`
* Describe characteristics: `"Transform to oil painting with visible brushstrokes, thick paint texture"`
* Preserve composition: `"Change to Bauhaus style while maintaining the original composition"`
### 3. Character Consistency
**Framework:**
* Specific description: `"The woman with short black hair"` instead of "she"
* Preserve features: `"while maintaining the same facial features, hairstyle, and expression"`
* Step-by-step modifications: Change background first, then actions
### 4. Text Editing
* Use quotes: `"Replace 'joy' with 'BFL'"`
* Maintain format: `"Replace text while maintaining the same font style"`
## Common Problem Solutions
### Character Changes Too Much
❌ Wrong: `"Transform the person into a Viking"`
✅ Correct: `"Change the clothes to be a viking warrior while preserving facial features"`
### Composition Position Changes
❌ Wrong: `"Put him on a beach"`
✅ Correct: `"Change the background to a beach while keeping the person in the exact same position, scale, and pose"`
### Style Application Inaccuracy
❌ Wrong: `"Make it a sketch"`
✅ Correct: `"Convert to pencil sketch with natural graphite lines, cross-hatching, and visible paper texture"`
## Core Principles
1. **Be Specific and Clear** - Use precise descriptions, avoid vague terms
2. **Step-by-step Editing** - Break complex modifications into multiple simple steps
3. **Explicit Preservation** - State what should remain unchanged
4. **Verb Selection** - Use "change", "replace" rather than "transform"
## Best Practice Templates
**Object Modification:**
`"Change [object] to [new state], keep [content to preserve] unchanged"`
**Style Transfer:**
`"Transform to [specific style], while maintaining [composition/character/other] unchanged"`
**Background Replacement:**
`"Change the background to [new background], keep the subject in the exact same position and pose"`
**Text Editing:**
`"Replace '[original text]' with '[new text]', maintain the same font style"`
> **Remember:** The more specific, the better. Kontext excels at understanding detailed instructions and maintaining consistency.
---
# Source: https://docs.comfy.org/tutorials/partner-nodes/black-forest-labs/flux-1-kontext.md
> ## Documentation Index
> Fetch the complete documentation index at: https://docs.comfy.org/llms.txt
> Use this file to discover all available pages before exploring further.
# ComfyUI Flux.1 Kontext Pro Image API Node Official Example
> This guide will show you how to use the Flux.1 Kontext Pro Image Partner node in ComfyUI to perform image editing
FLUX.1 Kontext is a professional image-to-image editing model developed by Black Forest Labs, focusing on intelligent understanding of image context and precise editing.
It can perform various editing tasks without complex descriptions, including object modification, style transfer, background replacement, character consistency editing, and text editing.
The core advantage of Kontext lies in its excellent context understanding ability and character consistency maintenance, ensuring that key elements such as character features and composition layout remain stable even after multiple iterations of editing.
Currently, ComfyUI has supported two models of Flux.1 Kontext:
* **Kontext Pro** is ideal for editing, composing, and remixing.
* **Kontext Max** pushes the limits on typography, prompt precision, and speed.
In this guide, we will briefly introduce how to use the Flux.1 Kontext Partner nodes to perform image editing through corresponding workflows.
To use the API nodes, you need to ensure that you are logged in properly and using a permitted network environment. Please refer to the [API Nodes Overview](/tutorials/partner-nodes/overview) section of the documentation to understand the specific requirements for using the API nodes.
Make sure your ComfyUI is updated.
* [Download ComfyUI](https://www.comfy.org/download)
* [Update Guide](/installation/update_comfyui)
Workflows in this guide can be found in the [Workflow Templates](/interface/features/template).
If you can't find them in the template, your ComfyUI may be outdated. (Desktop version's update will delay sometime)
If nodes are missing when loading a workflow, possible reasons:
1. You are not using the latest ComfyUI version (Nightly version)
2. Some nodes failed to import at startup
* The Desktop is base on ComfyUI stable release, it will auto-update when there is a new Desktop stable release available.
* [Cloud](https://cloud.comfy.org) will update after ComfyUI stable release.
So, if you find any core node missing in this document, it might be because the new core nodes have not yet been released in the latest stable version. Please wait for the next stable release.
## Flux.1 Kontext Multiple Image Input Workflow
We have recently updated to support multiple image input workflows. Using the new `Image Stitch` node, you can stitch multiple images into a single image and edit it using Flux.1 Kontext.
### 1. Workflow File Download
The `metadata` of the images below contains the workflow information. Please download and drag them into ComfyUI to load the corresponding workflow.

Download the following images for input or use your own images:


### 2. Complete the Workflow Step by Step
You can follow the numbered steps in the image to complete the workflow:
1. Upload the provided images in the `Load image` node
2. Modify the necessary parameters in `Flux.1 Kontext Pro Image`:
* `prompt` Enter the prompt for the image you want to edit
* `aspect_ratio` Set the aspect ratio of the original image, which must be between 1:4 and 4:1
* `prompt_upsampling` Set whether to use prompt upsampling. If enabled, it will automatically modify the prompt to get richer results, but the results are not reproducible
3. Click the `Run` button or use the shortcut `Ctrl(cmd) + Enter` to execute the image editing
4. After waiting for the API to return results, you can view the edited image in the `Save Image` node, and the corresponding image will also be saved to the `ComfyUI/output/` directory
The subsequent two workflows only differ in the Partner nodes used. In fact, you only need to modify based on the multiple image input workflow, with no significant differences
## Flux.1 Kontext Pro Image API Node Workflow
### 1. Workflow File Download
The `metadata` of the image below contains the workflow information. Please download and drag it into ComfyUI to load the corresponding workflow.

Download the image below for input or use your own image:

### 2. Complete the Workflow Step by Step
You can follow the numbered steps in the image to complete the workflow:
1. Load the image you want to edit in the `Load Image` node
2. (Optional) Modify the necessary parameters in `Flux.1 Kontext Pro Image`
3. Click the `Run` button or use the shortcut `Ctrl(cmd) + Enter` to execute the image editing
4. After waiting for the API to return results, you can view the edited image in the `Save Image` node, and the corresponding image will also be saved to the `ComfyUI/output/` directory
## Flux.1 Kontext Max Image API Node Workflow
### 1. Workflow File Download
The `metadata` of the image below contains the workflow information. Please download and drag it into ComfyUI to load the corresponding workflow.

Download the image below for input or use your own image for demonstration:

### 2. Complete the Workflow Step by Step
You can follow the numbered steps in the image to complete the workflow:
1. Load the image you want to edit in the `Load Image` node
2. (Optional) Modify the necessary parameters in `Flux.1 Kontext Max Image`
3. Click the `Run` button or use the shortcut `Ctrl(cmd) + Enter` to execute the image editing
4. After waiting for the API to return results, you can view the edited image in the `Save Image` node, and the corresponding image will also be saved to the `ComfyUI/output/` directory
## Flux Kontext Prompt Techniques
### 1. Basic Modifications
* Simple and direct: `"Change the car color to red"`
* Maintain style: `"Change to daytime while maintaining the same style of the painting"`
### 2. Style Transfer
**Principles:**
* Clearly name style: `"Transform to Bauhaus art style"`
* Describe characteristics: `"Transform to oil painting with visible brushstrokes, thick paint texture"`
* Preserve composition: `"Change to Bauhaus style while maintaining the original composition"`
### 3. Character Consistency
**Framework:**
* Specific description: `"The woman with short black hair"` instead of "she"
* Preserve features: `"while maintaining the same facial features, hairstyle, and expression"`
* Step-by-step modifications: Change background first, then actions
### 4. Text Editing
* Use quotes: `"Replace 'joy' with 'BFL'"`
* Maintain format: `"Replace text while maintaining the same font style"`
## Common Problem Solutions
### Character Changes Too Much
❌ Wrong: `"Transform the person into a Viking"`
✅ Correct: `"Change the clothes to be a viking warrior while preserving facial features"`
### Composition Position Changes
❌ Wrong: `"Put him on a beach"`
✅ Correct: `"Change the background to a beach while keeping the person in the exact same position, scale, and pose"`
### Style Application Inaccuracy
❌ Wrong: `"Make it a sketch"`
✅ Correct: `"Convert to pencil sketch with natural graphite lines, cross-hatching, and visible paper texture"`
## Core Principles
1. **Be Specific and Clear** - Use precise descriptions, avoid vague terms
2. **Step-by-step Editing** - Break complex modifications into multiple simple steps
3. **Explicit Preservation** - State what should remain unchanged
4. **Verb Selection** - Use "change", "replace" rather than "transform"
## Best Practice Templates
**Object Modification:**
`"Change [object] to [new state], keep [content to preserve] unchanged"`
**Style Transfer:**
`"Transform to [specific style], while maintaining [composition/character/other] unchanged"`
**Background Replacement:**
`"Change the background to [new background], keep the subject in the exact same position and pose"`
**Text Editing:**
`"Replace '[original text]' with '[new text]', maintain the same font style"`
> **Remember:** The more specific, the better. Kontext excels at understanding detailed instructions and maintaining consistency.
---
# Source: https://docs.comfy.org/tutorials/flux/flux-1-text-to-image.md
> ## Documentation Index
> Fetch the complete documentation index at: https://docs.comfy.org/llms.txt
> Use this file to discover all available pages before exploring further.
# ComfyUI Flux.1 Text-to-Image Workflow Example
> This guide provides a brief introduction to the Flux.1 model and guides you through using the Flux.1 model for text-to-image generation with examples including the full version and the FP8 Checkpoint version.
Flux is one of the largest open-source text-to-image generation models, with 12B parameters and an original file size of approximately 23GB. It was developed by [Black Forest Labs](https://blackforestlabs.ai/), a team founded by former Stable Diffusion team members.
Flux is known for its excellent image quality and flexibility, capable of generating high-quality, diverse images.
Currently, the Flux.1 model has several main versions:
* **Flux.1 Pro:** The best performing model, closed-source, only available through API calls.
* **[Flux.1 \[dev\]:](https://huggingface.co/black-forest-labs/FLUX.1-dev)** Open-source but limited to non-commercial use, distilled from the Pro version, with performance close to the Pro version.
* **[Flux.1 \[schnell\]:](https://huggingface.co/black-forest-labs/FLUX.1-schnell)** Uses the Apache2.0 license, requires only 4 steps to generate images, suitable for low-spec hardware.
**Flux.1 Model Features**
* **Hybrid Architecture:** Combines the advantages of Transformer networks and diffusion models, effectively integrating text and image information, improving the alignment accuracy between generated images and prompts, with excellent fidelity to complex prompts.
* **Parameter Scale:** Flux has 12B parameters, capturing more complex pattern relationships and generating more realistic, diverse images.
* **Supports Multiple Styles:** Supports diverse styles, with excellent performance for various types of images.
In this example, we'll introduce text-to-image examples using both Flux.1 Dev and Flux.1 Schnell versions, including the full version model and the simplified FP8 Checkpoint version.
* **Flux Full Version:** Best performance, but requires larger VRAM resources and installation of multiple model files.
* **Flux FP8 Checkpoint:** Requires only one fp8 version of the model, but quality is slightly reduced compared to the full version.
All workflow images's Metadata contains the corresponding model download information. You can load the workflows by:
* Dragging them directly into ComfyUI
* Or using the menu `Workflows` -> `Open(ctrl+o)`
If you're not using the Desktop Version or some models can't be downloaded automatically, please refer to the manual installation sections to save the model files to the corresponding folder.
Make sure your ComfyUI is updated to the latest version before starting.
## Flux.1 Full Version Text-to-Image Example
If you can't download models from [black-forest-labs/FLUX.1-dev](https://huggingface.co/black-forest-labs/FLUX.1-dev), make sure you've logged into Huggingface and agreed to the corresponding repository's license agreement.
### Flux.1 Dev
#### 1. Workflow File
Please download the image below and drag it into ComfyUI to load the workflow.

#### 2. Manual Model Installation
* The `flux1-dev.safetensors` file requires agreeing to the [black-forest-labs/FLUX.1-dev](https://huggingface.co/black-forest-labs/FLUX.1-dev) agreement before downloading via browser.
* If your VRAM is low, you can try using [t5xxl\_fp8\_e4m3fn.safetensors](https://huggingface.co/comfyanonymous/flux_text_encoders/resolve/main/t5xxl_fp8_e4m3fn.safetensors?download=true) to replace the `t5xxl_fp16.safetensors` file.
Please download the following model files:
* [clip\_l.safetensors](https://huggingface.co/comfyanonymous/flux_text_encoders/resolve/main/clip_l.safetensors?download=true)
* [t5xxl\_fp16.safetensors](https://huggingface.co/comfyanonymous/flux_text_encoders/resolve/main/t5xxl_fp16.safetensors?download=true) Recommended when your VRAM is greater than 32GB.
* [ae.safetensors](https://huggingface.co/black-forest-labs/FLUX.1-schnell/resolve/main/ae.safetensors?download=true)
* [flux1-dev.safetensors](https://huggingface.co/black-forest-labs/FLUX.1-dev/resolve/main/flux1-dev.safetensors)
Storage location:
```
ComfyUI/
├── models/
│ ├── text_encoders/
│ │ ├── clip_l.safetensors
│ │ └── t5xxl_fp16.safetensors
│ ├── vae/
│ │ └── ae.safetensors
│ └── diffusion_models/
│ └── flux1-dev.safetensors
```
#### 3. Steps to Run the Workflow
Please refer to the image below to ensure all model files are loaded correctly
1. Ensure the `DualCLIPLoader` node has the following models loaded:
* clip\_name1: t5xxl\_fp16.safetensors
* clip\_name2: clip\_l.safetensors
2. Ensure the `Load Diffusion Model` node has `flux1-dev.safetensors` loaded
3. Make sure the `Load VAE` node has `ae.safetensors` loaded
4. Click the `Queue` button, or use the shortcut `Ctrl(cmd) + Enter` to run the workflow
Thanks to Flux's excellent prompt following capability, we don't need any negative prompts
### Flux.1 Schnell
#### 1. Workflow File
Please download the image below and drag it into ComfyUI to load the workflow.

#### 2. Manual Models Installation
In this workflow, only two model files are different from the Flux1 Dev version workflow. For t5xxl, you can still use the fp16 version for better results.
* **t5xxl\_fp16.safetensors** -> **t5xxl\_fp8.safetensors**
* **flux1-dev.safetensors** -> **flux1-schnell.safetensors**
Complete model file list:
* [clip\_l.safetensors](https://huggingface.co/comfyanonymous/flux_text_encoders/resolve/main/clip_l.safetensors?download=true)
* [t5xxl\_fp8\_e4m3fn.safetensors](https://huggingface.co/comfyanonymous/flux_text_encoders/resolve/main/t5xxl_fp8_e4m3fn.safetensors?download=true)
* [ae.safetensors](https://huggingface.co/black-forest-labs/FLUX.1-schnell/resolve/main/ae.safetensors?download=true)
* [flux1-schnell.safetensors](https://huggingface.co/black-forest-labs/FLUX.1-schnell/resolve/main/flux1-schnell.safetensors)
File storage location:
```
ComfyUI/
├── models/
│ ├── text_encoders/
│ │ ├── clip_l.safetensors
│ │ └── t5xxl_fp8_e4m3fn.safetensors
│ ├── vae/
│ │ └── ae.safetensors
│ └── diffusion_models/
│ └── flux1-schnell.safetensors
```
#### 3. Steps to Run the Workflow
1. Ensure the `DualCLIPLoader` node has the following models loaded:
* clip\_name1: t5xxl\_fp8\_e4m3fn.safetensors
* clip\_name2: clip\_l.safetensors
2. Ensure the `Load Diffusion Model` node has `flux1-schnell.safetensors` loaded
3. Ensure the `Load VAE` node has `ae.safetensors` loaded
4. Click the `Queue` button, or use the shortcut `Ctrl(cmd) + Enter` to run the workflow
## Flux.1 FP8 Checkpoint Version Text-to-Image Example
The fp8 version is a quantized version of the original Flux.1 fp16 version.
To some extent, the quality of this version will be lower than that of the fp16 version,
but it also requires less VRAM, and you only need to install one model file to try running it.
### Flux.1 Dev
Please download the image below and drag it into ComfyUI to load the workflow.

Please download [flux1-dev-fp8.safetensors](https://huggingface.co/Comfy-Org/flux1-dev/resolve/main/flux1-dev-fp8.safetensors?download=true) and save it to the `ComfyUI/models/checkpoints/` directory.
Ensure that the corresponding `Load Checkpoint` node loads `flux1-dev-fp8.safetensors`, and you can try to run the workflow.
### Flux.1 Schnell
Please download the image below and drag it into ComfyUI to load the workflow.

Please download [flux1-schnell-fp8.safetensors](https://huggingface.co/Comfy-Org/flux1-schnell/resolve/main/flux1-schnell-fp8.safetensors?download=true) and save it to the `ComfyUI/models/checkpoints/` directory.
Ensure that the corresponding `Load Checkpoint` node loads `flux1-schnell-fp8.safetensors`, and you can try to run the workflow.
---
# Source: https://docs.comfy.org/tutorials/flux/flux-1-uso.md
> ## Documentation Index
> Fetch the complete documentation index at: https://docs.comfy.org/llms.txt
> Use this file to discover all available pages before exploring further.
# ByteDance USO ComfyUI Native Workflow example
> Unified Style and Subject-Driven Generation with ByteDance's USO model
**USO (Unified Style-Subject Optimized)** is a model developed by ByteDance's UXO Team that unifies style-driven and subject-driven generation tasks.
Built on FLUX.1-dev architecture, the model achieves both style similarity and subject consistency through disentangled learning and style reward learning (SRL).
USO supports three main approaches:
* **Subject-Driven**: Place subjects into new scenes while maintaining identity consistency
* **Style-Driven**: Apply artistic styles to new content based on reference images
* **Combined**: Use both subject and style references simultaneously
**Related Links**
* [Project Page](https://bytedance.github.io/USO/)
* [GitHub](https://github.com/bytedance/USO)
* [Model Weights](https://huggingface.co/bytedance-research/USO)
## ByteDance USO ComfyUI Native Workflow
Make sure your ComfyUI is updated.
* [Download ComfyUI](https://www.comfy.org/download)
* [Update Guide](/installation/update_comfyui)
Workflows in this guide can be found in the [Workflow Templates](/interface/features/template).
If you can't find them in the template, your ComfyUI may be outdated. (Desktop version's update will delay sometime)
If nodes are missing when loading a workflow, possible reasons:
1. You are not using the latest ComfyUI version (Nightly version)
2. Some nodes failed to import at startup
* The Desktop is base on ComfyUI stable release, it will auto-update when there is a new Desktop stable release available.
* [Cloud](https://cloud.comfy.org) will update after ComfyUI stable release.
So, if you find any core node missing in this document, it might be because the new core nodes have not yet been released in the latest stable version. Please wait for the next stable release.
### 1. Workflow and input
Download the image below and drag it into ComfyUI to load the corresponding workflow.

Use the image below as an input image.

### 2. Model links
**checkpoints**
* [flux1-dev-fp8.safetensors](https://huggingface.co/Comfy-Org/flux1-dev/resolve/main/flux1-dev-fp8.safetensors)
**loras**
* [uso-flux1-dit-lora-v1.safetensors](https://huggingface.co/Comfy-Org/USO_1.0_Repackaged/resolve/main/split_files/loras/uso-flux1-dit-lora-v1.safetensors)
**model\_patches**
* [uso-flux1-projector-v1.safetensors](https://huggingface.co/Comfy-Org/USO_1.0_Repackaged/resolve/main/split_files/model_patches/uso-flux1-projector-v1.safetensors)
**clip\_visions**
* [sigclip\_vision\_patch14\_384.safetensors](https://huggingface.co/Comfy-Org/sigclip_vision_384/resolve/main/sigclip_vision_patch14_384.safetensors)
Please download all models and place them in the following directories:
```
📂 ComfyUI/
├── 📂 models/
│ ├── 📂 checkpoints/
│ │ └── flux1-dev-fp8.safetensors
│ ├── 📂 loras/
│ │ └── uso-flux1-dit-lora-v1.safetensors
│ ├── 📂 model_patches/
│ │ └── uso-flux1-projector-v1.safetensors
│ ├── 📂 clip_visions/
│ │ └── sigclip_vision_patch14_384.safetensors
```
### 3. Workflow instructions
1. Load models:
* 1.1 Ensure the `Load Checkpoint` node has `flux1-dev-fp8.safetensors` loaded
* 1.2 Ensure the `LoraLoaderModelOnly` node has `dit_lora.safetensors` loaded
* 1.3 Ensure the `ModelPatchLoader` node has `projector.safetensors` loaded
* 1.4 Ensure the `Load CLIP Vision` node has `sigclip_vision_patch14_384.safetensors` loaded
2. Content Reference:
* 2.1 Click `Upload` to upload the input image we provided
* 2.2 The `ImageScaleToMaxDimension` node will scale your input image for content reference, 512px will keep more character features, but if you only use the character's head as input, the final output image often has issues like the character taking up too much space. Setting it to 1024px gives much better results.
3. In the example, we only use the `content reference` image input. If you want to use the `style reference` image input, you can use `Ctrl-B` to bypass the marked node group.
4. Write your prompt or keep default
5. Set the image size if you need
6. The EasyCache node is for inference acceleration, but it will also sacrifice some quality and details. You can bypass it (Ctrl+B) if you don't need to use it.
7. Click the `Run` button, or use the shortcut `Ctrl(Cmd) + Enter` to run the workflow
### 4. Additional Notes
1. Style reference only:
We also provide a workflow that only uses style reference in the same workflow we provided
The only different is we replaced the `content reference` node and only use an `Empty Latent Image` node.
2. You can also bypass whole `Style Reference` group and use the workflow as a text to image workflow, which means this workflow has 4 variations
* Only use content (subject) reference
* Only use style reference
* Mixed content and style reference
* As a text to image workflow
---
# Source: https://docs.comfy.org/tutorials/flux/flux-2-dev.md
> ## Documentation Index
> Fetch the complete documentation index at: https://docs.comfy.org/llms.txt
> Use this file to discover all available pages before exploring further.
# ComfyUI Flux.2 Dev Example
> This guide provides a brief introduction to the Flux.2 model and guides you through using the Flux.2 Dev model for text-to-image generation in ComfyUI.
## About FLUX.2
[FLUX.2](https://bfl.ai/blog/flux-2) is a next-generation image model from [Black Forest Labs](https://blackforestlabs.ai/), delivering up to 4MP photorealistic output with far better lighting, skin, fabric, and hand detail. It adds reliable multi-reference consistency (up to 10 images), improved editing precision, better visual understanding, and professional-class text rendering.
**Key Features:**
* **Multi-Reference Consistency:** Reliably maintains identity, product geometry, textures, materials, wardrobe, and composition intent across multiple outputs
* **High-Resolution Photorealism:** Generates images up to 4MP with real-world lighting behavior, spatial reasoning, and physics-aware detail
* **Professional-Grade Control:** Exact pose control, hex-code accurate brand colors, any aspect ratio, and structured prompting for programmatic workflows
* **Usable Text Rendering:** Produces clean, legible text across UI screens, infographics, and multi-language content
**Available Models:**
* **FLUX.2 Dev:** Open-source model (used in this tutorial)
* **FLUX.2 Pro:** API version from Black Forest Labs
We are using quantized weights in this workflow. The original FLUX.2 repository is available [here](https://huggingface.co/black-forest-labs/FLUX.2-dev/).
Make sure your ComfyUI is updated.
* [Download ComfyUI](https://www.comfy.org/download)
* [Update Guide](/installation/update_comfyui)
Workflows in this guide can be found in the [Workflow Templates](/interface/features/template).
If you can't find them in the template, your ComfyUI may be outdated. (Desktop version's update will delay sometime)
If nodes are missing when loading a workflow, possible reasons:
1. You are not using the latest ComfyUI version (Nightly version)
2. Some nodes failed to import at startup
* The Desktop is base on ComfyUI stable release, it will auto-update when there is a new Desktop stable release available.
* [Cloud](https://cloud.comfy.org) will update after ComfyUI stable release.
So, if you find any core node missing in this document, it might be because the new core nodes have not yet been released in the latest stable version. Please wait for the next stable release.
## Flux.2 Dev Workflow
## Model links
**text\_encoders**
* [mistral\_3\_small\_flux2\_bf16.safetensors](https://huggingface.co/Comfy-Org/flux2-dev/resolve/main/split_files/text_encoders/mistral_3_small_flux2_bf16.safetensors)
**diffusion\_models**
* [flux2\_dev\_fp8mixed.safetensors](https://huggingface.co/Comfy-Org/flux2-dev/resolve/main/split_files/diffusion_models/flux2_dev_fp8mixed.safetensors)
**vae**
* [flux2-vae.safetensors](https://huggingface.co/Comfy-Org/flux2-dev/resolve/main/split_files/vae/flux2-vae.safetensors)
**Model Storage Location**
```
📂 ComfyUI/
├── 📂 models/
│ ├── 📂 text_encoders/
│ │ └── mistral_3_small_flux2_bf16.safetensors
│ ├── 📂 diffusion_models/
│ │ └── flux2_dev_fp8mixed.safetensors
│ └── 📂 vae/
│ └── flux2-vae.safetensors
```
---
# Source: https://docs.comfy.org/tutorials/flux/flux-2-klein.md
> ## Documentation Index
> Fetch the complete documentation index at: https://docs.comfy.org/llms.txt
> Use this file to discover all available pages before exploring further.
# ComfyUI Flux.2 Klein 4B Guide
> A quick introduction to FLUX.2 [klein] 4B and how to run text-to-image and image editing workflows in ComfyUI.
## About FLUX.2 \[klein]
FLUX.2 \[Klein] is the fastest model in the Flux family, unifying text-to-image and image editing in one compact architecture. It’s designed for interactive workflows, immediate previews, and latency-critical applications, with distilled variants delivering end-to-end inference around one second while keeping strong quality for single- and multi-reference editing.
**Model highlights:**
* Two 4B types: Base (undistilled) for maximum flexibility and fine-tuning; Distilled (4-step) for speed-first deployments
* Performance: distilled \~1.2s (5090) · 8.4GB VRAM; base \~17s (5090) · 9.2GB VRAM
* Editing support: style transforms, semantic edits, object replacement/removal, multi-reference composition, iterative edits
Make sure your ComfyUI is updated.
* [Download ComfyUI](https://www.comfy.org/download)
* [Update Guide](/installation/update_comfyui)
Workflows in this guide can be found in the [Workflow Templates](/interface/features/template).
If you can't find them in the template, your ComfyUI may be outdated. (Desktop version's update will delay sometime)
If nodes are missing when loading a workflow, possible reasons:
1. You are not using the latest ComfyUI version (Nightly version)
2. Some nodes failed to import at startup
* The Desktop is base on ComfyUI stable release, it will auto-update when there is a new Desktop stable release available.
* [Cloud](https://cloud.comfy.org) will update after ComfyUI stable release.
So, if you find any core node missing in this document, it might be because the new core nodes have not yet been released in the latest stable version. Please wait for the next stable release.
## Flux.2 Klein 4B Workflows
Download the text-to-image workflow for Flux.2 Klein 4B.
Download the image editing workflow using the 4B base model.
Download the fast distilled 4B image editing workflow.
## Flux.2 Klein 4B Model Downloads
Text encoder for 4B models.
Diffusion model (4B base).
Diffusion model (4B distilled).
VAE for 4B models.
**4B Model Storage Location**
```
📂 ComfyUI/
├── 📂 models/
│ ├── 📂 text_encoders/
│ │ └── qwen_3_4b.safetensors
│ ├── 📂 diffusion_models/
│ │ ├── flux-2-klein-base-4b-fp8.safetensors
│ │ └── flux-2-klein-4b-fp8.safetensors
│ └── 📂 vae/
│ └── flux2-vae.safetensors
```
## Flux.2 Klein 9B Workflows
Download the text-to-image workflow for Flux.2 Klein 9B.
Download the image editing workflow using the 9B base model.
Download the fast distilled 9B image editing workflow.
## Flux.2 Klein 9B Model Downloads
For diffusion models, please visit BFL's repo, accept the agreement, and then download the models.
Diffusion model (9B base).
Diffusion model (9B distilled).
Text encoder for 9B models.
VAE for 9B models.
**9B Model Storage Location**
```
📂 ComfyUI/
├── 📂 models/
│ ├── 📂 diffusion_models/
│ │ ├── flux-2-klein-9b-fp8.safetensors
│ │ └── flux-2-klein-base-9b-fp8.safetensors
│ ├── 📂 text_encoders/
│ │ └── qwen_3_8b_fp8mixed.safetensors
│ └── 📂 vae/
│ └── flux2-vae.safetensors
```
---
# Source: https://docs.comfy.org/tutorials/flux/flux1-krea-dev.md
> ## Documentation Index
> Fetch the complete documentation index at: https://docs.comfy.org/llms.txt
> Use this file to discover all available pages before exploring further.
# Flux.1 Krea Dev ComfyUI Workflow Tutorial
> Best open-source FLUX model developed by Black Forest Labs in collaboration with Krea, focusing on unique aesthetic style and natural details, avoiding AI look, providing exceptional realism and image quality.
[Flux.1 Krea Dev](https://huggingface.co/black-forest-labs/FLUX.1-Krea-dev) is an advanced text-to-image generation model developed in collaboration between Black Forest Labs (BFL) and Krea. This is currently the best open-source FLUX model, specifically designed for text-to-image generation.
**Model Features**
* **Unique Aesthetic Style**: Focuses on generating images with unique aesthetics, avoiding common "AI look" appearance
* **Natural Details**: Does not produce blown-out highlights, maintaining natural detail representatio
* **Exceptional Realism**: Provides outstanding realism and image quality
* **Fully Compatible Architecture**: Fully compatible architecture design with FLUX.1 \[dev]
**Model License**
This model is released under the [flux-1-dev-non-commercial-license](https://huggingface.co/black-forest-labs/FLUX.1-Krea-dev/blob/main/LICENSE.md)
## Flux.1 Krea Dev ComfyUI Workflow
Make sure your ComfyUI is updated.
* [Download ComfyUI](https://www.comfy.org/download)
* [Update Guide](/installation/update_comfyui)
Workflows in this guide can be found in the [Workflow Templates](/interface/features/template).
If you can't find them in the template, your ComfyUI may be outdated. (Desktop version's update will delay sometime)
If nodes are missing when loading a workflow, possible reasons:
1. You are not using the latest ComfyUI version (Nightly version)
2. Some nodes failed to import at startup
* The Desktop is base on ComfyUI stable release, it will auto-update when there is a new Desktop stable release available.
* [Cloud](https://cloud.comfy.org) will update after ComfyUI stable release.
So, if you find any core node missing in this document, it might be because the new core nodes have not yet been released in the latest stable version. Please wait for the next stable release.
#### 1. Workflow Files
Download the image or JSON below and drag it into ComfyUI to load the corresponding workflow

#### 2. Manual Model Installation
Please download the following model files:
**Diffusion model**
* [flux1-krea-dev\_fp8\_scaled.safetensors](https://huggingface.co/Comfy-Org/FLUX.1-Krea-dev_ComfyUI/blob/main/split_files/diffusion_models/flux1-krea-dev_fp8_scaled.safetensors)
If you want to pursue higher quality and have enough VRAM, you can try the original model weights
* [flux1-krea-dev.safetensors](https://huggingface.co/black-forest-labs/FLUX.1-Krea-dev/resolve/main/flux1-krea-dev.safetensors)
The `flux1-dev.safetensors` file requires agreeing to the [black-forest-labs/FLUX.1-Krea-dev](https://huggingface.co/black-forest-labs/FLUX.1-Krea-dev/) agreement before downloading via browser.
If you have used Flux related workflows before, the following models are the same and don't need to be downloaded again
**Text encoders**
* [clip\_l.safetensors](https://huggingface.co/comfyanonymous/flux_text_encoders/resolve/main/clip_l.safetensors?download=true)
* [t5xxl\_fp16.safetensors](https://huggingface.co/comfyanonymous/flux_text_encoders/resolve/main/t5xxl_fp16.safetensors?download=true) Recommended when your VRAM is greater than 32GB.
* [t5xxl\_fp8\_e4m3fn.safetensors](https://huggingface.co/comfyanonymous/flux_text_encoders/resolve/main/t5xxl_fp8_e4m3fn.safetensors) For Low VRAM
**VAE**
* [ae.safetensors](https://huggingface.co/black-forest-labs/FLUX.1-schnell/resolve/main/ae.safetensors?download=true)
File save location:
```
ComfyUI/
├── models/
│ ├── diffusion_models/
│ │ └── flux1-krea-dev_fp8_scaled.safetensors or flux1-krea-dev.safetensors
│ ├── text_encoders/
│ │ ├── clip_l.safetensors
│ │ └── t5xxl_fp16.safetensors or t5xxl_fp8_e4m3fn.safetensors
│ ├── vae/
│ │ └── ae.safetensors
```
#### 3. Step-by-step Verification to Ensure Workflow Runs Properly
For low VRAM users, this model may not run smoothly on your device, you can wait for the community to provide FP8 or GGUF version.
Please refer to the image below to ensure all model files have been loaded correctly
1. Ensure that `flux1-krea-dev_fp8_scaled.safetensors` or `flux1-krea-dev.safetensors` is loaded in the `Load Diffusion Model` node
* `flux1-krea-dev_fp8_scaled.safetensors` is recommended for low VRAM users
* `flux1-krea-dev.safetensors` is the original weights, if you have enough VRAM like 24GB you can use it for better quality
2. Ensure the following models are loaded in the `DualCLIPLoader` node:
* clip\_name1: t5xxl\_fp16.safetensors or t5xxl\_fp8\_e4m3fn.safetensors
* clip\_name2: clip\_l.safetensors
3. Ensure that `ae.safetensors` is loaded in the `Load VAE` node
4. Click the `Queue` button, or use the shortcut `Ctrl(cmd) + Enter` to run the workflow
---
# Source: https://docs.comfy.org/tutorials/video/wan/fun-camera.md
> ## Documentation Index
> Fetch the complete documentation index at: https://docs.comfy.org/llms.txt
> Use this file to discover all available pages before exploring further.
# ComfyUI Wan2.1 Fun Camera Official Examples
> This guide demonstrates how to use Wan2.1 Fun Camera in ComfyUI for video generation
## About Wan2.1 Fun Camera
**Wan2.1 Fun Camera** is a video generation project launched by the Alibaba team, focusing on controlling video generation effects through camera motion.
**Model Weights Download**:
* [14B Version](https://huggingface.co/alibaba-pai/Wan2.1-Fun-V1.1-14B-Control-Camera)
* [1.3B Version](https://huggingface.co/alibaba-pai/Wan2.1-Fun-V1.1-1.3B-Control-Camera)
**Code Repository**: [VideoX-Fun](https://github.com/aigc-apps/VideoX-Fun)
**ComfyUI now natively supports the Wan2.1 Fun Camera model**.
Make sure your ComfyUI is updated.
* [Download ComfyUI](https://www.comfy.org/download)
* [Update Guide](/installation/update_comfyui)
Workflows in this guide can be found in the [Workflow Templates](/interface/features/template).
If you can't find them in the template, your ComfyUI may be outdated. (Desktop version's update will delay sometime)
If nodes are missing when loading a workflow, possible reasons:
1. You are not using the latest ComfyUI version (Nightly version)
2. Some nodes failed to import at startup
* The Desktop is base on ComfyUI stable release, it will auto-update when there is a new Desktop stable release available.
* [Cloud](https://cloud.comfy.org) will update after ComfyUI stable release.
So, if you find any core node missing in this document, it might be because the new core nodes have not yet been released in the latest stable version. Please wait for the next stable release.
## Model Installation
These models only need to be installed once. Additionally, model download information is included in the corresponding workflow images, so you can choose your preferred way to download the models.
All of the following models can be found at [Wan\_2.1\_ComfyUI\_repackaged](https://huggingface.co/Comfy-Org/Wan_2.1_ComfyUI_repackaged)
**Diffusion Models** choose either 1.3B or 14B:
* [wan2.1\_fun\_camera\_v1.1\_1.3B\_bf16.safetensors](https://huggingface.co/Comfy-Org/Wan_2.1_ComfyUI_repackaged/resolve/main/split_files/diffusion_models/wan2.1_fun_camera_v1.1_1.3B_bf16.safetensors)
* [wan2.1\_fun\_camera\_v1.1\_14B\_bf16.safetensors](https://huggingface.co/Comfy-Org/Wan_2.1_ComfyUI_repackaged/resolve/main/split_files/diffusion_models/wan2.1_fun_camera_v1.1_14B_bf16.safetensors)
If you've used Wan2.1 related models before, you should already have the following models. If not, please download them:
**Text Encoders** choose one:
* [umt5\_xxl\_fp16.safetensors](https://huggingface.co/Comfy-Org/Wan_2.1_ComfyUI_repackaged/resolve/main/split_files/text_encoders/umt5_xxl_fp16.safetensors)
* [umt5\_xxl\_fp8\_e4m3fn\_scaled.safetensors](https://huggingface.co/Comfy-Org/Wan_2.1_ComfyUI_repackaged/resolve/main/split_files/text_encoders/umt5_xxl_fp8_e4m3fn_scaled.safetensors)
**VAE**
* [wan\_2.1\_vae.safetensors](https://huggingface.co/Comfy-Org/Wan_2.1_ComfyUI_repackaged/resolve/main/split_files/vae/wan_2.1_vae.safetensors)
**CLIP Vision**
* [clip\_vision\_h.safetensors](https://huggingface.co/Comfy-Org/Wan_2.1_ComfyUI_repackaged/resolve/main/split_files/clip_vision/clip_vision_h.safetensors)
File Storage Location:
```
📂 ComfyUI/
├── 📂 models/
│ ├── 📂 diffusion_models/
│ │ ├── wan2.1_fun_camera_v1.1_1.3B_bf16.safetensors # 1.3B version
│ │ └── wan2.1_fun_camera_v1.1_14B_bf16.safetensors # 14B version
│ ├── 📂 text_encoders/
│ │ └── umt5_xxl_fp8_e4m3fn_scaled.safetensors
│ ├── 📂 vae/
│ │ └── wan_2.1_vae.safetensors
│ └── 📂 clip_vision/
│ └── clip_vision_h.safetensors
```
## ComfyUI Wan2.1 Fun Camera 1.3B Native Workflow Example
### 1. Workflow Related Files Download
#### 1.1 Workflow File
Download the video below and drag it into ComfyUI to load the corresponding workflow:
If you want to use the 14B version, simply replace the model file with the 14B version, but please be aware of the VRAM requirements.
#### 1.2 Input Image Download
Please download the image below, which we will use as the starting frame:

### 2. Complete the Workflow Step by Step
1. Ensure the correct version of model file is loaded:
* 1.3B version: `wan2.1_fun_camera_v1.1_1.3B_bf16.safetensors`
* 14B version: `wan2.1_fun_camera_v1.1_14B_bf16.safetensors`
2. Ensure the `Load CLIP` node has loaded `umt5_xxl_fp8_e4m3fn_scaled.safetensors`
3. Ensure the `Load VAE` node has loaded `wan_2.1_vae.safetensors`
4. Ensure the `Load CLIP Vision` node has loaded `clip_vision_h.safetensors`
5. Upload the starting frame to the `Load Image` node
6. Modify the Prompt if you're using your own input image
7. Set camera motion in the `WanCameraEmbedding` node
8. Click the `Run` button or use the shortcut `Ctrl(cmd) + Enter` to execute generation
## ComfyUI Wan2.1 Fun Camera 14B Workflow and Input Image
**Input Image**

## Performance Reference
**1.3B Version**:
* 512×512 resolution on RTX 4090 takes about 72 seconds to generate 81 frames
**14B Version**:
* RTX4090 24GB VRAM may experience insufficient memory when generating 512×512 resolution, and memory issues have also occurred on A100 when using larger sizes
---
# Source: https://docs.comfy.org/tutorials/video/wan/fun-control.md
> ## Documentation Index
> Fetch the complete documentation index at: https://docs.comfy.org/llms.txt
> Use this file to discover all available pages before exploring further.
# ComfyUI Wan2.1 Fun Control Video Examples
> This guide demonstrates how to use Wan2.1 Fun Control in ComfyUI to generate videos with control videos
## About Wan2.1-Fun-Control
**Wan2.1-Fun-Control** is an open-source video generation and control project developed by Alibaba team.
It introduces innovative Control Codes mechanisms combined with deep learning and multimodal conditional inputs to generate high-quality videos that conform to preset control conditions. The project focuses on precisely guiding generated video content through multimodal control conditions.
Currently, the Fun Control model supports various control conditions, including **Canny (line art), Depth, OpenPose (human posture), MLSD (geometric edges), and trajectory control.**
The model also supports multi-resolution video prediction with options for 512, 768, and 1024 resolutions at 16 frames per second, generating videos up to 81 frames (approximately 5 seconds) in length.
Model versions:
* **1.3B** Lightweight: Suitable for local deployment and quick inference with **lower VRAM requirements**
* **14B** High-performance: Model size reaches 32GB+, offering better results but **requiring higher VRAM**
Here are the relevant code repositories:
* [Wan2.1-Fun-1.3B-Control](https://huggingface.co/alibaba-pai/Wan2.1-Fun-1.3B-Control)
* [Wan2.1-Fun-14B-Control](https://huggingface.co/alibaba-pai/Wan2.1-Fun-14B-Control)
* Code repository: [VideoX-Fun](https://github.com/aigc-apps/VideoX-Fun)
ComfyUI now **natively supports** the Wan2.1 Fun Control model. Before starting this tutorial, please update your ComfyUI to ensure you're using a version after [this commit](https://github.com/comfyanonymous/ComfyUI/commit/3661c833bcc41b788a7c9f0e7bc48524f8ee5f82).
In this guide, we'll provide two workflows:
1. A workflow using only native Comfy Core nodes
2. A workflow using custom nodes
Due to current limitations in native nodes for video support, the native-only workflow ensures users can complete the process without installing custom nodes.
However, we've found that providing a good user experience for video generation is challenging without custom nodes, so we're providing both workflow versions in this guide.
Make sure your ComfyUI is updated.
* [Download ComfyUI](https://www.comfy.org/download)
* [Update Guide](/installation/update_comfyui)
Workflows in this guide can be found in the [Workflow Templates](/interface/features/template).
If you can't find them in the template, your ComfyUI may be outdated. (Desktop version's update will delay sometime)
If nodes are missing when loading a workflow, possible reasons:
1. You are not using the latest ComfyUI version (Nightly version)
2. Some nodes failed to import at startup
* The Desktop is base on ComfyUI stable release, it will auto-update when there is a new Desktop stable release available.
* [Cloud](https://cloud.comfy.org) will update after ComfyUI stable release.
So, if you find any core node missing in this document, it might be because the new core nodes have not yet been released in the latest stable version. Please wait for the next stable release.
## Model Installation
You only need to install these models once. The workflow images also contain model download information, so you can choose your preferred download method.
The following models can be found at [Wan\_2.1\_ComfyUI\_repackaged](https://huggingface.co/Comfy-Org/Wan_2.1_ComfyUI_repackaged) and [Wan2.1-Fun](https://huggingface.co/collections/alibaba-pai/wan21-fun-67e4fb3b76ca01241eb7e334)
Click the corresponding links to download. If you've used Wan-related workflows before, you only need to download the **Diffusion models**.
**Diffusion models** - choose 1.3B or 14B. The 14B version has a larger file size (32GB) and higher VRAM requirements:
* [wan2.1\_fun\_control\_1.3B\_bf16.safetensors](https://huggingface.co/Comfy-Org/Wan_2.1_ComfyUI_repackaged/resolve/main/split_files/diffusion_models/wan2.1_fun_control_1.3B_bf16.safetensors?download=true)
* [Wan2.1-Fun-14B-Control](https://huggingface.co/alibaba-pai/Wan2.1-Fun-14B-Control/blob/main/diffusion_pytorch_model.safetensors?download=true): Rename to `Wan2.1-Fun-14B-Control.safetensors` after downloading
**Text encoders** - choose one of the following models (fp16 precision has a larger size and higher performance requirements):
* [umt5\_xxl\_fp16.safetensors](https://huggingface.co/Comfy-Org/Wan_2.1_ComfyUI_repackaged/resolve/main/split_files/text_encoders/umt5_xxl_fp16.safetensors?download=true)
* [umt5\_xxl\_fp8\_e4m3fn\_scaled.safetensors](https://huggingface.co/Comfy-Org/Wan_2.1_ComfyUI_repackaged/resolve/main/split_files/text_encoders/umt5_xxl_fp8_e4m3fn_scaled.safetensors?download=true)
**VAE**
* [wan\_2.1\_vae.safetensors](https://huggingface.co/Comfy-Org/Wan_2.1_ComfyUI_repackaged/resolve/main/split_files/vae/wan_2.1_vae.safetensors?download=true)
**CLIP Vision**
* [clip\_vision\_h.safetensors](https://huggingface.co/Comfy-Org/Wan_2.1_ComfyUI_repackaged/resolve/main/split_files/clip_vision/clip_vision_h.safetensors?download=true)
File storage location:
```
📂 ComfyUI/
├── 📂 models/
│ ├── 📂 diffusion_models/
│ │ └── wan2.1_fun_control_1.3B_bf16.safetensors
│ ├── 📂 text_encoders/
│ │ └─── umt5_xxl_fp8_e4m3fn_scaled.safetensors
│ └── 📂 vae/
│ │ └── wan_2.1_vae.safetensors
│ └── 📂 clip_vision/
│ └── clip_vision_h.safetensors
```
## ComfyUI Native Workflow
In this workflow, we use videos converted to **WebP format** since the `Load Image` node doesn't currently support mp4 format. We also use **Canny Edge** to preprocess the original video.
Because many users encounter installation failures and environment issues when installing custom nodes, this version of the workflow uses only native nodes to ensure a smoother experience.
Thanks to our powerful ComfyUI authors who provide feature-rich nodes. If you want to directly check the related version, see [Workflow Using Custom Nodes](#workflow-using-custom-nodes).
### 1. Workflow File Download
#### 1.1 Workflow File
Download the image below and drag it into ComfyUI to load the workflow:

#### 1.2 Input Images and Videos Download
Please download the following image and video for input:


### 2. Complete the Workflow Step by Step
1. Ensure the `Load Diffusion Model` node has loaded `wan2.1_fun_control_1.3B_bf16.safetensors`
2. Ensure the `Load CLIP` node has loaded `umt5_xxl_fp8_e4m3fn_scaled.safetensors`
3. Ensure the `Load VAE` node has loaded `wan_2.1_vae.safetensors`
4. Ensure the `Load CLIP Vision` node has loaded `clip_vision_h.safetensors`
5. Upload the starting frame to the `Load Image` node (renamed to `Start_image`)
6. Upload the control video to the second `Load Image` node. Note: This node currently doesn't support mp4, only WebP videos
7. (Optional) Modify the prompt (both English and Chinese are supported)
8. (Optional) Adjust the video size in `WanFunControlToVideo`, avoiding overly large dimensions
9. Click the `Run` button or use the shortcut `Ctrl(cmd) + Enter` to execute video generation
### 3. Usage Notes
* Since we need to input the same number of frames as the control video into the `WanFunControlToVideo` node, if the specified frame count exceeds the actual control video frames, the excess frames may display scenes not conforming to control conditions. We'll address this issue in the [Workflow Using Custom Nodes](#workflow-using-custom-nodes)
* Avoid setting overly large dimensions, as this can make the sampling process very time-consuming. Try generating smaller images first, then upscale
* Use your imagination to build upon this workflow by adding text-to-image or other types of workflows to achieve direct text-to-video generation or style transfer
* Use tools like [ComfyUI-comfyui\_controlnet\_aux](https://github.com/Fannovel16/comfyui_controlnet_aux) for richer control options
## Workflow Using Custom Nodes
We'll need to install the following two custom nodes:
* [ComfyUI-VideoHelperSuite](https://github.com/Kosinkadink/ComfyUI-VideoHelperSuite)
* [ComfyUI-comfyui\_controlnet\_aux](https://github.com/Fannovel16/comfyui_controlnet_aux)
You can use [ComfyUI Manager](https://github.com/Comfy-Org/ComfyUI-Manager) to install missing nodes or follow the installation instructions for each custom node package.
### 1. Workflow File Download
#### 1.1 Workflow File
Download the image below and drag it into ComfyUI to load the workflow:

Due to the large size of video files, you can also click [here](https://raw.githubusercontent.com/Comfy-Org/example_workflows/main/wan2.1_fun_control/wan2.1_fun_control_use_custom_nodes.json) to download the workflow file in JSON format.
#### 1.2 Input Images and Videos Download
Please download the following image and video for input:

### 2. Complete the Workflow Step by Step
> The model part is essentially the same. If you've already experienced the native-only workflow, you can directly upload the corresponding images and run it.
1. Ensure the `Load Diffusion Model` node has loaded `wan2.1_fun_control_1.3B_bf16.safetensors`
2. Ensure the `Load CLIP` node has loaded `umt5_xxl_fp8_e4m3fn_scaled.safetensors`
3. Ensure the `Load VAE` node has loaded `wan_2.1_vae.safetensors`
4. Ensure the `Load CLIP Vision` node has loaded `clip_vision_h.safetensors`
5. Upload the starting frame to the `Load Image` node
6. Upload an mp4 format video to the `Load Video(Upload)` custom node. Note that the workflow has adjusted the default `frame_load_cap`
7. For the current image, the `DWPose Estimator` only uses the `detect_face` option
8. (Optional) Modify the prompt (both English and Chinese are supported)
9. (Optional) Adjust the video size in `WanFunControlToVideo`, avoiding overly large dimensions
10. Click the `Run` button or use the shortcut `Ctrl(cmd) + Enter` to execute video generation
### 3. Workflow Notes
Thanks to the ComfyUI community authors for their custom node packages:
* This example uses `Load Video(Upload)` to support mp4 videos
* The `video_info` obtained from `Load Video(Upload)` allows us to maintain the same `fps` for the output video
* You can replace `DWPose Estimator` with other preprocessors from the `ComfyUI-comfyui_controlnet_aux` node package
* Prompts support multiple languages
## Usage Tips
* A useful tip is that you can combine multiple image preprocessing techniques and then use the `Image Blend` node to achieve the goal of applying multiple control methods simultaneously.
* You can use the `Video Combine` node from `ComfyUI-VideoHelperSuite` to save videos in mp4 format
* We use `SaveAnimatedWEBP` because we currently don't support embedding workflow into **mp4** and some other custom nodes may not support embedding workflow too. To preserve the workflow in the video, we choose `SaveAnimatedWEBP` node.
* In the `WanFunControlToVideo` node, `control_video` is not mandatory, so sometimes you can skip using a control video, first generate a very small video size like 320x320, and then use them as control video input to achieve consistent results.
* [ComfyUI-WanVideoWrapper](https://github.com/kijai/ComfyUI-WanVideoWrapper)
* [ComfyUI-KJNodes](https://github.com/kijai/ComfyUI-KJNodes)
---
# Source: https://docs.comfy.org/tutorials/video/wan/fun-inp.md
> ## Documentation Index
> Fetch the complete documentation index at: https://docs.comfy.org/llms.txt
> Use this file to discover all available pages before exploring further.
# ComfyUI Wan2.1 Fun InP Video Examples
> This guide demonstrates how to use Wan2.1 Fun InP in ComfyUI to generate videos with first and last frame control
## About Wan2.1-Fun-InP
**Wan-Fun InP** is an open-source video generation model released by Alibaba, part of the Wan2.1-Fun series, focusing on generating videos from images with first and last frame control.
**Key features**:
* **First and last frame control**: Supports inputting both first and last frame images to generate transitional video between them, enhancing video coherence and creative freedom. Compared to earlier community versions, Alibaba's official model produces more stable and significantly higher quality results.
* **Multi-resolution support**: Supports generating videos at 512×512, 768×768, 1024×1024 and other resolutions to accommodate different scenario requirements.
**Model versions**:
* **1.3B** Lightweight: Suitable for local deployment and quick inference with **lower VRAM requirements**
* **14B** High-performance: Model size reaches 32GB+, offering better results but requiring **higher VRAM**
Below are the relevant model weights and code repositories:
* [Wan2.1-Fun-1.3B-Input](https://huggingface.co/alibaba-pai/Wan2.1-Fun-1.3B-Input)
* [Wan2.1-Fun-14B-Input](https://huggingface.co/alibaba-pai/Wan2.1-Fun-14B-Input)
* Code repository: [VideoX-Fun](https://github.com/aigc-apps/VideoX-Fun)
Currently, ComfyUI natively supports the Wan2.1 Fun InP model. Before starting this tutorial, please update your ComfyUI to ensure your version is after [this commit](https://github.com/comfyanonymous/ComfyUI/commit/0a1f8869c9998bbfcfeb2e97aa96a6d3e0a2b5df).
Make sure your ComfyUI is updated.
* [Download ComfyUI](https://www.comfy.org/download)
* [Update Guide](/installation/update_comfyui)
Workflows in this guide can be found in the [Workflow Templates](/interface/features/template).
If you can't find them in the template, your ComfyUI may be outdated. (Desktop version's update will delay sometime)
If nodes are missing when loading a workflow, possible reasons:
1. You are not using the latest ComfyUI version (Nightly version)
2. Some nodes failed to import at startup
* The Desktop is base on ComfyUI stable release, it will auto-update when there is a new Desktop stable release available.
* [Cloud](https://cloud.comfy.org) will update after ComfyUI stable release.
So, if you find any core node missing in this document, it might be because the new core nodes have not yet been released in the latest stable version. Please wait for the next stable release.
## Wan2.1 Fun InP Workflow
Download the image below and drag it into ComfyUI to load the workflow:

### 1. Workflow File Download
### 2. Manual Model Installation
If automatic model downloading is ineffective, please download the models manually and save them to the corresponding folders.
The following models can be found at [Wan\_2.1\_ComfyUI\_repackaged](https://huggingface.co/Comfy-Org/Wan_2.1_ComfyUI_repackaged) and [Wan2.1-Fun](https://huggingface.co/collections/alibaba-pai/wan21-fun-67e4fb3b76ca01241eb7e334)
**Diffusion models** - choose 1.3B or 14B. The 14B version has a larger file size (32GB) and higher VRAM requirements:
* [wan2.1\_fun\_inp\_1.3B\_bf16.safetensors](https://huggingface.co/Comfy-Org/Wan_2.1_ComfyUI_repackaged/resolve/main/split_files/diffusion_models/wan2.1_fun_inp_1.3B_bf16.safetensors?download=true)
* [Wan2.1-Fun-14B-InP](https://huggingface.co/alibaba-pai/Wan2.1-Fun-14B-InP/resolve/main/diffusion_pytorch_model.safetensors?download=true): Rename to `Wan2.1-Fun-14B-InP.safetensors` after downloading
**Text encoders** - choose one of the following models (fp16 precision has a larger size and higher performance requirements):
* [umt5\_xxl\_fp16.safetensors](https://huggingface.co/Comfy-Org/Wan_2.1_ComfyUI_repackaged/resolve/main/split_files/text_encoders/umt5_xxl_fp16.safetensors?download=true)
* [umt5\_xxl\_fp8\_e4m3fn\_scaled.safetensors](https://huggingface.co/Comfy-Org/Wan_2.1_ComfyUI_repackaged/resolve/main/split_files/text_encoders/umt5_xxl_fp8_e4m3fn_scaled.safetensors?download=true)
**VAE**
* [wan\_2.1\_vae.safetensors](https://huggingface.co/Comfy-Org/Wan_2.1_ComfyUI_repackaged/resolve/main/split_files/vae/wan_2.1_vae.safetensors?download=true)
**CLIP Vision**
* [clip\_vision\_h.safetensors](https://huggingface.co/Comfy-Org/Wan_2.1_ComfyUI_repackaged/resolve/main/split_files/clip_vision/clip_vision_h.safetensors?download=true)
File storage location:
```
📂 ComfyUI/
├── 📂 models/
│ ├── 📂 diffusion_models/
│ │ └── wan2.1_fun_inp_1.3B_bf16.safetensors
│ ├── 📂 text_encoders/
│ │ └─── umt5_xxl_fp8_e4m3fn_scaled.safetensors
│ └── 📂 vae/
│ │ └── wan_2.1_vae.safetensors
│ └── 📂 clip_vision/
│ └── clip_vision_h.safetensors
```
### 3. Complete the Workflow Step by Step
1. Ensure the `Load Diffusion Model` node has loaded `wan2.1_fun_inp_1.3B_bf16.safetensors`
2. Ensure the `Load CLIP` node has loaded `umt5_xxl_fp8_e4m3fn_scaled.safetensors`
3. Ensure the `Load VAE` node has loaded `wan_2.1_vae.safetensors`
4. Ensure the `Load CLIP Vision` node has loaded `clip_vision_h.safetensors`
5. Upload the starting frame to the `Load Image` node (renamed to `Start_image`)
6. Upload the ending frame to the second `Load Image` node
7. (Optional) Modify the prompt (both English and Chinese are supported)
8. (Optional) Adjust the video size in `WanFunInpaintToVideo`, avoiding overly large dimensions
9. Click the `Run` button or use the shortcut `Ctrl(cmd) + Enter` to execute video generation
### 4. Workflow Notes
Please make sure to use the correct model, as `wan2.1_fun_inp_1.3B_bf16.safetensors` and `wan2.1_fun_control_1.3B_bf16.safetensors` are stored in the same folder and have very similar names. Ensure you're using the right model.
* When using Wan Fun InP, you may need to frequently modify prompts to ensure the accuracy of the corresponding scene transitions.
## Other Wan2.1 Fun InP or video-related custom node packages
* [ComfyUI-VideoHelperSuite](https://github.com/Kosinkadink/ComfyUI-VideoHelperSuite)
* [ComfyUI-WanVideoWrapper](https://github.com/kijai/ComfyUI-WanVideoWrapper)
* [ComfyUI-KJNodes](https://github.com/kijai/ComfyUI-KJNodes)
---
# Source: https://docs.comfy.org/tutorials/partner-nodes/google/gemini.md
> ## Documentation Index
> Fetch the complete documentation index at: https://docs.comfy.org/llms.txt
> Use this file to discover all available pages before exploring further.
# Google Gemini API Node ComfyUI Official Example
> This article will introduce how to use Google Gemini Partner nodes in ComfyUI to complete conversational functions
Google Gemini is a powerful AI model developed by Google, supporting conversational and text generation functions. Currently, ComfyUI has integrated the Google Gemini API, allowing you to directly use the related nodes in ComfyUI to complete conversational functions.
In this guide, we will walk you through completing the corresponding conversational functionality.
To use the API nodes, you need to ensure that you are logged in properly and using a permitted network environment. Please refer to the [API Nodes Overview](/tutorials/partner-nodes/overview) section of the documentation to understand the specific requirements for using the API nodes.
Make sure your ComfyUI is updated.
* [Download ComfyUI](https://www.comfy.org/download)
* [Update Guide](/installation/update_comfyui)
Workflows in this guide can be found in the [Workflow Templates](/interface/features/template).
If you can't find them in the template, your ComfyUI may be outdated. (Desktop version's update will delay sometime)
If nodes are missing when loading a workflow, possible reasons:
1. You are not using the latest ComfyUI version (Nightly version)
2. Some nodes failed to import at startup
* The Desktop is base on ComfyUI stable release, it will auto-update when there is a new Desktop stable release available.
* [Cloud](https://cloud.comfy.org) will update after ComfyUI stable release.
So, if you find any core node missing in this document, it might be because the new core nodes have not yet been released in the latest stable version. Please wait for the next stable release.
## Google Gemini Chat Workflow
### 1. Workflow File Download
Please download the Json file below and drag it into ComfyUI to load the corresponding workflow.
### 2. Complete the Workflow Execution Step by Step
In the corresponding template, we have built a prompt for analyzing and generating role prompts, used to interpret your images into corresponding drawing prompts
You can refer to the numbers in the image to complete the basic text-to-image workflow execution:
1. In the `Load Image` node, load the image you need AI to interpret
2. (Optional) If needed, you can modify the prompt in `Google Gemini` to have AI execute specific tasks
3. Click the `Run` button, or use the shortcut `Ctrl(cmd) + Enter` to execute the conversation.
4. After waiting for the API to return results, you can view the corresponding AI returned content in the `Preview Any` node.
### 3. Additional Notes
* Currently, the file input node `Gemini Input Files` requires files to be uploaded to the `ComfyUI/input/` directory first. This node is being improved, and we will modify the template after updates
* The workflow provides an example using `Batch Images` for input. If you have multiple images that need AI interpretation, you can refer to the step diagram and use right-click to set the corresponding node mode to `Always` to enable it
---
# Source: https://docs.comfy.org/api-reference/admin/generate-a-short-lived-jwt-admin-token.md
> ## Documentation Index
> Fetch the complete documentation index at: https://docs.comfy.org/llms.txt
> Use this file to discover all available pages before exploring further.
# Generate a short-lived JWT admin token
> Generates a short-lived JWT admin token for browser-based admin operations.
The user must already be authenticated with Firebase and have admin privileges.
The generated token expires after 1 hour.
## OpenAPI
````yaml https://api.comfy.org/openapi post /admin/generate-token
openapi: 3.0.2
info:
title: Comfy API
version: '1.0'
servers:
- url: https://api.comfy.org
security: []
paths:
/admin/generate-token:
post:
tags:
- Admin
summary: Generate a short-lived JWT admin token
description: >
Generates a short-lived JWT admin token for browser-based admin
operations.
The user must already be authenticated with Firebase and have admin
privileges.
The generated token expires after 1 hour.
operationId: GenerateAdminToken
responses:
'200':
content:
application/json:
schema:
properties:
expires_at:
description: When the token expires
format: date-time
type: string
token:
description: The JWT admin token
type: string
required:
- token
- expires_at
type: object
description: JWT token generated successfully
'401':
content:
application/json:
schema:
$ref: '#/components/schemas/ErrorResponse'
description: Unauthorized or user is not an admin
'500':
content:
application/json:
schema:
$ref: '#/components/schemas/ErrorResponse'
description: Internal server error
security:
- BearerAuth: []
components:
schemas:
ErrorResponse:
properties:
error:
type: string
message:
type: string
required:
- error
- message
type: object
securitySchemes:
BearerAuth:
bearerFormat: JWT
scheme: bearer
type: http
````
---
# Source: https://docs.comfy.org/api-reference/cloud/workflow/get-a-specific-subgraph-blueprint.md
> ## Documentation Index
> Fetch the complete documentation index at: https://docs.comfy.org/llms.txt
> Use this file to discover all available pages before exploring further.
# Get a specific subgraph blueprint
> Returns the full data for a specific subgraph blueprint by ID
## OpenAPI
````yaml openapi-cloud.yaml get /api/global_subgraphs/{id}
openapi: 3.0.3
info:
title: Comfy Cloud API
description: >
**Experimental API:** This API is experimental and subject to change.
Endpoints, request/response formats, and behavior may be modified without
notice.
API for Comfy Cloud - Run ComfyUI workflows on cloud infrastructure.
This API allows you to interact with Comfy Cloud programmatically,
including:
- Submitting and managing workflows
- Uploading and downloading files
- Monitoring job status and progress
## Cloud vs OSS ComfyUI Compatibility
Comfy Cloud implements the same API interfaces as OSS ComfyUI for maximum
compatibility,
but some fields are accepted for compatibility while being handled
differently or ignored:
| Field | Endpoints | Cloud Behavior |
|-------|-----------|----------------|
| `subfolder` | `/api/view`, `/api/upload/*` | **Ignored** - Cloud uses
content-addressed storage (hash-based). Returned in responses for
client-side organization. |
| `type` (input/output/temp) | `/api/view`, `/api/upload/*` | Partially used
- All files stored with tag-based organization rather than directory
structure. |
| `overwrite` | `/api/upload/*` | **Ignored** - Content-addressed storage
means identical content always has the same hash. |
| `number`, `front` | `/api/prompt` | **Ignored** - Cloud uses its own fair
queue scheduling per user. |
| `split`, `full_info` | `/api/userdata` | **Ignored** - Cloud always
returns full file metadata. |
These fields are retained in the API schema for drop-in compatibility with
existing ComfyUI clients and workflows.
version: 1.0.0
license:
name: GNU General Public License v3.0
url: https://github.com/comfyanonymous/ComfyUI/blob/master/LICENSE
servers:
- url: https://cloud.comfy.org
description: Comfy Cloud API
security:
- ApiKeyAuth: []
tags:
- name: workflow
description: |
Submit workflows for execution and manage the execution queue.
This is the primary way to run ComfyUI workflows on the cloud.
- name: job
description: |
Monitor job status, view execution history, and manage running jobs.
Jobs are created when you submit a workflow via POST /api/prompt.
- name: asset
description: |
Upload, download, and manage persistent assets (images, models, outputs).
Assets provide durable storage with tagging and metadata support.
- name: file
description: |
Legacy file upload and download endpoints compatible with local ComfyUI.
For new integrations, consider using the Assets API instead.
- name: model
description: |
Browse available AI models. Models are pre-loaded on cloud infrastructure.
- name: node
description: |
Get information about available ComfyUI nodes and their inputs/outputs.
Useful for building dynamic workflow interfaces.
- name: user
description: |
User account information and personal data storage.
- name: system
description: |
Server status, health checks, and system information.
paths:
/api/global_subgraphs/{id}:
get:
tags:
- workflow
summary: Get a specific subgraph blueprint
description: Returns the full data for a specific subgraph blueprint by ID
operationId: getGlobalSubgraph
parameters:
- name: id
in: path
required: true
description: The unique identifier of the subgraph blueprint
schema:
type: string
responses:
'200':
description: Success - Full subgraph data
content:
application/json:
schema:
$ref: '#/components/schemas/GlobalSubgraphData'
'404':
description: Subgraph not found
content:
application/json:
schema:
$ref: '#/components/schemas/ErrorResponse'
'500':
description: Internal server error
content:
application/json:
schema:
$ref: '#/components/schemas/ErrorResponse'
security: []
components:
schemas:
GlobalSubgraphData:
type: object
description: Full data for a global subgraph blueprint
required:
- source
- name
- info
- data
properties:
source:
type: string
description: >-
Source type of the subgraph - "templates" for workflow templates or
"custom_node" for custom node subgraphs
name:
type: string
description: Display name of the subgraph blueprint
info:
type: object
description: Additional information about the subgraph
required:
- node_pack
properties:
node_pack:
type: string
description: The node pack/module that provides this subgraph
data:
type: string
description: The full subgraph JSON data as a string
ErrorResponse:
type: object
required:
- code
- message
properties:
code:
type: string
message:
type: string
securitySchemes:
ApiKeyAuth:
type: apiKey
in: header
name: X-API-Key
description: |
API key authentication. Generate an API key from your account settings
at https://comfy.org/account. Pass the key in the X-API-Key header.
````
---
# Source: https://docs.comfy.org/api-reference/cloud/node/get-all-node-information.md
> ## Documentation Index
> Fetch the complete documentation index at: https://docs.comfy.org/llms.txt
> Use this file to discover all available pages before exploring further.
# Get all node information
> Returns information about all available nodes
## OpenAPI
````yaml openapi-cloud.yaml get /api/object_info
openapi: 3.0.3
info:
title: Comfy Cloud API
description: >
**Experimental API:** This API is experimental and subject to change.
Endpoints, request/response formats, and behavior may be modified without
notice.
API for Comfy Cloud - Run ComfyUI workflows on cloud infrastructure.
This API allows you to interact with Comfy Cloud programmatically,
including:
- Submitting and managing workflows
- Uploading and downloading files
- Monitoring job status and progress
## Cloud vs OSS ComfyUI Compatibility
Comfy Cloud implements the same API interfaces as OSS ComfyUI for maximum
compatibility,
but some fields are accepted for compatibility while being handled
differently or ignored:
| Field | Endpoints | Cloud Behavior |
|-------|-----------|----------------|
| `subfolder` | `/api/view`, `/api/upload/*` | **Ignored** - Cloud uses
content-addressed storage (hash-based). Returned in responses for
client-side organization. |
| `type` (input/output/temp) | `/api/view`, `/api/upload/*` | Partially used
- All files stored with tag-based organization rather than directory
structure. |
| `overwrite` | `/api/upload/*` | **Ignored** - Content-addressed storage
means identical content always has the same hash. |
| `number`, `front` | `/api/prompt` | **Ignored** - Cloud uses its own fair
queue scheduling per user. |
| `split`, `full_info` | `/api/userdata` | **Ignored** - Cloud always
returns full file metadata. |
These fields are retained in the API schema for drop-in compatibility with
existing ComfyUI clients and workflows.
version: 1.0.0
license:
name: GNU General Public License v3.0
url: https://github.com/comfyanonymous/ComfyUI/blob/master/LICENSE
servers:
- url: https://cloud.comfy.org
description: Comfy Cloud API
security:
- ApiKeyAuth: []
tags:
- name: workflow
description: |
Submit workflows for execution and manage the execution queue.
This is the primary way to run ComfyUI workflows on the cloud.
- name: job
description: |
Monitor job status, view execution history, and manage running jobs.
Jobs are created when you submit a workflow via POST /api/prompt.
- name: asset
description: |
Upload, download, and manage persistent assets (images, models, outputs).
Assets provide durable storage with tagging and metadata support.
- name: file
description: |
Legacy file upload and download endpoints compatible with local ComfyUI.
For new integrations, consider using the Assets API instead.
- name: model
description: |
Browse available AI models. Models are pre-loaded on cloud infrastructure.
- name: node
description: |
Get information about available ComfyUI nodes and their inputs/outputs.
Useful for building dynamic workflow interfaces.
- name: user
description: |
User account information and personal data storage.
- name: system
description: |
Server status, health checks, and system information.
paths:
/api/object_info:
get:
tags:
- node
summary: Get all node information
description: Returns information about all available nodes
operationId: getNodeInfo
responses:
'200':
description: Success
content:
application/json:
schema:
type: object
additionalProperties:
$ref: '#/components/schemas/NodeInfo'
components:
schemas:
NodeInfo:
type: object
properties:
input:
type: object
description: Input specifications for the node
additionalProperties: true
input_order:
type: object
description: Order of inputs for display
additionalProperties:
type: array
items:
type: string
output:
type: array
items:
type: string
description: Output types of the node
output_is_list:
type: array
items:
type: boolean
description: Whether each output is a list
output_name:
type: array
items:
type: string
description: Names of the outputs
name:
type: string
description: Internal name of the node
display_name:
type: string
description: Display name of the node
description:
type: string
description: Description of the node
python_module:
type: string
description: Python module implementing the node
category:
type: string
description: Category of the node
output_node:
type: boolean
description: Whether this is an output node
output_tooltips:
type: array
items:
type: string
description: Tooltips for outputs
deprecated:
type: boolean
description: Whether the node is deprecated
experimental:
type: boolean
description: Whether the node is experimental
api_node:
type: boolean
description: Whether this is an API node
securitySchemes:
ApiKeyAuth:
type: apiKey
in: header
name: X-API-Key
description: |
API key authentication. Generate an API key from your account settings
at https://comfy.org/account. Pass the key in the X-API-Key header.
````
---
# Source: https://docs.comfy.org/api-reference/cloud/asset/get-asset-details.md
> ## Documentation Index
> Fetch the complete documentation index at: https://docs.comfy.org/llms.txt
> Use this file to discover all available pages before exploring further.
# Get asset details
> Retrieves detailed information about a specific asset
## OpenAPI
````yaml openapi-cloud.yaml get /api/assets/{id}
openapi: 3.0.3
info:
title: Comfy Cloud API
description: >
**Experimental API:** This API is experimental and subject to change.
Endpoints, request/response formats, and behavior may be modified without
notice.
API for Comfy Cloud - Run ComfyUI workflows on cloud infrastructure.
This API allows you to interact with Comfy Cloud programmatically,
including:
- Submitting and managing workflows
- Uploading and downloading files
- Monitoring job status and progress
## Cloud vs OSS ComfyUI Compatibility
Comfy Cloud implements the same API interfaces as OSS ComfyUI for maximum
compatibility,
but some fields are accepted for compatibility while being handled
differently or ignored:
| Field | Endpoints | Cloud Behavior |
|-------|-----------|----------------|
| `subfolder` | `/api/view`, `/api/upload/*` | **Ignored** - Cloud uses
content-addressed storage (hash-based). Returned in responses for
client-side organization. |
| `type` (input/output/temp) | `/api/view`, `/api/upload/*` | Partially used
- All files stored with tag-based organization rather than directory
structure. |
| `overwrite` | `/api/upload/*` | **Ignored** - Content-addressed storage
means identical content always has the same hash. |
| `number`, `front` | `/api/prompt` | **Ignored** - Cloud uses its own fair
queue scheduling per user. |
| `split`, `full_info` | `/api/userdata` | **Ignored** - Cloud always
returns full file metadata. |
These fields are retained in the API schema for drop-in compatibility with
existing ComfyUI clients and workflows.
version: 1.0.0
license:
name: GNU General Public License v3.0
url: https://github.com/comfyanonymous/ComfyUI/blob/master/LICENSE
servers:
- url: https://cloud.comfy.org
description: Comfy Cloud API
security:
- ApiKeyAuth: []
tags:
- name: workflow
description: |
Submit workflows for execution and manage the execution queue.
This is the primary way to run ComfyUI workflows on the cloud.
- name: job
description: |
Monitor job status, view execution history, and manage running jobs.
Jobs are created when you submit a workflow via POST /api/prompt.
- name: asset
description: |
Upload, download, and manage persistent assets (images, models, outputs).
Assets provide durable storage with tagging and metadata support.
- name: file
description: |
Legacy file upload and download endpoints compatible with local ComfyUI.
For new integrations, consider using the Assets API instead.
- name: model
description: |
Browse available AI models. Models are pre-loaded on cloud infrastructure.
- name: node
description: |
Get information about available ComfyUI nodes and their inputs/outputs.
Useful for building dynamic workflow interfaces.
- name: user
description: |
User account information and personal data storage.
- name: system
description: |
Server status, health checks, and system information.
paths:
/api/assets/{id}:
get:
tags:
- asset
summary: Get asset details
description: Retrieves detailed information about a specific asset
operationId: getAssetById
parameters:
- name: id
in: path
required: true
description: Asset ID
schema:
type: string
format: uuid
responses:
'200':
description: Asset details retrieved successfully
content:
application/json:
schema:
$ref: '#/components/schemas/Asset'
'401':
description: Unauthorized
content:
application/json:
schema:
$ref: '#/components/schemas/ErrorResponse'
'404':
description: Asset not found
content:
application/json:
schema:
$ref: '#/components/schemas/ErrorResponse'
'500':
description: Internal server error
content:
application/json:
schema:
$ref: '#/components/schemas/ErrorResponse'
components:
schemas:
Asset:
type: object
required:
- id
- name
- size
- created_at
- updated_at
properties:
id:
type: string
format: uuid
description: Unique identifier for the asset
name:
type: string
description: Name of the asset file
asset_hash:
type: string
description: Blake3 hash of the asset content
pattern: ^blake3:[a-f0-9]{64}$
size:
type: integer
format: int64
description: Size of the asset in bytes
mime_type:
type: string
description: MIME type of the asset
tags:
type: array
items:
type: string
description: Tags associated with the asset
user_metadata:
type: object
description: Custom user metadata for the asset
additionalProperties: true
preview_url:
type: string
format: uri
description: URL for asset preview/thumbnail
preview_id:
type: string
format: uuid
description: ID of the preview asset if available
nullable: true
prompt_id:
type: string
format: uuid
description: ID of the job/prompt that created this asset, if available
nullable: true
created_at:
type: string
format: date-time
description: Timestamp when the asset was created
updated_at:
type: string
format: date-time
description: Timestamp when the asset was last updated
last_access_time:
type: string
format: date-time
description: Timestamp when the asset was last accessed
is_immutable:
type: boolean
description: Whether this asset is immutable (cannot be modified or deleted)
ErrorResponse:
type: object
required:
- code
- message
properties:
code:
type: string
message:
type: string
securitySchemes:
ApiKeyAuth:
type: apiKey
in: header
name: X-API-Key
description: |
API key authentication. Generate an API key from your account settings
at https://comfy.org/account. Pass the key in the X-API-Key header.
````
---
# Source: https://docs.comfy.org/api-reference/cloud/asset/get-asset-metadata-from-remote-url.md
> ## Documentation Index
> Fetch the complete documentation index at: https://docs.comfy.org/llms.txt
> Use this file to discover all available pages before exploring further.
# Get asset metadata from remote URL
> Retrieves metadata for an asset from a remote download URL without downloading the entire file.
Supports various sources including CivitAI and other model repositories.
Uses HEAD requests or API calls to fetch metadata efficiently.
This endpoint is for previewing metadata before downloading, not for getting metadata of existing assets.
## OpenAPI
````yaml openapi-cloud.yaml get /api/assets/remote-metadata
openapi: 3.0.3
info:
title: Comfy Cloud API
description: >
**Experimental API:** This API is experimental and subject to change.
Endpoints, request/response formats, and behavior may be modified without
notice.
API for Comfy Cloud - Run ComfyUI workflows on cloud infrastructure.
This API allows you to interact with Comfy Cloud programmatically,
including:
- Submitting and managing workflows
- Uploading and downloading files
- Monitoring job status and progress
## Cloud vs OSS ComfyUI Compatibility
Comfy Cloud implements the same API interfaces as OSS ComfyUI for maximum
compatibility,
but some fields are accepted for compatibility while being handled
differently or ignored:
| Field | Endpoints | Cloud Behavior |
|-------|-----------|----------------|
| `subfolder` | `/api/view`, `/api/upload/*` | **Ignored** - Cloud uses
content-addressed storage (hash-based). Returned in responses for
client-side organization. |
| `type` (input/output/temp) | `/api/view`, `/api/upload/*` | Partially used
- All files stored with tag-based organization rather than directory
structure. |
| `overwrite` | `/api/upload/*` | **Ignored** - Content-addressed storage
means identical content always has the same hash. |
| `number`, `front` | `/api/prompt` | **Ignored** - Cloud uses its own fair
queue scheduling per user. |
| `split`, `full_info` | `/api/userdata` | **Ignored** - Cloud always
returns full file metadata. |
These fields are retained in the API schema for drop-in compatibility with
existing ComfyUI clients and workflows.
version: 1.0.0
license:
name: GNU General Public License v3.0
url: https://github.com/comfyanonymous/ComfyUI/blob/master/LICENSE
servers:
- url: https://cloud.comfy.org
description: Comfy Cloud API
security:
- ApiKeyAuth: []
tags:
- name: workflow
description: |
Submit workflows for execution and manage the execution queue.
This is the primary way to run ComfyUI workflows on the cloud.
- name: job
description: |
Monitor job status, view execution history, and manage running jobs.
Jobs are created when you submit a workflow via POST /api/prompt.
- name: asset
description: |
Upload, download, and manage persistent assets (images, models, outputs).
Assets provide durable storage with tagging and metadata support.
- name: file
description: |
Legacy file upload and download endpoints compatible with local ComfyUI.
For new integrations, consider using the Assets API instead.
- name: model
description: |
Browse available AI models. Models are pre-loaded on cloud infrastructure.
- name: node
description: |
Get information about available ComfyUI nodes and their inputs/outputs.
Useful for building dynamic workflow interfaces.
- name: user
description: |
User account information and personal data storage.
- name: system
description: |
Server status, health checks, and system information.
paths:
/api/assets/remote-metadata:
get:
tags:
- asset
summary: Get asset metadata from remote URL
description: >
Retrieves metadata for an asset from a remote download URL without
downloading the entire file.
Supports various sources including CivitAI and other model repositories.
Uses HEAD requests or API calls to fetch metadata efficiently.
This endpoint is for previewing metadata before downloading, not for
getting metadata of existing assets.
operationId: getRemoteAssetMetadata
parameters:
- name: url
in: query
required: true
description: Download URL to retrieve metadata from
schema:
type: string
format: uri
example: https://civitai.com/api/download/models/123456
responses:
'200':
description: Metadata retrieved successfully
content:
application/json:
schema:
$ref: '#/components/schemas/AssetMetadataResponse'
'400':
description: Invalid URL or missing required parameter
content:
application/json:
schema:
$ref: '#/components/schemas/ErrorResponse'
'401':
description: Unauthorized
content:
application/json:
schema:
$ref: '#/components/schemas/ErrorResponse'
'422':
description: Failed to retrieve metadata from source
content:
application/json:
schema:
$ref: '#/components/schemas/ErrorResponse'
'500':
description: Internal server error
content:
application/json:
schema:
$ref: '#/components/schemas/ErrorResponse'
components:
schemas:
AssetMetadataResponse:
type: object
required:
- content_length
properties:
content_length:
type: integer
format: int64
description: Size of the asset in bytes (-1 if unknown)
example: 4294967296
content_type:
type: string
description: MIME type of the asset
example: application/octet-stream
filename:
type: string
description: Suggested filename for the asset from source
example: realistic-vision-v5.safetensors
name:
type: string
description: Display name or title for the asset from source
example: Realistic Vision v5.0
tags:
type: array
items:
type: string
description: Tags for categorization from source
example:
- models
- checkpoint
preview_image:
type: string
description: Preview image as base64-encoded data URL
example: data:image/jpeg;base64,/9j/4AAQSkZJRg...
validation:
$ref: '#/components/schemas/ValidationResult'
description: Validation results for the file
ErrorResponse:
type: object
required:
- code
- message
properties:
code:
type: string
message:
type: string
ValidationResult:
type: object
required:
- is_valid
properties:
is_valid:
type: boolean
description: Overall validation status (true if all checks passed)
example: true
errors:
type: array
items:
$ref: '#/components/schemas/ValidationError'
description: Blocking validation errors that prevent download
warnings:
type: array
items:
$ref: '#/components/schemas/ValidationError'
description: Non-blocking validation warnings (informational only)
ValidationError:
type: object
required:
- code
- message
- field
properties:
code:
type: string
description: Machine-readable error code
example: FORMAT_NOT_ALLOWED
message:
type: string
description: Human-readable error message
example: >-
File format "PickleTensor" is not allowed. Allowed formats:
[SafeTensor]
field:
type: string
description: Field that failed validation
example: format
securitySchemes:
ApiKeyAuth:
type: apiKey
in: header
name: X-API-Key
description: |
API key authentication. Generate an API key from your account settings
at https://comfy.org/account. Pass the key in the X-API-Key header.
````
---
# Source: https://docs.comfy.org/api-reference/cloud/model/get-available-model-folders.md
> ## Documentation Index
> Fetch the complete documentation index at: https://docs.comfy.org/llms.txt
> Use this file to discover all available pages before exploring further.
# Get available model folders
> Returns a list of model folders available in the system.
This is an experimental endpoint that replaces the legacy /models endpoint.
## OpenAPI
````yaml openapi-cloud.yaml get /api/experiment/models
openapi: 3.0.3
info:
title: Comfy Cloud API
description: >
**Experimental API:** This API is experimental and subject to change.
Endpoints, request/response formats, and behavior may be modified without
notice.
API for Comfy Cloud - Run ComfyUI workflows on cloud infrastructure.
This API allows you to interact with Comfy Cloud programmatically,
including:
- Submitting and managing workflows
- Uploading and downloading files
- Monitoring job status and progress
## Cloud vs OSS ComfyUI Compatibility
Comfy Cloud implements the same API interfaces as OSS ComfyUI for maximum
compatibility,
but some fields are accepted for compatibility while being handled
differently or ignored:
| Field | Endpoints | Cloud Behavior |
|-------|-----------|----------------|
| `subfolder` | `/api/view`, `/api/upload/*` | **Ignored** - Cloud uses
content-addressed storage (hash-based). Returned in responses for
client-side organization. |
| `type` (input/output/temp) | `/api/view`, `/api/upload/*` | Partially used
- All files stored with tag-based organization rather than directory
structure. |
| `overwrite` | `/api/upload/*` | **Ignored** - Content-addressed storage
means identical content always has the same hash. |
| `number`, `front` | `/api/prompt` | **Ignored** - Cloud uses its own fair
queue scheduling per user. |
| `split`, `full_info` | `/api/userdata` | **Ignored** - Cloud always
returns full file metadata. |
These fields are retained in the API schema for drop-in compatibility with
existing ComfyUI clients and workflows.
version: 1.0.0
license:
name: GNU General Public License v3.0
url: https://github.com/comfyanonymous/ComfyUI/blob/master/LICENSE
servers:
- url: https://cloud.comfy.org
description: Comfy Cloud API
security:
- ApiKeyAuth: []
tags:
- name: workflow
description: |
Submit workflows for execution and manage the execution queue.
This is the primary way to run ComfyUI workflows on the cloud.
- name: job
description: |
Monitor job status, view execution history, and manage running jobs.
Jobs are created when you submit a workflow via POST /api/prompt.
- name: asset
description: |
Upload, download, and manage persistent assets (images, models, outputs).
Assets provide durable storage with tagging and metadata support.
- name: file
description: |
Legacy file upload and download endpoints compatible with local ComfyUI.
For new integrations, consider using the Assets API instead.
- name: model
description: |
Browse available AI models. Models are pre-loaded on cloud infrastructure.
- name: node
description: |
Get information about available ComfyUI nodes and their inputs/outputs.
Useful for building dynamic workflow interfaces.
- name: user
description: |
User account information and personal data storage.
- name: system
description: |
Server status, health checks, and system information.
paths:
/api/experiment/models:
get:
tags:
- model
summary: Get available model folders
description: >
Returns a list of model folders available in the system.
This is an experimental endpoint that replaces the legacy /models
endpoint.
operationId: getModelFolders
responses:
'200':
description: Success - List of model folders
content:
application/json:
schema:
type: array
items:
$ref: '#/components/schemas/ModelFolder'
'500':
description: Internal server error
content:
application/json:
schema:
$ref: '#/components/schemas/ErrorResponse'
security: []
components:
schemas:
ModelFolder:
type: object
description: Represents a folder containing models
required:
- name
- folders
properties:
name:
type: string
description: The name of the model folder
example: checkpoints
folders:
type: array
items:
type: string
description: List of paths where models of this type are stored
example:
- checkpoints
ErrorResponse:
type: object
required:
- code
- message
properties:
code:
type: string
message:
type: string
securitySchemes:
ApiKeyAuth:
type: apiKey
in: header
name: X-API-Key
description: |
API key authentication. Generate an API key from your account settings
at https://comfy.org/account. Pass the key in the X-API-Key header.
````
---
# Source: https://docs.comfy.org/api-reference/cloud/workflow/get-available-subgraph-blueprints.md
> ## Documentation Index
> Fetch the complete documentation index at: https://docs.comfy.org/llms.txt
> Use this file to discover all available pages before exploring further.
# Get available subgraph blueprints
> Returns a list of globally available subgraph blueprints.
These are pre-built workflow components that can be used as nodes.
The data field contains a promise that resolves to the full subgraph JSON.
## OpenAPI
````yaml openapi-cloud.yaml get /api/global_subgraphs
openapi: 3.0.3
info:
title: Comfy Cloud API
description: >
**Experimental API:** This API is experimental and subject to change.
Endpoints, request/response formats, and behavior may be modified without
notice.
API for Comfy Cloud - Run ComfyUI workflows on cloud infrastructure.
This API allows you to interact with Comfy Cloud programmatically,
including:
- Submitting and managing workflows
- Uploading and downloading files
- Monitoring job status and progress
## Cloud vs OSS ComfyUI Compatibility
Comfy Cloud implements the same API interfaces as OSS ComfyUI for maximum
compatibility,
but some fields are accepted for compatibility while being handled
differently or ignored:
| Field | Endpoints | Cloud Behavior |
|-------|-----------|----------------|
| `subfolder` | `/api/view`, `/api/upload/*` | **Ignored** - Cloud uses
content-addressed storage (hash-based). Returned in responses for
client-side organization. |
| `type` (input/output/temp) | `/api/view`, `/api/upload/*` | Partially used
- All files stored with tag-based organization rather than directory
structure. |
| `overwrite` | `/api/upload/*` | **Ignored** - Content-addressed storage
means identical content always has the same hash. |
| `number`, `front` | `/api/prompt` | **Ignored** - Cloud uses its own fair
queue scheduling per user. |
| `split`, `full_info` | `/api/userdata` | **Ignored** - Cloud always
returns full file metadata. |
These fields are retained in the API schema for drop-in compatibility with
existing ComfyUI clients and workflows.
version: 1.0.0
license:
name: GNU General Public License v3.0
url: https://github.com/comfyanonymous/ComfyUI/blob/master/LICENSE
servers:
- url: https://cloud.comfy.org
description: Comfy Cloud API
security:
- ApiKeyAuth: []
tags:
- name: workflow
description: |
Submit workflows for execution and manage the execution queue.
This is the primary way to run ComfyUI workflows on the cloud.
- name: job
description: |
Monitor job status, view execution history, and manage running jobs.
Jobs are created when you submit a workflow via POST /api/prompt.
- name: asset
description: |
Upload, download, and manage persistent assets (images, models, outputs).
Assets provide durable storage with tagging and metadata support.
- name: file
description: |
Legacy file upload and download endpoints compatible with local ComfyUI.
For new integrations, consider using the Assets API instead.
- name: model
description: |
Browse available AI models. Models are pre-loaded on cloud infrastructure.
- name: node
description: |
Get information about available ComfyUI nodes and their inputs/outputs.
Useful for building dynamic workflow interfaces.
- name: user
description: |
User account information and personal data storage.
- name: system
description: |
Server status, health checks, and system information.
paths:
/api/global_subgraphs:
get:
tags:
- workflow
summary: Get available subgraph blueprints
description: >
Returns a list of globally available subgraph blueprints.
These are pre-built workflow components that can be used as nodes.
The data field contains a promise that resolves to the full subgraph
JSON.
operationId: getGlobalSubgraphs
responses:
'200':
description: Success - Map of subgraph IDs to their metadata
content:
application/json:
schema:
type: object
additionalProperties:
$ref: '#/components/schemas/GlobalSubgraphInfo'
'500':
description: Internal server error
content:
application/json:
schema:
$ref: '#/components/schemas/ErrorResponse'
security: []
components:
schemas:
GlobalSubgraphInfo:
type: object
description: Metadata for a global subgraph blueprint (without full data)
required:
- source
- name
- info
properties:
source:
type: string
description: >-
Source type of the subgraph - "templates" for workflow templates or
"custom_node" for custom node subgraphs
name:
type: string
description: Display name of the subgraph blueprint
info:
type: object
description: Additional information about the subgraph
required:
- node_pack
properties:
node_pack:
type: string
description: The node pack/module that provides this subgraph
data:
type: string
description: The full subgraph JSON data (may be empty in list view)
ErrorResponse:
type: object
required:
- code
- message
properties:
code:
type: string
message:
type: string
securitySchemes:
ApiKeyAuth:
type: apiKey
in: header
name: X-API-Key
description: |
API key authentication. Generate an API key from your account settings
at https://comfy.org/account. Pass the key in the X-API-Key header.
````
---
# Source: https://docs.comfy.org/api-reference/cloud/workflow/get-available-workflow-templates.md
> ## Documentation Index
> Fetch the complete documentation index at: https://docs.comfy.org/llms.txt
> Use this file to discover all available pages before exploring further.
# Get available workflow templates
> Returns available workflow templates
## OpenAPI
````yaml openapi-cloud.yaml get /api/workflow_templates
openapi: 3.0.3
info:
title: Comfy Cloud API
description: >
**Experimental API:** This API is experimental and subject to change.
Endpoints, request/response formats, and behavior may be modified without
notice.
API for Comfy Cloud - Run ComfyUI workflows on cloud infrastructure.
This API allows you to interact with Comfy Cloud programmatically,
including:
- Submitting and managing workflows
- Uploading and downloading files
- Monitoring job status and progress
## Cloud vs OSS ComfyUI Compatibility
Comfy Cloud implements the same API interfaces as OSS ComfyUI for maximum
compatibility,
but some fields are accepted for compatibility while being handled
differently or ignored:
| Field | Endpoints | Cloud Behavior |
|-------|-----------|----------------|
| `subfolder` | `/api/view`, `/api/upload/*` | **Ignored** - Cloud uses
content-addressed storage (hash-based). Returned in responses for
client-side organization. |
| `type` (input/output/temp) | `/api/view`, `/api/upload/*` | Partially used
- All files stored with tag-based organization rather than directory
structure. |
| `overwrite` | `/api/upload/*` | **Ignored** - Content-addressed storage
means identical content always has the same hash. |
| `number`, `front` | `/api/prompt` | **Ignored** - Cloud uses its own fair
queue scheduling per user. |
| `split`, `full_info` | `/api/userdata` | **Ignored** - Cloud always
returns full file metadata. |
These fields are retained in the API schema for drop-in compatibility with
existing ComfyUI clients and workflows.
version: 1.0.0
license:
name: GNU General Public License v3.0
url: https://github.com/comfyanonymous/ComfyUI/blob/master/LICENSE
servers:
- url: https://cloud.comfy.org
description: Comfy Cloud API
security:
- ApiKeyAuth: []
tags:
- name: workflow
description: |
Submit workflows for execution and manage the execution queue.
This is the primary way to run ComfyUI workflows on the cloud.
- name: job
description: |
Monitor job status, view execution history, and manage running jobs.
Jobs are created when you submit a workflow via POST /api/prompt.
- name: asset
description: |
Upload, download, and manage persistent assets (images, models, outputs).
Assets provide durable storage with tagging and metadata support.
- name: file
description: |
Legacy file upload and download endpoints compatible with local ComfyUI.
For new integrations, consider using the Assets API instead.
- name: model
description: |
Browse available AI models. Models are pre-loaded on cloud infrastructure.
- name: node
description: |
Get information about available ComfyUI nodes and their inputs/outputs.
Useful for building dynamic workflow interfaces.
- name: user
description: |
User account information and personal data storage.
- name: system
description: |
Server status, health checks, and system information.
paths:
/api/workflow_templates:
get:
tags:
- workflow
summary: Get available workflow templates
description: Returns available workflow templates
operationId: getWorkflowTemplates
responses:
'200':
description: Success
content:
application/json:
schema:
type: object
description: Empty object for workflow templates
security: []
components:
securitySchemes:
ApiKeyAuth:
type: apiKey
in: header
name: X-API-Key
description: |
API key authentication. Generate an API key from your account settings
at https://comfy.org/account. Pass the key in the X-API-Key header.
````
---
# Source: https://docs.comfy.org/api-reference/cloud/user/get-current-user-information.md
> ## Documentation Index
> Fetch the complete documentation index at: https://docs.comfy.org/llms.txt
> Use this file to discover all available pages before exploring further.
# Get current user information
> Returns information about the currently authenticated user
## OpenAPI
````yaml openapi-cloud.yaml get /api/user
openapi: 3.0.3
info:
title: Comfy Cloud API
description: >
**Experimental API:** This API is experimental and subject to change.
Endpoints, request/response formats, and behavior may be modified without
notice.
API for Comfy Cloud - Run ComfyUI workflows on cloud infrastructure.
This API allows you to interact with Comfy Cloud programmatically,
including:
- Submitting and managing workflows
- Uploading and downloading files
- Monitoring job status and progress
## Cloud vs OSS ComfyUI Compatibility
Comfy Cloud implements the same API interfaces as OSS ComfyUI for maximum
compatibility,
but some fields are accepted for compatibility while being handled
differently or ignored:
| Field | Endpoints | Cloud Behavior |
|-------|-----------|----------------|
| `subfolder` | `/api/view`, `/api/upload/*` | **Ignored** - Cloud uses
content-addressed storage (hash-based). Returned in responses for
client-side organization. |
| `type` (input/output/temp) | `/api/view`, `/api/upload/*` | Partially used
- All files stored with tag-based organization rather than directory
structure. |
| `overwrite` | `/api/upload/*` | **Ignored** - Content-addressed storage
means identical content always has the same hash. |
| `number`, `front` | `/api/prompt` | **Ignored** - Cloud uses its own fair
queue scheduling per user. |
| `split`, `full_info` | `/api/userdata` | **Ignored** - Cloud always
returns full file metadata. |
These fields are retained in the API schema for drop-in compatibility with
existing ComfyUI clients and workflows.
version: 1.0.0
license:
name: GNU General Public License v3.0
url: https://github.com/comfyanonymous/ComfyUI/blob/master/LICENSE
servers:
- url: https://cloud.comfy.org
description: Comfy Cloud API
security:
- ApiKeyAuth: []
tags:
- name: workflow
description: |
Submit workflows for execution and manage the execution queue.
This is the primary way to run ComfyUI workflows on the cloud.
- name: job
description: |
Monitor job status, view execution history, and manage running jobs.
Jobs are created when you submit a workflow via POST /api/prompt.
- name: asset
description: |
Upload, download, and manage persistent assets (images, models, outputs).
Assets provide durable storage with tagging and metadata support.
- name: file
description: |
Legacy file upload and download endpoints compatible with local ComfyUI.
For new integrations, consider using the Assets API instead.
- name: model
description: |
Browse available AI models. Models are pre-loaded on cloud infrastructure.
- name: node
description: |
Get information about available ComfyUI nodes and their inputs/outputs.
Useful for building dynamic workflow interfaces.
- name: user
description: |
User account information and personal data storage.
- name: system
description: |
Server status, health checks, and system information.
paths:
/api/user:
get:
tags:
- user
summary: Get current user information
description: Returns information about the currently authenticated user
operationId: getUser
responses:
'200':
description: Success
content:
application/json:
schema:
$ref: '#/components/schemas/UserResponse'
'401':
description: Unauthorized
content:
application/json:
schema:
$ref: '#/components/schemas/ErrorResponse'
components:
schemas:
UserResponse:
type: object
description: User information response
required:
- status
properties:
status:
type: string
description: User status (active or waitlisted)
ErrorResponse:
type: object
required:
- code
- message
properties:
code:
type: string
message:
type: string
securitySchemes:
ApiKeyAuth:
type: apiKey
in: header
name: X-API-Key
description: |
API key authentication. Generate an API key from your account settings
at https://comfy.org/account. Pass the key in the X-API-Key header.
````
---
# Source: https://docs.comfy.org/api-reference/cloud/job/get-execution-history-v2.md
> ## Documentation Index
> Fetch the complete documentation index at: https://docs.comfy.org/llms.txt
> Use this file to discover all available pages before exploring further.
# Get execution history (v2)
> Retrieve execution history for the authenticated user with pagination support.
Returns a lightweight history format with filtered prompt data (workflow removed from extra_pnginfo).
## OpenAPI
````yaml openapi-cloud.yaml get /api/history_v2
openapi: 3.0.3
info:
title: Comfy Cloud API
description: >
**Experimental API:** This API is experimental and subject to change.
Endpoints, request/response formats, and behavior may be modified without
notice.
API for Comfy Cloud - Run ComfyUI workflows on cloud infrastructure.
This API allows you to interact with Comfy Cloud programmatically,
including:
- Submitting and managing workflows
- Uploading and downloading files
- Monitoring job status and progress
## Cloud vs OSS ComfyUI Compatibility
Comfy Cloud implements the same API interfaces as OSS ComfyUI for maximum
compatibility,
but some fields are accepted for compatibility while being handled
differently or ignored:
| Field | Endpoints | Cloud Behavior |
|-------|-----------|----------------|
| `subfolder` | `/api/view`, `/api/upload/*` | **Ignored** - Cloud uses
content-addressed storage (hash-based). Returned in responses for
client-side organization. |
| `type` (input/output/temp) | `/api/view`, `/api/upload/*` | Partially used
- All files stored with tag-based organization rather than directory
structure. |
| `overwrite` | `/api/upload/*` | **Ignored** - Content-addressed storage
means identical content always has the same hash. |
| `number`, `front` | `/api/prompt` | **Ignored** - Cloud uses its own fair
queue scheduling per user. |
| `split`, `full_info` | `/api/userdata` | **Ignored** - Cloud always
returns full file metadata. |
These fields are retained in the API schema for drop-in compatibility with
existing ComfyUI clients and workflows.
version: 1.0.0
license:
name: GNU General Public License v3.0
url: https://github.com/comfyanonymous/ComfyUI/blob/master/LICENSE
servers:
- url: https://cloud.comfy.org
description: Comfy Cloud API
security:
- ApiKeyAuth: []
tags:
- name: workflow
description: |
Submit workflows for execution and manage the execution queue.
This is the primary way to run ComfyUI workflows on the cloud.
- name: job
description: |
Monitor job status, view execution history, and manage running jobs.
Jobs are created when you submit a workflow via POST /api/prompt.
- name: asset
description: |
Upload, download, and manage persistent assets (images, models, outputs).
Assets provide durable storage with tagging and metadata support.
- name: file
description: |
Legacy file upload and download endpoints compatible with local ComfyUI.
For new integrations, consider using the Assets API instead.
- name: model
description: |
Browse available AI models. Models are pre-loaded on cloud infrastructure.
- name: node
description: |
Get information about available ComfyUI nodes and their inputs/outputs.
Useful for building dynamic workflow interfaces.
- name: user
description: |
User account information and personal data storage.
- name: system
description: |
Server status, health checks, and system information.
paths:
/api/history_v2:
get:
tags:
- job
summary: Get execution history (v2)
description: >
Retrieve execution history for the authenticated user with pagination
support.
Returns a lightweight history format with filtered prompt data (workflow
removed from extra_pnginfo).
operationId: getHistory
parameters:
- name: max_items
in: query
required: false
description: Maximum number of items to return
schema:
type: integer
- name: offset
in: query
required: false
description: Starting position (default 0)
schema:
type: integer
default: 0
responses:
'200':
description: Success - Execution history retrieved
content:
application/json:
schema:
$ref: '#/components/schemas/HistoryResponse'
'401':
description: Unauthorized - Authentication required
content:
application/json:
schema:
$ref: '#/components/schemas/ErrorResponse'
'500':
description: Internal server error
content:
application/json:
schema:
$ref: '#/components/schemas/ErrorResponse'
components:
schemas:
HistoryResponse:
type: object
description: >
Execution history response with history array.
Returns an object with a "history" key containing an array of history
entries.
Each entry includes prompt_id as a property along with execution data.
required:
- history
properties:
history:
type: array
description: Array of history entries ordered by creation time (newest first)
items:
$ref: '#/components/schemas/HistoryEntry'
ErrorResponse:
type: object
required:
- code
- message
properties:
code:
type: string
message:
type: string
HistoryEntry:
type: object
description: History entry with prompt_id and execution data
required:
- prompt_id
properties:
prompt_id:
type: string
description: Unique identifier for this prompt execution
create_time:
type: integer
format: int64
description: Job creation timestamp (Unix timestamp in milliseconds)
workflow_id:
type: string
description: UUID identifying the workflow graph definition
prompt:
type: object
description: Filtered prompt execution data (lightweight format)
properties:
priority:
type: number
format: double
description: Execution priority
prompt_id:
type: string
description: The prompt ID
extra_data:
type: object
description: Additional execution data (workflow removed from extra_pnginfo)
additionalProperties: true
outputs:
type: object
description: Output data from execution (generated images, files, etc.)
additionalProperties: true
status:
type: object
description: Execution status and timeline information
additionalProperties: true
meta:
type: object
description: Metadata about the execution and nodes
additionalProperties: true
securitySchemes:
ApiKeyAuth:
type: apiKey
in: header
name: X-API-Key
description: |
API key authentication. Generate an API key from your account settings
at https://comfy.org/account. Pass the key in the X-API-Key header.
````
---
# Source: https://docs.comfy.org/api-reference/cloud/job/get-full-job-details.md
> ## Documentation Index
> Fetch the complete documentation index at: https://docs.comfy.org/llms.txt
> Use this file to discover all available pages before exploring further.
# Get full job details
> Retrieve complete details for a specific job including workflow and outputs.
Used for detail views, workflow re-execution, and debugging.
## OpenAPI
````yaml openapi-cloud.yaml get /api/jobs/{job_id}
openapi: 3.0.3
info:
title: Comfy Cloud API
description: >
**Experimental API:** This API is experimental and subject to change.
Endpoints, request/response formats, and behavior may be modified without
notice.
API for Comfy Cloud - Run ComfyUI workflows on cloud infrastructure.
This API allows you to interact with Comfy Cloud programmatically,
including:
- Submitting and managing workflows
- Uploading and downloading files
- Monitoring job status and progress
## Cloud vs OSS ComfyUI Compatibility
Comfy Cloud implements the same API interfaces as OSS ComfyUI for maximum
compatibility,
but some fields are accepted for compatibility while being handled
differently or ignored:
| Field | Endpoints | Cloud Behavior |
|-------|-----------|----------------|
| `subfolder` | `/api/view`, `/api/upload/*` | **Ignored** - Cloud uses
content-addressed storage (hash-based). Returned in responses for
client-side organization. |
| `type` (input/output/temp) | `/api/view`, `/api/upload/*` | Partially used
- All files stored with tag-based organization rather than directory
structure. |
| `overwrite` | `/api/upload/*` | **Ignored** - Content-addressed storage
means identical content always has the same hash. |
| `number`, `front` | `/api/prompt` | **Ignored** - Cloud uses its own fair
queue scheduling per user. |
| `split`, `full_info` | `/api/userdata` | **Ignored** - Cloud always
returns full file metadata. |
These fields are retained in the API schema for drop-in compatibility with
existing ComfyUI clients and workflows.
version: 1.0.0
license:
name: GNU General Public License v3.0
url: https://github.com/comfyanonymous/ComfyUI/blob/master/LICENSE
servers:
- url: https://cloud.comfy.org
description: Comfy Cloud API
security:
- ApiKeyAuth: []
tags:
- name: workflow
description: |
Submit workflows for execution and manage the execution queue.
This is the primary way to run ComfyUI workflows on the cloud.
- name: job
description: |
Monitor job status, view execution history, and manage running jobs.
Jobs are created when you submit a workflow via POST /api/prompt.
- name: asset
description: |
Upload, download, and manage persistent assets (images, models, outputs).
Assets provide durable storage with tagging and metadata support.
- name: file
description: |
Legacy file upload and download endpoints compatible with local ComfyUI.
For new integrations, consider using the Assets API instead.
- name: model
description: |
Browse available AI models. Models are pre-loaded on cloud infrastructure.
- name: node
description: |
Get information about available ComfyUI nodes and their inputs/outputs.
Useful for building dynamic workflow interfaces.
- name: user
description: |
User account information and personal data storage.
- name: system
description: |
Server status, health checks, and system information.
paths:
/api/jobs/{job_id}:
get:
tags:
- job
summary: Get full job details
description: >
Retrieve complete details for a specific job including workflow and
outputs.
Used for detail views, workflow re-execution, and debugging.
operationId: getJobDetail
parameters:
- name: job_id
in: path
required: true
description: Job identifier (UUID)
schema:
type: string
format: uuid
responses:
'200':
description: Success - Job details retrieved
content:
application/json:
schema:
$ref: '#/components/schemas/JobDetailResponse'
'401':
description: Unauthorized - Authentication required
content:
application/json:
schema:
$ref: '#/components/schemas/ErrorResponse'
'403':
description: Forbidden - Job does not belong to user
content:
application/json:
schema:
$ref: '#/components/schemas/ErrorResponse'
'404':
description: Job not found
content:
application/json:
schema:
$ref: '#/components/schemas/ErrorResponse'
'500':
description: Internal server error
content:
application/json:
schema:
$ref: '#/components/schemas/ErrorResponse'
components:
schemas:
JobDetailResponse:
type: object
description: Full job details including workflow and outputs
required:
- id
- status
- create_time
- update_time
properties:
id:
type: string
format: uuid
description: Unique job identifier
status:
type: string
enum:
- pending
- in_progress
- completed
- failed
- cancelled
description: User-friendly job status
workflow:
type: object
description: Full ComfyUI workflow (10-100KB, omitted if not available)
additionalProperties: true
execution_error:
$ref: '#/components/schemas/ExecutionError'
description: >-
Detailed execution error from ComfyUI (only for failed jobs with
structured error data)
create_time:
type: integer
format: int64
description: Job creation timestamp (Unix timestamp in seconds)
update_time:
type: integer
format: int64
description: Last update timestamp (Unix timestamp in seconds)
outputs:
type: object
description: Full outputs object from ComfyUI (only for terminal states)
additionalProperties: true
preview_output:
type: object
description: Primary preview output (only for terminal states)
additionalProperties: true
outputs_count:
type: integer
description: Total number of output files (omitted for non-terminal states)
workflow_id:
type: string
description: UUID identifying the workflow graph definition
execution_status:
type: object
description: ComfyUI execution status and timeline (only for terminal states)
additionalProperties: true
execution_meta:
type: object
description: Node-level execution metadata (only for terminal states)
additionalProperties: true
ErrorResponse:
type: object
required:
- code
- message
properties:
code:
type: string
message:
type: string
ExecutionError:
type: object
description: Detailed execution error information from ComfyUI
required:
- node_id
- node_type
- exception_message
- exception_type
- traceback
- current_inputs
- current_outputs
properties:
node_id:
type: string
description: ID of the node that failed
node_type:
type: string
description: Type name of the node (e.g., "KSampler")
exception_message:
type: string
description: Human-readable error message
exception_type:
type: string
description: Python exception type (e.g., "RuntimeError")
traceback:
type: array
items:
type: string
description: Array of traceback lines (empty array if not available)
current_inputs:
type: object
additionalProperties: true
description: Input values at time of failure (empty object if not available)
current_outputs:
type: object
additionalProperties: true
description: Output values at time of failure (empty object if not available)
securitySchemes:
ApiKeyAuth:
type: apiKey
in: header
name: X-API-Key
description: |
API key authentication. Generate an API key from your account settings
at https://comfy.org/account. Pass the key in the X-API-Key header.
````
---
# Source: https://docs.comfy.org/api-reference/cloud/job/get-history-for-specific-prompt.md
> ## Documentation Index
> Fetch the complete documentation index at: https://docs.comfy.org/llms.txt
> Use this file to discover all available pages before exploring further.
# Get history for specific prompt
> Retrieve detailed execution history for a specific prompt ID.
Returns full history data including complete prompt information.
## OpenAPI
````yaml openapi-cloud.yaml get /api/history_v2/{prompt_id}
openapi: 3.0.3
info:
title: Comfy Cloud API
description: >
**Experimental API:** This API is experimental and subject to change.
Endpoints, request/response formats, and behavior may be modified without
notice.
API for Comfy Cloud - Run ComfyUI workflows on cloud infrastructure.
This API allows you to interact with Comfy Cloud programmatically,
including:
- Submitting and managing workflows
- Uploading and downloading files
- Monitoring job status and progress
## Cloud vs OSS ComfyUI Compatibility
Comfy Cloud implements the same API interfaces as OSS ComfyUI for maximum
compatibility,
but some fields are accepted for compatibility while being handled
differently or ignored:
| Field | Endpoints | Cloud Behavior |
|-------|-----------|----------------|
| `subfolder` | `/api/view`, `/api/upload/*` | **Ignored** - Cloud uses
content-addressed storage (hash-based). Returned in responses for
client-side organization. |
| `type` (input/output/temp) | `/api/view`, `/api/upload/*` | Partially used
- All files stored with tag-based organization rather than directory
structure. |
| `overwrite` | `/api/upload/*` | **Ignored** - Content-addressed storage
means identical content always has the same hash. |
| `number`, `front` | `/api/prompt` | **Ignored** - Cloud uses its own fair
queue scheduling per user. |
| `split`, `full_info` | `/api/userdata` | **Ignored** - Cloud always
returns full file metadata. |
These fields are retained in the API schema for drop-in compatibility with
existing ComfyUI clients and workflows.
version: 1.0.0
license:
name: GNU General Public License v3.0
url: https://github.com/comfyanonymous/ComfyUI/blob/master/LICENSE
servers:
- url: https://cloud.comfy.org
description: Comfy Cloud API
security:
- ApiKeyAuth: []
tags:
- name: workflow
description: |
Submit workflows for execution and manage the execution queue.
This is the primary way to run ComfyUI workflows on the cloud.
- name: job
description: |
Monitor job status, view execution history, and manage running jobs.
Jobs are created when you submit a workflow via POST /api/prompt.
- name: asset
description: |
Upload, download, and manage persistent assets (images, models, outputs).
Assets provide durable storage with tagging and metadata support.
- name: file
description: |
Legacy file upload and download endpoints compatible with local ComfyUI.
For new integrations, consider using the Assets API instead.
- name: model
description: |
Browse available AI models. Models are pre-loaded on cloud infrastructure.
- name: node
description: |
Get information about available ComfyUI nodes and their inputs/outputs.
Useful for building dynamic workflow interfaces.
- name: user
description: |
User account information and personal data storage.
- name: system
description: |
Server status, health checks, and system information.
paths:
/api/history_v2/{prompt_id}:
get:
tags:
- job
summary: Get history for specific prompt
description: |
Retrieve detailed execution history for a specific prompt ID.
Returns full history data including complete prompt information.
operationId: getHistoryForPrompt
parameters:
- name: prompt_id
in: path
required: true
description: The prompt ID to retrieve history for
schema:
type: string
responses:
'200':
description: Success - History for prompt retrieved
content:
application/json:
schema:
$ref: '#/components/schemas/HistoryDetailResponse'
'401':
description: Unauthorized - Authentication required
content:
application/json:
schema:
$ref: '#/components/schemas/ErrorResponse'
'404':
description: Prompt not found
content:
application/json:
schema:
$ref: '#/components/schemas/ErrorResponse'
'500':
description: Internal server error
content:
application/json:
schema:
$ref: '#/components/schemas/ErrorResponse'
components:
schemas:
HistoryDetailResponse:
type: object
description: >
Detailed execution history response for a specific prompt.
Returns a dictionary with prompt_id as key and full history data as
value.
additionalProperties:
$ref: '#/components/schemas/HistoryDetailEntry'
ErrorResponse:
type: object
required:
- code
- message
properties:
code:
type: string
message:
type: string
HistoryDetailEntry:
type: object
description: History entry with full prompt data
properties:
prompt:
type: object
description: Full prompt execution data
properties:
priority:
type: number
format: double
description: Execution priority
prompt_id:
type: string
description: The prompt ID
prompt:
type: object
description: The workflow nodes
additionalProperties: true
extra_data:
type: object
description: Additional execution data
additionalProperties: true
outputs_to_execute:
type: array
items:
type: string
description: Output nodes to execute
outputs:
type: object
description: Output data from execution (generated images, files, etc.)
additionalProperties: true
status:
type: object
description: Execution status and timeline information
additionalProperties: true
meta:
type: object
description: Metadata about the execution and nodes
additionalProperties: true
securitySchemes:
ApiKeyAuth:
type: apiKey
in: header
name: X-API-Key
description: |
API key authentication. Generate an API key from your account settings
at https://comfy.org/account. Pass the key in the X-API-Key header.
````
---
# Source: https://docs.comfy.org/api-reference/cloud/workflow/get-information-about-current-prompt-execution.md
> ## Documentation Index
> Fetch the complete documentation index at: https://docs.comfy.org/llms.txt
> Use this file to discover all available pages before exploring further.
# Get information about current prompt execution
> Returns information about the current prompt in the execution queue
## OpenAPI
````yaml openapi-cloud.yaml get /api/prompt
openapi: 3.0.3
info:
title: Comfy Cloud API
description: >
**Experimental API:** This API is experimental and subject to change.
Endpoints, request/response formats, and behavior may be modified without
notice.
API for Comfy Cloud - Run ComfyUI workflows on cloud infrastructure.
This API allows you to interact with Comfy Cloud programmatically,
including:
- Submitting and managing workflows
- Uploading and downloading files
- Monitoring job status and progress
## Cloud vs OSS ComfyUI Compatibility
Comfy Cloud implements the same API interfaces as OSS ComfyUI for maximum
compatibility,
but some fields are accepted for compatibility while being handled
differently or ignored:
| Field | Endpoints | Cloud Behavior |
|-------|-----------|----------------|
| `subfolder` | `/api/view`, `/api/upload/*` | **Ignored** - Cloud uses
content-addressed storage (hash-based). Returned in responses for
client-side organization. |
| `type` (input/output/temp) | `/api/view`, `/api/upload/*` | Partially used
- All files stored with tag-based organization rather than directory
structure. |
| `overwrite` | `/api/upload/*` | **Ignored** - Content-addressed storage
means identical content always has the same hash. |
| `number`, `front` | `/api/prompt` | **Ignored** - Cloud uses its own fair
queue scheduling per user. |
| `split`, `full_info` | `/api/userdata` | **Ignored** - Cloud always
returns full file metadata. |
These fields are retained in the API schema for drop-in compatibility with
existing ComfyUI clients and workflows.
version: 1.0.0
license:
name: GNU General Public License v3.0
url: https://github.com/comfyanonymous/ComfyUI/blob/master/LICENSE
servers:
- url: https://cloud.comfy.org
description: Comfy Cloud API
security:
- ApiKeyAuth: []
tags:
- name: workflow
description: |
Submit workflows for execution and manage the execution queue.
This is the primary way to run ComfyUI workflows on the cloud.
- name: job
description: |
Monitor job status, view execution history, and manage running jobs.
Jobs are created when you submit a workflow via POST /api/prompt.
- name: asset
description: |
Upload, download, and manage persistent assets (images, models, outputs).
Assets provide durable storage with tagging and metadata support.
- name: file
description: |
Legacy file upload and download endpoints compatible with local ComfyUI.
For new integrations, consider using the Assets API instead.
- name: model
description: |
Browse available AI models. Models are pre-loaded on cloud infrastructure.
- name: node
description: |
Get information about available ComfyUI nodes and their inputs/outputs.
Useful for building dynamic workflow interfaces.
- name: user
description: |
User account information and personal data storage.
- name: system
description: |
Server status, health checks, and system information.
paths:
/api/prompt:
get:
tags:
- workflow
summary: Get information about current prompt execution
description: Returns information about the current prompt in the execution queue
operationId: getPromptInfo
responses:
'200':
description: Success
content:
application/json:
schema:
$ref: '#/components/schemas/PromptInfo'
'401':
description: Unauthorized
content:
application/json:
schema:
$ref: '#/components/schemas/ErrorResponse'
'500':
description: Internal server error
content:
application/json:
schema:
$ref: '#/components/schemas/ErrorResponse'
components:
schemas:
PromptInfo:
type: object
properties:
exec_info:
type: object
properties:
queue_remaining:
type: integer
description: Number of items remaining in the queue
ErrorResponse:
type: object
required:
- code
- message
properties:
code:
type: string
message:
type: string
securitySchemes:
ApiKeyAuth:
type: apiKey
in: header
name: X-API-Key
description: |
API key authentication. Generate an API key from your account settings
at https://comfy.org/account. Pass the key in the X-API-Key header.
````
---
# Source: https://docs.comfy.org/api-reference/registry/get-information-about-the-calling-user.md
> ## Documentation Index
> Fetch the complete documentation index at: https://docs.comfy.org/llms.txt
> Use this file to discover all available pages before exploring further.
# Get information about the calling user.
## OpenAPI
````yaml https://api.comfy.org/openapi get /users
openapi: 3.0.2
info:
title: Comfy API
version: '1.0'
servers:
- url: https://api.comfy.org
security: []
paths:
/users:
get:
tags:
- Registry
summary: Get information about the calling user.
operationId: GetUser
responses:
'200':
content:
application/json:
schema:
$ref: '#/components/schemas/User'
description: OK
'401':
description: Unauthorized
'404':
description: Not Found
security:
- BearerAuth: []
components:
schemas:
User:
properties:
email:
description: The email address for this user.
type: string
id:
description: The unique id for this user.
type: string
isAdmin:
description: Indicates if the user has admin privileges.
type: boolean
isApproved:
description: Indicates if the user is approved.
type: boolean
name:
description: The name for this user.
type: string
type: object
securitySchemes:
BearerAuth:
bearerFormat: JWT
scheme: bearer
type: http
````
---
# Source: https://docs.comfy.org/api-reference/cloud/job/get-job-status.md
> ## Documentation Index
> Fetch the complete documentation index at: https://docs.comfy.org/llms.txt
> Use this file to discover all available pages before exploring further.
# Get job status
> Returns the current status of a specific job by ID
## OpenAPI
````yaml openapi-cloud.yaml get /api/job/{job_id}/status
openapi: 3.0.3
info:
title: Comfy Cloud API
description: >
**Experimental API:** This API is experimental and subject to change.
Endpoints, request/response formats, and behavior may be modified without
notice.
API for Comfy Cloud - Run ComfyUI workflows on cloud infrastructure.
This API allows you to interact with Comfy Cloud programmatically,
including:
- Submitting and managing workflows
- Uploading and downloading files
- Monitoring job status and progress
## Cloud vs OSS ComfyUI Compatibility
Comfy Cloud implements the same API interfaces as OSS ComfyUI for maximum
compatibility,
but some fields are accepted for compatibility while being handled
differently or ignored:
| Field | Endpoints | Cloud Behavior |
|-------|-----------|----------------|
| `subfolder` | `/api/view`, `/api/upload/*` | **Ignored** - Cloud uses
content-addressed storage (hash-based). Returned in responses for
client-side organization. |
| `type` (input/output/temp) | `/api/view`, `/api/upload/*` | Partially used
- All files stored with tag-based organization rather than directory
structure. |
| `overwrite` | `/api/upload/*` | **Ignored** - Content-addressed storage
means identical content always has the same hash. |
| `number`, `front` | `/api/prompt` | **Ignored** - Cloud uses its own fair
queue scheduling per user. |
| `split`, `full_info` | `/api/userdata` | **Ignored** - Cloud always
returns full file metadata. |
These fields are retained in the API schema for drop-in compatibility with
existing ComfyUI clients and workflows.
version: 1.0.0
license:
name: GNU General Public License v3.0
url: https://github.com/comfyanonymous/ComfyUI/blob/master/LICENSE
servers:
- url: https://cloud.comfy.org
description: Comfy Cloud API
security:
- ApiKeyAuth: []
tags:
- name: workflow
description: |
Submit workflows for execution and manage the execution queue.
This is the primary way to run ComfyUI workflows on the cloud.
- name: job
description: |
Monitor job status, view execution history, and manage running jobs.
Jobs are created when you submit a workflow via POST /api/prompt.
- name: asset
description: |
Upload, download, and manage persistent assets (images, models, outputs).
Assets provide durable storage with tagging and metadata support.
- name: file
description: |
Legacy file upload and download endpoints compatible with local ComfyUI.
For new integrations, consider using the Assets API instead.
- name: model
description: |
Browse available AI models. Models are pre-loaded on cloud infrastructure.
- name: node
description: |
Get information about available ComfyUI nodes and their inputs/outputs.
Useful for building dynamic workflow interfaces.
- name: user
description: |
User account information and personal data storage.
- name: system
description: |
Server status, health checks, and system information.
paths:
/api/job/{job_id}/status:
get:
tags:
- job
summary: Get job status
description: Returns the current status of a specific job by ID
operationId: getJobStatus
parameters:
- name: job_id
in: path
required: true
description: The unique ID of the job
schema:
type: string
format: uuid
responses:
'200':
description: Success - Job status returned
content:
application/json:
schema:
$ref: '#/components/schemas/JobStatusResponse'
'401':
description: Unauthorized
content:
application/json:
schema:
$ref: '#/components/schemas/ErrorResponse'
'403':
description: Forbidden - job belongs to another user
content:
application/json:
schema:
$ref: '#/components/schemas/ErrorResponse'
'404':
description: Job not found
content:
application/json:
schema:
$ref: '#/components/schemas/ErrorResponse'
'500':
description: Internal server error
content:
application/json:
schema:
$ref: '#/components/schemas/ErrorResponse'
components:
schemas:
JobStatusResponse:
type: object
description: Job status information
properties:
id:
type: string
format: uuid
description: The job ID
status:
type: string
enum:
- waiting_to_dispatch
- pending
- in_progress
- completed
- error
- cancelled
description: Current job status
created_at:
type: string
format: date-time
description: When the job was created
updated_at:
type: string
format: date-time
description: When the job was last updated
last_state_update:
type: string
format: date-time
description: When the job status was last changed
assigned_inference:
type: string
nullable: true
description: The inference instance assigned to this job (if any)
error_message:
type: string
nullable: true
description: Error message if the job failed
required:
- id
- status
- created_at
- updated_at
ErrorResponse:
type: object
required:
- code
- message
properties:
code:
type: string
message:
type: string
securitySchemes:
ApiKeyAuth:
type: apiKey
in: header
name: X-API-Key
description: |
API key authentication. Generate an API key from your account settings
at https://comfy.org/account. Pass the key in the X-API-Key header.
````
---
# Source: https://docs.comfy.org/api-reference/cloud/model/get-model-preview-image.md
> ## Documentation Index
> Fetch the complete documentation index at: https://docs.comfy.org/llms.txt
> Use this file to discover all available pages before exploring further.
# Get model preview image
> Returns a preview image for the specified model.
The image is returned in WebP format for optimal performance.
## OpenAPI
````yaml openapi-cloud.yaml get /api/experiment/models/preview/{folder}/{path_index}/{filename}
openapi: 3.0.3
info:
title: Comfy Cloud API
description: >
**Experimental API:** This API is experimental and subject to change.
Endpoints, request/response formats, and behavior may be modified without
notice.
API for Comfy Cloud - Run ComfyUI workflows on cloud infrastructure.
This API allows you to interact with Comfy Cloud programmatically,
including:
- Submitting and managing workflows
- Uploading and downloading files
- Monitoring job status and progress
## Cloud vs OSS ComfyUI Compatibility
Comfy Cloud implements the same API interfaces as OSS ComfyUI for maximum
compatibility,
but some fields are accepted for compatibility while being handled
differently or ignored:
| Field | Endpoints | Cloud Behavior |
|-------|-----------|----------------|
| `subfolder` | `/api/view`, `/api/upload/*` | **Ignored** - Cloud uses
content-addressed storage (hash-based). Returned in responses for
client-side organization. |
| `type` (input/output/temp) | `/api/view`, `/api/upload/*` | Partially used
- All files stored with tag-based organization rather than directory
structure. |
| `overwrite` | `/api/upload/*` | **Ignored** - Content-addressed storage
means identical content always has the same hash. |
| `number`, `front` | `/api/prompt` | **Ignored** - Cloud uses its own fair
queue scheduling per user. |
| `split`, `full_info` | `/api/userdata` | **Ignored** - Cloud always
returns full file metadata. |
These fields are retained in the API schema for drop-in compatibility with
existing ComfyUI clients and workflows.
version: 1.0.0
license:
name: GNU General Public License v3.0
url: https://github.com/comfyanonymous/ComfyUI/blob/master/LICENSE
servers:
- url: https://cloud.comfy.org
description: Comfy Cloud API
security:
- ApiKeyAuth: []
tags:
- name: workflow
description: |
Submit workflows for execution and manage the execution queue.
This is the primary way to run ComfyUI workflows on the cloud.
- name: job
description: |
Monitor job status, view execution history, and manage running jobs.
Jobs are created when you submit a workflow via POST /api/prompt.
- name: asset
description: |
Upload, download, and manage persistent assets (images, models, outputs).
Assets provide durable storage with tagging and metadata support.
- name: file
description: |
Legacy file upload and download endpoints compatible with local ComfyUI.
For new integrations, consider using the Assets API instead.
- name: model
description: |
Browse available AI models. Models are pre-loaded on cloud infrastructure.
- name: node
description: |
Get information about available ComfyUI nodes and their inputs/outputs.
Useful for building dynamic workflow interfaces.
- name: user
description: |
User account information and personal data storage.
- name: system
description: |
Server status, health checks, and system information.
paths:
/api/experiment/models/preview/{folder}/{path_index}/{filename}:
get:
tags:
- model
summary: Get model preview image
description: |
Returns a preview image for the specified model.
The image is returned in WebP format for optimal performance.
operationId: getModelPreview
parameters:
- name: folder
in: path
required: true
description: The folder name containing the model
schema:
type: string
example: checkpoints
- name: path_index
in: path
required: true
description: The path index (usually 0 for cloud service)
schema:
type: integer
example: 0
- name: filename
in: path
required: true
description: The model filename (with or without .webp extension)
schema:
type: string
example: model.safetensors
responses:
'200':
description: Success - Model preview image
content:
image/webp:
schema:
type: string
format: binary
'404':
description: Model not found or preview not available
content:
application/json:
schema:
$ref: '#/components/schemas/ErrorResponse'
'500':
description: Internal server error
content:
application/json:
schema:
$ref: '#/components/schemas/ErrorResponse'
security: []
components:
schemas:
ErrorResponse:
type: object
required:
- code
- message
properties:
code:
type: string
message:
type: string
securitySchemes:
ApiKeyAuth:
type: apiKey
in: header
name: X-API-Key
description: |
API key authentication. Generate an API key from your account settings
at https://comfy.org/account. Pass the key in the X-API-Key header.
````
---
# Source: https://docs.comfy.org/api-reference/cloud/model/get-models-in-a-specific-folder.md
> ## Documentation Index
> Fetch the complete documentation index at: https://docs.comfy.org/llms.txt
> Use this file to discover all available pages before exploring further.
# Get models in a specific folder
> Returns a list of models available in the specified folder.
This is an experimental endpoint that provides enhanced model information.
## OpenAPI
````yaml openapi-cloud.yaml get /api/experiment/models/{folder}
openapi: 3.0.3
info:
title: Comfy Cloud API
description: >
**Experimental API:** This API is experimental and subject to change.
Endpoints, request/response formats, and behavior may be modified without
notice.
API for Comfy Cloud - Run ComfyUI workflows on cloud infrastructure.
This API allows you to interact with Comfy Cloud programmatically,
including:
- Submitting and managing workflows
- Uploading and downloading files
- Monitoring job status and progress
## Cloud vs OSS ComfyUI Compatibility
Comfy Cloud implements the same API interfaces as OSS ComfyUI for maximum
compatibility,
but some fields are accepted for compatibility while being handled
differently or ignored:
| Field | Endpoints | Cloud Behavior |
|-------|-----------|----------------|
| `subfolder` | `/api/view`, `/api/upload/*` | **Ignored** - Cloud uses
content-addressed storage (hash-based). Returned in responses for
client-side organization. |
| `type` (input/output/temp) | `/api/view`, `/api/upload/*` | Partially used
- All files stored with tag-based organization rather than directory
structure. |
| `overwrite` | `/api/upload/*` | **Ignored** - Content-addressed storage
means identical content always has the same hash. |
| `number`, `front` | `/api/prompt` | **Ignored** - Cloud uses its own fair
queue scheduling per user. |
| `split`, `full_info` | `/api/userdata` | **Ignored** - Cloud always
returns full file metadata. |
These fields are retained in the API schema for drop-in compatibility with
existing ComfyUI clients and workflows.
version: 1.0.0
license:
name: GNU General Public License v3.0
url: https://github.com/comfyanonymous/ComfyUI/blob/master/LICENSE
servers:
- url: https://cloud.comfy.org
description: Comfy Cloud API
security:
- ApiKeyAuth: []
tags:
- name: workflow
description: |
Submit workflows for execution and manage the execution queue.
This is the primary way to run ComfyUI workflows on the cloud.
- name: job
description: |
Monitor job status, view execution history, and manage running jobs.
Jobs are created when you submit a workflow via POST /api/prompt.
- name: asset
description: |
Upload, download, and manage persistent assets (images, models, outputs).
Assets provide durable storage with tagging and metadata support.
- name: file
description: |
Legacy file upload and download endpoints compatible with local ComfyUI.
For new integrations, consider using the Assets API instead.
- name: model
description: |
Browse available AI models. Models are pre-loaded on cloud infrastructure.
- name: node
description: |
Get information about available ComfyUI nodes and their inputs/outputs.
Useful for building dynamic workflow interfaces.
- name: user
description: |
User account information and personal data storage.
- name: system
description: |
Server status, health checks, and system information.
paths:
/api/experiment/models/{folder}:
get:
tags:
- model
summary: Get models in a specific folder
description: >
Returns a list of models available in the specified folder.
This is an experimental endpoint that provides enhanced model
information.
operationId: getModelsInFolder
parameters:
- name: folder
in: path
required: true
description: The folder name to list models from
schema:
type: string
example: checkpoints
responses:
'200':
description: Success - List of models in the folder
content:
application/json:
schema:
type: array
items:
$ref: '#/components/schemas/ModelFile'
'404':
description: Folder not found or no models in folder
content:
application/json:
schema:
$ref: '#/components/schemas/ErrorResponse'
'500':
description: Internal server error
content:
application/json:
schema:
$ref: '#/components/schemas/ErrorResponse'
security: []
components:
schemas:
ModelFile:
type: object
description: Represents a model file with metadata
required:
- name
- pathIndex
properties:
name:
type: string
description: The filename of the model
example: model.safetensors
pathIndex:
type: integer
description: Index of the path where this model is located
example: 0
ErrorResponse:
type: object
required:
- code
- message
properties:
code:
type: string
message:
type: string
securitySchemes:
ApiKeyAuth:
type: apiKey
in: header
name: X-API-Key
description: |
API key authentication. Generate an API key from your account settings
at https://comfy.org/account. Pass the key in the X-API-Key header.
````
---
# Source: https://docs.comfy.org/api-reference/api-nodes/get-proxyvidutasks-creations.md
> ## Documentation Index
> Fetch the complete documentation index at: https://docs.comfy.org/llms.txt
> Use this file to discover all available pages before exploring further.
# Get proxyvidutasks creations
## OpenAPI
````yaml https://api.comfy.org/openapi get /proxy/vidu/tasks/{id}/creations
openapi: 3.0.2
info:
title: Comfy API
version: '1.0'
servers:
- url: https://api.comfy.org
security: []
paths:
/proxy/vidu/tasks/{id}/creations:
get:
tags:
- API Nodes
- Released
operationId: ViduGetCreations
parameters:
- in: path
name: id
required: true
schema:
type: string
responses:
'200':
content:
application/json:
schema:
$ref: '#/components/schemas/ViduGetCreationsReply'
description: OK
'400':
content:
application/json:
schema:
$ref: '#/components/schemas/Error'
description: Error 4xx/5xx
default:
content:
application/json:
schema:
$ref: '#/components/schemas/Error'
description: Error 4xx/5xx
components:
schemas:
ViduGetCreationsReply:
properties:
creations:
items:
$ref: '#/components/schemas/ViduCreation'
type: array
err_code:
type: string
id:
type: string
state:
$ref: '#/components/schemas/ViduState'
type: object
Error:
properties:
details:
description: >-
Optional detailed information about the error or hints for resolving
it.
items:
type: string
type: array
message:
description: A clear and concise description of the error.
type: string
type: object
ViduCreation:
properties:
cover_url:
type: string
id:
type: string
moderation_url:
items:
type: string
type: array
url:
type: string
watermarked_url:
type: string
type: object
ViduState:
enum:
- created
- processing
- queueing
- success
- failed
type: string
````
---
# Source: https://docs.comfy.org/api-reference/cloud/job/get-queue-information.md
> ## Documentation Index
> Fetch the complete documentation index at: https://docs.comfy.org/llms.txt
> Use this file to discover all available pages before exploring further.
# Get queue information
> Returns information about running and pending items in the queue
## OpenAPI
````yaml openapi-cloud.yaml get /api/queue
openapi: 3.0.3
info:
title: Comfy Cloud API
description: >
**Experimental API:** This API is experimental and subject to change.
Endpoints, request/response formats, and behavior may be modified without
notice.
API for Comfy Cloud - Run ComfyUI workflows on cloud infrastructure.
This API allows you to interact with Comfy Cloud programmatically,
including:
- Submitting and managing workflows
- Uploading and downloading files
- Monitoring job status and progress
## Cloud vs OSS ComfyUI Compatibility
Comfy Cloud implements the same API interfaces as OSS ComfyUI for maximum
compatibility,
but some fields are accepted for compatibility while being handled
differently or ignored:
| Field | Endpoints | Cloud Behavior |
|-------|-----------|----------------|
| `subfolder` | `/api/view`, `/api/upload/*` | **Ignored** - Cloud uses
content-addressed storage (hash-based). Returned in responses for
client-side organization. |
| `type` (input/output/temp) | `/api/view`, `/api/upload/*` | Partially used
- All files stored with tag-based organization rather than directory
structure. |
| `overwrite` | `/api/upload/*` | **Ignored** - Content-addressed storage
means identical content always has the same hash. |
| `number`, `front` | `/api/prompt` | **Ignored** - Cloud uses its own fair
queue scheduling per user. |
| `split`, `full_info` | `/api/userdata` | **Ignored** - Cloud always
returns full file metadata. |
These fields are retained in the API schema for drop-in compatibility with
existing ComfyUI clients and workflows.
version: 1.0.0
license:
name: GNU General Public License v3.0
url: https://github.com/comfyanonymous/ComfyUI/blob/master/LICENSE
servers:
- url: https://cloud.comfy.org
description: Comfy Cloud API
security:
- ApiKeyAuth: []
tags:
- name: workflow
description: |
Submit workflows for execution and manage the execution queue.
This is the primary way to run ComfyUI workflows on the cloud.
- name: job
description: |
Monitor job status, view execution history, and manage running jobs.
Jobs are created when you submit a workflow via POST /api/prompt.
- name: asset
description: |
Upload, download, and manage persistent assets (images, models, outputs).
Assets provide durable storage with tagging and metadata support.
- name: file
description: |
Legacy file upload and download endpoints compatible with local ComfyUI.
For new integrations, consider using the Assets API instead.
- name: model
description: |
Browse available AI models. Models are pre-loaded on cloud infrastructure.
- name: node
description: |
Get information about available ComfyUI nodes and their inputs/outputs.
Useful for building dynamic workflow interfaces.
- name: user
description: |
User account information and personal data storage.
- name: system
description: |
Server status, health checks, and system information.
paths:
/api/queue:
get:
tags:
- job
summary: Get queue information
description: Returns information about running and pending items in the queue
operationId: getQueueInfo
responses:
'200':
description: Success
content:
application/json:
schema:
$ref: '#/components/schemas/QueueInfo'
'400':
description: Invalid request parameters
content:
application/json:
schema:
$ref: '#/components/schemas/ErrorResponse'
'500':
description: Invalid request parameters
content:
application/json:
schema:
$ref: '#/components/schemas/ErrorResponse'
components:
schemas:
QueueInfo:
type: object
description: Queue information with pending and running jobs
properties:
queue_running:
type: array
description: Array of currently running job items
items:
$ref: '#/components/schemas/QueueItem'
queue_pending:
type: array
description: Array of pending job items (ordered by creation time, oldest first)
items:
$ref: '#/components/schemas/QueueItem'
ErrorResponse:
type: object
required:
- code
- message
properties:
code:
type: string
message:
type: string
QueueItem:
type: array
description: >
Queue item tuple format: [job_number, prompt_id, workflow_json,
output_node_ids, metadata]
- [0] job_number (integer): Position in queue (1-based)
- [1] prompt_id (string): Job UUID
- [2] workflow_json (object): Full ComfyUI workflow
- [3] output_node_ids (array): Node IDs to return results from
- [4] metadata (object): Contains {create_time: }
items:
oneOf:
- type: integer
description: Job number (position in queue)
- type: string
description: Prompt ID (UUID)
- type: object
description: Workflow JSON
- type: array
items:
type: string
description: Output node IDs
- type: object
description: Metadata with create_time
securitySchemes:
ApiKeyAuth:
type: apiKey
in: header
name: X-API-Key
description: |
API key authentication. Generate an API key from your account settings
at https://comfy.org/account. Pass the key in the X-API-Key header.
````
---
# Source: https://docs.comfy.org/api-reference/cloud/file/get-related-mask-layer-files.md
> ## Documentation Index
> Fetch the complete documentation index at: https://docs.comfy.org/llms.txt
> Use this file to discover all available pages before exploring further.
# Get related mask layer files
> Given a mask file (any of the 4 layers), returns all related mask layer files.
This is used by the mask editor to load the paint, mask, and painted layers
when reopening a previously edited mask.
## OpenAPI
````yaml openapi-cloud.yaml get /api/files/mask-layers
openapi: 3.0.3
info:
title: Comfy Cloud API
description: >
**Experimental API:** This API is experimental and subject to change.
Endpoints, request/response formats, and behavior may be modified without
notice.
API for Comfy Cloud - Run ComfyUI workflows on cloud infrastructure.
This API allows you to interact with Comfy Cloud programmatically,
including:
- Submitting and managing workflows
- Uploading and downloading files
- Monitoring job status and progress
## Cloud vs OSS ComfyUI Compatibility
Comfy Cloud implements the same API interfaces as OSS ComfyUI for maximum
compatibility,
but some fields are accepted for compatibility while being handled
differently or ignored:
| Field | Endpoints | Cloud Behavior |
|-------|-----------|----------------|
| `subfolder` | `/api/view`, `/api/upload/*` | **Ignored** - Cloud uses
content-addressed storage (hash-based). Returned in responses for
client-side organization. |
| `type` (input/output/temp) | `/api/view`, `/api/upload/*` | Partially used
- All files stored with tag-based organization rather than directory
structure. |
| `overwrite` | `/api/upload/*` | **Ignored** - Content-addressed storage
means identical content always has the same hash. |
| `number`, `front` | `/api/prompt` | **Ignored** - Cloud uses its own fair
queue scheduling per user. |
| `split`, `full_info` | `/api/userdata` | **Ignored** - Cloud always
returns full file metadata. |
These fields are retained in the API schema for drop-in compatibility with
existing ComfyUI clients and workflows.
version: 1.0.0
license:
name: GNU General Public License v3.0
url: https://github.com/comfyanonymous/ComfyUI/blob/master/LICENSE
servers:
- url: https://cloud.comfy.org
description: Comfy Cloud API
security:
- ApiKeyAuth: []
tags:
- name: workflow
description: |
Submit workflows for execution and manage the execution queue.
This is the primary way to run ComfyUI workflows on the cloud.
- name: job
description: |
Monitor job status, view execution history, and manage running jobs.
Jobs are created when you submit a workflow via POST /api/prompt.
- name: asset
description: |
Upload, download, and manage persistent assets (images, models, outputs).
Assets provide durable storage with tagging and metadata support.
- name: file
description: |
Legacy file upload and download endpoints compatible with local ComfyUI.
For new integrations, consider using the Assets API instead.
- name: model
description: |
Browse available AI models. Models are pre-loaded on cloud infrastructure.
- name: node
description: |
Get information about available ComfyUI nodes and their inputs/outputs.
Useful for building dynamic workflow interfaces.
- name: user
description: |
User account information and personal data storage.
- name: system
description: |
Server status, health checks, and system information.
paths:
/api/files/mask-layers:
get:
tags:
- file
summary: Get related mask layer files
description: >
Given a mask file (any of the 4 layers), returns all related mask layer
files.
This is used by the mask editor to load the paint, mask, and painted
layers
when reopening a previously edited mask.
operationId: getMaskLayers
parameters:
- name: filename
in: query
required: true
description: Hash filename of any mask layer file
schema:
type: string
example: abc123def456.png
responses:
'200':
description: Success - Related mask layers returned
content:
application/json:
schema:
type: object
properties:
mask:
type: string
description: Filename of the mask layer
nullable: true
paint:
type: string
description: Filename of the paint strokes layer
nullable: true
painted:
type: string
description: Filename of the painted image layer
nullable: true
painted_masked:
type: string
description: Filename of the final composite layer
nullable: true
'404':
description: File not found or not a mask file
content:
application/json:
schema:
$ref: '#/components/schemas/ErrorResponse'
components:
schemas:
ErrorResponse:
type: object
required:
- code
- message
properties:
code:
type: string
message:
type: string
securitySchemes:
ApiKeyAuth:
type: apiKey
in: header
name: X-API-Key
description: |
API key authentication. Generate an API key from your account settings
at https://comfy.org/account. Pass the key in the X-API-Key header.
````
---
# Source: https://docs.comfy.org/api-reference/releases/get-release-notes.md
> ## Documentation Index
> Fetch the complete documentation index at: https://docs.comfy.org/llms.txt
> Use this file to discover all available pages before exploring further.
# Get release notes
> Fetch release notes from Strapi with caching
## OpenAPI
````yaml https://api.comfy.org/openapi get /releases
openapi: 3.0.2
info:
title: Comfy API
version: '1.0'
servers:
- url: https://api.comfy.org
security: []
paths:
/releases:
get:
tags:
- Releases
summary: Get release notes
description: Fetch release notes from Strapi with caching
operationId: GetReleaseNotes
parameters:
- description: The project to get release notes for
in: query
name: project
required: true
schema:
enum:
- comfyui
- comfyui_frontend
- desktop
- cloud
type: string
- description: The current version to filter release notes
in: query
name: current_version
schema:
type: string
- description: The locale for the release notes
in: query
name: locale
schema:
default: en
enum:
- en
- es
- fr
- ja
- ko
- ru
- zh
type: string
- description: The platform requesting the release notes
in: query
name: form_factor
schema:
type: string
responses:
'200':
content:
application/json:
schema:
items:
$ref: '#/components/schemas/ReleaseNote'
type: array
description: Release notes retrieved successfully
'400':
content:
application/json:
schema:
$ref: '#/components/schemas/ErrorResponse'
description: Bad request
'500':
content:
application/json:
schema:
$ref: '#/components/schemas/ErrorResponse'
description: Internal server error
components:
schemas:
ReleaseNote:
properties:
attention:
description: The attention level for this release
enum:
- low
- medium
- high
type: string
content:
description: The content of the release note in markdown format
type: string
id:
description: Unique identifier for the release note
type: integer
project:
description: The project this release note belongs to
enum:
- comfyui
- comfyui_frontend
- desktop
- cloud
type: string
published_at:
description: When the release note was published
format: date-time
type: string
version:
description: The version of the release
type: string
required:
- id
- project
- version
- attention
- content
- published_at
type: object
ErrorResponse:
properties:
error:
type: string
message:
type: string
required:
- error
- message
type: object
````
---
# Source: https://docs.comfy.org/api-reference/registry/get-server-feature-flags.md
# Source: https://docs.comfy.org/api-reference/cloud/node/get-server-feature-flags.md
> ## Documentation Index
> Fetch the complete documentation index at: https://docs.comfy.org/llms.txt
> Use this file to discover all available pages before exploring further.
# Get server feature flags
> Returns the server's feature capabilities
## OpenAPI
````yaml openapi-cloud.yaml get /api/features
openapi: 3.0.3
info:
title: Comfy Cloud API
description: >
**Experimental API:** This API is experimental and subject to change.
Endpoints, request/response formats, and behavior may be modified without
notice.
API for Comfy Cloud - Run ComfyUI workflows on cloud infrastructure.
This API allows you to interact with Comfy Cloud programmatically,
including:
- Submitting and managing workflows
- Uploading and downloading files
- Monitoring job status and progress
## Cloud vs OSS ComfyUI Compatibility
Comfy Cloud implements the same API interfaces as OSS ComfyUI for maximum
compatibility,
but some fields are accepted for compatibility while being handled
differently or ignored:
| Field | Endpoints | Cloud Behavior |
|-------|-----------|----------------|
| `subfolder` | `/api/view`, `/api/upload/*` | **Ignored** - Cloud uses
content-addressed storage (hash-based). Returned in responses for
client-side organization. |
| `type` (input/output/temp) | `/api/view`, `/api/upload/*` | Partially used
- All files stored with tag-based organization rather than directory
structure. |
| `overwrite` | `/api/upload/*` | **Ignored** - Content-addressed storage
means identical content always has the same hash. |
| `number`, `front` | `/api/prompt` | **Ignored** - Cloud uses its own fair
queue scheduling per user. |
| `split`, `full_info` | `/api/userdata` | **Ignored** - Cloud always
returns full file metadata. |
These fields are retained in the API schema for drop-in compatibility with
existing ComfyUI clients and workflows.
version: 1.0.0
license:
name: GNU General Public License v3.0
url: https://github.com/comfyanonymous/ComfyUI/blob/master/LICENSE
servers:
- url: https://cloud.comfy.org
description: Comfy Cloud API
security:
- ApiKeyAuth: []
tags:
- name: workflow
description: |
Submit workflows for execution and manage the execution queue.
This is the primary way to run ComfyUI workflows on the cloud.
- name: job
description: |
Monitor job status, view execution history, and manage running jobs.
Jobs are created when you submit a workflow via POST /api/prompt.
- name: asset
description: |
Upload, download, and manage persistent assets (images, models, outputs).
Assets provide durable storage with tagging and metadata support.
- name: file
description: |
Legacy file upload and download endpoints compatible with local ComfyUI.
For new integrations, consider using the Assets API instead.
- name: model
description: |
Browse available AI models. Models are pre-loaded on cloud infrastructure.
- name: node
description: |
Get information about available ComfyUI nodes and their inputs/outputs.
Useful for building dynamic workflow interfaces.
- name: user
description: |
User account information and personal data storage.
- name: system
description: |
Server status, health checks, and system information.
paths:
/api/features:
get:
tags:
- node
summary: Get server feature flags
description: Returns the server's feature capabilities
operationId: getFeatures
responses:
'200':
description: Success
content:
application/json:
schema:
type: object
properties:
supports_preview_metadata:
type: boolean
description: Whether the server supports preview metadata
max_upload_size:
type: integer
description: Maximum upload size in bytes
additionalProperties: true
security:
- ApiKeyAuth: []
- {}
components:
securitySchemes:
ApiKeyAuth:
type: apiKey
in: header
name: X-API-Key
description: |
API key authentication. Generate an API key from your account settings
at https://comfy.org/account. Pass the key in the X-API-Key header.
````
---
# Source: https://docs.comfy.org/api-reference/registry/get-specify-comfy-node-based-on-its-id.md
> ## Documentation Index
> Fetch the complete documentation index at: https://docs.comfy.org/llms.txt
> Use this file to discover all available pages before exploring further.
# get specify comfy-node based on its id
## OpenAPI
````yaml https://api.comfy.org/openapi get /nodes/{nodeId}/versions/{version}/comfy-nodes/{comfyNodeName}
openapi: 3.0.2
info:
title: Comfy API
version: '1.0'
servers:
- url: https://api.comfy.org
security: []
paths:
/nodes/{nodeId}/versions/{version}/comfy-nodes/{comfyNodeName}:
get:
tags:
- Registry
summary: get specify comfy-node based on its id
operationId: GetComfyNode
parameters:
- in: path
name: nodeId
required: true
schema:
type: string
- in: path
name: version
required: true
schema:
type: string
- in: path
name: comfyNodeName
required: true
schema:
type: string
responses:
'200':
content:
application/json:
schema:
$ref: '#/components/schemas/ComfyNode'
description: Comy Nodes created successfully
'401':
description: Unauthorized
'403':
content:
application/json:
schema:
$ref: '#/components/schemas/ErrorResponse'
description: Forbidden
'404':
content:
application/json:
schema:
$ref: '#/components/schemas/ErrorResponse'
description: Version not found
'500':
content:
application/json:
schema:
$ref: '#/components/schemas/ErrorResponse'
description: Internal server error
components:
schemas:
ComfyNode:
properties:
category:
description: UI category where the node is listed, used for grouping nodes.
type: string
comfy_node_name:
description: Unique identifier for the node
type: string
deprecated:
description: >-
Indicates if the node is deprecated. Deprecated nodes are hidden in
the UI.
type: boolean
description:
description: Brief description of the node's functionality or purpose.
type: string
experimental:
description: >-
Indicates if the node is experimental, subject to changes or
removal.
type: boolean
function:
description: Name of the entry-point function to execute the node.
type: string
input_types:
description: Defines input parameters
type: string
output_is_list:
description: Boolean values indicating if each output is a list.
items:
type: boolean
type: array
policy:
$ref: '#/components/schemas/ComfyNodePolicy'
return_names:
description: Names of the outputs for clarity in workflows.
type: string
return_types:
description: Specifies the types of outputs produced by the node.
type: string
type: object
ErrorResponse:
properties:
error:
type: string
message:
type: string
required:
- error
- message
type: object
ComfyNodePolicy:
enum:
- ComfyNodePolicyActive
- ComfyNodePolicyBanned
- ComfyNodePolicyLocalOnly
type: string
````
---
# Source: https://docs.comfy.org/api-reference/cloud/system/get-system-statistics.md
> ## Documentation Index
> Fetch the complete documentation index at: https://docs.comfy.org/llms.txt
> Use this file to discover all available pages before exploring further.
# Get system statistics
> Returns system statistics including ComfyUI version, device info, and system resources
## OpenAPI
````yaml openapi-cloud.yaml get /api/system_stats
openapi: 3.0.3
info:
title: Comfy Cloud API
description: >
**Experimental API:** This API is experimental and subject to change.
Endpoints, request/response formats, and behavior may be modified without
notice.
API for Comfy Cloud - Run ComfyUI workflows on cloud infrastructure.
This API allows you to interact with Comfy Cloud programmatically,
including:
- Submitting and managing workflows
- Uploading and downloading files
- Monitoring job status and progress
## Cloud vs OSS ComfyUI Compatibility
Comfy Cloud implements the same API interfaces as OSS ComfyUI for maximum
compatibility,
but some fields are accepted for compatibility while being handled
differently or ignored:
| Field | Endpoints | Cloud Behavior |
|-------|-----------|----------------|
| `subfolder` | `/api/view`, `/api/upload/*` | **Ignored** - Cloud uses
content-addressed storage (hash-based). Returned in responses for
client-side organization. |
| `type` (input/output/temp) | `/api/view`, `/api/upload/*` | Partially used
- All files stored with tag-based organization rather than directory
structure. |
| `overwrite` | `/api/upload/*` | **Ignored** - Content-addressed storage
means identical content always has the same hash. |
| `number`, `front` | `/api/prompt` | **Ignored** - Cloud uses its own fair
queue scheduling per user. |
| `split`, `full_info` | `/api/userdata` | **Ignored** - Cloud always
returns full file metadata. |
These fields are retained in the API schema for drop-in compatibility with
existing ComfyUI clients and workflows.
version: 1.0.0
license:
name: GNU General Public License v3.0
url: https://github.com/comfyanonymous/ComfyUI/blob/master/LICENSE
servers:
- url: https://cloud.comfy.org
description: Comfy Cloud API
security:
- ApiKeyAuth: []
tags:
- name: workflow
description: |
Submit workflows for execution and manage the execution queue.
This is the primary way to run ComfyUI workflows on the cloud.
- name: job
description: |
Monitor job status, view execution history, and manage running jobs.
Jobs are created when you submit a workflow via POST /api/prompt.
- name: asset
description: |
Upload, download, and manage persistent assets (images, models, outputs).
Assets provide durable storage with tagging and metadata support.
- name: file
description: |
Legacy file upload and download endpoints compatible with local ComfyUI.
For new integrations, consider using the Assets API instead.
- name: model
description: |
Browse available AI models. Models are pre-loaded on cloud infrastructure.
- name: node
description: |
Get information about available ComfyUI nodes and their inputs/outputs.
Useful for building dynamic workflow interfaces.
- name: user
description: |
User account information and personal data storage.
- name: system
description: |
Server status, health checks, and system information.
paths:
/api/system_stats:
get:
tags:
- system
summary: Get system statistics
description: >-
Returns system statistics including ComfyUI version, device info, and
system resources
operationId: getSystemStats
responses:
'200':
description: Success
content:
application/json:
schema:
$ref: '#/components/schemas/SystemStatsResponse'
'401':
description: Unauthorized
content:
application/json:
schema:
$ref: '#/components/schemas/ErrorResponse'
security: []
components:
schemas:
SystemStatsResponse:
type: object
description: System statistics response
required:
- system
- devices
properties:
system:
type: object
required:
- os
- python_version
- embedded_python
- comfyui_version
- pytorch_version
- argv
- ram_total
- ram_free
properties:
os:
type: string
description: Operating system
python_version:
type: string
description: Python version
embedded_python:
type: boolean
description: Whether using embedded Python
comfyui_version:
type: string
description: ComfyUI version
comfyui_frontend_version:
type: string
description: ComfyUI frontend version (commit hash or tag)
workflow_templates_version:
type: string
description: Workflow templates version
cloud_version:
type: string
description: Cloud ingest service version (commit hash)
pytorch_version:
type: string
description: PyTorch version
argv:
type: array
items:
type: string
description: Command line arguments
ram_total:
type: number
description: Total RAM in bytes
ram_free:
type: number
description: Free RAM in bytes
devices:
type: array
items:
type: object
required:
- name
- type
properties:
name:
type: string
description: Device name
type:
type: string
description: Device type
vram_total:
type: number
description: Total VRAM in bytes
vram_free:
type: number
description: Free VRAM in bytes
ErrorResponse:
type: object
required:
- code
- message
properties:
code:
type: string
message:
type: string
securitySchemes:
ApiKeyAuth:
type: apiKey
in: header
name: X-API-Key
description: |
API key authentication. Generate an API key from your account settings
at https://comfy.org/account. Pass the key in the X-API-Key header.
````
---
# Source: https://docs.comfy.org/api-reference/cloud/asset/get-tag-histogram-for-filtered-assets.md
> ## Documentation Index
> Fetch the complete documentation index at: https://docs.comfy.org/llms.txt
> Use this file to discover all available pages before exploring further.
# Get tag histogram for filtered assets
> Returns a histogram of tags appearing on assets matching the given filters.
Useful for refining asset searches by showing available tags and their counts.
Only returns tags with non-zero counts (tags that exist on matching assets).
## OpenAPI
````yaml openapi-cloud.yaml get /api/assets/tags/refine
openapi: 3.0.3
info:
title: Comfy Cloud API
description: >
**Experimental API:** This API is experimental and subject to change.
Endpoints, request/response formats, and behavior may be modified without
notice.
API for Comfy Cloud - Run ComfyUI workflows on cloud infrastructure.
This API allows you to interact with Comfy Cloud programmatically,
including:
- Submitting and managing workflows
- Uploading and downloading files
- Monitoring job status and progress
## Cloud vs OSS ComfyUI Compatibility
Comfy Cloud implements the same API interfaces as OSS ComfyUI for maximum
compatibility,
but some fields are accepted for compatibility while being handled
differently or ignored:
| Field | Endpoints | Cloud Behavior |
|-------|-----------|----------------|
| `subfolder` | `/api/view`, `/api/upload/*` | **Ignored** - Cloud uses
content-addressed storage (hash-based). Returned in responses for
client-side organization. |
| `type` (input/output/temp) | `/api/view`, `/api/upload/*` | Partially used
- All files stored with tag-based organization rather than directory
structure. |
| `overwrite` | `/api/upload/*` | **Ignored** - Content-addressed storage
means identical content always has the same hash. |
| `number`, `front` | `/api/prompt` | **Ignored** - Cloud uses its own fair
queue scheduling per user. |
| `split`, `full_info` | `/api/userdata` | **Ignored** - Cloud always
returns full file metadata. |
These fields are retained in the API schema for drop-in compatibility with
existing ComfyUI clients and workflows.
version: 1.0.0
license:
name: GNU General Public License v3.0
url: https://github.com/comfyanonymous/ComfyUI/blob/master/LICENSE
servers:
- url: https://cloud.comfy.org
description: Comfy Cloud API
security:
- ApiKeyAuth: []
tags:
- name: workflow
description: |
Submit workflows for execution and manage the execution queue.
This is the primary way to run ComfyUI workflows on the cloud.
- name: job
description: |
Monitor job status, view execution history, and manage running jobs.
Jobs are created when you submit a workflow via POST /api/prompt.
- name: asset
description: |
Upload, download, and manage persistent assets (images, models, outputs).
Assets provide durable storage with tagging and metadata support.
- name: file
description: |
Legacy file upload and download endpoints compatible with local ComfyUI.
For new integrations, consider using the Assets API instead.
- name: model
description: |
Browse available AI models. Models are pre-loaded on cloud infrastructure.
- name: node
description: |
Get information about available ComfyUI nodes and their inputs/outputs.
Useful for building dynamic workflow interfaces.
- name: user
description: |
User account information and personal data storage.
- name: system
description: |
Server status, health checks, and system information.
paths:
/api/assets/tags/refine:
get:
tags:
- asset
summary: Get tag histogram for filtered assets
description: >
Returns a histogram of tags appearing on assets matching the given
filters.
Useful for refining asset searches by showing available tags and their
counts.
Only returns tags with non-zero counts (tags that exist on matching
assets).
operationId: getAssetTagHistogram
parameters:
- name: include_tags
in: query
description: Filter assets that have ALL of these tags
schema:
type: array
items:
type: string
style: form
explode: false
- name: exclude_tags
in: query
description: Exclude assets that have ANY of these tags
schema:
type: array
items:
type: string
style: form
explode: false
- name: name_contains
in: query
description: Filter assets where name contains this substring (case-insensitive)
schema:
type: string
- name: metadata_filter
in: query
description: JSON object for filtering by metadata fields
schema:
type: string
- name: limit
in: query
description: Maximum number of tags to return (1-1000, default 100)
schema:
type: integer
minimum: 1
maximum: 1000
default: 100
- name: include_public
in: query
description: Whether to include public/shared assets in results
schema:
type: boolean
default: true
responses:
'200':
description: Success - Tag histogram returned
content:
application/json:
schema:
$ref: '#/components/schemas/AssetTagHistogramResponse'
'400':
description: Invalid request parameters
content:
application/json:
schema:
$ref: '#/components/schemas/ErrorResponse'
'401':
description: Unauthorized
content:
application/json:
schema:
$ref: '#/components/schemas/ErrorResponse'
'500':
description: Internal server error
content:
application/json:
schema:
$ref: '#/components/schemas/ErrorResponse'
components:
schemas:
AssetTagHistogramResponse:
type: object
required:
- tag_counts
properties:
tag_counts:
type: object
additionalProperties:
type: integer
description: Map of tag names to their occurrence counts on matching assets
example:
checkpoint: 32
lora: 193
vae: 6
ErrorResponse:
type: object
required:
- code
- message
properties:
code:
type: string
message:
type: string
securitySchemes:
ApiKeyAuth:
type: apiKey
in: header
name: X-API-Key
description: |
API key authentication. Generate an API key from your account settings
at https://comfy.org/account. Pass the key in the X-API-Key header.
````
---
# Source: https://docs.comfy.org/api-reference/freepik/get-the-status-of-one-skin-enhancer-task.md
> ## Documentation Index
> Fetch the complete documentation index at: https://docs.comfy.org/llms.txt
> Use this file to discover all available pages before exploring further.
# Get the status of one skin enhancer task
> Get the status of a skin enhancer task (works for both Creative and Faithful modes)
## OpenAPI
````yaml https://api.comfy.org/openapi get /proxy/freepik/v1/ai/skin-enhancer/{task_id}
openapi: 3.0.2
info:
title: Comfy API
version: '1.0'
servers:
- url: https://api.comfy.org
security: []
paths:
/proxy/freepik/v1/ai/skin-enhancer/{task_id}:
get:
tags:
- Freepik
- Proxy
summary: Get the status of one skin enhancer task
description: >-
Get the status of a skin enhancer task (works for both Creative and
Faithful modes)
operationId: FreepikSkinEnhancerGetStatus
parameters:
- description: ID of the task
in: path
name: task_id
required: true
schema:
type: string
responses:
'200':
content:
application/json:
schema:
$ref: '#/components/schemas/FreepikTaskResponse'
description: OK - The task status is returned
'404':
description: Task not found
'500':
content:
application/json:
schema:
$ref: '#/components/schemas/FreepikErrorResponse'
description: Internal Server Error
security:
- BearerAuth: []
components:
schemas:
FreepikTaskResponse:
properties:
data:
$ref: '#/components/schemas/FreepikTaskData'
required:
- data
type: object
FreepikErrorResponse:
properties:
error:
type: string
message:
type: string
type: object
FreepikTaskData:
properties:
generated:
description: URLs to the generated images.
items:
format: uri
type: string
type: array
status:
enum:
- CREATED
- IN_PROGRESS
- COMPLETED
- FAILED
type: string
task_id:
example: 046b6c7f-0b8a-43b9-b35d-6489e6daee91
format: uuid
type: string
type: object
securitySchemes:
BearerAuth:
bearerFormat: JWT
scheme: bearer
type: http
````
---
# Source: https://docs.comfy.org/api-reference/freepik/get-the-status-of-the-relight-task.md
> ## Documentation Index
> Fetch the complete documentation index at: https://docs.comfy.org/llms.txt
> Use this file to discover all available pages before exploring further.
# Get the status of the relight task
> Get the status of the relight task
## OpenAPI
````yaml https://api.comfy.org/openapi get /proxy/freepik/v1/ai/image-relight/{task_id}
openapi: 3.0.2
info:
title: Comfy API
version: '1.0'
servers:
- url: https://api.comfy.org
security: []
paths:
/proxy/freepik/v1/ai/image-relight/{task_id}:
get:
tags:
- Freepik
- Proxy
summary: Get the status of the relight task
description: Get the status of the relight task
operationId: FreepikMagnificRelightGetStatus
parameters:
- description: ID of the task
in: path
name: task_id
required: true
schema:
type: string
responses:
'200':
content:
application/json:
schema:
$ref: '#/components/schemas/FreepikTaskResponse'
description: OK - The task status is returned
'404':
description: Task not found
'500':
content:
application/json:
schema:
$ref: '#/components/schemas/FreepikErrorResponse'
description: Internal Server Error
security:
- BearerAuth: []
components:
schemas:
FreepikTaskResponse:
properties:
data:
$ref: '#/components/schemas/FreepikTaskData'
required:
- data
type: object
FreepikErrorResponse:
properties:
error:
type: string
message:
type: string
type: object
FreepikTaskData:
properties:
generated:
description: URLs to the generated images.
items:
format: uri
type: string
type: array
status:
enum:
- CREATED
- IN_PROGRESS
- COMPLETED
- FAILED
type: string
task_id:
example: 046b6c7f-0b8a-43b9-b35d-6489e6daee91
format: uuid
type: string
type: object
securitySchemes:
BearerAuth:
bearerFormat: JWT
scheme: bearer
type: http
````
---
# Source: https://docs.comfy.org/api-reference/freepik/get-the-status-of-the-style-transfer-task.md
> ## Documentation Index
> Fetch the complete documentation index at: https://docs.comfy.org/llms.txt
> Use this file to discover all available pages before exploring further.
# Get the status of the style transfer task
> Get the status of the style transfer task
## OpenAPI
````yaml https://api.comfy.org/openapi get /proxy/freepik/v1/ai/image-style-transfer/{task_id}
openapi: 3.0.2
info:
title: Comfy API
version: '1.0'
servers:
- url: https://api.comfy.org
security: []
paths:
/proxy/freepik/v1/ai/image-style-transfer/{task_id}:
get:
tags:
- Freepik
- Proxy
summary: Get the status of the style transfer task
description: Get the status of the style transfer task
operationId: FreepikMagnificStyleTransferGetStatus
parameters:
- description: ID of the task
in: path
name: task_id
required: true
schema:
type: string
responses:
'200':
content:
application/json:
schema:
$ref: '#/components/schemas/FreepikTaskResponse'
description: OK - The task status is returned
'404':
description: Task not found
'500':
content:
application/json:
schema:
$ref: '#/components/schemas/FreepikErrorResponse'
description: Internal Server Error
security:
- BearerAuth: []
components:
schemas:
FreepikTaskResponse:
properties:
data:
$ref: '#/components/schemas/FreepikTaskData'
required:
- data
type: object
FreepikErrorResponse:
properties:
error:
type: string
message:
type: string
type: object
FreepikTaskData:
properties:
generated:
description: URLs to the generated images.
items:
format: uri
type: string
type: array
status:
enum:
- CREATED
- IN_PROGRESS
- COMPLETED
- FAILED
type: string
task_id:
example: 046b6c7f-0b8a-43b9-b35d-6489e6daee91
format: uuid
type: string
type: object
securitySchemes:
BearerAuth:
bearerFormat: JWT
scheme: bearer
type: http
````
---
# Source: https://docs.comfy.org/api-reference/cloud/user/get-user-data-file.md
> ## Documentation Index
> Fetch the complete documentation index at: https://docs.comfy.org/llms.txt
> Use this file to discover all available pages before exploring further.
# Get user data file
> Returns the requested user data file if it exists.
## OpenAPI
````yaml openapi-cloud.yaml get /api/userdata/{file}
openapi: 3.0.3
info:
title: Comfy Cloud API
description: >
**Experimental API:** This API is experimental and subject to change.
Endpoints, request/response formats, and behavior may be modified without
notice.
API for Comfy Cloud - Run ComfyUI workflows on cloud infrastructure.
This API allows you to interact with Comfy Cloud programmatically,
including:
- Submitting and managing workflows
- Uploading and downloading files
- Monitoring job status and progress
## Cloud vs OSS ComfyUI Compatibility
Comfy Cloud implements the same API interfaces as OSS ComfyUI for maximum
compatibility,
but some fields are accepted for compatibility while being handled
differently or ignored:
| Field | Endpoints | Cloud Behavior |
|-------|-----------|----------------|
| `subfolder` | `/api/view`, `/api/upload/*` | **Ignored** - Cloud uses
content-addressed storage (hash-based). Returned in responses for
client-side organization. |
| `type` (input/output/temp) | `/api/view`, `/api/upload/*` | Partially used
- All files stored with tag-based organization rather than directory
structure. |
| `overwrite` | `/api/upload/*` | **Ignored** - Content-addressed storage
means identical content always has the same hash. |
| `number`, `front` | `/api/prompt` | **Ignored** - Cloud uses its own fair
queue scheduling per user. |
| `split`, `full_info` | `/api/userdata` | **Ignored** - Cloud always
returns full file metadata. |
These fields are retained in the API schema for drop-in compatibility with
existing ComfyUI clients and workflows.
version: 1.0.0
license:
name: GNU General Public License v3.0
url: https://github.com/comfyanonymous/ComfyUI/blob/master/LICENSE
servers:
- url: https://cloud.comfy.org
description: Comfy Cloud API
security:
- ApiKeyAuth: []
tags:
- name: workflow
description: |
Submit workflows for execution and manage the execution queue.
This is the primary way to run ComfyUI workflows on the cloud.
- name: job
description: |
Monitor job status, view execution history, and manage running jobs.
Jobs are created when you submit a workflow via POST /api/prompt.
- name: asset
description: |
Upload, download, and manage persistent assets (images, models, outputs).
Assets provide durable storage with tagging and metadata support.
- name: file
description: |
Legacy file upload and download endpoints compatible with local ComfyUI.
For new integrations, consider using the Assets API instead.
- name: model
description: |
Browse available AI models. Models are pre-loaded on cloud infrastructure.
- name: node
description: |
Get information about available ComfyUI nodes and their inputs/outputs.
Useful for building dynamic workflow interfaces.
- name: user
description: |
User account information and personal data storage.
- name: system
description: |
Server status, health checks, and system information.
paths:
/api/userdata/{file}:
get:
tags:
- user
summary: Get user data file
description: Returns the requested user data file if it exists.
operationId: getUserdataFile
parameters:
- name: file
in: path
required: true
description: The filename of the user data to retrieve.
schema:
type: string
responses:
'200':
description: Successfully retrieved the file.
content:
application/octet-stream:
schema:
type: string
format: binary
'400':
description: Bad request (e.g., invalid filename).
content:
text/plain:
schema:
type: string
'401':
description: Unauthorized.
content:
text/plain:
schema:
type: string
'404':
description: File not found or invalid path.
content:
text/plain:
schema:
type: string
'500':
description: General error
content:
text/plain:
schema:
type: string
components:
securitySchemes:
ApiKeyAuth:
type: apiKey
in: header
name: X-API-Key
description: |
API key authentication. Generate an API key from your account settings
at https://comfy.org/account. Pass the key in the X-API-Key header.
````
---
# Source: https://docs.comfy.org/comfy-cli/getting-started.md
> ## Documentation Index
> Fetch the complete documentation index at: https://docs.comfy.org/llms.txt
> Use this file to discover all available pages before exploring further.
# Getting Started
### Overview
`comfy-cli` is a [command line tool](https://github.com/Comfy-Org/comfy-cli) that makes it easier to install and manage Comfy.
### Install CLI
```bash pip theme={null}
pip install comfy-cli
```
```bash homebrew theme={null}
brew tap Comfy-Org/comfy-cli
brew install comfy-org/comfy-cli/comfy-cli
```
To get shell completion hints:
```bash theme={null}
comfy --install-completion
```
### Install ComfyUI
Create a virtual environment with any Python version greater than 3.9.
```bash conda theme={null}
conda create -n comfy-env python=3.11
conda activate comfy-env
```
```bash venv theme={null}
python3 -m venv comfy-env
source comfy-env/bin/activate
```
Install ComfyUI
```bash theme={null}
comfy install
```
You still need to install CUDA, or ROCm depending on your GPU.
### Run ComfyUI
```bash theme={null}
comfy launch
```
### Manage Custom Nodes
```bash theme={null}
comfy node install
```
We use `cm-cli` for installing custom nodes. See the [docs](https://github.com/ltdrdata/ComfyUI-Manager/blob/main/docs/en/cm-cli.md) for more information.
### Manage Models
Downloading models with `comfy-cli` is easy. Just run:
```bash theme={null}
comfy model download models/checkpoints
```
### Contributing
We encourage contributions to comfy-cli! If you have suggestions, ideas, or bug reports, please open an issue on our [GitHub repository](https://github.com/Comfy-Org/comfy-cli/issues). If you want to contribute code, fork the repository and submit a pull request.
Refer to the [Dev Guide](https://github.com/Comfy-Org/comfy-cli/blob/main/DEV_README.md) for further details.
### Analytics
We track usage of the CLI to improve the user experience. You can disable this by running:
```bash theme={null}
comfy tracking disable
```
To re-enable tracking, run:
```bash theme={null}
comfy tracking enable
```
---
# Source: https://docs.comfy.org/built-in-nodes/partner-node/video/google/google-veo2-video.md
> ## Documentation Index
> Fetch the complete documentation index at: https://docs.comfy.org/llms.txt
> Use this file to discover all available pages before exploring further.
# Google Veo2 Video - ComfyUI Native Node Documentation
> A node that generates videos from text descriptions using Google's Veo2 technology
The Google Veo2 Video node generates high-quality videos from text descriptions using Google's Veo2 API technology, converting text prompts into dynamic video content.
## Parameters
### Basic Parameters
| Parameter | Type | Default | Description |
| ------------------ | ------- | ------- | ---------------------------------------------------- |
| prompt | string | "" | Text description of the video content to generate |
| aspect\_ratio | select | "16:9" | Output video aspect ratio, "16:9" or "9:16" |
| negative\_prompt | string | "" | Text describing what to avoid in the video |
| duration\_seconds | integer | 5 | Video duration, 5-8 seconds |
| enhance\_prompt | boolean | True | Whether to use AI to enhance the prompt |
| person\_generation | select | "ALLOW" | Allow or block person generation, "ALLOW" or "BLOCK" |
| seed | integer | 0 | Random seed, 0 means randomly generated |
### Optional Parameters
| Parameter | Type | Default | Description |
| --------- | ----- | ------- | ------------------------------------------------ |
| image | image | None | Optional reference image to guide video creation |
### Output
| Output | Type | Description |
| ------ | ----- | --------------- |
| VIDEO | video | Generated video |
## Source Code
\[Node Source Code (Updated 2025-05-03)]
```python theme={null}
class VeoVideoGenerationNode(ComfyNodeABC):
"""
Generates videos from text prompts using Google's Veo API.
This node can create videos from text descriptions and optional image inputs,
with control over parameters like aspect ratio, duration, and more.
"""
@classmethod
def INPUT_TYPES(s):
return {
"required": {
"prompt": (
IO.STRING,
{
"multiline": True,
"default": "",
"tooltip": "Text description of the video",
},
),
"aspect_ratio": (
IO.COMBO,
{
"options": ["16:9", "9:16"],
"default": "16:9",
"tooltip": "Aspect ratio of the output video",
},
),
},
"optional": {
"negative_prompt": (
IO.STRING,
{
"multiline": True,
"default": "",
"tooltip": "Negative text prompt to guide what to avoid in the video",
},
),
"duration_seconds": (
IO.INT,
{
"default": 5,
"min": 5,
"max": 8,
"step": 1,
"display": "number",
"tooltip": "Duration of the output video in seconds",
},
),
"enhance_prompt": (
IO.BOOLEAN,
{
"default": True,
"tooltip": "Whether to enhance the prompt with AI assistance",
}
),
"person_generation": (
IO.COMBO,
{
"options": ["ALLOW", "BLOCK"],
"default": "ALLOW",
"tooltip": "Whether to allow generating people in the video",
},
),
"seed": (
IO.INT,
{
"default": 0,
"min": 0,
"max": 0xFFFFFFFF,
"step": 1,
"display": "number",
"control_after_generate": True,
"tooltip": "Seed for video generation (0 for random)",
},
),
"image": (IO.IMAGE, {
"default": None,
"tooltip": "Optional reference image to guide video generation",
}),
},
"hidden": {
"auth_token": "AUTH_TOKEN_COMFY_ORG",
},
}
RETURN_TYPES = (IO.VIDEO,)
FUNCTION = "generate_video"
CATEGORY = "api node/video/Veo"
DESCRIPTION = "Generates videos from text prompts using Google's Veo API"
API_NODE = True
def generate_video(
self,
prompt,
aspect_ratio="16:9",
negative_prompt="",
duration_seconds=5,
enhance_prompt=True,
person_generation="ALLOW",
seed=0,
image=None,
auth_token=None,
):
# Prepare the instances for the request
instances = []
instance = {
"prompt": prompt
}
# Add image if provided
if image is not None:
image_base64 = convert_image_to_base64(image)
if image_base64:
instance["image"] = {
"bytesBase64Encoded": image_base64,
"mimeType": "image/png"
}
instances.append(instance)
# Create parameters dictionary
parameters = {
"aspectRatio": aspect_ratio,
"personGeneration": person_generation,
"durationSeconds": duration_seconds,
"enhancePrompt": enhance_prompt,
}
# Add optional parameters if provided
if negative_prompt:
parameters["negativePrompt"] = negative_prompt
if seed > 0:
parameters["seed"] = seed
# Initial request to start video generation
initial_operation = SynchronousOperation(
endpoint=ApiEndpoint(
path="/proxy/veo/generate",
method=HttpMethod.POST,
request_model=Veo2GenVidRequest,
response_model=Veo2GenVidResponse
),
request=Veo2GenVidRequest(
instances=instances,
parameters=parameters
),
auth_token=auth_token
)
initial_response = initial_operation.execute()
operation_name = initial_response.name
logging.info(f"Veo generation started with operation name: {operation_name}")
# Define status extractor function
def status_extractor(response):
# Only return "completed" if the operation is done, regardless of success or failure
# We'll check for errors after polling completes
return "completed" if response.done else "pending"
# Define progress extractor function
def progress_extractor(response):
# Could be enhanced if the API provides progress information
return None
# Define the polling operation
poll_operation = PollingOperation(
poll_endpoint=ApiEndpoint(
path="/proxy/veo/poll",
method=HttpMethod.POST,
request_model=Veo2GenVidPollRequest,
response_model=Veo2GenVidPollResponse
),
completed_statuses=["completed"],
failed_statuses=[], # No failed statuses, we'll handle errors after polling
status_extractor=status_extractor,
progress_extractor=progress_extractor,
request=Veo2GenVidPollRequest(
operationName=operation_name
),
auth_token=auth_token,
poll_interval=5.0
)
# Execute the polling operation
poll_response = poll_operation.execute()
# Now check for errors in the final response
# Check for error in poll response
if hasattr(poll_response, 'error') and poll_response.error:
error_message = f"Veo API error: {poll_response.error.message} (code: {poll_response.error.code})"
logging.error(error_message)
raise Exception(error_message)
# Check for RAI filtered content
if (hasattr(poll_response.response, 'raiMediaFilteredCount') and
poll_response.response.raiMediaFilteredCount > 0):
# Extract reason message if available
if (hasattr(poll_response.response, 'raiMediaFilteredReasons') and
poll_response.response.raiMediaFilteredReasons):
reason = poll_response.response.raiMediaFilteredReasons[0]
error_message = f"Content filtered by Google's Responsible AI practices: {reason} ({poll_response.response.raiMediaFilteredCount} videos filtered.)"
else:
error_message = f"Content filtered by Google's Responsible AI practices ({poll_response.response.raiMediaFilteredCount} videos filtered.)"
logging.error(error_message)
raise Exception(error_message)
# Extract video data
video_data = None
if poll_response.response and hasattr(poll_response.response, 'videos') and poll_response.response.videos and len(poll_response.response.videos) > 0:
video = poll_response.response.videos[0]
# Check if video is provided as base64 or URL
if hasattr(video, 'bytesBase64Encoded') and video.bytesBase64Encoded:
# Decode base64 string to bytes
video_data = base64.b64decode(video.bytesBase64Encoded)
elif hasattr(video, 'gcsUri') and video.gcsUri:
# Download from URL
video_url = video.gcsUri
video_response = requests.get(video_url)
video_data = video_response.content
else:
raise Exception("Video returned but no data or URL was provided")
else:
raise Exception("Video generation completed but no video was returned")
if not video_data:
raise Exception("No video data was returned")
logging.info("Video generation completed successfully")
# Convert video data to BytesIO object
video_io = io.BytesIO(video_data)
# Return VideoFromFile object
return (VideoFromFile(video_io),)
```
---
# Source: https://docs.comfy.org/tutorials/partner-nodes/openai/gpt-image-1.md
> ## Documentation Index
> Fetch the complete documentation index at: https://docs.comfy.org/llms.txt
> Use this file to discover all available pages before exploring further.
# OpenAI GPT-Image-1 Node
> Learn how to use the OpenAI GPT-Image-1 Partner node to generate images in ComfyUI
OpenAI GPT-Image-1 is part of the ComfyUI Partner nodes series that allows users to generate images through OpenAI's **GPT-Image-1** model. This is the same model used for image generation in ChatGPT 4o.
This node supports:
* Text-to-image generation
* Image editing functionality (inpainting through masks)
## Node Overview
The **OpenAI GPT-Image-1** node synchronously generates images through OpenAI's image generation API. It receives text prompts and returns images matching the description. GPT-Image-1 is OpenAI's most advanced image generation model currently available, capable of creating highly detailed and realistic images.
To use the API nodes, you need to ensure that you are logged in properly and using a permitted network environment. Please refer to the [API Nodes Overview](/tutorials/partner-nodes/overview) section of the documentation to understand the specific requirements for using the API nodes.
Make sure your ComfyUI is updated.
* [Download ComfyUI](https://www.comfy.org/download)
* [Update Guide](/installation/update_comfyui)
Workflows in this guide can be found in the [Workflow Templates](/interface/features/template).
If you can't find them in the template, your ComfyUI may be outdated. (Desktop version's update will delay sometime)
If nodes are missing when loading a workflow, possible reasons:
1. You are not using the latest ComfyUI version (Nightly version)
2. Some nodes failed to import at startup
* The Desktop is base on ComfyUI stable release, it will auto-update when there is a new Desktop stable release available.
* [Cloud](https://cloud.comfy.org) will update after ComfyUI stable release.
So, if you find any core node missing in this document, it might be because the new core nodes have not yet been released in the latest stable version. Please wait for the next stable release.
## Parameter Description
### Required Parameters
| Parameter | Type | Description |
| --------- | ---- | ------------------------------------------------------------- |
| `prompt` | Text | Text prompt describing the image content you want to generate |
### Widget Parameters
| Parameter | Type | Options | Default | Description |
| ------------ | ------- | ------------------------------------- | ------- | ------------------------------------------------------- |
| `seed` | Integer | 0-2147483647 | 0 | Random seed used to control generation results |
| `quality` | Option | low, medium, high | low | Image quality setting, affects cost and generation time |
| `background` | Option | opaque, transparent | opaque | Whether the returned image has a background |
| `size` | Option | auto, 1024x1024, 1024x1536, 1536x1024 | auto | Size of the generated image |
| `n` | Integer | 1-8 | 1 | Number of images to generate |
### Optional Parameters
| Parameter | Type | Options | Default | Description |
| --------- | ----- | --------------- | ------- | ----------------------------------------------------------- |
| `image` | Image | Any image input | None | Optional reference image for image editing |
| `mask` | Mask | Mask input | None | Optional mask for inpainting (white areas will be replaced) |
## Usage Examples
### Text-to-Image Example
The image below contains a simple text-to-image workflow. Please download the image and drag it into ComfyUI to load the corresponding workflow.

The corresponding workflow is very simple:
You only need to load the `OpenAI GPT-Image-1` node, input the description of the image you want to generate in the `prompt` node, connect a `Save Image` node, and then run the workflow.
### Image-to-Image Example
The image below contains a simple image-to-image workflow. Please download the image and drag it into ComfyUI to load the corresponding workflow.

We will use the image below as input:

In this workflow, we use the `OpenAI GPT-Image-1` node to generate images and the `Load Image` node to load the input image, then connect it to the `image` input of the `OpenAI GPT-Image-1` node.
### Multiple Image Input Example
Please download the image below and drag it into ComfyUI to load the corresponding workflow.

Use the hat image below as an additional input image.

The corresponding workflow is shown in the image below:
The `Batch Images` node is used to load multiple images into the `OpenAI GPT-Image-1` node.
### Inpainting Workflow
GPT-Image-1 also supports image editing functionality, allowing you to specify areas to replace using a mask. Below is a simple inpainting workflow example:
Download the image below and drag it into ComfyUI to load the corresponding workflow. We will continue to use the input image from the image-to-image workflow section.

The corresponding workflow is shown in the image
Compared to the image-to-image workflow, we use the MaskEditor in the `Load Image` node through the right-click menu to draw a mask, then connect it to the `mask` input of the `OpenAI GPT-Image-1` node to complete the workflow.
**Notes**
* The mask and image must be the same size
* When inputting large images, the node will automatically resize the image to an appropriate size
## FAQs
Please update your ComfyUI to the latest version (the latest commit or the latest [desktop version](https://www.comfy.org/download)).
We may add more API support in the future, and the corresponding nodes will be updated, so please keep your ComfyUI up to date.
Please note that you need to distinguish between the nightly version and the release version.
In some cases, the latest `release` version may not be updated in time compared to the `nightly` version.
Since we are still iterating quickly, please ensure you are using the latest version when you cannot find the corresponding node.
API access requires that your current request is based on a secure network environment. The current requirements for API access are as follows:
* The local network only allows access from `127.0.0.1` or `localhost`, which may mean that you cannot use the API Nodes in a ComfyUI service started with the `--listen` parameter in a LAN environment.
* Able to access our API service normally (a proxy service may be required in some regions).
* Your account does not have enough [credits](/interface/credits).
* Currently, only `127.0.0.1` or `localhost` access is supported.
* Ensure your account has enough credits.
API Nodes require credits for API calls to closed-source models, so they do not support free usage.
Please refer to the following documentation:
1. [Comfy Account](/interface/user): Find the `User` section in the settings menu to log in.
2. [Credits](/interface/credits): After logging in, the settings interface will show the credits menu. You can purchase credits in `Settings` → `Credits`. We use a prepaid system, so there will be no unexpected charges.
3. Complete the payment through Stripe.
4. Check if the credits have been updated. If not, try restarting or refreshing the page.
Currently, we do not support refunds for credits.
If you believe there is an error resulting in unused balance due to technical issues, please [contact support](mailto:support@comfy.org).
Credits are not intended to be used as a negative balance or credit line. However, due to race conditions where partner nodes don't always report costs before execution, a single execution may consume more credits than your remaining balance and temporarily result in a negative balance after completion. When your balance is negative, you will not be able to run Partner Nodes until you top up and restore a positive balance. Please ensure you have enough credits before making API calls.
Please visit the [Credits](/interface/credits) menu after logging in to check the corresponding credits.
Currently, the API Nodes are still in the testing phase and do not support this feature yet, but we have considered adding it.
No, your credits do not expire.
No, your credits cannot be transferred to other users and are limited to the currently logged-in account, but we do not restrict the number of devices that can log in.
We do not limit the number of devices that can log in; you can use your account anywhere you want.
Email a request to [support@comfy.org](mailto:support@comfy.org) and we will delete your information
---
# Source: https://docs.comfy.org/custom-nodes/help_page.md
> ## Documentation Index
> Fetch the complete documentation index at: https://docs.comfy.org/llms.txt
> Use this file to discover all available pages before exploring further.
# Add node docs for your ComfyUI custom node
> How to create rich documentation for your custom nodes
## Node Documentation with Markdown
Custom nodes can include rich markdown documentation that will be displayed in the UI instead of the generic node description. This provides users with detailed information about your node's functionality, parameters, and usage examples.
If you have already added tooltips for each parameter in the node definition, this basic information can be directly accessed via the node documentation panel.
No additional node documentation needs to be added, and you can refer to the related implementation of [ContextWindowsManualNode](https://github.com/comfyanonymous/ComfyUI/blob/master/comfy_extras/nodes_context_windows.py#L7)
## Setup
To add documentation for your custom nodes or multi-language support documentation:
1. Create a `docs` folder inside your `WEB_DIRECTORY`
2. Add markdown files named after your nodes (the names of your nodes are the dictionary keys in the `NODE_CLASS_MAPPINGS` dictionary used to register the nodes):
* `WEB_DIRECTORY/docs/NodeName.md` - Default documentation
* `WEB_DIRECTORY/docs/NodeName/en.md` - English documentation
* `WEB_DIRECTORY/docs/NodeName/zh.md` - Chinese documentation
* Add other locales as needed (e.g., `fr.md`, `de.md`, etc.)
The system will automatically load the appropriate documentation based on the user's locale, falling back to `NodeName.md` if a localized version is not available.
## Supported Markdown Features
* Standard markdown syntax (headings, lists, code blocks, etc.)
* Images using markdown syntax: ``
* HTML media elements with specific attributes:
* `


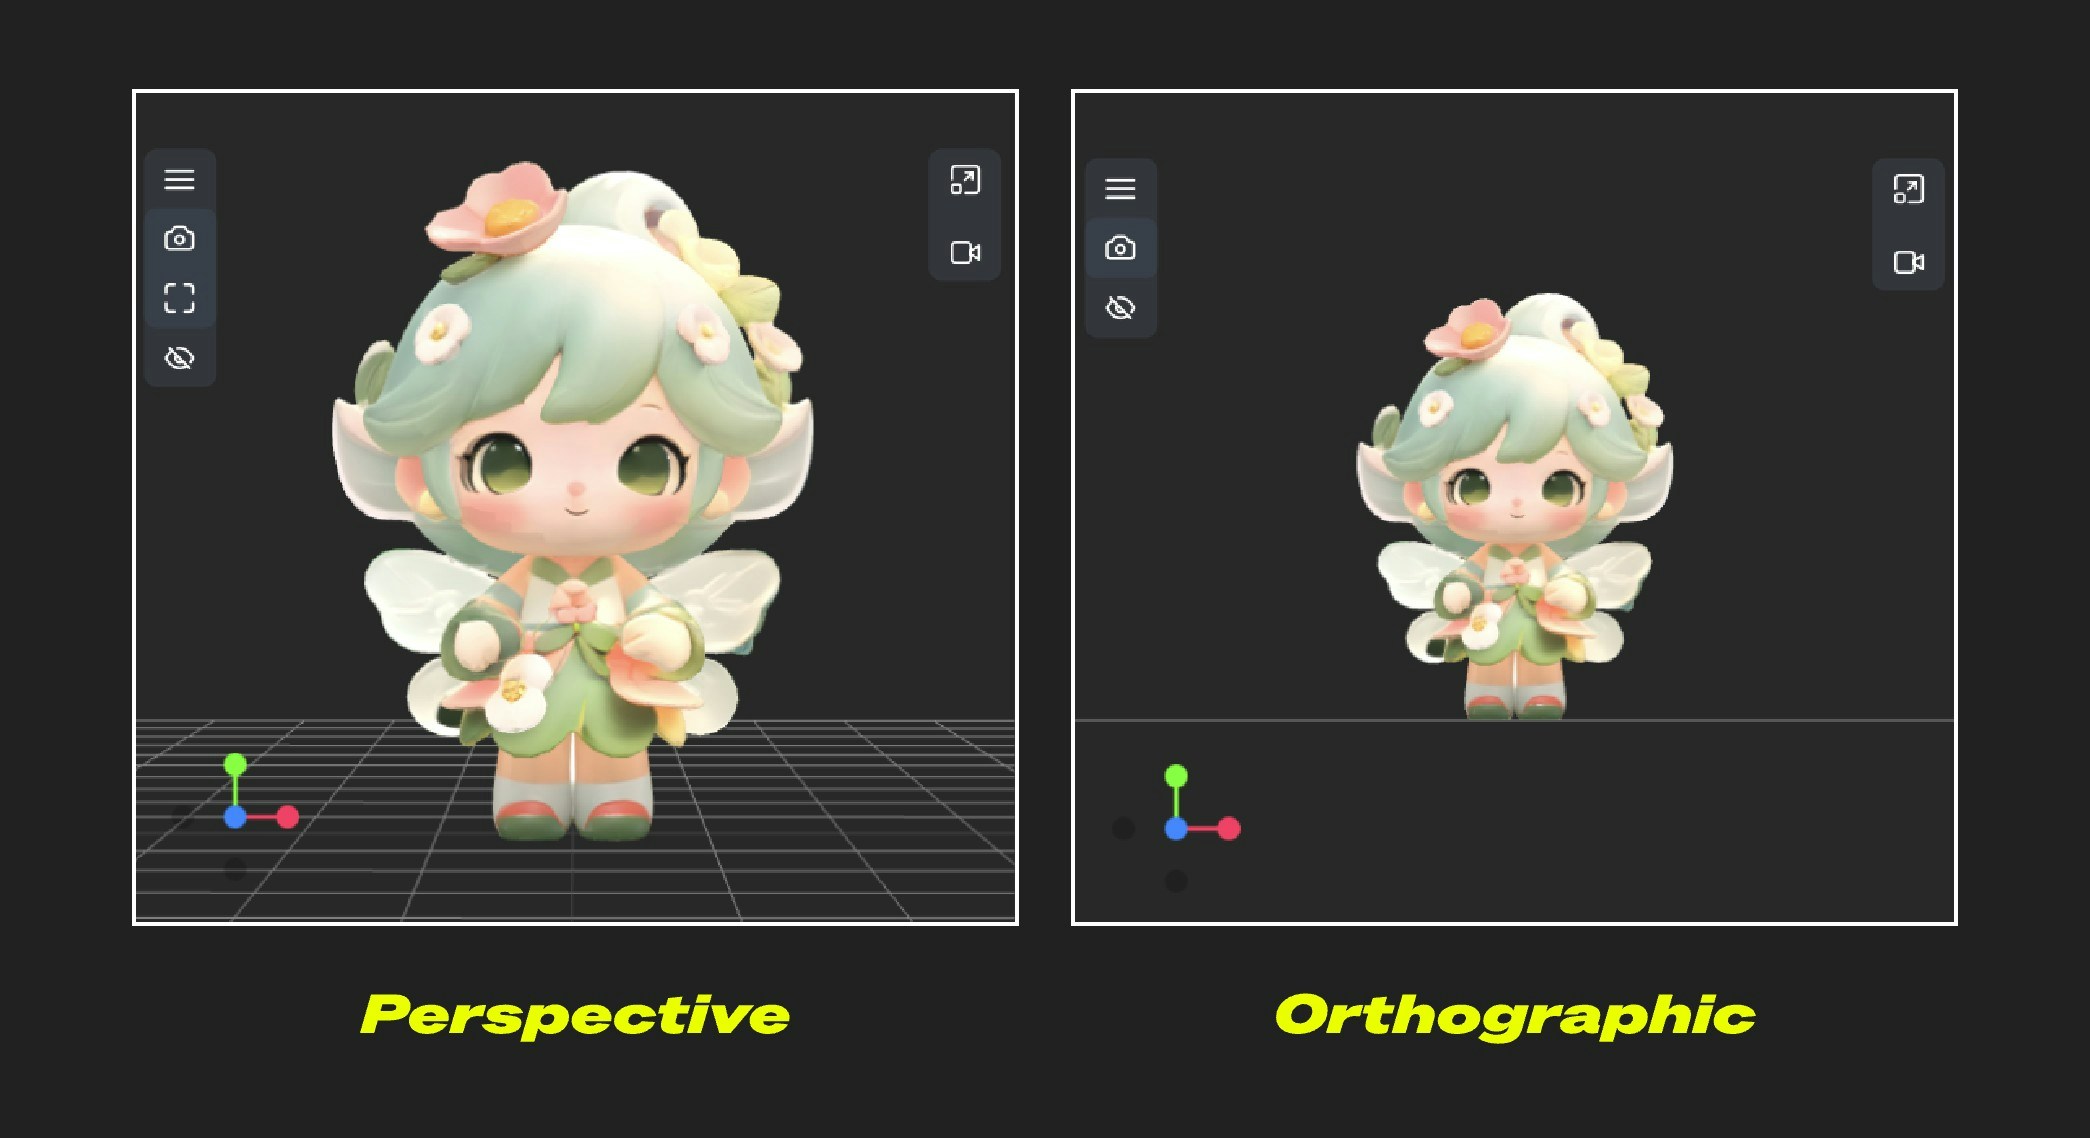 ## Light
The light settings in this section are used to set the default lighting settings for 3D components. The corresponding settings in the 3D settings in ComfyUI can also be modified.
## Light
The light settings in this section are used to set the default lighting settings for 3D components. The corresponding settings in the 3D settings in ComfyUI can also be modified.
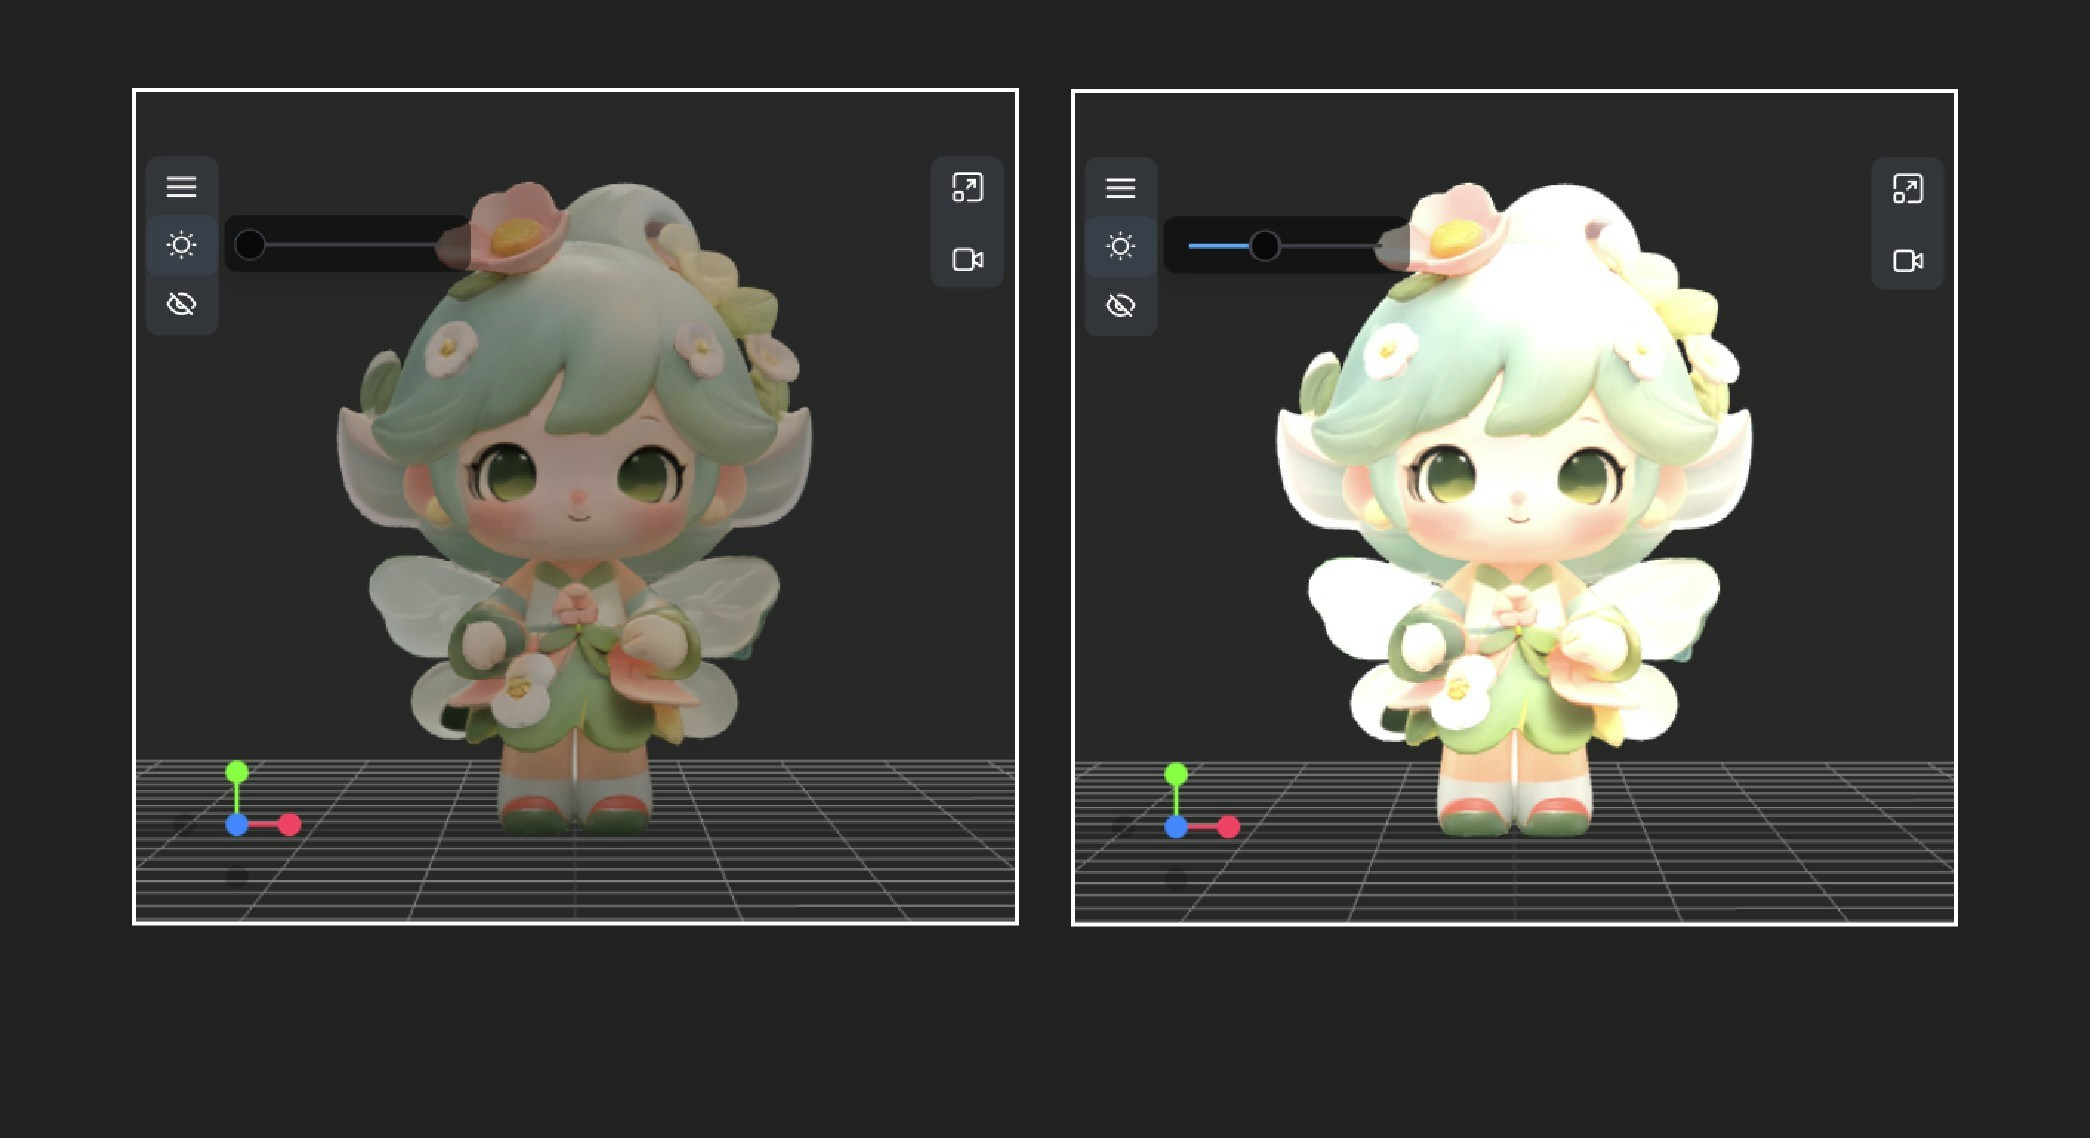 ### Light Adjustment Increment
* **Default Value**: 0.5
* **Function**: Controls the step size when adjusting light intensity in 3D scenes. Smaller step values allow for finer light adjustments, while larger values make each adjustment more noticeable
### Light Intensity Minimum
* **Default Value**: 1
* **Function**: Sets the minimum light intensity value allowed in 3D scenes. This defines the lowest brightness that can be set when adjusting the lighting of any 3D control
### Light Intensity Maximum
* **Default Value**: 10
* **Function**: Sets the maximum light intensity value allowed in 3D scenes. This defines the upper limit of brightness that can be set when adjusting the lighting of any 3D control
### Initial Light Intensity
* **Default Value**: 3
* **Function**: Sets the default brightness level of lights in 3D scenes. This value determines the intensity with which lights illuminate objects when creating new 3D controls, but each control can be adjusted individually after creation
## Scene
### Initial Background Color
* **Function**: Controls the default background color of 3D scenes. This setting determines the background appearance when creating new 3D components, but each component can be adjusted individually after creation
* **Default Value**: `282828` (dark gray)
Change the background color, which can also be adjusted in the canvas.
### Light Adjustment Increment
* **Default Value**: 0.5
* **Function**: Controls the step size when adjusting light intensity in 3D scenes. Smaller step values allow for finer light adjustments, while larger values make each adjustment more noticeable
### Light Intensity Minimum
* **Default Value**: 1
* **Function**: Sets the minimum light intensity value allowed in 3D scenes. This defines the lowest brightness that can be set when adjusting the lighting of any 3D control
### Light Intensity Maximum
* **Default Value**: 10
* **Function**: Sets the maximum light intensity value allowed in 3D scenes. This defines the upper limit of brightness that can be set when adjusting the lighting of any 3D control
### Initial Light Intensity
* **Default Value**: 3
* **Function**: Sets the default brightness level of lights in 3D scenes. This value determines the intensity with which lights illuminate objects when creating new 3D controls, but each control can be adjusted individually after creation
## Scene
### Initial Background Color
* **Function**: Controls the default background color of 3D scenes. This setting determines the background appearance when creating new 3D components, but each component can be adjusted individually after creation
* **Default Value**: `282828` (dark gray)
Change the background color, which can also be adjusted in the canvas.
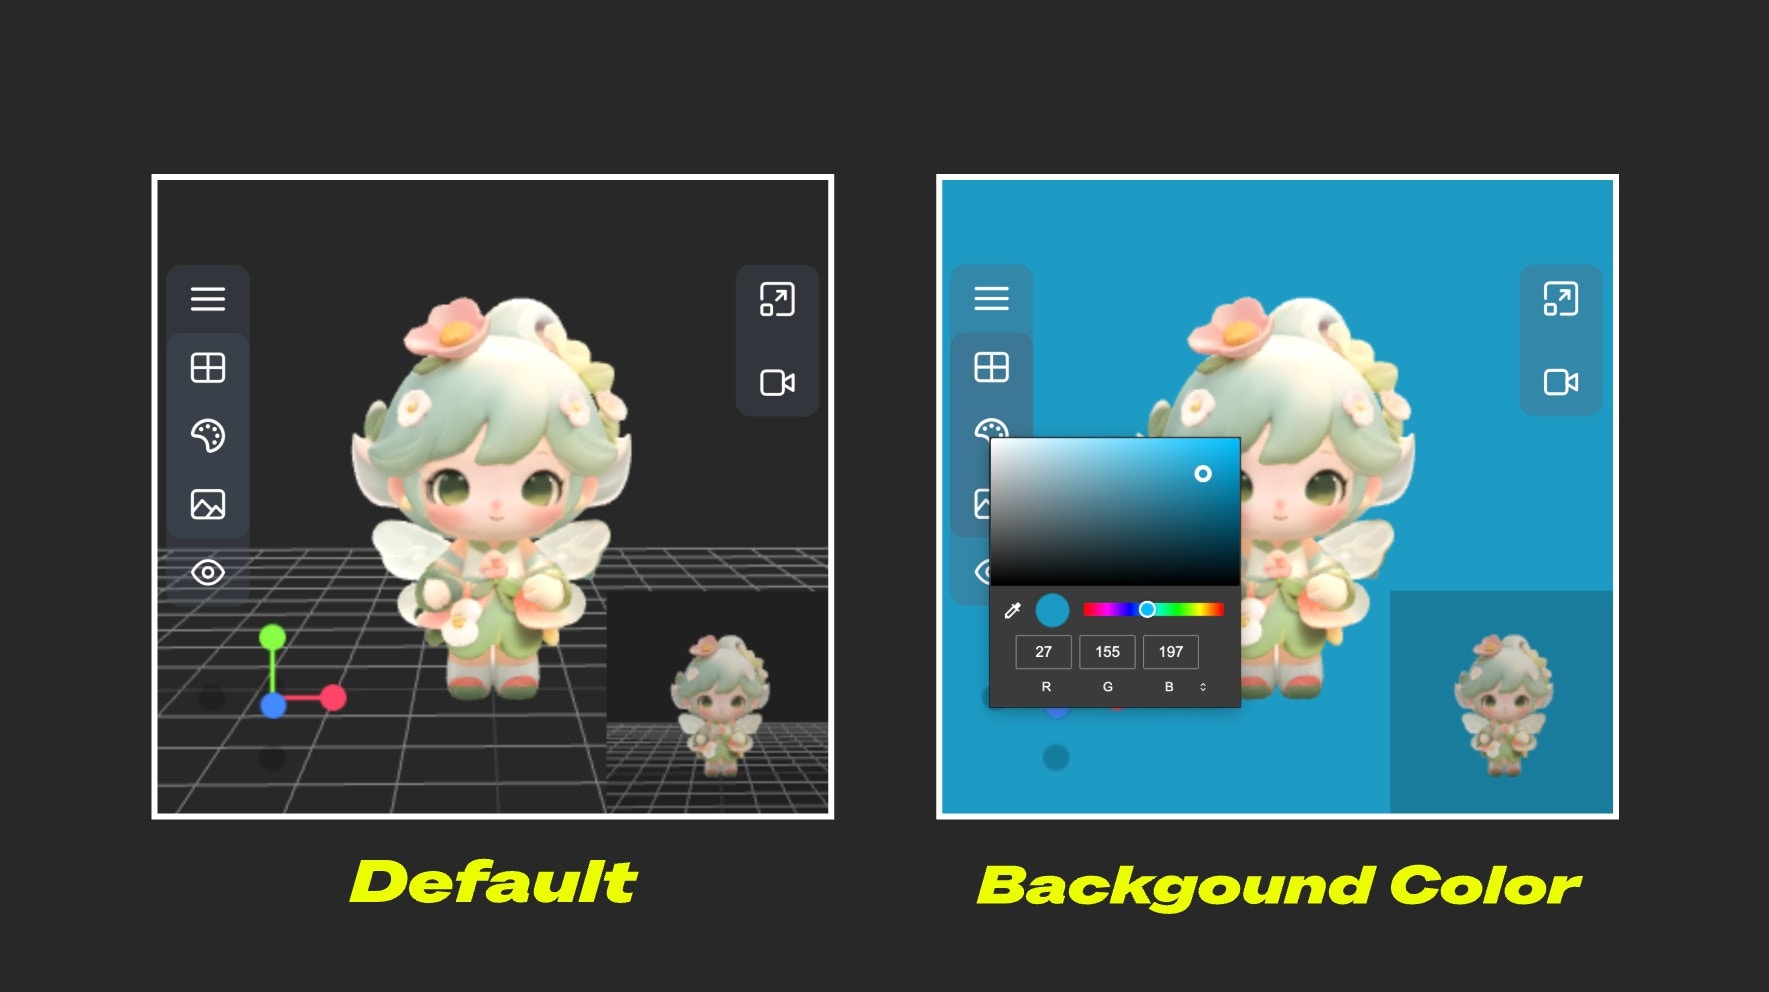 ### Initial Preview Visibility
* **Function**: Controls whether the preview screen is displayed by default when creating new 3D components. This default setting can still be toggled individually for each component after creation
* **Default Value**: true (enabled)
### Initial Preview Visibility
* **Function**: Controls whether the preview screen is displayed by default when creating new 3D components. This default setting can still be toggled individually for each component after creation
* **Default Value**: true (enabled)
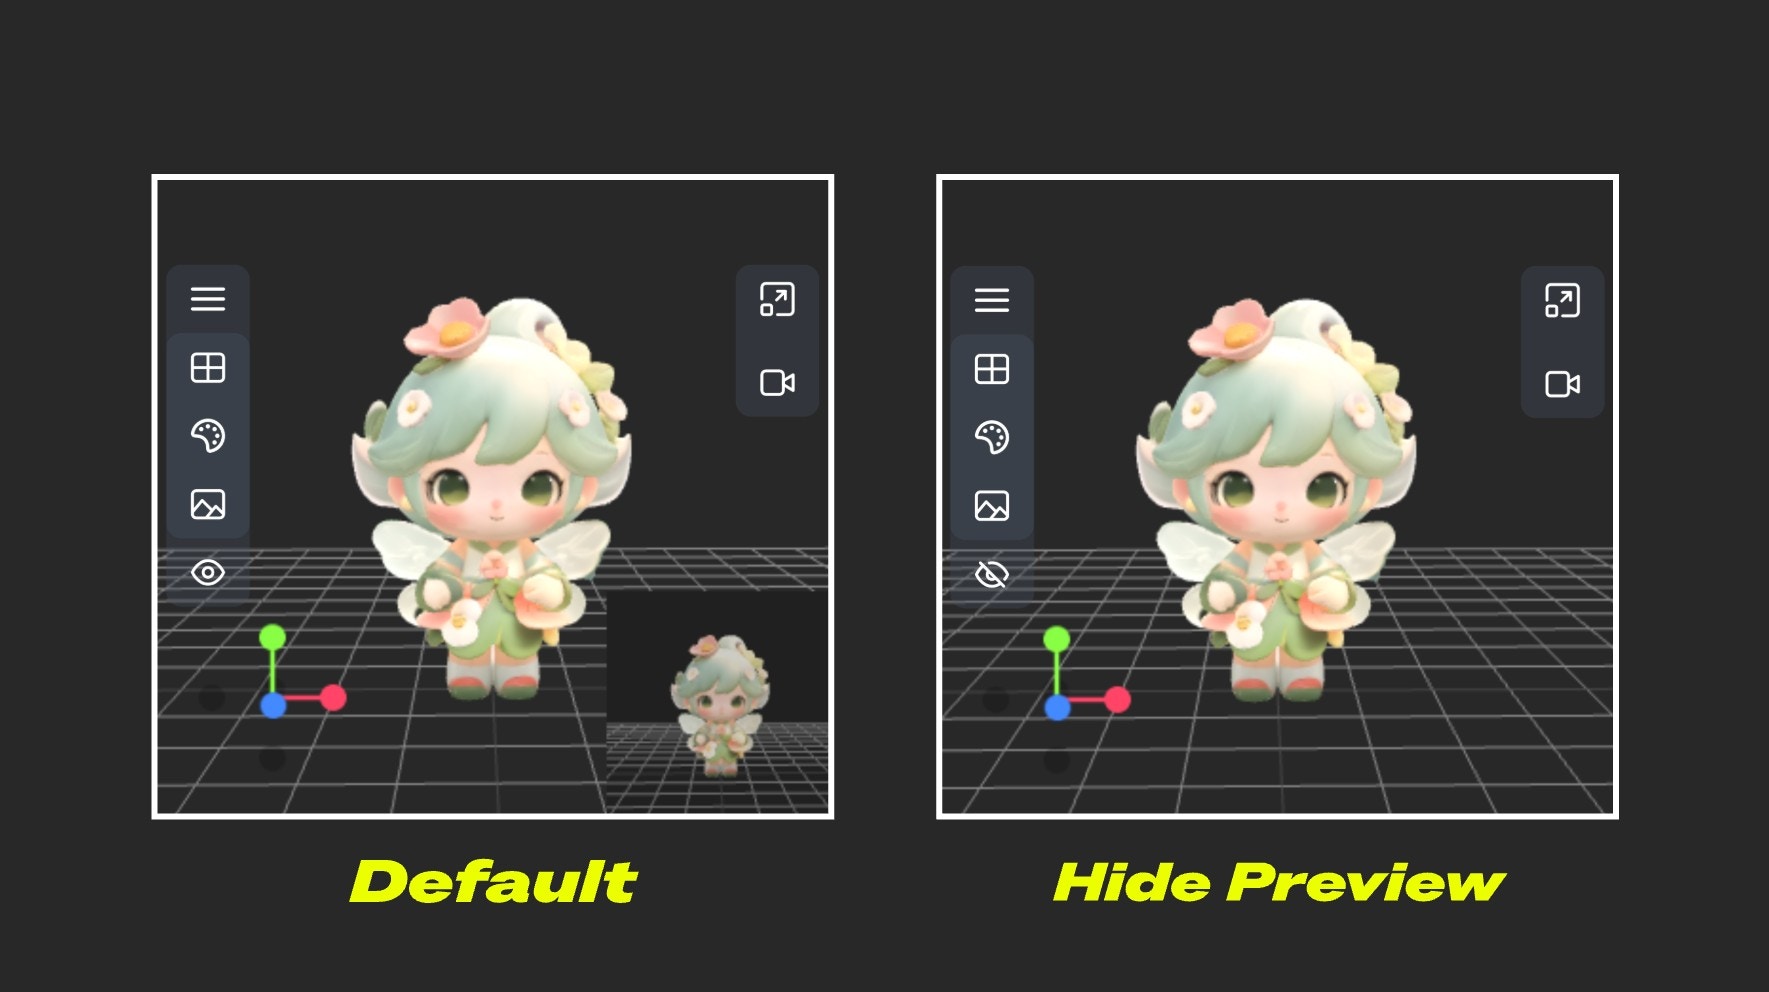 ### Initial Grid Visibility
* **Function**: Controls whether the grid is displayed by default when creating new 3D components. This default setting can still be toggled individually for each component after creation
* **Default Value**: true (enabled)
Hide or show the grid on initialization
### Initial Grid Visibility
* **Function**: Controls whether the grid is displayed by default when creating new 3D components. This default setting can still be toggled individually for each component after creation
* **Default Value**: true (enabled)
Hide or show the grid on initialization
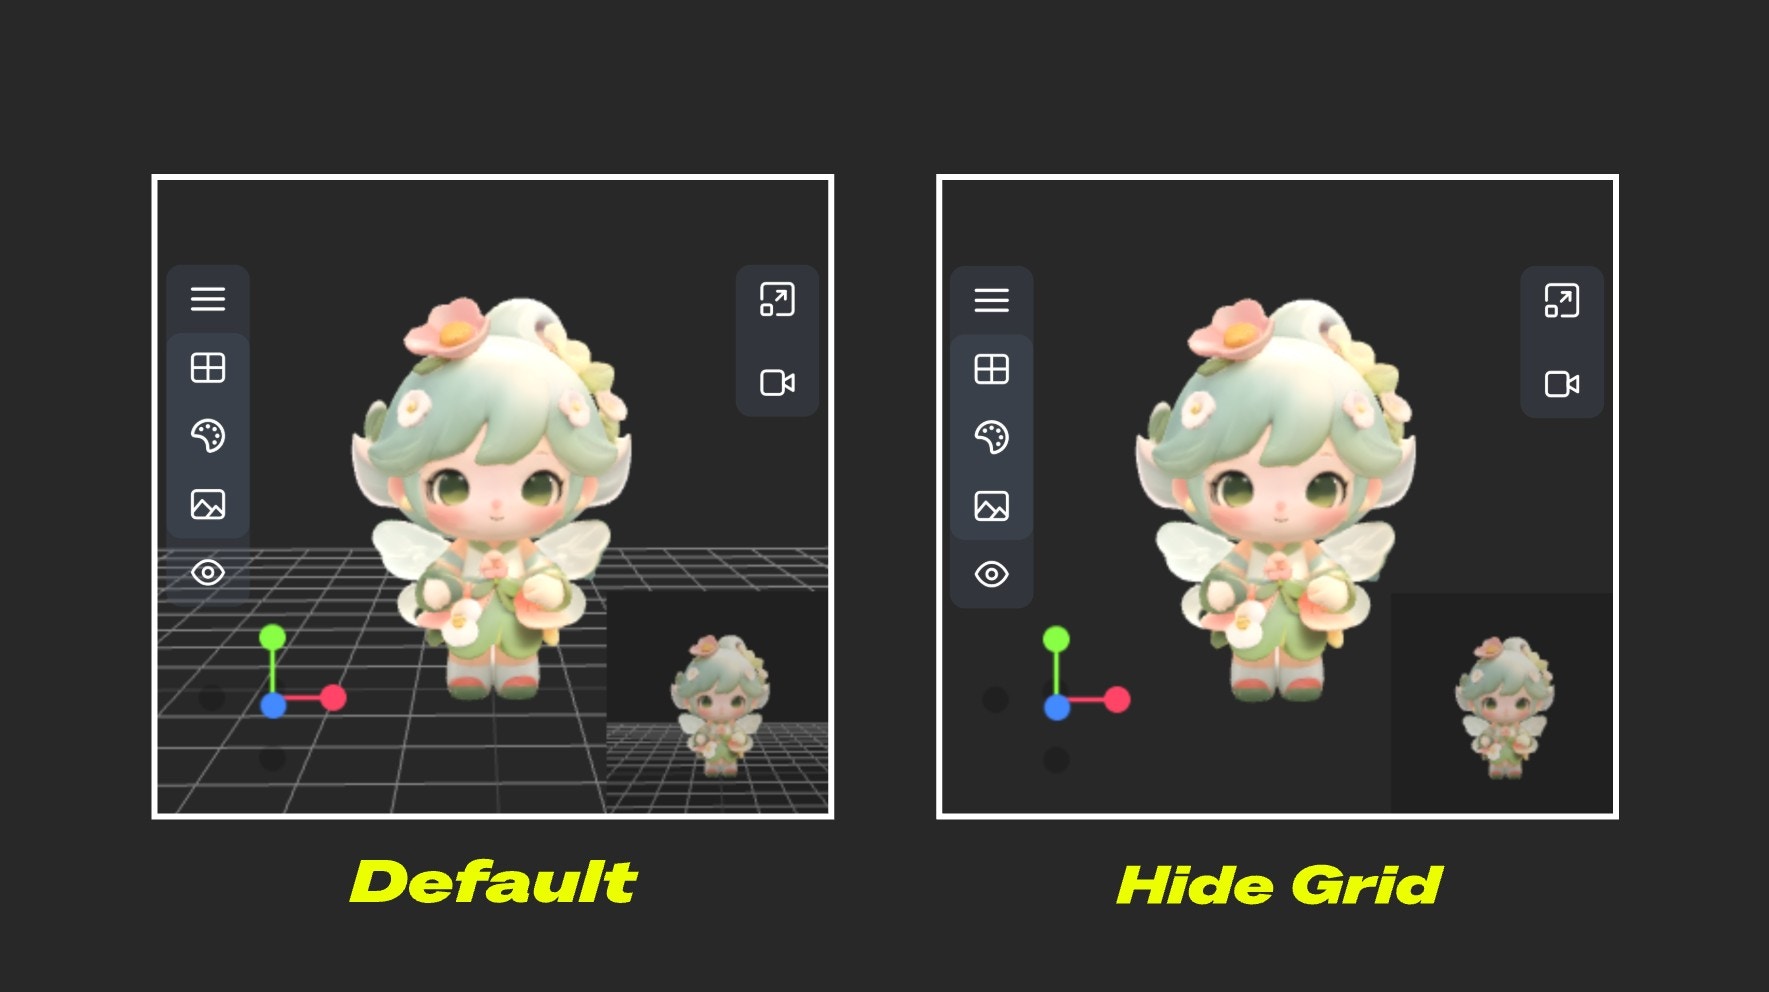 ---
# Source: https://docs.comfy.org/built-in-nodes/BasicScheduler.md
> ## Documentation Index
> Fetch the complete documentation index at: https://docs.comfy.org/llms.txt
> Use this file to discover all available pages before exploring further.
# BasicScheduler - ComfyUI Built-in Node Documentation
> The BasicScheduler node is used to compute a sequence of sigma values for diffusion models based on the provided scheduler, model, and denoising parameters.
The `BasicScheduler` node is designed to compute a sequence of sigma values for diffusion models based on the provided scheduler, model, and denoising parameters. It dynamically adjusts the total number of steps based on the denoise factor to fine-tune the diffusion process, providing precise "recipes" for different stages in advanced sampling processes that require fine control (such as multi-stage sampling).
## Inputs
| Parameter | Data Type | Input Type | Default | Range | Metaphor Description | Technical Purpose |
| ----------- | -------------- | ---------- | ------- | --------- | ------------------------------------------------------------------------- | ---------------------------------------------------------- |
| `model` | MODEL | Input | - | - | **Canvas Type**: Different canvas materials need different paint formulas | Diffusion model object, determines sigma calculation basis |
| `scheduler` | COMBO\[STRING] | Widget | - | 9 options | **Mixing Technique**: Choose how paint concentration changes | Scheduling algorithm, controls noise decay mode |
| `steps` | INT | Widget | 20 | 1-10000 | **Mixing Count**: 20 mixes vs 50 mixes precision difference | Sampling steps, affects generation quality and speed |
| `denoise` | FLOAT | Widget | 1.0 | 0.0-1.0 | **Creation Intensity**: Control level from fine-tuning to repainting | Denoising strength, supports partial repainting scenarios |
### Scheduler Types
Based on source code `comfy.samplers.SCHEDULER_NAMES`, supports the following 9 schedulers:
| Scheduler Name | Characteristics | Use Cases | Noise Decay Pattern |
| --------------------- | ----------------- | ----------------------------- | ----------------------------- |
| **normal** | Standard linear | General scenarios, balanced | Uniform decay |
| **karras** | Smooth transition | High quality, detail-rich | Smooth non-linear decay |
| **exponential** | Exponential decay | Fast generation, efficiency | Exponential rapid decay |
| **sgm\_uniform** | SGM uniform | Specific model optimization | SGM optimized decay |
| **simple** | Simple scheduling | Quick testing, basic use | Simplified decay |
| **ddim\_uniform** | DDIM uniform | DDIM sampling optimization | DDIM specific decay |
| **beta** | Beta distribution | Special distribution needs | Beta function decay |
| **linear\_quadratic** | Linear quadratic | Complex scenario optimization | Quadratic function decay |
| **kl\_optimal** | KL optimal | Theoretical optimization | KL divergence optimized decay |
## Outputs
| Parameter | Data Type | Output Type | Metaphor Description | Technical Meaning |
| --------- | --------- | ----------- | ------------------------------------------------------------------------------ | -------------------------------------------------------------- |
| `sigmas` | SIGMAS | Output | **Paint Recipe Chart**: Detailed paint concentration list for step-by-step use | Noise level sequence, guides diffusion model denoising process |
## Node Role: Artist's Color Mixing Assistant
Imagine you are an artist creating a clear image from a chaotic mixture of paint (noise). `BasicScheduler` acts like your **professional color mixing assistant**, whose job is to prepare a series of precise paint concentration recipes:
### Workflow
* **Step 1**: Use 90% concentration paint (high noise level)
* **Step 2**: Use 80% concentration paint
* **Step 3**: Use 70% concentration paint
* **...**
* **Final Step**: Use 0% concentration (clean canvas, no noise)
### Color Assistant's Special Skills
**Different mixing methods (scheduler)**:
* **"karras" mixing method**: Paint concentration changes very smoothly, like professional artist's gradient technique
* **"exponential" mixing method**: Paint concentration decreases rapidly, suitable for quick creation
* **"linear" mixing method**: Paint concentration decreases uniformly, stable and controllable
**Fine control (steps)**:
* **20 mixes**: Quick painting, efficiency priority
* **50 mixes**: Fine painting, quality priority
**Creation intensity (denoise)**:
* **1.0 = Complete new creation**: Start completely from blank canvas
* **0.5 = Half transformation**: Keep half of original painting, transform half
* **0.2 = Fine adjustment**: Only make subtle adjustments to original painting
### Collaboration with Other Nodes
`BasicScheduler` (Color Assistant) → Prepare Recipe → `SamplerCustom` (Artist) → Actual Painting → Completed Work
---
# Source: https://docs.comfy.org/built-in-nodes/Canny.md
> ## Documentation Index
> Fetch the complete documentation index at: https://docs.comfy.org/llms.txt
> Use this file to discover all available pages before exploring further.
# Canny - ComfyUI Built-in Node Documentation
> The Canny node used to extract edge lines from photos.
Extract all edge lines from photos, like using a pen to outline a photo, drawing out the contours and detail boundaries of objects.
## Working Principle
Imagine you are an artist who needs to use a pen to outline a photo. The Canny node acts like an intelligent assistant, helping you decide where to draw lines (edges) and where not to.
This process is like a screening job:
* **High threshold** is the "must draw line standard": only very obvious and clear contour lines will be drawn, such as facial contours of people and building frames
* **Low threshold** is the "definitely don't draw line standard": edges that are too weak will be ignored to avoid drawing noise and meaningless lines
* **Middle area**: edges between the two standards will be drawn together if they connect to "must draw lines", but won't be drawn if they are isolated
The final output is a black and white image, where white parts are detected edge lines and black parts are areas without edges.
## Inputs
| Parameter Name | Data Type | Input Type | Default | Range | Function Description |
| ---------------- | --------- | ---------- | ------- | --------- | --------------------------------------------------------------------------------------------------------------- |
| `image` | IMAGE | Input | - | - | Original photo that needs edge extraction |
| `low_threshold` | FLOAT | Widget | 0.4 | 0.01-0.99 | Low threshold, determines how weak edges to ignore. Lower values preserve more details but may produce noise |
| `high_threshold` | FLOAT | Widget | 0.8 | 0.01-0.99 | High threshold, determines how strong edges to preserve. Higher values only keep the most obvious contour lines |
## Outputs
| Output Name | Data Type | Description |
| ----------- | --------- | ----------------------------------------------------------------------------------------------- |
| `image` | IMAGE | Black and white edge image, white lines are detected edges, black areas are parts without edges |
## Parameter Comparison
---
# Source: https://docs.comfy.org/built-in-nodes/BasicScheduler.md
> ## Documentation Index
> Fetch the complete documentation index at: https://docs.comfy.org/llms.txt
> Use this file to discover all available pages before exploring further.
# BasicScheduler - ComfyUI Built-in Node Documentation
> The BasicScheduler node is used to compute a sequence of sigma values for diffusion models based on the provided scheduler, model, and denoising parameters.
The `BasicScheduler` node is designed to compute a sequence of sigma values for diffusion models based on the provided scheduler, model, and denoising parameters. It dynamically adjusts the total number of steps based on the denoise factor to fine-tune the diffusion process, providing precise "recipes" for different stages in advanced sampling processes that require fine control (such as multi-stage sampling).
## Inputs
| Parameter | Data Type | Input Type | Default | Range | Metaphor Description | Technical Purpose |
| ----------- | -------------- | ---------- | ------- | --------- | ------------------------------------------------------------------------- | ---------------------------------------------------------- |
| `model` | MODEL | Input | - | - | **Canvas Type**: Different canvas materials need different paint formulas | Diffusion model object, determines sigma calculation basis |
| `scheduler` | COMBO\[STRING] | Widget | - | 9 options | **Mixing Technique**: Choose how paint concentration changes | Scheduling algorithm, controls noise decay mode |
| `steps` | INT | Widget | 20 | 1-10000 | **Mixing Count**: 20 mixes vs 50 mixes precision difference | Sampling steps, affects generation quality and speed |
| `denoise` | FLOAT | Widget | 1.0 | 0.0-1.0 | **Creation Intensity**: Control level from fine-tuning to repainting | Denoising strength, supports partial repainting scenarios |
### Scheduler Types
Based on source code `comfy.samplers.SCHEDULER_NAMES`, supports the following 9 schedulers:
| Scheduler Name | Characteristics | Use Cases | Noise Decay Pattern |
| --------------------- | ----------------- | ----------------------------- | ----------------------------- |
| **normal** | Standard linear | General scenarios, balanced | Uniform decay |
| **karras** | Smooth transition | High quality, detail-rich | Smooth non-linear decay |
| **exponential** | Exponential decay | Fast generation, efficiency | Exponential rapid decay |
| **sgm\_uniform** | SGM uniform | Specific model optimization | SGM optimized decay |
| **simple** | Simple scheduling | Quick testing, basic use | Simplified decay |
| **ddim\_uniform** | DDIM uniform | DDIM sampling optimization | DDIM specific decay |
| **beta** | Beta distribution | Special distribution needs | Beta function decay |
| **linear\_quadratic** | Linear quadratic | Complex scenario optimization | Quadratic function decay |
| **kl\_optimal** | KL optimal | Theoretical optimization | KL divergence optimized decay |
## Outputs
| Parameter | Data Type | Output Type | Metaphor Description | Technical Meaning |
| --------- | --------- | ----------- | ------------------------------------------------------------------------------ | -------------------------------------------------------------- |
| `sigmas` | SIGMAS | Output | **Paint Recipe Chart**: Detailed paint concentration list for step-by-step use | Noise level sequence, guides diffusion model denoising process |
## Node Role: Artist's Color Mixing Assistant
Imagine you are an artist creating a clear image from a chaotic mixture of paint (noise). `BasicScheduler` acts like your **professional color mixing assistant**, whose job is to prepare a series of precise paint concentration recipes:
### Workflow
* **Step 1**: Use 90% concentration paint (high noise level)
* **Step 2**: Use 80% concentration paint
* **Step 3**: Use 70% concentration paint
* **...**
* **Final Step**: Use 0% concentration (clean canvas, no noise)
### Color Assistant's Special Skills
**Different mixing methods (scheduler)**:
* **"karras" mixing method**: Paint concentration changes very smoothly, like professional artist's gradient technique
* **"exponential" mixing method**: Paint concentration decreases rapidly, suitable for quick creation
* **"linear" mixing method**: Paint concentration decreases uniformly, stable and controllable
**Fine control (steps)**:
* **20 mixes**: Quick painting, efficiency priority
* **50 mixes**: Fine painting, quality priority
**Creation intensity (denoise)**:
* **1.0 = Complete new creation**: Start completely from blank canvas
* **0.5 = Half transformation**: Keep half of original painting, transform half
* **0.2 = Fine adjustment**: Only make subtle adjustments to original painting
### Collaboration with Other Nodes
`BasicScheduler` (Color Assistant) → Prepare Recipe → `SamplerCustom` (Artist) → Actual Painting → Completed Work
---
# Source: https://docs.comfy.org/built-in-nodes/Canny.md
> ## Documentation Index
> Fetch the complete documentation index at: https://docs.comfy.org/llms.txt
> Use this file to discover all available pages before exploring further.
# Canny - ComfyUI Built-in Node Documentation
> The Canny node used to extract edge lines from photos.
Extract all edge lines from photos, like using a pen to outline a photo, drawing out the contours and detail boundaries of objects.
## Working Principle
Imagine you are an artist who needs to use a pen to outline a photo. The Canny node acts like an intelligent assistant, helping you decide where to draw lines (edges) and where not to.
This process is like a screening job:
* **High threshold** is the "must draw line standard": only very obvious and clear contour lines will be drawn, such as facial contours of people and building frames
* **Low threshold** is the "definitely don't draw line standard": edges that are too weak will be ignored to avoid drawing noise and meaningless lines
* **Middle area**: edges between the two standards will be drawn together if they connect to "must draw lines", but won't be drawn if they are isolated
The final output is a black and white image, where white parts are detected edge lines and black parts are areas without edges.
## Inputs
| Parameter Name | Data Type | Input Type | Default | Range | Function Description |
| ---------------- | --------- | ---------- | ------- | --------- | --------------------------------------------------------------------------------------------------------------- |
| `image` | IMAGE | Input | - | - | Original photo that needs edge extraction |
| `low_threshold` | FLOAT | Widget | 0.4 | 0.01-0.99 | Low threshold, determines how weak edges to ignore. Lower values preserve more details but may produce noise |
| `high_threshold` | FLOAT | Widget | 0.8 | 0.01-0.99 | High threshold, determines how strong edges to preserve. Higher values only keep the most obvious contour lines |
## Outputs
| Output Name | Data Type | Description |
| ----------- | --------- | ----------------------------------------------------------------------------------------------- |
| `image` | IMAGE | Black and white edge image, white lines are detected edges, black areas are parts without edges |
## Parameter Comparison

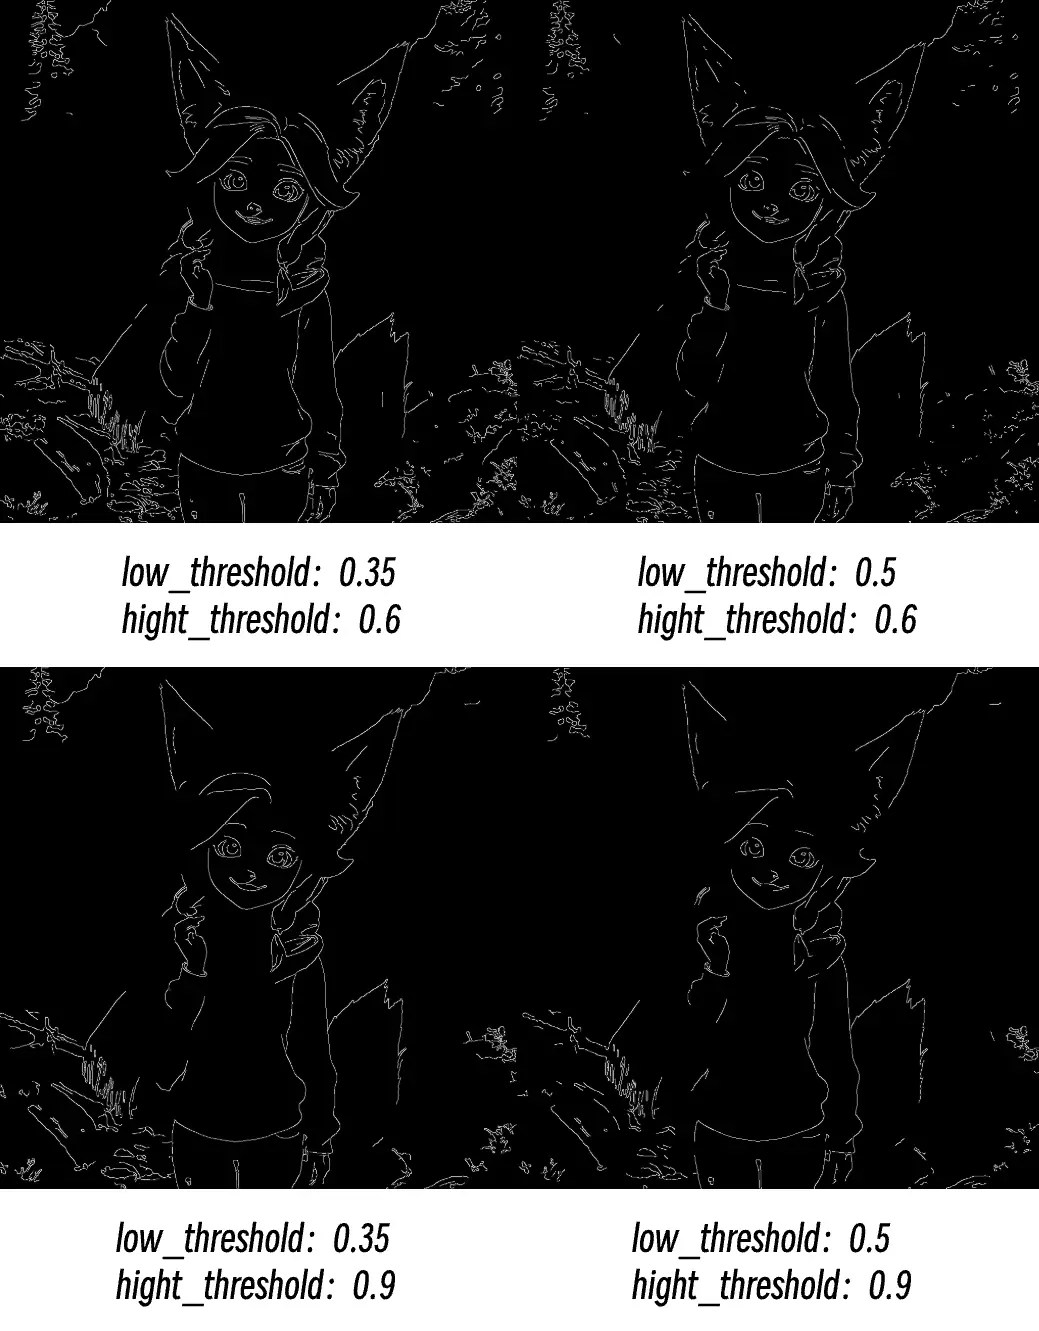 **Common Issues:**
* Broken edges: Try lowering high threshold
* Too much noise: Raise low threshold
* Missing important details: Lower low threshold
* Edges too rough: Check input image quality and resolution
---
# Source: https://docs.comfy.org/built-in-nodes/CheckpointLoaderSimple.md
> ## Documentation Index
> Fetch the complete documentation index at: https://docs.comfy.org/llms.txt
> Use this file to discover all available pages before exploring further.
# CheckpointLoaderSimple - ComfyUI Built-in Node Documentation
> The CheckpointLoaderSimple node is used to load model files from specified locations and decompose them into three core components: the main model, text encoder, and image encoder/decoder.
This is a model loader node that loads model files from specified locations and decomposes them into three core components: the main model, text encoder, and image encoder/decoder.
This node automatically detects all model files in the `ComfyUI/models/checkpoints` folder, as well as additional paths configured in your `extra_model_paths.yaml` file.
1. **Model Compatibility**: Ensure the selected model is compatible with your workflow. Different model types (such as SD1.5, SDXL, Flux, etc.) need to be paired with corresponding samplers and other nodes
2. **File Management**: Place model files in the `ComfyUI/models/checkpoints` folder, or configure other paths through extra\_model\_paths.yaml
3. **Interface Refresh**: If new model files are added while ComfyUI is running, you need to refresh the browser (Ctrl+R) to see the new files in the dropdown list
## Inputs
| Parameter | Data Type | Input Type | Default | Range | Description |
| ----------- | --------- | ---------- | ------- | ------------------------------------- | ----------------------------------------------------------------------------------------------------------------- |
| `ckpt_name` | STRING | Widget | null | All model files in checkpoints folder | Select the checkpoint model file name to load, which determines the AI model used for subsequent image generation |
## Outputs
| Output Name | Data Type | Description |
| ----------- | --------- | --------------------------------------------------------------------------------------------------------------- |
| `MODEL` | MODEL | The main diffusion model used for image denoising generation, the core component of AI image creation |
| `CLIP` | CLIP | The model used for encoding text prompts, converting text descriptions into information that AI can understand |
| `VAE` | VAE | The model used for image encoding and decoding, responsible for converting between pixel space and latent space |
---
# Source: https://docs.comfy.org/built-in-nodes/ClipLoader.md
> ## Documentation Index
> Fetch the complete documentation index at: https://docs.comfy.org/llms.txt
> Use this file to discover all available pages before exploring further.
# ClipLoader - ComfyUI Built-in Node Documentation
> The ClipLoader node is used to load CLIP text encoder models independently.
This node is primarily used for loading CLIP text encoder models independently.
The model files can be detected in the following paths:
* "ComfyUI/models/text\_encoders/"
* "ComfyUI/models/clip/"
> If you save a model after ComfyUI has started, you'll need to refresh the ComfyUI frontend to get the latest model file path list
Supported model formats:
* `.ckpt`
* `.pt`
* `.pt2`
* `.bin`
* `.pth`
* `.safetensors`
* `.pkl`
* `.sft`
For more details on the latest model file loading, please refer to [folder\_paths](https://github.com/comfyanonymous/ComfyUI/blob/master/folder_paths.py)
## Inputs
| Parameter | Data Type | Description |
| ----------- | -------------- | -------------------------------------------------------------------------------------------------------------------------------------------------------------------------------------------------------------------------------------------------- |
| `clip_name` | COMBO\[STRING] | Specifies the name of the CLIP model to be loaded. This name is used to locate the model file within a predefined directory structure. |
| `type` | COMBO\[STRING] | Determines the type of CLIP model to load. As ComfyUI supports more models, new types will be added here. Please check the `CLIPLoader` class definition in [node.py](https://github.com/comfyanonymous/ComfyUI/blob/master/nodes.py) for details. |
| `device` | COMBO\[STRING] | Choose the device for loading the CLIP model. `default` will run the model on GPU, while selecting `CPU` will force loading on CPU. |
### Device Options Explained
**When to choose "default":**
* Have sufficient GPU memory
* Want the best performance
* Let the system optimize memory usage automatically
**When to choose "cpu":**
* Insufficient GPU memory
* Need to reserve GPU memory for other models (like UNet)
* Running in a low VRAM environment
* Debugging or special purpose needs
**Performance Impact**
Running on CPU will be much slower than GPU, but it can save valuable GPU memory for other more important model components. In memory-constrained environments, putting the CLIP model on CPU is a common optimization strategy.
### Supported Combinations
| Model Type | Corresponding Encoder |
| ----------------- | ----------------------- |
| stable\_diffusion | clip-l |
| stable\_cascade | clip-g |
| sd3 | t5 xxl/ clip-g / clip-l |
| stable\_audio | t5 base |
| mochi | t5 xxl |
| cosmos | old t5 xxl |
| lumina2 | gemma 2 2B |
| wan | umt5 xxl |
As ComfyUI updates, these combinations may expand. For details, please refer to the `CLIPLoader` class definition in [node.py](https://github.com/comfyanonymous/ComfyUI/blob/master/nodes.py)
## Outputs
| Parameter | Data Type | Description |
| --------- | --------- | ------------------------------------------------------------------------------- |
| `clip` | CLIP | The loaded CLIP model, ready for use in downstream tasks or further processing. |
## Additional Notes
CLIP models play a core role as text encoders in ComfyUI, responsible for converting text prompts into numerical representations that diffusion models can understand. You can think of them as translators, responsible for translating your text into a language that large models can understand. Of course, different models have their own "dialects," so different CLIP encoders are needed between different architectures to complete the text encoding process.
---
# Source: https://docs.comfy.org/built-in-nodes/ClipMergeSimple.md
> ## Documentation Index
> Fetch the complete documentation index at: https://docs.comfy.org/llms.txt
> Use this file to discover all available pages before exploring further.
# ClipMergeSimple - ComfyUI Built-in Node Documentation
> The ClipMergeSimple node is used to combine two CLIP text encoder models based on a specified ratio.
`CLIPMergeSimple` is an advanced model merging node used to combine two CLIP text encoder models based on a specified ratio.
This node specializes in merging two CLIP models based on a specified ratio, effectively blending their characteristics. It selectively applies patches from one model to another, excluding specific components like position IDs and logit scale, to create a hybrid model that combines features from both source models.
## Inputs
| Parameter | Data Type | Description |
| --------- | --------- | --------------------------------------------------------------------------------------------------------------------------------------------------------------------------------------------------------------------------------- |
| `clip1` | CLIP | The first CLIP model to be merged. It serves as the base model for the merging process. |
| `clip2` | CLIP | The second CLIP model to be merged. Its key patches, except for position IDs and logit scale, are applied to the first model based on the specified ratio. |
| `ratio` | FLOAT | Range `0.0 - 1.0`, determines the proportion of features from the second model to blend into the first model. A ratio of 1.0 means fully adopting the second model's features, while 0.0 retains only the first model's features. |
## Outputs
| Parameter | Data Type | Description |
| --------- | --------- | ---------------------------------------------------------------------------------------------------------------- |
| `clip` | CLIP | The resulting merged CLIP model, incorporating features from both input models according to the specified ratio. |
## Merging Mechanism Explained
### Merging Algorithm
The node uses weighted averaging to merge the two models:
1. **Clone Base Model**: First clones `clip1` as the base model
2. **Get Patches**: Obtains all key patches from `clip2`
3. **Filter Special Keys**: Skips keys ending with `.position_ids` and `.logit_scale`
4. **Apply Weighted Merge**: Uses the formula `(1.0 - ratio) * clip1 + ratio * clip2`
### Ratio Parameter Explained
* **ratio = 0.0**: Fully uses clip1, ignores clip2
* **ratio = 0.5**: 50% contribution from each model
* **ratio = 1.0**: Fully uses clip2, ignores clip1
## Use Cases
1. **Model Style Fusion**: Combine characteristics of CLIP models trained on different data
2. **Performance Optimization**: Balance strengths and weaknesses of different models
3. **Experimental Research**: Explore combinations of different CLIP encoders
---
# Source: https://docs.comfy.org/built-in-nodes/ClipSave.md
> ## Documentation Index
> Fetch the complete documentation index at: https://docs.comfy.org/llms.txt
> Use this file to discover all available pages before exploring further.
# ClipSave - ComfyUI Built-in Node Documentation
> The ClipSave node is used to save CLIP text encoder models in SafeTensors format.
The `CLIPSave` node is designed for saving CLIP text encoder models in SafeTensors format. This node is part of advanced model merging workflows and is typically used in conjunction with nodes like `CLIPMergeSimple` and `CLIPMergeAdd`. The saved files use the SafeTensors format to ensure security and compatibility.
## Inputs
| Parameter | Data Type | Required | Default Value | Description |
| ---------------- | -------------- | -------- | -------------- | ------------------------------------------ |
| clip | CLIP | Yes | - | The CLIP model to be saved |
| filename\_prefix | STRING | Yes | "clip/ComfyUI" | The prefix path for the saved file |
| prompt | PROMPT | Hidden | - | Workflow prompt information (for metadata) |
| extra\_pnginfo | EXTRA\_PNGINFO | Hidden | - | Additional PNG information (for metadata) |
## Outputs
This node has no defined output types. It saves the processed files to the `ComfyUI/output/` folder.
### Multi-file Saving Strategy
The node saves different components based on the CLIP model type:
| Prefix Type | File Suffix | Description |
| ------------ | ----------- | --------------------- |
| `clip_l.` | `_clip_l` | CLIP-L text encoder |
| `clip_g.` | `_clip_g` | CLIP-G text encoder |
| Empty prefix | No suffix | Other CLIP components |
## Usage Notes
1. **File Location**: All files are saved in the `ComfyUI/output/` directory
2. **File Format**: Models are saved in SafeTensors format for security
3. **Metadata**: Includes workflow information and PNG metadata if available
4. **Naming Convention**: Uses the specified prefix plus appropriate suffixes based on model type
---
# Source: https://docs.comfy.org/built-in-nodes/ClipSetLastLayer.md
> ## Documentation Index
> Fetch the complete documentation index at: https://docs.comfy.org/llms.txt
> Use this file to discover all available pages before exploring further.
# ClipSetLastLayer - ComfyUI Built-in Node Documentation
> The ClipSetLastLayer node is used to control the processing depth of CLIP models.
`CLIP Set Last Layer` is a core node in ComfyUI for controlling the processing depth of CLIP models. It allows users to precisely control where the CLIP text encoder stops processing, affecting both the depth of text understanding and the style of generated images.
Imagine the CLIP model as a 24-layer intelligent brain:
* Shallow layers (1-8): Recognize basic letters and words
* Middle layers (9-16): Understand grammar and sentence structure
* Deep layers (17-24): Grasp abstract concepts and complex semantics
`CLIP Set Last Layer` works like a **"thinking depth controller"**:
-1: Use all 24 layers (complete understanding)
-2: Stop at layer 23 (slightly simplified)
-12: Stop at layer 13 (medium understanding)
-24: Use only layer 1 (basic understanding)
## Inputs
| Parameter | Data Type | Default | Range | Description |
| -------------------- | --------- | ------- | --------- | ----------------------------------------------------------------------------------- |
| `clip` | CLIP | - | - | The CLIP model to be modified |
| `stop_at_clip_layer` | INT | -1 | -24 to -1 | Specifies which layer to stop at, -1 uses all layers, -24 uses only the first layer |
## Outputs
| Output Name | Data Type | Description |
| ----------- | --------- | -------------------------------------------------------------------- |
| clip | CLIP | The modified CLIP model with the specified layer set as the last one |
## Why Set the Last Layer
* **Performance Optimization**: Like not needing a PhD to understand simple sentences, sometimes shallow understanding is enough and faster
* **Style Control**: Different levels of understanding produce different artistic styles
* **Compatibility**: Some models might perform better at specific layers
---
# Source: https://docs.comfy.org/built-in-nodes/ClipTextEncode.md
> ## Documentation Index
> Fetch the complete documentation index at: https://docs.comfy.org/llms.txt
> Use this file to discover all available pages before exploring further.
# ClipTextEncode - ComfyUI Built-in Node Documentation
> The ClipTextEncode node is used to convert text prompts into AI-understandable 'language' for image generation.
`CLIP Text Encode (CLIPTextEncode)` acts like a translator, converting your creative text prompts into a special "language" that AI can understand, helping the AI accurately interpret what kind of image you want to create.
Imagine communicating with a foreign artist - you need a translator to help accurately convey the artwork you want. This node acts as that translator, using the CLIP model (an AI model trained on vast amounts of image-text pairs) to understand your text descriptions and convert them into "instructions" that the AI art model can understand.
## Inputs
| Parameter | Data Type | Input Method | Default | Range | Description |
| --------- | --------- | --------------- | ------- | ------------------ | ---------------------------------------------------------------------------------------------------------------------------------------------------- |
| text | STRING | Text Input | Empty | Any text | Like detailed instructions to an artist, enter your image description here. Supports multi-line text for detailed descriptions. |
| clip | CLIP | Model Selection | None | Loaded CLIP models | Like choosing a specific translator, different CLIP models are like different translators with slightly different understandings of artistic styles. |
## Outputs
| Output Name | Data Type | Description |
| ------------ | ------------ | --------------------------------------------------------------------------------------------------------------------------------------------------------------------------------------------------------------- |
| CONDITIONING | CONDITIONING | These are the translated "painting instructions" containing detailed creative guidance that the AI model can understand. These instructions tell the AI model how to create an image matching your description. |
## Usage Tips
1. **Basic Text Prompt Usage**
* Write detailed descriptions like you're writing a short essay
* More specific descriptions lead to more accurate results
* Use English commas to separate different descriptive elements
2. **Special Feature: Using Embedding Models**
* Embedding models are like preset art style packages that can quickly apply specific artistic effects
* Currently supports .safetensors, .pt, and .bin file formats, and you don't necessarily need to use the complete model name
* How to use:
1. Place the embedding model file (in .pt format) in the `ComfyUI/models/embeddings` folder
2. Use `embedding:model_name` in your text
Example: If you have a model called `EasyNegative.pt`, you can use it like this:
```
a beautiful landscape, embedding:EasyNegative, high quality
```
3. **Prompt Weight Adjustment**
* Use parentheses to adjust the importance of certain descriptions
* For example: `(beautiful:1.2)` will make the "beautiful" feature more prominent
* Regular parentheses `()` have a default weight of 1.1
* Use keyboard shortcuts `ctrl + up/down arrow` to quickly adjust weights
* The weight adjustment step size can be modified in settings
4. **Important Notes**
* Ensure the CLIP model is properly loaded
* Use positive and clear text descriptions
* When using embedding models, make sure the file name is correct and compatible with your current main model's architecture
---
# Source: https://docs.comfy.org/built-in-nodes/ClipTextEncodeFlux.md
> ## Documentation Index
> Fetch the complete documentation index at: https://docs.comfy.org/llms.txt
> Use this file to discover all available pages before exploring further.
# ClipTextEncodeFlux - ComfyUI Built-in Node Documentation
> The ClipTextEncodeFlux node is used to encode text prompts into Flux-compatible conditioning embeddings.
`CLIPTextEncodeFlux` is an advanced text encoding node in ComfyUI, specifically designed for the Flux architecture. It uses a dual-encoder mechanism (CLIP-L and T5XXL) to process both structured keywords and detailed natural language descriptions, providing the Flux model with more accurate and comprehensive text understanding for improved text-to-image generation quality.
This node is based on a dual-encoder collaboration mechanism:
1. The `clip_l` input is processed by the CLIP-L encoder, extracting style, theme, and other keyword features—ideal for concise descriptions.
2. The `t5xxl` input is processed by the T5XXL encoder, which excels at understanding complex and detailed natural language scene descriptions.
3. The outputs from both encoders are fused, and combined with the `guidance` parameter to generate unified conditioning embeddings (`CONDITIONING`) for downstream Flux sampler nodes, controlling how closely the generated content matches the text description.
## Inputs
| Parameter | Data Type | Input Method | Default | Range | Description |
| ---------- | --------- | ------------ | ------- | ---------------- | ---------------------------------------------------------------------------------------------------------------------- |
| `clip` | CLIP | Node input | None | - | Must be a CLIP model supporting the Flux architecture, including both CLIP-L and T5XXL encoders |
| `clip_l` | STRING | Text box | None | Up to 77 tokens | Suitable for concise keyword descriptions, such as style or theme |
| `t5xxl` | STRING | Text box | None | Nearly unlimited | Suitable for detailed natural language descriptions, expressing complex scenes and details |
| `guidance` | FLOAT | Slider | 3.5 | 0.0 - 100.0 | Controls the influence of text conditions on the generation process; higher values mean stricter adherence to the text |
## Outputs
| Output Name | Data Type | Description |
| -------------- | ------------ | ------------------------------------------------------------------------------------------------------------------ |
| `CONDITIONING` | CONDITIONING | Contains the fused embeddings from both encoders and the guidance parameter, used for conditional image generation |
## Usage Examples
### Prompt Examples
* **clip\_l input** (keyword style):
* Use structured, concise keyword combinations
* Example: `masterpiece, best quality, portrait, oil painting, dramatic lighting`
* Focus on style, quality, and main subject
* **t5xxl input** (natural language description):
* Use complete, fluent scene descriptions
* Example: `A highly detailed portrait in oil painting style, featuring dramatic chiaroscuro lighting that creates deep shadows and bright highlights, emphasizing the subject's features with renaissance-inspired composition.`
* Focus on scene details, spatial relationships, and lighting effects
### Notes
1. Make sure to use a CLIP model compatible with the Flux architecture
2. It is recommended to fill in both `clip_l` and `t5xxl` to leverage the dual-encoder advantage
3. Note the 77-token limit for `clip_l`
4. Adjust the `guidance` parameter based on the generated results
---
# Source: https://docs.comfy.org/built-in-nodes/ClipTextEncodeHunyuanDit.md
> ## Documentation Index
> Fetch the complete documentation index at: https://docs.comfy.org/llms.txt
> Use this file to discover all available pages before exploring further.
# ClipTextEncodeHunyuanDit - ComfyUI Built-in Node Documentation
> The ClipTextEncodeHunyuanDit node is used to encode text prompts into HunyuanDiT-compatible conditioning embeddings.
The `CLIPTextEncodeHunyuanDiT` node's main function is to convert input text into a form that the model can understand. It is an advanced conditioning node specifically designed for the dual text encoder architecture of the HunyuanDiT model.
Its primary role is like a translator, converting our text descriptions into "machine language" that the AI model can understand. The `bert` and `mt5xl` inputs prefer different types of prompt inputs.
## Inputs
| Parameter | Data Type | Description |
| --------- | --------- | -------------------------------------------------------------------------------------------------------------------------------------------- |
| `clip` | CLIP | A CLIP model instance used for text tokenization and encoding, which is core to generating conditions. |
| `bert` | STRING | Text input for encoding, prefers phrases and keywords, supports multiline and dynamic prompts. |
| `mt5xl` | STRING | Another text input for encoding, supports multiline and dynamic prompts (multilingual), can use complete sentences and complex descriptions. |
## Outputs
| Parameter | Data Type | Description |
| -------------- | ------------ | ------------------------------------------------------------------------------- |
| `CONDITIONING` | CONDITIONING | The encoded conditional output used for further processing in generation tasks. |
---
# Source: https://docs.comfy.org/built-in-nodes/ClipTextEncodeSdxl.md
> ## Documentation Index
> Fetch the complete documentation index at: https://docs.comfy.org/llms.txt
> Use this file to discover all available pages before exploring further.
# ClipTextEncodeSdxl - ComfyUI Built-in Node Documentation
> The ClipTextEncodeSdxl node is used to encode text prompts into SDXL-compatible conditioning embeddings.
This node is designed to encode text input using a CLIP model specifically customized for the SDXL architecture. It uses a dual encoder system (CLIP-L and CLIP-G) to process text descriptions, resulting in more accurate image generation.
## Inputs
| Parameter | Data Type | Description |
| --------------- | --------- | ------------------------------------------------------ |
| `clip` | CLIP | CLIP model instance used for text encoding. |
| `width` | INT | Specifies the image width in pixels, default 1024. |
| `height` | INT | Specifies the image height in pixels, default 1024. |
| `crop_w` | INT | Width of the crop area in pixels, default 0. |
| `crop_h` | INT | Height of the crop area in pixels, default 0. |
| `target_width` | INT | Target width for the output image, default 1024. |
| `target_height` | INT | Target height for the output image, default 1024. |
| `text_g` | STRING | Global text description for overall scene description. |
| `text_l` | STRING | Local text description for detail description. |
## Outputs
| Parameter | Data Type | Description |
| -------------- | ------------ | ------------------------------------------------------------------------------ |
| `CONDITIONING` | CONDITIONING | Contains encoded text and conditional information needed for image generation. |
---
# Source: https://docs.comfy.org/built-in-nodes/ClipTextEncodeSdxlRefiner.md
> ## Documentation Index
> Fetch the complete documentation index at: https://docs.comfy.org/llms.txt
> Use this file to discover all available pages before exploring further.
# ClipTextEncodeSdxlRefiner - ComfyUI Built-in Node Documentation
> The ClipTextEncodeSdxlRefiner node is used to encode text prompts into SDXL Refiner-compatible conditioning embeddings.
This node is specifically designed for the SDXL Refiner model to convert text prompts into conditioning information by incorporating aesthetic scores and dimensional information to enhance the conditions for generation tasks, thereby improving the final refinement effect. It acts like a professional art director, not only conveying your creative intent but also injecting precise aesthetic standards and specification requirements into the work.
## About SDXL Refiner
SDXL Refiner is a specialized refinement model that focuses on enhancing image details and quality based on the SDXL base model. This process is like having an art retoucher:
1. First, it receives preliminary images or text descriptions generated by the base model
2. Then, it guides the refinement process through precise aesthetic scoring and dimensional parameters
3. Finally, it focuses on processing high-frequency image details to improve overall quality
Refiner can be used in two ways:
* As a standalone refinement step for post-processing images generated by the base model
* As part of an expert integration system, taking over processing during the low-noise phase of generation
## Inputs
| Parameter Name | Data Type | Input Type | Default Value | Value Range | Description |
| -------------- | --------- | ---------- | ------------- | ----------- | ---------------------------------------------------------------------------------------------------------------------------------------------------------------------------------------------------------------------------------------------------------------------------------------------------------- |
| `clip` | CLIP | Required | - | - | CLIP model instance used for text tokenization and encoding, the core component for converting text into model-understandable format |
| `ascore` | FLOAT | Optional | 6.0 | 0.0-1000.0 | Controls the visual quality and aesthetics of generated images, similar to setting quality standards for artwork:
**Common Issues:**
* Broken edges: Try lowering high threshold
* Too much noise: Raise low threshold
* Missing important details: Lower low threshold
* Edges too rough: Check input image quality and resolution
---
# Source: https://docs.comfy.org/built-in-nodes/CheckpointLoaderSimple.md
> ## Documentation Index
> Fetch the complete documentation index at: https://docs.comfy.org/llms.txt
> Use this file to discover all available pages before exploring further.
# CheckpointLoaderSimple - ComfyUI Built-in Node Documentation
> The CheckpointLoaderSimple node is used to load model files from specified locations and decompose them into three core components: the main model, text encoder, and image encoder/decoder.
This is a model loader node that loads model files from specified locations and decomposes them into three core components: the main model, text encoder, and image encoder/decoder.
This node automatically detects all model files in the `ComfyUI/models/checkpoints` folder, as well as additional paths configured in your `extra_model_paths.yaml` file.
1. **Model Compatibility**: Ensure the selected model is compatible with your workflow. Different model types (such as SD1.5, SDXL, Flux, etc.) need to be paired with corresponding samplers and other nodes
2. **File Management**: Place model files in the `ComfyUI/models/checkpoints` folder, or configure other paths through extra\_model\_paths.yaml
3. **Interface Refresh**: If new model files are added while ComfyUI is running, you need to refresh the browser (Ctrl+R) to see the new files in the dropdown list
## Inputs
| Parameter | Data Type | Input Type | Default | Range | Description |
| ----------- | --------- | ---------- | ------- | ------------------------------------- | ----------------------------------------------------------------------------------------------------------------- |
| `ckpt_name` | STRING | Widget | null | All model files in checkpoints folder | Select the checkpoint model file name to load, which determines the AI model used for subsequent image generation |
## Outputs
| Output Name | Data Type | Description |
| ----------- | --------- | --------------------------------------------------------------------------------------------------------------- |
| `MODEL` | MODEL | The main diffusion model used for image denoising generation, the core component of AI image creation |
| `CLIP` | CLIP | The model used for encoding text prompts, converting text descriptions into information that AI can understand |
| `VAE` | VAE | The model used for image encoding and decoding, responsible for converting between pixel space and latent space |
---
# Source: https://docs.comfy.org/built-in-nodes/ClipLoader.md
> ## Documentation Index
> Fetch the complete documentation index at: https://docs.comfy.org/llms.txt
> Use this file to discover all available pages before exploring further.
# ClipLoader - ComfyUI Built-in Node Documentation
> The ClipLoader node is used to load CLIP text encoder models independently.
This node is primarily used for loading CLIP text encoder models independently.
The model files can be detected in the following paths:
* "ComfyUI/models/text\_encoders/"
* "ComfyUI/models/clip/"
> If you save a model after ComfyUI has started, you'll need to refresh the ComfyUI frontend to get the latest model file path list
Supported model formats:
* `.ckpt`
* `.pt`
* `.pt2`
* `.bin`
* `.pth`
* `.safetensors`
* `.pkl`
* `.sft`
For more details on the latest model file loading, please refer to [folder\_paths](https://github.com/comfyanonymous/ComfyUI/blob/master/folder_paths.py)
## Inputs
| Parameter | Data Type | Description |
| ----------- | -------------- | -------------------------------------------------------------------------------------------------------------------------------------------------------------------------------------------------------------------------------------------------- |
| `clip_name` | COMBO\[STRING] | Specifies the name of the CLIP model to be loaded. This name is used to locate the model file within a predefined directory structure. |
| `type` | COMBO\[STRING] | Determines the type of CLIP model to load. As ComfyUI supports more models, new types will be added here. Please check the `CLIPLoader` class definition in [node.py](https://github.com/comfyanonymous/ComfyUI/blob/master/nodes.py) for details. |
| `device` | COMBO\[STRING] | Choose the device for loading the CLIP model. `default` will run the model on GPU, while selecting `CPU` will force loading on CPU. |
### Device Options Explained
**When to choose "default":**
* Have sufficient GPU memory
* Want the best performance
* Let the system optimize memory usage automatically
**When to choose "cpu":**
* Insufficient GPU memory
* Need to reserve GPU memory for other models (like UNet)
* Running in a low VRAM environment
* Debugging or special purpose needs
**Performance Impact**
Running on CPU will be much slower than GPU, but it can save valuable GPU memory for other more important model components. In memory-constrained environments, putting the CLIP model on CPU is a common optimization strategy.
### Supported Combinations
| Model Type | Corresponding Encoder |
| ----------------- | ----------------------- |
| stable\_diffusion | clip-l |
| stable\_cascade | clip-g |
| sd3 | t5 xxl/ clip-g / clip-l |
| stable\_audio | t5 base |
| mochi | t5 xxl |
| cosmos | old t5 xxl |
| lumina2 | gemma 2 2B |
| wan | umt5 xxl |
As ComfyUI updates, these combinations may expand. For details, please refer to the `CLIPLoader` class definition in [node.py](https://github.com/comfyanonymous/ComfyUI/blob/master/nodes.py)
## Outputs
| Parameter | Data Type | Description |
| --------- | --------- | ------------------------------------------------------------------------------- |
| `clip` | CLIP | The loaded CLIP model, ready for use in downstream tasks or further processing. |
## Additional Notes
CLIP models play a core role as text encoders in ComfyUI, responsible for converting text prompts into numerical representations that diffusion models can understand. You can think of them as translators, responsible for translating your text into a language that large models can understand. Of course, different models have their own "dialects," so different CLIP encoders are needed between different architectures to complete the text encoding process.
---
# Source: https://docs.comfy.org/built-in-nodes/ClipMergeSimple.md
> ## Documentation Index
> Fetch the complete documentation index at: https://docs.comfy.org/llms.txt
> Use this file to discover all available pages before exploring further.
# ClipMergeSimple - ComfyUI Built-in Node Documentation
> The ClipMergeSimple node is used to combine two CLIP text encoder models based on a specified ratio.
`CLIPMergeSimple` is an advanced model merging node used to combine two CLIP text encoder models based on a specified ratio.
This node specializes in merging two CLIP models based on a specified ratio, effectively blending their characteristics. It selectively applies patches from one model to another, excluding specific components like position IDs and logit scale, to create a hybrid model that combines features from both source models.
## Inputs
| Parameter | Data Type | Description |
| --------- | --------- | --------------------------------------------------------------------------------------------------------------------------------------------------------------------------------------------------------------------------------- |
| `clip1` | CLIP | The first CLIP model to be merged. It serves as the base model for the merging process. |
| `clip2` | CLIP | The second CLIP model to be merged. Its key patches, except for position IDs and logit scale, are applied to the first model based on the specified ratio. |
| `ratio` | FLOAT | Range `0.0 - 1.0`, determines the proportion of features from the second model to blend into the first model. A ratio of 1.0 means fully adopting the second model's features, while 0.0 retains only the first model's features. |
## Outputs
| Parameter | Data Type | Description |
| --------- | --------- | ---------------------------------------------------------------------------------------------------------------- |
| `clip` | CLIP | The resulting merged CLIP model, incorporating features from both input models according to the specified ratio. |
## Merging Mechanism Explained
### Merging Algorithm
The node uses weighted averaging to merge the two models:
1. **Clone Base Model**: First clones `clip1` as the base model
2. **Get Patches**: Obtains all key patches from `clip2`
3. **Filter Special Keys**: Skips keys ending with `.position_ids` and `.logit_scale`
4. **Apply Weighted Merge**: Uses the formula `(1.0 - ratio) * clip1 + ratio * clip2`
### Ratio Parameter Explained
* **ratio = 0.0**: Fully uses clip1, ignores clip2
* **ratio = 0.5**: 50% contribution from each model
* **ratio = 1.0**: Fully uses clip2, ignores clip1
## Use Cases
1. **Model Style Fusion**: Combine characteristics of CLIP models trained on different data
2. **Performance Optimization**: Balance strengths and weaknesses of different models
3. **Experimental Research**: Explore combinations of different CLIP encoders
---
# Source: https://docs.comfy.org/built-in-nodes/ClipSave.md
> ## Documentation Index
> Fetch the complete documentation index at: https://docs.comfy.org/llms.txt
> Use this file to discover all available pages before exploring further.
# ClipSave - ComfyUI Built-in Node Documentation
> The ClipSave node is used to save CLIP text encoder models in SafeTensors format.
The `CLIPSave` node is designed for saving CLIP text encoder models in SafeTensors format. This node is part of advanced model merging workflows and is typically used in conjunction with nodes like `CLIPMergeSimple` and `CLIPMergeAdd`. The saved files use the SafeTensors format to ensure security and compatibility.
## Inputs
| Parameter | Data Type | Required | Default Value | Description |
| ---------------- | -------------- | -------- | -------------- | ------------------------------------------ |
| clip | CLIP | Yes | - | The CLIP model to be saved |
| filename\_prefix | STRING | Yes | "clip/ComfyUI" | The prefix path for the saved file |
| prompt | PROMPT | Hidden | - | Workflow prompt information (for metadata) |
| extra\_pnginfo | EXTRA\_PNGINFO | Hidden | - | Additional PNG information (for metadata) |
## Outputs
This node has no defined output types. It saves the processed files to the `ComfyUI/output/` folder.
### Multi-file Saving Strategy
The node saves different components based on the CLIP model type:
| Prefix Type | File Suffix | Description |
| ------------ | ----------- | --------------------- |
| `clip_l.` | `_clip_l` | CLIP-L text encoder |
| `clip_g.` | `_clip_g` | CLIP-G text encoder |
| Empty prefix | No suffix | Other CLIP components |
## Usage Notes
1. **File Location**: All files are saved in the `ComfyUI/output/` directory
2. **File Format**: Models are saved in SafeTensors format for security
3. **Metadata**: Includes workflow information and PNG metadata if available
4. **Naming Convention**: Uses the specified prefix plus appropriate suffixes based on model type
---
# Source: https://docs.comfy.org/built-in-nodes/ClipSetLastLayer.md
> ## Documentation Index
> Fetch the complete documentation index at: https://docs.comfy.org/llms.txt
> Use this file to discover all available pages before exploring further.
# ClipSetLastLayer - ComfyUI Built-in Node Documentation
> The ClipSetLastLayer node is used to control the processing depth of CLIP models.
`CLIP Set Last Layer` is a core node in ComfyUI for controlling the processing depth of CLIP models. It allows users to precisely control where the CLIP text encoder stops processing, affecting both the depth of text understanding and the style of generated images.
Imagine the CLIP model as a 24-layer intelligent brain:
* Shallow layers (1-8): Recognize basic letters and words
* Middle layers (9-16): Understand grammar and sentence structure
* Deep layers (17-24): Grasp abstract concepts and complex semantics
`CLIP Set Last Layer` works like a **"thinking depth controller"**:
-1: Use all 24 layers (complete understanding)
-2: Stop at layer 23 (slightly simplified)
-12: Stop at layer 13 (medium understanding)
-24: Use only layer 1 (basic understanding)
## Inputs
| Parameter | Data Type | Default | Range | Description |
| -------------------- | --------- | ------- | --------- | ----------------------------------------------------------------------------------- |
| `clip` | CLIP | - | - | The CLIP model to be modified |
| `stop_at_clip_layer` | INT | -1 | -24 to -1 | Specifies which layer to stop at, -1 uses all layers, -24 uses only the first layer |
## Outputs
| Output Name | Data Type | Description |
| ----------- | --------- | -------------------------------------------------------------------- |
| clip | CLIP | The modified CLIP model with the specified layer set as the last one |
## Why Set the Last Layer
* **Performance Optimization**: Like not needing a PhD to understand simple sentences, sometimes shallow understanding is enough and faster
* **Style Control**: Different levels of understanding produce different artistic styles
* **Compatibility**: Some models might perform better at specific layers
---
# Source: https://docs.comfy.org/built-in-nodes/ClipTextEncode.md
> ## Documentation Index
> Fetch the complete documentation index at: https://docs.comfy.org/llms.txt
> Use this file to discover all available pages before exploring further.
# ClipTextEncode - ComfyUI Built-in Node Documentation
> The ClipTextEncode node is used to convert text prompts into AI-understandable 'language' for image generation.
`CLIP Text Encode (CLIPTextEncode)` acts like a translator, converting your creative text prompts into a special "language" that AI can understand, helping the AI accurately interpret what kind of image you want to create.
Imagine communicating with a foreign artist - you need a translator to help accurately convey the artwork you want. This node acts as that translator, using the CLIP model (an AI model trained on vast amounts of image-text pairs) to understand your text descriptions and convert them into "instructions" that the AI art model can understand.
## Inputs
| Parameter | Data Type | Input Method | Default | Range | Description |
| --------- | --------- | --------------- | ------- | ------------------ | ---------------------------------------------------------------------------------------------------------------------------------------------------- |
| text | STRING | Text Input | Empty | Any text | Like detailed instructions to an artist, enter your image description here. Supports multi-line text for detailed descriptions. |
| clip | CLIP | Model Selection | None | Loaded CLIP models | Like choosing a specific translator, different CLIP models are like different translators with slightly different understandings of artistic styles. |
## Outputs
| Output Name | Data Type | Description |
| ------------ | ------------ | --------------------------------------------------------------------------------------------------------------------------------------------------------------------------------------------------------------- |
| CONDITIONING | CONDITIONING | These are the translated "painting instructions" containing detailed creative guidance that the AI model can understand. These instructions tell the AI model how to create an image matching your description. |
## Usage Tips
1. **Basic Text Prompt Usage**
* Write detailed descriptions like you're writing a short essay
* More specific descriptions lead to more accurate results
* Use English commas to separate different descriptive elements
2. **Special Feature: Using Embedding Models**
* Embedding models are like preset art style packages that can quickly apply specific artistic effects
* Currently supports .safetensors, .pt, and .bin file formats, and you don't necessarily need to use the complete model name
* How to use:
1. Place the embedding model file (in .pt format) in the `ComfyUI/models/embeddings` folder
2. Use `embedding:model_name` in your text
Example: If you have a model called `EasyNegative.pt`, you can use it like this:
```
a beautiful landscape, embedding:EasyNegative, high quality
```
3. **Prompt Weight Adjustment**
* Use parentheses to adjust the importance of certain descriptions
* For example: `(beautiful:1.2)` will make the "beautiful" feature more prominent
* Regular parentheses `()` have a default weight of 1.1
* Use keyboard shortcuts `ctrl + up/down arrow` to quickly adjust weights
* The weight adjustment step size can be modified in settings
4. **Important Notes**
* Ensure the CLIP model is properly loaded
* Use positive and clear text descriptions
* When using embedding models, make sure the file name is correct and compatible with your current main model's architecture
---
# Source: https://docs.comfy.org/built-in-nodes/ClipTextEncodeFlux.md
> ## Documentation Index
> Fetch the complete documentation index at: https://docs.comfy.org/llms.txt
> Use this file to discover all available pages before exploring further.
# ClipTextEncodeFlux - ComfyUI Built-in Node Documentation
> The ClipTextEncodeFlux node is used to encode text prompts into Flux-compatible conditioning embeddings.
`CLIPTextEncodeFlux` is an advanced text encoding node in ComfyUI, specifically designed for the Flux architecture. It uses a dual-encoder mechanism (CLIP-L and T5XXL) to process both structured keywords and detailed natural language descriptions, providing the Flux model with more accurate and comprehensive text understanding for improved text-to-image generation quality.
This node is based on a dual-encoder collaboration mechanism:
1. The `clip_l` input is processed by the CLIP-L encoder, extracting style, theme, and other keyword features—ideal for concise descriptions.
2. The `t5xxl` input is processed by the T5XXL encoder, which excels at understanding complex and detailed natural language scene descriptions.
3. The outputs from both encoders are fused, and combined with the `guidance` parameter to generate unified conditioning embeddings (`CONDITIONING`) for downstream Flux sampler nodes, controlling how closely the generated content matches the text description.
## Inputs
| Parameter | Data Type | Input Method | Default | Range | Description |
| ---------- | --------- | ------------ | ------- | ---------------- | ---------------------------------------------------------------------------------------------------------------------- |
| `clip` | CLIP | Node input | None | - | Must be a CLIP model supporting the Flux architecture, including both CLIP-L and T5XXL encoders |
| `clip_l` | STRING | Text box | None | Up to 77 tokens | Suitable for concise keyword descriptions, such as style or theme |
| `t5xxl` | STRING | Text box | None | Nearly unlimited | Suitable for detailed natural language descriptions, expressing complex scenes and details |
| `guidance` | FLOAT | Slider | 3.5 | 0.0 - 100.0 | Controls the influence of text conditions on the generation process; higher values mean stricter adherence to the text |
## Outputs
| Output Name | Data Type | Description |
| -------------- | ------------ | ------------------------------------------------------------------------------------------------------------------ |
| `CONDITIONING` | CONDITIONING | Contains the fused embeddings from both encoders and the guidance parameter, used for conditional image generation |
## Usage Examples
### Prompt Examples
* **clip\_l input** (keyword style):
* Use structured, concise keyword combinations
* Example: `masterpiece, best quality, portrait, oil painting, dramatic lighting`
* Focus on style, quality, and main subject
* **t5xxl input** (natural language description):
* Use complete, fluent scene descriptions
* Example: `A highly detailed portrait in oil painting style, featuring dramatic chiaroscuro lighting that creates deep shadows and bright highlights, emphasizing the subject's features with renaissance-inspired composition.`
* Focus on scene details, spatial relationships, and lighting effects
### Notes
1. Make sure to use a CLIP model compatible with the Flux architecture
2. It is recommended to fill in both `clip_l` and `t5xxl` to leverage the dual-encoder advantage
3. Note the 77-token limit for `clip_l`
4. Adjust the `guidance` parameter based on the generated results
---
# Source: https://docs.comfy.org/built-in-nodes/ClipTextEncodeHunyuanDit.md
> ## Documentation Index
> Fetch the complete documentation index at: https://docs.comfy.org/llms.txt
> Use this file to discover all available pages before exploring further.
# ClipTextEncodeHunyuanDit - ComfyUI Built-in Node Documentation
> The ClipTextEncodeHunyuanDit node is used to encode text prompts into HunyuanDiT-compatible conditioning embeddings.
The `CLIPTextEncodeHunyuanDiT` node's main function is to convert input text into a form that the model can understand. It is an advanced conditioning node specifically designed for the dual text encoder architecture of the HunyuanDiT model.
Its primary role is like a translator, converting our text descriptions into "machine language" that the AI model can understand. The `bert` and `mt5xl` inputs prefer different types of prompt inputs.
## Inputs
| Parameter | Data Type | Description |
| --------- | --------- | -------------------------------------------------------------------------------------------------------------------------------------------- |
| `clip` | CLIP | A CLIP model instance used for text tokenization and encoding, which is core to generating conditions. |
| `bert` | STRING | Text input for encoding, prefers phrases and keywords, supports multiline and dynamic prompts. |
| `mt5xl` | STRING | Another text input for encoding, supports multiline and dynamic prompts (multilingual), can use complete sentences and complex descriptions. |
## Outputs
| Parameter | Data Type | Description |
| -------------- | ------------ | ------------------------------------------------------------------------------- |
| `CONDITIONING` | CONDITIONING | The encoded conditional output used for further processing in generation tasks. |
---
# Source: https://docs.comfy.org/built-in-nodes/ClipTextEncodeSdxl.md
> ## Documentation Index
> Fetch the complete documentation index at: https://docs.comfy.org/llms.txt
> Use this file to discover all available pages before exploring further.
# ClipTextEncodeSdxl - ComfyUI Built-in Node Documentation
> The ClipTextEncodeSdxl node is used to encode text prompts into SDXL-compatible conditioning embeddings.
This node is designed to encode text input using a CLIP model specifically customized for the SDXL architecture. It uses a dual encoder system (CLIP-L and CLIP-G) to process text descriptions, resulting in more accurate image generation.
## Inputs
| Parameter | Data Type | Description |
| --------------- | --------- | ------------------------------------------------------ |
| `clip` | CLIP | CLIP model instance used for text encoding. |
| `width` | INT | Specifies the image width in pixels, default 1024. |
| `height` | INT | Specifies the image height in pixels, default 1024. |
| `crop_w` | INT | Width of the crop area in pixels, default 0. |
| `crop_h` | INT | Height of the crop area in pixels, default 0. |
| `target_width` | INT | Target width for the output image, default 1024. |
| `target_height` | INT | Target height for the output image, default 1024. |
| `text_g` | STRING | Global text description for overall scene description. |
| `text_l` | STRING | Local text description for detail description. |
## Outputs
| Parameter | Data Type | Description |
| -------------- | ------------ | ------------------------------------------------------------------------------ |
| `CONDITIONING` | CONDITIONING | Contains encoded text and conditional information needed for image generation. |
---
# Source: https://docs.comfy.org/built-in-nodes/ClipTextEncodeSdxlRefiner.md
> ## Documentation Index
> Fetch the complete documentation index at: https://docs.comfy.org/llms.txt
> Use this file to discover all available pages before exploring further.
# ClipTextEncodeSdxlRefiner - ComfyUI Built-in Node Documentation
> The ClipTextEncodeSdxlRefiner node is used to encode text prompts into SDXL Refiner-compatible conditioning embeddings.
This node is specifically designed for the SDXL Refiner model to convert text prompts into conditioning information by incorporating aesthetic scores and dimensional information to enhance the conditions for generation tasks, thereby improving the final refinement effect. It acts like a professional art director, not only conveying your creative intent but also injecting precise aesthetic standards and specification requirements into the work.
## About SDXL Refiner
SDXL Refiner is a specialized refinement model that focuses on enhancing image details and quality based on the SDXL base model. This process is like having an art retoucher:
1. First, it receives preliminary images or text descriptions generated by the base model
2. Then, it guides the refinement process through precise aesthetic scoring and dimensional parameters
3. Finally, it focuses on processing high-frequency image details to improve overall quality
Refiner can be used in two ways:
* As a standalone refinement step for post-processing images generated by the base model
* As part of an expert integration system, taking over processing during the low-noise phase of generation
## Inputs
| Parameter Name | Data Type | Input Type | Default Value | Value Range | Description |
| -------------- | --------- | ---------- | ------------- | ----------- | ---------------------------------------------------------------------------------------------------------------------------------------------------------------------------------------------------------------------------------------------------------------------------------------------------------- |
| `clip` | CLIP | Required | - | - | CLIP model instance used for text tokenization and encoding, the core component for converting text into model-understandable format |
| `ascore` | FLOAT | Optional | 6.0 | 0.0-1000.0 | Controls the visual quality and aesthetics of generated images, similar to setting quality standards for artwork: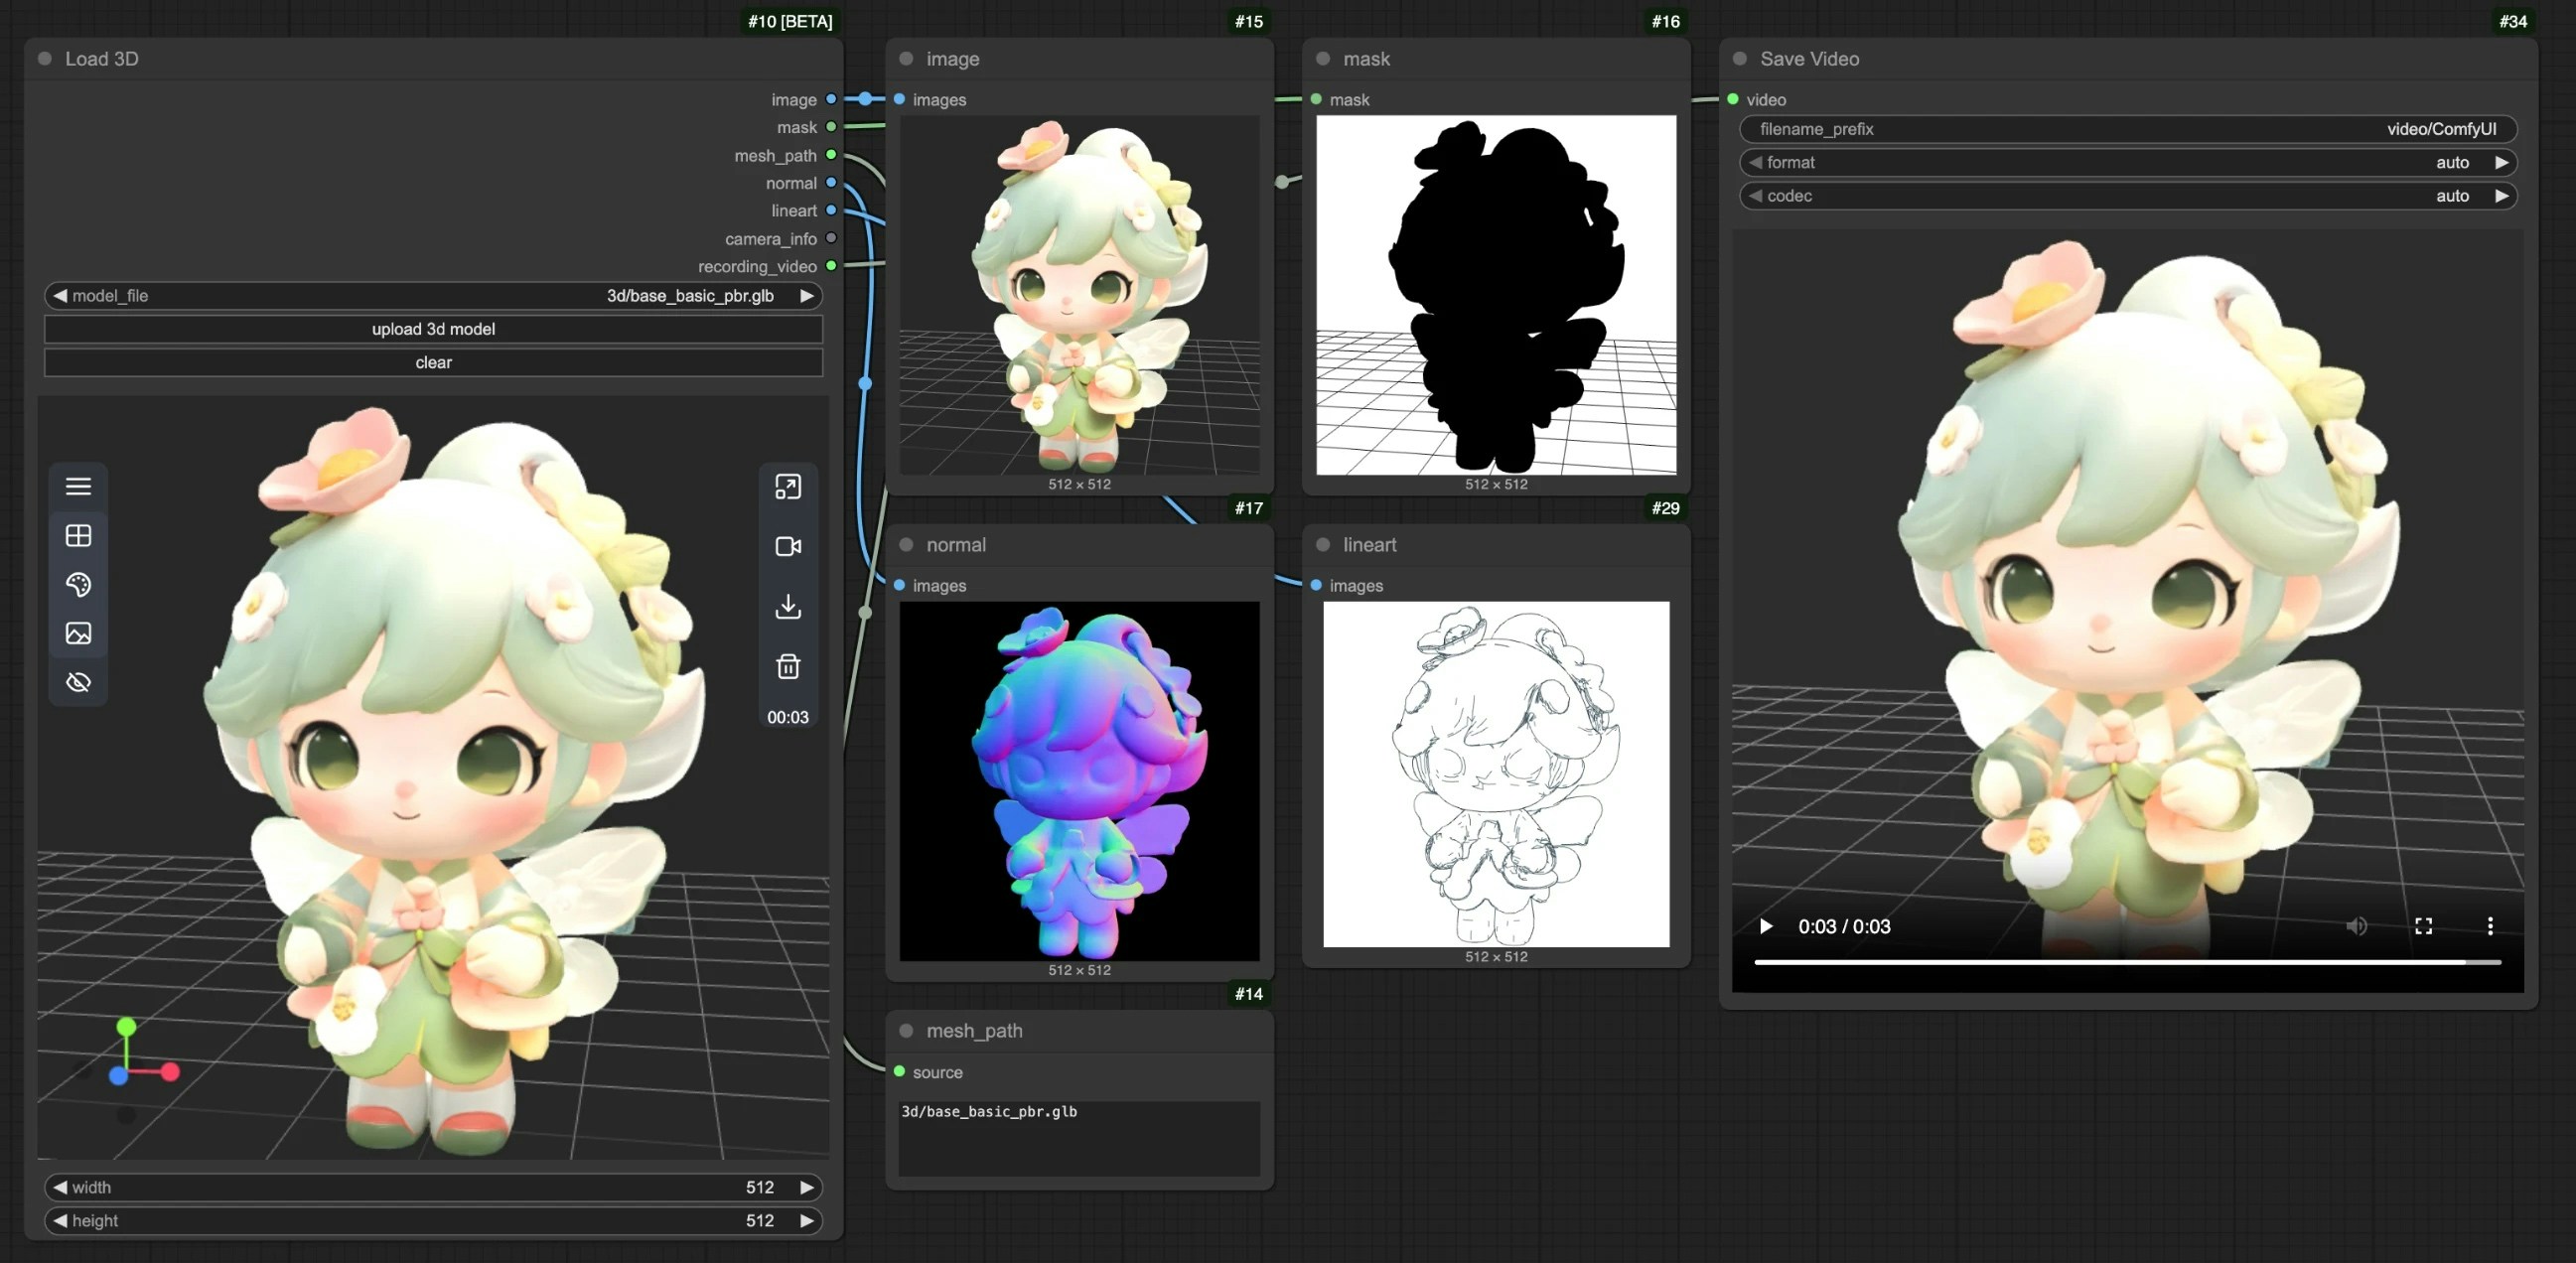 ## Canvas Area Description
The Load3D node's Canvas area contains numerous view operations, including:
* Preview view settings (grid, background color, preview view)
* Camera control: Control FOV, camera type
* Global illumination intensity: Adjust lighting intensity
* Video recording: Record and export videos
* Model export: Supports `GLB`, `OBJ`, `STL` formats
* And more
## Canvas Area Description
The Load3D node's Canvas area contains numerous view operations, including:
* Preview view settings (grid, background color, preview view)
* Camera control: Control FOV, camera type
* Global illumination intensity: Adjust lighting intensity
* Video recording: Record and export videos
* Model export: Supports `GLB`, `OBJ`, `STL` formats
* And more
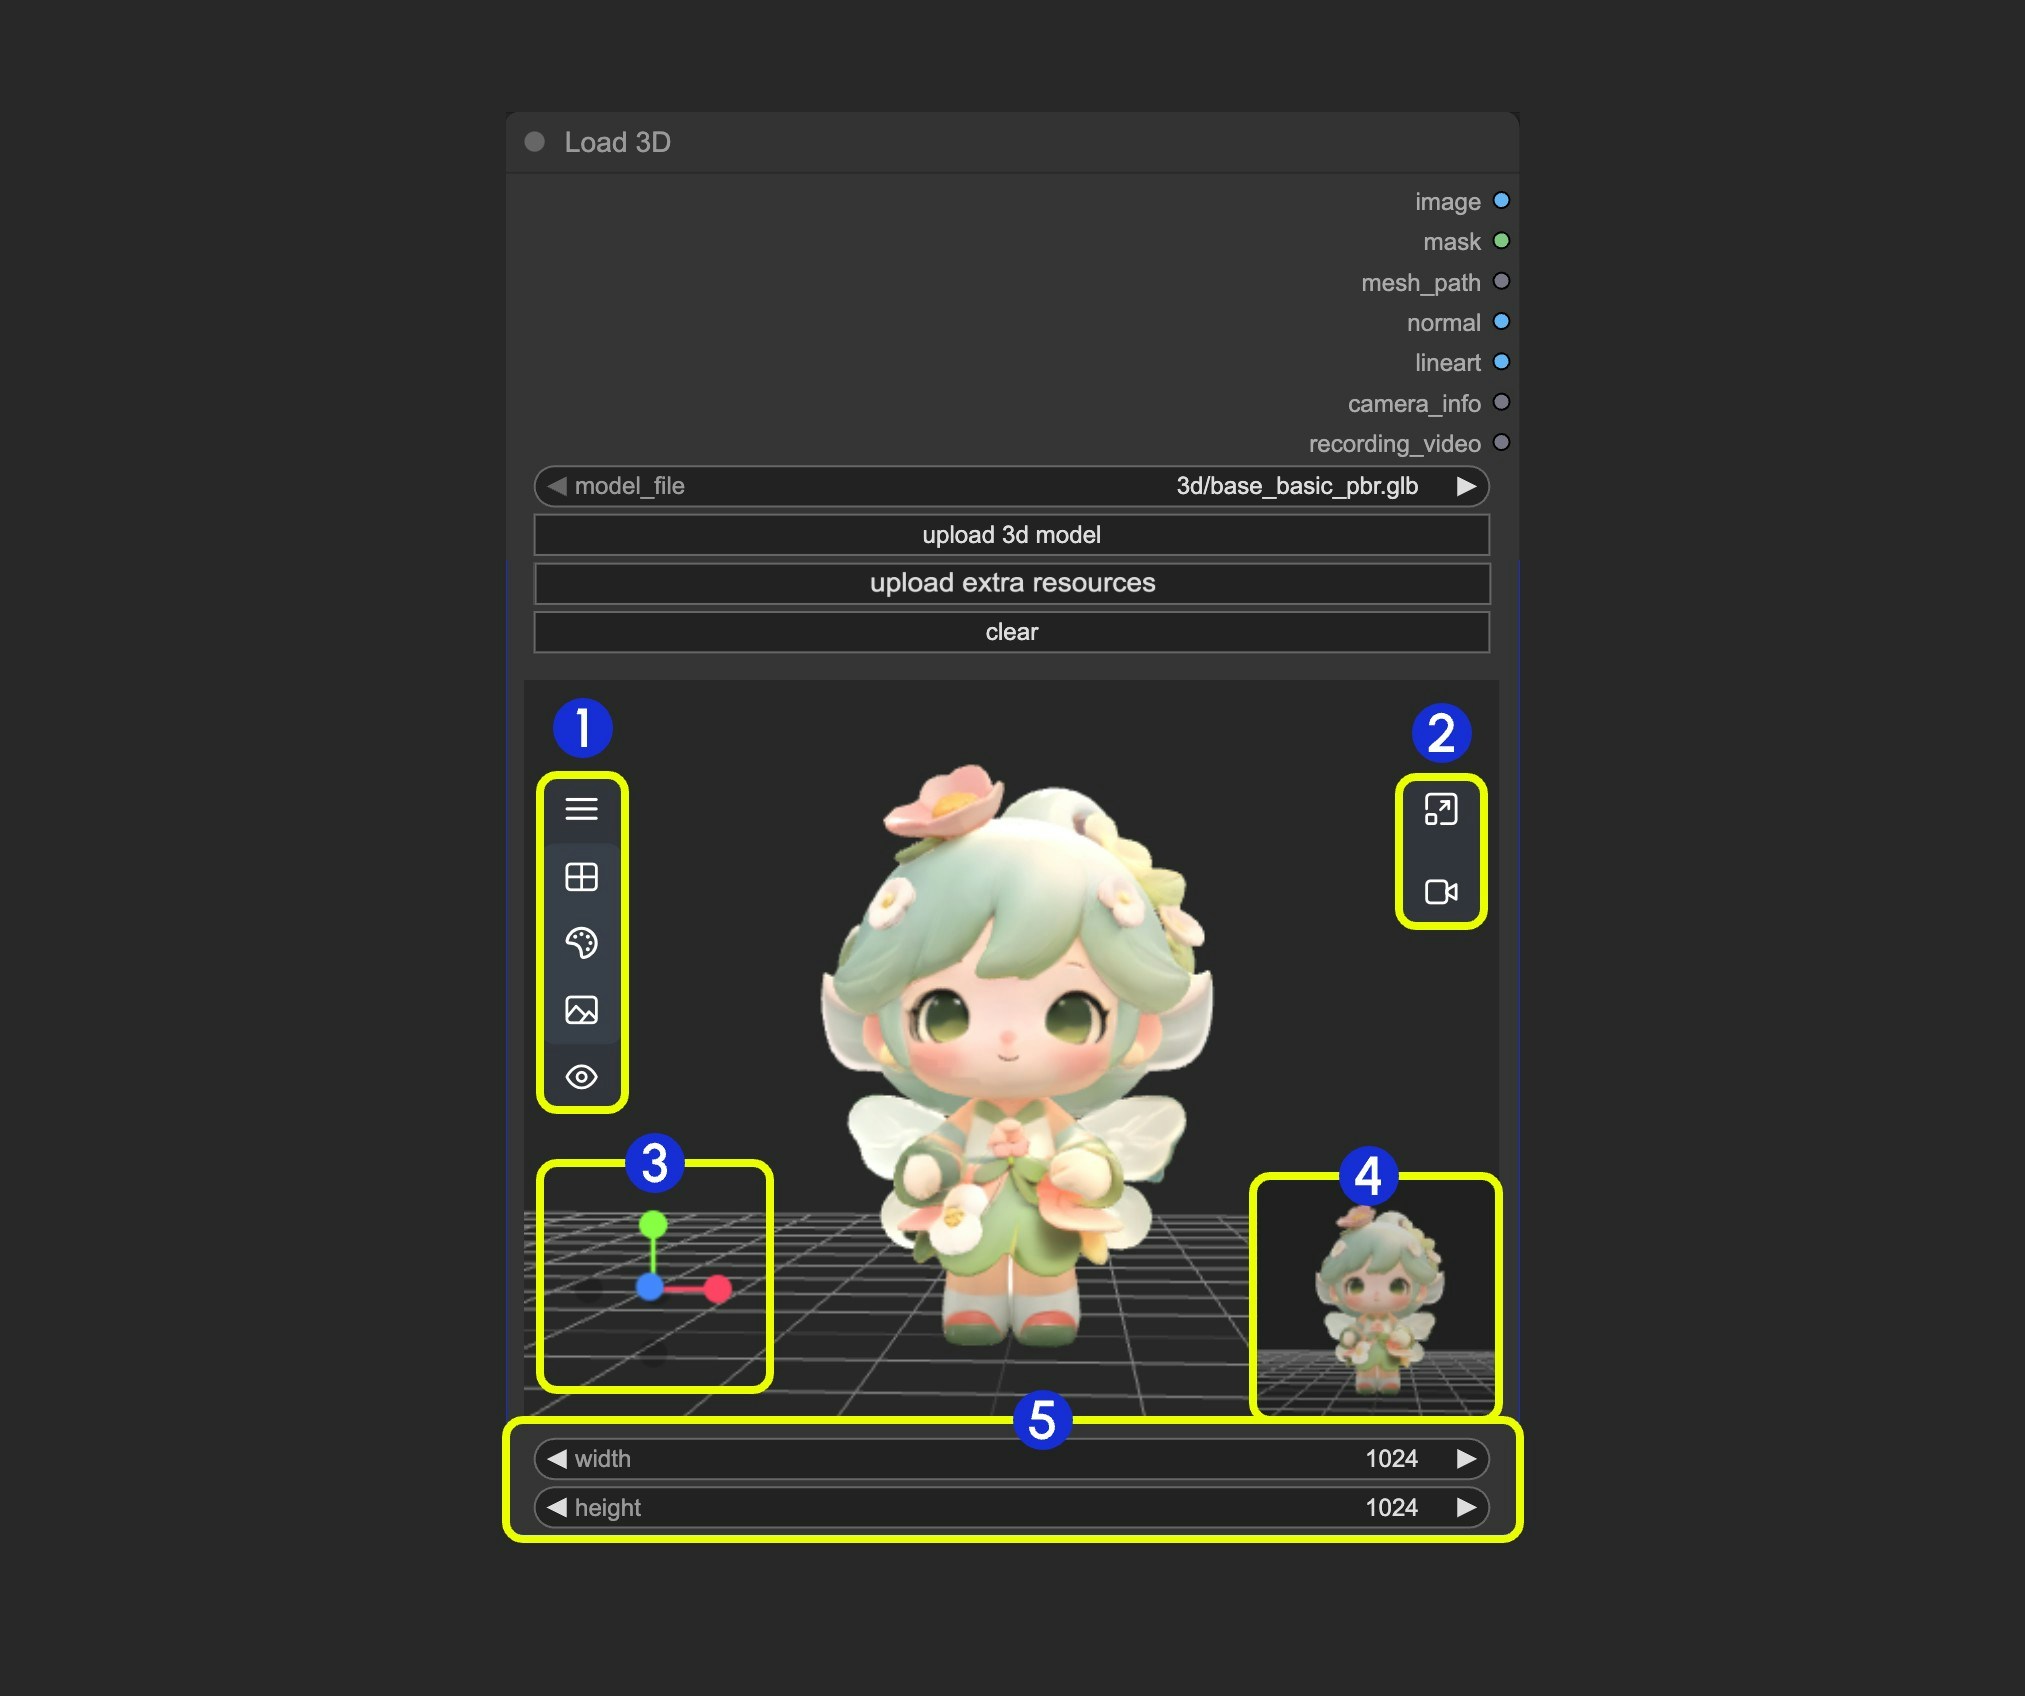 1. Contains multiple menus and hidden menus of the Load 3D node
2. Menu for `resizing preview window` and `canvas video recording`
3. 3D view operation axis
4. Preview thumbnail
5. Preview size settings, scale preview view display by setting dimensions and then resizing window
### 1. View Operations
View control operations:
* Left-click + drag: Rotate the view
* Right-click + drag: Pan the view
* Middle wheel scroll or middle-click + drag: Zoom in/out
* Coordinate axis: Switch views
### 2. Left Menu Functions
1. Contains multiple menus and hidden menus of the Load 3D node
2. Menu for `resizing preview window` and `canvas video recording`
3. 3D view operation axis
4. Preview thumbnail
5. Preview size settings, scale preview view display by setting dimensions and then resizing window
### 1. View Operations
View control operations:
* Left-click + drag: Rotate the view
* Right-click + drag: Pan the view
* Middle wheel scroll or middle-click + drag: Zoom in/out
* Coordinate axis: Switch views
### 2. Left Menu Functions
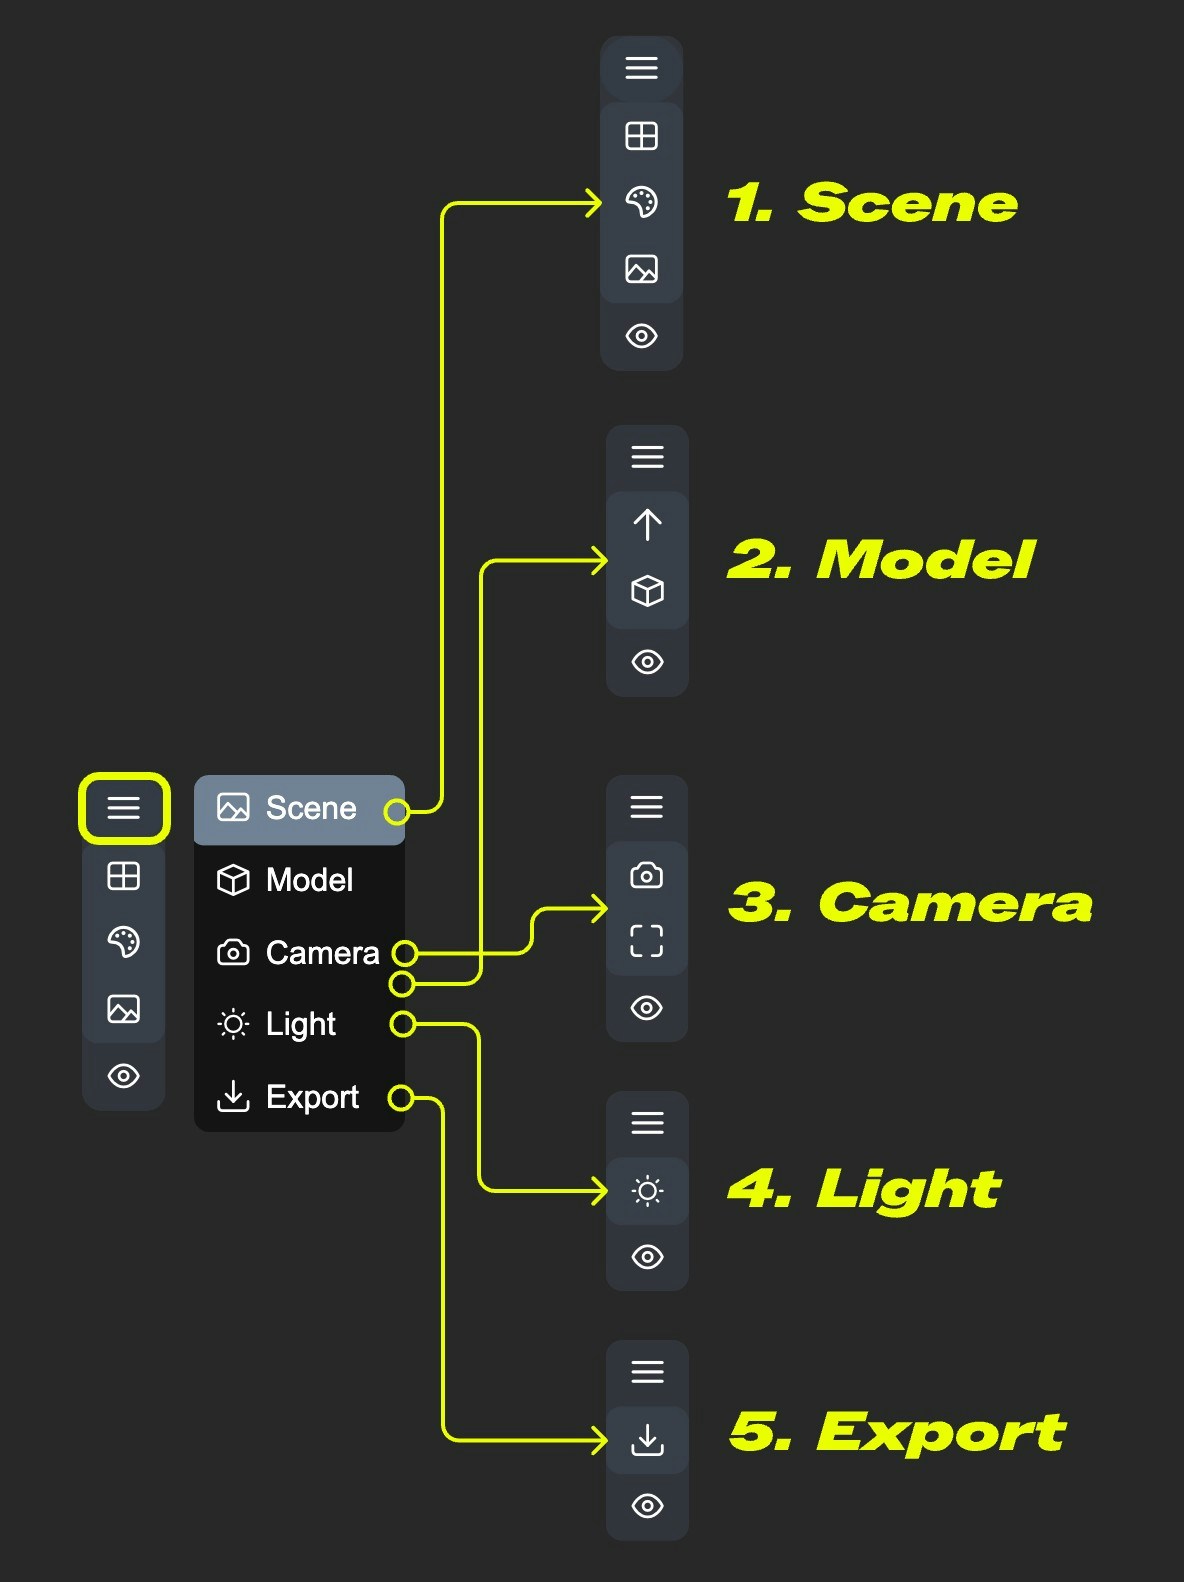 In the canvas, some settings are hidden in the menu. Click the menu button to expand different menus
* 1. Scene: Contains preview window grid, background color, preview settings
* 2. Model: Model rendering mode, texture materials, up direction settings
* 3. Camera: Switch between orthographic and perspective views, and set the perspective angle size
* 4. Light: Scene global illumination intensity
* 5. Export: Export model to other formats (GLB, OBJ, STL)
#### Scene
In the canvas, some settings are hidden in the menu. Click the menu button to expand different menus
* 1. Scene: Contains preview window grid, background color, preview settings
* 2. Model: Model rendering mode, texture materials, up direction settings
* 3. Camera: Switch between orthographic and perspective views, and set the perspective angle size
* 4. Light: Scene global illumination intensity
* 5. Export: Export model to other formats (GLB, OBJ, STL)
#### Scene
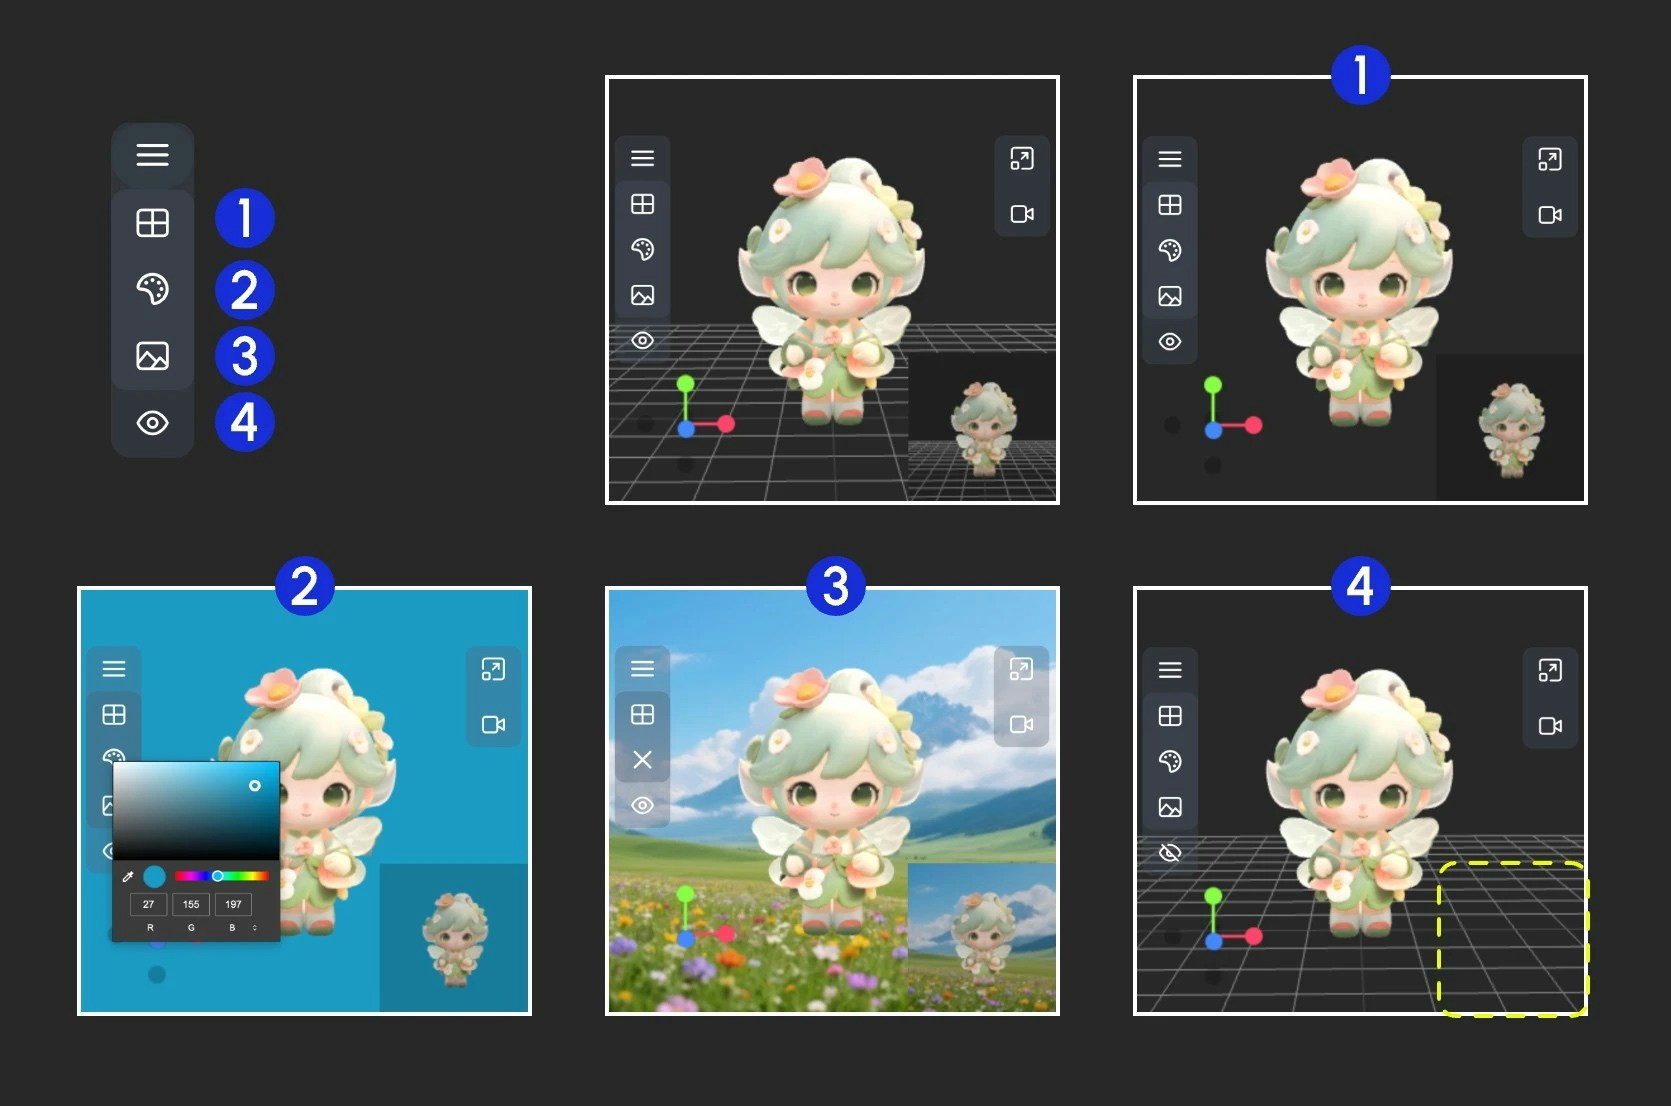 The Scene menu provides some basic scene setting functions
1. Show/Hide grid
2. Set background color
3. Click to upload a background image
4. Hide the preview
#### Model
The Scene menu provides some basic scene setting functions
1. Show/Hide grid
2. Set background color
3. Click to upload a background image
4. Hide the preview
#### Model
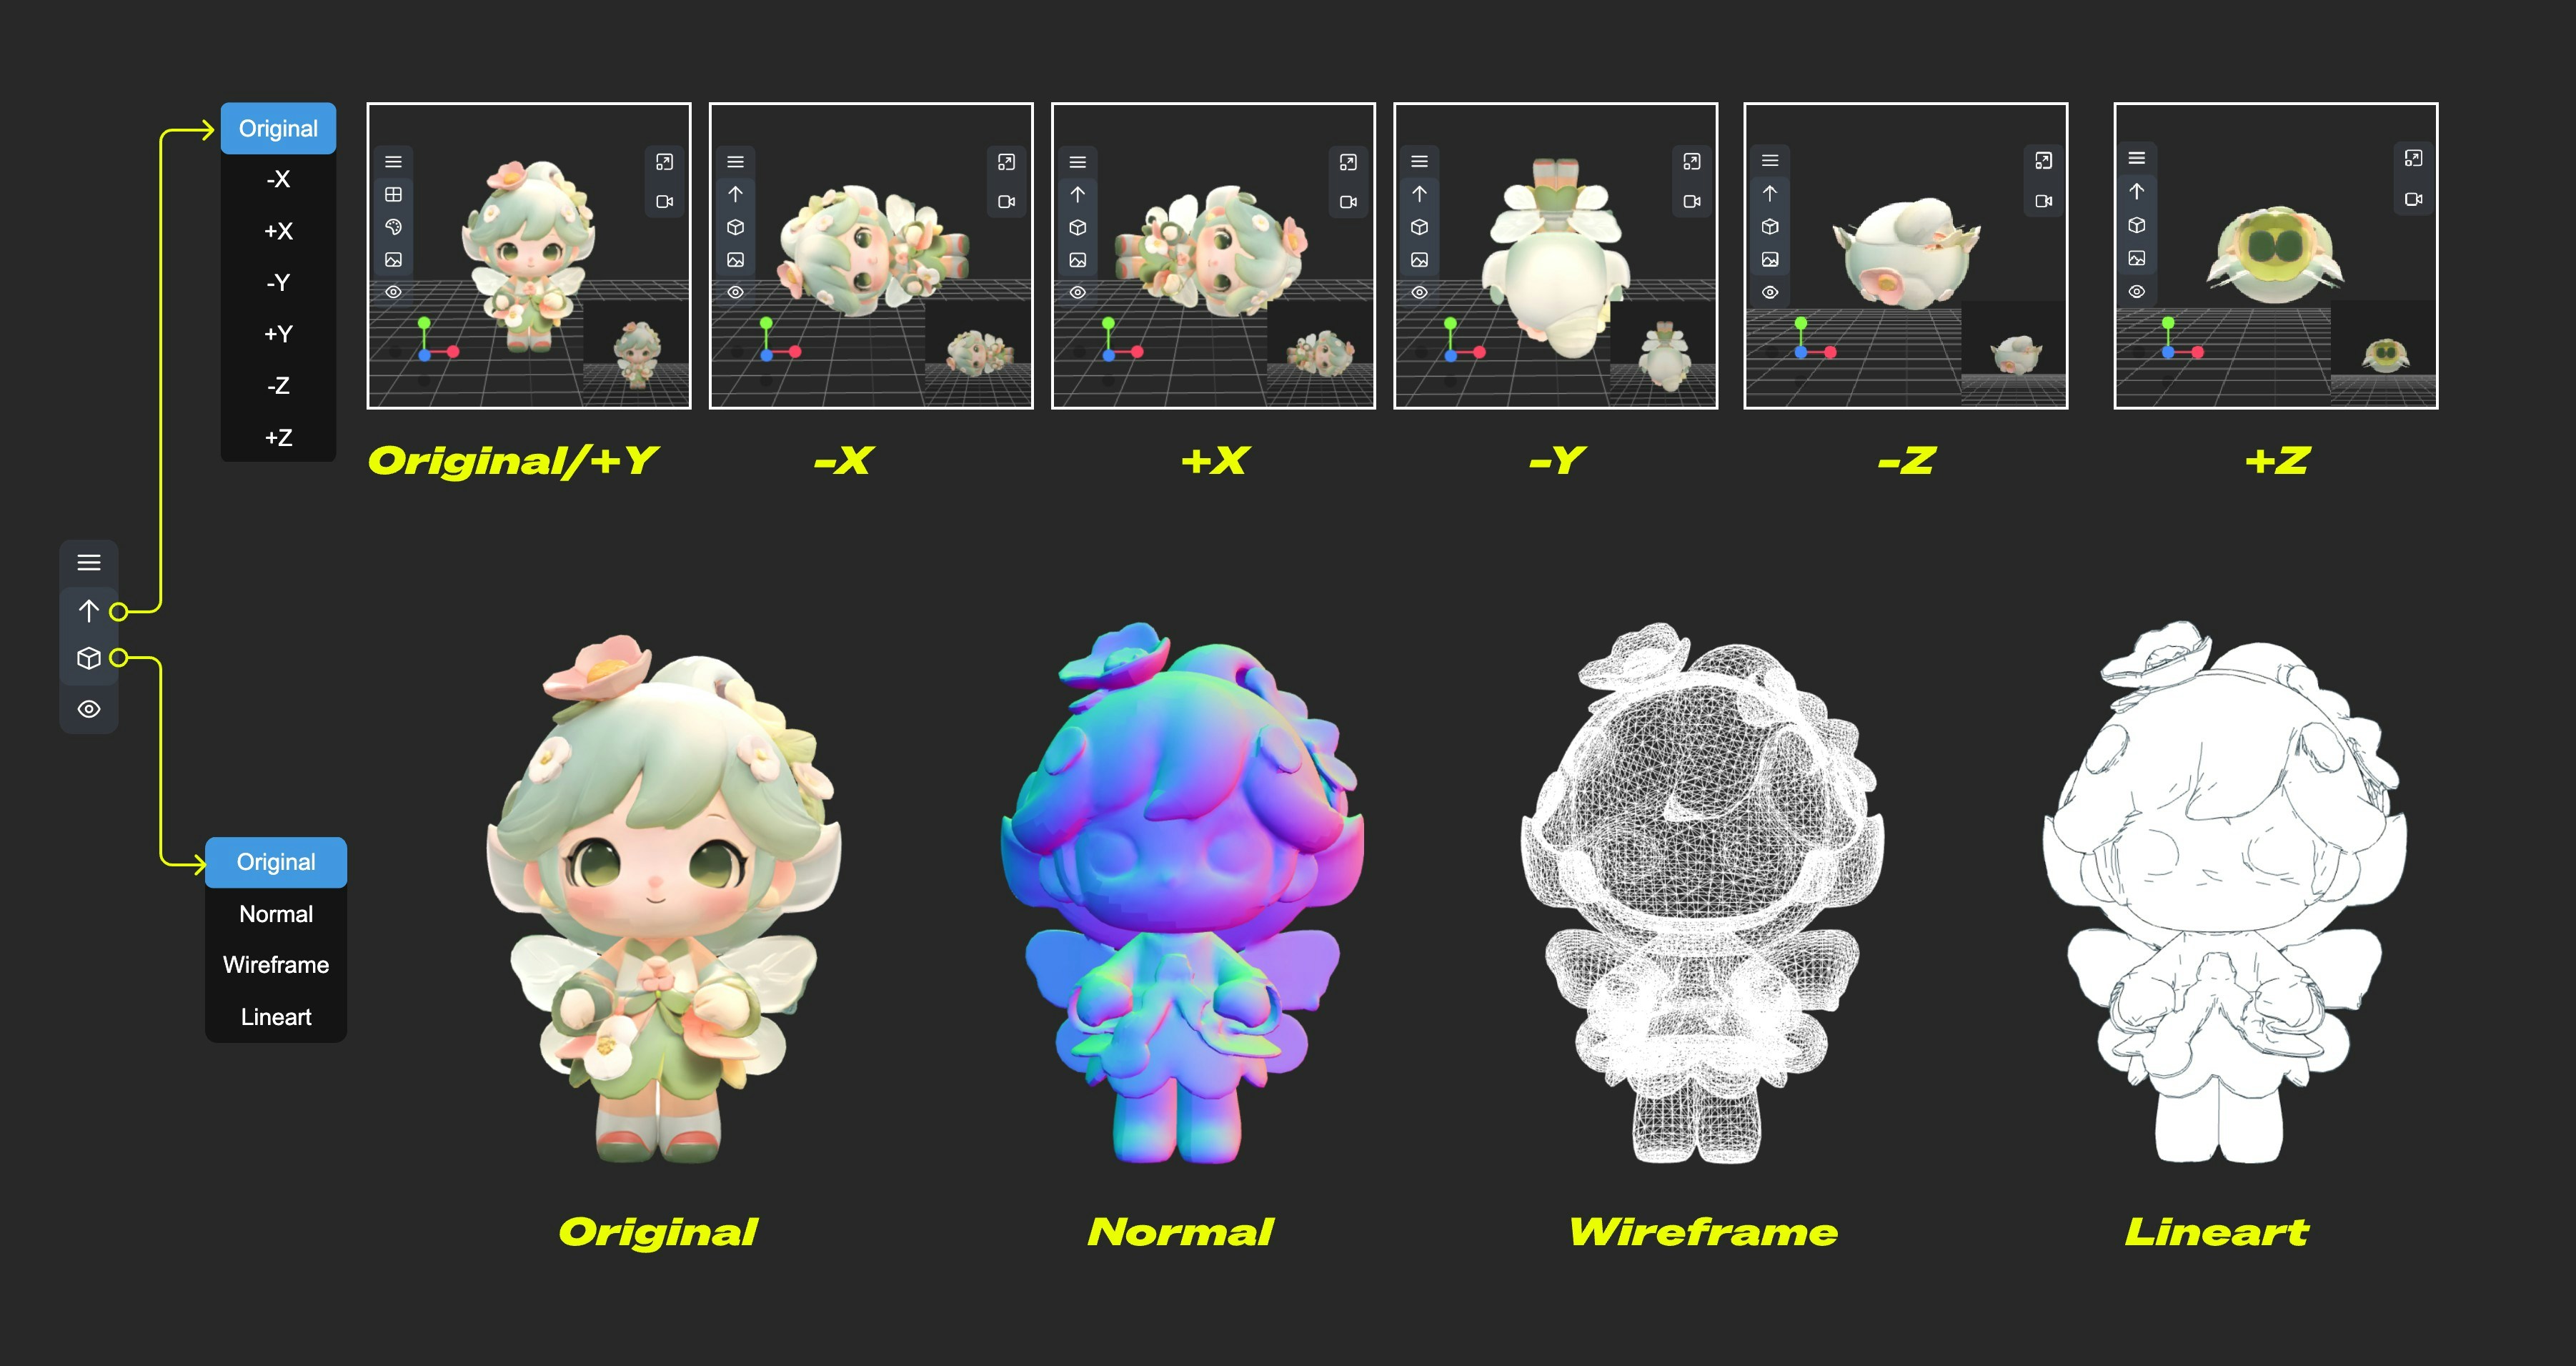 The Model menu provides some model-related functions
1. **Up direction**: Determine which axis is the up direction for the model
2. **Material mode**: Switch model rendering modes - Original, Normal, Wireframe, Lineart
#### Camera
The Model menu provides some model-related functions
1. **Up direction**: Determine which axis is the up direction for the model
2. **Material mode**: Switch model rendering modes - Original, Normal, Wireframe, Lineart
#### Camera
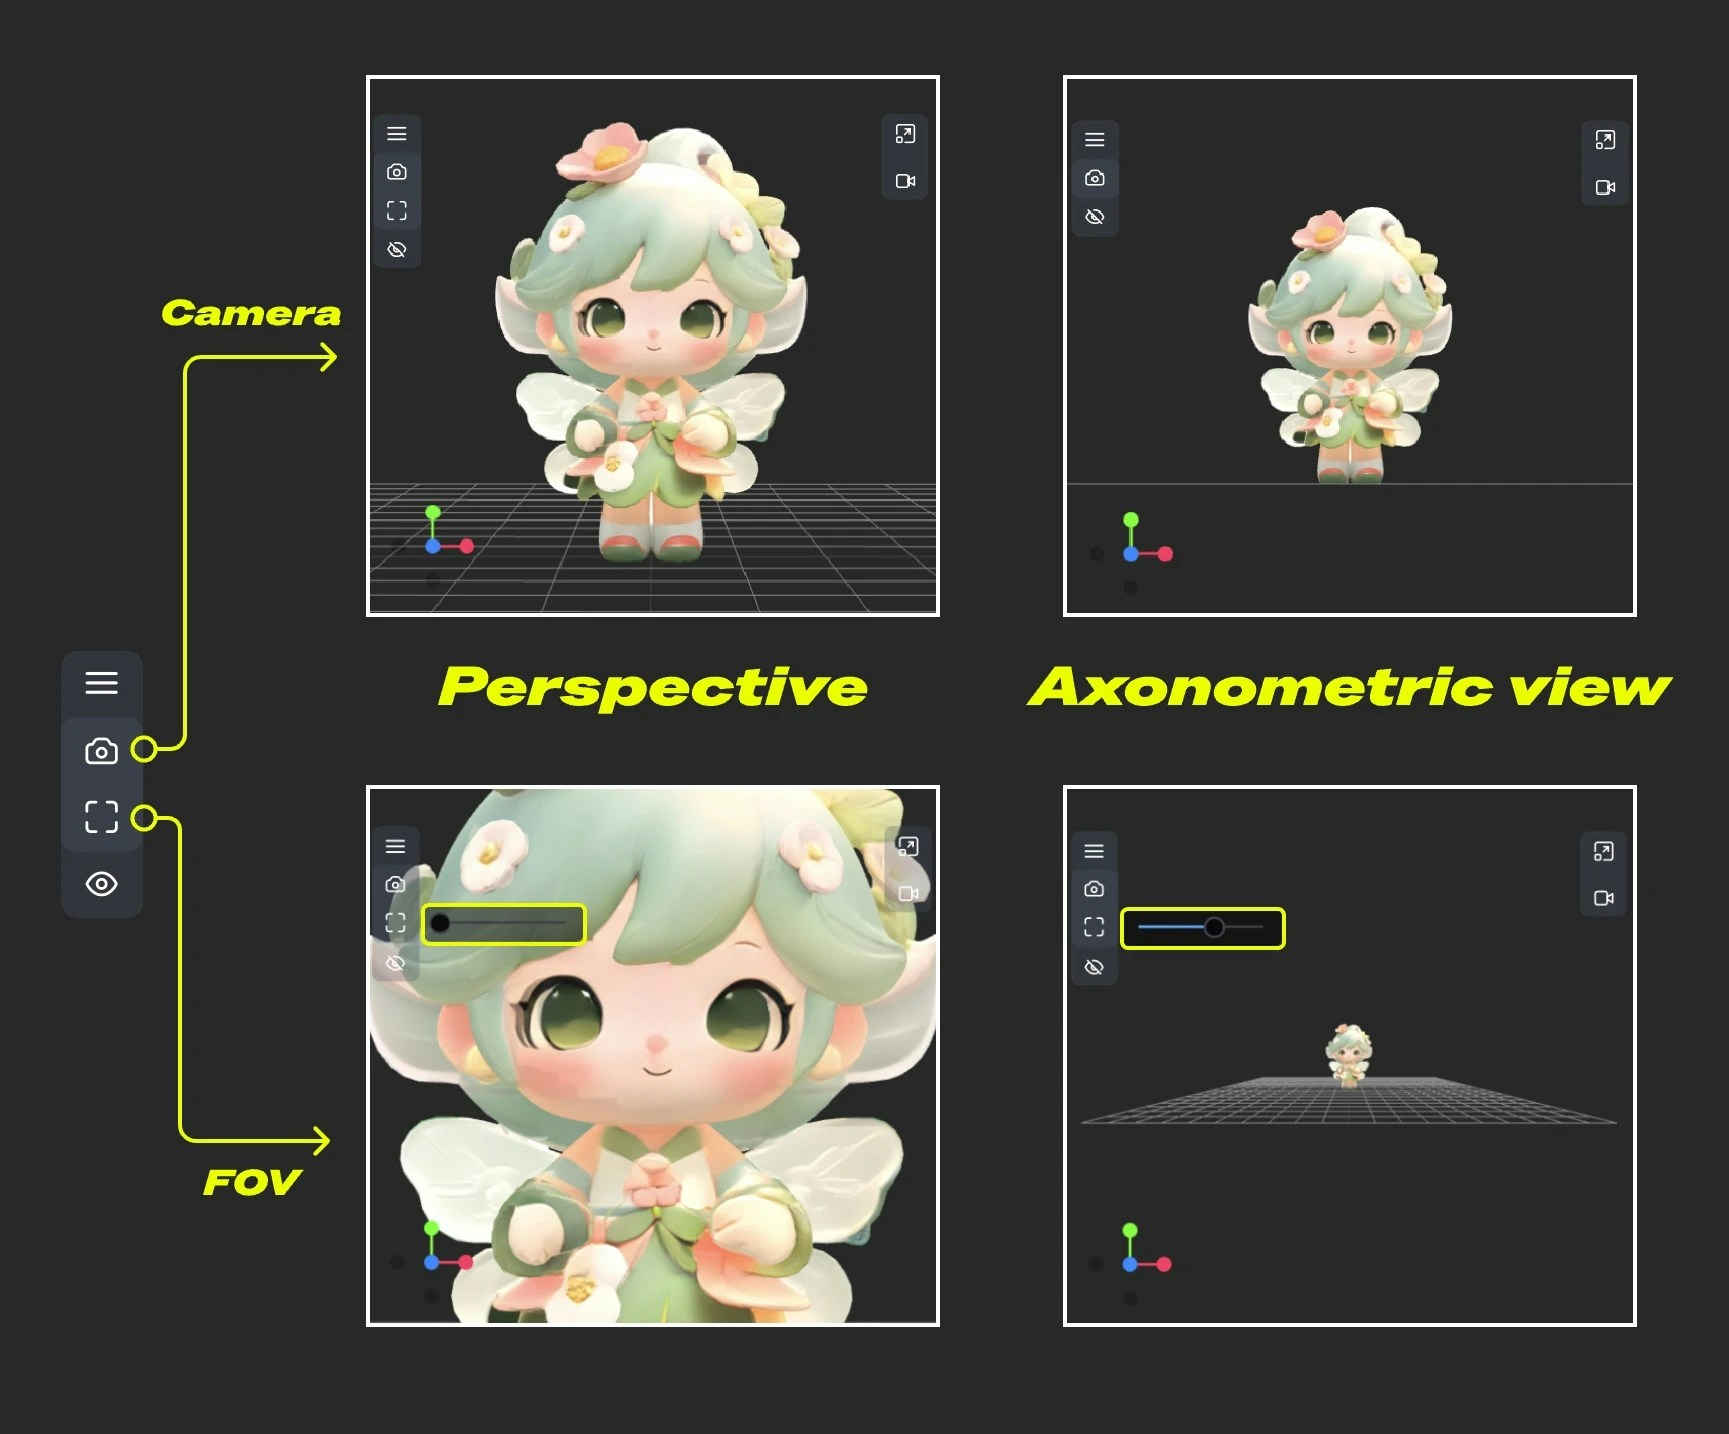 This menu provides switching between orthographic and perspective views, and perspective angle size settings
1. **Camera**: Quickly switch between orthographic and orthographic views
2. **FOV**: Adjust FOV angle
#### Light
This menu provides switching between orthographic and perspective views, and perspective angle size settings
1. **Camera**: Quickly switch between orthographic and orthographic views
2. **FOV**: Adjust FOV angle
#### Light
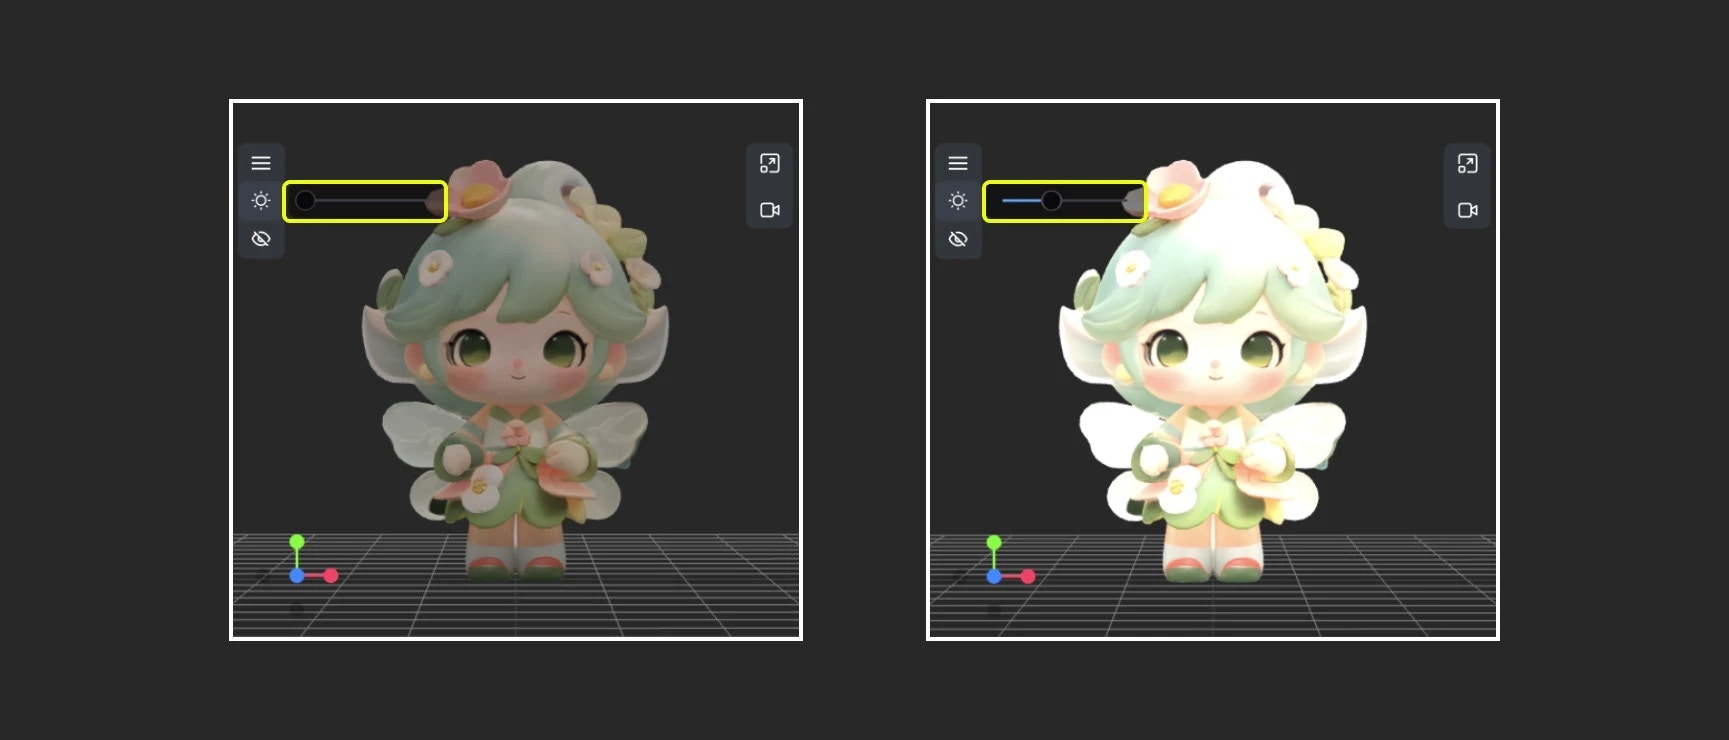 Through this menu, you can quickly adjust the scene's global illumination intensity
#### Export
Through this menu, you can quickly adjust the scene's global illumination intensity
#### Export
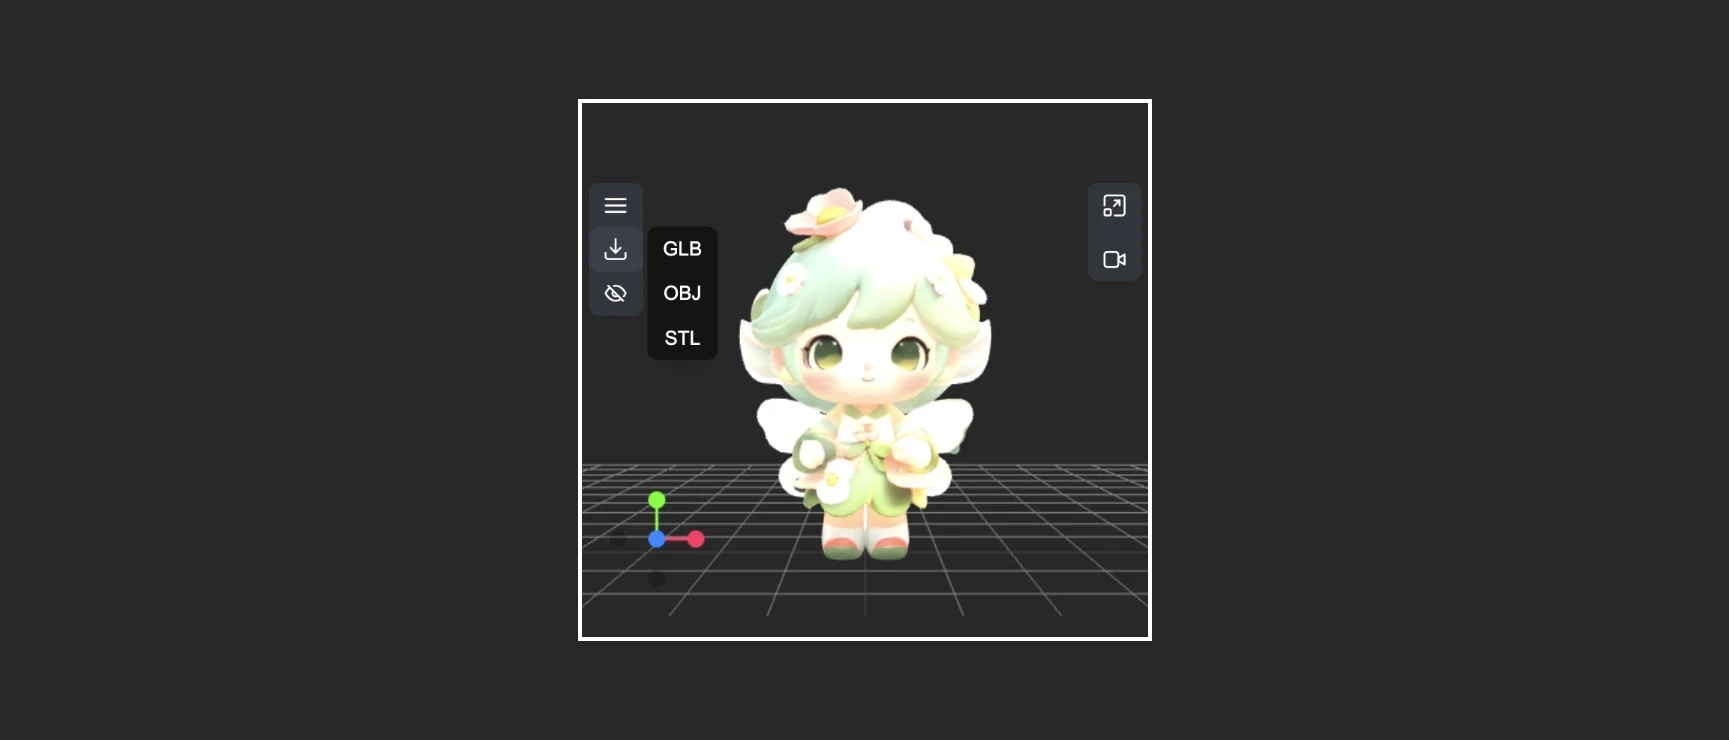 This menu provides the ability to quickly convert and export model formats
### 3. Right Menu Functions
The right menu has two main functions:
1. **Reset view ratio**: After clicking the button, the view will adjust the canvas rendering area ratio according to the set width and height
2. **Video recording**: Allows you to record current 3D view operations as video, allows import, and can be output as `recording_video` to subsequent nodes
---
# Source: https://docs.comfy.org/interface/settings/about.md
> ## Documentation Index
> Fetch the complete documentation index at: https://docs.comfy.org/llms.txt
> Use this file to discover all available pages before exploring further.
# About Page
> Detailed description of ComfyUI About settings page
The About page is an information display panel in the ComfyUI settings system, used to show application version information, related links, and system statistics. These settings can provide us with critical information when you submit feedback or report issues.
This menu provides the ability to quickly convert and export model formats
### 3. Right Menu Functions
The right menu has two main functions:
1. **Reset view ratio**: After clicking the button, the view will adjust the canvas rendering area ratio according to the set width and height
2. **Video recording**: Allows you to record current 3D view operations as video, allows import, and can be output as `recording_video` to subsequent nodes
---
# Source: https://docs.comfy.org/interface/settings/about.md
> ## Documentation Index
> Fetch the complete documentation index at: https://docs.comfy.org/llms.txt
> Use this file to discover all available pages before exploring further.
# About Page
> Detailed description of ComfyUI About settings page
The About page is an information display panel in the ComfyUI settings system, used to show application version information, related links, and system statistics. These settings can provide us with critical information when you submit feedback or report issues.
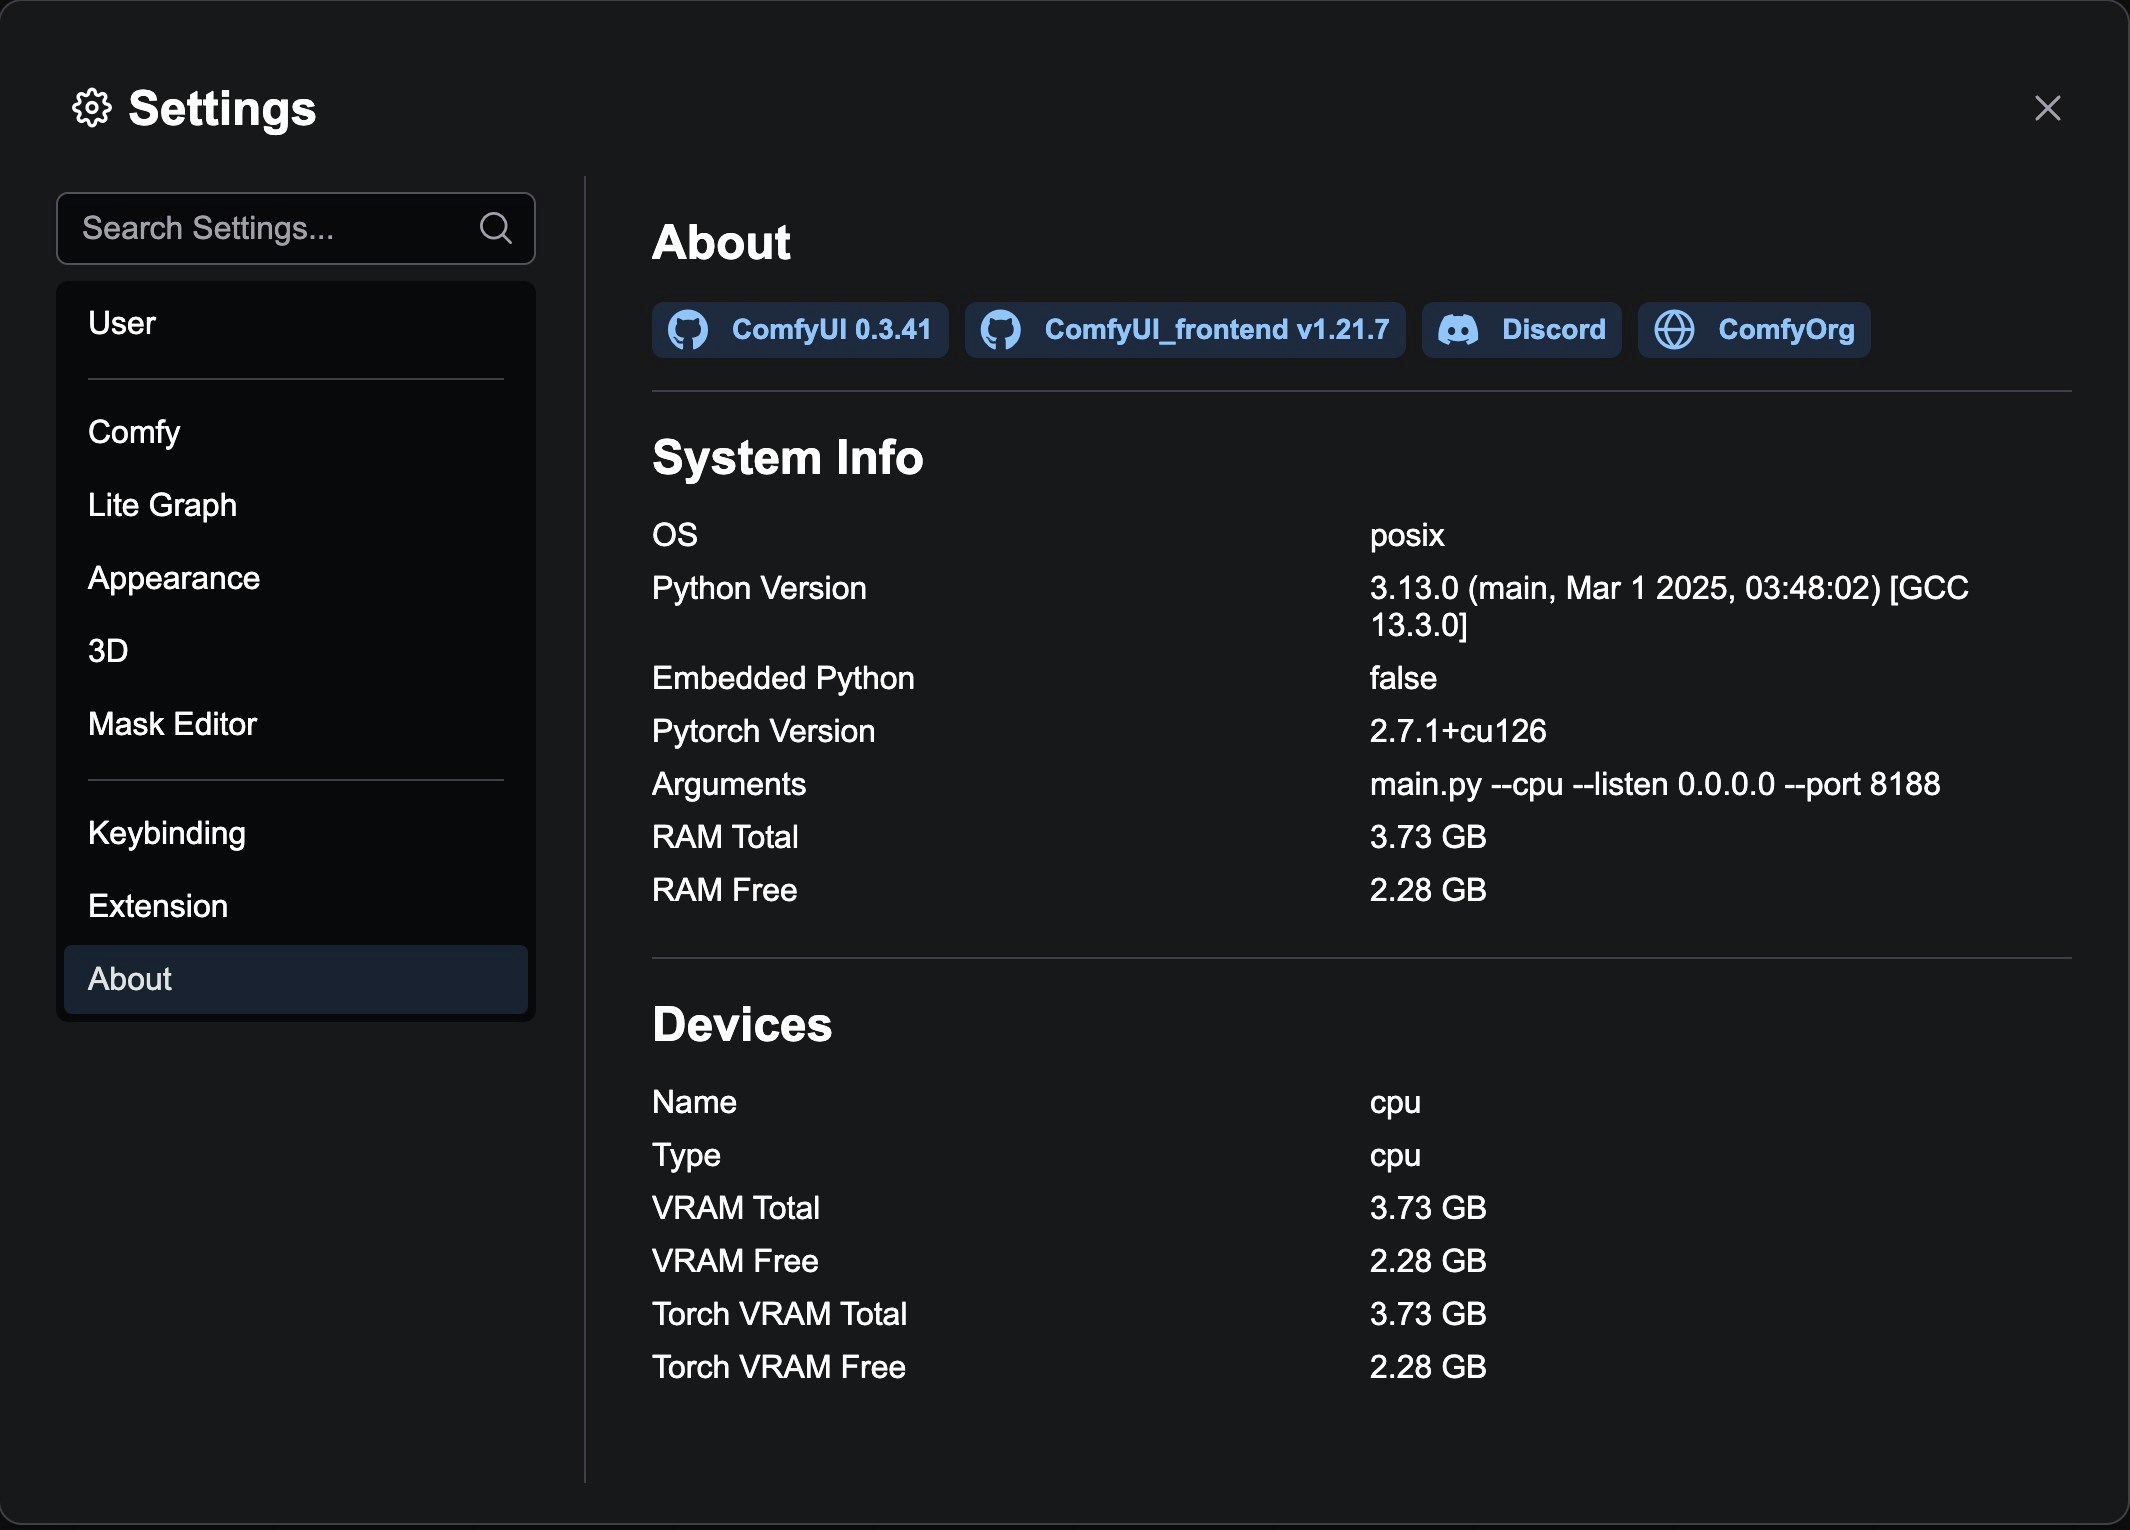 ### Version Information Badges
The About page displays the following core version information:
* **ComfyUI Version**: Shows the backend ComfyUI version number, linked to the official GitHub repository
* **ComfyUI\_frontend Version**: Shows the frontend interface version number, linked to the frontend GitHub repository
* **Discord Community**: Provides a link to the ComfyOrg Discord server
* **Official Website**: Links to the ComfyOrg official website
### Version Information Badges
The About page displays the following core version information:
* **ComfyUI Version**: Shows the backend ComfyUI version number, linked to the official GitHub repository
* **ComfyUI\_frontend Version**: Shows the frontend interface version number, linked to the frontend GitHub repository
* **Discord Community**: Provides a link to the ComfyOrg Discord server
* **Official Website**: Links to the ComfyOrg official website
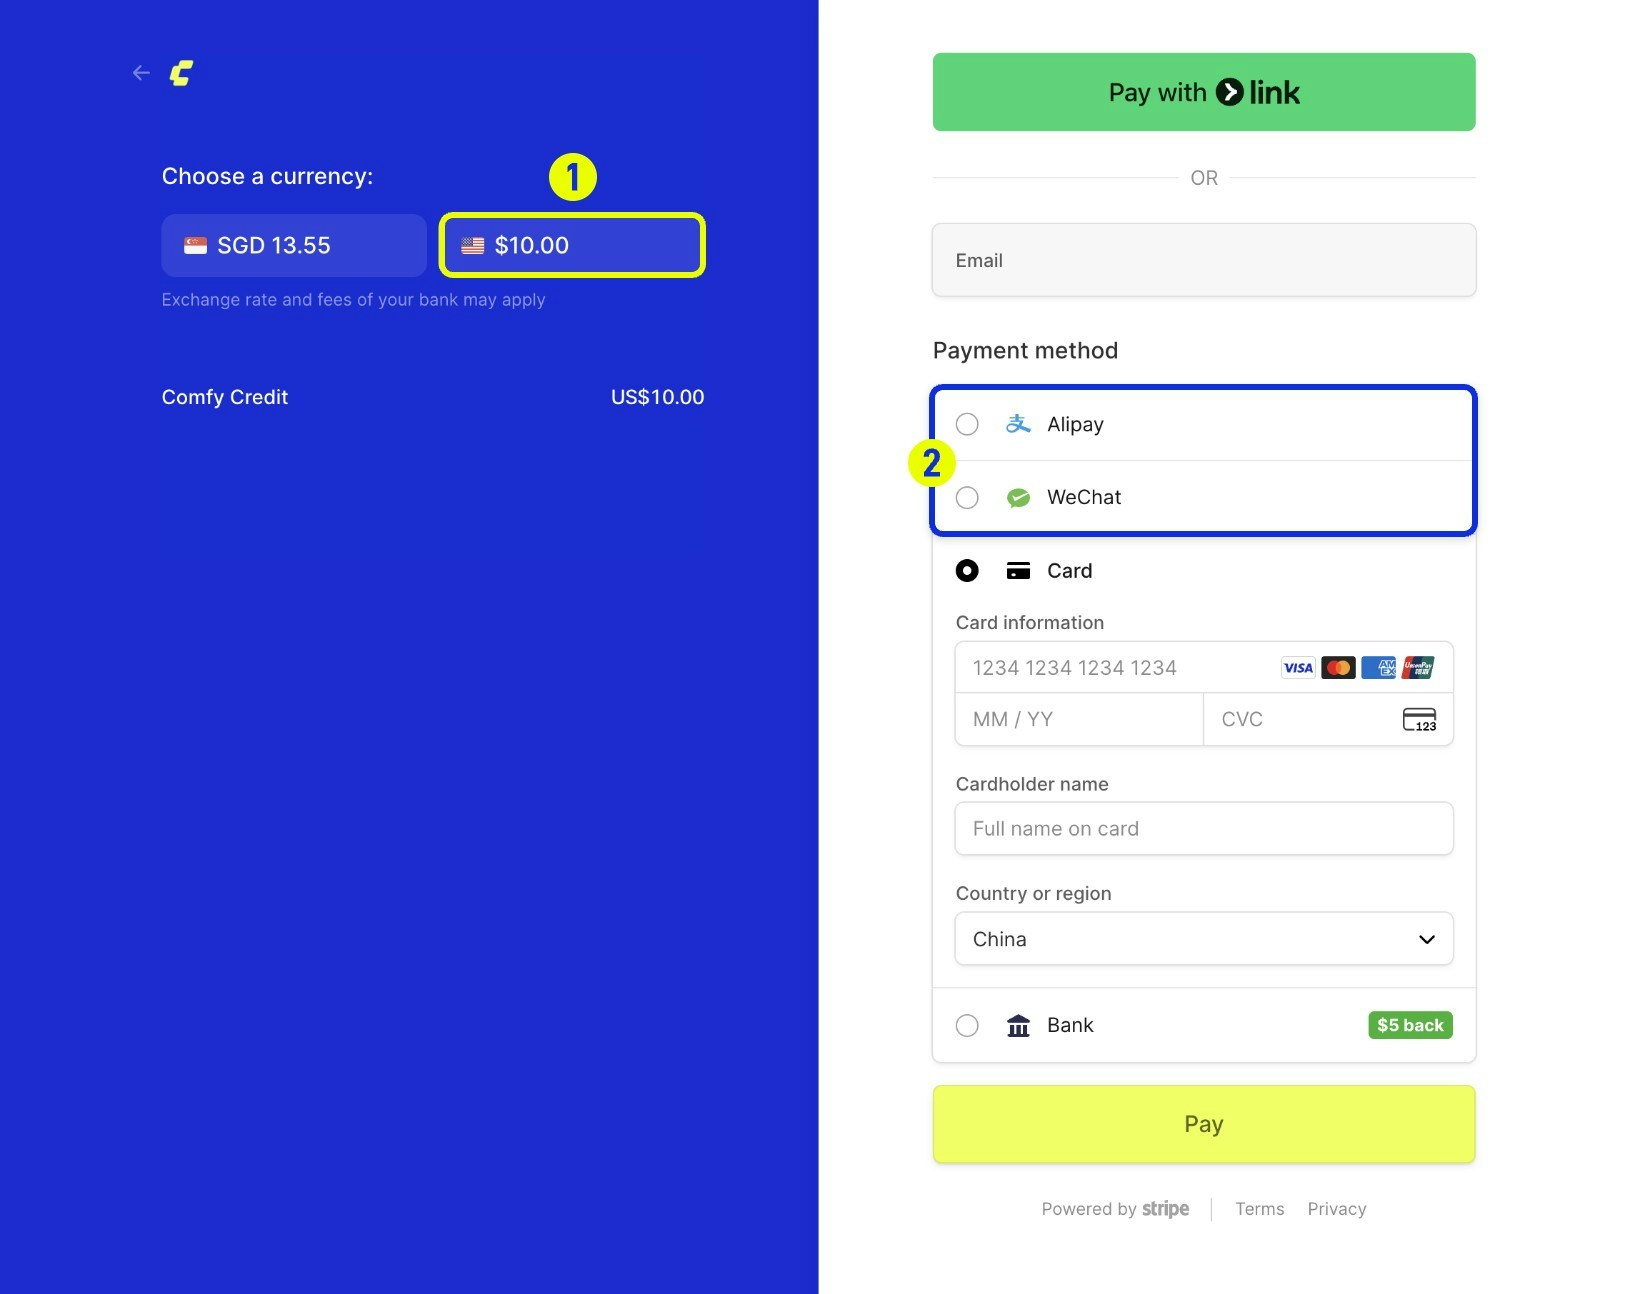 *Select **USD** as your payment currency (1) to unlock the Alipay and WeChat Pay options (2) during checkout.*
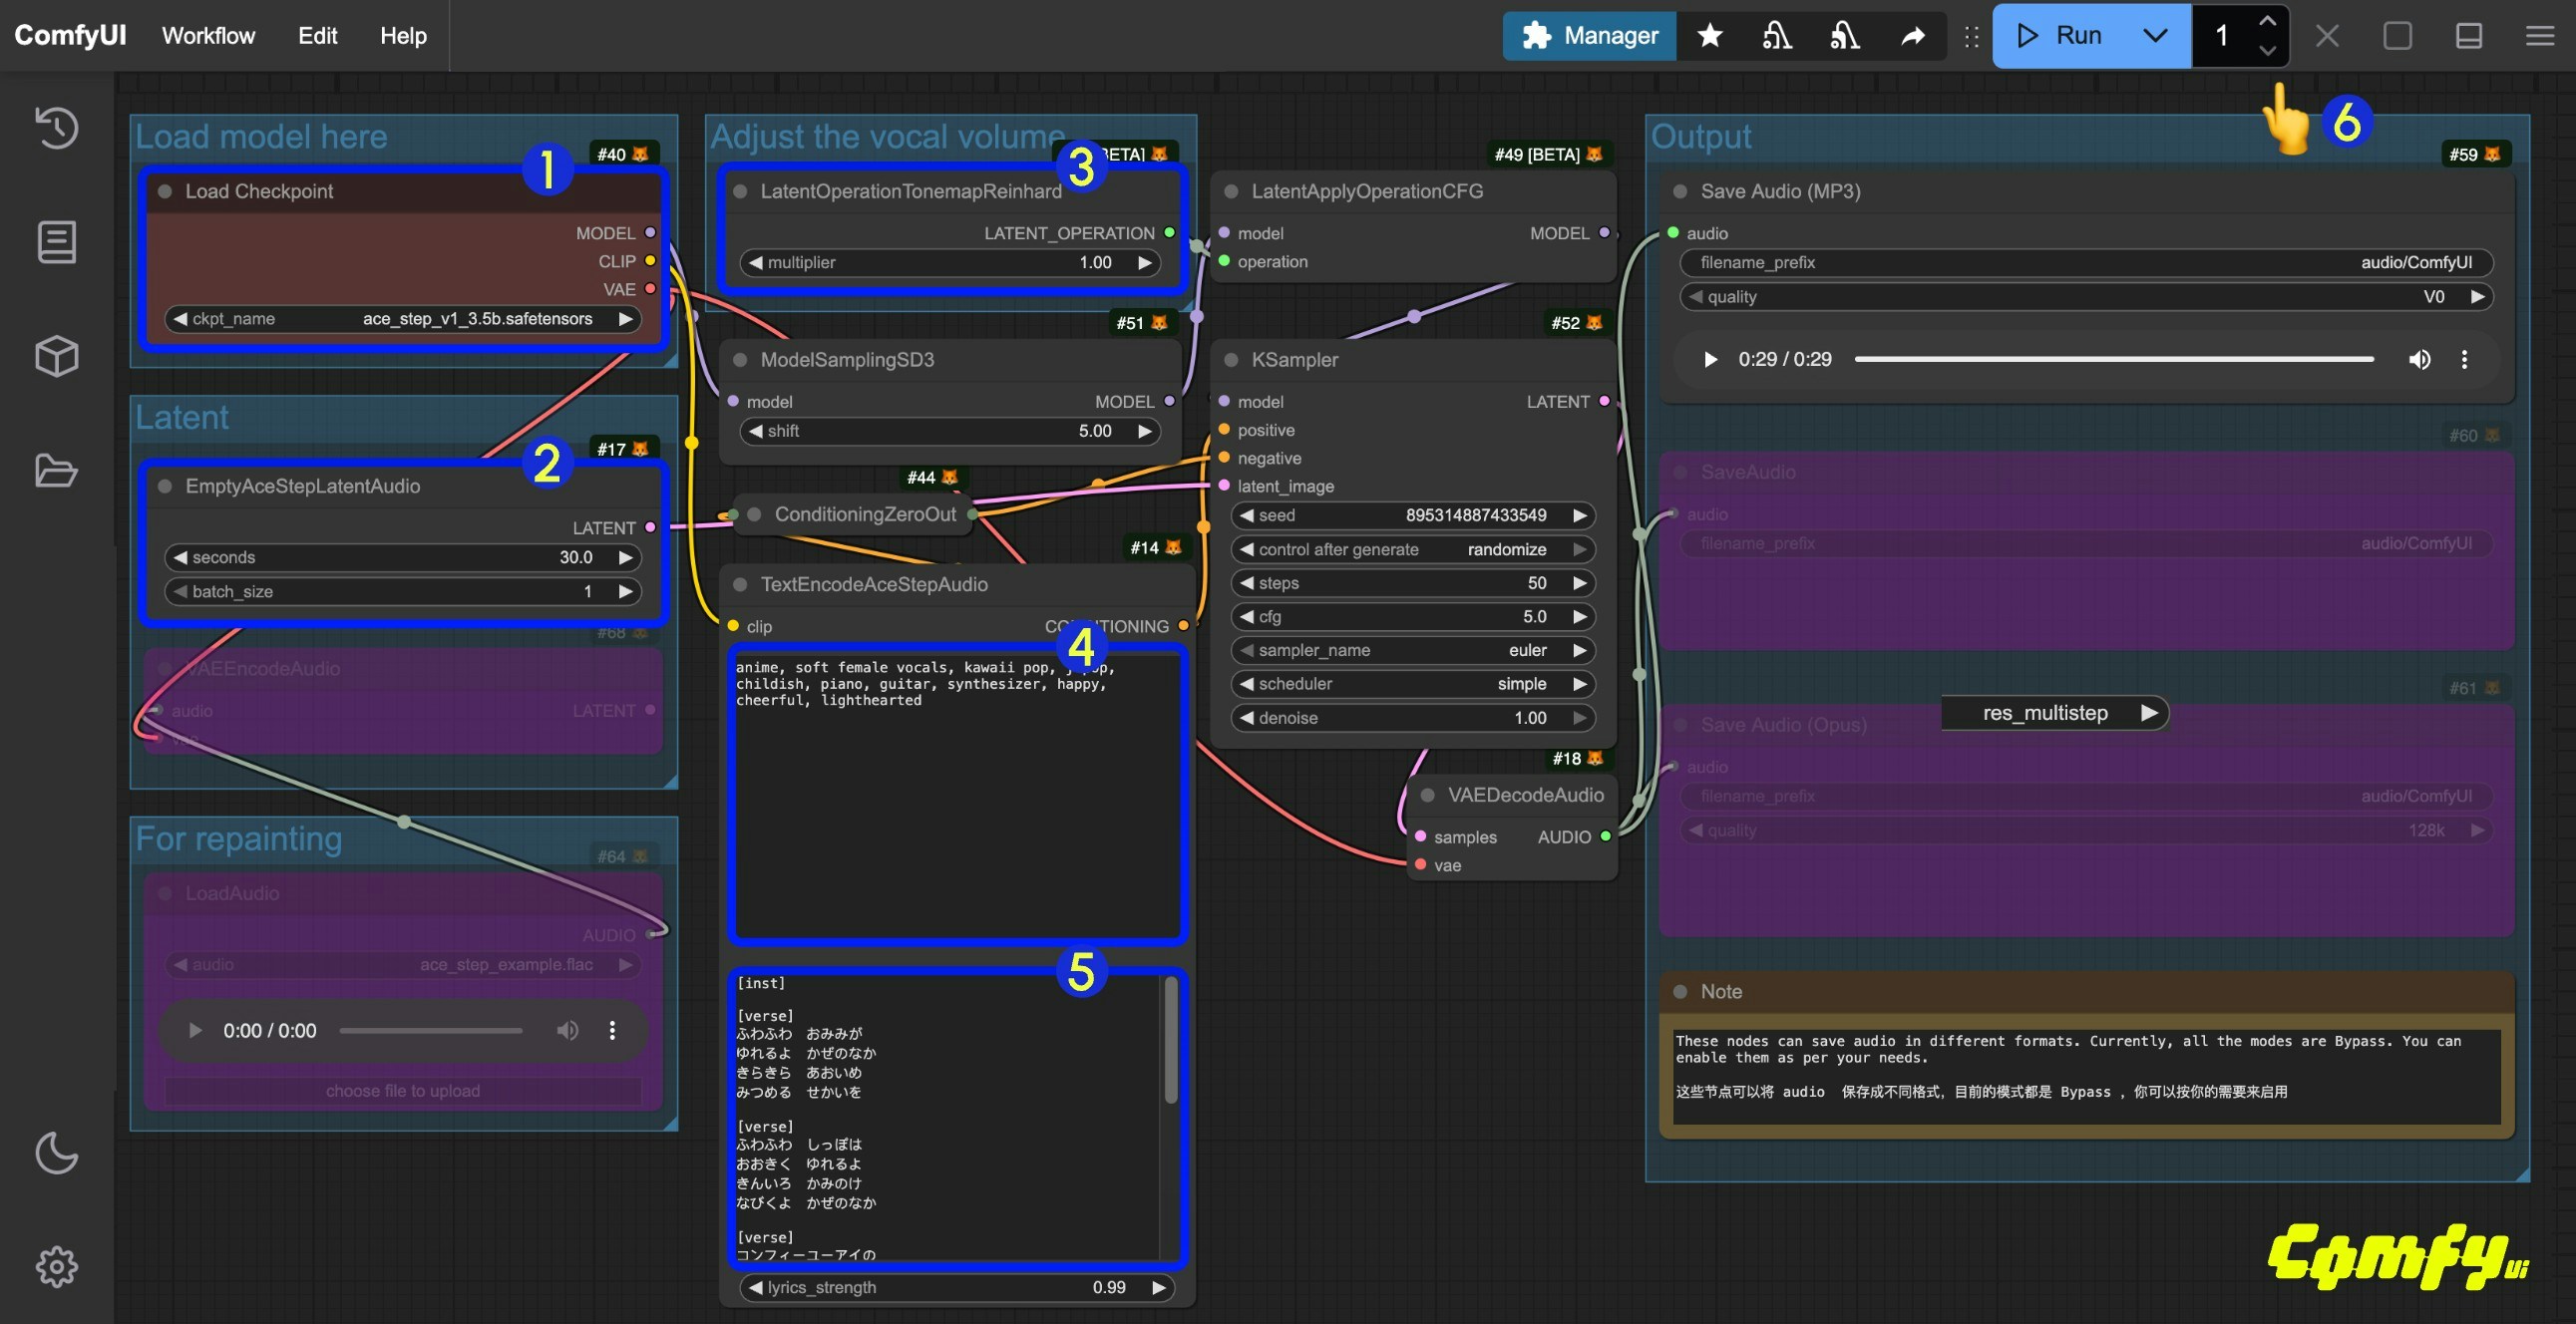 1. Ensure the `Load Checkpoints` node has loaded the `ace_step_v1_3.5b.safetensors` model
2. (Optional) In the `EmptyAceStepLatentAudio` node, you can set the duration of the music to be generated
3. (Optional) In the `LatentOperationTonemapReinhard` node, you can adjust the `multiplier` to control the volume of the vocals (higher numbers result in more prominent vocals)
4. (Optional) Input corresponding music styles etc. in the `tags` field of `TextEncodeAceStepAudio`
5. (Optional) Input corresponding lyrics in the `lyrics` field of `TextEncodeAceStepAudio`
6. Click the `Run` button, or use the shortcut `Ctrl(cmd) + Enter` to execute the audio generation
7. After the workflow completes,, you can preview the generated audio in the `Save Audio` node. You can click to play and listen to it, and the audio will also be saved to `ComfyUI/output/audio` (subdirectory determined by the `Save Audio` node).
## ACE-Step ComfyUI Audio-to-Audio Workflow
Similar to image-to-image workflows, you can input a piece of music and use the workflow below to resample and generate music. You can also adjust the difference from the original audio by controlling the `denoise` parameter in the `Ksampler`.
### 1. Download Workflow File
Click the button below to download the corresponding workflow file. Drag it into ComfyUI to load the workflow information.
1. Ensure the `Load Checkpoints` node has loaded the `ace_step_v1_3.5b.safetensors` model
2. (Optional) In the `EmptyAceStepLatentAudio` node, you can set the duration of the music to be generated
3. (Optional) In the `LatentOperationTonemapReinhard` node, you can adjust the `multiplier` to control the volume of the vocals (higher numbers result in more prominent vocals)
4. (Optional) Input corresponding music styles etc. in the `tags` field of `TextEncodeAceStepAudio`
5. (Optional) Input corresponding lyrics in the `lyrics` field of `TextEncodeAceStepAudio`
6. Click the `Run` button, or use the shortcut `Ctrl(cmd) + Enter` to execute the audio generation
7. After the workflow completes,, you can preview the generated audio in the `Save Audio` node. You can click to play and listen to it, and the audio will also be saved to `ComfyUI/output/audio` (subdirectory determined by the `Save Audio` node).
## ACE-Step ComfyUI Audio-to-Audio Workflow
Similar to image-to-image workflows, you can input a piece of music and use the workflow below to resample and generate music. You can also adjust the difference from the original audio by controlling the `denoise` parameter in the `Ksampler`.
### 1. Download Workflow File
Click the button below to download the corresponding workflow file. Drag it into ComfyUI to load the workflow information.
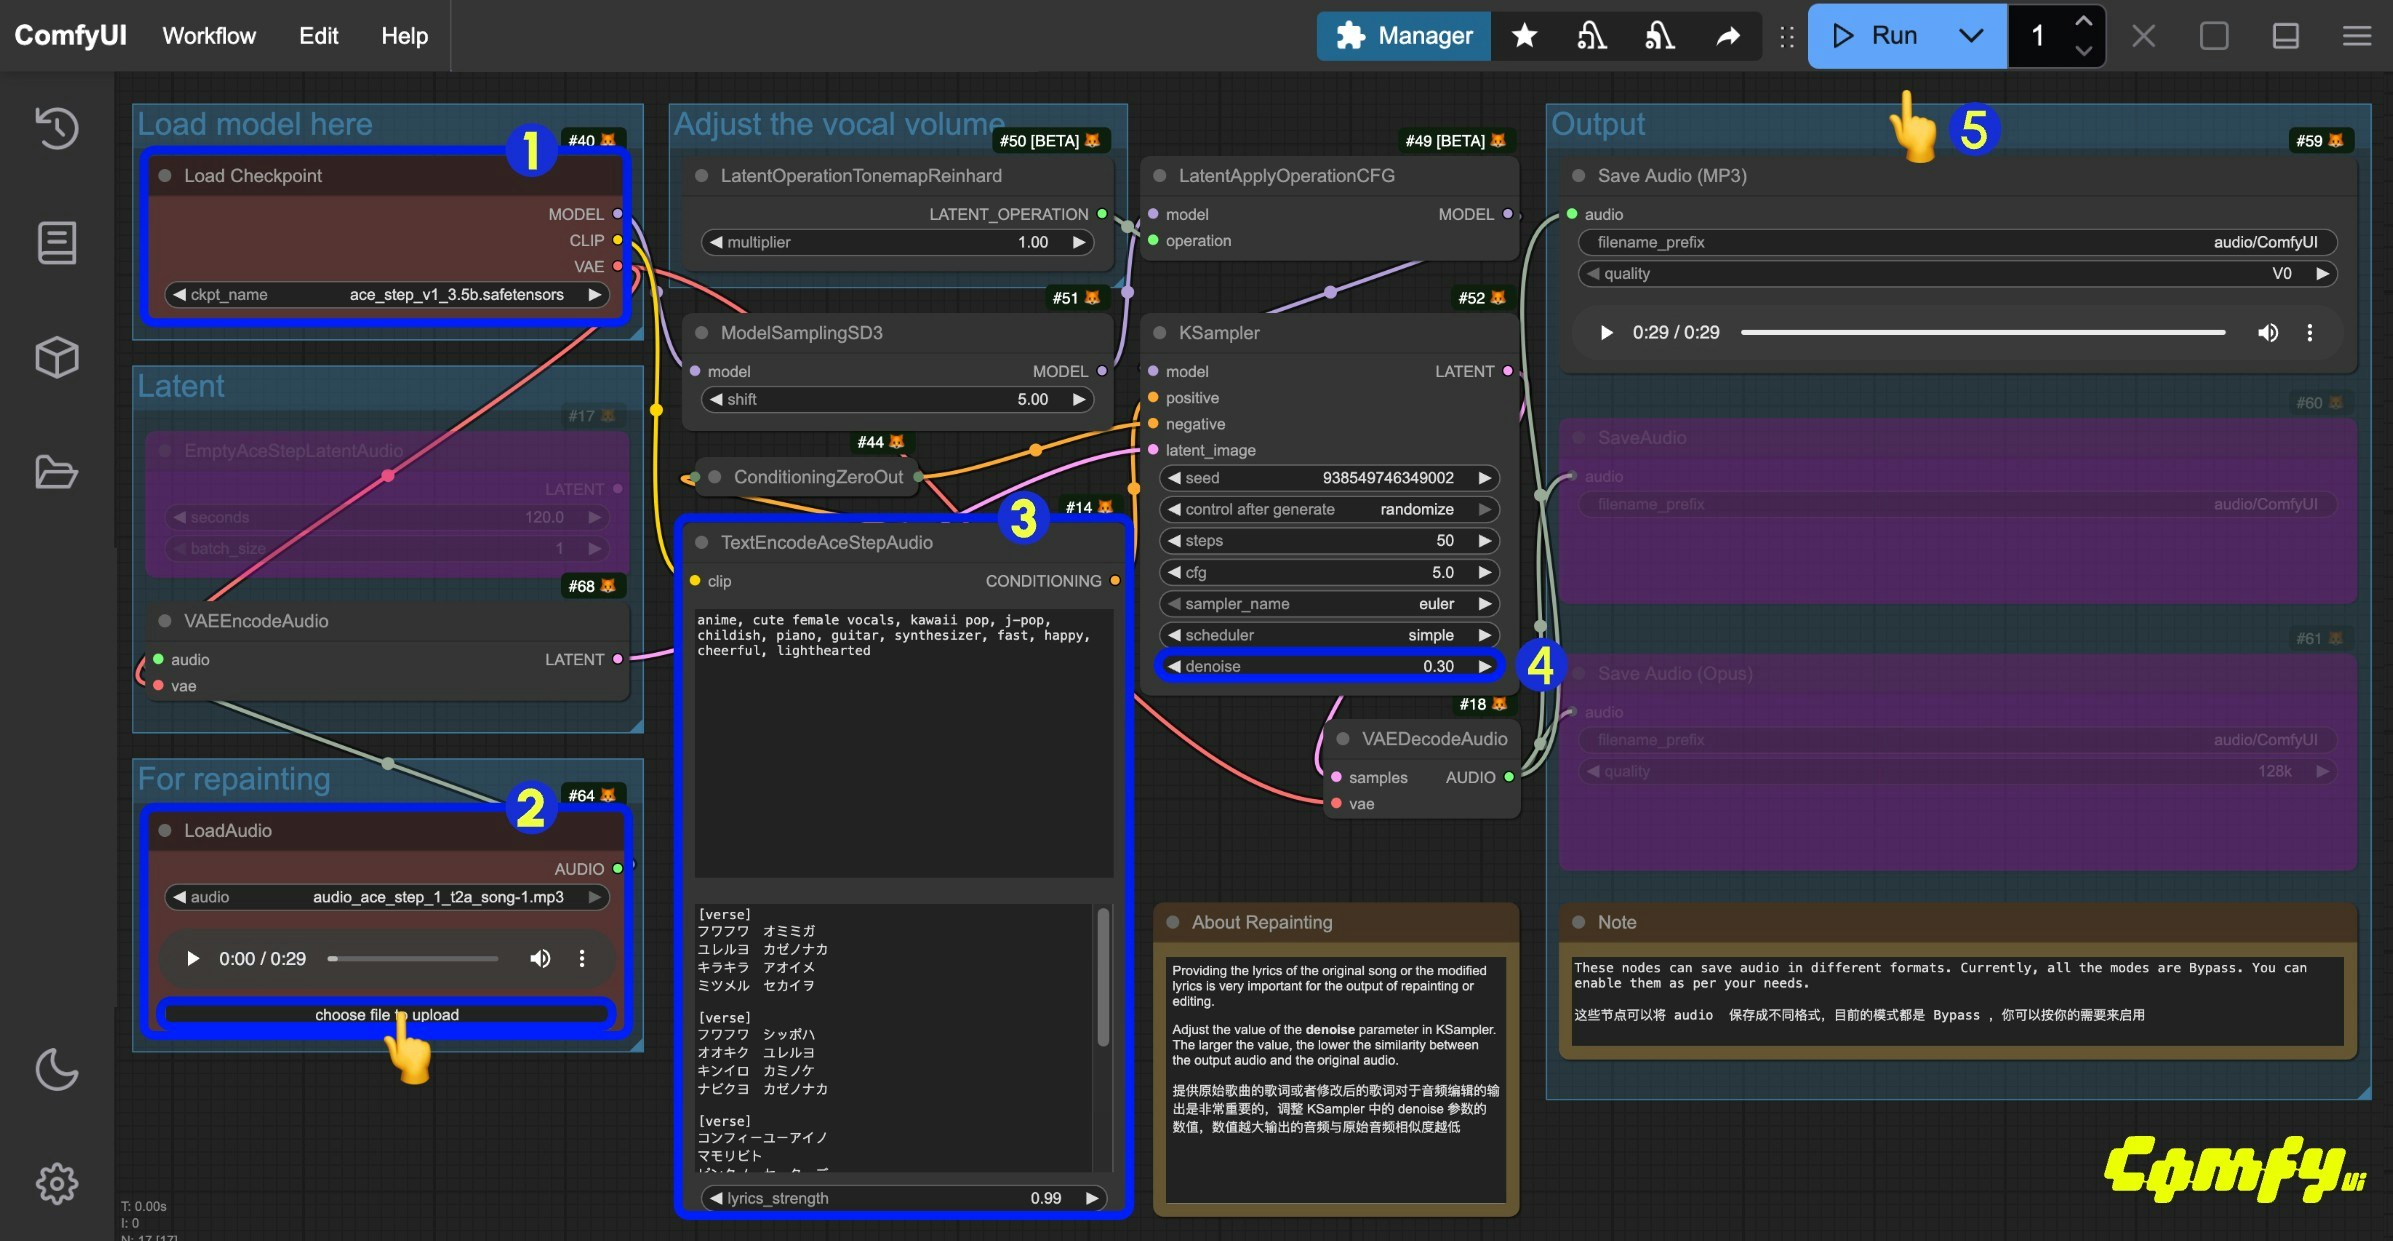 1. Ensure the `Load Checkpoints` node has loaded the `ace_step_v1_3.5b.safetensors` model
2. Upload the provided audio file in the `LoadAudio` node
3. (Optional) Input corresponding music styles and lyrics in the `tags` and `lyrics` fields of `TextEncodeAceStepAudio`. Providing lyrics is very important for audio editing
4. (Optional) Modify the `denoise` parameter in the `Ksampler` node to adjust the noise added during sampling to control similarity with the original audio (smaller values result in more similarity to the original audio; setting it to `1.00` is approximately equivalent to having no audio input)
5. Click the `Run` button, or use the shortcut `Ctrl(cmd) + Enter` to execute the audio generation
6. After the workflow completes, you can preview the generated audio in the `Save Audio` node. You can click to play and listen to it, and the audio will also be saved to `ComfyUI/output/audio` (subdirectory determined by the `Save Audio` node).
You can also implement the lyrics modification and editing functionality from the ACE-Step project page, modifying the original lyrics to change the audio effect.
### 3. Additional Workflow Notes
1. In the example workflow, you can change the `tags` in `TextEncodeAceStepAudio` from `male voice` to `female voice` to generate female vocals.
2. You can also modify the `lyrics` in `TextEncodeAceStepAudio` to change the lyrics and thus the generated audio. Refer to the examples on the ACE-Step project page for more details.
## ACE-Step Prompt Guide
ACE currently uses two types of prompts: `tags` and `lyrics`.
* `tags`: Mainly used to describe music styles, scenes, etc. Similar to prompts we use for other generations, they primarily describe the overall style and requirements of the audio, separated by English commas
* `lyrics`: Mainly used to describe lyrics, supporting lyric structure tags such as \[verse], \[chorus], and \[bridge] to distinguish different parts of the lyrics. You can also input instrument names for purely instrumental music
You can find rich examples of `tags` and `lyrics` on the [ACE-Step model homepage](https://ace-step.github.io/). You can refer to these examples to try corresponding prompts. This document's prompt guide is organized based on the project to help you quickly try combinations to achieve your desired effect.
### Tags (prompt)
#### Mainstream Music Styles
Use short tag combinations to generate specific music styles
* electronic
* rock
* pop
* funk
* soul
* cyberpunk
* Acid jazz
* electro
* em (electronic music)
* soft electric drums
* melodic
#### Scene Types
Combine specific usage scenarios and atmospheres to generate music that matches the corresponding mood
* background music for parties
* radio broadcasts
* workout playlists
#### Instrumental Elements
* saxophone
* jazz
* piano, violin
#### Vocal Types
* female voice
* male voice
* clean vocals
#### Professional Terms
Use some professional terms commonly used in music to precisely control music effects
* 110 bpm (beats per minute is 110)
* fast tempo
* slow tempo
* loops
* fills
* acoustic guitar
* electric bass
{/* - Lyrics editing:
- edit lyrics: 'When I was young' -> 'When you were kid' (lyrics editing example) */}
### Lyrics
#### Lyric Structure Tags
* \[outro]
* \[verse]
* \[chorus]
* \[bridge]
#### Multilingual Support
* ACE-Step V1 supports multiple languages. When used, ACE-Step converts different languages into English letters and then generates music.
* In ComfyUI, we haven't fully implemented the conversion of all languages to English letters. Currently, only [Japanese hiragana and katakana characters](https://github.com/comfyanonymous/ComfyUI/commit/5d3cc85e13833aeb6ef9242cdae243083e30c6fc) are implemented.
So if you need to use multiple languages for music generation, you need to first convert the corresponding language to English letters, and then input the language code abbreviation at the beginning of the `lyrics`, such as Chinese `[zh]`, Korean `[ko]`, etc.
For example:
```
[verse]
[zh]wo3zou3guo4shen1ye4de5jie1dao4
[zh]leng3feng1chui1luan4si1nian4de5piao4liang4wai4tao4
[zh]ni3de5wei1xiao4xiang4xing1guang1hen3xuan4yao4
[zh]zhao4liang4le5wo3gu1du2de5mei3fen1mei3miao3
[chorus]
[verse]
[ko]hamkke si-kkeuleo-un sesang-ui sodong-eul pihae
[ko]honja ogsang-eseo dalbich-ui eolyeompus-ileul balaboda
[ko]niga salang-eun lideum-i ganghan eum-ag gatdago malhaess-eo
[ko]han ta han tamada ma-eum-ui ondoga eolmana heojeonhanji ijge hae
[bridge]
[es]cantar mi anhelo por ti sin ocultar
[es]como poesía y pintura, lleno de anhelo indescifrable
[es]tu sombra es tan terca como el viento, inborrable
[es]persiguiéndote en vuelo, brilla como cruzar una mar de nubes
[chorus]
[fr]que tu sois le vent qui souffle sur ma main
[fr]un contact chaud comme la douce pluie printanière
[fr]que tu sois le vent qui s'entoure de mon corps
[fr]un amour profond qui ne s'éloignera jamais
```
Currently, ACE-Step supports 19 languages, but the following ten languages have better support:
* English
* Chinese: \[zh]
* Russian: \[ru]
* Spanish: \[es]
* Japanese: \[ja]
* German: \[de]
* French: \[fr]
* Portuguese: \[pt]
* Italian: \[it]
* Korean: \[ko]
1. Ensure the `Load Checkpoints` node has loaded the `ace_step_v1_3.5b.safetensors` model
2. Upload the provided audio file in the `LoadAudio` node
3. (Optional) Input corresponding music styles and lyrics in the `tags` and `lyrics` fields of `TextEncodeAceStepAudio`. Providing lyrics is very important for audio editing
4. (Optional) Modify the `denoise` parameter in the `Ksampler` node to adjust the noise added during sampling to control similarity with the original audio (smaller values result in more similarity to the original audio; setting it to `1.00` is approximately equivalent to having no audio input)
5. Click the `Run` button, or use the shortcut `Ctrl(cmd) + Enter` to execute the audio generation
6. After the workflow completes, you can preview the generated audio in the `Save Audio` node. You can click to play and listen to it, and the audio will also be saved to `ComfyUI/output/audio` (subdirectory determined by the `Save Audio` node).
You can also implement the lyrics modification and editing functionality from the ACE-Step project page, modifying the original lyrics to change the audio effect.
### 3. Additional Workflow Notes
1. In the example workflow, you can change the `tags` in `TextEncodeAceStepAudio` from `male voice` to `female voice` to generate female vocals.
2. You can also modify the `lyrics` in `TextEncodeAceStepAudio` to change the lyrics and thus the generated audio. Refer to the examples on the ACE-Step project page for more details.
## ACE-Step Prompt Guide
ACE currently uses two types of prompts: `tags` and `lyrics`.
* `tags`: Mainly used to describe music styles, scenes, etc. Similar to prompts we use for other generations, they primarily describe the overall style and requirements of the audio, separated by English commas
* `lyrics`: Mainly used to describe lyrics, supporting lyric structure tags such as \[verse], \[chorus], and \[bridge] to distinguish different parts of the lyrics. You can also input instrument names for purely instrumental music
You can find rich examples of `tags` and `lyrics` on the [ACE-Step model homepage](https://ace-step.github.io/). You can refer to these examples to try corresponding prompts. This document's prompt guide is organized based on the project to help you quickly try combinations to achieve your desired effect.
### Tags (prompt)
#### Mainstream Music Styles
Use short tag combinations to generate specific music styles
* electronic
* rock
* pop
* funk
* soul
* cyberpunk
* Acid jazz
* electro
* em (electronic music)
* soft electric drums
* melodic
#### Scene Types
Combine specific usage scenarios and atmospheres to generate music that matches the corresponding mood
* background music for parties
* radio broadcasts
* workout playlists
#### Instrumental Elements
* saxophone
* jazz
* piano, violin
#### Vocal Types
* female voice
* male voice
* clean vocals
#### Professional Terms
Use some professional terms commonly used in music to precisely control music effects
* 110 bpm (beats per minute is 110)
* fast tempo
* slow tempo
* loops
* fills
* acoustic guitar
* electric bass
{/* - Lyrics editing:
- edit lyrics: 'When I was young' -> 'When you were kid' (lyrics editing example) */}
### Lyrics
#### Lyric Structure Tags
* \[outro]
* \[verse]
* \[chorus]
* \[bridge]
#### Multilingual Support
* ACE-Step V1 supports multiple languages. When used, ACE-Step converts different languages into English letters and then generates music.
* In ComfyUI, we haven't fully implemented the conversion of all languages to English letters. Currently, only [Japanese hiragana and katakana characters](https://github.com/comfyanonymous/ComfyUI/commit/5d3cc85e13833aeb6ef9242cdae243083e30c6fc) are implemented.
So if you need to use multiple languages for music generation, you need to first convert the corresponding language to English letters, and then input the language code abbreviation at the beginning of the `lyrics`, such as Chinese `[zh]`, Korean `[ko]`, etc.
For example:
```
[verse]
[zh]wo3zou3guo4shen1ye4de5jie1dao4
[zh]leng3feng1chui1luan4si1nian4de5piao4liang4wai4tao4
[zh]ni3de5wei1xiao4xiang4xing1guang1hen3xuan4yao4
[zh]zhao4liang4le5wo3gu1du2de5mei3fen1mei3miao3
[chorus]
[verse]
[ko]hamkke si-kkeuleo-un sesang-ui sodong-eul pihae
[ko]honja ogsang-eseo dalbich-ui eolyeompus-ileul balaboda
[ko]niga salang-eun lideum-i ganghan eum-ag gatdago malhaess-eo
[ko]han ta han tamada ma-eum-ui ondoga eolmana heojeonhanji ijge hae
[bridge]
[es]cantar mi anhelo por ti sin ocultar
[es]como poesía y pintura, lleno de anhelo indescifrable
[es]tu sombra es tan terca como el viento, inborrable
[es]persiguiéndote en vuelo, brilla como cruzar una mar de nubes
[chorus]
[fr]que tu sois le vent qui souffle sur ma main
[fr]un contact chaud comme la douce pluie printanière
[fr]que tu sois le vent qui s'entoure de mon corps
[fr]un amour profond qui ne s'éloignera jamais
```
Currently, ACE-Step supports 19 languages, but the following ten languages have better support:
* English
* Chinese: \[zh]
* Russian: \[ru]
* Spanish: \[es]
* Japanese: \[ja]
* German: \[de]
* French: \[fr]
* Portuguese: \[pt]
* Italian: \[it]
* Korean: \[ko]
 This allows you to:
1. Switch ComfyUI themes
2. Export the currently selected theme as JSON format
3. Load custom theme configuration from JSON file
4. Delete custom theme configuration
This allows you to:
1. Switch ComfyUI themes
2. Export the currently selected theme as JSON format
3. Load custom theme configuration from JSON file
4. Delete custom theme configuration
 ## Node
### Node Opacity
* **Function**: Set the opacity of nodes, where 0 represents completely transparent and 1 represents completely opaque.
## Node
### Node Opacity
* **Function**: Set the opacity of nodes, where 0 represents completely transparent and 1 represents completely opaque.
 ## Node Widget
### Textarea Widget Font Size
* **Range**: 8 - 24
* **Function**: Set the font size in textarea widgets. Adjusts the text display size in text input boxes to improve readability.
## Node Widget
### Textarea Widget Font Size
* **Range**: 8 - 24
* **Function**: Set the font size in textarea widgets. Adjusts the text display size in text input boxes to improve readability.
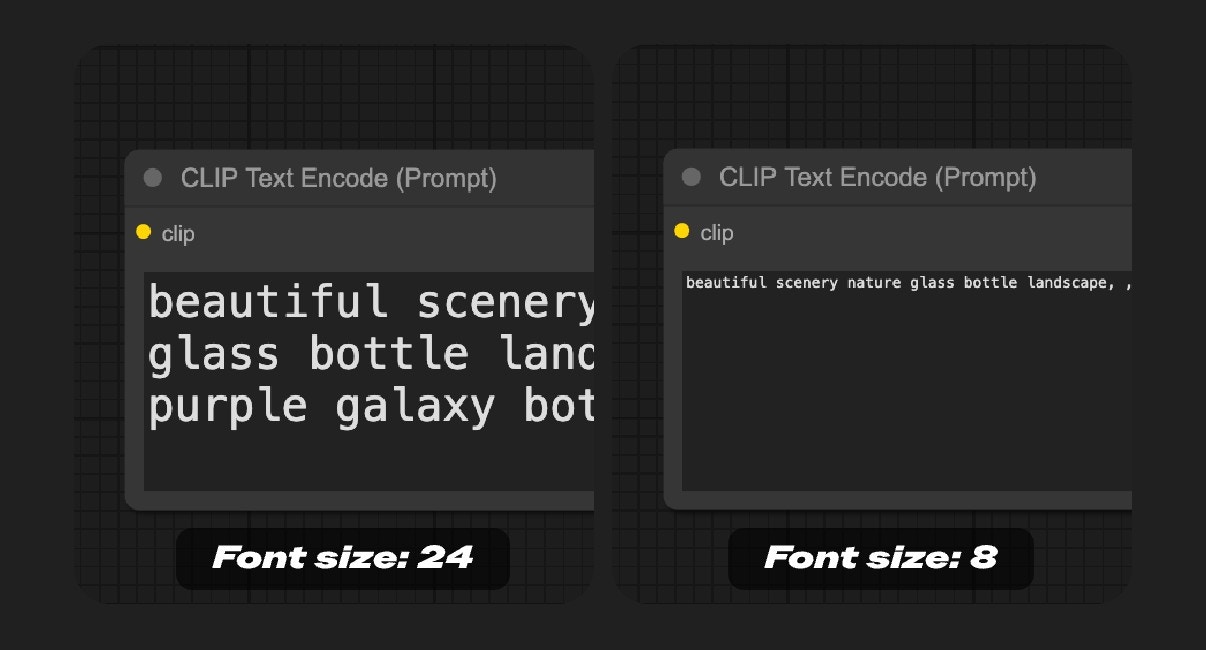 ## Sidebar
### Unified Sidebar Width
* **Function**: When enabled, the sidebar width will be unified to a consistent width when switching between different sidebars. If disabled, different sidebars can maintain their custom widths when switching.
### Sidebar Size
* **Function**: Control the size of the sidebar, can be set to normal or small.
### Sidebar Location
* **Function**: Control whether the sidebar is displayed on the left or right side of the interface, allowing users to adjust the sidebar position according to their usage habits.
### Sidebar Style
* **Function**: Control the visual style of the sidebar. Options include:
* **Connected**: The sidebar appears connected to the edge of the interface.
* **Floating**: The sidebar appears as a floating panel with visual separation from the interface edge.
## Sidebar
### Unified Sidebar Width
* **Function**: When enabled, the sidebar width will be unified to a consistent width when switching between different sidebars. If disabled, different sidebars can maintain their custom widths when switching.
### Sidebar Size
* **Function**: Control the size of the sidebar, can be set to normal or small.
### Sidebar Location
* **Function**: Control whether the sidebar is displayed on the left or right side of the interface, allowing users to adjust the sidebar position according to their usage habits.
### Sidebar Style
* **Function**: Control the visual style of the sidebar. Options include:
* **Connected**: The sidebar appears connected to the edge of the interface.
* **Floating**: The sidebar appears as a floating panel with visual separation from the interface edge.
 ## Tree Explorer
### Tree Explorer Item Padding
* **Function**: Set the padding of items in the tree explorer (sidebar panel), adjusting the spacing between items in the tree structure.
## Tree Explorer
### Tree Explorer Item Padding
* **Function**: Set the padding of items in the tree explorer (sidebar panel), adjusting the spacing between items in the tree structure.
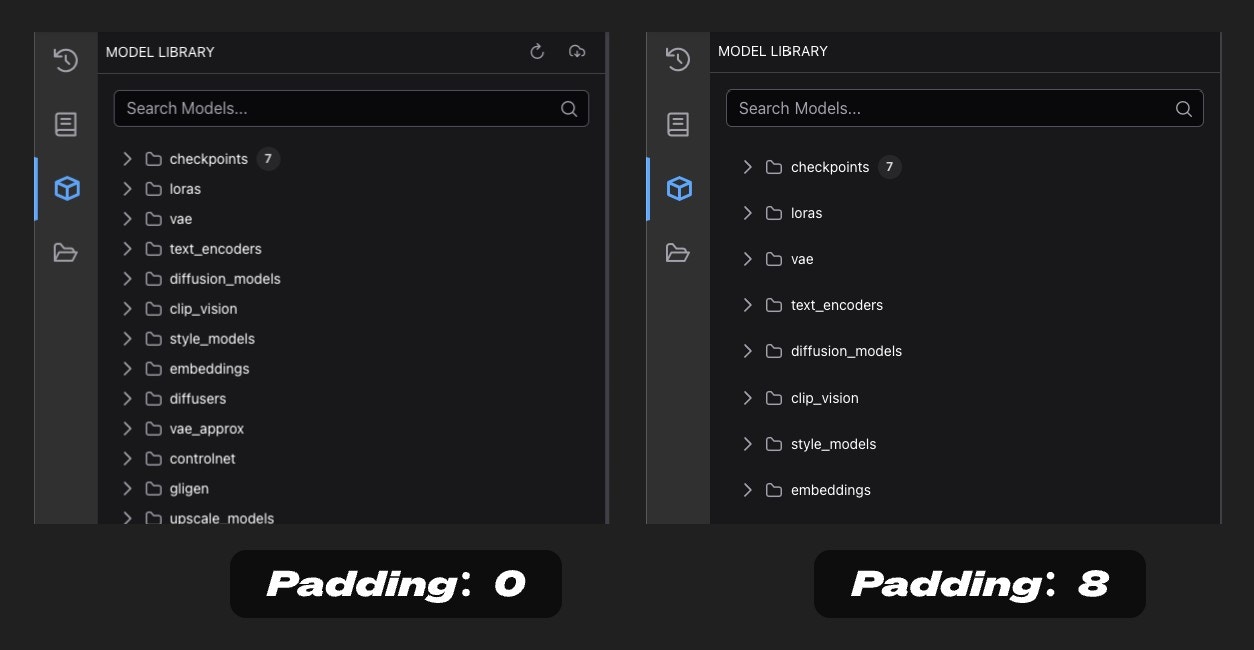 ## Advanced Customization with user.css
For cases where the color palette doesn't provide enough control, you can use custom CSS via a user.css file. This method is recommended for advanced users who need to customize elements that aren't available in the color palette system.
### Requirements
* ComfyUI frontend version 1.20.5 or newer
### Setting Up user.css
1. Create a file named `user.css` in your ComfyUI user directory (same location as your workflows and settings - see location details below)
2. Add your custom CSS rules to this file
3. Restart ComfyUI or refresh the page to apply changes
### User Directory Location
The ComfyUI user directory is where your personal settings, workflows, and customizations are stored. The location depends on your installation type:
## Advanced Customization with user.css
For cases where the color palette doesn't provide enough control, you can use custom CSS via a user.css file. This method is recommended for advanced users who need to customize elements that aren't available in the color palette system.
### Requirements
* ComfyUI frontend version 1.20.5 or newer
### Setting Up user.css
1. Create a file named `user.css` in your ComfyUI user directory (same location as your workflows and settings - see location details below)
2. Add your custom CSS rules to this file
3. Restart ComfyUI or refresh the page to apply changes
### User Directory Location
The ComfyUI user directory is where your personal settings, workflows, and customizations are stored. The location depends on your installation type:
 5. Click `Cancel subscription` button in Stripe to cancel your subscription
 ## Important notes
* All Comfy Cloud subscription plans automatically renew unless you set your plan to cancel
* Your subscription will remain active until the end of your current billing period
* You can resubscribe at any time by visiting [cloud.comfy.org](https://cloud.comfy.org/?utm_source=docs)
---
# Source: https://docs.comfy.org/support/subscription/changing-plan.md
> ## Documentation Index
> Fetch the complete documentation index at: https://docs.comfy.org/llms.txt
> Use this file to discover all available pages before exploring further.
# Changing your subscription plan
> Learn how to change your Comfy Cloud subscription plan
## How to change your subscription plan
You can upgrade or downgrade your Comfy Cloud subscription plan at any time. Follow these steps to change your plan:
### Step 1: Open the settings panel
Click the **Plan & Credits** menu to open the settings panel.
## Important notes
* All Comfy Cloud subscription plans automatically renew unless you set your plan to cancel
* Your subscription will remain active until the end of your current billing period
* You can resubscribe at any time by visiting [cloud.comfy.org](https://cloud.comfy.org/?utm_source=docs)
---
# Source: https://docs.comfy.org/support/subscription/changing-plan.md
> ## Documentation Index
> Fetch the complete documentation index at: https://docs.comfy.org/llms.txt
> Use this file to discover all available pages before exploring further.
# Changing your subscription plan
> Learn how to change your Comfy Cloud subscription plan
## How to change your subscription plan
You can upgrade or downgrade your Comfy Cloud subscription plan at any time. Follow these steps to change your plan:
### Step 1: Open the settings panel
Click the **Plan & Credits** menu to open the settings panel.
 ### Step 2: Access subscription management
In the **Plan & Credits** panel, click the **Manage subscription** button to open the subscription settings.
### Step 2: Access subscription management
In the **Plan & Credits** panel, click the **Manage subscription** button to open the subscription settings.
 ### Step 4: Open the billing portal
After opening the Comfy billing portal, click the **Update subscription** button.
### Step 4: Open the billing portal
After opening the Comfy billing portal, click the **Update subscription** button.
 ## Billing for plan changes
### Upgrading to a higher-priced plan
If your current subscription plan price is lower than the target plan, you will need to pay the price difference. You will receive an equivalent credit amount corresponding to the price difference.
### Downgrading to a lower-priced plan
If your current subscription plan price is higher than the target plan, your subscription will switch to the new plan after the current billing cycle ends. The new subscription will be based on the new pricing plan.
---
# Source: https://docs.comfy.org/tutorials/partner-nodes/openai/chat.md
> ## Documentation Index
> Fetch the complete documentation index at: https://docs.comfy.org/llms.txt
> Use this file to discover all available pages before exploring further.
# OpenAI Chat API Node ComfyUI Official Example
> This article will introduce how to use OpenAI Chat Partner nodes in ComfyUI to complete conversational functions
OpenAI is a company focused on generative AI, providing powerful conversational capabilities. Currently, ComfyUI has integrated the OpenAI API, allowing you to directly use the related nodes in ComfyUI to complete conversational functions.
In this guide, we will walk you through completing the corresponding conversational functionality.
## Billing for plan changes
### Upgrading to a higher-priced plan
If your current subscription plan price is lower than the target plan, you will need to pay the price difference. You will receive an equivalent credit amount corresponding to the price difference.
### Downgrading to a lower-priced plan
If your current subscription plan price is higher than the target plan, your subscription will switch to the new plan after the current billing cycle ends. The new subscription will be based on the new pricing plan.
---
# Source: https://docs.comfy.org/tutorials/partner-nodes/openai/chat.md
> ## Documentation Index
> Fetch the complete documentation index at: https://docs.comfy.org/llms.txt
> Use this file to discover all available pages before exploring further.
# OpenAI Chat API Node ComfyUI Official Example
> This article will introduce how to use OpenAI Chat Partner nodes in ComfyUI to complete conversational functions
OpenAI is a company focused on generative AI, providing powerful conversational capabilities. Currently, ComfyUI has integrated the OpenAI API, allowing you to directly use the related nodes in ComfyUI to complete conversational functions.
In this guide, we will walk you through completing the corresponding conversational functionality.

 ---
# Source: https://docs.comfy.org/registry/claim-my-node.md
> ## Documentation Index
> Fetch the complete documentation index at: https://docs.comfy.org/llms.txt
> Use this file to discover all available pages before exploring further.
# Claim My Node
## Overview
The **Claim My Node** feature allows developers to claim ownership of custom nodes in the ComfyUI Registry. This system ensures that only the rightful authors can manage and update their published nodes, providing security and accountability within the community.
## What are Unclaimed Nodes?
As we migrate from ComfyUI Manager to the Comfy Registry with new standards, many custom nodes that were previously listed in the ComfyUI Manager legacy system now appear as "unclaimed" in the registry. These are nodes that:
* Were originally published in the ComfyUI Manager legacy system
* Have been migrated to the Comfy Registry to meet the latest standards
* Are waiting for their original authors to claim ownership
We provide an easy way for developers to claim these migrated nodes, ensuring a smooth transition from the legacy system to the new registry standard while maintaining proper ownership and control.
## Getting Started
To claim your nodes:
1. **Navigate to Your Unclaimed Node Page**: Visit your unclaimed node page, Click "Claim my node!" button.
2. **Create a Publisher (if you don't have one yet)**:
* If you haven't created a publisher yet, you'll be prompted to create one. A publisher is required to claim nodes and manage them effectively.
3. **Select a Publisher**: Choose the publisher under which you want to claim the node. this step will redirect you to the claim page.
---
# Source: https://docs.comfy.org/registry/claim-my-node.md
> ## Documentation Index
> Fetch the complete documentation index at: https://docs.comfy.org/llms.txt
> Use this file to discover all available pages before exploring further.
# Claim My Node
## Overview
The **Claim My Node** feature allows developers to claim ownership of custom nodes in the ComfyUI Registry. This system ensures that only the rightful authors can manage and update their published nodes, providing security and accountability within the community.
## What are Unclaimed Nodes?
As we migrate from ComfyUI Manager to the Comfy Registry with new standards, many custom nodes that were previously listed in the ComfyUI Manager legacy system now appear as "unclaimed" in the registry. These are nodes that:
* Were originally published in the ComfyUI Manager legacy system
* Have been migrated to the Comfy Registry to meet the latest standards
* Are waiting for their original authors to claim ownership
We provide an easy way for developers to claim these migrated nodes, ensuring a smooth transition from the legacy system to the new registry standard while maintaining proper ownership and control.
## Getting Started
To claim your nodes:
1. **Navigate to Your Unclaimed Node Page**: Visit your unclaimed node page, Click "Claim my node!" button.
2. **Create a Publisher (if you don't have one yet)**:
* If you haven't created a publisher yet, you'll be prompted to create one. A publisher is required to claim nodes and manage them effectively.
3. **Select a Publisher**: Choose the publisher under which you want to claim the node. this step will redirect you to the claim page.
 ## Frequently Asked Questions
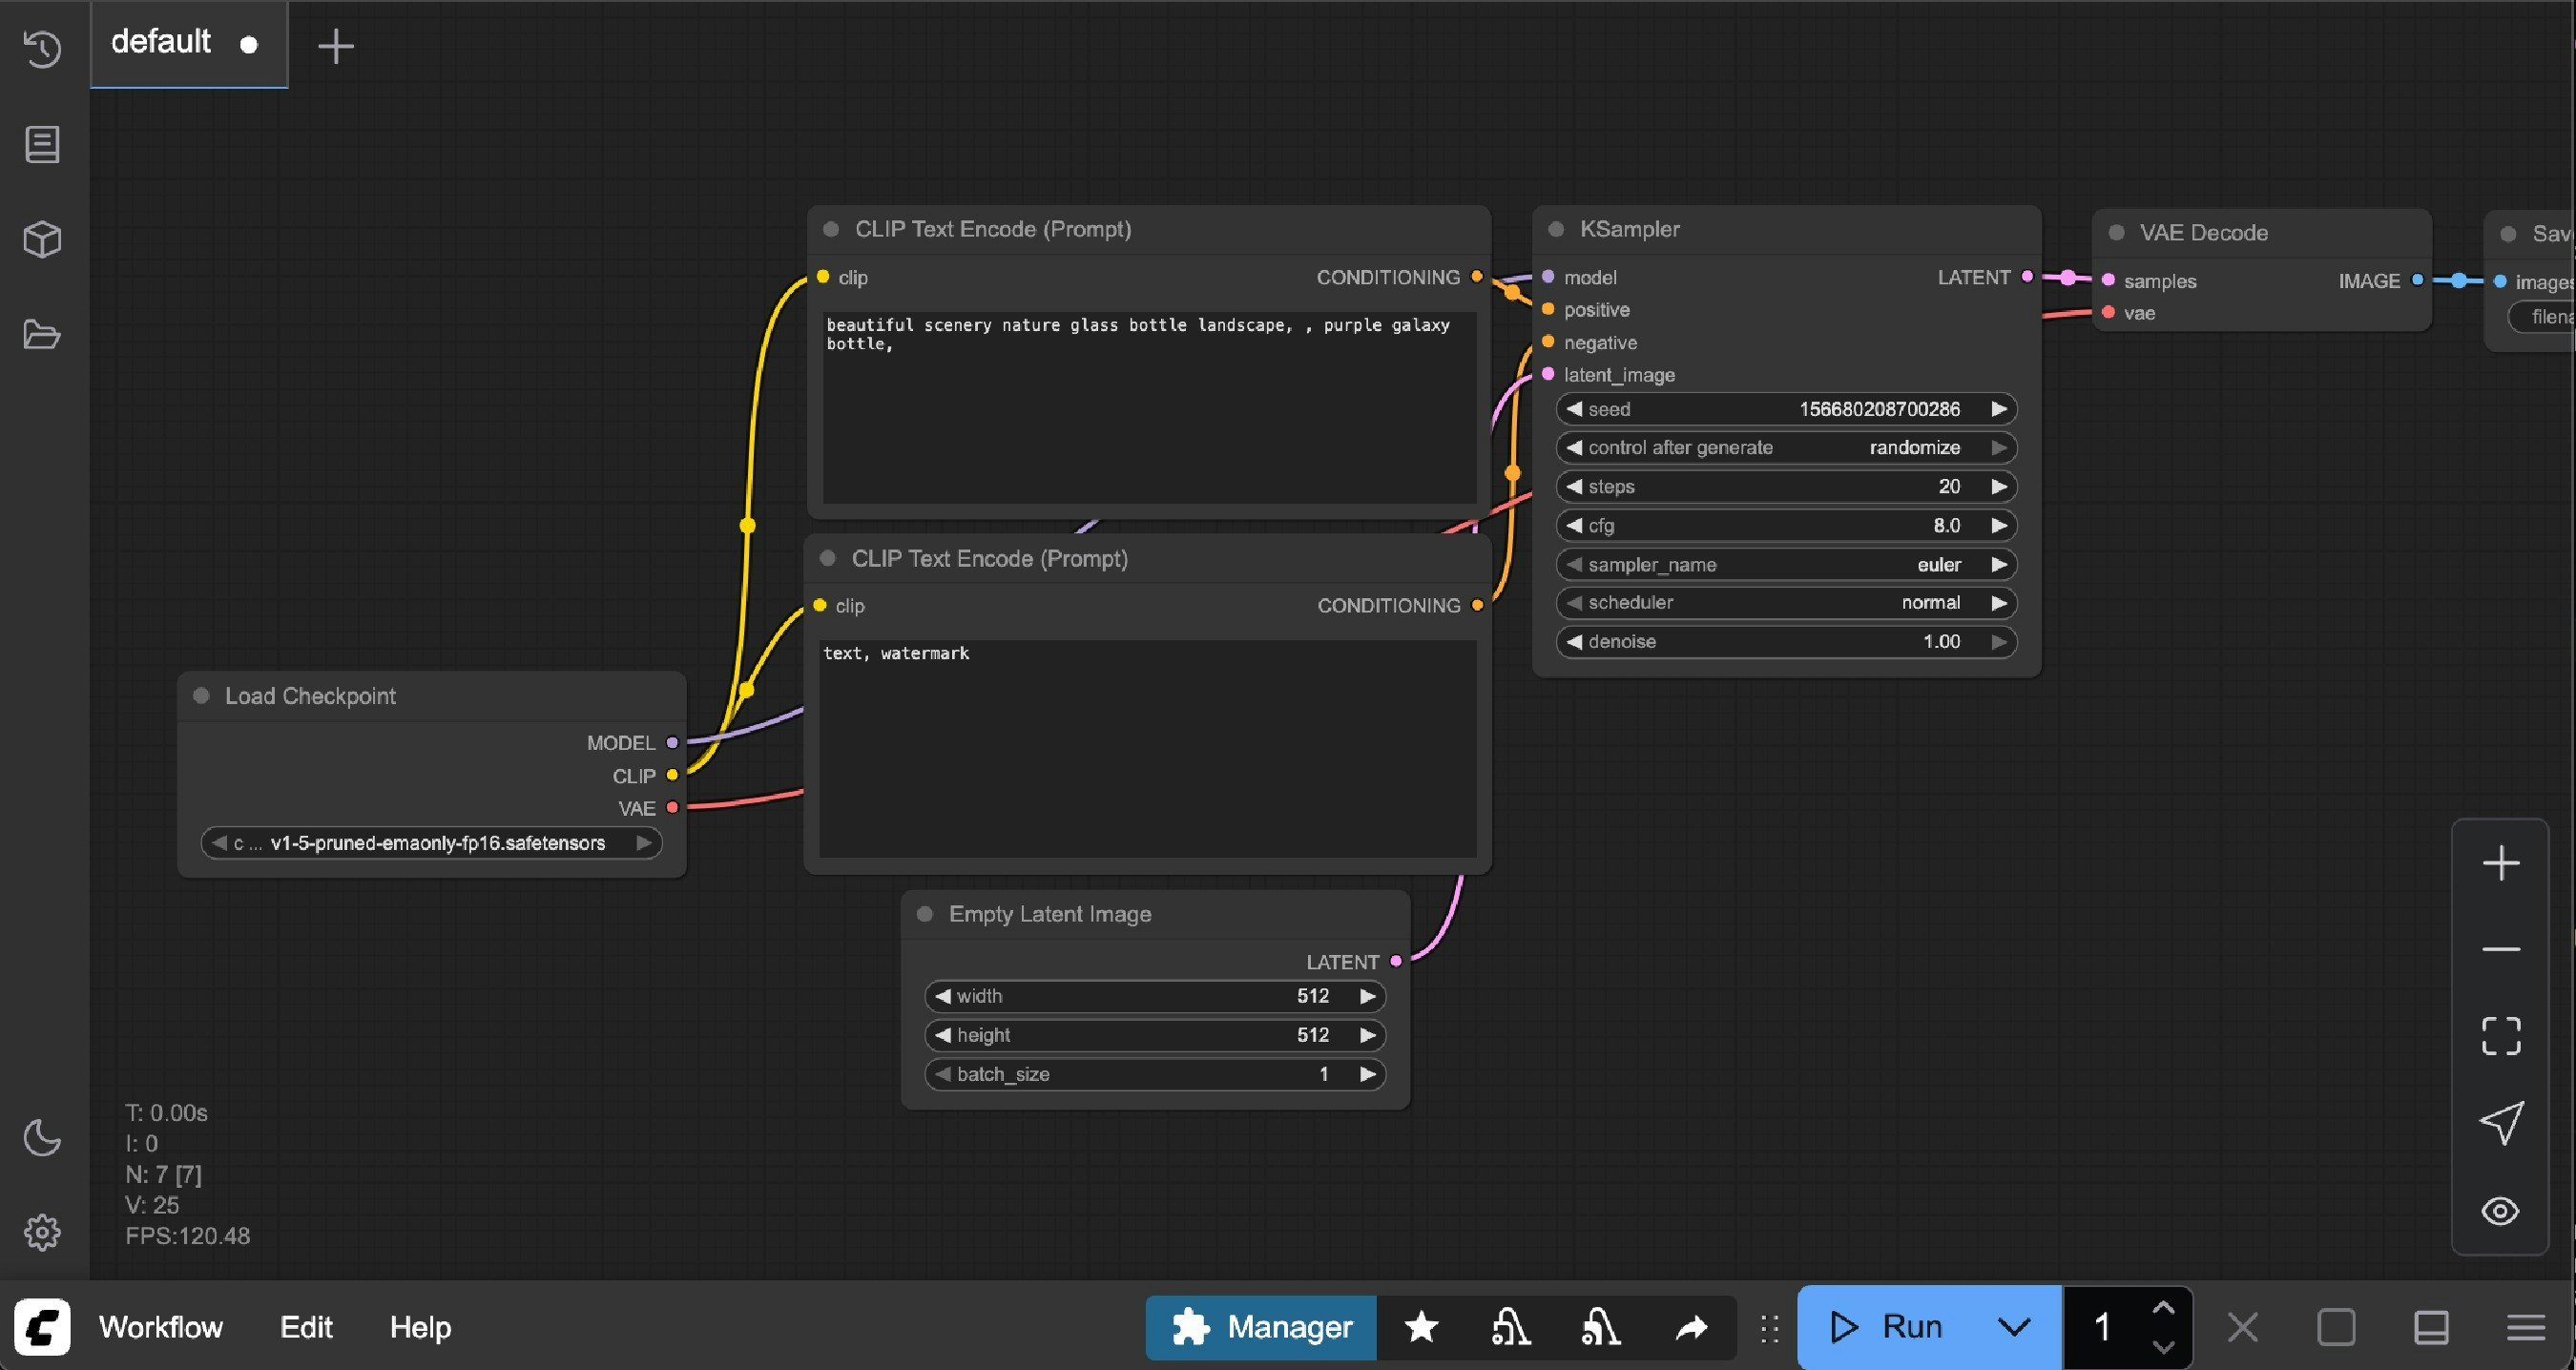
 ### What name to display in the model library tree view
* **Default Value**: title
* **Function**: Select the name format to display in the model library tree view, currently only supports filename and title
### Automatically load all model folders
* **Default Value**: Disabled
* **Function**: Whether to automatically detect model files in all folders when clicking the model library. Enabling may cause loading delays (requires traversing all folders). When disabled, files in the corresponding folder will only be loaded when clicking the folder name.
## Node
During the iteration process of ComfyUI, we will adjust some nodes and enable some nodes. These nodes may undergo major changes or be removed in future versions. However, to ensure compatibility, deprecated nodes have not been removed. You can use the settings below to enable whether to display **experimental nodes** and **deprecated nodes**.
### Show deprecated nodes in search
* **Default Value**: Disabled
* **Function**: Controls whether to display deprecated nodes in search. Deprecated nodes are hidden by default in the UI, but remain effective in existing workflows.
### What name to display in the model library tree view
* **Default Value**: title
* **Function**: Select the name format to display in the model library tree view, currently only supports filename and title
### Automatically load all model folders
* **Default Value**: Disabled
* **Function**: Whether to automatically detect model files in all folders when clicking the model library. Enabling may cause loading delays (requires traversing all folders). When disabled, files in the corresponding folder will only be loaded when clicking the folder name.
## Node
During the iteration process of ComfyUI, we will adjust some nodes and enable some nodes. These nodes may undergo major changes or be removed in future versions. However, to ensure compatibility, deprecated nodes have not been removed. You can use the settings below to enable whether to display **experimental nodes** and **deprecated nodes**.
### Show deprecated nodes in search
* **Default Value**: Disabled
* **Function**: Controls whether to display deprecated nodes in search. Deprecated nodes are hidden by default in the UI, but remain effective in existing workflows.
 ### Show experimental nodes in search
* **Default Value**: Enabled
* **Function**: Controls whether to display experimental nodes in search. Experimental nodes are some new feature support, but are not fully stable and may change or be removed in future versions.
### Show experimental nodes in search
* **Default Value**: Enabled
* **Function**: Controls whether to display experimental nodes in search. Experimental nodes are some new feature support, but are not fully stable and may change or be removed in future versions.
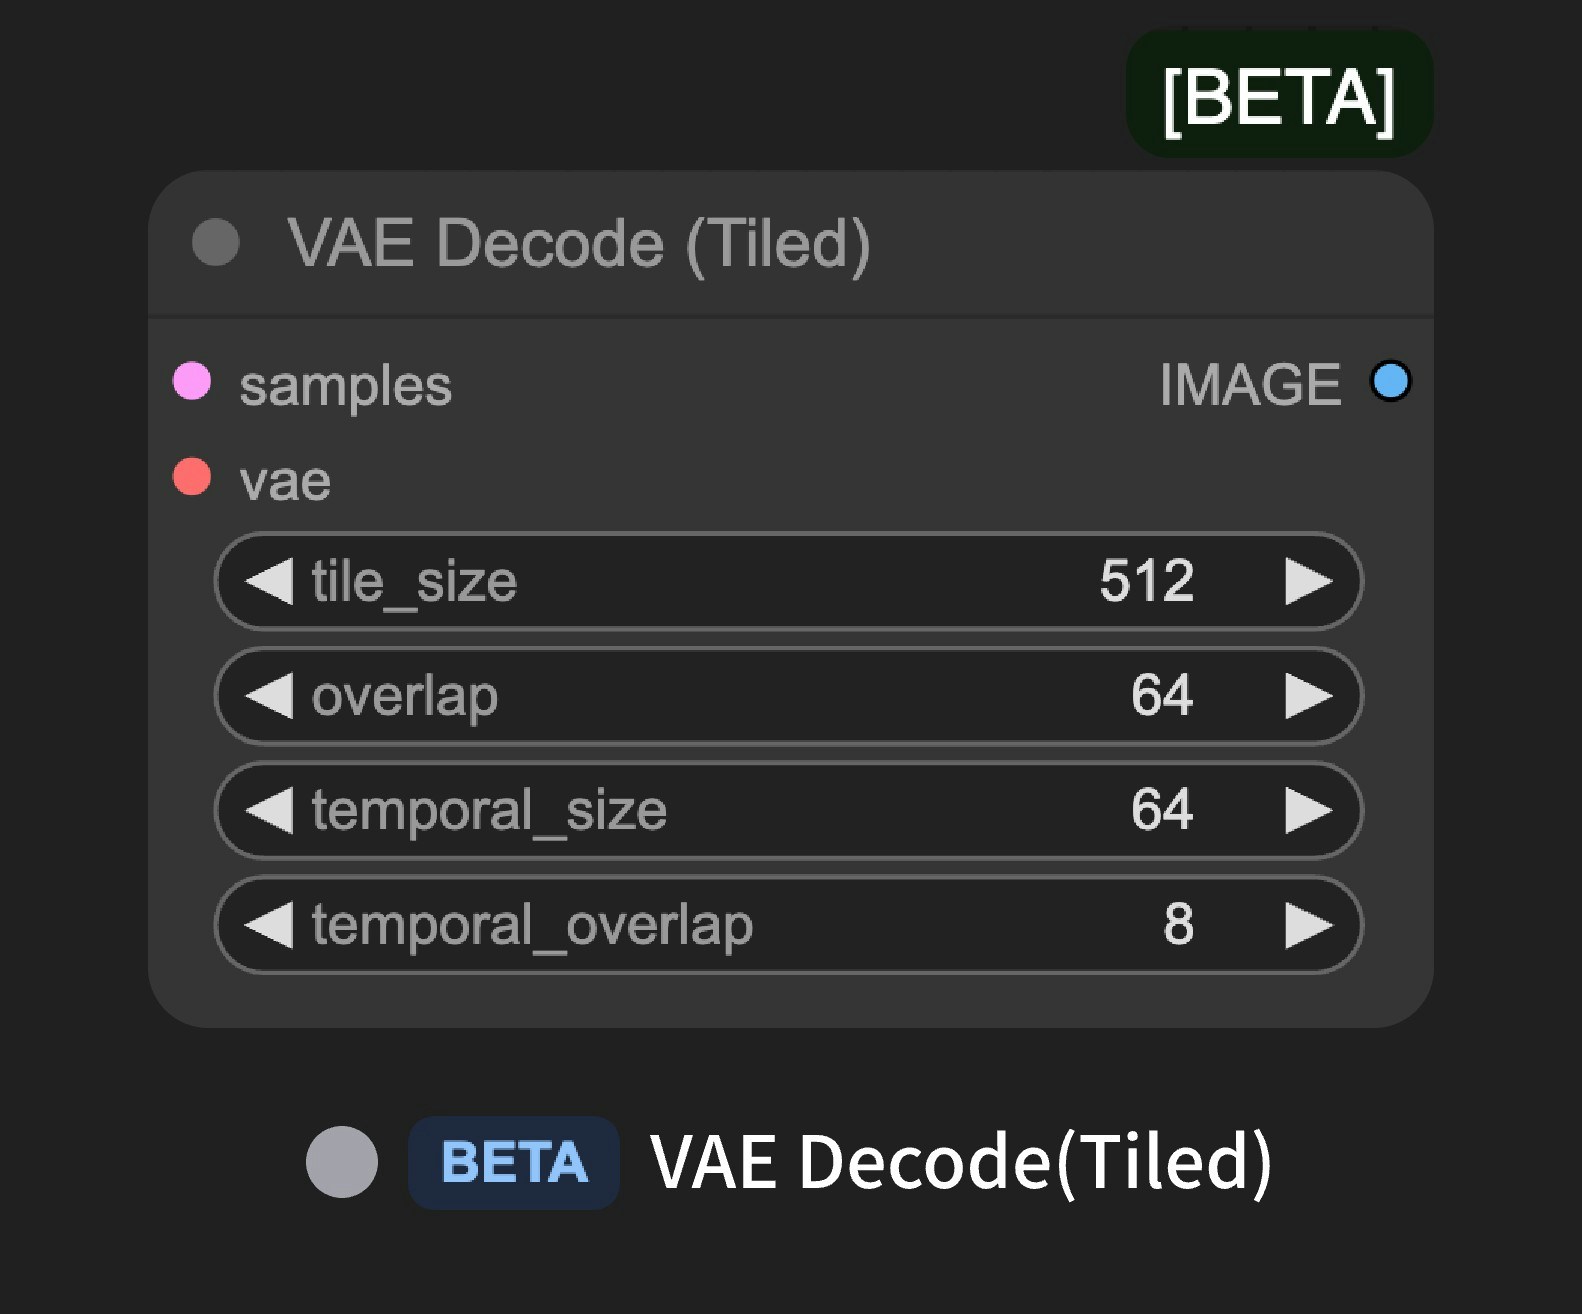 ## Node Search Box
### Number of nodes suggestions
* **Default Value**: 5
* **Function**: Used to modify the number of recommended nodes in the related node context menu. The larger the value, the more related recommended nodes are displayed.
## Node Search Box
### Number of nodes suggestions
* **Default Value**: 5
* **Function**: Used to modify the number of recommended nodes in the related node context menu. The larger the value, the more related recommended nodes are displayed.
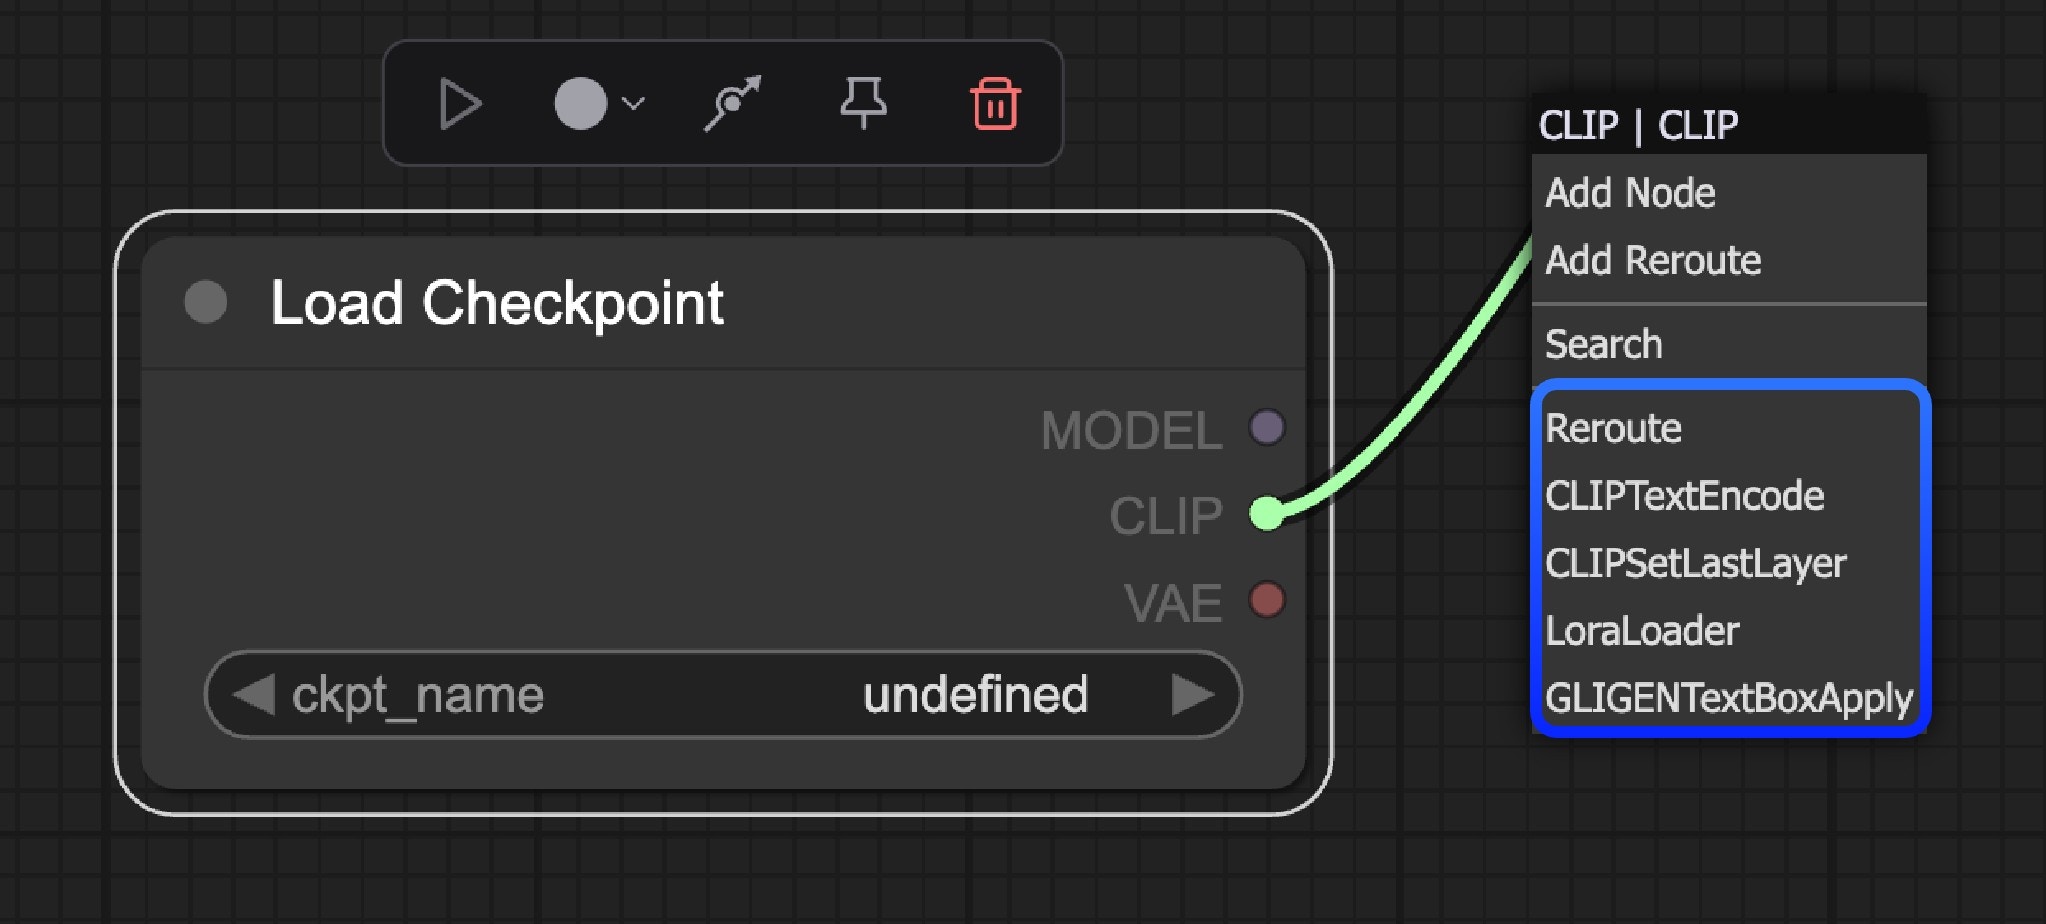 ### Show node frequency in search results
* **Default Value**: Disabled
* **Function**: Controls whether to display node usage frequency in search results
### Show node frequency in search results
* **Default Value**: Disabled
* **Function**: Controls whether to display node usage frequency in search results
 ### Show node id name in search results
* **Default Value**: Disabled
* **Function**: Controls whether to display node ID names in search results
### Show node id name in search results
* **Default Value**: Disabled
* **Function**: Controls whether to display node ID names in search results
 ### Show node category in search results
* **Default Value**: Enabled
* **Function**: Controls whether to display node categories in search results, helping users understand node classification information
### Node preview
* **Default Value**: Enabled
* **Function**: Controls whether to display node previews in search results, making it convenient for you to quickly preview nodes
### Node search box implementation
* **Default Value**: default
* **Function**: Select the implementation method of the node search box (experimental feature). If you select `litegraph (legacy)`, it will switch to the early ComfyUI search box
## Node Widget
### Widget control mode
* **Options**: before, after
* **Function**: Controls whether the timing of node widget value updates is before or after workflow execution, such as updating seed values
### Textarea widget spellcheck
* **Default Value**: Disabled
* **Function**: Controls whether text area widgets enable spellcheck, providing spellcheck functionality during text input. This functionality is implemented through the browser's spellcheck attribute
## Queue
### Queue history size
* **Default Value**: 100
* **Function**: Controls the queue history size recorded in the sidebar queue history panel. The larger the value, the more queue history is recorded. When the number is large, loading the page will also consume more memory
## Queue Button
### Batch count limit
* **Default Value**: 100
* **Function**: Sets the maximum number of tasks added to the queue in a single click, preventing accidentally adding too many tasks to the queue
## Validation
### Validate node definitions (slow)
* **Default Value**: Disabled
* **Function**: Controls whether to validate all node definitions at startup (slow). Only recommended for node developers. When enabled, the system will use Zod schemas to strictly validate each node definition. This functionality will consume more memory and time
* **Error Handling**: Failed node definitions will be skipped and warning information will be output to the console
### Show node category in search results
* **Default Value**: Enabled
* **Function**: Controls whether to display node categories in search results, helping users understand node classification information
### Node preview
* **Default Value**: Enabled
* **Function**: Controls whether to display node previews in search results, making it convenient for you to quickly preview nodes
### Node search box implementation
* **Default Value**: default
* **Function**: Select the implementation method of the node search box (experimental feature). If you select `litegraph (legacy)`, it will switch to the early ComfyUI search box
## Node Widget
### Widget control mode
* **Options**: before, after
* **Function**: Controls whether the timing of node widget value updates is before or after workflow execution, such as updating seed values
### Textarea widget spellcheck
* **Default Value**: Disabled
* **Function**: Controls whether text area widgets enable spellcheck, providing spellcheck functionality during text input. This functionality is implemented through the browser's spellcheck attribute
## Queue
### Queue history size
* **Default Value**: 100
* **Function**: Controls the queue history size recorded in the sidebar queue history panel. The larger the value, the more queue history is recorded. When the number is large, loading the page will also consume more memory
## Queue Button
### Batch count limit
* **Default Value**: 100
* **Function**: Sets the maximum number of tasks added to the queue in a single click, preventing accidentally adding too many tasks to the queue
## Validation
### Validate node definitions (slow)
* **Default Value**: Disabled
* **Function**: Controls whether to validate all node definitions at startup (slow). Only recommended for node developers. When enabled, the system will use Zod schemas to strictly validate each node definition. This functionality will consume more memory and time
* **Error Handling**: Failed node definitions will be skipped and warning information will be output to the console
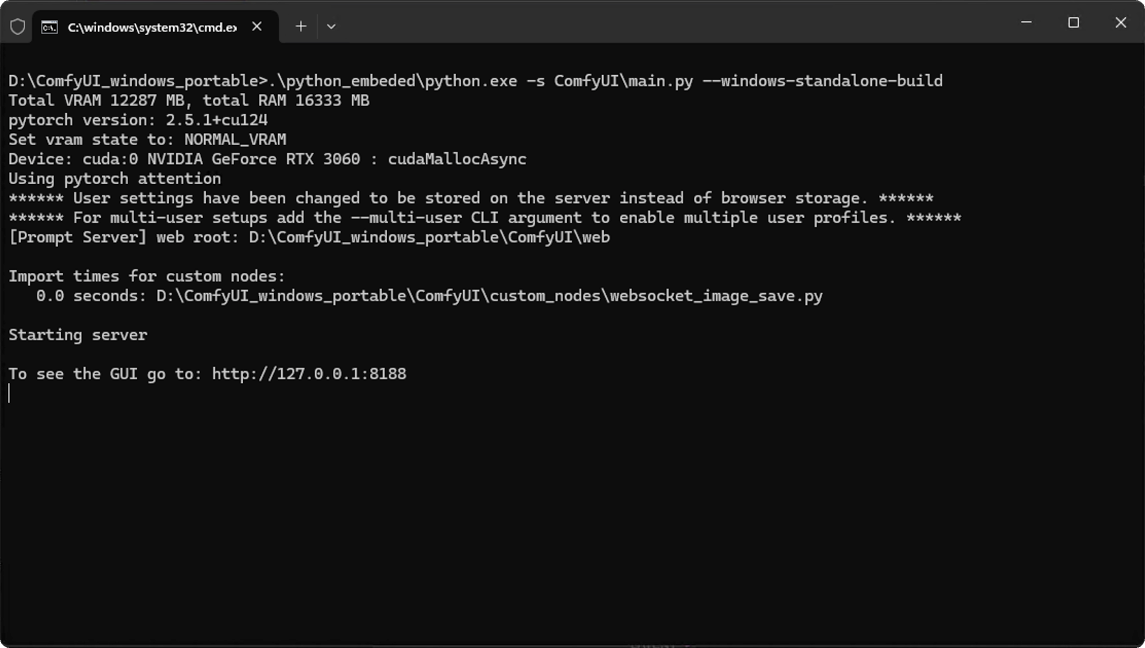 When you see something similar to the image
```
To see the GUI go to: http://127.0.0.1:8188
```
At this point, your ComfyUI service has started. Normally, ComfyUI will automatically open your default browser and navigate to `http://127.0.0.1:8188`. If it doesn't open automatically, please manually open your browser and visit this address.
When you see something similar to the image
```
To see the GUI go to: http://127.0.0.1:8188
```
At this point, your ComfyUI service has started. Normally, ComfyUI will automatically open your default browser and navigate to `http://127.0.0.1:8188`. If it doesn't open automatically, please manually open your browser and visit this address.
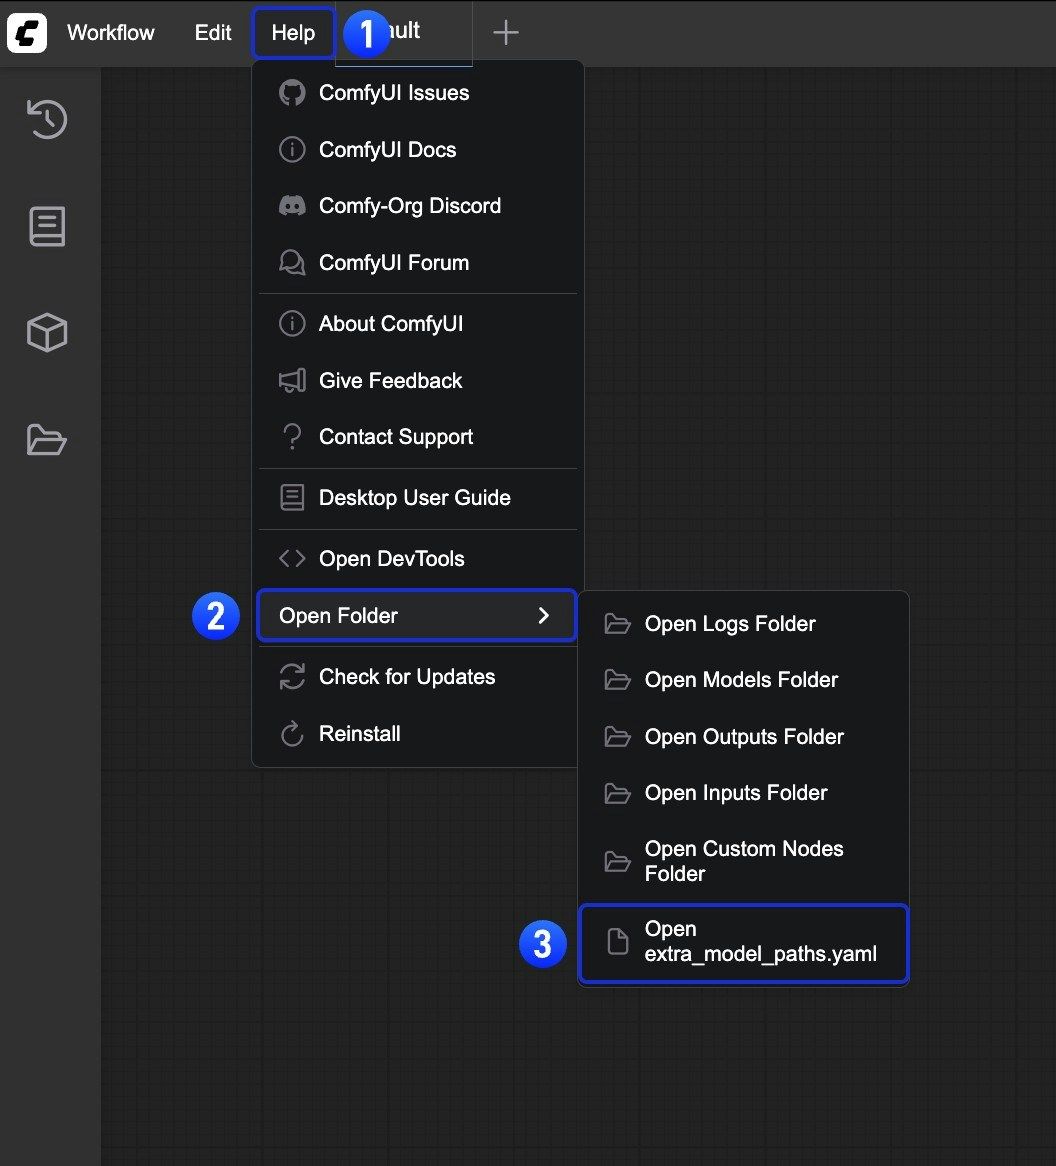 Or open it directly at:
 With the advent of ControlNet, we can control image generation by introducing additional conditions.
For example, we can use a simple sketch to guide the image generation process, producing images that closely align with our sketch.
With the advent of ControlNet, we can control image generation by introducing additional conditions.
For example, we can use a simple sketch to guide the image generation process, producing images that closely align with our sketch.
 In this example, we will guide you through installing and using ControlNet models in [ComfyUI](https://github.com/comfyanonymous/ComfyUI), and complete a sketch-controlled image generation example.

In this example, we will guide you through installing and using ControlNet models in [ComfyUI](https://github.com/comfyanonymous/ComfyUI), and complete a sketch-controlled image generation example.

 1. Ensure that `Load Checkpoint` can load **dreamCreationVirtual3DECommerce\_v10.safetensors**
2. Ensure that `Load VAE` can load **vae-ft-mse-840000-ema-pruned.safetensors**
3. Click `Upload` in the `Load Image` node to upload the input image provided earlier
4. Ensure that `Load ControlNet` can load **control\_v11p\_sd15\_scribble\_fp16.safetensors**
5. Click the `Queue` button or use the shortcut `Ctrl(cmd) + Enter` to execute the image generation
## Related Node Explanations
### Load ControlNet Node Explanation
1. Ensure that `Load Checkpoint` can load **dreamCreationVirtual3DECommerce\_v10.safetensors**
2. Ensure that `Load VAE` can load **vae-ft-mse-840000-ema-pruned.safetensors**
3. Click `Upload` in the `Load Image` node to upload the input image provided earlier
4. Ensure that `Load ControlNet` can load **control\_v11p\_sd15\_scribble\_fp16.safetensors**
5. Click the `Queue` button or use the shortcut `Ctrl(cmd) + Enter` to execute the image generation
## Related Node Explanations
### Load ControlNet Node Explanation
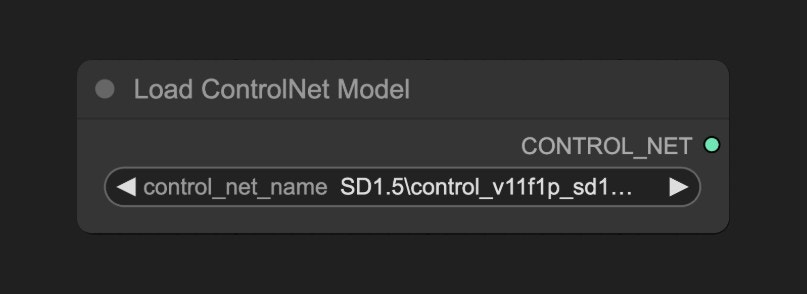 Models located in `ComfyUI\models\controlnet` will be detected by ComfyUI and can be loaded through this node.
### Apply ControlNet Node Explanation
Models located in `ComfyUI\models\controlnet` will be detected by ComfyUI and can be loaded through this node.
### Apply ControlNet Node Explanation
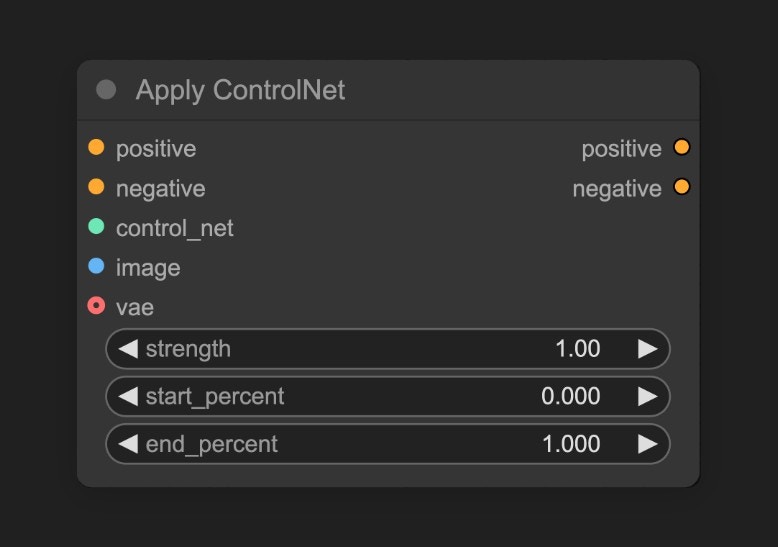 This node accepts the ControlNet model loaded by `load controlnet` and generates corresponding control conditions based on the input image.
**Input Types**
| Parameter Name | Function |
| --------------- | ------------------------------------------------------------------------------------------------------------------------------------------ |
| `positive` | Positive conditioning |
| `negative` | Negative conditioning |
| `control_net` | The ControlNet model to be applied |
| `image` | Preprocessed image used as reference for ControlNet application |
| `vae` | VAE model input |
| `strength` | Strength of ControlNet application; higher values increase ControlNet's influence on the generated image |
| `start_percent` | Determines when to start applying ControlNet as a percentage; e.g., 0.2 means ControlNet guidance begins when 20% of diffusion is complete |
| `end_percent` | Determines when to stop applying ControlNet as a percentage; e.g., 0.8 means ControlNet guidance stops when 80% of diffusion is complete |
**Output Types**
| Parameter Name | Function |
| -------------- | -------------------------------------------------- |
| `positive` | Positive conditioning data processed by ControlNet |
| `negative` | Negative conditioning data processed by ControlNet |
You can use chain connections to apply multiple ControlNet models, as shown in the image below. You can also refer to the [Mixing ControlNet Models](/tutorials/controlnet/mixing-controlnets) guide to learn more about combining multiple ControlNet models.
This node accepts the ControlNet model loaded by `load controlnet` and generates corresponding control conditions based on the input image.
**Input Types**
| Parameter Name | Function |
| --------------- | ------------------------------------------------------------------------------------------------------------------------------------------ |
| `positive` | Positive conditioning |
| `negative` | Negative conditioning |
| `control_net` | The ControlNet model to be applied |
| `image` | Preprocessed image used as reference for ControlNet application |
| `vae` | VAE model input |
| `strength` | Strength of ControlNet application; higher values increase ControlNet's influence on the generated image |
| `start_percent` | Determines when to start applying ControlNet as a percentage; e.g., 0.2 means ControlNet guidance begins when 20% of diffusion is complete |
| `end_percent` | Determines when to stop applying ControlNet as a percentage; e.g., 0.8 means ControlNet guidance stops when 80% of diffusion is complete |
**Output Types**
| Parameter Name | Function |
| -------------- | -------------------------------------------------- |
| `positive` | Positive conditioning data processed by ControlNet |
| `negative` | Negative conditioning data processed by ControlNet |
You can use chain connections to apply multiple ControlNet models, as shown in the image below. You can also refer to the [Mixing ControlNet Models](/tutorials/controlnet/mixing-controlnets) guide to learn more about combining multiple ControlNet models.
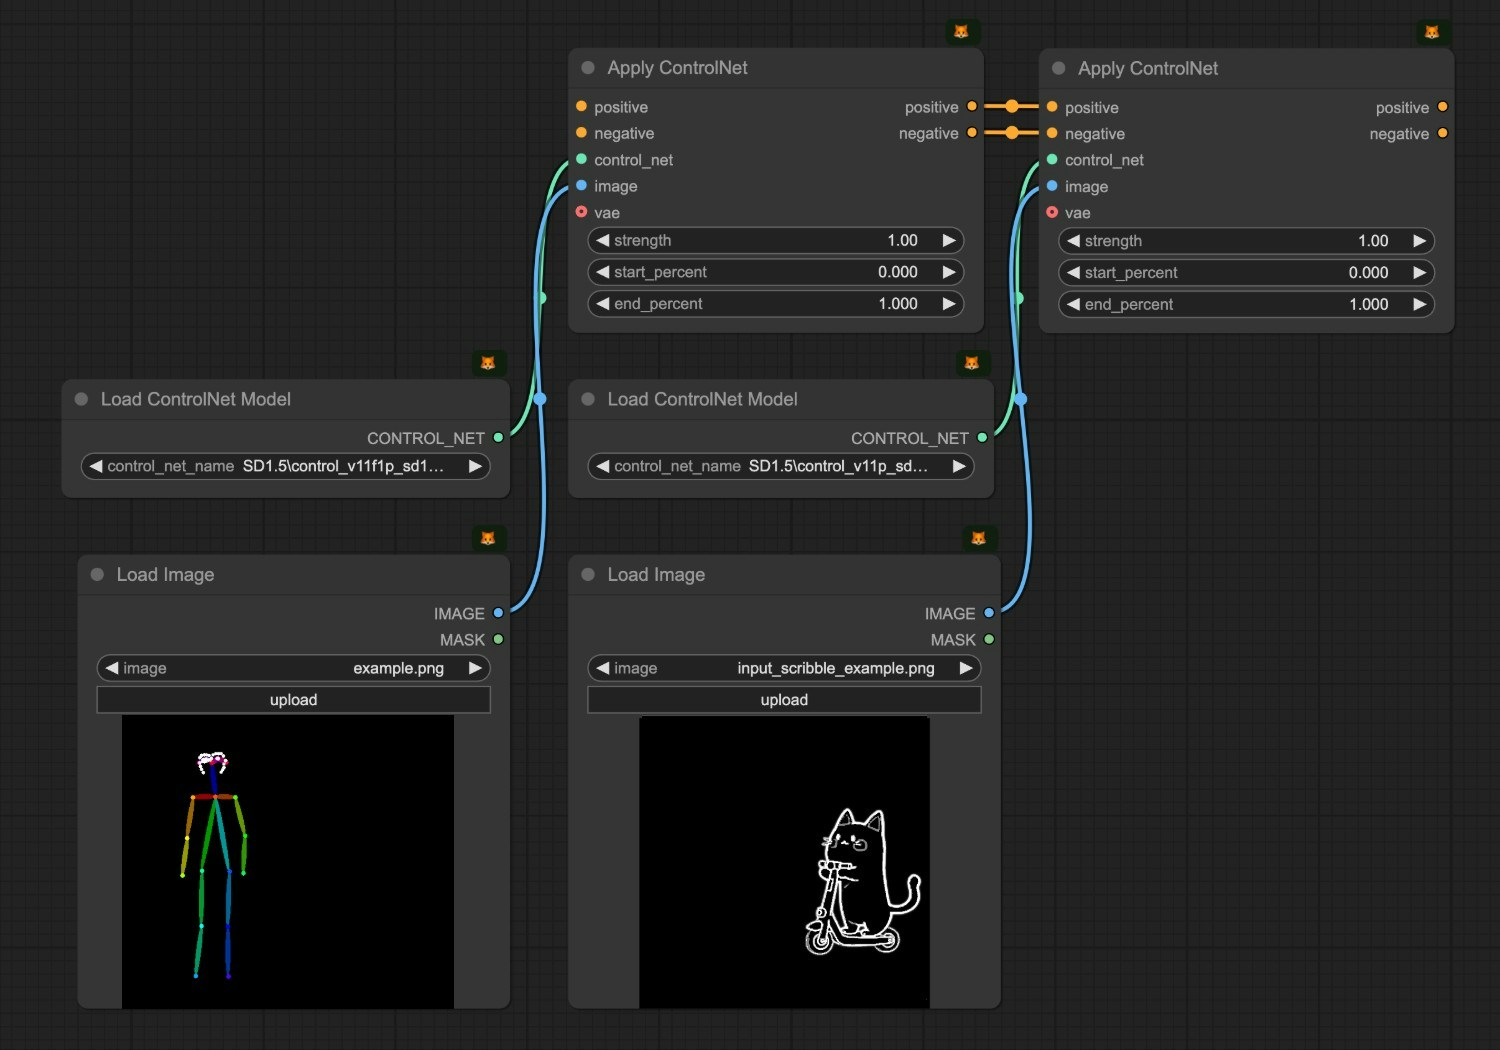
 To enable it, go to **Settings** --> **comfy** --> **Node** and enable the `Show deprecated nodes in search` option. However, it's recommended to use the new node.
 ## Next steps
Once your account is created and verified:
* [Log in to your account](/account/login)
* Set up your profile preferences
* Start using ComfyUI features
* Explore tutorials and documentation
## Troubleshooting
If you encounter issues during account creation:
* Ensure your email address is valid and not already registered
* Check that your password meets the minimum requirements
* Clear your browser cache and try again
* Contact [support](/support/contact-support) if problems persist
---
# Source: https://docs.comfy.org/api-reference/cloud/asset/create-asset-reference-from-existing-hash.md
> ## Documentation Index
> Fetch the complete documentation index at: https://docs.comfy.org/llms.txt
> Use this file to discover all available pages before exploring further.
# Create asset reference from existing hash
> Creates a new asset reference using an existing hash from cloud storage.
This avoids re-uploading file content when the underlying data already exists,
which is useful for large files or when referencing well-known assets.
The user provides their own metadata and tags for the new reference.
## OpenAPI
````yaml openapi-cloud.yaml post /api/assets/from-hash
openapi: 3.0.3
info:
title: Comfy Cloud API
description: >
## Next steps
Once your account is created and verified:
* [Log in to your account](/account/login)
* Set up your profile preferences
* Start using ComfyUI features
* Explore tutorials and documentation
## Troubleshooting
If you encounter issues during account creation:
* Ensure your email address is valid and not already registered
* Check that your password meets the minimum requirements
* Clear your browser cache and try again
* Contact [support](/support/contact-support) if problems persist
---
# Source: https://docs.comfy.org/api-reference/cloud/asset/create-asset-reference-from-existing-hash.md
> ## Documentation Index
> Fetch the complete documentation index at: https://docs.comfy.org/llms.txt
> Use this file to discover all available pages before exploring further.
# Create asset reference from existing hash
> Creates a new asset reference using an existing hash from cloud storage.
This avoids re-uploading file content when the underlying data already exists,
which is useful for large files or when referencing well-known assets.
The user provides their own metadata and tags for the new reference.
## OpenAPI
````yaml openapi-cloud.yaml post /api/assets/from-hash
openapi: 3.0.3
info:
title: Comfy Cloud API
description: >
 In the popup, set the purchase amount and click the `Buy` button
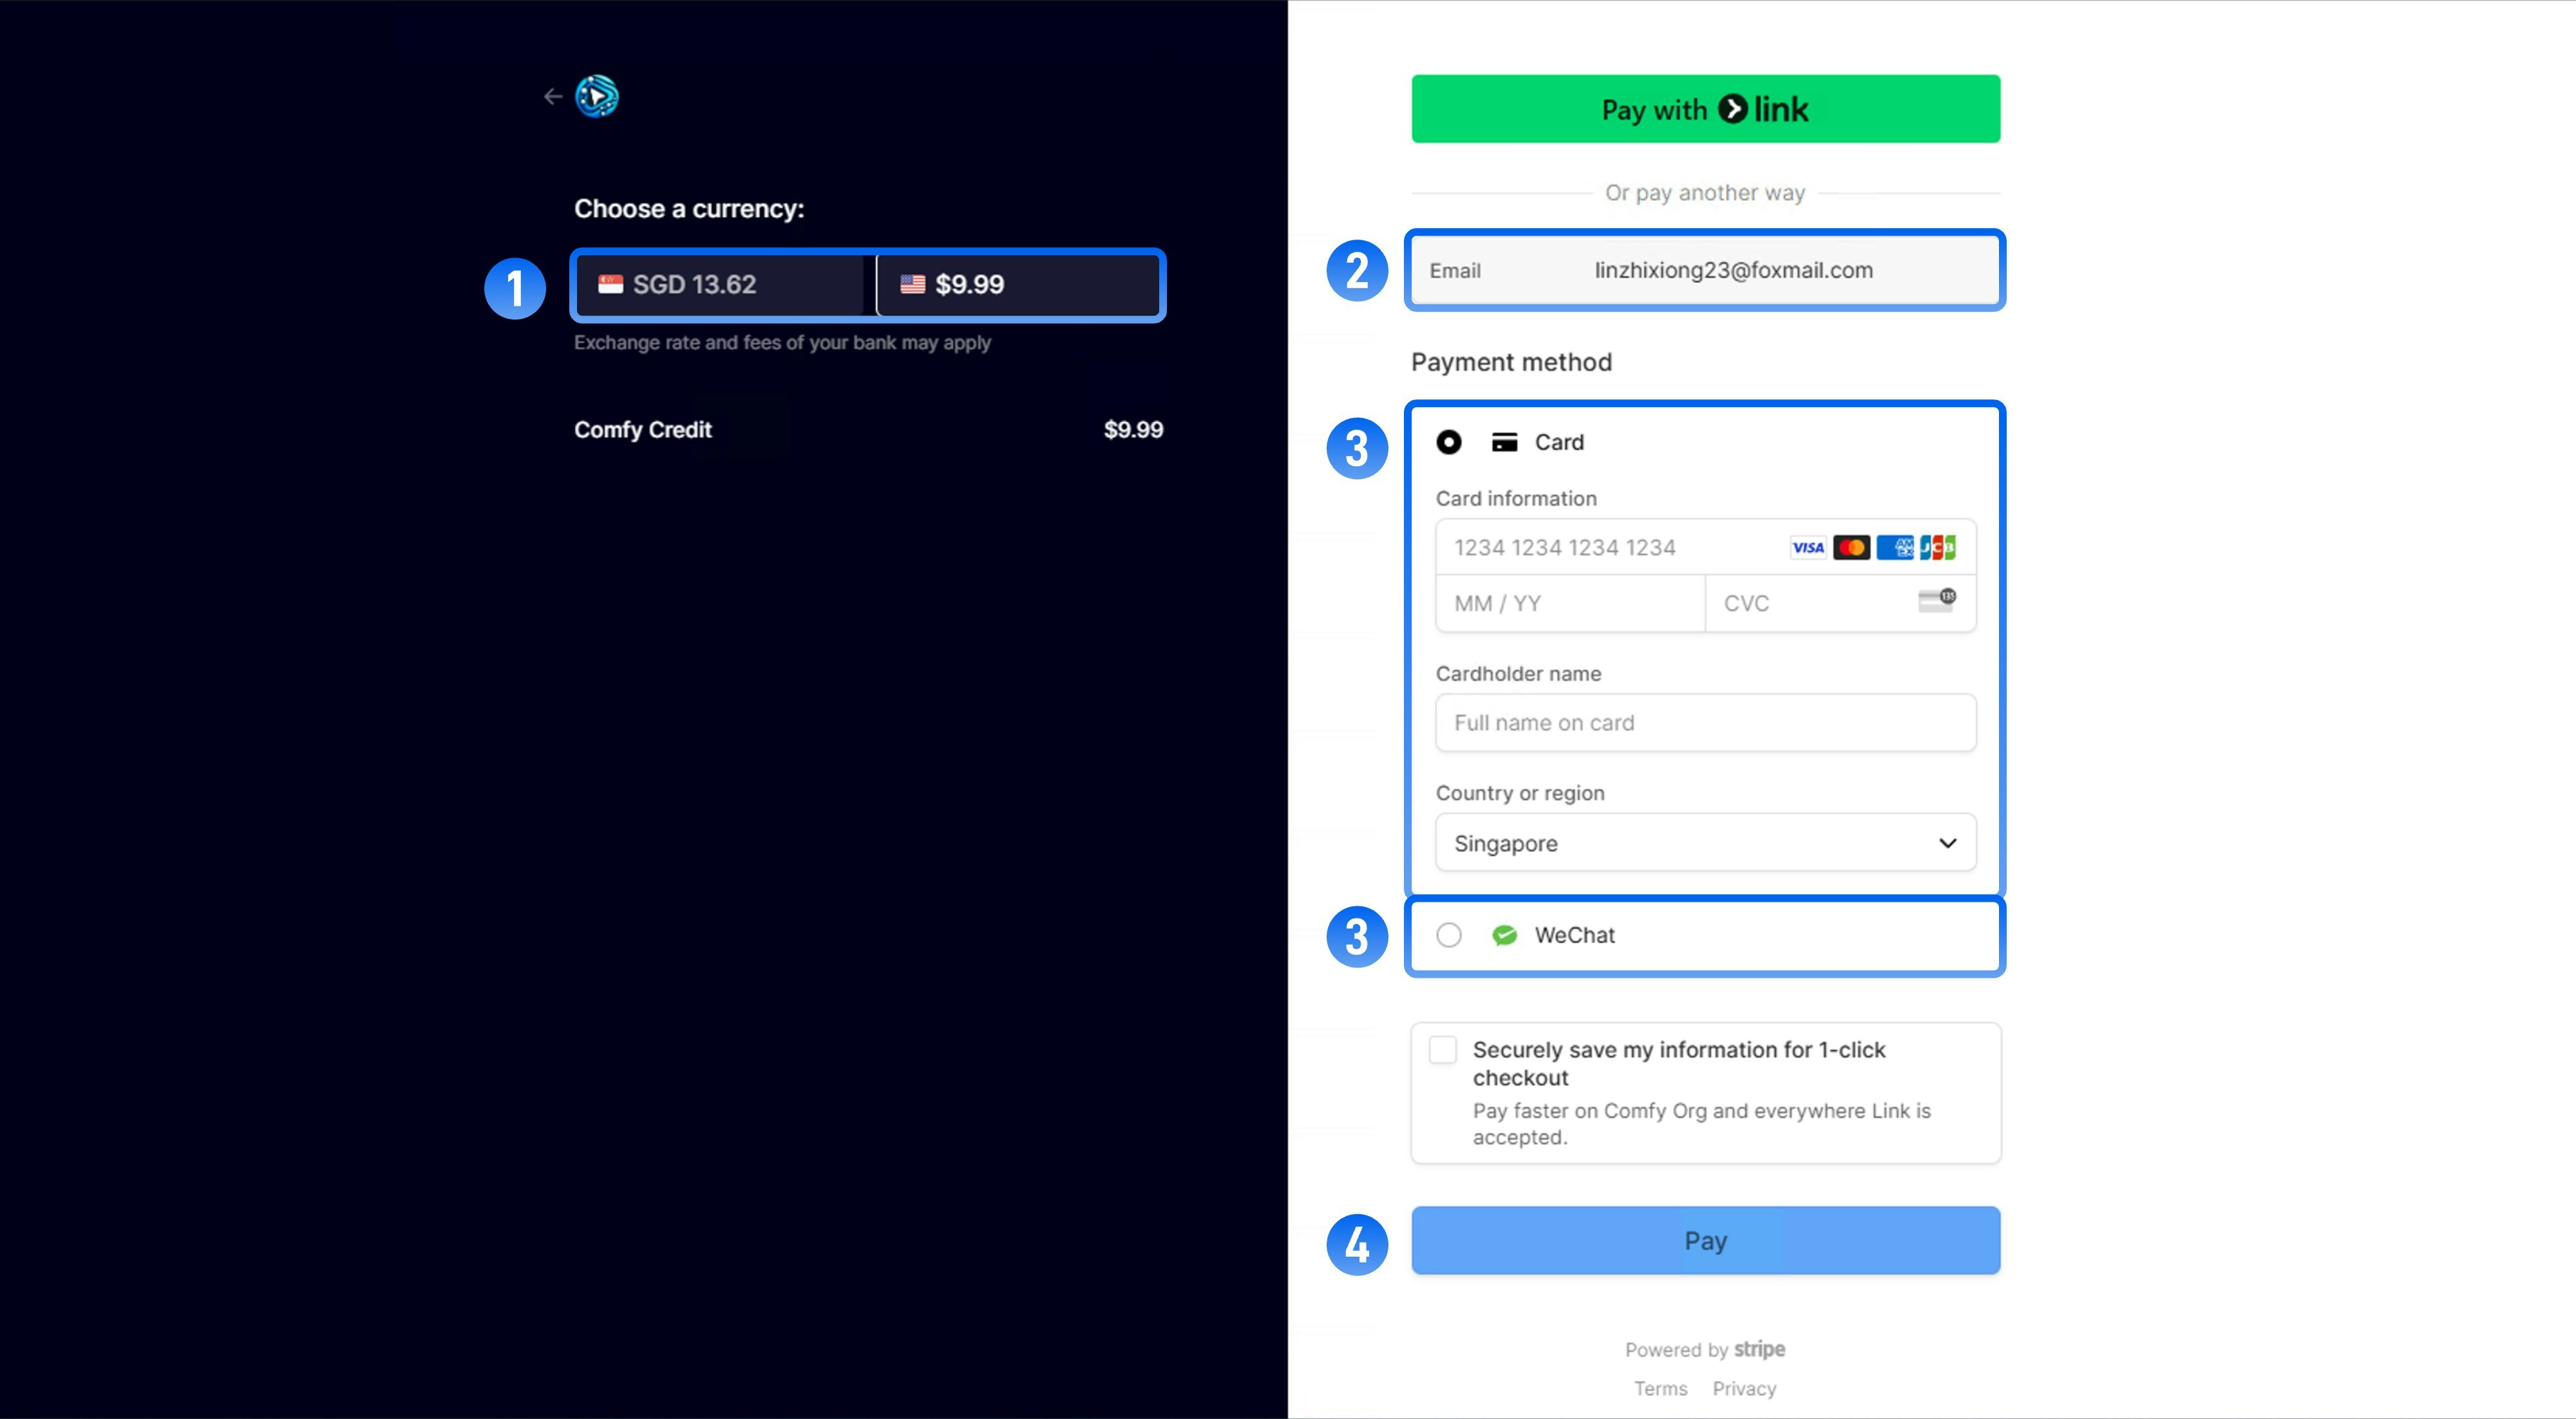 On the payment page, please follow these steps:
1. Select the currency for payment
2. Confirm that the email is the same as your ComfyUI registration email
3. Choose your payment method
* Credit Card
* WeChat (only supported when paying in Comfy Credits)
* Alipay (only supported when paying in Comfy Credits)
4. Click the `Pay` button or the `Generate QR Code` button to complete the payment process
On the payment page, please follow these steps:
1. Select the currency for payment
2. Confirm that the email is the same as your ComfyUI registration email
3. Choose your payment method
* Credit Card
* WeChat (only supported when paying in Comfy Credits)
* Alipay (only supported when paying in Comfy Credits)
4. Click the `Pay` button or the `Generate QR Code` button to complete the payment process
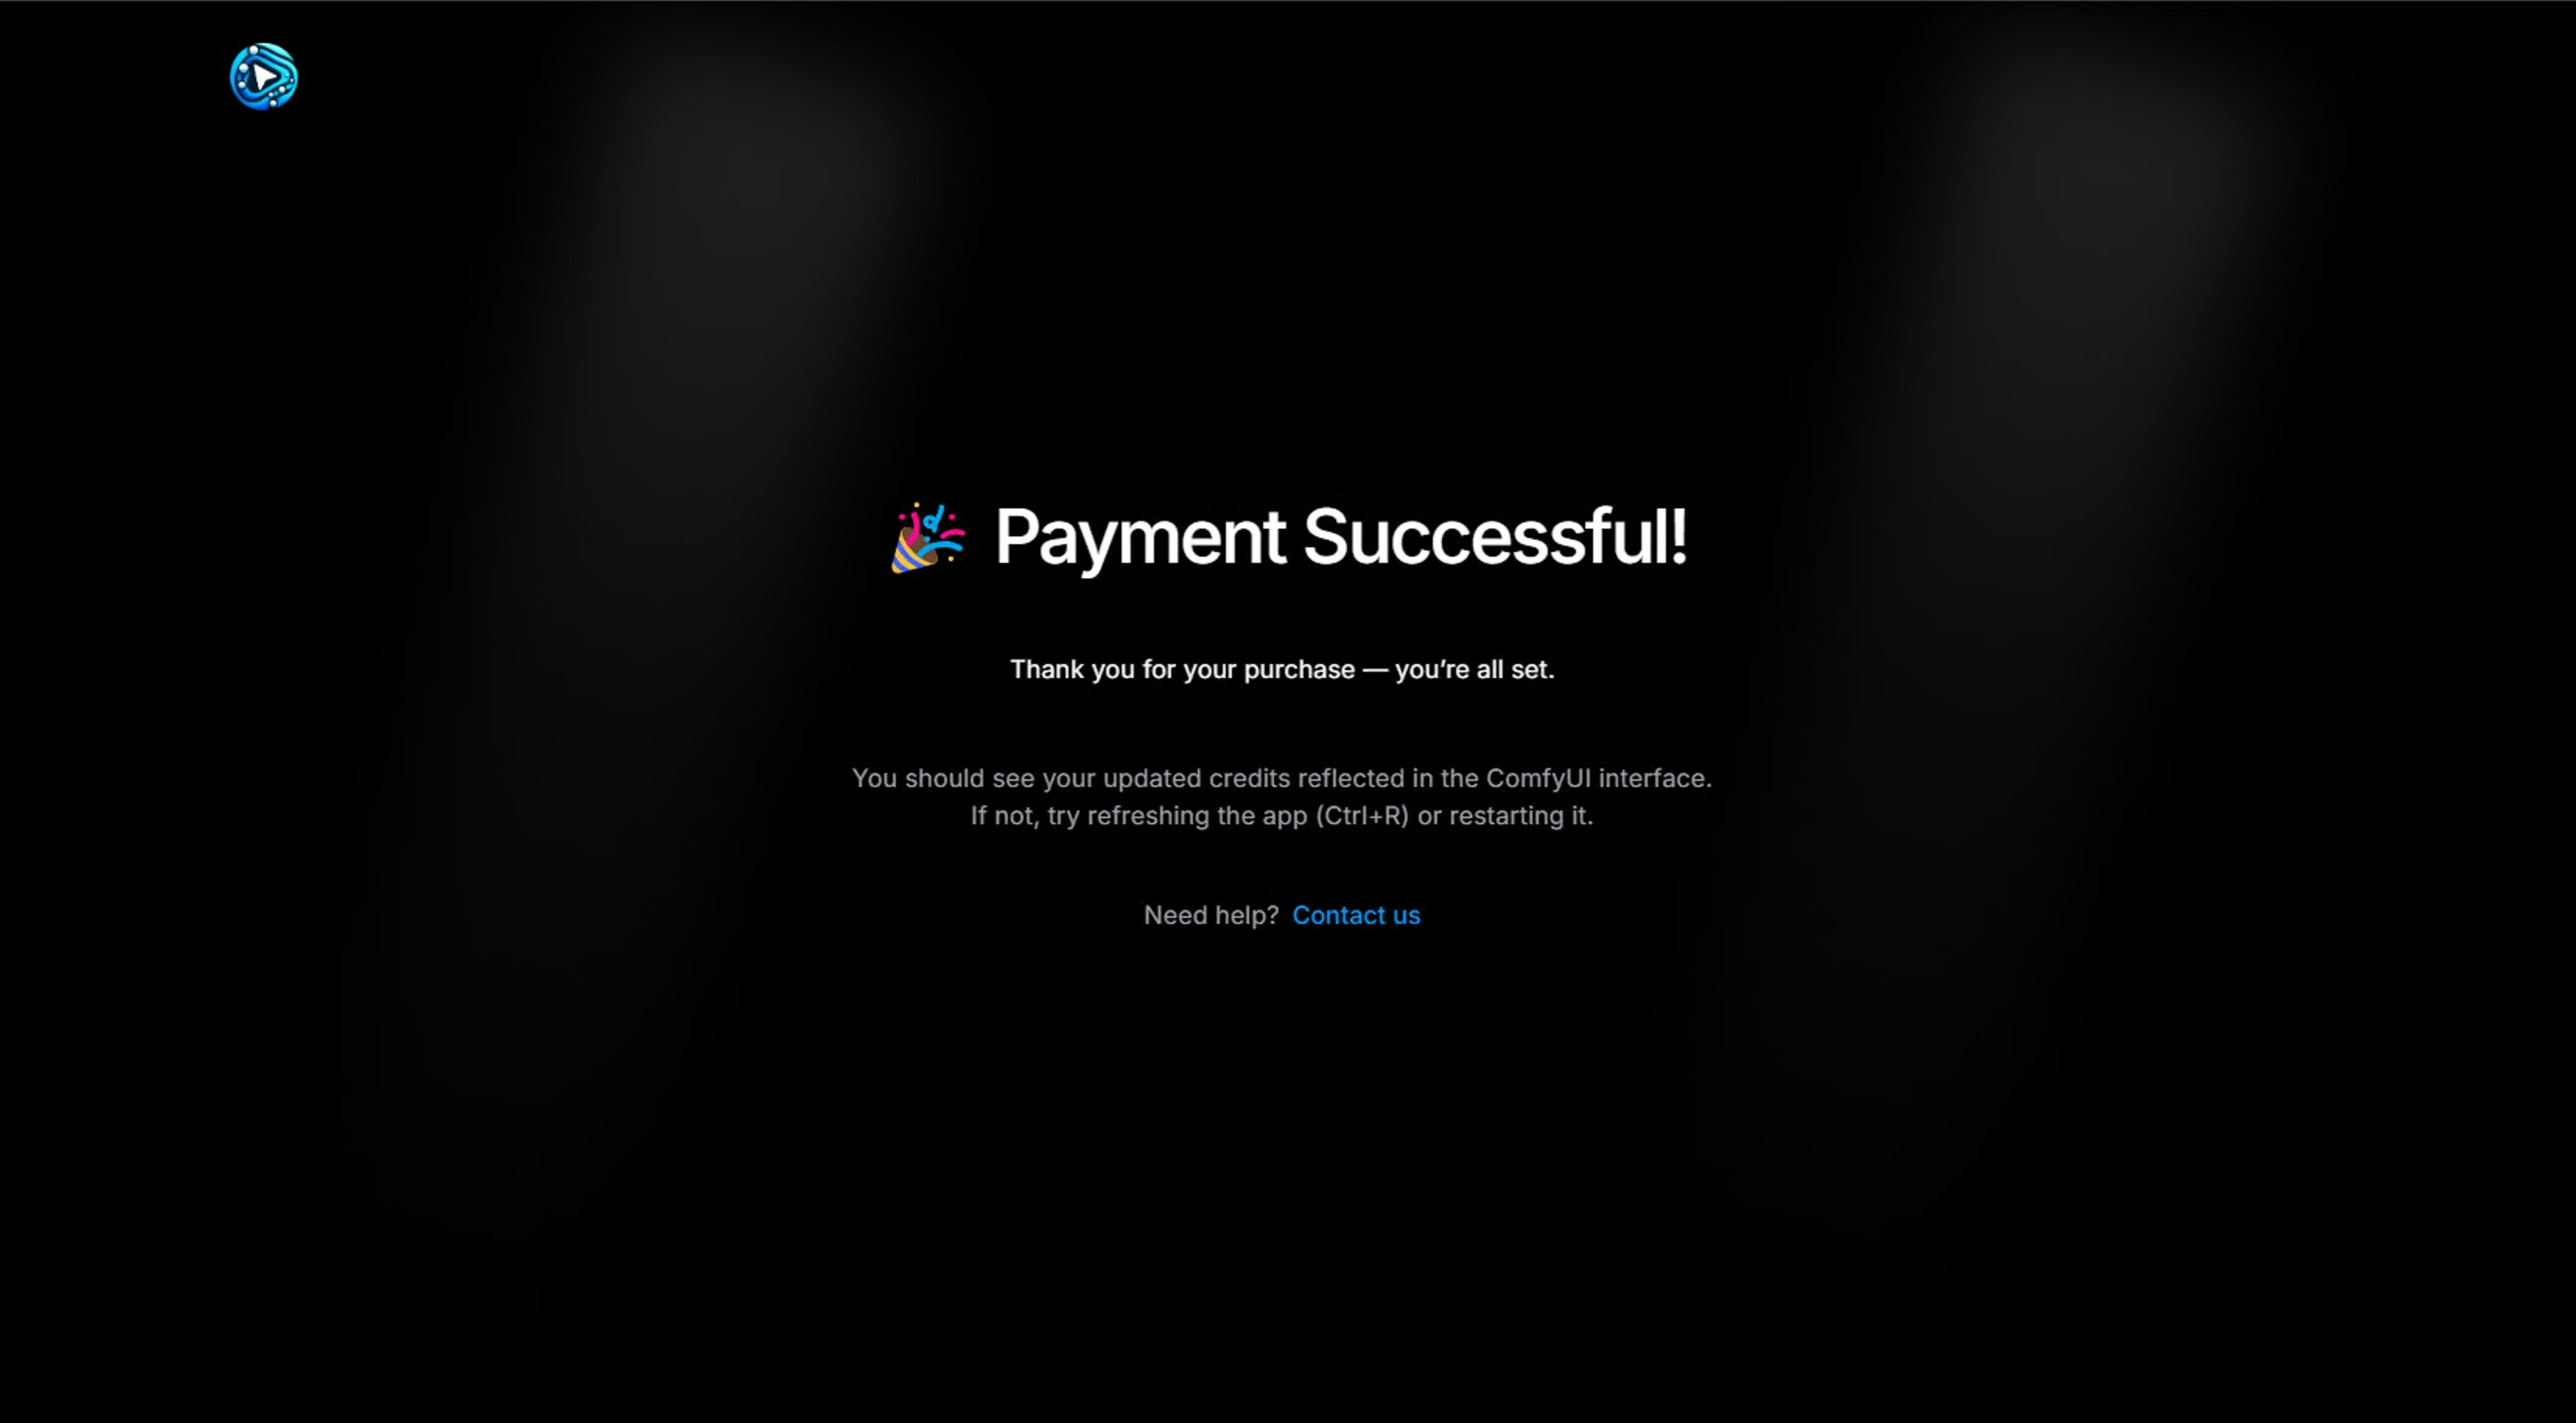 After completing the payment, please return to `Menu` -> `Credits` to check if your balance has been updated. Try refreshing the interface or restarting if necessary
 or run the server manually:
```bash theme={null}
cd path/to/your/comfyui
python main.py --disable-all-custom-nodes
```
or run the server manually:
```bash theme={null}
cd path/to/your/comfyui
python main.py --disable-all-custom-nodes
```
 1. Copy `run_nvidia_gpu.bat` or `run_cpu.bat` file and rename it to `run_nvidia_gpu_disable_custom_nodes.bat`
2. Open the copied file with Notepad
3. Add the `--disable-all-custom-nodes` parameter to the file, or copy the parameters below into a `.txt` file and rename the file to `run_nvidia_gpu_disable_custom_nodes.bat`
```bash theme={null}
.\python_embeded\python.exe -s ComfyUI\main.py --disable-all-custom-nodes --windows-standalone-build
pause
```
4. Save the file and close it
5. Double-click the file to run it. If everything is normal, you should see ComfyUI start and custom nodes disabled
1. Copy `run_nvidia_gpu.bat` or `run_cpu.bat` file and rename it to `run_nvidia_gpu_disable_custom_nodes.bat`
2. Open the copied file with Notepad
3. Add the `--disable-all-custom-nodes` parameter to the file, or copy the parameters below into a `.txt` file and rename the file to `run_nvidia_gpu_disable_custom_nodes.bat`
```bash theme={null}
.\python_embeded\python.exe -s ComfyUI\main.py --disable-all-custom-nodes --windows-standalone-build
pause
```
4. Save the file and close it
5. Double-click the file to run it. If everything is normal, you should see ComfyUI start and custom nodes disabled
 1. Enter the folder where the portable version is located
2. Open the terminal by right-clicking the menu → Open terminal
1. Enter the folder where the portable version is located
2. Open the terminal by right-clicking the menu → Open terminal
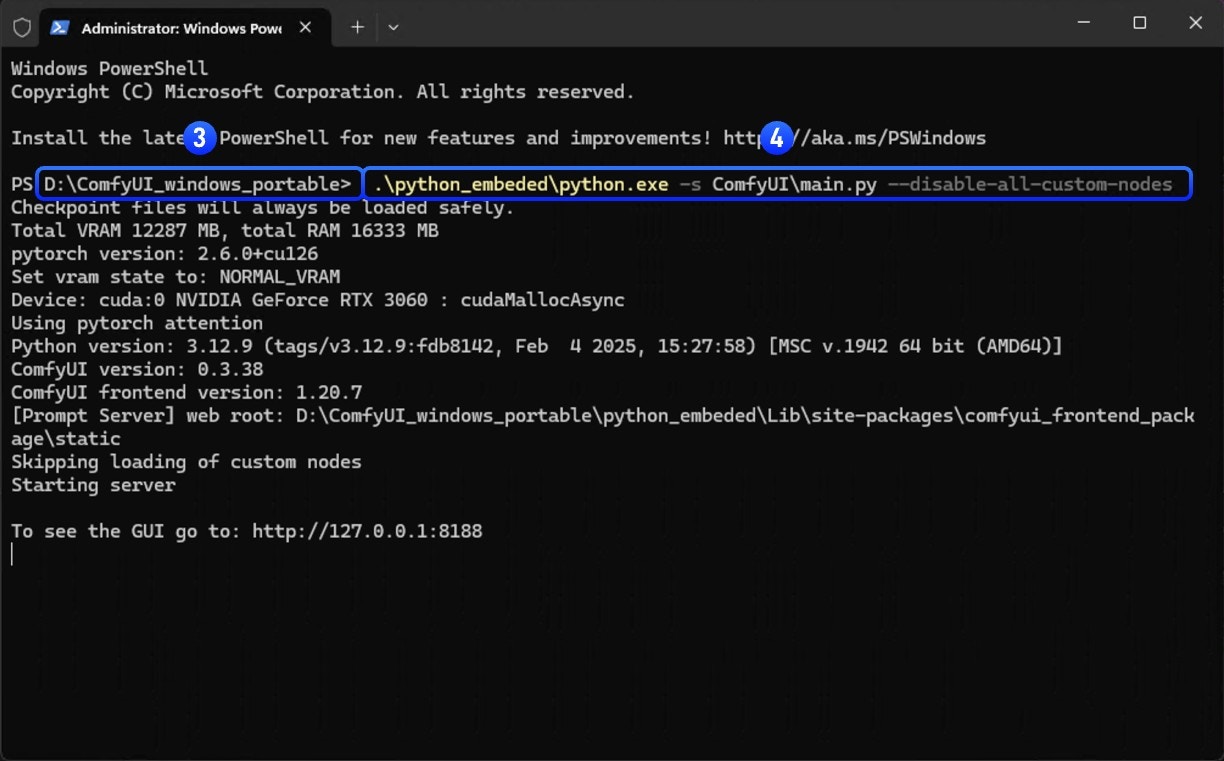 3. Ensure that the folder name is the current directory of the portable version
4. Enter the following command to start ComfyUI through the portable python and disable custom nodes
```
.\python_embeded\python.exe -s ComfyUI\main.py --disable-all-custom-nodes
```
3. Ensure that the folder name is the current directory of the portable version
4. Enter the following command to start ComfyUI through the portable python and disable custom nodes
```
.\python_embeded\python.exe -s ComfyUI\main.py --disable-all-custom-nodes
```
 * A: Custom nodes with frontend extensions
* B: Regular custom nodes
Let's first understand the potential issues and causes for different types of custom nodes:
* A: Custom nodes with frontend extensions
* B: Regular custom nodes
Let's first understand the potential issues and causes for different types of custom nodes:
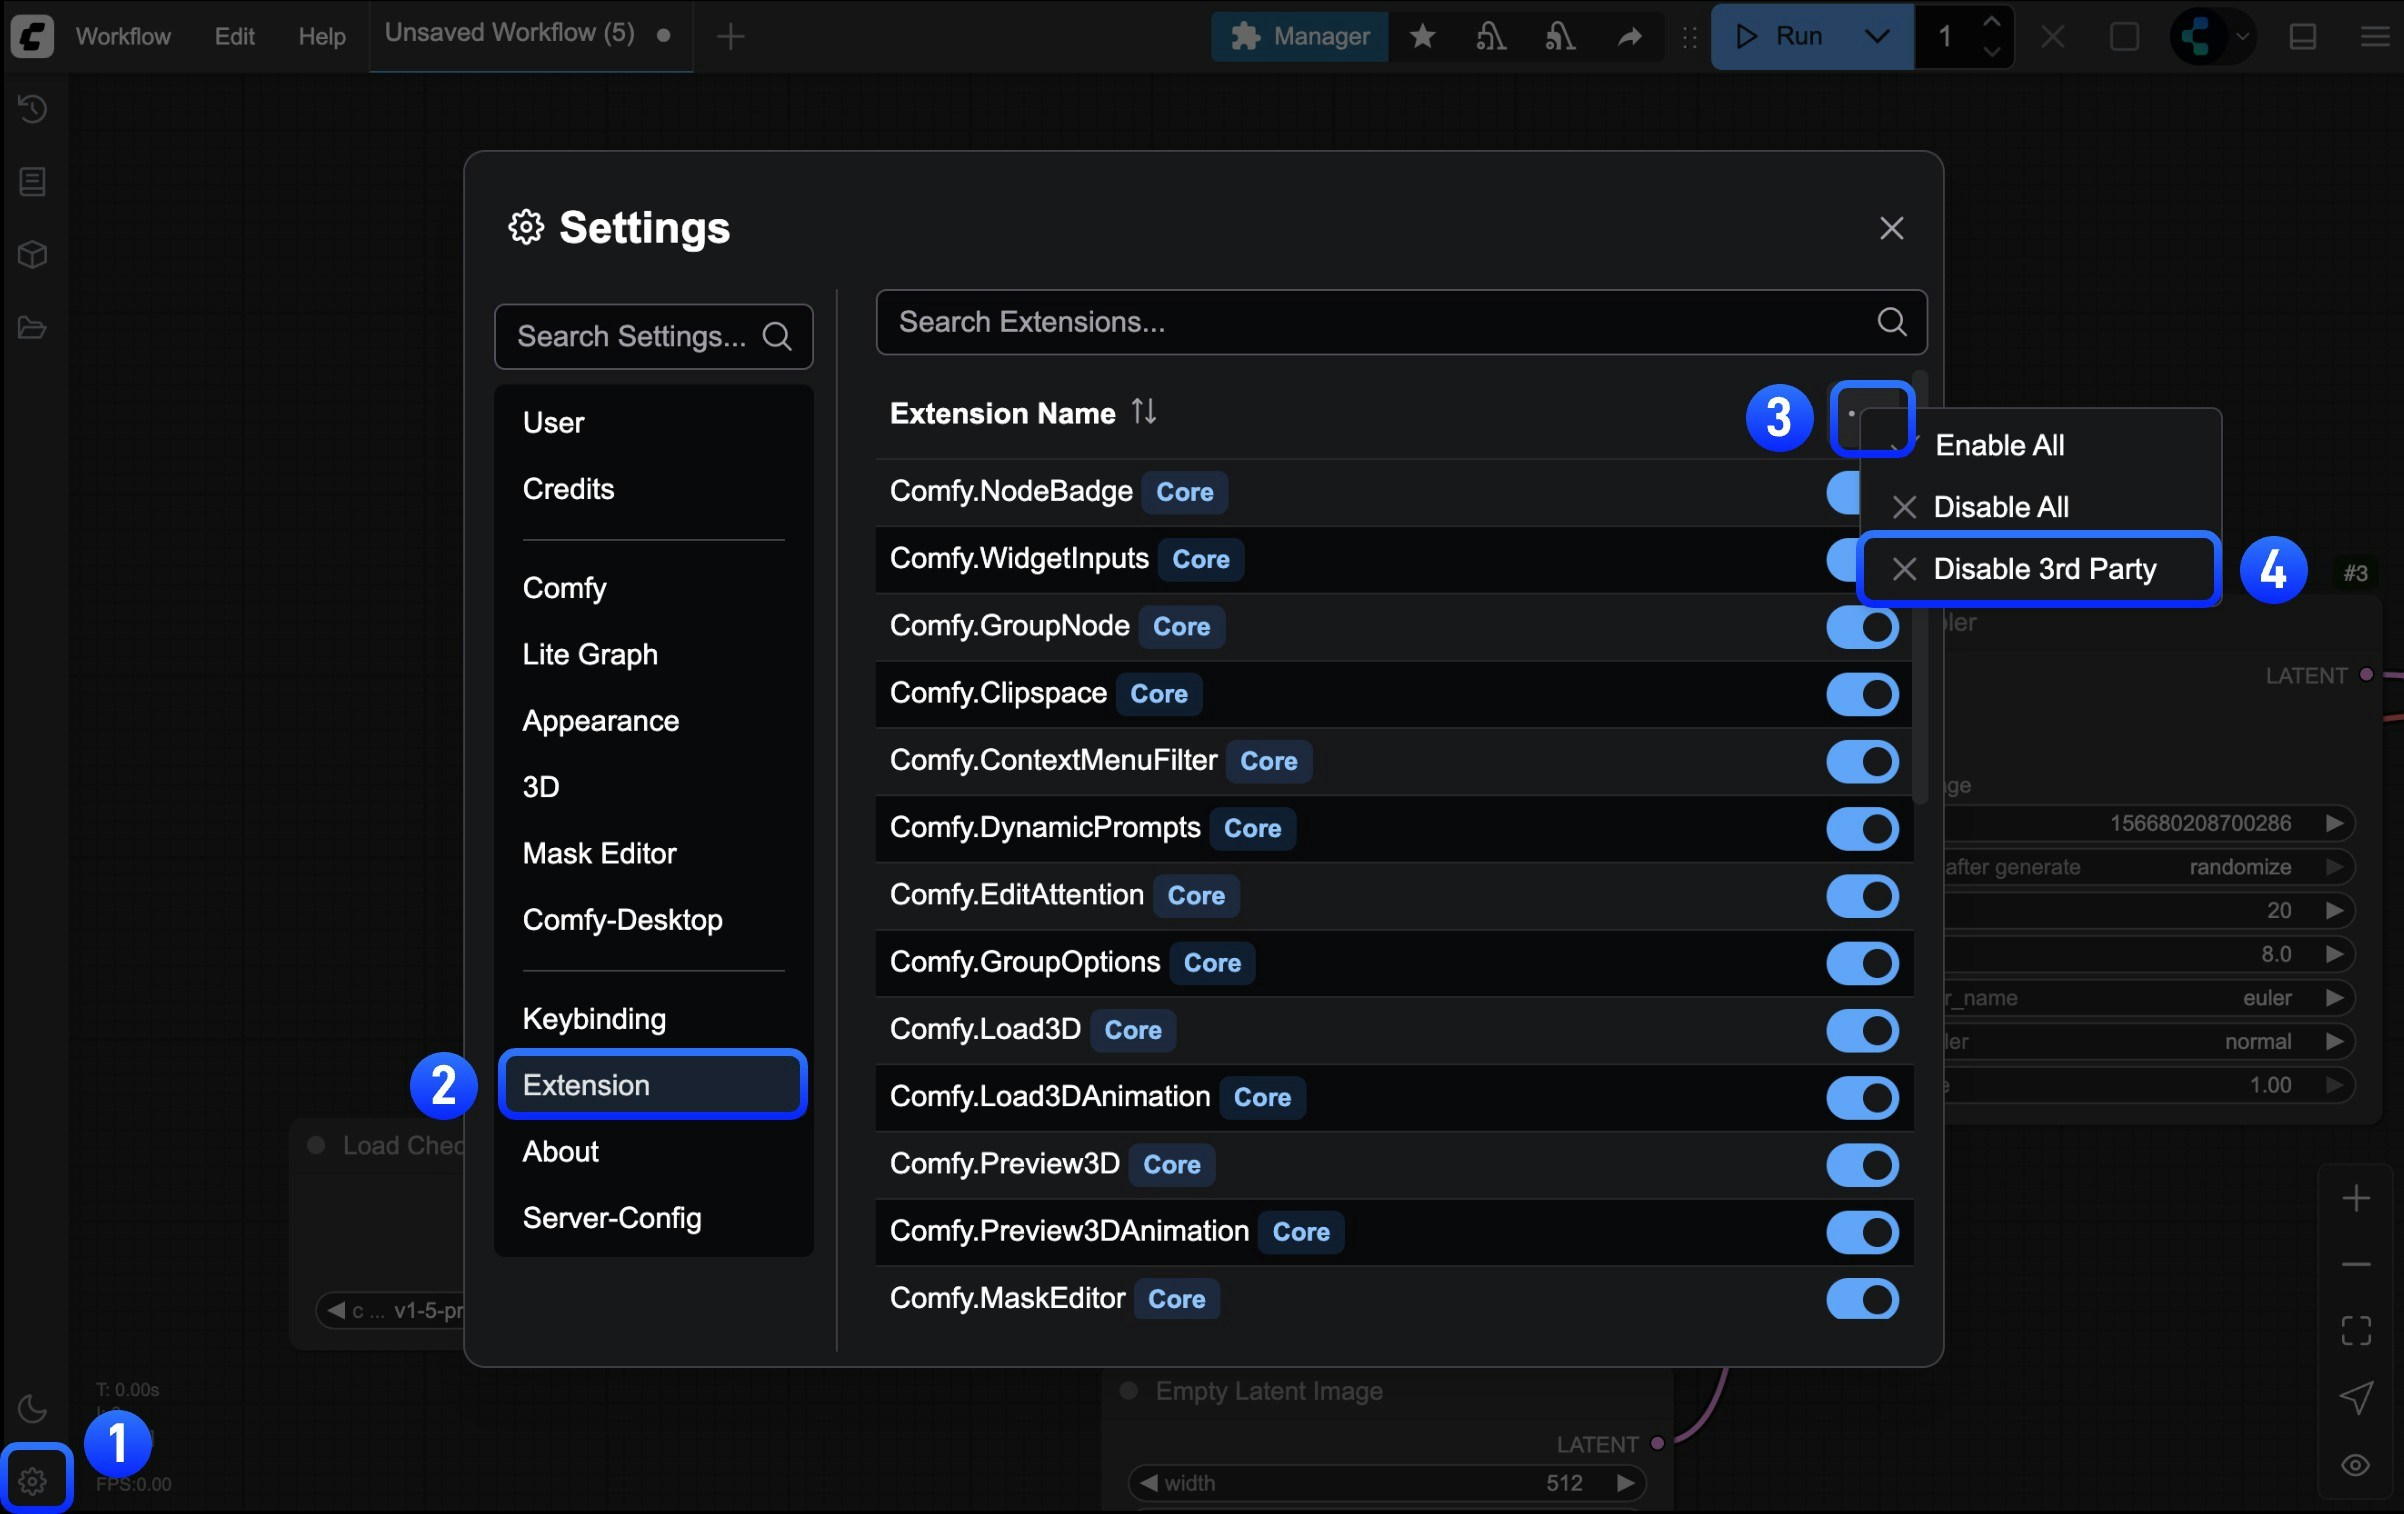 After starting ComfyUI, find the `Extensions` menu in settings and follow the steps shown in the image to disable all third-party extensions
 Refer to the image to enable half of the frontend extensions. Note that if extension names are similar, they likely come from the same custom node's frontend extensions
 If not yet installed, please visit [git-scm.com](https://git-scm.com/) to download the corresponding installation package. Linux users please refer to [git-scm.com/downloads/linux](https://git-scm.com/downloads/linux) for installation instructions.
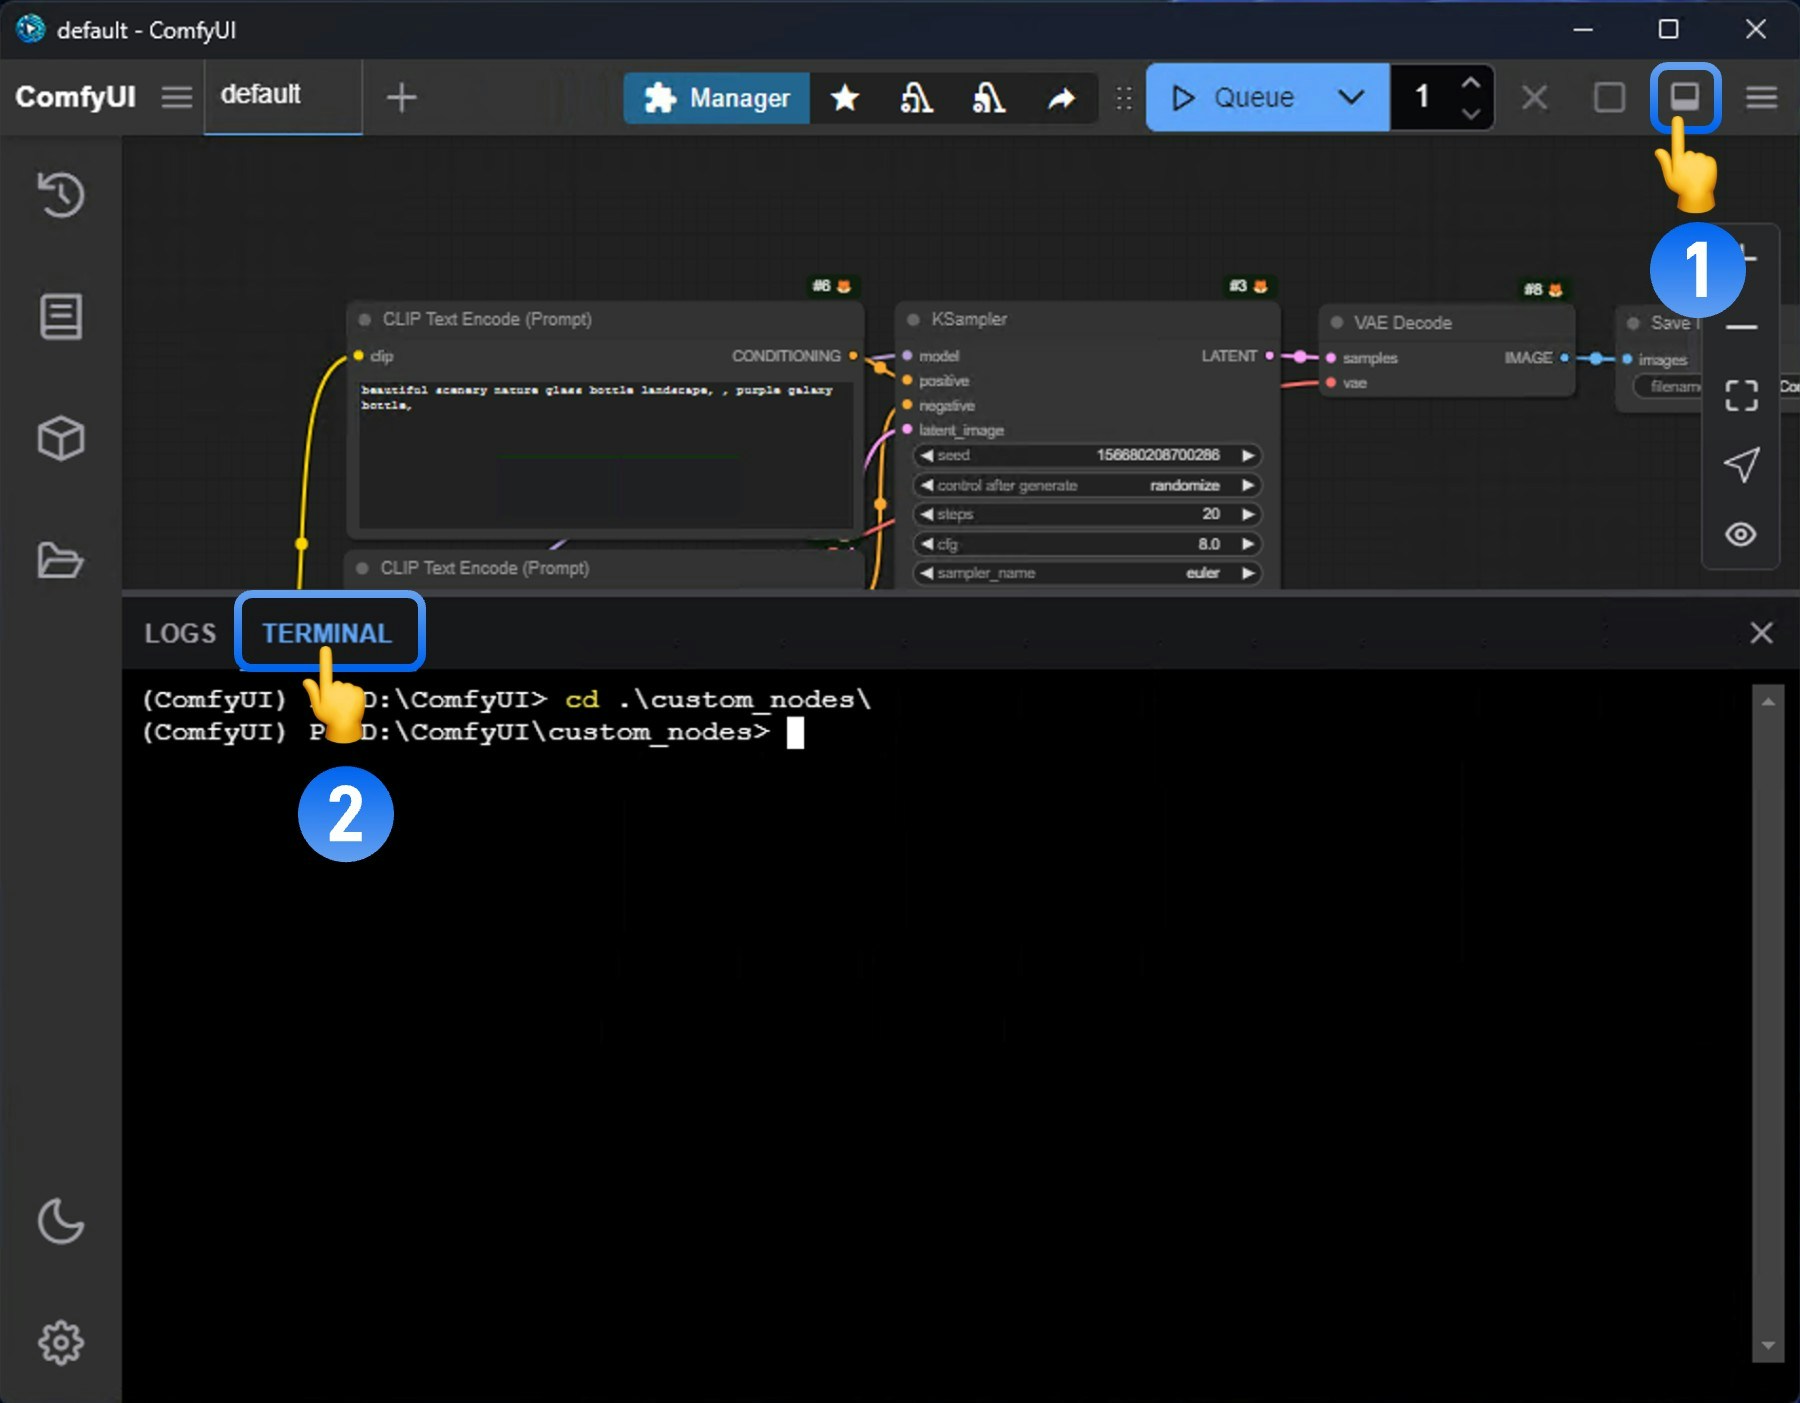
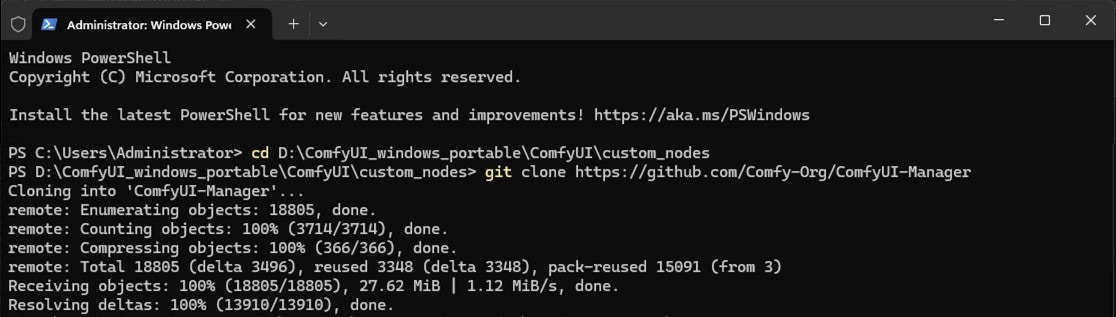 This means you have successfully cloned the custom node code. Next, we need to install the corresponding dependencies.
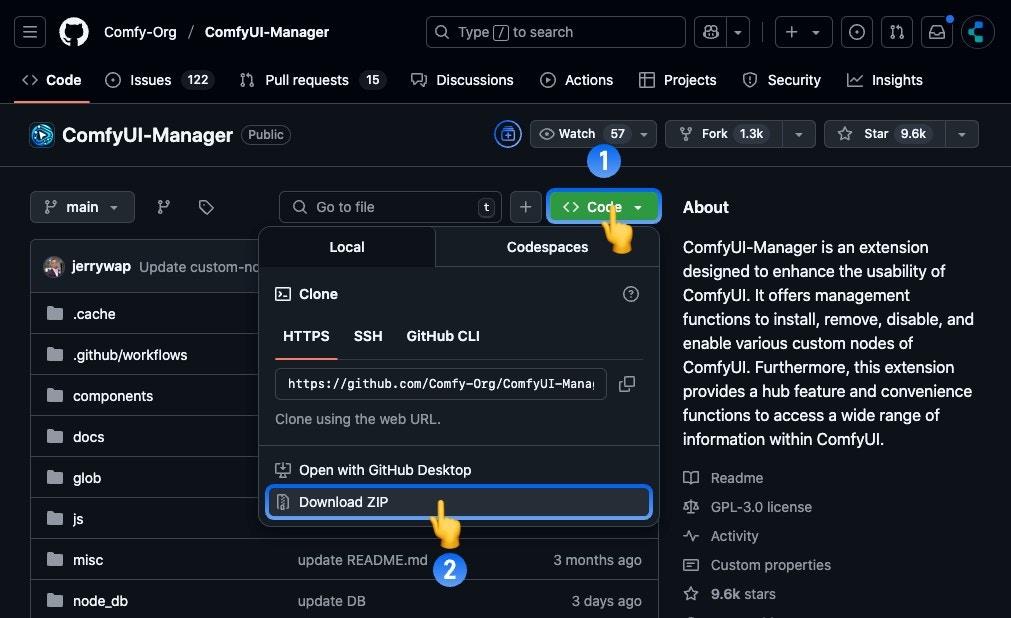 Visit the corresponding custom node repository page:
1. Click the `Code` button
2. Then click the `Download ZIP` button to download the ZIP package
3. Extract the ZIP package
Visit the corresponding custom node repository page:
1. Click the `Code` button
2. Then click the `Download ZIP` button to download the ZIP package
3. Extract the ZIP package
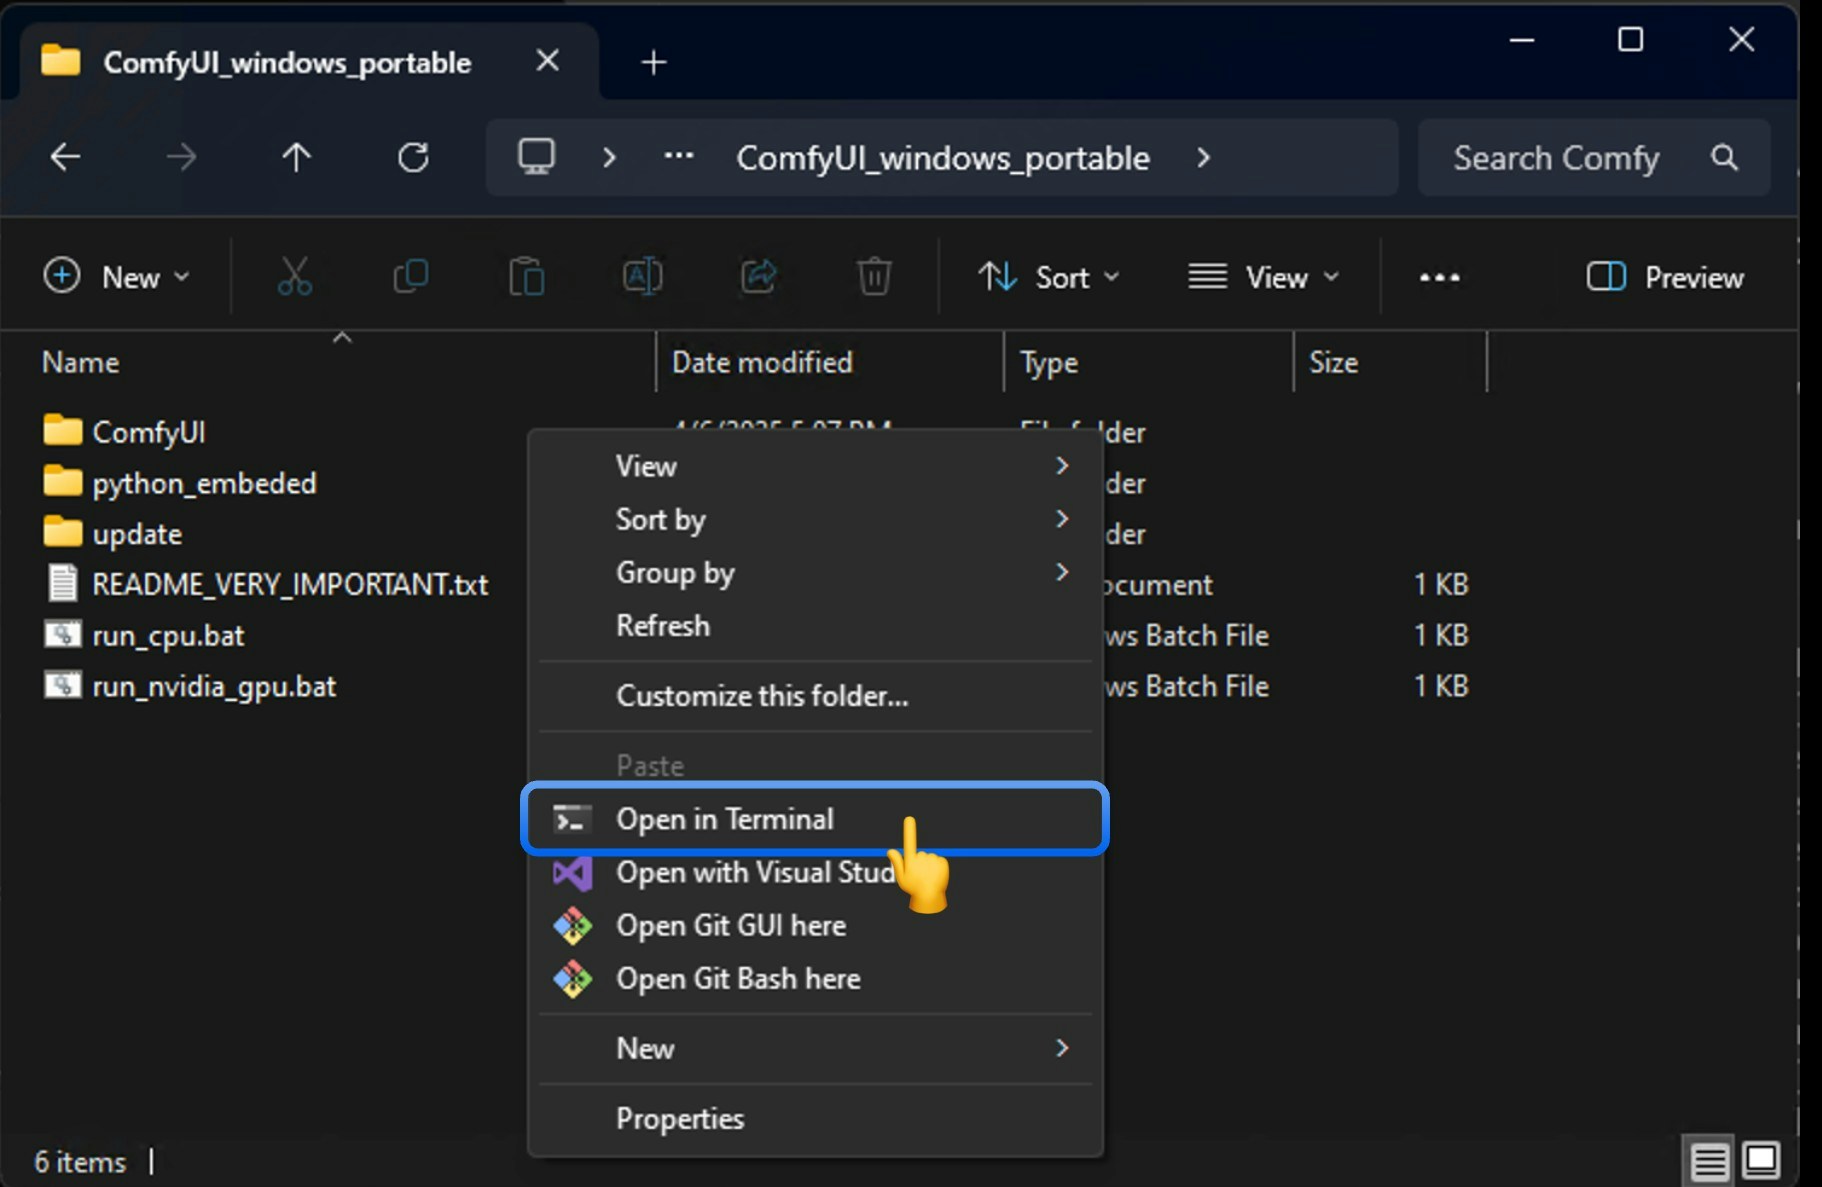 Ensure that the terminal directory is `\ComfyUI_windows_portable\`, as shown below for `D:\ComfyUI_windows_portable\`
 Then use `python_embeded\python.exe` to complete the dependency installation:
```bash theme={null}
python_embeded\python.exe -m pip install -r ComfyUI\custom_nodes\ComfyUI-Manager\requirements.txt
```
Of course, you can replace ComfyUI-Manager with the name of the custom node you actually installed, but make sure that a `requirements.txt` file exists in the corresponding node directory.
Then use `python_embeded\python.exe` to complete the dependency installation:
```bash theme={null}
python_embeded\python.exe -m pip install -r ComfyUI\custom_nodes\ComfyUI-Manager\requirements.txt
```
Of course, you can replace ComfyUI-Manager with the name of the custom node you actually installed, but make sure that a `requirements.txt` file exists in the corresponding node directory.
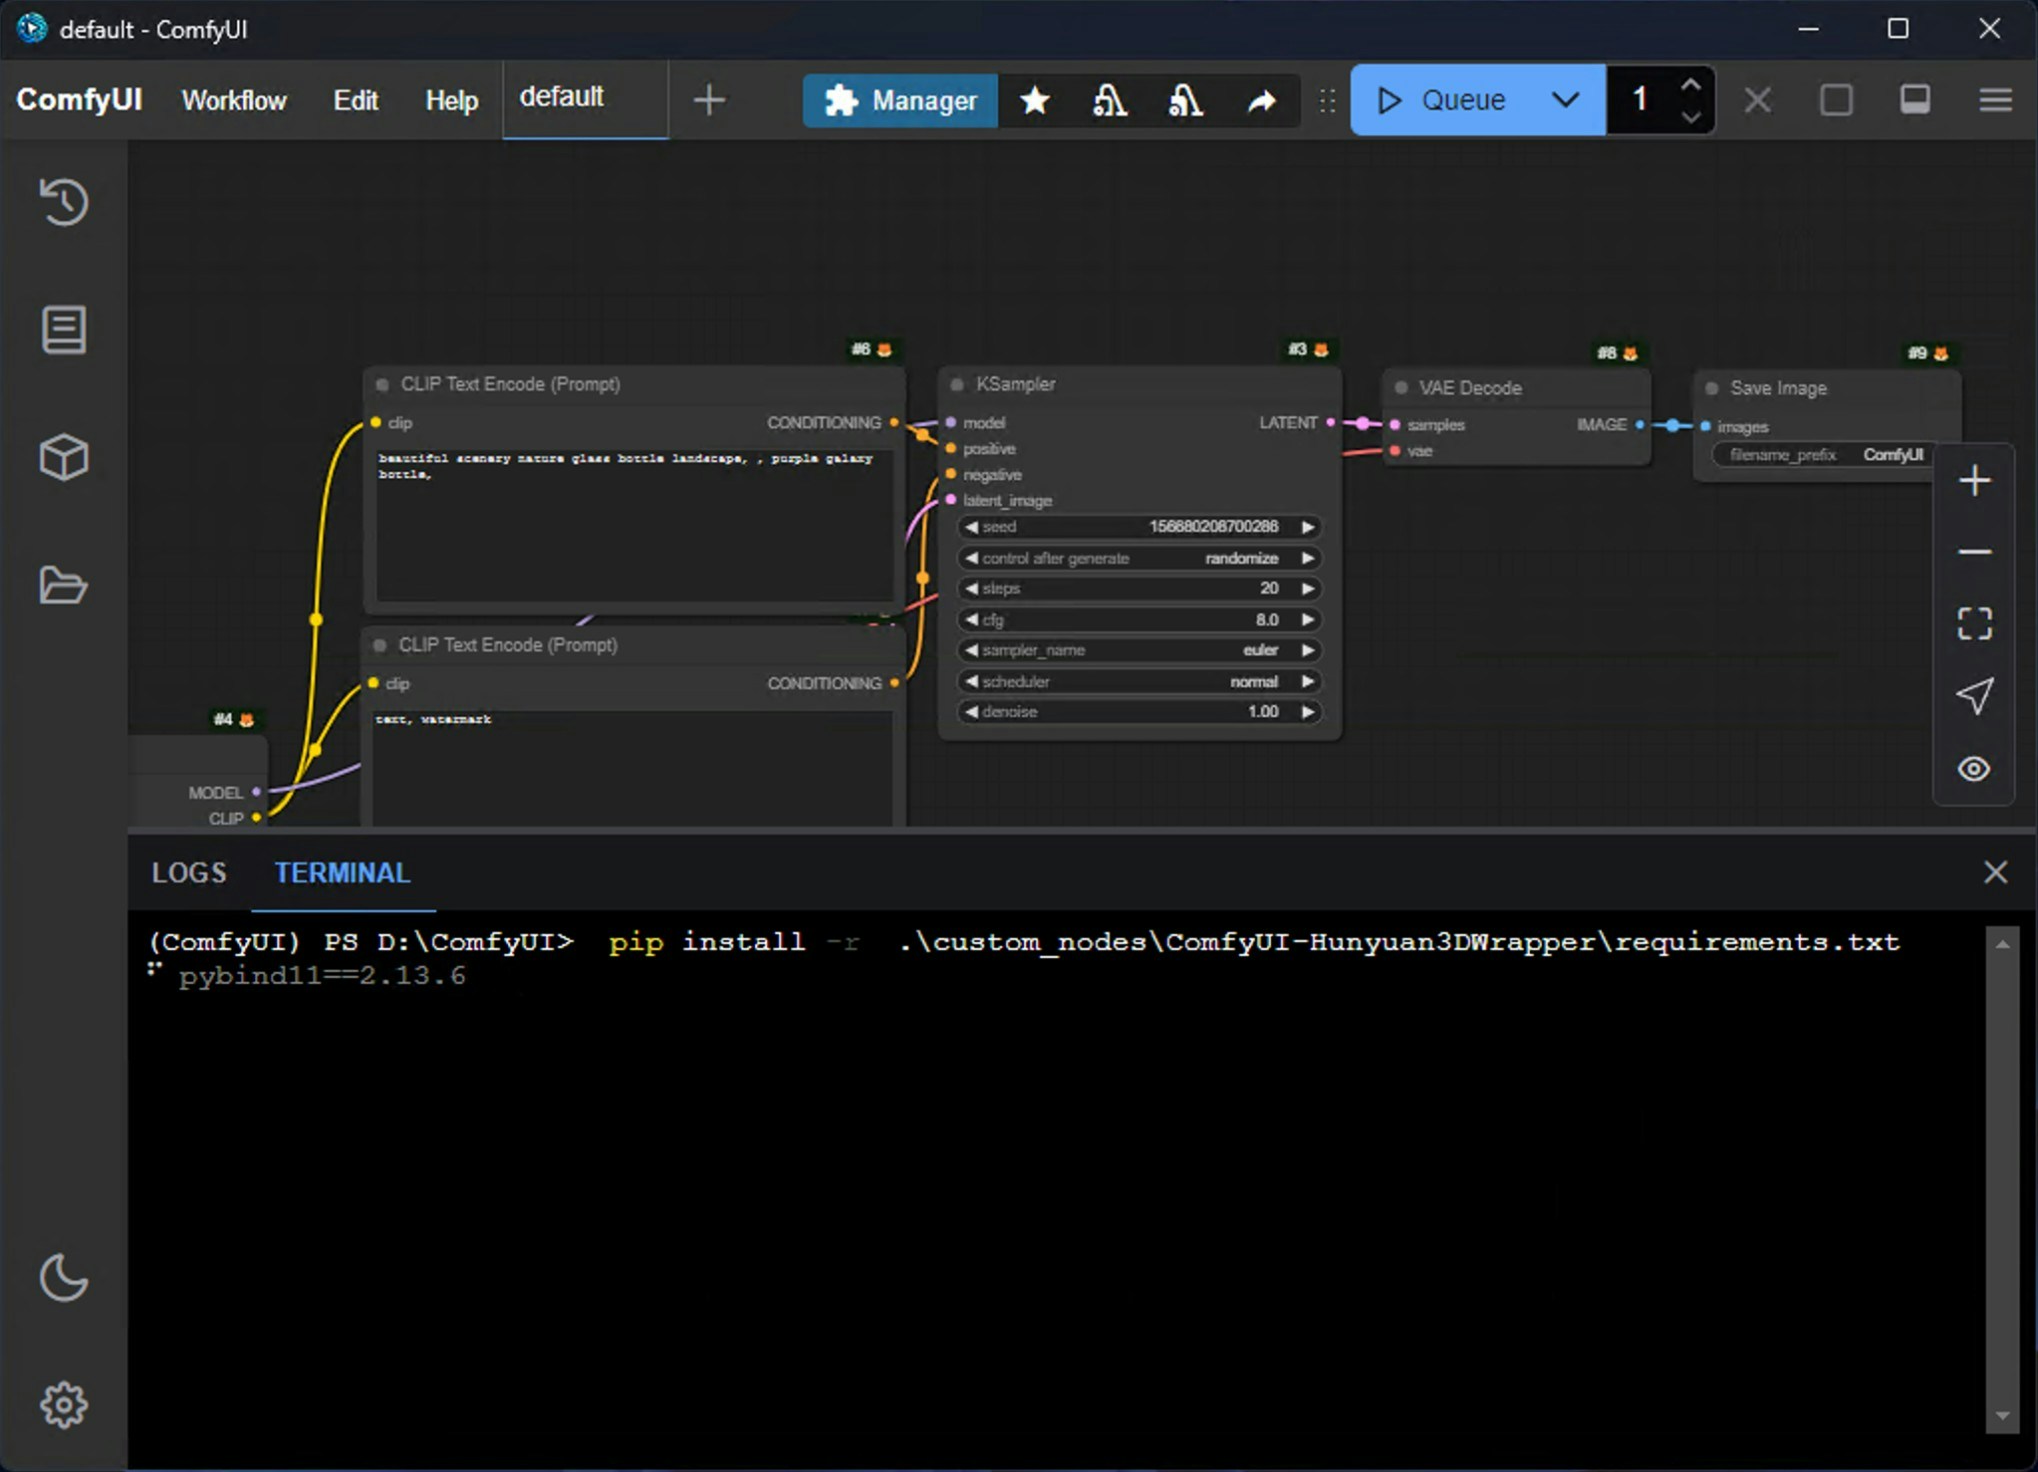
 This tool is currently included by default in the [Desktop version](/installation/desktop/windows), while in the [Portable version](/installation/comfyui_portable_windows), you need to refer to the installation instructions in the [Install Manager](#installing-custom-nodes) section of this document.
 OpenAI DALL·E 2 is part of the ComfyUI Partner Nodes series, allowing users to generate images through OpenAI's **DALL·E 2** model.
This node supports:
* Text-to-image generation
* Image editing functionality (inpainting through masks)
## Node Overview
The **OpenAI DALL·E 2** node generates images synchronously through OpenAI's image generation API. It receives text prompts and returns images that match the description.
OpenAI DALL·E 2 is part of the ComfyUI Partner Nodes series, allowing users to generate images through OpenAI's **DALL·E 2** model.
This node supports:
* Text-to-image generation
* Image editing functionality (inpainting through masks)
## Node Overview
The **OpenAI DALL·E 2** node generates images synchronously through OpenAI's image generation API. It receives text prompts and returns images that match the description.
 You only need to load the `OpenAI DALL·E 2` node, input the description of the image you want to generate in the `prompt` node, connect a `Save Image` node, and then run the workflow.
### Inpainting Workflow
DALL·E 2 supports image editing functionality, allowing you to use a mask to specify the area to be replaced. Below is a simple inpainting workflow example:
#### 1. Workflow File Download
Download the image below and drag it into ComfyUI to load the corresponding workflow.

We will use the image below as input:

#### 2. Workflow File Usage Instructions
You only need to load the `OpenAI DALL·E 2` node, input the description of the image you want to generate in the `prompt` node, connect a `Save Image` node, and then run the workflow.
### Inpainting Workflow
DALL·E 2 supports image editing functionality, allowing you to use a mask to specify the area to be replaced. Below is a simple inpainting workflow example:
#### 1. Workflow File Download
Download the image below and drag it into ComfyUI to load the corresponding workflow.

We will use the image below as input:

#### 2. Workflow File Usage Instructions
 Since this workflow is relatively simple, if you want to manually implement the corresponding workflow yourself, you can follow the steps below:
1. Use the `Load Image` node to load the image
2. Right-click on the load image node and select `MaskEditor`
3. In the mask editor, use the brush to draw the area you want to redraw
4. Connect the loaded image to the `image` input of the **OpenAI DALL·E 2** node
5. Connect the mask to the `mask` input of the **OpenAI DALL·E 2** node
6. Edit the prompt in the `prompt` node
7. Run the workflow
**Notes**
* If you want to use the image editing functionality, you must provide both an image and a mask (both are required)
* The mask and image must be the same size
* When inputting large images, the node will automatically resize the image to an appropriate size
* The URLs returned by the API are valid for a short period, please save the results promptly
* Each generation consumes credits, charged according to image size and quantity
## FAQs
Since this workflow is relatively simple, if you want to manually implement the corresponding workflow yourself, you can follow the steps below:
1. Use the `Load Image` node to load the image
2. Right-click on the load image node and select `MaskEditor`
3. In the mask editor, use the brush to draw the area you want to redraw
4. Connect the loaded image to the `image` input of the **OpenAI DALL·E 2** node
5. Connect the mask to the `mask` input of the **OpenAI DALL·E 2** node
6. Edit the prompt in the `prompt` node
7. Run the workflow
**Notes**
* If you want to use the image editing functionality, you must provide both an image and a mask (both are required)
* The mask and image must be the same size
* When inputting large images, the node will automatically resize the image to an appropriate size
* The URLs returned by the API are valid for a short period, please save the results promptly
* Each generation consumes credits, charged according to image size and quantity
## FAQs
 ## Node Overview
DALL·E 3 is OpenAI's latest image generation model, capable of creating detailed and high-quality images based on text prompts. Through this node in ComfyUI, you can directly access DALL·E 3's generation capabilities without leaving the ComfyUI interface.
The **OpenAI DALL·E 3** node generates images synchronously through OpenAI's image generation API. It receives text prompts and returns images that match the description.
## Node Overview
DALL·E 3 is OpenAI's latest image generation model, capable of creating detailed and high-quality images based on text prompts. Through this node in ComfyUI, you can directly access DALL·E 3's generation capabilities without leaving the ComfyUI interface.
The **OpenAI DALL·E 3** node generates images synchronously through OpenAI's image generation API. It receives text prompts and returns images that match the description.
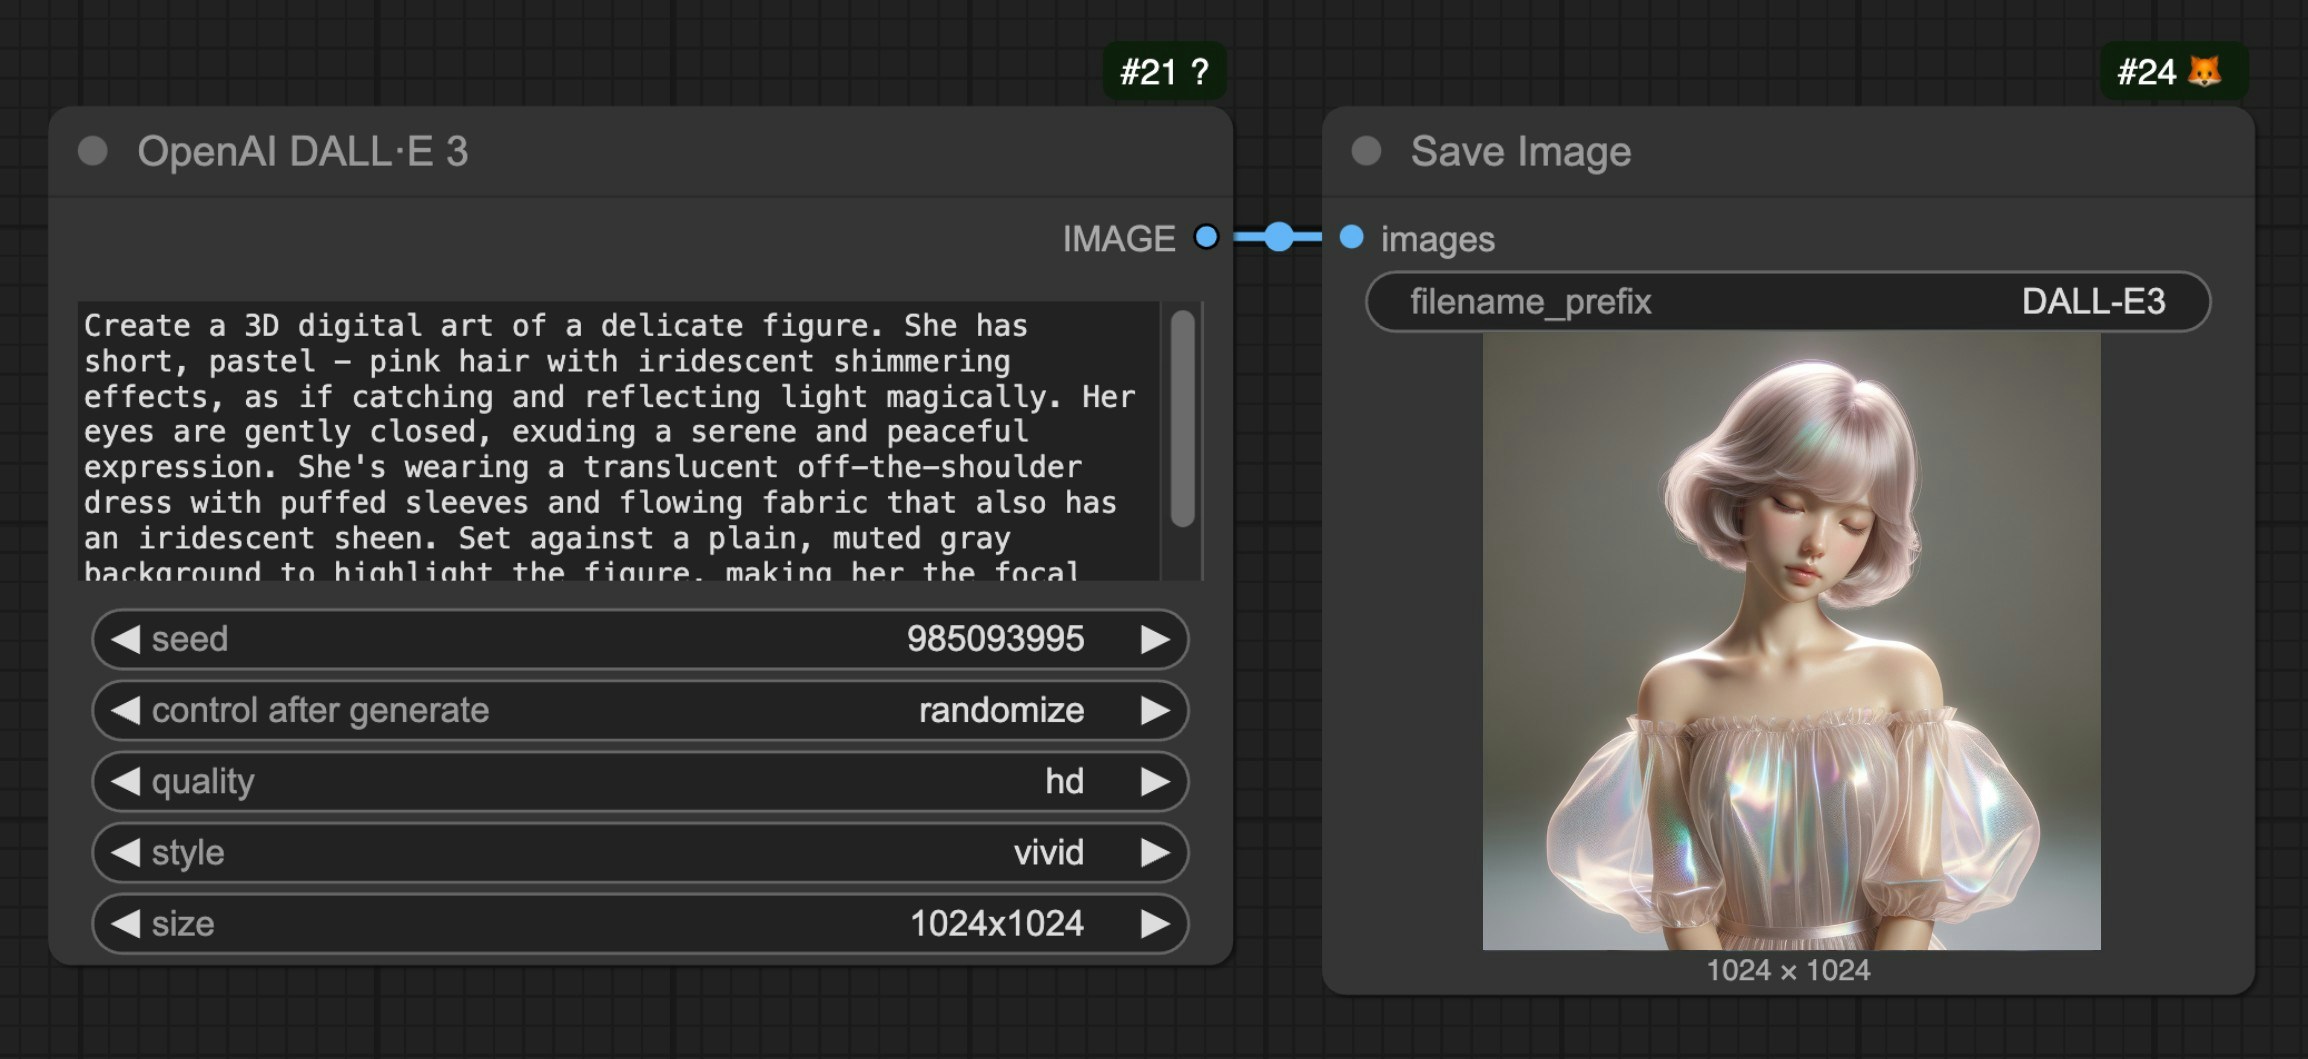 1. Add the **OpenAI DALL·E 3** node in ComfyUI
2. Enter the description of the image you want to generate in the prompt text box
3. Adjust optional parameters as needed (quality, style, size, etc.)
4. Run the workflow to generate the image
## FAQs
1. Add the **OpenAI DALL·E 3** node in ComfyUI
2. Enter the description of the image you want to generate in the prompt text box
3. Adjust optional parameters as needed (quality, style, size, etc.)
4. Run the workflow to generate the image
## FAQs
 ---
# Source: https://docs.comfy.org/tutorials/controlnet/depth-controlnet.md
> ## Documentation Index
> Fetch the complete documentation index at: https://docs.comfy.org/llms.txt
> Use this file to discover all available pages before exploring further.
# ComfyUI Depth ControlNet Usage Example
> This guide will introduce you to the basic concepts of Depth ControlNet and demonstrate how to generate corresponding images in ComfyUI
## Introduction to Depth Maps and Depth ControlNet
A depth map is a special type of image that uses grayscale values to represent the distance between objects in a scene and the observer or camera. In a depth map, the grayscale value is inversely proportional to distance: brighter areas (closer to white) indicate objects that are closer, while darker areas (closer to black) indicate objects that are farther away.

Depth ControlNet is a ControlNet model specifically trained to understand and utilize depth map information. It helps AI correctly interpret spatial relationships, ensuring that generated images conform to the spatial structure specified by the depth map, thereby enabling precise control over three-dimensional spatial layouts.
### Application Scenarios for Depth Maps with ControlNet
Depth maps have numerous applications in various scenarios:
1. **Portrait Scenes**: Control the spatial relationship between subjects and backgrounds, avoiding distortion in critical areas such as faces
2. **Landscape Scenes**: Control the hierarchical relationships between foreground, middle ground, and background
3. **Architectural Scenes**: Control the spatial structure and perspective relationships of buildings
4. **Product Showcase**: Control the separation and spatial positioning of products against their backgrounds
In this example, we will use a depth map to generate an architectural visualization scene.
## ComfyUI ControlNet Workflow Example Explanation
### 1. ControlNet Workflow Assets
Please download the workflow image below and drag it into ComfyUI to load the workflow:

---
# Source: https://docs.comfy.org/tutorials/controlnet/depth-controlnet.md
> ## Documentation Index
> Fetch the complete documentation index at: https://docs.comfy.org/llms.txt
> Use this file to discover all available pages before exploring further.
# ComfyUI Depth ControlNet Usage Example
> This guide will introduce you to the basic concepts of Depth ControlNet and demonstrate how to generate corresponding images in ComfyUI
## Introduction to Depth Maps and Depth ControlNet
A depth map is a special type of image that uses grayscale values to represent the distance between objects in a scene and the observer or camera. In a depth map, the grayscale value is inversely proportional to distance: brighter areas (closer to white) indicate objects that are closer, while darker areas (closer to black) indicate objects that are farther away.

Depth ControlNet is a ControlNet model specifically trained to understand and utilize depth map information. It helps AI correctly interpret spatial relationships, ensuring that generated images conform to the spatial structure specified by the depth map, thereby enabling precise control over three-dimensional spatial layouts.
### Application Scenarios for Depth Maps with ControlNet
Depth maps have numerous applications in various scenarios:
1. **Portrait Scenes**: Control the spatial relationship between subjects and backgrounds, avoiding distortion in critical areas such as faces
2. **Landscape Scenes**: Control the hierarchical relationships between foreground, middle ground, and background
3. **Architectural Scenes**: Control the spatial structure and perspective relationships of buildings
4. **Product Showcase**: Control the separation and spatial positioning of products against their backgrounds
In this example, we will use a depth map to generate an architectural visualization scene.
## ComfyUI ControlNet Workflow Example Explanation
### 1. ControlNet Workflow Assets
Please download the workflow image below and drag it into ComfyUI to load the workflow:

 1. Ensure that `Load Checkpoint` can load **architecturerealmix\_v11.safetensors**
2. Ensure that `Load ControlNet` can load **control\_v11f1p\_sd15\_depth\_fp16.safetensors**
3. Click `Upload` in the `Load Image` node to upload the depth image provided earlier
4. Click the `Queue` button or use the shortcut `Ctrl(cmd) + Enter` to execute the image generation
## Combining Depth Control with Other Techniques
Based on different creative needs, you can combine Depth ControlNet with other types of ControlNet to achieve better results:
1. **Depth + Lineart**: Maintain spatial relationships while reinforcing outlines, suitable for architecture, products, and character design
2. **Depth + Pose**: Control character posture while maintaining correct spatial relationships, suitable for character scenes
For more information on using multiple ControlNet models together, please refer to the [Mixing ControlNet](/tutorials/controlnet/mixing-controlnets) example.
---
# Source: https://docs.comfy.org/tutorials/controlnet/depth-t2i-adapter.md
> ## Documentation Index
> Fetch the complete documentation index at: https://docs.comfy.org/llms.txt
> Use this file to discover all available pages before exploring further.
# ComfyUI Depth T2I Adapter Usage Example
> This guide will introduce you to the basic concepts of Depth T2I Adapter and demonstrate how to generate corresponding images in ComfyUI
## Introduction to T2I Adapter
[T2I-Adapter](https://huggingface.co/TencentARC/T2I-Adapter) is a lightweight adapter developed by [Tencent ARC Lab](https://github.com/TencentARC) designed to enhance the structural, color, and style control capabilities of text-to-image generation models (such as Stable Diffusion).
It works by aligning external conditions (such as edge detection maps, depth maps, sketches, or color reference images) with the model's internal features, achieving high-precision control without modifying the original model structure. With only about 77M parameters (approximately 300MB in size), its inference speed is about 3 times faster than [ControlNet](https://github.com/lllyasviel/ControlNet-v1-1-nightly), and it supports multiple condition combinations (such as sketch + color grid). Application scenarios include line art to image conversion, color style transfer, multi-element scene generation, and more.
### Comparison Between T2I Adapter and ControlNet
Although their functions are similar, there are notable differences in implementation and application:
1. **Lightweight Design**: T2I Adapter has fewer parameters and a smaller memory footprint
2. **Inference Speed**: T2I Adapter is typically about 3 times faster than ControlNet
3. **Control Precision**: ControlNet offers more precise control in certain scenarios, while T2I Adapter is more suitable for lightweight control
4. **Multi-condition Combination**: T2I Adapter shows more significant resource advantages when combining multiple conditions
### Main Types of T2I Adapter
T2I Adapter provides various types to control different aspects:
* **Depth**: Controls the spatial structure and depth relationships in images
* **Line Art (Canny/Sketch)**: Controls image edges and lines
* **Keypose**: Controls character poses and actions
* **Segmentation (Seg)**: Controls scene layout through semantic segmentation
* **Color**: Controls the overall color scheme of images
In ComfyUI, using T2I Adapter is similar to [ControlNet](/tutorials/controlnet/controlnet) in terms of interface and workflow. In this example, we will demonstrate how to use a depth T2I Adapter to control an interior scene.

## Value of Depth T2I Adapter Applications
Depth maps have several important applications in image generation:
1. **Spatial Layout Control**: Accurately describes three-dimensional spatial structures, suitable for interior design and architectural visualization
2. **Object Positioning**: Controls the relative position and size of objects in a scene, suitable for product showcases and scene construction
3. **Perspective Relationships**: Maintains reasonable perspective and proportions, suitable for landscape and urban scene generation
4. **Light and Shadow Layout**: Natural light and shadow distribution based on depth information, enhancing realism
We will use interior design as an example to demonstrate how to use the depth T2I Adapter, but these techniques are applicable to other scenarios as well.
## ComfyUI Depth T2I Adapter Workflow Example Explanation
### 1. Depth T2I Adapter Workflow Assets
Please download the workflow image below and drag it into ComfyUI to load the workflow:

1. Ensure that `Load Checkpoint` can load **architecturerealmix\_v11.safetensors**
2. Ensure that `Load ControlNet` can load **control\_v11f1p\_sd15\_depth\_fp16.safetensors**
3. Click `Upload` in the `Load Image` node to upload the depth image provided earlier
4. Click the `Queue` button or use the shortcut `Ctrl(cmd) + Enter` to execute the image generation
## Combining Depth Control with Other Techniques
Based on different creative needs, you can combine Depth ControlNet with other types of ControlNet to achieve better results:
1. **Depth + Lineart**: Maintain spatial relationships while reinforcing outlines, suitable for architecture, products, and character design
2. **Depth + Pose**: Control character posture while maintaining correct spatial relationships, suitable for character scenes
For more information on using multiple ControlNet models together, please refer to the [Mixing ControlNet](/tutorials/controlnet/mixing-controlnets) example.
---
# Source: https://docs.comfy.org/tutorials/controlnet/depth-t2i-adapter.md
> ## Documentation Index
> Fetch the complete documentation index at: https://docs.comfy.org/llms.txt
> Use this file to discover all available pages before exploring further.
# ComfyUI Depth T2I Adapter Usage Example
> This guide will introduce you to the basic concepts of Depth T2I Adapter and demonstrate how to generate corresponding images in ComfyUI
## Introduction to T2I Adapter
[T2I-Adapter](https://huggingface.co/TencentARC/T2I-Adapter) is a lightweight adapter developed by [Tencent ARC Lab](https://github.com/TencentARC) designed to enhance the structural, color, and style control capabilities of text-to-image generation models (such as Stable Diffusion).
It works by aligning external conditions (such as edge detection maps, depth maps, sketches, or color reference images) with the model's internal features, achieving high-precision control without modifying the original model structure. With only about 77M parameters (approximately 300MB in size), its inference speed is about 3 times faster than [ControlNet](https://github.com/lllyasviel/ControlNet-v1-1-nightly), and it supports multiple condition combinations (such as sketch + color grid). Application scenarios include line art to image conversion, color style transfer, multi-element scene generation, and more.
### Comparison Between T2I Adapter and ControlNet
Although their functions are similar, there are notable differences in implementation and application:
1. **Lightweight Design**: T2I Adapter has fewer parameters and a smaller memory footprint
2. **Inference Speed**: T2I Adapter is typically about 3 times faster than ControlNet
3. **Control Precision**: ControlNet offers more precise control in certain scenarios, while T2I Adapter is more suitable for lightweight control
4. **Multi-condition Combination**: T2I Adapter shows more significant resource advantages when combining multiple conditions
### Main Types of T2I Adapter
T2I Adapter provides various types to control different aspects:
* **Depth**: Controls the spatial structure and depth relationships in images
* **Line Art (Canny/Sketch)**: Controls image edges and lines
* **Keypose**: Controls character poses and actions
* **Segmentation (Seg)**: Controls scene layout through semantic segmentation
* **Color**: Controls the overall color scheme of images
In ComfyUI, using T2I Adapter is similar to [ControlNet](/tutorials/controlnet/controlnet) in terms of interface and workflow. In this example, we will demonstrate how to use a depth T2I Adapter to control an interior scene.

## Value of Depth T2I Adapter Applications
Depth maps have several important applications in image generation:
1. **Spatial Layout Control**: Accurately describes three-dimensional spatial structures, suitable for interior design and architectural visualization
2. **Object Positioning**: Controls the relative position and size of objects in a scene, suitable for product showcases and scene construction
3. **Perspective Relationships**: Maintains reasonable perspective and proportions, suitable for landscape and urban scene generation
4. **Light and Shadow Layout**: Natural light and shadow distribution based on depth information, enhancing realism
We will use interior design as an example to demonstrate how to use the depth T2I Adapter, but these techniques are applicable to other scenarios as well.
## ComfyUI Depth T2I Adapter Workflow Example Explanation
### 1. Depth T2I Adapter Workflow Assets
Please download the workflow image below and drag it into ComfyUI to load the workflow:

 1. Ensure that `Load Checkpoint` can load **interiordesignsuperm\_v2.safetensors**
2. Ensure that `Load ControlNet` can load **t2iadapter\_depth\_sd15v2.pth**
3. Click `Upload` in the `Load Image` node to upload the input image provided earlier
4. Click the `Queue` button or use the shortcut `Ctrl(cmd) + Enter` to execute the image generation
## General Tips for Using T2I Adapter
### Input Image Quality Optimization
Regardless of the application scenario, high-quality input images are key to successfully using T2I Adapter:
1. **Moderate Contrast**: Control images (such as depth maps, line art) should have clear contrast, but not excessively extreme
2. **Clear Boundaries**: Ensure that major structures and element boundaries are clearly distinguishable in the control image
3. **Noise Control**: Try to avoid excessive noise in control images, especially for depth maps and line art
4. **Reasonable Layout**: Control images should have a reasonable spatial layout and element distribution
## Characteristics of T2I Adapter Usage
One major advantage of T2I Adapter is its ability to easily combine multiple conditions for complex control effects:
1. **Depth + Edge**: Control spatial layout while maintaining clear structural edges, suitable for architecture and interior design
2. **Line Art + Color**: Control shapes while specifying color schemes, suitable for character design and illustrations
3. **Pose + Segmentation**: Control character actions while defining scene areas, suitable for complex narrative scenes
Mixing different T2I Adapters, or combining them with other control methods (such as ControlNet, regional prompts, etc.), can further expand creative possibilities. To achieve mixing, simply chain multiple `Apply ControlNet` nodes together in the same way as described in [Mixing ControlNet](/tutorials/controlnet/mixing-controlnets).
---
# Source: https://docs.comfy.org/support/payment/editing-payment-information.md
> ## Documentation Index
> Fetch the complete documentation index at: https://docs.comfy.org/llms.txt
> Use this file to discover all available pages before exploring further.
# Editing your payment information
> Learn how to update your payment method and billing details
You can update your payment information at any time through your account settings.
## How to edit payment information
1. Log in to your ComfyUI account and open the profile menu
2. Click **User Settings**
3. Select the **Credits** tab in the settings panel
4. Choose **Invoice History** to open the Stripe billing portal in a new tab
5. Click **Update information** and edit your billing or payment details
6. Save your changes in the Stripe portal
### Visual walkthrough
1. Ensure that `Load Checkpoint` can load **interiordesignsuperm\_v2.safetensors**
2. Ensure that `Load ControlNet` can load **t2iadapter\_depth\_sd15v2.pth**
3. Click `Upload` in the `Load Image` node to upload the input image provided earlier
4. Click the `Queue` button or use the shortcut `Ctrl(cmd) + Enter` to execute the image generation
## General Tips for Using T2I Adapter
### Input Image Quality Optimization
Regardless of the application scenario, high-quality input images are key to successfully using T2I Adapter:
1. **Moderate Contrast**: Control images (such as depth maps, line art) should have clear contrast, but not excessively extreme
2. **Clear Boundaries**: Ensure that major structures and element boundaries are clearly distinguishable in the control image
3. **Noise Control**: Try to avoid excessive noise in control images, especially for depth maps and line art
4. **Reasonable Layout**: Control images should have a reasonable spatial layout and element distribution
## Characteristics of T2I Adapter Usage
One major advantage of T2I Adapter is its ability to easily combine multiple conditions for complex control effects:
1. **Depth + Edge**: Control spatial layout while maintaining clear structural edges, suitable for architecture and interior design
2. **Line Art + Color**: Control shapes while specifying color schemes, suitable for character design and illustrations
3. **Pose + Segmentation**: Control character actions while defining scene areas, suitable for complex narrative scenes
Mixing different T2I Adapters, or combining them with other control methods (such as ControlNet, regional prompts, etc.), can further expand creative possibilities. To achieve mixing, simply chain multiple `Apply ControlNet` nodes together in the same way as described in [Mixing ControlNet](/tutorials/controlnet/mixing-controlnets).
---
# Source: https://docs.comfy.org/support/payment/editing-payment-information.md
> ## Documentation Index
> Fetch the complete documentation index at: https://docs.comfy.org/llms.txt
> Use this file to discover all available pages before exploring further.
# Editing your payment information
> Learn how to update your payment method and billing details
You can update your payment information at any time through your account settings.
## How to edit payment information
1. Log in to your ComfyUI account and open the profile menu
2. Click **User Settings**
3. Select the **Credits** tab in the settings panel
4. Choose **Invoice History** to open the Stripe billing portal in a new tab
5. Click **Update information** and edit your billing or payment details
6. Save your changes in the Stripe portal
### Visual walkthrough
 *Go to the **Credits** tab and select **Invoice History**.*
 *Review the billing information fields in the Stripe portal.*
 *Click **Update information** to edit payment details and save your changes.*
## What you can update
You can modify the following payment details:
* Credit or debit card number
* Card expiration date
* CVV/security code
* Billing address
* Payment method type (switch between card and digital wallet)
## When changes take effect
* Changes to your payment method take effect immediately
* Your next billing cycle will use the updated payment information
* Updates to billing details (name, address, tax ID) only apply to future invoices; existing invoices cannot be modified
* Active subscriptions will not be interrupted when you update payment details
## Important notes
* You must have an active payment method on file to maintain your subscription
* If you remove a payment method, you must add a new one before the next billing date
* Keep a copy of past invoices before making changes if you need them for record keeping
* Updating your payment information does not change your billing date or subscription plan
## Troubleshooting
If you encounter issues updating your payment information:
* Verify that all information is entered correctly
* Ensure your card has not expired
* Check that your billing address matches your card issuer's records
* Try using a different browser or clearing your cache
* Contact our [support team](https://support.comfy.org/) if problems persist
---
# Source: https://docs.comfy.org/development/comfyui-server/execution_model_inversion_guide.md
> ## Documentation Index
> Fetch the complete documentation index at: https://docs.comfy.org/llms.txt
> Use this file to discover all available pages before exploring further.
# Execution Model Inversion Guide
[PR #2666](https://github.com/comfyanonymous/ComfyUI/pull/2666) inverts the execution model from a back-to-front recursive model to a front-to-back topological sort. While most custom nodes should continue to "just work", this page is intended to serve as a guide for custom node creators to the things that *could* break.
## Breaking Changes
### Monkey Patching
Any code that monkey patched the execution model is likely to stop working. Note that the performance of execution with this PR exceeds that with the most popular monkey patches, so many of them will be unnecessary.
### Optional Input Validation
Prior to this PR, only nodes that were connected to outputs exclusively through a string of `"required"` inputs were actually validated. If you had custom nodes that were only ever connected to `"optional"` inputs, you previously wouldn't have been seeing that they failed validation.
*Click **Update information** to edit payment details and save your changes.*
## What you can update
You can modify the following payment details:
* Credit or debit card number
* Card expiration date
* CVV/security code
* Billing address
* Payment method type (switch between card and digital wallet)
## When changes take effect
* Changes to your payment method take effect immediately
* Your next billing cycle will use the updated payment information
* Updates to billing details (name, address, tax ID) only apply to future invoices; existing invoices cannot be modified
* Active subscriptions will not be interrupted when you update payment details
## Important notes
* You must have an active payment method on file to maintain your subscription
* If you remove a payment method, you must add a new one before the next billing date
* Keep a copy of past invoices before making changes if you need them for record keeping
* Updating your payment information does not change your billing date or subscription plan
## Troubleshooting
If you encounter issues updating your payment information:
* Verify that all information is entered correctly
* Ensure your card has not expired
* Check that your billing address matches your card issuer's records
* Try using a different browser or clearing your cache
* Contact our [support team](https://support.comfy.org/) if problems persist
---
# Source: https://docs.comfy.org/development/comfyui-server/execution_model_inversion_guide.md
> ## Documentation Index
> Fetch the complete documentation index at: https://docs.comfy.org/llms.txt
> Use this file to discover all available pages before exploring further.
# Execution Model Inversion Guide
[PR #2666](https://github.com/comfyanonymous/ComfyUI/pull/2666) inverts the execution model from a back-to-front recursive model to a front-to-back topological sort. While most custom nodes should continue to "just work", this page is intended to serve as a guide for custom node creators to the things that *could* break.
## Breaking Changes
### Monkey Patching
Any code that monkey patched the execution model is likely to stop working. Note that the performance of execution with this PR exceeds that with the most popular monkey patches, so many of them will be unnecessary.
### Optional Input Validation
Prior to this PR, only nodes that were connected to outputs exclusively through a string of `"required"` inputs were actually validated. If you had custom nodes that were only ever connected to `"optional"` inputs, you previously wouldn't have been seeing that they failed validation.
 These frontend extension plugins are used to enhance the ComfyUI experience, such as providing shortcuts, settings, UI components, menu items, and other features.
Extension status changes require a page reload to take effect:
## Extension Settings Panel Features
### 1. Extension List Management
Displays all registered extensions, including:
* Extension Name
* Core extension identification (displays "Core" label)
* Enable/disable status
### 2. Search Functionality
Provides a search box to quickly find specific extensions:
### 3. Enable/Disable Control
Each extension has an independent toggle switch:
### 4. Batch Operations
Provides right-click menu for batch operations:
* Enable All extensions
* Disable All extensions
* Disable 3rd Party extensions (keep core extensions)
## Notes
* Extension status changes require a page reload to take effect
* Some core extensions cannot be disabled
* The system will automatically disable known problematic extensions
* Extension settings are automatically saved to the user configuration file
This Extension settings panel is essentially a "frontend plugin manager" that allows users to flexibly control ComfyUI's functional modules.
---
# Source: https://docs.comfy.org/tutorials/partner-nodes/faq.md
> ## Documentation Index
> Fetch the complete documentation index at: https://docs.comfy.org/llms.txt
> Use this file to discover all available pages before exploring further.
# FAQs about Partner Nodes
> Some FAQs you may encounter when using Partner Nodes.
This article addresses common questions regarding the use of Partner nodes.
These frontend extension plugins are used to enhance the ComfyUI experience, such as providing shortcuts, settings, UI components, menu items, and other features.
Extension status changes require a page reload to take effect:
## Extension Settings Panel Features
### 1. Extension List Management
Displays all registered extensions, including:
* Extension Name
* Core extension identification (displays "Core" label)
* Enable/disable status
### 2. Search Functionality
Provides a search box to quickly find specific extensions:
### 3. Enable/Disable Control
Each extension has an independent toggle switch:
### 4. Batch Operations
Provides right-click menu for batch operations:
* Enable All extensions
* Disable All extensions
* Disable 3rd Party extensions (keep core extensions)
## Notes
* Extension status changes require a page reload to take effect
* Some core extensions cannot be disabled
* The system will automatically disable known problematic extensions
* Extension settings are automatically saved to the user configuration file
This Extension settings panel is essentially a "frontend plugin manager" that allows users to flexibly control ComfyUI's functional modules.
---
# Source: https://docs.comfy.org/tutorials/partner-nodes/faq.md
> ## Documentation Index
> Fetch the complete documentation index at: https://docs.comfy.org/llms.txt
> Use this file to discover all available pages before exploring further.
# FAQs about Partner Nodes
> Some FAQs you may encounter when using Partner Nodes.
This article addresses common questions regarding the use of Partner nodes.
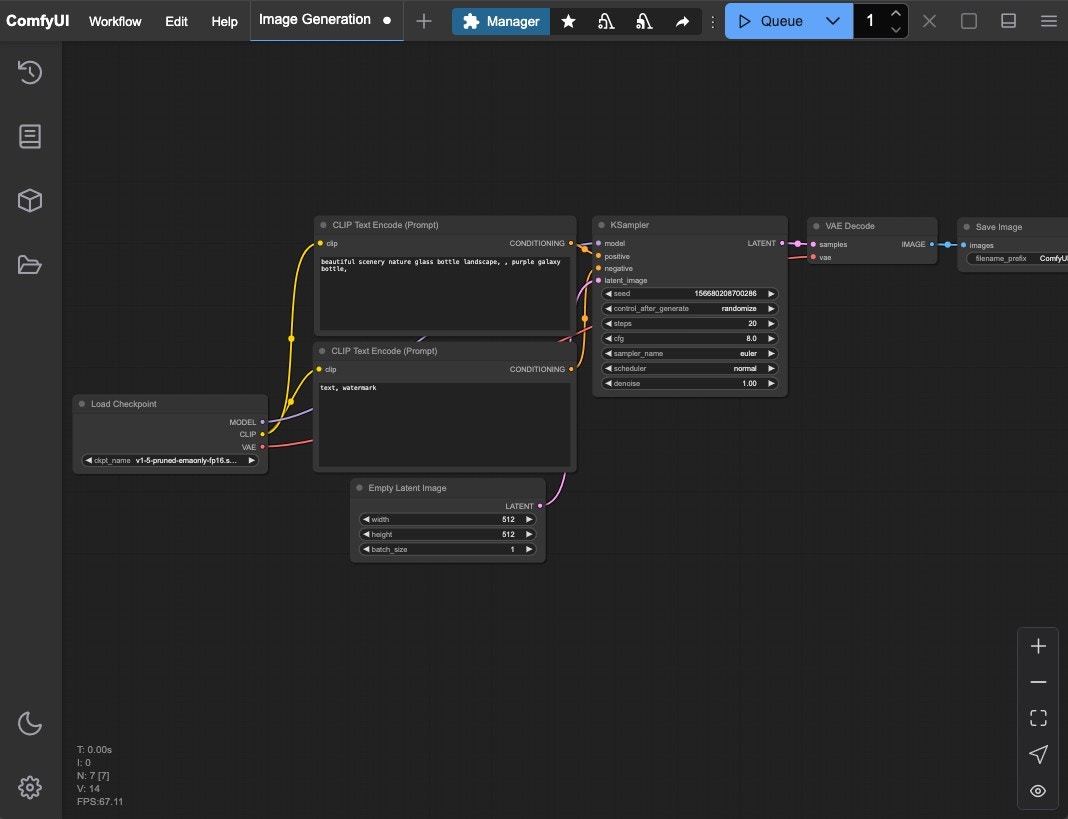 If you have not installed ComfyUI, please choose a suitable version to install based on your device.
 Follow the numbered steps in the image:
1. Click the **Fit View** button in the bottom right to ensure any loaded workflow isn't hidden
2. Click the **folder icon (workflows)** in the sidebar
3. Click the **Browse example workflows** button at the top of the Workflows panel
Continue with:
Follow the numbered steps in the image:
1. Click the **Fit View** button in the bottom right to ensure any loaded workflow isn't hidden
2. Click the **folder icon (workflows)** in the sidebar
3. Click the **Browse example workflows** button at the top of the Workflows panel
Continue with:
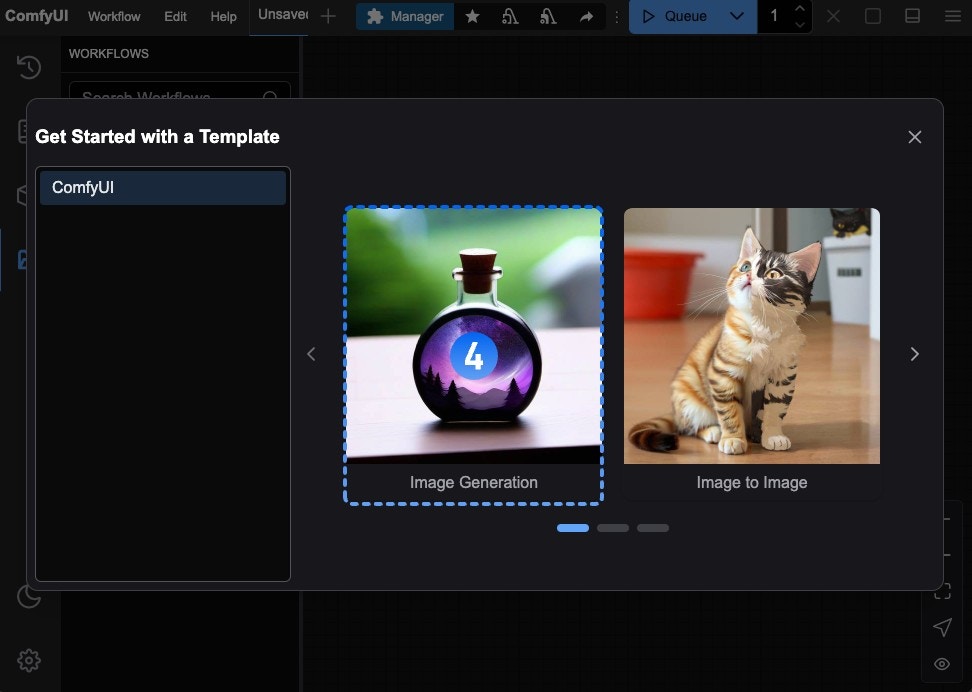 4. Select the first default workflow **Image Generation** to load it
Alternatively, you can select **Browse workflow templates** from the workflow menu
4. Select the first default workflow **Image Generation** to load it
Alternatively, you can select **Browse workflow templates** from the workflow menu
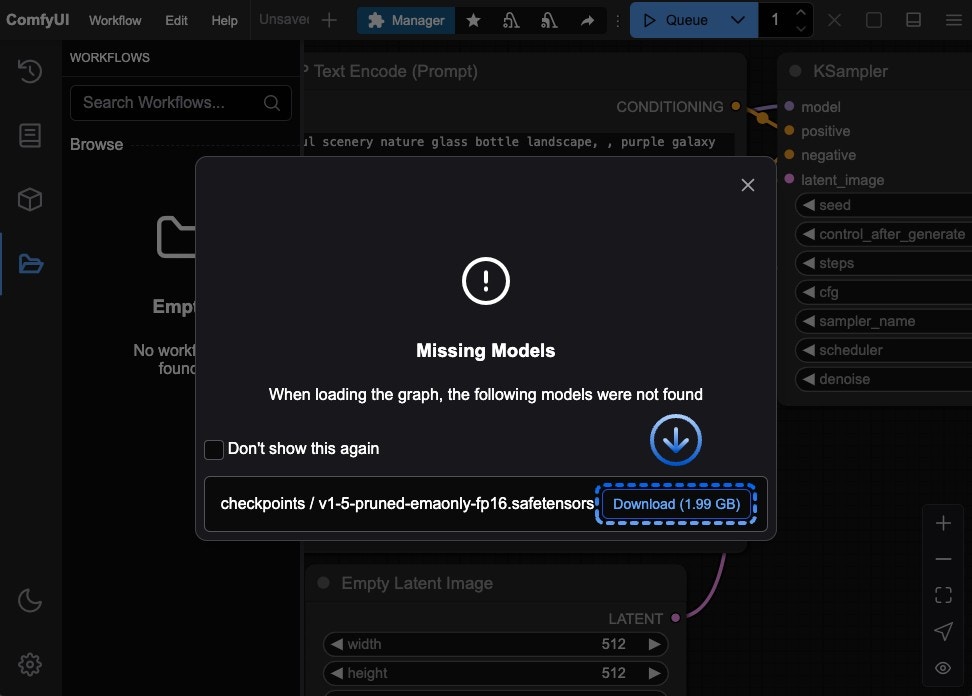 All models are stored in `
 You can install models through:
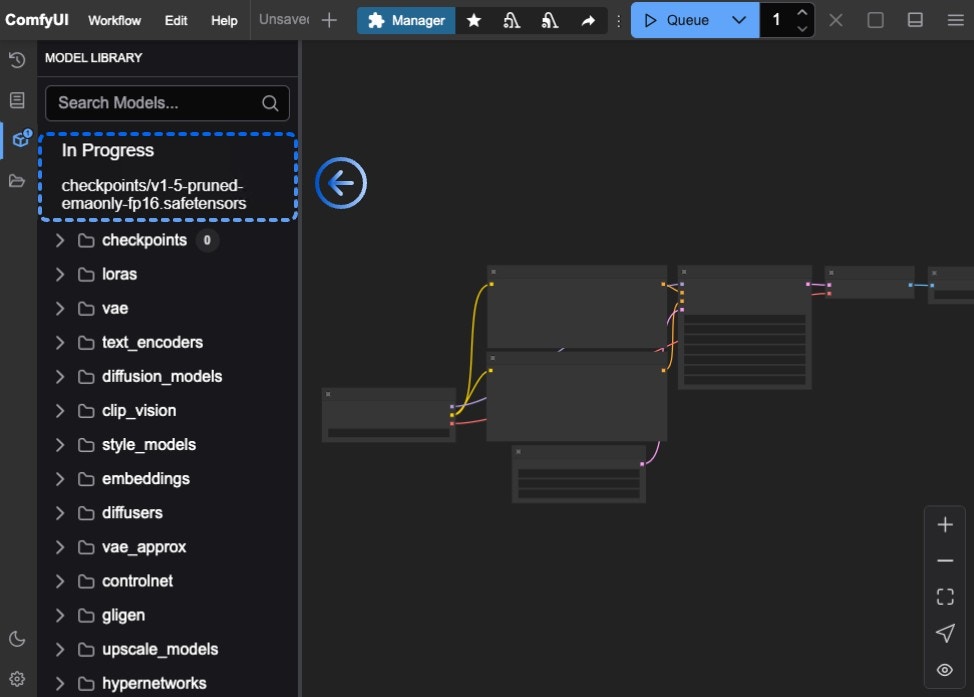 If everything goes smoothly, the model should be able to download locally. If the download fails for a long time, please try other installation methods.
 Click the `Manager` button to open ComfyUI Manager
 Click `Model Manager`
 1. Search for `v1-5-pruned-emaonly.ckpt`
2. Click `install` on the desired model
1. Search for `v1-5-pruned-emaonly.ckpt`
2. Click `install` on the desired model
 Save the downloaded file to:


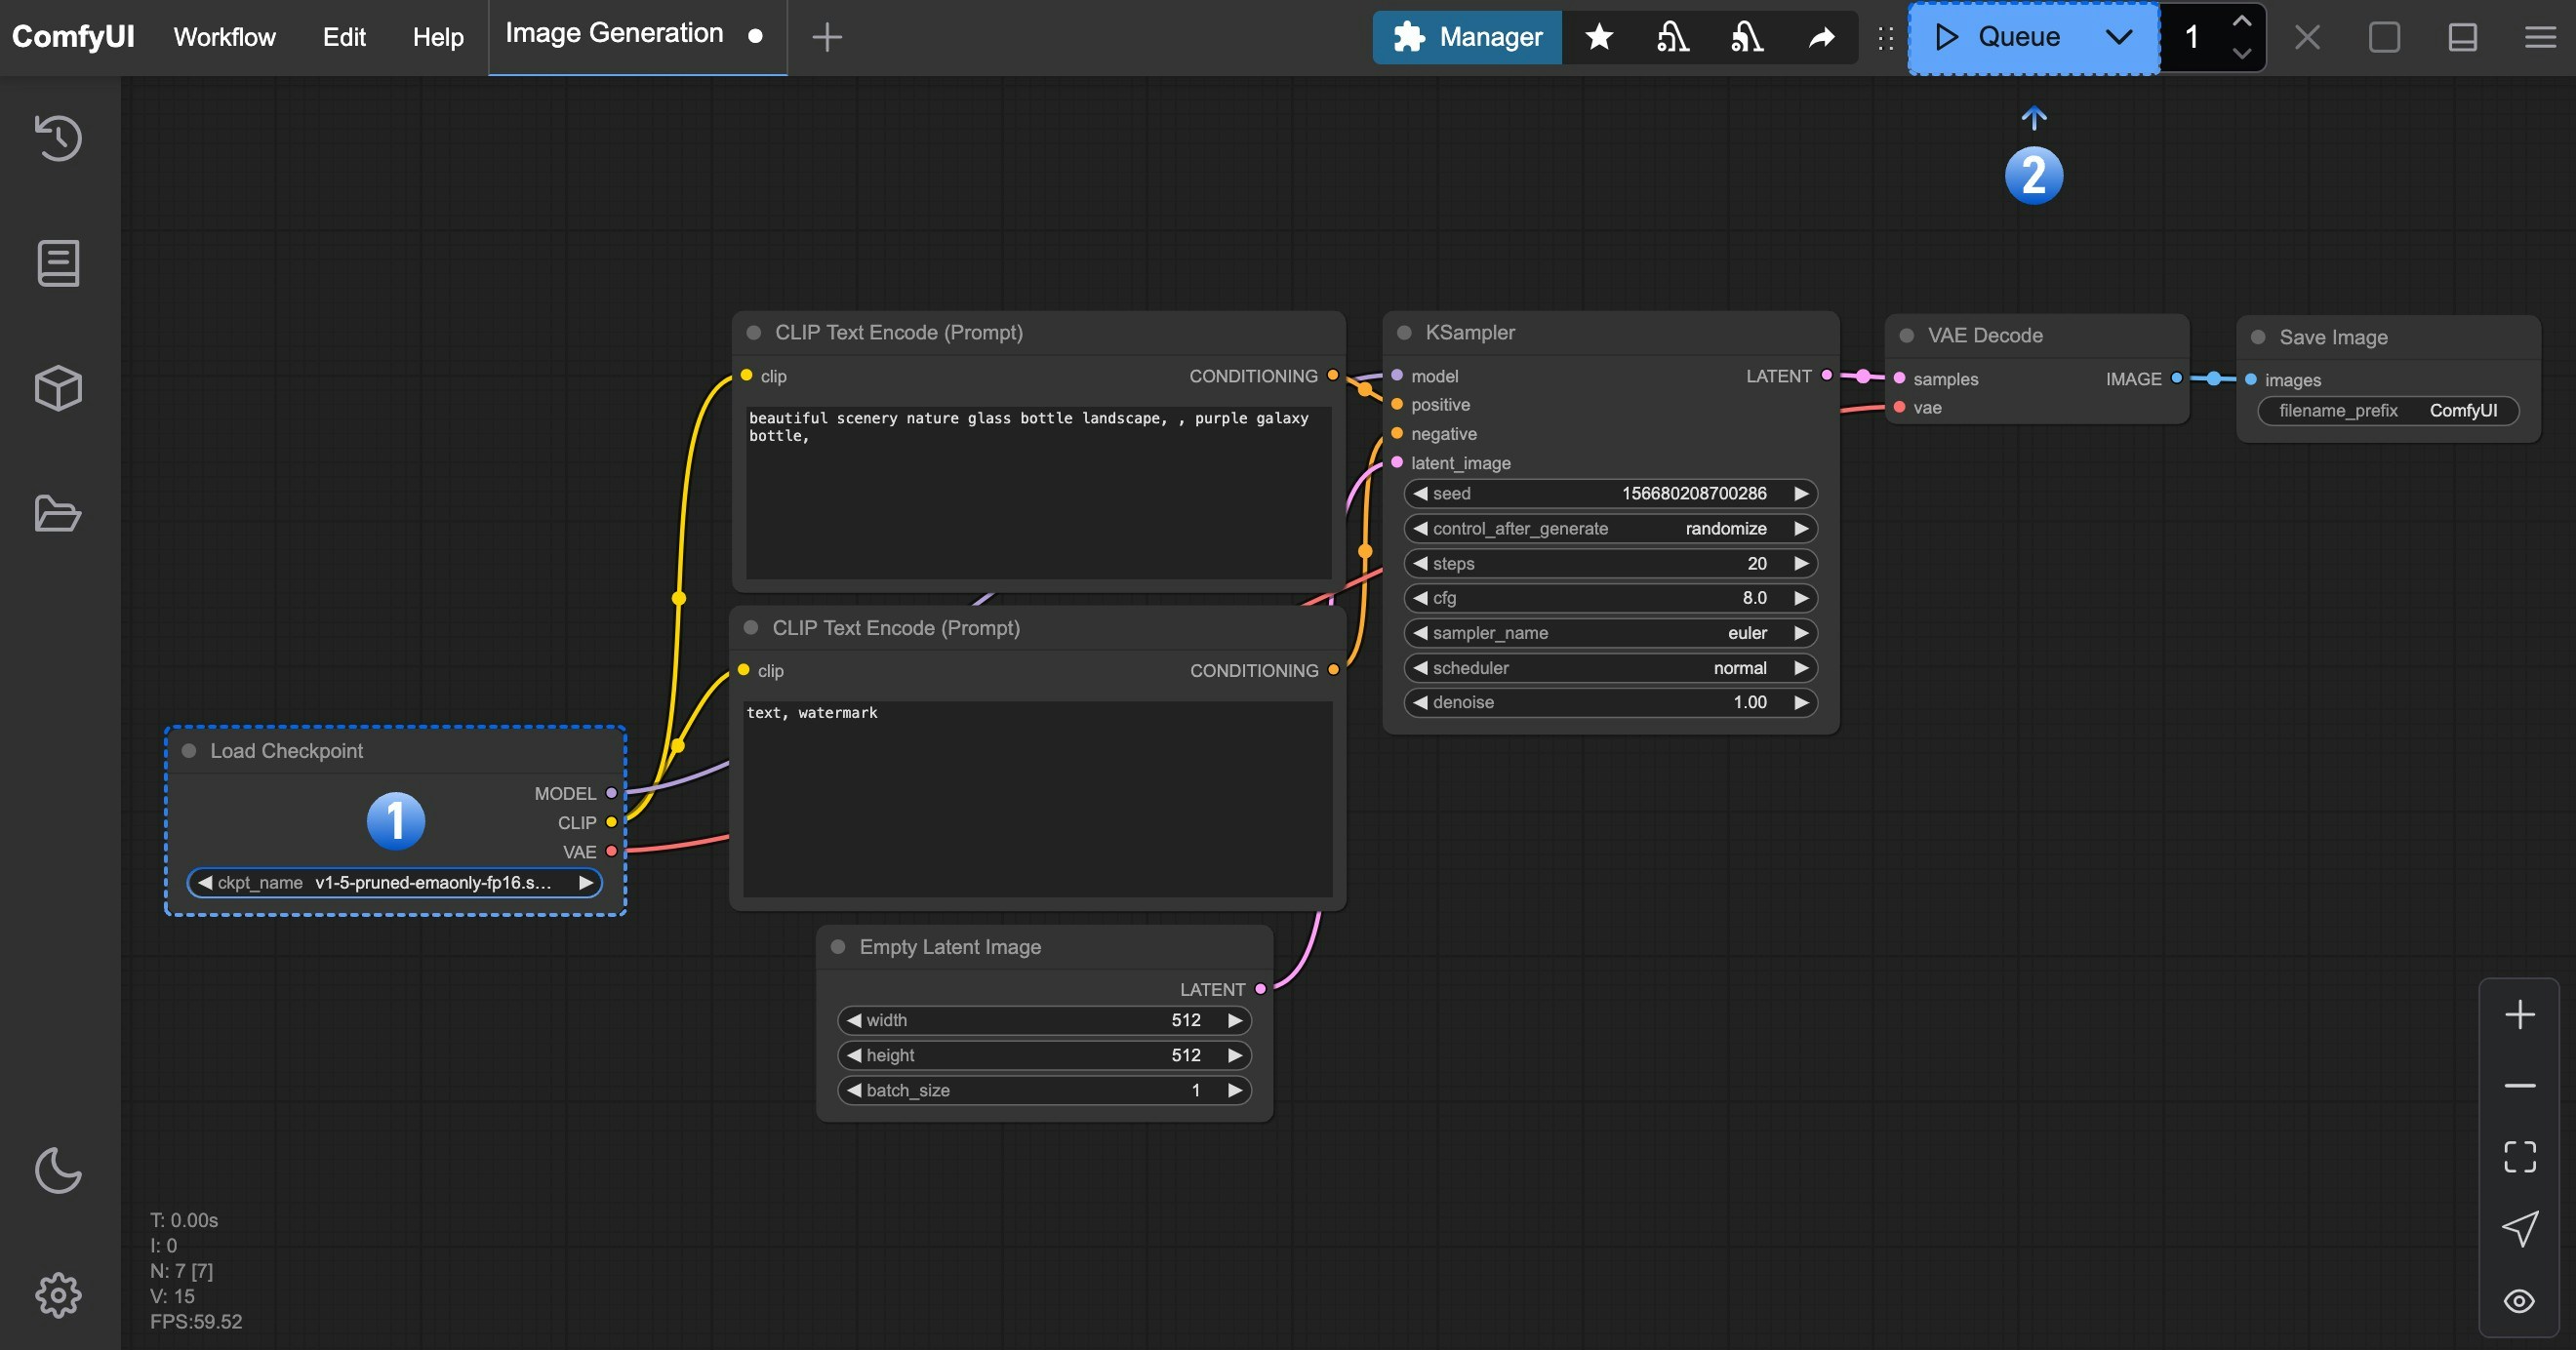 1. In the **Load Checkpoint** node, ensure **v1-5-pruned-emaonly-fp16.safetensors** is selected
2. Click `Queue` or press `Ctrl + Enter` to generate
The result will appear in the **Save Image** node. Right-click to save locally.
1. In the **Load Checkpoint** node, ensure **v1-5-pruned-emaonly-fp16.safetensors** is selected
2. Click `Queue` or press `Ctrl + Enter` to generate
The result will appear in the **Save Image** node. Right-click to save locally.
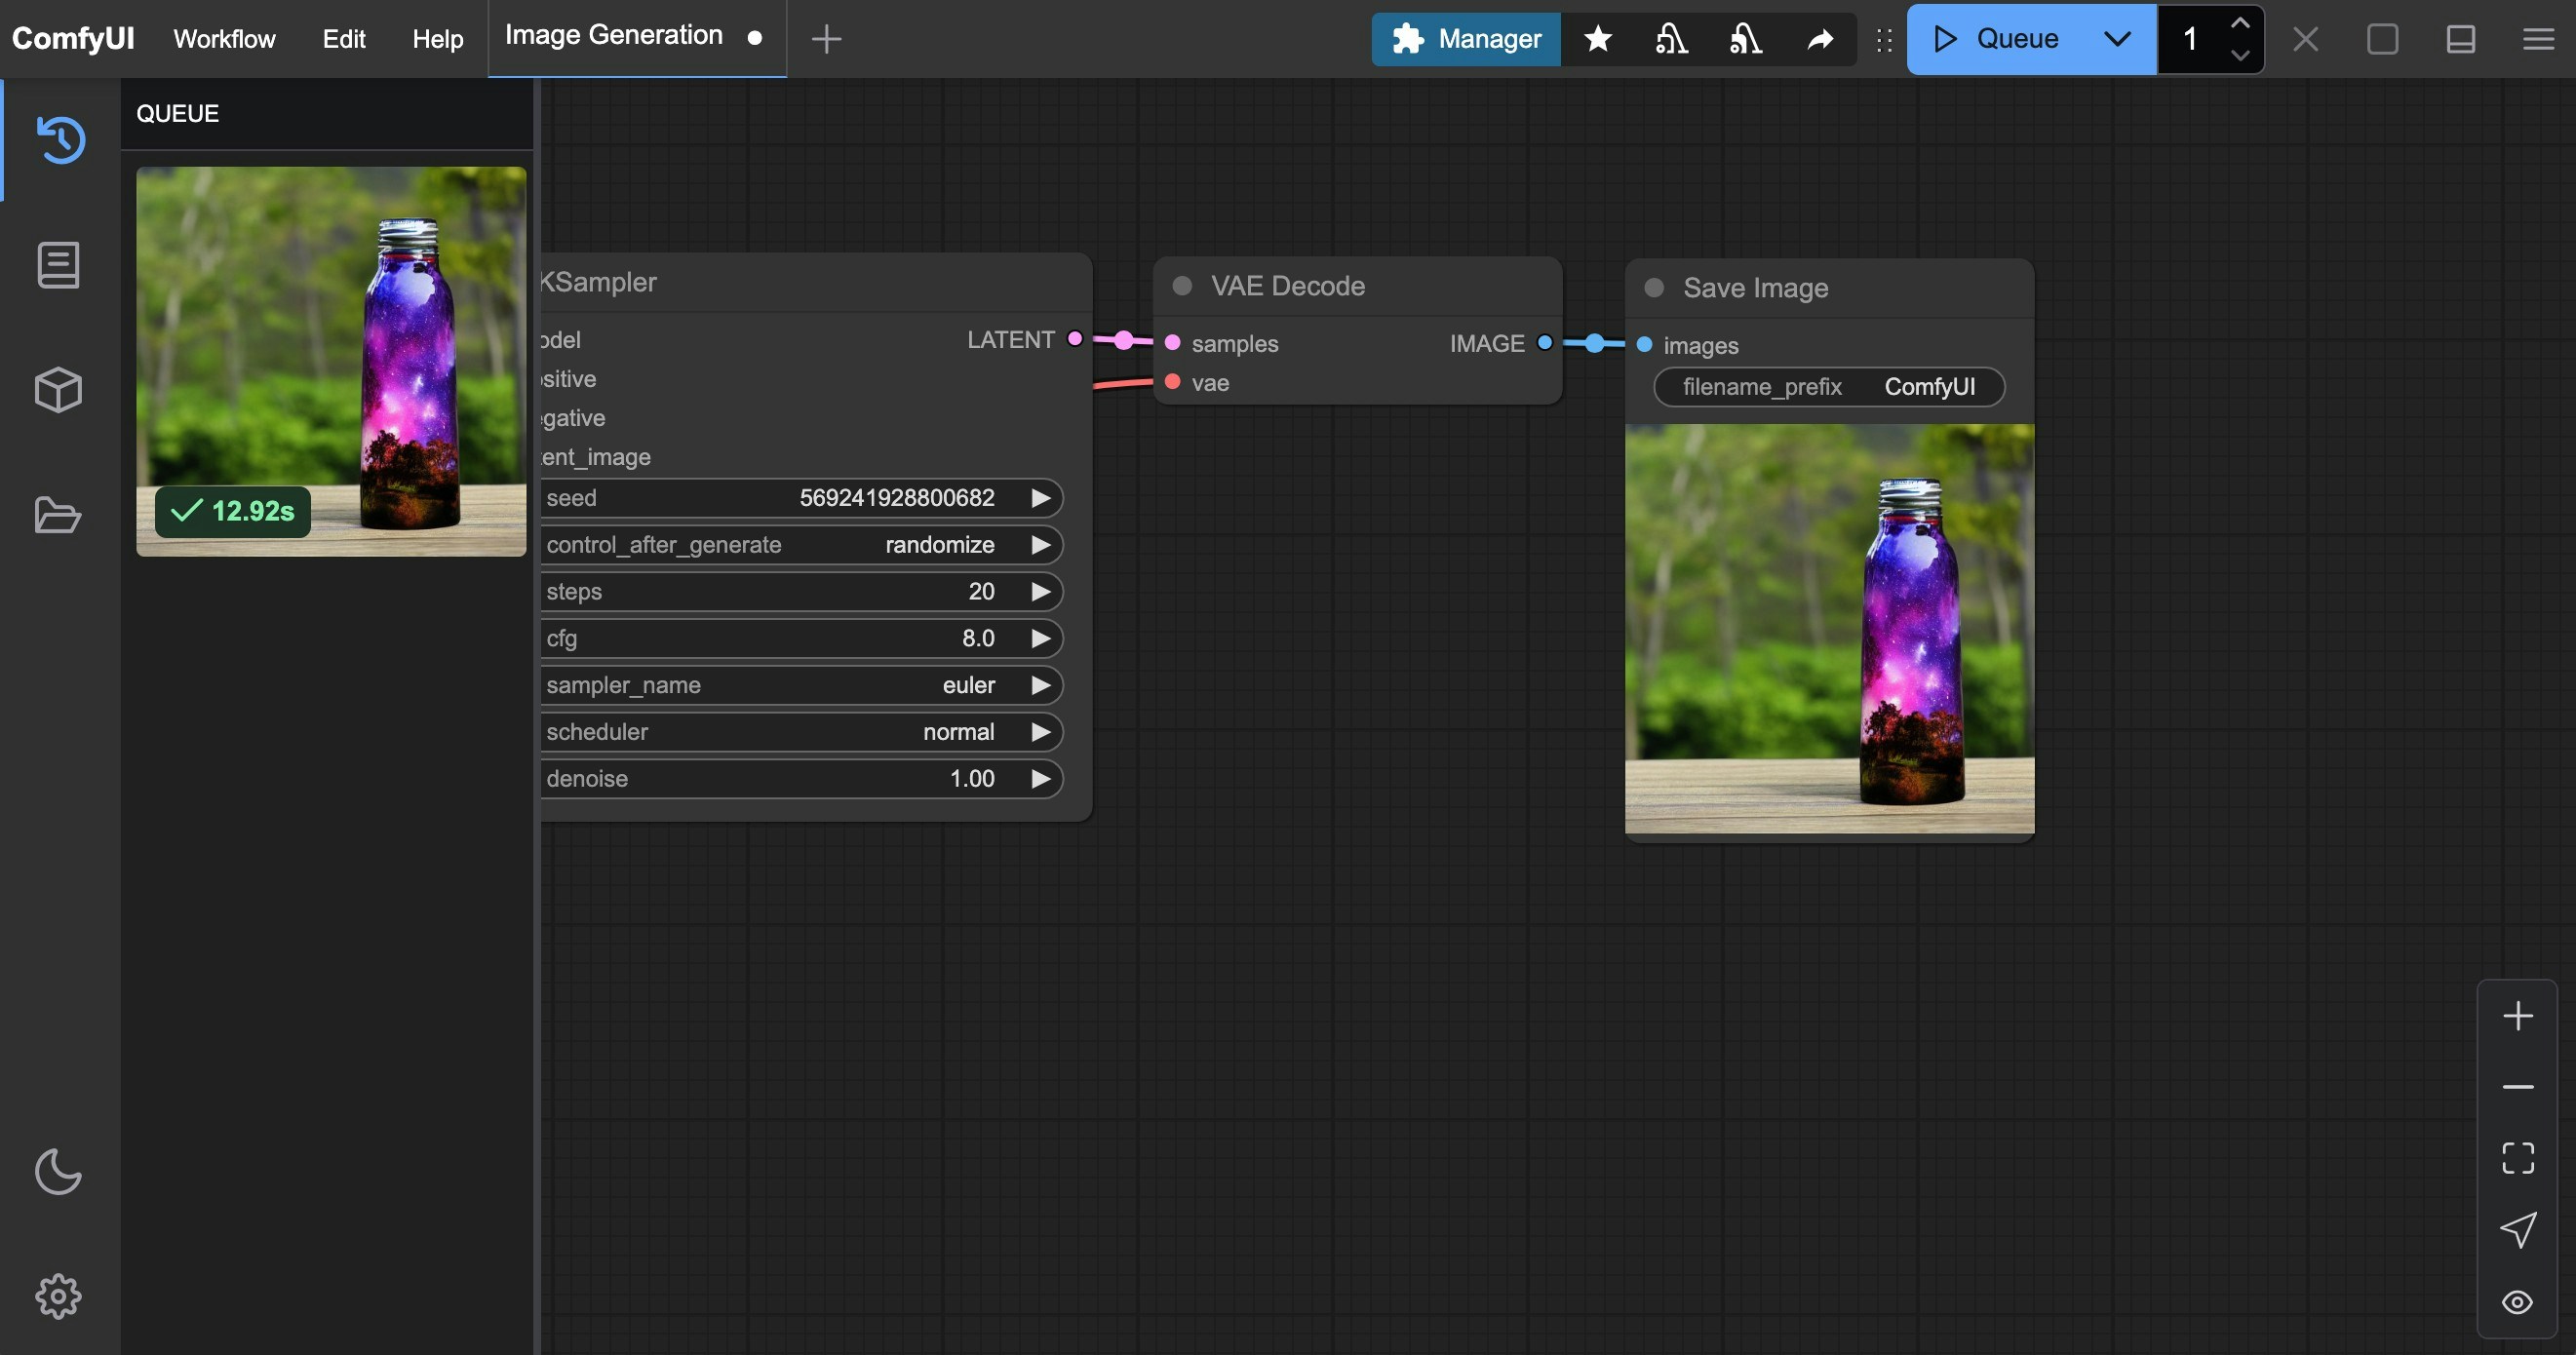 For detailed text-to-image instructions, see our comprehensive guide:
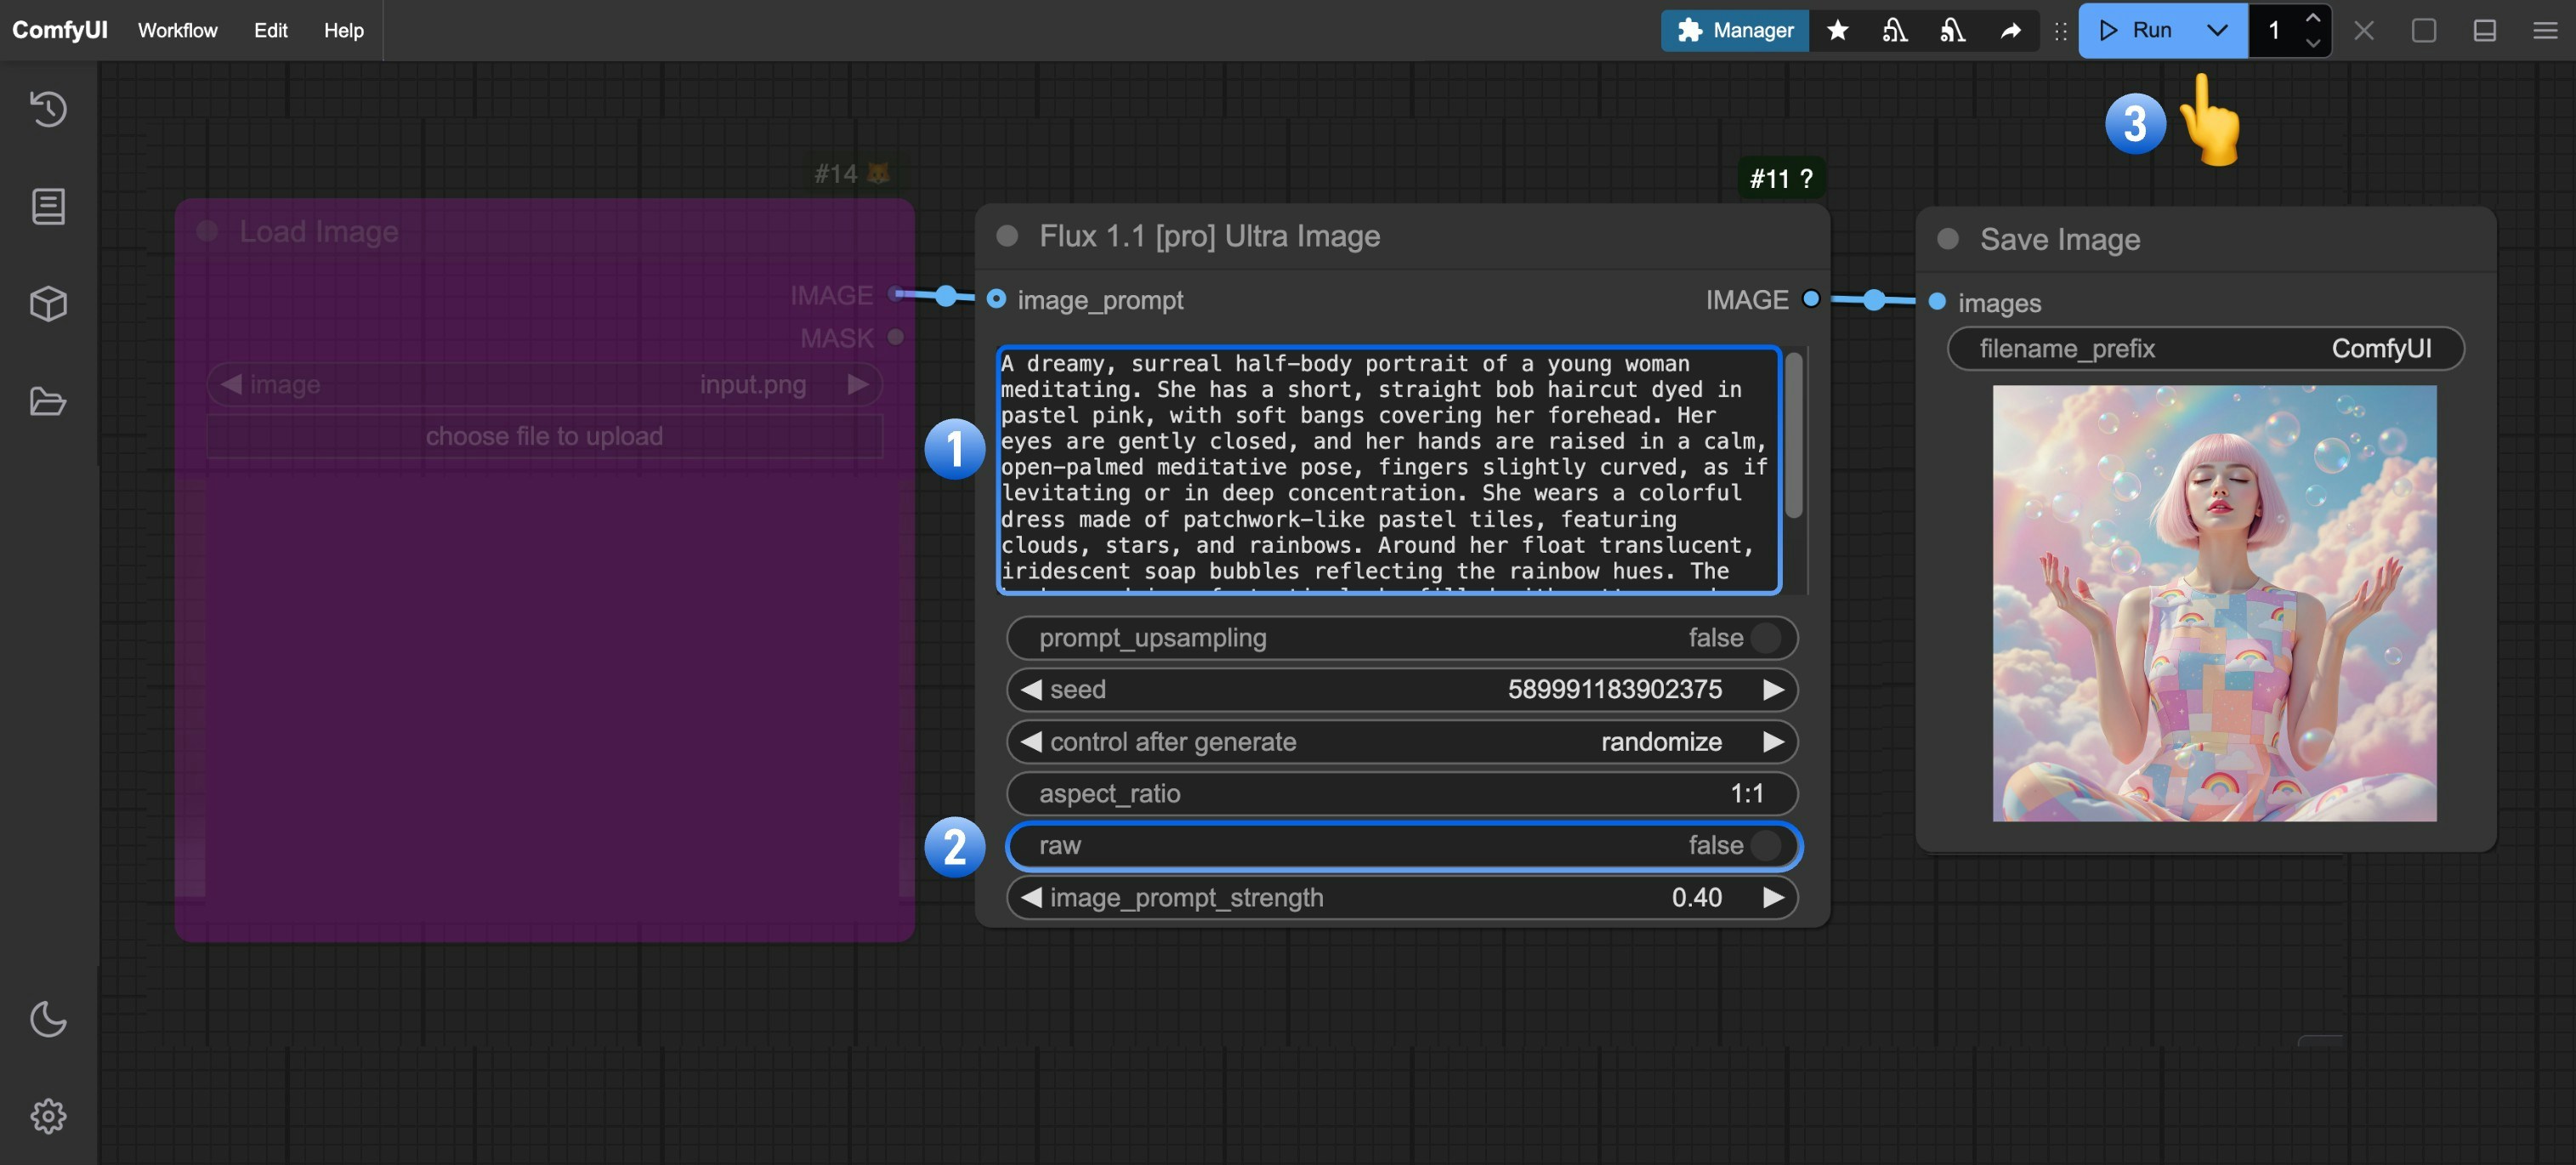 Follow the numbered steps to complete the basic workflow:
1. (Optional) Modify the prompt in the `Flux 1.1 [pro] Ultra Image` node
2. (Optional) Set `raw` parameter to `false` for more realistic output
3. Click `Run` or use shortcut `Ctrl(cmd) + Enter` to generate the image
4. After the API returns results, view the generated image in the `Save Image` node. Images are saved to the `ComfyUI/output/` directory
## Flux 1.1\[pro] Image-to-Image Tutorial
When adding an `image_prompt` to the node input, the output will blend features from the input image (Remix). The `image_prompt_strength` value affects the blend ratio: higher values make the output more similar to the input image.
### 1. Download Workflow File
Download and drag the following file into ComfyUI, or right-click the purple node in the Text-to-Image workflow and set `mode` to `always` to enable `image_prompt` input:

We'll use this image as input:

### 2. Complete the Workflow Steps
Follow the numbered steps to complete the basic workflow:
1. (Optional) Modify the prompt in the `Flux 1.1 [pro] Ultra Image` node
2. (Optional) Set `raw` parameter to `false` for more realistic output
3. Click `Run` or use shortcut `Ctrl(cmd) + Enter` to generate the image
4. After the API returns results, view the generated image in the `Save Image` node. Images are saved to the `ComfyUI/output/` directory
## Flux 1.1\[pro] Image-to-Image Tutorial
When adding an `image_prompt` to the node input, the output will blend features from the input image (Remix). The `image_prompt_strength` value affects the blend ratio: higher values make the output more similar to the input image.
### 1. Download Workflow File
Download and drag the following file into ComfyUI, or right-click the purple node in the Text-to-Image workflow and set `mode` to `always` to enable `image_prompt` input:

We'll use this image as input:

### 2. Complete the Workflow Steps
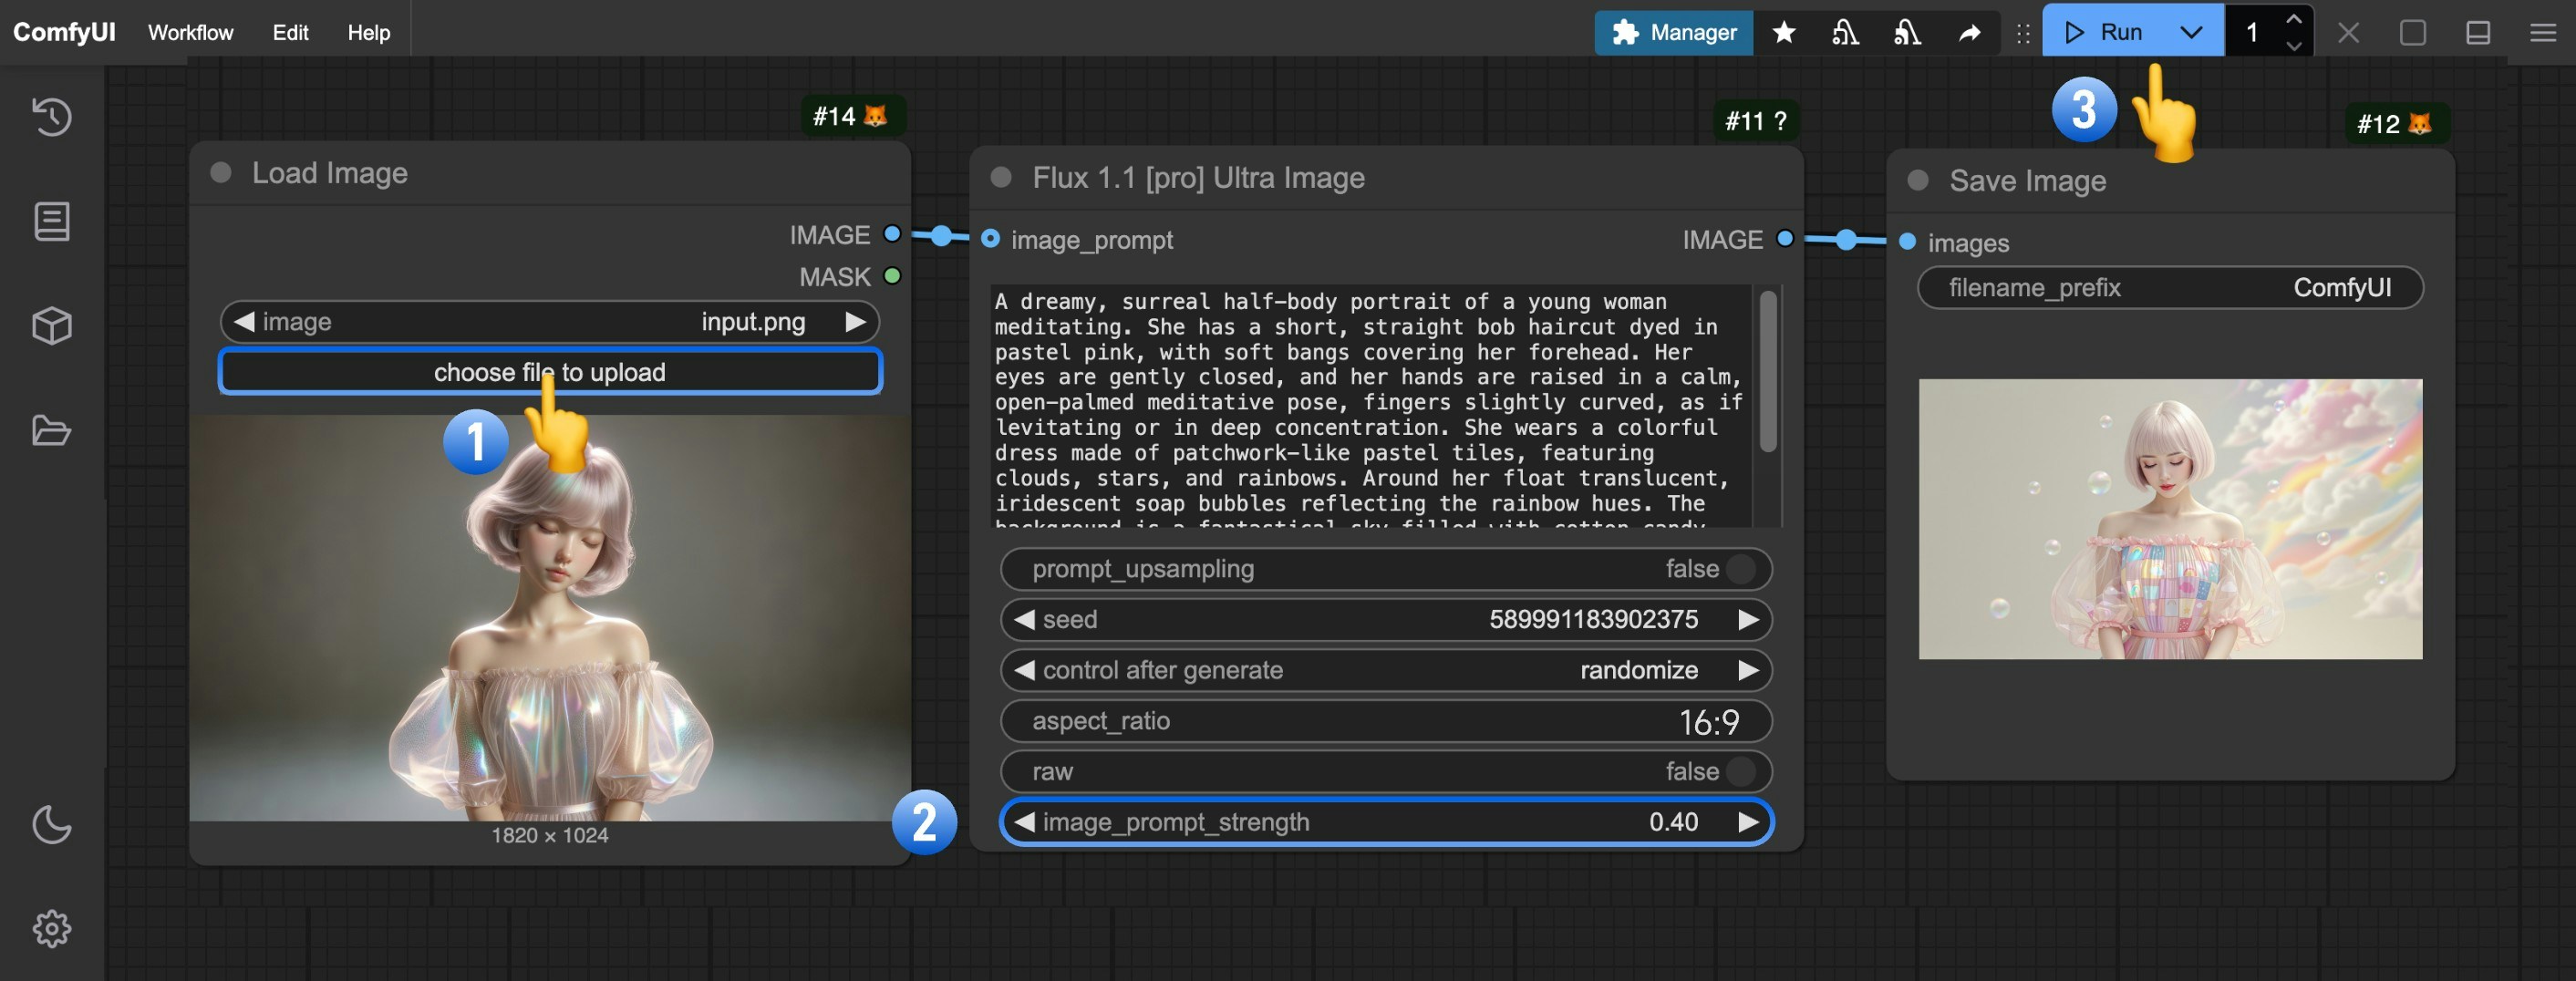 Follow these numbered steps:
1. Click **Upload** on the `Load Image` node to upload your input image
2. (Optional) Adjust `image_prompt_strength` in `Flux 1.1 [pro] Ultra Image` to change the blend ratio
3. Click `Run` or use shortcut `Ctrl(cmd) + Enter` to generate the image
4. After the API returns results, view the generated image in the `Save Image` node. Images are saved to the `ComfyUI/output/` directory
Here's a comparison of outputs with different `image_prompt_strength` values:
Follow these numbered steps:
1. Click **Upload** on the `Load Image` node to upload your input image
2. (Optional) Adjust `image_prompt_strength` in `Flux 1.1 [pro] Ultra Image` to change the blend ratio
3. Click `Run` or use shortcut `Ctrl(cmd) + Enter` to generate the image
4. After the API returns results, view the generated image in the `Save Image` node. Images are saved to the `ComfyUI/output/` directory
Here's a comparison of outputs with different `image_prompt_strength` values:
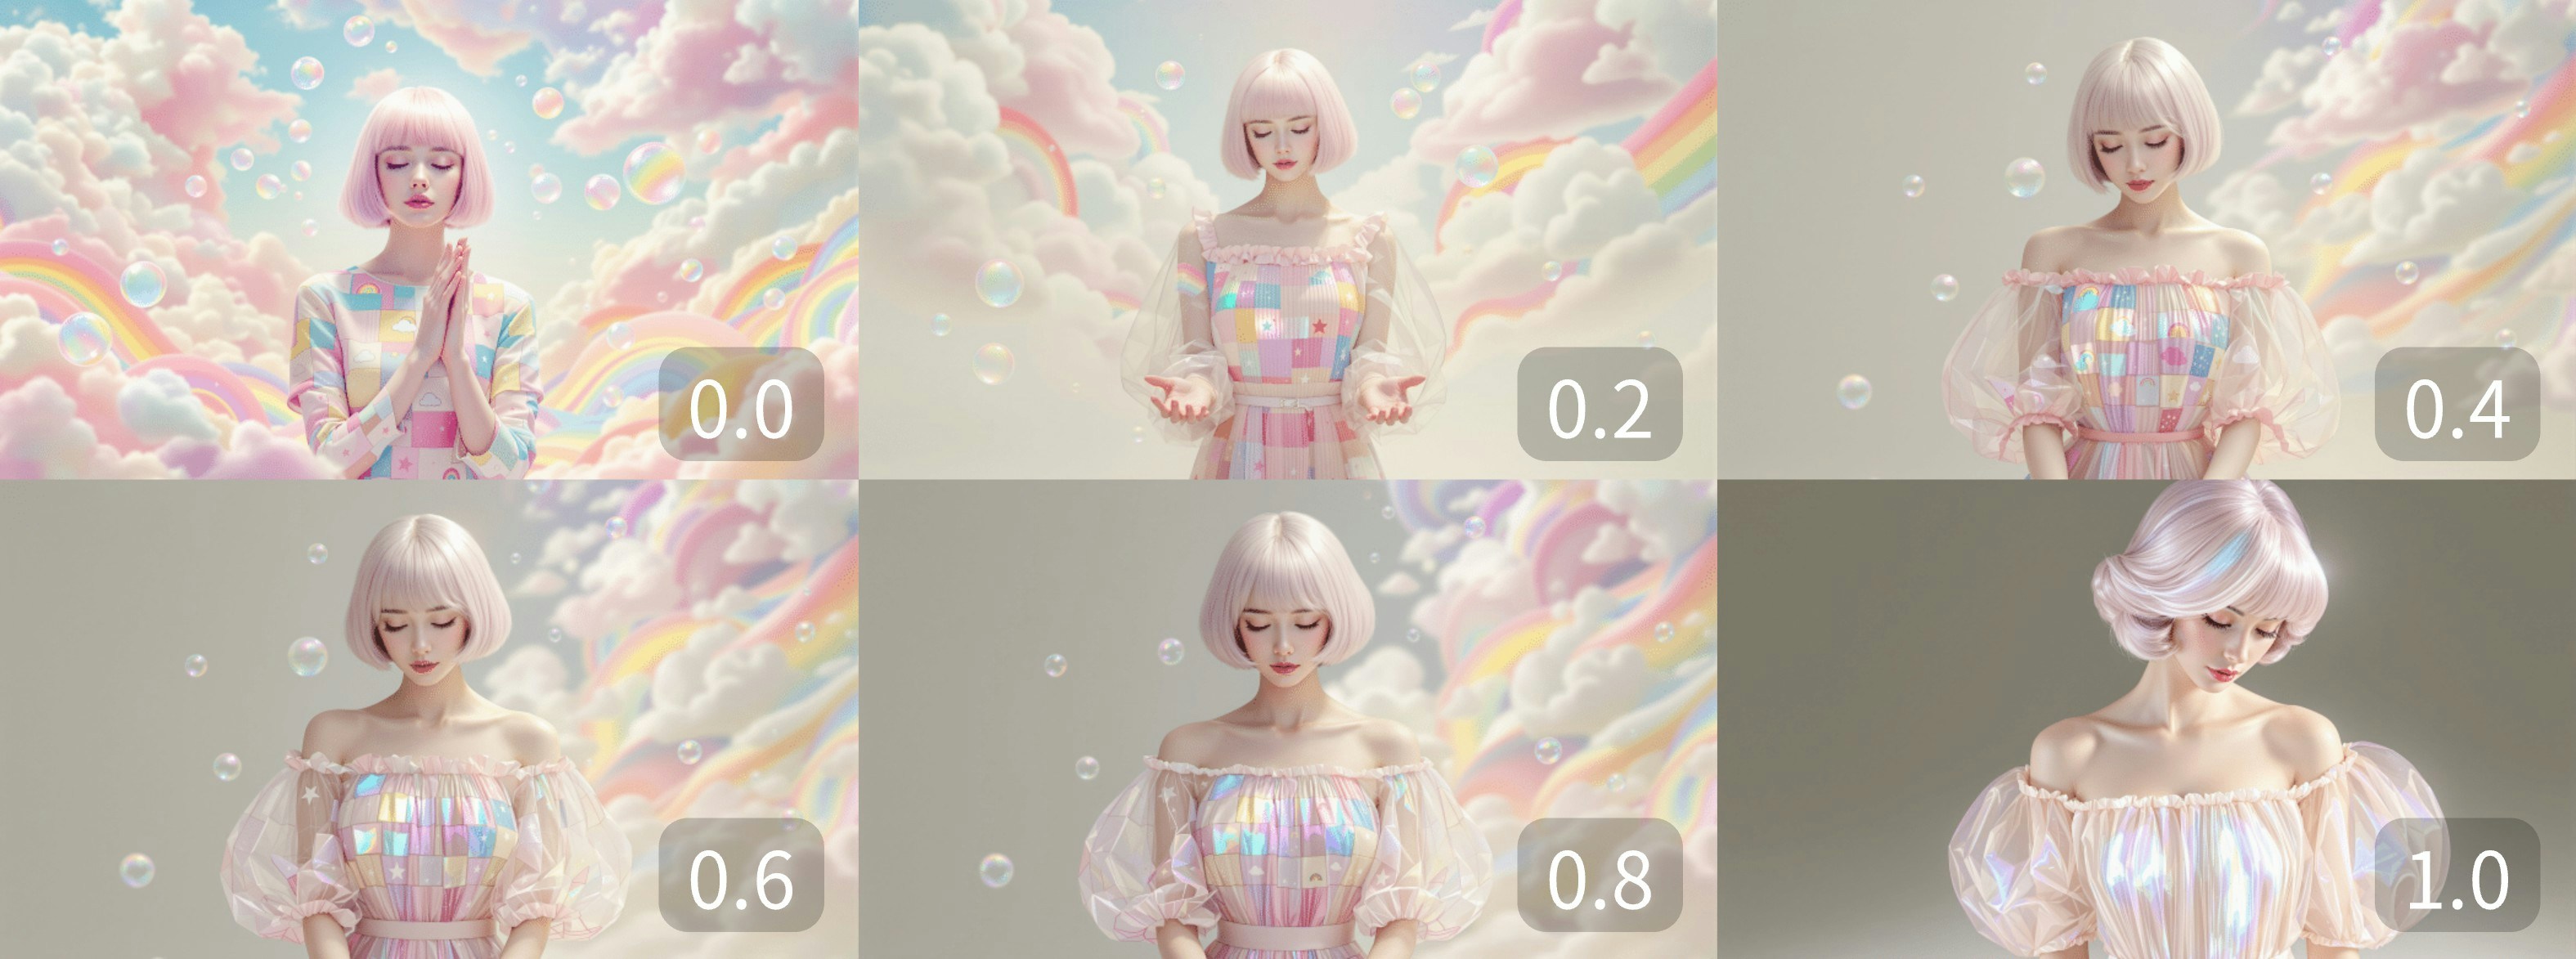 ---
# Source: https://docs.comfy.org/tutorials/flux/flux-1-controlnet.md
> ## Documentation Index
> Fetch the complete documentation index at: https://docs.comfy.org/llms.txt
> Use this file to discover all available pages before exploring further.
# ComfyUI Flux.1 ControlNet Examples
> This guide will demonstrate workflow examples using Flux.1 ControlNet.
---
# Source: https://docs.comfy.org/tutorials/flux/flux-1-controlnet.md
> ## Documentation Index
> Fetch the complete documentation index at: https://docs.comfy.org/llms.txt
> Use this file to discover all available pages before exploring further.
# ComfyUI Flux.1 ControlNet Examples
> This guide will demonstrate workflow examples using Flux.1 ControlNet.
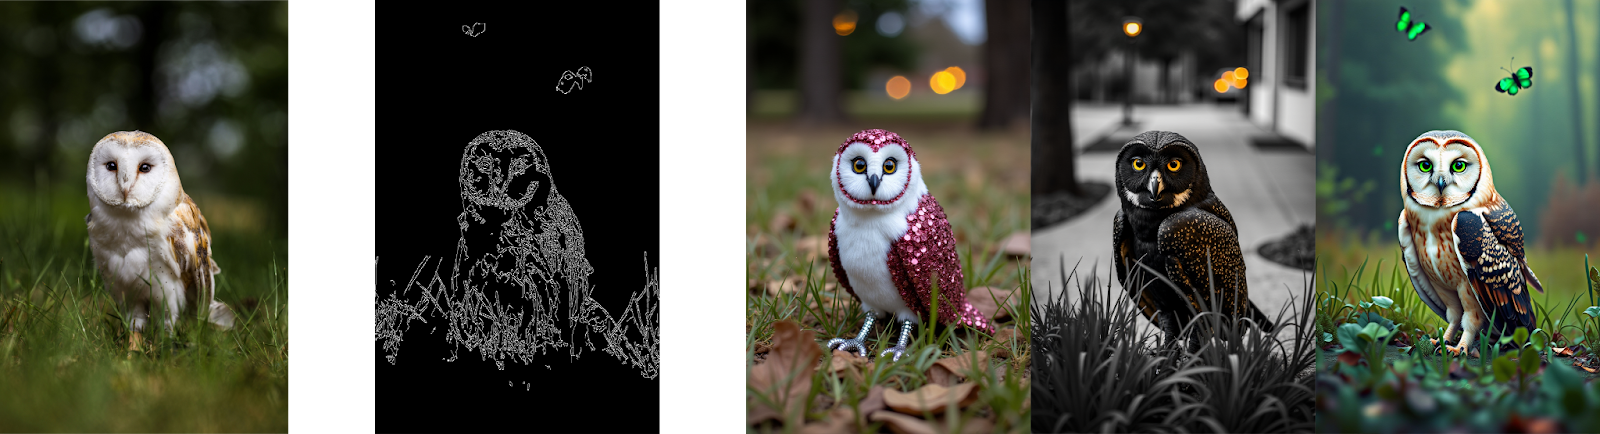
 ## FLUX.1 ControlNet Model Introduction
FLUX.1 Canny and Depth are two powerful models from the [FLUX.1 Tools](https://blackforestlabs.ai/flux-1-tools/) launched by [Black Forest Labs](https://blackforestlabs.ai/). This toolkit is designed to add control and guidance capabilities to FLUX.1, enabling users to modify and recreate real or generated images.
**FLUX.1-Depth-dev** and **FLUX.1-Canny-dev** are both 12B parameter Rectified Flow Transformer models that can generate images based on text descriptions while maintaining the structural features of the input image.
The Depth version maintains the spatial structure of the source image through depth map extraction techniques, while the Canny version uses edge detection techniques to preserve the structural features of the source image, allowing users to choose the appropriate control method based on different needs.
Both models have the following features:
* Top-tier output quality and detail representation
* Excellent prompt following ability while maintaining consistency with the original image
* Trained using guided distillation techniques for improved efficiency
* Open weights for the research community
* API interfaces (pro version) and open-source weights (dev version)
Additionally, Black Forest Labs also provides **FLUX.1-Depth-dev-lora** and **FLUX.1-Canny-dev-lora** adapter versions extracted from the complete models.
These can be applied to the FLUX.1 \[dev] base model to provide similar functionality with smaller file size, especially suitable for resource-constrained environments.
We will use the full version of **FLUX.1-Canny-dev** and **FLUX.1-Depth-dev-lora** to complete the workflow examples.
## FLUX.1 ControlNet Model Introduction
FLUX.1 Canny and Depth are two powerful models from the [FLUX.1 Tools](https://blackforestlabs.ai/flux-1-tools/) launched by [Black Forest Labs](https://blackforestlabs.ai/). This toolkit is designed to add control and guidance capabilities to FLUX.1, enabling users to modify and recreate real or generated images.
**FLUX.1-Depth-dev** and **FLUX.1-Canny-dev** are both 12B parameter Rectified Flow Transformer models that can generate images based on text descriptions while maintaining the structural features of the input image.
The Depth version maintains the spatial structure of the source image through depth map extraction techniques, while the Canny version uses edge detection techniques to preserve the structural features of the source image, allowing users to choose the appropriate control method based on different needs.
Both models have the following features:
* Top-tier output quality and detail representation
* Excellent prompt following ability while maintaining consistency with the original image
* Trained using guided distillation techniques for improved efficiency
* Open weights for the research community
* API interfaces (pro version) and open-source weights (dev version)
Additionally, Black Forest Labs also provides **FLUX.1-Depth-dev-lora** and **FLUX.1-Canny-dev-lora** adapter versions extracted from the complete models.
These can be applied to the FLUX.1 \[dev] base model to provide similar functionality with smaller file size, especially suitable for resource-constrained environments.
We will use the full version of **FLUX.1-Canny-dev** and **FLUX.1-Depth-dev-lora** to complete the workflow examples.
 1. Make sure `ae.safetensors` is loaded in the `Load VAE` node
2. Make sure `flux1-canny-dev.safetensors` is loaded in the `Load Diffusion Model` node
3. Make sure the following models are loaded in the `DualCLIPLoader` node:
* clip\_name1: t5xxl\_fp16.safetensors
* clip\_name2: clip\_l.safetensors
4. Upload the provided input image in the `Load Image` node
5. Click the `Queue` button, or use the shortcut `Ctrl(cmd) + Enter` to run the workflow
### 4. Start Your Experimentation
Try using the [FLUX.1-Depth-dev](https://huggingface.co/black-forest-labs/FLUX.1-Depth-dev) model to complete the Depth version of the workflow
You can use the image below as input

Or use the following custom nodes to complete image preprocessing:
* [ComfyUI-Advanced-ControlNet](https://github.com/Kosinkadink/ComfyUI-Advanced-ControlNet)
* [ComfyUI ControlNet aux](https://github.com/Fannovel16/comfyui_controlnet_aux)
## FLUX.1-Depth-dev-lora Workflow
1. Make sure `ae.safetensors` is loaded in the `Load VAE` node
2. Make sure `flux1-canny-dev.safetensors` is loaded in the `Load Diffusion Model` node
3. Make sure the following models are loaded in the `DualCLIPLoader` node:
* clip\_name1: t5xxl\_fp16.safetensors
* clip\_name2: clip\_l.safetensors
4. Upload the provided input image in the `Load Image` node
5. Click the `Queue` button, or use the shortcut `Ctrl(cmd) + Enter` to run the workflow
### 4. Start Your Experimentation
Try using the [FLUX.1-Depth-dev](https://huggingface.co/black-forest-labs/FLUX.1-Depth-dev) model to complete the Depth version of the workflow
You can use the image below as input

Or use the following custom nodes to complete image preprocessing:
* [ComfyUI-Advanced-ControlNet](https://github.com/Kosinkadink/ComfyUI-Advanced-ControlNet)
* [ComfyUI ControlNet aux](https://github.com/Fannovel16/comfyui_controlnet_aux)
## FLUX.1-Depth-dev-lora Workflow
 1. Make sure `flux1-dev.safetensors` is loaded in the `Load Diffusion Model` node
2. Make sure `flux1-depth-dev-lora.safetensors` is loaded in the `LoraLoaderModelOnly` node
3. Make sure the following models are loaded in the `DualCLIPLoader` node:
* clip\_name1: t5xxl\_fp16.safetensors
* clip\_name2: clip\_l.safetensors
4. Upload the provided input image in the `Load Image` node
5. Make sure `ae.safetensors` is loaded in the `Load VAE` node
6. Click the `Queue` button, or use the shortcut `Ctrl(cmd) + Enter` to run the workflow
### 4. Start Your Experimentation
Try using the [FLUX.1-Canny-dev-lora](https://huggingface.co/black-forest-labs/FLUX.1-Canny-dev-lora) model to complete the Canny version of the workflow
Use [ComfyUI-Advanced-ControlNet](https://github.com/Kosinkadink/ComfyUI-Advanced-ControlNet) or [ComfyUI ControlNet aux](https://github.com/Fannovel16/comfyui_controlnet_aux) to complete image preprocessing
## Community Versions of Flux Controlnets
XLab and InstantX + Shakker Labs have released Controlnets for Flux.
**InstantX:**
* [FLUX.1-dev-Controlnet-Canny](https://huggingface.co/InstantX/FLUX.1-dev-Controlnet-Canny/blob/main/diffusion_pytorch_model.safetensors)
* [FLUX.1-dev-ControlNet-Depth](https://huggingface.co/Shakker-Labs/FLUX.1-dev-ControlNet-Depth/blob/main/diffusion_pytorch_model.safetensors)
* [FLUX.1-dev-ControlNet-Union-Pro](https://huggingface.co/Shakker-Labs/FLUX.1-dev-ControlNet-Union-Pro/blob/main/diffusion_pytorch_model.safetensors)
**XLab**: [flux-controlnet-collections](https://huggingface.co/XLabs-AI/flux-controlnet-collections)
Place these files in the `ComfyUI/models/controlnet` directory.
You can visit [Flux Controlnet Example](https://raw.githubusercontent.com/comfyanonymous/ComfyUI_examples/refs/heads/master/flux/flux_controlnet_example.png) to get the corresponding workflow image, and use the image from [here](https://raw.githubusercontent.com/comfyanonymous/ComfyUI_examples/refs/heads/master/flux/girl_in_field.png) as the input image.
---
# Source: https://docs.comfy.org/tutorials/flux/flux-1-fill-dev.md
> ## Documentation Index
> Fetch the complete documentation index at: https://docs.comfy.org/llms.txt
> Use this file to discover all available pages before exploring further.
# ComfyUI Flux.1 fill dev Example
> This guide demonstrates how to use Flux.1 fill dev to create Inpainting and Outpainting workflows.
1. Make sure `flux1-dev.safetensors` is loaded in the `Load Diffusion Model` node
2. Make sure `flux1-depth-dev-lora.safetensors` is loaded in the `LoraLoaderModelOnly` node
3. Make sure the following models are loaded in the `DualCLIPLoader` node:
* clip\_name1: t5xxl\_fp16.safetensors
* clip\_name2: clip\_l.safetensors
4. Upload the provided input image in the `Load Image` node
5. Make sure `ae.safetensors` is loaded in the `Load VAE` node
6. Click the `Queue` button, or use the shortcut `Ctrl(cmd) + Enter` to run the workflow
### 4. Start Your Experimentation
Try using the [FLUX.1-Canny-dev-lora](https://huggingface.co/black-forest-labs/FLUX.1-Canny-dev-lora) model to complete the Canny version of the workflow
Use [ComfyUI-Advanced-ControlNet](https://github.com/Kosinkadink/ComfyUI-Advanced-ControlNet) or [ComfyUI ControlNet aux](https://github.com/Fannovel16/comfyui_controlnet_aux) to complete image preprocessing
## Community Versions of Flux Controlnets
XLab and InstantX + Shakker Labs have released Controlnets for Flux.
**InstantX:**
* [FLUX.1-dev-Controlnet-Canny](https://huggingface.co/InstantX/FLUX.1-dev-Controlnet-Canny/blob/main/diffusion_pytorch_model.safetensors)
* [FLUX.1-dev-ControlNet-Depth](https://huggingface.co/Shakker-Labs/FLUX.1-dev-ControlNet-Depth/blob/main/diffusion_pytorch_model.safetensors)
* [FLUX.1-dev-ControlNet-Union-Pro](https://huggingface.co/Shakker-Labs/FLUX.1-dev-ControlNet-Union-Pro/blob/main/diffusion_pytorch_model.safetensors)
**XLab**: [flux-controlnet-collections](https://huggingface.co/XLabs-AI/flux-controlnet-collections)
Place these files in the `ComfyUI/models/controlnet` directory.
You can visit [Flux Controlnet Example](https://raw.githubusercontent.com/comfyanonymous/ComfyUI_examples/refs/heads/master/flux/flux_controlnet_example.png) to get the corresponding workflow image, and use the image from [here](https://raw.githubusercontent.com/comfyanonymous/ComfyUI_examples/refs/heads/master/flux/girl_in_field.png) as the input image.
---
# Source: https://docs.comfy.org/tutorials/flux/flux-1-fill-dev.md
> ## Documentation Index
> Fetch the complete documentation index at: https://docs.comfy.org/llms.txt
> Use this file to discover all available pages before exploring further.
# ComfyUI Flux.1 fill dev Example
> This guide demonstrates how to use Flux.1 fill dev to create Inpainting and Outpainting workflows.
 ## Introduction to Flux.1 fill dev Model
Flux.1 fill dev is one of the core tools in the [FLUX.1 Tools suite](https://blackforestlabs.ai/flux-1-tools/) launched by [Black Forest Labs](https://blackforestlabs.ai/), specifically designed for image inpainting and outpainting.
Key features of Flux.1 fill dev:
* Powerful image inpainting and outpainting capabilities, with results second only to the commercial version FLUX.1 Fill \[pro].
* Excellent prompt understanding and following ability, precisely capturing user intent while maintaining high consistency with the original image.
* Advanced guided distillation training technology, making the model more efficient while maintaining high-quality output.
* Friendly licensing terms, with generated outputs usable for personal, scientific, and commercial purposes, please refer to the [FLUX.1 \[dev\] non-commercial license](https://huggingface.co/black-forest-labs/FLUX.1-dev/blob/main/LICENSE.md) for details.
Open Source Repository: [FLUX.1 \[dev\]](https://huggingface.co/black-forest-labs/FLUX.1-dev)
This guide will demonstrate inpainting and outpainting workflows based on the Flux.1 fill dev model.
If you're not familiar with inpainting and outpainting workflows, you can refer to [ComfyUI Layout Inpainting Example](/tutorials/basic/inpaint) and [ComfyUI Image Extension Example](/tutorials/basic/outpaint) for some related explanations.
## Flux.1 Fill dev and related models installation
Before we begin, let's complete the installation of the Flux.1 Fill dev model files. The inpainting and outpainting workflows will use exactly the same model files.
If you've previously used the full version of the [Flux.1 Text-to-Image workflow](/tutorials/flux/flux-1-text-to-image),
then you only need to download the **flux1-fill-dev.safetensors** model file in this section.
However, since downloading the corresponding model requires agreeing to the corresponding usage agreement, please visit the [black-forest-labs/FLUX.1-Fill-dev](https://huggingface.co/black-forest-labs/FLUX.1-Fill-dev) page and make sure you have agreed to the corresponding agreement as shown in the image below.
## Introduction to Flux.1 fill dev Model
Flux.1 fill dev is one of the core tools in the [FLUX.1 Tools suite](https://blackforestlabs.ai/flux-1-tools/) launched by [Black Forest Labs](https://blackforestlabs.ai/), specifically designed for image inpainting and outpainting.
Key features of Flux.1 fill dev:
* Powerful image inpainting and outpainting capabilities, with results second only to the commercial version FLUX.1 Fill \[pro].
* Excellent prompt understanding and following ability, precisely capturing user intent while maintaining high consistency with the original image.
* Advanced guided distillation training technology, making the model more efficient while maintaining high-quality output.
* Friendly licensing terms, with generated outputs usable for personal, scientific, and commercial purposes, please refer to the [FLUX.1 \[dev\] non-commercial license](https://huggingface.co/black-forest-labs/FLUX.1-dev/blob/main/LICENSE.md) for details.
Open Source Repository: [FLUX.1 \[dev\]](https://huggingface.co/black-forest-labs/FLUX.1-dev)
This guide will demonstrate inpainting and outpainting workflows based on the Flux.1 fill dev model.
If you're not familiar with inpainting and outpainting workflows, you can refer to [ComfyUI Layout Inpainting Example](/tutorials/basic/inpaint) and [ComfyUI Image Extension Example](/tutorials/basic/outpaint) for some related explanations.
## Flux.1 Fill dev and related models installation
Before we begin, let's complete the installation of the Flux.1 Fill dev model files. The inpainting and outpainting workflows will use exactly the same model files.
If you've previously used the full version of the [Flux.1 Text-to-Image workflow](/tutorials/flux/flux-1-text-to-image),
then you only need to download the **flux1-fill-dev.safetensors** model file in this section.
However, since downloading the corresponding model requires agreeing to the corresponding usage agreement, please visit the [black-forest-labs/FLUX.1-Fill-dev](https://huggingface.co/black-forest-labs/FLUX.1-Fill-dev) page and make sure you have agreed to the corresponding agreement as shown in the image below.
 Complete model list:
* [clip\_l.safetensors](https://huggingface.co/comfyanonymous/flux_text_encoders/resolve/main/clip_l.safetensors?download=true)
* [t5xxl\_fp16.safetensors](https://huggingface.co/comfyanonymous/flux_text_encoders/resolve/main/t5xxl_fp16.safetensors?download=true)
* [ae.safetensors](https://huggingface.co/black-forest-labs/FLUX.1-schnell/resolve/main/ae.safetensors?download=true)
* [flux1-fill-dev.safetensors](https://huggingface.co/black-forest-labs/FLUX.1-Fill-dev/resolve/main/flux1-fill-dev.safetensors?download=true)
File storage location:
```
ComfyUI/
├── models/
│ ├── text_encoders/
│ │ ├── clip_l.safetensors
│ │ └── t5xxl_fp16.safetensors
│ ├── vae/
│ │ └── ae.safetensors
│ └── diffusion_models/
│ └── flux1-fill-dev.safetensors
```
## Flux.1 Fill dev inpainting workflow
### 1. Inpainting workflow and asset
Complete model list:
* [clip\_l.safetensors](https://huggingface.co/comfyanonymous/flux_text_encoders/resolve/main/clip_l.safetensors?download=true)
* [t5xxl\_fp16.safetensors](https://huggingface.co/comfyanonymous/flux_text_encoders/resolve/main/t5xxl_fp16.safetensors?download=true)
* [ae.safetensors](https://huggingface.co/black-forest-labs/FLUX.1-schnell/resolve/main/ae.safetensors?download=true)
* [flux1-fill-dev.safetensors](https://huggingface.co/black-forest-labs/FLUX.1-Fill-dev/resolve/main/flux1-fill-dev.safetensors?download=true)
File storage location:
```
ComfyUI/
├── models/
│ ├── text_encoders/
│ │ ├── clip_l.safetensors
│ │ └── t5xxl_fp16.safetensors
│ ├── vae/
│ │ └── ae.safetensors
│ └── diffusion_models/
│ └── flux1-fill-dev.safetensors
```
## Flux.1 Fill dev inpainting workflow
### 1. Inpainting workflow and asset
 1. Ensure the `Load Diffusion Model` node has `flux1-fill-dev.safetensors` loaded.
2. Ensure the `DualCLIPLoader` node has the following models loaded:
* clip\_name1: `t5xxl_fp16.safetensors`
* clip\_name2: `clip_l.safetensors`
3. Ensure the `Load VAE` node has `ae.safetensors` loaded.
4. Upload the input image provided in the document to the `Load Image` node; if you're using the version without a mask, remember to complete the mask drawing using the mask editor
5. Click the `Queue` button, or use the shortcut `Ctrl(cmd) + Enter` to run the workflow
## Flux.1 Fill dev Outpainting Workflow
### 1. Outpainting workflow and asset
Please download the image below and drag it into ComfyUI to load the corresponding workflow

Please download the image below, we will use it as the input image

### 2. Steps to run the workflow
1. Ensure the `Load Diffusion Model` node has `flux1-fill-dev.safetensors` loaded.
2. Ensure the `DualCLIPLoader` node has the following models loaded:
* clip\_name1: `t5xxl_fp16.safetensors`
* clip\_name2: `clip_l.safetensors`
3. Ensure the `Load VAE` node has `ae.safetensors` loaded.
4. Upload the input image provided in the document to the `Load Image` node; if you're using the version without a mask, remember to complete the mask drawing using the mask editor
5. Click the `Queue` button, or use the shortcut `Ctrl(cmd) + Enter` to run the workflow
## Flux.1 Fill dev Outpainting Workflow
### 1. Outpainting workflow and asset
Please download the image below and drag it into ComfyUI to load the corresponding workflow

Please download the image below, we will use it as the input image

### 2. Steps to run the workflow
 1. Ensure the `Load Diffusion Model` node has `flux1-fill-dev.safetensors` loaded.
2. Ensure the `DualCLIPLoader` node has the following models loaded:
* clip\_name1: `t5xxl_fp16.safetensors`
* clip\_name2: `clip_l.safetensors`
3. Ensure the `Load VAE` node has `ae.safetensors` loaded.
4. Upload the input image provided in the document to the `Load Image` node
5. Click the `Queue` button, or use the shortcut `Ctrl(cmd) + Enter` to run the workflow
---
# Source: https://docs.comfy.org/tutorials/flux/flux-1-kontext-dev.md
> ## Documentation Index
> Fetch the complete documentation index at: https://docs.comfy.org/llms.txt
> Use this file to discover all available pages before exploring further.
# ComfyUI Flux Kontext Dev Native Workflow Example
> ComfyUI Flux Kontext Dev Native Workflow Example.
## About FLUX.1 Kontext Dev
FLUX.1 Kontext is a breakthrough multimodal image editing model from Black Forest Labs that supports simultaneous text and image input, intelligently understanding image context and performing precise editing. Its development version is an open-source diffusion transformer model with 12 billion parameters, featuring excellent context understanding and character consistency maintenance, ensuring that key elements such as character features and composition layout remain stable even after multiple iterative edits.
It shares the same core capabilities as the FLUX.1 Kontext suite:
* Character Consistency: Preserves unique elements in images across multiple scenes and environments, such as reference characters or objects in the image.
* Editing: Makes targeted modifications to specific elements in the image without affecting other parts.
* Style Reference: Generates novel scenes while preserving the unique style of the reference image according to text prompts.
* Interactive Speed: Minimal latency in image generation and editing.
While the previously released API version offers the highest fidelity and speed, FLUX.1 Kontext \[Dev] runs entirely on local machines, providing unparalleled flexibility for developers, researchers, and advanced users who wish to experiment.
### Version Information
* **\[FLUX.1 Kontext \[pro]** - Commercial version, focused on rapid iterative editing
* **FLUX.1 Kontext \[max]** - Experimental version with stronger prompt adherence
* **FLUX.1 Kontext \[dev]** - Open source version (used in this tutorial), 12B parameters, mainly for research
Currently in ComfyUI, you can use all these versions, where [Pro and Max versions](/tutorials/partner-nodes/black-forest-labs/flux-1-kontext) can be called through API nodes, while the Dev open source version please refer to the instructions in this guide.
1. Ensure the `Load Diffusion Model` node has `flux1-fill-dev.safetensors` loaded.
2. Ensure the `DualCLIPLoader` node has the following models loaded:
* clip\_name1: `t5xxl_fp16.safetensors`
* clip\_name2: `clip_l.safetensors`
3. Ensure the `Load VAE` node has `ae.safetensors` loaded.
4. Upload the input image provided in the document to the `Load Image` node
5. Click the `Queue` button, or use the shortcut `Ctrl(cmd) + Enter` to run the workflow
---
# Source: https://docs.comfy.org/tutorials/flux/flux-1-kontext-dev.md
> ## Documentation Index
> Fetch the complete documentation index at: https://docs.comfy.org/llms.txt
> Use this file to discover all available pages before exploring further.
# ComfyUI Flux Kontext Dev Native Workflow Example
> ComfyUI Flux Kontext Dev Native Workflow Example.
## About FLUX.1 Kontext Dev
FLUX.1 Kontext is a breakthrough multimodal image editing model from Black Forest Labs that supports simultaneous text and image input, intelligently understanding image context and performing precise editing. Its development version is an open-source diffusion transformer model with 12 billion parameters, featuring excellent context understanding and character consistency maintenance, ensuring that key elements such as character features and composition layout remain stable even after multiple iterative edits.
It shares the same core capabilities as the FLUX.1 Kontext suite:
* Character Consistency: Preserves unique elements in images across multiple scenes and environments, such as reference characters or objects in the image.
* Editing: Makes targeted modifications to specific elements in the image without affecting other parts.
* Style Reference: Generates novel scenes while preserving the unique style of the reference image according to text prompts.
* Interactive Speed: Minimal latency in image generation and editing.
While the previously released API version offers the highest fidelity and speed, FLUX.1 Kontext \[Dev] runs entirely on local machines, providing unparalleled flexibility for developers, researchers, and advanced users who wish to experiment.
### Version Information
* **\[FLUX.1 Kontext \[pro]** - Commercial version, focused on rapid iterative editing
* **FLUX.1 Kontext \[max]** - Experimental version with stronger prompt adherence
* **FLUX.1 Kontext \[dev]** - Open source version (used in this tutorial), 12B parameters, mainly for research
Currently in ComfyUI, you can use all these versions, where [Pro and Max versions](/tutorials/partner-nodes/black-forest-labs/flux-1-kontext) can be called through API nodes, while the Dev open source version please refer to the instructions in this guide.
 You can refer to the numbers in the image to complete the workflow run:
1. In the `Load Diffusion Model` node, load the `flux1-dev-kontext_fp8_scaled.safetensors` model
2. In the `DualCLIP Load` node, ensure that `clip_l.safetensors` and `t5xxl_fp16.safetensors` or `t5xxl_fp8_e4m3fn_scaled.safetensors` are loaded
3. In the `Load VAE` node, ensure that `ae.safetensors` model is loaded
4. In the `Load Image(from output)` node, load the provided input image
5. In the `CLIP Text Encode` node, modify the prompts, only English is supported
6. Click the `Queue` button, or use the shortcut `Ctrl(cmd) + Enter` to run the workflow
## Flux Kontext Prompt Techniques
### 1. Basic Modifications
* Simple and direct: `"Change the car color to red"`
* Maintain style: `"Change to daytime while maintaining the same style of the painting"`
### 2. Style Transfer
**Principles:**
* Clearly name style: `"Transform to Bauhaus art style"`
* Describe characteristics: `"Transform to oil painting with visible brushstrokes, thick paint texture"`
* Preserve composition: `"Change to Bauhaus style while maintaining the original composition"`
### 3. Character Consistency
**Framework:**
* Specific description: `"The woman with short black hair"` instead of "she"
* Preserve features: `"while maintaining the same facial features, hairstyle, and expression"`
* Step-by-step modifications: Change background first, then actions
### 4. Text Editing
* Use quotes: `"Replace 'joy' with 'BFL'"`
* Maintain format: `"Replace text while maintaining the same font style"`
## Common Problem Solutions
### Character Changes Too Much
❌ Wrong: `"Transform the person into a Viking"`
✅ Correct: `"Change the clothes to be a viking warrior while preserving facial features"`
### Composition Position Changes
❌ Wrong: `"Put him on a beach"`
✅ Correct: `"Change the background to a beach while keeping the person in the exact same position, scale, and pose"`
### Style Application Inaccuracy
❌ Wrong: `"Make it a sketch"`
✅ Correct: `"Convert to pencil sketch with natural graphite lines, cross-hatching, and visible paper texture"`
## Core Principles
1. **Be Specific and Clear** - Use precise descriptions, avoid vague terms
2. **Step-by-step Editing** - Break complex modifications into multiple simple steps
3. **Explicit Preservation** - State what should remain unchanged
4. **Verb Selection** - Use "change", "replace" rather than "transform"
## Best Practice Templates
**Object Modification:**
`"Change [object] to [new state], keep [content to preserve] unchanged"`
**Style Transfer:**
`"Transform to [specific style], while maintaining [composition/character/other] unchanged"`
**Background Replacement:**
`"Change the background to [new background], keep the subject in the exact same position and pose"`
**Text Editing:**
`"Replace '[original text]' with '[new text]', maintain the same font style"`
> **Remember:** The more specific, the better. Kontext excels at understanding detailed instructions and maintaining consistency.
---
# Source: https://docs.comfy.org/tutorials/partner-nodes/black-forest-labs/flux-1-kontext.md
> ## Documentation Index
> Fetch the complete documentation index at: https://docs.comfy.org/llms.txt
> Use this file to discover all available pages before exploring further.
# ComfyUI Flux.1 Kontext Pro Image API Node Official Example
> This guide will show you how to use the Flux.1 Kontext Pro Image Partner node in ComfyUI to perform image editing
FLUX.1 Kontext is a professional image-to-image editing model developed by Black Forest Labs, focusing on intelligent understanding of image context and precise editing.
It can perform various editing tasks without complex descriptions, including object modification, style transfer, background replacement, character consistency editing, and text editing.
The core advantage of Kontext lies in its excellent context understanding ability and character consistency maintenance, ensuring that key elements such as character features and composition layout remain stable even after multiple iterations of editing.
Currently, ComfyUI has supported two models of Flux.1 Kontext:
* **Kontext Pro** is ideal for editing, composing, and remixing.
* **Kontext Max** pushes the limits on typography, prompt precision, and speed.
In this guide, we will briefly introduce how to use the Flux.1 Kontext Partner nodes to perform image editing through corresponding workflows.
You can refer to the numbers in the image to complete the workflow run:
1. In the `Load Diffusion Model` node, load the `flux1-dev-kontext_fp8_scaled.safetensors` model
2. In the `DualCLIP Load` node, ensure that `clip_l.safetensors` and `t5xxl_fp16.safetensors` or `t5xxl_fp8_e4m3fn_scaled.safetensors` are loaded
3. In the `Load VAE` node, ensure that `ae.safetensors` model is loaded
4. In the `Load Image(from output)` node, load the provided input image
5. In the `CLIP Text Encode` node, modify the prompts, only English is supported
6. Click the `Queue` button, or use the shortcut `Ctrl(cmd) + Enter` to run the workflow
## Flux Kontext Prompt Techniques
### 1. Basic Modifications
* Simple and direct: `"Change the car color to red"`
* Maintain style: `"Change to daytime while maintaining the same style of the painting"`
### 2. Style Transfer
**Principles:**
* Clearly name style: `"Transform to Bauhaus art style"`
* Describe characteristics: `"Transform to oil painting with visible brushstrokes, thick paint texture"`
* Preserve composition: `"Change to Bauhaus style while maintaining the original composition"`
### 3. Character Consistency
**Framework:**
* Specific description: `"The woman with short black hair"` instead of "she"
* Preserve features: `"while maintaining the same facial features, hairstyle, and expression"`
* Step-by-step modifications: Change background first, then actions
### 4. Text Editing
* Use quotes: `"Replace 'joy' with 'BFL'"`
* Maintain format: `"Replace text while maintaining the same font style"`
## Common Problem Solutions
### Character Changes Too Much
❌ Wrong: `"Transform the person into a Viking"`
✅ Correct: `"Change the clothes to be a viking warrior while preserving facial features"`
### Composition Position Changes
❌ Wrong: `"Put him on a beach"`
✅ Correct: `"Change the background to a beach while keeping the person in the exact same position, scale, and pose"`
### Style Application Inaccuracy
❌ Wrong: `"Make it a sketch"`
✅ Correct: `"Convert to pencil sketch with natural graphite lines, cross-hatching, and visible paper texture"`
## Core Principles
1. **Be Specific and Clear** - Use precise descriptions, avoid vague terms
2. **Step-by-step Editing** - Break complex modifications into multiple simple steps
3. **Explicit Preservation** - State what should remain unchanged
4. **Verb Selection** - Use "change", "replace" rather than "transform"
## Best Practice Templates
**Object Modification:**
`"Change [object] to [new state], keep [content to preserve] unchanged"`
**Style Transfer:**
`"Transform to [specific style], while maintaining [composition/character/other] unchanged"`
**Background Replacement:**
`"Change the background to [new background], keep the subject in the exact same position and pose"`
**Text Editing:**
`"Replace '[original text]' with '[new text]', maintain the same font style"`
> **Remember:** The more specific, the better. Kontext excels at understanding detailed instructions and maintaining consistency.
---
# Source: https://docs.comfy.org/tutorials/partner-nodes/black-forest-labs/flux-1-kontext.md
> ## Documentation Index
> Fetch the complete documentation index at: https://docs.comfy.org/llms.txt
> Use this file to discover all available pages before exploring further.
# ComfyUI Flux.1 Kontext Pro Image API Node Official Example
> This guide will show you how to use the Flux.1 Kontext Pro Image Partner node in ComfyUI to perform image editing
FLUX.1 Kontext is a professional image-to-image editing model developed by Black Forest Labs, focusing on intelligent understanding of image context and precise editing.
It can perform various editing tasks without complex descriptions, including object modification, style transfer, background replacement, character consistency editing, and text editing.
The core advantage of Kontext lies in its excellent context understanding ability and character consistency maintenance, ensuring that key elements such as character features and composition layout remain stable even after multiple iterations of editing.
Currently, ComfyUI has supported two models of Flux.1 Kontext:
* **Kontext Pro** is ideal for editing, composing, and remixing.
* **Kontext Max** pushes the limits on typography, prompt precision, and speed.
In this guide, we will briefly introduce how to use the Flux.1 Kontext Partner nodes to perform image editing through corresponding workflows.
 You can follow the numbered steps in the image to complete the workflow:
1. Upload the provided images in the `Load image` node
2. Modify the necessary parameters in `Flux.1 Kontext Pro Image`:
* `prompt` Enter the prompt for the image you want to edit
* `aspect_ratio` Set the aspect ratio of the original image, which must be between 1:4 and 4:1
* `prompt_upsampling` Set whether to use prompt upsampling. If enabled, it will automatically modify the prompt to get richer results, but the results are not reproducible
3. Click the `Run` button or use the shortcut `Ctrl(cmd) + Enter` to execute the image editing
4. After waiting for the API to return results, you can view the edited image in the `Save Image` node, and the corresponding image will also be saved to the `ComfyUI/output/` directory
You can follow the numbered steps in the image to complete the workflow:
1. Upload the provided images in the `Load image` node
2. Modify the necessary parameters in `Flux.1 Kontext Pro Image`:
* `prompt` Enter the prompt for the image you want to edit
* `aspect_ratio` Set the aspect ratio of the original image, which must be between 1:4 and 4:1
* `prompt_upsampling` Set whether to use prompt upsampling. If enabled, it will automatically modify the prompt to get richer results, but the results are not reproducible
3. Click the `Run` button or use the shortcut `Ctrl(cmd) + Enter` to execute the image editing
4. After waiting for the API to return results, you can view the edited image in the `Save Image` node, and the corresponding image will also be saved to the `ComfyUI/output/` directory
 You can follow the numbered steps in the image to complete the workflow:
1. Load the image you want to edit in the `Load Image` node
2. (Optional) Modify the necessary parameters in `Flux.1 Kontext Pro Image`
3. Click the `Run` button or use the shortcut `Ctrl(cmd) + Enter` to execute the image editing
4. After waiting for the API to return results, you can view the edited image in the `Save Image` node, and the corresponding image will also be saved to the `ComfyUI/output/` directory
## Flux.1 Kontext Max Image API Node Workflow
### 1. Workflow File Download
The `metadata` of the image below contains the workflow information. Please download and drag it into ComfyUI to load the corresponding workflow.

Download the image below for input or use your own image for demonstration:

### 2. Complete the Workflow Step by Step
You can follow the numbered steps in the image to complete the workflow:
1. Load the image you want to edit in the `Load Image` node
2. (Optional) Modify the necessary parameters in `Flux.1 Kontext Pro Image`
3. Click the `Run` button or use the shortcut `Ctrl(cmd) + Enter` to execute the image editing
4. After waiting for the API to return results, you can view the edited image in the `Save Image` node, and the corresponding image will also be saved to the `ComfyUI/output/` directory
## Flux.1 Kontext Max Image API Node Workflow
### 1. Workflow File Download
The `metadata` of the image below contains the workflow information. Please download and drag it into ComfyUI to load the corresponding workflow.

Download the image below for input or use your own image for demonstration:

### 2. Complete the Workflow Step by Step
 You can follow the numbered steps in the image to complete the workflow:
1. Load the image you want to edit in the `Load Image` node
2. (Optional) Modify the necessary parameters in `Flux.1 Kontext Max Image`
3. Click the `Run` button or use the shortcut `Ctrl(cmd) + Enter` to execute the image editing
4. After waiting for the API to return results, you can view the edited image in the `Save Image` node, and the corresponding image will also be saved to the `ComfyUI/output/` directory
## Flux Kontext Prompt Techniques
### 1. Basic Modifications
* Simple and direct: `"Change the car color to red"`
* Maintain style: `"Change to daytime while maintaining the same style of the painting"`
### 2. Style Transfer
**Principles:**
* Clearly name style: `"Transform to Bauhaus art style"`
* Describe characteristics: `"Transform to oil painting with visible brushstrokes, thick paint texture"`
* Preserve composition: `"Change to Bauhaus style while maintaining the original composition"`
### 3. Character Consistency
**Framework:**
* Specific description: `"The woman with short black hair"` instead of "she"
* Preserve features: `"while maintaining the same facial features, hairstyle, and expression"`
* Step-by-step modifications: Change background first, then actions
### 4. Text Editing
* Use quotes: `"Replace 'joy' with 'BFL'"`
* Maintain format: `"Replace text while maintaining the same font style"`
## Common Problem Solutions
### Character Changes Too Much
❌ Wrong: `"Transform the person into a Viking"`
✅ Correct: `"Change the clothes to be a viking warrior while preserving facial features"`
### Composition Position Changes
❌ Wrong: `"Put him on a beach"`
✅ Correct: `"Change the background to a beach while keeping the person in the exact same position, scale, and pose"`
### Style Application Inaccuracy
❌ Wrong: `"Make it a sketch"`
✅ Correct: `"Convert to pencil sketch with natural graphite lines, cross-hatching, and visible paper texture"`
## Core Principles
1. **Be Specific and Clear** - Use precise descriptions, avoid vague terms
2. **Step-by-step Editing** - Break complex modifications into multiple simple steps
3. **Explicit Preservation** - State what should remain unchanged
4. **Verb Selection** - Use "change", "replace" rather than "transform"
## Best Practice Templates
**Object Modification:**
`"Change [object] to [new state], keep [content to preserve] unchanged"`
**Style Transfer:**
`"Transform to [specific style], while maintaining [composition/character/other] unchanged"`
**Background Replacement:**
`"Change the background to [new background], keep the subject in the exact same position and pose"`
**Text Editing:**
`"Replace '[original text]' with '[new text]', maintain the same font style"`
> **Remember:** The more specific, the better. Kontext excels at understanding detailed instructions and maintaining consistency.
---
# Source: https://docs.comfy.org/tutorials/flux/flux-1-text-to-image.md
> ## Documentation Index
> Fetch the complete documentation index at: https://docs.comfy.org/llms.txt
> Use this file to discover all available pages before exploring further.
# ComfyUI Flux.1 Text-to-Image Workflow Example
> This guide provides a brief introduction to the Flux.1 model and guides you through using the Flux.1 model for text-to-image generation with examples including the full version and the FP8 Checkpoint version.
You can follow the numbered steps in the image to complete the workflow:
1. Load the image you want to edit in the `Load Image` node
2. (Optional) Modify the necessary parameters in `Flux.1 Kontext Max Image`
3. Click the `Run` button or use the shortcut `Ctrl(cmd) + Enter` to execute the image editing
4. After waiting for the API to return results, you can view the edited image in the `Save Image` node, and the corresponding image will also be saved to the `ComfyUI/output/` directory
## Flux Kontext Prompt Techniques
### 1. Basic Modifications
* Simple and direct: `"Change the car color to red"`
* Maintain style: `"Change to daytime while maintaining the same style of the painting"`
### 2. Style Transfer
**Principles:**
* Clearly name style: `"Transform to Bauhaus art style"`
* Describe characteristics: `"Transform to oil painting with visible brushstrokes, thick paint texture"`
* Preserve composition: `"Change to Bauhaus style while maintaining the original composition"`
### 3. Character Consistency
**Framework:**
* Specific description: `"The woman with short black hair"` instead of "she"
* Preserve features: `"while maintaining the same facial features, hairstyle, and expression"`
* Step-by-step modifications: Change background first, then actions
### 4. Text Editing
* Use quotes: `"Replace 'joy' with 'BFL'"`
* Maintain format: `"Replace text while maintaining the same font style"`
## Common Problem Solutions
### Character Changes Too Much
❌ Wrong: `"Transform the person into a Viking"`
✅ Correct: `"Change the clothes to be a viking warrior while preserving facial features"`
### Composition Position Changes
❌ Wrong: `"Put him on a beach"`
✅ Correct: `"Change the background to a beach while keeping the person in the exact same position, scale, and pose"`
### Style Application Inaccuracy
❌ Wrong: `"Make it a sketch"`
✅ Correct: `"Convert to pencil sketch with natural graphite lines, cross-hatching, and visible paper texture"`
## Core Principles
1. **Be Specific and Clear** - Use precise descriptions, avoid vague terms
2. **Step-by-step Editing** - Break complex modifications into multiple simple steps
3. **Explicit Preservation** - State what should remain unchanged
4. **Verb Selection** - Use "change", "replace" rather than "transform"
## Best Practice Templates
**Object Modification:**
`"Change [object] to [new state], keep [content to preserve] unchanged"`
**Style Transfer:**
`"Transform to [specific style], while maintaining [composition/character/other] unchanged"`
**Background Replacement:**
`"Change the background to [new background], keep the subject in the exact same position and pose"`
**Text Editing:**
`"Replace '[original text]' with '[new text]', maintain the same font style"`
> **Remember:** The more specific, the better. Kontext excels at understanding detailed instructions and maintaining consistency.
---
# Source: https://docs.comfy.org/tutorials/flux/flux-1-text-to-image.md
> ## Documentation Index
> Fetch the complete documentation index at: https://docs.comfy.org/llms.txt
> Use this file to discover all available pages before exploring further.
# ComfyUI Flux.1 Text-to-Image Workflow Example
> This guide provides a brief introduction to the Flux.1 model and guides you through using the Flux.1 model for text-to-image generation with examples including the full version and the FP8 Checkpoint version.
 Flux is one of the largest open-source text-to-image generation models, with 12B parameters and an original file size of approximately 23GB. It was developed by [Black Forest Labs](https://blackforestlabs.ai/), a team founded by former Stable Diffusion team members.
Flux is known for its excellent image quality and flexibility, capable of generating high-quality, diverse images.
Currently, the Flux.1 model has several main versions:
* **Flux.1 Pro:** The best performing model, closed-source, only available through API calls.
* **[Flux.1 \[dev\]:](https://huggingface.co/black-forest-labs/FLUX.1-dev)** Open-source but limited to non-commercial use, distilled from the Pro version, with performance close to the Pro version.
* **[Flux.1 \[schnell\]:](https://huggingface.co/black-forest-labs/FLUX.1-schnell)** Uses the Apache2.0 license, requires only 4 steps to generate images, suitable for low-spec hardware.
**Flux.1 Model Features**
* **Hybrid Architecture:** Combines the advantages of Transformer networks and diffusion models, effectively integrating text and image information, improving the alignment accuracy between generated images and prompts, with excellent fidelity to complex prompts.
* **Parameter Scale:** Flux has 12B parameters, capturing more complex pattern relationships and generating more realistic, diverse images.
* **Supports Multiple Styles:** Supports diverse styles, with excellent performance for various types of images.
In this example, we'll introduce text-to-image examples using both Flux.1 Dev and Flux.1 Schnell versions, including the full version model and the simplified FP8 Checkpoint version.
* **Flux Full Version:** Best performance, but requires larger VRAM resources and installation of multiple model files.
* **Flux FP8 Checkpoint:** Requires only one fp8 version of the model, but quality is slightly reduced compared to the full version.
Flux is one of the largest open-source text-to-image generation models, with 12B parameters and an original file size of approximately 23GB. It was developed by [Black Forest Labs](https://blackforestlabs.ai/), a team founded by former Stable Diffusion team members.
Flux is known for its excellent image quality and flexibility, capable of generating high-quality, diverse images.
Currently, the Flux.1 model has several main versions:
* **Flux.1 Pro:** The best performing model, closed-source, only available through API calls.
* **[Flux.1 \[dev\]:](https://huggingface.co/black-forest-labs/FLUX.1-dev)** Open-source but limited to non-commercial use, distilled from the Pro version, with performance close to the Pro version.
* **[Flux.1 \[schnell\]:](https://huggingface.co/black-forest-labs/FLUX.1-schnell)** Uses the Apache2.0 license, requires only 4 steps to generate images, suitable for low-spec hardware.
**Flux.1 Model Features**
* **Hybrid Architecture:** Combines the advantages of Transformer networks and diffusion models, effectively integrating text and image information, improving the alignment accuracy between generated images and prompts, with excellent fidelity to complex prompts.
* **Parameter Scale:** Flux has 12B parameters, capturing more complex pattern relationships and generating more realistic, diverse images.
* **Supports Multiple Styles:** Supports diverse styles, with excellent performance for various types of images.
In this example, we'll introduce text-to-image examples using both Flux.1 Dev and Flux.1 Schnell versions, including the full version model and the simplified FP8 Checkpoint version.
* **Flux Full Version:** Best performance, but requires larger VRAM resources and installation of multiple model files.
* **Flux FP8 Checkpoint:** Requires only one fp8 version of the model, but quality is slightly reduced compared to the full version.

 1. Ensure the `DualCLIPLoader` node has the following models loaded:
* clip\_name1: t5xxl\_fp16.safetensors
* clip\_name2: clip\_l.safetensors
2. Ensure the `Load Diffusion Model` node has `flux1-dev.safetensors` loaded
3. Make sure the `Load VAE` node has `ae.safetensors` loaded
4. Click the `Queue` button, or use the shortcut `Ctrl(cmd) + Enter` to run the workflow
1. Ensure the `DualCLIPLoader` node has the following models loaded:
* clip\_name1: t5xxl\_fp16.safetensors
* clip\_name2: clip\_l.safetensors
2. Ensure the `Load Diffusion Model` node has `flux1-dev.safetensors` loaded
3. Make sure the `Load VAE` node has `ae.safetensors` loaded
4. Click the `Queue` button, or use the shortcut `Ctrl(cmd) + Enter` to run the workflow
 1. Ensure the `DualCLIPLoader` node has the following models loaded:
* clip\_name1: t5xxl\_fp8\_e4m3fn.safetensors
* clip\_name2: clip\_l.safetensors
2. Ensure the `Load Diffusion Model` node has `flux1-schnell.safetensors` loaded
3. Ensure the `Load VAE` node has `ae.safetensors` loaded
4. Click the `Queue` button, or use the shortcut `Ctrl(cmd) + Enter` to run the workflow
## Flux.1 FP8 Checkpoint Version Text-to-Image Example
The fp8 version is a quantized version of the original Flux.1 fp16 version.
To some extent, the quality of this version will be lower than that of the fp16 version,
but it also requires less VRAM, and you only need to install one model file to try running it.
### Flux.1 Dev
Please download the image below and drag it into ComfyUI to load the workflow.

1. Ensure the `DualCLIPLoader` node has the following models loaded:
* clip\_name1: t5xxl\_fp8\_e4m3fn.safetensors
* clip\_name2: clip\_l.safetensors
2. Ensure the `Load Diffusion Model` node has `flux1-schnell.safetensors` loaded
3. Ensure the `Load VAE` node has `ae.safetensors` loaded
4. Click the `Queue` button, or use the shortcut `Ctrl(cmd) + Enter` to run the workflow
## Flux.1 FP8 Checkpoint Version Text-to-Image Example
The fp8 version is a quantized version of the original Flux.1 fp16 version.
To some extent, the quality of this version will be lower than that of the fp16 version,
but it also requires less VRAM, and you only need to install one model file to try running it.
### Flux.1 Dev
Please download the image below and drag it into ComfyUI to load the workflow.

 1. Load models:
* 1.1 Ensure the `Load Checkpoint` node has `flux1-dev-fp8.safetensors` loaded
* 1.2 Ensure the `LoraLoaderModelOnly` node has `dit_lora.safetensors` loaded
* 1.3 Ensure the `ModelPatchLoader` node has `projector.safetensors` loaded
* 1.4 Ensure the `Load CLIP Vision` node has `sigclip_vision_patch14_384.safetensors` loaded
2. Content Reference:
* 2.1 Click `Upload` to upload the input image we provided
* 2.2 The `ImageScaleToMaxDimension` node will scale your input image for content reference, 512px will keep more character features, but if you only use the character's head as input, the final output image often has issues like the character taking up too much space. Setting it to 1024px gives much better results.
3. In the example, we only use the `content reference` image input. If you want to use the `style reference` image input, you can use `Ctrl-B` to bypass the marked node group.
4. Write your prompt or keep default
5. Set the image size if you need
6. The EasyCache node is for inference acceleration, but it will also sacrifice some quality and details. You can bypass it (Ctrl+B) if you don't need to use it.
7. Click the `Run` button, or use the shortcut `Ctrl(Cmd) + Enter` to run the workflow
### 4. Additional Notes
1. Style reference only:
We also provide a workflow that only uses style reference in the same workflow we provided
1. Load models:
* 1.1 Ensure the `Load Checkpoint` node has `flux1-dev-fp8.safetensors` loaded
* 1.2 Ensure the `LoraLoaderModelOnly` node has `dit_lora.safetensors` loaded
* 1.3 Ensure the `ModelPatchLoader` node has `projector.safetensors` loaded
* 1.4 Ensure the `Load CLIP Vision` node has `sigclip_vision_patch14_384.safetensors` loaded
2. Content Reference:
* 2.1 Click `Upload` to upload the input image we provided
* 2.2 The `ImageScaleToMaxDimension` node will scale your input image for content reference, 512px will keep more character features, but if you only use the character's head as input, the final output image often has issues like the character taking up too much space. Setting it to 1024px gives much better results.
3. In the example, we only use the `content reference` image input. If you want to use the `style reference` image input, you can use `Ctrl-B` to bypass the marked node group.
4. Write your prompt or keep default
5. Set the image size if you need
6. The EasyCache node is for inference acceleration, but it will also sacrifice some quality and details. You can bypass it (Ctrl+B) if you don't need to use it.
7. Click the `Run` button, or use the shortcut `Ctrl(Cmd) + Enter` to run the workflow
### 4. Additional Notes
1. Style reference only:
We also provide a workflow that only uses style reference in the same workflow we provided
 The only different is we replaced the `content reference` node and only use an `Empty Latent Image` node.
2. You can also bypass whole `Style Reference` group and use the workflow as a text to image workflow, which means this workflow has 4 variations
* Only use content (subject) reference
* Only use style reference
* Mixed content and style reference
* As a text to image workflow
---
# Source: https://docs.comfy.org/tutorials/flux/flux-2-dev.md
> ## Documentation Index
> Fetch the complete documentation index at: https://docs.comfy.org/llms.txt
> Use this file to discover all available pages before exploring further.
# ComfyUI Flux.2 Dev Example
> This guide provides a brief introduction to the Flux.2 model and guides you through using the Flux.2 Dev model for text-to-image generation in ComfyUI.
## About FLUX.2
[FLUX.2](https://bfl.ai/blog/flux-2) is a next-generation image model from [Black Forest Labs](https://blackforestlabs.ai/), delivering up to 4MP photorealistic output with far better lighting, skin, fabric, and hand detail. It adds reliable multi-reference consistency (up to 10 images), improved editing precision, better visual understanding, and professional-class text rendering.
**Key Features:**
* **Multi-Reference Consistency:** Reliably maintains identity, product geometry, textures, materials, wardrobe, and composition intent across multiple outputs
* **High-Resolution Photorealism:** Generates images up to 4MP with real-world lighting behavior, spatial reasoning, and physics-aware detail
* **Professional-Grade Control:** Exact pose control, hex-code accurate brand colors, any aspect ratio, and structured prompting for programmatic workflows
* **Usable Text Rendering:** Produces clean, legible text across UI screens, infographics, and multi-language content
**Available Models:**
* **FLUX.2 Dev:** Open-source model (used in this tutorial)
* **FLUX.2 Pro:** API version from Black Forest Labs
The only different is we replaced the `content reference` node and only use an `Empty Latent Image` node.
2. You can also bypass whole `Style Reference` group and use the workflow as a text to image workflow, which means this workflow has 4 variations
* Only use content (subject) reference
* Only use style reference
* Mixed content and style reference
* As a text to image workflow
---
# Source: https://docs.comfy.org/tutorials/flux/flux-2-dev.md
> ## Documentation Index
> Fetch the complete documentation index at: https://docs.comfy.org/llms.txt
> Use this file to discover all available pages before exploring further.
# ComfyUI Flux.2 Dev Example
> This guide provides a brief introduction to the Flux.2 model and guides you through using the Flux.2 Dev model for text-to-image generation in ComfyUI.
## About FLUX.2
[FLUX.2](https://bfl.ai/blog/flux-2) is a next-generation image model from [Black Forest Labs](https://blackforestlabs.ai/), delivering up to 4MP photorealistic output with far better lighting, skin, fabric, and hand detail. It adds reliable multi-reference consistency (up to 10 images), improved editing precision, better visual understanding, and professional-class text rendering.
**Key Features:**
* **Multi-Reference Consistency:** Reliably maintains identity, product geometry, textures, materials, wardrobe, and composition intent across multiple outputs
* **High-Resolution Photorealism:** Generates images up to 4MP with real-world lighting behavior, spatial reasoning, and physics-aware detail
* **Professional-Grade Control:** Exact pose control, hex-code accurate brand colors, any aspect ratio, and structured prompting for programmatic workflows
* **Usable Text Rendering:** Produces clean, legible text across UI screens, infographics, and multi-language content
**Available Models:**
* **FLUX.2 Dev:** Open-source model (used in this tutorial)
* **FLUX.2 Pro:** API version from Black Forest Labs
 [Flux.1 Krea Dev](https://huggingface.co/black-forest-labs/FLUX.1-Krea-dev) is an advanced text-to-image generation model developed in collaboration between Black Forest Labs (BFL) and Krea. This is currently the best open-source FLUX model, specifically designed for text-to-image generation.
**Model Features**
* **Unique Aesthetic Style**: Focuses on generating images with unique aesthetics, avoiding common "AI look" appearance
* **Natural Details**: Does not produce blown-out highlights, maintaining natural detail representatio
* **Exceptional Realism**: Provides outstanding realism and image quality
* **Fully Compatible Architecture**: Fully compatible architecture design with FLUX.1 \[dev]
**Model License**
This model is released under the [flux-1-dev-non-commercial-license](https://huggingface.co/black-forest-labs/FLUX.1-Krea-dev/blob/main/LICENSE.md)
## Flux.1 Krea Dev ComfyUI Workflow
[Flux.1 Krea Dev](https://huggingface.co/black-forest-labs/FLUX.1-Krea-dev) is an advanced text-to-image generation model developed in collaboration between Black Forest Labs (BFL) and Krea. This is currently the best open-source FLUX model, specifically designed for text-to-image generation.
**Model Features**
* **Unique Aesthetic Style**: Focuses on generating images with unique aesthetics, avoiding common "AI look" appearance
* **Natural Details**: Does not produce blown-out highlights, maintaining natural detail representatio
* **Exceptional Realism**: Provides outstanding realism and image quality
* **Fully Compatible Architecture**: Fully compatible architecture design with FLUX.1 \[dev]
**Model License**
This model is released under the [flux-1-dev-non-commercial-license](https://huggingface.co/black-forest-labs/FLUX.1-Krea-dev/blob/main/LICENSE.md)
## Flux.1 Krea Dev ComfyUI Workflow
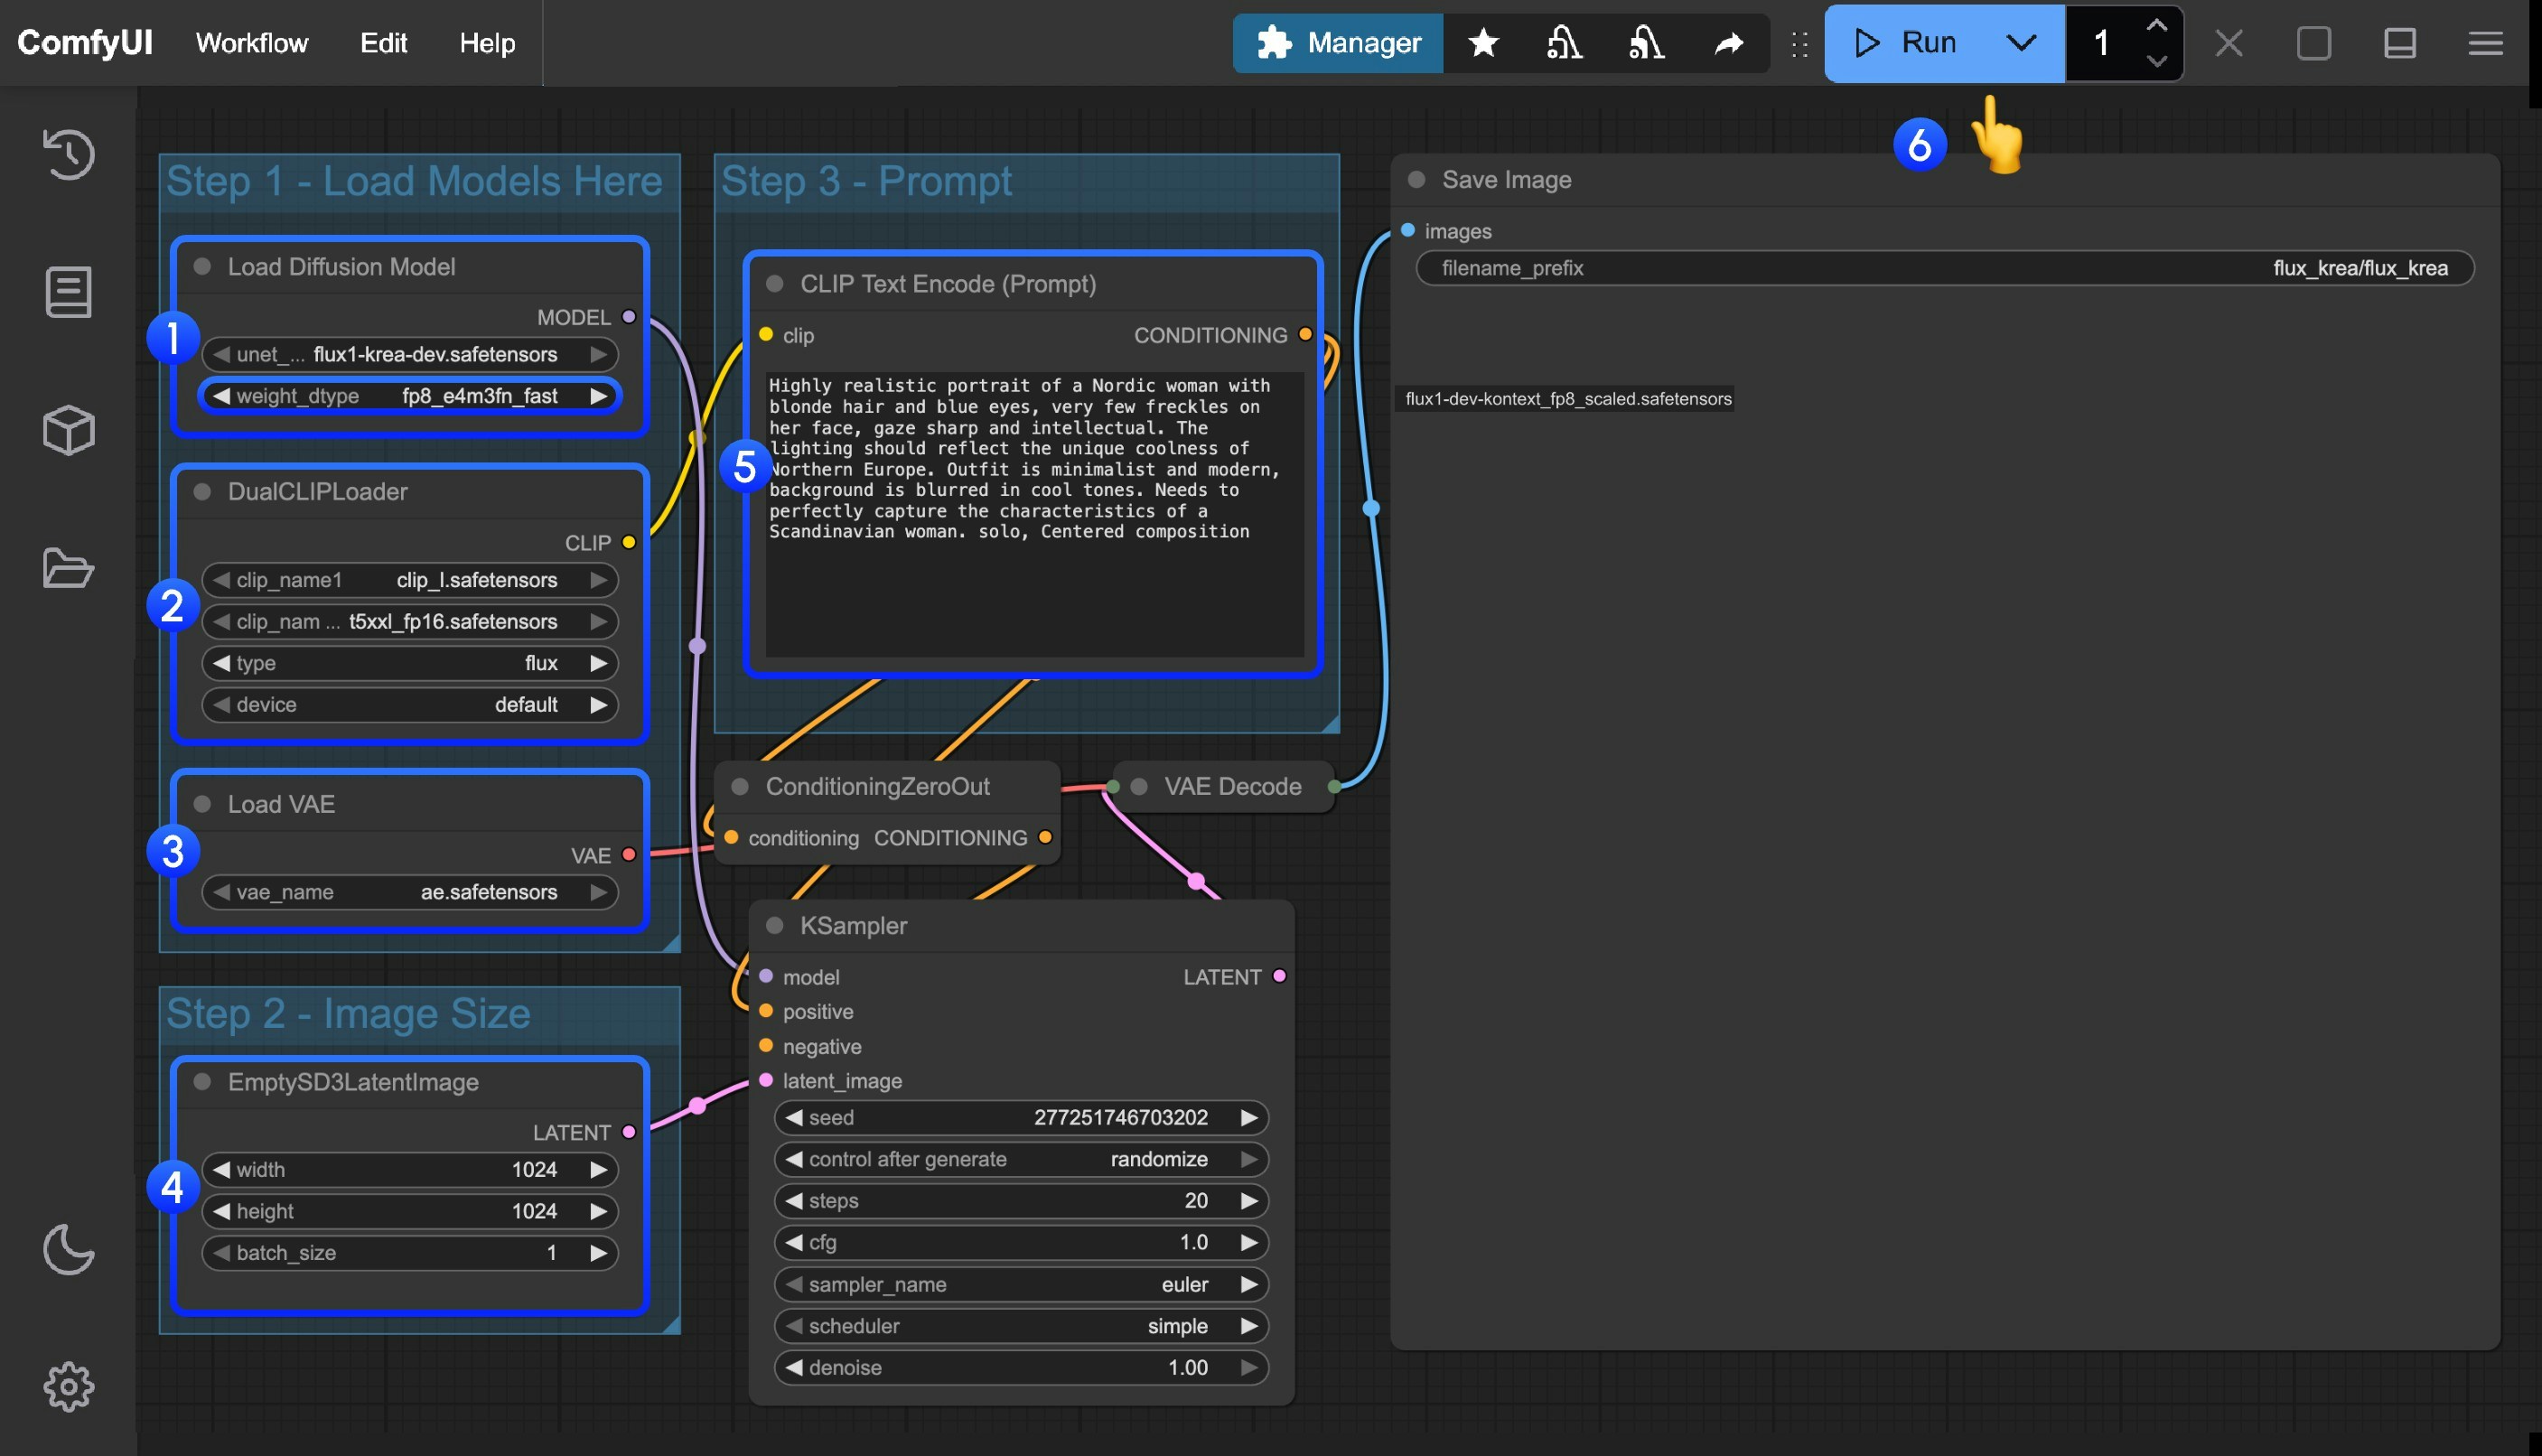 1. Ensure that `flux1-krea-dev_fp8_scaled.safetensors` or `flux1-krea-dev.safetensors` is loaded in the `Load Diffusion Model` node
* `flux1-krea-dev_fp8_scaled.safetensors` is recommended for low VRAM users
* `flux1-krea-dev.safetensors` is the original weights, if you have enough VRAM like 24GB you can use it for better quality
2. Ensure the following models are loaded in the `DualCLIPLoader` node:
* clip\_name1: t5xxl\_fp16.safetensors or t5xxl\_fp8\_e4m3fn.safetensors
* clip\_name2: clip\_l.safetensors
3. Ensure that `ae.safetensors` is loaded in the `Load VAE` node
4. Click the `Queue` button, or use the shortcut `Ctrl(cmd) + Enter` to run the workflow
---
# Source: https://docs.comfy.org/tutorials/video/wan/fun-camera.md
> ## Documentation Index
> Fetch the complete documentation index at: https://docs.comfy.org/llms.txt
> Use this file to discover all available pages before exploring further.
# ComfyUI Wan2.1 Fun Camera Official Examples
> This guide demonstrates how to use Wan2.1 Fun Camera in ComfyUI for video generation
## About Wan2.1 Fun Camera
**Wan2.1 Fun Camera** is a video generation project launched by the Alibaba team, focusing on controlling video generation effects through camera motion.
**Model Weights Download**:
* [14B Version](https://huggingface.co/alibaba-pai/Wan2.1-Fun-V1.1-14B-Control-Camera)
* [1.3B Version](https://huggingface.co/alibaba-pai/Wan2.1-Fun-V1.1-1.3B-Control-Camera)
**Code Repository**: [VideoX-Fun](https://github.com/aigc-apps/VideoX-Fun)
**ComfyUI now natively supports the Wan2.1 Fun Camera model**.
1. Ensure that `flux1-krea-dev_fp8_scaled.safetensors` or `flux1-krea-dev.safetensors` is loaded in the `Load Diffusion Model` node
* `flux1-krea-dev_fp8_scaled.safetensors` is recommended for low VRAM users
* `flux1-krea-dev.safetensors` is the original weights, if you have enough VRAM like 24GB you can use it for better quality
2. Ensure the following models are loaded in the `DualCLIPLoader` node:
* clip\_name1: t5xxl\_fp16.safetensors or t5xxl\_fp8\_e4m3fn.safetensors
* clip\_name2: clip\_l.safetensors
3. Ensure that `ae.safetensors` is loaded in the `Load VAE` node
4. Click the `Queue` button, or use the shortcut `Ctrl(cmd) + Enter` to run the workflow
---
# Source: https://docs.comfy.org/tutorials/video/wan/fun-camera.md
> ## Documentation Index
> Fetch the complete documentation index at: https://docs.comfy.org/llms.txt
> Use this file to discover all available pages before exploring further.
# ComfyUI Wan2.1 Fun Camera Official Examples
> This guide demonstrates how to use Wan2.1 Fun Camera in ComfyUI for video generation
## About Wan2.1 Fun Camera
**Wan2.1 Fun Camera** is a video generation project launched by the Alibaba team, focusing on controlling video generation effects through camera motion.
**Model Weights Download**:
* [14B Version](https://huggingface.co/alibaba-pai/Wan2.1-Fun-V1.1-14B-Control-Camera)
* [1.3B Version](https://huggingface.co/alibaba-pai/Wan2.1-Fun-V1.1-1.3B-Control-Camera)
**Code Repository**: [VideoX-Fun](https://github.com/aigc-apps/VideoX-Fun)
**ComfyUI now natively supports the Wan2.1 Fun Camera model**.
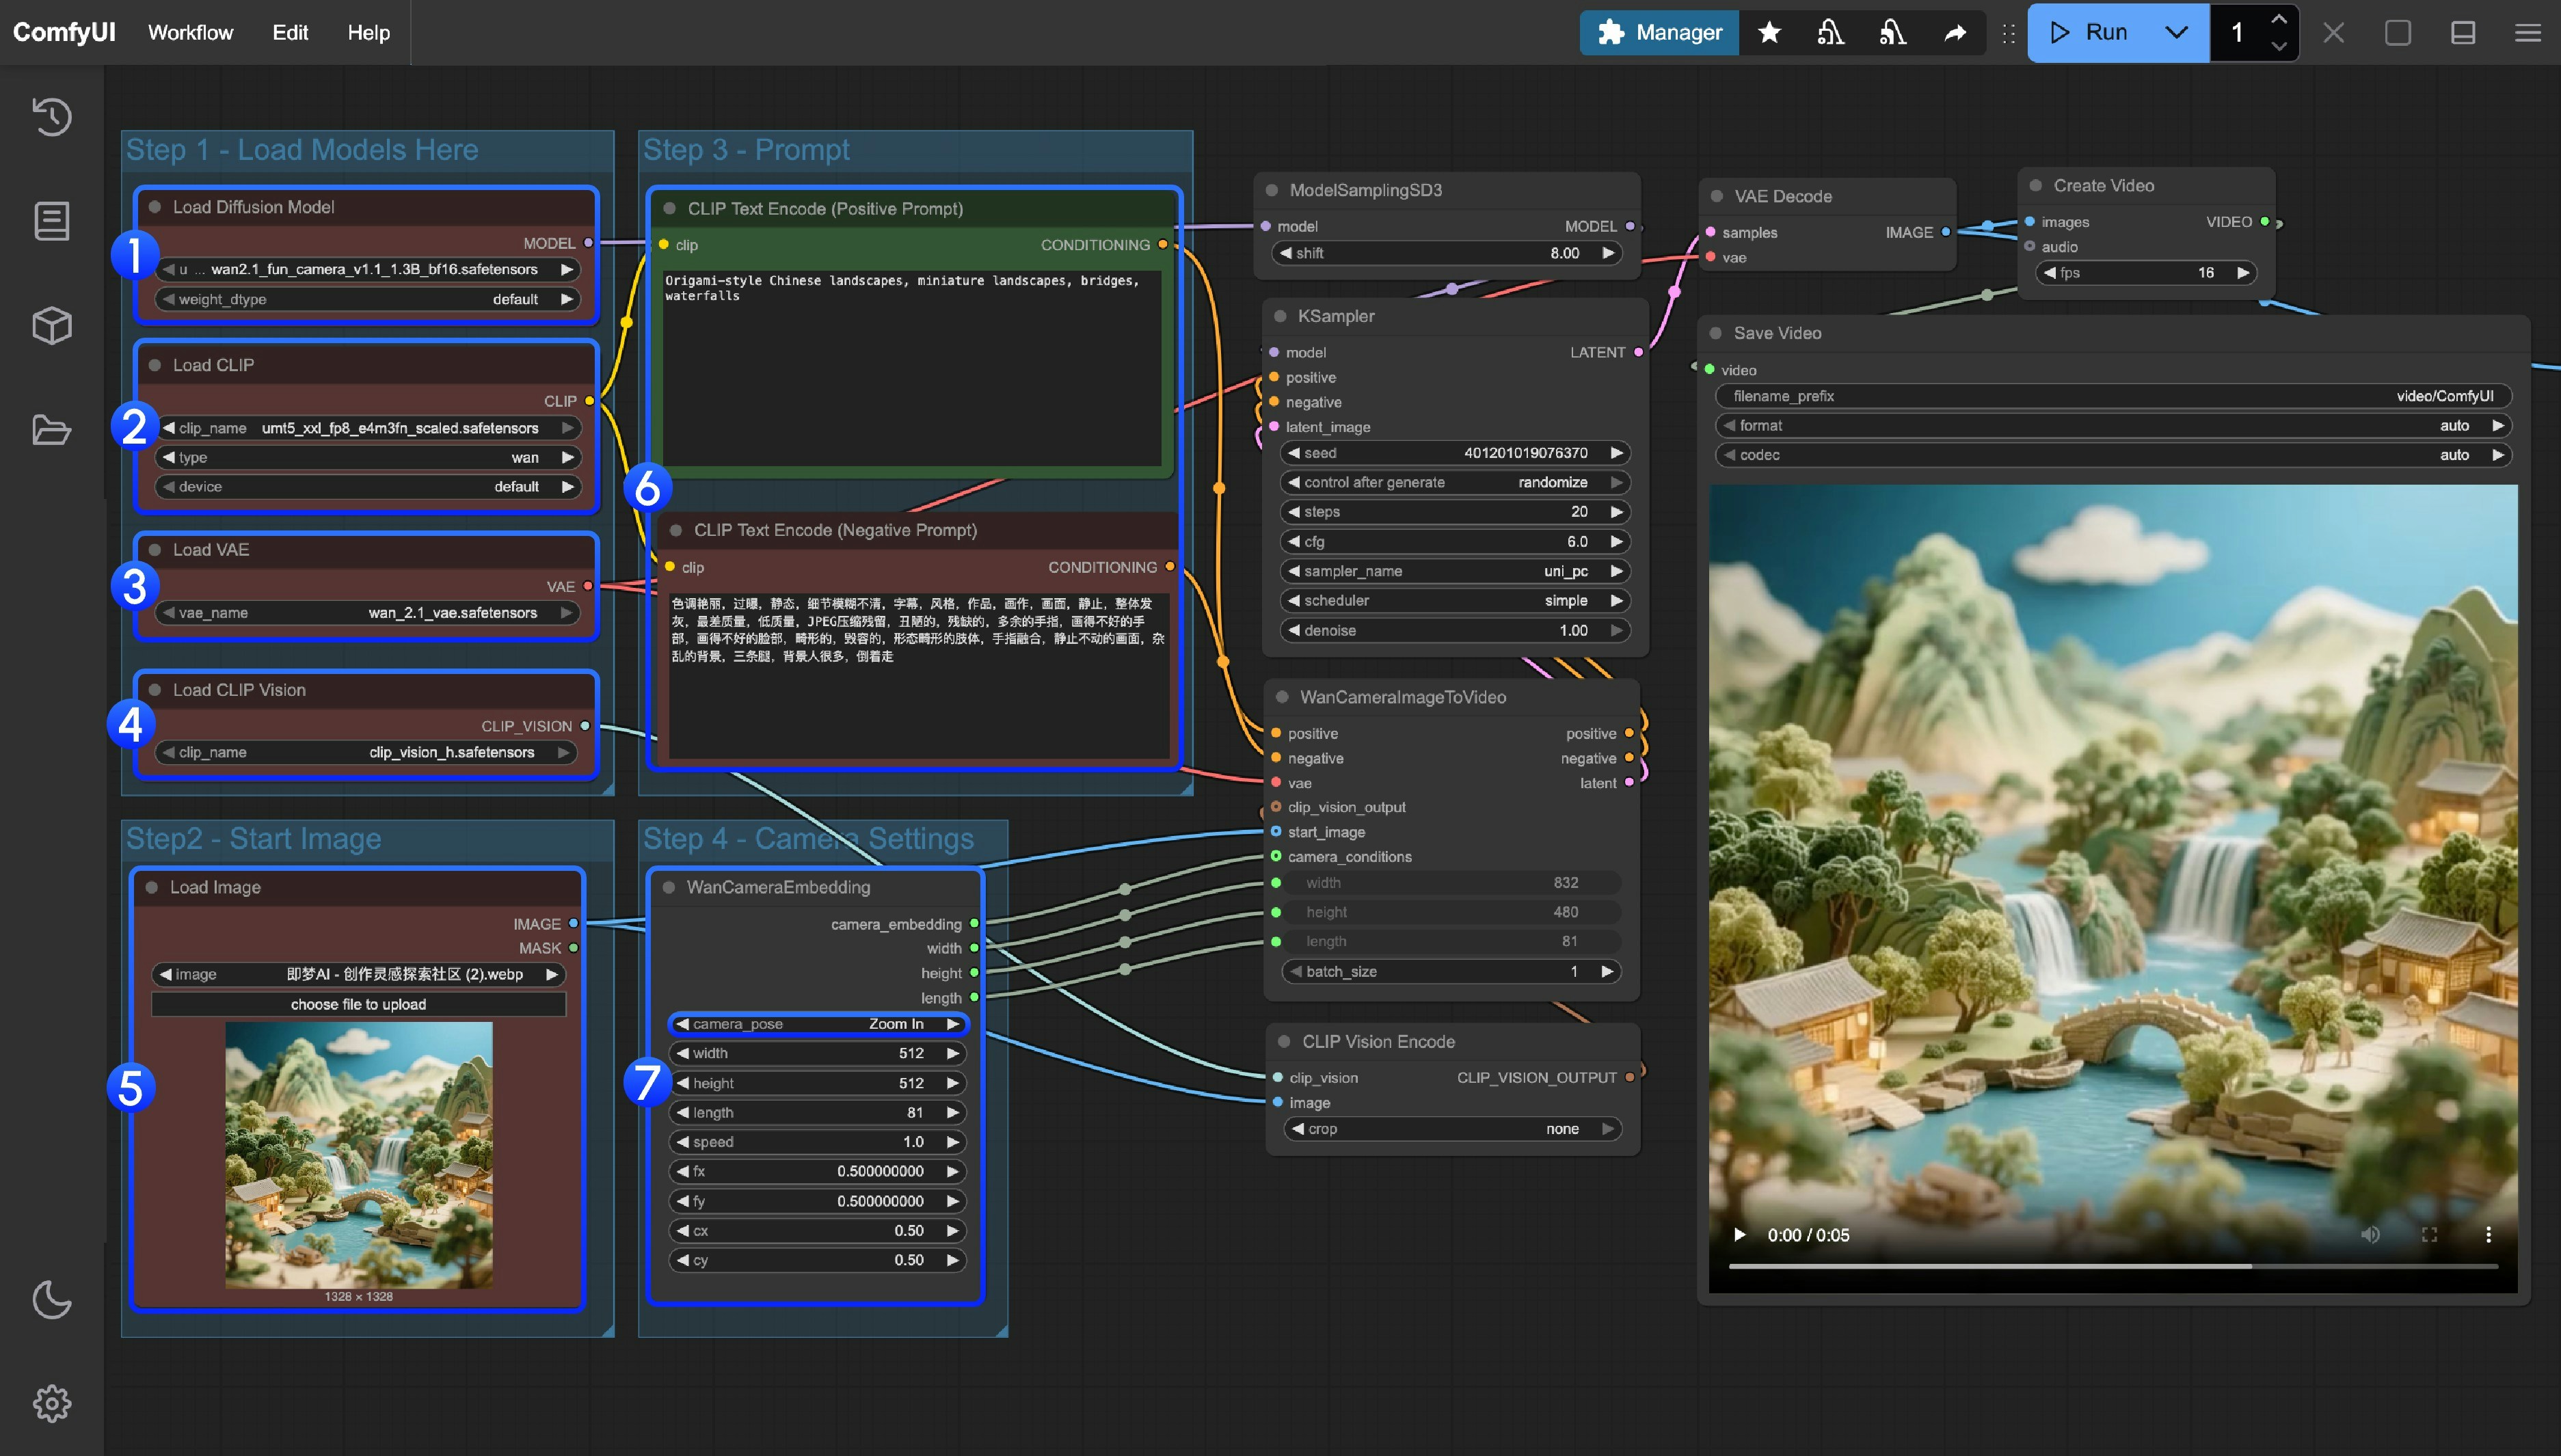 1. Ensure the correct version of model file is loaded:
* 1.3B version: `wan2.1_fun_camera_v1.1_1.3B_bf16.safetensors`
* 14B version: `wan2.1_fun_camera_v1.1_14B_bf16.safetensors`
2. Ensure the `Load CLIP` node has loaded `umt5_xxl_fp8_e4m3fn_scaled.safetensors`
3. Ensure the `Load VAE` node has loaded `wan_2.1_vae.safetensors`
4. Ensure the `Load CLIP Vision` node has loaded `clip_vision_h.safetensors`
5. Upload the starting frame to the `Load Image` node
6. Modify the Prompt if you're using your own input image
7. Set camera motion in the `WanCameraEmbedding` node
8. Click the `Run` button or use the shortcut `Ctrl(cmd) + Enter` to execute generation
## ComfyUI Wan2.1 Fun Camera 14B Workflow and Input Image
1. Ensure the correct version of model file is loaded:
* 1.3B version: `wan2.1_fun_camera_v1.1_1.3B_bf16.safetensors`
* 14B version: `wan2.1_fun_camera_v1.1_14B_bf16.safetensors`
2. Ensure the `Load CLIP` node has loaded `umt5_xxl_fp8_e4m3fn_scaled.safetensors`
3. Ensure the `Load VAE` node has loaded `wan_2.1_vae.safetensors`
4. Ensure the `Load CLIP Vision` node has loaded `clip_vision_h.safetensors`
5. Upload the starting frame to the `Load Image` node
6. Modify the Prompt if you're using your own input image
7. Set camera motion in the `WanCameraEmbedding` node
8. Click the `Run` button or use the shortcut `Ctrl(cmd) + Enter` to execute generation
## ComfyUI Wan2.1 Fun Camera 14B Workflow and Input Image
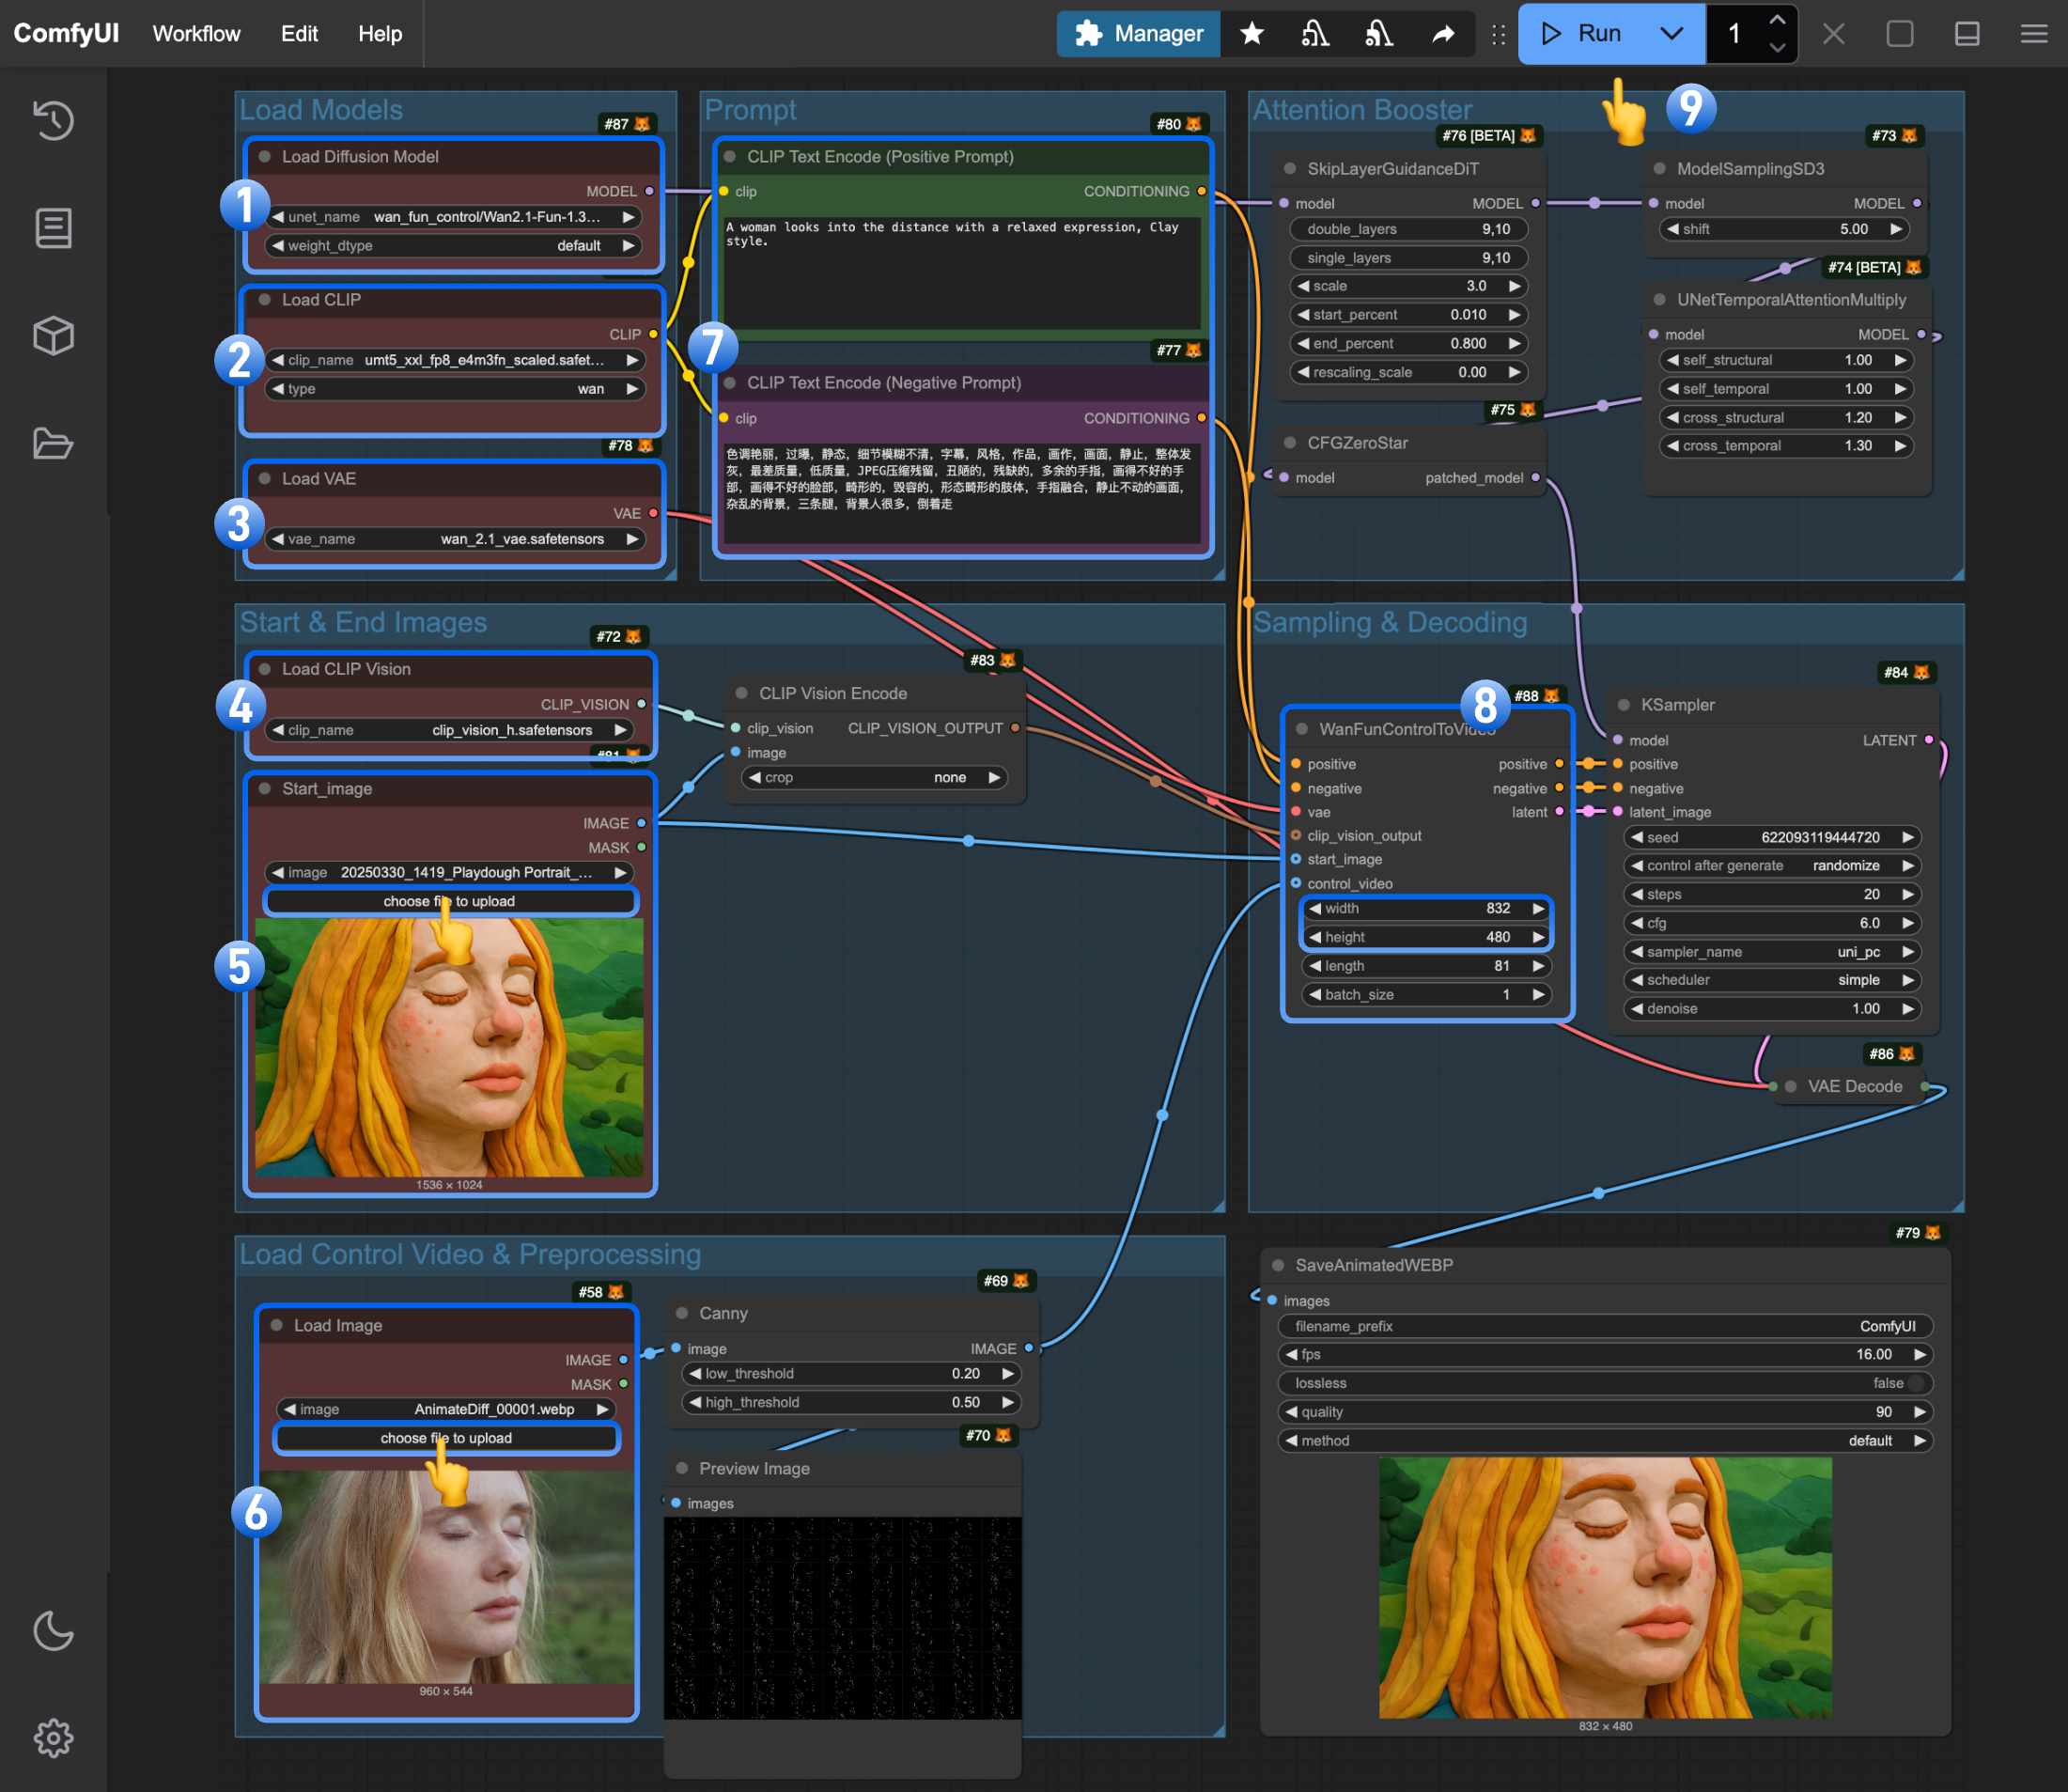 1. Ensure the `Load Diffusion Model` node has loaded `wan2.1_fun_control_1.3B_bf16.safetensors`
2. Ensure the `Load CLIP` node has loaded `umt5_xxl_fp8_e4m3fn_scaled.safetensors`
3. Ensure the `Load VAE` node has loaded `wan_2.1_vae.safetensors`
4. Ensure the `Load CLIP Vision` node has loaded `clip_vision_h.safetensors`
5. Upload the starting frame to the `Load Image` node (renamed to `Start_image`)
6. Upload the control video to the second `Load Image` node. Note: This node currently doesn't support mp4, only WebP videos
7. (Optional) Modify the prompt (both English and Chinese are supported)
8. (Optional) Adjust the video size in `WanFunControlToVideo`, avoiding overly large dimensions
9. Click the `Run` button or use the shortcut `Ctrl(cmd) + Enter` to execute video generation
### 3. Usage Notes
* Since we need to input the same number of frames as the control video into the `WanFunControlToVideo` node, if the specified frame count exceeds the actual control video frames, the excess frames may display scenes not conforming to control conditions. We'll address this issue in the [Workflow Using Custom Nodes](#workflow-using-custom-nodes)
* Avoid setting overly large dimensions, as this can make the sampling process very time-consuming. Try generating smaller images first, then upscale
* Use your imagination to build upon this workflow by adding text-to-image or other types of workflows to achieve direct text-to-video generation or style transfer
* Use tools like [ComfyUI-comfyui\_controlnet\_aux](https://github.com/Fannovel16/comfyui_controlnet_aux) for richer control options
## Workflow Using Custom Nodes
We'll need to install the following two custom nodes:
* [ComfyUI-VideoHelperSuite](https://github.com/Kosinkadink/ComfyUI-VideoHelperSuite)
* [ComfyUI-comfyui\_controlnet\_aux](https://github.com/Fannovel16/comfyui_controlnet_aux)
You can use [ComfyUI Manager](https://github.com/Comfy-Org/ComfyUI-Manager) to install missing nodes or follow the installation instructions for each custom node package.
### 1. Workflow File Download
#### 1.1 Workflow File
Download the image below and drag it into ComfyUI to load the workflow:

1. Ensure the `Load Diffusion Model` node has loaded `wan2.1_fun_control_1.3B_bf16.safetensors`
2. Ensure the `Load CLIP` node has loaded `umt5_xxl_fp8_e4m3fn_scaled.safetensors`
3. Ensure the `Load VAE` node has loaded `wan_2.1_vae.safetensors`
4. Ensure the `Load CLIP Vision` node has loaded `clip_vision_h.safetensors`
5. Upload the starting frame to the `Load Image` node (renamed to `Start_image`)
6. Upload the control video to the second `Load Image` node. Note: This node currently doesn't support mp4, only WebP videos
7. (Optional) Modify the prompt (both English and Chinese are supported)
8. (Optional) Adjust the video size in `WanFunControlToVideo`, avoiding overly large dimensions
9. Click the `Run` button or use the shortcut `Ctrl(cmd) + Enter` to execute video generation
### 3. Usage Notes
* Since we need to input the same number of frames as the control video into the `WanFunControlToVideo` node, if the specified frame count exceeds the actual control video frames, the excess frames may display scenes not conforming to control conditions. We'll address this issue in the [Workflow Using Custom Nodes](#workflow-using-custom-nodes)
* Avoid setting overly large dimensions, as this can make the sampling process very time-consuming. Try generating smaller images first, then upscale
* Use your imagination to build upon this workflow by adding text-to-image or other types of workflows to achieve direct text-to-video generation or style transfer
* Use tools like [ComfyUI-comfyui\_controlnet\_aux](https://github.com/Fannovel16/comfyui_controlnet_aux) for richer control options
## Workflow Using Custom Nodes
We'll need to install the following two custom nodes:
* [ComfyUI-VideoHelperSuite](https://github.com/Kosinkadink/ComfyUI-VideoHelperSuite)
* [ComfyUI-comfyui\_controlnet\_aux](https://github.com/Fannovel16/comfyui_controlnet_aux)
You can use [ComfyUI Manager](https://github.com/Comfy-Org/ComfyUI-Manager) to install missing nodes or follow the installation instructions for each custom node package.
### 1. Workflow File Download
#### 1.1 Workflow File
Download the image below and drag it into ComfyUI to load the workflow:

 > The model part is essentially the same. If you've already experienced the native-only workflow, you can directly upload the corresponding images and run it.
1. Ensure the `Load Diffusion Model` node has loaded `wan2.1_fun_control_1.3B_bf16.safetensors`
2. Ensure the `Load CLIP` node has loaded `umt5_xxl_fp8_e4m3fn_scaled.safetensors`
3. Ensure the `Load VAE` node has loaded `wan_2.1_vae.safetensors`
4. Ensure the `Load CLIP Vision` node has loaded `clip_vision_h.safetensors`
5. Upload the starting frame to the `Load Image` node
6. Upload an mp4 format video to the `Load Video(Upload)` custom node. Note that the workflow has adjusted the default `frame_load_cap`
7. For the current image, the `DWPose Estimator` only uses the `detect_face` option
8. (Optional) Modify the prompt (both English and Chinese are supported)
9. (Optional) Adjust the video size in `WanFunControlToVideo`, avoiding overly large dimensions
10. Click the `Run` button or use the shortcut `Ctrl(cmd) + Enter` to execute video generation
### 3. Workflow Notes
Thanks to the ComfyUI community authors for their custom node packages:
* This example uses `Load Video(Upload)` to support mp4 videos
* The `video_info` obtained from `Load Video(Upload)` allows us to maintain the same `fps` for the output video
* You can replace `DWPose Estimator` with other preprocessors from the `ComfyUI-comfyui_controlnet_aux` node package
* Prompts support multiple languages
## Usage Tips
> The model part is essentially the same. If you've already experienced the native-only workflow, you can directly upload the corresponding images and run it.
1. Ensure the `Load Diffusion Model` node has loaded `wan2.1_fun_control_1.3B_bf16.safetensors`
2. Ensure the `Load CLIP` node has loaded `umt5_xxl_fp8_e4m3fn_scaled.safetensors`
3. Ensure the `Load VAE` node has loaded `wan_2.1_vae.safetensors`
4. Ensure the `Load CLIP Vision` node has loaded `clip_vision_h.safetensors`
5. Upload the starting frame to the `Load Image` node
6. Upload an mp4 format video to the `Load Video(Upload)` custom node. Note that the workflow has adjusted the default `frame_load_cap`
7. For the current image, the `DWPose Estimator` only uses the `detect_face` option
8. (Optional) Modify the prompt (both English and Chinese are supported)
9. (Optional) Adjust the video size in `WanFunControlToVideo`, avoiding overly large dimensions
10. Click the `Run` button or use the shortcut `Ctrl(cmd) + Enter` to execute video generation
### 3. Workflow Notes
Thanks to the ComfyUI community authors for their custom node packages:
* This example uses `Load Video(Upload)` to support mp4 videos
* The `video_info` obtained from `Load Video(Upload)` allows us to maintain the same `fps` for the output video
* You can replace `DWPose Estimator` with other preprocessors from the `ComfyUI-comfyui_controlnet_aux` node package
* Prompts support multiple languages
## Usage Tips
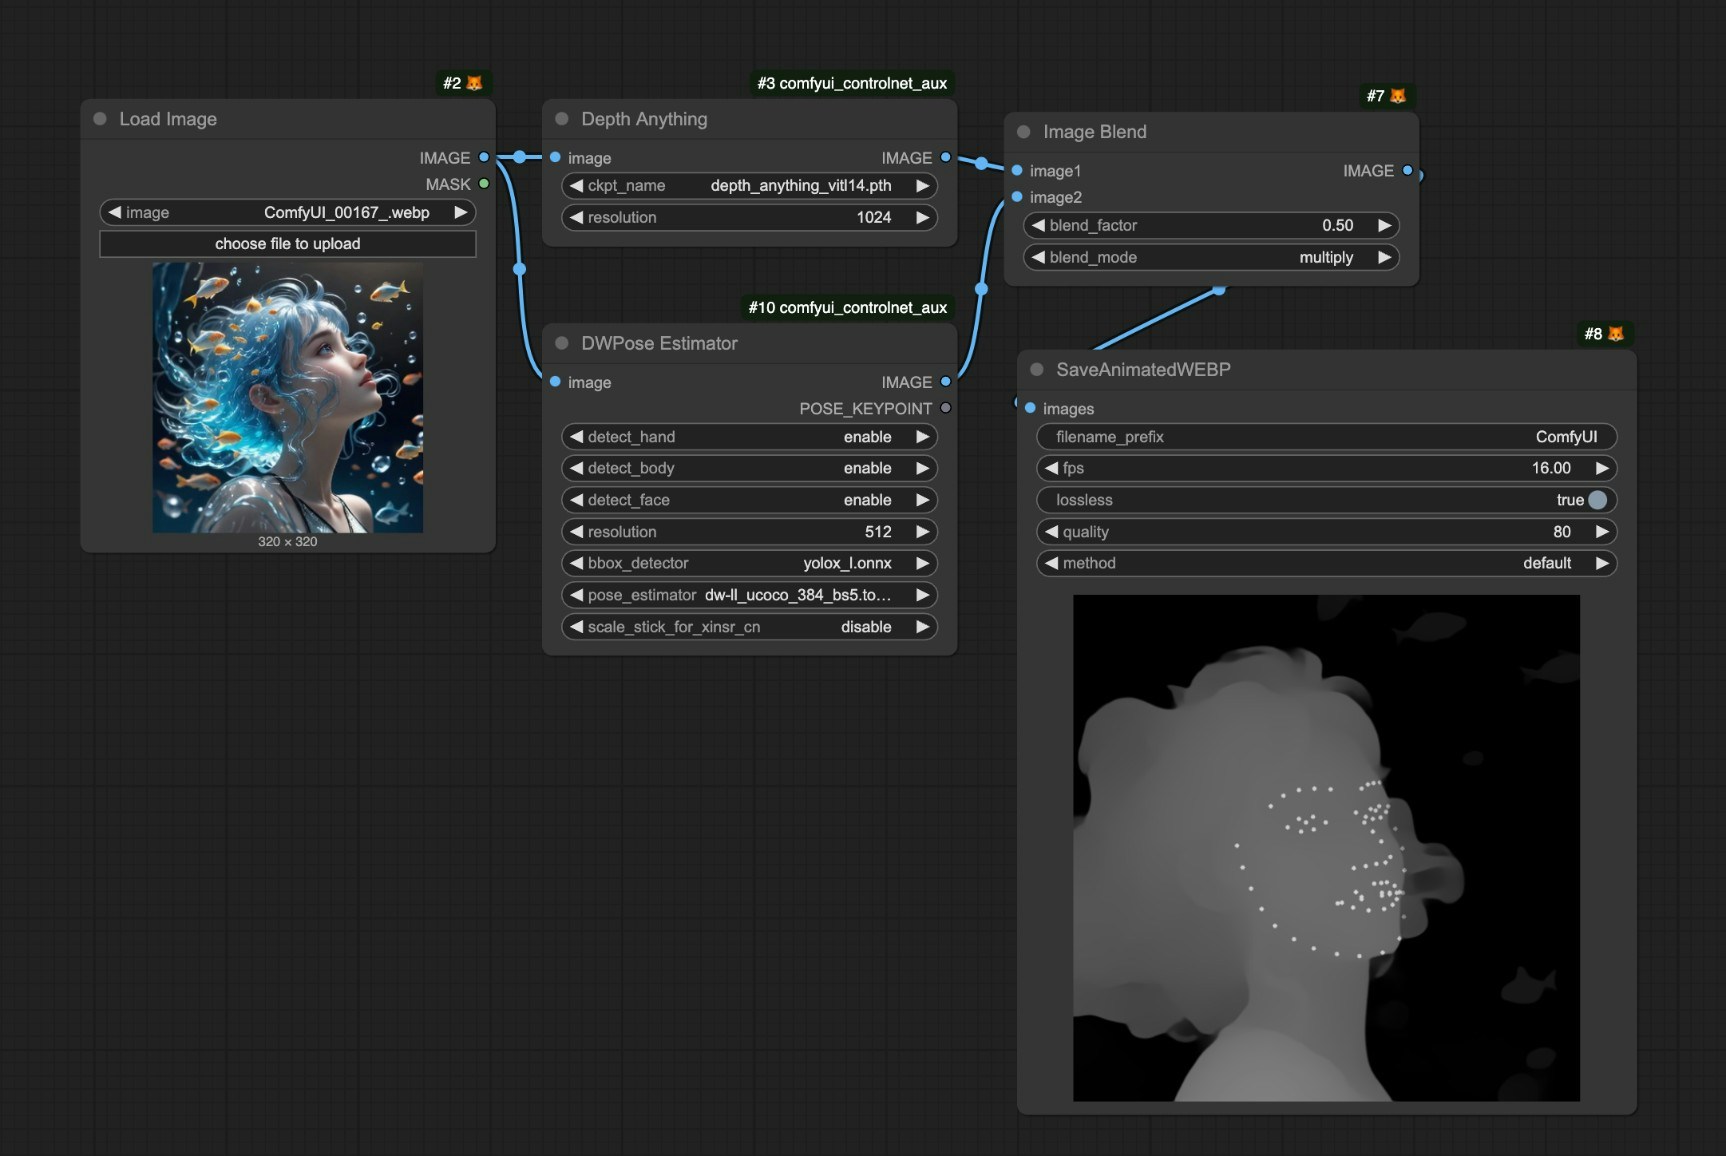 * A useful tip is that you can combine multiple image preprocessing techniques and then use the `Image Blend` node to achieve the goal of applying multiple control methods simultaneously.
* You can use the `Video Combine` node from `ComfyUI-VideoHelperSuite` to save videos in mp4 format
* We use `SaveAnimatedWEBP` because we currently don't support embedding workflow into **mp4** and some other custom nodes may not support embedding workflow too. To preserve the workflow in the video, we choose `SaveAnimatedWEBP` node.
* In the `WanFunControlToVideo` node, `control_video` is not mandatory, so sometimes you can skip using a control video, first generate a very small video size like 320x320, and then use them as control video input to achieve consistent results.
* [ComfyUI-WanVideoWrapper](https://github.com/kijai/ComfyUI-WanVideoWrapper)
* [ComfyUI-KJNodes](https://github.com/kijai/ComfyUI-KJNodes)
---
# Source: https://docs.comfy.org/tutorials/video/wan/fun-inp.md
> ## Documentation Index
> Fetch the complete documentation index at: https://docs.comfy.org/llms.txt
> Use this file to discover all available pages before exploring further.
# ComfyUI Wan2.1 Fun InP Video Examples
> This guide demonstrates how to use Wan2.1 Fun InP in ComfyUI to generate videos with first and last frame control
## About Wan2.1-Fun-InP
**Wan-Fun InP** is an open-source video generation model released by Alibaba, part of the Wan2.1-Fun series, focusing on generating videos from images with first and last frame control.
**Key features**:
* **First and last frame control**: Supports inputting both first and last frame images to generate transitional video between them, enhancing video coherence and creative freedom. Compared to earlier community versions, Alibaba's official model produces more stable and significantly higher quality results.
* **Multi-resolution support**: Supports generating videos at 512×512, 768×768, 1024×1024 and other resolutions to accommodate different scenario requirements.
**Model versions**:
* **1.3B** Lightweight: Suitable for local deployment and quick inference with **lower VRAM requirements**
* **14B** High-performance: Model size reaches 32GB+, offering better results but requiring **higher VRAM**
Below are the relevant model weights and code repositories:
* [Wan2.1-Fun-1.3B-Input](https://huggingface.co/alibaba-pai/Wan2.1-Fun-1.3B-Input)
* [Wan2.1-Fun-14B-Input](https://huggingface.co/alibaba-pai/Wan2.1-Fun-14B-Input)
* Code repository: [VideoX-Fun](https://github.com/aigc-apps/VideoX-Fun)
* A useful tip is that you can combine multiple image preprocessing techniques and then use the `Image Blend` node to achieve the goal of applying multiple control methods simultaneously.
* You can use the `Video Combine` node from `ComfyUI-VideoHelperSuite` to save videos in mp4 format
* We use `SaveAnimatedWEBP` because we currently don't support embedding workflow into **mp4** and some other custom nodes may not support embedding workflow too. To preserve the workflow in the video, we choose `SaveAnimatedWEBP` node.
* In the `WanFunControlToVideo` node, `control_video` is not mandatory, so sometimes you can skip using a control video, first generate a very small video size like 320x320, and then use them as control video input to achieve consistent results.
* [ComfyUI-WanVideoWrapper](https://github.com/kijai/ComfyUI-WanVideoWrapper)
* [ComfyUI-KJNodes](https://github.com/kijai/ComfyUI-KJNodes)
---
# Source: https://docs.comfy.org/tutorials/video/wan/fun-inp.md
> ## Documentation Index
> Fetch the complete documentation index at: https://docs.comfy.org/llms.txt
> Use this file to discover all available pages before exploring further.
# ComfyUI Wan2.1 Fun InP Video Examples
> This guide demonstrates how to use Wan2.1 Fun InP in ComfyUI to generate videos with first and last frame control
## About Wan2.1-Fun-InP
**Wan-Fun InP** is an open-source video generation model released by Alibaba, part of the Wan2.1-Fun series, focusing on generating videos from images with first and last frame control.
**Key features**:
* **First and last frame control**: Supports inputting both first and last frame images to generate transitional video between them, enhancing video coherence and creative freedom. Compared to earlier community versions, Alibaba's official model produces more stable and significantly higher quality results.
* **Multi-resolution support**: Supports generating videos at 512×512, 768×768, 1024×1024 and other resolutions to accommodate different scenario requirements.
**Model versions**:
* **1.3B** Lightweight: Suitable for local deployment and quick inference with **lower VRAM requirements**
* **14B** High-performance: Model size reaches 32GB+, offering better results but requiring **higher VRAM**
Below are the relevant model weights and code repositories:
* [Wan2.1-Fun-1.3B-Input](https://huggingface.co/alibaba-pai/Wan2.1-Fun-1.3B-Input)
* [Wan2.1-Fun-14B-Input](https://huggingface.co/alibaba-pai/Wan2.1-Fun-14B-Input)
* Code repository: [VideoX-Fun](https://github.com/aigc-apps/VideoX-Fun)
 1. Ensure the `Load Diffusion Model` node has loaded `wan2.1_fun_inp_1.3B_bf16.safetensors`
2. Ensure the `Load CLIP` node has loaded `umt5_xxl_fp8_e4m3fn_scaled.safetensors`
3. Ensure the `Load VAE` node has loaded `wan_2.1_vae.safetensors`
4. Ensure the `Load CLIP Vision` node has loaded `clip_vision_h.safetensors`
5. Upload the starting frame to the `Load Image` node (renamed to `Start_image`)
6. Upload the ending frame to the second `Load Image` node
7. (Optional) Modify the prompt (both English and Chinese are supported)
8. (Optional) Adjust the video size in `WanFunInpaintToVideo`, avoiding overly large dimensions
9. Click the `Run` button or use the shortcut `Ctrl(cmd) + Enter` to execute video generation
### 4. Workflow Notes
1. Ensure the `Load Diffusion Model` node has loaded `wan2.1_fun_inp_1.3B_bf16.safetensors`
2. Ensure the `Load CLIP` node has loaded `umt5_xxl_fp8_e4m3fn_scaled.safetensors`
3. Ensure the `Load VAE` node has loaded `wan_2.1_vae.safetensors`
4. Ensure the `Load CLIP Vision` node has loaded `clip_vision_h.safetensors`
5. Upload the starting frame to the `Load Image` node (renamed to `Start_image`)
6. Upload the ending frame to the second `Load Image` node
7. (Optional) Modify the prompt (both English and Chinese are supported)
8. (Optional) Adjust the video size in `WanFunInpaintToVideo`, avoiding overly large dimensions
9. Click the `Run` button or use the shortcut `Ctrl(cmd) + Enter` to execute video generation
### 4. Workflow Notes
 The Google Veo2 Video node generates high-quality videos from text descriptions using Google's Veo2 API technology, converting text prompts into dynamic video content.
## Parameters
### Basic Parameters
| Parameter | Type | Default | Description |
| ------------------ | ------- | ------- | ---------------------------------------------------- |
| prompt | string | "" | Text description of the video content to generate |
| aspect\_ratio | select | "16:9" | Output video aspect ratio, "16:9" or "9:16" |
| negative\_prompt | string | "" | Text describing what to avoid in the video |
| duration\_seconds | integer | 5 | Video duration, 5-8 seconds |
| enhance\_prompt | boolean | True | Whether to use AI to enhance the prompt |
| person\_generation | select | "ALLOW" | Allow or block person generation, "ALLOW" or "BLOCK" |
| seed | integer | 0 | Random seed, 0 means randomly generated |
### Optional Parameters
| Parameter | Type | Default | Description |
| --------- | ----- | ------- | ------------------------------------------------ |
| image | image | None | Optional reference image to guide video creation |
### Output
| Output | Type | Description |
| ------ | ----- | --------------- |
| VIDEO | video | Generated video |
## Source Code
\[Node Source Code (Updated 2025-05-03)]
```python theme={null}
class VeoVideoGenerationNode(ComfyNodeABC):
"""
Generates videos from text prompts using Google's Veo API.
This node can create videos from text descriptions and optional image inputs,
with control over parameters like aspect ratio, duration, and more.
"""
@classmethod
def INPUT_TYPES(s):
return {
"required": {
"prompt": (
IO.STRING,
{
"multiline": True,
"default": "",
"tooltip": "Text description of the video",
},
),
"aspect_ratio": (
IO.COMBO,
{
"options": ["16:9", "9:16"],
"default": "16:9",
"tooltip": "Aspect ratio of the output video",
},
),
},
"optional": {
"negative_prompt": (
IO.STRING,
{
"multiline": True,
"default": "",
"tooltip": "Negative text prompt to guide what to avoid in the video",
},
),
"duration_seconds": (
IO.INT,
{
"default": 5,
"min": 5,
"max": 8,
"step": 1,
"display": "number",
"tooltip": "Duration of the output video in seconds",
},
),
"enhance_prompt": (
IO.BOOLEAN,
{
"default": True,
"tooltip": "Whether to enhance the prompt with AI assistance",
}
),
"person_generation": (
IO.COMBO,
{
"options": ["ALLOW", "BLOCK"],
"default": "ALLOW",
"tooltip": "Whether to allow generating people in the video",
},
),
"seed": (
IO.INT,
{
"default": 0,
"min": 0,
"max": 0xFFFFFFFF,
"step": 1,
"display": "number",
"control_after_generate": True,
"tooltip": "Seed for video generation (0 for random)",
},
),
"image": (IO.IMAGE, {
"default": None,
"tooltip": "Optional reference image to guide video generation",
}),
},
"hidden": {
"auth_token": "AUTH_TOKEN_COMFY_ORG",
},
}
RETURN_TYPES = (IO.VIDEO,)
FUNCTION = "generate_video"
CATEGORY = "api node/video/Veo"
DESCRIPTION = "Generates videos from text prompts using Google's Veo API"
API_NODE = True
def generate_video(
self,
prompt,
aspect_ratio="16:9",
negative_prompt="",
duration_seconds=5,
enhance_prompt=True,
person_generation="ALLOW",
seed=0,
image=None,
auth_token=None,
):
# Prepare the instances for the request
instances = []
instance = {
"prompt": prompt
}
# Add image if provided
if image is not None:
image_base64 = convert_image_to_base64(image)
if image_base64:
instance["image"] = {
"bytesBase64Encoded": image_base64,
"mimeType": "image/png"
}
instances.append(instance)
# Create parameters dictionary
parameters = {
"aspectRatio": aspect_ratio,
"personGeneration": person_generation,
"durationSeconds": duration_seconds,
"enhancePrompt": enhance_prompt,
}
# Add optional parameters if provided
if negative_prompt:
parameters["negativePrompt"] = negative_prompt
if seed > 0:
parameters["seed"] = seed
# Initial request to start video generation
initial_operation = SynchronousOperation(
endpoint=ApiEndpoint(
path="/proxy/veo/generate",
method=HttpMethod.POST,
request_model=Veo2GenVidRequest,
response_model=Veo2GenVidResponse
),
request=Veo2GenVidRequest(
instances=instances,
parameters=parameters
),
auth_token=auth_token
)
initial_response = initial_operation.execute()
operation_name = initial_response.name
logging.info(f"Veo generation started with operation name: {operation_name}")
# Define status extractor function
def status_extractor(response):
# Only return "completed" if the operation is done, regardless of success or failure
# We'll check for errors after polling completes
return "completed" if response.done else "pending"
# Define progress extractor function
def progress_extractor(response):
# Could be enhanced if the API provides progress information
return None
# Define the polling operation
poll_operation = PollingOperation(
poll_endpoint=ApiEndpoint(
path="/proxy/veo/poll",
method=HttpMethod.POST,
request_model=Veo2GenVidPollRequest,
response_model=Veo2GenVidPollResponse
),
completed_statuses=["completed"],
failed_statuses=[], # No failed statuses, we'll handle errors after polling
status_extractor=status_extractor,
progress_extractor=progress_extractor,
request=Veo2GenVidPollRequest(
operationName=operation_name
),
auth_token=auth_token,
poll_interval=5.0
)
# Execute the polling operation
poll_response = poll_operation.execute()
# Now check for errors in the final response
# Check for error in poll response
if hasattr(poll_response, 'error') and poll_response.error:
error_message = f"Veo API error: {poll_response.error.message} (code: {poll_response.error.code})"
logging.error(error_message)
raise Exception(error_message)
# Check for RAI filtered content
if (hasattr(poll_response.response, 'raiMediaFilteredCount') and
poll_response.response.raiMediaFilteredCount > 0):
# Extract reason message if available
if (hasattr(poll_response.response, 'raiMediaFilteredReasons') and
poll_response.response.raiMediaFilteredReasons):
reason = poll_response.response.raiMediaFilteredReasons[0]
error_message = f"Content filtered by Google's Responsible AI practices: {reason} ({poll_response.response.raiMediaFilteredCount} videos filtered.)"
else:
error_message = f"Content filtered by Google's Responsible AI practices ({poll_response.response.raiMediaFilteredCount} videos filtered.)"
logging.error(error_message)
raise Exception(error_message)
# Extract video data
video_data = None
if poll_response.response and hasattr(poll_response.response, 'videos') and poll_response.response.videos and len(poll_response.response.videos) > 0:
video = poll_response.response.videos[0]
# Check if video is provided as base64 or URL
if hasattr(video, 'bytesBase64Encoded') and video.bytesBase64Encoded:
# Decode base64 string to bytes
video_data = base64.b64decode(video.bytesBase64Encoded)
elif hasattr(video, 'gcsUri') and video.gcsUri:
# Download from URL
video_url = video.gcsUri
video_response = requests.get(video_url)
video_data = video_response.content
else:
raise Exception("Video returned but no data or URL was provided")
else:
raise Exception("Video generation completed but no video was returned")
if not video_data:
raise Exception("No video data was returned")
logging.info("Video generation completed successfully")
# Convert video data to BytesIO object
video_io = io.BytesIO(video_data)
# Return VideoFromFile object
return (VideoFromFile(video_io),)
```
---
# Source: https://docs.comfy.org/tutorials/partner-nodes/openai/gpt-image-1.md
> ## Documentation Index
> Fetch the complete documentation index at: https://docs.comfy.org/llms.txt
> Use this file to discover all available pages before exploring further.
# OpenAI GPT-Image-1 Node
> Learn how to use the OpenAI GPT-Image-1 Partner node to generate images in ComfyUI
The Google Veo2 Video node generates high-quality videos from text descriptions using Google's Veo2 API technology, converting text prompts into dynamic video content.
## Parameters
### Basic Parameters
| Parameter | Type | Default | Description |
| ------------------ | ------- | ------- | ---------------------------------------------------- |
| prompt | string | "" | Text description of the video content to generate |
| aspect\_ratio | select | "16:9" | Output video aspect ratio, "16:9" or "9:16" |
| negative\_prompt | string | "" | Text describing what to avoid in the video |
| duration\_seconds | integer | 5 | Video duration, 5-8 seconds |
| enhance\_prompt | boolean | True | Whether to use AI to enhance the prompt |
| person\_generation | select | "ALLOW" | Allow or block person generation, "ALLOW" or "BLOCK" |
| seed | integer | 0 | Random seed, 0 means randomly generated |
### Optional Parameters
| Parameter | Type | Default | Description |
| --------- | ----- | ------- | ------------------------------------------------ |
| image | image | None | Optional reference image to guide video creation |
### Output
| Output | Type | Description |
| ------ | ----- | --------------- |
| VIDEO | video | Generated video |
## Source Code
\[Node Source Code (Updated 2025-05-03)]
```python theme={null}
class VeoVideoGenerationNode(ComfyNodeABC):
"""
Generates videos from text prompts using Google's Veo API.
This node can create videos from text descriptions and optional image inputs,
with control over parameters like aspect ratio, duration, and more.
"""
@classmethod
def INPUT_TYPES(s):
return {
"required": {
"prompt": (
IO.STRING,
{
"multiline": True,
"default": "",
"tooltip": "Text description of the video",
},
),
"aspect_ratio": (
IO.COMBO,
{
"options": ["16:9", "9:16"],
"default": "16:9",
"tooltip": "Aspect ratio of the output video",
},
),
},
"optional": {
"negative_prompt": (
IO.STRING,
{
"multiline": True,
"default": "",
"tooltip": "Negative text prompt to guide what to avoid in the video",
},
),
"duration_seconds": (
IO.INT,
{
"default": 5,
"min": 5,
"max": 8,
"step": 1,
"display": "number",
"tooltip": "Duration of the output video in seconds",
},
),
"enhance_prompt": (
IO.BOOLEAN,
{
"default": True,
"tooltip": "Whether to enhance the prompt with AI assistance",
}
),
"person_generation": (
IO.COMBO,
{
"options": ["ALLOW", "BLOCK"],
"default": "ALLOW",
"tooltip": "Whether to allow generating people in the video",
},
),
"seed": (
IO.INT,
{
"default": 0,
"min": 0,
"max": 0xFFFFFFFF,
"step": 1,
"display": "number",
"control_after_generate": True,
"tooltip": "Seed for video generation (0 for random)",
},
),
"image": (IO.IMAGE, {
"default": None,
"tooltip": "Optional reference image to guide video generation",
}),
},
"hidden": {
"auth_token": "AUTH_TOKEN_COMFY_ORG",
},
}
RETURN_TYPES = (IO.VIDEO,)
FUNCTION = "generate_video"
CATEGORY = "api node/video/Veo"
DESCRIPTION = "Generates videos from text prompts using Google's Veo API"
API_NODE = True
def generate_video(
self,
prompt,
aspect_ratio="16:9",
negative_prompt="",
duration_seconds=5,
enhance_prompt=True,
person_generation="ALLOW",
seed=0,
image=None,
auth_token=None,
):
# Prepare the instances for the request
instances = []
instance = {
"prompt": prompt
}
# Add image if provided
if image is not None:
image_base64 = convert_image_to_base64(image)
if image_base64:
instance["image"] = {
"bytesBase64Encoded": image_base64,
"mimeType": "image/png"
}
instances.append(instance)
# Create parameters dictionary
parameters = {
"aspectRatio": aspect_ratio,
"personGeneration": person_generation,
"durationSeconds": duration_seconds,
"enhancePrompt": enhance_prompt,
}
# Add optional parameters if provided
if negative_prompt:
parameters["negativePrompt"] = negative_prompt
if seed > 0:
parameters["seed"] = seed
# Initial request to start video generation
initial_operation = SynchronousOperation(
endpoint=ApiEndpoint(
path="/proxy/veo/generate",
method=HttpMethod.POST,
request_model=Veo2GenVidRequest,
response_model=Veo2GenVidResponse
),
request=Veo2GenVidRequest(
instances=instances,
parameters=parameters
),
auth_token=auth_token
)
initial_response = initial_operation.execute()
operation_name = initial_response.name
logging.info(f"Veo generation started with operation name: {operation_name}")
# Define status extractor function
def status_extractor(response):
# Only return "completed" if the operation is done, regardless of success or failure
# We'll check for errors after polling completes
return "completed" if response.done else "pending"
# Define progress extractor function
def progress_extractor(response):
# Could be enhanced if the API provides progress information
return None
# Define the polling operation
poll_operation = PollingOperation(
poll_endpoint=ApiEndpoint(
path="/proxy/veo/poll",
method=HttpMethod.POST,
request_model=Veo2GenVidPollRequest,
response_model=Veo2GenVidPollResponse
),
completed_statuses=["completed"],
failed_statuses=[], # No failed statuses, we'll handle errors after polling
status_extractor=status_extractor,
progress_extractor=progress_extractor,
request=Veo2GenVidPollRequest(
operationName=operation_name
),
auth_token=auth_token,
poll_interval=5.0
)
# Execute the polling operation
poll_response = poll_operation.execute()
# Now check for errors in the final response
# Check for error in poll response
if hasattr(poll_response, 'error') and poll_response.error:
error_message = f"Veo API error: {poll_response.error.message} (code: {poll_response.error.code})"
logging.error(error_message)
raise Exception(error_message)
# Check for RAI filtered content
if (hasattr(poll_response.response, 'raiMediaFilteredCount') and
poll_response.response.raiMediaFilteredCount > 0):
# Extract reason message if available
if (hasattr(poll_response.response, 'raiMediaFilteredReasons') and
poll_response.response.raiMediaFilteredReasons):
reason = poll_response.response.raiMediaFilteredReasons[0]
error_message = f"Content filtered by Google's Responsible AI practices: {reason} ({poll_response.response.raiMediaFilteredCount} videos filtered.)"
else:
error_message = f"Content filtered by Google's Responsible AI practices ({poll_response.response.raiMediaFilteredCount} videos filtered.)"
logging.error(error_message)
raise Exception(error_message)
# Extract video data
video_data = None
if poll_response.response and hasattr(poll_response.response, 'videos') and poll_response.response.videos and len(poll_response.response.videos) > 0:
video = poll_response.response.videos[0]
# Check if video is provided as base64 or URL
if hasattr(video, 'bytesBase64Encoded') and video.bytesBase64Encoded:
# Decode base64 string to bytes
video_data = base64.b64decode(video.bytesBase64Encoded)
elif hasattr(video, 'gcsUri') and video.gcsUri:
# Download from URL
video_url = video.gcsUri
video_response = requests.get(video_url)
video_data = video_response.content
else:
raise Exception("Video returned but no data or URL was provided")
else:
raise Exception("Video generation completed but no video was returned")
if not video_data:
raise Exception("No video data was returned")
logging.info("Video generation completed successfully")
# Convert video data to BytesIO object
video_io = io.BytesIO(video_data)
# Return VideoFromFile object
return (VideoFromFile(video_io),)
```
---
# Source: https://docs.comfy.org/tutorials/partner-nodes/openai/gpt-image-1.md
> ## Documentation Index
> Fetch the complete documentation index at: https://docs.comfy.org/llms.txt
> Use this file to discover all available pages before exploring further.
# OpenAI GPT-Image-1 Node
> Learn how to use the OpenAI GPT-Image-1 Partner node to generate images in ComfyUI
 OpenAI GPT-Image-1 is part of the ComfyUI Partner nodes series that allows users to generate images through OpenAI's **GPT-Image-1** model. This is the same model used for image generation in ChatGPT 4o.
This node supports:
* Text-to-image generation
* Image editing functionality (inpainting through masks)
## Node Overview
The **OpenAI GPT-Image-1** node synchronously generates images through OpenAI's image generation API. It receives text prompts and returns images matching the description. GPT-Image-1 is OpenAI's most advanced image generation model currently available, capable of creating highly detailed and realistic images.
OpenAI GPT-Image-1 is part of the ComfyUI Partner nodes series that allows users to generate images through OpenAI's **GPT-Image-1** model. This is the same model used for image generation in ChatGPT 4o.
This node supports:
* Text-to-image generation
* Image editing functionality (inpainting through masks)
## Node Overview
The **OpenAI GPT-Image-1** node synchronously generates images through OpenAI's image generation API. It receives text prompts and returns images matching the description. GPT-Image-1 is OpenAI's most advanced image generation model currently available, capable of creating highly detailed and realistic images.
 You only need to load the `OpenAI GPT-Image-1` node, input the description of the image you want to generate in the `prompt` node, connect a `Save Image` node, and then run the workflow.
### Image-to-Image Example
The image below contains a simple image-to-image workflow. Please download the image and drag it into ComfyUI to load the corresponding workflow.

We will use the image below as input:

In this workflow, we use the `OpenAI GPT-Image-1` node to generate images and the `Load Image` node to load the input image, then connect it to the `image` input of the `OpenAI GPT-Image-1` node.
You only need to load the `OpenAI GPT-Image-1` node, input the description of the image you want to generate in the `prompt` node, connect a `Save Image` node, and then run the workflow.
### Image-to-Image Example
The image below contains a simple image-to-image workflow. Please download the image and drag it into ComfyUI to load the corresponding workflow.

We will use the image below as input:

In this workflow, we use the `OpenAI GPT-Image-1` node to generate images and the `Load Image` node to load the input image, then connect it to the `image` input of the `OpenAI GPT-Image-1` node.
 ### Multiple Image Input Example
Please download the image below and drag it into ComfyUI to load the corresponding workflow.

Use the hat image below as an additional input image.

The corresponding workflow is shown in the image below:
### Multiple Image Input Example
Please download the image below and drag it into ComfyUI to load the corresponding workflow.

Use the hat image below as an additional input image.

The corresponding workflow is shown in the image below:
 The `Batch Images` node is used to load multiple images into the `OpenAI GPT-Image-1` node.
### Inpainting Workflow
GPT-Image-1 also supports image editing functionality, allowing you to specify areas to replace using a mask. Below is a simple inpainting workflow example:
Download the image below and drag it into ComfyUI to load the corresponding workflow. We will continue to use the input image from the image-to-image workflow section.

The corresponding workflow is shown in the image
The `Batch Images` node is used to load multiple images into the `OpenAI GPT-Image-1` node.
### Inpainting Workflow
GPT-Image-1 also supports image editing functionality, allowing you to specify areas to replace using a mask. Below is a simple inpainting workflow example:
Download the image below and drag it into ComfyUI to load the corresponding workflow. We will continue to use the input image from the image-to-image workflow section.

The corresponding workflow is shown in the image
 Compared to the image-to-image workflow, we use the MaskEditor in the `Load Image` node through the right-click menu to draw a mask, then connect it to the `mask` input of the `OpenAI GPT-Image-1` node to complete the workflow.
**Notes**
* The mask and image must be the same size
* When inputting large images, the node will automatically resize the image to an appropriate size
## FAQs
Compared to the image-to-image workflow, we use the MaskEditor in the `Load Image` node through the right-click menu to draw a mask, then connect it to the `mask` input of the `OpenAI GPT-Image-1` node to complete the workflow.
**Notes**
* The mask and image must be the same size
* When inputting large images, the node will automatically resize the image to an appropriate size
## FAQs