--help` | Command-specific help |
**Examples:**
```shellscript
# Main help
bitoarch --help
# Command help
bitoarch index-repos --help
bitoarch add-repo --help
bitoarch mcp-tools --help
```
***
### Environment
Configuration is loaded from `.env-bitoarch` file. Key variables:
* `BITO_API_KEY` - API key for authentication
* `GIT_PROVIDER` - Git provider (github, gitlab, bitbucket)
* `GIT_ACCESS_TOKEN` - Git access token
* `BITO_MCP_ACCESS_TOKEN` - MCP server access token
* `CIS_*_EXTERNAL_PORT` - Service external ports
***
### Version
Check CLI version:
```shellscript
bitoarch --version
```
---
# Source: https://docs.bito.ai/ai-code-reviews-in-ide/ai-that-understands-your-code/available-keywords.md
# Available Keywords
Here is the list of keywords in different languages to ask questions regarding your entire codebase. Use any of these keywords in your prompts inside Bito chatbox.
### English:
* my code
* my repo
* my project
* my workspace
### Chinese:
* 我的代码
* 我的仓库
* 我的代码库
* 我的项目
* 我的文件夹
### Chinese Traditional:
* 我的程式碼
* 我的倉庫
* 我的項目
* 我的工作區
### Spanish:
* Mi código
* Mi repo
* Mi proyecto
* Mi espacio de trabajo
### Japanese:
* 私のコード
* 私のリポ
* 私のプロジェクト
* 私のワークスペース
### Portuguese:
* Meu código
* Meu repo
* Meu projeto
* Meu espaço de trabalho
## Polish
* Mój obszar roboczy
* moje miejsce pracy
* mój obszar roboczy
* moj kod
* mój kod
* moim kodzie
* moje repo
* moje repozytorium
* moim repo
* moj projekt
* mój projekt
* moim projekcie
---
# Source: https://docs.bito.ai/ai-architect/available-mcp-tools.md
# Available MCP tools
[**AI Architect's**](https://docs.bito.ai/ai-architect/overview) MCP server provides a comprehensive suite of tools for exploring, analyzing, and understanding your organization's codebase. These tools enable AI coding assistants to access deep repository intelligence, architectural insights, and code-level information across all your Git repositories.
Below is the complete list of MCP tools provided by AI Architect:
| Tool name | Description |
| :------------------------------: | :--------------------------------------------------------------------------------------------------------------------------------------------------------------------------------------------------------------------------------------------------------------------------------------------------------------------------------------------------------------------------------------------------------------------------------------------------------------------------------------------------------------------------------------------------------------------------------------------------------------------------------------------------------------------------------------------------------------------------------------------------------------------------------------------------------------------------: |
| **getCapabilities** | Discover what repository intelligence and analysis capabilities this MCP server provides.
Returns comprehensive information about available repository data, dependency analysis features, architectural insights, and clustering patterns for your organization's Git repositories.
Use this to understand what repository information is available through this specialized service.
|
| **listRepositories** | Browse all Git repositories in your organization. Returns comprehensive repository catalog with names, descriptions, and resource URIs.
Use this to discover available repositories, understand the organization's project landscape, identify microservices and components, or get an overview of all systems.
Each entry includes a resource URI for accessing detailed repository information.
Instant access to pre-indexed organizational repository data.
|
| **listClusters** | View automatically identified clusters of related repositories in your organization.
Clusters represent groups of repositories with strong dependencies or architectural relationships, often forming subsystems or microservice groups.
Use this to understand system architecture, identify bounded contexts, discover service groupings, or analyze component relationships.
Returns cluster information with member repositories and their resource URIs.
|
| **getRepositoryInfo** | Get comprehensive repository information including metadata, structure, and dependencies.
To access incoming dependencies (services depending on this repo): set includeIncomingDependencies=true.
To access outgoing dependencies (services this repo depends on): set includeOutgoingDependencies=true.
Edge data includes various dependency types - filter by edge.type field to isolate specific categories.
Smart defaults: dependencies auto-limited by detailLevel (summary: 10, standard: 25, full: unlimited).
Essential for understanding repository relationships, analyzing dependencies, investigating integration points, and assessing impact of changes.
Returns pre-analyzed dependency graphs and relationship data.
|
| **getClusterInfo** | Examine a specific cluster of related repositories to understand subsystem architecture within your organization.
Returns all member repositories, their interdependencies, project summaries, and resource URIs.
Use this to analyze how repositories collaborate, understand service boundaries, explore microservice architectures, or investigate system decomposition patterns.
Valuable for architectural reviews and impact analysis.
|
| **searchRepositories** | ONLY use when you DON'T know the repository name. If you know exact name, use getRepositoryInfo or getFieldPath directly.
Intelligent search across your organization's Git repositories using natural language queries.
Search by technology, functionality, frameworks, or project characteristics when repository name is unknown.
Uses TF-IDF algorithm on pre-indexed repository metadata for relevant results.
Examples: 'Python microservices', 'repositories using Redis', 'authentication services', 'React applications', 'payment processing systems', 'Kubernetes deployments'.
Returns repositories with relevance scores and direct access URIs.
|
| **searchWithinRepository** | Search for content within a single repository including metadata and dependency data.
Searches metadata fields and optionally incoming\_dependencies and outgoing\_dependencies.
By default searches ALL data for comprehensive results.
Use includeIncomingDependencies=false and includeOutgoingDependencies=false for faster metadata-only search.
Returns filtered results with matches from metadata and dependencies.
Use when: You know which repo but need to find specific information without knowing exact field paths.
Natural language queries work well.
|
| **getRepositorySchema** | Discover repository structure without fetching data.
Returns field names, types, array counts, and nested hierarchy.
Essential first step for exploring unfamiliar repositories.
|
| **getFieldPath** | Extract specific nested field using dot notation and array indexing.
MOST EFFICIENT for surgical data extraction - returns only requested field vs full repository.
For dependencies: use 'incoming\_dependencies' or 'outgoing\_dependencies' paths with arraySlice, then filter by edge.type field to isolate specific categories.
Supports deep nesting, array slicing, and optional parent context.
Returns only the requested field data.
|
| **queryFieldAcrossRepositories** | Query same field path across multiple repositories in single call.
Comparative analysis, pattern discovery, and technology audits across repos.
|
| **searchCode** | Search code using zoekt index with powerful query syntax.
Supports file filters, exclusions, case sensitivity.
Returns code matches with snippets.
|
| **searchSymbols** | Search for symbol definitions (functions, classes, methods) across indexed codebase. |
| **getCode** | Retrieve actual source code content from repository files.
Use after searchCode/searchSymbols to view the full code around matches.
Returns file contents with line numbers. Only available when reposDir is configured.
|
---
# Source: https://docs.bito.ai/help/billing-and-plans.md
# Billing and plans
---
# Source: https://docs.bito.ai/help/billing-and-plans/billing-details.md
# Billing details
## Add or Update Billing Address
1. Open the [**Manage Subscription > Billing and Plans**](https://alpha.bito.ai/home/settings/bito-premium/billing) page.
2. Click on the "Edit billing details" button. You will be redirected to a secure page powered by Stripe.
 3. On this page, you will see your current plan details as well as billing information such as address. Click on "Update information" button to add/edit your billing details.
 4. Now, you will see a form through which you can add your billing information such as the billing address and tax (VAT, GST, etc) details. Click on the "Save" button to save your changes or click on the "Cancel" button to return to the previous screen.
 ---
# Source: https://docs.bito.ai/help/billing-and-plans/billing-history.md
# Billing history
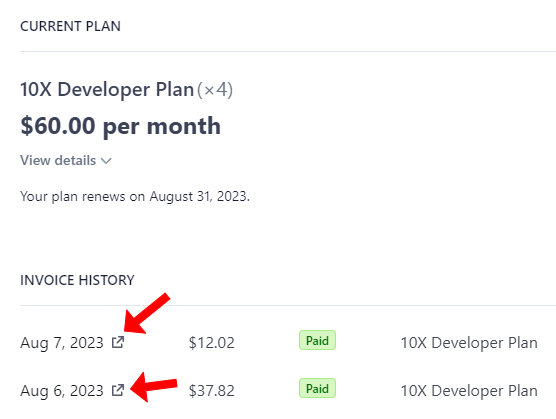
Bito maintains your billing history through [Stripe](https://stripe.com/).
To view your past payments, follow these steps:
1. Open the [**Manage Subscription > Billing and Plans**](https://alpha.bito.ai/home/settings/bito-premium/billing) page.
2. Click on the "View billing history" button. You will be redirected to a secure page powered by Stripe.
---
# Source: https://docs.bito.ai/help/billing-and-plans/billing-history.md
# Billing history
Bito maintains your billing history through [Stripe](https://stripe.com/).
To view your past payments, follow these steps:
1. Open the [**Manage Subscription > Billing and Plans**](https://alpha.bito.ai/home/settings/bito-premium/billing) page.
2. Click on the "View billing history" button. You will be redirected to a secure page powered by Stripe.
 3. On this page, you will see your complete billing history.
 4. Open a specific invoice to view its complete details.
 5. From the invoice page, you can view more details by clicking “View invoice and payment details”.

 6. You can also download the invoice and the receipt from this page by clicking the “Download invoice” and “Download receipt” buttons respectively.
 {% hint style="info" %}
Billing History functionality is not available for workspaces on the **Free Plan**.
{% endhint %}
---
# Source: https://docs.bito.ai/other-bito-ai-tools/bito-cli.md
# Bito CLI
{% embed url="" %}
---
# Source: https://docs.bito.ai/help/bitos-ai-stack.md
# Bito's AI stack
---
# Source: https://docs.bito.ai/changelog.md
# Changelog
{% hint style="info" %}
[**Get a 14-day FREE trial of Bito's AI Code Review Agent.**](https://alpha.bito.ai/home/welcome)
{% endhint %}
{% hint style="info" %}
Looking for older updates? You can find them on our [**Previous releases**](https://docs.bito.ai/changelog/previous-releases) page.
{% endhint %}
## AI Code Review Agent - 19th Jan 2026
**New feature**
**Introducing AI Code Reviews in CLI:** Get AI-powered code reviews directly in your terminal. Catch security vulnerabilities, bugs, and performance issues early – before they reach production.
Integrate seamlessly into your CI/CD pipeline!
Ship code with confidence knowing critical issues are caught early when they're cheapest to fix.
Learn more
## AI Architect - 12th Jan 2026
**New feature**
**Kubernetes deployment support:** [AI Architect](https://docs.bito.ai/ai-architect/overview) now supports Kubernetes deployment alongside Docker Compose. Deploy to your existing K8s cluster to leverage enterprise orchestration, advanced scaling capabilities, and seamless integration with your containerized infrastructure.
Learn more
## AI Architect - 11th Dec 2025
**New feature**
**Introducing Bito's AI Architect:** [AI Architect](https://docs.bito.ai/ai-architect/overview) builds a knowledge graph of your codebase — from repos to modules to APIs — delivering deep codebase intelligence to the coding agents you already use (e.g. Claude Code, Cursor, Windsurf, GitHub Copilot, and more).
Get production-ready code in one shot, faster issue triaging, consistent design adherence, and smarter code reviews powered by deep understanding of your architecture, services, and patterns.
**Getting started:**
1. [**Download and install Bito's AI Architect**](https://docs.bito.ai/ai-architect/install-ai-architect-self-hosted) — Get AI Architect from GitHub, run the setup script to connect your Git provider and LLMs, then index your repositories to build the knowledge graph
2. **Connect your coding agent** — Configure the MCP server in your preferred AI coding agent:
* [Claude Code](https://docs.bito.ai/ai-architect/guide-for-claude-code)
* [Cursor](https://docs.bito.ai/ai-architect/guide-for-cursor)
* [Windsurf](https://docs.bito.ai/ai-architect/guide-for-windsurf)
* [GitHub Copilot (VS Code)](https://docs.bito.ai/ai-architect/guide-for-github-copilot-vs-code)
* [Junie (JetBrains)](https://docs.bito.ai/ai-architect/guide-for-junie-jetbrains)
* [JetBrains AI Assistant](https://docs.bito.ai/ai-architect/guide-for-jetbrains-ai-assistant)
Try Bito's AI ArchitectRead documentationWatch demo
## AI Code Review Agent - 10th Nov 2025
**New feature**
**Repository-level Agent settings with `.bito.yaml`:** You can now customize [AI Code Review Agent](https://docs.bito.ai/ai-code-reviews-in-git/overview) behavior for individual repositories using a `.bito.yaml` configuration file. This gives teams the flexibility to define repository-specific review settings, coding guidelines, and preferences while admins maintain centralized oversight and visibility from the Bito dashboard.
[**Learn more**](https://docs.bito.ai/ai-code-reviews-in-git/agent-settings/repo-level-settings)
## Billing and plan updates - 5th Nov 2025
**New Professional plan and annual billing options:** We've introduced a new **Professional Plan** ($20/month per seat, billed annually) designed for growing teams that need advanced capabilities beyond our **Team Plan**.
Additionally, **annual billing is now available** across all paid plans at a discounted rate.
Our updated plan structure:
* **Team:** $12/month per seat (billed annually) or $15/month per seat (billed monthly)
* *Up to 25 seats per team*
* **Professional:** $20/month per seat (billed annually) or $25/month per seat (billed monthly)
* *Unlimited seats*
* **Enterprise:** [Contact us for custom pricing](https://bit.ly/contact-bito-sales)
[Learn more](https://bito.ai/pricing/)
## AI Code Review Agent - 3rd Nov 2025
**New feature**
**Project-aware code reviews:** The [AI Code Review Agent](https://docs.bito.ai/ai-code-reviews-in-git/overview) now reads and uses guideline files that are commonly used by AI coding agents like Cursor, Windsurf, and Claude Code.
Simply add guideline files (`.cursor/rules/*.mdc`, `.windsurf/rules/*.md`, `CLAUDE.md`, `GEMINI.md`, or `AGENTS.md`) to your repository, and the agent automatically applies your project's standards when reviewing pull requests.
Bito comments based on these guidelines include a citation linking to the specific guideline, so you can see exactly which rule triggered the feedback.
[**Learn more**](https://docs.bito.ai/ai-code-reviews-in-git/implementing-custom-code-review-rules#id-3-use-project-specific-guideline-files)
## AI Code Review Agent - 3rd Oct 2025
**New feature**
**Support for Perforce and SVN:** The [Bito IDE extension](https://docs.bito.ai/ai-code-reviews-in-ide/overview) now supports AI code reviews for projects using Perforce and SVN, in addition to Git. This means developers working in enterprise or legacy environments can get the same automated code insights and faster feedback without needing to switch tools or workflows.
**New review option `uncommittedchanges`:** You can now review all uncommitted changes in one go, including both local (unstaged) changes and staged changes. This makes it easier to spot issues across your entire workspace, helping you fix problems earlier and keep your commits clean.
[**Learn more**](https://docs.bito.ai/ai-code-reviews-in-ide/overview)
{% hint style="info" %}
Billing History functionality is not available for workspaces on the **Free Plan**.
{% endhint %}
---
# Source: https://docs.bito.ai/other-bito-ai-tools/bito-cli.md
# Bito CLI
{% embed url="" %}
---
# Source: https://docs.bito.ai/help/bitos-ai-stack.md
# Bito's AI stack
---
# Source: https://docs.bito.ai/changelog.md
# Changelog
{% hint style="info" %}
[**Get a 14-day FREE trial of Bito's AI Code Review Agent.**](https://alpha.bito.ai/home/welcome)
{% endhint %}
{% hint style="info" %}
Looking for older updates? You can find them on our [**Previous releases**](https://docs.bito.ai/changelog/previous-releases) page.
{% endhint %}
## AI Code Review Agent - 19th Jan 2026
**New feature**
**Introducing AI Code Reviews in CLI:** Get AI-powered code reviews directly in your terminal. Catch security vulnerabilities, bugs, and performance issues early – before they reach production.
Integrate seamlessly into your CI/CD pipeline!
Ship code with confidence knowing critical issues are caught early when they're cheapest to fix.
Learn more
## AI Architect - 12th Jan 2026
**New feature**
**Kubernetes deployment support:** [AI Architect](https://docs.bito.ai/ai-architect/overview) now supports Kubernetes deployment alongside Docker Compose. Deploy to your existing K8s cluster to leverage enterprise orchestration, advanced scaling capabilities, and seamless integration with your containerized infrastructure.
Learn more
## AI Architect - 11th Dec 2025
**New feature**
**Introducing Bito's AI Architect:** [AI Architect](https://docs.bito.ai/ai-architect/overview) builds a knowledge graph of your codebase — from repos to modules to APIs — delivering deep codebase intelligence to the coding agents you already use (e.g. Claude Code, Cursor, Windsurf, GitHub Copilot, and more).
Get production-ready code in one shot, faster issue triaging, consistent design adherence, and smarter code reviews powered by deep understanding of your architecture, services, and patterns.
**Getting started:**
1. [**Download and install Bito's AI Architect**](https://docs.bito.ai/ai-architect/install-ai-architect-self-hosted) — Get AI Architect from GitHub, run the setup script to connect your Git provider and LLMs, then index your repositories to build the knowledge graph
2. **Connect your coding agent** — Configure the MCP server in your preferred AI coding agent:
* [Claude Code](https://docs.bito.ai/ai-architect/guide-for-claude-code)
* [Cursor](https://docs.bito.ai/ai-architect/guide-for-cursor)
* [Windsurf](https://docs.bito.ai/ai-architect/guide-for-windsurf)
* [GitHub Copilot (VS Code)](https://docs.bito.ai/ai-architect/guide-for-github-copilot-vs-code)
* [Junie (JetBrains)](https://docs.bito.ai/ai-architect/guide-for-junie-jetbrains)
* [JetBrains AI Assistant](https://docs.bito.ai/ai-architect/guide-for-jetbrains-ai-assistant)
Try Bito's AI ArchitectRead documentationWatch demo
## AI Code Review Agent - 10th Nov 2025
**New feature**
**Repository-level Agent settings with `.bito.yaml`:** You can now customize [AI Code Review Agent](https://docs.bito.ai/ai-code-reviews-in-git/overview) behavior for individual repositories using a `.bito.yaml` configuration file. This gives teams the flexibility to define repository-specific review settings, coding guidelines, and preferences while admins maintain centralized oversight and visibility from the Bito dashboard.
[**Learn more**](https://docs.bito.ai/ai-code-reviews-in-git/agent-settings/repo-level-settings)
## Billing and plan updates - 5th Nov 2025
**New Professional plan and annual billing options:** We've introduced a new **Professional Plan** ($20/month per seat, billed annually) designed for growing teams that need advanced capabilities beyond our **Team Plan**.
Additionally, **annual billing is now available** across all paid plans at a discounted rate.
Our updated plan structure:
* **Team:** $12/month per seat (billed annually) or $15/month per seat (billed monthly)
* *Up to 25 seats per team*
* **Professional:** $20/month per seat (billed annually) or $25/month per seat (billed monthly)
* *Unlimited seats*
* **Enterprise:** [Contact us for custom pricing](https://bit.ly/contact-bito-sales)
[Learn more](https://bito.ai/pricing/)
## AI Code Review Agent - 3rd Nov 2025
**New feature**
**Project-aware code reviews:** The [AI Code Review Agent](https://docs.bito.ai/ai-code-reviews-in-git/overview) now reads and uses guideline files that are commonly used by AI coding agents like Cursor, Windsurf, and Claude Code.
Simply add guideline files (`.cursor/rules/*.mdc`, `.windsurf/rules/*.md`, `CLAUDE.md`, `GEMINI.md`, or `AGENTS.md`) to your repository, and the agent automatically applies your project's standards when reviewing pull requests.
Bito comments based on these guidelines include a citation linking to the specific guideline, so you can see exactly which rule triggered the feedback.
[**Learn more**](https://docs.bito.ai/ai-code-reviews-in-git/implementing-custom-code-review-rules#id-3-use-project-specific-guideline-files)
## AI Code Review Agent - 3rd Oct 2025
**New feature**
**Support for Perforce and SVN:** The [Bito IDE extension](https://docs.bito.ai/ai-code-reviews-in-ide/overview) now supports AI code reviews for projects using Perforce and SVN, in addition to Git. This means developers working in enterprise or legacy environments can get the same automated code insights and faster feedback without needing to switch tools or workflows.
**New review option `uncommittedchanges`:** You can now review all uncommitted changes in one go, including both local (unstaged) changes and staged changes. This makes it easier to spot issues across your entire workspace, helping you fix problems earlier and keep your commits clean.
[**Learn more**](https://docs.bito.ai/ai-code-reviews-in-ide/overview)
 ## AI Code Review Agent - 19th Sep 2025
**New feature**
**Simplified Bitbucket integration:** Say goodbye to API tokens! We've completely streamlined your Bitbucket integration experience. Instead of manually creating API tokens and filling out forms, you can now connect Bito to Bitbucket with just a few clicks by installing the Bito app directly.
It's faster, more secure, and eliminates all the tedious setup steps.
[**Check out our updated setup guide**](https://docs.bito.ai/ai-code-reviews-in-git/install-run-using-bito-cloud/guide-for-bitbucket) to get started.
## AI Code Review Agent - 19th Sep 2025
**New feature**
**Simplified Bitbucket integration:** Say goodbye to API tokens! We've completely streamlined your Bitbucket integration experience. Instead of manually creating API tokens and filling out forms, you can now connect Bito to Bitbucket with just a few clicks by installing the Bito app directly.
It's faster, more secure, and eliminates all the tedious setup steps.
[**Check out our updated setup guide**](https://docs.bito.ai/ai-code-reviews-in-git/install-run-using-bito-cloud/guide-for-bitbucket) to get started.
 ## AI Code Review Agent - 11th Sep 2025
**New feature**
**Introducing Jira integration:** Bito now automatically validates your pull requests against Jira ticket requirements, ensuring your code changes align perfectly with project specs.
Reviewers no longer need to manually cross-check tickets and code — they can see requirement coverage at a glance.
To get started, simply [connect Bito with Jira](https://alpha.bito.ai/home/cra-integrations) and reference your Jira tickets in pull request titles, descriptions, or branch names.
[**Learn more about Jira Integration**](https://docs.bito.ai/ai-code-reviews-in-git/jira-integration)
## AI Code Review Agent - 11th Sep 2025
**New feature**
**Introducing Jira integration:** Bito now automatically validates your pull requests against Jira ticket requirements, ensuring your code changes align perfectly with project specs.
Reviewers no longer need to manually cross-check tickets and code — they can see requirement coverage at a glance.
To get started, simply [connect Bito with Jira](https://alpha.bito.ai/home/cra-integrations) and reference your Jira tickets in pull request titles, descriptions, or branch names.
[**Learn more about Jira Integration**](https://docs.bito.ai/ai-code-reviews-in-git/jira-integration)

 ## AI Code Review Agent - 9th Sep 2025
**Important update**
**Bitbucket integration now uses API tokens:** Bitbucket has announced the [deprecation of app passwords](https://www.atlassian.com/blog/bitbucket/bitbucket-cloud-transitions-to-api-tokens-enhancing-security-with-app-password-deprecation) to enhance security across their platform. Starting September 9th, 2025, no new app passwords can be created, and existing app passwords will stop working entirely on June 9, 2026.
**What's changing:** We've updated Bito to support Bitbucket's new API token authentication method. This transition ensures your Bitbucket integration remains secure and functional beyond the deprecation timeline.
**What you need to do:** If you're currently using app passwords for your Bitbucket integration, you'll need to switch to API tokens.
[Check out our updated setup guide](https://docs.bito.ai/ai-code-review-agent/install-run-using-bito-cloud/guide-for-bitbucket) to get started.
## AI Code Review Agent - 9th Sep 2025
**Important update**
**Bitbucket integration now uses API tokens:** Bitbucket has announced the [deprecation of app passwords](https://www.atlassian.com/blog/bitbucket/bitbucket-cloud-transitions-to-api-tokens-enhancing-security-with-app-password-deprecation) to enhance security across their platform. Starting September 9th, 2025, no new app passwords can be created, and existing app passwords will stop working entirely on June 9, 2026.
**What's changing:** We've updated Bito to support Bitbucket's new API token authentication method. This transition ensures your Bitbucket integration remains secure and functional beyond the deprecation timeline.
**What you need to do:** If you're currently using app passwords for your Bitbucket integration, you'll need to switch to API tokens.
[Check out our updated setup guide](https://docs.bito.ai/ai-code-review-agent/install-run-using-bito-cloud/guide-for-bitbucket) to get started.
 ## AI Code Review Agent - 8th Sep 2025
**New feature**
**Pull request and issue-level analytics:** We're excited to introduce the [**PR Analytics dashboard**](https://alpha.bito.ai/home/dashboard?view=PR_Analytics) – a powerful new addition to [Bito's Code Review Analytics](https://docs.bito.ai/ai-code-reviews-in-git/code-review-analytics) that gives you granular visibility into individual pull request performance and issue-level insights.
See exactly how many issues were found in each pull request.
[**Learn more**](https://docs.bito.ai/ai-code-reviews-in-git/code-review-analytics#pr-analytics-dashboard)
## AI Code Review Agent - 8th Sep 2025
**New feature**
**Pull request and issue-level analytics:** We're excited to introduce the [**PR Analytics dashboard**](https://alpha.bito.ai/home/dashboard?view=PR_Analytics) – a powerful new addition to [Bito's Code Review Analytics](https://docs.bito.ai/ai-code-reviews-in-git/code-review-analytics) that gives you granular visibility into individual pull request performance and issue-level insights.
See exactly how many issues were found in each pull request.
[**Learn more**](https://docs.bito.ai/ai-code-reviews-in-git/code-review-analytics#pr-analytics-dashboard)

 ---
# Source: https://docs.bito.ai/ai-code-reviews-in-ide/ai-chat-in-bito/chat-session-history.md
# Chat session history
Bito automatically saves the chat session History. The session history is stored locally on your computer. You can return to any chat session and continue the AI conversation from where you left off. Bito will automatically maintain and restore the memory of the loaded chat session.
You can "Delete" any saved chat session or share a permalink to the session with your coworkers.
Here is the video overview of accessing and managing the session history.
{% embed url="" %}
Chat Session History
{% endembed %}
---
# Source: https://docs.bito.ai/ai-code-reviews-in-git/chat-with-ai-code-review-agent.md
# Chat with AI Code Review Agent
Ask questions directly to the AI Code Review Agent regarding its code review feedback. You can inquire about highlighted issues, request alternative solutions, or seek clarifications on suggested fixes.
Real-time collaboration with the AI Code Review Agent accelerates your development cycle. By delivering immediate, actionable insights, it eliminates the delays typically experienced with human reviews. Developers can engage directly with the Agent to clarify recommendations on the spot, ensuring that any issues are addressed swiftly and accurately.
Bito supports over 20 languages—including English, Hindi, Chinese, and Spanish—so you can interact with the AI in the language you’re most comfortable with.
## How to chat?
To start a conversation, type your question directly as a reply to the Agent’s code review comment.
The AI Code Review Agent will **analyze your comment and determine** if it’s a valid and relevant question.
* If the agent decides it’s a valid question, it will respond with helpful insights.
* If the agent determines it’s unclear, off-topic, or not related to its feedback, it will **not respond**.
To help the agent recognize your question faster, you can also **tag your comment** with **@bitoagent** or **@askbito**. Tagging informs the Agent that your message is intended as a question. However, **tagging does not guarantee a reply**. The agent will still **analyze your comment and decide** whether it is a valid question worth responding to.
Bito usually responds within about 10 seconds.
* On **GitHub** and **Bitbucket**, you may need to manually refresh the page to see the response.
* On **GitLab**, updates happen automatically.
{% hint style="info" %}
**Note:** The AI Code Review Agent will only respond to questions posted as a reply to its own comments.\
It will not reply to questions added on threads that it didn’t start.
{% endhint %}
---
# Source: https://docs.bito.ai/ai-code-reviews-in-ide/ai-chat-in-bito/chat-session-history.md
# Chat session history
Bito automatically saves the chat session History. The session history is stored locally on your computer. You can return to any chat session and continue the AI conversation from where you left off. Bito will automatically maintain and restore the memory of the loaded chat session.
You can "Delete" any saved chat session or share a permalink to the session with your coworkers.
Here is the video overview of accessing and managing the session history.
{% embed url="" %}
Chat Session History
{% endembed %}
---
# Source: https://docs.bito.ai/ai-code-reviews-in-git/chat-with-ai-code-review-agent.md
# Chat with AI Code Review Agent
Ask questions directly to the AI Code Review Agent regarding its code review feedback. You can inquire about highlighted issues, request alternative solutions, or seek clarifications on suggested fixes.
Real-time collaboration with the AI Code Review Agent accelerates your development cycle. By delivering immediate, actionable insights, it eliminates the delays typically experienced with human reviews. Developers can engage directly with the Agent to clarify recommendations on the spot, ensuring that any issues are addressed swiftly and accurately.
Bito supports over 20 languages—including English, Hindi, Chinese, and Spanish—so you can interact with the AI in the language you’re most comfortable with.
## How to chat?
To start a conversation, type your question directly as a reply to the Agent’s code review comment.
The AI Code Review Agent will **analyze your comment and determine** if it’s a valid and relevant question.
* If the agent decides it’s a valid question, it will respond with helpful insights.
* If the agent determines it’s unclear, off-topic, or not related to its feedback, it will **not respond**.
To help the agent recognize your question faster, you can also **tag your comment** with **@bitoagent** or **@askbito**. Tagging informs the Agent that your message is intended as a question. However, **tagging does not guarantee a reply**. The agent will still **analyze your comment and decide** whether it is a valid question worth responding to.
Bito usually responds within about 10 seconds.
* On **GitHub** and **Bitbucket**, you may need to manually refresh the page to see the response.
* On **GitLab**, updates happen automatically.
{% hint style="info" %}
**Note:** The AI Code Review Agent will only respond to questions posted as a reply to its own comments.\
It will not reply to questions added on threads that it didn’t start.
{% endhint %}
 ### What you can ask about
When chatting with the AI Code Review Agent, you can ask questions to better understand or improve the code feedback it provided. Here are examples of what you can ask:
* **Clarifications about a highlighted issue**\
Ask the AI to explain why it flagged a certain line of code or why something might cause a problem.
* **Request for alternative solutions**\
Request different ways to fix or improve the code beyond what was originally suggested.
* **Deeper explanations**\
If you want to understand the technical reasoning behind a suggestion (e.g., security concerns, performance impacts, best practices), you can ask for more detailed explanations.
* **Request for examples**\
Ask the AI to provide an example snippet showing the corrected or improved code.
* **Trade-off discussions**\
Ask the AI about pros and cons of different approaches it may have suggested (e.g., performance vs. readability).
* **Best practices guidance**\
Request advice on best practices related to the specific code snippet — such as naming conventions, error handling, optimization tips, or design patterns.
* **Language-specific advice**\
If you’re working in a particular language (e.g., JavaScript, Python, Java), you can ask for language-specific guidance related to the comment.
* **Request for more context**\
If the suggestion feels too "short" or "surface level," you can ask the AI to explain more about the broader coding or architectural concept behind its feedback.
* **Security and safety questions**\
If a suggestion touches on security (like input validation, authentication, or encryption), you can ask for further security-related advice.
* **Testing and validation**\
Ask the AI if it recommends writing any tests based on its code suggestions and what those tests might look like.
{% hint style="info" %}
**Tip:** Feel free to ask your question in your preferred language! Bito supports over 20 languages, including English, Hindi, Chinese, and Spanish.
{% endhint %}
### What you cannot ask about
The AI can only answer questions related to its **own code review comments**.
* **You cannot** ask general questions about the repository or unrelated topics.
* **You cannot** start a new thread independently — your question must be a reply to a comment made by Bito’s AI Code Review Agent.
If your comment is not linked to a Bito review comment, the AI will **not respond**.
---
# Source: https://docs.bito.ai/ai-code-reviews-in-git/install-run-as-a-self-hosted-service/cli-vs-webhooks-service.md
# CLI vs webhooks service
On your machine or in a Private Cloud, you can run the AI Code Review Agent via either CLI or webhooks service. This guide will teach you about the key differences between CLI and webhooks service and when to use each mode.
## Difference Between CLI and webhooks service
The main difference between CLI and webhooks service lies in their operational approach and purpose. In CLI, the docker container is used for a one-time code review. This mode is ideal for isolated, single-instance analyses where a quick, direct review of the code is needed.
On the other hand, webhooks service is designed for continuous operation. When set in webhooks service mode, the AI Code Review Agent remains online and active at a specified URL. This continuous operation allows it to respond automatically whenever a pull request is opened in a repository. In this scenario, the git provider notifies the server, triggering the AI Code Review Agent to analyze the pull request and post its review as a comment directly on it.
## When to Use CLI and When to Use webhooks service
Selecting the appropriate mode for code review with the AI Code Review Agent depends largely on the nature and frequency of your code review needs.
### CLI: Ideal for Specific, One-Time Reviews
CLI mode is best suited for scenarios requiring immediate, one-time code reviews. It's particularly effective for:
* Conducting quick assessments of specific pull requests.
* Performing periodic, scheduled code analyses.
* Reviewing code in environments with limited or no continuous integration support.
* Integrating with batch processing scripts for ad-hoc analysis.
* Using in educational settings to demonstrate code review practices.
* Experimenting with different code review configurations.
* Reviewing code on local setups or for personal projects.
* Performing a final check before pushing code to a repository.
CLI mode stands out for its simplicity and is perfect for standalone tasks where a single, direct execution of the code review process is all that's needed.
### Webhooks service: For Continuous, Automated Reviews
Webhooks service, on the other hand, is the go-to choice for continuous code review processes. It excels in:
* Continuously monitoring all pull requests in a repository.
* Providing instant feedback in collaborative projects.
* Seamlessly integrating with CI/CD pipelines for automated reviews.
* Performing automated code quality checks in team environments.
* Conducting real-time security scans on new pull requests.
* Ensuring adherence to coding standards in every pull request.
* Streamlining the code review process in large-scale projects.
* Maintaining consistency in code review across multiple projects.
* Enhancing workflows in remote or distributed development teams.
* Offering prompt feedback in agile development settings.
Webhooks service is indispensable in active development environments where consistent monitoring and immediate feedback are critical. It automates the code review process, integrating seamlessly into the workflow and eliminating the need for manual initiation of code reviews.
---
# Source: https://docs.bito.ai/ai-code-reviews-in-git/install-run-using-bito-cloud/clone-an-agent-instance.md
# Clone an Agent instance
Save time and effort by quickly creating a new [AI Code Review Agent](https://docs.bito.ai/ai-code-reviews-in-git/overview) instance using the configuration settings of an existing one. It’s a fast and simple way to set up multiple Agent instances without having to reconfigure each one.
Follow the steps below to get started:
1. [**Log in to Bito Cloud**](https://alpha.bito.ai/) and select a workspace to get started.
2. From the left sidebar, select [**Code Review Agents**](https://alpha.bito.ai/home/ai-agents/code-review-agent).
### What you can ask about
When chatting with the AI Code Review Agent, you can ask questions to better understand or improve the code feedback it provided. Here are examples of what you can ask:
* **Clarifications about a highlighted issue**\
Ask the AI to explain why it flagged a certain line of code or why something might cause a problem.
* **Request for alternative solutions**\
Request different ways to fix or improve the code beyond what was originally suggested.
* **Deeper explanations**\
If you want to understand the technical reasoning behind a suggestion (e.g., security concerns, performance impacts, best practices), you can ask for more detailed explanations.
* **Request for examples**\
Ask the AI to provide an example snippet showing the corrected or improved code.
* **Trade-off discussions**\
Ask the AI about pros and cons of different approaches it may have suggested (e.g., performance vs. readability).
* **Best practices guidance**\
Request advice on best practices related to the specific code snippet — such as naming conventions, error handling, optimization tips, or design patterns.
* **Language-specific advice**\
If you’re working in a particular language (e.g., JavaScript, Python, Java), you can ask for language-specific guidance related to the comment.
* **Request for more context**\
If the suggestion feels too "short" or "surface level," you can ask the AI to explain more about the broader coding or architectural concept behind its feedback.
* **Security and safety questions**\
If a suggestion touches on security (like input validation, authentication, or encryption), you can ask for further security-related advice.
* **Testing and validation**\
Ask the AI if it recommends writing any tests based on its code suggestions and what those tests might look like.
{% hint style="info" %}
**Tip:** Feel free to ask your question in your preferred language! Bito supports over 20 languages, including English, Hindi, Chinese, and Spanish.
{% endhint %}
### What you cannot ask about
The AI can only answer questions related to its **own code review comments**.
* **You cannot** ask general questions about the repository or unrelated topics.
* **You cannot** start a new thread independently — your question must be a reply to a comment made by Bito’s AI Code Review Agent.
If your comment is not linked to a Bito review comment, the AI will **not respond**.
---
# Source: https://docs.bito.ai/ai-code-reviews-in-git/install-run-as-a-self-hosted-service/cli-vs-webhooks-service.md
# CLI vs webhooks service
On your machine or in a Private Cloud, you can run the AI Code Review Agent via either CLI or webhooks service. This guide will teach you about the key differences between CLI and webhooks service and when to use each mode.
## Difference Between CLI and webhooks service
The main difference between CLI and webhooks service lies in their operational approach and purpose. In CLI, the docker container is used for a one-time code review. This mode is ideal for isolated, single-instance analyses where a quick, direct review of the code is needed.
On the other hand, webhooks service is designed for continuous operation. When set in webhooks service mode, the AI Code Review Agent remains online and active at a specified URL. This continuous operation allows it to respond automatically whenever a pull request is opened in a repository. In this scenario, the git provider notifies the server, triggering the AI Code Review Agent to analyze the pull request and post its review as a comment directly on it.
## When to Use CLI and When to Use webhooks service
Selecting the appropriate mode for code review with the AI Code Review Agent depends largely on the nature and frequency of your code review needs.
### CLI: Ideal for Specific, One-Time Reviews
CLI mode is best suited for scenarios requiring immediate, one-time code reviews. It's particularly effective for:
* Conducting quick assessments of specific pull requests.
* Performing periodic, scheduled code analyses.
* Reviewing code in environments with limited or no continuous integration support.
* Integrating with batch processing scripts for ad-hoc analysis.
* Using in educational settings to demonstrate code review practices.
* Experimenting with different code review configurations.
* Reviewing code on local setups or for personal projects.
* Performing a final check before pushing code to a repository.
CLI mode stands out for its simplicity and is perfect for standalone tasks where a single, direct execution of the code review process is all that's needed.
### Webhooks service: For Continuous, Automated Reviews
Webhooks service, on the other hand, is the go-to choice for continuous code review processes. It excels in:
* Continuously monitoring all pull requests in a repository.
* Providing instant feedback in collaborative projects.
* Seamlessly integrating with CI/CD pipelines for automated reviews.
* Performing automated code quality checks in team environments.
* Conducting real-time security scans on new pull requests.
* Ensuring adherence to coding standards in every pull request.
* Streamlining the code review process in large-scale projects.
* Maintaining consistency in code review across multiple projects.
* Enhancing workflows in remote or distributed development teams.
* Offering prompt feedback in agile development settings.
Webhooks service is indispensable in active development environments where consistent monitoring and immediate feedback are critical. It automates the code review process, integrating seamlessly into the workflow and eliminating the need for manual initiation of code reviews.
---
# Source: https://docs.bito.ai/ai-code-reviews-in-git/install-run-using-bito-cloud/clone-an-agent-instance.md
# Clone an Agent instance
Save time and effort by quickly creating a new [AI Code Review Agent](https://docs.bito.ai/ai-code-reviews-in-git/overview) instance using the configuration settings of an existing one. It’s a fast and simple way to set up multiple Agent instances without having to reconfigure each one.
Follow the steps below to get started:
1. [**Log in to Bito Cloud**](https://alpha.bito.ai/) and select a workspace to get started.
2. From the left sidebar, select [**Code Review Agents**](https://alpha.bito.ai/home/ai-agents/code-review-agent).
 3. If your Bito workspace is connected to your GitHub/GitLab/Bitbucket account, a list of AI Code Review Agent instances configured in your workspace will appear. Locate the instance you wish to duplicate and click the **Clone** button given in front of it.
 4. An Agent configuration form will open, pre-populated with the input field values. You can edit these values as needed.
 5. Click **Select repositories** to choose Git repositories for the new Agent.
 6. To enable code review for a specific repository, simply select its corresponding checkbox. You can also enable repositories later, after the Agent has been created. Once done, click **Save and continue** to save the new Agent configuration.
 7. When you save the configuration, your new Agent instance will be added and available on the [**Code Review Agents**](https://alpha.bito.ai/home/ai-agents/code-review-agent) page.
 ---
# Source: https://docs.bito.ai/ai-code-reviews-in-git/code-review-analytics.md
# Code review analytics
The user-friendly [**Code Review Analytics**](https://alpha.bito.ai/home/dashboard?view=overview) dashboards help you track key metrics such as pull requests reviewed, issues found, lines of code reviewed, and understand individual contributions.
This helps you identify trends and optimize your development workflow.
---
# Source: https://docs.bito.ai/ai-code-reviews-in-git/code-review-analytics.md
# Code review analytics
The user-friendly [**Code Review Analytics**](https://alpha.bito.ai/home/dashboard?view=overview) dashboards help you track key metrics such as pull requests reviewed, issues found, lines of code reviewed, and understand individual contributions.
This helps you identify trends and optimize your development workflow.

Code Review Analytics dashboard
Bito provides four distinct analytical views to help you understand your code review performance from multiple perspectives:
1. [**Overview**](#overview-dashboard): High-level workspace metrics and trends
2. [**Submitter Analytics**](#submitter-analytics-dashboard): Individual contributor performance and patterns
3. [**Repository Analytics**](#repository-analytics-dashboard): Repository and language-specific insights
4. [**PR Analytics**](#pr-analytics-dashboard): Detailed pull request and issue tracking
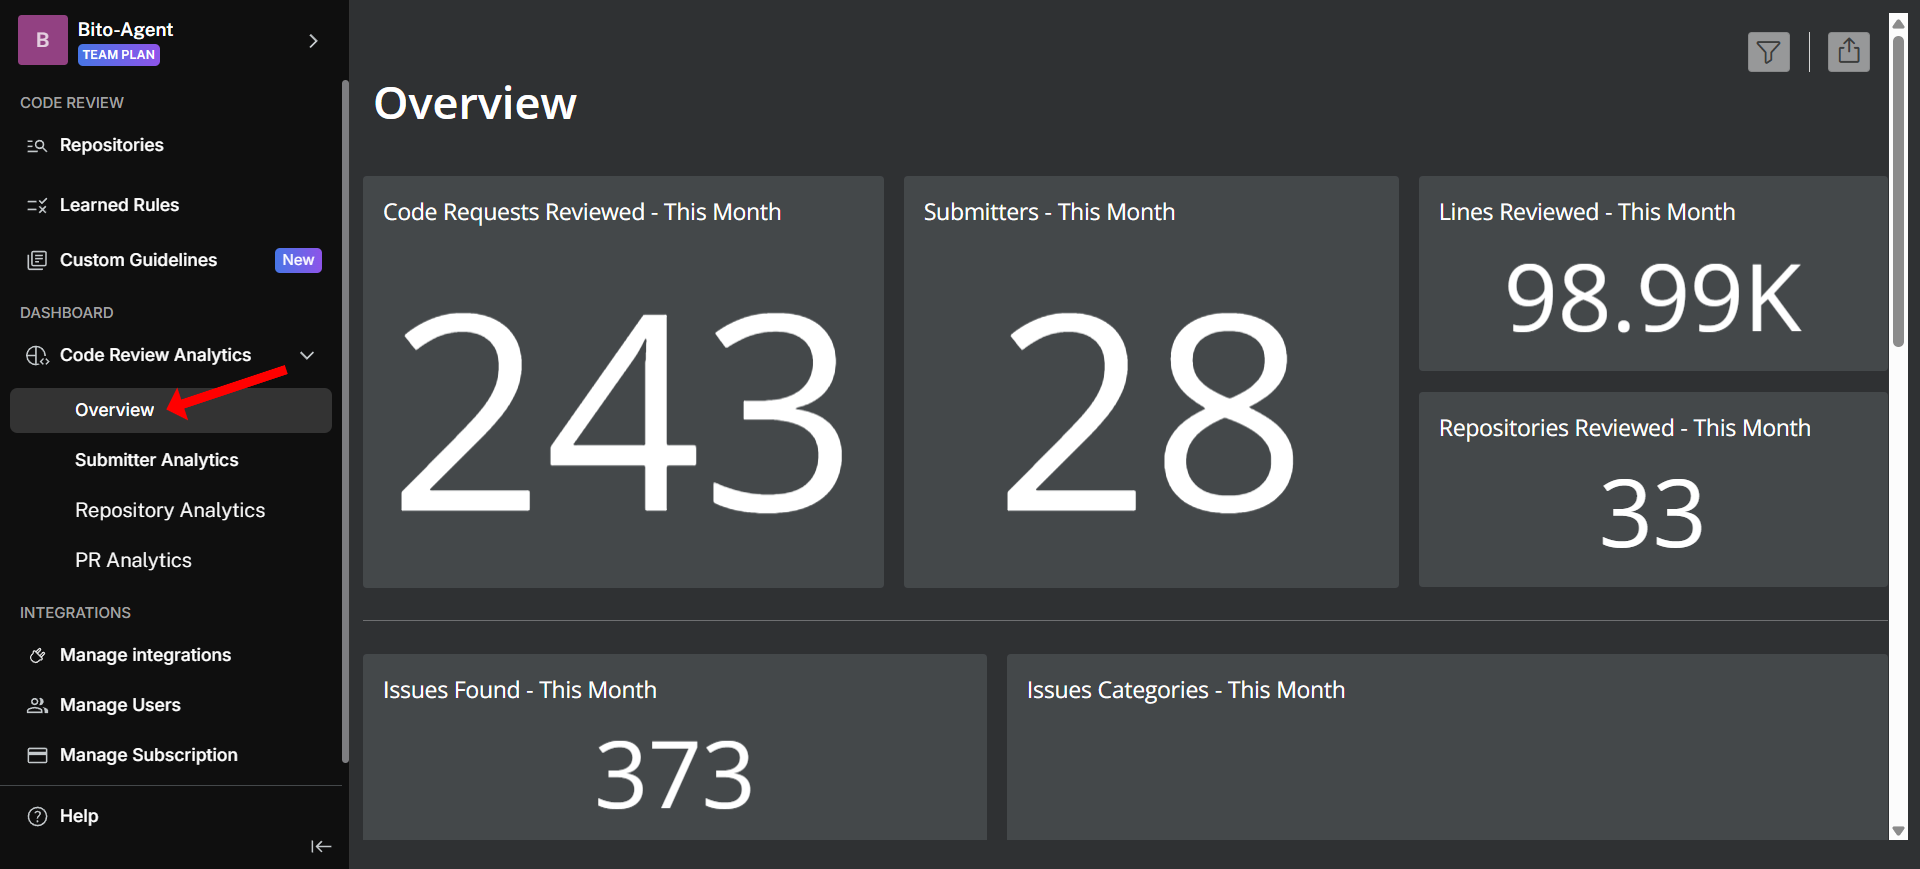
## "Overview" dashboard
The [**Overview dashboard**](https://alpha.bito.ai/home/dashboard?view=overview) provides a comprehensive high-level view of your workspace's code review performance, showing pull requests reviewed, issues found, and their categorization.
### Key metrics:
* **Code Requests Reviewed - This Month**: Total number of code reviews completed by Bito, including both pull requests from git workflows and IDE-based reviews
* **Lines Reviewed - This Month**: Total lines of code analyzed across all pull request diffs
* **Repositories Reviewed - This Month**: Number of unique repositories that received code review coverage
* **Submitters - This Month**: Count of unique developers (based on Git handles) whose pull requests were reviewed by Bito
* **Issues Found - This Month**: Total number of issues identified across all reviewed code
* **Issues Categories - This Month**: Visual breakdown of issues by primary categories (Security, Performance, Functionality, etc.)
* *Note: When issues span multiple categories, Bito assigns the most relevant primary category*
* **Merged PRs - This Month**: Number of Bito-reviewed pull requests that were subsequently merged or closed
* **Issues Evaluated for Acceptance Rate - This Month**: Issues in merged pull requests evaluated for potential fixes
* **Acceptance Rate (Merged PRs) - This Month**: Percentage of agent-identified issues that were potentially addressed
* *Calculated based on code changes detected in related hunks when pull requests were merged*
* *Available for reviews conducted on or after August 8th, 2024*
* *Note: This is an approximation based on code change detection*
* **Pull Requests Skipped - This Month**: Pull requests excluded from review due to:
* Matching exclusion filters in agent configuration
* Empty diffs
* Invalid Bito plan status
* **Skip Reason - This Month**: Breakdown of why specific pull requests were skipped
{% hint style="info" %}
Use the **Filters** button (top-right) to customize your view. You can also export the data to PowerPoint or PDF using the **Share menu** button (top-right).
{% endhint %}
 ## "Submitter Analytics" dashboard
The [**Submitter Analytics dashboard**](https://alpha.bito.ai/home/dashboard?view=Submitter_Analytics) helps you gain insights into individual contributor patterns and performance with user-level statistics and visualizations.
### Key metrics:
* **Pull Requests Reviewed - This Month**: Number of pull requests reviewed for each developer. It helps you identify most active team members.
* Shows top 30 contributors by pull request count
* Remaining contributors aggregated under 'Other'
* **Lines of Code Reviewed - This Month**: Lines of code reviewed by Bito per developer. It is useful for understanding workload distribution.
* Displays contributors with minimum 100 lines reviewed
* Top 30 contributors shown individually
* Remaining contributors grouped under 'Other'
* **Issues Reported Per 1K Lines - This Month**: Issue density normalized by code volume for developers with at least 1,000 lines of code, enabling fair comparison across different contribution levels. It helps identify patterns in code quality by developer
* **Issue Distribution by Category - This Month**: Breakdown of issues by type for each developer, showing both total count and percentage. Categories with fewer than 5 issues are excluded, with bar height representing total issues and width showing percentage distribution. It helps identify individual strengths and areas for improvement.
{% hint style="info" %}
Use the **Filters** button (top-right) to customize your view. You can also export the data to PowerPoint or PDF using the **Share menu** button (top-right).
{% endhint %}
## "Submitter Analytics" dashboard
The [**Submitter Analytics dashboard**](https://alpha.bito.ai/home/dashboard?view=Submitter_Analytics) helps you gain insights into individual contributor patterns and performance with user-level statistics and visualizations.
### Key metrics:
* **Pull Requests Reviewed - This Month**: Number of pull requests reviewed for each developer. It helps you identify most active team members.
* Shows top 30 contributors by pull request count
* Remaining contributors aggregated under 'Other'
* **Lines of Code Reviewed - This Month**: Lines of code reviewed by Bito per developer. It is useful for understanding workload distribution.
* Displays contributors with minimum 100 lines reviewed
* Top 30 contributors shown individually
* Remaining contributors grouped under 'Other'
* **Issues Reported Per 1K Lines - This Month**: Issue density normalized by code volume for developers with at least 1,000 lines of code, enabling fair comparison across different contribution levels. It helps identify patterns in code quality by developer
* **Issue Distribution by Category - This Month**: Breakdown of issues by type for each developer, showing both total count and percentage. Categories with fewer than 5 issues are excluded, with bar height representing total issues and width showing percentage distribution. It helps identify individual strengths and areas for improvement.
{% hint style="info" %}
Use the **Filters** button (top-right) to customize your view. You can also export the data to PowerPoint or PDF using the **Share menu** button (top-right).
{% endhint %}
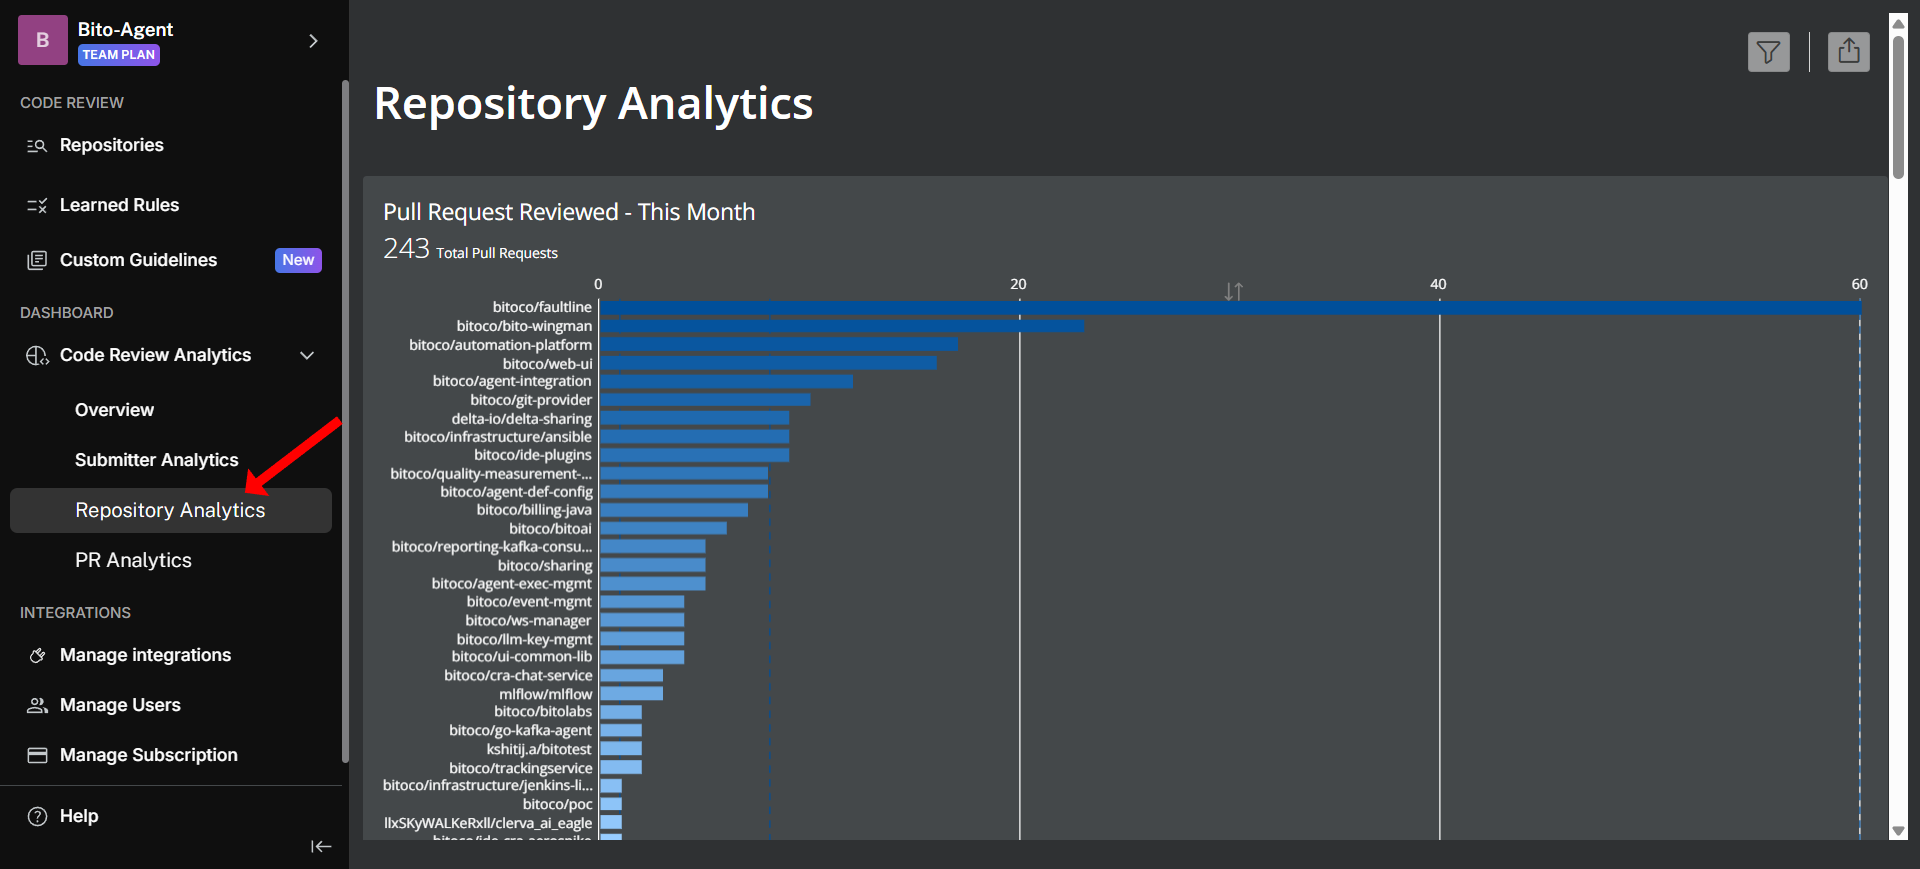
 ## "Repository Analytics" dashboard
The [**Repository Analytics dashboard**](https://alpha.bito.ai/home/dashboard?view=Repository_Analytics) helps you understand repository-level performance and language-specific trends across your codebase.
### Key metrics:
* **Pull Requests Reviewed - This Month**: Review activity across repositories (top 30 shown, remainder grouped as 'Other'). It identifies which codebases receive most attention.
* **Lines of Code Reviewed (Repo) - This Month**: Lines of code reviewed by Bito in each repository (top 30 displayed individually). It helps you understand where development effort is concentrated.
* **Lines of Code Reviewed (Language) - This Month**: Breakdown of reviewed code by programming language. It is useful for resource allocation and expertise planning.
* **Issues Reported Per 1K Lines (Repo) - This Month**: Issue density for repositories with at least 1,000 lines of changes. It identifies repositories that may need additional attention
* **Issues Reported Per 1K Lines (Language) - This Month**: Issue rates across different programming languages (minimum 100 lines required). It helps you identify language-specific training needs.
* **Issue Distribution by Category × Language - This Month**: Issues categorized by both type and programming language, with visualization showing total count (bar height) and percentage distribution (bar width). Categories with fewer than 5 issues excluded. It reveals language-specific issue patterns.
* **Issue Distribution by Category × Repo - This Month**: Issues analyzed across category and repository dimensions, excluding categories with fewer than 5 issues. The visualization shows total issues (bar height) and percentage distribution (bar width). It identifies repository-specific issue trends.
{% hint style="info" %}
Use the **Filters** button (top-right) to customize your view. You can also export the data to PowerPoint or PDF using the **Share menu** button (top-right).
{% endhint %}
## "Repository Analytics" dashboard
The [**Repository Analytics dashboard**](https://alpha.bito.ai/home/dashboard?view=Repository_Analytics) helps you understand repository-level performance and language-specific trends across your codebase.
### Key metrics:
* **Pull Requests Reviewed - This Month**: Review activity across repositories (top 30 shown, remainder grouped as 'Other'). It identifies which codebases receive most attention.
* **Lines of Code Reviewed (Repo) - This Month**: Lines of code reviewed by Bito in each repository (top 30 displayed individually). It helps you understand where development effort is concentrated.
* **Lines of Code Reviewed (Language) - This Month**: Breakdown of reviewed code by programming language. It is useful for resource allocation and expertise planning.
* **Issues Reported Per 1K Lines (Repo) - This Month**: Issue density for repositories with at least 1,000 lines of changes. It identifies repositories that may need additional attention
* **Issues Reported Per 1K Lines (Language) - This Month**: Issue rates across different programming languages (minimum 100 lines required). It helps you identify language-specific training needs.
* **Issue Distribution by Category × Language - This Month**: Issues categorized by both type and programming language, with visualization showing total count (bar height) and percentage distribution (bar width). Categories with fewer than 5 issues excluded. It reveals language-specific issue patterns.
* **Issue Distribution by Category × Repo - This Month**: Issues analyzed across category and repository dimensions, excluding categories with fewer than 5 issues. The visualization shows total issues (bar height) and percentage distribution (bar width). It identifies repository-specific issue trends.
{% hint style="info" %}
Use the **Filters** button (top-right) to customize your view. You can also export the data to PowerPoint or PDF using the **Share menu** button (top-right).
{% endhint %}
 ## "PR Analytics" dashboard
The [**PR Analytics dashboard**](https://alpha.bito.ai/home/dashboard?view=PR_Analytics) helps you dive deep into individual pull request performance with detailed pull request and issue-level analytics.
## "PR Analytics" dashboard
The [**PR Analytics dashboard**](https://alpha.bito.ai/home/dashboard?view=PR_Analytics) helps you dive deep into individual pull request performance with detailed pull request and issue-level analytics.
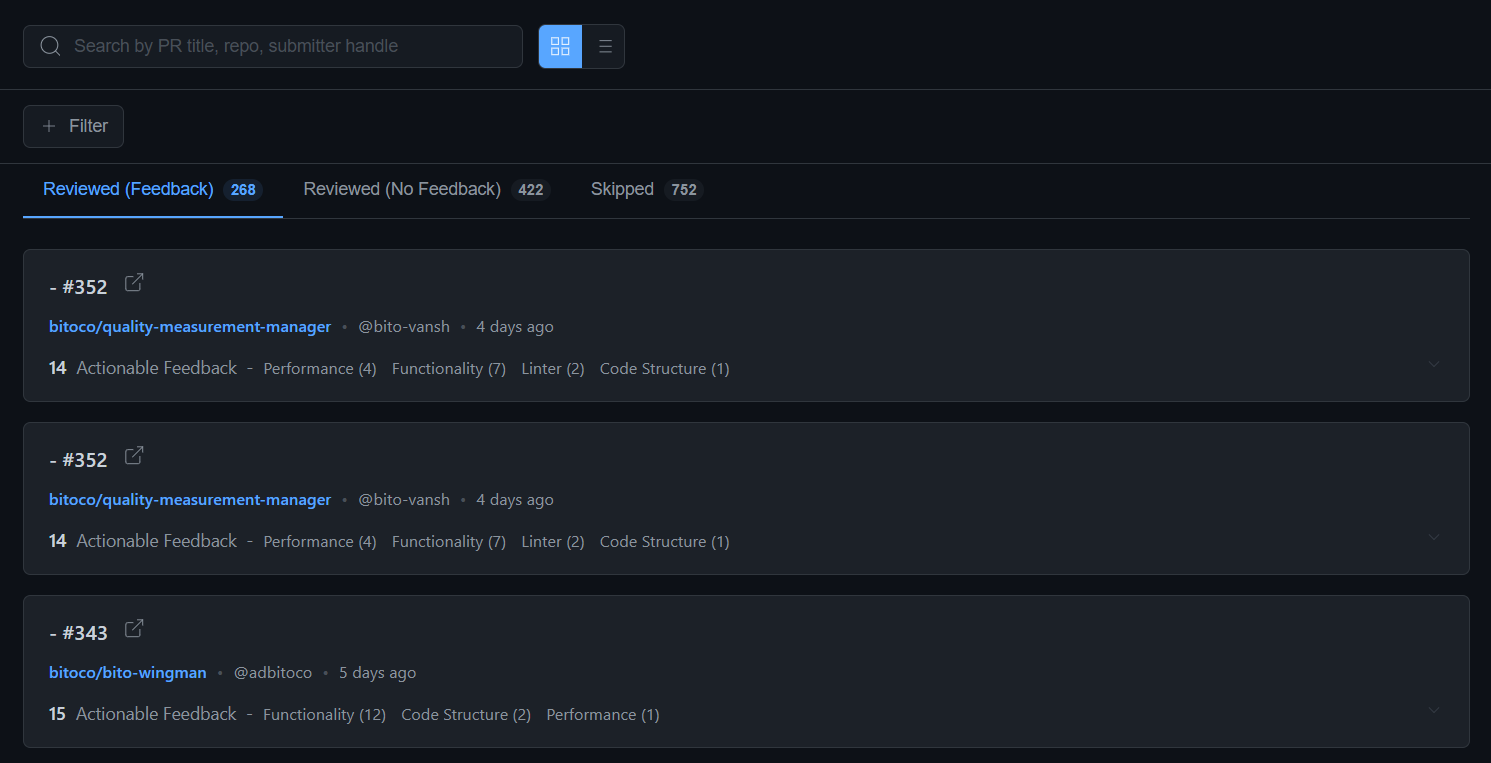
 The dashboard organizes pull requests into three tabs:
### **1. "Reviewed (Feedback)" tab**
* Shows pull requests where Bito provided actionable feedback
* These pull requests contain issues that require your attention
* Click any pull request to access comprehensive details including every feedback item with its category (Security, Performance, Linter, Functionality, etc.), affected programming language, and direct links to the specific code location within the pull request for quick reference.
* Useful for tracking reviews that generated value
The dashboard organizes pull requests into three tabs:
### **1. "Reviewed (Feedback)" tab**
* Shows pull requests where Bito provided actionable feedback
* These pull requests contain issues that require your attention
* Click any pull request to access comprehensive details including every feedback item with its category (Security, Performance, Linter, Functionality, etc.), affected programming language, and direct links to the specific code location within the pull request for quick reference.
* Useful for tracking reviews that generated value
 ### **2. "Reviewed (No Feedback)" tab**
* Shows pull requests that Bito reviewed but found no actionable issues
* Indicates clean code submissions
### **2. "Reviewed (No Feedback)" tab**
* Shows pull requests that Bito reviewed but found no actionable issues
* Indicates clean code submissions
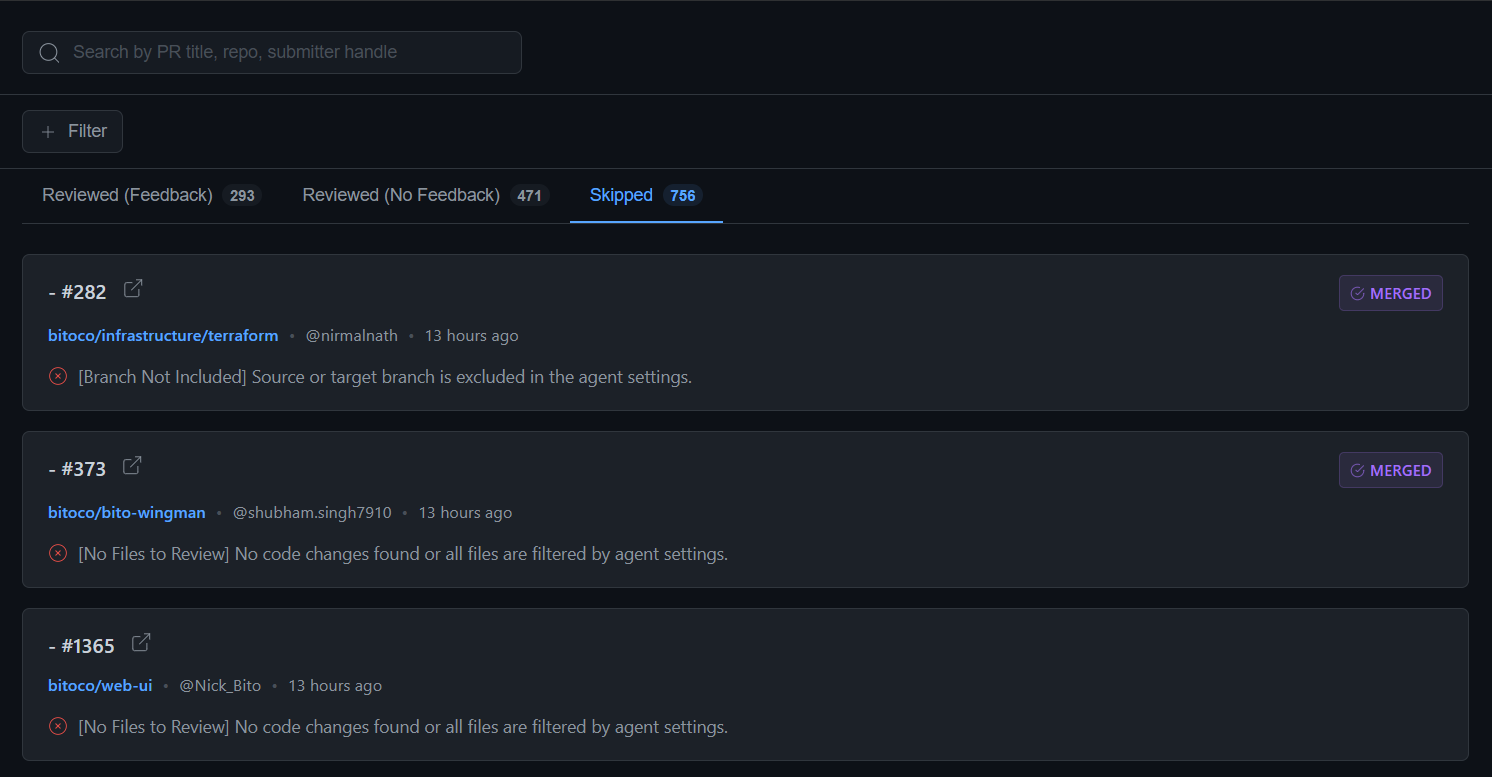
 ### **3. "Skipped" tab**
* Shows pull requests that Bito didn't review due to configuration settings or other constraints
* Includes skip reasons for transparency
### **3. "Skipped" tab**
* Shows pull requests that Bito didn't review due to configuration settings or other constraints
* Includes skip reasons for transparency
 {% hint style="info" %}
Use the **Filter** button (top-left) to customize views by:
* Specific submitters
* Date ranges
* Pull request status
{% endhint %}
## **Benefits for technical leadership**
The detailed code review analytics reports enables tech leads and reviewers to:
* **Trace patterns**: Identify recurring issues across pull requests
* **Spot trends**: Recognize systematic problems in code quality
* **Connect insights**: Link high-level analytics to specific code examples
* **Targeted mentoring**: Provide specific guidance based on actual code issues
* **Process improvement**: Adjust development practices based on concrete data
## Best practices for using analytics
#### 1. Regular review cadence
* Check [Overview](#overview-dashboard) metrics for trend monitoring
* Review [Submitter Analytics](#submitter-analytics-dashboard) for team performance discussions
* Analyze [Repository Analytics](#repository-analytics-dashboard) for strategic planning
* Use [PR Analytics](#pr-analytics-dashboard) for issue tracking and mentoring
#### 2. Filtering for insights
* Use date filters to compare time periods
* Filter by specific teams or repositories during retrospectives
* Focus on high-activity contributors or repositories for targeted improvements
#### 3. Export and sharing
* Export monthly reports for stakeholder updates
* Share repository-specific insights with relevant teams
* Use PowerPoint exports for executive presentations
* Archive PDF reports for compliance or historical analysis
#### 4. Action-oriented analysis
* Identify submitters who might benefit from additional code review training
* Focus attention on repositories with high issue density
* Address language-specific patterns through targeted workshops
* Use acceptance rate trends to validate review effectiveness
---
# Source: https://docs.bito.ai/other-bito-ai-tools/bito-cli/configuration.md
# Configuration
## bito config \[flags]
* run `bito config -l` or `bito config --list` to list all config variables and values.
* run `bito config -e` or `bito config --edit` to open the config file in default editor.
## Sample Configuration
```
bito:
access_key: ""
email: first.last@mycompany.com
preferred_ai_model: ADVANCED
settings:
auto_update: true
max_context_entries: 20
```
## What is an Access Key and How to Get it?
[**Access Key**](https://docs.bito.ai/help/account-and-settings/access-key) is an alternate authentication mechanism to Email & OTP based authentication. You can use an Access Key in Bito CLI to access various functionalities such as **Bito AI Chat**. Here’s a guide on [how to create an Access Key](https://docs.bito.ai/help/account-and-settings/access-key). Basically, after creating the Access Key, you have to use it in the config file mentioned above. For example, `access_key: “YOUR_ACCESS_KEY_HERE”`
Access Key can be persisted in Bito CLI by adding it in the config file using `bito config -e`. Such persisted Access Key can be over-ridden by running `bito -k ` or `bito --key ` for the transient session (sessions that last only for a short time).
## Preferred AI Model Type
By default AI Model Type is set to `ADVANCED` and it can be overridden by running `bito -m `. Model type is used for AI query in the current session. Model type can be set to `BASIC` or `ADVANCED`, which is case insensitive.
"ADVANCED" refers to AI models like GPT-4o, Claude Sonnet 3.5, and best in class AI models, while "BASIC" refers to AI models like GPT-4o mini and similar models.
When using Basic AI models, your prompts and the chat's memory are limited to 40,000 characters (about 18 single-spaced pages). However, with Advanced AI models, your prompts and the chat memory can go up to 240,000 characters (about 110 single-spaced pages). This means that Advanced models can process your entire code files, leading to more accurate answers.
If you are seeking the best results for complex tasks, then choose Advanced AI models.
{% hint style="info" %}
Access to Advanced AI models is only available in Bito's [**Team Plan**](https://bito.ai/pricing/). However, Basic AI models can be used by both free and paid users.
{% endhint %}
To see how many Advanced AI requests you have left, please visit the [Requests Usage](https://alpha.bito.ai/home/settings/bito-premium/request-usage) page. On this page, you can also set [hard and soft limits](https://docs.bito.ai/billing-and-plans/advanced-ai-requests-usage#hard-and-soft-limits) to control usage of Advanced AI model requests for your workspace and avoid unexpected expenses.
Also note that even if you have set `preferred_ai_model: ADVANCED` in Bito CLI config but your Advanced AI model requests quota is finished (or your self-imposed [hard limit](https://docs.bito.ai/billing-and-plans/advanced-ai-requests-usage#what-is-the-hard-limit) is reached) then Bito CLI will start using Basic AI models instead of Advanced AI models.
---
# Source: https://docs.bito.ai/ai-code-reviews-in-git/install-run-using-bito-cloud/create-or-customize-an-agent-instance.md
# Create or customize an Agent instance
{% embed url="" %}
[Connecting your Bito workspace to GitHub, GitLab, or Bitbucket](https://docs.bito.ai/ai-code-reviews-in-git/install-run-using-bito-cloud/..#connect-bito-to-your-git-provider) provides immediate access to the [AI Code Review Agent](https://docs.bito.ai/ai-code-reviews-in-git/overview). To get you started quickly, Bito offers a **Default Agent** instance—pre-configured and ready to deliver AI-powered code reviews for pull requests and code changes within supported IDEs such as VS Code and JetBrains.
While the **Default Agent** is ready for use right away, Bito also gives you the option to **create new Agent instances** or **customize existing ones** to suit your specific requirements. This flexibility ensures that the Agent can adapt to a range of workflows and project needs.
For example, you might configure one Agent to disable automatic code reviews for certain repositories, another to exclude specific Git branches from review, and yet another to filter out particular files or folders.
This guide will walk you through how to create or customize an Agent instance, unlocking its full potential to streamline your code reviews.
## Creating or customizing AI Code Review Agents
Once Bito is connected to your GitHub/GitLab/Bitbucket account, you can easily create a new Agent or customize an existing one to suit your workflow.
1. To **create a new Agent**, navigate to the [Code Review > Repositories](https://alpha.bito.ai/home/ai-agents/code-review-agent) dashboard and click the **New Agent** button to open the Agent configuration form.
{% hint style="info" %}
Use the **Filter** button (top-left) to customize views by:
* Specific submitters
* Date ranges
* Pull request status
{% endhint %}
## **Benefits for technical leadership**
The detailed code review analytics reports enables tech leads and reviewers to:
* **Trace patterns**: Identify recurring issues across pull requests
* **Spot trends**: Recognize systematic problems in code quality
* **Connect insights**: Link high-level analytics to specific code examples
* **Targeted mentoring**: Provide specific guidance based on actual code issues
* **Process improvement**: Adjust development practices based on concrete data
## Best practices for using analytics
#### 1. Regular review cadence
* Check [Overview](#overview-dashboard) metrics for trend monitoring
* Review [Submitter Analytics](#submitter-analytics-dashboard) for team performance discussions
* Analyze [Repository Analytics](#repository-analytics-dashboard) for strategic planning
* Use [PR Analytics](#pr-analytics-dashboard) for issue tracking and mentoring
#### 2. Filtering for insights
* Use date filters to compare time periods
* Filter by specific teams or repositories during retrospectives
* Focus on high-activity contributors or repositories for targeted improvements
#### 3. Export and sharing
* Export monthly reports for stakeholder updates
* Share repository-specific insights with relevant teams
* Use PowerPoint exports for executive presentations
* Archive PDF reports for compliance or historical analysis
#### 4. Action-oriented analysis
* Identify submitters who might benefit from additional code review training
* Focus attention on repositories with high issue density
* Address language-specific patterns through targeted workshops
* Use acceptance rate trends to validate review effectiveness
---
# Source: https://docs.bito.ai/other-bito-ai-tools/bito-cli/configuration.md
# Configuration
## bito config \[flags]
* run `bito config -l` or `bito config --list` to list all config variables and values.
* run `bito config -e` or `bito config --edit` to open the config file in default editor.
## Sample Configuration
```
bito:
access_key: ""
email: first.last@mycompany.com
preferred_ai_model: ADVANCED
settings:
auto_update: true
max_context_entries: 20
```
## What is an Access Key and How to Get it?
[**Access Key**](https://docs.bito.ai/help/account-and-settings/access-key) is an alternate authentication mechanism to Email & OTP based authentication. You can use an Access Key in Bito CLI to access various functionalities such as **Bito AI Chat**. Here’s a guide on [how to create an Access Key](https://docs.bito.ai/help/account-and-settings/access-key). Basically, after creating the Access Key, you have to use it in the config file mentioned above. For example, `access_key: “YOUR_ACCESS_KEY_HERE”`
Access Key can be persisted in Bito CLI by adding it in the config file using `bito config -e`. Such persisted Access Key can be over-ridden by running `bito -k ` or `bito --key ` for the transient session (sessions that last only for a short time).
## Preferred AI Model Type
By default AI Model Type is set to `ADVANCED` and it can be overridden by running `bito -m `. Model type is used for AI query in the current session. Model type can be set to `BASIC` or `ADVANCED`, which is case insensitive.
"ADVANCED" refers to AI models like GPT-4o, Claude Sonnet 3.5, and best in class AI models, while "BASIC" refers to AI models like GPT-4o mini and similar models.
When using Basic AI models, your prompts and the chat's memory are limited to 40,000 characters (about 18 single-spaced pages). However, with Advanced AI models, your prompts and the chat memory can go up to 240,000 characters (about 110 single-spaced pages). This means that Advanced models can process your entire code files, leading to more accurate answers.
If you are seeking the best results for complex tasks, then choose Advanced AI models.
{% hint style="info" %}
Access to Advanced AI models is only available in Bito's [**Team Plan**](https://bito.ai/pricing/). However, Basic AI models can be used by both free and paid users.
{% endhint %}
To see how many Advanced AI requests you have left, please visit the [Requests Usage](https://alpha.bito.ai/home/settings/bito-premium/request-usage) page. On this page, you can also set [hard and soft limits](https://docs.bito.ai/billing-and-plans/advanced-ai-requests-usage#hard-and-soft-limits) to control usage of Advanced AI model requests for your workspace and avoid unexpected expenses.
Also note that even if you have set `preferred_ai_model: ADVANCED` in Bito CLI config but your Advanced AI model requests quota is finished (or your self-imposed [hard limit](https://docs.bito.ai/billing-and-plans/advanced-ai-requests-usage#what-is-the-hard-limit) is reached) then Bito CLI will start using Basic AI models instead of Advanced AI models.
---
# Source: https://docs.bito.ai/ai-code-reviews-in-git/install-run-using-bito-cloud/create-or-customize-an-agent-instance.md
# Create or customize an Agent instance
{% embed url="" %}
[Connecting your Bito workspace to GitHub, GitLab, or Bitbucket](https://docs.bito.ai/ai-code-reviews-in-git/install-run-using-bito-cloud/..#connect-bito-to-your-git-provider) provides immediate access to the [AI Code Review Agent](https://docs.bito.ai/ai-code-reviews-in-git/overview). To get you started quickly, Bito offers a **Default Agent** instance—pre-configured and ready to deliver AI-powered code reviews for pull requests and code changes within supported IDEs such as VS Code and JetBrains.
While the **Default Agent** is ready for use right away, Bito also gives you the option to **create new Agent instances** or **customize existing ones** to suit your specific requirements. This flexibility ensures that the Agent can adapt to a range of workflows and project needs.
For example, you might configure one Agent to disable automatic code reviews for certain repositories, another to exclude specific Git branches from review, and yet another to filter out particular files or folders.
This guide will walk you through how to create or customize an Agent instance, unlocking its full potential to streamline your code reviews.
## Creating or customizing AI Code Review Agents
Once Bito is connected to your GitHub/GitLab/Bitbucket account, you can easily create a new Agent or customize an existing one to suit your workflow.
1. To **create a new Agent**, navigate to the [Code Review > Repositories](https://alpha.bito.ai/home/ai-agents/code-review-agent) dashboard and click the **New Agent** button to open the Agent configuration form.
 2. If you’d like to **customize an existing agent**, simply go to the same [Code Review > Repositories](https://alpha.bito.ai/home/ai-agents/code-review-agent) dashboard and click the **Settings** button next to the Agent instance you wish to modify.
 Once you have selected an Agent to customize, you can modify its settings in the following areas:
## 1. General settings
### Agent name
Assign a unique alphanumeric name to your Agent. This name acts as an identifier and allows you to invoke the Agent in supported clients using the **`@`** command.
Once you have selected an Agent to customize, you can modify its settings in the following areas:
## 1. General settings
### Agent name
Assign a unique alphanumeric name to your Agent. This name acts as an identifier and allows you to invoke the Agent in supported clients using the **`@`** command.
 ## 2. Customization options
Bito provides six tabs for in-depth Agent customization.
These include:
1. Review
2. Custom Guidelines
3. Filters
4. Tools
5. Chat
6. Functional Validation
## 2. Customization options
Bito provides six tabs for in-depth Agent customization.
These include:
1. Review
2. Custom Guidelines
3. Filters
4. Tools
5. Chat
6. Functional Validation
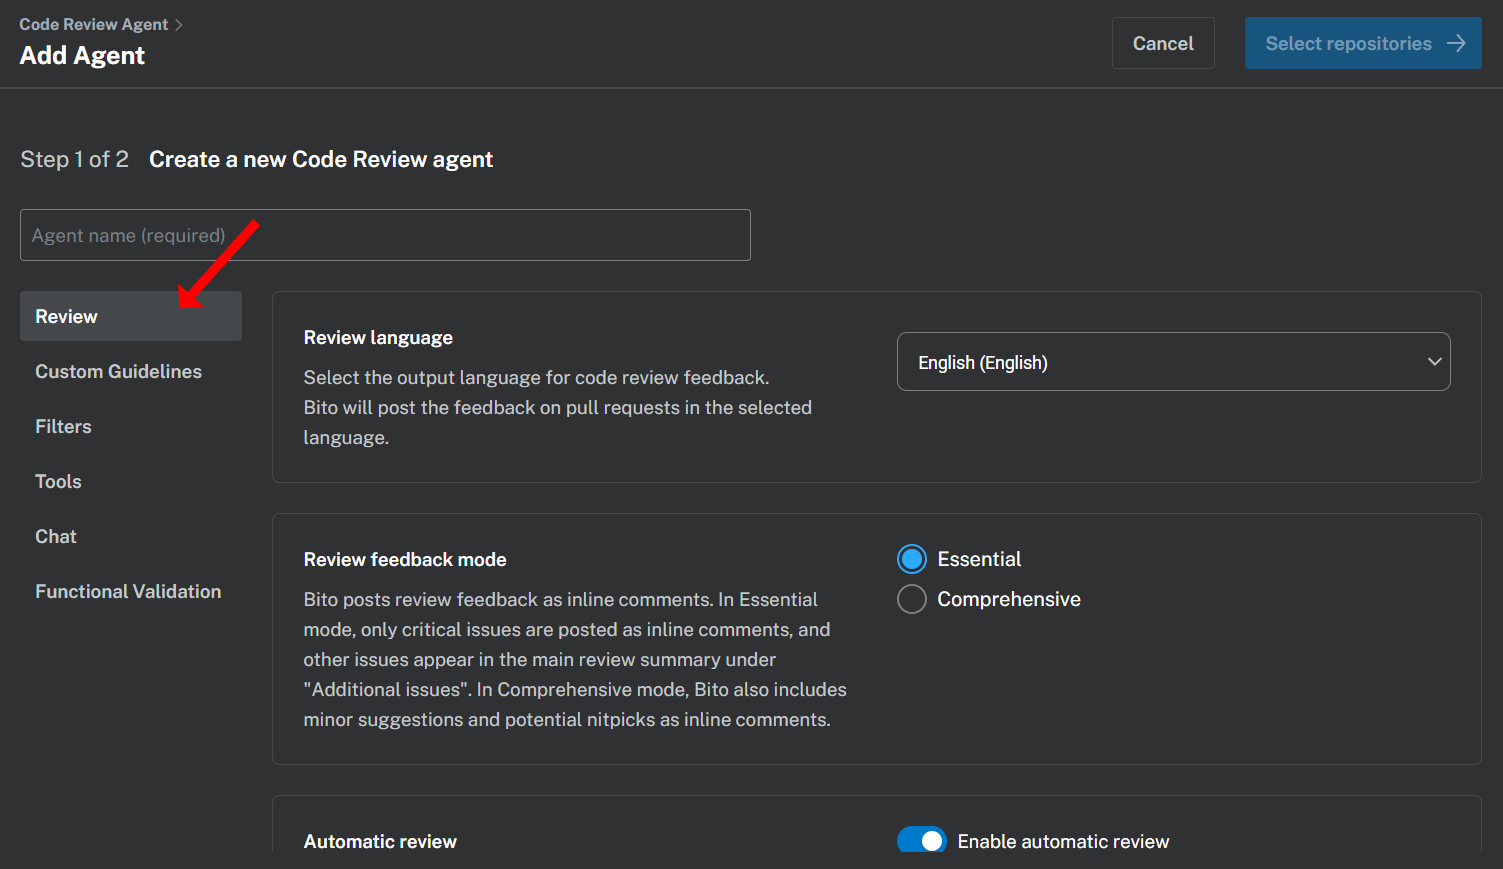 Let's have a look at each tab in detail.
### a. Review
In this tab, you can configure how and when the Agent performs reviews:
* **Review language:** Select the output language for code review feedback.
Bito supports over 20 languages, including English, Hindi, Chinese, and Spanish. The AI code review feedback will be posted on the pull requests in the selected language.
* **Review feedback mode:** Choose between **Essential** and **Comprehensive** review modes and tailor review request settings to fit your team's unique workflow requirements.
* In **Essential** mode, only critical issues are posted as inline comments, and other issues appear in the main review summary under "Additional issues".
* In **Comprehensive** mode, Bito also includes minor suggestion and potential nitpicks as inline comments.
* **Automatic review:** Toggle to enable or disable automatic reviews when a pull request is created and ready for review.
* **Automatic incremental review:** Toggle to enable or disable reviews for new commits added to a pull request. Only changes since the last review are assessed.
* **Batch time:** Specifies how long the AI Code Review Agent waits before running an incremental review after new commits are pushed. The value can range from **`0m` (review immediately)** to **`24h` (review after 24 hours)**. Lower values result in more frequent incremental reviews.
**Examples:**
* `10s` → waits **10 seconds** before running the review
* `12m` → waits **12 minutes** before running the review
* `1h10m` → waits **1 hour and 10 minutes** before running the review
* **Request changes comments:** Enable this option to get Bito feedback as **"Request changes"** review comments. Depending on your organization's Git settings, you may need to resolve all comments before merging.
* **Draft pull requests:** By default, the Agent excludes draft pull requests from automated reviews. Disable this toggle to include drafts.
* **Automatic summary:** Toggle to enable automatic generation of AI summaries for changes, which are appended to the pull request description.
* **Change Walkthrough:** Enable this option to generate a table of changes and associated files, posted as a comment on the pull request.
* **Allow config file settings:** Enabling this setting will allow Agent Settings to be overridden at a repository level by placing a `.bito.yaml` file in the root folder of that repository. [**Learn more**](https://docs.bito.ai/ai-code-reviews-in-git/agent-settings/repo-level-settings)
* **Auto-apply agent rules:** Automatically detect and apply best-practice guidelines from agent configuration files like `CLAUDE.md`, `AGENTS.md`, `.cursor/rules`, `.windsurf/rules`, or `GEMINI.md`. When enabled, Bito uses these files to guide its code review. [**Learn more**](https://docs.bito.ai/implementing-custom-code-review-rules#id-3-use-project-specific-guideline-files)
* **Generate interaction diagrams:** When enabled, Bito will generate interaction diagrams during code reviews to visualize the architecture and impacted components in the submitted changes. Currently, it is supported for GitHub and GitLab.
Let's have a look at each tab in detail.
### a. Review
In this tab, you can configure how and when the Agent performs reviews:
* **Review language:** Select the output language for code review feedback.
Bito supports over 20 languages, including English, Hindi, Chinese, and Spanish. The AI code review feedback will be posted on the pull requests in the selected language.
* **Review feedback mode:** Choose between **Essential** and **Comprehensive** review modes and tailor review request settings to fit your team's unique workflow requirements.
* In **Essential** mode, only critical issues are posted as inline comments, and other issues appear in the main review summary under "Additional issues".
* In **Comprehensive** mode, Bito also includes minor suggestion and potential nitpicks as inline comments.
* **Automatic review:** Toggle to enable or disable automatic reviews when a pull request is created and ready for review.
* **Automatic incremental review:** Toggle to enable or disable reviews for new commits added to a pull request. Only changes since the last review are assessed.
* **Batch time:** Specifies how long the AI Code Review Agent waits before running an incremental review after new commits are pushed. The value can range from **`0m` (review immediately)** to **`24h` (review after 24 hours)**. Lower values result in more frequent incremental reviews.
**Examples:**
* `10s` → waits **10 seconds** before running the review
* `12m` → waits **12 minutes** before running the review
* `1h10m` → waits **1 hour and 10 minutes** before running the review
* **Request changes comments:** Enable this option to get Bito feedback as **"Request changes"** review comments. Depending on your organization's Git settings, you may need to resolve all comments before merging.
* **Draft pull requests:** By default, the Agent excludes draft pull requests from automated reviews. Disable this toggle to include drafts.
* **Automatic summary:** Toggle to enable automatic generation of AI summaries for changes, which are appended to the pull request description.
* **Change Walkthrough:** Enable this option to generate a table of changes and associated files, posted as a comment on the pull request.
* **Allow config file settings:** Enabling this setting will allow Agent Settings to be overridden at a repository level by placing a `.bito.yaml` file in the root folder of that repository. [**Learn more**](https://docs.bito.ai/ai-code-reviews-in-git/agent-settings/repo-level-settings)
* **Auto-apply agent rules:** Automatically detect and apply best-practice guidelines from agent configuration files like `CLAUDE.md`, `AGENTS.md`, `.cursor/rules`, `.windsurf/rules`, or `GEMINI.md`. When enabled, Bito uses these files to guide its code review. [**Learn more**](https://docs.bito.ai/implementing-custom-code-review-rules#id-3-use-project-specific-guideline-files)
* **Generate interaction diagrams:** When enabled, Bito will generate interaction diagrams during code reviews to visualize the architecture and impacted components in the submitted changes. Currently, it is supported for GitHub and GitLab.


 ### b. Custom Guidelines
Create, apply, and manage custom code review guidelines to align the AI agent’s reviews with your team’s specific coding standards.
The agent will follow your guidelines when reviewing pull requests.
[**Learn more**](https://docs.bito.ai/implementing-custom-code-review-rules#id-2-create-custom-code-review-guidelines)
### b. Custom Guidelines
Create, apply, and manage custom code review guidelines to align the AI agent’s reviews with your team’s specific coding standards.
The agent will follow your guidelines when reviewing pull requests.
[**Learn more**](https://docs.bito.ai/implementing-custom-code-review-rules#id-2-create-custom-code-review-guidelines)
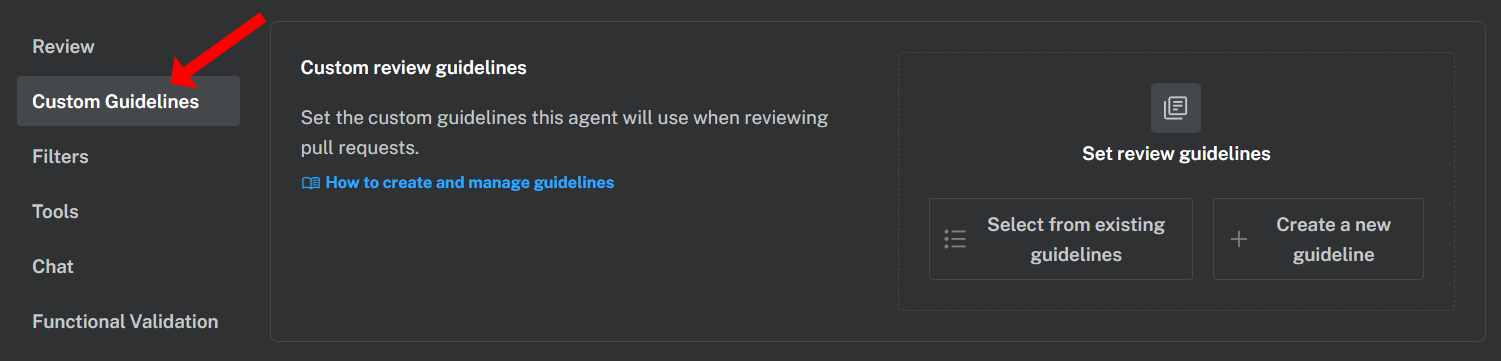 ### c. Filters
Use filters to customize which files, folders, and Git branches are reviewed when the Agent triggers automatically on pull requests:
* **Exclude Files and Folders:** A list of files/folders that the AI Code Review Agent will not review if they are present in the diff. You can specify the files/folders to exclude from the review by name or glob/regex pattern. The Agent will automatically skip any files or folders that match the exclusion list. This filter applies to both manual reviews initiated through the **`/review`** command and automated reviews.
* **Include Source/Target Branches:** This filter defines which pull requests trigger automated reviews based on their source or target branch, allowing you to focus on critical code and avoid unnecessary reviews or AI usage. By default, pull requests merging into the repository’s default branch are subject to review. To review additional branches, you can use the [Include Source/Target Branches filter](https://docs.bito.ai/excluding-files-folders-or-branches-with-filters#include-source-target-branches-filter). Bito will review pull requests when the source or target branch matches the list. This filter applies only to automatically triggered reviews. Users should still be able to trigger reviews manually via the `/review` command.
* **Exclude Labels:** Specify pull request (PR) labels to exclude from review by name or glob/regex pattern. The agent will skip any PRs tagged with these labels in GitHub or GitLab.
{% hint style="info" %}
For more information and examples, see [Excluding Files, Folders, or Branches with Filters](https://docs.bito.ai/ai-code-reviews-in-git/excluding-files-folders-or-branches-with-filters).
{% endhint %}
### c. Filters
Use filters to customize which files, folders, and Git branches are reviewed when the Agent triggers automatically on pull requests:
* **Exclude Files and Folders:** A list of files/folders that the AI Code Review Agent will not review if they are present in the diff. You can specify the files/folders to exclude from the review by name or glob/regex pattern. The Agent will automatically skip any files or folders that match the exclusion list. This filter applies to both manual reviews initiated through the **`/review`** command and automated reviews.
* **Include Source/Target Branches:** This filter defines which pull requests trigger automated reviews based on their source or target branch, allowing you to focus on critical code and avoid unnecessary reviews or AI usage. By default, pull requests merging into the repository’s default branch are subject to review. To review additional branches, you can use the [Include Source/Target Branches filter](https://docs.bito.ai/excluding-files-folders-or-branches-with-filters#include-source-target-branches-filter). Bito will review pull requests when the source or target branch matches the list. This filter applies only to automatically triggered reviews. Users should still be able to trigger reviews manually via the `/review` command.
* **Exclude Labels:** Specify pull request (PR) labels to exclude from review by name or glob/regex pattern. The agent will skip any PRs tagged with these labels in GitHub or GitLab.
{% hint style="info" %}
For more information and examples, see [Excluding Files, Folders, or Branches with Filters](https://docs.bito.ai/ai-code-reviews-in-git/excluding-files-folders-or-branches-with-filters).
{% endhint %}

 ### d. Tools
Enhance the Agent’s reviews by enabling additional tools for static analysis, security checks, and secret detection:
* **Secret Scanner:** Enable this tool to detect and report secrets left in code changes.
### d. Tools
Enhance the Agent’s reviews by enabling additional tools for static analysis, security checks, and secret detection:
* **Secret Scanner:** Enable this tool to detect and report secrets left in code changes.
 ### e. Chat
You can chat with the [AI Code Review Agent](https://docs.bito.ai/ai-code-reviews-in-git) to ask follow-up questions, request alternative solutions, or get clarification on review comments. From this tab, you can manage how the agent responds to these interactions.
* **Auto reply:** Enable Bito to automatically reply to user questions posted as comments on its code review suggestions—no need to tag `@bitoagent` or `@askbito`.
### e. Chat
You can chat with the [AI Code Review Agent](https://docs.bito.ai/ai-code-reviews-in-git) to ask follow-up questions, request alternative solutions, or get clarification on review comments. From this tab, you can manage how the agent responds to these interactions.
* **Auto reply:** Enable Bito to automatically reply to user questions posted as comments on its code review suggestions—no need to tag `@bitoagent` or `@askbito`.
 ### f. Functional Validation
Automatically validate pull requests against Jira tickets. Ticket references are detected in the PR description, title, or branch name.
[**Learn more**](https://docs.bito.ai/ai-code-reviews-in-git/jira-integration)
### f. Functional Validation
Automatically validate pull requests against Jira tickets. Ticket references are detected in the PR description, title, or branch name.
[**Learn more**](https://docs.bito.ai/ai-code-reviews-in-git/jira-integration)
 If you are editing an existing agent, click **Save** to apply the changes.
 ## 3. Select repositories for code review
1. If you are creating a new agent instance, click **Select repositories** after configuration to choose the Git repositories the agent will review.
## 3. Select repositories for code review
1. If you are creating a new agent instance, click **Select repositories** after configuration to choose the Git repositories the agent will review.
 2. To enable code review for a specific repository, simply select its corresponding checkbox. You can also enable repositories later, after the Agent has been created. Once done, click **Save and continue** to save the new Agent configuration.
 3. When you save the configuration, your new Agent instance will be added and available on the [**Code Review > Repositories**](https://alpha.bito.ai/home/ai-agents/code-review-agent) page.
 ---
# Source: https://docs.bito.ai/help/account-and-settings/creating-a-bito-account.md
# Creating a Bito account
You would need to create an account with your email to use Bito. You can sign up for Bito directly from the IDE extension or the Bito web interface at .
1. After you install the Bito extension, click the "Sign up or Sign-in" button on the Bito sign-up flow screen.
---
# Source: https://docs.bito.ai/help/account-and-settings/creating-a-bito-account.md
# Creating a Bito account
You would need to create an account with your email to use Bito. You can sign up for Bito directly from the IDE extension or the Bito web interface at .
1. After you install the Bito extension, click the "Sign up or Sign-in" button on the Bito sign-up flow screen.
 2. In the next screen, enter your work email address, and verify through a six-digit code sent to your email address.

 3. Once your email is verified, you will get an option to create your profile. Enter your full name and set the language for the AI setup. Bito uses this setting to generate the output regardless of prompt language.
 Now, let's learn[ **how to create a new workspace or join an existing one**](https://docs.bito.ai/help/account-and-settings/workspace) to start using Bito.
---
# Source: https://docs.bito.ai/ai-code-reviews-in-git/install-run-using-bito-cloud/delete-unused-agent-instances.md
# Delete unused Agent instances
If you no longer need an [AI Code Review Agent](https://docs.bito.ai/ai-code-reviews-in-git/overview) instance, you can delete it to keep your workspace organized. Follow the steps below to quickly remove any unused Agents.
1. [**Log in to Bito Cloud**](https://alpha.bito.ai/) and select a workspace to get started.
2. From the left sidebar, select [**Code Review Agents**](https://alpha.bito.ai/home/ai-agents/code-review-agent).
If your Bito workspace is connected to your GitHub/GitLab/Bitbucket account, a list of AI Code Review Agent instances configured in your workspace will appear.
Now, let's learn[ **how to create a new workspace or join an existing one**](https://docs.bito.ai/help/account-and-settings/workspace) to start using Bito.
---
# Source: https://docs.bito.ai/ai-code-reviews-in-git/install-run-using-bito-cloud/delete-unused-agent-instances.md
# Delete unused Agent instances
If you no longer need an [AI Code Review Agent](https://docs.bito.ai/ai-code-reviews-in-git/overview) instance, you can delete it to keep your workspace organized. Follow the steps below to quickly remove any unused Agents.
1. [**Log in to Bito Cloud**](https://alpha.bito.ai/) and select a workspace to get started.
2. From the left sidebar, select [**Code Review Agents**](https://alpha.bito.ai/home/ai-agents/code-review-agent).
If your Bito workspace is connected to your GitHub/GitLab/Bitbucket account, a list of AI Code Review Agent instances configured in your workspace will appear.
 2. Before deleting an Agent, ensure that any repositories currently using it are reassigned to another Agent otherwise a warning popup will appear.
 3. Locate the Agent you wish to delete and click the **Delete** button given in front of it.
{% hint style="info" %}
**Note:** The **Default Agent** (provided by Bito) cannot be deleted.
{% endhint %}
3. Locate the Agent you wish to delete and click the **Delete** button given in front of it.
{% hint style="info" %}
**Note:** The **Default Agent** (provided by Bito) cannot be deleted.
{% endhint %}
 ---
# Source: https://docs.bito.ai/help/billing-and-plans/discounts.md
# Discounts
We do not offer any student discounts or different pricing for nonprofits or educational institutions. We are exploring this for the future.
---
# Source: https://docs.bito.ai/help/bitos-ai-stack/embeddings.md
# Embeddings
Bito leverages the power of embeddings to [understand your entire codebase](https://docs.bito.ai/feature-guides/ai-that-understands-your-code). But WTF are these embeddings, and how do they help Bito understand your code?
If you are curious to know, this guide is for you!
## What is Embedding?
---
# Source: https://docs.bito.ai/help/billing-and-plans/discounts.md
# Discounts
We do not offer any student discounts or different pricing for nonprofits or educational institutions. We are exploring this for the future.
---
# Source: https://docs.bito.ai/help/bitos-ai-stack/embeddings.md
# Embeddings
Bito leverages the power of embeddings to [understand your entire codebase](https://docs.bito.ai/feature-guides/ai-that-understands-your-code). But WTF are these embeddings, and how do they help Bito understand your code?
If you are curious to know, this guide is for you!
## What is Embedding?
 Embeddings, at their essence, are like magic translators. They convert data—whether words, images, or, in Bito's case, code—into vectors in a dense numerical space. These vectors encapsulate meaning or semantics. Basically, these vectors help computers understand and work with data more efficiently.
Imagine an embedding as a vector (list) of floating-point numbers. If two vectors are close, they're similar. If they're far apart, they're different. Simple as that!
{% hint style="info" %}
**A vector embedding looks something like this:** \[0.02362240, -0.01716885, 0.00493248, ..., 0.01665339]
{% endhint %}
## Why Embeddings?
In this section, we'll explore the most common and impactful ways embeddings are used in everyday tech and applications.
**Word Similarity & Semantics:** Word embeddings, like Word2Vec, map words to vectors such that semantically similar words are closer in the vector space. This allows algorithms to discern synonyms, antonyms, and more based on their vector representations.
**Sentiment Analysis:** By converting text into embeddings, machine learning models can be trained to detect and classify the sentiment of a text, such as determining if a product review is positive or negative.
**Recommendation Systems:** Embeddings can represent items (like movies, books, or products) and users. By comparing these embeddings, recommendation systems can suggest items similar to a user's preferences. For example, by converting audio or video data into embeddings, systems can recommend content based on similarity in the embedded space, leading to personalized user recommendations.
**Document Clustering & Categorization:** Text documents can be turned into embeddings using models like Doc2Vec. These embeddings can then be used to cluster or categorize documents based on their content.
**Translation & Language Models:** Models like BERT and GPT use embeddings to understand the context within sentences. This contextual understanding aids in tasks like translation and text generation.
**Image Recognition:** Images can be converted into embeddings using convolutional neural networks (CNNs). These embeddings can then be used to recognize and classify objects within the images.
**Anomaly Detection:** By converting data points into embeddings, algorithms can identify outliers or anomalies by measuring the distance between data points in the embedded space.
**Chatbots & Virtual Assistants:** Conversational models turn user inputs into embeddings to understand intent and context, enabling more natural and relevant responses.
**Search Engines:** Text queries can be converted into embeddings, which are then used to find relevant documents or information in a database by comparing embeddings.
## Let’s look at an example
Suppose you have two functions in your codebase:
**Function # 1:**
```python
def add(x, y):
return x + y
```
**Function # 2:**
```python
def subtract(x, y):
return x - y
```
Using embeddings, Bito might convert these functions into two vectors. Because these functions perform different operations, their embeddings would be at a certain distance apart. Now, if you had another function that also performed addition but with a slight variation, its embedding would be closer to the `add` function than the `subtract` function.
Let's oversimplify and imagine these embeddings visually:
**Embedding for Function # 1 (add):**
\[0.9, 0.2, 0.1]
**Embedding for Function # 2 (subtract):**
\[0.2, 0.9, 0.1]
Notice the numbers? The first positions in these lists are quite different: **0.9** for addition and **0.2** for subtraction. This difference signifies the varied operations these functions perform.
Now, let's add a twist. Suppose you wrote another addition function, but with an extra print statement:
**Function # 3:**
```python
def add_and_print(x, y):
result = x + y
print(result)
return result
```
**Bito might give an embedding like:**
\[0.85, 0.3, 0.15]
If you compare, this new list is more similar to the `add` function's list than the `subtract` one, especially in the first position. But it's not exactly the same as the pure `add` function because of the added print operation.
This distance or difference between lists is what Bito uses to determine how similar functions or chunks of code are to one another. So, when you ask Bito about a piece of code, it quickly checks these number lists, finds the closest match, and guides you accordingly!
## How Bito Uses Embeddings
When you ask Bito a question or seek assistance with a certain piece of code, Bito doesn't read the code the way we do. Instead, it refers to these vector representations (embeddings). By doing so, it can quickly find related pieces of code in your repository or understand the essence of your query.
For example, if you ask Bito, "Where did I implement addition logic?", Bito will convert your question into an embedding and then look for the most related (or closest) embeddings in its index. Since it already knows the `add` function's embedding represents addition, it can swiftly point you to that function.
## Models for Generating Embeddings
When we talk about turning data into these nifty lists of numbers (embeddings), several models and techniques come into play. These models have been designed to extract meaningful patterns from vast amounts of data and represent them as compact vectors. Here are some of the standout models:
**Word2Vec:** One of the pioneers in the world of embeddings, this model, developed by researchers at Google, primarily focuses on words. Given a large amount of text, Word2Vec can produce a vector for each word, capturing its context and meaning.
**Doc2Vec:** An extension of Word2Vec, this model is designed to represent entire documents or paragraphs as vectors, making it suitable for larger chunks of text.
**GloVe (Global Vectors for Word Representation):** Developed by Stanford, GloVe is another method to generate word embeddings. It stands out because it combines both global statistical information and local semantic details from a text.
**BERT (Bidirectional Encoder Representations from Transformers):** A more recent and advanced model from Google, BERT captures context from both left and right (hence, bidirectional) of a word in all layers. This deep understanding allows for more accurate embeddings, especially in complex linguistic scenarios.
**FastText:** Developed by Facebook’s AI Research lab, FastText enhances Word2Vec by considering sub-words. This means it can generate embeddings even for misspelled words or words not seen during training by breaking them into smaller chunks.
**ELMo (Embeddings from Language Models):** This model dynamically generates embeddings based on the context in which words appear, allowing for richer representations.
**Universal Sentence Encoder:** This model, developed by Google, is designed to embed entire sentences, making it especially useful for tasks that deal with larger text chunks or require understanding the nuances of entire sentences.
**GPT (Generative Pre-trained Transformer):** Developed by OpenAI, GPT is a series of models (from GPT-1 to GPT-4o) that use the Transformer architecture to generate text. While GPT models are famous for generating text, they can also produce vector embeddings. Their latest embeddings model is **text-embedding-ada-002** which can generate embeddings for text search, code search, sentence similarity, and text classification tasks.
{% hint style="info" %}
Bito uses **text-embedding-ada-002** from **OpenAI** and we’re also trying out some open-source embedding models for our [AI that Understands Your Code](https://docs.bito.ai/feature-guides/ai-that-understands-your-code) feature.
{% endhint %}
These models, among many others, power a wide range of applications, from natural language processing tasks like sentiment analysis and machine translation to aiding assistants like Bito in understanding and processing code or any other form of data.
## Embeddings: More Than Just Numbers
While embeddings might seem like just another technical term or a mere list of numbers, they are crucial bridges that connect human logic and machine understanding. The ability to convert complex data, be it code, images, or even human language, into such vectors, and then use the 'distance' between these vectors to find relatedness, is nothing short of magic.
In the context of Bito, embeddings aren't just a feature—it's the core that powers its deep understanding of your code, making it an indispensable tool for developers. So, the next time you think of Bito's answers as magical, remember, it's the power of embeddings at work!
---
# Source: https://docs.bito.ai/ai-code-reviews-in-ide/ai-that-understands-your-code/example-questions.md
# Example Questions
You can try asking any question you may have in mind regarding your codebase. In most cases, Bito will give you an accurate answer. Bito uses AI to determine if you are asking about something in your codebase.
However, if you want to ask a question about your code no matter what, then you can use our pre-defined keywords such as **"my code", "my repo", "my project", "my workspace"**, etc., in your question.
The complete list of these keywords is given on our [**Available Keywords**](https://docs.bito.ai/ai-code-reviews-in-ide/ai-that-understands-your-code/available-keywords) page.
## **Here are some popular use cases (with example questions):**
### Code Explanation
* What a particular code file does
* In **my code** what does code in sendgrid/sendemail.sh do?
* What a particular function in my code does
* In **my repo** explain what function message\_tokens do
### Code Translation
* In **my project** rewrite the code of signup.php file in nodejs
### Code Refactoring
* In **my workspace** suggest code refactoring for api.py and mention all other files that need to be updated accordingly
### Fix Bugs
* In **my code** find runtime error possibilities in script.js
* Find logical errors in scraper.py in **my code**
### Detect Code Smells
* In **my code** detect code smells in /app/cart.php and give solution
### Generate Documentation
* Generate documentation for search.ts in **my workspace** in markdown format
### Generate Unit tests
* In **my code** write unit tests for index.php
* In **my code** generate test code for code coverage of cache.c
### Summarize Recent Code Changes
* summarize recent code changes in **my code**
### Code Search using natural language
* Any function to compute tokens in **my project**?
* Any code or script to send emails in **my workspace**?
* In **my repo** list all the line numbers where $alexa array is used in index.php.
### Give details of making modifications
* In **my code** list all the files and code changes needed to add column desc in table raw\_data in dailyReport DB.
---
# Source: https://docs.bito.ai/ai-code-reviews-in-git/excluding-files-folders-or-branches-with-filters.md
# Excluding files, folders, or branches with filters
The [AI Code Review Agent](https://docs.bito.ai/ai-code-reviews-in-git/overview) offers powerful filters to exclude specific files and folders from code reviews and gives you precise control over which Git branches are included in automated reviews.
These filters can be configured at the Agent instance level, overriding the default behavior.
## Exclude Files and Folders filter
A list of files/folders that the AI Code Review Agent will not review if they are present in the diff. You can specify the files/folders to exclude from the review by name or glob/regex pattern. The Agent will automatically skip any files or folders that match the exclusion list.
This filter applies to both manual reviews initiated through the `/review` command and automated reviews triggered via webhook.
By default, these files are excluded: `*.xml`, `*.json`, `*.properties`, `.gitignore`, `*.yml`, `*.md`
Embeddings, at their essence, are like magic translators. They convert data—whether words, images, or, in Bito's case, code—into vectors in a dense numerical space. These vectors encapsulate meaning or semantics. Basically, these vectors help computers understand and work with data more efficiently.
Imagine an embedding as a vector (list) of floating-point numbers. If two vectors are close, they're similar. If they're far apart, they're different. Simple as that!
{% hint style="info" %}
**A vector embedding looks something like this:** \[0.02362240, -0.01716885, 0.00493248, ..., 0.01665339]
{% endhint %}
## Why Embeddings?
In this section, we'll explore the most common and impactful ways embeddings are used in everyday tech and applications.
**Word Similarity & Semantics:** Word embeddings, like Word2Vec, map words to vectors such that semantically similar words are closer in the vector space. This allows algorithms to discern synonyms, antonyms, and more based on their vector representations.
**Sentiment Analysis:** By converting text into embeddings, machine learning models can be trained to detect and classify the sentiment of a text, such as determining if a product review is positive or negative.
**Recommendation Systems:** Embeddings can represent items (like movies, books, or products) and users. By comparing these embeddings, recommendation systems can suggest items similar to a user's preferences. For example, by converting audio or video data into embeddings, systems can recommend content based on similarity in the embedded space, leading to personalized user recommendations.
**Document Clustering & Categorization:** Text documents can be turned into embeddings using models like Doc2Vec. These embeddings can then be used to cluster or categorize documents based on their content.
**Translation & Language Models:** Models like BERT and GPT use embeddings to understand the context within sentences. This contextual understanding aids in tasks like translation and text generation.
**Image Recognition:** Images can be converted into embeddings using convolutional neural networks (CNNs). These embeddings can then be used to recognize and classify objects within the images.
**Anomaly Detection:** By converting data points into embeddings, algorithms can identify outliers or anomalies by measuring the distance between data points in the embedded space.
**Chatbots & Virtual Assistants:** Conversational models turn user inputs into embeddings to understand intent and context, enabling more natural and relevant responses.
**Search Engines:** Text queries can be converted into embeddings, which are then used to find relevant documents or information in a database by comparing embeddings.
## Let’s look at an example
Suppose you have two functions in your codebase:
**Function # 1:**
```python
def add(x, y):
return x + y
```
**Function # 2:**
```python
def subtract(x, y):
return x - y
```
Using embeddings, Bito might convert these functions into two vectors. Because these functions perform different operations, their embeddings would be at a certain distance apart. Now, if you had another function that also performed addition but with a slight variation, its embedding would be closer to the `add` function than the `subtract` function.
Let's oversimplify and imagine these embeddings visually:
**Embedding for Function # 1 (add):**
\[0.9, 0.2, 0.1]
**Embedding for Function # 2 (subtract):**
\[0.2, 0.9, 0.1]
Notice the numbers? The first positions in these lists are quite different: **0.9** for addition and **0.2** for subtraction. This difference signifies the varied operations these functions perform.
Now, let's add a twist. Suppose you wrote another addition function, but with an extra print statement:
**Function # 3:**
```python
def add_and_print(x, y):
result = x + y
print(result)
return result
```
**Bito might give an embedding like:**
\[0.85, 0.3, 0.15]
If you compare, this new list is more similar to the `add` function's list than the `subtract` one, especially in the first position. But it's not exactly the same as the pure `add` function because of the added print operation.
This distance or difference between lists is what Bito uses to determine how similar functions or chunks of code are to one another. So, when you ask Bito about a piece of code, it quickly checks these number lists, finds the closest match, and guides you accordingly!
## How Bito Uses Embeddings
When you ask Bito a question or seek assistance with a certain piece of code, Bito doesn't read the code the way we do. Instead, it refers to these vector representations (embeddings). By doing so, it can quickly find related pieces of code in your repository or understand the essence of your query.
For example, if you ask Bito, "Where did I implement addition logic?", Bito will convert your question into an embedding and then look for the most related (or closest) embeddings in its index. Since it already knows the `add` function's embedding represents addition, it can swiftly point you to that function.
## Models for Generating Embeddings
When we talk about turning data into these nifty lists of numbers (embeddings), several models and techniques come into play. These models have been designed to extract meaningful patterns from vast amounts of data and represent them as compact vectors. Here are some of the standout models:
**Word2Vec:** One of the pioneers in the world of embeddings, this model, developed by researchers at Google, primarily focuses on words. Given a large amount of text, Word2Vec can produce a vector for each word, capturing its context and meaning.
**Doc2Vec:** An extension of Word2Vec, this model is designed to represent entire documents or paragraphs as vectors, making it suitable for larger chunks of text.
**GloVe (Global Vectors for Word Representation):** Developed by Stanford, GloVe is another method to generate word embeddings. It stands out because it combines both global statistical information and local semantic details from a text.
**BERT (Bidirectional Encoder Representations from Transformers):** A more recent and advanced model from Google, BERT captures context from both left and right (hence, bidirectional) of a word in all layers. This deep understanding allows for more accurate embeddings, especially in complex linguistic scenarios.
**FastText:** Developed by Facebook’s AI Research lab, FastText enhances Word2Vec by considering sub-words. This means it can generate embeddings even for misspelled words or words not seen during training by breaking them into smaller chunks.
**ELMo (Embeddings from Language Models):** This model dynamically generates embeddings based on the context in which words appear, allowing for richer representations.
**Universal Sentence Encoder:** This model, developed by Google, is designed to embed entire sentences, making it especially useful for tasks that deal with larger text chunks or require understanding the nuances of entire sentences.
**GPT (Generative Pre-trained Transformer):** Developed by OpenAI, GPT is a series of models (from GPT-1 to GPT-4o) that use the Transformer architecture to generate text. While GPT models are famous for generating text, they can also produce vector embeddings. Their latest embeddings model is **text-embedding-ada-002** which can generate embeddings for text search, code search, sentence similarity, and text classification tasks.
{% hint style="info" %}
Bito uses **text-embedding-ada-002** from **OpenAI** and we’re also trying out some open-source embedding models for our [AI that Understands Your Code](https://docs.bito.ai/feature-guides/ai-that-understands-your-code) feature.
{% endhint %}
These models, among many others, power a wide range of applications, from natural language processing tasks like sentiment analysis and machine translation to aiding assistants like Bito in understanding and processing code or any other form of data.
## Embeddings: More Than Just Numbers
While embeddings might seem like just another technical term or a mere list of numbers, they are crucial bridges that connect human logic and machine understanding. The ability to convert complex data, be it code, images, or even human language, into such vectors, and then use the 'distance' between these vectors to find relatedness, is nothing short of magic.
In the context of Bito, embeddings aren't just a feature—it's the core that powers its deep understanding of your code, making it an indispensable tool for developers. So, the next time you think of Bito's answers as magical, remember, it's the power of embeddings at work!
---
# Source: https://docs.bito.ai/ai-code-reviews-in-ide/ai-that-understands-your-code/example-questions.md
# Example Questions
You can try asking any question you may have in mind regarding your codebase. In most cases, Bito will give you an accurate answer. Bito uses AI to determine if you are asking about something in your codebase.
However, if you want to ask a question about your code no matter what, then you can use our pre-defined keywords such as **"my code", "my repo", "my project", "my workspace"**, etc., in your question.
The complete list of these keywords is given on our [**Available Keywords**](https://docs.bito.ai/ai-code-reviews-in-ide/ai-that-understands-your-code/available-keywords) page.
## **Here are some popular use cases (with example questions):**
### Code Explanation
* What a particular code file does
* In **my code** what does code in sendgrid/sendemail.sh do?
* What a particular function in my code does
* In **my repo** explain what function message\_tokens do
### Code Translation
* In **my project** rewrite the code of signup.php file in nodejs
### Code Refactoring
* In **my workspace** suggest code refactoring for api.py and mention all other files that need to be updated accordingly
### Fix Bugs
* In **my code** find runtime error possibilities in script.js
* Find logical errors in scraper.py in **my code**
### Detect Code Smells
* In **my code** detect code smells in /app/cart.php and give solution
### Generate Documentation
* Generate documentation for search.ts in **my workspace** in markdown format
### Generate Unit tests
* In **my code** write unit tests for index.php
* In **my code** generate test code for code coverage of cache.c
### Summarize Recent Code Changes
* summarize recent code changes in **my code**
### Code Search using natural language
* Any function to compute tokens in **my project**?
* Any code or script to send emails in **my workspace**?
* In **my repo** list all the line numbers where $alexa array is used in index.php.
### Give details of making modifications
* In **my code** list all the files and code changes needed to add column desc in table raw\_data in dailyReport DB.
---
# Source: https://docs.bito.ai/ai-code-reviews-in-git/excluding-files-folders-or-branches-with-filters.md
# Excluding files, folders, or branches with filters
The [AI Code Review Agent](https://docs.bito.ai/ai-code-reviews-in-git/overview) offers powerful filters to exclude specific files and folders from code reviews and gives you precise control over which Git branches are included in automated reviews.
These filters can be configured at the Agent instance level, overriding the default behavior.
## Exclude Files and Folders filter
A list of files/folders that the AI Code Review Agent will not review if they are present in the diff. You can specify the files/folders to exclude from the review by name or glob/regex pattern. The Agent will automatically skip any files or folders that match the exclusion list.
This filter applies to both manual reviews initiated through the `/review` command and automated reviews triggered via webhook.
By default, these files are excluded: `*.xml`, `*.json`, `*.properties`, `.gitignore`, `*.yml`, `*.md`
 ### Examples
{% hint style="info" %}
**Note:**
* Patterns are case sensitive.
* Don’t use double quotes, single quotes or comma in the pattern.
* Users can pass both types of patterns - Unix files system based glob pattern or regex.
{% endhint %}
| Exclusion Rule for Files & Folders | Applicable Pattern | Matched Examples | Not Matched Examples |
| ------------------------------------------------------------------------------------------------------- | ---------------------------------------- | ------------------------------------------------------------------------------------------------------------------------------------------------ | ----------------------------------------------------------------------------- |
| Exclude all properties files in all folders and subfolders | `*.properties` | `resource/config.properties`, `resource/server/server.properties` | `resource/config.yaml`, `resource/config.json` |
| Exclude all files, folders and subfolders in folder starting with `resources` | `resources/` | `resources/application.properties`, `resources/config/config.yaml` | `app/resources/file.txt`, `config/resources/service.properties` |
| Exclude all files, folders and subfolders in folder `src/com/resources` | `src/com/resources/` | `resources/application.properties`, `resources/config/config.yaml` | `app/resources/file.txt`, `config/resources/service.properties` |
| Exclude all files, folders and subfolders in subfolder `resource` and in parent folder `src` | `src/*/resource/*` |
### Examples
{% hint style="info" %}
**Note:**
* Patterns are case sensitive.
* Don’t use double quotes, single quotes or comma in the pattern.
* Users can pass both types of patterns - Unix files system based glob pattern or regex.
{% endhint %}
| Exclusion Rule for Files & Folders | Applicable Pattern | Matched Examples | Not Matched Examples |
| ------------------------------------------------------------------------------------------------------- | ---------------------------------------- | ------------------------------------------------------------------------------------------------------------------------------------------------ | ----------------------------------------------------------------------------- |
| Exclude all properties files in all folders and subfolders | `*.properties` | `resource/config.properties`, `resource/server/server.properties` | `resource/config.yaml`, `resource/config.json` |
| Exclude all files, folders and subfolders in folder starting with `resources` | `resources/` | `resources/application.properties`, `resources/config/config.yaml` | `app/resources/file.txt`, `config/resources/service.properties` |
| Exclude all files, folders and subfolders in folder `src/com/resources` | `src/com/resources/` | `resources/application.properties`, `resources/config/config.yaml` | `app/resources/file.txt`, `config/resources/service.properties` |
| Exclude all files, folders and subfolders in subfolder `resource` and in parent folder `src` | `src/*/resource/*` | src/com/resource/main.html,
src/com/resource/script/file.css, src/com/resource/app/script.js
| `src/resource/file.txt`, `src/com/config/file.txt`, `app/com/config/file.txt` |
| Exclude non-css files from folder `src/com/resource/` and subfolders | `^src\/com\/resource\\/(?!.*\\.css$).*$` | src/com/resource/main.html, src/com/resource/app/script.js,
src/com/config/file.txt
| `src/com/resource/script/file.css` |
| Exclude specific file `controller/webhook_controller.go` | `controller/webhook_controller.go` | `controller/webhook_controller.go` | `controller/controller.go`, `controller/webhook_service.go` |
| Exclude non-css files from folder starting with `config` and its subfolders | `^config\\/(?!.*\\.css$).*$` | `config/server.yml`, `config/util/conf.properties` | `config/profile.css`, `config/styles/main.css` |
| Exclude all files & folders | `*` | `resource/file.txt`, `config/file.properties`, `app/folder/` | `-` |
| Exclude all files & folders starting with name `bito` in `module` folder | `module/bito*` | `module/bito123`, `module/bitofile.js`, `module/bito/file.js` | `module/filebito.js`, `module/file2.txt`, `module/util/file.txt` |
| Exclude single-character folder names | `*/?/*` | `src/a/file.txt`, `app/b/folder/file.yaml` | `folder/file.txt`, `ab/folder/file.txt` |
| Exclude all folders, subfolders and files in those folders except folder starting with `service` folder | `^(?!service\\/).*$` | `config/file.txt`, `resources/file.yaml` | `service/file.txt`, `service/config/file.yaml` |
| Exclude all files in all folders except `.py`, `.go`, and `.java` files | `^(?!.*\\.(py\|go\|java)$).*$` | `config/file.txt`, `app/main.js` | `main.py`, `module/service.go`, `test/Example.java` |
| Exclude non-css files from folder `src/com/config` and its subfolders | `^config\\/(?!.*\\.css$).*$` | `config/server.yml`, `config/util/conf.properties` | `config/profile.css`, `config/styles/main.css` |
## Include Source/Target Branches filter
This filter defines which pull requests trigger automated reviews based on their source or target branch, allowing you to focus on critical code and avoid unnecessary reviews or AI usage.
By default, pull requests merging into the repository’s default branch are subject to review. To extend review coverage, additional branches may be specified using explicit branch names or valid glob/regex patterns. When the source or target branch of a pull request matches one of the patterns on your inclusion list, Bito’s AI Code Review Agent will trigger an automated review.
This filter applies only to automatically triggered reviews. Users should still be able to trigger reviews manually via the `/review` command.
 **Watch video tutorial:**
{% embed url="" %}
### Examples
{% hint style="info" %}
**Note:**
* Patterns are case sensitive.
* Don’t use double quotes, single quotes or comma in the pattern.
* Users can pass both types of patterns - Unix files system based glob pattern or regex.
{% endhint %}
| Inclusion Rules for Branch | Pattern | Matched Examples | Not Matched Examples |
| ------------------------------------------------------------------------------------------------------------------ | ----------------------------------------------------- | ----------------------------------------------- | --------------------------------------------------- |
| Include any branch that starts with name `BITO-` | `BITO-*` | `BITO-feature`, `BITO-123` | `feature-BITO`, `development` |
| Include any branch that does not start with `BITO-` | `^(?!BITO-).*` | `feature-123`, `release-v1.0` | `BITO-feature`, `BITO-123` |
| Include any branch which is not `BITO` | `^(?!BITO$).*` | `feature-BITO`, `development` | `BITO` |
| Include branches like `release/v1.0` and `release/v1.0.1` | `release/v\\d+\\.\\d+(\\.\\d+)?` | `release/v1.0`, `release/v1.0.1` | `release/v1`, `release/v1.0.x` |
| Include any branch ending with `-test` | `*-test` | `feature-test`, `release-test` | `test-feature`, `release-testing` |
| Include the branch that has keyword `main` | `main` | `main`, `main-feature`, `mainline` | `master`, `development` |
| Include the branch named `main` | `^main$` | `main` | `main-feature`, `mainline`, `master`, `development` |
| Include any branch name that does not start with `feature-` or `release-` | `^(?!release-\|feature-).*$` | `hotfix-123`, `development` | `feature-123`, `release-v1.0` |
| Include branches with names containing digits | `.*\\d+.*` | `feature-123`, `release-v1.0` | `feature-abc`, `main` |
| Include branches with names ending with `test` or `testing` | `.*(test\|testing)$` | `feature-test`, `bugfix-testing` | `testing-feature`, `test-branch` |
| Include branches with names containing a specific substring `test` | `*test*` | `feature-test`, `test-branch`, `testing` | `feature`, `release` |
| Include branches with names containing exactly three characters | `^.{3}$` | `abc`, `123` | `abcd`, `ab` |
| Include branch names starting with `release`, `hotfix`, or `development` but not starting with `Bito` or `feature` | `^(?!Bito\|feature)(release\|hotfix\|development).*$` | `release-v1.0`, `hotfix-123`, `development-xyz` | `Bito-release`, `feature-hotfix`, `main-release` |
| Include all branches where name do not contains version like `1.0`, `1.0.1`, etc. | `^(?!.\\b\\d+\\.\\d+(\\.\\d+)?\\b).*` | `feature-xyz`, `main` | `release-v1.0`, `hotfix-1.0.1` |
| Include all branches which are not alphanumeric | `^.[^a-zA-Z0-9].$` | `feature-!abc`, `release-@123` | `feature-123`, `release-v1.0` |
| Include all branches which contains space | `.*\\s.*` | `feature 123`, `release v1.0` | `feature-123`, `release-v1.0` |
## Draft pull requests filter
A binary setting that enables/disables automated review of pull requests (PR) based on the draft status. Enter `True` to disable automated review for draft pull requests, or `False` to enable it.
The default value is `True` which skips automated review of draft PR.
**Watch video tutorial:**
{% embed url="" %}
### Examples
{% hint style="info" %}
**Note:**
* Patterns are case sensitive.
* Don’t use double quotes, single quotes or comma in the pattern.
* Users can pass both types of patterns - Unix files system based glob pattern or regex.
{% endhint %}
| Inclusion Rules for Branch | Pattern | Matched Examples | Not Matched Examples |
| ------------------------------------------------------------------------------------------------------------------ | ----------------------------------------------------- | ----------------------------------------------- | --------------------------------------------------- |
| Include any branch that starts with name `BITO-` | `BITO-*` | `BITO-feature`, `BITO-123` | `feature-BITO`, `development` |
| Include any branch that does not start with `BITO-` | `^(?!BITO-).*` | `feature-123`, `release-v1.0` | `BITO-feature`, `BITO-123` |
| Include any branch which is not `BITO` | `^(?!BITO$).*` | `feature-BITO`, `development` | `BITO` |
| Include branches like `release/v1.0` and `release/v1.0.1` | `release/v\\d+\\.\\d+(\\.\\d+)?` | `release/v1.0`, `release/v1.0.1` | `release/v1`, `release/v1.0.x` |
| Include any branch ending with `-test` | `*-test` | `feature-test`, `release-test` | `test-feature`, `release-testing` |
| Include the branch that has keyword `main` | `main` | `main`, `main-feature`, `mainline` | `master`, `development` |
| Include the branch named `main` | `^main$` | `main` | `main-feature`, `mainline`, `master`, `development` |
| Include any branch name that does not start with `feature-` or `release-` | `^(?!release-\|feature-).*$` | `hotfix-123`, `development` | `feature-123`, `release-v1.0` |
| Include branches with names containing digits | `.*\\d+.*` | `feature-123`, `release-v1.0` | `feature-abc`, `main` |
| Include branches with names ending with `test` or `testing` | `.*(test\|testing)$` | `feature-test`, `bugfix-testing` | `testing-feature`, `test-branch` |
| Include branches with names containing a specific substring `test` | `*test*` | `feature-test`, `test-branch`, `testing` | `feature`, `release` |
| Include branches with names containing exactly three characters | `^.{3}$` | `abc`, `123` | `abcd`, `ab` |
| Include branch names starting with `release`, `hotfix`, or `development` but not starting with `Bito` or `feature` | `^(?!Bito\|feature)(release\|hotfix\|development).*$` | `release-v1.0`, `hotfix-123`, `development-xyz` | `Bito-release`, `feature-hotfix`, `main-release` |
| Include all branches where name do not contains version like `1.0`, `1.0.1`, etc. | `^(?!.\\b\\d+\\.\\d+(\\.\\d+)?\\b).*` | `feature-xyz`, `main` | `release-v1.0`, `hotfix-1.0.1` |
| Include all branches which are not alphanumeric | `^.[^a-zA-Z0-9].$` | `feature-!abc`, `release-@123` | `feature-123`, `release-v1.0` |
| Include all branches which contains space | `.*\\s.*` | `feature 123`, `release v1.0` | `feature-123`, `release-v1.0` |
## Draft pull requests filter
A binary setting that enables/disables automated review of pull requests (PR) based on the draft status. Enter `True` to disable automated review for draft pull requests, or `False` to enable it.
The default value is `True` which skips automated review of draft PR.
 ## How to configure the filters?
### Bito Cloud (Bito-hosted Agent)
You can configure filters using the Agent configuration page. For detailed instructions, please refer to the [**Install/run Using Bito Cloud**](https://docs.bito.ai/ai-code-reviews-in-git/install-run-using-bito-cloud) documentation page.
### CLI or webhooks service (self-hosted Agent)
You can configure filters using the [**bito-cra.properties file**](https://docs.bito.ai/ai-code-reviews-in-git/install-run-as-a-self-hosted-service/agent-configuration-bito-cra.properties-file). Check the options `exclude_branches`, `exclude_files`, and `exclude_draft_pr` for more details.
### GitHub Actions (self-hosted Agent)
You can configure filters using the GitHub Actions repository variables: `EXCLUDE_BRANCHES`, `EXCLUDE_FILES`, and `EXCLUDE_DRAFT_PR`. For detailed instructions, please refer to the [**Install/Run via GitHub Actions**](https://docs.bito.ai/ai-code-reviews-in-git/install-run-as-a-self-hosted-service/install-run-via-github-actions) documentation page.
---
# Source: https://docs.bito.ai/other-bito-ai-tools/bito-cli/faqs.md
# Source: https://docs.bito.ai/ai-code-reviews-in-ide/ai-that-understands-your-code/faqs.md
# Source: https://docs.bito.ai/ai-code-reviews-in-git/faqs.md
# FAQs
## How do I whitelist Bito's gateway IP address for my on-premise Git platform?
To ensure the [AI Code Review Agent](https://docs.bito.ai/ai-code-reviews-in-git/overview) operates smoothly with your **GitHub (Self-Managed)** or **GitLab (Self-Managed)**, please whitelist all of Bito's gateway IP addresses in your firewall to allow incoming traffic from Bito. This will enable Bito to access your self-hosted repository.
**List of IP addresses to whitelist:**
* **`18.188.201.104`**
* **`3.23.173.30`**
* **`18.216.64.170`**
The agent response can come from any of these IPs.
## How can I prevent the AI Code Review Agent from stopping due to token expiry?
You should set a longer expiration period for your **GitHub Personal Access Token (Classic)** or **GitLab Personal Access Token**. We recommend setting the expiration to at least one year. This prevents the token from expiring early and avoids disruptions in the AI Code Review Agent's functionality.
Additionally, we highly recommend updating the token before expiry to maintain seamless integration and code review processes.
For more details on how to create tokens, follow these guides:
* **GitHub Personal Access Token (Classic):** [**View Guide**](https://docs.github.com/en/authentication/keeping-your-account-and-data-secure/managing-your-personal-access-tokens#creating-a-personal-access-token-classic)
* **GitLab Personal Access Token:** [**View Guide**](https://docs.gitlab.com/ee/user/profile/personal_access_tokens.html#create-a-personal-access-token)
## What is "Estimated effort to review" in code review output?
This is an estimate, on a scale of 1-5 (inclusive), of the time and effort required to review this Pull Request (PR) by an experienced and knowledgeable developer. A score of 1 means a short and easy review, while a score of 5 means a long and hard review. It takes into account the size, complexity, quality, and the needed changes of the PR code diff. The score is produced by AI.
## How to configure the filters?
### Bito Cloud (Bito-hosted Agent)
You can configure filters using the Agent configuration page. For detailed instructions, please refer to the [**Install/run Using Bito Cloud**](https://docs.bito.ai/ai-code-reviews-in-git/install-run-using-bito-cloud) documentation page.
### CLI or webhooks service (self-hosted Agent)
You can configure filters using the [**bito-cra.properties file**](https://docs.bito.ai/ai-code-reviews-in-git/install-run-as-a-self-hosted-service/agent-configuration-bito-cra.properties-file). Check the options `exclude_branches`, `exclude_files`, and `exclude_draft_pr` for more details.
### GitHub Actions (self-hosted Agent)
You can configure filters using the GitHub Actions repository variables: `EXCLUDE_BRANCHES`, `EXCLUDE_FILES`, and `EXCLUDE_DRAFT_PR`. For detailed instructions, please refer to the [**Install/Run via GitHub Actions**](https://docs.bito.ai/ai-code-reviews-in-git/install-run-as-a-self-hosted-service/install-run-via-github-actions) documentation page.
---
# Source: https://docs.bito.ai/other-bito-ai-tools/bito-cli/faqs.md
# Source: https://docs.bito.ai/ai-code-reviews-in-ide/ai-that-understands-your-code/faqs.md
# Source: https://docs.bito.ai/ai-code-reviews-in-git/faqs.md
# FAQs
## How do I whitelist Bito's gateway IP address for my on-premise Git platform?
To ensure the [AI Code Review Agent](https://docs.bito.ai/ai-code-reviews-in-git/overview) operates smoothly with your **GitHub (Self-Managed)** or **GitLab (Self-Managed)**, please whitelist all of Bito's gateway IP addresses in your firewall to allow incoming traffic from Bito. This will enable Bito to access your self-hosted repository.
**List of IP addresses to whitelist:**
* **`18.188.201.104`**
* **`3.23.173.30`**
* **`18.216.64.170`**
The agent response can come from any of these IPs.
## How can I prevent the AI Code Review Agent from stopping due to token expiry?
You should set a longer expiration period for your **GitHub Personal Access Token (Classic)** or **GitLab Personal Access Token**. We recommend setting the expiration to at least one year. This prevents the token from expiring early and avoids disruptions in the AI Code Review Agent's functionality.
Additionally, we highly recommend updating the token before expiry to maintain seamless integration and code review processes.
For more details on how to create tokens, follow these guides:
* **GitHub Personal Access Token (Classic):** [**View Guide**](https://docs.github.com/en/authentication/keeping-your-account-and-data-secure/managing-your-personal-access-tokens#creating-a-personal-access-token-classic)
* **GitLab Personal Access Token:** [**View Guide**](https://docs.gitlab.com/ee/user/profile/personal_access_tokens.html#create-a-personal-access-token)
## What is "Estimated effort to review" in code review output?
This is an estimate, on a scale of 1-5 (inclusive), of the time and effort required to review this Pull Request (PR) by an experienced and knowledgeable developer. A score of 1 means a short and easy review, while a score of 5 means a long and hard review. It takes into account the size, complexity, quality, and the needed changes of the PR code diff. The score is produced by AI.
 ## Why does Bito need access to my Git account?
Bito requires certain permissions to analyze pull requests and provide AI-powered code reviews. It never stores your code and only accesses the necessary data to deliver review insights.
## What permissions does Bito need?
Bito requires:
1. Read access to code and metadata: To analyze PRs and suggest improvements
2. Read and write access to issues and pull requests: To post AI-generated review comments
3. Read access to organization members: To provide better review context
## I don’t have admin permissions. Can I still use Bito?
If you don’t have admin access, you’ll need your administrator to install Bito on your organization’s Git account. Once installed, you can use it for PR reviews on allowed repositories. GitHub also sends a notification to the organization owner to request the organization owner to install the app.
## Does Bito store my code?
No, Bito does not store or train models on your code. It only analyzes pull request data in real-time and provides suggestions directly within the PR.
## Can I choose which repositories Bito has access to?
Yes, after installation, you can select specific repositories instead of granting access to all. You can also manage repository access later through our web dashboard.
## What happens after I install the Bito App?
Once installed, you’ll be redirected to Bito, where you can:
1. Select repositories for AI-powered reviews
2. Customize review settings to fit your workflow
3. Open a pull request to start receiving AI-driven suggestions
## Where can I get help if I have issues installing Bito?
Contact for any assistance.
---
# Source: https://docs.bito.ai/help/bitos-ai-stack/generative-ai.md
# Generative AI
Generative AI has been making waves across various sectors, from art to technology, leaving many people scratching their heads and wondering: WTF is Generative AI? In this guide, we'll unpack the buzzword and provide you with a clear understanding of what Generative AI is, how it works, and why it's becoming increasingly important in our digital world.
## What is Generative AI?
At its core, Generative AI refers to the subset of artificial intelligence where the systems are designed to generate new content. It’s like giving an artist a canvas, but the artist is an algorithm that can create images, compose music, write text, generate programming source code, and much more.
Generative AI systems are typically powered by machine learning models that have been trained on vast datasets. They learn patterns, structures, and features from this data and use this understanding to generate new, original creations that are often indistinguishable from content created by humans.
## How Does Generative AI Work?
Generative AI works using advanced machine learning models such as Generative Adversarial Networks (GANs) and Variational Autoencoders (VAEs).
These models involve two key components:
1. **Generative Models:** These are the AI algorithms that create the new data. For example, a generative model might create new images of animals it has never seen before by learning from a dataset of animal pictures.
2. **Discriminative Models:** In the case of GANs, the discriminative model evaluates the data generated by the generative model. This is like an art critic who tells the artist if their work is believable or not.
The two models work together in a sort of AI tug-of-war, with the generative model trying to produce better and better outputs and the discriminative model trying to get better at telling the difference between generated and real data.
## Applications of Generative AI
## Why does Bito need access to my Git account?
Bito requires certain permissions to analyze pull requests and provide AI-powered code reviews. It never stores your code and only accesses the necessary data to deliver review insights.
## What permissions does Bito need?
Bito requires:
1. Read access to code and metadata: To analyze PRs and suggest improvements
2. Read and write access to issues and pull requests: To post AI-generated review comments
3. Read access to organization members: To provide better review context
## I don’t have admin permissions. Can I still use Bito?
If you don’t have admin access, you’ll need your administrator to install Bito on your organization’s Git account. Once installed, you can use it for PR reviews on allowed repositories. GitHub also sends a notification to the organization owner to request the organization owner to install the app.
## Does Bito store my code?
No, Bito does not store or train models on your code. It only analyzes pull request data in real-time and provides suggestions directly within the PR.
## Can I choose which repositories Bito has access to?
Yes, after installation, you can select specific repositories instead of granting access to all. You can also manage repository access later through our web dashboard.
## What happens after I install the Bito App?
Once installed, you’ll be redirected to Bito, where you can:
1. Select repositories for AI-powered reviews
2. Customize review settings to fit your workflow
3. Open a pull request to start receiving AI-driven suggestions
## Where can I get help if I have issues installing Bito?
Contact for any assistance.
---
# Source: https://docs.bito.ai/help/bitos-ai-stack/generative-ai.md
# Generative AI
Generative AI has been making waves across various sectors, from art to technology, leaving many people scratching their heads and wondering: WTF is Generative AI? In this guide, we'll unpack the buzzword and provide you with a clear understanding of what Generative AI is, how it works, and why it's becoming increasingly important in our digital world.
## What is Generative AI?
At its core, Generative AI refers to the subset of artificial intelligence where the systems are designed to generate new content. It’s like giving an artist a canvas, but the artist is an algorithm that can create images, compose music, write text, generate programming source code, and much more.
Generative AI systems are typically powered by machine learning models that have been trained on vast datasets. They learn patterns, structures, and features from this data and use this understanding to generate new, original creations that are often indistinguishable from content created by humans.
## How Does Generative AI Work?
Generative AI works using advanced machine learning models such as Generative Adversarial Networks (GANs) and Variational Autoencoders (VAEs).
These models involve two key components:
1. **Generative Models:** These are the AI algorithms that create the new data. For example, a generative model might create new images of animals it has never seen before by learning from a dataset of animal pictures.
2. **Discriminative Models:** In the case of GANs, the discriminative model evaluates the data generated by the generative model. This is like an art critic who tells the artist if their work is believable or not.
The two models work together in a sort of AI tug-of-war, with the generative model trying to produce better and better outputs and the discriminative model trying to get better at telling the difference between generated and real data.
## Applications of Generative AI
 Generative AI has a plethora of applications, here are a few:
* **Art:** Apps like DeepArt and platforms like DALL-E generate original visuals and art based on user prompts.
* **Music:** AI like OpenAI's Jukebox can generate music, complete with lyrics and melody, in various styles and genres.
* **Text:** Tools like ChatGPT can write articles, poetry, and even code based on text prompts. Bito also falls in this category as an AI Coding Assistant.
* **Design:** Generative AI can suggest design layouts for everything from websites to interior decorating.
* **Deepfakes:** This controversial use involves generating realistic video and audio recordings that can mimic real people.
## Benefits and Challenges
### Benefits
* **Efficiency:** Generative AI can produce content much faster than humans.
* **Creativity:** It has the potential to create novel combinations that might not occur to human creators.
* **Personalization:** AI can tailor content to individual tastes and preferences.
### Challenges
* **Ethics:** Generative AI raises questions about authenticity and the ownership of AI-generated content.
* **Quality Control:** Ensuring consistent quality of AI-generated content can be challenging.
* **Misuse:** There’s a risk of its use in creating misleading information or deepfakes.
## Future Prospects
The future of Generative AI is both exciting and uncertain. It could revolutionize how we create and consume content. For instance, imagine personalized movies generated in real-time to match your mood, or educational content adapted perfectly to each student's learning style.
As technology advances, so too will the capabilities of Generative AI. It's not just about the ‘WTF’ factor; it's about recognizing the potential and preparing for the transformation it will bring about.
## Conclusion
Generative AI is at the frontier of innovation, standing at the crossroads of creativity and computation. It is transforming the conventional processes of creation across various fields and presenting us with a future where the line between human and machine-made is increasingly blurred. While it brings with it a host of benefits, we must tread carefully to navigate the ethical considerations and harness its power for the greater good.
As with any transformative technology, the question isn’t just 'WTF is Generative AI?' but also 'How do we responsibly integrate it into our society?' That is the real challenge and opportunity ahead.
---
# Source: https://docs.bito.ai/ai-code-reviews-in-git/getting-started.md
# Getting started
**The** [**AI Code Review Agent**](https://docs.bito.ai/ai-code-reviews-in-git/overview) **supports two deployment options:**
* [**Bito Cloud (fully managed)**](https://docs.bito.ai/ai-code-reviews-in-git/install-run-using-bito-cloud)
* [**Self-hosted service (run on your own infrastructure)**](https://docs.bito.ai/ai-code-reviews-in-git/install-run-as-a-self-hosted-service)
Each option comes with its own set of benefits and considerations.
This guide walks you through both options to help you determine which deployment model best fits your team’s needs.
## Bito Cloud
[**Bito Cloud**](https://docs.bito.ai/ai-code-reviews-in-git/install-run-using-bito-cloud) provides a managed environment for running the AI Code Review Agent, offering a seamless, hassle-free experience. This option is ideal for teams looking for quick deployment and minimal operational overhead.
**Pros:**
* **Simplicity:** Enjoy a straightforward setup with a single-click installation process, making it easy to get started without technical hurdles.
* **Maintenance-Free:** Bito Cloud takes care of all necessary updates and maintenance, ensuring your Agent always operates on the latest software version without any effort on your part.
* **Scalability:** The platform is designed to easily scale, accommodating project growth effortlessly and ensuring reliable performance under varying loads.
**Cons:**
* **Handling of Pull Request Diffs:** For analysis purposes, diffs from pull requests are temporarily stored on our servers.
Generative AI has a plethora of applications, here are a few:
* **Art:** Apps like DeepArt and platforms like DALL-E generate original visuals and art based on user prompts.
* **Music:** AI like OpenAI's Jukebox can generate music, complete with lyrics and melody, in various styles and genres.
* **Text:** Tools like ChatGPT can write articles, poetry, and even code based on text prompts. Bito also falls in this category as an AI Coding Assistant.
* **Design:** Generative AI can suggest design layouts for everything from websites to interior decorating.
* **Deepfakes:** This controversial use involves generating realistic video and audio recordings that can mimic real people.
## Benefits and Challenges
### Benefits
* **Efficiency:** Generative AI can produce content much faster than humans.
* **Creativity:** It has the potential to create novel combinations that might not occur to human creators.
* **Personalization:** AI can tailor content to individual tastes and preferences.
### Challenges
* **Ethics:** Generative AI raises questions about authenticity and the ownership of AI-generated content.
* **Quality Control:** Ensuring consistent quality of AI-generated content can be challenging.
* **Misuse:** There’s a risk of its use in creating misleading information or deepfakes.
## Future Prospects
The future of Generative AI is both exciting and uncertain. It could revolutionize how we create and consume content. For instance, imagine personalized movies generated in real-time to match your mood, or educational content adapted perfectly to each student's learning style.
As technology advances, so too will the capabilities of Generative AI. It's not just about the ‘WTF’ factor; it's about recognizing the potential and preparing for the transformation it will bring about.
## Conclusion
Generative AI is at the frontier of innovation, standing at the crossroads of creativity and computation. It is transforming the conventional processes of creation across various fields and presenting us with a future where the line between human and machine-made is increasingly blurred. While it brings with it a host of benefits, we must tread carefully to navigate the ethical considerations and harness its power for the greater good.
As with any transformative technology, the question isn’t just 'WTF is Generative AI?' but also 'How do we responsibly integrate it into our society?' That is the real challenge and opportunity ahead.
---
# Source: https://docs.bito.ai/ai-code-reviews-in-git/getting-started.md
# Getting started
**The** [**AI Code Review Agent**](https://docs.bito.ai/ai-code-reviews-in-git/overview) **supports two deployment options:**
* [**Bito Cloud (fully managed)**](https://docs.bito.ai/ai-code-reviews-in-git/install-run-using-bito-cloud)
* [**Self-hosted service (run on your own infrastructure)**](https://docs.bito.ai/ai-code-reviews-in-git/install-run-as-a-self-hosted-service)
Each option comes with its own set of benefits and considerations.
This guide walks you through both options to help you determine which deployment model best fits your team’s needs.
## Bito Cloud
[**Bito Cloud**](https://docs.bito.ai/ai-code-reviews-in-git/install-run-using-bito-cloud) provides a managed environment for running the AI Code Review Agent, offering a seamless, hassle-free experience. This option is ideal for teams looking for quick deployment and minimal operational overhead.
**Pros:**
* **Simplicity:** Enjoy a straightforward setup with a single-click installation process, making it easy to get started without technical hurdles.
* **Maintenance-Free:** Bito Cloud takes care of all necessary updates and maintenance, ensuring your Agent always operates on the latest software version without any effort on your part.
* **Scalability:** The platform is designed to easily scale, accommodating project growth effortlessly and ensuring reliable performance under varying loads.
**Cons:**
* **Handling of Pull Request Diffs:** For analysis purposes, diffs from pull requests are temporarily stored on our servers.
Install/run using Bito Cloud
***
## Self-hosted service
[**Self-hosted**](https://docs.bito.ai/ai-code-reviews-in-git/install-run-as-a-self-hosted-service) AI Code Review Agent offers a higher degree of control and customization, suited for organizations with specific requirements or those who prefer to manage their own infrastructure.
**Pros:**
* **Full Control:** Self-hosting provides complete control over the deployment environment, allowing for extensive customization and the ability to integrate with existing systems as needed.
* **Privacy and Security:** Keeping the AI Code Review Agent within your own infrastructure can enhance data security and privacy, as all information remains under your direct control.
**Cons:**
* **Setup Complexity:** Establishing a self-hosted environment requires technical know-how and can be more complex than using a managed service, potentially leading to longer setup times.
* **Maintenance Responsibility:** The responsibility of maintaining and updating the software falls entirely on your team, which includes ensuring the system is scaled appropriately to handle demand.
Install/run as a self-hosted service
---
# Source: https://docs.bito.ai/help/support-and-questions/getting-support.md
# Getting support
## E-mail
Please write to us at [**support@bito.ai**](mailto:support@bito.ai) for any issue you might face with Bito. We would love to hear feedback, comments, feature requests, and how Bito improves your development experience.
## Engage with Community
Engage with our constantly growing Slack community.
{% embed url="" %}
## Bito Github
Bito Github is growing. Engage with your fellow developers at
---
# Source: https://docs.bito.ai/ai-code-reviews-in-git/install-run-using-bito-cloud/guide-for-bitbucket-self-managed.md
# Guide for Bitbucket (Self-Managed)
Speed up code reviews by configuring the [AI Code Review Agent](https://docs.bito.ai/ai-code-reviews-in-git) with your Bitbucket (Self-Managed) server. In this guide, you'll learn how to set up the Agent to receive automated code reviews that trigger whenever you create a pull request, as well as how to manually initiate reviews using [available commands](https://docs.bito.ai/ai-code-reviews-in-git/available-commands).
{% hint style="info" %}
The **Free Plan** offers **AI-generated pull request summaries** to provide a quick overview of changes. For advanced features like **line-level code suggestions**, consider upgrading to the **Team Plan**. For detailed pricing information, visit our [**Pricing**](https://bito.ai/pricing/) page.
[**Get a 14-day FREE trial of Bito's AI Code Review Agent.**](https://alpha.bito.ai/home/welcome)
{% endhint %}
## Video tutorial
{% embed url="" %}
## Prerequisites
Before proceeding, ensure you've completed all necessary prerequisites.
### **1. Create a Bitbucket Personal Access Token:**
For Bitbucket pull request code reviews, a token with **`Project Admin`** permission is required. Make sure that the token is created by a Bitbucket user who has the **`Admin`** privileges.
{% hint style="info" %}
**Important:** Bito posts comments using the Bitbucket user account linked to the Personal Access Token used during setup. To display "Bito" instead of your name, create a separate user account (e.g., Bito Agent) and use its token for integration.
{% endhint %}
You can use the **Create Token** button that appears once you provide the **Hosted Bitbucket URL** and your **Bitbucket username**.
 Or directly visit the URL of your self-hosted Bitbucket.
To create a token for your user account:
1. Go to **Profile picture** > **Manage account** > **HTTP access tokens**.
2. Select **Create token**.
3. Set the token name, permissions, and expiry.
Or directly visit the URL of your self-hosted Bitbucket.
To create a token for your user account:
1. Go to **Profile picture** > **Manage account** > **HTTP access tokens**.
2. Select **Create token**.
3. Set the token name, permissions, and expiry.
.png?alt=media&token=07dadb9b-3494-480e-8c35-aeca49af780b)
.png?alt=media&token=10217b14-4a6d-4795-a987-e8f05a7b1aa6)
.png?alt=media&token=4ae08d23-8710-4a7d-babc-1064b3062aea) View Bitbucket documentation
### **2. Authorizing a Bitbucket Personal Access Token for use with SAML single sign-on:**
If your Bitbucket organization enforces SAML Single Sign-On (SSO), you must authorize your Personal Access Token through your Identity Provider (IdP); otherwise, Bito's AI Code Review Agent won't function properly.
For more information, please refer to [Bitbucket SAML SSO documentation](https://support.atlassian.com/bitbucket-data-center/kb/how-to-configure-saml-sso-for-bitbucket-data-center-with-okta/).
## Installation and configuration steps
Follow the step-by-step instructions below to install the **AI Code Review Agent** using **Bito Cloud**:
### **Step 1: Log in to Bito**
[Log in to Bito Cloud](https://alpha.bito.ai/) and select a workspace to get started.
### **Step 2: Open the Code Review Agents setup**
Click [**Repositories**](https://alpha.bito.ai/home/ai-agents/code-review-agent) under the **CODE REVIEW** section in the sidebar.
View Bitbucket documentation
### **2. Authorizing a Bitbucket Personal Access Token for use with SAML single sign-on:**
If your Bitbucket organization enforces SAML Single Sign-On (SSO), you must authorize your Personal Access Token through your Identity Provider (IdP); otherwise, Bito's AI Code Review Agent won't function properly.
For more information, please refer to [Bitbucket SAML SSO documentation](https://support.atlassian.com/bitbucket-data-center/kb/how-to-configure-saml-sso-for-bitbucket-data-center-with-okta/).
## Installation and configuration steps
Follow the step-by-step instructions below to install the **AI Code Review Agent** using **Bito Cloud**:
### **Step 1: Log in to Bito**
[Log in to Bito Cloud](https://alpha.bito.ai/) and select a workspace to get started.
### **Step 2: Open the Code Review Agents setup**
Click [**Repositories**](https://alpha.bito.ai/home/ai-agents/code-review-agent) under the **CODE REVIEW** section in the sidebar.
 ### **Step 3: Select your Git provider**
Bito supports integration with the following Git providers:
* GitHub
* GitHub (Self-Managed)
* GitLab
* GitLab (Self-Managed)
* Bitbucket
* Bitbucket (Self-Managed)
Since we are setting up the Agent for Bitbucket (Self-Managed) server, select **Bitbucket (Self-Managed)** to proceed.
### **Step 3: Select your Git provider**
Bito supports integration with the following Git providers:
* GitHub
* GitHub (Self-Managed)
* GitLab
* GitLab (Self-Managed)
* Bitbucket
* Bitbucket (Self-Managed)
Since we are setting up the Agent for Bitbucket (Self-Managed) server, select **Bitbucket (Self-Managed)** to proceed.
 ### **Step 4: Connect Bito to Bitbucket**
To enable pull request reviews, you’ll need to connect your Bito workspace to your Bitbucket (Self-Managed) server.
{% hint style="info" %}
If your network blocks external services from interacting with the Bitbucket server, whitelist all of Bito's gateway IP addresses in your firewall to ensure Bito can access your self-hosted repositories. The Agent response can come from any of these IPs.
* **List of IP addresses to whitelist:**
* **`18.188.201.104`**
* **`3.23.173.30`**
* **`18.216.64.170`**
{% endhint %}
You need to enter the details for the below mentioned input fields:
* **Hosted Bitbucket URL:** This is the domain portion of the URL where your Bitbucket Enterprise server is hosted (e.g., `https://bitbucket.mycompany.com`). Please check with your Bitbucket administrator for the correct URL.
* **Bitbucket username:** This is your Bitbucket username used for login. Please check it from your user profile page or ask your Admin.
* **Personal Access Token:** Generate a **Bitbucket Personal Access Token** with **`Project Admin`** permission in your Bitbucket (Self-Managed) account. Ensure you have Bitbucket **Admin** privileges. Enter the token into the **Personal Access Token** input field. You can use the **Create Token** button that appears once you provide the **Hosted Bitbucket URL** and your **Bitbucket username**.
For guidance, refer to the instructions in the [Prerequisites](#prerequisites) section.
{% hint style="info" %}
**Important:** Bito posts comments using the Bitbucket user account linked to the Personal Access Token used during setup. To display "Bito" instead of your name, create a separate user account (e.g., Bito Agent) and use its token for integration.
{% endhint %}
Click **Validate** to ensure the token is functioning properly.
### **Step 4: Connect Bito to Bitbucket**
To enable pull request reviews, you’ll need to connect your Bito workspace to your Bitbucket (Self-Managed) server.
{% hint style="info" %}
If your network blocks external services from interacting with the Bitbucket server, whitelist all of Bito's gateway IP addresses in your firewall to ensure Bito can access your self-hosted repositories. The Agent response can come from any of these IPs.
* **List of IP addresses to whitelist:**
* **`18.188.201.104`**
* **`3.23.173.30`**
* **`18.216.64.170`**
{% endhint %}
You need to enter the details for the below mentioned input fields:
* **Hosted Bitbucket URL:** This is the domain portion of the URL where your Bitbucket Enterprise server is hosted (e.g., `https://bitbucket.mycompany.com`). Please check with your Bitbucket administrator for the correct URL.
* **Bitbucket username:** This is your Bitbucket username used for login. Please check it from your user profile page or ask your Admin.
* **Personal Access Token:** Generate a **Bitbucket Personal Access Token** with **`Project Admin`** permission in your Bitbucket (Self-Managed) account. Ensure you have Bitbucket **Admin** privileges. Enter the token into the **Personal Access Token** input field. You can use the **Create Token** button that appears once you provide the **Hosted Bitbucket URL** and your **Bitbucket username**.
For guidance, refer to the instructions in the [Prerequisites](#prerequisites) section.
{% hint style="info" %}
**Important:** Bito posts comments using the Bitbucket user account linked to the Personal Access Token used during setup. To display "Bito" instead of your name, create a separate user account (e.g., Bito Agent) and use its token for integration.
{% endhint %}
Click **Validate** to ensure the token is functioning properly.
 If the token is successfully validated, click **Connect Bito to Bitbucket** to proceed.
### **Step 5: Enable AI Code Review Agent on repositories**
After connecting Bito to your Bitbucket self-managed server, you'll see a list of repositories that Bito has access to.
Use the toggles in the **Code Review Status** column to **enable** or **disable** the Agent for each repository.
If the token is successfully validated, click **Connect Bito to Bitbucket** to proceed.
### **Step 5: Enable AI Code Review Agent on repositories**
After connecting Bito to your Bitbucket self-managed server, you'll see a list of repositories that Bito has access to.
Use the toggles in the **Code Review Status** column to **enable** or **disable** the Agent for each repository.
 {% hint style="info" %}
To customize the Agent’s behavior, you can edit existing configurations or create new Agents as needed.
[Learn more](https://docs.bito.ai/ai-code-reviews-in-git/install-run-using-bito-cloud/create-or-customize-an-agent-instance)
{% endhint %}
### **Step 6: Automated and manual merge request reviews**
Once a repository is enabled, you can invoke the AI Code Review Agent in the following ways:
1. **Automated code review:** By default, the Agent automatically reviews all new pull requests and provides detailed feedback.
2. **Manually trigger code review:** To initiate a manual review, simply type **`/review`** in the comment box on the pull request and submit it. This action will start the code review process.
The AI-generated code review feedback will be posted as comments directly within your pull request, making it seamless to view and address suggestions right where they matter most.
{% hint style="info" %}
**Note:** To enhance efficiency, the automated code reviews are only triggered for pull requests merging into the repository’s default branch. This prevents unnecessary processing and Advanced AI requests usage.
To review additional branches, you can use the [Include Source/Target Branches filter](https://docs.bito.ai/excluding-files-folders-or-branches-with-filters#include-source-target-branches-filter). Bito will review pull requests when the source or target branch matches the list.
The **Include Source/Target Branches** filter applies only to automatically triggered reviews. Users should still be able to trigger reviews manually via the `/review` command.
{% endhint %}
{% hint style="info" %}
The AI Code Review Agent automatically reviews code changes up to 5000 lines when a pull request is created. For larger changes, you can use the **`/review`** command.
{% endhint %}
{% hint style="info" %}
It may take a few minutes to get the code review posted as a comment, depending on the size of the pull request.
{% endhint %}
### **Step 7: Specialized commands for code reviews**
Bito also offers **specialized commands** that are designed to provide detailed insights into specific areas of your source code, including security, performance, scalability, code structure, and optimization.
* **`/review security`**: Analyzes code to identify security vulnerabilities and ensure secure coding practices.
* **`/review performance`**: Evaluates code for performance issues, identifying slow or resource-heavy areas.
* **`/review scalability`**: Assesses the code's ability to handle increased usage and scale effectively.
* **`/review codeorg`**: Scans for readability and maintainability, promoting clear and efficient code organization.
* **`/review codeoptimize`**: Identifies optimization opportunities to enhance code efficiency and reduce resource usage.
By default, the **`/review`** command generates inline comments, meaning that code suggestions are inserted directly beneath the code diffs in each file. This approach provides a clearer view of the exact lines requiring improvement. However, if you prefer a code review in a single post rather than separate inline comments under the diffs, you can include the optional parameter: **`/review #inline_comment=False`**
For more details, refer to [Available Commands](https://docs.bito.ai/ai-code-reviews-in-git/available-commands).
### **Step 8: Chat with AI Code Review Agent**
Ask questions directly to the AI Code Review Agent regarding its code review feedback. You can inquire about highlighted issues, request alternative solutions, or seek clarifications on suggested fixes.
To start the conversation, type your question in the comment box within the inline suggestions on your pull request, and then submit it. Typically, Bito AI responses are delivered in about 10 seconds. On GitHub and Bitbucket, you need to manually refresh the page to see the responses, while GitLab updates automatically.
Bito supports over 20 languages—including English, Hindi, Chinese, and Spanish—so you can interact with the AI in the language you’re most comfortable with.
### Step 9: Configure Agent settings
[Agent settings](https://docs.bito.ai/ai-code-reviews-in-git/install-run-using-bito-cloud/create-or-customize-an-agent-instance) let you control how reviews are performed, ensuring feedback is tailored to your team’s needs. By adjusting the options, you can:
* Make reviews more focused and actionable.
* Apply your own coding standards.
* Reduce noise by excluding irrelevant files or branches.
* Add extra checks to improve code quality and security.
[**Learn more**](https://docs.bito.ai/ai-code-reviews-in-git/install-run-using-bito-cloud/create-or-customize-an-agent-instance)
---
# Source: https://docs.bito.ai/ai-code-reviews-in-git/install-run-using-bito-cloud/guide-for-bitbucket.md
# Guide for Bitbucket
Speed up code reviews by configuring the [AI Code Review Agent](https://docs.bito.ai/bito-dev-agents/ai-code-review-agent) with your Bitbucket repositories. In this guide, you'll learn how to set up the Agent to receive automated code reviews that trigger whenever you create a pull request, as well as how to manually initiate reviews using [available commands](https://docs.bito.ai/bito-dev-agents/ai-code-review-agent/available-commands).
{% hint style="info" %}
The **Free Plan** offers **AI-generated pull request summaries** to provide a quick overview of changes. For advanced features like **line-level code suggestions**, consider upgrading to the **Team Plan**. For detailed pricing information, visit our [**Pricing**](https://bito.ai/pricing/) page.
[**Get a 14-day FREE trial of Bito's AI Code Review Agent.**](https://alpha.bito.ai/home/welcome)
{% endhint %}
## Video tutorial
{% embed url="" %}
## Installation and configuration steps
Follow the step-by-step instructions below to install the **AI Code Review Agent** using **Bito Cloud**:
### **Step 1: Log in to Bito**
[Log in to Bito Cloud](https://alpha.bito.ai/) and select a workspace to get started.
### **Step 2: Open the Code Review Agents setup**
Click [**Repositories**](https://alpha.bito.ai/home/ai-agents/code-review-agent) under the **CODE REVIEW** section in the sidebar.
{% hint style="info" %}
To customize the Agent’s behavior, you can edit existing configurations or create new Agents as needed.
[Learn more](https://docs.bito.ai/ai-code-reviews-in-git/install-run-using-bito-cloud/create-or-customize-an-agent-instance)
{% endhint %}
### **Step 6: Automated and manual merge request reviews**
Once a repository is enabled, you can invoke the AI Code Review Agent in the following ways:
1. **Automated code review:** By default, the Agent automatically reviews all new pull requests and provides detailed feedback.
2. **Manually trigger code review:** To initiate a manual review, simply type **`/review`** in the comment box on the pull request and submit it. This action will start the code review process.
The AI-generated code review feedback will be posted as comments directly within your pull request, making it seamless to view and address suggestions right where they matter most.
{% hint style="info" %}
**Note:** To enhance efficiency, the automated code reviews are only triggered for pull requests merging into the repository’s default branch. This prevents unnecessary processing and Advanced AI requests usage.
To review additional branches, you can use the [Include Source/Target Branches filter](https://docs.bito.ai/excluding-files-folders-or-branches-with-filters#include-source-target-branches-filter). Bito will review pull requests when the source or target branch matches the list.
The **Include Source/Target Branches** filter applies only to automatically triggered reviews. Users should still be able to trigger reviews manually via the `/review` command.
{% endhint %}
{% hint style="info" %}
The AI Code Review Agent automatically reviews code changes up to 5000 lines when a pull request is created. For larger changes, you can use the **`/review`** command.
{% endhint %}
{% hint style="info" %}
It may take a few minutes to get the code review posted as a comment, depending on the size of the pull request.
{% endhint %}
### **Step 7: Specialized commands for code reviews**
Bito also offers **specialized commands** that are designed to provide detailed insights into specific areas of your source code, including security, performance, scalability, code structure, and optimization.
* **`/review security`**: Analyzes code to identify security vulnerabilities and ensure secure coding practices.
* **`/review performance`**: Evaluates code for performance issues, identifying slow or resource-heavy areas.
* **`/review scalability`**: Assesses the code's ability to handle increased usage and scale effectively.
* **`/review codeorg`**: Scans for readability and maintainability, promoting clear and efficient code organization.
* **`/review codeoptimize`**: Identifies optimization opportunities to enhance code efficiency and reduce resource usage.
By default, the **`/review`** command generates inline comments, meaning that code suggestions are inserted directly beneath the code diffs in each file. This approach provides a clearer view of the exact lines requiring improvement. However, if you prefer a code review in a single post rather than separate inline comments under the diffs, you can include the optional parameter: **`/review #inline_comment=False`**
For more details, refer to [Available Commands](https://docs.bito.ai/ai-code-reviews-in-git/available-commands).
### **Step 8: Chat with AI Code Review Agent**
Ask questions directly to the AI Code Review Agent regarding its code review feedback. You can inquire about highlighted issues, request alternative solutions, or seek clarifications on suggested fixes.
To start the conversation, type your question in the comment box within the inline suggestions on your pull request, and then submit it. Typically, Bito AI responses are delivered in about 10 seconds. On GitHub and Bitbucket, you need to manually refresh the page to see the responses, while GitLab updates automatically.
Bito supports over 20 languages—including English, Hindi, Chinese, and Spanish—so you can interact with the AI in the language you’re most comfortable with.
### Step 9: Configure Agent settings
[Agent settings](https://docs.bito.ai/ai-code-reviews-in-git/install-run-using-bito-cloud/create-or-customize-an-agent-instance) let you control how reviews are performed, ensuring feedback is tailored to your team’s needs. By adjusting the options, you can:
* Make reviews more focused and actionable.
* Apply your own coding standards.
* Reduce noise by excluding irrelevant files or branches.
* Add extra checks to improve code quality and security.
[**Learn more**](https://docs.bito.ai/ai-code-reviews-in-git/install-run-using-bito-cloud/create-or-customize-an-agent-instance)
---
# Source: https://docs.bito.ai/ai-code-reviews-in-git/install-run-using-bito-cloud/guide-for-bitbucket.md
# Guide for Bitbucket
Speed up code reviews by configuring the [AI Code Review Agent](https://docs.bito.ai/bito-dev-agents/ai-code-review-agent) with your Bitbucket repositories. In this guide, you'll learn how to set up the Agent to receive automated code reviews that trigger whenever you create a pull request, as well as how to manually initiate reviews using [available commands](https://docs.bito.ai/bito-dev-agents/ai-code-review-agent/available-commands).
{% hint style="info" %}
The **Free Plan** offers **AI-generated pull request summaries** to provide a quick overview of changes. For advanced features like **line-level code suggestions**, consider upgrading to the **Team Plan**. For detailed pricing information, visit our [**Pricing**](https://bito.ai/pricing/) page.
[**Get a 14-day FREE trial of Bito's AI Code Review Agent.**](https://alpha.bito.ai/home/welcome)
{% endhint %}
## Video tutorial
{% embed url="" %}
## Installation and configuration steps
Follow the step-by-step instructions below to install the **AI Code Review Agent** using **Bito Cloud**:
### **Step 1: Log in to Bito**
[Log in to Bito Cloud](https://alpha.bito.ai/) and select a workspace to get started.
### **Step 2: Open the Code Review Agents setup**
Click [**Repositories**](https://alpha.bito.ai/home/ai-agents/code-review-agent) under the **CODE REVIEW** section in the sidebar.
 ### **Step 3: Select your Git provider**
Bito supports integration with the following Git providers:
* GitHub
* GitHub (Self-Managed)
* GitLab
* GitLab (Self-Managed)
* Bitbucket
* Bitbucket (Self-Managed)
Since we are setting up the Agent for Bitbucket, select **Bitbucket** to proceed.
### **Step 3: Select your Git provider**
Bito supports integration with the following Git providers:
* GitHub
* GitHub (Self-Managed)
* GitLab
* GitLab (Self-Managed)
* Bitbucket
* Bitbucket (Self-Managed)
Since we are setting up the Agent for Bitbucket, select **Bitbucket** to proceed.
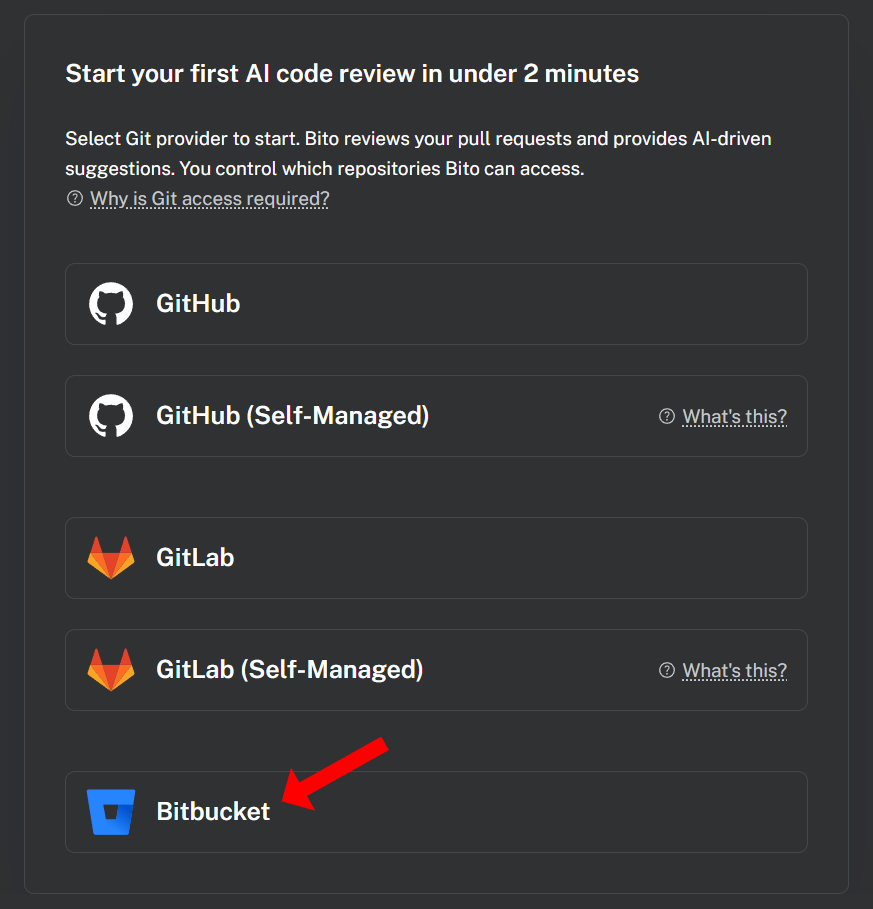 ### **Step 4: Connect Bito to Bitbucket**
To enable pull request reviews, you’ll need to connect your Bito workspace to your Bitbucket account.
{% hint style="info" %}
If your [Bitbucket access control settings](https://support.atlassian.com/bitbucket-cloud/docs/control-access-to-your-private-content/) block external services from interacting with the Bitbucket server, whitelist all of Bito's gateway IP addresses to ensure Bito can access your repositories. The Agent response can come from any of these IPs.
* **List of IP addresses to whitelist:**
* **`18.188.201.104`**
* **`3.23.173.30`**
* **`18.216.64.170`**
See the [Bitbucket documentation](https://support.atlassian.com/bitbucket-cloud/docs/control-access-to-your-private-content/) for more information.
{% endhint %}
Click **Install Bito App for Bitbucket**. This will redirect you to Bitbucket.
Now, authorize the Bito App to access your Bitbucket repositories.
Select your Bitbucket workspace from the **Authorize for workspace** dropdown menu and then click **Grant access**. Once completed, you will be redirected to Bito.
{% hint style="info" %}
**Note:** You'll only see Bitbucket workspaces where you have **Admin** access. If no workspaces appear in the dropdown, it means your account doesn’t have admin access to any workspace. To connect a workspace, make sure you have admin access for it.
{% endhint %}
### **Step 4: Connect Bito to Bitbucket**
To enable pull request reviews, you’ll need to connect your Bito workspace to your Bitbucket account.
{% hint style="info" %}
If your [Bitbucket access control settings](https://support.atlassian.com/bitbucket-cloud/docs/control-access-to-your-private-content/) block external services from interacting with the Bitbucket server, whitelist all of Bito's gateway IP addresses to ensure Bito can access your repositories. The Agent response can come from any of these IPs.
* **List of IP addresses to whitelist:**
* **`18.188.201.104`**
* **`3.23.173.30`**
* **`18.216.64.170`**
See the [Bitbucket documentation](https://support.atlassian.com/bitbucket-cloud/docs/control-access-to-your-private-content/) for more information.
{% endhint %}
Click **Install Bito App for Bitbucket**. This will redirect you to Bitbucket.
Now, authorize the Bito App to access your Bitbucket repositories.
Select your Bitbucket workspace from the **Authorize for workspace** dropdown menu and then click **Grant access**. Once completed, you will be redirected to Bito.
{% hint style="info" %}
**Note:** You'll only see Bitbucket workspaces where you have **Admin** access. If no workspaces appear in the dropdown, it means your account doesn’t have admin access to any workspace. To connect a workspace, make sure you have admin access for it.
{% endhint %}
 ### **Step 5: Enable AI Code Review Agent on repositories**
After connecting Bito to your Bitbucket account, you'll see a list of repositories that Bito has access to.
Use the toggles in the **Code Review Status** column to **enable** or **disable** the Agent for each repository.
### **Step 5: Enable AI Code Review Agent on repositories**
After connecting Bito to your Bitbucket account, you'll see a list of repositories that Bito has access to.
Use the toggles in the **Code Review Status** column to **enable** or **disable** the Agent for each repository.
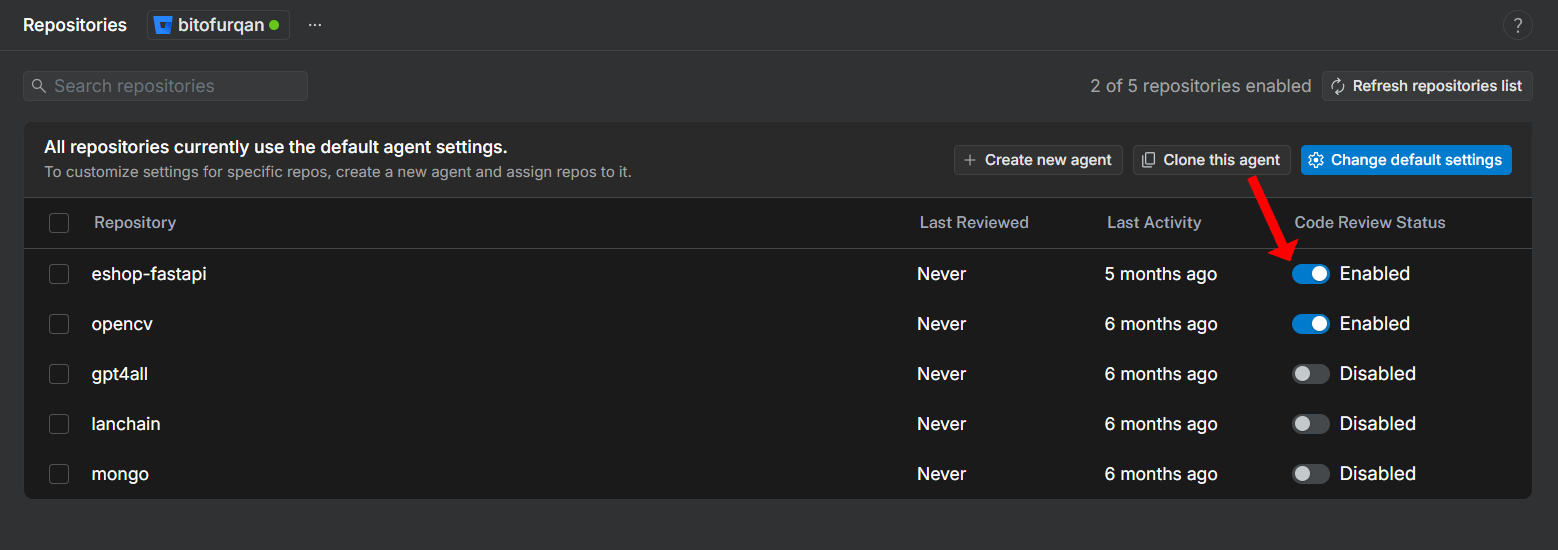 {% hint style="info" %}
To customize the Agent’s behavior, you can edit existing configurations or create new Agents as needed.
[Learn more](https://docs.bito.ai/ai-code-reviews-in-git/install-run-using-bito-cloud/create-or-customize-an-agent-instance)
{% endhint %}
### **Step 6: Automated and manual pull request reviews**
Once a repository is enabled, you can invoke the AI Code Review Agent in the following ways:
1. **Automated code review:** By default, the Agent automatically reviews all new pull requests and provides detailed feedback.
2. **Manually trigger code review:** To initiate a manual review, simply type **`/review`** in the comment box on the pull request and click **Add comment now** to submit it. This action will start the code review process.
{% hint style="info" %}
**Note:** After typing **`/review`**, add a space inside the comment box to ensure that **`/review`** is not highlighted as a Bitbucket slash command so that the comment can be posted correctly.
{% endhint %}
The AI-generated code review feedback will be posted as comments directly within your pull request, making it seamless to view and address suggestions right where they matter most.
{% hint style="info" %}
To customize the Agent’s behavior, you can edit existing configurations or create new Agents as needed.
[Learn more](https://docs.bito.ai/ai-code-reviews-in-git/install-run-using-bito-cloud/create-or-customize-an-agent-instance)
{% endhint %}
### **Step 6: Automated and manual pull request reviews**
Once a repository is enabled, you can invoke the AI Code Review Agent in the following ways:
1. **Automated code review:** By default, the Agent automatically reviews all new pull requests and provides detailed feedback.
2. **Manually trigger code review:** To initiate a manual review, simply type **`/review`** in the comment box on the pull request and click **Add comment now** to submit it. This action will start the code review process.
{% hint style="info" %}
**Note:** After typing **`/review`**, add a space inside the comment box to ensure that **`/review`** is not highlighted as a Bitbucket slash command so that the comment can be posted correctly.
{% endhint %}
The AI-generated code review feedback will be posted as comments directly within your pull request, making it seamless to view and address suggestions right where they matter most.
 {% hint style="info" %}
**Note:** To enhance efficiency, the automated code reviews are only triggered for pull requests merging into the repository’s default branch. This prevents unnecessary processing and Advanced AI requests usage.
To review additional branches, you can use the [Include Source/Target Branches filter](https://docs.bito.ai/excluding-files-folders-or-branches-with-filters#include-source-target-branches-filter). Bito will review pull requests when the source or target branch matches the list.
The **Include Source/Target Branches** filter applies only to automatically triggered reviews. Users should still be able to trigger reviews manually via the `/review` command.
{% endhint %}
{% hint style="info" %}
The AI Code Review Agent automatically reviews code changes up to 5000 lines when a pull request is created. For larger changes, you can use the **`/review`** command.
{% endhint %}
{% hint style="info" %}
It may take a few minutes to get the code review posted as a comment, depending on the size of the pull request.
{% endhint %}
### **Step 7: Specialized commands for code reviews**
Bito also offers **specialized commands** that are designed to provide detailed insights into specific areas of your source code, including security, performance, scalability, code structure, and optimization.
* **`/review security`**: Analyzes code to identify security vulnerabilities and ensure secure coding practices.
* **`/review performance`**: Evaluates code for performance issues, identifying slow or resource-heavy areas.
* **`/review scalability`**: Assesses the code's ability to handle increased usage and scale effectively.
* **`/review codeorg`**: Scans for readability and maintainability, promoting clear and efficient code organization.
* **`/review codeoptimize`**: Identifies optimization opportunities to enhance code efficiency and reduce resource usage.
By default, the **`/review`** command generates inline comments, meaning that code suggestions are inserted directly beneath the code diffs in each file. This approach provides a clearer view of the exact lines requiring improvement. However, if you prefer a code review in a single post rather than separate inline comments under the diffs, you can include the optional parameter: **`/review #inline_comment=False`**
For more details, refer to [Available Commands](https://docs.bito.ai/bito-dev-agents/ai-code-review-agent/available-commands).
### **Step 8: Chat with AI Code Review Agent**
Ask questions directly to the AI Code Review Agent regarding its code review feedback. You can inquire about highlighted issues, request alternative solutions, or seek clarifications on suggested fixes.
To start the conversation, type your question in the comment box within the inline suggestions on your pull request, and then submit it. Typically, Bito AI responses are delivered in about 10 seconds. On GitHub and Bitbucket, you need to manually refresh the page to see the responses, while GitLab updates automatically.
Bito supports over 20 languages—including English, Hindi, Chinese, and Spanish—so you can interact with the AI in the language you’re most comfortable with.
{% hint style="info" %}
**Note:** To enhance efficiency, the automated code reviews are only triggered for pull requests merging into the repository’s default branch. This prevents unnecessary processing and Advanced AI requests usage.
To review additional branches, you can use the [Include Source/Target Branches filter](https://docs.bito.ai/excluding-files-folders-or-branches-with-filters#include-source-target-branches-filter). Bito will review pull requests when the source or target branch matches the list.
The **Include Source/Target Branches** filter applies only to automatically triggered reviews. Users should still be able to trigger reviews manually via the `/review` command.
{% endhint %}
{% hint style="info" %}
The AI Code Review Agent automatically reviews code changes up to 5000 lines when a pull request is created. For larger changes, you can use the **`/review`** command.
{% endhint %}
{% hint style="info" %}
It may take a few minutes to get the code review posted as a comment, depending on the size of the pull request.
{% endhint %}
### **Step 7: Specialized commands for code reviews**
Bito also offers **specialized commands** that are designed to provide detailed insights into specific areas of your source code, including security, performance, scalability, code structure, and optimization.
* **`/review security`**: Analyzes code to identify security vulnerabilities and ensure secure coding practices.
* **`/review performance`**: Evaluates code for performance issues, identifying slow or resource-heavy areas.
* **`/review scalability`**: Assesses the code's ability to handle increased usage and scale effectively.
* **`/review codeorg`**: Scans for readability and maintainability, promoting clear and efficient code organization.
* **`/review codeoptimize`**: Identifies optimization opportunities to enhance code efficiency and reduce resource usage.
By default, the **`/review`** command generates inline comments, meaning that code suggestions are inserted directly beneath the code diffs in each file. This approach provides a clearer view of the exact lines requiring improvement. However, if you prefer a code review in a single post rather than separate inline comments under the diffs, you can include the optional parameter: **`/review #inline_comment=False`**
For more details, refer to [Available Commands](https://docs.bito.ai/bito-dev-agents/ai-code-review-agent/available-commands).
### **Step 8: Chat with AI Code Review Agent**
Ask questions directly to the AI Code Review Agent regarding its code review feedback. You can inquire about highlighted issues, request alternative solutions, or seek clarifications on suggested fixes.
To start the conversation, type your question in the comment box within the inline suggestions on your pull request, and then submit it. Typically, Bito AI responses are delivered in about 10 seconds. On GitHub and Bitbucket, you need to manually refresh the page to see the responses, while GitLab updates automatically.
Bito supports over 20 languages—including English, Hindi, Chinese, and Spanish—so you can interact with the AI in the language you’re most comfortable with.
 ### Step 9: Configure Agent settings
[Agent settings](https://docs.bito.ai/ai-code-reviews-in-git/install-run-using-bito-cloud/create-or-customize-an-agent-instance) let you control how reviews are performed, ensuring feedback is tailored to your team’s needs. By adjusting the options, you can:
* Make reviews more focused and actionable.
* Apply your own coding standards.
* Reduce noise by excluding irrelevant files or branches.
* Add extra checks to improve code quality and security.
[**Learn more**](https://docs.bito.ai/ai-code-reviews-in-git/install-run-using-bito-cloud/create-or-customize-an-agent-instance)
## Screenshots
### Screenshot # 1
{% hint style="info" %}
*AI-generated pull request (PR) summary*
{% endhint %}
### Step 9: Configure Agent settings
[Agent settings](https://docs.bito.ai/ai-code-reviews-in-git/install-run-using-bito-cloud/create-or-customize-an-agent-instance) let you control how reviews are performed, ensuring feedback is tailored to your team’s needs. By adjusting the options, you can:
* Make reviews more focused and actionable.
* Apply your own coding standards.
* Reduce noise by excluding irrelevant files or branches.
* Add extra checks to improve code quality and security.
[**Learn more**](https://docs.bito.ai/ai-code-reviews-in-git/install-run-using-bito-cloud/create-or-customize-an-agent-instance)
## Screenshots
### Screenshot # 1
{% hint style="info" %}
*AI-generated pull request (PR) summary*
{% endhint %}
 ### Screenshot # 2
{% hint style="info" %}
**Changelist** showing key changes and impacted files in a pull request.
{% endhint %}
### Screenshot # 2
{% hint style="info" %}
**Changelist** showing key changes and impacted files in a pull request.
{% endhint %}

Changelist in AI Code Review Agent's feedback.
### Screenshot # 3
{% hint style="info" %}
*AI code review feedback posted as comments on the pull request.*
{% endhint %}
 ---
# Source: https://docs.bito.ai/ai-architect/guide-for-chatgpt-web-and-desktop.md
# Guide for ChatGPT (Web & Desktop)
Use Bito's [**AI Architect**](https://docs.bito.ai/ai-architect/overview) with **ChatGPT (Web & Desktop)** to enhance your AI-powered coding experience.
Once connected via MCP (Model Context Protocol), ChatGPT can leverage AI Architect's deep contextual understanding of your project, enabling more accurate code suggestions, explanations, and code insights.
{% hint style="info" %}
**Note:** This guide covers setup for both the web interface (chat.openai.com) and the ChatGPT desktop app. The configuration is identical for both platforms.
{% endhint %}
## Prerequisites
1. Follow the [**AI Architect installation instructions**](https://docs.bito.ai/ai-architect/install-ai-architect-self-hosted). Upon successful setup, you will receive a **Bito MCP URL** and **Bito MCP Access Token** that you need to enter in your coding agent.
* **Note:** When using Bito AI Architect MCP with ChatGPT (Web), the **Bito MCP URL** must be publicly accessible. Localhost or private network URLs (for example, `http://localhost` or internal IP addresses) are not supported and will not work.
2. [Download **BitoAIArchitectGuidelines.md file**](https://github.com/gitbito/ai-architect/blob/main/BitoAIArchitectGuidelines.md). You will need to copy/paste the content from this file later when configuring AI Architect.
* **Note:** This file contains best practices, usage instructions, and prompting guidelines for the Bito AI Architect MCP server. The setup will work without this file, but including it helps AI tools interact more effectively with the Bito AI Architect MCP server.
3. **A paid ChatGPT subscription** - MCP connectors require one of the following:
* ChatGPT Plus
* ChatGPT Pro
* ChatGPT Team
* ChatGPT Enterprise
* ChatGPT Edu
{% hint style="info" %}
**Note:** Free tier accounts do not have access to MCP connectors.
{% endhint %}
{% hint style="info" %}
**Note:** Full MCP support (including write/modify actions) is available for Team, Enterprise, and Edu plans. Plus and Pro users have read/fetch permissions via Developer Mode.
{% endhint %}
## OAuth authentication
ChatGPT uses **OAuth 2.1 with PKCE** for secure MCP server authentication via the Connectors feature in Developer Mode.
**How OAuth authentication works:**
1. You enable Developer Mode and add the MCP server URL in Connectors settings
2. ChatGPT initiates an OAuth flow
3. Your browser opens a consent page hosted by Bito
4. You enter your email and approve the connection
5. ChatGPT receives secure tokens automatically
6. Your email is tracked for usage analytics (collected during OAuth consent)
**Benefits:**
* No manual token management
* Secure browser-based authentication
* Automatic token refresh
* Email collected during consent (no separate header needed)
## Set up AI Architect
{% stepper %}
{% step %}
### Enable Developer mode
1. Go to [chatgpt.com](https://chatgpt.com) (or open the ChatGPT desktop app) and sign in
2. Click on your **profile icon** (bottom-left corner)
3. Select **Settings**
4. Go to **Apps and Connectors** (or just **Connectors**)
5. Scroll down and click **"Advanced Settings"**
6. Toggle **"Developer Mode"** to ON
{% endstep %}
{% step %}
### Create Bito AI Architect Connector
1. In the **Connectors** section, click **"Create"** or **"+ Add Connector"**
2. Fill in the connector details:
* **Connector Name:** BitoAIArchitect
* **Description:** Repository intelligence and architecture analysis for your organization
* **MCP Server URL:** ``
* **Authentication:** Select **"OAuth"**
{% hint style="info" %}
**Note:**
* Replace `` with the **Bito MCP URL** you received after completing the AI Architect setup.
* For the Bito-hosted AI Architect, use the following URL format: `https://mcp.bito.ai//mcp`
Replace `` with your actual Bito workspace ID, which you can find after logging into your Bito account at [**alpha.bito.ai**](https://alpha.bito.ai/)
{% endhint %}
3. Click **"Create"** or **"Save"**
{% endstep %}
{% step %}
### Complete OAuth authorization
1. Click on the newly created BitoAIArchitect connector
2. Click **"Connect"** to initiate the OAuth flow
3. A browser window opens showing the **Bito Authorization** page
4. Review the requested permissions
5. **Enter your email address** (required for tracking)
6. Click **"Authorize"** or **"Allow"**
7. Return to ChatGPT - the connection is now active
{% endstep %}
{% step %}
### Verify connection
1. Return to ChatGPT Settings → Connectors
2. BitoAIArchitect should show as **"Connected"**
3. Start a new conversation
4. In the composer, click **"Use Connectors"** or look for the connector tools
5. Try asking:
```
What repositories are available in my organization?
```
{% endstep %}
{% step %}
### Using Bito AI Architect in ChatGPT
Once connected, you can use **BitoAIArchitect** in several ways:
* **Direct prompts:** Ask questions about your repositories
* **Deep Research:** BitoAIArchitect tools appear in "Deep Research" mode
* **Connectors menu:** Select BitoAIArchitect from the "Use Connectors" option
{% endstep %}
{% endstepper %}
## Troubleshooting ChatGPT
#### **"Connectors" or Developer Mode option not visible:**
* Verify you have a paid ChatGPT subscription (Plus, Pro, Team, Enterprise, or Edu)
* Free tier accounts do not have connector access
* The feature may be rolling out gradually - check back later if recently subscribed
#### **OAuth authorization fails:**
* Ensure pop-ups are allowed for chatgpt.com
* Check that your Workspace ID is correct
* Verify your organization has OAuth enabled for the MCP server
* Try using an incognito/private browser window
#### **"Error fetching OAuth configuration":**
* Verify the MCP server URL is correct and accessible
* Ensure the server supports OAuth 2.1 with dynamic client registration
* Check that `code_challenge_methods_supported` includes `S256` in the authorization server metadata
#### **Connection shows "Error" or "Disconnected":**
* Click the connection and select "Reconnect"
* OAuth tokens may have expired - re-authorize when prompted
* Check if your Bito workspace is still active
#### **Tools not working in conversation:**
* Ensure the MCP connection shows "Connected" status
* Try starting a fresh conversation
* Explicitly mention "use BitoAIArchitect" in your prompt if tools don't activate automatically
* Check that you're using the connector in a mode that supports tools (not all chat modes do)
---
# Source: https://docs.bito.ai/ai-architect/guide-for-claude-code.md
# Guide for Claude Code
Use Bito's [**AI Architect**](https://docs.bito.ai/ai-architect/overview) with **Claude Code** to enhance your AI-powered coding experience.
Once connected via MCP (Model Context Protocol), Claude Code can leverage AI Architect’s deep contextual understanding of your project, enabling more accurate code suggestions, explanations, and code insights.
## Quick setup (recommended)
**Want to get started faster?** We offer an automated installer that can configure AI Architect for all your AI coding tools in just a few seconds.
The automated setup will:
* Detect all compatible AI tools installed on your system
* Configure them automatically with your credentials
* Save you time by eliminating manual configuration steps
👉 [**Try our Quick MCP Integration Guide**](https://docs.bito.ai/ai-architect/quick-mcp-integration-with-ai-coding-agents) for automated setup.
## Manual setup
If you prefer manual configuration, follow the step-by-step instructions below.
## Prerequisites
1. Follow the [**AI Architect installation instructions**](https://docs.bito.ai/ai-architect/install-ai-architect-self-hosted). Upon successful setup, you will receive a **Bito MCP URL** and **Bito MCP Access Token** that you need to enter in your coding agent.
2. [Download **BitoAIArchitectGuidelines.md** file](https://github.com/gitbito/ai-architect/blob/main/BitoAIArchitectGuidelines.md). You will need to copy/paste the content from this file later when configuring AI Architect.
* **Note:** This file contains best practices, usage instructions, and prompting guidelines for the Bito AI Architect MCP server. The setup will work without this file, but including it helps AI tools interact more effectively with the Bito AI Architect MCP server.
## Set up AI Architect
Claude Code has the same setup process across all platforms (Windows, macOS, Linux, WSL) using the command line.
Claude Code uses CLI-based configuration, NOT manual JSON editing.
{% stepper %}
{% step %}
### Install Claude Code
If you haven't already:
```shellscript
npm install -g @anthropic-ai/claude-code
```
Verify installation:
```shellscript
claude --version
```
{% endstep %}
{% step %}
### Add Bito AI Architect MCP server
Use the `claude mcp add` command with the correct parameter order:
```shellscript
claude mcp add \
--transport http \
--scope user \
BitoAIArchitect \
\
--header "Authorization: Bearer " \
--header "x-email-id: "
```
{% hint style="info" %}
**Note:**
* Replace `` with the **Bito MCP URL** you received after completing the AI Architect setup.
* For the Bito-hosted AI Architect, use the following URL format: `https://mcp.bito.ai//mcp`
Replace `` with your actual Bito workspace ID, which you can find after logging into your Bito account at [**alpha.bito.ai**](https://alpha.bito.ai/)
* Replace `` with the **Bito MCP Access Token** you received after completing the AI Architect setup.
* Replace `` with your actual email address.
{% endhint %}
{% hint style="info" %}
**Important:** The server name and URL must come BEFORE the `--header` option.
{% endhint %}
{% hint style="info" %}
**Scope options:**
* `--scope user`: Available in all your projects (recommended)
* `--scope project`: Only in current project (stored in `.mcp.json`)
* `--scope local`: Only in current directory (default)
{% endhint %}
{% endstep %}
{% step %}
### Verify installation
List your MCP servers:
```shellscript
claude mcp list
```
You should see "BitoAIArchitect" in the list.
Test the server:
```shellscript
claude mcp get BitoAIArchitect
```
{% endstep %}
{% step %}
### Add guidelines (optional but highly recommended)
The [**BitoAIArchitectGuidelines.md** file](#prerequisites) contains best practices, usage instructions, and prompting guidelines for the Bito AI Architect MCP server.
The setup will work without this file, but including it helps AI tools interact more effectively with the Bito AI Architect MCP server.
**You can either create:**
1. **Global guidelines** - Apply across all your projects. Best for teams or developers who want consistent standards everywhere.
2. **Project-specific guidelines** - Apply to a single project only.
Choose one of the following based on your preference:
### Option A: Global guidelines
Create `.claude` directory if it doesn't exist:
```shellscript
mkdir -p ~/.claude
```
Create or edit `CLAUDE.md`:
```shellscript
nano ~/.claude/CLAUDE.md
```
Copy the contents of your [**BitoAIArchitectGuidelines.md** file](#prerequisites) into this file, then save.
### Option B: Project-specific guidelines
Run this command in your project directory:
```shellscript
nano CLAUDE.md
```
Or run these commands:
```shellscript
mkdir -p .claude
```
```shellscript
nano .claude/CLAUDE.md
```
Copy the contents of your [**BitoAIArchitectGuidelines.md** file](#prerequisites) into this file, then save.
{% endstep %}
{% step %}
### Start using Claude Code
In your project directory, run:
```shellscript
claude
```
Now, in the chat you can ask questions about your indexed repositories. The AI Architect will help Claude Code provide accurate answers based on your codebase.
**Try asking something like:**
```
What repositories are available in my organization?
```
{% endstep %}
{% endstepper %}
## Windows-specific notes
#### Windows (Native - Command Prompt/PowerShell):
* MCP servers using `npx` require the `cmd /c` wrapper:
```shellscript
# For stdio servers on Windows
claude mcp add --transport stdio my-server -- cmd /c npx -y @some/package
```
#### Windows (WSL):
* Configuration is stored in Linux file system
* No need for `cmd /c` wrapper
* Use standard Linux paths (`~/.claude/`)
## Configuration file locations
---
# Source: https://docs.bito.ai/ai-architect/guide-for-chatgpt-web-and-desktop.md
# Guide for ChatGPT (Web & Desktop)
Use Bito's [**AI Architect**](https://docs.bito.ai/ai-architect/overview) with **ChatGPT (Web & Desktop)** to enhance your AI-powered coding experience.
Once connected via MCP (Model Context Protocol), ChatGPT can leverage AI Architect's deep contextual understanding of your project, enabling more accurate code suggestions, explanations, and code insights.
{% hint style="info" %}
**Note:** This guide covers setup for both the web interface (chat.openai.com) and the ChatGPT desktop app. The configuration is identical for both platforms.
{% endhint %}
## Prerequisites
1. Follow the [**AI Architect installation instructions**](https://docs.bito.ai/ai-architect/install-ai-architect-self-hosted). Upon successful setup, you will receive a **Bito MCP URL** and **Bito MCP Access Token** that you need to enter in your coding agent.
* **Note:** When using Bito AI Architect MCP with ChatGPT (Web), the **Bito MCP URL** must be publicly accessible. Localhost or private network URLs (for example, `http://localhost` or internal IP addresses) are not supported and will not work.
2. [Download **BitoAIArchitectGuidelines.md file**](https://github.com/gitbito/ai-architect/blob/main/BitoAIArchitectGuidelines.md). You will need to copy/paste the content from this file later when configuring AI Architect.
* **Note:** This file contains best practices, usage instructions, and prompting guidelines for the Bito AI Architect MCP server. The setup will work without this file, but including it helps AI tools interact more effectively with the Bito AI Architect MCP server.
3. **A paid ChatGPT subscription** - MCP connectors require one of the following:
* ChatGPT Plus
* ChatGPT Pro
* ChatGPT Team
* ChatGPT Enterprise
* ChatGPT Edu
{% hint style="info" %}
**Note:** Free tier accounts do not have access to MCP connectors.
{% endhint %}
{% hint style="info" %}
**Note:** Full MCP support (including write/modify actions) is available for Team, Enterprise, and Edu plans. Plus and Pro users have read/fetch permissions via Developer Mode.
{% endhint %}
## OAuth authentication
ChatGPT uses **OAuth 2.1 with PKCE** for secure MCP server authentication via the Connectors feature in Developer Mode.
**How OAuth authentication works:**
1. You enable Developer Mode and add the MCP server URL in Connectors settings
2. ChatGPT initiates an OAuth flow
3. Your browser opens a consent page hosted by Bito
4. You enter your email and approve the connection
5. ChatGPT receives secure tokens automatically
6. Your email is tracked for usage analytics (collected during OAuth consent)
**Benefits:**
* No manual token management
* Secure browser-based authentication
* Automatic token refresh
* Email collected during consent (no separate header needed)
## Set up AI Architect
{% stepper %}
{% step %}
### Enable Developer mode
1. Go to [chatgpt.com](https://chatgpt.com) (or open the ChatGPT desktop app) and sign in
2. Click on your **profile icon** (bottom-left corner)
3. Select **Settings**
4. Go to **Apps and Connectors** (or just **Connectors**)
5. Scroll down and click **"Advanced Settings"**
6. Toggle **"Developer Mode"** to ON
{% endstep %}
{% step %}
### Create Bito AI Architect Connector
1. In the **Connectors** section, click **"Create"** or **"+ Add Connector"**
2. Fill in the connector details:
* **Connector Name:** BitoAIArchitect
* **Description:** Repository intelligence and architecture analysis for your organization
* **MCP Server URL:** ``
* **Authentication:** Select **"OAuth"**
{% hint style="info" %}
**Note:**
* Replace `` with the **Bito MCP URL** you received after completing the AI Architect setup.
* For the Bito-hosted AI Architect, use the following URL format: `https://mcp.bito.ai//mcp`
Replace `` with your actual Bito workspace ID, which you can find after logging into your Bito account at [**alpha.bito.ai**](https://alpha.bito.ai/)
{% endhint %}
3. Click **"Create"** or **"Save"**
{% endstep %}
{% step %}
### Complete OAuth authorization
1. Click on the newly created BitoAIArchitect connector
2. Click **"Connect"** to initiate the OAuth flow
3. A browser window opens showing the **Bito Authorization** page
4. Review the requested permissions
5. **Enter your email address** (required for tracking)
6. Click **"Authorize"** or **"Allow"**
7. Return to ChatGPT - the connection is now active
{% endstep %}
{% step %}
### Verify connection
1. Return to ChatGPT Settings → Connectors
2. BitoAIArchitect should show as **"Connected"**
3. Start a new conversation
4. In the composer, click **"Use Connectors"** or look for the connector tools
5. Try asking:
```
What repositories are available in my organization?
```
{% endstep %}
{% step %}
### Using Bito AI Architect in ChatGPT
Once connected, you can use **BitoAIArchitect** in several ways:
* **Direct prompts:** Ask questions about your repositories
* **Deep Research:** BitoAIArchitect tools appear in "Deep Research" mode
* **Connectors menu:** Select BitoAIArchitect from the "Use Connectors" option
{% endstep %}
{% endstepper %}
## Troubleshooting ChatGPT
#### **"Connectors" or Developer Mode option not visible:**
* Verify you have a paid ChatGPT subscription (Plus, Pro, Team, Enterprise, or Edu)
* Free tier accounts do not have connector access
* The feature may be rolling out gradually - check back later if recently subscribed
#### **OAuth authorization fails:**
* Ensure pop-ups are allowed for chatgpt.com
* Check that your Workspace ID is correct
* Verify your organization has OAuth enabled for the MCP server
* Try using an incognito/private browser window
#### **"Error fetching OAuth configuration":**
* Verify the MCP server URL is correct and accessible
* Ensure the server supports OAuth 2.1 with dynamic client registration
* Check that `code_challenge_methods_supported` includes `S256` in the authorization server metadata
#### **Connection shows "Error" or "Disconnected":**
* Click the connection and select "Reconnect"
* OAuth tokens may have expired - re-authorize when prompted
* Check if your Bito workspace is still active
#### **Tools not working in conversation:**
* Ensure the MCP connection shows "Connected" status
* Try starting a fresh conversation
* Explicitly mention "use BitoAIArchitect" in your prompt if tools don't activate automatically
* Check that you're using the connector in a mode that supports tools (not all chat modes do)
---
# Source: https://docs.bito.ai/ai-architect/guide-for-claude-code.md
# Guide for Claude Code
Use Bito's [**AI Architect**](https://docs.bito.ai/ai-architect/overview) with **Claude Code** to enhance your AI-powered coding experience.
Once connected via MCP (Model Context Protocol), Claude Code can leverage AI Architect’s deep contextual understanding of your project, enabling more accurate code suggestions, explanations, and code insights.
## Quick setup (recommended)
**Want to get started faster?** We offer an automated installer that can configure AI Architect for all your AI coding tools in just a few seconds.
The automated setup will:
* Detect all compatible AI tools installed on your system
* Configure them automatically with your credentials
* Save you time by eliminating manual configuration steps
👉 [**Try our Quick MCP Integration Guide**](https://docs.bito.ai/ai-architect/quick-mcp-integration-with-ai-coding-agents) for automated setup.
## Manual setup
If you prefer manual configuration, follow the step-by-step instructions below.
## Prerequisites
1. Follow the [**AI Architect installation instructions**](https://docs.bito.ai/ai-architect/install-ai-architect-self-hosted). Upon successful setup, you will receive a **Bito MCP URL** and **Bito MCP Access Token** that you need to enter in your coding agent.
2. [Download **BitoAIArchitectGuidelines.md** file](https://github.com/gitbito/ai-architect/blob/main/BitoAIArchitectGuidelines.md). You will need to copy/paste the content from this file later when configuring AI Architect.
* **Note:** This file contains best practices, usage instructions, and prompting guidelines for the Bito AI Architect MCP server. The setup will work without this file, but including it helps AI tools interact more effectively with the Bito AI Architect MCP server.
## Set up AI Architect
Claude Code has the same setup process across all platforms (Windows, macOS, Linux, WSL) using the command line.
Claude Code uses CLI-based configuration, NOT manual JSON editing.
{% stepper %}
{% step %}
### Install Claude Code
If you haven't already:
```shellscript
npm install -g @anthropic-ai/claude-code
```
Verify installation:
```shellscript
claude --version
```
{% endstep %}
{% step %}
### Add Bito AI Architect MCP server
Use the `claude mcp add` command with the correct parameter order:
```shellscript
claude mcp add \
--transport http \
--scope user \
BitoAIArchitect \
\
--header "Authorization: Bearer " \
--header "x-email-id: "
```
{% hint style="info" %}
**Note:**
* Replace `` with the **Bito MCP URL** you received after completing the AI Architect setup.
* For the Bito-hosted AI Architect, use the following URL format: `https://mcp.bito.ai//mcp`
Replace `` with your actual Bito workspace ID, which you can find after logging into your Bito account at [**alpha.bito.ai**](https://alpha.bito.ai/)
* Replace `` with the **Bito MCP Access Token** you received after completing the AI Architect setup.
* Replace `` with your actual email address.
{% endhint %}
{% hint style="info" %}
**Important:** The server name and URL must come BEFORE the `--header` option.
{% endhint %}
{% hint style="info" %}
**Scope options:**
* `--scope user`: Available in all your projects (recommended)
* `--scope project`: Only in current project (stored in `.mcp.json`)
* `--scope local`: Only in current directory (default)
{% endhint %}
{% endstep %}
{% step %}
### Verify installation
List your MCP servers:
```shellscript
claude mcp list
```
You should see "BitoAIArchitect" in the list.
Test the server:
```shellscript
claude mcp get BitoAIArchitect
```
{% endstep %}
{% step %}
### Add guidelines (optional but highly recommended)
The [**BitoAIArchitectGuidelines.md** file](#prerequisites) contains best practices, usage instructions, and prompting guidelines for the Bito AI Architect MCP server.
The setup will work without this file, but including it helps AI tools interact more effectively with the Bito AI Architect MCP server.
**You can either create:**
1. **Global guidelines** - Apply across all your projects. Best for teams or developers who want consistent standards everywhere.
2. **Project-specific guidelines** - Apply to a single project only.
Choose one of the following based on your preference:
### Option A: Global guidelines
Create `.claude` directory if it doesn't exist:
```shellscript
mkdir -p ~/.claude
```
Create or edit `CLAUDE.md`:
```shellscript
nano ~/.claude/CLAUDE.md
```
Copy the contents of your [**BitoAIArchitectGuidelines.md** file](#prerequisites) into this file, then save.
### Option B: Project-specific guidelines
Run this command in your project directory:
```shellscript
nano CLAUDE.md
```
Or run these commands:
```shellscript
mkdir -p .claude
```
```shellscript
nano .claude/CLAUDE.md
```
Copy the contents of your [**BitoAIArchitectGuidelines.md** file](#prerequisites) into this file, then save.
{% endstep %}
{% step %}
### Start using Claude Code
In your project directory, run:
```shellscript
claude
```
Now, in the chat you can ask questions about your indexed repositories. The AI Architect will help Claude Code provide accurate answers based on your codebase.
**Try asking something like:**
```
What repositories are available in my organization?
```
{% endstep %}
{% endstepper %}
## Windows-specific notes
#### Windows (Native - Command Prompt/PowerShell):
* MCP servers using `npx` require the `cmd /c` wrapper:
```shellscript
# For stdio servers on Windows
claude mcp add --transport stdio my-server -- cmd /c npx -y @some/package
```
#### Windows (WSL):
* Configuration is stored in Linux file system
* No need for `cmd /c` wrapper
* Use standard Linux paths (`~/.claude/`)
## Configuration file locations
| Platform | Main config | Settings | Global guidelines |
|---|
| Windows | %USERPROFILE%\.claude\claude.json | %USERPROFILE%\.claude\settings.json | %USERPROFILE%\.claude\CLAUDE.md |
| macOS | ~/.claude/claude.json | ~/.claude/settings.json | ~/.claude/CLAUDE.md |
| Linux | ~/.claude/claude.json | ~/.claude/settings.json | ~/.claude/CLAUDE.md |
| WSL | ~/.claude/claude.json | ~/.claude/settings.json | ~/.claude/CLAUDE.md |
{% hint style="info" %}
**IMPORTANT:**
* ✅ These files are managed automatically by `claude mcp` commands
* ❌ Do NOT manually create `~/.claude/mcp.json` (this file doesn't exist)
* ❌ Do NOT manually edit `~/.claude/claude.json` (use CLI commands instead)
{% endhint %}
## Common Claude Code MCP commands
```shellscript
# Add HTTP server with Bearer token (correct parameter order)
claude mcp add --transport http --scope user \
\
--header "Authorization: Bearer " \
--header "x-email-id: "
# Add server with environment variables
claude mcp add -e API_KEY="value" -- npx @server/package
# Add server with JSON config (for complex setups)
claude mcp add-json '{"type":"http","url":"...","headers":{...}}'
# List all MCP servers
claude mcp list
# Get server details
claude mcp get
# Remove MCP server
claude mcp remove
# View server status (inside Claude Code session)
/mcp
# Reset project-scoped server approval choices
claude mcp reset-project-choices
```
## Troubleshooting Claude Code
#### Server not appearing:
```shellscript
# Verify it was added
claude mcp list
# Check for errors
claude --verbose
# Try removing and re-adding
claude mcp remove BitoAIArchitect
claude mcp add --transport http --scope user \
BitoAIArchitect \
--header "Authorization: Bearer " \
--header "x-email-id: "
```
{% hint style="info" %}
**Note:**
* Replace `` with the **Bito MCP URL** you received after completing the AI Architect setup.
* For the Bito-hosted AI Architect, use the following URL format: `https://mcp.bito.ai//mcp`
Replace `` with your actual Bito workspace ID, which you can find after logging into your Bito account at [**alpha.bito.ai**](https://alpha.bito.ai/)
* Replace `` with the **Bito MCP Access Token** you received after completing the AI Architect setup.
* Replace `` with your actual email address.
{% endhint %}
#### Connection issues:
```shellscript
# Test the endpoint with proper MCP protocol
curl -s -X POST \
-H "Authorization: Bearer " \
-H "Content-Type: application/json" \
-d '{"jsonrpc":"2.0","method":"initialize","params":{},"id":1}' \
# Should return HTTP 200 with JSON response for valid credentials
# HTTP 401: Invalid Bito MCP Access Token
# HTTP 404: Invalid Bito MCP URL
```
{% hint style="info" %}
**Note:**
* Replace `` with the **Bito MCP URL** you received after completing the AI Architect setup.
* For the Bito-hosted AI Architect, use the following URL format: `https://mcp.bito.ai//mcp`
Replace `` with your actual Bito workspace ID, which you can find after logging into your Bito account at [**alpha.bito.ai**](https://alpha.bito.ai/)
* Replace `` with the **Bito MCP Access Token** you received after completing the AI Architect setup.
{% endhint %}
#### Permission issues (macOS/Linux):
```shellscript
chmod 755 ~/.claude
chmod 644 ~/.claude/claude.json
chmod 644 ~/.claude/settings.json
```
---
# Source: https://docs.bito.ai/ai-architect/guide-for-claude-desktop.md
# Guide for Claude Desktop
Use Bito's [**AI Architect**](https://docs.bito.ai/ai-architect/overview) with **Claude Desktop** to enhance your AI-powered coding experience.
Once connected via MCP (Model Context Protocol), Claude Desktop can leverage AI Architect's deep contextual understanding of your project, enabling more accurate code suggestions, explanations, and code insights.
## Prerequisites
1. Follow the [**AI Architect installation instructions**](https://docs.bito.ai/ai-architect/install-ai-architect-self-hosted). Upon successful setup, you will receive a **Bito MCP URL** and **Bito MCP Access Token** that you need to enter in your coding agent.
2. [Download **BitoAIArchitectGuidelines.md file**](https://github.com/gitbito/ai-architect/blob/main/BitoAIArchitectGuidelines.md). You will need to copy/paste the content from this file later when configuring AI Architect.
* **Note:** This file contains best practices, usage instructions, and prompting guidelines for the Bito AI Architect MCP server. The setup will work without this file, but including it helps AI tools interact more effectively with the Bito AI Architect MCP server.
3. **Claude Desktop installed** - Download and install Claude Desktop from [claude.ai/download](https://claude.ai/download) if you haven't already.
4. **Node.js 20.18.1 or higher** - Required for the `mcp-remote` proxy
* **macOS:**
```shellscript
brew install node@20
# Or use nvm: nvm install 20 && nvm use 20
```
* **Windows:** Download from (download 20.x LTS)
* **Linux (Ubuntu/Debian):**
```shellscript
curl -fsSL https://deb.nodesource.com/setup_20.x | sudo -E bash -
sudo apt-get install -y nodejs
```
* **Verify installation:**
```shellscript
node --version # Should show v20.x.x or higher
npx --version
```
{% hint style="info" %}
**Note:** Claude Desktop uses OAuth 2.1 authentication via the `mcp-remote` proxy, so you don't need to manually manage access tokens. Your email will be collected during the OAuth consent flow.
{% endhint %}
## Set up AI Architect
Claude Desktop uses `claude_desktop_config.json` with the `mcp-remote` proxy for OAuth-enabled remote servers.
Claude Desktop supports both local MCP servers and remote HTTP servers. For Bito AI Architect (a remote OAuth server), we use the `mcp-remote` proxy which handles the OAuth flow automatically.
{% stepper %}
{% step %}
### Open configuration file
#### **macOS:**
1. Open Claude Desktop
2. Click **Claude** menu → **Settings** → **Developer** tab
3. Click **Edit Config** to open `claude_desktop_config.json`
Or manually open: `~/Library/Application Support/Claude/claude_desktop_config.json`
#### **Windows:**
1. Open Claude Desktop
2. Click **File** → **Settings** → **Developer** tab
3. Click **Edit Config** to open `claude_desktop_config.json`
Or manually open: `%APPDATA%\Claude\claude_desktop_config.json`
{% endstep %}
{% step %}
### Add AI Architect configuration
Add the following to your `claude_desktop_config.json`:
```json
{
"mcpServers": {
"BitoAIArchitect": {
"command": "npx",
"args": [
"-y",
"mcp-remote",
""
]
}
}
}
```
{% hint style="info" %}
* Replace `` with the **Bito MCP URL** you received after completing the AI Architect setup.
* For the Bito-hosted AI Architect, use the following URL format: `https://mcp.bito.ai//mcp`
Replace `` with your actual Bito workspace ID, which you can find after logging into your Bito account at [**alpha.bito.ai**](https://alpha.bito.ai/)
{% endhint %}
If you already have other MCP servers configured, add BitoAIArchitect to the existing `mcpServers` object:
```json
{
"mcpServers": {
"existing-server": {
...
},
"BitoAIArchitect": {
"command": "npx",
"args": [
"-y",
"mcp-remote",
""
]
}
}
}
```
{% hint style="info" %}
* Replace `` with the **Bito MCP URL** you received after completing the AI Architect setup.
* For the Bito-hosted AI Architect, use the following URL format: `https://mcp.bito.ai//mcp`
Replace `` with your actual Bito workspace ID, which you can find after logging into your Bito account at [**alpha.bito.ai**](https://alpha.bito.ai/)
{% endhint %}
**Windows-specific configuration:**
On Windows, you may need to use the `cmd` wrapper:
```json
{
"mcpServers": {
"BitoAIArchitect": {
"command": "cmd",
"args": [
"/c",
"npx",
"-y",
"mcp-remote",
""
]
}
}
}
```
{% hint style="info" %}
* Replace `` with the **Bito MCP URL** you received after completing the AI Architect setup.
* For the Bito-hosted AI Architect, use the following URL format: `https://mcp.bito.ai//mcp`
Replace `` with your actual Bito workspace ID, which you can find after logging into your Bito account at [**alpha.bito.ai**](https://alpha.bito.ai/)
{% endhint %}
{% endstep %}
{% step %}
### Restart Claude Desktop
1. **Completely quit** Claude Desktop (not just close the window)
* macOS: Claude menu → Quit Claude
* Windows: Right-click system tray icon → Exit
2. Reopen Claude Desktop
3. The MCP server will start automatically
{% endstep %}
{% step %}
### Complete OAuth authorization
On first use, `mcp-remote` will open your browser to complete OAuth:
1. A browser window opens showing the **Bito Authorization** page
2. Review the requested permissions
3. **Enter your email address** (required for tracking)
4. Click **"Authorize"** or **"Allow"**
5. Return to Claude Desktop - the connection is now active
{% endstep %}
{% step %}
### Verify connection
1. In Claude Desktop, click the **"+"** button at the bottom of the chat
2. Select **"Connectors"** or look for the hammer/wrench icon
3. BitoAIArchitect should appear in the list
4. Try asking: "What repositories are available?"
{% endstep %}
{% endstepper %}
## Troubleshooting Claude Desktop
#### **Server not appearing:**
1. Verify JSON syntax in config file
2. Ensure Node.js 20+ is installed: `node --version`
3. Check that `npx` is available: `npx --version`
4. Fully quit and restart Claude Desktop
#### **OAuth flow not starting:**
1. Ensure your browser is set as default
2. Allow pop-ups for the OAuth flow
3. Check firewall settings
#### **"mcp-remote not found" error:**
* Ensure Node.js is in your PATH
* Try running `npx -y mcp-remote --help` in terminal to verify it works
#### **Connection shows "Disconnected":**
* OAuth tokens may have expired - restart Claude Desktop to re-authorize
* Check your internet connection
* Verify the Workspace ID is correct
---
# Source: https://docs.bito.ai/ai-architect/guide-for-claude.ai-web.md
# Guide for Claude.ai (Web)
Use Bito's [**AI Architect**](https://docs.bito.ai/ai-architect/overview) with **Claude.ai (Web)** to enhance your AI-powered coding experience.
Once connected via MCP (Model Context Protocol), Claude.ai can leverage AI Architect's deep contextual understanding of your project, enabling more accurate code suggestions, explanations, and code insights.
## Prerequisites
1. Follow the [**AI Architect installation instructions**](https://docs.bito.ai/ai-architect/install-ai-architect-self-hosted). Upon successful setup, you will receive a **Bito MCP URL** and **Bito MCP Access Token** that you need to enter in your coding agent.
* **Note:** The **Bito MCP URL** must be publicly accessible. Localhost or private network URLs (for example, `http://localhost` or internal IP addresses) are not supported and will not work.
2. [Download **BitoAIArchitectGuidelines.md file**](https://github.com/gitbito/ai-architect/blob/main/BitoAIArchitectGuidelines.md). You will need to copy/paste the content from this file later when configuring AI Architect.
* **Note:** This file contains best practices, usage instructions, and prompting guidelines for the Bito AI Architect MCP server. The setup will work without this file, but including it helps AI tools interact more effectively with the Bito AI Architect MCP server.
3. **A paid Claude.ai subscription** - MCP integrations require one of the following:
* Claude Pro
* Claude Max
* Claude Team
* Claude Enterprise
{% hint style="info" %}
**Note:** Free tier accounts do not have access to MCP Integrations.
{% endhint %}
## OAuth authentication
Claude.ai uses **OAuth 2.1 with PKCE** for secure authentication, so you don't need to manually manage access tokens. Your email will be collected during the OAuth consent flow for tracking purposes.
**How OAuth authentication works:**
1. You add the MCP server URL in Claude.ai Integrations settings
2. Claude.ai initiates an OAuth flow
3. Your browser opens a consent page hosted by Bito
4. You enter your email and approve the connection
5. Claude.ai receives secure tokens automatically
6. Your email is tracked for usage analytics (collected during OAuth consent)
**Benefits:**
* No manual token management
* Secure browser-based authentication
* Automatic token refresh
* Email collected during consent (no separate header needed)
**OAuth Callback URL:** `https://claude.ai/api/mcp/auth_callback`
## Set up AI Architect
{% stepper %}
{% step %}
### Open Claude.ai integrations
1. Go to [claude.ai](https://claude.ai) and sign in with your paid account
2. Click on your **profile icon** (bottom-left corner)
3. Select **Settings**
4. Navigate to **Integrations** section
{% endstep %}
{% step %}
### Add Bito AI Architect MCP server
1. Click **"+ Add Custom Integration"**
2. Enter the integration details:
* **Name:** BitoAIArchitect
* **URL:** ``
{% hint style="info" %}
* Replace `` with the **Bito MCP URL** you received after completing the AI Architect setup.
* For the Bito-hosted AI Architect, use the following URL format: `https://mcp.bito.ai//mcp`
Replace `` with your actual Bito workspace ID, which you can find after logging into your Bito account at [**alpha.bito.ai**](https://alpha.bito.ai/)
{% endhint %}
3. Click **"Connect"** or **"Add"**
{% endstep %}
{% step %}
### Complete OAuth authorization
1. A new browser window/tab will open showing the **Bito Authorization** page
2. Review the requested permissions
3. **Enter your email address** (required for tracking/identification)
4. Click **"Authorize"** or **"Allow"**
5. The window will close and you'll be returned to Claude.ai
{% endstep %}
{% step %}
### Verify connection
1. Return to Claude.ai Settings → Integrations
2. BitoAIArchitect should show as **"Connected"** with a green indicator
3. Start a new conversation and try:
```
What repositories are available in my organization?
```
{% endstep %}
{% endstepper %}
## Troubleshooting Claude.ai
#### **"Integrations" option not visible:**
* Verify you have a paid Claude subscription (Pro, Max, Team, or Enterprise)
* Free tier accounts do not have MCP access
* Contact Anthropic support if you have a paid plan but don't see the option
#### **OAuth authorization fails:**
* Ensure pop-ups are allowed for claude.ai
* Check that your Workspace ID is correct
* Verify your organization has OAuth enabled for the MCP server
* Try clearing browser cache and cookies, then retry
#### **Connection shows "Disconnected":**
* Click the server entry and select "Reconnect"
* OAuth tokens may have expired - re-authorize when prompted
* Check if your Bito workspace is still active
#### **Tools not appearing in conversation:**
* Ensure the MCP server shows "Connected" status
* Try starting a fresh conversation
* Some tools may require specific prompts to activate
---
# Source: https://docs.bito.ai/ai-architect/guide-for-cursor.md
# Guide for Cursor
Use Bito's [**AI Architect**](https://docs.bito.ai/ai-architect/overview) with **Cursor** to enhance your AI-powered coding experience.
Once connected via MCP (Model Context Protocol), Cursor can leverage AI Architect’s deep contextual understanding of your project, enabling more accurate code suggestions, explanations, and code insights.
## Quick setup (recommended)
**Want to get started faster?** We offer an automated installer that can configure AI Architect for all your AI coding tools in just a few seconds.
The automated setup will:
* Detect all compatible AI tools installed on your system
* Configure them automatically with your credentials
* Save you time by eliminating manual configuration steps
👉 [**Try our Quick MCP Integration Guide**](https://docs.bito.ai/ai-architect/quick-mcp-integration-with-ai-coding-agents) for automated setup.
## Manual setup
If you prefer manual configuration, follow the step-by-step instructions below.
## Prerequisites
1. Follow the [**AI Architect installation instructions**](https://docs.bito.ai/ai-architect/install-ai-architect-self-hosted). Upon successful setup, you will receive a **Bito MCP URL** and **Bito MCP Access Token** that you need to enter in your coding agent.
2. [Download **BitoAIArchitectGuidelines.md** file](https://github.com/gitbito/ai-architect/blob/main/BitoAIArchitectGuidelines.md). You will need to copy/paste the content from this file later when configuring AI Architect.
* **Note:** This file contains best practices, usage instructions, and prompting guidelines for the Bito AI Architect MCP server. The setup will work without this file, but including it helps AI tools interact more effectively with the Bito AI Architect MCP server.
## Set up AI Architect
Follow the setup instructions for your operating system:
* [**Windows**](#windows)
* [**macOS/Linux**](#macos-linux)
## Windows
{% stepper %}
{% step %}
### Create Cursor config directory
1. Press `Win + R`
2. Type: `%USERPROFILE%\.cursor`
3. Press Enter
If the folder doesn't exist, create it:
1. Open File Explorer
2. Navigate to `%USERPROFILE%`
3. Create new folder: `.cursor`
{% endstep %}
{% step %}
### Create or edit mcp.json
1. Open `%USERPROFILE%\.cursor\mcp.json` in a text editor.
2. If the file doesn't exist, create it with this content:
```json
{
"mcpServers": {
"BitoAIArchitect": {
"url": "",
"headers": {
"Authorization": "Bearer ",
"x-email-id": ""
}
}
}
}
```
{% hint style="info" %}
**Note:**
* Replace `` with the **Bito MCP URL** you received after completing the AI Architect setup.
* For the Bito-hosted AI Architect, use the following URL format: `https://mcp.bito.ai//mcp`
Replace `` with your actual Bito workspace ID, which you can find after logging into your Bito account at [**alpha.bito.ai**](https://alpha.bito.ai/)
* Replace `` with the **Bito MCP Access Token** you received after completing the AI Architect setup.
* Replace `` with your actual email address.
{% endhint %}
3. If the file exists with other servers, add `BitoAIArchitect` to the `mcpServers` object:
```json
{
"mcpServers": {
"existing-server": {
...
},
"BitoAIArchitect": {
"url": "",
"headers": {
"Authorization": "Bearer ",
"x-email-id": ""
}
}
}
}
```
{% hint style="info" %}
**Note:**
* Replace `` with the **Bito MCP URL** you received after completing the AI Architect setup.
* For the Bito-hosted AI Architect, use the following URL format: `https://mcp.bito.ai//mcp`
Replace `` with your actual Bito workspace ID, which you can find after logging into your Bito account at [**alpha.bito.ai**](https://alpha.bito.ai/)
* Replace `` with the **Bito MCP Access Token** you received after completing the AI Architect setup.
* Replace `` with your actual email address.
{% endhint %}
{% endstep %}
{% step %}
### Add guidelines (optional but highly recommended)
The [**BitoAIArchitectGuidelines.md** file](#prerequisites) contains best practices, usage instructions, and prompting guidelines for the Bito AI Architect MCP server.
The setup will work without this file, but including it helps AI tools interact more effectively with the Bito AI Architect MCP server.
1. In your project root, create `.cursorrules` file.
2. Open this file with a text editor.
3. Copy the contents of your [**BitoAIArchitectGuidelines.md** file](#prerequisites) into `.cursorules` file.
4. Save.
{% endstep %}
{% step %}
### Restart Cursor
1. Close Cursor completely
2. Reopen Cursor
3. Open **Settings → Tools & MCP**
4. Verify `BitoAIArchitect` appears in the MCP servers list
{% endstep %}
{% endstepper %}
## macOS/Linux
{% stepper %}
{% step %}
### Create Cursor config directory
```shellscript
mkdir -p ~/.cursor
```
{% endstep %}
{% step %}
### Create or edit mcp.json
```
nano ~/.cursor/mcp.json
```
Add this content:
```json
{
"mcpServers": {
"BitoAIArchitect": {
"url": "",
"headers": {
"Authorization": "Bearer ",
"x-email-id": ""
}
}
}
}
```
{% hint style="info" %}
**Note:**
* Replace `` with the **Bito MCP URL** you received after completing the AI Architect setup.
* For the Bito-hosted AI Architect, use the following URL format: `https://mcp.bito.ai//mcp`
Replace `` with your actual Bito workspace ID, which you can find after logging into your Bito account at [**alpha.bito.ai**](https://alpha.bito.ai/)
* Replace `` with the **Bito MCP Access Token** you received after completing the AI Architect setup.
* Replace `` with your actual email address.
{% endhint %}
Save and exit (Ctrl+O, Enter, Ctrl+X)
{% endstep %}
{% step %}
### Add guidelines (optional but highly recommended)
The [**BitoAIArchitectGuidelines.md** file](#prerequisites) contains best practices, usage instructions, and prompting guidelines for the Bito AI Architect MCP server.
The setup will work without this file, but including it helps AI tools interact more effectively with the Bito AI Architect MCP server.
1. In your project root, create `.cursorrules` file.
2. Open this file with a text editor.
3. Copy the contents of your [**BitoAIArchitectGuidelines.md** file](#prerequisites) into `.cursorules` file.
4. Save.
{% endstep %}
{% step %}
### Restart Cursor
1. Close Cursor completely
2. Reopen Cursor
3. Open **Settings → Tools & MCP**
4. Verify `BitoAIArchitect` appears in the MCP servers list
{% endstep %}
{% endstepper %}
## Troubleshooting Cursor
#### Server not showing:
```shellscript
# Verify file location
ls -la ~/.cursor/mcp.json
# Check file permissions
chmod 644 ~/.cursor/mcp.json
# Verify JSON syntax
cat ~/.cursor/mcp.json | python -m json.tool
```
#### Connection errors:
* Verify **Bito MCP URL** and **Bito MCP Access Token** are correct.
* Test endpoint with MCP protocol:
```shellscript
curl -s -X POST \
-H "Authorization: Bearer " \
-H "Content-Type: application/json" \
-d '{"jsonrpc":"2.0","method":"initialize","params":{},"id":1}' \
# Should return HTTP 200 with JSON response for valid credentials
# HTTP 401: Invalid Bito MCP Access Token
# HTTP 404: Invalid Bito MCP URL
```
{% hint style="info" %}
**Note:**
* Replace `` with the **Bito MCP URL** you received after completing the AI Architect setup.
* For the Bito-hosted AI Architect, use the following URL format: `https://mcp.bito.ai//mcp`
Replace `` with your actual Bito workspace ID, which you can find after logging into your Bito account at [**alpha.bito.ai**](https://alpha.bito.ai/)
* Replace `` with the **Bito MCP Access Token** you received after completing the AI Architect setup.
{% endhint %}
* Check **Settings → Tools & MCP** for error messages
---
# Source: https://docs.bito.ai/ai-architect/guide-for-github-copilot-vs-code.md
# Guide for GitHub Copilot (VS Code)
Use Bito's [**AI Architect**](https://docs.bito.ai/ai-architect/overview) with **GitHub Copilot in VS Code** to enhance your AI-powered coding experience.
Once connected via MCP (Model Context Protocol), GitHub Copilot can leverage AI Architect’s deep contextual understanding of your project, enabling more accurate code suggestions, explanations, and code insights.
## Quick setup (recommended)
**Want to get started faster?** We offer an automated installer that can configure AI Architect for all your AI coding tools in just a few seconds.
The automated setup will:
* Detect all compatible AI tools installed on your system
* Configure them automatically with your credentials
* Save you time by eliminating manual configuration steps
👉 [**Try our Quick MCP Integration Guide**](https://docs.bito.ai/ai-architect/quick-mcp-integration-with-ai-coding-agents) for automated setup.
## Manual setup
If you prefer manual configuration, follow the step-by-step instructions below.
## Prerequisites
1. Follow the [**AI Architect installation instructions**](https://docs.bito.ai/ai-architect/install-ai-architect-self-hosted). Upon successful setup, you will receive a **Bito MCP URL** and **Bito MCP Access Token** that you need to enter in your coding agent.
2. [Download **BitoAIArchitectGuidelines.md** file](https://github.com/gitbito/ai-architect/blob/main/BitoAIArchitectGuidelines.md). You will need to copy/paste the content from this file later when configuring AI Architect.
* **Note:** This file contains best practices, usage instructions, and prompting guidelines for the Bito AI Architect MCP server. The setup will work without this file, but including it helps AI tools interact more effectively with the Bito AI Architect MCP server.
3. **Requires Visual Studio Code version 1.99 or later**
1. **Check VS Code version:** `code --version`
2. **Update VS Code if needed:** Help → Check for Updates
4. **Enable Agent Mode**
1. Open VS Code Settings (Ctrl/Cmd + ,)
2. Search: `chat.agent.enabled`
3. Check the box to enable Agent Mode
5. **Ensure Node.js 20.18.1+ is Installed:**
VS Code's MCP implementation automatically tries to use OAuth for HTTP servers. For static Bearer token authentication (which Bito AI Architect uses), you need to use the `mcp-remote` proxy tool.
The `mcp-remote` proxy requires **Node.js 20.18.1 or higher**.
**Why Node.js 20+?** The mcp-remote proxy depends on undici v7, which requires Node.js 20+ (needs the `File` global API added in Node 20.0.0). Node.js 18 and earlier will fail with `ReferenceError: File is not defined`.
**Windows:** Download from (download 20.x LTS)
**macOS:**
```shellscript
brew install node@20
# Or use nvm: nvm install 20 && nvm use 20
```
**Linux (Ubuntu/Debian):**
```shellscript
curl -fsSL https://deb.nodesource.com/setup_20.x | sudo -E bash -
sudo apt-get install -y nodejs
```
**Verify:**
```shellscript
node --version # Should show v20.x.x or higher
npx --version
```
6. GitHub Copilot extension installed and enabled
7. GitHub account with Copilot access
## Set up AI Architect
VS Code has the same setup process across all platforms (Windows, macOS, Linux, WSL).
### Workspace configuration (recommended)
{% stepper %}
{% step %}
### Create .vscode directory
In your project root:
```shellscript
mkdir .vscode
```
{% endstep %}
{% step %}
### Create mcp.json
Create `.vscode/mcp.json`:
```json
{
"servers": {
"BitoAIArchitect": {
"type": "stdio",
"command": "npx",
"args": [
"-y",
"mcp-remote",
"",
"--header",
"Authorization: Bearer ",
"--header",
"x-email-id: "
]
}
}
}
```
{% hint style="info" %}
**Note:**
* Replace `` with the **Bito MCP URL** you received after completing the AI Architect setup.
* For the Bito-hosted AI Architect, use the following URL format: `https://mcp.bito.ai//mcp`
Replace `` with your actual Bito workspace ID, which you can find after logging into your Bito account at [**alpha.bito.ai**](https://alpha.bito.ai/)
* Replace `` with the **Bito MCP Access Token** you received after completing the AI Architect setup.
* Replace `` with your actual email address.
{% endhint %}
**Important:**
* Include `"type": "stdio"` in the configuration
* VS Code requires `mcp-remote` proxy for static Bearer token authentication
* The `"servers"` object is at the root level in workspace configs
* Direct HTTP transport with static Bearer tokens triggers OAuth flows in VS Code
**Why mcp-remote?** VS Code's MCP implementation automatically initiates OAuth discovery when connecting to HTTP MCP servers. Since `BitoAIArchitect` uses static Bearer token authentication (not OAuth), we use the `mcp-remote` proxy to handle the authentication properly.
{% endstep %}
{% step %}
### Add guidelines (optional but highly recommended)
The [**BitoAIArchitectGuidelines.md** file](#prerequisites) contains best practices, usage instructions, and prompting guidelines for the Bito AI Architect MCP server.
The setup will work without this file, but including it helps AI tools interact more effectively with the Bito AI Architect MCP server.
Create `.github` directory:
```shellscript
mkdir -p .github
```
Copy the contents of your [**BitoAIArchitectGuidelines.md** file](#prerequisites) into `.github/copilot-instructions.md` file:
```shellscript
cp BitoAIArchitectGuidelines.md .github/copilot-instructions.md
```
{% endstep %}
{% step %}
### Start the MCP server
**Important:** VS Code requires manually starting MCP servers. Follow these steps:
1. Open **Copilot Chat** (Ctrl/Cmd + I)
2. Click the **gear icon** in the Copilot Chat panel
3. Select **"MCP Servers"**
4. Find **BitoAIArchitect** in the list
5. Click the **gear icon** next to BitoAIArchitect
6. Select **"Start Server"**
**Alternative method:**
1. Open `.vscode/mcp.json` in VS Code
2. Look for a **Start** button above the configuration
3. Click **Start** to initialize the server
{% endstep %}
{% step %}
### Verify in Copilot Chat
1. Open Copilot Chat (Ctrl/Cmd + I)
2. Switch to Agent mode (toggle in chat interface)
3. Click the Tools icon (wrench)
4. Verify `BitoAIArchitect` appears in the tools list
5. Try asking: "What repositories are available?"
{% endstep %}
{% endstepper %}
### User configuration (global)
To make `BitoAIArchitect` available in ALL projects, create a user-level `mcp.json` file:
#### Windows
* **Create/edit:** `%APPDATA%\Code\User\mcp.json`
#### macOS
* **Create/edit:** `~/Library/Application Support/Code/User/mcp.json`
#### Linux
* **Create/edit:** `~/.config/Code/User/mcp.json`
#### Configuration
Add this to your `mcp.json`:
```json
{
"servers": {
"BitoAIArchitect": {
"type": "stdio",
"command": "npx",
"args": [
"-y",
"mcp-remote",
"",
"--header",
"Authorization: Bearer ",
"--header",
"x-email-id: "
]
}
}
}
```
{% hint style="info" %}
**Note:**
* Replace `` with the **Bito MCP URL** you received after completing the AI Architect setup.
* For the Bito-hosted AI Architect, use the following URL format: `https://mcp.bito.ai//mcp`
Replace `` with your actual Bito workspace ID, which you can find after logging into your Bito account at [**alpha.bito.ai**](https://alpha.bito.ai/)
* Replace `` with the **Bito MCP Access Token** you received after completing the AI Architect setup.
* Replace `` with your actual email address.
{% endhint %}
#### Enable MCP discovery
Also ensure MCP discovery is enabled in your `settings.json`:
```
{
"chat.mcp.discovery.enabled": true
}
```
**Important:**
* User-level config uses `mcp.json` (separate from `settings.json`)
* Include `"type": "stdio"` in the configuration
* After saving, manually start the server via Copilot Chat (see Step 4 above)
## Troubleshooting VS Code (GitHub Copilot)
#### Server not appearing in MCP Servers list:
1. Verify `mcp.json` is in the correct location (see paths above)
2. Ensure `"type": "stdio"` is included in the configuration
3. Check JSON syntax is valid
4. Restart VS Code completely (Cmd+Q / Alt+F4)
#### Server not starting:
1. Manually start the server:
* Open Copilot Chat → gear icon → MCP Servers
* Click gear icon next to BitoAIArchitect → Start Server
2. Check Node.js version: `node --version` (must be 20.18.1+)
3. View → Output → select "MCP" for error messages
#### Tools not showing in Copilot Chat:
1. Ensure server is started (see above)
2. Open Copilot Chat
3. Switch to Agent mode
4. Click Tools (wrench icon)
5. Verify BitoAIArchitect appears
#### Agent Mode not available:
1. Update VS Code to 1.99+
2. Settings → Search: `chat.agent.enabled`
3. Enable the checkbox
#### MCP discovery issues:
Ensure `settings.json` has:
```
"chat.mcp.discovery.enabled": true
```
**Note:** This must be a boolean `true`, NOT an object like `{"claude-desktop": true}`.
#### Node.js version too old:
Error: `ReferenceError: File is not defined` or similar
* Upgrade Node.js to 20.18.1 or later
* If using nvm: `nvm install 20 && nvm use 20 && nvm alias default 20`
#### Reset if needed:
* Ctrl/Cmd + Shift + P
* Run: `MCP: Reset Cached Tools`
* Restart VS Code
#### OAuth prompts appearing:
If VS Code is prompting for OAuth instead of using your Bearer token:
1. Ensure you're using the `mcp-remote` proxy configuration (not direct HTTP)
2. Verify `"type": "stdio"` is in your config
3. Cancel the OAuth prompt - the server should still work
4. Check that Node.js and npx are installed: `npx --version`
---
# Source: https://docs.bito.ai/ai-code-reviews-in-git/install-run-using-bito-cloud/guide-for-github-self-managed.md
# Guide for GitHub (Self-Managed)
Speed up code reviews by configuring the [AI Code Review Agent](https://docs.bito.ai/bito-dev-agents/ai-code-review-agent) with your self-managed GitHub Enterprise server. In this guide, you'll learn how to set up the Agent to receive automated code reviews that trigger whenever you create a pull request, as well as how to manually initiate reviews using [available commands](https://docs.bito.ai/bito-dev-agents/ai-code-review-agent/available-commands).
{% hint style="info" %}
The **Free Plan** offers **AI-generated pull request summaries** to provide a quick overview of changes. For advanced features like **line-level code suggestions**, consider upgrading to the **Team Plan**. For detailed pricing information, visit our [**Pricing**](https://bito.ai/pricing/) page.
[**Get a 14-day FREE trial of Bito's AI Code Review Agent.**](https://alpha.bito.ai/home/welcome)
{% endhint %}
## Video tutorial
coming soon...
## Prerequisites
Before proceeding, ensure you've completed all necessary prerequisites.
#### 1. Create a GitHub Personal Access Token (classic):
For GitHub pull request code reviews, ensure you have a **CLASSIC** personal access token with **`repo`** scope. We do not support fine-grained tokens currently.
[**View Guide**](https://docs.github.com/en/authentication/keeping-your-account-and-data-secure/managing-your-personal-access-tokens#creating-a-personal-access-token-classic)

GitHub Personal Access Token (classic)
#### 2. Authorizing a GitHub Personal Access Token for use with SAML single sign-on:
If your GitHub organization enforces [SAML Single Sign-On (SSO)](https://docs.github.com/en/enterprise-cloud@latest/organizations/managing-saml-single-sign-on-for-your-organization/enforcing-saml-single-sign-on-for-your-organization), you must authorize your Personal Access Token (classic) through your Identity Provider (IdP); otherwise, Bito's AI Code Review Agent won't function properly.
For detailed instructions, please refer to the [GitHub documentation](https://docs.github.com/en/enterprise-cloud@latest/authentication/authenticating-with-saml-single-sign-on/authorizing-a-personal-access-token-for-use-with-saml-single-sign-on).
## Installation and configuration steps
Follow the step-by-step instructions below to install the **AI Code Review Agent** using **Bito Cloud**:
### **Step 1: Log in to Bito**
[Log in to Bito Cloud](https://alpha.bito.ai/) and select a workspace to get started.
### **Step 2: Open the Code Review Agents setup**
Click [**Repositories**](https://alpha.bito.ai/home/ai-agents/code-review-agent) under the **CODE REVIEW** section in the sidebar.
### **Step 3: Select your Git provider**
Bito supports integration with the following Git providers:
* GitHub
* GitHub (Self-Managed)
* GitLab
* GitLab (Self-Managed)
* Bitbucket
* Bitbucket (Self-Managed)
Since we are setting up the Agent for self-managed GitHub Enterprise server, select **GitHub (Self-Managed)** to proceed.
{% hint style="info" %}
**Supported versions:**
* **GitHub Enterprise Server:** 3.0 and above
{% endhint %}
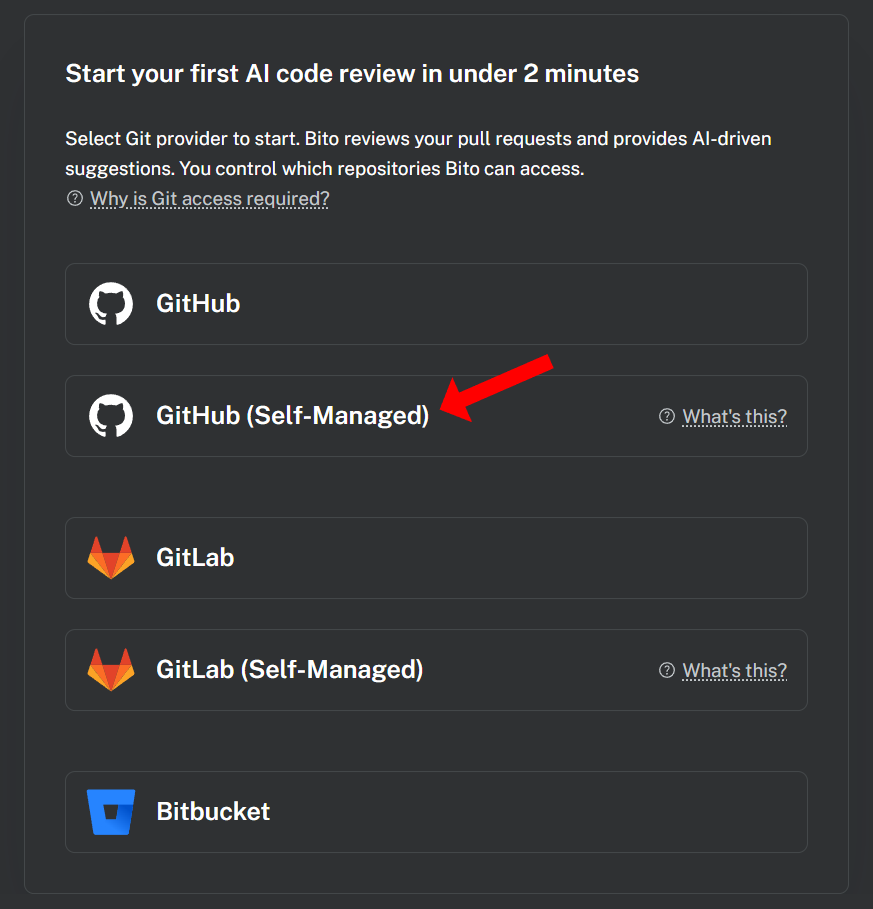 ### **Step 4: Register & install the Bito App for GitHub**
To enable pull request reviews, you need to register and install the **Bito’s AI Code Review Agent** app on your self-managed GitHub Enterprise server.
{% hint style="info" %}
If your network blocks external services from interacting with the GitHub server, whitelist all of Bito's gateway IP addresses in your firewall to ensure Bito can access your self-hosted repositories. The Agent response can come from any of these IPs.
* **List of IP addresses to whitelist:**
* **`18.188.201.104`**
* **`3.23.173.30`**
* **`18.216.64.170`**
{% endhint %}
You need to enter the details for the below mentioned input fields:
* **Hosted GitHub URL:** This is the domain portion of the URL where you GitHub Enterprise Server is hosted (e.g., `https://yourcompany.github.com`). Please check with your GitHub administrator for the correct URL.
* **Personal Access Token:** Generate a **Personal Access Token (classic)** with **“repo”** scope in your GitHub (Self-Managed) account and enter it into the **Personal Access Token** input field. We do not support fine-grained tokens currently. For guidance, refer to the instructions in the [Prerequisites](#prerequisites) section.
Click **Validate** to ensure the login credentials are working correctly. If the credentials are successfully validated, click the **Install Bito App for GitHub** button. This will redirect you to your GitHub (Self-Managed) server.
### **Step 4: Register & install the Bito App for GitHub**
To enable pull request reviews, you need to register and install the **Bito’s AI Code Review Agent** app on your self-managed GitHub Enterprise server.
{% hint style="info" %}
If your network blocks external services from interacting with the GitHub server, whitelist all of Bito's gateway IP addresses in your firewall to ensure Bito can access your self-hosted repositories. The Agent response can come from any of these IPs.
* **List of IP addresses to whitelist:**
* **`18.188.201.104`**
* **`3.23.173.30`**
* **`18.216.64.170`**
{% endhint %}
You need to enter the details for the below mentioned input fields:
* **Hosted GitHub URL:** This is the domain portion of the URL where you GitHub Enterprise Server is hosted (e.g., `https://yourcompany.github.com`). Please check with your GitHub administrator for the correct URL.
* **Personal Access Token:** Generate a **Personal Access Token (classic)** with **“repo”** scope in your GitHub (Self-Managed) account and enter it into the **Personal Access Token** input field. We do not support fine-grained tokens currently. For guidance, refer to the instructions in the [Prerequisites](#prerequisites) section.
Click **Validate** to ensure the login credentials are working correctly. If the credentials are successfully validated, click the **Install Bito App for GitHub** button. This will redirect you to your GitHub (Self-Managed) server.
 Before proceeding, you’ll be asked to **enter your GitHub App name** — this is the name that will appear in your GitHub Apps list and during installations. Choose a clear, recognizable name (for example, “Bito Code Reviewer”).
 Now select where you want to install the app:
* Choose **All repositories** to enable Bito for every repository in your account.
* Or, select **Only select repositories** and pick specific repositories using the dropdown menu.
{% hint style="info" %}
Bito app uses these permissions:
* **Read** access to metadata
* **Read** and **write** access to code, issues, and pull requests
* **Read** access to organization members
{% endhint %}
Click **Install & Authorize** to proceed. Once completed, you will be redirected to Bito.
Now select where you want to install the app:
* Choose **All repositories** to enable Bito for every repository in your account.
* Or, select **Only select repositories** and pick specific repositories using the dropdown menu.
{% hint style="info" %}
Bito app uses these permissions:
* **Read** access to metadata
* **Read** and **write** access to code, issues, and pull requests
* **Read** access to organization members
{% endhint %}
Click **Install & Authorize** to proceed. Once completed, you will be redirected to Bito.
 ### **Step 5: Enable AI Code Review Agent on repositories**
After connecting Bito to your self-managed GitHub Enterprise server, you'll see a list of repositories that Bito has access to.
Use the toggles in the **Code Review Status** column to **enable** or **disable** the Agent for each repository.
### **Step 5: Enable AI Code Review Agent on repositories**
After connecting Bito to your self-managed GitHub Enterprise server, you'll see a list of repositories that Bito has access to.
Use the toggles in the **Code Review Status** column to **enable** or **disable** the Agent for each repository.
 {% hint style="info" %}
To customize the Agent’s behavior, you can edit existing configurations or create new Agents as needed.
[Learn more](https://docs.bito.ai/ai-code-reviews-in-git/install-run-using-bito-cloud/create-or-customize-an-agent-instance)
{% endhint %}
### **Step 6: Automated and manual pull request reviews**
Once a repository is enabled, you can invoke the AI Code Review Agent in the following ways:
1. **Automated code review:** By default, the Agent automatically reviews all new pull requests and provides detailed feedback.
2. **Manually trigger code review:** To initiate a manual review, simply type **`/review`** in the comment box on the pull request and submit it. This action will start the code review process.
The AI-generated code review feedback will be posted as comments directly within your pull request, making it seamless to view and address suggestions right where they matter most.
{% hint style="info" %}
To customize the Agent’s behavior, you can edit existing configurations or create new Agents as needed.
[Learn more](https://docs.bito.ai/ai-code-reviews-in-git/install-run-using-bito-cloud/create-or-customize-an-agent-instance)
{% endhint %}
### **Step 6: Automated and manual pull request reviews**
Once a repository is enabled, you can invoke the AI Code Review Agent in the following ways:
1. **Automated code review:** By default, the Agent automatically reviews all new pull requests and provides detailed feedback.
2. **Manually trigger code review:** To initiate a manual review, simply type **`/review`** in the comment box on the pull request and submit it. This action will start the code review process.
The AI-generated code review feedback will be posted as comments directly within your pull request, making it seamless to view and address suggestions right where they matter most.
 {% hint style="info" %}
**Note:** To enhance efficiency, the automated code reviews are only triggered for pull requests merging into the repository’s default branch. This prevents unnecessary processing and Advanced AI requests usage.
To review additional branches, you can use the [Include Source/Target Branches filter](https://docs.bito.ai/excluding-files-folders-or-branches-with-filters#include-source-target-branches-filter). Bito will review pull requests when the source or target branch matches the list.
The **Include Source/Target Branches** filter applies only to automatically triggered reviews. Users should still be able to trigger reviews manually via the `/review` command.
{% endhint %}
{% hint style="info" %}
The AI Code Review Agent automatically reviews code changes up to 5000 lines when a pull request is created. For larger changes, you can use the **`/review`** command.
{% endhint %}
{% hint style="info" %}
It may take a few minutes to get the code review posted as a comment, depending on the size of the pull request.
{% endhint %}
### **Step 7: Specialized commands for code reviews**
Bito also offers **specialized commands** that are designed to provide detailed insights into specific areas of your source code, including security, performance, scalability, code structure, and optimization.
* **`/review security`**: Analyzes code to identify security vulnerabilities and ensure secure coding practices.
* **`/review performance`**: Evaluates code for performance issues, identifying slow or resource-heavy areas.
* **`/review scalability`**: Assesses the code's ability to handle increased usage and scale effectively.
* **`/review codeorg`**: Scans for readability and maintainability, promoting clear and efficient code organization.
* **`/review codeoptimize`**: Identifies optimization opportunities to enhance code efficiency and reduce resource usage.
By default, the **`/review`** command generates inline comments, meaning that code suggestions are inserted directly beneath the code diffs in each file. This approach provides a clearer view of the exact lines requiring improvement. However, if you prefer a code review in a single post rather than separate inline comments under the diffs, you can include the optional parameter: **`/review #inline_comment=False`**
For more details, refer to [Available Commands](https://docs.bito.ai/bito-dev-agents/ai-code-review-agent/available-commands).
### **Step 8: Chat with AI Code Review Agent**
Ask questions directly to the AI Code Review Agent regarding its code review feedback. You can inquire about highlighted issues, request alternative solutions, or seek clarifications on suggested fixes.
To start the conversation, type your question in the comment box within the inline suggestions on your pull request, and then submit it. Typically, Bito AI responses are delivered in about 10 seconds. On GitHub and Bitbucket, you need to manually refresh the page to see the responses, while GitLab updates automatically.
Bito supports over 20 languages—including English, Hindi, Chinese, and Spanish—so you can interact with the AI in the language you’re most comfortable with.
### Step 9: Configure Agent settings
[Agent settings](https://docs.bito.ai/ai-code-reviews-in-git/install-run-using-bito-cloud/create-or-customize-an-agent-instance) let you control how reviews are performed, ensuring feedback is tailored to your team’s needs. By adjusting the options, you can:
* Make reviews more focused and actionable.
* Apply your own coding standards.
* Reduce noise by excluding irrelevant files or branches.
* Add extra checks to improve code quality and security.
[**Learn more**](https://docs.bito.ai/ai-code-reviews-in-git/install-run-using-bito-cloud/create-or-customize-an-agent-instance)
## Screenshots
### Screenshot # 1
{% hint style="info" %}
*AI-generated pull request (PR) summary*
{% endhint %}
{% hint style="info" %}
**Note:** To enhance efficiency, the automated code reviews are only triggered for pull requests merging into the repository’s default branch. This prevents unnecessary processing and Advanced AI requests usage.
To review additional branches, you can use the [Include Source/Target Branches filter](https://docs.bito.ai/excluding-files-folders-or-branches-with-filters#include-source-target-branches-filter). Bito will review pull requests when the source or target branch matches the list.
The **Include Source/Target Branches** filter applies only to automatically triggered reviews. Users should still be able to trigger reviews manually via the `/review` command.
{% endhint %}
{% hint style="info" %}
The AI Code Review Agent automatically reviews code changes up to 5000 lines when a pull request is created. For larger changes, you can use the **`/review`** command.
{% endhint %}
{% hint style="info" %}
It may take a few minutes to get the code review posted as a comment, depending on the size of the pull request.
{% endhint %}
### **Step 7: Specialized commands for code reviews**
Bito also offers **specialized commands** that are designed to provide detailed insights into specific areas of your source code, including security, performance, scalability, code structure, and optimization.
* **`/review security`**: Analyzes code to identify security vulnerabilities and ensure secure coding practices.
* **`/review performance`**: Evaluates code for performance issues, identifying slow or resource-heavy areas.
* **`/review scalability`**: Assesses the code's ability to handle increased usage and scale effectively.
* **`/review codeorg`**: Scans for readability and maintainability, promoting clear and efficient code organization.
* **`/review codeoptimize`**: Identifies optimization opportunities to enhance code efficiency and reduce resource usage.
By default, the **`/review`** command generates inline comments, meaning that code suggestions are inserted directly beneath the code diffs in each file. This approach provides a clearer view of the exact lines requiring improvement. However, if you prefer a code review in a single post rather than separate inline comments under the diffs, you can include the optional parameter: **`/review #inline_comment=False`**
For more details, refer to [Available Commands](https://docs.bito.ai/bito-dev-agents/ai-code-review-agent/available-commands).
### **Step 8: Chat with AI Code Review Agent**
Ask questions directly to the AI Code Review Agent regarding its code review feedback. You can inquire about highlighted issues, request alternative solutions, or seek clarifications on suggested fixes.
To start the conversation, type your question in the comment box within the inline suggestions on your pull request, and then submit it. Typically, Bito AI responses are delivered in about 10 seconds. On GitHub and Bitbucket, you need to manually refresh the page to see the responses, while GitLab updates automatically.
Bito supports over 20 languages—including English, Hindi, Chinese, and Spanish—so you can interact with the AI in the language you’re most comfortable with.
### Step 9: Configure Agent settings
[Agent settings](https://docs.bito.ai/ai-code-reviews-in-git/install-run-using-bito-cloud/create-or-customize-an-agent-instance) let you control how reviews are performed, ensuring feedback is tailored to your team’s needs. By adjusting the options, you can:
* Make reviews more focused and actionable.
* Apply your own coding standards.
* Reduce noise by excluding irrelevant files or branches.
* Add extra checks to improve code quality and security.
[**Learn more**](https://docs.bito.ai/ai-code-reviews-in-git/install-run-using-bito-cloud/create-or-customize-an-agent-instance)
## Screenshots
### Screenshot # 1
{% hint style="info" %}
*AI-generated pull request (PR) summary*
{% endhint %}
 ### Screenshot # 2
{% hint style="info" %}
**Changelist** showing key changes and impacted files in a pull request.
{% endhint %}
### Screenshot # 2
{% hint style="info" %}
**Changelist** showing key changes and impacted files in a pull request.
{% endhint %}
Changelist in AI Code Review Agent's feedback.
### Screenshot # 3
{% hint style="info" %}
*AI code review feedback posted as comments on the pull request.*
{% endhint %}
 ---
# Source: https://docs.bito.ai/ai-code-reviews-in-git/install-run-using-bito-cloud/guide-for-github.md
# Guide for GitHub
Speed up code reviews by configuring the [AI Code Review Agent](https://docs.bito.ai/ai-code-reviews-in-git/overview) with your GitHub repositories. In this guide, you'll learn how to set up the Agent to receive automated code reviews that trigger whenever you create a pull request, as well as how to manually initiate reviews using [available commands](https://docs.bito.ai/bito-dev-agents/ai-code-review-agent/available-commands).
{% hint style="info" %}
The **Free Plan** offers **AI-generated pull request summaries** to provide a quick overview of changes. For advanced features like **line-level code suggestions**, consider upgrading to the **Team Plan**. For detailed pricing information, visit our [**Pricing**](https://bito.ai/pricing/) page.
[**Get a 14-day FREE trial of Bito's AI Code Review Agent.**](https://alpha.bito.ai/home/welcome)
{% endhint %}
## Video tutorial
{% embed url="" %}
## Installation and configuration steps
Follow the step-by-step instructions below to install the **AI Code Review Agent** using **Bito Cloud**:
### **Step 1: Log in to Bito**
[Log in to Bito Cloud](https://alpha.bito.ai/) and select a workspace to get started.
### **Step 2: Open the Code Review Agents setup**
Click [**Repositories**](https://alpha.bito.ai/home/ai-agents/code-review-agent) under the **CODE REVIEW** section in the sidebar.
### **Step 3: Select your Git provider**
Bito supports integration with the following Git providers:
* GitHub
* GitHub (Self-Managed)
* GitLab
* GitLab (Self-Managed)
* Bitbucket
* Bitbucket (Self-Managed)
Since we are setting up the Agent for GitHub, select **GitHub** to proceed.
This will redirect you to **GitHub**.
---
# Source: https://docs.bito.ai/ai-code-reviews-in-git/install-run-using-bito-cloud/guide-for-github.md
# Guide for GitHub
Speed up code reviews by configuring the [AI Code Review Agent](https://docs.bito.ai/ai-code-reviews-in-git/overview) with your GitHub repositories. In this guide, you'll learn how to set up the Agent to receive automated code reviews that trigger whenever you create a pull request, as well as how to manually initiate reviews using [available commands](https://docs.bito.ai/bito-dev-agents/ai-code-review-agent/available-commands).
{% hint style="info" %}
The **Free Plan** offers **AI-generated pull request summaries** to provide a quick overview of changes. For advanced features like **line-level code suggestions**, consider upgrading to the **Team Plan**. For detailed pricing information, visit our [**Pricing**](https://bito.ai/pricing/) page.
[**Get a 14-day FREE trial of Bito's AI Code Review Agent.**](https://alpha.bito.ai/home/welcome)
{% endhint %}
## Video tutorial
{% embed url="" %}
## Installation and configuration steps
Follow the step-by-step instructions below to install the **AI Code Review Agent** using **Bito Cloud**:
### **Step 1: Log in to Bito**
[Log in to Bito Cloud](https://alpha.bito.ai/) and select a workspace to get started.
### **Step 2: Open the Code Review Agents setup**
Click [**Repositories**](https://alpha.bito.ai/home/ai-agents/code-review-agent) under the **CODE REVIEW** section in the sidebar.
### **Step 3: Select your Git provider**
Bito supports integration with the following Git providers:
* GitHub
* GitHub (Self-Managed)
* GitLab
* GitLab (Self-Managed)
* Bitbucket
* Bitbucket (Self-Managed)
Since we are setting up the Agent for GitHub, select **GitHub** to proceed.
This will redirect you to **GitHub**.
 ### **Step 4: Install the Bito app for GitHub**
To enable pull request reviews, you need to install and authorize the **Bito’s AI Code Review Agent** app.
On GitHub, select where you want to install the app.
### **Step 4: Install the Bito app for GitHub**
To enable pull request reviews, you need to install and authorize the **Bito’s AI Code Review Agent** app.
On GitHub, select where you want to install the app.
 Grant Bito access to your repositories:
* Choose **All repositories** to enable Bito for every repository in your account.
* Or, select **Only select repositories** and pick specific repositories using the dropdown menu.
{% hint style="info" %}
Bito app uses these permissions:
* **Read** access to metadata
* **Read** and **write** access to code, issues, and pull requests
* **Read** access to organization members
{% endhint %}
Click **Install & Authorize** to proceed. Once completed, you will be redirected to Bito.
Grant Bito access to your repositories:
* Choose **All repositories** to enable Bito for every repository in your account.
* Or, select **Only select repositories** and pick specific repositories using the dropdown menu.
{% hint style="info" %}
Bito app uses these permissions:
* **Read** access to metadata
* **Read** and **write** access to code, issues, and pull requests
* **Read** access to organization members
{% endhint %}
Click **Install & Authorize** to proceed. Once completed, you will be redirected to Bito.
 ### **Step 5: Enable AI Code Review Agent on repositories**
After connecting Bito to your GitHub account, you'll see a list of repositories that Bito has access to.
Use the toggles in the **Code Review Status** column to **enable** or **disable** the Agent for each repository.
### **Step 5: Enable AI Code Review Agent on repositories**
After connecting Bito to your GitHub account, you'll see a list of repositories that Bito has access to.
Use the toggles in the **Code Review Status** column to **enable** or **disable** the Agent for each repository.
 {% hint style="info" %}
To customize the Agent’s behavior, you can edit existing configurations or create new Agents as needed.
[Learn more](https://docs.bito.ai/ai-code-reviews-in-git/install-run-using-bito-cloud/create-or-customize-an-agent-instance)
{% endhint %}
### **Step 6: Automated and manual pull request reviews**
Once a repository is enabled, you can invoke the AI Code Review Agent in the following ways:
1. **Automated code review:** By default, the Agent automatically reviews all new pull requests and provides detailed feedback.
2. **Manually trigger code review:** To initiate a manual review, simply type **`/review`** in the comment box on the pull request and submit it. This action will start the code review process.
The AI-generated code review feedback will be posted as comments directly within your pull request, making it seamless to view and address suggestions right where they matter most.
{% hint style="info" %}
**Note:** To enhance efficiency, the automated code reviews are only triggered for pull requests merging into the repository’s default branch. This prevents unnecessary processing and Advanced AI requests usage.
To review additional branches, you can use the [Include Source/Target Branches filter](https://docs.bito.ai/excluding-files-folders-or-branches-with-filters#include-source-target-branches-filter). Bito will review pull requests when the source or target branch matches the list.
The **Include Source/Target Branches** filter applies only to automatically triggered reviews. Users should still be able to trigger reviews manually via the `/review` command.
{% endhint %}
{% hint style="info" %}
The AI Code Review Agent automatically reviews code changes up to 5000 lines when a pull request is created. For larger changes, you can use the **`/review`** command.
{% endhint %}
{% hint style="info" %}
It may take a few minutes to get the code review posted as a comment, depending on the size of the pull request.
{% endhint %}
### **Step 7: Specialized commands for code reviews**
Bito also offers **specialized commands** that are designed to provide detailed insights into specific areas of your source code, including security, performance, scalability, code structure, and optimization.
* **`/review security`**: Analyzes code to identify security vulnerabilities and ensure secure coding practices.
* **`/review performance`**: Evaluates code for performance issues, identifying slow or resource-heavy areas.
* **`/review scalability`**: Assesses the code's ability to handle increased usage and scale effectively.
* **`/review codeorg`**: Scans for readability and maintainability, promoting clear and efficient code organization.
* **`/review codeoptimize`**: Identifies optimization opportunities to enhance code efficiency and reduce resource usage.
By default, the **`/review`** command generates inline comments, meaning that code suggestions are inserted directly beneath the code diffs in each file. This approach provides a clearer view of the exact lines requiring improvement. However, if you prefer a code review in a single post rather than separate inline comments under the diffs, you can include the optional parameter: **`/review #inline_comment=False`**
For more details, refer to [Available Commands](https://docs.bito.ai/bito-dev-agents/ai-code-review-agent/available-commands).
### **Step 8: Chat with AI Code Review Agent**
Ask questions directly to the AI Code Review Agent regarding its code review feedback. You can inquire about highlighted issues, request alternative solutions, or seek clarifications on suggested fixes.
To start the conversation, type your question in the comment box within the inline suggestions on your pull request, and then submit it. Typically, Bito AI responses are delivered in about 10 seconds. On GitHub and Bitbucket, you need to manually refresh the page to see the responses, while GitLab updates automatically.
Bito supports over 20 languages—including English, Hindi, Chinese, and Spanish—so you can interact with the AI in the language you’re most comfortable with.
### Step 9: Configure Agent settings
[Agent settings](https://docs.bito.ai/ai-code-reviews-in-git/install-run-using-bito-cloud/create-or-customize-an-agent-instance) let you control how reviews are performed, ensuring feedback is tailored to your team’s needs. By adjusting the options, you can:
* Make reviews more focused and actionable.
* Apply your own coding standards.
* Reduce noise by excluding irrelevant files or branches.
* Add extra checks to improve code quality and security.
[**Learn more**](https://docs.bito.ai/ai-code-reviews-in-git/install-run-using-bito-cloud/create-or-customize-an-agent-instance)
## Screenshots
### Screenshot # 1
{% hint style="info" %}
*AI-generated pull request (PR) summary*
{% endhint %}
### Screenshot # 2
{% hint style="info" %}
**Changelist** showing key changes and impacted files in a pull request.
{% endhint %}
{% hint style="info" %}
To customize the Agent’s behavior, you can edit existing configurations or create new Agents as needed.
[Learn more](https://docs.bito.ai/ai-code-reviews-in-git/install-run-using-bito-cloud/create-or-customize-an-agent-instance)
{% endhint %}
### **Step 6: Automated and manual pull request reviews**
Once a repository is enabled, you can invoke the AI Code Review Agent in the following ways:
1. **Automated code review:** By default, the Agent automatically reviews all new pull requests and provides detailed feedback.
2. **Manually trigger code review:** To initiate a manual review, simply type **`/review`** in the comment box on the pull request and submit it. This action will start the code review process.
The AI-generated code review feedback will be posted as comments directly within your pull request, making it seamless to view and address suggestions right where they matter most.
{% hint style="info" %}
**Note:** To enhance efficiency, the automated code reviews are only triggered for pull requests merging into the repository’s default branch. This prevents unnecessary processing and Advanced AI requests usage.
To review additional branches, you can use the [Include Source/Target Branches filter](https://docs.bito.ai/excluding-files-folders-or-branches-with-filters#include-source-target-branches-filter). Bito will review pull requests when the source or target branch matches the list.
The **Include Source/Target Branches** filter applies only to automatically triggered reviews. Users should still be able to trigger reviews manually via the `/review` command.
{% endhint %}
{% hint style="info" %}
The AI Code Review Agent automatically reviews code changes up to 5000 lines when a pull request is created. For larger changes, you can use the **`/review`** command.
{% endhint %}
{% hint style="info" %}
It may take a few minutes to get the code review posted as a comment, depending on the size of the pull request.
{% endhint %}
### **Step 7: Specialized commands for code reviews**
Bito also offers **specialized commands** that are designed to provide detailed insights into specific areas of your source code, including security, performance, scalability, code structure, and optimization.
* **`/review security`**: Analyzes code to identify security vulnerabilities and ensure secure coding practices.
* **`/review performance`**: Evaluates code for performance issues, identifying slow or resource-heavy areas.
* **`/review scalability`**: Assesses the code's ability to handle increased usage and scale effectively.
* **`/review codeorg`**: Scans for readability and maintainability, promoting clear and efficient code organization.
* **`/review codeoptimize`**: Identifies optimization opportunities to enhance code efficiency and reduce resource usage.
By default, the **`/review`** command generates inline comments, meaning that code suggestions are inserted directly beneath the code diffs in each file. This approach provides a clearer view of the exact lines requiring improvement. However, if you prefer a code review in a single post rather than separate inline comments under the diffs, you can include the optional parameter: **`/review #inline_comment=False`**
For more details, refer to [Available Commands](https://docs.bito.ai/bito-dev-agents/ai-code-review-agent/available-commands).
### **Step 8: Chat with AI Code Review Agent**
Ask questions directly to the AI Code Review Agent regarding its code review feedback. You can inquire about highlighted issues, request alternative solutions, or seek clarifications on suggested fixes.
To start the conversation, type your question in the comment box within the inline suggestions on your pull request, and then submit it. Typically, Bito AI responses are delivered in about 10 seconds. On GitHub and Bitbucket, you need to manually refresh the page to see the responses, while GitLab updates automatically.
Bito supports over 20 languages—including English, Hindi, Chinese, and Spanish—so you can interact with the AI in the language you’re most comfortable with.
### Step 9: Configure Agent settings
[Agent settings](https://docs.bito.ai/ai-code-reviews-in-git/install-run-using-bito-cloud/create-or-customize-an-agent-instance) let you control how reviews are performed, ensuring feedback is tailored to your team’s needs. By adjusting the options, you can:
* Make reviews more focused and actionable.
* Apply your own coding standards.
* Reduce noise by excluding irrelevant files or branches.
* Add extra checks to improve code quality and security.
[**Learn more**](https://docs.bito.ai/ai-code-reviews-in-git/install-run-using-bito-cloud/create-or-customize-an-agent-instance)
## Screenshots
### Screenshot # 1
{% hint style="info" %}
*AI-generated pull request (PR) summary*
{% endhint %}
### Screenshot # 2
{% hint style="info" %}
**Changelist** showing key changes and impacted files in a pull request.
{% endhint %}
Changelist in AI Code Review Agent's feedback.
### Screenshot # 3
{% hint style="info" %}
*AI code review feedback posted as comments on the pull request.*
{% endhint %}
---
# Source: https://docs.bito.ai/ai-code-reviews-in-git/install-run-using-bito-cloud/guide-for-gitlab-self-managed.md
# Guide for GitLab (Self-Managed)
Speed up code reviews by configuring the [AI Code Review Agent](https://docs.bito.ai/bito-dev-agents/ai-code-review-agent) with your GitLab (Self-Managed) server. In this guide, you'll learn how to set up the Agent to receive automated code reviews that trigger whenever you create a merge request, as well as how to manually initiate reviews using [available commands](https://docs.bito.ai/bito-dev-agents/ai-code-review-agent/available-commands).
{% hint style="info" %}
The **Free Plan** offers **AI-generated pull request summaries** to provide a quick overview of changes. For advanced features like **line-level code suggestions**, consider upgrading to the **Team Plan**. For detailed pricing information, visit our [**Pricing**](https://bito.ai/pricing/) page.
[**Get a 14-day FREE trial of Bito's AI Code Review Agent.**](https://alpha.bito.ai/home/welcome)
{% endhint %}
## Video tutorial
coming soon...
## Prerequisites
Before proceeding, ensure you've completed all necessary prerequisites.
#### 1. Create a GitLab Personal Access Token:
For GitLab merge request code reviews, a token with **`api`** scope is required. Make sure that the token is created by a GitLab user who has the **`Maintainer`** access role.
[**View Guide**](https://docs.gitlab.com/ee/user/profile/personal_access_tokens.html#create-a-personal-access-token)
{% hint style="info" %}
**Important:** Bito posts comments using the GitLab user account linked to the Personal Access Token used during setup. To display "Bito" instead of your name, create a separate user account (e.g., Bito Agent) and use its token for integration.
{% endhint %}
{% hint style="info" %}
We recommend setting the **token expiration** to at least one year. This prevents the token from expiring early and avoids disruptions in the AI Code Review Agent's functionality.
Additionally, we highly recommend updating the token before expiry to maintain seamless integration and code review processes.
{% endhint %}
.png?alt=media&token=6feb55f7-39b3-4d61-8e46-f6b233e64849)
GitLab Personal Access Token
#### 2. Authorizing a GitLab Personal Access Token for use with SAML single sign-on:
If your GitLab organization enforces SAML Single Sign-On (SSO), you must authorize your Personal Access Token through your Identity Provider (IdP); otherwise, Bito's AI Code Review Agent won't function properly.
For more information, please refer to the following GitLab documentation:
* [SAML SSO for GitLab.com groups](https://docs.gitlab.com/user/group/saml_sso/)
* [SAML SSO for GitLab Self-Managed](https://docs.gitlab.com/integration/saml/)
* [Password generation for users created through SAML](https://docs.gitlab.com/integration/saml/#password-generation-for-users-created-through-saml)
## Installation and configuration steps
Follow the step-by-step instructions below to install the **AI Code Review Agent** using **Bito Cloud**:
### **Step 1: Log in to Bito**
[Log in to Bito Cloud](https://alpha.bito.ai/) and select a workspace to get started.
### **Step 2: Open the Code Review Agents setup**
Click [**Repositories**](https://alpha.bito.ai/home/ai-agents/code-review-agent) under the **CODE REVIEW** section in the sidebar.
### **Step 3: Select your Git provider**
Bito supports integration with the following Git providers:
* GitHub
* GitHub (Self-Managed)
* GitLab
* GitLab (Self-Managed)
* Bitbucket
* Bitbucket (Self-Managed)
Since we are setting up the Agent for GitLab (Self-Managed) server, select **GitLab (Self-Managed)** to proceed.
{% hint style="info" %}
**Supported versions:**
* **GitLab (Self-Managed):** 15.5 and above
{% endhint %}
 ### **Step 4: Connect Bito to GitLab**
To enable merge request reviews, you’ll need to connect your Bito workspace to your GitLab (Self-Managed) server.
{% hint style="info" %}
If your network blocks external services from interacting with the GitLab server, whitelist all of Bito's gateway IP addresses in your firewall to ensure Bito can access your self-hosted repositories. The Agent response can come from any of these IPs.
* **List of IP addresses to whitelist:**
* **`18.188.201.104`**
* **`3.23.173.30`**
* **`18.216.64.170`**
{% endhint %}
You need to enter the details for the below mentioned input fields:
* **Hosted GitLab URL:** This is the domain portion of the URL where you GitLab Enterprise Server is hosted (e.g., `https://yourcompany.gitlab.com`). Please check with your GitLab administrator for the correct URL.
* **Personal Access Token:** Generate a **GitLab Personal Access Token** with **`api`** scope in your GitLab (Self-Managed) account and enter it into the **Personal Access Token** input field. For guidance, refer to the instructions in the [Prerequisites](#prerequisites) section.
Click **Validate** to ensure the token is functioning properly.
### **Step 4: Connect Bito to GitLab**
To enable merge request reviews, you’ll need to connect your Bito workspace to your GitLab (Self-Managed) server.
{% hint style="info" %}
If your network blocks external services from interacting with the GitLab server, whitelist all of Bito's gateway IP addresses in your firewall to ensure Bito can access your self-hosted repositories. The Agent response can come from any of these IPs.
* **List of IP addresses to whitelist:**
* **`18.188.201.104`**
* **`3.23.173.30`**
* **`18.216.64.170`**
{% endhint %}
You need to enter the details for the below mentioned input fields:
* **Hosted GitLab URL:** This is the domain portion of the URL where you GitLab Enterprise Server is hosted (e.g., `https://yourcompany.gitlab.com`). Please check with your GitLab administrator for the correct URL.
* **Personal Access Token:** Generate a **GitLab Personal Access Token** with **`api`** scope in your GitLab (Self-Managed) account and enter it into the **Personal Access Token** input field. For guidance, refer to the instructions in the [Prerequisites](#prerequisites) section.
Click **Validate** to ensure the token is functioning properly.
 If the token is successfully validated, you can select your **GitLab Group** from the dropdown menu.
* **Note:** You can select multiple groups after the setup is complete.
Click **Connect Bito to GitLab** to proceed.
If the token is successfully validated, you can select your **GitLab Group** from the dropdown menu.
* **Note:** You can select multiple groups after the setup is complete.
Click **Connect Bito to GitLab** to proceed.
 ### **Step 5: Enable AI Code Review Agent on repositories**
After connecting Bito to your GitLab self-managed server, you'll see a list of repositories that Bito has access to.
Use the toggles in the **Code Review Status** column to **enable** or **disable** the Agent for each repository.
### **Step 5: Enable AI Code Review Agent on repositories**
After connecting Bito to your GitLab self-managed server, you'll see a list of repositories that Bito has access to.
Use the toggles in the **Code Review Status** column to **enable** or **disable** the Agent for each repository.
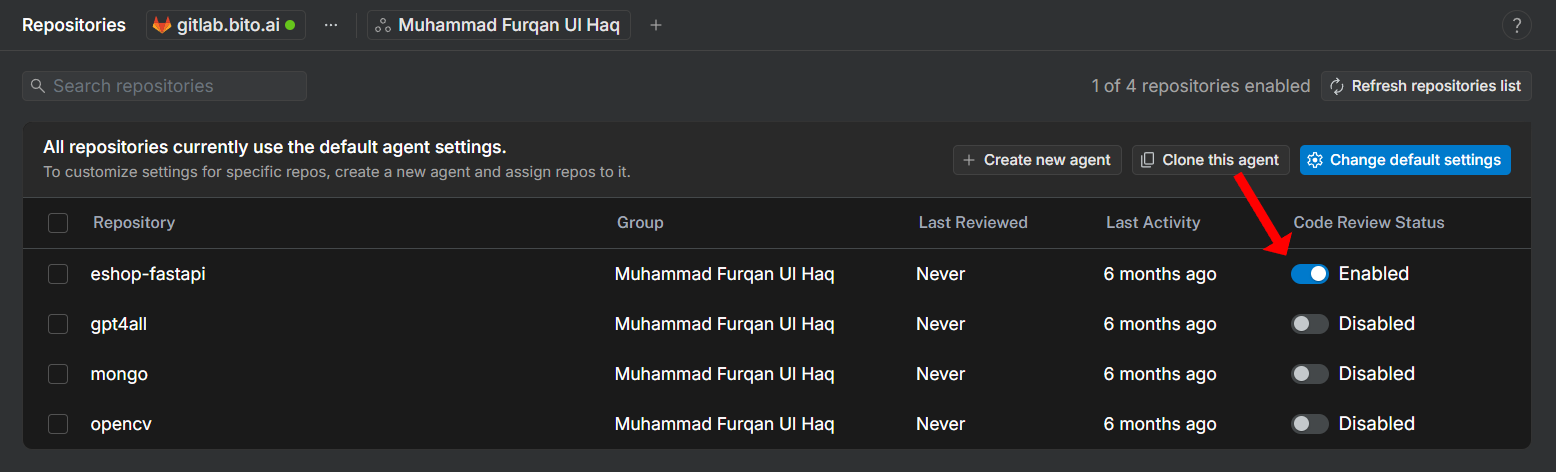 {% hint style="info" %}
To customize the Agent’s behavior, you can edit existing configurations or create new Agents as needed.
[Learn more](https://docs.bito.ai/ai-code-reviews-in-git/install-run-using-bito-cloud/create-or-customize-an-agent-instance)
{% endhint %}
### **Step 6: Automated and manual merge request reviews**
Once a repository is enabled, you can invoke the AI Code Review Agent in the following ways:
1. **Automated code review:** By default, the Agent automatically reviews all new merge requests and provides detailed feedback.
2. **Manually trigger code review:** To initiate a manual review, simply type **`/review`** in the comment box on the merge request and submit it. This action will start the code review process.
The AI-generated code review feedback will be posted as comments directly within your merge request, making it seamless to view and address suggestions right where they matter most.
{% hint style="info" %}
To customize the Agent’s behavior, you can edit existing configurations or create new Agents as needed.
[Learn more](https://docs.bito.ai/ai-code-reviews-in-git/install-run-using-bito-cloud/create-or-customize-an-agent-instance)
{% endhint %}
### **Step 6: Automated and manual merge request reviews**
Once a repository is enabled, you can invoke the AI Code Review Agent in the following ways:
1. **Automated code review:** By default, the Agent automatically reviews all new merge requests and provides detailed feedback.
2. **Manually trigger code review:** To initiate a manual review, simply type **`/review`** in the comment box on the merge request and submit it. This action will start the code review process.
The AI-generated code review feedback will be posted as comments directly within your merge request, making it seamless to view and address suggestions right where they matter most.
 {% hint style="info" %}
**Note:** To enhance efficiency, the automated code reviews are only triggered for merge requests merging into the repository’s default branch. This prevents unnecessary processing and Advanced AI requests usage.
To review additional branches, you can use the [Include Source/Target Branches filter](https://docs.bito.ai/excluding-files-folders-or-branches-with-filters#include-source-target-branches-filter). Bito will review merge requests when the source or target branch matches the list.
The **Include Source/Target Branches** filter applies only to automatically triggered reviews. Users should still be able to trigger reviews manually via the `/review` command.
{% endhint %}
{% hint style="info" %}
The AI Code Review Agent automatically reviews code changes up to 5000 lines when a merge request is created. For larger changes, you can use the **`/review`** command.
{% endhint %}
{% hint style="info" %}
It may take a few minutes to get the code review posted as a comment, depending on the size of the merge request.
{% endhint %}
### **Step 7: Specialized commands for code reviews**
Bito also offers **specialized commands** that are designed to provide detailed insights into specific areas of your source code, including security, performance, scalability, code structure, and optimization.
* **`/review security`**: Analyzes code to identify security vulnerabilities and ensure secure coding practices.
* **`/review performance`**: Evaluates code for performance issues, identifying slow or resource-heavy areas.
* **`/review scalability`**: Assesses the code's ability to handle increased usage and scale effectively.
* **`/review codeorg`**: Scans for readability and maintainability, promoting clear and efficient code organization.
* **`/review codeoptimize`**: Identifies optimization opportunities to enhance code efficiency and reduce resource usage.
By default, the **`/review`** command generates inline comments, meaning that code suggestions are inserted directly beneath the code diffs in each file. This approach provides a clearer view of the exact lines requiring improvement. However, if you prefer a code review in a single post rather than separate inline comments under the diffs, you can include the optional parameter: **`/review #inline_comment=False`**
For more details, refer to [Available Commands](https://docs.bito.ai/bito-dev-agents/ai-code-review-agent/available-commands).
### **Step 8: Chat with AI Code Review Agent**
Ask questions directly to the AI Code Review Agent regarding its code review feedback. You can inquire about highlighted issues, request alternative solutions, or seek clarifications on suggested fixes.
To start the conversation, type your question in the comment box within the inline suggestions on your merge request, and then submit it. Typically, Bito AI responses are delivered in about 10 seconds. On GitHub and Bitbucket, you need to manually refresh the page to see the responses, while GitLab updates automatically.
Bito supports over 20 languages—including English, Hindi, Chinese, and Spanish—so you can interact with the AI in the language you’re most comfortable with.
### Step 9: Configure Agent settings
[Agent settings](https://docs.bito.ai/ai-code-reviews-in-git/install-run-using-bito-cloud/create-or-customize-an-agent-instance) let you control how reviews are performed, ensuring feedback is tailored to your team’s needs. By adjusting the options, you can:
* Make reviews more focused and actionable.
* Apply your own coding standards.
* Reduce noise by excluding irrelevant files or branches.
* Add extra checks to improve code quality and security.
[**Learn more**](https://docs.bito.ai/ai-code-reviews-in-git/install-run-using-bito-cloud/create-or-customize-an-agent-instance)
## Managing multiple GitLab groups in Bito Cloud
[Bito Cloud](https://alpha.bito.ai/) allows you to connect and manage multiple GitLab groups for **GitLab (Self-Managed)** integrations. Use the instructions below to add or remove GitLab groups for AI code reviews.
### How to add multiple GitLab groups?
You can connect more than one GitLab group to Bito for AI code reviews.
Follow these steps to add additional groups:
1. Go to the [**Repositories**](https://alpha.bito.ai/home/ai-agents/code-review-agent) page.
{% hint style="info" %}
**Note:** To enhance efficiency, the automated code reviews are only triggered for merge requests merging into the repository’s default branch. This prevents unnecessary processing and Advanced AI requests usage.
To review additional branches, you can use the [Include Source/Target Branches filter](https://docs.bito.ai/excluding-files-folders-or-branches-with-filters#include-source-target-branches-filter). Bito will review merge requests when the source or target branch matches the list.
The **Include Source/Target Branches** filter applies only to automatically triggered reviews. Users should still be able to trigger reviews manually via the `/review` command.
{% endhint %}
{% hint style="info" %}
The AI Code Review Agent automatically reviews code changes up to 5000 lines when a merge request is created. For larger changes, you can use the **`/review`** command.
{% endhint %}
{% hint style="info" %}
It may take a few minutes to get the code review posted as a comment, depending on the size of the merge request.
{% endhint %}
### **Step 7: Specialized commands for code reviews**
Bito also offers **specialized commands** that are designed to provide detailed insights into specific areas of your source code, including security, performance, scalability, code structure, and optimization.
* **`/review security`**: Analyzes code to identify security vulnerabilities and ensure secure coding practices.
* **`/review performance`**: Evaluates code for performance issues, identifying slow or resource-heavy areas.
* **`/review scalability`**: Assesses the code's ability to handle increased usage and scale effectively.
* **`/review codeorg`**: Scans for readability and maintainability, promoting clear and efficient code organization.
* **`/review codeoptimize`**: Identifies optimization opportunities to enhance code efficiency and reduce resource usage.
By default, the **`/review`** command generates inline comments, meaning that code suggestions are inserted directly beneath the code diffs in each file. This approach provides a clearer view of the exact lines requiring improvement. However, if you prefer a code review in a single post rather than separate inline comments under the diffs, you can include the optional parameter: **`/review #inline_comment=False`**
For more details, refer to [Available Commands](https://docs.bito.ai/bito-dev-agents/ai-code-review-agent/available-commands).
### **Step 8: Chat with AI Code Review Agent**
Ask questions directly to the AI Code Review Agent regarding its code review feedback. You can inquire about highlighted issues, request alternative solutions, or seek clarifications on suggested fixes.
To start the conversation, type your question in the comment box within the inline suggestions on your merge request, and then submit it. Typically, Bito AI responses are delivered in about 10 seconds. On GitHub and Bitbucket, you need to manually refresh the page to see the responses, while GitLab updates automatically.
Bito supports over 20 languages—including English, Hindi, Chinese, and Spanish—so you can interact with the AI in the language you’re most comfortable with.
### Step 9: Configure Agent settings
[Agent settings](https://docs.bito.ai/ai-code-reviews-in-git/install-run-using-bito-cloud/create-or-customize-an-agent-instance) let you control how reviews are performed, ensuring feedback is tailored to your team’s needs. By adjusting the options, you can:
* Make reviews more focused and actionable.
* Apply your own coding standards.
* Reduce noise by excluding irrelevant files or branches.
* Add extra checks to improve code quality and security.
[**Learn more**](https://docs.bito.ai/ai-code-reviews-in-git/install-run-using-bito-cloud/create-or-customize-an-agent-instance)
## Managing multiple GitLab groups in Bito Cloud
[Bito Cloud](https://alpha.bito.ai/) allows you to connect and manage multiple GitLab groups for **GitLab (Self-Managed)** integrations. Use the instructions below to add or remove GitLab groups for AI code reviews.
### How to add multiple GitLab groups?
You can connect more than one GitLab group to Bito for AI code reviews.
Follow these steps to add additional groups:
1. Go to the [**Repositories**](https://alpha.bito.ai/home/ai-agents/code-review-agent) page.
 2. At the top-center of the page, click the **“+” (plus) icon** next to the currently selected GitLab group name, then select **Add group** from the dropdown menu.
 3. A popup will appear. Use the **dropdown menu** to select a GitLab group you want to add.
 4. Click the **Add group** button.
 Once added, all repositories from that group will be listed and available for AI code reviews under the default agent.
{% hint style="info" %}
**Note:** This **multiple GitLab groups** feature is currently available **only for GitLab (Self-Managed)** integrations.
{% endhint %}
### How to remove a GitLab group?
To disconnect a GitLab group from Bito Cloud:
1. Go to the [**Repositories**](https://alpha.bito.ai/home/ai-agents/code-review-agent) page.
Once added, all repositories from that group will be listed and available for AI code reviews under the default agent.
{% hint style="info" %}
**Note:** This **multiple GitLab groups** feature is currently available **only for GitLab (Self-Managed)** integrations.
{% endhint %}
### How to remove a GitLab group?
To disconnect a GitLab group from Bito Cloud:
1. Go to the [**Repositories**](https://alpha.bito.ai/home/ai-agents/code-review-agent) page.
 2. At the top-center of the page, click the **three dots icon** next to the currently selected GitLab group name, then select **Manage groups** from the dropdown menu.
 3. A popup will appear showing a list of connected groups. Click the **“✕” (cross) icon** next to the group you want to remove.
 3. Confirm the removal in the prompt.
 Once removed, the repositories from that group will no longer appear in Bito or be included in AI code reviews.
### How to select one or more GitLab Groups?
When you have **multiple GitLab groups connected** in Bito Cloud, the group name at the top-center of the [Repositories](https://alpha.bito.ai/home/ai-agents/code-review-agent) page becomes a **dropdown menu**.
From this dropdown, you can:
* Select **a single group**
* Select **multiple groups as needed**
* Select **All groups**
The list of repositories displayed below will update automatically based on your selection—showing only the repositories from the selected groups.
Once removed, the repositories from that group will no longer appear in Bito or be included in AI code reviews.
### How to select one or more GitLab Groups?
When you have **multiple GitLab groups connected** in Bito Cloud, the group name at the top-center of the [Repositories](https://alpha.bito.ai/home/ai-agents/code-review-agent) page becomes a **dropdown menu**.
From this dropdown, you can:
* Select **a single group**
* Select **multiple groups as needed**
* Select **All groups**
The list of repositories displayed below will update automatically based on your selection—showing only the repositories from the selected groups.
 ## Screenshots
### Screenshot # 1
{% hint style="info" %}
*AI-generated merge request (MR) summary*
{% endhint %}
## Screenshots
### Screenshot # 1
{% hint style="info" %}
*AI-generated merge request (MR) summary*
{% endhint %}
 ### Screenshot # 2
{% hint style="info" %}
**Changelist** showing key changes and impacted files in a merge request.
{% endhint %}
### Screenshot # 2
{% hint style="info" %}
**Changelist** showing key changes and impacted files in a merge request.
{% endhint %}
Changelist in AI Code Review Agent's feedback.
### Screenshot # 3
{% hint style="info" %}
*AI code review feedback posted as comments on the merge request.*
{% endhint %}
 ---
# Source: https://docs.bito.ai/ai-code-reviews-in-git/install-run-using-bito-cloud/guide-for-gitlab.md
# Guide for GitLab
Speed up code reviews by configuring the [AI Code Review Agent](https://docs.bito.ai/bito-dev-agents/ai-code-review-agent) with your GitLab repositories. In this guide, you'll learn how to set up the Agent to receive automated code reviews that trigger whenever you create a pull request, as well as how to manually initiate reviews using [available commands](https://docs.bito.ai/bito-dev-agents/ai-code-review-agent/available-commands).
{% hint style="info" %}
The **Free Plan** offers **AI-generated pull request summaries** to provide a quick overview of changes. For advanced features like **line-level code suggestions**, consider upgrading to the **Team Plan**. For detailed pricing information, visit our [**Pricing**](https://bito.ai/pricing/) page.
[**Get a 14-day FREE trial of Bito's AI Code Review Agent.**](https://alpha.bito.ai/home/welcome)
{% endhint %}
## Video tutorial
{% embed url="" %}
## Prerequisites
Before proceeding, ensure you've completed all necessary prerequisites.
#### 1. Create a GitLab Personal Access Token:
For GitLab merge request code reviews, a token with **`api`** scope is required. Make sure that the token is created by a GitLab user who has the **`Maintainer`** access role.
[**View Guide**](https://docs.gitlab.com/ee/user/profile/personal_access_tokens.html#create-a-personal-access-token)
{% hint style="info" %}
**Important:** Bito posts comments using the GitLab user account linked to the Personal Access Token used during setup. To display "Bito" instead of your name, create a separate user account (e.g., Bito Agent) and use its token for integration.
{% endhint %}
{% hint style="info" %}
We recommend setting the **token expiration** to at least one year. This prevents the token from expiring early and avoids disruptions in the AI Code Review Agent's functionality.
Additionally, we highly recommend updating the token before expiry to maintain seamless integration and code review processes.
{% endhint %}
---
# Source: https://docs.bito.ai/ai-code-reviews-in-git/install-run-using-bito-cloud/guide-for-gitlab.md
# Guide for GitLab
Speed up code reviews by configuring the [AI Code Review Agent](https://docs.bito.ai/bito-dev-agents/ai-code-review-agent) with your GitLab repositories. In this guide, you'll learn how to set up the Agent to receive automated code reviews that trigger whenever you create a pull request, as well as how to manually initiate reviews using [available commands](https://docs.bito.ai/bito-dev-agents/ai-code-review-agent/available-commands).
{% hint style="info" %}
The **Free Plan** offers **AI-generated pull request summaries** to provide a quick overview of changes. For advanced features like **line-level code suggestions**, consider upgrading to the **Team Plan**. For detailed pricing information, visit our [**Pricing**](https://bito.ai/pricing/) page.
[**Get a 14-day FREE trial of Bito's AI Code Review Agent.**](https://alpha.bito.ai/home/welcome)
{% endhint %}
## Video tutorial
{% embed url="" %}
## Prerequisites
Before proceeding, ensure you've completed all necessary prerequisites.
#### 1. Create a GitLab Personal Access Token:
For GitLab merge request code reviews, a token with **`api`** scope is required. Make sure that the token is created by a GitLab user who has the **`Maintainer`** access role.
[**View Guide**](https://docs.gitlab.com/ee/user/profile/personal_access_tokens.html#create-a-personal-access-token)
{% hint style="info" %}
**Important:** Bito posts comments using the GitLab user account linked to the Personal Access Token used during setup. To display "Bito" instead of your name, create a separate user account (e.g., Bito Agent) and use its token for integration.
{% endhint %}
{% hint style="info" %}
We recommend setting the **token expiration** to at least one year. This prevents the token from expiring early and avoids disruptions in the AI Code Review Agent's functionality.
Additionally, we highly recommend updating the token before expiry to maintain seamless integration and code review processes.
{% endhint %}
GitLab Personal Access Token
#### 2. Authorizing a GitLab Personal Access Token for use with SAML single sign-on:
If your GitLab organization enforces SAML Single Sign-On (SSO), you must authorize your Personal Access Token through your Identity Provider (IdP); otherwise, Bito's AI Code Review Agent won't function properly.
For more information, please refer to these GitLab documentation:
*
*
*
## Installation and configuration steps
Follow the step-by-step instructions below to install the **AI Code Review Agent** using **Bito Cloud**:
### **Step 1: Log in to Bito**
[Log in to Bito Cloud](https://alpha.bito.ai/) and select a workspace to get started.
### **Step 2: Open the Code Review Agents setup**
Click [**Repositories**](https://alpha.bito.ai/home/ai-agents/code-review-agent) under the **CODE REVIEW** section in the sidebar.
### **Step 3: Select your Git provider**
Bito supports integration with the following Git providers:
* GitHub
* GitHub (Self-Managed)
* GitLab
* GitLab (Self-Managed)
* Bitbucket
* Bitbucket (Self-Managed)
Since we are setting up the Agent for GitLab, select **GitLab** to proceed.
 ### **Step 4: Connect Bito to GitLab**
To enable merge request reviews, you’ll need to connect your Bito workspace to your GitLab account.
You can either connect using **OAuth (recommended)** for a seamless, one-click setup or manually enter your **Personal Access Token**.
To connect via OAuth, simply click the **Connect with OAuth (Recommended)** button. This will redirect you to the GitLab website, where you'll need to log in. Once authenticated, you'll be redirected back to Bito, confirming a successful connection.
### **Step 4: Connect Bito to GitLab**
To enable merge request reviews, you’ll need to connect your Bito workspace to your GitLab account.
You can either connect using **OAuth (recommended)** for a seamless, one-click setup or manually enter your **Personal Access Token**.
To connect via OAuth, simply click the **Connect with OAuth (Recommended)** button. This will redirect you to the GitLab website, where you'll need to log in. Once authenticated, you'll be redirected back to Bito, confirming a successful connection.
 If you prefer not to use OAuth, you can connect manually using a **Personal Access Token**.
Start by [generating a Personal Access Token](https://gitlab.com/-/user_settings/personal_access_tokens) with **`api`** scope in your GitLab account. For guidance, refer to the instructions in the [Prerequisites](#prerequisites) section.
Once generated, click the **Alternatively, use Personal or Group Access Token** button.
If you prefer not to use OAuth, you can connect manually using a **Personal Access Token**.
Start by [generating a Personal Access Token](https://gitlab.com/-/user_settings/personal_access_tokens) with **`api`** scope in your GitLab account. For guidance, refer to the instructions in the [Prerequisites](#prerequisites) section.
Once generated, click the **Alternatively, use Personal or Group Access Token** button.
 Now, enter the token into the **Personal Access Token** input field in Bito.
Click **Validate** to ensure the token is functioning properly.
Now, enter the token into the **Personal Access Token** input field in Bito.
Click **Validate** to ensure the token is functioning properly.
 If you've successfully connected via OAuth or manually validated your token, you can select your **GitLab Group** from the dropdown menu.
Click **Connect Bito to GitLab** to proceed.
If you've successfully connected via OAuth or manually validated your token, you can select your **GitLab Group** from the dropdown menu.
Click **Connect Bito to GitLab** to proceed.
 ### **Step 5: Enable AI Code Review Agent on repositories**
After connecting Bito to your GitLab account, you'll see a list of repositories that Bito has access to.
Use the toggles in the **Code Review Status** column to **enable** or **disable** the Agent for each repository.
### **Step 5: Enable AI Code Review Agent on repositories**
After connecting Bito to your GitLab account, you'll see a list of repositories that Bito has access to.
Use the toggles in the **Code Review Status** column to **enable** or **disable** the Agent for each repository.
 {% hint style="info" %}
To customize the Agent’s behavior, you can edit existing configurations or create new Agents as needed.
[Learn more](https://docs.bito.ai/ai-code-reviews-in-git/install-run-using-bito-cloud/create-or-customize-an-agent-instance)
{% endhint %}
### **Step 6: Automated and manual merge request reviews**
Once a repository is enabled, you can invoke the AI Code Review Agent in the following ways:
1. **Automated code review:** By default, the Agent automatically reviews all new merge requests and provides detailed feedback.
2. **Manually trigger code review:** To initiate a manual review, simply type **`/review`** in the comment box on the merge request and submit it. This action will start the code review process.
The AI-generated code review feedback will be posted as comments directly within your merge request, making it seamless to view and address suggestions right where they matter most.
{% hint style="info" %}
**Note:** To enhance efficiency, the automated code reviews are only triggered for merge requests merging into the repository’s default branch. This prevents unnecessary processing and Advanced AI requests usage.
To review additional branches, you can use the [Include Source/Target Branches filter](https://docs.bito.ai/excluding-files-folders-or-branches-with-filters#include-source-target-branches-filter). Bito will review merge requests when the source or target branch matches the list.
The **Include Source/Target Branches** filter applies only to automatically triggered reviews. Users should still be able to trigger reviews manually via the `/review` command.
{% endhint %}
{% hint style="info" %}
The AI Code Review Agent automatically reviews code changes up to 5000 lines when a merge request is created. For larger changes, you can use the **`/review`** command.
{% endhint %}
{% hint style="info" %}
It may take a few minutes to get the code review posted as a comment, depending on the size of the merge request.
{% endhint %}
### **Step 7: Specialized commands for code reviews**
Bito also offers **specialized commands** that are designed to provide detailed insights into specific areas of your source code, including security, performance, scalability, code structure, and optimization.
* **`/review security`**: Analyzes code to identify security vulnerabilities and ensure secure coding practices.
* **`/review performance`**: Evaluates code for performance issues, identifying slow or resource-heavy areas.
* **`/review scalability`**: Assesses the code's ability to handle increased usage and scale effectively.
* **`/review codeorg`**: Scans for readability and maintainability, promoting clear and efficient code organization.
* **`/review codeoptimize`**: Identifies optimization opportunities to enhance code efficiency and reduce resource usage.
By default, the **`/review`** command generates inline comments, meaning that code suggestions are inserted directly beneath the code diffs in each file. This approach provides a clearer view of the exact lines requiring improvement. However, if you prefer a code review in a single post rather than separate inline comments under the diffs, you can include the optional parameter: **`/review #inline_comment=False`**
For more details, refer to [Available Commands](https://docs.bito.ai/bito-dev-agents/ai-code-review-agent/available-commands).
### **Step 8: Chat with AI Code Review Agent**
Ask questions directly to the AI Code Review Agent regarding its code review feedback. You can inquire about highlighted issues, request alternative solutions, or seek clarifications on suggested fixes.
To start the conversation, type your question in the comment box within the inline suggestions on your merge request, and then submit it. Typically, Bito AI responses are delivered in about 10 seconds. On GitHub and Bitbucket, you need to manually refresh the page to see the responses, while GitLab updates automatically.
Bito supports over 20 languages—including English, Hindi, Chinese, and Spanish—so you can interact with the AI in the language you’re most comfortable with.
### Step 9: Configure Agent settings
[Agent settings](https://docs.bito.ai/ai-code-reviews-in-git/install-run-using-bito-cloud/create-or-customize-an-agent-instance) let you control how reviews are performed, ensuring feedback is tailored to your team’s needs. By adjusting the options, you can:
* Make reviews more focused and actionable.
* Apply your own coding standards.
* Reduce noise by excluding irrelevant files or branches.
* Add extra checks to improve code quality and security.
[**Learn more**](https://docs.bito.ai/ai-code-reviews-in-git/install-run-using-bito-cloud/create-or-customize-an-agent-instance)
## Screenshots
### Screenshot # 1
{% hint style="info" %}
*AI-generated merge request (MR) summary*
{% endhint %}
### Screenshot # 2
{% hint style="info" %}
**Changelist** showing key changes and impacted files in a merge request.
{% endhint %}
{% hint style="info" %}
To customize the Agent’s behavior, you can edit existing configurations or create new Agents as needed.
[Learn more](https://docs.bito.ai/ai-code-reviews-in-git/install-run-using-bito-cloud/create-or-customize-an-agent-instance)
{% endhint %}
### **Step 6: Automated and manual merge request reviews**
Once a repository is enabled, you can invoke the AI Code Review Agent in the following ways:
1. **Automated code review:** By default, the Agent automatically reviews all new merge requests and provides detailed feedback.
2. **Manually trigger code review:** To initiate a manual review, simply type **`/review`** in the comment box on the merge request and submit it. This action will start the code review process.
The AI-generated code review feedback will be posted as comments directly within your merge request, making it seamless to view and address suggestions right where they matter most.
{% hint style="info" %}
**Note:** To enhance efficiency, the automated code reviews are only triggered for merge requests merging into the repository’s default branch. This prevents unnecessary processing and Advanced AI requests usage.
To review additional branches, you can use the [Include Source/Target Branches filter](https://docs.bito.ai/excluding-files-folders-or-branches-with-filters#include-source-target-branches-filter). Bito will review merge requests when the source or target branch matches the list.
The **Include Source/Target Branches** filter applies only to automatically triggered reviews. Users should still be able to trigger reviews manually via the `/review` command.
{% endhint %}
{% hint style="info" %}
The AI Code Review Agent automatically reviews code changes up to 5000 lines when a merge request is created. For larger changes, you can use the **`/review`** command.
{% endhint %}
{% hint style="info" %}
It may take a few minutes to get the code review posted as a comment, depending on the size of the merge request.
{% endhint %}
### **Step 7: Specialized commands for code reviews**
Bito also offers **specialized commands** that are designed to provide detailed insights into specific areas of your source code, including security, performance, scalability, code structure, and optimization.
* **`/review security`**: Analyzes code to identify security vulnerabilities and ensure secure coding practices.
* **`/review performance`**: Evaluates code for performance issues, identifying slow or resource-heavy areas.
* **`/review scalability`**: Assesses the code's ability to handle increased usage and scale effectively.
* **`/review codeorg`**: Scans for readability and maintainability, promoting clear and efficient code organization.
* **`/review codeoptimize`**: Identifies optimization opportunities to enhance code efficiency and reduce resource usage.
By default, the **`/review`** command generates inline comments, meaning that code suggestions are inserted directly beneath the code diffs in each file. This approach provides a clearer view of the exact lines requiring improvement. However, if you prefer a code review in a single post rather than separate inline comments under the diffs, you can include the optional parameter: **`/review #inline_comment=False`**
For more details, refer to [Available Commands](https://docs.bito.ai/bito-dev-agents/ai-code-review-agent/available-commands).
### **Step 8: Chat with AI Code Review Agent**
Ask questions directly to the AI Code Review Agent regarding its code review feedback. You can inquire about highlighted issues, request alternative solutions, or seek clarifications on suggested fixes.
To start the conversation, type your question in the comment box within the inline suggestions on your merge request, and then submit it. Typically, Bito AI responses are delivered in about 10 seconds. On GitHub and Bitbucket, you need to manually refresh the page to see the responses, while GitLab updates automatically.
Bito supports over 20 languages—including English, Hindi, Chinese, and Spanish—so you can interact with the AI in the language you’re most comfortable with.
### Step 9: Configure Agent settings
[Agent settings](https://docs.bito.ai/ai-code-reviews-in-git/install-run-using-bito-cloud/create-or-customize-an-agent-instance) let you control how reviews are performed, ensuring feedback is tailored to your team’s needs. By adjusting the options, you can:
* Make reviews more focused and actionable.
* Apply your own coding standards.
* Reduce noise by excluding irrelevant files or branches.
* Add extra checks to improve code quality and security.
[**Learn more**](https://docs.bito.ai/ai-code-reviews-in-git/install-run-using-bito-cloud/create-or-customize-an-agent-instance)
## Screenshots
### Screenshot # 1
{% hint style="info" %}
*AI-generated merge request (MR) summary*
{% endhint %}
### Screenshot # 2
{% hint style="info" %}
**Changelist** showing key changes and impacted files in a merge request.
{% endhint %}
Changelist in AI Code Review Agent's feedback.
### Screenshot # 3
{% hint style="info" %}
*AI code review feedback posted as comments on the merge request.*
{% endhint %}
---
# Source: https://docs.bito.ai/ai-architect/guide-for-jetbrains-ai-assistant.md
# Guide for JetBrains AI Assistant
Use Bito's [**AI Architect**](https://docs.bito.ai/ai-architect/overview) with **JetBrains AI Assistant** to enhance your AI-powered coding experience.
Once connected via MCP (Model Context Protocol), JetBrains AI Assistant can leverage AI Architect’s deep contextual understanding of your project, enabling more accurate code suggestions, explanations, and code insights.
## Quick setup (recommended)
**Want to get started faster?** We offer an automated installer that can configure AI Architect for all your AI coding tools in just a few seconds.
The automated setup will:
* Detect all compatible AI tools installed on your system
* Configure them automatically with your credentials
* Save you time by eliminating manual configuration steps
👉 [**Try our Quick MCP Integration Guide**](https://docs.bito.ai/ai-architect/quick-mcp-integration-with-ai-coding-agents) for automated setup.
## Manual setup
If you prefer manual configuration, follow the step-by-step instructions below.
## Prerequisites
1. Follow the [**AI Architect installation instructions**](https://docs.bito.ai/ai-architect/install-ai-architect-self-hosted). Upon successful setup, you will receive a **Bito MCP URL** and **Bito MCP Access Token** that you need to enter in your coding agent.
2. [Download **BitoAIArchitectGuidelines.md** file](https://github.com/gitbito/ai-architect/blob/main/BitoAIArchitectGuidelines.md). You will need to copy/paste the content from this file later when configuring AI Architect.
* **Note:** This file contains best practices, usage instructions, and prompting guidelines for the Bito AI Architect MCP server. The setup will work without this file, but including it helps AI tools interact more effectively with the Bito AI Architect MCP server.
3. **JetBrains IDE**: IntelliJ IDEA 2025.1+ (or PyCharm, WebStorm, PhpStorm, etc. 2025.1+)
4. **AI Assistant Plugin (version 251.26094.80.5 or higher)**
1. Open your JetBrains IDE
2. Go to: **Settings** (Ctrl/Cmd + Alt + S)
3. Navigate to: **Plugins**
4. Search for "AI Assistant"
5. Verify version is 251.26094.80.5 or higher
5. **Node.js**: **20.18.1+** installed (for mcp-remote proxy)
1. **Why Node.js 20+?** The mcp-remote proxy depends on undici v7, which requires Node.js 20+ (needs the `File` global API added in Node 20.0.0). Node.js 18 and earlier will fail with `ReferenceError: File is not defined`.
2. Verify:
```shellscript
node --version # Should show v20.x.x or higher
npx --version
```
3. If Node.js is not installed or the version < 20 then [download Node.js 20.x LTS](https://nodejs.org/)
## Set up AI Architect
JetBrains AI Assistant has the same setup process across all platforms (Windows, macOS, Linux, WSL).
{% stepper %}
{% step %}
### Access MCP settings
1. Open your JetBrains IDE (IntelliJ IDEA, PyCharm, WebStorm, etc.)
2. Go to: **Settings** (Ctrl/Cmd + Alt + S)
3. Navigate to: **Tools** → **AI Assistant** → **Model Context Protocol (MCP)**
4. Click **Add** to add a new MCP server
{% endstep %}
{% step %}
### Configure `BitoAIArchitect`
The configuration dialog accepts JSON input. Paste the appropriate JSON configuration for your platform:
#### **macOS/Linux configuration:**
```json
{
"mcpServers": {
"BitoAIArchitect": {
"command": "npx",
"args": [
"-y",
"mcp-remote",
"",
"--header",
"Authorization:${AUTH_HEADER}",
"--header",
"x-email-id: "
],
"env": {
"AUTH_HEADER": "Bearer "
}
}
}
}
```
{% hint style="info" %}
**Note:**
* Replace `` with the **Bito MCP URL** you received after completing the AI Architect setup.
* For the Bito-hosted AI Architect, use the following URL format: `https://mcp.bito.ai//mcp`
Replace `` with your actual Bito workspace ID, which you can find after logging into your Bito account at [**alpha.bito.ai**](https://alpha.bito.ai/)
* Replace `` with the **Bito MCP Access Token** you received after completing the AI Architect setup.
* Replace `` with your actual email address.
{% endhint %}
#### **Windows configuration (IMPORTANT - uses cmd):**
```json
{
"mcpServers": {
"BitoAIArchitect": {
"command": "cmd",
"args": [
"/c",
"npx",
"-y",
"mcp-remote",
"",
"--header",
"Authorization:${AUTH_HEADER}",
"--header",
"x-email-id: "
],
"env": {
"AUTH_HEADER": "Bearer "
}
}
}
}
```
{% hint style="info" %}
**Note:**
* Replace `` with the **Bito MCP URL** you received after completing the AI Architect setup.
* For the Bito-hosted AI Architect, use the following URL format: `https://mcp.bito.ai//mcp`
Replace `` with your actual Bito workspace ID, which you can find after logging into your Bito account at [**alpha.bito.ai**](https://alpha.bito.ai/)
* Replace `` with the **Bito MCP Access Token** you received after completing the AI Architect setup.
* Replace `` with your actual email address.
{% endhint %}
{% endstep %}
{% step %}
### Save and restart
1. Click **OK** to save the MCP server configuration
2. Click **OK** to close Settings
3. Restart your IDE completely
{% endstep %}
{% step %}
### Verify connection
1. Go to: **Settings** → **Tools** → **AI Assistant** → **Model Context Protocol (MCP)**
2. Find `BitoAIArchitect` in the list
3. Check the **Status** column - should show **Running** or **Connected**
{% endstep %}
{% step %}
### Enable Codebase Mode
**IMPORTANT**: MCP tools only work in "Codebase" mode or Edit mode.
To use `BitoAIArchitect`:
1. Open JetBrains AI Assistant chat
2. Toggle on the **"Codebase"** mode switch at the top of the chat window
3. OR use Edit mode (Ctrl/Cmd + Shift + Enter), which implicitly enables codebase context
{% endstep %}
{% step %}
### Add guidelines (optional but highly recommended)
The [**BitoAIArchitectGuidelines.md** file](#prerequisites) contains best practices, usage instructions, and prompting guidelines for the Bito AI Architect MCP server.
The setup will work without this file, but including it helps AI tools interact more effectively with the Bito AI Architect MCP server.
To add Bito AI Architect usage rules to a specific project:
1. Navigate to your project root
2. Create `.aiassistant/rules/` directory:
```shellscript
mkdir -p .aiassistant/rules
```
3. Create a rule file (e.g., `bitoai-architect.md`):
Copy the contents of your [**BitoAIArchitectGuidelines.md** file](#prerequisites) into `.aiassistant/rules/bitoai-architect.md` file:
```shellscript
cp /path/to/BitoAIArchitectGuidelines.md .aiassistant/rules/bitoai-architect.md
```
4. In your IDE: **Settings** → **Tools** → **AI Assistant** → **Rules**
5. The rule file should appear automatically
6. Configure how it should be applied:
* **Always**: Applied to all chats automatically
* **Manually**: Invoked using `@rule:bitoai-architect`
* **By Model Decision**: AI decides when to apply
* **By File Patterns**: Applied when specific files are open
**What AI Assistant rules should contain:**
* `BitoAIArchitect` MCP usage instructions
* When to query organizational repositories
* How to search for dependencies and tech stacks
{% endstep %}
{% endstepper %}
## Troubleshooting
#### JetBrains AI Assistant not showing MCP settings:
1. Verify IDE version is 2025.1 or later
2. Verify AI Assistant plugin is version 251.26094.80.5+
3. Update both if needed
#### `BitoAIArchitect` not appearing or showing "Not started":
1. Verify Node.js is installed: `node --version`
2. Check that you've toggled "Codebase" mode ON in the chat
3. On Windows, ensure you're using `cmd` command (not `npx` directly)
4. Restart the IDE completely
5. Check IDE logs for errors: **Help** → **Show Log in Explorer/Finder**
* Look for files in the `mcp` folder
#### Connection errors:
1. **Test the endpoint manually:**
```shellscript
# Use proper MCP protocol to test authentication
curl -s -X POST \
-H "Authorization: Bearer " \
-H "Content-Type: application/json" \
-d '{"jsonrpc":"2.0","method":"initialize","params":{},"id":1}' \
```
{% hint style="info" %}
**Note:**
* Replace `` with the **Bito MCP URL** you received after completing the AI Architect setup.
* For the Bito-hosted AI Architect, use the following URL format: `https://mcp.bito.ai//mcp`
Replace `` with your actual Bito workspace ID, which you can find after logging into your Bito account at [**alpha.bito.ai**](https://alpha.bito.ai/)
* Replace `` with the **Bito MCP Access Token** you received after completing the AI Architect setup.
{% endhint %}
2. Verify your **Bito MCP URL** and **Bito MCP Access Token** are correct
3. Check firewall settings
4. Verify the `--header` argument format: `Authorization:${AUTH_HEADER}` (colon, no space)
#### Windows-specific issues:
1. Verify the JSON uses `"command": "cmd"` (not `npx`)
2. Ensure `"/c"` is the first element in the `args` array
3. Node.js must be in system PATH
---
# Source: https://docs.bito.ai/ai-architect/guide-for-junie-jetbrains.md
# Guide for Junie (JetBrains)
Use Bito's [**AI Architect**](https://docs.bito.ai/ai-architect/overview) with **Junie (JetBrains)** to enhance your AI-powered coding experience.
Once connected via MCP (Model Context Protocol), Junie can leverage AI Architect’s deep contextual understanding of your project, enabling more accurate code suggestions, explanations, and code insights.
## Quick setup (recommended)
**Want to get started faster?** We offer an automated installer that can configure AI Architect for all your AI coding tools in just a few seconds.
The automated setup will:
* Detect all compatible AI tools installed on your system
* Configure them automatically with your credentials
* Save you time by eliminating manual configuration steps
👉 [**Try our Quick MCP Integration Guide**](https://docs.bito.ai/ai-architect/quick-mcp-integration-with-ai-coding-agents) for automated setup.
## Manual setup
If you prefer manual configuration, follow the step-by-step instructions below.
## Prerequisites
1. Follow the [**AI Architect installation instructions**](https://docs.bito.ai/ai-architect/install-ai-architect-self-hosted). Upon successful setup, you will receive a **Bito MCP URL** and **Bito MCP Access Token** that you need to enter in your coding agent.
2. [Download **BitoAIArchitectGuidelines.md** file](https://github.com/gitbito/ai-architect/blob/main/BitoAIArchitectGuidelines.md). You will need to copy/paste the content from this file later when configuring AI Architect.
* **Note:** This file contains best practices, usage instructions, and prompting guidelines for the Bito AI Architect MCP server. The setup will work without this file, but including it helps AI tools interact more effectively with the Bito AI Architect MCP server.
3. **Junie installed in a JetBrains IDE** (IntelliJ IDEA, PyCharm, WebStorm, etc.)
4. **Node.js 20.18.1+** installed (for `mcp-remote` proxy)
1. **Why Node.js 20+?** The mcp-remote proxy depends on undici v7, which requires Node.js 20+ (needs the `File` global API added in Node 20.0.0). Node.js 18 and earlier will fail with `ReferenceError: File is not defined`.
2. **Verify:**
```shellscript
node --version # Should show v20.x.x or higher
npx --version
```
3. If Node.js is not installed or the version < 20 then [download Node.js 20.x LTS](https://nodejs.org/)
## Set up AI Architect
Junie has the same setup process across all platforms (Windows, macOS, Linux, WSL).
{% stepper %}
{% step %}
### Access Junie MCP settings
1. Open your JetBrains IDE (IntelliJ, PyCharm, etc.)
2. Go to: **Settings** (Ctrl/Cmd + Alt + S)
3. Navigate to: **Tools** → **Junie** → **MCP Settings**
4. Click the **+** (Add) button to open the global `mcp.json` configuration file in the editor, or manually edit the file as shown below
{% endstep %}
{% step %}
### Configure `BitoAIArchitect`
The global configuration file is located at:
* **macOS/Linux**: `~/.junie/mcp/mcp.json`
* **Windows**: `%USERPROFILE%\.junie\mcp\mcp.json`
**macOS/Linux configuration:**
```json
{
"mcpServers": {
"BitoAIArchitect": {
"command": "npx",
"args": [
"-y",
"mcp-remote",
"",
"--header",
"Authorization:${AUTH_HEADER}",
"--header",
"x-email-id: "
],
"env": {
"AUTH_HEADER": "Bearer "
}
}
}
}
```
{% hint style="info" %}
**Note:**
* Replace `` with the **Bito MCP URL** you received after completing the AI Architect setup.
* For the Bito-hosted AI Architect, use the following URL format: `https://mcp.bito.ai//mcp`
Replace `` with your actual Bito workspace ID, which you can find after logging into your Bito account at [**alpha.bito.ai**](https://alpha.bito.ai/)
* Replace `` with the **Bito MCP Access Token** you received after completing the AI Architect setup.
* Replace `` with your actual email address.
{% endhint %}
**Windows configuration (IMPORTANT - uses cmd /c):**
```json
{
"mcpServers": {
"BitoAIArchitect": {
"command": "cmd",
"args": [
"/c",
"npx",
"-y",
"mcp-remote",
"",
"--header",
"Authorization:${AUTH_HEADER}",
"--header",
"x-email-id: "
],
"env": {
"AUTH_HEADER": "Bearer "
}
}
}
}
```
{% hint style="info" %}
**Note:**
* Replace `` with the **Bito MCP URL** you received after completing the AI Architect setup.
* For the Bito-hosted AI Architect, use the following URL format: `https://mcp.bito.ai//mcp`
Replace `` with your actual Bito workspace ID, which you can find after logging into your Bito account at [**alpha.bito.ai**](https://alpha.bito.ai/)
* Replace `` with the **Bito MCP Access Token** you received after completing the AI Architect setup.
* Replace `` with your actual email address.
{% endhint %}
{% endstep %}
{% step %}
### Save and restart
1. Save the `mcp.json` file
2. Close all JetBrains IDE windows
3. Reopen your IDE
{% endstep %}
{% step %}
### Verify connection
1. Go to: **Settings** → **Tools** → **Junie** → **MCP Settings**
2. Check that `BitoAIArchitect` appears in the server list
3. Status should show as **Connected** or **Running**
{% endstep %}
{% step %}
### Add guidelines (optional but highly recommended)
The [**BitoAIArchitectGuidelines.md** file](#prerequisites) contains best practices, usage instructions, and prompting guidelines for the Bito AI Architect MCP server.
The setup will work without this file, but including it helps AI tools interact more effectively with the Bito AI Architect MCP server.
To add Bito AI Architect usage guidelines to a specific project:
1. Navigate to your project root
2. Create `.junie` directory:
```shellscript
mkdir -p .junie
```
Copy the contents of your [**BitoAIArchitectGuidelines.md** file](#prerequisites) into `.junie/guidelines.md` file:
```shellscript
cp /path/to/BitoAIArchitectGuidelines.md .junie/guidelines.md
```
3. Junie will automatically use these guidelines for the project
**What Junie guidelines should contain:**
* `BitoAIArchitect` MCP usage best practices
* When to query repository information
* How to search for dependencies and tech stacks
{% endstep %}
{% endstepper %}
## Troubleshooting
#### Junie not showing `BitoAIArchitect`:
1. Verify Node.js is installed: `node --version`
2. Check `mcp.json` syntax (must be valid JSON)
3. On Windows, ensure you're using `cmd` with `/c` argument
4. Restart the IDE completely
#### Connection errors:
1. **Test the endpoint manually:**
```shellscript
# Use proper MCP protocol to test authentication
curl -s -X POST \
-H "Authorization: Bearer " \
-H "Content-Type: application/json" \
-d '{"jsonrpc":"2.0","method":"initialize","params":{},"id":1}' \
```
{% hint style="info" %}
**Note:**
* Replace `` with the **Bito MCP URL** you received after completing the AI Architect setup.
* For the Bito-hosted AI Architect, use the following URL format: `https://mcp.bito.ai//mcp`
Replace `` with your actual Bito workspace ID, which you can find after logging into your Bito account at [**alpha.bito.ai**](https://alpha.bito.ai/)
* Replace `` with the **Bito MCP Access Token** you received after completing the AI Architect setup.
{% endhint %}
2. Verify your **Bito MCP URL** and **Bito MCP Access Token** are correct
3. Check firewall settings
---
# Source: https://docs.bito.ai/ai-architect/guide-for-windsurf.md
# Guide for Windsurf
Use Bito's [**AI Architect**](https://docs.bito.ai/ai-architect/overview) with **Windsurf** to enhance your AI-powered coding experience.
Once connected via MCP (Model Context Protocol), Windsurf can leverage AI Architect’s deep contextual understanding of your project, enabling more accurate code suggestions, explanations, and code insights.
## Quick setup (recommended)
**Want to get started faster?** We offer an automated installer that can configure AI Architect for all your AI coding tools in just a few seconds.
The automated setup will:
* Detect all compatible AI tools installed on your system
* Configure them automatically with your credentials
* Save you time by eliminating manual configuration steps
👉 [**Try our Quick MCP Integration Guide**](https://docs.bito.ai/ai-architect/quick-mcp-integration-with-ai-coding-agents) for automated setup.
## Manual setup
If you prefer manual configuration, follow the step-by-step instructions below.
## Prerequisites
1. Follow the [**AI Architect installation instructions**](https://docs.bito.ai/ai-architect/install-ai-architect-self-hosted). Upon successful setup, you will receive a **Bito MCP URL** and **Bito MCP Access Token** that you need to enter in your coding agent.
2. [Download **BitoAIArchitectGuidelines.md** file](https://github.com/gitbito/ai-architect/blob/main/BitoAIArchitectGuidelines.md). You will need to copy/paste the content from this file later when configuring AI Architect.
* **Note:** This file contains best practices, usage instructions, and prompting guidelines for the Bito AI Architect MCP server. The setup will work without this file, but including it helps AI tools interact more effectively with the Bito AI Architect MCP server.
## Set up AI Architect
Follow the setup instructions for your operating system:
* [**Windows**](#windows)
* [**macOS/Linux**](#macos-linux)
## Windows
{% stepper %}
{% step %}
### Create Windsurf config directory
1. Press **Win + R**
2. Type: `%USERPROFILE%\.codeium\windsurf`
3. Press **Enter**
If the folders don't exist, create them:
1. Open File Explorer
2. Navigate to `%USERPROFILE%`
3. Create folders: `.codeium\windsurf`
{% endstep %}
{% step %}
### Create or edit mcp\_config.json
1. Open `%USERPROFILE%\.codeium\windsurf\mcp_config.json` in a text editor.
2. If the file doesn't exist, create it with this content:
```json
{
"mcpServers": {
"BitoAIArchitect": {
"serverUrl": "",
"headers": {
"Authorization": "Bearer ",
"x-email-id": ""
}
}
}
}
```
{% hint style="info" %}
**Note:**
* Replace `` with the **Bito MCP URL** you received after completing the AI Architect setup.
* For the Bito-hosted AI Architect, use the following URL format: `https://mcp.bito.ai//mcp`
Replace `` with your actual Bito workspace ID, which you can find after logging into your Bito account at [**alpha.bito.ai**](https://alpha.bito.ai/)
* Replace `` with the **Bito MCP Access Token** you received after completing the AI Architect setup.
* Replace `` with your actual email address.
{% endhint %}
3. If the file exists with other servers, add `BitoAIArchitect` to the `mcpServers` object:
```json
{
"mcpServers": {
"existing-server": {
...
},
"BitoAIArchitect": {
"serverUrl": "",
"headers": {
"Authorization": "Bearer ",
"x-email-id": ""
}
}
}
}
```
{% hint style="info" %}
**Note:**
* Replace `` with the **Bito MCP URL** you received after completing the AI Architect setup.
* For the Bito-hosted AI Architect, use the following URL format: `https://mcp.bito.ai//mcp`
Replace `` with your actual Bito workspace ID, which you can find after logging into your Bito account at [**alpha.bito.ai**](https://alpha.bito.ai/)
* Replace `` with the **Bito MCP Access Token** you received after completing the AI Architect setup.
* Replace `` with your actual email address.
{% endhint %}
4. Save
{% endstep %}
{% step %}
### Add guidelines (optional but highly recommended)
The [**BitoAIArchitectGuidelines.md** file](#prerequisites) contains best practices, usage instructions, and prompting guidelines for the Bito AI Architect MCP server.
The setup will work without this file, but including it helps AI tools interact more effectively with the Bito AI Architect MCP server.
#### Option A: Global guidelines (applies to all projects):
Create directory:
```shellscript
mkdir %USERPROFILE%\.codeium\windsurf\memories
```
Copy the contents of your [**BitoAIArchitectGuidelines.md** file](#prerequisites) into `global_rules.md` file:
```shellscript
copy BitoAIArchitectGuidelines.md %USERPROFILE%\.codeium\windsurf\memories\global_rules.md
```
#### Option B: Project-level guidelines (applies to specific project):
In your project directory, create `.windsurf\rules` directory:
```shellscript
mkdir .windsurf\rules
```
Copy the contents of your [**BitoAIArchitectGuidelines.md** file](#prerequisites) into `bitoai-architect.md` file:
```shellscript
copy BitoAIArchitectGuidelines.md .windsurf\rules\bitoai-architect.md
```
{% hint style="info" %}
**Note:** Windsurf Wave 8+ uses `.windsurf\rules\*.md` format for project-level rules. Global guidelines in `~/.codeium/windsurf/memories/global_rules.md` are supported in all versions.
{% endhint %}
{% endstep %}
{% step %}
### Restart Windsurf
1. Close Windsurf completely
2. Reopen Windsurf
3. Open **Settings → Cascade → MCP Servers**
4. Click "Refresh"
5. Verify `BitoAIArchitect` appears with green status
{% endstep %}
{% endstepper %}
## macOS/Linux
{% stepper %}
{% step %}
### Create Windsurf config directory
```shellscript
mkdir -p ~/.codeium/windsurf
```
{% endstep %}
{% step %}
### Create or edit mcp\_config.json
```shellscript
nano ~/.codeium/windsurf/mcp_config.json
```
Add this content:
```json
{
"mcpServers": {
"BitoAIArchitect": {
"serverUrl": "",
"headers": {
"Authorization": "Bearer ",
"x-email-id": ""
}
}
}
}
```
{% hint style="info" %}
**Note:**
* Replace `` with the **Bito MCP URL** you received after completing the AI Architect setup.
* For the Bito-hosted AI Architect, use the following URL format: `https://mcp.bito.ai//mcp`
Replace `` with your actual Bito workspace ID, which you can find after logging into your Bito account at [**alpha.bito.ai**](https://alpha.bito.ai/)
* Replace `` with the **Bito MCP Access Token** you received after completing the AI Architect setup.
* Replace `` with your actual email address.
{% endhint %}
Save and exit (Ctrl+O, Enter, Ctrl+X)
{% endstep %}
{% step %}
### Add guidelines (optional but highly recommended)
The [**BitoAIArchitectGuidelines.md** file](#prerequisites) contains best practices, usage instructions, and prompting guidelines for the Bito AI Architect MCP server.
The setup will work without this file, but including it helps AI tools interact more effectively with the Bito AI Architect MCP server.
#### Option A: Global guidelines (applies to all projects):
Create directory:
```shellscript
mkdir -p ~/.codeium/windsurf/memories
```
Copy the contents of your [**BitoAIArchitectGuidelines.md** file](#prerequisites) into `global_rules.md` file:
```shellscript
cp BitoAIArchitectGuidelines.md ~/.codeium/windsurf/memories/global_rules.md
```
#### Option B: Project-level guidelines (applies to specific project):
In your project directory, create `.windsurf/rules` directory:
```shellscript
mkdir -p .windsurf/rules
```
Copy the contents of your [**BitoAIArchitectGuidelines.md** file](#prerequisites) into `bitoai-architect.md` file:
```shellscript
cp BitoAIArchitectGuidelines.md .windsurf/rules/bitoai-architect.md
```
{% hint style="info" %}
**Note:** Windsurf Wave 8+ uses `.windsurf/rules/*.md` format for project-level rules. Global guidelines in `~/.codeium/windsurf/memories/global_rules.md` are supported in all versions.
{% endhint %}
{% endstep %}
{% step %}
### Restart Windsurf
1. Close Windsurf completely
2. Reopen Windsurf
3. Open **Settings → Cascade → MCP Servers**
4. Click "Refresh"
5. Verify `BitoAIArchitect` appears with green status
{% endstep %}
{% endstepper %}
## Troubleshooting Windsurf
#### Server not showing:
```shellscript
# Verify file location
ls -la ~/.codeium/windsurf/mcp_config.json
# Check permissions
chmod 755 ~/.codeium/windsurf
chmod 644 ~/.codeium/windsurf/mcp_config.json
# Verify JSON syntax
cat ~/.codeium/windsurf/mcp_config.json | python -m json.tool
```
#### Connection errors:
* Verify **Bito MCP URL** and **Bito MCP Access Token** are correct.
* Test endpoint with MCP protocol:
```shellscript
curl -s -X POST \
-H "Authorization: Bearer " \
-H "Content-Type: application/json" \
-d '{"jsonrpc":"2.0","method":"initialize","params":{},"id":1}' \
# Should return HTTP 200 with JSON response for valid credentials
# HTTP 401: Invalid Bito MCP Access Token
# HTTP 404: Invalid Bito MCP URL
```
{% hint style="info" %}
**Note:**
* Replace `` with the **Bito MCP URL** you received after completing the AI Architect setup.
* For the Bito-hosted AI Architect, use the following URL format: `https://mcp.bito.ai//mcp`
Replace `` with your actual Bito workspace ID, which you can find after logging into your Bito account at [**alpha.bito.ai**](https://alpha.bito.ai/)
* Replace `` with the **Bito MCP Access Token** you received after completing the AI Architect setup.
{% endhint %}
* Check **Settings → Cascade → MCP Servers** for error messages.
---
# Source: https://docs.bito.ai/ai-code-reviews-in-ide/ai-that-understands-your-code/how-does-bito-understand-my-code.md
# How does Bito Understand My Code?
Bito deploys a [**Vector Database**](https://docs.bito.ai/help/bitos-ai-stack/vector-databases) locally on the user’s machine, bundled as part of the Bito IDE plug-in. This database uses [**Embeddings**](https://docs.bito.ai/help/bitos-ai-stack/embeddings) (a vector with over 1,000 dimensions) to retrieve text, function names, objects, etc. from the codebase and then transform them into multi-dimensional vector space.
Then when you give it a function name or ask it a question, that query is converted into a vector and is compared to other vectors nearby. This returns the relevant search results. So, it's a way to perform search not on keywords, but on meaning. Vector Databases are able to do this kind of search very quickly.
{% hint style="info" %}
Learn more about [**how Bito indexes your code**](https://docs.bito.ai/help/bitos-ai-stack/indexing) so that it can understand it.
{% endhint %}
Bito also uses an **Agent Selection Framework** that acts like an autonomous entity capable of perceiving its environment, making decisions, and taking actions to achieve certain goals. It figures out if it’s necessary to do an embeddings comparison on your codebase, do we need to perform an action against Jira, or do we do something else.
Finally, Bito utilizes [**Large Language Models (LLMs)**](https://docs.bito.ai/help/bitos-ai-stack/large-language-models-llm) from Open AI, Anthropic, and others that actually provide the answer to the question by leveraging the context provided by the Agent Selection Framework and the embeddings.
This is what makes us stand out from other AI tools like ChatGPT, GitHub Copilot, etc. that do not understand your entire codebase.
We’re making significant innovations in our [**AI Stack**](https://docs.bito.ai/help/bitos-ai-stack) to simplify coding for everyone. To learn more about this head over to [**Bito’s AI Stack documentation**](https://docs.bito.ai/help/bitos-ai-stack).
---
# Source: https://docs.bito.ai/ai-code-reviews-in-ide/ai-that-understands-your-code/how-it-works.md
# How it Works?
{% embed url="" %}
When you open a project in Visual Studio Code or JetBrains IDEs, Bito lets you enable the [**indexing**](https://docs.bito.ai/help/bitos-ai-stack/indexing) of code files from that project’s folder. Basically, this indexing mechanism leverages our new [**AI Stack**](https://docs.bito.ai/help/bitos-ai-stack) that enables Bito to understand your entire codebase and answer any questions regarding it.
The index is stored locally on your system to provide better performance while maintaining the security/privacy of your private code.
{% hint style="info" %}
It takes 12 minutes per each 10MB of code to understand your repo, as the index is being built locally.
{% endhint %}
## How to Ask Questions?
Once indexing is complete, you can ask any question in the Bito chatbox. Bito uses AI to determine if you are asking about something in your codebase. If Bito is confident, it grabs the relevant parts of your code from our [**index**](https://docs.bito.ai/help/bitos-ai-stack/indexing) and feeds them to the [**Large Language Models (LLMs)**](https://docs.bito.ai/help/bitos-ai-stack/large-language-models-llm) for accurate answers. But if it's unsure, Bito will ask you to confirm before proceeding.
 In case you ask a general question (not related to your codebase), then Bito will directly send your request to our LLM without first looking for the appropriate local context.
However, if you want to ask a question about your code no matter what, then you can use specific keywords such as **"my code", "my repo", "my project", "my workspace"**, etc., in your question.
The complete list of these keywords is given on our [**Available Keywords**](https://docs.bito.ai/ai-code-reviews-in-ide/ai-that-understands-your-code/available-keywords) page.
Once Bito sees any input containing these keywords, it will use the index to identify relevant portions of code or content in your folder and use it for processing your question, query, or task.
## Security of your code
As usual, security is top of mind at Bito, especially when it comes to your code. A fundamental approach we have taken is to keep all code on your machine, and not store any code, code snippets, indexes, or [**embedding vectors**](https://docs.bito.ai/help/bitos-ai-stack/embeddings) on Bito’s servers or our API partners. All code remains on your machine, Bito does not store it. In addition, none of your code is used for AI model training.
Learn more about [**Bito’s Privacy and Security Practices**](https://docs.bito.ai/privacy-and-security).
---
# Source: https://docs.bito.ai/other-bito-ai-tools/bito-cli/how-to-use.md
# Source: https://docs.bito.ai/ai-code-reviews-in-cli/how-to-use.md
# How to use?
Get up and running in minutes. This guide walks you through running your first code review from the terminal and shows common workflows you can adopt right away.
## Prerequisites
Before you begin, make sure you have:
* ✅ Installed the CLI ([Installation guide](https://docs.bito.ai/ai-code-reviews-in-cli/installation-guide))
* ✅ Configured your [Bito API key (aka Bito Access Key)](https://docs.bito.ai/help/account-and-settings/access-key)
* ✅ A Git repository with code changes (committed or uncommitted)
## Run your first code review
#### Review all changes (default)
From your project's root directory, run:
```shellscript
bitoreview review
```
**Command format:**
```shellscript
bitoreview review [files...] [options]
```
**Options:**
| Flag | Description |
| :----------------------: | :----------------------------------------------: |
| `-t, --type ` | Review scope: `all`, `uncommitted`, `committed` |
| `-i, --interactive` | Enable interactive fix application |
| `--plain` | Plain text output (no colors) |
| `--prompt-only` | Minimal output optimized for AI agents |
| `--focus ` | Focus area (see Focus Areas) |
| `--mode ` | `essential` (HIGH only) or `comprehensive` (all) |
| `--severity ` | Filter by severity: `high`, `medium`, `low` |
| `--base ` | Base branch for comparison |
| `--base-commit ` | Specific commit for comparison |
| `--scm ` | Override SCM: `git`, `svn`, `hg`, `p4`, `plain` |
| `-c, --config ` | Custom config file path |
| `--api-key ` | Pass API key directly |
| `--cwd ` | Set working directory |
| `-d, --debug` | Enable debug output |
| `-v, --verbose` | Enable verbose logging |
| `--max-retries ` | Retry attempts (default: 2) |
| `--no-color` | Disable colored output |
{% hint style="info" %}
For complete reference of CLI commands, refer to [Available commands](https://docs.bito.ai/ai-code-reviews-in-cli/available-commands).
{% endhint %}
#### Review only uncommitted changes
Use this while actively coding, before committing:
```shellscript
bitoreview review --type uncommitted
```
#### Review only committed changes
Review commits that haven't been pushed yet:
```shellscript
bitoreview review --type committed
```
#### Review specific files
Limit the review scope to specific files:
```shellscript
bitoreview review src/api/*.js src/utils/helper.js
```
#### Review changes against a specific branch
Compare your current branch with another branch (for example, `main`):
```shellscript
bitoreview review --base main
```
#### Review changes against a specific commit
Compare your current code with a specific commit by providing its hash:
```shellscript
bitoreview review --base-commit abc123
```
{% hint style="info" %}
**Note:** replace `abc123` with your actual commit hash.
{% endhint %}
#### Short alias for `bitoreview` command
You can use `br` as a shortcut:
```shellscript
br review
```
```shellscript
br review --type uncommitted
```
## Review modes
{% stepper %}
{% step %}
### Essential mode (fast, critical issues only)
* Only shows HIGH severity issues
* Ideal for CI/CD pipelines and pre-commit hooks
* Quick, focused feedback
```shellscript
bitoreview review --mode essential
```
{% endstep %}
{% step %}
### Comprehensive mode (full analysis)
* Shows all severity levels (HIGH, MEDIUM, LOW)
* Thorough analysis for pull requests and code audits
* This is the **default mode**.
```shellscript
bitoreview review --mode comprehensive
```
{% endstep %}
{% endstepper %}
## Focus areas
Use `--focus ` to concentrate the review on specific aspects:
| Focus area | Description |
| :--------------: | :---------------------------------------------------: |
| `security` | SQL injection, authentication, data validation, XSS |
| `performance` | Bottlenecks, memory leaks, optimization opportunities |
| `bugs` | Logic errors, edge cases, runtime errors |
| `best-practices` | Code style, design patterns, maintainability |
| `tests` | Test coverage, test quality, testability |
| `documentation` | Comments, documentation, code clarity |
**Example:**
```shellscript
bitoreview review --focus security --mode essential
```
## Severity levels
| Level | Description |
| :------: | :-----------------------------------------------------------: |
| `high` | Must-fix: crashes, security vulnerabilities, breaking changes |
| `medium` | Should-fix: best practice violations, moderate issues |
| `low` | Nice-to-have: formatting, minor refactoring suggestions |
Filter by minimum severity:
```shellscript
bitoreview review --severity high
```
## Output formats
{% stepper %}
{% step %}
### Interactive mode (default)
Rich terminal UI with:
* Colored output
* Tables for metrics and issues
* Real-time progress spinners
```shellscript
bitoreview review
```
{% endstep %}
{% step %}
### Plain text mode
No colors, suitable for logs and CI/CD:
```shellscript
bitoreview review --plain
```
Save to file:
```shellscript
bitoreview review --plain > review-report.txt
```
{% endstep %}
{% step %}
### Prompt-only mode
Minimal output optimized for AI agents:
```shellscript
bitoreview review --prompt-only
```
{% endstep %}
{% endstepper %}
## Interactive fix application
Enable interactive mode to review and apply suggested fixes one by one:
```shellscript
bitoreview review --interactive
# or
bitoreview review -i
```
#### Interactive prompts
For each fixable issue, you'll see:
| Option | Action |
| ---------- | ------------------------------------------- |
| `y` (yes) | Apply this fix |
| `n` (no) | Skip this fix |
| `s` (skip) | Same as 'no' |
| `a` (all) | Apply all remaining fixes without prompting |
| `q` (quit) | Exit interactive mode |
#### Backup files
When fixes are applied, backup files are automatically created with the `.bitoreview-backup` extension.
## Multi-SCM support
The CLI automatically detects your version control system:
| SCM | Detection |
| :---------: | :--------------: |
| Git | `.git` directory |
| SVN | `.svn` directory |
| Mercurial | `.hg` directory |
| Perforce | `.p4config` file |
| Plain files | No VCS required |
#### Override SCM detection
```shellscript
bitoreview review --scm git
bitoreview review --scm svn
bitoreview review --scm hg
bitoreview review --scm p4
bitoreview review --scm plain
```
#### Review types across SCMs
| Review type | Git | SVN | Mercurial | Perforce |
| :-----------: | :----------: | :----------: | :---------: | :-------------: |
| `uncommitted` | Working tree | Working copy | Working dir | Pending changes |
| `committed` | Committed | Revisions | Changesets | Submitted |
| `all` | Both | Both | Both | Both |
## Combine review options for precision
You can mix options to match your workflow:
```shellscript
# Quick security check before commit
bitoreview review --type uncommitted --focus security --mode essential
# High-severity performance issues vs main branch
bitoreview review --base main --focus performance --severity high
# Full review of selected files
bitoreview review src/auth/*.js --mode comprehensive
```
## Configuration
Customize settings to match your project's needs and workflow preferences.
#### Configuration methods
AI Code Reviews in CLI can be configured in three ways, with each method overriding the previous:
1. **Built-in defaults** - Sensible defaults that work for most projects
2. **Configuration file** - Project-specific settings in `.bitoreview.yaml`
3. **CLI flags** - Per-command overrides (highest priority)
#### Configuration file
Create a `.bitoreview.yaml` file in your project root to set default options:
```shellscript
# Review scope: all, uncommitted, committed
type: all
# Review mode: essential (HIGH only) or comprehensive (all severities)
mode: comprehensive
# Focus area: security, performance, bugs, best-practices, tests, documentation
focus: best-practices
# Minimum severity: high, medium, low
severity: medium
# Custom instructions for the AI reviewer
customInstructions: |
- Pay special attention to error handling
- Check for proper input validation
- Ensure consistent coding style
```
{% hint style="info" %}
For complete reference of review options, refer to [Available commands](https://docs.bito.ai/ai-code-reviews-in-cli/available-commands).
{% endhint %}
#### Environment variables
| Variable | Description |
| -------------- | ------------------------------------------------------------------------------------------------------------------ |
| `BITO_API_KEY` | [Bito API key (aka Bito Access key)](https://docs.bito.ai/help/account-and-settings/access-key) for authentication |
## Getting help
View help directly from the CLI:
```shellscript
# Show help
bitoreview --help
bitoreview review --help
bitoreview config --help
# Show version
bitoreview --version
```
**Still running into issues?**\
👉 Visit the [**Troubleshooting guide**](https://docs.bito.ai/ai-code-reviews-in-cli/troubleshooting) to find solutions for common installation, configuration, and runtime problems, along with tips for resolving frequent errors quickly.
---
# Source: https://docs.bito.ai/ai-code-reviews-in-git/implementing-custom-code-review-rules.md
# Implementing custom code review rules
Bito’s [AI Code Review Agent](https://docs.bito.ai/ai-code-reviews-in-git/overview) offers a flexible solution for teams looking to enforce custom code review rules, standards, and guidelines tailored to their unique development practices. Whether your team follows specific coding conventions or industry best practices, you can customize the Agent to suite your needs.
We support three ways to customize AI Code Review Agent’s suggestions:
1. [**Provide feedback on Bito-reported issues in pull requests**](#id-1-provide-feedback-on-bito-reported-issues), and the AI Code Review Agent automatically adapts by creating code review rules to prevent similar suggestions in the future.
2. [**Create custom code review guidelines via the dashboard**](#id-2-create-custom-code-review-guidelines). Define rules through the [**Custom Guidelines**](https://alpha.bito.ai/home/ai-agents/custom-guidelines) dashboard in Bito Cloud and apply them to agent instances in your workspace.
3. [**Use project-specific guideline files**](#id-3-use-project-specific-guideline-files). Add guideline files (like `.cursor/rules/*.mdc`, `.windsurf/rules/*.md`, `CLAUDE.md`, `GEMINI.md`, or `AGENTS.md`) to your repository, and the AI Code Review Agent automatically uses them during pull request reviews to provide feedback aligned with your project's standards.
## 1- Provide feedback on Bito-reported issues
AI Code Review Agent refines its suggestions based on your feedback. When you **provide negative feedback on Bito-reported issues in pull requests**, the Agent automatically adapts by creating **custom code review rules** to prevent similar suggestions in the future.
Depending on your Git platform, you can provide negative feedback in the following ways:
* **GitHub:** Select the checkbox given in feedback question at the end of each Bito suggestion or leave a negative comment explaining the issue with the suggestion.
In case you ask a general question (not related to your codebase), then Bito will directly send your request to our LLM without first looking for the appropriate local context.
However, if you want to ask a question about your code no matter what, then you can use specific keywords such as **"my code", "my repo", "my project", "my workspace"**, etc., in your question.
The complete list of these keywords is given on our [**Available Keywords**](https://docs.bito.ai/ai-code-reviews-in-ide/ai-that-understands-your-code/available-keywords) page.
Once Bito sees any input containing these keywords, it will use the index to identify relevant portions of code or content in your folder and use it for processing your question, query, or task.
## Security of your code
As usual, security is top of mind at Bito, especially when it comes to your code. A fundamental approach we have taken is to keep all code on your machine, and not store any code, code snippets, indexes, or [**embedding vectors**](https://docs.bito.ai/help/bitos-ai-stack/embeddings) on Bito’s servers or our API partners. All code remains on your machine, Bito does not store it. In addition, none of your code is used for AI model training.
Learn more about [**Bito’s Privacy and Security Practices**](https://docs.bito.ai/privacy-and-security).
---
# Source: https://docs.bito.ai/other-bito-ai-tools/bito-cli/how-to-use.md
# Source: https://docs.bito.ai/ai-code-reviews-in-cli/how-to-use.md
# How to use?
Get up and running in minutes. This guide walks you through running your first code review from the terminal and shows common workflows you can adopt right away.
## Prerequisites
Before you begin, make sure you have:
* ✅ Installed the CLI ([Installation guide](https://docs.bito.ai/ai-code-reviews-in-cli/installation-guide))
* ✅ Configured your [Bito API key (aka Bito Access Key)](https://docs.bito.ai/help/account-and-settings/access-key)
* ✅ A Git repository with code changes (committed or uncommitted)
## Run your first code review
#### Review all changes (default)
From your project's root directory, run:
```shellscript
bitoreview review
```
**Command format:**
```shellscript
bitoreview review [files...] [options]
```
**Options:**
| Flag | Description |
| :----------------------: | :----------------------------------------------: |
| `-t, --type ` | Review scope: `all`, `uncommitted`, `committed` |
| `-i, --interactive` | Enable interactive fix application |
| `--plain` | Plain text output (no colors) |
| `--prompt-only` | Minimal output optimized for AI agents |
| `--focus ` | Focus area (see Focus Areas) |
| `--mode ` | `essential` (HIGH only) or `comprehensive` (all) |
| `--severity ` | Filter by severity: `high`, `medium`, `low` |
| `--base ` | Base branch for comparison |
| `--base-commit ` | Specific commit for comparison |
| `--scm ` | Override SCM: `git`, `svn`, `hg`, `p4`, `plain` |
| `-c, --config ` | Custom config file path |
| `--api-key ` | Pass API key directly |
| `--cwd ` | Set working directory |
| `-d, --debug` | Enable debug output |
| `-v, --verbose` | Enable verbose logging |
| `--max-retries ` | Retry attempts (default: 2) |
| `--no-color` | Disable colored output |
{% hint style="info" %}
For complete reference of CLI commands, refer to [Available commands](https://docs.bito.ai/ai-code-reviews-in-cli/available-commands).
{% endhint %}
#### Review only uncommitted changes
Use this while actively coding, before committing:
```shellscript
bitoreview review --type uncommitted
```
#### Review only committed changes
Review commits that haven't been pushed yet:
```shellscript
bitoreview review --type committed
```
#### Review specific files
Limit the review scope to specific files:
```shellscript
bitoreview review src/api/*.js src/utils/helper.js
```
#### Review changes against a specific branch
Compare your current branch with another branch (for example, `main`):
```shellscript
bitoreview review --base main
```
#### Review changes against a specific commit
Compare your current code with a specific commit by providing its hash:
```shellscript
bitoreview review --base-commit abc123
```
{% hint style="info" %}
**Note:** replace `abc123` with your actual commit hash.
{% endhint %}
#### Short alias for `bitoreview` command
You can use `br` as a shortcut:
```shellscript
br review
```
```shellscript
br review --type uncommitted
```
## Review modes
{% stepper %}
{% step %}
### Essential mode (fast, critical issues only)
* Only shows HIGH severity issues
* Ideal for CI/CD pipelines and pre-commit hooks
* Quick, focused feedback
```shellscript
bitoreview review --mode essential
```
{% endstep %}
{% step %}
### Comprehensive mode (full analysis)
* Shows all severity levels (HIGH, MEDIUM, LOW)
* Thorough analysis for pull requests and code audits
* This is the **default mode**.
```shellscript
bitoreview review --mode comprehensive
```
{% endstep %}
{% endstepper %}
## Focus areas
Use `--focus ` to concentrate the review on specific aspects:
| Focus area | Description |
| :--------------: | :---------------------------------------------------: |
| `security` | SQL injection, authentication, data validation, XSS |
| `performance` | Bottlenecks, memory leaks, optimization opportunities |
| `bugs` | Logic errors, edge cases, runtime errors |
| `best-practices` | Code style, design patterns, maintainability |
| `tests` | Test coverage, test quality, testability |
| `documentation` | Comments, documentation, code clarity |
**Example:**
```shellscript
bitoreview review --focus security --mode essential
```
## Severity levels
| Level | Description |
| :------: | :-----------------------------------------------------------: |
| `high` | Must-fix: crashes, security vulnerabilities, breaking changes |
| `medium` | Should-fix: best practice violations, moderate issues |
| `low` | Nice-to-have: formatting, minor refactoring suggestions |
Filter by minimum severity:
```shellscript
bitoreview review --severity high
```
## Output formats
{% stepper %}
{% step %}
### Interactive mode (default)
Rich terminal UI with:
* Colored output
* Tables for metrics and issues
* Real-time progress spinners
```shellscript
bitoreview review
```
{% endstep %}
{% step %}
### Plain text mode
No colors, suitable for logs and CI/CD:
```shellscript
bitoreview review --plain
```
Save to file:
```shellscript
bitoreview review --plain > review-report.txt
```
{% endstep %}
{% step %}
### Prompt-only mode
Minimal output optimized for AI agents:
```shellscript
bitoreview review --prompt-only
```
{% endstep %}
{% endstepper %}
## Interactive fix application
Enable interactive mode to review and apply suggested fixes one by one:
```shellscript
bitoreview review --interactive
# or
bitoreview review -i
```
#### Interactive prompts
For each fixable issue, you'll see:
| Option | Action |
| ---------- | ------------------------------------------- |
| `y` (yes) | Apply this fix |
| `n` (no) | Skip this fix |
| `s` (skip) | Same as 'no' |
| `a` (all) | Apply all remaining fixes without prompting |
| `q` (quit) | Exit interactive mode |
#### Backup files
When fixes are applied, backup files are automatically created with the `.bitoreview-backup` extension.
## Multi-SCM support
The CLI automatically detects your version control system:
| SCM | Detection |
| :---------: | :--------------: |
| Git | `.git` directory |
| SVN | `.svn` directory |
| Mercurial | `.hg` directory |
| Perforce | `.p4config` file |
| Plain files | No VCS required |
#### Override SCM detection
```shellscript
bitoreview review --scm git
bitoreview review --scm svn
bitoreview review --scm hg
bitoreview review --scm p4
bitoreview review --scm plain
```
#### Review types across SCMs
| Review type | Git | SVN | Mercurial | Perforce |
| :-----------: | :----------: | :----------: | :---------: | :-------------: |
| `uncommitted` | Working tree | Working copy | Working dir | Pending changes |
| `committed` | Committed | Revisions | Changesets | Submitted |
| `all` | Both | Both | Both | Both |
## Combine review options for precision
You can mix options to match your workflow:
```shellscript
# Quick security check before commit
bitoreview review --type uncommitted --focus security --mode essential
# High-severity performance issues vs main branch
bitoreview review --base main --focus performance --severity high
# Full review of selected files
bitoreview review src/auth/*.js --mode comprehensive
```
## Configuration
Customize settings to match your project's needs and workflow preferences.
#### Configuration methods
AI Code Reviews in CLI can be configured in three ways, with each method overriding the previous:
1. **Built-in defaults** - Sensible defaults that work for most projects
2. **Configuration file** - Project-specific settings in `.bitoreview.yaml`
3. **CLI flags** - Per-command overrides (highest priority)
#### Configuration file
Create a `.bitoreview.yaml` file in your project root to set default options:
```shellscript
# Review scope: all, uncommitted, committed
type: all
# Review mode: essential (HIGH only) or comprehensive (all severities)
mode: comprehensive
# Focus area: security, performance, bugs, best-practices, tests, documentation
focus: best-practices
# Minimum severity: high, medium, low
severity: medium
# Custom instructions for the AI reviewer
customInstructions: |
- Pay special attention to error handling
- Check for proper input validation
- Ensure consistent coding style
```
{% hint style="info" %}
For complete reference of review options, refer to [Available commands](https://docs.bito.ai/ai-code-reviews-in-cli/available-commands).
{% endhint %}
#### Environment variables
| Variable | Description |
| -------------- | ------------------------------------------------------------------------------------------------------------------ |
| `BITO_API_KEY` | [Bito API key (aka Bito Access key)](https://docs.bito.ai/help/account-and-settings/access-key) for authentication |
## Getting help
View help directly from the CLI:
```shellscript
# Show help
bitoreview --help
bitoreview review --help
bitoreview config --help
# Show version
bitoreview --version
```
**Still running into issues?**\
👉 Visit the [**Troubleshooting guide**](https://docs.bito.ai/ai-code-reviews-in-cli/troubleshooting) to find solutions for common installation, configuration, and runtime problems, along with tips for resolving frequent errors quickly.
---
# Source: https://docs.bito.ai/ai-code-reviews-in-git/implementing-custom-code-review-rules.md
# Implementing custom code review rules
Bito’s [AI Code Review Agent](https://docs.bito.ai/ai-code-reviews-in-git/overview) offers a flexible solution for teams looking to enforce custom code review rules, standards, and guidelines tailored to their unique development practices. Whether your team follows specific coding conventions or industry best practices, you can customize the Agent to suite your needs.
We support three ways to customize AI Code Review Agent’s suggestions:
1. [**Provide feedback on Bito-reported issues in pull requests**](#id-1-provide-feedback-on-bito-reported-issues), and the AI Code Review Agent automatically adapts by creating code review rules to prevent similar suggestions in the future.
2. [**Create custom code review guidelines via the dashboard**](#id-2-create-custom-code-review-guidelines). Define rules through the [**Custom Guidelines**](https://alpha.bito.ai/home/ai-agents/custom-guidelines) dashboard in Bito Cloud and apply them to agent instances in your workspace.
3. [**Use project-specific guideline files**](#id-3-use-project-specific-guideline-files). Add guideline files (like `.cursor/rules/*.mdc`, `.windsurf/rules/*.md`, `CLAUDE.md`, `GEMINI.md`, or `AGENTS.md`) to your repository, and the AI Code Review Agent automatically uses them during pull request reviews to provide feedback aligned with your project's standards.
## 1- Provide feedback on Bito-reported issues
AI Code Review Agent refines its suggestions based on your feedback. When you **provide negative feedback on Bito-reported issues in pull requests**, the Agent automatically adapts by creating **custom code review rules** to prevent similar suggestions in the future.
Depending on your Git platform, you can provide negative feedback in the following ways:
* **GitHub:** Select the checkbox given in feedback question at the end of each Bito suggestion or leave a negative comment explaining the issue with the suggestion.
 * **GitLab:** React with negative emojis (e.g., thumbs down) or leave a negative comment explaining the issue with the suggestion.
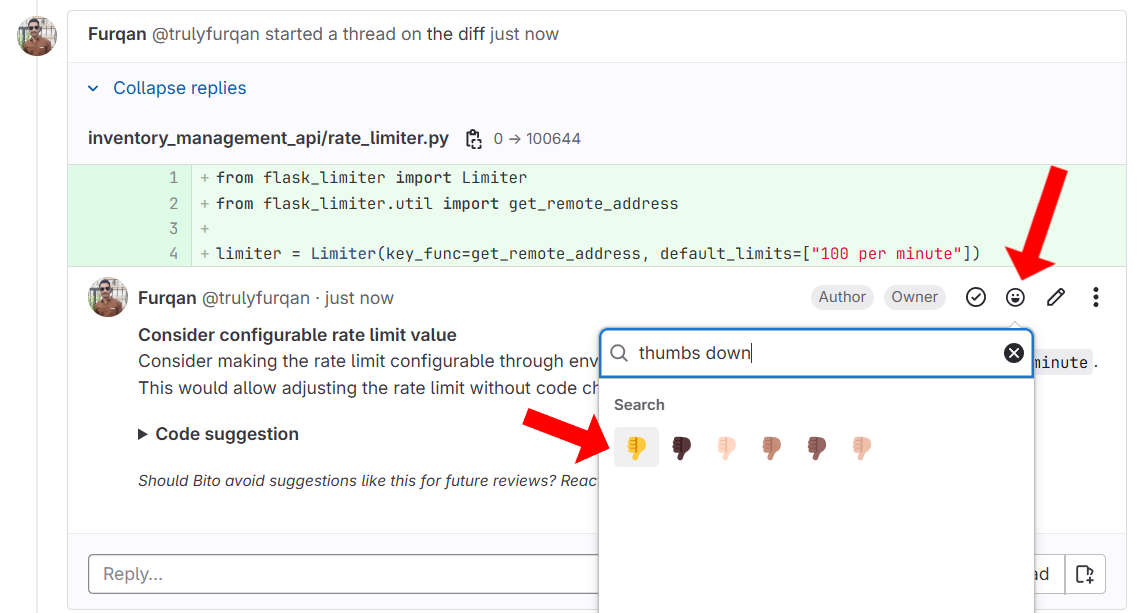 * **Bitbucket:** Provide manual review feedback by leaving a negative comment explaining the issue with the suggestion.
 The **custom code review rules** are displayed on the [**Learned Rules**](https://alpha.bito.ai/home/ai-agents/review-rules) dashboard in Bito Cloud.
These rules are applied at the repository level for the specific programming language.
By default, newly generated custom code review rules are disabled. Once negative feedback for a specific rule reaches a threshold of 3, the rule is automatically enabled. You can also manually enable or disable these rules at any time using the toggle button in the **Status** column.
The **custom code review rules** are displayed on the [**Learned Rules**](https://alpha.bito.ai/home/ai-agents/review-rules) dashboard in Bito Cloud.
These rules are applied at the repository level for the specific programming language.
By default, newly generated custom code review rules are disabled. Once negative feedback for a specific rule reaches a threshold of 3, the rule is automatically enabled. You can also manually enable or disable these rules at any time using the toggle button in the **Status** column.
 {% hint style="info" %}
**Note:** Providing a positive reaction emoji or comment has no effect and will not generate a new code review rule.
{% endhint %}
After you provide negative feedback, Bito generates a new code review rule in your workspace. The next time the AI Code Review Agent reviews your pull requests, it will automatically filter out the unwanted suggestions.
## 2- **Create custom code review guidelines**
We understand that different development teams have unique needs. To accommodate these needs, we offer the ability to implement **custom code review guidelines** in Bito’s [AI Code Review Agent](https://docs.bito.ai/ai-code-reviews-in-git).
Once you add guidelines, the agent will follow them when reviewing pull requests. You can manage guidelines (create, apply, and edit) entirely in the dashboard.
By enabling custom code review guidelines, Bito helps your team maintain consistency and improve code quality.
{% hint style="info" %}
**Note:** Custom review guidelines are available only on the [**Enterprise Plan**](https://bito.ai/pricing/). Enabling them also upgrades your workspace to the **Enterprise Plan**.
\
[**Visit pricing page**](https://bito.ai/pricing/)
{% endhint %}
### How to add a guideline
#### Step 1: Open the **Custom Guidelines** tab
* Sign in to [Bito Cloud](https://alpha.bito.ai/).
* Click [Custom Guidelines](https://alpha.bito.ai/home/ai-agents/custom-guidelines) in the sidebar.
{% hint style="info" %}
**Note:** Providing a positive reaction emoji or comment has no effect and will not generate a new code review rule.
{% endhint %}
After you provide negative feedback, Bito generates a new code review rule in your workspace. The next time the AI Code Review Agent reviews your pull requests, it will automatically filter out the unwanted suggestions.
## 2- **Create custom code review guidelines**
We understand that different development teams have unique needs. To accommodate these needs, we offer the ability to implement **custom code review guidelines** in Bito’s [AI Code Review Agent](https://docs.bito.ai/ai-code-reviews-in-git).
Once you add guidelines, the agent will follow them when reviewing pull requests. You can manage guidelines (create, apply, and edit) entirely in the dashboard.
By enabling custom code review guidelines, Bito helps your team maintain consistency and improve code quality.
{% hint style="info" %}
**Note:** Custom review guidelines are available only on the [**Enterprise Plan**](https://bito.ai/pricing/). Enabling them also upgrades your workspace to the **Enterprise Plan**.
\
[**Visit pricing page**](https://bito.ai/pricing/)
{% endhint %}
### How to add a guideline
#### Step 1: Open the **Custom Guidelines** tab
* Sign in to [Bito Cloud](https://alpha.bito.ai/).
* Click [Custom Guidelines](https://alpha.bito.ai/home/ai-agents/custom-guidelines) in the sidebar.
 #### Step 2: Fill the form
**A. Manual setup**
1. Click **Add guidelines** button from the top right.
2. Fill out:
* **Guideline name**
* **Language** (select a specific programming language or select **General** if the guideline applies to all languages)
* **Custom Guidelines and Rules** (enter your guidelines here)
3. Click **Create guideline**.
#### Step 2: Fill the form
**A. Manual setup**
1. Click **Add guidelines** button from the top right.
2. Fill out:
* **Guideline name**
* **Language** (select a specific programming language or select **General** if the guideline applies to all languages)
* **Custom Guidelines and Rules** (enter your guidelines here)
3. Click **Create guideline**.
 **B. Use a Template**
1. Click **Add guidelines** button from the top right.
2. Choose a template from the **Use template** dropdown menu.
3. Review/edit fields as needed.
4. Click **Create guideline**.
**B. Use a Template**
1. Click **Add guidelines** button from the top right.
2. Choose a template from the **Use template** dropdown menu.
3. Review/edit fields as needed.
4. Click **Create guideline**.
 #### Step 3: Apply to an Agent
* After creating a guideline, you’ll see an **Apply review guideline** dropdown.
* Select the **Agent instance**, then click **Manage review guidelines** to open its settings.
{% hint style="info" %}
**To apply the guideline later:** go to [**Repositories**](https://alpha.bito.ai/home/ai-agents/code-review-agent), find the Agent instance, click **Settings**, and manage guidelines there.
{% endhint %}
#### Step 3: Apply to an Agent
* After creating a guideline, you’ll see an **Apply review guideline** dropdown.
* Select the **Agent instance**, then click **Manage review guidelines** to open its settings.
{% hint style="info" %}
**To apply the guideline later:** go to [**Repositories**](https://alpha.bito.ai/home/ai-agents/code-review-agent), find the Agent instance, click **Settings**, and manage guidelines there.
{% endhint %}
 #### Step 4: Save configuration
On the Agent settings page, hit **Save** (top-right) to apply guideline changes.
{% hint style="info" %}
**Note:** Visit the [**Custom Guidelines**](https://alpha.bito.ai/home/ai-agents/custom-guidelines) tab to edit or delete any guideline.
{% endhint %}
#### Step 4: Save configuration
On the Agent settings page, hit **Save** (top-right) to apply guideline changes.
{% hint style="info" %}
**Note:** Visit the [**Custom Guidelines**](https://alpha.bito.ai/home/ai-agents/custom-guidelines) tab to edit or delete any guideline.
{% endhint %}
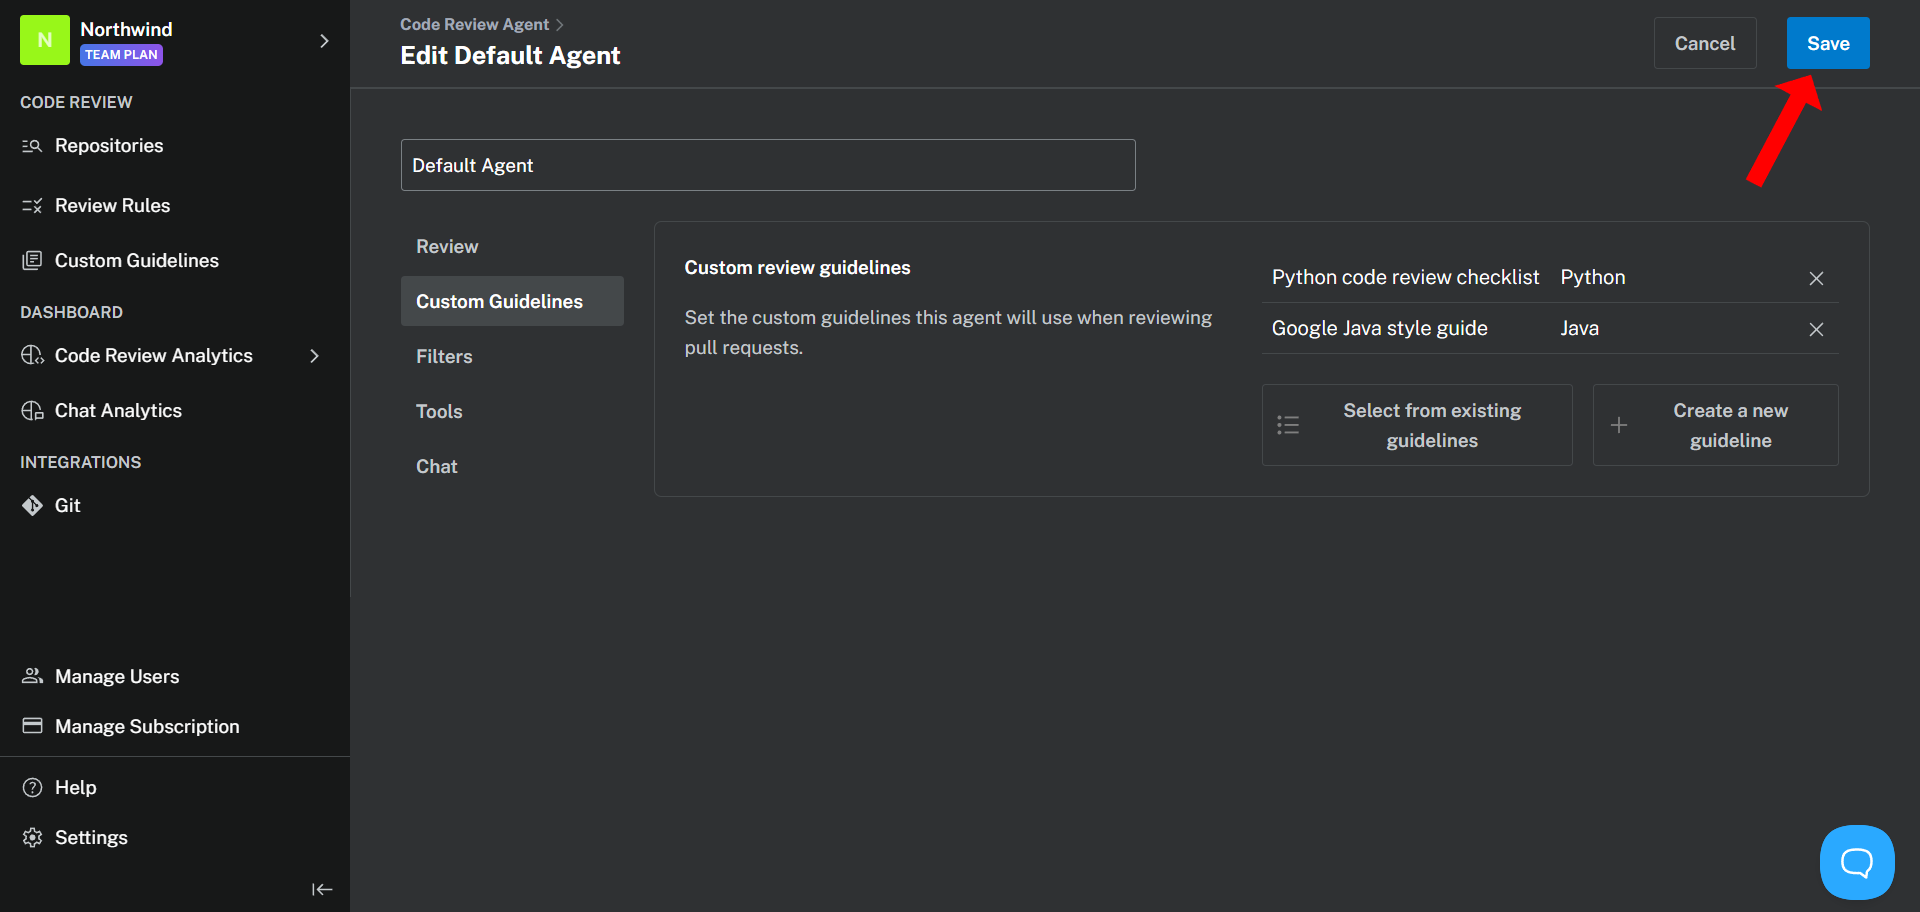 ### Managing review guidelines from agent settings
Efficiently control which custom guidelines apply to your AI Code Review Agent through the Agent settings interface.
1. Go to [**Repositories**](https://alpha.bito.ai/home/ai-agents/code-review-agent) dashboard from the Bito Cloud sidebar.
2. Click **Settings** next to the target agent instance.
### Managing review guidelines from agent settings
Efficiently control which custom guidelines apply to your AI Code Review Agent through the Agent settings interface.
1. Go to [**Repositories**](https://alpha.bito.ai/home/ai-agents/code-review-agent) dashboard from the Bito Cloud sidebar.
2. Click **Settings** next to the target agent instance.
 3. Navigate to the **Custom Guidelines** section. Here you can either create a new guideline or select from existing guidelines.
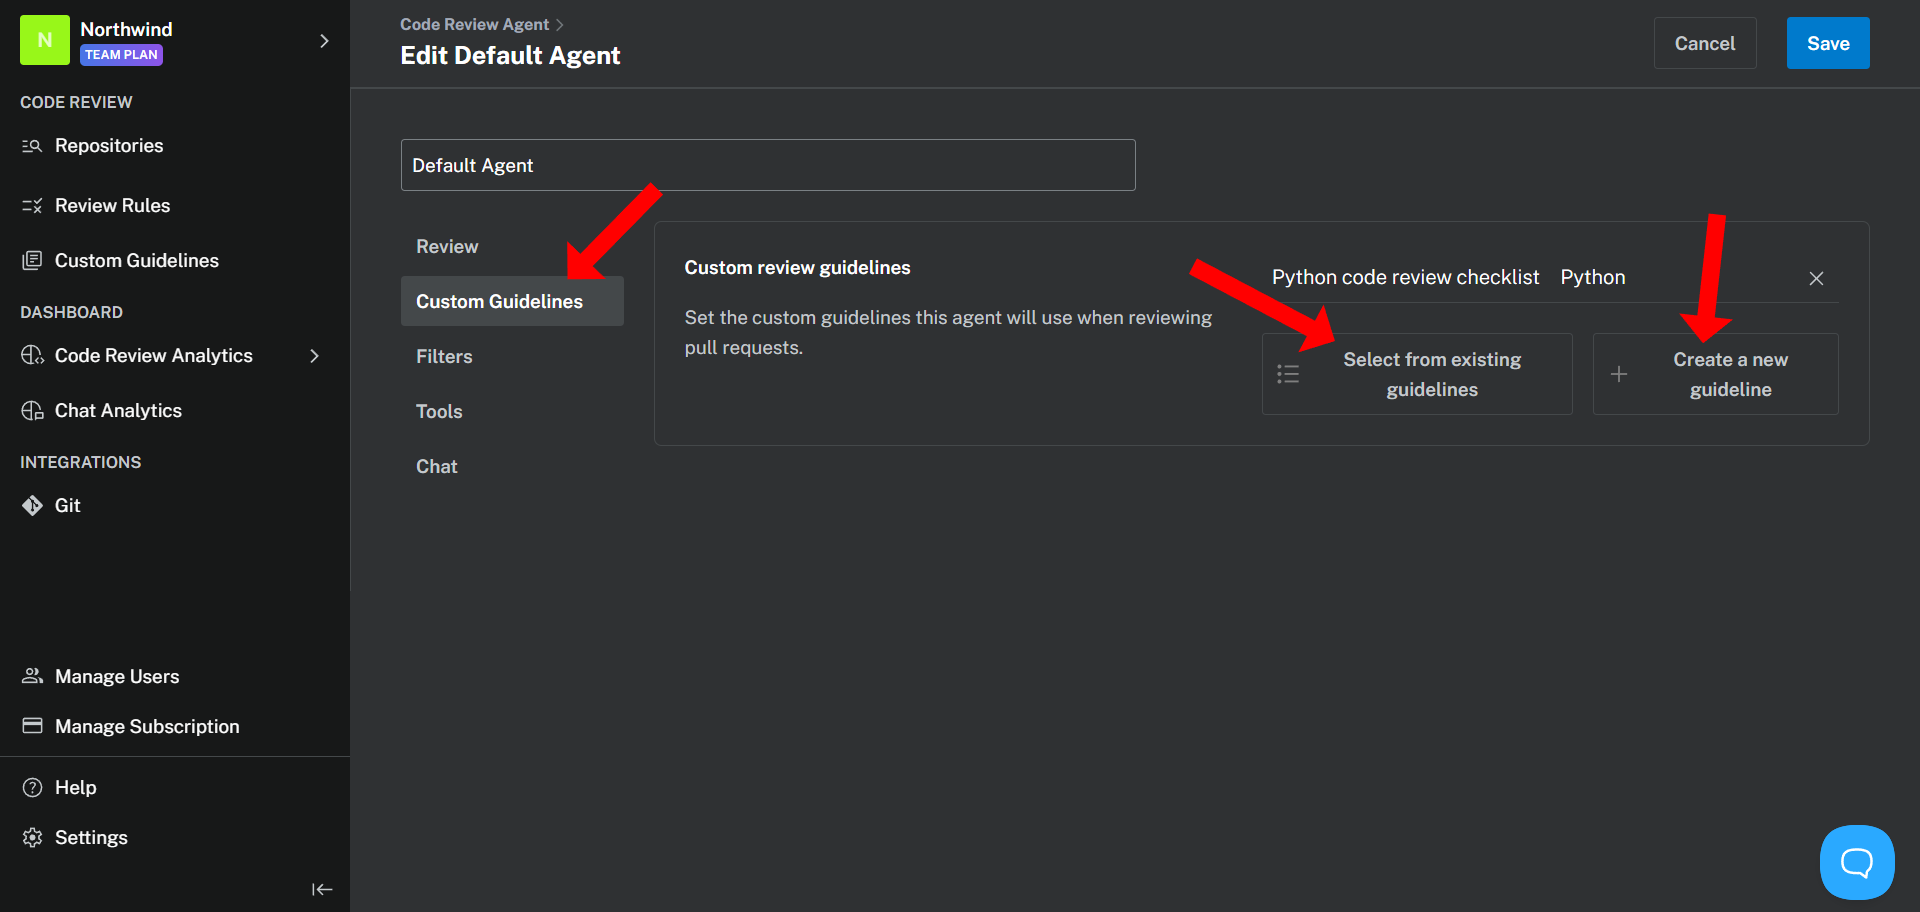 3. **Create a new guideline**
* If you click **Create a new guideline** button, you will see the same form as mentioned earlier where you can enter the details to create a review guideline.
3. **Create a new guideline**
* If you click **Create a new guideline** button, you will see the same form as mentioned earlier where you can enter the details to create a review guideline.
 4. **Or select an existing guideline**
* If you click **Select from existing guidelines** button, you will get a popup screen from where you can select from a list review guidelines you already created. Use checkboxes to enable or disable each guideline for the selected agent and then click **Add selected**.
4. **Or select an existing guideline**
* If you click **Select from existing guidelines** button, you will get a popup screen from where you can select from a list review guidelines you already created. Use checkboxes to enable or disable each guideline for the selected agent and then click **Add selected**.
 5. Once you’ve applied or adjusted guidelines, click the **Save** button in the top-right corner to confirm changes.
 ### FAQs
#### What types of custom code review guidelines can be implemented?
You can implement a wide range of custom code review guidelines, including:
* Style and formatting guidelines
* Security best practices
* Performance optimization checks
* Code complexity and maintainability standards
* etc.
#### Is "custom code review guidelines" feature available in Team Plan?
No, this feature is available exclusively on the [**Enterprise Plan**](https://bito.ai/pricing/). Enabling the **"custom code review guidelines"** feature also upgrades your workspace to the **Enterprise Plan**.
For more details on **Enterprise Plan**, visit our [**Pricing Page**](https://bito.ai/pricing/).
## 3- Use project-specific guideline files
The AI Code Review Agent can read guideline files directly from your repository and use them during code reviews. These are the same guideline files that AI coding assistants (like Cursor, Windsurf, and Claude Code) use to help developers write code.
By adding these files to your repository, the agent automatically follows your project's specific coding standards, architecture patterns, and best practices when reviewing pull requests.
### Supported guideline files
The AI Code Review Agent currently supports analyzing the following guideline files that are commonly used by different AI coding agents:
CRA currently supports analyzing the following guideline files that are commonly used by different AI coding agents:
| `.cursor/rules/*.mdc` | Cursor IDE |
| ---------------------- | ------------------------ |
| `.windsurf/rules/*.md` | Windsurf IDE |
| `CLAUDE.md` | Claude Code |
| `GEMINI.md` | Gemini CLI |
| `AGENTS.md` | OpenAI CodeX, Cursor IDE |
### How to organize your guideline files
**Multiple files in one directory**
You can split your guidelines across multiple files:
```
.cursor/rules/project-overview.mdc
.cursor/rules/architecture-principles.mdc
.cursor/rules/security-standards.mdc
```
For Windsurf, use the `.md` extension:
```
.windsurf/rules/coding-standards.md
.windsurf/rules/api-patterns.md
```
**Module-specific guidelines:**
Place guideline files in subdirectories to create rules for specific parts of your codebase:
```
.cursor/rules/global-standards.mdc
providers/.cursor/rules/provider-implementation.mdc
auth/.cursor/rules/authentication-rules.mdc
```
The agent finds all relevant guideline files based on which files changed in your pull request.
{% hint style="info" %}
**Note:** Rule precedence (where subdirectory rules override parent-level rules) will be added in a future release. Currently, the agent considers all applicable guideline files equally.
{% endhint %}
### How citations work
Every relevant Bito comment includes a **Citations** section that links to the specific guideline that triggered the comment. The link takes you directly to the relevant line in your guideline file, making it easy to verify the feedback and understand why it was given.
### Example scenario
Let's say you're building an application that integrates multiple LLM providers. Your guideline file specifies:
* All providers must extend the `BaseLLMProvider` class
* All providers must implement standard methods like `generateResponse()` and `streamResponse()`
* New providers must be registered in the `config/providers.json` file
When someone submits a pull request to add a new provider, the agent can catch issues like:
* The new provider doesn't extend the base class
* Required methods are missing
* The provider wasn't added to the configuration file
Each comment links back to the specific guideline, so the developer knows exactly what needs to be fixed.
### Sample guideline file
Here's an example `AGENT.md` file to help you get started:
{% code expandable="true" %}
````markdown
# LLM Proxy Architecture & Design Document
## Document Overview
### Purpose
This document serves as a coding guideline and technical reference for AI agents working with this codebase. It provides comprehensive information about the current architecture, design patterns, implementation details, and the rationale behind design decisions. AI agents should use this document to understand the existing code structure, maintain consistency when making modifications, and follow established patterns when extending functionality.
### What This Document Covers
- **System Architecture**: High-level overview of components and their interactions
- **Design Patterns**: Detailed explanation of the Factory Pattern implementation
- **Component Design**: In-depth analysis of each system component
- **Data Flow**: Request/response lifecycle through the system
- **Design Decisions**: Rationale behind current architectural choices
- **Implementation Details**: Code structure, conventions, and patterns in use
---
## Table of Contents
1. [System Architecture](#system-architecture)
2. [Design Patterns](#design-patterns)
3. [Component Design](#component-design)
4. [Data Flow](#data-flow)
5. [Design Decisions](#design-decisions)
6. [Error Handling Strategy](#error-handling-strategy)
7. [Security Considerations](#security-considerations)
8. [Coding Conventions](#coding-conventions)
---
## System Architecture
### High-Level Overview
The LLM Proxy application follows a layered architecture with clear separation between the presentation layer (FastAPI), business logic layer (Provider implementations), and integration layer (external LLM APIs).
```
┌─────────────────────────────────────────────┐
│ FastAPI Application │
│ (Presentation Layer) │
│ - Request validation (Pydantic) │
│ - Route handling (/chat endpoint) │
│ - Response formatting │
└────────────────┬────────────────────────────┘
│
▼
┌─────────────────────────────────────────────┐
│ Provider Factory │
│ (Abstraction Layer) │
│ - Provider selection logic │
│ - Instance creation │
└────────────────┬────────────────────────────┘
│
┌────────┴────────┐
▼ ▼
┌──────────────┐ ┌──────────────┐
│ OpenAI │ │ Anthropic │
│ Provider │ │ Provider │
│ │ │ │
│ (Concrete │ │ (Concrete │
│ Impl.) │ │ Impl.) │
└──────┬───────┘ └──────┬───────┘
│ │
▼ ▼
┌──────────────┐ ┌──────────────┐
│ OpenAI API │ │ Anthropic API│
└──────────────┘ └──────────────┘
```
### Component Layers
1. **Presentation Layer** (`main.py`)
- Handles HTTP requests/responses
- Validates input using Pydantic models
- Manages API endpoints
2. **Abstraction Layer** (`providers/factory.py`)
- Implements Factory Pattern
- Routes requests to appropriate providers
- Decouples client code from concrete implementations
3. **Business Logic Layer** (`providers/*.py`)
- Abstract base class defines contract
- Concrete providers implement LLM-specific logic
- Handles API communication and response parsing
4. **Integration Layer**
- External API calls via httpx
- Authentication management
- Network error handling
---
## Design Patterns
### Factory Design Pattern
The application implements the **Factory Design Pattern** to create provider instances without exposing creation logic to the client.
#### Pattern Components
1. **Abstract Product** (`LLMProvider`)
```python
class LLMProvider(ABC):
def __init__(self, model: str):
self.model = model
@abstractmethod
def generate_response(self, prompt: str) -> str:
pass
```
**Purpose**: Defines the contract that all concrete providers must implement.
2. **Concrete Products** (`OpenAIProvider`, `AnthropicProvider`)
```python
class OpenAIProvider(LLMProvider):
def generate_response(self, prompt: str) -> str:
# OpenAI-specific implementation
pass
```
**Purpose**: Implement provider-specific logic while adhering to the base contract.
3. **Factory** (`ProviderFactory`)
```python
class ProviderFactory:
@staticmethod
def get_provider(provider_name: str, model: str) -> LLMProvider:
providers = {
"openai": OpenAIProvider,
"anthropic": AnthropicProvider
}
return providers[provider_name.lower()](model)
```
**Purpose**: Encapsulates provider instantiation logic.
#### Benefits of This Pattern
- **Loose Coupling**: Client code depends on abstractions, not concrete classes
- **Open/Closed Principle**: Open for extension (new providers), closed for modification
- **Single Responsibility**: Each provider handles only its specific implementation
- **Testability**: Easy to mock providers for testing
- **Scalability**: Adding new providers requires minimal changes
---
## Component Design
### 1. Base Provider (`providers/base.py`)
**Responsibility**: Define the contract for all LLM providers
**Key Design Decisions**:
- Uses ABC (Abstract Base Class) to enforce implementation
- Stores model name as instance variable for reuse
- Single abstract method keeps interface simple
**Design Rationale**:
- Python's ABC ensures compile-time checking of implementations
- Simple interface reduces cognitive load for implementers
- Storing model allows for provider-specific model validation in future
### 2. OpenAI Provider (`providers/openai_provider.py`)
**Responsibility**: Implement OpenAI Chat Completions API integration
**Key Features**:
- Environment-based API key management
- Message format conversion (user prompt → OpenAI format)
- Response parsing (extract content from choices)
- Timeout handling (30 seconds)
**API Contract**:
```
POST https://api.openai.com/v1/chat/completions
Headers: Authorization: Bearer
Body: {
"model": "gpt-4",
"messages": [{"role": "user", "content": "prompt"}]
}
```
**Error Handling**:
- Validates API key presence on initialization
- Catches HTTP errors and wraps with descriptive messages
- Re-raises exceptions for upstream handling
### 3. Anthropic Provider (`providers/anthropic_provider.py`)
**Responsibility**: Implement Anthropic Messages API integration
**Key Features**:
- Custom header format (x-api-key, anthropic-version)
- Max tokens configuration (1024)
- Content array response parsing
**API Contract**:
```
POST https://api.anthropic.com/v1/messages
Headers:
x-api-key:
anthropic-version: 2023-06-01
Body: {
"model": "claude-3-sonnet",
"max_tokens": 1024,
"messages": [{"role": "user", "content": "prompt"}]
}
```
**Design Choices**:
- Hard-coded max_tokens provides consistent behavior
- Version header ensures API stability
- Array access for content assumes single response
### 4. Provider Factory (`providers/factory.py`)
**Responsibility**: Create provider instances based on string identifiers
**Implementation Strategy**:
- Dictionary-based mapping for O(1) lookup
- Case-insensitive provider names
- Descriptive error messages for invalid providers
**Extensibility**:
```python
# Adding new provider:
providers = {
"openai": OpenAIProvider,
"anthropic": AnthropicProvider,
"deepseek": DeepseekProvider, # Just add here
}
```
### 5. FastAPI Application (`main.py`)
**Responsibility**: HTTP interface and request orchestration
**Key Components**:
1. **Request Model**:
```python
class ChatRequest(BaseModel):
provider: str
model: str
prompt: str
```
- Leverages Pydantic for automatic validation
- Clear field names match user expectations
2. **Response Model**:
```python
class ChatResponse(BaseModel):
provider: str
model: str
response: str
```
- Echoes input parameters for traceability
- Returns plain text response
3. **Endpoint Handler**:
```python
@app.post("/chat", response_model=ChatResponse)
async def chat(request: ChatRequest):
provider = ProviderFactory.get_provider(request.provider, request.model)
response_text = provider.generate_response(request.prompt)
return ChatResponse(...)
```
**Error Mapping**:
- `ValueError` (invalid provider) → HTTP 400
- Generic `Exception` (API errors) → HTTP 500
---
## Data Flow
### Request Lifecycle
```
1. Client sends POST /chat
↓
2. FastAPI receives request
↓
3. Pydantic validates request body
↓
4. ProviderFactory.get_provider() called
↓
5. Factory returns concrete provider instance
↓
6. provider.generate_response() called
↓
7. Provider makes HTTP call to LLM API
↓
8. Provider parses response
↓
9. Response wrapped in ChatResponse model
↓
10. JSON response sent to client
```
### Detailed Flow Example (OpenAI)
```python
# Client Request
POST /chat
{
"provider": "openai",
"model": "gpt-4",
"prompt": "Tell me a joke"
}
# Internal Processing
1. Pydantic validates: ChatRequest object created
2. Factory called: ProviderFactory.get_provider("openai", "gpt-4")
3. OpenAIProvider instantiated with model="gpt-4"
4. generate_response("Tell me a joke") called
5. HTTP POST to OpenAI API:
{
"model": "gpt-4",
"messages": [{"role": "user", "content": "Tell me a joke"}]
}
6. OpenAI responds with completion
7. Extract: data["choices"][0]["message"]["content"]
8. Return text to endpoint
9. Wrap in ChatResponse
# Client Response
{
"provider": "openai",
"model": "gpt-4",
"response": "Why did the chicken cross the road?..."
}
```
---
## Design Decisions
### 1. Why Factory Pattern?
**Decision**: Use Factory Pattern instead of simple if/else logic
**Rationale**:
- **Scalability**: Adding providers doesn't require modifying existing code
- **Testability**: Easy to mock factory for unit tests
- **Maintainability**: Provider logic isolated in separate classes
- **Professional Standard**: Industry-recognized pattern for this use case
**Alternative Considered**: Direct instantiation with if/else
```python
# Rejected approach
if provider == "openai":
result = OpenAIProvider(model).generate_response(prompt)
elif provider == "anthropic":
result = AnthropicProvider(model).generate_response(prompt)
```
**Why Rejected**: Violates Open/Closed Principle, harder to extend
### 2. Why httpx Over Official SDKs?
**Decision**: Use httpx for HTTP calls instead of official provider SDKs
**Rationale**:
- **Minimal Dependencies**: Keeps requirements.txt small
- **Unified Interface**: Single HTTP client for all providers
- **Transparency**: Direct API calls are easier to debug
- **Control**: Full control over request/response handling
**Trade-offs**:
- Less abstraction (must handle response parsing)
- No built-in retry logic
- Manual API version management
### 3. Synchronous vs Asynchronous
**Decision**: Use synchronous HTTP calls with httpx.Client
**Rationale**:
- **Simplicity**: Easier to understand and debug
- **Current Scale**: Single request doesn't benefit from async
- **API Constraints**: LLM APIs are inherently blocking
**Future Consideration**: Switch to async if supporting streaming responses
### 4. Error Handling Strategy
**Decision**: Simple try/except with HTTP status code mapping
**Rationale**:
- **Simplicity**: Requirements specified basic error handling
- **Client Clarity**: HTTP status codes are standard
- **Debugging**: Error messages preserved in exceptions
**Not Included** (but recommended for production):
- Structured logging
- Retry logic
- Rate limiting
- Circuit breakers
### 5. Environment Variables for API Keys
**Decision**: Use environment variables instead of configuration files
**Rationale**:
- **Security**: Prevents accidental commit of credentials
- **12-Factor App**: Follows best practices for configuration
- **Flexibility**: Easy to change without code modification
- **Cloud-Ready**: Works seamlessly with container orchestration
---
## Error Handling Strategy
### Current Implementation
```python
try:
provider = ProviderFactory.get_provider(request.provider, request.model)
response_text = provider.generate_response(request.prompt)
return ChatResponse(...)
except ValueError as e:
# Invalid provider name
raise HTTPException(status_code=400, detail=str(e))
except Exception as e:
# API errors, network issues, etc.
raise HTTPException(status_code=500, detail=str(e))
```
### Error Categories
1. **Client Errors (400)**:
- Invalid provider name
- Unsupported model
- Malformed request
2. **Server Errors (500)**:
- Missing API keys
- Network timeouts
- API errors (rate limits, service unavailable)
- Response parsing failures
---
## Security Considerations
### Current Implementation
1. **API Key Management**:
- Stored in environment variables
- Never logged or returned in responses
- Validated on provider initialization
2. **Request Validation**:
- Pydantic models enforce type safety
- No SQL injection risk (no database)
- No command injection (no shell execution)
### Current Limitations
1. **No Rate Limiting**: The application does not implement rate limiting
2. **No Authentication**: Endpoints are publicly accessible
3. **No Input Sanitization**: Prompt length and content are not validated beyond Pydantic type checking
4. **No Retry Logic**: Failed API calls are not automatically retried
---
## Coding Conventions
### File Organization
**Current Structure**:
```
llm-proxy/
├── main.py # FastAPI application entry point
├── providers/ # Provider package
│ ├── __init__.py # Package exports
│ ├── base.py # Abstract base class
│ ├── openai_provider.py # OpenAI implementation
│ ├── anthropic_provider.py # Anthropic implementation
│ └── factory.py # Factory implementation
├── requirements.txt # Python dependencies
├── .env.example # Environment variable template
└── README.md # User documentation
```
### Naming Conventions
1. **Classes**: PascalCase (e.g., `LLMProvider`, `OpenAIProvider`)
2. **Functions/Methods**: snake_case (e.g., `generate_response`, `get_provider`)
3. **Constants**: UPPER_SNAKE_CASE (e.g., `OPENAI_API_KEY`)
4. **Files**: snake_case (e.g., `openai_provider.py`)
### Code Patterns
1. **Provider Implementation**:
- Inherit from `LLMProvider`
- Validate API key in `__init__`
- Implement `generate_response(prompt: str) -> str`
- Use httpx.Client with 30-second timeout
- Wrap errors with descriptive messages
2. **Error Handling**:
- Use `try/except` blocks in provider implementations
- Raise `ValueError` for missing API keys
- Raise generic `Exception` with descriptive messages for API errors
- Let FastAPI endpoint handle HTTP status code mapping
3. **Environment Variables**:
- Load with `os.getenv()`
- Validate presence in provider `__init__`
- Use pattern: `{PROVIDER}_API_KEY`
4. **Type Hints**:
- All methods should include type hints
- Use Pydantic models for request/response validation
- Return type explicitly stated
### Documentation Standards
1. **Docstrings**: All classes and methods include docstrings
2. **Comments**: Inline comments explain non-obvious logic
3. **README**: User-facing documentation with examples
### Dependencies
**Current Dependencies**:
- `fastapi==0.109.0`: Web framework
- `uvicorn[standard]==0.27.0`: ASGI server
- `pydantic==2.5.3`: Data validation
- `httpx==0.26.0`: HTTP client
- `python-dotenv==1.0.0`: Environment variable management
**Rationale**: Minimal, well-maintained dependencies that serve specific purposes.
---
## Summary
This document captures the current state of the LLM Proxy application. When working with this codebase, AI agents should:
1. **Follow the Factory Pattern**: All new providers must inherit from `LLMProvider` and be registered in `ProviderFactory`
2. **Maintain Consistency**: Use the same error handling, timeout values, and code structure as existing providers
3. **Respect Abstractions**: Keep provider-specific logic within provider classes
4. **Update Documentation**: Any changes to architecture should be reflected in this document
5. **Preserve Simplicity**: The design prioritizes simplicity and clarity over advanced features
The architecture demonstrates clean separation of concerns through the Factory Design Pattern, making the codebase maintainable and understandable for both human developers and AI agents.
````
{% endcode %}
---
# Source: https://docs.bito.ai/help/bitos-ai-stack/indexing.md
# Indexing
Indexing involves breaking down a source code file into smaller chunks and converting these chunks into [**embeddings**](https://docs.bito.ai/help/bitos-ai-stack/embeddings) that can be stored in a [**vector database**](https://docs.bito.ai/help/bitos-ai-stack/vector-databases). Bito indexes your entire codebase locally (on your machine) to understand it and provide answers tailored to your code.
{% hint style="info" %}
Learn more about Bito's [**AI that Understands Your Code**](https://docs.bito.ai/ai-code-reviews-in-ide/ai-that-understands-your-code) feature.
{% endhint %}
## How Bito Indexes Your Code
In the steps below, we'll show you how Bito indexes your code, ensuring that each query you have is met with precise and contextually relevant information. From breaking down code into digestible chunks to leveraging advanced AI models for nuanced understanding, Bito transforms the daunting task of code analysis into a seamless and efficient experience.
Here's how the magic happens:
### Step 1: Chunk Breakdown
*Dividing Code into Pieces*
Bito starts by breaking down your source code files into smaller sections, known as 'chunks'. It’s like cutting up a long text into paragraphs to make it more manageable. Each chunk represents a piece of your code that can be individually indexed and analyzed.
### Step 2: Indexing Each Chunk
*Creating a Searchable Reference*
After breaking down the file, each chunk is indexed, similar to creating a catalog entry. This step is crucial as it allows for the efficient location of the code segment later on.
### Step 3: Generating Embeddings
*Translating Code into Numeric Vectors*
For every chunk, Bito generates a numeric vector or [**“embedding”**](https://docs.bito.ai/help/bitos-ai-stack/embeddings). This process, which can be done using OpenAI or alternative open-source embedding models, translates the code into a mathematical representation. The idea is to create a form that can be easily compared and matched with other code chunks.
### Step 4: Storing the Vectors
*Saving the Essential Data*
These embeddings are then stored in an index file on your machine. This index file is like a detailed directory, listing the file name, the location of the chunk within the file (start and end), and the embedding vector for each piece of code.
### Step 5: Query Embedding
*Understanding Your Questions*
When you ask a question in Bito's chatbox, the AI checks whether it has some specific keywords like "my code", "my project", etc. If so, Bito generates a numeric vector for your query, mirroring the process used for code chunks.
{% hint style="info" %}
The complete list of these keywords is given on our [**Available Keywords**](https://docs.bito.ai/ai-code-reviews-in-ide/ai-that-understands-your-code/available-keywords) page.
{% endhint %}
### Step 6: Finding the Nearest Neighbor
*Matching Your Query with Code*
Using the query's vector, Bito searches the index to find the code chunk with the closest matching embedding. This step identifies the relevant sections of your codebase that can answer your question.
### Step 7: Contextualization
*Building a Bigger Picture*
Identifying chunks is just part of the process. Bito ensures that these chunks make sense in the broader context of your code. If necessary, it expands the search to include complete functions or related code segments, creating a fuller, more accurate context.
### Step 8: Leveraging Language Models
*Consulting the AI Experts*
With the context in hand, Bito consults with language models – either basic (GPT-4o mini and similar models) or advanced (GPT-4o, Claude Sonnet 3.5, and best in class AI models) – to interpret the code within the context and provide an accurate response to your query.
### Step 9: Session Privacy
*Keeping Your Data Local*
All the indexing and querying happens on your local machine. The index files are stored in the user’s home folder, for example on Windows the path will be something like **C:\Users\Furqan\\.bito\localcodesearch** folder. It ensures that your code and session history remain private and secure.
### Step 10: Safeguarding Data
*Ensuring Confidentiality*
Bito is committed to privacy. All LLM accounts it uses are under strict agreements to prevent your data from being used for training, recorded, or logged.
### Step 11: Handling Hallucination
*Reducing AI Fabrication*
Bito is designed to minimize AI 'hallucinations' or fabrications, ensuring the answers you receive are based on your actual code. Although complete elimination of hallucination isn't feasible, as it sometimes aids in constructing beyond seen data, Bito strives to keep it in check, especially when dealing with your local code.
With these steps, Bito provides a robust and privacy-conscious method for indexing and understanding your code, simplifying navigation and enhancing productivity in your development projects.
---
# Source: https://docs.bito.ai/ai-architect/install-ai-architect-self-hosted.md
# Install AI Architect (self-hosted)
This guide walks you through installing [**Bito's AI Architect**](https://docs.bito.ai/ai-architect/overview) as a self-hosted service in your own infrastructure. Self-hosting gives you complete control over where your code knowledge graph resides and how AI Architect accesses your repositories.
**Why choose self-hosted deployment?** Organizations with strict data governance requirements, air-gapped environments, or specific compliance needs benefit from running AI Architect within their own infrastructure. Your codebase analysis and knowledge graph stay entirely within your control, while still providing the same powerful context-aware capabilities to your AI coding tools.
**What you'll accomplish:** By the end of this guide, you'll have AI Architect running on your infrastructure, connected to your Git repositories, and ready to integrate with AI coding tools like Claude Code, Cursor, Windsurf, and GitHub Copilot through the Model Context Protocol (MCP).
### Deployment options
AI Architect can be deployed in three different configurations depending on your team size, infrastructure, and security requirements:
#### a. Personal use (with your LLM keys)
Set up AI Architect on your local machine for individual development work. You'll provide your own LLM API keys for indexing, giving you complete control over the AI models used and associated costs.
**Best for:** Individual developers who want codebase understanding on their personal machine.
#### b. Team / shared access (with your LLM keys)
Deploy AI Architect on a shared server within your infrastructure, allowing multiple team members to connect their AI coding tools to the same MCP server. Each team member can configure AI Architect with their preferred AI coding agent while sharing the same indexed codebase knowledge graph.
**Best for:** Development teams that want to share codebase intelligence across the team while managing their own LLM costs.
#### c. Enterprise deployment (requires Bito Enterprise Plan)
Deploy AI Architect on your infrastructure (local machine or shared server) with indexing managed by Bito. Instead of providing your own LLM keys, Bito handles the repository indexing process, simplifying setup and cost management.
**Best for:** Organizations that prefer managed indexing without handling individual LLM API keys and costs.
{% hint style="info" %}
**Note:** All deployment options are self-hosted on your infrastructure — your code and knowledge graph remain under your control.
{% endhint %}
## Prerequisites
### a. Required accounts and tokens
{% stepper %}
{% step %}
### Bito API Key (aka Bito Access Key)
You'll need a **Bito account** and a **Bito Access Key** to authenticate AI Architect. You can sign up for a Bito account at [**https://alpha.bito.ai**](https://alpha.bito.ai/), and create an access key from [**Settings -> Advanced Settings**](https://alpha.bito.ai/home/advanced)
* [**View Guide**](https://docs.bito.ai/help/account-and-settings/access-key)
{% endstep %}
{% step %}
### Git provider
We support the following Git providers:
* GitHub
* GitLab
* Bitbucket
So, you'll need an account on one of these Git providers to index your repositories with AI Architect.
{% endstep %}
{% step %}
### Git Access Token
A personal access token from your chosen Git provider is required. You'll use this token to allow AI Architect to read and index your repositories.
1. **GitHub Personal Access Token (Classic):** To use GitHub repositories with AI Architect, ensure you have a CLASSIC personal access token with repo access. We do not support fine-grained tokens currently.
* [**View Guide**](https://docs.github.com/en/authentication/keeping-your-account-and-data-secure/managing-your-personal-access-tokens#creating-a-personal-access-token-classic)
2. **GitLab Personal Access Token:** To use GitLab repositories with AI Architect, a token with API access is required.
* [**View Guide**](https://docs.gitlab.com/ee/user/profile/personal_access_tokens.html#create-a-personal-access-token)
3. **Bitbucket Access Token:** To use Bitbucket repositories with AI Architect, you need **API Token** or **HTTP Access Token** depending on your Bitbucket setup.
1. **Bitbucket Cloud (`API Token`):** You must provide both your **token** and **email address**.
* [**View Guide**](https://support.atlassian.com/bitbucket-cloud/docs/create-an-api-token/)
2. **Bitbucket Self-Hosted (`HTTP Access Token`):** You must provide both your **token** and **username**.
* [**View Guide**](https://confluence.atlassian.com/bitbucketserver/personal-access-tokens-939515499.html)
{% endstep %}
{% step %}
### LLM API keys
Bito's AI Architect uses Large Language Models (LLMs) to build a knowledge graph of your codebase.
We suggest you provide API keys for both **Anthropic** and **Grok** LLMs, as that provides the best coverage and the best cost of indexing.
Bito will use **Claude Haiku** and **Grok Code Fast** together to index your codebase. It will cost you approximately USD $0.20 - $0.40 per MB of indexable code (we do not index binaries, TARs, zips, images, etc). If you provide only an Anthropic key without Grok, your indexing costs will be significantly higher, approximately USD $1.00 - $1.50 per MB of indexable code.
{% endstep %}
{% endstepper %}
### b. System requirements
AI Architect can be installed on your local machine for individual use, or on a shared server that your entire team can connect to. When installed on a server, multiple developers can configure their AI coding tools (such as Claude Code, Cursor, Windsurf, etc.) to use the same MCP server, sharing access to the indexed codebase.
The AI Architect supports the following operating systems:
* **macOS**
* **Unix-based systems** (Ubuntu, Debian, RHEL, or similar distributions)
* **Windows (via WSL2)**
#### Shared servers (for team deployments)
* **On-premise physical servers** - Bare metal Linux servers in your data center
* **On-premise virtual machines** - VMware, Hyper-V, Proxmox, KVM, or other virtualization platforms
* **Cloud virtual machines** - AWS EC2, Google Cloud Compute Engine, Azure VMs, DigitalOcean Droplets, or similar cloud instances
{% stepper %}
{% step %}
### Hardware specifications
| | Recommended |
| :------: | :-----------------------------------------------------------------------------------------------------------------------------------------------------------------------------: |
| **CPU** | 6-8 cores |
| **RAM** | 8-12 GB |
| **Disk** |
### FAQs
#### What types of custom code review guidelines can be implemented?
You can implement a wide range of custom code review guidelines, including:
* Style and formatting guidelines
* Security best practices
* Performance optimization checks
* Code complexity and maintainability standards
* etc.
#### Is "custom code review guidelines" feature available in Team Plan?
No, this feature is available exclusively on the [**Enterprise Plan**](https://bito.ai/pricing/). Enabling the **"custom code review guidelines"** feature also upgrades your workspace to the **Enterprise Plan**.
For more details on **Enterprise Plan**, visit our [**Pricing Page**](https://bito.ai/pricing/).
## 3- Use project-specific guideline files
The AI Code Review Agent can read guideline files directly from your repository and use them during code reviews. These are the same guideline files that AI coding assistants (like Cursor, Windsurf, and Claude Code) use to help developers write code.
By adding these files to your repository, the agent automatically follows your project's specific coding standards, architecture patterns, and best practices when reviewing pull requests.
### Supported guideline files
The AI Code Review Agent currently supports analyzing the following guideline files that are commonly used by different AI coding agents:
CRA currently supports analyzing the following guideline files that are commonly used by different AI coding agents:
| `.cursor/rules/*.mdc` | Cursor IDE |
| ---------------------- | ------------------------ |
| `.windsurf/rules/*.md` | Windsurf IDE |
| `CLAUDE.md` | Claude Code |
| `GEMINI.md` | Gemini CLI |
| `AGENTS.md` | OpenAI CodeX, Cursor IDE |
### How to organize your guideline files
**Multiple files in one directory**
You can split your guidelines across multiple files:
```
.cursor/rules/project-overview.mdc
.cursor/rules/architecture-principles.mdc
.cursor/rules/security-standards.mdc
```
For Windsurf, use the `.md` extension:
```
.windsurf/rules/coding-standards.md
.windsurf/rules/api-patterns.md
```
**Module-specific guidelines:**
Place guideline files in subdirectories to create rules for specific parts of your codebase:
```
.cursor/rules/global-standards.mdc
providers/.cursor/rules/provider-implementation.mdc
auth/.cursor/rules/authentication-rules.mdc
```
The agent finds all relevant guideline files based on which files changed in your pull request.
{% hint style="info" %}
**Note:** Rule precedence (where subdirectory rules override parent-level rules) will be added in a future release. Currently, the agent considers all applicable guideline files equally.
{% endhint %}
### How citations work
Every relevant Bito comment includes a **Citations** section that links to the specific guideline that triggered the comment. The link takes you directly to the relevant line in your guideline file, making it easy to verify the feedback and understand why it was given.
### Example scenario
Let's say you're building an application that integrates multiple LLM providers. Your guideline file specifies:
* All providers must extend the `BaseLLMProvider` class
* All providers must implement standard methods like `generateResponse()` and `streamResponse()`
* New providers must be registered in the `config/providers.json` file
When someone submits a pull request to add a new provider, the agent can catch issues like:
* The new provider doesn't extend the base class
* Required methods are missing
* The provider wasn't added to the configuration file
Each comment links back to the specific guideline, so the developer knows exactly what needs to be fixed.
### Sample guideline file
Here's an example `AGENT.md` file to help you get started:
{% code expandable="true" %}
````markdown
# LLM Proxy Architecture & Design Document
## Document Overview
### Purpose
This document serves as a coding guideline and technical reference for AI agents working with this codebase. It provides comprehensive information about the current architecture, design patterns, implementation details, and the rationale behind design decisions. AI agents should use this document to understand the existing code structure, maintain consistency when making modifications, and follow established patterns when extending functionality.
### What This Document Covers
- **System Architecture**: High-level overview of components and their interactions
- **Design Patterns**: Detailed explanation of the Factory Pattern implementation
- **Component Design**: In-depth analysis of each system component
- **Data Flow**: Request/response lifecycle through the system
- **Design Decisions**: Rationale behind current architectural choices
- **Implementation Details**: Code structure, conventions, and patterns in use
---
## Table of Contents
1. [System Architecture](#system-architecture)
2. [Design Patterns](#design-patterns)
3. [Component Design](#component-design)
4. [Data Flow](#data-flow)
5. [Design Decisions](#design-decisions)
6. [Error Handling Strategy](#error-handling-strategy)
7. [Security Considerations](#security-considerations)
8. [Coding Conventions](#coding-conventions)
---
## System Architecture
### High-Level Overview
The LLM Proxy application follows a layered architecture with clear separation between the presentation layer (FastAPI), business logic layer (Provider implementations), and integration layer (external LLM APIs).
```
┌─────────────────────────────────────────────┐
│ FastAPI Application │
│ (Presentation Layer) │
│ - Request validation (Pydantic) │
│ - Route handling (/chat endpoint) │
│ - Response formatting │
└────────────────┬────────────────────────────┘
│
▼
┌─────────────────────────────────────────────┐
│ Provider Factory │
│ (Abstraction Layer) │
│ - Provider selection logic │
│ - Instance creation │
└────────────────┬────────────────────────────┘
│
┌────────┴────────┐
▼ ▼
┌──────────────┐ ┌──────────────┐
│ OpenAI │ │ Anthropic │
│ Provider │ │ Provider │
│ │ │ │
│ (Concrete │ │ (Concrete │
│ Impl.) │ │ Impl.) │
└──────┬───────┘ └──────┬───────┘
│ │
▼ ▼
┌──────────────┐ ┌──────────────┐
│ OpenAI API │ │ Anthropic API│
└──────────────┘ └──────────────┘
```
### Component Layers
1. **Presentation Layer** (`main.py`)
- Handles HTTP requests/responses
- Validates input using Pydantic models
- Manages API endpoints
2. **Abstraction Layer** (`providers/factory.py`)
- Implements Factory Pattern
- Routes requests to appropriate providers
- Decouples client code from concrete implementations
3. **Business Logic Layer** (`providers/*.py`)
- Abstract base class defines contract
- Concrete providers implement LLM-specific logic
- Handles API communication and response parsing
4. **Integration Layer**
- External API calls via httpx
- Authentication management
- Network error handling
---
## Design Patterns
### Factory Design Pattern
The application implements the **Factory Design Pattern** to create provider instances without exposing creation logic to the client.
#### Pattern Components
1. **Abstract Product** (`LLMProvider`)
```python
class LLMProvider(ABC):
def __init__(self, model: str):
self.model = model
@abstractmethod
def generate_response(self, prompt: str) -> str:
pass
```
**Purpose**: Defines the contract that all concrete providers must implement.
2. **Concrete Products** (`OpenAIProvider`, `AnthropicProvider`)
```python
class OpenAIProvider(LLMProvider):
def generate_response(self, prompt: str) -> str:
# OpenAI-specific implementation
pass
```
**Purpose**: Implement provider-specific logic while adhering to the base contract.
3. **Factory** (`ProviderFactory`)
```python
class ProviderFactory:
@staticmethod
def get_provider(provider_name: str, model: str) -> LLMProvider:
providers = {
"openai": OpenAIProvider,
"anthropic": AnthropicProvider
}
return providers[provider_name.lower()](model)
```
**Purpose**: Encapsulates provider instantiation logic.
#### Benefits of This Pattern
- **Loose Coupling**: Client code depends on abstractions, not concrete classes
- **Open/Closed Principle**: Open for extension (new providers), closed for modification
- **Single Responsibility**: Each provider handles only its specific implementation
- **Testability**: Easy to mock providers for testing
- **Scalability**: Adding new providers requires minimal changes
---
## Component Design
### 1. Base Provider (`providers/base.py`)
**Responsibility**: Define the contract for all LLM providers
**Key Design Decisions**:
- Uses ABC (Abstract Base Class) to enforce implementation
- Stores model name as instance variable for reuse
- Single abstract method keeps interface simple
**Design Rationale**:
- Python's ABC ensures compile-time checking of implementations
- Simple interface reduces cognitive load for implementers
- Storing model allows for provider-specific model validation in future
### 2. OpenAI Provider (`providers/openai_provider.py`)
**Responsibility**: Implement OpenAI Chat Completions API integration
**Key Features**:
- Environment-based API key management
- Message format conversion (user prompt → OpenAI format)
- Response parsing (extract content from choices)
- Timeout handling (30 seconds)
**API Contract**:
```
POST https://api.openai.com/v1/chat/completions
Headers: Authorization: Bearer
Body: {
"model": "gpt-4",
"messages": [{"role": "user", "content": "prompt"}]
}
```
**Error Handling**:
- Validates API key presence on initialization
- Catches HTTP errors and wraps with descriptive messages
- Re-raises exceptions for upstream handling
### 3. Anthropic Provider (`providers/anthropic_provider.py`)
**Responsibility**: Implement Anthropic Messages API integration
**Key Features**:
- Custom header format (x-api-key, anthropic-version)
- Max tokens configuration (1024)
- Content array response parsing
**API Contract**:
```
POST https://api.anthropic.com/v1/messages
Headers:
x-api-key:
anthropic-version: 2023-06-01
Body: {
"model": "claude-3-sonnet",
"max_tokens": 1024,
"messages": [{"role": "user", "content": "prompt"}]
}
```
**Design Choices**:
- Hard-coded max_tokens provides consistent behavior
- Version header ensures API stability
- Array access for content assumes single response
### 4. Provider Factory (`providers/factory.py`)
**Responsibility**: Create provider instances based on string identifiers
**Implementation Strategy**:
- Dictionary-based mapping for O(1) lookup
- Case-insensitive provider names
- Descriptive error messages for invalid providers
**Extensibility**:
```python
# Adding new provider:
providers = {
"openai": OpenAIProvider,
"anthropic": AnthropicProvider,
"deepseek": DeepseekProvider, # Just add here
}
```
### 5. FastAPI Application (`main.py`)
**Responsibility**: HTTP interface and request orchestration
**Key Components**:
1. **Request Model**:
```python
class ChatRequest(BaseModel):
provider: str
model: str
prompt: str
```
- Leverages Pydantic for automatic validation
- Clear field names match user expectations
2. **Response Model**:
```python
class ChatResponse(BaseModel):
provider: str
model: str
response: str
```
- Echoes input parameters for traceability
- Returns plain text response
3. **Endpoint Handler**:
```python
@app.post("/chat", response_model=ChatResponse)
async def chat(request: ChatRequest):
provider = ProviderFactory.get_provider(request.provider, request.model)
response_text = provider.generate_response(request.prompt)
return ChatResponse(...)
```
**Error Mapping**:
- `ValueError` (invalid provider) → HTTP 400
- Generic `Exception` (API errors) → HTTP 500
---
## Data Flow
### Request Lifecycle
```
1. Client sends POST /chat
↓
2. FastAPI receives request
↓
3. Pydantic validates request body
↓
4. ProviderFactory.get_provider() called
↓
5. Factory returns concrete provider instance
↓
6. provider.generate_response() called
↓
7. Provider makes HTTP call to LLM API
↓
8. Provider parses response
↓
9. Response wrapped in ChatResponse model
↓
10. JSON response sent to client
```
### Detailed Flow Example (OpenAI)
```python
# Client Request
POST /chat
{
"provider": "openai",
"model": "gpt-4",
"prompt": "Tell me a joke"
}
# Internal Processing
1. Pydantic validates: ChatRequest object created
2. Factory called: ProviderFactory.get_provider("openai", "gpt-4")
3. OpenAIProvider instantiated with model="gpt-4"
4. generate_response("Tell me a joke") called
5. HTTP POST to OpenAI API:
{
"model": "gpt-4",
"messages": [{"role": "user", "content": "Tell me a joke"}]
}
6. OpenAI responds with completion
7. Extract: data["choices"][0]["message"]["content"]
8. Return text to endpoint
9. Wrap in ChatResponse
# Client Response
{
"provider": "openai",
"model": "gpt-4",
"response": "Why did the chicken cross the road?..."
}
```
---
## Design Decisions
### 1. Why Factory Pattern?
**Decision**: Use Factory Pattern instead of simple if/else logic
**Rationale**:
- **Scalability**: Adding providers doesn't require modifying existing code
- **Testability**: Easy to mock factory for unit tests
- **Maintainability**: Provider logic isolated in separate classes
- **Professional Standard**: Industry-recognized pattern for this use case
**Alternative Considered**: Direct instantiation with if/else
```python
# Rejected approach
if provider == "openai":
result = OpenAIProvider(model).generate_response(prompt)
elif provider == "anthropic":
result = AnthropicProvider(model).generate_response(prompt)
```
**Why Rejected**: Violates Open/Closed Principle, harder to extend
### 2. Why httpx Over Official SDKs?
**Decision**: Use httpx for HTTP calls instead of official provider SDKs
**Rationale**:
- **Minimal Dependencies**: Keeps requirements.txt small
- **Unified Interface**: Single HTTP client for all providers
- **Transparency**: Direct API calls are easier to debug
- **Control**: Full control over request/response handling
**Trade-offs**:
- Less abstraction (must handle response parsing)
- No built-in retry logic
- Manual API version management
### 3. Synchronous vs Asynchronous
**Decision**: Use synchronous HTTP calls with httpx.Client
**Rationale**:
- **Simplicity**: Easier to understand and debug
- **Current Scale**: Single request doesn't benefit from async
- **API Constraints**: LLM APIs are inherently blocking
**Future Consideration**: Switch to async if supporting streaming responses
### 4. Error Handling Strategy
**Decision**: Simple try/except with HTTP status code mapping
**Rationale**:
- **Simplicity**: Requirements specified basic error handling
- **Client Clarity**: HTTP status codes are standard
- **Debugging**: Error messages preserved in exceptions
**Not Included** (but recommended for production):
- Structured logging
- Retry logic
- Rate limiting
- Circuit breakers
### 5. Environment Variables for API Keys
**Decision**: Use environment variables instead of configuration files
**Rationale**:
- **Security**: Prevents accidental commit of credentials
- **12-Factor App**: Follows best practices for configuration
- **Flexibility**: Easy to change without code modification
- **Cloud-Ready**: Works seamlessly with container orchestration
---
## Error Handling Strategy
### Current Implementation
```python
try:
provider = ProviderFactory.get_provider(request.provider, request.model)
response_text = provider.generate_response(request.prompt)
return ChatResponse(...)
except ValueError as e:
# Invalid provider name
raise HTTPException(status_code=400, detail=str(e))
except Exception as e:
# API errors, network issues, etc.
raise HTTPException(status_code=500, detail=str(e))
```
### Error Categories
1. **Client Errors (400)**:
- Invalid provider name
- Unsupported model
- Malformed request
2. **Server Errors (500)**:
- Missing API keys
- Network timeouts
- API errors (rate limits, service unavailable)
- Response parsing failures
---
## Security Considerations
### Current Implementation
1. **API Key Management**:
- Stored in environment variables
- Never logged or returned in responses
- Validated on provider initialization
2. **Request Validation**:
- Pydantic models enforce type safety
- No SQL injection risk (no database)
- No command injection (no shell execution)
### Current Limitations
1. **No Rate Limiting**: The application does not implement rate limiting
2. **No Authentication**: Endpoints are publicly accessible
3. **No Input Sanitization**: Prompt length and content are not validated beyond Pydantic type checking
4. **No Retry Logic**: Failed API calls are not automatically retried
---
## Coding Conventions
### File Organization
**Current Structure**:
```
llm-proxy/
├── main.py # FastAPI application entry point
├── providers/ # Provider package
│ ├── __init__.py # Package exports
│ ├── base.py # Abstract base class
│ ├── openai_provider.py # OpenAI implementation
│ ├── anthropic_provider.py # Anthropic implementation
│ └── factory.py # Factory implementation
├── requirements.txt # Python dependencies
├── .env.example # Environment variable template
└── README.md # User documentation
```
### Naming Conventions
1. **Classes**: PascalCase (e.g., `LLMProvider`, `OpenAIProvider`)
2. **Functions/Methods**: snake_case (e.g., `generate_response`, `get_provider`)
3. **Constants**: UPPER_SNAKE_CASE (e.g., `OPENAI_API_KEY`)
4. **Files**: snake_case (e.g., `openai_provider.py`)
### Code Patterns
1. **Provider Implementation**:
- Inherit from `LLMProvider`
- Validate API key in `__init__`
- Implement `generate_response(prompt: str) -> str`
- Use httpx.Client with 30-second timeout
- Wrap errors with descriptive messages
2. **Error Handling**:
- Use `try/except` blocks in provider implementations
- Raise `ValueError` for missing API keys
- Raise generic `Exception` with descriptive messages for API errors
- Let FastAPI endpoint handle HTTP status code mapping
3. **Environment Variables**:
- Load with `os.getenv()`
- Validate presence in provider `__init__`
- Use pattern: `{PROVIDER}_API_KEY`
4. **Type Hints**:
- All methods should include type hints
- Use Pydantic models for request/response validation
- Return type explicitly stated
### Documentation Standards
1. **Docstrings**: All classes and methods include docstrings
2. **Comments**: Inline comments explain non-obvious logic
3. **README**: User-facing documentation with examples
### Dependencies
**Current Dependencies**:
- `fastapi==0.109.0`: Web framework
- `uvicorn[standard]==0.27.0`: ASGI server
- `pydantic==2.5.3`: Data validation
- `httpx==0.26.0`: HTTP client
- `python-dotenv==1.0.0`: Environment variable management
**Rationale**: Minimal, well-maintained dependencies that serve specific purposes.
---
## Summary
This document captures the current state of the LLM Proxy application. When working with this codebase, AI agents should:
1. **Follow the Factory Pattern**: All new providers must inherit from `LLMProvider` and be registered in `ProviderFactory`
2. **Maintain Consistency**: Use the same error handling, timeout values, and code structure as existing providers
3. **Respect Abstractions**: Keep provider-specific logic within provider classes
4. **Update Documentation**: Any changes to architecture should be reflected in this document
5. **Preserve Simplicity**: The design prioritizes simplicity and clarity over advanced features
The architecture demonstrates clean separation of concerns through the Factory Design Pattern, making the codebase maintainable and understandable for both human developers and AI agents.
````
{% endcode %}
---
# Source: https://docs.bito.ai/help/bitos-ai-stack/indexing.md
# Indexing
Indexing involves breaking down a source code file into smaller chunks and converting these chunks into [**embeddings**](https://docs.bito.ai/help/bitos-ai-stack/embeddings) that can be stored in a [**vector database**](https://docs.bito.ai/help/bitos-ai-stack/vector-databases). Bito indexes your entire codebase locally (on your machine) to understand it and provide answers tailored to your code.
{% hint style="info" %}
Learn more about Bito's [**AI that Understands Your Code**](https://docs.bito.ai/ai-code-reviews-in-ide/ai-that-understands-your-code) feature.
{% endhint %}
## How Bito Indexes Your Code
In the steps below, we'll show you how Bito indexes your code, ensuring that each query you have is met with precise and contextually relevant information. From breaking down code into digestible chunks to leveraging advanced AI models for nuanced understanding, Bito transforms the daunting task of code analysis into a seamless and efficient experience.
Here's how the magic happens:
### Step 1: Chunk Breakdown
*Dividing Code into Pieces*
Bito starts by breaking down your source code files into smaller sections, known as 'chunks'. It’s like cutting up a long text into paragraphs to make it more manageable. Each chunk represents a piece of your code that can be individually indexed and analyzed.
### Step 2: Indexing Each Chunk
*Creating a Searchable Reference*
After breaking down the file, each chunk is indexed, similar to creating a catalog entry. This step is crucial as it allows for the efficient location of the code segment later on.
### Step 3: Generating Embeddings
*Translating Code into Numeric Vectors*
For every chunk, Bito generates a numeric vector or [**“embedding”**](https://docs.bito.ai/help/bitos-ai-stack/embeddings). This process, which can be done using OpenAI or alternative open-source embedding models, translates the code into a mathematical representation. The idea is to create a form that can be easily compared and matched with other code chunks.
### Step 4: Storing the Vectors
*Saving the Essential Data*
These embeddings are then stored in an index file on your machine. This index file is like a detailed directory, listing the file name, the location of the chunk within the file (start and end), and the embedding vector for each piece of code.
### Step 5: Query Embedding
*Understanding Your Questions*
When you ask a question in Bito's chatbox, the AI checks whether it has some specific keywords like "my code", "my project", etc. If so, Bito generates a numeric vector for your query, mirroring the process used for code chunks.
{% hint style="info" %}
The complete list of these keywords is given on our [**Available Keywords**](https://docs.bito.ai/ai-code-reviews-in-ide/ai-that-understands-your-code/available-keywords) page.
{% endhint %}
### Step 6: Finding the Nearest Neighbor
*Matching Your Query with Code*
Using the query's vector, Bito searches the index to find the code chunk with the closest matching embedding. This step identifies the relevant sections of your codebase that can answer your question.
### Step 7: Contextualization
*Building a Bigger Picture*
Identifying chunks is just part of the process. Bito ensures that these chunks make sense in the broader context of your code. If necessary, it expands the search to include complete functions or related code segments, creating a fuller, more accurate context.
### Step 8: Leveraging Language Models
*Consulting the AI Experts*
With the context in hand, Bito consults with language models – either basic (GPT-4o mini and similar models) or advanced (GPT-4o, Claude Sonnet 3.5, and best in class AI models) – to interpret the code within the context and provide an accurate response to your query.
### Step 9: Session Privacy
*Keeping Your Data Local*
All the indexing and querying happens on your local machine. The index files are stored in the user’s home folder, for example on Windows the path will be something like **C:\Users\Furqan\\.bito\localcodesearch** folder. It ensures that your code and session history remain private and secure.
### Step 10: Safeguarding Data
*Ensuring Confidentiality*
Bito is committed to privacy. All LLM accounts it uses are under strict agreements to prevent your data from being used for training, recorded, or logged.
### Step 11: Handling Hallucination
*Reducing AI Fabrication*
Bito is designed to minimize AI 'hallucinations' or fabrications, ensuring the answers you receive are based on your actual code. Although complete elimination of hallucination isn't feasible, as it sometimes aids in constructing beyond seen data, Bito strives to keep it in check, especially when dealing with your local code.
With these steps, Bito provides a robust and privacy-conscious method for indexing and understanding your code, simplifying navigation and enhancing productivity in your development projects.
---
# Source: https://docs.bito.ai/ai-architect/install-ai-architect-self-hosted.md
# Install AI Architect (self-hosted)
This guide walks you through installing [**Bito's AI Architect**](https://docs.bito.ai/ai-architect/overview) as a self-hosted service in your own infrastructure. Self-hosting gives you complete control over where your code knowledge graph resides and how AI Architect accesses your repositories.
**Why choose self-hosted deployment?** Organizations with strict data governance requirements, air-gapped environments, or specific compliance needs benefit from running AI Architect within their own infrastructure. Your codebase analysis and knowledge graph stay entirely within your control, while still providing the same powerful context-aware capabilities to your AI coding tools.
**What you'll accomplish:** By the end of this guide, you'll have AI Architect running on your infrastructure, connected to your Git repositories, and ready to integrate with AI coding tools like Claude Code, Cursor, Windsurf, and GitHub Copilot through the Model Context Protocol (MCP).
### Deployment options
AI Architect can be deployed in three different configurations depending on your team size, infrastructure, and security requirements:
#### a. Personal use (with your LLM keys)
Set up AI Architect on your local machine for individual development work. You'll provide your own LLM API keys for indexing, giving you complete control over the AI models used and associated costs.
**Best for:** Individual developers who want codebase understanding on their personal machine.
#### b. Team / shared access (with your LLM keys)
Deploy AI Architect on a shared server within your infrastructure, allowing multiple team members to connect their AI coding tools to the same MCP server. Each team member can configure AI Architect with their preferred AI coding agent while sharing the same indexed codebase knowledge graph.
**Best for:** Development teams that want to share codebase intelligence across the team while managing their own LLM costs.
#### c. Enterprise deployment (requires Bito Enterprise Plan)
Deploy AI Architect on your infrastructure (local machine or shared server) with indexing managed by Bito. Instead of providing your own LLM keys, Bito handles the repository indexing process, simplifying setup and cost management.
**Best for:** Organizations that prefer managed indexing without handling individual LLM API keys and costs.
{% hint style="info" %}
**Note:** All deployment options are self-hosted on your infrastructure — your code and knowledge graph remain under your control.
{% endhint %}
## Prerequisites
### a. Required accounts and tokens
{% stepper %}
{% step %}
### Bito API Key (aka Bito Access Key)
You'll need a **Bito account** and a **Bito Access Key** to authenticate AI Architect. You can sign up for a Bito account at [**https://alpha.bito.ai**](https://alpha.bito.ai/), and create an access key from [**Settings -> Advanced Settings**](https://alpha.bito.ai/home/advanced)
* [**View Guide**](https://docs.bito.ai/help/account-and-settings/access-key)
{% endstep %}
{% step %}
### Git provider
We support the following Git providers:
* GitHub
* GitLab
* Bitbucket
So, you'll need an account on one of these Git providers to index your repositories with AI Architect.
{% endstep %}
{% step %}
### Git Access Token
A personal access token from your chosen Git provider is required. You'll use this token to allow AI Architect to read and index your repositories.
1. **GitHub Personal Access Token (Classic):** To use GitHub repositories with AI Architect, ensure you have a CLASSIC personal access token with repo access. We do not support fine-grained tokens currently.
* [**View Guide**](https://docs.github.com/en/authentication/keeping-your-account-and-data-secure/managing-your-personal-access-tokens#creating-a-personal-access-token-classic)
2. **GitLab Personal Access Token:** To use GitLab repositories with AI Architect, a token with API access is required.
* [**View Guide**](https://docs.gitlab.com/ee/user/profile/personal_access_tokens.html#create-a-personal-access-token)
3. **Bitbucket Access Token:** To use Bitbucket repositories with AI Architect, you need **API Token** or **HTTP Access Token** depending on your Bitbucket setup.
1. **Bitbucket Cloud (`API Token`):** You must provide both your **token** and **email address**.
* [**View Guide**](https://support.atlassian.com/bitbucket-cloud/docs/create-an-api-token/)
2. **Bitbucket Self-Hosted (`HTTP Access Token`):** You must provide both your **token** and **username**.
* [**View Guide**](https://confluence.atlassian.com/bitbucketserver/personal-access-tokens-939515499.html)
{% endstep %}
{% step %}
### LLM API keys
Bito's AI Architect uses Large Language Models (LLMs) to build a knowledge graph of your codebase.
We suggest you provide API keys for both **Anthropic** and **Grok** LLMs, as that provides the best coverage and the best cost of indexing.
Bito will use **Claude Haiku** and **Grok Code Fast** together to index your codebase. It will cost you approximately USD $0.20 - $0.40 per MB of indexable code (we do not index binaries, TARs, zips, images, etc). If you provide only an Anthropic key without Grok, your indexing costs will be significantly higher, approximately USD $1.00 - $1.50 per MB of indexable code.
{% endstep %}
{% endstepper %}
### b. System requirements
AI Architect can be installed on your local machine for individual use, or on a shared server that your entire team can connect to. When installed on a server, multiple developers can configure their AI coding tools (such as Claude Code, Cursor, Windsurf, etc.) to use the same MCP server, sharing access to the indexed codebase.
The AI Architect supports the following operating systems:
* **macOS**
* **Unix-based systems** (Ubuntu, Debian, RHEL, or similar distributions)
* **Windows (via WSL2)**
#### Shared servers (for team deployments)
* **On-premise physical servers** - Bare metal Linux servers in your data center
* **On-premise virtual machines** - VMware, Hyper-V, Proxmox, KVM, or other virtualization platforms
* **Cloud virtual machines** - AWS EC2, Google Cloud Compute Engine, Azure VMs, DigitalOcean Droplets, or similar cloud instances
{% stepper %}
{% step %}
### Hardware specifications
| | Recommended |
| :------: | :-----------------------------------------------------------------------------------------------------------------------------------------------------------------------------: |
| **CPU** | 6-8 cores |
| **RAM** | 8-12 GB |
| **Disk** | SSD with adequate IOPS
Note: Ensure sufficient disk space is available, as all configured repositories will be cloned to this disk during setup.
|
AI Architect automatically detects available system resources during setup and configures optimal resource allocation for its Docker containers. For most deployments, the automatic configuration provides good performance. However, you can manually adjust these settings to fine-tune performance or accommodate specific workload requirements.
You can customize resource limits by editing the `.env-bitoarch` file and run the command `./setup.sh --force-restart` to update the allocation. The following environment variables can be manually configured to control resource allocation.
```dotenv
CIS_PROVIDER_MEMORY_LIMIT=1g
CIS_MANAGER_MEMORY_LIMIT=2g
CIS_CONFIG_MEMORY_LIMIT=512m
MYSQL_MEMORY_LIMIT=2g
CIS_TRACKER_MEMORY_LIMIT=512m
CIS_PROVIDER_CPU_LIMIT=1.0
CIS_MANAGER_CPU_LIMIT=2.0
CIS_CONFIG_CPU_LIMIT=0.5
MYSQL_CPU_LIMIT=1.0
CIS_TRACKER_CPU_LIMIT=0.5
```
{% endstep %}
{% step %}
### **WSL2 is required for Windows users**
If you're running Windows, Windows Subsystem for Linux 2 (WSL2) must be installed before proceeding.
**To install WSL2:**
1. Open PowerShell or Command Prompt as Administrator
2. Run the following command:
```shellscript
wsl --install
```
3. Set up your Ubuntu username and password when prompted.
{% endstep %}
{% step %}
### Docker Desktop / Docker Service (required)
**Docker Compose** is required to run AI Architect.
The easiest and recommended way to get Docker Compose is to install **Docker Desktop**.
Docker Desktop includes Docker Compose along with Docker Engine and Docker CLI which are Docker Compose prerequisites.
[**Install Docker Desktop**](https://docs.docker.com/compose/install)
**Configuration for Windows (WSL2):**
If you're using Windows with WSL2, you need to enable Docker integration with your WSL distribution:
1. Open **Docker Desktop**
2. Go to **Settings** > **Resources** > **WSL Integration**
3. Enable integration for your WSL distribution (e.g., Ubuntu)
4. Click **Apply**
{% endstep %}
{% step %}
### Kubernetes cluster (required for Kubernetes based deployment method)
### For production environments:
During the setup process given below, if you choose [**Kubernetes**](https://kubernetes.io/docs/home/) as your deployment method, you must have an existing Kubernetes cluster set up and running.
Ensure your Kubernetes cluster have the following required tools:
* **kubectl** (Kubernetes command-line tool)
* **helm** (Kubernetes package manager)
### For testing and development:
For testing purposes, you can create a local Kubernetes cluster using KIND (Kubernetes in Docker). KIND allows you to run Kubernetes clusters in Docker containers.
**Install KIND:**
* **macOS:**
```shellscript
brew install kind kubectl helm
```
* **Linux:**
```shellscript
# KIND
curl -Lo ./kind https://kind.sigs.k8s.io/dl/v0.20.0/kind-linux-amd64
chmod +x ./kind
sudo mv ./kind /usr/local/bin/kind
# kubectl
curl -LO "https://dl.k8s.io/release/$(curl -L -s https://dl.k8s.io/release/stable.txt)/bin/linux/amd64/kubectl"
chmod +x kubectl
sudo mv kubectl /usr/local/bin/
# Helm
curl https://raw.githubusercontent.com/helm/helm/main/scripts/get-helm-3 | bash
```
{% hint style="info" %}
**Note:** Before creating a KIND cluster, verify Docker has sufficient resources:
```shellscript
docker info --format 'CPUs={{.NCPU}} Mem={{.MemTotal}}'
```
\
**Required:** Minimum 4 CPUs and 8GB RAM
If resources are insufficient, increase Docker Desktop resources (Preferences → Resources) and restart Docker.
{% endhint %}
#### Setting up a test cluster with KIND
Create a KIND cluster with proper port mappings for service access:
```shellscript
kind create cluster --name bito-ai-architect --config - <
```
{% hint style="info" %}
Replace `` with your new secure token value.
**Important:** After rotating the token, you'll need to update it in all AI coding agents (Claude Code, Cursor, Windsurf, etc.) where you've configured this MCP server.
{% endhint %}
{% endstep %}
{% endstepper %}
## Update repository list and re-index
Edit `/usr/local/etc/bitoarch/.bitoarch-config.yaml` file to add/remove repositories.
```shellscript
vim /usr/local/etc/bitoarch/.bitoarch-config.yaml
```
To apply the changes, run this command:
```shellscript
bitoarch update-repos /usr/local/etc/bitoarch/.bitoarch-config.yaml
```
Start the re-indexing process using this command:
```shellscript
bitoarch index-repos
```
## Accessing services (Kubernetes-based deployment)
Port-forwards are exposed on all network interfaces (0.0.0.0) and are accessible from any machine on the network.
#### Local access (from the Kubernetes host machine)
```shellscript
curl http://localhost:5001/health # Provider
curl http://localhost:5002/health # Manager
curl http://localhost:5003/health # Config
```
#### Network access (from other machines on your network)
Get the host machine's IP address:
```shellscript
kubectl get nodes -o wide
# Or: hostname -I (Linux) / ifconfig (macOS)
```
From another machine on the network:
```shellscript
curl http://:5001/health # Provider
curl http://:5002/health # Manager
curl http://:5003/health # Config
curl http://:5005/health # Tracker
```
#### Security considerations
> **Important security notes:**
>
> * Port-forwards use HTTP (not HTTPS) - traffic is unencrypted
> * Services are accessible from any machine that can reach the host
>
> **For production internet-facing deployments:**
>
> * Use firewall rules to restrict access to trusted IPs
> * Consider using Kubernetes Ingress with TLS/SSL
> * Implement VPN for remote access
> * Use network policies to limit pod-to-pod traffic
#### Alternative: Kubernetes Ingress (production)
For production deployments, configure a Kubernetes Ingress Controller with TLS/SSL instead of using port-forwards. This provides secure HTTPS access with proper certificate management.
## Setting up AI Architect MCP in coding agents
Now that AI Architect is installed and your repositories are indexed, the next step is to connect it to your AI coding tools (such as Claude Code, Cursor, Windsurf, GitHub Copilot, etc.) through the Model Context Protocol (MCP).
#### Quick setup (recommended)
**Save time with our automated installer!** We provide a one-command setup that automatically configures AI Architect for all compatible AI coding tools on your system.
The automated installer will:
* Detect all supported AI tools installed on your system
* Configure them automatically with your MCP credentials
* Get you up and running in seconds instead of manually configuring each tool
👉 [**Try our Quick MCP Integration Guide**](https://docs.bito.ai/ai-architect/quick-mcp-integration-with-ai-coding-agents) for automated setup across all your tools.
#### Manual setup
If you prefer hands-on control over your configuration or encounter issues with automated setup, we provide detailed step-by-step guides for each supported AI coding tool:
* [**Guide for Claude Code**](https://docs.bito.ai/ai-architect/guide-for-claude-code)
* [**Guide for Cursor**](https://docs.bito.ai/ai-architect/guide-for-cursor)
* [**Guide for Windsurf**](https://docs.bito.ai/ai-architect/guide-for-windsurf)
* [**Guide for GitHub Copilot (VS Code)**](https://docs.bito.ai/ai-architect/guide-for-github-copilot-vs-code)
* [**Guide for Junie (JetBrains)**](https://docs.bito.ai/ai-architect/guide-for-junie-jetbrains)
* [**Guide for JetBrains AI Assistant**](https://docs.bito.ai/ai-architect/guide-for-jetbrains-ai-assistant)
Each guide walks you through the complete manual configuration process for that specific tool.
## Configuring AI Architect for Bito AI Code Review Agent
Now that you have **AI Architect** set up, you can take your code quality to the next level by integrating it with [**Bito's AI Code Review Agent**](https://bito.ai/product/ai-code-review-agent/). This powerful combination delivers significantly more accurate and context-aware code reviews by leveraging the deep codebase knowledge graph that AI Architect has built.
**Why integrate AI Architect with AI Code Review Agent?**
When the AI Code Review Agent has access to AI Architect's knowledge graph, it gains a comprehensive understanding of your entire codebase architecture — including microservices, modules, APIs, dependencies, and design patterns.
This enables the AI Code Review Agent to:
* **Provide system-aware code reviews** - Understand how changes in one service or module impact other parts of your system
* **Catch architectural inconsistencies** - Identify when new code doesn't align with your established patterns and conventions
* **Detect cross-repository issues** - Spot problems that span multiple repositories or services
* **Deliver more accurate suggestions** - Generate fixes that are grounded in your actual codebase structure and usage patterns
* **Reduce false positives** - Better understand context to avoid flagging valid code as problematic
#### Getting started with AI Architect-powered code reviews
1. Log in to [**Bito Cloud**](https://alpha.bito.ai/home/welcome)
2. Open the [**AI Architect Settings**](https://alpha.bito.ai/home/ai-architect/settings?mode=self-hosted) dashboard.
3. In the **Server URL** field, enter your **Bito MCP URL**
4. In the **Auth token** field, enter your **Bito MCP Access Token**
**Need help getting started?** Contact our team at [**support@bito.ai**](mailto:support@bito.ai) to request a trial. We'll help you configure the integration and get your team up and running quickly.
## Upgrading AI Architect
Upgrade your AI Architect installation to the latest version while preserving your data and configuration. The upgrade process:
* Automatically detects your current version
* Downloads and extracts the new version
* Migrates your configuration and data
* Seamlessly transitions to the new version
* Preserves all indexed repositories and settings
#### Upgrade instructions
#### Option 1: Upgrade from within your installation (Recommended)
If you're running **version 1.1.0 or higher**, navigate to your current installation directory and run:
```shellscript
cd /path/to/bito-ai-architect
```
```shellscript
./scripts/upgrade.sh --version=latest
```
#### Option 2: Upgrade from external location
If you need to run the upgrade from outside your installation directory (useful for **version 1.0.0**), use the `--old-path` parameter:
```shellscript
# Download the standalone upgrade script
curl -O https://github.com/gitbito/ai-architect/blob/main/upgrade.sh
chmod +x upgrade.sh
# Run upgrade with explicit path
./upgrade.sh --old-path=/path/to/bito-ai-architect --version=latest
```
#### Upgrade parameters
The upgrade script supports the following parameters:
```shellscript
# Description
--version=VERSION
# Upgrade to specific version
--version=latest
# Upgrade from custom URL or file
--url=file:///path/to/package.tar.gz
# Specify installation path (required if running outside installation directory)
--old-path=/opt/bito-ai-architect
# Show help message
--help
```
{% hint style="info" %}
**Your data is safe:** All repositories, indexes, API keys, and settings are automatically preserved during upgrade.
{% endhint %}
{% hint style="info" %}
**Important:** You can only upgrade within the same deployment type. To switch from **Docker Compose** to **Kubernetes** or vice versa, you must use the `./setup.sh --clean` command, which will result in data loss.
{% endhint %}
## Troubleshooting guide
```shellscript
# Check all services
bitoarch status
bitoarch health --verbose
# View full configuration
bitoarch show-config --raw
# Test MCP connection
bitoarch mcp-test
# Check indexing status with details
bitoarch index-status --raw
# Check setup log
tail -f setup.log
# Local log files
tail -f var/logs/cis-provider/provider.log
tail -f var/logs/cis-manager/manager.log
# Complete logs
./setup.sh --logs
# Reset installation (removes all data and configuration)
./setup.sh --clean
# Then run setup again
./setup.sh
# To stop all the service
./setup.sh --stop
# Restart service (for env based config updates)
./setup.sh --restart
# Force pull latest images based on service-versions.json and restart services
./setup.sh --update
```
#### Commands specific to Kubernetes-based deployment
```shellscript
# Check Kubernetes pod status
# All pods should show "Running" status.
kubectl get pods -n bito-ai-architect
# Check detailed information about a specific Kubernetes pod
kubectl describe pod -n bito-ai-architect
# Access Kubernetes pod shell
kubectl exec -it -n bito-ai-architect \
$(kubectl get pod -n bito-ai-architect -l app.kubernetes.io/component=provider -o jsonpath='{.items[0].metadata.name}') \
-- /bin/sh
# Stop KIND cluster (preserves data)
docker stop bito-ai-architect-control-plane
# Start KIND cluster again
docker start bito-ai-architect-control-plane
# Delete KIND cluster completely
kind delete cluster --name bito-ai-architect
# View Provider service logs:
kubectl logs -n bito-ai-architect -l app.kubernetes.io/component=provider --tail=100 -f
# View Manager service logs:
kubectl logs -n bito-ai-architect -l app.kubernetes.io/component=manager --tail=100 -f
```
## Available commands
For complete reference of AI Architect CLI commands, refer to [Available commands](https://docs.bito.ai/ai-architect/available-commands).
---
# Source: https://docs.bito.ai/other-bito-ai-tools/bito-cli/install-or-uninstall.md
# Install or uninstall
## Installing Bito CLI (Recommended)
We recommend you use the following methods to install Bito CLI.
### Mac and Linux
`sudo curl https://alpha.bito.ai/downloads/cli/install.sh -fsSL | bash`
**Note:** curl will always download the latest version.
#### Archlinux
Arch and Arch based distro users can install it from [AUR](https://aur.archlinux.org/packages/bito-cli)
`yay -S bito-cli`
or
`paru -S bito-cli`
**Note for the Mac Users:** You might face issues related to verification for which you will have to manually do the steps from [here](https://support.apple.com/en-in/guide/mac-help/mh40616/mac) (we are working on fixing it as soon as possible).
### Windows
* In the [Bito CLI GitHub repo](https://github.com/gitbito/CLI), open the folder that has the latest version number.
* From here, download the MSI file called `Bito CLI.exe` and then install Bito CLI using this installer.
* On Windows 11, you might get notification related to publisher verification. Click on "Show more" or "More info" and click on "Run anyway" (we are working on fixing this as soon as possible).
{% hint style="info" %}
Once the installation is complete, start a new command prompt and run `bito` command to get started.
{% endhint %}
## Installing with Manual Binary Download (Not Recommended)
While it's not recommended, you can download the Bito CLI binary from our repository, and install it manually. The binary is available for Windows, Linux, and Mac OS (x86 and ARM architecture).
### Mac and Linux
1. In the [Bito CLI GitHub repo](https://github.com/gitbito/CLI), open the folder that has the latest version number.
2. From here, download the Bito CLI binary specific to your OS platform.
3. Start the terminal, go to the location where you downloaded the binary, move the downloaded file (in the command below use bito-\* filename you have downloaded) to filename bito.
`mv bito-- bito`
4. Make the file executable using following command `chmod +x ./bito`
5. Copy the binary to `/usr/local/bin` using following command `sudo cp ./bito /usr/local/bin`
6. Set PATH variable so that Bito CLI is always accessible. `PATH=$PATH:/usr/local/bin`
7. Run Bito CLI with `bito` command. If PATH variable is not set, you will need to run command with the complete or relative path to the Bito executable binary.
### Windows
1. In the [Bito CLI GitHub repo](https://github.com/gitbito/CLI), open the folder that has the latest version number.
2. From here, download the Bito CLI binary for Windows called `bito.exe`.
3. For using Bito CLI, always move to the directory containing Bito CLI prior to running it.
4. Set PATH variable so that Bito CLI is always accessible.
1. Follow the instructions as per this [link](https://share.bito.co/static/share?aid=02f4506f-1208-4d97-bb1d-96f3b4a1a017)
2. Edit the "Path" variable and add a new path of the location where Bito CLI is installed on your machine.
## Uninstalling Bito CLI
### Mac and Linux
`sudo curl https://alpha.bito.ai/downloads/cli/uninstall.sh -fsSL | bash`
**Note:** This will completely uninstall Bito CLI and all of its components.
### Windows
For Windows, you can uninstall Bito CLI just like you uninstall any other software from the control panel. You can follow these steps:
1. Click on the Windows Start button and type "control panel" in the search box, and then open the Control Panel app.
2. Under the "Programs" option, click on "Uninstall a program".
3. Find "Bito CLI" in the list of installed programs and click on it.
4. Click on the "Uninstall" button (given at the top) to start the uninstallation process.
5. Follow the instructions provided by the uninstall wizard to complete the uninstallation process.
After completing these steps, Bito CLI should be completely removed from your Windows machine.
---
# Source: https://docs.bito.ai/ai-code-reviews-in-git/install-run-as-a-self-hosted-service.md
# Install/run as a self-hosted service
The self-hosted AI Code Review Agent offers a more private and customizable option for teams looking to enhance their code review processes within their own infrastructure, while maintaining complete control over their data. This approach is ideal for organizations with specific compliance, security, or customization requirements.
## Understanding CLI vs webhooks service
When setting up the AI Code Review Agent, you have the flexibility to choose between two primary modes of operation: **CLI** and **webhooks service**.
* **CLI** allows developers to manually initiate code reviews directly from terminal. This mode is ideal for quick, on-demand code reviews without the need for continuous monitoring or integration.
* **Webhooks service** transforms the Agent into a persistent service that automatically triggers code reviews based on specific events, such as pull requests or comments on pull requests. This mode is suitable for teams looking to automate their code review processes.
For more details, visit the [**CLI vs webhooks service**](https://docs.bito.ai/ai-code-reviews-in-git/install-run-as-a-self-hosted-service/cli-vs-webhooks-service) page.
## Deployment Options
Based on your needs and the desired integration level with your development workflow, choose one of the following options to install and run the AI Code Review Agent:
{% hint style="info" %}
Before proceeding, ensure you've completed all necessary [**prerequisites for self-hosted**](https://docs.bito.ai/ai-code-reviews-in-git/install-run-as-a-self-hosted-service/prerequisites) AI Code Review Agent.
{% endhint %}
1. [**Install/run via CLI**](https://docs.bito.ai/ai-code-reviews-in-git/install-run-as-a-self-hosted-service/install-run-via-cli): Ideal for developers seeking a simple, interactive way to conduct code reviews from the command line.
2. [**Install/run via webhooks service**](https://docs.bito.ai/ai-code-reviews-in-git/install-run-as-a-self-hosted-service/install-run-via-webhooks-service): Perfect for teams looking to automate code reviews through external events, enhancing their CI/CD workflow.
3. [**Install/run via GitHub Actions**](https://docs.bito.ai/ai-code-reviews-in-git/install-run-as-a-self-hosted-service/install-run-via-github-actions): A great option for GitHub users to seamlessly integrate automated code reviews into their GitHub Actions workflows.
---
# Source: https://docs.bito.ai/ai-code-reviews-in-git/install-run-using-bito-cloud.md
# Install/run using Bito Cloud
[**Bito Cloud**](https://alpha.bito.ai/) offers a single-click solution for using the [**AI Code Review Agent**](https://docs.bito.ai/ai-code-reviews-in-git/overview), eliminating the need for any downloads on your machine. You can create multiple instances of the Agent, allowing each to be used with a different repository on a Git provider such as GitHub, GitLab, or Bitbucket.
We also support **GitHub (Self-Managed)**, **GitLab (Self-Managed)**, and **Bitbucket (Self-Managed)**.
{% hint style="info" %}
The **Free Plan** offers **AI-generated pull request summaries** to provide a quick overview of changes. For advanced features like **line-level code suggestions**, consider upgrading to the **Team Plan**. For detailed pricing information, visit our [**Pricing**](https://bito.ai/pricing/) page.
[**Get a 14-day FREE trial of Bito's AI Code Review Agent.**](https://alpha.bito.ai/home/welcome)
{% endhint %}
## Connect Bito to your Git provider
Select your Git provider from the options below and follow the step-by-step installation guide to seamlessly set up your AI Code Review Agent.
---
# Source: https://docs.bito.ai/ai-code-reviews-in-git/install-run-as-a-self-hosted-service/install-run-via-cli.md
# Install/run via CLI
1. **Prerequisites:** Before proceeding, ensure you've completed all necessary [**prerequisites for self-hosted**](https://docs.bito.ai/ai-code-reviews-in-git/install-run-as-a-self-hosted-service/prerequisites) AI Code Review Agent.
2. **Start Docker:** Ensure Docker is running on your machine.
3. **Repository Download:** [**Download the AI Code Review Agent**](https://github.com/gitbito/codereviewagent) GitHub repository to your machine.
4. **Extract and Navigate:**
* Extract the downloaded .zip file to a preferred location.
 * Navigate to the extracted folder and then to the “cra-scripts” subfolder.
 * Note the full path to the “cra-scripts” folder for later use.
 5. **Open Command Line:**
* Use Bash for Linux and macOS.
* Use PowerShell for Windows.
6. **Set Directory:**
* Change the current directory in Bash/PowerShell to the “cra-scripts” folder.
* Example command: `cd [Path to cra-scripts folder]`
* Adjust the path based on your extraction location.
5. **Open Command Line:**
* Use Bash for Linux and macOS.
* Use PowerShell for Windows.
6. **Set Directory:**
* Change the current directory in Bash/PowerShell to the “cra-scripts” folder.
* Example command: `cd [Path to cra-scripts folder]`
* Adjust the path based on your extraction location.

 7. **Configure Properties:**
* Open the **bito-cra.properties** file in a text editor from the “cra-scripts” folder. Detailed information for each property is provided on [**Agent Configuration: bito-cra.properties File**](https://docs.bito.ai/ai-code-reviews-in-git/install-run-as-a-self-hosted-service/agent-configuration-bito-cra.properties-file) page.
* Set mandatory properties:
* mode = cli
* pr\_url
* bito\_cli.bito.access\_key
* git.provider
* git.access\_token
{% hint style="info" %}
**Note:** Valid values for git.provider are GITHUB, GITLAB, or BITBUCKET.
{% endhint %}
* Optional properties (can be skipped or set as needed):
* git.domain
* code\_feedback
* static\_analysis
* dependency\_check
* dependency\_check.snyk\_auth\_token
* review\_scope
* exclude\_branches
* exclude\_files
* exclude\_draft\_pr
{% hint style="info" %}
**Note:** Detailed information for each property is provided on [**Agent Configuration: bito-cra.properties File**](https://docs.bito.ai/ai-code-reviews-in-git/install-run-as-a-self-hosted-service/agent-configuration-bito-cra.properties-file) page.
{% endhint %}
{% hint style="info" %}
Check the [**Required Access Tokens**](https://docs.bito.ai/ai-code-reviews-in-git/prerequisites#required-access-tokens) guide to learn more about creating the access tokens needed to configure the Agent.
{% endhint %}
7. **Configure Properties:**
* Open the **bito-cra.properties** file in a text editor from the “cra-scripts” folder. Detailed information for each property is provided on [**Agent Configuration: bito-cra.properties File**](https://docs.bito.ai/ai-code-reviews-in-git/install-run-as-a-self-hosted-service/agent-configuration-bito-cra.properties-file) page.
* Set mandatory properties:
* mode = cli
* pr\_url
* bito\_cli.bito.access\_key
* git.provider
* git.access\_token
{% hint style="info" %}
**Note:** Valid values for git.provider are GITHUB, GITLAB, or BITBUCKET.
{% endhint %}
* Optional properties (can be skipped or set as needed):
* git.domain
* code\_feedback
* static\_analysis
* dependency\_check
* dependency\_check.snyk\_auth\_token
* review\_scope
* exclude\_branches
* exclude\_files
* exclude\_draft\_pr
{% hint style="info" %}
**Note:** Detailed information for each property is provided on [**Agent Configuration: bito-cra.properties File**](https://docs.bito.ai/ai-code-reviews-in-git/install-run-as-a-self-hosted-service/agent-configuration-bito-cra.properties-file) page.
{% endhint %}
{% hint style="info" %}
Check the [**Required Access Tokens**](https://docs.bito.ai/ai-code-reviews-in-git/prerequisites#required-access-tokens) guide to learn more about creating the access tokens needed to configure the Agent.
{% endhint %}
 8. **Run the Agent:**
* On Linux/macOS in Bash: Run `./bito-cra.sh bito-cra.properties`
* On Windows in PowerShell: Run `./bito-cra.ps1 bito-cra.properties`
{% hint style="info" %}
This step might take time initially as it pulls the Docker image and performs the code review.
{% endhint %}
8. **Run the Agent:**
* On Linux/macOS in Bash: Run `./bito-cra.sh bito-cra.properties`
* On Windows in PowerShell: Run `./bito-cra.ps1 bito-cra.properties`
{% hint style="info" %}
This step might take time initially as it pulls the Docker image and performs the code review.
{% endhint %}
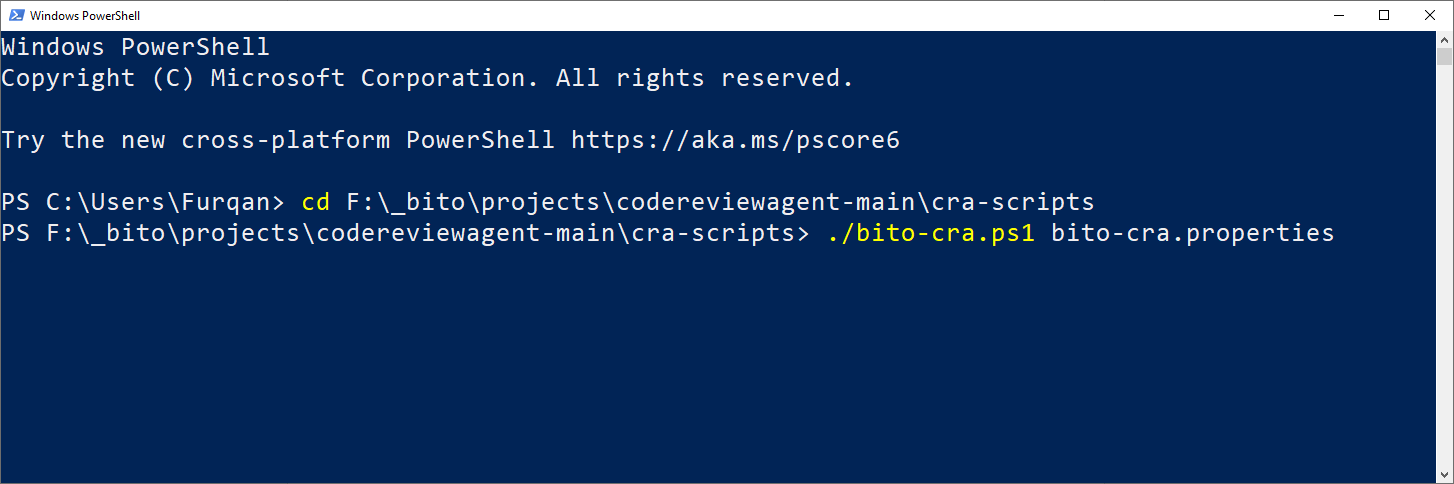
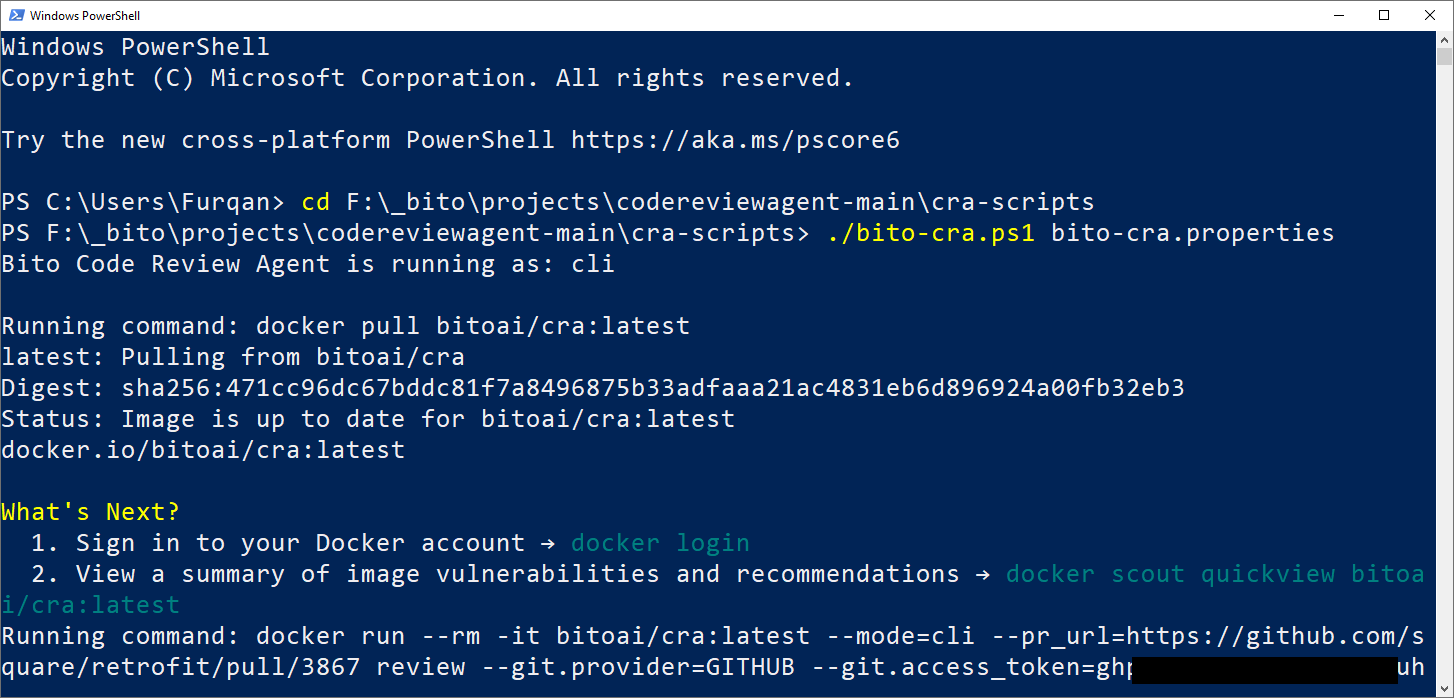 9. **Final Steps:**
* The script may prompt values of mandatory/optional properties if they are not preconfigured.
* Upon completion, a code review comment is automatically posted on the Pull Request specified in the **pr\_url** property.
{% hint style="info" %}
**Note:** To improve efficiency, the AI Code Review Agent is disabled by default for pull requests involving the **"main"** branch. This prevents unnecessary processing and token usage, as changes to the **"main"** branch are typically already reviewed in release or feature branches. To change this default behavior and include the **"main"** branch, please [**contact support**](mailto:support@bito.ai).
{% endhint %}
## Screenshots
### Screenshot # 1
{% hint style="info" %}
*AI-generated pull request (PR) summary*
{% endhint %}
### Screenshot # 2
{% hint style="info" %}
**Changelist** showing key changes and impacted files in a pull request.
{% endhint %}
9. **Final Steps:**
* The script may prompt values of mandatory/optional properties if they are not preconfigured.
* Upon completion, a code review comment is automatically posted on the Pull Request specified in the **pr\_url** property.
{% hint style="info" %}
**Note:** To improve efficiency, the AI Code Review Agent is disabled by default for pull requests involving the **"main"** branch. This prevents unnecessary processing and token usage, as changes to the **"main"** branch are typically already reviewed in release or feature branches. To change this default behavior and include the **"main"** branch, please [**contact support**](mailto:support@bito.ai).
{% endhint %}
## Screenshots
### Screenshot # 1
{% hint style="info" %}
*AI-generated pull request (PR) summary*
{% endhint %}
### Screenshot # 2
{% hint style="info" %}
**Changelist** showing key changes and impacted files in a pull request.
{% endhint %}
Changelist in AI Code Review Agent's feedback.
### Screenshot # 3
{% hint style="info" %}
*AI code review feedback posted as comments on the pull request.*
{% endhint %}
---
# Source: https://docs.bito.ai/ai-code-reviews-in-git/install-run-as-a-self-hosted-service/install-run-via-github-actions.md
# Install/run via GitHub Actions
## Prerequisites
* **Bito Access Key:** Obtain your Bito Access Key. [**View Guide**](https://docs.bito.ai/help/account-and-settings/access-key)
* **GitHub Personal Access Token (Classic):** For GitHub PR code reviews, ensure you have a CLASSIC personal access token with repo access. We do not support fine-grained tokens currently. [**View Guide**](https://docs.github.com/en/authentication/keeping-your-account-and-data-secure/managing-your-personal-access-tokens#creating-a-personal-access-token-classic)
GitHub Personal Access Token (Classic)
***
## Installation and Configuration Steps:
1. **Enable GitHub Actions:**
* Login to your [GitHub](https://github.com/) account.
* Open your repository and click on the "Settings" tab.
 * Select "Actions" from the left sidebar, then click on "General".
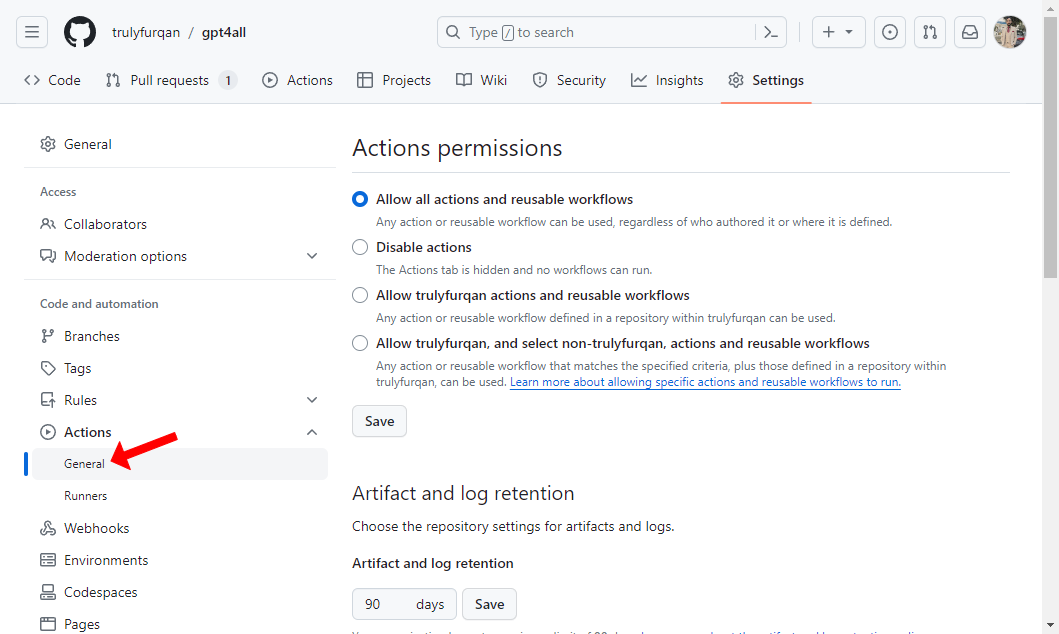 * Under "Actions permissions", choose "Allow all actions and reusable workflows" and click "Save".
 2. **Set Up Environment Variables:**
* Still in the "Settings" tab, navigate to "Secrets and variables" > "Actions" from the left sidebar.
2. **Set Up Environment Variables:**
* Still in the "Settings" tab, navigate to "Secrets and variables" > "Actions" from the left sidebar.
 * **Configure the following under the "Secrets" tab:**
For each secret, click the **New repository secret** button, then enter the exact name and value of the secret in the form. Finally, click **Add secret** to save it.
* **Name:** `BITO_ACCESS_KEY`
* **Secret:** Enter your Bito Access Key here. Refer to the [guide for obtaining your Bito Access Key](https://docs.bito.ai/help/account-and-settings/access-key#creating-an-access-key).
* **Name:** `GIT_ACCESS_TOKEN`
* **Secret:** Enter your GitHub Personal Access Token (Classic) with repo access. We do not support fine-grained tokens currently. For more information, see the [Prerequisites](#prerequisites) section.
{% hint style="info" %}
Check the above ["Prerequisites"](#prerequisites) section to learn more about creating the access tokens needed to configure the Agent.
{% endhint %}
* **Configure the following under the "Secrets" tab:**
For each secret, click the **New repository secret** button, then enter the exact name and value of the secret in the form. Finally, click **Add secret** to save it.
* **Name:** `BITO_ACCESS_KEY`
* **Secret:** Enter your Bito Access Key here. Refer to the [guide for obtaining your Bito Access Key](https://docs.bito.ai/help/account-and-settings/access-key#creating-an-access-key).
* **Name:** `GIT_ACCESS_TOKEN`
* **Secret:** Enter your GitHub Personal Access Token (Classic) with repo access. We do not support fine-grained tokens currently. For more information, see the [Prerequisites](#prerequisites) section.
{% hint style="info" %}
Check the above ["Prerequisites"](#prerequisites) section to learn more about creating the access tokens needed to configure the Agent.
{% endhint %}
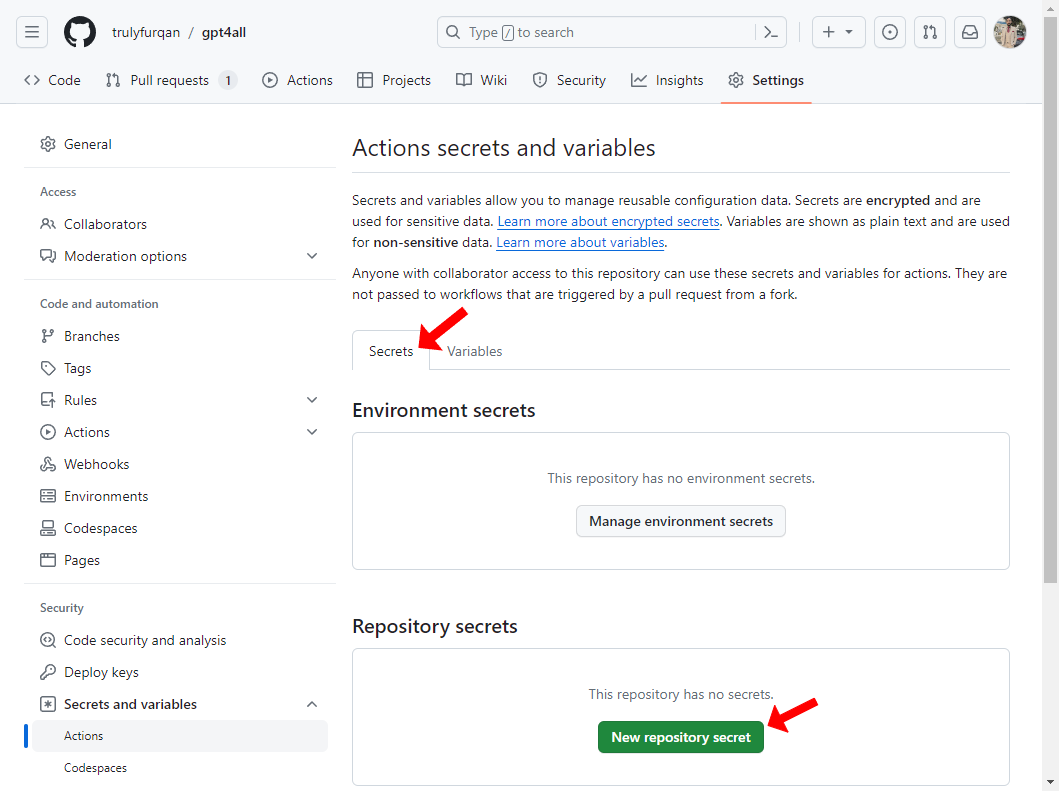

 * **Configure the following under the "Variables" tab:**
For each variable, click the **New repository variable** button, then enter the exact name and value of the variable in the form. Finally, click **Add variable** to save it.
* **Name:** `STATIC_ANALYSIS_TOOL`
* **Value:** Enter the following text string as value: `fb_infer,astral_ruff,mypy`
* **Name:** `GIT_DOMAIN`
* **Value:** Enter the domain name of your Enterprise or self-hosted GitHub deployment or skip this if you are not using Enterprise or self-hosted GitHub deployment.
* **Example of domain name:** `https://your.company.git.com`
* **Name:** `EXCLUDE_BRANCHES`
* **Value:** Specify branches to exclude from the review by name or valid glob/regex patterns. The agent will skip the pull request review if the source or target branch matches the exclusion list.
* **Note:** For more information, see [**Source or Target branch filter**](https://docs.bito.ai/excluding-files-folders-or-branches-with-filters#source-or-target-branch-filter).
* **Name:** `EXCLUDE_FILES`
* **Value:** Specify files/folders to exclude from the review by name or glob/regex pattern. The agent will skip files/folders that match the exclusion list.
* **Note:** For more information, see [**Files and folders filter**](https://docs.bito.ai/excluding-files-folders-or-branches-with-filters#files-and-folders-filter).
* **Name:** `EXCLUDE_DRAFT_PR`
* **Value:** Enter `True` to disable automated review for draft pull requests, or `False` to enable it.
* **Note:** For more information, see [**Draft pull requests filter**](https://docs.bito.ai/excluding-files-folders-or-branches-with-filters#draft-pull-requests-filter).
* **Configure the following under the "Variables" tab:**
For each variable, click the **New repository variable** button, then enter the exact name and value of the variable in the form. Finally, click **Add variable** to save it.
* **Name:** `STATIC_ANALYSIS_TOOL`
* **Value:** Enter the following text string as value: `fb_infer,astral_ruff,mypy`
* **Name:** `GIT_DOMAIN`
* **Value:** Enter the domain name of your Enterprise or self-hosted GitHub deployment or skip this if you are not using Enterprise or self-hosted GitHub deployment.
* **Example of domain name:** `https://your.company.git.com`
* **Name:** `EXCLUDE_BRANCHES`
* **Value:** Specify branches to exclude from the review by name or valid glob/regex patterns. The agent will skip the pull request review if the source or target branch matches the exclusion list.
* **Note:** For more information, see [**Source or Target branch filter**](https://docs.bito.ai/excluding-files-folders-or-branches-with-filters#source-or-target-branch-filter).
* **Name:** `EXCLUDE_FILES`
* **Value:** Specify files/folders to exclude from the review by name or glob/regex pattern. The agent will skip files/folders that match the exclusion list.
* **Note:** For more information, see [**Files and folders filter**](https://docs.bito.ai/excluding-files-folders-or-branches-with-filters#files-and-folders-filter).
* **Name:** `EXCLUDE_DRAFT_PR`
* **Value:** Enter `True` to disable automated review for draft pull requests, or `False` to enable it.
* **Note:** For more information, see [**Draft pull requests filter**](https://docs.bito.ai/excluding-files-folders-or-branches-with-filters#draft-pull-requests-filter).


 3. **Create the Workflow Directory:**
* In your repository, create a new directory path: `.github/workflows`.
3. **Create the Workflow Directory:**
* In your repository, create a new directory path: `.github/workflows`.
 4. **Add the Workflow File:**
* [**Download this `test_cra.yml` file**](https://github.com/gitbito/codereviewagent/blob/main/.github/workflows/test_cra.yml) from AI Code Review Agent's GitHub repo.
4. **Add the Workflow File:**
* [**Download this `test_cra.yml` file**](https://github.com/gitbito/codereviewagent/blob/main/.github/workflows/test_cra.yml) from AI Code Review Agent's GitHub repo.
 * In your repository, upload this `test_cra.yml` file inside the `.github/workflows` directory either in your source branch of each PR or in a branch (e.g. main) from which all the source branches for PRs will be created.

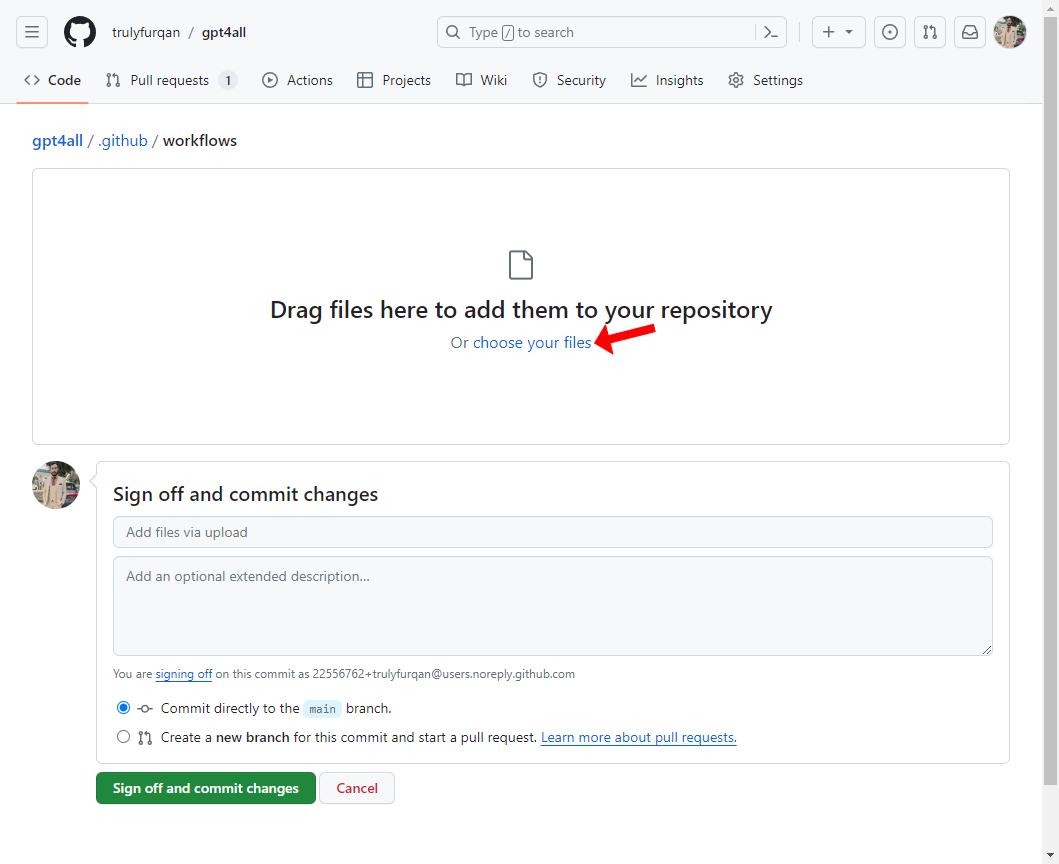
 * Commit your changes.
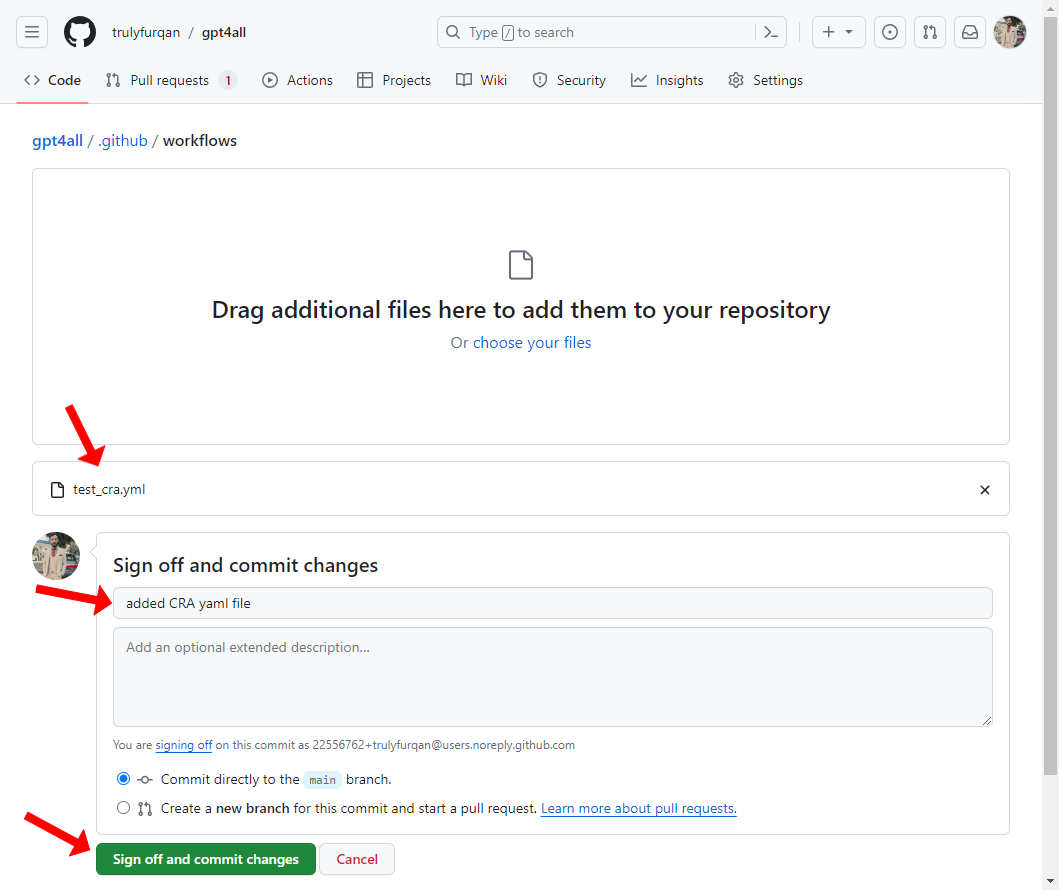
 ## Customizations for self-hosted GitHub
1. Create a self-hosted Runner using Linux image and x64 architecture as described in the [**GitHub documentation**](https://docs.github.com/en/actions/hosting-your-own-runners/managing-self-hosted-runners/adding-self-hosted-runners).
2. Create a copy of Bito's repository [**gitbito/codereviewagent**](https://github.com/gitbito/CodeReviewAgent) main branch into your self-hosted GitHub organization e.g. "myorg" under the required name e.g. "gitbito-bitocodereview". In this example, now this repository will be accessible as "myorg/gitbito-bitocodereview".
3. Update `test_cra.yml`as below:
* **Change line from:**
* runs-on: ubuntu-latest
* **to:**
* runs-on: \
## Customizations for self-hosted GitHub
1. Create a self-hosted Runner using Linux image and x64 architecture as described in the [**GitHub documentation**](https://docs.github.com/en/actions/hosting-your-own-runners/managing-self-hosted-runners/adding-self-hosted-runners).
2. Create a copy of Bito's repository [**gitbito/codereviewagent**](https://github.com/gitbito/CodeReviewAgent) main branch into your self-hosted GitHub organization e.g. "myorg" under the required name e.g. "gitbito-bitocodereview". In this example, now this repository will be accessible as "myorg/gitbito-bitocodereview".
3. Update `test_cra.yml`as below:
* **Change line from:**
* runs-on: ubuntu-latest
* **to:**
* runs-on: \