Customer Profile
Name: {customer?.name}
Email: {customer?.email}
Balance: {customer?.features.chat_messages?.balance}
{{ session.data }}
{$session.data?.user.email}
```{JSON.stringify(session(), null, 2)}
);
}
```
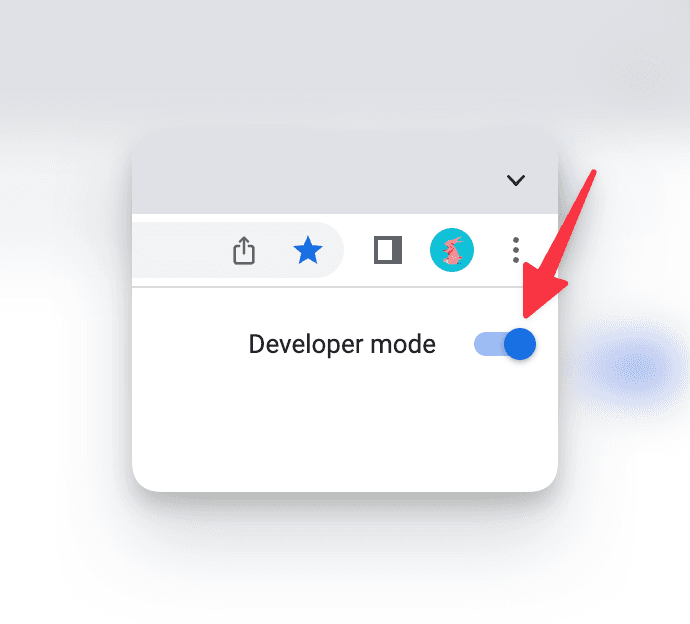 Click on "Load Unpacked" and navigate to your extension's `build/chrome-mv3-dev` (or `build/chrome-mv3-prod`) directory.
To see your popup, click on the puzzle piece icon on the Chrome toolbar, and click on your extension.
Learn more about bundling your extension here.
Click on "Load Unpacked" and navigate to your extension's `build/chrome-mv3-dev` (or `build/chrome-mv3-prod`) directory.
To see your popup, click on the puzzle piece icon on the Chrome toolbar, and click on your extension.
Learn more about bundling your extension here.
 Head to your server's auth file, and make sure that your extension's URL is added to the `trustedOrigins` list.
```ts title="server.ts"
import { betterAuth } from "better-auth"
import { auth } from "@/auth/auth"
export const auth = betterAuth({
trustedOrigins: ["chrome-extension://YOUR_EXTENSION_ID"],
})
```
If you're developing multiple extensions or need to support different browser extensions with different IDs, you can use wildcard patterns:
```ts title="server.ts"
export const auth = betterAuth({
trustedOrigins: [
// Support a specific extension ID
"chrome-extension://YOUR_EXTENSION_ID",
// Or support multiple extensions with wildcard (less secure)
"chrome-extension://*"
],
})
```
Head to your server's auth file, and make sure that your extension's URL is added to the `trustedOrigins` list.
```ts title="server.ts"
import { betterAuth } from "better-auth"
import { auth } from "@/auth/auth"
export const auth = betterAuth({
trustedOrigins: ["chrome-extension://YOUR_EXTENSION_ID"],
})
```
If you're developing multiple extensions or need to support different browser extensions with different IDs, you can use wildcard patterns:
```ts title="server.ts"
export const auth = betterAuth({
trustedOrigins: [
// Support a specific extension ID
"chrome-extension://YOUR_EXTENSION_ID",
// Or support multiple extensions with wildcard (less secure)
"chrome-extension://*"
],
})
```
{{ session.data }}
{$session.data.user.name}
{$session.data.user.email}
 [erquhart](https://github.com/erquhart) |
| [surreal-better-auth](https://github.com/oskar-gmerek/surreal-better-auth) | [SurrealDB](https://surrealdb.com/) |
[erquhart](https://github.com/erquhart) |
| [surreal-better-auth](https://github.com/oskar-gmerek/surreal-better-auth) | [SurrealDB](https://surrealdb.com/) |  Oskar Gmerek |
| [surrealdb-better-auth](https://github.com/Necmttn/surrealdb-better-auth) | [Surreal Database](https://surrealdb.com/) |
Oskar Gmerek |
| [surrealdb-better-auth](https://github.com/Necmttn/surrealdb-better-auth) | [Surreal Database](https://surrealdb.com/) |  [Necmttn](https://github.com/Necmttn) |
| [better-auth-surrealdb](https://github.com/msanchezdev/better-auth-surrealdb) | [Surreal Database](https://surrealdb.com/) |
[Necmttn](https://github.com/Necmttn) |
| [better-auth-surrealdb](https://github.com/msanchezdev/better-auth-surrealdb) | [Surreal Database](https://surrealdb.com/) |  [msanchezdev](https://github.com/msanchezdev) |
| [@payload-auth/better-auth-plugin](https://github.com/payload-auth/payload-auth) | [Payload CMS](https://payloadcms.com/) |
[msanchezdev](https://github.com/msanchezdev) |
| [@payload-auth/better-auth-plugin](https://github.com/payload-auth/payload-auth) | [Payload CMS](https://payloadcms.com/) |  [forrestdevs](https://github.com/forrestdevs) |
| [better-auth-instantdb](https://github.com/daveyplate/better-auth-instantdb) | [InstantDB](https://www.instantdb.com/) |
[forrestdevs](https://github.com/forrestdevs) |
| [better-auth-instantdb](https://github.com/daveyplate/better-auth-instantdb) | [InstantDB](https://www.instantdb.com/) |  [daveycodez](https://github.com/daveycodez) |
| [@nerdfolio/remult-better-auth](https://github.com/nerdfolio/remult-better-auth) | [Remult](https://remult.dev/) |
[daveycodez](https://github.com/daveycodez) |
| [@nerdfolio/remult-better-auth](https://github.com/nerdfolio/remult-better-auth) | [Remult](https://remult.dev/) |  [Tai Vo](https://github.com/taivo) |
| [pocketbase-better-auth](https://github.com/LightInn/pocketbase-better-auth) | [PocketBase](https://pocketbase.io/) |
[Tai Vo](https://github.com/taivo) |
| [pocketbase-better-auth](https://github.com/LightInn/pocketbase-better-auth) | [PocketBase](https://pocketbase.io/) |  [LightInn](https://github.com/LightInn) |
| [better-auth-firestore](https://github.com/yultyyev/better-auth-firestore) | [Firebase Firestore](https://firebase.google.com/docs/firestore) |
[LightInn](https://github.com/LightInn) |
| [better-auth-firestore](https://github.com/yultyyev/better-auth-firestore) | [Firebase Firestore](https://firebase.google.com/docs/firestore) |  [yultyyev](https://github.com/yultyyev) |
| [@zenstackhq/better-auth](https://github.com/zenstackhq/zenstack-v3/tree/main/packages/auth-adapters/better-auth) | [ZenStack](https://zenstack.dev) |
[yultyyev](https://github.com/yultyyev) |
| [@zenstackhq/better-auth](https://github.com/zenstackhq/zenstack-v3/tree/main/packages/auth-adapters/better-auth) | [ZenStack](https://zenstack.dev) |  [zenstackhq](https://github.com/zenstackhq) |
| [@strapi-community/plugin-better-auth](https://github.com/strapi-community/plugin-better-auth) | [Strapi CMS](https://strapi.io/) |
[zenstackhq](https://github.com/zenstackhq) |
| [@strapi-community/plugin-better-auth](https://github.com/strapi-community/plugin-better-auth) | [Strapi CMS](https://strapi.io/) |  [boazpoolman](https://github.com/boazpoolman) |
---
# Source: https://www.better-auth.com/llms.txt/docs/plugins/community-plugins.md
# Community Plugins
A list of recommended community plugins.
import { CommunityPluginsTable } from "@/components/community-plugins-table";
This page showcases a list of recommended community made plugins. We encourage you to create custom plugins and maybe get added to the list!
## Create Your Own Plugin
To create your own custom plugin, get started by reading our [plugins documentation](/docs/concepts/plugins). And if you want to share your plugin with the community, please open a pull request to add it to this list.
## Browse Community Plugins
[boazpoolman](https://github.com/boazpoolman) |
---
# Source: https://www.better-auth.com/llms.txt/docs/plugins/community-plugins.md
# Community Plugins
A list of recommended community plugins.
import { CommunityPluginsTable } from "@/components/community-plugins-table";
This page showcases a list of recommended community made plugins. We encourage you to create custom plugins and maybe get added to the list!
## Create Your Own Plugin
To create your own custom plugin, get started by reading our [plugins documentation](/docs/concepts/plugins). And if you want to share your plugin with the community, please open a pull request to add it to this list.
## Browse Community Plugins
> Comparison is the thief of joy. >
Here are non detailed reasons why you may want to use Better Auth over other auth libraries and services. ### vs Other Auth Libraries * **Framework agnostic** - Works with any framework, not just specific ones * **Advanced features built-in** - 2FA, multi-tenancy, multi-session, rate limiting, and many more * **Plugin system** - Extend functionality without forking or complex workarounds * **Full control** - Customize auth flows exactly how you want ### vs Self-Hosted Auth Servers * **No separate infrastructure** - Runs in your app, users stay in your database * **Zero server maintenance** - No auth servers to deploy, monitor, or update * **Complete feature set** - Everything you need without the operational overhead ### vs Managed Auth Services * **Keep your data** - Users stay in your database, not a third-party service * **No per-user costs** - Scale without worrying about auth billing * **Single source of truth** - All user data in one place ### vs Rolling Your Own * **Security handled** - Battle-tested auth flows and security practices * **Focus on your product** - Spend time on features that matter to your business * **Plugin extensibility** - Add custom features without starting from scratch --- # Source: https://www.better-auth.com/llms.txt/docs/reference/contributing.md # Contributing to BetterAuth A concise guide to contributing to BetterAuth Thank you for your interest in contributing to Better Auth! This guide is a concise guide to contributing to Better Auth. ## Getting Started Before diving in, here are a few important resources: * Take a look at our existing issues and pull requests * Join our community discussions in Discord ## Development Setup To get started with development:{JSON.stringify(user, null, 2)}
Hello
Welcome to Dashboard
Subscription Status: {status.status}
{status.expiresAt && (Renews: {status.expiresAt.toLocaleDateString()}
)}Device Authorization Request
A device is requesting access to your account.
Code: {userCode}
authClient.dodopayments.checkoutSession for new integrations.
It maps one-to-one with Dodo Payments' Create Checkout Session API and honors
the product slugs you configured on the server.
customer or billing in the request body when
necessary.
successUrl configured in the
server-side checkout plugin, so you do not need to send a return\_url
from the client.
authClient.dodopayments.checkout helper remains for backward
compatibility only. Prefer checkoutSession for new builds.
usage() plugin (shown in the server setup) to ingest
metered events for the signed-in, email-verified customer and expose recent
usage history.
```typescript
const { error: ingestError } = await authClient.dodopayments.usage.ingest({
event_id: crypto.randomUUID(),
event_name: "api_request",
metadata: {
route: "/reports",
method: "GET",
},
timestamp: new Date(),
});
if (ingestError) {
console.error("Failed to record usage", ingestError);
}
const { data: usage, error: usageError } =
await authClient.dodopayments.usage.meters.list({
query: {
page_size: 20,
meter_id: "mtr_yourMeterId",
},
});
if (usage?.items) {
usage.items.forEach((event) => {
console.log(event.event_name, event.timestamp, event.metadata);
});
}
```
meter\_id to return all meters tied to the customer's active
subscriptions.
Sign In
{/* Email sign in */}Welcome, {session.user.name}!
{JSON.stringify(session, null, 2)}
)}
{session.user.name}
{session.user.email}
|
MS SQL Schema Generation |
MS SQL Schema Migration |
|---|---|
| â Supported | â Supported |
|
MySQL Schema Generation |
MySQL Schema Migration |
|---|---|
| â Supported | â Supported |
Welcome {data.user.name}
Welcome {session.user.name}
Welcome {session.user.name}
getSessionCookie() function does not automatically reference the auth config specified in auth.ts. Therefore, if you customized the cookie name or prefix, you need to ensure that the configuration in getSessionCookie() matches the config defined in your auth.ts.
Welcome {session.user.name}
} ``` ## Next.js 16 Compatibility Better Auth is fully compatible with Next.js 16. The main change is that "middleware" is now called "proxy". See the [Auth Protection](#auth-protection) section above for Next.js 16+ proxy examples. ### Migration Guide Use Next.js codemod for automatic migration: ```bash npx @next/codemod@canary middleware-to-proxy . ``` Or manually: * Rename `middleware.ts` â `proxy.ts` * Change function name: `middleware` â `proxy` All Better Auth methods work identically. See the [Next.js migration guide](https://nextjs.org/docs/app/api-reference/file-conventions/proxy#migration-to-proxy) for details. --- # Source: https://www.better-auth.com/llms.txt/docs/integrations/nitro.md # Nitro Integration Integrate Better Auth with Nitro. Better Auth can be integrated with your [Nitro Application](https://nitro.build/) (an open source framework to build web servers). This guide aims to help you integrate Better Auth with your Nitro application in a few simple steps. ## Create a new Nitro Application Start by scaffolding a new Nitro application using the following command: ```bash title="Terminal" npx giget@latest nitro nitro-app --install ``` This will create the `nitro-app` directory and install all the dependencies. You can now open the `nitro-app` directory in your code editor. ### Prisma Adapter Setup-
{users.map(user => (
- {user.name} ))}
`http://app.example.com`
`http://api.app.example.com` | `https://api.example.com`
`http://example.com` | | `https://**.example.com` | `https://api.example.com`
`https://api.app.example.com` | `http://api.example.com` | | `https://example.com` | `https://example.com`
`https://example.com/path` | `https://api.example.com`
`http://example.com` | | `exp://192.168.*.*:*/**` | `exp://192.168.1.100:8081/path`
`exp://192.168.50.200:19000/auth/callback` | `exp://10.0.0.29:8081/path` | | `myapp://` | All URLs starting with `myapp://` | - |
{org.name}
))}Organizations
{#if $organizations.isPending}Loading...
{:else if !$organizations.data?.length}No organizations found.
{:else}-
{#each $organizations.data as organization}
- {organization.name} {/each}
Organizations
- {{ organization.name }}
{activeOrganization.name}
: null}Active Organization
{#if $activeOrganization.isPending}Loading...
{:else if $activeOrganization.data === null}No active organization found.
{:else}{$activeOrganization.data.name}
{/if} ```Active organization
|
PostgreSQL Schema Generation |
PostgreSQL Schema Migration |
|---|---|
| â Supported | â Supported |
|
Prisma Schema Generation |
Prisma Schema Migration |
|---|---|
| â Supported | â Not Supported |
|
SQLite Schema Generation |
SQLite Schema Migration |
|---|---|
| â Supported | â Supported |
Welcome {session.user.name}
getSessionCookie() function does not automatically reference the auth config specified in auth.ts. Therefore, if you customized the cookie name or prefix, you need to ensure that the configuration in getSessionCookie() matches the config defined in your auth.ts.
Welcome {session.user.name}
Sign Up
Sign In
Welcome {user.firstName && `, ${user.lastName}`}
Welcome {session.user.name}
Welcome {user.firstName && `, ${user.lastName}`}
Welcome {data.user.name}