 If your firewall configuration, allowlist or network policy requires a static IP for this integration, please refer to our [static IP address](https://docs.augmentcode.com/setup-augment/static-ip-support#allow-augment-traffic-from-static-ips) documentation.
 ### Permissions requested by the Augment GitHub App:
* Contents, read-only: Clone repositories
* Pull Requests, read and write: Read pull requests and post comments to pull requests
* Issues, read-only: Read top-level PRs / Issues
* Organization Members, read-only: Read members of an organization, to distinguish internal and external users and their access levels to Augment features
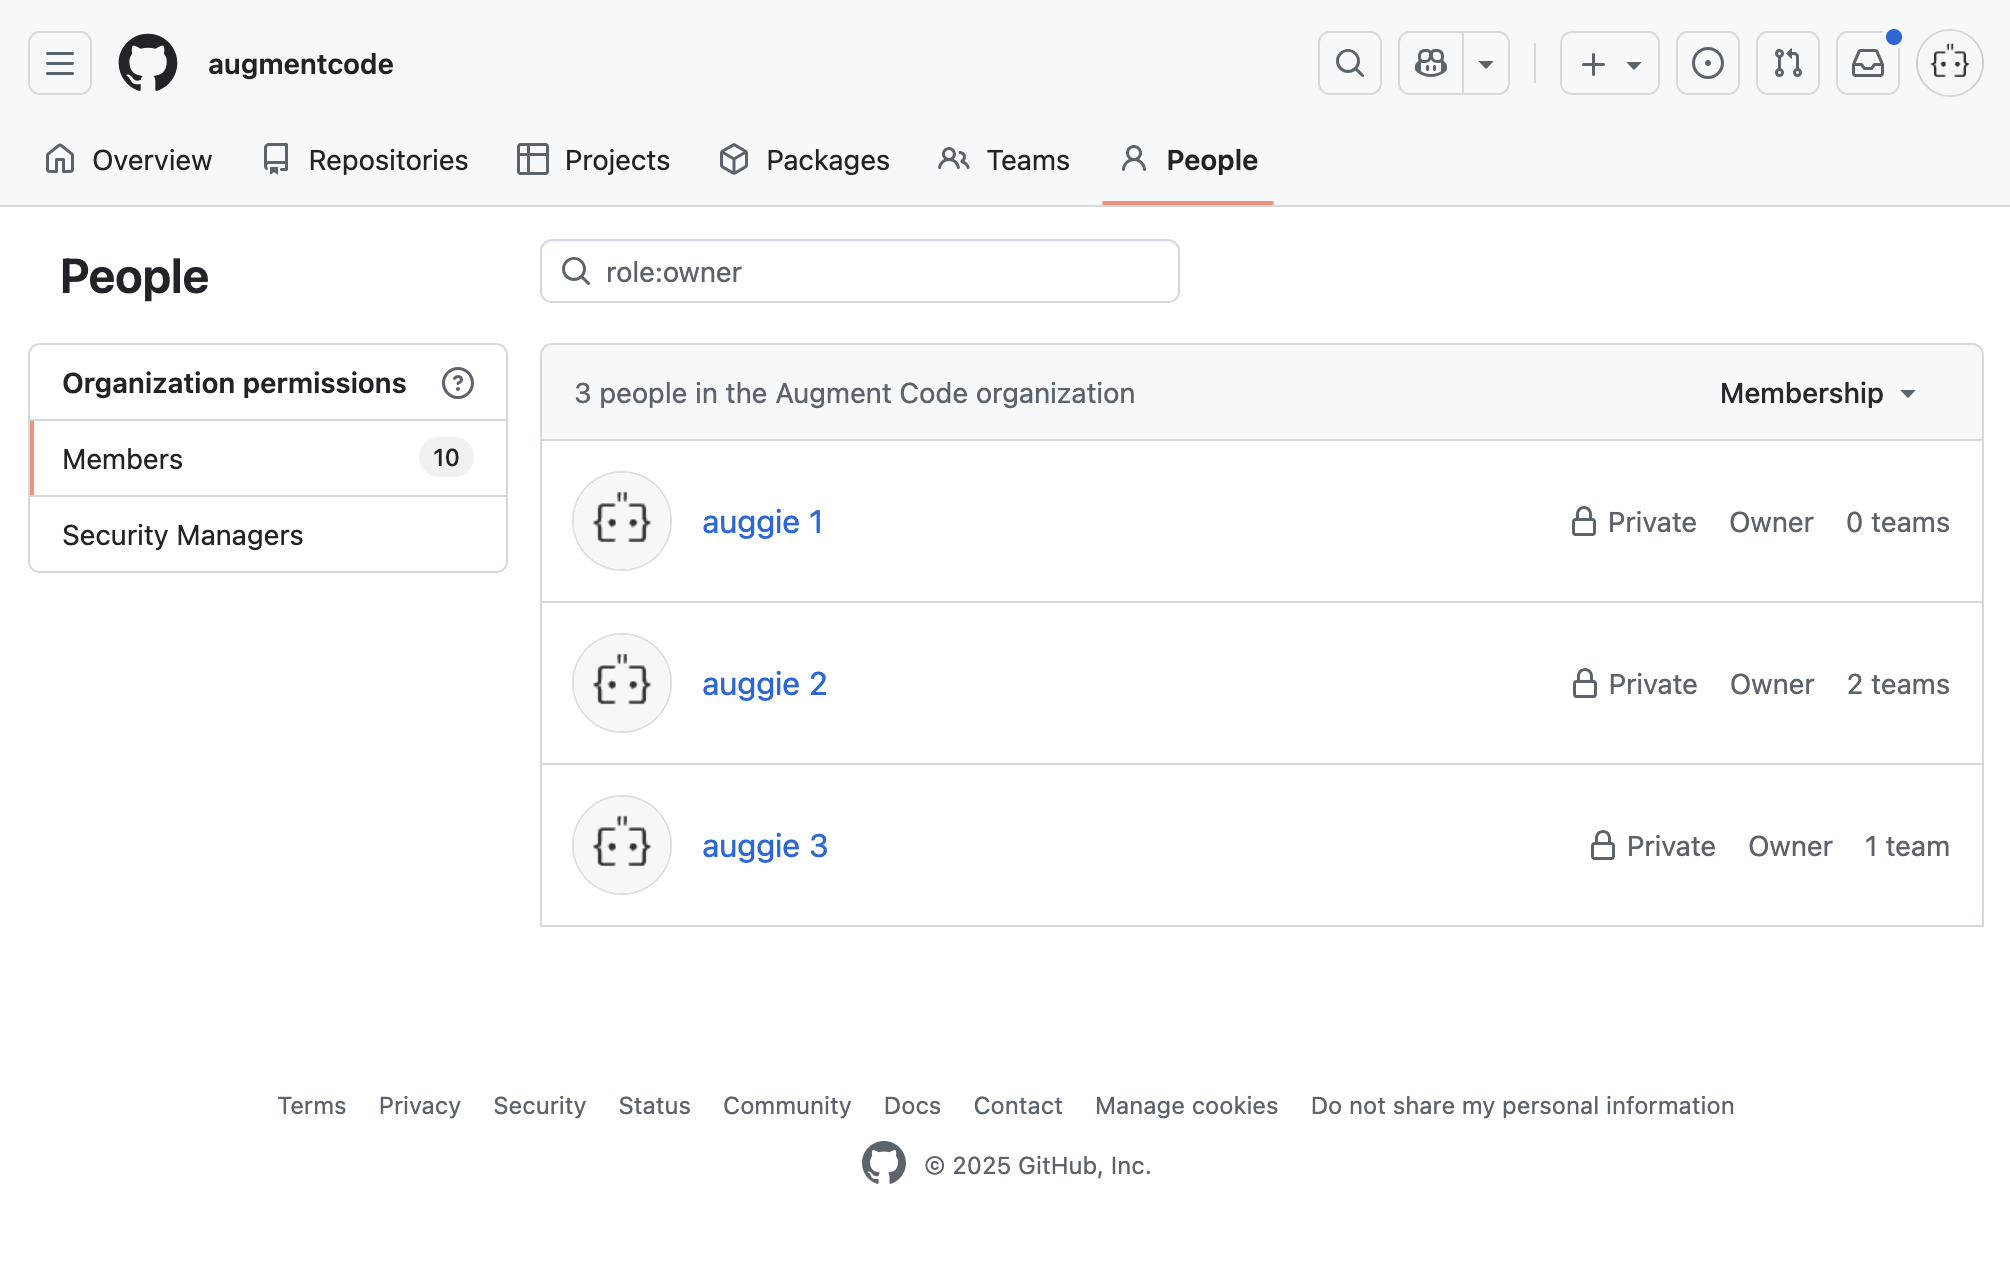
Organization owners and repository admins can install the app directly; others will need owner approval. See [GitHub documentation](https://docs.github.com/en/apps/using-github-apps/installing-a-github-app-from-a-third-party) for details. If your organization uses [Augment for Slack,](https://docs.augmentcode.com/setup-augment/install-slack-app) the same selections will apply to both Augment for Slack and Augment Code Review.
### Permissions requested by the Augment GitHub App:
* Contents, read-only: Clone repositories
* Pull Requests, read and write: Read pull requests and post comments to pull requests
* Issues, read-only: Read top-level PRs / Issues
* Organization Members, read-only: Read members of an organization, to distinguish internal and external users and their access levels to Augment features
Organization owners and repository admins can install the app directly; others will need owner approval. See [GitHub documentation](https://docs.github.com/en/apps/using-github-apps/installing-a-github-app-from-a-third-party) for details. If your organization uses [Augment for Slack,](https://docs.augmentcode.com/setup-augment/install-slack-app) the same selections will apply to both Augment for Slack and Augment Code Review.
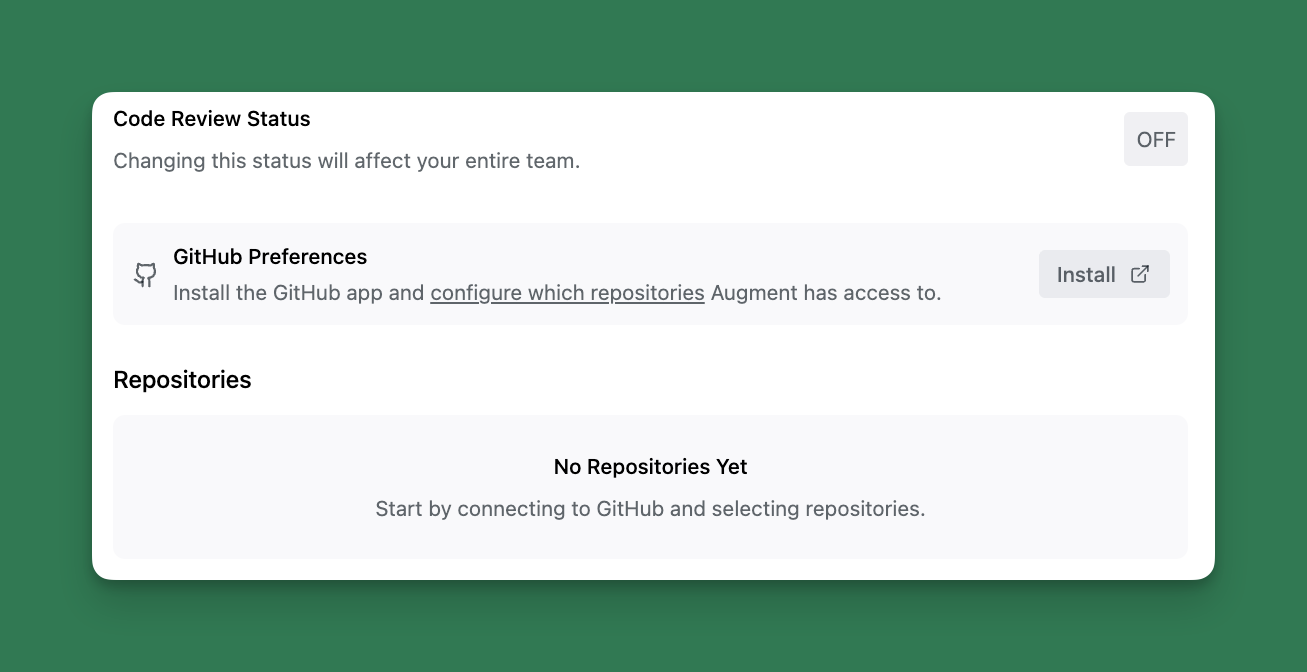
 You can modify repository access anytime in the Augment GitHub App settings.
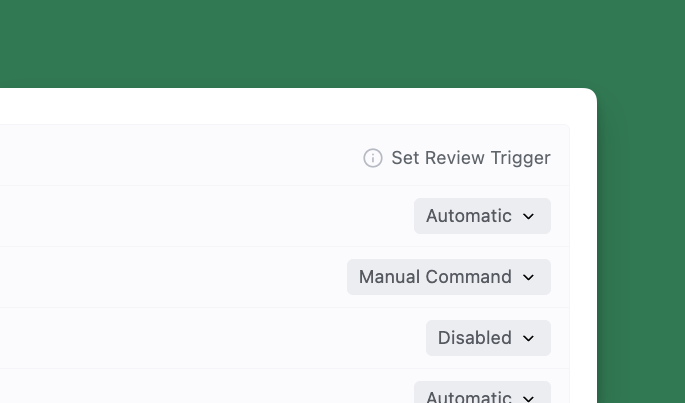
### Configuring Triggers Per Repository
As the Administrator, you control when Augment Code Review triggers via [Settings](https://app.augmentcode.com/settings/code-review):
* **Automatic**: Augment Code Review will automatically review and post a comment as soon as the PR is opened for review in GitHub. Use it when your teams want immediate feedback on all pull requests.
* **Manual Command**: Augment Code Review is only triggered when someone comments on the PR with any of the following: `auggie review`, `augment review`, or `augmentcode review` on GitHub. Use it when you want full control over when a review happens.
* **Disabled**: Augment Code Review will not run on the repository.
You can modify repository access anytime in the Augment GitHub App settings.
### Configuring Triggers Per Repository
As the Administrator, you control when Augment Code Review triggers via [Settings](https://app.augmentcode.com/settings/code-review):
* **Automatic**: Augment Code Review will automatically review and post a comment as soon as the PR is opened for review in GitHub. Use it when your teams want immediate feedback on all pull requests.
* **Manual Command**: Augment Code Review is only triggered when someone comments on the PR with any of the following: `auggie review`, `augment review`, or `augmentcode review` on GitHub. Use it when you want full control over when a review happens.
* **Disabled**: Augment Code Review will not run on the repository.
 If the repo is set to "Automatic" or "Manual Command", to run additional rounds of reviews on a subsequent commit of any PR, you can use the same manual trigger keywords (`auggie review`, `augment review`, or `augmentcode review`).
On public repositories, reviews are only triggered for PRs whose authors are members of the GitHub organization, outside collaborators to the organization or repository, or contributors to that repository.
## Change the GitHub Organization using Augment Code Review
Today, Code Review is limited to one GitHub organization per Enterprise account. Augment will address this limitation in an upcoming release. You can change the organization by reinstalling the Augment GitHub App.
* To get started you need to review the GitHub Apps installed on an organization:
* In the top right corner of GitHub, click your profile picture, then click Your organizations.
* Next to your organization name, click Settings.
* In the side bar, under "Third-party Access," click GitHub Apps. A list of the GitHub Apps installed on your organization will be displayed.
* Next to the GitHub App you want to review or modify, click Configure.
* To uninstall the Augment GitHub App, click Uninstall.
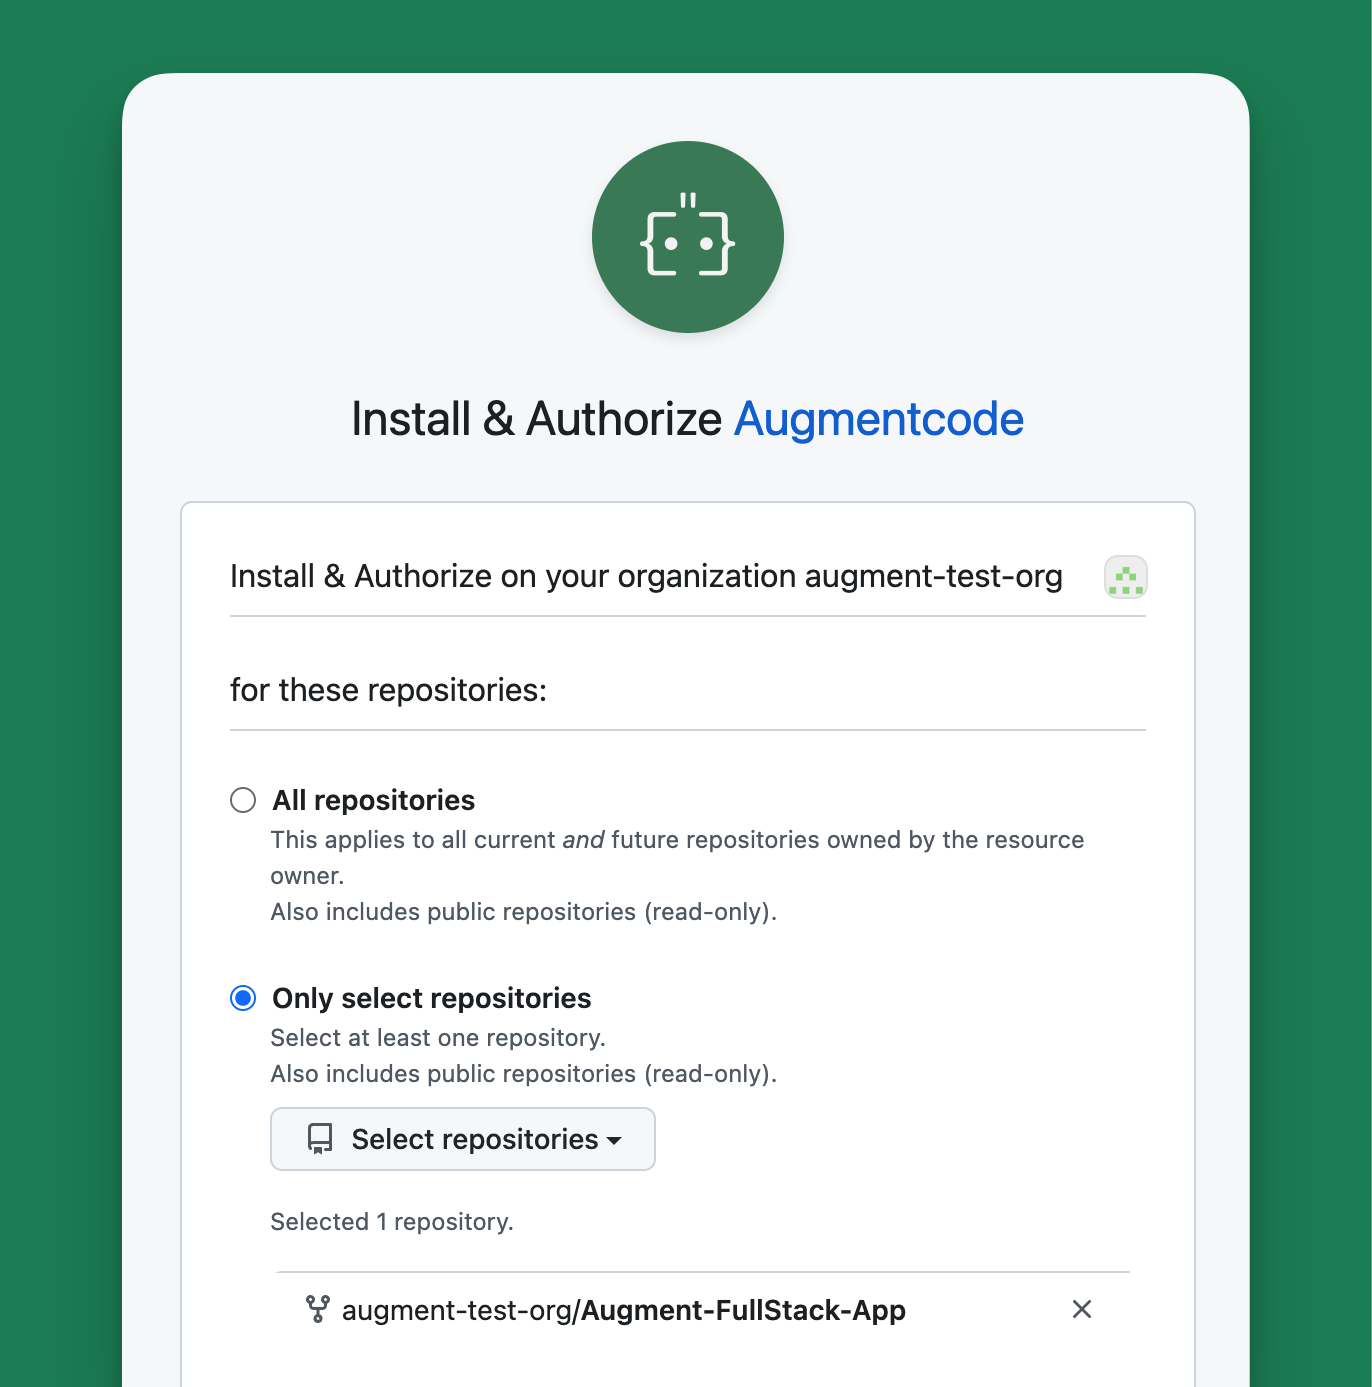
* To reinstall, visit: [https://github.com/apps/augmentcode/installations/new](https://github.com/apps/augmentcode/installations/new). Select your organization.
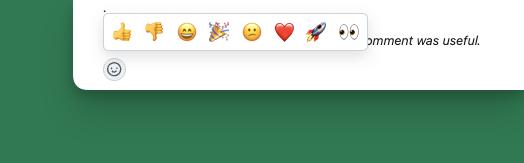
## Providing feedback
You can provide in product feedback directly in GitHub by reacting with a thumbs up or thumbs down emoji to the inline comment left by Augment Code Review.
If the repo is set to "Automatic" or "Manual Command", to run additional rounds of reviews on a subsequent commit of any PR, you can use the same manual trigger keywords (`auggie review`, `augment review`, or `augmentcode review`).
On public repositories, reviews are only triggered for PRs whose authors are members of the GitHub organization, outside collaborators to the organization or repository, or contributors to that repository.
## Change the GitHub Organization using Augment Code Review
Today, Code Review is limited to one GitHub organization per Enterprise account. Augment will address this limitation in an upcoming release. You can change the organization by reinstalling the Augment GitHub App.
* To get started you need to review the GitHub Apps installed on an organization:
* In the top right corner of GitHub, click your profile picture, then click Your organizations.
* Next to your organization name, click Settings.
* In the side bar, under "Third-party Access," click GitHub Apps. A list of the GitHub Apps installed on your organization will be displayed.
* Next to the GitHub App you want to review or modify, click Configure.
* To uninstall the Augment GitHub App, click Uninstall.
* To reinstall, visit: [https://github.com/apps/augmentcode/installations/new](https://github.com/apps/augmentcode/installations/new). Select your organization.
## Providing feedback
You can provide in product feedback directly in GitHub by reacting with a thumbs up or thumbs down emoji to the inline comment left by Augment Code Review.
 ## Tell Augment Code Review to check specific areas with guidelines
Domain knowledge that isn't always evident in the code. Tell Augment Code Review to check specific areas like security vulnerabilities or inside particular directories when relevant. Augment Code Review allows you to outline these special guidelines per repository. Describe any areas of focus using a yaml file entitled code\_review\_guidelines.yaml inside the .augment folder at the repository root:
`
## Tell Augment Code Review to check specific areas with guidelines
Domain knowledge that isn't always evident in the code. Tell Augment Code Review to check specific areas like security vulnerabilities or inside particular directories when relevant. Augment Code Review allows you to outline these special guidelines per repository. Describe any areas of focus using a yaml file entitled code\_review\_guidelines.yaml inside the .augment folder at the repository root:
` You'll be redirected to authorize the integration with the appropriate service. After authorization, the integration will be available for use with Augment Agent.
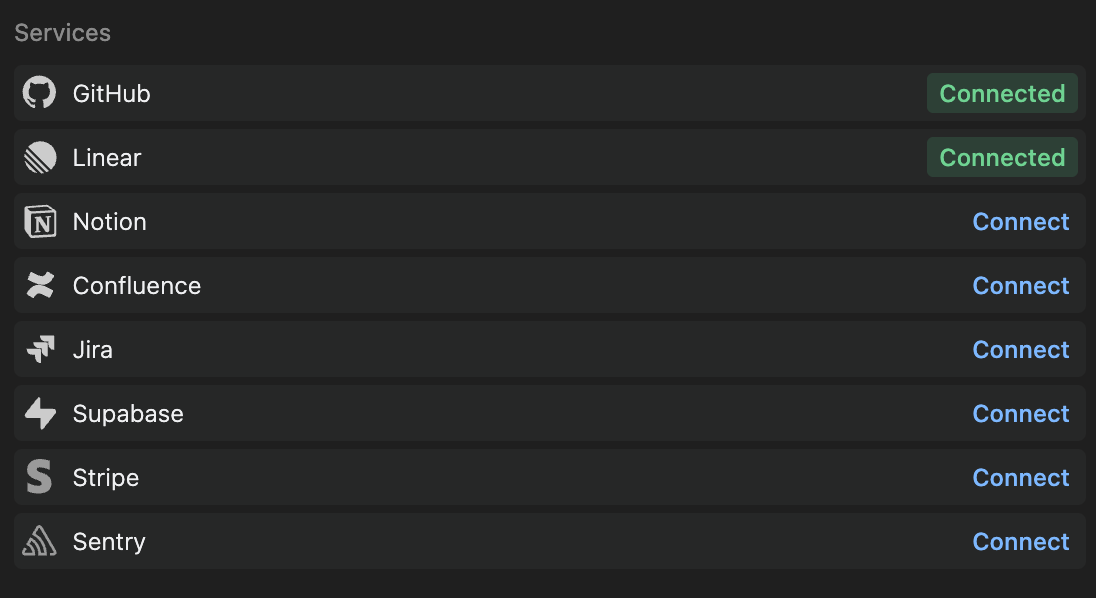
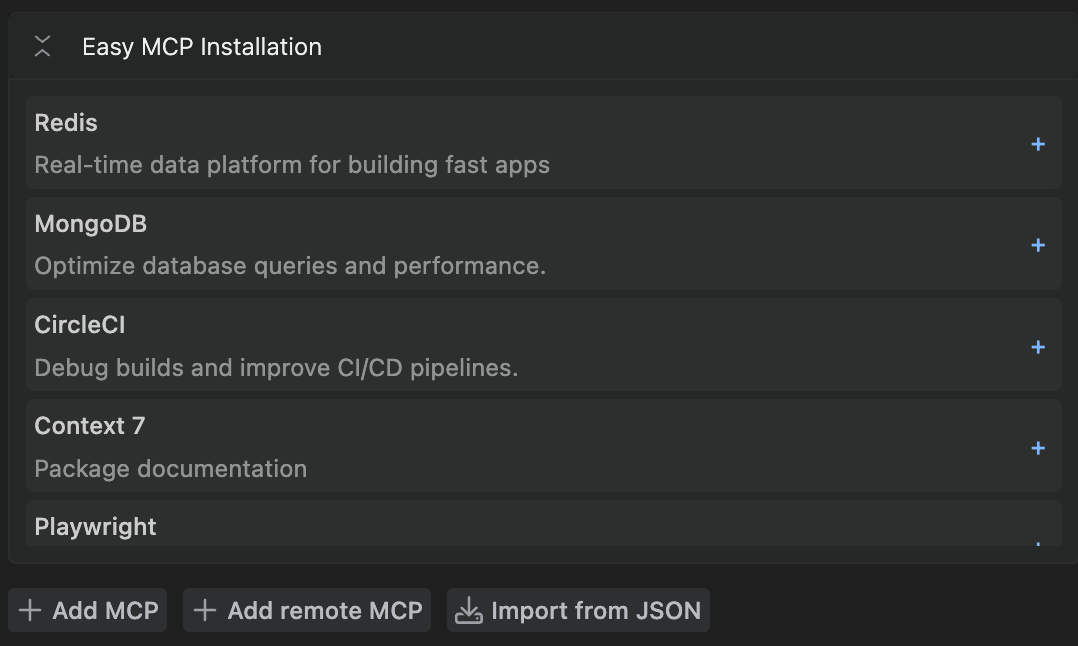
## Easy MCP Integrations
> **New:** Easy MCP launched ONLY July 30, 2025, providing one-click access to popular developer tools.
Easy MCP transforms complex MCP server setup into a single click. Available integrations include:
* **CircleCI** - Build logs, test insights, and flaky-test detection
* **MongoDB** - Data exploration, database management, and context-aware code generation
* **Redis** - Keyspace introspection, TTL audits, and migration helpers
For detailed setup instructions and examples, see [Configure MCP servers](/jetbrains/setup-augment/mcp).
## Native Integrations
##
You'll be redirected to authorize the integration with the appropriate service. After authorization, the integration will be available for use with Augment Agent.
## Easy MCP Integrations
> **New:** Easy MCP launched ONLY July 30, 2025, providing one-click access to popular developer tools.
Easy MCP transforms complex MCP server setup into a single click. Available integrations include:
* **CircleCI** - Build logs, test insights, and flaky-test detection
* **MongoDB** - Data exploration, database management, and context-aware code generation
* **Redis** - Keyspace introspection, TTL audits, and migration helpers
For detailed setup instructions and examples, see [Configure MCP servers](/jetbrains/setup-augment/mcp).
## Native Integrations
## 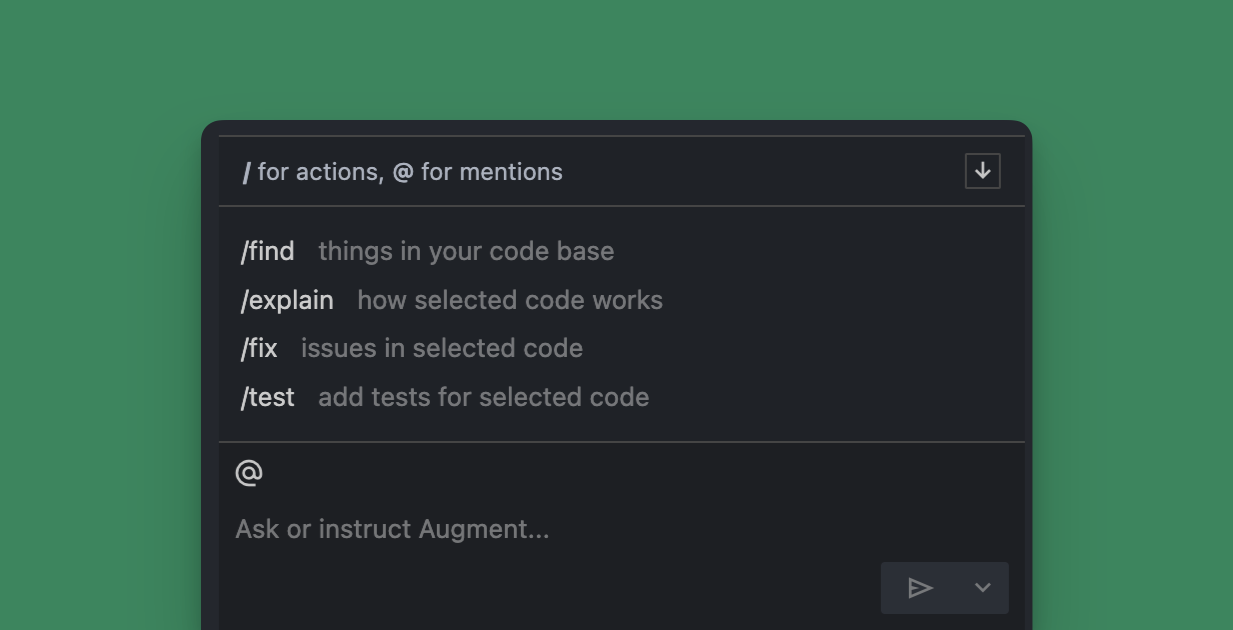 ## Using actions in Chat
To use a quick action, you an use a
## Using actions in Chat
To use a quick action, you an use a  ## Using code blocks from within Chat
Whenever Chat responds with code, you will have the option to add the code to your codebase. The most common option will be shown as a button and you can access the other options by clicking the overflow menu icon
## Using code blocks from within Chat
Whenever Chat responds with code, you will have the option to add the code to your codebase. The most common option will be shown as a button and you can access the other options by clicking the overflow menu icon ## Accessing Chat
Access the Chat sidebar by clicking the Augment icon
## Accessing Chat
Access the Chat sidebar by clicking the Augment icon 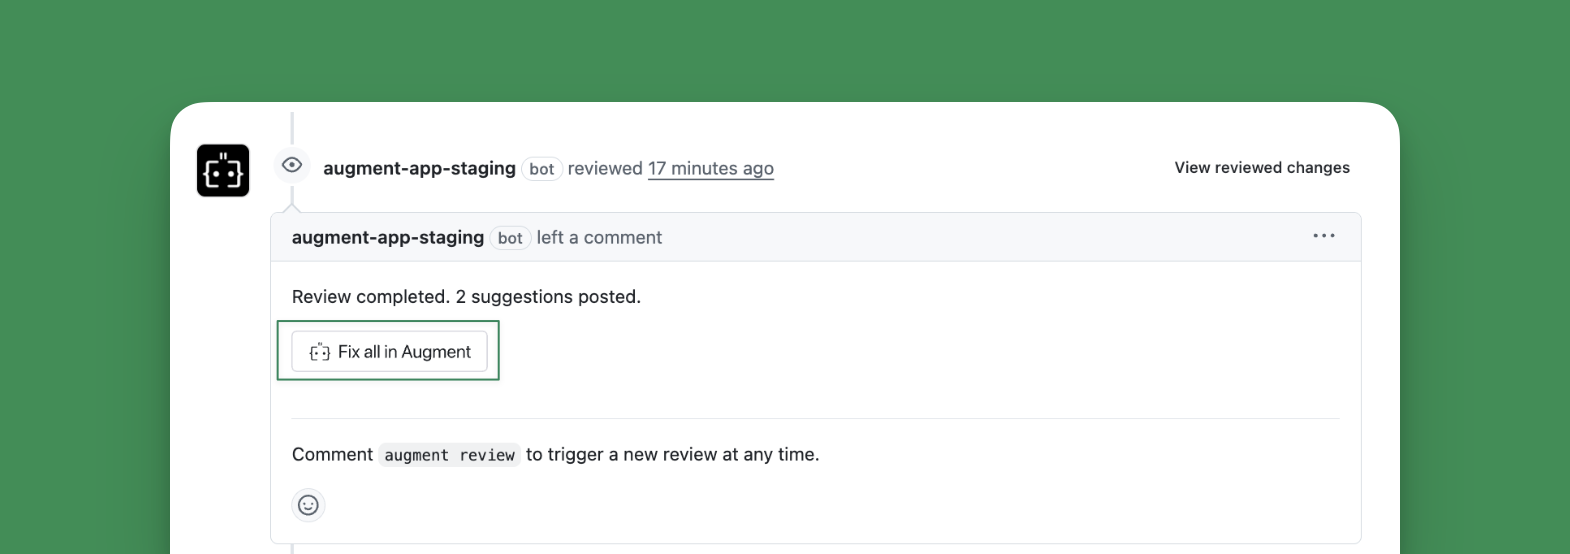 Options include:
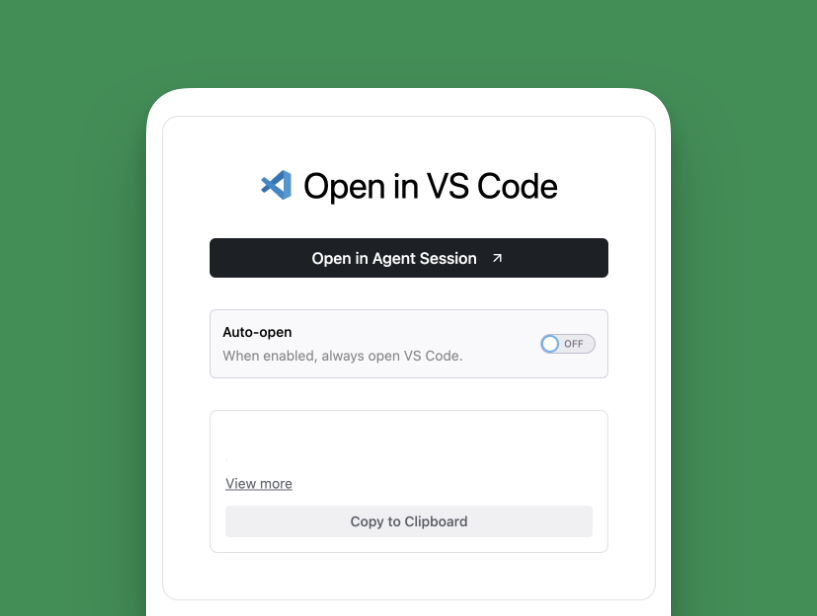
* **Open in Agent Session**: For VS Code only, allows you to copy the prompt and start a new thread inside the Augment Code extension
* **Copy to Clipboard**: Allows you to paste the prompt into your preferred environment, e.g. Auggie CLI, Augment Code for JetBrains, etc.
Options include:
* **Open in Agent Session**: For VS Code only, allows you to copy the prompt and start a new thread inside the Augment Code extension
* **Copy to Clipboard**: Allows you to paste the prompt into your preferred environment, e.g. Auggie CLI, Augment Code for JetBrains, etc.
 ***
## Best Practices
**Review the Fix**: Always review the changes proposed by Agent before accepting them. While Agent has full context, you should verify the fix aligns with your intent.
**Test the Changes**: Run your tests after applying the fix to ensure the issue is resolved and no new issues are introduced.
**Update the PR**: After pushing your fix, you can reply to the Code Review comment to indicate you've addressed the issue.
**Request Follow-up Review**: If you make significant changes, consider requesting another review by commenting `auggie review` on your PR.
---
# Source: https://docs.augmentcode.com/context-services/context-connectors/quickstart/github-actions-indexing.md
> ## Documentation Index
> Fetch the complete documentation index at: https://docs.augmentcode.com/llms.txt
> Use this file to discover all available pages before exploring further.
# GitHub Actions Auto-Indexing
> Automatically index your repository on every push using GitHub Actions in 5 minutes
***
## Best Practices
**Review the Fix**: Always review the changes proposed by Agent before accepting them. While Agent has full context, you should verify the fix aligns with your intent.
**Test the Changes**: Run your tests after applying the fix to ensure the issue is resolved and no new issues are introduced.
**Update the PR**: After pushing your fix, you can reply to the Code Review comment to indicate you've addressed the issue.
**Request Follow-up Review**: If you make significant changes, consider requesting another review by commenting `auggie review` on your PR.
---
# Source: https://docs.augmentcode.com/context-services/context-connectors/quickstart/github-actions-indexing.md
> ## Documentation Index
> Fetch the complete documentation index at: https://docs.augmentcode.com/llms.txt
> Use this file to discover all available pages before exploring further.
# GitHub Actions Auto-Indexing
> Automatically index your repository on every push using GitHub Actions in 5 minutes
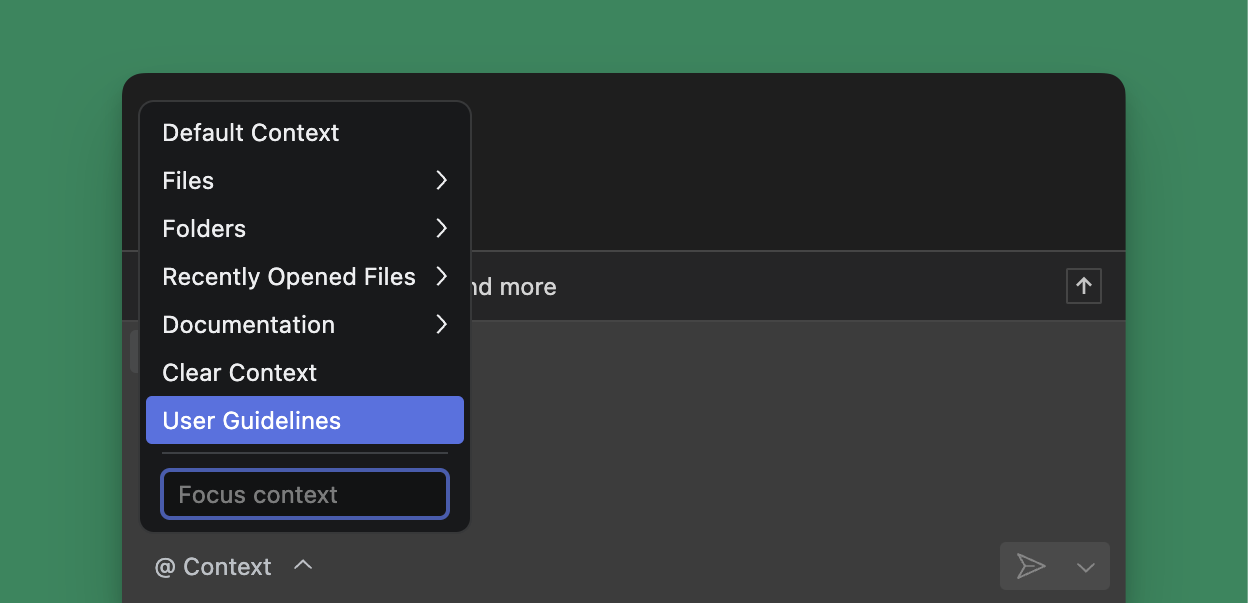 You can add user guidelines by clicking Context menu (@), starting an @-mention inside Chat, or clicking Settings > Rules and User Guidelines.
### Navigating from the Context menu (@) User Guidelines
1. @ mention and select `User Guidelines`
2. Enter your guidelines (see below for tips)
3. Press Escape to save or wait for autosave
### Navigating from Settings > User Guidelines and Rules
You can add user guidelines by clicking Context menu (@), starting an @-mention inside Chat, or clicking Settings > Rules and User Guidelines.
### Navigating from the Context menu (@) User Guidelines
1. @ mention and select `User Guidelines`
2. Enter your guidelines (see below for tips)
3. Press Escape to save or wait for autosave
### Navigating from Settings > User Guidelines and Rules
 1. In the top right corner, select the hamburger menu (⋯)
2. Select Settings
3. From the left menu in Augment Settings, select User Guidelines and Rules
## Working with Rules
You can craft Rules to guide Augment towards specific documentation, frameworks, workflows or workstyles.
Rules are files that live in the `.augment/rules` directory. Currently, we support 3 types of rules:
* **Always**: contents will be included in every user prompt
* **Manual**: needs to be tagged through @ attaching the Rules file manually
* **Auto**: Agent will automatically detect and attach rules based on a description field
### User Rules vs Workspace Rules
Rules can be defined at two levels:
| Scope | Location | Availability |
| :-------- | :--------------------------------- | :---------------------------------- |
| User | `~/.augment/rules/` | Available in all workspaces |
| Workspace | `
1. In the top right corner, select the hamburger menu (⋯)
2. Select Settings
3. From the left menu in Augment Settings, select User Guidelines and Rules
## Working with Rules
You can craft Rules to guide Augment towards specific documentation, frameworks, workflows or workstyles.
Rules are files that live in the `.augment/rules` directory. Currently, we support 3 types of rules:
* **Always**: contents will be included in every user prompt
* **Manual**: needs to be tagged through @ attaching the Rules file manually
* **Auto**: Agent will automatically detect and attach rules based on a description field
### User Rules vs Workspace Rules
Rules can be defined at two levels:
| Scope | Location | Availability |
| :-------- | :--------------------------------- | :---------------------------------- |
| User | `~/.augment/rules/` | Available in all workspaces |
| Workspace | `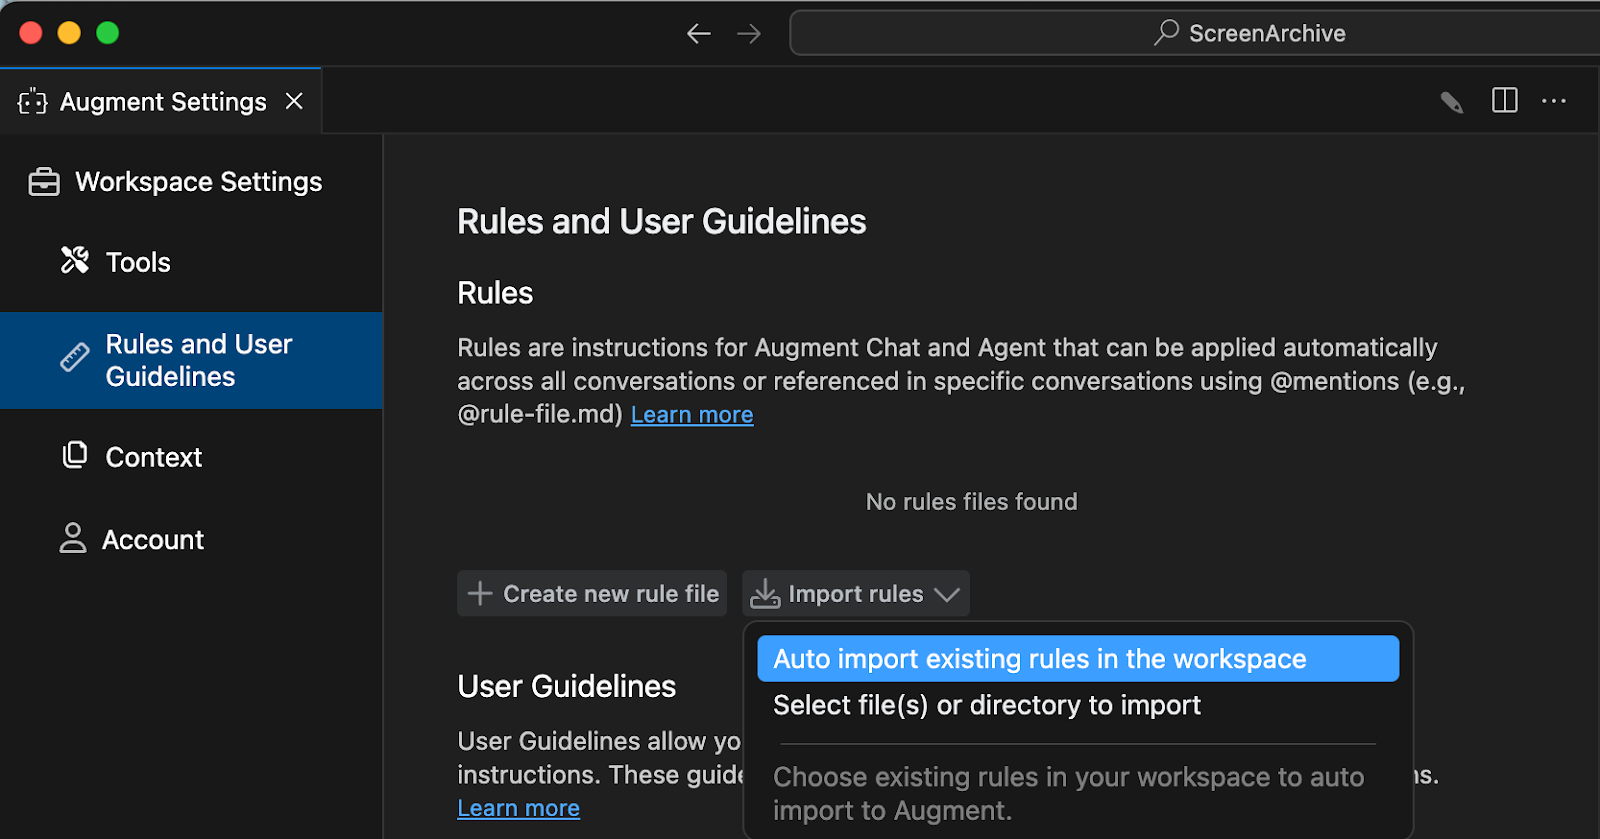 ### Importing Augment Memories into Rules or User Guidelines
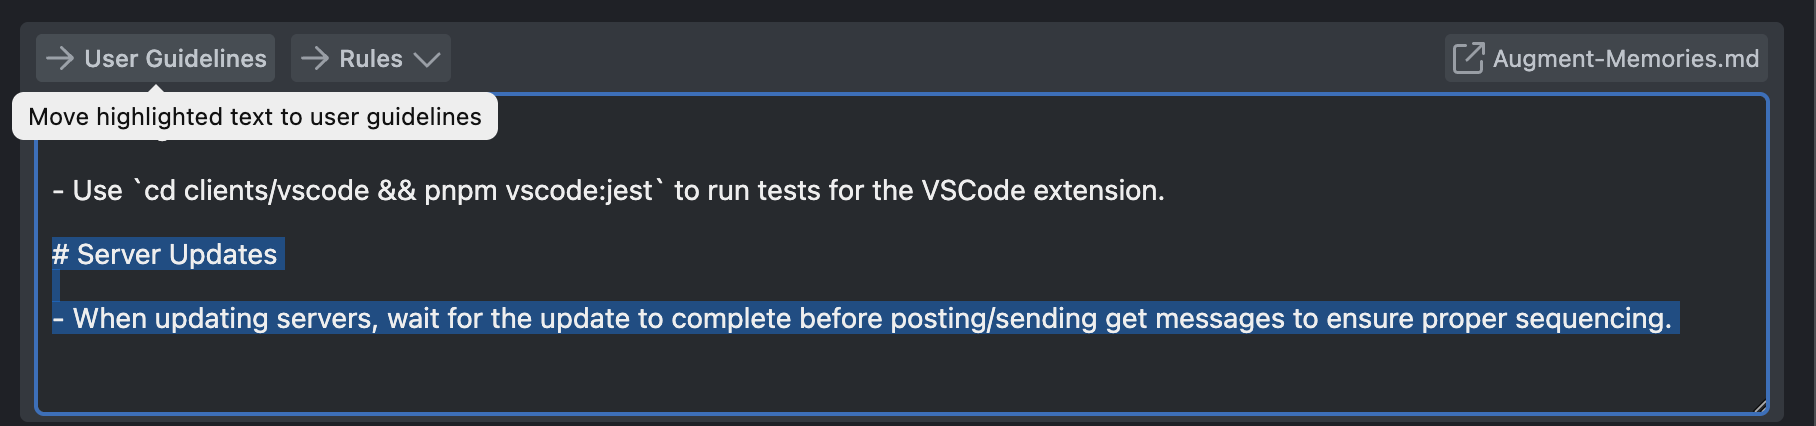
Augment Memories are automatically created by the Agent. If you’ve ever modified the Memories or prompted the Agent to remember something you can import these preferences as Rules or User Guidelines.
1. From the prompt box, click on Augment Memories
2. Select the item you'd like to import and then click User Guidelines at the top of Augment Memories from inside the editor.
3. To add the memory as a Rule, you'll first need to add at least one rule using +Create new rule file. Now, you can select any information inside the Augment Memories and save it as a Rule.
### Importing Augment Memories into Rules or User Guidelines
Augment Memories are automatically created by the Agent. If you’ve ever modified the Memories or prompted the Agent to remember something you can import these preferences as Rules or User Guidelines.
1. From the prompt box, click on Augment Memories
2. Select the item you'd like to import and then click User Guidelines at the top of Augment Memories from inside the editor.
3. To add the memory as a Rule, you'll first need to add at least one rule using +Create new rule file. Now, you can select any information inside the Augment Memories and save it as a Rule.
 ## Working with Workspace Guidelines `.augment-guidelines` (legacy)
You can add an `.augment-guidelines` file to the root of a repository to specify a set of guidelines that Augment will follow for all Agent and Chat sessions on the codebase. The `.augment-guidelines` file should be added to your version control system so that everyone working on the codebase has the same guidelines.
### Tips for good rules and guidelines
* Provide guidelines as a list
* Use simple, clear, and concise language for your guidelines
* Asking for shorter or code-only answers may hurt response quality
### Examples
## Working with Workspace Guidelines `.augment-guidelines` (legacy)
You can add an `.augment-guidelines` file to the root of a repository to specify a set of guidelines that Augment will follow for all Agent and Chat sessions on the codebase. The `.augment-guidelines` file should be added to your version control system so that everyone working on the codebase has the same guidelines.
### Tips for good rules and guidelines
* Provide guidelines as a list
* Use simple, clear, and concise language for your guidelines
* Asking for shorter or code-only answers may hurt response quality
### Examples
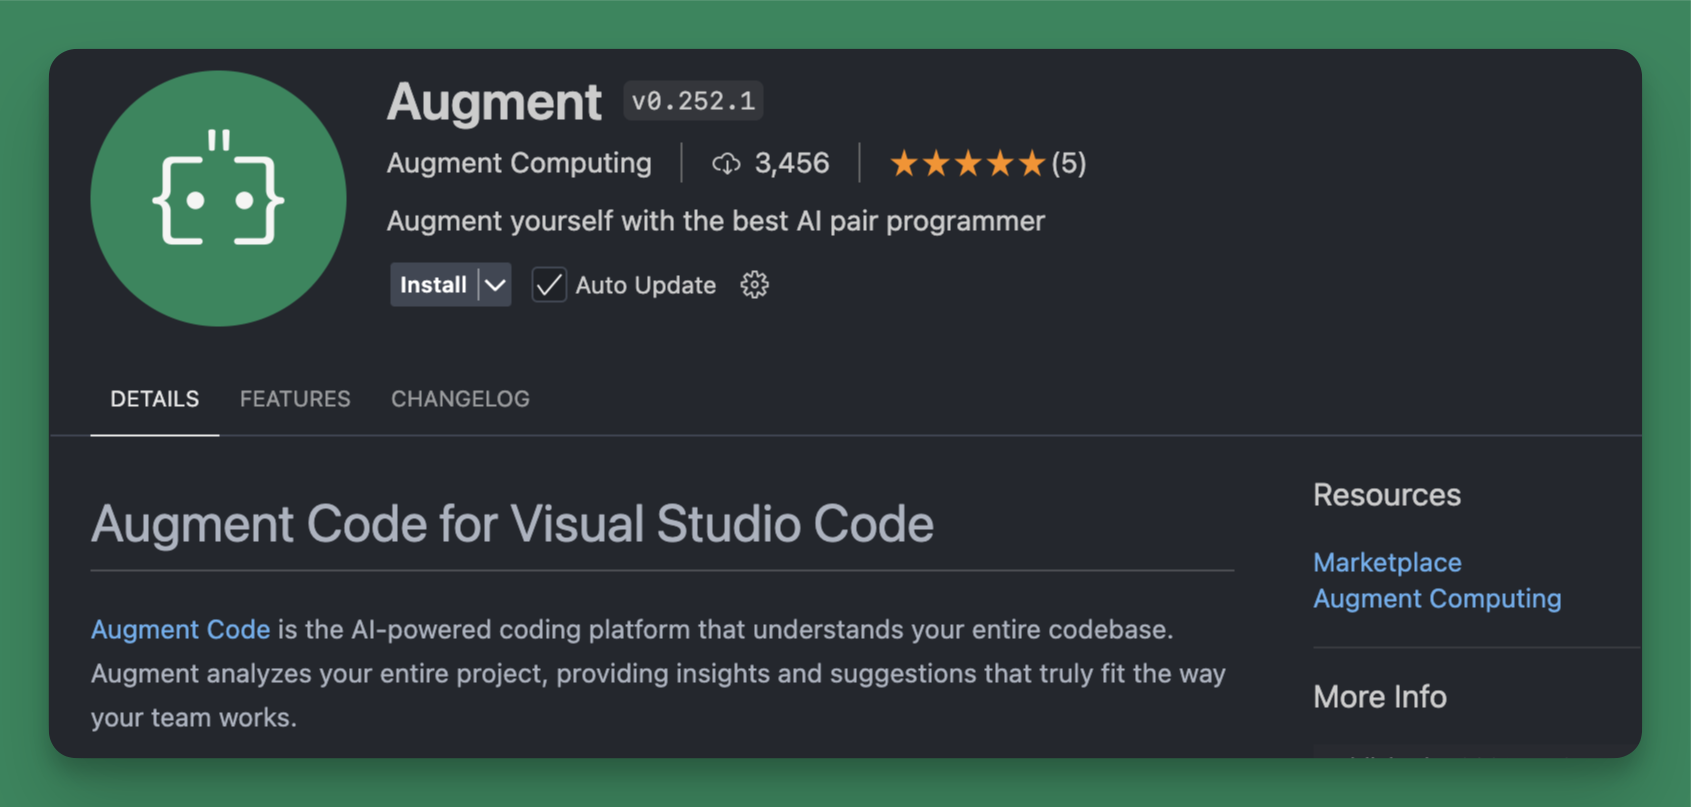
 ## Installing Augment for JetBrains IDEs
### 2. Install Slack App
## Installing Augment for JetBrains IDEs
### 2. Install Slack App
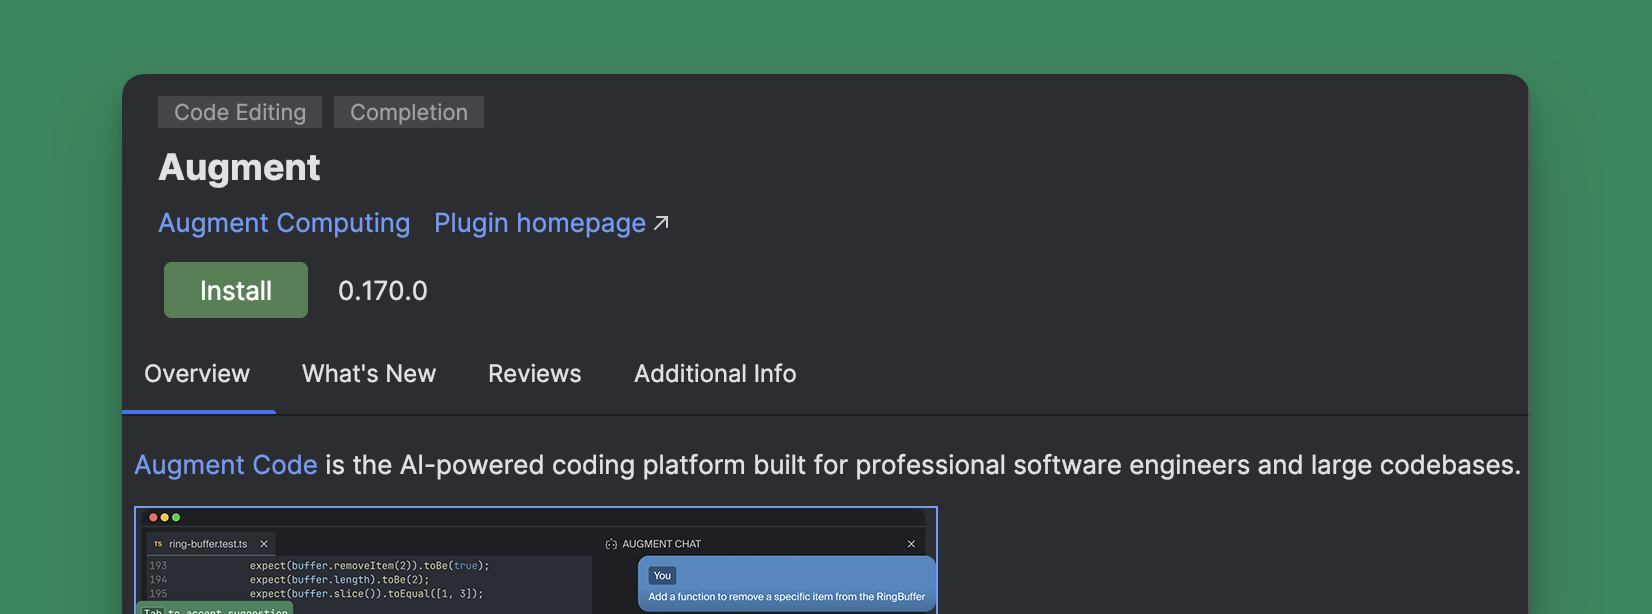
 ## Installing Augment for Visual Studio Code
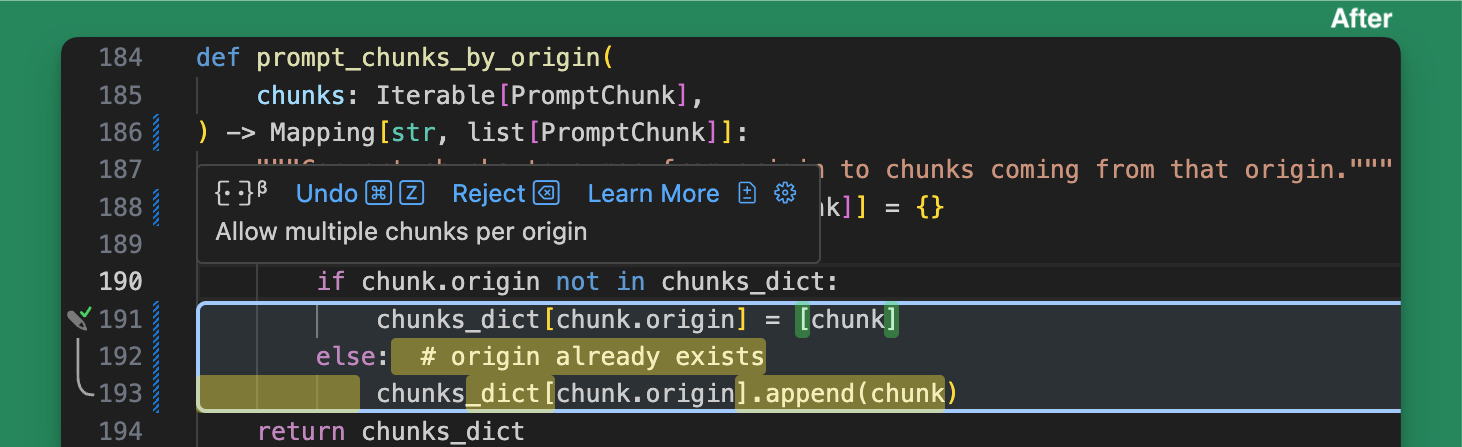
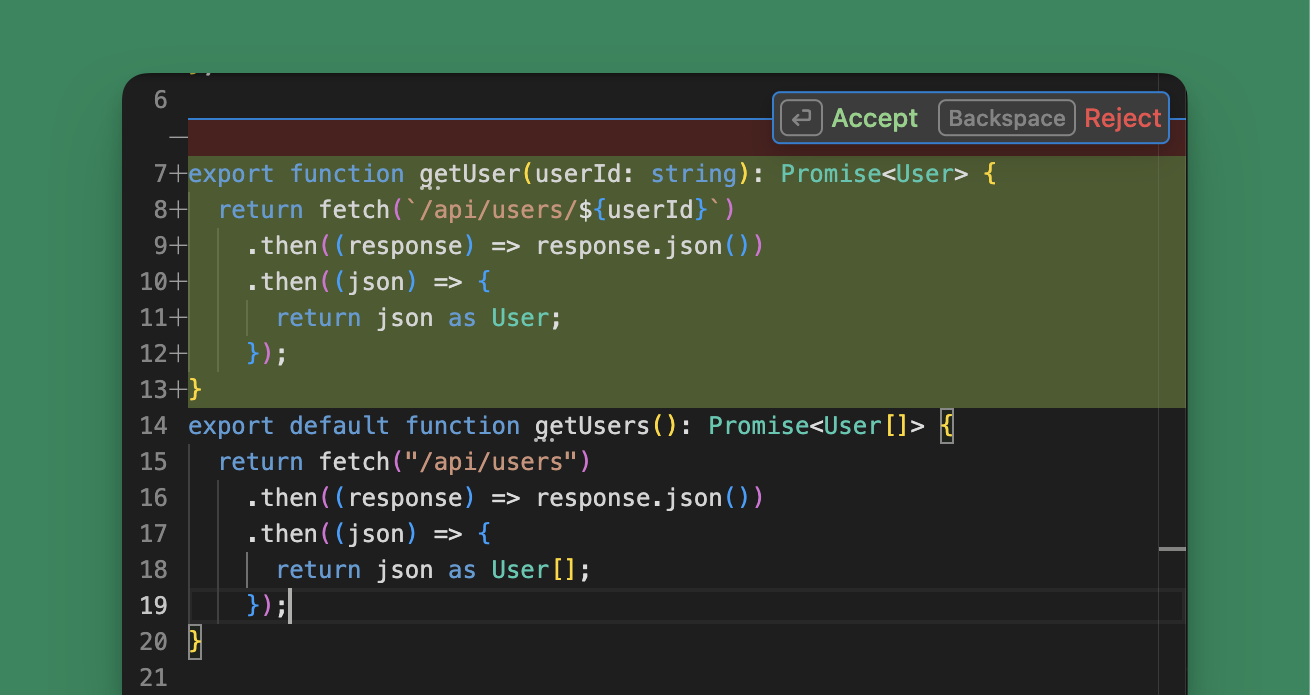 Your change will be made as a diff, so you can review the suggested updates before modifying your code. Use the following shortcuts or click the options in the UI to accept or reject the changes.
You'll be redirected to authorize the integration with the appropriate service. After authorization, the integration will be available for use with Augment Agent.
## MCP Integrations
In addition to native integrations, Auggie can also access external systems through Model Context Protocol (MCP) servers. MCP servers enable Auggie to interact with external tools and services through a standardized protocol, such as accessing databases, running browser automation, sending messages to Slack, or integrating with APIs.
### Configure MCP via settings.json
You can persist MCP servers in the Augment settings file `~/.augment/settings.json`, which will initialize on startup and can be checked with `/mcp-status`.
```json theme={null}
{
"mcpServers": {
"context7": {
"type": "http",
"url": "https://mcp.context7.com/mcp",
"headers": {
"CONTEXT7_API_KEY": "YOUR_API_KEY"
}
},
"weather": {
"type": "sse",
"url": "https://weather-mcp.example.com/v1",
"headers": {
"X-API-Key": "your_weather_api_key",
"Content-Type": "application/json"
}
},
"renderMCP": {
"type": "http",
"url": "https://mcp.render.com/mcp",
"headers": {
"Authorization": "Bearer
Your change will be made as a diff, so you can review the suggested updates before modifying your code. Use the following shortcuts or click the options in the UI to accept or reject the changes.
You'll be redirected to authorize the integration with the appropriate service. After authorization, the integration will be available for use with Augment Agent.
## MCP Integrations
In addition to native integrations, Auggie can also access external systems through Model Context Protocol (MCP) servers. MCP servers enable Auggie to interact with external tools and services through a standardized protocol, such as accessing databases, running browser automation, sending messages to Slack, or integrating with APIs.
### Configure MCP via settings.json
You can persist MCP servers in the Augment settings file `~/.augment/settings.json`, which will initialize on startup and can be checked with `/mcp-status`.
```json theme={null}
{
"mcpServers": {
"context7": {
"type": "http",
"url": "https://mcp.context7.com/mcp",
"headers": {
"CONTEXT7_API_KEY": "YOUR_API_KEY"
}
},
"weather": {
"type": "sse",
"url": "https://weather-mcp.example.com/v1",
"headers": {
"X-API-Key": "your_weather_api_key",
"Content-Type": "application/json"
}
},
"renderMCP": {
"type": "http",
"url": "https://mcp.render.com/mcp",
"headers": {
"Authorization": "Bearer 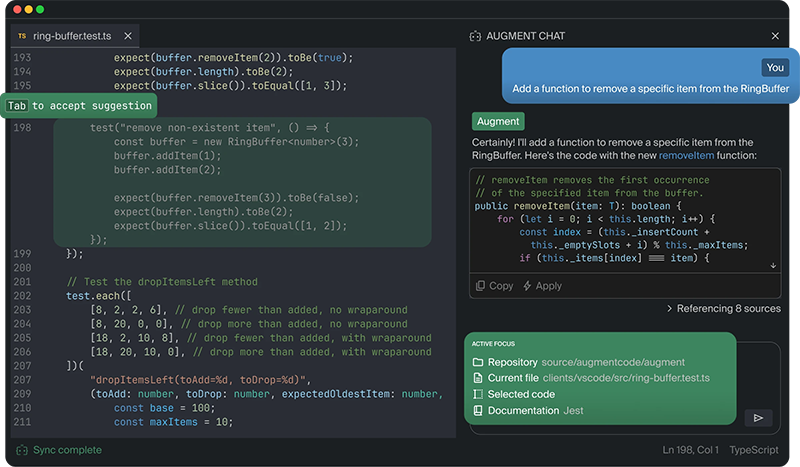 ## Get started in minutes
Augment works with your favorite IDE and your favorite programming language. Download the extension, sign in, and get coding.
## Get started in minutes
Augment works with your favorite IDE and your favorite programming language. Download the extension, sign in, and get coding.
Get completions, chat, and instructions in your favorite open source editor.
Completions are available for all JetBrains IDEs, like WebStorm, PyCharm, and IntelliJ.

All the power of Augment's agent, context engine, and tools in your terminal.
 From that moment on, Augment Code streams your tool's live context into every suggestion and autonomous Agent run.
## Advanced Configuration: Settings Panel
For developers who need custom MCP server configurations or want to use servers not available through Easy MCP, you can configure MCP servers manually using the Augment Settings Panel.
To access the settings panel, select the gear icon in the upper right of the Augment panel. Once the settings panel is open, you will see a section for MCP servers.
From that moment on, Augment Code streams your tool's live context into every suggestion and autonomous Agent run.
## Advanced Configuration: Settings Panel
For developers who need custom MCP server configurations or want to use servers not available through Easy MCP, you can configure MCP servers manually using the Augment Settings Panel.
To access the settings panel, select the gear icon in the upper right of the Augment panel. Once the settings panel is open, you will see a section for MCP servers.
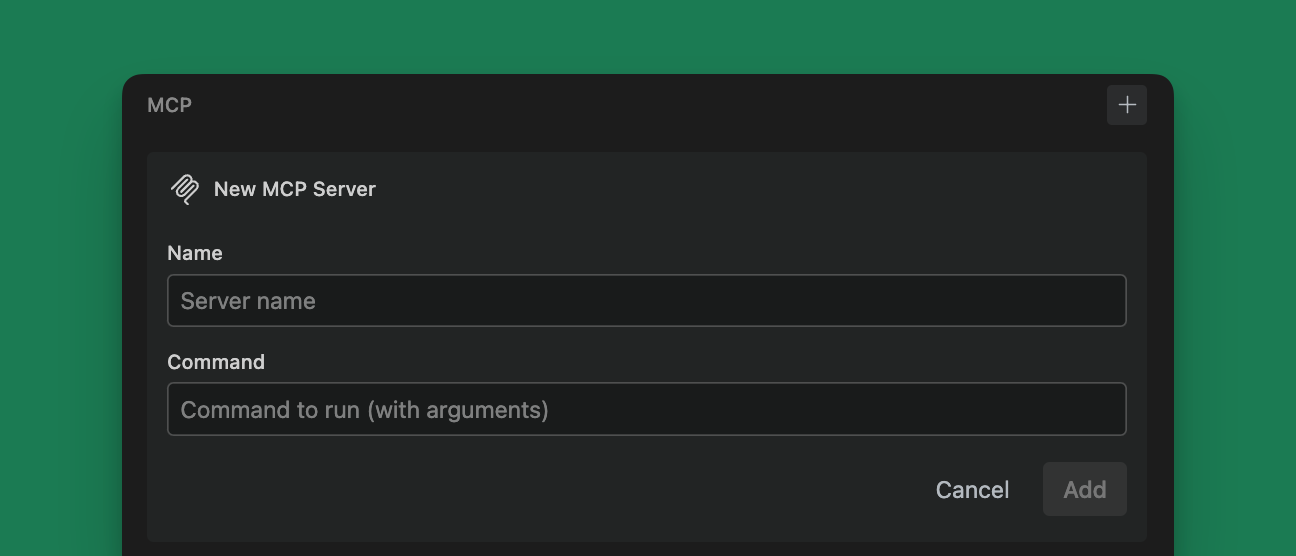 Fill in the `name` and `command` fields. The `name` field must be a unique name for the server. The `command` field is the command to run the server. Environment variables have their own section and no longer need to be specified in the command.
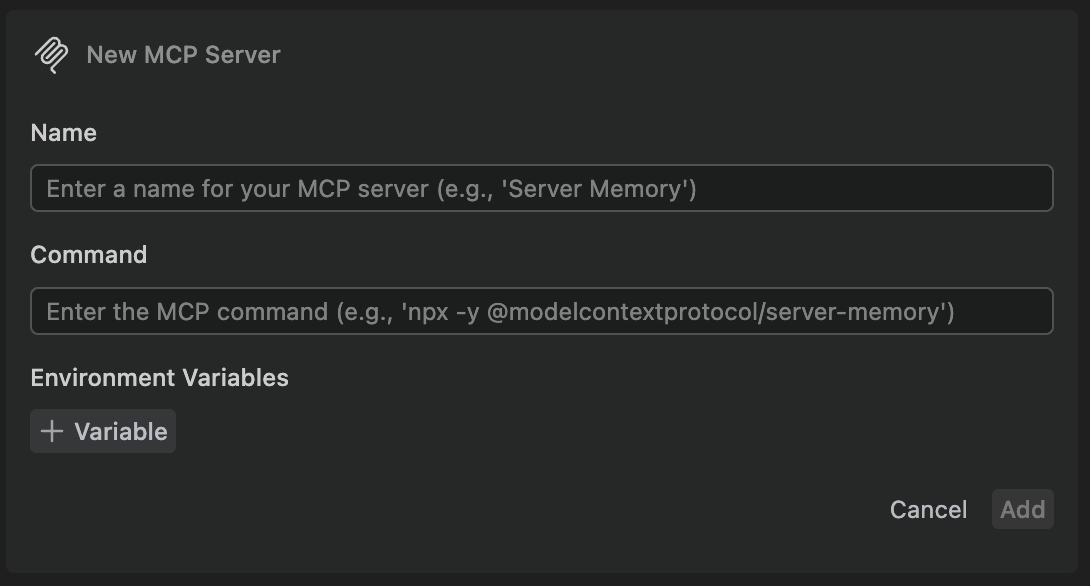 To add additional servers, click the `+` button next to the `MCP` header.
To edit a configuration or to delete a server, click the `...` button next to the server name.
### Add a Remote MCP server
If your MCP server runs remotely (for example, a hosted service), click the "+ Add remote MCP" button in the MCP section. Remote MCP connections support both HTTP and SSE (Server‑Sent Events).
To add additional servers, click the `+` button next to the `MCP` header.
To edit a configuration or to delete a server, click the `...` button next to the server name.
### Add a Remote MCP server
If your MCP server runs remotely (for example, a hosted service), click the "+ Add remote MCP" button in the MCP section. Remote MCP connections support both HTTP and SSE (Server‑Sent Events).
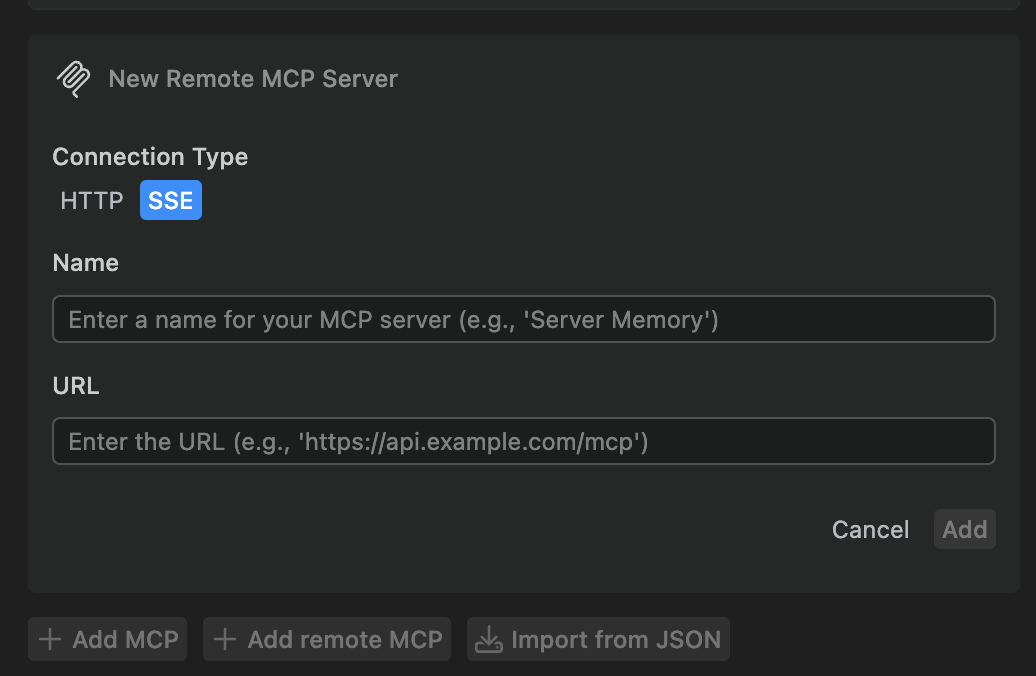 * Connection Type: choose HTTP or SSE
* Name: a unique display name for the server
* URL: the base URL to your MCP server (e.g., [https://api.example.com](https://api.example.com))
Remote MCP servers appear alongside your local MCP servers in the list. You can edit or remove them using the "..." menu next to the server name.
## Server compatibility
Not all MCP servers are compatible with Augment's models. The MCP standard, implementation of specific servers, and Augment's MCP support are frequently being updated, so check compatibility frequently.
---
# Source: https://docs.augmentcode.com/using-augment/next-edit.md
> ## Documentation Index
> Fetch the complete documentation index at: https://docs.augmentcode.com/llms.txt
> Use this file to discover all available pages before exploring further.
# Next Edit
> Use Next Edit to flow through complex changes across your codebase. Cut down the time you spend on repetitive work like refactors, library upgrades, and schema changes.
export const NextEditSettingsIcon = () =>
* Connection Type: choose HTTP or SSE
* Name: a unique display name for the server
* URL: the base URL to your MCP server (e.g., [https://api.example.com](https://api.example.com))
Remote MCP servers appear alongside your local MCP servers in the list. You can edit or remove them using the "..." menu next to the server name.
## Server compatibility
Not all MCP servers are compatible with Augment's models. The MCP standard, implementation of specific servers, and Augment's MCP support are frequently being updated, so check compatibility frequently.
---
# Source: https://docs.augmentcode.com/using-augment/next-edit.md
> ## Documentation Index
> Fetch the complete documentation index at: https://docs.augmentcode.com/llms.txt
> Use this file to discover all available pages before exploring further.
# Next Edit
> Use Next Edit to flow through complex changes across your codebase. Cut down the time you spend on repetitive work like refactors, library upgrades, and schema changes.
export const NextEditSettingsIcon = () => 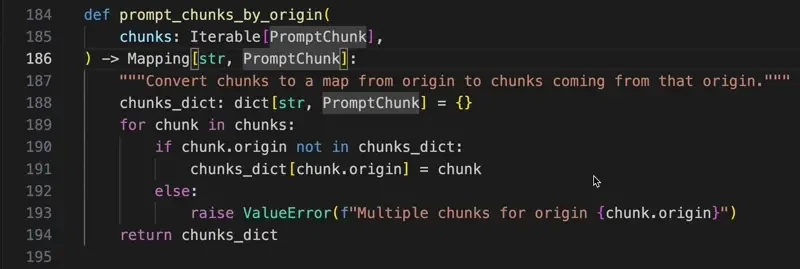 When Next Edit has a suggestion available, you will see a gutter icon and a summary
of the change in gray at the end of the line.
To jump to the next suggestion, press
When Next Edit has a suggestion available, you will see a gutter icon and a summary
of the change in gray at the end of the line.
To jump to the next suggestion, press 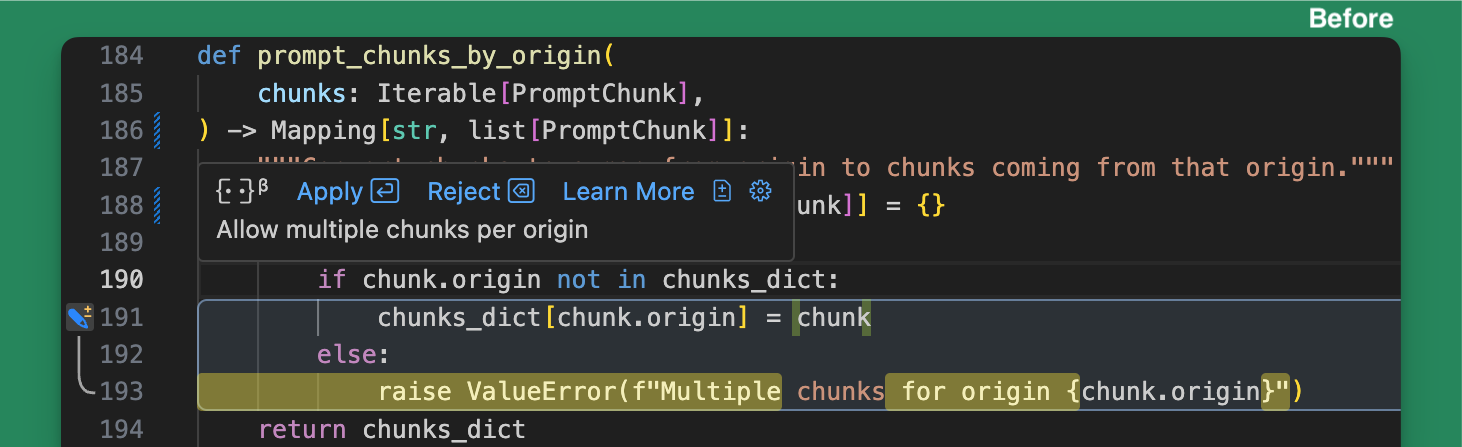
 By default, Next Edit will briefly highlight which parts of the existing code will
change before applying the change and highlighting the new code. Use Undo
(
By default, Next Edit will briefly highlight which parts of the existing code will
change before applying the change and highlighting the new code. Use Undo
( 1. **Editor Title Icon** (Top Right): Changes colors when next edits are available.
Click on the
1. **Editor Title Icon** (Top Right): Changes colors when next edits are available.
Click on the  4. **Hint Box** (Bottom Left) - appears when the next suggestion is off screen with
brief summary of the change and the keybinding to press (typically
---
# Source: https://docs.augmentcode.com/context-services/mcp/quickstart-anti-gravity.md
> ## Documentation Index
> Fetch the complete documentation index at: https://docs.augmentcode.com/llms.txt
> Use this file to discover all available pages before exploring further.
# Quickstart (AntiGravity)
> Get started with Augment Context Engine MCP in AntiGravity in minutes
## Quick Start with AntiGravity
### 1. Install Auggie CLI
```bash theme={null}
npm install -g @augmentcode/auggie@latest
```
### 2. Sign in to Augment
```bash theme={null}
auggie login
```
This will open a browser window for authentication.
### 3. Configure the MCP server in AntiGravity
* Click the MCP server icon
4. **Hint Box** (Bottom Left) - appears when the next suggestion is off screen with
brief summary of the change and the keybinding to press (typically
---
# Source: https://docs.augmentcode.com/context-services/mcp/quickstart-anti-gravity.md
> ## Documentation Index
> Fetch the complete documentation index at: https://docs.augmentcode.com/llms.txt
> Use this file to discover all available pages before exploring further.
# Quickstart (AntiGravity)
> Get started with Augment Context Engine MCP in AntiGravity in minutes
## Quick Start with AntiGravity
### 1. Install Auggie CLI
```bash theme={null}
npm install -g @augmentcode/auggie@latest
```
### 2. Sign in to Augment
```bash theme={null}
auggie login
```
This will open a browser window for authentication.
### 3. Configure the MCP server in AntiGravity
* Click the MCP server icon
 * Click manage MCP server
 Paste this configuration:
```json theme={null}
{
"mcpServers": {
"augment-context-engine": {
"command": "auggie",
"args": ["--mcp", "--mcp-auto-workspace"]
}
}
}
```
### 4. Test the integration
```
Prompt: "What is this project? Please use codebase retrieval tool to get the answer."
```
AntiGravity should confirm it has access to the `codebase-retrieval` tool.
Paste this configuration:
```json theme={null}
{
"mcpServers": {
"augment-context-engine": {
"command": "auggie",
"args": ["--mcp", "--mcp-auto-workspace"]
}
}
}
```
### 4. Test the integration
```
Prompt: "What is this project? Please use codebase retrieval tool to get the answer."
```
AntiGravity should confirm it has access to the `codebase-retrieval` tool.
 ---
# Source: https://docs.augmentcode.com/context-services/mcp/quickstart-claude-code.md
> ## Documentation Index
> Fetch the complete documentation index at: https://docs.augmentcode.com/llms.txt
> Use this file to discover all available pages before exploring further.
# Quickstart (Claude Code)
> Get started with Augment Context Engine MCP in Claude Code in minutes
## Quick Start with Claude Code
### 1. Install Auggie CLI
```bash theme={null}
npm install -g @augmentcode/auggie@latest
```
### 2. Sign in to Augment
```bash theme={null}
auggie login
```
This will open a browser window for authentication.
### 3. Configure the MCP server in Claude Code
Add the MCP server to user scope (available in all projects):
```bash theme={null}
claude mcp add-json auggie-mcp --scope user '{"type":"stdio","command":"auggie","args":["--mcp","--mcp-auto-workspace"]}'
```
Or add to project scope (only available in the current project):
```bash theme={null}
claude mcp add-json auggie-mcp --scope project '{"type":"stdio","command":"auggie","args":["--mcp","--mcp-auto-workspace"]}'
```
### 4. Test the integration
```bash theme={null}
claude --print "Do you have access to the Augment codebase retrieval tool? Answer in one sentence."
```
Claude should confirm it has access to the `codebase-retrieval` tool.
## Advanced: Non-Interactive Setup
For non-interactive environments like CI/CD pipelines, GitHub Actions, or automated scripts where you cannot run `auggie login` interactively, you can configure authentication using environment variables.
### 1. Get your authentication token
```bash theme={null}
auggie token print
```
This will output something like:
```
TOKEN={"accessToken":"your-access-token","tenantURL":"your-tenant-url","scopes":["read","write"]}
```
Copy the `accessToken` value (the long string after `"accessToken":"`) and the `tenantURL` value.
### 2. Configure with environment variables
```bash theme={null}
claude mcp add-json auggie-mcp --scope user '{"type":"stdio","command":"auggie","args":["--mcp","--mcp-auto-workspace"],"env":{"AUGMENT_API_TOKEN":"your-access-token","AUGMENT_API_URL":"your-tenant-url"}}'
```
Replace `your-access-token` and `your-tenant-url` with the values from step 1.
---
# Source: https://docs.augmentcode.com/context-services/mcp/quickstart-codex.md
> ## Documentation Index
> Fetch the complete documentation index at: https://docs.augmentcode.com/llms.txt
> Use this file to discover all available pages before exploring further.
# Quickstart (Codex)
> Get started with Augment Context Engine MCP in OpenAI Codex CLI in minutes
## Quick Start with Codex
### 1. Install Auggie CLI
```bash theme={null}
npm install -g @augmentcode/auggie@latest
```
### 2. Sign in to Augment
```bash theme={null}
auggie login
```
This will open a browser window for authentication.
### 3. Configure the MCP server in Codex
Add the MCP server using the Codex CLI:
```bash theme={null}
codex mcp add codebase-retrieval -- auggie --mcp --mcp-auto-workspace
```
The `--mcp-auto-workspace` flag automatically detects your workspace when using Codex.
### 4. Test the integration
Run Codex and prompt it with:
```
"What is this project? Please use the codebase-retrieval tool to get the answer."
```
Codex should confirm it has access to the `codebase-retrieval` tool.
## Advanced: Non-Interactive Setup
For non-interactive environments like CI/CD pipelines, GitHub Actions, or automated scripts where you cannot run `auggie login` interactively, you can configure authentication using environment variables.
### 1. Get your authentication token
```bash theme={null}
auggie token print
```
This will output something like:
```
TOKEN={"accessToken":"your-access-token","tenantURL":"your-tenant-url","scopes":["read","write"]}
```
Copy the `accessToken` value (the long string after `"accessToken":"`) and the `tenantURL` value.
### 2. Configure with environment variables
```bash theme={null}
codex mcp add codebase-retrieval --env AUGMENT_API_TOKEN=your-access-token --env AUGMENT_API_URL=your-tenant-url -- auggie --mcp --mcp-auto-workspace
```
Replace `your-access-token` and `your-tenant-url` with the values from step 1.
---
# Source: https://docs.augmentcode.com/context-services/mcp/quickstart-cursor.md
> ## Documentation Index
> Fetch the complete documentation index at: https://docs.augmentcode.com/llms.txt
> Use this file to discover all available pages before exploring further.
# Quickstart (Cursor)
> Get started with Augment Context Engine MCP in Cursor in minutes
## Quick Start with Cursor
### 1. Install Auggie CLI
```bash theme={null}
npm install -g @augmentcode/auggie@latest
```
### 2. Sign in to Augment
```bash theme={null}
auggie login
```
This will open a browser window for authentication.
### 3. Configure the MCP server in Cursor
* Go in settings (top right)
---
# Source: https://docs.augmentcode.com/context-services/mcp/quickstart-claude-code.md
> ## Documentation Index
> Fetch the complete documentation index at: https://docs.augmentcode.com/llms.txt
> Use this file to discover all available pages before exploring further.
# Quickstart (Claude Code)
> Get started with Augment Context Engine MCP in Claude Code in minutes
## Quick Start with Claude Code
### 1. Install Auggie CLI
```bash theme={null}
npm install -g @augmentcode/auggie@latest
```
### 2. Sign in to Augment
```bash theme={null}
auggie login
```
This will open a browser window for authentication.
### 3. Configure the MCP server in Claude Code
Add the MCP server to user scope (available in all projects):
```bash theme={null}
claude mcp add-json auggie-mcp --scope user '{"type":"stdio","command":"auggie","args":["--mcp","--mcp-auto-workspace"]}'
```
Or add to project scope (only available in the current project):
```bash theme={null}
claude mcp add-json auggie-mcp --scope project '{"type":"stdio","command":"auggie","args":["--mcp","--mcp-auto-workspace"]}'
```
### 4. Test the integration
```bash theme={null}
claude --print "Do you have access to the Augment codebase retrieval tool? Answer in one sentence."
```
Claude should confirm it has access to the `codebase-retrieval` tool.
## Advanced: Non-Interactive Setup
For non-interactive environments like CI/CD pipelines, GitHub Actions, or automated scripts where you cannot run `auggie login` interactively, you can configure authentication using environment variables.
### 1. Get your authentication token
```bash theme={null}
auggie token print
```
This will output something like:
```
TOKEN={"accessToken":"your-access-token","tenantURL":"your-tenant-url","scopes":["read","write"]}
```
Copy the `accessToken` value (the long string after `"accessToken":"`) and the `tenantURL` value.
### 2. Configure with environment variables
```bash theme={null}
claude mcp add-json auggie-mcp --scope user '{"type":"stdio","command":"auggie","args":["--mcp","--mcp-auto-workspace"],"env":{"AUGMENT_API_TOKEN":"your-access-token","AUGMENT_API_URL":"your-tenant-url"}}'
```
Replace `your-access-token` and `your-tenant-url` with the values from step 1.
---
# Source: https://docs.augmentcode.com/context-services/mcp/quickstart-codex.md
> ## Documentation Index
> Fetch the complete documentation index at: https://docs.augmentcode.com/llms.txt
> Use this file to discover all available pages before exploring further.
# Quickstart (Codex)
> Get started with Augment Context Engine MCP in OpenAI Codex CLI in minutes
## Quick Start with Codex
### 1. Install Auggie CLI
```bash theme={null}
npm install -g @augmentcode/auggie@latest
```
### 2. Sign in to Augment
```bash theme={null}
auggie login
```
This will open a browser window for authentication.
### 3. Configure the MCP server in Codex
Add the MCP server using the Codex CLI:
```bash theme={null}
codex mcp add codebase-retrieval -- auggie --mcp --mcp-auto-workspace
```
The `--mcp-auto-workspace` flag automatically detects your workspace when using Codex.
### 4. Test the integration
Run Codex and prompt it with:
```
"What is this project? Please use the codebase-retrieval tool to get the answer."
```
Codex should confirm it has access to the `codebase-retrieval` tool.
## Advanced: Non-Interactive Setup
For non-interactive environments like CI/CD pipelines, GitHub Actions, or automated scripts where you cannot run `auggie login` interactively, you can configure authentication using environment variables.
### 1. Get your authentication token
```bash theme={null}
auggie token print
```
This will output something like:
```
TOKEN={"accessToken":"your-access-token","tenantURL":"your-tenant-url","scopes":["read","write"]}
```
Copy the `accessToken` value (the long string after `"accessToken":"`) and the `tenantURL` value.
### 2. Configure with environment variables
```bash theme={null}
codex mcp add codebase-retrieval --env AUGMENT_API_TOKEN=your-access-token --env AUGMENT_API_URL=your-tenant-url -- auggie --mcp --mcp-auto-workspace
```
Replace `your-access-token` and `your-tenant-url` with the values from step 1.
---
# Source: https://docs.augmentcode.com/context-services/mcp/quickstart-cursor.md
> ## Documentation Index
> Fetch the complete documentation index at: https://docs.augmentcode.com/llms.txt
> Use this file to discover all available pages before exploring further.
# Quickstart (Cursor)
> Get started with Augment Context Engine MCP in Cursor in minutes
## Quick Start with Cursor
### 1. Install Auggie CLI
```bash theme={null}
npm install -g @augmentcode/auggie@latest
```
### 2. Sign in to Augment
```bash theme={null}
auggie login
```
This will open a browser window for authentication.
### 3. Configure the MCP server in Cursor
* Go in settings (top right)
 Paste this configuration:
```json theme={null}
{
"mcpServers": {
"augment-context-engine": {
"type": "local",
"command": "auggie",
"args": ["--mcp", "--mcp-auto-workspace"],
"enabled": true
}
}
}
```
### 4. Test the integration
```
Prompt: "What is this project? Please use codebase retrieval tool to get the answer."
```
Cursor should confirm it has access to the `codebase-retrieval` tool.
Paste this configuration:
```json theme={null}
{
"mcpServers": {
"augment-context-engine": {
"type": "local",
"command": "auggie",
"args": ["--mcp", "--mcp-auto-workspace"],
"enabled": true
}
}
}
```
### 4. Test the integration
```
Prompt: "What is this project? Please use codebase retrieval tool to get the answer."
```
Cursor should confirm it has access to the `codebase-retrieval` tool.
 See [MCP Server Mode](/cli/reference#mcp-server-mode) for more options.
---
# Source: https://docs.augmentcode.com/context-services/mcp/quickstart-droid.md
> ## Documentation Index
> Fetch the complete documentation index at: https://docs.augmentcode.com/llms.txt
> Use this file to discover all available pages before exploring further.
# Quickstart (Droid)
> Get started with Augment Context Engine MCP in Droid in minutes
## Quick Start with Droid
### 1. Install Auggie CLI
```bash theme={null}
npm install -g @augmentcode/auggie@latest
```
### 2. Sign in to Augment
```bash theme={null}
auggie login
```
This will open a browser window for authentication.
### 3. Configure the MCP server in Droid
Add the Augment Context Engine MCP server:
```bash theme={null}
droid mcp add augment-code "auggie" --mcp --mcp-auto-workspace
```
### 4. Test the integration
```
Prompt: "Do you have access to the Augment codebase retrieval tool?"
```
Droid should confirm it has access to the `codebase-retrieval` tool.
## Advanced: Non-Interactive Setup
For non-interactive environments like CI/CD pipelines, GitHub Actions, or automated scripts where you cannot run `auggie login` interactively, you can configure authentication using environment variables.
### 1. Get your authentication token
```bash theme={null}
auggie token print
```
This will output something like:
```
TOKEN={"accessToken":"your-access-token","tenantURL":"your-tenant-url","scopes":["read","write"]}
```
Copy the `accessToken` value (the long string after `"accessToken":"`) and the `tenantURL` value.
### 2. Configure with environment variables
```bash theme={null}
droid mcp add augment-code "auggie" --mcp --mcp-auto-workspace --env AUGMENT_API_TOKEN=your-access-token --env AUGMENT_API_URL=your-tenant-url
```
Replace `your-access-token` and `your-tenant-url` with the values from step 1.
---
# Source: https://docs.augmentcode.com/context-services/mcp/quickstart-gemini-cli.md
> ## Documentation Index
> Fetch the complete documentation index at: https://docs.augmentcode.com/llms.txt
> Use this file to discover all available pages before exploring further.
# Quickstart (Gemini CLI)
> Get started with Augment Context Engine MCP in Gemini CLI in minutes
## Quick Start with Gemini CLI
### 1. Install Auggie CLI
```bash theme={null}
npm install -g @augmentcode/auggie@latest
```
### 2. Sign in to Augment
```bash theme={null}
auggie login
```
This will open a browser window for authentication.
### 3. Configure the MCP server in Gemini CLI
Gemini CLI reads the MCP server configuration from a settings file. You can configure MCP servers at either the user level (applies to all projects) or project level (applies only to that specific project):
**Configuration file locations:**
* **User settings** (global):
* macOS/Linux: `~/.gemini/settings.json`
* Windows: `%USERPROFILE%\.gemini\settings.json`
* **Project settings** (optional): `.gemini/settings.json` in your project's root directory
Add the following configuration to your Gemini CLI settings file:
```json theme={null}
{
"mcpServers": {
"augment-context-engine": {
"command": "auggie",
"args": ["--mcp", "--mcp-auto-workspace"]
}
}
}
```
### 4. Test the integration
Prompt the Gemini CLI with:
```
Prompt: "What is this project? Please use codebase retrieval tool to get the answer."
```
Gemini CLI should confirm it has access to the `codebase-retrieval` tool.
## Advanced: Non-Interactive Setup
For non-interactive environments like CI/CD pipelines, GitHub Actions, or automated scripts where you cannot run `auggie login` interactively, you can configure authentication using environment variables.
### 1. Get your authentication token
```bash theme={null}
auggie token print
```
This will output something like:
```
TOKEN={"accessToken":"your-access-token","tenantURL":"your-tenant-url","scopes":["read","write"]}
```
Copy the `accessToken` value (the long string after `"accessToken":"`) and the `tenantURL` value.
### 2. Configure with environment variables
Add the `env` section to your configuration:
```json theme={null}
{
"mcpServers": {
"augment-context-engine": {
"command": "auggie",
"args": ["--mcp", "--mcp-auto-workspace"],
"env": {
"AUGMENT_API_TOKEN": "your-access-token",
"AUGMENT_API_URL": "your-tenant-url"
}
}
}
}
```
Replace `your-access-token` and `your-tenant-url` with the values from step 1.
---
# Source: https://docs.augmentcode.com/context-services/mcp/quickstart-github-copilot.md
> ## Documentation Index
> Fetch the complete documentation index at: https://docs.augmentcode.com/llms.txt
> Use this file to discover all available pages before exploring further.
# Quickstart (GitHub Copilot)
> Get started with Augment Context Engine MCP in GitHub Copilot in minutes
## Quick Start with GitHub Copilot
### 1. Install Auggie CLI
```bash theme={null}
npm install -g @augmentcode/auggie@latest
```
### 2. Sign in to Augment
```bash theme={null}
auggie login
```
This will open a browser window for authentication.
### 3. Configure the MCP server in GitHub Copilot
* Please create the following file **at the root** of your project: **.vscode/mcp.json**
* Paste this content inside and **Save**
```json theme={null}
{
"servers": {
"augmentcode": {
"type": "stdio",
"command": "auggie",
"args": ["--mcp", "--mcp-auto-workspace"]
}
},
"inputs": []
}
```
### 4. Test the integration
Prompt this in **AGENT MODE**: "What is this project? Please use codebase retrieval tool to get the answer."
Copilot should confirm it has access to the `codebase-retrieval` tool.
See [MCP Server Mode](/cli/reference#mcp-server-mode) for more options.
---
# Source: https://docs.augmentcode.com/context-services/mcp/quickstart-droid.md
> ## Documentation Index
> Fetch the complete documentation index at: https://docs.augmentcode.com/llms.txt
> Use this file to discover all available pages before exploring further.
# Quickstart (Droid)
> Get started with Augment Context Engine MCP in Droid in minutes
## Quick Start with Droid
### 1. Install Auggie CLI
```bash theme={null}
npm install -g @augmentcode/auggie@latest
```
### 2. Sign in to Augment
```bash theme={null}
auggie login
```
This will open a browser window for authentication.
### 3. Configure the MCP server in Droid
Add the Augment Context Engine MCP server:
```bash theme={null}
droid mcp add augment-code "auggie" --mcp --mcp-auto-workspace
```
### 4. Test the integration
```
Prompt: "Do you have access to the Augment codebase retrieval tool?"
```
Droid should confirm it has access to the `codebase-retrieval` tool.
## Advanced: Non-Interactive Setup
For non-interactive environments like CI/CD pipelines, GitHub Actions, or automated scripts where you cannot run `auggie login` interactively, you can configure authentication using environment variables.
### 1. Get your authentication token
```bash theme={null}
auggie token print
```
This will output something like:
```
TOKEN={"accessToken":"your-access-token","tenantURL":"your-tenant-url","scopes":["read","write"]}
```
Copy the `accessToken` value (the long string after `"accessToken":"`) and the `tenantURL` value.
### 2. Configure with environment variables
```bash theme={null}
droid mcp add augment-code "auggie" --mcp --mcp-auto-workspace --env AUGMENT_API_TOKEN=your-access-token --env AUGMENT_API_URL=your-tenant-url
```
Replace `your-access-token` and `your-tenant-url` with the values from step 1.
---
# Source: https://docs.augmentcode.com/context-services/mcp/quickstart-gemini-cli.md
> ## Documentation Index
> Fetch the complete documentation index at: https://docs.augmentcode.com/llms.txt
> Use this file to discover all available pages before exploring further.
# Quickstart (Gemini CLI)
> Get started with Augment Context Engine MCP in Gemini CLI in minutes
## Quick Start with Gemini CLI
### 1. Install Auggie CLI
```bash theme={null}
npm install -g @augmentcode/auggie@latest
```
### 2. Sign in to Augment
```bash theme={null}
auggie login
```
This will open a browser window for authentication.
### 3. Configure the MCP server in Gemini CLI
Gemini CLI reads the MCP server configuration from a settings file. You can configure MCP servers at either the user level (applies to all projects) or project level (applies only to that specific project):
**Configuration file locations:**
* **User settings** (global):
* macOS/Linux: `~/.gemini/settings.json`
* Windows: `%USERPROFILE%\.gemini\settings.json`
* **Project settings** (optional): `.gemini/settings.json` in your project's root directory
Add the following configuration to your Gemini CLI settings file:
```json theme={null}
{
"mcpServers": {
"augment-context-engine": {
"command": "auggie",
"args": ["--mcp", "--mcp-auto-workspace"]
}
}
}
```
### 4. Test the integration
Prompt the Gemini CLI with:
```
Prompt: "What is this project? Please use codebase retrieval tool to get the answer."
```
Gemini CLI should confirm it has access to the `codebase-retrieval` tool.
## Advanced: Non-Interactive Setup
For non-interactive environments like CI/CD pipelines, GitHub Actions, or automated scripts where you cannot run `auggie login` interactively, you can configure authentication using environment variables.
### 1. Get your authentication token
```bash theme={null}
auggie token print
```
This will output something like:
```
TOKEN={"accessToken":"your-access-token","tenantURL":"your-tenant-url","scopes":["read","write"]}
```
Copy the `accessToken` value (the long string after `"accessToken":"`) and the `tenantURL` value.
### 2. Configure with environment variables
Add the `env` section to your configuration:
```json theme={null}
{
"mcpServers": {
"augment-context-engine": {
"command": "auggie",
"args": ["--mcp", "--mcp-auto-workspace"],
"env": {
"AUGMENT_API_TOKEN": "your-access-token",
"AUGMENT_API_URL": "your-tenant-url"
}
}
}
}
```
Replace `your-access-token` and `your-tenant-url` with the values from step 1.
---
# Source: https://docs.augmentcode.com/context-services/mcp/quickstart-github-copilot.md
> ## Documentation Index
> Fetch the complete documentation index at: https://docs.augmentcode.com/llms.txt
> Use this file to discover all available pages before exploring further.
# Quickstart (GitHub Copilot)
> Get started with Augment Context Engine MCP in GitHub Copilot in minutes
## Quick Start with GitHub Copilot
### 1. Install Auggie CLI
```bash theme={null}
npm install -g @augmentcode/auggie@latest
```
### 2. Sign in to Augment
```bash theme={null}
auggie login
```
This will open a browser window for authentication.
### 3. Configure the MCP server in GitHub Copilot
* Please create the following file **at the root** of your project: **.vscode/mcp.json**
* Paste this content inside and **Save**
```json theme={null}
{
"servers": {
"augmentcode": {
"type": "stdio",
"command": "auggie",
"args": ["--mcp", "--mcp-auto-workspace"]
}
},
"inputs": []
}
```
### 4. Test the integration
Prompt this in **AGENT MODE**: "What is this project? Please use codebase retrieval tool to get the answer."
Copilot should confirm it has access to the `codebase-retrieval` tool.
 ---
# Source: https://docs.augmentcode.com/context-services/mcp/quickstart-kilo.md
> ## Documentation Index
> Fetch the complete documentation index at: https://docs.augmentcode.com/llms.txt
> Use this file to discover all available pages before exploring further.
# Quickstart (Kilo)
> Get started with Augment Context Engine MCP in Kilo in minutes
## Quick Start with Kilo
### 1. Install Auggie CLI
```bash theme={null}
npm install -g @augmentcode/auggie@latest
```
### 2. Sign in to Augment
```bash theme={null}
auggie login
```
This will open a browser window for authentication.
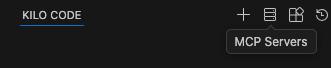
### 3. Configure the MCP server in Kilo
* Click the MCP server icon
---
# Source: https://docs.augmentcode.com/context-services/mcp/quickstart-kilo.md
> ## Documentation Index
> Fetch the complete documentation index at: https://docs.augmentcode.com/llms.txt
> Use this file to discover all available pages before exploring further.
# Quickstart (Kilo)
> Get started with Augment Context Engine MCP in Kilo in minutes
## Quick Start with Kilo
### 1. Install Auggie CLI
```bash theme={null}
npm install -g @augmentcode/auggie@latest
```
### 2. Sign in to Augment
```bash theme={null}
auggie login
```
This will open a browser window for authentication.
### 3. Configure the MCP server in Kilo
* Click the MCP server icon
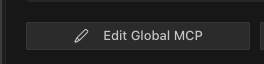
 * Click Edit Global MCP
 Paste this configuration:
```json theme={null}
{
"mcpServers": {
"augment-context-engine": {
"command": "auggie",
"type": "stdio",
"args": ["--mcp", "--mcp-auto-workspace"],
"disabled": false,
"alwaysAllow": ["codebase-retrieval"]
}
}
}
```
### 4. Test the integration
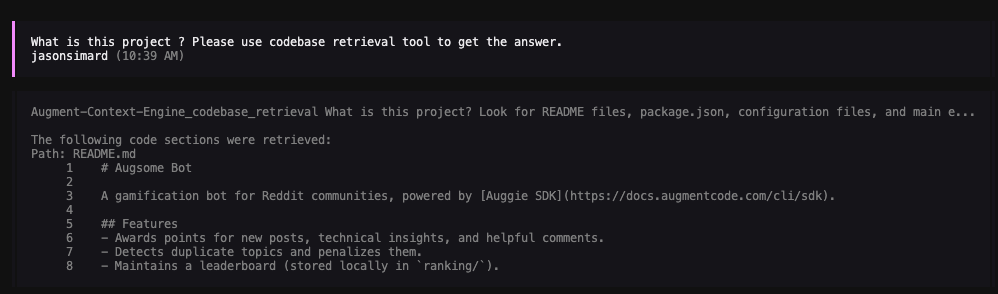
Prompt: "What is this project? Please use codebase retrieval tool to get the answer."
Kilo should confirm it has access to the `codebase-retrieval` tool.
Paste this configuration:
```json theme={null}
{
"mcpServers": {
"augment-context-engine": {
"command": "auggie",
"type": "stdio",
"args": ["--mcp", "--mcp-auto-workspace"],
"disabled": false,
"alwaysAllow": ["codebase-retrieval"]
}
}
}
```
### 4. Test the integration
Prompt: "What is this project? Please use codebase retrieval tool to get the answer."
Kilo should confirm it has access to the `codebase-retrieval` tool.
 ---
# Source: https://docs.augmentcode.com/context-services/mcp/quickstart-kiro.md
> ## Documentation Index
> Fetch the complete documentation index at: https://docs.augmentcode.com/llms.txt
> Use this file to discover all available pages before exploring further.
# Quickstart (Kiro)
> Get started with Augment Context Engine MCP in Kiro in minutes
## Quick Start with Kiro
### 1. Install Auggie CLI
```bash theme={null}
npm install -g @augmentcode/auggie@latest
```
### 2. Sign in to Augment
```bash theme={null}
auggie login
```
This will open a browser window for authentication.
### 3. Configure the MCP server in Kiro
Open the command palette (`Cmd + Shift + P` on Mac, `Ctrl + Shift + P` on Windows/Linux) and select:
* **Kiro: Open workspace MCP config (JSON)** - For workspace-level configuration
* **Kiro: Open user MCP config (JSON)** - For user-level configuration
Paste this configuration:
```json theme={null}
{
"mcpServers": {
"Augment-Context-Engine": {
"command": "auggie",
"args": ["--mcp", "--mcp-auto-workspace"],
"disabled": false,
"autoApprove": ["codebase-retrieval"]
}
}
}
```
### 4. Test the integration
```
Prompt: "Do you have access to the Augment codebase retrieval tool?"
```
Kiro should confirm it has access to the `codebase-retrieval` tool.
---
# Source: https://docs.augmentcode.com/context-services/mcp/quickstart-open-code.md
> ## Documentation Index
> Fetch the complete documentation index at: https://docs.augmentcode.com/llms.txt
> Use this file to discover all available pages before exploring further.
# Quickstart (OpenCode)
> Get started with Augment Context Engine MCP in OpenCode in minutes
## Quick Start with OpenCode
### 1. Install Auggie CLI
```bash theme={null}
npm install -g @augmentcode/auggie@latest
```
### 2. Sign in to Augment
```bash theme={null}
auggie login
```
This will open a browser window for authentication.
### 3. Configure the MCP server in OpenCode
* Go to Folder: \~/.config/opencode/
* Create a file named: opencode.json
Paste this configuration:
```json theme={null}
{
"$schema": "https://opencode.ai/config.json",
"mcp": {
"augment-context-engine": {
"type": "local",
"command": ["auggie", "--mcp", "--mcp-auto-workspace"],
"enabled": true
}
}
}
```
### 4. Test the integration
```
Prompt: "What is this project? Please use codebase retrieval tool to get the answer."
```
OpenCode should confirm it has access to the `codebase-retrieval` tool.
---
# Source: https://docs.augmentcode.com/context-services/mcp/quickstart-kiro.md
> ## Documentation Index
> Fetch the complete documentation index at: https://docs.augmentcode.com/llms.txt
> Use this file to discover all available pages before exploring further.
# Quickstart (Kiro)
> Get started with Augment Context Engine MCP in Kiro in minutes
## Quick Start with Kiro
### 1. Install Auggie CLI
```bash theme={null}
npm install -g @augmentcode/auggie@latest
```
### 2. Sign in to Augment
```bash theme={null}
auggie login
```
This will open a browser window for authentication.
### 3. Configure the MCP server in Kiro
Open the command palette (`Cmd + Shift + P` on Mac, `Ctrl + Shift + P` on Windows/Linux) and select:
* **Kiro: Open workspace MCP config (JSON)** - For workspace-level configuration
* **Kiro: Open user MCP config (JSON)** - For user-level configuration
Paste this configuration:
```json theme={null}
{
"mcpServers": {
"Augment-Context-Engine": {
"command": "auggie",
"args": ["--mcp", "--mcp-auto-workspace"],
"disabled": false,
"autoApprove": ["codebase-retrieval"]
}
}
}
```
### 4. Test the integration
```
Prompt: "Do you have access to the Augment codebase retrieval tool?"
```
Kiro should confirm it has access to the `codebase-retrieval` tool.
---
# Source: https://docs.augmentcode.com/context-services/mcp/quickstart-open-code.md
> ## Documentation Index
> Fetch the complete documentation index at: https://docs.augmentcode.com/llms.txt
> Use this file to discover all available pages before exploring further.
# Quickstart (OpenCode)
> Get started with Augment Context Engine MCP in OpenCode in minutes
## Quick Start with OpenCode
### 1. Install Auggie CLI
```bash theme={null}
npm install -g @augmentcode/auggie@latest
```
### 2. Sign in to Augment
```bash theme={null}
auggie login
```
This will open a browser window for authentication.
### 3. Configure the MCP server in OpenCode
* Go to Folder: \~/.config/opencode/
* Create a file named: opencode.json
Paste this configuration:
```json theme={null}
{
"$schema": "https://opencode.ai/config.json",
"mcp": {
"augment-context-engine": {
"type": "local",
"command": ["auggie", "--mcp", "--mcp-auto-workspace"],
"enabled": true
}
}
}
```
### 4. Test the integration
```
Prompt: "What is this project? Please use codebase retrieval tool to get the answer."
```
OpenCode should confirm it has access to the `codebase-retrieval` tool.
 ## Advanced: Non-Interactive Setup
For non-interactive environments like CI/CD pipelines, GitHub Actions, or automated scripts where you cannot run `auggie login` interactively, you can configure authentication using environment variables.
### 1. Get your authentication token
```bash theme={null}
auggie token print
```
This will output something like:
```
TOKEN={"accessToken":"your-access-token","tenantURL":"your-tenant-url","scopes":["read","write"]}
```
Copy the `accessToken` value (the long string after `"accessToken":"`) and the `tenantURL` value.
### 2. Configure with environment variables
Add the `env` section to your configuration:
```json theme={null}
{
"$schema": "https://opencode.ai/config.json",
"mcp": {
"augment-context-engine": {
"type": "local",
"command": ["auggie", "--mcp", "--mcp-auto-workspace"],
"enabled": true,
"env": {
"AUGMENT_API_TOKEN": "your-access-token",
"AUGMENT_API_URL": "your-tenant-url"
}
}
}
}
```
Replace `your-access-token` and `your-tenant-url` with the values from step 1.
---
# Source: https://docs.augmentcode.com/context-services/mcp/quickstart-zed.md
> ## Documentation Index
> Fetch the complete documentation index at: https://docs.augmentcode.com/llms.txt
> Use this file to discover all available pages before exploring further.
# Quickstart (Zed)
> Get started with Augment Context Engine MCP in Zed in minutes
## Quick Start with Zed
### 1. Install Auggie CLI
```bash theme={null}
npm install -g @augmentcode/auggie@latest
```
### 2. Sign in to Augment
```bash theme={null}
auggie login
```
This will open a browser window for authentication.
### 3. Get your authentication token (Only if you set it up remotely, this is not mandatory locally.)
```bash theme={null}
auggie token print
```
This will output something like:
```
TOKEN={"accessToken":"your-access-token","tenantURL":"your-tenant-url","scopes":["read","write"]}
```
Copy the `accessToken` value (the long string after `"accessToken":"`) and the `tenantURL` value for the next step.
### 4. Configure the MCP server in Zed
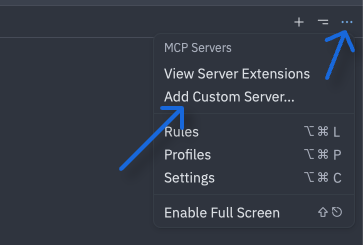
* Click the ... then **Add Custom Server**
## Advanced: Non-Interactive Setup
For non-interactive environments like CI/CD pipelines, GitHub Actions, or automated scripts where you cannot run `auggie login` interactively, you can configure authentication using environment variables.
### 1. Get your authentication token
```bash theme={null}
auggie token print
```
This will output something like:
```
TOKEN={"accessToken":"your-access-token","tenantURL":"your-tenant-url","scopes":["read","write"]}
```
Copy the `accessToken` value (the long string after `"accessToken":"`) and the `tenantURL` value.
### 2. Configure with environment variables
Add the `env` section to your configuration:
```json theme={null}
{
"$schema": "https://opencode.ai/config.json",
"mcp": {
"augment-context-engine": {
"type": "local",
"command": ["auggie", "--mcp", "--mcp-auto-workspace"],
"enabled": true,
"env": {
"AUGMENT_API_TOKEN": "your-access-token",
"AUGMENT_API_URL": "your-tenant-url"
}
}
}
}
```
Replace `your-access-token` and `your-tenant-url` with the values from step 1.
---
# Source: https://docs.augmentcode.com/context-services/mcp/quickstart-zed.md
> ## Documentation Index
> Fetch the complete documentation index at: https://docs.augmentcode.com/llms.txt
> Use this file to discover all available pages before exploring further.
# Quickstart (Zed)
> Get started with Augment Context Engine MCP in Zed in minutes
## Quick Start with Zed
### 1. Install Auggie CLI
```bash theme={null}
npm install -g @augmentcode/auggie@latest
```
### 2. Sign in to Augment
```bash theme={null}
auggie login
```
This will open a browser window for authentication.
### 3. Get your authentication token (Only if you set it up remotely, this is not mandatory locally.)
```bash theme={null}
auggie token print
```
This will output something like:
```
TOKEN={"accessToken":"your-access-token","tenantURL":"your-tenant-url","scopes":["read","write"]}
```
Copy the `accessToken` value (the long string after `"accessToken":"`) and the `tenantURL` value for the next step.
### 4. Configure the MCP server in Zed
* Click the ... then **Add Custom Server**
 * Paste the config below
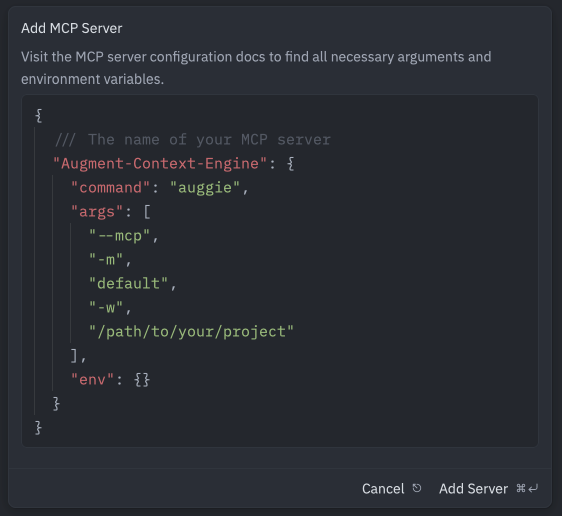 ```json theme={null}
{
"Augment-Context-Engine": {
"enabled": true,
"command": "auggie",
"args": ["--mcp", "--mcp-auto-workspace"],
"env": {}
}
}
```
### 5. Test the integration
Prompt: "What is this project? Please use codebase retrieval tool to get the answer."
Zed should confirm it has access to the `codebase-retrieval` tool.
```json theme={null}
{
"Augment-Context-Engine": {
"enabled": true,
"command": "auggie",
"args": ["--mcp", "--mcp-auto-workspace"],
"env": {}
}
}
```
### 5. Test the integration
Prompt: "What is this project? Please use codebase retrieval tool to get the answer."
Zed should confirm it has access to the `codebase-retrieval` tool.
 ---
# Source: https://docs.augmentcode.com/quickstart.md
> ## Documentation Index
> Fetch the complete documentation index at: https://docs.augmentcode.com/llms.txt
> Use this file to discover all available pages before exploring further.
# Quickstart
> Augment is the developer AI for teams that deeply understands your codebase and how you build software. Your code, your dependencies, and your best practices are all at your fingertips.
export const Next = ({children}) =>
---
# Source: https://docs.augmentcode.com/quickstart.md
> ## Documentation Index
> Fetch the complete documentation index at: https://docs.augmentcode.com/llms.txt
> Use this file to discover all available pages before exploring further.
# Quickstart
> Augment is the developer AI for teams that deeply understands your codebase and how you build software. Your code, your dependencies, and your best practices are all at your fingertips.
export const Next = ({children}) => Install Augment for Visual Studio Code
Install Augment for JetBrains IDEs, including WebStorm, PyCharm, and IntelliJ
All the power of Augment's agent, context engine, and tools in your terminal.
 ### Agent dashboard
You can view all of your remote agents in the Remote Agent dashboard by clicking the
### Agent dashboard
You can view all of your remote agents in the Remote Agent dashboard by clicking the 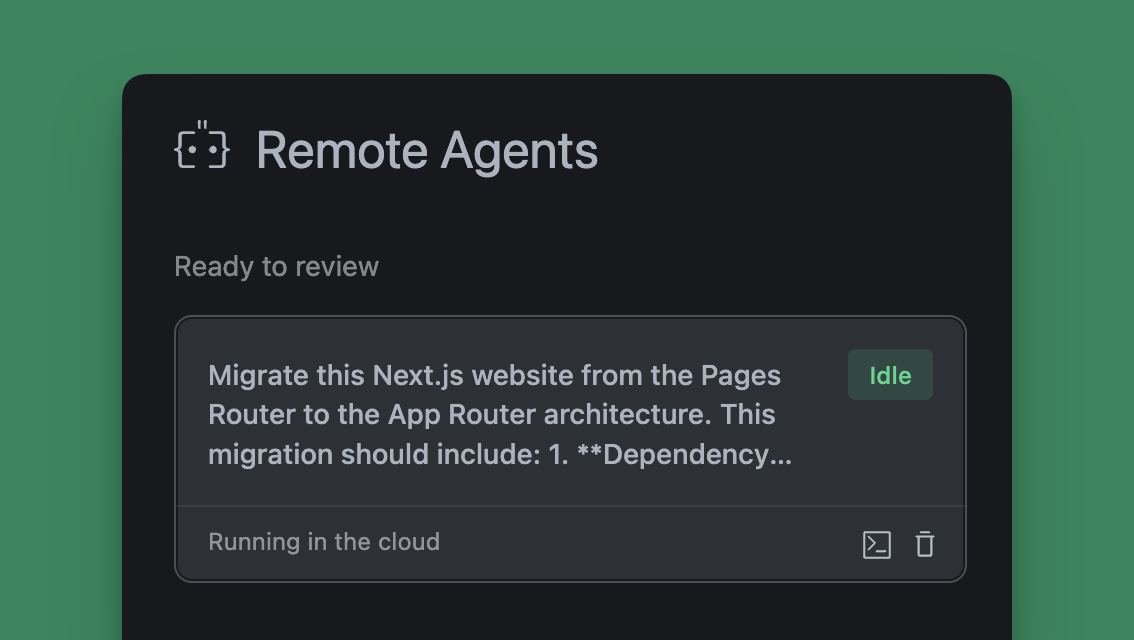 ## Using Remote Agent
Remote Agents function nearly identically to IDE-bound agents as you work through your tasks and projects. Because they run asynchronously in the cloud, you can access and manage them while working on other projects in your editor. Access your Remote Agents from the threads menu at the top of the Augment panel or through the Remote Agent dashboard.
You can create and manage a Remote Agent for any repository you have access to through GitHub regardless of which project you are currently working on in your editor.
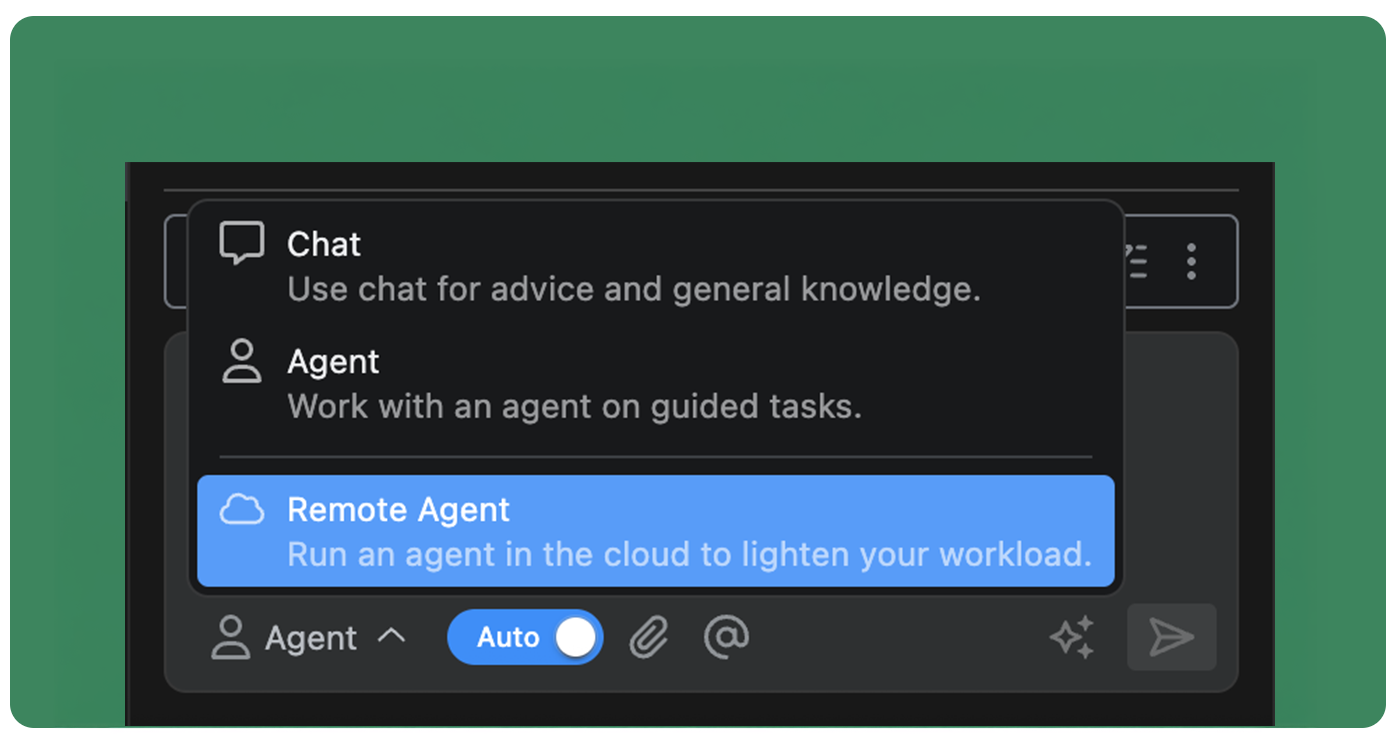
### Create a remote agent
## Using Remote Agent
Remote Agents function nearly identically to IDE-bound agents as you work through your tasks and projects. Because they run asynchronously in the cloud, you can access and manage them while working on other projects in your editor. Access your Remote Agents from the threads menu at the top of the Augment panel or through the Remote Agent dashboard.
You can create and manage a Remote Agent for any repository you have access to through GitHub regardless of which project you are currently working on in your editor.
### Create a remote agent
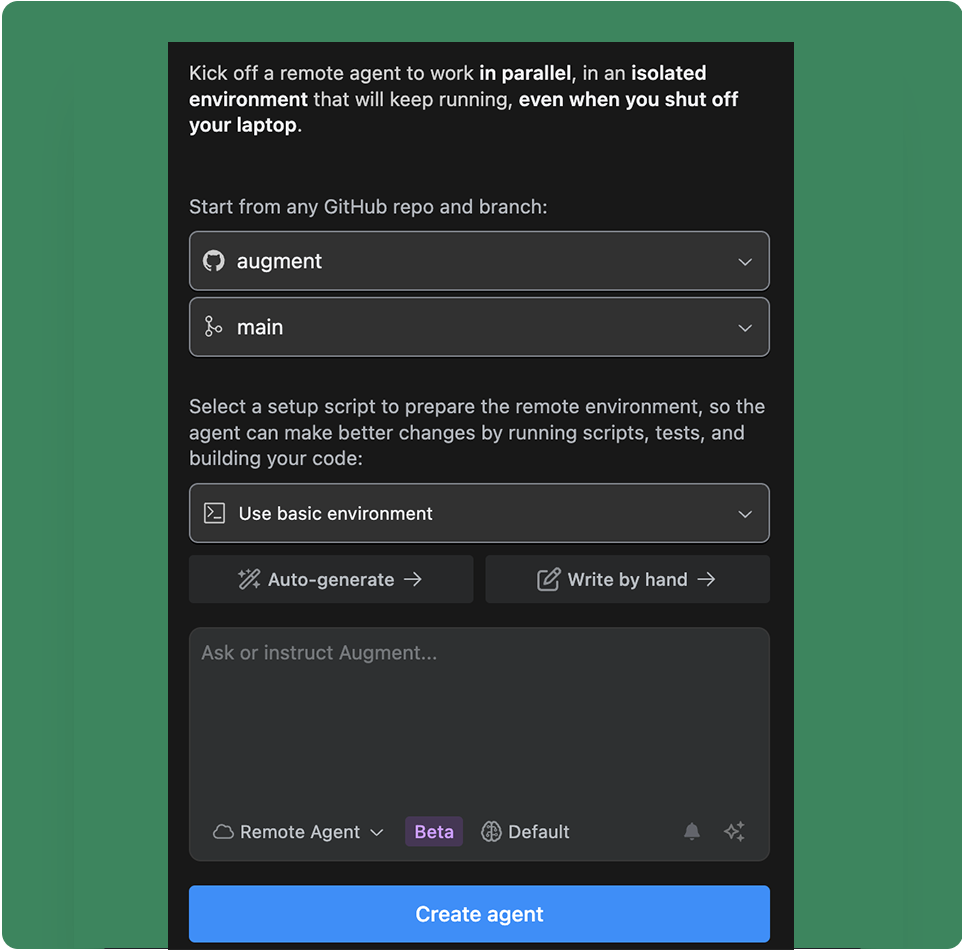 #### Agent environment
Each Remote Agent runs in an secure, independent environment in the cloud. This enables each agent to have its own workspace, copy of the repository, and virtualized operating system to run other tools and commands. You can use the [base environment](/using-augment/remote-agent-environment#base-environment), or setup a custom environment using a bash script to configure the tools the agent will need to complete the task.
See [Remote Agent Environment](/using-augment/remote-agent-environment) for more details on customizing the agent environment.
### Agent notifications
By default, you will receive a notification in VS Code when the agent has completed a task or needs your attention. You can disable notifications for a remote agent by clicking the bell icon in the theads list of the Augment panel.
### Iterating with an agent
Once an agent has completed the task, you can continue to iterate with the agent by sending additional messages. The agent will continue to work on the task, using its past conversations as context. If you need to switch to editing files directly, you can connect to the agent environment over SSH. See [Connecting to a Remote Agent](#connecting-to-a-remote-agent-environment) for more details.
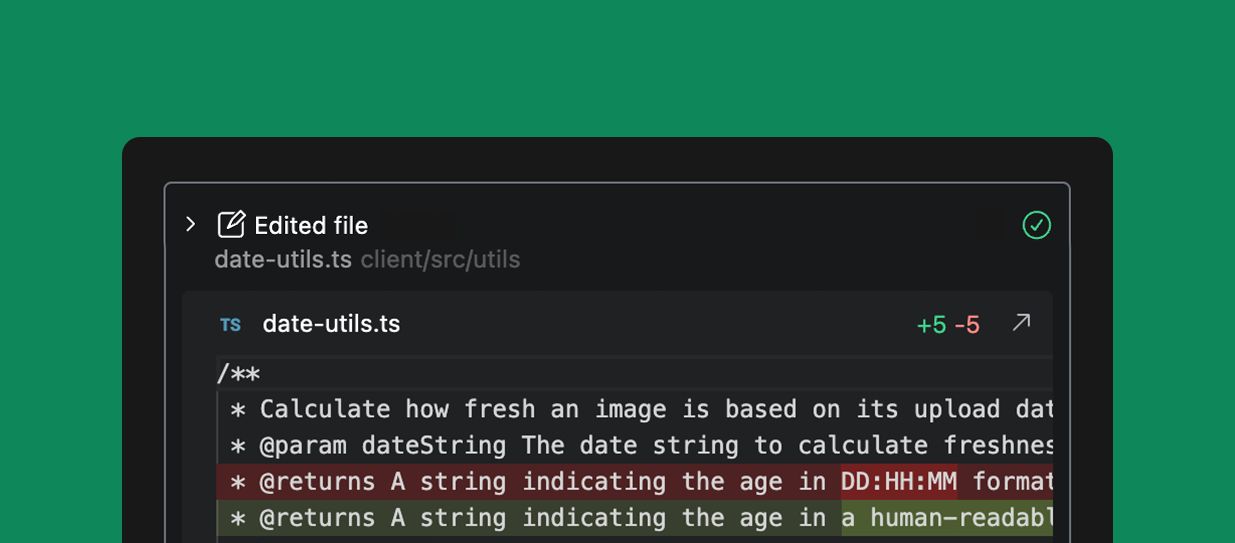
### Reviewing changes
You can review every change Agent makes by clicking on the action to expand the view. Review diffs for file changes, see complete terminal commands and output, and the results of external integration calls.
#### Agent environment
Each Remote Agent runs in an secure, independent environment in the cloud. This enables each agent to have its own workspace, copy of the repository, and virtualized operating system to run other tools and commands. You can use the [base environment](/using-augment/remote-agent-environment#base-environment), or setup a custom environment using a bash script to configure the tools the agent will need to complete the task.
See [Remote Agent Environment](/using-augment/remote-agent-environment) for more details on customizing the agent environment.
### Agent notifications
By default, you will receive a notification in VS Code when the agent has completed a task or needs your attention. You can disable notifications for a remote agent by clicking the bell icon in the theads list of the Augment panel.
### Iterating with an agent
Once an agent has completed the task, you can continue to iterate with the agent by sending additional messages. The agent will continue to work on the task, using its past conversations as context. If you need to switch to editing files directly, you can connect to the agent environment over SSH. See [Connecting to a Remote Agent](#connecting-to-a-remote-agent-environment) for more details.
### Reviewing changes
You can review every change Agent makes by clicking on the action to expand the view. Review diffs for file changes, see complete terminal commands and output, and the results of external integration calls.
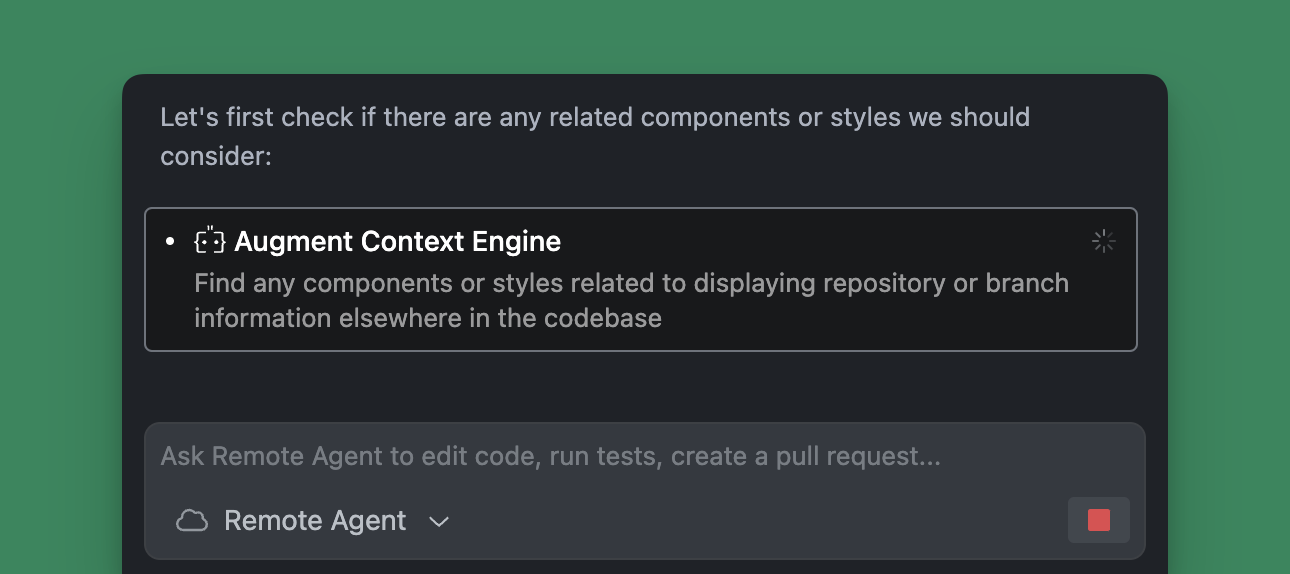
 ### Stop or guide the Agent
You can interrupt the Agent at any time by clicking Stop. This will pause the action to allow you to correct something you see the agent doing incorrectly. While Agent is working, you can also prompt the Agent to try a different approach which will automatically stop the agent and prompt it to correct its course.
### Stop or guide the Agent
You can interrupt the Agent at any time by clicking Stop. This will pause the action to allow you to correct something you see the agent doing incorrectly. While Agent is working, you can also prompt the Agent to try a different approach which will automatically stop the agent and prompt it to correct its course.
 ### Connecting to a Remote Agent environment
 You can use the new VS Code window to view and edit files, run commands in the terminal, and generally interact with the agent just like you would a local IDE-bound agent.
### Opening a Pull Request
When the agent has completed the work, you can open a pull request to have your changes opened for review and merging into the main branch. Select the agent from the threads list and click
You can use the new VS Code window to view and edit files, run commands in the terminal, and generally interact with the agent just like you would a local IDE-bound agent.
### Opening a Pull Request
When the agent has completed the work, you can open a pull request to have your changes opened for review and merging into the main branch. Select the agent from the threads list and click 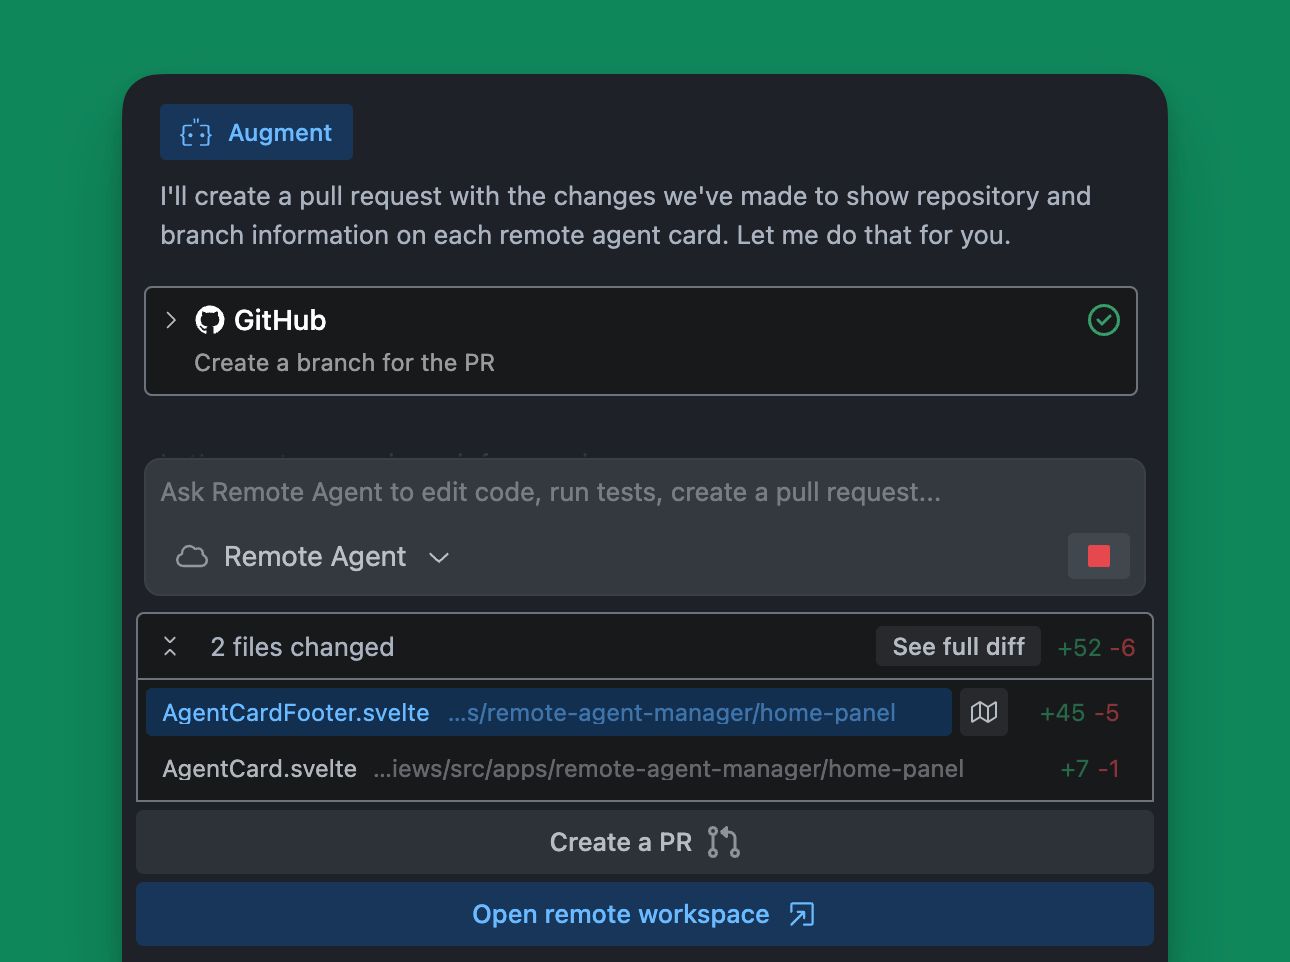 ### Resuming a Remote Agent
Remote Agents automatically pause after completing a request or remaining idle for a period of time. To resume a paused Remote Agent, either click
### Resuming a Remote Agent
Remote Agents automatically pause after completing a request or remaining idle for a period of time. To resume a paused Remote Agent, either click