# Apache Apisix
> description: This article lists solutions to common problems when using Apache APISIX.
---
---
title: FAQ
keywords:
- Apache APISIX
- API Gateway
- FAQ
description: This article lists solutions to common problems when using Apache APISIX.
---
## Why do I need a new API gateway?
As organizations move towards cloud native microservices, there is a need for an API gateway that is performant, flexible, secure and scalable.
APISIX outperforms other API gateways in these metrics while being platform agnostic and fully dynamic delivering features like supporting multiple protocols, fine-grained routing and multi-language support.
## How does Apache APISIX differ from other API gateways?
Apache APISIX differs in the following ways:
- It uses etcd to save and synchronize configurations rather than relational databases like PostgreSQL or MySQL. The real-time event notification system in etcd is easier to scale than in these alternatives. This allows APISIX to synchronize the configuration in real-time, makes the code concise and avoids a single point of failure.
- Fully dynamic.
- Supports [hot loading of Plugins](./terminology/plugin.md#hot-reload).
## What is the performance impact of using Apache APISIX?
Apache APISIX delivers the best performance among other API gateways with a single-core QPS of 18,000 with an average delay of 0.2 ms.
Specific results of the performance benchmarks can be found [here](benchmark.md).
## Which platforms does Apache APISIX support?
Apache APISIX is platform agnostic and avoids vendor lock-in. It is built for cloud native environments and can run on bare-metal machines to Kubernetes. It even support Apple Silicon chips.
## What does it mean by "Apache APISIX is fully dynamic"?
Apache APISIX is fully dynamic in the sense that it doesn't require restarts to change its behavior.
It does the following dynamically:
- Reloading Plugins
- Proxy rewrites
- Proxy mirror
- Response rewrites
- Health checks
- Traffic split
## Does Apache APISIX have a user interface?
APISIX has a powerful built-in Dashboard [APISIX Dashboard](https://github.com/apache/apisix-dashboard). You can manage APISIX configurations through the [APISIX Dashboard](https://github.com/apache/apisix-dashboard) user interface.
## Can I write my own Plugins for Apache APISIX?
Yes. Apache APISIX is flexible and extensible through the use of custom Plugins that can be specific to user needs.
You can write your own Plugins by referring to [How to write your own Plugins](plugin-develop.md).
## Why does Apache APISIX use etcd for the configuration center?
In addition to the basic functionality of storing the configurations, Apache APISIX also needs a storage system that supports these features:
1. Distributed deployments in clusters.
2. Guarded transactions by comparisons.
3. Multi-version concurrency control.
4. Notifications and watch streams.
5. High performance with minimum read/write latency.
etcd provides these features and more making it ideal over other databases like PostgreSQL and MySQL.
To learn more on how etcd compares with other alternatives see this [comparison chart](https://etcd.io/docs/latest/learning/why/#comparison-chart).
## When installing Apache APISIX dependencies with LuaRocks, why does it cause a timeout or result in a slow or unsuccessful installation?
This is likely because the LuaRocks server used is blocked.
To solve this you can use https_proxy or use the `--server` flag to specify a faster LuaRocks server.
You can run the command below to see the available servers (needs LuaRocks 3.0+):
```shell
luarocks config rocks_servers
```
Mainland China users can use `luarocks.cn` as the LuaRocks server. You can use this wrapper with the Makefile to set this up:
```bash
make deps ENV_LUAROCKS_SERVER=https://luarocks.cn
```
If this does not solve your problem, you can try getting a detailed log by using the `--verbose` or `-v` flag to diagnose the problem.
## How do I build the APISIX-Runtime environment?
Some functions need to introduce additional NGINX modules, which requires APISIX to run on APISIX-Runtime. If you need these functions, you can refer to the code in [api7/apisix-build-tools](https://github.com/api7/apisix-build-tools) to build your own APISIX-Runtime environment.
## How can I make a gray release with Apache APISIX?
Let's take an example query `foo.com/product/index.html?id=204&page=2` and consider that you need to make a gray release based on the `id` in the query string with this condition:
1. Group A: `id <= 1000`
2. Group B: `id > 1000`
There are two different ways to achieve this in Apache APISIX:
:::note
You can fetch the `admin_key` from `config.yaml` and save to an environment variable with the following command:
```bash
admin_key=$(yq '.deployment.admin.admin_key[0].key' conf/config.yaml | sed 's/"//g')
```
:::
1. Using the `vars` field in a [Route](terminology/route.md):
```shell
curl -i http://127.0.0.1:9180/apisix/admin/routes/1 -H "X-API-KEY: $admin_key" -X PUT -d '
{
"uri": "/index.html",
"vars": [
["arg_id", "<=", "1000"]
],
"plugins": {
"redirect": {
"uri": "/test?group_id=1"
}
}
}'
curl -i http://127.0.0.1:9180/apisix/admin/routes/2 -H "X-API-KEY: $admin_key" -X PUT -d '
{
"uri": "/index.html",
"vars": [
["arg_id", ">", "1000"]
],
"plugins": {
"redirect": {
"uri": "/test?group_id=2"
}
}
}'
```
All the available operators of the current `lua-resty-radixtree` are listed [here](https://github.com/api7/lua-resty-radixtree#operator-list).
2. Using the [traffic-split](plugins/traffic-split.md) Plugin.
## How do I redirect HTTP traffic to HTTPS with Apache APISIX?
For example, you need to redirect traffic from `http://foo.com` to `https://foo.com`.
Apache APISIX provides several different ways to achieve this:
1. Setting `http_to_https` to `true` in the [redirect](plugins/redirect.md) Plugin:
```shell
curl http://127.0.0.1:9180/apisix/admin/routes/1 -H "X-API-KEY: $admin_key" -X PUT -d '
{
"uri": "/hello",
"host": "foo.com",
"plugins": {
"redirect": {
"http_to_https": true
}
}
}'
```
2. Advanced routing with `vars` in the redirect Plugin:
```shell
curl -i http://127.0.0.1:9180/apisix/admin/routes/1 -H "X-API-KEY: $admin_key" -X PUT -d '
{
"uri": "/hello",
"host": "foo.com",
"vars": [
[
"scheme",
"==",
"http"
]
],
"plugins": {
"redirect": {
"uri": "https://$host$request_uri",
"ret_code": 301
}
}
}'
```
3. Using the `serverless` Plugin:
```shell
curl -i http://127.0.0.1:9180/apisix/admin/routes/1 -H "X-API-KEY: $admin_key" -X PUT -d '
{
"uri": "/hello",
"plugins": {
"serverless-pre-function": {
"phase": "rewrite",
"functions": ["return function() if ngx.var.scheme == \"http\" and ngx.var.host == \"foo.com\" then ngx.header[\"Location\"] = \"https://foo.com\" .. ngx.var.request_uri; ngx.exit(ngx.HTTP_MOVED_PERMANENTLY); end; end"]
}
}
}'
```
To test this serverless Plugin:
```shell
curl -i -H 'Host: foo.com' http://127.0.0.1:9080/hello
```
The response should be:
```
HTTP/1.1 301 Moved Permanently
Date: Mon, 18 May 2020 02:56:04 GMT
Content-Type: text/html
Content-Length: 166
Connection: keep-alive
Location: https://foo.com/hello
Server: APISIX web server
301 Moved Permanently
301 Moved Permanently
openresty
```
## How do I change Apache APISIX's log level?
By default the log level of Apache APISIX is set to `warn`. You can set this to `info` to trace the messages printed by `core.log.info`.
For this, you can set the `error_log_level` parameter in your configuration file (conf/config.yaml) as shown below and reload Apache APISIX.
```yaml
nginx_config:
error_log_level: "info"
```
## How do I reload my custom Plugins for Apache APISIX?
All Plugins in Apache APISIX are hot reloaded.
You can learn more about hot reloading of Plugins [here](./terminology/plugin.md#hot-reload).
## How do I configure Apache APISIX to listen on multiple ports when handling HTTP or HTTPS requests?
By default, Apache APISIX listens only on port 9080 when handling HTTP requests.
To configure Apache APISIX to listen on multiple ports, you can:
1. Modify the parameter `node_listen` in `conf/config.yaml`:
```
apisix:
node_listen:
- 9080
- 9081
- 9082
```
Similarly for HTTPS requests, modify the parameter `ssl.listen` in `conf/config.yaml`:
```
apisix:
ssl:
enable: true
listen:
- port: 9443
- port: 9444
- port: 9445
```
2. Reload or restart Apache APISIX.
## After uploading the SSL certificate, why can't the corresponding route be accessed through HTTPS + IP?
If you directly use HTTPS + IP address to access the server, the server will use the IP address to compare with the bound SNI. Since the SSL certificate is bound to the domain name, the corresponding resource cannot be found in the SNI, so that the certificate will be verified. The authentication fails, and the user cannot access the gateway via HTTPS + IP.
You can implement this function by setting the `fallback_sni` parameter in the configuration file and configuring the domain name. When the user uses HTTPS + IP to access the gateway, when the SNI is empty, it will fall back to the default SNI to achieve HTTPS + IP access to the gateway.
```yaml title="./conf/config.yaml"
apisix
ssl:
fallback_sni: "${your sni}"
```
## How does Apache APISIX achieve millisecond-level configuration synchronization?
Apache APISIX uses etcd for its configuration center. etcd provides subscription functions like [watch](https://github.com/api7/lua-resty-etcd/blob/master/api_v3.md#watch) and [watchdir](https://github.com/api7/lua-resty-etcd/blob/master/api_v3.md#watchdir) that can monitor changes to specific keywords or directories.
In Apache APISIX, we use [etcd.watchdir](https://github.com/api7/lua-resty-etcd/blob/master/api_v3.md#watchdir) to monitor changes in a directory.
If there is no change in the directory being monitored, the process will be blocked until it times out or run into any errors.
If there are changes in the directory being monitored, etcd will return this new data within milliseconds and Apache APISIX will update the cache memory.
## How do I customize the Apache APISIX instance id?
By default, Apache APISIX reads the instance id from `conf/apisix.uid`. If this is not found and no id is configured, Apache APISIX will generate a `uuid` for the instance id.
To specify a meaningful id to bind Apache APISIX to your internal system, set the `id` in your `conf/config.yaml` file:
```yaml
apisix:
id: "your-id"
```
## Why are there errors saying "failed to fetch data from etcd, failed to read etcd dir, etcd key: xxxxxx" in the error.log?
Please follow the troubleshooting steps described below:
1. Make sure that there aren't any networking issues between Apache APISIX and your etcd deployment in your cluster.
2. If your network is healthy, check whether you have enabled the [gRPC gateway](https://etcd.io/docs/v3.4/dev-guide/api_grpc_gateway/) for etcd. The default state depends on whether you used command line options or a configuration file to start the etcd server.
- If you used command line options, gRPC gateway is enabled by default. You can enable it manually as shown below:
```sh
etcd --enable-grpc-gateway --data-dir=/path/to/data
```
**Note**: This flag is not shown while running `etcd --help`.
- If you used a configuration file, gRPC gateway is disabled by default. You can manually enable it as shown below:
In `etcd.json`:
```json
{
"enable-grpc-gateway": true,
"data-dir": "/path/to/data"
}
```
In `etcd.conf.yml`:
```yml
enable-grpc-gateway: true
```
**Note**: This distinction was eliminated by etcd in their latest master branch but wasn't backported to previous versions.
## How do I setup high availability Apache APISIX clusters?
Apache APISIX can be made highly available by adding a load balancer in front of it as APISIX's data plane is stateless and can be scaled when needed.
The control plane of Apache APISIX is highly available as it relies only on an etcd cluster.
## Why does the `make deps` command fail when installing Apache APISIX from source?
When executing `make deps` to install Apache APISIX from source, you can get an error as shown below:
```shell
$ make deps
......
Error: Failed installing dependency: https://luarocks.org/luasec-0.9-1.src.rock - Could not find header file for OPENSSL
No file openssl/ssl.h in /usr/local/include
You may have to install OPENSSL in your system and/or pass OPENSSL_DIR or OPENSSL_INCDIR to the luarocks command.
Example: luarocks install luasec OPENSSL_DIR=/usr/local
make: *** [deps] Error 1
```
This is caused by the missing OpenResty openssl development kit. To install it, refer [installing dependencies](install-dependencies.md).
## How do I use regular expressions (regex) for matching `uri` in a Route?
You can use the `vars` field in a Route for matching regular expressions:
```shell
curl -i http://127.0.0.1:9180/apisix/admin/routes/1 -H "X-API-KEY: $admin_key" -X PUT -d '
{
"uri": "/*",
"vars": [
["uri", "~~", "^/[a-z]+$"]
],
"upstream": {
"type": "roundrobin",
"nodes": {
"127.0.0.1:1980": 1
}
}
}'
```
And to test this request:
```shell
# uri matched
$ curl http://127.0.0.1:9080/hello -i
HTTP/1.1 200 OK
...
# uri didn't match
$ curl http://127.0.0.1:9080/12ab -i
HTTP/1.1 404 Not Found
...
```
For more info on using `vars` refer to [lua-resty-expr](https://github.com/api7/lua-resty-expr).
## Does the Upstream node support configuring a [FQDN](https://en.wikipedia.org/wiki/Fully_qualified_domain_name) address?
Yes. The example below shows configuring the FQDN `httpbin.default.svc.cluster.local` (a Kubernetes service):
```shell
curl http://127.0.0.1:9180/apisix/admin/routes/1 -H "X-API-KEY: $admin_key" -X PUT -d '
{
"uri": "/ip",
"upstream": {
"type": "roundrobin",
"nodes": {
"httpbin.default.svc.cluster.local": 1
}
}
}'
```
To test this Route:
```shell
$ curl http://127.0.0.1:9080/ip -i
HTTP/1.1 200 OK
...
```
## What is the `X-API-KEY` of the Admin API? Can it be modified?
`X-API-KEY` of the Admin API refers to the `apisix.admin_key.key` in your `conf/config.yaml` file. It is the access token for the Admin API.
By default, it is set to `edd1c9f034335f136f87ad84b625c8f1` and can be modified by changing the parameter in your `conf/config.yaml` file:
```yaml
apisix:
admin_key
-
name: "admin"
key: newkey
role: admin
```
Now, to access the Admin API:
```shell
$ curl -i http://127.0.0.1:9180/apisix/admin/routes/1 -H 'X-API-KEY: newkey' -X PUT -d '
{
"uris":[ "/*" ],
"name":"admin-token-test",
"upstream":{
"nodes":[
{
"host":"127.0.0.1",
"port":1980,
"weight":1
}
],
"type":"roundrobin"
}
}'
HTTP/1.1 200 OK
......
```
**Note**: By using the default token, you could be exposed to security risks. It is required to update it when deploying to a production environment.
## How do I allow all IPs to access Apache APISIX's Admin API?
By default, Apache APISIX only allows IPs in the range `127.0.0.0/24` to access the Admin API.
To allow IPs in all ranges, you can update your configuration file as show below and restart or reload Apache APISIX.
```yaml
deployment:
admin:
allow_admin:
- 0.0.0.0/0
```
**Note**: This should only be used in non-production environments to allow all clients to access Apache APISIX and is not safe for production environments. Always authorize specific IP addresses or address ranges for production environments.
## How do I auto renew SSL certificates with acme.sh?
You can run the commands below to achieve this:
```bash
curl --output /root/.acme.sh/renew-hook-update-apisix.sh --silent https://gist.githubusercontent.com/anjia0532/9ebf8011322f43e3f5037bc2af3aeaa6/raw/65b359a4eed0ae990f9188c2afa22bacd8471652/renew-hook-update-apisix.sh
```
```bash
chmod +x /root/.acme.sh/renew-hook-update-apisix.sh
```
```bash
acme.sh --issue --staging -d demo.domain --renew-hook "/root/.acme.sh/renew-hook-update-apisix.sh -h http://apisix-admin:port -p /root/.acme.sh/demo.domain/demo.domain.cer -k /root/.acme.sh/demo.domain/demo.domain.key -a xxxxxxxxxxxxx"
```
```bash
acme.sh --renew --domain demo.domain
```
You can check [this post](https://juejin.cn/post/6965778290619449351) for a more detailed instruction on setting this up.
## How do I strip a prefix from a path before forwarding to Upstream in Apache APISIX?
To strip a prefix from a path in your route, like to take `/foo/get` and strip it to `/get`, you can use the [proxy-rewrite](plugins/proxy-rewrite.md) Plugin:
```shell
curl -i http://127.0.0.1:9180/apisix/admin/routes/1 -H "X-API-KEY: $admin_key" -X PUT -d '
{
"uri": "/foo/*",
"plugins": {
"proxy-rewrite": {
"regex_uri": ["^/foo/(.*)","/$1"]
}
},
"upstream": {
"type": "roundrobin",
"nodes": {
"httpbin.org:80": 1
}
}
}'
```
And to test this configuration:
```shell
curl http://127.0.0.1:9080/foo/get -i
HTTP/1.1 200 OK
...
{
...
"url": "http://127.0.0.1/get"
}
```
## How do I fix the error `unable to get local issuer certificate` in Apache APISIX?
You can manually set the path to your certificate by adding it to your `conf/config.yaml` file as shown below:
```yaml
apisix:
ssl:
ssl_trusted_certificate: /path/to/certs/ca-certificates.crt
```
**Note**: When you are trying to connect TLS services with cosocket and if APISIX does not trust the peer's TLS certificate, you should set the parameter `apisix.ssl.ssl_trusted_certificate`.
For example, if you are using Nacos for service discovery in APISIX, and Nacos has TLS enabled (configured host starts with `https://`), you should set `apisix.ssl.ssl_trusted_certificate` and use the same CA certificate as Nacos.
## How do I fix the error `module 'resty.worker.events' not found` in Apache APISIX?
This error is caused by installing Apache APISIX in the `/root` directory. The worker process would by run by the user "nobody" and it would not have enough permissions to access the files in the `/root` directory.
To fix this, you can change the APISIX installation directory to the recommended directory: `/usr/local`.
## What is the difference between `plugin-metadata` and `plugin-configs` in Apache APISIX?
The differences between the two are described in the table below:
| `plugin-metadata` | `plugin-config` |
| ---------------------------------------------------------------------------------------------------------------- | --------------------------------------------------------------------------------------------------------------------------------------------------- |
| Metadata of a Plugin shared by all configuration instances of the Plugin. | Collection of configuration instances of multiple different Plugins. |
| Used when there are property changes that needs to be propagated across all configuration instances of a Plugin. | Used when you need to reuse a common set of configuration instances so that it can be extracted to a `plugin-config` and bound to different Routes. |
| Takes effect on all the entities bound to the configuration instances of the Plugin. | Takes effect on Routes bound to the `plugin-config`. |
## After deploying Apache APISIX, how to detect the survival of the APISIX data plane?
You can create a route named `health-info` and enable the [fault-injection](https://apisix.apache.org/docs/apisix/plugins/fault-injection/) plugin (where YOUR-TOKEN is the user's token; 127.0.0.1 is the IP address of the control plane, which can be modified by yourself):
```shell
curl http://127.0.0.1:9180/apisix/admin/routes/health-info \
-H 'X-API-KEY: YOUR-TOKEN' -X PUT -d '
{
"plugins": {
"fault-injection": {
"abort": {
"http_status": 200,
"body": "fine"
}
}
},
"uri": "/status"
}'
````
Verification:
Access the `/status` of the Apache APISIX data plane to detect APISIX. If the response code is 200, it means APISIX is alive.
:::note
This method only detects whether the APISIX data plane is alive or not. It does not mean that the routing and other functions of APISIX are normal. These require more routing-level detection.
:::
## What are the scenarios with high APISIX latency related to [etcd](https://etcd.io/) and how to fix them?
etcd is the data storage component of apisix, and its stability is related to the stability of APISIX.
In actual scenarios, if APISIX uses a certificate to connect to etcd through HTTPS, the following two problems of high latency for data query or writing may occur:
1. Query or write data through APISIX Admin API.
2. In the monitoring scenario, Prometheus crawls the APISIX data plane Metrics API timeout.
These problems related to higher latency seriously affect the service stability of APISIX, and the reason why such problems occur is mainly because etcd provides two modes of operation: HTTP (HTTPS) and gRPC. And APISIX uses the HTTP (HTTPS) protocol to operate etcd by default.
In this scenario, etcd has a bug about HTTP/2: if etcd is operated over HTTPS (HTTP is not affected), the upper limit of HTTP/2 connections is the default `250` in Golang. Therefore, when the number of APISIX data plane nodes is large, once the number of connections between all APISIX nodes and etcd exceeds this upper limit, the response of APISIX API interface will be very slow.
In Golang, the default upper limit of HTTP/2 connections is `250`, the code is as follows:
```go
package http2
import ...
const (
prefaceTimeout = 10 * time.Second
firstSettingsTimeout = 2 * time.Second // should be in-flight with preface anyway
handlerChunkWriteSize = 4 << 10
defaultMaxStreams = 250 // TODO: make this 100 as the GFE seems to?
maxQueuedControlFrames = 10000
)
```
etcd officially maintains two main branches, `3.4` and `3.5`. In the `3.4` series, the recently released `3.4.20` version has fixed this issue. As for the `3.5` version, the official is preparing to release the `3.5.5` version a long time ago, but it has not been released as of now (2022.09.13). So, if you are using etcd version less than `3.5.5`, you can refer to the following ways to solve this problem:
1. Change the communication method between APISIX and etcd from HTTPS to HTTP.
2. Roll back the etcd to `3.4.20`.
3. Clone the etcd source code and compile the `release-3.5` branch directly (this branch has fixed the problem of HTTP/2 connections, but the new version has not been released yet).
The way to recompile etcd is as follows:
```shell
git checkout release-3.5
make GOOS=linux GOARCH=amd64
```
The compiled binary is in the bin directory, replace it with the etcd binary of your server environment, and then restart etcd:
For more information, please refer to:
- [when etcd node have many http long polling connections, it may cause etcd to respond slowly to http requests.](https://github.com/etcd-io/etcd/issues/14185)
- [bug: when apisix starts for a while, its communication with etcd starts to time out](https://github.com/apache/apisix/issues/7078)
- [the prometheus metrics API is tool slow](https://github.com/apache/apisix/issues/7353)
- [Support configuring `MaxConcurrentStreams` for http2](https://github.com/etcd-io/etcd/pull/14169)
Another solution is to switch to an experimental gRPC-based configuration synchronization. This requires setting `use_grpc: true` in the configuration file `conf/config.yaml`:
```yaml
etcd:
use_grpc: true
host:
- "http://127.0.0.1:2379"
prefix: "/apisix"
```
## Why is the file-logger logging garbled?
If you are using the `file-logger` plugin but getting garbled logs, one possible reason is your upstream response has returned a compressed response body. You can fix this by setting the accept-encoding in the request header to not receive compressed responses using the [proxy-rewirte](https://apisix.apache.org/docs/apisix/plugins/proxy-rewrite/) plugin:
```shell
curl http://127.0.0.1:9180/apisix/admin/routes/1 \
-H 'X-API-KEY: YOUR-TOKEN' -X PUT -d '
{
"methods":[
"GET"
],
"uri":"/test/index.html",
"plugins":{
"proxy-rewrite":{
"headers":{
"set":{
"accept-encoding":"gzip;q=0,deflate,sdch"
}
}
}
},
"upstream":{
"type":"roundrobin",
"nodes":{
"127.0.0.1:80":1
}
}
}'
```
## How does APISIX configure ETCD with authentication?
Suppose you have an ETCD cluster that enables the auth. To access this cluster, you need to configure the correct username and password for Apache APISIX in `conf/config.yaml`:
```yaml
deployment:
etcd:
host:
- "http://127.0.0.1:2379"
user: etcd_user # username for etcd
password: etcd_password # password for etcd
```
For other ETCD configurations, such as expiration times, retries, and so on, you can refer to the `etcd` section in the sample configuration `conf/config.yaml.example` file.
## What is the difference between SSLs, `tls.client_cert` in upstream configurations, and `ssl_trusted_certificate` in `config.yaml`?
The `ssls` is managed through the `/apisix/admin/ssls` API. It's used for managing TLS certificates. These certificates may be used during TLS handshake (between Apache APISIX and its clients). Apache APISIX uses Server Name Indication (SNI) to differentiate between certificates of different domains.
The `tls.client_cert`, `tls.client_key`, and `tls.client_cert_id` in upstream are used for mTLS communication with the upstream.
The `ssl_trusted_certificate` in `config.yaml` configures a trusted CA certificate. It is used for verifying some certificates signed by private authorities within APISIX, to avoid APISIX rejects the certificate. Note that it is not used to trust the certificates of APISIX upstream, because APISIX does not verify the legality of the upstream certificates. Therefore, even if the upstream uses an invalid TLS certificate, it can still be accessed without configuring a root certificate.
## Where can I find more answers?
You can find more answers on:
- [Apache APISIX Slack Channel](/docs/general/join/#join-the-slack-channel)
- [Ask questions on APISIX mailing list](/docs/general/join/#subscribe-to-the-mailing-list)
- [GitHub Issues](https://github.com/apache/apisix/issues?q=is%3Aissue+is%3Aopen+sort%3Aupdated-desc) and [GitHub Discussions](https://github.com/apache/apisix/discussions)
---
---
title: Admin API
keywords:
- Apache APISIX
- API Gateway
- Admin API
- Route
- Plugin
- Upstream
description: This article introduces the functions supported by the Apache APISIX Admin API, which you can use to get, create, update, and delete resources.
---
## Description
The Admin API lets users control their deployed Apache APISIX instance. The [architecture design](./architecture-design/apisix.md) gives an idea about how everything fits together.
## Configuration
When APISIX is started, the Admin API will listen on port `9180` by default and take the API prefixed with `/apisix/admin`.
Therefore, to avoid conflicts between your designed API and `/apisix/admin`, you can modify the configuration file [`/conf/config.yaml`](https://github.com/apache/apisix/blob/master/conf/config.yaml) to modify the default listening port.
APISIX supports setting the IP access allowlist of Admin API to prevent APISIX from being illegally accessed and attacked. You can configure the IP addresses to allow access in the `deployment.admin.allow_admin` option in the `./conf/config.yaml` file.
The `X-API-KEY` shown below refers to the `deployment.admin.admin_key.key` in the `./conf/config.yaml` file, which is the access token for the Admin API.
:::tip
For security reasons, please modify the default `admin_key`, and check the `allow_admin` IP access list.
:::
```yaml title="./conf/config.yaml"
deployment:
admin:
admin_key:
- name: admin
key: edd1c9f034335f136f87ad84b625c8f1 # using fixed API token has security risk, please update it when you deploy to production environment
role: admin
allow_admin: # http://nginx.org/en/docs/http/ngx_http_access_module.html#allow
- 127.0.0.0/24
admin_listen:
ip: 0.0.0.0 # Specific IP, if not set, the default value is `0.0.0.0`.
port: 9180 # Specific port, which must be different from node_listen's port.
```
### Using environment variables
To configure via environment variables, you can use the `${{VAR}}` syntax. For instance:
```yaml title="./conf/config.yaml"
deployment:
admin:
admin_key:
- name: admin
key: ${{ADMIN_KEY}}
role: admin
allow_admin:
- 127.0.0.0/24
admin_listen:
ip: 0.0.0.0
port: 9180
```
And then run `export ADMIN_KEY=$your_admin_key` before running `make init`.
If the configured environment variable can't be found, an error will be thrown.
If you want to use a default value when the environment variable is not set, use `${{VAR:=default_value}}` instead. For instance:
```yaml title="./conf/config.yaml"
deployment:
admin:
admin_key:
- name: admin
key: ${{ADMIN_KEY:=edd1c9f034335f136f87ad84b625c8f1}}
role: admin
allow_admin:
- 127.0.0.0/24
admin_listen:
ip: 0.0.0.0
port: 9180
```
This will find the environment variable `ADMIN_KEY` first, and if it does not exist, it will use `edd1c9f034335f136f87ad84b625c8f1` as the default value.
You can also specify environment variables in yaml keys. This is specifically useful in the `standalone` [mode](./deployment-modes.md#standalone) where you can specify the upstream nodes as follows:
```yaml title="./conf/apisix.yaml"
routes:
-
uri: "/test"
upstream:
nodes:
"${{HOST_IP}}:${{PORT}}": 1
type: roundrobin
#END
```
### Force Delete
By default, the Admin API checks for references between resources and will refuse to delete resources in use.
You can make a force deletion by adding the request argument `force=true` to the delete request, for example:
:::note
You can fetch the `admin_key` from `config.yaml` and save to an environment variable with the following command:
```bash
admin_key=$(yq '.deployment.admin.admin_key[0].key' conf/config.yaml | sed 's/"//g')
```
:::
```bash
$ curl http://127.0.0.1:9180/apisix/admin/upstreams/1 -H "X-API-KEY: $admin_key" -X PUT -d '{
"nodes": {
"127.0.0.1:8080": 1
},
"type": "roundrobin"
}'
$ curl http://127.0.0.1:9180/apisix/admin/routes/1 -H "X-API-KEY: $admin_key" -X PUT -d '{
"uri": "/*",
"upstream_id": 1
}'
{"value":{"priority":0,"upstream_id":1,"uri":"/*","create_time":1689038794,"id":"1","status":1,"update_time":1689038916},"key":"/apisix/routes/1"}
$ curl http://127.0.0.1:9180/apisix/admin/upstreams/1 -H "X-API-KEY: $admin_key" -X DELETE
{"error_msg":"can not delete this upstream, route [1] is still using it now"}
$ curl "http://127.0.0.1:9180/apisix/admin/upstreams/1?force=anyvalue" -H "X-API-KEY: $admin_key" -X DELETE
{"error_msg":"can not delete this upstream, route [1] is still using it now"}
$ curl "http://127.0.0.1:9180/apisix/admin/upstreams/1?force=true" -H "X-API-KEY: $admin_key" -X DELETE
{"deleted":"1","key":"/apisix/upstreams/1"}
```
## V3 new feature
The Admin API has made some breaking changes in V3 version, as well as supporting additional features.
### Support new response body format
1. Remove `action` field in response body;
2. Adjust the response body structure when fetching the list of resources, the new response body structure like:
Return single resource:
```json
{
"modifiedIndex": 2685183,
"value": {
"id": "1",
...
},
"key": "/apisix/routes/1",
"createdIndex": 2684956
}
```
Return multiple resources:
```json
{
"list": [
{
"modifiedIndex": 2685183,
"value": {
"id": "1",
...
},
"key": "/apisix/routes/1",
"createdIndex": 2684956
},
{
"modifiedIndex": 2685163,
"value": {
"id": "2",
...
},
"key": "/apisix/routes/2",
"createdIndex": 2685163
}
],
"total": 2
}
```
### Support paging query
Paging query is supported when getting the resource list, paging parameters include:
| parameter | Default | Valid range | Description |
| --------- | ------ | ----------- | ----------------------------- |
| page | 1 | [1, ...] | Number of pages. |
| page_size | | [10, 500] | Number of resources per page. |
The example is as follows:
```shell
curl "http://127.0.0.1:9180/apisix/admin/routes?page=1&page_size=10" \
-H "X-API-KEY: $admin_key" -X GET
```
```json
{
"total": 1,
"list": [
{
...
}
]
}
```
Resources that support paging queries:
- Consumer
- Consumer Group
- Global Rules
- Plugin Config
- Proto
- Route
- Service
- SSL
- Stream Route
- Upstream
- Secret
### Support filtering query
When getting a list of resources, it supports filtering resources based on `name`, `label`, `uri`.
| parameter | parameter |
| --------- | ------------------------------------------------------------ |
| name | Query resource by their `name`, which will not appear in the query results if the resource itself does not have `name`. |
| label | Query resource by their `label`, which will not appear in the query results if the resource itself does not have `label`. |
| uri | Supported on Route resources only. If the `uri` of a Route is equal to the uri of the query or if the `uris` contains the uri of the query, the Route resource appears in the query results. |
:::tip
When multiple filter parameters are enabled, use the intersection of the query results for different filter parameters.
:::
The following example will return a list of routes, and all routes in the list satisfy: the `name` of the route contains the string "test", the `uri` contains the string "foo", and there is no restriction on the `label` of the route, since the label of the query is the empty string.
```shell
curl 'http://127.0.0.1:9180/apisix/admin/routes?name=test&uri=foo&label=' \
-H "X-API-KEY: $admin_key" -X GET
```
```json
{
"total": 1,
"list": [
{
...
}
]
}
```
### Support reference filtering query
:::note
This feature was introduced in APISIX 3.13.0.
APISIX supports querying routes and stream routes by `service_id` and `upstream_id`. Other resources or fields are not currently supported.
:::
When getting a list of resources, it supports a `filter` for filtering resources by filters.
It is encoded in the following manner.
```text
filter=escape_uri(key1=value1&key2=value2)
```
The following example filters routes using `service_id`. Applying multiple filters simultaneously will return results that match all filter conditions.
```shell
curl 'http://127.0.0.1:9180/apisix/admin/routes?filter=service_id%3D1' \
-H "X-API-KEY: $admin_key" -X GET
```
```json
{
"total": 1,
"list": [
{
...
}
]
}
```
## Route
[Routes](./terminology/route.md) match the client's request based on defined rules, loads and executes the corresponding [plugins](#plugin), and forwards the request to the specified [Upstream](#upstream).
### Route API
Route resource request address: /apisix/admin/routes/{id}?ttl=0
### Quick Note on ID Syntax
ID's as a text string must be of a length between 1 and 64 characters and they should only contain uppercase, lowercase, numbers and no special characters apart from dashes ( - ), periods ( . ) and underscores ( _ ). For integer values they simply must have a minimum character count of 1.
### Request Methods
| Method | Request URI | Request Body | Description |
| ------ | -------------------------------- | ------------ | ----------------------------------------------------------------------------------------------------------------------------- |
| GET | /apisix/admin/routes | NULL | Fetches a list of all configured Routes. |
| GET | /apisix/admin/routes/{id} | NULL | Fetches specified Route by id. |
| PUT | /apisix/admin/routes/{id} | {...} | Creates a Route with the specified id. |
| POST | /apisix/admin/routes | {...} | Creates a Route and assigns a random id. |
| DELETE | /apisix/admin/routes/{id} | NULL | Removes the Route with the specified id. |
| PATCH | /apisix/admin/routes/{id} | {...} | Updates the selected attributes of the specified, existing Route. To delete an attribute, set value of attribute set to null. |
| PATCH | /apisix/admin/routes/{id}/{path} | {...} | Updates the attribute specified in the path. The values of other attributes remain unchanged. |
### URI Request Parameters
| parameter | Required | Type | Description | Example |
| --------- | -------- | --------- | --------------------------------------------------- | ------- |
| ttl | False | Auxiliary | Request expires after the specified target seconds. | ttl=1 |
### Request Body Parameters
| Parameter | Required | Type | Description | Example |
| ---------------- | ---------------------------------------- | ----------- | ---------------------------------------------------------------------------------------------------------------------------------------------------------------------------------------------------------------------------------------------------------------------------------------------- | ---------------------------------------------------- |
| name | False | Auxiliary | Identifier for the Route. | route-xxxx |
| desc | False | Auxiliary | Description of usage scenarios. | route xxxx |
| uri | True, can't be used with `uris` | Match Rules | Matches the uri. For more advanced matching see [Router](./terminology/router.md). | "/hello" |
| uris | True, can't be used with `uri` | Match Rules | Matches with any one of the multiple `uri`s specified in the form of a non-empty list. | ["/hello", "/word"] |
| host | False, can't be used with `hosts` | Match Rules | Matches with domain names such as `foo.com` or PAN domain names like `*.foo.com`. | "foo.com" |
| hosts | False, can't be used with `host` | Match Rules | Matches with any one of the multiple `host`s specified in the form of a non-empty list. | ["foo.com", "*.bar.com"] |
| remote_addr | False, can't be used with `remote_addrs` | Match Rules | Matches with the specified IP address in standard IPv4 format (`192.168.1.101`), CIDR format (`192.168.1.0/24`), or in IPv6 format (`::1`, `fe80::1`, `fe80::1/64`). | "192.168.1.0/24" |
| remote_addrs | False, can't be used with `remote_addr` | Match Rules | Matches with any one of the multiple `remote_addr`s specified in the form of a non-empty list. | ["127.0.0.1", "192.0.0.0/8", "::1"] |
| methods | False | Match Rules | Matches with the specified methods. Matches all methods if empty or unspecified. | ["GET", "POST"] |
| priority | False | Match Rules | If different Routes matches to the same `uri`, then the Route is matched based on its `priority`. A higher value corresponds to higher priority. It is set to `0` by default. | priority = 10 |
| vars | False | Match Rules | Matches based on the specified variables consistent with variables in Nginx. Takes the form `[[var, operator, val], [var, operator, val], ...]]`. Note that this is case sensitive when matching a cookie name. See [lua-resty-expr](https://github.com/api7/lua-resty-expr) for more details. | [["arg_name", "==", "json"], ["arg_age", ">", 18]] |
| filter_func | False | Match Rules | Matches using a user-defined function in Lua. Used in scenarios where `vars` is not sufficient. Functions accept an argument `vars` which provides access to built-in variables (including Nginx variables). | function(vars) return tonumber(vars.arg_userid) % 4 > 2; end |
| plugins | False | Plugin | Plugins that are executed during the request/response cycle. See [Plugin](terminology/plugin.md) for more. | |
| script | False | Script | Used for writing arbitrary Lua code or directly calling existing plugins to be executed. See [Script](terminology/script.md) for more. | |
| upstream | False | Upstream | Configuration of the [Upstream](./terminology/upstream.md). | |
| upstream_id | False | Upstream | Id of the [Upstream](terminology/upstream.md) service. | |
| service_id | False | Service | Configuration of the bound [Service](terminology/service.md). | |
| plugin_config_id | False, can't be used with `script` | Plugin | [Plugin config](terminology/plugin-config.md) bound to the Route. | |
| labels | False | Match Rules | Attributes of the Route specified as key-value pairs. | {"version":"v2","build":"16","env":"production"} |
| timeout | False | Auxiliary | Sets the timeout (in seconds) for connecting to, and sending and receiving messages between the Upstream and the Route. This will overwrite the `timeout` value configured in your [Upstream](#upstream). | {"connect": 3, "send": 3, "read": 3} |
| enable_websocket | False | Auxiliary | Enables a websocket. Set to `false` by default. | |
| status | False | Auxiliary | Enables the current Route. Set to `1` (enabled) by default. | `1` to enable, `0` to disable |
Example configuration:
```shell
{
"id": "1", # id, unnecessary.
"uris": ["/a","/b"], # A set of uri.
"methods": ["GET","POST"], # Can fill multiple methods
"hosts": ["a.com","b.com"], # A set of host.
"plugins": {}, # Bound plugin
"priority": 0, # If different routes contain the same `uri`, determine which route is matched first based on the attribute` priority`, the default value is 0.
"name": "route-xxx",
"desc": "hello world",
"remote_addrs": ["127.0.0.1"], # A set of Client IP.
"vars": [["http_user", "==", "ios"]], # A list of one or more `[var, operator, val]` elements
"upstream_id": "1", # upstream id, recommended
"upstream": {}, # upstream, not recommended
"timeout": { # Set the upstream timeout for connecting, sending and receiving messages of the route.
"connect": 3,
"send": 3,
"read": 3
},
"filter_func": "" # User-defined filtering function
}
```
### Example API usage
- Create a route
```shell
curl http://127.0.0.1:9180/apisix/admin/routes/1 -H "X-API-KEY: $admin_key" -X PUT -i -d '
{
"uri": "/index.html",
"hosts": ["foo.com", "*.bar.com"],
"remote_addrs": ["127.0.0.0/8"],
"methods": ["PUT", "GET"],
"enable_websocket": true,
"upstream": {
"type": "roundrobin",
"nodes": {
"127.0.0.1:1980": 1
}
}
}'
```
```shell
HTTP/1.1 201 Created
Date: Sat, 31 Aug 2019 01:17:15 GMT
...
```
- Create a route expires after 60 seconds, then it's deleted automatically
```shell
curl 'http://127.0.0.1:9180/apisix/admin/routes/2?ttl=60' \
-H "X-API-KEY: $admin_key" -X PUT -i -d '
{
"uri": "/aa/index.html",
"upstream": {
"type": "roundrobin",
"nodes": {
"127.0.0.1:1980": 1
}
}
}'
```
```shell
HTTP/1.1 201 Created
Date: Sat, 31 Aug 2019 01:17:15 GMT
...
```
- Add an upstream node to the Route
```shell
curl http://127.0.0.1:9180/apisix/admin/routes/1 \
-H "X-API-KEY: $admin_key" -X PATCH -i -d '
{
"upstream": {
"nodes": {
"127.0.0.1:1981": 1
}
}
}'
```
```shell
HTTP/1.1 200 OK
...
```
After successful execution, upstream nodes will be updated to:
```shell
{
"127.0.0.1:1980": 1,
"127.0.0.1:1981": 1
}
```
- Update the weight of an upstream node to the Route
```shell
curl http://127.0.0.1:9180/apisix/admin/routes/1 \
-H "X-API-KEY: $admin_key" -X PATCH -i -d '
{
"upstream": {
"nodes": {
"127.0.0.1:1981": 10
}
}
}'
```
```shell
HTTP/1.1 200 OK
...
```
After successful execution, upstream nodes will be updated to:
```shell
{
"127.0.0.1:1980": 1,
"127.0.0.1:1981": 10
}
```
- Delete an upstream node for the Route
```shell
curl http://127.0.0.1:9180/apisix/admin/routes/1 \
-H "X-API-KEY: $admin_key" -X PATCH -i -d '
{
"upstream": {
"nodes": {
"127.0.0.1:1980": null
}
}
}'
```
```shell
HTTP/1.1 200 OK
...
```
After successful execution, upstream nodes will be updated to:
```shell
{
"127.0.0.1:1981": 10
}
```
- Replace methods of the Route -- array
```shell
curl http://127.0.0.1:9180/apisix/admin/routes/1 \
-H "X-API-KEY: $admin_key" -X PATCH -i -d '{
"methods": ["GET", "POST"]
}'
```
```shell
HTTP/1.1 200 OK
...
```
After successful execution, methods will not retain the original data, and the entire update is:
```shell
["GET", "POST"]
```
- Replace upstream nodes of the Route -- sub path
```shell
curl http://127.0.0.1:9180/apisix/admin/routes/1/upstream/nodes \
-H "X-API-KEY: $admin_key" -X PATCH -i -d '
{
"127.0.0.1:1982": 1
}'
```
```shell
HTTP/1.1 200 OK
...
```
After successful execution, nodes will not retain the original data, and the entire update is:
```shell
{
"127.0.0.1:1982": 1
}
```
- Replace methods of the Route -- sub path
```shell
curl http://127.0.0.1:9180/apisix/admin/routes/1/methods \
-H "X-API-KEY: $admin_key" -X PATCH -i -d'["POST", "DELETE", " PATCH"]'
```
```shell
HTTP/1.1 200 OK
...
```
After successful execution, methods will not retain the original data, and the entire update is:
```shell
["POST", "DELETE", "PATCH"]
```
- Disable route
```shell
curl http://127.0.0.1:9180/apisix/admin/routes/1 \
-H "X-API-KEY: $admin_key" -X PATCH -i -d '
{
"status": 0
}'
```
```shell
HTTP/1.1 200 OK
...
```
After successful execution, status nodes will be updated to:
```shell
{
"status": 0
}
```
- Enable route
```shell
curl http://127.0.0.1:9180/apisix/admin/routes/1 \
-H "X-API-KEY: $admin_key" -X PATCH -i -d '
{
"status": 1
}'
```
```shell
HTTP/1.1 200 OK
...
```
After successful execution, status nodes will be updated to:
```shell
{
"status": 1
}
```
### Response Parameters
Currently, the response is returned from etcd.
## Service
A Service is an abstraction of an API (which can also be understood as a set of Route abstractions). It usually corresponds to an upstream service abstraction.
The relationship between Routes and a Service is usually N:1.
### Service API
Service resource request address: /apisix/admin/services/{id}
### Request Methods
| Method | Request URI | Request Body | Description |
| ------ | ---------------------------------- | ------------ | ------------------------------------------------------------------------------------------------------------------------------- |
| GET | /apisix/admin/services | NULL | Fetches a list of available Services. |
| GET | /apisix/admin/services/{id} | NULL | Fetches specified Service by id. |
| PUT | /apisix/admin/services/{id} | {...} | Creates a Service with the specified id. |
| POST | /apisix/admin/services | {...} | Creates a Service and assigns a random id. |
| DELETE | /apisix/admin/services/{id} | NULL | Removes the Service with the specified id. |
| PATCH | /apisix/admin/services/{id} | {...} | Updates the selected attributes of the specified, existing Service. To delete an attribute, set value of attribute set to null. |
| PATCH | /apisix/admin/services/{id}/{path} | {...} | Updates the attribute specified in the path. The values of other attributes remain unchanged. |
### Request Body Parameters
| Parameter | Required | Type | Description | Example |
| ---------------- | -------- | ----------- | ------------------------------------------------------------------------------------------------------------------ | ------------------------------------------------ |
| plugins | False | Plugin | Plugins that are executed during the request/response cycle. See [Plugin](terminology/plugin.md) for more. | |
| upstream | False | Upstream | Configuration of the [Upstream](./terminology/upstream.md). | |
| upstream_id | False | Upstream | Id of the [Upstream](terminology/upstream.md) service. | |
| name | False | Auxiliary | Identifier for the Service. | service-xxxx |
| desc | False | Auxiliary | Description of usage scenarios. | service xxxx |
| labels | False | Match Rules | Attributes of the Service specified as key-value pairs. | {"version":"v2","build":"16","env":"production"} |
| enable_websocket | False | Auxiliary | Enables a websocket. Set to `false` by default. | |
| hosts | False | Match Rules | Matches with any one of the multiple `host`s specified in the form of a non-empty list. | ["foo.com", "*.bar.com"] |
Example configuration:
```shell
{
"id": "1", # id
"plugins": {}, # Bound plugin
"upstream_id": "1", # upstream id, recommended
"upstream": {}, # upstream, not recommended
"name": "service-test",
"desc": "hello world",
"enable_websocket": true,
"hosts": ["foo.com"]
}
```
### Example API usage
- Create a service
```shell
curl http://127.0.0.1:9180/apisix/admin/services/201 \
-H "X-API-KEY: $admin_key" -X PUT -i -d '
{
"plugins": {
"limit-count": {
"count": 2,
"time_window": 60,
"rejected_code": 503,
"key": "remote_addr"
}
},
"enable_websocket": true,
"upstream": {
"type": "roundrobin",
"nodes": {
"127.0.0.1:1980": 1
}
}
}'
```
```shell
HTTP/1.1 201 Created
...
```
- Add an upstream node to the Service
```shell
curl http://127.0.0.1:9180/apisix/admin/services/201 \
-H "X-API-KEY: $admin_key" -X PATCH -i -d '
{
"upstream": {
"nodes": {
"127.0.0.1:1981": 1
}
}
}'
```
```shell
HTTP/1.1 200 OK
...
```
After successful execution, upstream nodes will be updated to:
```shell
{
"127.0.0.1:1980": 1,
"127.0.0.1:1981": 1
}
```
- Update the weight of an upstream node to the Service
```shell
curl http://127.0.0.1:9180/apisix/admin/services/201 \
-H'X-API-KEY: edd1c9f034335f136f87ad84b625c8f1' -X PATCH -i -d '
{
"upstream": {
"nodes": {
"127.0.0.1:1981": 10
}
}
}'
```
```shell
HTTP/1.1 200 OK
...
```
After successful execution, upstream nodes will be updated to:
```shell
{
"127.0.0.1:1980": 1,
"127.0.0.1:1981": 10
}
```
- Delete an upstream node for the Service
```shell
curl http://127.0.0.1:9180/apisix/admin/services/201 \
-H'X-API-KEY: edd1c9f034335f136f87ad84b625c8f1' -X PATCH -i -d '
{
"upstream": {
"nodes": {
"127.0.0.1:1980": null
}
}
}'
```
```shell
HTTP/1.1 200 OK
...
```
After successful execution, upstream nodes will be updated to:
```shell
{
"127.0.0.1:1981": 10
}
```
- Replace upstream nodes of the Service
```shell
curl http://127.0.0.1:9180/apisix/admin/services/201/upstream/nodes \
-H'X-API-KEY: edd1c9f034335f136f87ad84b625c8f1' -X PATCH -i -d '
{
"127.0.0.1:1982": 1
}'
```
```shell
HTTP/1.1 200 OK
...
```
After successful execution, upstream nodes will not retain the original data, and the entire update is:
```shell
{
"127.0.0.1:1982": 1
}
```
### Response Parameters
Currently, the response is returned from etcd.
## Consumer
Consumers are users of services and can only be used in conjunction with a user authentication system. A Consumer is identified by a `username` property. So, for creating a new Consumer, only the HTTP `PUT` method is supported.
### Consumer API
Consumer resource request address: /apisix/admin/consumers/{username}
### Request Methods
| Method | Request URI | Request Body | Description |
| ------ | ---------------------------------- | ------------ | ------------------------------------------------- |
| GET | /apisix/admin/consumers | NULL | Fetches a list of all Consumers. |
| GET | /apisix/admin/consumers/{username} | NULL | Fetches specified Consumer by username. |
| PUT | /apisix/admin/consumers | {...} | Create new Consumer. |
| DELETE | /apisix/admin/consumers/{username} | NULL | Removes the Consumer with the specified username. |
### Request Body Parameters
| Parameter | Required | Type | Description | Example |
| ----------- | -------- | ----------- | ------------------------------------------------------------------------------------------------------------------ | ------------------------------------------------ |
| username | True | Name | Name of the Consumer. | |
| group_id | False | Name | Group of the Consumer. | |
| plugins | False | Plugin | Plugins that are executed during the request/response cycle. See [Plugin](terminology/plugin.md) for more. | |
| desc | False | Auxiliary | Description of usage scenarios. | customer xxxx |
| labels | False | Match Rules | Attributes of the Consumer specified as key-value pairs. | {"version":"v2","build":"16","env":"production"} |
Example Configuration:
```shell
{
"plugins": {}, # Bound plugin
"username": "name", # Consumer name
"desc": "hello world" # Consumer desc
}
```
When bound to a Route or Service, the Authentication Plugin infers the Consumer from the request and does not require any parameters. Whereas, when it is bound to a Consumer, username, password and other information needs to be provided.
### Example API usage
```shell
curl http://127.0.0.1:9180/apisix/admin/consumers \
-H "X-API-KEY: $admin_key" -X PUT -i -d '
{
"username": "jack",
"plugins": {
"key-auth": {
"key": "auth-one"
},
"limit-count": {
"count": 2,
"time_window": 60,
"rejected_code": 503,
"key": "remote_addr"
}
}
}'
```
```shell
HTTP/1.1 200 OK
Date: Thu, 26 Dec 2019 08:17:49 GMT
...
{"node":{"value":{"username":"jack","plugins":{"key-auth":{"key":"auth-one"},"limit-count":{"time_window":60,"count":2,"rejected_code":503,"key":"remote_addr","policy":"local"}}},"createdIndex":64,"key":"\/apisix\/consumers\/jack","modifiedIndex":64},"prevNode":{"value":"{\"username\":\"jack\",\"plugins\":{\"key-auth\":{\"key\":\"auth-one\"},\"limit-count\":{\"time_window\":60,\"count\":2,\"rejected_code\":503,\"key\":\"remote_addr\",\"policy\":\"local\"}}}","createdIndex":63,"key":"\/apisix\/consumers\/jack","modifiedIndex":63}}
```
Since `v2.2`, we can bind multiple authentication plugins to the same consumer.
### Response Parameters
Currently, the response is returned from etcd.
## Credential
Credential is used to hold the authentication credentials for the Consumer.
Credentials are used when multiple credentials need to be configured for a Consumer.
### Credential API
Credential resource request address:/apisix/admin/consumers/{username}/credentials/{credential_id}
### Request Methods
| Method | Request URI | Request Body | Description |
| ------ |----------------------------------------------------------------|--------------|------------------------------------------------|
| GET | /apisix/admin/consumers/{username}/credentials | NUll | Fetches list of all credentials of the Consumer |
| GET | /apisix/admin/consumers/{username}/credentials/{credential_id} | NUll | Fetches the Credential by `credential_id` |
| PUT | /apisix/admin/consumers/{username}/credentials/{credential_id} | {...} | Create or update a Creddential |
| DELETE | /apisix/admin/consumers/{username}/credentials/{credential_id} | NUll | Delete the Credential |
### Request Body Parameters
| Parameter | Required | Type | Description | Example |
| ----------- |-----| ------- |------------------------------------------------------------|-------------------------------------------------|
| plugins | False | Plugin | Auth plugins configuration. | |
| name | False | Auxiliary | Identifier for the Credential. | credential_primary |
| desc | False | Auxiliary | Description of usage scenarios. | credential xxxx |
| labels | False | Match Rules | Attributes of the Credential specified as key-value pairs. | {"version":"v2","build":"16","env":"production"} |
Example Configuration:
```shell
{
"plugins": {
"key-auth": {
"key": "auth-one"
}
},
"desc": "hello world"
}
```
### Example API usage
Prerequisite: Consumer `jack` has been created.
Create the `key-auth` Credential for consumer `jack`:
```shell
curl http://127.0.0.1:9180/apisix/admin/consumers/jack/credentials/auth-one \
-H "X-API-KEY: $admin_key" -X PUT -i -d '
{
"plugins": {
"key-auth": {
"key": "auth-one"
}
}
}'
```
```
HTTP/1.1 200 OK
Date: Thu, 26 Dec 2019 08:17:49 GMT
...
{"key":"\/apisix\/consumers\/jack\/credentials\/auth-one","value":{"update_time":1666260780,"plugins":{"key-auth":{"key":"auth-one"}},"create_time":1666260780}}
```
## Upstream
Upstream is a virtual host abstraction that performs load balancing on a given set of service nodes according to the configured rules.
An Upstream configuration can be directly bound to a Route or a Service, but the configuration in Route has a higher priority. This behavior is consistent with priority followed by the Plugin object.
### Upstream API
Upstream resource request address: /apisix/admin/upstreams/{id}
For notes on ID syntax please refer to: [ID Syntax](#quick-note-on-id-syntax)
### Request Methods
| Method | Request URI | Request Body | Description |
| ------ | ----------------------------------- | ------------ | -------------------------------------------------------------------------------------------------------------------------------- |
| GET | /apisix/admin/upstreams | NULL | Fetch a list of all configured Upstreams. |
| GET | /apisix/admin/upstreams/{id} | NULL | Fetches specified Upstream by id. |
| PUT | /apisix/admin/upstreams/{id} | {...} | Creates an Upstream with the specified id. |
| POST | /apisix/admin/upstreams | {...} | Creates an Upstream and assigns a random id. |
| DELETE | /apisix/admin/upstreams/{id} | NULL | Removes the Upstream with the specified id. |
| PATCH | /apisix/admin/upstreams/{id} | {...} | Updates the selected attributes of the specified, existing Upstream. To delete an attribute, set value of attribute set to null. |
| PATCH | /apisix/admin/upstreams/{id}/{path} | {...} | Updates the attribute specified in the path. The values of other attributes remain unchanged. |
### Request Body Parameters
In addition to the equalization algorithm selections, Upstream also supports passive health check and retry for the upstream. See the table below for more details:
| Parameter | Required | Type | Description | Example |
|-----------------------------|------------------------------------------------------------------|-------------------------------|------------------------------------------------------------------------------------------------------------------------------------------------------------------------------------------------------------------------------------------------------------------------------------------------------------------------------------------------------------------------------------------------------------------------------------------------------------------------------------------------------------------------------------------------------------------------------------------------------------------------------|--------------------------------------------------------------------------------------------------------------------------------------------|
| type | False | Enumeration | Load balancing algorithm to be used, and the default value is `roundrobin`. | |
| nodes | True, can't be used with `service_name` | Node | IP addresses (with optional ports) of the Upstream nodes represented as a hash table or an array. In the hash table, the key is the IP address and the value is the weight of the node for the load balancing algorithm. For hash table case, if the key is IPv6 address with port, then the IPv6 address must be quoted with square brackets. In the array, each item is a hash table with keys `host`, `weight`, and the optional `port` and `priority` (defaults to `0`). Nodes with lower priority are used only when all nodes with a higher priority are tried and are unavailable. Empty nodes are treated as placeholders and clients trying to access this Upstream will receive a 502 response. | `192.168.1.100:80`, `[::1]:80` |
| service_name | True, can't be used with `nodes` | String | Service name used for [service discovery](discovery.md). | `a-bootiful-client` |
| discovery_type | True, if `service_name` is used | String | The type of service [discovery](discovery.md). | `eureka` |
| hash_on | False | Auxiliary | Only valid if the `type` is `chash`. Supports Nginx variables (`vars`), custom headers (`header`), `cookie` and `consumer`. Defaults to `vars`. | |
| key | False | Match Rules | Only valid if the `type` is `chash`. Finds the corresponding node `id` according to `hash_on` and `key` values. When `hash_on` is set to `vars`, `key` is a required parameter and it supports [Nginx variables](http://nginx.org/en/docs/varindex.html). When `hash_on` is set as `header`, `key` is a required parameter, and `header name` can be customized. When `hash_on` is set to `cookie`, `key` is also a required parameter, and `cookie name` can be customized. When `hash_on` is set to `consumer`, `key` need not be set and the `key` used by the hash algorithm would be the authenticated `consumer_name`. | `uri`, `server_name`, `server_addr`, `request_uri`, `remote_port`, `remote_addr`, `query_string`, `host`, `hostname`, `arg_***`, `arg_***` |
| checks | False | Health Checker | Configures the parameters for the [health check](./tutorials/health-check.md). | |
| retries | False | Integer | Sets the number of retries while passing the request to Upstream using the underlying Nginx mechanism. Set according to the number of available backend nodes by default. Setting this to `0` disables retry. | |
| retry_timeout | False | Integer | Timeout to continue with retries. Setting this to `0` disables the retry timeout. | |
| timeout | False | Timeout | Sets the timeout (in seconds) for connecting to, and sending and receiving messages to and from the Upstream. | `{"connect": 0.5,"send": 0.5,"read": 0.5}` |
| name | False | Auxiliary | Identifier for the Upstream. | |
| desc | False | Auxiliary | Description of usage scenarios. | |
| pass_host | False | Enumeration | Configures the `host` when the request is forwarded to the upstream. Can be one of `pass`, `node` or `rewrite`. Defaults to `pass` if not specified. `pass`- transparently passes the client's host to the Upstream. `node`- uses the host configured in the node of the Upstream. `rewrite`- Uses the value configured in `upstream_host`. | |
| upstream_host | False | Auxiliary | Specifies the host of the Upstream request. This is only valid if the `pass_host` is set to `rewrite`. | |
| scheme | False | Auxiliary | The scheme used when communicating with the Upstream. For an L7 proxy, this value can be one of `http`, `https`, `grpc`, `grpcs`. For an L4 proxy, this value could be one of `tcp`, `udp`, `tls`. Defaults to `http`. | |
| labels | False | Match Rules | Attributes of the Upstream specified as `key-value` pairs. | {"version":"v2","build":"16","env":"production"} |
| tls.client_cert | False, can't be used with `tls.client_cert_id` | HTTPS certificate | Sets the client certificate while connecting to a TLS Upstream. | |
| tls.client_key | False, can't be used with `tls.client_cert_id` | HTTPS certificate private key | Sets the client private key while connecting to a TLS Upstream. | |
| tls.client_cert_id | False, can't be used with `tls.client_cert` and `tls.client_key` | SSL | Set the referenced [SSL](#ssl) id. | |
| tls.verify | False, currently only kafka upstream is supported | Boolean | Turn on server certificate verification, currently only kafka upstream is supported. | |
| keepalive_pool.size | False | Auxiliary | Sets `keepalive` directive dynamically. | |
| keepalive_pool.idle_timeout | False | Auxiliary | Sets `keepalive_timeout` directive dynamically. | |
| keepalive_pool.requests | False | Auxiliary | Sets `keepalive_requests` directive dynamically. | |
An Upstream can be one of the following `types`:
- `roundrobin`: Round robin balancing with weights.
- `chash`: Consistent hash.
- `ewma`: Pick the node with minimum latency. See [EWMA Chart](https://en.wikipedia.org/wiki/EWMA_chart) for more details.
- `least_conn`: Picks the node with the lowest value of `(active_conn + 1) / weight`. Here, an active connection is a connection being used by the request and is similar to the concept in Nginx.
- user-defined load balancer loaded via `require("apisix.balancer.your_balancer")`.
The following should be considered when setting the `hash_on` value:
- When set to `vars`, a `key` is required. The value of the key can be any of the [Nginx variables](http://nginx.org/en/docs/varindex.html) without the `$` prefix.
- When set to `header`, a `key` is required. This is equal to "http\_`key`".
- When set to `cookie`, a `key` is required. This key is equal to "cookie\_`key`". The cookie name is case-sensitive.
- When set to `consumer`, the `key` is optional and the key is set to the `consumer_name` captured from the authentication Plugin.
- When set to `vars_combinations`, the `key` is required. The value of the key can be a combination of any of the [Nginx variables](http://nginx.org/en/docs/varindex.html) like `$request_uri$remote_addr`.
The features described below requires APISIX to be run on [APISIX-Runtime](./FAQ.md#how-do-i-build-the-apisix-runtime-environment):
You can set the `scheme` to `tls`, which means "TLS over TCP".
To use mTLS to communicate with Upstream, you can use the `tls.client_cert/key` in the same format as SSL's `cert` and `key` fields.
Or you can reference SSL object by `tls.client_cert_id` to set SSL cert and key. The SSL object can be referenced only if the `type` field is `client`, otherwise the request will be rejected by APISIX. In addition, only `cert` and `key` will be used in the SSL object.
To allow Upstream to have a separate connection pool, use `keepalive_pool`. It can be configured by modifying its child fields.
Example Configuration:
```shell
{
"id": "1", # id
"retries": 1, # retry times
"timeout": { # Set the timeout for connecting, sending and receiving messages, each is 15 seconds.
"connect":15,
"send":15,
"read":15
},
"nodes": {"host:80": 100}, # Upstream machine address list, the format is `Address + Port`
# is the same as "nodes": [ {"host": "host", "port": 80, "weight": 100} ],
"type":"roundrobin",
"checks": {}, # Health check parameters
"hash_on": "",
"key": "",
"name": "upstream-for-test",
"desc": "hello world",
"scheme": "http" # The scheme used when communicating with upstream, the default is `http`
}
```
### Example API usage
#### Create an Upstream and modify the data in `nodes`
1. Create upstream
```shell
curl http://127.0.0.1:9180/apisix/admin/upstreams/100 \
-H "X-API-KEY: $admin_key" -i -X PUT -d '
{
"type":"roundrobin",
"nodes":{
"127.0.0.1:1980": 1
}
}'
```
```shell
HTTP/1.1 201 Created
...
```
2. Add a node to the Upstream
```shell
curl http://127.0.0.1:9180/apisix/admin/upstreams/100 \
-H "X-API-KEY: $admin_key" -X PATCH -i -d '
{
"nodes": {
"127.0.0.1:1981": 1
}
}'
```
```
HTTP/1.1 200 OK
...
```
After successful execution, nodes will be updated to:
```shell
{
"127.0.0.1:1980": 1,
"127.0.0.1:1981": 1
}
```
3. Update the weight of a node to the Upstream
```shell
curl http://127.0.0.1:9180/apisix/admin/upstreams/100 \
-H'X-API-KEY: edd1c9f034335f136f87ad84b625c8f1' -X PATCH -i -d '
{
"nodes": {
"127.0.0.1:1981": 10
}
}'
```
```shell
HTTP/1.1 200 OK
...
```
After successful execution, nodes will be updated to:
```shell
{
"127.0.0.1:1980": 1,
"127.0.0.1:1981": 10
}
```
4. Delete a node for the Upstream
```shell
curl http://127.0.0.1:9180/apisix/admin/upstreams/100 \
-H "X-API-KEY: $admin_key" -X PATCH -i -d '
{
"nodes": {
"127.0.0.1:1980": null
}
}'
```
```
HTTP/1.1 200 OK
...
```
After successful execution, nodes will be updated to:
```shell
{
"127.0.0.1:1981": 10
}
```
5. Replace the nodes of the Upstream
```shell
curl http://127.0.0.1:9180/apisix/admin/upstreams/100/nodes \
-H "X-API-KEY: $admin_key" -X PATCH -i -d '
{
"127.0.0.1:1982": 1
}'
```
```
HTTP/1.1 200 OK
...
```
After the execution is successful, nodes will not retain the original data, and the entire update is:
```shell
{
"127.0.0.1:1982": 1
}
```
#### Proxy client request to `https` Upstream service
1. Create a route and configure the upstream scheme as `https`.
```shell
curl -i http://127.0.0.1:9180/apisix/admin/routes/1 \
-H "X-API-KEY: $admin_key" -X PUT -d '
{
"uri": "/get",
"upstream": {
"type": "roundrobin",
"scheme": "https",
"nodes": {
"httpbin.org:443": 1
}
}
}'
```
After successful execution, the scheme when requesting to communicate with the upstream will be `https`.
2. Send a request to test.
```shell
curl http://127.0.0.1:9080/get
```
```shell
{
"args": {},
"headers": {
"Accept": "*/*",
"Host": "127.0.0.1",
"User-Agent": "curl/7.29.0",
"X-Amzn-Trace-Id": "Root=1-6058324a-0e898a7f04a5e95b526bb183",
"X-Forwarded-Host": "127.0.0.1"
},
"origin": "127.0.0.1",
"url": "https://127.0.0.1/get"
}
```
The request is successful, meaning that the proxy Upstream `https` is valid.
:::note
Each node can be configured with a priority. A node with low priority will only be
used when all the nodes with higher priority have been tried or are unavailable.
:::
As the default priority is 0, nodes with negative priority can be configured as a backup.
For example:
```json
{
"uri": "/hello",
"upstream": {
"type": "roundrobin",
"nodes": [
{ "host": "127.0.0.1", "port": 1980, "weight": 2000 },
{ "host": "127.0.0.1", "port": 1981, "weight": 1, "priority": -1 }
],
"checks": {
"active": {
"http_path": "/status",
"healthy": {
"interval": 1,
"successes": 1
},
"unhealthy": {
"interval": 1,
"http_failures": 1
}
}
}
}
}
```
Node `127.0.0.2` will be used only after `127.0.0.1` is tried or unavailable.
It can therefore act as a backup for the node `127.0.0.1`.
### Response Parameters
Currently, the response is returned from etcd.
## SSL
### SSL API
SSL resource request address: /apisix/admin/ssls/{id}
For notes on ID syntax please refer to: [ID Syntax](#quick-note-on-id-syntax)
### Request Methods
| Method | Request URI | Request Body | Description |
| ------ | ---------------------- | ------------ | ----------------------------------------------- |
| GET | /apisix/admin/ssls | NULL | Fetches a list of all configured SSL resources. |
| GET | /apisix/admin/ssls/{id} | NULL | Fetch specified resource by id. |
| PUT | /apisix/admin/ssls/{id} | {...} | Creates a resource with the specified id. |
| POST | /apisix/admin/ssls | {...} | Creates a resource and assigns a random id. |
| DELETE | /apisix/admin/ssls/{id} | NULL | Removes the resource with the specified id. |
### Request Body Parameters
| Parameter | Required | Type | Description | Example |
| ------------ | -------- | ------------------------ | -------------------------------------------------------------------------------------------------------------- | ------------------------------------------------ |
| cert | True | Certificate | HTTPS certificate. This field supports saving the value in Secret Manager using the [APISIX Secret](./terminology/secret.md) resource. | |
| key | True | Private key | HTTPS private key. This field supports saving the value in Secret Manager using the [APISIX Secret](./terminology/secret.md) resource. | |
| certs | False | An array of certificates | Used for configuring multiple certificates for the same domain excluding the one provided in the `cert` field. This field supports saving the value in Secret Manager using the [APISIX Secret](./terminology/secret.md) resource. | |
| keys | False | An array of private keys | Private keys to pair with the `certs`. This field supports saving the value in Secret Manager using the [APISIX Secret](./terminology/secret.md) resource. | |
| client.ca | False | Certificate | Sets the CA certificate that verifies the client. Requires OpenResty 1.19+. | |
| client.depth | False | Certificate | Sets the verification depth in client certificate chains. Defaults to 1. Requires OpenResty 1.19+. | |
| client.skip_mtls_uri_regex | False | An array of regular expressions, in PCRE format | Used to match URI, if matched, this request bypasses the client certificate checking, i.e. skip the MTLS. | ["/hello[0-9]+", "/foobar"] |
| snis | True, only if `type` is `server` | Match Rules | A non-empty array of HTTPS SNI | |
| desc | False | Auxiliary | Description of usage scenarios. | certs for production env |
| labels | False | Match Rules | Attributes of the resource specified as key-value pairs. | {"version":"v2","build":"16","env":"production"} |
| type | False | Auxiliary | Identifies the type of certificate, default `server`. | `client` Indicates that the certificate is a client certificate, which is used when APISIX accesses the upstream; `server` Indicates that the certificate is a server-side certificate, which is used by APISIX when verifying client requests. |
| status | False | Auxiliary | Enables the current SSL. Set to `1` (enabled) by default. | `1` to enable, `0` to disable |
| ssl_protocols | False | An array of ssl protocols | It is used to control the SSL/TLS protocol version used between servers and clients. See [SSL Protocol](./ssl-protocol.md) for more examples. | `["TLSv1.1", "TLSv1.2", "TLSv1.3"]` |
Example Configuration:
```shell
{
"id": "1", # id
"cert": "cert", # Certificate
"key": "key", # Private key
"snis": ["t.com"] # https SNI
}
```
See [Certificate](./certificate.md) for more examples.
## Global Rule
Sets Plugins which run globally. i.e these Plugins will be run before any Route/Service level Plugins.
### Global Rule API
Global Rule resource request address: /apisix/admin/global_rules/{id}
### Request Methods
| Method | Request URI | Request Body | Description |
| ------ | -------------------------------------- | ------------ | ----------------------------------------------------------------------------------------------------------------------------------- |
| GET | /apisix/admin/global_rules | NULL | Fetches a list of all Global Rules. |
| GET | /apisix/admin/global_rules/{id} | NULL | Fetches specified Global Rule by id. |
| PUT | /apisix/admin/global_rules/{id} | {...} | Creates a Global Rule with the specified id. |
| DELETE | /apisix/admin/global_rules/{id} | NULL | Removes the Global Rule with the specified id. |
| PATCH | /apisix/admin/global_rules/{id} | {...} | Updates the selected attributes of the specified, existing Global Rule. To delete an attribute, set value of attribute set to null. |
| PATCH | /apisix/admin/global_rules/{id}/{path} | {...} | Updates the attribute specified in the path. The values of other attributes remain unchanged. |
### Request Body Parameters
| Parameter | Required | Description | Example |
| ----------- | -------- | ------------------------------------------------------------------------------------------------------------------ | ---------- |
| plugins | True | Plugins that are executed during the request/response cycle. See [Plugin](terminology/plugin.md) for more. | |
## Consumer group
Group of Plugins which can be reused across Consumers.
### Consumer group API
Consumer group resource request address: /apisix/admin/consumer_groups/{id}
### Request Methods
| Method | Request URI | Request Body | Description |
| ------ | ---------------------------------------- | ------------ | ------------------------------------------------------------------------------------------------------------------------------------- |
| GET | /apisix/admin/consumer_groups | NULL | Fetches a list of all Consumer groups. |
| GET | /apisix/admin/consumer_groups/{id} | NULL | Fetches specified Consumer group by id. |
| PUT | /apisix/admin/consumer_groups/{id} | {...} | Creates a new Consumer group with the specified id. |
| DELETE | /apisix/admin/consumer_groups/{id} | NULL | Removes the Consumer group with the specified id. |
| PATCH | /apisix/admin/consumer_groups/{id} | {...} | Updates the selected attributes of the specified, existing Consumer group. To delete an attribute, set value of attribute set to null. |
| PATCH | /apisix/admin/consumer_groups/{id}/{path} | {...} | Updates the attribute specified in the path. The values of other attributes remain unchanged. |
### Request Body Parameters
| Parameter | Required | Description | Example |
| ----------- | -------- | ------------------------------------------------------------------------------------------------------------------ | ------------------------------------------------ |
| plugins | True | Plugins that are executed during the request/response cycle. See [Plugin](terminology/plugin.md) for more. | |
| name | False | Identifier for the consumer group. | premium-tier |
| desc | False | Description of usage scenarios. | customer xxxx |
| labels | False | Attributes of the Consumer group specified as key-value pairs. | {"version":"v2","build":"16","env":"production"} |
## Plugin config
Group of Plugins which can be reused across Routes.
### Plugin Config API
Plugin Config resource request address: /apisix/admin/plugin_configs/{id}
### Request Methods
| Method | Request URI | Request Body | Description |
| ------ | ---------------------------------------- | ------------ | ------------------------------------------------------------------------------------------------------------------------------------- |
| GET | /apisix/admin/plugin_configs | NULL | Fetches a list of all Plugin configs. |
| GET | /apisix/admin/plugin_configs/{id} | NULL | Fetches specified Plugin config by id. |
| PUT | /apisix/admin/plugin_configs/{id} | {...} | Creates a new Plugin config with the specified id. |
| DELETE | /apisix/admin/plugin_configs/{id} | NULL | Removes the Plugin config with the specified id. |
| PATCH | /apisix/admin/plugin_configs/{id} | {...} | Updates the selected attributes of the specified, existing Plugin config. To delete an attribute, set value of attribute set to null. |
| PATCH | /apisix/admin/plugin_configs/{id}/{path} | {...} | Updates the attribute specified in the path. The values of other attributes remain unchanged. |
### Request Body Parameters
| Parameter | Required | Description | Example |
| ----------- | -------- | ------------------------------------------------------------------------------------------------------------------ | ------------------------------------------------ |
| plugins | True | Plugins that are executed during the request/response cycle. See [Plugin](terminology/plugin.md) for more. | |
| desc | False | Description of usage scenarios. | customer xxxx |
| labels | False | Attributes of the Plugin config specified as key-value pairs. | {"version":"v2","build":"16","env":"production"} |
## Plugin Metadata
### Plugin Metadata API
Plugin Metadata resource request address: /apisix/admin/plugin_metadata/{plugin_name}
### Request Methods
| Method | Request URI | Request Body | Description |
| ------ | ------------------------------------------- | ------------ | --------------------------------------------------------------- |
| GET | /apisix/admin/plugin_metadata | NULL | Fetches a list of all Plugin metadata. |
| GET | /apisix/admin/plugin_metadata/{plugin_name} | NULL | Fetches the metadata of the specified Plugin by `plugin_name`. |
| PUT | /apisix/admin/plugin_metadata/{plugin_name} | {...} | Creates metadata for the Plugin specified by the `plugin_name`. |
| DELETE | /apisix/admin/plugin_metadata/{plugin_name} | NULL | Removes metadata for the Plugin specified by the `plugin_name`. |
### Request Body Parameters
A JSON object defined according to the `metadata_schema` of the Plugin ({plugin_name}).
Example Configuration:
```shell
curl http://127.0.0.1:9180/apisix/admin/plugin_metadata/example-plugin \
-H "X-API-KEY: $admin_key" -i -X PUT -d '
{
"skey": "val",
"ikey": 1
}'
```
```shell
HTTP/1.1 201 Created
Date: Thu, 26 Dec 2019 04:19:34 GMT
Content-Type: text/plain
```
## Plugin
### Plugin API
Plugin resource request address: /apisix/admin/plugins/{plugin_name}
### Request Methods
| Method | Request URI | Request Body | Description |
| ------ | ----------------------------------- | ------------ | ---------------------------------------------- |
| GET | /apisix/admin/plugins/list | NULL | Fetches a list of all Plugins. |
| GET | /apisix/admin/plugins/{plugin_name} | NULL | Fetches the specified Plugin by `plugin_name`. |
| GET | /apisix/admin/plugins?all=true | NULL | Get all properties of all plugins. |
| GET | /apisix/admin/plugins?all=true&subsystem=stream| NULL | Gets properties of all Stream plugins.|
| GET | /apisix/admin/plugins?all=true&subsystem=http | NULL | Gets properties of all HTTP plugins. |
| PUT | /apisix/admin/plugins/reload | NULL | Reloads the plugin according to the changes made in code |
| GET | apisix/admin/plugins/{plugin_name}?subsystem=stream | NULL | Gets properties of a specified plugin if it is supported in Stream/L4 subsystem. |
| GET | apisix/admin/plugins/{plugin_name}?subsystem=http | NULL | Gets properties of a specified plugin if it is supported in HTTP/L7 subsystem. |
:::caution
The interface of getting properties of all plugins via `/apisix/admin/plugins?all=true` will be deprecated soon.
:::
### Request Body Parameters
The Plugin ({plugin_name}) of the data structure.
### Request Arguments
| Name | Description | Default |
| --------- | ----------------------------- | ------- |
| subsystem | The subsystem of the Plugins. | http |
The plugin can be filtered on subsystem so that the ({plugin_name}) is searched in the subsystem passed through query params.
### Example API usage:
```shell
curl "http://127.0.0.1:9180/apisix/admin/plugins/list" \
-H 'X-API-KEY: edd1c9f034335f136f87ad84b625c8f1'
```
```shell
["zipkin","request-id",...]
```
```shell
curl "http://127.0.0.1:9180/apisix/admin/plugins/key-auth?subsystem=http" -H 'X-API-KEY: edd1c9f034335f136f87ad84b625c8f1'
```
```json
{"$comment":"this is a mark for our injected plugin schema","properties":{"header":{"default":"apikey","type":"string"},"hide_credentials":{"default":false,"type":"boolean"},"_meta":{"properties":{"filter":{"type":"array","description":"filter determines whether the plugin needs to be executed at runtime"},"disable":{"type":"boolean"},"error_response":{"oneOf":[{"type":"string"},{"type":"object"}]},"priority":{"type":"integer","description":"priority of plugins by customized order"}},"type":"object"},"query":{"default":"apikey","type":"string"}},"type":"object"}
```
:::tip
You can use the `/apisix/admin/plugins?all=true` API to get all properties of all plugins. This API will be deprecated soon.
:::
## Stream Route
Route used in the [Stream Proxy](./stream-proxy.md).
### Stream Route API
Stream Route resource request address: /apisix/admin/stream_routes/{id}
### Request Methods
| Method | Request URI | Request Body | Description |
| ------ | -------------------------------- | ------------ | ----------------------------------------------- |
| GET | /apisix/admin/stream_routes | NULL | Fetches a list of all configured Stream Routes. |
| GET | /apisix/admin/stream_routes/{id} | NULL | Fetches specified Stream Route by id. |
| PUT | /apisix/admin/stream_routes/{id} | {...} | Creates a Stream Route with the specified id. |
| POST | /apisix/admin/stream_routes | {...} | Creates a Stream Route and assigns a random id. |
| DELETE | /apisix/admin/stream_routes/{id} | NULL | Removes the Stream Route with the specified id. |
### Request Body Parameters
| Parameter | Required | Type | Description | Example |
| ----------- | -------- | -------- | ------------------------------------------------------------------- | ----------------------------- |
| name | False | Auxiliary | Identifier for the Stream Route. | postgres-proxy |
| desc | False | Auxiliary | Description of usage scenarios. | proxy endpoint for postgresql |
| labels | False | Match Rules | Attributes of the Proto specified as key-value pairs. | {"version":"17","service":"user","env":"production"} |
| upstream | False | Upstream | Configuration of the [Upstream](./terminology/upstream.md). | |
| upstream_id | False | Upstream | Id of the [Upstream](terminology/upstream.md) service. | |
| service_id | False | String | Id of the [Service](terminology/service.md) service. | |
| remote_addr | False | IPv4, IPv4 CIDR, IPv6 | Filters Upstream forwards by matching with client IP. | "127.0.0.1" or "127.0.0.1/32" or "::1" |
| server_addr | False | IPv4, IPv4 CIDR, IPv6 | Filters Upstream forwards by matching with APISIX Server IP. | "127.0.0.1" or "127.0.0.1/32" or "::1" |
| server_port | False | Integer | Filters Upstream forwards by matching with APISIX Server port. | 9090 |
| sni | False | Host | Server Name Indication. | "test.com" |
| protocol.name | False | String | Name of the protocol proxyed by xRPC framework. | "redis" |
| protocol.conf | False | Configuration | Protocol-specific configuration. | |
To learn more about filtering in stream proxies, check [this](./stream-proxy.md#more-route-match-options) document.
## Secret
Secret means `Secrets Management`, which could use any secret manager supported, e.g. `vault`.
### Secret API
Secret resource request address: /apisix/admin/secrets/{secretmanager}/{id}
### Request Methods
| Method | Request URI | Request Body | Description |
| ------ | ---------------------------------- | ------------ | ------------------------------------------------- |
| GET | /apisix/admin/secrets | NULL | Fetches a list of all secrets. |
| GET | /apisix/admin/secrets/{manager}/{id} | NULL | Fetches specified secrets by id. |
| PUT | /apisix/admin/secrets/{manager} | {...} | Create new secrets configuration. |
| DELETE | /apisix/admin/secrets/{manager}/{id} | NULL | Removes the secrets with the specified id. |
| PATCH | /apisix/admin/secrets/{manager}/{id} | {...} | Updates the selected attributes of the specified, existing secrets. To delete an attribute, set value of attribute set to null. |
| PATCH | /apisix/admin/secrets/{manager}/{id}/{path} | {...} | Updates the attribute specified in the path. The values of other attributes remain unchanged. |
### Request Body Parameters
#### When Secret Manager is Vault
| Parameter | Required | Type | Description | Example |
| ----------- | -------- | ----------- | ------------------------------------------------------------------------------------------------------------------ | ------------------------------------------------ |
| uri | True | URI | URI of the vault server. | |
| prefix | True | string | key prefix
| token | True | string | vault token. | |
| namespace | False | string | Vault namespace, no default value | `admin` |
Example Configuration:
```shell
{
"uri": "https://localhost/vault",
"prefix": "/apisix/kv",
"token": "343effad"
}
```
Example API usage:
```shell
curl -i http://127.0.0.1:9180/apisix/admin/secrets/vault/test2 \
-H "X-API-KEY: $admin_key" -X PUT -d '
{
"uri": "http://xxx/get",
"prefix" : "apisix",
"token" : "apisix"
}'
```
```shell
HTTP/1.1 200 OK
...
{"key":"\/apisix\/secrets\/vault\/test2","value":{"id":"vault\/test2","token":"apisix","prefix":"apisix","update_time":1669625828,"create_time":1669625828,"uri":"http:\/\/xxx\/get"}}
```
#### When Secret Manager is AWS
| Parameter | Required | Type | Description |
| ----------------- | -------- | ------ | --------------------------------------- |
| access_key_id | True | string | AWS Access Key ID |
| secret_access_key | True | string | AWS Secret Access Key |
| session_token | False | string | Temporary access credential information |
| region | False | string | AWS Region |
| endpoint_url | False | URI | AWS Secret Manager URL |
Example Configuration:
```json
{
"endpoint_url": "http://127.0.0.1:4566",
"region": "us-east-1",
"access_key_id": "access",
"secret_access_key": "secret",
"session_token": "token"
}
```
Example API usage:
```shell
curl -i http://127.0.0.1:9180/apisix/admin/secrets/aws/test3 \
-H "X-API-KEY: $admin_key" -X PUT -d '
{
"endpoint_url": "http://127.0.0.1:4566",
"region": "us-east-1",
"access_key_id": "access",
"secret_access_key": "secret",
"session_token": "token"
}'
```
```shell
HTTP/1.1 200 OK
...
{"value":{"create_time":1726069970,"endpoint_url":"http://127.0.0.1:4566","region":"us-east-1","access_key_id":"access","secret_access_key":"secret","id":"aws/test3","update_time":1726069970,"session_token":"token"},"key":"/apisix/secrets/aws/test3"}
```
#### When Secret Manager is GCP
| Parameter | Required | Type | Description | Example |
| ------------------------ | -------- | ------- | --------------------------------------------------------------------------------------------------------------------------------------------------------- | ------------------------------------------------------------------------------------------------ |
| auth_config | True | object | Either `auth_config` or `auth_file` must be provided. | |
| auth_config.client_email | True | string | Email address of the Google Cloud service account. | |
| auth_config.private_key | True | string | Private key of the Google Cloud service account. | |
| auth_config.project_id | True | string | Project ID in the Google Cloud service account. | |
| auth_config.token_uri | False | string | Token URI of the Google Cloud service account. | [https://oauth2.googleapis.com/token](https://oauth2.googleapis.com/token) |
| auth_config.entries_uri | False | string | The API access endpoint for the Google Secrets Manager. | [https://secretmanager.googleapis.com/v1](https://secretmanager.googleapis.com/v1) |
| auth_config.scope | False | string | Access scopes of the Google Cloud service account. See [OAuth 2.0 Scopes for Google APIs](https://developers.google.com/identity/protocols/oauth2/scopes) | [https://www.googleapis.com/auth/cloud-platform](https://www.googleapis.com/auth/cloud-platform) |
| auth_file | True | string | Path to the Google Cloud service account authentication JSON file. Either `auth_config` or `auth_file` must be provided. | |
| ssl_verify | False | boolean | When set to `true`, enables SSL verification as mentioned in [OpenResty docs](https://github.com/openresty/lua-nginx-module#tcpsocksslhandshake). | true |
Example Configuration:
```json
{
"auth_config" : {
"client_email": "email@apisix.iam.gserviceaccount.com",
"private_key": "private_key",
"project_id": "apisix-project",
"token_uri": "https://oauth2.googleapis.com/token",
"entries_uri": "https://secretmanager.googleapis.com/v1",
"scope": ["https://www.googleapis.com/auth/cloud-platform"]
}
}
```
Example API usage:
```shell
curl -i http://127.0.0.1:9180/apisix/admin/secrets/gcp/test4 \
-H "X-API-KEY: $admin_key" -X PUT -d '
{
"auth_config" : {
"client_email": "email@apisix.iam.gserviceaccount.com",
"private_key": "private_key",
"project_id": "apisix-project",
"token_uri": "https://oauth2.googleapis.com/token",
"entries_uri": "https://secretmanager.googleapis.com/v1",
"scope": ["https://www.googleapis.com/auth/cloud-platform"]
}
}'
```
```shell
HTTP/1.1 200 OK
...
{"value":{"id":"gcp/test4","ssl_verify":true,"auth_config":{"token_uri":"https://oauth2.googleapis.com/token","scope":["https://www.googleapis.com/auth/cloud-platform"],"entries_uri":"https://secretmanager.googleapis.com/v1","client_email":"email@apisix.iam.gserviceaccount.com","private_key":"private_key","project_id":"apisix-project"},"create_time":1726070161,"update_time":1726070161},"key":"/apisix/secrets/gcp/test4"}
```
### Response Parameters
Currently, the response is returned from etcd.
## Proto
Proto is used to store protocol buffers so that APISIX can communicate in gRPC.
See [grpc-transcode plugin](./plugins/grpc-transcode.md#enabling-the-plugin) doc for more examples.
### Proto API
Proto resource request address: /apisix/admin/protos/{id}
### Request Methods
| Method | Request URI | Request Body | Description |
| ------ | -------------------------------- | ------------ | ----------------------------------------------- |
| GET | /apisix/admin/protos | NULL | List all Protos. |
| GET | /apisix/admin/protos/{id} | NULL | Get a Proto by id. |
| PUT | /apisix/admin/protos/{id} | {...} | Create or update a Proto with the given id. |
| POST | /apisix/admin/protos | {...} | Create a Proto with a random id. |
| DELETE | /apisix/admin/protos/{id} | NULL | Delete Proto by id. |
### Request Body Parameters
| Parameter | Required | Type | Description | Example |
|-----------|----------|-----------|--------------------------------------| ----------------------------- |
| content | True | String | Content of `.proto` or `.pb` files | See [here](./plugins/grpc-transcode.md#enabling-the-plugin) |
| name | False | Auxiliary | Identifier for the Protobuf definition. | user-proto |
| desc | False | Auxiliary | Description of usage scenarios. | protobuf for user service |
| labels | False | Match Rules | Attributes of the Proto specified as key-value pairs. | {"version":"v2","service":"user","env":"production"} |
## Schema validation
Check the validity of a configuration against its entity schema. This allows you to test your input before submitting a request to the entity endpoints of the Admin API.
Note that this only performs the schema validation checks, checking that the input configuration is well-formed. Requests to the entity endpoint using the given configuration may still fail due to other reasons, such as invalid foreign key relationships or uniqueness check failures against the contents of the data store.
### Schema validation
Schema validation request address: /apisix/admin/schema/validate/{resource}
### Request Methods
| Method | Request URI | Request Body | Description |
| ------ | -------------------------------- | ------------ | ----------------------------------------------- |
| POST | /apisix/admin/schema/validate/{resource} | {..resource conf..} | Validate the resource configuration against corresponding schema. |
### Request Body Parameters
* 200: validate ok.
* 400: validate failed, with error as response body in JSON format.
Example:
```bash
curl http://127.0.0.1:9180/apisix/admin/schema/validate/routes \
-H "X-API-KEY: $admin_key" -X POST -i -d '{
"uri": 1980,
"upstream": {
"scheme": "https",
"type": "roundrobin",
"nodes": {
"nghttp2.org": 1
}
}
}'
HTTP/1.1 400 Bad Request
Date: Mon, 21 Aug 2023 07:37:13 GMT
Content-Type: application/json
Transfer-Encoding: chunked
Connection: keep-alive
Server: APISIX/3.4.0
Access-Control-Allow-Origin: *
Access-Control-Allow-Credentials: true
Access-Control-Expose-Headers: *
Access-Control-Max-Age: 3600
{"error_msg":"property \"uri\" validation failed: wrong type: expected string, got number"}
```
---
---
title: APISIX variable
keywords:
- Apache APISIX
- API Gateway
- APISIX variable
description: This article describes the variables supported by Apache APISIX.
---
## Description
Besides [NGINX variable](http://nginx.org/en/docs/varindex.html), APISIX also provides
additional variables.
## List of variables
| Variable Name | Origin | Description | Example |
|-------------------- | ---------- | ----------------------------------------------------------------------------------- | ------------- |
| balancer_ip | core | The IP of picked upstream server. | 192.168.1.2 |
| balancer_port | core | The port of picked upstream server. | 80 |
| consumer_name | core | Username of Consumer. | |
| consumer_group_id | core | Group ID of Consumer. | |
| graphql_name | core | The [operation name](https://graphql.org/learn/queries/#operation-name) of GraphQL. | HeroComparison |
| graphql_operation | core | The operation type of GraphQL. | mutation |
| graphql_root_fields | core | The top level fields of GraphQL. | ["hero"] |
| mqtt_client_id | mqtt-proxy | The client id in MQTT protocol. | |
| route_id | core | Id of Route. | |
| route_name | core | Name of Route. | |
| service_id | core | Id of Service. | |
| service_name | core | Name of Service. | |
| redis_cmd_line | Redis | The content of Redis command. | |
| resp_body | core | In the logger plugin, if some of the plugins support logging of response body, for example by configuring `include_resp_body: true`, then this variable can be used in the log format. | |
| rpc_time | xRPC | Time spent at the rpc request level. | |
You can also register your own [variable](./plugin-develop.md#register-custom-variable).
---
---
title: Architecture
keywords:
- API Gateway
- Apache APISIX
- APISIX architecture
description: Architecture of Apache APISIX—the Cloud Native API Gateway.
---
APISIX is built on top of Nginx and [ngx_lua](https://github.com/openresty/lua-nginx-module) leveraging the power offered by LuaJIT. See [Why Apache APISIX chose Nginx and Lua to build API Gateway?](https://apisix.apache.org/blog/2021/08/25/why-apache-apisix-chose-nginx-and-lua/).
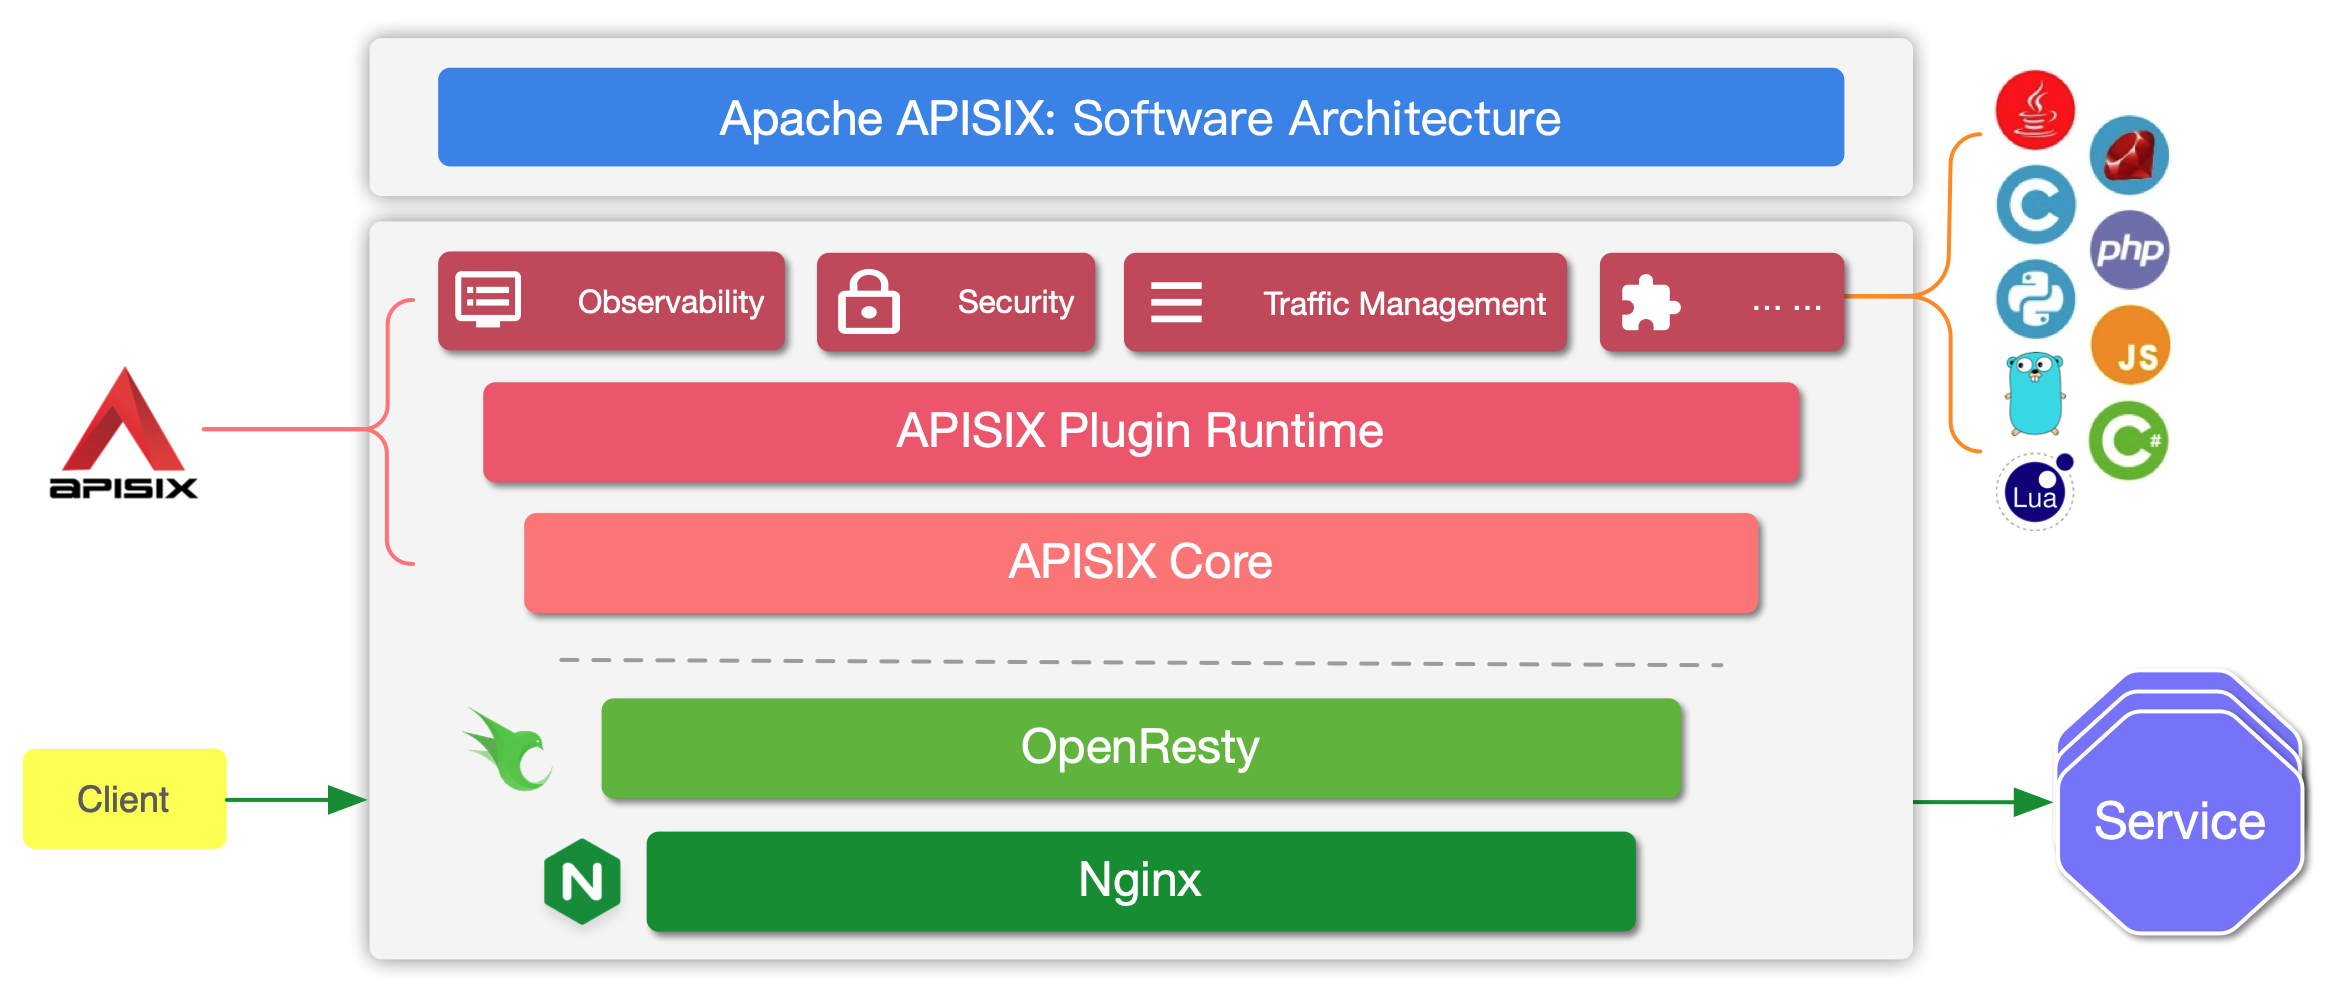
APISIX has two main parts:
1. APISIX core, Lua plugin, multi-language Plugin runtime, and the WASM plugin runtime.
2. Built-in Plugins that adds features for observability, security, traffic control, etc.
The APISIX core handles the important functions like matching Routes, load balancing, service discovery, configuration management, and provides a management API. It also includes APISIX Plugin runtime supporting Lua and multilingual Plugins (Go, Java , Python, JavaScript, etc) including the experimental WASM Plugin runtime.
APISIX also has a set of [built-in Plugins](https://apisix.apache.org/docs/apisix/plugins/batch-requests) that adds features like authentication, security, observability, etc. They are written in Lua.
## Request handling process
The diagram below shows how APISIX handles an incoming request and applies corresponding Plugins:
## Plugin hierarchy
The chart below shows the order in which different types of Plugin are applied to a request:
---
---
title: Running APISIX in AWS with AWS CDK
---
[APISIX](https://github.com/apache/apisix) is a cloud-native microservices API gateway, delivering the ultimate performance, security, open source and scalable platform for all your APIs and microservices.
## Architecture
This reference architecture walks you through building **APISIX** as a serverless container API Gateway on top of AWS Fargate with AWS CDK.

## Generate an AWS CDK project with `projen`
```bash
$ mkdir apisix-aws
$ cd $_
$ npx projen new awscdk-app-ts
```
update the `.projenrc.js` with the following content:
```js
const { AwsCdkTypeScriptApp } = require('projen');
const project = new AwsCdkTypeScriptApp({
cdkVersion: "1.70.0",
name: "apisix-aws",
cdkDependencies: [
'@aws-cdk/aws-ec2',
'@aws-cdk/aws-ecs',
'@aws-cdk/aws-ecs-patterns',
]
});
project.synth();
```
update the project:
```ts
$ npx projen
```
## update `src/main.ts`
```ts
import * as cdk from '@aws-cdk/core';
import { Vpc, Port } from '@aws-cdk/aws-ec2';
import { Cluster, ContainerImage, TaskDefinition, Compatibility } from '@aws-cdk/aws-ecs';
import { ApplicationLoadBalancedFargateService, NetworkLoadBalancedFargateService } from '@aws-cdk/aws-ecs-patterns';
export class ApiSixStack extends cdk.Stack {
constructor(scope: cdk.Construct, id: string, props?: cdk.StackProps) {
super(scope, id, props);
const vpc = Vpc.fromLookup(this, 'VPC', {
isDefault: true
})
const cluster = new Cluster(this, 'Cluster', {
vpc
})
/**
* ApiSix service
*/
const taskDefinition = new TaskDefinition(this, 'TaskApiSix', {
compatibility: Compatibility.FARGATE,
memoryMiB: '512',
cpu: '256'
})
taskDefinition
.addContainer('apisix', {
image: ContainerImage.fromRegistry('iresty/apisix'),
})
.addPortMappings({
containerPort: 9080
})
taskDefinition
.addContainer('etcd', {
image: ContainerImage.fromRegistry('gcr.azk8s.cn/etcd-development/etcd:v3.3.12'),
// image: ContainerImage.fromRegistry('gcr.io/etcd-development/etcd:v3.3.12'),
})
.addPortMappings({
containerPort: 2379
})
const svc = new ApplicationLoadBalancedFargateService(this, 'ApiSixService', {
cluster,
taskDefinition,
})
svc.targetGroup.setAttribute('deregistration_delay.timeout_seconds', '30')
svc.targetGroup.configureHealthCheck({
interval: cdk.Duration.seconds(5),
healthyHttpCodes: '404',
healthyThresholdCount: 2,
unhealthyThresholdCount: 3,
timeout: cdk.Duration.seconds(4)
})
/**
* PHP service
*/
const taskDefinitionPHP = new TaskDefinition(this, 'TaskPHP', {
compatibility: Compatibility.FARGATE,
memoryMiB: '512',
cpu: '256'
})
taskDefinitionPHP
.addContainer('php', {
image: ContainerImage.fromRegistry('abiosoft/caddy:php'),
})
.addPortMappings({
containerPort: 2015
})
const svcPHP = new NetworkLoadBalancedFargateService(this, 'PhpService', {
cluster,
taskDefinition: taskDefinitionPHP,
assignPublicIp: true,
})
// allow Fargate task behind NLB to accept all traffic
svcPHP.service.connections.allowFromAnyIpv4(Port.tcp(2015))
svcPHP.targetGroup.setAttribute('deregistration_delay.timeout_seconds', '30')
svcPHP.loadBalancer.setAttribute('load_balancing.cross_zone.enabled', 'true')
new cdk.CfnOutput(this, 'ApiSixDashboardURL', {
value: `http://${svc.loadBalancer.loadBalancerDnsName}/apisix/dashboard/`
})
}
}
const devEnv = {
account: process.env.CDK_DEFAULT_ACCOUNT,
region: process.env.CDK_DEFAULT_REGION,
};
const app = new cdk.App();
new ApiSixStack(app, 'apisix-stack-dev', { env: devEnv });
app.synth();
```
## Deploy the APISIX Stack with AWS CDK
```bash
$ cdk diff
$ cdk deploy
```
On deployment complete, some outputs will be returned:
```bash
Outputs:
apiSix.PhpServiceLoadBalancerDNS5E5BAB1B = apiSi-PhpSe-FOL2MM4TW7G8-09029e095ab36fcc.elb.us-west-2.amazonaws.com
apiSix.ApiSixDashboardURL = http://apiSi-ApiSi-1TM103DN35GRY-1477666967.us-west-2.elb.amazonaws.com/apisix/dashboard/
apiSix.ApiSixServiceLoadBalancerDNSD4E5B8CB = apiSi-ApiSi-1TM103DN35GRY-1477666967.us-west-2.elb.amazonaws.com
apiSix.ApiSixServiceServiceURLF6EC7872 = http://apiSi-ApiSi-1TM103DN35GRY-1477666967.us-west-2.elb.amazonaws.com
```
Open the `apiSix.ApiSixDashboardURL` from your browser and you will see the login prompt.
### Configure the upstream nodes
All upstream nodes are running as **AWS Fargate** tasks and registered to the **NLB(Network Load Balancer)** exposing multiple static IP addresses. We can query the IP addresses by **nslookup** the **apiSix.PhpServiceLoadBalancerDNS5E5BAB1B** like this:
```bash
$ nslookup apiSi-PhpSe-FOL2MM4TW7G8-09029e095ab36fcc.elb.us-west-2.amazonaws.com
Server: 192.168.31.1
Address: 192.168.31.1#53
Non-authoritative answer:
Name: apiSi-PhpSe-FOL2MM4TW7G8-09029e095ab36fcc.elb.us-west-2.amazonaws.com
Address: 44.224.124.213
Name: apiSi-PhpSe-FOL2MM4TW7G8-09029e095ab36fcc.elb.us-west-2.amazonaws.com
Address: 18.236.43.167
Name: apiSi-PhpSe-FOL2MM4TW7G8-09029e095ab36fcc.elb.us-west-2.amazonaws.com
Address: 35.164.164.178
Name: apiSi-PhpSe-FOL2MM4TW7G8-09029e095ab36fcc.elb.us-west-2.amazonaws.com
Address: 44.226.102.63
```
Configure the IP addresses returned as your upstream nodes in your **APISIX** dashboard followed by the **Services** and **Routes** configuration. Let's say we have a `/index.php` as the URI for the first route for our first **Service** from the **Upstream** IP addresses.


## Validation
OK. Let's test the `/index.php` on `{apiSix.ApiSixServiceServiceURL}/index.php`

Now we have been successfully running **APISIX** in AWS Fargate as serverless container API Gateway service.
## Clean up
```bash
$ cdk destroy
```
## Running APISIX in AWS China Regions
update `src/main.ts`
```js
taskDefinition
.addContainer('etcd', {
image: ContainerImage.fromRegistry('gcr.azk8s.cn/etcd-development/etcd:v3.3.12'),
// image: ContainerImage.fromRegistry('gcr.io/etcd-development/etcd:v3.3.12'),
})
.addPortMappings({
containerPort: 2379
})
```
_(read [here](https://github.com/iresty/docker-apisix/blob/9a731f698171f4838e9bc0f1c05d6dda130ca89b/example/docker-compose.yml#L18-L19) for more reference)_
Run `cdk deploy` and specify your preferred AWS region in China.
```bash
# let's say we have another AWS_PROFILE for China regions called 'cn'
# make sure you have aws configure --profile=cn properly.
#
# deploy to NingXia region
$ cdk deploy --profile cn -c region=cn-northwest-1
# deploy to Beijing region
$ cdk deploy --profile cn -c region=cn-north-1
```
In the following case, we got the `Outputs` returned for **AWS Ningxia region(cn-northwest-1)**:
```bash
Outputs:
apiSix.PhpServiceLoadBalancerDNS5E5BAB1B = apiSi-PhpSe-1760FFS3K7TXH-562fa1f7f642ec24.elb.cn-northwest-1.amazonaws.com.cn
apiSix.ApiSixDashboardURL = http://apiSi-ApiSi-123HOROQKWZKA-1268325233.cn-northwest-1.elb.amazonaws.com.cn/apisix/dashboard/
apiSix.ApiSixServiceLoadBalancerDNSD4E5B8CB = apiSi-ApiSi-123HOROQKWZKA-1268325233.cn-northwest-1.elb.amazonaws.com.cn
apiSix.ApiSixServiceServiceURLF6EC7872 = http://apiSi-ApiSi-123HOROQKWZKA-1268325233.cn-northwest-1.elb.amazonaws.com.cn
```
Open the `apiSix.ApiSixDashboardURL` URL and log in to configure your **APISIX** in AWS China region.
_TBD_
## Decouple APISIX and etcd3 on AWS
For high availability and state consistency consideration, you might be interested to decouple the **etcd3** as a separate cluster from **APISIX** not only for performance but also high availability and fault tolerance yet with highly reliable state consistency.
_TBD_
---
---
title: Batch Processor
---
The batch processor can be used to aggregate entries(logs/any data) and process them in a batch.
When the batch_max_size is set to 1 the processor will execute each entry immediately. Setting the batch max size more
than 1 will start aggregating the entries until it reaches the max size or the timeout expires.
## Configurations
The only mandatory parameter to create a batch processor is a function. The function will be executed when the batch reaches the max size
or when the buffer duration exceeds.
| Name | Type | Requirement | Default | Valid | Description |
| ---------------- | ------- | ----------- | ------- | ------- | ------------------------------------------------------------ |
| name | string | optional | logger's name | ["http logger",...] | A unique identifier used to identify the batch processor, which defaults to the name of the logger plug-in that calls the batch processor, such as plug-in "http logger" 's `name` is "http logger. |
| batch_max_size | integer | optional | 1000 | [1,...] | Sets the maximum number of logs sent in each batch. When the number of logs reaches the set maximum, all logs will be automatically pushed to the HTTP/HTTPS service. |
| inactive_timeout | integer | optional | 5 | [1,...] | The maximum time to refresh the buffer (in seconds). When the maximum refresh time is reached, all logs will be automatically pushed to the HTTP/HTTPS service regardless of whether the number of logs in the buffer reaches the maximum number set. |
| buffer_duration | integer | optional | 60 | [1,...] | Maximum age in seconds of the oldest entry in a batch before the batch must be processed. |
| max_retry_count | integer | optional | 0 | [0,...] | Maximum number of retries before removing the entry from the processing pipeline when an error occurs. |
| retry_delay | integer | optional | 1 | [0,...] | Number of seconds the process execution should be delayed if the execution fails. |
The following code shows an example of how to use batch processor in your plugin:
```lua
local bp_manager_mod = require("apisix.utils.batch-processor-manager")
...
local plugin_name = "xxx-logger"
local batch_processor_manager = bp_manager_mod.new(plugin_name)
local schema = {...}
local _M = {
...
name = plugin_name,
schema = batch_processor_manager:wrap_schema(schema),
}
...
function _M.log(conf, ctx)
local entry = {...} -- data to log
if batch_processor_manager:add_entry(conf, entry) then
return
end
-- create a new processor if not found
-- entries is an array table of entry, which can be processed in batch
local func = function(entries)
-- serialize to json array core.json.encode(entries)
-- process/send data
return true
-- return false, err_msg, first_fail if failed
-- first_fail(optional) indicates first_fail-1 entries have been successfully processed
-- and during processing of entries[first_fail], the error occurred. So the batch processor
-- only retries for the entries having index >= first_fail as per the retry policy.
end
batch_processor_manager:add_entry_to_new_processor(conf, entry, ctx, func)
end
```
The batch processor's configuration will be set inside the plugin's configuration.
For example:
:::note
You can fetch the `admin_key` from `config.yaml` and save to an environment variable with the following command:
```bash
admin_key=$(yq '.deployment.admin.admin_key[0].key' conf/config.yaml | sed 's/"//g')
```
:::
```shell
curl http://127.0.0.1:9180/apisix/admin/routes/1 -H "X-API-KEY: $admin_key" -X PUT -d '
{
"plugins": {
"http-logger": {
"uri": "http://mockbin.org/bin/:ID",
"batch_max_size": 10,
"max_retry_count": 1
}
},
"upstream": {
"type": "roundrobin",
"nodes": {
"127.0.0.1:1980": 1
}
},
"uri": "/hello"
}'
```
If your plugin only uses one global batch processor,
you can also use the processor directly:
```lua
local entry = {...} -- data to log
if log_buffer then
log_buffer:push(entry)
return
end
local config_bat = {
name = config.name,
retry_delay = config.retry_delay,
...
}
local err
-- entries is an array table of entry, which can be processed in batch
local func = function(entries)
...
return true
-- return false, err_msg, first_fail if failed
end
log_buffer, err = batch_processor:new(func, config_bat)
if not log_buffer then
core.log.warn("error when creating the batch processor: ", err)
return
end
log_buffer:push(entry)
```
Note: Please make sure the batch max size (entry count) is within the limits of the function execution.
The timer to flush the batch runs based on the `inactive_timeout` configuration. Thus, for optimal usage,
keep the `inactive_timeout` smaller than the `buffer_duration`.
---
---
title: Benchmark
---
### Benchmark Environments
n1-highcpu-8 (8 vCPUs, 7.2 GB memory) on Google Cloud
But we **only** used 4 cores to run APISIX, and left 4 cores for system and [wrk](https://github.com/wg/wrk),
which is the HTTP benchmarking tool.
### Benchmark Test for reverse proxy
Only used APISIX as the reverse proxy server, with no logging, limit rate, or other plugins enabled,
and the response size was 1KB.
#### QPS
The x-axis means the size of CPU core, and the y-axis is QPS.

#### Latency
Note the y-axis latency in **microsecond(μs)** not millisecond.

#### Flame Graph
The result of Flame Graph:

And if you want to run the benchmark test in your machine, you should run another Nginx to listen 80 port.
:::note
You can fetch the `admin_key` from `config.yaml` and save to an environment variable with the following command:
```bash
admin_key=$(yq '.deployment.admin.admin_key[0].key' conf/config.yaml | sed 's/"//g')
```
:::
```shell
curl http://127.0.0.1:9180/apisix/admin/routes/1 -H "X-API-KEY: $admin_key" -X PUT -d '
{
"methods": ["GET"],
"uri": "/hello",
"upstream": {
"type": "roundrobin",
"nodes": {
"127.0.0.1:80": 1,
"127.0.0.2:80": 1
}
}
}'
```
then run wrk:
```shell
wrk -d 60 --latency http://127.0.0.1:9080/hello
```
### Benchmark Test for reverse proxy, enabled 2 plugins
Only used APISIX as the reverse proxy server, enabled the limit rate and prometheus plugins,
and the response size was 1KB.
#### QPS
The x-axis means the size of CPU core, and the y-axis is QPS.

#### Latency
Note the y-axis latency in **microsecond(μs)** not millisecond.

#### Flame Graph
The result of Flame Graph:

And if you want to run the benchmark test in your machine, you should run another Nginx to listen 80 port.
```shell
curl http://127.0.0.1:9180/apisix/admin/routes/1 -H "X-API-KEY: $admin_key" -X PUT -d '
{
"methods": ["GET"],
"uri": "/hello",
"plugins": {
"limit-count": {
"count": 999999999,
"time_window": 60,
"rejected_code": 503,
"key": "remote_addr"
},
"prometheus":{}
},
"upstream": {
"type": "roundrobin",
"nodes": {
"127.0.0.1:80": 1,
"127.0.0.2:80": 1
}
}
}'
```
then run wrk:
```shell
wrk -d 60 --latency http://127.0.0.1:9080/hello
```
For more reference on how to run the benchmark test, you can see this [PR](https://github.com/apache/apisix/pull/6136) and this [script](https://gist.github.com/membphis/137db97a4bf64d3653aa42f3e016bd01).
:::tip
If you want to run the benchmark with a large number of connections, You may have to update the [**keepalive**](https://github.com/apache/apisix/blob/master/conf/config.yaml.example#L241) config by adding the configuration to [`config.yaml`](https://github.com/apache/apisix/blob/master/conf/config.yaml) and reload APISIX. Connections exceeding this number will become short connections. You can run the following command to test the benchmark with a large number of connections:
```bash
wrk -t200 -c5000 -d30s http://127.0.0.1:9080/hello
```
For more details, you can refer to [Module ngx_http_upstream_module](http://nginx.org/en/docs/http/ngx_http_upstream_module.html).
:::
---
---
id: build-apisix-dev-environment-devcontainers
title: Build development environment with Dev Containers
description: This paper introduces how to quickly start the APISIX API Gateway development environment using Dev Containers.
---
Previously, building and developing APISIX on Linux or macOS required developers to install its runtime environment and toolchain themselves, and developers might not be familiar with them.
As it needs to support multiple operating systems and CPU ISAs, the process has inherent complexities in how to find and install dependencies and toolchains.
:::note
The tutorial can be used as an alternative to a [bare-metal environment](building-apisix.md) or a [macOS container development environment](build-apisix-dev-environment-on-mac.md).
It only requires that you have an environment running Docker or a similar alternative (the docker/docker compose command is required), and no other dependent components need to be installed on your host machine.
:::
## Supported systems and CPU ISA
- Linux
- AMD64
- ARM64
- Windows (with WSL2 supported)
- AMD64
- macOS
- ARM64
- AMD64
## Quick Setup of Apache APISIX Development Environment
### Implementation Idea
We use Dev Containers to build development environment, and when we open an APISIX project using the IDE, we have access to the container-driven runtime environment.
There the etcd is ready and we can start APISIX directly.
### Steps
:::note
The following uses Visual Studio Code, which has built-in integration with Dev Containers.
In theory you could also use any other editor or IDE that integrates with Dev Containers.
:::
First, clone the APISIX source code, open project in Visual Studio Code.
```shell
git clone https://github.com/apache/apisix.git
cd apisix
code . # VSCode needs to be in the PATH environment variable, you can also open the project directory manually in the UI.
```
Next, switch to Dev Containers. Open the VSCode Command Palette, and execute `Dev Containers: Reopen in Container`.

VSCode will open the Dev Containers project in a new window, where it will build the runtime and install the toolchain according to the Dockerfile before starting the connection and finally installing the APISIX dependencies.
:::note
This process requires a reliable network connection, and it will access Docker Hub, GitHub, and some other sites. You will need to ensure the network connection yourself, otherwise the container build may fail.
:::
Wait some minutes, depending on the internet connection or computer performance, it may take from a few minutes to tens of minutes, you can click on the Progress Bar in the bottom right corner to view a live log where you will be able to check unusual stuck.
If you encounter any problems, you can search or ask questions in [GitHub Issues](https://github.com/apache/apisix/issues) or [GitHub Discussions](https://github.com/apache/apisix/discussions), and community members will respond as promptly as possible.

When the process in the terminal is complete, the development environment is ready, and even etcd is ready.
Start APISIX with the following command:
```shell
make run
```
Now you can start writing code and test cases, and testing tools are available:
```shell
export TEST_NGINX_BINARY=openresty
# run all tests
make test
# or run a specify test case file
FLUSH_ETCD=1 prove -Itest-nginx/lib -I. -r t/admin/api.t
```
## FAQ
### Where's the code? When I delete the container, are the changes lost?
It will be on your host, which is where you cloned the APISIX source code, and the container uses the volume to mount the code into the container. Containers contain only the runtime environment, not the source code, so no changes will be lost whether you close or delete the container.
And, the `git` is already installed in the container, so you can commit a change directly there.
---
---
id: build-apisix-dev-environment-on-mac
title: Build development environment on Mac
description: This paper introduces how to use Docker to quickly build the development environment of API gateway Apache APISIX on Mac.
---
If you want to quickly build and develop APISIX on your Mac platform, you can refer to this tutorial.
:::note
This tutorial is suitable for situations where you need to quickly start development on the Mac platform, if you want to go further and have a better development experience, the better choice is the Linux-based virtual machine, or directly use this kind of system as your development environment.
You can see the specific supported systems [here](install-dependencies.md#install).
:::
## Quick Setup of Apache APISIX Development Environment
### Implementation Idea
We use Docker to build the test environment of Apache APISIX. When the container starts, we can mount the source code of Apache APISIX into the container, and then we can build and run test cases in the container.
### Implementation Steps
First, clone the APISIX source code, build an image that can run test cases, and compile the Apache APISIX.
```shell
git clone https://github.com/apache/apisix.git
cd apisix
docker build -t apisix-dev-env -f example/build-dev-image.dockerfile .
```
Next, start Etcd:
```shell
docker run -d --name etcd-apisix --net=host pachyderm/etcd:v3.5.2
```
Mount the APISIX directory and start the development environment container:
```shell
docker run -d --name apisix-dev-env --net=host -v $(pwd):/apisix:rw apisix-dev-env:latest
```
Finally, enter the container, build the Apache APISIX runtime, and configure the test environment:
```shell
docker exec -it apisix-dev-env make deps
docker exec -it apisix-dev-env ln -s /usr/bin/openresty /usr/bin/nginx
```
### Run and Stop APISIX
```shell
docker exec -it apisix-dev-env make run
docker exec -it apisix-dev-env make stop
```
:::note
If you encounter an error message like `nginx: [emerg] bind() to unix:/apisix/logs/worker_events.sock failed (95: Operation not supported)` while running `make run`, please use this solution.
Change the `File Sharing` settings of your Docker-Desktop:

Changing to either `gRPC FUSE` or `osxfs` can resolve this issue.
:::
### Run Specific Test Cases
```shell
docker exec -it apisix-dev-env prove t/admin/routes.t
```
---
---
id: building-apisix
title: Building APISIX from source
keywords:
- API Gateway
- Apache APISIX
- Code Contribution
- Building APISIX
description: Guide for building and running APISIX locally for development.
---
import Tabs from '@theme/Tabs';
import TabItem from '@theme/TabItem';
If you are looking to setup a development environment or contribute to APISIX, this guide is for you.
If you are looking to quickly get started with APISIX, check out the other [installation methods](./installation-guide.md).
:::note
To build an APISIX docker image from source code, see [build image from source code](https://apisix.apache.org/docs/docker/build/#build-an-image-from-customizedpatched-source-code).
To build and package APISIX for a specific platform, see [apisix-build-tools](https://github.com/api7/apisix-build-tools) instead.
:::
## Building APISIX from source
First of all, we need to specify the branch to be built:
```shell
APISIX_BRANCH='release/3.14'
```
Then, you can run the following command to clone the APISIX source code from Github:
```shell
git clone --depth 1 --branch ${APISIX_BRANCH} https://github.com/apache/apisix.git apisix-${APISIX_BRANCH}
```
Alternatively, you can also download the source package from the [Downloads](https://apisix.apache.org/downloads/) page. Note that source packages here are not distributed with test cases.
Before installation, install [OpenResty](https://openresty.org/en/installation.html).
Next, navigate to the directory, install dependencies, and build APISIX.
```shell
cd apisix-${APISIX_BRANCH}
make deps
make install
```
This will install the runtime-dependent Lua libraries and `apisix-runtime` the `apisix` CLI tool.
:::note
If you get an error message like `Could not find header file for LDAP/PCRE/openssl` while running `make deps`, use this solution.
`luarocks` supports custom compile-time dependencies (See: [Config file format](https://github.com/luarocks/luarocks/wiki/Config-file-format)). You can use a third-party tool to install the missing packages and add its installation directory to the `luarocks`' variables table. This method works on macOS, Ubuntu, CentOS, and other similar operating systems.
The solution below is for macOS but it works similarly for other operating systems:
1. Install `openldap` by running:
```shell
brew install openldap
```
2. Locate the installation directory by running:
```shell
brew --prefix openldap
```
3. Add this path to the project configuration file by any of the two methods shown below:
1. You can use the `luarocks config` command to set `LDAP_DIR`:
```shell
luarocks config variables.LDAP_DIR /opt/homebrew/cellar/openldap/2.6.1
```
2. You can also change the default configuration file of `luarocks`. Open the file `~/.luaorcks/config-5.1.lua` and add the following:
```shell
variables = { LDAP_DIR = "/opt/homebrew/cellar/openldap/2.6.1", LDAP_INCDIR = "/opt/homebrew/cellar/openldap/2.6.1/include", }
```
`/opt/homebrew/cellar/openldap/` is default path `openldap` is installed on Apple Silicon macOS machines. For Intel machines, the default path is `/usr/local/opt/openldap/`.
:::
To uninstall the APISIX runtime, run:
```shell
make uninstall
make undeps
```
:::danger
This operation will remove the files completely.
:::
## Installing etcd
APISIX uses [etcd](https://github.com/etcd-io/etcd) to save and synchronize configuration. Before running APISIX, you need to install etcd on your machine. Installation methods based on your operating system are mentioned below.
```shell
ETCD_VERSION='3.4.18'
wget https://github.com/etcd-io/etcd/releases/download/v${ETCD_VERSION}/etcd-v${ETCD_VERSION}-linux-amd64.tar.gz
tar -xvf etcd-v${ETCD_VERSION}-linux-amd64.tar.gz && \
cd etcd-v${ETCD_VERSION}-linux-amd64 && \
sudo cp -a etcd etcdctl /usr/bin/
nohup etcd >/tmp/etcd.log 2>&1 &
```
```shell
brew install etcd
brew services start etcd
```
## Running and managing APISIX server
To initialize the configuration file, within the APISIX directory, run:
```shell
apisix init
```
:::tip
You can run `apisix help` to see a list of available commands.
:::
You can then test the created configuration file by running:
```shell
apisix test
```
Finally, you can run the command below to start APISIX:
```shell
apisix start
```
To stop APISIX, you can use either the `quit` or the `stop` subcommand.
`apisix quit` will gracefully shutdown APISIX. It will ensure that all received requests are completed before stopping.
```shell
apisix quit
```
Where as, the `apisix stop` command does a force shutdown and discards all pending requests.
```shell
apisix stop
```
## Building runtime for APISIX
Some features of APISIX requires additional Nginx modules to be introduced into OpenResty.
To use these features, you need to build a custom distribution of OpenResty (apisix-runtime). See [apisix-build-tools](https://github.com/api7/apisix-build-tools) for setting up your build environment and building it.
## Running tests
The steps below show how to run the test cases for APISIX:
1. Install [cpanminus](https://metacpan.org/pod/App::cpanminus#INSTALLATION), the package manager for Perl.
2. Install the [test-nginx](https://github.com/openresty/test-nginx) dependencies with `cpanm`:
```shell
sudo cpanm --notest Test::Nginx IPC::Run > build.log 2>&1 || (cat build.log && exit 1)
```
3. Clone the test-nginx source code locally:
```shell
git clone https://github.com/openresty/test-nginx.git
```
4. Append the current directory to Perl's module directory by running:
```shell
export PERL5LIB=.:$PERL5LIB
```
You can specify the Nginx binary path by running:
```shell
TEST_NGINX_BINARY=/usr/local/bin/openresty prove -Itest-nginx/lib -r t
```
5. Run the tests by running:
```shell
make test
```
:::note
Some tests rely on external services and system configuration modification. See [ci/linux_openresty_common_runner.sh](https://github.com/apache/apisix/blob/master/ci/linux_openresty_common_runner.sh) for a complete test environment build.
:::
### Troubleshooting
These are some common troubleshooting steps for running APISIX test cases.
#### Configuring Nginx path
For the error `Error unknown directive "lua_package_path" in /API_ASPIX/apisix/t/servroot/conf/nginx.conf`, ensure that OpenResty is set to the default Nginx and export the path as follows:
- Linux default installation path:
```shell
export PATH=/usr/local/openresty/nginx/sbin:$PATH
```
#### Running a specific test case
To run a specific test case, use the command below:
```shell
prove -Itest-nginx/lib -r t/plugin/openid-connect.t
```
See [testing framework](./internal/testing-framework.md) for more details.
---
---
title: Certificate
---
`APISIX` supports to load multiple SSL certificates by TLS extension Server Name Indication (SNI).
### Single SNI
It is most common for an SSL certificate to contain only one domain. We can create an `ssl` object. Here is a simple case, creates a `ssl` object and `route` object.
* `cert`: PEM-encoded public certificate of the SSL key pair.
* `key`: PEM-encoded private key of the SSL key pair.
* `snis`: Hostname(s) to associate with this certificate as SNIs. To set this attribute this certificate must have a valid private key associated with it.
The following is an example of configuring an SSL certificate with a single SNI in APISIX.
Create an SSL object with the certificate and key valid for the SNI:
:::note
You can fetch the `admin_key` from `config.yaml` and save to an environment variable with the following command:
```bash
admin_key=$(yq '.deployment.admin.admin_key[0].key' conf/config.yaml | sed 's/"//g')
```
:::
```shell
curl http://127.0.0.1:9180/apisix/admin/ssls/1 \
-H "X-API-KEY: $admin_key" -X PUT -d '
{
"cert" : "'"$(cat t/certs/apisix.crt)"'",
"key": "'"$(cat t/certs/apisix.key)"'",
"snis": ["test.com"]
}'
```
Create a Router object:
```shell
curl http://127.0.0.1:9180/apisix/admin/routes/1 -H "X-API-KEY: $admin_key" -X PUT -i -d '
{
"uri": "/get",
"hosts": ["test.com"],
"methods": ["GET"],
"upstream": {
"type": "roundrobin",
"nodes": {
"httpbin.org": 1
}
}
}'
```
Send a request to verify:
```shell
curl --resolve 'test.com:9443:127.0.0.1' https://test.com:9443/get -k -vvv
* Added test.com:9443:127.0.0.1 to DNS cache
* About to connect() to test.com port 9443 (#0)
* Trying 127.0.0.1...
* Connected to test.com (127.0.0.1) port 9443 (#0)
* SSL connection using TLSv1.3 / TLS_AES_256_GCM_SHA384
* ALPN, server accepted to use h2
* Server certificate:
* subject: C=CN; ST=GuangDong; L=ZhuHai; O=iresty; CN=test.com
* start date: Jun 24 22:18:05 2019 GMT
* expire date: May 31 22:18:05 2119 GMT
* issuer: C=CN; ST=GuangDong; L=ZhuHai; O=iresty; CN=test.com
* SSL certificate verify result: self-signed certificate (18), continuing anyway.
> GET /get HTTP/2
> Host: test.com:9443
> user-agent: curl/7.81.0
> accept: */*
```
### wildcard SNI
An SSL certificate could also be valid for a wildcard domain like `*.test.com`, which means it is valid for any domain of that pattern, including `www.test.com` and `mail.test.com`.
The following is an example of configuring an SSL certificate with a wildcard SNI in APISIX.
Create an SSL object with the certificate and key valid for the SNI:
```shell
curl http://127.0.0.1:9180/apisix/admin/ssls/1 \
-H "X-API-KEY: $admin_key" -X PUT -d '
{
"cert" : "'"$(cat t/certs/apisix.crt)"'",
"key": "'"$(cat t/certs/apisix.key)"'",
"snis": ["*.test.com"]
}'
```
Create a Router object:
```shell
curl http://127.0.0.1:9180/apisix/admin/routes/1 -H "X-API-KEY: $admin_key" -X PUT -i -d '
{
"uri": "/get",
"hosts": ["*.test.com"],
"methods": ["GET"],
"upstream": {
"type": "roundrobin",
"nodes": {
"httpbin.org": 1
}
}
}'
```
Send a request to verify:
```shell
curl --resolve 'www.test.com:9443:127.0.0.1' https://www.test.com:9443/get -k -vvv
* Added www.test.com:9443:127.0.0.1 to DNS cache
* Hostname www.test.com was found in DNS cache
* Trying 127.0.0.1:9443...
* Connected to www.test.com (127.0.0.1) port 9443 (#0)
* SSL connection using TLSv1.3 / TLS_AES_256_GCM_SHA384
* ALPN, server accepted to use h2
* Server certificate:
* subject: C=CN; ST=GuangDong; L=ZhuHai; O=iresty; CN=test.com
* start date: Jun 24 22:18:05 2019 GMT
* expire date: May 31 22:18:05 2119 GMT
* issuer: C=CN; ST=GuangDong; L=ZhuHai; O=iresty; CN=test.com
* SSL certificate verify result: self signed certificate (18), continuing anyway.
> GET /get HTTP/2
> Host: www.test.com:9443
> user-agent: curl/7.74.0
> accept: */*
```
### multiple domain
If your SSL certificate may contain more than one domain, like `www.test.com` and `mail.test.com`, then you can add them into the `snis` array. For example:
```json
{
"snis": ["www.test.com", "mail.test.com"]
}
```
### multiple certificates for a single domain
If you want to configure multiple certificate for a single domain, for
instance, supporting both the
[ECC](https://en.wikipedia.org/wiki/Elliptic-curve_cryptography)
and RSA key-exchange algorithm, then just configure the extra certificates (the
first certificate and private key should be still put in `cert` and `key`) and
private keys by `certs` and `keys`.
* `certs`: PEM-encoded certificate array.
* `keys`: PEM-encoded private key array.
`APISIX` will pair certificate and private key with the same indice as a SSL key
pair. So the length of `certs` and `keys` must be same.
### set up multiple CA certificates
APISIX currently uses CA certificates in several places, such as [Protect Admin API](./mtls.md#protect-admin-api), [etcd with mTLS](./mtls.md#etcd-with-mtls), and [Deployment Modes](./deployment-modes.md).
In these places, `ssl_trusted_certificate` or `trusted_ca_cert` will be used to set up the CA certificate, but these configurations will eventually be translated into [lua_ssl_trusted_certificate](https://github.com/openresty/lua-nginx-module#lua_ssl_trusted_certificate) directive in OpenResty.
If you need to set up different CA certificates in different places, then you can package these CA certificates into a CA bundle file and point to this file when you need to set up CAs. This will avoid the problem that the generated `lua_ssl_trusted_certificate` has multiple locations and overwrites each other.
The following is a complete example to show how to set up multiple CA certificates in APISIX.
Suppose we let client and APISIX Admin API, APISIX and ETCD communicate with each other using mTLS protocol, and currently there are two CA certificates, `foo_ca.crt` and `bar_ca.crt`, and use each of these two CA certificates to issue client and server certificate pairs, `foo_ca.crt` and its issued certificate pair are used to protect Admin API, and `bar_ca.crt` and its issued certificate pair are used to protect ETCD.
The following table details the configurations involved in this example and what they do:
| Configuration | Type | Description |
| ------------- | ------- | ------------------------------------------------------------------------------------------------------------------------------------------------------------- |
| foo_ca.crt | CA cert | Issues the secondary certificate required for the client to communicate with the APISIX Admin API over mTLS. |
| foo_client.crt | cert | A certificate issued by `foo_ca.crt` and used by the client to prove its identity when accessing the APISIX Admin API. |
| foo_client.key | key | Issued by `foo_ca.crt`, used by the client, the key file required to access the APISIX Admin API. |
| foo_server.crt | cert | Issued by `foo_ca.crt`, used by APISIX, corresponding to the `admin_api_mtls.admin_ssl_cert` configuration entry. |
| foo_server.key | key | Issued by `foo_ca.crt`, used by APISIX, corresponding to the `admin_api_mtls.admin_ssl_cert_key` configuration entry. |
| admin.apisix.dev | doname | Common Name used in issuing `foo_server.crt` certificate, through which the client accesses APISIX Admin API |
| bar_ca.crt | CA cert | Issues the secondary certificate required for APISIX to communicate with ETCD over mTLS. |
| bar_etcd.crt | cert | Issued by `bar_ca.crt` and used by ETCD, corresponding to the `-cert-file` option in the ETCD startup command. |
| bar_etcd.key | key | Issued by `bar_ca.crt` and used by ETCD, corresponding to the `--key-file` option in the ETCD startup command. |
| bar_apisix.crt | cert | Issued by `bar_ca.crt`, used by APISIX, corresponding to the `etcd.tls.cert` configuration entry. |
| bar_apisix.key | key | Issued by `bar_ca.crt`, used by APISIX, corresponding to the `etcd.tls.key` configuration entry. |
| etcd.cluster.dev | key | Common Name used in issuing `bar_etcd.crt` certificate, which is used as SNI when APISIX communicates with ETCD over mTLS. corresponds to `etcd.tls.sni` configuration item. |
| apisix.ca-bundle | CA bundle | Merged from `foo_ca.crt` and `bar_ca.crt`, replacing `foo_ca.crt` and `bar_ca.crt`. |
1. Create CA bundle files
```shell
cat /path/to/foo_ca.crt /path/to/bar_ca.crt > apisix.ca-bundle
```
2. Start the ETCD cluster and enable client authentication
Start by writing a `goreman` configuration named `Procfile-single-enable-mtls`, the content as:
```text
# Use goreman to run `go get github.com/mattn/goreman`
etcd1: etcd --name infra1 --listen-client-urls https://127.0.0.1:12379 --advertise-client-urls https://127.0.0.1:12379 --listen-peer-urls http://127.0.0.1:12380 --initial-advertise-peer-urls http://127.0.0.1:12380 --initial-cluster-token etcd-cluster-1 --initial-cluster 'infra1=http://127.0.0.1:12380,infra2=http://127.0.0.1:22380,infra3=http://127.0.0.1:32380' --initial-cluster-state new --cert-file /path/to/bar_etcd.crt --key-file /path/to/bar_etcd.key --client-cert-auth --trusted-ca-file /path/to/apisix.ca-bundle
etcd2: etcd --name infra2 --listen-client-urls https://127.0.0.1:22379 --advertise-client-urls https://127.0.0.1:22379 --listen-peer-urls http://127.0.0.1:22380 --initial-advertise-peer-urls http://127.0.0.1:22380 --initial-cluster-token etcd-cluster-1 --initial-cluster 'infra1=http://127.0.0.1:12380,infra2=http://127.0.0.1:22380,infra3=http://127.0.0.1:32380' --initial-cluster-state new --cert-file /path/to/bar_etcd.crt --key-file /path/to/bar_etcd.key --client-cert-auth --trusted-ca-file /path/to/apisix.ca-bundle
etcd3: etcd --name infra3 --listen-client-urls https://127.0.0.1:32379 --advertise-client-urls https://127.0.0.1:32379 --listen-peer-urls http://127.0.0.1:32380 --initial-advertise-peer-urls http://127.0.0.1:32380 --initial-cluster-token etcd-cluster-1 --initial-cluster 'infra1=http://127.0.0.1:12380,infra2=http://127.0.0.1:22380,infra3=http://127.0.0.1:32380' --initial-cluster-state new --cert-file /path/to/bar_etcd.crt --key-file /path/to/bar_etcd.key --client-cert-auth --trusted-ca-file /path/to/apisix.ca-bundle
```
Use `goreman` to start the ETCD cluster:
```shell
goreman -f Procfile-single-enable-mtls start > goreman.log 2>&1 &
```
3. Update `config.yaml`
```yaml title="conf/config.yaml"
deployment:
admin:
admin_key
- name: admin
key: edd1c9f034335f136f87ad84b625c8f1
role: admin
admin_listen:
ip: 127.0.0.1
port: 9180
https_admin: true
admin_api_mtls:
admin_ssl_ca_cert: /path/to/apisix.ca-bundle
admin_ssl_cert: /path/to/foo_server.crt
admin_ssl_cert_key: /path/to/foo_server.key
apisix:
ssl:
ssl_trusted_certificate: /path/to/apisix.ca-bundle
deployment:
role: traditional
role_traditional:
config_provider: etcd
etcd:
host:
- "https://127.0.0.1:12379"
- "https://127.0.0.1:22379"
- "https://127.0.0.1:32379"
tls:
cert: /path/to/bar_apisix.crt
key: /path/to/bar_apisix.key
sni: etcd.cluster.dev
```
4. Test APISIX Admin API
Start APISIX, if APISIX starts successfully and there is no abnormal output in `logs/error.log`, it means that mTLS communication between APISIX and ETCD is normal.
Use curl to simulate a client, communicate with APISIX Admin API with mTLS, and create a route:
```shell
curl -vvv \
--resolve 'admin.apisix.dev:9180:127.0.0.1' https://admin.apisix.dev:9180/apisix/admin/routes/1 \
--cert /path/to/foo_client.crt \
--key /path/to/foo_client.key \
--cacert /path/to/apisix.ca-bundle \
-H "X-API-KEY: $admin_key" -X PUT -i -d '
{
"uri": "/get",
"upstream": {
"type": "roundrobin",
"nodes": {
"httpbin.org:80": 1
}
}
}'
```
A successful mTLS communication between curl and the APISIX Admin API is indicated if the following SSL handshake process is output:
```shell
* TLSv1.3 (OUT), TLS handshake, Client hello (1):
* TLSv1.3 (IN), TLS handshake, Server hello (2):
* TLSv1.3 (IN), TLS handshake, Encrypted Extensions (8):
* TLSv1.3 (IN), TLS handshake, Request CERT (13):
* TLSv1.3 (IN), TLS handshake, Certificate (11):
* TLSv1.3 (IN), TLS handshake, CERT verify (15):
* TLSv1.3 (IN), TLS handshake, Finished (20):
* TLSv1.3 (OUT), TLS change cipher, Change cipher spec (1):
* TLSv1.3 (OUT), TLS handshake, Certificate (11):
* TLSv1.3 (OUT), TLS handshake, CERT verify (15):
* TLSv1.3 (OUT), TLS handshake, Finished (20):
* SSL connection using TLSv1.3 / TLS_AES_256_GCM_SHA384
```
5. Verify APISIX proxy
```shell
curl http://127.0.0.1:9080/get -i
HTTP/1.1 200 OK
Content-Type: application/json
Content-Length: 298
Connection: keep-alive
Date: Tue, 26 Jul 2022 16:31:00 GMT
Access-Control-Allow-Origin: *
Access-Control-Allow-Credentials: true
Server: APISIX/2.14.1
...
```
APISIX proxied the request to the `/get` path of the upstream `httpbin.org` and returned `HTTP/1.1 200 OK`. The whole process is working fine using CA bundle instead of CA certificate.
---
---
title: Control API
---
In Apache APISIX, the control API is used to:
* Expose the internal state of APISIX.
* Control the behavior of a single, isolated APISIX data plane.
To change the default endpoint (`127.0.0.1:9090`) of the Control API server, change the `ip` and `port` in the `control` section in your configuration file (`conf/config.yaml`):
```yaml
apisix:
...
enable_control: true
control:
ip: "127.0.0.1"
port: 9090
```
To enable parameter matching in plugin's control API, add `router: 'radixtree_uri_with_parameter'` to the control section.
**Note**: Never configure the control API server to listen to public traffic.
## Control API Added via Plugins
[Plugins](./terminology/plugin.md) can be enabled to add its control API.
Some Plugins have their own control APIs. See the documentation of the specific Plugin to learn more.
## Plugin Independent Control API
The supported APIs are listed below.
### GET /v1/schema
Introduced in [v2.2](https://github.com/apache/apisix/releases/tag/2.2).
Returns the JSON schema used by the APISIX instance:
```json
{
"main": {
"route": {
"properties": {...}
},
"upstream": {
"properties": {...}
},
...
},
"plugins": {
"example-plugin": {
"consumer_schema": {...},
"metadata_schema": {...},
"schema": {...},
"type": ...,
"priority": 0,
"version": 0.1
},
...
},
"stream-plugins": {
"mqtt-proxy": {
...
},
...
}
}
```
**Note**: Only the enabled `plugins` are returned and they may lack fields like `consumer_schema` or `type` depending on how they were defined.
### GET /v1/healthcheck
Introduced in [v2.3](https://github.com/apache/apisix/releases/tag/2.3).
Returns a [health check](./tutorials/health-check.md) of the APISIX instance.
```json
[
{
"nodes": [
{
"ip": "52.86.68.46",
"counter": {
"http_failure": 0,
"success": 0,
"timeout_failure": 0,
"tcp_failure": 0
},
"port": 80,
"status": "healthy"
},
{
"ip": "100.24.156.8",
"counter": {
"http_failure": 5,
"success": 0,
"timeout_failure": 0,
"tcp_failure": 0
},
"port": 80,
"status": "unhealthy"
}
],
"name": "/apisix/routes/1",
"type": "http"
}
]
```
Each of the returned objects contain the following fields:
* name: resource id, where the health checker is reporting from.
* type: health check type: `["http", "https", "tcp"]`.
* nodes: target nodes of the health checker.
* nodes[i].ip: ip address.
* nodes[i].port: port number.
* nodes[i].status: health check result: `["healthy", "unhealthy", "mostly_healthy", "mostly_unhealthy"]`.
* nodes[i].counter.success: success health check count.
* nodes[i].counter.http_failure: http failures count.
* nodes[i].counter.tcp_failure: tcp connect/read/write failures count.
* nodes[i].counter.timeout_failure: timeout count.
You can also use `/v1/healthcheck/$src_type/$src_id` to get the health status of specific nodes.
For example, `GET /v1/healthcheck/upstreams/1` returns:
```json
{
"nodes": [
{
"ip": "52.86.68.46",
"counter": {
"http_failure": 0,
"success": 2,
"timeout_failure": 0,
"tcp_failure": 0
},
"port": 80,
"status": "healthy"
},
{
"ip": "100.24.156.8",
"counter": {
"http_failure": 5,
"success": 0,
"timeout_failure": 0,
"tcp_failure": 0
},
"port": 80,
"status": "unhealthy"
}
],
"type": "http"
"name": "/apisix/routes/1"
}
```
:::note
Only when one upstream is satisfied by the conditions below,
its status is shown in the result list:
* The upstream is configured with a health checker
* The upstream has served requests in any worker process
:::
If you use browser to access the control API URL, then you will get the HTML output:
### POST /v1/gc
Introduced in [v2.8](https://github.com/apache/apisix/releases/tag/2.8).
Triggers a full garbage collection in the HTTP subsystem.
**Note**: When stream proxy is enabled, APISIX runs another Lua VM for the stream subsystem. Full garbage collection is not triggered in this VM.
### GET /v1/routes
Introduced in [v2.10.0](https://github.com/apache/apisix/releases/tag/2.10.0).
Returns all configured [Routes](./terminology/route.md):
```json
[
{
"value": {
"priority": 0,
"uris": [
"/hello"
],
"id": "1",
"upstream": {
"scheme": "http",
"pass_host": "pass",
"nodes": [
{
"port": 1980,
"host": "127.0.0.1",
"weight": 1
}
],
"type": "roundrobin",
"hash_on": "vars"
},
"status": 1
},
"clean_handlers": {},
"has_domain": false,
"orig_modifiedIndex": 1631193445,
"modifiedIndex": 1631193445,
"key": "/routes/1"
}
]
```
### GET /v1/route/{route_id}
Introduced in [v2.10.0](https://github.com/apache/apisix/releases/tag/2.10.0).
Returns the Route with the specified `route_id`:
```json
{
"value": {
"priority": 0,
"uris": [
"/hello"
],
"id": "1",
"upstream": {
"scheme": "http",
"pass_host": "pass",
"nodes": [
{
"port": 1980,
"host": "127.0.0.1",
"weight": 1
}
],
"type": "roundrobin",
"hash_on": "vars"
},
"status": 1
},
"clean_handlers": {},
"has_domain": false,
"orig_modifiedIndex": 1631193445,
"modifiedIndex": 1631193445,
"key": "/routes/1"
}
```
### GET /v1/services
Introduced in [v2.11.0](https://github.com/apache/apisix/releases/tag/2.11.0).
Returns all the Services:
```json
[
{
"has_domain": false,
"clean_handlers": {},
"modifiedIndex": 671,
"key": "/apisix/services/200",
"createdIndex": 671,
"value": {
"upstream": {
"scheme": "http",
"hash_on": "vars",
"pass_host": "pass",
"type": "roundrobin",
"nodes": [
{
"port": 1980,
"weight": 1,
"host": "127.0.0.1"
}
]
},
"create_time": 1634552648,
"id": "200",
"plugins": {
"limit-count": {
"key": "remote_addr",
"time_window": 60,
"redis_timeout": 1000,
"allow_degradation": false,
"show_limit_quota_header": true,
"policy": "local",
"count": 2,
"rejected_code": 503
}
},
"update_time": 1634552648
}
}
]
```
### GET /v1/service/{service_id}
Introduced in [v2.11.0](https://github.com/apache/apisix/releases/tag/2.11.0).
Returns the Service with the specified `service_id`:
```json
{
"has_domain": false,
"clean_handlers": {},
"modifiedIndex": 728,
"key": "/apisix/services/5",
"createdIndex": 728,
"value": {
"create_time": 1634554563,
"id": "5",
"upstream": {
"scheme": "http",
"hash_on": "vars",
"pass_host": "pass",
"type": "roundrobin",
"nodes": [
{
"port": 1980,
"weight": 1,
"host": "127.0.0.1"
}
]
},
"update_time": 1634554563
}
}
```
### GET /v1/upstreams
Introduced in [v2.11.0](https://github.com/apache/apisix/releases/tag/2.11.0).
Dumps all Upstreams:
```json
[
{
"value":{
"scheme":"http",
"pass_host":"pass",
"nodes":[
{
"host":"127.0.0.1",
"port":80,
"weight":1
},
{
"host":"foo.com",
"port":80,
"weight":2
}
],
"hash_on":"vars",
"update_time":1634543819,
"key":"remote_addr",
"create_time":1634539759,
"id":"1",
"type":"chash"
},
"has_domain":true,
"key":"\/apisix\/upstreams\/1",
"clean_handlers":{
},
"createdIndex":938,
"modifiedIndex":1225
}
]
```
### GET /v1/upstream/{upstream_id}
Introduced in [v2.11.0](https://github.com/apache/apisix/releases/tag/2.11.0).
Dumps the Upstream with the specified `upstream_id`:
```json
{
"value":{
"scheme":"http",
"pass_host":"pass",
"nodes":[
{
"host":"127.0.0.1",
"port":80,
"weight":1
},
{
"host":"foo.com",
"port":80,
"weight":2
}
],
"hash_on":"vars",
"update_time":1634543819,
"key":"remote_addr",
"create_time":1634539759,
"id":"1",
"type":"chash"
},
"has_domain":true,
"key":"\/apisix\/upstreams\/1",
"clean_handlers":{
},
"createdIndex":938,
"modifiedIndex":1225
}
```
### GET /v1/plugin_metadatas
Introduced in [v3.0.0](https://github.com/apache/apisix/releases/tag/3.0.0).
Dumps all plugin_metadatas:
```json
[
{
"log_format": {
"upstream_response_time": "$upstream_response_time"
},
"id": "file-logger"
},
{
"ikey": 1,
"skey": "val",
"id": "example-plugin"
}
]
```
### GET /v1/plugin_metadata/{plugin_name}
Introduced in [v3.0.0](https://github.com/apache/apisix/releases/tag/3.0.0).
Dumps the metadata with the specified `plugin_name`:
```json
{
"log_format": {
"upstream_response_time": "$upstream_response_time"
},
"id": "file-logger"
}
```
### PUT /v1/plugins/reload
Introduced in [v3.9.0](https://github.com/apache/apisix/releases/tag/3.9.0)
Triggers a hot reload of the plugins.
```shell
curl "http://127.0.0.1:9090/v1/plugins/reload" -X PUT
```
### GET /v1/discovery/{service}/dump
Get memory dump of discovered service endpoints and configuration details:
```json
{
"endpoints": [
{
"endpoints": [
{
"value": "{\"https\":[{\"host\":\"172.18.164.170\",\"port\":6443,\"weight\":50},{\"host\":\"172.18.164.171\",\"port\":6443,\"weight\":50},{\"host\":\"172.18.164.172\",\"port\":6443,\"weight\":50}]}",
"name": "default/kubernetes"
},
{
"value": "{\"metrics\":[{\"host\":\"172.18.164.170\",\"port\":2379,\"weight\":50},{\"host\":\"172.18.164.171\",\"port\":2379,\"weight\":50},{\"host\":\"172.18.164.172\",\"port\":2379,\"weight\":50}]}",
"name": "kube-system/etcd"
},
{
"value": "{\"http-85\":[{\"host\":\"172.64.89.2\",\"port\":85,\"weight\":50}]}",
"name": "test-ws/testing"
}
],
"id": "first"
}
],
"config": [
{
"default_weight": 50,
"id": "first",
"client": {
"token": "xxx"
},
"service": {
"host": "172.18.164.170",
"port": "6443",
"schema": "https"
},
"shared_size": "1m"
}
]
}
```
## GET /v1/discovery/{service}/show_dump_file
Get configured services details.
```json
{
"services": {
"service_a": [
{
"host": "172.19.5.12",
"port": 8000,
"weight": 120
},
{
"host": "172.19.5.13",
"port": 8000,
"weight": 120
}
]
},
"expire": 0,
"last_update": 1615877468
}
```
---
---
title: Customize Nginx configuration
---
The Nginx configuration used by APISIX is generated via the template file `apisix/cli/ngx_tpl.lua` and the parameters in `apisix/cli/config.lua` and `conf/config.yaml`.
You can take a look at the generated Nginx configuration in `conf/nginx.conf` after running `./bin/apisix start`.
If you want to customize the Nginx configuration, please read through the `nginx_config` in `conf/config.default.example`. You can override the default value in the `conf/config.yaml`. For instance, you can inject some snippets in the `conf/nginx.conf` via configuring the `xxx_snippet` entries:
```yaml
...
# put this in config.yaml:
nginx_config:
main_configuration_snippet: |
daemon on;
http_configuration_snippet: |
server
{
listen 45651;
server_name _;
access_log off;
location /ysec_status {
req_status_show;
allow 127.0.0.1;
deny all;
}
}
chunked_transfer_encoding on;
http_server_configuration_snippet: |
set $my "var";
http_admin_configuration_snippet: |
log_format admin "$request_time $pipe";
http_end_configuration_snippet: |
server_names_hash_bucket_size 128;
stream_configuration_snippet: |
tcp_nodelay off;
...
```
Pay attention to the indent of `nginx_config` and sub indent of the sub entries, the incorrect indent may cause `./bin/apisix start` to fail to generate Nginx configuration in `conf/nginx.conf`.
---
---
title: Apache APISIX Dashboard
id: dashboard
---
## Overview
[Apache APISIX Dashboard](https://github.com/apache/apisix-dashboard) provides users with an intuitive web interface to operate and manage Apache APISIX. APISIX has a built-in Dashboard UI that is enabled by default, allowing users to easily configure routes, plugins, upstream services, and more through a graphical interface.
## Configuring Dashboard
### Enable or Disable Dashboard
Apache APISIX enables the embedded Dashboard by default. To modify this setting, please edit the `conf/config.yaml` file:
```yaml title="./conf/config.yaml"
deployment:
admin:
# Enable embedded APISIX Dashboard
enable_admin_ui: true
```
**Configuration Description:**
- `enable_admin_ui: true` - Enable embedded Dashboard (enabled by default)
- `enable_admin_ui: false` - Disable embedded Dashboard
After modifying the configuration, restart Apache APISIX for changes to take effect.
### Restrict IP Access
Apache APISIX supports setting an IP access whitelist for the Admin API to prevent unauthorized access and attacks on Apache APISIX.
```yaml title="./conf/config.yaml"
deployment:
admin:
# http://nginx.org/en/docs/http/ngx_http_access_module.html#allow
allow_admin:
- 127.0.0.0/24
```
### Admin API Key
The Dashboard interacts with Apache APISIX through the Admin API and requires a correct Admin API Key for authentication.
#### Configuration
Configure the Admin API Key in `conf/config.yaml`:
```yaml title="./conf/config.yaml"
deployment:
admin:
admin_key:
-
name: admin
role: admin
# Using a simple Admin API Key poses security risks. Please update it when deploying to production
key: edd1c9f034335f136f87ad84b625c8f1
```
Configuration via environment variables is also supported:
```yaml title="./conf/config.yaml"
deployment:
admin:
admin_key:
- name: admin
# Read from environment variable
key: ${{ADMIN_KEY}}
role: admin
```
Set the environment variable before use:
```bash
export ADMIN_KEY=your-secure-api-key
```
Restart Apache APISIX after modifying the configuration for changes to take effect.
#### Using in Dashboard
Access the Dashboard, for example at `http://127.0.0.1:9180/ui/`.
When the Admin API Key is not configured, the settings modal will pop up:

If you accidentally close the settings modal, you can click the button  on the right side of the navigation bar to reopen it.

Next, enter the Admin API Key configured in the previous section. The Dashboard will automatically make a request. If configured incorrectly, the Dashboard will still display `failed to check token` in the upper right corner:

If configured correctly, the Dashboard will no longer display `failed to check token`. At this point, click `X` or the blank area to close the settings modal and use normally.

## FAQ
### Why was Apache APISIX Dashboard refactored?
Apache APISIX Dashboard has evolved through multiple versions:
- **Version 1.x**: A simple Web UI based on Vue.js that directly called the Admin API
- **Version 2.x**: Adopted React + Ant Design Pro frontend architecture, introducing a Golang backend and database storage
During the development of version 2.x, as community demand for features continued to increase, the project gradually became complex and bloated, while synchronization with the main APISIX version also faced challenges.
After thorough discussion, the community decided to clarify the Dashboard's positioning and functional boundaries, returning to a lightweight design to ensure tight integration and version synchronization with the APISIX core.
Future Apache APISIX Dashboard will focus on:
- **Simplified Architecture**: Remove unnecessary complex components and return to the Dashboard's essential functions
- **Enhanced User Experience**: Provide an intuitive and efficient management interface
- **Version Synchronization**: Maintain synchronized releases with Apache APISIX main versions
- **Production Ready**: Ensure stability and reliability, suitable for production environments
For more planning information, please see: [Dashboard Roadmap](https://github.com/apache/apisix-dashboard/issues/2981)
### Release Cycles
The project no longer releases independently and has deprecated the release and tag versioning approach.
When Apache APISIX is released, the Dashboard will be built directly based on a specified Git commit hash, and the artifacts will be embedded into Apache APISIX.
### Legacy Apache APISIX Dashboard
Apache APISIX Dashboard 3.0.1 is the last version before the refactoring that used the old release model. It should only be used with Apache APISIX 3.0, as any higher or lower versions have not been tested.
If needed, you can read the [Legacy Apache APISIX Dashboard Documentation](https://apache-apisix.netlify.app/docs/dashboard/user_guide/).
If you are a new user of Apache APISIX or Apache APISIX Dashboard, we strongly recommend that you always start with the latest version rather than any historical version.
### Contributing Guide
For details, please read the [Apache APISIX Dashboard README](https://github.com/apache/apisix-dashboard/blob/master/README.md).
---
---
title: Debug Function
---
## `5xx` response status code
Similar `5xx` status codes such as 500, 502, 503, etc., are the status codes in response to a server error. When a request has a `5xx` status code; it may come from `APISIX` or `Upstream`. How to identify the source of these response status codes is a very meaningful thing. It can quickly help us determine the problem. (When modifying the configuration `show_upstream_status_in_response_header` in `conf/config.yaml` to `true`, all upstream status codes will be returned, not only `5xx` status.)
## How to identify the source of the `5xx` response status code
In the response header of the request, through the response header of `X-APISIX-Upstream-Status`, we can effectively identify the source of the `5xx` status code. When the `5xx` status code comes from `Upstream`, the response header `X-APISIX-Upstream-Status` can be seen in the response header, and the value of this response header is the response status code. When the `5xx` status code is derived from `APISIX`, there is no response header information of `X-APISIX-Upstream-Status` in the response header. That is, only when the status code of `5xx` is derived from Upstream will the `X-APISIX-Upstream-Status` response header appear.
## Example
:::note
You can fetch the `admin_key` from `config.yaml` and save to an environment variable with the following command:
```bash
admin_key=$(yq '.deployment.admin.admin_key[0].key' conf/config.yaml | sed 's/"//g')
```
:::
>Example 1: `502` response status code comes from `Upstream` (IP address is not available)
```shell
$ curl http://127.0.0.1:9180/apisix/admin/routes/1 -H "X-API-KEY: $admin_key" -X PUT -d '
{
"methods": ["GET"],
"upstream": {
"nodes": {
"127.0.0.1:1": 1
},
"type": "roundrobin"
},
"uri": "/hello"
}'
```
Test:
```shell
$ curl http://127.0.0.1:9080/hello -v
......
< HTTP/1.1 502 Bad Gateway
< Date: Wed, 25 Nov 2020 14:40:22 GMT
< Content-Type: text/html; charset=utf-8
< Content-Length: 154
< Connection: keep-alive
< Server: APISIX/2.0
< X-APISIX-Upstream-Status: 502
<
502 Bad Gateway
on the right side of the navigation bar to reopen it.

Next, enter the Admin API Key configured in the previous section. The Dashboard will automatically make a request. If configured incorrectly, the Dashboard will still display `failed to check token` in the upper right corner:

If configured correctly, the Dashboard will no longer display `failed to check token`. At this point, click `X` or the blank area to close the settings modal and use normally.

## FAQ
### Why was Apache APISIX Dashboard refactored?
Apache APISIX Dashboard has evolved through multiple versions:
- **Version 1.x**: A simple Web UI based on Vue.js that directly called the Admin API
- **Version 2.x**: Adopted React + Ant Design Pro frontend architecture, introducing a Golang backend and database storage
During the development of version 2.x, as community demand for features continued to increase, the project gradually became complex and bloated, while synchronization with the main APISIX version also faced challenges.
After thorough discussion, the community decided to clarify the Dashboard's positioning and functional boundaries, returning to a lightweight design to ensure tight integration and version synchronization with the APISIX core.
Future Apache APISIX Dashboard will focus on:
- **Simplified Architecture**: Remove unnecessary complex components and return to the Dashboard's essential functions
- **Enhanced User Experience**: Provide an intuitive and efficient management interface
- **Version Synchronization**: Maintain synchronized releases with Apache APISIX main versions
- **Production Ready**: Ensure stability and reliability, suitable for production environments
For more planning information, please see: [Dashboard Roadmap](https://github.com/apache/apisix-dashboard/issues/2981)
### Release Cycles
The project no longer releases independently and has deprecated the release and tag versioning approach.
When Apache APISIX is released, the Dashboard will be built directly based on a specified Git commit hash, and the artifacts will be embedded into Apache APISIX.
### Legacy Apache APISIX Dashboard
Apache APISIX Dashboard 3.0.1 is the last version before the refactoring that used the old release model. It should only be used with Apache APISIX 3.0, as any higher or lower versions have not been tested.
If needed, you can read the [Legacy Apache APISIX Dashboard Documentation](https://apache-apisix.netlify.app/docs/dashboard/user_guide/).
If you are a new user of Apache APISIX or Apache APISIX Dashboard, we strongly recommend that you always start with the latest version rather than any historical version.
### Contributing Guide
For details, please read the [Apache APISIX Dashboard README](https://github.com/apache/apisix-dashboard/blob/master/README.md).
---
---
title: Debug Function
---
## `5xx` response status code
Similar `5xx` status codes such as 500, 502, 503, etc., are the status codes in response to a server error. When a request has a `5xx` status code; it may come from `APISIX` or `Upstream`. How to identify the source of these response status codes is a very meaningful thing. It can quickly help us determine the problem. (When modifying the configuration `show_upstream_status_in_response_header` in `conf/config.yaml` to `true`, all upstream status codes will be returned, not only `5xx` status.)
## How to identify the source of the `5xx` response status code
In the response header of the request, through the response header of `X-APISIX-Upstream-Status`, we can effectively identify the source of the `5xx` status code. When the `5xx` status code comes from `Upstream`, the response header `X-APISIX-Upstream-Status` can be seen in the response header, and the value of this response header is the response status code. When the `5xx` status code is derived from `APISIX`, there is no response header information of `X-APISIX-Upstream-Status` in the response header. That is, only when the status code of `5xx` is derived from Upstream will the `X-APISIX-Upstream-Status` response header appear.
## Example
:::note
You can fetch the `admin_key` from `config.yaml` and save to an environment variable with the following command:
```bash
admin_key=$(yq '.deployment.admin.admin_key[0].key' conf/config.yaml | sed 's/"//g')
```
:::
>Example 1: `502` response status code comes from `Upstream` (IP address is not available)
```shell
$ curl http://127.0.0.1:9180/apisix/admin/routes/1 -H "X-API-KEY: $admin_key" -X PUT -d '
{
"methods": ["GET"],
"upstream": {
"nodes": {
"127.0.0.1:1": 1
},
"type": "roundrobin"
},
"uri": "/hello"
}'
```
Test:
```shell
$ curl http://127.0.0.1:9080/hello -v
......
< HTTP/1.1 502 Bad Gateway
< Date: Wed, 25 Nov 2020 14:40:22 GMT
< Content-Type: text/html; charset=utf-8
< Content-Length: 154
< Connection: keep-alive
< Server: APISIX/2.0
< X-APISIX-Upstream-Status: 502
<
502 Bad Gateway
502 Bad Gateway
openresty
```
It has a response header of `X-APISIX-Upstream-Status: 502`.
>Example 2: `502` response status code comes from `APISIX`
```shell
$ curl http://127.0.0.1:9180/apisix/admin/routes/1 -H "X-API-KEY: $admin_key" -X PUT -d '
{
"plugins": {
"fault-injection": {
"abort": {
"http_status": 500,
"body": "Fault Injection!\n"
}
}
},
"uri": "/hello"
}'
```
Test:
```shell
$ curl http://127.0.0.1:9080/hello -v
......
< HTTP/1.1 500 Internal Server Error
< Date: Wed, 25 Nov 2020 14:50:20 GMT
< Content-Type: text/plain; charset=utf-8
< Transfer-Encoding: chunked
< Connection: keep-alive
< Server: APISIX/2.0
<
Fault Injection!
```
There is no response header for `X-APISIX-Upstream-Status`.
>Example 3: `Upstream` has multiple nodes, and all nodes are unavailable
```shell
$ curl http://127.0.0.1:9180/apisix/admin/upstreams/1 -H "X-API-KEY: $admin_key" -X PUT -d '
{
"nodes": {
"127.0.0.3:1": 1,
"127.0.0.2:1": 1,
"127.0.0.1:1": 1
},
"retries": 2,
"type": "roundrobin"
}'
```
```shell
$ curl http://127.0.0.1:9180/apisix/admin/routes/1 -H "X-API-KEY: $admin_key" -X PUT -d '
{
"uri": "/hello",
"upstream_id": "1"
}'
```
Test:
```shell
$ curl http://127.0.0.1:9080/hello -v
< HTTP/1.1 502 Bad Gateway
< Date: Wed, 25 Nov 2020 15:07:34 GMT
< Content-Type: text/html; charset=utf-8
< Content-Length: 154
< Connection: keep-alive
< Server: APISIX/2.0
< X-APISIX-Upstream-Status: 502, 502, 502
<
502 Bad Gateway
502 Bad Gateway
openresty
```
It has a response header of `X-APISIX-Upstream-Status: 502, 502, 502`.
---
---
id: debug-mode
title: Debug mode
keywords:
- API gateway
- Apache APISIX
- Debug mode
description: Guide for enabling debug mode in Apache APISIX.
---
You can use APISIX's debug mode to troubleshoot your configuration.
## Basic debug mode
You can enable the basic debug mode by adding this line to your debug configuration file (`conf/debug.yaml`):
```yaml title="conf/debug.yaml"
basic:
enable: true
#END
```
APISIX loads the configurations of `debug.yaml` on startup and then checks if the file is modified on an interval of 1 second. If the file is changed, APISIX automatically applies the configuration changes.
:::note
For APISIX releases prior to v2.10, basic debug mode is enabled by setting `apisix.enable_debug = true` in your configuration file (`conf/config.yaml`).
:::
If you have configured two Plugins `limit-conn` and `limit-count` on the Route `/hello`, you will receive a response with the header `Apisix-Plugins: limit-conn, limit-count` when you enable the basic debug mode.
```shell
curl http://127.0.0.1:1984/hello -i
```
```shell
HTTP/1.1 200 OK
Content-Type: text/plain
Transfer-Encoding: chunked
Connection: keep-alive
Apisix-Plugins: limit-conn, limit-count
X-RateLimit-Limit: 2
X-RateLimit-Remaining: 1
Server: openresty
hello world
```
:::info IMPORTANT
If the debug information cannot be included in a response header (for example, when the Plugin is in a stream subsystem), the debug information will be logged as an error log at a `warn` level.
:::
## Advanced debug mode
You can configure advanced options in debug mode by modifying your debug configuration file (`conf/debug.yaml`).
The following configurations are available:
| Key | Required | Default | Description |
|---------------------------------|----------|---------|-----------------------------------------------------------------------------------------------------------------------|
| hook_conf.enable | True | false | Enables/disables hook debug trace. i.e. if enabled, will print the target module function's inputs or returned value. |
| hook_conf.name | True | | Module list name of the hook that enabled the debug trace. |
| hook_conf.log_level | True | warn | Log level for input arguments & returned values. |
| hook_conf.is_print_input_args | True | true | When set to `true` enables printing input arguments. |
| hook_conf.is_print_return_value | True | true | When set to `true` enables printing returned values. |
:::note
A checker would check every second for changes to the configuration file. It will only check a file if the file was updated based on its last modification time.
You can add an `#END` flag to indicate to the checker to only look for changes until that point.
:::
The example below shows how you can configure advanced options in debug mode:
```yaml title="conf/debug.yaml"
hook_conf:
enable: false # Enables/disables hook debug trace
name: hook_phase # Module list name of the hook that enabled the debug trace
log_level: warn # Log level for input arguments & returned values
is_print_input_args: true # When set to `true` enables printing input arguments
is_print_return_value: true # When set to `true` enables printing returned values
hook_phase: # Module function list, Name: hook_phase
apisix: # Referenced module name
- http_access_phase # Function names:Array
- http_header_filter_phase
- http_body_filter_phase
- http_log_phase
#END
```
### Dynamically enable advanced debug mode
You can also enable advanced debug mode only on particular requests.
The example below shows how you can enable it on requests with the header `X-APISIX-Dynamic-Debug`:
```yaml title="conf/debug.yaml"
http_filter:
enable: true # Enable/disable advanced debug mode dynamically
enable_header_name: X-APISIX-Dynamic-Debug # Trace for the request with this header
...
#END
```
This will enable the advanced debug mode only for requests like:
```shell
curl 127.0.0.1:9090/hello --header 'X-APISIX-Dynamic-Debug: foo'
```
:::note
The `apisix.http_access_phase` module cannot be hooked for this dynamic rule as the advanced debug mode is enabled based on the request.
:::
---
---
title: Deployment modes
keywords:
- API Gateway
- Apache APISIX
- APISIX deployment modes
description: Documentation about the three deployment modes of Apache APISIX.
---
import Tabs from '@theme/Tabs';
import TabItem from '@theme/TabItem';
APISIX has three different deployment modes for different production use cases. The table below summarises the deployment modes:
| Deployment mode | Roles | Description |
|-----------------|----------------------------|---------------------------------------------------------------------------------------------------------------------|
| traditional | traditional | Data plane and control plane are deployed together. `enable_admin` attribute should be disabled manually. |
| decoupled | data_plane / control_plane | Data plane and control plane are deployed independently. |
| standalone | data_plane / traditional | The `data_plane` mode loads configuration from a local YAML / JSON file, while the traditional mode expects configuration through Admin API. |
Each of these deployment modes are explained in detail below.
## Traditional
In the traditional deployment mode, one instance of APISIX will be both the `data_plane` and the `control_plane`.
An example configuration of the traditional deployment mode is shown below:
```yaml title="conf/config.yaml"
apisix:
node_listen:
- port: 9080
deployment:
role: traditional
role_traditional:
config_provider: etcd
admin:
admin_listen:
port: 9180
etcd:
host:
- http://${etcd_IP}:${etcd_Port}
prefix: /apisix
timeout: 30
#END
```
The instance of APISIX deployed as the traditional role will:
1. Listen on port `9080` to handle user requests, controlled by `node_listen`.
2. Listen on port `9180` to handle Admin API requests, controlled by `admin_listen`.
## Decoupled
In the decoupled deployment mode the `data_plane` and `control_plane` instances of APISIX are deployed separately, i.e., one instance of APISIX is configured to be a *data plane* and the other to be a *control plane*.
The instance of APISIX deployed as the data plane will:
Once the service is started, it will handle the user requests.
The example below shows the configuration of an APISIX instance as *data plane* in the decoupled mode:
```yaml title="conf/config.yaml"
deployment:
role: data_plane
role_data_plane:
config_provider: etcd
etcd:
host:
- https://${etcd_IP}:${etcd_Port}
#END
```
The instance of APISIX deployed as the control plane will:
1. Listen on port `9180` and handle Admin API requests.
The example below shows the configuration of an APISIX instance as *control plane* in the decoupled mode:
```yaml title="conf/config.yaml"
deployment:
role: control_plane
role_control_plane:
config_provider: etcd
etcd:
host:
- https://${etcd_IP}:${etcd_Port}
prefix: /apisix
timeout: 30
#END
```
## Standalone
Turning on the APISIX node in Standalone mode will no longer use the default etcd as the configuration center.
This method is more suitable for two types of users:
1. Kubernetes(k8s):Declarative API that dynamically updates the routing rules with a full yaml configuration.
2. Different configuration centers: There are many implementations of the configuration center, such as Consul, etc., using the full yaml file for intermediate conversion.
### Modes
Now, we have two standalone running modes, file-driven and API-driven.
#### File-driven
The file-driven mode is the kind APISIX has always supported.
The routing rules in the `conf/apisix.yaml` file are loaded into memory immediately after the APISIX node service starts. At each interval (default: 1 second), APISIX checks for updates to the file. If changes are detected, it reloads the rules.
*Note*: Reloading and updating routing rules are all hot memory updates. There is no replacement of working processes, since it's a hot update.
This requires us to set the APISIX role to data plane. That is, set `deployment.role` to `data_plane` and `deployment.role_data_plane.config_provider` to `yaml`.
Refer to the example below:
```yaml
deployment:
role: data_plane
role_data_plane:
config_provider: yaml
```
You can also provide the configuration in JSON format by placing it in `conf/apisix.json`. Before proceeding, you should change the `deployment.role_data_plane.config_provider` to `json`.
Refer to the example below:
```yaml
deployment:
role: data_plane
role_data_plane:
config_provider: json
```
This makes it possible to disable the Admin API and discover configuration changes and reloads based on the local file system.
#### API-driven
The API-drive standalone mode is designed specifically for the APISIX Ingress Controller and is primarily intended for integration with ADC. APISIX provides an official, end-to-end, stateless Ingress Controller implementation. Do not use this feature directly unless you fully understand its internal workings and behavior.
##### Overview
API-driven mode is an emerging paradigm for standalone deployment, where routing rules are stored entirely in memory rather than in a configuration file. Updates must be made through the dedicated Standalone Admin API. Each update replaces the full configuration and takes effect immediately through hot updates, without requiring a restart.
##### Configuration
To enable this mode, set the APISIX role to `traditional` (to start both the API gateway and the Admin API endpoint) and use the YAML config provider. Example configuration:
```yaml
deployment:
role: traditional
role_traditional:
config_provider: yaml
```
This disables the local file source of configuration in favor of the API. When APISIX starts, it uses an empty configuration until updated via the API.
##### API Endpoints
* `conf_version` by resource type
Use `_conf_version` to indicate the client’s current version for each resource type (e.g. routes, upstreams, services, etc.).
```json
{
"routes_conf_version": 12,
"upstreams_conf_version": 102,
"routes": [],
"upstreams": []
}
```
APISIX compares each provided `_conf_version` against its in-memory `_conf_version` for that resource type. If the provided `_conf_version` is:
- **Greater than** the current `conf_version`, APISIX will **rebuild/reset** that resource type’s data to match your payload.
- **Equal to** the current `conf_version`, APISIX treats the resource as **unchanged** and **ignores** it (no data is rebuilt).
- **Less than** the current `conf_version`, APISIX considers your update **stale** and **rejects** the request for that resource type with a **400 Bad Request**.
* `modifiedIndex` by individual resource
Allow setting an index for each resource. APISIX compares this index to its modifiedIndex to determine whether to accept the update.
##### Example
1. get configuration
```shell
curl -X GET http://127.0.0.1:9180/apisix/admin/configs \
-H "X-API-KEY: " \
-H "Accept: application/json" ## or application/yaml
```
This returns the current configuration in JSON or YAML format.
```json
{
"consumer_groups_conf_version": 0,
"consumers_conf_version": 0,
"global_rules_conf_version": 0,
"plugin_configs_conf_version": 0,
"plugin_metadata_conf_version": 0,
"protos_conf_version": 0,
"routes_conf_version": 0,
"secrets_conf_version": 0,
"services_conf_version": 0,
"ssls_conf_version": 0,
"upstreams_conf_version": 0
}
```
2. full update
```shell
curl -X PUT http://127.0.0.1:9180/apisix/admin/configs \
-H "X-API-KEY: " \
-H "Content-Type: application/json" ## or application/yaml \
-H "X-Digest: example_string#1" \
-d '{}'
```
:::note
The X-Digest in the request header, which is an arbitrary string that indicates to APISIX the characteristics of the current configuration version. When the value in the new request is the same as the configuration version already loaded by APISIX, APISIX skips this update.
This allows the client to determine and exclude certain unnecessary update requests. For example, the client can calculate a hash digest of the configuration and send it to APISIX; if two update requests contain the same hash digest, APISIX will not update the configuration.
The client can determine its content. The value is transparent to APISIX and will not be parsed and used for any purpose.
:::
3. update based on resource type
In APISIX memory, the current configuration is:
```json
{
"routes_conf_version": 1000,
"upstreams_conf_version": 1000,
}
```
Update the previous upstreams configuration by setting a higher version number, such as 1001, to replace the current version 1000:
```shell
curl -X PUT http://127.0.0.1:9180/apisix/admin/configs \
-H "X-API-KEY: ${API_KEY}" \
-H "Content-Type: application/json" \
-H "X-Digest: example_string#2" \
-d '
{
"routes_conf_version": 1000,
"upstreams_conf_version": 1001,
"routes": [
{
"modifiedIndex": 1000,
"id": "r1",
"uri": "/hello",
"upstream_id": "u1"
}
],
"upstreams": [
{
"modifiedIndex": 1001,
"id": "u1",
"nodes": {
"127.0.0.1:1980": 1,
"127.0.0.1:1980": 1
},
"type": "roundrobin"
}
]
}'
```
:::note
These APIs apply the same security requirements as the Admin API, including API key, TLS/mTLS, CORS, and IP allowlist.
The API accepts input in the same format as the file-based mode, supporting both JSON and YAML. Unlike the file-based mode, the API does not rely on the `#END` suffix, as HTTP guarantees input integrity.
:::
### How to configure rules
#### To `config_provider: yaml`
All of the rules are stored in one file which named `conf/apisix.yaml`,
APISIX checks if this file has any change **every second**.
If the file is changed & it ends with `#END`,
APISIX loads the rules from this file and updates its memory.
Here is a mini example:
```yaml
routes:
-
uri: /hello
upstream:
nodes:
"127.0.0.1:1980": 1
type: roundrobin
#END
```
*WARNING*: APISIX will not load the rules into memory from file `conf/apisix.yaml` if there is no `#END` at the end.
Environment variables can also be used like so:
```yaml
routes:
-
uri: /hello
upstream:
nodes:
"${{UPSTREAM_ADDR}}": 1
type: roundrobin
#END
```
*WARNING*: When using docker to deploy APISIX in standalone mode. New environment variables added to `apisix.yaml` while APISIX has been initialized will only take effect after a reload.
More information about using environment variables can be found [here](./admin-api.md#using-environment-variables).
#### To `config_provider: json`
All of the rules are stored in one file which named `conf/apisix.json`,
APISIX checks if this file has any change **every second**.
If the file is changed,
APISIX loads the rules from this file and updates its memory.
Here is a mini example:
```json
{
"routes": [
{
"uri": "/hello",
"upstream": {
"nodes": {
"127.0.0.1:1980": 1
},
"type": "roundrobin"
}
}
]
}
```
*WARNING*: when using `conf/apisix.json`, the `#END` marker is not required, as APISIX can directly parse and validate the JSON structure.
### How to configure Route
Single Route:
```yaml
routes:
-
uri: /hello
upstream:
nodes:
"127.0.0.1:1980": 1
type: roundrobin
#END
```
```json
{
"routes": [
{
"uri": "/hello",
"upstream": {
"nodes": {
"127.0.0.1:1980": 1
},
"type": "roundrobin"
}
}
]
}
```
Multiple Routes:
```yaml
routes:
-
uri: /hello
upstream:
nodes:
"127.0.0.1:1980": 1
type: roundrobin
-
uri: /hello2
upstream:
nodes:
"127.0.0.1:1981": 1
type: roundrobin
#END
```
```json
{
"routes": [
{
"uri": "/hello",
"upstream": {
"nodes": {
"127.0.0.1:1980": 1
},
"type": "roundrobin"
}
},
{
"uri": "/hello2",
"upstream": {
"nodes": {
"127.0.0.1:1981": 1
},
"type": "roundrobin"
}
}
]
}
```
### How to configure Route + Service
```yaml
routes:
-
uri: /hello
service_id: 1
services:
-
id: 1
upstream:
nodes:
"127.0.0.1:1980": 1
type: roundrobin
#END
```
```json
{
"routes": [
{
"uri": "/hello",
"service_id": 1
}
],
"services": [
{
"id": 1,
"upstream": {
"nodes": {
"127.0.0.1:1980": 1
},
"type": "roundrobin"
}
}
]
}
```
### How to configure Route + Upstream
```yaml
routes:
-
uri: /hello
upstream_id: 1
upstreams:
-
id: 1
nodes:
"127.0.0.1:1980": 1
type: roundrobin
#END
```
```json
{
"routes": [
{
"uri": "/hello",
"upstream_id": 1
}
],
"upstreams": [
{
"id": 1,
"nodes": {
"127.0.0.1:1980": 1
},
"type": "roundrobin"
}
]
}
```
### How to configure Route + Service + Upstream
```yaml
routes:
-
uri: /hello
service_id: 1
services:
-
id: 1
upstream_id: 2
upstreams:
-
id: 2
nodes:
"127.0.0.1:1980": 1
type: roundrobin
#END
```
```json
{
"routes": [
{
"uri": "/hello",
"service_id": 1
}
],
"services": [
{
"id": 1,
"upstream_id": 2
}
],
"upstreams": [
{
"id": 2,
"nodes": {
"127.0.0.1:1980": 1
},
"type": "roundrobin"
}
]
}
```
### How to configure Plugins
```yaml
# plugins listed here will be hot reloaded and override the boot configuration
plugins:
- name: ip-restriction
- name: jwt-auth
- name: mqtt-proxy
stream: true # set 'stream' to true for stream plugins
#END
```
```json
{
"plugins": [
{
"name": "ip-restriction"
},
{
"name": "jwt-auth"
},
{
"name": "mqtt-proxy",
"stream": true
}
]
}
```
### How to configure Plugin Configs
```yaml
plugin_configs:
-
id: 1
plugins:
response-rewrite:
body: "hello\n"
routes:
- id: 1
uri: /hello
plugin_config_id: 1
upstream:
nodes:
"127.0.0.1:1980": 1
type: roundrobin
#END
```
```json
{
"plugin_configs": [
{
"id": 1,
"plugins": {
"response-rewrite": {
"body": "hello\n"
}
}
}
],
"routes": [
{
"id": 1,
"uri": "/hello",
"plugin_config_id": 1,
"upstream": {
"nodes": {
"127.0.0.1:1980": 1
},
"type": "roundrobin"
}
}
]
}
```
### How to enable SSL
```yaml
ssls:
-
cert: |
-----BEGIN CERTIFICATE-----
MIIDrzCCApegAwIBAgIJAI3Meu/gJVTLMA0GCSqGSIb3DQEBCwUAMG4xCzAJBgNV
BAYTAkNOMREwDwYDVQQIDAhaaGVqaWFuZzERMA8GA1UEBwwISGFuZ3pob3UxDTAL
BgNVBAoMBHRlc3QxDTALBgNVBAsMBHRlc3QxGzAZBgNVBAMMEmV0Y2QuY2x1c3Rl
ci5sb2NhbDAeFw0yMDEwMjgwMzMzMDJaFw0yMTEwMjgwMzMzMDJaMG4xCzAJBgNV
BAYTAkNOMREwDwYDVQQIDAhaaGVqaWFuZzERMA0GA1UEBwwISGFuZ3pob3UxDTAL
BgNVBAoMBHRlc3QxDTALBgNVBAsMBHRlc3QxGzAZBgNVBAMMEmV0Y2QuY2x1c3Rl
ci5sb2NhbDCCASIwDQYJKoZIhvcNAQEBBQADggEPADCCAQoCggEBAJ/qwxCR7g5S
s9+VleopkLi5pAszEkHYOBpwF/hDeRdxU0I0e1zZTdTlwwPy2vf8m3kwoq6fmNCt
tdUUXh5Wvgi/2OA8HBBzaQFQL1Av9qWwyES5cx6p0ZBwIrcXQIsl1XfNSUpQNTSS
D44TGduXUIdeshukPvMvLWLezynf2/WlgVh/haWtDG99r/Gj3uBdjl0m/xGvKvIv
NFy6EdgG9fkwcIalutjrUnGl9moGjwKYu4eXW2Zt5el0d1AHXUsqK4voe0p+U2Nz
quDmvxteXWdlsz8o5kQT6a4DUtWhpPIfNj9oZfPRs3LhBFQ74N70kVxMOCdec1lU
bnFzLIMGlz0CAwEAAaNQME4wHQYDVR0OBBYEFFHeljijrr+SPxlH5fjHRPcC7bv2
MB8GA1UdIwQYMBaAFFHeljijrr+SPxlH5fjHRPcC7bv2MAwGA1UdEwQFMAMBAf8w
DQYJKoZIhvcNAQELBQADggEBAG6NNTK7sl9nJxeewVuogCdMtkcdnx9onGtCOeiQ
qvh5Xwn9akZtoLMVEdceU0ihO4wILlcom3OqHs9WOd6VbgW5a19Thh2toxKidHz5
rAaBMyZsQbFb6+vFshZwoCtOLZI/eIZfUUMFqMXlEPrKru1nSddNdai2+zi5rEnM
HCot43+3XYuqkvWlOjoi9cP+C4epFYrxpykVbcrtbd7TK+wZNiK3xtDPnVzjdNWL
geAEl9xrrk0ss4nO/EreTQgS46gVU+tLC+b23m2dU7dcKZ7RDoiA9bdVc4a2IsaS
2MvLL4NZ2nUh8hAEHiLtGMAV3C6xNbEyM07hEpDW6vk6tqk=
-----END CERTIFICATE-----
key: |
-----BEGIN PRIVATE KEY-----
MIIEvgIBADANBgkqhkiG9w0BAQEFAASCBKgwggSkAgEAAoIBAQCf6sMQke4OUrPf
lZXqKZC4uaQLMxJB2DgacBf4Q3kXcVNCNHtc2U3U5cMD8tr3/Jt5MKKun5jQrbXV
FF4eVr4Iv9jgPBwQc2kBUC9QL/alsMhEuXMeqdGQcCK3F0CLJdV3zUlKUDU0kg+O
Exnbl1CHXrIbpD7zLy1i3s8p39v1pYFYf4WlrQxvfa/xo97gXY5dJv8RryryLzRc
uhHYBvX5MHCGpbrY61JxpfZqBo8CmLuHl1tmbeXpdHdQB11LKiuL6HtKflNjc6rg
5r8bXl1nZbM/KOZEE+muA1LVoaTyHzY/aGXz0bNy4QRUO+De9JFcTDgnXnNZVG5x
cyyDBpc9AgMBAAECggEAatcEtehZPJaCeClPPF/Cwbe9YoIfe4BCk186lHI3z7K1
5nB7zt+bwVY0AUpagv3wvXoB5lrYVOsJpa9y5iAb3GqYMc/XDCKfD/KLea5hwfcn
BctEn0LjsPVKLDrLs2t2gBDWG2EU+udunwQh7XTdp2Nb6V3FdOGbGAg2LgrSwP1g
0r4z14F70oWGYyTQ5N8UGuyryVrzQH525OYl38Yt7R6zJ/44FVi/2TvdfHM5ss39
SXWi00Q30fzaBEf4AdHVwVCRKctwSbrIOyM53kiScFDmBGRblCWOxXbiFV+d3bjX
gf2zxs7QYZrFOzOO7kLtHGua4itEB02497v+1oKDwQKBgQDOBvCVGRe2WpItOLnj
SF8iz7Sm+jJGQz0D9FhWyGPvrN7IXGrsXavA1kKRz22dsU8xdKk0yciOB13Wb5y6
yLsr/fPBjAhPb4h543VHFjpAQcxpsH51DE0b2oYOWMmz+rXGB5Jy8EkP7Q4njIsc
2wLod1dps8OT8zFx1jX3Us6iUQKBgQDGtKkfsvWi3HkwjFTR+/Y0oMz7bSruE5Z8
g0VOHPkSr4XiYgLpQxjbNjq8fwsa/jTt1B57+By4xLpZYD0BTFuf5po+igSZhH8s
QS5XnUnbM7d6Xr/da7ZkhSmUbEaMeHONSIVpYNgtRo4bB9Mh0l1HWdoevw/w5Ryt
L/OQiPhfLQKBgQCh1iG1fPh7bbnVe/HI71iL58xoPbCwMLEFIjMiOFcINirqCG6V
LR91Ytj34JCihl1G4/TmWnsH1hGIGDRtJLCiZeHL70u32kzCMkI1jOhFAWqoutMa
7obDkmwraONIVW/kFp6bWtSJhhTQTD4adI9cPCKWDXdcCHSWj0Xk+U8HgQKBgBng
t1HYhaLzIZlP/U/nh3XtJyTrX7bnuCZ5FhKJNWrYjxAfgY+NXHRYCKg5x2F5j70V
be7pLhxmCnrPTMKZhik56AaTBOxVVBaYWoewhUjV4GRAaK5Wc8d9jB+3RizPFwVk
V3OU2DJ1SNZ+W2HBOsKrEfwFF/dgby6i2w6MuAP1AoGBAIxvxUygeT/6P0fHN22P
zAHFI4v2925wYdb7H//D8DIADyBwv18N6YH8uH7L+USZN7e4p2k8MGGyvTXeC6aX
IeVtU6fH57Ddn59VPbF20m8RCSkmBvSdcbyBmqlZSBE+fKwCliKl6u/GH0BNAWKz
r8yiEiskqRmy7P7MY9hDmEbG
-----END PRIVATE KEY-----
snis:
- "yourdomain.com"
#END
```
```json
{
"ssls": [
{
"cert": "-----BEGIN CERTIFICATE-----\nMIIDrzCCApegAwIBAgIJAI3Meu/gJVTLMA0GCSqGSIb3DQEBCwUAMG4xCzAJBgNV\nBAYTAkNOMREwDwYDVQQIDAhaaGVqaWFuZzERMA8GA1UEBwwISGFuZ3pob3UxDTAL\nBgNVBAoMBHRlc3QxDTALBgNVBAsMBHRlc3QxGzAZBgNVBAMMEmV0Y2QuY2x1c3Rl\nci5sb2NhbDAeFw0yMDEwMjgwMzMzMDJaFw0yMTEwMjgwMzMzMDJaMG4xCzAJBgNV\nBAYTAkNOMREwDwYDVQQIDAhaaGVqaWFuZzERMA8GA1UEBwwISGFuZ3pob3UxDTAL\nBgNVBAoMBHRlc3QxDTALBgNVBAsMBHRlc3QxGzAZBgNVBAMMEmV0Y2QuY2x1c3Rl\nci5sb2NhbDCCASIwDQYJKoZIhvcNAQEBBQADggEPADCCAQoCggEBAJ/qwxCR7g5S\ns9+VleopkLi5pAszEkHYOBpwF/hDeRdxU0I0e1zZTdTlwwPy2vf8m3kwoq6fmNCt\ntdUUXh5Wvgi/2OA8HBBzaQFQL1Av9qWwyES5cx6p0ZBwIrcXQIsl1XfNSUpQNTSS\nD44TGduXUIdeshukPvMvLWLezynf2/WlgVh/haWtDG99r/Gj3uBdjl0m/xGvKvIv\nNFy6EdgG9fkwcIalutjrUnGl9moGjwKYu4eXW2Zt5el0d1AHXUsqK4voe0p+U2Nz\nquDmvxteXWdlsz8o5kQT6a4DUtWhpPIfNj9oZfPRs3LhBFQ74N70kVxMOCdec1lU\nbnFzLIMGlz0CAwEAAaNQME4wHQYDVR0OBBYEFFHeljijrr+SPxlH5fjHRPcC7bv2\nMB8GA1UdIwQYMBaAFFHeljijrr+SPxlH5fjHRPcC7bv2MAwGA1UdEwQFMAMBAf8w\nDQYJKoZIhvcNAQELBQADggEBAG6NNTK7sl9nJxeewVuogCdMtkcdnx9onGtCOeiQ\nqvh5Xwn9akZtoLMVEdceU0ihO4wILlcom3OqHs9WOd6VbgW5a19Thh2toxKidHz5\nrAaBMyZsQbFb6+vFshZwoCtOLZI/eIZfUUMFqMXlEPrKru1nSddNdai2+zi5rEnM\nHCot43+3XYuqkvWlOjoi9cP+C4epFYrxpykVbcrtbd7TK+wZNiK3xtDPnVzjdNWL\ngeAEl9xrrk0ss4nO/EreTQgS46gVU+tLC+b23m2dU7dcKZ7RDoiA9bdVc4a2IsaS\n2MvLL4NZ2nUh8hAEHiLtGMAV3C6xNbEyM07hEpDW6vk6tqk=\n-----END CERTIFICATE-----",
"key": "-----BEGIN PRIVATE KEY-----\nMIIEvgIBADANBgkqhkiG9w0BAQEFAASCBKgwggSkAgEAAoIBAQCf6sMQke4OUrPf\nlZXqKZC4uaQLMxJB2DgacBf4Q3kXcVNCNHtc2U3U5cMD8tr3/Jt5MKKun5jQrbXV\nFF4eVr4Iv9jgPBwQc2kBUC9QL/alsMhEuXMeqdGQcCK3F0CLJdV3zUlKUDU0kg+O\nExnbl1CHXrIbpD7zLy1i3s8p39v1pYFYf4WlrQxvfa/xo97gXY5dJv8RryryLzRc\nuhHYBvX5MHCGpbrY61JxpfZqBo8CmLuHl1tmbeXpdHdQB11LKiuL6HtKflNjc6rg\n5r8bXl1nZbM/KOZEE+muA1LVoaTyHzY/aGXz0bNy4QRUO+De9JFcTDgnXnNZVG5x\ncyyDBpc9AgMBAAECggEAatcEtehZPJaCeClPPF/Cwbe9YoIfe4BCk186lHI3z7K1\n5nB7zt+bwVY0AUpagv3wvXoB5lrYVOsJpa9y5iAb3GqYMc/XDCKfD/KLea5hwfcn\nBctEn0LjsPVKLDrLs2t2gBDWG2EU+udunwQh7XTdp2Nb6V3FdOGbGAg2LgrSwP1g\n0r4z14F70oWGYyTQ5N8UGuyryVrzQH525OYl38Yt7R6zJ/44FVi/2TvdfHM5ss39\nSXWi00Q30fzaBEf4AdHVwVCRKctwSbrIOyM53kiScFDmBGRblCWOxXbiFV+d3bjX\ngf2zxs7QYZrFOzOO7kLtHGua4itEB02497v+1oKDwQKBgQDOBvCVGRe2WpItOLnj\nSF8iz7Sm+jJGQz0D9FhWyGPvrN7IXGrsXavA1kKRz22dsU8xdKk0yciOB13Wb5y6\nyLsr/fPBjAhPb4h543VHFjpAQcxpsH51DE0b2oYOWMmz+rXGB5Jy8EkP7Q4njIsc\n2wLod1dps8OT8zFx1jX3Us6iUQKBgQDGtKkfsvWi3HkwjFTR+/Y0oMz7bSruE5Z8\ng0VOHPkSr4XiYgLpQxjbNjq8fwsa/jTt1B57+By4xLpZYD0BTFuf5po+igSZhH8s\nQS5XnUnbM7d6Xr/da7ZkhSmUbEaMeHONSIVpYNgtRo4bB9Mh0l1HWdoevw/w5Ryt\nL/OQiPhfLQKBgQCh1iG1fPh7bbnVe/HI71iL58xoPbCwMLEFIjMiOFcINirqCG6V\nLR91Ytj34JCihl1G4/TmWnsH1hGIGDRtJLCiZeHL70u32kzCMkI1jOhFAWqoutMa\n7obDkmwraONIVW/kFp6bWtSJhhTQTD4adI9cPCKWDXdcCHSWj0Xk+U8HgQKBgBng\nt1HYhaLzIZlP/U/nh3XtJyTrX7bnuCZ5FhKJNWrYjxAfgY+NXHRYCKg5x2F5j70V\nbe7pLhxmCnrPTMKZhik56AaTBOxVVBaYWoewhUjV4GRAaK5Wc8d9jB+3RizPFwVk\nV3OU2DJ1SNZ+W2HBOsKrEfwFF/dgby6i2w6MuAP1AoGBAIxvxUygeT/6P0fHN22P\nzAHFI4v2925wYdb7H//D8DIADyBwv18N6YH8uH7L+USZN7e4p2k8MGGyvTXeC6aX\nIeVtU6fH57Ddn59VPbF20m8RCSkmBvSdcbyBmqlZSBE+fKwCliKl6u/GH0BNAWKz\nr8yiEiskqRmy7P7MY9hDmEbG\n-----END PRIVATE KEY-----",
"snis": [
"yourdomain.com"
]
}
]
}
```
### How to configure global rule
```yaml
global_rules:
-
id: 1
plugins:
response-rewrite:
body: "hello\n"
#END
```
```json
{
"global_rules": [
{
"id": 1,
"plugins": {
"response-rewrite": {
"body": "hello\n"
}
}
}
]
}
```
### How to configure consumer
```yaml
consumers:
- username: jwt
plugins:
jwt-auth:
key: user-key
secret: my-secret-key
#END
```
```json
{
"consumers": [
{
"username": "jwt",
"plugins": {
"jwt-auth": {
"key": "user-key",
"secret": "my-secret-key"
}
}
}
]
}
```
### How to configure plugin metadata
```yaml
upstreams:
- id: 1
nodes:
"127.0.0.1:1980": 1
type: roundrobin
routes:
-
uri: /hello
upstream_id: 1
plugins:
http-logger:
batch_max_size: 1
uri: http://127.0.0.1:1980/log
plugin_metadata:
- id: http-logger # note the id is the plugin name
log_format:
host: "$host"
remote_addr: "$remote_addr"
#END
```
```json
{
"upstreams": [
{
"id": 1,
"nodes": {
"127.0.0.1:1980": 1
},
"type": "roundrobin"
}
],
"routes": [
{
"uri": "/hello",
"upstream_id": 1,
"plugins": {
"http-logger": {
"batch_max_size": 1,
"uri": "http://127.0.0.1:1980/log"
}
}
}
],
"plugin_metadata": [
{
"id": "http-logger",
"log_format": {
"host": "$host",
"remote_addr": "$remote_addr"
}
}
]
}
```
### How to configure stream route
```yaml
stream_routes:
- server_addr: 127.0.0.1
server_port: 1985
id: 1
upstream_id: 1
plugins:
mqtt-proxy:
protocol_name: "MQTT"
protocol_level: 4
upstreams:
- nodes:
"127.0.0.1:1995": 1
type: roundrobin
id: 1
#END
```
```json
{
"stream_routes": [
{
"server_addr": "127.0.0.1",
"server_port": 1985,
"id": 1,
"upstream_id": 1,
"plugins": {
"mqtt-proxy": {
"protocol_name": "MQTT",
"protocol_level": 4
}
}
}
],
"upstreams": [
{
"nodes": {
"127.0.0.1:1995": 1
},
"type": "roundrobin",
"id": 1
}
]
}
```
### How to configure protos
```yaml
protos:
- id: helloworld
desc: hello world
content: >
syntax = "proto3";
package helloworld;
service Greeter {
rpc SayHello (HelloRequest) returns (HelloReply) {}
}
message HelloRequest {
string name = 1;
}
message HelloReply {
string message = 1;
}
#END
```
```json
{
"protos": [
{
"id": "helloworld",
"desc": "hello world",
"content": "syntax = \"proto3\";\npackage helloworld;\n\nservice Greeter {\n rpc SayHello (HelloRequest) returns (HelloReply) {}\n}\nmessage HelloRequest {\n string name = 1;\n}\nmessage HelloReply {\n string message = 1;\n}\n"
}
]
}
```
---
---
title: consul
---
## Summary
APACHE APISIX supports Consul as a service discovery
## Configuration for discovery client
### Configuration for Consul
First of all, we need to add following configuration in `conf/config.yaml` :
```yaml
discovery:
consul:
servers: # make sure service name is unique in these consul servers
- "http://127.0.0.1:8500" # `http://127.0.0.1:8500` and `http://127.0.0.1:8600` are different clusters
- "http://127.0.0.1:8600" # `consul` service is default skip service
token: "..." # if your consul cluster has enabled acl access control, you need to specify the token
skip_services: # if you need to skip special services
- "service_a"
timeout:
connect: 1000 # default 2000 ms
read: 1000 # default 2000 ms
wait: 60 # default 60 sec
weight: 1 # default 1
fetch_interval: 5 # default 3 sec, only take effect for keepalive: false way
keepalive: true # default true, use the long pull way to query consul servers
sort_type: "origin" # default origin
default_service: # you can define default service when missing hit
host: "127.0.0.1"
port: 20999
metadata:
fail_timeout: 1 # default 1 ms
weight: 1 # default 1
max_fails: 1 # default 1
dump: # if you need, when registered nodes updated can dump into file
path: "logs/consul.dump"
expire: 2592000 # unit sec, here is 30 day
```
And you can config it in short by default value:
```yaml
discovery:
consul:
servers:
- "http://127.0.0.1:8500"
```
The `keepalive` has two optional values:
- `true`, default and recommend value, use the long pull way to query consul servers
- `false`, not recommend, it would use the short pull way to query consul servers, then you can set the `fetch_interval` for fetch interval
The `sort_type` has four optional values:
- `origin`, not sorting
- `host_sort`, sort by host
- `port_sort`, sort by port
- `combine_sort`, with the precondition that hosts are ordered, ports are also ordered.
#### Dump Data
When we need reload `apisix` online, as the `consul` module maybe loads data from CONSUL slower than load routes from ETCD, and would get the log at the moment before load successfully from consul:
```
http_access_phase(): failed to set upstream: no valid upstream node
```
So, we import the `dump` function for `consul` module. When reload, would load the dump file before from consul; when the registered nodes in consul been updated, would dump the upstream nodes into file automatically.
The `dump` has three optional values now:
- `path`, the dump file save path
- support relative path, eg: `logs/consul.dump`
- support absolute path, eg: `/tmp/consul.dump`
- make sure the dump file's parent path exist
- make sure the `apisix` has the dump file's read-write access permission,eg: add below config in `conf/config.yaml`
```yaml
nginx_config: # config for render the template to generate nginx.conf
user: root # specifies the execution user of the worker process.
```
- `load_on_init`, default value is `true`
- if `true`, just try to load the data from the dump file before loading data from consul when starting, does not care the dump file exists or not
- if `false`, ignore loading data from the dump file
- Whether `true` or `false`, we don't need to prepare a dump file for apisix at anytime
- `expire`, unit sec, avoiding load expired dump data when load
- default `0`, it is unexpired forever
- recommend 2592000, which is 30 days(equals 3600 \* 24 \* 30)
### Register Http API Services
Now, register nodes into consul:
```shell
curl -X PUT 'http://127.0.0.1:8500/v1/agent/service/register' \
-d '{
"ID": "service_a1",
"Name": "service_a",
"Tags": ["primary", "v1"],
"Address": "127.0.0.1",
"Port": 8000,
"Meta": {
"service_a_version": "4.0"
},
"EnableTagOverride": false,
"Weights": {
"Passing": 10,
"Warning": 1
}
}'
curl -X PUT 'http://127.0.0.1:8500/v1/agent/service/register' \
-d '{
"ID": "service_a1",
"Name": "service_a",
"Tags": ["primary", "v1"],
"Address": "127.0.0.1",
"Port": 8002,
"Meta": {
"service_a_version": "4.0"
},
"EnableTagOverride": false,
"Weights": {
"Passing": 10,
"Warning": 1
}
}'
```
In some cases, same service name might exist in different consul servers.
To avoid confusion, use the full consul key url path as service name in practice.
### Port Handling
When APISIX retrieves service information from Consul, it handles port values as follows:
- If the service registration includes a valid port number, that port will be used.
- If the port is `nil` (not specified) or `0`, APISIX will default to port `80` for HTTP services.
### Upstream setting
#### L7
Here is an example of routing a request with a URL of "/*" to a service which named "service_a" and use consul discovery client in the registry :
:::note
You can fetch the `admin_key` from `config.yaml` and save to an environment variable with the following command:
```bash
admin_key=$(yq '.deployment.admin.admin_key[0].key' conf/config.yaml | sed 's/"//g')
```
:::
```shell
$ curl http://127.0.0.1:9180/apisix/admin/routes/1 -H "X-API-KEY: $admin_key" -X PUT -i -d '
{
"uri": "/*",
"upstream": {
"service_name": "service_a",
"type": "roundrobin",
"discovery_type": "consul"
}
}'
```
The format response as below:
```json
{
"key": "/apisix/routes/1",
"value": {
"uri": "/*",
"priority": 0,
"id": "1",
"upstream": {
"scheme": "http",
"type": "roundrobin",
"hash_on": "vars",
"discovery_type": "consul",
"service_name": "service_a",
"pass_host": "pass"
},
"create_time": 1669267329,
"status": 1,
"update_time": 1669267329
}
}
```
You could find more usage in the `apisix/t/discovery/consul.t` file.
#### L4
Consul service discovery also supports use in L4, the configuration method is similar to L7.
```shell
$ curl http://127.0.0.1:9180/apisix/admin/stream_routes/1 -H "X-API-KEY: $admin_key" -X PUT -i -d '
{
"remote_addr": "127.0.0.1",
"upstream": {
"scheme": "tcp",
"service_name": "service_a",
"type": "roundrobin",
"discovery_type": "consul"
}
}'
```
You could find more usage in the `apisix/t/discovery/stream/consul.t` file.
## Debugging API
It also offers control api for debugging.
### Memory Dump API
```shell
GET /v1/discovery/consul/dump
```
For example:
```shell
# curl http://127.0.0.1:9090/v1/discovery/consul/dump | jq
{
"config": {
"fetch_interval": 3,
"timeout": {
"wait": 60,
"connect": 6000,
"read": 6000
},
"weight": 1,
"servers": [
"http://172.19.5.30:8500",
"http://172.19.5.31:8500"
],
"keepalive": true,
"default_service": {
"host": "172.19.5.11",
"port": 8899,
"metadata": {
"fail_timeout": 1,
"weight": 1,
"max_fails": 1
}
},
"skip_services": [
"service_d"
]
},
"services": {
"service_a": [
{
"host": "127.0.0.1",
"port": 30513,
"weight": 1
},
{
"host": "127.0.0.1",
"port": 30514,
"weight": 1
}
],
"service_b": [
{
"host": "172.19.5.51",
"port": 50051,
"weight": 1
}
],
"service_c": [
{
"host": "127.0.0.1",
"port": 30511,
"weight": 1
},
{
"host": "127.0.0.1",
"port": 30512,
"weight": 1
}
]
}
}
```
### Show Dump File API
It offers another control api for dump file view now. Maybe would add more api for debugging in future.
```shell
GET /v1/discovery/consul/show_dump_file
```
For example:
```shell
curl http://127.0.0.1:9090/v1/discovery/consul/show_dump_file | jq
{
"services": {
"service_a": [
{
"host": "172.19.5.12",
"port": 8000,
"weight": 120
},
{
"host": "172.19.5.13",
"port": 8000,
"weight": 120
}
]
},
"expire": 0,
"last_update": 1615877468
}
```
---
---
title: consul_kv
---
## Summary
For users that are using [nginx-upsync-module](https://github.com/weibocom/nginx-upsync-module) and Consul KV as a service discovery, like the Weibo Mobile Team, this may be needed.
Thanks to @fatman-x guy, who developed this module, called `consul_kv`, and its worker process data flow is below:

## Configuration for discovery client
### Configuration for Consul KV
Add following configuration in `conf/config.yaml` :
```yaml
discovery:
consul_kv:
servers:
- "http://127.0.0.1:8500"
- "http://127.0.0.1:8600"
token: "..." # if your consul cluster has enabled acl access control, you need to specify the token
prefix: "upstreams"
skip_keys: # if you need to skip special keys
- "upstreams/unused_api/"
timeout:
connect: 1000 # default 2000 ms
read: 1000 # default 2000 ms
wait: 60 # default 60 sec
weight: 1 # default 1
fetch_interval: 5 # default 3 sec, only take effect for keepalive: false way
keepalive: true # default true, use the long pull way to query consul servers
default_server: # you can define default server when missing hit
host: "127.0.0.1"
port: 20999
metadata:
fail_timeout: 1 # default 1 ms
weight: 1 # default 1
max_fails: 1 # default 1
dump: # if you need, when registered nodes updated can dump into file
path: "logs/consul_kv.dump"
expire: 2592000 # unit sec, here is 30 day
```
And you can config it in short by default value:
```yaml
discovery:
consul_kv:
servers:
- "http://127.0.0.1:8500"
```
The `keepalive` has two optional values:
- `true`, default and recommend value, use the long pull way to query consul servers
- `false`, not recommend, it would use the short pull way to query consul servers, then you can set the `fetch_interval` for fetch interval
#### Dump Data
When we need reload `apisix` online, as the `consul_kv` module maybe loads data from CONSUL slower than load routes from ETCD, and would get the log at the moment before load successfully from consul:
```
http_access_phase(): failed to set upstream: no valid upstream node
```
So, we import the `dump` function for `consul_kv` module. When reload, would load the dump file before from consul; when the registered nodes in consul been updated, would dump the upstream nodes into file automatically.
The `dump` has three optional values now:
- `path`, the dump file save path
- support relative path, eg: `logs/consul_kv.dump`
- support absolute path, eg: `/tmp/consul_kv.bin`
- make sure the dump file's parent path exist
- make sure the `apisix` has the dump file's read-write access permission,eg: `chown www:root conf/upstream.d/`
- `load_on_init`, default value is `true`
- if `true`, just try to load the data from the dump file before loading data from consul when starting, does not care the dump file exists or not
- if `false`, ignore loading data from the dump file
- Whether `true` or `false`, we don't need to prepare a dump file for apisix at anytime
- `expire`, unit sec, avoiding load expired dump data when load
- default `0`, it is unexpired forever
- recommend 2592000, which is 30 days(equals 3600 \* 24 \* 30)
### Register Http API Services
Service register Key&Value template:
```
Key: {Prefix}/{Service_Name}/{IP}:{Port}
Value: {"weight": , "max_fails": , "fail_timeout": }
```
The register consul key use `upstreams` as prefix by default. The http api service name called `webpages` for example, and you can also use `webpages/oneteam/hello` as service name. The api instance of node's ip and port make up new key: `:`.
Now, register nodes into consul:
```shell
curl \
-X PUT \
-d ' {"weight": 1, "max_fails": 2, "fail_timeout": 1}' \
http://127.0.0.1:8500/v1/kv/upstreams/webpages/172.19.5.12:8000
curl \
-X PUT \
-d ' {"weight": 1, "max_fails": 2, "fail_timeout": 1}' \
http://127.0.0.1:8500/v1/kv/upstreams/webpages/172.19.5.13:8000
```
In some case, same keys exist in different consul servers.
To avoid confusion, use the full consul key url path as service name in practice.
### Upstream setting
#### L7
Here is an example of routing a request with a URL of "/*" to a service which named "http://127.0.0.1:8500/v1/kv/upstreams/webpages/" and use consul_kv discovery client in the registry :
:::note
You can fetch the `admin_key` from `config.yaml` and save to an environment variable with the following command:
```bash
admin_key=$(yq '.deployment.admin.admin_key[0].key' conf/config.yaml | sed 's/"//g')
```
:::
```shell
$ curl http://127.0.0.1:9180/apisix/admin/routes/1 -H "X-API-KEY: $admin_key" -X PUT -i -d '
{
"uri": "/*",
"upstream": {
"service_name": "http://127.0.0.1:8500/v1/kv/upstreams/webpages/",
"type": "roundrobin",
"discovery_type": "consul_kv"
}
}'
```
The format response as below:
```json
{
"node": {
"value": {
"priority": 0,
"update_time": 1612755230,
"upstream": {
"discovery_type": "consul_kv",
"service_name": "http://127.0.0.1:8500/v1/kv/upstreams/webpages/",
"hash_on": "vars",
"type": "roundrobin",
"pass_host": "pass"
},
"id": "1",
"uri": "/*",
"create_time": 1612755230,
"status": 1
},
"key": "/apisix/routes/1"
}
}
```
You could find more usage in the `apisix/t/discovery/consul_kv.t` file.
#### L4
Consul_kv service discovery also supports use in L4, the configuration method is similar to L7.
```shell
$ curl http://127.0.0.1:9180/apisix/admin/stream_routes/1 -H "X-API-KEY: $admin_key" -X PUT -i -d '
{
"remote_addr": "127.0.0.1",
"upstream": {
"scheme": "tcp",
"service_name": "http://127.0.0.1:8500/v1/kv/upstreams/webpages/",
"type": "roundrobin",
"discovery_type": "consul_kv"
}
}'
```
You could find more usage in the `apisix/t/discovery/stream/consul_kv.t` file.
## Debugging API
It also offers control api for debugging.
### Memory Dump API
```shell
GET /v1/discovery/consul_kv/dump
```
For example:
```shell
# curl http://127.0.0.1:9090/v1/discovery/consul_kv/dump | jq
{
"config": {
"fetch_interval": 3,
"timeout": {
"wait": 60,
"connect": 6000,
"read": 6000
},
"prefix": "upstreams",
"weight": 1,
"servers": [
"http://172.19.5.30:8500",
"http://172.19.5.31:8500"
],
"keepalive": true,
"default_service": {
"host": "172.19.5.11",
"port": 8899,
"metadata": {
"fail_timeout": 1,
"weight": 1,
"max_fails": 1
}
},
"skip_keys": [
"upstreams/myapi/gateway/apisix/"
]
},
"services": {
"http://172.19.5.31:8500/v1/kv/upstreams/webpages/": [
{
"host": "127.0.0.1",
"port": 30513,
"weight": 1
},
{
"host": "127.0.0.1",
"port": 30514,
"weight": 1
}
],
"http://172.19.5.30:8500/v1/kv/upstreams/1614480/grpc/": [
{
"host": "172.19.5.51",
"port": 50051,
"weight": 1
}
],
"http://172.19.5.30:8500/v1/kv/upstreams/webpages/": [
{
"host": "127.0.0.1",
"port": 30511,
"weight": 1
},
{
"host": "127.0.0.1",
"port": 30512,
"weight": 1
}
]
}
}
```
### Show Dump File API
It offers another control api for dump file view now. Maybe would add more api for debugging in future.
```shell
GET /v1/discovery/consul_kv/show_dump_file
```
For example:
```shell
curl http://127.0.0.1:9090/v1/discovery/consul_kv/show_dump_file | jq
{
"services": {
"http://172.19.5.31:8500/v1/kv/upstreams/1614480/webpages/": [
{
"host": "172.19.5.12",
"port": 8000,
"weight": 120
},
{
"host": "172.19.5.13",
"port": 8000,
"weight": 120
}
]
},
"expire": 0,
"last_update": 1615877468
}
```
---
---
title: Control Plane Service Discovery
keywords:
- API Gateway
- Apache APISIX
- ZooKeeper
- Nacos
- APISIX-Seed
description: This documentation describes implementing service discovery through Nacos and ZooKeeper on the API Gateway APISIX Control Plane.
---
This document describes how to implement service discovery with Nacos and Zookeeper on the APISIX Control Plane.
## APISIX-Seed Architecture
Apache APISIX has supported Data Plane service discovery in the early days, and now APISIX also supports Control Plane service discovery through the [APISIX-Seed](https://github.com/api7/apisix-seed) project. The following figure shows the APISIX-Seed architecture diagram.

The specific information represented by the figures in the figure is as follows:
1. Register an upstream with APISIX and specify the service discovery type. APISIX-Seed will watch APISIX resource changes in etcd, filter discovery types, and obtain service names.
2. APISIX-Seed subscribes the specified service name to the service registry to obtain changes to the corresponding service.
3. After the client registers the service with the service registry, APISIX-Seed will obtain the new service information and write the updated service node into etcd;
4. When the corresponding resources in etcd change, APISIX worker will refresh the latest service node information to memory.
:::note
It should be noted that after the introduction of APISIX-Seed, if the service of the registry changes frequently, the data in etcd will also change frequently. So, it is best to set the `--auto-compaction` option when starting etcd to compress the history periodically to avoid etcd eventually exhausting its storage space. Please refer to [revisions](https://etcd.io/docs/v3.5/learning/api/#revisions).
:::
## Why APISIX-Seed
- Network topology becomes simpler
APISIX does not need to maintain a network connection with each registry, and only needs to pay attention to the configuration information in etcd. This will greatly simplify the network topology.
- Total data volume about upstream service becomes smaller
Due to the characteristics of the registry, APISIX may store the full amount of registry service data in the worker, such as consul_kv. By introducing APISIX-Seed, each process of APISIX will not need to additionally cache upstream service-related information.
- Easier to manage
Service discovery configuration needs to be configured once per APISIX instance. By introducing APISIX-Seed, Apache APISIX will be in different to the configuration changes of the service registry.
## Supported service registry
ZooKeeper and Nacos are currently supported, and more service registries will be supported in the future. For more information, please refer to: [APISIX Seed](https://github.com/api7/apisix-seed#apisix-seed-for-apache-apisix).
- If you want to enable control plane ZooKeeper service discovery, please refer to: [ZooKeeper Deployment Tutorial](https://github.com/api7/apisix-seed/blob/main/docs/en/latest/zookeeper.md).
- If you want to enable control plane Nacos service discovery, please refer to: [Nacos Deployment Tutorial](https://github.com/api7/apisix-seed/blob/main/docs/en/latest/nacos.md).
---
---
title: DNS
---
## service discovery via DNS
Some service discovery system, like Consul, support exposing service information
via DNS. Therefore we can use this way to discover service directly. Both L4 and L7 are supported.
First of all, we need to configure the address of DNS servers:
```yaml
# add this to config.yaml
discovery:
dns:
servers:
- "127.0.0.1:8600" # use the real address of your dns server
```
Unlike configuring the domain in the Upstream's `nodes` field, service discovery via
DNS will return all records. For example, with upstream configuration:
```json
{
"id": 1,
"discovery_type": "dns",
"service_name": "test.consul.service",
"type": "roundrobin"
}
```
and `test.consul.service` be resolved as `1.1.1.1` and `1.1.1.2`, this result will be the same as:
```json
{
"id": 1,
"type": "roundrobin",
"nodes": [
{"host": "1.1.1.1", "weight": 1},
{"host": "1.1.1.2", "weight": 1}
]
}
```
Note that all the IPs from `test.consul.service` share the same weight.
The resolved records will be cached according to their TTL.
For service whose record is not in the cache, we will query it in the order of `SRV -> A -> AAAA -> CNAME` by default.
When we refresh the cache record, we will try from the last previously successful type.
We can also customize the order by modifying the configuration file.
```yaml
# add this to config.yaml
discovery:
dns:
servers:
- "127.0.0.1:8600" # use the real address of your dns server
order: # order in which to try different dns record types when resolving
- last # "last" will try the last previously successful type for a hostname.
- SRV
- A
- AAAA
- CNAME
```
If you want to specify the port for the upstream server, you can add it to the `service_name`:
```json
{
"id": 1,
"discovery_type": "dns",
"service_name": "test.consul.service:1980",
"type": "roundrobin"
}
```
Another way to do it is via the SRV record, see below.
### SRV record
By using SRV record you can specify the port and the weight of a service.
Assumed you have the SRV record like this:
```
; under the section of blah.service
A 300 IN A 1.1.1.1
B 300 IN A 1.1.1.2
B 300 IN A 1.1.1.3
; name TTL type priority weight port
srv 86400 IN SRV 10 60 1980 A
srv 86400 IN SRV 20 20 1981 B
```
Upstream configuration like:
```json
{
"id": 1,
"discovery_type": "dns",
"service_name": "srv.blah.service",
"type": "roundrobin"
}
```
is the same as:
```json
{
"id": 1,
"type": "roundrobin",
"nodes": [
{"host": "1.1.1.1", "port": 1980, "weight": 60, "priority": -10},
{"host": "1.1.1.2", "port": 1981, "weight": 10, "priority": -20},
{"host": "1.1.1.3", "port": 1981, "weight": 10, "priority": -20}
]
}
```
Note that two records of domain B split the weight evenly.
For SRV record, nodes with lower priority are chosen first, so the final priority is negative.
As for 0 weight SRV record, the [RFC 2782](https://www.ietf.org/rfc/rfc2782.txt) says:
> Domain administrators SHOULD use Weight 0 when there isn't any server
selection to do, to make the RR easier to read for humans (less
noisy). In the presence of records containing weights greater
than 0, records with weight 0 should have a very small chance of
being selected.
We treat weight 0 record has a weight of 1 so the node "have a very small chance of
being selected", which is also the common way to treat this type of record.
For SRV record which has port 0, we will fallback to use the upstream protocol's default port.
You can also specify the port in the "service_name" field directly, like "srv.blah.service:8848".
---
---
title: eureka
---
Apache APISIX supports service discovery via Eureka. For the details, please start your
reading from [Supported discovery registries](../discovery.md#supported-discovery-registries).
---
---
title: Kubernetes
keywords:
- Kubernetes
- Apache APISIX
- Service discovery
- Cluster
- API Gateway
description: This article introduce how to perform service discovery based on Kubernetes in Apache APISIX and summarize related issues.
---
## Summary
The [_Kubernetes_](https://kubernetes.io/) service discovery [_List-Watch_](https://kubernetes.io/docs/reference/using-api/api-concepts/) real-time changes of [_Endpoints_](https://kubernetes.io/docs/concepts/services-networking/service/) resources, then store theirs value into `ngx.shared.DICT`.
Discovery also provides a node query interface in accordance with the [_APISIX Discovery Specification_](../discovery.md).
## How To Use
Kubernetes service discovery both support single-cluster and multi-cluster modes, applicable to the case where the service is distributed in single or multiple Kubernetes clusters.
### Single-Cluster Mode Configuration
A detailed configuration for single-cluster mode Kubernetes service discovery is as follows:
```yaml
discovery:
kubernetes:
service:
# apiserver schema, options [http, https]
schema: https #default https
# apiserver host, options [ipv4, ipv6, domain, environment variable]
host: ${KUBERNETES_SERVICE_HOST} #default ${KUBERNETES_SERVICE_HOST}
# apiserver port, options [port number, environment variable]
port: ${KUBERNETES_SERVICE_PORT} #default ${KUBERNETES_SERVICE_PORT}
client:
# serviceaccount token or token_file
token_file: /var/run/secrets/kubernetes.io/serviceaccount/token
#token: |-
# eyJhbGciOiJSUzI1NiIsImtpZCI6Ikx5ME1DNWdnbmhQNkZCNlZYMXBsT3pYU3BBS2swYzBPSkN3ZnBESGpkUEEif
# 6Ikx5ME1DNWdnbmhQNkZCNlZYMXBsT3pYU3BBS2swYzBPSkN3ZnBESGpkUEEifeyJhbGciOiJSUzI1NiIsImtpZCI
default_weight: 50 # weight assigned to each discovered endpoint. default 50, minimum 0
# kubernetes discovery support namespace_selector
# you can use one of [equal, not_equal, match, not_match] filter namespace
namespace_selector:
# only save endpoints with namespace equal default
equal: default
# only save endpoints with namespace not equal default
#not_equal: default
# only save endpoints with namespace match one of [default, ^my-[a-z]+$]
#match:
#- default
#- ^my-[a-z]+$
# only save endpoints with namespace not match one of [default, ^my-[a-z]+$ ]
#not_match:
#- default
#- ^my-[a-z]+$
# kubernetes discovery support label_selector
# for the expression of label_selector, please refer to https://kubernetes.io/docs/concepts/overview/working-with-objects/labels
label_selector: |-
first="a",second="b"
# reserved lua shared memory size,1m memory can store about 1000 pieces of endpoint
shared_size: 1m #default 1m
# if watch_endpoint_slices setting true, watch apiserver with endpointslices instead of endpoints
watch_endpoint_slices: false #default false
```
If the Kubernetes service discovery runs inside a pod, you can use minimal configuration:
```yaml
discovery:
kubernetes: { }
```
If the Kubernetes service discovery runs outside a pod, you need to create or select a specified [_ServiceAccount_](https://kubernetes.io/docs/tasks/configure-pod-container/configure-service-account/), then get its token value, and use following configuration:
```yaml
discovery:
kubernetes:
service:
schema: https
host: # enter apiserver host value here
port: # enter apiserver port value here
client:
token: # enter serviceaccount token value here
#token_file: # enter file path here
```
### Single-Cluster Mode Query Interface
The Kubernetes service discovery provides a query interface in accordance with the [_APISIX Discovery Specification_](../discovery.md).
**function:**
nodes(service_name)
**description:**
nodes() function attempts to look up the ngx.shared.DICT for nodes corresponding to service_name, \
service_name should match pattern: _[namespace]/[name]:[portName]_
+ namespace: The namespace where the Kubernetes endpoints is located
+ name: The name of the Kubernetes endpoints
+ portName: The `ports.name` value in the Kubernetes endpoints, if there is no `ports.name`, use `targetPort`, `port` instead. If `ports.name` exists, then port number cannot be used.
**return value:**
if the Kubernetes endpoints value is as follows:
```yaml
apiVersion: v1
kind: Endpoints
metadata:
name: plat-dev
namespace: default
subsets:
- addresses:
- ip: "10.5.10.109"
- ip: "10.5.10.110"
ports:
- port: 3306
name: port
```
a nodes("default/plat-dev:port") call will get follow result:
```
{
{
host="10.5.10.109",
port= 3306,
weight= 50,
},
{
host="10.5.10.110",
port= 3306,
weight= 50,
},
}
```
### Multi-Cluster Mode Configuration
A detailed configuration for multi-cluster mode Kubernetes service discovery is as follows:
```yaml
discovery:
kubernetes:
- id: release # a custom name refer to the cluster, pattern ^[a-z0-9]{1,8}
service:
# apiserver schema, options [http, https]
schema: https #default https
# apiserver host, options [ipv4, ipv6, domain, environment variable]
host: "1.cluster.com"
# apiserver port, options [port number, environment variable]
port: "6443"
client:
# serviceaccount token or token_file
token_file: /var/run/secrets/kubernetes.io/serviceaccount/token
#token: |-
# eyJhbGciOiJSUzI1NiIsImtpZCI6Ikx5ME1DNWdnbmhQNkZCNlZYMXBsT3pYU3BBS2swYzBPSkN3ZnBESGpkUEEif
# 6Ikx5ME1DNWdnbmhQNkZCNlZYMXBsT3pYU3BBS2swYzBPSkN3ZnBESGpkUEEifeyJhbGciOiJSUzI1NiIsImtpZCI
default_weight: 50 # weight assigned to each discovered endpoint. default 50, minimum 0
# kubernetes discovery support namespace_selector
# you can use one of [equal, not_equal, match, not_match] filter namespace
namespace_selector:
# only save endpoints with namespace equal default
equal: default
# only save endpoints with namespace not equal default
#not_equal: default
# only save endpoints with namespace match one of [default, ^my-[a-z]+$]
#match:
#- default
#- ^my-[a-z]+$
# only save endpoints with namespace not match one of [default, ^my-[a-z]+$]
#not_match:
#- default
#- ^my-[a-z]+$
# kubernetes discovery support label_selector
# for the expression of label_selector, please refer to https://kubernetes.io/docs/concepts/overview/working-with-objects/labels
label_selector: |-
first="a",second="b"
# reserved lua shared memory size,1m memory can store about 1000 pieces of endpoint
shared_size: 1m #default 1m
# if watch_endpoint_slices setting true, watch apiserver with endpointslices instead of endpoints
watch_endpoint_slices: false #default false
```
Multi-Kubernetes service discovery does not fill default values for service and client fields, you need to fill them according to the cluster configuration.
### Multi-Cluster Mode Query Interface
The Kubernetes service discovery provides a query interface in accordance with the [_APISIX Discovery Specification_](../discovery.md).
**function:**
nodes(service_name)
**description:**
nodes() function attempts to look up the ngx.shared.DICT for nodes corresponding to service_name, \
service_name should match pattern: _[id]/[namespace]/[name]:[portName]_
+ id: value defined in service discovery configuration
+ namespace: The namespace where the Kubernetes endpoints is located
+ name: The name of the Kubernetes endpoints
+ portName: The `ports.name` value in the Kubernetes endpoints, if there is no `ports.name`, use `targetPort`, `port` instead. If `ports.name` exists, then port number cannot be used.
**return value:**
if the Kubernetes endpoints value is as follows:
```yaml
apiVersion: v1
kind: Endpoints
metadata:
name: plat-dev
namespace: default
subsets:
- addresses:
- ip: "10.5.10.109"
- ip: "10.5.10.110"
ports:
- port: 3306
name: port
```
a nodes("release/default/plat-dev:port") call will get follow result:
```
{
{
host="10.5.10.109",
port= 3306,
weight= 50,
},
{
host="10.5.10.110",
port= 3306,
weight= 50,
},
}
```
## Q&A
**Q: Why only support configuration token to access _Kubernetes APIServer_?**
A: Usually, we will use three ways to complete the authentication of _Kubernetes APIServer_:
+ mTLS
+ Token
+ Basic authentication
Because lua-resty-http does not currently support mTLS, and basic authentication is not recommended, so currently only the token authentication method is implemented.
**Q: APISIX inherits Nginx's multiple process model, does it mean that each nginx worker process will [_List-Watch_](https://kubernetes.io/docs/reference/using-api/api-concepts/) kubernetes endpoints resources?**
A: The Kubernetes service discovery only uses privileged processes to [_List-Watch_](https://kubernetes.io/docs/reference/using-api/api-concepts/) Kubernetes endpoints resources, then store theirs value into `ngx.shared.DICT`, worker processes get results by querying `ngx.shared.DICT`.
**Q: What permissions do [_ServiceAccount_](https://kubernetes.io/docs/tasks/configure-pod-container/configure-service-account/) require?**
A: ServiceAccount requires the permissions of cluster-level [ get, list, watch ] endpoints and endpointslices resources, the declarative definition is as follows:
```yaml
kind: ServiceAccount
apiVersion: v1
metadata:
name: apisix-test
namespace: default
---
kind: ClusterRole
apiVersion: rbac.authorization.k8s.io/v1
metadata:
name: apisix-test
rules:
- apiGroups: [ "" ]
resources: [ endpoints]
verbs: [ get,list,watch ]
- apiGroups: [ "discovery.k8s.io" ]
resources: [ endpointslices ]
verbs: [ get,list,watch ]
---
apiVersion: rbac.authorization.k8s.io/v1
kind: ClusterRoleBinding
metadata:
name: apisix-test
roleRef:
apiGroup: rbac.authorization.k8s.io
kind: ClusterRole
name: apisix-test
subjects:
- kind: ServiceAccount
name: apisix-test
namespace: default
```
**Q: How to get [_ServiceAccount_](https://kubernetes.io/docs/tasks/configure-pod-container/configure-service-account/) token value?**
A: Assume your [_ServiceAccount_](https://kubernetes.io/docs/tasks/configure-pod-container/configure-service-account/) located in namespace apisix and name is Kubernetes-discovery, you can use the following steps to get token value.
1. Get secret name. You can execute the following command, the output of the first column is the secret name we want:
```shell
kubectl -n apisix get secrets | grep kubernetes-discovery
```
2. Get token value. Assume secret resources name is kubernetes-discovery-token-c64cv, you can execute the following command, the output is the service account token value we want:
```shell
kubectl -n apisix get secret kubernetes-discovery-token-c64cv -o jsonpath={.data.token} | base64 -d
```
## Debugging API
It also offers control api for debugging.
### Memory Dump API
To query/list the nodes discoverd by kubernetes discovery, you can query the /v1/discovery/kubernetes/dump control API endpoint like so:
```shell
GET /v1/discovery/kubernetes/dump
```
Which will yield the following response:
```
{
"endpoints": [
{
"endpoints": [
{
"value": "{\"https\":[{\"host\":\"172.18.164.170\",\"port\":6443,\"weight\":50},{\"host\":\"172.18.164.171\",\"port\":6443,\"weight\":50},{\"host\":\"172.18.164.172\",\"port\":6443,\"weight\":50}]}",
"name": "default/kubernetes"
},
{
"value": "{\"metrics\":[{\"host\":\"172.18.164.170\",\"port\":2379,\"weight\":50},{\"host\":\"172.18.164.171\",\"port\":2379,\"weight\":50},{\"host\":\"172.18.164.172\",\"port\":2379,\"weight\":50}]}",
"name": "kube-system/etcd"
},
{
"value": "{\"http-85\":[{\"host\":\"172.64.89.2\",\"port\":85,\"weight\":50}]}",
"name": "test-ws/testing"
}
],
"id": "first"
}
],
"config": [
{
"default_weight": 50,
"id": "first",
"client": {
"token": "xxx"
},
"service": {
"host": "172.18.164.170",
"port": "6443",
"schema": "https"
},
"shared_size": "1m"
}
]
}
```
---
---
title: nacos
---
## Service discovery via Nacos
The performance of this module needs to be improved:
1. send the request parallelly.
### Configuration for Nacos
Add following configuration in `conf/config.yaml` :
```yaml
discovery:
nacos:
host:
- "http://${username}:${password}@${host1}:${port1}"
prefix: "/nacos/v1/"
fetch_interval: 30 # default 30 sec
# `weight` is the `default_weight` that will be attached to each discovered node that
# doesn't have a weight explicitly provided in nacos results
weight: 100 # default 100
timeout:
connect: 2000 # default 2000 ms
send: 2000 # default 2000 ms
read: 5000 # default 5000 ms
```
And you can config it in short by default value:
```yaml
discovery:
nacos:
host:
- "http://192.168.33.1:8848"
```
### Upstream setting
#### L7
Here is an example of routing a request with an URI of "/nacos/*" to a service which named "http://192.168.33.1:8848/nacos/v1/ns/instance/list?serviceName=APISIX-NACOS" and use nacos discovery client in the registry:
:::note
You can fetch the `admin_key` from `config.yaml` and save to an environment variable with the following command:
```bash
admin_key=$(yq '.deployment.admin.admin_key[0].key' conf/config.yaml | sed 's/"//g')
```
:::
```shell
$ curl http://127.0.0.1:9180/apisix/admin/routes/1 -H "X-API-KEY: $admin_key" -X PUT -i -d '
{
"uri": "/nacos/*",
"upstream": {
"service_name": "APISIX-NACOS",
"type": "roundrobin",
"discovery_type": "nacos"
}
}'
```
The formatted response as below:
```json
{
"node": {
"key": "\/apisix\/routes\/1",
"value": {
"id": "1",
"create_time": 1615796097,
"status": 1,
"update_time": 1615799165,
"upstream": {
"hash_on": "vars",
"pass_host": "pass",
"scheme": "http",
"service_name": "APISIX-NACOS",
"type": "roundrobin",
"discovery_type": "nacos"
},
"priority": 0,
"uri": "\/nacos\/*"
}
}
}
```
#### L4
Nacos service discovery also supports use in L4, the configuration method is similar to L7.
```shell
$ curl http://127.0.0.1:9180/apisix/admin/stream_routes/1 -H "X-API-KEY: $admin_key" -X PUT -i -d '
{
"remote_addr": "127.0.0.1",
"upstream": {
"scheme": "tcp",
"discovery_type": "nacos",
"service_name": "APISIX-NACOS",
"type": "roundrobin"
}
}'
```
### discovery_args
| Name | Type | Requirement | Default | Valid | Description |
| ------------ | ------ | ----------- | ------- | ----- | ------------------------------------------------------------ |
| namespace_id | string | optional | public | | This parameter is used to specify the namespace of the corresponding service |
| group_name | string | optional | DEFAULT_GROUP | | This parameter is used to specify the group of the corresponding service |
#### Specify the namespace
Example of routing a request with an URI of "/nacosWithNamespaceId/*" to a service with name, namespaceId "http://192.168.33.1:8848/nacos/v1/ns/instance/list?serviceName=APISIX-NACOS&namespaceId=test_ns" and use nacos discovery client in the registry:
```shell
$ curl http://127.0.0.1:9180/apisix/admin/routes/2 -H "X-API-KEY: $admin_key" -X PUT -i -d '
{
"uri": "/nacosWithNamespaceId/*",
"upstream": {
"service_name": "APISIX-NACOS",
"type": "roundrobin",
"discovery_type": "nacos",
"discovery_args": {
"namespace_id": "test_ns"
}
}
}'
```
The formatted response as below:
```json
{
"node": {
"key": "\/apisix\/routes\/2",
"value": {
"id": "2",
"create_time": 1615796097,
"status": 1,
"update_time": 1615799165,
"upstream": {
"hash_on": "vars",
"pass_host": "pass",
"scheme": "http",
"service_name": "APISIX-NACOS",
"type": "roundrobin",
"discovery_type": "nacos",
"discovery_args": {
"namespace_id": "test_ns"
}
},
"priority": 0,
"uri": "\/nacosWithNamespaceId\/*"
}
}
}
```
#### Specify the group
Example of routing a request with an URI of "/nacosWithGroupName/*" to a service with name, groupName "http://192.168.33.1:8848/nacos/v1/ns/instance/list?serviceName=APISIX-NACOS&groupName=test_group" and use nacos discovery client in the registry:
```shell
$ curl http://127.0.0.1:9180/apisix/admin/routes/3 -H "X-API-KEY: $admin_key" -X PUT -i -d '
{
"uri": "/nacosWithGroupName/*",
"upstream": {
"service_name": "APISIX-NACOS",
"type": "roundrobin",
"discovery_type": "nacos",
"discovery_args": {
"group_name": "test_group"
}
}
}'
```
The formatted response as below:
```json
{
"node": {
"key": "\/apisix\/routes\/3",
"value": {
"id": "3",
"create_time": 1615796097,
"status": 1,
"update_time": 1615799165,
"upstream": {
"hash_on": "vars",
"pass_host": "pass",
"scheme": "http",
"service_name": "APISIX-NACOS",
"type": "roundrobin",
"discovery_type": "nacos",
"discovery_args": {
"group_name": "test_group"
}
},
"priority": 0,
"uri": "\/nacosWithGroupName\/*"
}
}
}
```
#### Specify the namespace and group
Example of routing a request with an URI of "/nacosWithNamespaceIdAndGroupName/*" to a service with name, namespaceId, groupName "http://192.168.33.1:8848/nacos/v1/ns/instance/list?serviceName=APISIX-NACOS&namespaceId=test_ns&groupName=test_group" and use nacos discovery client in the registry:
```shell
$ curl http://127.0.0.1:9180/apisix/admin/routes/4 -H "X-API-KEY: $admin_key" -X PUT -i -d '
{
"uri": "/nacosWithNamespaceIdAndGroupName/*",
"upstream": {
"service_name": "APISIX-NACOS",
"type": "roundrobin",
"discovery_type": "nacos",
"discovery_args": {
"namespace_id": "test_ns",
"group_name": "test_group"
}
}
}'
```
The formatted response as below:
```json
{
"node": {
"key": "\/apisix\/routes\/4",
"value": {
"id": "4",
"create_time": 1615796097,
"status": 1,
"update_time": 1615799165,
"upstream": {
"hash_on": "vars",
"pass_host": "pass",
"scheme": "http",
"service_name": "APISIX-NACOS",
"type": "roundrobin",
"discovery_type": "nacos",
"discovery_args": {
"namespace_id": "test_ns",
"group_name": "test_group"
}
},
"priority": 0,
"uri": "\/nacosWithNamespaceIdAndGroupName\/*"
}
}
}
```
---
---
title: Integration service discovery registry
---
## Summary
When system traffic changes, the number of servers of the upstream service also increases or decreases, or the server needs to be replaced due to its hardware failure. If the gateway maintains upstream service information through configuration, the maintenance costs in the microservices architecture pattern are unpredictable. Furthermore, due to the untimely update of these information, will also bring a certain impact for the business, and the impact of human error operation can not be ignored. So it is very necessary for the gateway to automatically get the latest list of service instances through the service registry。As shown in the figure below:

1. When the service starts, it will report some of its information, such as the service name, IP, port and other information to the registry. The services communicate with the registry using a mechanism such as a heartbeat, and if the registry and the service are unable to communicate for a long time, the instance will be cancel.When the service goes offline, the registry will delete the instance information.
2. The gateway gets service instance information from the registry in near-real time.
3. When the user requests the service through the gateway, the gateway selects one instance from the registry for proxy.
## How to extend the discovery client?
### Basic steps
It is very easy for APISIX to extend the discovery client, the basic steps are as follows
1. Add the implementation of registry client in the 'apisix/discovery/' directory;
2. Implement the `_M.init_worker()` function for initialization and the `_M.nodes(service_name)` function for obtaining the list of service instance nodes;
3. If you need the discovery module to export the debugging information online, implement the `_M.dump_data()` function;
4. Convert the registry data into data in APISIX;
### the example of Eureka
#### Implementation of Eureka client
First, create a directory `eureka` under `apisix/discovery`;
After that, add [`init.lua`](https://github.com/apache/apisix/blob/master/apisix/discovery/init.lua) in the `apisix/discovery/eureka` directory;
Then implement the `_M.init_worker()` function for initialization and the `_M.nodes(service_name)` function for obtaining the list of service instance nodes in `init.lua`:
```lua
local _M = {
version = 1.0,
}
function _M.nodes(service_name)
... ...
end
function _M.init_worker()
... ...
end
function _M.dump_data()
return {config = your_config, services = your_services, other = ... }
end
return _M
```
Finally, provide the schema for YAML configuration in the `schema.lua` under `apisix/discovery/eureka`.
#### How convert Eureka's instance data to APISIX's node?
Here's an example of Eureka's data:
```json
{
"applications": {
"application": [
{
"name": "USER-SERVICE", # service name
"instance": [
{
"instanceId": "192.168.1.100:8761",
"hostName": "192.168.1.100",
"app": "USER-SERVICE", # service name
"ipAddr": "192.168.1.100", # IP address
"status": "UP",
"overriddenStatus": "UNKNOWN",
"port": {
"$": 8761,
"@enabled": "true"
},
"securePort": {
"$": 443,
"@enabled": "false"
},
"metadata": {
"management.port": "8761",
"weight": 100 # Setting by 'eureka.instance.metadata-map.weight' of the spring boot application
},
"homePageUrl": "http://192.168.1.100:8761/",
"statusPageUrl": "http://192.168.1.100:8761/actuator/info",
"healthCheckUrl": "http://192.168.1.100:8761/actuator/health",
... ...
}
]
}
]
}
}
```
Deal with the Eureka's instance data need the following steps :
1. select the UP instance. When the value of `overriddenStatus` is "UP" or the value of `overriddenStatus` is "UNKNOWN" and the value of `status` is "UP".
2. Host. The `ipAddr` is the IP address of instance; and must be IPv4 or IPv6.
3. Port. If the value of `port["@enabled"]` is equal to "true", using the value of `port["\$"]`, If the value of `securePort["@enabled"]` is equal to "true", using the value of `securePort["\$"]`.
4. Weight. `local weight = metadata.weight or local_conf.eureka.weight or 100`
The result of this example is as follows:
```json
[
{
"host" : "192.168.1.100",
"port" : 8761,
"weight" : 100,
"metadata" : {
"management.port": "8761"
}
}
]
```
## Configuration for discovery client
### Initial service discovery
Add the following configuration to `conf/config.yaml` to add different service discovery clients for dynamic selection during use:
```yaml
discovery:
eureka:
...
```
This name should be consistent with the file name of the implementation registry in the `apisix/discovery/` directory.
The supported discovery client: Eureka.
### Configuration for Eureka
Add following configuration in `conf/config.yaml` :
```yaml
discovery:
eureka:
host: # it's possible to define multiple eureka hosts addresses of the same eureka cluster.
- "http://${username}:${password}@${eureka_host1}:${eureka_port1}"
- "http://${username}:${password}@${eureka_host2}:${eureka_port2}"
prefix: "/eureka/"
fetch_interval: 30 # 30s
weight: 100 # default weight for node
timeout:
connect: 2000 # 2000ms
send: 2000 # 2000ms
read: 5000 # 5000ms
```
## Upstream setting
### L7
Here is an example of routing a request with a URL of "/user/*" to a service which named "user-service" and use eureka discovery client in the registry :
:::note
You can fetch the `admin_key` from `config.yaml` and save to an environment variable with the following command:
```bash
admin_key=$(yq '.deployment.admin.admin_key[0].key' conf/config.yaml | sed 's/"//g')
```
:::
```shell
$ curl http://127.0.0.1:9180/apisix/admin/routes/1 -H "X-API-KEY: $admin_key" -X PUT -i -d '
{
"uri": "/user/*",
"upstream": {
"service_name": "USER-SERVICE",
"type": "roundrobin",
"discovery_type": "eureka"
}
}'
HTTP/1.1 201 Created
Date: Sat, 31 Aug 2019 01:17:15 GMT
Content-Type: text/plain
Transfer-Encoding: chunked
Connection: keep-alive
Server: APISIX web server
{"node":{"value":{"uri":"\/user\/*","upstream": {"service_name": "USER-SERVICE", "type": "roundrobin", "discovery_type": "eureka"}},"createdIndex":61925,"key":"\/apisix\/routes\/1","modifiedIndex":61925}}
```
Because the upstream interface URL may have conflict, usually in the gateway by prefix to distinguish:
```shell
$ curl http://127.0.0.1:9180/apisix/admin/routes/1 -H "X-API-KEY: $admin_key" -X PUT -i -d '
{
"uri": "/a/*",
"plugins": {
"proxy-rewrite" : {
"regex_uri": ["^/a/(.*)", "/${1}"]
}
},
"upstream": {
"service_name": "A-SERVICE",
"type": "roundrobin",
"discovery_type": "eureka"
}
}'
$ curl http://127.0.0.1:9180/apisix/admin/routes/2 -H "X-API-KEY: $admin_key" -X PUT -i -d '
{
"uri": "/b/*",
"plugins": {
"proxy-rewrite" : {
"regex_uri": ["^/b/(.*)", "/${1}"]
}
},
"upstream": {
"service_name": "B-SERVICE",
"type": "roundrobin",
"discovery_type": "eureka"
}
}'
```
Suppose both A-SERVICE and B-SERVICE provide a `/test` API. The above configuration allows access to A-SERVICE's `/test` API through `/a/test` and B-SERVICE's `/test` API through `/b/test`.
**Notice**:When configuring `upstream.service_name`, `upstream.nodes` will no longer take effect, but will be replaced by 'nodes' obtained from the registry.
### L4
Eureka service discovery also supports use in L4, the configuration method is similar to L7.
```shell
$ curl http://127.0.0.1:9180/apisix/admin/stream_routes/1 -H "X-API-KEY: $admin_key" -X PUT -i -d '
{
"remote_addr": "127.0.0.1",
"upstream": {
"scheme": "tcp",
"discovery_type": "eureka",
"service_name": "APISIX-EUREKA",
"type": "roundrobin"
}
}'
HTTP/1.1 200 OK
Date: Fri, 30 Dec 2022 03:52:19 GMT
Content-Type: application/json
Transfer-Encoding: chunked
Connection: keep-alive
Server: APISIX/3.0.0
Access-Control-Allow-Origin: *
Access-Control-Allow-Credentials: true
Access-Control-Expose-Headers: *
Access-Control-Max-Age: 3600
X-API-VERSION: v3
{"key":"\/apisix\/stream_routes\/1","value":{"remote_addr":"127.0.0.1","upstream":{"hash_on":"vars","type":"roundrobin","discovery_type":"eureka","scheme":"tcp","pass_host":"pass","service_name":"APISIX-EUREKA"},"id":"1","create_time":1672106762,"update_time":1672372339}}
```
## Embedded control api for debugging
Sometimes we need the discovery client to export online data snapshot in memory when running for debugging, and if you implement the `_M. dump_data()` function:
```lua
function _M.dump_data()
return {config = local_conf.discovery.eureka, services = applications}
end
```
Then you can call its control api as below:
```shell
GET /v1/discovery/{discovery_type}/dump
```
eg:
```shell
curl http://127.0.0.1:9090/v1/discovery/eureka/dump
```
---
---
title: HMAC Generate Signature Examples
---
## Python 3
```python
import base64
import hashlib
import hmac
secret = bytes('the shared secret key here', 'utf-8')
message = bytes('this is signature string', 'utf-8')
hash = hmac.new(secret, message, hashlib.sha256)
# to lowercase hexits
hash.hexdigest()
# to lowercase base64
base64.b64encode(hash.digest())
```
## Java
```java
import javax.crypto.Mac;
import javax.crypto.spec.SecretKeySpec;
import java.security.InvalidKeyException;
import java.security.NoSuchAlgorithmException;
import javax.xml.bind.DatatypeConverter;
class Main {
public static void main(String[] args) {
try {
String secret = "the shared secret key here";
String message = "this is signature string";
Mac hasher = Mac.getInstance("HmacSHA256");
hasher.init(new SecretKeySpec(secret.getBytes(), "HmacSHA256"));
byte[] hash = hasher.doFinal(message.getBytes());
// to lowercase hexits
DatatypeConverter.printHexBinary(hash);
// to base64
DatatypeConverter.printBase64Binary(hash);
}
catch (NoSuchAlgorithmException e) {}
catch (InvalidKeyException e) {}
}
}
```
## Go
```go
package main
import (
"crypto/hmac"
"crypto/sha256"
"encoding/base64"
"encoding/hex"
)
func main() {
secret := []byte("the shared secret key here")
message := []byte("this is signature string")
hash := hmac.New(sha256.New, secret)
hash.Write(message)
// to lowercase hexits
hex.EncodeToString(hash.Sum(nil))
// to base64
base64.StdEncoding.EncodeToString(hash.Sum(nil))
}
```
## Ruby
```ruby
require 'base64'
require 'openssl'
secret = 'the shared secret key here'
message = 'this is signature string'
# to lowercase hexits
OpenSSL::HMAC.hexdigest('sha256', secret, message)
# to base64
Base64.encode64(OpenSSL::HMAC.digest('sha256', secret, message))
```
## NodeJs
```js
var crypto = require('crypto');
var secret = 'the shared secret key here';
var message = 'this is signature string';
var hash = crypto.createHmac('sha256', secret).update(message);
// to lowercase hexits
hash.digest('hex');
// to base64
hash.digest('base64');
```
## JavaScript ES6
```js
const secret = 'the shared secret key here';
const message = 'this is signature string';
const getUtf8Bytes = str =>
new Uint8Array(
[...unescape(encodeURIComponent(str))].map(c => c.charCodeAt(0))
);
const secretBytes = getUtf8Bytes(secret);
const messageBytes = getUtf8Bytes(message);
const cryptoKey = await crypto.subtle.importKey(
'raw', secretBytes, { name: 'HMAC', hash: 'SHA-256' },
true, ['sign']
);
const sig = await crypto.subtle.sign('HMAC', cryptoKey, messageBytes);
// to lowercase hexits
[...new Uint8Array(sig)].map(b => b.toString(16).padStart(2, '0')).join('');
// to base64
btoa(String.fromCharCode(...new Uint8Array(sig)));
```
## PHP
```php
## What are external plugin and plugin runner
APISIX supports writing plugins in Lua. This type of plugin will be executed
inside APISIX. Sometimes you want to develop plugins in other languages, so APISIX
provides sidecars that load your plugins and run them when the requests hit
APISIX. These sidecars are called plugin runners and your plugins are called
external plugins.
## How does it work

When you configure a plugin runner in APISIX, APISIX will run the plugin runner
as a subprocess. The process will belong to the same user of the APISIX
process. When we restart or reload APISIX, the plugin runner will be restarted too.
Once you have configured `ext-plugin-*` plugins for a given route, the requests
which hit the route will trigger RPC call from APISIX to the plugin runner via
unix socket.
The plugin runner will handle the RPC call, create a fake request at its side,
run external plugins and return the result back to APISIX.
The target external plugins and the execution order are configured in the `ext-plugin-*`
plugins. Like other plugins, they can be enabled and reconfigured on the fly.
## How is it implemented
If you are interested in the implementation of Plugin Runner, please refer to [The Implementation of Plugin Runner](./internal/plugin-runner.md).
## Supported plugin runners
- Java: https://github.com/apache/apisix-java-plugin-runner
- Go: https://github.com/apache/apisix-go-plugin-runner
- Python: https://github.com/apache/apisix-python-plugin-runner
- JavaScript: https://github.com/zenozeng/apisix-javascript-plugin-runner
## Configuration for plugin runner in APISIX
To run the plugin runner in the prod, add the section below to `config.yaml`:
```yaml
ext-plugin:
cmd: ["blah"] # replace it to the real runner executable according to the runner you choice
```
Then APISIX will manage the runner as its subprocess.
Note: APISIX can't manage the runner on the Mac in `v2.6`.
During development, we want to run the runner separately so that we can restart it without
restarting APISIX first.
By specifying the environment variable `APISIX_LISTEN_ADDRESS`, we can force the runner to
listen to a fixed address.
For instance:
```bash
APISIX_LISTEN_ADDRESS=unix:/tmp/x.sock ./the_runner
```
will force the runner to listen to `/tmp/x.sock`.
Then you need to configure APISIX to send RPC to the fixed address:
```yaml
ext-plugin:
# cmd: ["blah"] # don't configure the executable!
path_for_test: "/tmp/x.sock" # without 'unix:' prefix
```
In the prod environment, `path_for_test` should not be used and the unix socket
path will be generated dynamically.
## FAQ
### When managing by APISIX, the runner can't access my environment variable
Since `v2.7`, APISIX can pass environment variables to the runner.
However, Nginx will hide all environment variables by default. So you need to
declare your variable first in the `conf/config.yaml`:
```yaml
nginx_config:
envs:
- MY_ENV_VAR
```
### APISIX terminates my runner with SIGKILL but not SIGTERM!
Since `v2.7`, APISIX will stop the runner with SIGTERM when it is running on
OpenResty 1.19+.
However, APISIX needs to wait for the runner to quit so that we can ensure the resource
for the process group is freed.
Therefore, we send SIGTERM first. And then after 1 second, if the runner is still
running, we will send SIGKILL.
---
---
title: Configure Routes
slug: /getting-started/configure-routes
---
> The Getting Started tutorials are contributed by [API7.ai](https://api7.ai/).
Apache APISIX provides flexible gateway management capabilities based on _routes_, where routing paths and targets are defined for requests.
This tutorial guides you on how to create a route and validate it. You will complete the following steps:
1. Create a route with a sample _upstream_ that points to [httpbin.org](http://httpbin.org).
2. Use _cURL_ to send a test request to see how APISIX proxies and forwards the request.
## What is a Route
A route is a routing path to upstream targets. In [Apache APISIX](https://api7.ai/apisix), routes are responsible for matching client's requests based on defined rules, loading and executing the corresponding plugins, as well as forwarding requests to the specified upstream services.
In APISIX, a simple route can be set up with a path-matching URI and a corresponding upstream address.
## What is an Upstream
An upstream is a set of target nodes with the same work. It defines a virtual host abstraction that performs load balancing on a given set of service nodes according to the configured rules.
## Prerequisite(s)
1. Complete [Get APISIX](./README.md) to install APISIX.
## Create a Route
In this section, you will create a route that forwards client requests to [httpbin.org](http://httpbin.org), a public HTTP request and response service.
The following command creates a route, which should forward all requests sent to `http://127.0.0.1:9080/ip` to [httpbin.org/ip](http://httpbin.org/ip):
[//]:
```shell
curl -i "http://127.0.0.1:9180/apisix/admin/routes" -X PUT -d '
{
"id": "getting-started-ip",
"uri": "/ip",
"upstream": {
"type": "roundrobin",
"nodes": {
"httpbin.org:80": 1
}
}
}'
```
You will receive an `HTTP/1.1 201 Created` response if the route was created successfully.
## Validate
```shell
curl "http://127.0.0.1:9080/ip"
```
The expected response is similar to the following:
```text
{
"origin": "183.94.122.205"
}
```
## What's Next
This tutorial creates a route with only one target node. In the next tutorial, you will learn how to configure load balancing with multiple target nodes.
---
---
title: Key Authentication
slug: /getting-started/key-authentication
---
> The Getting Started tutorials are contributed by [API7.ai](https://api7.ai/).
An API gateway's primary role is to connect API consumers and providers. For security reasons, it should authenticate and authorize consumers before access to internal resources.

APISIX has a flexible plugin extension system and a number of existing plugins for user authentication and authorization. For example:
- [Key Authentication](https://apisix.apache.org/docs/apisix/plugins/key-auth/)
- [Basic Authentication](https://apisix.apache.org/docs/apisix/plugins/basic-auth/)
- [JSON Web Token (JWT) Authentication](https://apisix.apache.org/docs/apisix/plugins/jwt-auth/)
- [Keycloak](https://apisix.apache.org/docs/apisix/plugins/authz-keycloak/)
- [Casdoor](https://apisix.apache.org/docs/apisix/plugins/authz-casdoor/)
- [Wolf RBAC](https://apisix.apache.org/docs/apisix/plugins/wolf-rbac/)
- [OpenID Connect](https://apisix.apache.org/docs/apisix/plugins/openid-connect/)
- [Central Authentication Service (CAS)](https://apisix.apache.org/docs/apisix/plugins/cas-auth/)
- [HMAC](https://apisix.apache.org/docs/apisix/plugins/hmac-auth/)
- [Casbin](https://apisix.apache.org/docs/apisix/plugins/authz-casbin/)
- [LDAP](https://apisix.apache.org/docs/apisix/plugins/ldap-auth/)
- [Open Policy Agent (OPA)](https://apisix.apache.org/docs/apisix/plugins/opa/)
- [Forward Authentication](https://apisix.apache.org/docs/apisix/plugins/forward-auth/)
- [Multiple Authentications](https://apisix.apache.org/docs/apisix/plugins/multi-auth/)
In this tutorial, you will create a _consumer_ with _key authentication_, and learn how to enable and disable key authentication.
## What is a Consumer
A Consumer is an application or a developer who consumes the API.
In APISIX, a Consumer requires a unique _username_ and an authentication _plugin_ from the list above to be created.
## What is Key Authentication
Key authentication is a relatively simple but widely used authentication approach. The idea is as follows:
1. Administrator adds an authentication key (API key) to the Route.
2. API consumers add the key to the query string or headers for authentication when sending requests.
## Enable Key Authentication
### Prerequisite(s)
1. Complete [Get APISIX](./README.md) to install APISIX.
2. Complete [Configure Routes](./configure-routes.md#what-is-a-route).
### Create a Consumer
Let's create a consumer named `tom` and enable the `key-auth` plugin with an API key `secret-key`. All requests sent with the key `secret-key` should be authenticated as `tom`.
:::caution
Please use a complex key in the Production environment.
:::
```shell
curl -i "http://127.0.0.1:9180/apisix/admin/consumers" -X PUT -d '
{
"username": "tom",
"plugins": {
"key-auth": {
"key": "secret-key"
}
}
}'
```
You will receive an `HTTP/1.1 201 Created` response if the consumer was created successfully.
### Enable Authentication
Inheriting the route `getting-started-ip` from [Configure Routes](./configure-routes.md), we only need to use the `PATCH` method to add the `key-auth` plugin to the route:
```shell
curl -i "http://127.0.0.1:9180/apisix/admin/routes/getting-started-ip" -X PATCH -d '
{
"plugins": {
"key-auth": {}
}
}'
```
You will receive an `HTTP/1.1 201 Created` response if the plugin was added successfully.
### Validate
Let's validate the authentication in the following scenarios:
#### 1. Send a request without any key
Send a request without the `apikey` header.
```shell
curl -i "http://127.0.0.1:9080/ip"
```
Since you enabled the key authentication, you will receive an unauthorized response with `HTTP/1.1 401 Unauthorized`.
```text
HTTP/1.1 401 Unauthorized
Date: Wed, 08 Feb 2023 09:38:36 GMT
Content-Type: text/plain; charset=utf-8
Transfer-Encoding: chunked
Connection: keep-alive
Server: APISIX/3.1.0
```
#### 2. Send a request with a wrong key
Send a request with a wrong key (e.g. `wrong-key`) in the `apikey` header.
```shell
curl -i "http://127.0.0.1:9080/ip" -H 'apikey: wrong-key'
```
Since the key is incorrect, you will receive an unauthorized response with `HTTP/1.1 401 Unauthorized`.
```text
HTTP/1.1 401 Unauthorized
Date: Wed, 08 Feb 2023 09:38:27 GMT
Content-Type: text/plain; charset=utf-8
Transfer-Encoding: chunked
Connection: keep-alive
Server: APISIX/3.1.0
```
#### 3. Send a request with the correct key
Send a request with the correct key (`secret-key`) in the `apikey` header.
```shell
curl -i "http://127.0.0.1:9080/ip" -H 'apikey: secret-key'
```
You will receive an `HTTP/1.1 200 OK` response.
```text
HTTP/1.1 200 OK
Content-Type: application/json
Content-Length: 44
Connection: keep-alive
Date: Thu, 09 Feb 2023 03:27:57 GMT
Access-Control-Allow-Origin: *
Access-Control-Allow-Credentials: true
Server: APISIX/3.1.0
```
### Disable Authentication
Disable the key authentication plugin by setting the `_meta.disable` parameter to `true`.
```shell
curl "http://127.0.0.1:9180/apisix/admin/routes/getting-started-ip" -X PATCH -d '
{
"plugins": {
"key-auth": {
"_meta": {
"disable": true
}
}
}
}'
```
You can send a request without any key to validate:
```shell
curl -i "http://127.0.0.1:9080/ip"
```
Because you have disabled the key authentication plugin, you will receive an `HTTP/1.1 200 OK` response.
## What's Next
You have learned how to configure key authentication for a route. In the next tutorial, you will learn how to configure rate limiting.
---
---
title: Load Balancing
slug: /getting-started/load-balancing
---
> The Getting Started tutorials are contributed by [API7.ai](https://api7.ai/).
Load balancing manages traffic between clients and servers. It is a mechanism used to decide which server handles a specific request, allowing for improved performance, scalability, and reliability. Load balancing is a key consideration in designing systems that need to handle a large volume of traffic.
Apache APISIX supports weighted round-robin load balancing, in which incoming traffic are distributed across a set of servers in a cyclical pattern, with each server taking a turn in a predefined order.
In this tutorial, you will create a route with two upstream services and enable round-robin load balancing to distribute traffic between the two services.
## Prerequisite(s)
1. Complete [Get APISIX](./README.md) to install APISIX.
2. Understand APISIX [Route and Upstream](./configure-routes.md#what-is-a-route).
## Enable Load Balancing
Let's create a route with two upstream services. All requests sent to the `/headers` endpoint will be forwarded to [httpbin.org](https://httpbin.org/headers) and [mock.api7.ai](https://mock.api7.ai/headers), which should echo back the requester's headers.
```shell
curl -i "http://127.0.0.1:9180/apisix/admin/routes" -X PUT -d '
{
"id": "getting-started-headers",
"uri": "/headers",
"upstream" : {
"type": "roundrobin",
"nodes": {
"httpbin.org:443": 1,
"mock.api7.ai:443": 1
},
"pass_host": "node",
"scheme": "https"
}
}'
```
You will receive an `HTTP/1.1 201 Created` response if the route was created successfully.
:::info
1. The `pass_host` field is set to `node` to pass the host header to the upstream.
2. The `scheme` field is set to `https` to enable TLS when sending requests to the upstream.
:::
## Validate
The two services respond with different data.
From `httpbin.org`:
```json
{
"headers": {
"Accept": "*/*",
"Host": "httpbin.org",
"User-Agent": "curl/7.58.0",
"X-Amzn-Trace-Id": "Root=1-63e34b15-19f666602f22591b525e1e80",
"X-Forwarded-Host": "localhost"
}
}
```
From `mock.api7.ai`:
```json
{
"headers": {
"accept": "*/*",
"host": "mock.api7.ai",
"user-agent": "curl/7.58.0",
"content-type": "application/json",
"x-application-owner": "API7.ai"
}
}
```
Let's generate 100 requests to test the load-balancing effect:
```shell
hc=$(seq 100 | xargs -I {} curl "http://127.0.0.1:9080/headers" -sL | grep "httpbin" | wc -l); echo httpbin.org: $hc, mock.api7.ai: $((100 - $hc))
```
The result shows the requests were distributed over the two services almost equally:
```text
httpbin.org: 51, mock.api7.ai: 49
```
## What's Next
You have learned how to configure load balancing. In the next tutorial, you will learn how to configure key authentication.
---
---
title: Rate Limiting
slug: /getting-started/rate-limiting
---
> The Getting Started tutorials are contributed by [API7.ai](https://api7.ai/).
APISIX is a unified control point, managing the ingress and egress of APIs and microservices traffic. In addition to the legitimate client requests, these requests may also include unwanted traffic generated by web crawlers as well as cyber attacks, such as DDoS.
APISIX offers rate limiting capabilities to protect APIs and microservices by limiting the number of requests sent to upstream services in a given period of time. The count of requests is done efficiently in memory with low latency and high performance.
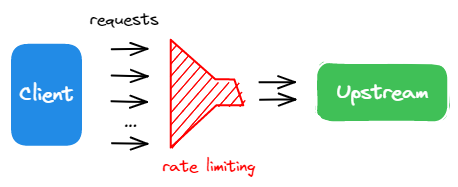
In this tutorial, you will enable the `limit-count` plugin to set a rate limiting constraint on the incoming traffic.
## Prerequisite(s)
1. Complete the [Get APISIX](./README.md) step to install APISIX first.
2. Complete the [Configure Routes](./configure-routes.md#what-is-a-route) step.
## Enable Rate Limiting
The following route `getting-started-ip` is inherited from [Configure Routes](./configure-routes.md). You only need to use the `PATCH` method to add the `limit-count` plugin to the route:
```shell
curl -i "http://127.0.0.1:9180/apisix/admin/routes/getting-started-ip" -X PATCH -d '
{
"plugins": {
"limit-count": {
"count": 2,
"time_window": 10,
"rejected_code": 503
}
}
}'
```
You will receive an `HTTP/1.1 201 Created` response if the plugin was added successfully. The above configuration limits the incoming requests to a maximum of 2 requests within 10 seconds.
### Validate
Let's generate 100 simultaneous requests to see the rate limiting plugin in effect.
```shell
count=$(seq 100 | xargs -I {} curl "http://127.0.0.1:9080/ip" -I -sL | grep "503" | wc -l); echo \"200\": $((100 - $count)), \"503\": $count
```
The results are as expected: out of the 100 requests, 2 requests were sent successfully (status code `200`) while the others were rejected (status code `503`).
```text
"200": 2, "503": 98
```
## Disable Rate Limiting
Disable rate limiting by setting the `_meta.disable` parameter to `true`:
```shell
curl -i "http://127.0.0.1:9180/apisix/admin/routes/getting-started-ip" -X PATCH -d '
{
"plugins": {
"limit-count": {
"_meta": {
"disable": true
}
}
}
}'
```
### Validate
Let's generate 100 requests again to validate if it is disabled:
```shell
count=$(seq 100 | xargs -i curl "http://127.0.0.1:9080/ip" -I -sL | grep "503" | wc -l); echo \"200\": $((100 - $count)), \"503\": $count
```
The results below show that all of the requests were sent successfully:
```text
"200": 100, "503": 0
```
## More
[//]:
[//]:
[//]:
You can use the APISIX variables to configure fined matching rules of rate limiting, such as `$host` and `$uri`. In addition, APISIX also supports rate limiting at the cluster level using Redis.
## What's Next
Congratulations! You have learned how to configure rate limiting and completed the Getting Started tutorials.
You can continue to explore other documentations to customize APISIX and meet your production needs.
---
---
title: gRPC Proxy
---
proxying gRPC traffic:
gRPC client -> APISIX -> gRPC/gRPCS server
## Parameters
* `scheme`: the `scheme` of the route's upstream must be `grpc` or `grpcs`.
* `uri`: format likes /service/method, Example:/helloworld.Greeter/SayHello
### Example
#### create proxying gRPC route
Here's an example, to proxying gRPC service by specified route:
* attention: the `scheme` of the route's upstream must be `grpc` or `grpcs`.
* attention: APISIX use TLS‑encrypted HTTP/2 to expose gRPC service, so need to [config SSL certificate](certificate.md)
* attention: APISIX also support to expose gRPC service with plaintext HTTP/2, which does not rely on TLS, usually used to proxy gRPC service in intranet environment
* the grpc server example:[grpc_server_example](https://github.com/api7/grpc_server_example)
:::note
You can fetch the `admin_key` from `config.yaml` and save to an environment variable with the following command:
```bash
admin_key=$(yq '.deployment.admin.admin_key[0].key' conf/config.yaml | sed 's/"//g')
```
:::
```shell
curl http://127.0.0.1:9180/apisix/admin/routes/1 -H "X-API-KEY: $admin_key" -X PUT -d '
{
"methods": ["POST", "GET"],
"uri": "/helloworld.Greeter/SayHello",
"upstream": {
"scheme": "grpc",
"type": "roundrobin",
"nodes": {
"127.0.0.1:50051": 1
}
}
}'
```
#### testing HTTP/2 with TLS‑encrypted
Invoking the route created before:
```shell
$ grpcurl -insecure -import-path /pathtoprotos -proto helloworld.proto -d '{"name":"apisix"}' 127.0.0.1:9443 helloworld.Greeter.SayHello
{
"message": "Hello apisix"
}
```
> grpcurl is a CLI tool, similar to curl, that acts as a gRPC client and lets you interact with a gRPC server. For installation, please check out the official [documentation](https://github.com/fullstorydev/grpcurl#installation).
This means that the proxying is working.
#### testing HTTP/2 with plaintext
By default, the APISIX only listens to `9443` for TLS‑encrypted HTTP/2. You can support HTTP/2 with plaintext via the `node_listen` section under `apisix` in `conf/config.yaml`:
```yaml
apisix:
node_listen:
- port: 9080
- port: 9081
enable_http2: true
```
Invoking the route created before:
```shell
$ grpcurl -plaintext -import-path /pathtoprotos -proto helloworld.proto -d '{"name":"apisix"}' 127.0.0.1:9081 helloworld.Greeter.SayHello
{
"message": "Hello apisix"
}
```
This means that the proxying is working.
### gRPCS
If your gRPC service encrypts with TLS by itself (so called `gPRCS`, gPRC + TLS), you need to change the `scheme` to `grpcs`. The example above runs gRPCS service on port 50052, to proxy gRPC request, we need to use the configuration below:
```shell
curl http://127.0.0.1:9180/apisix/admin/routes/1 -H "X-API-KEY: $admin_key" -X PUT -d '
{
"methods": ["POST", "GET"],
"uri": "/helloworld.Greeter/SayHello",
"upstream": {
"scheme": "grpcs",
"type": "roundrobin",
"nodes": {
"127.0.0.1:50052": 1
}
}
}'
```
---
---
title: HTTP/3 Protocol
---
[HTTP/3](https://en.wikipedia.org/wiki/HTTP/3) is the third major version of the Hypertext Transfer Protocol (HTTP). Unlike its predecessors which rely on TCP, HTTP/3 is based on [QUIC (Quick UDP Internet Connections) protocol](https://en.wikipedia.org/wiki/QUIC). It brings several benefits that collectively result in reduced latency and improved performance:
* enabling seamless transition between different network connections, such as switching from Wi-Fi to mobile data.
* eliminating head-of-line blocking, so that a lost packet does not block all streams.
* negotiating TLS versions at the same time as the TLS handshakes, allowing for faster connections.
* providing encryption by default, ensuring that all data transmitted over an HTTP/3 connection is protected and confidential.
* providing zero round-trip time (0-RTT) when communicating with servers that clients already established connections to.
APISIX currently supports HTTP/3 connections between downstream clients and APISIX. HTTP/3 connections with upstream services are not yet supported, and contributions are welcomed.
:::caution
This feature is currently experimental and not recommended for production use.
:::
This document will show you how to configure APISIX to enable HTTP/3 connections between client and APISIX and document a few known issues.
## Usage
### Enable HTTP/3 in APISIX
Enable HTTP/3 on port `9443` (or a different port) by adding the following configurations to APISIX's `config.yaml` configuration file:
```yaml title="config.yaml"
apisix:
ssl:
listen:
- port: 9443
enable_http3: true
ssl_protocols: TLSv1.3
```
:::info
If you are deploying APISIX using Docker, make sure to allow UDP in the HTTP3 port, such as `-p 9443:9443/udp`.
:::
Then reload APISIX for configuration changes to take effect:
```shell
apisix reload
```
### Generate Certificates and Keys
HTTP/3 requires TLS. You can leverage the purchased certificates or self-generate them, whichever applicable.
To self-generate, first generate the certificate authority (CA) key and certificate:
```shell
openssl genrsa -out ca.key 2048 && \
openssl req -new -sha256 -key ca.key -out ca.csr -subj "/CN=ROOTCA" && \
openssl x509 -req -days 36500 -sha256 -extensions v3_ca -signkey ca.key -in ca.csr -out ca.crt
```
Next, generate the key and certificate with a common name for APISIX, and sign with the CA certificate:
```shell
openssl genrsa -out server.key 2048 && \
openssl req -new -sha256 -key server.key -out server.csr -subj "/CN=test.com" && \
openssl x509 -req -days 36500 -sha256 -extensions v3_req \
-CA ca.crt -CAkey ca.key -CAserial ca.srl -CAcreateserial \
-in server.csr -out server.crt
```
### Configure HTTPS
Optionally load the content stored in `server.crt` and `server.key` into shell variables:
```shell
server_cert=$(cat server.crt)
server_key=$(cat server.key)
```
Create an SSL certificate object to save the server certificate and its key:
```shell
curl -i "http://127.0.0.1:9180/apisix/admin/ssls" -X PUT -d '
{
"id": "quickstart-tls-client-ssl",
"sni": "test.com",
"cert": "'"${server_cert}"'",
"key": "'"${server_key}"'"
}'
```
### Create a Route
Create a sample route to `httpbin.org`:
```shell
curl "http://127.0.0.1:9180/apisix/admin/routes" -X PUT -d '
{
"id":"httpbin-route",
"uri":"/get",
"upstream": {
"type":"roundrobin",
"nodes": {
"httpbin.org:80": 1
}
}
}'
```
### Verify HTTP/3 Connections
Install [static-curl](https://github.com/stunnel/static-curl) or any other curl executable that has HTTP/3 support.
Send a request to the route:
```shell
curl -kv --http3-only \
-H "Host: test.com" \
--resolve "test.com:9443:127.0.0.1" "https://test.com:9443/get"
```
You should receive an `HTTP/3 200` response similar to the following:
```text
* Added test.com:9443:127.0.0.1 to DNS cache
* Hostname test.com was found in DNS cache
* Trying 127.0.0.1:9443...
* QUIC cipher selection: TLS_AES_128_GCM_SHA256:TLS_AES_256_GCM_SHA384:TLS_CHACHA20_POLY1305_SHA256:TLS_AES_128_CCM_SHA256
* Skipped certificate verification
* Connected to test.com (127.0.0.1) port 9443
* using HTTP/3
* [HTTP/3] [0] OPENED stream for https://test.com:9443/get
* [HTTP/3] [0] [:method: GET]
* [HTTP/3] [0] [:scheme: https]
* [HTTP/3] [0] [:authority: test.com]
* [HTTP/3] [0] [:path: /get]
* [HTTP/3] [0] [user-agent: curl/8.7.1]
* [HTTP/3] [0] [accept: */*]
> GET /get HTTP/3
> Host: test.com
> User-Agent: curl/8.7.1
> Accept: */*
>
* Request completely sent off
< HTTP/3 200
...
{
"args": {},
"headers": {
"Accept": "*/*",
"Content-Length": "0",
"Host": "test.com",
"User-Agent": "curl/8.7.1",
"X-Amzn-Trace-Id": "Root=1-6656013a-27da6b6a34d98e3e79baaf5b",
"X-Forwarded-Host": "test.com"
},
"origin": "172.19.0.1, 123.40.79.456",
"url": "http://test.com/get"
}
* Connection #0 to host test.com left intact
```
## Known Issues
- For APISIX-3.9, test cases of Tongsuo will fail because the Tongsuo does not support QUIC TLS.
- APISIX-3.9 is based on NGINX-1.25.3 with vulnerabilities in HTTP/3 (CVE-2024-24989, CVE-2024-24990).
---
---
title: Install Dependencies
---
## Note
- Since v2.0 Apache APISIX would not support the v2 protocol storage to etcd anymore, and the minimum etcd version supported is v3.4.0. What's more, etcd v3 uses gRPC as the messaging protocol, while Apache APISIX uses HTTP(S) to communicate with etcd cluster, so be sure the [etcd gRPC gateway](https://etcd.io/docs/v3.4.0/dev-guide/api_grpc_gateway/) is enabled.
- Now by default Apache APISIX uses HTTP protocol to talk with etcd cluster, which is insecure. Please configure certificate and corresponding private key for your etcd cluster, and use "https" scheme explicitly in the etcd endpoints list in your Apache APISIX configuration, if you want to keep the data secure and integral. See the etcd section in `conf/config.yaml.example` for more details.
- If it is OpenResty 1.19, APISIX will use OpenResty's built-in LuaJIT to run `bin/apisix`; otherwise it will use Lua 5.1. If you encounter `luajit: lj_asm_x86.h:2819: asm_loop_ fixup: Assertion '((intptr_t)target & 15) == 0' failed`, this is a problem with the low version of OpenResty's built-in LuaJIT under certain compilation conditions.
- On some platforms, installing LuaRocks via the package manager will cause Lua to be upgraded to Lua 5.3, so we recommend installing LuaRocks via source code. if you install OpenResty and its OpenSSL develop library (openresty-openssl111-devel for rpm and openresty-openssl111-dev for deb) via the official repository, then [we provide a script for automatic installation](https://github.com/apache/apisix/blob/master/utils/linux-install-luarocks.sh). If you compile OpenResty yourself, you can refer to the above script and change the path in it. If you don't specify the OpenSSL library path when you compile, you don't need to configure the OpenSSL variables in LuaRocks, because the system's OpenSSL is used by default. If the OpenSSL library is specified at compile time, then you need to ensure that LuaRocks' OpenSSL configuration is consistent with OpenResty's.
- OpenResty is a dependency of APISIX. If it is your first time to deploy APISIX and you don't need to use OpenResty to deploy other services, you can stop and disable OpenResty after installation since it will not affect the normal work of APISIX. Please operate carefully according to your service. For example in Ubuntu: `systemctl stop openresty && systemctl disable openresty`.
## Install
Run the following command to install Apache APISIX's dependencies on a supported operating system.
Supported OS versions: Debian 11/12, Ubuntu 20.04/22.04/24.04, etc.
Note that in the case of Arch Linux, we use `openresty` from the AUR, thus requiring a AUR helper. For now `yay` and `pacaur` are supported.
```
curl https://raw.githubusercontent.com/apache/apisix/master/utils/install-dependencies.sh -sL | bash -
```
If you have cloned the Apache APISIX project, execute in the Apache APISIX root directory:
```
bash utils/install-dependencies.sh
```
---
---
title: Installation
keywords:
- APISIX
- Installation
description: This document walks you through the different Apache APISIX installation methods.
---
import Tabs from '@theme/Tabs';
import TabItem from '@theme/TabItem';
This guide walks you through how you can install and run Apache APISIX in your environment.
Refer to the [Getting Started](./getting-started/README.md) guide for a quick walk-through on running Apache APISIX.
## Installing APISIX
APISIX can be installed by the different methods listed below:
First clone the [apisix-docker](https://github.com/apache/apisix-docker) repository:
```shell
git clone https://github.com/apache/apisix-docker.git
cd apisix-docker/example
```
Now, you can use `docker-compose` to start APISIX.
```shell
docker-compose -p docker-apisix up -d
```
```shell
docker-compose -p docker-apisix -f docker-compose-arm64.yml up -d
```
To install APISIX via Helm, run:
```shell
helm repo add apisix https://charts.apiseven.com
helm repo update
helm install apisix apisix/apisix --create-namespace --namespace apisix
```
You can find other Helm charts on the [apisix-helm-chart](https://github.com/apache/apisix-helm-chart) repository.
This installation method is suitable for Redhat 8 and compatible systems. If you choose this method to install APISIX, you need to install etcd first. For the specific installation method, please refer to [Installing etcd](#installing-etcd).
### Installation via RPM repository
```shell
sudo yum-config-manager --add-repo https://repos.apiseven.com/packages/redhat/apache-apisix.repo
```
Then, to install APISIX, run:
```shell
sudo yum install apisix
```
:::tip
You can also install a specific version of APISIX by specifying it:
```shell
sudo yum install apisix-3.8.0
```
:::
### Installation via RPM offline package
First, download APISIX RPM offline package to an `apisix` folder:
```shell
sudo mkdir -p apisix
sudo yum install -y https://repos.apiseven.com/packages/redhat/8/x86_64/apisix-3.13.0-0.ubi8.6.x86_64.rpm
sudo yum clean all && yum makecache
sudo yum install -y --downloadonly --downloaddir=./apisix apisix
```
Then copy the `apisix` folder to the target host and run:
```shell
sudo yum install ./apisix/*.rpm
```
### Managing APISIX server
Once APISIX is installed, you can initialize the configuration file and etcd by running:
```shell
apisix init
```
To start APISIX server, run:
```shell
apisix start
```
:::tip
Run `apisix help` to get a list of all available operations.
:::
### Installation via DEB repository
Currently the only DEB repository supported by APISIX is Debian 11 (Bullseye) and supports both amd64 and arm64 architectures.
```shell
# amd64
wget -O - http://repos.apiseven.com/pubkey.gpg | sudo apt-key add -
echo "deb http://repos.apiseven.com/packages/debian bullseye main" | sudo tee /etc/apt/sources.list.d/apisix.list
# arm64
wget -O - http://repos.apiseven.com/pubkey.gpg | sudo apt-key add -
echo "deb http://repos.apiseven.com/packages/arm64/debian bullseye main" | sudo tee /etc/apt/sources.list.d/apisix.list
```
Then, to install APISIX, run:
```shell
sudo apt update
sudo apt install -y apisix=3.8.0-0
```
### Managing APISIX server
Once APISIX is installed, you can initialize the configuration file and etcd by running:
```shell
sudo apisix init
```
To start APISIX server, run:
```shell
sudo apisix start
```
:::tip
Run `apisix help` to get a list of all available operations.
:::
If you want to build APISIX from source, please refer to [Building APISIX from source](./building-apisix.md).
## Installing etcd
APISIX uses [etcd](https://github.com/etcd-io/etcd) to save and synchronize configuration. Before installing APISIX, you need to install etcd on your machine.
It would be installed automatically if you choose the Docker or Helm install method while installing APISIX. If you choose a different method or you need to install it manually, follow the steps shown below:
```shell
ETCD_VERSION='3.5.4'
wget https://github.com/etcd-io/etcd/releases/download/v${ETCD_VERSION}/etcd-v${ETCD_VERSION}-linux-amd64.tar.gz
tar -xvf etcd-v${ETCD_VERSION}-linux-amd64.tar.gz && \
cd etcd-v${ETCD_VERSION}-linux-amd64 && \
sudo cp -a etcd etcdctl /usr/bin/
nohup etcd >/tmp/etcd.log 2>&1 &
```
```shell
brew install etcd
brew services start etcd
```
## Next steps
### Configuring APISIX
You can configure your APISIX deployment in two ways:
1. By directly changing your configuration file (`conf/config.yaml`).
2. By using the `--config` or the `-c` flag to pass the path to your configuration file while starting APISIX.
```shell
apisix start -c
```
APISIX will use the configurations added in this configuration file and will fall back to the default configuration if anything is not configured. The default configurations can be found in `apisix/cli/config.lua` and should not be modified.
For example, to configure the default listening port to be `8000` without changing other configurations, your configuration file could look like this:
```yaml title="conf/config.yaml"
apisix:
node_listen: 8000
```
Now, if you decide you want to change the etcd address to `http://foo:2379`, you can add it to your configuration file. This will not change other configurations.
```yaml title="conf/config.yaml"
apisix:
node_listen: 8000
deployment:
role: traditional
role_traditional:
config_provider: etcd
etcd:
host:
- "http://foo:2379"
```
:::warning
The `conf/nginx.conf` file is automatically generated and should not be modified.
:::
### APISIX deployment modes
APISIX has three different deployment modes for different use cases. To learn more and configure deployment modes, see the [documentation](./deployment-modes.md).
### Updating Admin API key
It is recommended to modify the Admin API key to ensure security.
You can update your configuration file as shown below:
```yaml title="conf/config.yaml"
deployment:
admin:
admin_key:
- name: "admin"
key: newsupersecurekey
role: admin
```
Now, to access the Admin API, you can use the new key:
```shell
curl http://127.0.0.1:9180/apisix/admin/routes?api_key=newsupersecurekey -i
```
### Adding APISIX systemd unit file
If you installed APISIX via RPM, the APISIX unit file will already be configured and you can start APISIX by:
```shell
systemctl start apisix
systemctl stop apisix
```
If you installed APISIX through other methods, you can create `/usr/lib/systemd/system/apisix.service` and add the [configuration from the template](https://github.com/api7/apisix-build-tools/blob/master/usr/lib/systemd/system/apisix.service).
See the [Getting Started](./getting-started/README.md) guide for a quick walk-through of using APISIX.
---
---
title: The Implementation of Plugin Runner
---
## Prerequirement
Each request which runs the extern plugin will trigger an RPC to Plugin Runner over a connection on Unix socket. The data of RPC are serialized with [Flatbuffers](https://github.com/google/flatbuffers).
Therefore, the Plugin Runner needs to:
1. handle a connection on Unix socket
2. support Flatbuffers
3. use the proto & generated code in https://github.com/api7/ext-plugin-proto/
## Listening to the Path
APISIX will pass the path of Unix socket as an environment variable `APISIX_LISTEN_ADDRESS` to the Plugin Runner. So the runner needs to read the value and listen to that address during starting.
## Register Plugins
The Plugin Runner should be able to load plugins written in the particular language.
## Handle RPC
There are two kinds of RPC: PrepareConf & HTTPReqCall
### Handle PrepareConf
As people can configure the extern plugin on the side of APISIX, we need a way to sync the plugin configuration to the Plugin Runner.
When there is a configuration that needs to sync to the Plugin Runner, we will send it via the PrepareConf RPC call. The Plugin Runner should be able to handle the call and store the configuration in a cache, then returns a unique conf token that represents the configuration.
In the previous design, an idempotent key is sent with the configuration. This field is deprecated and the Plugin Runner can safely ignore it.
Requests run plugins with particular configuration will bear a particular conf token in the RPC call, and the Plugin Runner is expected to look up actual configuration via the token.
When the configuration is modified, APISIX will send a new PrepareConf to the Plugin Runner. Currently, there is no way to notify the Plugin Runner that a configuration is removed. Therefore, we introduce another environment variable `APISIX_CONF_EXPIRE_TIME` as the conf cache expire time. The Plugin Runner should be able to cache the conf slightly longer than `APISIX_CONF_EXPIRE_TIME`, and APISIX will send another PrepareConf to refresh the cache if the configuration is still existing after `APISIX_CONF_EXPIRE_TIME` seconds.
### Handle HTTPReqCall
Each request which runs the extern plugin will trigger the HTTPReqCall. The HTTPReqCall is almost a serialized version of HTTP request, plus a conf token. The Plugin Runner is expected to tell APISIX what to update by the response of HTTPReqCall RPC call.
Sometimes the plugin in the Plugin Runner needs to know some information that is not part of the HTTPReqCall request, such as the request start time and the route ID in APISIX. Hence the Plugin Runner needs to reply to an `ExtraInfo` message as the response on the connection which sends the HTTPReqCall request. APISIX will read the `ExtraInfo` message and return the asked information.
Currently, the information below is passed by `ExtraInfo`:
* variable value
* request body
The flow of HTTPReqCall procession is:
```
APISIX sends HTTPReqCall
Plugin Runner looks up the plugin configuration by the token in HTTPReqCall
(optional) loop:
Plugin Runner asks for ExtraInfo
APISIX replies the ExtraInfo
Plugin Runner replies HTTPReqCall
```
---
---
title: Introducing APISIX's testing framework
---
APISIX uses a testing framework based on test-nginx: https://github.com/openresty/test-nginx.
For details, you can check the [documentation](https://metacpan.org/pod/Test::Nginx) of this project.
If you want to test the CLI behavior of APISIX (`./bin/apisix`),
you need to write a shell script in the t/cli directory to test it. You can refer to the existing test scripts for more details.
If you want to test the others, you need to write test code based on the framework.
Here, we briefly describe how to do simple testing based on this framework.
## Test file
you need to write test cases in the t/ directory, in a corresponding `.t` file. Note that a single test file should not exceed `800` lines, and if it is too long, it needs to be divided by a suffix. For example:
```
t/
├── admin
│ ├── consumers.t
│ ├── consumers2.t
```
Both `consumers.t` and `consumers2.t` contain tests for consumers in the Admin API.
Some of the test files start with this paragraph:
```
add_block_preprocessor(sub {
my ($block) = @_;
if (! $block->request) {
$block->set_value("request", "GET /t");
}
if (! $block->no_error_log && ! $block->error_log) {
$block->set_value("no_error_log", "[error]\n[alert]");
}
});
```
It means that all tests in this test file that do not define `request` are set to `GET /t`. The same is true for error_log.
## Preparing the configuration
When testing a behavior, we need to prepare the configuration.
If the configuration is from etcd:
We can set up specific configurations through the Admin API.
```
=== TEST 7: refer to empty nodes upstream
--- config
location /t {
content_by_lua_block {
local core = require("apisix.core")
local t = require("lib.test_admin").test
local code, message = t('/apisix/admin/routes/1',
ngx.HTTP_PUT,
[[{
"methods": ["GET"],
"upstream_id": "1",
"uri": "/index.html"
}]]
)
if code >= 300 then
ngx.status = code
ngx.print(message)
return
end
ngx.say(message)
}
}
--- request
GET /t
--- response_body
passed
```
Then trigger it in a later test:
```
=== TEST 8: hit empty nodes upstream
--- request
GET /index.html
--- error_code: 503
--- error_log
no valid upstream node
```
## Preparing the upstream
To test the code, we need to provide a mock upstream.
For HTTP request, the upstream code is put in `t/lib/server.lua`. HTTP request with
a given `path` will trigger the method in the same name. For example, a call to `/server_port`
will call the `_M.server_port`.
For TCP request, a dummy upstream is used:
```
local sock = ngx.req.socket()
local data = sock:receive("1")
ngx.say("hello world")
```
If you want to custom the TCP upstream logic, you can use:
```
--- stream_upstream_code
local sock = ngx.req.socket()
local data = sock:receive("1")
ngx.sleep(0.2)
ngx.say("hello world")
```
## Send request
We can initiate a request with `request` and set the request headers with `more_headers`.
For example.
```
--- request
PUT /hello?xx=y&xx=z&&y=&&z
body part of the request
--- more_headers
X-Req: foo
X-Req: bar
X-Resp: cat
```
Lua code can be used to send multiple requests.
One request after another:
```
--- config
location /t {
content_by_lua_block {
local http = require "resty.http"
local uri = "http://127.0.0.1:" .. ngx.var.server_port
.. "/server_port"
local ports_count = {}
for i = 1, 12 do
local httpc = http.new()
local res, err = httpc:request_uri(uri, {method = "GET"})
if not res then
ngx.say(err)
return
end
ports_count[res.body] = (ports_count[res.body] or 0) + 1
end
}
}
```
Sending multiple requests concurrently:
```
--- config
location /t {
content_by_lua_block {
local http = require "resty.http"
local uri = "http://127.0.0.1:" .. ngx.var.server_port
.. "/server_port?var=2&var2="
local t = {}
local ports_count = {}
for i = 1, 180 do
local th = assert(ngx.thread.spawn(function(i)
local httpc = http.new()
local res, err = httpc:request_uri(uri..i, {method = "GET"})
if not res then
ngx.log(ngx.ERR, err)
return
end
ports_count[res.body] = (ports_count[res.body] or 0) + 1
end, i))
table.insert(t, th)
end
for i, th in ipairs(t) do
ngx.thread.wait(th)
end
}
}
```
## Send TCP request
We can use `stream_request` to send a TCP request, for example:
```
--- stream_request
hello
```
To send a TLS over TCP request, we can combine `stream_tls_request` with `stream_sni`:
```
--- stream_tls_request
mmm
--- stream_sni: xx.com
```
## Assertions
The following assertions are commonly used.
Check status (if not set, the framework will check if the request has 200 status code).
```
--- error_code: 405
```
Check response headers.
```
--- response_headers
X-Resp: foo
X-Req: foo, bar
```
Check response body.
```
--- response_body
[{"count":12, "port": "1982"}]
```
Check the TCP response.
When the request is sent via `stream_request`:
```
--- stream_response
receive stream response error: connection reset by peer
```
When the request is sent via `stream_tls_request`:
```
--- response_body
receive stream response error: connection reset by peer
```
Checking the error log (via grep error log with regular expression).
```
--- grep_error_log eval
qr/hash_on: header|chash_key: "custom-one"/
--- grep_error_log_out
hash_on: header
chash_key: "custom-one"
hash_on: header
chash_key: "custom-one"
hash_on: header
chash_key: "custom-one"
hash_on: header
chash_key: "custom-one"
```
The default log level is `info`, but you can get the debug level log with `--- log_level: debug`.
## Upstream
The test framework listens to multiple ports when it is started.
* 1980/1981/1982/5044: HTTP upstream port. We provide a mock upstream server for testing. See below for more information.
* 1983: HTTPS upstream port
* 1984: APISIX HTTP port. Can be used to verify HTTP related gateway logic, such as concurrent access to an API.
* 1985: APISIX TCP port. Can be used to verify TCP related gateway logic, such as concurrent access to an API.
* 1994: APISIX HTTPS port. Can be used to verify HTTPS related gateway logic, such as testing certificate matching logic.
* 1995: TCP upstream port
* 2005: APISIX TLS over TCP port. Can be used to verify TLS over TCP related gateway logic, such as concurrent access to an API.
The methods in `t/lib/server.lua` are executed when accessing the upstream port. `_M.go` is the entry point for this file.
When the request accesses the upstream `/xxx`, the `_M.xxx` method is executed. For example, a request for `/hello` will execute `_M.hello`.
This allows us to write methods inside `t/lib/server.lua` to emulate specific upstream logic, such as sending special responses.
Note that before adding new methods to `t/lib/server.lua`, make sure that you can reuse existing methods.
## Run the test
Assume your current work directory is the root of the apisix source code.
1. Git clone the latest [test-nginx](https://github.com/openresty/test-nginx) to `../test-nginx`.
2. Run the test: `prove -I. -I../test-nginx/inc -I../test-nginx/lib -r t/path/to/file.t`.
## Tips
### Debugging test cases
The Nginx configuration and logs generated by the test cases are located in the t/servroot directory. The Nginx configuration template for testing is located in t/APISIX.pm.
### Running only some test cases
Three notes can be used to control which parts of the tests are executed.
FIRST & LAST:
```
=== TEST 1: vars rule with ! (set)
--- FIRST
--- config
...
--- response_body
passed
=== TEST 2: vars rule with ! (hit)
--- request
GET /hello?name=jack&age=17
--- LAST
--- error_code: 403
--- response_body
Fault Injection!
```
ONLY:
```
=== TEST 1: list empty resources
--- ONLY
--- config
...
--- response_body
{"count":0,"node":{"dir":true,"key":"/apisix/upstreams","nodes":[]}}
```
### Executing Shell Commands
It is possible to execute shell commands while writing tests in test-nginx for APISIX. We expose this feature via `exec` code block. The `stdout` of the executed process can be captured via `response_body` code block and `stderr` (if any) can be captured by filtering error.log through `grep_error_log`. Here is an example:
```
=== TEST 1: check exec stdout
--- exec
echo hello world
--- response_body
hello world
=== TEST 2: when exec returns an error
--- exec
echxo hello world
--- grep_error_log eval
qr/failed to execute the script [ -~]*/
--- grep_error_log_out
failed to execute the script with status: 127, reason: exit, stderr: /bin/sh: 1: echxo: not found
```
---
---
title: Mutual TLS Authentication
keywords:
- Apache APISIX
- Mutual TLS
- mTLS
description: This document describes how you can secure communication to and within APISIX with mTLS.
---
## Protect Admin API
### Why use it
Mutual TLS authentication provides a better way to prevent unauthorized access to APISIX.
The clients will provide their certificates to the server and the server will check whether the cert is signed by the supplied CA and decide whether to serve the request.
### How to configure
1. Generate self-signed key pairs, including ca, server, client key pairs.
2. Modify configuration items in `conf/config.yaml`:
```yaml title="conf/config.yaml"
admin_listen:
ip: 127.0.0.1
port: 9180
https_admin: true
admin_api_mtls:
admin_ssl_ca_cert: "/data/certs/mtls_ca.crt" # Path of your self-signed ca cert.
admin_ssl_cert: "/data/certs/mtls_server.crt" # Path of your self-signed server side cert.
admin_ssl_cert_key: "/data/certs/mtls_server.key" # Path of your self-signed server side key.
```
3. Run command:
```shell
apisix init
apisix reload
```
### How client calls
Please replace the following certificate paths and domain name with your real ones.
* Note: The same CA certificate as the server needs to be used *
:::note
You can fetch the `admin_key` from `config.yaml` and save to an environment variable with the following command:
```bash
admin_key=$(yq '.deployment.admin.admin_key[0].key' conf/config.yaml | sed 's/"//g')
```
:::
```shell
curl --cacert /data/certs/mtls_ca.crt --key /data/certs/mtls_client.key --cert /data/certs/mtls_client.crt https://admin.apisix.dev:9180/apisix/admin/routes -H "X-API-KEY: $admin_key"
```
## etcd with mTLS
### How to configure
You need to configure `etcd.tls` for APISIX to work on an etcd cluster with mTLS enabled as shown below:
```yaml title="conf/config.yaml"
deployment:
role: traditional
role_traditional:
config_provider: etcd
etcd:
tls:
cert: /data/certs/etcd_client.pem # path of certificate used by the etcd client
key: /data/certs/etcd_client.key # path of key used by the etcd client
```
If APISIX does not trust the CA certificate that used by etcd server, we need to set up the CA certificate.
```yaml title="conf/config.yaml"
apisix:
ssl:
ssl_trusted_certificate: /path/to/certs/ca-certificates.crt # path of CA certificate used by the etcd server
```
## Protect Route
### Why use it
Using mTLS is a way to verify clients cryptographically. It is useful and important in cases where you want to have encrypted and secure traffic in both directions.
* Note: the mTLS protection only happens in HTTPS. If your route can also be accessed via HTTP, you should add additional protection in HTTP or disable the access via HTTP.*
### How to configure
We provide a [tutorial](./tutorials/client-to-apisix-mtls.md) that explains in detail how to configure mTLS between the client and APISIX.
When configuring `ssl`, use parameter `client.ca` and `client.depth` to configure the root CA that signing client certificates and the max length of certificate chain. Please refer to [Admin API](./admin-api.md#ssl) for details.
Here is an example shell script to create SSL with mTLS (id is `1`, changes admin API url if needed):
```shell
curl http://127.0.0.1:9180/apisix/admin/ssls/1 \
-H "X-API-KEY: $admin_key" -X PUT -d '
{
"cert": "'"$(cat t/certs/mtls_server.crt)"'",
"key": "'"$(cat t/certs/mtls_server.key)"'",
"snis": [
"admin.apisix.dev"
],
"client": {
"ca": "'"$(cat t/certs/mtls_ca.crt)"'",
"depth": 10
}
}'
```
Send a request to verify:
```bash
curl --resolve 'mtls.test.com::' "https://:/hello" -k --cert ./client.pem --key ./client.key
* Added admin.apisix.dev:9443:127.0.0.1 to DNS cache
* Hostname admin.apisix.dev was found in DNS cache
* Trying 127.0.0.1:9443...
* Connected to admin.apisix.dev (127.0.0.1) port 9443 (#0)
* ALPN: offers h2
* ALPN: offers http/1.1
* CAfile: t/certs/mtls_ca.crt
* CApath: none
* [CONN-0-0][CF-SSL] (304) (OUT), TLS handshake, Client hello (1):
* [CONN-0-0][CF-SSL] (304) (IN), TLS handshake, Server hello (2):
* [CONN-0-0][CF-SSL] (304) (IN), TLS handshake, Unknown (8):
* [CONN-0-0][CF-SSL] (304) (IN), TLS handshake, Request CERT (13):
* [CONN-0-0][CF-SSL] (304) (IN), TLS handshake, Certificate (11):
* [CONN-0-0][CF-SSL] (304) (IN), TLS handshake, CERT verify (15):
* [CONN-0-0][CF-SSL] (304) (IN), TLS handshake, Finished (20):
* [CONN-0-0][CF-SSL] (304) (OUT), TLS handshake, Certificate (11):
* [CONN-0-0][CF-SSL] (304) (OUT), TLS handshake, CERT verify (15):
* [CONN-0-0][CF-SSL] (304) (OUT), TLS handshake, Finished (20):
* SSL connection using TLSv1.3 / AEAD-AES256-GCM-SHA384
* ALPN: server accepted h2
* Server certificate:
* subject: C=cn; ST=GuangDong; L=ZhuHai; CN=admin.apisix.dev; OU=ops
* start date: Dec 1 10:17:24 2022 GMT
* expire date: Aug 18 10:17:24 2042 GMT
* subjectAltName: host "admin.apisix.dev" matched cert's "admin.apisix.dev"
* issuer: C=cn; ST=GuangDong; L=ZhuHai; CN=ca.apisix.dev; OU=ops
* SSL certificate verify ok.
* Using HTTP2, server supports multiplexing
* Copying HTTP/2 data in stream buffer to connection buffer after upgrade: len=0
* h2h3 [:method: GET]
* h2h3 [:path: /hello]
* h2h3 [:scheme: https]
* h2h3 [:authority: admin.apisix.dev:9443]
* h2h3 [user-agent: curl/7.87.0]
* h2h3 [accept: */*]
* Using Stream ID: 1 (easy handle 0x13000bc00)
> GET /hello HTTP/2
> Host: admin.apisix.dev:9443
> user-agent: curl/7.87.0
> accept: */*
```
Please make sure that the SNI fits the certificate domain.
## mTLS Between APISIX and Upstream
### Why use it
Sometimes the upstream requires mTLS. In this situation, the APISIX acts as the client, it needs to provide client certificate to communicate with upstream.
### How to configure
When configuring `upstreams`, we could use parameter `tls.client_cert` and `tls.client_key` to configure the client certificate APISIX used to communicate with upstreams. Please refer to [Admin API](./admin-api.md#upstream) for details.
This feature requires APISIX to run on [APISIX-Runtime](./FAQ.md#how-do-i-build-the-apisix-runtime-environment).
Here is a similar shell script to patch a existed upstream with mTLS (changes admin API url if needed):
```shell
curl http://127.0.0.1:9180/apisix/admin/upstreams/1 \
-H "X-API-KEY: $admin_key" -X PATCH -d '
{
"tls": {
"client_cert": "'"$(cat t/certs/mtls_client.crt)"'",
"client_key": "'"$(cat t/certs/mtls_client.key)"'"
}
}'
```
---
---
title: Plugin Develop
---
This documentation is about developing plugin in Lua. For other languages,
see [external plugin](./external-plugin.md).
## Where to put your plugins
Use the `extra_lua_path` parameter in `conf/config.yaml` file to load your custom plugin code (or use `extra_lua_cpath` for compiled `.so` or `.dll` file).
For example, you can create a directory `/path/to/example`:
```yaml
apisix:
...
extra_lua_path: "/path/to/example/?.lua"
```
The structure of the `example` directory should look like this:
```
├── example
│ └── apisix
│ ├── plugins
│ │ └── 3rd-party.lua
│ └── stream
│ └── plugins
│ └── 3rd-party.lua
```
:::note
The directory (`/path/to/example`) must contain the `/apisix/plugins` subdirectory.
:::
## Enable the plugin
To enable your custom plugin, add the plugin list to `conf/config.yaml` and append your plugin name. For instance:
```yaml
plugins: # See `conf/config.yaml.example` for an example
- ... # Add existing plugins
- your-plugin # Add your custom plugin name (name is the plugin name defined in the code)
```
:::warning
In particular, most APISIX plugins are enabled by default when the plugins field configuration is not defined (The default enabled plugins can be found in [apisix/cli/config.lua](https://github.com/apache/apisix/blob/master/apisix/cli/config.lua)).
Once the plugins configuration is defined in `conf/config.yaml`, the new plugins list will replace the default configuration instead of merging. Therefore, when defining the `plugins` field, make sure to include the built-in plugins that are being used. To maintain consistency with the default behavior, you can include all the default enabled plugins defined in `apisix/cli/config.lua`.
:::
## Writing plugins
The [`example-plugin`](https://github.com/apache/apisix/blob/master/apisix/plugins/example-plugin.lua) plugin in this repo provides an example.
### Naming and priority
Specify the plugin name (the name is the unique identifier of the plugin and cannot be duplicate) and priority in the code.
```lua
local plugin_name = "example-plugin"
local _M = {
version = 0.1,
priority = 0,
name = plugin_name,
schema = schema,
metadata_schema = metadata_schema,
}
```
Note: The priority of the new plugin cannot be same to any existing ones, you can use the `/v1/schema` method of [control API](./control-api.md#get-v1schema) to view the priority of all plugins. In addition, plugins with higher priority value will be executed first in a given phase (see the definition of `phase` in [choose-phase-to-run](#choose-phase-to-run)). For example, the priority of example-plugin is 0 and the priority of ip-restriction is 3000. Therefore, the ip-restriction plugin will be executed first, then the example-plugin plugin. It's recommended to use priority 1 ~ 99 for your plugin unless you want it to run before some builtin plugins.
Note: the order of the plugins is not related to the order of execution.
### Schema and check
Write [JSON Schema](https://json-schema.org) descriptions and check functions. Similarly, take the example-plugin plugin as an example to see its
configuration data:
```json
{
"example-plugin": {
"i": 1,
"s": "s",
"t": [1]
}
}
```
Let's look at its schema description :
```lua
local schema = {
type = "object",
properties = {
i = {type = "number", minimum = 0},
s = {type = "string"},
t = {type = "array", minItems = 1},
ip = {type = "string"},
port = {type = "integer"},
},
required = {"i"},
}
```
The schema defines a non-negative number `i`, a string `s`, a non-empty array of `t`, and `ip` / `port`. Only `i` is required.
At the same time, we need to implement the __check_schema(conf, schema_type)__ method to complete the specification verification.
```lua
function _M.check_schema(conf)
return core.schema.check(schema, conf)
end
```
:::note
Note: the project has provided the public method "__core.schema.check__", which can be used directly to complete JSON
verification.
:::
The input parameter **schema_type** is used to distinguish between different schemas types. For example, many plugins need to use some [metadata](./terminology/plugin-metadata.md), so they define the plugin's `metadata_schema`.
```lua title="example-plugin.lua"
-- schema definition for metadata
local metadata_schema = {
type = "object",
properties = {
ikey = {type = "number", minimum = 0},
skey = {type = "string"},
},
required = {"ikey", "skey"},
}
function _M.check_schema(conf, schema_type)
--- check schema for metadata
if schema_type == core.schema.TYPE_METADATA then
return core.schema.check(metadata_schema, conf)
end
return core.schema.check(schema, conf)
end
```
Another example, the [key-auth](https://github.com/apache/apisix/blob/master/apisix/plugins/key-auth.lua) plugin needs to provide a `consumer_schema` to check the configuration of the `plugins` attribute of the `consumer` resource in order to be used with the [Consumer](./admin-api.md#consumer) resource.
```lua title="key-auth.lua"
local consumer_schema = {
type = "object",
properties = {
key = {type = "string"},
},
required = {"key"},
}
function _M.check_schema(conf, schema_type)
if schema_type == core.schema.TYPE_CONSUMER then
return core.schema.check(consumer_schema, conf)
else
return core.schema.check(schema, conf)
end
end
```
### Choose phase to run
Determine which [phase](./terminology/plugin.md#plugins-execution-lifecycle) to run, generally access or rewrite. If you don't know the [OpenResty lifecycle](https://github.com/openresty/lua-nginx-module/blob/master/README.markdown#directives), it's
recommended to learn about it in advance. For example `key-auth` is an authentication plugin, thus the authentication should be completed
before forwarding the request to any upstream service. Therefore, the plugin must be executed in the rewrite phases.
Similarly, if you want to modify or process the response body or headers you can do that in the `body_filter` or in the `header_filter` phases respectively.
The following code snippet shows how to implement any logic relevant to the plugin in the OpenResty log phase.
```lua
function _M.log(conf, ctx)
-- Implement logic here
end
```
**Note : we can't invoke `ngx.exit`, `ngx.redirect` or `core.respond.exit` in rewrite phase and access phase. if need to exit, just return the status and body, the plugin engine will make the exit happen with the returned status and body. [example](https://github.com/apache/apisix/blob/35269581e21473e1a27b11cceca6f773cad0192a/apisix/plugins/limit-count.lua#L177)**
### extra phase
Besides OpenResty's phases, we also provide extra phases to satisfy specific purpose:
* `delayed_body_filter`
```lua
function _M.delayed_body_filter(conf, ctx)
-- delayed_body_filter is called after body_filter
-- it is used by the tracing plugins to end the span right after body_filter
end
```
### Implement the logic
Write the logic of the plugin in the corresponding phase. There are two parameters `conf` and `ctx` in the phase method, take the `limit-conn` plugin configuration as an example.
#### conf parameter
The `conf` parameter is the relevant configuration information of the plugin, you can use `core.log.warn(core.json.encode(conf))` to output it to `error.log` for viewing, as shown below:
```lua
function _M.access(conf, ctx)
core.log.warn(core.json.encode(conf))
......
end
```
conf:
```json
{
"rejected_code": 503,
"burst": 0,
"default_conn_delay": 0.1,
"conn": 1,
"key": "remote_addr"
}
```
#### ctx parameter
The `ctx` parameter caches data information related to the request. You can use `core.log.warn(core.json.encode(ctx, true))` to output it to `error.log` for viewing, as shown below :
```lua
function _M.access(conf, ctx)
core.log.warn(core.json.encode(ctx, true))
......
end
```
### Others
If your plugin has a new code directory of its own, and you need to redistribute it with the APISIX source code, you will need to modify the `Makefile` to create directory, such as:
```
$(INSTALL) -d $(INST_LUADIR)/apisix/plugins/skywalking
$(INSTALL) apisix/plugins/skywalking/*.lua $(INST_LUADIR)/apisix/plugins/skywalking/
```
There are other fields in the `_M` which affect the plugin's behavior.
```lua
local _M = {
...
type = 'auth',
run_policy = 'prefer_route',
}
```
`run_policy` field can be used to control the behavior of the plugin execution.
When this field set to `prefer_route`, and the plugin has been configured both
in the global and at the route level, only the route level one will take effect.
`type` field is required to be set to `auth` if your plugin needs to work with consumer.
## Load plugin and replace plugin
Using `require "apisix.plugins.3rd-party"` will load your plugin, just like `require "apisix.plugins.jwt-auth"` will load the `jwt-auth` plugin.
Sometimes you may want to override a method instead of a whole file. In this case, you can configure `lua_module_hook` in `conf/config.yaml`
to introduce your hook.
Assume that your configuration is as follows:
```yaml
apisix:
...
extra_lua_path: "/path/to/example/?.lua"
lua_module_hook: "my_hook"
```
The `example/my_hook.lua` will be loaded when APISIX starts, and you can use this hook to replace a method in APISIX.
The example of [my_hook.lua](https://github.com/apache/apisix/blob/master/example/my_hook.lua) can be found under the `example` directory of this project.
## Check external dependencies
If you have dependencies on external libraries, check the dependent items. If your plugin needs to use shared memory, it
needs to declare via [customizing Nginx configuration](./customize-nginx-configuration.md), for example :
```yaml
# put this in config.yaml:
nginx_config:
http_configuration_snippet: |
# for openid-connect plugin
lua_shared_dict discovery 1m; # cache for discovery metadata documents
lua_shared_dict jwks 1m; # cache for JWKs
lua_shared_dict introspection 10m; # cache for JWT verification results
```
The plugin itself provides the init method. It is convenient for plugins to perform some initialization after
the plugin is loaded. If you need to clean up the initialization, you can put it in the corresponding destroy method.
Note : if the dependency of some plugin needs to be initialized when Nginx start, you may need to add logic to the initialization
method "http_init" in the file `apisix/init.lua`, and you may need to add some processing on generated part of Nginx
configuration file in `apisix/cli/ngx_tpl.lua` file. But it is easy to have an impact on the overall situation according to the
existing plugin mechanism, **we do not recommend this unless you have a complete grasp of the code**.
## Encrypted storage fields
Some plugins require parameters to be stored encrypted, such as the `password` parameter of the `basic-auth` plugin. This plugin needs to specify in the `schema` which parameters need to be stored encrypted.
```lua
encrypt_fields = {"password"}
```
If it is a nested parameter, such as the `clickhouse.password` parameter of the `error-log-logger` plugin, it needs to be separated by `.`:
```lua
encrypt_fields = {"clickhouse.password"}
```
Currently not supported yet:
1. more than two levels of nesting
2. fields in arrays
Parameters can be stored encrypted by specifying `encrypt_fields = {"password"}` in the `schema`. APISIX will provide the following functionality.
- When adding and updating resources, APISIX automatically encrypts the parameters declared in `encrypt_fields` and stores them in etcd
- When fetching resources and when running the plugin, APISIX automatically decrypts the parameters declared in `encrypt_fields`
By default, APISIX has `data_encryption` enabled with [two default keys](https://github.com/apache/apisix/blob/85563f016c35834763376894e45908b2fb582d87/apisix/cli/config.lua#L75), you can modify them in `config.yaml`.
```yaml
apisix:
data_encryption:
enable: true
keyring:
- ...
```
APISIX will try to decrypt the data with keys in the order of the keys in the keyring (only for parameters declared in `encrypt_fields`). If the decryption fails, the next key will be tried until the decryption succeeds.
If none of the keys in `keyring` can decrypt the data, the original data is used.
## Register public API
A plugin can register API which exposes to the public. Take batch-requests plugin as an example, this plugin registers `POST /apisix/batch-requests` to allow developers to group multiple API requests into a single HTTP request/response cycle:
```lua
function batch_requests()
-- ...
end
function _M.api()
-- ...
return {
{
methods = {"POST"},
uri = "/apisix/batch-requests",
handler = batch_requests,
}
}
end
```
Note that the public API will not be exposed by default, you will need to use the [public-api plugin](plugins/public-api.md) to expose it.
## Register control API
If you only want to expose the API to the localhost or intranet, you can expose it via [Control API](./control-api.md).
Take a look at example-plugin plugin:
```lua
local function hello()
local args = ngx.req.get_uri_args()
if args["json"] then
return 200, {msg = "world"}
else
return 200, "world\n"
end
end
function _M.control_api()
return {
{
methods = {"GET"},
uris = {"/v1/plugin/example-plugin/hello"},
handler = hello,
}
}
end
```
If you don't change the default control API configuration, the plugin will be expose `GET /v1/plugin/example-plugin/hello` which can only be accessed via `127.0.0.1`. Test with the following command:
```shell
curl -i -X GET "http://127.0.0.1:9090/v1/plugin/example-plugin/hello"
```
[Read more about control API introduction](./control-api.md)
## Register custom variables
We can use variables in many places of APISIX. For example, customizing log format in http-logger, using it as the key of `limit-*` plugins. In some situations, the builtin variables are not enough. Therefore, APISIX allows developers to register their variables globally, and use them as normal builtin variables.
For instance, let's register a variable called `a6_labels_zone` to fetch the value of the `zone` label in a route:
```
local core = require "apisix.core"
core.ctx.register_var("a6_labels_zone", function(ctx)
local route = ctx.matched_route and ctx.matched_route.value
if route and route.labels then
return route.labels.zone
end
return nil
end)
```
After that, any get operation to `$a6_labels_zone` will call the registered getter to fetch the value.
Note that the custom variables can't be used in features that depend on the Nginx directive, like `access_log_format`.
## Write test cases
For functions, write and improve the test cases of various dimensions, do a comprehensive test for your plugin! The
test cases of plugins are all in the "__t/plugin__" directory. You can go ahead to find out. APISIX uses
[****test-nginx****](https://github.com/openresty/test-nginx) as the test framework. A test case (.t file) is usually
divided into prologue and data parts by \__data\__. Here we will briefly introduce the data part, that is, the part
of the real test case. For example, the key-auth plugin:
```perl
=== TEST 1: sanity
--- config
location /t {
content_by_lua_block {
local plugin = require("apisix.plugins.key-auth")
local ok, err = plugin.check_schema({key = 'test-key'}, core.schema.TYPE_CONSUMER)
if not ok then
ngx.say(err)
end
ngx.say("done")
}
}
--- request
GET /t
--- response_body
done
--- no_error_log
[error]
```
A test case consists of three parts :
- __Program code__ : configuration content of Nginx location
- __Input__ : http request information
- __Output check__ : status, header, body, error log check
When we request __/t__, which config in the configuration file, the Nginx will call "__content_by_lua_block__" instruction to
complete the Lua script, and finally return. The assertion of the use case is response_body return "done",
"__no_error_log__" means to check the "__error.log__" of Nginx. There must be no ERROR level record. The log files for the unit test
are located in the following folder: 't/servroot/logs'.
The above test case represents a simple scenario. Most scenarios will require multiple steps to validate. To do this, create multiple tests `=== TEST 1`, `=== TEST 2`, and so on. These tests will be executed sequentially, allowing you to break down scenarios into a sequence of atomic steps.
Additionally, there are some convenience testing endpoints which can be found [here](https://github.com/apache/apisix/blob/master/t/lib/server.lua#L36). For example, see [proxy-rewrite](https://github.com/apache/apisix/blob/master/t/plugin/proxy-rewrite.t). In test 42, the upstream `uri` is made to redirect `/test?new_uri=hello` to `/hello` (which always returns `hello world`). In test 43, the response body is confirmed to equal `hello world`, meaning the proxy-rewrite configuration added with test 42 worked correctly.
Refer the following [document](building-apisix.md) to setup the testing framework.
### Attach the test-nginx execution process:
According to the path we configured in the makefile and some configuration items at the front of each __.t__ file, the
framework will assemble into a complete nginx.conf file. "__t/servroot__" is the working directory of Nginx and start the
Nginx instance. according to the information provided by the test case, initiate the http request and check that the
return items of HTTP include HTTP status, HTTP response header, HTTP response body and so on.
## Additional Resource(s)
- Key Concepts - [Plugins](https://apisix.apache.org/docs/apisix/terminology/plugin/)
- [Apache APISIX Extensions Guide](https://apisix.apache.org/blog/2021/10/29/extension-guide/)
- [Create a Custom Plugin in Lua](https://docs.api7.ai/apisix/how-to-guide/custom-plugins/create-plugin-in-lua)
- [example-plugin code](https://github.com/apache/apisix/blob/master/apisix/plugins/example-plugin.lua)
---
---
title: ai-aliyun-content-moderation
keywords:
- Apache APISIX
- API Gateway
- Plugin
- ai-aliyun-content-moderation
description: This document contains information about the Apache APISIX ai-aliyun-content-moderation Plugin.
---
## Description
The `ai-aliyun-content-moderation` plugin integrates with Aliyun's content moderation service to check both request and response content for inappropriate material when working with LLMs. It supports both real-time streaming checks and final packet moderation.
This plugin must be used in routes that utilize the ai-proxy or ai-proxy-multi plugins.
## Plugin Attributes
| **Field** | **Required** | **Type** | **Description** |
| ---------------------------- | ------------ | --------- | --------------------------------------------------------------------------------------------------------------------------------------------------------------------------- |
| endpoint | Yes | String | Aliyun service endpoint URL |
| region_id | Yes | String | Aliyun region identifier |
| access_key_id | Yes | String | Aliyun access key ID |
| access_key_secret | Yes | String | Aliyun access key secret |
| check_request | No | Boolean | Enable request content moderation. Default: `true` |
| check_response | No | Boolean | Enable response content moderation. Default: `false` |
| stream_check_mode | No | String | Streaming moderation mode. Default: `"final_packet"`. Valid values: `["realtime", "final_packet"]` |
| stream_check_cache_size | No | Integer | Max characters per moderation batch in realtime mode. Default: `128`. Must be `>= 1`. |
| stream_check_interval | No | Number | Seconds between batch checks in realtime mode. Default: `3`. Must be `>= 0.1`. |
| request_check_service | No | String | Aliyun service for request moderation. Default: `"llm_query_moderation"` |
| request_check_length_limit | No | Number | Max characters per request moderation chunk. Default: `2000`. |
| response_check_service | No | String | Aliyun service for response moderation. Default: `"llm_response_moderation"` |
| response_check_length_limit | No | Number | Max characters per response moderation chunk. Default: `5000`. |
| risk_level_bar | No | String | Threshold for content rejection. Default: `"high"`. Valid values: `["none", "low", "medium", "high", "max"]` |
| deny_code | No | Number | HTTP status code for rejected content. Default: `200`. |
| deny_message | No | String | Custom message for rejected content. Default: `-`. |
| timeout | No | Integer | Request timeout in milliseconds. Default: `10000`. Must be `>= 1`. |
| ssl_verify | No | Boolean | Enable SSL certificate verification. Default: `true`. |
## Example usage
First initialise these shell variables:
```shell
ADMIN_API_KEY=edd1c9f034335f136f87ad84b625c8f1
ALIYUN_ACCESS_KEY_ID=your-aliyun-access-key-id
ALIYUN_ACCESS_KEY_SECRET=your-aliyun-access-key-secret
ALIYUN_REGION=cn-hangzhou
ALIYUN_ENDPOINT=https://green.cn-hangzhou.aliyuncs.com
OPENAI_KEY=your-openai-api-key
```
Create a route with the `ai-aliyun-content-moderation` and `ai-proxy` plugin like so:
```shell
curl "http://127.0.0.1:9180/apisix/admin/routes/1" -X PUT \
-H "X-API-KEY: ${ADMIN_API_KEY}" \
-d '{
"uri": "/v1/chat/completions",
"plugins": {
"ai-proxy": {
"provider": "openai",
"auth": {
"header": {
"Authorization": "Bearer '"$OPENAI_KEY"'"
}
},
"override": {
"endpoint": "http://localhost:6724/v1/chat/completions"
}
},
"ai-aliyun-content-moderation": {
"endpoint": "'"$ALIYUN_ENDPOINT"'",
"region_id": "'"$ALIYUN_REGION"'",
"access_key_id": "'"$ALIYUN_ACCESS_KEY_ID"'",
"access_key_secret": "'"$ALIYUN_ACCESS_KEY_SECRET"'",
"risk_level_bar": "high",
"check_request": true,
"check_response": true,
"deny_code": 400,
"deny_message": "Your request violates content policy"
}
}
}'
```
The `ai-proxy` plugin is used here as it simplifies access to LLMs. However, you may configure the LLM in the upstream configuration as well.
Now send a request:
```shell
curl http://127.0.0.1:9080/v1/chat/completions -i \
-H "Content-Type: application/json" \
-d '{
"model": "gpt-3.5-turbo",
"messages": [
{"role": "user", "content": "I want to kill you"}
],
"stream": false
}'
```
Then the request will be blocked with error like this:
```text
HTTP/1.1 400 Bad Request
Content-Type: application/json
{"id":"chatcmpl-123","object":"chat.completion","model":"gpt-3.5-turbo","choices":[{"index":0,"message":{"role":"assistant","content":"Your request violates content policy"},"finish_reason":"stop"}],"usage":{"prompt_tokens":0,"completion_tokens":0,"total_tokens":0}}
```
---
---
title: ai-aws-content-moderation
keywords:
- Apache APISIX
- API Gateway
- Plugin
- ai-aws-content-moderation
description: This document contains information about the Apache APISIX ai-aws-content-moderation Plugin.
---
## Description
The `ai-aws-content-moderation` plugin processes the request body to check for toxicity and rejects the request if it exceeds the configured threshold.
**_This plugin must be used in routes that proxy requests to LLMs only._**
**_As of now, the plugin only supports the integration with [AWS Comprehend](https://aws.amazon.com/comprehend/) for content moderation. PRs for introducing support for other service providers are welcomed._**
## Plugin Attributes
| **Field** | **Required** | **Type** | **Description** |
| ---------------------------- | ------------ | -------- | ------------------------------------------------------------------------------------------------------------------------------------------------------------------------------------------------------------------------------------------------------- |
| comprehend.access_key_id | Yes | String | AWS access key ID |
| comprehend.secret_access_key | Yes | String | AWS secret access key |
| comprehend.region | Yes | String | AWS region |
| comprehend.endpoint | No | String | AWS Comprehend service endpoint. Must match the pattern `^https?://` |
| comprehend.ssl_verify | No | String | Enables SSL certificate verification. |
| moderation_categories | No | Object | Key-value pairs of moderation category and their score. In each pair, the key should be one of the `PROFANITY`, `HATE_SPEECH`, `INSULT`, `HARASSMENT_OR_ABUSE`, `SEXUAL`, or `VIOLENCE_OR_THREAT`; and the value should be between 0 and 1 (inclusive). |
| moderation_threshold | No | Number | The degree to which content is harmful, offensive, or inappropriate. A higher value indicates more toxic content allowed. Range: 0 - 1. Default: 0.5 |
## Example usage
First initialise these shell variables:
```shell
ADMIN_API_KEY=edd1c9f034335f136f87ad84b625c8f1
ACCESS_KEY_ID=aws-comprehend-access-key-id-here
SECRET_ACCESS_KEY=aws-comprehend-secret-access-key-here
OPENAI_KEY=open-ai-key-here
```
Create a route with the `ai-aws-content-moderation` and `ai-proxy` plugin like so:
```shell
curl "http://127.0.0.1:9180/apisix/admin/routes/1" -X PUT \
-H "X-API-KEY: ${ADMIN_API_KEY}" \
-d '{
"uri": "/post",
"plugins": {
"ai-aws-content-moderation": {
"comprehend": {
"access_key_id": "'"$ACCESS_KEY_ID"'",
"secret_access_key": "'"$SECRET_ACCESS_KEY"'",
"region": "us-east-1"
},
"moderation_categories": {
"PROFANITY": 0.5
}
},
"ai-proxy": {
"auth": {
"header": {
"api-key": "'"$OPENAI_KEY"'"
}
},
"model": {
"provider": "openai",
"name": "gpt-4",
"options": {
"max_tokens": 512,
"temperature": 1.0
}
}
}
},
"upstream": {
"type": "roundrobin",
"nodes": {
"httpbin.org:80": 1
}
}
}'
```
The `ai-proxy` plugin is used here as it simplifies access to LLMs. However, you may configure the LLM in the upstream configuration as well.
Now send a request:
```shell
curl http://127.0.0.1:9080/post -i -XPOST -H 'Content-Type: application/json' -d '{
"messages": [
{
"role": "user",
"content": ""
}
]
}'
```
Then the request will be blocked with error like this:
```text
HTTP/1.1 400 Bad Request
Date: Thu, 03 Oct 2024 11:53:15 GMT
Content-Type: text/plain; charset=utf-8
Transfer-Encoding: chunked
Connection: keep-alive
Server: APISIX/3.10.0
request body exceeds PROFANITY threshold
```
Send a request with compliant content in the request body:
```shell
curl http://127.0.0.1:9080/post -i -XPOST -H 'Content-Type: application/json' -d '{
"messages": [
{
"role": "system",
"content": "You are a mathematician"
},
{ "role": "user", "content": "What is 1+1?" }
]
}'
```
This request will be proxied normally to the configured LLM.
```text
HTTP/1.1 200 OK
Date: Thu, 03 Oct 2024 11:53:00 GMT
Content-Type: text/plain; charset=utf-8
Transfer-Encoding: chunked
Connection: keep-alive
Server: APISIX/3.10.0
{"choices":[{"finish_reason":"stop","index":0,"message":{"content":"1+1 equals 2.","role":"assistant"}}],"created":1727956380,"id":"chatcmpl-AEEg8Pe5BAW5Sw3C1gdwXnuyulIkY","model":"gpt-4o-2024-05-13","object":"chat.completion","system_fingerprint":"fp_67802d9a6d","usage":{"completion_tokens":7,"prompt_tokens":23,"total_tokens":30}}
```
You can also configure filters on other moderation categories like so:
```shell
curl "http://127.0.0.1:9180/apisix/admin/routes/1" -X PUT \
-H "X-API-KEY: ${ADMIN_API_KEY}" \
-d '{
"uri": "/post",
"plugins": {
"ai-aws-content-moderation": {
"comprehend": {
"access_key_id": "'"$ACCESS_KEY_ID"'",
"secret_access_key": "'"$SECRET_ACCESS_KEY"'",
"region": "us-east-1"
},
"moderation_categories": {
"PROFANITY": 0.5,
"HARASSMENT_OR_ABUSE": 0.7,
"SEXUAL": 0.2
}
},
"ai-proxy": {
"auth": {
"header": {
"api-key": "'"$OPENAI_KEY"'"
}
},
"model": {
"provider": "openai",
"name": "gpt-4",
"options": {
"max_tokens": 512,
"temperature": 1.0
}
}
}
},
"upstream": {
"type": "roundrobin",
"nodes": {
"httpbin.org:80": 1
}
}
}'
```
If none of the `moderation_categories` are configured, request bodies will be moderated on the basis of overall toxicity.
The default `moderation_threshold` is 0.5, it can be configured like so.
```shell
curl "http://127.0.0.1:9180/apisix/admin/routes/1" -X PUT \
-H "X-API-KEY: ${ADMIN_API_KEY}" \
-d '{
"uri": "/post",
"plugins": {
"ai-aws-content-moderation": {
"provider": {
"comprehend": {
"access_key_id": "'"$ACCESS_KEY_ID"'",
"secret_access_key": "'"$SECRET_ACCESS_KEY"'",
"region": "us-east-1"
}
},
"moderation_threshold": 0.7,
"llm_provider": "openai"
},
"ai-proxy": {
"auth": {
"header": {
"api-key": "'"$OPENAI_KEY"'"
}
},
"model": {
"provider": "openai",
"name": "gpt-4",
"options": {
"max_tokens": 512,
"temperature": 1.0
}
}
}
},
"upstream": {
"type": "roundrobin",
"nodes": {
"httpbin.org:80": 1
}
}
}'
```
---
---
title: ai-prompt-decorator
keywords:
- Apache APISIX
- API Gateway
- Plugin
- ai-prompt-decorator
description: This document contains information about the Apache APISIX ai-prompt-decorator Plugin.
---
## Description
The `ai-prompt-decorator` plugin simplifies access to LLM providers, such as OpenAI and Anthropic, and their models by appending or prepending prompts into the request.
## Plugin Attributes
| **Field** | **Required** | **Type** | **Description** |
| ----------------- | --------------- | -------- | --------------------------------------------------- |
| `prepend` | Conditionally\* | Array | An array of prompt objects to be prepended |
| `prepend.role` | Yes | String | Role of the message (`system`, `user`, `assistant`) |
| `prepend.content` | Yes | String | Content of the message. Minimum length: 1 |
| `append` | Conditionally\* | Array | An array of prompt objects to be appended |
| `append.role` | Yes | String | Role of the message (`system`, `user`, `assistant`) |
| `append.content` | Yes | String | Content of the message. Minimum length: 1 |
\* **Conditionally Required**: At least one of `prepend` or `append` must be provided.
## Example usage
Create a route with the `ai-prompt-decorator` plugin like so:
```shell
curl "http://127.0.0.1:9180/apisix/admin/routes/1" -X PUT \
-H "X-API-KEY: ${ADMIN_API_KEY}" \
-d '{
"uri": "/v1/chat/completions",
"plugins": {
"ai-prompt-decorator": {
"prepend":[
{
"role": "system",
"content": "I have exams tomorrow so explain conceptually and briefly"
}
],
"append":[
{
"role": "system",
"content": "End the response with an analogy."
}
]
}
},
"upstream": {
"type": "roundrobin",
"nodes": {
"api.openai.com:443": 1
},
"pass_host": "node",
"scheme": "https"
}
}'
```
Now send a request:
```shell
curl http://127.0.0.1:9080/v1/chat/completions -i -XPOST -H 'Content-Type: application/json' -d '{
"model": "gpt-4",
"messages": [{ "role": "user", "content": "What is TLS Handshake?" }]
}' -H "Authorization: Bearer "
```
Then the request body will be modified to something like this:
```json
{
"model": "gpt-4",
"messages": [
{
"role": "system",
"content": "I have exams tomorrow so explain conceptually and briefly"
},
{ "role": "user", "content": "What is TLS Handshake?" },
{
"role": "system",
"content": "End the response with an analogy."
}
]
}
```
---
---
title: ai-prompt-guard
keywords:
- Apache APISIX
- API Gateway
- Plugin
- ai-prompt-guard
description: This document contains information about the Apache APISIX ai-prompt-guard Plugin.
---
## Description
The `ai-prompt-guard` plugin safeguards your AI endpoints by inspecting and validating incoming prompt messages. It checks the content of requests against user-defined allowed and denied patterns to ensure that only approved inputs are processed. Based on its configuration, the plugin can either examine just the latest message or the entire conversation history, and it can be set to check prompts from all roles or only from end users.
When both **allow** and **deny** patterns are configured, the plugin first ensures that at least one allowed pattern is matched. If none match, the request is rejected with a _"Request doesn't match allow patterns"_ error. If an allowed pattern is found, it then checks for any occurrences of denied patterns—rejecting the request with a _"Request contains prohibited content"_ error if any are detected.
## Plugin Attributes
| **Field** | **Required** | **Type** | **Description** |
| ------------------------------ | ------------ | --------- | -------------------------------------------------------------------------------------------------------------------------------------------------------------------- |
| match_all_roles | No | boolean | If set to `true`, the plugin will check prompt messages from all roles. Otherwise, it only validates when its role is `"user"`. Default is `false`. |
| match_all_conversation_history | No | boolean | When enabled, all messages in the conversation history are concatenated and checked. If `false`, only the content of the last message is examined. Default is `false`. |
| allow_patterns | No | array | A list of regex patterns. When provided, the prompt must match **at least one** pattern to be considered valid. |
| deny_patterns | No | array | A list of regex patterns. If any of these patterns match the prompt content, the request is rejected. |
## Example usage
Create a route with the `ai-prompt-guard` plugin like so:
```shell
curl "http://127.0.0.1:9180/apisix/admin/routes/1" -X PUT \
-H "X-API-KEY: ${ADMIN_API_KEY}" \
-d '{
"uri": "/v1/chat/completions",
"plugins": {
"ai-prompt-guard": {
"match_all_roles": true,
"allow_patterns": [
"goodword"
],
"deny_patterns": [
"badword"
]
}
},
"upstream": {
"type": "roundrobin",
"nodes": {
"api.openai.com:443": 1
},
"pass_host": "node",
"scheme": "https"
}
}'
```
Now send a request:
```shell
curl http://127.0.0.1:9080/v1/chat/completions -i -XPOST -H 'Content-Type: application/json' -d '{
"model": "gpt-4",
"messages": [{ "role": "user", "content": "badword request" }]
}' -H "Authorization: Bearer "
```
The request will fail with 400 error and following response.
```bash
{"message":"Request doesn't match allow patterns"}
```
---
---
title: ai-prompt-template
keywords:
- Apache APISIX
- API Gateway
- Plugin
- ai-prompt-template
description: This document contains information about the Apache APISIX ai-prompt-template Plugin.
---
## Description
The `ai-prompt-template` plugin simplifies access to LLM providers, such as OpenAI and Anthropic, and their models by predefining the request format
using a template, which only allows users to pass customized values into template variables.
## Plugin Attributes
| **Field** | **Required** | **Type** | **Description** |
| ------------------------------------- | ------------ | -------- | --------------------------------------------------------------------------------------------------------------------------- |
| `templates` | Yes | Array | An array of template objects |
| `templates.name` | Yes | String | Name of the template. |
| `templates.template.model` | Yes | String | Model of the AI Model, for example `gpt-4` or `gpt-3.5`. See your LLM provider API documentation for more available models. |
| `templates.template.messages.role` | Yes | String | Role of the message (`system`, `user`, `assistant`) |
| `templates.template.messages.content` | Yes | String | Content of the message. |
## Example usage
Create a route with the `ai-prompt-template` plugin like so:
```shell
curl "http://127.0.0.1:9180/apisix/admin/routes/1" -X PUT \
-H "X-API-KEY: ${ADMIN_API_KEY}" \
-d '{
"uri": "/v1/chat/completions",
"upstream": {
"type": "roundrobin",
"nodes": {
"api.openai.com:443": 1
},
"scheme": "https",
"pass_host": "node"
},
"plugins": {
"ai-prompt-template": {
"templates": [
{
"name": "level of detail",
"template": {
"model": "gpt-4",
"messages": [
{
"role": "user",
"content": "Explain about {{ topic }} in {{ level }}."
}
]
}
}
]
}
}
}'
```
Now send a request:
```shell
curl http://127.0.0.1:9080/v1/chat/completions -i -XPOST -H 'Content-Type: application/json' -d '{
"template_name": "level of detail",
"topic": "psychology",
"level": "brief"
}' -H "Authorization: Bearer "
```
Then the request body will be modified to something like this:
```json
{
"model": "some model",
"messages": [
{ "role": "user", "content": "Explain about psychology in brief." }
]
}
```
---
---
title: ai-proxy-multi
keywords:
- Apache APISIX
- API Gateway
- Plugin
- ai-proxy-multi
- AI
- LLM
description: The ai-proxy-multi Plugin extends the capabilities of ai-proxy with load balancing, retries, fallbacks, and health chekcs, simplifying the integration with OpenAI, DeepSeek, Azure, AIMLAPI, and other OpenAI-compatible APIs.
---
## Description
The `ai-proxy-multi` Plugin simplifies access to LLM and embedding models by transforming Plugin configurations into the designated request format for OpenAI, DeepSeek, Azure, AIMLAPI, and other OpenAI-compatible APIs. It extends the capabilities of [`ai-proxy`](./ai-proxy.md) with load balancing, retries, fallbacks, and health checks.
In addition, the Plugin also supports logging LLM request information in the access log, such as token usage, model, time to the first response, and more.
## Request Format
| Name | Type | Required | Description |
| ------------------ | ------ | -------- | --------------------------------------------------- |
| `messages` | Array | True | An array of message objects. |
| `messages.role` | String | True | Role of the message (`system`, `user`, `assistant`).|
| `messages.content` | String | True | Content of the message. |
## Attributes
| Name | Type | Required | Default | Valid Values | Description |
|------------------------------------|----------------|----------|-----------------------------------|--------------|-------------|
| fallback_strategy | string or array | False | | string: "instance_health_and_rate_limiting", "http_429", "http_5xx"
array: ["rate_limiting", "http_429", "http_5xx"] | Fallback strategy. When set, the Plugin will check whether the specified instance’s token has been exhausted when a request is forwarded. If so, forward the request to the next instance regardless of the instance priority. When not set, the Plugin will not forward the request to low priority instances when token of the high priority instance is exhausted. |
| balancer | object | False | | | Load balancing configurations. |
| balancer.algorithm | string | False | roundrobin | [roundrobin, chash] | Load balancing algorithm. When set to `roundrobin`, weighted round robin algorithm is used. When set to `chash`, consistent hashing algorithm is used. |
| balancer.hash_on | string | False | | [vars, headers, cookie, consumer, vars_combinations] | Used when `type` is `chash`. Support hashing on [NGINX variables](https://nginx.org/en/docs/varindex.html), headers, cookie, consumer, or a combination of [NGINX variables](https://nginx.org/en/docs/varindex.html). |
| balancer.key | string | False | | | Used when `type` is `chash`. When `hash_on` is set to `header` or `cookie`, `key` is required. When `hash_on` is set to `consumer`, `key` is not required as the consumer name will be used as the key automatically. |
| instances | array[object] | True | | | LLM instance configurations. |
| instances.name | string | True | | | Name of the LLM service instance. |
| instances.provider | string | True | | [openai, deepseek, azure-openai, aimlapi, openai-compatible] | LLM service provider. When set to `openai`, the Plugin will proxy the request to `api.openai.com`. When set to `deepseek`, the Plugin will proxy the request to `api.deepseek.com`. When set to `aimlapi`, the Plugin uses the OpenAI-compatible driver and proxies the request to `api.aimlapi.com` by default. When set to `openai-compatible`, the Plugin will proxy the request to the custom endpoint configured in `override`. |
| instances.priority | integer | False | 0 | | Priority of the LLM instance in load balancing. `priority` takes precedence over `weight`. |
| instances.weight | string | True | 0 | greater or equal to 0 | Weight of the LLM instance in load balancing. |
| instances.auth | object | True | | | Authentication configurations. |
| instances.auth.header | object | False | | | Authentication headers. At least one of the `header` and `query` should be configured. |
| instances.auth.query | object | False | | | Authentication query parameters. At least one of the `header` and `query` should be configured. |
| instances.options | object | False | | | Model configurations. In addition to `model`, you can configure additional parameters and they will be forwarded to the upstream LLM service in the request body. For instance, if you are working with OpenAI, DeepSeek, or AIMLAPI, you can configure additional parameters such as `max_tokens`, `temperature`, `top_p`, and `stream`. See your LLM provider's API documentation for more available options. |
| instances.options.model | string | False | | | Name of the LLM model, such as `gpt-4` or `gpt-3.5`. See your LLM provider's API documentation for more available models. |
| logging | object | False | | | Logging configurations. |
| logging.summaries | boolean | False | false | | If true, log request LLM model, duration, request, and response tokens. |
| logging.payloads | boolean | False | false | | If true, log request and response payload. |
| logging.override | object | False | | | Override setting. |
| logging.override.endpoint | string | False | | | LLM provider endpoint to replace the default endpoint with. If not configured, the Plugin uses the default OpenAI endpoint `https://api.openai.com/v1/chat/completions`. |
| checks | object | False | | | Health check configurations. Note that at the moment, OpenAI, DeepSeek, and AIMLAPI do not provide an official health check endpoint. Other LLM services that you can configure under `openai-compatible` provider may have available health check endpoints. |
| checks.active | object | True | | | Active health check configurations. |
| checks.active.type | string | False | http | [http, https, tcp] | Type of health check connection. |
| checks.active.timeout | number | False | 1 | | Health check timeout in seconds. |
| checks.active.concurrency | integer | False | 10 | | Number of upstream nodes to be checked at the same time. |
| checks.active.host | string | False | | | HTTP host. |
| checks.active.port | integer | False | | between 1 and 65535 inclusive | HTTP port. |
| checks.active.http_path | string | False | / | | Path for HTTP probing requests. |
| checks.active.https_verify_certificate | boolean | False | true | | If true, verify the node's TLS certificate. |
| timeout | integer | False | 30000 | greater than or equal to 1 | Request timeout in milliseconds when requesting the LLM service. |
| keepalive | boolean | False | true | | If true, keep the connection alive when requesting the LLM service. |
| keepalive_timeout | integer | False | 60000 | greater than or equal to 1000 | Request timeout in milliseconds when requesting the LLM service. |
| keepalive_pool | integer | False | 30 | | Keepalive pool size for when connecting with the LLM service. |
| ssl_verify | boolean | False | true | | If true, verify the LLM service's certificate. |
## Examples
The examples below demonstrate how you can configure `ai-proxy-multi` for different scenarios.
:::note
You can fetch the `admin_key` from `config.yaml` and save to an environment variable with the following command:
```bash
admin_key=$(yq '.deployment.admin.admin_key[0].key' conf/config.yaml | sed 's/"//g')
```
:::
### Load Balance between Instances
The following example demonstrates how you can configure two models for load balancing, forwarding 80% of the traffic to one instance and 20% to the other.
For demonstration and easier differentiation, you will be configuring one OpenAI instance and one DeepSeek instance as the upstream LLM services.
Create a Route as such and update with your LLM providers, models, API keys, and endpoints if applicable:
```shell
curl "http://127.0.0.1:9180/apisix/admin/routes" -X PUT \
-H "X-API-KEY: ${admin_key}" \
-d '{
"id": "ai-proxy-multi-route",
"uri": "/anything",
"methods": ["POST"],
"plugins": {
"ai-proxy-multi": {
"instances": [
{
"name": "openai-instance",
"provider": "openai",
"weight": 8,
"auth": {
"header": {
"Authorization": "Bearer '"$OPENAI_API_KEY"'"
}
},
"options": {
"model": "gpt-4"
}
},
{
"name": "deepseek-instance",
"provider": "deepseek",
"weight": 2,
"auth": {
"header": {
"Authorization": "Bearer '"$DEEPSEEK_API_KEY"'"
}
},
"options": {
"model": "deepseek-chat"
}
}
]
}
}
}'
```
Send 10 POST requests to the Route with a system prompt and a sample user question in the request body, to see the number of requests forwarded to OpenAI and DeepSeek:
```shell
openai_count=0
deepseek_count=0
for i in {1..10}; do
model=$(curl -s "http://127.0.0.1:9080/anything" -X POST \
-H "Content-Type: application/json" \
-d '{
"messages": [
{ "role": "system", "content": "You are a mathematician" },
{ "role": "user", "content": "What is 1+1?" }
]
}' | jq -r '.model')
if [[ "$model" == *"gpt-4"* ]]; then
((openai_count++))
elif [[ "$model" == "deepseek-chat" ]]; then
((deepseek_count++))
fi
done
echo "OpenAI responses: $openai_count"
echo "DeepSeek responses: $deepseek_count"
```
You should see a response similar to the following:
```text
OpenAI responses: 8
DeepSeek responses: 2
```
### Configure Instance Priority and Rate Limiting
The following example demonstrates how you can configure two models with different priorities and apply rate limiting on the instance with a higher priority. In the case where `fallback_strategy` is set to `["rate_limiting"]`, the Plugin should continue to forward requests to the low priority instance once the high priority instance's rate limiting quota is fully consumed.
Create a Route as such and update with your LLM providers, models, API keys, and endpoints if applicable:
```shell
curl "http://127.0.0.1:9180/apisix/admin/routes" -X PUT \
-H "X-API-KEY: ${admin_key}" \
-d '{
"id": "ai-proxy-multi-route",
"uri": "/anything",
"methods": ["POST"],
"plugins": {
"ai-proxy-multi": {
"fallback_strategy: ["rate_limiting"],
"instances": [
{
"name": "openai-instance",
"provider": "openai",
"priority": 1,
"weight": 0,
"auth": {
"header": {
"Authorization": "Bearer '"$OPENAI_API_KEY"'"
}
},
"options": {
"model": "gpt-4"
}
},
{
"name": "deepseek-instance",
"provider": "deepseek",
"priority": 0,
"weight": 0,
"auth": {
"header": {
"Authorization": "Bearer '"$DEEPSEEK_API_KEY"'"
}
},
"options": {
"model": "deepseek-chat"
}
}
]
},
"ai-rate-limiting": {
"instances": [
{
"name": "openai-instance",
"limit": 10,
"time_window": 60
}
],
"limit_strategy": "total_tokens"
}
}
}'
```
Send a POST request to the Route with a system prompt and a sample user question in the request body:
```shell
curl "http://127.0.0.1:9080/anything" -X POST \
-H "Content-Type: application/json" \
-d '{
"messages": [
{ "role": "system", "content": "You are a mathematician" },
{ "role": "user", "content": "What is 1+1?" }
]
}'
```
You should receive a response similar to the following:
```json
{
...,
"model": "gpt-4-0613",
"choices": [
{
"index": 0,
"message": {
"role": "assistant",
"content": "1+1 equals 2.",
"refusal": null
},
"logprobs": null,
"finish_reason": "stop"
}
],
"usage": {
"prompt_tokens": 23,
"completion_tokens": 8,
"total_tokens": 31,
"prompt_tokens_details": {
"cached_tokens": 0,
"audio_tokens": 0
},
"completion_tokens_details": {
"reasoning_tokens": 0,
"audio_tokens": 0,
"accepted_prediction_tokens": 0,
"rejected_prediction_tokens": 0
}
},
"service_tier": "default",
"system_fingerprint": null
}
```
Since the `total_tokens` value exceeds the configured quota of `10`, the next request within the 60-second window is expected to be forwarded to the other instance.
Within the same 60-second window, send another POST request to the route:
```shell
curl "http://127.0.0.1:9080/anything" -X POST \
-H "Content-Type: application/json" \
-d '{
"messages": [
{ "role": "system", "content": "You are a mathematician" },
{ "role": "user", "content": "Explain Newton law" }
]
}'
```
You should see a response similar to the following:
```json
{
...,
"model": "deepseek-chat",
"choices": [
{
"index": 0,
"message": {
"role": "assistant",
"content": "Certainly! Newton's laws of motion are three fundamental principles that describe the relationship between the motion of an object and the forces acting on it. They were formulated by Sir Isaac Newton in the late 17th century and are foundational to classical mechanics.\n\n---\n\n### **1. Newton's First Law (Law of Inertia):**\n- **Statement:** An object at rest will remain at rest, and an object in motion will continue moving at a constant velocity (in a straight line at a constant speed), unless acted upon by an external force.\n- **Key Idea:** This law introduces the concept of **inertia**, which is the tendency of an object to resist changes in its state of motion.\n- **Example:** If you slide a book across a table, it eventually stops because of the force of friction acting on it. Without friction, the book would keep moving indefinitely.\n\n---\n\n### **2. Newton's Second Law (Law of Acceleration):**\n- **Statement:** The acceleration of an object is directly proportional to the net force acting on it and inversely proportional to its mass. Mathematically, this is expressed as:\n \\[\n F = ma\n \\]\n where:\n - \\( F \\) = net force applied (in Newtons),\n -"
},
...
}
],
...
}
```
### Load Balance and Rate Limit by Consumers
The following example demonstrates how you can configure two models for load balancing and apply rate limiting by consumer.
Create a Consumer `johndoe` and a rate limiting quota of 10 tokens in a 60-second window on `openai-instance` instance:
```shell
curl "http://127.0.0.1:9180/apisix/admin/consumers" -X PUT \
-H "X-API-KEY: ${admin_key}" \
-d '{
"username": "johndoe",
"plugins": {
"ai-rate-limiting": {
"instances": [
{
"name": "openai-instance",
"limit": 10,
"time_window": 60
}
],
"rejected_code": 429,
"limit_strategy": "total_tokens"
}
}
}'
```
Configure `key-auth` credential for `johndoe`:
```shell
curl "http://127.0.0.1:9180/apisix/admin/consumers/johndoe/credentials" -X PUT \
-H "X-API-KEY: ${admin_key}" \
-d '{
"id": "cred-john-key-auth",
"plugins": {
"key-auth": {
"key": "john-key"
}
}
}'
```
Create another Consumer `janedoe` and a rate limiting quota of 10 tokens in a 60-second window on `deepseek-instance` instance:
```shell
curl "http://127.0.0.1:9180/apisix/admin/consumers" -X PUT \
-H "X-API-KEY: ${admin_key}" \
-d '{
"username": "johndoe",
"plugins": {
"ai-rate-limiting": {
"instances": [
{
"name": "deepseek-instance",
"limit": 10,
"time_window": 60
}
],
"rejected_code": 429,
"limit_strategy": "total_tokens"
}
}
}'
```
Configure `key-auth` credential for `janedoe`:
```shell
curl "http://127.0.0.1:9180/apisix/admin/consumers/janedoe/credentials" -X PUT \
-H "X-API-KEY: ${admin_key}" \
-d '{
"id": "cred-jane-key-auth",
"plugins": {
"key-auth": {
"key": "jane-key"
}
}
}'
```
Create a Route as such and update with your LLM providers, models, API keys, and endpoints if applicable:
```shell
curl "http://127.0.0.1:9180/apisix/admin/routes" -X PUT \
-H "X-API-KEY: ${admin_key}" \
-d '{
"id": "ai-proxy-multi-route",
"uri": "/anything",
"methods": ["POST"],
"plugins": {
"key-auth": {},
"ai-proxy-multi": {
"fallback_strategy: ["rate_limiting"],
"instances": [
{
"name": "openai-instance",
"provider": "openai",
"weight": 0,
"auth": {
"header": {
"Authorization": "Bearer '"$OPENAI_API_KEY"'"
}
},
"options": {
"model": "gpt-4"
}
},
{
"name": "deepseek-instance",
"provider": "deepseek",
"weight": 0,
"auth": {
"header": {
"Authorization": "Bearer '"$DEEPSEEK_API_KEY"'"
}
},
"options": {
"model": "deepseek-chat"
}
}
]
}
}
}'
```
Send a POST request to the Route without any consumer key:
```shell
curl -i "http://127.0.0.1:9080/anything" -X POST \
-H "Content-Type: application/json" \
-d '{
"messages": [
{ "role": "system", "content": "You are a mathematician" },
{ "role": "user", "content": "What is 1+1?" }
]
}'
```
You should receive an `HTTP/1.1 401 Unauthorized` response.
Send a POST request to the Route with `johndoe`'s key:
```shell
curl "http://127.0.0.1:9080/anything" -X POST \
-H "Content-Type: application/json" \
-H 'apikey: john-key' \
-d '{
"messages": [
{ "role": "system", "content": "You are a mathematician" },
{ "role": "user", "content": "What is 1+1?" }
]
}'
```
You should receive a response similar to the following:
```json
{
...,
"model": "gpt-4-0613",
"choices": [
{
"index": 0,
"message": {
"role": "assistant",
"content": "1+1 equals 2.",
"refusal": null
},
"logprobs": null,
"finish_reason": "stop"
}
],
"usage": {
"prompt_tokens": 23,
"completion_tokens": 8,
"total_tokens": 31,
"prompt_tokens_details": {
"cached_tokens": 0,
"audio_tokens": 0
},
"completion_tokens_details": {
"reasoning_tokens": 0,
"audio_tokens": 0,
"accepted_prediction_tokens": 0,
"rejected_prediction_tokens": 0
}
},
"service_tier": "default",
"system_fingerprint": null
}
```
Since the `total_tokens` value exceeds the configured quota of the `openai` instance for `johndoe`, the next request within the 60-second window from `johndoe` is expected to be forwarded to the `deepseek` instance.
Within the same 60-second window, send another POST request to the Route with `johndoe`'s key:
```shell
curl "http://127.0.0.1:9080/anything" -X POST \
-H "Content-Type: application/json" \
-H 'apikey: john-key' \
-d '{
"messages": [
{ "role": "system", "content": "You are a mathematician" },
{ "role": "user", "content": "Explain Newtons laws to me" }
]
}'
```
You should see a response similar to the following:
```json
{
...,
"model": "deepseek-chat",
"choices": [
{
"index": 0,
"message": {
"role": "assistant",
"content": "Certainly! Newton's laws of motion are three fundamental principles that describe the relationship between the motion of an object and the forces acting on it. They were formulated by Sir Isaac Newton in the late 17th century and are foundational to classical mechanics.\n\n---\n\n### **1. Newton's First Law (Law of Inertia):**\n- **Statement:** An object at rest will remain at rest, and an object in motion will continue moving at a constant velocity (in a straight line at a constant speed), unless acted upon by an external force.\n- **Key Idea:** This law introduces the concept of **inertia**, which is the tendency of an object to resist changes in its state of motion.\n- **Example:** If you slide a book across a table, it eventually stops because of the force of friction acting on it. Without friction, the book would keep moving indefinitely.\n\n---\n\n### **2. Newton's Second Law (Law of Acceleration):**\n- **Statement:** The acceleration of an object is directly proportional to the net force acting on it and inversely proportional to its mass. Mathematically, this is expressed as:\n \\[\n F = ma\n \\]\n where:\n - \\( F \\) = net force applied (in Newtons),\n -"
},
...
}
],
...
}
```
Send a POST request to the Route with `janedoe`'s key:
```shell
curl "http://127.0.0.1:9080/anything" -X POST \
-H "Content-Type: application/json" \
-H 'apikey: jane-key' \
-d '{
"messages": [
{ "role": "system", "content": "You are a mathematician" },
{ "role": "user", "content": "What is 1+1?" }
]
}'
```
You should receive a response similar to the following:
```json
{
...,
"model": "deepseek-chat",
"choices": [
{
"index": 0,
"message": {
"role": "assistant",
"content": "The sum of 1 and 1 is 2. This is a basic arithmetic operation where you combine two units to get a total of two units."
},
"logprobs": null,
"finish_reason": "stop"
}
],
"usage": {
"prompt_tokens": 14,
"completion_tokens": 31,
"total_tokens": 45,
"prompt_tokens_details": {
"cached_tokens": 0
},
"prompt_cache_hit_tokens": 0,
"prompt_cache_miss_tokens": 14
},
"system_fingerprint": "fp_3a5770e1b4_prod0225"
}
```
Since the `total_tokens` value exceeds the configured quota of the `deepseek` instance for `janedoe`, the next request within the 60-second window from `janedoe` is expected to be forwarded to the `openai` instance.
Within the same 60-second window, send another POST request to the Route with `janedoe`'s key:
```shell
curl "http://127.0.0.1:9080/anything" -X POST \
-H "Content-Type: application/json" \
-H 'apikey: jane-key' \
-d '{
"messages": [
{ "role": "system", "content": "You are a mathematician" },
{ "role": "user", "content": "Explain Newtons laws to me" }
]
}'
```
You should see a response similar to the following:
```json
{
...,
"model": "gpt-4-0613",
"choices": [
{
"index": 0,
"message": {
"role": "assistant",
"content": "Sure, here are Newton's three laws of motion:\n\n1) Newton's First Law, also known as the Law of Inertia, states that an object at rest will stay at rest, and an object in motion will stay in motion, unless acted on by an external force. In simple words, this law suggests that an object will keep doing whatever it is doing until something causes it to do otherwise. \n\n2) Newton's Second Law states that the force acting on an object is equal to the mass of that object times its acceleration (F=ma). This means that force is directly proportional to mass and acceleration. The heavier the object and the faster it accelerates, the greater the force.\n\n3) Newton's Third Law, also known as the law of action and reaction, states that for every action, there is an equal and opposite reaction. Essentially, any force exerted onto a body will create a force of equal magnitude but in the opposite direction on the object that exerted the first force.\n\nRemember, these laws become less accurate when considering speeds near the speed of light (where Einstein's theory of relativity becomes more appropriate) or objects very small or very large. However, for everyday situations, they provide a good model of how things move.",
"refusal": null
},
"logprobs": null,
"finish_reason": "stop"
}
],
...
}
```
This shows `ai-proxy-multi` load balance the traffic with respect to the rate limiting rules in `ai-rate-limiting` by consumers.
### Restrict Maximum Number of Completion Tokens
The following example demonstrates how you can restrict the number of `completion_tokens` used when generating the chat completion.
For demonstration and easier differentiation, you will be configuring one OpenAI instance and one DeepSeek instance as the upstream LLM services.
Create a Route as such and update with your LLM providers, models, API keys, and endpoints if applicable:
```shell
curl "http://127.0.0.1:9180/apisix/admin/routes" -X PUT \
-H "X-API-KEY: ${admin_key}" \
-d '{
"id": "ai-proxy-multi-route",
"uri": "/anything",
"methods": ["POST"],
"plugins": {
"ai-proxy-multi": {
"instances": [
{
"name": "openai-instance",
"provider": "openai",
"weight": 0,
"auth": {
"header": {
"Authorization": "Bearer '"$OPENAI_API_KEY"'"
}
},
"options": {
"model": "gpt-4",
"max_tokens": 50
}
},
{
"name": "deepseek-instance",
"provider": "deepseek",
"weight": 0,
"auth": {
"header": {
"Authorization": "Bearer '"$DEEPSEEK_API_KEY"'"
}
},
"options": {
"model": "deepseek-chat",
"max_tokens": 100
}
}
]
}
}
}'
```
Send a POST request to the Route with a system prompt and a sample user question in the request body:
```shell
curl "http://127.0.0.1:9080/anything" -X POST \
-H "Content-Type: application/json" \
-d '{
"messages": [
{ "role": "system", "content": "You are a mathematician" },
{ "role": "user", "content": "Explain Newtons law" }
]
}'
```
If the request is proxied to OpenAI, you should see a response similar to the following, where the content is truncated per 50 `max_tokens` threshold:
```json
{
...,
"model": "gpt-4-0613",
"choices": [
{
"index": 0,
"message": {
"role": "assistant",
"content": "Newton's Laws of Motion are three physical laws that form the bedrock for classical mechanics. They describe the relationship between a body and the forces acting upon it, and the body's motion in response to those forces. \n\n1. Newton's First Law",
"refusal": null
},
"logprobs": null,
"finish_reason": "length"
}
],
"usage": {
"prompt_tokens": 20,
"completion_tokens": 50,
"total_tokens": 70,
"prompt_tokens_details": {
"cached_tokens": 0,
"audio_tokens": 0
},
"completion_tokens_details": {
"reasoning_tokens": 0,
"audio_tokens": 0,
"accepted_prediction_tokens": 0,
"rejected_prediction_tokens": 0
}
},
"service_tier": "default",
"system_fingerprint": null
}
```
If the request is proxied to DeepSeek, you should see a response similar to the following, where the content is truncated per 100 `max_tokens` threshold:
```json
{
...,
"model": "deepseek-chat",
"choices": [
{
"index": 0,
"message": {
"role": "assistant",
"content": "Newton's Laws of Motion are three fundamental principles that form the foundation of classical mechanics. They describe the relationship between a body and the forces acting upon it, and the body's motion in response to those forces. Here's a brief explanation of each law:\n\n1. **Newton's First Law (Law of Inertia):**\n - **Statement:** An object will remain at rest or in uniform motion in a straight line unless acted upon by an external force.\n - **Explanation:** This law"
},
"logprobs": null,
"finish_reason": "length"
}
],
"usage": {
"prompt_tokens": 10,
"completion_tokens": 100,
"total_tokens": 110,
"prompt_tokens_details": {
"cached_tokens": 0
},
"prompt_cache_hit_tokens": 0,
"prompt_cache_miss_tokens": 10
},
"system_fingerprint": "fp_3a5770e1b4_prod0225"
}
```
### Proxy to Embedding Models
The following example demonstrates how you can configure the `ai-proxy-multi` Plugin to proxy requests and load balance between embedding models.
Create a Route as such and update with your LLM providers, embedding models, API keys, and endpoints:
```shell
curl "http://127.0.0.1:9180/apisix/admin/routes" -X PUT \
-H "X-API-KEY: ${admin_key}" \
-d '{
"id": "ai-proxy-multi-route",
"uri": "/anything",
"methods": ["POST"],
"plugins": {
"ai-proxy-multi": {
"instances": [
{
"name": "openai-instance",
"provider": "openai",
"weight": 0,
"auth": {
"header": {
"Authorization": "Bearer '"$OPENAI_API_KEY"'"
}
},
"options": {
"model": "text-embedding-3-small"
},
"override": {
"endpoint": "https://api.openai.com/v1/embeddings"
}
},
{
"name": "az-openai-instance",
"provider": "openai-compatible",
"weight": 0,
"auth": {
"header": {
"Authorization": "Bearer '"$AZ_OPENAI_API_KEY"'"
}
},
"options": {
"model": "text-embedding-3-small"
},
"override": {
"endpoint": "https://ai-plugin-developer.openai.azure.com/openai/deployments/text-embedding-3-small/embeddings?api-version=2023-05-15"
}
}
]
}
}
}'
```
Send a POST request to the Route with an input string:
```shell
curl "http://127.0.0.1:9080/embeddings" -X POST \
-H "Content-Type: application/json" \
-d '{
"input": "hello world"
}'
```
You should receive a response similar to the following:
```json
{
"object": "list",
"data": [
{
"object": "embedding",
"index": 0,
"embedding": [
-0.0067144386,
-0.039197803,
0.034177095,
0.028763203,
-0.024785956,
-0.04201061,
...
],
}
],
"model": "text-embedding-3-small",
"usage": {
"prompt_tokens": 2,
"total_tokens": 2
}
}
```
### Enable Active Health Checks
The following example demonstrates how you can configure the `ai-proxy-multi` Plugin to proxy requests and load balance between models, and enable active health check to improve service availability. You can enable health check on one or multiple instances.
Create a Route as such and update the LLM providers, embedding models, API keys, and health check related configurations:
```shell
curl "http://127.0.0.1:9180/apisix/admin/routes" -X PUT \
-H "X-API-KEY: ${admin_key}" \
-d '{
"id": "ai-proxy-multi-route",
"uri": "/anything",
"methods": ["POST"],
"plugins": {
"ai-proxy-multi": {
"instances": [
{
"name": "llm-instance-1",
"provider": "openai-compatible",
"weight": 0,
"auth": {
"header": {
"Authorization": "Bearer '"$YOUR_LLM_API_KEY"'"
}
},
"options": {
"model": "'"$YOUR_LLM_MODEL"'"
}
},
{
"name": "llm-instance-2",
"provider": "openai-compatible",
"weight": 0,
"auth": {
"header": {
"Authorization": "Bearer '"$YOUR_LLM_API_KEY"'"
}
},
"options": {
"model": "'"$YOUR_LLM_MODEL"'"
},
"checks": {
"active": {
"type": "https",
"host": "yourhost.com",
"http_path": "/your/probe/path",
"healthy": {
"interval": 2,
"successes": 1
},
"unhealthy": {
"interval": 1,
"http_failures": 3
}
}
}
}
]
}
}
}'
```
For verification, the behaviours should be consistent with the verification in [active health checks](../tutorials/health-check.md).
### Include LLM Information in Access Log
The following example demonstrates how you can log LLM request related information in the gateway's access log to improve analytics and audit. The following variables are available:
* `request_llm_model`: LLM model name specified in the request.
* `apisix_upstream_response_time`: Time taken for APISIX to send the request to the upstream service and receive the full response
* `request_type`: Type of request, where the value could be `traditional_http`, `ai_chat`, or `ai_stream`.
* `llm_time_to_first_token`: Duration from request sending to the first token received from the LLM service, in milliseconds.
* `llm_model`: LLM model.
* `llm_prompt_tokens`: Number of tokens in the prompt.
* `llm_completion_tokens`: Number of chat completion tokens in the prompt.
Update the access log format in your configuration file to include additional LLM related variables:
```yaml title="conf/config.yaml"
nginx_config:
http:
access_log_format: "$remote_addr - $remote_user [$time_local] $http_host \"$request_line\" $status $body_bytes_sent $request_time \"$http_referer\" \"$http_user_agent\" $upstream_addr $upstream_status $apisix_upstream_response_time \"$upstream_scheme://$upstream_host$upstream_uri\" \"$apisix_request_id\" \"$request_type\" \"$llm_time_to_first_token\" \"$llm_model\" \"$request_llm_model\" \"$llm_prompt_tokens\" \"$llm_completion_tokens\""
```
Reload APISIX for configuration changes to take effect.
Next, create a Route with the `ai-proxy-multi` Plugin and send a request. For instance, if the request is forwarded to OpenAI and you receive the following response:
```json
{
...,
"model": "gpt-4-0613",
"choices": [
{
"index": 0,
"message": {
"role": "assistant",
"content": "1+1 equals 2.",
"refusal": null,
"annotations": []
},
"logprobs": null,
"finish_reason": "stop"
}
],
"usage": {
"prompt_tokens": 23,
"completion_tokens": 8,
"total_tokens": 31,
"prompt_tokens_details": {
"cached_tokens": 0,
"audio_tokens": 0
},
...
},
"service_tier": "default",
"system_fingerprint": null
}
```
In the gateway's access log, you should see a log entry similar to the following:
```text
192.168.215.1 - - [21/Mar/2025:04:28:03 +0000] api.openai.com "POST /anything HTTP/1.1" 200 804 2.858 "-" "curl/8.6.0" - - - 5765 "http://api.openai.com" "5c5e0b95f8d303cb81e4dc456a4b12d9" "ai_chat" "2858" "gpt-4" "gpt-4" "23" "8"
```
The access log entry shows the request type is `ai_chat`, Apisix upstream response time is `5765` milliseconds, time to first token is `2858` milliseconds, Requested LLM model is `gpt-4`. LLM model is `gpt-4`, prompt token usage is `23`, and completion token usage is `8`.
---
---
title: ai-proxy
keywords:
- Apache APISIX
- API Gateway
- Plugin
- ai-proxy
- AI
- LLM
description: The ai-proxy Plugin simplifies access to LLM and embedding models providers by converting Plugin configurations into the required request format for OpenAI, DeepSeek, Azure, AIMLAPI, and other OpenAI-compatible APIs.
---
## Description
The `ai-proxy` Plugin simplifies access to LLM and embedding models by transforming Plugin configurations into the designated request format. It supports the integration with OpenAI, DeepSeek, Azure, AIMLAPI, and other OpenAI-compatible APIs.
In addition, the Plugin also supports logging LLM request information in the access log, such as token usage, model, time to the first response, and more.
## Request Format
| Name | Type | Required | Description |
| ------------------ | ------ | -------- | --------------------------------------------------- |
| `messages` | Array | True | An array of message objects. |
| `messages.role` | String | True | Role of the message (`system`, `user`, `assistant`).|
| `messages.content` | String | True | Content of the message. |
## Attributes
| Name | Type | Required | Default | Valid values | Description |
|--------------------|--------|----------|---------|------------------------------------------|-------------|
| provider | string | True | | [openai, deepseek, azure-openai, aimlapi, openai-compatible] | LLM service provider. When set to `openai`, the Plugin will proxy the request to `https://api.openai.com/chat/completions`. When set to `deepseek`, the Plugin will proxy the request to `https://api.deepseek.com/chat/completions`. When set to `aimlapi`, the Plugin uses the OpenAI-compatible driver and proxies the request to `https://api.aimlapi.com/v1/chat/completions` by default. When set to `openai-compatible`, the Plugin will proxy the request to the custom endpoint configured in `override`. |
| auth | object | True | | | Authentication configurations. |
| auth.header | object | False | | | Authentication headers. At least one of `header` or `query` must be configured. |
| auth.query | object | False | | | Authentication query parameters. At least one of `header` or `query` must be configured. |
| options | object | False | | | Model configurations. In addition to `model`, you can configure additional parameters and they will be forwarded to the upstream LLM service in the request body. For instance, if you are working with OpenAI, you can configure additional parameters such as `temperature`, `top_p`, and `stream`. See your LLM provider's API documentation for more available options. |
| options.model | string | False | | | Name of the LLM model, such as `gpt-4` or `gpt-3.5`. Refer to the LLM provider's API documentation for available models. |
| override | object | False | | | Override setting. |
| override.endpoint | string | False | | | Custom LLM provider endpoint, required when `provider` is `openai-compatible`. |
| logging | object | False | | | Logging configurations. |
| logging.summaries | boolean | False | false | | If true, logs request LLM model, duration, request, and response tokens. |
| logging.payloads | boolean | False | false | | If true, logs request and response payload. |
| timeout | integer | False | 30000 | ≥ 1 | Request timeout in milliseconds when requesting the LLM service. |
| keepalive | boolean | False | true | | If true, keeps the connection alive when requesting the LLM service. |
| keepalive_timeout | integer | False | 60000 | ≥ 1000 | Keepalive timeout in milliseconds when connecting to the LLM service. |
| keepalive_pool | integer | False | 30 | | Keepalive pool size for the LLM service connection. |
| ssl_verify | boolean | False | true | | If true, verifies the LLM service's certificate. |
## Examples
The examples below demonstrate how you can configure `ai-proxy` for different scenarios.
:::note
You can fetch the `admin_key` from `config.yaml` and save to an environment variable with the following command:
```bash
admin_key=$(yq '.deployment.admin.admin_key[0].key' conf/config.yaml | sed 's/"//g')
```
:::
### Proxy to OpenAI
The following example demonstrates how you can configure the API key, model, and other parameters in the `ai-proxy` Plugin and configure the Plugin on a Route to proxy user prompts to OpenAI.
Obtain the OpenAI [API key](https://openai.com/blog/openai-api) and save it to an environment variable:
```shell
export OPENAI_API_KEY=
```
Create a Route and configure the `ai-proxy` Plugin as such:
```shell
curl "http://127.0.0.1:9180/apisix/admin/routes" -X PUT \
-H "X-API-KEY: ${admin_key}" \
-d '{
"id": "ai-proxy-route",
"uri": "/anything",
"methods": ["POST"],
"plugins": {
"ai-proxy": {
"provider": "openai",
"auth": {
"header": {
"Authorization": "Bearer '"$OPENAI_API_KEY"'"
}
},
"options":{
"model": "gpt-4"
}
}
}
}'
```
Send a POST request to the Route with a system prompt and a sample user question in the request body:
```shell
curl "http://127.0.0.1:9080/anything" -X POST \
-H "Content-Type: application/json" \
-H "Host: api.openai.com" \
-d '{
"messages": [
{ "role": "system", "content": "You are a mathematician" },
{ "role": "user", "content": "What is 1+1?" }
]
}'
```
You should receive a response similar to the following:
```json
{
...,
"model": "gpt-4-0613",
"choices": [
{
"index": 0,
"message": {
"role": "assistant",
"content": "1+1 equals 2.",
"refusal": null
},
"logprobs": null,
"finish_reason": "stop"
}
],
...
}
```
### Proxy to DeepSeek
The following example demonstrates how you can configure the `ai-proxy` Plugin to proxy requests to DeekSeek.
Obtain the DeekSeek API key and save it to an environment variable:
```shell
export DEEPSEEK_API_KEY=
```
Create a Route and configure the `ai-proxy` Plugin as such:
```shell
curl "http://127.0.0.1:9180/apisix/admin/routes" -X PUT \
-H "X-API-KEY: ${admin_key}" \
-d '{
"id": "ai-proxy-route",
"uri": "/anything",
"methods": ["POST"],
"plugins": {
"ai-proxy": {
"provider": "deepseek",
"auth": {
"header": {
"Authorization": "Bearer '"$DEEPSEEK_API_KEY"'"
}
},
"options": {
"model": "deepseek-chat"
}
}
}
}'
```
Send a POST request to the Route with a sample question in the request body:
```shell
curl "http://127.0.0.1:9080/anything" -X POST \
-H "Content-Type: application/json" \
-d '{
"messages": [
{
"role": "system",
"content": "You are an AI assistant that helps people find information."
},
{
"role": "user",
"content": "Write me a 50-word introduction for Apache APISIX."
}
]
}'
```
You should receive a response similar to the following:
```json
{
...
"choices": [
{
"index": 0,
"message": {
"role": "assistant",
"content": "Apache APISIX is a dynamic, real-time, high-performance API gateway and cloud-native platform. It provides rich traffic management features like load balancing, dynamic upstream, canary release, circuit breaking, authentication, observability, and more. Designed for microservices and serverless architectures, APISIX ensures scalability, security, and seamless integration with modern DevOps workflows."
},
"logprobs": null,
"finish_reason": "stop"
}
],
...
}
```
### Proxy to Azure OpenAI
The following example demonstrates how you can configure the `ai-proxy` Plugin to proxy requests to other LLM services, such as Azure OpenAI.
Obtain the Azure OpenAI API key and save it to an environment variable:
```shell
export AZ_OPENAI_API_KEY=
```
Create a Route and configure the `ai-proxy` Plugin as such:
```shell
curl "http://127.0.0.1:9180/apisix/admin/routes" -X PUT \
-H "X-API-KEY: ${admin_key}" \
-d '{
"id": "ai-proxy-route",
"uri": "/anything",
"methods": ["POST"],
"plugins": {
"ai-proxy": {
"provider": "openai-compatible",
"auth": {
"header": {
"api-key": "'"$AZ_OPENAI_API_KEY"'"
}
},
"options":{
"model": "gpt-4"
},
"override": {
"endpoint": "https://api7-auzre-openai.openai.azure.com/openai/deployments/gpt-4/chat/completions?api-version=2024-02-15-preview"
}
}
}
}'
```
Send a POST request to the Route with a sample question in the request body:
```shell
curl "http://127.0.0.1:9080/anything" -X POST \
-H "Content-Type: application/json" \
-d '{
"messages": [
{
"role": "system",
"content": "You are an AI assistant that helps people find information."
},
{
"role": "user",
"content": "Write me a 50-word introduction for Apache APISIX."
}
],
"max_tokens": 800,
"temperature": 0.7,
"frequency_penalty": 0,
"presence_penalty": 0,
"top_p": 0.95,
"stop": null
}'
```
You should receive a response similar to the following:
```json
{
"choices": [
{
...,
"message": {
"content": "Apache APISIX is a modern, cloud-native API gateway built to handle high-performance and low-latency use cases. It offers a wide range of features, including load balancing, rate limiting, authentication, and dynamic routing, making it an ideal choice for microservices and cloud-native architectures.",
"role": "assistant"
}
}
],
...
}
```
### Proxy to Embedding Models
The following example demonstrates how you can configure the `ai-proxy` Plugin to proxy requests to embedding models. This example will use the OpenAI embedding model endpoint.
Obtain the OpenAI [API key](https://openai.com/blog/openai-api) and save it to an environment variable:
```shell
export OPENAI_API_KEY=
```
Create a Route and configure the `ai-proxy` Plugin as such:
```shell
curl "http://127.0.0.1:9180/apisix/admin/routes" -X PUT \
-H "X-API-KEY: ${admin_key}" \
-d '{
"id": "ai-proxy-route",
"uri": "/embeddings",
"methods": ["POST"],
"plugins": {
"ai-proxy": {
"provider": "openai",
"auth": {
"header": {
"Authorization": "Bearer '"$OPENAI_API_KEY"'"
}
},
"options":{
"model": "text-embedding-3-small",
"encoding_format": "float"
},
"override": {
"endpoint": "https://api.openai.com/v1/embeddings"
}
}
}
}'
```
Send a POST request to the Route with an input string:
```shell
curl "http://127.0.0.1:9080/embeddings" -X POST \
-H "Content-Type: application/json" \
-d '{
"input": "hello world"
}'
```
You should receive a response similar to the following:
```json
{
"object": "list",
"data": [
{
"object": "embedding",
"index": 0,
"embedding": [
-0.0067144386,
-0.039197803,
0.034177095,
0.028763203,
-0.024785956,
-0.04201061,
...
],
}
],
"model": "text-embedding-3-small",
"usage": {
"prompt_tokens": 2,
"total_tokens": 2
}
}
```
### Include LLM Information in Access Log
The following example demonstrates how you can log LLM request related information in the gateway's access log to improve analytics and audit. The following variables are available:
* `request_llm_model`: LLM model name specified in the request.
* `apisix_upstream_response_time`: Time taken for APISIX to send the request to the upstream service and receive the full response
* `request_type`: Type of request, where the value could be `traditional_http`, `ai_chat`, or `ai_stream`.
* `llm_time_to_first_token`: Duration from request sending to the first token received from the LLM service, in milliseconds.
* `llm_model`: LLM model.
* `llm_prompt_tokens`: Number of tokens in the prompt.
* `llm_completion_tokens`: Number of chat completion tokens in the prompt.
Update the access log format in your configuration file to include additional LLM related variables:
```yaml title="conf/config.yaml"
nginx_config:
http:
access_log_format: "$remote_addr - $remote_user [$time_local] $http_host \"$request_line\" $status $body_bytes_sent $request_time \"$http_referer\" \"$http_user_agent\" $upstream_addr $upstream_status $apisix_upstream_response_time \"$upstream_scheme://$upstream_host$upstream_uri\" \"$apisix_request_id\" \"$request_type\" \"$llm_time_to_first_token\" \"$llm_model\" \"$request_llm_model\" \"$llm_prompt_tokens\" \"$llm_completion_tokens\""
```
Reload APISIX for configuration changes to take effect.
Now if you create a Route and send a request following the [Proxy to OpenAI example](#proxy-to-openai), you should receive a response similar to the following:
```json
{
...,
"model": "gpt-4-0613",
"choices": [
{
"index": 0,
"message": {
"role": "assistant",
"content": "1+1 equals 2.",
"refusal": null,
"annotations": []
},
"logprobs": null,
"finish_reason": "stop"
}
],
"usage": {
"prompt_tokens": 23,
"completion_tokens": 8,
"total_tokens": 31,
"prompt_tokens_details": {
"cached_tokens": 0,
"audio_tokens": 0
},
...
},
"service_tier": "default",
"system_fingerprint": null
}
```
In the gateway's access log, you should see a log entry similar to the following:
```text
192.168.215.1 - - [21/Mar/2025:04:28:03 +0000] api.openai.com "POST /anything HTTP/1.1" 200 804 2.858 "-" "curl/8.6.0" - - - 5765 "http://api.openai.com" "5c5e0b95f8d303cb81e4dc456a4b12d9" "ai_chat" "2858" "gpt-4" "gpt-4" "23" "8"
```
The access log entry shows the request type is `ai_chat`, Apisix upstream response time is `5765` milliseconds, time to first token is `2858` milliseconds, Requested LLM model is `gpt-4`. LLM model is `gpt-4`, prompt token usage is `23`, and completion token usage is `8`.
---
---
title: ai-rag
keywords:
- Apache APISIX
- API Gateway
- Plugin
- ai-rag
- AI
- LLM
description: The ai-rag Plugin enhances LLM outputs with Retrieval-Augmented Generation (RAG), efficiently retrieving relevant documents to improve accuracy and contextual relevance in responses.
---
## Description
The `ai-rag` Plugin provides Retrieval-Augmented Generation (RAG) capabilities with LLMs. It facilitates the efficient retrieval of relevant documents or information from external data sources, which are used to enhance the LLM responses, thereby improving the accuracy and contextual relevance of the generated outputs.
The Plugin supports using [Azure OpenAI](https://azure.microsoft.com/en-us/products/ai-services/openai-service) and [Azure AI Search](https://azure.microsoft.com/en-us/products/ai-services/ai-search) services for generating embeddings and performing vector search.
**_As of now only [Azure OpenAI](https://azure.microsoft.com/en-us/products/ai-services/openai-service) and [Azure AI Search](https://azure.microsoft.com/en-us/products/ai-services/ai-search) services are supported for generating embeddings and performing vector search respectively. PRs for introducing support for other service providers are welcomed._**
## Attributes
| Name | Required | Type | Description |
| ----------------------------------------------- | ------------ | -------- | ----------------------------------------------------------------------------------------------------------------------------------------- |
| embeddings_provider | True | object | Configurations of the embedding models provider. |
| embeddings_provider.azure_openai | True | object | Configurations of [Azure OpenAI](https://azure.microsoft.com/en-us/products/ai-services/openai-service) as the embedding models provider. |
| embeddings_provider.azure_openai.endpoint | True | string | Azure OpenAI embedding model endpoint. |
| embeddings_provider.azure_openai.api_key | True | string | Azure OpenAI API key. |
| vector_search_provider | True | object | Configuration for the vector search provider. |
| vector_search_provider.azure_ai_search | True | object | Configuration for Azure AI Search. |
| vector_search_provider.azure_ai_search.endpoint | True | string | Azure AI Search endpoint. |
| vector_search_provider.azure_ai_search.api_key | True | string | Azure AI Search API key. |
## Request Body Format
The following fields must be present in the request body.
| Field | Type | Description |
| -------------------- | -------- | ------------------------------------------------------------------------------------------------------------------------------- |
| ai_rag | object | Request body RAG specifications. |
| ai_rag.embeddings | object | Request parameters required to generate embeddings. Contents will depend on the API specification of the configured provider. |
| ai_rag.vector_search | object | Request parameters required to perform vector search. Contents will depend on the API specification of the configured provider. |
- Parameters of `ai_rag.embeddings`
- Azure OpenAI
| Name | Required | Type | Description |
| --------------- | ------------ | -------- | -------------------------------------------------------------------------------------------------------------------------- |
| input | True | string | Input text used to compute embeddings, encoded as a string. |
| user | False | string | A unique identifier representing your end-user, which can help in monitoring and detecting abuse. |
| encoding_format | False | string | The format to return the embeddings in. Can be either `float` or `base64`. Defaults to `float`. |
| dimensions | False | integer | The number of dimensions the resulting output embeddings should have. Only supported in text-embedding-3 and later models. |
For other parameters please refer to the [Azure OpenAI embeddings documentation](https://learn.microsoft.com/en-us/azure/ai-services/openai/reference#embeddings).
- Parameters of `ai_rag.vector_search`
- Azure AI Search
| Field | Required | Type | Description |
| --------- | ------------ | -------- | ---------------------------- |
| fields | True | String | Fields for the vector search. |
For other parameters please refer the [Azure AI Search documentation](https://learn.microsoft.com/en-us/rest/api/searchservice/documents/search-post).
Example request body:
```json
{
"ai_rag": {
"vector_search": { "fields": "contentVector" },
"embeddings": {
"input": "which service is good for devops",
"dimensions": 1024
}
}
}
```
## Example
To follow along the example, create an [Azure account](https://portal.azure.com) and complete the following steps:
* In [Azure AI Foundry](https://oai.azure.com/portal), deploy a generative chat model, such as `gpt-4o`, and an embedding model, such as `text-embedding-3-large`. Obtain the API key and model endpoints.
* Follow [Azure's example](https://github.com/Azure/azure-search-vector-samples/blob/main/demo-python/code/basic-vector-workflow/azure-search-vector-python-sample.ipynb) to prepare for a vector search in [Azure AI Search](https://azure.microsoft.com/en-us/products/ai-services/ai-search) using Python. The example will create a search index called `vectest` with the desired schema and upload the [sample data](https://github.com/Azure/azure-search-vector-samples/blob/main/data/text-sample.json) which contains 108 descriptions of various Azure services, for embeddings `titleVector` and `contentVector` to be generated based on `title` and `content`. Complete all the setups before performing vector searches in Python.
* In [Azure AI Search](https://azure.microsoft.com/en-us/products/ai-services/ai-search), [obtain the Azure vector search API key and the search service endpoint](https://learn.microsoft.com/en-us/azure/search/search-get-started-vector?tabs=api-key#retrieve-resource-information).
Save the API keys and endpoints to environment variables:
```shell
# replace with your values
AZ_OPENAI_DOMAIN=https://ai-plugin-developer.openai.azure.com
AZ_OPENAI_API_KEY=9m7VYroxITMDEqKKEnpOknn1rV7QNQT7DrIBApcwMLYJQQJ99ALACYeBjFXJ3w3AAABACOGXGcd
AZ_CHAT_ENDPOINT=${AZ_OPENAI_DOMAIN}/openai/deployments/gpt-4o/chat/completions?api-version=2024-02-15-preview
AZ_EMBEDDING_MODEL=text-embedding-3-large
AZ_EMBEDDINGS_ENDPOINT=${AZ_OPENAI_DOMAIN}/openai/deployments/${AZ_EMBEDDING_MODEL}/embeddings?api-version=2023-05-15
AZ_AI_SEARCH_SVC_DOMAIN=https://ai-plugin-developer.search.windows.net
AZ_AI_SEARCH_KEY=IFZBp3fKVdq7loEVe9LdwMvVdZrad9A4lPH90AzSeC06SlR
AZ_AI_SEARCH_INDEX=vectest
AZ_AI_SEARCH_ENDPOINT=${AZ_AI_SEARCH_SVC_DOMAIN}/indexes/${AZ_AI_SEARCH_INDEX}/docs/search?api-version=2024-07-01
```
:::note
You can fetch the `admin_key` from `config.yaml` and save to an environment variable with the following command:
```bash
admin_key=$(yq '.deployment.admin.admin_key[0].key' conf/config.yaml | sed 's/"//g')
```
:::
### Integrate with Azure for RAG-Enhaned Responses
The following example demonstrates how you can use the [`ai-proxy`](./ai-proxy.md) Plugin to proxy requests to Azure OpenAI LLM and use the `ai-rag` Plugin to generate embeddings and perform vector search to enhance LLM responses.
Create a Route as such:
```shell
curl "http://127.0.0.1:9180/apisix/admin/routes" -X PUT \
-H "X-API-KEY: ${ADMIN_API_KEY}" \
-d '{
"id": "ai-rag-route",
"uri": "/rag",
"plugins": {
"ai-rag": {
"embeddings_provider": {
"azure_openai": {
"endpoint": "'"$AZ_EMBEDDINGS_ENDPOINT"'",
"api_key": "'"$AZ_OPENAI_API_KEY"'"
}
},
"vector_search_provider": {
"azure_ai_search": {
"endpoint": "'"$AZ_AI_SEARCH_ENDPOINT"'",
"api_key": "'"$AZ_AI_SEARCH_KEY"'"
}
}
},
"ai-proxy": {
"provider": "openai",
"auth": {
"header": {
"api-key": "'"$AZ_OPENAI_API_KEY"'"
}
},
"model": "gpt-4o",
"override": {
"endpoint": "'"$AZ_CHAT_ENDPOINT"'"
}
}
}
}'
```
Send a POST request to the Route with the vector fields name, embedding model dimensions, and an input prompt in the request body:
```shell
curl "http://127.0.0.1:9080/rag" -X POST \
-H "Content-Type: application/json" \
-d '{
"ai_rag":{
"vector_search":{
"fields":"contentVector"
},
"embeddings":{
"input":"Which Azure services are good for DevOps?",
"dimensions":1024
}
}
}'
```
You should receive an `HTTP/1.1 200 OK` response similar to the following:
```json
{
"choices": [
{
"content_filter_results": {
...
},
"finish_reason": "length",
"index": 0,
"logprobs": null,
"message": {
"content": "Here is a list of Azure services categorized along with a brief description of each based on the provided JSON data:\n\n### Developer Tools\n- **Azure DevOps**: A suite of services that help you plan, build, and deploy applications, including Azure Boards, Azure Repos, Azure Pipelines, Azure Test Plans, and Azure Artifacts.\n- **Azure DevTest Labs**: A fully managed service to create, manage, and share development and test environments in Azure, supporting custom templates, cost management, and integration with Azure DevOps.\n\n### Containers\n- **Azure Kubernetes Service (AKS)**: A managed container orchestration service based on Kubernetes, simplifying deployment and management of containerized applications with features like automatic upgrades and scaling.\n- **Azure Container Instances**: A serverless container runtime to run and scale containerized applications without managing the underlying infrastructure.\n- **Azure Container Registry**: A fully managed Docker registry service to store and manage container images and artifacts.\n\n### Web\n- **Azure App Service**: A fully managed platform for building, deploying, and scaling web apps, mobile app backends, and RESTful APIs with support for multiple programming languages.\n- **Azure SignalR Service**: A fully managed real-time messaging service to build and scale real-time web applications.\n- **Azure Static Web Apps**: A serverless hosting service for modern web applications using static front-end technologies and serverless APIs.\n\n### Compute\n- **Azure Virtual Machines**: Infrastructure-as-a-Service (IaaS) offering for deploying and managing virtual machines in the cloud.\n- **Azure Functions**: A serverless compute service to run event-driven code without managing infrastructure.\n- **Azure Batch**: A job scheduling service to run large-scale parallel and high-performance computing (HPC) applications.\n- **Azure Service Fabric**: A platform to build, deploy, and manage scalable and reliable microservices and container-based applications.\n- **Azure Quantum**: A quantum computing service to build and run quantum applications.\n- **Azure Stack Edge**: A managed edge computing appliance to run Azure services and AI workloads on-premises or at the edge.\n\n### Security\n- **Azure Bastion**: A fully managed service providing secure and scalable remote access to virtual machines.\n- **Azure Security Center**: A unified security management service to protect workloads across Azure and on-premises infrastructure.\n- **Azure DDoS Protection**: A cloud-based service to protect applications and resources from distributed denial-of-service (DDoS) attacks.\n\n### Databases\n",
"role": "assistant"
}
}
],
"created": 1740625850,
"id": "chatcmpl-B54gQdumpfioMPIybFnirr6rq9ZZS",
"model": "gpt-4o-2024-05-13",
"object": "chat.completion",
"prompt_filter_results": [
{
"prompt_index": 0,
"content_filter_results": {
...
}
}
],
"system_fingerprint": "fp_65792305e4",
"usage": {
...
}
}
```
---
---
title: ai-rate-limiting
keywords:
- Apache APISIX
- API Gateway
- Plugin
- ai-rate-limiting
- AI
- LLM
description: The ai-rate-limiting Plugin enforces token-based rate limiting for LLM service requests, preventing overuse, optimizing API consumption, and ensuring efficient resource allocation.
---
## Description
The `ai-rate-limiting` Plugin enforces token-based rate limiting for requests sent to LLM services. It helps manage API usage by controlling the number of tokens consumed within a specified time frame, ensuring fair resource allocation and preventing excessive load on the service. It is often used with [`ai-proxy`](./ai-proxy.md) or [`ai-proxy-multi`](./ai-proxy-multi.md) plugin.
## Attributes
| Name | Type | Required | Default | Valid values | Description |
|------------------------------|----------------|----------|----------|---------------------------------------------------------|-------------|
| limit | integer | False | | >0 | The maximum number of tokens allowed within a given time interval. At least one of `limit` and `instances.limit` should be configured. |
| time_window | integer | False | | >0 | The time interval corresponding to the rate limiting `limit` in seconds. At least one of `time_window` and `instances.time_window` should be configured. |
| show_limit_quota_header | boolean | False | true | | If true, includes `X-AI-RateLimit-Limit-*`, `X-AI-RateLimit-Remaining-*`, and `X-AI-RateLimit-Reset-*` headers in the response, where `*` is the instance name. |
| limit_strategy | string | False | total_tokens | [total_tokens, prompt_tokens, completion_tokens] | Type of token to apply rate limiting. `total_tokens` is the sum of `prompt_tokens` and `completion_tokens`. |
| instances | array[object] | False | | | LLM instance rate limiting configurations. |
| instances.name | string | True | | | Name of the LLM service instance. |
| instances.limit | integer | True | | >0 | The maximum number of tokens allowed within a given time interval for an instance. |
| instances.time_window | integer | True | | >0 | The time interval corresponding to the rate limiting `limit` in seconds for an instance. |
| rejected_code | integer | False | 503 | [200, 599] | The HTTP status code returned when a request exceeding the quota is rejected. |
| rejected_msg | string | False | | | The response body returned when a request exceeding the quota is rejected. |
## Examples
The examples below demonstrate how you can configure `ai-rate-limiting` for different scenarios.
:::note
You can fetch the `admin_key` from `config.yaml` and save to an environment variable with the following command:
```bash
admin_key=$(yq '.deployment.admin.admin_key[0].key' conf/config.yaml | sed 's/"//g')
```
:::
### Apply Rate Limiting with `ai-proxy`
The following example demonstrates how you can use `ai-proxy` to proxy LLM traffic and use `ai-rate-limiting` to configure token-based rate limiting on the instance.
Create a Route as such and update with your LLM providers, models, API keys, and endpoints, if applicable:
```shell
curl "http://127.0.0.1:9180/apisix/admin/routes" -X PUT \
-H "X-API-KEY: ${admin_key}" \
-d '{
"id": "ai-rate-limiting-route",
"uri": "/anything",
"methods": ["POST"],
"plugins": {
"ai-proxy": {
"provider": "openai",
"auth": {
"header": {
"Authorization": "Bearer '"$OPENAI_API_KEY"'"
}
},
"options": {
"model": "gpt-35-turbo-instruct",
"max_tokens": 512,
"temperature": 1.0
}
},
"ai-rate-limiting": {
"limit": 300,
"time_window": 30,
"limit_strategy": "prompt_tokens"
}
}
}'
```
Send a POST request to the Route with a system prompt and a sample user question in the request body:
```shell
curl "http://127.0.0.1:9080/anything" -X POST \
-H "Content-Type: application/json" \
-d '{
"messages": [
{ "role": "system", "content": "You are a mathematician" },
{ "role": "user", "content": "What is 1+1?" }
]
}'
```
You should receive a response similar to the following:
```json
{
...
"model": "deepseek-chat",
"choices": [
{
"index": 0,
"message": {
"role": "assistant",
"content": "1 + 1 equals 2. This is a fundamental arithmetic operation where adding one unit to another results in a total of two units."
},
"logprobs": null,
"finish_reason": "stop"
}
],
...
}
```
If the rate limiting quota of 300 prompt tokens has been consumed in a 30-second window, all additional requests will be rejected.
### Rate Limit One Instance Among Multiple
The following example demonstrates how you can use `ai-proxy-multi` to configure two models for load balancing, forwarding 80% of the traffic to one instance and 20% to the other. Additionally, use `ai-rate-limiting` to configure token-based rate limiting on the instance that receives 80% of the traffic, such that when the configured quota is fully consumed, the additional traffic will be forwarded to the other instance.
Create a Route which applies rate limiting quota of 100 total tokens in a 30-second window on the `deepseek-instance-1` instance, and update with your LLM providers, models, API keys, and endpoints, if applicable:
```shell
curl "http://127.0.0.1:9180/apisix/admin/routes" -X PUT \
-H "X-API-KEY: ${admin_key}" \
-d '{
"id": "ai-rate-limiting-route",
"uri": "/anything",
"methods": ["POST"],
"plugins": {
"ai-rate-limiting": {
"instances": [
{
"name": "deepseek-instance-1",
"provider": "deepseek",
"weight": 8,
"auth": {
"header": {
"Authorization": "Bearer '"$DEEPSEEK_API_KEY"'"
}
},
"options": {
"model": "deepseek-chat"
}
},
{
"name": "deepseek-instance-2",
"provider": "deepseek",
"weight": 2,
"auth": {
"header": {
"Authorization": "Bearer '"$DEEPSEEK_API_KEY"'"
}
},
"options": {
"model": "deepseek-chat"
}
}
]
},
"ai-rate-limiting": {
"instances": [
{
"name": "deepseek-instance-1",
"limit_strategy": "total_tokens",
"limit": 100,
"time_window": 30
}
]
}
}
}'
```
Send a POST request to the Route with a system prompt and a sample user question in the request body:
```shell
curl "http://127.0.0.1:9080/anything" -X POST \
-H "Content-Type: application/json" \
-d '{
"messages": [
{ "role": "system", "content": "You are a mathematician" },
{ "role": "user", "content": "What is 1+1?" }
]
}'
```
You should receive a response similar to the following:
```json
{
...
"model": "deepseek-chat",
"choices": [
{
"index": 0,
"message": {
"role": "assistant",
"content": "1 + 1 equals 2. This is a fundamental arithmetic operation where adding one unit to another results in a total of two units."
},
"logprobs": null,
"finish_reason": "stop"
}
],
...
}
```
If `deepseek-instance-1` instance rate limiting quota of 100 tokens has been consumed in a 30-second window, the additional requests will all be forwarded to `deepseek-instance-2`, which is not rate limited.
### Apply the Same Quota to All Instances
The following example demonstrates how you can apply the same rate limiting quota to all LLM upstream instances in `ai-rate-limiting`.
For demonstration and easier differentiation, you will be configuring one OpenAI instance and one DeepSeek instance as the upstream LLM services.
Create a Route which applies a rate limiting quota of 100 total tokens for all instances within a 60-second window, and update with your LLM providers, models, API keys, and endpoints, if applicable:
```shell
curl "http://127.0.0.1:9180/apisix/admin/routes" -X PUT \
-H "X-API-KEY: ${admin_key}" \
-d '{
"id": "ai-rate-limiting-route",
"uri": "/anything",
"methods": ["POST"],
"plugins": {
"ai-rate-limiting": {
"instances": [
{
"name": "openai-instance",
"provider": "openai",
"weight": 0,
"auth": {
"header": {
"Authorization": "Bearer '"$OPENAI_API_KEY"'"
}
},
"options": {
"model": "gpt-4"
}
},
{
"name": "deepseek-instance",
"provider": "deepseek",
"weight": 0,
"auth": {
"header": {
"Authorization": "Bearer '"$DEEPSEEK_API_KEY"'"
}
},
"options": {
"model": "deepseek-chat"
}
}
]
},
"ai-rate-limiting": {
"limit": 100,
"time_window": 60,
"rejected_code": 429,
"limit_strategy": "total_tokens"
}
}
}'
```
Send a POST request to the Route with a system prompt and a sample user question in the request body:
```shell
curl -i "http://127.0.0.1:9080/anything" -X POST \
-H "Content-Type: application/json" \
-d '{
"messages": [
{ "role": "system", "content": "You are a mathematician" },
{ "role": "user", "content": "Explain Newtons laws" }
]
}'
```
You should receive a response from either LLM instance, similar to the following:
```json
{
...,
"model": "gpt-4-0613",
"choices": [
{
"index": 0,
"message": {
"role": "assistant",
"content": "Sure! Sir Isaac Newton formulated three laws of motion that describe the motion of objects. These laws are widely used in physics and engineering for studying and understanding how things move. Here they are:\n\n1. Newton's First Law - Law of Inertia: An object at rest tends to stay at rest and an object in motion tends to stay in motion with the same speed and in the same direction unless acted upon by an unbalanced force. This is also known as the principle of inertia.\n\n2. Newton's Second Law of Motion - Force and Acceleration: The acceleration of an object is directly proportional to the net force acting on it and inversely proportional to its mass. This is usually formulated as F=ma where F is the force applied, m is the mass of the object and a is the acceleration produced.\n\n3. Newton's Third Law - Action and Reaction: For every action, there is an equal and opposite reaction. This means that any force exerted on a body will create a force of equal magnitude but in the opposite direction on the object that exerted the first force.\n\nIn simple terms: \n1. If you slide a book on a table and let go, it will stop because of the friction (or force) between it and the table.\n2.",
"refusal": null
},
"logprobs": null,
"finish_reason": "length"
}
],
"usage": {
"prompt_tokens": 23,
"completion_tokens": 256,
"total_tokens": 279,
"prompt_tokens_details": {
"cached_tokens": 0,
"audio_tokens": 0
},
"completion_tokens_details": {
"reasoning_tokens": 0,
"audio_tokens": 0,
"accepted_prediction_tokens": 0,
"rejected_prediction_tokens": 0
}
},
"service_tier": "default",
"system_fingerprint": null
}
```
Since the `total_tokens` value exceeds the configured quota of `100`, the next request within the 60-second window is expected to be forwarded to the other instance.
Within the same 60-second window, send another POST request to the Route:
```shell
curl -i "http://127.0.0.1:9080/anything" -X POST \
-H "Content-Type: application/json" \
-d '{
"messages": [
{ "role": "system", "content": "You are a mathematician" },
{ "role": "user", "content": "Explain Newtons laws" }
]
}'
```
You should receive a response from the other LLM instance, similar to the following:
```json
{
...
"model": "deepseek-chat",
"choices": [
{
"index": 0,
"message": {
"role": "assistant",
"content": "Sure! Newton's laws of motion are three fundamental principles that describe the relationship between the motion of an object and the forces acting on it. They were formulated by Sir Isaac Newton in the late 17th century and are foundational to classical mechanics. Here's an explanation of each law:\n\n---\n\n### **1. Newton's First Law (Law of Inertia)**\n- **Statement**: An object will remain at rest or in uniform motion in a straight line unless acted upon by an external force.\n- **What it means**: This law introduces the concept of **inertia**, which is the tendency of an object to resist changes in its state of motion. If no net force acts on an object, its velocity (speed and direction) will not change.\n- **Example**: A book lying on a table will stay at rest unless you push it. Similarly, a hockey puck sliding on ice will keep moving at a constant speed unless friction or another force slows it down.\n\n---\n\n### **2. Newton's Second Law (Law of Acceleration)**\n- **Statement**: The acceleration of an object is directly proportional to the net force acting on it and inversely proportional to its mass. Mathematically, this is expressed as:\n \\[\n F = ma\n \\]\n"
},
"logprobs": null,
"finish_reason": "length"
}
],
"usage": {
"prompt_tokens": 13,
"completion_tokens": 256,
"total_tokens": 269,
"prompt_tokens_details": {
"cached_tokens": 0
},
"prompt_cache_hit_tokens": 0,
"prompt_cache_miss_tokens": 13
},
"system_fingerprint": "fp_3a5770e1b4_prod0225"
}
```
Since the `total_tokens` value exceeds the configured quota of `100`, the next request within the 60-second window is expected to be rejected.
Within the same 60-second window, send a third POST request to the Route:
```shell
curl -i "http://127.0.0.1:9080/anything" -X POST \
-H "Content-Type: application/json" \
-d '{
"messages": [
{ "role": "system", "content": "You are a mathematician" },
{ "role": "user", "content": "Explain Newtons laws" }
]
}'
```
You should receive an `HTTP 429 Too Many Requests` response and observe the following headers:
```text
X-AI-RateLimit-Limit-openai-instance: 100
X-AI-RateLimit-Remaining-openai-instance: 0
X-AI-RateLimit-Reset-openai-instance: 0
X-AI-RateLimit-Limit-deepseek-instance: 100
X-AI-RateLimit-Remaining-deepseek-instance: 0
X-AI-RateLimit-Reset-deepseek-instance: 0
```
### Configure Instance Priority and Rate Limiting
The following example demonstrates how you can configure two models with different priorities and apply rate limiting on the instance with a higher priority. In the case where `fallback_strategy` is set to `["rate_limiting"]`, the Plugin should continue to forward requests to the low priority instance once the high priority instance's rate limiting quota is fully consumed.
Create a Route as such to set rate limiting and a higher priority on `openai-instance` instance and set the `fallback_strategy` to `["rate_limiting"]`. Update with your LLM providers, models, API keys, and endpoints, if applicable:
```shell
curl "http://127.0.0.1:9180/apisix/admin/routes" -X PUT \
-H "X-API-KEY: ${admin_key}" \
-d '{
"id": "ai-rate-limiting-route",
"uri": "/anything",
"methods": ["POST"],
"plugins": {
"ai-proxy-multi": {
"fallback_strategy: ["rate_limiting"],
"instances": [
{
"name": "openai-instance",
"provider": "openai",
"priority": 1,
"weight": 0,
"auth": {
"header": {
"Authorization": "Bearer '"$OPENAI_API_KEY"'"
}
},
"options": {
"model": "gpt-4"
}
},
{
"name": "deepseek-instance",
"provider": "deepseek",
"priority": 0,
"weight": 0,
"auth": {
"header": {
"Authorization": "Bearer '"$DEEPSEEK_API_KEY"'"
}
},
"options": {
"model": "deepseek-chat"
}
}
]
},
"ai-rate-limiting": {
"instances": [
{
"name": "openai-instance",
"limit": 10,
"time_window": 60
}
],
"limit_strategy": "total_tokens"
}
}
}'
```
Send a POST request to the Route with a system prompt and a sample user question in the request body:
```shell
curl "http://127.0.0.1:9080/anything" -X POST \
-H "Content-Type: application/json" \
-d '{
"messages": [
{ "role": "system", "content": "You are a mathematician" },
{ "role": "user", "content": "What is 1+1?" }
]
}'
```
You should receive a response similar to the following:
```json
{
...,
"model": "gpt-4-0613",
"choices": [
{
"index": 0,
"message": {
"role": "assistant",
"content": "1+1 equals 2.",
"refusal": null
},
"logprobs": null,
"finish_reason": "stop"
}
],
"usage": {
"prompt_tokens": 23,
"completion_tokens": 8,
"total_tokens": 31,
"prompt_tokens_details": {
"cached_tokens": 0,
"audio_tokens": 0
},
"completion_tokens_details": {
"reasoning_tokens": 0,
"audio_tokens": 0,
"accepted_prediction_tokens": 0,
"rejected_prediction_tokens": 0
}
},
"service_tier": "default",
"system_fingerprint": null
}
```
Since the `total_tokens` value exceeds the configured quota of `10`, the next request within the 60-second window is expected to be forwarded to the other instance.
Within the same 60-second window, send another POST request to the Route:
```shell
curl "http://127.0.0.1:9080/anything" -X POST \
-H "Content-Type: application/json" \
-d '{
"messages": [
{ "role": "system", "content": "You are a mathematician" },
{ "role": "user", "content": "Explain Newton law" }
]
}'
```
You should see a response similar to the following:
```json
{
...,
"model": "deepseek-chat",
"choices": [
{
"index": 0,
"message": {
"role": "assistant",
"content": "Certainly! Newton's laws of motion are three fundamental principles that describe the relationship between the motion of an object and the forces acting on it. They were formulated by Sir Isaac Newton in the late 17th century and are foundational to classical mechanics.\n\n---\n\n### **1. Newton's First Law (Law of Inertia):**\n- **Statement:** An object at rest will remain at rest, and an object in motion will continue moving at a constant velocity (in a straight line at a constant speed), unless acted upon by an external force.\n- **Key Idea:** This law introduces the concept of **inertia**, which is the tendency of an object to resist changes in its state of motion.\n- **Example:** If you slide a book across a table, it eventually stops because of the force of friction acting on it. Without friction, the book would keep moving indefinitely.\n\n---\n\n### **2. Newton's Second Law (Law of Acceleration):**\n- **Statement:** The acceleration of an object is directly proportional to the net force acting on it and inversely proportional to its mass. Mathematically, this is expressed as:\n \\[\n F = ma\n \\]\n where:\n - \\( F \\) = net force applied (in Newtons),\n -"
},
...
}
],
...
}
```
### Load Balance and Rate Limit by Consumers
The following example demonstrates how you can configure two models for load balancing and apply rate limiting by Consumer.
Create a Consumer `johndoe` and a rate limiting quota of 10 tokens in a 60-second window on `openai-instance` instance:
```shell
curl "http://127.0.0.1:9180/apisix/admin/consumers" -X PUT \
-H "X-API-KEY: ${admin_key}" \
-d '{
"username": "johndoe",
"plugins": {
"ai-rate-limiting": {
"instances": [
{
"name": "openai-instance",
"limit": 10,
"time_window": 60
}
],
"rejected_code": 429,
"limit_strategy": "total_tokens"
}
}
}'
```
Configure `key-auth` credential for `johndoe`:
```shell
curl "http://127.0.0.1:9180/apisix/admin/consumers/johndoe/credentials" -X PUT \
-H "X-API-KEY: ${admin_key}" \
-d '{
"id": "cred-john-key-auth",
"plugins": {
"key-auth": {
"key": "john-key"
}
}
}'
```
Create another Consumer `janedoe` and a rate limiting quota of 10 tokens in a 60-second window on `deepseek-instance` instance:
```shell
curl "http://127.0.0.1:9180/apisix/admin/consumers" -X PUT \
-H "X-API-KEY: ${admin_key}" \
-d '{
"username": "johndoe",
"plugins": {
"ai-rate-limiting": {
"instances": [
{
"name": "deepseek-instance",
"limit": 10,
"time_window": 60
}
],
"rejected_code": 429,
"limit_strategy": "total_tokens"
}
}
}'
```
Configure `key-auth` credential for `janedoe`:
```shell
curl "http://127.0.0.1:9180/apisix/admin/consumers/janedoe/credentials" -X PUT \
-H "X-API-KEY: ${admin_key}" \
-d '{
"id": "cred-jane-key-auth",
"plugins": {
"key-auth": {
"key": "jane-key"
}
}
}'
```
Create a Route as such and update with your LLM providers, models, API keys, and endpoints, if applicable:
```shell
curl "http://127.0.0.1:9180/apisix/admin/routes" -X PUT \
-H "X-API-KEY: ${admin_key}" \
-d '{
"id": "ai-rate-limiting-route",
"uri": "/anything",
"methods": ["POST"],
"plugins": {
"key-auth": {},
"ai-proxy-multi": {
"fallback_strategy: ["rate_limiting"],
"instances": [
{
"name": "openai-instance",
"provider": "openai",
"weight": 0,
"auth": {
"header": {
"Authorization": "Bearer '"$OPENAI_API_KEY"'"
}
},
"options": {
"model": "gpt-4"
}
},
{
"name": "deepseek-instance",
"provider": "deepseek",
"weight": 0,
"auth": {
"header": {
"Authorization": "Bearer '"$DEEPSEEK_API_KEY"'"
}
},
"options": {
"model": "deepseek-chat"
}
}
]
}
}
}'
```
Send a POST request to the Route without any Consumer key:
```shell
curl -i "http://127.0.0.1:9080/anything" -X POST \
-H "Content-Type: application/json" \
-d '{
"messages": [
{ "role": "system", "content": "You are a mathematician" },
{ "role": "user", "content": "What is 1+1?" }
]
}'
```
You should receive an `HTTP/1.1 401 Unauthorized` response.
Send a POST request to the Route with `johndoe`'s key:
```shell
curl "http://127.0.0.1:9080/anything" -X POST \
-H "Content-Type: application/json" \
-H 'apikey: john-key' \
-d '{
"messages": [
{ "role": "system", "content": "You are a mathematician" },
{ "role": "user", "content": "What is 1+1?" }
]
}'
```
You should receive a response similar to the following:
```json
{
...,
"model": "gpt-4-0613",
"choices": [
{
"index": 0,
"message": {
"role": "assistant",
"content": "1+1 equals 2.",
"refusal": null
},
"logprobs": null,
"finish_reason": "stop"
}
],
"usage": {
"prompt_tokens": 23,
"completion_tokens": 8,
"total_tokens": 31,
"prompt_tokens_details": {
"cached_tokens": 0,
"audio_tokens": 0
},
"completion_tokens_details": {
"reasoning_tokens": 0,
"audio_tokens": 0,
"accepted_prediction_tokens": 0,
"rejected_prediction_tokens": 0
}
},
"service_tier": "default",
"system_fingerprint": null
}
```
Since the `total_tokens` value exceeds the configured quota of the `openai` instance for `johndoe`, the next request within the 60-second window from `johndoe` is expected to be forwarded to the `deepseek` instance.
Within the same 60-second window, send another POST request to the Route with `johndoe`'s key:
```shell
curl "http://127.0.0.1:9080/anything" -X POST \
-H "Content-Type: application/json" \
-H 'apikey: john-key' \
-d '{
"messages": [
{ "role": "system", "content": "You are a mathematician" },
{ "role": "user", "content": "Explain Newtons laws to me" }
]
}'
```
You should see a response similar to the following:
```json
{
...,
"model": "deepseek-chat",
"choices": [
{
"index": 0,
"message": {
"role": "assistant",
"content": "Certainly! Newton's laws of motion are three fundamental principles that describe the relationship between the motion of an object and the forces acting on it. They were formulated by Sir Isaac Newton in the late 17th century and are foundational to classical mechanics.\n\n---\n\n### **1. Newton's First Law (Law of Inertia):**\n- **Statement:** An object at rest will remain at rest, and an object in motion will continue moving at a constant velocity (in a straight line at a constant speed), unless acted upon by an external force.\n- **Key Idea:** This law introduces the concept of **inertia**, which is the tendency of an object to resist changes in its state of motion.\n- **Example:** If you slide a book across a table, it eventually stops because of the force of friction acting on it. Without friction, the book would keep moving indefinitely.\n\n---\n\n### **2. Newton's Second Law (Law of Acceleration):**\n- **Statement:** The acceleration of an object is directly proportional to the net force acting on it and inversely proportional to its mass. Mathematically, this is expressed as:\n \\[\n F = ma\n \\]\n where:\n - \\( F \\) = net force applied (in Newtons),\n -"
},
...
}
],
...
}
```
Send a POST request to the Route with `janedoe`'s key:
```shell
curl "http://127.0.0.1:9080/anything" -X POST \
-H "Content-Type: application/json" \
-H 'apikey: jane-key' \
-d '{
"messages": [
{ "role": "system", "content": "You are a mathematician" },
{ "role": "user", "content": "What is 1+1?" }
]
}'
```
You should receive a response similar to the following:
```json
{
...,
"model": "deepseek-chat",
"choices": [
{
"index": 0,
"message": {
"role": "assistant",
"content": "The sum of 1 and 1 is 2. This is a basic arithmetic operation where you combine two units to get a total of two units."
},
"logprobs": null,
"finish_reason": "stop"
}
],
"usage": {
"prompt_tokens": 14,
"completion_tokens": 31,
"total_tokens": 45,
"prompt_tokens_details": {
"cached_tokens": 0
},
"prompt_cache_hit_tokens": 0,
"prompt_cache_miss_tokens": 14
},
"system_fingerprint": "fp_3a5770e1b4_prod0225"
}
```
Since the `total_tokens` value exceeds the configured quota of the `deepseek` instance for `janedoe`, the next request within the 60-second window from `janedoe` is expected to be forwarded to the `openai` instance.
Within the same 60-second window, send another POST request to the Route with `janedoe`'s key:
```shell
curl "http://127.0.0.1:9080/anything" -X POST \
-H "Content-Type: application/json" \
-H 'apikey: jane-key' \
-d '{
"messages": [
{ "role": "system", "content": "You are a mathematician" },
{ "role": "user", "content": "Explain Newtons laws to me" }
]
}'
```
You should see a response similar to the following:
```json
{
...,
"model": "gpt-4-0613",
"choices": [
{
"index": 0,
"message": {
"role": "assistant",
"content": "Sure, here are Newton's three laws of motion:\n\n1) Newton's First Law, also known as the Law of Inertia, states that an object at rest will stay at rest, and an object in motion will stay in motion, unless acted on by an external force. In simple words, this law suggests that an object will keep doing whatever it is doing until something causes it to do otherwise. \n\n2) Newton's Second Law states that the force acting on an object is equal to the mass of that object times its acceleration (F=ma). This means that force is directly proportional to mass and acceleration. The heavier the object and the faster it accelerates, the greater the force.\n\n3) Newton's Third Law, also known as the law of action and reaction, states that for every action, there is an equal and opposite reaction. Essentially, any force exerted onto a body will create a force of equal magnitude but in the opposite direction on the object that exerted the first force.\n\nRemember, these laws become less accurate when considering speeds near the speed of light (where Einstein's theory of relativity becomes more appropriate) or objects very small or very large. However, for everyday situations, they provide a good model of how things move.",
"refusal": null
},
"logprobs": null,
"finish_reason": "stop"
}
],
...
}
```
This shows `ai-proxy-multi` load balance the traffic with respect to the rate limiting rules in `ai-rate-limiting` by Consumers.
---
---
title: ai-request-rewrite
keywords:
- Apache APISIX
- AI Gateway
- Plugin
- ai-request-rewrite
description: The ai-request-rewrite plugin intercepts client requests before they are forwarded to the upstream service. It sends a predefined prompt, along with the original request body, to a specified LLM service. The LLM processes the input and returns a modified request body, which is then used for the upstream request. This allows dynamic transformation of API requests based on AI-generated content.
---
## Description
The `ai-request-rewrite` plugin intercepts client requests before they are forwarded to the upstream service. It sends a predefined prompt, along with the original request body, to a specified LLM service. The LLM processes the input and returns a modified request body, which is then used for the upstream request. This allows dynamic transformation of API requests based on AI-generated content.
## Plugin Attributes
| **Field** | **Required** | **Type** | **Description** |
| ------------------------- | ------------ | -------- | ------------------------------------------------------------------------------------ |
| prompt | Yes | String | The prompt send to LLM service. |
| provider | Yes | String | Name of the LLM service. Available options: openai, deekseek, azure-openai, aimlapi and openai-compatible. When `aimlapi` is selected, the plugin uses the OpenAI-compatible driver with a default endpoint of `https://api.aimlapi.com/v1/chat/completions`. |
| auth | Yes | Object | Authentication configuration |
| auth.header | No | Object | Authentication headers. Key must match pattern `^[a-zA-Z0-9._-]+$`. |
| auth.query | No | Object | Authentication query parameters. Key must match pattern `^[a-zA-Z0-9._-]+$`. |
| options | No | Object | Key/value settings for the model |
| options.model | No | String | Model to execute. Examples: "gpt-3.5-turbo" for openai, "deepseek-chat" for deekseek, or "qwen-turbo" for openai-compatible or aimlapi services |
| override.endpoint | No | String | Override the default endpoint when using OpenAI-compatible services (e.g., self-hosted models or third-party LLM services). When the provider is 'openai-compatible', the endpoint field is required. |
| timeout | No | Integer | Total timeout in milliseconds for requests to LLM service, including connect, send, and read timeouts. Range: 1 - 60000. Default: 30000|
| keepalive | No | Boolean | Enable keepalive for requests to LLM service. Default: true |
| keepalive_timeout | No | Integer | Keepalive timeout in milliseconds for requests to LLM service. Minimum: 1000. Default: 60000 |
| keepalive_pool | No | Integer | Keepalive pool size for requests to LLM service. Minimum: 1. Default: 30 |
| ssl_verify | No | Boolean | SSL verification for requests to LLM service. Default: true |
## How it works

## Examples
The examples below demonstrate how you can configure `ai-request-rewrite` for different scenarios.
:::note
You can fetch the admin_key from config.yaml and save to an environment variable with the following command:
admin_key=$(yq '.deployment.admin.admin_key[0].key' conf/config.yaml | sed 's/"//g')
:::
### Redact sensitive information
```shell
curl "http://127.0.0.1:9180/apisix/admin/routes/1" -X PUT \
-H "X-API-KEY: ${admin_key}" \
-d '{
"uri": "/anything",
"plugins": {
"ai-request-rewrite": {
"prompt": "Given a JSON request body, identify and mask any sensitive information such as credit card numbers, social security numbers, and personal identification numbers (e.g., passport or driver'\''s license numbers). Replace detected sensitive values with a masked format (e.g., \"*** **** **** 1234\") for credit card numbers. Ensure the JSON structure remains unchanged.",
"provider": "openai",
"auth": {
"header": {
"Authorization": "Bearer "
}
},
"options": {
"model": "gpt-4"
}
}
},
"upstream": {
"type": "roundrobin",
"nodes": {
"httpbin.org:80": 1
}
}
}'
```
Now send a request:
```shell
curl "http://127.0.0.1:9080/anything" \
-H "Content-Type: application/json" \
-d '{
"name": "John Doe",
"email": "john.doe@example.com",
"credit_card": "4111 1111 1111 1111",
"ssn": "123-45-6789",
"address": "123 Main St"
}'
```
The request body send to the LLM Service is as follows:
```json
{
"messages": [
{
"role": "system",
"content": "Given a JSON request body, identify and mask any sensitive information such as credit card numbers, social security numbers, and personal identification numbers (e.g., passport or driver's license numbers). Replace detected sensitive values with a masked format (e.g., '*** **** **** 1234') for credit card numbers). Ensure the JSON structure remains unchanged."
},
{
"role": "user",
"content": "{\n\"name\":\"John Doe\",\n\"email\":\"john.doe@example.com\",\n\"credit_card\":\"4111 1111 1111 1111\",\n\"ssn\":\"123-45-6789\",\n\"address\":\"123 Main St\"\n}"
}
]
}
```
The LLM processes the input and returns a modified request body, which replace detected sensitive values with a masked format then used for the upstream request:
```json
{
"name": "John Doe",
"email": "john.doe@example.com",
"credit_card": "**** **** **** 1111",
"ssn": "***-**-6789",
"address": "123 Main St"
}
```
### Send request to an OpenAI compatible LLM
Create a route with the `ai-request-rewrite` plugin with `provider` set to `openai-compatible` and the endpoint of the model set to `override.endpoint` like so:
```shell
curl "http://127.0.0.1:9180/apisix/admin/routes/1" -X PUT \
-H "X-API-KEY: ${admin_key}" \
-d '{
"uri": "/anything",
"plugins": {
"ai-request-rewrite": {
"prompt": "Given a JSON request body, identify and mask any sensitive information such as credit card numbers, social security numbers, and personal identification numbers (e.g., passport or driver'\''s license numbers). Replace detected sensitive values with a masked format (e.g., '*** **** **** 1234') for credit card numbers). Ensure the JSON structure remains unchanged.",
"provider": "openai-compatible",
"auth": {
"header": {
"Authorization": "Bearer "
}
},
"options": {
"model": "qwen-plus",
"max_tokens": 1024,
"temperature": 1
},
"override": {
"endpoint": "https://dashscope.aliyuncs.com/compatible-mode/v1/chat/completions"
}
}
},
"upstream": {
"type": "roundrobin",
"nodes": {
"httpbin.org:80": 1
}
}
}'
```
---
---
title: api-breaker
keywords:
- Apache APISIX
- API Gateway
- API Breaker
description: This document describes the information about the Apache APISIX api-breaker Plugin, you can use it to protect Upstream services.
---
## Description
The `api-breaker` Plugin implements circuit breaker functionality to protect Upstream services.
:::note
Whenever the Upstream service responds with a status code from the configured `unhealthy.http_statuses` list for the configured `unhealthy.failures` number of times, the Upstream service will be considered unhealthy.
The request is then retried in 2, 4, 8, 16 ... seconds until the `max_breaker_sec`.
In an unhealthy state, if the Upstream service responds with a status code from the configured list `healthy.http_statuses` for `healthy.successes` times, the service is considered healthy again.
:::
## Attributes
| Name | Type | Required | Default | Valid values | Description |
|-------------------------|----------------|----------|---------|-----------------|----------------------------------------------------------------------------------------------------------------------------------------------------------------------------------------------------------------------------------------------|
| break_response_code | integer | True | | [200, ..., 599] | HTTP error code to return when Upstream is unhealthy. |
| break_response_body | string | False | | | Body of the response message to return when Upstream is unhealthy. |
| break_response_headers | array[object] | False | | [{"key":"header_name","value":"can contain Nginx $var"}] | Headers of the response message to return when Upstream is unhealthy. Can only be configured when the `break_response_body` attribute is configured. The values can contain APISIX variables. For example, we can use `{"key":"X-Client-Addr","value":"$remote_addr:$remote_port"}`. |
| max_breaker_sec | integer | False | 300 | >=3 | Maximum time in seconds for circuit breaking. |
| unhealthy.http_statuses | array[integer] | False | [500] | [500, ..., 599] | Status codes of Upstream to be considered unhealthy. |
| unhealthy.failures | integer | False | 3 | >=1 | Number of failures within a certain period of time for the Upstream service to be considered unhealthy. |
| healthy.http_statuses | array[integer] | False | [200] | [200, ..., 499] | Status codes of Upstream to be considered healthy. |
| healthy.successes | integer | False | 3 | >=1 | Number of consecutive healthy requests for the Upstream service to be considered healthy. |
## Enable Plugin
The example below shows how you can configure the Plugin on a specific Route:
:::note
You can fetch the `admin_key` from `config.yaml` and save to an environment variable with the following command:
```bash
admin_key=$(yq '.deployment.admin.admin_key[0].key' conf/config.yaml | sed 's/"//g')
```
:::
```shell
curl "http://127.0.0.1:9180/apisix/admin/routes/1" \
-H "X-API-KEY: $admin_key" -X PUT -d '
{
"plugins": {
"api-breaker": {
"break_response_code": 502,
"unhealthy": {
"http_statuses": [500, 503],
"failures": 3
},
"healthy": {
"http_statuses": [200],
"successes": 1
}
}
},
"upstream": {
"type": "roundrobin",
"nodes": {
"127.0.0.1:1980": 1
}
},
"uri": "/hello"
}'
```
In this configuration, a response code of `500` or `503` three times within a certain period of time triggers the unhealthy status of the Upstream service. A response code of `200` restores its healthy status.
## Example usage
Once you have configured the Plugin as shown above, you can test it out by sending a request.
```shell
curl -i -X POST "http://127.0.0.1:9080/hello"
```
If the Upstream service responds with an unhealthy response code, you will receive the configured response code (`break_response_code`).
```shell
HTTP/1.1 502 Bad Gateway
...
502 Bad Gateway
502 Bad Gateway
openresty
```
## Delete Plugin
To remove the `api-breaker` Plugin, you can delete the corresponding JSON configuration from the Plugin configuration. APISIX will automatically reload and you do not have to restart for this to take effect.
```shell
curl http://127.0.0.1:9180/apisix/admin/routes/1 \
-H "X-API-KEY: $admin_key" -X PUT -d '
{
"uri": "/hello",
"upstream": {
"type": "roundrobin",
"nodes": {
"127.0.0.1:1980": 1
}
}
}'
```
---
---
title: attach-consumer-label
keywords:
- Apache APISIX
- API Gateway
- API Consumer
description: This article describes the Apache APISIX attach-consumer-label plugin, which you can use to pass custom consumer labels to upstream services.
---
## Description
The `attach-consumer-label` plugin attaches custom consumer-related labels, in addition to `X-Consumer-Username` and `X-Credential-Indentifier`, to authenticated requests, for upstream services to differentiate between consumers and implement additional logics.
## Attributes
| Name | Type | Required | Default | Valid values | Description |
|----------|--------|----------|---------|--------------|-----------------------------------------------------------------------------------------------------------------------------------------------------------------------------------------------------------------------------------------------------------------------------------------------------------------------------------------------------------------------------------------------------------------|
| headers | object | True | | | Key-value pairs of consumer labels to be attached to request headers, where key is the request header name, such as `X-Consumer-Role`, and the value is a reference to the custom label key, such as `$role`. Note that the value should always start with a dollar sign (`$`). If a referenced consumer value is not configured on the consumer, the corresponding header will not be attached to the request. |
## Enable Plugin
The following example demonstrates how you can attach custom labels to request headers before authenticated requests are forwarded to upstream services. If the request is rejected, you should not see any consumer labels attached to request headers. If a certain label value is not configured on the consumer but referenced in the `attach-consumer-label` plugin, the corresponding header will also not be attached.
:::note
You can fetch the `admin_key` from `config.yaml` and save to an environment variable with the following command:
```bash
admin_key=$(yq '.deployment.admin.admin_key[0].key' conf/config.yaml | sed 's/"//g')
```
:::
Create a consumer `john` with custom labels:
```shell
curl "http://127.0.0.1:9180/apisix/admin/consumers" -X PUT \
-H "X-API-KEY: ${ADMIN_API_KEY}" \
-d '{
"username": "john",
"labels": {
"department": "devops",
"company": "api7"
}
}'
```
Configure the `key-auth` credential for the consumer `john`:
```shell
curl "http://127.0.0.1:9180/apisix/admin/consumers/john/credentials" -X PUT \
-H "X-API-KEY: ${ADMIN_API_KEY}" \
-d '{
"id": "cred-john-key-auth",
"plugins": {
"key-auth": {
"key": "john-key"
}
}
}'
```
Create a route enabling the `key-auth` and `attach-consumer-label` plugins:
```shell
curl "http://127.0.0.1:9180/apisix/admin/routes" -X PUT \
-H "X-API-KEY: ${ADMIN_API_KEY}" \
-d '{
"id": "attach-consumer-label-route",
"uri": "/get",
"plugins": {
"key-auth": {},
"attach-consumer-label": {
"headers": {
"X-Consumer-Department": "$department",
"X-Consumer-Company": "$company",
"X-Consumer-Role": "$role"
}
}
},
"upstream": {
"type": "roundrobin",
"nodes": {
"httpbin.org:80": 1
}
}
}'
```
:::tip
The consumer label references must be prefixed by a dollar sign (`$`).
:::
To verify, send a request to the route with the valid credential:
```shell
curl -i "http://127.0.0.1:9080/get" -H 'apikey: john-key'
```
You should see an `HTTP/1.1 200 OK` response similar to the following:
```json
{
"args": {},
"headers": {
"Accept": "*/*",
"Apikey": "john-key",
"Host": "127.0.0.1",
"X-Consumer-Username": "john",
"X-Credential-Indentifier": "cred-john-key-auth",
"X-Consumer-Company": "api7",
"X-Consumer-Department": "devops",
"User-Agent": "curl/8.6.0",
"X-Amzn-Trace-Id": "Root=1-66e5107c-5bb3e24f2de5baf733aec1cc",
"X-Forwarded-Host": "127.0.0.1"
},
"origin": "192.168.65.1, 205.198.122.37",
"url": "http://127.0.0.1/get"
}
```
## Delete plugin
To remove the Plugin, you can delete the corresponding JSON configuration from the Plugin configuration. APISIX will automatically reload and you do not have to restart for this to take effect.
```shell
curl "http://127.0.0.1:9180/apisix/admin/routes/attach-consumer-label-route" -X PUT \
-H "X-API-KEY: ${ADMIN_API_KEY}" \
-d '{
"uri": "/get",
"upstream": {
"type": "roundrobin",
"nodes": {
"httpbin.org:80": 1
}
}
}'
```
---
---
title: authz-casbin
keywords:
- Apache APISIX
- API Gateway
- Plugin
- Authz Casbin
- authz-casbin
description: This document contains information about the Apache APISIX authz-casbin Plugin.
---
## Description
The `authz-casbin` Plugin is an authorization Plugin based on [Lua Casbin](https://github.com/casbin/lua-casbin/). This Plugin supports powerful authorization scenarios based on various [access control models](https://casbin.org/docs/en/supported-models).
## Attributes
| Name | Type | Required | Description |
|-------------|--------|----------|----------------------------------------------------------------------------------------|
| model_path | string | True | Path of the Casbin model configuration file. |
| policy_path | string | True | Path of the Casbin policy file. |
| model | string | True | Casbin model configuration in text format. |
| policy | string | True | Casbin policy in text format. |
| username | string | True | Header in the request that will be used in the request to pass the username (subject). |
:::note
You must either specify the `model_path`, `policy_path`, and the `username` attributes or specify the `model`, `policy` and the `username` attributes in the Plugin configuration for it to be valid.
If you wish to use a global Casbin configuration, you can first specify `model` and `policy` attributes in the Plugin metadata and only the `username` attribute in the Plugin configuration. All Routes will use the Plugin configuration this way.
:::
## Metadata
| Name | Type | Required | Description |
|--------|--------|----------|--------------------------------------------|
| model | string | True | Casbin model configuration in text format. |
| policy | string | True | Casbin policy in text format. |
## Enable Plugin
You can enable the Plugin on a Route by either using the model/policy file paths or using the model/policy text in Plugin configuration/metadata.
### By using model/policy file paths
The example below shows setting up Casbin authentication from your model/policy configuration file:
:::note
You can fetch the `admin_key` from `config.yaml` and save to an environment variable with the following command:
```bash
admin_key=$(yq '.deployment.admin.admin_key[0].key' conf/config.yaml | sed 's/"//g')
```
:::
```shell
curl http://127.0.0.1:9180/apisix/admin/routes/1 -H "X-API-KEY: $admin_key" -X PUT -d '
{
"plugins": {
"authz-casbin": {
"model_path": "/path/to/model.conf",
"policy_path": "/path/to/policy.csv",
"username": "user"
}
},
"upstream": {
"nodes": {
"127.0.0.1:1980": 1
},
"type": "roundrobin"
},
"uri": "/*"
}'
```
### By using model/policy text in Plugin configuration
The example below shows setting up Casbin authentication from your model/policy text in your Plugin configuration:
```shell
curl http://127.0.0.1:9180/apisix/admin/routes/1 -H "X-API-KEY: $admin_key" -X PUT -d '
{
"plugins": {
"authz-casbin": {
"model": "[request_definition]
r = sub, obj, act
[policy_definition]
p = sub, obj, act
[role_definition]
g = _, _
[policy_effect]
e = some(where (p.eft == allow))
[matchers]
m = (g(r.sub, p.sub) || keyMatch(r.sub, p.sub)) && keyMatch(r.obj, p.obj) && keyMatch(r.act, p.act)",
"policy": "p, *, /, GET
p, admin, *, *
g, alice, admin",
"username": "user"
}
},
"upstream": {
"nodes": {
"127.0.0.1:1980": 1
},
"type": "roundrobin"
},
"uri": "/*"
}'
```
### By using model/policy text in Plugin metadata
First, you need to send a `PUT` request to the Admin API to add the `model` and `policy` text to the Plugin metadata.
All Routes configured this way will use a single Casbin enforcer with the configured Plugin metadata. You can also update the model/policy in this way and the Plugin will automatically update to the new configuration.
```shell
curl http://127.0.0.1:9180/apisix/admin/plugin_metadata/authz-casbin -H "X-API-KEY: $admin_key" -i -X PUT -d '
{
"model": "[request_definition]
r = sub, obj, act
[policy_definition]
p = sub, obj, act
[role_definition]
g = _, _
[policy_effect]
e = some(where (p.eft == allow))
[matchers]
m = (g(r.sub, p.sub) || keyMatch(r.sub, p.sub)) && keyMatch(r.obj, p.obj) && keyMatch(r.act, p.act)",
"policy": "p, *, /, GET
p, admin, *, *
g, alice, admin"
}'
```
Once you have updated the Plugin metadata, you can add the Plugin to a specific Route:
```shell
curl http://127.0.0.1:9180/apisix/admin/routes/1 -H "X-API-KEY: $admin_key" -X PUT -d '
{
"plugins": {
"authz-casbin": {
"username": "user"
}
},
"upstream": {
"nodes": {
"127.0.0.1:1980": 1
},
"type": "roundrobin"
},
"uri": "/*"
}'
```
:::note
The Plugin Route configuration has a higher precedence than the Plugin metadata configuration. If the model/policy configuration is present in the Plugin Route configuration, it is used instead of the metadata configuration.
:::
## Example usage
We define the example model as:
```conf
[request_definition]
r = sub, obj, act
[policy_definition]
p = sub, obj, act
[role_definition]
g = _, _
[policy_effect]
e = some(where (p.eft == allow))
[matchers]
m = (g(r.sub, p.sub) || keyMatch(r.sub, p.sub)) && keyMatch(r.obj, p.obj) && keyMatch(r.act, p.act)
```
And the example policy as:
```conf
p, *, /, GET
p, admin, *, *
g, alice, admin
```
See [examples](https://github.com/casbin/lua-casbin/tree/master/examples) for more policy and model configurations.
The above configuration will let anyone access the homepage (`/`) using a `GET` request while only users with admin permissions can access other pages and use other request methods.
So if we make a get request to the homepage:
```shell
curl -i http://127.0.0.1:9080/ -X GET
```
But if an unauthorized user tries to access any other page, they will get a 403 error:
```shell
curl -i http://127.0.0.1:9080/res -H 'user: bob' -X GET
HTTP/1.1 403 Forbidden
```
And only users with admin privileges can access the endpoints:
```shell
curl -i http://127.0.0.1:9080/res -H 'user: alice' -X GET
```
## Delete Plugin
To remove the `authz-casbin` Plugin, you can delete the corresponding JSON configuration from the Plugin configuration. APISIX will automatically reload and you do not have to restart for this to take effect.
```shell
curl http://127.0.0.1:9180/apisix/admin/routes/1 -H "X-API-KEY: $admin_key" -X PUT -d '
{
"methods": ["GET"],
"uri": "/*",
"plugins": {},
"upstream": {
"type": "roundrobin",
"nodes": {
"127.0.0.1:1980": 1
}
}
}'
```
---
---
title: authz-casdoor
keywords:
- Apache APISIX
- API Gateway
- Plugin
- Authz Casdoor
- authz-casdoor
description: This document contains information about the Apache APISIX authz-casdoor Plugin.
---
## Description
The `authz-casdoor` Plugin can be used to add centralized authentication with [Casdoor](https://casdoor.org/).
## Attributes
| Name | Type | Required | Description |
|---------------|--------|----------|----------------------------------------------|
| endpoint_addr | string | True | URL of Casdoor. |
| client_id | string | True | Client ID in Casdoor. |
| client_secret | string | True | Client secret in Casdoor. |
| callback_url | string | True | Callback URL used to receive state and code. |
NOTE: `encrypt_fields = {"client_secret"}` is also defined in the schema, which means that the field will be stored encrypted in etcd. See [encrypted storage fields](../plugin-develop.md#encrypted-storage-fields).
:::info IMPORTANT
`endpoint_addr` and `callback_url` should not end with '/'.
:::
:::info IMPORTANT
The `callback_url` must belong to the URI of your Route. See the code snippet below for an example configuration.
:::
## Enable Plugin
You can enable the Plugin on a specific Route as shown below:
```shell
curl "http://127.0.0.1:9180/apisix/admin/routes/1" -H "X-API-KEY: edd1c9f034335f136f87ad84b625c8f1" -X PUT -d '
{
"methods": ["GET"],
"uri": "/anything/*",
"plugins": {
"authz-casdoor": {
"endpoint_addr":"http://localhost:8000",
"callback_url":"http://localhost:9080/anything/callback",
"client_id":"7ceb9b7fda4a9061ec1c",
"client_secret":"3416238e1edf915eac08b8fe345b2b95cdba7e04"
}
},
"upstream": {
"type": "roundrobin",
"nodes": {
"httpbin.org:80": 1
}
}
}'
```
## Example usage
Once you have enabled the Plugin, a new user visiting this Route would first be processed by the `authz-casdoor` Plugin. They would be redirected to the login page of Casdoor.
After successfully logging in, Casdoor will redirect this user to the `callback_url` with GET parameters `code` and `state` specified. The Plugin will also request for an access token and confirm whether the user is really logged in. This process is only done once and subsequent requests are left uninterrupted.
Once this is done, the user is redirected to the original URL they wanted to visit.
## Delete Plugin
To remove the `authz-casdoor` Plugin, you can delete the corresponding JSON configuration from the Plugin configuration. APISIX will automatically reload and you do not have to restart for this to take effect.
:::note
You can fetch the `admin_key` from `config.yaml` and save to an environment variable with the following command:
```bash
admin_key=$(yq '.deployment.admin.admin_key[0].key' conf/config.yaml | sed 's/"//g')
```
:::
```shell
curl http://127.0.0.1:9180/apisix/admin/routes/1 -H "X-API-KEY: $admin_key" -X PUT -d '
{
"methods": ["GET"],
"uri": "/anything/*",
"plugins": {},
"upstream": {
"type": "roundrobin",
"nodes": {
"httpbin.org:80": 1
}
}
}'
```
---
---
title: authz-keycloak
keywords:
- Apache APISIX
- API Gateway
- Plugin
- Authz Keycloak
- authz-keycloak
description: This document contains information about the Apache APISIX authz-keycloak Plugin.
---
## Description
The `authz-keycloak` Plugin can be used to add authentication with [Keycloak Identity Server](https://www.keycloak.org/).
:::tip
Although this Plugin was developed to work with Keycloak, it should work with any OAuth/OIDC and UMA compliant identity providers as well.
:::
Refer to [Authorization Services Guide](https://www.keycloak.org/docs/latest/authorization_services/) for more information on Keycloak.
## Attributes
| Name | Type | Required | Default | Valid values | Description |
|----------------------------------------------|---------------|----------|-----------------------------------------------|--------------------------------------------------------------------|-------------------------------------------------------------------------------------------------------------------------------------------------------------------------------------------------------------------------------------------------------|
| discovery | string | False | | https://host.domain/realms/foo/.well-known/uma2-configuration | URL to [discovery document](https://www.keycloak.org/docs/latest/authorization_services/index.html) of Keycloak Authorization Services. |
| token_endpoint | string | False | | https://host.domain/realms/foo/protocol/openid-connect/token | An OAuth2-compliant token endpoint that supports the `urn:ietf:params:oauth:grant-type:uma-ticket` grant type. If provided, overrides the value from discovery. |
| resource_registration_endpoint | string | False | | https://host.domain/realms/foo/authz/protection/resource_set | A UMA-compliant resource registration endpoint. If provided, overrides the value from discovery. |
| client_id | string | True | | | The identifier of the resource server to which the client is seeking access. |
| client_secret | string | False | | | The client secret, if required. You can use APISIX secret to store and reference this value. APISIX currently supports storing secrets in two ways. [Environment Variables and HashiCorp Vault](../terminology/secret.md) |
| grant_type | string | False | "urn:ietf:params:oauth:grant-type:uma-ticket" | ["urn:ietf:params:oauth:grant-type:uma-ticket"] | |
| policy_enforcement_mode | string | False | "ENFORCING" | ["ENFORCING", "PERMISSIVE"] | |
| permissions | array[string] | False | | | An array of strings, each representing a set of one or more resources and scopes the client is seeking access. |
| lazy_load_paths | boolean | False | false | | When set to true, dynamically resolves the request URI to resource(s) using the resource registration endpoint instead of the static permission. |
| http_method_as_scope | boolean | False | false | | When set to true, maps the HTTP request type to scope of the same name and adds to all requested permissions. |
| timeout | integer | False | 3000 | [1000, ...] | Timeout in ms for the HTTP connection with the Identity Server. |
| access_token_expires_in | integer | False | 300 | [1, ...] | Expiration time(s) of the access token. |
| access_token_expires_leeway | integer | False | 0 | [0, ...] | Expiration leeway(s) for access_token renewal. When set, the token will be renewed access_token_expires_leeway seconds before expiration. This avoids errors in cases where the access_token just expires when reaching the OAuth Resource Server. |
| refresh_token_expires_in | integer | False | 3600 | [1, ...] | The expiration time(s) of the refresh token. |
| refresh_token_expires_leeway | integer | False | 0 | [0, ...] | Expiration leeway(s) for refresh_token renewal. When set, the token will be renewed refresh_token_expires_leeway seconds before expiration. This avoids errors in cases where the refresh_token just expires when reaching the OAuth Resource Server. |
| ssl_verify | boolean | False | true | | When set to true, verifies if TLS certificate matches hostname. |
| cache_ttl_seconds | integer | False | 86400 (equivalent to 24h) | positive integer >= 1 | Maximum time in seconds up to which the Plugin caches discovery documents and tokens used by the Plugin to authenticate to Keycloak. |
| keepalive | boolean | False | true | | When set to true, enables HTTP keep-alive to keep connections open after use. Set to `true` if you are expecting a lot of requests to Keycloak. |
| keepalive_timeout | integer | False | 60000 | positive integer >= 1000 | Idle time after which the established HTTP connections will be closed. |
| keepalive_pool | integer | False | 5 | positive integer >= 1 | Maximum number of connections in the connection pool. |
| access_denied_redirect_uri | string | False | | [1, 2048] | URI to redirect the user to instead of returning an error message like `"error_description":"not_authorized"`. |
| password_grant_token_generation_incoming_uri | string | False | | /api/token | Set this to generate token using the password grant type. The Plugin will compare incoming request URI to this value. |
NOTE: `encrypt_fields = {"client_secret"}` is also defined in the schema, which means that the field will be stored encrypted in etcd. See [encrypted storage fields](../plugin-develop.md#encrypted-storage-fields).
### Discovery and endpoints
It is recommended to use the `discovery` attribute as the `authz-keycloak` Plugin can discover the Keycloak API endpoints from it.
If set, the `token_endpoint` and `resource_registration_endpoint` will override the values obtained from the discovery document.
### Client ID and secret
The Plugin needs the `client_id` attribute for identification and to specify the context in which to evaluate permissions when interacting with Keycloak.
If the `lazy_load_paths` attribute is set to true, then the Plugin additionally needs to obtain an access token for itself from Keycloak. In such cases, if the client access to Keycloak is confidential, you need to configure the `client_secret` attribute.
### Policy enforcement mode
The `policy_enforcement_mode` attribute specifies how policies are enforced when processing authorization requests sent to the server.
#### `ENFORCING` mode
Requests are denied by default even when there is no policy associated with a resource.
The `policy_enforcement_mode` is set to `ENFORCING` by default.
#### `PERMISSIVE` mode
Requests are allowed when there is no policy associated with a given resource.
### Permissions
When handling incoming requests, the Plugin can determine the permissions to check with Keycloak statically or dynamically from the properties of the request.
If the `lazy_load_paths` attribute is set to `false`, the permissions are taken from the `permissions` attribute. Each entry in `permissions` needs to be formatted as expected by the token endpoint's `permission` parameter. See [Obtaining Permissions](https://www.keycloak.org/docs/latest/authorization_services/index.html#_service_obtaining_permissions).
:::note
A valid permission can be a single resource or a resource paired with on or more scopes.
:::
If the `lazy_load_paths` attribute is set to `true`, the request URI is resolved to one or more resources configured in Keycloak using the resource registration endpoint. The resolved resources are used as the permissions to check.
:::note
This requires the Plugin to obtain a separate access token for itself from the token endpoint. So, make sure to set the `Service Accounts Enabled` option in the client settings in Keycloak.
Also make sure that the issued access token contains the `resource_access` claim with the `uma_protection` role to ensure that the Plugin is able to query resources through the Protection API.
:::
### Automatically mapping HTTP method to scope
The `http_method_as_scope` is often used together with `lazy_load_paths` but can also be used with a static permission list.
If the `http_method_as_scope` attribute is set to `true`, the Plugin maps the request's HTTP method to the scope with the same name. The scope is then added to every permission to check.
If the `lazy_load_paths` attribute is set to false, the Plugin adds the mapped scope to any of the static permissions configured in the `permissions` attribute—even if they contain on or more scopes already.
### Generating a token using `password` grant
To generate a token using `password` grant, you can set the value of the `password_grant_token_generation_incoming_uri` attribute.
If the incoming URI matches the configured attribute and the request method is POST, a token is generated using the `token_endpoint`.
You also need to add `application/x-www-form-urlencoded` as `Content-Type` header and `username` and `password` as parameters.
The example below shows a request if the `password_grant_token_generation_incoming_uri` is `/api/token`:
```shell
curl --location --request POST 'http://127.0.0.1:9080/api/token' \
--header 'Accept: application/json, text/plain, */*' \
--header 'Content-Type: application/x-www-form-urlencoded' \
--data-urlencode 'username=' \
--data-urlencode 'password='
```
## Enable Plugin
The example below shows how you can enable the `authz-keycloak` Plugin on a specific Route. `${realm}` represents the realm name in Keycloak.
:::note
You can fetch the `admin_key` from `config.yaml` and save to an environment variable with the following command:
```bash
admin_key=$(yq '.deployment.admin.admin_key[0].key' conf/config.yaml | sed 's/"//g')
```
:::
```shell
curl http://127.0.0.1:9180/apisix/admin/routes/5 -H "X-API-KEY: $admin_key" -X PUT -d '
{
"uri": "/get",
"plugins": {
"authz-keycloak": {
"token_endpoint": "http://127.0.0.1:8090/realms/${realm}/protocol/openid-connect/token",
"permissions": ["resource name#scope name"],
"client_id": "Client ID"
}
},
"upstream": {
"type": "roundrobin",
"nodes": {
"127.0.0.1:8080": 1
}
}
}'
```
## Example usage
Once you have enabled the Plugin on a Route you can use it.
First, you have to get the JWT token from Keycloak:
```shell
curl "http:///realms//protocol/openid-connect/token" \
-d "client_id=" \
-d "client_secret=" \
-d "username=" \
-d "password=" \
-d "grant_type=password"
```
You should see a response similar to the following:
```text
{"access_token":"eyJhbGciOiJSUzI1NiIsInR5cCIgOiAiSldUIiwia2lkIiA6ICJoT3ludlBPY2d6Y3VWWnYtTU42bXZKMUczb0dOX2d6MFo3WFl6S2FSa1NBIn0.eyJleHAiOjE3MDMyOTAyNjAsImlhdCI6MTcwMzI4OTk2MCwianRpIjoiMjJhOGFmMzItNDM5Mi00Yzg3LThkM2UtZDkyNDVmZmNiYTNmIiwiaXNzIjoiaHR0cDovLzE5Mi4xNjguMS44Mzo4MDgwL3JlYWxtcy9xdWlja3N0YXJ0LXJlYWxtIiwiYXVkIjoiYWNjb3VudCIsInN1YiI6IjAyZWZlY2VlLTBmYTgtNDg1OS1iYmIwLTgyMGZmZDdjMWRmYSIsInR5cCI6IkJlYXJlciIsImF6cCI6ImFwaXNpeC1xdWlja3N0YXJ0LWNsaWVudCIsInNlc3Npb25fc3RhdGUiOiI1YzIzZjVkZC1hN2ZhLTRlMmItOWQxNC02MmI1YzYyNmU1NDYiLCJhY3IiOiIxIiwicmVhbG1fYWNjZXNzIjp7InJvbGVzIjpbImRlZmF1bHQtcm9sZXMtcXVpY2tzdGFydC1yZWFsbSIsIm9mZmxpbmVfYWNjZXNzIiwidW1hX2F1dGhvcml6YXRpb24iXX0sInJlc291cmNlX2FjY2VzcyI6eyJhY2NvdW50Ijp7InJvbGVzIjpbIm1hbmFnZS1hY2NvdW50IiwibWFuYWdlLWFjY291bnQtbGlua3MiLCJ2aWV3LXByb2ZpbGUiXX19LCJzY29wZSI6ImVtYWlsIHByb2ZpbGUiLCJzaWQiOiI1YzIzZjVkZC1hN2ZhLTRlMmItOWQxNC02MmI1YzYyNmU1NDYiLCJlbWFpbF92ZXJpZmllZCI6ZmFsc2UsInByZWZlcnJlZF91c2VybmFtZSI6InF1aWNrc3RhcnQtdXNlciJ9.WNZQiLRleqCxw-JS-MHkqXnX_BPA9i6fyVHqF8l-L-2QxcqTAwbIp7AYKX-z90CG6EdRXOizAEkQytB32eVWXaRkLeTYCI7wIrT8XSVTJle4F88ohuBOjDfRR61yFh5k8FXXdAyRzcR7tIeE2YUFkRqw1gCT_VEsUuXPqm2wTKOmZ8fRBf4T-rP4-ZJwPkHAWc_nG21TmLOBCSulzYqoC6Lc-OvX5AHde9cfRuXx-r2HhSYs4cXtvX-ijA715MY634CQdedheoGca5yzPsJWrAlBbCruN2rdb4u5bDxKU62pJoJpmAsR7d5qYpYVA6AsANDxHLk2-W5F7I_IxqR0YQ","expires_in":300,"refresh_expires_in":1800,"refresh_token":"eyJhbGciOiJIUzI1NiIsInR5cCIgOiAiSldUIiwia2lkIiA6ICJjN2IwYmY4NC1kYjk0LTQ5YzctYWIyZC01NmU3ZDc1MmRkNDkifQ.eyJleHAiOjE3MDMyOTE3NjAsImlhdCI6MTcwMzI4OTk2MCwianRpIjoiYzcyZjAzMzctYmZhNS00MWEzLTlhYjEtZmJlNGY0NmZjMDgxIiwiaXNzIjoiaHR0cDovLzE5Mi4xNjguMS44Mzo4MDgwL3JlYWxtcy9xdWlja3N0YXJ0LXJlYWxtIiwiYXVkIjoiaHR0cDovLzE5Mi4xNjguMS44Mzo4MDgwL3JlYWxtcy9xdWlja3N0YXJ0LXJlYWxtIiwic3ViIjoiMDJlZmVjZWUtMGZhOC00ODU5LWJiYjAtODIwZmZkN2MxZGZhIiwidHlwIjoiUmVmcmVzaCIsImF6cCI6ImFwaXNpeC1xdWlja3N0YXJ0LWNsaWVudCIsInNlc3Npb25fc3RhdGUiOiI1YzIzZjVkZC1hN2ZhLTRlMmItOWQxNC02MmI1YzYyNmU1NDYiLCJzY29wZSI6ImVtYWlsIHByb2ZpbGUiLCJzaWQiOiI1YzIzZjVkZC1hN2ZhLTRlMmItOWQxNC02MmI1YzYyNmU1NDYifQ.7AH7ppbVOlkYc9CoJ7kLSlDUkmFuNga28Amugn2t724","token_type":"Bearer","not-before-policy":0,"session_state":"5c23f5dd-a7fa-4e2b-9d14-62b5c626e546","scope":"email profile"}
```
Now you can make requests with the access token:
```shell
curl http://127.0.0.1:9080/get -H 'Authorization: Bearer ${ACCESS_TOKEN}'
```
To learn more about how you can integrate authorization policies into your API workflows you can checkout the unit test [authz-keycloak.t](https://github.com/apache/apisix/blob/master/t/plugin/authz-keycloak.t).
Run the following Docker image and go to `http://localhost:8090` to view the associated policies for the unit tests.
```bash
docker run -e KEYCLOAK_USER=admin -e KEYCLOAK_PASSWORD=123456 -p 8090:8080 sshniro/keycloak-apisix
```
The image below shows how the policies are configured in the Keycloak server:

## Delete Plugin
To remove the `authz-keycloak` Plugin, you can delete the corresponding JSON configuration from the Plugin configuration. APISIX will automatically reload and you do not have to restart for this to take effect.
```shell
curl http://127.0.0.1:9180/apisix/admin/routes/5 -H "X-API-KEY: $admin_key" -X PUT -d '
{
"uri": "/get",
"plugins": {
},
"upstream": {
"type": "roundrobin",
"nodes": {
"127.0.0.1:8080": 1
}
}
}'
```
## Plugin roadmap
- Currently, the `authz-keycloak` Plugin requires you to define the resource name and the required scopes to enforce policies for a Route. Keycloak's official adapted (Java, Javascript) provides path matching by querying Keycloak paths dynamically and lazy loading the paths to identity resources. Upcoming releases of the Plugin will support this function.
- To support reading scope and configurations from the Keycloak JSON file.
---
---
title: aws-lambda
keywords:
- Apache APISIX
- Plugin
- AWS Lambda
- aws-lambda
description: This document contains information about the Apache APISIX aws-lambda Plugin.
---
## Description
The `aws-lambda` Plugin is used for integrating APISIX with [AWS Lambda](https://aws.amazon.com/lambda/) and [Amazon API Gateway](https://aws.amazon.com/api-gateway/) as a dynamic upstream to proxy all requests for a particular URI to the AWS Cloud.
When enabled, the Plugin terminates the ongoing request to the configured URI and initiates a new request to the AWS Lambda Gateway URI on behalf of the client with configured authorization details, request headers, body and parameters (all three passed from the original request). It returns the response with headers, status code and the body to the client that initiated the request with APISIX.
This Plugin supports authorization via AWS API key and AWS IAM secrets. The Plugin implements [AWS Signature Version 4 signing](https://docs.aws.amazon.com/IAM/latest/UserGuide/reference_aws-signing.html) for IAM secrets.
## Attributes
| Name | Type | Required | Default | Valid values | Description |
|----------------------|---------|----------|---------|--------------|--------------------------------------------------------------------------------------------------------------------------------------------|
| function_uri | string | True | | | AWS API Gateway endpoint which triggers the lambda serverless function. |
| authorization | object | False | | | Authorization credentials to access the cloud function. |
| authorization.apikey | string | False | | | Generated API Key to authorize requests to the AWS Gateway endpoint. |
| authorization.iam | object | False | | | Used for AWS IAM role based authorization performed via AWS v4 request signing. See [IAM authorization schema](#iam-authorization-schema). |
| authorization.iam.accesskey | string | True | | Generated access key ID from AWS IAM console. |
| authorization.iam.secretkey | string | True | | Generated access key secret from AWS IAM console. |
| authorization.iam.aws_region | string | False | "us-east-1" | AWS region where the request is being sent. |
| authorization.iam.service | string | False | "execute-api" | The service that is receiving the request. For Amazon API gateway APIs, it should be set to `execute-api`. For Lambda function, it should be set to `lambda`. |
| timeout | integer | False | 3000 | [100,...] | Proxy request timeout in milliseconds. |
| ssl_verify | boolean | False | true | true/false | When set to `true` performs SSL verification. |
| keepalive | boolean | False | true | true/false | When set to `true` keeps the connection alive for reuse. |
| keepalive_pool | integer | False | 5 | [1,...] | Maximum number of requests that can be sent on this connection before closing it. |
| keepalive_timeout | integer | False | 60000 | [1000,...] | Time is ms for connection to remain idle without closing. |
## Enable Plugin
The example below shows how you can configure the Plugin on a specific Route:
:::note
You can fetch the `admin_key` from `config.yaml` and save to an environment variable with the following command:
```bash
admin_key=$(yq '.deployment.admin.admin_key[0].key' conf/config.yaml | sed 's/"//g')
```
:::
```shell
curl http://127.0.0.1:9180/apisix/admin/routes/1 -H "X-API-KEY: $admin_key" -X PUT -d '
{
"plugins": {
"aws-lambda": {
"function_uri": "https://x9w6z07gb9.execute-api.us-east-1.amazonaws.com/default/test-apisix",
"authorization": {
"apikey": ""
},
"ssl_verify":false
}
},
"uri": "/aws"
}'
```
Now, any requests (HTTP/1.1, HTTPS, HTTP2) to the endpoint `/aws` will invoke the configured AWS Functions URI and the response will be proxied back to the client.
In the example below, AWS Lambda takes in name from the query and returns a message "Hello $name":
```shell
curl -i -XGET localhost:9080/aws\?name=APISIX
```
```shell
HTTP/1.1 200 OK
Content-Type: application/json
Connection: keep-alive
Date: Sat, 27 Nov 2021 13:08:27 GMT
x-amz-apigw-id: JdwXuEVxIAMFtKw=
x-amzn-RequestId: 471289ab-d3b7-4819-9e1a-cb59cac611e0
Content-Length: 16
X-Amzn-Trace-Id: Root=1-61a22dca-600c552d1c05fec747fd6db0;Sampled=0
Server: APISIX/2.10.2
"Hello, APISIX!"
```
Another example of a request where the client communicates with APISIX via HTTP/2 is shown below. Before proceeding, make sure you have configured `enable_http2: true` in your configuration file `config.yaml` for port `9081` and reloaded APISIX. See [`config.yaml.example`](https://github.com/apache/apisix/blob/master/conf/config.yaml.example) for the example configuration.
```shell
curl -i -XGET --http2 --http2-prior-knowledge localhost:9081/aws\?name=APISIX
```
```shell
HTTP/2 200
content-type: application/json
content-length: 16
x-amz-apigw-id: JdwulHHrIAMFoFg=
date: Sat, 27 Nov 2021 13:10:53 GMT
x-amzn-trace-id: Root=1-61a22e5d-342eb64077dc9877644860dd;Sampled=0
x-amzn-requestid: a2c2b799-ecc6-44ec-b586-38c0e3b11fe4
server: APISIX/2.10.2
"Hello, APISIX!"
```
Similarly, the function can be triggered via AWS API Gateway by using AWS IAM permissions for authorization. The Plugin includes authentication signatures in HTTP calls via AWS v4 request signing. The example below shows this method:
```shell
curl http://127.0.0.1:9180/apisix/admin/routes/1 -H "X-API-KEY: $admin_key" -X PUT -d '
{
"plugins": {
"aws-lambda": {
"function_uri": "https://ajycz5e0v9.execute-api.us-east-1.amazonaws.com/default/test-apisix",
"authorization": {
"iam": {
"accesskey": "",
"secretkey": ""
}
},
"ssl_verify": false
}
},
"uri": "/aws"
}'
```
:::note
This approach assumes that you have already an IAM user with programmatic access enabled with the required permissions (`AmazonAPIGatewayInvokeFullAccess`) to access the endpoint.
:::
### Configuring path forwarding
The `aws-lambda` Plugin also supports URL path forwarding while proxying requests to the AWS upstream. Extensions to the base request path gets appended to the `function_uri` specified in the Plugin configuration.
:::info IMPORTANT
The `uri` configured on a Route must end with `*` for this feature to work properly. APISIX Routes are matched strictly and the `*` implies that any subpath to this URI would be matched to the same Route.
:::
The example below configures this feature:
```shell
curl http://127.0.0.1:9180/apisix/admin/routes/1 -H "X-API-KEY: $admin_key" -X PUT -d '
{
"plugins": {
"aws-lambda": {
"function_uri": "https://x9w6z07gb9.execute-api.us-east-1.amazonaws.com",
"authorization": {
"apikey": ""
},
"ssl_verify":false
}
},
"uri": "/aws/*"
}'
```
Now, any requests to the path `aws/default/test-apisix` will invoke the AWS Lambda Function and the added path is forwarded:
```shell
curl -i -XGET http://127.0.0.1:9080/aws/default/test-apisix\?name\=APISIX
```
```shell
HTTP/1.1 200 OK
Content-Type: application/json
Connection: keep-alive
Date: Wed, 01 Dec 2021 14:23:27 GMT
X-Amzn-Trace-Id: Root=1-61a7855f-0addc03e0cf54ddc683de505;Sampled=0
x-amzn-RequestId: f5f4e197-9cdd-49f9-9b41-48f0d269885b
Content-Length: 16
x-amz-apigw-id: JrHG8GC4IAMFaGA=
Server: APISIX/2.11.0
"Hello, APISIX!"
```
## Delete Plugin
To remove the `aws-lambda` Plugin, you can delete the corresponding JSON configuration from the Plugin configuration. APISIX will automatically reload and you do not have to restart for this to take effect.
```shell
curl http://127.0.0.1:9180/apisix/admin/routes/1 -H "X-API-KEY: $admin_key" -X PUT -d '
{
"uri": "/aws",
"plugins": {},
"upstream": {
"type": "roundrobin",
"nodes": {
"127.0.0.1:1980": 1
}
}
}'
```
---
---
title: azure-functions
keywords:
- Apache APISIX
- API Gateway
- Plugin
- Azure Functions
- azure-functions
description: This document contains information about the Apache APISIX azure-functions Plugin.
---
## Description
The `azure-functions` Plugin is used to integrate APISIX with [Azure Serverless Function](https://azure.microsoft.com/en-in/services/functions/) as a dynamic upstream to proxy all requests for a particular URI to the Microsoft Azure Cloud.
When enabled, the Plugin terminates the ongoing request to the configured URI and initiates a new request to Azure Functions on behalf of the client with configured authorization details, request headers, body and parameters (all three passed from the original request). It returns back the response with headers, status code and the body to the client that initiated the request with APISIX.
## Attributes
| Name | Type | Required | Default | Valid values | Description |
|------------------------|---------|----------|---------|--------------|---------------------------------------------------------------------------------------------------------------------------------------|
| function_uri | string | True | | | Azure FunctionS endpoint which triggers the serverless function. For example, `http://test-apisix.azurewebsites.net/api/HttpTrigger`. |
| authorization | object | False | | | Authorization credentials to access Azure Functions. |
| authorization.apikey | string | False | | | Generated API key to authorize requests. |
| authorization.clientid | string | False | | | Azure AD client ID to authorize requests. |
| timeout | integer | False | 3000 | [100,...] | Proxy request timeout in milliseconds. |
| ssl_verify | boolean | False | true | true/false | When set to `true` performs SSL verification. |
| keepalive | boolean | False | true | true/false | When set to `true` keeps the connection alive for reuse. |
| keepalive_pool | integer | False | 5 | [1,...] | Maximum number of requests that can be sent on this connection before closing it. |
| keepalive_timeout | integer | False | 60000 | [1000,...] | Time is ms for connection to remain idle without closing. |
## Metadata
| Name | Type | Required | Default | Description |
|-----------------|--------|----------|---------|----------------------------------------------------------------------|
| master_apikey | string | False | "" | API Key secret that could be used to access the Azure Functions URI. |
| master_clientid | string | False | "" | Azure AD client ID that could be used to authorize the function URI. |
Metadata can be used in the `azure-functions` Plugin for an authorization fallback. If there are no authorization details in the Plugin's attributes, the `master_apikey` and `master_clientid` configured in the metadata is used.
The relative order priority is as follows:
1. Plugin looks for `x-functions-key` or `x-functions-clientid` key inside the header from the request to APISIX.
2. If not found, the Plugin checks the configured attributes for authorization details. If present, it adds the respective header to the request sent to the Azure Functions.
3. If authorization details are not configured in the Plugin's attributes, APISIX fetches the metadata and uses the master keys.
To add a new master API key, you can make a request to `/apisix/admin/plugin_metadata` with the required metadata as shown below:
:::note
You can fetch the `admin_key` from `config.yaml` and save to an environment variable with the following command:
```bash
admin_key=$(yq '.deployment.admin.admin_key[0].key' conf/config.yaml | sed 's/"//g')
```
:::
```shell
curl http://127.0.0.1:9180/apisix/admin/plugin_metadata/azure-functions -H "X-API-KEY: $admin_key" -X PUT -d '
{
"master_apikey" : ""
}'
```
## Enable Plugin
You can configure the Plugin on a specific Route as shown below assuming that you already have your Azure Functions up and running:
```shell
curl http://127.0.0.1:9180/apisix/admin/routes/1 -H "X-API-KEY: $admin_key" -X PUT -d '
{
"plugins": {
"azure-functions": {
"function_uri": "http://test-apisix.azurewebsites.net/api/HttpTrigger",
"authorization": {
"apikey": ""
}
}
},
"uri": "/azure"
}'
```
Now, any requests (HTTP/1.1, HTTPS, HTTP2) to the endpoint `/azure` will invoke the configured Azure Functions URI and the response will be proxied back to the client.
In the example below, the Azure Function takes in name from the query and returns a message "Hello $name":
```shell
curl -i -XGET http://localhost:9080/azure\?name=APISIX
```
```shell
HTTP/1.1 200 OK
Content-Type: text/plain; charset=utf-8
Transfer-Encoding: chunked
Connection: keep-alive
Request-Context: appId=cid-v1:38aae829-293b-43c2-82c6-fa94aec0a071
Date: Wed, 17 Nov 2021 14:46:55 GMT
Server: APISIX/2.10.2
Hello, APISIX
```
Another example of a request where the client communicates with APISIX via HTTP/2 is shown below. Before proceeding, make sure you have configured `enable_http2: true` in your configuration file `config.yaml` for port `9081` and reloaded APISIX. See [`config.yaml.example`](https://github.com/apache/apisix/blob/master/conf/config.yaml.example) for the example configuration.
```shell
curl -i -XGET --http2 --http2-prior-knowledge http://localhost:9081/azure\?name=APISIX
```
```shell
HTTP/2 200
content-type: text/plain; charset=utf-8
request-context: appId=cid-v1:38aae829-293b-43c2-82c6-fa94aec0a071
date: Wed, 17 Nov 2021 14:54:07 GMT
server: APISIX/2.10.2
Hello, APISIX
```
### Configuring path forwarding
The `azure-functions` Plugins also supports URL path forwarding while proxying requests to the Azure Functions upstream. Extensions to the base request path gets appended to the `function_uri` specified in the Plugin configuration.
:::info IMPORTANT
The `uri` configured on a Route must end with `*` for this feature to work properly. APISIX Routes are matched strictly and the `*` implies that any subpath to this URI would be matched to the same Route.
:::
The example below configures this feature:
```shell
curl http://127.0.0.1:9180/apisix/admin/routes/1 -H "X-API-KEY: $admin_key" -X PUT -d '
{
"plugins": {
"azure-functions": {
"function_uri": "http://app-bisakh.azurewebsites.net/api",
"authorization": {
"apikey": ""
}
}
},
"uri": "/azure/*"
}'
```
Now, any requests to the path `azure/HttpTrigger1` will invoke the Azure Function and the added path is forwarded:
```shell
curl -i -XGET http://127.0.0.1:9080/azure/HttpTrigger1\?name\=APISIX\
```
```shell
HTTP/1.1 200 OK
Content-Type: text/plain; charset=utf-8
Transfer-Encoding: chunked
Connection: keep-alive
Date: Wed, 01 Dec 2021 14:19:53 GMT
Request-Context: appId=cid-v1:4d4b6221-07f1-4e1a-9ea0-b86a5d533a94
Server: APISIX/2.11.0
Hello, APISIX
```
## Delete Plugin
To remove the `azure-functions` Plugin, you can delete the corresponding JSON configuration from the Plugin configuration. APISIX will automatically reload and you do not have to restart for this to take effect.
```shell
curl http://127.0.0.1:9180/apisix/admin/routes/1 -H "X-API-KEY: $admin_key" -X PUT -d '
{
"uri": "/azure",
"plugins": {},
"upstream": {
"type": "roundrobin",
"nodes": {
"127.0.0.1:1980": 1
}
}
}'
```
---
---
title: basic-auth
keywords:
- Apache APISIX
- API Gateway
- Plugin
- Basic Auth
- basic-auth
description: The basic-auth Plugin adds basic access authentication for Consumers to authenticate themselves before being able to access Upstream resources.
---
## Description
The `basic-auth` Plugin adds [basic access authentication](https://en.wikipedia.org/wiki/Basic_access_authentication) for [Consumers](../terminology/consumer.md) to authenticate themselves before being able to access Upstream resources.
When a Consumer is successfully authenticated, APISIX adds additional headers, such as `X-Consumer-Username`, `X-Credential-Indentifier`, and other Consumer custom headers if configured, to the request, before proxying it to the Upstream service. The Upstream service will be able to differentiate between consumers and implement additional logics as needed. If any of these values is not available, the corresponding header will not be added.
## Attributes
For Consumer/Credentials:
| Name | Type | Required | Description |
|----------|--------|----------|------------------------------------------------------------------------------------------------------------------------|
| username | string | True | Unique basic auth username for a consumer. |
| password | string | True | Basic auth password for the consumer. |
NOTE: `encrypt_fields = {"password"}` is also defined in the schema, which means that the field will be stored encrypted in etcd. See [encrypted storage fields](../plugin-develop.md#encrypted-storage-fields).
For Route:
| Name | Type | Required | Default | Description |
|------------------|---------|----------|---------|------------------------------------------------------------------------|
| hide_credentials | boolean | False | false | If true, do not pass the authorization request header to Upstream services. |
| anonymous_consumer | boolean | False | false | Anonymous Consumer name. If configured, allow anonymous users to bypass the authentication. |
## Examples
The examples below demonstrate how you can work with the `basic-auth` Plugin for different scenarios.
:::note
You can fetch the `admin_key` from `config.yaml` and save to an environment variable with the following command:
```bash
admin_key=$(yq '.deployment.admin.admin_key[0].key' conf/config.yaml | sed 's/"//g')
```
:::
### Implement Basic Authentication on Route
The following example demonstrates how to implement basic authentication on a Route.
Create a Consumer `johndoe`:
```shell
curl "http://127.0.0.1:9180/apisix/admin/consumers" -X PUT \
-H "X-API-KEY: ${admin_key}" \
-d '{
"username": "johndoe"
}'
```
Create `basic-auth` Credential for the consumer:
```shell
curl "http://127.0.0.1:9180/apisix/admin/consumers/johndoe/credentials" -X PUT \
-H "X-API-KEY: ${admin_key}" \
-d '{
"id": "cred-john-basic-auth",
"plugins": {
"basic-auth": {
"username": "johndoe",
"password": "john-key"
}
}
}'
```
Create a Route with `basic-auth`:
```shell
curl "http://127.0.0.1:9180/apisix/admin/routes" -X PUT \
-H "X-API-KEY: ${admin_key}" \
-d '{
"id": "basic-auth-route",
"uri": "/anything",
"plugins": {
"basic-auth": {}
},
"upstream": {
"type": "roundrobin",
"nodes": {
"httpbin.org:80": 1
}
}
}'
```
#### Verify with a Valid Key
Send a request to with the valid key:
```shell
curl -i "http://127.0.0.1:9080/anything" -u johndoe:john-key
```
You should see an `HTTP/1.1 200 OK` response similar to the following:
```json
{
"args": {},
"headers": {
"Accept": "*/*",
"Apikey": "john-key",
"Authorization": "Basic am9obmRvZTpqb2huLWtleQ==",
"Host": "127.0.0.1",
"User-Agent": "curl/8.6.0",
"X-Amzn-Trace-Id": "Root=1-66e5107c-5bb3e24f2de5baf733aec1cc",
"X-Consumer-Username": "john",
"X-Credential-Indentifier": "cred-john-basic-auth",
"X-Forwarded-Host": "127.0.0.1"
},
"origin": "192.168.65.1, 205.198.122.37",
"url": "http://127.0.0.1/get"
}
```
#### Verify with an Invalid Key
Send a request with an invalid key:
```shell
curl -i "http://127.0.0.1:9080/anything" -u johndoe:invalid-key
```
You should see an `HTTP/1.1 401 Unauthorized` response with the following:
```text
{"message":"Invalid user authorization"}
```
#### Verify without a Key
Send a request to without a key:
```shell
curl -i "http://127.0.0.1:9080/anything"
```
You should see an `HTTP/1.1 401 Unauthorized` response with the following:
```text
{"message":"Missing authorization in request"}
```
### Hide Authentication Information From Upstream
The following example demonstrates how to prevent the key from being sent to the Upstream services by configuring `hide_credentials`. In APISIX, the authentication key is forwarded to the Upstream services by default, which might lead to security risks in some circumstances and you should consider updating `hide_credentials`.
Create a Consumer `johndoe`:
```shell
curl "http://127.0.0.1:9180/apisix/admin/consumers" -X PUT \
-H "X-API-KEY: ${admin_key}" \
-d '{
"username": "johndoe"
}'
```
Create `basic-auth` Credential for the consumer:
```shell
curl "http://127.0.0.1:9180/apisix/admin/consumers/johndoe/credentials" -X PUT \
-H "X-API-KEY: ${admin_key}" \
-d '{
"id": "cred-john-basic-auth",
"plugins": {
"basic-auth": {
"username": "johndoe",
"password": "john-key"
}
}
}'
```
#### Without Hiding Credentials
Create a Route with `basic-auth` and configure `hide_credentials` to `false`, which is the default configuration:
```shell
curl "http://127.0.0.1:9180/apisix/admin/routes" -X PUT \
-H "X-API-KEY: ${admin_key}" \
-d '{
"id": "basic-auth-route",
"uri": "/anything",
"plugins": {
"basic-auth": {
"hide_credentials": false
}
},
"upstream": {
"type": "roundrobin",
"nodes": {
"httpbin.org:80": 1
}
}
}'
```
Send a request with the valid key:
```shell
curl -i "http://127.0.0.1:9080/anything" -u johndoe:john-key
```
You should see an `HTTP/1.1 200 OK` response with the following:
```json
{
"args": {},
"data": "",
"files": {},
"form": {},
"headers": {
"Accept": "*/*",
"Authorization": "Basic am9obmRvZTpqb2huLWtleQ==",
"Host": "127.0.0.1",
"User-Agent": "curl/8.6.0",
"X-Amzn-Trace-Id": "Root=1-66cc2195-22bd5f401b13480e63c498c6",
"X-Consumer-Username": "john",
"X-Credential-Indentifier": "cred-john-basic-auth",
"X-Forwarded-Host": "127.0.0.1"
},
"json": null,
"method": "GET",
"origin": "192.168.65.1, 43.228.226.23",
"url": "http://127.0.0.1/anything"
}
```
Note that the credentials are visible to the Upstream service in base64-encoded format.
:::tip
You can also pass the base64-encoded credentials in the request using the `Authorization` header as such:
```shell
curl -i "http://127.0.0.1:9080/anything" -H "Authorization: Basic am9obmRvZTpqb2huLWtleQ=="
```
:::
#### Hide Credentials
Update the plugin's `hide_credentials` to `true`:
```shell
curl "http://127.0.0.1:9180/apisix/admin/routes/basic-auth-route" -X PATCH \
-H "X-API-KEY: ${admin_key}" \
-d '{
"plugins": {
"basic-auth": {
"hide_credentials": true
}
}
}'
```
Send a request with the valid key:
```shell
curl -i "http://127.0.0.1:9080/anything" -u johndoe:john-key
```
You should see an `HTTP/1.1 200 OK` response with the following:
```json
{
"args": {},
"data": "",
"files": {},
"form": {},
"headers": {
"Accept": "*/*",
"Host": "127.0.0.1",
"User-Agent": "curl/8.6.0",
"X-Amzn-Trace-Id": "Root=1-66cc21a7-4f6ac87946e25f325167d53a",
"X-Consumer-Username": "john",
"X-Credential-Indentifier": "cred-john-basic-auth",
"X-Forwarded-Host": "127.0.0.1"
},
"json": null,
"method": "GET",
"origin": "192.168.65.1, 43.228.226.23",
"url": "http://127.0.0.1/anything"
}
```
Note that the credentials are no longer visible to the Upstream service.
### Add Consumer Custom ID to Header
The following example demonstrates how you can attach a Consumer custom ID to authenticated request in the `Consumer-Custom-Id` header, which can be used to implement additional logics as needed.
Create a Consumer `johndoe` with a custom ID label:
```shell
curl "http://127.0.0.1:9180/apisix/admin/consumers" -X PUT \
-H "X-API-KEY: ${admin_key}" \
-d '{
"username": "johndoe",
"labels": {
"custom_id": "495aec6a"
}
}'
```
Create `basic-auth` Credential for the consumer:
```shell
curl "http://127.0.0.1:9180/apisix/admin/consumers/johndoe/credentials" -X PUT \
-H "X-API-KEY: ${admin_key}" \
-d '{
"id": "cred-john-basic-auth",
"plugins": {
"basic-auth": {
"username": "johndoe",
"password": "john-key"
}
}
}'
```
Create a Route with `basic-auth`:
```shell
curl "http://127.0.0.1:9180/apisix/admin/routes" -X PUT \
-H "X-API-KEY: ${admin_key}" \
-d '{
"id": "basic-auth-route",
"uri": "/anything",
"plugins": {
"basic-auth": {}
},
"upstream": {
"type": "roundrobin",
"nodes": {
"httpbin.org:80": 1
}
}
}'
```
To verify, send a request to the Route with the valid key:
```shell
curl -i "http://127.0.0.1:9080/anything" -u johndoe:john-key
```
You should see an `HTTP/1.1 200 OK` response with the `X-Consumer-Custom-Id` similar to the following:
```json
{
"args": {},
"data": "",
"files": {},
"form": {},
"headers": {
"Accept": "*/*",
"Authorization": "Basic am9obmRvZTpqb2huLWtleQ==",
"Host": "127.0.0.1",
"User-Agent": "curl/8.6.0",
"X-Amzn-Trace-Id": "Root=1-66ea8d64-33df89052ae198a706e18c2a",
"X-Consumer-Username": "johndoe",
"X-Credential-Identifier": "cred-john-basic-auth",
"X-Consumer-Custom-Id": "495aec6a",
"X-Forwarded-Host": "127.0.0.1"
},
"json": null,
"method": "GET",
"origin": "192.168.65.1, 205.198.122.37",
"url": "http://127.0.0.1/anything"
}
```
### Rate Limit with Anonymous Consumer
The following example demonstrates how you can configure different rate limiting policies by regular and anonymous consumers, where the anonymous Consumer does not need to authenticate and has less quotas.
Create a regular Consumer `johndoe` and configure the `limit-count` Plugin to allow for a quota of 3 within a 30-second window:
```shell
curl "http://127.0.0.1:9180/apisix/admin/consumers" -X PUT \
-H "X-API-KEY: ${admin_key}" \
-d '{
"username": "johndoe",
"plugins": {
"limit-count": {
"count": 3,
"time_window": 30,
"rejected_code": 429
}
}
}'
```
Create the `basic-auth` Credential for the Consumer `johndoe`:
```shell
curl "http://127.0.0.1:9180/apisix/admin/consumers/johndoe/credentials" -X PUT \
-H "X-API-KEY: ${admin_key}" \
-d '{
"id": "cred-john-basic-auth",
"plugins": {
"basic-auth": {
"username": "johndoe",
"password": "john-key"
}
}
}'
```
Create an anonymous user `anonymous` and configure the `limit-count` Plugin to allow for a quota of 1 within a 30-second window:
```shell
curl "http://127.0.0.1:9180/apisix/admin/consumers" -X PUT \
-H "X-API-KEY: ${admin_key}" \
-d '{
"username": "anonymous",
"plugins": {
"limit-count": {
"count": 1,
"time_window": 30,
"rejected_code": 429
}
}
}'
```
Create a Route and configure the `basic-auth` Plugin to accept anonymous Consumer `anonymous` from bypassing the authentication:
```shell
curl "http://127.0.0.1:9180/apisix/admin/routes" -X PUT \
-H "X-API-KEY: ${admin_key}" \
-d '{
"id": "basic-auth-route",
"uri": "/anything",
"plugins": {
"basic-auth": {
"anonymous_consumer": "anonymous"
}
},
"upstream": {
"type": "roundrobin",
"nodes": {
"httpbin.org:80": 1
}
}
}'
```
To verify, send five consecutive requests with `john`'s key:
```shell
resp=$(seq 5 | xargs -I{} curl "http://127.0.0.1:9080/anything" -u johndoe:john-key -o /dev/null -s -w "%{http_code}\n") && \
count_200=$(echo "$resp" | grep "200" | wc -l) && \
count_429=$(echo "$resp" | grep "429" | wc -l) && \
echo "200": $count_200, "429": $count_429
```
You should see the following response, showing that out of the 5 requests, 3 requests were successful (status code 200) while the others were rejected (status code 429).
```text
200: 3, 429: 2
```
Send five anonymous requests:
```shell
resp=$(seq 5 | xargs -I{} curl "http://127.0.0.1:9080/anything" -o /dev/null -s -w "%{http_code}\n") && \
count_200=$(echo "$resp" | grep "200" | wc -l) && \
count_429=$(echo "$resp" | grep "429" | wc -l) && \
echo "200": $count_200, "429": $count_429
```
You should see the following response, showing that only one request was successful:
```text
200: 1, 429: 4
```
---
---
title: batch-requests
keywords:
- Apache APISIX
- API Gateway
- Plugin
- Batch Requests
description: This document contains information about the Apache APISIX batch-request Plugin.
---
## Description
After enabling the batch-requests plugin, users can assemble multiple requests into one request and send them to the gateway. The gateway will parse the corresponding requests from the request body and then individually encapsulate them into separate requests. Instead of the user initiating multiple HTTP requests to the gateway, the gateway will use the HTTP pipeline method, go through several stages such as route matching, forwarding to the corresponding upstream, and then return the combined results to the client after merging.
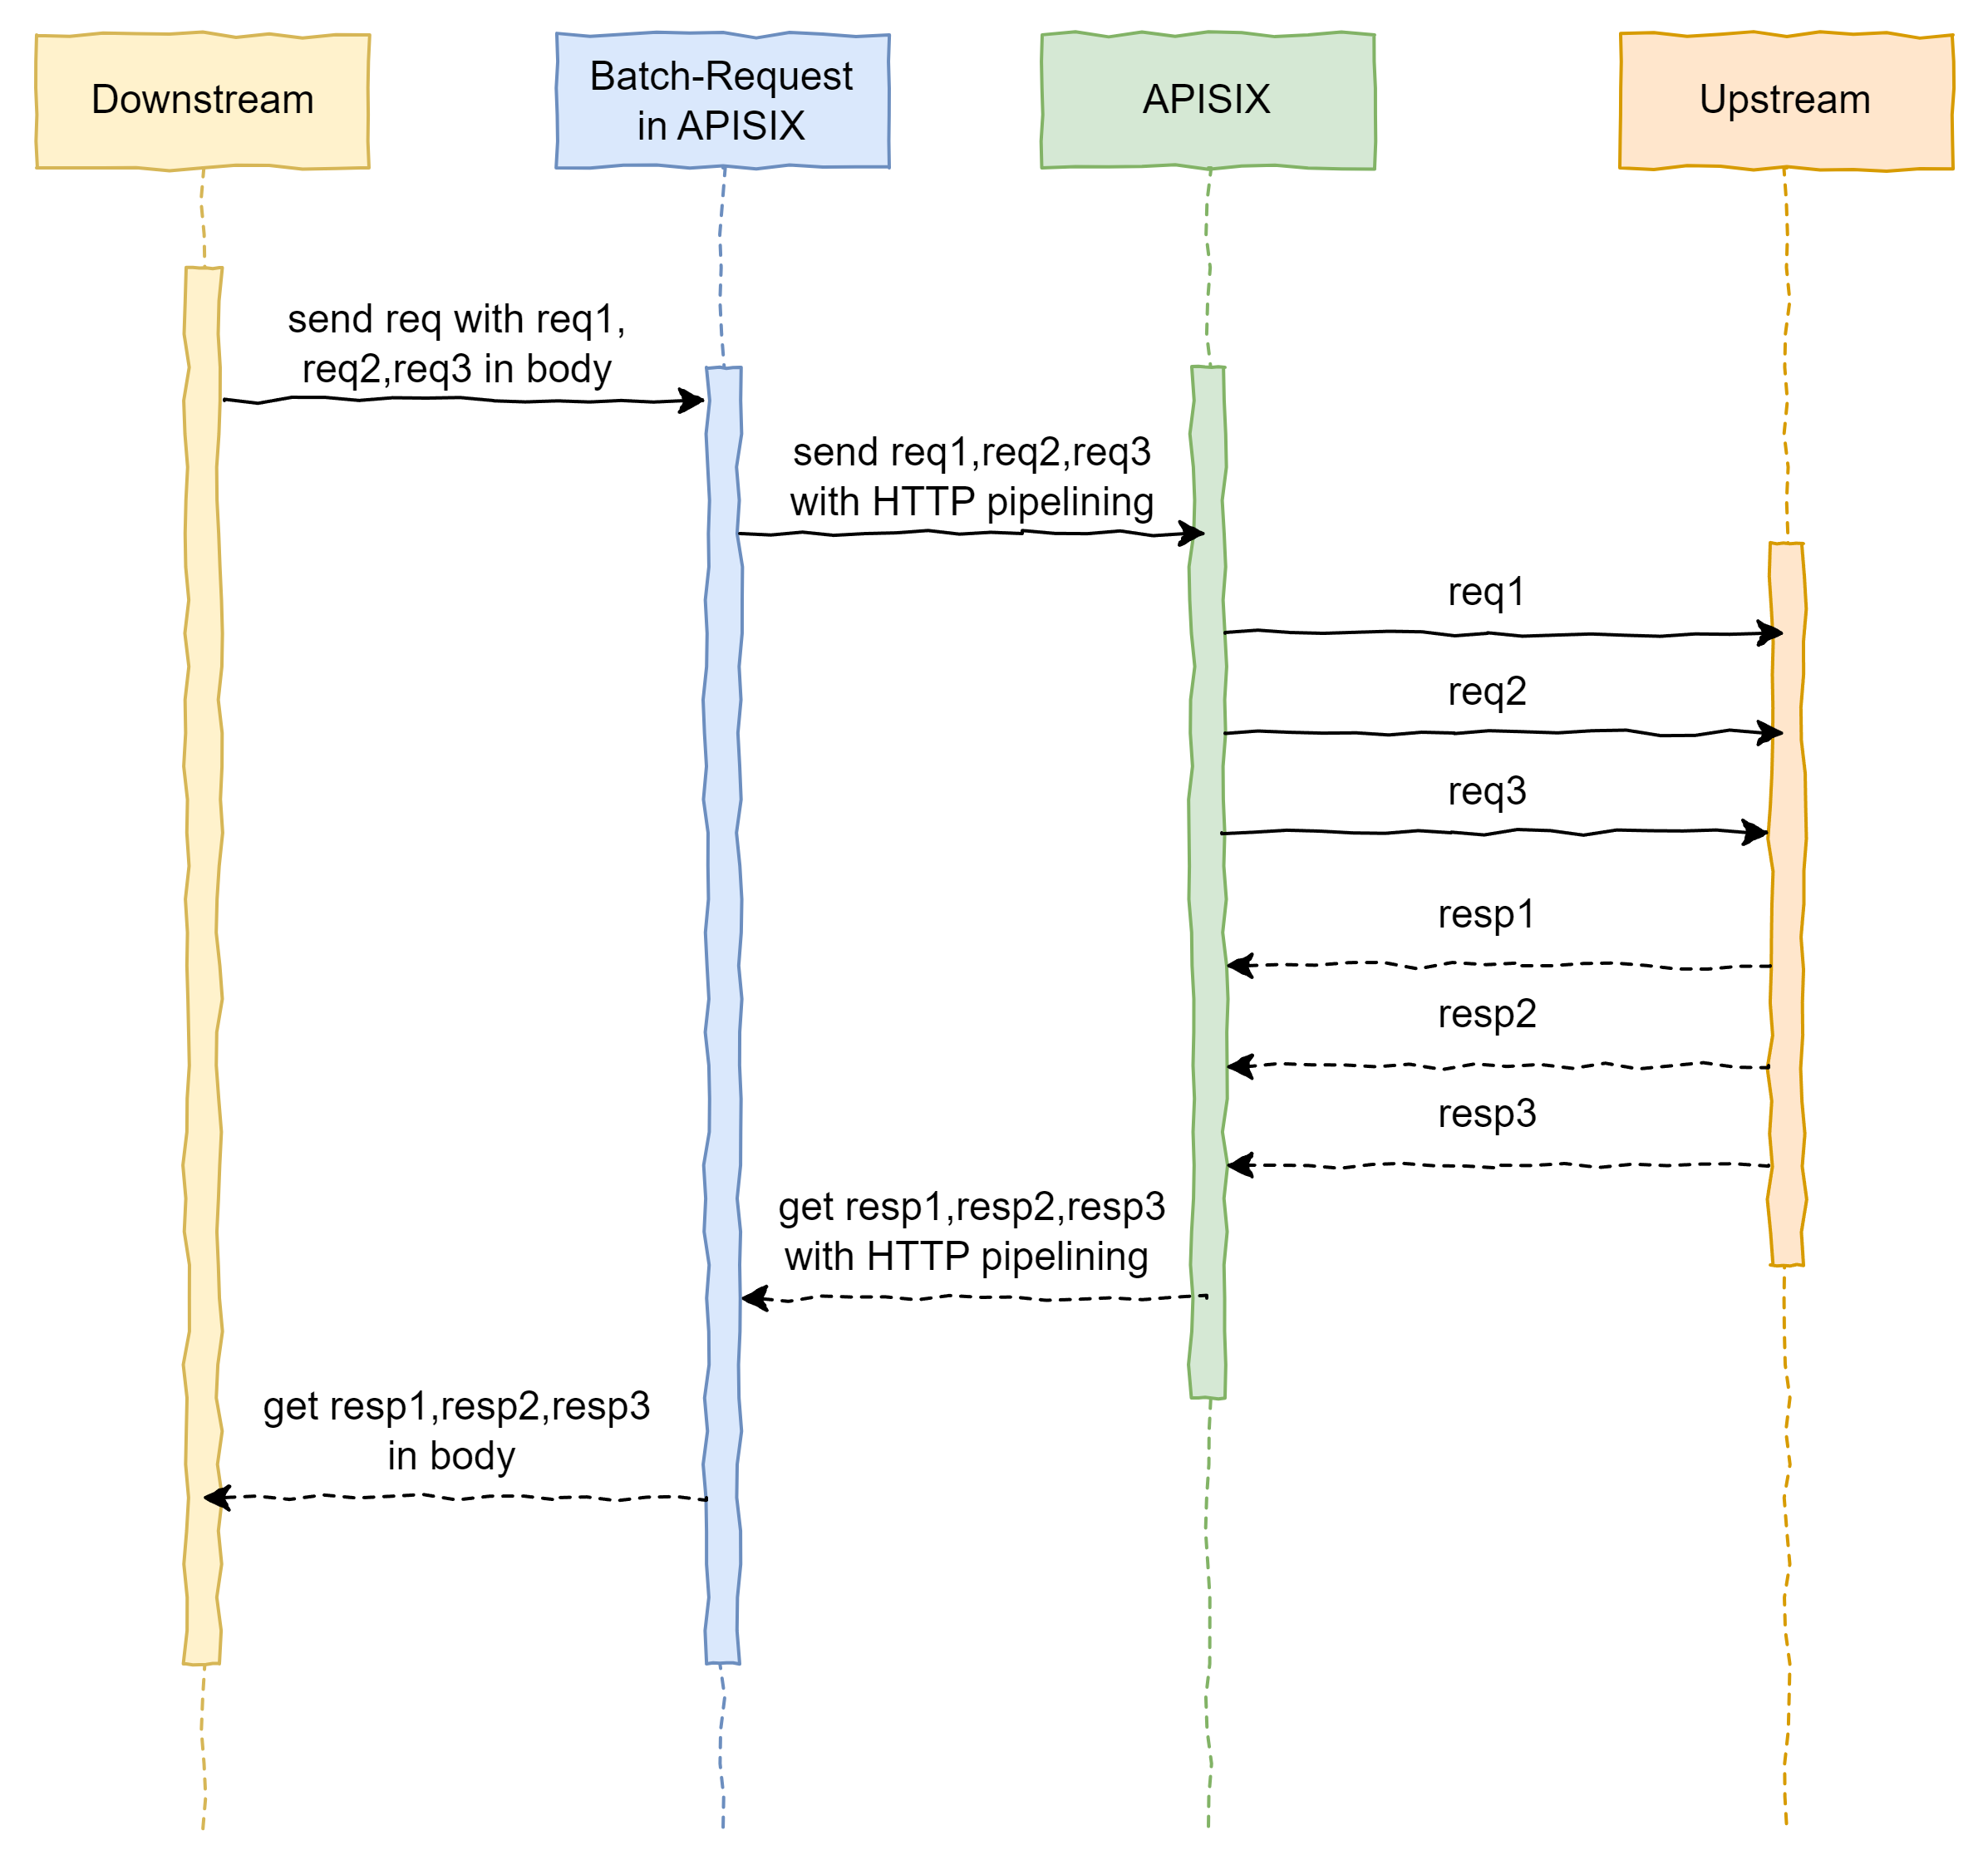
In cases where the client needs to access multiple APIs, this will significantly improve performance.
:::note
The request headers in the user’s original request (except for headers starting with “Content-”, such as “Content-Type”) will be assigned to each request in the HTTP pipeline. Therefore, to the gateway, these HTTP pipeline requests sent to itself are no different from external requests initiated directly by users. They can only access pre-configured routes and will undergo a complete authentication process, so there are no security issues.
If the request headers of the original request conflict with those configured in the plugin, the request headers configured in the plugin will take precedence (except for the real_ip_header specified in the configuration file).
:::
## Attributes
None.
## API
This plugin adds `/apisix/batch-requests` as an endpoint.
:::note
You may need to use the [public-api](public-api.md) plugin to expose this endpoint.
:::
## Enable Plugin
You can enable the `batch-requests` Plugin by adding it to your configuration file (`conf/config.yaml`):
```yaml title="conf/config.yaml"
plugins:
- ...
- batch-requests
```
## Configuration
By default, the maximum body size that can be sent to `/apisix/batch-requests` can't be larger than 1 MiB. You can change this configuration of the Plugin through the endpoint `apisix/admin/plugin_metadata/batch-requests`:
:::note
You can fetch the `admin_key` from `config.yaml` and save to an environment variable with the following command:
```bash
admin_key=$(yq '.deployment.admin.admin_key[0].key' conf/config.yaml | sed 's/"//g')
```
:::
```shell
curl http://127.0.0.1:9180/apisix/admin/plugin_metadata/batch-requests -H "X-API-KEY: $admin_key" -X PUT -d '
{
"max_body_size": 4194304
}'
```
## Metadata
| Name | Type | Required | Default | Valid values | Description |
| ------------- | ------- | -------- | ------- | ------------ | ------------------------------------------ |
| max_body_size | integer | True | 1048576 | [1, ...] | Maximum size of the request body in bytes. |
## Request and response format
This plugin will create an API endpoint in APISIX to handle batch requests.
### Request
| Name | Type | Required | Default | Description |
| -------- |------------------------------------| -------- | ------- | ----------------------------- |
| query | object | False | | Query string for the request. |
| headers | object | False | | Headers for all the requests. |
| timeout | integer | False | 30000 | Timeout in ms. |
| pipeline | array[[HttpRequest](#httprequest)] | True | | Details of the request. |
#### HttpRequest
| Name | Type | Required | Default | Valid | Description |
| ---------- | ------- | -------- | ------- | -------------------------------------------------------------------------------- | ------------------------------------------------------------------------------------- |
| version | string | False | 1.1 | [1.0, 1.1] | HTTP version. |
| method | string | False | GET | ["GET", "POST", "PUT", "DELETE", "PATCH", "HEAD", "OPTIONS", "CONNECT", "TRACE"] | HTTP method. |
| query | object | False | | | Query string for the request. If set, overrides the value of the global query string. |
| headers | object | False | | | Headers for the request. If set, overrides the value of the global query string. |
| path | string | True | | | Path of the HTTP request. |
| body | string | False | | | Body of the HTTP request. |
| ssl_verify | boolean | False | false | | Set to verify if the SSL certs matches the hostname. |
### Response
The response is an array of [HttpResponses](#httpresponse).
#### HttpResponse
| Name | Type | Description |
| ------- | ------- | ---------------------- |
| status | integer | HTTP status code. |
| reason | string | HTTP reason-phrase. |
| body | string | HTTP response body. |
| headers | object | HTTP response headers. |
## Specifying a custom URI
You can specify a custom URI with the [public-api](public-api.md) Plugin.
You can set the URI you want when creating the Route and change the configuration of the public-api Plugin:
```shell
curl http://127.0.0.1:9180/apisix/admin/routes/br -H "X-API-KEY: $admin_key" -X PUT -d '
{
"uri": "/batch-requests",
"plugins": {
"public-api": {
"uri": "/apisix/batch-requests"
}
}
}'
```
## Example usage
First, you need to setup a Route to the batch request API. We will use the [public-api](public-api.md) Plugin for this:
```shell
curl http://127.0.0.1:9180/apisix/admin/routes/br -H "X-API-KEY: $admin_key" -X PUT -d '
{
"uri": "/apisix/batch-requests",
"plugins": {
"public-api": {}
}
}'
```
Now you can make a request to the batch request API (`/apisix/batch-requests`):
```shell
curl --location --request POST 'http://127.0.0.1:9080/apisix/batch-requests' \
--header 'Content-Type: application/json' \
--data '{
"headers": {
"Content-Type": "application/json",
"admin-jwt":"xxxx"
},
"timeout": 500,
"pipeline": [
{
"method": "POST",
"path": "/community.GiftSrv/GetGifts",
"body": "test"
},
{
"method": "POST",
"path": "/community.GiftSrv/GetGifts",
"body": "test2"
}
]
}'
```
This will give a response:
```json
[
{
"status": 200,
"reason": "OK",
"body": "{\"ret\":500,\"msg\":\"error\",\"game_info\":null,\"gift\":[],\"to_gets\":0,\"get_all_msg\":\"\"}",
"headers": {
"Connection": "keep-alive",
"Date": "Sat, 11 Apr 2020 17:53:20 GMT",
"Content-Type": "application/json",
"Content-Length": "81",
"Server": "APISIX web server"
}
},
{
"status": 200,
"reason": "OK",
"body": "{\"ret\":500,\"msg\":\"error\",\"game_info\":null,\"gift\":[],\"to_gets\":0,\"get_all_msg\":\"\"}",
"headers": {
"Connection": "keep-alive",
"Date": "Sat, 11 Apr 2020 17:53:20 GMT",
"Content-Type": "application/json",
"Content-Length": "81",
"Server": "APISIX web server"
}
}
]
```
## Delete Plugin
You can remove `batch-requests` from your list of Plugins in your configuration file (`conf/config.yaml`).
---
---
title: body-transformer
keywords:
- Apache APISIX
- API Gateway
- Plugin
- BODY TRANSFORMER
- body-transformer
description: The body-transformer Plugin performs template-based transformations to transform the request and/or response bodies from one format to another, for example, from JSON to JSON, JSON to HTML, or XML to YAML.
---
## Description
The `body-transformer` Plugin performs template-based transformations to transform the request and/or response bodies from one format to another, for example, from JSON to JSON, JSON to HTML, or XML to YAML.
## Attributes
| Name | Type | Required | Default | Valid values | Description |
| ------------- | ------- | -------- | ------- | ------------ | ------------------------------------------ |
| `request` | object | False | | | Request body transformation configuration. |
| `request.input_format` | string | False | | [`xml`,`json`,`encoded`,`args`,`plain`,`multipart`] | Request body original media type. If unspecified, the value would be determined by the `Content-Type` header to apply the corresponding decoder. The `xml` option corresponds to `text/xml` media type. The `json` option corresponds to `application/json` media type. The `encoded` option corresponds to `application/x-www-form-urlencoded` media type. The `args` option corresponds to GET requests. The `plain` option corresponds to `text/plain` media type. The `multipart` option corresponds to `multipart/related` media type. If the media type is neither type, the value would be left unset and the transformation template will be directly applied. |
| `request.template` | string | True | | | Request body transformation template. The template uses [lua-resty-template](https://github.com/bungle/lua-resty-template) syntax. See the [template syntax](https://github.com/bungle/lua-resty-template#template-syntax) for more details. You can also use auxiliary functions `_escape_json()` and `_escape_xml()` to escape special characters such as double quotes, `_body` to access request body, and `_ctx` to access context variables. |
| `request.template_is_base64` | boolean | False | false | | Set to true if the template is base64 encoded. |
| `response` | object | False | | | Response body transformation configuration. |
| `response.input_format` | string | False | | [`xml`,`json`] | Response body original media type. If unspecified, the value would be determined by the `Content-Type` header to apply the corresponding decoder. If the media type is neither `xml` nor `json`, the value would be left unset and the transformation template will be directly applied. |
| `response.template` | string | True | | | Response body transformation template. |
| `response.template_is_base64` | boolean | False | false | | Set to true if the template is base64 encoded. |
## Examples
The examples below demonstrate how you can configure `body-transformer` for different scenarios.
:::note
You can fetch the `admin_key` from `config.yaml` and save to an environment variable with the following command:
```bash
admin_key=$(yq '.deployment.admin.admin_key[0].key' conf/config.yaml | sed 's/"//g')
```
:::
The transformation template uses [lua-resty-template](https://github.com/bungle/lua-resty-template) syntax. See the [template syntax](https://github.com/bungle/lua-resty-template#template-syntax) to learn more.
You can also use auxiliary functions `_escape_json()` and `_escape_xml()` to escape special characters such as double quotes, `_body` to access request body, and `_ctx` to access context variables.
In all cases, you should ensure that the transformation template is a valid JSON string.
### Transform between JSON and XML SOAP
The following example demonstrates how to transform the request body from JSON to XML and the response body from XML to JSON when working with a SOAP Upstream service.
Start the sample SOAP service:
```shell
cd /tmp
git clone https://github.com/spring-guides/gs-soap-service.git
cd gs-soap-service/complete
./mvnw spring-boot:run
```
Create the request and response transformation templates:
```shell
req_template=$(cat <
{{_escape_xml(name)}}
EOF
)
rsp_template=$(cat < 18 then
context._multipart:set_simple("status", "adult")
else
context._multipart:set_simple("status", "minor")
end
local body = context._multipart:tostring()
%}{* body *}
EOF
)
```
Create a Route with `body-transformer`, which sets the `input_format` to `multipart` and uses the previously created request template for transformation:
```shell
curl "http://127.0.0.1:9180/apisix/admin/routes" -X PUT \
-H "X-API-KEY: ${admin_key}" \
-d '{
"id": "body-transformer-route",
"uri": "/anything",
"plugins": {
"body-transformer": {
"request": {
"input_format": "multipart",
"template": "'"$req_template"'"
}
}
},
"upstream": {
"type": "roundrobin",
"nodes": {
"httpbin.org:80": 1
}
}
}'
```
Send a multipart POST request to the Route:
```shell
curl -X POST \
-F "name=john" \
-F "age=10" \
"http://127.0.0.1:9080/anything"
```
You should see a response similar to the following:
```json
{
"args": {},
"data": "",
"files": {},
"form": {
"age": "10",
"name": "john",
"status": "minor"
},
"headers": {
"Accept": "*/*",
"Content-Length": "361",
"Content-Type": "multipart/form-data; boundary=------------------------qtPjk4c8ZjmGOXNKzhqnOP",
...
},
...
}
```
---
---
title: brotli
keywords:
- Apache APISIX
- API Gateway
- Plugin
- brotli
description: This document contains information about the Apache APISIX brotli Plugin.
---
## Description
The `brotli` Plugin dynamically sets the behavior of [brotli in Nginx](https://github.com/google/ngx_brotli).
## Prerequisites
This Plugin requires brotli shared libraries.
The example commands to build and install brotli shared libraries:
``` shell
wget https://github.com/google/brotli/archive/refs/tags/v1.1.0.zip
unzip v1.1.0.zip
cd brotli-1.1.0 && mkdir build && cd build
cmake -DCMAKE_BUILD_TYPE=Release -DCMAKE_INSTALL_PREFIX=/usr/local/brotli ..
sudo cmake --build . --config Release --target install
sudo sh -c "echo /usr/local/brotli/lib >> /etc/ld.so.conf.d/brotli.conf"
sudo ldconfig
```
:::caution
If the upstream is returning a compressed response, then the Brotli plugin won't be able to compress it.
:::
## Attributes
| Name | Type | Required | Default | Valid values | Description |
|----------------|----------------------|----------|---------------|--------------|-----------------------------------------------------------------------------------------|
| types | array[string] or "*" | False | ["text/html"] | | Dynamically sets the `brotli_types` directive. Special value `"*"` matches any MIME type. |
| min_length | integer | False | 20 | >= 1 | Dynamically sets the `brotli_min_length` directive. |
| comp_level | integer | False | 6 | [0, 11] | Dynamically sets the `brotli_comp_level` directive. |
| mode | integer | False | 0 | [0, 2] | Dynamically sets the `brotli decompress mode`, more info in [RFC 7932](https://tools.ietf.org/html/rfc7932). |
| lgwin | integer | False | 19 | [0, 10-24] | Dynamically sets the `brotli sliding window size`, `lgwin` is Base 2 logarithm of the sliding window size, set to `0` lets compressor decide over the optimal value, more info in [RFC 7932](https://tools.ietf.org/html/rfc7932). |
| lgblock | integer | False | 0 | [0, 16-24] | Dynamically sets the `brotli input block size`, `lgblock` is Base 2 logarithm of the maximum input block size, set to `0` lets compressor decide over the optimal value, more info in [RFC 7932](https://tools.ietf.org/html/rfc7932). |
| http_version | number | False | 1.1 | 1.1, 1.0 | Like the `gzip_http_version` directive, sets the minimum HTTP version of a request required to compress a response. |
| vary | boolean | False | false | | Like the `gzip_vary` directive, enables or disables inserting the “Vary: Accept-Encoding” response header field. |
## Enable Plugin
The example below enables the `brotli` Plugin on the specified Route:
:::note
You can fetch the `admin_key` from `config.yaml` and save to an environment variable with the following command:
```bash
admin_key=$(yq '.deployment.admin.admin_key[0].key' conf/config.yaml | sed 's/"//g')
```
:::
```shell
curl -i http://127.0.0.1:9180/apisix/admin/routes/1 -H "X-API-KEY: $admin_key" -X PUT -d '
{
"uri": "/",
"plugins": {
"brotli": {
}
},
"upstream": {
"type": "roundrobin",
"nodes": {
"httpbin.org": 1
}
}
}'
```
## Example usage
Once you have configured the Plugin as shown above, you can make a request as shown below:
```shell
curl http://127.0.0.1:9080/ -i -H "Accept-Encoding: br"
```
```
HTTP/1.1 200 OK
Content-Type: text/html; charset=utf-8
Transfer-Encoding: chunked
Connection: keep-alive
Date: Tue, 05 Dec 2023 03:06:49 GMT
Access-Control-Allow-Origin: *
Access-Control-Allow-Credentials: true
Server: APISIX/3.6.0
Content-Encoding: br
Warning: Binary output can mess up your terminal. Use "--output -" to tell
Warning: curl to output it to your terminal anyway, or consider "--output
Warning: " to save to a file.
```
## Delete Plugin
To remove the `brotli` Plugin, you can delete the corresponding JSON configuration from the Plugin configuration. APISIX will automatically reload and you do not have to restart for this to take effect.
```shell
curl http://127.0.0.1:9180/apisix/admin/routes/1 -H "X-API-KEY: $admin_key" -X PUT -d '
{
"uri": "/",
"upstream": {
"type": "roundrobin",
"nodes": {
"httpbin.org": 1
}
}
}'
```
---
---
title: cas-auth
keywords:
- Apache APISIX
- API Gateway
- Plugin
- CAS AUTH
- cas-auth
description: This document contains information about the Apache APISIX cas-auth Plugin.
---
## Description
The `cas-auth` Plugin can be used to access CAS (Central Authentication Service 2.0) IdP (Identity Provider)
to do authentication, from the SP (service provider) perspective.
## Attributes
| Name | Type | Required | Description |
| ----------- | ----------- | ----------- | ----------- |
| `idp_uri` | string | True | URI of IdP. |
| `cas_callback_uri` | string | True | redirect uri used to callback the SP from IdP after login or logout. |
| `logout_uri` | string | True | logout uri to trigger logout. |
## Enable Plugin
You can enable the Plugin on a specific Route as shown below:
:::note
You can fetch the `admin_key` from `config.yaml` and save to an environment variable with the following command:
```bash
admin_key=$(yq '.deployment.admin.admin_key[0].key' conf/config.yaml | sed 's/"//g')
```
:::
```shell
curl http://127.0.0.1:9180/apisix/admin/routes/cas1 -H "X-API-KEY: $admin_key" -X PUT -d '
{
"methods": ["GET", "POST"],
"host" : "127.0.0.1",
"uri": "/anything/*",
"plugins": {
"cas-auth": {
"idp_uri": "http://127.0.0.1:8080/realms/test/protocol/cas",
"cas_callback_uri": "/anything/cas_callback",
"logout_uri": "/anything/logout"
}
},
"upstream": {
"type": "roundrobin",
"nodes": {
"httpbin.org": 1
}
}
}'
```
## Configuration description
Once you have enabled the Plugin, a new user visiting this Route would first be processed by the `cas-auth` Plugin.
If no login session exists, the user would be redirected to the login page of `idp_uri`.
After successfully logging in from IdP, IdP will redirect this user to the `cas_callback_uri` with
GET parameters CAS ticket specified. If the ticket gets verified, the login session would be created.
This process is only done once and subsequent requests are left uninterrupted.
Once this is done, the user is redirected to the original URL they wanted to visit.
Later, the user could visit `logout_uri` to start logout process. The user would be redirected to `idp_uri` to do logout.
Note that, `cas_callback_uri` and `logout_uri` should be
either full qualified address (e.g. `http://127.0.0.1:9080/anything/logout`),
or path only (e.g. `/anything/logout`), but it is recommended to be path only to keep consistent.
These uris need to be captured by the route where the current APISIX is located.
For example, if the `uri` of the current route is `/api/v1/*`, `cas_callback_uri` can be filled in as `/api/v1/cas_callback`.
## Delete Plugin
To remove the `cas-auth` Plugin, you can delete the corresponding JSON configuration from the Plugin configuration. APISIX will automatically reload and you do not have to restart for this to take effect.
```shell
curl http://127.0.0.1:9180/apisix/admin/routes/cas1 -H "X-API-KEY: $admin_key" -X PUT -d '
{
"methods": ["GET", "POST"],
"uri": "/anything/*",
"plugins": {},
"upstream": {
"type": "roundrobin",
"nodes": {
"httpbin.org:80": 1
}
}
}'
```
---
---
title: chaitin-waf
keywords:
- Apache APISIX
- API Gateway
- Plugin
- WAF
description: The chaitin-waf Plugin integrates with Chaitin WAF (SafeLine) to detect and block web threats, strengthening API security and protecting user data.
---
## Description
The `chaitin-waf` Plugin integrates with the Chaitin WAF (SafeLine) service to provide advanced detection and prevention of web-based threats, enhancing application security and protecting sensitive user data.
## Response Headers
The Plugin can add the following response headers, depending on the configuration of `append_waf_resp_header` and `append_waf_debug_header`:
| Header | Description |
|--------|-------------|
| `X-APISIX-CHAITIN-WAF` | Indicates whether APISIX forwarded the request to the WAF server.
• `yes`: Request was forwarded to the WAF server.
• `no`: Request was not forwarded to the WAF server.
• `unhealthy`: Request matches the configured rules, but no WAF service is available.
• `err`: An error occurred during Plugin execution. The `X-APISIX-CHAITIN-WAF-ERROR` header is also included with details.
• `waf-err`: Error while interacting with the WAF server. The `X-APISIX-CHAITIN-WAF-ERROR` header is also included with details.
• `timeout`: Request to the WAF server timed out. |
| `X-APISIX-CHAITIN-WAF-TIME` | Round-trip time (RTT) in milliseconds for the request to the Chaitin WAF server, including both network latency and WAF server processing. |
| `X-APISIX-CHAITIN-WAF-STATUS` | Status code returned to APISIX by the WAF server. |
| `X-APISIX-CHAITIN-WAF-ACTION` | Action returned to APISIX by the WAF server.
• `pass`: Request was allowed by the WAF service.
• `reject`: Request was blocked by the WAF service. |
| `X-APISIX-CHAITIN-WAF-ERROR` | Debug header. Contains WAF error message. |
| `X-APISIX-CHAITIN-WAF-SERVER` | Debug header. Indicates which WAF server was selected. |
## Attributes
| Name | Type | Required | Default | Valid values | Description |
|--------------------------|---------------|----------|---------|--------------------------|-------------|
| mode | string | false | block | `off`, `monitor`, `block`| Mode to determine how the Plugin behaves for matched requests. In `off` mode, WAF checks are skipped. In `monitor` mode, requests with potential threats are logged but not blocked. In `block` mode, requests with threats are blocked as determined by the WAF service. |
| match | array[object] | false | | | An array of matching rules. The Plugin uses these rules to decide whether to perform a WAF check on a request. If the list is empty, all requests are processed. |
| match.vars | array[array] | false | | | An array of one or more matching conditions in the form of [lua-resty-expr](https://github.com/api7/lua-resty-expr#operator-list) to conditionally execute the plugin. |
| append_waf_resp_header | boolean | false | true | | If true, add response headers `X-APISIX-CHAITIN-WAF`, `X-APISIX-CHAITIN-WAF-TIME`, `X-APISIX-CHAITIN-WAF-ACTION`, and `X-APISIX-CHAITIN-WAF-STATUS`. |
| append_waf_debug_header | boolean | false | false | | If true, add debugging headers `X-APISIX-CHAITIN-WAF-ERROR` and `X-APISIX-CHAITIN-WAF-SERVER` to the response. Effective only when `append_waf_resp_header` is `true`. |
| config | object | false | | | Chaitin WAF service configurations. These settings override the corresponding metadata defaults when specified. |
| config.connect_timeout | integer | false | 1000 | | The connection timeout to the WAF service, in milliseconds. |
| config.send_timeout | integer | false | 1000 | | The sending timeout for transmitting data to the WAF service, in milliseconds. |
| config.read_timeout | integer | false | 1000 | | The reading timeout for receiving data from the WAF service, in milliseconds. |
| config.req_body_size | integer | false | 1024 | | The maximum allowed request body size, in KB. |
| config.keepalive_size | integer | false | 256 | | The maximum number of idle connections to the WAF detection service that can be maintained concurrently. |
| config.keepalive_timeout | integer | false | 60000 | | The idle connection timeout for the WAF service, in milliseconds. |
| config.real_client_ip | boolean | false | true | | If true, the client IP is obtained from the `X-Forwarded-For` header. If false, the Plugin uses the client IP from the connection. |
## Plugin Metadata
| Name | Type | Required | Default | Valid values | Description |
|--------------------------|---------------|----------|---------|--------------|-------------|
| nodes | array[object] | True | | | An array of addresses for the Chaitin WAF service. |
| nodes.host | string | True | | | Address of Chaitin WAF service. Supports IPv4, IPv6, Unix Socket, etc. |
| nodes.port | integer | False | 80 | | Port of Chaitin WAF service. |
| mode | string | False | | block | Mode to determine how the Plugin behaves for matched requests. In `off` mode, WAF checks are skipped. In `monitor` mode, requests with potential threats are logged but not blocked. In `block` mode, requests with threats are blocked as determined by the WAF service. |
| config | object | False | | | Chaitin WAF service configurations. |
| config.connect_timeout | integer | False | 1000 | | The connection timeout to the WAF service, in milliseconds. |
| config.send_timeout | integer | False | 1000 | | The sending timeout for transmitting data to the WAF service, in milliseconds. |
| config.read_timeout | integer | False | 1000 | | The reading timeout for receiving data from the WAF service, in milliseconds. |
| config.req_body_size | integer | False | 1024 | | The maximum allowed request body size, in KB. |
| config.keepalive_size | integer | False | 256 | | The maximum number of idle connections to the WAF detection service that can be maintained concurrently. |
| config.keepalive_timeout | integer | False | 60000 | | The idle connection timeout for the WAF service, in milliseconds. |
| config.real_client_ip | boolean | False | true | | If true, the client IP is obtained from the `X-Forwarded-For` header. If false, the Plugin uses the client IP from the connection. |
## Examples
The examples below demonstrate how you can configure chaitin-waf Plugin for different scenarios.
Before proceeding, make sure you have installed [Chaitin WAF (SafeLine)](https://docs.waf.chaitin.com/en/GetStarted/Deploy).
:::note
Only `X-Forwarded-*` headers sent from addresses in the `apisix.trusted_addresses` configuration (supports IP and CIDR) will be trusted and passed to plugins or upstream. If `apisix.trusted_addresses` is not configured or the IP is not within the configured address range, all `X-Forwarded-*` headers will be overridden with trusted values.
:::
:::note
You can fetch the `admin_key` from `config.yaml` and save to an environment variable with the following command:
```bash
admin_key=$(yq '.deployment.admin.admin_key[0].key' conf/config.yaml | sed 's/"//g')
```
:::
### Block Malicious Requests on a Route
The following example demonstrates how to integrate with Chaitin WAF to protect traffic on a route, rejecting malicious requests immediately.
Configure the Chaitin WAF connection details using Plugin Metadata (update the address accordingly):
```shell
curl "http://127.0.0.1:9180/apisix/admin/plugin_metadata/chaitin-waf" -X PUT \
-H 'X-API-KEY: ${admin_key}' \
-d '{
"nodes": [
{
"host": "172.22.222.5",
"port": 8000
}
]
}'
```
Create a Route and enable `chaitin-waf` on the Route to block requests identified to be malicious:
```shell
curl "http://127.0.0.1:9180/apisix/admin/routes" -X PUT \
-H "X-API-KEY: ${admin_key}" \
-d '{
"id": "chaitin-waf-route",
"uri": "/anything",
"plugins": {
"chaitin-waf": {
"mode": "block",
"append_waf_resp_header": true,
"append_waf_debug_header": true
}
},
"upstream": {
"type": "roundrobin",
"nodes": {
"httpbin.org:80": 1
}
}
}'
```
Send a standard request to the Route:
```shell
curl -i "http://127.0.0.1:9080/anything"
```
You should receive an `HTTP/1.1 200 OK` response.
Send a request with SQL injection to the Route:
```shell
curl -i "http://127.0.0.1:9080/anything" -d 'a=1 and 1=1'
```
You should see an `HTTP/1.1 403 Forbidden` response similar to the following:
```text
...
X-APISIX-CHAITIN-WAF-STATUS: 403
X-APISIX-CHAITIN-WAF-ACTION: reject
X-APISIX-CHAITIN-WAF-SERVER: 172.22.222.5
X-APISIX-CHAITIN-WAF: yes
X-APISIX-CHAITIN-WAF-TIME: 3
...
{"code": 403, "success":false, "message": "blocked by Chaitin SafeLine Web Application Firewall", "event_id": "276be6457d8447a4bf1f792501dfba6c"}
```
### Monitor Requests for Malicious Intent
This example shows how to integrate with Chaitin WAF to monitor all routes with `chaitin-waf` without rejection, and to reject potentially malicious requests on a specific route.
Configure the Chaitin WAF connection details using Plugin Metadata (update the address accordingly) and configure the mode:
```shell
curl "http://127.0.0.1:9180/apisix/admin/plugin_metadata/chaitin-waf" -X PUT \
-H 'X-API-KEY: ${admin_key}' \
-d '{
"nodes": [
{
"host": "172.22.222.5",
"port": 8000
}
],
"mode": "monitor"
}'
```
Create a Route and enable `chaitin-waf` without any configuration on the Route:
```shell
curl "http://127.0.0.1:9180/apisix/admin/routes" -X PUT \
-H "X-API-KEY: ${admin_key}" \
-d '{
"id": "chaitin-waf-route",
"uri": "/anything",
"plugins": {
"chaitin-waf": {}
},
"upstream": {
"type": "roundrobin",
"nodes": {
"httpbin.org:80": 1
}
}
}'
```
Send a standard request to the Route:
```shell
curl -i "http://127.0.0.1:9080/anything"
```
You should receive an `HTTP/1.1 200 OK` response.
Send a request with SQL injection to the Route:
```shell
curl -i "http://127.0.0.1:9080/anything" -d 'a=1 and 1=1'
```
You should also receive an `HTTP/1.1 200 OK` response as the request is not blocked in the `monitor` mode, but observe the following in the log entry:
```text
2025/09/09 11:44:08 [warn] 115#115: *31683 [lua] chaitin-waf.lua:385: do_access(): chaitin-waf monitor mode: request would have been rejected, event_id: 49bed20603e242f9be5ba6f1744bba4b, client: 172.20.0.1, server: _, request: "POST /anything HTTP/1.1", host: "127.0.0.1:9080"
```
If you explicitly configure the `mode` on a route, it will take precedence over the configuration in the Plugin Metadata. For instance, if you create a Route like this:
```shell
curl "http://127.0.0.1:9180/apisix/admin/routes" -X PUT \
-H "X-API-KEY: ${admin_key}" \
-d '{
"id": "chaitin-waf-route",
"uri": "/anything",
"plugins": {
"chaitin-waf": {
"mode": "block"
}
},
"upstream": {
"type": "roundrobin",
"nodes": {
"httpbin.org:80": 1
}
}
}'
```
Send a standard request to the Route:
```shell
curl -i "http://127.0.0.1:9080/anything"
```
You should receive an `HTTP/1.1 200 OK` response.
Send a request with SQL injection to the Route:
```shell
curl -i "http://127.0.0.1:9080/anything" -d 'a=1 and 1=1'
```
You should see an `HTTP/1.1 403 Forbidden` response similar to the following:
```text
...
X-APISIX-CHAITIN-WAF-STATUS: 403
X-APISIX-CHAITIN-WAF-ACTION: reject
X-APISIX-CHAITIN-WAF: yes
X-APISIX-CHAITIN-WAF-TIME: 3
...
{"code": 403, "success":false, "message": "blocked by Chaitin SafeLine Web Application Firewall", "event_id": "c3eb25eaa7ae4c0d82eb8ceebf3600d0"}
```
---
---
title: clickhouse-logger
keywords:
- Apache APISIX
- API Gateway
- Plugin
- ClickHouse Logger
description: This document contains information about the Apache APISIX clickhouse-logger Plugin.
---
## Description
The `clickhouse-logger` Plugin is used to push logs to [ClickHouse](https://clickhouse.com/) database.
## Attributes
| Name | Type | Required | Default | Valid values | Description |
|---------------|---------|----------|---------------------|--------------|----------------------------------------------------------------|
| endpoint_addr | Deprecated | True | | | Use `endpoint_addrs` instead. ClickHouse endpoints. |
| endpoint_addrs | array | True | | | ClickHouse endpoints. |
| database | string | True | | | Name of the database to store the logs. |
| logtable | string | True | | | Table name to store the logs. |
| user | string | True | | | ClickHouse username. |
| password | string | True | | | ClickHouse password. |
| timeout | integer | False | 3 | [1,...] | Time to keep the connection alive for after sending a request. |
| name | string | False | "clickhouse logger" | | Unique identifier for the logger. If you use Prometheus to monitor APISIX metrics, the name is exported in `apisix_batch_process_entries`. |
| ssl_verify | boolean | False | true | [true,false] | When set to `true`, verifies SSL. |
| log_format | object | False | | | Log format declared as key-value pairs in JSON. Values support strings and nested objects (up to five levels deep; deeper fields are truncated). Within strings, [APISIX](../apisix-variable.md) or [NGINX](http://nginx.org/en/docs/varindex.html) variables can be referenced by prefixing with `$`. |
| include_req_body | boolean | False | false | [false, true] | When set to `true` includes the request body in the log. If the request body is too big to be kept in the memory, it can't be logged due to Nginx's limitations. |
| include_req_body_expr | array | False | | | Filter for when the `include_req_body` attribute is set to `true`. Request body is only logged when the expression set here evaluates to `true`. See [lua-resty-expr](https://github.com/api7/lua-resty-expr) for more. |
| include_resp_body | boolean | False | false | [false, true] | When set to `true` includes the response body in the log. |
| include_resp_body_expr | array | False | | | Filter for when the `include_resp_body` attribute is set to `true`. Response body is only logged when the expression set here evaluates to `true`. See [lua-resty-expr](https://github.com/api7/lua-resty-expr) for more. |
NOTE: `encrypt_fields = {"password"}` is also defined in the schema, which means that the field will be stored encrypted in etcd. See [encrypted storage fields](../plugin-develop.md#encrypted-storage-fields).
This Plugin supports using batch processors to aggregate and process entries (logs/data) in a batch. This avoids the need for frequently submitting the data. The batch processor submits data every `5` seconds or when the data in the queue reaches `1000`. See [Batch Processor](../batch-processor.md#configuration) for more information or setting your custom configuration.
### Example of default log format
```json
{
"response": {
"status": 200,
"size": 118,
"headers": {
"content-type": "text/plain",
"connection": "close",
"server": "APISIX/3.7.0",
"content-length": "12"
}
},
"client_ip": "127.0.0.1",
"upstream_latency": 3,
"apisix_latency": 98.999998092651,
"upstream": "127.0.0.1:1982",
"latency": 101.99999809265,
"server": {
"version": "3.7.0",
"hostname": "localhost"
},
"route_id": "1",
"start_time": 1704507612177,
"service_id": "",
"request": {
"method": "POST",
"querystring": {
"foo": "unknown"
},
"headers": {
"host": "localhost",
"connection": "close",
"content-length": "18"
},
"size": 110,
"uri": "/hello?foo=unknown",
"url": "http://localhost:1984/hello?foo=unknown"
}
}
```
## Metadata
You can also set the format of the logs by configuring the Plugin metadata. The following configurations are available:
| Name | Type | Required | Default | Description |
| ---------- | ------ | -------- | ----------------------------------------------------------------------------- | ------------------------------------------------------------------------------------------------------------------------------------------------------------------------------------------------------------------------------------------------------- |
| log_format | object | False | | Log format declared as key-value pairs in JSON. Values support strings and nested objects (up to five levels deep; deeper fields are truncated). Within strings, [APISIX](../apisix-variable.md) or [NGINX](http://nginx.org/en/docs/varindex.html) variables can be referenced by prefixing with `$`. |
| max_pending_entries | integer | False | | Maximum number of pending entries that can be buffered in batch processor before it starts dropping them. |
:::info IMPORTANT
Configuring the Plugin metadata is global in scope. This means that it will take effect on all Routes and Services which use the `clickhouse-logger` Plugin.
:::
The example below shows how you can configure through the Admin API:
:::note
You can fetch the `admin_key` from `config.yaml` and save to an environment variable with the following command:
```bash
admin_key=$(yq '.deployment.admin.admin_key[0].key' conf/config.yaml | sed 's/"//g')
```
:::
```shell
curl http://127.0.0.1:9180/apisix/admin/plugin_metadata/clickhouse-logger -H "X-API-KEY: $admin_key" -X PUT -d '
{
"log_format": {
"host": "$host",
"@timestamp": "$time_iso8601",
"client_ip": "$remote_addr"
}
}'
```
You can use the clickhouse docker image to create a container like so:
```shell
docker run -d -p 8123:8123 -p 9000:9000 -p 9009:9009 --name some-clickhouse-server --ulimit nofile=262144:262144 clickhouse/clickhouse-server
```
Then create a table in your ClickHouse database to store the logs.
```shell
curl -X POST 'http://localhost:8123/' \
--data-binary 'CREATE TABLE default.test (host String, client_ip String, route_id String, service_id String, `@timestamp` String, PRIMARY KEY(`@timestamp`)) ENGINE = MergeTree()' --user default:
```
## Enable Plugin
If multiple endpoints are configured, they will be written randomly.
The example below shows how you can enable the Plugin on a specific Route:
```shell
curl http://127.0.0.1:9180/apisix/admin/routes/1 -H "X-API-KEY: $admin_key" -X PUT -d '
{
"plugins": {
"clickhouse-logger": {
"user": "default",
"password": "",
"database": "default",
"logtable": "test",
"endpoint_addrs": ["http://127.0.0.1:8123"]
}
},
"upstream": {
"type": "roundrobin",
"nodes": {
"127.0.0.1:1980": 1
}
},
"uri": "/hello"
}'
```
## Example usage
Now, if you make a request to APISIX, it will be logged in your ClickHouse database:
```shell
curl -i http://127.0.0.1:9080/hello
```
Now, if you check for the rows in the table, you will get the following output:
```shell
curl 'http://localhost:8123/?query=select%20*%20from%20default.test'
127.0.0.1 127.0.0.1 1 2023-05-08T19:15:53+05:30
```
## Delete Plugin
To remove the `clickhouse-logger` Plugin, you can delete the corresponding JSON configuration from the Plugin configuration. APISIX will automatically reload and you do not have to restart for this to take effect.
```shell
curl http://127.0.0.1:9180/apisix/admin/routes/1 -H "X-API-KEY: $admin_key" -X PUT -d '
{
"uri": "/hello",
"plugins": {},
"upstream": {
"type": "roundrobin",
"nodes": {
"127.0.0.1:1980": 1
}
}
}'
```
---
---
title: client-control
keywords:
- Apache APISIX
- API Gateway
- Client Control
description: This document describes the Apache APISIX client-control Plugin, you can use it to control NGINX behavior to handle a client request dynamically.
---
## Description
The `client-control` Plugin can be used to dynamically control the behavior of NGINX to handle a client request, by setting the max size of the request body.
:::info IMPORTANT
This Plugin requires APISIX to run on APISIX-Runtime. See [apisix-build-tools](https://github.com/api7/apisix-build-tools) for more info.
:::
## Attributes
| Name | Type | Required | Valid values | Description |
| ------------- | ------- | -------- | ------------ | ------------------------------------------------------------------------------------------------------------------------------------ |
| max_body_size | integer | False | [0,...] | Set the maximum limit for the client request body and dynamically adjust the size of [`client_max_body_size`](https://nginx.org/en/docs/http/ngx_http_core_module.html#client_max_body_size), measured in bytes. If you set the `max_body_size` to 0, then the size of the client's request body will not be checked. |
## Enable Plugin
The example below enables the Plugin on a specific Route:
:::note
You can fetch the `admin_key` from `config.yaml` and save to an environment variable with the following command:
```bash
admin_key=$(yq '.deployment.admin.admin_key[0].key' conf/config.yaml | sed 's/"//g')
```
:::
```shell
curl -i http://127.0.0.1:9180/apisix/admin/routes/1 \
-H "X-API-KEY: $admin_key" -X PUT -d '
{
"uri": "/index.html",
"plugins": {
"client-control": {
"max_body_size" : 1
}
},
"upstream": {
"type": "roundrobin",
"nodes": {
"127.0.0.1:1980": 1
}
}
}'
```
## Example usage
Now since you have configured the `max_body_size` to `1` above, you will get the following message when you make a request:
```shell
curl -i http://127.0.0.1:9080/index.html -d '123'
```
```shell
HTTP/1.1 413 Request Entity Too Large
...
413 Request Entity Too Large
413 Request Entity Too Large
openresty
```
## Delete Plugin
To remove the `client-control` Plugin, you can delete the corresponding JSON configuration from the Plugin configuration. APISIX will automatically reload, and you do not have to restart for this to take effect.
```shell
curl http://127.0.0.1:9180/apisix/admin/routes/1 \
-H "X-API-KEY: $admin_key" -X PUT -d '
{
"uri": "/index.html",
"upstream": {
"type": "roundrobin",
"nodes": {
"127.0.0.1:1980": 1
}
}
}'
```
---
---
title: consumer-restriction
keywords:
- Apache APISIX
- API Gateway
- Consumer restriction
description: The Consumer Restriction Plugin allows users to configure access restrictions on Consumer, Route, Service, or Consumer Group.
---
## Description
The `consumer-restriction` Plugin allows users to configure access restrictions on Consumer, Route, Service, or Consumer Group.
## Attributes
| Name | Type | Required | Default | Valid values | Description |
| -------------------------- | ------------- | -------- | ------------- | ------------------------------------------------------------ | ------------------------------------------------------------ |
| type | string | False | consumer_name | ["consumer_name", "consumer_group_id", "service_id", "route_id"] | Type of object to base the restriction on. |
| whitelist | array[string] | True | | | List of objects to whitelist. Has a higher priority than `allowed_by_methods`. |
| blacklist | array[string] | True | | | List of objects to blacklist. Has a higher priority than `whitelist`. |
| rejected_code | integer | False | 403 | [200,...] | HTTP status code returned when the request is rejected. |
| rejected_msg | string | False | | | Message returned when the request is rejected. |
| allowed_by_methods | array[object] | False | | | List of allowed configurations for Consumer settings, including a username of the Consumer and a list of allowed HTTP methods. |
| allowed_by_methods.user | string | False | | | A username for a Consumer. |
| allowed_by_methods.methods | array[string] | False | | ["GET", "POST", "PUT", "DELETE", "PATCH", "HEAD", "OPTIONS", "CONNECT", "TRACE", "PURGE"] | List of allowed HTTP methods for a Consumer. |
:::note
The different values in the `type` attribute have these meanings:
- `consumer_name`: Username of the Consumer to restrict access to a Route or a Service.
- `consumer_group_id`: ID of the Consumer Group to restrict access to a Route or a Service.
- `service_id`: ID of the Service to restrict access from a Consumer. Need to be used with an Authentication Plugin.
- `route_id`: ID of the Route to restrict access from a Consumer.
:::
## Example usage
### Restricting by `consumer_name`
The example below shows how you can use the `consumer-restriction` Plugin on a Route to restrict specific consumers.
You can first create two consumers `jack1` and `jack2`:
:::note
You can fetch the `admin_key` from `config.yaml` and save to an environment variable with the following command:
```bash
admin_key=$(yq '.deployment.admin.admin_key[0].key' conf/config.yaml | sed 's/"//g')
```
:::
```shell
curl http://127.0.0.1:9180/apisix/admin/consumers -H "X-API-KEY: $admin_key" -X PUT -i -d '
{
"username": "jack1",
"plugins": {
"basic-auth": {
"username":"jack2019",
"password": "123456"
}
}
}'
curl http://127.0.0.1:9180/apisix/admin/consumers -H "X-API-KEY: $admin_key" -X PUT -i -d '
{
"username": "jack2",
"plugins": {
"basic-auth": {
"username":"jack2020",
"password": "123456"
}
}
}'
```
Next, you can configure the Plugin to the Route:
```shell
curl http://127.0.0.1:9180/apisix/admin/routes/1 -H "X-API-KEY: $admin_key" -X PUT -d '
{
"uri": "/index.html",
"upstream": {
"type": "roundrobin",
"nodes": {
"127.0.0.1:1980": 1
}
},
"plugins": {
"basic-auth": {},
"consumer-restriction": {
"whitelist": [
"jack1"
]
}
}
}'
```
Now, this configuration will only allow `jack1` to access your Route:
```shell
curl -u jack2019:123456 http://127.0.0.1:9080/index.html
```
```shell
HTTP/1.1 200 OK
```
And requests from `jack2` are blocked:
```shell
curl -u jack2020:123456 http://127.0.0.1:9080/index.html -i
```
```shell
HTTP/1.1 403 Forbidden
...
{"message":"The consumer_name is forbidden."}
```
### Restricting by `allowed_by_methods`
The example below configures the Plugin to a Route to restrict `jack1` to only make `POST` requests:
```shell
curl http://127.0.0.1:9180/apisix/admin/routes/1 -H "X-API-KEY: $admin_key" -X PUT -d '
{
"uri": "/index.html",
"upstream": {
"type": "roundrobin",
"nodes": {
"127.0.0.1:1980": 1
}
},
"plugins": {
"basic-auth": {},
"consumer-restriction": {
"allowed_by_methods":[{
"user": "jack1",
"methods": ["POST"]
}]
}
}
}'
```
Now if `jack1` makes a `GET` request, the access is restricted:
```shell
curl -u jack2019:123456 http://127.0.0.1:9080/index.html
```
```shell
HTTP/1.1 403 Forbidden
...
{"message":"The consumer_name is forbidden."}
```
To also allow `GET` requests, you can update the Plugin configuration and it would be reloaded automatically:
```shell
curl http://127.0.0.1:9180/apisix/admin/routes/1 -H "X-API-KEY: $admin_key" -X PUT -d '
{
"uri": "/index.html",
"upstream": {
"type": "roundrobin",
"nodes": {
"127.0.0.1:1980": 1
}
},
"plugins": {
"basic-auth": {},
"consumer-restriction": {
"allowed_by_methods":[{
"user": "jack1",
"methods": ["POST","GET"]
}]
}
}
}'
```
Now, if a `GET` request is made:
```shell
curl -u jack2019:123456 http://127.0.0.1:9080/index.html
```
```shell
HTTP/1.1 200 OK
```
### Restricting by `service_id`
To restrict a Consumer from accessing a Service, you also need to use an Authentication Plugin. The example below uses the [key-auth](./key-auth.md) Plugin.
First, you can create two services:
```shell
curl http://127.0.0.1:9180/apisix/admin/services/1 -H "X-API-KEY: $admin_key" -X PUT -d '
{
"upstream": {
"nodes": {
"127.0.0.1:1980": 1
},
"type": "roundrobin"
},
"desc": "new service 001"
}'
curl http://127.0.0.1:9180/apisix/admin/services/2 -H "X-API-KEY: $admin_key" -X PUT -d '
{
"upstream": {
"nodes": {
"127.0.0.1:1980": 1
},
"type": "roundrobin"
},
"desc": "new service 002"
}'
```
Then configure the `consumer-restriction` Plugin on the Consumer with the `key-auth` Plugin and the `service_id` to whitelist.
```shell
curl http://127.0.0.1:9180/apisix/admin/consumers -H "X-API-KEY: $admin_key" -X PUT -d '
{
"username": "new_consumer",
"plugins": {
"key-auth": {
"key": "auth-jack"
},
"consumer-restriction": {
"type": "service_id",
"whitelist": [
"1"
],
"rejected_code": 403
}
}
}'
```
Finally, you can configure the `key-auth` Plugin and bind the service to the Route:
```shell
curl http://127.0.0.1:9180/apisix/admin/routes/1 -H "X-API-KEY: $admin_key" -X PUT -d '
{
"uri": "/index.html",
"upstream": {
"type": "roundrobin",
"nodes": {
"127.0.0.1:1980": 1
}
},
"service_id": 1,
"plugins": {
"key-auth": {
}
}
}'
```
Now, if you test the Route, you should be able to access the Service:
```shell
curl http://127.0.0.1:9080/index.html -H 'apikey: auth-jack' -i
```
```shell
HTTP/1.1 200 OK
...
```
Now, if the Route is configured to the Service with `service_id` `2`:
```shell
curl http://127.0.0.1:9180/apisix/admin/routes/1 -H "X-API-KEY: $admin_key" -X PUT -d '
{
"uri": "/index.html",
"upstream": {
"type": "roundrobin",
"nodes": {
"127.0.0.1:1980": 1
}
},
"service_id": 2,
"plugins": {
"key-auth": {
}
}
}'
```
Since the Service is not in the whitelist, it cannot be accessed:
```shell
curl http://127.0.0.1:9080/index.html -H 'apikey: auth-jack' -i
```
```shell
HTTP/1.1 403 Forbidden
...
{"message":"The service_id is forbidden."}
```
## Delete Plugin
To remove the `consumer-restriction` Plugin, you can delete the corresponding JSON configuration from the Plugin configuration. APISIX will automatically reload and you do not have to restart for this to take effect.
```shell
curl http://127.0.0.1:9180/apisix/admin/routes/1 -H "X-API-KEY: $admin_key" -X PUT -d '
{
"uri": "/index.html",
"upstream": {
"type": "roundrobin",
"nodes": {
"127.0.0.1:1980": 1
}
},
"plugins": {
"basic-auth": {}
}
}'
```
---
---
title: cors
keywords:
- Apache APISIX
- API Gateway
- CORS
description: This document contains information about the Apache APISIX cors Plugin.
---
## Description
The `cors` Plugins lets you enable [CORS](https://developer.mozilla.org/en-US/docs/Web/HTTP/CORS) easily.
## Attributes
### CORS attributes
| Name | Type | Required | Default | Description |
|---------------------------|---------|----------|---------|----------------------------------------------------------------------------------------------------------------------------------------------------------------------------------------------------------------------------------------------------------------------------------------------------------------------------------------------------------------------------------------------------|
| allow_origins | string | False | "*" | Origins to allow CORS. Use the `scheme://host:port` format. For example, `https://somedomain.com:8081`. If you have multiple origins, use a `,` to list them. If `allow_credential` is set to `false`, you can enable CORS for all origins by using `*`. If `allow_credential` is set to `true`, you can forcefully allow CORS on all origins by using `**` but it will pose some security issues. |
| allow_methods | string | False | "*" | Request methods to enable CORS on. For example `GET`, `POST`. Use `,` to add multiple methods. If `allow_credential` is set to `false`, you can enable CORS for all methods by using `*`. If `allow_credential` is set to `true`, you can forcefully allow CORS on all methods by using `**` but it will pose some security issues. |
| allow_headers | string | False | "*" | Headers in the request allowed when accessing a cross-origin resource. Use `,` to add multiple headers. If `allow_credential` is set to `false`, you can enable CORS for all request headers by using `*`. If `allow_credential` is set to `true`, you can forcefully allow CORS on all request headers by using `**` but it will pose some security issues. |
| expose_headers | string | False | | Headers in the response allowed when accessing a cross-origin resource. Use `,` to add multiple headers. If `allow_credential` is set to `false`, you can enable CORS for all response headers by using `*`. If not specified, the plugin will not modify the `Access-Control-Expose-Headers header`. See [Access-Control-Expose-Headers - MDN](https://developer.mozilla.org/en-US/docs/Web/HTTP/Headers/Access-Control-Expose-Headers) for more details. |
| max_age | integer | False | 5 | Maximum time in seconds the result is cached. If the time is within this limit, the browser will check the cached result. Set to `-1` to disable caching. Note that the maximum value is browser dependent. See [Access-Control-Max-Age](https://developer.mozilla.org/en-US/docs/Web/HTTP/Headers/Access-Control-Max-Age#Directives) for more details. |
| allow_credential | boolean | False | false | When set to `true`, allows requests to include credentials like cookies. According to CORS specification, if you set this to `true`, you cannot use '*' to allow all for the other attributes. |
| allow_origins_by_regex | array | False | nil | Regex to match origins that allow CORS. For example, `[".*\.test.com$"]` can match all subdomains of `test.com`. When set to specified range, only domains in this range will be allowed, no matter what `allow_origins` is. |
| allow_origins_by_metadata | array | False | nil | Origins to enable CORS referenced from `allow_origins` set in the Plugin metadata. For example, if `"allow_origins": {"EXAMPLE": "https://example.com"}` is set in the Plugin metadata, then `["EXAMPLE"]` can be used to allow CORS on the origin `https://example.com`. |
:::info IMPORTANT
1. The `allow_credential` attribute is sensitive and must be used carefully. If set to `true` the default value `*` of the other attributes will be invalid and they should be specified explicitly.
2. When using `**` you are vulnerable to security risks like CSRF. Make sure that this meets your security levels before using it.
:::
### Resource Timing attributes
| Name | Type | Required | Default | Description |
|---------------------------|---------|----------|---------|----------------------------------------------------------------------------------------------------------------------------------------------------------------------------------------------------------------------------------------------------------------------------------------------------------------------------------------------------------------------------------------------------|
| timing_allow_origins | string | False | nil | Origin to allow to access the resource timing information. See [Timing-Allow-Origin](https://developer.mozilla.org/en-US/docs/Web/HTTP/Headers/Timing-Allow-Origin). Use the `scheme://host:port` format. For example, `https://somedomain.com:8081`. If you have multiple origins, use a `,` to list them. |
| timing_allow_origins_by_regex | array | False | nil | Regex to match with origin for enabling access to the resource timing information. For example, `[".*\.test.com"]` can match all subdomain of `test.com`. When set to specified range, only domains in this range will be allowed, no matter what `timing_allow_origins` is. |
:::note
The Timing-Allow-Origin header is defined in the Resource Timing API, but it is related to the CORS concept.
Suppose you have 2 domains, `domain-A.com` and `domain-B.com`.
You are on a page on `domain-A.com`, you have an XHR call to a resource on `domain-B.com` and you need its timing information.
You can allow the browser to show this timing information only if you have cross-origin permissions on `domain-B.com`.
So, you have to set the CORS headers first, then access the `domain-B.com` URL, and if you set [Timing-Allow-Origin](https://developer.mozilla.org/en-US/docs/Web/HTTP/Headers/Timing-Allow-Origin), the browser will show the requested timing information.
:::
## Metadata
| Name | Type | Required | Description |
|---------------|--------|----------|---------------------------------------------------------------------------------------------------------------------------------------------------------------------------------------------------------|
| allow_origins | object | False | A map with origin reference and allowed origins. The keys in the map are used in the attribute `allow_origins_by_metadata` and the value are equivalent to the `allow_origins` attribute of the Plugin. |
## Enable Plugin
You can enable the Plugin on a specific Route or Service:
:::note
You can fetch the `admin_key` from `config.yaml` and save to an environment variable with the following command:
```bash
admin_key=$(yq '.deployment.admin.admin_key[0].key' conf/config.yaml | sed 's/"//g')
```
:::
```shell
curl http://127.0.0.1:9180/apisix/admin/routes/1 -H "X-API-KEY: $admin_key" -X PUT -d '
{
"uri": "/hello",
"plugins": {
"cors": {}
},
"upstream": {
"type": "roundrobin",
"nodes": {
"127.0.0.1:8080": 1
}
}
}'
```
## Example usage
After enabling the Plugin, you can make a request to the server and see the CORS headers returned:
```shell
curl http://127.0.0.1:9080/hello -v
```
```shell
...
< Server: APISIX web server
< Access-Control-Allow-Origin: *
< Access-Control-Allow-Methods: *
< Access-Control-Allow-Headers: *
< Access-Control-Max-Age: 5
...
```
## Delete Plugin
To remove the `cors` Plugin, you can delete the corresponding JSON configuration from the Plugin configuration. APISIX will automatically reload and you do not have to restart for this to take effect.
```shell
curl http://127.0.0.1:9180/apisix/admin/routes/1 -H "X-API-KEY: $admin_key" -X PUT -d '
{
"uri": "/hello",
"plugins": {},
"upstream": {
"type": "roundrobin",
"nodes": {
"127.0.0.1:8080": 1
}
}
}'
```
---
---
title: csrf
keywords:
- Apache APISIX
- API Gateway
- Plugin
- Cross-site request forgery
- csrf
description: The CSRF Plugin can be used to protect your API against CSRF attacks using the Double Submit Cookie method.
---
## Description
The `csrf` Plugin can be used to protect your API against [CSRF attacks](https://en.wikipedia.org/wiki/Cross-site_request_forgery) using the [Double Submit Cookie](https://en.wikipedia.org/wiki/Cross-site_request_forgery#Double_Submit_Cookie) method.
This Plugin considers the `GET`, `HEAD` and `OPTIONS` methods to be safe operations (`safe-methods`) and such requests are not checked for interception by an attacker. Other methods are termed as `unsafe-methods`.
## Attributes
| Name | Type | Required | Default | Description |
|---------|--------|----------|---------------------|---------------------------------------------------------------------------------------------|
| name | string | False | `apisix-csrf-token` | Name of the token in the generated cookie. |
| expires | number | False | `7200` | Expiration time in seconds of the CSRF cookie. Set to `0` to skip checking expiration time. |
| key | string | True | | Secret key used to encrypt the cookie. |
NOTE: `encrypt_fields = {"key"}` is also defined in the schema, which means that the field will be stored encrypted in etcd. See [encrypted storage fields](../plugin-develop.md#encrypted-storage-fields).
## Enable Plugin
The example below shows how you can enable the Plugin on a specific Route:
:::note
You can fetch the `admin_key` from `config.yaml` and save to an environment variable with the following command:
```bash
admin_key=$(yq '.deployment.admin.admin_key[0].key' conf/config.yaml | sed 's/"//g')
```
:::
```shell
curl -i http://127.0.0.1:9180/apisix/admin/routes/1 -H "X-API-KEY: $admin_key" -X PUT-d '
{
"uri": "/hello",
"plugins": {
"csrf": {
"key": "edd1c9f034335f136f87ad84b625c8f1"
}
},
"upstream": {
"type": "roundrobin",
"nodes": {
"127.0.0.1:9001": 1
}
}
}'
```
The Route is now protected and trying to access it with methods other than `GET` will be blocked with a 401 status code.
Sending a `GET` request to the `/hello` endpoint will send back a cookie with an encrypted token. The name of the token can be set through the `name` attribute of the Plugin configuration and if unset, it defaults to `apisix-csrf-token`.
:::note
A new cookie is returned for each request.
:::
For subsequent requests with `unsafe-methods`, you need to read the encrypted token from the cookie and append the token to the request header by setting the field name to the `name` attribute in the Plugin configuration.
## Example usage
After you have configured the Plugin as shown above, trying to directly make a `POST` request to the `/hello` Route will result in an error:
```shell
curl -i http://127.0.0.1:9080/hello -X POST
```
```shell
HTTP/1.1 401 Unauthorized
...
{"error_msg":"no csrf token in headers"}
```
To get the cookie with the encrypted token, you can make a `GET` request:
```shell
curl -i http://127.0.0.1:9080/hello
```
```shell
HTTP/1.1 200 OK
Set-Cookie: apisix-csrf-token=eyJyYW5kb20iOjAuNjg4OTcyMzA4ODM1NDMsImV4cGlyZXMiOjcyMDAsInNpZ24iOiJcL09uZEF4WUZDZGYwSnBiNDlKREtnbzVoYkJjbzhkS0JRZXVDQm44MG9ldz0ifQ==;path=/;Expires=Mon, 13-Dec-21 09:33:55 GMT
```
This token must then be read from the cookie and added to the request header for subsequent `unsafe-methods` requests.
For example, you can use [js-cookie](https://github.com/js-cookie/js-cookie) to read the cookie and [axios](https://github.com/axios/axios) to send requests:
```js
const token = Cookie.get('apisix-csrf-token');
const instance = axios.create({
headers: {'apisix-csrf-token': token}
});
```
Also make sure that you carry the cookie.
You can also use curl to send the request:
```shell
curl -i http://127.0.0.1:9080/hello -X POST -H 'apisix-csrf-token: eyJyYW5kb20iOjAuNjg4OTcyMzA4ODM1NDMsImV4cGlyZXMiOjcyMDAsInNpZ24iOiJcL09uZEF4WUZDZGYwSnBiNDlKREtnbzVoYkJjbzhkS0JRZXVDQm44MG9ldz0ifQ==' -b 'apisix-csrf-token=eyJyYW5kb20iOjAuNjg4OTcyMzA4ODM1NDMsImV4cGlyZXMiOjcyMDAsInNpZ24iOiJcL09uZEF4WUZDZGYwSnBiNDlKREtnbzVoYkJjbzhkS0JRZXVDQm44MG9ldz0ifQ=='
```
```shell
HTTP/1.1 200 OK
```
## Delete Plugin
To remove the `csrf` Plugin, you can delete the corresponding JSON configuration from the Plugin configuration. APISIX will automatically reload and you do not have to restart for this to take effect.
```shell
curl http://127.0.0.1:9180/apisix/admin/routes/1 -H "X-API-KEY: $admin_key" -X PUT -d '
{
"uri": "/hello",
"upstream": {
"type": "roundrobin",
"nodes": {
"127.0.0.1:1980": 1
}
}
}'
```
---
---
title: datadog
keywords:
- Apache APISIX
- API Gateway
- Plugin
- Datadog
description: This document contains information about the Apache APISIX datadog Plugin.
---
## Description
The `datadog` monitoring Plugin is for seamless integration of APISIX with [Datadog](https://www.datadoghq.com/), one of the most used monitoring and observability platform for cloud applications.
When enabled, the Plugin supports multiple metric capture types for request and response cycles.
This Plugin, pushes its custom metrics to the [DogStatsD](https://docs.datadoghq.com/developers/dogstatsd/?tab=hostagent) server over UDP protocol and comes bundled with [Datadog agent](https://docs.datadoghq.com/agent/).
DogStatsD implements the StatsD protocol which collects the custom metrics for the Apache APISIX agent, aggregates them into a single data point, and sends it to the configured Datadog server.
This Plugin provides the ability to push metrics as a batch to the external Datadog agent, reusing the same datagram socket. It might take some time to receive the log data. It will be automatically sent after the timer function in the [batch processor](../batch-processor.md) expires.
## Attributes
| Name | Type | Required | Default | Valid values | Description |
| -------------- | ------- | -------- | ------- | ------------ | ---------------------------------------------------------------------------------------------------------------- |
| prefer_name | boolean | False | true | [true,false] | When set to `false`, uses Route/Service ID instead of name (default) with metric tags. |
| include_path | boolean | False | false | [true,false] | When set to `true`, includes the path pattern in metric tags. |
| include_method | boolean | False | false | [true,false] | When set to `true`, includes the HTTP method in metric tags. |
| constant_tags | array | False | [] | | Static tags to embed into all metrics generated by this route. Useful for grouping metrics over certain signals. |
This Plugin supports using batch processors to aggregate and process entries (logs/data) in a batch. This avoids the need for frequently submitting the data. The batch processor submits data every `5` seconds or when the data in the queue reaches `1000`. See [Batch Processor](../batch-processor.md#configuration) for more information or setting your custom configuration.
## Metadata
You can configure the Plugin through the Plugin metadata.
| Name | Type | Required | Default | Description |
| ------------- | ------- | -------- | ------------------- | ----------------------------------------------------------------------------------------------------------------------------------------- |
| host | string | False | "127.0.0.1" | DogStatsD server host address. |
| port | integer | False | 8125 | DogStatsD server host port. |
| namespace | string | False | "apisix" | Prefix for all custom metrics sent by APISIX agent. Useful for finding entities for metrics graph. For example, `apisix.request.counter`. |
| constant_tags | array | False | [ "source:apisix" ] | Static tags to embed into generated metrics. Useful for grouping metrics over certain signals. |
:::tip
See [defining tags](https://docs.datadoghq.com/getting_started/tagging/#defining-tags) to know more about how to effectively use tags.
:::
By default, the Plugin expects the DogStatsD service to be available at `127.0.0.1:8125`. If you want to change this, you can update the Plugin metadata as shown below:
:::note
You can fetch the `admin_key` from `config.yaml` and save to an environment variable with the following command:
```bash
admin_key=$(yq '.deployment.admin.admin_key[0].key' conf/config.yaml | sed 's/"//g')
```
:::
```shell
curl http://127.0.0.1:9180/apisix/admin/plugin_metadata/datadog -H "X-API-KEY: $admin_key" -X PUT -d '
{
"host": "172.168.45.29",
"port": 8126,
"constant_tags": [
"source:apisix",
"service:custom"
],
"namespace": "apisix"
}'
```
To reset to default configuration, make a PUT request with empty body:
```shell
curl http://127.0.0.1:9180/apisix/admin/plugin_metadata/datadog -H "X-API-KEY: $admin_key" -X PUT -d '{}'
```
## Exported metrics
When the `datadog` Plugin is enabled, the APISIX agent exports the following metrics to the DogStatsD server for each request/response cycle:
| Metric name | StatsD type | Description |
| ---------------- | ----------- | ----------------------------------------------------------------------------------------------------- |
| Request Counter | Counter | Number of requests received. |
| Request Latency | Histogram | Time taken to process the request (in milliseconds). |
| Upstream latency | Histogram | Time taken to proxy the request to the upstream server till a response is received (in milliseconds). |
| APISIX Latency | Histogram | Time taken by APISIX agent to process the request (in milliseconds). |
| Ingress Size | Timer | Request body size in bytes. |
| Egress Size | Timer | Response body size in bytes. |
The metrics will be sent to the DogStatsD agent with the following tags:
- `route_name`: Name specified in the Route schema definition. If not present or if the attribute `prefer_name` is set to false, falls back to the Route ID.
- `service_name`: If a Route has been created with an abstracted Service, the Service name/ID based on the attribute `prefer_name`.
- `consumer`: If the Route is linked to a Consumer, the username will be added as a tag.
- `balancer_ip`: IP address of the Upstream balancer that processed the current request.
- `response_status`: HTTP response status code. E.g. "200", "404", "503".
- `response_status_class`: HTTP response status code class. E.g. "2xx", "4xx", "5xx".
- `scheme`: Request scheme such as HTTP, gRPC, and gRPCs.
- `path`: The HTTP path pattern. Only available if the attribute `include_path` is set to true.
- `method`: The HTTP method. Only available if the attribute `include_method` is set to true.
:::note
If there are no suitable values for any particular tag, the tag will be omitted.
:::
## Enable Plugin
Once you have your Datadog agent running, you can enable the Plugin as shown below:
```shell
curl http://127.0.0.1:9180/apisix/admin/routes/1 -H "X-API-KEY: $admin_key" -X PUT -d '
{
"plugins": {
"datadog": {}
},
"upstream": {
"type": "roundrobin",
"nodes": {
"127.0.0.1:1980": 1
}
},
"uri": "/hello"
}'
```
Now, requests to the endpoint `/hello` will generate metrics and push it to the DogStatsD server.
## Delete Plugin
To remove the `datadog` Plugin, you can delete the corresponding JSON configuration from the Plugin configuration. APISIX will automatically reload and you do not have to restart for this to take effect.
```shell
curl http://127.0.0.1:9180/apisix/admin/routes/1 -H "X-API-KEY: $admin_key" -X PUT -d '
{
"methods": ["GET"],
"uri": "/hello",
"plugins": {},
"upstream": {
"type": "roundrobin",
"nodes": {
"127.0.0.1:1980": 1
}
}
}'
```
---
---
title: degraphql
keywords:
- Apache APISIX
- API Gateway
- Plugin
- Degraphql
description: This document contains information about the Apache APISIX degraphql Plugin.
---
## Description
The `degraphql` Plugin is used to support decoding RESTful API to GraphQL.
## Attributes
| Name | Type | Required | Description |
| -------------- | ------ | -------- | -------------------------------------------------------------------------------------------- |
| query | string | True | The GraphQL query sent to the upstream |
| operation_name | string | False | The name of the operation, is only required if multiple operations are present in the query. |
| variables | array | False | The variables used in the GraphQL query |
## Example usage
### Start GraphQL server
We use docker to deploy a [GraphQL server demo](https://github.com/npalm/graphql-java-demo) as the backend.
```bash
docker run -d --name grapql-demo -p 8080:8080 npalm/graphql-java-demo
```
After starting the server, the following endpoints are now available:
- http://localhost:8080/graphiql - GraphQL IDE - GrahphiQL
- http://localhost:8080/playground - GraphQL IDE - Prisma GraphQL Client
- http://localhost:8080/altair - GraphQL IDE - Altair GraphQL Client
- http://localhost:8080/ - A simple reacter
- ws://localhost:8080/subscriptions
### Enable Plugin
#### Query list
If we have a GraphQL query like this:
```graphql
query {
persons {
id
name
}
}
```
We can execute it on `http://localhost:8080/playground`, and get the data as below:
```json
{
"data": {
"persons": [
{
"id": "7",
"name": "Niek"
},
{
"id": "8",
"name": "Josh"
},
......
]
}
}
```
Now we can use RESTful API to query the same data that is proxy by APISIX.
First, we need to create a route in APISIX, and enable the degreaph plugin on the route, we need to define the GraphQL query in the plugin's config.
```bash
curl --location --request PUT 'http://localhost:9180/apisix/admin/routes/1' \
--header 'X-API-KEY: edd1c9f034335f136f87ad84b625c8f1' \
--header 'Content-Type: application/json' \
--data-raw '{
"uri": "/graphql",
"upstream": {
"type": "roundrobin",
"nodes": {
"127.0.0.1:8080": 1
}
},
"plugins": {
"degraphql": {
"query": "{\n persons {\n id\n name\n }\n}\n"
}
}
}'
```
We convert the GraphQL query
```graphql
{
persons {
id
name
}
}
```
to JSON string `"{\n persons {\n id\n name\n }\n}\n"`, and put it in the plugin's configuration.
Then we can query the data by RESTful API:
```bash
curl --location --request POST 'http://localhost:9080/graphql'
```
and get the result:
```json
{
"data": {
"persons": [
{
"id": "7",
"name": "Niek"
},
{
"id": "8",
"name": "Josh"
},
......
]
}
}
```
#### Query with variables
If we have a GraphQL query like this:
```graphql
query($name: String!, $githubAccount: String!) {
persons(filter: { name: $name, githubAccount: $githubAccount }) {
id
name
blog
githubAccount
talks {
id
title
}
}
}
variables:
{
"name": "Niek",
"githubAccount": "npalm"
}
```
we can execute it on `http://localhost:8080/playground`, and get the data as below:
```json
{
"data": {
"persons": [
{
"id": "7",
"name": "Niek",
"blog": "https://040code.github.io",
"githubAccount": "npalm",
"talks": [
{
"id": "19",
"title": "GraphQL - The Next API Language"
},
{
"id": "20",
"title": "Immutable Infrastructure"
}
]
}
]
}
}
```
We convert the GraphQL query to JSON string like `"query($name: String!, $githubAccount: String!) {\n persons(filter: { name: $name, githubAccount: $githubAccount }) {\n id\n name\n blog\n githubAccount\n talks {\n id\n title\n }\n }\n}"`, so we create a route like this:
```bash
curl --location --request PUT 'http://localhost:9180/apisix/admin/routes/1' \
--header 'X-API-KEY: edd1c9f034335f136f87ad84b625c8f1' \
--header 'Content-Type: application/json' \
--data-raw '{
"uri": "/graphql",
"upstream": {
"type": "roundrobin",
"nodes": {
"127.0.0.1:8080": 1
}
},
"plugins": {
"degraphql": {
"query": "query($name: String!, $githubAccount: String!) {\n persons(filter: { name: $name, githubAccount: $githubAccount }) {\n id\n name\n blog\n githubAccount\n talks {\n id\n title\n }\n }\n}",
"variables": [
"name",
"githubAccount"
]
}
}
}'
```
We define the `variables` in the plugin's config, and the `variables` is an array, which contains the variables' name in the GraphQL query, so that we can pass the query variables by RESTful API.
Query the data by RESTful API that proxy by APISIX:
```bash
curl --location --request POST 'http://localhost:9080/graphql' \
--header 'Content-Type: application/json' \
--data-raw '{
"name": "Niek",
"githubAccount": "npalm"
}'
```
and get the result:
```json
{
"data": {
"persons": [
{
"id": "7",
"name": "Niek",
"blog": "https://040code.github.io",
"githubAccount": "npalm",
"talks": [
{
"id": "19",
"title": "GraphQL - The Next API Language"
},
{
"id": "20",
"title": "Immutable Infrastructure"
}
]
}
]
}
}
```
which is the same as the result of the GraphQL query.
It's also possible to get the same result via GET request:
```bash
curl 'http://localhost:9080/graphql?name=Niek&githubAccount=npalm'
```
```json
{
"data": {
"persons": [
{
"id": "7",
"name": "Niek",
"blog": "https://040code.github.io",
"githubAccount": "npalm",
"talks": [
{
"id": "19",
"title": "GraphQL - The Next API Language"
},
{
"id": "20",
"title": "Immutable Infrastructure"
}
]
}
]
}
}
```
In the GET request, the variables are passed in the query string.
## Delete Plugin
To remove the `degraphql` Plugin, you can delete the corresponding JSON configuration from the Plugin configuration. APISIX will automatically reload and you do not have to restart for this to take effect.
:::note
You can fetch the `admin_key` from `config.yaml` and save to an environment variable with the following command:
```bash
admin_key=$(yq '.deployment.admin.admin_key[0].key' conf/config.yaml | sed 's/"//g')
```
:::
```shell
curl http://127.0.0.1:9180/apisix/admin/routes/1 -H "X-API-KEY: $admin_key" -X PUT -d '
{
"methods": ["GET"],
"uri": "/graphql",
"plugins": {},
"upstream": {
"type": "roundrobin",
"nodes": {
"127.0.0.1:8080": 1
}
}
}'
```
---
---
title: dubbo-proxy
keywords:
- Apache APISIX
- API Gateway
- Plugin
- Apache Dubbo
- dubbo-proxy
description: This document contains information about the Apache APISIX dubbo-proxy Plugin.
---
## Description
The `dubbo-proxy` Plugin allows you to proxy HTTP requests to [Apache Dubbo](https://dubbo.apache.org/en/index.html).
:::info IMPORTANT
If you are using OpenResty, you need to build it with Dubbo support. See [How do I build the APISIX runtime environment](./../FAQ.md#how-do-i-build-the-apisix-runtime-environment) for details.
:::
## Runtime Attributes
| Name | Type | Required | Default | Description |
| --------------- | ------ | -------- | -------------------- | ------------------------------- |
| service_name | string | True | | Dubbo provider service name. |
| service_version | string | True | | Dubbo provider service version. |
| method | string | False | The path of the URI. | Dubbo provider service method. |
## Static Attributes
| Name | Type | Required | Default | Valid values | Description |
| ------------------------ | ------ | -------- | ------- | ------------ | --------------------------------------------------------------- |
| upstream_multiplex_count | number | True | 32 | >= 1 | Maximum number of multiplex requests in an upstream connection. |
## Enable Plugin
To enable the `dubbo-proxy` Plugin, you have to add it in your configuration file (`conf/config.yaml`):
```yaml title="conf/config.yaml"
plugins:
- ...
- dubbo-proxy
```
Now, when APISIX is reloaded, you can add it to a specific Route as shown below:
:::note
You can fetch the `admin_key` from `config.yaml` and save to an environment variable with the following command:
```bash
admin_key=$(yq '.deployment.admin.admin_key[0].key' conf/config.yaml | sed 's/"//g')
```
:::
```shell
curl http://127.0.0.1:9180/apisix/admin/upstreams/1 -H "X-API-KEY: $admin_key" -X PUT -d '
{
"nodes": {
"127.0.0.1:20880": 1
},
"type": "roundrobin"
}'
curl http://127.0.0.1:9180/apisix/admin/routes/1 -H "X-API-KEY: $admin_key" -X PUT -d '
{
"uris": [
"/hello"
],
"plugins": {
"dubbo-proxy": {
"service_name": "org.apache.dubbo.sample.tengine.DemoService",
"service_version": "0.0.0",
"method": "tengineDubbo"
}
},
"upstream_id": 1
}'
```
## Example usage
You can follow the [Quick Start](https://github.com/alibaba/tengine/tree/master/modules/mod_dubbo#quick-start) guide in Tengine with the configuration above for testing.
APISIX dubbo plugin uses `hessian2` as the serialization protocol. It supports only `Map` as the request and response data type.
### Application
Your dubbo config should be configured to use `hessian2` as the serialization protocol.
```yml
dubbo:
...
protocol:
...
serialization: hessian2
```
Your application should implement the interface with the request and response data type as `Map`.
```java
public interface DemoService {
Map sayHello(Map context);
}
```
### Request and Response
If you need to pass request data, you can add the data to the HTTP request header. The plugin will convert the HTTP request header to the request data of the Dubbo service. Here is a sample HTTP request that passes `user` information:
```bash
curl -i -X POST 'http://localhost:9080/hello' \
--header 'user: apisix'
HTTP/1.1 200 OK
Date: Mon, 15 Jan 2024 10:15:57 GMT
Content-Type: text/plain; charset=utf-8
...
hello: apisix
...
Server: APISIX/3.8.0
```
If the returned data is:
```json
{
"status": "200",
"header1": "value1",
"header2": "value2",
"body": "body of the message"
}
```
The converted HTTP response will be:
```
HTTP/1.1 200 OK
...
header1: value1
header2: value2
...
body of the message
```
## Delete Plugin
To remove the `dubbo-proxy` Plugin, you can delete the corresponding JSON configuration from the Plugin configuration. APISIX will automatically reload and you do not have to restart for this to take effect.
```shell
curl http://127.0.0.1:9180/apisix/admin/routes/1 -H "X-API-KEY: $admin_key" -X PUT -d '
{
"methods": ["GET"],
"uris": [
"/hello"
],
"plugins": {
},
"upstream_id": 1
}
}'
```
To completely disable the `dubbo-proxy` Plugin, you can remove it from your configuration file (`conf/config.yaml`):
```yaml title="conf/config.yaml"
plugins:
# - dubbo-proxy
```
---
---
title: echo
keywords:
- Apache APISIX
- API Gateway
- Plugin
- Echo
description: This document contains information about the Apache APISIX echo Plugin.
---
## Description
The `echo` Plugin is to help users understand how they can develop an APISIX Plugin.
This Plugin addresses common functionalities in phases like init, rewrite, access, balancer, header filter, body filter and log.
:::caution WARNING
The `echo` Plugin is built as an example. It has missing cases and should **not** be used in production environments.
:::
## Attributes
| Name | Type | Requirement | Default | Valid | Description |
| ----------- | ------ | ----------- | ------- | ----- | ----------------------------------------- |
| before_body | string | optional | | | Body to use before the filter phase. |
| body | string | optional | | | Body that replaces the Upstream response. |
| after_body | string | optional | | | Body to use after the modification phase. |
| headers | object | optional | | | New headers to use for the response. |
At least one of `before_body`, `body`, and `after_body` must be specified.
## Enable Plugin
The example below shows how you can enable the `echo` Plugin for a specific Route:
:::note
You can fetch the `admin_key` from `config.yaml` and save to an environment variable with the following command:
```bash
admin_key=$(yq '.deployment.admin.admin_key[0].key' conf/config.yaml | sed 's/"//g')
```
:::
```shell
curl http://127.0.0.1:9180/apisix/admin/routes/1 -H "X-API-KEY: $admin_key" -X PUT -d '
{
"plugins": {
"echo": {
"before_body": "before the body modification "
}
},
"upstream": {
"nodes": {
"127.0.0.1:1980": 1
},
"type": "roundrobin"
},
"uri": "/hello"
}'
```
## Example usage
First, we configure the Plugin as mentioned above. We can then make a request as shown below:
```shell
curl -i http://127.0.0.1:9080/hello
```
```
HTTP/1.1 200 OK
...
before the body modification hello world
```
## Delete Plugin
To remove the `echo` Plugin, you can delete the corresponding JSON configuration from the Plugin configuration. APISIX will automatically reload and you do not have to restart for this to take effect.
```shell
curl http://127.0.0.1:9180/apisix/admin/routes/1 \
-H "X-API-KEY: $admin_key" -X PUT -d '
{
"methods": ["GET"],
"uri": "/hello",
"plugins": {},
"upstream": {
"type": "roundrobin",
"nodes": {
"127.0.0.1:1980": 1
}
}
}'
```
---
---
title: elasticsearch-logger
keywords:
- Apache APISIX
- API Gateway
- Plugin
- Elasticsearch-logger
description: The elasticsearch-logger Plugin pushes request and response logs in batches to Elasticsearch and supports the customization of log formats.
---
## Description
The `elasticsearch-logger` Plugin pushes request and response logs in batches to [Elasticsearch](https://www.elastic.co) and supports the customization of log formats. When enabled, the Plugin will serialize the request context information to [Elasticsearch Bulk format](https://www.elastic.co/guide/en/elasticsearch/reference/current/docs-bulk.html#docs-bulk) and add them to the queue, before they are pushed to Elasticsearch. See [batch processor](../batch-processor.md) for more details.
## Attributes
| Name | Type | Required | Default | Description |
| ------------- | ------- | -------- | --------------------------- | ------------------------------------------------------------ |
| endpoint_addrs | array[string] | True | | Elasticsearch API endpoint addresses. If multiple endpoints are configured, they will be written randomly. |
| field | object | True | | Elasticsearch `field` configuration. |
| field.index | string | True | | Elasticsearch [_index field](https://www.elastic.co/guide/en/elasticsearch/reference/current/mapping-index-field.html#mapping-index-field). |
| log_format | object | False | | Custom log format as key-value pairs in JSON. Values support strings and nested objects (up to five levels deep; deeper fields are truncated). Within strings, [APISIX](../apisix-variable.md) or [NGINX variables](http://nginx.org/en/docs/varindex.html) can be referenced by prefixing with `$`. |
| auth | array | False | | Elasticsearch [authentication](https://www.elastic.co/guide/en/elasticsearch/reference/current/setting-up-authentication.html) configuration. |
| auth.username | string | True | | Elasticsearch [authentication](https://www.elastic.co/guide/en/elasticsearch/reference/current/setting-up-authentication.html) username. |
| auth.password | string | True | | Elasticsearch [authentication](https://www.elastic.co/guide/en/elasticsearch/reference/current/setting-up-authentication.html) password. |
| ssl_verify | boolean | False | true | If true, perform SSL verification. |
| timeout | integer | False | 10 | Elasticsearch send data timeout in seconds. |
| include_req_body | boolean | False | false | If true, include the request body in the log. Note that if the request body is too big to be kept in the memory, it can not be logged due to NGINX's limitations. |
| include_req_body_expr | array[array] | False | | An array of one or more conditions in the form of [lua-resty-expr](https://github.com/api7/lua-resty-expr). Used when the `include_req_body` is true. Request body would only be logged when the expressions configured here evaluate to true. |
| include_resp_body | boolean | False | false | If true, include the response body in the log. |
| include_resp_body_expr | array[array] | False | | An array of one or more conditions in the form of [lua-resty-expr](https://github.com/api7/lua-resty-expr). Used when the `include_resp_body` is true. Response body would only be logged when the expressions configured here evaluate to true. |
NOTE: `encrypt_fields = {"auth.password"}` is also defined in the schema, which means that the field will be stored encrypted in etcd. See [encrypted storage fields](../plugin-develop.md#encrypted-storage-fields).
This Plugin supports using batch processors to aggregate and process entries (logs/data) in a batch. This avoids the need for frequently submitting the data. The batch processor submits data every `5` seconds or when the data in the queue reaches `1000`. See [Batch Processor](../batch-processor.md#configuration) for more information or setting your custom configuration.
## Plugin Metadata
| Name | Type | Required | Default | Description |
|------|------|----------|---------|-------------|
| log_format | object | False | | Log format declared as key-value pairs in JSON. Values support strings and nested objects (up to five levels deep; deeper fields are truncated). Within strings, [APISIX](../apisix-variable.md) or [NGINX](http://nginx.org/en/docs/varindex.html) variables can be referenced by prefixing with `$`. |
| max_pending_entries | integer | False | | Maximum number of pending entries that can be buffered in batch processor before it starts dropping them. |
## Examples
The examples below demonstrate how you can configure `elasticsearch-logger` Plugin for different scenarios.
To follow along the examples, start an Elasticsearch instance in Docker:
```shell
docker run -d \
--name elasticsearch \
--network apisix-quickstart-net \
-v elasticsearch_vol:/usr/share/elasticsearch/data/ \
-p 9200:9200 \
-p 9300:9300 \
-e ES_JAVA_OPTS="-Xms512m -Xmx512m" \
-e discovery.type=single-node \
-e xpack.security.enabled=false \
docker.elastic.co/elasticsearch/elasticsearch:7.17.1
```
Start a Kibana instance in Docker to visualize the indexed data in Elasticsearch:
```shell
docker run -d \
--name kibana \
--network apisix-quickstart-net \
-p 5601:5601 \
-e ELASTICSEARCH_HOSTS="http://elasticsearch:9200" \
docker.elastic.co/kibana/kibana:7.17.1
```
If successful, you should see the Kibana dashboard on [localhost:5601](http://localhost:5601).
:::note
You can fetch the APISIX `admin_key` from `config.yaml` and save to an environment variable with the following command:
```bash
admin_key=$(yq '.deployment.admin.admin_key[0].key' conf/config.yaml | sed 's/"//g')
```
:::
### Log in the Default Log Format
The following example demonstrates how you can enable the `elasticsearch-logger` Plugin on a route, which logs client requests and responses to the Route and pushes logs to Elasticsearch.
Create a Route with `elasticsearch-logger` to configure the `index` field as `gateway`:
```shell
curl "http://127.0.0.1:9180/apisix/admin/routes" -X PUT \
-H "X-API-KEY: ${admin_key}" \
-d '{
"id": "elasticsearch-logger-route",
"uri": "/anything",
"plugins": {
"elasticsearch-logger": {
"endpoint_addrs": ["http://elasticsearch:9200"],
"field": {
"index": "gateway"
}
}
},
"upstream": {
"nodes": {
"httpbin.org:80": 1
},
"type": "roundrobin"
}
}'
```
Send a request to the Route to generate a log entry:
```shell
curl -i "http://127.0.0.1:9080/anything"
```
You should receive an `HTTP/1.1 200 OK` response.
Navigate to the Kibana dashboard on [localhost:5601](http://localhost:5601) and under __Discover__ tab, create a new index pattern `gateway` to fetch the data from Elasticsearch. Once configured, navigate back to the __Discover__ tab and you should see a log generated, similar to the following:
```json
{
"_index": "gateway",
"_id": "CE-JL5QBOkdYRG7kEjTJ",
"_version": 1,
"_score": 1,
"_source": {
"request": {
"headers": {
"host": "127.0.0.1:9080",
"accept": "*/*",
"user-agent": "curl/8.6.0"
},
"size": 85,
"querystring": {},
"method": "GET",
"url": "http://127.0.0.1:9080/anything",
"uri": "/anything"
},
"response": {
"headers": {
"content-type": "application/json",
"access-control-allow-credentials": "true",
"server": "APISIX/3.11.0",
"content-length": "390",
"access-control-allow-origin": "*",
"connection": "close",
"date": "Mon, 13 Jan 2025 10:18:14 GMT"
},
"status": 200,
"size": 618
},
"route_id": "elasticsearch-logger-route",
"latency": 585.00003814697,
"apisix_latency": 18.000038146973,
"upstream_latency": 567,
"upstream": "50.19.58.113:80",
"server": {
"hostname": "0b9a772e68f8",
"version": "3.11.0"
},
"service_id": "",
"client_ip": "192.168.65.1"
},
"fields": {
...
}
}
```
### Log Request and Response Headers With Plugin Metadata
The following example demonstrates how you can customize log format using [Plugin Metadata](../terminology/plugin-metadata.md) and [NGINX variables](http://nginx.org/en/docs/varindex.html) to log specific headers from request and response.
In APISIX, [Plugin Metadata](../terminology/plugin-metadata.md) is used to configure the common metadata fields of all Plugin instances of the same plugin. It is useful when a Plugin is enabled across multiple resources and requires a universal update to their metadata fields.
First, create a Route with `elasticsearch-logger` as follows:
```shell
curl "http://127.0.0.1:9180/apisix/admin/routes" -X PUT \
-H "X-API-KEY: ${admin_key}" \
-d '{
"id": "elasticsearch-logger-route",
"uri": "/anything",
"plugins": {
"elasticsearch-logger": {
"endpoint_addrs": ["http://elasticsearch:9200"],
"field": {
"index": "gateway"
}
},
"upstream": {
"nodes": {
"httpbin.org:80": 1
},
"type": "roundrobin"
}
}'
```
Next, configure the Plugin metadata for `elasticsearch-logger`:
```shell
curl "http://127.0.0.1:9180/apisix/admin/plugin_metadata/elasticsearch-logger" -X PUT \
-H "X-API-KEY: ${admin_key}" \
-d '{
"log_format": {
"host": "$host",
"@timestamp": "$time_iso8601",
"client_ip": "$remote_addr",
"env": "$http_env",
"resp_content_type": "$sent_http_Content_Type"
}
}'
```
Send a request to the Route with the `env` header:
```shell
curl -i "http://127.0.0.1:9080/anything" -H "env: dev"
```
You should receive an `HTTP/1.1 200 OK` response.
Navigate to the Kibana dashboard on [localhost:5601](http://localhost:5601) and under __Discover__ tab, create a new index pattern `gateway` to fetch the data from Elasticsearch, if you have not done so already. Once configured, navigate back to the __Discover__ tab and you should see a log generated, similar to the following:
```json
{
"_index": "gateway",
"_id": "Ck-WL5QBOkdYRG7kODS0",
"_version": 1,
"_score": 1,
"_source": {
"client_ip": "192.168.65.1",
"route_id": "elasticsearch-logger-route",
"@timestamp": "2025-01-06T10:32:36+00:00",
"host": "127.0.0.1",
"resp_content_type": "application/json"
},
"fields": {
...
}
}
```
### Log Request Bodies Conditionally
The following example demonstrates how you can conditionally log request body.
Create a Route with `elasticsearch-logger` to only log request body if the URL query string `log_body` is `true`:
```shell
curl "http://127.0.0.1:9180/apisix/admin/routes" -X PUT \
-H "X-API-KEY: ${admin_key}" \
-d '{
"plugins": {
"elasticsearch-logger": {
"endpoint_addrs": ["http://elasticsearch:9200"],
"field": {
"index": "gateway"
},
"include_req_body": true,
"include_req_body_expr": [["arg_log_body", "==", "yes"]]
}
},
"upstream": {
"nodes": {
"httpbin.org:80": 1
},
"type": "roundrobin"
},
"uri": "/anything",
"id": "elasticsearch-logger-route"
}'
```
Send a request to the Route with an URL query string satisfying the condition:
```shell
curl -i "http://127.0.0.1:9080/anything?log_body=yes" -X POST -d '{"env": "dev"}'
```
You should receive an `HTTP/1.1 200 OK` response.
Navigate to the Kibana dashboard on [localhost:5601](http://localhost:5601) and under __Discover__ tab, create a new index pattern `gateway` to fetch the data from Elasticsearch, if you have not done so already. Once configured, navigate back to the __Discover__ tab and you should see a log generated, similar to the following:
```json
{
"_index": "gateway",
"_id": "Dk-cL5QBOkdYRG7k7DSW",
"_version": 1,
"_score": 1,
"_source": {
"request": {
"headers": {
"user-agent": "curl/8.6.0",
"accept": "*/*",
"content-length": "14",
"host": "127.0.0.1:9080",
"content-type": "application/x-www-form-urlencoded"
},
"size": 182,
"querystring": {
"log_body": "yes"
},
"body": "{\"env\": \"dev\"}",
"method": "POST",
"url": "http://127.0.0.1:9080/anything?log_body=yes",
"uri": "/anything?log_body=yes"
},
"start_time": 1735965595203,
"response": {
"headers": {
"content-type": "application/json",
"server": "APISIX/3.11.0",
"access-control-allow-credentials": "true",
"content-length": "548",
"access-control-allow-origin": "*",
"connection": "close",
"date": "Mon, 13 Jan 2025 11:02:32 GMT"
},
"status": 200,
"size": 776
},
"route_id": "elasticsearch-logger-route",
"latency": 703.9999961853,
"apisix_latency": 34.999996185303,
"upstream_latency": 669,
"upstream": "34.197.122.172:80",
"server": {
"hostname": "0b9a772e68f8",
"version": "3.11.0"
},
"service_id": "",
"client_ip": "192.168.65.1"
},
"fields": {
...
}
}
```
Send a request to the Route without any URL query string:
```shell
curl -i "http://127.0.0.1:9080/anything" -X POST -d '{"env": "dev"}'
```
Navigate to the Kibana dashboard __Discover__ tab and you should see a log generated, but without the request body:
```json
{
"_index": "gateway",
"_id": "EU-eL5QBOkdYRG7kUDST",
"_version": 1,
"_score": 1,
"_source": {
"request": {
"headers": {
"content-type": "application/x-www-form-urlencoded",
"accept": "*/*",
"content-length": "14",
"host": "127.0.0.1:9080",
"user-agent": "curl/8.6.0"
},
"size": 169,
"querystring": {},
"method": "POST",
"url": "http://127.0.0.1:9080/anything",
"uri": "/anything"
},
"start_time": 1735965686363,
"response": {
"headers": {
"content-type": "application/json",
"access-control-allow-credentials": "true",
"server": "APISIX/3.11.0",
"content-length": "510",
"access-control-allow-origin": "*",
"connection": "close",
"date": "Mon, 13 Jan 2025 11:15:54 GMT"
},
"status": 200,
"size": 738
},
"route_id": "elasticsearch-logger-route",
"latency": 680.99999427795,
"apisix_latency": 4.9999942779541,
"upstream_latency": 676,
"upstream": "34.197.122.172:80",
"server": {
"hostname": "0b9a772e68f8",
"version": "3.11.0"
},
"service_id": "",
"client_ip": "192.168.65.1"
},
"fields": {
...
}
}
```
:::info
If you have customized the `log_format` in addition to setting `include_req_body` or `include_resp_body` to `true`, the Plugin would not include the bodies in the logs.
As a workaround, you may be able to use the NGINX variable `$request_body` in the log format, such as:
```json
{
"elasticsearch-logger": {
...,
"log_format": {"body": "$request_body"}
}
}
```
:::
---
---
title: error-log-logger
keywords:
- Apache APISIX
- API Gateway
- Plugin
- Error log logger
description: This document contains information about the Apache APISIX error-log-logger Plugin.
---
## Description
The `error-log-logger` Plugin is used to push APISIX's error logs (`error.log`) to TCP, [Apache SkyWalking](https://skywalking.apache.org/), Apache Kafka or ClickHouse servers. You can also set the error log level to send the logs to server.
It might take some time to receive the log data. It will be automatically sent after the timer function in the [batch processor](../batch-processor.md) expires.
## Attributes
| Name | Type | Required | Default | Valid values | Description |
|----------------------------------|---------|----------|--------------------------------|-----------------------------------------------------------------------------------------|--------------------------------------------------------------------------------------------------------------|
| tcp.host | string | True | | | IP address or the hostname of the TCP server. |
| tcp.port | integer | True | | [0,...] | Target upstream port. |
| tcp.tls | boolean | False | false | | When set to `true` performs SSL verification. |
| tcp.tls_server_name | string | False | | | Server name for the new TLS extension SNI. |
| skywalking.endpoint_addr | string | False | http://127.0.0.1:12900/v3/logs | | Apache SkyWalking HTTP endpoint. |
| skywalking.service_name | string | False | APISIX | | Service name for the SkyWalking reporter. |
| skywalking.service_instance_name | String | False | APISIX Instance Name | | Service instance name for the SkyWalking reporter. Set it to `$hostname` to directly get the local hostname. |
| clickhouse.endpoint_addr | String | False | http://127.0.0.1:8213 | | ClickHouse endpoint. |
| clickhouse.user | String | False | default | | ClickHouse username. |
| clickhouse.password | String | False | | | ClickHouse password. |
| clickhouse.database | String | False | | | Name of the database to store the logs. |
| clickhouse.logtable | String | False | | | Table name to store the logs. |
| kafka.brokers | array | True | | | List of Kafka brokers (nodes). |
| kafka.brokers.host | string | True | | | The host of Kafka broker, e.g, `192.168.1.1`. |
| kafka.brokers.port | integer | True | | [0, 65535] | The port of Kafka broker |
| kafka.brokers.sasl_config | object | False | | | The sasl config of Kafka broker |
| kafka.brokers.sasl_config.mechanism | string | False | "PLAIN" | ["PLAIN"] | The mechaism of sasl config |
| kafka.brokers.sasl_config.user | string | True | | | The user of sasl_config. If sasl_config exists, it's required. |
| kafka.brokers.sasl_config.password | string | True | | | The password of sasl_config. If sasl_config exists, it's required. |
| kafka.kafka_topic | string | True | | | Target topic to push the logs for organisation. |
| kafka.producer_type | string | False | async | ["async", "sync"] | Message sending mode of the producer. |
| kafka.required_acks | integer | False | 1 | [0, 1, -1] | Number of acknowledgements the leader needs to receive for the producer to consider the request complete. This controls the durability of the sent records. The attribute follows the same configuration as the Kafka `acks` attribute. See [Apache Kafka documentation](https://kafka.apache.org/documentation/#producerconfigs_acks) for more. |
| kafka.key | string | False | | | Key used for allocating partitions for messages. |
| kafka.cluster_name | integer | False | 1 | [0,...] | Name of the cluster. Used when there are two or more Kafka clusters. Only works if the `producer_type` attribute is set to `async`. |
| kafka.meta_refresh_interval | integer | False | 30 | [1,...] | `refresh_interval` parameter in [lua-resty-kafka](https://github.com/doujiang24/lua-resty-kafka) specifies the time to auto refresh the metadata, in seconds.|
| timeout | integer | False | 3 | [1,...] | Timeout (in seconds) for the upstream to connect and send data. |
| keepalive | integer | False | 30 | [1,...] | Time in seconds to keep the connection alive after sending data. |
| level | string | False | WARN | ["STDERR", "EMERG", "ALERT", "CRIT", "ERR", "ERROR", "WARN", "NOTICE", "INFO", "DEBUG"] | Log level to filter the error logs. `ERR` is same as `ERROR`. |
NOTE: `encrypt_fields = {"clickhouse.password"}` is also defined in the schema, which means that the field will be stored encrypted in etcd. See [encrypted storage fields](../plugin-develop.md#encrypted-storage-fields).
This Plugin supports using batch processors to aggregate and process entries (logs/data) in a batch. This avoids the need for frequently submitting the data. The batch processor submits data every `5` seconds or when the data in the queue reaches `1000`. See [Batch Processor](../batch-processor.md#configuration) for more information or setting your custom configuration.
### Example of default log format
```text
["2024/01/06 16:04:30 [warn] 11786#9692271: *1 [lua] plugin.lua:205: load(): new plugins: {"error-log-logger":true}, context: init_worker_by_lua*","\n","2024/01/06 16:04:30 [warn] 11786#9692271: *1 [lua] plugin.lua:255: load_stream(): new plugins: {"limit-conn":true,"ip-restriction":true,"syslog":true,"mqtt-proxy":true}, context: init_worker_by_lua*","\n"]
```
## Enable Plugin
To enable the Plugin, you can add it in your configuration file (`conf/config.yaml`):
```yaml title="conf/config.yaml"
plugins:
- request-id
- hmac-auth
- api-breaker
- error-log-logger
```
Once you have enabled the Plugin, you can configure it through the Plugin metadata.
### Configuring TCP server address
You can set the TCP server address by configuring the Plugin metadata as shown below:
:::note
You can fetch the `admin_key` from `config.yaml` and save to an environment variable with the following command:
```bash
admin_key=$(yq '.deployment.admin.admin_key[0].key' conf/config.yaml | sed 's/"//g')
```
:::
```shell
curl http://127.0.0.1:9180/apisix/admin/plugin_metadata/error-log-logger -H "X-API-KEY: $admin_key" -X PUT -d '
{
"tcp": {
"host": "127.0.0.1",
"port": 1999
},
"inactive_timeout": 1
}'
```
### Configuring SkyWalking OAP server address
You can configure the SkyWalking OAP server address as shown below:
```shell
curl http://127.0.0.1:9180/apisix/admin/plugin_metadata/error-log-logger -H "X-API-KEY: $admin_key" -X PUT -d '
{
"skywalking": {
"endpoint_addr":"http://127.0.0.1:12800/v3/logs"
},
"inactive_timeout": 1
}'
```
### Configuring ClickHouse server details
The Plugin sends the error log as a string to the `data` field of a table in your ClickHouse server.
You can configure it as shown below:
```shell
curl http://127.0.0.1:9180/apisix/admin/plugin_metadata/error-log-logger -H "X-API-KEY: $admin_key" -X PUT -d '
{
"clickhouse": {
"user": "default",
"password": "a",
"database": "error_log",
"logtable": "t",
"endpoint_addr": "http://127.0.0.1:8123"
}
}'
```
### Configuring Kafka server
The Plugin sends the error log to Kafka, you can configure it as shown below:
```shell
curl http://127.0.0.1:9180/apisix/admin/plugin_metadata/error-log-logger \
-H "X-API-KEY: $admin_key" -X PUT -d '
{
"kafka":{
"brokers":[
{
"host":"127.0.0.1",
"port":9092
}
],
"kafka_topic":"test2"
},
"level":"ERROR",
"inactive_timeout":1
}'
```
## Delete Plugin
To remove the Plugin, you can remove it from your configuration file (`conf/config.yaml`):
```yaml title="conf/config.yaml"
plugins:
- request-id
- hmac-auth
- api-breaker
# - error-log-logger
```
---
---
title: ext-plugin-post-req
keywords:
- Apache APISIX
- Plugin
- ext-plugin-post-req
description: This document contains information about the Apache APISIX ext-plugin-post-req Plugin.
---
## Description
`ext-plugin-post-req` differs from the [ext-plugin-pre-req](./ext-plugin-pre-req.md) Plugin in that it runs after executing the built-in Lua Plugins and before proxying to the Upstream.
You can learn more about the configuration from the [ext-plugin-pre-req](./ext-plugin-pre-req.md) Plugin document.
---
---
title: ext-plugin-post-resp
keywords:
- Apache APISIX
- API Gateway
- Plugin
- ext-plugin-post-resp
description: This document contains information about the Apache APISIX ext-plugin-post-resp Plugin.
---
## Description
The `ext-plugin-post-resp` Plugin is for running specific external Plugins in the Plugin Runner before executing the built-in Lua Plugins.
The `ext-plugin-post-resp` plugin will be executed after the request gets a response from the upstream.
This plugin uses [lua-resty-http](https://github.com/api7/lua-resty-http) library under the hood to send requests to the upstream, due to which the [proxy-control](./proxy-control.md), [proxy-mirror](./proxy-mirror.md), and [proxy-cache](./proxy-cache.md) plugins are not available to be used alongside this plugin. Also, [mTLS Between APISIX and Upstream](../mtls.md#mtls-between-apisix-and-upstream) is not yet supported.
See [External Plugin](../external-plugin.md) to learn more.
:::note
Execution of External Plugins will affect the response of the current request.
:::
## Attributes
| Name | Type | Required | Default | Valid values | Description |
|-------------------|---------|----------|---------|-----------------------------------------------------------------|------------------------------------------------------------------------------------------------------------------------|
| conf | array | False | | [{"name": "ext-plugin-A", "value": "{\"enable\":\"feature\"}"}] | List of Plugins and their configurations to be executed on the Plugin Runner. |
| allow_degradation | boolean | False | false | | Sets Plugin degradation when the Plugin Runner is not available. When set to `true`, requests are allowed to continue. |
## Enable Plugin
The example below enables the `ext-plugin-post-resp` Plugin on a specific Route:
:::note
You can fetch the `admin_key` from `config.yaml` and save to an environment variable with the following command:
```bash
admin_key=$(yq '.deployment.admin.admin_key[0].key' conf/config.yaml | sed 's/"//g')
```
:::
```shell
curl -i http://127.0.0.1:9180/apisix/admin/routes/1 -H "X-API-KEY: $admin_key" -X PUT -d '
{
"uri": "/index.html",
"plugins": {
"ext-plugin-post-resp": {
"conf" : [
{"name": "ext-plugin-A", "value": "{\"enable\":\"feature\"}"}
]
}
},
"upstream": {
"type": "roundrobin",
"nodes": {
"127.0.0.1:1980": 1
}
}
}'
```
## Example usage
Once you have configured the External Plugin as shown above, you can make a request to execute the Plugin:
```shell
curl -i http://127.0.0.1:9080/index.html
```
This will reach the configured Plugin Runner and the `ext-plugin-A` will be executed.
## Delete Plugin
To remove the `ext-plugin-post-resp` Plugin, you can delete the corresponding JSON configuration from the Plugin configuration. APISIX will automatically reload and you do not have to restart for this to take effect.
```shell
curl http://127.0.0.1:9180/apisix/admin/routes/1 -H "X-API-KEY: $admin_key" -X PUT -d '
{
"uri": "/index.html",
"upstream": {
"type": "roundrobin",
"nodes": {
"127.0.0.1:1980": 1
}
}
}'
```
---
---
title: ext-plugin-pre-req
keywords:
- Apache APISIX
- API Gateway
- Plugin
- ext-plugin-pre-req
description: This document contains information about the Apache APISIX ext-plugin-pre-req Plugin.
---
## Description
The `ext-plugin-pre-req` Plugin is for running specific external Plugins in the Plugin Runner before executing the built-in Lua Plugins.
See [External Plugin](../external-plugin.md) to learn more.
:::note
Execution of External Plugins will affect the behavior of the current request.
:::
## Attributes
| Name | Type | Required | Default | Valid values | Description |
|-------------------|---------|----------|---------|-----------------------------------------------------------------|------------------------------------------------------------------------------------------------------------------------|
| conf | array | False | | [{"name": "ext-plugin-A", "value": "{\"enable\":\"feature\"}"}] | List of Plugins and their configurations to be executed on the Plugin Runner. |
| allow_degradation | boolean | False | false | | Sets Plugin degradation when the Plugin Runner is not available. When set to `true`, requests are allowed to continue. |
## Enable Plugin
The example below enables the `ext-plugin-pre-req` Plugin on a specific Route:
:::note
You can fetch the `admin_key` from `config.yaml` and save to an environment variable with the following command:
```bash
admin_key=$(yq '.deployment.admin.admin_key[0].key' conf/config.yaml | sed 's/"//g')
```
:::
```shell
curl -i http://127.0.0.1:9180/apisix/admin/routes/1 -H "X-API-KEY: $admin_key" -X PUT -d '
{
"uri": "/index.html",
"plugins": {
"ext-plugin-pre-req": {
"conf" : [
{"name": "ext-plugin-A", "value": "{\"enable\":\"feature\"}"}
]
}
},
"upstream": {
"type": "roundrobin",
"nodes": {
"127.0.0.1:1980": 1
}
}
}'
```
## Example usage
Once you have configured the External Plugin as shown above, you can make a request to execute the Plugin:
```shell
curl -i http://127.0.0.1:9080/index.html
```
This will reach the configured Plugin Runner and the `ext-plugin-A` will be executed.
## Delete Plugin
To remove the `ext-plugin-pre-req` Plugin, you can delete the corresponding JSON configuration from the Plugin configuration. APISIX will automatically reload and you do not have to restart for this to take effect.
```shell
curl http://127.0.0.1:9180/apisix/admin/routes/1 -H "X-API-KEY: $admin_key" -X PUT -d '
{
"uri": "/index.html",
"upstream": {
"type": "roundrobin",
"nodes": {
"127.0.0.1:1980": 1
}
}
}'
```
---
---
title: fault-injection
keywords:
- Apache APISIX
- API Gateway
- Plugin
- Fault Injection
- fault-injection
description: This document contains information about the Apache APISIX fault-injection Plugin.
---
## Description
The `fault-injection` Plugin can be used to test the resiliency of your application. This Plugin will be executed before the other configured Plugins.
The `abort` attribute will directly return the specified HTTP code to the client and skips executing the subsequent Plugins.
The `delay` attribute delays a request and executes the subsequent Plugins.
## Attributes
| Name | Type | Requirement | Default | Valid | Description |
|-------------------|---------|-------------|---------|------------|-------------------------------------------------------------------------------------------------------------------------------------------------------------|
| abort.http_status | integer | required | | [200, ...] | HTTP status code of the response to return to the client. |
| abort.body | string | optional | | | Body of the response returned to the client. Nginx variables like `client addr: $remote_addr\n` can be used in the body. |
| abort.headers | object | optional | | | Headers of the response returned to the client. The values in the header can contain Nginx variables like `$remote_addr`. |
| abort.percentage | integer | optional | | [0, 100] | Percentage of requests to be aborted. |
| abort.vars | array[] | optional | | | Rules which are matched before executing fault injection. See [lua-resty-expr](https://github.com/api7/lua-resty-expr) for a list of available expressions. |
| delay.duration | number | required | | | Duration of the delay. Can be decimal. |
| delay.percentage | integer | optional | | [0, 100] | Percentage of requests to be delayed. |
| delay.vars | array[] | optional | | | Rules which are matched before executing fault injection. See [lua-resty-expr](https://github.com/api7/lua-resty-expr) for a list of available expressions. |
:::info IMPORTANT
To use the `fault-injection` Plugin one of `abort` or `delay` must be specified.
:::
:::tip
`vars` can have expressions from [lua-resty-expr](https://github.com/api7/lua-resty-expr) and can flexibly implement AND/OR relationship between rules. For example:
```json
[
[
[ "arg_name","==","jack" ],
[ "arg_age","==",18 ]
],
[
[ "arg_name2","==","allen" ]
]
]
```
This means that the relationship between the first two expressions is AND, and the relationship between them and the third expression is OR.
:::
## Enable Plugin
You can enable the `fault-injection` Plugin on a specific Route as shown below:
:::note
You can fetch the `admin_key` from `config.yaml` and save to an environment variable with the following command:
```bash
admin_key=$(yq '.deployment.admin.admin_key[0].key' conf/config.yaml | sed 's/"//g')
```
:::
```shell
curl http://127.0.0.1:9180/apisix/admin/routes/1 -H "X-API-KEY: $admin_key" -X PUT -d '
{
"plugins": {
"fault-injection": {
"abort": {
"http_status": 200,
"body": "Fault Injection!"
}
}
},
"upstream": {
"nodes": {
"127.0.0.1:1980": 1
},
"type": "roundrobin"
},
"uri": "/hello"
}'
```
Similarly, to enable a `delay` fault:
```shell
curl http://127.0.0.1:9180/apisix/admin/routes/1 -H "X-API-KEY: $admin_key" -X PUT -d '
{
"plugins": {
"fault-injection": {
"delay": {
"duration": 3
}
}
},
"upstream": {
"nodes": {
"127.0.0.1:1980": 1
},
"type": "roundrobin"
},
"uri": "/hello"
}'
```
You can also enable the Plugin with both `abort` and `delay` which can have `vars` for matching:
```shell
curl http://127.0.0.1:9180/apisix/admin/routes/1 -H "X-API-KEY: $admin_key" -X PUT -d '
{
"plugins": {
"fault-injection": {
"abort": {
"http_status": 403,
"body": "Fault Injection!\n",
"vars": [
[
[ "arg_name","==","jack" ]
]
]
},
"delay": {
"duration": 2,
"vars": [
[
[ "http_age","==","18" ]
]
]
}
}
},
"upstream": {
"nodes": {
"127.0.0.1:1980": 1
},
"type": "roundrobin"
},
"uri": "/hello"
}'
```
## Example usage
Once you have enabled the Plugin as shown above, you can make a request to the configured Route:
```shell
curl http://127.0.0.1:9080/hello -i
```
```
HTTP/1.1 200 OK
Date: Mon, 13 Jan 2020 13:50:04 GMT
Content-Type: text/plain
Transfer-Encoding: chunked
Connection: keep-alive
Server: APISIX web server
Fault Injection!
```
And if we configure the `delay` fault:
```shell
time curl http://127.0.0.1:9080/hello -i
```
```
HTTP/1.1 200 OK
Content-Type: application/octet-stream
Content-Length: 6
Connection: keep-alive
Server: APISIX web server
Date: Tue, 14 Jan 2020 14:30:54 GMT
Last-Modified: Sat, 11 Jan 2020 12:46:21 GMT
hello
real 0m3.034s
user 0m0.007s
sys 0m0.010s
```
### Fault injection with criteria matching
You can enable the `fault-injection` Plugin with the `vars` attribute to set specific rules:
```shell
curl http://127.0.0.1:9180/apisix/admin/routes/1 -H "X-API-KEY: $admin_key" -X PUT -d '
{
"plugins": {
"fault-injection": {
"abort": {
"http_status": 403,
"body": "Fault Injection!\n",
"vars": [
[
[ "arg_name","==","jack" ]
]
]
}
}
},
"upstream": {
"nodes": {
"127.0.0.1:1980": 1
},
"type": "roundrobin"
},
"uri": "/hello"
}'
```
Now, we can test the Route. First, we test with a different `name` argument:
```shell
curl "http://127.0.0.1:9080/hello?name=allen" -i
```
You will get the expected response without the fault injected:
```
HTTP/1.1 200 OK
Content-Type: application/octet-stream
Transfer-Encoding: chunked
Connection: keep-alive
Date: Wed, 20 Jan 2021 07:21:57 GMT
Server: APISIX/2.2
hello
```
Now if we set the `name` to match our configuration, the `fault-injection` Plugin is executed:
```shell
curl "http://127.0.0.1:9080/hello?name=jack" -i
```
```
HTTP/1.1 403 Forbidden
Date: Wed, 20 Jan 2021 07:23:37 GMT
Content-Type: text/plain; charset=utf-8
Transfer-Encoding: chunked
Connection: keep-alive
Server: APISIX/2.2
Fault Injection!
```
## Delete Plugin
To remove the `fault-injection` Plugin, you can delete the corresponding JSON configuration from the Plugin configuration. APISIX will automatically reload and you do not have to restart for this to take effect.
```shell
curl http://127.0.0.1:9180/apisix/admin/routes/1 -H "X-API-KEY: $admin_key" -X PUT -d '
{
"uri": "/hello",
"plugins": {},
"upstream": {
"type": "roundrobin",
"nodes": {
"127.0.0.1:1980": 1
}
}
}'
```
---
---
title: file-logger
keywords:
- Apache APISIX
- API Gateway
- Plugin
- File Logger
description: This document contains information about the Apache APISIX file-logger Plugin.
---
## Description
The `file-logger` Plugin is used to push log streams to a specific location.
:::tip
- `file-logger` plugin can count request and response data for individual routes locally, which is useful for [debugging](../debug-mode.md).
- `file-logger` plugin can get [APISIX variables](../apisix-variable.md) and [NGINX variables](http://nginx.org/en/docs/varindex.html), while `access.log` can only use NGINX variables.
- `file-logger` plugin support hot-loaded so that we can change its configuration at any time with immediate effect.
- `file-logger` plugin saves every data in JSON format.
- The user can modify the functions executed by the `file-logger` during the `log phase` to collect the information they want.
:::
## Attributes
| Name | Type | Required | Description |
| ---- | ------ | -------- | ------------- |
| path | string | True | Log file path. |
| log_format | object | False | Log format declared as key-value pairs in JSON. Values support strings and nested objects (up to five levels deep; deeper fields are truncated). Within strings, [APISIX](../apisix-variable.md) or [NGINX](http://nginx.org/en/docs/varindex.html) variables can be referenced by prefixing with `$`. |
| include_req_body | boolean | False | When set to `true` includes the request body in the log. If the request body is too big to be kept in the memory, it can't be logged due to Nginx's limitations. |
| include_req_body_expr | array | False | Filter for when the `include_req_body` attribute is set to `true`. Request body is only logged when the expression set here evaluates to `true`. See [lua-resty-expr](https://github.com/api7/lua-resty-expr) for more. |
| include_resp_body | boolean | False | When set to `true` includes the response body in the log file. |
| include_resp_body_expr | array | False | When the `include_resp_body` attribute is set to `true`, use this to filter based on [lua-resty-expr](https://github.com/api7/lua-resty-expr). If present, only logs the response into file if the expression evaluates to `true`. |
| match | array[array] | False | Logs will be recorded when the rule matching is successful if the option is set. See [lua-resty-expr](https://github.com/api7/lua-resty-expr#operator-list) for a list of available expressions. |
### Example of default log format
```json
{
"service_id": "",
"apisix_latency": 100.99999809265,
"start_time": 1703907485819,
"latency": 101.99999809265,
"upstream_latency": 1,
"client_ip": "127.0.0.1",
"route_id": "1",
"server": {
"version": "3.7.0",
"hostname": "localhost"
},
"request": {
"headers": {
"host": "127.0.0.1:1984",
"content-type": "application/x-www-form-urlencoded",
"user-agent": "lua-resty-http/0.16.1 (Lua) ngx_lua/10025",
"content-length": "12"
},
"method": "POST",
"size": 194,
"url": "http://127.0.0.1:1984/hello?log_body=no",
"uri": "/hello?log_body=no",
"querystring": {
"log_body": "no"
}
},
"response": {
"headers": {
"content-type": "text/plain",
"connection": "close",
"content-length": "12",
"server": "APISIX/3.7.0"
},
"status": 200,
"size": 123
},
"upstream": "127.0.0.1:1982"
}
```
## Metadata
You can also set the format of the logs by configuring the Plugin metadata. The following configurations are available:
| Name | Type | Required | Default | Description |
| ---------- | ------ | -------- | ----------------------------------------------------------------------------- | ------------------------------------------------------------------------------------------------------------------------------------------------------------------------------------------------------------------------------------------------------- |
| path | string | False | | Log file path used when the Plugin configuration does not specify `path`. |
| log_format | object | False | | Log format declared as key-value pairs in JSON. Values support strings and nested objects (up to five levels deep; deeper fields are truncated). Within strings, [APISIX](../apisix-variable.md) or [NGINX](http://nginx.org/en/docs/varindex.html) variables can be referenced by prefixing with `$`. |
The example below shows how you can configure through the Admin API:
:::note
You can fetch the `admin_key` from `config.yaml` and save to an environment variable with the following command:
```bash
admin_key=$(yq '.deployment.admin.admin_key[0].key' conf/config.yaml | sed 's/"//g')
```
:::
```shell
curl http://127.0.0.1:9180/apisix/admin/plugin_metadata/file-logger -H "X-API-KEY: $admin_key" -X PUT -d '
{
"path": "logs/metadata-file.log",
"log_format": {
"host": "$host",
"@timestamp": "$time_iso8601",
"client_ip": "$remote_addr",
"request": {
"method": "$request_method",
"uri": "$request_uri"
},
"response": {
"status": "$status"
}
}
}'
```
With this configuration, your logs would be formatted as shown below:
```shell
{"host":"localhost","@timestamp":"2020-09-23T19:05:05-04:00","client_ip":"127.0.0.1","request":{"method":"GET","uri":"/hello"},"response":{"status":200},"route_id":"1"}
{"host":"localhost","@timestamp":"2020-09-23T19:05:05-04:00","client_ip":"127.0.0.1","request":{"method":"GET","uri":"/hello"},"response":{"status":200},"route_id":"1"}
```
## Enable Plugin
The example below shows how you can enable the Plugin on a specific Route:
```shell
curl http://127.0.0.1:9180/apisix/admin/routes/1 -H "X-API-KEY: $admin_key" -X PUT -d '
{
"plugins": {
"file-logger": {
"path": "logs/file.log"
}
},
"upstream": {
"type": "roundrobin",
"nodes": {
"127.0.0.1:9001": 1
}
},
"uri": "/hello"
}'
```
## Example usage
Now, if you make a request, it will be logged in the path you specified:
```shell
curl -i http://127.0.0.1:9080/hello
```
You will be able to find the `file.log` file in the configured `logs` directory.
## Filter logs
```shell
curl http://127.0.0.1:9180/apisix/admin/routes/1 \
-H "X-API-KEY: $admin_key" -X PUT -d '
{
"plugins": {
"file-logger": {
"path": "logs/file.log",
"match": [
[
[ "arg_name","==","jack" ]
]
]
}
},
"upstream": {
"type": "roundrobin",
"nodes": {
"127.0.0.1:9001": 1
}
},
"uri": "/hello"
}'
```
Test:
```shell
curl -i http://127.0.0.1:9080/hello?name=jack
```
Log records can be seen in `logs/file.log`.
```shell
curl -i http://127.0.0.1:9080/hello?name=rose
```
Log records cannot be seen in `logs/file.log`.
## Delete Plugin
To remove the `file-logger` Plugin, you can delete the corresponding JSON configuration from the Plugin configuration. APISIX will automatically reload and you do not have to restart for this to take effect.
```shell
curl http://127.0.0.1:9180/apisix/admin/routes/1 -H "X-API-KEY: $admin_key" -X PUT -d '
{
"methods": ["GET"],
"uri": "/hello",
"plugins": {},
"upstream": {
"type": "roundrobin",
"nodes": {
"127.0.0.1:9001": 1
}
}
}'
```
---
---
title: forward-auth
keywords:
- Apache APISIX
- API Gateway
- Plugin
- Forward Authentication
- forward-auth
description: This document contains information about the Apache APISIX forward-auth Plugin.
---
## Description
The `forward-auth` Plugin implements a classic external authentication model. When authentication fails, you can have a custom error message or redirect the user to an authentication page.
This Plugin moves the authentication and authorization logic to a dedicated external service. APISIX forwards the user's requests to the external service, blocks the original request, and replaces the result when the external service responds with a non 2xx status code.
## Attributes
| Name | Type | Required | Default | Valid values | Description |
| ----------------- | ------------- | -------- | ------- | -------------- | ---------------------------------------------------------------------------------------------------------------------------------------------------------- |
| uri | string | True | | | URI of the authorization service. |
| ssl_verify | boolean | False | true | | When set to `true`, verifies the SSL certificate. |
| request_method | string | False | GET | ["GET","POST"] | HTTP method for a client to send requests to the authorization service. When set to `POST` the request body is sent to the authorization service. (not recommended - see section on [Using data from POST body](#using-data-from-post-body-to-make-decision-on-authorization-service)) |
| request_headers | array[string] | False | | | Client request headers to be sent to the authorization service. If not set, only the headers provided by APISIX are sent (for example, `X-Forwarded-XXX`). |
| extra_headers |object | False | | | Extra headers to be sent to the authorization service passed in key-value format. The value can be a variable like `$request_uri`, `$post_arg.xyz` |
| upstream_headers | array[string] | False | | | Authorization service response headers to be forwarded to the Upstream. If not set, no headers are forwarded to the Upstream service. |
| client_headers | array[string] | False | | | Authorization service response headers to be sent to the client when authorization fails. If not set, no headers will be sent to the client. |
| timeout | integer | False | 3000ms | [1, 60000]ms | Timeout for the authorization service HTTP call. |
| keepalive | boolean | False | true | | When set to `true`, keeps the connection alive for multiple requests. |
| keepalive_timeout | integer | False | 60000ms | [1000, ...]ms | Idle time after which the connection is closed. |
| keepalive_pool | integer | False | 5 | [1, ...]ms | Connection pool limit. |
| allow_degradation | boolean | False | false | | When set to `true`, allows authentication to be skipped when authentication server is unavailable. |
| status_on_error | integer | False | 403 | [200,...,599] | Sets the HTTP status that is returned to the client when there is a network error to the authorization service. The default status is “403” (HTTP Forbidden). |
## Data definition
APISIX will generate and send the request headers listed below to the authorization service:
| Scheme | HTTP Method | Host | URI | Source IP |
| ----------------- | ------------------ | ---------------- | --------------- | --------------- |
| X-Forwarded-Proto | X-Forwarded-Method | X-Forwarded-Host | X-Forwarded-Uri | X-Forwarded-For |
## Example usage
First, you need to setup your external authorization service. The example below uses Apache APISIX's [serverless](./serverless.md) Plugin to mock the service:
:::note
You can fetch the `admin_key` from `config.yaml` and save to an environment variable with the following command:
```bash
admin_key=$(yq '.deployment.admin.admin_key[0].key' conf/config.yaml | sed 's/"//g')
```
:::
```shell
curl -X PUT 'http://127.0.0.1:9180/apisix/admin/routes/auth' \
-H "X-API-KEY: $admin_key" \
-H 'Content-Type: application/json' \
-d '{
"uri": "/auth",
"plugins": {
"serverless-pre-function": {
"phase": "rewrite",
"functions": [
"return function (conf, ctx)
local core = require(\"apisix.core\");
local authorization = core.request.header(ctx, \"Authorization\");
if authorization == \"123\" then
core.response.exit(200);
elseif authorization == \"321\" then
core.response.set_header(\"X-User-ID\", \"i-am-user\");
core.response.exit(200);
else core.response.set_header(\"Location\", \"http://example.com/auth\");
core.response.exit(403);
end
end"
]
}
}
}'
```
Now you can configure the `forward-auth` Plugin to a specific Route:
```shell
curl -X PUT 'http://127.0.0.1:9180/apisix/admin/routes/1' \
-H "X-API-KEY: $admin_key" \
-d '{
"uri": "/headers",
"plugins": {
"forward-auth": {
"uri": "http://127.0.0.1:9080/auth",
"request_headers": ["Authorization"],
"upstream_headers": ["X-User-ID"],
"client_headers": ["Location"]
}
},
"upstream": {
"nodes": {
"httpbin.org:80": 1
},
"type": "roundrobin"
}
}'
```
Now if we send the authorization details in the request header:
```shell
curl http://127.0.0.1:9080/headers -H 'Authorization: 123'
```
```
{
"headers": {
"Authorization": "123",
"Next": "More-headers"
}
}
```
The authorization service response can also be forwarded to the Upstream:
```shell
curl http://127.0.0.1:9080/headers -H 'Authorization: 321'
```
```
{
"headers": {
"Authorization": "321",
"X-User-ID": "i-am-user",
"Next": "More-headers"
}
}
```
When authorization fails, the authorization service can send custom response back to the user:
```shell
curl -i http://127.0.0.1:9080/headers
```
```
HTTP/1.1 403 Forbidden
Location: http://example.com/auth
```
### Using data from POST body to make decision on Authorization service
::: note
When the decision is to be made on the basis of POST body, then it is recommended to use `$post_arg.*` with `extra_headers` field and make the decision on Authorization service on basis of headers rather than using POST `request_method` to pass the entire request body to Authorization service.
:::
Create a serverless function on the `/auth` route that checks for the presence of the `tenant_id` header and confirms its value. If present, the route responds with HTTP 200.. If `tenant_id` is missing, it returns HTTP 400 with an error message.
```shell
curl -X PUT 'http://127.0.0.1:9180/apisix/admin/routes/auth' \
-H "X-API-KEY: $admin_key" \
-H 'Content-Type: application/json' \
-d '{
"uri": "/auth",
"plugins": {
"serverless-pre-function": {
"phase": "rewrite",
"functions": [
"return function(conf, ctx)
local core = require(\"apisix.core\")
local tenant_id = core.request.header(ctx, \"tenant_id\")
if tenant_id == \"123\" then
core.response.set_header(\"X-User-ID\", \"i-am-an-user\");
core.response.exit(200);
else
core.response.exit(400, \"tenant_id is \"..tenant_id .. \" but expected 123\");
end
end"
]
}
}
}'
```
Create a route that accepts POST requests and uses the `forward-auth` plugin to call the auth endpoint with the `tenant_id` from the request. The request is forwarded to the upstream service only if the auth check returns 200.
```shell
curl -X PUT 'http://127.0.0.1:9180/apisix/admin/routes/1' \
-H "X-API-KEY: $admin_key" \
-d '{
"uri": "/post",
"methods": ["POST"],
"plugins": {
"forward-auth": {
"uri": "http://127.0.0.1:9080/auth",
"request_method": "GET",
"extra_headers": {"tenant_id": "$post_arg.tenant_id"}
}
},
"upstream": {
"nodes": {
"httpbin.org:80": 1
},
"type": "roundrobin"
}
}'
```
Send a POST request with the `tenant_id` header:
```shell
curl -i http://127.0.0.1:9080/post -H "Content-Type: application/json" -X POST -d '{
"tenant_id": "123"
}'
```
You should receive an `HTTP/1.1 200 OK` response similar to the following:
```json
{
"args": {},
"data": "{\n \"tenant_id\": \"123\"\n}",
"files": {},
"form": {},
"headers": {
"Accept": "*/*",
"Content-Length": "25",
"Content-Type": "application/json",
"Host": "127.0.0.1",
"User-Agent": "curl/8.13.0",
"X-Amzn-Trace-Id": "Root=1-687775d8-6890073173b30c2834901e8b",
"X-Forwarded-Host": "127.0.0.1"
},
"json": {
"tenant_id": "123"
},
"origin": "127.0.0.1, 106.215.82.114",
"url": "http://127.0.0.1/post"
}
```
Send a POST request with wrong the `tenant_id` header:
```shell
curl -i http://127.0.0.1:9080/post -H "Content-Type: application/json" -X POST -d '{
"tenant_id": "asdfasd"
}'
```
You should receive an `HTTP/1.1 400 Bad Request` response with the following message:
```shell
tenant_id is asdfasd but expected 123
```
## Delete Plugin
To remove the `forward-auth` Plugin, you can delete the corresponding JSON configuration from the Plugin configuration. APISIX will automatically reload and you do not have to restart for this to take effect.
```shell
curl http://127.0.0.1:9180/apisix/admin/routes/1 -H "X-API-KEY: $admin_key" -X PUT -d '
{
"methods": ["GET"],
"uri": "/hello",
"plugins": {},
"upstream": {
"type": "roundrobin",
"nodes": {
"127.0.0.1:1980": 1
}
}
}'
```
---
---
title: GM
keywords:
- Apache APISIX
- Plugin
- GM
description: This article introduces the basic information and usage of the Apache APISIX `gm` plugin.
---
:::info
The function usage scenarios introduced in this article are mainly in China, so this article only has a Chinese version temporarily. You can click [here](https://apisix.apache.org/zh/docs/apisix/plugins/gm/) for more details. If you are interested in this feature, welcome to translate this document.
:::
---
---
title: google-cloud-logging
keywords:
- Apache APISIX
- API Gateway
- Plugin
- Google Cloud logging
description: This document contains information about the Apache APISIX google-cloud-logging Plugin.
---
## Description
The `google-cloud-logging` Plugin is used to send APISIX access logs to [Google Cloud Logging Service](https://cloud.google.com/logging/).
This plugin also allows to push logs as a batch to your Google Cloud Logging Service. It might take some time to receive the log data. It will be automatically sent after the timer function in the [batch processor](../batch-processor.md) expires.
## Attributes
| Name | Required | Default | Description |
|-------------------------|----------|------------------------------------------------------------------------------------------------------------------------------------------------------------------------------------------------------|--------------------------------------------------------------------------------------------------------------------------------------------------------------------|
| auth_config | True | | Either `auth_config` or `auth_file` must be provided. |
| auth_config.client_email | True | | Email address of the Google Cloud service account. |
| auth_config.private_key | True | | Private key of the Google Cloud service account. |
| auth_config.project_id | True | | Project ID in the Google Cloud service account. |
| auth_config.token_uri | True | https://oauth2.googleapis.com/token | Token URI of the Google Cloud service account. |
| auth_config.entries_uri | False | https://logging.googleapis.com/v2/entries:write | Google Cloud Logging Service API. |
| auth_config.scope | False | ["https://www.googleapis.com/auth/logging.read", "https://www.googleapis.com/auth/logging.write", "https://www.googleapis.com/auth/logging.admin", "https://www.googleapis.com/auth/cloud-platform"] | Access scopes of the Google Cloud service account. See [OAuth 2.0 Scopes for Google APIs](https://developers.google.com/identity/protocols/oauth2/scopes#logging). |
| auth_config.scopes | Deprecated | ["https://www.googleapis.com/auth/logging.read", "https://www.googleapis.com/auth/logging.write", "https://www.googleapis.com/auth/logging.admin", "https://www.googleapis.com/auth/cloud-platform"] | Access scopes of the Google Cloud service account. Use `auth_config.scope` instead. |
| auth_file | True | | Path to the Google Cloud service account authentication JSON file. Either `auth_config` or `auth_file` must be provided. |
| ssl_verify | False | true | When set to `true`, enables SSL verification as mentioned in [OpenResty docs](https://github.com/openresty/lua-nginx-module#tcpsocksslhandshake). |
| resource | False | {"type": "global"} | Google monitor resource. See [MonitoredResource](https://cloud.google.com/logging/docs/reference/v2/rest/v2/MonitoredResource) for more details. |
| log_id | False | apisix.apache.org%2Flogs | Google Cloud logging ID. See [LogEntry](https://cloud.google.com/logging/docs/reference/v2/rest/v2/LogEntry) for details. |
| log_format | False | | Log format declared as key-value pairs in JSON. Values support strings and nested objects (up to five levels deep; deeper fields are truncated). Within strings, [APISIX](../apisix-variable.md) or [NGINX](http://nginx.org/en/docs/varindex.html) variables can be referenced by prefixing with `$`. |
NOTE: `encrypt_fields = {"auth_config.private_key"}` is also defined in the schema, which means that the field will be stored encrypted in etcd. See [encrypted storage fields](../plugin-develop.md#encrypted-storage-fields).
This Plugin supports using batch processors to aggregate and process entries (logs/data) in a batch. This avoids the need for frequently submitting the data. The batch processor submits data every `5` seconds or when the data in the queue reaches `1000`. See [Batch Processor](../batch-processor.md#configuration) for more information or setting your custom configuration.
### Example of default log format
```json
{
"insertId": "0013a6afc9c281ce2e7f413c01892bdc",
"labels": {
"source": "apache-apisix-google-cloud-logging"
},
"logName": "projects/apisix/logs/apisix.apache.org%2Flogs",
"httpRequest": {
"requestMethod": "GET",
"requestUrl": "http://localhost:1984/hello",
"requestSize": 59,
"responseSize": 118,
"status": 200,
"remoteIp": "127.0.0.1",
"serverIp": "127.0.0.1:1980",
"latency": "0.103s"
},
"resource": {
"type": "global"
},
"jsonPayload": {
"service_id": "",
"route_id": "1"
},
"timestamp": "2024-01-06T03:34:45.065Z"
}
```
## Metadata
You can also set the format of the logs by configuring the Plugin metadata. The following configurations are available:
| Name | Type | Required | Default | Description |
| ---------- | ------ | -------- | ----------------------------------------------------------------------------- | ------------------------------------------------------------------------------------------------------------------------------------------------------------------------------------------------------------------------------------------------------- |
| log_format | object | False | | Log format declared as key-value pairs in JSON. Values support strings and nested objects (up to five levels deep; deeper fields are truncated). Within strings, [APISIX](../apisix-variable.md) or [NGINX](http://nginx.org/en/docs/varindex.html) variables can be referenced by prefixing with `$`. |
| max_pending_entries | integer | False | | Maximum number of pending entries that can be buffered in batch processor before it starts dropping them. |
:::info IMPORTANT
Configuring the Plugin metadata is global in scope. This means that it will take effect on all Routes and Services which use the `google-cloud-logging` Plugin.
:::
The example below shows how you can configure through the Admin API:
:::note
You can fetch the `admin_key` from `config.yaml` and save to an environment variable with the following command:
```bash
admin_key=$(yq '.deployment.admin.admin_key[0].key' conf/config.yaml | sed 's/"//g')
```
:::
```shell
curl http://127.0.0.1:9180/apisix/admin/plugin_metadata/google-cloud-logging -H "X-API-KEY: $admin_key" -X PUT -d '
{
"log_format": {
"host": "$host",
"@timestamp": "$time_iso8601",
"client_ip": "$remote_addr",
"request": { "method": "$request_method", "uri": "$request_uri" },
"response": { "status": "$status" }
}
}'
```
With this configuration, your logs would be formatted as shown below:
```json
{"partialSuccess":false,"entries":[{"jsonPayload":{"host":"localhost","client_ip":"127.0.0.1","@timestamp":"2023-01-09T14:47:25+08:00","request":{"method":"GET","uri":"/hello"},"response":{"status":200},"route_id":"1"},"resource":{"type":"global"},"insertId":"942e81f60b9157f0d46bc9f5a8f0cc40","logName":"projects/apisix/logs/apisix.apache.org%2Flogs","timestamp":"2023-01-09T14:47:25+08:00","labels":{"source":"apache-apisix-google-cloud-logging"}}]}
```
## Enable Plugin
### Full configuration
The example below shows a complete configuration of the Plugin on a specific Route:
```shell
curl http://127.0.0.1:9180/apisix/admin/routes/1 -H "X-API-KEY: $admin_key" -X PUT -d '
{
"plugins": {
"google-cloud-logging": {
"auth_config":{
"project_id":"apisix",
"client_email":"your service account email@apisix.iam.gserviceaccount.com",
"private_key":"-----BEGIN RSA PRIVATE KEY-----your private key-----END RSA PRIVATE KEY-----",
"token_uri":"https://oauth2.googleapis.com/token",
"scope":[
"https://www.googleapis.com/auth/logging.admin"
],
"entries_uri":"https://logging.googleapis.com/v2/entries:write"
},
"resource":{
"type":"global"
},
"log_id":"apisix.apache.org%2Flogs",
"inactive_timeout":10,
"max_retry_count":0,
"buffer_duration":60,
"retry_delay":1,
"batch_max_size":1
}
},
"upstream": {
"type": "roundrobin",
"nodes": {
"127.0.0.1:1980": 1
}
},
"uri": "/hello"
}'
```
### Minimal configuration
The example below shows a bare minimum configuration of the Plugin on a Route:
```shell
curl http://127.0.0.1:9180/apisix/admin/routes/1 -H "X-API-KEY: $admin_key" -X PUT -d '
{
"plugins": {
"google-cloud-logging": {
"auth_config":{
"project_id":"apisix",
"client_email":"your service account email@apisix.iam.gserviceaccount.com",
"private_key":"-----BEGIN RSA PRIVATE KEY-----your private key-----END RSA PRIVATE KEY-----"
}
}
},
"upstream": {
"type": "roundrobin",
"nodes": {
"127.0.0.1:1980": 1
}
},
"uri": "/hello"
}'
```
## Example usage
Now, if you make a request to APISIX, it will be logged in your Google Cloud Logging Service.
```shell
curl -i http://127.0.0.1:9080/hello
```
You can then login and view the logs in [Google Cloud Logging Service](https://console.cloud.google.com/logs/viewer).
## Delete Plugin
To remove the `google-cloud-logging` Plugin, you can delete the corresponding JSON configuration from the Plugin configuration. APISIX will automatically reload and you do not have to restart for this to take effect.
```shell
curl http://127.0.0.1:9180/apisix/admin/routes/1 -H "X-API-KEY: $admin_key" -X PUT -d '
{
"uri": "/hello",
"plugins": {},
"upstream": {
"type": "roundrobin",
"nodes": {
"127.0.0.1:1980": 1
}
}
}'
```
---
---
title: grpc-transcode
keywords:
- Apache APISIX
- API Gateway
- Plugin
- gRPC Transcode
- grpc-transcode
description: This document contains information about the Apache APISIX grpc-transcode Plugin.
---
## Description
The `grpc-transcode` Plugin converts between HTTP and gRPC requests.
APISIX takes in an HTTP request, transcodes it and forwards it to a gRPC service, gets the response and returns it back to the client in HTTP format.
## Attributes
| Name | Type | Required | Default | Description |
| --------- | ------------------------------------------------------ | -------- | ------- | ------------------------------------ |
| proto_id | string/integer | True | | id of the the proto content. |
| service | string | True | | Name of the gRPC service. |
| method | string | True | | Method name of the gRPC service. |
| deadline | number | False | 0 | Deadline for the gRPC service in ms. |
| pb_option | array[string([pb_option_def](#options-for-pb_option))] | False | | protobuf options. |
| show_status_in_body | boolean | False | false | Whether to display the parsed `grpc-status-details-bin` in the response body |
| status_detail_type | string | False | | The message type corresponding to the [details](https://github.com/googleapis/googleapis/blob/b7cb84f5d42e6dba0fdcc2d8689313f6a8c9d7b9/google/rpc/status.proto#L46) part of `grpc-status-details-bin`, if not specified, this part will not be decoded |
### Options for pb_option
| Type | Valid values |
|-----------------|-------------------------------------------------------------------------------------------|
| enum as result | `enum_as_name`, `enum_as_value` |
| int64 as result | `int64_as_number`, `int64_as_string`, `int64_as_hexstring` |
| default values | `auto_default_values`, `no_default_values`, `use_default_values`, `use_default_metatable` |
| hooks | `enable_hooks`, `disable_hooks` |
## Enable Plugin
Before enabling the Plugin, you have to add the content of your `.proto` or `.pb` files to APISIX.
You can use the `/admin/protos/id` endpoint and add the contents of the file to the `content` field:
:::note
You can fetch the `admin_key` from `config.yaml` and save to an environment variable with the following command:
```bash
admin_key=$(yq '.deployment.admin.admin_key[0].key' conf/config.yaml | sed 's/"//g')
```
:::
```shell
curl http://127.0.0.1:9180/apisix/admin/protos/1 -H "X-API-KEY: $admin_key" -X PUT -d '
{
"content" : "syntax = \"proto3\";
package helloworld;
service Greeter {
rpc SayHello (HelloRequest) returns (HelloReply) {}
}
message HelloRequest {
string name = 1;
}
message HelloReply {
string message = 1;
}"
}'
```
If your proto file contains imports, or if you want to combine multiple proto files, you can generate a `.pb` file and use it in APISIX.
For example, if we have a file called `proto/helloworld.proto` which imports another proto file:
```proto
syntax = "proto3";
package helloworld;
import "proto/import.proto";
...
```
We first generate a `.pb` file from the proto files:
```shell
protoc --include_imports --descriptor_set_out=proto.pb proto/helloworld.proto
```
The output binary file, `proto.pb` will contain both `helloworld.proto` and `import.proto`.
We can now use the content of `proto.pb` in the `content` field of the API request.
As the content of the proto is binary, we encode it in `base64` and configure the content in APISIX:
```shell
curl http://127.0.0.1:9180/apisix/admin/protos/1 \
-H "X-API-KEY: $admin_key" -X PUT -d '
{
"content" : "'"$(base64 -w0 /path/to/proto.pb)"'"
}'
```
You should see an `HTTP/1.1 201 Created` response with the following:
```
{"node":{"value":{"create_time":1643879753,"update_time":1643883085,"content":"CmgKEnByb3RvL2ltcG9ydC5wcm90bxIDcGtnIhoKBFVzZXISEgoEbmFtZRgBIAEoCVIEbmFtZSIeCghSZXNwb25zZRISCgRib2R5GAEgASgJUgRib2R5QglaBy4vcHJvdG9iBnByb3RvMwq9AQoPcHJvdG8vc3JjLnByb3RvEgpoZWxsb3dvcmxkGhJwcm90by9pbXBvcnQucHJvdG8iPAoHUmVxdWVzdBIdCgR1c2VyGAEgASgLMgkucGtnLlVzZXJSBHVzZXISEgoEYm9keRgCIAEoCVIEYm9keTI5CgpUZXN0SW1wb3J0EisKA1J1bhITLmhlbGxvd29ybGQuUmVxdWVzdBoNLnBrZy5SZXNwb25zZSIAQglaBy4vcHJvdG9iBnByb3RvMw=="},"key":"\/apisix\/proto\/1"}}
```
Now, we can enable the `grpc-transcode` Plugin to a specific Route:
```shell
curl http://127.0.0.1:9180/apisix/admin/routes/111 -H "X-API-KEY: $admin_key" -X PUT -d '
{
"methods": ["GET"],
"uri": "/grpctest",
"plugins": {
"grpc-transcode": {
"proto_id": "1",
"service": "helloworld.Greeter",
"method": "SayHello"
}
},
"upstream": {
"scheme": "grpc",
"type": "roundrobin",
"nodes": {
"127.0.0.1:50051": 1
}
}
}'
```
:::note
The Upstream service used here should be a gRPC service. Note that the `scheme` is set to `grpc`.
You can use the [grpc_server_example](https://github.com/api7/grpc_server_example) for testing.
:::
## Example usage
Once you configured the Plugin as mentioned above, you can make a request to APISIX to get a response back from the gRPC service (through APISIX):
```shell
curl -i http://127.0.0.1:9080/grpctest?name=world
```
Response:
```shell
HTTP/1.1 200 OK
Date: Fri, 16 Aug 2019 11:55:36 GMT
Content-Type: application/json
Transfer-Encoding: chunked
Connection: keep-alive
Server: APISIX web server
Proxy-Connection: keep-alive
{"message":"Hello world"}
```
You can also configure the `pb_option` as shown below:
```shell
curl http://127.0.0.1:9180/apisix/admin/routes/23 -H "X-API-KEY: $admin_key" -X PUT -d '
{
"methods": ["GET"],
"uri": "/zeebe/WorkflowInstanceCreate",
"plugins": {
"grpc-transcode": {
"proto_id": "1",
"service": "gateway_protocol.Gateway",
"method": "CreateWorkflowInstance",
"pb_option":["int64_as_string"]
}
},
"upstream": {
"scheme": "grpc",
"type": "roundrobin",
"nodes": {
"127.0.0.1:26500": 1
}
}
}'
```
Now if you check the configured Route:
```shell
curl -i "http://127.0.0.1:9080/zeebe/WorkflowInstanceCreate?bpmnProcessId=order-process&version=1&variables=\{\"orderId\":\"7\",\"ordervalue\":99\}"
```
```
HTTP/1.1 200 OK
Date: Wed, 13 Nov 2019 03:38:27 GMT
Content-Type: application/json
Transfer-Encoding: chunked
Connection: keep-alive
grpc-encoding: identity
grpc-accept-encoding: gzip
Server: APISIX web server
Trailer: grpc-status
Trailer: grpc-message
{"workflowKey":"#2251799813685260","workflowInstanceKey":"#2251799813688013","bpmnProcessId":"order-process","version":1}
```
## Show `grpc-status-details-bin` in response body
If the gRPC service returns an error, there may be a `grpc-status-details-bin` field in the response header describing the error, which you can decode and display in the response body.
Upload the proto file:
```shell
curl http://127.0.0.1:9180/apisix/admin/protos/1 \
-H "X-API-KEY: $admin_key" -X PUT -d '
{
"content" : "syntax = \"proto3\";
package helloworld;
service Greeter {
rpc GetErrResp (HelloRequest) returns (HelloReply) {}
}
message HelloRequest {
string name = 1;
repeated string items = 2;
}
message HelloReply {
string message = 1;
repeated string items = 2;
}"
}'
```
Enable the `grpc-transcode` plugin,and set the option `show_status_in_body` to `true`:
```shell
curl http://127.0.0.1:9180/apisix/admin/routes/1 \
-H "X-API-KEY: $admin_key" -X PUT -d '
{
"methods": ["GET"],
"uri": "/grpctest",
"plugins": {
"grpc-transcode": {
"proto_id": "1",
"service": "helloworld.Greeter",
"method": "GetErrResp",
"show_status_in_body": true
}
},
"upstream": {
"scheme": "grpc",
"type": "roundrobin",
"nodes": {
"127.0.0.1:50051": 1
}
}
}'
```
Access the route configured above:
```shell
curl -i http://127.0.0.1:9080/grpctest?name=world
```
Response:
```Shell
HTTP/1.1 503 Service Temporarily Unavailable
Date: Wed, 10 Aug 2022 08:59:46 GMT
Content-Type: application/json
Transfer-Encoding: chunked
Connection: keep-alive
grpc-status: 14
grpc-message: Out of service
grpc-status-details-bin: CA4SDk91dCBvZiBzZXJ2aWNlGlcKKnR5cGUuZ29vZ2xlYXBpcy5jb20vaGVsbG93b3JsZC5FcnJvckRldGFpbBIpCAESHFRoZSBzZXJ2ZXIgaXMgb3V0IG9mIHNlcnZpY2UaB3NlcnZpY2U
Server: APISIX web server
{"error":{"details":[{"type_url":"type.googleapis.com\/helloworld.ErrorDetail","value":"\b\u0001\u0012\u001cThe server is out of service\u001a\u0007service"}],"message":"Out of service","code":14}}
```
Note that there is an undecoded field in the return body. If you need to decode the field, you need to add the `message type` of the field in the uploaded proto file.
```shell
curl http://127.0.0.1:9180/apisix/admin/protos/1 \
-H "X-API-KEY: $admin_key" -X PUT -d '
{
"content" : "syntax = \"proto3\";
package helloworld;
service Greeter {
rpc GetErrResp (HelloRequest) returns (HelloReply) {}
}
message HelloRequest {
string name = 1;
repeated string items = 2;
}
message HelloReply {
string message = 1;
repeated string items = 2;
}
message ErrorDetail {
int64 code = 1;
string message = 2;
string type = 3;
}"
}'
```
Also configure the option `status_detail_type` to `helloworld.ErrorDetail`.
```shell
curl http://127.0.0.1:9180/apisix/admin/routes/1 \
-H "X-API-KEY: $admin_key" -X PUT -d '
{
"methods": ["GET"],
"uri": "/grpctest",
"plugins": {
"grpc-transcode": {
"proto_id": "1",
"service": "helloworld.Greeter",
"method": "GetErrResp",
"show_status_in_body": true,
"status_detail_type": "helloworld.ErrorDetail"
}
},
"upstream": {
"scheme": "grpc",
"type": "roundrobin",
"nodes": {
"127.0.0.1:50051": 1
}
}
}'
```
The fully decoded result is returned.
```Shell
HTTP/1.1 503 Service Temporarily Unavailable
Date: Wed, 10 Aug 2022 09:02:46 GMT
Content-Type: application/json
Transfer-Encoding: chunked
Connection: keep-alive
grpc-status: 14
grpc-message: Out of service
grpc-status-details-bin: CA4SDk91dCBvZiBzZXJ2aWNlGlcKKnR5cGUuZ29vZ2xlYXBpcy5jb20vaGVsbG93b3JsZC5FcnJvckRldGFpbBIpCAESHFRoZSBzZXJ2ZXIgaXMgb3V0IG9mIHNlcnZpY2UaB3NlcnZpY2U
Server: APISIX web server
{"error":{"details":[{"type":"service","message":"The server is out of service","code":1}],"message":"Out of service","code":14}}
```
## Delete Plugin
To remove the `grpc-transcode` Plugin, you can delete the corresponding JSON configuration from the Plugin configuration. APISIX will automatically reload and you do not have to restart for this to take effect.
```shell
curl http://127.0.0.1:9180/apisix/admin/routes/111 -H "X-API-KEY: $admin_key" -X PUT -d '
{
"uri": "/grpctest",
"plugins": {},
"upstream": {
"scheme": "grpc",
"type": "roundrobin",
"nodes": {
"127.0.0.1:50051": 1
}
}
}'
```
---
---
title: grpc-web
keywords:
- Apache APISIX
- API Gateway
- Plugin
- gRPC Web
- grpc-web
description: This document contains information about the Apache APISIX grpc-web Plugin.
---
## Description
The `grpc-web` Plugin is a proxy Plugin that can process [gRPC Web](https://github.com/grpc/grpc-web) requests from JavaScript clients to a gRPC service.
## Attributes
| Name | Type | Required | Default | Description |
|-------------------------|---------|----------|-----------------------------------------|----------------------------------------------------------------------------------------------------------|
| cors_allow_headers | string | False | "content-type,x-grpc-web,x-user-agent" | Headers in the request allowed when accessing a cross-origin resource. Use `,` to add multiple headers. |
## Enable Plugin
You can enable the `grpc-web` Plugin on a specific Route as shown below:
:::note
You can fetch the `admin_key` from `config.yaml` and save to an environment variable with the following command:
```bash
admin_key=$(yq '.deployment.admin.admin_key[0].key' conf/config.yaml | sed 's/"//g')
```
:::
```shell
curl http://127.0.0.1:9180/apisix/admin/routes/1 -H "X-API-KEY: $admin_key" -X PUT -d '
{
"uri":"/grpc/web/*",
"plugins":{
"grpc-web":{}
},
"upstream":{
"scheme":"grpc",
"type":"roundrobin",
"nodes":{
"127.0.0.1:1980":1
}
}
}'
```
:::info IMPORTANT
While using the `grpc-web` Plugin, always use a prefix matching pattern (`/*`, `/grpc/example/*`) for matching Routes. This is because the gRPC Web client passes the package name, the service interface name, the method name and other information in the proto in the URI. For example, `/path/a6.RouteService/Insert`.
So, when absolute matching is used, the Plugin would not be hit and the information from the proto would not be extracted.
:::
## Example usage
Refer to [gRPC-Web Client Runtime Library](https://www.npmjs.com/package/grpc-web) or [Apache APISIX gRPC Web Test Framework](https://github.com/apache/apisix/tree/master/t/plugin/grpc-web) to learn how to setup your web client.
Once you have your gRPC Web client running, you can make a request to APISIX from the browser or through Node.js.
:::note
The supported request methods are `POST` and `OPTIONS`. See [CORS support](https://github.com/grpc/grpc-web/blob/master/doc/browser-features.md#cors-support).
The supported `Content-Type` includes `application/grpc-web`, `application/grpc-web-text`, `application/grpc-web+proto`, and `application/grpc-web-text+proto`. See [Protocol differences vs gRPC over HTTP2](https://github.com/grpc/grpc/blob/master/doc/PROTOCOL-WEB.md#protocol-differences-vs-grpc-over-http2).
:::
## Delete Plugin
To remove the `grpc-web` Plugin, you can delete the corresponding JSON configuration from the Plugin configuration. APISIX will automatically reload and you do not have to restart for this to take effect.
```shell
curl http://127.0.0.1:9180/apisix/admin/routes/1 -H "X-API-KEY: $admin_key" -X PUT -d '
{
"uri":"/grpc/web/*",
"plugins":{},
"upstream":{
"scheme":"grpc",
"type":"roundrobin",
"nodes":{
"127.0.0.1:1980":1
}
}
}'
```
---
---
title: gzip
keywords:
- Apache APISIX
- API Gateway
- Plugin
- gzip
description: This document contains information about the Apache APISIX gzip Plugin.
---
## Description
The `gzip` Plugin dynamically sets the behavior of [gzip in Nginx](https://docs.nginx.com/nginx/admin-guide/web-server/compression/).
When the `gzip` plugin is enabled, the client needs to include `Accept-Encoding: gzip` in the request header to indicate support for gzip compression. Upon receiving the request, APISIX dynamically determines whether to compress the response content based on the client's support and server configuration. If the conditions are met, `APISIX` adds the `Content-Encoding: gzip` header to the response, indicating that the response content has been compressed using gzip. Upon receiving the response, the client uses the corresponding decompression algorithm based on the `Content-Encoding` header to decompress the response content and obtain the original response content.
:::info IMPORTANT
This Plugin requires APISIX to run on [APISIX-Runtime](../FAQ.md#how-do-i-build-the-apisix-runtime-environment).
:::
## Attributes
| Name | Type | Required | Default | Valid values | Description |
|----------------|----------------------|----------|---------------|--------------|-----------------------------------------------------------------------------------------|
| types | array[string] or "*" | False | ["text/html"] | | Dynamically sets the `gzip_types` directive. Special value `"*"` matches any MIME type. |
| min_length | integer | False | 20 | >= 1 | Dynamically sets the `gzip_min_length` directive. |
| comp_level | integer | False | 1 | [1, 9] | Dynamically sets the `gzip_comp_level` directive. |
| http_version | number | False | 1.1 | 1.1, 1.0 | Dynamically sets the `gzip_http_version` directive. |
| buffers.number | integer | False | 32 | >= 1 | Dynamically sets the `gzip_buffers` directive parameter `number`. |
| buffers.size | integer | False | 4096 | >= 1 | Dynamically sets the `gzip_buffers` directive parameter `size`. The unit is in bytes. |
| vary | boolean | False | false | | Dynamically sets the `gzip_vary` directive. |
## Enable Plugin
The example below enables the `gzip` Plugin on the specified Route:
:::note
You can fetch the `admin_key` from `config.yaml` and save to an environment variable with the following command:
```bash
admin_key=$(yq '.deployment.admin.admin_key[0].key' conf/config.yaml | sed 's/"//g')
```
:::
```shell
curl -i http://127.0.0.1:9180/apisix/admin/routes/1 -H "X-API-KEY: $admin_key" -X PUT -d '
{
"uri": "/index.html",
"plugins": {
"gzip": {
"buffers": {
"number": 8
}
}
},
"upstream": {
"type": "roundrobin",
"nodes": {
"127.0.0.1:1980": 1
}
}
}'
```
## Example usage
Once you have configured the Plugin as shown above, you can make a request as shown below:
```shell
curl http://127.0.0.1:9080/index.html -i -H "Accept-Encoding: gzip"
```
```
HTTP/1.1 404 Not Found
Content-Type: text/html; charset=utf-8
Transfer-Encoding: chunked
Connection: keep-alive
Date: Wed, 21 Jul 2021 03:52:55 GMT
Server: APISIX/2.7
Content-Encoding: gzip
Warning: Binary output can mess up your terminal. Use "--output -" to tell
Warning: curl to output it to your terminal anyway, or consider "--output
Warning: " to save to a file.
```
## Delete Plugin
To remove the `gzip` Plugin, you can delete the corresponding JSON configuration from the Plugin configuration. APISIX will automatically reload and you do not have to restart for this to take effect.
```shell
curl http://127.0.0.1:9180/apisix/admin/routes/1 -H "X-API-KEY: $admin_key" -X PUT -d '
{
"uri": "/index.html",
"upstream": {
"type": "roundrobin",
"nodes": {
"127.0.0.1:1980": 1
}
}
}'
```
---
---
title: hmac-auth
keywords:
- Apache APISIX
- API Gateway
- Plugin
- HMAC Authentication
- hmac-auth
description: The hmac-auth Plugin supports HMAC authentication to ensure request integrity, preventing modifications during transmission and enhancing API security.
---
## Description
The `hmac-auth` Plugin supports HMAC (Hash-based Message Authentication Code) authentication as a mechanism to ensure the integrity of requests, preventing them from being modified during transmissions. To use the Plugin, you would configure HMAC secret keys on [Consumers](../terminology/consumer.md) and enable the Plugin on Routes or Services.
When a Consumer is successfully authenticated, APISIX adds additional headers, such as `X-Consumer-Username`, `X-Credential-Indentifier`, and other Consumer custom headers if configured, to the request, before proxying it to the Upstream service. The Upstream service will be able to differentiate between consumers and implement additional logics as needed. If any of these values is not available, the corresponding header will not be added.
Once enabled, the Plugin verifies the HMAC signature in the request's `Authorization` header and check that incoming requests are from trusted sources. Specifically, when APISIX receives an HMAC-signed request, the key ID is extracted from the `Authorization` header. APISIX then retrieves the corresponding Consumer configuration, including the secret key. If the key ID is valid and exists, APISIX generates an HMAC signature using the request's `Date` header and the secret key. If this generated signature matches the signature provided in the `Authorization` header, the request is authenticated and forwarded to Upstream services.
The Plugin implementation is based on [draft-cavage-http-signatures](https://www.ietf.org/archive/id/draft-cavage-http-signatures-12.txt).
## Attributes
The following attributes are available for configurations on Consumers or Credentials.
| Name | Type | Required | Default | Valid values | Description |
|-----------------------|---------------|----------|---------------|---------------------------------------------|-----------------------------------------------------------------------------------------------------------------------------------------------------------------------------------------------------------|
| key_id | string | True | | | Unique identifier for the Consumer, which identifies the associated configurations such as the secret key. |
| secret_key | string | True | | | Secret key used to generate an HMAC. This field supports saving the value in Secret Manager using the [APISIX Secret](../terminology/secret.md) resource. |
The following attributes are available for configurations on Routes or Services.
| Name | Type | Required | Default | Valid values | Description |
|-----------------------|---------------|----------|---------------|---------------------------------------------|-----------------------------------------------------------------------------------------------------------------------------------------------------------------------------------------------------------|
| allowed_algorithms | array[string] | False | ["hmac-sha1","hmac-sha256","hmac-sha512"] | combination of "hmac-sha1","hmac-sha256",and "hmac-sha512" | The list of HMAC algorithms allowed. |
| clock_skew | integer | False | 300 | >=1 | Maximum allowable time difference in seconds between the client request's timestamp and APISIX server's current time. This helps account for discrepancies in time synchronization between the client’s and server’s clocks and protect against replay attacks. The timestamp in the Date header (must be in GMT format) will be used for the calculation. |
| signed_headers | array[string] | False | | | The list of HMAC-signed headers that should be included in the client request's HMAC signature. |
| validate_request_body | boolean | False | false | | If true, validate the integrity of the request body to ensure it has not been tampered with during transmission. Specifically, the Plugin creates a SHA-256 base64-encoded digest and compare it to the `Digest` header. If the Digest` header is missing or if the digests do not match, the validation fails. |
| hide_credentials | boolean | False | false | | If true, do not pass the authorization request header to Upstream services. |
| anonymous_consumer | string | False | | | Anonymous Consumer name. If configured, allow anonymous users to bypass the authentication. |
NOTE: `encrypt_fields = {"secret_key"}` is also defined in the schema, which means that the field will be stored encrypted in etcd. See [encrypted storage fields](../plugin-develop.md#encrypted-storage-fields).
## Examples
The examples below demonstrate how you can work with the `hmac-auth` Plugin for different scenarios.
:::note
You can fetch the `admin_key` from `config.yaml` and save to an environment variable with the following command:
```bash
admin_key=$(yq '.deployment.admin.admin_key[0].key' conf/config.yaml | sed 's/"//g')
```
:::
### Implement HMAC Authentication on a Route
The following example demonstrates how to implement HMAC authentications on a route. You will also attach a Consumer custom ID to authenticated request in the `Consumer-Custom-Id` header, which can be used to implement additional logics as needed.
Create a Consumer `john` with a custom ID label:
```shell
curl "http://127.0.0.1:9180/apisix/admin/consumers" -X PUT \
-H "X-API-KEY: ${admin_key}" \
-d '{
"username": "john",
"labels": {
"custom_id": "495aec6a"
}
}'
```
Create `hmac-auth` Credential for the Consumer:
```shell
curl "http://127.0.0.1:9180/apisix/admin/consumers/john/credentials" -X PUT \
-H "X-API-KEY: ${admin_key}" \
-d '{
"id": "cred-john-hmac-auth",
"plugins": {
"hmac-auth": {
"key_id": "john-key",
"secret_key": "john-secret-key"
}
}
}'
```
Create a Route with the `hmac-auth` Plugin using its default configurations:
```shell
curl "http://127.0.0.1:9180/apisix/admin/routes" -X PUT \
-H "X-API-KEY: ${admin_key}" \
-d '{
"id": "hmac-auth-route",
"uri": "/get",
"methods": ["GET"],
"plugins": {
"hmac-auth": {}
},
"upstream": {
"type": "roundrobin",
"nodes": {
"httpbin.org:80": 1
}
}
}'
```
Generate a signature. You can use the below Python snippet or other stack of your choice:
```python title="hmac-sig-header-gen.py"
import hmac
import hashlib
import base64
from datetime import datetime, timezone
key_id = "john-key" # key id
secret_key = b"john-secret-key" # secret key
request_method = "GET" # HTTP method
request_path = "/get" # Route URI
algorithm= "hmac-sha256" # can use other algorithms in allowed_algorithms
# get current datetime in GMT
# note: the signature will become invalid after the clock skew (default 300s)
# you can regenerate the signature after it becomes invalid, or increase the clock
# skew to prolong the validity within the advised security boundary
gmt_time = datetime.now(timezone.utc).strftime('%a, %d %b %Y %H:%M:%S GMT')
# construct the signing string (ordered)
# the date and any subsequent custom headers should be lowercased and separated by a
# single space character, i.e. `:`
# https://datatracker.ietf.org/doc/html/draft-cavage-http-signatures-12#section-2.1.6
signing_string = (
f"{key_id}\n"
f"{request_method} {request_path}\n"
f"date: {gmt_time}\n"
)
# create signature
signature = hmac.new(secret_key, signing_string.encode('utf-8'), hashlib.sha256).digest()
signature_base64 = base64.b64encode(signature).decode('utf-8')
# construct the request headers
headers = {
"Date": gmt_time,
"Authorization": (
f'Signature keyId="{key_id}",algorithm="{algorithm}",'
f'headers="@request-target date",'
f'signature="{signature_base64}"'
)
}
# print headers
print(headers)
```
Run the script:
```shell
python3 hmac-sig-header-gen.py
```
You should see the request headers printed:
```text
{'Date': 'Fri, 06 Sep 2024 06:41:29 GMT', 'Authorization': 'Signature keyId="john-key",algorithm="hmac-sha256",headers="@request-target date",signature="wWfKQvPDr0wHQ4IHdluB4IzeNZcj0bGJs2wvoCOT5rM="'}
```
Using the headers generated, send a request to the route:
```shell
curl -X GET "http://127.0.0.1:9080/get" \
-H "Date: Fri, 06 Sep 2024 06:41:29 GMT" \
-H 'Authorization: Signature keyId="john-key",algorithm="hmac-sha256",headers="@request-target date",signature="wWfKQvPDr0wHQ4IHdluB4IzeNZcj0bGJs2wvoCOT5rM="'
```
You should see an `HTTP/1.1 200 OK` response similar to the following:
```json
{
"args": {},
"headers": {
"Accept": "*/*",
"Authorization": "Signature keyId=\"john-key\",algorithm=\"hmac-sha256\",headers=\"@request-target date\",signature=\"wWfKQvPDr0wHQ4IHdluB4IzeNZcj0bGJs2wvoCOT5rM=\"",
"Date": "Fri, 06 Sep 2024 06:41:29 GMT",
"Host": "127.0.0.1",
"User-Agent": "curl/8.6.0",
"X-Amzn-Trace-Id": "Root=1-66d96513-2e52d4f35c9b6a2772d667ea",
"X-Consumer-Username": "john",
"X-Credential-Identifier": "cred-john-hmac-auth",
"X-Consumer-Custom-Id": "495aec6a",
"X-Forwarded-Host": "127.0.0.1"
},
"origin": "192.168.65.1, 34.0.34.160",
"url": "http://127.0.0.1/get"
}
```
### Hide Authorization Information From Upstream
As seen the in the [last example](#implement-hmac-authentication-on-a-route), the `Authorization` header passed to the Upstream includes the signature and all other details. This could potentially introduce security risks.
The following example demonstrates how to prevent these information from being sent to the Upstream service.
Update the Plugin configuration to set `hide_credentials` to `true`:
```shell
curl "http://127.0.0.1:9180/apisix/admin/routes/hmac-auth-route" -X PATCH \
-H "X-API-KEY: ${admin_key}" \
-d '{
"plugins": {
"hmac-auth": {
"hide_credentials": true
}
}
}'
```
Send a request to the route:
```shell
curl -X GET "http://127.0.0.1:9080/get" \
-H "Date: Fri, 06 Sep 2024 06:41:29 GMT" \
-H 'Authorization: Signature keyId="john-key",algorithm="hmac-sha256",headers="@request-target date",signature="wWfKQvPDr0wHQ4IHdluB4IzeNZcj0bGJs2wvoCOT5rM="'
```
You should see an `HTTP/1.1 200 OK` response and notice the `Authorization` header is entirely removed:
```json
{
"args": {},
"headers": {
"Accept": "*/*",
"Host": "127.0.0.1",
"User-Agent": "curl/8.6.0",
"X-Amzn-Trace-Id": "Root=1-66d96513-2e52d4f35c9b6a2772d667ea",
"X-Consumer-Username": "john",
"X-Credential-Identifier": "cred-john-hmac-auth",
"X-Forwarded-Host": "127.0.0.1"
},
"origin": "192.168.65.1, 34.0.34.160",
"url": "http://127.0.0.1/get"
}
```
### Enable Body Validation
The following example demonstrates how to enable body validation to ensure the integrity of the request body.
Create a Consumer `john`:
```shell
curl "http://127.0.0.1:9180/apisix/admin/consumers" -X PUT \
-H "X-API-KEY: ${admin_key}" \
-d '{
"username": "john"
}'
```
Create `hmac-auth` Credential for the Consumer:
```shell
curl "http://127.0.0.1:9180/apisix/admin/consumers/john/credentials" -X PUT \
-H "X-API-KEY: ${admin_key}" \
-d '{
"id": "cred-john-hmac-auth",
"plugins": {
"hmac-auth": {
"key_id": "john-key",
"secret_key": "john-secret-key"
}
}
}'
```
Create a Route with the `hmac-auth` Plugin as such:
```shell
curl "http://127.0.0.1:9180/apisix/admin/routes" -X PUT \
-H "X-API-KEY: ${admin_key}" \
-d '{
"id": "hmac-auth-route",
"uri": "/post",
"methods": ["POST"],
"plugins": {
"hmac-auth": {
"validate_request_body": true
}
},
"upstream": {
"type": "roundrobin",
"nodes": {
"httpbin.org:80": 1
}
}
}'
```
Generate a signature. You can use the below Python snippet or other stack of your choice:
```python title="hmac-sig-digest-header-gen.py"
import hmac
import hashlib
import base64
from datetime import datetime, timezone
key_id = "john-key" # key id
secret_key = b"john-secret-key" # secret key
request_method = "POST" # HTTP method
request_path = "/post" # Route URI
algorithm= "hmac-sha256" # can use other algorithms in allowed_algorithms
body = '{"name": "world"}' # example request body
# get current datetime in GMT
# note: the signature will become invalid after the clock skew (default 300s).
# you can regenerate the signature after it becomes invalid, or increase the clock
# skew to prolong the validity within the advised security boundary
gmt_time = datetime.now(timezone.utc).strftime('%a, %d %b %Y %H:%M:%S GMT')
# construct the signing string (ordered)
# the date and any subsequent custom headers should be lowercased and separated by a
# single space character, i.e. `:`
# https://datatracker.ietf.org/doc/html/draft-cavage-http-signatures-12#section-2.1.6
signing_string = (
f"{key_id}\n"
f"{request_method} {request_path}\n"
f"date: {gmt_time}\n"
)
# create signature
signature = hmac.new(secret_key, signing_string.encode('utf-8'), hashlib.sha256).digest()
signature_base64 = base64.b64encode(signature).decode('utf-8')
# create the SHA-256 digest of the request body and base64 encode it
body_digest = hashlib.sha256(body.encode('utf-8')).digest()
body_digest_base64 = base64.b64encode(body_digest).decode('utf-8')
# construct the request headers
headers = {
"Date": gmt_time,
"Digest": f"SHA-256={body_digest_base64}",
"Authorization": (
f'Signature keyId="{key_id}",algorithm="hmac-sha256",'
f'headers="@request-target date",'
f'signature="{signature_base64}"'
)
}
# print headers
print(headers)
```
Run the script:
```shell
python3 hmac-sig-digest-header-gen.py
```
You should see the request headers printed:
```text
{'Date': 'Fri, 06 Sep 2024 09:16:16 GMT', 'Digest': 'SHA-256=78qzJuLwSpZ8HacsTdFCQJWxzPMOf8bYctRk2ySLpS8=', 'Authorization': 'Signature keyId="john-key",algorithm="hmac-sha256",headers="@request-target date",signature="rjS6NxOBKmzS8CZL05uLiAfE16hXdIpMD/L/HukOTYE="'}
```
Using the headers generated, send a request to the route:
```shell
curl "http://127.0.0.1:9080/post" -X POST \
-H "Date: Fri, 06 Sep 2024 09:16:16 GMT" \
-H "Digest: SHA-256=78qzJuLwSpZ8HacsTdFCQJWxzPMOf8bYctRk2ySLpS8=" \
-H 'Authorization: Signature keyId="john-key",algorithm="hmac-sha256",headers="@request-target date",signature="rjS6NxOBKmzS8CZL05uLiAfE16hXdIpMD/L/HukOTYE="' \
-d '{"name": "world"}'
```
You should see an `HTTP/1.1 200 OK` response similar to the following:
```json
{
"args": {},
"data": "",
"files": {},
"form": {
"{\"name\": \"world\"}": ""
},
"headers": {
"Accept": "*/*",
"Authorization": "Signature keyId=\"john-key\",algorithm=\"hmac-sha256\",headers=\"@request-target date\",signature=\"rjS6NxOBKmzS8CZL05uLiAfE16hXdIpMD/L/HukOTYE=\"",
"Content-Length": "17",
"Content-Type": "application/x-www-form-urlencoded",
"Date": "Fri, 06 Sep 2024 09:16:16 GMT",
"Digest": "SHA-256=78qzJuLwSpZ8HacsTdFCQJWxzPMOf8bYctRk2ySLpS8=",
"Host": "127.0.0.1",
"User-Agent": "curl/8.6.0",
"X-Amzn-Trace-Id": "Root=1-66d978c3-49f929ad5237da5340bbbeb4",
"X-Consumer-Username": "john",
"X-Credential-Identifier": "cred-john-hmac-auth",
"X-Forwarded-Host": "127.0.0.1"
},
"json": null,
"origin": "192.168.65.1, 34.0.34.160",
"url": "http://127.0.0.1/post"
}
```
If you send a request without the digest or with an invalid digest:
```shell
curl "http://127.0.0.1:9080/post" -X POST \
-H "Date: Fri, 06 Sep 2024 09:16:16 GMT" \
-H "Digest: SHA-256=78qzJuLwSpZ8HacsTdFCQJWxzPMOf8bYctRk2ySLpS8=" \
-H 'Authorization: Signature keyId="john-key",algorithm="hmac-sha256",headers="@request-target date",signature="rjS6NxOBKmzS8CZL05uLiAfE16hXdIpMD/L/HukOTYE="' \
-d '{"name": "world"}'
```
You should see an `HTTP/1.1 401 Unauthorized` response with the following message:
```text
{"message":"client request can't be validated"}
```
### Mandate Signed Headers
The following example demonstrates how you can mandate certain headers to be signed in the request's HMAC signature.
Create a Consumer `john`:
```shell
curl "http://127.0.0.1:9180/apisix/admin/consumers" -X PUT \
-H "X-API-KEY: ${admin_key}" \
-d '{
"username": "john"
}'
```
Create `hmac-auth` Credential for the Consumer:
```shell
curl "http://127.0.0.1:9180/apisix/admin/consumers/john/credentials" -X PUT \
-H "X-API-KEY: ${admin_key}" \
-d '{
"id": "cred-john-hmac-auth",
"plugins": {
"hmac-auth": {
"key_id": "john-key",
"secret_key": "john-secret-key"
}
}
}'
```
Create a Route with the `hmac-auth` Plugin which requires three headers to be present in the HMAC signature:
```shell
curl "http://127.0.0.1:9180/apisix/admin/routes" -X PUT \
-H "X-API-KEY: ${admin_key}" \
-d '{
"id": "hmac-auth-route",
"uri": "/get",
"methods": ["GET"],
"plugins": {
"hmac-auth": {
"signed_headers": ["date","x-custom-header-a","x-custom-header-b"]
}
},
"upstream": {
"type": "roundrobin",
"nodes": {
"httpbin.org:80": 1
}
}
}'
```
Generate a signature. You can use the below Python snippet or other stack of your choice:
```python title="hmac-sig-req-header-gen.py"
import hmac
import hashlib
import base64
from datetime import datetime, timezone
key_id = "john-key" # key id
secret_key = b"john-secret-key" # secret key
request_method = "GET" # HTTP method
request_path = "/get" # Route URI
algorithm= "hmac-sha256" # can use other algorithms in allowed_algorithms
custom_header_a = "hello123" # required custom header
custom_header_b = "world456" # required custom header
# get current datetime in GMT
# note: the signature will become invalid after the clock skew (default 300s)
# you can regenerate the signature after it becomes invalid, or increase the clock
# skew to prolong the validity within the advised security boundary
gmt_time = datetime.now(timezone.utc).strftime('%a, %d %b %Y %H:%M:%S GMT')
# construct the signing string (ordered)
# the date and any subsequent custom headers should be lowercased and separated by a
# single space character, i.e. `:`
# https://datatracker.ietf.org/doc/html/draft-cavage-http-signatures-12#section-2.1.6
signing_string = (
f"{key_id}\n"
f"{request_method} {request_path}\n"
f"date: {gmt_time}\n"
f"x-custom-header-a: {custom_header_a}\n"
f"x-custom-header-b: {custom_header_b}\n"
)
# create signature
signature = hmac.new(secret_key, signing_string.encode('utf-8'), hashlib.sha256).digest()
signature_base64 = base64.b64encode(signature).decode('utf-8')
# construct the request headers
headers = {
"Date": gmt_time,
"Authorization": (
f'Signature keyId="{key_id}",algorithm="hmac-sha256",'
f'headers="@request-target date x-custom-header-a x-custom-header-b",'
f'signature="{signature_base64}"'
),
"x-custom-header-a": custom_header_a,
"x-custom-header-b": custom_header_b
}
# print headers
print(headers)
```
Run the script:
```shell
python3 hmac-sig-req-header-gen.py
```
You should see the request headers printed:
```text
{'Date': 'Fri, 06 Sep 2024 09:58:49 GMT', 'Authorization': 'Signature keyId="john-key",algorithm="hmac-sha256",headers="@request-target date x-custom-header-a x-custom-header-b",signature="MwJR8JOhhRLIyaHlJ3Snbrf5hv0XwdeeRiijvX3A3yE="', 'x-custom-header-a': 'hello123', 'x-custom-header-b': 'world456'}
```
Using the headers generated, send a request to the route:
```shell
curl -X GET "http://127.0.0.1:9080/get" \
-H "Date: Fri, 06 Sep 2024 09:58:49 GMT" \
-H 'Authorization: Signature keyId="john-key",algorithm="hmac-sha256",headers="@request-target date x-custom-header-a x-custom-header-b",signature="MwJR8JOhhRLIyaHlJ3Snbrf5hv0XwdeeRiijvX3A3yE="' \
-H "x-custom-header-a: hello123" \
-H "x-custom-header-b: world456"
```
You should see an `HTTP/1.1 200 OK` response similar to the following:
```json
{
"args": {},
"headers": {
"Accept": "*/*",
"Authorization": "Signature keyId=\"john-key\",algorithm=\"hmac-sha256\",headers=\"@request-target date x-custom-header-a x-custom-header-b\",signature=\"MwJR8JOhhRLIyaHlJ3Snbrf5hv0XwdeeRiijvX3A3yE=\"",
"Date": "Fri, 06 Sep 2024 09:58:49 GMT",
"Host": "127.0.0.1",
"User-Agent": "curl/8.6.0",
"X-Amzn-Trace-Id": "Root=1-66d98196-64a58db25ece71c077999ecd",
"X-Consumer-Username": "john",
"X-Credential-Identifier": "cred-john-hmac-auth",
"X-Custom-Header-A": "hello123",
"X-Custom-Header-B": "world456",
"X-Forwarded-Host": "127.0.0.1"
},
"origin": "192.168.65.1, 103.97.2.206",
"url": "http://127.0.0.1/get"
}
```
### Rate Limit with Anonymous Consumer
The following example demonstrates how you can configure different rate limiting policies by regular and anonymous consumers, where the anonymous Consumer does not need to authenticate and has less quotas.
Create a regular Consumer `john` and configure the `limit-count` Plugin to allow for a quota of 3 within a 30-second window:
```shell
curl "http://127.0.0.1:9180/apisix/admin/consumers" -X PUT \
-H "X-API-KEY: ${admin_key}" \
-d '{
"username": "john",
"plugins": {
"limit-count": {
"count": 3,
"time_window": 30,
"rejected_code": 429
}
}
}'
```
Create the `hmac-auth` Credential for the Consumer `john`:
```shell
curl "http://127.0.0.1:9180/apisix/admin/consumers/john/credentials" -X PUT \
-H "X-API-KEY: ${admin_key}" \
-d '{
"id": "cred-john-hmac-auth",
"plugins": {
"hmac-auth": {
"key_id": "john-key",
"secret_key": "john-secret-key"
}
}
}'
```
Create an anonymous user `anonymous` and configure the `limit-count` Plugin to allow for a quota of 1 within a 30-second window:
```shell
curl "http://127.0.0.1:9180/apisix/admin/consumers" -X PUT \
-H "X-API-KEY: ${admin_key}" \
-d '{
"username": "anonymous",
"plugins": {
"limit-count": {
"count": 1,
"time_window": 30,
"rejected_code": 429
}
}
}'
```
Create a Route and configure the `hmac-auth` Plugin to accept anonymous Consumer `anonymous` from bypassing the authentication:
```shell
curl "http://127.0.0.1:9180/apisix/admin/routes" -X PUT \
-H "X-API-KEY: ${admin_key}" \
-d '{
"id": "hmac-auth-route",
"uri": "/get",
"methods": ["GET"],
"plugins": {
"hmac-auth": {
"anonymous_consumer": "anonymous"
}
},
"upstream": {
"type": "roundrobin",
"nodes": {
"httpbin.org:80": 1
}
}
}'
```
Generate a signature. You can use the below Python snippet or other stack of your choice:
```python title="hmac-sig-header-gen.py"
import hmac
import hashlib
import base64
from datetime import datetime, timezone
key_id = "john-key" # key id
secret_key = b"john-secret-key" # secret key
request_method = "GET" # HTTP method
request_path = "/get" # Route URI
algorithm= "hmac-sha256" # can use other algorithms in allowed_algorithms
# get current datetime in GMT
# note: the signature will become invalid after the clock skew (default 300s)
# you can regenerate the signature after it becomes invalid, or increase the clock
# skew to prolong the validity within the advised security boundary
gmt_time = datetime.now(timezone.utc).strftime('%a, %d %b %Y %H:%M:%S GMT')
# construct the signing string (ordered)
# the date and any subsequent custom headers should be lowercased and separated by a
# single space character, i.e. `:`
# https://datatracker.ietf.org/doc/html/draft-cavage-http-signatures-12#section-2.1.6
signing_string = (
f"{key_id}\n"
f"{request_method} {request_path}\n"
f"date: {gmt_time}\n"
)
# create signature
signature = hmac.new(secret_key, signing_string.encode('utf-8'), hashlib.sha256).digest()
signature_base64 = base64.b64encode(signature).decode('utf-8')
# construct the request headers
headers = {
"Date": gmt_time,
"Authorization": (
f'Signature keyId="{key_id}",algorithm="{algorithm}",'
f'headers="@request-target date",'
f'signature="{signature_base64}"'
)
}
# print headers
print(headers)
```
Run the script:
```shell
python3 hmac-sig-header-gen.py
```
You should see the request headers printed:
```text
{'Date': 'Mon, 21 Oct 2024 17:31:18 GMT', 'Authorization': 'Signature keyId="john-key",algorithm="hmac-sha256",headers="@request-target date",signature="ztFfl9w7LmCrIuPjRC/DWSF4gN6Bt8dBBz4y+u1pzt8="'}
```
To verify, send five consecutive requests with the generated headers:
```shell
resp=$(seq 5 | xargs -I{} curl "http://127.0.0.1:9080/anything" -H "Date: Mon, 21 Oct 2024 17:31:18 GMT" -H 'Authorization: Signature keyId="john-key",algorithm="hmac-sha256",headers="@request-target date",signature="ztFfl9w7LmCrIuPjRC/DWSF4gN6Bt8dBBz4y+u1pzt8="' -o /dev/null -s -w "%{http_code}\n") && \
count_200=$(echo "$resp" | grep "200" | wc -l) && \
count_429=$(echo "$resp" | grep "429" | wc -l) && \
echo "200": $count_200, "429": $count_429
```
You should see the following response, showing that out of the 5 requests, 3 requests were successful (status code 200) while the others were rejected (status code 429).
```text
200: 3, 429: 2
```
Send five anonymous requests:
```shell
resp=$(seq 5 | xargs -I{} curl "http://127.0.0.1:9080/anything" -o /dev/null -s -w "%{http_code}\n") && \
count_200=$(echo "$resp" | grep "200" | wc -l) && \
count_429=$(echo "$resp" | grep "429" | wc -l) && \
echo "200": $count_200, "429": $count_429
```
You should see the following response, showing that only one request was successful:
```text
200: 1, 429: 4
```
---
---
title: http-dubbo
keywords:
- Apache APISIX
- API Gateway
- Plugin
- http-dubbo
- http to dubbo
- transcode
description: This document contains information about the Apache APISIX http-dubbo Plugin.
---
## Description
The `http-dubbo` plugin can transcode between http and Dubbo (Note: in
Dubbo 2.x, the serialization type of the upstream service must be fastjson).
## Attributes
| Name | Type | Required | Default | Valid values | Description |
|--------------------------|---------|----------|---------|--------------|--------------------------------------------------------------------------------------------------------------------------------------------------------------------------------------------------------------------------------------------------------------------------------------------------------------------------------------------------------------------------------------------------------------------------------------------------------------------------------------------------------------------------------------------------------------------------------------------------------------|
| service_name | string | True | | | Dubbo service name |
| service_version | string | False | 0.0.0 | | Dubbo service version |
| method | string | True | | | Dubbo service method name |
| params_type_desc | string | True | | | Description of the Dubbo service method signature |
| serialization_header_key | string | False | | | If `serialization_header_key` is set, the plugin will read this request header to determine if the body has already been serialized according to the Dubbo protocol. If the value of this request header is true, the plugin will not modify the body content and will directly consider it as Dubbo request parameters. If it is false, the developer is required to pass parameters in the format of Dubbo's generic invocation, and the plugin will handle serialization. Note: Due to differences in precision between Lua and Java, serialization by the plugin may lead to parameter precision discrepancies. |
| serialized | boolean | False | false | [true, false] | Same as `serialization_header_key`. Priority is lower than `serialization_header_key`. |
| connect_timeout | number | False | 6000 | | Upstream tcp connect timeout |
| read_timeout | number | False | 6000 | | Upstream tcp read_timeout |
| send_timeout | number | False | 6000 | | Upstream tcp send_timeout |
## Enable Plugin
The example below enables the `http-dubbo` Plugin on the specified Route:
:::note
You can fetch the `admin_key` from `config.yaml` and save to an environment variable with the following command:
```bash
admin_key=$(yq '.deployment.admin.admin_key[0].key' conf/config.yaml | sed 's/"//g')
```
:::
```shell
curl -i http://127.0.0.1:9180/apisix/admin/routes/1 \
-H "X-API-KEY: $admin_key" -X PUT -d '
{
"uri": "/TestService/testMethod",
"plugins": {
"http-dubbo": {
"method": "testMethod",
"params_type_desc": "Ljava/lang/Long;Ljava/lang/Integer;",
"serialized": true,
"service_name": "com.xxx.xxx.TestService",
"service_version": "0.0.0"
}
},
"upstream": {
"type": "roundrobin",
"nodes": {
"127.0.0.1:20880": 1
}
}
}'
```
## Example usage
Once you have configured the Plugin as shown above, you can make a request as shown below:
```shell
curl --location 'http://127.0.0.1:9080/TestService/testMethod' \
--data '1
2'
```
## How to Get `params_type_desc`
```java
Method[] declaredMethods = YourService.class.getDeclaredMethods();
String params_type_desc = ReflectUtils.getDesc(Arrays.stream(declaredMethods).filter(it -> it.getName().equals("yourmethod")).findAny().get().getParameterTypes());
// If there are method overloads, you need to find the method you want to expose.
// ReflectUtils is a Dubbo implementation.
```
## How to Serialize JSON According to Dubbo Protocol
To prevent loss of precision, we recommend using pre-serialized bodies for requests. The serialization rules for Dubbo's
fastjson are as follows:
- Convert each parameter to a JSON string using toJSONString.
- Separate each parameter with a newline character `\n`.
Some languages and libraries may produce unchanged results when calling toJSONString on strings or numbers. In such
cases, you may need to manually handle some special cases. For example:
- The string `abc"` needs to be encoded as `"abc\""`.
- The string `123` needs to be encoded as `"123"`.
Abstract class, parent class, or generic type as input parameter signature, when the input parameter requires a specific
type. Serialization requires writing specific type information.
Refer to [WriteClassName](https://github.com/alibaba/fastjson/wiki/SerializerFeature_cn) for more details.
## Delete Plugin
To remove the `http-dubbo` Plugin, you can delete the corresponding JSON configuration from the Plugin configuration.
APISIX will automatically reload and you do not have to restart for this to take effect.
---
---
title: http-logger
keywords:
- Apache APISIX
- API Gateway
- Plugin
- HTTP Logger
description: This document contains information about the Apache APISIX http-logger Plugin. Using this Plugin, you can push APISIX log data to HTTP or HTTPS servers.
---
## Description
The `http-logger` Plugin is used to push log data requests to HTTP/HTTPS servers.
This will allow the ability to send log data requests as JSON objects to monitoring tools and other HTTP servers.
## Attributes
| Name | Type | Required | Default | Valid values | Description |
| ---------------------- | ------- | -------- | ------------- | -------------------- | ------------------------------------------------------------------------------------------------------------------------------------------------------------------------------------------------------------------------ |
| uri | string | True | | | URI of the HTTP/HTTPS server. |
| auth_header | string | False | | | Authorization headers if required. |
| timeout | integer | False | 3 | [1,...] | Time to keep the connection alive for after sending a request. |
| log_format | object | False | | | Log format declared as key-value pairs in JSON. Values support strings and nested objects (up to five levels deep; deeper fields are truncated). Within strings, [APISIX](../apisix-variable.md) or [NGINX](http://nginx.org/en/docs/varindex.html) variables can be referenced by prefixing with `$`. |
| include_req_body | boolean | False | false | [false, true] | When set to `true` includes the request body in the log. If the request body is too big to be kept in the memory, it can't be logged due to Nginx's limitations. |
| include_req_body_expr | array | False | | | Filter for when the `include_req_body` attribute is set to `true`. Request body is only logged when the expression set here evaluates to `true`. See [lua-resty-expr](https://github.com/api7/lua-resty-expr) for more. |
| include_resp_body | boolean | False | false | [false, true] | When set to `true` includes the response body in the log. |
| include_resp_body_expr | array | False | | | When the `include_resp_body` attribute is set to `true`, use this to filter based on [lua-resty-expr](https://github.com/api7/lua-resty-expr). If present, only logs the response if the expression evaluates to `true`. |
| concat_method | string | False | "json" | ["json", "new_line"] | Sets how to concatenate logs. When set to `json`, uses `json.encode` for all pending logs and when set to `new_line`, also uses `json.encode` but uses the newline (`\n`) to concatenate lines. |
| ssl_verify | boolean | False | false | [false, true] | When set to `true` verifies the SSL certificate. |
:::note
This Plugin supports using batch processors to aggregate and process entries (logs/data) in a batch. This avoids the need for frequently submitting the data. The batch processor submits data every `5` seconds or when the data in the queue reaches `1000`. See [Batch Processor](../batch-processor.md#configuration) for more information or setting your custom configuration.
:::
### Example of default log format
```json
{
"service_id": "",
"apisix_latency": 100.99999809265,
"start_time": 1703907485819,
"latency": 101.99999809265,
"upstream_latency": 1,
"client_ip": "127.0.0.1",
"route_id": "1",
"server": {
"version": "3.7.0",
"hostname": "localhost"
},
"request": {
"headers": {
"host": "127.0.0.1:1984",
"content-type": "application/x-www-form-urlencoded",
"user-agent": "lua-resty-http/0.16.1 (Lua) ngx_lua/10025",
"content-length": "12"
},
"method": "POST",
"size": 194,
"url": "http://127.0.0.1:1984/hello?log_body=no",
"uri": "/hello?log_body=no",
"querystring": {
"log_body": "no"
}
},
"response": {
"headers": {
"content-type": "text/plain",
"connection": "close",
"content-length": "12",
"server": "APISIX/3.7.0"
},
"status": 200,
"size": 123
},
"upstream": "127.0.0.1:1982"
}
```
## Metadata
You can also set the format of the logs by configuring the Plugin metadata. The following configurations are available:
| Name | Type | Required | Default | Description |
| ---------- | ------ | -------- | ----------------------------------------------------------------------------- | ------------------------------------------------------------------------------------------------------------------------------------------------------------------------------------------------------------------------------------------------------- |
| log_format | object | False | | Log format declared as key-value pairs in JSON. Values support strings and nested objects (up to five levels deep; deeper fields are truncated). Within strings, [APISIX](../apisix-variable.md) or [NGINX](http://nginx.org/en/docs/varindex.html) variables can be referenced by prefixing with `$`. |
| max_pending_entries | integer | False | | Maximum number of pending entries that can be buffered in batch processor before it starts dropping them. |
:::info IMPORTANT
Configuring the Plugin metadata is global in scope. This means that it will take effect on all Routes and Services which use the `http-logger` Plugin.
:::
The example below shows how you can configure through the Admin API:
:::note
You can fetch the `admin_key` from `config.yaml` and save to an environment variable with the following command:
```bash
admin_key=$(yq '.deployment.admin.admin_key[0].key' conf/config.yaml | sed 's/"//g')
```
:::
```shell
curl http://127.0.0.1:9180/apisix/admin/plugin_metadata/http-logger \
-H "X-API-KEY: $admin_key" -X PUT -d '
{
"log_format": {
"host": "$host",
"@timestamp": "$time_iso8601",
"client_ip": "$remote_addr",
"request": { "method": "$request_method", "uri": "$request_uri" },
"response": { "status": "$status" }
}
}'
```
With this configuration, your logs would be formatted as shown below:
```shell
{"host":"localhost","@timestamp":"2020-09-23T19:05:05-04:00","client_ip":"127.0.0.1","request":{"method":"GET","uri":"/hello"},"response":{"status":200},"route_id":"1"}
{"host":"localhost","@timestamp":"2020-09-23T19:05:05-04:00","client_ip":"127.0.0.1","request":{"method":"GET","uri":"/hello"},"response":{"status":200},"route_id":"1"}
```
## Enable Plugin
The example below shows how you can enable the Plugin on a specific Route:
```shell
curl http://127.0.0.1:9180/apisix/admin/routes/1 \
-H "X-API-KEY: $admin_key" -X PUT -d '
{
"plugins": {
"http-logger": {
"uri": "http://mockbin.org/bin/:ID"
}
},
"upstream": {
"type": "roundrobin",
"nodes": {
"127.0.0.1:1980": 1
}
},
"uri": "/hello"
}'
```
As an example the [mockbin](http://mockbin.org/bin/create) server is used for mocking an HTTP server to see the logs produced by APISIX.
## Example usage
Now, if you make a request to APISIX, it will be logged in your mockbin server:
```shell
curl -i http://127.0.0.1:9080/hello
```
## Delete Plugin
To disable this Plugin, you can delete the corresponding JSON configuration from the Plugin configuration. APISIX will automatically reload and you do not have to restart for this to take effect.
```shell
curl http://127.0.0.1:9180/apisix/admin/routes/1 -H "X-API-KEY: $admin_key" -X PUT -d '
{
"uri": "/hello",
"plugins": {},
"upstream": {
"type": "roundrobin",
"nodes": {
"127.0.0.1:1980": 1
}
}
}'
```
---
---
title: inspect
keywords:
- Apache APISIX
- API Gateway
- Plugin
- Inspect
- Dynamic Lua Debugging
description: This document contains information about the Apache APISIX inspect Plugin.
---
## Description
It's useful to set arbitrary breakpoint in any Lua file to inspect the context information,
e.g. print local variables if some condition satisfied.
In this way, you don't need to modify the source code of your project, and just get diagnose information
on demand, i.e. dynamic logging.
This plugin supports setting breakpoints within both interpretd function and jit compiled function.
The breakpoint could be at any position within the function. The function could be global/local/module/ananymous.
## Features
* Set breakpoint at any position
* Dynamic breakpoint
* customized breakpoint handler
* You could define one-shot breakpoint
* Work for jit compiled function
* If function reference specified, then performance impact is only bound to that function (JIT compiled code will not trigger debug hook, so they would run fast even if hook is enabled)
* If all breakpoints deleted, jit could recover
## Operation Graph
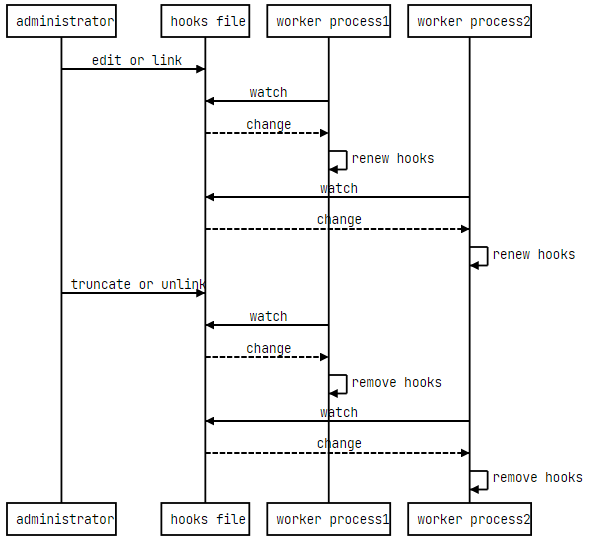
## API to define hook in hooks file
### require("apisix.inspect.dbg").set_hook(file, line, func, filter_func)
The breakpoint is specified by `file` (full qualified or short file name) and the `line` number.
The `func` specified the scope (which function or global) of jit cache to flush:
* If the breakpoint is related to a module function or
global function, you should set it that function reference, then only the jit cache of that function would
be flushed, and it would not affect other caches to avoid slowing down other parts of the program.
* If the breakpointis related to local function or anonymous function,
then you have to set it to `nil` (because no way to get function reference), which would flush the whole jit cache of Lua vm.
You attach a `filter_func` function to the breakpoint. The function takes the `info` as an argument and returns
true or false to determine whether the breakpoint would be removed. This allows you to set up a one-shot breakpoint
at ease.
The `info` is a hash table which contains below keys:
* `finfo`: `debug.getinfo(level, "nSlf")`
* `uv`: upvalues hash table
* `vals`: local variables hash table
## Attributes
| Name | Type | Required | Default | Description |
|--------------------|---------|----------|---------|------------------------------------------------------------------------------------------------|
| delay | integer | False | 3 | Time in seconds specifying how often to check the hooks file. |
| hooks_file | string | False | "/usr/local/apisix/plugin_inspect_hooks.lua" | Lua file to define hooks, which could be a link file. Ensure only administrator could write this file, otherwise it may be a security risk. |
## Enable Plugin
Plugin is enabled by default:
```yaml title="apisix/cli/config.lua"
local _M = {
plugins = {
"inspect",
...
},
plugin_attr = {
inspect = {
delay = 3,
hooks_file = "/usr/local/apisix/plugin_inspect_hooks.lua"
},
...
},
...
}
```
## Example usage
:::note
You can fetch the `admin_key` from `config.yaml` and save to an environment variable with the following command:
```bash
admin_key=$(yq '.deployment.admin.admin_key[0].key' conf/config.yaml | sed 's/"//g')
```
:::
```bash
# create test route
curl http://127.0.0.1:9180/apisix/admin/routes/test_limit_req -H "X-API-KEY: $admin_key" -X PUT -d '
{
"methods": ["GET"],
"uri": "/get",
"plugins": {
"limit-req": {
"rate": 100,
"burst": 0,
"rejected_code": 503,
"key_type": "var",
"key": "remote_addr"
}
},
"upstream": {
"type": "roundrobin",
"nodes": {
"httpbin.org": 1
}
}
}'
# create a hooks file to set a test breakpoint
# Note that the breakpoint is associated with the line number,
# so if the Lua code changes, you need to adjust the line number in the hooks file
cat </usr/local/apisix/example_hooks.lua
local dbg = require "apisix.inspect.dbg"
dbg.set_hook("limit-req.lua", 88, require("apisix.plugins.limit-req").access, function(info)
ngx.log(ngx.INFO, debug.traceback("foo traceback", 3))
ngx.log(ngx.INFO, dbg.getname(info.finfo))
ngx.log(ngx.INFO, "conf_key=", info.vals.conf_key)
return true
end)
--- more breakpoints could be defined via dbg.set_hook()
--- ...
EOF
# enable the hooks file
ln -sf /usr/local/apisix/example_hooks.lua /usr/local/apisix/plugin_inspect_hooks.lua
# check errors.log to confirm the test breakpoint is enabled
2022/09/01 00:55:38 [info] 2754534#2754534: *3700 [lua] init.lua:29: setup_hooks(): set hooks: err=nil, hooks=["limit-req.lua#88"], context: ngx.timer
# access the test route
curl -i http://127.0.0.1:9080/get
# check errors.log to confirm the test breakpoint is triggered
2022/09/01 00:55:52 [info] 2754534#2754534: *4070 [lua] resty_inspect_hooks.lua:4: foo traceback
stack traceback:
/opt/lua-resty-inspect/lib/resty/inspect/dbg.lua:50: in function
/opt/apisix.fork/apisix/plugins/limit-req.lua:88: in function 'phase_func'
/opt/apisix.fork/apisix/plugin.lua:900: in function 'run_plugin'
/opt/apisix.fork/apisix/init.lua:456: in function 'http_access_phase'
access_by_lua(nginx.conf:303):2: in main chunk, client: 127.0.0.1, server: _, request: "GET /get HTTP/1.1", host: "127.0.0.1:9080"
2022/09/01 00:55:52 [info] 2754534#2754534: *4070 [lua] resty_inspect_hooks.lua:5: /opt/apisix.fork/apisix/plugins/limit-req.lua:88 (phase_func), client: 127.0.0.1, server: _, request: "GET /get HTTP/1.1", host: "127.0.0.1:9080"
2022/09/01 00:55:52 [info] 2754534#2754534: *4070 [lua] resty_inspect_hooks.lua:6: conf_key=remote_addr, client: 127.0.0.1, server: _, request: "GET /get HTTP/1.1", host: "127.0.0.1:9080"
```
## Delete Plugin
To remove the `inspect` Plugin, you can remove it from your configuration file (`conf/config.yaml`):
```yaml title="conf/config.yaml"
plugins:
# - inspect
```
---
---
title: ip-restriction
keywords:
- Apache APISIX
- API Gateway
- Plugin
- IP restriction
- ip-restriction
description: The ip-restriction Plugin supports restricting access to upstream resources by IP addresses, through either configuring a whitelist or blacklist of IP addresses.
---
## Description
The `ip-restriction` Plugin supports restricting access to upstream resources by IP addresses, through either configuring a whitelist or blacklist of IP addresses. Restricting IP to resources helps prevent unauthorized access and harden API security.
## Attributes
| Name | Type | Required | Default | Valid values | Description |
|---------------|---------------|----------|----------------------------------|--------------|------------------------------------------------------------------------|
| whitelist | array[string] | False | | | List of IPs or CIDR ranges to whitelist. |
| blacklist | array[string] | False | | | List of IPs or CIDR ranges to blacklist. |
| message | string | False | "Your IP address is not allowed" | [1, 1024] | Message returned when the IP address is not allowed access. |
| response_code | integer | False | 403 | [403, 404] | HTTP response code returned when the IP address is not allowed access. |
:::note
At least one of the `whitelist` or `blacklist` should be configured, but they cannot be configured at the same time.
:::
## Examples
The examples below demonstrate how you can configure the `ip-restriction` Plugin for different scenarios.
:::note
You can fetch the `admin_key` from `config.yaml` and save to an environment variable with the following command:
```bash
admin_key=$(yq '.deployment.admin.admin_key[0].key' conf/config.yaml | sed 's/"//g')
```
:::
### Restrict Access by Whitelisting
The following example demonstrates how you can whitelist a list of IP addresses that should have access to the upstream resource and customize the error message for access denial.
Create a Route with the `ip-restriction` Plugin to whitelist a range of IPs and customize the error message when the access is denied:
```shell
curl "http://127.0.0.1:9180/apisix/admin/routes" -X PUT \
-H "X-API-KEY: ${admin_key}" \
-d '{
"id": "ip-restriction-route",
"uri": "/anything",
"plugins": {
"ip-restriction": {
"whitelist": [
"192.168.0.1/24"
],
"message": "Access denied"
}
},
"upstream": {
"type": "roundrobin",
"nodes": {
"httpbin.org:80": 1
}
}
}'
```
Send a request to the Route:
```shell
curl -i "http://127.0.0.1:9080/anything"
```
If your IP is allowed, you should receive an `HTTP/1.1 200 OK` response. If not, you should receive an `HTTP/1.1 403 Forbidden` response with the following error message:
```text
{"message":"Access denied"}
```
### Restrict Access Using Modified IP
The following example demonstrates how you can modify the IP used for IP restriction, using the `real-ip` Plugin. This is particularly useful if APISIX is behind a reverse proxy and the real client IP is not available to APISIX.
Create a Route with the `ip-restriction` Plugin to whitelist a specific IP address and obtain client IP address from the URL parameter `realip`:
```shell
curl "http://127.0.0.1:9180/apisix/admin/routes" -X PUT \
-H "X-API-KEY: ${admin_key}" \
-d '{
"id": "ip-restriction-route",
"uri": "/anything",
"plugins": {
"ip-restriction": {
"whitelist": [
"192.168.1.241"
]
},
"real-ip": {
"source": "arg_realip"
}
},
"upstream": {
"type": "roundrobin",
"nodes": {
"httpbin.org:80": 1
}
}
}'
```
Send a request to the Route:
```shell
curl -i "http://127.0.0.1:9080/anything?realip=192.168.1.241"
```
You should receive an `HTTP/1.1 200 OK` response.
Send another request with a different IP address:
```shell
curl -i "http://127.0.0.1:9080/anything?realip=192.168.10.24"
```
You should receive an `HTTP/1.1 403 Forbidden` response.
---
---
title: jwe-decrypt
keywords:
- Apache APISIX
- API Gateway
- Plugin
- JWE Decrypt
- jwe-decrypt
description: This document contains information about the Apache APISIX jwe-decrypt Plugin.
---
## Description
The `jwe-decrypt` Plugin is used to decrypt [JWE](https://datatracker.ietf.org/doc/html/rfc7516) authorization headers in requests to an APISIX [Service](../terminology/service.md) or [Route](../terminology/route.md).
This Plugin adds an endpoint `/apisix/plugin/jwe/encrypt` for JWE encryption. For decryption, the key should be configured in [Consumer](../terminology/consumer.md).
## Attributes
For Consumer:
| Name | Type | Required | Default | Valid values | Description |
|---------------|---------|-------------------------------------------------------|---------|-----------------------------|----------------------------------------------------------------------------------------------------------------------------------------------|
| key | string | True | | | Unique key for a Consumer. |
| secret | string | True | | | The decryption key. Must be 32 characters. The key could be saved in a secret manager using the [Secret](../terminology/secret.md) resource. |
| is_base64_encoded | boolean | False | false | | Set to true if the secret is base64 encoded. |
:::note
After enabling `is_base64_encoded`, your `secret` length may exceed 32 chars. You only need to make sure that the length after decoding is still 32 chars.
:::
For Route:
| Name | Type | Required | Default | Description |
|--------|--------|----------|---------------|---------------------------------------------------------------------|
| header | string | True | Authorization | The header to get the token from. |
| forward_header | string | True | Authorization | Set the header name that passes the plaintext to the Upstream. |
| strict | boolean | False | true | If true, throw a 403 error if JWE token is missing from the request. If false, do not throw an error if JWE token cannot be found. |
## Example usage
First, create a Consumer with `jwe-decrypt` and configure the decryption key:
:::note
You can fetch the `admin_key` from `config.yaml` and save to an environment variable with the following command:
```bash
admin_key=$(yq '.deployment.admin.admin_key[0].key' conf/config.yaml | sed 's/"//g')
```
:::
```shell
curl http://127.0.0.1:9180/apisix/admin/consumers -H "X-API-KEY: $admin_key" -X PUT -d '
{
"username": "jack",
"plugins": {
"jwe-decrypt": {
"key": "user-key",
"secret": "-secret-length-must-be-32-chars-"
}
}
}'
```
Next, create a Route with `jwe-decrypt` enabled to decrypt the authorization header:
```shell
curl http://127.0.0.1:9180/apisix/admin/routes/1 -H "X-API-KEY: $admin_key" -X PUT -d '
{
"methods": ["GET"],
"uri": "/anything*",
"plugins": {
"jwe-decrypt": {}
},
"upstream": {
"type": "roundrobin",
"nodes": {
"httpbin.org:80": 1
}
}
}'
```
### Encrypt Data with JWE
The Plugin creates an internal endpoint `/apisix/plugin/jwe/encrypt` to encrypt data with JWE. To expose it publicly, create a Route with the [public-api](public-api.md) Plugin:
```shell
curl http://127.0.0.1:9180/apisix/admin/routes/jwenew -H "X-API-KEY: $admin_key" -X PUT -d '
{
"uri": "/apisix/plugin/jwe/encrypt",
"plugins": {
"public-api": {}
}
}'
```
Send a request to the endpoint passing the key configured in Consumer to the URI parameter to encrypt some sample data in the payload:
```shell
curl -G --data-urlencode 'payload={"uid":10000,"uname":"test"}' 'http://127.0.0.1:9080/apisix/plugin/jwe/encrypt?key=user-key' -i
```
You should see a response similar to the following, with the JWE encrypted data in the response body:
```
HTTP/1.1 200 OK
Date: Mon, 25 Sep 2023 02:38:16 GMT
Content-Type: text/plain; charset=utf-8
Transfer-Encoding: chunked
Connection: keep-alive
Server: APISIX/3.5.0
Apisix-Plugins: public-api
eyJhbGciOiJkaXIiLCJraWQiOiJ1c2VyLWtleSIsImVuYyI6IkEyNTZHQ00ifQ..MTIzNDU2Nzg5MDEy.hfzMJ0YfmbMcJ0ojgv4PYAHxPjlgMivmv35MiA.7nilnBt2dxLR_O6kf-HQUA
```
### Decrypt Data with JWE
Send a request to the route with the JWE encrypted data in the `Authorization` header:
```shell
curl http://127.0.0.1:9080/anything/hello -H 'Authorization: eyJhbGciOiJkaXIiLCJraWQiOiJ1c2VyLWtleSIsImVuYyI6IkEyNTZHQ00ifQ..MTIzNDU2Nzg5MDEy.hfzMJ0YfmbMcJ0ojgv4PYAHxPjlgMivmv35MiA.7nilnBt2dxLR_O6kf-HQUA' -i
```
You should see a response similar to the following, where the `Authorization` header shows the plaintext of the payload:
```
HTTP/1.1 200 OK
Content-Type: application/json
Content-Length: 452
Connection: keep-alive
Date: Mon, 25 Sep 2023 02:38:59 GMT
Access-Control-Allow-Origin: *
Access-Control-Allow-Credentials: true
Server: APISIX/3.5.0
Apisix-Plugins: jwe-decrypt
{
"args": {},
"data": "",
"files": {},
"form": {},
"headers": {
"Accept": "*/*",
"Authorization": "{\"uid\":10000,\"uname\":\"test\"}",
"Host": "127.0.0.1",
"User-Agent": "curl/8.1.2",
"X-Amzn-Trace-Id": "Root=1-6510f2c3-1586ec011a22b5094dbe1896",
"X-Forwarded-Host": "127.0.0.1"
},
"json": null,
"method": "GET",
"origin": "127.0.0.1, 119.143.79.94",
"url": "http://127.0.0.1/anything/hello"
}
```
## Delete Plugin
To remove the `jwe-decrypt` Plugin, you can delete the corresponding JSON configuration from the Plugin configuration. APISIX will automatically reload and you do not have to restart for this to take effect.
```shell
curl http://127.0.0.1:9180/apisix/admin/routes/1 -H "X-API-KEY: $admin_key" -X PUT -d '
{
"methods": ["GET"],
"uri": "/anything*",
"plugins": {},
"upstream": {
"type": "roundrobin",
"nodes": {
"httpbin.org:80": 1
}
}
}'
```
---
---
title: jwt-auth
keywords:
- Apache APISIX
- API Gateway
- Plugin
- JWT Auth
- jwt-auth
description: The jwt-auth Plugin supports the use of JSON Web Token (JWT) as a mechanism for clients to authenticate themselves before accessing Upstream resources.
---
## Description
The `jwt-auth` Plugin supports the use of [JSON Web Token (JWT)](https://jwt.io/) as a mechanism for clients to authenticate themselves before accessing Upstream resources.
Once enabled, the Plugin exposes an endpoint to create JWT credentials by [Consumers](../terminology/consumer.md). The process generates a token that client requests should carry to identify themselves to APISIX. The token can be included in the request URL query string, request header, or cookie. APISIX will then verify the token to determine if a request should be allowed or denied to access Upstream resources.
When a Consumer is successfully authenticated, APISIX adds additional headers, such as `X-Consumer-Username`, `X-Credential-Indentifier`, and other Consumer custom headers if configured, to the request, before proxying it to the Upstream service. The Upstream service will be able to differentiate between consumers and implement additional logics as needed. If any of these values is not available, the corresponding header will not be added.
## Attributes
For Consumer/Credential:
| Name | Type | Required | Default | Valid values | Description |
|---------------|---------|-------------------------------------------------------|---------|-----------------------------|---------------------------------------------------------------------------------------------------------------------------------------------------------------------------------------------|
| key | string | True | | non-empty | Unique key for a Consumer. |
| secret | string | False | | non-empty | Shared key used to sign and verify the JWT when the algorithm is symmetric. Required when using `HS256` or `HS512` as the algorithm. This field supports saving the value in Secret Manager using the [APISIX Secret](../terminology/secret.md) resource. |
| public_key | string | True if `RS256` or `ES256` is set for the `algorithm` attribute. | | | RSA or ECDSA public key. This field supports saving the value in Secret Manager using the [APISIX Secret](../terminology/secret.md) resource. |
| algorithm | string | False | HS256 | ["HS256","HS512","RS256","ES256"] | Encryption algorithm. |
| exp | integer | False | 86400 | [1,...] | Expiry time of the token in seconds. |
| base64_secret | boolean | False | false | | Set to true if the secret is base64 encoded. |
| lifetime_grace_period | integer | False | 0 | [0,...] | Grace period in seconds. Used to account for clock skew between the server generating the JWT and the server validating the JWT. |
| key_claim_name | string | False | key | | The claim in the JWT payload that identifies the associated secret, such as `iss`. |
NOTE: `encrypt_fields = {"secret"}` is also defined in the schema, which means that the field will be stored encrypted in etcd. See [encrypted storage fields](../plugin-develop.md#encrypted-storage-fields).
For Routes or Services:
| Name | Type | Required | Default | Description |
|--------|--------|----------|---------------|---------------------------------------------------------------------|
| header | string | False | authorization | The header to get the token from. |
| query | string | False | jwt | The query string to get the token from. Lower priority than header. |
| cookie | string | False | jwt | The cookie to get the token from. Lower priority than query. |
| hide_credentials| boolean | False | false | If true, do not pass the header, query, or cookie with JWT to Upstream services. |
| key_claim_name | string | False | key | The name of the JWT claim that contains the user key (corresponds to Consumer's key attribute). |
| anonymous_consumer | string | False | false | Anonymous Consumer name. If configured, allow anonymous users to bypass the authentication. |
| store_in_ctx | boolean | False | false | Set to true will store the JWT payload in the request context (`ctx.jwt_auth_payload`). This allows lower-priority plugins that run afterwards on the same request to retrieve and use the JWT token. |
You can implement `jwt-auth` with [HashiCorp Vault](https://www.vaultproject.io/) to store and fetch secrets and RSA keys pairs from its [encrypted KV engine](https://developer.hashicorp.com/vault/docs/secrets/kv) using the [APISIX Secret](../terminology/secret.md) resource.
## Examples
The examples below demonstrate how you can work with the `jwt-auth` Plugin for different scenarios.
:::note
You can fetch the `admin_key` from `config.yaml` and save to an environment variable with the following command:
```bash
admin_key=$(yq '.deployment.admin.admin_key[0].key' conf/config.yaml | sed 's/"//g')
```
:::
### Use JWT for Consumer Authentication
The following example demonstrates how to implement JWT for Consumer key authentication.
Create a Consumer `jack`:
```shell
curl "http://127.0.0.1:9180/apisix/admin/consumers" -X PUT \
-H "X-API-KEY: ${admin_key}" \
-d '{
"username": "jack"
}'
```
Create `jwt-auth` Credential for the consumer:
```shell
curl "http://127.0.0.1:9180/apisix/admin/consumers/jack/credentials" -X PUT \
-H "X-API-KEY: ${admin_key}" \
-d '{
"id": "cred-jack-jwt-auth",
"plugins": {
"jwt-auth": {
"key": "jack-key",
"secret": "jack-hs256-secret-that-is-very-long"
}
}
}'
```
Create a Route with `jwt-auth` Plugin:
```shell
curl "http://127.0.0.1:9180/apisix/admin/routes" -X PUT \
-H "X-API-KEY: ${admin_key}" \
-d '{
"id": "jwt-route",
"uri": "/headers",
"plugins": {
"jwt-auth": {}
},
"upstream": {
"type": "roundrobin",
"nodes": {
"httpbin.org:80": 1
}
}
}'
```
To issue a JWT for `jack`, you could use [JWT.io's JWT encoder](https://jwt.io) or other utilities. If you are using [JWT.io's JWT encoder](https://jwt.io), do the following:
* Fill in `HS256` as the algorithm.
* Update the secret in the __Valid secret__ section to be `jack-hs256-secret-that-is-very-long`.
* Update payload with Consumer key `jack-key`; and add `exp` or `nbf` in UNIX timestamp.
Your payload should look similar to the following:
```json
{
"key": "jack-key",
"nbf": 1729132271
}
```
Copy the generated JWT and save to a variable:
```shell
export jwt_token=eyJhbGciOiJIUzI1NiIsInR5cCI6IkpXVCJ9.eyJrZXkiOiJqYWNrLWtleSIsIm5iZiI6MTcyOTEzMjI3MX0.UEPXy5jpid624T1XpfjM0PLY73LZPjV3Qt8yZ92kVuU
```
Send a request to the Route with the JWT in the `Authorization` header:
```shell
curl -i "http://127.0.0.1:9080/headers" -H "Authorization: ${jwt_token}"
```
You should receive an `HTTP/1.1 200 OK` response similar to the following:
```json
{
"headers": {
"Accept": "*/*",
"Authorization": "eyJ0eXAiOiJKV1QiLCJhbGciOiJIUzI1NiJ9.eyJleHAiOjE3MjY2NDk2NDAsImtleSI6ImphY2sta2V5In0.kdhumNWrZFxjUvYzWLt4lFr546PNsr9TXuf0Az5opoM",
"Host": "127.0.0.1",
"User-Agent": "curl/8.6.0",
"X-Amzn-Trace-Id": "Root=1-66ea951a-4d740d724bd2a44f174d4daf",
"X-Consumer-Username": "jack",
"X-Credential-Identifier": "cred-jack-jwt-auth",
"X-Forwarded-Host": "127.0.0.1"
}
}
```
Send a request with an invalid token:
```shell
curl -i "http://127.0.0.1:9080/headers" -H "Authorization: eyJ0eXAiOiJKV1QiLCJhbGciOiJIUzI1NiJ9.eyJleHAiOjE3MjY2NDk2NDAsImtleSI6ImphY2sta2V5In0.kdhumNWrZFxjU_random_random"
```
You should receive an `HTTP/1.1 401 Unauthorized` response similar to the following:
```text
{"message":"failed to verify jwt"}
```
### Carry JWT in Request Header, Query String, or Cookie
The following example demonstrates how to accept JWT in specified header, query string, and cookie.
Create a Consumer `jack`:
```shell
curl "http://127.0.0.1:9180/apisix/admin/consumers" -X PUT \
-H "X-API-KEY: ${admin_key}" \
-d '{
"username": "jack"
}'
```
Create `jwt-auth` Credential for the Consumer:
```shell
curl "http://127.0.0.1:9180/apisix/admin/consumers/jack/credentials" -X PUT \
-H "X-API-KEY: ${admin_key}" \
-d '{
"id": "cred-jack-jwt-auth",
"plugins": {
"jwt-auth": {
"key": "jack-key",
"secret": "jack-hs256-secret-that-is-very-long"
}
}
}'
```
Create a Route with `jwt-auth` plugin, and specify the request parameters carrying the token:
```shell
curl "http://127.0.0.1:9180/apisix/admin/routes" -X PUT \
-H "X-API-KEY: ${admin_key}" \
-d '{
"id": "jwt-route",
"uri": "/get",
"plugins": {
"jwt-auth": {
"header": "jwt-auth-header",
"query": "jwt-query",
"cookie": "jwt-cookie"
}
},
"upstream": {
"type": "roundrobin",
"nodes": {
"httpbin.org:80": 1
}
}
}'
```
To issue a JWT for `jack`, you could use [JWT.io's JWT encoder](https://jwt.io) or other utilities. If you are using [JWT.io's JWT encoder](https://jwt.io), do the following:
* Fill in `HS256` as the algorithm.
* Update the secret in the __Valid secret__ section to be `jack-hs256-secret-that-is-very-long`.
* Update payload with Consumer key `jack-key`; and add `exp` or `nbf` in UNIX timestamp.
Your payload should look similar to the following:
```json
{
"key": "jack-key",
"nbf": 1729132271
}
```
Copy the generated JWT and save to a variable:
```shell
export jwt_token=eyJhbGciOiJIUzI1NiIsInR5cCI6IkpXVCJ9.eyJrZXkiOiJqYWNrLWtleSIsIm5iZiI6MTcyOTEzMjI3MX0.UEPXy5jpid624T1XpfjM0PLY73LZPjV3Qt8yZ92kVuU
```
#### Verify With JWT in Header
Sending request with JWT in the header:
```shell
curl -i "http://127.0.0.1:9080/get" -H "jwt-auth-header: ${jwt_token}"
```
You should receive an `HTTP/1.1 200 OK` response similar to the following:
```json
{
"args": {},
"headers": {
"Accept": "*/*",
"Host": "127.0.0.1",
"Jwt-Auth-Header": "eyJhbGciOiJIUzI1NiIsInR5cCI6IkpXVCJ9.eyJrZXkiOiJqYWNrLWtleSIsIm5iZiI6MTcyOTEzMjI3MX0.UEPXy5jpid624T1XpfjM0PLY73LZPjV3Qt8yZ92kVuU",
...
},
...
}
```
#### Verify With JWT in Query String
Sending request with JWT in the query string:
```shell
curl -i "http://127.0.0.1:9080/get?jwt-query=${jwt_token}"
```
You should receive an `HTTP/1.1 200 OK` response similar to the following:
```json
{
"args": {
"jwt-query": "eyJhbGciOiJIUzI1NiIsInR5cCI6IkpXVCJ9.eyJrZXkiOiJqYWNrLWtleSIsIm5iZiI6MTcyOTEzMjI3MX0.UEPXy5jpid624T1XpfjM0PLY73LZPjV3Qt8yZ92kVuU"
},
"headers": {
"Accept": "*/*",
...
},
"origin": "127.0.0.1, 183.17.233.107",
"url": "http://127.0.0.1/get?jwt-query=eyJ0eXAiOiJKV1QiLCJhbGciOiJIUzI1NiJ9.eyJrZXkiOiJ1c2VyLWtleSIsImV4cCI6MTY5NTEyOTA0NH0.EiktFX7di_tBbspbjmqDKoWAD9JG39Wo_CAQ1LZ9voQ"
}
```
#### Verify With JWT in Cookie
Sending request with JWT in the cookie:
```shell
curl -i "http://127.0.0.1:9080/get" --cookie jwt-cookie=${jwt_token}
```
You should receive an `HTTP/1.1 200 OK` response similar to the following:
```json
{
"args": {},
"headers": {
"Accept": "*/*",
"Cookie": "jwt-cookie=eyJhbGciOiJIUzI1NiIsInR5cCI6IkpXVCJ9.eyJrZXkiOiJqYWNrLWtleSIsIm5iZiI6MTcyOTEzMjI3MX0.UEPXy5jpid624T1XpfjM0PLY73LZPjV3Qt8yZ92kVuU",
...
},
...
}
```
### Manage Secrets in Environment Variables
The following example demonstrates how to save `jwt-auth` Consumer key to an environment variable and reference it in configuration.
APISIX supports referencing system and user environment variables configured through the [NGINX `env` directive](https://nginx.org/en/docs/ngx_core_module.html#env).
Save the key to an environment variable:
```shell
export JACK_JWT_SECRET=jack-hs256-secret-that-is-very-long
```
:::tip
If you are running APISIX in Docker, you should set the environment variable using the `-e` flag when starting the container.
:::
Create a Consumer `jack`:
```shell
curl "http://127.0.0.1:9180/apisix/admin/consumers" -X PUT \
-H "X-API-KEY: ${admin_key}" \
-d '{
"username": "jack"
}'
```
Create `jwt-auth` Credential for the Consumer and reference the environment variable:
```shell
curl "http://127.0.0.1:9180/apisix/admin/consumers/jack/credentials" -X PUT \
-H "X-API-KEY: ${admin_key}" \
-d '{
"id": "cred-jack-jwt-auth",
"plugins": {
"jwt-auth": {
"key": "jack-key",
"secret": "$env://JACK_JWT_SECRET"
}
}
}'
```
Create a Route with `jwt-auth` enabled:
```shell
curl "http://127.0.0.1:9180/apisix/admin/routes" -X PUT \
-H "X-API-KEY: ${admin_key}" \
-d '{
"id": "jwt-route",
"uri": "/get",
"plugins": {
"jwt-auth": {}
},
"upstream": {
"type": "roundrobin",
"nodes": {
"httpbin.org:80": 1
}
}
}'
```
To issue a JWT for `jack`, you could use [JWT.io's JWT encoder](https://jwt.io) or other utilities. If you are using [JWT.io's JWT encoder](https://jwt.io), do the following:
* Fill in `HS256` as the algorithm.
* Update the secret in the __Valid secret__ section to be `jack-hs256-secret-that-is-very-long`.
* Update payload with Consumer key `jack-key`; and add `exp` or `nbf` in UNIX timestamp.
Your payload should look similar to the following:
```json
{
"key": "jack-key",
"nbf": 1729132271
}
```
Copy the generated JWT and save to a variable:
```shell
export jwt_token=eyJhbGciOiJIUzI1NiIsInR5cCI6IkpXVCJ9.eyJrZXkiOiJqYWNrLWtleSIsIm5iZiI6MTcyOTEzMjI3MX0.UEPXy5jpid624T1XpfjM0PLY73LZPjV3Qt8yZ92kVuU
```
Sending request with JWT in the header:
```shell
curl -i "http://127.0.0.1:9080/get" -H "Authorization: ${jwt_token}"
```
You should receive an `HTTP/1.1 200 OK` response.
### Manage Secrets in Secret Manager
The following example demonstrates how to manage `jwt-auth` consumer key in [HashiCorp Vault](https://www.vaultproject.io) and reference it in plugin configuration.
Start a Vault development server in Docker:
```shell
docker run -d \
--name vault \
-p 8200:8200 \
--cap-add IPC_LOCK \
-e VAULT_DEV_ROOT_TOKEN_ID=root \
-e VAULT_DEV_LISTEN_ADDRESS=0.0.0.0:8200 \
vault:1.9.0 \
vault server -dev
```
APISIX currently supports [Vault KV engine version 1](https://developer.hashicorp.com/vault/docs/secrets/kv#kv-version-1). Enable it in Vault:
```shell
docker exec -i vault sh -c "VAULT_TOKEN='root' VAULT_ADDR='http://0.0.0.0:8200' vault secrets enable -path=kv -version=1 kv"
```
You should see a response similar to the following:
```text
Success! Enabled the kv secrets engine at: kv/
```
Create a Secret and configure the Vault address and other connection information. Update the Vault address accordingly:
```shell
curl "http://127.0.0.1:9180/apisix/admin/secrets/vault/jwt" -X PUT \
-H "X-API-KEY: ${ADMIN_API_KEY}" \
-d '{
"uri": "https://127.0.0.1:8200",
"prefix": "kv/apisix",
"token": "root"
}'
```
Create a Consumer `jack`:
```shell
curl "http://127.0.0.1:9180/apisix/admin/consumers" -X PUT \
-H "X-API-KEY: ${ADMIN_API_KEY}" \
-d '{
"username": "jack"
}'
```
Create `jwt-auth` Credential for the Consumer and reference the Secret:
```shell
curl "http://127.0.0.1:9180/apisix/admin/consumers/jack/credentials" -X PUT \
-H "X-API-KEY: ${ADMIN_API_KEY}" \
-d '{
"id": "cred-jack-jwt-auth",
"plugins": {
"jwt-auth": {
"key": "jwt-vault-key",
"secret": "$secret://vault/jwt/jack/jwt-secret"
}
}
}'
```
Create a Route with `jwt-auth` enabled:
```shell
curl "http://127.0.0.1:9180/apisix/admin/routes" -X PUT \
-H "X-API-KEY: ${ADMIN_API_KEY}" \
-d '{
"id": "jwt-route",
"uri": "/get",
"plugins": {
"jwt-auth": {}
},
"upstream": {
"type": "roundrobin",
"nodes": {
"httpbin.org:80": 1
}
}
}'
```
Set `jwt-auth` key value to be `vault-hs256-secret-that-is-very-long` in Vault:
```shell
docker exec -i vault sh -c "VAULT_TOKEN='root' VAULT_ADDR='http://0.0.0.0:8200' vault kv put kv/apisix/jack jwt-secret=vault-hs256-secret-that-is-very-long"
```
You should see a response similar to the following:
```text
Success! Data written to: kv/apisix/jack
```
To issue a JWT, you could use [JWT.io's JWT encoder](https://jwt.io) or other utilities. If you are using [JWT.io's JWT encoder](https://jwt.io), do the following:
* Fill in `HS256` as the algorithm.
* Update the secret in the __Valid secret__ section to be `vault-hs256-secret-that-is-very-long`.
* Update payload with consumer key `jwt-vault-key`; and add `exp` or `nbf` in UNIX timestamp.
Your payload should look similar to the following:
```json
{
"key": "jwt-vault-key",
"nbf": 1729132271
}
```
Copy the generated JWT and save to a variable:
```shell
export jwt_token=eyJhbGciOiJIUzI1NiIsInR5cCI6IkpXVCJ9.eyJrZXkiOiJqd3QtdmF1bHQta2V5IiwibmJmIjoxNzI5MTMyMjcxfQ.i2pLj7QcQvnlSjB7iV5V522tIV43boQRtee7L0rwlkQ
```
Send a request with the token in the header:
```shell
curl -i "http://127.0.0.1:9080/get" -H "Authorization: ${jwt_token}"
```
You should receive an `HTTP/1.1 200 OK` response.
### Sign JWT with RS256 Algorithm
The following example demonstrates how you can use asymmetric algorithms, such as RS256, to sign and validate JWT when implementing JWT for Consumer authentication. You will be generating RSA key pairs using [openssl](https://openssl-library.org/source/) and generating JWT using [JWT.io](https://jwt.io) to better understand the composition of JWT.
Generate a 2048-bit RSA private key and extract the corresponding public key in PEM format:
```shell
openssl genrsa -out jwt-rsa256-private.pem 2048
openssl rsa -in jwt-rsa256-private.pem -pubout -out jwt-rsa256-public.pem
```
You should see `jwt-rsa256-private.pem` and `jwt-rsa256-public.pem` generated in your current working directory.
Visit [JWT.io's JWT encoder](https://jwt.io) and do the following:
* Fill in `RS256` as the algorithm.
* Copy and paste the private key content into the __SIGN JWT: PRIVATE KEY__ section.
* Update payload with Consumer key `jack-key`; and add `exp` or `nbf` in UNIX timestamp.
Your payload should look similar to the following:
```json
{
"key": "jack-key",
"nbf": 1729132271
}
```
Copy the generated JWT and save to a variable:
```shell
export jwt_token=eyJhbGciOiJSUzI1NiIsInR5cCI6IkpXVCJ9.eyJrZXkiOiJqYWNrLWtleSIsIm5iZiI6MTcyOTEzMjI3MX0.K-I13em84kAcyH1jfIJl7ls_4jlwg1GzEzo5_xrDu-3wt3Xa3irS6naUsWpxX-a-hmcZZxRa9zqunqQjUP4kvn5e3xg2f_KyCR-_ZbwqYEPk3bXeFV1l4iypv6z5L7W1Niharun-dpMU03b1Tz64vhFx6UwxNL5UIZ7bunDAo_BXZ7Xe8rFhNHvIHyBFsDEXIBgx8lNYMq8QJk3iKxZhZZ5Om7lgYjOOKRgew4WkhBAY0v1AkO77nTlvSK0OEeeiwhkROyntggyx-S-U222ykMQ6mBLxkP4Cq5qHwXD8AUcLk5mhEij-3QhboYnt7yhKeZ3wDSpcjDvvL2aasC25ng
```
Create a Consumer `jack`:
```shell
curl "http://127.0.0.1:9180/apisix/admin/consumers" -X PUT \
-H "X-API-KEY: ${admin_key}" \
-d '{
"username": "jack"
}'
```
Create `jwt-auth` Credential for the Consumer and configure the RSA keys:
```shell
curl "http://127.0.0.1:9180/apisix/admin/consumers/jack/credentials" -X PUT \
-H "X-API-KEY: ${admin_key}" \
-d '{
"id": "cred-jack-jwt-auth",
"plugins": {
"jwt-auth": {
"key": "jack-key",
"algorithm": "RS256",
"public_key": "-----BEGIN PUBLIC KEY-----\nMIIBIjANBgkqhkiG9w0BAQEFAAOCAQ8AMIIBCgKCAQEAoTxe7ZPycrEP0SK4OBA2\n0OUQsDN9gSFSHVvx/t++nZNrFxzZnV6q6/TRsihNXUIgwaOu5icFlIcxPL9Mf9UJ\na5/XCQExp1TxpuSmjkhIFAJ/x5zXrC8SGTztP3SjkhYnQO9PKVXI6ljwgakVCfpl\numuTYqI+ev7e45NdK8gJoJxPp8bPMdf8/nHfLXZuqhO/btrDg1x+j7frDNrEw+6B\nCK2SsuypmYN+LwHfaH4Of7MQFk3LNIxyBz0mdbsKJBzp360rbWnQeauWtDymZxLT\nATRNBVyl3nCNsURRTkc7eyknLaDt2N5xTIoUGHTUFYSdE68QWmukYMVGcEHEEPkp\naQIDAQAB\n-----END PUBLIC KEY-----"
}
}
}'
```
:::tip
You should add a newline character after the opening line and before the closing line, for example `-----BEGIN PUBLIC KEY-----\n......\n-----END PUBLIC KEY-----`.
The key content can be directly concatenated.
:::
Create a Route with the `jwt-auth` Plugin:
```shell
curl "http://127.0.0.1:9180/apisix/admin/routes" -X PUT \
-H "X-API-KEY: ${admin_key}" \
-d '{
"id": "jwt-route",
"uri": "/headers",
"plugins": {
"jwt-auth": {}
},
"upstream": {
"type": "roundrobin",
"nodes": {
"httpbin.org:80": 1
}
}
}'
```
To verify, send a request to the Route with the JWT in the `Authorization` header:
```shell
curl -i "http://127.0.0.1:9080/headers" -H "Authorization: ${jwt_token}"
```
You should receive an `HTTP/1.1 200 OK` response.
### Add Consumer Custom ID to Header
The following example demonstrates how you can attach a Consumer custom ID to authenticated request in the `Consumer-Custom-Id` header, which can be used to implement additional logics as needed.
Create a Consumer `jack` with a custom ID label:
```shell
curl "http://127.0.0.1:9180/apisix/admin/consumers" -X PUT \
-H "X-API-KEY: ${admin_key}" \
-d '{
"username": "jack",
"labels": {
"custom_id": "495aec6a"
}
}'
```
Create `jwt-auth` Credential for the Consumer:
```shell
curl "http://127.0.0.1:9180/apisix/admin/consumers/jack/credentials" -X PUT \
-H "X-API-KEY: ${admin_key}" \
-d '{
"id": "cred-jack-jwt-auth",
"plugins": {
"jwt-auth": {
"key": "jack-key",
"secret": "jack-hs256-secret-that-is-very-long"
}
}
}'
```
Create a Route with `jwt-auth`:
```shell
curl "http://127.0.0.1:9180/apisix/admin/routes" -X PUT \
-H "X-API-KEY: ${admin_key}" \
-d '{
"id": "jwt-auth-route",
"uri": "/anything",
"plugins": {
"jwt-auth": {}
},
"upstream": {
"type": "roundrobin",
"nodes": {
"httpbin.org:80": 1
}
}
}'
```
To issue a JWT for `jack`, you could use [JWT.io's JWT encoder](https://jwt.io) or other utilities. If you are using [JWT.io's JWT encoder](https://jwt.io), do the following:
* Fill in `HS256` as the algorithm.
* Update the secret in the __Valid secret__ section to be `jack-hs256-secret-that-is-very-long`.
* Update payload with Consumer key `jack-key`; and add `exp` or `nbf` in UNIX timestamp.
Your payload should look similar to the following:
```json
{
"key": "jack-key",
"nbf": 1729132271
}
```
Copy the generated JWT and save to a variable:
```shell
export jwt_token=eyJhbGciOiJIUzI1NiIsInR5cCI6IkpXVCJ9.eyJrZXkiOiJqYWNrLWtleSIsIm5iZiI6MTcyOTEzMjI3MX0.UEPXy5jpid624T1XpfjM0PLY73LZPjV3Qt8yZ92kVuU
```
To verify, send a request to the Route with the JWT in the `Authorization` header:
```shell
curl -i "http://127.0.0.1:9080/headers" -H "Authorization: ${jwt_token}"
```
You should see an `HTTP/1.1 200 OK` response similar to the following:
```json
{
"headers": {
"Accept": "*/*",
"Authorization": "eyJhbGciOiJIUzI1NiIsInR5cCI6IkpXVCJ9.eyJrZXkiOiJqYWNrLWtleSIsIm5iZiI6MTcyOTEzMjI3MX0.UEPXy5jpid624T1XpfjM0PLY73LZPjV3Qt8yZ92kVuU",
"Host": "127.0.0.1",
"User-Agent": "curl/8.6.0",
"X-Amzn-Trace-Id": "Root=1-6873b19d-329331db76e5e7194c942b47",
"X-Consumer-Custom-Id": "495aec6a",
"X-Consumer-Username": "jack",
"X-Credential-Identifier": "cred-jack-jwt-auth",
"X-Forwarded-Host": "127.0.0.1"
}
}
```
### Rate Limit with Anonymous Consumer
The following example demonstrates how you can configure different rate limiting policies by regular and anonymous consumers, where the anonymous Consumer does not need to authenticate and has less quotas.
Create a regular Consumer `jack` and configure the `limit-count` Plugin to allow for a quota of 3 within a 30-second window:
```shell
curl "http://127.0.0.1:9180/apisix/admin/consumers" -X PUT \
-H "X-API-KEY: ${admin_key}" \
-d '{
"username": "jack",
"plugins": {
"limit-count": {
"count": 3,
"time_window": 30,
"rejected_code": 429
}
}
}'
```
Create the `jwt-auth` Credential for the Consumer `jack`:
```shell
curl "http://127.0.0.1:9180/apisix/admin/consumers/jack/credentials" -X PUT \
-H "X-API-KEY: ${admin_key}" \
-d '{
"id": "cred-jack-jwt-auth",
"plugins": {
"jwt-auth": {
"key": "jack-key",
"secret": "jack-hs256-secret-that-is-very-long"
}
}
}'
```
Create an anonymous user `anonymous` and configure the `limit-count` Plugin to allow for a quota of 1 within a 30-second window:
```shell
curl "http://127.0.0.1:9180/apisix/admin/consumers" -X PUT \
-H "X-API-KEY: ${admin_key}" \
-d '{
"username": "anonymous",
"plugins": {
"limit-count": {
"count": 1,
"time_window": 30,
"rejected_code": 429
}
}
}'
```
Create a Route and configure the `jwt-auth` Plugin to accept anonymous Consumer `anonymous` from bypassing the authentication:
```shell
curl "http://127.0.0.1:9180/apisix/admin/routes" -X PUT \
-H "X-API-KEY: ${admin_key}" \
-d '{
"id": "jwt-auth-route",
"uri": "/anything",
"plugins": {
"jwt-auth": {
"anonymous_consumer": "anonymous"
}
},
"upstream": {
"type": "roundrobin",
"nodes": {
"httpbin.org:80": 1
}
}
}'
```
To issue a JWT for `jack`, you could use [JWT.io's JWT encoder](https://jwt.io) or other utilities. If you are using [JWT.io's JWT encoder](https://jwt.io), do the following:
* Fill in `HS256` as the algorithm.
* Update the secret in the __Valid secret__ section to be `jack-hs256-secret-that-is-very-long`.
* Update payload with Consumer key `jack-key`; and add `exp` or `nbf` in UNIX timestamp.
Your payload should look similar to the following:
```json
{
"key": "jack-key",
"nbf": 1729132271
}
```
Copy the generated JWT and save to a variable:
```shell
export jwt_token=eyJhbGciOiJIUzI1NiIsInR5cCI6IkpXVCJ9.eyJrZXkiOiJqYWNrLWtleSIsIm5iZiI6MTcyOTEzMjI3MX0.UEPXy5jpid624T1XpfjM0PLY73LZPjV3Qt8yZ92kVuU
```
To verify the rate limiting, send five consecutive requests with `jack`'s JWT:
```shell
resp=$(seq 5 | xargs -I{} curl "http://127.0.0.1:9080/anything" -H "Authorization: ${jwt_token}" -o /dev/null -s -w "%{http_code}\n") && \
count_200=$(echo "$resp" | grep "200" | wc -l) && \
count_429=$(echo "$resp" | grep "429" | wc -l) && \
echo "200": $count_200, "429": $count_429
```
You should see the following response, showing that out of the 5 requests, 3 requests were successful (status code 200) while the others were rejected (status code 429).
```text
200: 3, 429: 2
```
Send five anonymous requests:
```shell
resp=$(seq 5 | xargs -I{} curl "http://127.0.0.1:9080/anything" -o /dev/null -s -w "%{http_code}\n") && \
count_200=$(echo "$resp" | grep "200" | wc -l) && \
count_429=$(echo "$resp" | grep "429" | wc -l) && \
echo "200": $count_200, "429": $count_429
```
You should see the following response, showing that only one request was successful:
```text
200: 1, 429: 4
```
---
---
title: kafka-logger
keywords:
- Apache APISIX
- API Gateway
- Plugin
- Kafka Logger
description: This document contains information about the Apache APISIX kafka-logger Plugin.
---
## Description
The `kafka-logger` Plugin is used to push logs as JSON objects to Apache Kafka clusters. It works as a Kafka client driver for the ngx_lua Nginx module.
It might take some time to receive the log data. It will be automatically sent after the timer function in the [batch processor](../batch-processor.md) expires.
## Attributes
| Name | Type | Required | Default | Valid values | Description |
| ---------------------- | ------- | -------- | -------------- | --------------------- | ------------------------------------------------------------------------------------------------------------------------------------------------------------------------------------------------------------------------------------------------------------------------------------------------------------------------------------------------ |
| broker_list | object | True | | | Deprecated, use `brokers` instead. List of Kafka brokers. (nodes). |
| brokers | array | True | | | List of Kafka brokers (nodes). |
| brokers.host | string | True | | | The host of Kafka broker, e.g, `192.168.1.1`. |
| brokers.port | integer | True | | [0, 65535] | The port of Kafka broker |
| brokers.sasl_config | object | False | | | The sasl config of Kafka broker |
| brokers.sasl_config.mechanism | string | False | "PLAIN" | ["PLAIN", "SCRAM-SHA-256", "SCRAM-SHA-512"] | The mechaism of sasl config |
| brokers.sasl_config.user | string | True | | | The user of sasl_config. If sasl_config exists, it's required. |
| brokers.sasl_config.password | string | True | | | The password of sasl_config. If sasl_config exists, it's required. |
| kafka_topic | string | True | | | Target topic to push the logs for organisation. |
| producer_type | string | False | async | ["async", "sync"] | Message sending mode of the producer. |
| required_acks | integer | False | 1 | [1, -1] | Number of acknowledgements the leader needs to receive for the producer to consider the request complete. This controls the durability of the sent records. The attribute follows the same configuration as the Kafka `acks` attribute. `required_acks` cannot be 0. See [Apache Kafka documentation](https://kafka.apache.org/documentation/#producerconfigs_acks) for more. |
| key | string | False | | | Key used for allocating partitions for messages. |
| timeout | integer | False | 3 | [1,...] | Timeout for the upstream to send data. |
| name | string | False | "kafka logger" | | Unique identifier for the batch processor. If you use Prometheus to monitor APISIX metrics, the name is exported in `apisix_batch_process_entries`. |
| meta_format | enum | False | "default" | ["default","origin"] | Format to collect the request information. Setting to `default` collects the information in JSON format and `origin` collects the information with the original HTTP request. See [examples](#meta_format-example) below. |
| log_format | object | False | | | Log format declared as key-value pairs in JSON. Values support strings and nested objects (up to five levels deep; deeper fields are truncated). Within strings, [APISIX](../apisix-variable.md) or [NGINX](http://nginx.org/en/docs/varindex.html) variables can be referenced by prefixing with `$`. |
| include_req_body | boolean | False | false | [false, true] | When set to `true` includes the request body in the log. If the request body is too big to be kept in the memory, it can't be logged due to Nginx's limitations. |
| include_req_body_expr | array | False | | | Filter for when the `include_req_body` attribute is set to `true`. Request body is only logged when the expression set here evaluates to `true`. See [lua-resty-expr](https://github.com/api7/lua-resty-expr) for more. |
| max_req_body_bytes | integer | False | 524288 | >=1 | Maximum request body allowed in bytes. Request bodies falling within this limit will be pushed to Kafka. If the size exceeds the configured value, the body will be truncated before being pushed to Kafka. |
| include_resp_body | boolean | False | false | [false, true] | When set to `true` includes the response body in the log. |
| include_resp_body_expr | array | False | | | Filter for when the `include_resp_body` attribute is set to `true`. Response body is only logged when the expression set here evaluates to `true`. See [lua-resty-expr](https://github.com/api7/lua-resty-expr) for more. |
| max_resp_body_bytes | integer | False | 524288 | >=1 | Maximum response body allowed in bytes. Response bodies falling within this limit will be pushed to Kafka. If the size exceeds the configured value, the body will be truncated before being pushed to Kafka. |
| cluster_name | integer | False | 1 | [0,...] | Name of the cluster. Used when there are two or more Kafka clusters. Only works if the `producer_type` attribute is set to `async`. |
| producer_batch_num | integer | optional | 200 | [1,...] | `batch_num` parameter in [lua-resty-kafka](https://github.com/doujiang24/lua-resty-kafka). The merge message and batch is send to the server. Unit is message count. |
| producer_batch_size | integer | optional | 1048576 | [0,...] | `batch_size` parameter in [lua-resty-kafka](https://github.com/doujiang24/lua-resty-kafka) in bytes. |
| producer_max_buffering | integer | optional | 50000 | [1,...] | `max_buffering` parameter in [lua-resty-kafka](https://github.com/doujiang24/lua-resty-kafka) representing maximum buffer size. Unit is message count. |
| producer_time_linger | integer | optional | 1 | [1,...] | `flush_time` parameter in [lua-resty-kafka](https://github.com/doujiang24/lua-resty-kafka) in seconds. |
| meta_refresh_interval | integer | optional | 30 | [1,...] | `refresh_interval` parameter in [lua-resty-kafka](https://github.com/doujiang24/lua-resty-kafka) specifies the time to auto refresh the metadata, in seconds. |
This Plugin supports using batch processors to aggregate and process entries (logs/data) in a batch. This avoids the need for frequently submitting the data. The batch processor submits data every `5` seconds or when the data in the queue reaches `1000`. See [Batch Processor](../batch-processor.md#configuration) for more information or setting your custom configuration.
:::info IMPORTANT
The data is first written to a buffer. When the buffer exceeds the `batch_max_size` or `buffer_duration` attribute, the data is sent to the Kafka server and the buffer is flushed.
If the process is successful, it will return `true` and if it fails, returns `nil` with a string with the "buffer overflow" error.
:::
### meta_format example
- `default`:
```json
{
"upstream": "127.0.0.1:1980",
"start_time": 1619414294760,
"client_ip": "127.0.0.1",
"service_id": "",
"route_id": "1",
"request": {
"querystring": {
"ab": "cd"
},
"size": 90,
"uri": "/hello?ab=cd",
"url": "http://localhost:1984/hello?ab=cd",
"headers": {
"host": "localhost",
"content-length": "6",
"connection": "close"
},
"body": "abcdef",
"method": "GET"
},
"response": {
"headers": {
"connection": "close",
"content-type": "text/plain; charset=utf-8",
"date": "Mon, 26 Apr 2021 05:18:14 GMT",
"server": "APISIX/2.5",
"transfer-encoding": "chunked"
},
"size": 190,
"status": 200
},
"server": {
"hostname": "localhost",
"version": "2.5"
},
"latency": 0
}
```
- `origin`:
```http
GET /hello?ab=cd HTTP/1.1
host: localhost
content-length: 6
connection: close
abcdef
```
## Metadata
You can also set the format of the logs by configuring the Plugin metadata. The following configurations are available:
| Name | Type | Required | Default | Description |
| ---------- | ------ | -------- | ----------------------------------------------------------------------------- | ------------------------------------------------------------------------------------------------------------------------------------------------------------------------------------------------------------------------------------------------------- |
| log_format | object | False | | Log format declared as key-value pairs in JSON. Values support strings and nested objects (up to five levels deep; deeper fields are truncated). Within strings, [APISIX](../apisix-variable.md) or [NGINX](http://nginx.org/en/docs/varindex.html) variables can be referenced by prefixing with `$`. |
| max_pending_entries | integer | False | | Maximum number of pending entries that can be buffered in batch processor before it starts dropping them. |
:::info IMPORTANT
Configuring the Plugin metadata is global in scope. This means that it will take effect on all Routes and Services which use the `kafka-logger` Plugin.
:::
The example below shows how you can configure through the Admin API:
:::note
You can fetch the `admin_key` from `config.yaml` and save to an environment variable with the following command:
```bash
admin_key=$(yq '.deployment.admin.admin_key[0].key' conf/config.yaml | sed 's/"//g')
```
:::
```shell
curl http://127.0.0.1:9180/apisix/admin/plugin_metadata/kafka-logger -H "X-API-KEY: $admin_key" -X PUT -d '
{
"log_format": {
"host": "$host",
"@timestamp": "$time_iso8601",
"client_ip": "$remote_addr",
"request": { "method": "$request_method", "uri": "$request_uri" },
"response": { "status": "$status" }
}
}'
```
With this configuration, your logs would be formatted as shown below:
```shell
{"host":"localhost","@timestamp":"2020-09-23T19:05:05-04:00","client_ip":"127.0.0.1","request":{"method":"GET","uri":"/hello"},"response":{"status":200},"route_id":"1"}
{"host":"localhost","@timestamp":"2020-09-23T19:05:05-04:00","client_ip":"127.0.0.1","request":{"method":"GET","uri":"/hello"},"response":{"status":200},"route_id":"1"}
```
## Enable Plugin
The example below shows how you can enable the `kafka-logger` Plugin on a specific Route:
```shell
curl http://127.0.0.1:9180/apisix/admin/routes/5 -H "X-API-KEY: $admin_key" -X PUT -d '
{
"plugins": {
"kafka-logger": {
"brokers" : [
{
"host" :"127.0.0.1",
"port" : 9092
}
],
"kafka_topic" : "test2",
"key" : "key1",
"batch_max_size": 1,
"name": "kafka logger"
}
},
"upstream": {
"nodes": {
"127.0.0.1:1980": 1
},
"type": "roundrobin"
},
"uri": "/hello"
}'
```
This Plugin also supports pushing to more than one broker at a time. You can specify multiple brokers in the Plugin configuration as shown below:
```json
"brokers" : [
{
"host" :"127.0.0.1",
"port" : 9092
},
{
"host" :"127.0.0.1",
"port" : 9093
}
],
```
## Example usage
Now, if you make a request to APISIX, it will be logged in your Kafka server:
```shell
curl -i http://127.0.0.1:9080/hello
```
## Delete Plugin
To remove the `kafka-logger` Plugin, you can delete the corresponding JSON configuration from the Plugin configuration. APISIX will automatically reload and you do not have to restart for this to take effect.
```shell
curl http://127.0.0.1:9180/apisix/admin/routes/1 -H "X-API-KEY: $admin_key" -X PUT -d '
{
"methods": ["GET"],
"uri": "/hello",
"plugins": {},
"upstream": {
"type": "roundrobin",
"nodes": {
"127.0.0.1:1980": 1
}
}
}'
```
---
---
title: kafka-proxy
keywords:
- Apache APISIX
- API Gateway
- Plugin
- Kafka proxy
description: This document contains information about the Apache APISIX kafka-proxy Plugin.
---
## Description
The `kafka-proxy` plugin can be used to configure advanced parameters for the kafka upstream of Apache APISIX, such as SASL authentication.
## Attributes
| Name | Type | Required | Default | Valid values | Description |
|-------------------|---------|----------|---------|---------------|------------------------------------|
| sasl | object | optional | | {"username": "user", "password" :"pwd"} | SASL/PLAIN authentication configuration, when this configuration exists, turn on SASL authentication; this object will contain two parameters username and password, they must be configured. |
| sasl.username | string | required | | | SASL/PLAIN authentication username |
| sasl.password | string | required | | | SASL/PLAIN authentication password |
NOTE: `encrypt_fields = {"sasl.password"}` is also defined in the schema, which means that the field will be stored encrypted in etcd. See [encrypted storage fields](../plugin-develop.md#encrypted-storage-fields).
:::note
If SASL authentication is enabled, the `sasl.username` and `sasl.password` must be set.
The current SASL authentication only supports PLAIN mode, which is the username password login method.
:::
## Example usage
When we use scheme as the upstream of kafka, we can add kafka authentication configuration to it through this plugin.
```shell
curl -X PUT 'http://127.0.0.1:9180/apisix/admin/routes/r1' \
-H 'X-API-KEY: ' \
-H 'Content-Type: application/json' \
-d '{
"uri": "/kafka",
"plugins": {
"kafka-proxy": {
"sasl": {
"username": "user",
"password": "pwd"
}
}
},
"upstream": {
"nodes": {
"kafka-server1:9092": 1,
"kafka-server2:9092": 1,
"kafka-server3:9092": 1
},
"type": "none",
"scheme": "kafka"
}
}'
```
Now, we can test it by connecting to the `/kafka` endpoint via websocket.
## Delete Plugin
To remove the `kafka-proxy` Plugin, you can delete the corresponding JSON configuration from the Plugin configuration. APISIX will automatically reload and you do not have to restart for this to take effect.
---
---
title: key-auth
keywords:
- Apache APISIX
- API Gateway
- Plugin
- Key Auth
- key-auth
description: The key-auth Plugin supports the use of an authentication key as a mechanism for clients to authenticate themselves before accessing Upstream resources.
---
## Description
The `key-auth` Plugin supports the use of an authentication key as a mechanism for clients to authenticate themselves before accessing Upstream resources.
To use the plugin, you would configure authentication keys on [Consumers](../terminology/consumer.md) and enable the Plugin on routes or services. The key can be included in the request URL query string or request header. APISIX will then verify the key to determine if a request should be allowed or denied to access Upstream resources.
When a Consumer is successfully authenticated, APISIX adds additional headers, such as `X-Consumer-Username`, `X-Credential-Indentifier`, and other Consumer custom headers if configured, to the request, before proxying it to the Upstream service. The Upstream service will be able to differentiate between consumers and implement additional logics as needed. If any of these values is not available, the corresponding header will not be added.
## Attributes
For Consumer/Credential:
| Name | Type | Required | Description |
|------|--------|-------------|----------------------------|
| key | string | True | Unique key for a Consumer. This field supports saving the value in Secret Manager using the [APISIX Secret](../terminology/secret.md) resource. |
NOTE: `encrypt_fields = {"key"}` is also defined in the schema, which means that the field will be stored encrypted in etcd. See [encrypted storage fields](../plugin-develop.md#encrypted-storage-fields).
For Route:
| Name | Type | Required | Default | Description |
|--------|--------|-------------|-------|-------------------------------------------------------------------------------------------------------------------------------------------------------------------------------------------------------------------------------------------------------------------------------|
| header | string | False | apikey | The header to get the key from. |
| query | string | False | apikey | The query string to get the key from. Lower priority than header. |
| hide_credentials | boolean | False | false | If true, do not pass the header or query string with key to Upstream services. |
| anonymous_consumer | string | False | false | Anonymous Consumer name. If configured, allow anonymous users to bypass the authentication. |
## Examples
The examples below demonstrate how you can work with the `key-auth` Plugin for different scenarios.
:::note
You can fetch the `admin_key` from `config.yaml` and save to an environment variable with the following command:
```bash
admin_key=$(yq '.deployment.admin.admin_key[0].key' conf/config.yaml | sed 's/"//g')
```
:::
### Implement Key Authentication on Route
The following example demonstrates how to implement key authentications on a Route and include the key in the request header.
Create a Consumer `jack`:
```shell
curl "http://127.0.0.1:9180/apisix/admin/consumers" -X PUT \
-H "X-API-KEY: ${admin_key}" \
-d '{
"username": "jack"
}'
```
Create `key-auth` Credential for the Consumer:
```shell
curl "http://127.0.0.1:9180/apisix/admin/consumers/jack/credentials" -X PUT \
-H "X-API-KEY: ${admin_key}" \
-d '{
"id": "cred-jack-key-auth",
"plugins": {
"key-auth": {
"key": "jack-key"
}
}
}'
```
Create a Route with `key-auth`:
```shell
curl "http://127.0.0.1:9180/apisix/admin/routes" -X PUT \
-H "X-API-KEY: ${admin_key}" \
-d '{
"id": "key-auth-route",
"uri": "/anything",
"plugins": {
"key-auth": {}
},
"upstream": {
"type": "roundrobin",
"nodes": {
"httpbin.org:80": 1
}
}
}'
```
#### Verify with a Valid Key
Send a request to with the valid key:
```shell
curl -i "http://127.0.0.1:9080/anything" -H 'apikey: jack-key'
```
You should receive an `HTTP/1.1 200 OK` response.
#### Verify with an Invalid Key
Send a request with an invalid key:
```shell
curl -i "http://127.0.0.1:9080/anything" -H 'apikey: wrong-key'
```
You should see an `HTTP/1.1 401 Unauthorized` response with the following:
```text
{"message":"Invalid API key in request"}
```
#### Verify without a Key
Send a request to without a key:
```shell
curl -i "http://127.0.0.1:9080/anything"
```
You should see an `HTTP/1.1 401 Unauthorized` response with the following:
```text
{"message":"Missing API key found in request"}
```
### Hide Authentication Information From Upstream
The following example demonstrates how to prevent the key from being sent to the Upstream services by configuring `hide_credentials`. By default, the authentication key is forwarded to the Upstream services, which might lead to security risks in some circumstances.
Create a Consumer `jack`:
```shell
curl "http://127.0.0.1:9180/apisix/admin/consumers" -X PUT \
-H "X-API-KEY: ${admin_key}" \
-d '{
"username": "jack"
}'
```
Create `key-auth` Credential for the Consumer:
```shell
curl "http://127.0.0.1:9180/apisix/admin/consumers/jack/credentials" -X PUT \
-H "X-API-KEY: ${admin_key}" \
-d '{
"id": "cred-jack-key-auth",
"plugins": {
"key-auth": {
"key": "jack-key"
}
}
}'
```
#### Without Hiding Credentials
Create a Route with `key-auth` and configure `hide_credentials` to `false`, which is the default configuration:
```shell
curl "http://127.0.0.1:9180/apisix/admin/routes" -X PUT \
-H "X-API-KEY: ${admin_key}" \
-d '{
"id": "key-auth-route",
"uri": "/anything",
"plugins": {
"key-auth": {
"hide_credentials": false
}
},
"upstream": {
"type": "roundrobin",
"nodes": {
"httpbin.org:80": 1
}
}
}'
```
Send a request with the valid key:
```shell
curl -i "http://127.0.0.1:9080/anything?apikey=jack-key"
```
You should see an `HTTP/1.1 200 OK` response with the following:
```json
{
"args": {
"auth": "jack-key"
},
"data": "",
"files": {},
"form": {},
"headers": {
"Accept": "*/*",
"Host": "127.0.0.1",
"User-Agent": "curl/8.2.1",
"X-Consumer-Username": "jack",
"X-Credential-Identifier": "cred-jack-key-auth",
"X-Amzn-Trace-Id": "Root=1-6502d8a5-2194962a67aa21dd33f94bb2",
"X-Forwarded-Host": "127.0.0.1"
},
"json": null,
"method": "GET",
"origin": "127.0.0.1, 103.248.35.179",
"url": "http://127.0.0.1/anything?apikey=jack-key"
}
```
Note that the Credential `jack-key` is visible to the Upstream service.
#### Hide Credentials
Update the plugin's `hide_credentials` to `true`:
```shell
curl "http://127.0.0.1:9180/apisix/admin/routes/key-auth-route" -X PATCH \
-H "X-API-KEY: ${admin_key}" \
-d '{
"plugins": {
"key-auth": {
"hide_credentials": true
}
}
}'
```
Send a request with the valid key:
```shell
curl -i "http://127.0.0.1:9080/anything?apikey=jack-key"
```
You should see an `HTTP/1.1 200 OK` response with the following:
```json
{
"args": {},
"data": "",
"files": {},
"form": {},
"headers": {
"Accept": "*/*",
"Host": "127.0.0.1",
"User-Agent": "curl/8.2.1",
"X-Consumer-Username": "jack",
"X-Credential-Identifier": "cred-jack-key-auth",
"X-Amzn-Trace-Id": "Root=1-6502d85c-16f34dbb5629a5960183e803",
"X-Forwarded-Host": "127.0.0.1"
},
"json": null,
"method": "GET",
"origin": "127.0.0.1, 103.248.35.179",
"url": "http://127.0.0.1/anything"
}
```
Note that the Credential `jack-key` is no longer visible to the Upstream service.
### Demonstrate Priority of Keys in Header and Query
The following example demonstrates how to implement key authentication by consumers on a Route and customize the URL parameter that should include the key. The example also shows that when the API key is configured in both the header and the query string, the request header has a higher priority.
Create a Consumer `jack`:
```shell
curl "http://127.0.0.1:9180/apisix/admin/consumers" -X PUT \
-H "X-API-KEY: ${admin_key}" \
-d '{
"username": "jack"
}'
```
Create `key-auth` Credential for the Consumer:
```shell
curl "http://127.0.0.1:9180/apisix/admin/consumers/jack/credentials" -X PUT \
-H "X-API-KEY: ${admin_key}" \
-d '{
"id": "cred-jack-key-auth",
"plugins": {
"key-auth": {
"key": "jack-key"
}
}
}'
```
Create a Route with `key-auth`:
```shell
curl "http://127.0.0.1:9180/apisix/admin/routes" -X PUT \
-H "X-API-KEY: ${admin_key}" \
-d '{
"id": "key-auth-route",
"uri": "/anything",
"plugins": {
"key-auth": {
"query": "auth"
}
},
"upstream": {
"type": "roundrobin",
"nodes": {
"httpbin.org:80": 1
}
}
}'
```
#### Verify with a Valid Key
Send a request to with the valid key:
```shell
curl -i "http://127.0.0.1:9080/anything?auth=jack-key"
```
You should receive an `HTTP/1.1 200 OK` response.
#### Verify with an Invalid Key
Send a request with an invalid key:
```shell
curl -i "http://127.0.0.1:9080/anything?auth=wrong-key"
```
You should see an `HTTP/1.1 401 Unauthorized` response with the following:
```text
{"message":"Invalid API key in request"}
```
#### Verify with a Valid Key in Query String
However, if you include the valid key in header with the invalid key still in the URL query string:
```shell
curl -i "http://127.0.0.1:9080/anything?auth=wrong-key" -H 'apikey: jack-key'
```
You should see an `HTTP/1.1 200 OK` response. This shows that the key included in the header always has a higher priority.
### Add Consumer Custom ID to Header
The following example demonstrates how you can attach a Consumer custom ID to authenticated request in the `Consumer-Custom-Id` header, which can be used to implement additional logics as needed.
Create a Consumer `jack` with a custom ID label:
```shell
curl "http://127.0.0.1:9180/apisix/admin/consumers" -X PUT \
-H "X-API-KEY: ${admin_key}" \
-d '{
"username": "jack",
"labels": {
"custom_id": "495aec6a"
}
}'
```
Create `key-auth` Credential for the Consumer:
```shell
curl "http://127.0.0.1:9180/apisix/admin/consumers/jack/credentials" -X PUT \
-H "X-API-KEY: ${admin_key}" \
-d '{
"id": "cred-jack-key-auth",
"plugins": {
"key-auth": {
"key": "jack-key"
}
}
}'
```
Create a Route with `key-auth`:
```shell
curl "http://127.0.0.1:9180/apisix/admin/routes" -X PUT \
-H "X-API-KEY: ${admin_key}" \
-d '{
"id": "key-auth-route",
"uri": "/anything",
"plugins": {
"key-auth": {}
},
"upstream": {
"type": "roundrobin",
"nodes": {
"httpbin.org:80": 1
}
}
}'
```
To verify, send a request to the Route with the valid key:
```shell
curl -i "http://127.0.0.1:9080/anything?auth=jack-key"
```
You should see an `HTTP/1.1 200 OK` response similar to the following:
```json
{
"args": {
"auth": "jack-key"
},
"data": "",
"files": {},
"form": {},
"headers": {
"Accept": "*/*",
"Host": "127.0.0.1",
"User-Agent": "curl/8.6.0",
"X-Amzn-Trace-Id": "Root=1-66ea8d64-33df89052ae198a706e18c2a",
"X-Consumer-Username": "jack",
"X-Credential-Identifier": "cred-jack-key-auth",
"X-Consumer-Custom-Id": "495aec6a",
"X-Forwarded-Host": "127.0.0.1"
},
"json": null,
"method": "GET",
"origin": "192.168.65.1, 205.198.122.37",
"url": "http://127.0.0.1/anything?apikey=jack-key"
}
```
### Rate Limit with Anonymous Consumer
The following example demonstrates how you can configure different rate limiting policies by regular and anonymous consumers, where the anonymous Consumer does not need to authenticate and has less quotas.
Create a regular Consumer `jack` and configure the `limit-count` Plugin to allow for a quota of 3 within a 30-second window:
```shell
curl "http://127.0.0.1:9180/apisix/admin/consumers" -X PUT \
-H "X-API-KEY: ${admin_key}" \
-d '{
"username": "jack",
"plugins": {
"limit-count": {
"count": 3,
"time_window": 30,
"rejected_code": 429
}
}
}'
```
Create the `key-auth` Credential for the Consumer `jack`:
```shell
curl "http://127.0.0.1:9180/apisix/admin/consumers/jack/credentials" -X PUT \
-H "X-API-KEY: ${admin_key}" \
-d '{
"id": "cred-jack-key-auth",
"plugins": {
"key-auth": {
"key": "jack-key"
}
}
}'
```
Create an anonymous user `anonymous` and configure the `limit-count` Plugin to allow for a quota of 1 within a 30-second window:
```shell
curl "http://127.0.0.1:9180/apisix/admin/consumers" -X PUT \
-H "X-API-KEY: ${admin_key}" \
-d '{
"username": "anonymous",
"plugins": {
"limit-count": {
"count": 1,
"time_window": 30,
"rejected_code": 429
}
}
}'
```
Create a Route and configure the `key-auth` Plugin to accept anonymous Consumer `anonymous` from bypassing the authentication:
```shell
curl "http://127.0.0.1:9180/apisix/admin/routes" -X PUT \
-H "X-API-KEY: ${admin_key}" \
-d '{
"id": "key-auth-route",
"uri": "/anything",
"plugins": {
"key-auth": {
"anonymous_consumer": "anonymous"
}
},
"upstream": {
"type": "roundrobin",
"nodes": {
"httpbin.org:80": 1
}
}
}'
```
To verify, send five consecutive requests with `jack`'s key:
```shell
resp=$(seq 5 | xargs -I{} curl "http://127.0.0.1:9080/anything" -H 'apikey: jack-key' -o /dev/null -s -w "%{http_code}\n") && \
count_200=$(echo "$resp" | grep "200" | wc -l) && \
count_429=$(echo "$resp" | grep "429" | wc -l) && \
echo "200": $count_200, "429": $count_429
```
You should see the following response, showing that out of the 5 requests, 3 requests were successful (status code 200) while the others were rejected (status code 429).
```text
200: 3, 429: 2
```
Send five anonymous requests:
```shell
resp=$(seq 5 | xargs -I{} curl "http://127.0.0.1:9080/anything" -o /dev/null -s -w "%{http_code}\n") && \
count_200=$(echo "$resp" | grep "200" | wc -l) && \
count_429=$(echo "$resp" | grep "429" | wc -l) && \
echo "200": $count_200, "429": $count_429
```
You should see the following response, showing that only one request was successful:
```text
200: 1, 429: 4
```
---
---
title: lago
keywords:
- Apache APISIX
- API Gateway
- Plugin
- lago
- monetization
- github.com/getlago/lago
description: The lago plugin reports usage to a Lago instance, which allows users to integrate Lago with APISIX for API monetization.
---
## Description
The `lago` plugin pushes requests and responses to [Lago Self-hosted](https://github.com/getlago/lago) and [Lago Cloud](https://getlago.com) via the Lago REST API. the plugin allows you to use it with a variety of APISIX built-in features, such as the APISIX consumer and the request-id plugin.
This allows for API monetization or let APISIX to be an AI gateway for AI tokens billing scenarios.
:::note disclaimer
Lago owns its trademarks and controls its commercial products and open source projects.
The [https://github.com/getlago/lago](https://github.com/getlago/lago) project uses the `AGPL-3.0` license instead of the `Apache-2.0` license that is the same as Apache APISIX. As a user, you will need to evaluate for yourself whether it is applicable to your business to use the project in a compliant way or to obtain another type of license from Lago. Apache APISIX community does not endorse it.
The plugin does not contain any proprietary code or SDKs from Lago, it is contributed by contributors to Apache APISIX and licensed under the `Apache-2.0` license, which is in line with any other part of APISIX and you don't need to worry about its compliance.
:::
When enabled, the plugin will collect information from the request context (e.g. event code, transaction ID, associated subscription ID) as configured and serialize them into [Event JSON objects](https://getlago.com/docs/api-reference/events/event-object) as required by Lago. They will be added to the buffer and sent to Lago in batches of up to 100. This batch size is a [requirement](https://getlago.com/docs/api-reference/events/batch) from Lago. If you want to modify it, see [batch processor](../batch-processor.md) for more details.
## Attributes
| Name | Type | Required | Default | Valid values | Description |
|---|---|---|---|---|---|
| endpoint_addrs | array[string] | True | | | Lago API address, such as `http://127.0.0.1:3000`. It supports both self-hosted Lago and Lago Cloud. If multiple endpoints are configured, the log will be pushed to a randomly selected endpoint from the list. |
| endpoint_uri | string | False | /api/v1/events/batch | | Lago API endpoint for [batch usage events](https://docs.getlago.com/api-reference/events/batch). |
| token | string | True | | | Lago API key created in the Lago dashboard. |
| event_transaction_id | string | True | | | Event's transaction ID, used to identify and de-duplicate the event. It supports string templates containing APISIX and NGINX variables, such as `req_${request_id}`, which allows you to use values returned by upstream services or the `request-id` plugin. |
| event_subscription_id | string | True | | | Event's subscription ID, which is automatically generated or configured when you assign the plan to the customer on Lago. This is used to associate API consumption to a customer subscription and supports string templates containing APISIX and NGINX variables, such as `cus_${consumer_name}`, which allows you to use values returned by upstream services or APISIX consumer. |
| event_code | string | True | | | Lago billable metric's code for associating an event to a specified billable item. |
| event_properties | object | False | | | Event's properties, used to attach information to an event. This allows you to send certain information on an event to Lago, such as the HTTP status to exclude failed requests from billing, or the AI token consumption in the response body for accurate billing. The keys are fixed strings, while the values can be string templates containing APISIX and NGINX variables, such as `${status}`. |
| ssl_verify | boolean | False | true | | If true, verify Lago's SSL certificates. |
| timeout | integer | False | 3000 | [1, 60000] | Timeout for the Lago service HTTP call in milliseconds. |
| keepalive | boolean | False | true | | If true, keep the connection alive for multiple requests. |
| keepalive_timeout | integer | False | 60000 | >=1000 | Keepalive timeout in milliseconds. |
| keepalive_pool | integer | False | 5 | >=1 | Maximum number of connections in the connection pool. |
This Plugin supports using batch processors to aggregate and process events in a batch. This avoids the need for frequently submitting the data. The batch processor submits data every `5` seconds or when the data in the queue reaches `1000`. See [Batch Processor](../batch-processor.md#configuration) for more information or setting your custom configuration.
## Examples
The examples below demonstrate how you can configure `lago` Plugin for typical scenario.
To follow along the examples, start a Lago instance. Refer to [https://github.com/getlago/lago](https://github.com/getlago/lago) or use Lago Cloud.
Follow these brief steps to configure Lago:
1. Get the Lago API Key (also known as `token`), from the __Developer__ page of the Lago dashboard.
2. Next, create a billable metric used by APISIX, assuming its code is `test`. Set the `Aggregation type` to `Count`; and add a filter with a key of `tier` whose value contains `expensive` to allow us to distinguish between API values, which will be demonstrated later.
3. Create a plan and add the created metric to it. Its code can be configured however you like. In the __Usage-based charges__ section, add the billable metric created previously as a `Metered charge` item. Specify the default price as `$1`. Add a filter, use `tier: expensive` to perform the filtering, and specify its price as `$10`.
4. Select an existing consumer or create a new one to assign the plan you just created. You need to specify a `Subscription external ID` (or you can have Lago generate it), which will be used as the APISIX consumer username.
Next we need to configure APISIX for demonstrations.
:::note
You can fetch the `admin_key` from `config.yaml` and save to an environment variable with the following command:
```bash
admin_key=$(yq '.deployment.admin.admin_key[0].key' conf/config.yaml | sed 's/"//g')
```
:::
### Report API call usage
The following example demonstrates how you can configure the `lago` Plugin on a Route to measuring API call usage.
Create a Route with the `lago`, `request-id`, `key-auth` Plugins as such:
```shell
curl "http://127.0.0.1:9180/apisix/admin/routes" -X PUT \
-H "X-API-KEY: ${admin_key}" \
-d '{
"id": "lago-route-1",
"uri": "/get",
"plugins": {
"request-id": {
"include_in_response": true
},
"key-auth": {},
"lago": {
"endpoint_addrs": ["http://12.0.0.1:3000"],
"token": "",
"event_transaction_id": "${http_x_request_id}",
"event_subscription_id": "${http_x_consumer_username}",
"event_code": "test"
}
},
"upstream": {
"nodes": {
"httpbin.org:80": 1
},
"type": "roundrobin"
}
}'
```
Create a second route with the `lago`, `request-id`, `key-auth` Plugin as such:
```shell
curl "http://127.0.0.1:9180/apisix/admin/routes" -X PUT \
-H "X-API-KEY: ${admin_key}" \
-d '{
"id": "lago-route-2",
"uri": "/anything",
"plugins": {
"request-id": {
"include_in_response": true
},
"key-auth": {},
"lago": {
"endpoint_addrs": ["http://12.0.0.1:3000"],
"token": "",
"event_transaction_id": "${http_x_request_id}",
"event_subscription_id": "${http_x_consumer_username}",
"event_code": "test",
"event_properties": {
"tier": "expensive"
}
}
},
"upstream": {
"nodes": {
"httpbin.org:80": 1
},
"type": "roundrobin"
}
}'
```
Create a Consumer:
```shell
curl "http://127.0.0.1:9180/apisix/admin/consumers" -X PUT \
-H "X-API-KEY: ${admin_key}" \
-d '{
"username": "",
"plugins": {
"key-auth": {
"key": "demo"
}
}
}'
```
Send three requests to the two routes respectively:
```shell
curl "http://127.0.0.1:9080/get"
curl "http://127.0.0.1:9080/get"
curl "http://127.0.0.1:9080/get"
curl "http://127.0.0.1:9080/anything"
curl "http://127.0.0.1:9080/anything"
curl "http://127.0.0.1:9080/anything"
```
You should receive `HTTP/1.1 200 OK` responses for all requests.
Wait a few seconds, then navigate to the __Developer__ page in the Lago dashboard. Under __Events__, you should see 6 event entries sent by APISIX.
If the self-hosted instance's event worker is configured correctly (or if you're using Lago Cloud), you can also see the total amount consumed in real time in the consumer's subscription usage, which should be `3 * $1 + 3 * $10 = $33` according to our demo use case.
## FAQ
### Purpose of the Plugin
When you make an effort to monetize your API, it's hard to find a ready-made, low-cost solution, so you may have to build your own billing stack, which is complicated.
This plugin allows you to use APISIX to handle API proxies and use Lago as a billing stack through direct integration with Lago, and both the APISIX open source project and Lago will be part of your portfolio, which is a huge time saver.
Every API call results in a Lago event, which allows you to bill users for real usage, i.e. pay-as-you-go, and thanks to our built-in transaction ID (request ID) support, you can simply implement API call logging and troubleshooting for your customers.
In addition to typical API monetization scenarios, APISIX can also do AI tokens-based billing when it is acting as an AI gateway, where each Lago event generated by an API request includes exactly how many tokens were consumed, to allow you to charge the user for a fine-grained per-tokens usage.
### Is it flexible?
Of course, the fact that we make transaction ID, subscription ID as a configuration item and allow you to use APISIX and NGINX variables in it means that it's simple to integrate the plugin with any existing or your own authentication and internal services.
- Use custom authentication: as long as the Lago subscription ID represented by the user ID is registered as an APISIX variable, it will be available from there, so custom authentication is completely possible!
- Integration with internal services: You might not need the APISIX built-in request-id plugin. That's OK. You can have your internal service (APISIX upstream) generate it and include it in the HTTP response header. Then you can access it via an NGINX variable in the transaction ID.
Event properties are supported, allowing you to set special values for specific APIs. For example, if your service has 100 APIs, you can enable general billing for all of them while customizing a few with different pricing—just as demonstrated above.
### Which Lago versions does it work with?
When we first developed the Lago plugin, it was released to `1.17.0`, which we used for integration, so it works at least with `1.17.0`.
Technically, we use the Lago batch event API to submit events in batches, and APISIX will only use this API, so as long as Lago doesn't make any disruptive changes to this API, APISIX will be able to integrate with it.
Here's an [archive page](https://web.archive.org/web/20250516073803/https://getlago.com/docs/api-reference/events/batch) of the API documentation, which allows you to check the differences between the API at the time of our integration and the latest API.
If the latest API changes, you can submit an issue to inform the APISIX maintainers that this may require some changes.
### Why Lago can't receive events?
Look at `error.log` for such a log.
```text
2023/04/30 13:45:46 [error] 19381#19381: *1075673 [lua] batch-processor.lua:95: Batch Processor[lago logger] failed to process entries: lago api returned status: 400, body: , context: ngx.timer, client: 127.0.0.1, server: 0.0.0.0:9080
```
The error can be diagnosed based on the error code in the `failed to process entries: lago api returned status: 400, body: ` and the response body of the lago server.
### Reliability of reporting
The plugin may encounter a network problem that prevents the node where the gateway is located from communicating with the Lago API, in which case APISIX will discard the batch according to the [batch processor](../batch-processor.md) configuration, the batch will be discarded if the specified number of retries are made and the dosage still cannot be sent.
Discarded events are permanently lost, so it is recommended that you use this plugin in conjunction with other logging mechanisms and perform event replay after Lago is unavailable causing data to be discarded to ensure that all logs are correctly sent to Lago.
### Will the event duplicate?
While APISIX performs retries based on the [batch processor](../batch-processor.md) configuration, you don't need to worry about duplicate events being reported to Lago.
The `event_transcation_id` and `timestamp` are generated and logged after the request is processed on the APISIX side, and Lago de-duplicates the event based on them.
So even if a retry is triggered because the network causes Lago to send a `success` response that is not received by APISIX, the event is still not duplicated on Lago.
### Performance Impacts
The plugin is logically simple and reliable; it simply builds a Lago event object for each request, buffers and sends them in bulk. The logic is not coupled to the request proxy path, so this does not cause latency to rise for requests going through the gateway.
Technically, the logic is executed in the NGINX log phase and [batch processor](../batch-processor.md) timer, so this does not affect the request itself.
### Resource overhead
As explained earlier in the performance impact section, the plugin doesn't cause a significant increase in system resources. It only uses a small amount of memory to store events for batching.
---
---
title: ldap-auth
keywords:
- Apache APISIX
- API Gateway
- Plugin
- LDAP Authentication
- ldap-auth
description: This document contains information about the Apache APISIX ldap-auth Plugin.
---
## Description
The `ldap-auth` Plugin can be used to add LDAP authentication to a Route or a Service.
This Plugin works with the Consumer object and the consumers of the API can authenticate with an LDAP server using [basic authentication](https://en.wikipedia.org/wiki/Basic_access_authentication).
This Plugin uses [lua-resty-ldap](https://github.com/api7/lua-resty-ldap) for connecting with an LDAP server.
## Attributes
For Consumer:
| Name | Type | Required | Description |
| ------- | ------ | -------- | -------------------------------------------------------------------------------- |
| user_dn | string | True | User dn of the LDAP client. For example, `cn=user01,ou=users,dc=example,dc=org`. This field supports saving the value in Secret Manager using the [APISIX Secret](../terminology/secret.md) resource. |
For Route:
| Name | Type | Required | Default | Description |
|----------|---------|----------|---------|------------------------------------------------------------------------|
| base_dn | string | True | | Base dn of the LDAP server. For example, `ou=users,dc=example,dc=org`. |
| ldap_uri | string | True | | URI of the LDAP server. |
| use_tls | boolean | False | `false` | If set to `true` uses TLS. |
| tls_verify| boolean | False | `false` | Whether to verify the server certificate when `use_tls` is enabled; If set to `true`, you must set `ssl_trusted_certificate` in `config.yaml`, and make sure the host of `ldap_uri` matches the host in server certificate. |
| uid | string | False | `cn` | uid attribute. |
## Enable plugin
First, you have to create a Consumer and enable the `ldap-auth` Plugin on it:
:::note
You can fetch the `admin_key` from `config.yaml` and save to an environment variable with the following command:
```bash
admin_key=$(yq '.deployment.admin.admin_key[0].key' conf/config.yaml | sed 's/"//g')
```
:::
```shell
curl http://127.0.0.1:9180/apisix/admin/consumers -H "X-API-KEY: $admin_key" -X PUT -d '
{
"username": "foo",
"plugins": {
"ldap-auth": {
"user_dn": "cn=user01,ou=users,dc=example,dc=org"
}
}
}'
```
Now you can enable the Plugin on a specific Route or a Service as shown below:
```shell
curl http://127.0.0.1:9180/apisix/admin/routes/1 -H "X-API-KEY: $admin_key" -X PUT -d '
{
"methods": ["GET"],
"uri": "/hello",
"plugins": {
"ldap-auth": {
"base_dn": "ou=users,dc=example,dc=org",
"ldap_uri": "localhost:1389",
"uid": "cn"
},
},
"upstream": {
"type": "roundrobin",
"nodes": {
"127.0.0.1:1980": 1
}
}
}'
```
## Example usage
After configuring the Plugin as mentioned above, clients can make requests with authorization to access the API:
```shell
curl -i -uuser01:password1 http://127.0.0.1:9080/hello
```
```shell
HTTP/1.1 200 OK
...
hello, world
```
If an authorization header is missing or invalid, the request is denied:
```shell
curl -i http://127.0.0.1:9080/hello
```
```shell
HTTP/1.1 401 Unauthorized
...
{"message":"Missing authorization in request"}
```
```shell
curl -i -uuser:password1 http://127.0.0.1:9080/hello
```
```shell
HTTP/1.1 401 Unauthorized
...
{"message":"Invalid user authorization"}
```
```shell
curl -i -uuser01:passwordfalse http://127.0.0.1:9080/hello
```
```shell
HTTP/1.1 401 Unauthorized
...
{"message":"Invalid user authorization"}
```
## Delete Plugin
To remove the `ldap-auth` Plugin, you can delete the corresponding JSON configuration from the Plugin configuration. APISIX will automatically reload and you do not have to restart for this to take effect.
```shell
curl http://127.0.0.1:9180/apisix/admin/routes/1 -H "X-API-KEY: $admin_key" -X PUT -d '
{
"methods": ["GET"],
"uri": "/hello",
"plugins": {},
"upstream": {
"type": "roundrobin",
"nodes": {
"127.0.0.1:1980": 1
}
}
}'
```
---
---
title: limit-conn
keywords:
- Apache APISIX
- API Gateway
- Limit Connection
description: The limit-conn plugin restricts the rate of requests by managing concurrent connections. Requests exceeding the threshold may be delayed or rejected, ensuring controlled API usage and preventing overload.
---
## Description
The `limit-conn` Plugin limits the rate of requests by the number of concurrent connections. Requests exceeding the threshold will be delayed or rejected based on the configuration, ensuring controlled resource usage and preventing overload.
## Attributes
| Name | Type | Required | Default | Valid values | Description |
|------------|---------|----------|-------------|-------------------|-----------------|
| conn | integer | True | | > 0 | The maximum number of concurrent requests allowed. Requests exceeding the configured limit and below `conn + burst` will be delayed. |
| burst | integer | True | | >= 0 | The number of excessive concurrent requests allowed to be delayed per second. Requests exceeding the limit will be rejected immediately. |
| default_conn_delay | number | True | | > 0 | Processing latency allowed in seconds for concurrent requests exceeding `conn + burst`, which can be dynamically adjusted based on `only_use_default_delay` setting. |
| only_use_default_delay | boolean | False | false | | If false, delay requests proportionally based on how much they exceed the `conn` limit. The delay grows larger as congestion increases. For instance, with `conn` being `5`, `burst` being `3`, and `default_conn_delay` being `1`, 6 concurrent requests would result in a 1-second delay, 7 requests a 2-second delay, 8 requests a 3-second delay, and so on, until the total limit of `conn + burst` is reached, beyond which requests are rejected. If true, use `default_conn_delay` to delay all excessive requests within the `burst` range. Requests beyond `conn + burst` are rejected immediately. For instance, with `conn` being `5`, `burst` being `3`, and `default_conn_delay` being `1`, 6, 7, or 8 concurrent requests are all delayed by exactly 1 second each. |
| key_type | string | False | var | ["var","var_combination"] | The type of key. If the `key_type` is `var`, the `key` is interpreted a variable. If the `key_type` is `var_combination`, the `key` is interpreted as a combination of variables. |
| key | string | False | remote_addr | | The key to count requests by. If the `key_type` is `var`, the `key` is interpreted a variable. The variable does not need to be prefixed by a dollar sign (`$`). If the `key_type` is `var_combination`, the `key` is interpreted as a combination of variables. All variables should be prefixed by dollar signs (`$`). For example, to configure the `key` to use a combination of two request headers `custom-a` and `custom-b`, the `key` should be configured as `$http_custom_a $http_custom_b`. |
| rejected_code | integer | False | 503 | [200,...,599] | The HTTP status code returned when a request is rejected for exceeding the threshold. |
| rejected_msg | string | False | | non-empty | The response body returned when a request is rejected for exceeding the threshold. |
| allow_degradation | boolean | False | false | | If true, allow APISIX to continue handling requests without the Plugin when the Plugin or its dependencies become unavailable. |
| policy | string | False | local | ["local","redis","redis-cluster"] | The policy for rate limiting counter. If it is `local`, the counter is stored in memory locally. If it is `redis`, the counter is stored on a Redis instance. If it is `redis-cluster`, the counter is stored in a Redis cluster. |
| redis_host | string | False | | | The address of the Redis node. Required when `policy` is `redis`. |
| redis_port | integer | False | 6379 | [1,...] | The port of the Redis node when `policy` is `redis`. |
| redis_username | string | False | | | The username for Redis if Redis ACL is used. If you use the legacy authentication method `requirepass`, configure only the `redis_password`. Used when `policy` is `redis`. |
| redis_password | string | False | | | The password of the Redis node when `policy` is `redis` or `redis-cluster`. |
| redis_ssl | boolean | False | false | | If true, use SSL to connect to Redis cluster when `policy` is `redis`. |
| redis_ssl_verify | boolean | False | false | | If true, verify the server SSL certificate when `policy` is `redis`. |
| redis_database | integer | False | 0 | >= 0 | The database number in Redis when `policy` is `redis`. |
| redis_timeout | integer | False | 1000 | [1,...] | The Redis timeout value in milliseconds when `policy` is `redis` or `redis-cluster`. |
| redis_cluster_nodes | array[string] | False | | | The list of the Redis cluster nodes with at least two addresses. Required when policy is redis-cluster. |
| redis_cluster_name | string | False | | | The name of the Redis cluster. Required when `policy` is `redis-cluster`. |
| redis_cluster_ssl | boolean | False | false | | If true, use SSL to connect to Redis cluster when `policy` is |
| redis_cluster_ssl_verify | boolean | False | false | | If true, verify the server SSL certificate when `policy` is `redis-cluster`. |
## Examples
The examples below demonstrate how you can configure `limit-conn` in different scenarios.
:::note
You can fetch the `admin_key` from `config.yaml` and save to an environment variable with the following command:
```bash
admin_key=$(yq '.deployment.admin.admin_key[0].key' conf/config.yaml | sed 's/"//g')
```
:::
### Apply Rate Limiting by Remote Address
The following example demonstrates how to use `limit-conn` to rate limit requests by `remote_addr`, with example connection and burst thresholds.
Create a Route with `limit-conn` Plugin to allow 2 concurrent requests and 1 excessive concurrent request. Additionally:
* Configure the Plugin to allow 0.1 second of processing latency for concurrent requests exceeding `conn + burst`.
* Set the key type to `vars` to interpret `key` as a variable.
* Calculate rate limiting count by request's `remote_address`.
* Set `policy` to `local` to use the local counter in memory.
* Customize the `rejected_code` to `429`.
```shell
curl "http://127.0.0.1:9180/apisix/admin/routes" -X PUT \
-H "X-API-KEY: ${admin_key}" \
-d '{
"id": "limit-conn-route",
"uri": "/get",
"plugins": {
"limit-conn": {
"conn": 2,
"burst": 1,
"default_conn_delay": 0.1,
"key_type": "var",
"key": "remote_addr",
"policy": "local",
"rejected_code": 429
}
},
"upstream": {
"type": "roundrobin",
"nodes": {
"httpbin.org:80": 1
}
}
}'
```
Send five concurrent requests to the route:
```shell
seq 1 5 | xargs -n1 -P5 bash -c 'curl -s -o /dev/null -w "Response: %{http_code}\n" "http://127.0.0.1:9080/get"'
```
You should see responses similar to the following, where excessive requests are rejected:
```text
Response: 200
Response: 200
Response: 200
Response: 429
Response: 429
```
### Apply Rate Limiting by Remote Address and Consumer Name
The following example demonstrates how to use `limit-conn` to rate limit requests by a combination of variables, `remote_addr` and `consumer_name`.
Create a Consumer `john`:
```shell
curl "http://127.0.0.1:9180/apisix/admin/consumers" -X PUT \
-H "X-API-KEY: ${admin_key}" \
-d '{
"username": "john"
}'
```
Create `key-auth` Credential for the Consumer:
```shell
curl "http://127.0.0.1:9180/apisix/admin/consumers/john/credentials" -X PUT \
-H "X-API-KEY: ${admin_key}" \
-d '{
"id": "cred-john-key-auth",
"plugins": {
"key-auth": {
"key": "john-key"
}
}
}'
```
Create a second Consumer `jane`:
```shell
curl "http://127.0.0.1:9180/apisix/admin/consumers" -X PUT \
-H "X-API-KEY: ${admin_key}" \
-d '{
"username": "jane"
}'
```
Create `key-auth` Credential for the Consumer:
```shell
curl "http://127.0.0.1:9180/apisix/admin/consumers/jane/credentials" -X PUT \
-H "X-API-KEY: ${admin_key}" \
-d '{
"id": "cred-jane-key-auth",
"plugins": {
"key-auth": {
"key": "jane-key"
}
}
}'
```
Create a Route with `key-auth` and `limit-conn` Plugins, and specify in the `limit-conn` Plugin to use a combination of variables as the rate limiting key:
```shell
curl "http://127.0.0.1:9180/apisix/admin/routes" -X PUT \
-H "X-API-KEY: ${admin_key}" \
-d '{
"id": "limit-conn-route",
"uri": "/get",
"plugins": {
"key-auth": {},
"limit-conn": {
"conn": 2,
"burst": 1,
"default_conn_delay": 0.1,
"rejected_code": 429,
"key_type": "var_combination",
"key": "$remote_addr $consumer_name"
}
},
"upstream": {
"type": "roundrobin",
"nodes": {
"httpbin.org:80": 1
}
}
}'
```
Send five concurrent requests as the Consumer `john`:
```shell
seq 1 5 | xargs -n1 -P5 bash -c 'curl -s -o /dev/null -w "Response: %{http_code}\n" "http://127.0.0.1:9080/get" -H "apikey: john-key"'
```
You should see responses similar to the following, where excessive requests are rejected:
```text
Response: 200
Response: 200
Response: 200
Response: 429
Response: 429
```
Immediately send five concurrent requests as the Consumer `jane`:
```shell
seq 1 5 | xargs -n1 -P5 bash -c 'curl -s -o /dev/null -w "Response: %{http_code}\n" "http://127.0.0.1:9080/get" -H "apikey: jane-key"'
```
You should also see responses similar to the following, where excessive requests are rejected:
```text
Response: 200
Response: 200
Response: 200
Response: 429
Response: 429
```
### Rate Limit WebSocket Connections
The following example demonstrates how you can use the `limit-conn` Plugin to limit the number of concurrent WebSocket connections.
Start a [sample upstream WebSocket server](https://hub.docker.com/r/jmalloc/echo-server):
```shell
docker run -d \
-p 8080:8080 \
--name websocket-server \
--network=apisix-quickstart-net \
jmalloc/echo-server
```
Create a Route to the server WebSocket endpoint and enable WebSocket for the route. Adjust the WebSocket server address accordingly.
```shell
curl "http://127.0.0.1:9180/apisix/admin/routes" -X PUT -d '
{
"id": "ws-route",
"uri": "/.ws",
"plugins": {
"limit-conn": {
"conn": 2,
"burst": 1,
"default_conn_delay": 0.1,
"key_type": "var",
"key": "remote_addr",
"rejected_code": 429
}
},
"enable_websocket": true,
"upstream": {
"type": "roundrobin",
"nodes": {
"websocket-server:8080": 1
}
}
}'
```
Install a WebSocket client, such as [websocat](https://github.com/vi/websocat), if you have not already. Establish connection with the WebSocket server through the route:
```shell
websocat "ws://127.0.0.1:9080/.ws"
```
Send a "hello" message in the terminal, you should see the WebSocket server echoes back the same message:
```text
Request served by 1cd244052136
hello
hello
```
Open three more terminal sessions and run:
```shell
websocat "ws://127.0.0.1:9080/.ws"
```
You should see the last terminal session prints `429 Too Many Requests` when you try to establish a WebSocket connection with the server, due to the rate limiting effect.
### Share Quota Among APISIX Nodes with a Redis Server
The following example demonstrates the rate limiting of requests across multiple APISIX nodes with a Redis server, such that different APISIX nodes share the same rate limiting quota.
On each APISIX instance, create a Route with the following configurations. Adjust the address of the Admin API, Redis host, port, password, and database accordingly.
```shell
curl "http://127.0.0.1:9180/apisix/admin/routes" -X PUT \
-H "X-API-KEY: ${admin_key}" \
-d '{
"id": "limit-conn-route",
"uri": "/get",
"plugins": {
"limit-conn": {
"conn": 1,
"burst": 1,
"default_conn_delay": 0.1,
"rejected_code": 429,
"key_type": "var",
"key": "remote_addr",
"policy": "redis",
"redis_host": "192.168.xxx.xxx",
"redis_port": 6379,
"redis_password": "p@ssw0rd",
"redis_database": 1
}
},
"upstream": {
"type": "roundrobin",
"nodes": {
"httpbin.org:80": 1
}
}
}'
```
Send five concurrent requests to the route:
```shell
seq 1 5 | xargs -n1 -P5 bash -c 'curl -s -o /dev/null -w "Response: %{http_code}\n" "http://127.0.0.1:9080/get"'
```
You should see responses similar to the following, where excessive requests are rejected:
```text
Response: 200
Response: 200
Response: 429
Response: 429
Response: 429
```
This shows the two routes configured in different APISIX instances share the same quota.
### Share Quota Among APISIX Nodes with a Redis Cluster
You can also use a Redis cluster to apply the same quota across multiple APISIX nodes, such that different APISIX nodes share the same rate limiting quota.
Ensure that your Redis instances are running in [cluster mode](https://redis.io/docs/management/scaling/#create-and-use-a-redis-cluster). A minimum of two nodes are required for the `limit-conn` Plugin configurations.
On each APISIX instance, create a Route with the following configurations. Adjust the address of the Admin API, Redis cluster nodes, password, cluster name, and SSL varification accordingly.
```shell
curl "http://127.0.0.1:9180/apisix/admin/routes" -X PUT \
-H "X-API-KEY: ${admin_key}" \
-d '{
"id": "limit-conn-route",
"uri": "/get",
"plugins": {
"limit-conn": {
"conn": 1,
"burst": 1,
"default_conn_delay": 0.1,
"rejected_code": 429,
"key_type": "var",
"key": "remote_addr",
"policy": "redis-cluster",
"redis_cluster_nodes": [
"192.168.xxx.xxx:6379",
"192.168.xxx.xxx:16379"
],
"redis_password": "p@ssw0rd",
"redis_cluster_name": "redis-cluster-1",
"redis_cluster_ssl": true
}
},
"upstream": {
"type": "roundrobin",
"nodes": {
"httpbin.org:80": 1
}
}
}'
```
Send five concurrent requests to the route:
```shell
seq 1 5 | xargs -n1 -P5 bash -c 'curl -s -o /dev/null -w "Response: %{http_code}\n" "http://127.0.0.1:9080/get"'
```
You should see responses similar to the following, where excessive requests are rejected:
```text
Response: 200
Response: 200
Response: 429
Response: 429
Response: 429
```
This shows the two routes configured in different APISIX instances share the same quota.
---
---
title: limit-count
keywords:
- Apache APISIX
- API Gateway
- Limit Count
description: The limit-count plugin uses a fixed window algorithm to limit the rate of requests by the number of requests within a given time interval. Requests exceeding the configured quota will be rejected.
---
## Description
The `limit-count` plugin uses a fixed window algorithm to limit the rate of requests by the number of requests within a given time interval. Requests exceeding the configured quota will be rejected.
You may see the following rate limiting headers in the response:
* `X-RateLimit-Limit`: the total quota
* `X-RateLimit-Remaining`: the remaining quota
* `X-RateLimit-Reset`: number of seconds left for the counter to reset
## Attributes
| Name | Type | Required | Default | Valid values | Description |
| ----------------------- | ------- | ----------------------------------------- | ------------- | -------------------------------------- | ---------------------------------------------------------------------------------------------------------------------------------------------------------------------------------------------------------------------------------------------------------------------------------------------------------------------------------------------------------------------------------------------------------------------------------------------------------------------------------------------------- |
| count | integer | True | | > 0 | The maximum number of requests allowed within a given time interval. |
| time_window | integer | True | | > 0 | The time interval corresponding to the rate limiting `count` in seconds. |
| key_type | string | False | var | ["var","var_combination","constant"] | The type of key. If the `key_type` is `var`, the `key` is interpreted a variable. If the `key_type` is `var_combination`, the `key` is interpreted as a combination of variables. If the `key_type` is `constant`, the `key` is interpreted as a constant. |
| key | string | False | remote_addr | | The key to count requests by. If the `key_type` is `var`, the `key` is interpreted a variable. The variable does not need to be prefixed by a dollar sign (`$`). If the `key_type` is `var_combination`, the `key` is interpreted as a combination of variables. All variables should be prefixed by dollar signs (`$`). For example, to configure the `key` to use a combination of two request headers `custom-a` and `custom-b`, the `key` should be configured as `$http_custom_a $http_custom_b`. If the `key_type` is `constant`, the `key` is interpreted as a constant value. |
| rejected_code | integer | False | 503 | [200,...,599] | The HTTP status code returned when a request is rejected for exceeding the threshold. |
| rejected_msg | string | False | | non-empty | The response body returned when a request is rejected for exceeding the threshold. |
| policy | string | False | local | ["local","redis","redis-cluster"] | The policy for rate limiting counter. If it is `local`, the counter is stored in memory locally. If it is `redis`, the counter is stored on a Redis instance. If it is `redis-cluster`, the counter is stored in a Redis cluster. |
| allow_degradation | boolean | False | false | | If true, allow APISIX to continue handling requests without the plugin when the plugin or its dependencies become unavailable. |
| show_limit_quota_header | boolean | False | true | | If true, include `X-RateLimit-Limit` to show the total quota and `X-RateLimit-Remaining` to show the remaining quota in the response header. |
| group | string | False | | non-empty | The `group` ID for the plugin, such that routes of the same `group` can share the same rate limiting counter. |
| redis_host | string | False | | | The address of the Redis node. Required when `policy` is `redis`. |
| redis_port | integer | False | 6379 | [1,...] | The port of the Redis node when `policy` is `redis`. |
| redis_username | string | False | | | The username for Redis if Redis ACL is used. If you use the legacy authentication method `requirepass`, configure only the `redis_password`. Used when `policy` is `redis`. |
| redis_password | string | False | | | The password of the Redis node when `policy` is `redis` or `redis-cluster`. |
| redis_ssl | boolean | False | false | | If true, use SSL to connect to Redis cluster when `policy` is `redis`. |
| redis_ssl_verify | boolean | False | false | | If true, verify the server SSL certificate when `policy` is `redis`. |
| redis_database | integer | False | 0 | >= 0 | The database number in Redis when `policy` is `redis`. |
| redis_timeout | integer | False | 1000 | [1,...] | The Redis timeout value in milliseconds when `policy` is `redis` or `redis-cluster`. |
| redis_cluster_nodes | array[string] | False | | | The list of the Redis cluster nodes with at least two addresses. Required when policy is redis-cluster. |
| redis_cluster_name | string | False | | | The name of the Redis cluster. Required when `policy` is `redis-cluster`. |
| redis_cluster_ssl | boolean | False | false | | If true, use SSL to connect to Redis cluster when `policy` is `redis-cluster`. |
| redis_cluster_ssl_verify | boolean | False | false | | If true, verify the server SSL certificate when `policy` is `redis-cluster`. |
## Examples
The examples below demonstrate how you can configure `limit-count` in different scenarios.
:::note
You can fetch the `admin_key` from `config.yaml` and save to an environment variable with the following command:
```bash
admin_key=$(yq '.deployment.admin.admin_key[0].key' conf/config.yaml | sed 's/"//g')
```
:::
### Apply Rate Limiting by Remote Address
The following example demonstrates the rate limiting of requests by a single variable, `remote_addr`.
Create a Route with `limit-count` plugin that allows for a quota of 1 within a 30-second window per remote address:
```shell
curl "http://127.0.0.1:9180/apisix/admin/routes" -X PUT \
-H "X-API-KEY: ${admin_key}" \
-d '{
"id": "limit-count-route",
"uri": "/get",
"plugins": {
"limit-count": {
"count": 1,
"time_window": 30,
"rejected_code": 429,
"key_type": "var",
"key": "remote_addr"
}
},
"upstream": {
"type": "roundrobin",
"nodes": {
"httpbin.org:80": 1
}
}
}'
```
Send a request to verify:
```shell
curl -i "http://127.0.0.1:9080/get"
```
You should see an `HTTP/1.1 200 OK` response.
The request has consumed all the quota allowed for the time window. If you send the request again within the same 30-second time interval, you should receive an `HTTP/1.1 429 Too Many Requests` response, indicating the request surpasses the quota threshold.
### Apply Rate Limiting by Remote Address and Consumer Name
The following example demonstrates the rate limiting of requests by a combination of variables, `remote_addr` and `consumer_name`. It allows for a quota of 1 within a 30-second window per remote address and for each consumer.
Create a Consumer `john`:
```shell
curl "http://127.0.0.1:9180/apisix/admin/consumers" -X PUT \
-H "X-API-KEY: ${admin_key}" \
-d '{
"username": "john"
}'
```
Create `key-auth` Credential for the consumer:
```shell
curl "http://127.0.0.1:9180/apisix/admin/consumers/john/credentials" -X PUT \
-H "X-API-KEY: ${admin_key}" \
-d '{
"id": "cred-john-key-auth",
"plugins": {
"key-auth": {
"key": "john-key"
}
}
}'
```
Create a second Consumer `jane`:
```shell
curl "http://127.0.0.1:9180/apisix/admin/consumers" -X PUT \
-H "X-API-KEY: ${admin_key}" \
-d '{
"username": "jane"
}'
```
Create `key-auth` Credential for the Consumer:
```shell
curl "http://127.0.0.1:9180/apisix/admin/consumers/jane/credentials" -X PUT \
-H "X-API-KEY: ${admin_key}" \
-d '{
"id": "cred-jane-key-auth",
"plugins": {
"key-auth": {
"key": "jane-key"
}
}
}'
```
Create a Route with `key-auth` and `limit-count` plugins, and specify in the `limit-count` plugin to use a combination of variables as the rate limiting key:
```shell
curl "http://127.0.0.1:9180/apisix/admin/routes" -X PUT \
-H "X-API-KEY: ${admin_key}" \
-d '{
"id": "limit-count-route",
"uri": "/get",
"plugins": {
"key-auth": {},
"limit-count": {
"count": 1,
"time_window": 30,
"rejected_code": 429,
"key_type": "var_combination",
"key": "$remote_addr $consumer_name"
}
},
"upstream": {
"type": "roundrobin",
"nodes": {
"httpbin.org:80": 1
}
}
}'
```
Send a request as the Consumer `jane`:
```shell
curl -i "http://127.0.0.1:9080/get" -H 'apikey: jane-key'
```
You should see an `HTTP/1.1 200 OK` response with the corresponding response body.
This request has consumed all the quota set for the time window. If you send the same request as the Consumer `jane` within the same 30-second time interval, you should receive an `HTTP/1.1 429 Too Many Requests` response, indicating the request surpasses the quota threshold.
Send the same request as the Consumer `john` within the same 30-second time interval:
```shell
curl -i "http://127.0.0.1:9080/get" -H 'apikey: john-key'
```
You should see an `HTTP/1.1 200 OK` response with the corresponding response body, indicating the request is not rate limited.
Send the same request as the Consumer `john` again within the same 30-second time interval, you should receive an `HTTP/1.1 429 Too Many Requests` response.
This verifies the plugin rate limits by the combination of variables, `remote_addr` and `consumer_name`.
### Share Quota among Routes
The following example demonstrates the sharing of rate limiting quota among multiple routes by configuring the `group` of the `limit-count` plugin.
Note that the configurations of the `limit-count` plugin of the same `group` should be identical. To avoid update anomalies and repetitive configurations, you can create a Service with `limit-count` plugin and Upstream for routes to connect to.
Create a service:
```shell
curl "http://127.0.0.1:9180/apisix/admin/services" -X PUT \
-H "X-API-KEY: ${admin_key}" \
-d '{
"id": "limit-count-service",
"plugins": {
"limit-count": {
"count": 1,
"time_window": 30,
"rejected_code": 429,
"group": "srv1"
}
},
"upstream": {
"type": "roundrobin",
"nodes": {
"httpbin.org:80": 1
}
}
}'
```
Create two Routes and configure their `service_id` to be `limit-count-service`, so that they share the same configurations for the Plugin and Upstream:
```shell
curl "http://127.0.0.1:9180/apisix/admin/routes" -X PUT \
-H "X-API-KEY: ${admin_key}" \
-d '{
"id": "limit-count-route-1",
"service_id": "limit-count-service",
"uri": "/get1",
"plugins": {
"proxy-rewrite": {
"uri": "/get"
}
}
}'
```
```shell
curl "http://127.0.0.1:9180/apisix/admin/routes" -X PUT \
-H "X-API-KEY: ${admin_key}" \
-d '{
"id": "limit-count-route-2",
"service_id": "limit-count-service",
"uri": "/get2",
"plugins": {
"proxy-rewrite": {
"uri": "/get"
}
}
}'
```
:::note
The [`proxy-rewrite`](./proxy-rewrite.md) plugin is used to rewrite the URI to `/get` so that requests are forwarded to the correct endpoint.
:::
Send a request to Route `/get1`:
```shell
curl -i "http://127.0.0.1:9080/get1"
```
You should see an `HTTP/1.1 200 OK` response with the corresponding response body.
Send the same request to Route `/get2` within the same 30-second time interval:
```shell
curl -i "http://127.0.0.1:9080/get2"
```
You should receive an `HTTP/1.1 429 Too Many Requests` response, which verifies the two routes share the same rate limiting quota.
### Share Quota Among APISIX Nodes with a Redis Server
The following example demonstrates the rate limiting of requests across multiple APISIX nodes with a Redis server, such that different APISIX nodes share the same rate limiting quota.
On each APISIX instance, create a Route with the following configurations. Adjust the address of the Admin API, Redis host, port, password, and database accordingly.
```shell
curl "http://127.0.0.1:9180/apisix/admin/routes" -X PUT \
-H "X-API-KEY: ${admin_key}" \
-d '{
"id": "limit-count-route",
"uri": "/get",
"plugins": {
"limit-count": {
"count": 1,
"time_window": 30,
"rejected_code": 429,
"key": "remote_addr",
"policy": "redis",
"redis_host": "192.168.xxx.xxx",
"redis_port": 6379,
"redis_password": "p@ssw0rd",
"redis_database": 1
}
},
"upstream": {
"type": "roundrobin",
"nodes": {
"httpbin.org:80": 1
}
}
}'
```
Send a request to an APISIX instance:
```shell
curl -i "http://127.0.0.1:9080/get"
```
You should see an `HTTP/1.1 200 OK` response with the corresponding response body.
Send the same request to a different APISIX instance within the same 30-second time interval, you should receive an `HTTP/1.1 429 Too Many Requests` response, verifying routes configured in different APISIX nodes share the same quota.
### Share Quota Among APISIX Nodes with a Redis Cluster
You can also use a Redis cluster to apply the same quota across multiple APISIX nodes, such that different APISIX nodes share the same rate limiting quota.
Ensure that your Redis instances are running in [cluster mode](https://redis.io/docs/management/scaling/#create-and-use-a-redis-cluster). A minimum of two nodes are required for the `limit-count` plugin configurations.
On each APISIX instance, create a Route with the following configurations. Adjust the address of the Admin API, Redis cluster nodes, password, cluster name, and SSL varification accordingly.
```shell
curl "http://127.0.0.1:9180/apisix/admin/routes" -X PUT \
-H "X-API-KEY: ${admin_key}" \
-d '{
"id": "limit-count-route",
"uri": "/get",
"plugins": {
"limit-count": {
"count": 1,
"time_window": 30,
"rejected_code": 429,
"key": "remote_addr",
"policy": "redis-cluster",
"redis_cluster_nodes": [
"192.168.xxx.xxx:6379",
"192.168.xxx.xxx:16379"
],
"redis_password": "p@ssw0rd",
"redis_cluster_name": "redis-cluster-1",
"redis_cluster_ssl": true
}
},
"upstream": {
"type": "roundrobin",
"nodes": {
"httpbin.org:80": 1
}
}
}'
```
Send a request to an APISIX instance:
```shell
curl -i "http://127.0.0.1:9080/get"
```
You should see an `HTTP/1.1 200 OK` response with the corresponding response body.
Send the same request to a different APISIX instance within the same 30-second time interval, you should receive an `HTTP/1.1 429 Too Many Requests` response, verifying routes configured in different APISIX nodes share the same quota.
### Rate Limit with Anonymous Consumer
does not need to authenticate and has less quotas. While this example uses [`key-auth`](./key-auth.md) for authentication, the anonymous Consumer can also be configured with [`basic-auth`](./basic-auth.md), [`jwt-auth`](./jwt-auth.md), and [`hmac-auth`](./hmac-auth.md).
Create a regular Consumer `john` and configure the `limit-count` plugin to allow for a quota of 3 within a 30-second window:
```shell
curl "http://127.0.0.1:9180/apisix/admin/consumers" -X PUT \
-H "X-API-KEY: ${admin_key}" \
-d '{
"username": "john",
"plugins": {
"limit-count": {
"count": 3,
"time_window": 30,
"rejected_code": 429
}
}
}'
```
Create the `key-auth` Credential for the Consumer `john`:
```shell
curl "http://127.0.0.1:9180/apisix/admin/consumers/john/credentials" -X PUT \
-H "X-API-KEY: ${admin_key}" \
-d '{
"id": "cred-john-key-auth",
"plugins": {
"key-auth": {
"key": "john-key"
}
}
}'
```
Create an anonymous user `anonymous` and configure the `limit-count` Plugin to allow for a quota of 1 within a 30-second window:
```shell
curl "http://127.0.0.1:9180/apisix/admin/consumers" -X PUT \
-H "X-API-KEY: ${admin_key}" \
-d '{
"username": "anonymous",
"plugins": {
"limit-count": {
"count": 1,
"time_window": 30,
"rejected_code": 429
}
}
}'
```
Create a Route and configure the `key-auth` Plugin to accept anonymous Consumer `anonymous` from bypassing the authentication:
```shell
curl "http://127.0.0.1:9180/apisix/admin/routes" -X PUT \
-H "X-API-KEY: ${admin_key}" \
-d '{
"id": "key-auth-route",
"uri": "/anything",
"plugins": {
"key-auth": {
"anonymous_consumer": "anonymous"
}
},
"upstream": {
"type": "roundrobin",
"nodes": {
"httpbin.org:80": 1
}
}
}'
```
To verify, send five consecutive requests with `john`'s key:
```shell
resp=$(seq 5 | xargs -I{} curl "http://127.0.0.1:9080/anything" -H 'apikey: john-key' -o /dev/null -s -w "%{http_code}\n") && \
count_200=$(echo "$resp" | grep "200" | wc -l) && \
count_429=$(echo "$resp" | grep "429" | wc -l) && \
echo "200": $count_200, "429": $count_429
```
You should see the following response, showing that out of the 5 requests, 3 requests were successful (status code 200) while the others were rejected (status code 429).
```text
200: 3, 429: 2
```
Send five anonymous requests:
```shell
resp=$(seq 5 | xargs -I{} curl "http://127.0.0.1:9080/anything" -o /dev/null -s -w "%{http_code}\n") && \
count_200=$(echo "$resp" | grep "200" | wc -l) && \
count_429=$(echo "$resp" | grep "429" | wc -l) && \
echo "200": $count_200, "429": $count_429
```
You should see the following response, showing that only one request was successful:
```text
200: 1, 429: 4
```
---
---
title: limit-req
keywords:
- Apache APISIX
- API Gateway
- Limit Request
- limit-req
description: The limit-req Plugin uses the leaky bucket algorithm to rate limit the number of the requests and allow for throttling.
---
## Description
The `limit-req` Plugin uses the [leaky bucket](https://en.wikipedia.org/wiki/Leaky_bucket) algorithm to rate limit the number of the requests and allow for throttling.
## Attributes
| Name | Type | Required | Default | Valid values | Description |
|-------------------|---------|----------|---------|----------------------------|-------------------------------------------------------------------------------------------------------------------------------------------------------------------------------------------------------------------------------------------------------------------------------------------------------------------------------------------------------------------------------------------------------|
| rate | integer | True | | > 0 | The maximum number of requests allowed per second. Requests exceeding the rate and below burst will be delayed. |
| burst | integer | True | | >= 0 | The number of requests allowed to be delayed per second for throttling. Requests exceeding the rate and burst will get rejected. |
| key_type | string | False | var | ["var", "var_combination"] | The type of key. If the `key_type` is `var`, the `key` is interpreted a variable. If the `key_type` is `var_combination`, the `key` is interpreted as a combination of variables. |
| key | string | True | remote_addr | | The key to count requests by. If the `key_type` is `var`, the `key` is interpreted a variable. The variable does not need to be prefixed by a dollar sign (`$`). If the `key_type` is `var_combination`, the `key` is interpreted as a combination of variables. All variables should be prefixed by dollar signs (`$`). For example, to configure the `key` to use a combination of two request headers `custom-a` and `custom-b`, the `key` should be configured as `$http_custom_a $http_custom_b`. |
| rejected_code | integer | False | 503 | [200,...,599] | The HTTP status code returned when a request is rejected for exceeding the threshold. |
| rejected_msg | string | False | | non-empty | The response body returned when a request is rejected for exceeding the threshold. |
| nodelay | boolean | False | false | | If true, do not delay requests within the burst threshold. |
| allow_degradation | boolean | False | false | | If true, allow APISIX to continue handling requests without the Plugin when the Plugin or its dependencies become unavailable. |
| policy | string | False | local | ["local", "redis", "redis-cluster"] | The policy for rate limiting counter. If it is `local`, the counter is stored in memory locally. If it is `redis`, the counter is stored on a Redis instance. If it is `redis-cluster`, the counter is stored in a Redis cluster. |
| redis_host | string | False | | | The address of the Redis node. Required when `policy` is `redis`. |
| redis_port | integer | False | 6379 | [1,...] | The port of the Redis node when `policy` is `redis`. |
| redis_username | string | False | | | The username for Redis if Redis ACL is used. If you use the legacy authentication method `requirepass`, configure only the `redis_password`. Used when `policy` is `redis`. |
| redis_password | string | False | | | The password of the Redis node when `policy` is `redis` or `redis-cluster`. |
| redis_ssl | boolean | False | false | | If true, use SSL to connect to Redis cluster when `policy` is `redis`. |
| redis_ssl_verify | boolean | False | false | | If true, verify the server SSL certificate when `policy` is `redis`. |
| redis_database | integer | False | 0 | >= 0 | The database number in Redis when `policy` is `redis`. |
| redis_timeout | integer | False | 1000 | [1,...] | The Redis timeout value in milliseconds when `policy` is `redis` or `redis-cluster`. |
| redis_cluster_nodes | array[string] | False | | | The list of the Redis cluster nodes with at least two addresses. Required when policy is redis-cluster. |
| redis_cluster_name | string | False | | | The name of the Redis cluster. Required when `policy` is `redis-cluster`. |
| redis_cluster_ssl | boolean | False | false | | If true, use SSL to connect to Redis cluster when `policy` is |
| redis_cluster_ssl_verify | boolean | False | false | | If true, verify the server SSL certificate when `policy` is `redis-cluster`. |
## Examples
The examples below demonstrate how you can configure `limit-req` in different scenarios.
:::note
You can fetch the `admin_key` from `config.yaml` and save to an environment variable with the following command:
```bash
admin_key=$(yq '.deployment.admin.admin_key[0].key' conf/config.yaml | sed 's/"//g')
```
### Apply Rate Limiting by Remote Address
The following example demonstrates the rate limiting of HTTP requests by a single variable, `remote_addr`.
Create a Route with `limit-req` Plugin that allows for 1 QPS per remote address:
```shell
curl "http://127.0.0.1:9180/apisix/admin/routes" -X PUT \
-H "X-API-KEY: ${admin_key}" \
-d '
{
"id": "limit-req-route",
"uri": "/get",
"plugins": {
"limit-req": {
"rate": 1,
"burst": 0,
"key": "remote_addr",
"key_type": "var",
"rejected_code": 429,
"nodelay": true
}
},
"upstream": {
"type": "roundrobin",
"nodes": {
"httpbin.org:80": 1
}
}
}'
```
Send a request to verify:
```shell
curl -i "http://127.0.0.1:9080/get"
```
You should see an `HTTP/1.1 200 OK` response.
The request has consumed all the quota allowed for the time window. If you send the request again within the same second, you should receive an `HTTP/1.1 429 Too Many Requests` response, indicating the request surpasses the quota threshold.
### Implement API Throttling
The following example demonstrates how to configure `burst` to allow overrun of the rate limiting threshold by the configured value and achieve request throttling. You will also see a comparison against when throttling is not implemented.
Create a Route with `limit-req` Plugin that allows for 1 QPS per remote address, with a `burst` of 1 to allow for 1 request exceeding the `rate` to be delayed for processing:
```shell
curl "http://127.0.0.1:9180/apisix/admin/routes" -X PUT \
-H "X-API-KEY: ${admin_key}" \
-d '{
"id": "limit-req-route",
"uri": "/get",
"plugins": {
"limit-req": {
"rate": 1,
"burst": 1,
"key": "remote_addr",
"rejected_code": 429
}
},
"upstream": {
"type": "roundrobin",
"nodes": {
"httpbin.org:80": 1
}
}
}'
```
Generate three requests to the Route:
```shell
resp=$(seq 3 | xargs -I{} curl -i "http://127.0.0.1:9080/get" -o /dev/null -s -w "%{http_code}\n") && \
count_200=$(echo "$resp" | grep "200" | wc -l) && \
count_429=$(echo "$resp" | grep "429" | wc -l) && \
echo "200 responses: $count_200 ; 429 responses: $count_429"
```
You are likely to see that all three requests are successful:
```text
200 responses: 3 ; 429 responses: 0
```
To see the effect without `burst`, update `burst` to 0 or set `nodelay` to `true` as follows:
```shell
curl "http://127.0.0.1:9180/apisix/admin/routes/limit-req-route" -X PATCH \
-H "X-API-KEY: ${admin_key}" \
-d '{
"plugins": {
"limit-req": {
"nodelay": true
}
}
}'
```
Generate three requests to the Route again:
```shell
resp=$(seq 3 | xargs -I{} curl -i "http://127.0.0.1:9080/get" -o /dev/null -s -w "%{http_code}\n") && \
count_200=$(echo "$resp" | grep "200" | wc -l) && \
count_429=$(echo "$resp" | grep "429" | wc -l) && \
echo "200 responses: $count_200 ; 429 responses: $count_429"
```
You should see a response similar to the following, showing requests surpassing the rate have been rejected:
```text
200 responses: 1 ; 429 responses: 2
```
### Apply Rate Limiting by Remote Address and Consumer Name
The following example demonstrates the rate limiting of requests by a combination of variables, `remote_addr` and `consumer_name`.
Create a Route with `limit-req` Plugin that allows for 1 QPS per remote address and for each Consumer.
Create a Consumer `john`:
```shell
curl "http://127.0.0.1:9180/apisix/admin/consumers" -X PUT \
-H "X-API-KEY: ${admin_key}" \
-d '{
"username": "john"
}'
```
Create `key-auth` Credential for the Consumer:
```shell
curl "http://127.0.0.1:9180/apisix/admin/consumers/john/credentials" -X PUT \
-H "X-API-KEY: ${admin_key}" \
-d '{
"id": "cred-john-key-auth",
"plugins": {
"key-auth": {
"key": "john-key"
}
}
}'
```
Create a second Consumer `jane`:
```shell
curl "http://127.0.0.1:9180/apisix/admin/consumers" -X PUT \
-H "X-API-KEY: ${admin_key}" \
-d '{
"username": "jane"
}'
```
Create `key-auth` Credential for the Consumer:
```shell
curl "http://127.0.0.1:9180/apisix/admin/consumers/jane/credentials" -X PUT \
-H "X-API-KEY: ${admin_key}" \
-d '{
"id": "cred-jane-key-auth",
"plugins": {
"key-auth": {
"key": "jane-key"
}
}
}'
```
Create a Route with `key-auth` and `limit-req` Plugins, and specify in the `limit-req` Plugin to use a combination of variables as the rate-limiting key:
```shell
curl "http://127.0.0.1:9180/apisix/admin/routes" -X PUT \
-H "X-API-KEY: ${admin_key}" \
-d '{
"id": "limit-req-route",
"uri": "/get",
"plugins": {
"key-auth": {},
"limit-req": {
"rate": 1,
"burst": 0,
"key": "$remote_addr $consumer_name",
"key_type": "var_combination",
"rejected_code": 429
}
},
"upstream": {
"type": "roundrobin",
"nodes": {
"httpbin.org:80": 1
}
}
}'
```
Send two requests simultaneously, each for one Consumer:
```shell
curl -i "http://127.0.0.1:9080/get" -H 'apikey: jane-key' & \
curl -i "http://127.0.0.1:9080/get" -H 'apikey: john-key' &
```
You should receive `HTTP/1.1 200 OK` for both requests, indicating the request has not exceeded the threshold for each Consumer.
If you send more requests as either Consumer within the same second, you should receive an `HTTP/1.1 429 Too Many Requests` response.
This verifies the Plugin rate limits by the combination of variables, `remote_addr` and `consumer_name`.
---
---
title: log-rotate
keywords:
- Apache APISIX
- API Gateway
- Plugin
- Log rotate
description: This document contains information about the Apache APISIX log-rotate Plugin.
---
## Description
The `log-rotate` Plugin is used to keep rotating access and error log files in the log directory at regular intervals.
You can configure how often the logs are rotated and how many logs to keep. When the number of logs exceeds, older logs are automatically deleted.
## Attributes
| Name | Type | Required | Default | Description |
|--------------------|---------|----------|---------|------------------------------------------------------------------------------------------------|
| interval | integer | True | 60 * 60 | Time in seconds specifying how often to rotate the logs. |
| max_kept | integer | True | 24 * 7 | Maximum number of historical logs to keep. If this number is exceeded, older logs are deleted. |
| max_size | integer | False | -1 | Max size(Bytes) of log files to be rotated, size check would be skipped with a value less than 0 or time is up specified by interval. |
| enable_compression | boolean | False | false | When set to `true`, compresses the log file (gzip). Requires `tar` to be installed. |
## Enable Plugin
To enable the Plugin, add it in your configuration file (`conf/config.yaml`):
```yaml title="conf/config.yaml"
plugins:
- log-rotate
plugin_attr:
log-rotate:
interval: 3600 # rotate interval (unit: second)
max_kept: 168 # max number of log files will be kept
max_size: -1 # max size of log files will be kept
enable_compression: false # enable log file compression(gzip) or not, default false
```
## Example usage
Once you enable the Plugin as shown above, the logs will be stored and rotated based on your configuration.
In the example below the `interval` is set to `10` and `max_kept` is set to `10`. This will create logs as shown:
```shell
ll logs
```
```shell
total 44K
-rw-r--r--. 1 resty resty 0 Mar 20 20:32 2020-03-20_20-32-40_access.log
-rw-r--r--. 1 resty resty 2.4K Mar 20 20:32 2020-03-20_20-32-40_error.log
-rw-r--r--. 1 resty resty 0 Mar 20 20:32 2020-03-20_20-32-50_access.log
-rw-r--r--. 1 resty resty 2.8K Mar 20 20:32 2020-03-20_20-32-50_error.log
-rw-r--r--. 1 resty resty 0 Mar 20 20:32 2020-03-20_20-33-00_access.log
-rw-r--r--. 1 resty resty 2.4K Mar 20 20:33 2020-03-20_20-33-00_error.log
-rw-r--r--. 1 resty resty 0 Mar 20 20:33 2020-03-20_20-33-10_access.log
-rw-r--r--. 1 resty resty 2.4K Mar 20 20:33 2020-03-20_20-33-10_error.log
-rw-r--r--. 1 resty resty 0 Mar 20 20:33 2020-03-20_20-33-20_access.log
-rw-r--r--. 1 resty resty 2.4K Mar 20 20:33 2020-03-20_20-33-20_error.log
-rw-r--r--. 1 resty resty 0 Mar 20 20:33 2020-03-20_20-33-30_access.log
-rw-r--r--. 1 resty resty 2.4K Mar 20 20:33 2020-03-20_20-33-30_error.log
-rw-r--r--. 1 resty resty 0 Mar 20 20:33 2020-03-20_20-33-40_access.log
-rw-r--r--. 1 resty resty 2.8K Mar 20 20:33 2020-03-20_20-33-40_error.log
-rw-r--r--. 1 resty resty 0 Mar 20 20:33 2020-03-20_20-33-50_access.log
-rw-r--r--. 1 resty resty 2.4K Mar 20 20:33 2020-03-20_20-33-50_error.log
-rw-r--r--. 1 resty resty 0 Mar 20 20:33 2020-03-20_20-34-00_access.log
-rw-r--r--. 1 resty resty 2.4K Mar 20 20:34 2020-03-20_20-34-00_error.log
-rw-r--r--. 1 resty resty 0 Mar 20 20:34 2020-03-20_20-34-10_access.log
-rw-r--r--. 1 resty resty 2.4K Mar 20 20:34 2020-03-20_20-34-10_error.log
-rw-r--r--. 1 resty resty 0 Mar 20 20:34 access.log
-rw-r--r--. 1 resty resty 1.5K Mar 20 21:31 error.log
```
If you have enabled compression, the logs will be as shown below:
```shell
total 10.5K
-rw-r--r--. 1 resty resty 1.5K Mar 20 20:33 2020-03-20_20-33-50_access.log.tar.gz
-rw-r--r--. 1 resty resty 1.5K Mar 20 20:33 2020-03-20_20-33-50_error.log.tar.gz
-rw-r--r--. 1 resty resty 1.5K Mar 20 20:33 2020-03-20_20-34-00_access.log.tar.gz
-rw-r--r--. 1 resty resty 1.5K Mar 20 20:34 2020-03-20_20-34-00_error.log.tar.gz
-rw-r--r--. 1 resty resty 1.5K Mar 20 20:34 2020-03-20_20-34-10_access.log.tar.gz
-rw-r--r--. 1 resty resty 1.5K Mar 20 20:34 2020-03-20_20-34-10_error.log.tar.gz
-rw-r--r--. 1 resty resty 0 Mar 20 20:34 access.log
-rw-r--r--. 1 resty resty 1.5K Mar 20 21:31 error.log
```
## Delete Plugin
To remove the `log-rotate` Plugin, you can remove it from your configuration file (`conf/config.yaml`):
```yaml title="conf/config.yaml"
plugins:
# - log-rotate
```
---
---
title: loggly
keywords:
- Apache APISIX
- API Gateway
- Plugin
- SolarWinds Loggly
description: This document contains information about the Apache APISIX loggly Plugin.
---
## Description
The `loggly` Plugin is used to forward logs to [SolarWinds Loggly](https://www.solarwinds.com/loggly) for analysis and storage.
When the Plugin is enabled, APISIX will serialize the request context information to [Loggly Syslog](https://documentation.solarwinds.com/en/success_center/loggly/content/admin/streaming-syslog-without-using-files.htm?cshid=loggly_streaming-syslog-without-using-files) data format which is Syslog events with [RFC5424](https://datatracker.ietf.org/doc/html/rfc5424) compliant headers.
When the maximum batch size is exceeded, the data in the queue is pushed to Loggly enterprise syslog endpoint. See [batch processor](../batch-processor.md) for more details.
## Attributes
| Name | Type | Required | Default | Description |
|------------------------|---------------|----------|---------|--------------------------------------------------------------------------------------------------------------------------------------------------------------------------------------------------------------------------------|
| customer_token | string | True | | Unique identifier used when sending logs to Loggly to ensure that they are sent to the right organisation account. |
| severity | string (enum) | False | INFO | Syslog log event severity level. Choose between: `DEBUG`, `INFO`, `NOTICE`, `WARNING`, `ERR`, `CRIT`, `ALERT`, and `EMEGR`. |
| severity_map | object | False | nil | A way to map upstream HTTP response codes to Syslog severity. Key-value pairs where keys are the HTTP response codes and the values are the Syslog severity levels. For example `{"410": "CRIT"}`. |
| tags | array | False | | Metadata to be included with any event log to aid in segmentation and filtering. |
| log_format | object | False | {"host": "$host", "@timestamp": "$time_iso8601", "client_ip": "$remote_addr"} | Log format declared as key-value pairs in JSON. Values support strings and nested objects (up to five levels deep; deeper fields are truncated). Within strings, [APISIX](../apisix-variable.md) or [NGINX](http://nginx.org/en/docs/varindex.html) variables can be referenced by prefixing with `$`. |
| include_req_body | boolean | False | false | When set to `true` includes the request body in the log. If the request body is too big to be kept in the memory, it can't be logged due to Nginx's limitations. |
| include_req_body_expr | array | False | | Filter for when the `include_req_body` attribute is set to `true`. Request body is only logged when the expression set here evaluates to `true`. See [lua-resty-expr](https://github.com/api7/lua-resty-expr) for more. |
| include_resp_body | boolean | False | false | When set to `true` includes the response body in the log. |
| include_resp_body_expr | array | False | | When the `include_resp_body` attribute is set to `true`, use this to filter based on [lua-resty-expr](https://github.com/api7/lua-resty-expr). If present, only logs the response if the expression evaluates to `true`. |
This Plugin supports using batch processors to aggregate and process entries (logs/data) in a batch. This avoids the need for frequently submitting the data. The batch processor submits data every `5` seconds or when the data in the queue reaches `1000`. See [Batch Processor](../batch-processor.md#configuration) for more information or setting your custom configuration.
To generate a Customer token, go to `/loggly.com/tokens` or navigate to Logs > Source setup > Customer tokens.
### Example of default log format
```text
<10>1 2024-01-06T06:50:51.739Z 127.0.0.1 apisix 58525 - [token-1@41058 tag="apisix"] {"service_id":"","server":{"version":"3.7.0","hostname":"localhost"},"apisix_latency":100.99985313416,"request":{"url":"http://127.0.0.1:1984/opentracing","headers":{"content-type":"application/x-www-form-urlencoded","user-agent":"lua-resty-http/0.16.1 (Lua) ngx_lua/10025","host":"127.0.0.1:1984"},"querystring":{},"uri":"/opentracing","size":155,"method":"GET"},"response":{"headers":{"content-type":"text/plain","server":"APISIX/3.7.0","transfer-encoding":"chunked","connection":"close"},"size":141,"status":200},"route_id":"1","latency":103.99985313416,"upstream_latency":3,"client_ip":"127.0.0.1","upstream":"127.0.0.1:1982","start_time":1704523851634}
```
## Metadata
You can also configure the Plugin through Plugin metadata. The following configurations are available:
| Name | Type | Required | Default | Valid values | Description |
|------------|---------|----------|----------------------|--------------------------------|--------------------------------------------------------------------------------------------------------------------------------------------------------------------------------------------------------------------------------|
| host | string | False | "logs-01.loggly.com" | | Endpoint of the host where the logs are being sent. |
| port | integer | False | 514 | | Loggly port to connect to. Only used for `syslog` protocol. |
| timeout | integer | False | 5000 | | Loggly send data request timeout in milliseconds. |
| protocol | string | False | "syslog" | [ "syslog" , "http", "https" ] | Protocol in which the logs are sent to Loggly. |
| log_format | object | False | nil | | Log format declared as key-value pairs in JSON. Values support strings and nested objects (up to five levels deep; deeper fields are truncated). Within strings, [APISIX](../apisix-variable.md) or [NGINX](http://nginx.org/en/docs/varindex.html) variables can be referenced by prefixing with `$`. |
We support [Syslog](https://documentation.solarwinds.com/en/success_center/loggly/content/admin/streaming-syslog-without-using-files.htm), [HTTP/S](https://documentation.solarwinds.com/en/success_center/loggly/content/admin/http-bulk-endpoint.htm) (bulk endpoint) protocols to send log events to Loggly. By default, in APISIX side, the protocol is set to "syslog". It lets you send RFC5424 compliant syslog events with some fine-grained control (log severity mapping based on upstream HTTP response code). But HTTP/S bulk endpoint is great to send larger batches of log events with faster transmission speed. If you wish to update it, just update the metadata.
:::note
APISIX supports [Syslog](https://documentation.solarwinds.com/en/success_center/loggly/content/admin/streaming-syslog-without-using-files.htm) and [HTTP/S](https://documentation.solarwinds.com/en/success_center/loggly/content/admin/http-bulk-endpoint.htm) protocols to send data to Loggly. Syslog lets you send RFC5424 compliant syslog events with fine-grained control. But, HTTP/S bulk endpoint is better while sending large batches of logs at a fast transmission speed. You can configure the metadata to update the protocol as shown below:
:::note
You can fetch the `admin_key` from `config.yaml` and save to an environment variable with the following command:
```bash
admin_key=$(yq '.deployment.admin.admin_key[0].key' conf/config.yaml | sed 's/"//g')
```
:::
```shell
curl http://127.0.0.1:9180/apisix/admin/plugin_metadata/loggly -H "X-API-KEY: $admin_key" -X PUT -d '
{
"protocol": "http"
}'
```
:::
## Enable Plugin
### Full configuration
The example below shows a complete configuration of the Plugin on a specific Route:
```shell
curl http://127.0.0.1:9180/apisix/admin/routes/1 -H "X-API-KEY: $admin_key" -X PUT -d '
{
"plugins":{
"loggly":{
"customer_token":"0e6fe4bf-376e-40f4-b25f-1d55cb29f5a2",
"tags":["apisix", "testroute"],
"severity":"info",
"severity_map":{
"503": "err",
"410": "alert"
},
"buffer_duration":60,
"max_retry_count":0,
"retry_delay":1,
"inactive_timeout":2,
"batch_max_size":10
}
},
"upstream":{
"type":"roundrobin",
"nodes":{
"127.0.0.1:80":1
}
},
"uri":"/index.html"
}'
```
### Minimal configuration
The example below shows a bare minimum configuration of the Plugin on a Route:
```shell
curl http://127.0.0.1:9180/apisix/admin/routes/1 -H "X-API-KEY: $admin_key" -X PUT -d '
{
"plugins":{
"loggly":{
"customer_token":"0e6fe4bf-376e-40f4-b25f-1d55cb29f5a2",
}
},
"upstream":{
"type":"roundrobin",
"nodes":{
"127.0.0.1:80":1
}
},
"uri":"/index.html"
}'
```
## Example usage
Now, if you make a request to APISIX, it will be logged in Loggly:
```shell
curl -i http://127.0.0.1:9080/index.html
```
You can then view the logs on your Loggly Dashboard:

## Delete Plugin
To remove the `file-logger` Plugin, you can delete the corresponding JSON configuration from the Plugin configuration. APISIX will automatically reload and you do not have to restart for this to take effect.
```shell
curl http://127.0.0.1:9180/apisix/admin/routes/1 -H "X-API-KEY: $admin_key" -X PUT -d '
{
"uri": "/index.html",
"plugins": {},
"upstream": {
"type": "roundrobin",
"nodes": {
"127.0.0.1:80": 1
}
}
}'
```
---
---
title: loki-logger
keywords:
- Apache APISIX
- API Gateway
- Plugin
- Loki-logger
- Grafana Loki
description: The loki-logger Plugin pushes request and response logs in batches to Grafana Loki, via the Loki HTTP API /loki/api/v1/push. The Plugin also supports the customization of log formats.
---
## Description
The `loki-logger` Plugin pushes request and response logs in batches to [Grafana Loki](https://grafana.com/oss/loki/), via the [Loki HTTP API](https://grafana.com/docs/loki/latest/reference/loki-http-api/#loki-http-api) `/loki/api/v1/push`. The Plugin also supports the customization of log formats.
When enabled, the Plugin will serialize the request context information to [JSON objects](https://grafana.com/docs/loki/latest/api/#push-log-entries-to-loki) and add them to the queue, before they are pushed to Loki. See [batch processor](../batch-processor.md) for more details.
## Attributes
| Name | Type | Required | Default | Valid values | Description |
|---|---|---|---|---|---|
| endpoint_addrs | array[string] | True | | | Loki API base URLs, such as `http://127.0.0.1:3100`. If multiple endpoints are configured, the log will be pushed to a randomly determined endpoint from the list. |
| endpoint_uri | string | False | /loki/api/v1/push | | URI path to the Loki ingest endpoint. |
| tenant_id | string | False | fake | | Loki tenant ID. According to Loki's [multi-tenancy documentation](https://grafana.com/docs/loki/latest/operations/multi-tenancy/#multi-tenancy), the default value is set to `fake` under single-tenancy. |
| headers | object | False | | | Key-value pairs of request headers (settings for `X-Scope-OrgID` and `Content-Type` will be ignored). |
| log_labels | object | False | {job = "apisix"} | | Loki log label. Support [NGINX variables](https://nginx.org/en/docs/varindex.html) and constant strings in values. Variables should be prefixed with a `$` sign. For example, the label can be `{"origin" = "apisix"}` or `{"origin" = "$remote_addr"}`. |
| ssl_verify | boolean | False | true | | If true, verify Loki's SSL certificates. |
| timeout | integer | False | 3000 | [1, 60000] | Timeout for the Loki service HTTP call in milliseconds. |
| keepalive | boolean | False | true | | If true, keep the connection alive for multiple requests. |
| keepalive_timeout | integer | False | 60000 | >=1000 | Keepalive timeout in milliseconds. |
| keepalive_pool | integer | False | 5 | >=1 | Maximum number of connections in the connection pool. |
| log_format | object | False | | | Custom log format as key-value pairs in JSON. Values support strings and nested objects (up to five levels deep; deeper fields are truncated). Within strings, [APISIX variables](../apisix-variable.md) and [NGINX variables](http://nginx.org/en/docs/varindex.html) can be referenced by prefixing with `$`. |
| name | string | False | loki-logger | | Unique identifier of the Plugin for the batch processor. If you use [Prometheus](./prometheus.md) to monitor APISIX metrics, the name is exported in `apisix_batch_process_entries`. |
| include_req_body | boolean | False | false | | If true, include the request body in the log. Note that if the request body is too big to be kept in the memory, it can not be logged due to NGINX's limitations. |
| include_req_body_expr | array[array] | False | | | An array of one or more conditions in the form of [lua-resty-expr](https://github.com/api7/lua-resty-expr). Used when the `include_req_body` is true. Request body would only be logged when the expressions configured here evaluate to true. |
| include_resp_body | boolean | False | false | | If true, include the response body in the log. |
| include_resp_body_expr | array[array] | False | | | An array of one or more conditions in the form of [lua-resty-expr](https://github.com/api7/lua-resty-expr). Used when the `include_resp_body` is true. Response body would only be logged when the expressions configured here evaluate to true. |
This Plugin supports using batch processors to aggregate and process entries (logs/data) in a batch. This avoids the need for frequently submitting the data. The batch processor submits data every `5` seconds or when the data in the queue reaches `1000`. See [Batch Processor](../batch-processor.md#configuration) for more information or setting your custom configuration.
## Plugin Metadata
You can also configure log format on a global scale using the [Plugin Metadata](../terminology/plugin-metadata.md), which configures the log format for all `loki-logger` Plugin instances. If the log format configured on the individual Plugin instance differs from the log format configured on Plugin metadata, the log format configured on the individual Plugin instance takes precedence.
| Name | Type | Required | Default | Description |
|------|------|----------|---------|-------------|
| log_format | object | False | | Custom log format as key-value pairs in JSON. Values support strings and nested objects (up to five levels deep; deeper fields are truncated). Within strings, [APISIX variables](../apisix-variable.md) and [NGINX variables](http://nginx.org/en/docs/varindex.html) can be referenced by prefixing with `$`. |
| max_pending_entries | integer | False | | Maximum number of pending entries that can be buffered in batch processor before it starts dropping them. |
## Examples
The examples below demonstrate how you can configure `loki-logger` Plugin for different scenarios.
To follow along the examples, start a sample Loki instance in Docker:
```shell
wget https://raw.githubusercontent.com/grafana/loki/v3.0.0/cmd/loki/loki-local-config.yaml -O loki-config.yaml
docker run --name loki -d -v $(pwd):/mnt/config -p 3100:3100 grafana/loki:3.2.1 -config.file=/mnt/config/loki-config.yaml
```
Additionally, start a Grafana instance to view and visualize the logs:
```shell
docker run -d --name=apisix-quickstart-grafana \
-p 3000:3000 \
grafana/grafana-oss
```
To connect Loki and Grafana, visit Grafana at [`http://localhost:3000`](http://localhost:3000). Under __Connections > Data sources__, add a new data source and select Loki. Your connection URL should follow the format of `http://{your_ip_address}:3100`. When saving the new data source, Grafana should also test the connection, and you are expected to see Grafana notifying the data source is successfully connected.
:::note
You can fetch the `admin_key` from `config.yaml` and save to an environment variable with the following command:
```bash
admin_key=$(yq '.deployment.admin.admin_key[0].key' conf/config.yaml | sed 's/"//g')
```
:::
### Log Requests and Responses in Default Log Format
The following example demonstrates how you can configure the `loki-logger` Plugin on a Route to log requests and responses going through the route.
Create a Route with the `loki-logger` Plugin and configure the address of Loki:
```shell
curl "http://127.0.0.1:9180/apisix/admin/routes" -X PUT \
-H "X-API-KEY: ${admin_key}" \
-d '{
"id": "loki-logger-route",
"uri": "/anything",
"plugins": {
"loki-logger": {
"endpoint_addrs": ["http://192.168.1.5:3100"]
}
},
"upstream": {
"nodes": {
"httpbin.org:80": 1
},
"type": "roundrobin"
}
}'
```
Send a few requests to the Route to generate log entries:
```shell
curl "http://127.0.0.1:9080/anything"
```
You should receive `HTTP/1.1 200 OK` responses for all requests.
Navigate to the [Grafana explore view](http://localhost:3000/explore) and run a query `job = apisix`. You should see a number of logs corresponding to your requests, such as the following:
```json
{
"route_id": "loki-logger-route",
"response": {
"status": 200,
"headers": {
"date": "Fri, 03 Jan 2025 03:54:26 GMT",
"server": "APISIX/3.11.0",
"access-control-allow-credentials": "true",
"content-length": "391",
"access-control-allow-origin": "*",
"content-type": "application/json",
"connection": "close"
},
"size": 619
},
"start_time": 1735876466,
"client_ip": "192.168.65.1",
"service_id": "",
"apisix_latency": 5.0000038146973,
"upstream": "34.197.122.172:80",
"upstream_latency": 666,
"server": {
"hostname": "0b9a772e68f8",
"version": "3.11.0"
},
"request": {
"headers": {
"user-agent": "curl/8.6.0",
"accept": "*/*",
"host": "127.0.0.1:9080"
},
"size": 85,
"method": "GET",
"url": "http://127.0.0.1:9080/anything",
"querystring": {},
"uri": "/anything"
},
"latency": 671.0000038147
}
```
This verifies that Loki has been receiving logs from APISIX. You may also create dashboards in Grafana to further visualize and analyze the logs.
### Customize Log Format with Plugin Metadata
The following example demonstrates how you can customize log format using [Plugin Metadata](../terminology/plugin-metadata.md).
Create a Route with the `loki-logger` plugin:
```shell
curl "http://127.0.0.1:9180/apisix/admin/routes" -X PUT \
-H "X-API-KEY: ${admin_key}" \
-d '{
"id": "loki-logger-route",
"uri": "/anything",
"plugins": {
"loki-logger": {
"endpoint_addrs": ["http://192.168.1.5:3100"]
}
},
"upstream": {
"type": "roundrobin",
"nodes": {
"httpbin.org": 1
}
}
}'
```
Configure Plugin metadata for `loki-logger`, which will update the log format for all routes of which requests would be logged:
```shell
curl "http://127.0.0.1:9180/apisix/admin/plugin_metadata/loki-logger" -X PUT \
-H 'X-API-KEY: ${admin_key}' \
-d '{
"log_format": {
"host": "$host",
"client_ip": "$remote_addr",
"route_id": "$route_id",
"@timestamp": "$time_iso8601"
}
}'
```
Send a request to the Route to generate a new log entry:
```shell
curl -i "http://127.0.0.1:9080/anything"
```
You should receive an `HTTP/1.1 200 OK` response.
Navigate to the [Grafana explore view](http://localhost:3000/explore) and run a query `job = apisix`. You should see a log entry corresponding to your request, similar to the following:
```json
{
"@timestamp":"2025-01-03T21:11:34+00:00",
"client_ip":"192.168.65.1",
"route_id":"loki-logger-route",
"host":"127.0.0.1"
}
```
If the Plugin on a Route specifies a specific log format, it will take precedence over the log format specified in the Plugin metadata. For instance, update the Plugin on the previous Route as such:
```shell
curl "http://127.0.0.1:9180/apisix/admin/routes/loki-logger-route" -X PATCH \
-H "X-API-KEY: ${admin_key}" \
-d '{
"plugins": {
"loki-logger": {
"log_format": {
"route_id": "$route_id",
"client_ip": "$remote_addr",
"@timestamp": "$time_iso8601"
}
}
}
}'
```
Send a request to the Route to generate a new log entry:
```shell
curl -i "http://127.0.0.1:9080/anything"
```
You should receive an `HTTP/1.1 200 OK` response.
Navigate to the [Grafana explore view](http://localhost:3000/explore) and re-run the query `job = apisix`. You should see a log entry corresponding to your request, consistent with the format configured on the route, similar to the following:
```json
{
"client_ip":"192.168.65.1",
"route_id":"loki-logger-route",
"@timestamp":"2025-01-03T21:19:45+00:00"
}
```
### Log Request Bodies Conditionally
The following example demonstrates how you can conditionally log request body.
Create a Route with `loki-logger` to only log request body if the URL query string `log_body` is `yes`:
```shell
curl "http://127.0.0.1:9180/apisix/admin/routes" -X PUT \
-H "X-API-KEY: ${admin_key}" \
-d '{
"id": "loki-logger-route",
"uri": "/anything",
"plugins": {
"loki-logger": {
"endpoint_addrs": ["http://192.168.1.5:3100"],
"include_req_body": true,
"include_req_body_expr": [["arg_log_body", "==", "yes"]]
}
},
"upstream": {
"nodes": {
"httpbin.org:80": 1
},
"type": "roundrobin"
}
}'
```
Send a request to the Route with a URL query string satisfying the condition:
```shell
curl -i "http://127.0.0.1:9080/anything?log_body=yes" -X POST -d '{"env": "dev"}'
```
Navigate to the [Grafana explore view](http://localhost:3000/explore) and run the query `job = apisix`. You should see a log entry corresponding to your request, where the request body is logged:
```json
{
"route_id": "loki-logger-route",
...,
"request": {
"headers": {
...
},
"body": "{\"env\": \"dev\"}",
"size": 182,
"method": "POST",
"url": "http://127.0.0.1:9080/anything?log_body=yes",
"querystring": {
"log_body": "yes"
},
"uri": "/anything?log_body=yes"
},
"latency": 809.99994277954
}
```
Send a request to the Route without any URL query string:
```shell
curl -i "http://127.0.0.1:9080/anything" -X POST -d '{"env": "dev"}'
```
Navigate to the [Grafana explore view](http://localhost:3000/explore) and run the query `job = apisix`. You should see a log entry corresponding to your request, where the request body is not logged:
```json
{
"route_id": "loki-logger-route",
...,
"request": {
"headers": {
...
},
"size": 169,
"method": "POST",
"url": "http://127.0.0.1:9080/anything",
"querystring": {},
"uri": "/anything"
},
"latency": 557.00016021729
}
```
:::info
If you have customized the `log_format` in addition to setting `include_req_body` or `include_resp_body` to `true`, the Plugin would not include the bodies in the logs.
As a workaround, you may be able to use the NGINX variable `$request_body` in the log format, such as:
```json
{
"kafka-logger": {
...,
"log_format": {"body": "$request_body"}
}
}
```
:::
## FAQ
### Logs are not pushed properly
Look at `error.log` for such a log.
```text
2023/04/30 13:45:46 [error] 19381#19381: *1075673 [lua] batch-processor.lua:95: Batch Processor[loki logger] failed to process entries: loki server returned status: 401, body: no org id, context: ngx.timer, client: 127.0.0.1, server: 0.0.0.0:9081
```
The error can be diagnosed based on the error code in the `failed to process entries: loki server returned status: 401, body: no org id` and the response body of the loki server.
### Getting errors when RPS is high?
- Make sure to `keepalive` related configuration is set properly. See [Attributes](#attributes) for more information.
- Check the logs in `error.log`, look for such a log.
```text
2023/04/30 13:49:34 [error] 19381#19381: *1082680 [lua] batch-processor.lua:95: Batch Processor[loki logger] failed to process entries: loki server returned status: 429, body: Ingestion rate limit exceeded for user tenant_1 (limit: 4194304 bytes/sec) while attempting to ingest '1000' lines totaling '616307' bytes, reduce log volume or contact your Loki administrator to see if the limit can be increased, context: ngx.timer, client: 127.0.0.1, server: 0.0.0.0:9081
```
- The logs usually associated with high QPS look like the above. The error is: `Ingestion rate limit exceeded for user tenant_1 (limit: 4194304 bytes/sec) while attempting to ingest '1000' lines totaling '616307' bytes, reduce log volume or contact your Loki administrator to see if the limit can be increased`.
- Refer to [Loki documentation](https://grafana.com/docs/loki/latest/configuration/#limits_config) to add limits on the amount of default and burst logs, such as `ingestion_rate_mb` and `ingestion_burst_size_mb`.
As the test during development, setting the `ingestion_burst_size_mb` to 100 allows APISIX to push the logs correctly at least at 10000 RPS.
---
---
title: mocking
keywords:
- Apache APISIX
- API Gateway
- Plugin
- Mocking
description: This document contains information about the Apache APISIX mocking Plugin.
---
## Description
The `mocking` Plugin is used for mocking an API. When executed, it returns random mock data in the format specified and the request is not forwarded to the Upstream.
## Attributes
| Name | Type | Required | Default | Description |
|------------------|---------|----------|------------------|----------------------------------------------------------------------------------------|
| delay | integer | False | | Response delay in seconds. |
| response_status | integer | False | 200 | HTTP status code of the response. |
| content_type | string | False | application/json | Header `Content-Type` of the response. |
| response_example | string | False | | Body of the response, support use variables, like `$remote_addr $consumer_name`. |
| response_schema | object | False | | The JSON schema object for the response. Works when `response_example` is unspecified. |
| with_mock_header | boolean | False | true | When set to `true`, adds a response header `x-mock-by: APISIX/{version}`. |
| response_headers | object | false | | Headers to be added in the mocked response. Example: `{"X-Foo": "bar", "X-Few": "baz"}`|
The JSON schema supports the following types in their fields:
- `string`
- `number`
- `integer`
- `boolean`
- `object`
- `array`
Here is a JSON schema example:
```json
{
"properties":{
"field0":{
"example":"abcd",
"type":"string"
},
"field1":{
"example":123.12,
"type":"number"
},
"field3":{
"properties":{
"field3_1":{
"type":"string"
},
"field3_2":{
"properties":{
"field3_2_1":{
"example":true,
"type":"boolean"
},
"field3_2_2":{
"items":{
"example":155.55,
"type":"integer"
},
"type":"array"
}
},
"type":"object"
}
},
"type":"object"
},
"field2":{
"items":{
"type":"string"
},
"type":"array"
}
},
"type":"object"
}
```
This is the response generated by the Plugin from this JSON schema:
```json
{
"field1": 123.12,
"field3": {
"field3_1": "LCFE0",
"field3_2": {
"field3_2_1": true,
"field3_2_2": [
155,
155
]
}
},
"field0": "abcd",
"field2": [
"sC"
]
}
```
## Enable Plugin
The example below configures the `mocking` Plugin for a specific Route:
:::note
You can fetch the `admin_key` from `config.yaml` and save to an environment variable with the following command:
```bash
admin_key=$(yq '.deployment.admin.admin_key[0].key' conf/config.yaml | sed 's/"//g')
```
:::
```shell
curl http://127.0.0.1:9180/apisix/admin/routes/1 -H "X-API-KEY: $admin_key" -X PUT -d '
{
"methods": ["GET"],
"uri": "/index.html",
"plugins": {
"mocking": {
"delay": 1,
"content_type": "application/json",
"response_status": 200,
"response_schema": {
"properties":{
"field0":{
"example":"abcd",
"type":"string"
},
"field1":{
"example":123.12,
"type":"number"
},
"field3":{
"properties":{
"field3_1":{
"type":"string"
},
"field3_2":{
"properties":{
"field3_2_1":{
"example":true,
"type":"boolean"
},
"field3_2_2":{
"items":{
"example":155.55,
"type":"integer"
},
"type":"array"
}
},
"type":"object"
}
},
"type":"object"
},
"field2":{
"items":{
"type":"string"
},
"type":"array"
}
},
"type":"object"
}
}
},
"upstream": {
"type": "roundrobin",
"nodes": {
"127.0.0.1:1980": 1
}
}
}'
```
## Example usage
Once you have configured the Plugin as mentioned above, you can test the Route.
The example used here uses this mocked response:
```json
{
"delay":0,
"content_type":"",
"with_mock_header":true,
"response_status":201,
"response_example":"{\"a\":1,\"b\":2}"
}
```
Now to test the Route:
```shell
curl http://127.0.0.1:9080/test-mock -i
```
```
HTTP/1.1 201 Created
...
Content-Type: application/json;charset=utf8
x-mock-by: APISIX/2.10.0
...
{"a":1,"b":2}
```
## Delete Plugin
To remove the `mocking` Plugin, you can delete the corresponding JSON configuration from the Plugin configuration. APISIX will automatically reload and you do not have to restart for this to take effect.
```shell
curl http://127.0.0.1:9180/apisix/admin/routes/1 -H "X-API-KEY: $admin_key" -X PUT -d '
{
"methods": ["GET"],
"uri": "/index.html",
"upstream": {
"type": "roundrobin",
"nodes": {
"127.0.0.1:1980": 1
}
}
}'
```
---
---
title: mqtt-proxy
keywords:
- Apache APISIX
- API Gateway
- Plugin
- MQTT Proxy
description: This document contains information about the Apache APISIX mqtt-proxy Plugin. The `mqtt-proxy` Plugin is used for dynamic load balancing with `client_id` of MQTT.
---
## Description
The `mqtt-proxy` Plugin is used for dynamic load balancing with `client_id` of MQTT. It only works in stream model.
This Plugin supports both the protocols [3.1.*](http://docs.oasis-open.org/mqtt/mqtt/v3.1.1/os/mqtt-v3.1.1-os.html) and [5.0](https://docs.oasis-open.org/mqtt/mqtt/v5.0/mqtt-v5.0.html).
## Attributes
| Name | Type | Required | Description |
|----------------|---------|------------|-----------------------------------------------------------------------------------|
| protocol_name | string | False | Name of the protocol. Defaults to `MQTT`. |
| protocol_level | integer | True | Level of the protocol. It should be `4` for MQTT `3.1.*` and `5` for MQTT `5.0`. |
## Enable Plugin
To enable the Plugin, you need to first enable the `stream_proxy` configuration in your configuration file (`conf/config.yaml`). The below configuration represents listening on the `9100` TCP port:
```yaml title="conf/config.yaml"
...
router:
http: 'radixtree_uri'
ssl: 'radixtree_sni'
proxy_mode: http&stream
stream_proxy: # TCP/UDP proxy
tcp: # TCP proxy port list
- 9100
dns_resolver:
...
```
You can now send the MQTT request to port `9100`.
You can now create a stream Route and enable the `mqtt-proxy` Plugin:
:::note
You can fetch the `admin_key` from `config.yaml` and save to an environment variable with the following command:
```bash
admin_key=$(yq '.deployment.admin.admin_key[0].key' conf/config.yaml | sed 's/"//g')
```
:::
```shell
curl http://127.0.0.1:9180/apisix/admin/stream_routes/1 -H "X-API-KEY: $admin_key" -X PUT -d '
{
"plugins": {
"mqtt-proxy": {
"protocol_name": "MQTT",
"protocol_level": 4
}
},
"upstream": {
"type": "roundrobin",
"nodes": [{
"host": "127.0.0.1",
"port": 1980,
"weight": 1
}]
}
}'
```
:::note
If you are using Docker in macOS, then `host.docker.internal` is the right parameter for the `host` attribute.
:::
This Plugin exposes a variable `mqtt_client_id` which can be used for load balancing as shown below:
```shell
curl http://127.0.0.1:9180/apisix/admin/stream_routes/1 -H "X-API-KEY: $admin_key" -X PUT -d '
{
"plugins": {
"mqtt-proxy": {
"protocol_name": "MQTT",
"protocol_level": 4
}
},
"upstream": {
"type": "chash",
"key": "mqtt_client_id",
"nodes": [
{
"host": "127.0.0.1",
"port": 1995,
"weight": 1
},
{
"host": "127.0.0.2",
"port": 1995,
"weight": 1
}
]
}
}'
```
MQTT connections with different client ID will be forwarded to different nodes based on the consistent hash algorithm. If client ID is missing, client IP is used instead for load balancing.
## Enabling mTLS with mqtt-proxy plugin
Stream proxies use TCP connections and can accept TLS. Follow the guide about [how to accept tls over tcp connections](../stream-proxy.md/#accept-tls-over-tcp-connection) to open a stream proxy with enabled TLS.
The `mqtt-proxy` plugin is enabled through TCP communications on the specified port for the stream proxy, and will also require clients to authenticate via TLS if `tls` is set to `true`.
Configure `ssl` providing the CA certificate and the server certificate, together with a list of SNIs. Steps to protect `stream_routes` with `ssl` are equivalent to the ones to [protect Routes](../mtls.md/#protect-route).
### Create a stream_route using mqtt-proxy plugin and mTLS
Here is an example of how create a stream_route which is using the `mqtt-proxy` plugin, providing the CA certificate, the client certificate and the client key (for self-signed certificates which are not trusted by your host, use the `-k` flag):
```shell
curl 127.0.0.1:9180/apisix/admin/stream_routes/1 -H "X-API-KEY: $admin_key" -X PUT -d '
{
"plugins": {
"mqtt-proxy": {
"protocol_name": "MQTT",
"protocol_level": 4
}
},
"sni": "${your_sni_name}",
"upstream": {
"nodes": {
"127.0.0.1:1980": 1
},
"type": "roundrobin"
}
}'
```
The `sni` name must match one or more of the SNIs provided to the SSL object that you created with the CA and server certificates.
## Delete Plugin
To remove the `mqtt-proxy` Plugin you can remove the corresponding configuration as shown below:
```shell
curl http://127.0.0.1:9180/apisix/admin/stream_routes/1 -H "X-API-KEY: $admin_key" -X DELETE
```
---
---
title: multi-auth
keywords:
- Apache APISIX
- API Gateway
- Plugin
- Multi Auth
- multi-auth
description: This document contains information about the Apache APISIX multi-auth Plugin.
---
## Description
The `multi-auth` Plugin is used to add multiple authentication methods to a Route or a Service. It supports plugins of type 'auth'. You can combine different authentication methods using `multi-auth` plugin.
This plugin provides a flexible authentication mechanism by iterating through the list of authentication plugins specified in the `auth_plugins` attribute. It allows multiple consumers to share the same route while using different authentication methods. For example, one consumer can authenticate using basic authentication, while another consumer can authenticate using JWT.
## Attributes
For Route:
| Name | Type | Required | Default | Description |
|--------------|-------|----------|---------|-----------------------------------------------------------------------|
| auth_plugins | array | True | - | Add supporting auth plugins configuration. expects at least 2 plugins |
## Enable Plugin
To enable the Plugin, you have to create two or more Consumer objects with different authentication configurations:
First create a Consumer using basic authentication:
:::note
You can fetch the `admin_key` from `config.yaml` and save to an environment variable with the following command:
```bash
admin_key=$(yq '.deployment.admin.admin_key[0].key' conf/config.yaml | sed 's/"//g')
```
:::
```shell
curl http://127.0.0.1:9180/apisix/admin/consumers -H "X-API-KEY: $admin_key" -X PUT -d '
{
"username": "foo1",
"plugins": {
"basic-auth": {
"username": "foo1",
"password": "bar1"
}
}
}'
```
Then create a Consumer using key authentication:
```shell
curl http://127.0.0.1:9180/apisix/admin/consumers -H "X-API-KEY: $admin_key" -X PUT -d '
{
"username": "foo2",
"plugins": {
"key-auth": {
"key": "auth-one"
}
}
}'
```
Once you have created Consumer objects, you can then configure a Route or a Service to authenticate requests:
```shell
curl http://127.0.0.1:9180/apisix/admin/routes/1 -H "X-API-KEY: $admin_key" -X PUT -d '
{
"methods": ["GET"],
"uri": "/hello",
"plugins": {
"multi-auth":{
"auth_plugins":[
{
"basic-auth":{ }
},
{
"key-auth":{
"query":"apikey",
"hide_credentials":true,
"header":"apikey"
}
}
]
}
},
"upstream": {
"type": "roundrobin",
"nodes": {
"127.0.0.1:1980": 1
}
}
}'
```
## Example usage
After you have configured the Plugin as mentioned above, you can make a request to the Route as shown below:
Send a request with `basic-auth` credentials:
```shell
curl -i -ufoo1:bar1 http://127.0.0.1:9080/hello
```
Send a request with `key-auth` credentials:
```shell
curl http://127.0.0.1:9080/hello -H 'apikey: auth-one' -i
```
```
HTTP/1.1 200 OK
...
hello, world
```
If the request is not authorized, an `401 Unauthorized` error will be thrown:
```json
{"message":"Authorization Failed"}
```
## Delete Plugin
To remove the `multi-auth` Plugin, you can delete the corresponding JSON configuration from the Plugin configuration. APISIX will automatically reload and you do not have to restart for this to take effect.
```shell
curl http://127.0.0.1:9180/apisix/admin/routes/1 -H "X-API-KEY: $admin_key" -X PUT -d '
{
"methods": ["GET"],
"uri": "/hello",
"plugins": {},
"upstream": {
"type": "roundrobin",
"nodes": {
"127.0.0.1:1980": 1
}
}
}'
```
---
---
title: node-status
keywords:
- Apache APISIX
- API Gateway
- Plugin
- Node status
description: This document contains information about the Apache APISIX node-status Plugin.
---
## Description
The `node-status` Plugin can be used get the status of requests to APISIX by exposing an API endpoint.
## Attributes
None.
## API
This Plugin will add the endpoint `/apisix/status` to expose the status of APISIX.
You may need to use the [public-api](public-api.md) Plugin to expose the endpoint.
## Enable Plugin
To configure the `node-status` Plugin, you have to first enable it in your configuration file (`conf/config.yaml`):
```yaml title="conf/config.yaml"
plugins:
- example-plugin
- limit-req
- jwt-auth
- zipkin
- node-status
......
```
You have to the setup the Route for the status API and expose it using the [public-api](public-api.md) Plugin.
:::note
You can fetch the `admin_key` from `config.yaml` and save to an environment variable with the following command:
```bash
admin_key=$(yq '.deployment.admin.admin_key[0].key' conf/config.yaml | sed 's/"//g')
```
:::
```shell
curl http://127.0.0.1:9180/apisix/admin/routes/ns -H "X-API-KEY: $admin_key" -X PUT -d '
{
"uri": "/apisix/status",
"plugins": {
"public-api": {}
}
}'
```
## Example usage
Once you have configured the Plugin, you can make a request to the `apisix/status` endpoint to get the status:
```shell
curl http://127.0.0.1:9080/apisix/status -i
```
```shell
HTTP/1.1 200 OK
Date: Tue, 03 Nov 2020 11:12:55 GMT
Content-Type: text/plain; charset=utf-8
Transfer-Encoding: chunked
Connection: keep-alive
Server: APISIX web server
{"status":{"total":"23","waiting":"0","accepted":"22","writing":"1","handled":"22","active":"1","reading":"0"},"id":"6790a064-8f61-44ba-a6d3-5df42f2b1bb3"}
```
The parameters in the response are described below:
| Parameter | Description |
|-----------|------------------------------------------------------------------------------------------------------------------------|
| status | Status of APISIX. |
| total | Total number of client requests. |
| waiting | Number of idle client connections waiting for a request. |
| accepted | Number of accepted client connections. |
| writing | Number of connections to which APISIX is writing back a response. |
| handled | Number of handled connections. Generally, this value is the same as `accepted` unless any a resource limit is reached. |
| active | Number of active client connections including `waiting` connections. |
| reading | Number of connections where APISIX is reading the request header. |
| id | UID of APISIX instance saved in `apisix/conf/apisix.uid`. |
## Delete Plugin
To remove the Plugin, you can remove it from your configuration file (`conf/config.yaml`):
```yaml title="conf/config.yaml"
plugins:
- example-plugin
- limit-req
- jwt-auth
- zipkin
......
```
You can also remove the Route on `/apisix/status`:
```shell
curl http://127.0.0.1:9180/apisix/admin/routes/ns -H "X-API-KEY: $admin_key" -X DELETE
```
---
---
title: ocsp-stapling
keywords:
- Apache APISIX
- Plugin
- ocsp-stapling
description: This document contains information about the Apache APISIX ocsp-stapling Plugin.
---
## Description
The `ocsp-stapling` Plugin dynamically sets the behavior of [OCSP stapling](https://nginx.org/en/docs/http/ngx_http_ssl_module.html#ssl_stapling) in Nginx.
## Enable Plugin
This Plugin is disabled by default. Modify the config file to enable the plugin:
```yaml title="./conf/config.yaml"
plugins:
- ...
- ocsp-stapling
```
After modifying the config file, reload APISIX or send an hot-loaded HTTP request through the Admin API to take effect:
:::note
You can fetch the `admin_key` from `config.yaml` and save to an environment variable with the following command:
```bash
admin_key=$(yq '.deployment.admin.admin_key[0].key' conf/config.yaml | sed 's/"//g')
```
:::
```shell
curl http://127.0.0.1:9180/apisix/admin/plugins/reload -H "X-API-KEY: $admin_key" -X PUT
```
## Attributes
The attributes of this plugin are stored in specific field `ocsp_stapling` within SSL Resource.
| Name | Type | Required | Default | Valid values | Description |
|----------------|----------------------|----------|---------------|--------------|-----------------------------------------------------------------------------------------------|
| enabled | boolean | False | false | | Like the `ssl_stapling` directive, enables or disables OCSP stapling feature. |
| skip_verify | boolean | False | false | | Like the `ssl_stapling_verify` directive, enables or disables verification of OCSP responses. |
| cache_ttl | integer | False | 3600 | >= 60 | Specifies the expired time of OCSP response cache. |
## Example usage
You should create an SSL Resource first, and the certificate of the server certificate issuer should be known. Normally the fullchain certificate works fine.
Create an SSL Resource as such:
```shell
curl http://127.0.0.1:9180/apisix/admin/ssls/1 \
-H "X-API-KEY: $admin_key" -X PUT -d '
{
"cert" : "'"$(cat server.crt)"'",
"key": "'"$(cat server.key)"'",
"snis": ["test.com"],
"ocsp_stapling": {
"enabled": true
}
}'
```
Next, establish a secure connection to the server, request the SSL/TLS session status, and display the output from the server:
```shell
echo -n "Q" | openssl s_client -status -connect localhost:9443 -servername test.com 2>&1 | cat
```
```
...
CONNECTED(00000003)
OCSP response:
======================================
OCSP Response Data:
OCSP Response Status: successful (0x0)
...
```
To disable OCSP stapling feature, you can make a request as shown below:
```shell
curl http://127.0.0.1:9180/apisix/admin/ssls/1 \
-H "X-API-KEY: $admin_key" -X PUT -d '
{
"cert" : "'"$(cat server.crt)"'",
"key": "'"$(cat server.key)"'",
"snis": ["test.com"],
"ocsp_stapling": {
"enabled": false
}
}'
```
## Delete Plugin
Make sure all your SSL Resource doesn't contains `ocsp_stapling` field anymore. To remove this field, you can make a request as shown below:
```shell
curl http://127.0.0.1:9180/apisix/admin/ssls/1 \
-H "X-API-KEY: $admin_key" -X PATCH -d '
{
"ocsp_stapling": null
}'
```
Modify the config file `./conf/config.yaml` to disable the plugin:
```yaml title="./conf/config.yaml"
plugins:
- ...
# - ocsp-stapling
```
After modifying the config file, reload APISIX or send an hot-loaded HTTP request through the Admin API to take effect:
```shell
curl http://127.0.0.1:9180/apisix/admin/plugins/reload -H "X-API-KEY: $admin_key" -X PUT
```
---
---
title: opa
keywords:
- Apache APISIX
- API Gateway
- Plugin
- Open Policy Agent
- opa
description: This document contains information about the Apache APISIX opa Plugin.
---
## Description
The `opa` Plugin can be used to integrate with [Open Policy Agent (OPA)](https://www.openpolicyagent.org). OPA is a policy engine that helps defininig and enforcing authorization policies, which determines whether a user or application has the necessary permissions to perform a particular action or access a particular resource. Using OPA with APISIX decouples authorization logics from APISIX.
## Attributes
| Name | Type | Required | Default | Valid values | Description |
|-------------------|---------|----------|---------|---------------|--------------------------------------------------------------------------------------------------------------------------------------------------------------------------------------------|
| host | string | True | | | Host address of the OPA service. For example, `https://localhost:8181`. |
| ssl_verify | boolean | False | true | | When set to `true` verifies the SSL certificates. |
| policy | string | True | | | OPA policy path. A combination of `package` and `decision`. While using advanced features like custom response, you can omit `decision`. When specifying a namespace, use the slash format (`examples/echo`) instead of dot notation (`examples.echo`). |
| timeout | integer | False | 3000ms | [1, 60000]ms | Timeout for the HTTP call. |
| keepalive | boolean | False | true | | When set to `true`, keeps the connection alive for multiple requests. |
| keepalive_timeout | integer | False | 60000ms | [1000, ...]ms | Idle time after which the connection is closed. |
| keepalive_pool | integer | False | 5 | [1, ...]ms | Connection pool limit. |
| with_route | boolean | False | false | | When set to true, sends information about the current Route. |
| with_service | boolean | False | false | | When set to true, sends information about the current Service. |
| with_consumer | boolean | False | false | | When set to true, sends information about the current Consumer. Note that this may send sensitive information like the API key. Make sure to turn it on only when you are sure it is safe. |
## Data definition
### APISIX to OPA service
The JSON below shows the data sent to the OPA service by APISIX:
```json
{
"type": "http",
"request": {
"scheme": "http",
"path": "\/get",
"headers": {
"user-agent": "curl\/7.68.0",
"accept": "*\/*",
"host": "127.0.0.1:9080"
},
"query": {},
"port": 9080,
"method": "GET",
"host": "127.0.0.1"
},
"var": {
"timestamp": 1701234567,
"server_addr": "127.0.0.1",
"server_port": "9080",
"remote_port": "port",
"remote_addr": "ip address"
},
"route": {},
"service": {},
"consumer": {}
}
```
Each of these keys are explained below:
- `type` indicates the request type (`http` or `stream`).
- `request` is used when the `type` is `http` and contains the basic request information (URL, headers etc).
- `var` contains the basic information about the requested connection (IP, port, request timestamp etc).
- `route`, `service` and `consumer` contains the same data as stored in APISIX and are only sent if the `opa` Plugin is configured on these objects.
### OPA service to APISIX
The JSON below shows the response from the OPA service to APISIX:
```json
{
"result": {
"allow": true,
"reason": "test",
"headers": {
"an": "header"
},
"status_code": 401
}
}
```
The keys in the response are explained below:
- `allow` is indispensable and indicates whether the request is allowed to be forwarded through APISIX.
- `reason`, `headers`, and `status_code` are optional and are only returned when you configure a custom response. See the next section use cases for this.
## Example usage
First, you need to launch the Open Policy Agent environment:
```shell
docker run -d --name opa -p 8181:8181 openpolicyagent/opa:0.35.0 run -s
```
### Basic usage
Once you have the OPA service running, you can create a basic policy:
```shell
curl -X PUT '127.0.0.1:8181/v1/policies/example1' \
-H 'Content-Type: text/plain' \
-d 'package example1
import input.request
default allow = false
allow {
# HTTP method must GET
request.method == "GET"
}'
```
Then, you can configure the `opa` Plugin on a specific Route:
```shell
curl -X PUT 'http://127.0.0.1:9180/apisix/admin/routes/r1' \
-H 'X-API-KEY: ' \
-H 'Content-Type: application/json' \
-d '{
"uri": "/*",
"plugins": {
"opa": {
"host": "http://127.0.0.1:8181",
"policy": "example1"
}
},
"upstream": {
"nodes": {
"httpbin.org:80": 1
},
"type": "roundrobin"
}
}'
```
Now, to test it out:
```shell
curl -i -X GET 127.0.0.1:9080/get
```
```shell
HTTP/1.1 200 OK
```
Now if we try to make a request to a different endpoint the request will fail:
```
curl -i -X POST 127.0.0.1:9080/post
```
```shell
HTTP/1.1 403 FORBIDDEN
```
### Using custom response
You can also configure custom responses for more complex scenarios:
```shell
curl -X PUT '127.0.0.1:8181/v1/policies/example2' \
-H 'Content-Type: text/plain' \
-d 'package example2
import input.request
default allow = false
allow {
request.method == "GET"
}
# custom response body (Accepts a string or an object, the object will respond as JSON format)
reason = "test" {
not allow
}
# custom response header (The data of the object can be written in this way)
headers = {
"Location": "http://example.com/auth"
} {
not allow
}
# custom response status code
status_code = 302 {
not allow
}'
```
Now you can test it out by changing the `opa` Plugin's policy parameter to `example2` and then making a request:
```shell
curl -i -X GET 127.0.0.1:9080/get
```
```
HTTP/1.1 200 OK
```
Now if you make a failing request, you will see the custom response from the OPA service:
```
curl -i -X POST 127.0.0.1:9080/post
```
```
HTTP/1.1 302 FOUND
Location: http://example.com/auth
test
```
### Sending APISIX data
Let's think about another scenario, when your decision needs to use some APISIX data, such as `route`, `consumer`, etc., how should we do it?
If your OPA service needs to make decisions based on APISIX data like Route and Consumer details, you can configure the Plugin to do so.
The example below shows a simple `echo` policy which will return the data sent by APISIX as it is:
```shell
curl -X PUT '127.0.0.1:8181/v1/policies/echo' \
-H 'Content-Type: text/plain' \
-d 'package echo
allow = false
reason = input'
```
Now we can configure the Plugin on the Route to send APISIX data:
```shell
curl -X PUT 'http://127.0.0.1:9180/apisix/admin/routes/r1' \
-H 'X-API-KEY: ' \
-H 'Content-Type: application/json' \
-d '{
"uri": "/*",
"plugins": {
"opa": {
"host": "http://127.0.0.1:8181",
"policy": "echo",
"with_route": true
}
},
"upstream": {
"nodes": {
"httpbin.org:80": 1
},
"type": "roundrobin"
}
}'
```
Now if you make a request, you can see the data from the Route through the custom response:
```shell
curl -X GET 127.0.0.1:9080/get
{
"type": "http",
"request": {
xxx
},
"var": {
xxx
},
"route": {
xxx
}
}
```
## Delete Plugin
To remove the `opa` Plugin, you can delete the corresponding JSON configuration from the Plugin configuration. APISIX will automatically reload and you do not have to restart for this to take effect.
:::note
You can fetch the `admin_key` from `config.yaml` and save to an environment variable with the following command:
```bash
admin_key=$(yq '.deployment.admin.admin_key[0].key' conf/config.yaml | sed 's/"//g')
```
:::
```shell
curl http://127.0.0.1:9180/apisix/admin/routes/1 -H "X-API-KEY: $admin_key" -X PUT -d '
{
"methods": ["GET"],
"uri": "/hello",
"plugins": {},
"upstream": {
"type": "roundrobin",
"nodes": {
"127.0.0.1:1980": 1
}
}
}'
```
---
---
title: openfunction
keywords:
- Apache APISIX
- API Gateway
- Plugin
- OpenFunction
description: This document contains information about the Apache APISIX openfunction Plugin.
---
## Description
The `openfunction` Plugin is used to integrate APISIX with [CNCF OpenFunction](https://openfunction.dev/) serverless platform.
This Plugin can be configured on a Route and requests will be sent to the configured OpenFunction API endpoint as the upstream.
## Attributes
| Name | Type | Required | Default | Valid values | Description |
| --------------------------- | ------- | -------- | ------- | ------------ | ---------------------------------------------------------------------------------------------------------- |
| function_uri | string | True | | | function uri. For example, `https://localhost:30858/default/function-sample`. |
| ssl_verify | boolean | False | true | | When set to `true` verifies the SSL certificate. |
| authorization | object | False | | | Authorization credentials to access functions of OpenFunction. |
| authorization.service_token | string | False | | | The token format is 'xx:xx' which supports basic auth for function entry points. |
| timeout | integer | False | 3000 ms | [100, ...] ms| OpenFunction action and HTTP call timeout in ms. |
| keepalive | boolean | False | true | | When set to `true` keeps the connection alive for reuse. |
| keepalive_timeout | integer | False | 60000 ms| [1000,...] ms| Time is ms for connection to remain idle without closing. |
| keepalive_pool | integer | False | 5 | [1,...] | Maximum number of requests that can be sent on this connection before closing it. |
:::note
The `timeout` attribute sets the time taken by the OpenFunction to execute, and the timeout for the HTTP client in APISIX. OpenFunction calls may take time to pull the runtime image and start the container. So, if the value is set too small, it may cause a large number of requests to fail.
:::
## Prerequisites
Before configuring the plugin, you need to have OpenFunction running.
Installation of OpenFunction requires a certain version Kubernetes cluster.
For details, please refer to [Installation](https://openfunction.dev/docs/getting-started/installation/).
### Create and Push a Function
You can then create a function following the [sample](https://github.com/OpenFunction/samples)
You'll need to push your function container image to a container registry like Docker Hub or Quay.io when building a function. To do that, you'll need to generate a secret for your container registry first.
```shell
REGISTRY_SERVER=https://index.docker.io/v1/ REGISTRY_USER= ${your_registry_user} REGISTRY_PASSWORD= ${your_registry_password}
kubectl create secret docker-registry push-secret \
--docker-server=$REGISTRY_SERVER \
--docker-username=$REGISTRY_USER \
--docker-password=$REGISTRY_PASSWORD
```
## Enable the Plugin
You can now configure the Plugin on a specific Route and point to this running OpenFunction service:
:::note
You can fetch the `admin_key` from `config.yaml` and save to an environment variable with the following command:
```bash
admin_key=$(yq '.deployment.admin.admin_key[0].key' conf/config.yaml | sed 's/"//g')
```
:::
```shell
curl http://127.0.0.1:9180/apisix/admin/routes/1 -H "X-API-KEY: $admin_key" -X PUT -d '
{
"uri": "/hello",
"plugins": {
"openfunction": {
"function_uri": "http://localhost:3233/default/function-sample/test",
"authorization": {
"service_token": "test:test"
}
}
}
}'
```
## Example usage
Once you have configured the plugin, you can send a request to the Route and it will invoke the configured function:
```shell
curl -i http://127.0.0.1:9080/hello
```
This will give back the response from the function:
```
hello, test!
```
### Configure Path Transforming
The `OpenFunction` Plugin also supports transforming the URL path while proxying requests to the OpenFunction API endpoints. Extensions to the base request path get appended to the `function_uri` specified in the Plugin configuration.
:::info IMPORTANT
The `uri` configured on a Route must end with `*` for this feature to work properly. APISIX Routes are matched strictly and the `*` implies that any subpath to this URI would be matched to the same Route.
:::
The example below configures this feature:
```shell
curl http://127.0.0.1:9180/apisix/admin/routes/1 -H "X-API-KEY: $admin_key" -X PUT -d '
{
"uri": "/hello/*",
"plugins": {
"openfunction": {
"function_uri": "http://localhost:3233/default/function-sample",
"authorization": {
"service_token": "test:test"
}
}
}
}'
```
Now, any requests to the path `hello/123` will invoke the OpenFunction, and the added path is forwarded:
```shell
curl http://127.0.0.1:9080/hello/123
```
```shell
Hello, 123!
```
## Delete Plugin
To remove the `openfunction` Plugin, you can delete the corresponding JSON configuration from the Plugin configuration. APISIX will automatically reload and you do not have to restart for this to take effect.
```shell
curl http://127.0.0.1:9180/apisix/admin/routes/1 -H "X-API-KEY: $admin_key" -X PUT -d '
{
"methods": ["GET"],
"uri": "/index.html",
"upstream": {
"type": "roundrobin",
"nodes": {
"127.0.0.1:1980": 1
}
}
}'
```
---
---
title: openid-connect
keywords:
- Apache APISIX
- API Gateway
- OpenID Connect
- OIDC
description: The openid-connect Plugin supports the integration with OpenID Connect (OIDC) identity providers, such as Keycloak, Auth0, Microsoft Entra ID, Google, Okta, and more. It allows APISIX to authenticate clients and obtain their information from the identity provider before allowing or denying their access to upstream protected resources.
---
## Description
The `openid-connect` Plugin supports the integration with [OpenID Connect (OIDC)](https://openid.net/connect/) identity providers, such as Keycloak, Auth0, Microsoft Entra ID, Google, Okta, and more. It allows APISIX to authenticate clients and obtain their information from the identity provider before allowing or denying their access to upstream protected resources.
## Attributes
| Name | Type | Required | Default | Valid values | Description |
|--------------------------------------|----------|----------|-----------------------|--------------|---------------------------------------------------------------------------------------------------------------------------------------------------------------------------------------------------------------------------------------|
| client_id | string | True | | | OAuth client ID. |
| client_secret | string | True | | | OAuth client secret. |
| discovery | string | True | | | URL to the well-known discovery document of the OpenID provider, which contains a list of OP API endpoints. The Plugin can directly utilize the endpoints from the discovery document. You can also configure these endpoints individually, which takes precedence over the endpoints supplied in the discovery document. |
| scope | string | False | openid | | OIDC scope that corresponds to information that should be returned about the authenticated user, also known as [claims](https://openid.net/specs/openid-connect-core-1_0.html#StandardClaims). This is used to authorize users with proper permission. The default value is `openid`, the required scope for OIDC to return a `sub` claim that uniquely identifies the authenticated user. Additional scopes can be appended and delimited by spaces, such as `openid email profile`. |
| required_scopes | array[string] | False | | | Scopes required to be present in the access token. Used in conjunction with the introspection endpoint when `bearer_only` is `true`. If any required scope is missing, the Plugin rejects the request with a 403 forbidden error. |
| realm | string | False | apisix | | Realm in [`WWW-Authenticate`](https://www.rfc-editor.org/rfc/rfc6750#section-3) response header accompanying a 401 unauthorized request due to invalid bearer token. |
| bearer_only | boolean | False | false | | If true, strictly require bearer access token in requests for authentication. |
| logout_path | string | False | /logout | | Path to activate the logout. |
| post_logout_redirect_uri | string | False | | | URL to redirect users to after the `logout_path` receive a request to log out. |
| redirect_uri | string | False | | | URI to redirect to after authentication with the OpenID provider. Note that the redirect URI should not be the same as the request URI, but a sub-path of the request URI. For example, if the `uri` of the Route is `/api/v1/*`, `redirect_uri` can be configured as `/api/v1/redirect`. If `redirect_uri` is not configured, APISIX will append `/.apisix/redirect` to the request URI to determine the value for `redirect_uri`. |
| timeout | integer | False | 3 | [1,...] | Request timeout time in seconds. |
| ssl_verify | boolean | False | false | | If true, verify the OpenID provider 's SSL certificates. |
| introspection_endpoint | string | False | | | URL of the [token introspection](https://datatracker.ietf.org/doc/html/rfc7662) endpoint for the OpenID provider used to introspect access tokens. If this is unset, the introspection endpoint presented in the well-known discovery document is used [as a fallback](https://github.com/zmartzone/lua-resty-openidc/commit/cdaf824996d2b499de4c72852c91733872137c9c). |
| introspection_endpoint_auth_method | string | False | client_secret_basic | | Authentication method for the token introspection endpoint. The value should be one of the authentication methods specified in the `introspection_endpoint_auth_methods_supported` [authorization server metadata](https://www.rfc-editor.org/rfc/rfc8414.html) as seen in the well-known discovery document, such as `client_secret_basic`, `client_secret_post`, `private_key_jwt`, and `client_secret_jwt`. |
| token_endpoint_auth_method | string | False | client_secret_basic | | Authentication method for the token endpoint. The value should be one of the authentication methods specified in the `token_endpoint_auth_methods_supported` [authorization server metadata](https://www.rfc-editor.org/rfc/rfc8414.html) as seen in the well-known discovery document, such as `client_secret_basic`, `client_secret_post`, `private_key_jwt`, and `client_secret_jwt`. If the configured method is not supported, fall back to the first method in the `token_endpoint_auth_methods_supported` array. |
| public_key | string | False | | | Public key used to verify JWT signature id asymmetric algorithm is used. Providing this value to perform token verification will skip token introspection in client credentials flow. You can pass the public key in `-----BEGIN PUBLIC KEY-----\\n……\\n-----END PUBLIC KEY-----` format. |
| use_jwks | boolean | False | false | | If true and if `public_key` is not set, use the JWKS to verify JWT signature and skip token introspection in client credentials flow. The JWKS endpoint is parsed from the discovery document. |
| use_pkce | boolean | False | false | | If true, use the Proof Key for Code Exchange (PKCE) for Authorization Code Flow as defined in [RFC 7636](https://datatracker.ietf.org/doc/html/rfc7636). |
| token_signing_alg_values_expected | string | False | | | Algorithm used for signing JWT, such as `RS256`. |
| set_access_token_header | boolean | False | true | | If true, set the access token in a request header. By default, the `X-Access-Token` header is used. |
| access_token_in_authorization_header | boolean | False | false | | If true and if `set_access_token_header` is also true, set the access token in the `Authorization` header. |
| set_id_token_header | boolean | False | true | | If true and if the ID token is available, set the value in the `X-ID-Token` request header. |
| set_userinfo_header | boolean | False | true | | If true and if user info data is available, set the value in the `X-Userinfo` request header. |
| set_refresh_token_header | boolean | False | false | | If true and if the refresh token is available, set the value in the `X-Refresh-Token` request header. |
| session | object | False | | | Session configuration used when `bearer_only` is `false` and the Plugin uses Authorization Code flow. |
| session.secret | string | True | | 16 or more characters | Key used for session encryption and HMAC operation when `bearer_only` is `false`. |
| session.cookie | object | False | | | Cookie configurations. |
| session.cookie.lifetime | integer | False | 3600 | | Cookie lifetime in seconds. |
| session_contents | object | False | | | Session content configurations. If unconfigured, all data will be stored in the session. |
| session_contents.access_token | boolean | False | | | If true, store the access token in the session. |
| session_contents.id_token | boolean | False | | | If true, store the ID token in the session. |
| session_contents.enc_id_token | boolean | False | | | If true, store the encrypted ID token in the session. |
| session_contents.user | boolean | False | | | If true, store the user info in the session. |
| unauth_action | string | False | auth | ["auth","deny","pass"] | Action for unauthenticated requests. When set to `auth`, redirect to the authentication endpoint of the OpenID provider. When set to `pass`, allow the request without authentication. When set to `deny`, return 401 unauthenticated responses rather than start the authorization code grant flow. |
| proxy_opts | object | False | | | Configurations for the proxy server that the OpenID provider is behind. |
| proxy_opts.http_proxy | string | False | | | Proxy server address for HTTP requests, such as `http://:`. |
| proxy_opts.https_proxy | string | False | | | Proxy server address for HTTPS requests, such as `http://:`. |
| proxy_opts.http_proxy_authorization | string | False | | Basic [base64 username:password] | Default `Proxy-Authorization` header value to be used with `http_proxy`. Can be overridden with custom `Proxy-Authorization` request header. |
| proxy_opts.https_proxy_authorization | string | False | | Basic [base64 username:password] | Default `Proxy-Authorization` header value to be used with `https_proxy`. Cannot be overridden with custom `Proxy-Authorization` request header since with HTTPS, the authorization is completed when connecting. |
| proxy_opts.no_proxy | string | False | | | Comma separated list of hosts that should not be proxied. |
| authorization_params | object | False | | | Additional parameters to send in the request to the authorization endpoint. |
| client_rsa_private_key | string | False | | | Client RSA private key used to sign JWT for authentication to the OP. Required when `token_endpoint_auth_method` is `private_key_jwt`. |
| client_rsa_private_key_id | string | False | | | Client RSA private key ID used to compute a signed JWT. Optional when `token_endpoint_auth_method` is `private_key_jwt`. |
| client_jwt_assertion_expires_in | integer | False | 60 | | Life duration of the signed JWT for authentication to the OP, in seconds. Used when `token_endpoint_auth_method` is `private_key_jwt` or `client_secret_jwt`. |
| renew_access_token_on_expiry | boolean | False | true | | If true, attempt to silently renew the access token when it expires or if a refresh token is available. If the token fails to renew, redirect user for re-authentication. |
| access_token_expires_in | integer | False | | | Lifetime of the access token in seconds if no `expires_in` attribute is present in the token endpoint response. |
| refresh_session_interval | integer | False | | | Time interval to refresh user ID token without requiring re-authentication. When not set, it will not check the expiration time of the session issued to the client by the gateway. If set to 900, it means refreshing the user's id_token (or session in the browser) after 900 seconds without requiring re-authentication. |
| iat_slack | integer | False | 120 | | Tolerance of clock skew in seconds with the `iat` claim in an ID token. |
| accept_none_alg | boolean | False | false | | Set to true if the OpenID provider does not sign its ID token, such as when the signature algorithm is set to `none`. |
| accept_unsupported_alg | boolean | False | true | | If true, ignore ID token signature to accept unsupported signature algorithm. |
| access_token_expires_leeway | integer | False | 0 | | Expiration leeway in seconds for access token renewal. When set to a value greater than 0, token renewal will take place the set amount of time before token expiration. This avoids errors in case the access token just expires when arriving to the resource server. |
| force_reauthorize | boolean | False | false | | If true, execute the authorization flow even when a token has been cached. |
| use_nonce | boolean | False | false | | If true, enable nonce parameter in authorization request. |
| revoke_tokens_on_logout | boolean | False | false | | If true, notify the authorization server a previously obtained refresh or access token is no longer needed at the revocation endpoint. |
| jwk_expires_in | integer | False | 86400 | | Expiration time for JWK cache in seconds. |
| jwt_verification_cache_ignore | boolean | False | false | | If true, force re-verification for a bearer token and ignore any existing cached verification results. |
| cache_segment | string | False | | | Optional name of a cache segment, used to separate and differentiate caches used by token introspection or JWT verification. |
| introspection_interval | integer | False | 0 | | TTL of the cached and introspected access token in seconds. The default value is 0, which means this option is not used and the Plugin defaults to use the TTL passed by expiry claim defined in `introspection_expiry_claim`. If `introspection_interval` is larger than 0 and less than the TTL passed by expiry claim defined in `introspection_expiry_claim`, use `introspection_interval`. |
| introspection_expiry_claim | string | False | exp | | Name of the expiry claim, which controls the TTL of the cached and introspected access token. |
| introspection_addon_headers | array[string] | False | | | Used to append additional header values to the introspection HTTP request. If the specified header does not exist in origin request, value will not be appended. |
| claim_validator | object | False | | | JWT claim validation configurations. |
| claim_validator.issuer.valid_issuers | array[string] | False | | | An array of trusted JWT issuers. If unconfigured, the issuer returned by discovery endpoint will be used. If both are unavailable, the issuer will not be validated. |
| claim_validator.audience | object | False | | | [Audience claim](https://openid.net/specs/openid-connect-core-1_0.html) validation configurations. |
| claim_validator.audience.claim | string | False | aud | | Name of the claim that contains the audience. |
| claim_validator.audience.required | boolean | False | false | | If true, audience claim is required and the name of the claim will be the name defined in `claim`. |
| claim_validator.audience.match_with_client_id | boolean | False | false | | If true, require the audience to match the client ID. If the audience is a string, it must exactly match the client ID. If the audience is an array of strings, at least one of the values must match the client ID. If no match is found, you will receive a `mismatched audience` error. This requirement is stated in the OpenID Connect specification to ensure that the token is intended for the specific client. |
| claim_schema | object | False | | | JSON schema of OIDC response claim. Example: `{"type":"object","properties":{"access_token":{"type":"string"}},"required":["access_token"]}` - validates that the response contains a required string field `access_token`. |
NOTE: `encrypt_fields = {"client_secret"}` is also defined in the schema, which means that the field will be stored encrypted in etcd. See [encrypted storage fields](../plugin-develop.md#encrypted-storage-fields).
In addition, you can use Environment Variables or APISIX secret to store and reference plugin attributes. APISIX currently supports storing secrets in two ways - [Environment Variables and HashiCorp Vault](../terminology/secret.md).
For example, use below command to set environment variable
`export keycloak_secret=abc`
and use it in plugin conf like below
`"client_secret": "$ENV://keycloak_secret"`
## Examples
The examples below demonstrate how you can configure the `openid-connect` Plugin for different scenarios.
:::note
You can fetch the `admin_key` from `config.yaml` and save to an environment variable with the following command:
```bash
admin_key=$(yq '.deployment.admin.admin_key[0].key' conf/config.yaml | sed 's/"//g')
```
:::
### Authorization Code Flow
The authorization code flow is defined in [RFC 6749, Section 4.1](https://datatracker.ietf.org/doc/html/rfc6749#section-4.1). It involves exchanging an temporary authorization code for an access token, and is typically used by confidential and public clients.
The following diagram illustrates the interaction between different entities when you implement the authorization code flow:
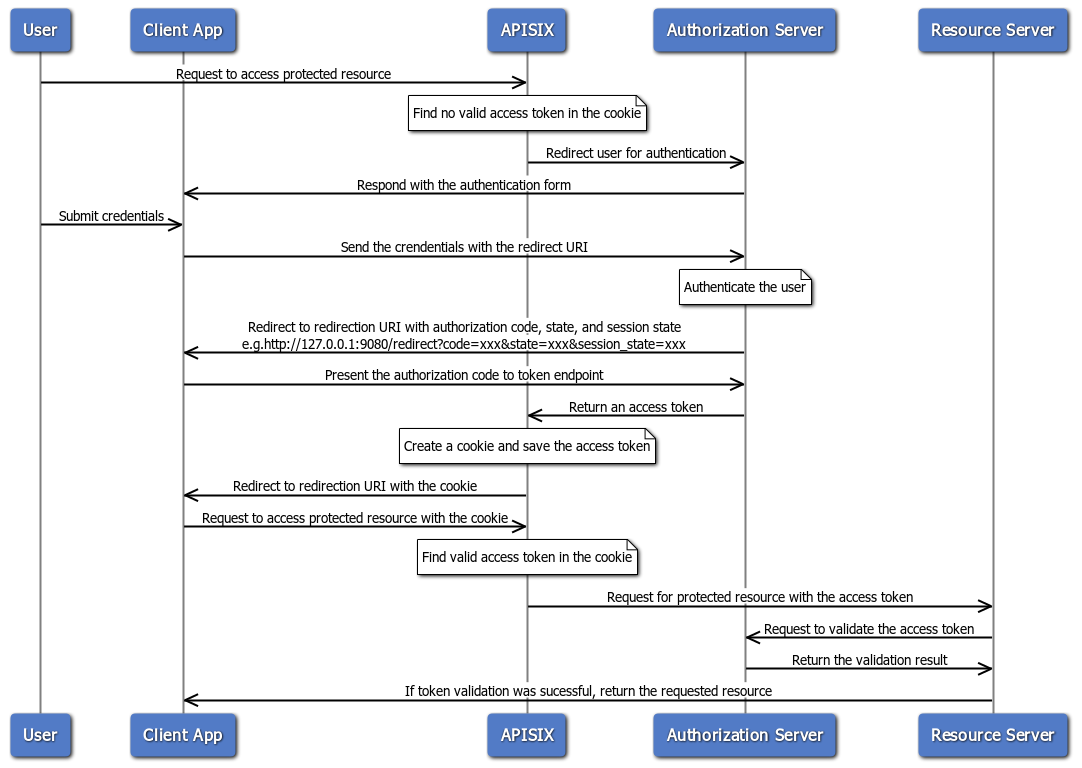
When an incoming request does not contain an access token in its header nor in an appropriate session cookie, the Plugin acts as a relying party and redirects to the authorization server to continue the authorization code flow.
After successful authentication, the Plugin keeps the token in the session cookie, and subsequent requests will use the token stored in the cookie.
See [Implement Authorization Code Grant](../tutorials/keycloak-oidc.md#implement-authorization-code-grant) for an example to use the `openid-connect` Plugin to integrate with Keycloak using the authorization code flow.
### Proof Key for Code Exchange (PKCE)
The Proof Key for Code Exchange (PKCE) is defined in [RFC 7636](https://datatracker.ietf.org/doc/html/rfc7636). PKCE enhances the authorization code flow by adding a code challenge and verifier to prevent authorization code interception attacks.
The following diagram illustrates the interaction between different entities when you implement the authorization code flow with PKCE:
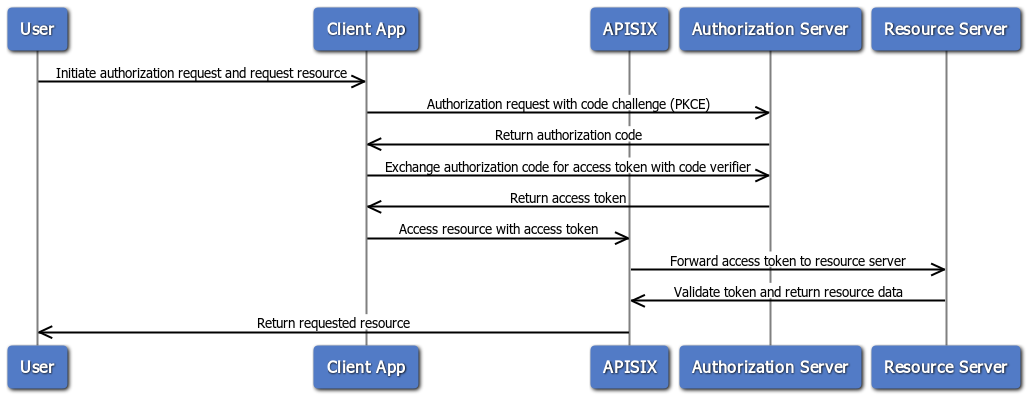
See [Implement Authorization Code Grant](../tutorials/keycloak-oidc.md#implement-authorization-code-grant) for an example to use the `openid-connect` Plugin to integrate with Keycloak using the authorization code flow with PKCE.
### Client Credential Flow
The client credential flow is defined in [RFC 6749, Section 4.4](https://datatracker.ietf.org/doc/html/rfc6749#section-4.4). It involves clients requesting an access token with its own credentials to access protected resources, typically used in machine to machine authentication and is not on behalf of a specific user.
The following diagram illustrates the interaction between different entities when you implement the client credential flow:
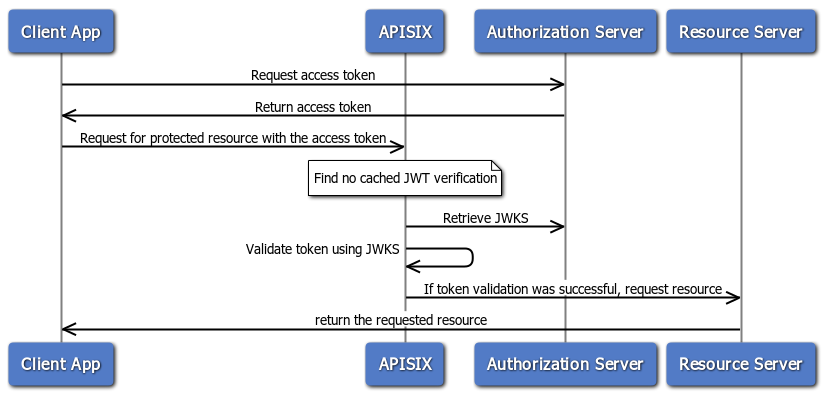
See [Implement Client Credentials Grant](../tutorials/keycloak-oidc.md#implement-client-credentials-grant) for an example to use the `openid-connect` Plugin to integrate with Keycloak using the client credentials flow.
### Introspection Flow
The introspection flow is defined in [RFC 7662](https://datatracker.ietf.org/doc/html/rfc7662). It involves verifying the validity and details of an access token by querying an authorization server’s introspection endpoint.
In this flow, when a client presents an access token to the resource server, the resource server sends a request to the authorization server’s introspection endpoint, which responds with token details if the token is active, including information like token expiration, associated scopes, and the user or client it belongs to.
The following diagram illustrates the interaction between different entities when you implement the authorization code flow with token introspection:
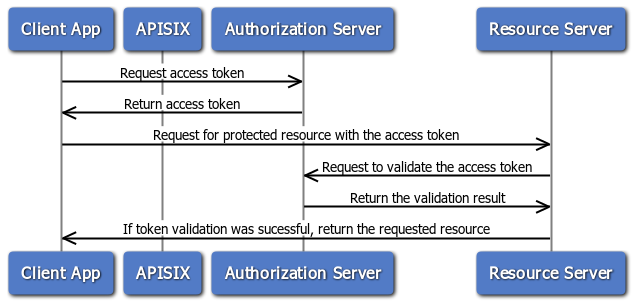
See [Implement Client Credentials Grant](../tutorials/keycloak-oidc.md#implement-client-credentials-grant) for an example to use the `openid-connect` Plugin to integrate with Keycloak using the client credentials flow with token introspection.
### Password Flow
The password flow is defined in [RFC 6749, Section 4.3](https://datatracker.ietf.org/doc/html/rfc6749#section-4.3). It is designed for trusted applications, allowing them to obtain an access token directly using a user’s username and password. In this grant type, the client app sends the user’s credentials along with its own client ID and secret to the authorization server, which then authenticates the user and, if valid, issues an access token.
Though efficient, this flow is intended for highly trusted, first-party applications only, as it requires the app to handle sensitive user credentials directly, posing significant security risks if used in third-party contexts.
The following diagram illustrates the interaction between different entities when you implement the password flow:
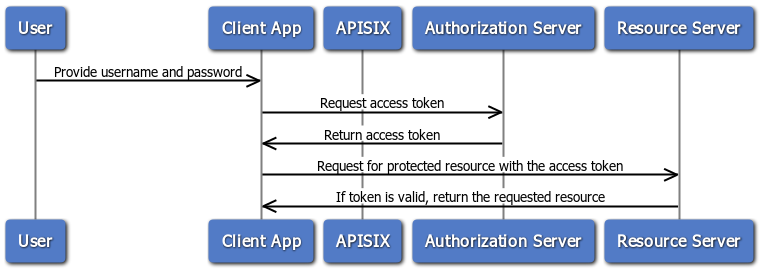
See [Implement Password Grant](../tutorials/keycloak-oidc.md#implement-password-grant) for an example to use the `openid-connect` Plugin to integrate with Keycloak using the password flow.
### Refresh Token Grant
The refresh token grant is defined in [RFC 6749, Section 6](https://datatracker.ietf.org/doc/html/rfc6749#section-6). It enables clients to request a new access token without requiring the user to re-authenticate, using a previously issued refresh token. This flow is typically used when an access token expires, allowing the client to maintain continuous access to resources without user intervention. Refresh tokens are issued along with access tokens in certain OAuth flows and their lifespan and security requirements depend on the authorization server’s configuration.
The following diagram illustrates the interaction between different entities when implementing password flow with refresh token flow:

See [Refresh Token](../tutorials/keycloak-oidc.md#refresh-token) for an example to use the `openid-connect` Plugin to integrate with Keycloak using the password flow with token refreshes.
## Troubleshooting
This section covers a few commonly seen issues when working with this Plugin to help you troubleshoot.
### APISIX Cannot Connect to OpenID provider
If APISIX fails to resolve or cannot connect to the OpenID provider, double check the DNS settings in your configuration file `config.yaml` and modify as needed.
### No Session State Found
If you encounter a `500 internal server error` with the following message in the log when working with [authorization code flow](#authorization-code-flow), there could be a number of reasons.
```text
the error request to the redirect_uri path, but there's no session state found
```
#### 1. Misconfigured Redirection URI
A common misconfiguration is to configure the `redirect_uri` the same as the URI of the route. When a user initiates a request to visit the protected resource, the request directly hits the redirection URI with no session cookie in the request, which leads to the no session state found error.
To properly configure the redirection URI, make sure that the `redirect_uri` matches the Route where the Plugin is configured, without being fully identical. For instance, a correct configuration would be to configure `uri` of the Route to `/api/v1/*` and the path portion of the `redirect_uri` to `/api/v1/redirect`.
You should also ensure that the `redirect_uri` include the scheme, such as `http` or `https`.
#### 2. Cookie Not Sent or Absent
Check if the [`SameSite`](https://developer.mozilla.org/en-US/docs/Web/HTTP/Headers/Set-Cookie#samesitesamesite-value) cookie attribute is properly set (i.e. if your application needs to send the cookie cross sites) to see if this could be a factor that prevents the cookie being saved to the browser's cookie jar or being sent from the browser.
#### 3. Upstream Sent Too Big Header
If you have NGINX sitting in front of APISIX to proxy client traffic, see if you observe the following error in NGINX's `error.log`:
```text
upstream sent too big header while reading response header from upstream
```
If so, try adjusting `proxy_buffers`, `proxy_buffer_size`, and `proxy_busy_buffers_size` to larger values.
Another option is to configure the `session_content` attribute to adjust which data to store in session. For instance, you can set `session_content.access_token` to `true`.
#### 4. Invalid Client Secret
Verify if `client_secret` is valid and correct. An invalid `client_secret` would lead to an authentication failure and no token shall be returned and stored in session.
#### 5. PKCE IdP Configuration
If you are enabling PKCE with the authorization code flow, make sure you have configured the IdP client to use PKCE. For example, in Keycloak, you should configure the PKCE challenge method in the client's advanced settings:
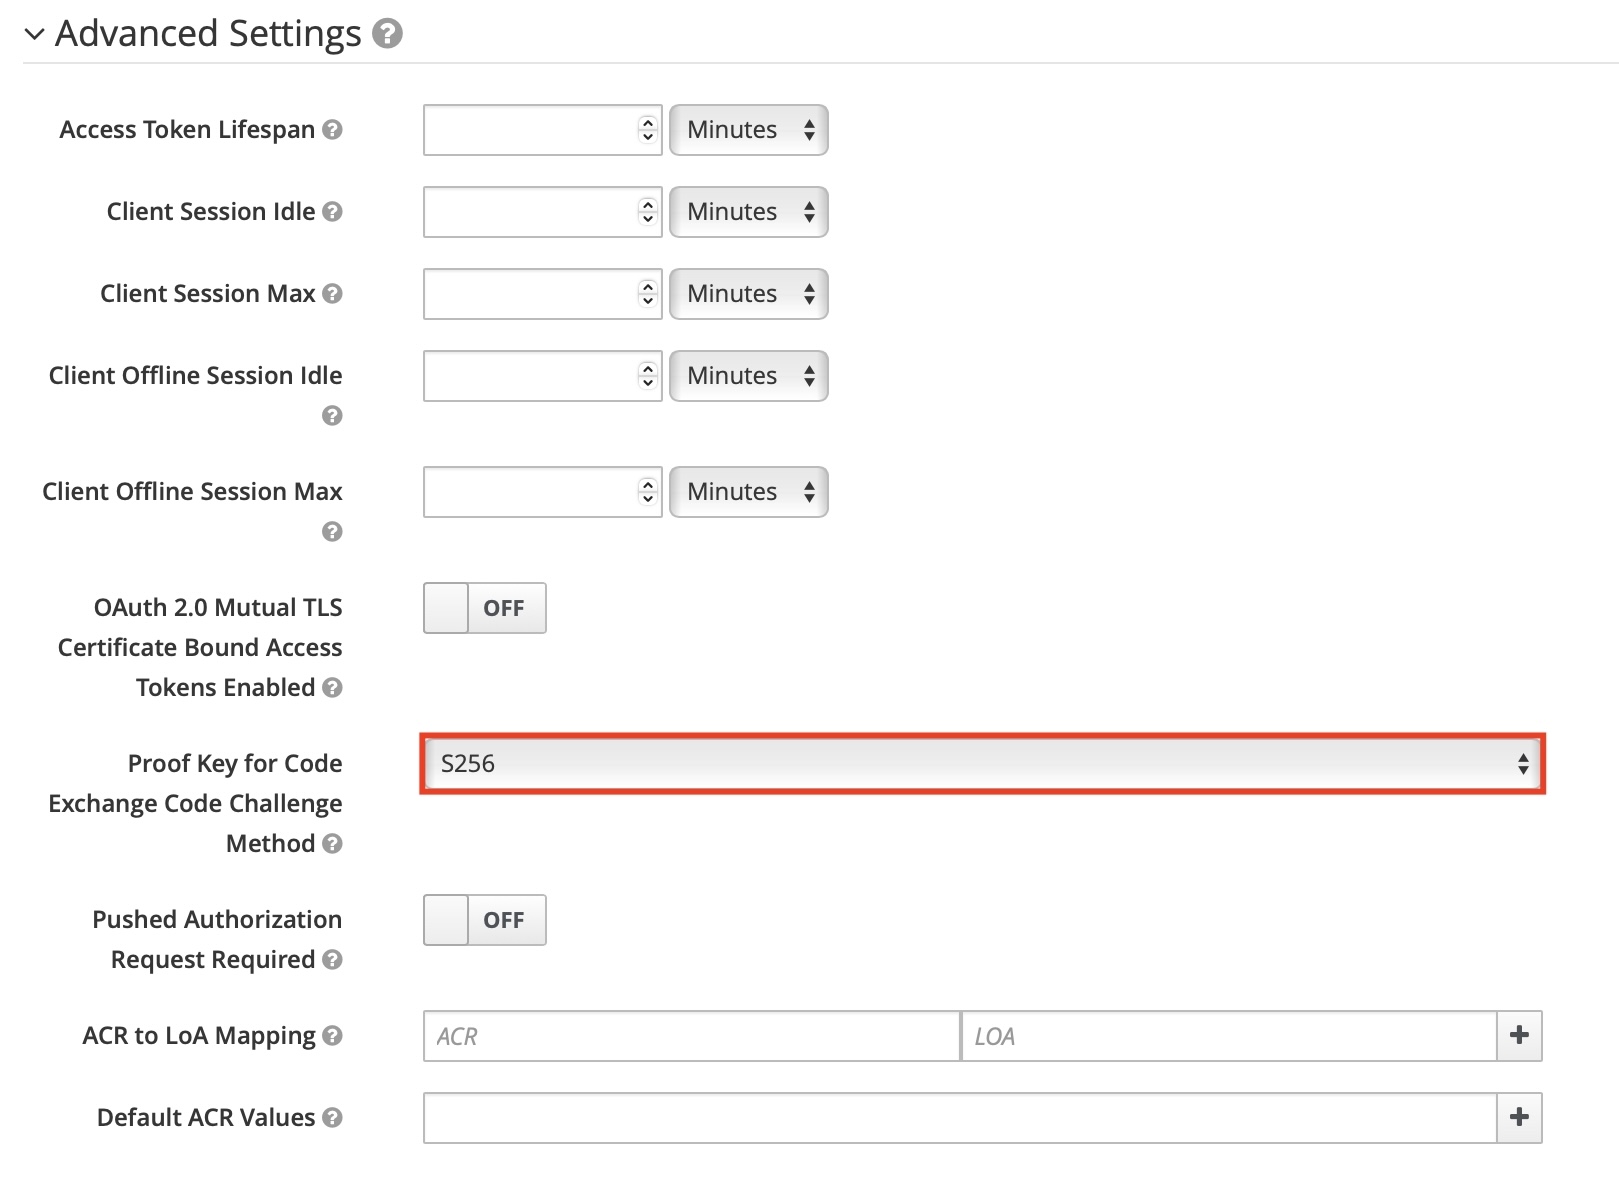
---
---
title: opentelemetry
keywords:
- Apache APISIX
- API Gateway
- Plugin
- OpenTelemetry
description: The opentelemetry Plugin instruments APISIX and sends traces to OpenTelemetry collector based on the OpenTelemetry specification, in binary-encoded OLTP over HTTP.
---
## Description
The `opentelemetry` Plugin can be used to report tracing data according to the [OpenTelemetry Specification](https://opentelemetry.io/docs/reference/specification/).
The Plugin only supports binary-encoded [OLTP over HTTP](https://opentelemetry.io/docs/reference/specification/protocol/otlp/#otlphttp).
## Configurations
By default, configurations of the Service name, tenant ID, collector, and batch span processor are pre-configured in [default configuration](https://github.com/apache/apisix/blob/master/apisix/cli/config.lua).
You can change this configuration of the Plugin through the endpoint `apisix/admin/plugin_metadata/opentelemetry` For example:
:::note
You can fetch the `admin_key` from `config.yaml` and save to an environment variable with the following command:
```bash
admin_key=$(yq '.deployment.admin.admin_key[0].key' conf/config.yaml | sed 's/"//g')
```
:::
```shell
curl http://127.0.0.1:9180/apisix/admin/plugin_metadata/opentelemetry -H "X-API-KEY: $admin_key" -X PUT -d '
{
"trace_id_source": "x-request-id",
"resource": {
"service.name": "APISIX"
},
"collector": {
"address": "127.0.0.1:4318",
"request_timeout": 3,
"request_headers": {
"Authorization": "token"
}
},
"batch_span_processor": {
"drop_on_queue_full": false,
"max_queue_size": 1024,
"batch_timeout": 2,
"inactive_timeout": 1,
"max_export_batch_size": 16
},
"set_ngx_var": false
}'
```
## Attributes
| Name | Type | Required | Default | Valid Values | Description |
|---------------------------------------|---------------|----------|--------------|--------------|-------------|
| sampler | object | False | - | - | Sampling configuration. |
| sampler.name | string | False | `always_off` | ["always_on", "always_off", "trace_id_ratio", "parent_base"] | Sampling strategy.
To always sample, use `always_on`.
To never sample, use `always_off`.
To randomly sample based on a given ratio, use `trace_id_ratio`.
To use the sampling decision of the span's parent, use `parent_base`. If there is no parent, use the root sampler. |
| sampler.options | object | False | - | - | Parameters for sampling strategy. |
| sampler.options.fraction | number | False | 0 | [0, 1] | Sampling ratio when the sampling strategy is `trace_id_ratio`. |
| sampler.options.root | object | False | - | - | Root sampler when the sampling strategy is `parent_base` strategy. |
| sampler.options.root.name | string | False | - | ["always_on", "always_off", "trace_id_ratio"] | Root sampling strategy. |
| sampler.options.root.options | object | False | - | - | Root sampling strategy parameters. |
| sampler.options.root.options.fraction | number | False | 0 | [0, 1] | Root sampling ratio when the sampling strategy is `trace_id_ratio`. |
| additional_attributes | array[string] | False | - | - | Additional attributes appended to the trace span. Support [built-in variables](https://apisix.apache.org/docs/apisix/apisix-variable/) in values. |
| additional_header_prefix_attributes | array[string] | False | - | - | Headers or header prefixes appended to the trace span's attributes. For example, use `x-my-header"` or `x-my-headers-*` to include all headers with the prefix `x-my-headers-`. |
## Examples
The examples below demonstrate how you can work with the `opentelemetry` Plugin for different scenarios.
### Enable `opentelemetry` Plugin
By default, the `opentelemetry` Plugin is disabled in APISIX. To enable, add the Plugin to your configuration file as such:
```yaml title="config.yaml"
plugins:
- ...
- opentelemetry
```
Reload APISIX for changes to take effect.
### Send Traces to OpenTelemetry
The following example demonstrates how to trace requests to a Route and send traces to OpenTelemetry.
Start an OpenTelemetry collector instance in Docker:
```shell
docker run -d --name otel-collector -p 4318:4318 otel/opentelemetry-collector-contrib
```
Create a Route with `opentelemetry` Plugin:
```shell
curl "http://127.0.0.1:9180/apisix/admin/routes" -X PUT \
-H "X-API-KEY: ${admin_key}" \
-d '{
"id": "otel-tracing-route",
"uri": "/anything",
"plugins": {
"opentelemetry": {
"sampler": {
"name": "always_on"
}
}
},
"upstream": {
"type": "roundrobin",
"nodes": {
"httpbin.org": 1
}
}
}'
```
Send a request to the Route:
```shell
curl "http://127.0.0.1:9080/anything"
```
You should receive an `HTTP/1.1 200 OK` response.
In OpenTelemetry collector's log, you should see information similar to the following:
```text
2024-02-18T17:14:03.825Z info ResourceSpans #0
Resource SchemaURL:
Resource attributes:
-> telemetry.sdk.language: Str(lua)
-> telemetry.sdk.name: Str(opentelemetry-lua)
-> telemetry.sdk.version: Str(0.1.1)
-> hostname: Str(e34673e24631)
-> service.name: Str(APISIX)
ScopeSpans #0
ScopeSpans SchemaURL:
InstrumentationScope opentelemetry-lua
Span #0
Trace ID : fbd0a38d4ea4a128ff1a688197bc58b0
Parent ID :
ID : af3dc7642104748a
Name : GET /anything
Kind : Server
Start time : 2024-02-18 17:14:03.763244032 +0000 UTC
End time : 2024-02-18 17:14:03.920229888 +0000 UTC
Status code : Unset
Status message :
Attributes:
-> net.host.name: Str(127.0.0.1)
-> http.method: Str(GET)
-> http.scheme: Str(http)
-> http.target: Str(/anything)
-> http.user_agent: Str(curl/7.64.1)
-> apisix.route_id: Str(otel-tracing-route)
-> apisix.route_name: Empty()
-> http.route: Str(/anything)
-> http.status_code: Int(200)
{"kind": "exporter", "data_type": "traces", "name": "debug"}
```
To visualize these traces, you can export your telemetry to backend Services, such as Zipkin and Prometheus. See [exporters](https://github.com/open-telemetry/opentelemetry-collector-contrib/tree/main/exporter) for more details.
### Using Trace Variables in Logging
The following example demonstrates how to configure the `opentelemetry` Plugin to set the following built-in variables, which can be used in logger Plugins or access logs:
- `opentelemetry_context_traceparent`: [trace parent](https://www.w3.org/TR/trace-context/#trace-context-http-headers-format) ID
- `opentelemetry_trace_id`: trace ID of the current span
- `opentelemetry_span_id`: span ID of the current span
Configure the plugin metadata to set `set_ngx_var` as true:
```shell
curl http://127.0.0.1:9180/apisix/admin/plugin_metadata/opentelemetry -H "X-API-KEY: $admin_key" -X PUT -d '
{
"set_ngx_var": true
}'
```
Update the configuration file as below. You should customize the access log format to use the `opentelemetry` Plugin variables.
```yaml title="conf/config.yaml"
nginx_config:
http:
enable_access_log: true
access_log_format: '{"time": "$time_iso8601","opentelemetry_context_traceparent": "$opentelemetry_context_traceparent","opentelemetry_trace_id": "$opentelemetry_trace_id","opentelemetry_span_id": "$opentelemetry_span_id","remote_addr": "$remote_addr"}'
access_log_format_escape: json
```
Reload APISIX for configuration changes to take effect.
You should see access log entries similar to the following when you generate requests:
```text
{"time": "18/Feb/2024:15:09:00 +0000","opentelemetry_context_traceparent": "00-fbd0a38d4ea4a128ff1a688197bc58b0-8f4b9d9970a02629-01","opentelemetry_trace_id": "fbd0a38d4ea4a128ff1a688197bc58b0","opentelemetry_span_id": "af3dc7642104748a","remote_addr": "172.10.0.1"}
```
---
---
title: openwhisk
keywords:
- Apache APISIX
- API Gateway
- Plugin
- OpenWhisk
description: This document contains information about the Apache openwhisk Plugin.
---
## Description
The `openwhisk` Plugin is used to integrate APISIX with [Apache OpenWhisk](https://openwhisk.apache.org) serverless platform.
This Plugin can be configured on a Route and requests will be send to the configured OpenWhisk API endpoint as the upstream.
## Attributes
| Name | Type | Required | Default | Valid values | Description |
| ----------------- | ------- | -------- | ------- | ------------ | ---------------------------------------------------------------------------------------------------------- |
| api_host | string | True | | | OpenWhisk API host address. For example, `https://localhost:3233`. |
| ssl_verify | boolean | False | true | | When set to `true` verifies the SSL certificate. |
| service_token | string | True | | | OpenWhisk service token. The format is `xxx:xxx` and it is passed through basic auth when calling the API. |
| namespace | string | True | | | OpenWhisk namespace. For example `guest`. |
| action | string | True | | | OpenWhisk action. For example `hello`. |
| result | boolean | False | true | | When set to `true` gets the action metadata (executes the function and gets response). |
| timeout | integer | False | 60000ms | [1, 60000]ms | OpenWhisk action and HTTP call timeout in ms. |
| keepalive | boolean | False | true | | When set to `true` keeps the connection alive for reuse. |
| keepalive_timeout | integer | False | 60000ms | [1000,...]ms | Time is ms for connection to remain idle without closing. |
| keepalive_pool | integer | False | 5 | [1,...] | Maximum number of requests that can be sent on this connection before closing it. |
:::note
The `timeout` attribute sets the time taken by the OpenWhisk action to execute, and the timeout for the HTTP client in APISIX. OpenWhisk action calls may take time to pull the runtime image and start the container. So, if the value is set too small, it may cause a large number of requests to fail.
OpenWhisk supports timeouts in the range 1ms to 60000ms and it is recommended to set it to at least 1000ms.
:::
## Enable Plugin
Before configuring the Plugin, you need to have OpenWhisk running. The example below shows OpenWhisk in standalone mode:
```shell
docker run --rm -d \
-h openwhisk --name openwhisk \
-p 3233:3233 -p 3232:3232 \
-v /var/run/docker.sock:/var/run/docker.sock \
openwhisk/standalone:nightly
docker exec openwhisk waitready
```
Install the [openwhisk-cli](https://github.com/apache/openwhisk-cli) utility.
You can download the released executable binaries wsk for Linux systems from the [openwhisk-cli](https://github.com/apache/openwhisk-cli) repository.
You can then create an action to test:
```shell
wsk property set --apihost "http://localhost:3233" --auth "23bc46b1-71f6-4ed5-8c54-816aa4f8c502:123zO3xZCLrMN6v2BKK1dXYFpXlPkccOFqm12CdAsMgRU4VrNZ9lyGVCGuMDGIwP"
wsk action update test <(echo 'function main(){return {"ready":true}}') --kind nodejs:14
```
You can now configure the Plugin on a specific Route and point to this running OpenWhisk service:
:::note
You can fetch the `admin_key` from `config.yaml` and save to an environment variable with the following command:
```bash
admin_key=$(yq '.deployment.admin.admin_key[0].key' conf/config.yaml | sed 's/"//g')
```
:::
```shell
curl http://127.0.0.1:9180/apisix/admin/routes/1 -H "X-API-KEY: $admin_key" -X PUT -d '
{
"uri": "/hello",
"plugins": {
"openwhisk": {
"api_host": "http://localhost:3233",
"service_token": "23bc46b1-71f6-4ed5-8c54-816aa4f8c502:123zO3xZCLrMN6v2BKK1dXYFpXlPkccOFqm12CdAsMgRU4VrNZ9lyGVCGuMDGIwP",
"namespace": "guest",
"action": "test"
}
}
}'
```
## Example usage
Once you have configured the Plugin, you can send a request to the Route and it will invoke the configured action:
```shell
curl -i http://127.0.0.1:9080/hello
```
This will give back the response from the action:
```json
{ "ready": true }
```
## Delete Plugin
To remove the `openwhisk` Plugin, you can delete the corresponding JSON configuration from the Plugin configuration. APISIX will automatically reload and you do not have to restart for this to take effect.
```shell
curl http://127.0.0.1:9180/apisix/admin/routes/1 -H "X-API-KEY: $admin_key" -X PUT -d '
{
"methods": ["GET"],
"uri": "/index.html",
"upstream": {
"type": "roundrobin",
"nodes": {
"127.0.0.1:1980": 1
}
}
}'
```
---
---
title: prometheus
keywords:
- Apache APISIX
- API Gateway
- Plugin
- Prometheus
description: The prometheus Plugin provides the capability to integrate APISIX with Prometheus for metric collection and continuous monitoring.
---
## Description
The `prometheus` Plugin provides the capability to integrate APISIX with [Prometheus](https://prometheus.io).
After enabling the Plugin, APISIX will start collecting relevant metrics, such as API requests and latencies, and exporting them in a [text-based exposition format](https://prometheus.io/docs/instrumenting/exposition_formats/#exposition-formats) to Prometheus. You can then create event monitoring and alerting in Prometheus to monitor the health of your API gateway and APIs.
## Static Configurations
By default, `prometheus` configurations are pre-configured in the [default configuration](https://github.com/apache/apisix/blob/master/apisix/cli/config.lua).
To customize these values, add the corresponding configurations to `config.yaml`. For example:
```yaml
plugin_attr:
prometheus: # Plugin: prometheus attributes
export_uri: /apisix/prometheus/metrics # Set the URI for the Prometheus metrics endpoint.
metric_prefix: apisix_ # Set the prefix for Prometheus metrics generated by APISIX.
enable_export_server: true # Enable the Prometheus export server.
export_addr: # Set the address for the Prometheus export server.
ip: 127.0.0.1 # Set the IP.
port: 9091 # Set the port.
# metrics: # Create extra labels for metrics.
# http_status: # These metrics will be prefixed with `apisix_`.
# extra_labels: # Set the extra labels for http_status metrics.
# - upstream_addr: $upstream_addr
# - status: $upstream_status
# expire: 0 # The expiration time of metrics in seconds.
# 0 means the metrics will not expire.
# http_latency:
# extra_labels: # Set the extra labels for http_latency metrics.
# - upstream_addr: $upstream_addr
# expire: 0 # The expiration time of metrics in seconds.
# 0 means the metrics will not expire.
# bandwidth:
# extra_labels: # Set the extra labels for bandwidth metrics.
# - upstream_addr: $upstream_addr
# expire: 0 # The expiration time of metrics in seconds.
# 0 means the metrics will not expire.
# default_buckets: # Set the default buckets for the `http_latency` metrics histogram.
# - 10
# - 50
# - 100
# - 200
# - 500
# - 1000
# - 2000
# - 5000
# - 10000
# - 30000
# - 60000
# - 500
```
You can use the [Nginx variable](https://nginx.org/en/docs/http/ngx_http_core_module.html) to create `extra_labels`. See [add extra labels](#add-extra-labels-for-metrics).
Reload APISIX for changes to take effect.
## Attribute
| Name | Type | Required | Default | Valid values | Description |
| ------------- | ------- | -------- | ------- | ------------ | ------------------------------------------ |
| prefer_name | boolean | | False | | If true, export Route/Service name instead of their ID in Prometheus metrics. |
## Metrics
There are different types of metrics in Prometheus. To understand their differences, see [metrics types](https://prometheus.io/docs/concepts/metric_types/).
The following metrics are exported by the `prometheus` Plugin by default. See [get APISIX metrics](#get-apisix-metrics) for an example. Note that some metrics, such as `apisix_batch_process_entries`, are not readily visible if there are no data.
| Name | Type | Description |
| ------------------------------ | --------- | ----------------------------------------------------------------------------------------------------------------------------------------------------------------------------- |
| apisix_bandwidth | counter | Total amount of traffic flowing through APISIX in bytes. |
| apisix_etcd_modify_indexes | gauge | Number of changes to etcd by APISIX keys. |
| apisix_batch_process_entries | gauge | Number of remaining entries in a batch when sending data in batches, such as with `http logger`, and other logging Plugins. |
| apisix_etcd_reachable | gauge | Whether APISIX can reach etcd. A value of `1` represents reachable and `0` represents unreachable. |
| apisix_http_status | counter | HTTP status codes returned from upstream Services. |
| apisix_http_requests_total | gauge | Number of HTTP requests from clients. |
| apisix_nginx_http_current_connections | gauge | Number of current connections with clients. |
| apisix_nginx_metric_errors_total | counter | Total number of `nginx-lua-prometheus` errors. |
| apisix_http_latency | histogram | HTTP request latency in milliseconds. |
| apisix_node_info | gauge | Information of the APISIX node, such as host name and the current APISIX version. |
| apisix_shared_dict_capacity_bytes | gauge | The total capacity of an [NGINX shared dictionary](https://github.com/openresty/lua-nginx-module#ngxshareddict). |
| apisix_shared_dict_free_space_bytes | gauge | The remaining space in an [NGINX shared dictionary](https://github.com/openresty/lua-nginx-module#ngxshareddict). |
| apisix_upstream_status | gauge | Health check status of upstream nodes, available if health checks are configured on the upstream. A value of `1` represents healthy and `0` represents unhealthy. |
| apisix_stream_connection_total | counter | Total number of connections handled per Stream Route. |
## Labels
[Labels](https://prometheus.io/docs/practices/naming/#labels) are attributes of metrics that are used to differentiate metrics.
For example, the `apisix_http_status` metric can be labeled with `route` information to identify which Route the HTTP status originates from.
The following are labels for a non-exhaustive list of APISIX metrics and their descriptions.
### Labels for `apisix_http_status`
The following labels are used to differentiate `apisix_http_status` metrics.
| Name | Description |
| ------------ | ----------------------------------------------------------------------------------------------------------------------------- |
| code | HTTP response code returned by the upstream node. |
| route | ID of the Route that the HTTP status originates from when `prefer_name` is `false` (default), and name of the Route when `prefer_name` to `true`. Default to an empty string if a request does not match any Route. |
| matched_uri | URI of the Route that matches the request. Default to an empty string if a request does not match any Route. |
| matched_host | Host of the Route that matches the request. Default to an empty string if a request does not match any Route, or host is not configured on the Route. |
| service | ID of the Service that the HTTP status originates from when `prefer_name` is `false` (default), and name of the Service when `prefer_name` to `true`. Default to the configured value of host on the Route if the matched Route does not belong to any Service. |
| consumer | Name of the Consumer associated with a request. Default to an empty string if no Consumer is associated with the request. |
| node | IP address of the upstream node. |
| request_type | traditional_http / ai_chat / ai_stream |
| llm_model | For non-traditional_http requests, name of the llm_model |
### Labels for `apisix_bandwidth`
The following labels are used to differentiate `apisix_bandwidth` metrics.
| Name | Description |
| ---------- | ----------------------------------------------------------------------------------------------------------------------------- |
| type | Type of traffic, `egress` or `ingress`. |
| route | ID of the Route that bandwidth corresponds to when `prefer_name` is `false` (default), and name of the Route when `prefer_name` to `true`. Default to an empty string if a request does not match any Route. |
| service | ID of the Service that bandwidth corresponds to when `prefer_name` is `false` (default), and name of the Service when `prefer_name` to `true`. Default to the configured value of host on the Route if the matched Route does not belong to any Service. |
| consumer | Name of the Consumer associated with a request. Default to an empty string if no Consumer is associated with the request. |
| node | IP address of the upstream node. |
| request_type | traditional_http / ai_chat / ai_stream |
| llm_model | For non-traditional_http requests, name of the llm_model |
### Labels for `apisix_llm_latency`
| Name | Description |
| ---------- | ----------------------------------------------------------------------------------------------------------------------------- | |
| route_id | ID of the Route that bandwidth corresponds to when `prefer_name` is `false` (default), and name of the Route when `prefer_name` to `true`. Default to an empty string if a request does not match any Route. |
| service_id | ID of the Service that bandwidth corresponds to when `prefer_name` is `false` (default), and name of the Service when `prefer_name` to `true`. Default to the configured value of host on the Route if the matched Route does not belong to any Service. |
| consumer | Name of the Consumer associated with a request. Default to an empty string if no Consumer is associated with the request. |
| node | IP address of the upstream node. |
| request_type | traditional_http / ai_chat / ai_stream |
| llm_model | For non-traditional_http requests, name of the llm_model |
### Labels for `apisix_llm_active_connections`
| Name | Description |
| ---------- | ----------------------------------------------------------------------------------------------------------------------------- |
| route | Name of the Route that bandwidth corresponds to. Default to an empty string if a request does not match any Route. |
| route_id | ID of the Route that bandwidth corresponds to when `prefer_name` is `false` (default), and name of the Route when `prefer_name` to `true`. Default to an empty string if a request does not match any Route. |
| matched_uri | URI of the Route that matches the request. Default to an empty string if a request does not match any Route. |
| matched_host | Host of the Route that matches the request. Default to an empty string if a request does not match any Route, or host is not configured on the Route. |
| service | Name of the Service that bandwidth corresponds to. Default to the configured value of host on the Route if the matched Route does not belong to any Service. |
| service_id | ID of the Service that bandwidth corresponds to when `prefer_name` is `false` (default), and name of the Service when `prefer_name` to `true`. Default to the configured value of host on the Route if the matched Route does not belong to any Service. |
| consumer | Name of the Consumer associated with a request. Default to an empty string if no Consumer is associated with the request. |
| node | IP address of the upstream node. |
| request_type | traditional_http / ai_chat / ai_stream |
| llm_model | For non-traditional_http requests, name of the llm_model |
### Labels for `apisix_llm_completion_tokens`
| Name | Description |
| ---------- | ----------------------------------------------------------------------------------------------------------------------------- | |
| route_id | ID of the Route that bandwidth corresponds to when `prefer_name` is `false` (default), and name of the Route when `prefer_name` to `true`. Default to an empty string if a request does not match any Route. |
| service_id | ID of the Service that bandwidth corresponds to when `prefer_name` is `false` (default), and name of the Service when `prefer_name` to `true`. Default to the configured value of host on the Route if the matched Route does not belong to any Service. |
| consumer | Name of the Consumer associated with a request. Default to an empty string if no Consumer is associated with the request. |
| node | IP address of the upstream node. |
| request_type | traditional_http / ai_chat / ai_stream |
| llm_model | For non-traditional_http requests, name of the llm_model |
### Labels for `apisix_llm_prompt_tokens`
| Name | Description |
| ---------- | ----------------------------------------------------------------------------------------------------------------------------- | |
| route_id | ID of the Route that bandwidth corresponds to when `prefer_name` is `false` (default), and name of the Route when `prefer_name` to `true`. Default to an empty string if a request does not match any Route. |
| service_id | ID of the Service that bandwidth corresponds to when `prefer_name` is `false` (default), and name of the Service when `prefer_name` to `true`. Default to the configured value of host on the Route if the matched Route does not belong to any Service. |
| consumer | Name of the Consumer associated with a request. Default to an empty string if no Consumer is associated with the request. |
| node | IP address of the upstream node. |
| request_type | traditional_http / ai_chat / ai_stream |
| llm_model | For non-traditional_http requests, name of the llm_model |
### Labels for `apisix_http_latency`
The following labels are used to differentiate `apisix_http_latency` metrics.
| Name | Description |
| ---------- | ----------------------------------------------------------------------------------------------------------------------------------- |
| type | Type of latencies. See [latency types](#latency-types) for details. |
| route | ID of the Route that latencies correspond to when `prefer_name` is `false` (default), and name of the Route when `prefer_name` to `true`. Default to an empty string if a request does not match any Route. |
| service | ID of the Service that latencies correspond to when `prefer_name` is `false` (default), and name of the Service when `prefer_name` to `true`. Default to the configured value of host on the Route if the matched Route does not belong to any Service. |
| consumer | Name of the Consumer associated with latencies. Default to an empty string if no Consumer is associated with the request. |
| node | IP address of the upstream node associated with latencies. |
| request_type | traditional_http / ai_chat / ai_stream |
| llm_model | For non-traditional_http requests, name of the llm_model |
#### Latency Types
`apisix_http_latency` can be labeled with one of the three types:
* `request` represents the time elapsed between the first byte was read from the client and the log write after the last byte was sent to the client.
* `upstream` represents the time elapsed waiting on responses from the upstream Service.
* `apisix` represents the difference between the `request` latency and `upstream` latency.
In other words, the APISIX latency is not only attributed to the Lua processing. It should be understood as follows:
```text
APISIX latency
= downstream request time - upstream response time
= downstream traffic latency + NGINX latency
```
### Labels for `apisix_upstream_status`
The following labels are used to differentiate `apisix_upstream_status` metrics.
| Name | Description |
| ---------- | --------------------------------------------------------------------------------------------------- |
| name | Resource ID corresponding to the upstream configured with health checks, such as `/apisix/routes/1` and `/apisix/upstreams/1`. |
| ip | IP address of the upstream node. |
| port | Port number of the node. |
## Examples
The examples below demonstrate how you can work with the `prometheus` Plugin for different scenarios.
### Get APISIX Metrics
The following example demonstrates how you can get metrics from APISIX.
The default Prometheus metrics endpoint and other Prometheus related configurations can be found in the [static configuration](#static-configurations). If you would like to customize these configuration, update `config.yaml` and reload APISIX.
If you deploy APISIX in a containerized environment and would like to access the Prometheus metrics endpoint externally, update the configuration file as follows and reload APISIX:
```yaml title="conf/config.yaml"
plugin_attr:
prometheus:
export_addr:
ip: 0.0.0.0
```
Send a request to the APISIX Prometheus metrics endpoint:
```shell
curl "http://127.0.0.1:9091/apisix/prometheus/metrics"
```
You should see an output similar to the following:
```text
# HELP apisix_bandwidth Total bandwidth in bytes consumed per Service in Apisix
# TYPE apisix_bandwidth counter
apisix_bandwidth{type="egress",route="",service="",consumer="",node="",request_type="traditional_http",request_llm_model="",llm_model=""} 8417
apisix_bandwidth{type="egress",route="1",service="",consumer="",node="127.0.0.1",request_type="traditional_http",request_llm_model="",llm_model=""} 1420
apisix_bandwidth{type="egress",route="2",service="",consumer="",node="127.0.0.1",request_type="traditional_http",request_llm_model="",llm_model=""} 1420
apisix_bandwidth{type="ingress",route="",service="",consumer="",node="",request_type="traditional_http",request_llm_model="",llm_model=""} 189
apisix_bandwidth{type="ingress",route="1",service="",consumer="",node="127.0.0.1",request_type="traditional_http",request_llm_model="",llm_model=""} 332
apisix_bandwidth{type="ingress",route="2",service="",consumer="",node="127.0.0.1",request_type="traditional_http",request_llm_model="",llm_model=""} 332
# HELP apisix_etcd_modify_indexes Etcd modify index for APISIX keys
# TYPE apisix_etcd_modify_indexes gauge
apisix_etcd_modify_indexes{key="consumers"} 0
apisix_etcd_modify_indexes{key="global_rules"} 0
...
```
### Expose APISIX Metrics on Public API Endpoint
The following example demonstrates how you can disable the Prometheus export server that, by default, exposes an endpoint on port `9091`, and expose APISIX Prometheus metrics on a new public API endpoint on port `9080`, which APISIX uses to listen to other client requests.
Disable the Prometheus export server in the configuration file and reload APISIX for changes to take effect:
```yaml title="conf/config.yaml"
plugin_attr:
prometheus:
enable_export_server: false
```
Next, create a Route with [`public-api`](../../../en/latest/plugins/public-api.md) Plugin and expose a public API endpoint for APISIX metrics:
```shell
curl "http://127.0.0.1:9180/apisix/admin/routes/prometheus-metrics" -X PUT \
-H "X-API-KEY: ${admin_key}" \
-d '{
"uri": "/apisix/prometheus/metrics",
"plugins": {
"public-api": {}
}
}'
```
Send a request to the new metrics endpoint to verify:
```shell
curl "http://127.0.0.1:9080/apisix/prometheus/metrics"
```
You should see an output similar to the following:
```text
# HELP apisix_http_requests_total The total number of client requests since APISIX started
# TYPE apisix_http_requests_total gauge
apisix_http_requests_total 1
# HELP apisix_nginx_http_current_connections Number of HTTP connections
# TYPE apisix_nginx_http_current_connections gauge
apisix_nginx_http_current_connections{state="accepted"} 1
apisix_nginx_http_current_connections{state="active"} 1
apisix_nginx_http_current_connections{state="handled"} 1
apisix_nginx_http_current_connections{state="reading"} 0
apisix_nginx_http_current_connections{state="waiting"} 0
apisix_nginx_http_current_connections{state="writing"} 1
...
```
### Monitor Upstream Health Statuses
The following example demonstrates how to monitor the health status of upstream nodes.
Create a Route with the `prometheus` Plugin and configure upstream active health checks:
```shell
curl "http://127.0.0.1:9180/apisix/admin/routes" -X PUT \
-H "X-API-KEY: ${admin_key}" \
-d '{
"id": "prometheus-route",
"uri": "/get",
"plugins": {
"prometheus": {}
},
"upstream": {
"type": "roundrobin",
"nodes": {
"httpbin.org:80": 1,
"127.0.0.1:20001": 1
},
"checks": {
"active": {
"timeout": 5,
"http_path": "/status",
"healthy": {
"interval": 2,
"successes": 1
},
"unhealthy": {
"interval": 1,
"http_failures": 2
}
},
"passive": {
"healthy": {
"http_statuses": [200, 201],
"successes": 3
},
"unhealthy": {
"http_statuses": [500],
"http_failures": 3,
"tcp_failures": 3
}
}
}
}
}'
```
Send a request to the APISIX Prometheus metrics endpoint:
```shell
curl "http://127.0.0.1:9091/apisix/prometheus/metrics"
```
You should see an output similar to the following:
```text
# HELP apisix_upstream_status upstream status from health check
# TYPE apisix_upstream_status gauge
apisix_upstream_status{name="/apisix/routes/1",ip="54.237.103.220",port="80"} 1
apisix_upstream_status{name="/apisix/routes/1",ip="127.0.0.1",port="20001"} 0
```
This shows that the upstream node `httpbin.org:80` is healthy and the upstream node `127.0.0.1:20001` is unhealthy.
### Add Extra Labels for Metrics
The following example demonstrates how to add additional labels to metrics and use the [Nginx variable](https://nginx.org/en/docs/http/ngx_http_core_module.html) in label values.
Currently, only the following metrics support extra labels:
* apisix_http_status
* apisix_http_latency
* apisix_bandwidth
Include the following configurations in the configuration file to add labels for metrics and reload APISIX for changes to take effect:
```yaml title="conf/config.yaml"
plugin_attr:
prometheus: # Plugin: prometheus
metrics: # Create extra labels from the NGINX variables.
http_status:
extra_labels: # Set the extra labels for http_status metrics.
- upstream_addr: $upstream_addr # Add an extra upstream_addr label with value being the NGINX variable $upstream_addr.
- route_name: $route_name # Add an extra route_name label with value being the APISIX variable $route_name.
```
Note that if you define a variable in the label value but it does not correspond to any existing [APISIX variables](https://apisix.apache.org/docs/apisix/apisix-variable/) and [Nginx variable](https://nginx.org/en/docs/http/ngx_http_core_module.html), the label value will default to an empty string.
Create a Route with the `prometheus` Plugin:
```shell
curl "http://127.0.0.1:9180/apisix/admin/routes" -X PUT \
-H "X-API-KEY: ${admin_key}" \
-d '{
"id": "prometheus-route",
Include the following configurations in the configuration file to add labels for metrics and reload APISIX for changes to take effect:
"name": "extra-label",
"plugins": {
"prometheus": {}
},
"upstream": {
"nodes": {
"httpbin.org:80": 1
}
}
}'
```
Send a request to the Route to verify:
```shell
curl -i "http://127.0.0.1:9080/get"
```
You should see an `HTTP/1.1 200 OK` response.
Send a request to the APISIX Prometheus metrics endpoint:
```shell
curl "http://127.0.0.1:9091/apisix/prometheus/metrics"
```
You should see an output similar to the following:
```text
# HELP apisix_http_status HTTP status codes per Service in APISIX
# TYPE apisix_http_status counter
apisix_http_status{code="200",route="1",matched_uri="/get",matched_host="",service="",consumer="",node="54.237.103.220",upstream_addr="54.237.103.220:80",route_name="extra-label"} 1
```
### Monitor TCP/UDP Traffic with Prometheus
The following example demonstrates how to collect TCP/UDP traffic metrics in APISIX.
Include the following configurations in `config.yaml` to enable stream proxy and `prometheus` Plugin for stream proxy. Reload APISIX for changes to take effect:
```yaml title="conf/config.yaml"
apisix:
proxy_mode: http&stream # Enable both L4 & L7 proxies
stream_proxy: # Configure L4 proxy
tcp:
- 9100 # Set TCP proxy listening port
udp:
- 9200 # Set UDP proxy listening port
stream_plugins:
- prometheus # Enable prometheus for stream proxy
```
Create a Stream Route with the `prometheus` Plugin:
```shell
curl "http://127.0.0.1:9180/apisix/admin/stream_routes" -X PUT \
-H "X-API-KEY: ${admin_key}" \
-d '{
Include the following configurations in `config.yaml` to enable stream proxy and enable `prometheus` Plugin for stream proxy. Reload APISIX for changes to take effect:
"plugins": {
"prometheus":{}
},
"upstream": {
"type": "roundrobin",
"nodes": {
"httpbin.org:80": 1
}
}
}'
```
Send a request to the Stream Route to verify:
```shell
curl -i "http://127.0.0.1:9100"
```
You should see an `HTTP/1.1 200 OK` response.
Send a request to the APISIX Prometheus metrics endpoint:
```shell
curl "http://127.0.0.1:9091/apisix/prometheus/metrics"
```
You should see an output similar to the following:
```text
# HELP apisix_stream_connection_total Total number of connections handled per Stream Route in APISIX
# TYPE apisix_stream_connection_total counter
apisix_stream_connection_total{route="1"} 1
```
---
---
title: proxy-cache
keywords:
- Apache APISIX
- API Gateway
- Proxy Cache
description: The proxy-cache Plugin caches responses based on keys, supporting disk and memory caching for GET, POST, and HEAD requests, enhancing API performance.
---
## Description
The `proxy-cache` Plugin provides the capability to cache responses based on a cache key. The Plugin supports both disk-based and memory-based caching options to cache for [GET](https://anything.org/learn/serving-over-http/#get-request), [POST](https://anything.org/learn/serving-over-http/#post-request), and [HEAD](https://developer.mozilla.org/en-US/docs/Web/HTTP/Methods/HEAD) requests.
Responses can be conditionally cached based on request HTTP methods, response status codes, request header values, and more.
## Attributes
| Name | Type | Required | Default | Valid values | Description |
|--------------------|----------------|----------|---------------------------|-------------------------|-------------------------------------------------------------------------------------------------------------------------------------------------------------------------------------------------------------------------------------------------------------------------------------------------------|
| cache_strategy | string | False | disk | ["disk","memory"] | Caching strategy. Cache on disk or in memory. |
| cache_zone | string | False | disk_cache_one | | Cache zone used with the caching strategy. The value should match one of the cache zones defined in the [configuration files](#static-configurations) and should correspond to the caching strategy. For example, when using the in-memory caching strategy, you should use an in-memory cache zone. |
| cache_key | array[string] | False | ["$host", "$request_uri"] | | Key to use for caching. Support [NGINX variables](https://nginx.org/en/docs/varindex.html) and constant strings in values. Variables should be prefixed with a `$` sign. |
| cache_bypass | array[string] | False | | | One or more parameters to parse value from, such that if any of the values is not empty and is not equal to `0`, response will not be retrieved from cache. Support [NGINX variables](https://nginx.org/en/docs/varindex.html) and constant strings in values. Variables should be prefixed with a `$` sign. |
| cache_method | array[string] | False | ["GET", "HEAD"] | ["GET", "POST", "HEAD"] | Request methods of which the response should be cached. |
| cache_http_status | array[integer] | False | [200, 301, 404] | [200, 599] | Response HTTP status codes of which the response should be cached. |
| hide_cache_headers | boolean | False | false | | If true, hide `Expires` and `Cache-Control` response headers. |
| cache_control | boolean | False | false | | If true, comply with `Cache-Control` behavior in the HTTP specification. Only valid for in-memory strategy. |
| no_cache | array[string] | False | | | One or more parameters to parse value from, such that if any of the values is not empty and is not equal to `0`, response will not be cached. Support [NGINX variables](https://nginx.org/en/docs/varindex.html) and constant strings in values. Variables should be prefixed with a `$` sign. |
| cache_ttl | integer | False | 300 | >=1 | Cache time to live (TTL) in seconds when caching in memory. To adjust the TTL when caching on disk, update `cache_ttl` in the [configuration files](#static-configurations). The TTL value is evaluated in conjunction with the values in the response headers [`Cache-Control`](https://developer.mozilla.org/en-US/docs/Web/HTTP/Headers/Cache-Control) and [`Expires`](https://developer.mozilla.org/en-US/docs/Web/HTTP/Headers/Expires) received from the Upstream service. |
## Static Configurations
By default, values such as `cache_ttl` when caching on disk and cache `zones` are pre-configured in the [default configuration](https://github.com/apache/apisix/blob/master/apisix/cli/config.lua).
To customize these values, add the corresponding configurations to `config.yaml`. For example:
```yaml
apisix:
proxy_cache:
cache_ttl: 10s # default cache TTL used when caching on disk, only if none of the `Expires`
# and `Cache-Control` response headers is present, or if APISIX returns
# `502 Bad Gateway` or `504 Gateway Timeout` due to unavailable upstreams
zones:
- name: disk_cache_one
memory_size: 50m
disk_size: 1G
disk_path: /tmp/disk_cache_one
cache_levels: 1:2
# - name: disk_cache_two
# memory_size: 50m
# disk_size: 1G
# disk_path: "/tmp/disk_cache_two"
# cache_levels: "1:2"
- name: memory_cache
memory_size: 50m
```
Reload APISIX for changes to take effect.
## Examples
The examples below demonstrate how you can configure `proxy-cache` for different scenarios.
:::note
You can fetch the `admin_key` from `config.yaml` and save to an environment variable with the following command:
```bash
admin_key=$(yq '.deployment.admin.admin_key[0].key' conf/config.yaml | sed 's/"//g')
```
:::
### Cache Data on Disk
On-disk caching strategy offers the advantages of data persistency when system restarts and having larger storage capacity compared to in-memory cache. It is suitable for applications that prioritize durability and can tolerate slightly larger cache access latency.
The following example demonstrates how you can use `proxy-cache` Plugin on a Route to cache data on disk.
When using the on-disk caching strategy, the cache TTL is determined by value from the response header `Expires` or `Cache-Control`. If none of these headers is present or if APISIX returns `502 Bad Gateway` or `504 Gateway Timeout` due to unavailable Upstreams, the cache TTL defaults to the value configured in the [configuration files](#static-configuration).
Create a Route with the `proxy-cache` Plugin to cache data on disk:
```shell
curl "http://127.0.0.1:9180/apisix/admin/routes" -X PUT \
-H "X-API-KEY: ${admin_key}" \
-d '{
"id": "proxy-cache-route",
"uri": "/anything",
"plugins": {
"proxy-cache": {
"cache_strategy": "disk"
}
},
"upstream": {
"type": "roundrobin",
"nodes": {
"httpbin.org": 1
}
}
}'
```
Send a request to the Route:
```shell
curl -i "http://127.0.0.1:9080/anything"
```
You should see an `HTTP/1.1 200 OK` response with the following header, showing the Plugin is successfully enabled:
```text
Apisix-Cache-Status: MISS
```
As there is no cache available before the first response, `Apisix-Cache-Status: MISS` is shown.
Send the same request again within the cache TTL window. You should see an `HTTP/1.1 200 OK` response with the following headers, showing the cache is hit:
```text
Apisix-Cache-Status: HIT
```
Wait for the cache to expire after the TTL and send the same request again. You should see an `HTTP/1.1 200 OK` response with the following headers, showing the cache has expired:
```text
Apisix-Cache-Status: EXPIRED
```
### Cache Data in Memory
In-memory caching strategy offers the advantage of low-latency access to the cached data, as retrieving data from RAM is faster than retrieving data from disk storage. It also works well for storing temporary data that does not need to be persisted long-term, allowing for efficient caching of frequently changing data.
The following example demonstrates how you can use `proxy-cache` Plugin on a Route to cache data in memory.
Create a Route with `proxy-cache` and configure it to use memory-based caching:
```shell
curl "http://127.0.0.1:9180/apisix/admin/routes" -X PUT \
-H "X-API-KEY: ${admin_key}" \
-d '{
"id": "proxy-cache-route",
"uri": "/anything",
"plugins": {
"proxy-cache": {
"cache_strategy": "memory",
"cache_zone": "memory_cache",
"cache_ttl": 10
}
},
"upstream": {
"type": "roundrobin",
"nodes": {
"httpbin.org": 1
}
}
}'
```
Send a request to the Route:
```shell
curl -i "http://127.0.0.1:9080/anything"
```
You should see an `HTTP/1.1 200 OK` response with the following header, showing the Plugin is successfully enabled:
```text
Apisix-Cache-Status: MISS
```
As there is no cache available before the first response, `Apisix-Cache-Status: MISS` is shown.
Send the same request again within the cache TTL window. You should see an `HTTP/1.1 200 OK` response with the following headers, showing the cache is hit:
```text
Apisix-Cache-Status: HIT
```
### Cache Responses Conditionally
The following example demonstrates how you can configure the `proxy-cache` Plugin to conditionally cache responses.
Create a Route with the `proxy-cache` Plugin and configure the `no_cache` attribute, such that if at least one of the values of the URL parameter `no_cache` and header `no_cache` is not empty and is not equal to `0`, the response will not be cached:
```shell
curl "http://127.0.0.1:9180/apisix/admin/routes" -X PUT \
-H "X-API-KEY: ${admin_key}" \
-d '{
"id": "proxy-cache-route",
"uri": "/anything",
"plugins": {
"proxy-cache": {
"no_cache": ["$arg_no_cache", "$http_no_cache"]
}
},
"upstream": {
"type": "roundrobin",
"nodes": {
"httpbin.org": 1
}
}
}'
```
Send a few requests to the Route with the URL parameter `no_cache` value indicating cache bypass:
```shell
curl -i "http://127.0.0.1:9080/anything?no_cache=1"
```
You should receive `HTTP/1.1 200 OK` responses for all requests and observe the following header every time:
```text
Apisix-Cache-Status: EXPIRED
```
Send a few other requests to the Route with the URL parameter `no_cache` value being zero:
```shell
curl -i "http://127.0.0.1:9080/anything?no_cache=0"
```
You should receive `HTTP/1.1 200 OK` responses for all requests and start seeing the cache being hit:
```text
Apisix-Cache-Status: HIT
```
You can also specify the value in the `no_cache` header as such:
```shell
curl -i "http://127.0.0.1:9080/anything" -H "no_cache: 1"
```
The response should not be cached:
```text
Apisix-Cache-Status: EXPIRED
```
### Retrieve Responses from Cache Conditionally
The following example demonstrates how you can configure the `proxy-cache` Plugin to conditionally retrieve responses from cache.
Create a Route with the `proxy-cache` Plugin and configure the `cache_bypass` attribute, such that if at least one of the values of the URL parameter `bypass` and header `bypass` is not empty and is not equal to `0`, the response will not be retrieved from the cache:
```shell
curl "http://127.0.0.1:9180/apisix/admin/routes" -X PUT \
-H "X-API-KEY: ${admin_key}" \
-d '{
"id": "proxy-cache-route",
"uri": "/anything",
"plugins": {
"proxy-cache": {
"cache_bypass": ["$arg_bypass", "$http_bypass"]
}
},
"upstream": {
"type": "roundrobin",
"nodes": {
"httpbin.org": 1
}
}
}'
```
Send a request to the Route with the URL parameter `bypass` value indicating cache bypass:
```shell
curl -i "http://127.0.0.1:9080/anything?bypass=1"
```
You should see an `HTTP/1.1 200 OK` response with the following header:
```text
Apisix-Cache-Status: BYPASS
```
Send another request to the Route with the URL parameter `bypass` value being zero:
```shell
curl -i "http://127.0.0.1:9080/anything?bypass=0"
```
You should see an `HTTP/1.1 200 OK` response with the following header:
```text
Apisix-Cache-Status: MISS
```
You can also specify the value in the `bypass` header as such:
```shell
curl -i "http://127.0.0.1:9080/anything" -H "bypass: 1"
```
The cache should be bypassed:
```text
Apisix-Cache-Status: BYPASS
```
### Cache for 502 and 504 Error Response Code
When the Upstream services return server errors in the 500 range, `proxy-cache` Plugin will cache the responses if and only if the returned status is `502 Bad Gateway` or `504 Gateway Timeout`.
The following example demonstrates the behavior of `proxy-cache` Plugin when the Upstream service returns `504 Gateway Timeout`.
Create a Route with the `proxy-cache` Plugin and configure a dummy Upstream service:
```shell
curl "http://127.0.0.1:9180/apisix/admin/routes" -X PUT \
-H "X-API-KEY: ${admin_key}" \
-d '{
"id": "proxy-cache-route",
"uri": "/timeout",
"plugins": {
"proxy-cache": { }
},
"upstream": {
"type": "roundrobin",
"nodes": {
"12.34.56.78": 1
}
}
}'
```
Generate a few requests to the Route:
```shell
seq 4 | xargs -I{} curl -I "http://127.0.0.1:9080/timeout"
```
You should see a response similar to the following:
```text
HTTP/1.1 504 Gateway Time-out
...
Apisix-Cache-Status: MISS
HTTP/1.1 504 Gateway Time-out
...
Apisix-Cache-Status: HIT
HTTP/1.1 504 Gateway Time-out
...
Apisix-Cache-Status: HIT
HTTP/1.1 504 Gateway Time-out
...
Apisix-Cache-Status: HIT
```
However, if the Upstream services returns `503 Service Temporarily Unavailable`, the response will not be cached.
---
---
title: proxy-control
keywords:
- Apache APISIX
- API Gateway
- Proxy Control
description: This document contains information about the Apache APISIX proxy-control Plugin, you can use it to control the behavior of the NGINX proxy dynamically.
---
## Description
The proxy-control Plugin dynamically controls the behavior of the NGINX proxy.
:::info IMPORTANT
This Plugin requires APISIX to run on [APISIX-Runtime](../FAQ.md#how-do-i-build-the-apisix-runtime-environment). See [apisix-build-tools](https://github.com/api7/apisix-build-tools) for more info.
:::
## Attributes
| Name | Type | Required | Default | Description |
| ----------------- | ------- | -------- | ------- | --------------------------------------------------------------------------------------------------------------------------------------------------------------------------- |
| request_buffering | boolean | False | true | When set to `true`, the Plugin dynamically sets the [`proxy_request_buffering`](https://nginx.org/en/docs/http/ngx_http_proxy_module.html#proxy_request_buffering) directive. |
## Enable Plugin
The example below enables the Plugin on a specific Route:
:::note
You can fetch the `admin_key` from `config.yaml` and save to an environment variable with the following command:
```bash
admin_key=$(yq '.deployment.admin.admin_key[0].key' conf/config.yaml | sed 's/"//g')
```
:::
```shell
curl -i http://127.0.0.1:9180/apisix/admin/routes/1 \
-H "X-API-KEY: $admin_key" -X PUT -d '
{
"uri": "/upload",
"plugins": {
"proxy-control": {
"request_buffering": false
}
},
"upstream": {
"type": "roundrobin",
"nodes": {
"127.0.0.1:1980": 1
}
}
}'
```
## Example usage
The example below shows the use case of uploading a big file:
```shell
curl -i http://127.0.0.1:9080/upload -d @very_big_file
```
It's expected to not find a message "a client request body is buffered to a temporary file" in the error log.
## Delete Plugin
To remove the `proxy-control` Plugin, you can delete the corresponding JSON configuration from the Plugin configuration. APISIX will automatically reload and you do not have to restart for this to take effect.
```shell
curl -i http://127.0.0.1:9180/apisix/admin/routes/1 \
-H "X-API-KEY: $admin_key" -X PUT -d '
{
"uri": "/upload",
"upstream": {
"type": "roundrobin",
"nodes": {
"127.0.0.1:1980": 1
}
}
}'
```
---
---
title: proxy-mirror
keywords:
- Apache APISIX
- API Gateway
- Proxy Mirror
description: The proxy-mirror Plugin duplicates ingress traffic to APISIX and forwards them to a designated Upstream without interrupting the regular services.
---
## Description
The `proxy-mirror` Plugin duplicates ingress traffic to APISIX and forwards them to a designated upstream, without interrupting the regular services. You can configure the Plugin to mirror all traffic or only a portion. The mechanism benefits a few use cases, including troubleshooting, security inspection, analytics, and more.
Note that APISIX ignores any response from the Upstream host receiving mirrored traffic.
## Attributes
| Name | Type | Required | Default | Valid values | Description |
|--------------|--------|----------|---------|--------------|---------------------------------------------------------------------------------------------------------------------------|
| host | string | True | | | Address of the host to forward the mirrored traffic to. The address should contain the scheme but without the path, such as `http://127.0.0.1:8081`. |
| path | string | False | | | Path of the host to forward the mirrored traffic to. If unspecified, default to the current URI path of the Route. Not applicable if the Plugin is mirroring gRPC traffic. |
| path_concat_mode | string | False | replace | ["replace", "prefix"] | Concatenation mode when `path` is specified. When set to `replace`, the configured `path` would be directly used as the path of the host to forward the mirrored traffic to. When set to `prefix`, the path to forward to would be the configured `path`, appended by the requested URI path of the Route. Not applicable if the Plugin is mirroring gRPC traffic. |
| sample_ratio | number | False | 1 | [0.00001, 1] | Ratio of the requests that will be mirrored. By default, all traffic are mirrored. |
## Static Configurations
By default, timeout values for the Plugin are pre-configured in the [default configuration](https://github.com/apache/apisix/blob/master/apisix/cli/config.lua).
To customize these values, add the corresponding configurations to `config.yaml`. For example:
```yaml
plugin_attr:
proxy-mirror:
timeout:
connect: 60s
read: 60s
send: 60s
```
Reload APISIX for changes to take effect.
## Examples
The examples below demonstrate how to configure `proxy-mirror` for different scenarios.
:::note
You can fetch the `admin_key` from `config.yaml` and save to an environment variable with the following command:
```bash
admin_key=$(yq '.deployment.admin.admin_key[0].key' conf/config.yaml | sed 's/"//g')
```
:::
### Mirror Partial Traffic
The following example demonstrates how you can configure `proxy-mirror` to mirror 50% of the traffic to a Route and forward them to another Upstream service.
Start a sample NGINX server for receiving mirrored traffic:
```shell
docker run -p 8081:80 --name nginx nginx
```
You should see NGINX access log and error log on the terminal session.
Open a new terminal session and create a Route with `proxy-mirror` to mirror 50% of the traffic:
```shell
curl "http://127.0.0.1:9180/apisix/admin/routes" -X PUT \
-H "X-API-KEY: ${admin_key}" \
-d '{
"id": "traffic-mirror-route",
"uri": "/get",
"plugins": {
"proxy-mirror": {
"host": "http://127.0.0.1:8081",
"sample_ratio": 0.5
}
},
"upstream": {
"nodes": {
"httpbin.org": 1
},
"type": "roundrobin"
}
}'
```
Send Generate a few requests to the Route:
```shell
curl -i "http://127.0.0.1:9080/get"
```
You should receive `HTTP/1.1 200 OK` responses for all requests.
Navigating back to the NGINX terminal session, you should see a number of access log entries, roughly half the number of requests generated:
```text
172.17.0.1 - - [29/Jan/2024:23:11:01 +0000] "GET /get HTTP/1.1" 404 153 "-" "curl/7.64.1" "-"
```
This suggests APISIX has mirrored the request to the NGINX server. Here, the HTTP response status is `404` since the sample NGINX server does not implement the Route.
### Configure Mirroring Timeouts
The following example demonstrates how you can update the default connect, read, and send timeouts for the Plugin. This could be useful when mirroring traffic to a very slow backend service.
As the request mirroring was implemented as sub-requests, excessive delays in the sub-requests could lead to the blocking of the original requests. By default, the connect, read, and send timeouts are set to 60 seconds. To update these values, you can configure them in the `plugin_attr` section of the configuration file as such:
```yaml title="conf/config.yaml"
plugin_attr:
proxy-mirror:
timeout:
connect: 2000ms
read: 2000ms
send: 2000ms
```
Reload APISIX for changes to take effect.
---
---
title: proxy-rewrite
keywords:
- Apache APISIX
- API Gateway
- Plugin
- Proxy Rewrite
- proxy-rewrite
description: The proxy-rewrite Plugin offers options to rewrite requests that APISIX forwards to Upstream services. With this plugin, you can modify the HTTP methods, request destination Upstream addresses, request headers, and more.
---
## Description
The `proxy-rewrite` Plugin offers options to rewrite requests that APISIX forwards to Upstream services. With this plugin, you can modify the HTTP methods, request destination Upstream addresses, request headers, and more.
## Attributes
| Name | Type | Required | Default | Valid values | Description |
|-----------------------------|---------------|----------|---------|----------------------------------------------------------------------------------------------------------------------------------------|------------------------------------------------------------------------------------------------------------------------------------------------------------------------------------------------------------------------------------------------------------------------------------------------------------------------------------------------------------------------------------------------------------------------------------------------------------------------------|
| uri | string | False | | | New Upstream URI path. Value supports [NGINX variables](https://nginx.org/en/docs/http/ngx_http_core_module.html). For example, `$arg_name`. |
| method | string | False | | ["GET", "POST", "PUT", "HEAD", "DELETE", "OPTIONS","MKCOL", "COPY", "MOVE", "PROPFIND", "PROPFIND","LOCK", "UNLOCK", "PATCH", "TRACE"] | HTTP method to rewrite requests to use. |
| regex_uri | array[string] | False | | | Regular expressions used to match the URI path from client requests and compose a new Upstream URI path. When both `uri` and `regex_uri` are configured, `uri` has a higher priority. The array should contain one or more **key-value pairs**, with the key being the regular expression to match URI against and value being the new Upstream URI path. For example, with `["^/iresty/(. *)/(. *)", "/$1-$2", ^/theothers/*", "/theothers"]`, if a request is originally sent to `/iresty/hello/world`, the Plugin will rewrite the Upstream URI path to `/iresty/hello-world`; if a request is originally sent to `/theothers/hello/world`, the Plugin will rewrite the Upstream URI path to `/theothers`. |
| host | string | False | | | Set [`Host`](https://developer.mozilla.org/en-US/docs/Web/HTTP/Headers/Host) request header. |
| headers | object | False | | | Header actions to be executed. Can be set to objects of action verbs `add`, `remove`, and/or `set`; or an object consisting of headers to be `set`. When multiple action verbs are configured, actions are executed in the order of `add`, `remove`, and `set`. |
| headers.add | object | False | | | Headers to append to requests. If a header already present in the request, the header value will be appended. Header value could be set to a constant, one or more [NGINX variables](https://nginx.org/en/docs/http/ngx_http_core_module.html), or the matched result of `regex_uri` using variables such as `$1-$2-$3`. |
| headers.set | object | False | | | Headers to set to requests. If a header already present in the request, the header value will be overwritten. Header value could be set to a constant, one or more [NGINX variables](https://nginx.org/en/docs/http/ngx_http_core_module.html), or the matched result of `regex_uri` using variables such as `$1-$2-$3`. Should not be used to set `Host`. |
| headers.remove | array[string] | False | | | Headers to remove from requests.
| use_real_request_uri_unsafe | boolean | False | false | | If true, bypass URI normalization and allow for the full original request URI. Enabling this option is considered unsafe. |
## Examples
The examples below demonstrate how you can configure `proxy-rewrite` on a Route in different scenarios.
:::note
You can fetch the `admin_key` from `config.yaml` and save to an environment variable with the following command:
```bash
admin_key=$(yq '.deployment.admin.admin_key[0].key' conf/config.yaml | sed 's/"//g')
```
:::
### Rewrite Host Header
The following example demonstrates how you can modify the `Host` header in a request. Note that you should not use `headers.set` to set the `Host` header.
```shell
curl "http://127.0.0.1:9180/apisix/admin/routes" -X PUT \
-H "X-API-KEY: ${admin_key}" \
-d '{
"id": "proxy-rewrite-route",
"methods": ["GET"],
"uri": "/headers",
"plugins": {
"proxy-rewrite": {
"host": "myapisix.demo"
}
},
"upstream": {
"type": "roundrobin",
"nodes": {
"httpbin.org:80": 1
}
}
}'
```
Send a request to `/headers` to check all the request headers sent to upstream:
```shell
curl "http://127.0.0.1:9080/headers"
```
You should see a response similar to the following:
```text
{
"headers": {
"Accept": "*/*",
"Host": "myapisix.demo",
"User-Agent": "curl/8.2.1",
"X-Amzn-Trace-Id": "Root=1-64fef198-29da0970383150175bd2d76d",
"X-Forwarded-Host": "127.0.0.1"
}
}
```
### Rewrite URI And Set Headers
The following example demonstrates how you can rewrite the request Upstream URI and set additional header values. If the same headers present in the client request, the corresponding header values set in the Plugin will overwrite the values present in the client request.
```shell
curl "http://127.0.0.1:9180/apisix/admin/routes" -X PUT \
-H "X-API-KEY: ${admin_key}" \
-d '{
"id": "proxy-rewrite-route",
"methods": ["GET"],
"uri": "/",
"plugins": {
"proxy-rewrite": {
"uri": "/anything",
"headers": {
"set": {
"X-Api-Version": "v1",
"X-Api-Engine": "apisix"
}
}
}
},
"upstream": {
"type": "roundrobin",
"nodes": {
"httpbin.org:80": 1
}
}
}'
```
Send a request to verify:
```shell
curl "http://127.0.0.1:9080/" -H '"X-Api-Version": "v2"'
```
You should see a response similar to the following:
```text
{
"args": {},
"data": "",
"files": {},
"form": {},
"headers": {
"Accept": "*/*",
"Host": "httpbin.org",
"User-Agent": "curl/8.2.1",
"X-Amzn-Trace-Id": "Root=1-64fed73a-59cd3bd640d76ab16c97f1f1",
"X-Api-Engine": "apisix",
"X-Api-Version": "v1",
"X-Forwarded-Host": "127.0.0.1"
},
"json": null,
"method": "GET",
"origin": "::1, 103.248.35.179",
"url": "http://localhost/anything"
}
```
Note that both headers present and the header value of `X-Api-Version` configured in the Plugin overwrites the header value passed in the request.
### Rewrite URI And Append Headers
The following example demonstrates how you can rewrite the request Upstream URI and append additional header values. If the same headers present in the client request, their headers values will append to the configured header values in the plugin.
```shell
curl "http://127.0.0.1:9180/apisix/admin/routes" -X PUT \
-H "X-API-KEY: ${admin_key}" \
-d '{
"id": "proxy-rewrite-route",
"methods": ["GET"],
"uri": "/",
"plugins": {
"proxy-rewrite": {
"uri": "/headers",
"headers": {
"add": {
"X-Api-Version": "v1",
"X-Api-Engine": "apisix"
}
}
}
},
"upstream": {
"type": "roundrobin",
"nodes": {
"httpbin.org:80": 1
}
}
}'
```
Send a request to verify:
```shell
curl "http://127.0.0.1:9080/" -H '"X-Api-Version": "v2"'
```
You should see a response similar to the following:
```text
{
"headers": {
"Accept": "*/*",
"Host": "httpbin.org",
"User-Agent": "curl/8.2.1",
"X-Amzn-Trace-Id": "Root=1-64fed73a-59cd3bd640d76ab16c97f1f1",
"X-Api-Engine": "apisix",
"X-Api-Version": "v1,v2",
"X-Forwarded-Host": "127.0.0.1"
}
}
```
Note that both headers present and the header value of `X-Api-Version` configured in the Plugin is appended by the header value passed in the request.
### Remove Existing Header
The following example demonstrates how you can remove an existing header `User-Agent`.
```shell
curl "http://127.0.0.1:9180/apisix/admin/routes" -X PUT \
-H "X-API-KEY: ${admin_key}" \
-d '{
"id": "proxy-rewrite-route",
"methods": ["GET"],
"uri": "/headers",
"plugins": {
"proxy-rewrite": {
"headers": {
"remove":[
"User-Agent"
]
}
}
},
"upstream": {
"type": "roundrobin",
"nodes": {
"httpbin.org:80": 1
}
}
}'
```
Send a request to verify if the specified header is removed:
```shell
curl "http://127.0.0.1:9080/headers"
```
You should see a response similar to the following, where the `User-Agent` header is not present:
```text
{
"headers": {
"Accept": "*/*",
"Host": "httpbin.org",
"X-Amzn-Trace-Id": "Root=1-64fef302-07f2b13e0eb006ba776ad91d",
"X-Forwarded-Host": "127.0.0.1"
}
}
```
### Rewrite URI Using RegEx
The following example demonstrates how you can parse text from the original Upstream URI path and use them to compose a new Upstream URI path. In this example, APISIX is configured to forward all requests from `/test/user/agent` to `/user-agent`.
```shell
curl "http://127.0.0.1:9180/apisix/admin/routes" -X PUT \
-H "X-API-KEY: ${admin_key}" \
-d '{
"id": "proxy-rewrite-route",
"uri": "/test/*",
"plugins": {
"proxy-rewrite": {
"regex_uri": ["^/test/(.*)/(.*)", "/$1-$2"]
}
},
"upstream": {
"type": "roundrobin",
"nodes": {
"httpbin.org:80": 1
}
}
}'
```
Send a request to `/test/user/agent` to check if it is redirected to `/user-agent`:
```shell
curl "http://127.0.0.1:9080/test/user/agent"
```
You should see a response similar to the following:
```text
{
"user-agent": "curl/8.2.1"
}
```
### Add URL Parameters
The following example demonstrates how you can add URL parameters to the request.
```shell
curl "http://127.0.0.1:9180/apisix/admin/routes" -X PUT \
-H "X-API-KEY: ${admin_key}" \
-d '{
"id": "proxy-rewrite-route",
"methods": ["GET"],
"uri": "/get",
"plugins": {
"proxy-rewrite": {
"uri": "/get?arg1=apisix&arg2=plugin"
}
},
"upstream": {
"type": "roundrobin",
"nodes": {
"httpbin.org:80": 1
}
}
}'
```
Send a request to verify if the URL parameters are also forwarded to upstream:
```shell
curl "http://127.0.0.1:9080/get"
```
You should see a response similar to the following:
```text
{
"args": {
"arg1": "apisix",
"arg2": "plugin"
},
"headers": {
"Accept": "*/*",
"Host": "127.0.0.1",
"User-Agent": "curl/8.2.1",
"X-Amzn-Trace-Id": "Root=1-64fef6dc-2b0e09591db7353a275cdae4",
"X-Forwarded-Host": "127.0.0.1"
},
"origin": "127.0.0.1, 103.248.35.148",
"url": "http://127.0.0.1/get?arg1=apisix&arg2=plugin"
}
```
### Rewrite HTTP Method
The following example demonstrates how you can rewrite a GET request into a POST request.
```shell
curl "http://127.0.0.1:9180/apisix/admin/routes" -X PUT \
-H "X-API-KEY: ${admin_key}" \
-d '{
"id": "proxy-rewrite-route",
"methods": ["GET"],
"uri": "/get",
"plugins": {
"proxy-rewrite": {
"uri": "/anything",
"method":"POST"
}
},
"upstream": {
"type": "roundrobin",
"nodes": {
"httpbin.org:80": 1
}
}
}'
```
Send a GET request to `/get` to verify if it is transformed into a POST request to `/anything`:
```shell
curl "http://127.0.0.1:9080/get"
```
You should see a response similar to the following:
```text
{
"args": {},
"data": "",
"files": {},
"form": {},
"headers": {
"Accept": "*/*",
"Host": "127.0.0.1",
"User-Agent": "curl/8.2.1",
"X-Amzn-Trace-Id": "Root=1-64fef7de-0c63387645353998196317f2",
"X-Forwarded-Host": "127.0.0.1"
},
"json": null,
"method": "POST",
"origin": "::1, 103.248.35.179",
"url": "http://localhost/anything"
}
```
### Forward Consumer Names to Upstream
The following example demonstrates how you can forward the name of consumers who authenticates successfully to Upstream services. As an example, you will be using `key-auth` as the authentication method.
Create a Consumer `JohnDoe`:
```shell
curl "http://127.0.0.1:9180/apisix/admin/consumers" -X PUT \
-H "X-API-KEY: ${admin_key}" \
-d '{
"username": "JohnDoe"
}'
```
Create `key-auth` credential for the Consumer:
```shell
curl "http://127.0.0.1:9180/apisix/admin/consumers/JohnDoe/credentials" -X PUT \
-H "X-API-KEY: ${admin_key}" \
-d '{
"id": "cred-john-key-auth",
"plugins": {
"key-auth": {
"key": "john-key"
}
}
}'
```
Next, create a Route with key authentication enabled, configure `proxy-rewrite` to add Consumer name to the header, and remove the authentication key so that it is not visible to the Upstream service:
```shell
curl "http://127.0.0.1:9180/apisix/admin/routes" -X PUT \
-H "X-API-KEY: ${admin_key}" \
-d '{
"id": "consumer-restricted-route",
"uri": "/get",
"plugins": {
"key-auth": {},
"proxy-rewrite": {
"headers": {
"set": {
"X-Apisix-Consumer": "$consumer_name"
},
"remove": [ "Apikey" ]
}
}
},
"upstream" : {
"nodes": {
"httpbin.org":1
}
}
}'
```
Send a request to the Route as Consumer `JohnDoe`:
```shell
curl -i "http://127.0.0.1:9080/get" -H 'apikey: john-key'
```
You should receive an `HTTP/1.1 200 OK` response with the following body:
```text
{
"args": {},
"headers": {
"Accept": "*/*",
"Host": "127.0.0.1",
"User-Agent": "curl/8.4.0",
"X-Amzn-Trace-Id": "Root=1-664b01a6-2163c0156ed4bff51d87d877",
"X-Apisix-Consumer": "JohnDoe",
"X-Forwarded-Host": "127.0.0.1"
},
"origin": "172.19.0.1, 203.12.12.12",
"url": "http://127.0.0.1/get"
}
```
Send another request to the Route without the valid credential:
```shell
curl -i "http://127.0.0.1:9080/get"
```
You should receive an `HTTP/1.1 403 Forbidden` response.
---
---
title: public-api
keywords:
- Apache APISIX
- API Gateway
- Public API
description: The public-api plugin exposes an internal API endpoint, making it publicly accessible. One of the primary use cases of this plugin is to expose internal endpoints created by other plugins.
---
## Description
The `public-api` Plugin exposes an internal API endpoint, making it publicly accessible. One of the primary use cases of this Plugin is to expose internal endpoints created by other Plugins.
## Attributes
| Name | Type | Required | Default | Valid Values | Description |
|---------|-----------|----------|---------|--------------|-------------|
| uri | string | False | | | Internal endpoint to expose. If not configured, expose the Route URI. |
## Examples
The examples below demonstrate how you can configure `public-api` in different scenarios.
### Expose Prometheus Metrics at Custom Endpoint
The following example demonstrates how you can disable the Prometheus export server that, by default, exposes an endpoint on port `9091`, and expose APISIX Prometheus metrics on a new public API endpoint on port `9080`, which APISIX uses to listen to other client requests.
You will also configure the Route such that the internal endpoint `/apisix/prometheus/metrics` is exposed at a custom endpoint.
:::caution
If a large quantity of metrics is being collected, the Plugin could take up a significant amount of CPU resources for metric computations and negatively impact the processing of regular requests.
To address this issue, APISIX uses [privileged agent](https://github.com/openresty/lua-resty-core/blob/master/lib/ngx/process.md#enable_privileged_agent) and offloads the metric computations to a separate process. This optimization applies automatically if you use the metric endpoint configured under `plugin_attr.prometheus.export_addr` in the configuration file. If you expose the metric endpoint with the `public-api` Plugin, you will not benefit from this optimization.
:::
Disable the Prometheus export server in the configuration file and reload APISIX for changes to take effect:
```yaml title="conf/config.yaml"
plugin_attr:
prometheus:
enable_export_server: false
```
Next, create a Route with the `public-api` Plugin and expose a public API endpoint for APISIX metrics. You should set the Route `uri` to the custom endpoint path and set the Plugin `uri` to the internal endpoint to be exposed.
```shell
curl "http://127.0.0.1:9180/apisix/admin/routes" -X PUT \
-H "X-API-KEY: ${admin_key}" \
-d '{
"id": "prometheus-metrics",
"uri": "/prometheus_metrics",
"plugins": {
"public-api": {
"uri": "/apisix/prometheus/metrics"
}
}
}'
```
Send a request to the custom metrics endpoint:
```shell
curl "http://127.0.0.1:9080/prometheus_metrics"
```
You should see an output similar to the following:
```text
# HELP apisix_http_requests_total The total number of client requests since APISIX started
# TYPE apisix_http_requests_total gauge
apisix_http_requests_total 1
# HELP apisix_nginx_http_current_connections Number of HTTP connections
# TYPE apisix_nginx_http_current_connections gauge
apisix_nginx_http_current_connections{state="accepted"} 1
apisix_nginx_http_current_connections{state="active"} 1
apisix_nginx_http_current_connections{state="handled"} 1
apisix_nginx_http_current_connections{state="reading"} 0
apisix_nginx_http_current_connections{state="waiting"} 0
apisix_nginx_http_current_connections{state="writing"} 1
...
```
### Expose Batch Requests Endpoint
The following example demonstrates how you can use the `public-api` Plugin to expose an endpoint for the `batch-requests` Plugin, which is used for assembling multiple requests into one single request before sending them to the gateway.
[//]:
Create a sample Route to httpbin's `/anything` endpoint for verification purpose:
```shell
curl "http://127.0.0.1:9180/apisix/admin/routes" -X PUT \
-H "X-API-KEY: ${admin_key}" \
-d '{
"id": "httpbin-anything",
"uri": "/anything",
"upstream": {
"type": "roundrobin",
"nodes": {
"httpbin.org:80": 1
}
}
}'
```
Create a Route with `public-api` Plugin and set the Route `uri` to the internal endpoint to be exposed:
```shell
curl "http://127.0.0.1:9180/apisix/admin/routes" -X PUT \
-H "X-API-KEY: ${admin_key}" \
-d '{
"id": "batch-requests",
"uri": "/apisix/batch-requests",
"plugins": {
"public-api": {}
}
}'
```
Send a pipelined request consisting of a GET and a POST request to the exposed batch requests endpoint:
```shell
curl "http://127.0.0.1:9080/apisix/batch-requests" -X POST -d '
{
"pipeline": [
{
"method": "GET",
"path": "/anything"
},
{
"method": "POST",
"path": "/anything",
"body": "a post request"
}
]
}'
```
You should receive responses from both requests, similar to the following:
```json
[
{
"reason": "OK",
"body": "{\n \"args\": {}, \n \"data\": \"\", \n \"files\": {}, \n \"form\": {}, \n \"headers\": {\n \"Accept\": \"*/*\", \n \"Host\": \"127.0.0.1\", \n \"User-Agent\": \"curl/8.6.0\", \n \"X-Amzn-Trace-Id\": \"Root=1-67b6e33b-5a30174f5534287928c54ca9\", \n \"X-Forwarded-Host\": \"127.0.0.1\"\n }, \n \"json\": null, \n \"method\": \"GET\", \n \"origin\": \"192.168.107.1, 43.252.208.84\", \n \"url\": \"http://127.0.0.1/anything\"\n}\n",
"headers": {
...
},
"status": 200
},
{
"reason": "OK",
"body": "{\n \"args\": {}, \n \"data\": \"a post request\", \n \"files\": {}, \n \"form\": {}, \n \"headers\": {\n \"Accept\": \"*/*\", \n \"Content-Length\": \"14\", \n \"Host\": \"127.0.0.1\", \n \"User-Agent\": \"curl/8.6.0\", \n \"X-Amzn-Trace-Id\": \"Root=1-67b6e33b-0eddcec07f154dac0d77876f\", \n \"X-Forwarded-Host\": \"127.0.0.1\"\n }, \n \"json\": null, \n \"method\": \"POST\", \n \"origin\": \"192.168.107.1, 43.252.208.84\", \n \"url\": \"http://127.0.0.1/anything\"\n}\n",
"headers": {
...
},
"status": 200
}
]
```
If you would like to expose the batch requests endpoint at a custom endpoint, create a Route with `public-api` Plugin as such. You should set the Route `uri` to the custom endpoint path and set the plugin `uri` to the internal endpoint to be exposed.
```shell
curl "http://127.0.0.1:9180/apisix/admin/routes" -X PUT \
-H "X-API-KEY: ${admin_key}" \
-d '{
"id": "batch-requests",
"uri": "/batch-requests",
"plugins": {
"public-api": {
"uri": "/apisix/batch-requests"
}
}
}'
```
The batch requests endpoint should now be exposed as `/batch-requests`, instead of `/apisix/batch-requests`.
Send a pipelined request consisting of a GET and a POST request to the exposed batch requests endpoint:
```shell
curl "http://127.0.0.1:9080/batch-requests" -X POST -d '
{
"pipeline": [
{
"method": "GET",
"path": "/anything"
},
{
"method": "POST",
"path": "/anything",
"body": "a post request"
}
]
}'
```
You should receive responses from both requests, similar to the following:
```json
[
{
"reason": "OK",
"body": "{\n \"args\": {}, \n \"data\": \"\", \n \"files\": {}, \n \"form\": {}, \n \"headers\": {\n \"Accept\": \"*/*\", \n \"Host\": \"127.0.0.1\", \n \"User-Agent\": \"curl/8.6.0\", \n \"X-Amzn-Trace-Id\": \"Root=1-67b6e33b-5a30174f5534287928c54ca9\", \n \"X-Forwarded-Host\": \"127.0.0.1\"\n }, \n \"json\": null, \n \"method\": \"GET\", \n \"origin\": \"192.168.107.1, 43.252.208.84\", \n \"url\": \"http://127.0.0.1/anything\"\n}\n",
"headers": {
...
},
"status": 200
},
{
"reason": "OK",
"body": "{\n \"args\": {}, \n \"data\": \"a post request\", \n \"files\": {}, \n \"form\": {}, \n \"headers\": {\n \"Accept\": \"*/*\", \n \"Content-Length\": \"14\", \n \"Host\": \"127.0.0.1\", \n \"User-Agent\": \"curl/8.6.0\", \n \"X-Amzn-Trace-Id\": \"Root=1-67b6e33b-0eddcec07f154dac0d77876f\", \n \"X-Forwarded-Host\": \"127.0.0.1\"\n }, \n \"json\": null, \n \"method\": \"POST\", \n \"origin\": \"192.168.107.1, 43.252.208.84\", \n \"url\": \"http://127.0.0.1/anything\"\n}\n",
"headers": {
...
},
"status": 200
}
]
```
---
---
title: real-ip
keywords:
- Apache APISIX
- API Gateway
- Plugin
- Real IP
description: The real-ip plugin allows Apache APISIX to set the client's real IP by the IP address passed in the HTTP header or HTTP query string.
---
## Description
The `real-ip` Plugin allows APISIX to set the client's real IP by the IP address passed in the HTTP header or HTTP query string. This is particularly useful when APISIX is behind a reverse proxy since the proxy could act as the request-originating client otherwise.
The Plugin is functionally similar to NGINX's [ngx_http_realip_module](https://nginx.org/en/docs/http/ngx_http_realip_module.html) but offers more flexibility.
## Attributes
| Name | Type | Required | Default | Valid values | Description |
|-----------|---------|----------|---------|----------------|---------------|
| source | string | True | | |A built-in [APISIX variable](https://apisix.apache.org/docs/apisix/apisix-variable/) or [NGINX variable](https://nginx.org/en/docs/varindex.html), such as `http_x_forwarded_for` or `arg_realip`. The variable value should be a valid IP address that represents the client's real IP address, with an optional port.|
| trusted_addresses | array[string] | False | | array of IPv4 or IPv6 addresses (CIDR notation acceptable) | Trusted addresses that are known to send correct replacement addresses. This configuration sets the [`set_real_ip_from`](https://nginx.org/en/docs/http/ngx_http_realip_module.html#set_real_ip_from) directive. |
| recursive | boolean | False | False | | If false, replace the original client address that matches one of the trusted addresses by the last address sent in the configured `source`.
If true, replace the original client address that matches one of the trusted addresses by the last non-trusted address sent in the configured `source`. |
:::note
Only `X-Forwarded-*` headers sent from addresses in the `apisix.trusted_addresses` configuration (supports IP and CIDR) will be trusted and passed to plugins or upstream. If `apisix.trusted_addresses` is not configured or the IP is not within the configured address range, all `X-Forwarded-*` headers will be overridden with trusted values.
:::
:::note
If the address specified in `source` is missing or invalid, the Plugin would not change the client address.
:::
## Examples
The examples below demonstrate how you can configure `real-ip` in different scenarios.
:::note
You can fetch the `admin_key` from `config.yaml` and save to an environment variable with the following command:
```bash
admin_key=$(yq '.deployment.admin.admin_key[0].key' conf/config.yaml | sed 's/"//g')
```
:::
### Obtain Real Client Address From URI Parameter
The following example demonstrates how to update the client IP address with a URI parameter.
Create a Route as follows. You should configure `source` to obtain value from the URL parameter `realip` using [APISIX variable](https://apisix.apache.org/docs/apisix/apisix-variable/) or [NGINX variable](https://nginx.org/en/docs/varindex.html). Use the `response-rewrite` Plugin to set response headers to verify if the client IP and port were actually updated.
```shell
curl "http://127.0.0.1:9180/apisix/admin/routes" -X PUT \
-H "X-API-KEY: ${admin_key}" \
-d '{
"id": "real-ip-route",
"uri": "/get",
"plugins": {
"real-ip": {
"source": "arg_realip",
"trusted_addresses": ["127.0.0.0/24"]
},
"response-rewrite": {
"headers": {
"remote_addr": "$remote_addr",
"remote_port": "$remote_port"
}
}
},
"upstream": {
"type": "roundrobin",
"nodes": {
"httpbin.org:80": 1
}
}
}'
```
Send a request to the Route with real IP and port in the URL parameter:
```shell
curl -i "http://127.0.0.1:9080/get?realip=1.2.3.4:9080"
```
You should see the response includes the following header:
```text
remote-addr: 1.2.3.4
remote-port: 9080
```
### Obtain Real Client Address From Header
The following example shows how to set the real client IP when APISIX is behind a reverse proxy, such as a load balancer when the proxy exposes the real client IP in the [`X-Forwarded-For`](https://developer.mozilla.org/en-US/docs/Web/HTTP/Headers/X-Forwarded-For) header.
Create a Route as follows. You should configure `source` to obtain value from the request header `X-Forwarded-For` using [APISIX variable](https://apisix.apache.org/docs/apisix/apisix-variable/) or [NGINX variable](https://nginx.org/en/docs/varindex.html). Use the `response-rewrite` Plugin to set a response header to verify if the client IP was actually updated.
```shell
curl "http://127.0.0.1:9180/apisix/admin/routes" -X PUT \
-H "X-API-KEY: ${admin_key}" \
-d '{
"id": "real-ip-route",
"uri": "/get",
"plugins": {
"real-ip": {
"source": "http_x_forwarded_for",
"trusted_addresses": ["127.0.0.0/24"]
},
"response-rewrite": {
"headers": {
"remote_addr": "$remote_addr"
}
}
},
"upstream": {
"type": "roundrobin",
"nodes": {
"httpbin.org:80": 1
}
}
}'
```
Send a request to the Route:
```shell
curl -i "http://127.0.0.1:9080/get"
```
You should see a response including the following header:
```text
remote-addr: 10.26.3.19
```
The IP address should correspond to the IP address of the request-originating client.
### Obtain Real Client Address Behind Multiple Proxies
The following example shows how to get the real client IP when APISIX is behind multiple proxies, which causes [`X-Forwarded-For`](https://developer.mozilla.org/en-US/docs/Web/HTTP/Headers/X-Forwarded-For) header to include a list of proxy IP addresses.
Create a Route as follows. You should configure `source` to obtain value from the request header `X-Forwarded-For` using [APISIX variable](https://apisix.apache.org/docs/apisix/apisix-variable/) or [NGINX variable](https://nginx.org/en/docs/varindex.html). Set `recursive` to `true` so that the original client address that matches one of the trusted addresses is replaced by the last non-trusted address sent in the configured `source`. Then, use the `response-rewrite` Plugin to set a response header to verify if the client IP was actually updated.
```shell
curl "http://127.0.0.1:9180/apisix/admin/routes" -X PUT \
-H "X-API-KEY: ${admin_key}" \
-d '{
"id": "real-ip-route",
"uri": "/get",
"plugins": {
"real-ip": {
"source": "http_x_forwarded_for",
"recursive": true,
"trusted_addresses": ["192.128.0.0/16", "127.0.0.0/24"]
},
"response-rewrite": {
"headers": {
"remote_addr": "$remote_addr"
}
}
},
"upstream": {
"type": "roundrobin",
"nodes": {
"httpbin.org:80": 1
}
}
}'
```
Send a request to the Route:
```shell
curl -i "http://127.0.0.1:9080/get" \
-H "X-Forwarded-For: 127.0.0.2, 192.128.1.1, 127.0.0.1"
```
You should see a response including the following header:
```text
remote-addr: 127.0.0.2
```
---
---
title: redirect
keywords:
- Apache APISIX
- API Gateway
- Plugin
- Redirect
description: This document contains information about the Apache APISIX redirect Plugin.
---
## Description
The `redirect` Plugin can be used to configure redirects.
## Attributes
| Name | Type | Required | Default | Valid values | Description |
|---------------------|---------------|----------|---------|--------------|---------------------------------------------------------------------------------------------------------------------------------------------------------------------------------------------------------------------------------------------------------------------------------------------------------------------------------------------------------------------------------------------------------------------------------------------------------------------|
| http_to_https | boolean | False | false | | When set to `true` and the request is HTTP, it will be redirected to HTTPS with the same URI with a 301 status code. Note the querystring from the raw URI will also be contained in the Location header. |
| uri | string | False | | | URI to redirect to. Can contain Nginx variables. For example, `/test/index.html`, `$uri/index.html`, `${uri}/index.html`, `https://example.com/foo/bar`. If you refer to a variable name that doesn't exist, instead of throwing an error, it will treat it as an empty variable. |
| regex_uri | array[string] | False | | | Match the URL from client with a regular expression and redirect. If it doesn't match, the request will be forwarded to the Upstream. Only either of `uri` or `regex_uri` can be used at a time. For example, [" ^/iresty/(.*)/(.*)/(.*)", "/$1-$2-$3"], where the first element is the regular expression to match and the second element is the URI to redirect to. APISIX only support one `regex_uri` currently, so the length of the `regex_uri` array is `2`. |
| ret_code | integer | False | 302 | [200, ...] | HTTP response code. |
| encode_uri | boolean | False | false | | When set to `true` the URI in the `Location` header will be encoded as per [RFC3986](https://datatracker.ietf.org/doc/html/rfc3986). |
| append_query_string | boolean | False | false | | When set to `true`, adds the query string from the original request to the `Location` header. If the configured `uri` or `regex_uri` already contains a query string, the query string from the request will be appended to it with an `&`. Do not use this if you have already handled the query string (for example, with an Nginx variable `$request_uri`) to avoid duplicates. |
:::note
* Only one of `http_to_https`, `uri` and `regex_uri` can be configured.
* Only one of `http_to_https` and `append_query_string` can be configured.
* When enabling `http_to_https`, the ports in the redirect URL will pick a value in the following order (in descending order of priority)
* Read `plugin_attr.redirect.https_port` from the configuration file (`conf/config.yaml`).
* If `apisix.ssl` is enabled, read `apisix.ssl.listen` and select a port randomly from it.
* Use 443 as the default https port.
:::
## Enable Plugin
The example below shows how you can enable the `redirect` Plugin on a specific Route:
:::note
You can fetch the `admin_key` from `config.yaml` and save to an environment variable with the following command:
```bash
admin_key=$(yq '.deployment.admin.admin_key[0].key' conf/config.yaml | sed 's/"//g')
```
:::
```shell
curl http://127.0.0.1:9180/apisix/admin/routes/1 -H "X-API-KEY: $admin_key" -X PUT -d '
{
"uri": "/test/index.html",
"plugins": {
"redirect": {
"uri": "/test/default.html",
"ret_code": 301
}
},
"upstream": {
"type": "roundrobin",
"nodes": {
"127.0.0.1:80": 1
}
}
}'
```
You can also use any built-in Nginx variables in the new URI:
```shell
curl http://127.0.0.1:9180/apisix/admin/routes/1 -H "X-API-KEY: $admin_key" -X PUT -d '
{
"uri": "/test",
"plugins": {
"redirect": {
"uri": "$uri/index.html",
"ret_code": 301
}
},
"upstream": {
"type": "roundrobin",
"nodes": {
"127.0.0.1:80": 1
}
}
}'
```
## Example usage
First, we configure the Plugin as mentioned above. We can then make a request and it will be redirected as shown below:
```shell
curl http://127.0.0.1:9080/test/index.html -i
```
```shell
HTTP/1.1 301 Moved Permanently
Date: Wed, 23 Oct 2019 13:48:23 GMT
Content-Type: text/html
Content-Length: 166
Connection: keep-alive
Location: /test/default.html
...
```
The response shows the response code and the `Location` header implying that the Plugin is in effect.
The example below shows how you can redirect HTTP to HTTPS:
```shell
curl http://127.0.0.1:9180/apisix/admin/routes/1 -H "X-API-KEY: $admin_key" -X PUT -d '
{
"uri": "/hello",
"plugins": {
"redirect": {
"http_to_https": true
}
}
}'
```
To test this:
```shell
curl http://127.0.0.1:9080/hello -i
```
```
HTTP/1.1 301 Moved Permanently
...
Location: https://127.0.0.1:9443/hello
...
```
## Delete Plugin
To remove the `redirect` Plugin, you can delete the corresponding JSON configuration from the Plugin configuration. APISIX will automatically reload and you do not have to restart for this to take effect.
```shell
curl http://127.0.0.1:9180/apisix/admin/routes/1 -H "X-API-KEY: $admin_key" -X PUT -d '
{
"uri": "/test/index.html",
"plugins": {},
"upstream": {
"type": "roundrobin",
"nodes": {
"127.0.0.1:80": 1
}
}
}'
```
---
---
title: referer-restriction
keywords:
- Apache APISIX
- API Gateway
- Referer restriction
description: This document contains information about the Apache APISIX referer-restriction Plugin, which can be used to restrict access to a Service or a Route by whitelisting/blacklisting the Referer request header.
---
## Description
The `referer-restriction` Plugin can be used to restrict access to a Service or a Route by whitelisting/blacklisting the `Referer` request header.
## Attributes
| Name | Type | Required | Default | Valid values | Description |
|----------------|---------------|----------|----------------------------------|--------------|---------------------------------------------------------------------------------------------------|
| whitelist | array[string] | False | | | List of hostnames to whitelist. A hostname can start with `*` for wildcard. |
| blacklist | array[string] | False | | | List of hostnames to blacklist. A hostname can start with `*` for wildcard. |
| message | string | False | "Your referer host is not allowed" | [1, 1024] | Message returned when access is not allowed. |
| bypass_missing | boolean | False | false | | When set to `true`, bypasses the check when the `Referer` request header is missing or malformed. |
:::info IMPORTANT
Only one of `whitelist` or `blacklist` attribute must be specified. They cannot work together.
:::
## Enable Plugin
You can enable the Plugin on a specific Route or a Service as shown below:
:::note
You can fetch the `admin_key` from `config.yaml` and save to an environment variable with the following command:
```bash
admin_key=$(yq '.deployment.admin.admin_key[0].key' conf/config.yaml | sed 's/"//g')
```
:::
```shell
curl http://127.0.0.1:9180/apisix/admin/routes/1 -H "X-API-KEY: $admin_key" -X PUT -d '
{
"uri": "/index.html",
"upstream": {
"type": "roundrobin",
"nodes": {
"127.0.0.1:1980": 1
}
},
"plugins": {
"referer-restriction": {
"bypass_missing": true,
"whitelist": [
"xx.com",
"*.xx.com"
]
}
}
}'
```
## Example usage
Once you have configured the Plugin as shown above, you can test it by setting `Referer: http://xx.com/x`:
```shell
curl http://127.0.0.1:9080/index.html -H 'Referer: http://xx.com/x'
```
```shell
HTTP/1.1 200 OK
...
```
Now, if you make a request with `Referer: http://yy.com/x`, the request will be blocked:
```shell
curl http://127.0.0.1:9080/index.html -H 'Referer: http://yy.com/x'
```
```shell
HTTP/1.1 403 Forbidden
...
{"message":"Your referer host is not allowed"}
```
Since we have set `bypass_missing` to `true`, a request without the `Referer` header will be successful as the check is skipped:
```shell
curl http://127.0.0.1:9080/index.html
```
```shell
HTTP/1.1 200 OK
...
```
## Delete Plugin
To remove the `referer-restriction` Plugin, you can delete the corresponding JSON configuration from the Plugin configuration. APISIX will automatically reload and you do not have to restart for this to take effect.
```shell
curl http://127.0.0.1:9180/apisix/admin/routes/1 -H "X-API-KEY: $admin_key" -X PUT -d '
{
"uri": "/index.html",
"plugins": {},
"upstream": {
"type": "roundrobin",
"nodes": {
"127.0.0.1:1980": 1
}
}
}'
```
---
---
title: request-id
keywords:
- Apache APISIX
- API Gateway
- Request ID
description: The request-id Plugin adds a unique ID to each request proxied through APISIX, which can be used to track API requests.
---
## Description
The `request-id` Plugin adds a unique ID to each request proxied through APISIX, which can be used to track API requests. If a request carries an ID in the header corresponding to `header_name`, the Plugin will use the header value as the unique ID and will not overwrite with the automatically generated ID.
## Attributes
| Name | Type | Required | Default | Valid values | Description |
| ------------------- | ------- | -------- | -------------- | ------------------------------- | ---------------------------------------------------------------------- |
| header_name | string | False | "X-Request-Id" | | Name of the header that carries the request unique ID. Note that if a request carries an ID in the `header_name` header, the Plugin will use the header value as the unique ID and will not overwrite it with the generated ID. |
| include_in_response | boolean | False | true | | If true, include the generated request ID in the response header, where the name of the header is the `header_name` value. |
| algorithm | string | False | "uuid" | ["uuid","nanoid","range_id","ksuid"] | Algorithm used for generating the unique ID. When set to `uuid` , the Plugin generates a universally unique identifier. When set to `nanoid`, the Plugin generates a compact, URL-safe ID. When set to `range_id`, the Plugin generates a sequential ID with specific parameters. When set to `ksuid`, the Plugin generates a sequential ID with timestamp and random number. |
| range_id | object | False | | | Configuration for generating a request ID using the `range_id` algorithm. |
| range_id.char_set | string | False | "abcdefghijklmnopqrstuvwxyzABCDEFGHIGKLMNOPQRSTUVWXYZ0123456789" | minimum length 6 | Character set used for the `range_id` algorithm. |
| range_id.length | integer | False | 16 | >=6 | Length of the generated ID for the `range_id` algorithm. |
## Examples
The examples below demonstrate how you can configure `request-id` in different scenarios.
:::note
You can fetch the `admin_key` from `config.yaml` and save to an environment variable with the following command:
```bash
admin_key=$(yq '.deployment.admin.admin_key[0].key' conf/config.yaml | sed 's/"//g')
```
:::
### Attach Request ID to Default Response Header
The following example demonstrates how to configure `request-id` on a Route which attaches a generated request ID to the default `X-Request-Id` response header, if the header value is not passed in the request. When the `X-Request-Id` header is set in the request, the Plugin will take the value in the request header as the request ID.
Create a Route with the `request-id` Plugin using its default configurations (explicitly defined):
```shell
curl "http://127.0.0.1:9180/apisix/admin/routes" -X PUT \
-H "X-API-KEY: ${ADMIN_API_KEY}" \
-d '{
"id": "request-id-route",
"uri": "/anything",
"plugins": {
"request-id": {
"header_name": "X-Request-Id",
"include_in_response": true,
"algorithm": "uuid"
}
},
"upstream": {
"type": "roundrobin",
"nodes": {
"httpbin.org:80": 1
}
}
}'
```
Send a request to the Route:
```shell
curl -i "http://127.0.0.1:9080/anything"
```
You should receive an `HTTP/1.1 200 OK` response and see the response includes the `X-Request-Id` header with a generated ID:
```text
X-Request-Id: b9b2c0d4-d058-46fa-bafc-dd91a0ccf441
```
Send a request to the Route with a custom request ID in the header:
```shell
curl -i "http://127.0.0.1:9080/anything" -H 'X-Request-Id: some-custom-request-id'
```
You should receive an `HTTP/1.1 200 OK` response and see the response includes the `X-Request-Id` header with the custom request ID:
```text
X-Request-Id: some-custom-request-id
```
### Attach Request ID to Custom Response Header
The following example demonstrates how to configure `request-id` on a Route which attaches a generated request ID to a specified header.
Create a Route with the `request-id` Plugin to define a custom header that carries the request ID and include the request ID in the response header:
```shell
curl "http://127.0.0.1:9180/apisix/admin/routes" -X PUT \
-H "X-API-KEY: ${ADMIN_API_KEY}" \
-d '{
"id": "request-id-route",
"uri": "/anything",
"plugins": {
"request-id": {
"header_name": "X-Req-Identifier",
"include_in_response": true
}
},
"upstream": {
"type": "roundrobin",
"nodes": {
"httpbin.org:80": 1
}
}
}'
```
Send a request to the route:
```shell
curl -i "http://127.0.0.1:9080/anything"
```
You should receive an `HTTP/1.1 200 OK` response and see the response includes the `X-Req-Identifier` header with a generated ID:
```text
X-Req-Identifier: 1c42ff59-ee4c-4103-a980-8359f4135b21
```
### Hide Request ID in Response Header
The following example demonstrates how to configure `request-id` on a Route which attaches a generated request ID to a specified header. The header containing the request ID should be forwarded to the Upstream service but not returned in the response header.
Create a Route with the `request-id` Plugin to define a custom header that carries the request ID and not include the request ID in the response header:
```shell
curl "http://127.0.0.1:9180/apisix/admin/routes" -X PUT \
-H "X-API-KEY: ${ADMIN_API_KEY}" \
-d '{
"id": "request-id-route",
"uri": "/anything",
"plugins": {
"request-id": {
"header_name": "X-Req-Identifier",
"include_in_response": false
}
},
"upstream": {
"type": "roundrobin",
"nodes": {
"httpbin.org:80": 1
}
}
}'
```
Send a request to the Route:
```shell
curl -i "http://127.0.0.1:9080/anything"
```
You should receive an `HTTP/1.1 200 OK` response not and see `X-Req-Identifier` header among the response headers. In the response body, you should see:
```json
{
"args": {},
"data": "",
"files": {},
"form": {},
"headers": {
"Accept": "*/*",
"Host": "127.0.0.1",
"User-Agent": "curl/8.6.0",
"X-Amzn-Trace-Id": "Root=1-6752748c-7d364f48564508db1e8c9ea8",
"X-Forwarded-Host": "127.0.0.1",
"X-Req-Identifier": "268092bc-15e1-4461-b277-bf7775f2856f"
},
...
}
```
This shows the request ID is forwarded to the Upstream service but not returned in the response header.
### Use `nanoid` Algorithm
The following example demonstrates how to configure `request-id` on a Route and use the `nanoid` algorithm to generate the request ID.
Create a Route with the `request-id` Plugin as such:
```shell
curl "http://127.0.0.1:9180/apisix/admin/routes" -X PUT \
-H "X-API-KEY: ${ADMIN_API_KEY}" \
-d '{
"id": "request-id-route",
"uri": "/anything",
"plugins": {
"request-id": {
"algorithm": "nanoid"
}
},
"upstream": {
"type": "roundrobin",
"nodes": {
"httpbin.org:80": 1
}
}
}'
```
Send a request to the Route:
```shell
curl -i "http://127.0.0.1:9080/anything"
```
You should receive an `HTTP/1.1 200 OK` response and see the response includes the `X-Req-Identifier` header with an ID generated using the `nanoid` algorithm:
```text
X-Request-Id: kepgHWCH2ycQ6JknQKrX2
```
### Use `ksuid` Algorithm
The following example demonstrates how to configure `request-id` on a Route and use the `ksuid` algorithm to generate the request ID.
Create a Route with the `request-id` Plugin as such:
```shell
curl "http://127.0.0.1:9180/apisix/admin/routes" -X PUT \
-H "X-API-KEY: ${ADMIN_API_KEY}" \
-d '{
"id": "request-id-route",
"uri": "/anything",
"plugins": {
"request-id": {
"algorithm": "ksuid"
}
},
"upstream": {
"type": "roundrobin",
"nodes": {
"httpbin.org:80": 1
}
}
}'
```
Send a request to the Route:
```shell
curl -i "http://127.0.0.1:9080/anything"
```
You should receive an `HTTP/1.1 200 OK` response and see the response includes the `X-Request-Id` header with an ID generated using the `ksuid` algorithm:
```text
X-Request-Id: 325ghCANEKjw6Jsfejg5p6QrLYB
```
If the [ksuid](https://github.com/segmentio/ksuid?tab=readme-ov-file#command-line-tool) is installed, this ID can be viewed through `ksuid -f inspect 325ghCANEKjw6Jsfejg5p6QrLYB`:
``` text
REPRESENTATION:
String: 325ghCANEKjw6Jsfejg5p6QrLYB
Raw: 15430DBBD7F68AD7CA0AE277772AB36DDB1A3C13
COMPONENTS:
Time: 2025-09-01 16:39:23 +0800 CST
Timestamp: 356715963
Payload: D7F68AD7CA0AE277772AB36DDB1A3C13
```
### Attach Request ID Globally and on a Route
The following example demonstrates how to configure `request-id` as a global Plugin and on a Route to attach two IDs.
Create a global rule for the `request-id` Plugin which adds request ID to a custom header:
```shell
curl -i "http://127.0.0.1:9180/apisix/admin/global_rules" -X PUT -d '{
"id": "rule-for-request-id",
"plugins": {
"request-id": {
"header_name": "Global-Request-ID"
}
}
}'
```
Create a Route with the `request-id` Plugin which adds request ID to a different custom header:
```shell
curl "http://127.0.0.1:9180/apisix/admin/routes" -X PUT \
-H "X-API-KEY: ${ADMIN_API_KEY}" \
-d '{
"id": "request-id-route",
"uri": "/anything",
"plugins": {
"request-id": {
"header_name": "Route-Request-ID"
}
},
"upstream": {
"type": "roundrobin",
"nodes": {
"httpbin.org:80": 1
}
}
}'
```
Send a request to the Route:
```shell
curl -i "http://127.0.0.1:9080/anything"
```
You should receive an `HTTP/1.1 200 OK` response and see the response includes the following headers:
```text
Global-Request-ID: 2e9b99c1-08ed-4a74-b347-49c0891b07ad
Route-Request-ID: d755666b-732c-4f0e-a30e-a7a71ace4e26
```
---
---
title: request-validation
keywords:
- Apache APISIX
- API Gateway
- Request Validation
description: The request-validation Plugin validates requests before forwarding them to Upstream services. This Plugin uses JSON Schema for validation and can validate headers and body of a request.
---
## Description
The `request-validation` Plugin validates requests before forwarding them to Upstream services. This Plugin uses [JSON Schema](https://github.com/api7/jsonschema) for validation and can validate headers and body of a request.
See [JSON schema specification](https://json-schema.org/specification) to learn more about the syntax.
## Attributes
| Name | Type | Required | Default | Valid values | Description |
|---------------|---------|----------|---------|---------------|---------------------------------------------------|
| header_schema | object | False | | | Schema for the request header data. |
| body_schema | object | False | | | Schema for the request body data. |
| rejected_code | integer | False | 400 | [200,...,599] | Status code to return when rejecting requests. |
| rejected_msg | string | False | | | Message to return when rejecting requests. |
:::note
At least one of `header_schema` or `body_schema` should be filled in.
:::
## Examples
The examples below demonstrate how you can configure `request-validation` for different scenarios.
:::note
You can fetch the `admin_key` from `config.yaml` and save to an environment variable with the following command:
```bash
admin_key=$(yq '.deployment.admin.admin_key[0].key' conf/config.yaml | sed 's/"//g')
```
:::
### Validate Request Header
The following example demonstrates how to validate request headers against a defined JSON schema, which requires two specific headers and the header value to conform to specified requirements.
Create a Route with `request-validation` Plugin as follows:
```shell
curl "http://127.0.0.1:9180/apisix/admin/routes" -X PUT \
-H "X-API-KEY: ${admin_key}" \
-d '{
"id": "request-validation-route",
"uri": "/get",
"plugins": {
"request-validation": {
"header_schema": {
"type": "object",
"required": ["User-Agent", "Host"],
"properties": {
"User-Agent": {
"type": "string",
"pattern": "^curl\/"
},
"Host": {
"type": "string",
"enum": ["httpbin.org", "httpbin"]
}
}
}
}
},
"upstream": {
"type": "roundrobin",
"nodes": {
"httpbin.org:80": 1
}
}
}'
```
#### Verify with Request Conforming to the Schema
Send a request with header `Host: httpbin`, which complies with the schema:
```shell
curl -i "http://127.0.0.1:9080/get" -H "Host: httpbin"
```
You should receive an `HTTP/1.1 200 OK` response similar to the following:
```json
{
"args": {},
"headers": {
"Accept": "*/*",
"Host": "httpbin",
"User-Agent": "curl/7.74.0",
"X-Amzn-Trace-Id": "Root=1-6509ae35-63d1e0fd3934e3f221a95dd8",
"X-Forwarded-Host": "httpbin"
},
"origin": "127.0.0.1, 183.17.233.107",
"url": "http://httpbin/get"
}
```
#### Verify with Request Not Conforming to the Schema
Send a request without any header:
```shell
curl -i "http://127.0.0.1:9080/get"
```
You should receive an `HTTP/1.1 400 Bad Request` response, showing that the request fails to pass validation:
```text
property "Host" validation failed: matches none of the enum value
```
Send a request with the required headers but with non-conformant header value:
```shell
curl -i "http://127.0.0.1:9080/get" -H "Host: httpbin" -H "User-Agent: cli-mock"
```
You should receive an `HTTP/1.1 400 Bad Request` response showing the `User-Agent` header value does not match the expected pattern:
```text
property "User-Agent" validation failed: failed to match pattern "^curl/" with "cli-mock"
```
### Customize Rejection Message and Status Code
The following example demonstrates how to customize response status and message when the validation fails.
Configure the Route with `request-validation` as follows:
```shell
curl "http://127.0.0.1:9180/apisix/admin/routes" -X PUT \
-H "X-API-KEY: ${admin_key}" \
-d '{
"id": "request-validation-route",
"uri": "/get",
"plugins": {
"request-validation": {
"header_schema": {
"type": "object",
"required": ["Host"],
"properties": {
"Host": {
"type": "string",
"enum": ["httpbin.org", "httpbin"]
}
}
},
"rejected_code": 403,
"rejected_msg": "Request header validation failed."
}
},
"upstream": {
"type": "roundrobin",
"nodes": {
"httpbin.org:80": 1
}
}
}'
```
Send a request with a misconfigured `Host` in the header:
```shell
curl -i "http://127.0.0.1:9080/get" -H "Host: httpbin2"
```
You should receive an `HTTP/1.1 403 Forbidden` response with the custom message:
```text
Request header validation failed.
```
### Validate Request Body
The following example demonstrates how to validate request body against a defined JSON schema.
The `request-validation` Plugin supports validation of two types of media types:
* `application/json`
* `application/x-www-form-urlencoded`
#### Validate JSON Request Body
Create a Route with `request-validation` Plugin as follows:
```shell
curl "http://127.0.0.1:9180/apisix/admin/routes" -X PUT \
-H "X-API-KEY: ${admin_key}" \
-d '{
"id": "request-validation-route",
"uri": "/post",
"plugins": {
"request-validation": {
"header_schema": {
"type": "object",
"required": ["Content-Type"],
"properties": {
"Content-Type": {
"type": "string",
"pattern": "^application\/json$"
}
}
},
"body_schema": {
"type": "object",
"required": ["required_payload"],
"properties": {
"required_payload": {"type": "string"},
"boolean_payload": {"type": "boolean"},
"array_payload": {
"type": "array",
"minItems": 1,
"items": {
"type": "integer",
"minimum": 200,
"maximum": 599
},
"uniqueItems": true,
"default": [200]
}
}
}
}
},
"upstream": {
"type": "roundrobin",
"nodes": {
"httpbin.org:80": 1
}
}
}'
```
Send a request with JSON body that conforms to the schema to verify:
```shell
curl -i "http://127.0.0.1:9080/post" -X POST \
-H "Content-Type: application/json" \
-d '{"required_payload":"hello", "array_payload":[301]}'
```
You should receive an `HTTP/1.1 200 OK` response similar to the following:
```json
{
"args": {},
"data": "{\"array_payload\":[301],\"required_payload\":\"hello\"}",
"files": {},
"form": {},
"headers": {
...
},
"json": {
"array_payload": [
301
],
"required_payload": "hello"
},
"origin": "127.0.0.1, 183.17.233.107",
"url": "http://127.0.0.1/post"
}
```
If you send a request without specifying `Content-Type: application/json`:
```shell
curl -i "http://127.0.0.1:9080/post" -X POST \
-d '{"required_payload":"hello,world"}'
```
You should receive an `HTTP/1.1 400 Bad Request` response similar to the following:
```text
property "Content-Type" validation failed: failed to match pattern "^application/json$" with "application/x-www-form-urlencoded"
```
Similarly, if you send a request without the required JSON field `required_payload`:
```shell
curl -i "http://127.0.0.1:9080/post" -X POST \
-H "Content-Type: application/json" \
-d '{}'
```
You should receive an `HTTP/1.1 400 Bad Request` response:
```text
property "required_payload" is required
```
#### Validate URL-Encoded Form Body
Create a Route with `request-validation` Plugin as follows:
```shell
curl "http://127.0.0.1:9180/apisix/admin/routes" -X PUT \
-H "X-API-KEY: ${admin_key}" \
-d '{
"id": "request-validation-route",
"uri": "/post",
"plugins": {
"request-validation": {
"header_schema": {
"type": "object",
"required": ["Content-Type"],
"properties": {
"Content-Type": {
"type": "string",
"pattern": "^application\/x-www-form-urlencoded$"
}
}
},
"body_schema": {
"type": "object",
"required": ["required_payload","enum_payload"],
"properties": {
"required_payload": {"type": "string"},
"enum_payload": {
"type": "string",
"enum": ["enum_string_1", "enum_string_2"],
"default": "enum_string_1"
}
}
}
}
},
"upstream": {
"type": "roundrobin",
"nodes": {
"httpbin.org:80": 1
}
}
}'
```
Send a request with URL-encoded form data to verify:
```shell
curl -i "http://127.0.0.1:9080/post" -X POST \
-H "Content-Type: application/x-www-form-urlencoded" \
-d "required_payload=hello&enum_payload=enum_string_1"
```
You should receive an `HTTP/1.1 400 Bad Request` response similar to the following:
```json
{
"args": {},
"data": "",
"files": {},
"form": {
"enum_payload": "enum_string_1",
"required_payload": "hello"
},
"headers": {
...
},
"json": null,
"origin": "127.0.0.1, 183.17.233.107",
"url": "http://127.0.0.1/post"
}
```
Send a request without the URL-encoded field `enum_payload`:
```shell
curl -i "http://127.0.0.1:9080/post" -X POST \
-H "Content-Type: application/x-www-form-urlencoded" \
-d "required_payload=hello"
```
You should receive an `HTTP/1.1 400 Bad Request` of the following:
```text
property "enum_payload" is required
```
## Appendix: JSON Schema
The following section provides boilerplate JSON schema for you to adjust, combine, and use with this Plugin. For a complete reference, see [JSON schema specification](https://json-schema.org/specification).
### Enumerated Values
```json
{
"body_schema": {
"type": "object",
"required": ["enum_payload"],
"properties": {
"enum_payload": {
"type": "string",
"enum": ["enum_string_1", "enum_string_2"],
"default": "enum_string_1"
}
}
}
}
```
### Boolean Values
```json
{
"body_schema": {
"type": "object",
"required": ["bool_payload"],
"properties": {
"bool_payload": {
"type": "boolean",
"default": true
}
}
}
}
```
### Numeric Values
```json
{
"body_schema": {
"type": "object",
"required": ["integer_payload"],
"properties": {
"integer_payload": {
"type": "integer",
"minimum": 1,
"maximum": 65535
}
}
}
}
```
### Strings
```json
{
"body_schema": {
"type": "object",
"required": ["string_payload"],
"properties": {
"string_payload": {
"type": "string",
"minLength": 1,
"maxLength": 32
}
}
}
}
```
### RegEx for Strings
```json
{
"body_schema": {
"type": "object",
"required": ["regex_payload"],
"properties": {
"regex_payload": {
"type": "string",
"minLength": 1,
"maxLength": 32,
"pattern": "[[^[a-zA-Z0-9_]+$]]"
}
}
}
}
```
### Arrays
```json
{
"body_schema": {
"type": "object",
"required": ["array_payload"],
"properties": {
"array_payload": {
"type": "array",
"minItems": 1,
"items": {
"type": "integer",
"minimum": 200,
"maximum": 599
},
"uniqueItems": true,
"default": [200, 302]
}
}
}
}
```
---
---
title: response-rewrite
keywords:
- Apache APISIX
- API Gateway
- Plugin
- Response Rewrite
- response-rewrite
description: The response-rewrite Plugin offers options to rewrite responses that APISIX and its Upstream services return to clients. With the Plugin, you can modify HTTP status codes, request headers, response body, and more.
---
## Description
The `response-rewrite` Plugin offers options to rewrite responses that APISIX and its Upstream services return to clients. With the Plugin, you can modify HTTP status codes, request headers, response body, and more.
For instance, you can use this Plugin to:
- Support [CORS](https://developer.mozilla.org/en-US/docs/Web/HTTP/CORS) by setting `Access-Control-Allow-*` headers.
- Indicate redirection by setting HTTP status codes and `Location` header.
:::tip
You can also use the [redirect](./redirect.md) Plugin to set up redirects.
:::
## Attributes
| Name | Type | Required | Default | Valid values | Description |
|-----------------|---------|----------|---------|---------------------------------------------------------------------------------------------------------------|-------------------------------------------------------------------------------------------------------------------------------------------------------------------------------------------------------------------------------------------------------------------------------------|
| status_code | integer | False | | [200, 598] | New HTTP status code in the response. If unset, falls back to the original status code. |
| body | string | False | | | New response body. The `Content-Length` header would also be reset. Should not be configured with `filters`. |
| body_base64 | boolean | False | false | | If true, decode the response body configured in `body` before sending to client, which is useful for image and protobuf decoding. Note that this configuration cannot be used to decode Upstream response. |
| headers | object | False | | | Actions to be executed in the order of `add`, `remove`, and `set`. |
| headers.add | array[string] | False | | | Headers to append to requests. If a header already present in the request, the header value will be appended. Header value could be set to a constant, or one or more [Nginx variables](https://nginx.org/en/docs/http/ngx_http_core_module.html). |
| headers.set | object | False | | |Headers to set to requests. If a header already present in the request, the header value will be overwritten. Header value could be set to a constant, or one or more[Nginx variables](https://nginx.org/en/docs/http/ngx_http_core_module.html). |
| headers.remove | array[string] | False | | | Headers to remove from requests. |
| vars | array[array] | False | | | An array of one or more matching conditions in the form of [lua-resty-expr](https://github.com/api7/lua-resty-expr#operator-list). |
| filters | array[object] | False | | | List of filters that modify the response body by replacing one specified string with another. Should not be configured with `body`. |
| filters.regex | string | True | | | RegEx pattern to match on the response body. |
| filters.scope | string | False | "once" | ["once","global"] | Scope of substitution. `once` substitutes the first matched instance and `global` substitutes globally. |
| filters.replace | string | True | | | Content to substitute with. |
| filters.options | string | False | "jo" | | RegEx options to control how the match operation should be performed. See [Lua NGINX module](https://github.com/openresty/lua-nginx-module#ngxrematch) for the available options. |
## Examples
The examples below demonstrate how you can configure `response-rewrite` on a Route in different scenarios.
:::note
You can fetch the `admin_key` from `config.yaml` and save to an environment variable with the following command:
```bash
admin_key=$(yq '.deployment.admin.admin_key[0].key' conf/config.yaml | sed 's/"//g')
```
:::
### Rewrite Header and Body
The following example demonstrates how to add response body and headers, only to responses with `200` HTTP status codes.
Create a Route with the `response-rewrite` Plugin:
```shell
curl "http://127.0.0.1:9180/apisix/admin/routes" -X PUT \
-H "X-API-KEY: ${admin_key}" \
-d '{
"id": "response-rewrite-route",
"methods": ["GET"],
"uri": "/headers",
"plugins": {
"response-rewrite": {
"body": "{\"code\":\"ok\",\"message\":\"new json body\"}",
"headers": {
"set": {
"X-Server-id": 3,
"X-Server-status": "on",
"X-Server-balancer-addr": "$balancer_ip:$balancer_port"
}
},
"vars": [
[ "status","==",200 ]
]
}
},
"upstream": {
"type": "roundrobin",
"nodes": {
"httpbin.org:80": 1
}
}
}'
```
Send a request to verify:
```shell
curl -i "http://127.0.0.1:9080/headers"
```
You should receive a `HTTP/1.1 200 OK` response similar to the following:
```text
...
X-Server-id: 3
X-Server-status: on
X-Server-balancer-addr: 50.237.103.220:80
{"code":"ok","message":"new json body"}
```
### Rewrite Header With RegEx Filter
The following example demonstrates how to use RegEx filter matching to replace `X-Amzn-Trace-Id` for responses.
Create a Route with the `response-rewrite` Plugin:
```shell
curl "http://127.0.0.1:9180/apisix/admin/routes" -X PUT \
-H "X-API-KEY: ${admin_key}" \
-d '{
"id": "response-rewrite-route",
"methods": ["GET"],
"uri": "/headers",
"plugins":{
"response-rewrite":{
"filters":[
{
"regex":"X-Amzn-Trace-Id",
"scope":"global",
"replace":"X-Amzn-Trace-Id-Replace"
}
]
}
},
"upstream": {
"type": "roundrobin",
"nodes": {
"httpbin.org:80": 1
}
}
}'
```
Send a request to verify:
```shell
curl -i "http://127.0.0.1:9080/headers"
```
You should see a response similar to the following:
```text
{
"headers": {
"Accept": "*/*",
"Host": "127.0.0.1",
"User-Agent": "curl/8.2.1",
"X-Amzn-Trace-Id-Replace": "Root=1-6500095d-1041b05e2ba9c6b37232dbc7",
"X-Forwarded-Host": "127.0.0.1"
}
}
```
### Decode Body from Base64
The following example demonstrates how to Decode Body from Base64 format.
Create a Route with the `response-rewrite` Plugin:
```shell
curl "http://127.0.0.1:9180/apisix/admin/routes" -X PUT \
-H "X-API-KEY: ${admin_key}" \
-d '{
"id": "response-rewrite-route",
"methods": ["GET"],
"uri": "/get",
"plugins":{
"response-rewrite": {
"body": "SGVsbG8gV29ybGQ=",
"body_base64": true
}
},
"upstream": {
"type": "roundrobin",
"nodes": {
"httpbin.org:80": 1
}
}
}'
```
Send a request to verify:
```shell
curl "http://127.0.0.1:9080/get"
```
You should see a response of the following:
```text
Hello World
```
### Rewrite Response and Its Connection with Execution Phases
The following example demonstrates the connection between the `response-rewrite` Plugin and [execution phases](/apisix/key-concepts/plugins#plugins-execution-lifecycle) by configuring the Plugin with the `key-auth` Plugin, and see how the response is still rewritten to `200 OK` in the case of an unauthenticated request.
Create a Consumer `jack`:
```shell
curl "http://127.0.0.1:9180/apisix/admin/consumers" -X PUT \
-H "X-API-KEY: ${admin_key}" \
-d '{
"username": "jack"
}'
```
Create `key-auth` credential for the Consumer:
```shell
curl "http://127.0.0.1:9180/apisix/admin/consumers/jack/credentials" -X PUT \
-H "X-API-KEY: ${admin_key}" \
-d '{
"id": "cred-jack-key-auth",
"plugins": {
"key-auth": {
"key": "jack-key"
}
}
}'
```
Create a Route with `key-auth` and configure `response-rewrite` to rewrite the response status code and body:
```shell
curl "http://127.0.0.1:9180/apisix/admin/routes" -X PUT \
-H "X-API-KEY: ${admin_key}" \
-d '{
"id": "response-rewrite-route",
"uri": "/get",
"plugins": {
"key-auth": {},
"response-rewrite": {
"status_code": 200,
"body": "{\"code\": 200, \"msg\": \"success\"}"
}
},
"upstream": {
"type": "roundrobin",
"nodes": {
"httpbin.org:80": 1
}
}
}'
```
Send a request to the Route with the valid key:
```shell
curl -i "http://127.0.0.1:9080/get" -H 'apikey: jack-key'
```
You should receive an `HTTP/1.1 200 OK` response of the following:
```text
{"code": 200, "msg": "success"}
```
Send a request to the Route without any key:
```shell
curl -i "http://127.0.0.1:9080/get"
```
You should still receive an `HTTP/1.1 200 OK` response of the same, instead of `HTTP/1.1 401 Unauthorized` from the `key-auth` Plugin. This shows that the `response-rewrite` Plugin still rewrites the response.
This is because **header_filter** and **body_filter** phase logics of the `response-rewrite` Plugin will continue to run after [`ngx.exit`](https://openresty-reference.readthedocs.io/en/latest/Lua_Nginx_API/#ngxexit) in the **access** or **rewrite** phases from other plugins.
The following table summarizes the impact of `ngx.exit` on execution phases.
| Phase | rewrite | access | header_filter | body_filter |
|---------------|----------|----------|---------------|-------------|
| **rewrite** | ngx.exit | | | |
| **access** | × | ngx.exit | | |
| **header_filter** | ✓ | ✓ | ngx.exit | |
| **body_filter** | ✓ | ✓ | × | ngx.exit |
For example, if `ngx.exit` takes places in the **rewrite** phase, it will interrupt the execution of **access** phase but not interfere with **header_filter** and **body_filter** phases.
---
---
title: rocketmq-logger
keywords:
- Apache APISIX
- API Gateway
- Plugin
- RocketMQ Logger
description: This document contains information about the Apache APISIX rocketmq-logger Plugin.
---
## Description
The `rocketmq-logger` Plugin provides the ability to push logs as JSON objects to your RocketMQ clusters.
It might take some time to receive the log data. It will be automatically sent after the timer function in the [batch processor](../batch-processor.md) expires.
## Attributes
| Name | Type | Required | Default | Valid values | Description |
|------------------------|---------|----------|-------------------------------------------------------------------------------|----------------------|--------------------------------------------------------------------------------------------------------------------------------------------------------------------------------------------------------------------------------|
| nameserver_list | object | True | | | List of RocketMQ nameservers. |
| topic | string | True | | | Target topic to push the data to. |
| key | string | False | | | Key of the messages. |
| tag | string | False | | | Tag of the messages. |
| log_format | object | False | | | Log format declared as key-value pairs in JSON. Values support strings and nested objects (up to five levels deep; deeper fields are truncated). Within strings, [APISIX](../apisix-variable.md) or [NGINX](http://nginx.org/en/docs/varindex.html) variables can be referenced by prefixing with `$`. |
| timeout | integer | False | 3 | [1,...] | Timeout for the upstream to send data. |
| use_tls | boolean | False | false | | When set to `true`, uses TLS. |
| access_key | string | False | "" | | Access key for ACL. Setting to an empty string will disable the ACL. |
| secret_key | string | False | "" | | secret key for ACL. |
| name | string | False | "rocketmq logger" | | Unique identifier for the batch processor. If you use Prometheus to monitor APISIX metrics, the name is exported in `apisix_batch_process_entries`. processor. |
| meta_format | enum | False | "default" | ["default","origin"] | Format to collect the request information. Setting to `default` collects the information in JSON format and `origin` collects the information with the original HTTP request. See [examples](#meta_format-example) below. |
| include_req_body | boolean | False | false | [false, true] | When set to `true` includes the request body in the log. If the request body is too big to be kept in the memory, it can't be logged due to Nginx's limitations. |
| include_req_body_expr | array | False | | | Filter for when the `include_req_body` attribute is set to `true`. Request body is only logged when the expression set here evaluates to `true`. See [lua-resty-expr](https://github.com/api7/lua-resty-expr) for more. |
| include_resp_body | boolean | False | false | [false, true] | When set to `true` includes the response body in the log. |
| include_resp_body_expr | array | False | | | Filter for when the `include_resp_body` attribute is set to `true`. Response body is only logged when the expression set here evaluates to `true`. See [lua-resty-expr](https://github.com/api7/lua-resty-expr) for more. |
NOTE: `encrypt_fields = {"secret_key"}` is also defined in the schema, which means that the field will be stored encrypted in etcd. See [encrypted storage fields](../plugin-develop.md#encrypted-storage-fields).
This Plugin supports using batch processors to aggregate and process entries (logs/data) in a batch. This avoids the need for frequently submitting the data. The batch processor submits data every `5` seconds or when the data in the queue reaches `1000`. See [Batch Processor](../batch-processor.md#configuration) for more information or setting your custom configuration.
:::info IMPORTANT
The data is first written to a buffer. When the buffer exceeds the `batch_max_size` or `buffer_duration` attribute, the data is sent to the RocketMQ server and the buffer is flushed.
If the process is successful, it will return `true` and if it fails, returns `nil` with a string with the "buffer overflow" error.
:::
### meta_format example
- default:
```json
{
"upstream": "127.0.0.1:1980",
"start_time": 1619414294760,
"client_ip": "127.0.0.1",
"service_id": "",
"route_id": "1",
"request": {
"querystring": {
"ab": "cd"
},
"size": 90,
"uri": "/hello?ab=cd",
"url": "http://localhost:1984/hello?ab=cd",
"headers": {
"host": "localhost",
"content-length": "6",
"connection": "close"
},
"method": "GET"
},
"response": {
"headers": {
"connection": "close",
"content-type": "text/plain; charset=utf-8",
"date": "Mon, 26 Apr 2021 05:18:14 GMT",
"server": "APISIX/2.5",
"transfer-encoding": "chunked"
},
"size": 190,
"status": 200
},
"server": {
"hostname": "localhost",
"version": "2.5"
},
"latency": 0
}
```
- origin:
```http
GET /hello?ab=cd HTTP/1.1
host: localhost
content-length: 6
connection: close
abcdef
```
### meta_format example
- `default`:
```json
{
"upstream": "127.0.0.1:1980",
"start_time": 1619414294760,
"client_ip": "127.0.0.1",
"service_id": "",
"route_id": "1",
"request": {
"querystring": {
"ab": "cd"
},
"size": 90,
"uri": "/hello?ab=cd",
"url": "http://localhost:1984/hello?ab=cd",
"headers": {
"host": "localhost",
"content-length": "6",
"connection": "close"
},
"body": "abcdef",
"method": "GET"
},
"response": {
"headers": {
"connection": "close",
"content-type": "text/plain; charset=utf-8",
"date": "Mon, 26 Apr 2021 05:18:14 GMT",
"server": "APISIX/2.5",
"transfer-encoding": "chunked"
},
"size": 190,
"status": 200
},
"server": {
"hostname": "localhost",
"version": "2.5"
},
"latency": 0
}
```
- `origin`:
```http
GET /hello?ab=cd HTTP/1.1
host: localhost
content-length: 6
connection: close
abcdef
```
## Metadata
You can also set the format of the logs by configuring the Plugin metadata. The following configurations are available:
| Name | Type | Required | Default | Description |
|------------|--------|----------|-------------------------------------------------------------------------------|--------------------------------------------------------------------------------------------------------------------------------------------------------------------------------------------------------------------------------|
| log_format | object | False | | Log format declared as key-value pairs in JSON. Values support strings and nested objects (up to five levels deep; deeper fields are truncated). Within strings, [APISIX](../apisix-variable.md) or [NGINX](http://nginx.org/en/docs/varindex.html) variables can be referenced by prefixing with `$`. |
| max_pending_entries | integer | False | | Maximum number of pending entries that can be buffered in batch processor before it starts dropping them. |
:::info IMPORTANT
Configuring the Plugin metadata is global in scope. This means that it will take effect on all Routes and Services which use the `rocketmq-logger` Plugin.
:::
The example below shows how you can configure through the Admin API:
:::note
You can fetch the `admin_key` from `config.yaml` and save to an environment variable with the following command:
```bash
admin_key=$(yq '.deployment.admin.admin_key[0].key' conf/config.yaml | sed 's/"//g')
```
:::
```shell
curl http://127.0.0.1:9180/apisix/admin/plugin_metadata/rocketmq-logger -H "X-API-KEY: $admin_key" -X PUT -d '
{
"log_format": {
"host": "$host",
"@timestamp": "$time_iso8601",
"client_ip": "$remote_addr",
"request": { "method": "$request_method", "uri": "$request_uri" },
"response": { "status": "$status" }
}
}'
```
With this configuration, your logs would be formatted as shown below:
```shell
{"host":"localhost","@timestamp":"2020-09-23T19:05:05-04:00","client_ip":"127.0.0.1","request":{"method":"GET","uri":"/hello"},"response":{"status":200},"route_id":"1"}
{"host":"localhost","@timestamp":"2020-09-23T19:05:05-04:00","client_ip":"127.0.0.1","request":{"method":"GET","uri":"/hello"},"response":{"status":200},"route_id":"1"}
```
## Enable Plugin
The example below shows how you can enable the `rocketmq-logger` Plugin on a specific Route:
```shell
curl http://127.0.0.1:9180/apisix/admin/routes/5 -H "X-API-KEY: $admin_key" -X PUT -d '
{
"plugins": {
"rocketmq-logger": {
"nameserver_list" : [ "127.0.0.1:9876" ],
"topic" : "test2",
"batch_max_size": 1,
"name": "rocketmq logger"
}
},
"upstream": {
"nodes": {
"127.0.0.1:1980": 1
},
"type": "roundrobin"
},
"uri": "/hello"
}'
```
This Plugin also supports pushing to more than one nameserver at a time. You can specify multiple nameserver in the Plugin configuration as shown below:
```json
"nameserver_list" : [
"127.0.0.1:9876",
"127.0.0.2:9876"
]
```
## Example usage
Now, if you make a request to APISIX, it will be logged in your RocketMQ server:
```shell
curl -i http://127.0.0.1:9080/hello
```
## Delete Plugin
To remove the `rocketmq-logger` Plugin, you can delete the corresponding JSON configuration from the Plugin configuration. APISIX will automatically reload, and you do not have to restart for this to take effect.
```shell
curl http://127.0.0.1:9180/apisix/admin/routes/1 -H "X-API-KEY: $admin_key" -X PUT -d '
{
"methods": ["GET"],
"uri": "/hello",
"plugins": {},
"upstream": {
"type": "roundrobin",
"nodes": {
"127.0.0.1:1980": 1
}
}
}'
```
---
---
title: server-info
keywords:
- Apache APISIX
- API Gateway
- Plugin
- Server info
- server-info
description: This document contains information about the Apache APISIX server-info Plugin.
---
## Description
The `server-info` Plugin periodically reports basic server information to etcd.
:::warning
The `server-info` Plugin is deprecated and will be removed in a future release. For more details about the deprecation and removal plan, please refer to [this discussion](https://github.com/apache/apisix/discussions/12298).
:::
The information reported by the Plugin is explained below:
| Name | Type | Description |
|--------------|---------|------------------------------------------------------------------------------------------------------------------------|
| boot_time | integer | Bootstrap time (UNIX timestamp) of the APISIX instance. Resets when hot updating but not when APISIX is just reloaded. |
| id | string | APISIX instance ID. |
| etcd_version | string | Version of the etcd cluster used by APISIX. Will be `unknown` if the network to etcd is partitioned. |
| version | string | Version of APISIX instance. |
| hostname | string | Hostname of the machine/pod APISIX is deployed to. |
## Attributes
None.
## API
This Plugin exposes the endpoint `/v1/server_info` to the [Control API](../control-api.md)
## Enable Plugin
Add `server-info` to the Plugin list in your configuration file (`conf/config.yaml`):
```yaml title="conf/config.yaml"
plugins:
- ...
- server-info
```
## Customizing server info report configuration
We can change the report configurations in the `plugin_attr` section of `conf/config.yaml`.
The following configurations of the server info report can be customized:
| Name | Type | Default | Description |
| ------------ | ------ | -------- | -------------------------------------------------------------------- |
| report_ttl | integer | 36 | Time in seconds after which the report is deleted from etcd (maximum: 86400, minimum: 3). |
To customize, you can modify the `plugin_attr` attribute in your configuration file (`conf/config.yaml`):
```yaml title="conf/config.yaml"
plugin_attr:
server-info:
report_ttl: 60
```
## Example usage
After you enable the Plugin as mentioned above, you can access the server info report through the Control API:
```shell
curl http://127.0.0.1:9090/v1/server_info -s | jq .
```
```json
{
"etcd_version": "3.5.0",
"id": "b7ce1c5c-b1aa-4df7-888a-cbe403f3e948",
"hostname": "fedora32",
"version": "2.1",
"boot_time": 1608522102
}
```
:::tip
You can also view the server info report through the [APISIX Dashboard](/docs/dashboard/USER_GUIDE).
:::
## Delete Plugin
To remove the Plugin, you can remove `server-info` from the list of Plugins in your configuration file:
```yaml title="conf/config.yaml"
plugins:
- ...
```
---
---
title: serverless
keywords:
- Apache APISIX
- API Gateway
- Plugin
- Serverless
description: This document contains information about the Apache APISIX serverless Plugin.
---
## Description
There are two `serverless` Plugins in APISIX: `serverless-pre-function` and `serverless-post-function`. The former runs at the beginning of the specified phase, while the latter runs at the end of the specified phase.
Both Plugins have the same attributes.
## Attributes
| Name | Type | Required | Default | Valid values | Description |
|-----------|---------------|----------|------------|------------------------------------------------------------------------------|------------------------------------------------------------------|
| phase | string | False | ["access"] | ["rewrite", "access", "header_filter", "body_filter", "log", "before_proxy"] | Phase before or after which the serverless function is executed. |
| functions | array[string] | True | | | List of functions that are executed sequentially. |
:::info IMPORTANT
Only Lua functions are allowed here and not other Lua code.
For example, anonymous functions are legal:
```lua
return function()
ngx.log(ngx.ERR, 'one')
end
```
Closures are also legal:
```lua
local count = 1
return function()
count = count + 1
ngx.say(count)
end
```
But code other than functions are illegal:
```lua
local count = 1
ngx.say(count)
```
:::
:::note
From v2.6, `conf` and `ctx` are passed as the first two arguments to a serverless function like regular Plugins.
Prior to v2.12.0, the phase `before_proxy` was called `balancer`. This was updated considering that this method would run after `access` and before the request goes Upstream and is unrelated to `balancer`.
:::
## Enable Plugin
The example below enables the Plugin on a specific Route:
:::note
You can fetch the `admin_key` from `config.yaml` and save to an environment variable with the following command:
```bash
admin_key=$(yq '.deployment.admin.admin_key[0].key' conf/config.yaml | sed 's/"//g')
```
:::
```shell
curl http://127.0.0.1:9180/apisix/admin/routes/1 -H "X-API-KEY: $admin_key" -X PUT -d '
{
"uri": "/index.html",
"plugins": {
"serverless-pre-function": {
"phase": "rewrite",
"functions" : ["return function() ngx.log(ngx.ERR, \"serverless pre function\"); end"]
},
"serverless-post-function": {
"phase": "rewrite",
"functions" : ["return function(conf, ctx) ngx.log(ngx.ERR, \"match uri \", ctx.curr_req_matched and ctx.curr_req_matched._path); end"]
}
},
"upstream": {
"type": "roundrobin",
"nodes": {
"127.0.0.1:1980": 1
}
}
}'
```
## Example usage
Once you have configured the Plugin as shown above, you can make a request as shown below:
```shell
curl -i http://127.0.0.1:9080/index.html
```
You will find a message "serverless pre-function" and "match uri /index.html" in the error.log.
## Delete Plugin
To remove the `serverless` Plugin, you can delete the corresponding JSON configuration from the Plugin configuration. APISIX will automatically reload and you do not have to restart for this to take effect.
```shell
curl http://127.0.0.1:9180/apisix/admin/routes/1 -H "X-API-KEY: $admin_key" -X PUT -d '
{
"methods": ["GET"],
"uri": "/index.html",
"upstream": {
"type": "roundrobin",
"nodes": {
"127.0.0.1:1980": 1
}
}
}'
```
---
---
title: skywalking-logger
keywords:
- Apache APISIX
- API Gateway
- Plugin
- SkyWalking Logger
- skywalking-logger
description: The skywalking-logger pushes request and response logs as JSON objects to SkyWalking OAP server in batches and supports the customization of log formats.
---
## Description
The `skywalking-logger` Plugin pushes request and response logs as JSON objects to SkyWalking OAP server in batches and supports the customization of log formats.
If there is an existing tracing context, it sets up the trace-log correlation automatically and relies on [SkyWalking Cross Process Propagation Headers Protocol](https://skywalking.apache.org/docs/main/next/en/api/x-process-propagation-headers-v3/).
## Attributes
| Name | Type | Required | Default | Valid values | Description |
|-----------------------|---------|----------|------------------------|---------------|--------------------------------------------------------------------------------------------------------------|
| endpoint_addr | string | True | | | URI of the SkyWalking OAP server. |
| service_name | string | False | "APISIX" | | Service name for the SkyWalking reporter. |
| service_instance_name | string | False | "APISIX Instance Name" | | Service instance name for the SkyWalking reporter. Set it to `$hostname` to directly get the local hostname. |
| log_format | object | False | | Custom log format as key-value pairs in JSON. Values support strings and nested objects (up to five levels deep; deeper fields are truncated). Within strings, [APISIX](../apisix-variable.md) or [NGINX variables](http://nginx.org/en/docs/varindex.html) can be referenced by prefixing with `$`. |
| timeout | integer | False | 3 | [1,...] | Time to keep the connection alive for after sending a request. |
| name | string | False | "skywalking logger" | | Unique identifier to identify the logger. If you use Prometheus to monitor APISIX metrics, the name is exported in `apisix_batch_process_entries`. |
| include_req_body | boolean | False | false | If true, include the request body in the log. Note that if the request body is too big to be kept in the memory, it can not be logged due to NGINX's limitations. |
| include_req_body_expr | array[array] | False | | An array of one or more conditions in the form of [lua-resty-expr](https://github.com/api7/lua-resty-expr). Used when the `include_req_body` is true. Request body would only be logged when the expressions configured here evaluate to true. |
| include_resp_body | boolean | False | false | If true, include the response body in the log. |
| include_resp_body_expr | array[array] | False | | An array of one or more conditions in the form of [lua-resty-expr](https://github.com/api7/lua-resty-expr). Used when the `include_resp_body` is true. Response body would only be logged when the expressions configured here evaluate to true. |
This Plugin supports using batch processors to aggregate and process entries (logs/data) in a batch. This avoids the need for frequently submitting the data. The batch processor submits data every `5` seconds or when the data in the queue reaches `1000`. See [Batch Processor](../batch-processor.md#configuration) for more information or setting your custom configuration.
## Metadata
You can also set the format of the logs by configuring the Plugin metadata. The following configurations are available:
| Name | Type | Required | Default | Description |
| ---------- | ------ | -------- | ----------------------------------------------------------------------------- | ------------------------------------------------------------------------------------------------------------------------------------------------------------------------------------------------------------------------------------------------------- |
| log_format | object | False | | Custom log format as key-value pairs in JSON. Values support strings and nested objects (up to five levels deep; deeper fields are truncated). Within strings, [APISIX](../apisix-variable.md) or [NGINX variables](http://nginx.org/en/docs/varindex.html) can be referenced by prefixing with `$`. |
| max_pending_entries | integer | False | | Maximum number of pending entries that can be buffered in batch processor before it starts dropping them. |
## Examples
The examples below demonstrate how you can configure `skywalking-logger` Plugin for different scenarios.
To follow along the example, start a storage, OAP and Booster UI with Docker Compose, following [Skywalking's documentation](https://skywalking.apache.org/docs/main/next/en/setup/backend/backend-docker/). Once set up, the OAP server should be listening on `12800` and you should be able to access the UI at [http://localhost:8080](http://localhost:8080).
:::note
You can fetch the `admin_key` from `config.yaml` and save to an environment variable with the following command:
```bash
admin_key=$(yq '.deployment.admin.admin_key[0].key' conf/config.yaml | sed 's/"//g')
```
:::
### Log Requests in Default Log Format
The following example demonstrates how you can configure the `skywalking-logger` Plugin on a Route to log information of requests hitting the Route.
Create a Route with the `skywalking-logger` Plugin and configure the Plugin with your OAP server URI:
```shell
curl "http://127.0.0.1:9180/apisix/admin/routes" -X PUT \
-H "X-API-KEY: ${admin_key}" \
-d '{
"id": "skywalking-logger-route",
"uri": "/anything",
"plugins": {
"skywalking-logger": {
"endpoint_addr": "http://192.168.2.103:12800"
}
},
"upstream": {
"nodes": {
"httpbin.org:80": 1
},
"type": "roundrobin"
}
}'
```
Send a request to the Route:
```shell
curl -i "http://127.0.0.1:9080/anything"
```
You should receive an `HTTP/1.1 200 OK` response.
In [Skywalking UI](http://localhost:8080), navigate to __General Service__ > __Services__. You should see a service called `APISIX` with a log entry corresponding to your request:
```json
{
"upstream_latency": 674,
"request": {
"method": "GET",
"headers": {
"user-agent": "curl/8.6.0",
"host": "127.0.0.1:9080",
"accept": "*/*"
},
"url": "http://127.0.0.1:9080/anything",
"size": 85,
"querystring": {},
"uri": "/anything"
},
"client_ip": "192.168.65.1",
"route_id": "skywalking-logger-route",
"start_time": 1736945107345,
"upstream": "3.210.94.60:80",
"server": {
"version": "3.11.0",
"hostname": "7edbcebe8eb3"
},
"service_id": "",
"response": {
"size": 619,
"status": 200,
"headers": {
"content-type": "application/json",
"date": "Thu, 16 Jan 2025 12:45:08 GMT",
"server": "APISIX/3.11.0",
"access-control-allow-origin": "*",
"connection": "close",
"access-control-allow-credentials": "true",
"content-length": "391"
}
},
"latency": 764.9998664856,
"apisix_latency": 90.999866485596
}
```
### Log Request and Response Headers With Plugin Metadata
The following example demonstrates how you can customize log format using Plugin metadata and built-in variables to log specific headers from request and response.
In APISIX, Plugin metadata is used to configure the common metadata fields of all Plugin instances of the same Plugin. It is useful when a Plugin is enabled across multiple resources and requires a universal update to their metadata fields.
First, create a Route with the `skywalking-logger` Plugin and configure the Plugin with your OAP server URI:
```shell
curl "http://127.0.0.1:9180/apisix/admin/routes" -X PUT \
-H "X-API-KEY: ${admin_key}" \
-d '{
"id": "skywalking-logger-route",
"uri": "/anything",
"plugins": {
"skywalking-logger": {
"endpoint_addr": "http://192.168.2.103:12800"
}
},
"upstream": {
"nodes": {
"httpbin.org:80": 1
},
"type": "roundrobin"
}
}'
```
Next, configure the Plugin metadata for `skywalking-logger` to log the custom request header `env` and the response header `Content-Type`:
```shell
curl "http://127.0.0.1:9180/apisix/admin/plugin_metadata/skywalking-logger" -X PUT \
-H "X-API-KEY: ${admin_key}" \
-d '{
"log_format": {
"host": "$host",
"@timestamp": "$time_iso8601",
"client_ip": "$remote_addr",
"env": "$http_env",
"resp_content_type": "$sent_http_Content_Type"
}
}'
```
Send a request to the Route with the `env` header:
```shell
curl -i "http://127.0.0.1:9080/anything" -H "env: dev"
```
You should receive an `HTTP/1.1 200 OK` response. In [Skywalking UI](http://localhost:8080), navigate to __General Service__ > __Services__. You should see a service called `APISIX` with a log entry corresponding to your request:
```json
[
{
"route_id": "skywalking-logger-route",
"client_ip": "192.168.65.1",
"@timestamp": "2025-01-16T12:51:53+00:00",
"host": "127.0.0.1",
"env": "dev",
"resp_content_type": "application/json"
}
]
```
### Log Request Bodies Conditionally
The following example demonstrates how you can conditionally log request body.
Create a Route with the `skywalking-logger` Plugin as such, to only include request body if the URL query string `log_body` is `yes`:
```shell
curl "http://127.0.0.1:9180/apisix/admin/routes" -X PUT \
-H "X-API-KEY: ${admin_key}" \
-d '{
"id": "skywalking-logger-route",
"uri": "/anything",
"plugins": {
"skywalking-logger": {
"endpoint_addr": "http://192.168.2.103:12800",
"include_req_body": true,
"include_req_body_expr": [["arg_log_body", "==", "yes"]]
}
},
"upstream": {
"nodes": {
"httpbin.org:80": 1
},
"type": "roundrobin"
}
}'
```
Send a request to the Route with a URL query string satisfying the condition:
```shell
curl -i "http://127.0.0.1:9080/anything?log_body=yes" -X POST -d '{"env": "dev"}'
```
You should receive an `HTTP/1.1 200 OK` response. In [Skywalking UI](http://localhost:8080), navigate to __General Service__ > __Services__. You should see a service called `APISIX` with a log entry corresponding to your request, with the request body logged:
```json
[
{
"request": {
"url": "http://127.0.0.1:9080/anything?log_body=yes",
"querystring": {
"log_body": "yes"
},
"uri": "/anything?log_body=yes",
...,
"body": "{\"env\": \"dev\"}",
},
...
}
]
```
Send a request to the Route without any URL query string:
```shell
curl -i "http://127.0.0.1:9080/anything" -X POST -d '{"env": "dev"}'
```
You should not observe a log entry without the request body.
:::info
If you have customized the `log_format` in addition to setting `include_req_body` or `include_resp_body` to `true`, the Plugin would not include the bodies in the logs.
As a workaround, you may be able to use the NGINX variable `$request_body` in the log format, such as:
```json
{
"skywalking-logger": {
...,
"log_format": {"body": "$request_body"}
}
}
```
:::
### Associate Traces with Logs
The following example demonstrates how you can configure the `skywalking-logger` Plugin on a Route to log information of requests hitting the route.
Create a Route with the `skywalking-logger` Plugin and configure the Plugin with your OAP server URI:
```shell
curl "http://127.0.0.1:9180/apisix/admin/routes" -X PUT \
-H "X-API-KEY: ${admin_key}" \
-d '{
"id": "skywalking-logger-route",
"uri": "/anything",
"plugins": {
"skywalking": {
"sample_ratio": 1
},
"skywalking-logger": {
"endpoint_addr": "http://192.168.2.103:12800"
}
},
"upstream": {
"nodes": {
"httpbin.org:80": 1
},
"type": "roundrobin"
}
}'
```
Generate a few requests to the Route:
```shell
curl -i "http://127.0.0.1:9080/anything"
```
You should receive `HTTP/1.1 200 OK` responses.
In [Skywalking UI](http://localhost:8080), navigate to __General Service__ > __Services__. You should see a service called `APISIX` with a trace corresponding to your request, where you can view the associated logs:

---
---
title: skywalking
keywords:
- Apache APISIX
- API Gateway
- Plugin
- SkyWalking
description: The skywalking Plugin supports the integrating with Apache SkyWalking for request tracing.
---
## Description
The `skywalking` Plugin supports the integrating with [Apache SkyWalking](https://skywalking.apache.org) for request tracing.
SkyWalking uses its native Nginx Lua tracer to provide tracing, topology analysis, and metrics from both service and URI perspectives. APISIX supports HTTP protocol to interact with the SkyWalking server.
The server currently supports two protocols: HTTP and gRPC. In APISIX, only HTTP is currently supported.
## Static Configurations
By default, service names and endpoint address for the Plugin are pre-configured in the [default configuration](https://github.com/apache/apisix/blob/master/apisix/cli/config.lua).
To customize these values, add the corresponding configurations to `config.yaml`. For example:
```yaml
plugin_attr:
skywalking:
report_interval: 3 # Reporting interval time in seconds.
service_name: APISIX # Service name for SkyWalking reporter.
service_instance_name: "APISIX Instance Name" # Service instance name for SkyWalking reporter.
# Set to $hostname to get the local hostname.
endpoint_addr: http://127.0.0.1:12800 # SkyWalking HTTP endpoint.
```
Reload APISIX for changes to take effect.
## Attributes
| Name | Type | Required | Default | Valid values | Description |
|--------------|--------|----------|---------|--------------|----------------------------------------------------------------------------|
| sample_ratio | number | True | 1 | [0.00001, 1] | Frequency of request sampling. Setting the sample ratio to `1` means to sample all requests. |
## Example
To follow along the example, start a storage, OAP and Booster UI with Docker Compose, following [Skywalking's documentation](https://skywalking.apache.org/docs/main/next/en/setup/backend/backend-docker/). Once set up, the OAP server should be listening on `12800` and you should be able to access the UI at [http://localhost:8080](http://localhost:8080).
Update APISIX configuration file to enable the `skywalking` plugin, which is disabled by default, and update the endpoint address:
```yaml title="config.yaml"
plugins:
- skywalking
- ...
plugin_attr:
skywalking:
report_interval: 3
service_name: APISIX
service_instance_name: APISIX Instance
endpoint_addr: http://192.168.2.103:12800
```
Reload APISIX for configuration changes to take effect.
:::note
You can fetch the `admin_key` from `config.yaml` and save to an environment variable with the following command:
```bash
admin_key=$(yq '.deployment.admin.admin_key[0].key' conf/config.yaml | sed 's/"//g')
```
:::
### Trace All Requests
The following example demonstrates how you can trace all requests passing through a Route.
Create a Route with `skywalking` and configure the sampling ratio to be 1 to trace all requests:
```shell
curl "http://127.0.0.1:9180/apisix/admin/routes" -X PUT \
-H "X-API-KEY: ${admin_key}" \
-d '{
"id": "skywalking-route",
"uri": "/anything",
"plugins": {
"skywalking": {
"sample_ratio": 1
}
},
"upstream": {
"nodes": {
"httpbin.org:80": 1
},
"type": "roundrobin"
}
}'
```
Send a few requests to the Route:
```shell
curl -i "http://127.0.0.1:9080/anything"
```
You should receive `HTTP/1.1 200 OK` responses.
In [Skywalking UI](http://localhost:8080), navigate to __General Service__ > __Services__. You should see a service called `APISIX` with traces corresponding to your requests:
### Associate Traces with Logs
The following example demonstrates how you can configure the `skywalking-logger` Plugin on a Route to log information of requests hitting the Route.
Create a Route with the `skywalking-logger` Plugin and configure the Plugin with your OAP server URI:
```shell
curl "http://127.0.0.1:9180/apisix/admin/routes" -X PUT \
-H "X-API-KEY: ${admin_key}" \
-d '{
"id": "skywalking-logger-route",
"uri": "/anything",
"plugins": {
"skywalking": {
"sample_ratio": 1
},
"skywalking-logger": {
"endpoint_addr": "http://192.168.2.103:12800"
}
},
"upstream": {
"nodes": {
"httpbin.org:80": 1
},
"type": "roundrobin"
}
}'
```
Generate a few requests to the Route:
```shell
curl -i "http://127.0.0.1:9080/anything"
```
You should receive `HTTP/1.1 200 OK` responses.
In [Skywalking UI](http://localhost:8080), navigate to __General Service__ > __Services__. You should see a service called `APISIX` with a trace corresponding to your request, where you can view the associated logs:


---
---
title: sls-logger
keywords:
- Apache APISIX
- API Gateway
- Plugin
- SLS Logger
- Alibaba Cloud Log Service
description: This document contains information about the Apache APISIX sls-logger Plugin.
---
## Description
The `sls-logger` Plugin is used to push logs to [Alibaba Cloud log Service](https://www.alibabacloud.com/help/en/log-service/latest/use-the-syslog-protocol-to-upload-logs) using [RF5424](https://tools.ietf.org/html/rfc5424).
It might take some time to receive the log data. It will be automatically sent after the timer function in the [batch processor](../batch-processor.md) expires.
## Attributes
| Name | Required | Description |
|-------------------|----------|-------------------------------------------------------------------------------------------------------------------------------------------------------------------------------------------------------------------------------------------------|
| host | True | IP address or the hostname of the TCP server. See [Alibaba Cloud log service documentation](https://www.alibabacloud.com/help/en/log-service/latest/endpoints) for details. Use IP address instead of domain. |
| port | True | Target upstream port. Defaults to `10009`. |
| timeout | False | Timeout for the upstream to send data. |
| log_format | False | Log format declared as key-value pairs in JSON. Values support strings and nested objects (up to five levels deep; deeper fields are truncated). Within strings, [APISIX](../apisix-variable.md) or [NGINX](http://nginx.org/en/docs/varindex.html) variables can be referenced by prefixing with `$`. |
| project | True | Project name in Alibaba Cloud log service. Create SLS before using this Plugin. |
| logstore | True | logstore name in Ali Cloud log service. Create SLS before using this Plugin. |
| access_key_id | True | AccessKey ID in Alibaba Cloud. See [Authorization](https://www.alibabacloud.com/help/en/log-service/latest/create-a-ram-user-and-authorize-the-ram-user-to-access-log-service) for more details. |
| access_key_secret | True | AccessKey Secret in Alibaba Cloud. See [Authorization](https://www.alibabacloud.com/help/en/log-service/latest/create-a-ram-user-and-authorize-the-ram-user-to-access-log-service) for more details. |
| include_req_body | True | When set to `true`, includes the request body in the log. |
| include_req_body_expr | No | Filter for when the `include_req_body` attribute is set to `true`. Request body is only logged when the expression set here evaluates to `true`. See [lua-resty-expr](https://github.com/api7/lua-resty-expr) for more. |
| include_resp_body | No | When set to `true` includes the response body in the log. |
| include_resp_body_expr | No | Filter for when the `include_resp_body` attribute is set to `true`. Response body is only logged when the expression set here evaluates to `true`. See [lua-resty-expr](https://github.com/api7/lua-resty-expr) for more. |
| name | False | Unique identifier for the batch processor. If you use Prometheus to monitor APISIX metrics, the name is exported in `apisix_batch_process_entries`. |
NOTE: `encrypt_fields = {"access_key_secret"}` is also defined in the schema, which means that the field will be stored encrypted in etcd. See [encrypted storage fields](../plugin-develop.md#encrypted-storage-fields).
This Plugin supports using batch processors to aggregate and process entries (logs/data) in a batch. This avoids the need for frequently submitting the data. The batch processor submits data every `5` seconds or when the data in the queue reaches `1000`. See [Batch Processor](../batch-processor.md#configuration) for more information or setting your custom configuration.
### Example of default log format
```json
{
"route_conf": {
"host": "100.100.99.135",
"buffer_duration": 60,
"timeout": 30000,
"include_req_body": false,
"logstore": "your_logstore",
"log_format": {
"vip": "$remote_addr"
},
"project": "your_project",
"inactive_timeout": 5,
"access_key_id": "your_access_key_id",
"access_key_secret": "your_access_key_secret",
"batch_max_size": 1000,
"max_retry_count": 0,
"retry_delay": 1,
"port": 10009,
"name": "sls-logger"
},
"data": "<46>1 2024-01-06T03:29:56.457Z localhost apisix 28063 - [logservice project=\"your_project\" logstore=\"your_logstore\" access-key-id=\"your_access_key_id\" access-key-secret=\"your_access_key_secret\"] {\"vip\":\"127.0.0.1\",\"route_id\":\"1\"}\n"
}
```
## Metadata
You can also set the format of the logs by configuring the Plugin metadata. The following configurations are available:
| Name | Type | Required | Default | Description |
| ---------- | ------ | -------- | ----------------------------------------------------------------------------- | ------------------------------------------------------------------------------------------------------------------------------------------------------------------------------------------------------------------------------------------------------- |
| log_format | object | False | | Log format declared as key-value pairs in JSON. Values support strings and nested objects (up to five levels deep; deeper fields are truncated). Within strings, [APISIX](../apisix-variable.md) or [NGINX](http://nginx.org/en/docs/varindex.html) variables can be referenced by prefixing with `$`. |
:::info IMPORTANT
Configuring the Plugin metadata is global in scope. This means that it will take effect on all Routes and Services which use the `sls-logger` Plugin.
:::
The example below shows how you can configure through the Admin API:
:::note
You can fetch the `admin_key` from `config.yaml` and save to an environment variable with the following command:
```bash
admin_key=$(yq '.deployment.admin.admin_key[0].key' conf/config.yaml | sed 's/"//g')
```
:::
```shell
curl http://127.0.0.1:9180/apisix/admin/plugin_metadata/sls-logger -H "X-API-KEY: $admin_key" -X PUT -d '
{
"log_format": {
"host": "$host",
"@timestamp": "$time_iso8601",
"client_ip": "$remote_addr",
"request": { "method": "$request_method", "uri": "$request_uri" },
"response": { "status": "$status" }
}
}'
```
With this configuration, your logs would be formatted as shown below:
```shell
{"host":"localhost","@timestamp":"2020-09-23T19:05:05-04:00","client_ip":"127.0.0.1","request":{"method":"GET","uri":"/hello"},"response":{"status":200},"route_id":"1"}
{"host":"localhost","@timestamp":"2020-09-23T19:05:05-04:00","client_ip":"127.0.0.1","request":{"method":"GET","uri":"/hello"},"response":{"status":200},"route_id":"1"}
```
## Enable Plugin
The example below shows how you can configure the Plugin on a specific Route:
```shell
curl http://127.0.0.1:9180/apisix/admin/routes/5 -H "X-API-KEY: $admin_key" -X PUT -d '
{
"plugins": {
"sls-logger": {
"host": "100.100.99.135",
"port": 10009,
"project": "your_project",
"logstore": "your_logstore",
"access_key_id": "your_access_key_id",
"access_key_secret": "your_access_key_secret",
"timeout": 30000
}
},
"upstream": {
"type": "roundrobin",
"nodes": {
"127.0.0.1:1980": 1
}
},
"uri": "/hello"
}'
```
## Example usage
Now, if you make a request to APISIX, it will be logged in your Ali Cloud log server:
```shell
curl -i http://127.0.0.1:9080/hello
```
Now if you check your Ali Cloud log server, you will be able to see the logs:

## Delete Plugin
To remove the `sls-logger` Plugin, you can delete the corresponding JSON configuration from the Plugin configuration. APISIX will automatically reload and you do not have to restart for this to take effect.
```shell
curl http://127.0.0.1:9180/apisix/admin/routes/1 -H "X-API-KEY: $admin_key" -X PUT -d '
{
"uri": "/hello",
"plugins": {},
"upstream": {
"type": "roundrobin",
"nodes": {
"127.0.0.1:1980": 1
}
}
}'
```
---
---
title: splunk-hec-logging
keywords:
- Apache APISIX
- API Gateway
- Plugin
- Splunk HTTP Event Collector
- splunk-hec-logging
description: This document contains information about the Apache APISIX splunk-hec-logging Plugin.
---
## Description
The `splunk-hec-logging` Plugin is used to forward logs to [Splunk HTTP Event Collector (HEC)](https://docs.splunk.com/Documentation/Splunk/8.2.6/Data/UsetheHTTPEventCollector) for analysis and storage.
When the Plugin is enabled, APISIX will serialize the request context information to [Splunk Event Data format](https://docs.splunk.com/Documentation/Splunk/latest/Data/FormateventsforHTTPEventCollector#Event_metadata) and submit it to the batch queue. When the maximum batch size is exceeded, the data in the queue is pushed to Splunk HEC. See [batch processor](../batch-processor.md) for more details.
## Attributes
| Name | Required | Default | Description |
|------------------|----------|---------|----------------------------------------------------------------------------------------------------------------------------------------------------------------------------------|
| endpoint | True | | Splunk HEC endpoint configurations. |
| endpoint.uri | True | | Splunk HEC event collector API endpoint. |
| endpoint.token | True | | Splunk HEC authentication token. |
| endpoint.channel | False | | Splunk HEC send data channel identifier. Read more: [About HTTP Event Collector Indexer Acknowledgment](https://docs.splunk.com/Documentation/Splunk/8.2.3/Data/AboutHECIDXAck). |
| endpoint.timeout | False | 10 | Splunk HEC send data timeout in seconds. |
| endpoint.keepalive_timeout | False | 60000 | Keepalive timeout in milliseconds. |
| ssl_verify | False | true | When set to `true` enables SSL verification as per [OpenResty docs](https://github.com/openresty/lua-nginx-module#tcpsocksslhandshake). |
| log_format | False | | Log format declared as key-value pairs in JSON. Values support strings and nested objects (up to five levels deep; deeper fields are truncated). Within strings, [APISIX](../apisix-variable.md) or [NGINX](http://nginx.org/en/docs/varindex.html) variables can be referenced by prefixing with `$`. |
This Plugin supports using batch processors to aggregate and process entries (logs/data) in a batch. This avoids the need for frequently submitting the data. The batch processor submits data every `5` seconds or when the data in the queue reaches `1000`. See [Batch Processor](../batch-processor.md#configuration) for more information or setting your custom configuration.
### Example of default log format
```json
{
"sourcetype": "_json",
"time": 1704513555.392,
"event": {
"upstream": "127.0.0.1:1980",
"request_url": "http://localhost:1984/hello",
"request_query": {},
"request_size": 59,
"response_headers": {
"content-length": "12",
"server": "APISIX/3.7.0",
"content-type": "text/plain",
"connection": "close"
},
"response_status": 200,
"response_size": 118,
"latency": 108.00004005432,
"request_method": "GET",
"request_headers": {
"connection": "close",
"host": "localhost"
}
},
"source": "apache-apisix-splunk-hec-logging",
"host": "localhost"
}
```
## Metadata
You can also set the format of the logs by configuring the Plugin metadata. The following configurations are available:
| Name | Type | Required | Default | Description |
| ---------- | ------ | -------- | ----------------------------------------------------------------------------- | ------------------------------------------------------------------------------------------------------------------------------------------------------------------------------------------------------------------------------------------------------- |
| log_format | object | False | | Log format declared as key-value pairs in JSON. Values support strings and nested objects (up to five levels deep; deeper fields are truncated). Within strings, [APISIX](../apisix-variable.md) or [NGINX](http://nginx.org/en/docs/varindex.html) variables can be referenced by prefixing with `$`. |
| max_pending_entries | integer | False | | Maximum number of pending entries that can be buffered in batch processor before it starts dropping them. |
:::info IMPORTANT
Configuring the Plugin metadata is global in scope. This means that it will take effect on all Routes and Services which use the `splunk-hec-logging` Plugin.
:::
The example below shows how you can configure through the Admin API:
:::note
You can fetch the `admin_key` from `config.yaml` and save to an environment variable with the following command:
```bash
admin_key=$(yq '.deployment.admin.admin_key[0].key' conf/config.yaml | sed 's/"//g')
```
:::
```shell
curl http://127.0.0.1:9180/apisix/admin/plugin_metadata/splunk-hec-logging -H "X-API-KEY: $admin_key" -X PUT -d '
{
"log_format": {
"host": "$host",
"@timestamp": "$time_iso8601",
"client_ip": "$remote_addr",
"request": { "method": "$request_method", "uri": "$request_uri" },
"response": { "status": "$status" }
}
}'
```
With this configuration, your logs would be formatted as shown below:
```json
[{"time":1673976669.269,"source":"apache-apisix-splunk-hec-logging","event":{"host":"localhost","client_ip":"127.0.0.1","@timestamp":"2023-01-09T14:47:25+08:00","request":{"method":"GET","uri":"/splunk.do"},"response":{"status":200},"route_id":"1"},"host":"DESKTOP-2022Q8F-wsl","sourcetype":"_json"}]
```
## Enable Plugin
### Full configuration
The example below shows a complete configuration of the Plugin on a specific Route:
```shell
curl http://127.0.0.1:9180/apisix/admin/routes/1 -H "X-API-KEY: $admin_key" -X PUT -d '
{
"plugins":{
"splunk-hec-logging":{
"endpoint":{
"uri":"http://127.0.0.1:8088/services/collector",
"token":"BD274822-96AA-4DA6-90EC-18940FB2414C",
"channel":"FE0ECFAD-13D5-401B-847D-77833BD77131",
"timeout":60
},
"buffer_duration":60,
"max_retry_count":0,
"retry_delay":1,
"inactive_timeout":2,
"batch_max_size":10
}
},
"upstream":{
"type":"roundrobin",
"nodes":{
"127.0.0.1:1980":1
}
},
"uri":"/splunk.do"
}'
```
### Minimal configuration
The example below shows a bare minimum configuration of the Plugin on a Route:
```shell
curl http://127.0.0.1:9180/apisix/admin/routes/1 -H "X-API-KEY: $admin_key" -X PUT -d '
{
"plugins":{
"splunk-hec-logging":{
"endpoint":{
"uri":"http://127.0.0.1:8088/services/collector",
"token":"BD274822-96AA-4DA6-90EC-18940FB2414C"
}
}
},
"upstream":{
"type":"roundrobin",
"nodes":{
"127.0.0.1:1980":1
}
},
"uri":"/splunk.do"
}'
```
## Example usage
Once you have configured the Route to use the Plugin, when you make a request to APISIX, it will be logged in your Splunk server:
```shell
curl -i http://127.0.0.1:9080/splunk.do?q=hello
```
You should be able to login and search these logs from your Splunk dashboard:

## Delete Plugin
To remove the `splunk-hec-logging` Plugin, you can delete the corresponding JSON configuration from the Plugin configuration. APISIX will automatically reload and you do not have to restart for this to take effect.
```shell
curl http://127.0.0.1:9180/apisix/admin/routes/1 -H "X-API-KEY: $admin_key" -X PUT -d '
{
"uri": "/hello",
"plugins": {},
"upstream": {
"type": "roundrobin",
"nodes": {
"127.0.0.1:1980": 1
}
}
}'
```
---
---
title: syslog
keywords:
- Apache APISIX
- API Gateway
- Plugin
- Syslog
description: This document contains information about the Apache APISIX syslog Plugin.
---
## Description
The `syslog` Plugin is used to push logs to a Syslog server.
Logs can be set as JSON objects.
## Attributes
| Name | Type | Required | Default | Valid values | Description |
|------------------|---------|----------|--------------|---------------|--------------------------------------------------------------------------------------------------------------------------|
| host | string | True | | | IP address or the hostname of the Syslog server. |
| port | integer | True | | | Target port of the Syslog server. |
| name | string | False | "sys logger" | | Identifier for the server. If you use Prometheus to monitor APISIX metrics, the name is exported in `apisix_batch_process_entries`. |
| timeout | integer | False | 3000 | [1, ...] | Timeout in ms for the upstream to send data. |
| tls | boolean | False | false | | When set to `true` performs TLS verification. |
| flush_limit | integer | False | 4096 | [1, ...] | Maximum size of the buffer (KB) and the current message before it is flushed and written to the server. |
| drop_limit | integer | False | 1048576 | | Maximum size of the buffer (KB) and the current message before the current message is dropped because of the size limit. |
| sock_type | string | False | "tcp" | ["tcp", "udp] | Transport layer protocol to use. |
| pool_size | integer | False | 5 | [5, ...] | Keep-alive pool size used by `sock:keepalive`. |
| log_format | object | False | | | Log format declared as key-value pairs in JSON. Values support strings and nested objects (up to five levels deep; deeper fields are truncated). Within strings, [APISIX](../apisix-variable.md) or [NGINX](http://nginx.org/en/docs/varindex.html) variables can be referenced by prefixing with `$`. |
| include_req_body | boolean | False | false | [false, true] | When set to `true` includes the request body in the log. |
| include_req_body_expr | array | False | | | Filter for when the `include_req_body` attribute is set to `true`. Request body is only logged when the expression set here evaluates to `true`. See [lua-resty-expr](https://github.com/api7/lua-resty-expr) for more. |
| include_resp_body | boolean | False | false | [false, true] | When set to `true` includes the response body in the log. |
| include_resp_body_expr | array | False | | | When the `include_resp_body` attribute is set to `true`, use this to filter based on [lua-resty-expr](https://github.com/api7/lua-resty-expr). If present, only logs the response if the expression evaluates to `true`. |
This Plugin supports using batch processors to aggregate and process entries (logs/data) in a batch. This avoids the need for frequently submitting the data. The batch processor submits data every `5` seconds or when the data in the queue reaches `1000`. See [Batch Processor](../batch-processor.md#configuration) for more information or setting your custom configuration.
### meta_format example
```text
"<46>1 2024-01-06T02:30:59.145Z 127.0.0.1 apisix 82324 - - {\"response\":{\"status\":200,\"size\":141,\"headers\":{\"content-type\":\"text/plain\",\"server\":\"APISIX/3.7.0\",\"transfer-encoding\":\"chunked\",\"connection\":\"close\"}},\"route_id\":\"1\",\"server\":{\"hostname\":\"baiyundeMacBook-Pro.local\",\"version\":\"3.7.0\"},\"request\":{\"uri\":\"/opentracing\",\"url\":\"http://127.0.0.1:1984/opentracing\",\"querystring\":{},\"method\":\"GET\",\"size\":155,\"headers\":{\"content-type\":\"application/x-www-form-urlencoded\",\"host\":\"127.0.0.1:1984\",\"user-agent\":\"lua-resty-http/0.16.1 (Lua) ngx_lua/10025\"}},\"upstream\":\"127.0.0.1:1982\",\"apisix_latency\":100.99999809265,\"service_id\":\"\",\"upstream_latency\":1,\"start_time\":1704508259044,\"client_ip\":\"127.0.0.1\",\"latency\":101.99999809265}\n"
```
## Metadata
You can also set the format of the logs by configuring the Plugin metadata. The following configurations are available:
| Name | Type | Required | Default | Description |
| ---------- | ------ | -------- | ----------------------------------------------------------------------------- | ------------------------------------------------------------------------------------------------------------------------------------------------------------------------------------------------------------------------------------------------------- |
| log_format | object | False | | Log format declared as key-value pairs in JSON. Values support strings and nested objects (up to five levels deep; deeper fields are truncated). Within strings, [APISIX](../apisix-variable.md) or [NGINX](http://nginx.org/en/docs/varindex.html) variables can be referenced by prefixing with `$`. |
:::info IMPORTANT
Configuring the Plugin metadata is global in scope. This means that it will take effect on all Routes and Services which use the `syslog` Plugin.
:::
The example below shows how you can configure through the Admin API:
:::note
You can fetch the `admin_key` from `config.yaml` and save to an environment variable with the following command:
```bash
admin_key=$(yq '.deployment.admin.admin_key[0].key' conf/config.yaml | sed 's/"//g')
```
:::
```shell
curl http://127.0.0.1:9180/apisix/admin/plugin_metadata/syslog -H "X-API-KEY: $admin_key" -X PUT -d '
{
"log_format": {
"host": "$host",
"@timestamp": "$time_iso8601",
"client_ip": "$remote_addr",
"request": { "method": "$request_method", "uri": "$request_uri" },
"response": { "status": "$status" }
}
}'
```
With this configuration, your logs would be formatted as shown below:
```shell
{"host":"localhost","@timestamp":"2020-09-23T19:05:05-04:00","client_ip":"127.0.0.1","request":{"method":"GET","uri":"/hello"},"response":{"status":200},"route_id":"1"}
{"host":"localhost","@timestamp":"2020-09-23T19:05:05-04:00","client_ip":"127.0.0.1","request":{"method":"GET","uri":"/hello"},"response":{"status":200},"route_id":"1"}
```
## Enable Plugin
The example below shows how you can enable the Plugin for a specific Route:
```shell
curl http://127.0.0.1:9180/apisix/admin/routes/1 -H "X-API-KEY: $admin_key" -X PUT -d '
{
"plugins": {
"syslog": {
"host" : "127.0.0.1",
"port" : 5044,
"flush_limit" : 1
}
},
"upstream": {
"type": "roundrobin",
"nodes": {
"127.0.0.1:1980": 1
}
},
"uri": "/hello"
}'
```
## Example usage
Now, if you make a request to APISIX, it will be logged in your Syslog server:
```shell
curl -i http://127.0.0.1:9080/hello
```
## Delete Plugin
To remove the `syslog` Plugin, you can delete the corresponding JSON configuration from the Plugin configuration. APISIX will automatically reload and you do not have to restart for this to take effect.
```shell
curl http://127.0.0.1:9180/apisix/admin/routes/1 -H "X-API-KEY: $admin_key" -X PUT -d '
{
"methods": ["GET"],
"uri": "/hello",
"plugins": {},
"upstream": {
"type": "roundrobin",
"nodes": {
"127.0.0.1:1980": 1
}
}
}'
```
---
---
title: tcp-logger
keywords:
- Apache APISIX
- API Gateway
- Plugin
- TCP Logger
- tcp-logger
description: This document contains information about the Apache APISIX tcp-logger Plugin.
---
## Description
The `tcp-logger` Plugin can be used to push log data requests to TCP servers.
This provides the ability to send log data requests as JSON objects to monitoring tools and other TCP servers.
This plugin also allows to push logs as a batch to your external TCP server. It might take some time to receive the log data. It will be automatically sent after the timer function in the [batch processor](../batch-processor.md) expires.
## Attributes
| Name | Type | Required | Default | Valid values | Description |
|------------------|---------|----------|---------|--------------|----------------------------------------------------------|
| host | string | True | | | IP address or the hostname of the TCP server. |
| port | integer | True | | [0,...] | Target upstream port. |
| timeout | integer | False | 1000 | [1,...] | Timeout for the upstream to send data. |
| log_format | object | False | | | Log format declared as key-value pairs in JSON. Values support strings and nested objects (up to five levels deep; deeper fields are truncated). Within strings, [APISIX](../apisix-variable.md) or [NGINX](http://nginx.org/en/docs/varindex.html) variables can be referenced by prefixing with `$`. |
| tls | boolean | False | false | | When set to `true` performs SSL verification. |
| tls_options | string | False | | | TLS options. |
| include_req_body | boolean | False | false | [false, true] | When set to `true` includes the request body in the log. |
| include_req_body_expr | array | No | | | Filter for when the `include_req_body` attribute is set to `true`. Request body is only logged when the expression set here evaluates to `true`. See [lua-resty-expr](https://github.com/api7/lua-resty-expr) for more. |
| include_resp_body | boolean | No | false | [false, true] | When set to `true` includes the response body in the log. |
| include_resp_body_expr | array | No | | | Filter for when the `include_resp_body` attribute is set to `true`. Response body is only logged when the expression set here evaluates to `true`. See [lua-resty-expr](https://github.com/api7/lua-resty-expr) for more. |
This Plugin supports using batch processors to aggregate and process entries (logs/data) in a batch. This avoids the need for frequently submitting the data. The batch processor submits data every `5` seconds or when the data in the queue reaches `1000`. See [Batch Processor](../batch-processor.md#configuration) for more information or setting your custom configuration.
### Example of default log format
```json
{
"response": {
"status": 200,
"headers": {
"server": "APISIX/3.7.0",
"content-type": "text/plain",
"content-length": "12",
"connection": "close"
},
"size": 118
},
"server": {
"version": "3.7.0",
"hostname": "localhost"
},
"start_time": 1704527628474,
"client_ip": "127.0.0.1",
"service_id": "",
"latency": 102.9999256134,
"apisix_latency": 100.9999256134,
"upstream_latency": 2,
"request": {
"headers": {
"connection": "close",
"host": "localhost"
},
"size": 59,
"method": "GET",
"uri": "/hello",
"url": "http://localhost:1984/hello",
"querystring": {}
},
"upstream": "127.0.0.1:1980",
"route_id": "1"
}
```
## Metadata
You can also set the format of the logs by configuring the Plugin metadata. The following configurations are available:
| Name | Type | Required | Default | Description |
| ---------- | ------ | -------- | ----------------------------------------------------------------------------- | ------------------------------------------------------------------------------------------------------------------------------------------------------------------------------------------------------------------------------------------------------- |
| log_format | object | False | | Log format declared as key-value pairs in JSON. Values support strings and nested objects (up to five levels deep; deeper fields are truncated). Within strings, [APISIX](../apisix-variable.md) or [NGINX](http://nginx.org/en/docs/varindex.html) variables can be referenced by prefixing with `$`. |
| max_pending_entries | integer | False | | Maximum number of pending entries that can be buffered in batch processor before it starts dropping them. |
:::info IMPORTANT
Configuring the Plugin metadata is global in scope. This means that it will take effect on all Routes and Services which use the `tcp-logger` Plugin.
:::
The example below shows how you can configure through the Admin API:
:::note
You can fetch the `admin_key` from `config.yaml` and save to an environment variable with the following command:
```bash
admin_key=$(yq '.deployment.admin.admin_key[0].key' conf/config.yaml | sed 's/"//g')
```
:::
```shell
curl http://127.0.0.1:9180/apisix/admin/plugin_metadata/tcp-logger -H "X-API-KEY: $admin_key" -X PUT -d '
{
"log_format": {
"host": "$host",
"@timestamp": "$time_iso8601",
"client_ip": "$remote_addr",
"request": { "method": "$request_method", "uri": "$request_uri" },
"response": { "status": "$status" }
}
}'
```
With this configuration, your logs would be formatted as shown below:
```json
{"@timestamp":"2023-01-09T14:47:25+08:00","route_id":"1","host":"localhost","client_ip":"127.0.0.1","request":{"method":"GET","uri":"/hello"},"response":{"status":200}}
```
## Enable Plugin
The example below shows how you can enable the `tcp-logger` Plugin on a specific Route:
```shell
curl http://127.0.0.1:9180/apisix/admin/routes/5 -H "X-API-KEY: $admin_key" -X PUT -d '
{
"plugins": {
"tcp-logger": {
"host": "127.0.0.1",
"port": 5044,
"tls": false,
"batch_max_size": 1,
"name": "tcp logger"
}
},
"upstream": {
"type": "roundrobin",
"nodes": {
"127.0.0.1:1980": 1
}
},
"uri": "/hello"
}'
```
## Example usage
Now, if you make a request to APISIX, it will be logged in your TCP server:
```shell
curl -i http://127.0.0.1:9080/hello
```
## Delete Plugin
To remove the `tcp-logger` Plugin, you can delete the corresponding JSON configuration from the Plugin configuration. APISIX will automatically reload and you do not have to restart for this to take effect.
```shell
curl http://127.0.0.1:9180/apisix/admin/routes/1 -H "X-API-KEY: $admin_key" -X PUT -d '
{
"methods": ["GET"],
"uri": "/hello",
"plugins": {},
"upstream": {
"type": "roundrobin",
"nodes": {
"127.0.0.1:1980": 1
}
}
}'
```
---
---
title: tencent-cloud-cls
keywords:
- Apache APISIX
- API Gateway
- Plugin
- CLS
- Tencent Cloud
description: This document contains information about the Apache APISIX tencent-cloud-cls Plugin.
---
## Description
The `tencent-cloud-cls` Plugin uses [TencentCloud CLS](https://cloud.tencent.com/document/product/614) API to forward APISIX logs to your topic.
## Attributes
| Name | Type | Required | Default | Valid values | Description |
| ----------------- | ------- |----------|---------|---------------|------------------------------------------------------------------------------------------------------------------------------------------------------------------|
| cls_host | string | Yes | | | CLS API host,please refer [Uploading Structured Logs](https://www.tencentcloud.com/document/api/614/16873). |
| cls_topic | string | Yes | | | topic id of CLS. |
| secret_id | string | Yes | | | SecretId of your API key. |
| secret_key | string | Yes | | | SecretKey of your API key. |
| sample_ratio | number | No | 1 | [0.00001, 1] | How often to sample the requests. Setting to `1` will sample all requests. |
| include_req_body | boolean | No | false | [false, true] | When set to `true` includes the request body in the log. If the request body is too big to be kept in the memory, it can't be logged due to NGINX's limitations. |
| include_req_body_expr | array | No | | | Filter for when the `include_req_body` attribute is set to `true`. Request body is only logged when the expression set here evaluates to `true`. See [lua-resty-expr](https://github.com/api7/lua-resty-expr) for more. |
| include_resp_body | boolean | No | false | [false, true] | When set to `true` includes the response body in the log. |
| include_resp_body_expr | array | No | | | Filter for when the `include_resp_body` attribute is set to `true`. Response body is only logged when the expression set here evaluates to `true`. See [lua-resty-expr](https://github.com/api7/lua-resty-expr) for more. |
| global_tag | object | No | | | kv pairs in JSON,send with each log. |
| log_format | object | No | | | Log format declared as key-value pairs in JSON. Values support strings and nested objects (up to five levels deep; deeper fields are truncated). Within strings, [APISIX](../apisix-variable.md) or [NGINX](http://nginx.org/en/docs/varindex.html) variables can be referenced by prefixing with `$`. |
NOTE: `encrypt_fields = {"secret_key"}` is also defined in the schema, which means that the field will be stored encrypted in etcd. See [encrypted storage fields](../plugin-develop.md#encrypted-storage-fields).
This Plugin supports using batch processors to aggregate and process entries (logs/data) in a batch. This avoids the need for frequently submitting the data. The batch processor submits data every `5` seconds or when the data in the queue reaches `1000`. See [Batch Processor](../batch-processor.md#configuration) for more information or setting your custom configuration.
### Example of default log format
```json
{
"response": {
"headers": {
"content-type": "text/plain",
"connection": "close",
"server": "APISIX/3.7.0",
"transfer-encoding": "chunked"
},
"size": 136,
"status": 200
},
"route_id": "1",
"upstream": "127.0.0.1:1982",
"client_ip": "127.0.0.1",
"apisix_latency": 100.99985313416,
"service_id": "",
"latency": 103.99985313416,
"start_time": 1704525145772,
"server": {
"version": "3.7.0",
"hostname": "localhost"
},
"upstream_latency": 3,
"request": {
"headers": {
"connection": "close",
"host": "localhost"
},
"url": "http://localhost:1984/opentracing",
"querystring": {},
"method": "GET",
"size": 65,
"uri": "/opentracing"
}
}
```
## Metadata
You can also set the format of the logs by configuring the Plugin metadata. The following configurations are available:
| Name | Type | Required | Default | Description |
| ---------- | ------ | -------- | ----------------------------------------------------------------------------- | ------------------------------------------------------------------------------------------------------------------------------------------------------------------------------------------------------------------------------------------------------- |
| log_format | object | False | | Log format declared as key-value pairs in JSON. Values support strings and nested objects (up to five levels deep; deeper fields are truncated). Within strings, [APISIX](../apisix-variable.md) or [NGINX](http://nginx.org/en/docs/varindex.html) variables can be referenced by prefixing with `$`. |
| max_pending_entries | integer | False | | Maximum number of pending entries that can be buffered in batch processor before it starts dropping them. |
:::info IMPORTANT
Configuring the Plugin metadata is global in scope. This means that it will take effect on all Routes and Services which use the `tencent-cloud-cls` Plugin.
:::
The example below shows how you can configure through the Admin API:
:::note
You can fetch the `admin_key` from `config.yaml` and save to an environment variable with the following command:
```bash
admin_key=$(yq '.deployment.admin.admin_key[0].key' conf/config.yaml | sed 's/"//g')
```
:::
```shell
curl http://127.0.0.1:9180/apisix/admin/plugin_metadata/tencent-cloud-cls \
-H "X-API-KEY: $admin_key" -X PUT -d '
{
"log_format": {
"host": "$host",
"@timestamp": "$time_iso8601",
"client_ip": "$remote_addr",
"request": { "method": "$request_method", "uri": "$request_uri" },
"response": { "status": "$status" }
}
}'
```
With this configuration, your logs would be formatted as shown below:
```shell
{"host":"localhost","@timestamp":"2020-09-23T19:05:05-04:00","client_ip":"127.0.0.1","request":{"method":"GET","uri":"/hello"},"response":{"status":200},"route_id":"1"}
{"host":"localhost","@timestamp":"2020-09-23T19:05:05-04:00","client_ip":"127.0.0.1","request":{"method":"GET","uri":"/hello"},"response":{"status":200},"route_id":"1"}
```
## Enable Plugin
The example below shows how you can enable the Plugin on a specific Route:
```shell
curl http://127.0.0.1:9180/apisix/admin/routes/1 \
-H "X-API-KEY: $admin_key" -X PUT -d '
{
"plugins": {
"tencent-cloud-cls": {
"cls_host": "ap-guangzhou.cls.tencentyun.com",
"cls_topic": "${your CLS topic name}",
"global_tag": {
"module": "cls-logger",
"server_name": "YourApiGateWay"
},
"include_req_body": true,
"include_resp_body": true,
"secret_id": "${your secret id}",
"secret_key": "${your secret key}"
}
},
"upstream": {
"type": "roundrobin",
"nodes": {
"127.0.0.1:1980": 1
}
},
"uri": "/hello"
}'
```
## Example usage
Now, if you make a request to APISIX, it will be logged in your cls topic:
```shell
curl -i http://127.0.0.1:9080/hello
```
## Delete Plugin
To disable this Plugin, you can delete the corresponding JSON configuration from the Plugin configuration. APISIX will automatically reload and you do not have to restart for this to take effect.
```shell
curl http://127.0.0.1:9180/apisix/admin/routes/1 \
-H "X-API-KEY: $admin_key" -X PUT -d '
{
"uri": "/hello",
"plugins": {},
"upstream": {
"type": "roundrobin",
"nodes": {
"127.0.0.1:1980": 1
}
}
}'
```
---
---
title: traffic-split
keywords:
- Apache APISIX
- API Gateway
- Traffic Split
- Blue-green Deployment
- Canary Deployment
description: The traffic-split Plugin directs traffic to various Upstream services based on conditions and/or weights. It provides a dynamic and flexible approach to implement release strategies and manage traffic.
---
## Description
The `traffic-split` Plugin directs traffic to various Upstream services based on conditions and/or weights. It provides a dynamic and flexible approach to implement release strategies and manage traffic.
:::note
The traffic ratio between Upstream services may be less accurate since round robin algorithm is used to direct traffic (especially when the state is reset).
:::
## Attributes
| Name | Type | Required | Default | Valid values | Description |
|--------------------------------|----------------|----------|------------|-----------------------------|-----------------------------------------------------------------------------------------------------------------------------------------------------------------------------------------------------------------------------------------------------------------------------------------------------------------------------------------------------------|
| rules.match | array[object] | False | | | An array of one or more pairs of matching conditions and actions to be executed. |
| rules.match | array[object] | False | | | Rules to match for conditional traffic split. |
| rules.match.vars | array[array] | False | | | An array of one or more matching conditions in the form of [lua-resty-expr](https://github.com/api7/lua-resty-expr#operator-list) to conditionally execute the plugin. |
| rules.weighted_upstreams | array[object] | False | | | List of Upstream configurations. |
| rules.weighted_upstreams.upstream_id | string/integer | False | | | ID of the configured Upstream object. |
| rules.weighted_upstreams.weight | integer | False | weight = 1 | | Weight for each upstream. |
| rules.weighted_upstreams.upstream | object | False | | | Configuration of the upstream. Certain configuration options Upstream are not supported here. These fields are `service_name`, `discovery_type`, `checks`, `retries`, `retry_timeout`, `desc`, and `labels`. As a workaround, you can create an Upstream object and configure it in `upstream_id`. |
| rules.weighted_upstreams.upstream.type | array | False | roundrobin | [roundrobin, chash] | Algorithm for traffic splitting. `roundrobin` for weighted round robin and `chash` for consistent hashing. |
| rules.weighted_upstreams.upstream.hash_on | array | False | vars | | Used when `type` is `chash`. Support hashing on [NGINX variables](https://nginx.org/en/docs/varindex.html), headers, cookie, Consumer, or a combination of [NGINX variables](https://nginx.org/en/docs/varindex.html). |
| rules.weighted_upstreams.upstream.key | string | False | | | Used when `type` is `chash`. When `hash_on` is set to `header` or `cookie`, `key` is required. When `hash_on` is set to `consumer`, `key` is not required as the Consumer name will be used as the key automatically. |
| rules.weighted_upstreams.upstream.nodes | object | False | | | Addresses of the Upstream nodes. |
| rules.weighted_upstreams.upstream.timeout | object | False | 15 | | Timeout in seconds for connecting, sending and receiving messages. |
| rules.weighted_upstreams.upstream.pass_host | array | False | "pass" | ["pass", "node", "rewrite"] | Mode deciding how the host name is passed. `pass` passes the client's host name to the upstream. `node` passes the host configured in the node of the upstream. `rewrite` passes the value configured in `upstream_host`. |
| rules.weighted_upstreams.upstream.name | string | False | | | Identifier for the Upstream for specifying service name, usage scenarios, and so on. |
| rules.weighted_upstreams.upstream.upstream_host | string | False | | | Used when `pass_host` is `rewrite`. Host name of the upstream. |
## Examples
The examples below show different use cases for using the `traffic-split` Plugin.
:::note
You can fetch the `admin_key` from `config.yaml` and save to an environment variable with the following command:
```bash
admin_key=$(yq '.deployment.admin.admin_key[0].key' conf/config.yaml | sed 's/"//g')
```
:::
### Implement Canary Release
The following example demonstrates how to implement canary release with this Plugin.
A Canary release is a gradual deployment in which an increasing percentage of traffic is directed to a new release, allowing for a controlled and monitored rollout. This method ensures that any potential issues or bugs in the new release can be identified and addressed early on, before fully redirecting all traffic.
Create a Route and configure `traffic-split` Plugin with the following rules:
```shell
curl "http://127.0.0.1:9180/apisix/admin/routes" -X PUT \
-H "X-API-KEY: ${ADMIN_API_KEY}" \
-d '{
"uri": "/headers",
"id": "traffic-split-route",
"plugins": {
"traffic-split": {
"rules": [
{
"weighted_upstreams": [
{
"upstream": {
"type": "roundrobin",
"scheme": "https",
"pass_host": "node",
"nodes": {
"httpbin.org:443":1
}
},
"weight": 3
},
{
"weight": 2
}
]
}
]
}
},
"upstream": {
"type": "roundrobin",
"scheme": "https",
"pass_host": "node",
"nodes": {
"mock.api7.ai:443":1
}
}
}'
```
The proportion of traffic to each Upstream is determined by the weight of the Upstream relative to the total weight of all upstreams. Here, the total weight is calculated as: 3 + 2 = 5.
Therefore, 60% of the traffic are to be forwarded to `httpbin.org` and the other 40% of the traffic are to be forwarded to `mock.api7.ai`.
Send 10 consecutive requests to the Route to verify:
```shell
resp=$(seq 10 | xargs -I{} curl "http://127.0.0.1:9080/headers" -sL) && \
count_httpbin=$(echo "$resp" | grep "httpbin.org" | wc -l) && \
count_mockapi7=$(echo "$resp" | grep "mock.api7.ai" | wc -l) && \
echo httpbin.org: $count_httpbin, mock.api7.ai: $count_mockapi7
```
You should see a response similar to the following:
```text
httpbin.org: 6, mock.api7.ai: 4
```
Adjust the Upstream weights accordingly to complete the canary release.
### Implement Blue-Green Deployment
The following example demonstrates how to implement blue-green deployment with this Plugin.
Blue-green deployment is a deployment strategy that involves maintaining two identical environments: the _blue_ and the _green_. The blue environment refers to the current production deployment and the green environment refers to the new deployment. Once the green environment is tested to be ready for production, traffic will be routed to the green environment, making it the new production deployment.
Create a Route and configure `traffic-split` Plugin to execute the Plugin to redirect traffic only when the request contains a header `release: new_release`:
```shell
curl "http://127.0.0.1:9180/apisix/admin/routes" -X PUT \
-H "X-API-KEY: ${ADMIN_API_KEY}" \
-d '{
"uri": "/headers",
"id": "traffic-split-route",
"plugins": {
"traffic-split": {
"rules": [
{
"match": [
{
"vars": [
["http_release","==","new_release"]
]
}
],
"weighted_upstreams": [
{
"upstream": {
"type": "roundrobin",
"scheme": "https",
"pass_host": "node",
"nodes": {
"httpbin.org:443":1
}
}
}
]
}
]
}
},
"upstream": {
"type": "roundrobin",
"scheme": "https",
"pass_host": "node",
"nodes": {
"mock.api7.ai:443":1
}
}
}'
```
Send a request to the Route with the `release` header:
```shell
curl "http://127.0.0.1:9080/headers" -H 'release: new_release'
```
You should see a response similar to the following:
```json
{
"headers": {
"Accept": "*/*",
"Host": "httpbin.org",
...
}
}
```
Send a request to the Route without any additional header:
```shell
curl "http://127.0.0.1:9080/headers"
```
You should see a response similar to the following:
```json
{
"headers": {
"accept": "*/*",
"host": "mock.api7.ai",
...
}
}
```
### Define Matching Condition for POST Request With APISIX Expressions
The following example demonstrates how to use [lua-resty-expr](https://github.com/api7/lua-resty-expr#operator-list) in rules to conditionally execute the Plugin when certain condition of a POST request is satisfied.
Create a Route and configure `traffic-split` Plugin with the following rules:
```shell
curl "http://127.0.0.1:9180/apisix/admin/routes" -X PUT \
-H "X-API-KEY: ${ADMIN_API_KEY}" \
-d '{
"uri": "/post",
"methods": ["POST"],
"id": "traffic-split-route",
"plugins": {
"traffic-split": {
"rules": [
{
"match": [
{
"vars": [
["post_arg_id", "==", "1"]
]
}
],
"weighted_upstreams": [
{
"upstream": {
"type": "roundrobin",
"scheme": "https",
"pass_host": "node",
"nodes": {
"httpbin.org:443":1
}
}
}
]
}
]
}
},
"upstream": {
"type": "roundrobin",
"scheme": "https",
"pass_host": "node",
"nodes": {
"mock.api7.ai:443":1
}
}
}'
```
Send a POST request with body `id=1`:
```shell
curl "http://127.0.0.1:9080/post" -X POST \
-H 'Content-Type: application/x-www-form-urlencoded' \
-d 'id=1'
```
You should see a response similar to the following:
```json
{
"args": {},
"data": "",
"files": {},
"form": {
"id": "1"
},
"headers": {
"Accept": "*/*",
"Content-Length": "4",
"Content-Type": "application/x-www-form-urlencoded",
"Host": "httpbin.org",
...
},
...
}
```
Send a POST request without `id=1` in the body:
```shell
curl "http://127.0.0.1:9080/post" -X POST \
-H 'Content-Type: application/x-www-form-urlencoded' \
-d 'random=string'
```
You should see that the request was forwarded to `mock.api7.ai`.
### Define AND Matching Conditions With APISIX Expressions
The following example demonstrates how to use [lua-resty-expr](https://github.com/api7/lua-resty-expr#operator-list) in rules to conditionally execute the Plugin when multiple conditions are satisfied.
Create a Route and configure `traffic-split` Plugin to redirect traffic only when all three conditions are satisfied:
```shell
curl "http://127.0.0.1:9180/apisix/admin/routes" -X PUT \
-H "X-API-KEY: ${ADMIN_API_KEY}" \
-d '{
"uri": "/headers",
"id": "traffic-split-route",
"plugins": {
"traffic-split": {
"rules": [
{
"match": [
{
"vars": [
["arg_name","==","jack"],
["http_user-id",">","23"],
["http_apisix-key","~~","[a-z]+"]
]
}
],
"weighted_upstreams": [
{
"upstream": {
"type": "roundrobin",
"scheme": "https",
"pass_host": "node",
"nodes": {
"httpbin.org:443":1
}
},
"weight": 3
},
{
"weight": 2
}
]
}
]
}
},
"upstream": {
"type": "roundrobin",
"scheme": "https",
"pass_host": "node",
"nodes": {
"mock.api7.ai:443":1
}
}
}'
```
If conditions are satisfied, 60% of the traffic should be directed to `httpbin.org` and the other 40% should be directed to `mock.api7.ai`. If conditions are not satisfied, all traffic should be directed to `mock.api7.ai`.
Send 10 consecutive requests that satisfy all conditions to verify:
```shell
resp=$(seq 10 | xargs -I{} curl "http://127.0.0.1:9080/headers?name=jack" -H 'user-id: 30' -H 'apisix-key: helloapisix' -sL) && \
count_httpbin=$(echo "$resp" | grep "httpbin.org" | wc -l) && \
count_mockapi7=$(echo "$resp" | grep "mock.api7.ai" | wc -l) && \
echo httpbin.org: $count_httpbin, mock.api7.ai: $count_mockapi7
```
You should see a response similar to the following:
```text
httpbin.org: 6, mock.api7.ai: 4
```
Send 10 consecutive requests that do not satisfy the conditions to verify:
```shell
resp=$(seq 10 | xargs -I{} curl "http://127.0.0.1:9080/headers?name=random" -sL) && \
count_httpbin=$(echo "$resp" | grep "httpbin.org" | wc -l) && \
count_mockapi7=$(echo "$resp" | grep "mock.api7.ai" | wc -l) && \
echo httpbin.org: $count_httpbin, mock.api7.ai: $count_mockapi7
```
You should see a response similar to the following:
```text
httpbin.org: 0, mock.api7.ai: 10
```
### Define OR Matching Conditions With APISIX Expressions
The following example demonstrates how to use [lua-resty-expr](https://github.com/api7/lua-resty-expr#operator-list) in rules to conditionally execute the Plugin when either set of the condition is satisfied.
Create a Route and configure `traffic-split` Plugin to redirect traffic when either set of the configured conditions are satisfied:
```shell
curl "http://127.0.0.1:9180/apisix/admin/routes" -X PUT \
-H "X-API-KEY: ${ADMIN_API_KEY}" \
-d '{
"uri": "/headers",
"id": "traffic-split-route",
"plugins": {
"traffic-split": {
"rules": [
{
"match": [
{
"vars": [
["arg_name","==","jack"],
["http_user-id",">","23"],
["http_apisix-key","~~","[a-z]+"]
]
},
{
"vars": [
["arg_name2","==","rose"],
["http_user-id2","!",">","33"],
["http_apisix-key2","~~","[a-z]+"]
]
}
],
"weighted_upstreams": [
{
"upstream": {
"type": "roundrobin",
"scheme": "https",
"pass_host": "node",
"nodes": {
"httpbin.org:443":1
}
},
"weight": 3
},
{
"weight": 2
}
]
}
]
}
},
"upstream": {
"type": "roundrobin",
"scheme": "https",
"pass_host": "node",
"nodes": {
"mock.api7.ai:443":1
}
}
}'
```
Alternatively, you can also use the OR operator in the [lua-resty-expr](https://github.com/api7/lua-resty-expr#operator-list) for these conditions.
If conditions are satisfied, 60% of the traffic should be directed to `httpbin.org` and the other 40% should be directed to `mock.api7.ai`. If conditions are not satisfied, all traffic should be directed to `mock.api7.ai`.
Send 10 consecutive requests that satisfy the second set of conditions to verify:
```shell
resp=$(seq 10 | xargs -I{} curl "http://127.0.0.1:9080/headers?name2=rose" -H 'user-id:30' -H 'apisix-key2: helloapisix' -sL) && \
count_httpbin=$(echo "$resp" | grep "httpbin.org" | wc -l) && \
count_mockapi7=$(echo "$resp" | grep "mock.api7.ai" | wc -l) && \
echo httpbin.org: $count_httpbin, mock.api7.ai: $count_mockapi7
```
You should see a response similar to the following:
```json
httpbin.org: 6, mock.api7.ai: 4
```
Send 10 consecutive requests that do not satisfy any set of conditions to verify:
```shell
resp=$(seq 10 | xargs -I{} curl "http://127.0.0.1:9080/headers?name=random" -sL) && \
count_httpbin=$(echo "$resp" | grep "httpbin.org" | wc -l) && \
count_mockapi7=$(echo "$resp" | grep "mock.api7.ai" | wc -l) && \
echo httpbin.org: $count_httpbin, mock.api7.ai: $count_mockapi7
```
You should see a response similar to the following:
```json
httpbin.org: 0, mock.api7.ai: 10
```
### Configure Different Rules for Different Upstreams
The following example demonstrates how to set one-to-one mapping between rule sets and upstreams.
Create a Route and configure `traffic-split` Plugin with the following matching rules to redirect traffic when the request contains a header `x-api-id: 1` or `x-api-id: 2`, to the corresponding Upstream service:
```shell
curl "http://127.0.0.1:9180/apisix/admin/routes" -X PUT \
-H "X-API-KEY: ${ADMIN_API_KEY}" \
-d '{
"uri": "/headers",
"id": "traffic-split-route",
"plugins": {
"traffic-split": {
"rules": [
{
"match": [
{
"vars": [
["http_x-api-id","==","1"]
]
}
],
"weighted_upstreams": [
{
"upstream": {
"type": "roundrobin",
"scheme": "https",
"pass_host": "node",
"nodes": {
"httpbin.org:443":1
}
},
"weight": 1
}
]
},
{
"match": [
{
"vars": [
["http_x-api-id","==","2"]
]
}
],
"weighted_upstreams": [
{
"upstream": {
"type": "roundrobin",
"scheme": "https",
"pass_host": "node",
"nodes": {
"mock.api7.ai:443":1
}
},
"weight": 1
}
]
}
]
}
},
"upstream": {
"type": "roundrobin",
"nodes": {
"postman-echo.com:443": 1
},
"scheme": "https",
"pass_host": "node"
}
}'
```
Send a request with header `x-api-id: 1`:
```shell
curl "http://127.0.0.1:9080/headers" -H 'x-api-id: 1'
```
You should see an `HTTP/1.1 200 OK` response similar to the following:
```json
{
"headers": {
"Accept": "*/*",
"Host": "httpbin.org",
...
}
}
```
Send a request with header `x-api-id: 2`:
```shell
curl "http://127.0.0.1:9080/headers" -H 'x-api-id: 2'
```
You should see an `HTTP/1.1 200 OK` response similar to the following:
```json
{
"headers": {
"accept": "*/*",
"host": "mock.api7.ai",
...
}
}
```
Send a request without any additional header:
```shell
curl "http://127.0.0.1:9080/headers"
```
You should see a response similar to the following:
```json
{
"headers": {
"accept": "*/*",
"host": "postman-echo.com",
...
}
}
```
---
---
title: ua-restriction
keywords:
- Apache APISIX
- API Gateway
- UA restriction
description: The ua-restriction Plugin restricts access to upstream resources using an allowlist or denylist of user agents, preventing overload from web crawlers and enhancing API security.
---
## Description
The `ua-restriction` Plugin supports restricting access to upstream resources through either configuring an allowlist or denylist of user agents. A common use case is to prevent web crawlers from overloading the upstream resources and causing service degradation.
## Attributes
| Name | Type | Required | Default | Valid values | Description |
|----------------|---------------|----------|--------------|-------------------------|---------------------------------------------------------------------------------|
| bypass_missing | boolean | False | false | | If true, bypass the user agent restriction check when the `User-Agent` header is missing. |
| allowlist | array[string] | False | | | List of user agents to allow. Support regular expressions. At least one of the `allowlist` and `denylist` should be configured, but they cannot be configured at the same time. |
| denylist | array[string] | False | | | List of user agents to deny. Support regular expressions. At least one of the `allowlist` and `denylist` should be configured, but they cannot be configured at the same time. |
| message | string | False | "Not allowed" | | Message returned when the user agent is denied access. |
## Examples
The examples below demonstrate how you can configure `ua-restriction` for different scenarios.
:::note
You can fetch the `admin_key` from `config.yaml` and save to an environment variable with the following command:
```bash
admin_key=$(yq '.deployment.admin.admin_key[0].key' conf/config.yaml | sed 's/"//g')
```
:::
### Reject Web Crawlers and Customize Error Message
The following example demonstrates how you can configure the Plugin to fend off unwanted web crawlers and customize the rejection message.
Create a Route and configure the Plugin to block specific crawlers from accessing resources with a customized message:
```shell
curl "http://127.0.0.1:9180/apisix/admin/routes" -X PUT \
-H "X-API-KEY: ${admin_key}" \
-d '{
"id": "ua-restriction-route",
"uri": "/anything",
"plugins": {
"ua-restriction": {
"bypass_missing": false,
"denylist": [
"(Baiduspider)/(\\d+)\\.(\\d+)",
"bad-bot-1"
],
"message": "Access denied"
}
},
"upstream": {
"type": "roundrobin",
"nodes": {
"httpbin.org:80": 1
}
}
}'
```
Send a request to the Route:
```shell
curl -i "http://127.0.0.1:9080/anything"
```
You should receive an `HTTP/1.1 200 OK` response.
Send another request to the Route with a disallowed user agent:
```shell
curl -i "http://127.0.0.1:9080/anything" -H 'User-Agent: Baiduspider/5.0'
```
You should receive an `HTTP/1.1 403 Forbidden` response with the following message:
```text
{"message":"Access denied"}
```
### Bypass UA Restriction Checks
The following example demonstrates how to configure the Plugin to allow requests of a specific user agent to bypass the UA restriction.
Create a Route as such:
```shell
curl "http://127.0.0.1:9180/apisix/admin/routes" -X PUT \
-H "X-API-KEY: ${admin_key}" \
-d '{
"id": "ua-restriction-route",
"uri": "/anything",
"plugins": {
"ua-restriction": {
"bypass_missing": true,
"allowlist": [
"good-bot-1"
],
"message": "Access denied"
}
},
"upstream": {
"type": "roundrobin",
"nodes": {
"httpbin.org:80": 1
}
}
}'
```
Send a request to the Route without modifying the user agent:
```shell
curl -i "http://127.0.0.1:9080/anything"
```
You should receive an `HTTP/1.1 403 Forbidden` response with the following message:
```text
{"message":"Access denied"}
```
Send another request to the Route with an empty user agent:
```shell
curl -i "http://127.0.0.1:9080/anything" -H 'User-Agent: '
```
You should receive an `HTTP/1.1 200 OK` response.
---
---
title: udp-logger
keywords:
- Apache APISIX
- API Gateway
- Plugin
- UDP Logger
description: This document contains information about the Apache APISIX udp-logger Plugin.
---
## Description
The `udp-logger` Plugin can be used to push log data requests to UDP servers.
This provides the ability to send log data requests as JSON objects to monitoring tools and other UDP servers.
This plugin also allows to push logs as a batch to your external UDP server. It might take some time to receive the log data. It will be automatically sent after the timer function in the [batch processor](../batch-processor.md) expires.
## Attributes
| Name | Type | Required | Default | Valid values | Description |
|------------------|---------|----------|--------------|--------------|----------------------------------------------------------|
| host | string | True | | | IP address or the hostname of the UDP server. |
| port | integer | True | | [0,...] | Target upstream port. |
| timeout | integer | False | 3 | [1,...] | Timeout for the upstream to send data. |
| log_format | object | False | | | Log format declared as key-value pairs in JSON. Values support strings and nested objects (up to five levels deep; deeper fields are truncated). Within strings, [APISIX](../apisix-variable.md) or [NGINX](http://nginx.org/en/docs/varindex.html) variables can be referenced by prefixing with `$`. |
| name | string | False | "udp logger" | | Unique identifier for the batch processor. If you use Prometheus to monitor APISIX metrics, the name is exported in `apisix_batch_process_entries`. processor. |
| include_req_body | boolean | False | false | [false, true] | When set to `true` includes the request body in the log. |
| include_req_body_expr | array | No | | | Filter for when the `include_req_body` attribute is set to `true`. Request body is only logged when the expression set here evaluates to `true`. See [lua-resty-expr](https://github.com/api7/lua-resty-expr) for more. |
| include_resp_body | boolean | No | false | [false, true] | When set to `true` includes the response body in the log. |
| include_resp_body_expr | array | No | | | Filter for when the `include_resp_body` attribute is set to `true`. Response body is only logged when the expression set here evaluates to `true`. See [lua-resty-expr](https://github.com/api7/lua-resty-expr) for more. |
This Plugin supports using batch processors to aggregate and process entries (logs/data) in a batch. This avoids the need for frequently submitting the data. The batch processor submits data every `5` seconds or when the data in the queue reaches `1000`. See [Batch Processor](../batch-processor.md#configuration) for more information or setting your custom configuration.
### Example of default log format
```json
{
"apisix_latency": 99.999988555908,
"service_id": "",
"server": {
"version": "3.7.0",
"hostname": "localhost"
},
"request": {
"method": "GET",
"headers": {
"connection": "close",
"host": "localhost"
},
"url": "http://localhost:1984/opentracing",
"size": 65,
"querystring": {},
"uri": "/opentracing"
},
"start_time": 1704527399740,
"client_ip": "127.0.0.1",
"response": {
"status": 200,
"size": 136,
"headers": {
"server": "APISIX/3.7.0",
"content-type": "text/plain",
"transfer-encoding": "chunked",
"connection": "close"
}
},
"upstream": "127.0.0.1:1982",
"route_id": "1",
"upstream_latency": 12,
"latency": 111.99998855591
}
```
## Metadata
You can also set the format of the logs by configuring the Plugin metadata. The following configurations are available:
| Name | Type | Required | Default | Description |
| ---------- | ------ | -------- | ----------------------------------------------------------------------------- | ------------------------------------------------------------------------------------------------------------------------------------------------------------------------------------------------------------------------------------------------------- |
| log_format | object | False | | Log format declared as key-value pairs in JSON. Values support strings and nested objects (up to five levels deep; deeper fields are truncated). Within strings, [APISIX](../apisix-variable.md) or [NGINX](http://nginx.org/en/docs/varindex.html) variables can be referenced by prefixing with `$`. |
| max_pending_entries | integer | False | | Maximum number of pending entries that can be buffered in batch processor before it starts dropping them. |
:::info IMPORTANT
Configuring the Plugin metadata is global in scope. This means that it will take effect on all Routes and Services which use the `udp-logger` Plugin.
:::
The example below shows how you can configure through the Admin API:
:::note
You can fetch the `admin_key` from `config.yaml` and save to an environment variable with the following command:
```bash
admin_key=$(yq '.deployment.admin.admin_key[0].key' conf/config.yaml | sed 's/"//g')
```
:::
```shell
curl http://127.0.0.1:9180/apisix/admin/plugin_metadata/udp-logger -H "X-API-KEY: $admin_key" -X PUT -d '
{
"log_format": {
"host": "$host",
"@timestamp": "$time_iso8601",
"client_ip": "$remote_addr",
"request": { "method": "$request_method", "uri": "$request_uri" },
"response": { "status": "$status" }
}
}'
```
With this configuration, your logs would be formatted as shown below:
```json
{"@timestamp":"2023-01-09T14:47:25+08:00","route_id":"1","host":"localhost","client_ip":"127.0.0.1","request":{"method":"GET","uri":"/hello"},"response":{"status":200}}
```
## Enable Plugin
The example below shows how you can enable the Plugin on a specific Route:
```shell
curl http://127.0.0.1:9180/apisix/admin/routes/5 -H "X-API-KEY: $admin_key" -X PUT -d '
{
"plugins": {
"udp-logger": {
"host": "127.0.0.1",
"port": 3000,
"batch_max_size": 1,
"name": "udp logger"
}
},
"upstream": {
"type": "roundrobin",
"nodes": {
"127.0.0.1:1980": 1
}
},
"uri": "/hello"
}'
```
## Example usage
Now, if you make a request to APISIX, it will be logged in your UDP server:
```shell
curl -i http://127.0.0.1:9080/hello
```
## Delete Plugin
To remove the `udp-logger` Plugin, you can delete the corresponding JSON configuration from the Plugin configuration. APISIX will automatically reload and you do not have to restart for this to take effect.
```shell
curl http://127.0.0.1:9180/apisix/admin/routes/1 -H "X-API-KEY: $admin_key" -X PUT -d '
{
"methods": ["GET"],
"uri": "/hello",
"plugins": {},
"upstream": {
"type": "roundrobin",
"nodes": {
"127.0.0.1:1980": 1
}
}
}'
```
---
---
title: uri-blocker
keywords:
- Apache APISIX
- API Gateway
- URI Blocker
description: This document contains information about the Apache APISIX uri-blocker Plugin.
---
## Description
The `uri-blocker` Plugin intercepts user requests with a set of `block_rules`.
## Attributes
| Name | Type | Required | Default | Valid values | Description |
|------------------|---------------|----------|---------|--------------|-------------------------------------------------------------------------------------------------------------------------------------------------------------------------------------------------------|
| block_rules | array[string] | True | | | List of regex filter rules. If the request URI hits any one of the rules, the response code is set to the `rejected_code` and the user request is terminated. For example, `["root.exe", "root.m+"]`. |
| rejected_code | integer | False | 403 | [200, ...] | HTTP status code returned when the request URI hits any of the `block_rules`. |
| rejected_msg | string | False | | non-empty | HTTP response body returned when the request URI hits any of the `block_rules`. |
| case_insensitive | boolean | False | false | | When set to `true`, ignores the case when matching request URI. |
## Enable Plugin
The example below enables the `uri-blocker` Plugin on a specific Route:
:::note
You can fetch the `admin_key` from `config.yaml` and save to an environment variable with the following command:
```bash
admin_key=$(yq '.deployment.admin.admin_key[0].key' conf/config.yaml | sed 's/"//g')
```
:::
```shell
curl -i http://127.0.0.1:9180/apisix/admin/routes/1 -H "X-API-KEY: $admin_key" -X PUT -d '
{
"uri": "/*",
"plugins": {
"uri-blocker": {
"block_rules": ["root.exe", "root.m+"]
}
},
"upstream": {
"type": "roundrobin",
"nodes": {
"127.0.0.1:1980": 1
}
}
}'
```
## Example usage
Once you have configured the Plugin as shown above, you can try accessing the file:
```shell
curl -i http://127.0.0.1:9080/root.exe?a=a
```
```shell
HTTP/1.1 403 Forbidden
Date: Wed, 17 Jun 2020 13:55:41 GMT
Content-Type: text/html; charset=utf-8
Content-Length: 150
Connection: keep-alive
Server: APISIX web server
... ...
```
You can also set a `rejected_msg` and it will be added to the response body:
```shell
HTTP/1.1 403 Forbidden
Date: Wed, 17 Jun 2020 13:55:41 GMT
Content-Type: text/html; charset=utf-8
Content-Length: 150
Connection: keep-alive
Server: APISIX web server
{"error_msg":"access is not allowed"}
```
## Delete Plugin
To remove the `uri-blocker` Plugin, you can delete the corresponding JSON configuration from the Plugin configuration. APISIX will automatically reload and you do not have to restart for this to take effect.
```shell
curl http://127.0.0.1:9180/apisix/admin/routes/1 -H "X-API-KEY: $admin_key" -X PUT -d '
{
"uri": "/*",
"upstream": {
"type": "roundrobin",
"nodes": {
"127.0.0.1:1980": 1
}
}
}'
```
---
---
title: wolf-rbac
keywords:
- Apache APISIX
- API Gateway
- Plugin
- wolf RBAC
- wolf-rbac
description: This document contains information about the Apache APISIX wolf-rbac Plugin.
---
## Description
The `wolf-rbac` Plugin provides a [role-based access control](https://en.wikipedia.org/wiki/Role-based_access_control) system with [wolf](https://github.com/iGeeky/wolf) to a Route or a Service. This Plugin can be used with a [Consumer](../terminology/consumer.md).
## Attributes
| Name | Type | Required | Default | Description |
|---------------|--------|----------|--------------------------|-----------------------------------------------------------------------------------------------------------------------------------------------------------------------------------------------------------------------------|
| server | string | False | "http://127.0.0.1:12180" | Service address of wolf server. |
| appid | string | False | "unset" | App id added in wolf console. This field supports saving the value in Secret Manager using the [APISIX Secret](../terminology/secret.md) resource. |
| header_prefix | string | False | "X-" | Prefix for a custom HTTP header. After authentication is successful, three headers will be added to the request header (for backend) and response header (for frontend) namely: `X-UserId`, `X-Username`, and `X-Nickname`. |
## API
This Plugin will add the following endpoints when enabled:
- `/apisix/plugin/wolf-rbac/login`
- `/apisix/plugin/wolf-rbac/change_pwd`
- `/apisix/plugin/wolf-rbac/user_info`
:::note
You may need to use the [public-api](public-api.md) Plugin to expose this endpoint.
:::
## Pre-requisites
To use this Plugin, you have to first [install wolf](https://github.com/iGeeky/wolf/blob/master/quick-start-with-docker/README.md) and start it.
Once you have done that you need to add `application`, `admin`, `normal user`, `permission`, `resource` and user authorize to the [wolf-console](https://github.com/iGeeky/wolf/blob/master/docs/usage.md).
## Enable Plugin
You need to first configure the Plugin on a Consumer:
:::note
You can fetch the `admin_key` from `config.yaml` and save to an environment variable with the following command:
```bash
admin_key=$(yq '.deployment.admin.admin_key[0].key' conf/config.yaml | sed 's/"//g')
```
:::
```shell
curl http://127.0.0.1:9180/apisix/admin/consumers -H "X-API-KEY: $admin_key" -X PUT -d '
{
"username":"wolf_rbac",
"plugins":{
"wolf-rbac":{
"server":"http://127.0.0.1:12180",
"appid":"restful"
}
},
"desc":"wolf-rbac"
}'
```
:::note
The `appid` added in the configuration should already exist in wolf.
:::
You can now add the Plugin to a Route or a Service:
```shell
curl http://127.0.0.1:9180/apisix/admin/routes/1 -H "X-API-KEY: $admin_key" -X PUT -d '
{
"methods": ["GET"],
"uri": "/*",
"plugins": {
"wolf-rbac": {}
},
"upstream": {
"type": "roundrobin",
"nodes": {
"www.baidu.com:80": 1
}
}
}'
```
You can also use the [APISIX Dashboard](/docs/dashboard/USER_GUIDE) to complete the operation through a web UI.
## Example usage
You can use the `public-api` Plugin to expose the API:
```shell
curl http://127.0.0.1:9180/apisix/admin/routes/wal -H "X-API-KEY: $admin_key" -X PUT -d '
{
"uri": "/apisix/plugin/wolf-rbac/login",
"plugins": {
"public-api": {}
}
}'
```
Similarly, you can setup the Routes for `change_pwd` and `user_info`.
You can now login and get a wolf `rbac_token`:
```shell
curl http://127.0.0.1:9080/apisix/plugin/wolf-rbac/login -i \
-H "Content-Type: application/json" \
-d '{"appid": "restful", "username":"test", "password":"user-password", "authType":1}'
```
```shell
HTTP/1.1 200 OK
Date: Wed, 24 Jul 2019 10:33:31 GMT
Content-Type: text/plain
Transfer-Encoding: chunked
Connection: keep-alive
Server: APISIX web server
{"rbac_token":"V1#restful#eyJhbGciOiJIUzI1NiIsInR5cCI6IkpXVCJ9.eyJpZCI6NzQ5LCJ1c2VybmFtZSI6InRlc3QiLCJtYW5hZ2VyIjoiIiwiYXBwaWQiOiJyZXN0ZnVsIiwiaWF0IjoxNTc5NDQ5ODQxLCJleHAiOjE1ODAwNTQ2NDF9.n2-830zbhrEh6OAxn4K_yYtg5pqfmjpZAjoQXgtcuts","user_info":{"nickname":"test","username":"test","id":"749"}}
```
:::note
The `appid`, `username`, and `password` must be configured in the wolf system.
`authType` is the authentication type—1 for password authentication (default) and 2 for LDAP authentication (v0.5.0+).
:::
You can also make a post request with `x-www-form-urlencoded` instead of JSON:
```shell
curl http://127.0.0.1:9080/apisix/plugin/wolf-rbac/login -i \
-H "Content-Type: application/x-www-form-urlencoded" \
-d 'appid=restful&username=test&password=user-password'
```
Now you can test the Route:
- without token:
```shell
curl http://127.0.0.1:9080/ -H"Host: www.baidu.com" -i
```
```
HTTP/1.1 401 Unauthorized
...
{"message":"Missing rbac token in request"}
```
- with token in `Authorization` header:
```shell
curl http://127.0.0.1:9080/ -H"Host: www.baidu.com" \
-H 'Authorization: V1#restful#eyJhbGciOiJIUzI1NiIsInR5cCI6IkpXVCJ9.eyJpZCI6NzQ5LCJ1c2VybmFtZSI6InRlc3QiLCJtYW5hZ2VyIjoiIiwiYXBwaWQiOiJyZXN0ZnVsIiwiaWF0IjoxNTc5NDQ5ODQxLCJleHAiOjE1ODAwNTQ2NDF9.n2-830zbhrEh6OAxn4K_yYtg5pqfmjpZAjoQXgtcuts' -i
```
```shell
HTTP/1.1 200 OK
```
- with token in `x-rbac-token` header:
```shell
curl http://127.0.0.1:9080/ -H"Host: www.baidu.com" \
-H 'x-rbac-token: V1#restful#eyJhbGciOiJIUzI1NiIsInR5cCI6IkpXVCJ9.eyJpZCI6NzQ5LCJ1c2VybmFtZSI6InRlc3QiLCJtYW5hZ2VyIjoiIiwiYXBwaWQiOiJyZXN0ZnVsIiwiaWF0IjoxNTc5NDQ5ODQxLCJleHAiOjE1ODAwNTQ2NDF9.n2-830zbhrEh6OAxn4K_yYtg5pqfmjpZAjoQXgtcuts' -i
```
```shell
HTTP/1.1 200 OK
```
- with token in request parameters:
```shell
curl 'http://127.0.0.1:9080?rbac_token=V1%23restful%23eyJhbGciOiJIUzI1NiIsInR5cCI6IkpXVCJ9.eyJpZCI6NzQ5LCJ1c2VybmFtZSI6InRlc3QiLCJtYW5hZ2VyIjoiIiwiYXBwaWQiOiJyZXN0ZnVsIiwiaWF0IjoxNTc5NDQ5ODQxLCJleHAiOjE1ODAwNTQ2NDF9.n2-830zbhrEh6OAxn4K_yYtg5pqfmjpZAjoQXgtcuts' -H"Host: www.baidu.com" -i
```
```shell
HTTP/1.1 200 OK
```
- with token in cookie:
```shell
curl http://127.0.0.1:9080 -H"Host: www.baidu.com" \
--cookie x-rbac-token=V1#restful#eyJhbGciOiJIUzI1NiIsInR5cCI6IkpXVCJ9.eyJpZCI6NzQ5LCJ1c2VybmFtZSI6InRlc3QiLCJtYW5hZ2VyIjoiIiwiYXBwaWQiOiJyZXN0ZnVsIiwiaWF0IjoxNTc5NDQ5ODQxLCJleHAiOjE1ODAwNTQ2NDF9.n2-830zbhrEh6OAxn4K_yYtg5pqfmjpZAjoQXgtcuts -i
```
```
HTTP/1.1 200 OK
```
And to get a user information:
```shell
curl http://127.0.0.1:9080/apisix/plugin/wolf-rbac/user_info \
--cookie x-rbac-token=V1#restful#eyJhbGciOiJIUzI1NiIsInR5cCI6IkpXVCJ9.eyJpZCI6NzQ5LCJ1c2VybmFtZSI6InRlc3QiLCJtYW5hZ2VyIjoiIiwiYXBwaWQiOiJyZXN0ZnVsIiwiaWF0IjoxNTc5NDQ5ODQxLCJleHAiOjE1ODAwNTQ2NDF9.n2-830zbhrEh6OAxn4K_yYtg5pqfmjpZAjoQXgtcuts -i
```
```shell
HTTP/1.1 200 OK
{
"user_info":{
"nickname":"test",
"lastLogin":1582816780,
"id":749,
"username":"test",
"appIDs":["restful"],
"manager":"none",
"permissions":{"USER_LIST":true},
"profile":null,
"roles":{},
"createTime":1578820506,
"email":""
}
}
```
And to change a user's password:
```shell
curl http://127.0.0.1:9080/apisix/plugin/wolf-rbac/change_pwd \
-H "Content-Type: application/json" \
--cookie x-rbac-token=V1#restful#eyJhbGciOiJIUzI1NiIsInR5cCI6IkpXVCJ9.eyJpZCI6NzQ5LCJ1c2VybmFtZSI6InRlc3QiLCJtYW5hZ2VyIjoiIiwiYXBwaWQiOiJyZXN0ZnVsIiwiaWF0IjoxNTc5NDQ5ODQxLCJleHAiOjE1ODAwNTQ2NDF9.n2-830zbhrEh6OAxn4K_yYtg5pqfmjpZAjoQXgtcuts -i \
-X PUT -d '{"oldPassword": "old password", "newPassword": "new password"}'
```
```shell
HTTP/1.1 200 OK
{"message":"success to change password"}
```
## Delete Plugin
To remove the `wolf-rbac` Plugin, you can delete the corresponding JSON configuration from the Plugin configuration. APISIX will automatically reload and you do not have to restart for this to take effect.
```shell
curl http://127.0.0.1:9180/apisix/admin/routes/1 -H "X-API-KEY: $admin_key" -X PUT -d '
{
"methods": ["GET"],
"uri": "/*",
"plugins": {
},
"upstream": {
"type": "roundrobin",
"nodes": {
"www.baidu.com:80": 1
}
}
}'
```
---
---
title: workflow
keywords:
- Apache APISIX
- API Gateway
- Plugin
- workflow
- traffic control
description: The workflow Plugin supports the conditional execution of user-defined actions to client traffic based a given set of rules. This provides a granular approach to implement complex traffic management.
---
## Description
The `workflow` Plugin supports the conditional execution of user-defined actions to client traffic based a given set of rules, defined using [lua-resty-expr](https://github.com/api7/lua-resty-expr#operator-list). This provides a granular approach to traffic management.
## Attributes
| Name | Type | Required | Default | Valid values | Description |
| ---------------------------- | ------------- | -------- | ------- | ------------ | ------------------------------------------------------------ |
| rules | array[object] | True | | | An array of one or more pairs of matching conditions and actions to be executed. |
| rules.case | array[array] | False | | | An array of one or more matching conditions in the form of [lua-resty-expr](https://github.com/api7/lua-resty-expr#operator-list). For example, `{"arg_name", "==", "json"}`. |
| rules.actions | array[object] | True | | | An array of actions to be executed when a condition is successfully matched. Currently, the array only supports one action, and it should be either `return`, or `limit-count` or `limit-conn`. When the action is configured to be `return`, you can configure an HTTP status code to return to the client when the condition is matched. When the action is configured to be `limit-count`, you can configure all options of the [`limit-count`](./limit-count.md) plugin, except for `group`. When the action is configured to be `limit-conn`, you can configure all options of the [`limit-conn`](./limit-conn.md) plugin. |
## Examples
The examples below demonstrates how you can use the `workflow` Plugin for different scenarios.
:::note
You can fetch the `admin_key` from `config.yaml` and save to an environment variable with the following command:
```bash
admin_key=$(yq '.deployment.admin.admin_key[0].key' conf/config.yaml | sed 's/"//g')
```
:::
### Return Response HTTP Status Code Conditionally
The following example demonstrates a simple rule with one matching condition and one associated action to return HTTP status code conditionally.
Create a Route with the `workflow` Plugin to return HTTP status code 403 when the request's URI path is `/anything/rejected`:
```shell
curl "http://127.0.0.1:9180/apisix/admin/routes" -X PUT \
-H "X-API-KEY: ${admin_key}" \
-d '{
"id": "workflow-route",
"uri": "/anything/*",
"plugins": {
"workflow":{
"rules":[
{
"case":[
["uri", "==", "/anything/rejected"]
],
"actions":[
[
"return",
{"code": 403}
]
]
}
]
}
},
"upstream": {
"type": "roundrobin",
"nodes": {
"httpbin.org": 1
}
}
}'
```
Send a request that matches none of the rules:
```shell
curl -i "http://127.0.0.1:9080/anything/anything"
```
You should receive an `HTTP/1.1 200 OK` response.
Send a request that matches the configured rule:
```shell
curl -i "http://127.0.0.1:9080/anything/rejected"
```
You should receive an `HTTP/1.1 403 Forbidden` response of following:
```text
{"error_msg":"rejected by workflow"}
```
### Apply Rate Limiting Conditionally by URI and Query Parameter
The following example demonstrates a rule with two matching conditions and one associated action to rate limit requests conditionally.
Create a Route with the `workflow` Plugin to apply rate limiting when the URI path is `/anything/rate-limit` and the query parameter `env` value is `v1`:
```shell
curl "http://127.0.0.1:9180/apisix/admin/routes" -X PUT \
-H "X-API-KEY: ${admin_key}" \
-d '{
"id": "workflow-route",
"uri": "/anything/*",
"plugins":{
"workflow":{
"rules":[
{
"case":[
["uri", "==", "/anything/rate-limit"],
["arg_env", "==", "v1"]
],
"actions":[
[
"limit-count",
{
"count":1,
"time_window":60,
"rejected_code":429
}
]
]
}
]
}
},
"upstream": {
"type": "roundrobin",
"nodes": {
"httpbin.org": 1
}
}
}'
```
Generate two consecutive requests that matches the second rule:
```shell
curl -i "http://127.0.0.1:9080/anything/rate-limit?env=v1"
```
You should receive an `HTTP/1.1 200 OK` response and an `HTTP 429 Too Many Requests` response.
Generate requests that do not match the condition:
```shell
curl -i "http://127.0.0.1:9080/anything/anything?env=v1"
```
You should receive `HTTP/1.1 200 OK` responses for all requests, as they are not rate limited.
### Apply Rate Limiting Conditionally by Consumers
The following example demonstrates how to configure the Plugin to perform rate limiting based on the following specifications:
* Consumer `john` should have a quota of 5 requests within a 30-second window
* Consumer `jane` should have a quota of 3 requests within a 30-second window
* All other consumers should have a quota of 2 requests within a 30-second window
While this example will be using [`key-auth`](./key-auth.md), you can easily replace it with other authentication Plugins.
Create a Consumer `john`:
```shell
curl "http://127.0.0.1:9180/apisix/admin/consumers" -X PUT \
-H "X-API-KEY: ${admin_key}" \
-d '{
"username": "john"
}'
```
Create `key-auth` credential for the consumer:
```shell
curl "http://127.0.0.1:9180/apisix/admin/consumers/john/credentials" -X PUT \
-H "X-API-KEY: ${admin_key}" \
-d '{
"id": "cred-john-key-auth",
"plugins": {
"key-auth": {
"key": "john-key"
}
}
}'
```
Create a second Consumer `jane`:
```shell
curl "http://127.0.0.1:9180/apisix/admin/consumers" -X PUT \
-H "X-API-KEY: ${admin_key}" \
-d '{
"username": "jane"
}'
```
Create `key-auth` credential for the consumer:
```shell
curl "http://127.0.0.1:9180/apisix/admin/consumers/jane/credentials" -X PUT \
-H "X-API-KEY: ${admin_key}" \
-d '{
"id": "cred-jane-key-auth",
"plugins": {
"key-auth": {
"key": "jane-key"
}
}
}'
```
Create a third Consumer `jimmy`:
```shell
curl "http://127.0.0.1:9180/apisix/admin/consumers" -X PUT \
-H "X-API-KEY: ${admin_key}" \
-d '{
"username": "jimmy"
}'
```
Create `key-auth` credential for the consumer:
```shell
curl "http://127.0.0.1:9180/apisix/admin/consumers/jimmy/credentials" -X PUT \
-H "X-API-KEY: ${admin_key}" \
-d '{
"id": "cred-jimmy-key-auth",
"plugins": {
"key-auth": {
"key": "jimmy-key"
}
}
}'
```
Create a Route with the `workflow` and `key-auth` Plugins, with the desired rate limiting rules:
```shell
curl "http://127.0.0.1:9180/apisix/admin/routes" -X PUT \
-H "X-API-KEY: ${admin_key}" \
-d '{
"id": "workflow-route",
"uri": "/anything",
"plugins":{
"key-auth": {},
"workflow":{
"rules":[
{
"actions": [
[
"limit-count",
{
"count": 5,
"key": "consumer_john",
"key_type": "constant",
"rejected_code": 429,
"time_window": 30
}
]
],
"case": [
[
"consumer_name",
"==",
"john"
]
]
},
{
"actions": [
[
"limit-count",
{
"count": 3,
"key": "consumer_jane",
"key_type": "constant",
"rejected_code": 429,
"time_window": 30
}
]
],
"case": [
[
"consumer_name",
"==",
"jane"
]
]
},
{
"actions": [
[
"limit-count",
{
"count": 2,
"key": "$consumer_name",
"key_type": "var",
"rejected_code": 429,
"time_window": 30
}
]
]
}
]
}
},
"upstream": {
"type": "roundrobin",
"nodes": {
"httpbin.org": 1
}
}
}'
```
To verify, send 6 consecutive requests with `john`'s key:
```shell
resp=$(seq 6 | xargs -I{} curl "http://127.0.0.1:9080/anything" -H 'apikey: john-key' -o /dev/null -s -w "%{http_code}\n") && \
count_200=$(echo "$resp" | grep "200" | wc -l) && \
count_429=$(echo "$resp" | grep "429" | wc -l) && \
echo "200": $count_200, "429": $count_429
```
You should see the following response, showing that out of the 6 requests, 5 requests were successful (status code 200) while the others were rejected (status code 429).
```text
200: 5, 429: 1
```
Send 6 consecutive requests with `jane`'s key:
```shell
resp=$(seq 6 | xargs -I{} curl "http://127.0.0.1:9080/anything" -H 'apikey: jane-key' -o /dev/null -s -w "%{http_code}\n") && \
count_200=$(echo "$resp" | grep "200" | wc -l) && \
count_429=$(echo "$resp" | grep "429" | wc -l) && \
echo "200": $count_200, "429": $count_429
```
You should see the following response, showing that out of the 6 requests, 3 requests were successful (status code 200) while the others were rejected (status code 429).
```text
200: 3, 429: 3
```
Send 3 consecutive requests with `jimmy`'s key:
```shell
resp=$(seq 3 | xargs -I{} curl "http://127.0.0.1:9080/anything" -H 'apikey: jimmy-key' -o /dev/null -s -w "%{http_code}\n") && \
count_200=$(echo "$resp" | grep "200" | wc -l) && \
count_429=$(echo "$resp" | grep "429" | wc -l) && \
echo "200": $count_200, "429": $count_429
```
You should see the following response, showing that out of the 3 requests, 2 requests were successful (status code 200) while the others were rejected (status code 429).
```text
200: 2, 429: 1
```
---
---
title: zipkin
keywords:
- Apache APISIX
- API Gateway
- Plugin
- Zipkin
description: Zipkin is an open-source distributed tracing system. The zipkin Plugin instruments APISIX and sends traces to Zipkin based on the Zipkin API specification.
---
## Description
[Zipkin](https://github.com/openzipkin/zipkin) is an open-source distributed tracing system. The `zipkin` Plugin instruments APISIX and sends traces to Zipkin based on the [Zipkin API specification](https://zipkin.io/pages/instrumenting.html).
The Plugin can also send traces to other compatible collectors, such as [Jaeger](https://www.jaegertracing.io/docs/1.51/getting-started/#migrating-from-zipkin) and [Apache SkyWalking](https://skywalking.apache.org/docs/main/latest/en/setup/backend/zipkin-trace/#zipkin-receiver), both of which support Zipkin [v1](https://zipkin.io/zipkin-api/zipkin-api.yaml) and [v2](https://zipkin.io/zipkin-api/zipkin2-api.yaml) APIs.
## Static Configurations
By default, `zipkin` Plugin NGINX variables configuration is set to false in the [default configuration](https://github.com/apache/apisix/blob/master/apisix/cli/config.lua):
To modify this value, add the updated configuration to `config.yaml`. For example:
```yaml
plugin_attr:
zipkin:
set_ngx_var: true
```
Reload APISIX for changes to take effect.
## Attributes
See the configuration file for configuration options available to all Plugins.
| Name | Type | Required | Default | Valid values | Description |
|--------------|---------|----------|----------------|--------------|---------------------------------------------------------------------------------|
| endpoint | string | True | | | Zipkin span endpoint to POST to, such as `http://127.0.0.1:9411/api/v2/spans`. |
|sample_ratio| number | True | | [0.00001, 1] | Frequency to sample requests. Setting to `1` means sampling every request. |
|service_name| string | False | "APISIX" | | Service name for the Zipkin reporter to be displayed in Zipkin. |
|server_addr | string | False |the value of `$server_addr` | IPv4 address | IPv4 address for the Zipkin reporter. For example, you can set this to your external IP address. |
|span_version | integer | False | 2 | [1, 2] | Version of the span type. |
## Examples
The examples below show different use cases of the `zipkin` Plugin.
### Send Traces to Zipkin
The following example demonstrates how to trace requests to a Route and send traces to Zipkin using [Zipkin API v2](https://zipkin.io/zipkin-api/zipkin2-api.yaml). You will also understand the differences between span version 2 and span version 1.
Start a Zipkin instance in Docker:
```shell
docker run -d --name zipkin -p 9411:9411 openzipkin/zipkin
```
Create a Route with `zipkin` and use the default span version 2. You should adjust the IP address as needed for the Zipkin HTTP endpoint, and configure the sample ratio to `1` to trace every request.
```shell
curl "http://127.0.0.1:9180/apisix/admin/routes" -X PUT \
-H "X-API-KEY: ${admin_key}" \
-d '{
"id": "zipkin-tracing-route",
"uri": "/anything",
"plugins": {
"zipkin": {
"endpoint": "http://127.0.0.1:9411/api/v2/spans",
"sample_ratio": 1,
"span_version": 2
}
},
"upstream": {
"type": "roundrobin",
"nodes": {
"httpbin.org": 1
}
}
}'
```
Send a request to the Route:
```shell
curl "http://127.0.0.1:9080/anything"
```
You should receive an `HTTP/1.1 200 OK` response similar to the following:
```json
{
"args": {},
"data": "",
"files": {},
"form": {},
"headers": {
"Accept": "*/*",
"Host": "127.0.0.1",
"User-Agent": "curl/7.64.1",
"X-Amzn-Trace-Id": "Root=1-65af2926-497590027bcdb09e34752b78",
"X-B3-Parentspanid": "347dddedf73ec176",
"X-B3-Sampled": "1",
"X-B3-Spanid": "429afa01d0b0067c",
"X-B3-Traceid": "aea58f4b490766eccb08275acd52a13a",
"X-Forwarded-Host": "127.0.0.1"
},
...
}
```
Navigate to the Zipkin web UI at [http://127.0.0.1:9411/zipkin](http://127.0.0.1:9411/zipkin) and click __Run Query__, you should see a trace corresponding to the request:

Click __Show__ to see more tracing details:
Note that with span version 2, every traced request creates the following spans:
```text
request
├── proxy
└── response
```
where `proxy` represents the time from the beginning of the request to the beginning of `header_filter`, and `response` represents the time from the beginning of `header_filter` to the beginning of `log`.
Now, update the Plugin on the Route to use span version 1:
```shell
curl "http://127.0.0.1:9180/apisix/admin/routes/zipkin-tracing-route" -X PATCH \
-H "X-API-KEY: ${admin_key}" \
-d '{
"plugins": {
"zipkin": {
"span_version": 1
}
}
}'
```
Send another request to the Route:
```shell
curl "http://127.0.0.1:9080/anything"
```
In the Zipkin web UI, you should see a new trace with details similar to the following:
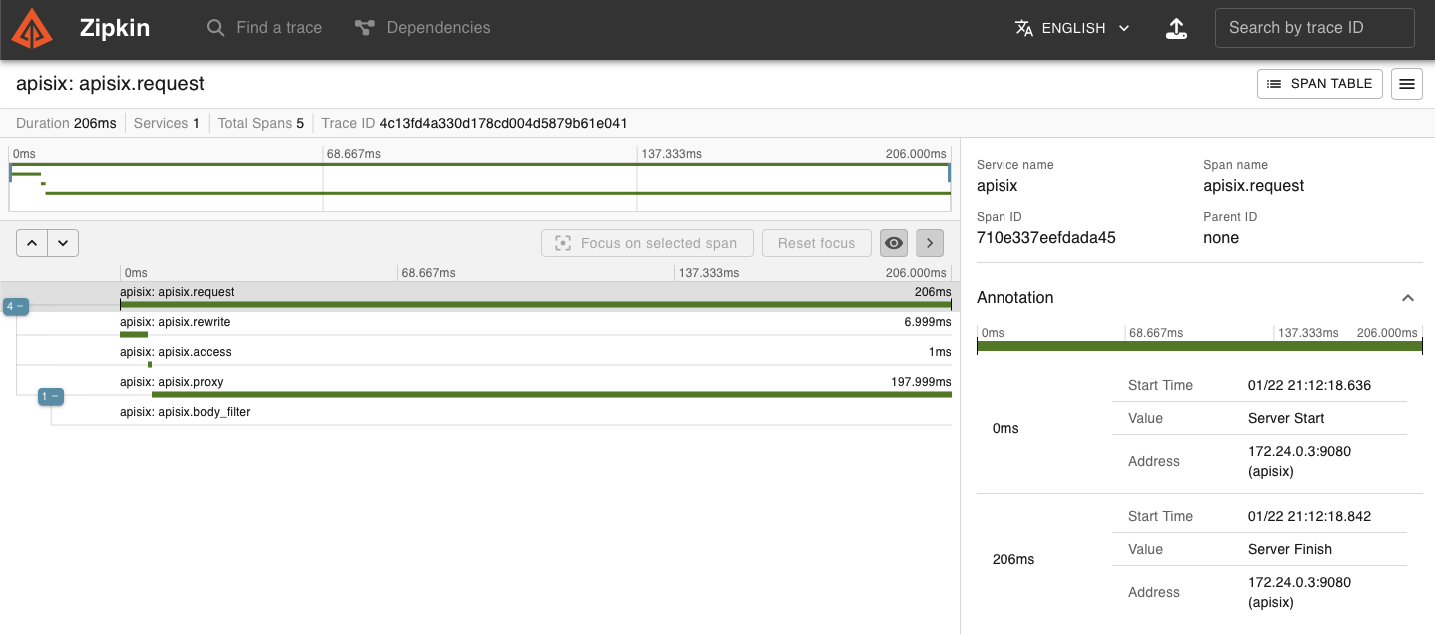
Note that with the older span version 1, every traced request creates the following spans:
```text
request
├── rewrite
├── access
└── proxy
└── body_filter
```
### Send Traces to Jaeger
The following example demonstrates how to trace requests to a Route and send traces to Jaeger.
Start a Jaeger instance in Docker:
```shell
docker run -d --name jaeger \
-e COLLECTOR_ZIPKIN_HOST_PORT=9411 \
-p 16686:16686 \
-p 9411:9411 \
jaegertracing/all-in-one
```
Create a Route with `zipkin`. Please adjust the IP address as needed for the Zipkin HTTP endpoint, and configure the sample ratio to `1` to trace every request.
```shell
curl "http://127.0.0.1:9180/apisix/admin/routes" -X PUT \
-H "X-API-KEY: ${admin_key}" \
-d '{
"id": "kin-tracing-route",
"uri": "/anything",
"plugins": {
"kin": {
"endpoint": "http://127.0.0.1:9411/api/v2/spans",
"sample_ratio": 1
}
},
"upstream": {
"type": "roundrobin",
"nodes": {
"httpbin.org": 1
}
}
}'
```
Send a request to the Route:
```shell
curl "http://127.0.0.1:9080/anything"
```
You should receive an `HTTP/1.1 200 OK` response.
Navigate to the Jaeger web UI at [http://127.0.0.1:16686](http://127.0.0.1:16686), select APISIX as the Service, and click __Find Traces__, you should see a trace corresponding to the request:
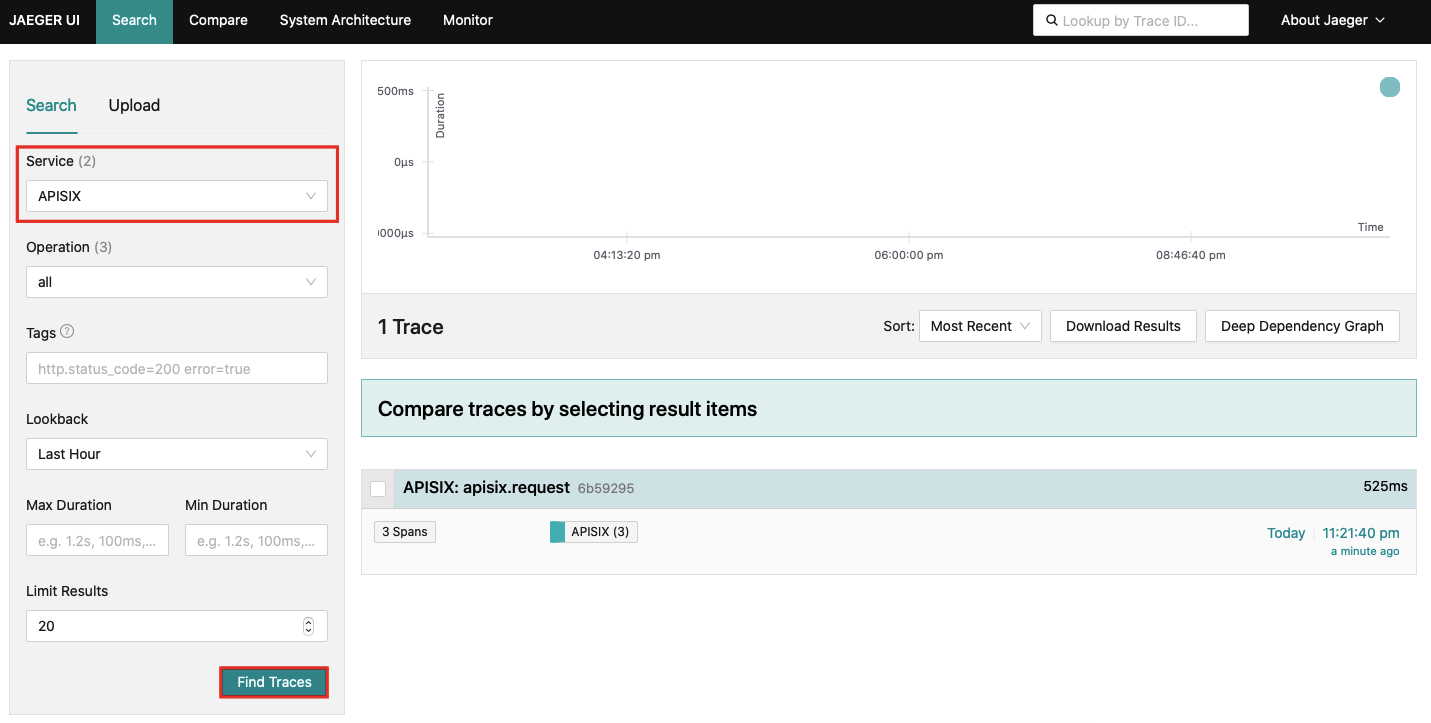
Similarly, you should find more span details once you click into a trace:
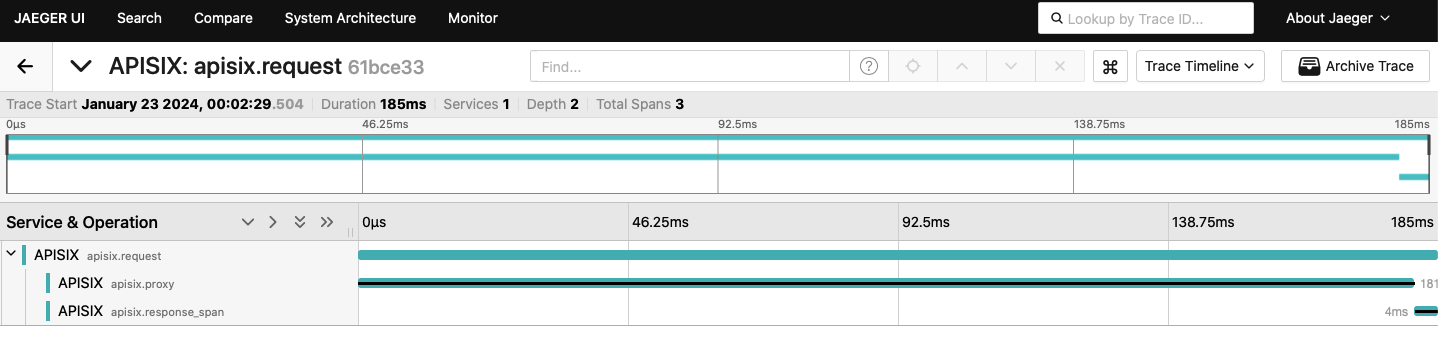
### Using Trace Variables in Logging
The following example demonstrates how to configure the `kin` Plugin to set the following built-in variables, which can be used in logger Plugins or access logs:
- `kin_context_traceparent`: [trace parent](https://www.w3.org/TR/trace-context/#trace-context-http-headers-format) ID
- `kin_trace_id`: trace ID of the current span
- `kin_span_id`: span ID of the current span
Update the configuration file as below. You can customize the access log format to use the `zipkin` Plugin variables, and set `zipkin` variables in the `set_ngx_var` field.
```yaml title="conf/config.yaml"
nginx_config:
http:
enable_access_log: true
access_log_format: '{"time": "$time_iso8601","zipkin_context_traceparent": "$zipkin_context_traceparent","zipkin_trace_id": "$zipkin_trace_id","zipkin_span_id": "$zipkin_span_id","remote_addr": "$remote_addr"}'
access_log_format_escape: json
plugin_attr:
zipkin:
set_ngx_var: true
```
Reload APISIX for configuration changes to take effect.
You should see access log entries similar to the following when you generate requests:
```text
{"time": "23/Jan/2024:06:28:00 +0000","zipkin_context_traceparent": "00-61bce33055c56f5b9bec75227befd142-13ff3c7370b29925-01","zipkin_trace_id": "61bce33055c56f5b9bec75227befd142","zipkin_span_id": "13ff3c7370b29925","remote_addr": "172.28.0.1"}
```
---
---
title: Configuration based on environments
keywords:
- Apache APISIX
- API Gateway
- Configuration
- Environment
description: This document describes how you can change APISIX configuration based on environments.
---
Extracting configuration from the code makes APISIX adaptable to changes in the operating environments. For example, APISIX can be deployed in a development environment for testing and then moved to a production environment. The configuration for APISIX in these environments would be different.
APISIX supports managing multiple configurations through environment variables in two different ways:
1. Using environment variables in the configuration file
2. Using an environment variable to switch between multiple configuration profiles
## Using environment variables in the configuration file
This is useful when you want to change some configurations based on the environment.
To use environment variables, you can use the syntax `key_name: ${{ENVIRONMENT_VARIABLE_NAME:=}}`. You can also set a default value to fall back to if no environment variables are set by adding it to the configuration as `key_name: ${{ENVIRONMENT_VARIABLE_NAME:=VALUE}}`. The example below shows how you can modify your configuration file to use environment variables to set the listening ports of APISIX:
```yaml title="config.yaml"
apisix:
node_listen:
- ${{APISIX_NODE_LISTEN:=}}
deployment:
admin:
admin_listen:
port: ${{DEPLOYMENT_ADMIN_ADMIN_LISTEN:=}}
```
When you run APISIX, you can set these environment variables dynamically:
```shell
export APISIX_NODE_LISTEN=8132
export DEPLOYMENT_ADMIN_ADMIN_LISTEN=9232
```
:::caution
You should set these variables with `export`. If you do not export, APISIX will fail to resolve for these variables.
:::
Now when you start APISIX, it will listen on port `8132` and expose the Admin API on port `9232`.
To use default values if no environment variables are set, you can add it to your configuration file as shown below:
```yaml title="config.yaml"
apisix:
node_listen:
- ${{APISIX_NODE_LISTEN:=9080}}
deployment:
admin:
admin_listen:
port: ${{DEPLOYMENT_ADMIN_ADMIN_LISTEN:=9180}}
```
Now if you don't specify these environment variables when running APISIX, it will fall back to the default values and expose the Admin API on port `9180` and listen on port `9080`.
Similarly, you can also use environment variables in `apisix.yaml` when deploying APISIX in standalone mode.
For example, you can export the upstream address and port to environment variables:
```shell
export HOST_ADDR=httpbin.org
export HOST_PORT=80
```
Then create a route as such:
```yaml title="apisix.yaml"
routes:
-
uri: "/anything"
upstream:
nodes:
"${{HOST_ADDR}}:${{HOST_PORT}}": 1
type: roundrobin
#END
```
Initialize and start APISIX in standalone mode, requests to `/anything` should now be forwarded to `httpbin.org:80/anything`.
*WARNING*: When using docker to deploy APISIX in standalone mode. New environment variables added to `apisix.yaml` while APISIX has been initialized will only take effect after a reload.
## Using the `APISIX_PROFILE` environment variable
If you have multiple configuration changes for multiple environments, it might be better to have a different configuration file for each.
Although this might increase the number of configuration files, you would be able to manage each independently and can even do version management.
APISIX uses the `APISIX_PROFILE` environment variable to switch between environments, i.e. to switch between different sets of configuration files. If the value of `APISIX_PROFILE` is `env`, then APISIX will look for the configuration files `conf/config-env.yaml`, `conf/apisix-env.yaml`, and `conf/debug-env.yaml`.
For example for the production environment, you can have:
* conf/config-prod.yaml
* conf/apisix-prod.yaml
* conf/debug-prod.yaml
And for the development environment:
* conf/config-dev.yaml
* conf/apisix-dev.yaml
* conf/debug-dev.yaml
And if no environment is specified, APISIX can use the default configuration files:
* conf/config.yaml
* conf/apisix.yaml
* conf/debug.yaml
To use a particular configuration, you can specify it in the environment variable:
```shell
export APISIX_PROFILE=prod
```
APISIX will now use the `-prod.yaml` configuration files.
---
---
title: Apache Kafka
keywords:
- Apache APISIX
- API Gateway
- PubSub
- Kafka
description: This document contains information about the Apache APISIX kafka pubsub scenario.
---
## Connect to Apache Kafka
Connecting to Apache Kafka in Apache APISIX is very simple.
Currently, we provide a simpler way to integrate by combining two APIs, ListOffsets and Fetch, to quickly implement the ability to pull Kafka messages. Still, they do not support Apache Kafka's consumer group feature for now and cannot be managed for offsets by Apache Kafka.
### Limitations
- Offsets need to be managed manually
They can be stored by a custom backend service or obtained via the list_offset command before starting to fetch the message, which can use timestamp to get the starting offset, or to get the initial and end offsets.
- Unsupported batch data acquisition
A single instruction can only obtain the data of a Topic Partition, does not support batch data acquisition through a single instruction
### Prepare
First, it is necessary to compile the [communication protocol](https://github.com/apache/apisix/blob/master/apisix/include/apisix/model/pubsub.proto) as a language-specific SDK using the `protoc`, which provides the command and response definitions to connect to Kafka via APISIX using the WebSocket.
The `sequence` field in the protocol is used to associate the request with the response, they will correspond one to one, the client can manage it in the way they want, APISIX will not modify it, only pass it back to the client through the response body.
The following commands are currently used by Apache Kafka connect:
- CmdKafkaFetch
- CmdKafkaListOffset
> The `timestamp` field in the `CmdKafkaListOffset` command supports the following value:
>
> - `unix timestamp`: Offset of the first message after the specified timestamp
> - `-1`:Offset of the last message of the current Partition
> - `-2`:Offset of the first message of current Partition
>
> For more information, see [Apache Kafka Protocol Documentation](https://kafka.apache.org/protocol.html#The_Messages_ListOffsets)
Possible response body: When an error occurs, `ErrorResp` will be returned, which includes the error string; the rest of the response will be returned after the execution of the particular command.
- ErrorResp
- KafkaFetchResp
- KafkaListOffsetResp
### How to use
#### Create route
Create a route, set the upstream `scheme` field to `kafka`, and configure `nodes` to be the address of the Kafka broker.
```shell
curl -X PUT 'http://127.0.0.1:9180/apisix/admin/routes/kafka' \
-H 'X-API-KEY: ' \
-H 'Content-Type: application/json' \
-d '{
"uri": "/kafka",
"upstream": {
"nodes": {
"kafka-server1:9092": 1,
"kafka-server2:9092": 1,
"kafka-server3:9092": 1
},
"type": "none",
"scheme": "kafka"
}
}'
```
After configuring the route, you can use this feature.
#### Enabling TLS and SASL/PLAIN authentication
Simply turn on the `kafka-proxy` plugin on the created route and enable the Kafka TLS handshake and SASL authentication through the configuration, which can be found in the [plugin documentation](../../../en/latest/plugins/kafka-proxy.md).
```shell
curl -X PUT 'http://127.0.0.1:9180/apisix/admin/routes/kafka' \
-H 'X-API-KEY: ' \
-H 'Content-Type: application/json' \
-d '{
"uri": "/kafka",
"plugins": {
"kafka-proxy": {
"sasl": {
"username": "user",
"password": "pwd"
}
}
},
"upstream": {
"nodes": {
"kafka-server1:9092": 1,
"kafka-server2:9092": 1,
"kafka-server3:9092": 1
},
"type": "none",
"scheme": "kafka",
"tls": {
"verify": true
}
}
}'
```
---
---
title: PubSub
keywords:
- APISIX
- PubSub
description: This document contains information about the Apache APISIX pubsub framework.
---
## What is PubSub
Publish-subscribe is a messaging paradigm:
- Producers send messages to specific brokers rather than directly to consumers.
- Brokers cache messages sent by producers and then actively push them to subscribed consumers or pull them.
The system architectures use this pattern to decouple or handle high traffic scenarios.
In Apache APISIX, the most common scenario is handling north-south traffic from the server to the client. Combining it with a publish-subscribe system, we can achieve more robust features, such as real-time collaboration on online documents, online games, etc.
## Architecture

Currently, Apache APISIX supports WebSocket communication with the client, which can be any application that supports WebSocket, with Protocol Buffer as the serialization mechanism, see the [protocol definition](https://github.com/apache/apisix/blob/master/apisix/include/apisix/model/pubsub.proto).
## Supported messaging systems
- [Apache Kafka](pubsub/kafka.md)
## How to support other messaging systems
Apache APISIX implement an extensible pubsub module, which is responsible for starting the WebSocket server, coding and decoding communication protocols, handling client commands, and adding support for the new messaging system.
### Basic Steps
- Add new commands and response body definitions to `pubsub.proto`
- Add a new option to the `scheme` configuration item in upstream
- Add a new `scheme` judgment branch to `http_access_phase`
- Implement the required message system instruction processing functions
- Optional: Create plugins to support advanced configurations of this messaging system
### Example of Apache Kafka
#### Add new commands and response body definitions to `pubsub.proto`
The core of the protocol definition in `pubsub.proto` is the two parts `PubSubReq` and `PubSubResp`.
First, create the `CmdKafkaFetch` command and add the required parameters. Then, register this command in the list of commands for `req` in `PubSubReq`, which is named `cmd_kafka_fetch`.
Then create the corresponding response body `KafkaFetchResp` and register it in the `resp` of `PubSubResp`, named `kafka_fetch_resp`.
The protocol definition [pubsub.proto](https://github.com/apache/apisix/blob/master/apisix/include/apisix/model/pubsub.proto).
#### Add a new option to the `scheme` configuration item in upstream
Add a new option `kafka` to the `scheme` field enumeration in the `upstream` of `apisix/schema_def.lua`.
The schema definition [schema_def.lua](https://github.com/apache/apisix/blob/master/apisix/schema_def.lua).
#### Add a new `scheme` judgment branch to `http_access_phase`
Add a `scheme` judgment branch to the `http_access_phase` function in `apisix/init.lua` to support the processing of `kafka` type upstreams. Because Apache Kafka has its clustering and partition scheme, we do not need to use the Apache APISIX built-in load balancing algorithm, so we intercept and take over the processing flow before selecting the upstream node, using the `kafka_access_phase` function.
The APISIX init file [init.lua](https://github.com/apache/apisix/blob/master/apisix/init.lua).
#### Implement the required message system commands processing functions
First, create an instance of the `pubsub` module, which is provided in the `core` package.
Then, an instance of the Apache Kafka client is created and omitted code here.
Next, add the command registered in the protocol definition above to the `pubsub` instance, which will provide a callback function that provides the parameters parsed from the communication protocol, in which the developer needs to call the kafka client to get the data and return it to the `pubsub` module as the function return value.
:::note Callback function prototype
The `params` is the data in the protocol definition; the first return value is the data, which needs to contain the fields in the response body definition, and returns the `nil` value when there is an error; the second return value is the error, and returns the error string when there is an error
:::
Finally, it enters the loop to wait for client commands, and when an error occurs, it returns the error and stops the processing flow.
The kafka pubsub implementation [kafka.lua](https://github.com/apache/apisix/blob/master/apisix/pubsub/kafka.lua).
#### Optional: Create plugins to support advanced configurations of this messaging system
Add the required fields to the plugin schema definition and write them to the context of the current request in the `access` function.
The `kafka-proxy` plugin [kafka-proxy.lua](https://github.com/apache/apisix/blob/master/apisix/plugins/kafka-proxy.lua).
Add this plugin to [the existing list of plugins](https://github.com/apache/apisix/blob/master/apisix/cli/config.yaml.example) in the APISIX configuration file [`config.yaml`](https://github.com/apache/apisix/blob/master/conf/config.yaml). For instance:
```yaml title="conf/config.yaml"
plugins: # see `conf/config.yaml.example` for an example
- ... # add existing plugins
- kafka-proxy
```
#### Results
After this is done, create a route like the one below to connect to this messaging system via APISIX using the WebSocket.
```shell
curl -X PUT 'http://127.0.0.1:9180/apisix/admin/routes/kafka' \
-H 'X-API-KEY: ${api-key}' \
-H 'Content-Type: application/json' \
-d '{
"uri": "/kafka",
"plugins": {
"kafka-proxy": {
"sasl": {
"username": "user",
"password": "pwd"
}
}
},
"upstream": {
"nodes": {
"kafka-server1:9092": 1,
"kafka-server2:9092": 1,
"kafka-server3:9092": 1
},
"type": "none",
"scheme": "kafka",
"tls": {
"verify": true
}
}
}'
```
---
---
Title: Router Radixtree
---
### What is Libradixtree?
[Libradixtree](https://github.com/api7/lua-resty-radixtree) is an adaptive radix tree that is implemented in Lua for OpenResty and it is based on FFI for [rax](https://github.com/antirez/rax). APISIX uses libradixtree as a route dispatching library.
### How to use Libradixtree in APISIX?
There are several ways to use Libradixtree in APISIX. Let's take a look at a few examples and have an intuitive understanding.
#### 1. Full match
```
/blog/foo
```
It will only match the full path `/blog/foo`.
#### 2. Prefix matching
```
/blog/bar*
```
It will match the path with the prefix `/blog/bar`. For example, `/blog/bar/a`,
`/blog/bar/b`, `/blog/bar/c/d/e`, `/blog/bar` etc.
#### 3. Match priority
Full match has a higher priority than deep prefix matching.
Here are the rules:
```
/blog/foo/*
/blog/foo/a/*
/blog/foo/c/*
/blog/foo/bar
```
| path | Match result |
|------|--------------|
|/blog/foo/bar | `/blog/foo/bar` |
|/blog/foo/a/b/c | `/blog/foo/a/*` |
|/blog/foo/c/d | `/blog/foo/c/*` |
|/blog/foo/gloo | `/blog/foo/*` |
|/blog/bar | not match |
#### 4. Different routes have the same `uri`
When different routes have the same `uri`, you can set the priority field of the route to determine which route to match first, or add other matching rules to distinguish different routes.
Note: In the matching rules, the `priority` field takes precedence over other rules except `uri`.
1. Different routes have the same `uri` but different `priority` field
Create two routes with different `priority` values (the larger the value, the higher the priority).
:::note
You can fetch the `admin_key` from `config.yaml` and save to an environment variable with the following command:
```bash
admin_key=$(yq '.deployment.admin.admin_key[0].key' conf/config.yaml | sed 's/"//g')
```
:::
```shell
$ curl http://127.0.0.1:9180/apisix/admin/routes/1 -H "X-API-KEY: $admin_key" -X PUT -d '
{
"upstream": {
"nodes": {
"127.0.0.1:1980": 1
},
"type": "roundrobin"
},
"priority": 3,
"uri": "/hello"
}'
```
```shell
$ curl http://127.0.0.1:9180/apisix/admin/routes/2 -H "X-API-KEY: $admin_key" -X PUT -d '
{
"upstream": {
"nodes": {
"127.0.0.1:1981": 1
},
"type": "roundrobin"
},
"priority": 2,
"uri": "/hello"
}'
```
Test:
```shell
curl http://127.0.0.1:1980/hello
1980
```
All requests will only hit the route of port `1980` because it has a priority of 3 while the route with the port of `1981` has a priority of 2.
2. Different routes have the same `uri` but different matching conditions
To understand this, look at the example of setting host matching rules:
```shell
$ curl http://127.0.0.1:9180/apisix/admin/routes/1 -H "X-API-KEY: $admin_key" -X PUT -d '
{
"upstream": {
"nodes": {
"127.0.0.1:1980": 1
},
"type": "roundrobin"
},
"hosts": ["localhost.com"],
"uri": "/hello"
}'
```
```shell
$ curl http://127.0.0.1:9180/apisix/admin/routes/2 -H "X-API-KEY: $admin_key" -X PUT -d '
{
"upstream": {
"nodes": {
"127.0.0.1:1981": 1
},
"type": "roundrobin"
},
"hosts": ["test.com"],
"uri": "/hello"
}'
```
Test:
```shell
$ curl http://127.0.0.1:9080/hello -H 'host: localhost.com'
1980
```
```shell
$ curl http://127.0.0.1:9080/hello -H 'host: test.com'
1981
```
```shell
$ curl http://127.0.0.1:9080/hello
{"error_msg":"404 Route Not Found"}
```
If the `host` rule matches, the request hits the corresponding upstream, and if the `host` does not match, the request returns a 404 message.
#### 5. Parameter match
When `radixtree_uri_with_parameter` is used, we can match routes with parameters.
For example, with configuration:
```yaml
apisix:
router:
http: 'radixtree_uri_with_parameter'
```
route like
```
/blog/:name
```
will match both `/blog/dog` and `/blog/cat`.
For more details, see https://github.com/api7/lua-resty-radixtree/#parameters-in-path.
### How to filter route by Nginx built-in variable?
Nginx provides a variety of built-in variables that can be used to filter routes based on certain criteria. Here is an example of how to filter routes by Nginx built-in variables:
```shell
$ curl http://127.0.0.1:9180/apisix/admin/routes/1 -H "X-API-KEY: $admin_key" -X PUT -i -d '
{
"uri": "/index.html",
"vars": [
["http_host", "==", "iresty.com"],
["cookie_device_id", "==", "a66f0cdc4ba2df8c096f74c9110163a9"],
["arg_name", "==", "json"],
["arg_age", ">", "18"],
["arg_address", "~~", "China.*"]
],
"upstream": {
"type": "roundrobin",
"nodes": {
"127.0.0.1:1980": 1
}
}
}'
```
This route will require the request header `host` equal `iresty.com`, request cookie key `_device_id` equal `a66f0cdc4ba2df8c096f74c9110163a9` etc. You can learn more at [radixtree-new](https://github.com/api7/lua-resty-radixtree#new).
### How to filter route by POST form attributes?
APISIX supports filtering route by POST form attributes with `Content-Type` = `application/x-www-form-urlencoded`.
We can define the following route:
```shell
$ curl http://127.0.0.1:9180/apisix/admin/routes/1 -H "X-API-KEY: $admin_key" -X PUT -i -d '
{
"methods": ["POST", "GET"],
"uri": "/_post",
"vars": [
["post_arg_name", "==", "json"]
],
"upstream": {
"type": "roundrobin",
"nodes": {
"127.0.0.1:1980": 1
}
}
}'
```
The route will be matched when the POST form contains `name=json`.
### How to filter route by GraphQL attributes?
APISIX can handle HTTP GET and POST methods. At the same time, the request body can be a GraphQL query string or JSON-formatted content.
APISIX supports filtering routes by some attributes of GraphQL. Currently, we support:
* graphql_operation
* graphql_name
* graphql_root_fields
For instance, with GraphQL like this:
```graphql
query getRepo {
owner {
name
}
repo {
created
}
}
```
Where
* The `graphql_operation` is `query`
* The `graphql_name` is `getRepo`,
* The `graphql_root_fields` is `["owner", "repo"]`
We can filter such route with:
```shell
$ curl http://127.0.0.1:9180/apisix/admin/routes/1 -H "X-API-KEY: $admin_key" -X PUT -i -d '
{
"methods": ["POST", "GET"],
"uri": "/graphql",
"vars": [
["graphql_operation", "==", "query"],
["graphql_name", "==", "getRepo"],
["graphql_root_fields", "has", "owner"]
],
"upstream": {
"type": "roundrobin",
"nodes": {
"127.0.0.1:1980": 1
}
}
}'
```
We can verify GraphQL matches in the following three ways:
1. GraphQL query strings
```shell
$ curl -H 'content-type: application/graphql' -X POST http://127.0.0.1:9080/graphql -d '
query getRepo {
owner {
name
}
repo {
created
}
}'
```
2. JSON format
```shell
$ curl -H 'content-type: application/json' -X POST \
http://127.0.0.1:9080/graphql --data '{"query": "query getRepo { owner {name } repo {created}}"}'
```
3. Try `GET` request match
```shell
$ curl -H 'content-type: application/graphql' -X GET \
"http://127.0.0.1:9080/graphql?query=query getRepo { owner {name } repo {created}}" -g
```
To prevent spending too much time reading invalid GraphQL request body, we only read the first 1 MiB
data from the request body. This limitation is configured via:
```yaml
graphql:
max_size: 1048576
```
If you need to pass a GraphQL body which is larger than the limitation, you can increase the value in `conf/config.yaml`.
### How to filter route by POST request JSON body?
APISIX supports filtering route by POST form attributes with `Content-Type` = `application/json`.
We can define the following route:
```shell
$ curl http://127.0.0.1:9180/apisix/admin/routes/1 -H "X-API-KEY: $admin_key" -X PUT -i -d '
{
"methods": ["POST"],
"uri": "/_post",
"vars": [
["post_arg.name", "==", "xyz"]
],
"upstream": {
"type": "roundrobin",
"nodes": {
"127.0.0.1:1980": 1
}
}
}'
```
It will match the following POST request
```shell
curl -X POST http://127.0.0.1:9180/_post \
-H "Content-Type: application/json" \
-d '{"name":"xyz"}'
```
We can also filter by complex queries like the example below:
```shell
$ curl http://127.0.0.1:9180/apisix/admin/routes/1 -H "X-API-KEY: $admin_key" -X PUT -i -d '
{
"methods": ["POST"],
"uri": "/_post",
"vars": [
["post_arg.messages[*].content[*].type","has","image_url"]
],
"upstream": {
"type": "roundrobin",
"nodes": {
"127.0.0.1:1980": 1
}
}
}'
```
It will match the following POST request
```shell
curl -X POST http://127.0.0.1:9180/_post \
-H "Content-Type: application/json" \
-d '{
"model": "deepseek",
"messages": [
{
"role": "system",
"content": [
{
"text": "You are a mathematician",
"type": "text"
},
{
"text": "You are a mathematician",
"type": "image_url"
}
]
}
]
}'
```
---
---
title: SSL Protocol
---
`APISIX` supports set TLS protocol and also supports dynamically specifying different TLS protocol versions for each [SNI](https://en.wikipedia.org/wiki/Server_Name_Indication).
**For security reasons, the encryption suite used by default in `APISIX` does not support TLSv1.1 and lower versions.**
**If you need to enable the TLSv1.1 protocol, please add the encryption suite supported by the TLSv1.1 protocol to the configuration item `apisix.ssl.ssl_ciphers` in `config.yaml`.**
## ssl_protocols Configuration
### Static Configuration
The `ssl_protocols` parameter in the static configuration `config.yaml` applies to the entire APISIX, but cannot be dynamically modified. It only takes effect when the matching SSL resource does not set `ssl_protocols`.
```yaml
apisix:
ssl:
ssl_protocols: TLSv1.2 TLSv1.3 # default TLSv1.2 TLSv1.3
```
### Dynamic Configuration
Use the `ssl_protocols` field in the `ssl` resource to dynamically specify different TLS protocol versions for each SNI.
Specify the `test.com` domain uses the TLSv1.2 and TLSv1.3:
```bash
{
"cert": "$cert",
"key": "$key",
"snis": ["test.com"],
"ssl_protocols": [
"TLSv1.2",
"TLSv1.3"
]
}
```
### Notes
- Dynamic configuration has a higher priority than static configuration. When the `ssl_protocols` configuration item in the ssl resource is not empty, the static configuration will be overridden.
- The static configuration applies to the entire APISIX and requires a reload of APISIX to take effect.
- Dynamic configuration can control the TLS protocol version of each SNI in a fine-grained manner and can be dynamically modified, which is more flexible than static configuration.
## Examples
### How to specify the TLSv1.1 protocol
While newer products utilize higher security-level TLS protocol versions, there are still legacy clients that rely on the lower-level TLSv1.1 protocol. However, enabling TLSv1.1 for new products presents potential security risks. In order to maintain the security of the API, it is crucial to have the ability to seamlessly switch between different protocol versions based on specific requirements and circumstances.
For example, consider two domain names: `test.com`, utilized by legacy clients requiring TLSv1.1 configuration, and `test2.com`, associated with new products that support TLSv1.2 and TLSv1.3 protocols.
1. `config.yaml` configuration.
```yaml
apisix:
ssl:
ssl_protocols: TLSv1.3
# ssl_ciphers is for reference only
ssl_ciphers: ECDHE-ECDSA-AES128-GCM-SHA256:ECDHE-RSA-AES128-GCM-SHA256:ECDHE-ECDSA-AES256-GCM-SHA384:ECDHE-RSA-AES256-GCM-SHA384:ECDHE-ECDSA-CHACHA20-POLY1305:ECDHE-RSA-CHACHA20-POLY1305:DHE-RSA-AES128-GCM-SHA256:DHE-RSA-AES256-GCM-SHA384:ECDHE-RSA-AES256-SHA:ECDHE-ECDSA-AES256-SHA:DHE-RSA-AES256-SHA:DHE-DSS-AES256-SHA
```
:::note
You can fetch the `admin_key` from `config.yaml` and save to an environment variable with the following command:
```bash
admin_key=$(yq '.deployment.admin.admin_key[0].key' conf/config.yaml | sed 's/"//g')
```
:::
2. Specify the TLSv1.1 protocol version for the test.com domain.
```bash
curl http://127.0.0.1:9180/apisix/admin/ssls/1 \
-H "X-API-KEY: $admin_key" -X PUT -d '
{
"cert" : "'"$(cat server.crt)"'",
"key": "'"$(cat server.key)"'",
"snis": ["test.com"],
"ssl_protocols": [
"TLSv1.1"
]
}'
```
3. Create an SSL object for test.com without specifying the TLS protocol version, which will use the static configuration by default.
```bash
curl http://127.0.0.1:9180/apisix/admin/ssls/1 \
-H "X-API-KEY: $admin_key" -X PUT -d '
{
"cert" : "'"$(cat server2.crt)"'",
"key": "'"$(cat server2.key)"'",
"snis": ["test2.com"]
}'
```
4. Access Verification
Failed, accessed test.com with TLSv1.3:
```shell
$ curl --tls-max 1.3 --tlsv1.3 https://test.com:9443 -v -k -I
* Trying 127.0.0.1:9443...
* Connected to test.com (127.0.0.1) port 9443 (#0)
* ALPN, offering h2
* ALPN, offering http/1.1
* successfully set certificate verify locations:
* CAfile: /etc/ssl/certs/ca-certificates.crt
* CApath: /etc/ssl/certs
* TLSv1.3 (OUT), TLS handshake, Client hello (1):
* TLSv1.3 (IN), TLS alert, protocol version (582):
* error:1409442E:SSL routines:ssl3_read_bytes:tlsv1 alert protocol version
* Closing connection 0
curl: (35) error:1409442E:SSL routines:ssl3_read_bytes:tlsv1 alert protocol version
```
Successfully, accessed test.com with TLSv1.1:
```shell
$ curl --tls-max 1.1 --tlsv1.1 https://test.com:9443 -v -k -I
* Trying 127.0.0.1:9443...
* Connected to test.com (127.0.0.1) port 9443 (#0)
* ALPN, offering h2
* ALPN, offering http/1.1
* successfully set certificate verify locations:
* CAfile: /etc/ssl/certs/ca-certificates.crt
* CApath: /etc/ssl/certs
* TLSv1.1 (OUT), TLS handshake, Client hello (1):
* TLSv1.1 (IN), TLS handshake, Server hello (2):
* TLSv1.1 (IN), TLS handshake, Certificate (11):
* TLSv1.1 (IN), TLS handshake, Server key exchange (12):
* TLSv1.1 (IN), TLS handshake, Server finished (14):
* TLSv1.1 (OUT), TLS handshake, Client key exchange (16):
* TLSv1.1 (OUT), TLS change cipher, Change cipher spec (1):
* TLSv1.1 (OUT), TLS handshake, Finished (20):
* TLSv1.1 (IN), TLS handshake, Finished (20):
* SSL connection using TLSv1.1 / ECDHE-RSA-AES256-SHA
```
Successfully, accessed test2.com with TLSv1.3:
```shell
$ curl --tls-max 1.3 --tlsv1.3 https://test2.com:9443 -v -k -I
* Trying 127.0.0.1:9443...
* Connected to test2.com (127.0.0.1) port 9443 (#0)
* ALPN, offering h2
* ALPN, offering http/1.1
* successfully set certificate verify locations:
* CAfile: /etc/ssl/certs/ca-certificates.crt
* CApath: /etc/ssl/certs
* TLSv1.3 (OUT), TLS handshake, Client hello (1):
* TLSv1.3 (IN), TLS handshake, Server hello (2):
* TLSv1.3 (IN), TLS handshake, Encrypted Extensions (8):
* TLSv1.3 (IN), TLS handshake, Certificate (11):
* TLSv1.3 (IN), TLS handshake, CERT verify (15):
* TLSv1.3 (IN), TLS handshake, Finished (20):
* TLSv1.3 (OUT), TLS change cipher, Change cipher spec (1):
* TLSv1.3 (OUT), TLS handshake, Finished (20):
* SSL connection using TLSv1.3 / TLS_AES_256_GCM_SHA384
```
Failed, accessed test2.com with TLSv1.1:
```shell
curl --tls-max 1.1 --tlsv1.1 https://test2.com:9443 -v -k -I
* Trying 127.0.0.1:9443...
* Connected to test2.com (127.0.0.1) port 9443 (#0)
* ALPN, offering h2
* ALPN, offering http/1.1
* successfully set certificate verify locations:
* CAfile: /etc/ssl/certs/ca-certificates.crt
* CApath: /etc/ssl/certs
* TLSv1.1 (OUT), TLS handshake, Client hello (1):
* TLSv1.1 (IN), TLS alert, protocol version (582):
* error:1409442E:SSL routines:ssl3_read_bytes:tlsv1 alert protocol version
* Closing connection 0
curl: (35) error:1409442E:SSL routines:ssl3_read_bytes:tlsv1 alert protocol version
```
### Certificates are associated with multiple domains, but different TLS protocols are used between domains
Sometimes, we may encounter a situation where a certificate is associated with multiple domains, but they need to use different TLS protocols to ensure security. For example, the test.com domain needs to use the TLSv1.2 protocol, while the test2.com domain needs to use the TLSv1.3 protocol. In this case, we cannot simply create an SSL object for all domains, but need to create an SSL object for each domain separately and specify the appropriate protocol version. This way, we can perform the correct SSL handshake and encrypted communication based on different domains and protocol versions. The example is as follows:
1. Create an SSL object for test.com using the certificate and specify the TLSv1.2 protocol.
```bash
curl http://127.0.0.1:9180/apisix/admin/ssls/1 \
-H "X-API-KEY: $admin_key" -X PUT -d '
{
"cert" : "'"$(cat server.crt)"'",
"key": "'"$(cat server.key)"'",
"snis": ["test.com"],
"ssl_protocols": [
"TLSv1.2"
]
}'
```
2. Use the same certificate as test.com to create an SSL object for test2.com and specify the TLSv1.3 protocol.
```bash
curl http://127.0.0.1:9180/apisix/admin/ssls/2 \
-H "X-API-KEY: $admin_key" -X PUT -d '
{
"cert" : "'"$(cat server.crt)"'",
"key": "'"$(cat server.key)"'",
"snis": ["test2.com"],
"ssl_protocols": [
"TLSv1.3"
]
}'
```
3. Access verification
Successfully, accessed test.com with TLSv1.2:
```shell
$ curl --tls-max 1.2 --tlsv1.2 https://test.com:9443 -v -k -I
* Trying 127.0.0.1:9443...
* Connected to test.com (127.0.0.1) port 9443 (#0)
* ALPN, offering h2
* ALPN, offering http/1.1
* successfully set certificate verify locations:
* CAfile: /etc/ssl/certs/ca-certificates.crt
* CApath: /etc/ssl/certs
* TLSv1.2 (OUT), TLS handshake, Client hello (1):
* TLSv1.2 (IN), TLS handshake, Server hello (2):
* TLSv1.2 (IN), TLS handshake, Certificate (11):
* TLSv1.2 (IN), TLS handshake, Server key exchange (12):
* TLSv1.2 (IN), TLS handshake, Server finished (14):
* TLSv1.2 (OUT), TLS handshake, Client key exchange (16):
* TLSv1.2 (OUT), TLS change cipher, Change cipher spec (1):
* TLSv1.2 (OUT), TLS handshake, Finished (20):
* TLSv1.2 (IN), TLS handshake, Finished (20):
* SSL connection using TLSv1.2 / ECDHE-RSA-AES128-GCM-SHA256
* ALPN, server accepted to use h2
* Server certificate:
* subject: C=AU; ST=Some-State; O=Internet Widgits Pty Ltd; CN=test.com
* start date: Jul 20 15:50:08 2023 GMT
* expire date: Jul 17 15:50:08 2033 GMT
* issuer: C=AU; ST=Some-State; O=Internet Widgits Pty Ltd; CN=test.com
* SSL certificate verify result: EE certificate key too weak (66), continuing anyway.
* Using HTTP2, server supports multi-use
* Connection state changed (HTTP/2 confirmed)
* Copying HTTP/2 data in stream buffer to connection buffer after upgrade: len=0
* Using Stream ID: 1 (easy handle 0x5608905ee2e0)
> HEAD / HTTP/2
> Host: test.com:9443
> user-agent: curl/7.74.0
> accept: */*
```
Failed, accessed test.com with TLSv1.3:
```shell
$ curl --tls-max 1.3 --tlsv1.3 https://test.com:9443 -v -k -I
* Trying 127.0.0.1:9443...
* Connected to test.com (127.0.0.1) port 9443 (#0)
* ALPN, offering h2
* ALPN, offering http/1.1
* successfully set certificate verify locations:
* CAfile: /etc/ssl/certs/ca-certificates.crt
* CApath: /etc/ssl/certs
* TLSv1.3 (OUT), TLS handshake, Client hello (1):
* TLSv1.3 (IN), TLS alert, protocol version (582):
* error:1409442E:SSL routines:ssl3_read_bytes:tlsv1 alert protocol version
* Closing connection 0
curl: (35) error:1409442E:SSL routines:ssl3_read_bytes:tlsv1 alert protocol version
```
Successfully, accessed test2.com with TLSv1.3:
```shell
$ curl --tls-max 1.3 --tlsv1.3 https://test2.com:9443 -v -k -I
* Trying 127.0.0.1:9443...
* Connected to test2.com (127.0.0.1) port 9443 (#0)
* ALPN, offering h2
* ALPN, offering http/1.1
* successfully set certificate verify locations:
* CAfile: /etc/ssl/certs/ca-certificates.crt
* CApath: /etc/ssl/certs
* TLSv1.3 (OUT), TLS handshake, Client hello (1):
* TLSv1.3 (IN), TLS handshake, Server hello (2):
* TLSv1.3 (IN), TLS handshake, Encrypted Extensions (8):
* TLSv1.3 (IN), TLS handshake, Certificate (11):
* TLSv1.3 (IN), TLS handshake, CERT verify (15):
* TLSv1.3 (IN), TLS handshake, Finished (20):
* TLSv1.3 (OUT), TLS change cipher, Change cipher spec (1):
* TLSv1.3 (OUT), TLS handshake, Finished (20):
* SSL connection using TLSv1.3 / TLS_AES_256_GCM_SHA384
* ALPN, server accepted to use h2
* Server certificate:
* subject: C=AU; ST=Some-State; O=Internet Widgits Pty Ltd; CN=test2.com
* start date: Jul 20 16:05:47 2023 GMT
* expire date: Jul 17 16:05:47 2033 GMT
* issuer: C=AU; ST=Some-State; O=Internet Widgits Pty Ltd; CN=test2.com
* SSL certificate verify result: EE certificate key too weak (66), continuing anyway.
* Using HTTP2, server supports multi-use
* Connection state changed (HTTP/2 confirmed)
* Copying HTTP/2 data in stream buffer to connection buffer after upgrade: len=0
* Using Stream ID: 1 (easy handle 0x55569cbe42e0)
> HEAD / HTTP/2
> Host: test2.com:9443
> user-agent: curl/7.74.0
> accept: */*
>
* TLSv1.3 (IN), TLS handshake, Newsession Ticket (4):
* TLSv1.3 (IN), TLS handshake, Newsession Ticket (4):
* old SSL session ID is stale, removing
```
Failed, accessed test2.com with TLSv1.2:
```shell
$ curl --tls-max 1.2 --tlsv1.2 https://test2.com:9443 -v -k -I
* Trying 127.0.0.1:9443...
* Connected to test2.com (127.0.0.1) port 9443 (#0)
* ALPN, offering h2
* ALPN, offering http/1.1
* successfully set certificate verify locations:
* CAfile: /etc/ssl/certs/ca-certificates.crt
* CApath: /etc/ssl/certs
* TLSv1.2 (OUT), TLS handshake, Client hello (1):
* TLSv1.2 (IN), TLS alert, protocol version (582):
* error:1409442E:SSL routines:ssl3_read_bytes:tlsv1 alert protocol version
* Closing connection 0
curl: (35) error:1409442E:SSL routines:ssl3_read_bytes:tlsv1 alert protocol version
```
---
---
title: Status API
---
In Apache APISIX, the status API is used to:
* Check if APISIX has successfully started and running correctly.
* Check if all of the workers have received and loaded the configuration.
To change the default endpoint (`127.0.0.1:7085`) of the Status API server, change the `ip` and `port` in the `status` section in your configuration file (`conf/config.yaml`):
```yaml
apisix:
status:
ip: "127.0.0.1"
port: 7085
```
This API can be used to perform readiness probes on APISIX before APISIX starts receiving user requests.
### GET /status
Returns a JSON reporting the status of APISIX workers. If APISIX is not running, the request will error out while establishing TCP connection. Otherwise this endpoint will always return ok if request reaches a running worker.
```json
{
"status": "ok"
}
```
### GET /status/ready
Returns `ok` when all workers have loaded the configuration, otherwise returns the specific error with `503` error code. Below are specific examples.
When all workers have loaded the configuration:
```json
{
"status": "ok"
}
```
When 1 workers has't been initialised:
```json
{
"status": "error",
"error": "worker count: 16 but status report count: 15"
}
```
When a particular worker hasn't loaded the configuration:
```json
{
"error": "worker id: 9 has not received configuration",
"status": "error"
}
```
---
---
title: Stream Proxy
---
A stream proxy operates at the transport layer, handling stream-oriented traffic based on TCP and UDP protocols. TCP is used for many applications and services, such as LDAP, MySQL, and RTMP. UDP is used for many popular non-transactional applications, such as DNS, syslog, and RADIUS.
APISIX can serve as a stream proxy, in addition to being an application layer proxy.
## How to enable stream proxy?
By default, stream proxy is disabled.
To enable this option, set `apisix.proxy_mode` to `stream` or `http&stream`, depending on whether you want stream proxy only or both http and stream. Then add the `apisix.stream_proxy` option in `conf/config.yaml` and specify the list of addresses where APISIX should act as a stream proxy and listen for incoming requests.
```yaml
apisix:
proxy_mode: http&stream # enable both http and stream proxies
stream_proxy:
tcp:
- 9100 # listen on 9100 ports of all network interfaces for TCP requests
- "127.0.0.1:9101"
udp:
- 9200 # listen on 9200 ports of all network interfaces for UDP requests
- "127.0.0.1:9211"
```
If `apisix.stream_proxy` is undefined in `conf/config.yaml`, you will encounter an error similar to the following and not be able to add a stream route:
```
{"error_msg":"stream mode is disabled, can not add stream routes"}
```
## How to set a route?
You can create a stream route using the Admin API `/stream_routes` endpoint. For example:
:::note
You can fetch the `admin_key` from `config.yaml` and save to an environment variable with the following command:
```bash
admin_key=$(yq '.deployment.admin.admin_key[0].key' conf/config.yaml | sed 's/"//g')
```
:::
```shell
curl http://127.0.0.1:9180/apisix/admin/stream_routes/1 -H "X-API-KEY: $admin_key" -X PUT -d '
{
"remote_addr": "192.168.5.3",
"upstream": {
"nodes": {
"192.168.4.10:1995": 1
},
"type": "roundrobin"
}
}'
```
With this configuration, APISIX would only forward the request to the upstream service at `192.168.4.10:1995` if and only if the request is sent from `192.168.5.3`. See the next section to learn more about filtering options.
More examples can be found in [test cases](https://github.com/apache/apisix/blob/master/t/stream-node/sanity.t).
## More stream route filtering options
Currently there are three attributes in stream routes that can be used for filtering requests:
- `server_addr`: The address of the APISIX server that accepts the L4 stream connection.
- `server_port`: The port of the APISIX server that accepts the L4 stream connection.
- `remote_addr`: The address of client from which the request has been made.
Here is an example:
```shell
curl http://127.0.0.1:9180/apisix/admin/stream_routes/1 -H "X-API-KEY: $admin_key" -X PUT -d '
{
"server_addr": "127.0.0.1",
"server_port": 2000,
"upstream": {
"nodes": {
"127.0.0.1:1995": 1
},
"type": "roundrobin"
}
}'
```
It means APISIX will proxy the request to `127.0.0.1:1995` when the server address is `127.0.0.1` and the server port is equal to `2000`.
Here is an example with MySQL:
1. Put this config inside `config.yaml`
```yaml
apisix:
proxy_mode: http&stream # enable both http and stream proxies
stream_proxy: # TCP/UDP proxy
tcp: # TCP proxy address list
- 9100 # by default uses 0.0.0.0
- "127.0.0.10:9101"
```
2. Now run a mysql docker container and expose port 3306 to the host
```shell
$ docker run --name mysql -e MYSQL_ROOT_PASSWORD=toor -p 3306:3306 -d mysql mysqld --default-authentication-plugin=mysql_native_password
# check it using a mysql client that it works
$ mysql --host=127.0.0.1 --port=3306 -u root -p
Enter password:
Welcome to the MySQL monitor. Commands end with ; or \g.
Your MySQL connection id is 25
...
mysql>
```
3. Now we are going to create a stream route with server filtering:
```shell
curl http://127.0.0.1:9180/apisix/admin/stream_routes/1 -H "X-API-KEY: $admin_key" -X PUT -d '
{
"server_addr": "127.0.0.10",
"server_port": 9101,
"upstream": {
"nodes": {
"127.0.0.1:3306": 1
},
"type": "roundrobin"
}
}'
```
It only forwards the request to the mysql upstream whenever a connection is received at APISIX server `127.0.0.10` and port `9101`. Let's test that behaviour:
4. Making a request to 9100 (stream proxy port enabled inside config.yaml), filter matching fails.
```shell
$ mysql --host=127.0.0.1 --port=9100 -u root -p
Enter password:
ERROR 2013 (HY000): Lost connection to MySQL server at 'reading initial communication packet', system error: 2
```
Instead making a request to the APISIX host and port where the filter matching succeeds:
```shell
mysql --host=127.0.0.10 --port=9101 -u root -p
Enter password:
Welcome to the MySQL monitor. Commands end with ; or \g.
Your MySQL connection id is 26
...
mysql>
```
Read [Admin API's Stream Route section](./admin-api.md#stream-route) for the complete options list.
## Accept TLS over TCP connection
APISIX can accept TLS over TCP connection.
First of all, we need to enable TLS for the TCP address:
```yaml
apisix:
proxy_mode: http&stream # enable both http and stream proxies
stream_proxy: # TCP/UDP proxy
tcp: # TCP proxy address list
- addr: 9100
tls: true
```
Second, we need to configure certificate for the given SNI.
See [Admin API's SSL section](./admin-api.md#ssl) for how to do.
mTLS is also supported, see [Protect Route](./mtls.md#protect-route) for how to do.
Third, we need to configure a stream route to match and proxy it to the upstream:
```shell
curl http://127.0.0.1:9180/apisix/admin/stream_routes/1 -H "X-API-KEY: $admin_key" -X PUT -d '
{
"upstream": {
"nodes": {
"127.0.0.1:1995": 1
},
"type": "roundrobin"
}
}'
```
When the connection is TLS over TCP, we can use the SNI to match a route, like:
```shell
curl http://127.0.0.1:9180/apisix/admin/stream_routes/1 -H "X-API-KEY: $admin_key" -X PUT -d '
{
"sni": "a.test.com",
"upstream": {
"nodes": {
"127.0.0.1:5991": 1
},
"type": "roundrobin"
}
}'
```
In this case, a connection handshaked with SNI `a.test.com` will be proxied to `127.0.0.1:5991`.
## Proxy to TLS over TCP upstream
APISIX also supports proxying to TLS over TCP upstream.
```shell
curl http://127.0.0.1:9180/apisix/admin/stream_routes/1 -H "X-API-KEY: $admin_key" -X PUT -d '
{
"upstream": {
"scheme": "tls",
"nodes": {
"127.0.0.1:1995": 1
},
"type": "roundrobin"
}
}'
```
By setting the `scheme` to `tls`, APISIX will do TLS handshake with the upstream.
When the client is also speaking TLS over TCP, the SNI from the client will pass through to the upstream. Otherwise, a dummy SNI `apisix_backend` will be used.
---
---
id: support-fips-in-apisix
title: Support FIPS in APISIX
keywords:
- API Gateway
- Apache APISIX
- Code Contribution
- Building APISIX
- OpenSSL 3.0 FIPS
description: Compile apisix-runtime with OpenSSL 3.0 (FIPS enabled)
---
OpenSSL 3.0 [supports](https://www.openssl.org/blog/blog/2022/08/24/FIPS-validation-certificate-issued/) [FIPS](https://en.wikipedia.org/wiki/FIPS_140-2) mode. To support FIPS in APISIX, you can compile apisix-runtime with OpenSSL 3.0.
## Compilation
To compile apisix-runtime with OpenSSL 3.0, run the commands below as root user:
```bash
cd $(mktemp -d)
OPENSSL3_PREFIX=${OPENSSL3_PREFIX-/usr/local}
apt install -y build-essential
git clone https://github.com/openssl/openssl
cd openssl
./Configure --prefix=$OPENSSL3_PREFIX/openssl-3.0 enable-fips
make install
echo $OPENSSL3_PREFIX/openssl-3.0/lib64 > /etc/ld.so.conf.d/openssl3.conf
ldconfig
$OPENSSL3_PREFIX/openssl-3.0/bin/openssl fipsinstall -out $OPENSSL3_PREFIX/openssl-3.0/ssl/fipsmodule.cnf -module $OPENSSL3_PREFIX/openssl-3.0/lib64/ossl-modules/fips.so
sed -i 's@# .include fipsmodule.cnf@.include '"$OPENSSL3_PREFIX"'/openssl-3.0/ssl/fipsmodule.cnf@g; s/# \(fips = fips_sect\)/\1\nbase = base_sect\n\n[base_sect]\nactivate=1\n/g' $OPENSSL3_PREFIX/openssl-3.0/ssl/openssl.cnf
cd ..
export cc_opt="-I$OPENSSL3_PREFIX/openssl-3.0/include"
export ld_opt="-L$OPENSSL3_PREFIX/openssl-3.0/lib64 -Wl,-rpath,$OPENSSL3_PREFIX/openssl-3.0/lib64"
wget --no-check-certificate https://raw.githubusercontent.com/api7/apisix-build-tools/master/build-apisix-runtime.sh
chmod +x build-apisix-runtime.sh
./build-apisix-runtime.sh
```
This will install apisix-runtime to `/usr/local/openresty`.
---
---
title: API Gateway
keywords:
- Apache APISIX
- API Gateway
- Gateway
description: This article mainly introduces the role of the API gateway and why it is needed.
---
## Description
An API gateway is a software pattern that sits in front of an application programming interface (API) or group of microservices, to facilitate requests and delivery of data and services. Its primary role is to act as a single entry point and standardized process for interactions between an organization's apps, data, and services and internal and external customers. The API gateway can also perform various other functions to support and manage API usage, from authentication to rate limiting to analytics.
An API gateway also acts as a gateway between the API and the underlying infrastructure. It can be used to route requests to different backends, such as a load balancer, or route requests to different services based on the request headers.
## Why use an API gateway?
An API gateway comes with a lot of benefits over a traditional API microservice. The following are some of the benefits:
- It is a single entry point for all API requests.
- It can be used to route requests to different backends, such as a load balancer, or route requests to different services based on the request headers.
- It can be used to perform authentication, authorization, and rate-limiting.
- It can be used to support analytics, such as monitoring, logging, and tracing.
- It can protect the API from malicious attack vectors such as SQL injections, DDOS attacks, and XSS.
- It decreases the complexity of the API and microservices.
---
---
title: Consumer Group
keywords:
- API gateway
- Apache APISIX
- Consumer Group
description: Consumer Group in Apache APISIX.
---
## Description
Consumer Groups are used to extract commonly used [Plugin](./plugin.md) configurations and can be bound directly to a [Consumer](./consumer.md).
With consumer groups, you can define any number of plugins, e.g. rate limiting and apply them to a set of consumers,
instead of managing each consumer individually.
## Example
The example below illustrates how to create a Consumer Group and bind it to a Consumer.
Create a Consumer Group which shares the same rate limiting quota:
:::note
You can fetch the `admin_key` from `config.yaml` and save to an environment variable with the following command:
```bash
admin_key=$(yq '.deployment.admin.admin_key[0].key' conf/config.yaml | sed 's/"//g')
```
:::
```shell
curl http://127.0.0.1:9180/apisix/admin/consumer_groups/company_a \
-H "X-API-KEY: $admin_key" -X PUT -d '
{
"plugins": {
"limit-count": {
"count": 200,
"time_window": 60,
"rejected_code": 503,
"group": "grp_company_a"
}
}
}'
```
Create a Consumer within the Consumer Group:
```shell
curl http://127.0.0.1:9180/apisix/admin/consumers \
-H "X-API-KEY: $admin_key" -X PUT -d '
{
"username": "jack",
"plugins": {
"key-auth": {
"key": "auth-one"
}
},
"group_id": "company_a"
}'
```
When APISIX can't find the Consumer Group with the `group_id`, the Admin API is terminated with a status code of `400`.
:::tip
1. When the same plugin is configured in [consumer](./consumer.md), [routing](./route.md), [plugin config](./plugin-config.md) and [service](./service.md), only one configuration is in effect, and the consumer has the highest priority. Please refer to [Plugin](./plugin.md).
2. If a Consumer already has the `plugins` field configured, the plugins in the Consumer Group will effectively be merged into it. The same plugin in the Consumer Group will not override the one configured directly in the Consumer.
:::
For example, if we configure a Consumer Group as shown below:
```json
{
"id": "bar",
"plugins": {
"response-rewrite": {
"body": "hello"
}
}
}
```
To a Consumer as shown below.
```json
{
"username": "foo",
"group_id": "bar",
"plugins": {
"basic-auth": {
"username": "foo",
"password": "bar"
},
"response-rewrite": {
"body": "world"
}
}
}
```
Then the `body` in `response-rewrite` keeps `world`.
---
---
title: Consumer
keywords:
- Apache APISIX
- API Gateway
- APISIX Consumer
- Consumer
description: This article describes the role of the Apache APISIX Consumer object and how to use the Consumer.
---
## Description
For an API gateway, it is usually possible to identify the type of the requester by using things like their request domain name and client IP address. A gateway like APISIX can then filter these requests using [Plugins](./plugin.md) and forward it to the specified [Upstream](./upstream.md).
It has the highest priority: Consumer > Route > Plugin Config > Service.
But this level of depth can be insufficient on some occasions.

An API gateway should know who the consumer of the API is to configure different rules for different consumers. This is where the **Consumer** construct comes in APISIX.
### Configuration options
The fields for defining a Consumer are defined as below.
| Field | Required | Description |
| ---------- | -------- | -------------------------------------------------------------------------------------------------------------------------------------------------------------------------------- |
| `username` | True | Name of the consumer. |
| `plugins` | False | Plugin configuration of the **Consumer**. For specific Plugin configurations, please refer the [Plugins](./plugin.md). |
## Identifying a Consumer
The process of identifying a Consumer in APISIX is described below:

1. The first step is Authentication. This is achieved by Authentication Plugins like [key-auth](../plugins/key-auth.md) and [JWT](../plugins/jwt-auth.md).
2. After authenticating, you can obtain the `id` of the Consumer. This `id` will be the unique identifier of a Consumer.
3. The configurations like Plugins and Upstream bound to the Consumer are then executed.
Consumers are useful when you have different consumers requesting the same API and you need to execute different Plugin and Upstream configurations based on the consumer. These need to be used in conjunction with the user authentication system.
Authentication plugins that can be configured with a Consumer include `basic-auth`, `hmac-auth`, `jwt-auth`, `key-auth`, `ldap-auth`, and `wolf-rbac`.
Refer to the documentation for the [key-auth](../plugins/key-auth.md) authentication Plugin to further understand the concept of a Consumer.
:::note
For more information about the Consumer object, you can refer to the [Admin API Consumer](../admin-api.md#consumer) object resource introduction.
:::
## Example
The example below shows how you can enable a Plugin for a specific Consumer.
:::note
You can fetch the `admin_key` from `config.yaml` and save to an environment variable with the following command:
```bash
admin_key=$(yq '.deployment.admin.admin_key[0].key' conf/config.yaml | sed 's/"//g')
```
:::
1. Create a Consumer, specify the authentication plugin `key-auth`, and enable the specific plugin `limit-count`.
```shell
curl http://127.0.0.1:9180/apisix/admin/consumers \
-H "X-API-KEY: $admin_key" -X PUT -d '
{
"username": "jack",
"plugins": {
"key-auth": {
"key": "auth-one"
},
"limit-count": {
"count": 2,
"time_window": 60,
"rejected_code": 503,
"key": "remote_addr"
}
}
}'
```
2. Create a Router, set routing rules and enable plugin configuration.
```shell
curl http://127.0.0.1:9180/apisix/admin/routes/1 \
-H "X-API-KEY: $admin_key" -X PUT -d '
{
"plugins": {
"key-auth": {}
},
"upstream": {
"nodes": {
"127.0.0.1:1980": 1
},
"type": "roundrobin"
},
"uri": "/hello"
}'
```
3. Send a test request, the first two return to normal, did not reach the speed limit threshold.
```shell
curl http://127.0.0.1:9080/hello -H 'apikey: auth-one' -I
```
The third test returns `503` and the request is restricted.
```shell
HTTP/1.1 503 Service Temporarily Unavailable
...
```
We can use the [consumer-restriction](../plugins/consumer-restriction.md) Plugin to restrict our user "Jack" from accessing the API.
1. Add Jack to the blacklist.
```shell
curl http://127.0.0.1:9180/apisix/admin/routes/1 \
-H "X-API-KEY: $admin_key" -X PUT -d '
{
"plugins": {
"key-auth": {},
"consumer-restriction": {
"blacklist": [
"jack"
]
}
},
"upstream": {
"nodes": {
"127.0.0.1:1980": 1
},
"type": "roundrobin"
},
"uri": "/hello"
}'
```
2. Repeated tests, all return `403`; Jack is forbidden to access this API.
```shell
curl http://127.0.0.1:9080/hello -H 'apikey: auth-one' -I
```
```shell
HTTP/1.1 403
...
```
---
---
title: Credential
keywords:
- APISIX
- API Gateway
- Consumer
- Credential
description: This article describes what the Apache APISIX Credential object does and how to use it.
---
## Description
Credential is the object that holds the [Consumer](./consumer.md) credential configuration.
A Consumer can use multiple credentials of different types.
Credentials are used when you need to configure multiple credentials for a Consumer.
Currently, Credential can be configured with the authentication plugins `basic-auth`, `hmac-auth`, `jwt-auth`, and `key-auth`.
### Configuration options
The fields for defining a Credential are defined as below.
| Field | Required | Description |
|---------|----------|---------------------------------------------------------------------------------------------------------|
| desc | False | Description of the Credential. |
| labels | False | Labels of the Credential. |
| plugins | False | The plugin configuration corresponding to Credential. For more information, see [Plugins](./plugin.md). |
:::note
For more information about the Credential object, you can refer to the [Admin API Credential](../admin-api.md#credential) resource guide.
:::
## Example
[Consumer Example](./consumer.md#example) describes how to configure the auth plugin for Consumer and how to use it with other plugins.
In this example, the Consumer has only one credential of type key-auth.
Now suppose the user needs to configure multiple credentials for that Consumer, you can use Credential to support this.
:::note
You can fetch the `admin_key` from `config.yaml` and save to an environment variable with the following command:
```bash
admin_key=$(yq '.deployment.admin.admin_key[0].key' conf/config.yaml | sed 's/"//g')
```
:::
1. Create the Consumer without specifying the auth plug-in, but use Credential to configure the auth plugin later.
```shell
curl http://127.0.0.1:9180/apisix/admin/consumers \
-H "X-API-KEY: $admin_key" -X PUT -d '
{
"username": "jack"
}'
```
2. Create 2 `key-auth` Credentials for the Consumer.
```shell
curl http://127.0.0.1:9180/apisix/admin/consumers/jack/credentials/key-auth-one \
-H "X-API-KEY: $admin_key" -X PUT -d '
{
"plugins": {
"key-auth": {
"key": "auth-one"
}
}
}'
```
```shell
curl http://127.0.0.1:9180/apisix/admin/consumers/jack/credentials/key-auth-two \
-H "X-API-KEY: $admin_key" -X PUT -d '
{
"plugins": {
"key-auth": {
"key": "auth-two"
}
}
}'
```
3. Create a route and enable `key-auth` plugin on it.
```shell
curl http://127.0.0.1:9180/apisix/admin/routes/1 \
-H "X-API-KEY: $admin_key" -X PUT -d '
{
"plugins": {
"key-auth": {}
},
"upstream": {
"nodes": {
"127.0.0.1:1980": 1
},
"type": "roundrobin"
},
"uri": "/hello"
}'
```
4. Test.
Test the request with the `auth-one` and `auth-two` keys, and they both respond correctly.
```shell
curl http://127.0.0.1:9080/hello -H 'apikey: auth-one' -I
curl http://127.0.0.1:9080/hello -H 'apikey: auth-two' -I
```
Enable the `limit-count` plugin for the Consumer.
```shell
curl http://127.0.0.1:9180/apisix/admin/consumers \
-H "X-API-KEY: $admin_key" -X PUT -d '
{
"username": "jack",
"plugins": {
"limit-count": {
"count": 2,
"time_window": 60,
"rejected_code": 503,
"key": "remote_addr"
}
}
}'
```
Requesting the route more than 3 times in a row with each of the two keys, the test returns `503` and the request is restricted.
---
---
title: Global Rules
keywords:
- API Gateway
- Apache APISIX
- Global Rules
description: This article describes how to use global rules.
---
## Description
A [Plugin](./plugin.md) configuration can be bound directly to a [Route](./route.md), a [Service](./service.md) or a [Consumer](./consumer.md). But what if we want a Plugin to work on all requests? This is where we register a global Plugin with Global Rule.
Compared with the plugin configuration in Route, Service, Plugin Config, and Consumer, the plugin in the Global Rules is always executed first.
## Example
The example below shows how you can use the `limit-count` Plugin on all requests:
:::note
You can fetch the `admin_key` from `config.yaml` and save to an environment variable with the following command:
```bash
admin_key=$(yq '.deployment.admin.admin_key[0].key' conf/config.yaml | sed 's/"//g')
```
:::
```shell
curl -X PUT \
http://{apisix_listen_address}/apisix/admin/global_rules/1 \
-H 'Content-Type: application/json' \
-H "X-API-KEY: $admin_key" \
-d '{
"plugins": {
"limit-count": {
"time_window": 60,
"policy": "local",
"count": 2,
"key": "remote_addr",
"rejected_code": 503
}
}
}'
```
You can also list all the Global rules by making this request with the Admin API:
```shell
curl http://{apisix_listen_address}/apisix/admin/global_rules -H "X-API-KEY: $admin_key"
```
---
---
title: Plugin Config
keywords:
- API Gateway
- Apache APISIX
- Plugin Config
description: Plugin Config in Apache APISIX.
---
## Description
Plugin Configs are used to extract commonly used [Plugin](./plugin.md) configurations and can be bound directly to a [Route](./route.md).
While configuring the same plugin, only one copy of the configuration is valid. Please read the [plugin execution order](../terminology/plugin.md#plugins-execution-order) and [plugin merging order](../terminology/plugin.md#plugins-merging-precedence).
## Example
The example below illustrates how to create a Plugin Config and bind it to a Route:
:::note
You can fetch the `admin_key` from `config.yaml` and save to an environment variable with the following command:
```bash
admin_key=$(yq '.deployment.admin.admin_key[0].key' conf/config.yaml | sed 's/"//g')
```
:::
```shell
curl http://127.0.0.1:9180/apisix/admin/plugin_configs/1 \
-H "X-API-KEY: $admin_key" -X PUT -i -d '
{
"desc": "blah",
"plugins": {
"limit-count": {
"count": 2,
"time_window": 60,
"rejected_code": 503
}
}
}'
```
```shell
curl http://127.0.0.1:9180/apisix/admin/routes/1 \
-H 'X-API-KEY:edd1c9f034335f136f87ad84b625c8f1' -X PUT -i -d '
{
"uris": ["/index.html"],
"plugin_config_id": 1,
"upstream": {
"type": "roundrobin",
"nodes": {
"127.0.0.1:1980": 1
}
}
}'
```
When APISIX can't find the Plugin Config with the `id`, the requests reaching this Route are terminated with a status code of `503`.
:::note
If a Route already has the `plugins` field configured, the plugins in the Plugin Config will effectively be merged to it.
The same plugin in the Plugin Config will not override the ones configured directly in the Route. For more information, see [Plugin](./plugin.md).
:::
For example, if you configure a Plugin Config as shown below:
```shell
curl http://127.0.0.1:9180/apisix/admin/plugin_configs/1 \
-H "X-API-KEY: $admin_key" -X PUT -i -d '
{
"desc": "I am plugin_config 1",
"plugins": {
"ip-restriction": {
"whitelist": [
"127.0.0.0/24",
"113.74.26.106"
]
},
"limit-count": {
"count": 2,
"time_window": 60,
"rejected_code": 503
}
}
}'
```
to a Route as shown below,
```shell
curl http://127.0.0.1:9180/apisix/admin/routes/1 \
-H "X-API-KEY: $admin_key" -X PUT -i -d '
{
"uris": ["/index.html"],
"plugin_config_id": 1,
"upstream": {
"type": "roundrobin",
"nodes": {
"127.0.0.1:1980": 1
}
}
"plugins": {
"proxy-rewrite": {
"uri": "/test/add",
"host": "apisix.iresty.com"
},
"limit-count": {
"count": 20,
"time_window": 60,
"rejected_code": 503,
"key": "remote_addr"
}
}
}'
```
the effective configuration will be as the one shown below:
```shell
curl http://127.0.0.1:9180/apisix/admin/routes/1 \
-H "X-API-KEY: $admin_key" -X PUT -i -d '
{
"uris": ["/index.html"],
"upstream": {
"type": "roundrobin",
"nodes": {
"127.0.0.1:1980": 1
}
}
"plugins": {
"ip-restriction": {
"whitelist": [
"127.0.0.0/24",
"113.74.26.106"
]
},
"proxy-rewrite": {
"uri": "/test/add",
"host": "apisix.iresty.com"
},
"limit-count": {
"count": 20,
"time_window": 60,
"rejected_code": 503
}
}
}'
```
---
---
title: Plugin Metadata
keywords:
- API Gateway
- Apache APISIX
- Plugin Metadata
description: Plugin Metadata in Apache APISIX.
---
## Description
In this document, you will learn the basic concept of plugin metadata in APISIX and why you may need them.
Explore additional resources at the end of the document for more information on related topics.
## Overview
In APISIX, a plugin metadata object is used to configure the common metadata field(s) of all plugin instances sharing the same plugin name. It is useful when a plugin is enabled across multiple objects and requires a universal update to their metadata fields.
The following diagram illustrates the concept of plugin metadata using two instances of [syslog](https://apisix.apache.org/docs/apisix/plugins/syslog/) plugins on two different routes, as well as a plugin metadata object setting a [global](https://apisix.apache.org/docs/apisix/plugins/syslog/) `log_format` for the syslog plugin:

Without otherwise specified, the `log_format` on plugin metadata object should apply the same log format uniformly to both `syslog` plugins. However, since the `syslog` plugin on the `/orders` route has a different `log_format`, requests visiting this route will generate logs in the `log_format` specified by the plugin in route.
Metadata properties set at the plugin level is more granular and has a higher priority over the "global" metadata object.
Plugin metadata objects should only be used for plugins that have metadata fields. Check the specific plugin documentation to know more.
## Example usage
The example below shows how you can configure through the Admin API:
:::note
You can fetch the `admin_key` from `config.yaml` and save to an environment variable with the following command:
```bash
admin_key=$(yq '.deployment.admin.admin_key[0].key' conf/config.yaml | sed 's/"//g')
```
:::
```shell
curl http://127.0.0.1:9180/apisix/admin/plugin_metadata/http-logger \
-H "X-API-KEY: $admin_key" -X PUT -d '
{
"log_format": {
"host": "$host",
"@timestamp": "$time_iso8601",
"client_ip": "$remote_addr"
}
}'
```
With this configuration, your logs would be formatted as shown below:
```json
{"host":"localhost","@timestamp":"2020-09-23T19:05:05-04:00","client_ip":"127.0.0.1","route_id":"1"}
{"host":"localhost","@timestamp":"2020-09-23T19:05:05-04:00","client_ip":"127.0.0.1","route_id":"1"}
```
## Additional Resource(s)
Key Concepts - [Plugins](https://apisix.apache.org/docs/apisix/terminology/plugin/)
---
---
title: Plugin
keywords:
- API Gateway
- Apache APISIX
- Plugin
- Filter
- Priority
description: This article introduces the related information of the APISIX Plugin object and how to use it, and introduces how to customize the plugin priority, customize the error response, and dynamically control the execution status of the plugin.
---
## Description
APISIX Plugins extend APISIX's functionalities to meet organization or user-specific requirements in traffic management, observability, security, request/response transformation, serverless computing, and more.
A **Plugin** configuration can be bound directly to a [`Route`](route.md), [`Service`](service.md), [`Consumer`](consumer.md) or [`Plugin Config`](plugin-config.md). You can refer to [Admin API plugins](../admin-api.md#plugin) for how to use this resource.
If existing APISIX Plugins do not meet your needs, you can also write your own plugins in Lua or other languages such as Java, Python, Go, and Wasm.
## Plugins installation
By default, most APISIX plugins are [installed](https://github.com/apache/apisix/blob/master/apisix/cli/config.lua):
```lua title="apisix/cli/config.lua"
local _M = {
...
plugins = {
"real-ip",
"ai",
"client-control",
"proxy-control",
"request-id",
"zipkin",
"ext-plugin-pre-req",
"fault-injection",
"mocking",
"serverless-pre-function",
...
},
...
}
```
If you would like to make adjustments to plugins installation, add the customized `plugins` configuration to `config.yaml`. For example:
```yaml
plugins:
- real-ip # installed
- ai
- real-ip
- ai
- client-control
- proxy-control
- request-id
- zipkin
- ext-plugin-pre-req
- fault-injection
# - mocking # not install
- serverless-pre-function
... # other plugins
```
See `config.yaml.example`(https://github.com/apache/apisix/blob/master/conf/config.yaml.example) for a complete configuration reference.
You should reload APISIX for configuration changes to take effect.
## Plugins execution lifecycle
An installed plugin is first initialized. The configuration of the plugin is then checked against the defined [JSON Schema](https://json-schema.org) to make sure the plugins configuration schema is correct.
When a request goes through APISIX, the plugin's corresponding methods are executed in one or more of the following phases : `rewrite`, `access`, `before_proxy`, `header_filter`, `body_filter`, and `log`. These phases are largely influenced by the [OpenResty directives](https://openresty-reference.readthedocs.io/en/latest/Directives/).
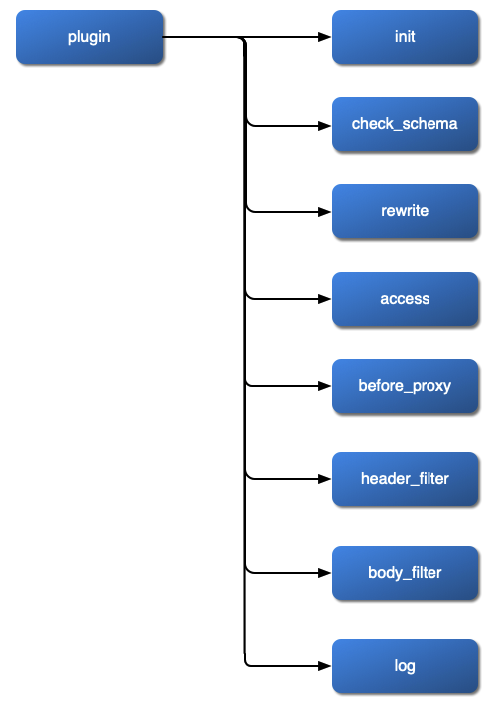
## Plugins execution order
In general, plugins are executed in the following order:
1. Plugins in [global rules](./global-rule.md)
1. plugins in rewrite phase
2. plugins in access phase
2. Plugins bound to other objects
1. plugins in rewrite phase
2. plugins in access phase
Within each phase, you can optionally define a new priority number in the `_meta.priority` field of the plugin, which takes precedence over the default plugins priority during execution. Plugins with higher priority numbers are executed first.
For example, if you want to have `limit-count` (priority 1002) run before `ip-restriction` (priority 3000) when requests hit a route, you can do so by passing a higher priority number to `_meta.priority` field of `limit-count`:
```json
{
...,
"plugins": {
"limit-count": {
...,
"_meta": {
"priority": 3010
}
}
}
}
```
To reset the priority of this plugin instance to the default, simply remove the `_meta.priority` field from your plugin configuration.
## Plugins merging precedence
When the same plugin is configured both globally in a global rule and locally in an object (e.g. a route), both plugin instances are executed sequentially.
However, if the same plugin is configured locally on multiple objects, such as on [Route](./route.md), [Service](./service.md), [Consumer](./consumer.md), [Consumer Group](./consumer-group.md), or [Plugin Config](./plugin-config.md), only one copy of configuration is used as each non-global plugin is only executed once. This is because during execution, plugins configured in these objects are merged with respect to a specific order of precedence:
`Consumer` > `Consumer Group` > `Route` > `Plugin Config` > `Service`
such that if the same plugin has different configurations in different objects, the plugin configuration with the highest order of precedence during merging will be used.
## Plugin common configuration
Some common configurations can be applied to plugins through the `_meta` configuration items, the specific configuration items are as follows:
| Name | Type | Description |
|----------------|--------------- |-------------|
| disable | boolean | When set to `true`, the plugin is disabled. |
| error_response | string/object | Custom error response. |
| priority | integer | Custom plugin priority. |
| filter | array | Depending on the requested parameters, it is decided at runtime whether the plugin should be executed. Something like this: `{{var, operator, val}, {var, operator, val}, ...}}`. For example: `{"arg_version", "==", "v2"}`, indicating that the current request parameter `version` is `v2`. The variables here are consistent with NGINX internal variables. For details on supported operators, please see [lua-resty-expr](https://github.com/api7/lua-resty-expr#operator-list). |
### Disable the plugin
Through the `disable` configuration, you can add a new plugin with disabled status and the request will not go through the plugin.
```json
{
"proxy-rewrite": {
"_meta": {
"disable": true
}
}
}
```
### Custom error response
Through the `error_response` configuration, you can configure the error response of any plugin to a fixed value to avoid troubles caused by the built-in error response information of the plugin.
The configuration below means to customize the error response of the `jwt-auth` plugin to `Missing credential in request`.
```json
{
"jwt-auth": {
"_meta": {
"error_response": {
"message": "Missing credential in request"
}
}
}
}
```
### Custom plugin priority
All plugins have default priorities, but through the `priority` configuration item you can customize the plugin priority and change the plugin execution order.
```json
{
"serverless-post-function": {
"_meta": {
"priority": 10000
},
"phase": "rewrite",
"functions" : ["return function(conf, ctx)
ngx.say(\"serverless-post-function\");
end"]
},
"serverless-pre-function": {
"_meta": {
"priority": -2000
},
"phase": "rewrite",
"functions": ["return function(conf, ctx)
ngx.say(\"serverless-pre-function\");
end"]
}
}
```
The default priority of serverless-pre-function is 10000, and the default priority of serverless-post-function is -2000. By default, the serverless-pre-function plugin will be executed first, and serverless-post-function plugin will be executed next.
The above configuration means setting the priority of the serverless-pre-function plugin to -2000 and the priority of the serverless-post-function plugin to 10000. The serverless-post-function plugin will be executed first, and serverless-pre-function plugin will be executed next.
:::note
- Custom plugin priority only affects the current object(route, service ...) of the plugin instance binding, not all instances of that plugin. For example, if the above plugin configuration belongs to Route A, the order of execution of the plugins serverless-post-function and serverless-post-function on Route B will not be affected and the default priority will be used.
- Custom plugin priority does not apply to the rewrite phase of some plugins configured on the consumer. The rewrite phase of plugins configured on the route will be executed first, and then the rewrite phase of plugins (exclude auth plugins) from the consumer will be executed.
:::
### Dynamically control whether the plugin is executed
By default, all plugins specified in the route will be executed. But we can add a filter to the plugin through the `filter` configuration item, and control whether the plugin is executed through the execution result of the filter.
The configuration below means that the `proxy-rewrite` plugin will only be executed if the `version` value in the request query parameters is `v2`.
```json
{
"proxy-rewrite": {
"_meta": {
"filter": [
["arg_version", "==", "v2"]
]
},
"uri": "/anything"
}
}
```
Create a complete route with the below configuration:
```json
{
"uri": "/get",
"plugins": {
"proxy-rewrite": {
"_meta": {
"filter": [
["arg_version", "==", "v2"]
]
},
"uri": "/anything"
}
},
"upstream": {
"type": "roundrobin",
"nodes": {
"httpbin.org:80": 1
}
}
}
```
When the request does not have any parameters, the `proxy-rewrite` plugin will not be executed, the request will be proxy to the upstream `/get`:
```shell
curl -v /dev/null http://127.0.0.1:9080/get -H"host:httpbin.org"
```
```shell
< HTTP/1.1 200 OK
......
< Server: APISIX/2.15.0
<
{
"args": {},
"headers": {
"Accept": "*/*",
"Host": "httpbin.org",
"User-Agent": "curl/7.79.1",
"X-Amzn-Trace-Id": "Root=1-62eb6eec-46c97e8a5d95141e621e07fe",
"X-Forwarded-Host": "httpbin.org"
},
"origin": "127.0.0.1, 117.152.66.200",
"url": "http://httpbin.org/get"
}
```
When the parameter `version=v2` is carried in the request, the `proxy-rewrite` plugin is executed, and the request will be proxy to the upstream `/anything`:
```shell
curl -v /dev/null http://127.0.0.1:9080/get?version=v2 -H"host:httpbin.org"
```
```shell
< HTTP/1.1 200 OK
......
< Server: APISIX/2.15.0
<
{
"args": {
"version": "v2"
},
"data": "",
"files": {},
"form": {},
"headers": {
"Accept": "*/*",
"Host": "httpbin.org",
"User-Agent": "curl/7.79.1",
"X-Amzn-Trace-Id": "Root=1-62eb6f02-24a613b57b6587a076ef18b4",
"X-Forwarded-Host": "httpbin.org"
},
"json": null,
"method": "GET",
"origin": "127.0.0.1, 117.152.66.200",
"url": "http://httpbin.org/anything?version=v2"
}
```
## Hot reload
APISIX Plugins are hot-loaded. This means that there is no need to restart the service if you add, delete, modify plugins, or even if you update the plugin code. To hot-reload, you can send an HTTP request through the [Admin API](../admin-api.md):
:::note
You can fetch the `admin_key` from `config.yaml` and save to an environment variable with the following command:
```bash
admin_key=$(yq '.deployment.admin.admin_key[0].key' conf/config.yaml | sed 's/"//g')
```
:::
```shell
curl http://127.0.0.1:9180/apisix/admin/plugins/reload -H "X-API-KEY: $admin_key" -X PUT
```
:::note
If a configured Plugin is disabled, then its execution will be skipped.
:::
### Hot reload in standalone mode
For hot-reloading in standalone mode, see the plugin related section in [stand alone mode](../deployment-modes.md#standalone).
---
---
title: Route
keywords:
- API Gateway
- Apache APISIX
- Route
description: This article describes the concept of Route and how to use it.
---
## Description
Routes match the client's request based on defined rules, load and execute the corresponding [plugins](./plugin.md), and forwards the request to the specified [Upstream](./upstream.md).
A Route mainly consists of three parts:
1. Matching rules (`uri`, `host`, `remote address`)
2. Plugin configuration (current-limit, rate-limit)
3. Upstream information
The image below shows some example Route rules. Note that the values are of the same color if they are identical.

All the parameters are configured directly in the Route. It is easy to set up, and each Route has a high degree of freedom.
When Routes have repetitive configurations (say, enabling the same plugin configuration or Upstream information), to update it, we need to traverse all the Routes and modify them. This adds a lot of complexity, making it difficult to maintain.
These shortcomings are independently abstracted in APISIX by two concepts: [Service](service.md) and [Upstream](upstream.md).
## Example
The Route example shown below proxies the request with the URL `/index.html` to the Upstream service with the address `127.0.0.1:1980`.
:::note
You can fetch the `admin_key` from `config.yaml` and save to an environment variable with the following command:
```bash
admin_key=$(yq '.deployment.admin.admin_key[0].key' conf/config.yaml | sed 's/"//g')
```
:::
```shell
curl http://127.0.0.1:9180/apisix/admin/routes/1 \
-H "X-API-KEY: $admin_key" -X PUT -i -d '
{
"uri": "/index.html",
"upstream": {
"type": "roundrobin",
"nodes": {
"127.0.0.1:1980": 1
}
}
}'
```
```shell
HTTP/1.1 201 Created
Date: Sat, 31 Aug 2019 01:17:15 GMT
Content-Type: text/plain
Transfer-Encoding: chunked
Connection: keep-alive
Server: APISIX web server
{"node":{"value":{"uri":"\/index.html","upstream":{"nodes":{"127.0.0.1:1980":1},"type":"roundrobin"}},"createdIndex":61925,"key":"\/apisix\/routes\/1","modifiedIndex":61925}}
```
A successful response indicates that the route was created.
## Configuration
For specific options of Route, please refer to the [Admin API](../admin-api.md#route).
---
---
title: Router
keywords:
- API Gateway
- Apache APISIX
- Router
description: This article describes how to choose a router for Apache APISIX.
---
## Description
A distinguishing feature of Apache APISIX from other API gateways is that it allows you to choose different Routers to better match free services, giving you the best choices for performance and freedom.
You can set the Router that best suits your needs in your configuration file `conf/config.yaml`.
## Configuration
A Router can have the following configurations:
- `apisix.router.http`: The HTTP request route. It can take the following values:
- `radixtree_uri`: Only use the `uri` as the primary index. To learn more about the support for full and deep prefix matching, check [How to use router-radixtree](../router-radixtree.md).
- `Absolute match`: Match completely with the given `uri` (`/foo/bar`, `/foo/glo`).
- `Prefix match`: Match with the given prefix. Use `*` to represent the given `uri` for prefix matching. For example, `/foo*` can match with `/foo/`, `/foo/a` and `/foo/b`.
- `match priority`: First try an absolute match, if it didn't match, try prefix matching.
- `Any filter attribute`: This allows you to specify any Nginx built-in variable as a filter, such as URL request parameters, request headers, and cookies.
- `radixtree_uri_with_parameter`: Like `radixtree_uri` but also supports parameter match.
- `radixtree_host_uri`: (Default) Matches both host and URI of the request. Use `host + uri` as the primary index (based on the `radixtree` engine).
:::note
In version 3.2 and earlier, APISIX used `radixtree_uri` as the default Router. `radixtree_uri` has better performance than `radixtree_host_uri`, so if you have higher performance requirements and can live with the fact that `radixtree_uri` only use the `uri` as the primary index, consider continuing to use `radixtree_uri` as the default Router.
:::
- `apisix.router.ssl`: SSL loads the matching route.
- `radixtree_sni`: (Default) Use `SNI` (Server Name Indication) as the primary index (based on the radixtree engine).
---
---
title: Script
---
## Description
Scripts lets you write arbitrary Lua code or directly call existing plugins and execute them during the HTTP request/response lifecycle.
A Script configuration can be directly bound to a [Route](./route.md).
Scripts and [Plugins](./plugin.md) are mutually exclusive, and a Script is executed before a Plugin. This means that after configuring a Script, the Plugin configured on the Route will **not** be executed.
Scripts also have a concept of execution phase which supports the `access`, `header_filter`, `body_filter`, and the `log` phase. The corresponding phase will be executed automatically by the system in the Script.
```json
{
...
"script": "local _M = {} \n function _M.access(api_ctx) \n ngx.log(ngx.INFO,\"hit access phase\") \n end \nreturn _M"
}
```
---
---
title: Secret
---
## Description
Secrets refer to any sensitive information required during the running process of APISIX, which may be part of the core configuration (such as the etcd's password) or some sensitive information in the plugin. Common types of Secrets in APISIX include:
- username, the password for some components (etcd, Redis, Kafka, etc.)
- the private key of the certificate
- API key
- Sensitive plugin configuration fields, typically used for authentication, hashing, signing, or encryption
APISIX Secret allows users to store secrets through some secrets management services (Vault, etc.) in APISIX, and read them according to the key when using them to ensure that **Secrets do not exist in plain text throughout the platform**.
Its working principle is shown in the figure:

APISIX currently supports storing secrets in the following ways:
- [Environment Variables](#use-environment-variables-to-manage-secrets)
- [HashiCorp Vault](#use-hashicorp-vault-to-manage-secrets)
- [AWS Secrets Manager](#use-aws-secrets-manager-to-manage-secrets)
- [GCP Secrets Manager](#use-gcp-secrets-manager-to-manage-secrets)
You can use APISIX Secret functions by specifying format variables in the consumer configuration of the following plugins, such as `key-auth`.
:::note
If a key-value pair `key: "$ENV://ABC"` is configured in APISIX and the value of `$ENV://ABC` is unassigned in the environment variable, `$ENV://ABC` will be interpreted as a string literal, instead of `nil`.
:::
## Use environment variables to manage secrets
Using environment variables to manage secrets means that you can save key information in environment variables, and refer to environment variables through variables in a specific format when configuring plugins. APISIX supports referencing system environment variables and environment variables configured through the Nginx `env` directive.
### Usage
```
$ENV://$env_name/$sub_key
```
- env_name: environment variable name
- sub_key: get the value of a property when the value of the environment variable is a JSON string
If the value of the environment variable is of type string, such as:
```
export JACK_AUTH_KEY=abc
```
It can be referenced as follows:
```
$ENV://JACK_AUTH_KEY
```
If the value of the environment variable is a JSON string like:
```
export JACK={"auth-key":"abc","openid-key": "def"}
```
It can be referenced as follows:
```
# Get the auth-key of the environment variable JACK
$ENV://JACK/auth-key
# Get the openid-key of the environment variable JACK
$ENV://JACK/openid-key
```
### Example: use in key-auth plugin
Step 1: Create environment variables before the APISIX instance starts
```
export JACK_AUTH_KEY=abc
```
Step 2: Reference the environment variable in the `key-auth` plugin
:::note
You can fetch the `admin_key` from `config.yaml` and save to an environment variable with the following command:
```bash
admin_key=$(yq '.deployment.admin.admin_key[0].key' conf/config.yaml | sed 's/"//g')
```
:::
```shell
curl http://127.0.0.1:9180/apisix/admin/consumers \
-H "X-API-KEY: $admin_key" -X PUT -d '
{
"username": "jack",
"plugins": {
"key-auth": {
"key": "$ENV://JACK_AUTH_KEY"
}
}
}'
```
Through the above steps, the `key` configuration in the `key-auth` plugin can be saved in the environment variable instead of being displayed in plain text when configuring the plugin.
## Use HashiCorp Vault to manage secrets
Using HashiCorp Vault to manage secrets means that you can store secrets information in the Vault service and refer to it through variables in a specific format when configuring plugins. APISIX currently supports [Vault KV engine version V1](https://developer.hashicorp.com/vault/docs/secrets/kv/kv-v1).
### Usage
```
$secret://$manager/$id/$secret_name/$key
```
- manager: secrets management service, could be the HashiCorp Vault, AWS, etc.
- id: APISIX Secrets resource ID, which needs to be consistent with the one specified when adding the APISIX Secrets resource
- secret_name: the secret name in the secrets management service
- key: the key corresponding to the secret in the secrets management service
### Example: use in key-auth plugin
Step 1: Create the corresponding key in the Vault, you can use the following command:
```shell
vault kv put apisix/jack auth-key=value
```
Step 2: Add APISIX Secrets resources through the Admin API, configure the Vault address and other connection information:
```shell
curl http://127.0.0.1:9180/apisix/admin/secrets/vault/1 \
-H "X-API-KEY: $admin_key" -X PUT -d '
{
"uri": "https://127.0.0.1:8200",
"prefix": "apisix",
"token": "root"
}'
```
If you use APISIX Standalone mode, you can add the following configuration in `apisix.yaml` configuration file:
```yaml
secrets:
- id: vault/1
prefix: apisix
token: root
uri: 127.0.0.1:8200
```
:::tip
It now supports the use of the [`namespace` field](../admin-api.md#request-body-parameters-11) to set the multi-tenant namespace concepts supported by [HashiCorp Vault Enterprise](https://developer.hashicorp.com/vault/docs/enterprise/namespaces#vault-api-and-namespaces) and HCP Vault.
:::
Step 3: Reference the APISIX Secrets resource in the `key-auth` plugin and fill in the key information:
```shell
curl http://127.0.0.1:9180/apisix/admin/consumers \
-H "X-API-KEY: $admin_key" -X PUT -d '
{
"username": "jack",
"plugins": {
"key-auth": {
"key": "$secret://vault/1/jack/auth-key"
}
}
}'
```
Through the above two steps, when the user request hits the `key-auth` plugin, the real value of the key in the Vault will be obtained through the APISIX Secret component.
## Use AWS Secrets Manager to manage secrets
Managing secrets with AWS Secrets Manager is a secure and convenient way to store and manage sensitive information. This method allows you to save secret information in AWS Secrets Manager and reference these secrets in a specific format when configuring APISIX plugins.
APISIX currently supports two authentication methods: using [long-term credentials](https://docs.aws.amazon.com/sdkref/latest/guide/access-iam-users.html) and [short-term credentials](https://docs.aws.amazon.com/sdkref/latest/guide/access-temp-idc.html).
### Usage
```
$secret://$manager/$id/$secret_name/$key
```
- manager: secrets management service, could be the HashiCorp Vault, AWS, etc.
- id: APISIX Secrets resource ID, which needs to be consistent with the one specified when adding the APISIX Secrets resource
- secret_name: the secret name in the secrets management service
- key: get the value of a property when the value of the secret is a JSON string
### Required Parameters
| Name | Required | Default Value | Description |
| --- | --- | --- | --- |
| access_key_id | True | | AWS Access Key ID |
| secret_access_key | True | | AWS Secret Access Key |
| session_token | False | | Temporary access credential information |
| region | False | us-east-1 | AWS Region |
| endpoint_url | False | https://secretsmanager.{region}.amazonaws.com | AWS Secret Manager URL |
### Example: use in key-auth plugin
Here, we use the key-auth plugin as an example to demonstrate how to manage secrets through AWS Secrets Manager.
Step 1: Create the corresponding key in the AWS secrets manager. Here, [localstack](https://www.localstack.cloud/) is used for as the example environment, and you can use the following command:
```shell
docker exec -i localstack sh -c "awslocal secretsmanager create-secret --name jack --description 'APISIX Secret' --secret-string '{\"auth-key\":\"value\"}'"
```
Step 2: Add APISIX Secrets resources through the Admin API, configure the connection information such as the address of AWS Secrets Manager.
You can store the critical key information in environment variables to ensure the configuration information is secure, and reference it where it is used:
```shell
export AWS_ACCESS_KEY_ID=
export AWS_SECRET_ACCESS_KEY=
export AWS_SESSION_TOKEN=
export AWS_REGION=
```
Alternatively, you can also specify all the information directly in the configuration:
```shell
curl http://127.0.0.1:9180/apisix/admin/secrets/aws/1 \
-H "X-API-KEY: $admin_key" -X PUT -d '
{
"endpoint_url": "http://127.0.0.1:4566",
"region": "us-east-1",
"access_key_id": "access",
"secret_access_key": "secret",
"session_token": "token"
}'
```
If you use APISIX Standalone mode, you can add the following configuration in `apisix.yaml` configuration file:
```yaml
secrets:
- id: aws/1
endpoint_url: http://127.0.0.1:4566
region: us-east-1
access_key_id: access
secret_access_key: secret
session_token: token
```
Step 3: Reference the APISIX Secrets resource in the `key-auth` plugin and fill in the key information:
```shell
curl http://127.0.0.1:9180/apisix/admin/consumers \
-H "X-API-KEY: $admin_key" -X PUT -d '
{
"username": "jack",
"plugins": {
"key-auth": {
"key": "$secret://aws/1/jack/auth-key"
}
}
}'
```
Through the above two steps, when the user request hits the `key-auth` plugin, the real value of the key in the Vault will be obtained through the APISIX Secret component.
### Verification
You can verify this with the following command:
```shell
#Replace the following your_route with the actual route path.
curl -i http://127.0.0.1:9080/your_route -H 'apikey: value'
```
This will verify whether the `key-auth` plugin is correctly using the key from AWS Secrets Manager.
## Use GCP Secrets Manager to manage secrets
Using the GCP Secrets Manager to manage secrets means you can store the secret information in the GCP service, and reference it using a specific format of variables when configuring plugins. APISIX currently supports integration with the GCP Secrets Manager, and the supported authentication method is [OAuth 2.0](https://developers.google.com/identity/protocols/oauth2).
### Reference Format
```
$secret://$manager/$id/$secret_name/$key
```
The reference format is the same as before:
- manager: secrets management service, could be the HashiCorp Vault, AWS, GCP etc.
- id: APISIX Secrets resource ID, which needs to be consistent with the one specified when adding the APISIX Secrets resource
- secret_name: the secret name in the secrets management service
- key: get the value of a property when the value of the secret is a JSON string
### Required Parameters
| Name | Required | Default | Description |
|-------------------------|----------|------------------------------------------------------------------------------------------------------------------------------------------------------------------------------------------------------|--------------------------------------------------------------------------------------------------------------------------------------------------------------------|
| auth_config | True | | Either `auth_config` or `auth_file` must be provided. |
| auth_config.client_email | True | | Email address of the Google Cloud service account. |
| auth_config.private_key | True | | Private key of the Google Cloud service account. |
| auth_config.project_id | True | | Project ID in the Google Cloud service account. |
| auth_config.token_uri | False | https://oauth2.googleapis.com/token | Token URI of the Google Cloud service account. |
| auth_config.entries_uri | False | https://secretmanager.googleapis.com/v1 | The API access endpoint for the Google Secrets Manager. |
| auth_config.scope | False | https://www.googleapis.com/auth/cloud-platform | Access scopes of the Google Cloud service account. See [OAuth 2.0 Scopes for Google APIs](https://developers.google.com/identity/protocols/oauth2/scopes) |
| auth_file | True | | Path to the Google Cloud service account authentication JSON file. Either `auth_config` or `auth_file` must be provided. |
| ssl_verify | False | true | When set to `true`, enables SSL verification as mentioned in [OpenResty docs](https://github.com/openresty/lua-nginx-module#tcpsocksslhandshake). |
You need to configure the corresponding authentication parameters, or specify the authentication file through auth_file, where the content of auth_file is in JSON format.
### Example
Here is a correct configuration example:
```
curl http://127.0.0.1:9180/apisix/admin/secrets/gcp/1 \
-H "X-API-KEY: $admin_key" -X PUT -d '
{
"auth_config" : {
"client_email": "email@apisix.iam.gserviceaccount.com",
"private_key": "private_key",
"project_id": "apisix-project",
"token_uri": "https://oauth2.googleapis.com/token",
"entries_uri": "https://secretmanager.googleapis.com/v1",
"scope": ["https://www.googleapis.com/auth/cloud-platform"]
}
}'
```
---
---
title: Service
---
## Description
A Service is an abstraction of an API (which can also be understood as a set of [Route](./route.md) abstractions). It usually corresponds to an upstream service abstraction.
The relationship between Routes and a Service is usually N:1 as shown in the image below.

As shown, different Routes could be bound to the same Service. This reduces redundancy as these bounded Routes will have the same [Upstream](./upstream.md) and [Plugin](./plugin.md) configurations.
For more information about Service, please refer to [Admin API Service object](../admin-api.md#service).
## Examples
The following example creates a Service that enables the `limit-count` Plugin and then binds it to the Routes with the ids `100` and `101`.
:::note
You can fetch the `admin_key` from `config.yaml` and save to an environment variable with the following command:
```bash
admin_key=$(yq '.deployment.admin.admin_key[0].key' conf/config.yaml | sed 's/"//g')
```
:::
1. Create a Service.
```shell
curl http://127.0.0.1:9180/apisix/admin/services/200 \
-H "X-API-KEY: $admin_key" -X PUT -d '
{
"plugins": {
"limit-count": {
"count": 2,
"time_window": 60,
"rejected_code": 503,
"key": "remote_addr"
}
},
"upstream": {
"type": "roundrobin",
"nodes": {
"127.0.0.1:1980": 1
}
}
}'
```
2. create new Route and reference the service by id `200`
```shell
curl http://127.0.0.1:9180/apisix/admin/routes/100 \
-H "X-API-KEY: $admin_key" -X PUT -d '
{
"methods": ["GET"],
"uri": "/index.html",
"service_id": "200"
}'
```
```shell
curl http://127.0.0.1:9180/apisix/admin/routes/101 \
-H "X-API-KEY: $admin_key" -X PUT -d '
{
"methods": ["GET"],
"uri": "/foo/index.html",
"service_id": "200"
}'
```
We can also specify different Plugins or Upstream for the Routes than the ones defined in the Service. The example below creates a Route with a `limit-count` Plugin. This Route will continue to use the other configurations defined in the Service (here, the Upstream configuration).
```shell
curl http://127.0.0.1:9180/apisix/admin/routes/102 \
-H "X-API-KEY: $admin_key" -X PUT -d '
{
"uri": "/bar/index.html",
"id": "102",
"service_id": "200",
"plugins": {
"limit-count": {
"count": 2000,
"time_window": 60,
"rejected_code": 503,
"key": "remote_addr"
}
}
}'
```
:::note
When a Route and a Service enable the same Plugin, the one defined in the Route is given the higher priority.
:::
---
---
title: Upstream
keywords:
- Apache APISIX
- API Gateway
- APISIX Upstream
- Upstream
description: This article describes the role of the Apache APISIX Upstream object and how to use the Upstream.
---
## Description
Upstream is a virtual host abstraction that performs load balancing on a given set of service nodes according to the configured rules.
Although Upstream can be directly configured to the [Route](./route.md) or [Service](./service.md), using an Upstream object is recommended when there is duplication as shown below.

By creating an Upstream object and referencing it by `upstream_id` in the Route, you can ensure that there is only a single value of the object that needs to be maintained.
An Upstream configuration can be directly bound to a Route or a Service, but the configuration in Route has a higher priority. This behavior is consistent with priority followed by the [Plugin](./plugin.md) object.
## Configuration
In addition to the equalization algorithm selections, Upstream also supports passive health check and retry for the upstream. You can learn more about this [Admin API Upstream](../admin-api.md#upstream).
To create an Upstream object, you can use the Admin API as shown below.
:::note
You can fetch the `admin_key` from `config.yaml` and save to an environment variable with the following command:
```bash
admin_key=$(yq '.deployment.admin.admin_key[0].key' conf/config.yaml | sed 's/"//g')
```
:::
```shell
curl http://127.0.0.1:9180/apisix/admin/upstreams/1 \
-H "X-API-KEY: $admin_key" -X PUT -d '
{
"type": "chash",
"key": "remote_addr",
"nodes": {
"127.0.0.1:80": 1,
"foo.com:80": 2
}
}'
```
After creating an Upstream object, it can be referenced by a specific Route or Service as shown below.
```shell
curl http://127.0.0.1:9180/apisix/admin/routes/1 \
-H "X-API-KEY: $admin_key" -X PUT -d '
{
"uri": "/index.html",
"upstream_id": 1
}'
```
For convenience, you can directly bind the upstream address to a Route or Service.
```shell
curl http://127.0.0.1:9180/apisix/admin/routes/1 \
-H "X-API-KEY: $admin_key" -X PUT -d '
{
"uri": "/index.html",
"plugins": {
"limit-count": {
"count": 2,
"time_window": 60,
"rejected_code": 503,
"key": "remote_addr"
}
},
"upstream": {
"type": "roundrobin",
"nodes": {
"127.0.0.1:1980": 1
}
}
}'
```
## Example
The example below shows how you can configure a health check.
```shell
curl http://127.0.0.1:9180/apisix/admin/routes/1 \
-H "X-API-KEY: $admin_key" -X PUT -d '
{
"uri": "/index.html",
"plugins": {
"limit-count": {
"count": 2,
"time_window": 60,
"rejected_code": 503,
"key": "remote_addr"
}
},
"upstream": {
"nodes": {
"127.0.0.1:1980": 1
}
"type": "roundrobin",
"retries": 2,
"checks": {
"active": {
"http_path": "/status",
"host": "foo.com",
"healthy": {
"interval": 2,
"successes": 1
},
"unhealthy": {
"interval": 1,
"http_failures": 2
}
}
}
}
}'
```
You can learn more about health checks [health-check](../tutorials/health-check.md).
The examples below show configurations that use different `hash_on` types.
### Consumer
Creating a Consumer object.
```shell
curl http://127.0.0.1:9180/apisix/admin/consumers \
-H "X-API-KEY: $admin_key" -X PUT -d '
{
"username": "jack",
"plugins": {
"key-auth": {
"key": "auth-jack"
}
}
}'
```
Creating a Route object and enabling the `key-auth` authentication Plugin.
```shell
curl http://127.0.0.1:9180/apisix/admin/routes/1 \
-H "X-API-KEY: $admin_key" -X PUT -d '
{
"plugins": {
"key-auth": {}
},
"upstream": {
"nodes": {
"127.0.0.1:1980": 1,
"127.0.0.1:1981": 1
},
"type": "chash",
"hash_on": "consumer"
},
"uri": "/server_port"
}'
```
To test the request, the `consumer_name` passed for authentication will be used as the hash value of the load balancing hash algorithm.
```shell
curl http://127.0.0.1:9080/server_port -H "apikey: auth-jack"
```
### Cookie
Creating a Route and an upstream object.
```shell
curl http://127.0.0.1:9180/apisix/admin/routes/1 \
-H "X-API-KEY: $admin_key" -X PUT -d '
{
"uri": "/hash_on_cookie",
"upstream": {
"key": "sid",
"type": "chash",
"hash_on": "cookie",
"nodes": {
"127.0.0.1:1980": 1,
"127.0.0.1:1981": 1
}
}
}'
```
The client can then send a request with a cookie.
```shell
curl http://127.0.0.1:9080/hash_on_cookie \
-H "Cookie: sid=3c183a30cffcda1408daf1c61d47b274"
```
### Header
Creating a Route and an upstream object.
```shell
curl http://127.0.0.1:9180/apisix/admin/routes/1 \
-H "X-API-KEY: $admin_key" -X PUT -d '
{
"uri": "/hash_on_header",
"upstream": {
"key": "content-type",
"type": "chash",
"hash_on": "header",
"nodes": {
"127.0.0.1:1980": 1,
"127.0.0.1:1981": 1
}
}
}'
```
The client can now send requests with a header. The example below shows using the header `Content-Type`.
```shell
curl http://127.0.0.1:9080/hash_on_header \
-H "X-API-KEY: $admin_key" \
-H "Content-Type: application/json"
```
---
---
title: Add multiple API versions
keywords:
- API Versioning
- Apache APISIX
- API Gateway
- Multiple APIs
- Proxy rewrite
- Request redirect
- Route API requests
description: In this tutorial, you will learn how to publish and manage multiple versions of your API with Apache APISIX.
---
## What is API versioning?
**API versioning** is the practice of managing changes to an API and ensuring that these changes are made without disrupting clients. A good API versioning strategy clearly communicates the changes made and allows API consumers to decide when to upgrade to the latest version at their own pace.
## Types of API versioning
#### URI Path
The most common way to version an API is in the URI path and is often done with the prefix "v". This method employs URI routing to direct requests to a specific version of the API.
```shell
http://apisix.apache.org/v1/hello
http://apisix.apache.org/v2/hello
```
#### Query parameters
In this method, the version number is included in the URI, but as a query parameter instead of in the path.
```shell
http://apisix.apache.org/hello?version=1
http://apisix.apache.org/hello?version=2
```
#### Custom request Header
You can also set the version number using custom headers in requests and responses. This leaves the URI of your resources unchanged.
```shell
http://apisix.apache.org/hello -H 'Version: 1'
http://apisix.apache.org/hello -H 'Version: 2'
```
The primary goal of versioning is to provide users of an API with the most functionality possible while causing minimal inconvenience. Keeping this goal in mind, let’s have a look in this tutorial at how to _publish and manage multiple versions of your API_ with Apache APISIX.
**In this tutorial**, you learn how to:
- Create a route and upstream for our sample API.
- Add a new version to the existing API.
- Use [proxy-rewrite](https://apisix.apache.org/docs/apisix/plugins/proxy-rewrite/) plugin to rewrite the path in a plugin configuration.
- Route API requests from the old version to the new one.
## Prerequisites
For the demo case, we will leverage the sample repository [Evolve APIs](https://github.com/nfrankel/evolve-apis) on GitHub built on the Spring boot that demonstrates our API. You can see the complete source code there.
To execute and customize the example project per your need shown in this tutorial, here are the minimum requirements you need to install in your system:
- [Docker](https://docs.docker.com/desktop/windows/install/) - you need [Docker](https://www.docker.com/products/docker-desktop/) installed locally to complete this tutorial. It is available for [Windows](https://desktop.docker.com/win/edge/Docker%20Desktop%20Installer.exe) or [macOS](https://desktop.docker.com/mac/edge/Docker.dmg).
Also, complete the following steps to run the sample project with Docker.
Use [git](https://git-scm.com/downloads) to clone the repository:
``` shell
git clone 'https://github.com/nfrankel/evolve-apis'
```
Go to root directory of _evolve-apis_
``` shell
cd evolve-apis
```
Now we can start our application by running `docker compose up` command from the root folder of the project:
``` shell
docker compose up -d
```
### Create a route and upstream for the API.
You first need to [Route](https://apisix.apache.org/docs/apisix/terminology/route/) your HTTP requests from the gateway to an [Upstream](https://apisix.apache.org/docs/apisix/terminology/upstream/) (your API). With APISIX, you can create a route by sending an HTTP request to the gateway.
```shell
curl http://apisix:9180/apisix/admin/routes/1 -H 'X-API-KEY: xyz' -X PUT -d '
{
"name": "Direct Route to Old API",
"methods": ["GET"],
"uris": ["/hello", "/hello/", "/hello/*"],
"upstream": {
"type": "roundrobin",
"nodes": {
"oldapi:8081": 1
}
}
}'
```
At this stage, we do not have yet any version and you can query the gateway as below:
```shell
curl http://apisix.apache.org/hello
```
```shell title="output"
Hello world
```
```shell
curl http://apisix.apache.org/hello/Joe
```
```shell title="output"
Hello Joe
```
In the previous step, we created a route that wrapped an upstream inside its configuration. Also, APISIX allows us to create an upstream with a dedicated ID to reuse it across several routes.
Let's create the shared upstream by running below curl cmd:
```shell
curl http://apisix:9180/apisix/admin/upstreams/1 -H 'X-API-KEY: xyz' -X PUT -d '
{
"name": "Old API",
"type": "roundrobin",
"nodes": {
"oldapi:8081": 1
}
}'
```
### Add a new version
In the scope of this tutorial, we will use _URI path-based versioning_ because it’s the most widespread. We are going to add `v1` version for our existing `oldapi` in this section.
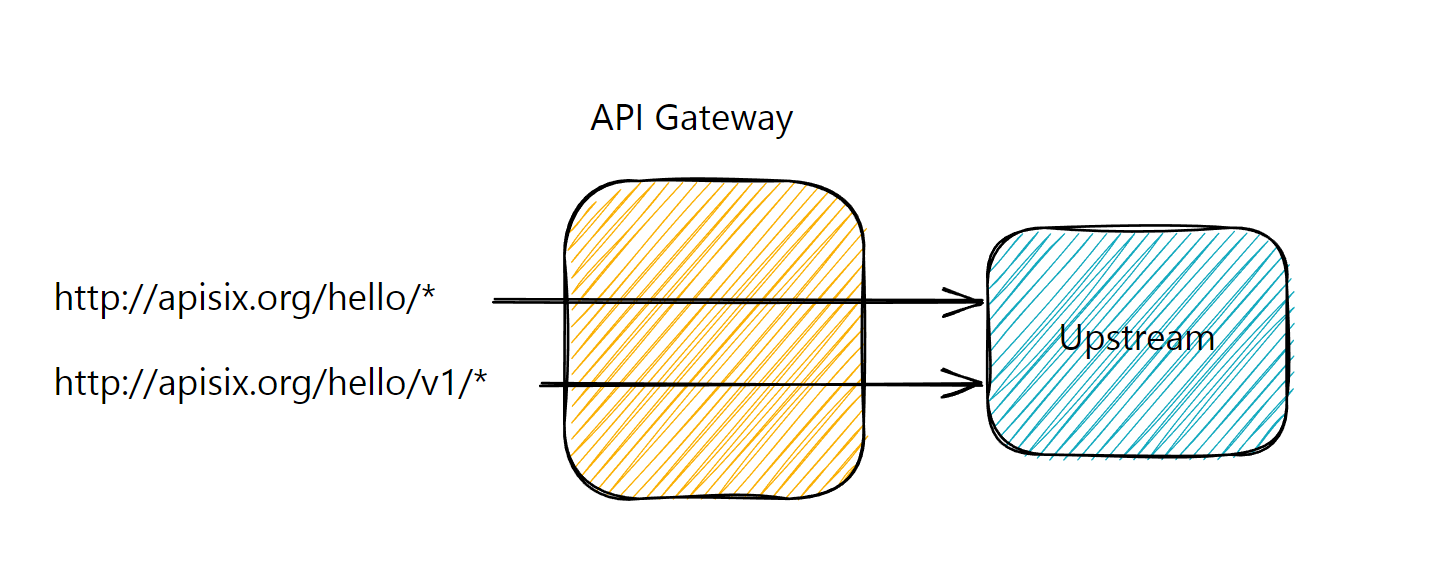
Before introducing the new version, we also need to rewrite the query that comes to the API gateway before forwarding it to the upstream. Because both the old and new versions should point to the same upstream and the upstream exposes endpoint `/hello`, not `/v1/hello`. Let’s create a plugin configuration to rewrite the path:
```shell
curl http://apisix:9180/apisix/admin/plugin_configs/1 -H 'X-API-KEY: xyz' -X PUT -d '
{
"plugins": {
"proxy-rewrite": {
"regex_uri": ["/v1/(.*)", "/$1"]
}
}
}'
```
We can now create the second versioned route that references the existing upstream and plugin config.
> Note that we can create routes for different API versions.
```shell
curl http://apisix:9180/apisix/admin/routes/2 -H 'X-API-KEY: xyz' -X PUT -d '
{
"name": "Versioned Route to Old API",
"methods": ["GET"],
"uris": ["/v1/hello", "/v1/hello/", "/v1/hello/*"],
"upstream_id": 1,
"plugin_config_id": 1
}'
```
At this stage, we have configured two routes, one versioned and the other non-versioned:
```shell
curl http://apisix.apache.org/hello
```
```shell title="output"
Hello world
```
```shell
curl http://apisix.apache.org/v1/hello
```
```shell title="output"
Hello world
```
## Route API requests from the old version to the new one
We have versioned our API, but our API consumers probably still use the legacy non-versioned API. We want them to migrate, but we cannot just delete the legacy route as our users are unaware of it. Fortunately, the `301 HTTP` status code is our friend: we can let users know that the resource has moved from `http://apisix.apache.org/hello` to `http://apisix.apache.org/v1/hello`. It requires configuring the [redirect plugin](https://apisix.apache.org/docs/apisix/plugins/redirect/) on the initial route:
```shell
curl http://apisix:9180/apisix/admin/routes/1 -H 'X-API-KEY: xyz' -X PATCH -d '
{
"plugins": {
"redirect": {
"uri": "/v1$uri",
"ret_code": 301
}
}
}'
```
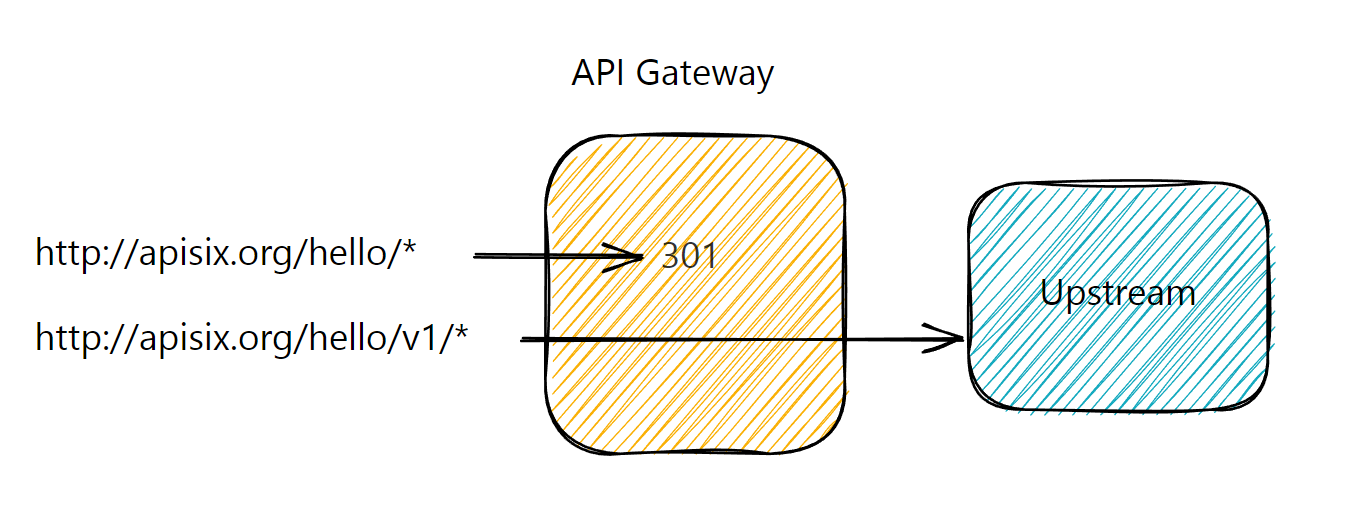
Now when we try to request the first non-versioned API endpoint, you will get an expected output:
```shell
curl http://apisix.apache.org/hello
301 Moved Permanently
301 Moved Permanently
openresty
```
Either API consumers will transparently use the new endpoint because they will follow, or their integration breaks and they will notice the 301 status and the new API location to use.
## Next steps
As you followed throughout the tutorial, it is very easy to publish multiple versions of your API with Apache APISIX and it does not require setting up actual API endpoints for each version of your API in the backend. It also allows your clients to switch between two versions without any downtime and save assets if there’s ever an update.
Learn more about how to [manage](./manage-api-consumers.md) API consumers and [protect](./protect-api.md) your APIs.
---
---
title: Cache API responses
keywords:
- API Gateway
- Apache APISIX
- Cache
- Performance
description: This tutorial will focus primarily on handling caching at the API Gateway level by using Apache APISIX API Gateway and you will learn how to use proxy-caching plugin to improve response efficiency for your Web or Microservices API.
---
This tutorial will focus primarily on handling caching at the API Gateway level by using Apache APISIX API Gateway and you will learn how to use the proxy-cache plugin to improve response efficiency for your Web or Microservices API.
**Here is an overview of what we cover in this walkthrough:**
- Caching in API Gateway
- About [Apache APISIX API Gateway](https://apisix.apache.org/docs/apisix/getting-started/)
- Run the demo project [apisix-dotnet-docker](https://github.com/Boburmirzo/apisix-dotnet-docker)
- Configure the [Proxy Cache](https://apisix.apache.org/docs/apisix/plugins/proxy-cache/) plugin
- Validate Proxy Caching
## Improve performance with caching
When you are building an API, you want to keep it simple and fast. Once the concurrent need to read the same data increase, you'll face a few issues where you might be considering introducing **caching**:
- There is latency on some API requests which is noticeably affecting the user's experience.
- Fetching data from a database takes more time to respond.
- Availability of your API is threatened by the API's high throughput.
- There are some network failures in getting frequently accessed information from your API.
## Caching in API Gateway
[Caching](https://en.wikipedia.org/wiki/Cache_(computing)) is capable of storing and retrieving network requests and their corresponding responses. Caching happens at different levels in a web application:
- Edge caching or CDN
- Database caching
- Server caching (API caching)
- Browser caching
**Reverse Proxy Caching** is yet another caching mechanism that is usually implemented inside **API Gateway**. It can reduce the number of calls made to your endpoint and also improve the latency of requests to your API by caching a response from the upstream. If the API Gateway cache has a fresh copy of the requested resource, it uses that copy to satisfy the request directly instead of making a request to the endpoint. If the cached data is not found, the request travels to the intended upstream services (backend services).
## Apache APISIX API Gateway Proxy Caching
With the help of Apache APISIX, you can enable API caching with [proxy-cache](https://apisix.apache.org/docs/apisix/plugins/proxy-cache/) plugin to cache your API endpoint's responses and enhance the performance. It can be used together with other Plugins too and currently supports disk-based caching. The data to be cached can be filtered with _responseCodes_, _requestModes_, or more complex methods using the _noCache_ and _cacheByPass_ attributes. You can specify cache expiration time or a memory capacity in the plugin configuration as well. Please, refer to other `proxy-cache` plugin's [attributes](https://apisix.apache.org/docs/apisix/plugins/proxy-cache/).
With all this in mind, we'll look next at an example of using `proxy-cache` plugin offered by Apache APISIX and apply it for ASP.NET Core Web API with a single endpoint.
## Run the demo project
Until now, I assume that you have the demo project [apisix-dotnet-docker](https://github.com/Boburmirzo/apisix-dotnet-docker) is up and running. You can see the complete source code on **Github** and the instruction on how to build a multi-container **APISIX** via **Docker CLI**.
In the **ASP.NET Core project**, there is a simple API to get all products list from the service layer in [ProductsController.cs](https://github.com/Boburmirzo/apisix-dotnet-docker/blob/main/ProductApi/Controllers/ProductsController.cs) file.
Let's assume that this product list is usually updated only once a day and the endpoint receives repeated billions of requests every day to fetch the product list partially or all of them. In this scenario, using API caching technique with `proxy-cache` plugin might be really helpful. For the demo purpose, we only enable caching for `GET` method.
> Ideally, `GET` requests should be cacheable by default - until a special condition arises.
## Configure the Proxy Cache Plugin
Now let's start with adding `proxy-cache` plugin to Apache APISIX declarative configuration file `config.yaml` in the project. Because in the current project, we have not registered yet the plugin we are going to use for this demo. We appended `proxy-cache` plugin's name to the end of plugins list:
``` yaml
plugins:
- http-logger
- ip-restriction
…
- proxy-cache
```
You can add your cache configuration in the same file if you need to specify values like _disk_size, memory_size_ as shown below:
``` yaml
proxy_cache:
cache_ttl: 10s # default caching time if the upstream doesn't specify the caching time
zones:
- name: disk_cache_one # name of the cache. Admin can specify which cache to use in the Admin API by name
memory_size: 50m # size of shared memory, used to store the cache index
disk_size: 1G # size of disk, used to store the cache data
disk_path: "/tmp/disk_cache_one" # path to store the cache data
cache_levels: "1:2" # hierarchy levels of the cache
```
Next, we can directly run `apisix reload` command to reload the latest plugin code without restarting Apache APISIX. See the command to reload the newly added plugin:
:::note
You can fetch the `admin_key` from `config.yaml` and save to an environment variable with the following command:
```bash
admin_key=$(yq '.deployment.admin.admin_key[0].key' conf/config.yaml | sed 's/"//g')
```
:::
``` shell
curl http://127.0.0.1:9180/apisix/admin/plugins/reload -H "X-API-KEY: $admin_key" -X PUT
```
Then, we run two more curl commands to configure an Upstream and Route for the `/api/products` endpoint. The following command creates a sample upstream (that's our API Server):
``` shell
curl "http://127.0.0.1:9180/apisix/admin/upstreams/1" -H "X-API-KEY: edd1c9f034335f136f87ad84b625c8f1" -X PUT -d '
{
"type": "roundrobin",
"nodes": {
"productapi:80": 1
}
}'
```
Next, we will add a new route with caching ability by setting `proxy-cache` plugin in `plugins` property and giving a reference to the upstream service by its unique id to forward requests to the API server:
``` shell
curl "http://127.0.0.1:9180/apisix/admin/routes/1" -H "X-API-KEY: edd1c9f034335f136f87ad84b625c8f1" -X PUT -d '{
"name": "Route for API Caching",
"methods": [
"GET"
],
"uri": "/api/products",
"plugins": {
"proxy-cache": {
"cache_key": [
"$uri",
"-cache-id"
],
"cache_bypass": [
"$arg_bypass"
],
"cache_method": [
"GET"
],
"cache_http_status": [
200
],
"hide_cache_headers": true,
"no_cache": [
"$arg_test"
]
}
},
"upstream_id": 1
}'
```
As you can see in the above configuration, we defined some plugin attributes that we want to cache only successful responses from the `GET` method of API.
## Validate Proxy Caching
Finally, we can test the proxy caching if it is working as it is expected.
We will send multiple requests to the `/api/products` path and we should receive `HTTP 200 OK` response each time. However, the `Apisix-Cache-Status` in the response shows _MISS_ meaning that the response has not cached yet when the request hits the route for the first time. Now, if you make another request, you will see that you get a cached response with the caching indicator as _HIT_.
Now we can make an initial request:
``` shell
curl http://localhost:9080/api/products -i
```
The response looks like as below:
``` shell
HTTP/1.1 200 OK
…
Apisix-Cache-Status: MISS
```
When you do the next call to the service, the route responds to the request with a cached response since it has already cached in the previous request:
``` shell
HTTP/1.1 200 OK
…
Apisix-Cache-Status: HIT
```
Or if you try again to hit the endpoint after the time-to-live (TTL) period for the cache ends, you will get:
``` shell
HTTP/1.1 200 OK
…
Apisix-Cache-Status: EXPIRED
```
Excellent! We enabled caching for our API endpoint.
### Additional test case
Optionally, you can also add some delay in the Product controller code and measure response time properly with and without cache:
``` c#
[HttpGet]
public IActionResult GetAll()
{
Console.Write("The delay starts.\n");
System.Threading.Thread.Sleep(5000);
Console.Write("The delay ends.");
return Ok(_productsService.GetAll());
}
```
The `curl` command to check response time would be:
```shell
curl -i 'http://localhost:9080/api/products' -s -o /dev/null -w "Response time: %{time_starttransfer} seconds\n"
```
## What's next
As we learned, it is easy to configure and quick to set up API response caching for our ASP.NET Core WEB API with the help of Apache APISIX. It can reduce significantly the number of calls made to your endpoint and also improve the latency of requests to your API. There are other numerous built-in plugins available in Apache APISIX, you can check them on [Plugin Hub page](https://apisix.apache.org/plugins) and use them per your need.
## Recommended content
You can refer to [Expose API](./protect-api.md) to learn about how to expose your first API.
You can refer to [Protect API](./protect-api.md) to protect your API.
---
---
title: Configure mTLS for client to APISIX
keywords:
- mTLS
- API Gateway
- Apache APISIX
description: This article describes how to configure mutual authentication (mTLS) between the client and Apache APISIX.
---
mTLS is a method for mutual authentication. Suppose in your network environment, only trusted clients are required to access the server. In that case, you can enable mTLS to verify the client's identity and ensure the server API's security. This article mainly introduces how to configure mutual authentication (mTLS) between the client and Apache APISIX.
## Configuration
This example includes the following procedures:
1. Generate certificates;
2. Configure the certificate in APISIX;
3. Create and configure routes in APISIX;
4. Test verification.
To make the test results clearer, the examples mentioned in this article pass some information about the client credentials upstream, including: `serial`, `fingerprint` and `common name`.
### Generate certificates
We need to generate three test certificates: the root, server, and client. Just use the following command to generate the test certificates we need via `OpenSSL`.
```shell
# For ROOT CA
openssl genrsa -out ca.key 2048
openssl req -new -sha256 -key ca.key -out ca.csr -subj "/CN=ROOTCA"
openssl x509 -req -days 36500 -sha256 -extensions v3_ca -signkey ca.key -in ca.csr -out ca.cer
# For server certificate
openssl genrsa -out server.key 2048
# Note: The `test.com` in the CN value is the domain name/hostname we want to test
openssl req -new -sha256 -key server.key -out server.csr -subj "/CN=test.com"
openssl x509 -req -days 36500 -sha256 -extensions v3_req -CA ca.cer -CAkey ca.key -CAserial ca.srl -CAcreateserial -in server.csr -out server.cer
# For client certificate
openssl genrsa -out client.key 2048
openssl req -new -sha256 -key client.key -out client.csr -subj "/CN=CLIENT"
openssl x509 -req -days 36500 -sha256 -extensions v3_req -CA ca.cer -CAkey ca.key -CAserial ca.srl -CAcreateserial -in client.csr -out client.cer
# Convert client certificate to pkcs12 for Windows usage (optional)
openssl pkcs12 -export -clcerts -in client.cer -inkey client.key -out client.p12
```
### Configure the certificate in APISIX
Use the `curl` command to request APISIX Admin API to set up SSL for specific SNI.
:::note
Note that the newline character in the certificate needs to be replaced with its escape character `\n`.
:::
```shell
curl -X PUT 'http://127.0.0.1:9180/apisix/admin/ssls/1' \
--header 'X-API-KEY: edd1c9f034335f136f87ad84b625c8f1' \
--header 'Content-Type: application/json' \
--data-raw '{
"sni": "test.com",
"cert": "",
"key": "",
"client": {
"ca": ""
}
}'
```
- `sni`: Specify the domain name (CN) of the certificate. When the client tries to handshake with APISIX via TLS, APISIX will match the SNI data in `ClientHello` with this field and find the corresponding server certificate for handshaking.
- `cert`: The server certificate.
- `key`: The private key of the server certificate.
- `client.ca`: The CA (certificate authority) file to verfiy the client certificate. For demonstration purposes, the same `CA` is used here.
### Configure the route in APISIX
Use the `curl` command to request the APISIX Admin API to create a route.
```shell
curl -X PUT 'http://127.0.0.1:9180/apisix/admin/routes/1' \
--header 'X-API-KEY: edd1c9f034335f136f87ad84b625c8f1' \
--header 'Content-Type: application/json' \
--data-raw '{
"uri": "/anything",
"plugins": {
"proxy-rewrite": {
"headers": {
"X-Ssl-Client-Fingerprint": "$ssl_client_fingerprint",
"X-Ssl-Client-Serial": "$ssl_client_serial",
"X-Ssl-Client-S-DN": "$ssl_client_s_dn"
}
}
},
"upstream": {
"nodes": {
"httpbin.org":1
},
"type":"roundrobin"
}
}'
```
APISIX automatically handles the TLS handshake based on the SNI and the SSL resource created in the previous step, so we do not need to specify the hostname in the route (but it is possible to specify the hostname if you need it).
Also, in the `curl` command above, we enabled the [proxy-rewrite](../plugins/proxy-rewrite.md) plugin, which will dynamically update the request header information. The source of the variable values in the example are the `NGINX` variables, and you can find them here: [http://nginx.org/en/docs/http/ngx_http_ssl_module.html#variables](http://nginx.org/en/docs/http/ngx_http_ssl_module.html#variables).
### Test
Since we are using the domain `test.com` as the test domain, we have to add the test domain to your DNS or local `hosts` file before we can start the verification.
1. If we don't use `hosts` and just want to test the results, then you can do so directly using the following command.
```
curl --resolve "test.com:9443:127.0.0.1" https://test.com:9443/anything -k --cert ./client.cer --key ./client.key
```
2. If you need to modify `hosts`, please read the following example (for Ubuntu).
- Modify the `/etc/hosts` file
```shell
# 127.0.0.1 localhost
127.0.0.1 test.com
```
- Verify that the test domain name is valid
```shell
ping test.com
PING test.com (127.0.0.1) 56(84) bytes of data.
64 bytes from localhost.localdomain (127.0.0.1): icmp_seq=1 ttl=64 time=0.028 ms
64 bytes from localhost.localdomain (127.0.0.1): icmp_seq=2 ttl=64 time=0.037 ms
64 bytes from localhost.localdomain (127.0.0.1): icmp_seq=3 ttl=64 time=0.036 ms
64 bytes from localhost.localdomain (127.0.0.1): icmp_seq=4 ttl=64 time=0.031 ms
^C
--- test.com ping statistics ---
4 packets transmitted, 4 received, 0% packet loss, time 3080ms
rtt min/avg/max/mdev = 0.028/0.033/0.037/0.003 ms
```
- Test results
```shell
curl https://test.com:9443/anything -k --cert ./client.cer --key ./client.key
```
You will then receive the following response body.
```shell
{
"args": {},
"data": "",
"files": {},
"form": {},
"headers": {
"Accept": "*/*",
"Host": "test.com",
"User-Agent": "curl/7.81.0",
"X-Amzn-Trace-Id": "Root=1-63256343-17e870ca1d8f72dc40b2c5a9",
"X-Forwarded-Host": "test.com",
"X-Ssl-Client-Fingerprint": "c1626ce3bca723f187d04e3757f1d000ca62d651",
"X-Ssl-Client-S-Dn": "CN=CLIENT",
"X-Ssl-Client-Serial": "5141CC6F5E2B4BA31746D7DBFE9BA81F069CF970"
},
"json": null,
"method": "GET",
"origin": "127.0.0.1",
"url": "http://test.com/anything"
}
```
Since we configured the [proxy-rewrite](../plugins/proxy-rewrite.md) plugin in the example, we can see that the response body contains the request body received upstream, containing the correct data.
## MTLS bypass based on regular expression matching against URI
APISIX allows configuring an URI whitelist to bypass MTLS.
If the URI of a request is in the whitelist, then the client certificate will not be checked.
Note that other URIs of the associated SNI will get HTTP 400 response
instead of alert error in the SSL handshake phase, if the client certificate is missing or invalid.
### Timing diagram

### Example
:::note
You can fetch the `admin_key` from `config.yaml` and save to an environment variable with the following command:
```bash
admin_key=$(yq '.deployment.admin.admin_key[0].key' conf/config.yaml | sed 's/"//g')
```
:::
1. Configure route and ssl via admin API
```bash
curl http://127.0.0.1:9180/apisix/admin/routes/1 \
-H "X-API-KEY: $admin_key" -X PUT -d '
{
"uri": "/*",
"upstream": {
"nodes": {
"httpbin.org": 1
}
}
}'
curl http://127.0.0.1:9180/apisix/admin/ssls/1 \
-H "X-API-KEY: $admin_key" -X PUT -d '
{
"cert": "'"$( GET /uuid HTTP/2
> Host: admin.apisix.dev:9443
> user-agent: curl/7.68.0
> accept: */*
>
* TLSv1.3 (IN), TLS handshake, Newsession Ticket (4):
* TLSv1.3 (IN), TLS handshake, Newsession Ticket (4):
* old SSL session ID is stale, removing
* Connection state changed (MAX_CONCURRENT_STREAMS == 128)!
< HTTP/2 400
< date: Fri, 21 Apr 2023 07:53:23 GMT
< content-type: text/html; charset=utf-8
< content-length: 229
< server: APISIX/3.2.0
<
400 Bad Request
400 Bad Request
openresty
Powered by APISIX.
* Connection #0 to host admin.apisix.dev left intact
```
3. Although the client certificate is missing, but the URI is in the whitelist,
you get successful response.
```bash
curl https://admin.apisix.dev:9443/anything/foobar -i \
--resolve 'admin.apisix.dev:9443:127.0.0.1' --cacert t/certs/mtls_ca.crt
HTTP/2 200
content-type: application/json
content-length: 416
date: Fri, 21 Apr 2023 07:58:28 GMT
access-control-allow-origin: *
access-control-allow-credentials: true
server: APISIX/3.2.0
...
```
## Conclusion
If you don't want to use curl or test on windows, you can read this gist for more details. [APISIX mTLS for client to APISIX](https://gist.github.com/bzp2010/6ce0bf7c15c191029ed54724547195b4).
For more information about the mTLS feature of Apache APISIX, you can read [Mutual TLS Authentication](../mtls.md).
---
---
title: Expose API
keywords:
- API Gateway
- Apache APISIX
- Expose Service
description: This article describes how to publish services through the API Gateway Apache APISIX.
---
This article will guide you through APISIX's upstream, routing, and service concepts and introduce how to publish your services through APISIX.
## Concept introduction
### Upstream
[Upstream](../terminology/upstream.md) is a virtual host abstraction that performs load balancing on a given set of service nodes according to the configured rules.
The role of the Upstream is to load balance the service nodes according to the configuration rules, and Upstream information can be directly configured to the Route or Service.
When multiple routes or services refer to the same upstream, you can create an upstream object and use the upstream ID in the Route or Service to reference the upstream to reduce maintenance pressure.
### Route
[Routes](../terminology/route.md) match the client's request based on defined rules, load and execute the corresponding plugins, and forwards the request to the specified Upstream.
### Service
A [Service](../terminology/service.md) is an abstraction of an API (which can also be understood as a set of Route abstractions). It usually corresponds to an upstream service abstraction.
## Prerequisites
Please make sure you have [installed Apache APISIX](../installation-guide.md) before doing the following.
## Expose your service
1. Create an Upstream.
Create an Upstream service containing `httpbin.org` that you can use for testing. This is a return service that will return the parameters we passed in the request.
```
curl "http://127.0.0.1:9180/apisix/admin/upstreams/1" \
-H "X-API-KEY: edd1c9f034335f136f87ad84b625c8f1" -X PUT -d '
{
"type": "roundrobin",
"nodes": {
"httpbin.org:80": 1
}
}'
```
In this command, we specify the Admin API Key of Apache APISIX as `edd1c9f034335f136f87ad84b625c8f1`, use `roundrobin` as the load balancing mechanism, and set `httpbin.org:80` as the upstream service. To bind this upstream to a route, `upstream_id` needs to be set to `1` here. Here you can specify multiple upstreams under `nodes` to achieve load balancing.
For more information, please refer to [Upstream](../terminology/upstream.md).
2. Create a Route.
```shell
curl "http://127.0.0.1:9180/apisix/admin/routes/1" \
-H "X-API-KEY: edd1c9f034335f136f87ad84b625c8f1" -X PUT -d '
{
"methods": ["GET"],
"host": "example.com",
"uri": "/anything/*",
"upstream_id": "1"
}'
```
:::note
Adding an `upstream` object to your route can achieve the above effect.
```shell
curl "http://127.0.0.1:9180/apisix/admin/routes/1" \
-H "X-API-KEY: edd1c9f034335f136f87ad84b625c8f1" -X PUT -d '
{
"methods": ["GET"],
"host": "example.com",
"uri": "/anything/*",
"upstream": {
"type": "roundrobin",
"nodes": {
"httpbin.org:80": 1
}
}
}'
```
:::
3. Test
After creating the Route, you can test the Service with the following command:
```
curl -i -X GET "http://127.0.0.1:9080/anything/get?foo1=bar1&foo2=bar2" -H "Host: example.com"
```
APISIX will forward the request to `http://httpbin.org:80/anything/get?foo1=bar1&foo2=bar2`.
## More Tutorials
You can refer to [Protect API](./protect-api.md) to protect your API.
You can also use APISIX's [Plugin](../terminology/plugin.md) to achieve more functions.
---
---
title: Health Check
keywords:
- APISIX
- API Gateway
- Health Check
description: This article describes how to use the health check feature of API Gateway Apache APISIX to check the health status of upstream nodes.
---
## Description
This article mainly introduces the health check function of Apache APISIX. The health check function can proxy requests to healthy nodes when the upstream node fails or migrates, avoiding the problem of service unavailability to the greatest extent. The health check function of APISIX is implemented using [lua-resty-healthcheck](https://github.com/api7/lua-resty-healthcheck), which is divided into active check and passive check.
## Active check
Active health check mainly means that APISIX actively detects the survivability of upstream nodes through preset probe types. APISIX supports three probe types: `HTTP`, `HTTPS`, and `TCP`.
When N consecutive probes sent to healthy node `A` fail, the node will be marked as unhealthy, and the unhealthy node will be ignored by APISIX's load balancer and cannot receive requests; if For an unhealthy node, if M consecutive probes are successful, the node will be re-marked as healthy and can be proxied.
## Passive check
Passive health check refers to judging whether the corresponding upstream node is healthy by judging the response status of the request forwarded from APISIX to the upstream node. Compared with the active health check, the passive health check method does not need to initiate additional probes, but it cannot sense the node status in advance, and there may be a certain amount of failed requests.
If `N` consecutive requests to a healthy node A fail, the node will be marked as unhealthy.
:::note
Since unhealthy nodes cannot receive requests, nodes cannot be re-marked as healthy using the passive health check strategy alone, so combining the active health check strategy is usually necessary.
:::
:::tip
- We only start the health check when the upstream is hit by a request. There won't be any health check if an upstream is configured but isn't in used.
- If there is no healthy node can be chosen, we will continue to access the upstream.
:::
### Configuration instructions
| Name | Configuration type | Value type | Valid values | Default | Description |
| ----------------------------------------------- | ------------------------------- | ---------- | -------------------- | --------------------------------------------------------------------------------------------- | -------------------------------------------------------------------------------------------------------------------- |
| upstream.checks.active.type | Active check | string | `http` `https` `tcp` | http | The type of active check. |
| upstream.checks.active.timeout | Active check | integer | | 1 | The timeout period of the active check (unit: second). |
| upstream.checks.active.concurrency | Active check | integer | | 10 | The number of targets to be checked at the same time during the active check. |
| upstream.checks.active.http_path | Active check | string | | / | The HTTP request path that is actively checked. |
| upstream.checks.active.host | Active check | string | | ${upstream.node.host} | The hostname of the HTTP request actively checked. |
| upstream.checks.active.port | Active check | integer | `1` to `65535` | ${upstream.node.port} | The host port of the HTTP request that is actively checked. |
| upstream.checks.active.https_verify_certificate | Active check | boolean | | true | Active check whether to check the SSL certificate of the remote host when HTTPS type checking is used. |
| upstream.checks.active.req_headers | Active check | array | | [] | Active check When using HTTP or HTTPS type checking, set additional request header information. |
| upstream.checks.active.healthy.interval | Active check (healthy node) | integer | `>= 1` | 1 | Active check (healthy node) check interval (unit: second) |
| upstream.checks.active.healthy.http_statuses | Active check (healthy node) | array | `200` to `599` | [200, 302] | Active check (healthy node) HTTP or HTTPS type check, the HTTP status code of the healthy node. |
| upstream.checks.active.healthy.successes | Active check (healthy node) | integer | `1` to `254` | 2 | Active check (healthy node) determine the number of times a node is healthy. |
| upstream.checks.active.unhealthy.interval | Active check (unhealthy node) | integer | `>= 1` | 1 | Active check (unhealthy node) check interval (unit: second) |
| upstream.checks.active.unhealthy.http_statuses | Active check (unhealthy node) | array | `200` to `599` | [429, 404, 500, 501, 502, 503, 504, 505] | Active check (unhealthy node) HTTP or HTTPS type check, the HTTP status code of the non-healthy node. |
| upstream.checks.active.unhealthy.http_failures | Active check (unhealthy node) | integer | `1` to `254` | 5 | Active check (unhealthy node) HTTP or HTTPS type check, determine the number of times that the node is not healthy. |
| upstream.checks.active.unhealthy.tcp_failures | Active check (unhealthy node) | integer | `1` to `254` | 2 | Active check (unhealthy node) TCP type check, determine the number of times that the node is not healthy. |
| upstream.checks.active.unhealthy.timeouts | Active check (unhealthy node) | integer | `1` to `254` | 3 | Active check (unhealthy node) to determine the number of timeouts for unhealthy nodes. |
| upstream.checks.passive.type | Passive check | string | `http` `https` `tcp` | http | The type of passive check. |
| upstream.checks.passive.healthy.http_statuses | Passive check (healthy node) | array | `200` to `599` | [200, 201, 202, 203, 204, 205, 206, 207, 208, 226, 300, 301, 302, 303, 304, 305, 306, 307, 308] | Passive check (healthy node) HTTP or HTTPS type check, the HTTP status code of the healthy node. |
| upstream.checks.passive.healthy.successes | Passive check (healthy node) | integer | `0` to `254` | 5 | Passive checks (healthy node) determine the number of times a node is healthy. |
| upstream.checks.passive.unhealthy.http_statuses | Passive check (unhealthy node) | array | `200` to `599` | [429, 500, 503] | Passive check (unhealthy node) HTTP or HTTPS type check, the HTTP status code of the non-healthy node. |
| upstream.checks.passive.unhealthy.tcp_failures | Passive check (unhealthy node) | integer | `0` to `254` | 2 | Passive check (unhealthy node) When TCP type is checked, determine the number of times that the node is not healthy. |
| upstream.checks.passive.unhealthy.timeouts | Passive check (unhealthy node) | integer | `0` to `254` | 7 | Passive checks (unhealthy node) determine the number of timeouts for unhealthy nodes. |
| upstream.checks.passive.unhealthy.http_failures | Passive check (unhealthy node) | integer | `0` to `254` | 5 | Passive check (unhealthy node) The number of times that the node is not healthy during HTTP or HTTPS type checking. |
### Configuration example
You can enable health checks in routes via the Admin API:
:::note
You can fetch the `admin_key` from `config.yaml` and save to an environment variable with the following command:
```bash
admin_key=$(yq '.deployment.admin.admin_key[0].key' conf/config.yaml | sed 's/"//g')
```
:::
```shell
curl http://127.0.0.1:9180/apisix/admin/routes/1 -H "X-API-KEY: $admin_key" -X PUT -d '
{
"uri": "/index.html",
"plugins": {
"limit-count": {
"count": 2,
"time_window": 60,
"rejected_code": 503,
"key": "remote_addr"
}
},
"upstream": {
"nodes": {
"127.0.0.1:1980": 1,
"127.0.0.1:1970": 1
},
"type": "roundrobin",
"retries": 2,
"checks": {
"active": {
"timeout": 5,
"http_path": "/status",
"host": "foo.com",
"healthy": {
"interval": 2,
"successes": 1
},
"unhealthy": {
"interval": 1,
"http_failures": 2
},
"req_headers": ["User-Agent: curl/7.29.0"]
},
"passive": {
"healthy": {
"http_statuses": [200, 201],
"successes": 3
},
"unhealthy": {
"http_statuses": [500],
"http_failures": 3,
"tcp_failures": 3
}
}
}
}
}'
```
If APISIX detects an unhealthy node, the following logs will be output in the error log:
```shell
enabled healthcheck passive while logging request
failed to receive status line from 'nil (127.0.0.1:1980)': closed
unhealthy TCP increment (1/2) for '(127.0.0.1:1980)'
failed to receive status line from 'nil (127.0.0.1:1980)': closed
unhealthy TCP increment (2/2) for '(127.0.0.1:1980'
```
:::tip
To observe the above log information, you need to adjust the error log level to `info`.
:::
The health check status can be fetched via `GET /v1/healthcheck` in [Control API](../control-api.md).
```shell
curl http://127.0.0.1:9090/v1/healthcheck/upstreams/healthycheck -s | jq .
```
## Health Check Status
APISIX provides comprehensive health check information, with particular emphasis on the `status` and `counter` parameters for effective health monitoring. In the APISIX context, nodes exhibit four states: `healthy`, `unhealthy`, `mostly_unhealthy`, and `mostly_healthy`. The `mostly_healthy` status indicates that the current node is considered healthy, but during health checks, the node's health status is not consistently successful. The `mostly_unhealthy` status indicates that the current node is considered unhealthy, but during health checks, the node's health detection is not consistently unsuccessful. The transition of a node's state depends on the success or failure of the current health check, along with the recording of four key metrics in the `counter`: `tcp_failure`, `http_failure`, `success`, and `timeout_failure`.
To retrieve health check information, you can use the following curl command:
```shell
curl -i http://127.0.0.1:9090/v1/healthcheck
```
Response Example:
```json
[
{
"nodes": {},
"name": "/apisix/routes/1",
"type": "http"
},
{
"nodes": [
{
"port": 1970,
"hostname": "127.0.0.1",
"status": "healthy",
"ip": "127.0.0.1",
"counter": {
"tcp_failure": 0,
"http_failure": 0,
"success": 0,
"timeout_failure": 0
}
},
{
"port": 1980,
"hostname": "127.0.0.1",
"status": "healthy",
"ip": "127.0.0.1",
"counter": {
"tcp_failure": 0,
"http_failure": 0,
"success": 0,
"timeout_failure": 0
}
}
],
"name": "/apisix/routes/example-hc-route",
"type": "http"
}
]
```
### State Transition Diagram

Note that all nodes start with the `healthy` status without any initial probes, and the counter only resets and updates with a state change. Hence, when nodes are `healthy` and all subsequent checks are successful, the `success` counter is not updated and remains zero.
### Counter Information
In the event of a health check failure, the `success` count in the counter will be reset to zero. Upon a successful health check, the `tcp_failure`, `http_failure`, and `timeout_failure` data will be reset to zero.
| Name | Description | Purpose |
|----------------|----------------------------------------|--------------------------------------------------------------------------------------------------------------------------|
| success | Number of successful health checks | When `success` exceeds the configured `healthy.successes` value, the node transitions to a `healthy` state. |
| tcp_failure | Number of TCP health check failures | When `tcp_failure` exceeds the configured `unhealthy.tcp_failures` value, the node transitions to an `unhealthy` state. |
| http_failure | Number of HTTP health check failures | When `http_failure` exceeds the configured `unhealthy.http_failures` value, the node transitions to an `unhealthy` state. |
| timeout_failure | Number of health check timeouts | When `timeout_failure` exceeds the configured `unhealthy.timeouts` value, the node transitions to an `unhealthy` state. |
---
---
title: Set Up SSO with Keycloak (OIDC)
keywords:
- APISIX
- API Gateway
- OIDC
- Keycloak
description: This article describes how to integrate APISIX with Keycloak using the authorization code grant, client credentials grant, and password grant, using the openid-connect Plugin.
---
[OpenID Connect (OIDC)](https://openid.net/connect/) is a simple identity layer on top of the [OAuth 2.0 protocol](https://www.rfc-editor.org/rfc/rfc6749). It allows clients to verify the identity of end users based on the authentication performed by the identity provider, as well as to obtain basic profile information about end users in an interoperable and REST-like manner. With APISIX and [Keycloak](https://www.keycloak.org/), you can implement OIDC-based authentication processes to protect your APIs and enable single sign-on (SSO).
[Keycloak](https://www.keycloak.org/) is an open-source identity and access management solution for modern applications and services. Keycloak supports single sign-on (SSO), which enables services to interface with Keycloak through protocols such as OIDC and OAuth 2.0. In addition, Keycloak also supports delegating authentication to third party identity providers such as Facebook and Google.
This tutorial will show you how to integrate APISIX with Keycloak using [authorization code grant](#implement-authorization-code-grant), [client credentials grant](#implement-client-credentials-grant), and [password grant](#implement-password-grant), using the [`openid-connect`](/hub/openid-connect) Plugin.
## Configure Keycloak
Start a Keycloak instance named `apisix-quickstart-keycloak` with the administrator name `quickstart-admin` and password `quickstart-admin-pass` in [development mode](https://www.keycloak.org/server/configuration#_starting_keycloak_in_development_mode) in Docker. The exposed port is mapped to `8080` on the host machine:
```shell
docker run -d --name "apisix-quickstart-keycloak" \
-e 'KEYCLOAK_ADMIN=quickstart-admin' \
-e 'KEYCLOAK_ADMIN_PASSWORD=quickstart-admin-pass' \
-p 8080:8080 \
quay.io/keycloak/keycloak:18.0.2 start-dev
```
Keycloak provides an easy-to-use web UI to help the administrator manage all resources, such as clients, roles, and users.
Navigate to `http://localhost:8080` in browser to access the Keycloak web page, then click __Administration Console__:
Enter the administrator’s username `quickstart-admin` and password `quickstart-admin-pass` and sign in:
You need to maintain the login status to configure Keycloak during the following steps.
### Create a Realm
_Realms_ in Keycloak are workspaces to manage resources such as users, credentials, and roles. The resources in different realms are isolated from each other. You need to create a realm named `quickstart-realm` for APISIX.
In the left menu, hover over **Master**, and select __Add realm__ in the dropdown:
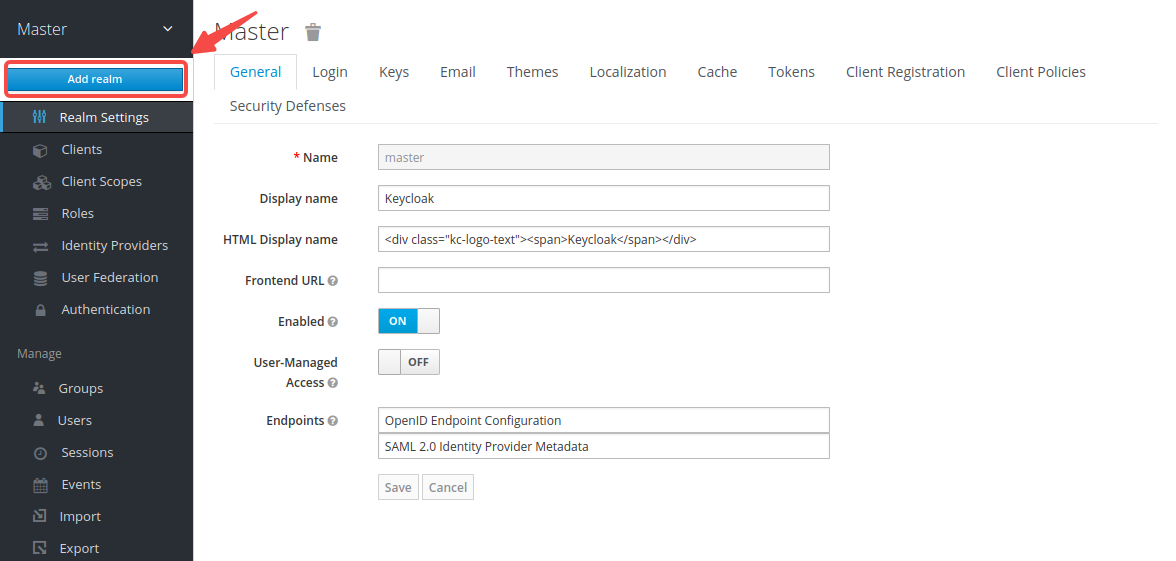
Enter the realm name `quickstart-realm` and click __Create__ to create it:

### Create a Client
_Clients_ in Keycloak are entities that request Keycloak to authenticate a user. More often, clients are applications that want to use Keycloak to secure themselves and provide a single sign-on solution. APISIX is equivalent to a client that is responsible for initiating authentication requests to Keycloak, so you need to create its corresponding client named `apisix-quickstart-client`.
Click __Clients__ > __Create__ to open the __Add Client__ page:
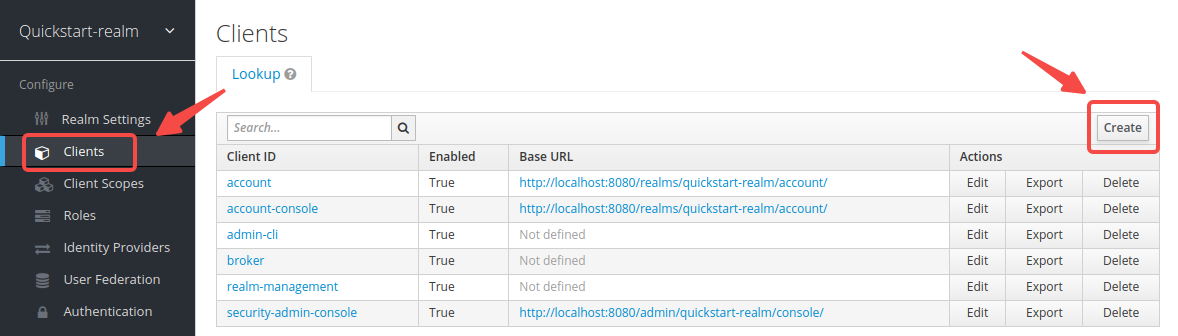
Enter __Client ID__ as `apisix-quickstart-client`, then select __Client Protocol__ as `openid-connect` and __Save__:
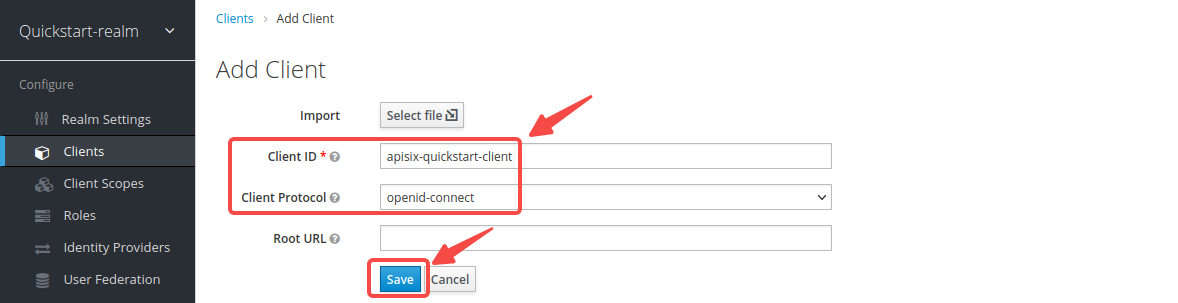
The client `apisix-quickstart-client` is created. After redirecting to the detailed page, select `confidential` as the __Access Type__:
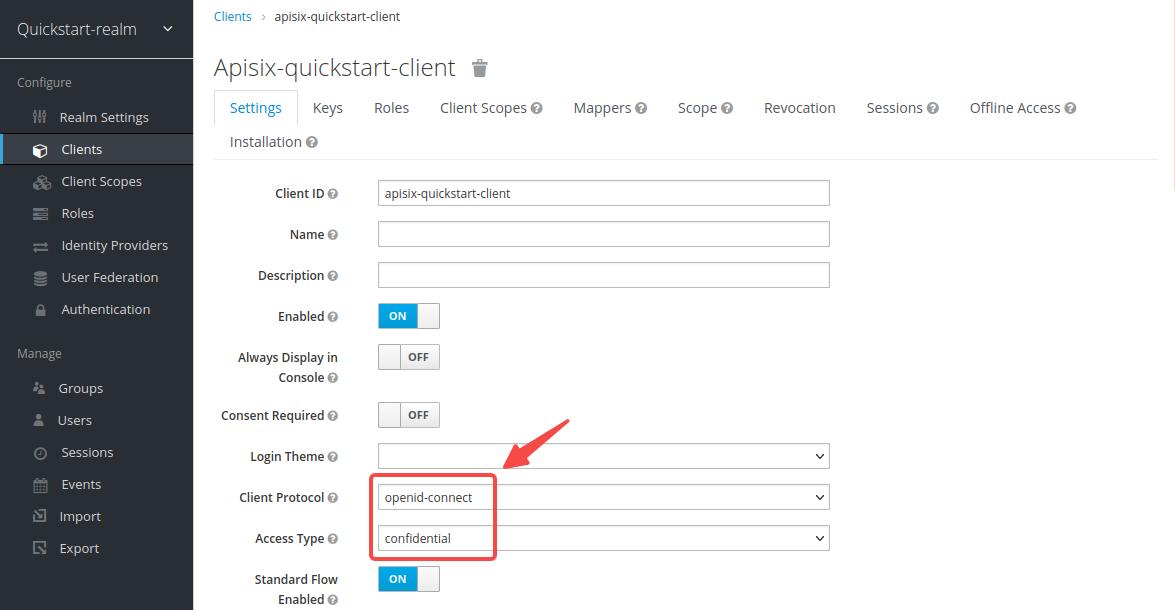
When the user login is successful during the SSO, Keycloak will carry the state and code to redirect the client to the addresses in __Valid Redirect URIs__. To simplify the operation, enter wildcard `*` to consider any URI valid:

If you are implementing the [authorization code grant with PKCE](#implement-authorization-code-grant), configure the PKCE challenge method in the client's advanced settings:
If you are implementing [client credentials grant](#implement-client-credentials-grant), enable service accounts for the client:

Select __Save__ to apply custom configurations.
### Create a User
Users in Keycloak are entities that are able to log into the system. They can have attributes associated with themselves, such as username, email, and address.
If you are only implementing [client credentials grant](#implement-client-credentials-grant), you can [skip this section](#obtain-the-oidc-configuration).
Click __Users__ > __Add user__ to open the __Add user__ page:
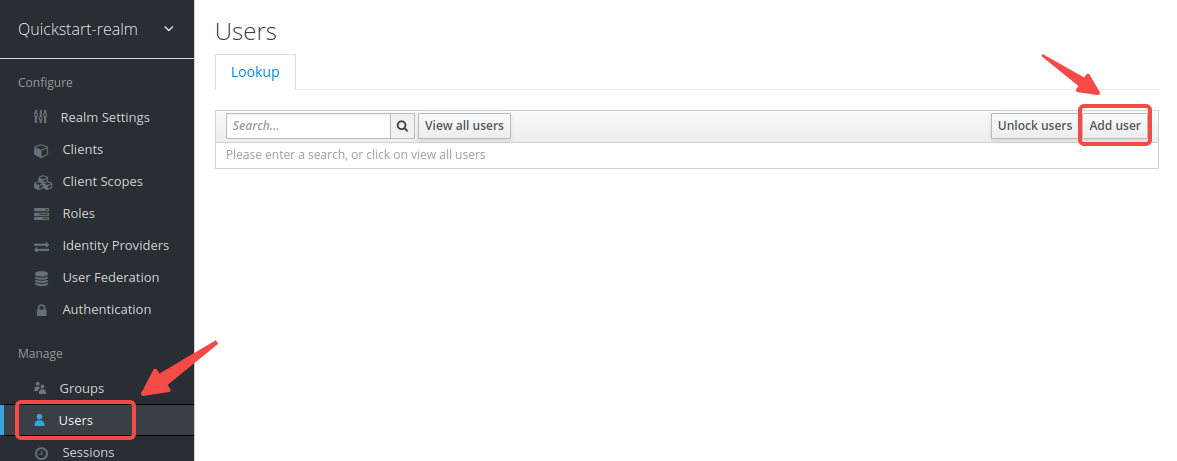
Enter the __Username__ as `quickstart-user` and select __Save__:
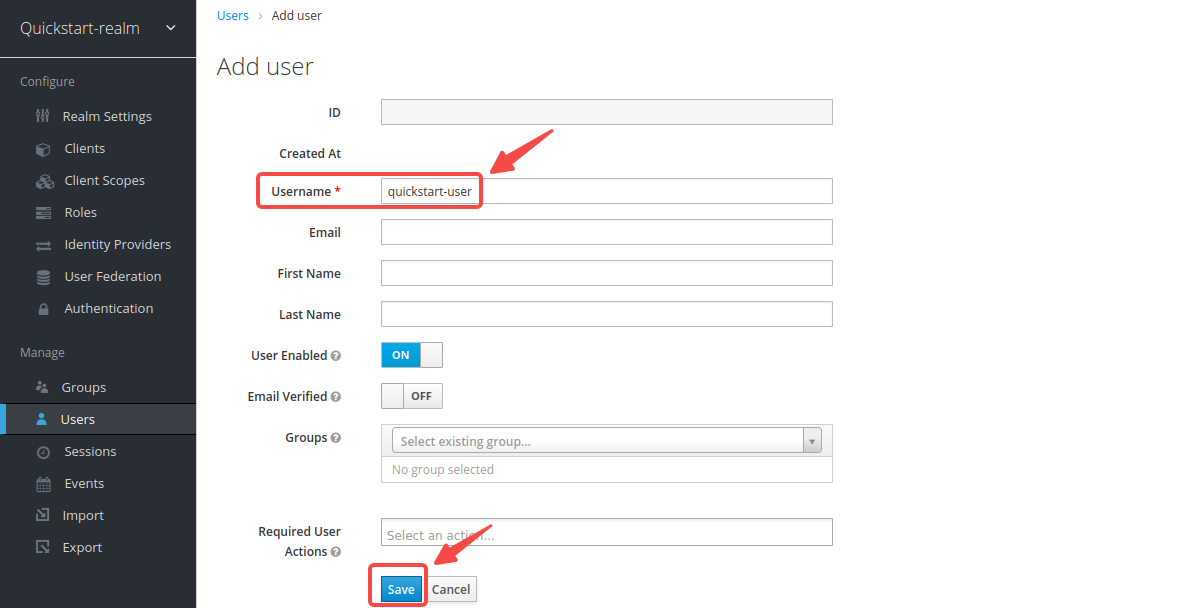
Click on __Credentials__, then set the __Password__ as `quickstart-user-pass`. Switch __Temporary__ to `OFF` to turn off the restriction, so that you need not to change password the first time you log in:
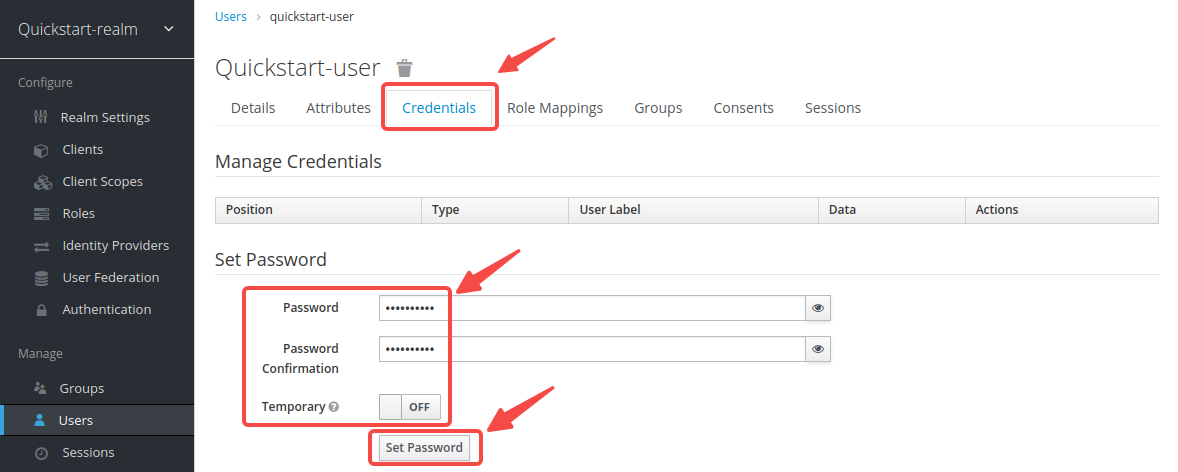
## Obtain the OIDC Configuration
In this section, you will obtain the key OIDC configuration from Keycloak and define them as shell variables. Steps after this section will use these variables to configure the OIDC by shell commands.
:::info
Open a separate terminal to follow the steps and define related shell variables. Then steps after this section could use the defined variables directly.
:::
### Get Discovery Endpoint
Click __Realm Settings__, then right click __OpenID Endpoints Configuration__ and copy the link.
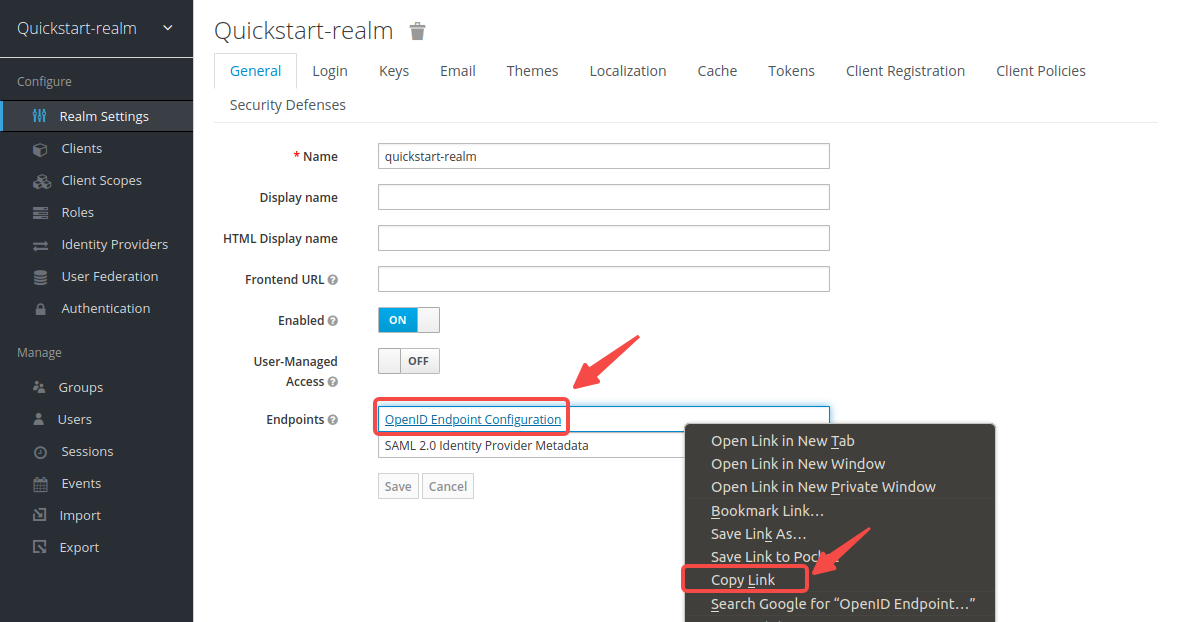
The link should be the same as the following:
```text
http://localhost:8080/realms/quickstart-realm/.well-known/openid-configuration
```
Configuration values exposed with this endpoint are required during OIDC authentication. Update the address with your host IP and save to environment variables:
```shell
export KEYCLOAK_IP=192.168.42.145 # replace with your host IP
export OIDC_DISCOVERY=http://${KEYCLOAK_IP}:8080/realms/quickstart-realm/.well-known/openid-configuration
```
### Get Client ID and Secret
Click on __Clients__ > `apisix-quickstart-client` > __Credentials__, and copy the client secret from __Secret__:
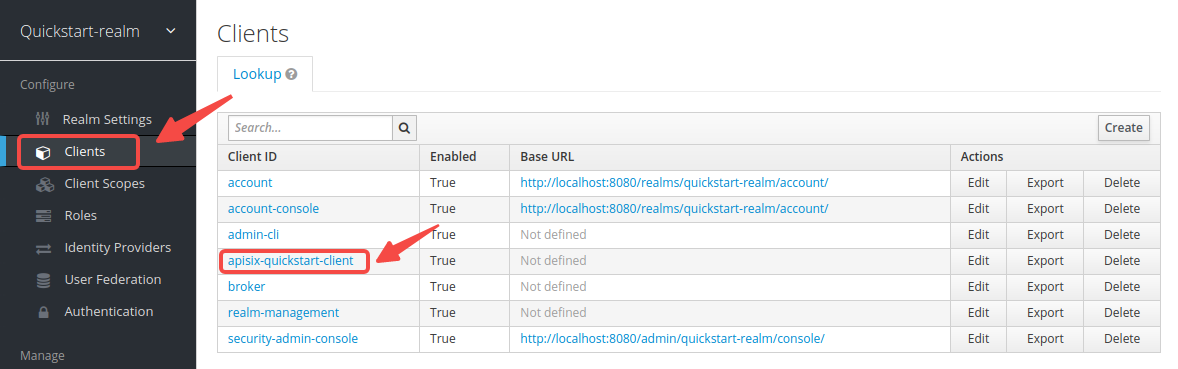

Save the OIDC client ID and secret to environment variables:
```shell
export OIDC_CLIENT_ID=apisix-quickstart-client
export OIDC_CLIENT_SECRET=bSaIN3MV1YynmtXvU8lKkfeY0iwpr9cH # replace with your value
```
## Implement Authorization Code Grant
The authorization code grant is used by web and mobile applications. The flow starts by authorization server displaying a login page in browser where users could key in their credentials. During the process, a short-lived authorization code is exchanged for an access token, which APISIX stores in browser session cookies and will be sent with every request visiting the upstream resource server.
To implement authorization code grant, create a Route with `openid-connect` Plugin as such:
```shell
curl -i "http://127.0.0.1:9180/apisix/admin/routes" -X PUT -d '
{
"id": "auth-with-oidc",
"uri":"/anything/*",
"plugins": {
"openid-connect": {
"bearer_only": false,
"session": {
"secret": "change_to_whatever_secret_you_want"
},
"client_id": "'"$OIDC_CLIENT_ID"'",
"client_secret": "'"$OIDC_CLIENT_SECRET"'",
"discovery": "'"$OIDC_DISCOVERY"'",
"scope": "openid profile",
"redirect_uri": "http://localhost:9080/anything/callback"
}
},
"upstream":{
"type":"roundrobin",
"nodes":{
"httpbin.org:80":1
}
}
}'
```
Alternatively, if you would like to implement authorization code grant with PKCE, create a Route with `openid-connect` Plugin as such:
```shell
curl -i "http://127.0.0.1:9180/apisix/admin/routes" -X PUT -d '
{
"id": "auth-with-oidc",
"uri":"/anything/*",
"plugins": {
"openid-connect": {
"bearer_only": false,
"session": {
"secret": "change_to_whatever_secret_you_want"
},
"use_pkce": true,
"client_id": "'"$OIDC_CLIENT_ID"'",
"client_secret": "'"$OIDC_CLIENT_SECRET"'",
"discovery": "'"$OIDC_DISCOVERY"'",
"scope": "openid profile",
"redirect_uri": "http://localhost:9080/anything/callback"
}
},
"upstream":{
"type":"roundrobin",
"nodes":{
"httpbin.org:80":1
}
}
}'
```
### Verify with Valid Credentials
Navigate to `http://127.0.0.1:9080/anything/test` in browser. The request will be redirected to a login page:
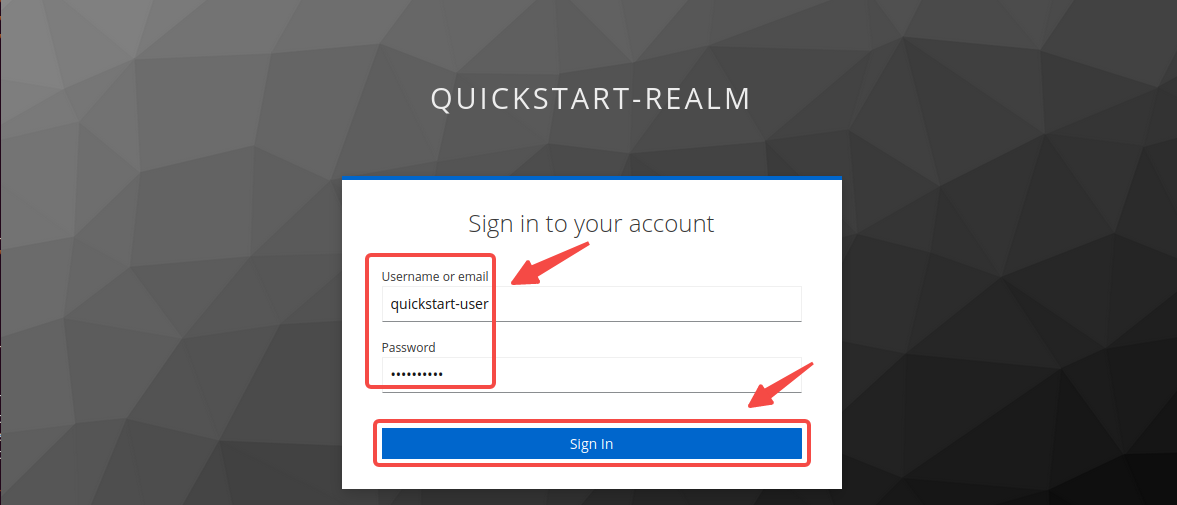
Log in with the correct username `quickstart-user` and password `quickstart-user-pass`. If successful, the request will be forwarded to `httpbin.org` and you should see a response similar to the following:
```json
{
"args": {},
"data": "",
"files": {},
"form": {},
"headers": {
"Accept": "text/html..."
...
},
"json": null,
"method": "GET",
"origin": "127.0.0.1, 59.71.244.81",
"url": "http://127.0.0.1/anything/test"
}
```
### Verify with Invalid Credentials
Sign in with the wrong credentials. You should see an authentication failure:
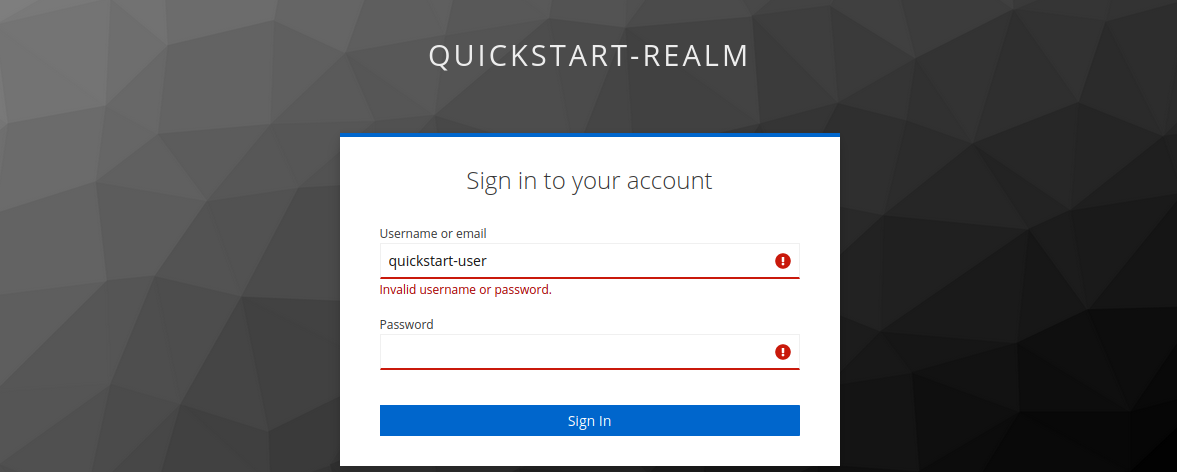
## Implement Client Credentials Grant
In client credentials grant, clients obtain access tokens without any users involved. It is typically used in machine-to-machine (M2M) communications.
To implement client credentials grant, create a Route with `openid-connect` Plugin to use the JWKS endpoint of the identity provider to verify the token. The endpoint would be obtained from the discovery document.
```shell
curl -i "http://127.0.0.1:9180/apisix/admin/routes" -X PUT -d '
{
"id": "auth-with-oidc",
"uri":"/anything/*",
"plugins": {
"openid-connect": {
"use_jwks": true,
"client_id": "'"$OIDC_CLIENT_ID"'",
"client_secret": "'"$OIDC_CLIENT_SECRET"'",
"discovery": "'"$OIDC_DISCOVERY"'",
"scope": "openid profile",
"redirect_uri": "http://localhost:9080/anything/callback"
}
},
"upstream":{
"type":"roundrobin",
"nodes":{
"httpbin.org:80":1
}
}
}'
```
Alternatively, if you would like to use the introspection endpoint to verify the token, create the Route as such:
```shell
curl -i "http://127.0.0.1:9180/apisix/admin/routes" -X PUT -d '
{
"id": "auth-with-oidc",
"uri":"/anything/*",
"plugins": {
"openid-connect": {
"bearer_only": true,
"client_id": "'"$OIDC_CLIENT_ID"'",
"client_secret": "'"$OIDC_CLIENT_SECRET"'",
"discovery": "'"$OIDC_DISCOVERY"'",
"scope": "openid profile",
"redirect_uri": "http://localhost:9080/anything/callback"
}
},
"upstream":{
"type":"roundrobin",
"nodes":{
"httpbin.org:80":1
}
}
}'
```
The introspection endpoint will be obtained from the discovery document.
### Verify With Valid Access Token
Obtain an access token for the Keycloak server at the [token endpoint](https://www.keycloak.org/docs/latest/securing_apps/#token-endpoint):
```shell
curl -i "http://$KEYCLOAK_IP:8080/realms/quickstart-realm/protocol/openid-connect/token" -X POST \
-d 'grant_type=client_credentials' \
-d 'client_id='$OIDC_CLIENT_ID'' \
-d 'client_secret='$OIDC_CLIENT_SECRET''
```
The expected response is similar to the following:
```text
{"access_token":"eyJhbGciOiJSUzI1NiIsInR5cCIgOiAiSldUIiwia2lkIiA6ICJoT3ludlBPY2d6Y3VWWnYtTU42bXZKMUczb0dOX2d6MFo3WFl6S2FSa1NBIn0.eyJleHAiOjE3MDM4MjU1NjQsImlhdCI6MTcwMzgyNTI2NCwianRpIjoiMWQ4NWE4N2UtZDFhMC00NThmLThiMTItNGZiYWM2ODA5YmYwIiwiaXNzIjoiaHR0cDovLzE5Mi4xNjguMS44Mzo4MDgwL3JlYWxtcy9xdWlja3N0YXJ0LXJlYWxtIiwiYXVkIjoiYWNjb3VudCIsInN1YiI6IjE1OGUzOWFlLTk0YjAtNDI3Zi04ZGU3LTU3MTRhYWYwOGYzOSIsInR5cCI6IkJlYXJlciIsImF6cCI6ImFwaXNpeC1xdWlja3N0YXJ0LWNsaWVudCIsImFjciI6IjEiLCJyZWFsbV9hY2Nlc3MiOnsicm9sZXMiOlsiZGVmYXVsdC1yb2xlcy1xdWlja3N0YXJ0LXJlYWxtIiwib2ZmbGluZV9hY2Nlc3MiLCJ1bWFfYXV0aG9yaXphdGlvbiJdfSwicmVzb3VyY2VfYWNjZXNzIjp7ImFjY291bnQiOnsicm9sZXMiOlsibWFuYWdlLWFjY291bnQiLCJtYW5hZ2UtYWNjb3VudC1saW5rcyIsInZpZXctcHJvZmlsZSJdfX0sInNjb3BlIjoiZW1haWwgcHJvZmlsZSIsImVtYWlsX3ZlcmlmaWVkIjpmYWxzZSwiY2xpZW50SG9zdCI6IjE3Mi4xNy4wLjEiLCJjbGllbnRJZCI6ImFwaXNpeC1xdWlja3N0YXJ0LWNsaWVudCIsInByZWZlcnJlZF91c2VybmFtZSI6InNlcnZpY2UtYWNjb3VudC1hcGlzaXgtcXVpY2tzdGFydC1jbGllbnQiLCJjbGllbnRBZGRyZXNzIjoiMTcyLjE3LjAuMSJ9.TltzSXqrJuVID7aGrb35jn-oc07U_-jugSn-3jKz4A44LwtAsME_8b3qkmR4boMOIht_5pF6bnnp70MFAlg6JKu4_yIQDxF_GAHjnZXEO8OCKhtIKwXm2w-hnnJVIhIdGkIVkbPP0HfILuar_m0hpa53VpPBGYR-OS4pyh0KTUs8MB22xAEqyz9zjCm6SX9vXCqgeVkSpRW2E8NaGEbAdY25uY-ZC4dI_pON87Ey5e8GdD6HQLXQlGIOdCDi3N7k0HDoD9TZRv2bMRPfy4zVYm1ZlClIuF79A-ZBwr0c-XYuq7t6EY0gPGEXB-s0SaKlrIU5S9JBeVXRzYvqAih41g","expires_in":300,"refresh_expires_in":0,"token_type":"Bearer","not-before-policy":0,"scope":"email profile"}
```
Save the access token to an environment variable:
```shell
# replace with your access token
export ACCESS_TOKEN="eyJhbGciOiJSUzI1NiIsInR5cCIgOiAiSldUIiwia2lkIiA6ICJoT3ludlBPY2d6Y3VWWnYtTU42bXZKMUczb0dOX2d6MFo3WFl6S2FSa1NBIn0.eyJleHAiOjE3MDM4MjU1NjQsImlhdCI6MTcwMzgyNTI2NCwianRpIjoiMWQ4NWE4N2UtZDFhMC00NThmLThiMTItNGZiYWM2ODA5YmYwIiwiaXNzIjoiaHR0cDovLzE5Mi4xNjguMS44Mzo4MDgwL3JlYWxtcy9xdWlja3N0YXJ0LXJlYWxtIiwiYXVkIjoiYWNjb3VudCIsInN1YiI6IjE1OGUzOWFlLTk0YjAtNDI3Zi04ZGU3LTU3MTRhYWYwOGYzOSIsInR5cCI6IkJlYXJlciIsImF6cCI6ImFwaXNpeC1xdWlja3N0YXJ0LWNsaWVudCIsImFjciI6IjEiLCJyZWFsbV9hY2Nlc3MiOnsicm9sZXMiOlsiZGVmYXVsdC1yb2xlcy1xdWlja3N0YXJ0LXJlYWxtIiwib2ZmbGluZV9hY2Nlc3MiLCJ1bWFfYXV0aG9yaXphdGlvbiJdfSwicmVzb3VyY2VfYWNjZXNzIjp7ImFjY291bnQiOnsicm9sZXMiOlsibWFuYWdlLWFjY291bnQiLCJtYW5hZ2UtYWNjb3VudC1saW5rcyIsInZpZXctcHJvZmlsZSJdfX0sInNjb3BlIjoiZW1haWwgcHJvZmlsZSIsImVtYWlsX3ZlcmlmaWVkIjpmYWxzZSwiY2xpZW50SG9zdCI6IjE3Mi4xNy4wLjEiLCJjbGllbnRJZCI6ImFwaXNpeC1xdWlja3N0YXJ0LWNsaWVudCIsInByZWZlcnJlZF91c2VybmFtZSI6InNlcnZpY2UtYWNjb3VudC1hcGlzaXgtcXVpY2tzdGFydC1jbGllbnQiLCJjbGllbnRBZGRyZXNzIjoiMTcyLjE3LjAuMSJ9.TltzSXqrJuVID7aGrb35jn-oc07U_-jugSn-3jKz4A44LwtAsME_8b3qkmR4boMOIht_5pF6bnnp70MFAlg6JKu4_yIQDxF_GAHjnZXEO8OCKhtIKwXm2w-hnnJVIhIdGkIVkbPP0HfILuar_m0hpa53VpPBGYR-OS4pyh0KTUs8MB22xAEqyz9zjCm6SX9vXCqgeVkSpRW2E8NaGEbAdY25uY-ZC4dI_pON87Ey5e8GdD6HQLXQlGIOdCDi3N7k0HDoD9TZRv2bMRPfy4zVYm1ZlClIuF79A-ZBwr0c-XYuq7t6EY0gPGEXB-s0SaKlrIU5S9JBeVXRzYvqAih41g"
```
Send a request to the route with the valid access token:
```shell
curl -i "http://127.0.0.1:9080/anything/test" -H "Authorization: Bearer $ACCESS_TOKEN"
```
An `HTTP/1.1 200 OK` response verifies that the request to the upstream resource was authorized.
### Verify With Invalid Access Token
Send a request to the Route with invalid access token:
```shell
curl -i "http://127.0.0.1:9080/anything/test" -H "Authorization: Bearer invalid-access-token"
```
An `HTTP/1.1 401 Unauthorized` response verifies that the OIDC Plugin rejects requests with invalid access token.
### Verify without Access Token
Send a request to the Route without access token:
```shell
curl -i "http://127.0.0.1:9080/anything/test"
```
An `HTTP/1.1 401 Unauthorized` response verifies that the OIDC Plugin rejects requests without access token.
## Implement Password Grant
Password grant is a legacy approach to exchange user credentials for an access token.
To implement password grant, create a Route with `openid-connect` Plugin to use the JWKS endpoint of the identity provider to verify the token. The endpoint would be obtained from the discovery document.
```shell
curl -i "http://127.0.0.1:9180/apisix/admin/routes" -X PUT -d '
{
"id": "auth-with-oidc",
"uri":"/anything/*",
"plugins": {
"openid-connect": {
"use_jwks": true,
"client_id": "'"$OIDC_CLIENT_ID"'",
"client_secret": "'"$OIDC_CLIENT_SECRET"'",
"discovery": "'"$OIDC_DISCOVERY"'",
"scope": "openid profile",
"redirect_uri": "http://localhost:9080/anything/callback"
}
},
"upstream":{
"type":"roundrobin",
"nodes":{
"httpbin.org:80":1
}
}
}'
```
### Verify With Valid Access Token
Obtain an access token for the Keycloak server at the [token endpoint](https://www.keycloak.org/docs/latest/securing_apps/#token-endpoint):
```shell
OIDC_USER=quickstart-user
OIDC_PASSWORD=quickstart-user-pass
curl -i "http://$KEYCLOAK_IP:8080/realms/quickstart-realm/protocol/openid-connect/token" -X POST \
-d 'grant_type=password' \
-d 'client_id='$OIDC_CLIENT_ID'' \
-d 'client_secret='$OIDC_CLIENT_SECRET'' \
-d 'username='$OIDC_USER'' \
-d 'password='$OIDC_PASSWORD''
```
The expected response is similar to the following:
```text
{"access_token":"eyJhbGciOiJSUzI1NiIsInR5cCIgOiAiSldUIiwia2lkIiA6ICJ6U3FFaXN6VlpuYi1sRWMzZkp0UHNpU1ZZcGs4RGN3dXI1Mkx5V05aQTR3In0.eyJleHAiOjE2ODAxNjA5NjgsImlhdCI6MTY4MDE2MDY2OCwianRpIjoiMzQ5MTc4YjQtYmExZC00ZWZjLWFlYTUtZGY2MzJiMDJhNWY5IiwiaXNzIjoiaHR0cDovLzE5Mi4xNjguNDIuMTQ1OjgwODAvcmVhbG1zL3F1aWNrc3RhcnQtcmVhbG0iLCJhdWQiOiJhY2NvdW50Iiwic3ViIjoiMTg4MTVjM2EtNmQwNy00YTY2LWJjZjItYWQ5NjdmMmIwMTFmIiwidHlwIjoiQmVhcmVyIiwiYXpwIjoiYXBpc2l4LXF1aWNrc3RhcnQtY2xpZW50Iiwic2Vzc2lvbl9zdGF0ZSI6ImIxNmIyNjJlLTEwNTYtNDUxNS1hNDU1LWYyNWUwNzdjY2I3NiIsImFjciI6IjEiLCJyZWFsbV9hY2Nlc3MiOnsicm9sZXMiOlsiZGVmYXVsdC1yb2xlcy1xdWlja3N0YXJ0LXJlYWxtIiwib2ZmbGluZV9hY2Nlc3MiLCJ1bWFfYXV0aG9yaXphdGlvbiJdfSwicmVzb3VyY2VfYWNjZXNzIjp7ImFjY291bnQiOnsicm9sZXMiOlsibWFuYWdlLWFjY291bnQiLCJtYW5hZ2UtYWNjb3VudC1saW5rcyIsInZpZXctcHJvZmlsZSJdfX0sInNjb3BlIjoicHJvZmlsZSBlbWFpbCIsInNpZCI6ImIxNmIyNjJlLTEwNTYtNDUxNS1hNDU1LWYyNWUwNzdjY2I3NiIsImVtYWlsX3ZlcmlmaWVkIjpmYWxzZSwicHJlZmVycmVkX3VzZXJuYW1lIjoicXVpY2tzdGFydC11c2VyIn0.uD_7zfZv5182aLXu9-YBzBDK0nr2mE4FWb_4saTog2JTqFTPZZa99Gm8AIDJx2ZUcZ_ElkATqNUZ4OpWmL2Se5NecMw3slJReewjD6xgpZ3-WvQuTGpoHdW5wN9-Rjy8ungilrnAsnDA3tzctsxm2w6i9KISxvZrzn5Rbk-GN6fxH01VC5eekkPUQJcJgwuJiEiu70SjGnm21xDN4VGkNRC6jrURoclv3j6AeOqDDIV95kA_MTfBswDFMCr2PQlj5U0RTndZqgSoxwFklpjGV09Azp_jnU7L32_Sq-8coZd0nj5mSdbkJLJ8ZDQDV_PP3HjCP7EHdy4P6TyZ7oGvjw","expires_in":300,"refresh_expires_in":1800,"refresh_token":"eyJhbGciOiJIUzI1NiIsInR5cCIgOiAiSldUIiwia2lkIiA6ICI0YjFiNTQ3Yi0zZmZjLTQ5YzQtYjE2Ni03YjdhNzIxMjk1ODcifQ.eyJleHAiOjE2ODAxNjI0NjgsImlhdCI6MTY4MDE2MDY2OCwianRpIjoiYzRjNjNlMTEtZTdlZS00ZmEzLWJlNGYtNDMyZWQ4ZmY5OTQwIiwiaXNzIjoiaHR0cDovLzE5Mi4xNjguNDIuMTQ1OjgwODAvcmVhbG1zL3F1aWNrc3RhcnQtcmVhbG0iLCJhdWQiOiJodHRwOi8vMTkyLjE2OC40Mi4xNDU6ODA4MC9yZWFsbXMvcXVpY2tzdGFydC1yZWFsbSIsInN1YiI6IjE4ODE1YzNhLTZkMDctNGE2Ni1iY2YyLWFkOTY3ZjJiMDExZiIsInR5cCI6IlJlZnJlc2giLCJhenAiOiJhcGlzaXgtcXVpY2tzdGFydC1jbGllbnQiLCJzZXNzaW9uX3N0YXRlIjoiYjE2YjI2MmUtMTA1Ni00NTE1LWE0NTUtZjI1ZTA3N2NjYjc2Iiwic2NvcGUiOiJwcm9maWxlIGVtYWlsIiwic2lkIjoiYjE2YjI2MmUtMTA1Ni00NTE1LWE0NTUtZjI1ZTA3N2NjYjc2In0.8xYP4bhDg1U9B5cTaEVD7B4oxNp8wwAYEynUne_Jm78","token_type":"Bearer","not-before-policy":0,"session_state":"b16b262e-1056-4515-a455-f25e077ccb76","scope":"profile email"}
```
Save the access token and refresh token to environment variables. The refresh token will be used in the [refresh token step](#refresh-token).
```shell
# replace with your access token
export ACCESS_TOKEN="eyJhbGciOiJSUzI1NiIsInR5cCIgOiAiSldUIiwia2lkIiA6ICJ6U3FFaXN6VlpuYi1sRWMzZkp0UHNpU1ZZcGs4RGN3dXI1Mkx5V05aQTR3In0.eyJleHAiOjE2ODAxNjA5NjgsImlhdCI6MTY4MDE2MDY2OCwianRpIjoiMzQ5MTc4YjQtYmExZC00ZWZjLWFlYTUtZGY2MzJiMDJhNWY5IiwiaXNzIjoiaHR0cDovLzE5Mi4xNjguNDIuMTQ1OjgwODAvcmVhbG1zL3F1aWNrc3RhcnQtcmVhbG0iLCJhdWQiOiJhY2NvdW50Iiwic3ViIjoiMTg4MTVjM2EtNmQwNy00YTY2LWJjZjItYWQ5NjdmMmIwMTFmIiwidHlwIjoiQmVhcmVyIiwiYXpwIjoiYXBpc2l4LXF1aWNrc3RhcnQtY2xpZW50Iiwic2Vzc2lvbl9zdGF0ZSI6ImIxNmIyNjJlLTEwNTYtNDUxNS1hNDU1LWYyNWUwNzdjY2I3NiIsImFjciI6IjEiLCJyZWFsbV9hY2Nlc3MiOnsicm9sZXMiOlsiZGVmYXVsdC1yb2xlcy1xdWlja3N0YXJ0LXJlYWxtIiwib2ZmbGluZV9hY2Nlc3MiLCJ1bWFfYXV0aG9yaXphdGlvbiJdfSwicmVzb3VyY2VfYWNjZXNzIjp7ImFjY291bnQiOnsicm9sZXMiOlsibWFuYWdlLWFjY291bnQiLCJtYW5hZ2UtYWNjb3VudC1saW5rcyIsInZpZXctcHJvZmlsZSJdfX0sInNjb3BlIjoicHJvZmlsZSBlbWFpbCIsInNpZCI6ImIxNmIyNjJlLTEwNTYtNDUxNS1hNDU1LWYyNWUwNzdjY2I3NiIsImVtYWlsX3ZlcmlmaWVkIjpmYWxzZSwicHJlZmVycmVkX3VzZXJuYW1lIjoicXVpY2tzdGFydC11c2VyIn0.uD_7zfZv5182aLXu9-YBzBDK0nr2mE4FWb_4saTog2JTqFTPZZa99Gm8AIDJx2ZUcZ_ElkATqNUZ4OpWmL2Se5NecMw3slJReewjD6xgpZ3-WvQuTGpoHdW5wN9-Rjy8ungilrnAsnDA3tzctsxm2w6i9KISxvZrzn5Rbk-GN6fxH01VC5eekkPUQJcJgwuJiEiu70SjGnm21xDN4VGkNRC6jrURoclv3j6AeOqDDIV95kA_MTfBswDFMCr2PQlj5U0RTndZqgSoxwFklpjGV09Azp_jnU7L32_Sq-8coZd0nj5mSdbkJLJ8ZDQDV_PP3HjCP7EHdy4P6TyZ7oGvjw"
export REFRESH_TOKEN="eyJhbGciOiJIUzI1NiIsInR5cCIgOiAiSldUIiwia2lkIiA6ICI0YjFiNTQ3Yi0zZmZjLTQ5YzQtYjE2Ni03YjdhNzIxMjk1ODcifQ.eyJleHAiOjE2ODAxNjI0NjgsImlhdCI6MTY4MDE2MDY2OCwianRpIjoiYzRjNjNlMTEtZTdlZS00ZmEzLWJlNGYtNDMyZWQ4ZmY5OTQwIiwiaXNzIjoiaHR0cDovLzE5Mi4xNjguNDIuMTQ1OjgwODAvcmVhbG1zL3F1aWNrc3RhcnQtcmVhbG0iLCJhdWQiOiJodHRwOi8vMTkyLjE2OC40Mi4xNDU6ODA4MC9yZWFsbXMvcXVpY2tzdGFydC1yZWFsbSIsInN1YiI6IjE4ODE1YzNhLTZkMDctNGE2Ni1iY2YyLWFkOTY3ZjJiMDExZiIsInR5cCI6IlJlZnJlc2giLCJhenAiOiJhcGlzaXgtcXVpY2tzdGFydC1jbGllbnQiLCJzZXNzaW9uX3N0YXRlIjoiYjE2YjI2MmUtMTA1Ni00NTE1LWE0NTUtZjI1ZTA3N2NjYjc2Iiwic2NvcGUiOiJwcm9maWxlIGVtYWlsIiwic2lkIjoiYjE2YjI2MmUtMTA1Ni00NTE1LWE0NTUtZjI1ZTA3N2NjYjc2In0.8xYP4bhDg1U9B5cTaEVD7B4oxNp8wwAYEynUne_Jm78"
```
Send a request to the route with the valid access token:
```shell
curl -i "http://127.0.0.1:9080/anything/test" -H "Authorization: Bearer $ACCESS_TOKEN"
```
An `HTTP/1.1 200 OK` response verifies that the request to the upstream resource was authorized.
### Verify With Invalid Access Token
Send a request to the Route with invalid access token:
```shell
curl -i "http://127.0.0.1:9080/anything/test" -H "Authorization: Bearer invalid-access-token"
```
An `HTTP/1.1 401 Unauthorized` response verifies that the OIDC Plugin rejects requests with invalid access token.
### Verify without Access Token
Send a request to the Route without access token:
```shell
curl -i "http://127.0.0.1:9080/anything/test"
```
An `HTTP/1.1 401 Unauthorized` response verifies that the OIDC Plugin rejects requests without access token.
### Refresh Token
To refresh the access token, send a request to the Keycloak token endpoint as such:
```shell
curl -i "http://$KEYCLOAK_IP:8080/realms/quickstart-realm/protocol/openid-connect/token" -X POST \
-d 'grant_type=refresh_token' \
-d 'client_id='$OIDC_CLIENT_ID'' \
-d 'client_secret='$OIDC_CLIENT_SECRET'' \
-d 'refresh_token='$REFRESH_TOKEN''
```
You should see a response similar to the following, with the new access token and refresh token, which you can use for subsequent requests and token refreshes:
```text
{"access_token":"eyJhbGciOiJSUzI1NiIsInR5cCIgOiAiSldUIiwia2lkIiA6ICJTdnVwLXlPMHhDdTJBVi1za2pCZ0h6SHZNaG1mcDVDQWc0NHpYb2QxVTlNIn0.eyJleHAiOjE3MzAyNzQ3NDUsImlhdCI6MTczMDI3NDQ0NSwianRpIjoiMjk2Mjk5MWUtM2ExOC00YWFiLWE0NzAtODgxNWEzNjZjZmM4IiwiaXNzIjoiaHR0cDovLzE5Mi4xNjguMTUyLjU6ODA4MC9yZWFsbXMvcXVpY2tzdGFydC1yZWFsbSIsImF1ZCI6ImFjY291bnQiLCJzdWIiOiI2ZWI0ZTg0Yy00NmJmLTRkYzUtOTNkMC01YWM5YzE5MWU0OTciLCJ0eXAiOiJCZWFyZXIiLCJhenAiOiJhcGlzaXgtcXVpY2tzdGFydC1jbGllbnQiLCJzZXNzaW9uX3N0YXRlIjoiNTU2ZTQyYjktMjE2Yi00NTEyLWE5ZjAtNzE3ZTAyYTQ4MjZhIiwiYWNyIjoiMSIsInJlYWxtX2FjY2VzcyI6eyJyb2xlcyI6WyJkZWZhdWx0LXJvbGVzLXF1aWNrc3RhcnQtcmVhbG0iLCJvZmZsaW5lX2FjY2VzcyIsInVtYV9hdXRob3JpemF0aW9uIl19LCJyZXNvdXJjZV9hY2Nlc3MiOnsiYWNjb3VudCI6eyJyb2xlcyI6WyJtYW5hZ2UtYWNjb3VudCIsIm1hbmFnZS1hY2NvdW50LWxpbmtzIiwidmlldy1wcm9maWxlIl19fSwic2NvcGUiOiJlbWFpbCBwcm9maWxlIiwic2lkIjoiNTU2ZTQyYjktMjE2Yi00NTEyLWE5ZjAtNzE3ZTAyYTQ4MjZhIiwiZW1haWxfdmVyaWZpZWQiOmZhbHNlLCJwcmVmZXJyZWRfdXNlcm5hbWUiOiJxdWlja3N0YXJ0LXVzZXIifQ.KLqn1LQdazoPBqLLR856C35XpqbMO9I7WFt3KrDxZF1N8vwv4AvZYWI_2rsbdjCakh9JmPgyYRgEGufYLiDBsqy9CrMVejAIJPYsJIonIXBCp5Ysu92ODJuqtTKuuJ6K7dam7fisBFfCBbVvGspnZ3p0caedpOaF_kSd-F8ARHKVsmkuX3_ucDrP3UctjEXHezefTY4YHjNMB9wuMDPXX2vXt2BsOasnznsIHHHX-ZH8JY6eEfWPtfx0qAED6lVZICT6Rqj_j5-Cf9ogzFtLyy_XvtG9BbHME2B8AXYpxdzqxOxmVVbZdrB8elfmFjs1R3vUn2r3xA9hO_znZo_IoQ","expires_in":300,"refresh_expires_in":1800,"refresh_token":"eyJhbGciOiJIUzI1NiIsInR5cCIgOiAiSldUIiwia2lkIiA6ICIwYWYwZTAwYy0xMThjLTRkNDktYmIwMS1iMDIwNDE3MmFjMzIifQ.eyJleHAiOjE3MzAyNzYyNDUsImlhdCI6MTczMDI3NDQ0NSwianRpIjoiZGQyZTJmYTktN2Y3Zi00MjM5LWEwODAtNWQyZDFiZTdjNzk4IiwiaXNzIjoiaHR0cDovLzE5Mi4xNjguMTUyLjU6ODA4MC9yZWFsbXMvcXVpY2tzdGFydC1yZWFsbSIsImF1ZCI6Imh0dHA6Ly8xOTIuMTY4LjE1Mi41OjgwODAvcmVhbG1zL3F1aWNrc3RhcnQtcmVhbG0iLCJzdWIiOiI2ZWI0ZTg0Yy00NmJmLTRkYzUtOTNkMC01YWM5YzE5MWU0OTciLCJ0eXAiOiJSZWZyZXNoIiwiYXpwIjoiYXBpc2l4LXF1aWNrc3RhcnQtY2xpZW50Iiwic2Vzc2lvbl9zdGF0ZSI6IjU1NmU0MmI5LTIxNmItNDUxMi1hOWYwLTcxN2UwMmE0ODI2YSIsInNjb3BlIjoiZW1haWwgcHJvZmlsZSIsInNpZCI6IjU1NmU0MmI5LTIxNmItNDUxMi1hOWYwLTcxN2UwMmE0ODI2YSJ9.Uad4BVuojHfyxqedFT5BHliWjIqVDbjM-Xeme0G2AAg","token_type":"Bearer","not-before-policy":0,"session_state":"556e42b9-216b-4512-a9f0-717e02a4826a","scope":"email profile"}
```
---
---
title: Manage API Consumers
keywords:
- API Gateway
- Apache APISIX
- Rate Limit
- Consumer
- Consumer Group
description: This tutorial explains how to manage your single or multiple API consumers with Apache APISIX.
---
This tutorial explains how to manage your single or multiple API consumers with Apache APISIX.
Nowadays [APIs](https://en.wikipedia.org/wiki/API) connect multiple systems, internal services, and third-party applications easily and securely. _API consumers_ are probably the most important stakeholders for API providers because they interact the most with the APIs and the developer portal. This post explains how to manage your single or multiple API consumers with an open-source API Management solution such as [Apache APISIX](https://apisix.apache.org/).
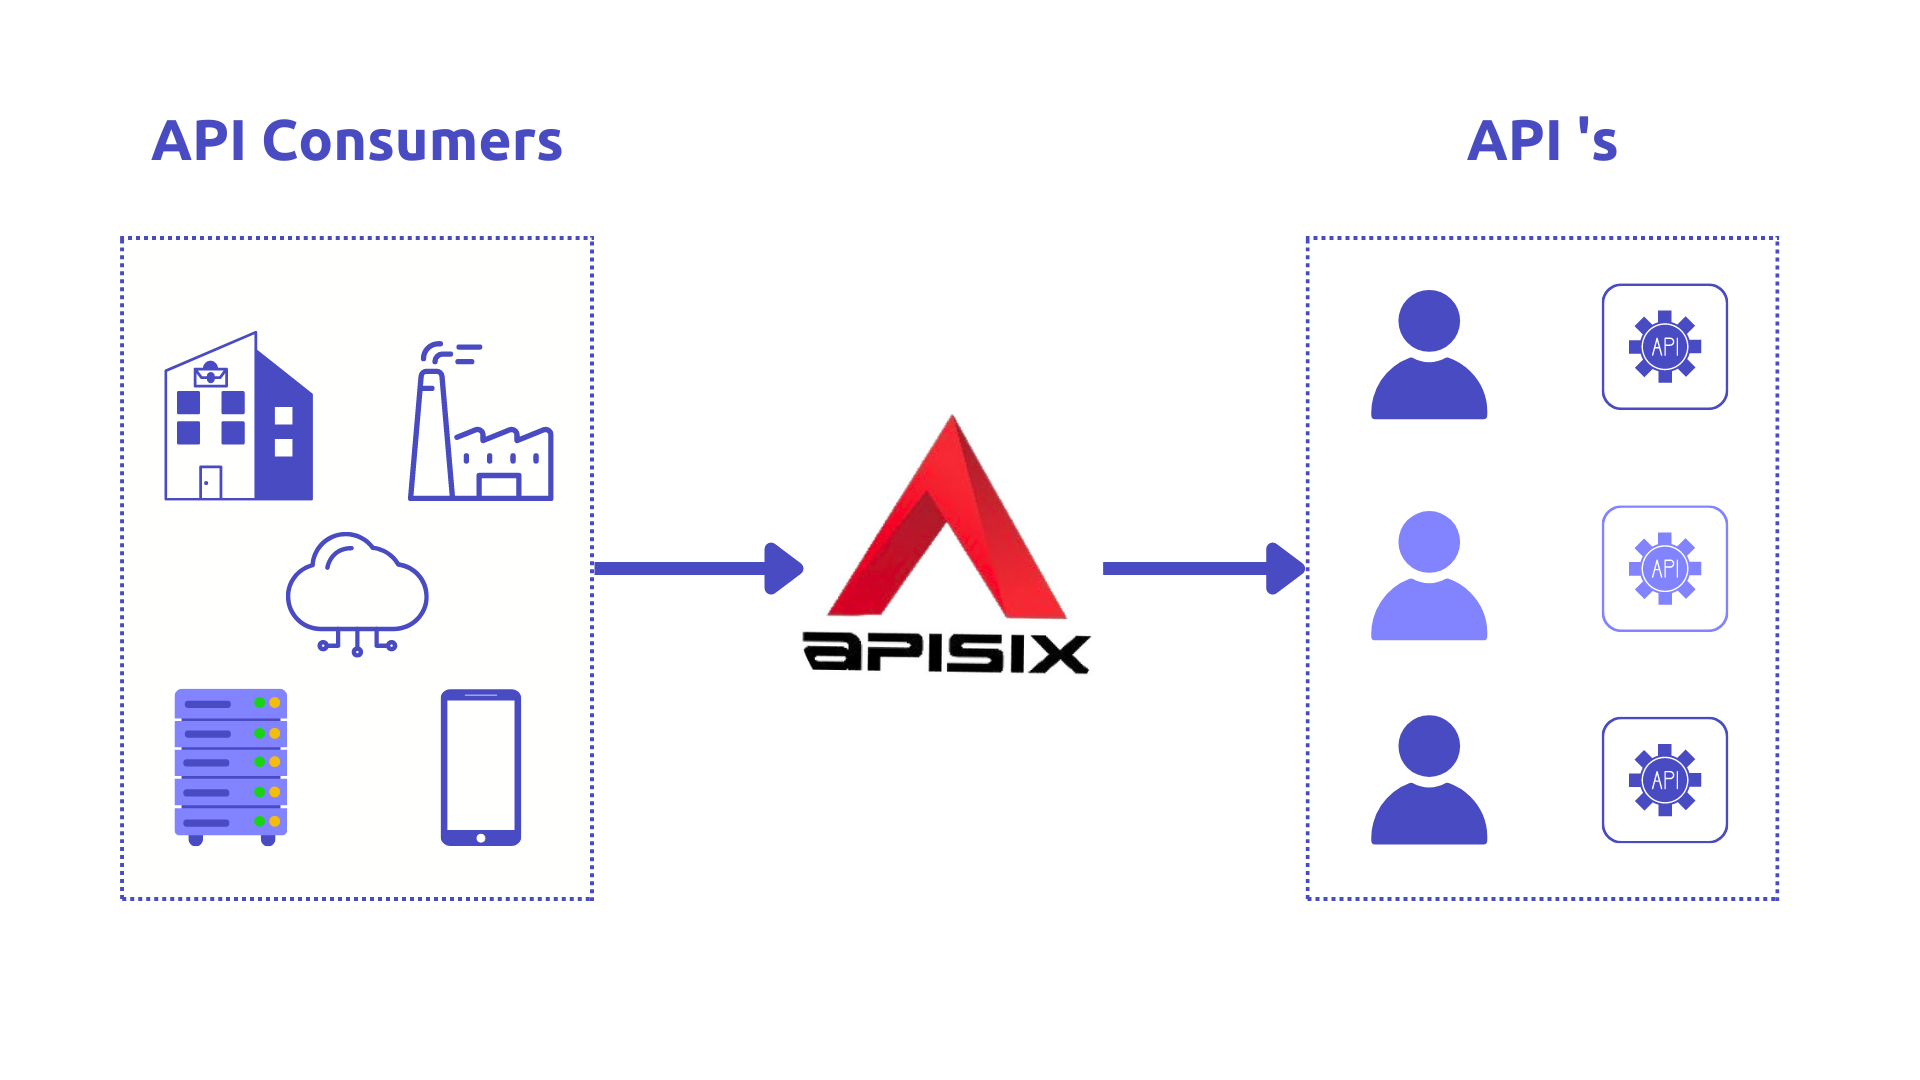
## API Consumers
API consumers use an API without integrating it into an APP developed for it. In other words, API consumers are _the users of APIs_. This means, for example, a marketing department uses a [Facebook API](https://developers.facebook.com/docs/) to analyze social media responses to specific actions. It does this with individual, irregular requests to the API provided, as needed.
An [API Management](https://en.wikipedia.org/wiki/API_management) solution should know who the consumer of the API is to configure different rules for different consumers.
## Apache APISIX Consumers
In Apache APISIX, the [Consumer object](https://apisix.apache.org/docs/apisix/terminology/consumer/) is the most common way for API consumers to access APIs published through its [API Gateway](https://apisix.apache.org/docs/apisix/terminology/api-gateway/). Consumer concept is extremely useful when you have different consumers requesting the same API and you need to execute various [Plugins](https://apisix.apache.org/docs/apisix/terminology/plugin/) and [Upstream](https://apisix.apache.org/docs/apisix/terminology/upstream/) configurations based on the consumer.
By publishing APIs through **Apache APISIX API Gateway**, you can easily secure API access using consumer keys or sometimes it can be referred to as subscription keys. Developers who need to consume the published APIs must include a valid subscription key in `HTTP` requests when calling those APIs. Without a valid subscription key, the calls are rejected immediately by the API gateway and not forwarded to the back-end services.
Consumers can be associated with various scopes: per Plugin, all APIs, or an individual API. There are many use cases for consumer objects in the API Gateway that you get with the combination of its plugins:
1. Enable different authentication methods for different consumers. It can be useful when consumers are trying to access the API by using various authentication mechanisms such as [API key](https://apisix.apache.org/docs/apisix/plugins/key-auth/), [Basic](https://apisix.apache.org/docs/apisix/plugins/basic-auth/), or [JWT](https://apisix.apache.org/docs/apisix/plugins/jwt-auth/)-based auth.
2. Restrict access to API resources for specific consumers.
3. Route requests to the corresponding backend service based on the consumer.
4. Define rate limiting on the number of data clients can consume.
5. Analyze data usage for an individual and a subset of consumers.
## Apache APISIX Consumer example
Let's look at some examples of configuring the rate-limiting policy for a single consumer and a group of consumers with the help of [key-auth](https://apisix.apache.org/docs/apisix/plugins/key-auth/) authentication key (API Key) and [limit-count](https://apisix.apache.org/docs/apisix/plugins/limit-count/) plugins. For the demo case, we can leverage [the sample project](https://github.com/Boburmirzo/apisix-api-consumers-management) built on [ASP.NET Core WEB API](https://learn.microsoft.com/en-us/aspnet/core/?view=aspnetcore-7.0) with a single `GET` endpoint (retrieves all products list). You can find in [README file](https://github.com/Boburmirzo/apisix-api-consumers-management#readme) all instructions on how to run the sample app.
### Enable rate-limiting for a single consumer
Up to now, I assume that the sample project is up and running. To use consumer object along with the other two plugins we need to follow easy steps:
- Create a new Consumer.
- Specify the authentication plugin key-auth and limit count for the consumer.
- Create a new Route, and set a routing rule (If necessary).
- Enable key-auth plugin configuration for the created route.
The above steps can be achieved by running simple two [curl commands](https://en.wikipedia.org/wiki/CURL) against APISIX [Admin API](https://apisix.apache.org/docs/apisix/admin-api/).
The first `cmd` creates a **new Consumer** with API Key based authentication enabled where the API consumer can only make 2 requests against the Product API within 60 seconds.
:::note
You can fetch the `admin_key` from `config.yaml` and save to an environment variable with the following command:
```bash
admin_key=$(yq '.deployment.admin.admin_key[0].key' conf/config.yaml | sed 's/"//g')
```
:::
``` shell
curl http://127.0.0.1:9180/apisix/admin/consumers -H "X-API-KEY: $admin_key" -X PUT -d '
{
"username":"consumer1",
"plugins":{
"key-auth":{
"key":"auth-one"
},
"limit-count":{
"count":2,
"time_window":60,
"rejected_code":403,
"rejected_msg":"Requests are too many, please try again later or upgrade your subscription plan.",
"key":"remote_addr"
}
}
}'
```
Then, we define our **new Route and Upstream** so that all incoming requests to the gateway endpoint `/api/products` will be forwarded to our example product backend service after a successful authentication process.
``` shell
curl http://127.0.0.1:9180/apisix/admin/routes/1 -H "X-API-KEY: $admin_key" -X PUT -d '
{
"name": "Route for consumer request rate limiting",
"methods": [
"GET"
],
"uri": "/api/products",
"plugins": {
"key-auth": {}
},
"upstream": {
"type": "roundrobin",
"nodes": {
"productapi:80": 1
}
}
}'
```
Apache APISIX will handle the first two requests as usual, but a third request in the same period will return a `403` HTTP code.
``` shell
curl http://127.0.0.1:9080/api/products -H 'apikey: auth-one' -i
```
Sample output after calling the API 3 times within 60 sec:
``` shell
HTTP/1.1 403 Forbidden
Content-Type: text/plain; charset=utf-8
Transfer-Encoding: chunked
Connection: keep-alive
Server: APISIX/2.13.1
{"error_msg":"Requests are too many, please try again later or upgrade your subscription plan."}
```
Indeed, after reaching the threshold, the subsequent requests are not allowed by APISIX.
### Enable rate-limiting for consumer groups
In Apache APISIX, [Consumer group](https://apisix.apache.org/docs/apisix/terminology/consumer-group/) object is used to manage the visibility of backend services to developers. Backend services are first made visible to groups, and then developers in those groups can view and subscribe to the products that are associated with the groups.
With consumer groups, you can specify any number of rate-limiting tiers and apply them to a group of consumers, instead of managing each consumer individually.
Typical scenarios can be different pricing models for your API Monetization like API Consumers with the basic plan are allowed to make 50 API calls per minute or in another use case, you can enable specific APIs for Admins, Developers, and Guests based on their roles in the system.
You can create, update, delete and manage your groups using the Apache APISIX Admin REST API [Consumer Group entity](https://apisix.apache.org/docs/apisix/admin-api/#consumer-group).
#### Consumer groups example
For the sake of the demo, let’s create two consumer groups for the basic and premium plans respectively. We can add one or two consumers for each group and control the traffic from consumer groups with the help of the `rate-limiting` plugin.
To use consumer groups with rate limiting, you need to:
- Create one or more consumer groups with a limit-count plugin enabled.
- Create consumers and assign consumers to groups.
Below two curl cmds create consumer groups named `basic_plan` and `premium_plan`:
Create a Consumer Group Basic Plan.
``` shell
curl http://127.0.0.1:9180/apisix/admin/consumer_groups/basic_plan -H "X-API-KEY: $admin_key" -X PUT -d '
{
"plugins": {
"limit-count": {
"count": 2,
"time_window": 60,
"rejected_code": 403,
"group": "basic_plan"
}
}
}'
```
Create a Consumer Group Premium Plan.
``` shell
curl http://127.0.0.1:9180/apisix/admin/consumer_groups/premium_plan -H "X-API-KEY: $admin_key" -X PUT -d '
{
"plugins": {
"limit-count": {
"count": 200,
"time_window": 60,
"rejected_code": 403,
"group": "premium_plan"
}
}
}'
```
In the above steps, we set up the rate limiting config for Basic plan to have only 2 requests per 60secs, and the Premium plan has 200 allowed API requests within the the same time window.
Create and add first consumer to the Basic group.
``` shell
curl http://127.0.0.1:9180/apisix/admin/consumers -H "X-API-KEY: $admin_key" -X PUT -d '
{
"username": "consumer1",
"plugins": {
"key-auth": {
"key": "auth-one"
}
},
"group_id": "basic_plan"
}'
```
Create and add second consumer to the Premium group.
``` shell
curl http://127.0.0.1:9180/apisix/admin/consumers -H "X-API-KEY: $admin_key" -X PUT -d '
{
"username": "consumer2",
"plugins": {
"key-auth": {
"key": "auth-two"
}
},
"group_id": "premium_plan"
}'
```
Create and add third consumer to the Premium group.
``` shell
curl http://127.0.0.1:9180/apisix/admin/consumers -H "X-API-KEY: $admin_key" -X PUT -d '
{
"username": "consumer3",
"plugins": {
"key-auth": {
"key": "auth-three"
}
},
"group_id": "premium_plan"
}'
```
Afterward, we can easily check that the first consumer `Consumer1` in the Basic Plan group will get a `403 HTTP status error` after hitting the 2 API calls per a minute, while the other two consumers in the Premium Plan group can request as many times as until they reach the limit.
You can run below cmds by changing auth key for each consumer in the request header:
``` shell
curl -i http://127.0.0.1:9080/api/products -H 'apikey: auth-one'
```
``` shell
curl -i http://127.0.0.1:9080/api/products -H 'apikey: auth-two'
```
``` shell
curl -i http://127.0.0.1:9080/api/products -H 'apikey: auth-three'
```
Note that you can also add or remove a consumer from any consumer group and enable other built-in plugins.
## More Tutorials
Read our other [tutorials](./expose-api.md) to learn more about API Management.
---
---
title: Monitor API Health Check with Prometheus
keywords:
- API Health Check
- Monitoring with Prometheus
- API Gateway
description: In this tutorial, we'll guide you on how to enable and monitor API health checks using APISIX and Prometheus.
---
[APISIX](https://apisix.apache.org/) has a [health check](https://apisix.apache.org/docs/apisix/tutorials/health-check/) mechanism, which proactively checks the health status of the upstream nodes in your system. Also, APISIX integrates with [Prometheus](https://prometheus.io/) through its [plugin](https://apisix.apache.org/docs/apisix/plugins/prometheus/) that exposes upstream nodes (multiple instances of a backend API service that APISIX manages) health check metrics on the Prometheus metrics endpoint typically, on URL path **`/apisix/prometheus/metrics`**.
In this tutorial, we'll guide you on how to **enable and monitor API health checks** using APISIX and Prometheus.
## Prerequisite(s)
- Before you start, it is good to have a basic understanding of APISIX. Familiarity with [API gateway](https://apisix.apache.org/docs/apisix/terminology/api-gateway/), and its key concepts such as [routes](https://docs.api7.ai/apisix/key-concepts/routes), [upstream](https://docs.api7.ai/apisix/key-concepts/upstreams), [Admin API](https://apisix.apache.org/docs/apisix/admin-api/), [plugins](https://docs.api7.ai/apisix/key-concepts/plugins), and HTTP protocol will also be beneficial.
- [Docker](https://docs.docker.com/get-docker/) is used to install the containerized etcd and APISIX.
- Install [cURL](https://curl.se/) to send requests to the services for validation.
## Start the APISIX demo project
This project leverages the pre-defined [Docker Compose configuration](https://github.com/apache/apisix-docker/blob/master/example/docker-compose.yml) file to set up, deploy and run APISIX, etcd, Prometheus, and other services with a single command. First, clone the [apisix-docker](https://github.com/apache/apisix-docker) repo on GitHub and open it in your favorite editor, navigate to `/example` folder, and start the project by simply running `docker compose up` from the folder.
When you start the project, Docker downloads any images it needs to run. You can see the full list of services in [docker-compose.yaml](https://github.com/apache/apisix-docker/blob/master/example/docker-compose.yml) file.
## Add health check API endpoints in upstream
To check API health periodically, APISIX needs an HTTP path of the health endpoint of the upstream service. So, you need first to add `/health` endpoint for your backend service. From there, you inspect the most relevant metrics for that service such as memory usage, database connectivity, response duration, and more. Assume that we have two backend REST API services web1 and web2 running using the demo project and each has its **own health check** endpoint at URL path `/health`. At this point, you do not need to make additional configurations. In reality, you can replace them with your backend services.
> The simplest and standardized way to validate the status of a service is to define a new [health check](https://datatracker.ietf.org/doc/html/draft-inadarei-api-health-check) endpoint like `/health` or `/status`
## Setting Up Health Checks in APISIX
This process involves checking the operational status of the 'upstream' nodes. APISIX provides two types of health checks: **Active checks** and **Passive Checks** respectively. Read more about Health Checks and how to enable them [here](https://apisix.apache.org/docs/apisix/tutorials/health-check/). Use the [Admin API](https://apisix.apache.org/docs/apisix/admin-api/) to create an Upstream object. Here is an example of creating an [Upstream](https://apisix.apache.org/docs/apisix/terminology/upstream/) object with two nodes (Per each backend service we defined) and configuring the health check parameters in the upstream object:
```bash
curl "http://127.0.0.1:9180/apisix/admin/upstreams/1" -H "X-API-KEY: edd1c9f034335f136f87ad84b625c8f1" -X PUT -d '
{
"nodes":{
"web1:80":1,
"web2:80":1
},
"checks":{
"active":{
"timeout":5,
"type":"http",
"http_path":"/health",
"healthy":{
"interval":2,
"successes":1
},
"unhealthy":{
"interval":1,
"http_failures":2
}
}
}
}'
```
This example configures an active health check on the **`/health`** endpoint of the node. It considers the node healthy after **one successful health check** and unhealthy **after two failed health checks**.
> Note that sometimes you might need the IP addresses of upstream nodes, not their domains (`web1` and `web2`) if you are running services outside docker network. Health check will be started only if the number of nodes (resolved IPs) is bigger than 1.
## Enable the Prometheus Plugin
Create a global rule to enable the `prometheus` plugin on all routes by adding `"prometheus": {}` in the plugins option. APISIX gathers internal runtime metrics and exposes them through port `9091` and URI path `/apisix/prometheus/metrics` by default that Prometheus can scrape. It is also possible to customize the export port and **URI path**, **add** **extra labels, the frequency of these scrapes, and other parameters** by configuring them in the Prometheus configuration `/prometheus_conf/prometheus.yml`file.
```bash
curl "http://127.0.0.1:9180/apisix/admin/global_rules" -H "X-API-KEY: edd1c9f034335f136f87ad84b625c8f1" -X PUT -d '
{
"id":"rule-for-metrics",
"plugins":{
"prometheus":{
}
}
}'
```
## Create a Route
Create a [Route](https://apisix.apache.org/docs/apisix/terminology/route/) object to route incoming requests to upstream nodes:
```bash
curl "http://127.0.0.1:9180/apisix/admin/routes/1" -H "X-API-KEY: edd1c9f034335f136f87ad84b625c8f1" -X PUT -d '
{
"name":"backend-service-route",
"methods":[
"GET"
],
"uri":"/",
"upstream_id":"1"
}'
```
## Send validation requests to the route
To generate some metrics, you try to send few requests to the route we created in the previous step:
```bash
curl -i -X GET "http://localhost:9080/"
```
If you run the above requests a couple of times, you can see from responses that APISIX routes some requests to `node1` and others to `node2`. That’s how Gateway load balancing works!
```bash
HTTP/1.1 200 OK
Content-Type: text/plain; charset=utf-8
Content-Length: 10
Connection: keep-alive
Date: Sat, 22 Jul 2023 10:16:38 GMT
Server: APISIX/3.3.0
hello web2
...
HTTP/1.1 200 OK
Content-Type: text/plain; charset=utf-8
Content-Length: 10
Connection: keep-alive
Date: Sat, 22 Jul 2023 10:16:39 GMT
Server: APISIX/3.3.0
hello web1
```
## Collecting health check data with the Prometheus plugin
Once the health checks and route are configured in APISIX, you can employ Prometheus to monitor health checks. APISIX **automatically exposes health check metrics data** for your APIs if the health check parameter is enabled for upstream nodes. You will see metrics in the response after fetching them from APISIX:
```bash
curl -i http://127.0.0.1:9091/apisix/prometheus/metrics
```
Example Output:
```bash
# HELP apisix_http_requests_total The total number of client requests since APISIX started
# TYPE apisix_http_requests_total gauge
apisix_http_requests_total 119740
# HELP apisix_http_status HTTP status codes per service in APISIX
# TYPE apisix_http_status counter
apisix_http_status{code="200",route="1",matched_uri="/",matched_host="",service="",consumer="",node="172.27.0.5"} 29
apisix_http_status{code="200",route="1",matched_uri="/",matched_host="",service="",consumer="",node="172.27.0.7"} 12
# HELP apisix_upstream_status Upstream status from health check
# TYPE apisix_upstream_status gauge
apisix_upstream_status{name="/apisix/upstreams/1",ip="172.27.0.5",port="443"} 0
apisix_upstream_status{name="/apisix/upstreams/1",ip="172.27.0.5",port="80"} 1
apisix_upstream_status{name="/apisix/upstreams/1",ip="172.27.0.7",port="443"} 0
apisix_upstream_status{name="/apisix/upstreams/1",ip="172.27.0.7",port="80"} 1
```
Health check data is represented with metrics label `apisix_upstream_status`. It has attributes like upstream `name`, `ip` and `port`. A value of 1 represents healthy and 0 means the upstream node is unhealthy.
## Visualize the data in the Prometheus dashboard
Navigate to http://localhost:9090/ where the Prometheus instance is running in Docker and type **Expression** `apisix_upstream_status` in the search bar. You can also see the output of the health check statuses of upstream nodes on the **Prometheus dashboard** in the table or graph view:
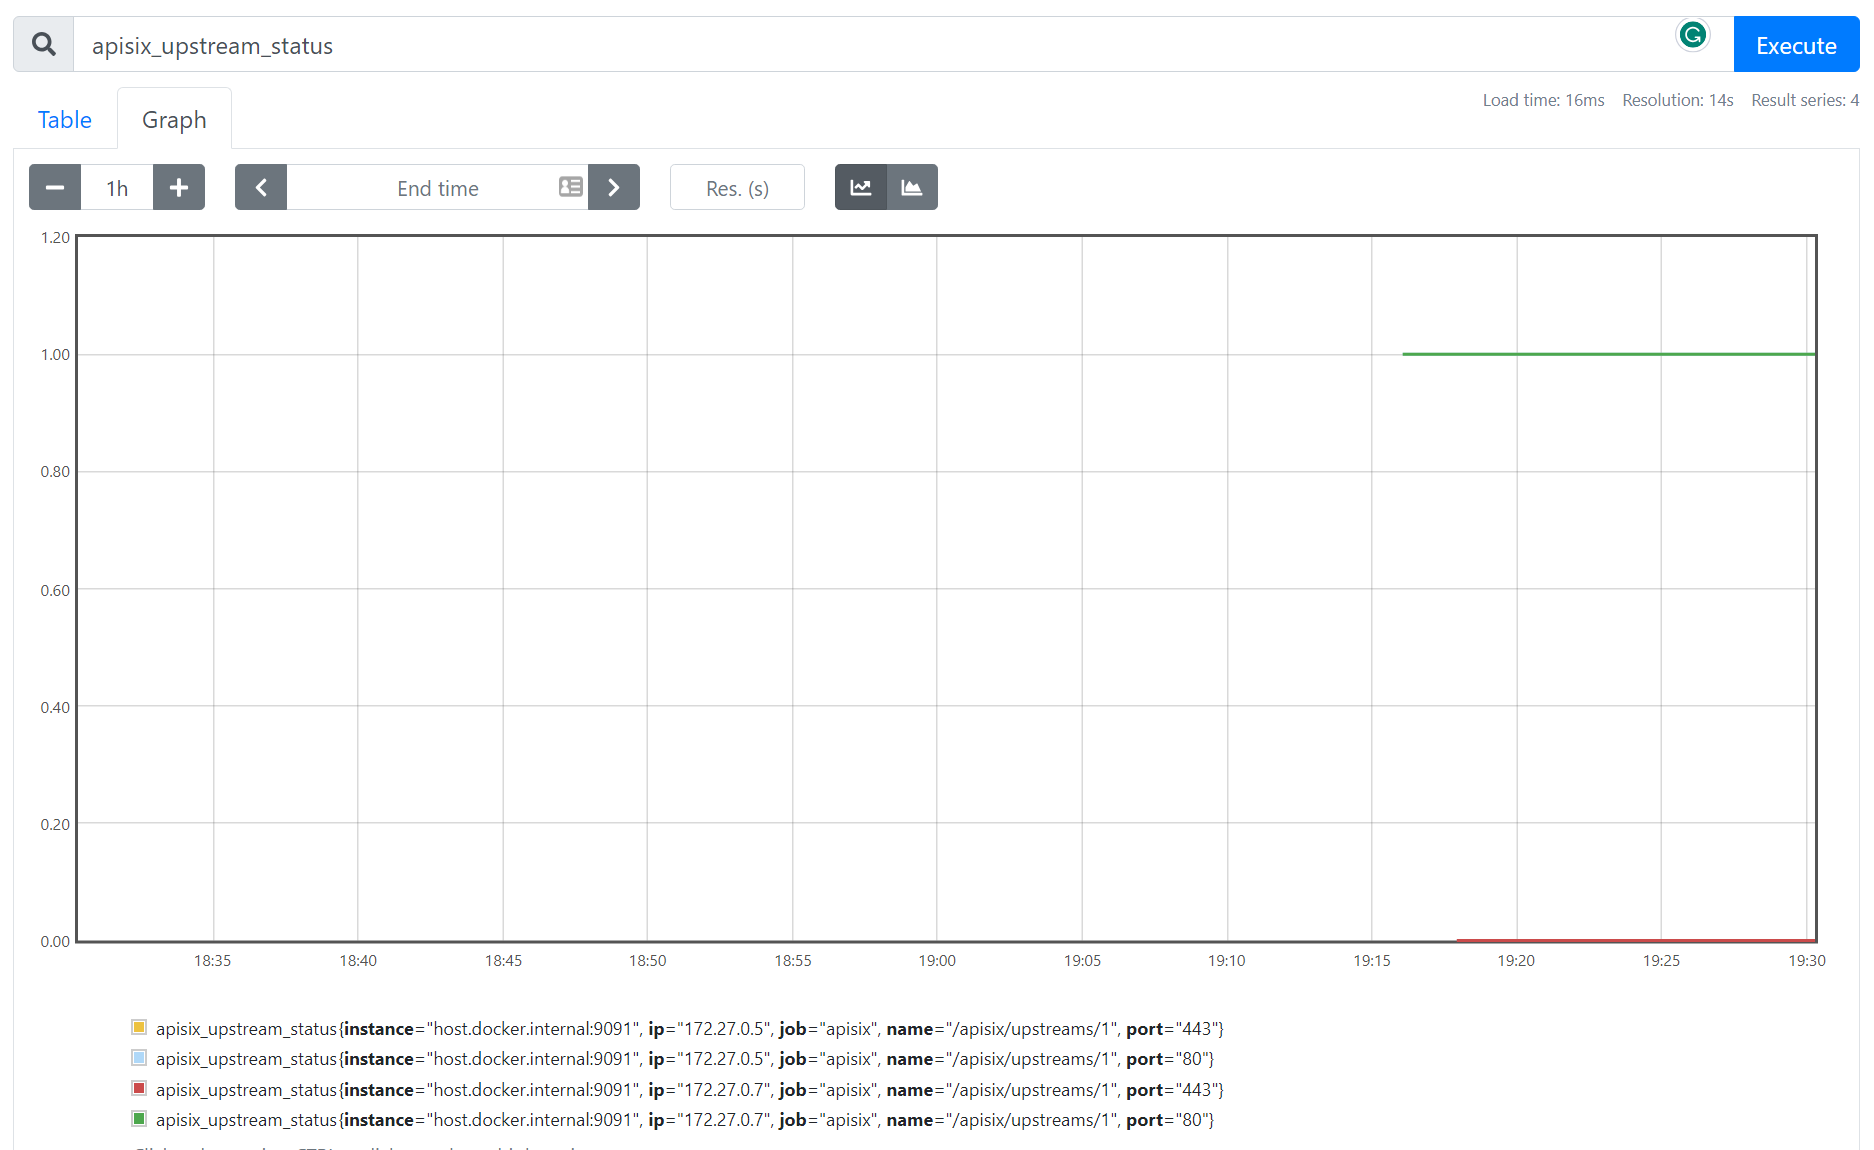
## Next Steps
You have now learned how to set up and monitor API health checks with Prometheus and APISIX. APISIX Prometheus plugin is configured to connect [Grafana](https://grafana.com/) automatically to visualize metrics. Keep exploring the data and customize the [Grafana dashboard](https://grafana.com/grafana/dashboards/11719-apache-apisix/) by adding a panel that shows the number of active health checks.
### Related resources
- [Monitoring API Metrics: How to Ensure Optimal Performance of Your API?](https://api7.ai/blog/api7-portal-monitor-api-metrics)
- [Monitoring Microservices with Prometheus and Grafana](https://api7.ai/blog/introduction-to-monitoring-microservices)
### Recommended content
- [Implementing resilient applications with API Gateway (Health Check)](https://dev.to/apisix/implementing-resilient-applications-with-api-gateway-health-check-338c)
---
---
title: Observe APIs
keywords:
- API gateway
- Apache APISIX
- Observability
- Monitor
- Plugins
description: Apache APISIX Observability Plugins and take a look at how to set up these plugins.
---
In this guide, we can leverage the power of some [Apache APISIX](https://apisix.apache.org/) Observability Plugins and take a look at how to set up these plugins, how to use them to understand API behavior, and later solve problems that impact our users.
## API Observability
Nowadays **API Observability** is already a part of every API development as it addresses many problems related to API consistency, reliability, and the ability to quickly iterate on new API features. When you design for full-stack observability, you get everything you need to find issues and catch breaking changes.
API observability can help every team in your organization:
- Sales and growth teams to monitor your API usage, free trials, observe expansion opportunities and ensure that API serves the correct data.
- Engineering teams to monitor and troubleshoot API issues.
- Product teams to understand API usage and business value.
- Security teams to detect and protect from API threats.

## A central point for observation
We know that **an API gateway** offers a central control point for incoming traffic to a variety of destinations but it can also be a central point for observation as well since it is uniquely qualified to know about all the traffic moving between clients and our service networks.
The core of observability breaks down into _three key areas_: structured logs, metrics, and traces. Let’s break down each pillar of API observability and learn how with Apache APISIX Plugins we can simplify these tasks and provides a solution that you can use to better understand API usage.
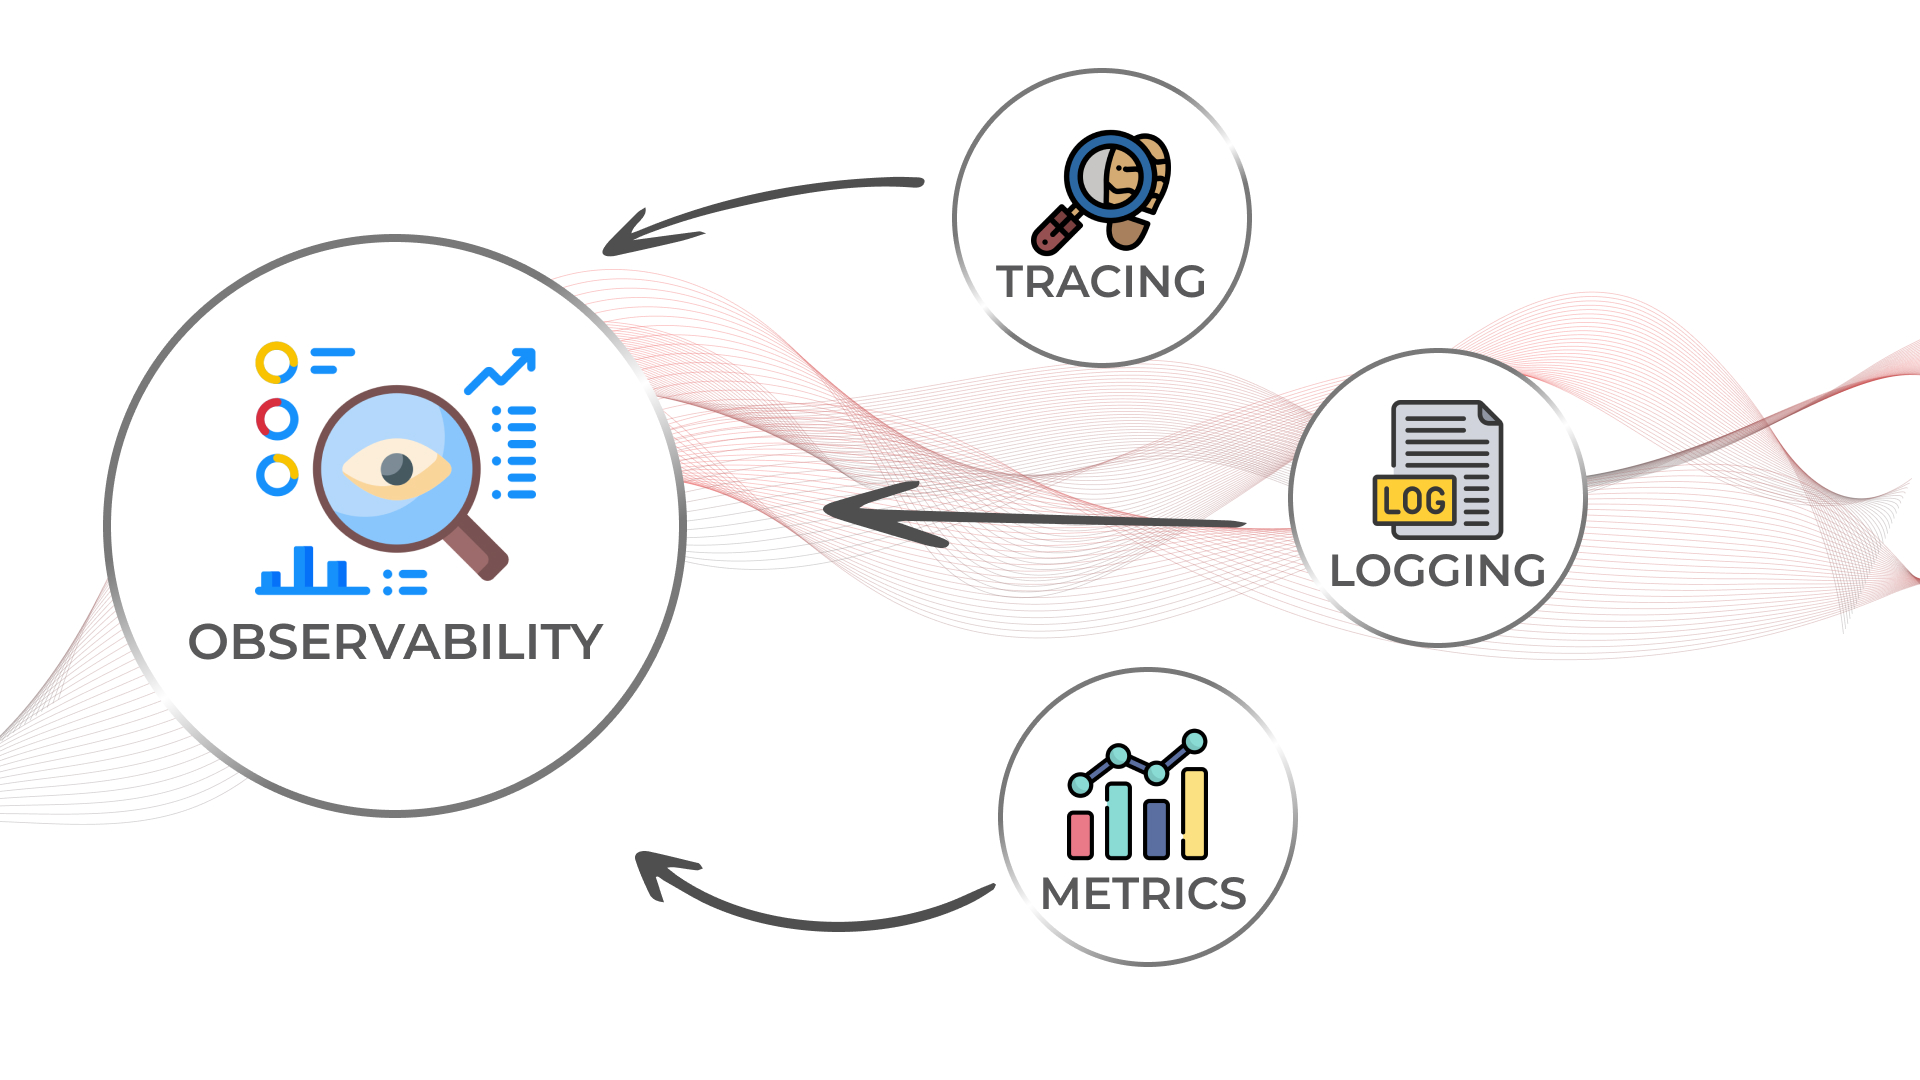
## Prerequisites
Before enabling our plugins we need to install Apache APISIX, create a route, an upstream, and map the route to the upstream. You can simply follow [getting started guide](https://apisix.apache.org/docs/apisix/getting-started) provided on the website.
## Logs
**Logs** are also easy to instrument and trivial steps of API observability, they can be used to inspect API calls in real-time for debugging, auditing, and recording time-stamped events that happened over time. There are several logger plugins Apache APISIX provides such as:
- [http-logger](https://apisix.apache.org/docs/apisix/plugins/http-logger/)
- [skywalking-logger](https://apisix.apache.org/docs/apisix/plugins/skywalking-logger/)
- [tcp-logger](https://apisix.apache.org/docs/apisix/plugins/tcp-logger)
- [kafka-logger](https://apisix.apache.org/docs/apisix/plugins/kafka-logger)
- [rocketmq-logger](https://apisix.apache.org/docs/apisix/plugins/rocketmq-logger)
- [udp-logger](https://apisix.apache.org/docs/apisix/plugins/udp-logger)
- [clickhouse-logger](https://apisix.apache.org/docs/apisix/plugins/clickhouse-logger)
- [error-logger](https://apisix.apache.org/docs/apisix/plugins/error-log-logger)
- [google-cloud-logging](https://apisix.apache.org/docs/apisix/plugins/google-cloud-logging)
And you can see the [full list](../plugins/http-logger.md) on the official website of Apache APISIX. Now for demo purposes, let's choose a simple but mostly used _http-logger_ plugin that is capable of sending API Log data requests to HTTP/HTTPS servers or sends as JSON objects to Monitoring tools. We can assume that a route and an upstream are created. You can learn how to set up them in the **[Getting started with Apache APISIX](https://youtu.be/dUOjJkb61so)** video tutorial. Also, you can find all command-line examples on the GitHub page [apisix-observability-plugins](https://boburmirzo.github.io/apisix-observability-plugins/)
You can generate a mock HTTP server at [mockbin.com](https://mockbin.org/) to record and view the logs. Note that we also bind the route to an upstream (You can refer to this documentation to learn about more [core concepts of Apache APISIX](https://apisix.apache.org/docs/apisix/architecture-design/apisix)).
The following is an example of how to enable the http-logger for a specific route.
:::note
You can fetch the `admin_key` from `config.yaml` and save to an environment variable with the following command:
```bash
admin_key=$(yq '.deployment.admin.admin_key[0].key' conf/config.yaml | sed 's/"//g')
```
:::
```shell
curl http://127.0.0.1:9180/apisix/admin/routes/1 \
-H "X-API-KEY: $admin_key" -X PUT -d '
{
"plugins": {
"http-logger": {
"uri": "http://mockbin.org/bin/5451b7cd-af27-41b8-8df1-282ffea13a61"
}
},
"upstream_id": "1",
"uri": "/get"
}'
```
:::note
To `http-logger` plugin settings, your can just put your mock server URI address like below:
```json
{
"uri": "http://mockbin.org/bin/5451b7cd-af27-41b8-8df1-282ffea13a61"
}
```
:::
Once we get a successful response from APISIX server, we can send a request to this _get_ endpoint to generate logs.
```shell
curl -i http://127.0.0.1:9080/get
```
Then if you click and navigate to the following our [mock server link](http://mockbin.org/bin/5451b7cd-af27-41b8-8df1-282ffea13a61/log) some recent logs are sent and we can see them:
## Metrics
**Metrics** are a numeric representation of data measured over intervals of time. You can also aggregate this data into daily or weekly frequency and run queries against a distributed system like [Elasticsearch](https://www.elastic.co/). Or sometimes based on metrics you trigger alerts to take any action later. Once API metrics are collected, you can track them with metrics tracking tools such as [Prometheus](https://prometheus.io/).
Apache APISIX API Gateway also offers [prometheus-plugin](https://apisix.apache.org/docs/apisix/plugins/prometheus/) to fetch your API metrics and expose them in Prometheus. Behind the scene, Apache APISIX downloads the Grafana dashboard meta, imports it to [Grafana](https://grafana.com/), and fetches real-time metrics from the Prometheus plugin.
Let’s enable prometheus-plugin for our route:
```shell
curl http://127.0.0.1:9180/apisix/admin/routes/1 \
-H "X-API-KEY: $admin_key" -X PUT -d '
{
"uri": "/get",
"plugins": {
"prometheus": {}
},
"upstream_id": "1"
}'
```
We fetch the metric data from the specified URL `/apisix/prometheus/metrics`.
```shell
curl -i http://127.0.0.1:9091/apisix/prometheus/metrics
```
You will get a response with Prometheus metrics something like below:
```text
HTTP/1.1 200 OK
Server: openresty
Content-Type: text/plain; charset=utf-8
Transfer-Encoding: chunked
Connection: keep-alive
# HELP apisix_batch_process_entries batch process remaining entries
# TYPE apisix_batch_process_entries gauge
apisix_batch_process_entries{name="http logger",route_id="1",server_addr="172.19.0.8"} 0
# HELP apisix_etcd_modify_indexes Etcd modify index for APISIX keys
# TYPE apisix_etcd_modify_indexes gauge
apisix_etcd_modify_indexes{key="consumers"} 17819
apisix_etcd_modify_indexes{key="global_rules"} 17832
apisix_etcd_modify_indexes{key="max_modify_index"} 20028
apisix_etcd_modify_indexes{key="prev_index"} 18963
apisix_etcd_modify_indexes{key="protos"} 0
apisix_etcd_modify_indexes{key="routes"} 20028
...
```
And we can also check the status of our endpoint at the Prometheus dashboard by pointing to this URL `http://localhost:9090/targets`
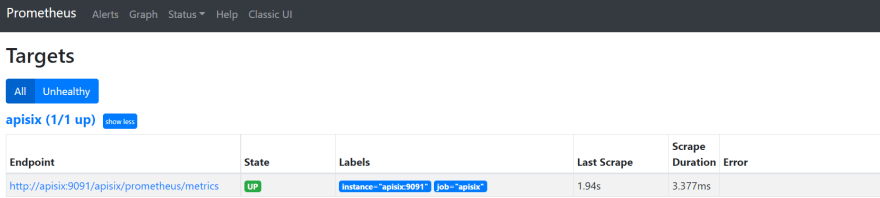
As you can see, Apache APISIX exposed metrics endpoint is upon and running.
Now you can query metrics for `apisix_http_status` to see what HTTP requests are handled by API Gateway and what was the outcome.
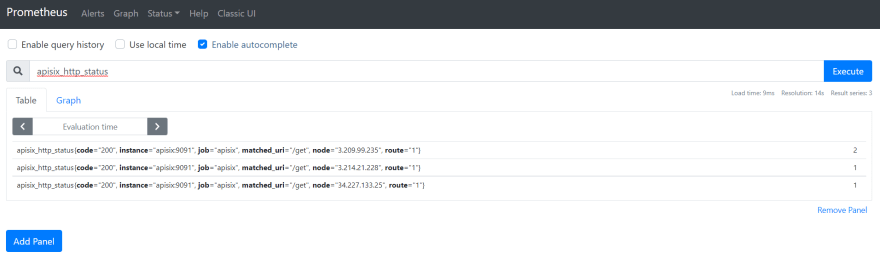
In addition to this, you can view the Grafana dashboard running in your local instance. Go to `http://localhost:3000/`
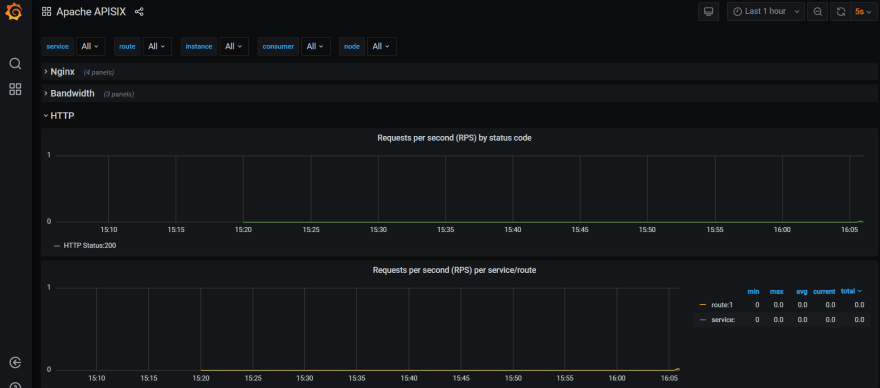
You can also check two other plugins for metrics:
- [Node status Plugin](../plugins/node-status.md)
- [Datadog Plugin](../plugins/datadog.md)
## Tracing
The third is **tracing** or distributed tracing allows you to understand the life of a request as it traverses your service network and allows you to answer questions like what service has this request touched and how much latency was introduced. Traces enable you to further explore which logs to look at for a particular session or related set of API calls.
[Zipkin](https://zipkin.io/) an open-source distributed tracing system. [APISIX plugin](https://apisix.apache.org/docs/apisix/plugins/zipkin) is supported to collect tracing and report to Zipkin Collector based on [Zipkin API specification](https://zipkin.io/pages/instrumenting.html).
Here’s an example to enable the `zipkin` plugin on the specified route:
```shell
curl http://127.0.0.1:9180/apisix/admin/routes/1 \
-H "X-API-KEY: $admin_key" -X PUT -d '
{
"methods": [
"GET"
],
"uri": "/get",
"plugins": {
"zipkin": {
"endpoint": "http://127.0.0.1:9411/api/v2/spans",
"sample_ratio": 1
}
},
"upstream_id": "1"
}'
```
We can test our example by simply running the following curl command:
```shell
curl -i http://127.0.0.1:9080/get
```
As you can see, there are some additional trace identifiers (like traceId, spanId, parentId) were appended to the headers:
```text
"X-B3-Parentspanid": "61bd3f4046a800e7",
"X-B3-Sampled": "1",
"X-B3-Spanid": "855cd5465957f414",
"X-B3-Traceid": "e18985df47dab632d62083fd96626692",
```
Then you can use a browser to access `http://127.0.0.1:9411/zipkin`, see traces on the Web UI of Zipkin.
> Note that you need to run the Zipkin instance in order to install Zipkin Web UI. For example, by using docker you can simply run it:
>`docker run -d -p 9411:9411 openzipkin/zipkin`
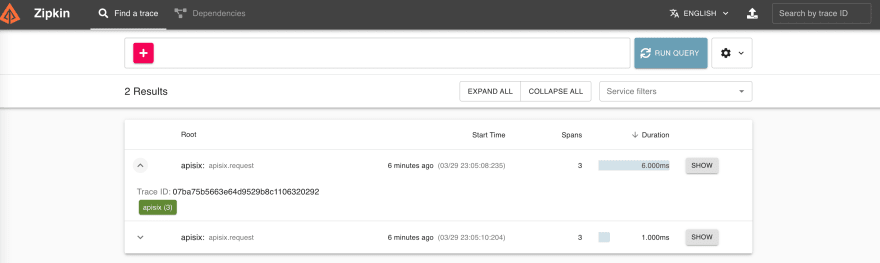
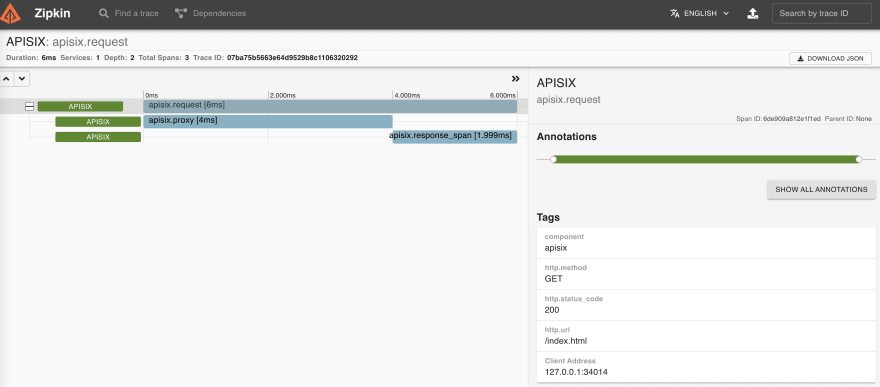
As you noticed, the recent traces were exposed in the above pictures.
You can also check two other plugins for tracing:
- [Skywalking-plugin](../plugins/skywalking.md)
- [Opentelemetry-plugin](../plugins/opentelemetry.md)
## Summary
As we learned, API Observability is a sort of framework for managing your applications in an API world and Apache APISIX API Gateway plugins can help when observing modern API-driven applications by integrating to several observability platforms. So, you can make your development work focused on core business features instead of building a custom integration for observability tools.
---
---
title: Protect API
keywords:
- API Gateway
- Apache APISIX
- Rate Limit
- Protect API
description: This article describes how to secure your API with the rate limiting plugin for API Gateway Apache APISIX.
---
This article describes secure your API with the rate limiting plugin for API Gateway Apache APISIX.
## Concept introduction
### Plugin
This represents the configuration of the plugins that are executed during the HTTP request/response lifecycle. A [Plugin](../terminology/plugin.md) configuration can be bound directly to a Route, a Service, a Consumer or a Plugin Config.
:::note
If [Route](../terminology/route.md), [Service](../terminology/service.md), [Plugin Config](../terminology/plugin-config.md) or [Consumer](../terminology/consumer.md) are all bound to the same for plugins, only one plugin configuration will take effect. The priority of plugin configurations is described in [plugin execution order](../terminology/plugin.md#plugins-execution-order). At the same time, there are various stages involved in the plugin execution process. See [plugin execution lifecycle](../terminology/plugin.md#plugins-execution-order).
:::
## Preconditions
Before following this tutorial, ensure you have [exposed the service](./expose-api.md).
## Protect your API
We can use rate limits to limit our API services to ensure the stable operation of API services and avoid system crashes caused by some sudden traffic. We can restrict as follows:
1. Limit the request rate;
2. Limit the number of requests per unit time;
3. Delay request;
4. Reject client requests;
5. Limit the rate of response data.
APISIX provides several plugins for limiting current and speed, including [limit-conn](../plugins/limit-conn.md), [limit-count](../plugins/limit-count.md), [limit- req](../plugins/limit-req.md) and other plugins.
- The `limit-conn` Plugin limits the number of concurrent requests to your services.
- The `limit-req` Plugin limits the number of requests to your service using the leaky bucket algorithm.
- The `limit-count` Plugin limits the number of requests to your service by a given count per time.
Next, we will use the `limit-count` plugin as an example to show you how to protect your API with a rate limit plugin:
:::note
You can fetch the `admin_key` from `config.yaml` and save to an environment variable with the following command:
```bash
admin_key=$(yq '.deployment.admin.admin_key[0].key' conf/config.yaml | sed 's/"//g')
```
:::
1. Create a Route.
```shell
curl -i http://127.0.0.1:9180/apisix/admin/routes/1 \
-H "X-API-KEY: $admin_key" -X PUT -d '
{
"uri": "/index.html",
"plugins": {
"limit-count": {
"count": 2,
"time_window": 60,
"rejected_code": 503,
"key_type": "var",
"key": "remote_addr"
}
},
"upstream_id": "1"
}'
```
In the above configuration, a Route with ID `1` is created using the upstream made in [Expose Service](./expose-api.md), and the `limit-count` plugin is enabled. The plugin only allows the client to access the upstream service `2` times within `60` seconds. If more than two times, the `503` error code will be returned.
2. Test
```shell
curl http://127.0.0.1:9080/index.html
```
After using the above command to access three times in a row, the following error will appear:
```
503 Service Temporarily Unavailable
503 Service Temporarily Unavailable
openresty
```
If the above result is returned, the `limit-count` plugin has taken effect and protected your API.
## More Traffic plugins
In addition to providing plugins for limiting current and speed, APISIX also offers many other plugins to meet the needs of actual scenarios:
- [proxy-cache](../plugins/proxy-cache.md): This plugin provides the ability to cache backend response data. It can be used with other plugins. The plugin supports both disk and memory-based caching. Currently, the data to be cached can be specified according to the response code and request mode, and more complex caching strategies can also be configured through the no_cache and cache_bypass attributes.
- [request-validation](../plugins/request-validation.md): This plugin is used to validate requests forwarded to upstream services in advance.
- [proxy-mirror](../plugins/proxy-mirror.md): This plugin provides the ability to mirror client requests. Traffic mirroring is copying the real online traffic to the mirroring service, so that the online traffic or request content can be analyzed in detail without affecting the online service.
- [api-breaker](../plugins/api-breaker.md): This plugin implements an API circuit breaker to help us protect upstream business services.
- [traffic-split](../plugins/traffic-split.md): You can use this plugin to gradually guide the percentage of traffic between upstreams to achieve blue-green release and grayscale release.
- [request-id](../plugins/request-id.md): The plugin adds a `unique` ID to each request proxy through APISIX for tracking API requests.
- [proxy-control](../plugins/proxy-control.md): This plugin can dynamically control the behavior of NGINX proxy.
- [client-control](../plugins/client-control.md): This plugin can dynamically control how NGINX handles client requests by setting an upper limit on the client request body size.
## More Tutorials
You can refer to the [Observe API](./observe-your-api.md) document to monitor APISIX, collect logs, and track.
---
---
title: WebSocket Authentication
keywords:
- API Gateway
- Apache APISIX
- WebSocket
- Authentication
description: This article is a guide on how to configure authentication for WebSocket connections.
---
Apache APISIX supports [WebSocket](https://en.wikipedia.org/wiki/WebSocket) traffic, but the WebSocket protocol doesn't handle authentication. This article guides you on how to configure authentication for WebSocket connections using Apache APISIX.
## WebSocket Protocol
To establish a WebSocket connection, the client sends a WebSocket handshake request, for which the server returns a WebSocket handshake response as shown below:
```text title="Client request"
GET /chat HTTP/1.1
Host: server.example.com
Upgrade: websocket
Connection: Upgrade
Sec-WebSocket-Key: x3JJHMbDL1EzLkh9GBhXDw==
Sec-WebSocket-Protocol: chat, superchat
Sec-WebSocket-Version: 13
Origin: http://example.com
```
```text title="Server response"
HTTP/1.1 101 Switching Protocols
Upgrade: websocket
Connection: Upgrade
Sec-WebSocket-Accept: HSmrc0sMlYUkAGmm5OPpG2HaGWk=
Sec-WebSocket-Protocol: chat
```
The handshake workflow is shown below:
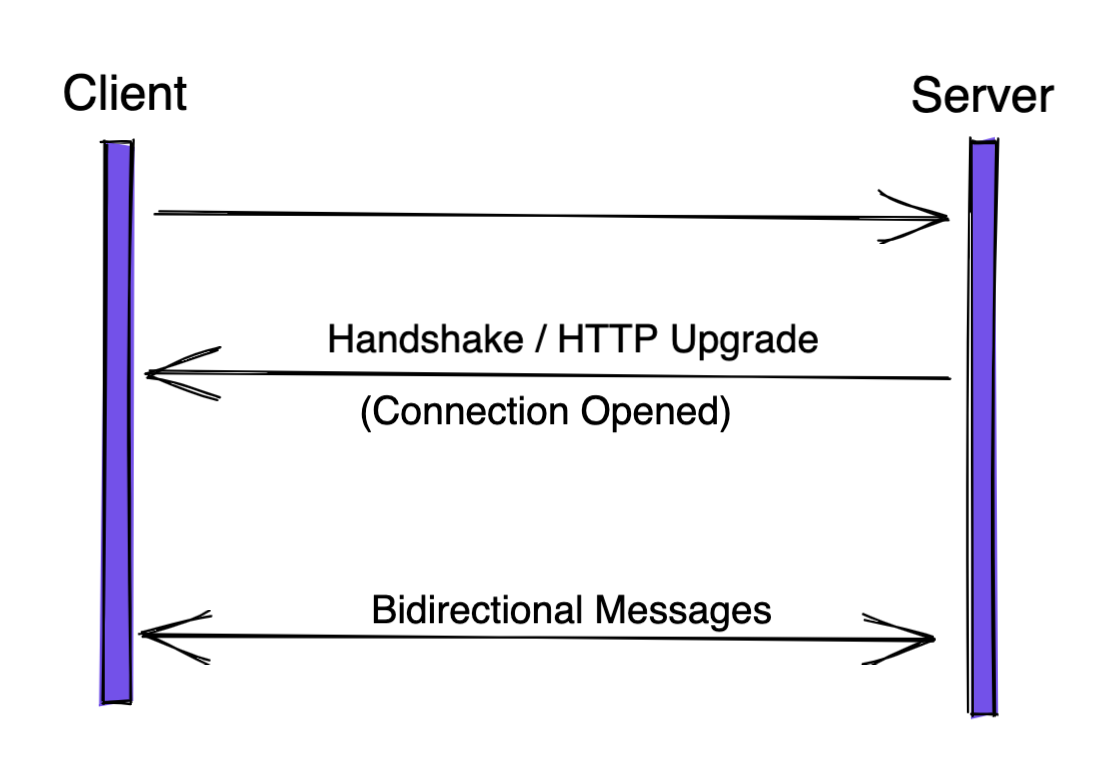
## WebSocket Authentication
APISIX supports several authentication methods like [basic-auth](https://apisix.apache.org/docs/apisix/plugins/basic-auth/), [key-auth](https://apisix.apache.org/docs/apisix/plugins/key-auth/), and [jwt-auth](https://apisix.apache.org/docs/apisix/plugins/jwt-auth/).
While establishing connections from the client to server in the _handshake_ phase, APISIX first checks its authentication information before choosing to forward the request or deny it.
## Prerequisites
Before you move on, make sure you have:
1. A WebSocket server as the Upstream. This article uses [Postman's public echo service](https://blog.postman.com/introducing-postman-websocket-echo-service/): `wss://ws.postman-echo.com/raw`.
2. APISIX 3.0 installed.
## Configuring Authentication
### Create a Route
First we will create a Route to the Upstream echo service.
Since the Upstream uses wss protocol, the scheme is set to `https`. We should also set `enable_websocket` to `true`.
In this tutorial, we will use the [key-auth](https://apisix.apache.org/docs/apisix/plugins/key-auth/) Plugin. This would work similarly for other authentication methods:
```shell
curl --location --request PUT 'http://127.0.0.1:9180/apisix/admin/routes/1' \
--header 'X-API-KEY: edd1c9f034335f136f87ad84b625c8f1' \
--header 'Content-Type: application/json' \
--data-raw '{
"uri": "/*",
"methods": ["GET"],
"enable_websocket": true,
"upstream": {
"type": "roundrobin",
"nodes": {
"ws.postman-echo.com:443": 1
},
"scheme": "https"
},
"plugins": {
"key-auth": {}
}
}'
```
### Create a Consumer
We will now create a [Consumer](https://apisix.apache.org/docs/apisix/terminology/consumer/) and add a key `this_is_the_key`. A user would now need to use this key configured in the Consumer object to access the API.
```sh
curl --location --request PUT 'http://127.0.0.1:9180/apisix/admin/consumers/jack' \
--header 'X-API-KEY: edd1c9f034335f136f87ad84b625c8f1' \
--header 'Content-Type: application/json' \
--data-raw '{
"username": "jack",
"plugins": {
"key-auth": {
"key": "this_is_the_key"
}
}
}'
```
## Testing the Route
Now, if you try to connect `ws://127.0.0.1:9080/raw` without the `apikey` header or an incorrect key, APISIX will return a `401 Unauthorized`.
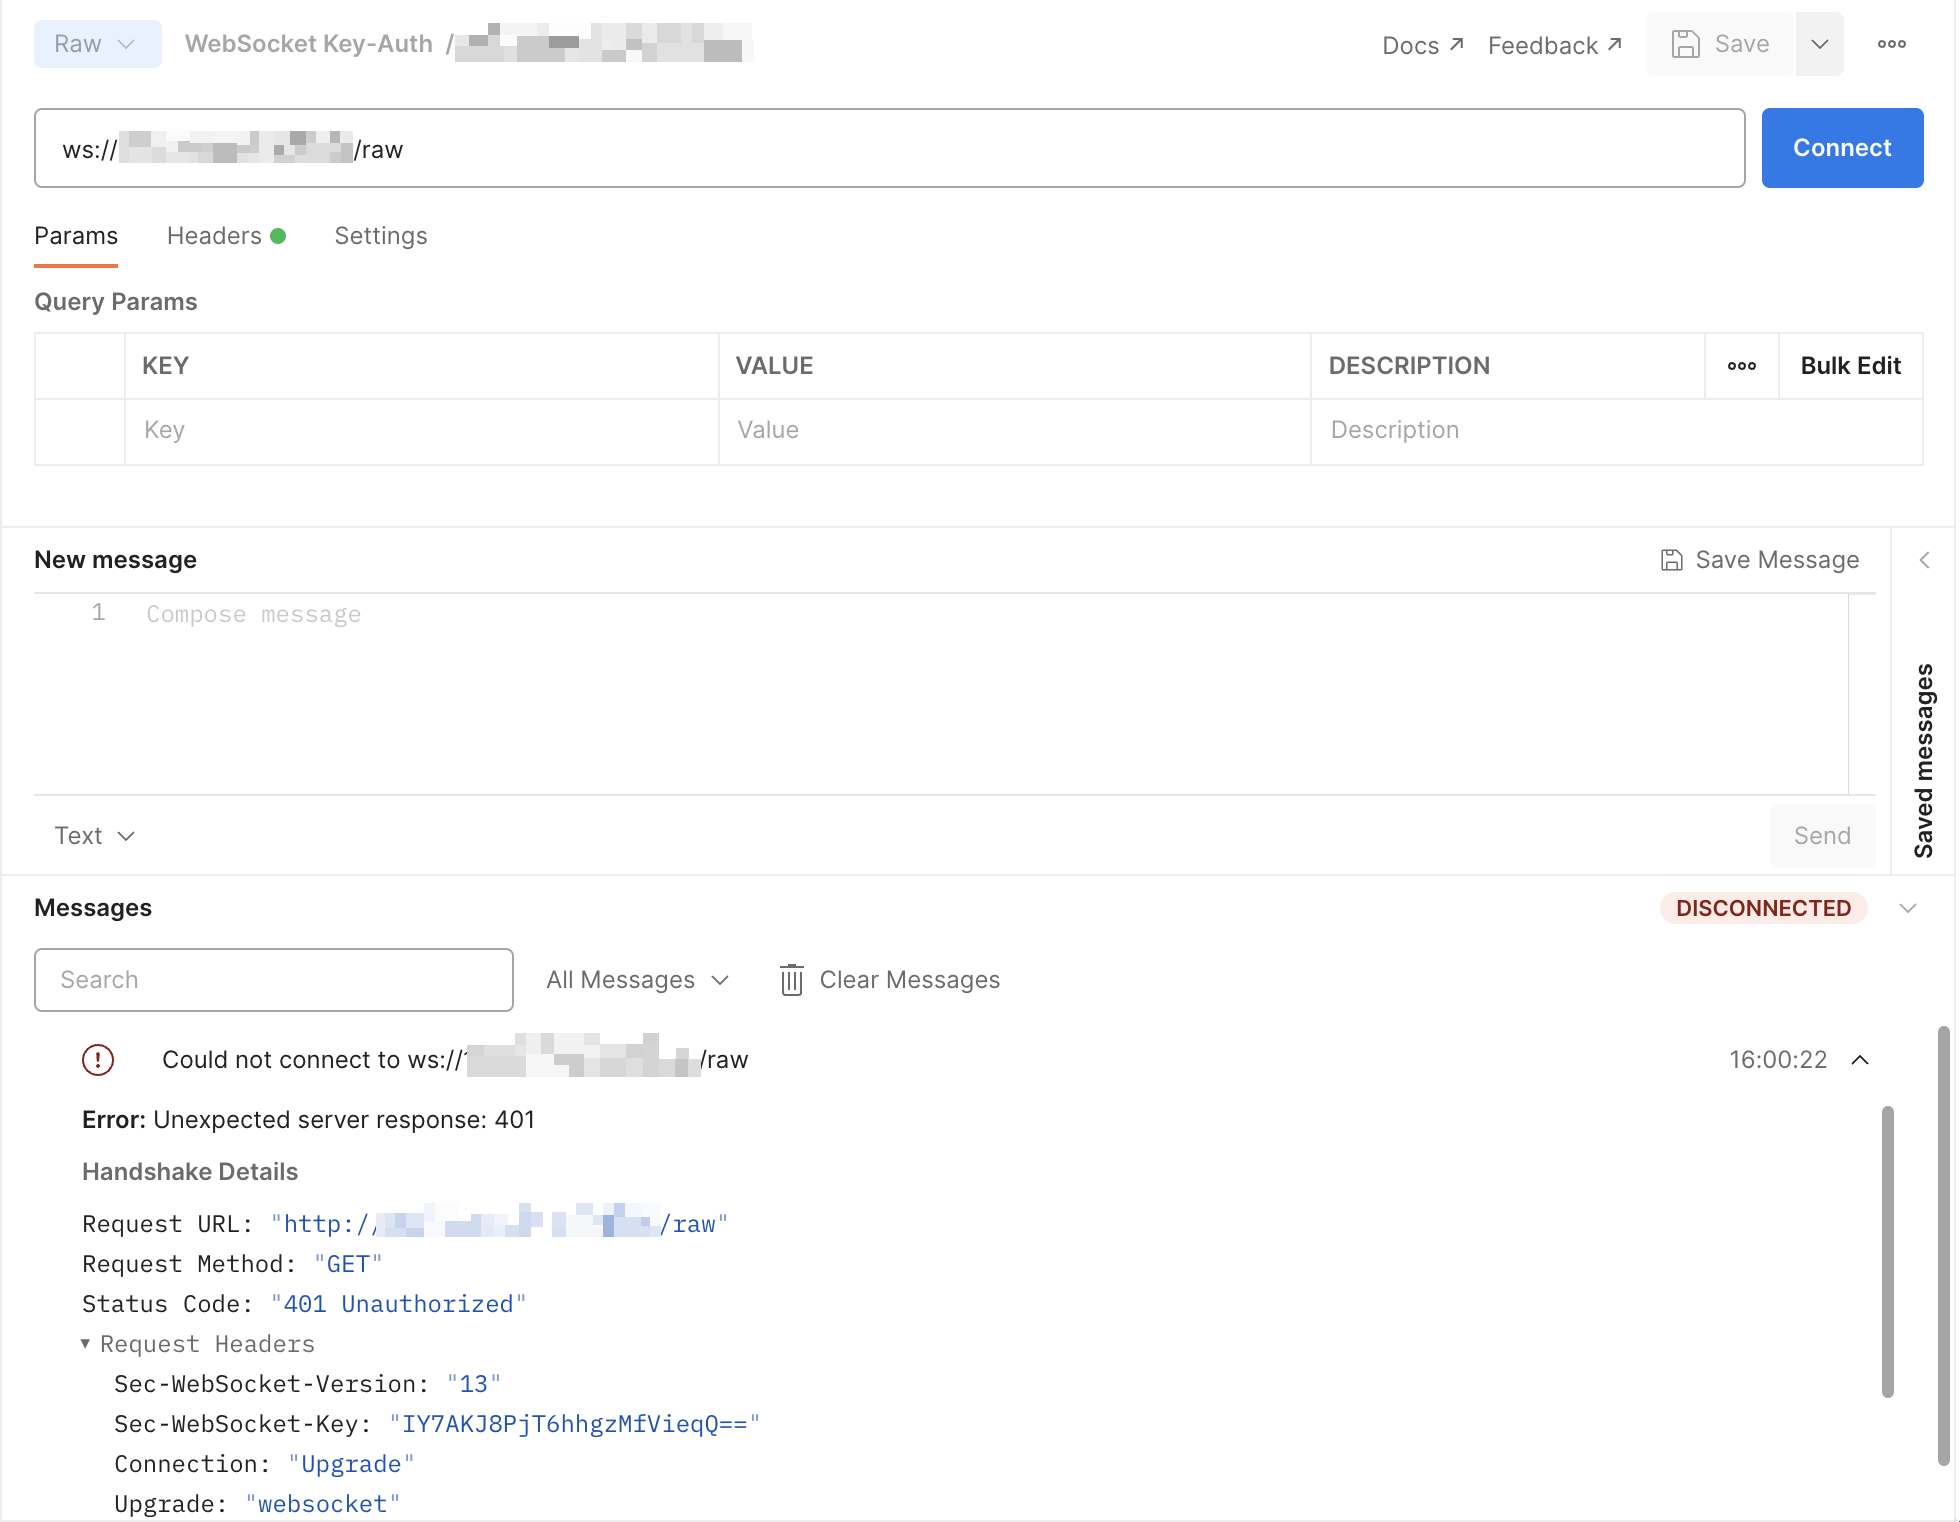
To authenticate, you can add the header `apikey` with the value `this_is_the_key`:
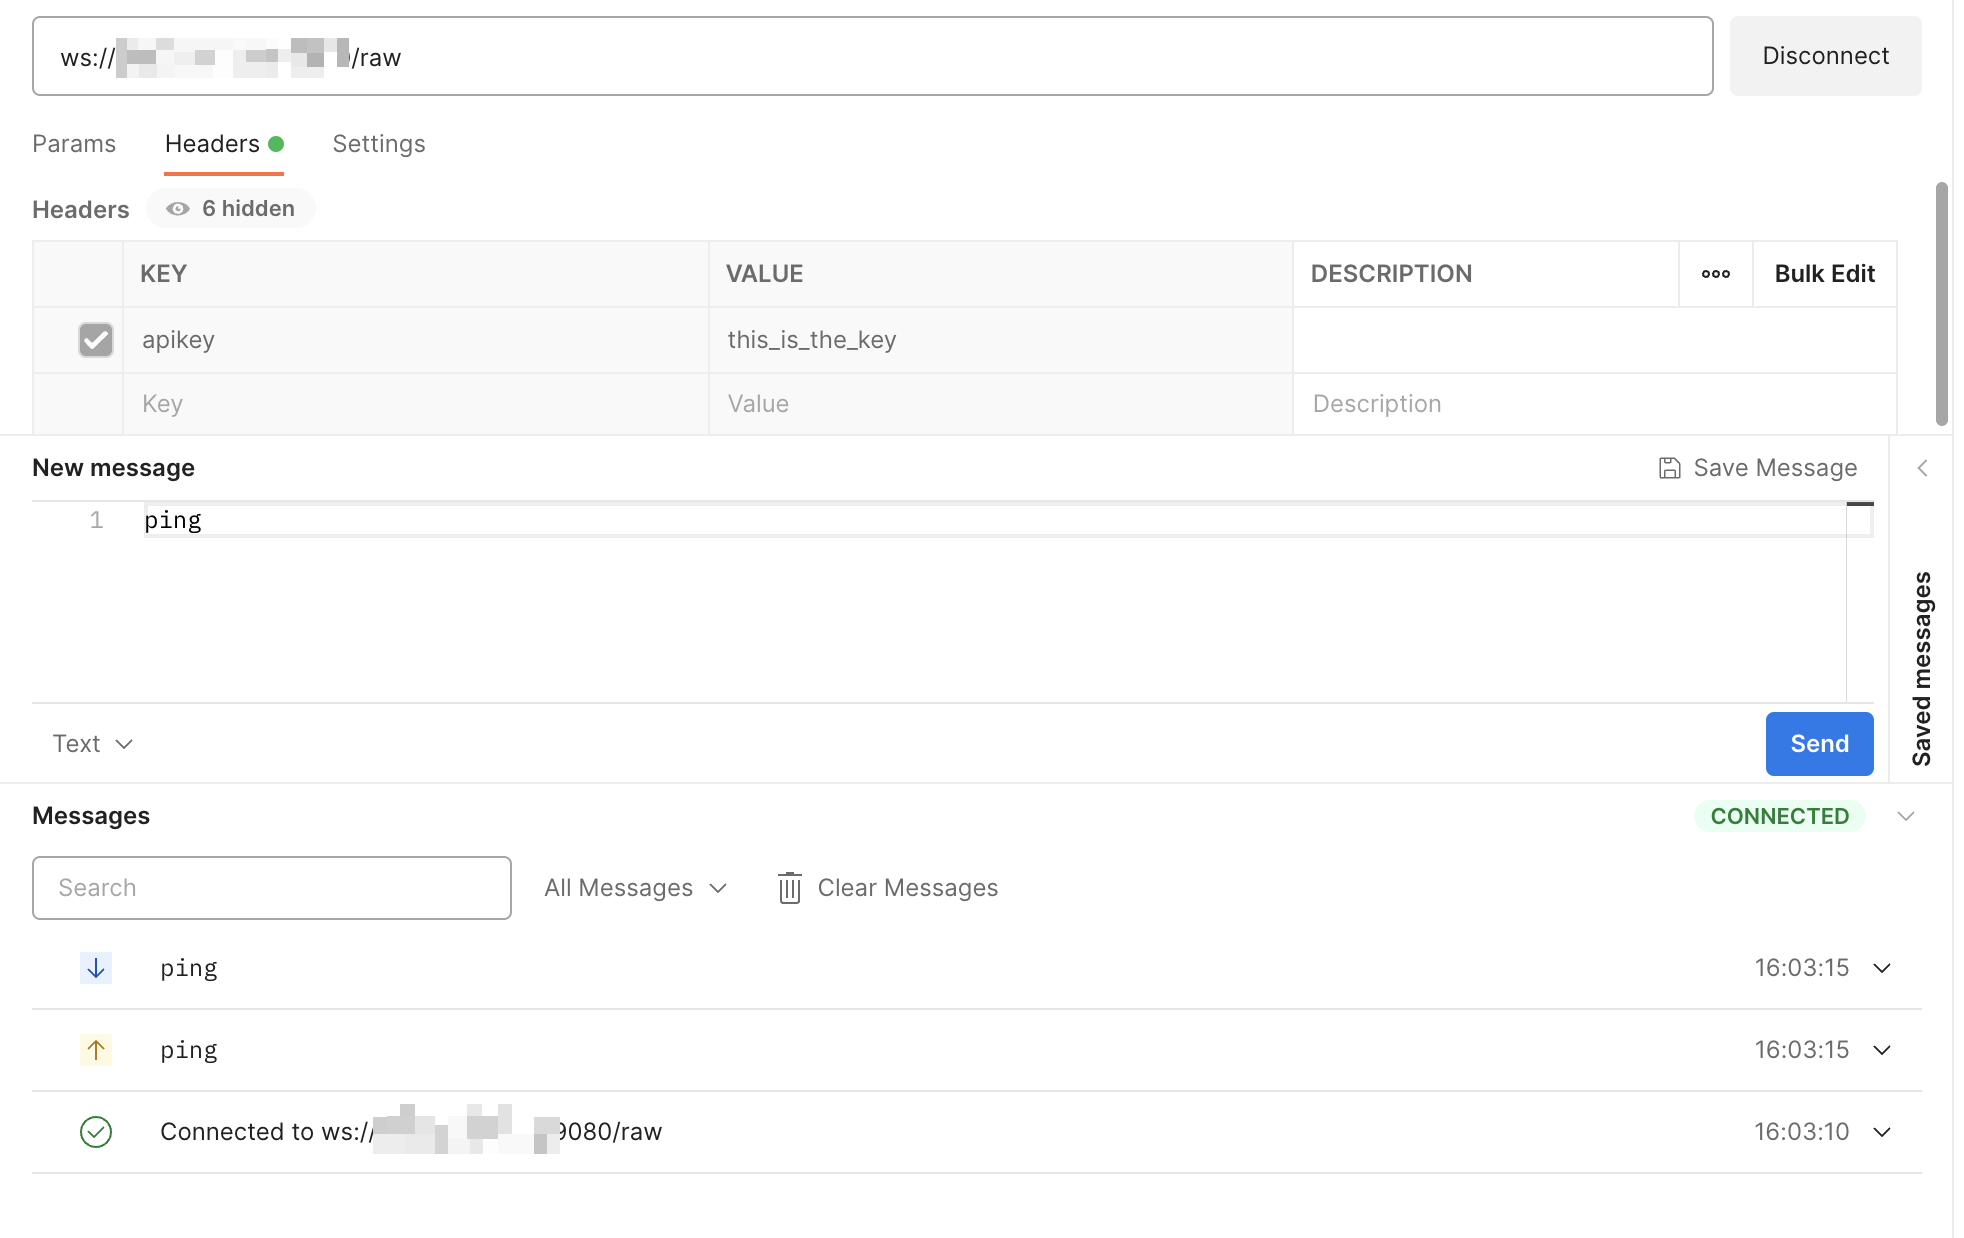
---
---
title: Upgrade Guide
keywords:
- APISIX
- APISIX Upgrade Guide
- APISIX Version Upgrade
description: Guide for upgrading APISIX from version 2.15.x to 3.0.0.
---
This document guides you in upgrading APISIX from version 2.15.x to 3.0.0.
:::note
Upgrading to version 3.0.0 is a major change and it is recommended that you first upgrade to version 2.15.x before you upgrade to 3.0.0.
:::
## Changelog
Please refer to the [3.0.0-beta](https://github.com/apache/apisix/blob/master/CHANGELOG.md#300-beta) and [3.0.0](https://github.com/apache/apisix/blob/master/CHANGELOG.md#300) changelogs for a complete list of incompatible changes and major updates.
## Deployments
From 3.0.0, we no longer support the Alpine-based images of APISIX. You can use the [Debian or CentOS-based images](https://hub.docker.com/r/apache/apisix/tags?page=1&ordering=last_updated) instead.
In addition to the Docker images, we also provide:
1. RPM packages for CentOS 7 and CentOS 8 supporting both AMD64 and ARM64 architectures.
2. DEB packages for Debian 11 (bullseye) supporting both AMD64 and ARM64 architectures.
See the [installation guide](/installation-guide.md) for more details.
3.0.0 also introduces multiple deployment modes. The following modes are supported:
1. [Traditional](./deployment-modes.md#traditional): As the name implies, this is the original deployment mode where one instance of APISIX acts as the control plane and the data plane. Use this deployment mode to keep your deployment similar to older versions.
2. [Decoupled](./deployment-modes.md#decoupled): In this mode, the data plane and the control plane are separated. You can deploy an instance of APISIX either as a control plane or a data plane.
3. [Standalone](./deployment-modes.md#standalone): Using this mode will disable etcd as the configuration center and use a static configuration file instead. You can use this to manage APISIX configuration decaratively or for using other configuration centers.
## Dependencies
All Docker images and binary packages (RPM, DEB) already come with all the necessary dependencies for APISIX.
Some features might require additional Nginx modules in OpenResty and requires you to [build a custom OpenResty distribution (APISIX-Base)](https://github.com/api7/apisix-build-tools).
To run APISIX on a native OpenResty instance use [OpenResty version 1.19.3.2](https://openresty.org/en/download.html#legacy-releases) and above.
## Configurations
There are some major changes to the configuration file in APISIX. You need to update your configuration file (`conf/config.yaml`) to reflect these changes. See the `conf/config-default.yaml` file for the complete changes.
The following attributes in the configuration have been moved:
1. `config_center` is replaced by `config_provider` and moved under `deployment`.
2. `etcd` is moved under `deployment`.
3. The following Admin API configuration attributes are moved to the `admin` attribute under `deployment`:
1. `admin_key`
2. `enable_admin_cors`
3. `allow_admin`
4. `admin_listen`
5. `https_admin`
6. `admin_api_mtls`
7. `admin_api_version`
The following attributes in the configuration have been replaced:
1. `enable_http2` and `listen_port` under `apisix.ssl` are replaced by `apisix.ssl.listen`. i.e., the below configuration:
```yaml title="conf/config.yaml"
ssl:
enable_http2: true
listen_port: 9443
```
changes to:
```yaml title="conf/config.yaml"
ssl:
listen:
- port: 9443
enable_http2: true
```
2. `nginx_config.http.lua_shared_dicts` is replaced by `nginx_config.http.custom_lua_shared_dict`. i.e., the below configuration:
```yaml title="conf/config.yaml"
nginx_config:
http:
lua_shared_dicts:
my_dict: 1m
```
changes to:
```yaml title="conf/config.yaml"
nginx_config:
http:
custom_lua_shared_dict:
my_dict: 1m
```
This attribute declares custom shared memory blocks.
3. `etcd.health_check_retry` is replaced by `deployment.etcd.startup_retry`. So this configuration:
```yaml title="conf/config.yaml"
etcd:
health_check_retry: 2
```
changes to:
```yaml title="conf/config.yaml"
deployment:
etcd:
startup_retry: 2
```
This attribute is to configure the number of retries when APISIX tries to connect to etcd.
4. `apisix.port_admin` is replaced by `deployment.admin.admin_listen`. So your previous configuration:
```yaml title="conf/config.yaml"
apisix:
port_admin: 9180
```
Should be changed to:
```yaml title="conf/config.yaml"
deployment:
apisix:
admin_listen:
ip: 127.0.0.1 # replace with the actual IP exposed
port: 9180
```
This attribute configures the Admin API listening port.
5. `apisix.real_ip_header` is replaced by `nginx_config.http.real_ip_header`.
6. `enable_cpu_affinity` is set to `false` by default instead of `true`. This is because Nginx's `worker_cpu_affinity` does not count against the cgroup when APISIX is deployed in containers. In such scenarios, it can affect APISIX's behavior when multiple instances are bound to a single CPU.
## Data Compatibility
In 3.0.0, the data structures holding route, upstream, and plugin configuration have been modified and is not fully compatible with 2.15.x. You won't be able to connect an instance of APISIX 3.0.0 to an etcd cluster used by APISIX 2.15.x.
To ensure compatibility, you can try one of the two ways mentioned below:
1. Backup the incompatible data (see [etcdctl snapshot](https://etcd.io/docs/v3.5/op-guide/maintenance/#snapshot-backup)) in etcd and clear it. Convert the backed up data to be compatible with 3.0.0 as mentioned in the below examples and reconfigure it through the Admin API of 3.0.0 instance.
2. Use custom scripts to convert the data structure in etcd to be compatible with 3.0.0.
The following changes have been made in version 3.0.0:
1. `disable` attribute of a plugin has been moved under `_meta`. It enables or disables the plugin. For example, this configuration to disable the `limit-count` plugin:
```json
{
"plugins":{
"limit-count":{
... // plugin configuration
"disable":true
}
}
}
```
should be changed to:
```json
{
"plugins":{
"limit-count":{
... // plugin configuration
"_meta":{
"disable":true
}
}
}
}
```
2. `service_protocol` in route has been replaced with `upstream.scheme`. For example, this configuration:
```json
{
"uri": "/hello",
"service_protocol": "grpc",
"upstream": {
"type": "roundrobin",
"nodes": {
"127.0.0.1:1980": 1
}
}
}
```
Should be changed to:
```json
{
"uri": "/hello",
"upstream": {
"type": "roundrobin",
"scheme": "grpc",
"nodes": {
"127.0.0.1:1980": 1
}
}
}
```
3. `audience` field from the [authz-keycloak](./plugins/authz-keycloak.md) plugin has been replaced with `client_id`. So this configuration:
```json
{
"plugins":{
"authz-keycloak":{
... // plugin configuration
"audience":"Client ID"
}
}
}
```
should be changed to:
```json
{
"plugins":{
"authz-keycloak":{
... // plugin configuration
"client_id":"Client ID"
}
}
}
```
4. `upstream` attribute from the [mqtt-proxy](./plugins/mqtt-proxy.md) plugin has been moved outside the plugin conference and referenced in the plugin. The configuration below:
```json
{
"remote_addr": "127.0.0.1",
"plugins": {
"mqtt-proxy": {
"protocol_name": "MQTT",
"protocol_level": 4,
"upstream": {
"ip": "127.0.0.1",
"port": 1980
}
}
}
}
```
changes to:
```json
{
"remote_addr": "127.0.0.1",
"plugins": {
"mqtt-proxy": {
"protocol_name": "MQTT",
"protocol_level": 4
}
},
"upstream": {
"type": "chash",
"key": "mqtt_client_id",
"nodes": [
{
"host": "127.0.0.1",
"port": 1980,
"weight": 1
}
]
}
}
```
5. `max_retry_times` and `retry_interval` fields from the [syslog](./plugins/syslog.md) plugin are replaced `max_retry_count` and `retry_delay` respectively. The configuration below:
```json
{
"plugins":{
"syslog":{
"max_retry_times":1,
"retry_interval":1,
... // other configuration
}
}
}
```
changes to:
```json
{
"plugins":{
"syslog":{
"max_retry_count":1,
"retry_delay":1,
... // other configuration
}
}
}
```
6. `scheme` attribute has been removed from the [proxy-rewrite](./plugins/proxy-rewrite.md) plugin and has been added to the upstream. The configuration below:
```json
{
"plugins":{
"proxy-rewrite":{
"scheme":"https",
... // other configuration
}
},
"upstream":{
"nodes":{
"127.0.0.1:1983":1
},
"type":"roundrobin"
},
"uri":"/hello"
}
```
changes to:
```json
{
"plugins":{
"proxy-rewrite":{
... // other configuration
}
},
"upstream":{
"scheme":"https",
"nodes":{
"127.0.0.1:1983":1
},
"type":"roundrobin"
},
"uri":"/hello"
}
```
## API
Changes have been made to the Admin API to make it easier to use and be more RESTful.
The following changes have been made:
1. The `count`, `action`, and `node` fields in the response body when querying resources (single and list) are removed and the fields in `node` are moved up to the root of the response body. For example, if you query the `/apisix/admin/routes/1` endpoint of the Admin API in version 2.15.x, you get the response:
```json
{
"count":1,
"action":"get",
"node":{
"key":"\/apisix\/routes\/1",
"value":{
... // content
}
}
}
```
In 3.0.0, this response body is changes to:
```json
{
"key":"\/apisix\/routes\/1",
"value":{
... // content
}
}
```
2. When querying list resources, the `dir` field is removed from the response body, a `list` field to store the data of the list resources and a `total` field to show the total number of list resources are added. For example, if you query the `/apisix/admin/routes` endpoint of the Admin API in version 2.15.x, you get the response:
```json
{
"action":"get",
"count":2,
"node":{
"key":"\/apisix\/routes",
"nodes":[
{
"key":"\/apisix\/routes\/1",
"value":{
... // content
}
},
{
"key":"\/apisix\/routes\/2",
"value":{
... // content
}
}
],
"dir":true
}
}
```
In 3.0.0, the response body is:
```json
{
"list":[
{
"key":"\/apisix\/routes\/1",
"value":{
... // content
}
},
{
"key":"\/apisix\/routes\/2",
"value":{
... // content
}
}
],
"total":2
}
```
3. The endpoint to SSL resource is changed from `/apisix/admin/ssl/{id}` to `/apisix/admin/ssls/{id}`.
4. The endpoint to Proto resource is changed from `/apisix/admin/proto/{id}` to `/apisix/admin/protos/{id}`.
5. Admin API port is set to `9180` by default.
---
---
title: Wasm
---
APISIX supports Wasm plugins written with [Proxy Wasm SDK](https://github.com/proxy-wasm/spec#sdks).
Currently, only a few APIs are implemented. Please follow [wasm-nginx-module](https://github.com/api7/wasm-nginx-module) to know the progress.
## Programming model
The plugin supports the following concepts from Proxy Wasm:
```
Wasm Virtual Machine
┌────────────────────────────────────────────────────────────────┐
│ Your Plugin │
│ │ │
│ │ 1: 1 │
│ │ 1: N │
│ VMContext ────────── PluginContext │
│ ╲ 1: N │
│ ╲ │
│ ╲ HttpContext │
│ (Http stream) │
└────────────────────────────────────────────────────────────────┘
```
* All plugins run in the same Wasm VM, like the Lua plugin in the Lua VM
* Each plugin has its own VMContext (the root ctx)
* Each configured route/global rules has its own PluginContext (the plugin ctx).
For example, if we have a service configuring with Wasm plugin, and two routes inherit from it,
there will be two plugin ctxs.
* Each HTTP request which hits the configuration will have its own HttpContext (the HTTP ctx).
For example, if we configure both global rules and route, the HTTP request will
have two HTTP ctxs, one for the plugin ctx from global rules and the other for the
plugin ctx from route.
## How to use
First of all, we need to define the plugin in `config.yaml`:
```yaml
wasm:
plugins:
- name: wasm_log # the name of the plugin
priority: 7999 # priority
file: t/wasm/log/main.go.wasm # the path of `.wasm` file
http_request_phase: access # default to "access", can be one of ["access", "rewrite"]
```
That's all. Now you can use the wasm plugin as a regular plugin.
For example, enable this plugin on the specified route:
:::note
You can fetch the `admin_key` from `config.yaml` and save to an environment variable with the following command:
```bash
admin_key=$(yq '.deployment.admin.admin_key[0].key' conf/config.yaml | sed 's/"//g')
```
:::
```shell
curl -i http://127.0.0.1:9180/apisix/admin/routes/1 -H "X-API-KEY: $admin_key" -X PUT -d '
{
"uri": "/index.html",
"plugins": {
"wasm_log": {
"conf": "blahblah"
}
},
"upstream": {
"type": "roundrobin",
"nodes": {
"127.0.0.1:1980": 1
}
}
}'
```
Attributes below can be configured in the plugin:
| Name | Type | Requirement | Default | Valid | Description |
| --------------------------------------| ------------| -------------- | -------- | --------------------------------------------------------------- | --------------------------------------------------------------------------------------------------------------------------------------------------- |
| conf | string or object | required | | != "" and != {} | the plugin ctx configuration which can be fetched via Proxy Wasm SDK |
Here is the mapping between Proxy Wasm callbacks and APISIX's phases:
* `proxy_on_configure`: run once there is not PluginContext for the new configuration.
For example, when the first request hits the route which has Wasm plugin configured.
* `proxy_on_http_request_headers`: run in the access/rewrite phase, depends on the configuration of `http_request_phase`.
* `proxy_on_http_request_body`: run in the same phase of `proxy_on_http_request_headers`. To run this callback, we need to set property `wasm_process_req_body` to non-empty value in `proxy_on_http_request_headers`. See `t/wasm/request-body/main.go` as an example.
* `proxy_on_http_response_headers`: run in the header_filter phase.
* `proxy_on_http_response_body`: run in the body_filter phase. To run this callback, we need to set property `wasm_process_resp_body` to non-empty value in `proxy_on_http_response_headers`. See `t/wasm/response-rewrite/main.go` as an example.
## Example
We have reimplemented some Lua plugin via Wasm, under `t/wasm/` of this repo:
* fault-injection
* forward-auth
* response-rewrite
---
---
title: redis
keywords:
- Apache APISIX
- API Gateway
- xRPC
- redis
description: This document contains information about the Apache APISIX xRPC implementation for Redis.
---
## Description
The Redis protocol support allows APISIX to proxy Redis commands, and provide various features according to the content of the commands, including:
* [Redis protocol](https://redis.io/docs/reference/protocol-spec/) codec
* Fault injection according to the commands and key
:::note
This feature requires APISIX to be run on [APISIX-Runtime](../FAQ.md#how-do-i-build-the-apisix-runtime-environment).
It also requires the data sent from clients are well-formed and sane. Therefore, it should only be used in deployments where both the downstream and upstream are trusted.
:::
## Granularity of the request
Like other protocols based on the xRPC framework, the Redis implementation here also has the concept of `request`.
Each Redis command is considered a request. However, the message subscribed from the server won't be considered a request.
For example, when a Redis client subscribes to channel `foo` and receives the message `bar`, then it unsubscribes the `foo` channel, there are two requests: `subscribe foo` and `unsubscribe foo`.
## Attributes
| Name | Type | Required | Default | Valid values | Description |
|----------------------------------------------|---------------|----------|-----------------------------------------------|--------------------------------------------------------------------|-------------------------------------------------------------------------------------------------------------------------------------------------------------------------------------------------------------------------------------------------------|
| faults | array[object] | False | | | Fault injections which can be applied based on the commands and keys |
Fields under an entry of `faults`:
| Name | Type | Required | Default | Valid values | Description |
|----------------------------------------------|---------------|----------|-----------------------------------------------|--------------------------------------------------------------------|-------------------------------------------------------------------------------------------------------------------------------------------------------------------------------------------------------------------------------------------------------|
| commands | array[string] | True | | ["get", "mget"] | Commands fault is restricted to |
| key | string | False | | "blahblah" | Key fault is restricted to |
| delay | number | True | | 0.1 | Duration of the delay in seconds |
## Metrics
* `apisix_redis_commands_total`: Total number of requests for a specific Redis command.
| Labels | Description |
| ------------- | -------------------- |
| route | matched stream route ID |
| command | the Redis command |
* `apisix_redis_commands_latency_seconds`: Latency of requests for a specific Redis command.
| Labels | Description |
| ------------- | -------------------- |
| route | matched stream route ID |
| command | the Redis command |
## Example usage
:::note
You can fetch the `admin_key` from `config.yaml` and save to an environment variable with the following command:
```bash
admin_key=$(yq '.deployment.admin.admin_key[0].key' conf/config.yaml | sed 's/"//g')
```
:::
Assumed the APISIX is proxying TCP on port `9101`, and the Redis is listening on port `6379`.
Let's create a Stream Route:
```shell
curl http://127.0.0.1:9180/apisix/admin/stream_routes/1 -H "X-API-KEY: $admin_key" -X PUT -d '
{
"upstream": {
"type": "none",
"nodes": {
"127.0.0.1:6379": 1
}
},
"protocol": {
"name": "redis",
"conf": {
"faults": [{
"commands": ["get", "ping"],
"delay": 5
}]
}
}
}
'
```
Once you have configured the stream route, as shown above, you can make a request to it:
```shell
redis-cli -p 9101
```
```
127.0.0.1:9101> ping
PONG
(5.00s)
```
You can notice that there is a 5 seconds delay for the ping command.
---
---
title: xRPC
---
## What is xRPC
APISIX supports proxy TCP protocols, but there are times when a pure TCP protocol proxy is not enough. It would be helpful if you had an application-specific proxy, such as Redis Proxy, Kafka Proxy, etc. In addition, some features must be coded and decoded for that protocol before they can be implemented.
Therefore, Apache APISIX implements an L4 protocol extension framework called xRPC that allows developers to customize application-specific protocols. Based on xRPC, developers can codec requests and responses through Lua code and then implement fault injection, log reporting, dynamic routing, and other functions based on understanding the protocol content.
Based on the xRPC framework, APISIX can provide a proxy implementation of several major application protocols. In addition, users can also support their own private TCP-based application protocols based on this framework, giving them precise granularity and higher-level 7-layer control similar to HTTP protocol proxies.
## How to use
Currently, the steps for users to use xRPC are relatively simple and can be handled quickly in just two steps.
1. First, enable the corresponding protocol in `conf/config.yaml`.
```yaml
xrpc:
protocols:
- name: redis
```
2. Then specify the protocol in the relevant `stream_routes`.
```json
{
...
"protocol": {
"name": "redis",
"conf": {
"faults": [
{ "delay": 5, "key": "bogus_key", "commands":["GET", "MGET"]}
]
}
}
}
```
The TCP connection that hits that `stream_route` is then handled according to that protocol.
## Configuration
| Name | Type | Required | Default | Description |
|-------------|--------|----------|---------|-------------------------------------------------|
| name | string | True | | the protocol name |
| conf | | False | | the application-specific protocol configuration |
| superior_id | ID | False | | the ID of the superior stream route |
## Scenarios
### Fault injection
Taking Redis protocol as an example, after decoding the RESP protocol of Redis, we can know the command and parameters of the current request and then get the corresponding content according to the configuration, encode it using RESP protocol, and return it to the client.
Suppose the user uses the following routing configuration.
```json
{
...
"protocol": {
"name": "redis",
"conf": {
"faults": [
{ "delay": 5, "key": "bogus_key", "commands":["GET", "MGET"]}
]
}
}
}
```
Then when the command is "GET" or "MGET", and the operation key contains "bogus_key", it will get "delay" according to the configuration: "5" parameter, and the corresponding operation will be performed with a delay of 5 seconds.
Since xRPC requires developers to codec the protocol when customizing it, the same operation can be applied to other protocols.
### Dynamic Routing
In the process of proxy RPC protocol, there are often different RPC calls that need to be forwarded to different upstream requirements. Therefore, the xRPC framework has built-in support for dynamic routing.
To solve this problem, the concept of superior and subordinate is used in xRPC routing, as shown in the following two examples.
```json
# /stream_routes/1
{
"sni": "a.test.com",
"protocol": {
"name": "xx",
"conf": {
...
}
},
"upstream_id": "1"
}
```
```json
# /stream_routes/2
{
"protocol": {
"name": "xx",
"superior_id": "1",
"conf": {
...
}
},
"upstream_id": "2"
}
```
One specifies the `superior_id`, whose corresponding value is the ID of another route; the other specifies that the route with the `superior_id` is a subordinate route, subordinate to the one with the `superior_id`. Only the superior route is involved in matching at the entry point. The subordinate route is then matched by the specific protocol when the request is decoded.
For example, for the Dubbo RPC protocol, the subordinate route is matched based on the service_name and other parameters configured in the route and the actual service_name brought in the request. If the match is successful, the configuration above the subordinate route is used, otherwise, the configuration of the superior route is still used. In the above example, if the match for route 2 is successful, it will be forwarded to upstream 2; otherwise, it will still be forwarded to upstream 1.
### Log Reporting
xRPC supports logging-related functions. You can use this feature to filter requests that require attention, such as high latency, excessive transfer content, etc.
Each logger item configuration parameter will contain
- name: the Logger plugin name,
- filter: the prerequisites for the execution of the logger plugin(e.g., request processing time exceeding a given value),
- conf: the configuration of the logger plugin itself.
The following configuration is an example:
```json
{
...
"protocol": {
"name": "redis",
"logger": {
{
"name": "syslog",
"filter": [
["rpc_time", ">=", 0.01]
],
"conf": {
"host": "127.0.0.1",
"port": 8125,
}
}
}
}
}
```
This configuration means that when the `rpc_time` is greater than 0.01 seconds, xRPC reports the request log to the log server via the `syslog` plugin. `conf` is the configuration of the logging server required by the `syslog` plugin.
Unlike standard TCP proxies, which only execute a logger when the connection is closed, xRPC executes a logger at the end of each 'request'.
The protocol itself defines the granularity of the specific request, and the xRPC extension code implements the request's granularity.
For example, in the Redis protocol, the execution of a command is considered a request.
### Dynamic metrics
xRPC also supports gathering metrics on the fly and exposing them via Prometheus.
To know how to enable Prometheus metrics for TCP and collect them, please refer to [prometheus](./plugins/prometheus.md).
To get the protocol-specific metrics, you need to:
1. Make sure the Prometheus is enabled for TCP
2. Add the metric field to the specific route and ensure the `enable` is true:
```json
{
...
"protocol": {
"name": "redis",
"metric": {
"enable": true
}
}
}
```
Different protocols will have different metrics. Please refer to the `Metrics` section of their own documentation.
## How to write your own protocol
Assuming that your protocol is named `my_proto`, you need to create a directory that can be introduced by `require "apisix.stream.xrpc.protocols.my_proto"`.
Inside this directory you need to have two files, `init.lua`, which implements the methods required by the xRPC framework, and `schema.lua`, which implements the schema checks for the protocol configuration.
For a concrete implementation, you can refer to the existing protocols at:
* https://github.com/apache/apisix/tree/master/apisix/stream/xrpc/protocols
* https://github.com/apache/apisix/tree/master/t/xrpc/apisix/stream/xrpc/protocols
To know what methods are required to be implemented and how the xRPC framework works, please refer to:
https://github.com/apache/apisix/tree/master/apisix/stream/xrpc/runner.lua