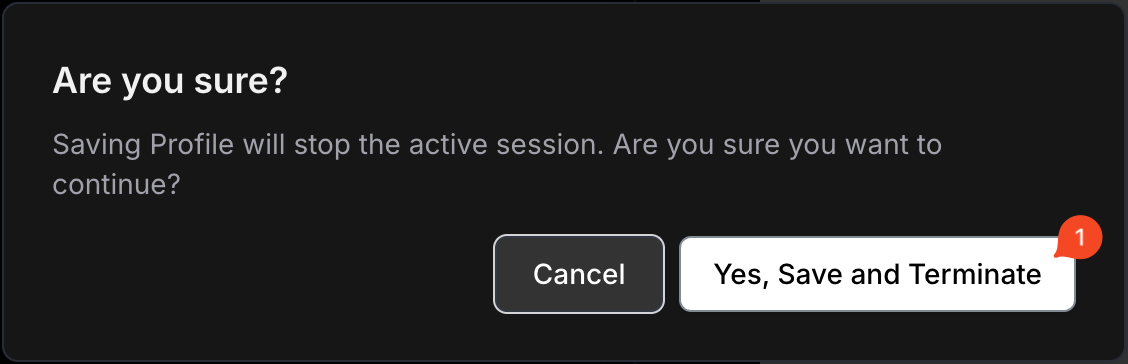
 Then approve it in the popup window 'Yes, Save and Terminate'

 ## Core Advantages
Securely pass credentials and sensitive data to AI agents during task execution. Secret values are not logged and automatically cleaned up after completion.
Learn more about Secret Values →
## Available Models For Browser-Use
Then approve it in the popup window 'Yes, Save and Terminate'
 To create a browser in headful mode, simply [create a session](/sdk-reference/browser-sessions/start-browser-session):
 ## How It Works
1. **Session Creation**: Create a browser session with web bot auth enabled
2. **HTTP Message Signing**: All HTTP requests are automatically signed as Anchor Browser
3. **Authentication**: Cloudflare validates the signatures
4. **Access Granted**: Successfully authenticated requests can access protected content
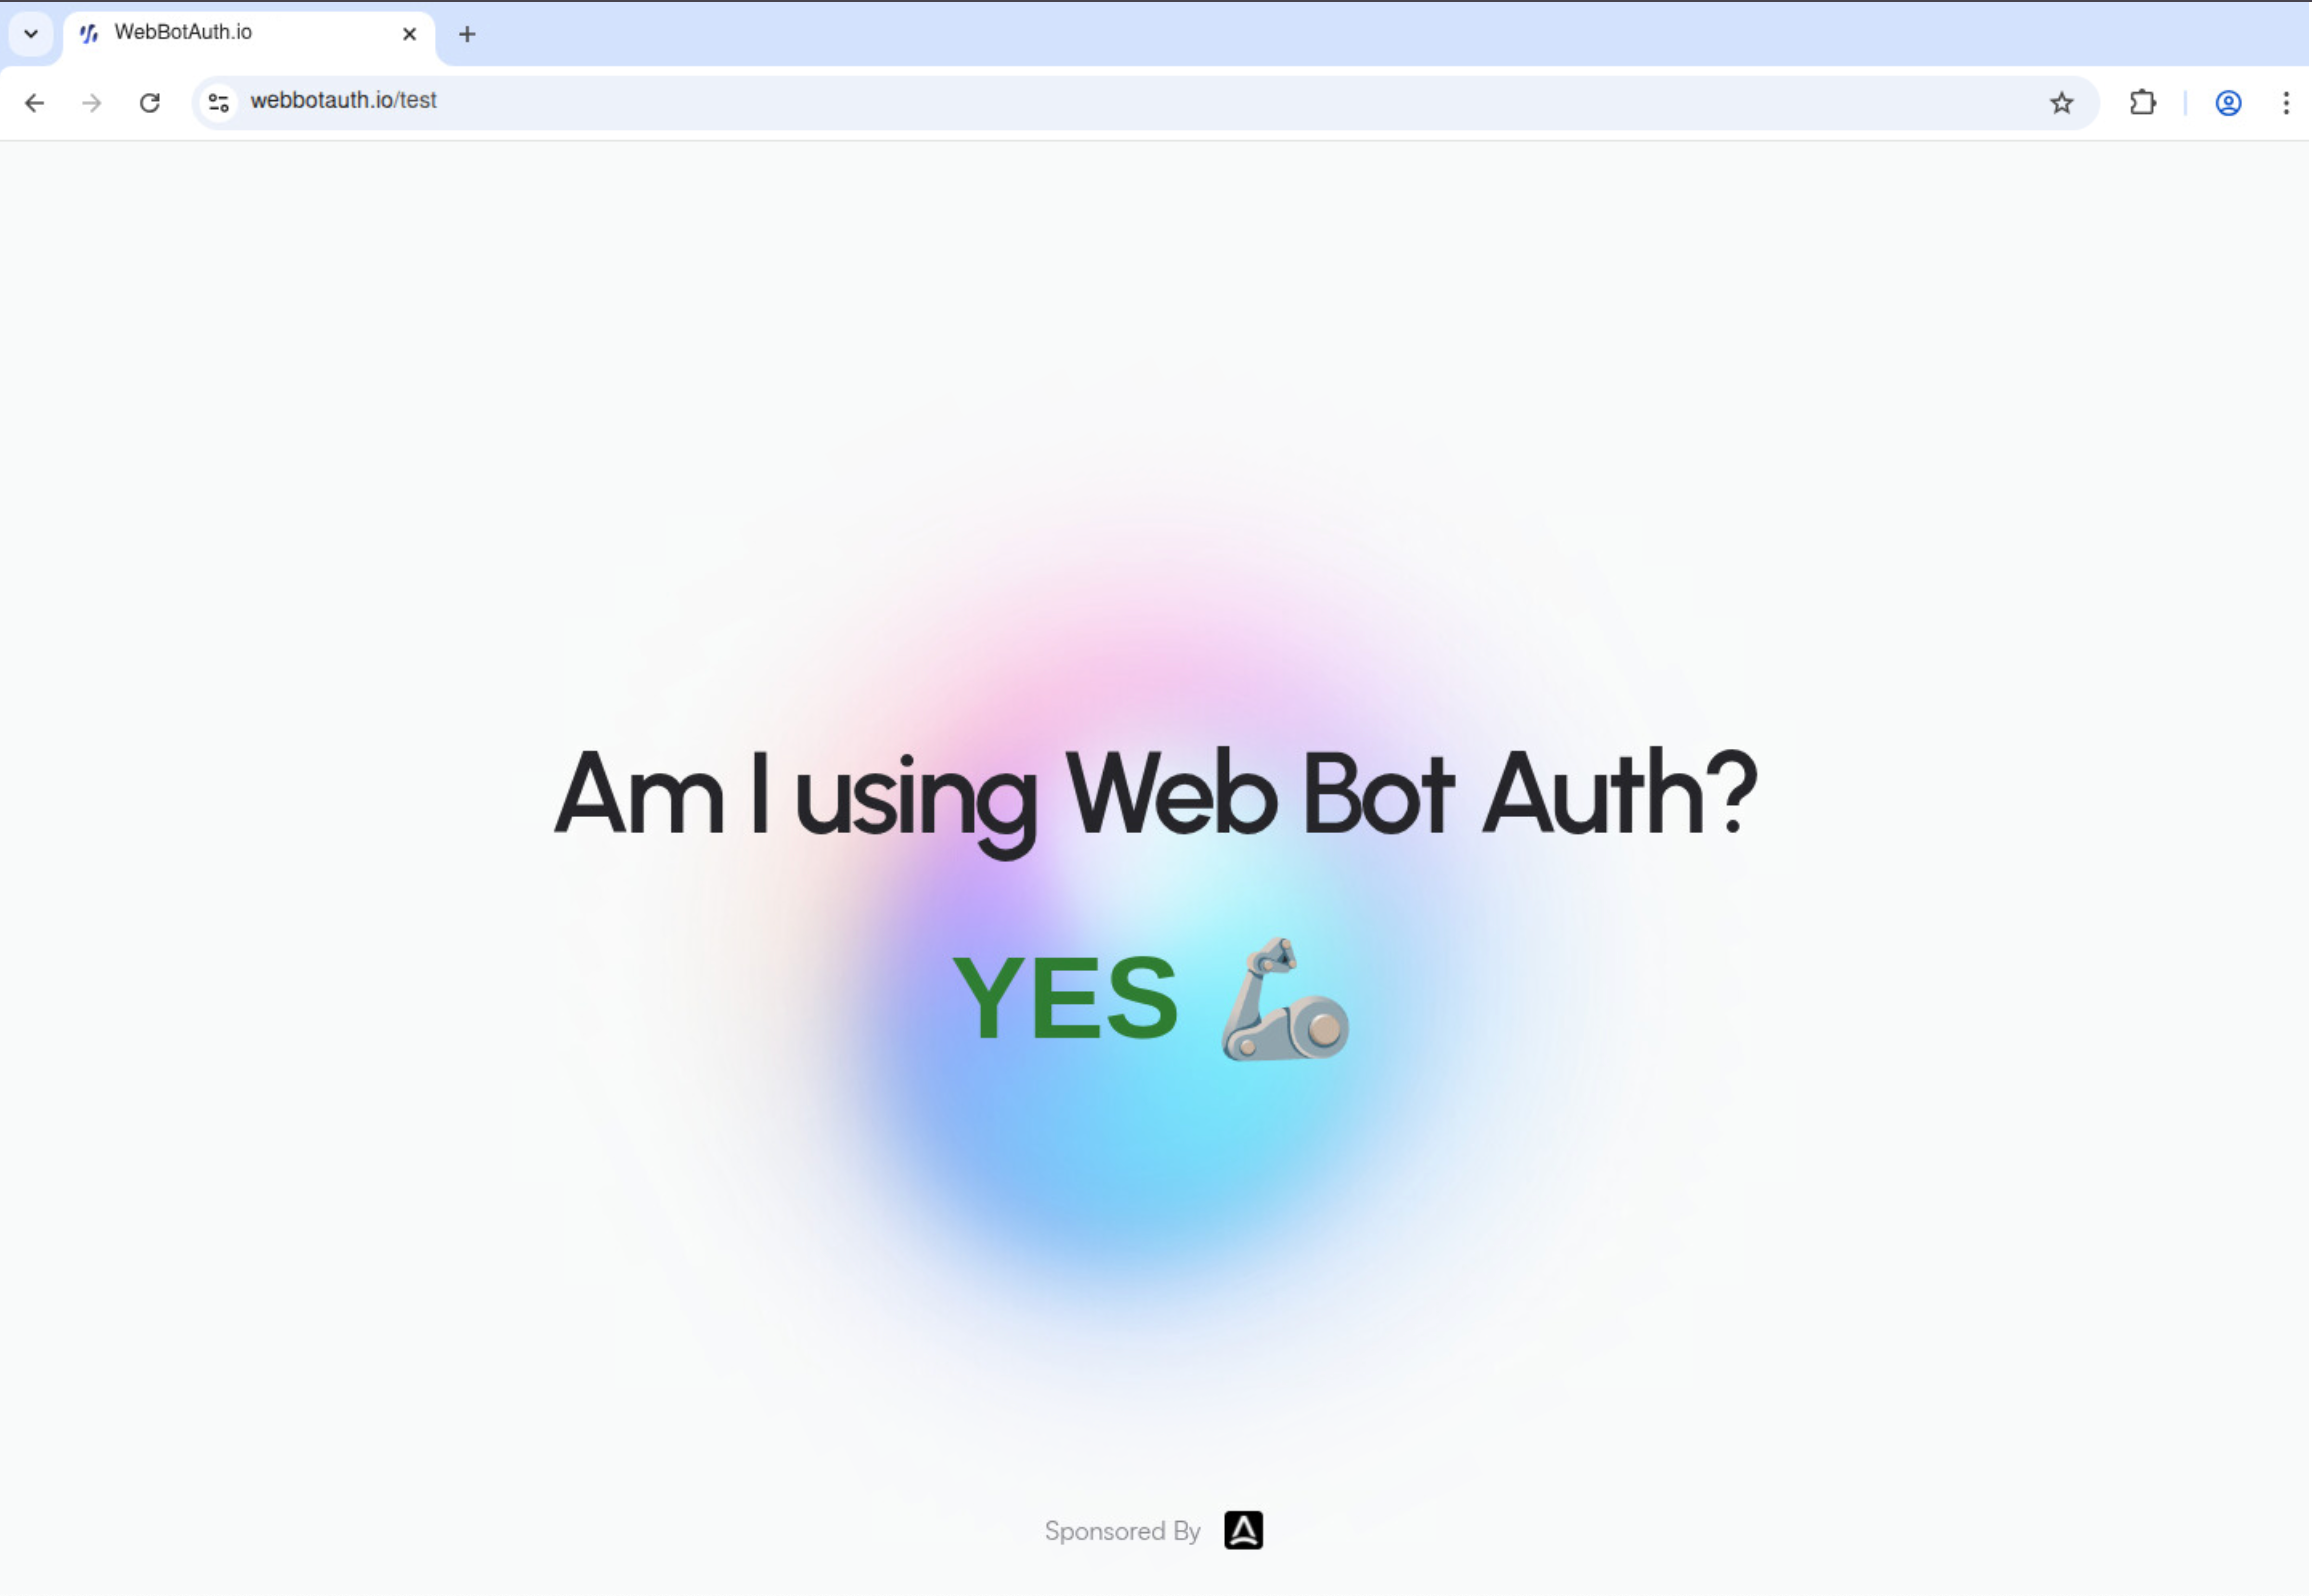
## Using Web Bot Auth
### How Authentication Works
When you enable web bot auth, Anchor Browser automatically identifies all HTTP requests to websites using our registered identity. This allows you to access protected content that requires Cloudflare's web bot authentication without any additional configuration.
### Browser Configuration
```typescript theme={null}
{
"browser": {
"web_bot_auth": {
"active": boolean // Enable/disable web bot auth (default: false)
}
}
}
```
### SDK Examples
Enable web bot auth by setting the `web_bot_auth.active` flag to `true` in your session configuration:
## How It Works
1. **Session Creation**: Create a browser session with web bot auth enabled
2. **HTTP Message Signing**: All HTTP requests are automatically signed as Anchor Browser
3. **Authentication**: Cloudflare validates the signatures
4. **Access Granted**: Successfully authenticated requests can access protected content
## Using Web Bot Auth
### How Authentication Works
When you enable web bot auth, Anchor Browser automatically identifies all HTTP requests to websites using our registered identity. This allows you to access protected content that requires Cloudflare's web bot authentication without any additional configuration.
### Browser Configuration
```typescript theme={null}
{
"browser": {
"web_bot_auth": {
"active": boolean // Enable/disable web bot auth (default: false)
}
}
}
```
### SDK Examples
Enable web bot auth by setting the `web_bot_auth.active` flag to `true` in your session configuration:
 ### Prerequisites
* Python 3.8 or higher installed.
### Setup
1. **Get your API keys:**
* Go to [Anchor Browser API Key](https://app.anchorbrowser.io/api-keys?utm_source=groq)
2. **Install dependencies:**
Install the [Anchor Browser Python SDK](https://docs.anchorbrowser.io/quickstart/use-via-sdk?utm_source=groq). ([Typescript SDK](https://docs.anchorbrowser.io/quickstart/use-via-sdk?utm_source=groq) is also available).
```bash theme={null}
pip install anchorbrowser pydantic
```
## Quick Example: Extract Latest AI News
```python python theme={null}
import os
from anchorbrowser import Anchorbrowser
# Initialize the Anchor Browser Client
client = Anchorbrowser(api_key=os.getenv("ANCHOR_API_KEY"))
# Collect the newest from AI News website
task_result = client.agent.task(
"Extract the latest news title from this AI News website",
task_options={
"url": "https://www.artificialintelligence-news.com/",
"provider": "groq",
"model": "openai/gpt-oss-120b",
}
)
print("Latest news title:", task_result)
```
## Advanced Session Configuration
Create a session using advanced configuration (see Anchor [API reference](https://docs.anchorbrowser.io/api-reference/browser-sessions/start-browser-session?utm_source=groq)).
```python python theme={null}
import os
from anchorbrowser import Anchorbrowser
# configuration example, can be ommited for default values.
session_config = {
"session": {
"recording": False, # Disable session recording
"proxy": {
"active": True,
"type": "anchor_residential",
"country_code": "us"
},
"max_duration": 5, # 5 minutes
"idle_timeout": 1 # 1 minute
}
}
client = Anchorbrowser(api_key=os.getenv("ANCHOR_API_KEY"))
configured_session = client.sessions.create(browser=session_config)
# Get the session_id to run automation workflows to the same running session.
session_id = configured_session.data.id
# Get the live view url to browse the browser in action (it's interactive!).
live_view_url = configured_session.data.live_view_url
print('session_id:', session_id, '\nlive_view_url:', live_view_url)
```
## Next Steps
* Explore the [API Reference](https://docs.anchorbrowser.io/api-reference?utm_source=groq) for detailed documentation
* Learn about [Authentication and Identity management](https://docs.anchorbrowser.io/essentials/authentication-and-identity?utm_source=groq)
* Check out [Advanced Proxy Configuration](https://docs.anchorbrowser.io/advanced/proxy?utm_source=groq) for location-specific browsing
* Use more [Agentic tools](https://docs.anchorbrowser.io/agentic-browser-control?utm_source=groq)
---
# Source: https://docs.anchorbrowser.io/integrations/open-source/playwright/business-applications/hubspot.md
> ## Documentation Index
> Fetch the complete documentation index at: https://docs.anchorbrowser.io/llms.txt
> Use this file to discover all available pages before exploring further.
# HubSpot
> Automate HubSpot CRM workflows with Playwright when APIs aren't available.
# How to Automate HubSpot with Playwright
Automate critical HubSpot CRM workflows with Playwright when APIs aren't available or sufficient. You'll eliminate manual lead processing and reduce sales pipeline errors by automating repetitive marketing and sales processes. Use Playwright to interact with HubSpot's web interface programmatically.
[View HubSpot's API documentation](https://developers.hubspot.com/docs/api/overview) for integration services when available.
## Setup
Install Playwright and configure authentication:
```bash theme={null}
npm install playwright
```
## Automate Workflows
Create scripts for common HubSpot tasks:
```JavaScript theme={null}
import { chromium } from 'playwright';
const browser = await chromium.launch();
const page = await browser.newPage();
// Login to HubSpot
await page.goto('https://app.hubspot.com/login');
await page.fill('#username', process.env.HUBSPOT_EMAIL);
await page.fill('#password', process.env.HUBSPOT_PASSWORD);
await page.click('#loginBtn');
// Navigate to contacts
await page.click('[data-selenium-test="nav-primary-contacts-contacts"]');
await page.click('[data-selenium-test="create-contact-button"]');
// Create new contact
await page.fill('[data-field="firstname"]', 'Michael');
await page.fill('[data-field="lastname"]', 'Chen');
await page.fill('[data-field="email"]', 'michael.chen@techcorp.com');
await page.fill('[data-field="company"]', 'TechCorp Solutions');
await page.selectOption('[data-field="lifecyclestage"]', 'marketingqualifiedlead');
// Create associated deal
await page.click('[data-selenium-test="associations-tab"]');
await page.click('[data-selenium-test="create-deal-button"]');
await page.fill('[data-field="dealname"]', 'TechCorp Enterprise Package');
await page.fill('[data-field="amount"]', '75000');
await page.selectOption('[data-field="dealstage"]', 'qualifiedtobuy');
await page.click('[data-selenium-test="save-contact"]');
await browser.close();
```
Playwright handles form validations, association creation, and pipeline updates automatically. You can automate lead scoring, email campaign management, and sales forecasting workflows.
## Scale your HubSpot automation with Anchor Browser
Run your Playwright HubSpot automations on cloud browsers with enterprise-grade reliability and persistent HubSpot CRM sessions. Learn more and get started for free: [https://anchorbrowser.io](https://anchorbrowser.io)
---
# Source: https://docs.anchorbrowser.io/agentic-browser-control/human-in-the-loop.md
> ## Documentation Index
> Fetch the complete documentation index at: https://docs.anchorbrowser.io/llms.txt
> Use this file to discover all available pages before exploring further.
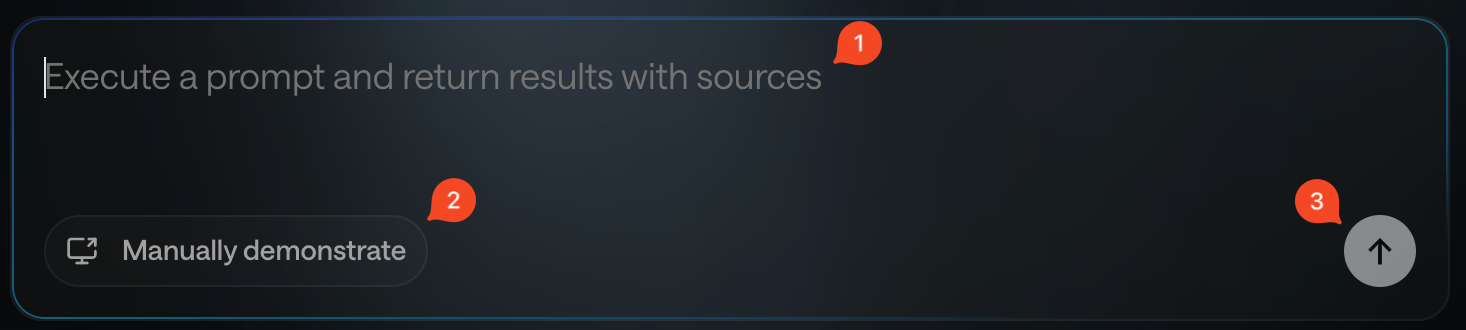
# Human-in-the-Loop
> Enable human intervention during AI agent task execution
Enabling Human-in-the-loop (HITL) allows the AI agent to pause execution and request human intervention when needed. This feature is essential for tasks that require human judgment, approval, or handling of unexpected situations.
## Basic Usage
### How It Works
When HITL is enabled, the agent sends its intervention requests to a session-specific queue. The agent then continues execution based on your instructions.
### Prerequisites
* Python 3.8 or higher installed.
### Setup
1. **Get your API keys:**
* Go to [Anchor Browser API Key](https://app.anchorbrowser.io/api-keys?utm_source=groq)
2. **Install dependencies:**
Install the [Anchor Browser Python SDK](https://docs.anchorbrowser.io/quickstart/use-via-sdk?utm_source=groq). ([Typescript SDK](https://docs.anchorbrowser.io/quickstart/use-via-sdk?utm_source=groq) is also available).
```bash theme={null}
pip install anchorbrowser pydantic
```
## Quick Example: Extract Latest AI News
```python python theme={null}
import os
from anchorbrowser import Anchorbrowser
# Initialize the Anchor Browser Client
client = Anchorbrowser(api_key=os.getenv("ANCHOR_API_KEY"))
# Collect the newest from AI News website
task_result = client.agent.task(
"Extract the latest news title from this AI News website",
task_options={
"url": "https://www.artificialintelligence-news.com/",
"provider": "groq",
"model": "openai/gpt-oss-120b",
}
)
print("Latest news title:", task_result)
```
## Advanced Session Configuration
Create a session using advanced configuration (see Anchor [API reference](https://docs.anchorbrowser.io/api-reference/browser-sessions/start-browser-session?utm_source=groq)).
```python python theme={null}
import os
from anchorbrowser import Anchorbrowser
# configuration example, can be ommited for default values.
session_config = {
"session": {
"recording": False, # Disable session recording
"proxy": {
"active": True,
"type": "anchor_residential",
"country_code": "us"
},
"max_duration": 5, # 5 minutes
"idle_timeout": 1 # 1 minute
}
}
client = Anchorbrowser(api_key=os.getenv("ANCHOR_API_KEY"))
configured_session = client.sessions.create(browser=session_config)
# Get the session_id to run automation workflows to the same running session.
session_id = configured_session.data.id
# Get the live view url to browse the browser in action (it's interactive!).
live_view_url = configured_session.data.live_view_url
print('session_id:', session_id, '\nlive_view_url:', live_view_url)
```
## Next Steps
* Explore the [API Reference](https://docs.anchorbrowser.io/api-reference?utm_source=groq) for detailed documentation
* Learn about [Authentication and Identity management](https://docs.anchorbrowser.io/essentials/authentication-and-identity?utm_source=groq)
* Check out [Advanced Proxy Configuration](https://docs.anchorbrowser.io/advanced/proxy?utm_source=groq) for location-specific browsing
* Use more [Agentic tools](https://docs.anchorbrowser.io/agentic-browser-control?utm_source=groq)
---
# Source: https://docs.anchorbrowser.io/integrations/open-source/playwright/business-applications/hubspot.md
> ## Documentation Index
> Fetch the complete documentation index at: https://docs.anchorbrowser.io/llms.txt
> Use this file to discover all available pages before exploring further.
# HubSpot
> Automate HubSpot CRM workflows with Playwright when APIs aren't available.
# How to Automate HubSpot with Playwright
Automate critical HubSpot CRM workflows with Playwright when APIs aren't available or sufficient. You'll eliminate manual lead processing and reduce sales pipeline errors by automating repetitive marketing and sales processes. Use Playwright to interact with HubSpot's web interface programmatically.
[View HubSpot's API documentation](https://developers.hubspot.com/docs/api/overview) for integration services when available.
## Setup
Install Playwright and configure authentication:
```bash theme={null}
npm install playwright
```
## Automate Workflows
Create scripts for common HubSpot tasks:
```JavaScript theme={null}
import { chromium } from 'playwright';
const browser = await chromium.launch();
const page = await browser.newPage();
// Login to HubSpot
await page.goto('https://app.hubspot.com/login');
await page.fill('#username', process.env.HUBSPOT_EMAIL);
await page.fill('#password', process.env.HUBSPOT_PASSWORD);
await page.click('#loginBtn');
// Navigate to contacts
await page.click('[data-selenium-test="nav-primary-contacts-contacts"]');
await page.click('[data-selenium-test="create-contact-button"]');
// Create new contact
await page.fill('[data-field="firstname"]', 'Michael');
await page.fill('[data-field="lastname"]', 'Chen');
await page.fill('[data-field="email"]', 'michael.chen@techcorp.com');
await page.fill('[data-field="company"]', 'TechCorp Solutions');
await page.selectOption('[data-field="lifecyclestage"]', 'marketingqualifiedlead');
// Create associated deal
await page.click('[data-selenium-test="associations-tab"]');
await page.click('[data-selenium-test="create-deal-button"]');
await page.fill('[data-field="dealname"]', 'TechCorp Enterprise Package');
await page.fill('[data-field="amount"]', '75000');
await page.selectOption('[data-field="dealstage"]', 'qualifiedtobuy');
await page.click('[data-selenium-test="save-contact"]');
await browser.close();
```
Playwright handles form validations, association creation, and pipeline updates automatically. You can automate lead scoring, email campaign management, and sales forecasting workflows.
## Scale your HubSpot automation with Anchor Browser
Run your Playwright HubSpot automations on cloud browsers with enterprise-grade reliability and persistent HubSpot CRM sessions. Learn more and get started for free: [https://anchorbrowser.io](https://anchorbrowser.io)
---
# Source: https://docs.anchorbrowser.io/agentic-browser-control/human-in-the-loop.md
> ## Documentation Index
> Fetch the complete documentation index at: https://docs.anchorbrowser.io/llms.txt
> Use this file to discover all available pages before exploring further.
# Human-in-the-Loop
> Enable human intervention during AI agent task execution
Enabling Human-in-the-loop (HITL) allows the AI agent to pause execution and request human intervention when needed. This feature is essential for tasks that require human judgment, approval, or handling of unexpected situations.
## Basic Usage
### How It Works
When HITL is enabled, the agent sends its intervention requests to a session-specific queue. The agent then continues execution based on your instructions.
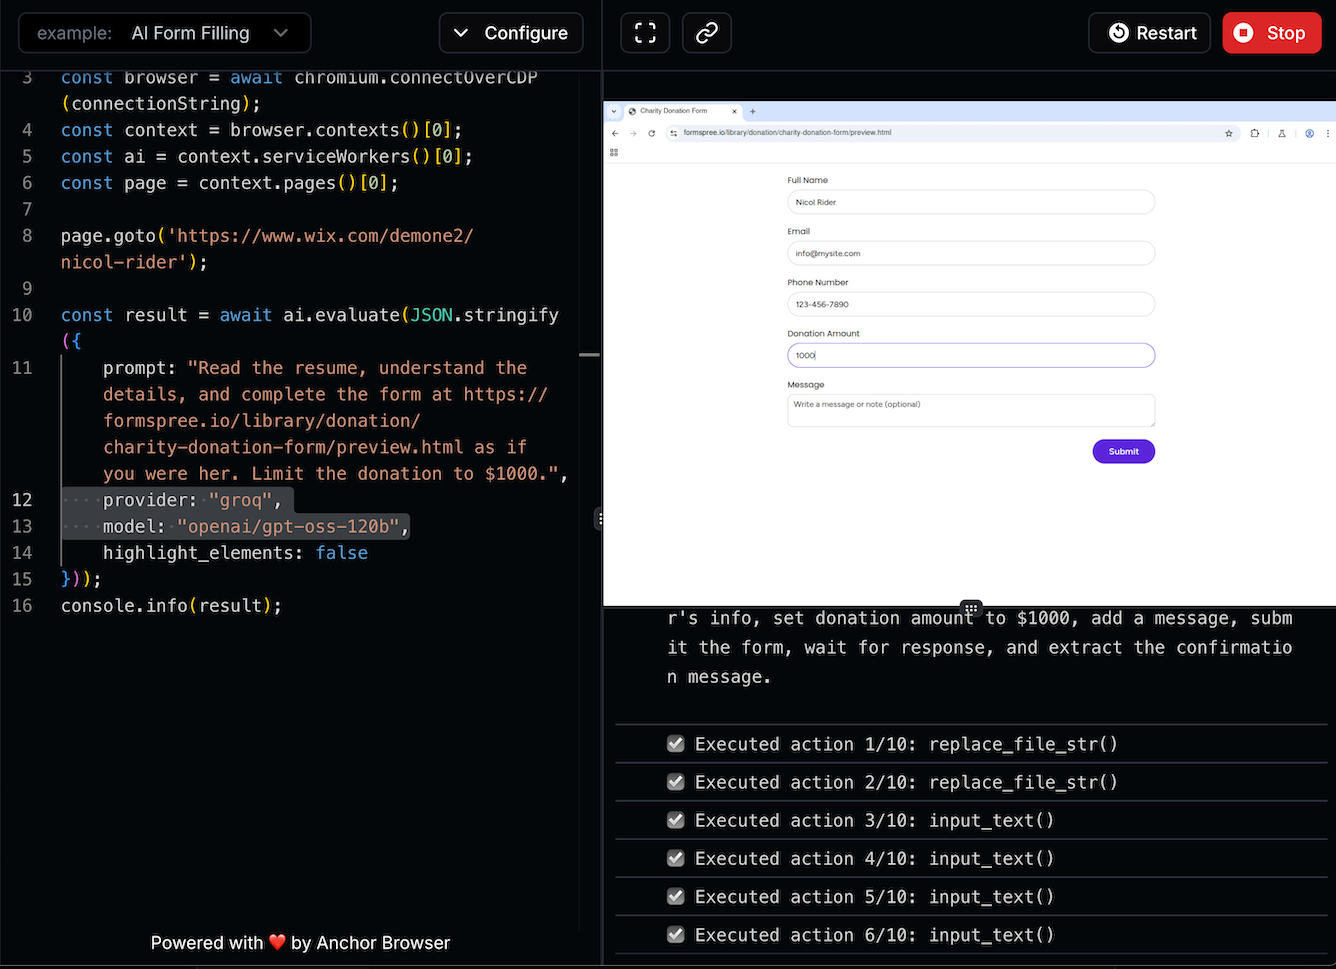
 Use our [AI Task Completion](/agentic-browser-control/ai-task-completion) module to perform various tasks in a single module.
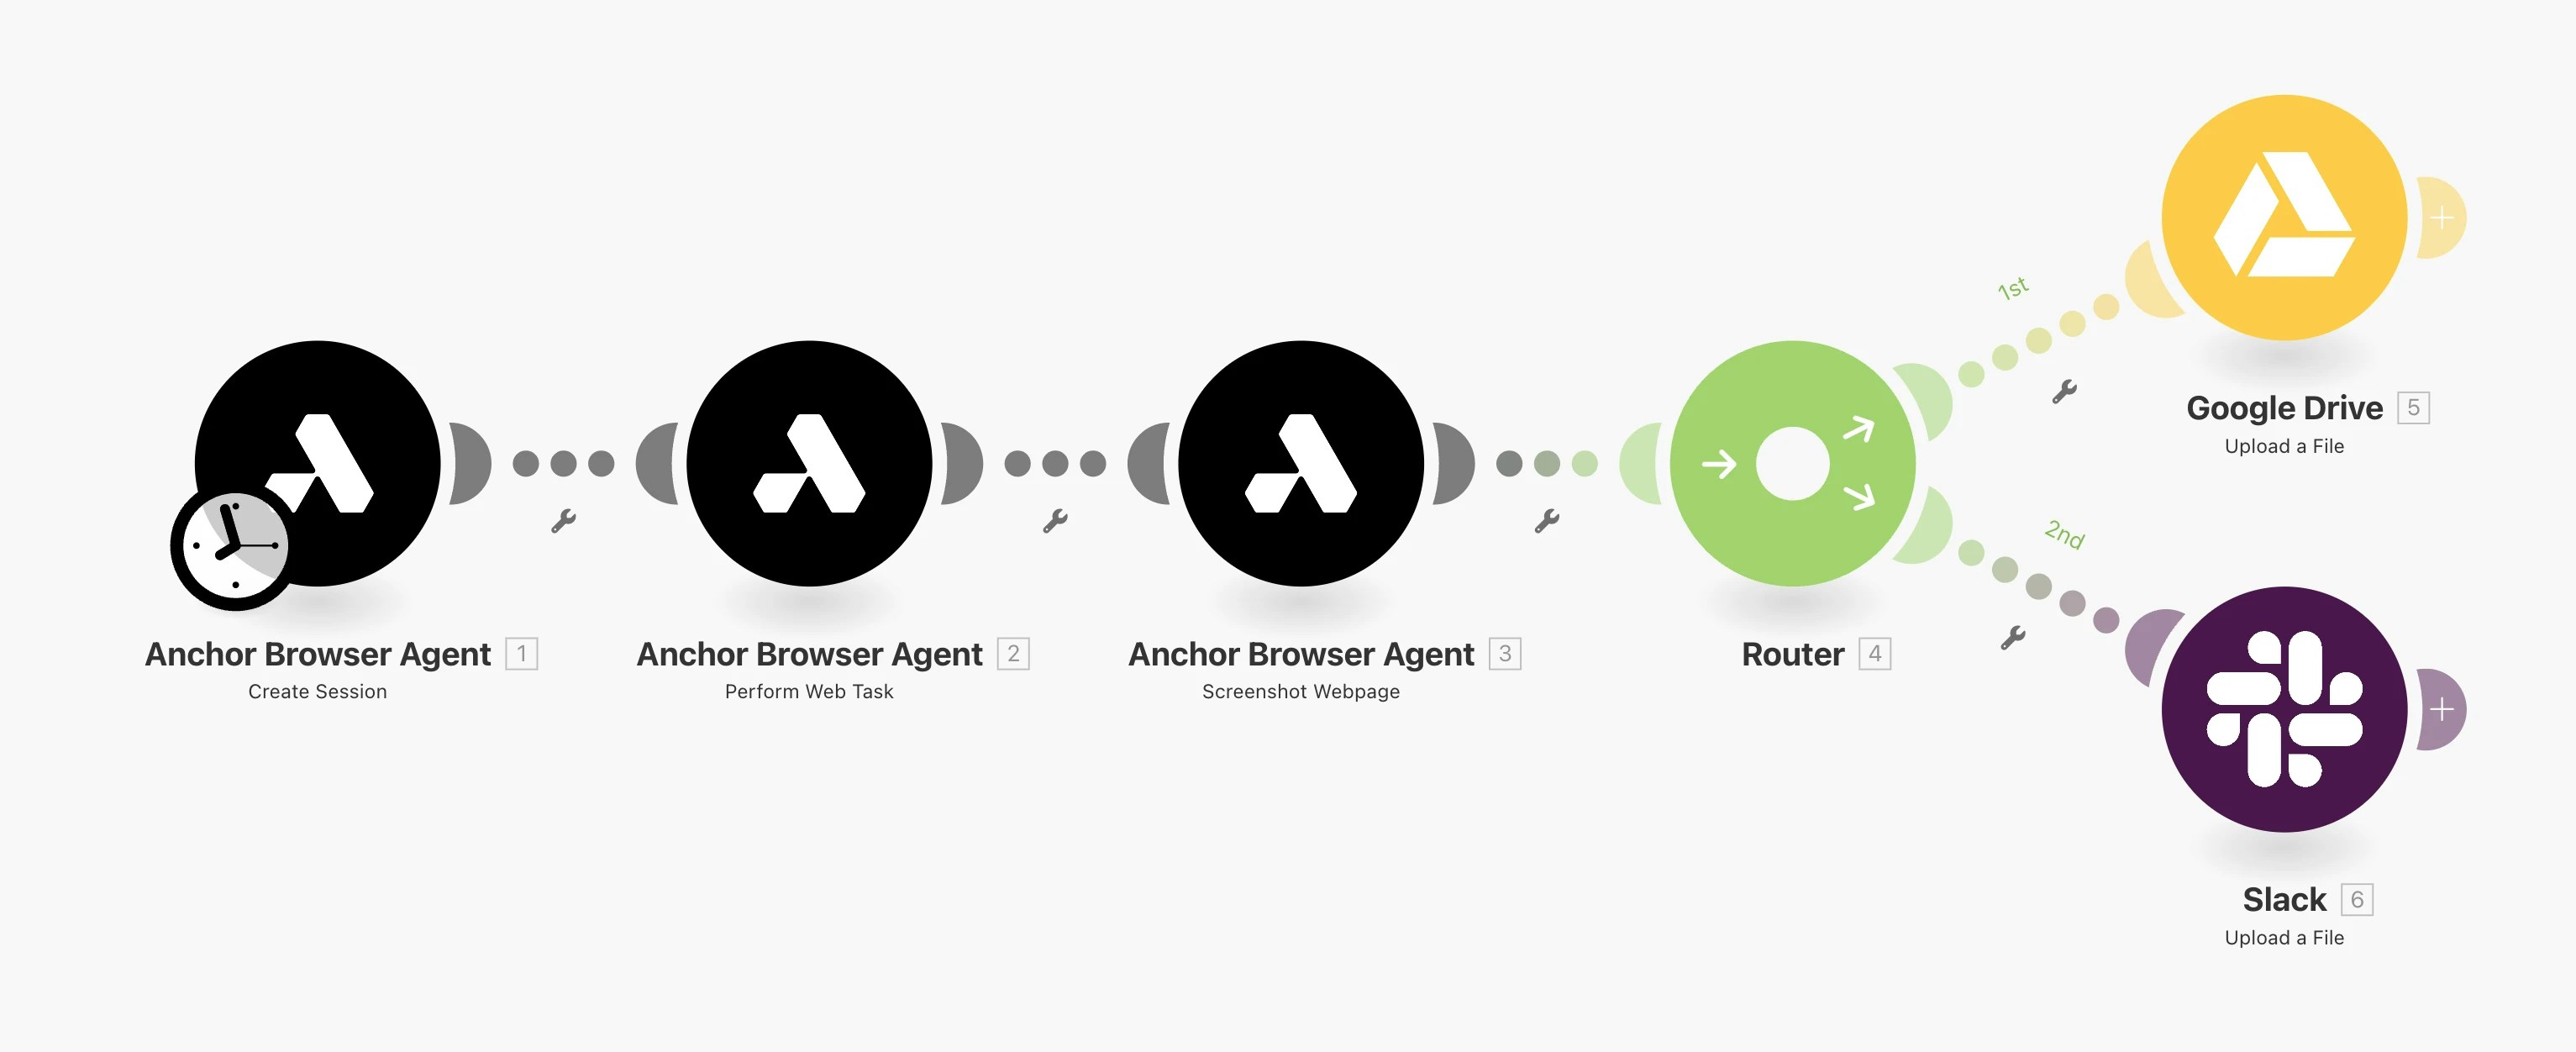
 ### Basic Workflow
Here is a basic workflow that uses our modules to perform a task, capture a screenshot and save it to a file both in google drive and slack.
### Basic Workflow
Here is a basic workflow that uses our modules to perform a task, capture a screenshot and save it to a file both in google drive and slack.
 ***
## Getting Help
If you experience any issues with Anchor Browser Make modules, please contact our support team at [support@anchorbrowser.io](mailto:support@anchorbrowser.io).
---
# Source: https://docs.anchorbrowser.io/advanced/mcp-open-source.md
> ## Documentation Index
> Fetch the complete documentation index at: https://docs.anchorbrowser.io/llms.txt
> Use this file to discover all available pages before exploring further.
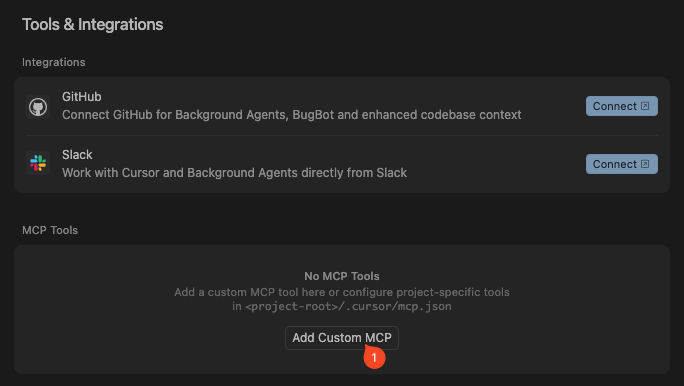
# MCP - Open Source
> Self-host Anchor MCP server with customizable Playwright integration for your specific needs
# Anchor MCP Server (Open Source)
***
## Getting Help
If you experience any issues with Anchor Browser Make modules, please contact our support team at [support@anchorbrowser.io](mailto:support@anchorbrowser.io).
---
# Source: https://docs.anchorbrowser.io/advanced/mcp-open-source.md
> ## Documentation Index
> Fetch the complete documentation index at: https://docs.anchorbrowser.io/llms.txt
> Use this file to discover all available pages before exploring further.
# MCP - Open Source
> Self-host Anchor MCP server with customizable Playwright integration for your specific needs
# Anchor MCP Server (Open Source)
 ### Credentials Setup
Set up your Anchor Browser API credentials:
### Credentials Setup
Set up your Anchor Browser API credentials:
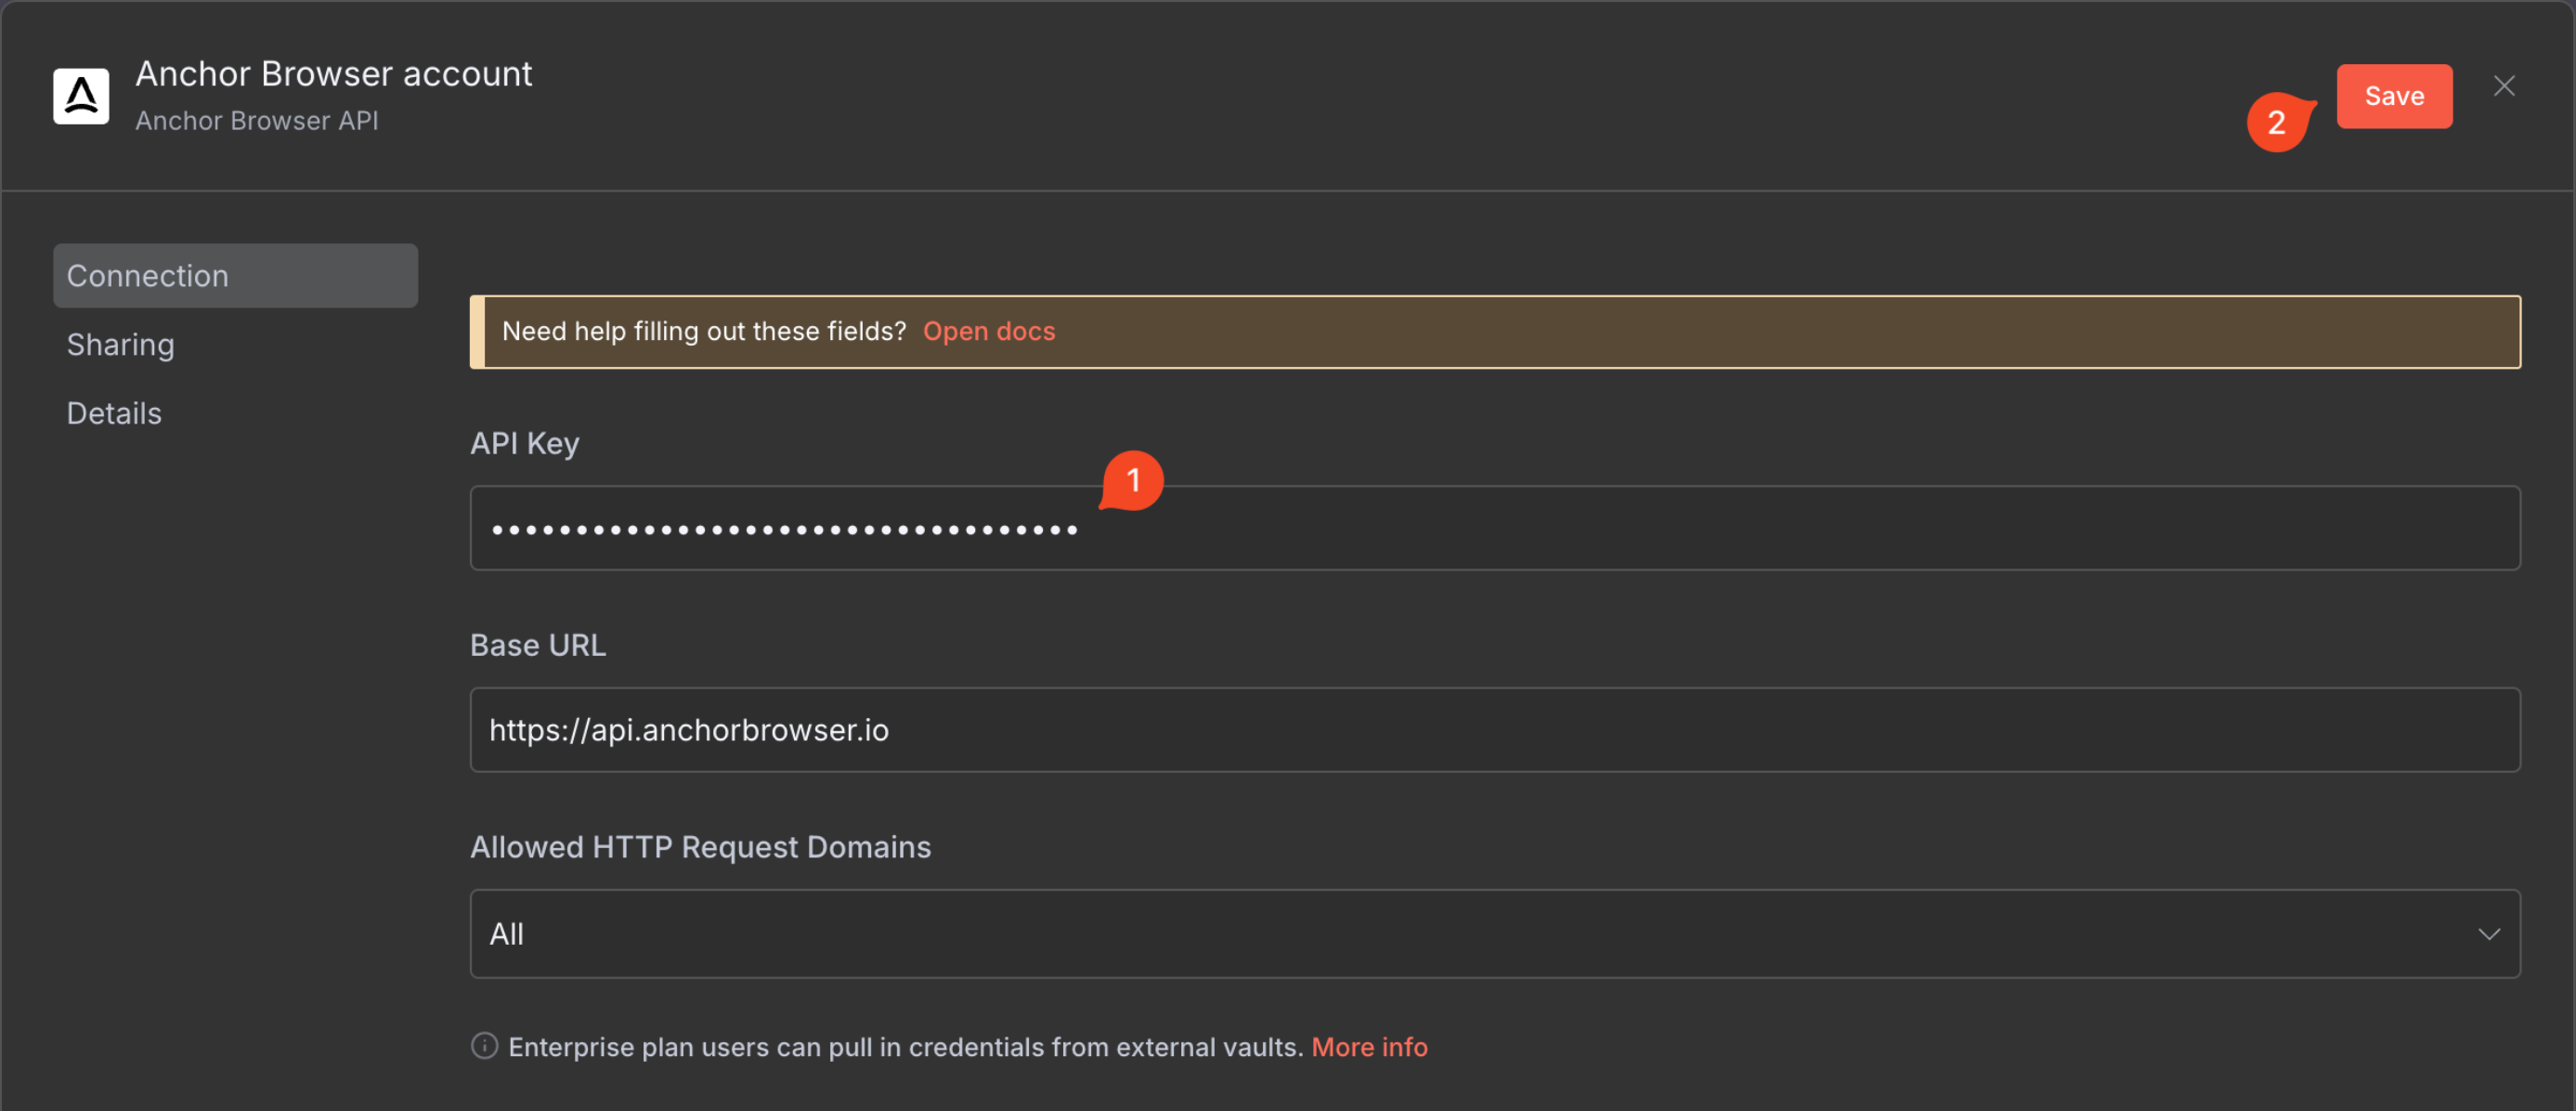 Make sure after saving that the connection is tested successfully.
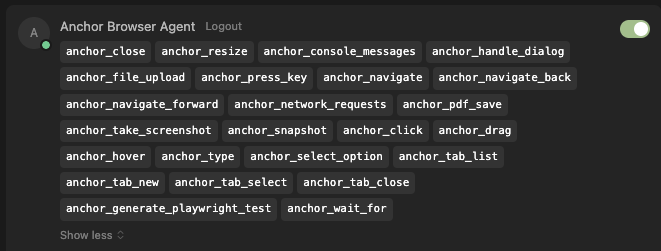
 ### Node Selection
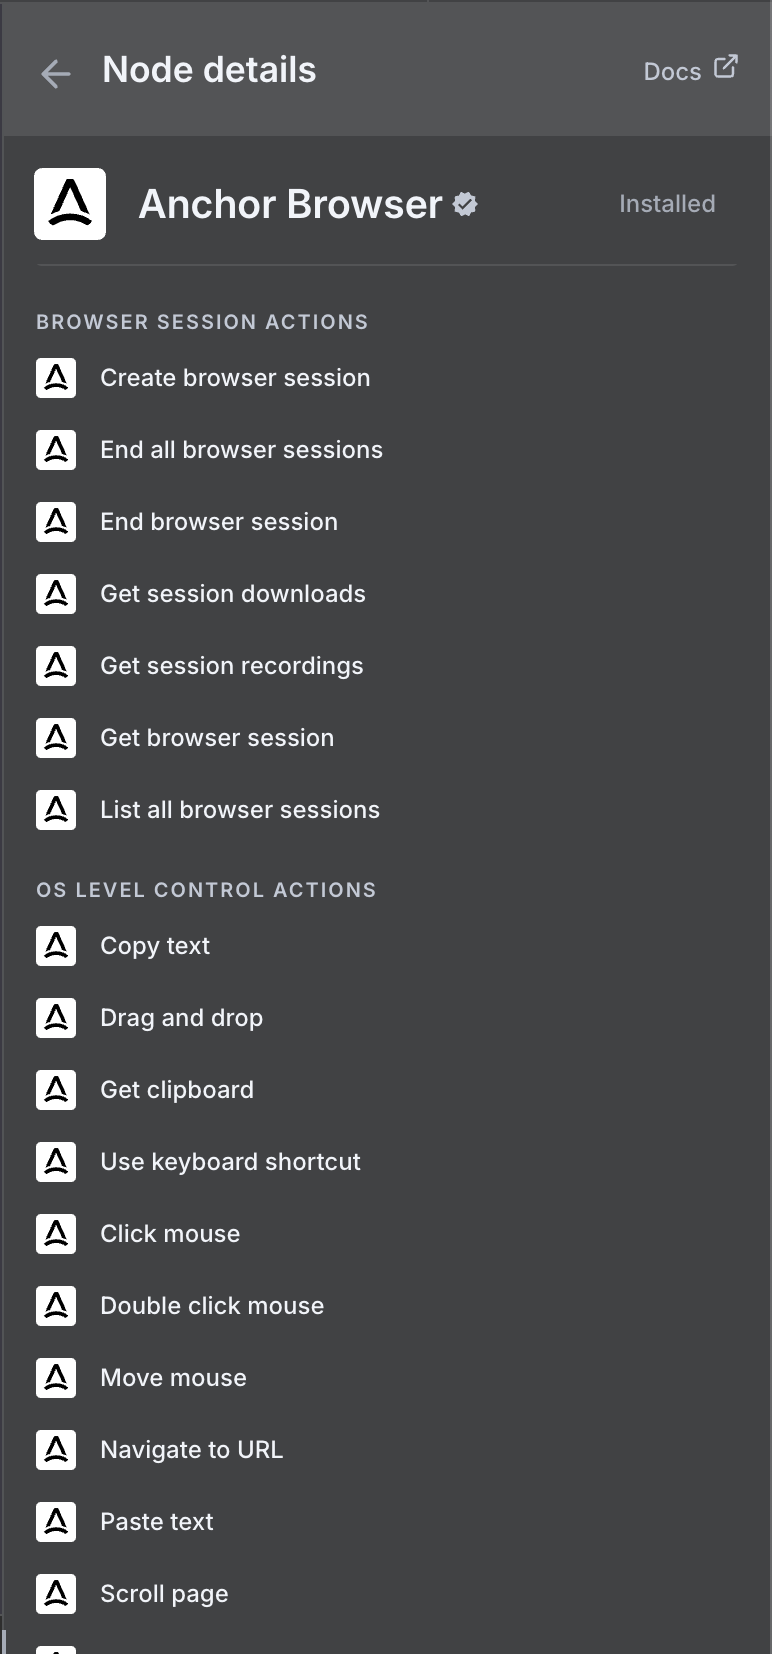
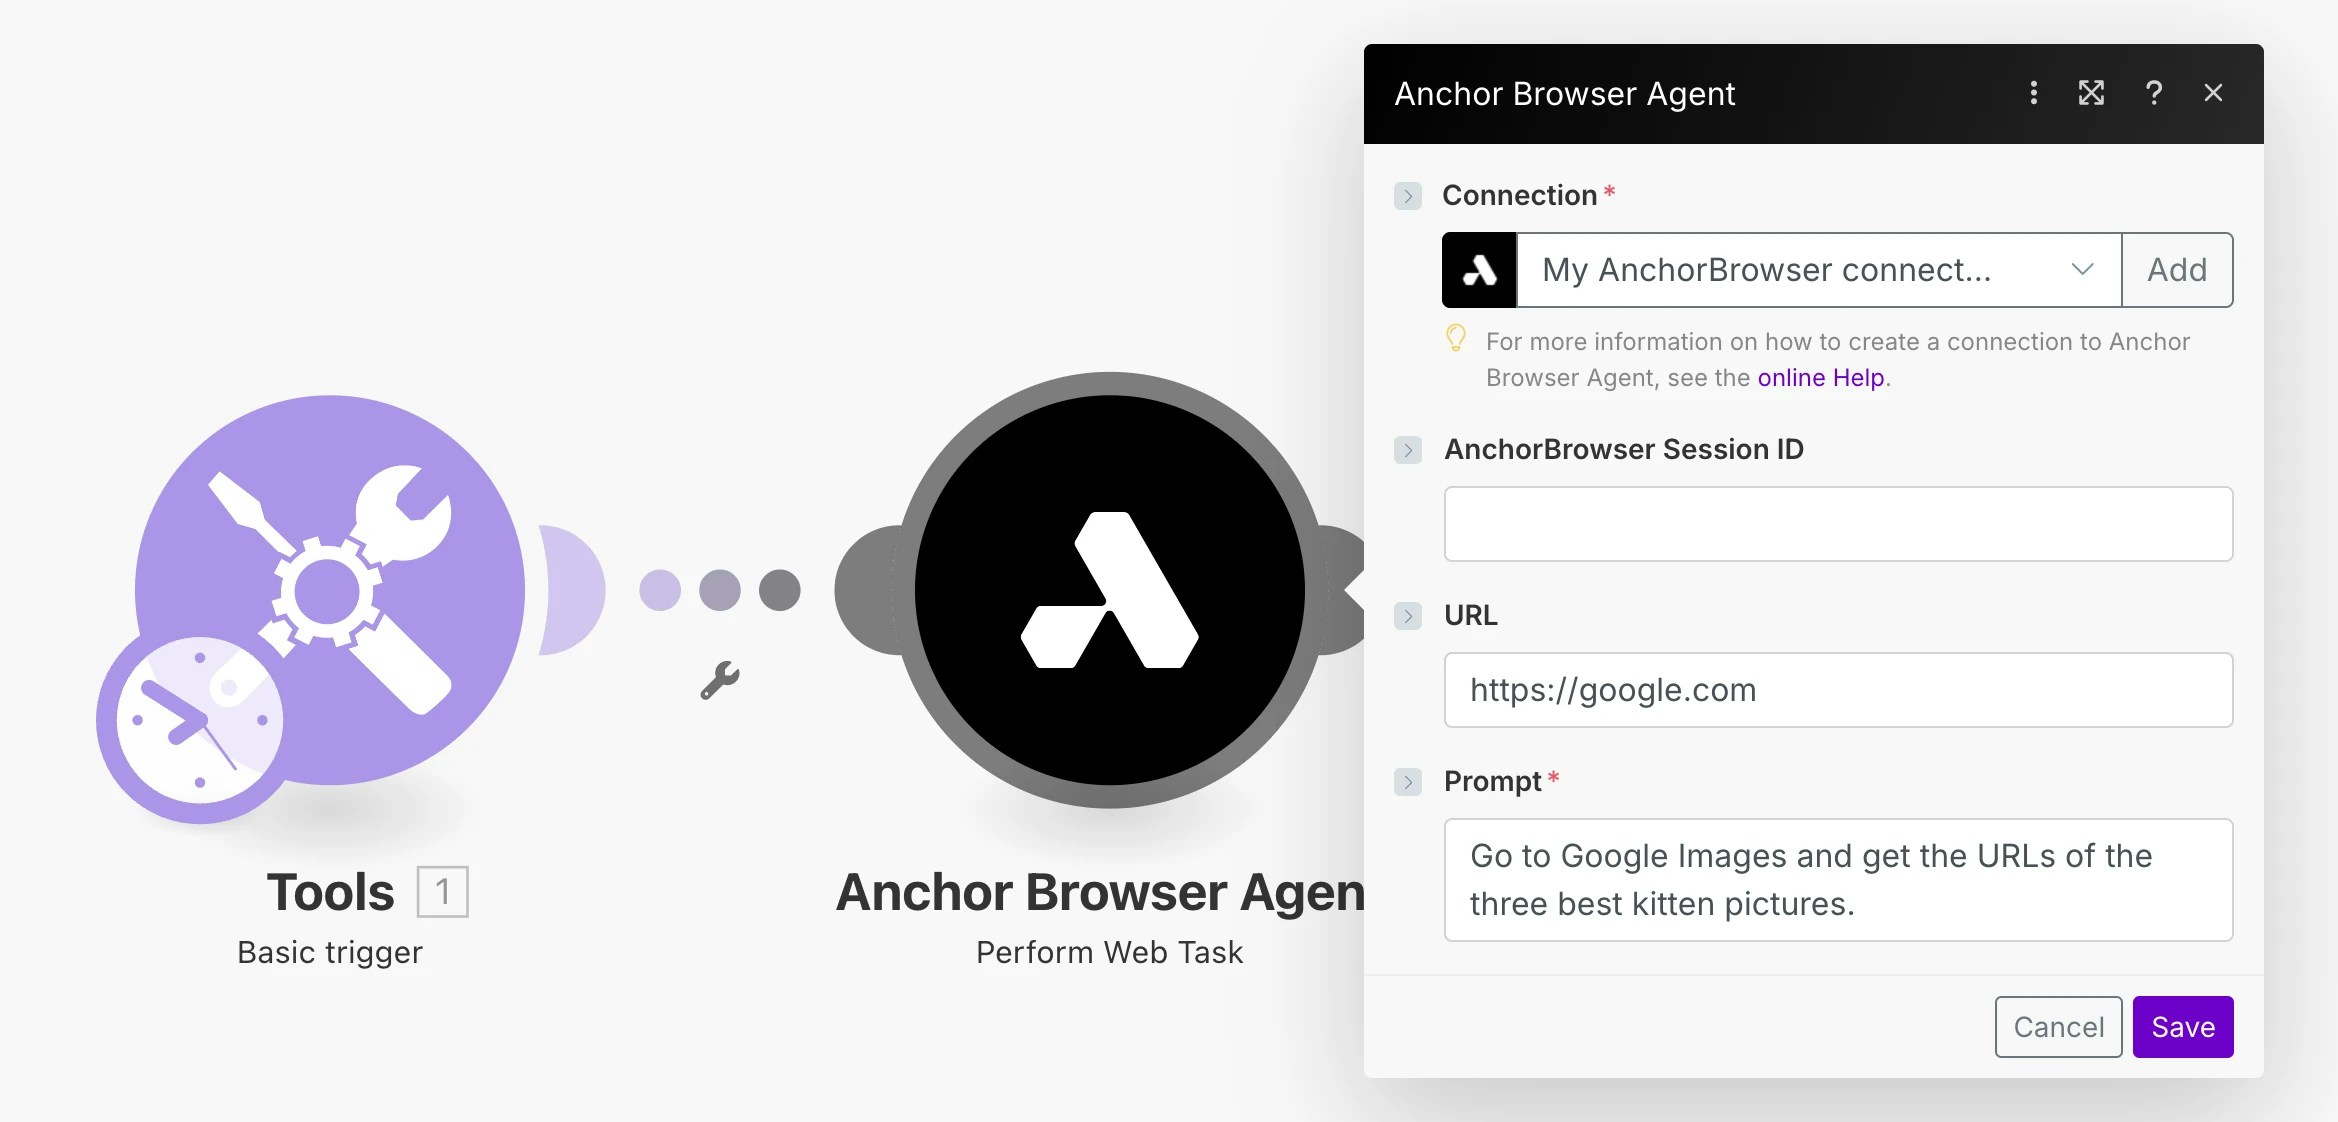
 Use our [AI Task Completion](/agentic-browser-control/ai-task-completion) node to perform various tasks in a single operation.
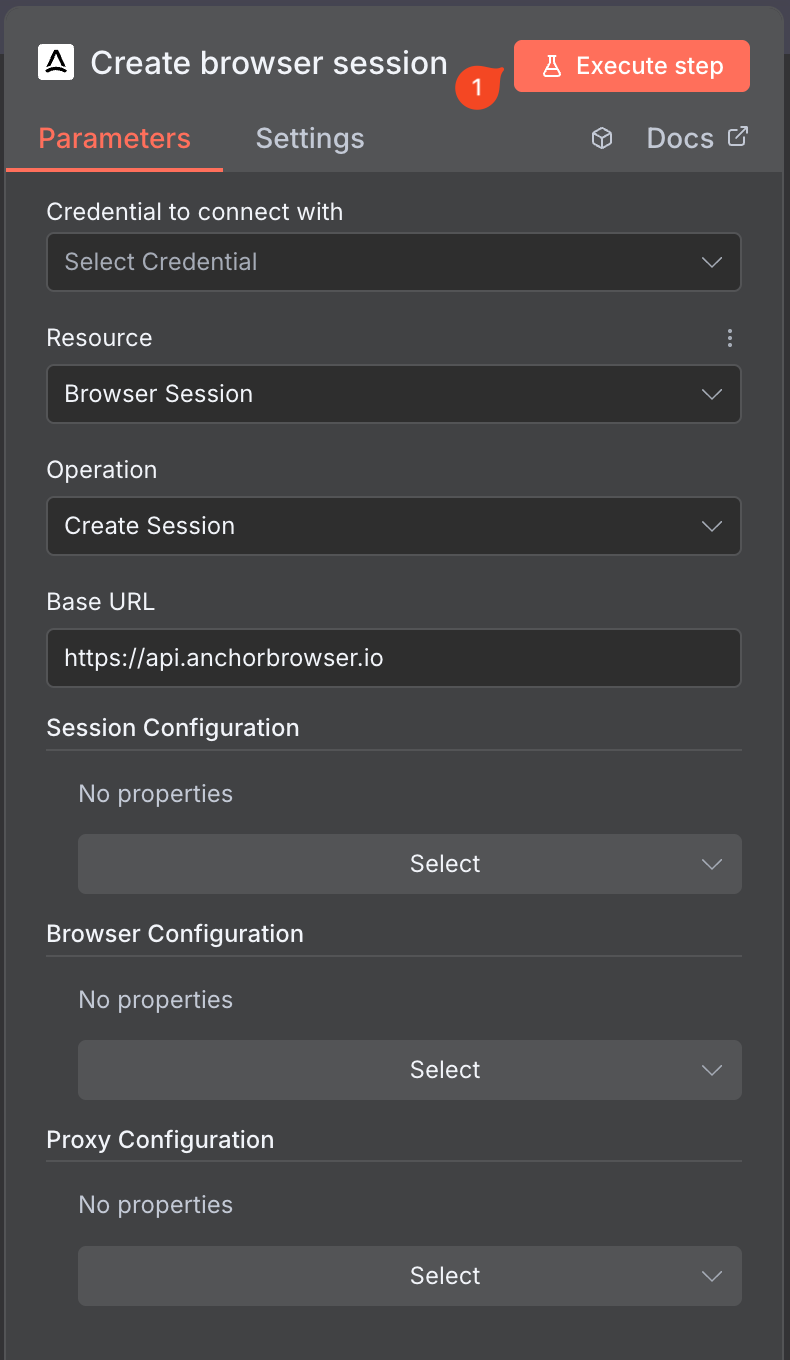
### Node Configuration
Configure your Anchor Browser node with the necessary settings, and then Execute step.
Use our [AI Task Completion](/agentic-browser-control/ai-task-completion) node to perform various tasks in a single operation.
### Node Configuration
Configure your Anchor Browser node with the necessary settings, and then Execute step.
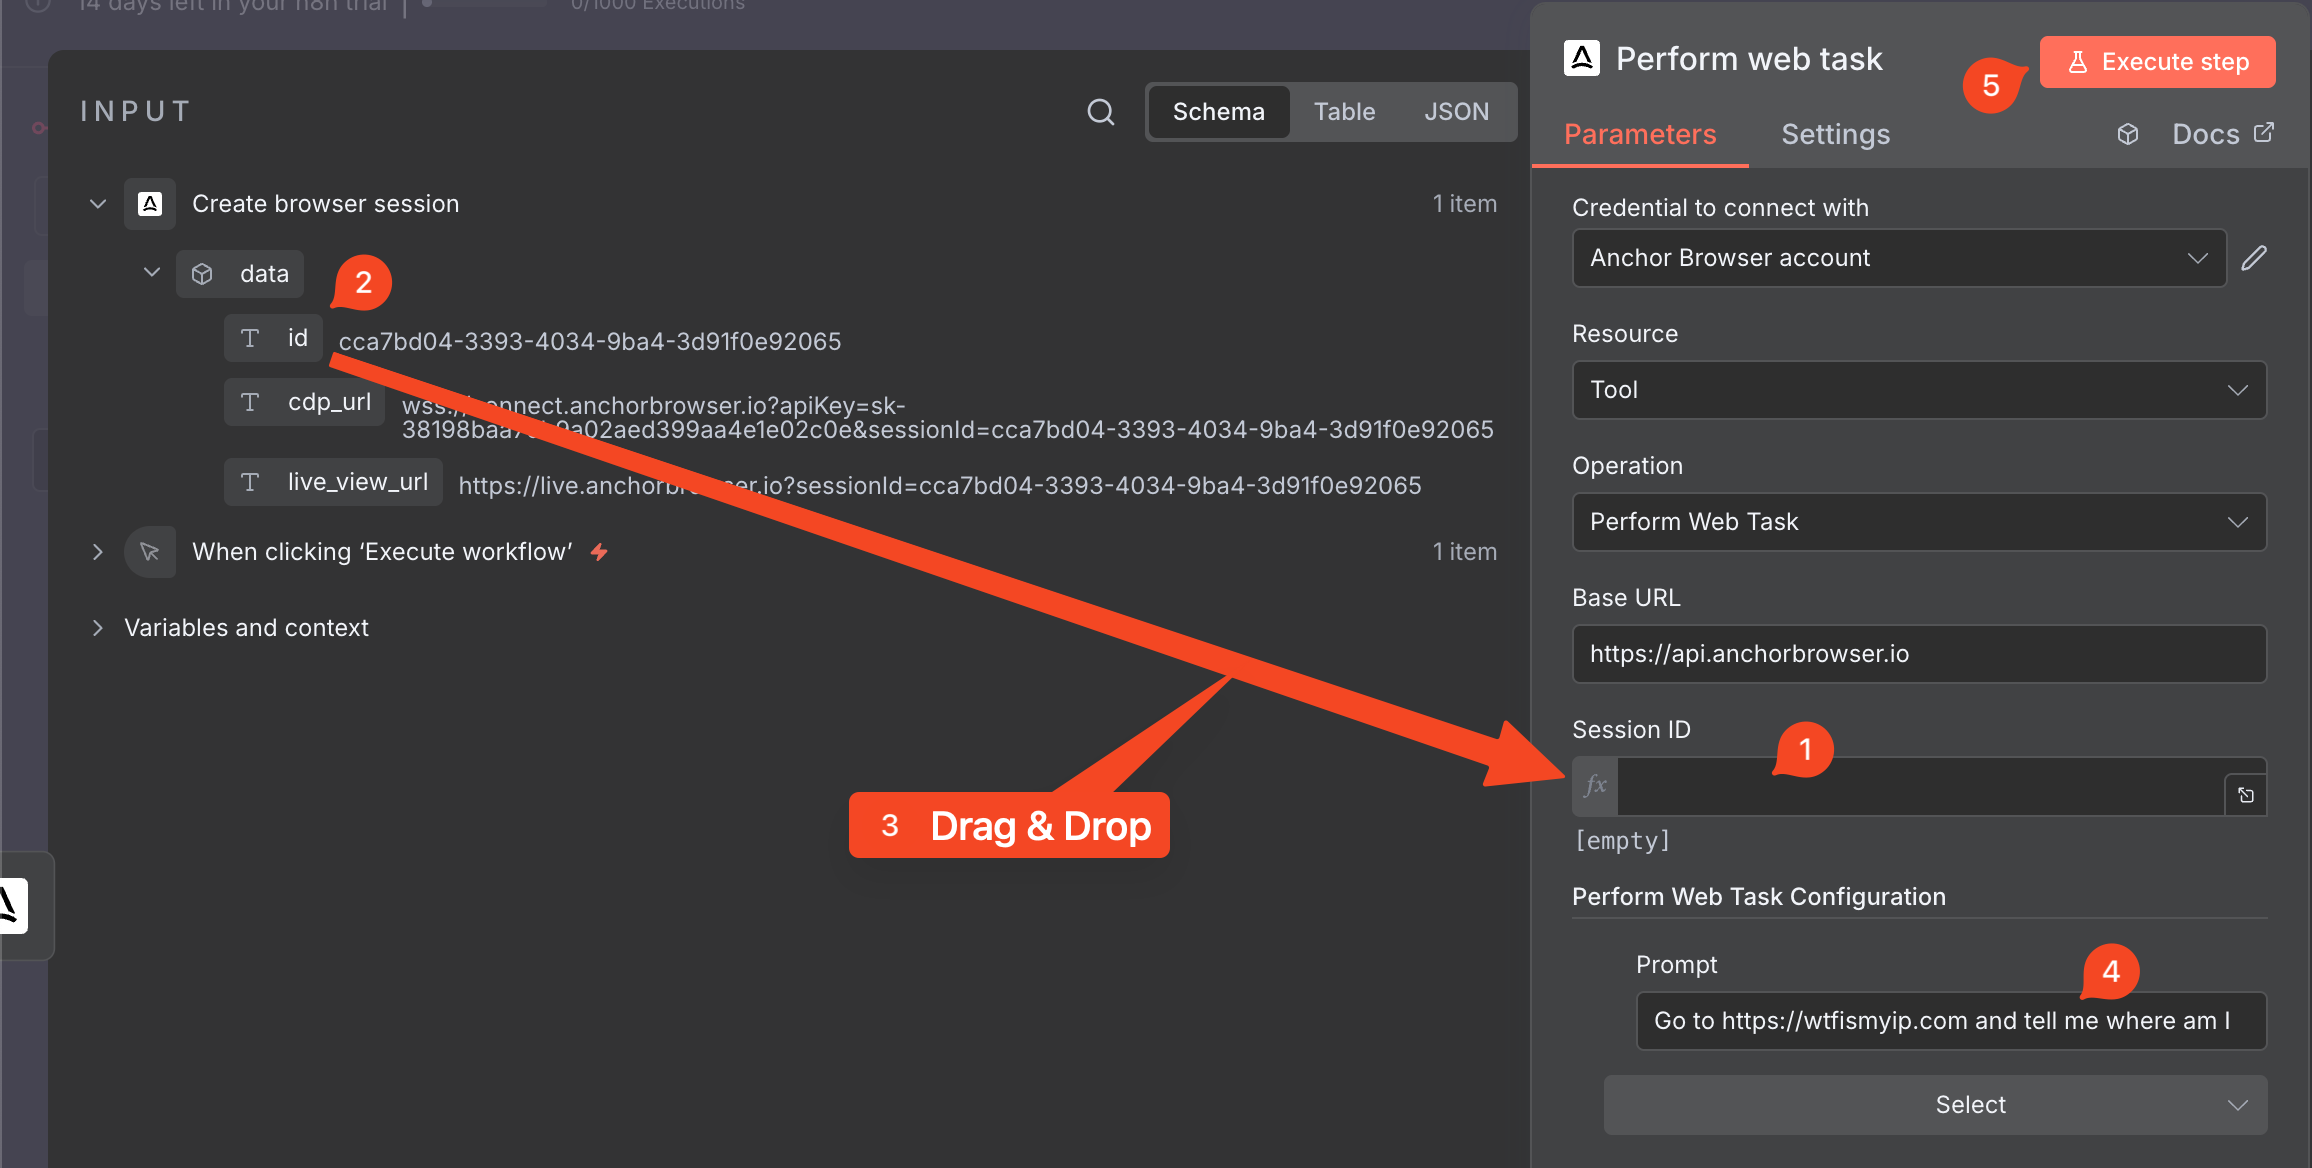
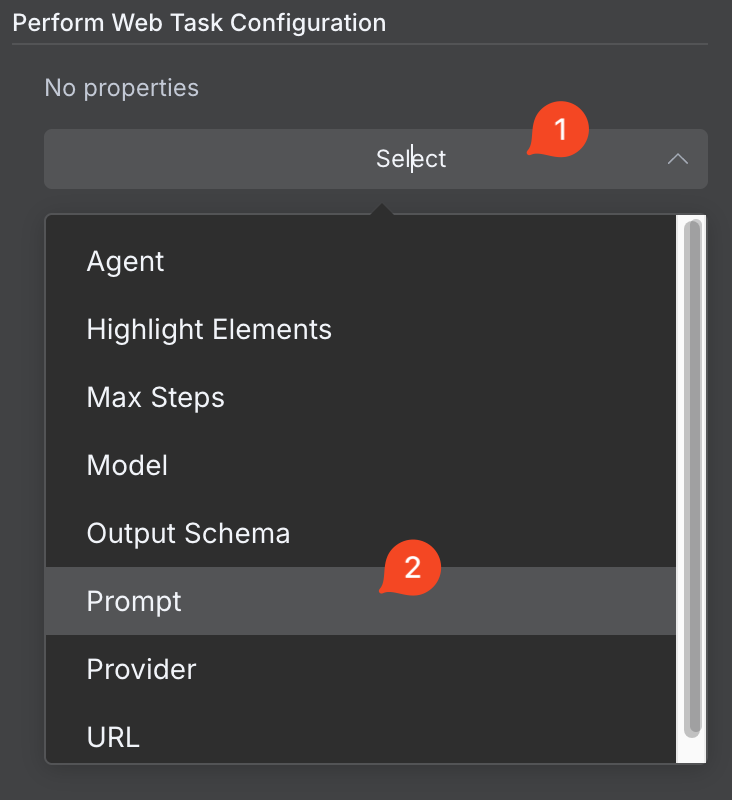
 ### Task Configuration
Configure your browser automation task:
### Task Configuration
Configure your browser automation task:
 ***
## Getting Help
If you experience any issues with Anchor Browser n8n node, please contact our support team at [support@anchorbrowser.io](mailto:support@anchorbrowser.io).
---
# Source: https://docs.anchorbrowser.io/api-reference/os-level-control/navigate-to-url.md
> ## Documentation Index
> Fetch the complete documentation index at: https://docs.anchorbrowser.io/llms.txt
> Use this file to discover all available pages before exploring further.
# Navigate to URL
> Navigates the browser session to the specified URL
## OpenAPI
````yaml openapi-mintlify.yaml post /v1/sessions/{sessionId}/goto
openapi: 3.1.0
info:
title: AnchorBrowser API
version: 1.0.0
description: APIs to manage all browser-related actions and configuration.
servers:
- url: https://api.anchorbrowser.io
description: API server
security: []
paths:
/v1/sessions/{sessionId}/goto:
post:
tags:
- OS Level Control
summary: Navigate to URL
description: Navigates the browser session to the specified URL
parameters:
- name: sessionId
in: path
required: true
description: The ID of the browser session
schema:
type: string
format: uuid
requestBody:
required: true
content:
application/json:
schema:
$ref: '#/components/schemas/NavigateRequestSchema'
responses:
'200':
description: Navigation successful
content:
application/json:
schema:
type: object
properties:
status:
type: string
'400':
description: Invalid URL or parameters
content:
application/json:
schema:
$ref: '#/components/schemas/ErrorResponse'
'404':
description: Session not found
content:
application/json:
schema:
type: object
properties:
error:
$ref: '#/components/schemas/ErrorResponse'
'500':
description: Failed to navigate to URL
content:
application/json:
schema:
type: object
properties:
error:
$ref: '#/components/schemas/ErrorResponse'
security:
- api_key_header: []
components:
schemas:
NavigateRequestSchema:
type: object
required:
- url
properties:
url:
type: string
description: The URL to navigate to
ErrorResponse:
type: object
properties:
error:
type: object
properties:
code:
type: integer
message:
type: string
securitySchemes:
api_key_header:
type: apiKey
in: header
name: anchor-api-key
description: API key passed in the header
````
---
# Source: https://docs.anchorbrowser.io/integrations/open-source/playwright/business-applications/netsuite.md
> ## Documentation Index
> Fetch the complete documentation index at: https://docs.anchorbrowser.io/llms.txt
> Use this file to discover all available pages before exploring further.
# NetSuite
> Automate NetSuite business workflows with Playwright when APIs aren't available.
# How to Automate NetSuite with Playwright
Automate critical NetSuite workflows with Playwright when APIs aren't available or sufficient. You'll eliminate manual data entry and reduce errors by automating repetitive business processes. Use Playwright to interact with NetSuite's web interface programmatically.
[View NetSuite's SuiteScript documentation](https://system.netsuite.com/help/helpcenter/en_US/APIs/REST_API_Browser/record/v1/2023.1/index.html) for API alternatives when available.
## Setup
Install Playwright and configure authentication:
```bash theme={null}
npm install playwright
```
## Automate Workflows
Create scripts for common NetSuite tasks:
```JavaScript theme={null}
import { chromium } from 'playwright';
const browser = await chromium.launch();
const page = await browser.newPage();
// Login to NetSuite
await page.goto('https://system.netsuite.com/pages/customerlogin.jsp');
await page.fill('#email', process.env.NETSUITE_EMAIL);
await page.fill('#password', process.env.NETSUITE_PASSWORD);
await page.click('#login-submit');
// Navigate to customer records
await page.click('text=Lists');
await page.click('text=Customers');
// Create new customer record
await page.click('text=New');
await page.fill('#companyname', 'Acme Corporation');
await page.fill('#email', 'contact@acme.com');
await page.click('#btn_multibutton_submitter');
await browser.close();
```
Playwright handles dynamic loading, form submissions, and navigation automatically. You can automate financial reporting, customer management, and inventory updates.
## Scale your NetSuite automation with Anchor Browser
Run your Playwright NetSuite automations on cloud browsers with enterprise-grade reliability and session persistence. Learn more and get started for free: [https://anchorbrowser.io](https://anchorbrowser.io)
---
# Source: https://docs.anchorbrowser.io/integrations/open-source/playwright/business-applications/notion.md
> ## Documentation Index
> Fetch the complete documentation index at: https://docs.anchorbrowser.io/llms.txt
> Use this file to discover all available pages before exploring further.
# Notion
> Automate Notion workspace workflows with Playwright when APIs aren't available.
# How to Automate Notion with Playwright
Automate critical Notion workspace workflows with Playwright when APIs aren't available or sufficient. You'll eliminate manual page creation and reduce content management errors by automating repetitive documentation processes. Use Playwright to interact with Notion's web interface programmatically.
[View Notion's API documentation](https://developers.notion.com/) for integration services when available.
## Setup
Install Playwright and configure authentication:
```bash theme={null}
npm install playwright
```
## Automate Workflows
Create scripts for common Notion tasks:
```JavaScript theme={null}
import { chromium } from 'playwright';
const browser = await chromium.launch();
const page = await browser.newPage();
// Login to Notion
await page.goto('https://www.notion.so/login');
await page.fill('[data-testid="login-email"]', process.env.NOTION_EMAIL);
await page.fill('[data-testid="login-password"]', process.env.NOTION_PASSWORD);
await page.click('[data-testid="login-submit"]');
// Navigate to workspace
await page.click('[data-testid="workspace-switcher"]');
await page.click('text=Team Workspace');
// Create new page
await page.click('text=+ New page');
await page.fill('[placeholder="Untitled"]', 'Weekly Status Report');
await page.click('[data-testid="template-button"]');
await page.click('text=Meeting notes');
// Add content to database
await page.click('text=Projects Database');
await page.click('text=+ New');
await page.fill('[data-testid="title-input"]', 'Q1 Marketing Campaign');
await page.selectOption('[data-testid="status-select"]', 'In Progress');
await page.click('[data-testid="save-button"]');
await browser.close();
```
Playwright handles page loading, template selection, and database updates automatically. You can automate content publishing, team collaboration workflows, and project tracking processes.
## Scale your Notion automation with Anchor Browser
Run your Playwright Notion automations on cloud browsers with enterprise-grade reliability and persistent Notion sessions. Learn more and get started for free: [https://anchorbrowser.io](https://anchorbrowser.io)
---
# Source: https://docs.anchorbrowser.io/agentic-browser-control/computer-use-agents/openai.md
> ## Documentation Index
> Fetch the complete documentation index at: https://docs.anchorbrowser.io/llms.txt
> Use this file to discover all available pages before exploring further.
# OpenAI Computer Use
> Use OpenAI models with computer use capabilities for browser automation
OpenAI's Computer Use Agent (`openai-cua`) leverages GPT models with vision and reasoning capabilities for screenshot-based browser automation.
## Overview
OpenAI Computer Use provides:
* **Screenshot-based interactions** for visual understanding of web pages
* **Advanced reasoning** powered by GPT models
* **High accuracy** for complex web interactions
* **Structured outputs** for reliable data extraction
## Supported Models
| Model | Model ID | Best For |
| -------------------- | ---------------------- | ----------------------------------------- |
| Computer Use Preview | `computer-use-preview` | Screenshot-based automation **(default)** |
## Code Example
***
## Getting Help
If you experience any issues with Anchor Browser n8n node, please contact our support team at [support@anchorbrowser.io](mailto:support@anchorbrowser.io).
---
# Source: https://docs.anchorbrowser.io/api-reference/os-level-control/navigate-to-url.md
> ## Documentation Index
> Fetch the complete documentation index at: https://docs.anchorbrowser.io/llms.txt
> Use this file to discover all available pages before exploring further.
# Navigate to URL
> Navigates the browser session to the specified URL
## OpenAPI
````yaml openapi-mintlify.yaml post /v1/sessions/{sessionId}/goto
openapi: 3.1.0
info:
title: AnchorBrowser API
version: 1.0.0
description: APIs to manage all browser-related actions and configuration.
servers:
- url: https://api.anchorbrowser.io
description: API server
security: []
paths:
/v1/sessions/{sessionId}/goto:
post:
tags:
- OS Level Control
summary: Navigate to URL
description: Navigates the browser session to the specified URL
parameters:
- name: sessionId
in: path
required: true
description: The ID of the browser session
schema:
type: string
format: uuid
requestBody:
required: true
content:
application/json:
schema:
$ref: '#/components/schemas/NavigateRequestSchema'
responses:
'200':
description: Navigation successful
content:
application/json:
schema:
type: object
properties:
status:
type: string
'400':
description: Invalid URL or parameters
content:
application/json:
schema:
$ref: '#/components/schemas/ErrorResponse'
'404':
description: Session not found
content:
application/json:
schema:
type: object
properties:
error:
$ref: '#/components/schemas/ErrorResponse'
'500':
description: Failed to navigate to URL
content:
application/json:
schema:
type: object
properties:
error:
$ref: '#/components/schemas/ErrorResponse'
security:
- api_key_header: []
components:
schemas:
NavigateRequestSchema:
type: object
required:
- url
properties:
url:
type: string
description: The URL to navigate to
ErrorResponse:
type: object
properties:
error:
type: object
properties:
code:
type: integer
message:
type: string
securitySchemes:
api_key_header:
type: apiKey
in: header
name: anchor-api-key
description: API key passed in the header
````
---
# Source: https://docs.anchorbrowser.io/integrations/open-source/playwright/business-applications/netsuite.md
> ## Documentation Index
> Fetch the complete documentation index at: https://docs.anchorbrowser.io/llms.txt
> Use this file to discover all available pages before exploring further.
# NetSuite
> Automate NetSuite business workflows with Playwright when APIs aren't available.
# How to Automate NetSuite with Playwright
Automate critical NetSuite workflows with Playwright when APIs aren't available or sufficient. You'll eliminate manual data entry and reduce errors by automating repetitive business processes. Use Playwright to interact with NetSuite's web interface programmatically.
[View NetSuite's SuiteScript documentation](https://system.netsuite.com/help/helpcenter/en_US/APIs/REST_API_Browser/record/v1/2023.1/index.html) for API alternatives when available.
## Setup
Install Playwright and configure authentication:
```bash theme={null}
npm install playwright
```
## Automate Workflows
Create scripts for common NetSuite tasks:
```JavaScript theme={null}
import { chromium } from 'playwright';
const browser = await chromium.launch();
const page = await browser.newPage();
// Login to NetSuite
await page.goto('https://system.netsuite.com/pages/customerlogin.jsp');
await page.fill('#email', process.env.NETSUITE_EMAIL);
await page.fill('#password', process.env.NETSUITE_PASSWORD);
await page.click('#login-submit');
// Navigate to customer records
await page.click('text=Lists');
await page.click('text=Customers');
// Create new customer record
await page.click('text=New');
await page.fill('#companyname', 'Acme Corporation');
await page.fill('#email', 'contact@acme.com');
await page.click('#btn_multibutton_submitter');
await browser.close();
```
Playwright handles dynamic loading, form submissions, and navigation automatically. You can automate financial reporting, customer management, and inventory updates.
## Scale your NetSuite automation with Anchor Browser
Run your Playwright NetSuite automations on cloud browsers with enterprise-grade reliability and session persistence. Learn more and get started for free: [https://anchorbrowser.io](https://anchorbrowser.io)
---
# Source: https://docs.anchorbrowser.io/integrations/open-source/playwright/business-applications/notion.md
> ## Documentation Index
> Fetch the complete documentation index at: https://docs.anchorbrowser.io/llms.txt
> Use this file to discover all available pages before exploring further.
# Notion
> Automate Notion workspace workflows with Playwright when APIs aren't available.
# How to Automate Notion with Playwright
Automate critical Notion workspace workflows with Playwright when APIs aren't available or sufficient. You'll eliminate manual page creation and reduce content management errors by automating repetitive documentation processes. Use Playwright to interact with Notion's web interface programmatically.
[View Notion's API documentation](https://developers.notion.com/) for integration services when available.
## Setup
Install Playwright and configure authentication:
```bash theme={null}
npm install playwright
```
## Automate Workflows
Create scripts for common Notion tasks:
```JavaScript theme={null}
import { chromium } from 'playwright';
const browser = await chromium.launch();
const page = await browser.newPage();
// Login to Notion
await page.goto('https://www.notion.so/login');
await page.fill('[data-testid="login-email"]', process.env.NOTION_EMAIL);
await page.fill('[data-testid="login-password"]', process.env.NOTION_PASSWORD);
await page.click('[data-testid="login-submit"]');
// Navigate to workspace
await page.click('[data-testid="workspace-switcher"]');
await page.click('text=Team Workspace');
// Create new page
await page.click('text=+ New page');
await page.fill('[placeholder="Untitled"]', 'Weekly Status Report');
await page.click('[data-testid="template-button"]');
await page.click('text=Meeting notes');
// Add content to database
await page.click('text=Projects Database');
await page.click('text=+ New');
await page.fill('[data-testid="title-input"]', 'Q1 Marketing Campaign');
await page.selectOption('[data-testid="status-select"]', 'In Progress');
await page.click('[data-testid="save-button"]');
await browser.close();
```
Playwright handles page loading, template selection, and database updates automatically. You can automate content publishing, team collaboration workflows, and project tracking processes.
## Scale your Notion automation with Anchor Browser
Run your Playwright Notion automations on cloud browsers with enterprise-grade reliability and persistent Notion sessions. Learn more and get started for free: [https://anchorbrowser.io](https://anchorbrowser.io)
---
# Source: https://docs.anchorbrowser.io/agentic-browser-control/computer-use-agents/openai.md
> ## Documentation Index
> Fetch the complete documentation index at: https://docs.anchorbrowser.io/llms.txt
> Use this file to discover all available pages before exploring further.
# OpenAI Computer Use
> Use OpenAI models with computer use capabilities for browser automation
OpenAI's Computer Use Agent (`openai-cua`) leverages GPT models with vision and reasoning capabilities for screenshot-based browser automation.
## Overview
OpenAI Computer Use provides:
* **Screenshot-based interactions** for visual understanding of web pages
* **Advanced reasoning** powered by GPT models
* **High accuracy** for complex web interactions
* **Structured outputs** for reliable data extraction
## Supported Models
| Model | Model ID | Best For |
| -------------------- | ---------------------- | ----------------------------------------- |
| Computer Use Preview | `computer-use-preview` | Screenshot-based automation **(default)** |
## Code Example
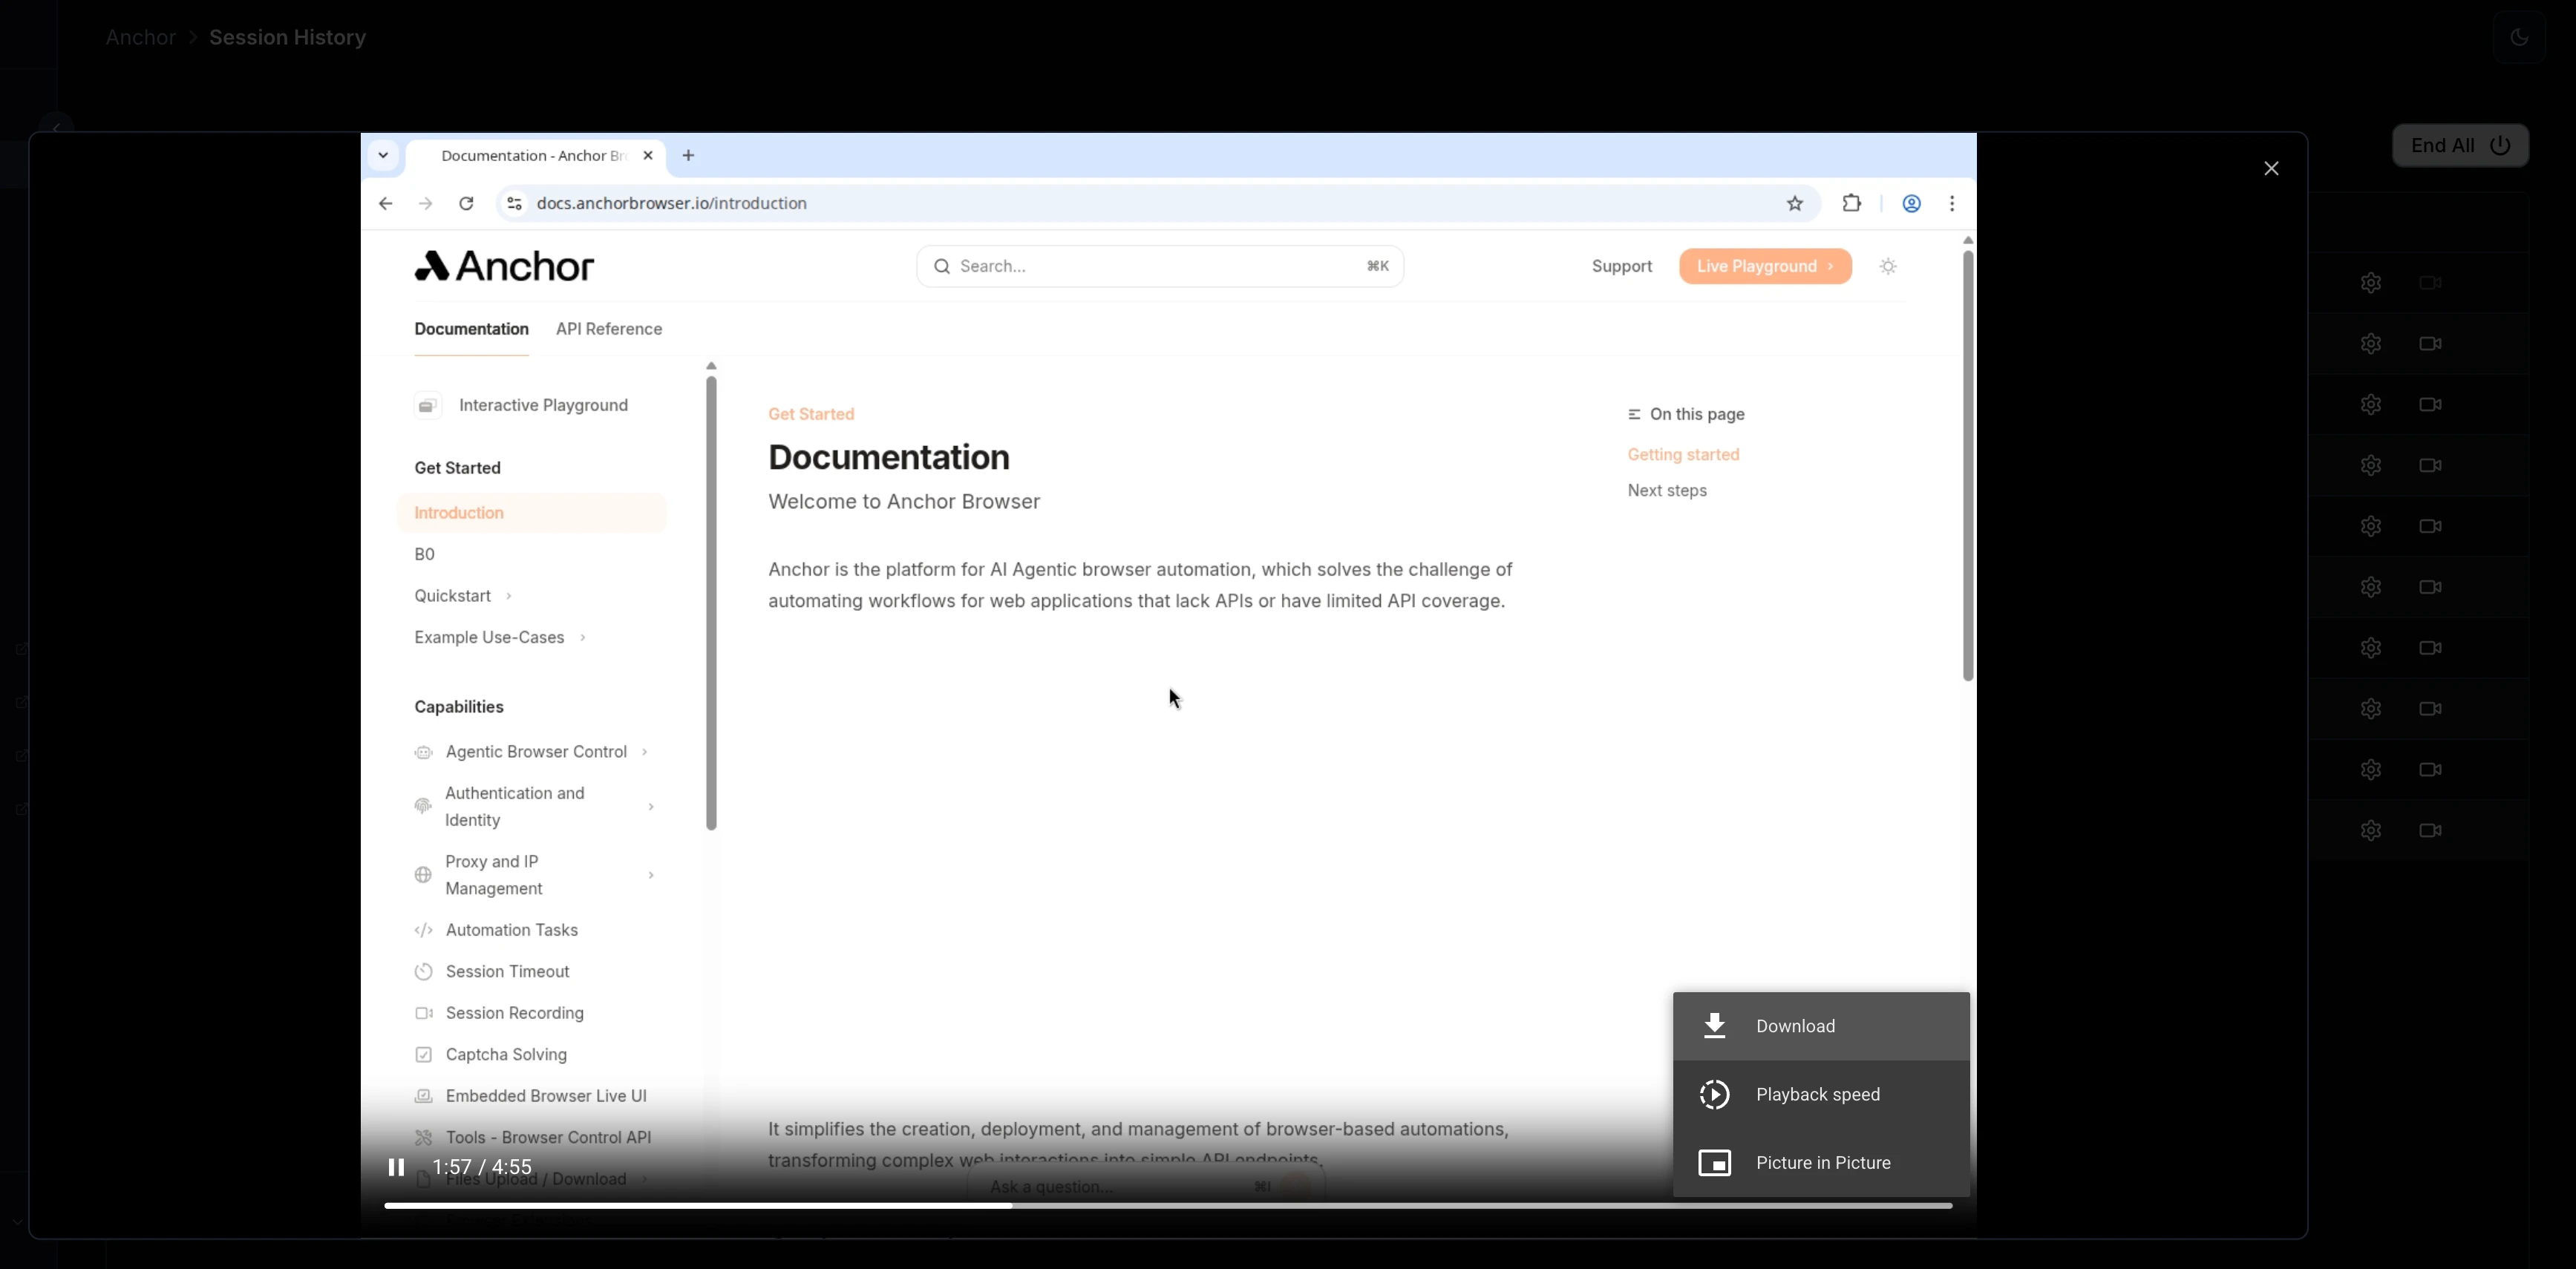
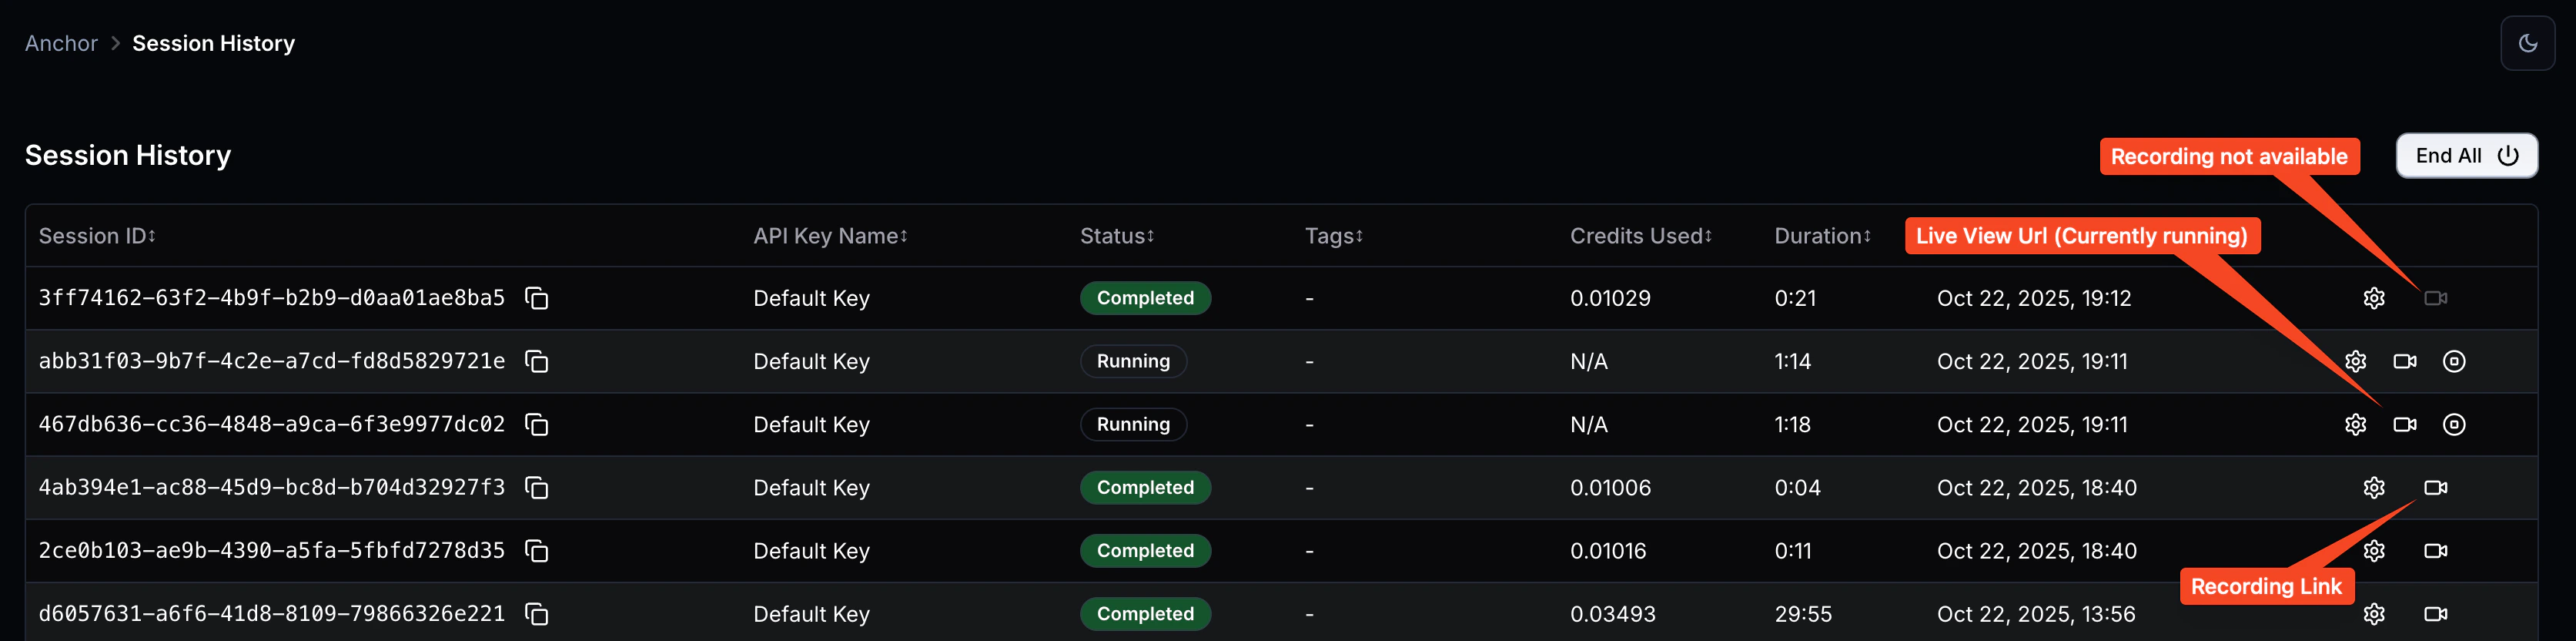
 ## Session Recordings
The Session History dashboard shows all sessions. Each session has a link to its recording.
## Session Recordings
The Session History dashboard shows all sessions. Each session has a link to its recording.
 ## Recording Playback
When you click on a session recording, the playback interface will be opened.
You can use it to view the recording, navigate through it, and download it as MP4 file.
## Recording Playback
When you click on a session recording, the playback interface will be opened.
You can use it to view the recording, navigate through it, and download it as MP4 file.